

Page 1
Owners Manual
TEC ELECTRONIC CASH REGISTER
MA-136-100 SERIES
TEC
TO KYO E LE CTR IC С ОЛ О.
Page 2

WARNING
This equipment generates, uses, and can radiate radio frequency energy and if
not installed and used in accordance with the instructions manual, may cause
interference to radio communications. It has been tested and found to comply
with the limits for a Class A computing device pursuant to Subpart J of Part 15
of FCC Rules, which are designed to provide reasonable protection against
such interference when operated in a commercial environment. Operation of
this equipment in a residential area is likely to cause interference in which cause
the user at his own expense will required to take whatever measures may be re
quired to correct the interference.
Page 3

TEC ELECTRONIC CASH REGISTER
MA-136-100 SERIES
OWNERS MANUAL
TABLE OF CONTENTS
TO OUR CUSTOMERS ..................................................................................................................... 1
PRECAUTIONS ................................................................................................................................ 1
APPEARANCE AND NOMENCLATURE ........................................................................................ 1
CONTROL LOCKS AND MODE SELECTOR KEYS .................................................................... 2
DISPLAY ............................................................................................................................................... 3
KEYBOARD LAYOUT ........................................................................................................................ 5
FUNCTION OF EACH KEY ............................................................................................................... 6
OTHER OPTIONAL KEYS ...............................................................................................................13
REGISTERING PROCEDURE FOR SALES
........................................
■......................................U
READ{X) AND RESET(Z) REPORTS ............................................................................................22
PROGRAMMING OF THE REGISTER ..........................................................................................26
VERIFICATION OF PROGRAMMED DATA ................................................................................. 33
MANUAL CASH DRAWER RELEASING .......................................................................................35
REMOVING THE DRAWER .............................................................................................................35
REPLACING THE RECEIPT PAPER ROLL ................................................................................. 35
REPLACING THE JOURNAL PAPER ROLL ................................................................................36
REPLACING THE INK ROLLER .....................................................................................................36
REPLENISHING INK TO THE STORE MESSAGE STAMP ......................................................36
WHEN A POWER FAILURE OCCURS ..........................................................................................37
SPECIFICATIONS ............................................................................................................................ 37
BEFORE CALLING FOR SERVICE ............................................................................................... 37
page
Page 4

Page 5
TO OUR CUSTOMERS
Thank you for choosing a TEC electronic cash register MA-136-100 series. This
instruction manual provides a description of the functions and handling of
this register and should be read carefully to obtain maximum performance.
Since every consideration has been given to safety, there is no danger of
damaging the machine by incorrect operation.
Please refer to this manual whenever you have any doubts concerning the
machine. This machine has been manufactured under strict quality control
and should give you full satisfaction. However, if the machine is damaged
during transit, or there are any unclear points in this manual, please contact
your TEC representative listed in this booklet.
I The specifications described in this manual may be modified by TEC, if
necessary.
I Be sure to keep this manual for future reference.
PRECAUTIONS
1. The keys on the keyboard work with a light touch. Avoid pressing the keys
too hard.
2. Avoid handling the machine with wet hands.
3. Do not apply thinner or other volatile oils to the cabinet or other plastic
parts. If the dirt is very bad, wipe off with a piece of cloth soaked
in neutral detergent and squeezed tightly.
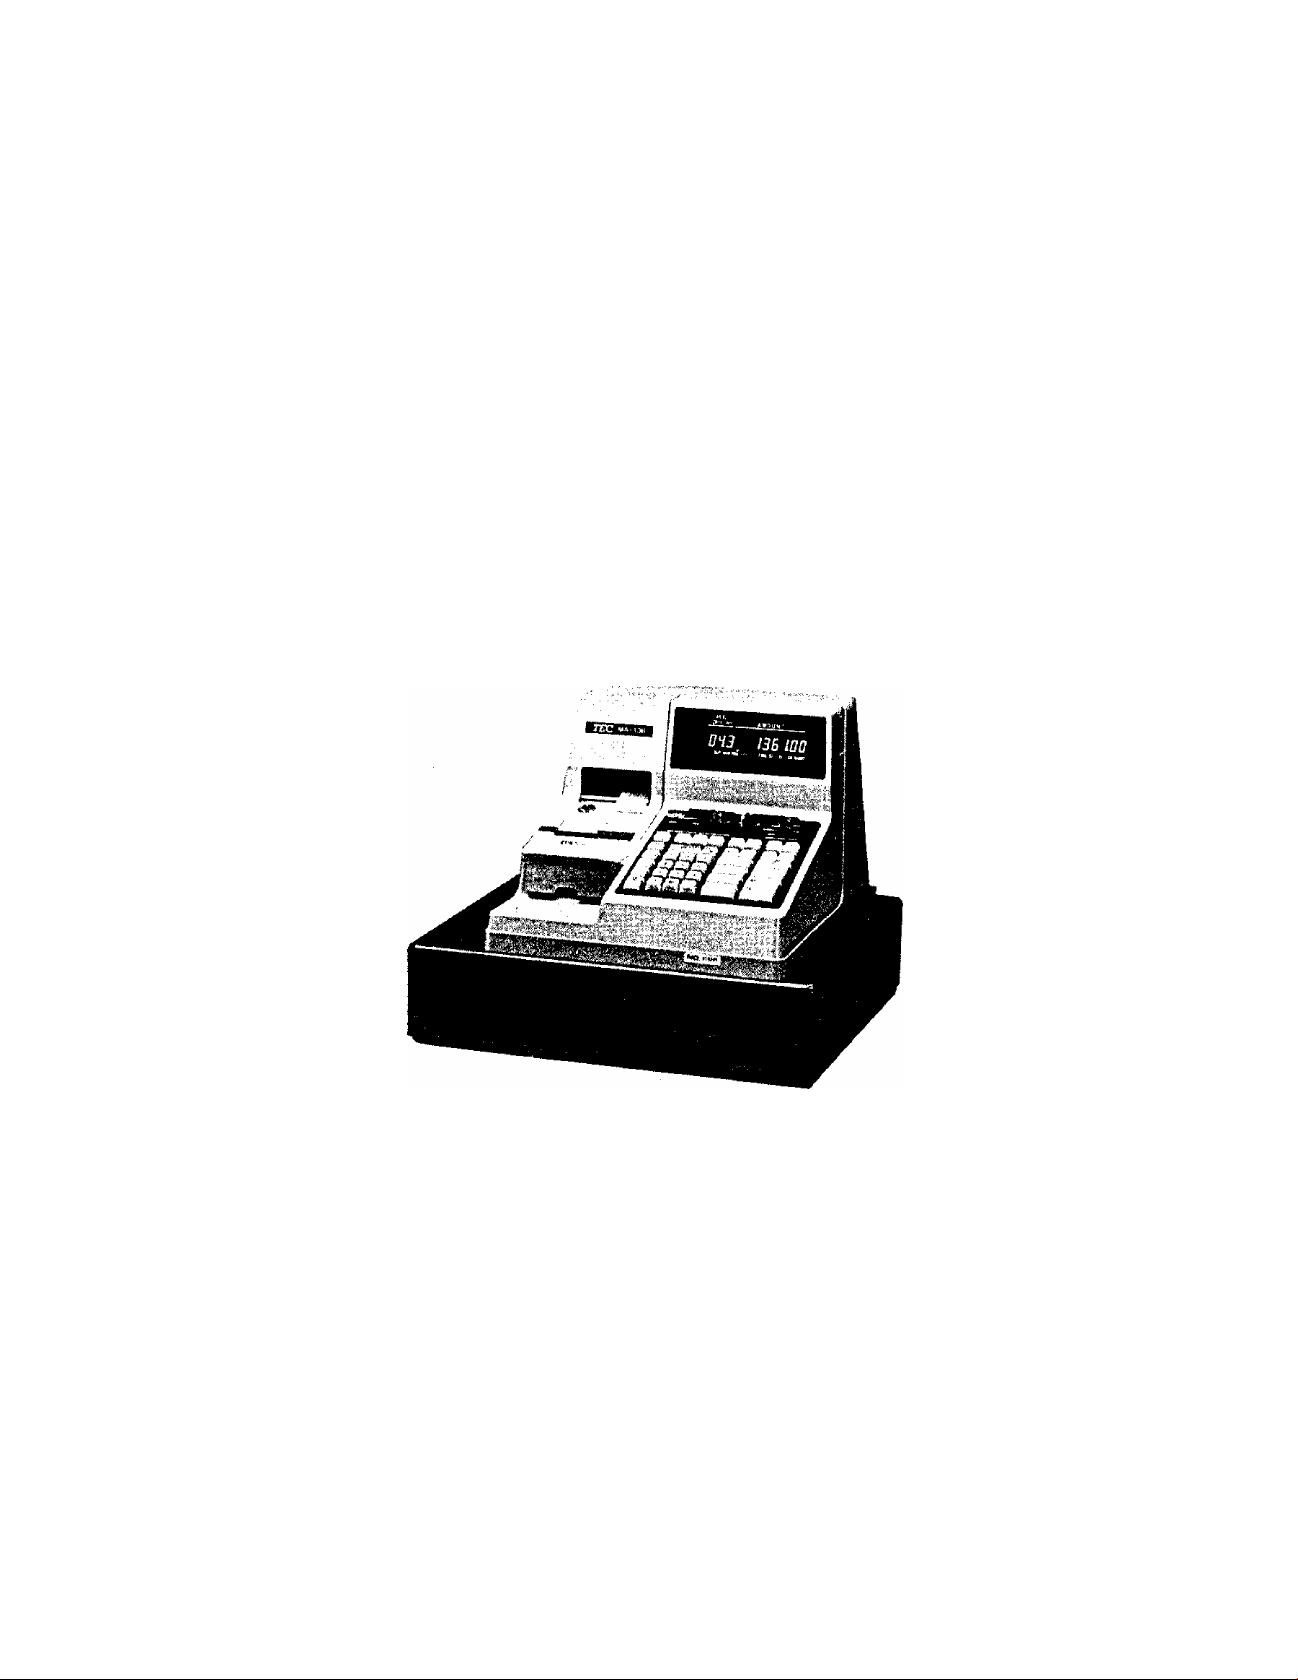
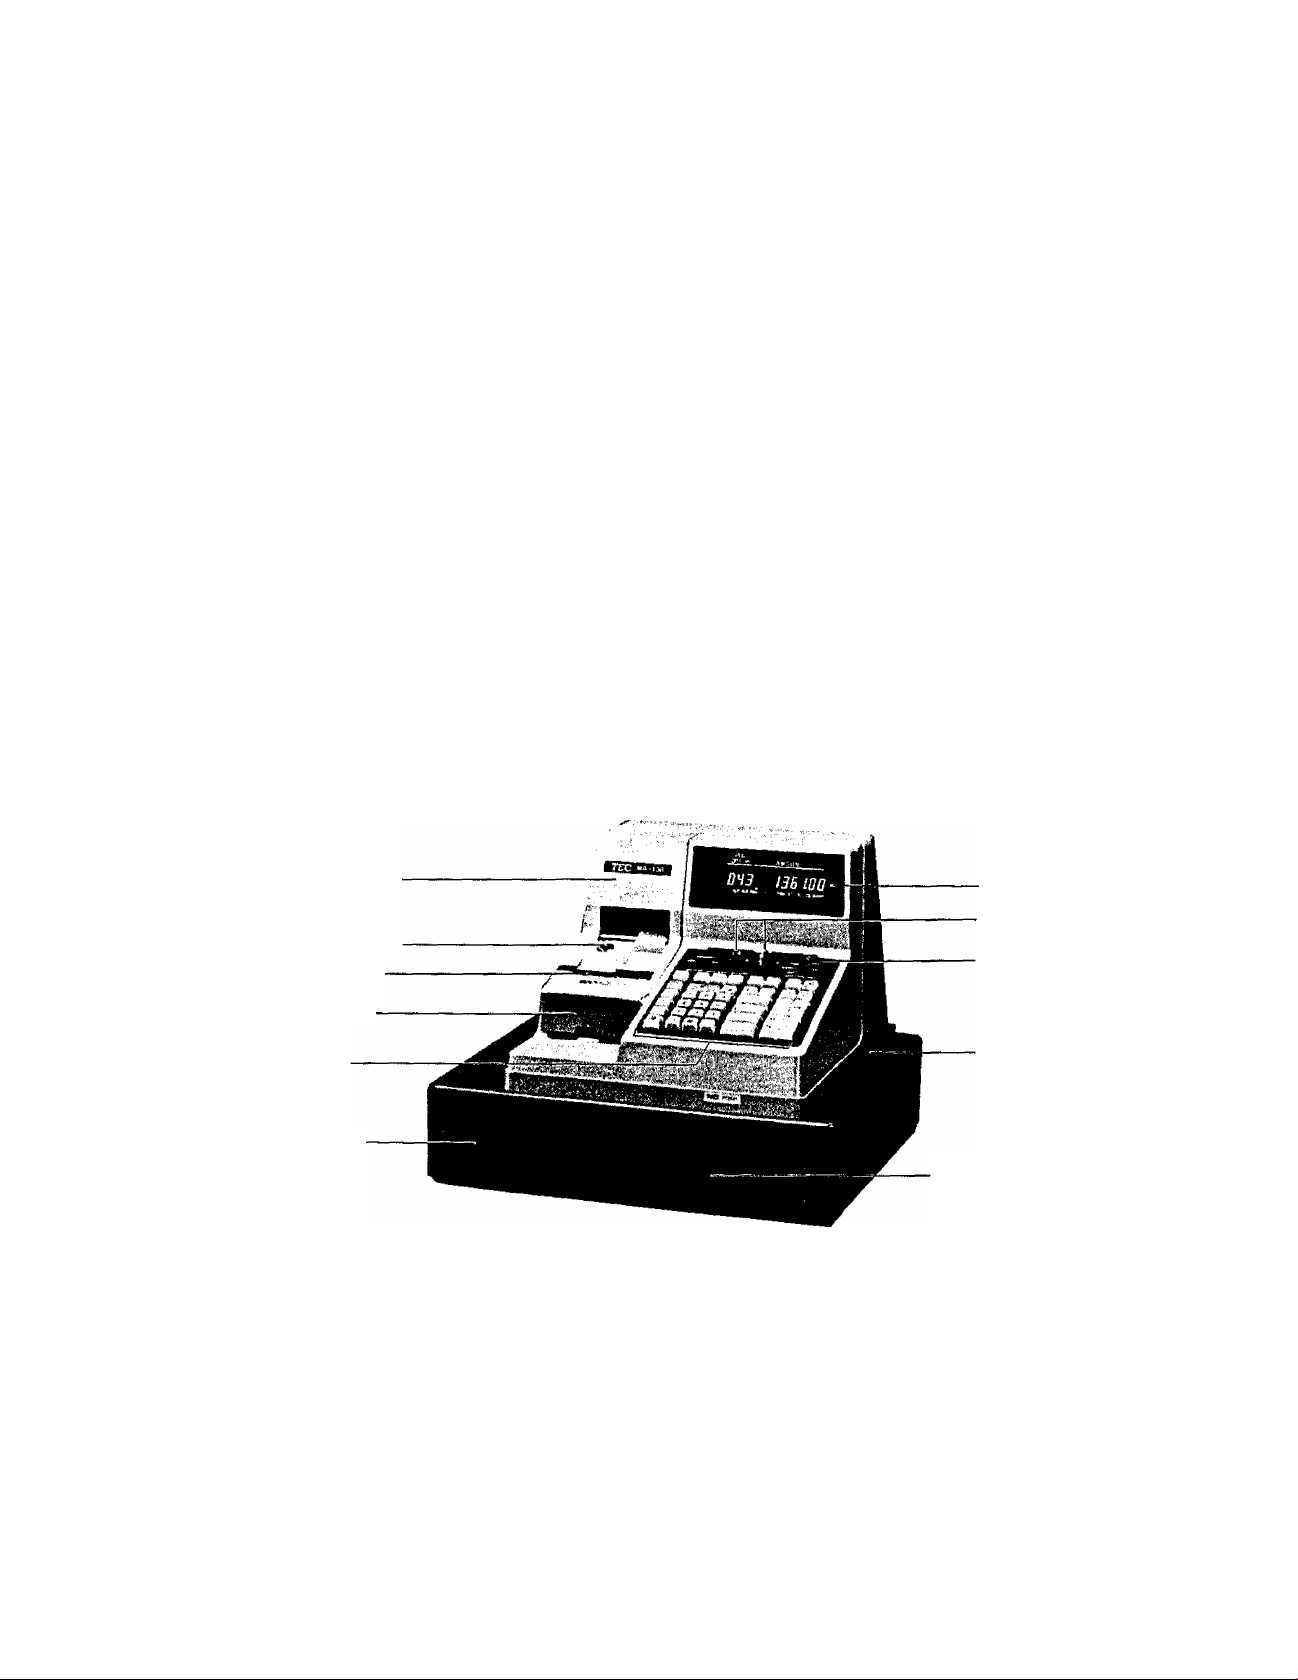
APPEARANCE AND NOMENCLATURE
Paper Cover
Paper Cover Lock
Receipt Outlet
Slip Inlet
Stamp Cover
Keyboard
Cash Drawer
I Power Switch
Display
Cashier Lock
Control Lock
Power Switch
Drawer Release Lock
The power switch is provided at the righthand side of
the cabinet. The AC power is turned on when the switch
is pushed to ON, and turned off when the switch is
pushed to OFF.
Page 6
CONTROL LOCKS AND MODE SELECTOR KEYS
Mode Lock
(POSITION)
LOCK
REG
MGR
SET
(FUNCTION)
The register operations are locked
when the Mode Lock is set to this
position. Displays the current time.
Normal cash register operations are
carried out In this mode. However,
the operations using the keys that
have been programmed to require the
"MGR” position cannot be done in this
mode.
The sale totals can be read and the
programmed data can be verified in
this position.
This position allows to register all
normal cash register operations to
be carried out in the REG mode and
the operations using the keys that
have been programmed to reguire the
"MGR” position.
All the resettable totals and' their
respective counters will be read and
reset in this position.
In this position, the register will
allow programming operations.
register,
and REG,
authorized by the manager. This key can access the
positions of LOCK, REG, X, and MGR.
The MA Key is used by the store manager who will daily
supervise the collection of money and the printout
of transactions recorded by the register. This key
can access the positions of LOCK, REG, X, MGR,
and Z.
SET Key The SET Key is used by the programmer. This key,, can
access the positions of LOCK and SET.
This key can access the positions of LOCK
Page 7
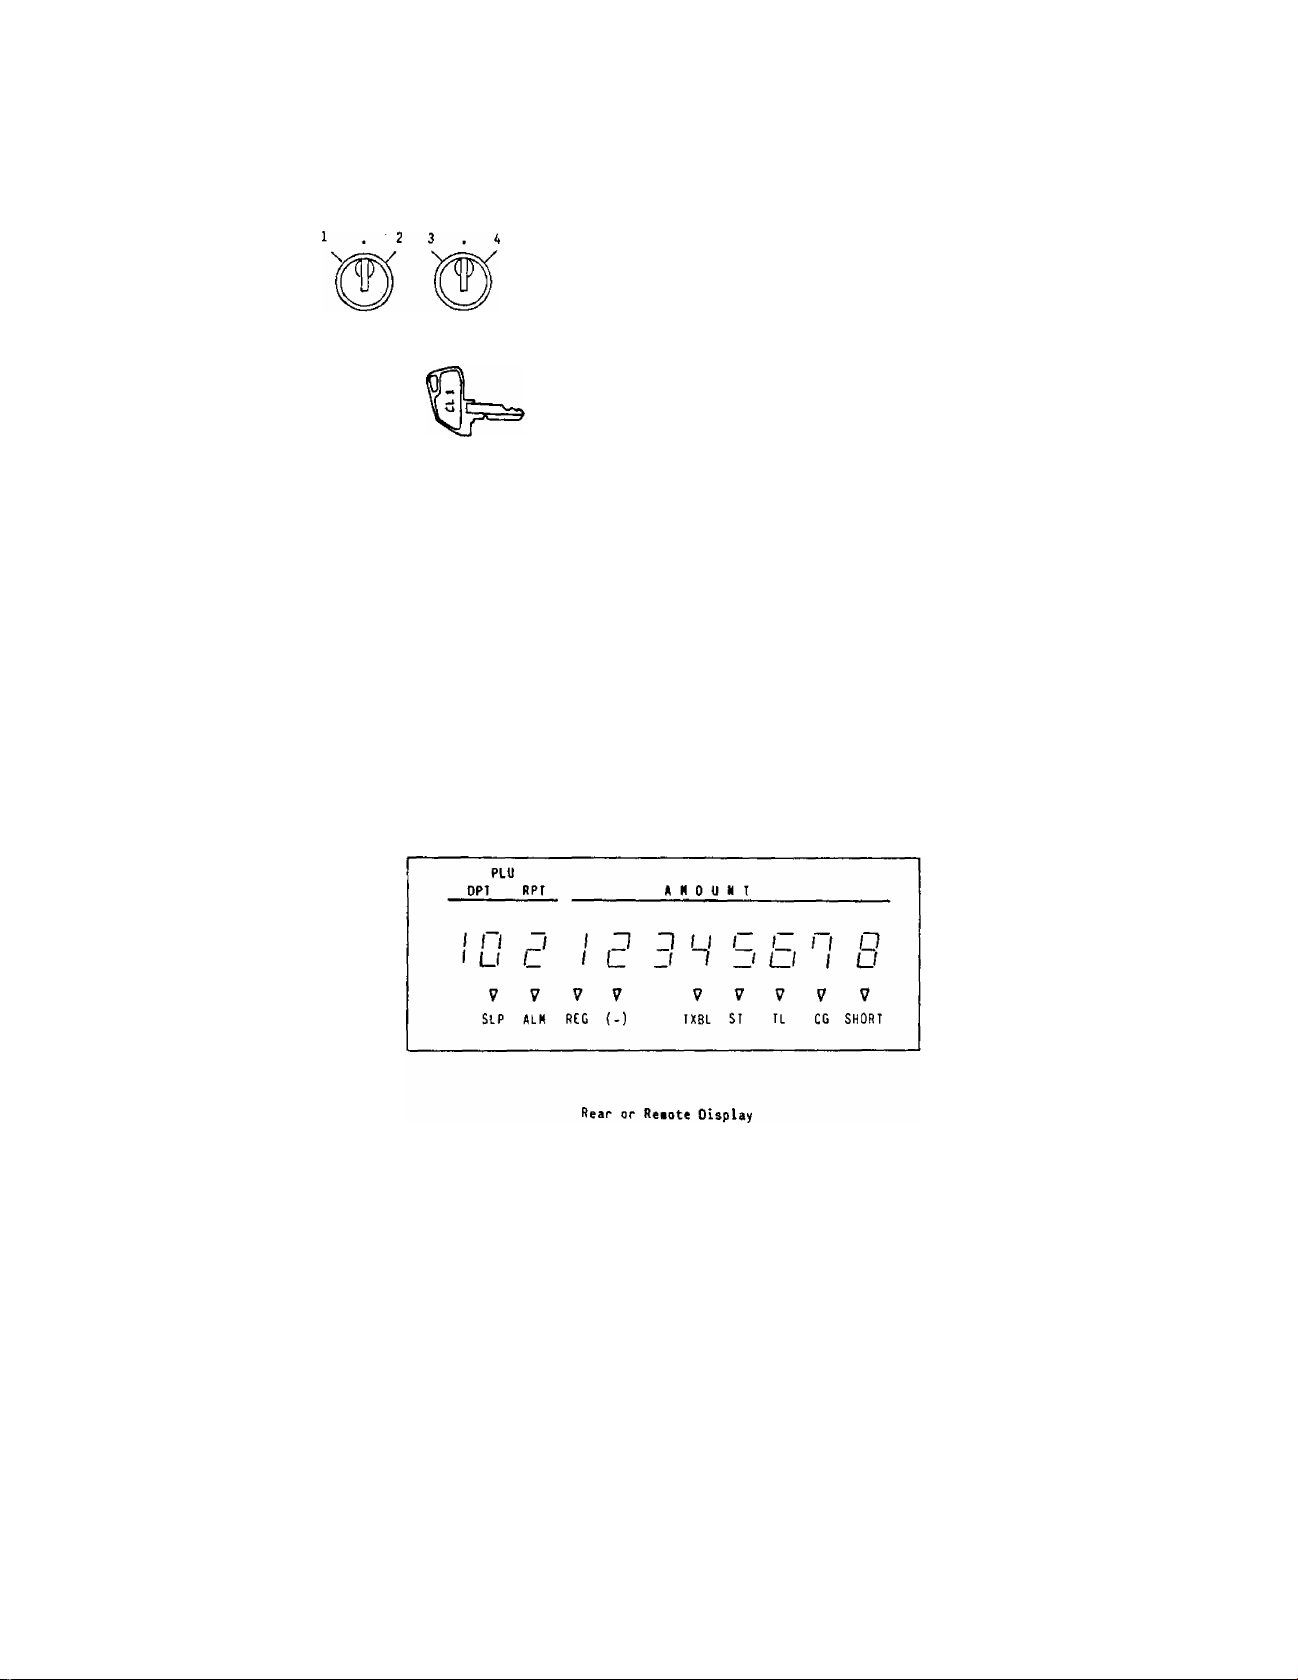
Clerk Locks
These locks are used to identify which clerk
is operating the register.
CLERK KEYS (CL 1, CL 2, CL 3. CL 4)
Each clerk should keep his/her clerk key. The register
will not operate unless one of these keys is inserted
and set to the corresponding position on the Clerk
Locks. Each of the keys may be inserted and pulled
out in the neutral position marked with the (point).
NOTES: 1. The push-style Clerk Keys may be installed in place of the Clerk
Locks. In that case. Four Clerk Keys will be installed
DISPLAY
The front display is located at the top of the register just above the
keyboard. The display has two types of display — numeric display and message
descriptors.
Front Display
A K 0 U H T
J
L
V ? 7
(-)
J U
IXBL SI IL
u
C
1 1
^ „i
u
V
1
7 7
a
8
SHORT
Page 8

Numeric Display
AMOUNT (8 digits)
DPT (2 digits)
RPT (1 digit)
PLU (2 digits, commonly used with the DPT)
Message Descriptors
SLP
ALM
REG
(-)
Lights up when a slip has been properly inserted to allow
validation.
It flashes to require a slip insertion when validation
compulsion is programmed on a transaction key.
Lights up with the alarm buzzer to indicate that the last
operation or numeric entry has resulted in an error. To clear
the erroneous condition, depress the key.
Lights up when sale items have been entered into a department.
Lights up when the IRTN MDSEI, iDOLL DISC I , [%-], or
Displays the numeric data, such as amount, quantity,
etc.
Dispalys the code which represents each Department Key.
It stays lit when repeating the same department entry.
Displays the repeat department entry count.
Displays the PLU code when any PLU is entered. It goes
out when repeating the same PLU entry.
I ITEM CORK I key has been operated.
It also lights up when the (STj or one of the total keys has
been depressed and the displayed amount is negative.
TXBL
ST
TL
CG
SHORT
Lights up when a taxable department or PLU is entered.
It also lights up with the 'ST* Lamp when the iTXBL TL 1 key
is depressed.
Lights up when the sub-total amount is displayed after the
key has been depressed.
Lights up on a finalizing operation with the total amount
displayed when finalized without any amount tendered.
When an amount tendering operation has been performed, this
lamp lights up with the change due displayed.
Lights up when the amount tendered is less than the sale total
with the shortage amount displayed.
- 4 -
Page 9
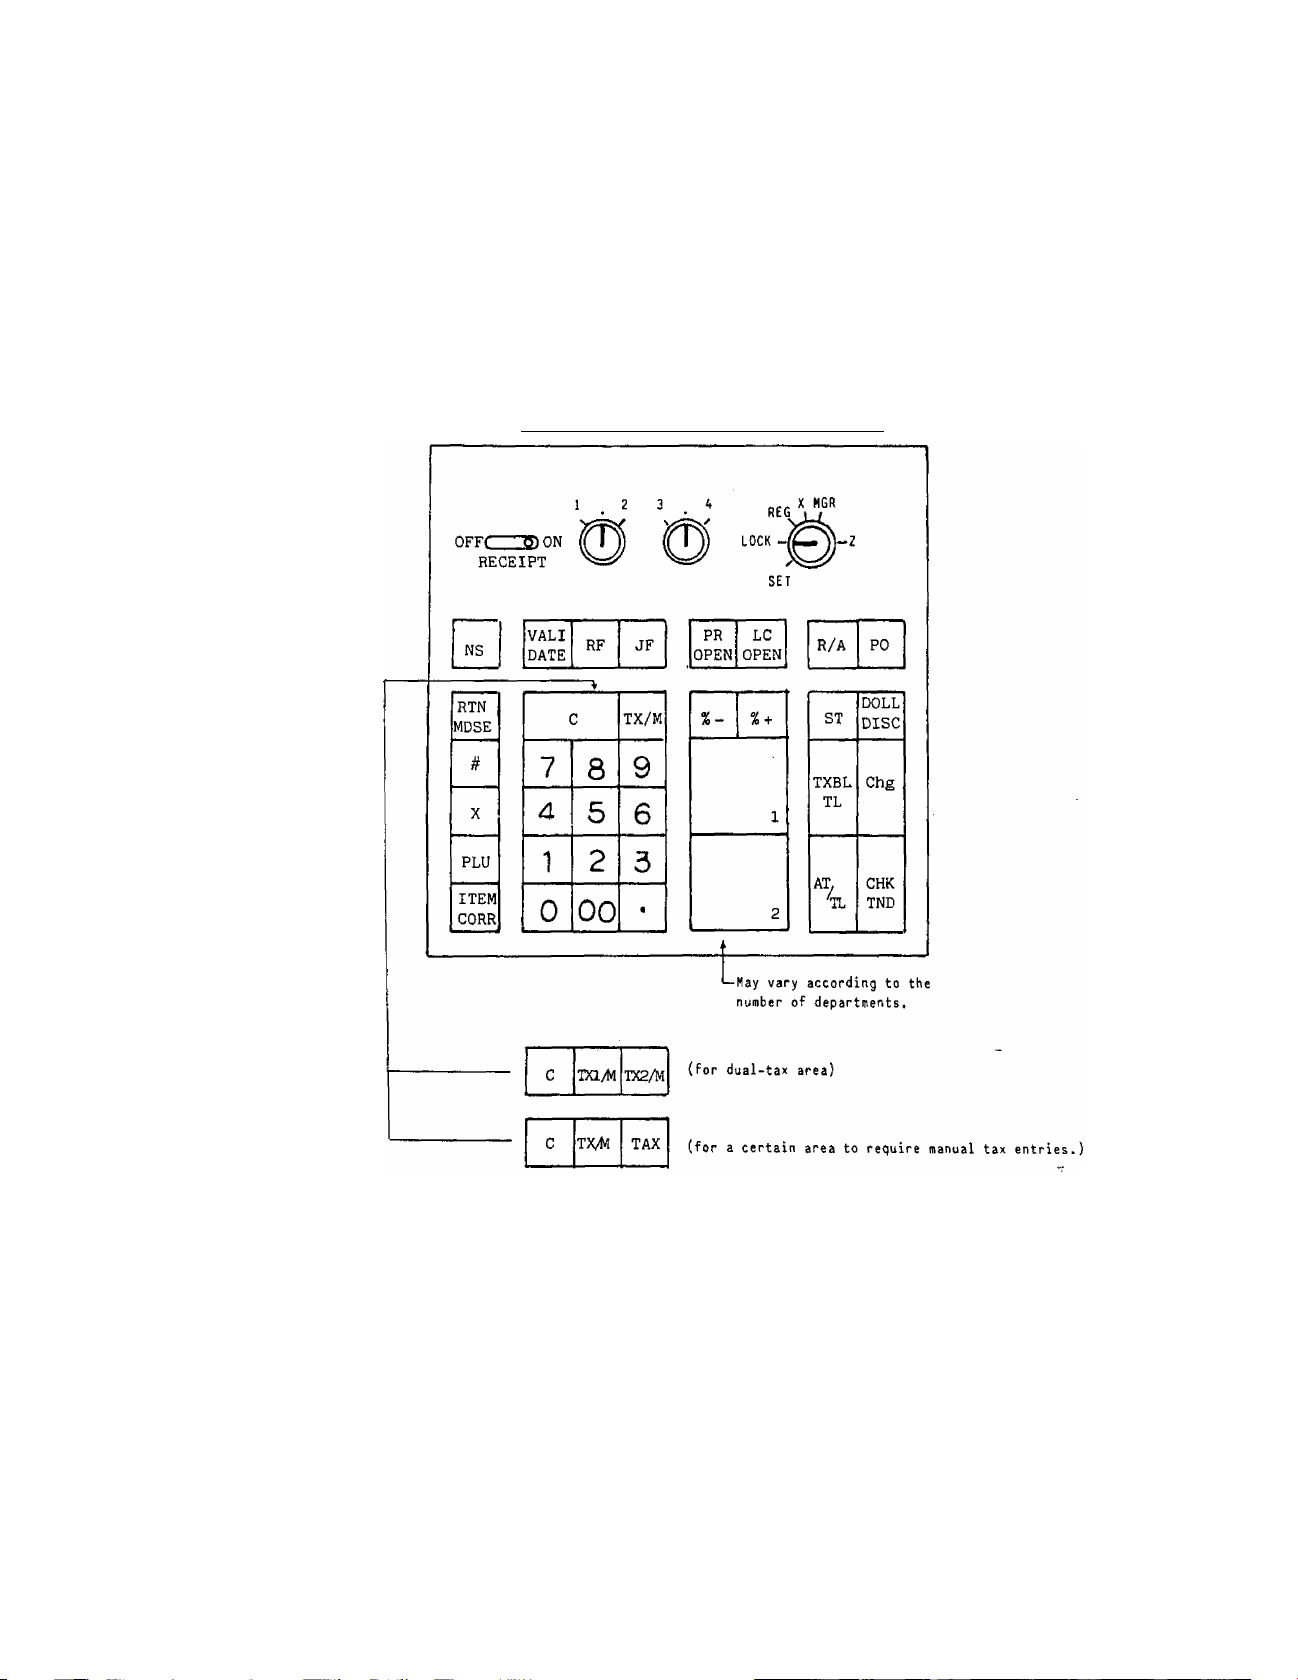
KEYBOARD LAYOUT
Below is a typical keybaord layout for the MA-136-100 series. Since this
series is designed to be capable of programming most of the keys to be palced
in the desired place on the keyboard, this is merely an example. Please ask
your TEC representative if any other alternative or additional keys must be
installed, referring to the description of the "FUNCTION OF EACH KEY" and
"OTHER OPTIONAL KEYS" in this manual.
MA-136-T02-US (Standard Keyboard]
Page 10

FUNCTION OF EACH KEY
RECEIPT
off[
I VALIDATE] Validation Key
ON
No-sale Key
Receipt ON/OFF Switch
This switch has two positions available — 'OFF' position and 'ON'
poisition. When in the 'OFF' position, no receipt is issued from
the register and sales are printed on the audit roll only. When
the switch is turned to the 'ON' position, sales are printed on both
the receipt roll and audit roll, then a receipt is issued which is
torn off and given to the customer.
This key is used, when the Mode Lock is in the REG position, to open
the cash drawer while the machine is outside a sale. To operate,
depress this key once. A non-add number may usually be entered prior
to a no-sale operation. However, it can be programmed to prohibit
it when a no-sale is operated.
This key is used to over print a validation slip.
To operate, after registering an item or finalizing a sale, insert
a slip into the validation slot and depress the I VALIDATeI key.
The item, the amount, and the date and/or consecutive number will
be printed on one line on the slip.
The system option provides program selections as to the printing
position, single- or multi-validation, validation compulsion on some
transaction keys, etc.
If the SLIP Lamp flashes, it means that validation compulsion is
programmed for the last item entered. In this case, insert a slip
into the validation slot and depress the IVALIDATFI key; no other
operation is allowed until the compulsory validation has been done.
Receipt Feed Key
This key is used to advance the receipt roll. It is operated by
depressing the key and holding it in that position until the paper
has advanced to the required position.
[JF| Journal Feed Key
This key is used to advance the audit roll in the same fashion as
the RF key. These two keys are useful if the cashier, due perhaps
to an interruption whilst ringing up a sale, is unsure which items
have already been entered. By using the feed key the cashier can
see which figures have actually been printed.
jPR OPEN] Preset Open Key
This key is used to modify the status of preset department keys.
When the | PR OPE^I key is depressed prior to depressing a preset
department key (either before or after the numeric entry), the preset
Page 11

department key is reversed to non-preset and allows amount entry
through the numeric keyboard.
If a preset department is entered with a price through the numeric
keyboard using the I PR OPEN] key, no repeat operation is then
possible for that department key.
The I PR OPENT key cannot be used with the 1PLUI key.
iLC OPEHI
jR/Aj Received on Account Key
Listing Capacity Open Key
This key is used to release the listing capacity on each Department
key. To operate, depress the jLC ^iPENl key before depressing the
department key (either before or after the numeric entry).
By depressing the 1 LC OPE^ key, the HALC (High Amount Listing
Capacity) of each department will be released to allow a numeric
entry with two further digits.
In order to allow a numeric entry outside the values defined above,
the Mode Lock must be turned to the 'MGR' position using the MA or
MGR key.
Repeat operation is possible on any department key even when the
ILC open] key is depressed before the department key.
A received on account transaction is used to identify money which
is in the drawer but not business. The amount entered is thus
included in the "Cash-in-drawer" total but not in the sales totals.
To operate, enter an amount of payment and then depress the [R/A j
key. Repeat this operation if multiple payments are entered at a
time. The payments entered are usually finalized by the |~^/TL I
(if paid in cash), or ICHK TNDI (if paid in check). The LChg I key
may function to finalize payments received on account if so program
med in the system option. The above operation can only be done when
the register is outside a sale.
The I ITEM CORRI key is effective to delete a payment just recorded
with the depression of the I R/A I key, if before finalized by a media
key.
IpoI Paid Out Key
A paid out transaction is used when an amount of money is removed
from the cash drawer without relating to a sale. When the fPOI key
is used, the amount entered is subtracted from the "Cash-in-drawer"
total but does not affect the sales totals.
To operate, enter an amount taken from the cash drawer and depress
the fPO 1 key whilst the register is in an out-of-sale condition.
This operation may be repeated as many times as required if multiple
paid-out items are registered at a time. The paid-out amounts
recorded are finalized by the iAT/TLI key only.
Page 12

IRTN mdse] Returned Merchandise Key
This is the Returned Merchandise Key which is used for refunding
money to a customer who has returned goods to the store.
To operate, depress the [RTN MDSE] key either before or after ringing
up the amount to be refunded, and then depress the appropriate depart
ment key (the department key may be replaced by a PLU code and the
iPLUI key combination). The amount is automatically printed and
deducted from the bill.
The [RTN MDSEI key can be used outside as well as inside a sale.
pTl Quantity Extension Key
This key is used to multiply a department item entry by a quantity.
The order of multiplication is "QUANTITY x PRICE". As for the
details of multiplication orders for various cases, see the
"REGISTERING PROCEDURE FOR SALES".
The QUANTITY can be of maximum 3 integral digits and 3 decimal digits.
(Use the □ key if any decimal portion of the quantity is required.)
The PRICE can be maximum 6 digits. The product must not exceed 7
digits.
Usually, the fraction below the least effective digit (the second
digit below the decimal point) will be rounded off. However, it
may be programmed to be discarded or rounded up by the system option.
IPLUI Price-Look-Up Key
This key is used to enter a PLU price that has been programmed and
linked to a department.
To operate, enter the PLU code for the required item, and then
depress the 1 PLU 1 key. If the IPLUl key is depressed more than once
in sequence, the entry of the price looked up by the PLU code is
repeated. Quantity extension is permissible on a PLU using the fx]
key.
Each PLU is programmed with a 2-digit PLU code (1 throug_50), a 6digit preset price, and a 2-digit link department code. To modify
the link department, a reset of the entire PLUs sales totals is
necessary. However, changing the preset prices of individual PLUs
or programming new PLUs may be carried out anytime if the
register is outside a sale. But please note that if a unit price
of any PLU is changed between sales (but not after resetting)the
accurate data of the PLU total may not be printed in the X and Z
reports due to the price change.
ITtem CQRrI Item Correct Key
This key is used to remove the last line item from the bill, printing
a line through that item on the receipt and journal.
Page 13

The item correct function is effective even when a numeric entry and
a key depression are done between the department entry to be
corrected and the
key-in operation, including a key depression to clear an error
condition, comes in between them, the item correct will not function.
The I ITEM CORK I key will function to correct any last item entered
through a department, ['pLUl . O. [|3 . IR/AI . fPOl . I DOLL DISCI .
or 1 TAX I key.
HFI Non-add Number Print Key
When the Mode Lock is in the REG position, this key is used to print
a non-adding number (such as Customer No., Check No., Credit Card
No., etc.) on the receipt and journal for future reference. To
operate, enter a maximum 8-digit number and then depress the
key. The number is then printed. This operation may be done any
time between items, before or after all the sale items, if the sale
has not been finalized yet. Usually, non-add numbers may be entered
as many times as required within a sale. However, it is programmable
to prohibit more than one non-add number entry within a sale by the
system option.
io1 ~ , 1001 Numeric Keys
These keys are used to enter numeric values such as amount, quantity,
date, or code number.
Depressing the 1001 key once is the same as depressing the key
twice consecutively.
I ITEM CORK I key depression. However, if any other
fTj Decimal Point Key
This key is used, as part of numeric keys, to designate, the position
of the decimal point when entering a percent rate or a quantity.
For example, to enter 0.5%, index 0 -*■ □ - 5, or 5.
When entering a price or amount such as $0.25, just index 2 5.
In this case, depression of the □ key is not necessary and will
cause an error.
1 11 - I 2| {Standard Model) or maximum | 11 - ( 15l Department Keys
These are department keys through which sales items are registered.
These keys may be programmed as either 'PRESET' keys or 'OPEN' keys.
OPEN DEPARTMENT KEY
A key which has no preset price programmed is an 'OPEN' key and
must have a price entered into it manually. The price is rung
up on the numeric keyboard and appropriate department key is
depressed. The price is then displayed and printed on the receipt
and audit rolls.
When the same department key is depressed more than once after
a price entry, the price entered is repeated as many times as the
department key is depressed.
As for multiplication using a preset department key, see the
"REGISTERING PROCEDURE FOR SALES".
Page 14

PRESET DEPARTMENT KEY
A preset key is a key which has already a price programmed in it.
It is therefore unnecessary to enter the price of an item; simply
depress the key to register the sale of one item.
To repeat the same preset item, depress the same department key
as many times as desired.
As for multiplication using a preset department key, see the
"REGISTERING PROCEDURE FOR SALES".
If a price different from the preset price is entered on numeric
keys into a preset department, depress the 1 PR OPEN I key either
before or after the price entry on the numeric keyboard.
Each department key can be programmed with a unit price, either
positive or negative use, a HALC (High Amount Listing Capacity),
and taxable/non-taxable status.
When a department is programmed as a negative department, a price
entry may not be repeated by depressing the department key. Neither
may a price entry be repeated when the i RTN MDSE I or [PR OPEN 1 key
has been depressed prior to a department key depression.
fcl Clear Key
This key is used to correct a numeric entry error prior to depressing
any other key or to correct any error condition and cancel the alarm
buzzer.
If the key is depressed after a sub-total is obtained, the sub
total is displayed.
1%^ Percent Charge Key
This key is used to add a percent rate to a sale. If the pre
programmed percentage rate is to be added, depress the \%+1 key
without a prior numeric entry. If a rate different from the pre
programmed % rate is added, enter the desired rate on the numreic
keyboard and then depress the |%+1 key. (The manual rate will take
priority.)
To operate, depress the l%+1 key either immediately after a depart
ment entry if only that item requires the percentage addition, or
after the I ST I key has been depressed if required on the total bill.
The percentage rate and the amount are printed and will be added
to the sales total.
The percentage rate may be within the range from 0.001 to 99.999%.
The fraction resulted from the percentage calculation is usually
programmed to be rounded off. However', it can be programmed to be
rounded up or discarded.
Usually, if the l%+ j key is depressed after a second 1 ST I key
depression within a sale, it adds the rate to the sale total of the
items entered between the first and the second I ST I key depressions.
However., it can be programmed to add the rate to the entire sale
by the system option.
Page 15

\%~\ Percent Discount Key
This key operates in the same fashion as the I%+1 key except that
operation will subtract from instead of adding to a sale.
iDOLL Disci Dollar Discount Key
This key is used to subtract an amount from the sale total such as
a discount during a sale. This key cannot normally be used outside
a sale. An amount exceeding the sales total cannot normally be
entered. However, when the "Credit Balance" option has been selected,
this key can be used inside or outside the sale and over-subtraction
of the sale total is allowed.
T
To operate, enter the discount amou
then depress the I DOLL DISCI key.
The I DOLL Disci key can be programmed either taxable or non-taxabie
status.
Sub-total Key
This key is used to obtain the sub-total amount without tax during
a sale. When this key is depressed after all items have been rung
up, the sub-total of the sale is printed and displayed.
If the I ST 1 key is depressed more than once, the first depression
only will print and displayed the sub-total; further depressions
will only display but not print the sub-total.
The system option provides the selection
The system option provides selection not to print but
only display the sub-total on the depression of the Ist'I key.
It is also programmable to obtain the sub-total of entire sale total
but not the additional items if the 1ST I key is depressed for the
second time (after the additional item entries after the first I'STI
key depression) within a sale.
IAT/tlI Amount Tendered / Cash Total Key
This key is used to record all cash paid on transactions, and will
be able to finalize a sale operation. The key may be programmed
to operate with enforced tendering, as a total-only key,- or may
operate both ways.
on the numeric keyboar ,
AMOUNT TENDERED FUMCTION
After the ITXBL Tp key has been depressed, enter the amount tendered
by the customer in payment of the sale, and then depress the IAT/TLI
key. The sale total, tax, and the amount tendered are printed.
The change is automatically computed, displayed, and printed.
If the amount tendered is smaller than the sale total with tax, it
prints the amount tendered on the receipt with the balance still
due displayed, but the drawer is not yet opened. In this case,
ask the customer for additional payment in cash and repeat the same
amount tendering operation, or operate another media key if the
balance due is processed into that media.
- 11 -
Page 16

TOTAL KEY FUNCTION
To obtain the total and finalize the cash sale, depress the IAT/^I
key only without a prior amount entry. The sale is finalized with
the tax and the sale total with tax are printed, and the drawer
opens.
NOTES: 1
The I AT/TL 1 key is also used to finalize received on account payment
entries or paid out amounts.
If the IAT/TLI key has been programmed to function as
the "AMOUNT TENDERED KEY ONLY" and the sale total is
"0" or negative, no amount endering is then allowed.
In this case, the IAT/TLI key will function as the "TOTAL
KEY", so just depress the I AT/TL I to obtain the total
and finalize the sale.
ICHK TNdI Check Tendered Key
This key is used to cash a check when the register is outside a sale,
or to finalize the sale as a check payment when the register is
inside a sale.
CHECK CASHING
When the register is outside a sale, enter the check amount and
depress the ICHK TN^ key. A receipt is issued and the drawer
is opened to enable the exchange.
check cashing may be prohibited if so programmed in the system
option.
FINALIZING AS CHECK PAYMENT
On finalizing a sale, enter the amount of the check given by the
customer and depress the I CHK TNO^ key. If the amount received
is greater than the sale total, the receipt is issued with the
change due printed and displayed. Then the change is given to
the customer in cash. If the amount received is smaller than the
sale total, the shortage is displayed, and the customer may pay
the additional amount in cash to finalize the sale by depressing
the IAT/TLI key.
The I CHK TNdI key is also used to finalize received on account pay
ment entries if paid in check.
iChg) Charge Total Key
This key is used as an alternative method of payment for charge sales.
To operate, depress the fchgl key instead of the I AT/TL | key, after
obtaining the sub-total.
- 12 -
Page 17

[TX/MI (or |TX1/m|. ITX2/MI for Dual-tax Area) Tax Modifier Key
This key is used to reverse the taxable/non-taxable status on depart
ments and other tax-status-programmable keys for one entry only.
For dual-tax areas, two keys should be provided — ITXl/MI and
ITX2/MI — in place of the 1 TX/M I key. The two tax modifier keys
will function independently each with its own tax table pre
programmed for taxable items.
The tax modifier(s) will be effective to reverse the tax status
programmed on Departments, PLUs, I DOLL DISCt, 1%+i, and \%-1 keys.
To operate, depress the |TX/M| key prior to depressing any of these
motorized keys above listed, i.e., either before or after the amount
entry.
ÍTXBL TL[ Taxable Total Key
This key is used to display the contents of the main itemizer plus
any taxes due. The amount will display only but not be printed.
In order to allow add-on operation following the use of this key,
the taxes are not added into any totals until actual finalization
is initiated.
Mandatory depression of this key prior to finalizing is a program
mable option.
OTHER OPTIONAL KEYS
The following keys are not shown in the KEYBOARD LAYOUT already stated.
However, any of these may be installed if the customer requires. But please
note that some of the present keys may have to be dispensed with in order
to gain additional functions. Please contact your TEC representative if any
of the following keys is necessary.
Depcirtment Keys .Maximum 15 Department Keys are available.
I
OPEN I LC/PR Open Key
This is a dual-function key, i.e., both [lC OPEN I and [PR QPErTI
functions can operate using this key.
r#/NSI Non-add Number Print / No-sale Key
This is a dual-function key, i.e., both [¿] and
operate using this key.
If this key is depressed with a prior numeric entry, it functions
as the 171 key. If depressed without a numeric entry, it functions
as the 1N5 I key.
iTAXl Manual Tax Key
This key is used to enter an irregular tax amount that cannot be
calculated on the basis of programmed tax table, and to add it to
the sale.
functions can
- 13 -
Page 18

To operate, enter the desired amount of tax, and then depress the
1 tax] key. The tax amount entered is then printed. This tax amount
is processed into the TAX 2 memory. Therefore, the : tax amount
automatically calculated and printed at finalizing the sale (TAX
1) does not include a manual-centered tax, while the entire sale total
printed on the receipt last line includes the manual-entered tax
also.
This key is also used, if depressed without an amount entry within
a sale, to display the total of only non-taxable items so far entered.
Usually, this non-taxable total is only displayed but not printed.
However, it may be programmed to print also in the system option.
REGISTERING PROCEDURE FOR SALES
Here are patterns for actual registering operations. In the following
examples, "[
a depression of the transaction key, and "
and/or finalizing operations.
NO-SALE (Mode Lock; REG)
DEPARTMENT ENTRY (Mode Lock: REG)
_ _
^|" indicates an input through numeric keys, " 1 I" indicates
----
" indicates other registering
1 PRICE I !OPEN DEPfl
PRESET DEPT
PR OPENl ^ I PRICE 1 ^ 1 PRESET DE^ >
NOTE: To enter a price to override the listing capacity, the |LC OPEN]
key may be depressed either before or after the price entry but
before the department key depression. In this case, a price two-
digit larger may be entered for that entry only. To allow a price
even larger than this, the MA or MGR key is required and set to
the MGR position of the Mode Lock.
PLU ENTRY (Mode Lock: REG)
jPLU Codel -i rPUTI ^--
REPEAT ENTRY (Mode Lock: REG)
1 PRESET DEPT I I PRESET DEPT | I PRESET DEPfl -}■
(Repeat depressing the same key as many times as the desired count.)
-----
I T——
- - -
!
--
----------------
1
I PRICE] I OPEN DEP^ ¡OPEN DEPT I ■> lOPEN DEPY] -----
I PRESET PLU CODE I fPLU] -i fPLU] fPLU]
--------
Page 19

NOTES: 1. Repeat entry is not possible when the I PR OPEN] or IRTN MDSE I
key has been depressed prior to the I DEPT I or [PLU| key.
2. The [LC 0PEH1 key is effective on repeat operation.
QUANTITY EXTENSION (Mode Lock: REG)
I QUANTITY I (XI [PRESET DETTI ^
I PR~OPE^ 1 QUANTITY 1 [U | PRICE | I PRESET DEPT I
I QUANTITY I -> [X] -» 1 PRICE 1 [ÖPEN DEPfl ^
I QUANTITY I ^ [X] |PLU CODE | |PLU| ->
NOTE,: The QUANTITY may be max. 3-digit integral and 3-digit below the
decimal point. (Use the [Xl key for a quantity containing the
decimal point.) The PRICE may be max. 6-digit. The product must
not exceeed 8 digits for a department and 7 digits for a PLU entry.
RETURNED MERCHANDISE (Mode Lock: REG; or MGR if so programmed)
I RTN mdse! [PRESET DEFTI
I RTN MDSE I I PRICE I [OPEN DEPT1
I RTN MDSE 1 ^ I PR OPEN I | PRICE | -> [PRESET DEPT I -f----
[RTN MDSE[ I PLU CODE | -» iPLUl
I RTN MDS^ Quantity Extension Operation —-
DOLLAR DISCOUNT (Mode Lock; REG; or MGR if so programmed)
[DISCOUNT amount! [DOLL DISCi
----
-
-
-
--
---
--- --
-- -
NOTES: 1, The ITX/Mj (ITXI/m] and/or ItXS/MI) key may be operated either
PERCENT DISCOUNT (Mode Lock: REG)
(1) To discount from the sub-total:
before or after the DISCOUNT AMOUNT entry if the tax status
of the I DOLL Disci key is reversed.
2, Unless the "Credit Balance" option has been selected, no
discount amount exceeding the sale. If dollar discounting
is made on a taxable item and the [POLL DISC~[ key is programmed
with the taxable status, no amount exceeding the taxable item
amount will be allowed.
3, Unless the "Credit Balance" option has been selected, no dollar
discount operation outside a sale will be allowed.
[STi [%- [
LS.'T [ I RATE I I %~ I
--
... to discount by the preset % rate
-- - - -
... to discount by a manual rate
- 1 R -
Page 20

iZ) To discount from an individual department item:
I PRICE 1 -»lOPEN DEPTI
[PRESET DEPTI
El
^ 1 RATE.I -» E ^
iPLU CODE I->ГрШ ■
— ... to discount by the preset
% rate
-----------------
... to discount by a manual rate
NOTES: 1. The rate may be entered within the range up to 99.999%. If
the rate contains the decimal point, use the □ key^
__
2. The tax modifier key(s) may be used prior to the 1%-1 key if
necessary.
PERCENT CHARGE (SPECIAL FEE ENTRY) (Mode Lock: REG)
This operates the same as in the ’’PERCENT DISCOUNT'* operation above,
except that the l%^l is used instead of the key.
ITEM CORRECTION (LAST LINE VOIDING) (Mode Lock: REG)
PRESET DEPT
PRICE 1 I OPEN DEPT1
I PR OPEN I I PRICE I I PRESET DEPTI
IPLU CODE I iPLUl
I ITEM CORRI
--------------
---
( I RATE I )
I AMOUNT i - -» iWAl
I AMOUNT I ШШ
I AMOUNT I ^ ГтШ
[%±3
or IS
-------
----
-
NOTE: _ The I ITEM CORRI key depression will delete the last line item
already printed within a sale.
NON-ADD NUMBER PRINT (Mode Lock: REG)
NUMBER
m
—
(Check No., Customer No., Credit Card No., etc,; 8 digits maximum)
NOTES: 1, If the "Non-add Number Print Allowed Only Once in a Sale" has
been selected in the system option, a second non-add number
entry will result in an error.
2. The □ key cannot be used to enter a non-add number. Neither
can any other key be used along with the [S key.
_ 1 _
Page 21

SUB-TOTAL (Mode Lock: REG)
--
I ST I
----
... The sale total without tax so far is displayed
and printed, but the sale is not finalized.
NOTES: 1. If the [c] key is depressed after once obtaining a sub-total,
the sub-total amount will be displayed.
2. If the fST 1 key is depressed more than once consecutively,
the first depression only will print and display the sub-total;
further depression will only display but not print the sub
total .
TAXABLE TOTAL (Mode Lock: REG)
--
iTXBL TLI ->
---
... The sale total with tax so far is displayed
but not printed. The sale is not finalized.
NOTE: If the key is depressed after the ITXBL TLI has once been
depressed, the sale total with tax is then displayed.
MANUAL TAX ENTRY (Mode Lock: REG)
I TAX AMOUNT I ir^ -»
-
NON-TAXABLE ITEM TOTAL READ (Mode Lock: REG)
--
iTAXl
-- - - -
,
The total of the non-taxable items so far entered
within the sale is displayed. It is usually
not printed, but programti.able to print if
required.
CASH TOTAL (Mode Lock: REG)
--
-» ( ÎTXBL TLI ) ^ lAT/TLi .
.. The drawer opens, the sale total is dis
played and printed, and a receipt is
issued.
CASH TENDERING (Mode Lock: REG)
--
( i TXBL TL \ ) ICASH AMOUNT TENDERED | ^ IAT/TLI
CHECK TENDERING (Mode Lock: REG)
------
i ( [TXBL TL I ) ^ j CHECK AMOUNT TENDERED! (CHK TND'I
CHARGE TOTAL (Mode Lock: REG)
--
^ (ITXBL TLI) ^ iChfil
- 17 -
Page 22

MULTI-TENDERING, SPLIT-TENDERING (Mode Lock: REG)
MULTI-TENDERING (Short tendering repeated multiple .times by the same media)
SPLIT-TENDERING (Short tendering repeated by different media keys)
NOTES: 1. In both MULTI-TENDERING and SPLIT-TENDERING operations, the
^ f*
- -
^ i iTJtBL TH ) ^ [AMOUNT TENDERED I ICHK TNDl
L
May repeat until the
total of the amounts
tendered reaches the
sale total.
* The i CHK TNdI key may be replaced by IAT/TLI key if it is
programmed to alllow tendering.
- -
( I TXBL TLl )
sale is finalized, a receipt is issued, and the drawer opens
on reaching the sale total amount.
2. If a media key is depressed without an amount tender entry
(if that key can function as a "TOTAL" Key), the sale is then
finalized on that stage, processing all the balance due into
that media.
I AMOUNT I ■ -> I CHK TNDI -* ( | AMOUNT | ) I AT/TL I
I AMOUNT I I CHK TNDI fChg]
^ 1 AMOUNT 1 I CHK TND l [ AMOUNT [ ^ I AT/TL I h-
^ 1 AMOUNT I I AT/TL I fChgl
J
EHi]
CHECK CASHING (Mode Lock: REG)
[AMOUNT OF CHECK TO BE CASHED] f ICHK TNDl ... The drawer opens and a
receipt is issued.
Receive the check and
pay the amount' in cash
to the customer.
NOTES: 1. Check cashing is allowed only outside a sale.
2. The system option provides a selection to prohibit check cash
ing operations, if necessary. ;
RECEIVED ON ACCOUNT (Mode Lock: REG)
[AMOUNT OF PAYMENT I IR/A1 -)■ I AT/TL [ ... if paid in cash
L
Repeat if multiple payment
items are recorded at a
time.
J
CHECK amount! I CHK "tndI
CHECK AMOUNT [ iCHiT TND I -»j
([CASH AMOUNT [ )-»fAT/TL I .
if paid in
check
if paid in
both media.
Page 23

NOTE: The |Chg| key may finalize payments received on account if so
programmed in the system option.
PAID OUT (Mode Lock: REG; or MGR if so programmed)
[amount to be paid OUtI [p^ ^ IAT/TLi
'
-----------,-------------------------------
Repeat if multiple amounts to be paid out are entered.
VALIDATION PRINT (Mode Lock: REG)
After entering an item
through a transaction
key or a media key
'
Insert a validation slip into
the validation slot. Make sure
that the "SLP" Lamp is lit.
Depress
VALI
DATE
NOTES: 1. No other operations can follow until the validation slip once
printed is withdrawn.
2. If the "SLP" Lamp flashes, it means that the last item entered
requires a validation print.
3. The following are the selections that can be programmed in
the system option related to validation:
(1) PRINT FORMAT:
a) AMOUNT only
b) DATE (MONTH, DAY, YEAR) and AMOUNT
c) MONTH, DAY, AMOUNT, and CONSECUTIVE NUMBER
(2) MULTI-VALIDATION or SINGLE-VALIDATION
(3) VALIDATION COMPULSORY on IRTN MDSE I. [p^. (rTaI.
iCHK xTTDi , !ITEM C0RR1 , I DOLL DISC1 , , and/or
Negative Department keys.
- iq -
Page 24

REGISTERING RECEIPT SAMPLES
NO-SALE
Thank you
Call again
C4-02-82 ■
lci-0 0 3i4
H 1. - 3 L
Clerk ID
DEPT.ENTRY, TENDERING
NON-AOD NUMBER. CHECK PAYMENT
Store Name/Message
Stamp Print
Date(April 4, 1982)
Register No.
No-sale Symbol
Consecutive No.
Current Time
RETURNED MERCHANDISE, QUANTITY EXTENSION
Thank you
04-02-82
#/ 3 4 5 6 7
01 *045
02 *123
ld-0Cl39.
11-34
Call again
§123
*168
*168 i
*Q0 0
— Non-add Number
'Check Amount Tendered
-Change due
Thank you
Coll again
04-02-82
§12 3.
/
*1237
01
02
*100
*062
*1396
*1400
*0 0.4
1 d - 0 0 3. 8
11-33
Thank you
Department Code
■\
Price entered
Taxable Symbol
Tax Amount
— Sale Total with Tax
— Cash Tendered
— Change due
01 *050
01
ld-0042
_ ?n _
Cali again
04-02-82
§123
025
*075
-00
6,
-131
11-37
Returned Merchandise Symbol
■Quantity (3)
-Unit Price ($0.25)
■Product($0.75) into DP 1 as
a returned item
'Sale Balance
(to be paid back in cash to
the customer)
Page 25

REGISTERING RECEIPT SAMPLES
RECEIVED ON ACCOUNT
Thank you
Call again
0 4 - 0 2. - 8 2
S122
--------Atfte s
*1QOO 5
*1QOO S
ld-0043
11-3 7.
SeLlT-TEKDERIHG
Payment of $1.00,
but item-corrected
“ Payment of $10.00
-Finalized in cash
( IUZID)
PAID OUT
Thank you
Call again
04-02-82
S123
*3,00
*200
-------
*ftt5
*1 5 0
*650
ld-0046
11-38
PLU ENTRY
— $3.00 Paid Out
— $2.00 Paid Out
-$0.15 Paid Out,
item-corrected
^Paid Out Total
but
Thank you
Call again
04-02-82
§12 3.
01 *123 i
02 *456
*Q06 fi
* 5 8 5 pi
* 2 0 0 g
* 3 0 0
* 0 8 5 5
lc-0065
1 1. - 4 6.
— Tax Amount
—Sale Total with Tax
—Check Amount Tendered
—Cash Amount Tendered
—Charge Total
Thank you
Call again
- 0 2 - 8 2
04
§12 3
20 a*200 i
10
-020
25 ¿*1 5 0
20
*030
*010 f
* 3 7 0 5
Id- 0 0 6 9,
11 -48
- 21 -
%-
% +
-PLU No.20 Price $2.00
j-l0% discount from the above PLU
-PLU N0.25 $1.50
Page 26

READ(X) AND RESET(Z) REPORTS
The following table shows the key operation to take each report and its
content. The "X" and "Z" reports have the exactly the same content printed,
except that:
1. The "X” reports allow to read the totals but not clear memories, while
"Z" reports allow to read the totals and at the same time all the
resettable memories will be cleared when the reports have been issued.
2. The symbol "X" is printed on the top line of a "X" report, while ”Z"
is printed on a "Z" report, to indicate the type of report.
3. A reset count is printed on the bottom of a "Z" report.
TABLE OF X AND Z REPORTS
(REPORT NAME)
AUTO SCAN READ
AUTO SCAN RESET
PLU READ
PLU RESET
PRESET-DATA VERIFICATION Mode Lock: X
Mode Lock: X -»
Mode Lock: Z
Mode Lock: -X ->
Mode Lock: Z ->
(KEY OPERATION)
1
2
(CONTENT & REMARKS)
All DEPT and Transaction
-»I AT/TL1 Totals and Counters that
have memories opened.
All the totals of PLUs
I PLU I that have been se t. The
Z report will clear only
the sales quantity but
not the preset prices.
In the X report, PLUs
with no sales data record
ed will not be printed.
DEPT Preset Prices
DEPT L.C., Tax Status,
Pos./Neg. Status
PLU Codes, Preset Prices,
Link Depts
% Preset Rates, Common LC
NOTES: 1. The cash drawer will open when final key to start each report print
ing is depressed except on the PRESET DATA VERIFICATION.
2. The display stays to indicate "0" throughout any report issuing
operation.
3. No Clerk Key is necessary to issue any of the reports.
4. Refer to the report samples on the following pages. As for the
PRESET VERIFICATION print samples, see the "VERIFICATION OF
PROGRAMMED DATA" near the end of this manual.
_ 00 _
Page 27

Thank you
Call ogain
0^-02-82
§12 3
05
6
*600
20
1
*200
25
Q
*00 0
29 i
160
* 7 2 0 0 0. 0
30 £
5
*250
oooiz -
ld-0076
11-53
REPORT SAMPLES
0
PUI RESET REPORT
„ , , , {X for READ) „ r—
Mode Lock; ^ RESET fPLUl.
Reset Report Symbol
PLU Code (PLU No.5)
~~ Sales Item Count
— Sales Total
No sales were made on this PLU.
(The PLUs with no sales recorded will
D
be skipped in a PLU READ(X) REPORT.)
■Reset Count
Page 28

REPORT SAMPLES
Thank you
Call again
04-02-82
il23
1 2 69 9 6 4 0 Ì5
407 .
12699640 S
01
?a U
A 7 05 5
02
346 i;
12 0 8 5 9.0 6
a % +
* 4 4 5 % +
1
* 6 0 4 3.4 0 f
3 6 4 tS
12697746 S
2
. % -
*088 %-
2
*100
-
35 3
1 2 6 9 7 5 5 8 Fi
2 6 6 5
*1868 Sfi
*1389
3.
*3100
1
*650
’Gross Sales Item Count
'Gross Sales Total
■ Department 1
— Item Count
--
•Department 2
- -
--
-%+
“3i+ Total
—Tax 1 Total
— Net Sales Item Count
— Net Sales With Tax (Net Sales Without Tax
~%~
— Total (on ST)
"Dollar Discount Count
— Dollar Discount Total
— Total Customer Total
-Total - CATL + CKTL + CHTL
— Cash Customer Count
— Cash Sales Total
—Check Customer Count
— Check Customer Count
—Charge Customer Count
I ¡j
U 1-
— Charge Sales Total
— Received on Account Count
a
« H
— Received on Account Total
It K
o
— Paid Out Count
a
— Paid Out Total
AUTO SCAN RESET REPORT
Mode Lock:
Reset Report Symbol
Non-resettable Grand Total
Sales Total
Item Count
Sale Total
Count
■(Tax 2 Total if dual-tax)
Count (on sub-total)
(X for READ REPORT)
Z for RESET REPORT
Depress ÌAT/TLI
optional}
_ -
Page 29

REPORT SAMPLES
(AUTO SCAN RESET REPORT —Continued—}
12694901
7
*3718
d
*1020
2 3
*165
2
3
*090
%-
7
*784
*6 76 0
2 0
1 ¡j * * * —
4 0 7 I
12699640
384
12697746
35
1 2 6 9 4 9,0 1
*1894
*353
*650
* *
a i
*000
oa-oc
35
12697746
16-00
0
*0,00
23-00
OOOIZ -
1 C-Ü Ü 7 7 •
11-53 -
Cash-in-drawer Total
■Check-in-drawer Count
•Check-in-drawer Total
■ Item Correct Count
■ Item Correct Total
■Item Correct Count —i , i
— Item Correct Total
• %-
Count on DP Line Item
Total on DP line Item
■Returned Merchandise Count
■Returned Merchandise Total
— Taxable Total 1
- Validation Count
' Clerk 1 Sales Data:
---
Gross Item Count
---
Gross Sales Total
---
Net Item Count
----
Net Sales Total
----
Total Customer Count
----
Cash-in-drawer Total'
---
Check-in-drawe- Total
----
Negative 1 (= Neg.Sale + Item Correct + RTN +
----
Negative 2 (» %-l + DOLLDISC + Item Correct)
-Paid Out Total
Hourly Total Data:
before 8:00
-8:00-16:00
— Customer Count
— Sales Total
—16:00-23:00
— Customer count
— Sales Total
Reset Count
Clerk ID when this report is issued, Consecutive No.
Current Time
^on Department Items
Jon others (%,P0,fi/A, )
■(Taxable Total 2 on a dual-tax ECR)
(on DP)
(on ST)
—(Clerk 2, 3, A Data if any)
% ~2 )
- 25 -
Page 30

PROGRAMMING OF THE REGISTER
SETTING OR CHANGING THE STORE/REGISTER NUMBER (Condition: after an AUTO SCAN Z
report)
Mode Lock: SET
Key Operation
NOTE: The ED is
I
NUMBER I [S
--
1
-------
^ (0 ~ 999999 max.6 digits)
SETTING THE DATE (Condition: anytime outside a sale)
Mode Lock: SET Key Operation
|6l - [X] 1 MONTH I DAY I YEAR I IaT/TLI
1 or 2 digits
(1 ~ 12)
2 digits
(01 ~ 31)
SETTING THE TIME (Condition: aytime outside a sale)
Mode Lock; SET Key Operation
l5l ^ -i- I HOUR I MINUTE I I AT/TLi
1 or 2 dig.
(0-23)
2 digits
(00-59)
2'digits
(82, 83, etc.)
allowed in the number
entry -
SETTING INDIVIDUAL DEPARTMENT STATUS (Condition: after an AUTO SCAN Z report;
also requires a PLU Z report if the
positive/negative status is to be changed
also)
Mode Lock: SET
111 [D
Key Operation:
(rWMl) -
for single
tax status
^([RTNEMDSE])^ I DEm ^ I AT/TLi
change
-K ITXI/Ml) -f- (ITX2/MI )•
for TAXI for TAX2
status status
change change
(Repeat until all the required DEPTs are set
or changed with the status.)
_ -
Page 31

NOTES: 1. Among ITXI/Ml iITX/mI). and ITX27mI keys, depress the key(s)
for the required status change(s) for each department. The
1RTN MDSË1 is depressed to set or reset the negative DEPT
status.
2. Depressing any of the three keys above, the related status
reverses. For example, depressing the ITX/Ml reverses a nontaxable DEPT to a taxable, or taxable to non-taxable. Each
department status is read by the number indicated on the
display when each department key is depressed in the above
operation. The numbers and their respective statuses are:
0; Non-taxable
1 : Tax 1 only
2: Tax 2 only
3: Tax 1 and Tax 2
Watching the number, adjust the status by depressing those
keys. See the examples below:
STATUS
BEFORE
.3. In order to simplify the status setting operation, each depart
ment status may be reset to *'0" by entering "0" and depressing
the department key in the above operation. (This can only
be done after a PLU reset as well as an AUTO SCAN reset.)
Then the required status is set simply by depressing the keys
ITXI/mI {i TX/MI) and/or ITX2/MI, each only once .
NUMBER_^
CHANGE
0
0
0
1
1
1 ITXi7m1ITX2/MI
2
2
3
KEY-IN FOR CHANGE
PRIOR TO iDEPT 1 KEY
ITXI/MI
1 TX17mI 1 TX2/M1 -*
ITX2/MI
etc.
1txi7m1
ITX2/MI
etc.
1TX2/M1
|TX1/M|
ITXl/Ml
etc.
NEW NUMBER AND
-
STATUS OBTAINED
KTaxl only)
3(Taxl and Tax2)
2(Tax2 only)
0{Non-taxable)
3(Taxl and Tax2)
2{Tax2 only)
0(Non-taxable)
3(Taxl and Tax2)
2(Tax2 only)
Page 32

SETTING OR CHANGING DEPARTMENT PRESET PRICE (Condition: anytime outside a sale)
Mode Lock: SET
I New Preset Price]
Key Operation
1 DEPT I ^ i AT/TL i
max. 6 digits
NOTES:
1. To preset the price of "0",
enter "0" in place of the
Repeat for all the
required departments.
price entry in the above
operation.
2. If no price is entered in
the above operation, the
department is set as an open
department.
PROGRAMMING PLU TABLE (Condition: after a PLU RESET-to renew the PLU table,
or anytime outside a sale to program
additional PLUs)
Mode Lock: SET
3] [X] ^ iPLU Code! ^ [PUT]
Key Operation
'max.2 digits
[Preset Price] [Link DEPT I -»I AT/TL1
max.6 digits
(1-50)
----
To program another PLU
-----------------
NOTES: 1. No PLUs can be programmed to link a negative department.
2. A maximum of 50 PLUs may be programmed.
3. The PLUs that have not been programmed v/ith a preset price
in the above operation are automatically set as PLUs with
the preset price of "0".
4. The tax status of each PLU is automatically determined
by the status of the linked Department.
CHANGING PLU PRESET PRICE (Condition: anytime outside a sale)
Mode Lock: SET Key Operation
[PLU Code! -V ГРиЛ [New Price] Ц] [aT/TL'I
max.2 digits max. 6 digits
(1 - 50)
— To change the price of another PLU
NOTE: In this operation, changes of link departments, programming
additional PLUs, etc. are not possible.
Page 33

PROGRAMMING TAX TABLE (Condition: after an AUTO SCAN RESET)
Mode Lock: SET
1) TAX 1 FULL BREAKS
Key Operation: -Imax. amount non-taxable[ i TXl/Ml
|max. amount for 1^ tax leviedl—»[txI/MI
I max, amount for tax levied! —»1TX1/M~1
Repeat until the "A** Break is entered.
jmax. amount for tax levied |"^^»ГfXl/M| ... "A" Break
I ST I (to indicate the "A" Break entry)
I max, amount for N.+1^ tax levied!—> I TXl/Mj
I max, amount for N+2(j tax levied |—>| TXl/M I
Repeat until the ”B" Break is entered.
IAT7Tl1 (to end)
NOTE: The amount entry may be maximum 4-digit value (up to 9999ii).
2) TAX 1 "A*' BREAK AND % RATE COMBINATION
Key Operation: First set the "A" Break following the same operation
up to the "A" Break entry and the |ST I key depression
in "D TAX 1 FULL BREAKS" above.
I TAX RATE applied when exceeding the “A" Break amountj
(max, 4 digits, up to 99,99%. Do not use the Q
key. The fraction of the amount resulted from this
% rate calculation will be rounded off.)
I
IAT/TLI (to end)
3) TAX 1 % RATE ONLY
Key Operation; lol^iTXl7MT-»l~^Tl->|TAX RATE 1-»Tat/'tlI
(The conditions
of the rate are
the same as the
above TAX RATE.)
NOTES: 1. If only one tax modifier key ( ITX/Ml ) is installed on the key
board, use the ITX/MI in place of the I TXl/M I in the descrip
tion 1), 2), or 3) above.
Page 34

2. For TAX 2 Table programming, follow the same procedure in thide a sale)
1), 2), or 3) above, using the ITX2/MI instead of the ITXl/Ml.
3. If both TAX 1 and TAX 2 tables are programmed, the TAX 1 must
be set first. The TAX 1 table entry will automatically reset
both the TAX 1 and TAX 2 tables that have been programmed.
4. No second depression of the I ST I key is allowed within one
tax table programming.
SETTING NON-TAXABLE LIMIT AMOUNT (for a certain area only)
(Condition: after an AUTO SCAN RESET)
This may be programmed only when one tax modifier key ( I TX/M I ) is
installed. The tax levied when exceeding this limit amount will be
calculated by the TAX 1 table.
Mode Lock: SET Key Operation:
)9l—> ■ —>|Non-taxable Limit Amount[—»1AT/TL1
NOTES: 1. If this program has been set, the tax is calculated and added
to the sale total which exceeds the limit amount even when
the sale is entirely composed of non-taxable items,
2. To reset the limt amount once set, enter "0" in place of the
]Non-taxable Limit Amount] in the above operation.
3. This tax calculation program will be disregarded when the sale
total turns out to be negative.
ex.) In case the limit amount "$3.25" is set:
'0",
the
love
in
the
ipen
Case 1: Normal Department Entry; (Mode Lock: REG)
l326l->|non-taxable DEPT I-» IAT/TLI
.. .
The entered amount $3.26 is greater than the
limit amount $3.25. It will therefore be taxed.
Case 2: Returned Merchandise Entry: (Mode Lock: REG)
IRTN MDSË1-»|326l^|non-taxable DEPT|->| AT/TL|
.. .
The non-taxable total is negative. The tax
already levied will therefore not be returned.
nee
vith
ined
Tiing
Page 35

SETTING THE LISTING CAPACITY OF DEPARTMENT (Condition: after an AUTO SCAN RESET)
Mode Lock: SET Key Operation
|2| IXl IHALCI > IAT/TLI ... for the common listing capacity
~ for all the departments
(2j -> [x] I HALC I I DEPT | •> \ AT/TL | ... for individual departments'
♦Note 1: HALC .. Hight Amount Listing Capacity
ex.) l3|4|
NOTES: 1. If the individual listing capacity of a department has been
2. To reset an individual listing capacity, enter "0" beioi'e the
*(Note 1)
*tNote 1)
I listing capacities
Repeat until all**
L
the required indiv.
dept. Listing Capacities
are set.
Number of maximum digits allowed
■Maximum value of the. top digit-allowed
indicates 3999
L
4 digits —
-Value of the
top digit
set, it prevails over the common listing capacity of all the
departments.
[pE^tI key in the above operation. Then the common listing
capacity of all the departments, if pre-programmed, will
prevail.
T
The amount range allowed
to enter will be:
Equal to or smaller than
the HALC (3999 in this case)
SETTING THE PRESET RATES OF AND KEYS (Condition: anytime outside a
Mode Lock SET Key Operation
1) To set a rate of integral value:
I RATE I -» dg
I RATE I E]
2) To set a rate containing the decimal point:
I Integral Portion! [Tl [Decimal Portion] \%+\
max. 2 digits max. 3 digits I
(up to 99.999%)
3) To reset the rate once set:
io| ^ d3
|0| ^ E
-SI -
sale)
Page 36

SETTING HOURLY RANGES (Condition: after an AUTO SCAN RESET)
Mode Lock: SET
111 -y [X]
NOTES: 1.
A maximum of 16 hourly ranges may be set.
To change the table of hourly ranges once set, partially or
2,
entirely, do the entire setting operation over again.
To reset the hourly range table once set:
3.
Do not set an hourly range accross 24:00, such as "from 23:00
4.
to 1:00".
Key Operation
(0-23) (01-59)
I HOUR IMINUTE 1
m
lAT/TLi
Enter the time to
end each hourly range,
in the 24-hour system.
__ Repeat until all the
time ranges are entered.
Mode Lock: SET, 141-»[3(1-»10UfFI ^[ATTfLl
- 3? -
Page 37

VERIFICATION OF PROGRAMMED DATA
1. DEPARTMENT PRESET PRICE READ
Mode Lock: X Key Operation: [l
Thank you
Cali ogoin
04-02-82
S123
Department Code-
01 *2.5.0
02 *L00
Read Symbol
—Preset Department (preset price of $2,50)
0 0 2 6
11. - 2 5
2, DEPARTMENT LISTING CAPACITY AND STATUS READ
Mode Lock: X Key Operation: |2j -*■
Thank you
Tax Status—
0:Non-txbl
1;Taxi
2:Tax2
3:Taxl and
Tax 2
Department Code
Call again
04-02-82
S125
X
r
oil 93
Listing Capacity (HALC,..High Amount
0 2 0 9 4
0 0 2 7,
11-25
NOTE:
programmed as a negative department.
The Listing Capacity of ”00" indicates that no HALC
has been set on that department.
9 3
listing Capacity)
^Maximum Number of Digits allowed
^Value of the Top Digit allowed
will be printed if the department is
- 33 -
Page 38

3. PLU TABLE READ
Mode Lock: X Key Operation: j3
Thank you
Call again
0 4 - 0 2 -,8 2
§123
PLU Code
05 ¿01 ^
*100^
2 0 ¿01
*200
25 ¿02
*15.0
2 9 ¿0 2
*45000
3 0 ¿0 2
*Q5,C
0 0 2 8
11-26
4. OTHER PRESET DATA READ
Mode Lock: X Key Operation: l4| -»
Thank you
Call again
'Link Department Code
Preset Price
§
@
@
@
@
04-02-82
§123
X
20
10
0 0 2 9
11-26
97
Si +
%~
@
- 34 -
3;+ Preset Rate: 20%
% -
Preset Rate: 10%
Common Listing Capacity (KALC) of All Depts.
Page 39

MANUAL CASH DRAWER RELEASING
Usually the drawer is released automatically. However,
in an emergency, the drawer can be released manually.
Insert the Drawer Release Key into the Drawer Lock, turn
the key by ^5 degrees in the arrow direction. The drawer
is then opened. The drawer Release Key can be taken out
by returning it to the original position.
REMOVING THE DRAWER
The drawer can be removed by pulling it while lifting the
Drawer Stopper section at both sides of drawer.
The cash tray can be removed by simply lifting it up.
GOOD
Fit fresh
rolls
this way.
NO GOOD
X
REPLACING THE RECEIPT PAPER ROLL
Receipt Inlet
Fig. e
!. Open the Paper Cover.
2. Pull the existing paper core backwards while pulling the Paper Release Lever toward you and
remove the paper out of the printer. (Fig. 7) ^
3. Place the new receipt roll into the paper roll compartment .so that the paper Feeds From the
bottom of the roll.
4. Insert the paper end by pushing it into the paper inlet. (Fig. 8)
5. Depress the fRF 1 key to advance the receipt paper until the paper end comes out of the
receipt outlet. (Fig. 9)
(If the receipt paper does not advance evenly though the rFFTl key is depressed, re-insert
the end of the paper into the paper inlet with the IRFI key depressed.)
Fig. 9
Page 40

REPLACING THE JOURNAL PAPER ROLL
Fig. 10
1. Open the Paper Cower.
2. Depress the IJFI key to advance the journal tape until unprinted part of the paper comes
out of the Journal Paper Guide,
3. Lift the printed journal together with the Journal Receiving Shaft and cot the journal paper
at the edge of the Journal Paper Guide, (fig. lO)
it. Remove the printed journal off the Journal Receiving Shaft.
5. Replace the existing journal paper roll with a new roll following the sane procedure as for
the receipt roll.
6, Depress the fjFI key to advance the Journal paper about 20 cm (8").
7, Insert the end of the journal paper into the slot on the Journal Receiving Shaft and wrap
it around the shaft twice to secure the paper. {Fig, U)
8. Place the Journal Receiving Shaft into the guide slots so that the shaft gear engages with
REPLACING THE INK ROLLER
Ink Roller
the journal take-up motor gear.
Fig. 12
Ink Roller Case
Fig. 14
1. Set the Power Switch to OFF.
2. Remove the stamp cover to gain access to the Ink Roller and Stamp Assembly, (fig, 13)
3. Pull the Ink Roller Case upwards with your right fingertips, (fig. H)
A. When replacing the Ink Roller, use a vinyl glove or cover the Ink Roller using the vinyl
strip to prevent inking the hands.
REPLENISHING INK TO THE STORE MESSAGE STAMP
Stamp Case
Page 41

1. Set the Power Switch to OFF.
2.
Pull out the Store Message Stamp upwards. (Fig, 15)
3. Replenish ink to the bottom of the Stamp. (Fig. 16)
The amount of ink to be replenished should be 2 c.c. or less depending on the intensity of
print. (The supplied ink bottle contains 5 c.c. ink.)
WHEN A POWER FAILURE OCCURS
When power is restored, the register will display the last item entered before the power Failure
i f the item was entered through a notorized key (such as fDLPj], media keys, etc.). In this
case, contiue the registering operation. However, if the register displays "FAIL" when the power
is restored, it indicates that the last item entry was not completed (i.e., only numeric keys
or a declaration key such as LRlTl-ìlDiG were operated but not any motorized key). In this case,
first depress the [Q key to clear the "FAIL" condition, and then do the registering operation
again from the numeric or declaration key entry. In the event of a power failure, be sure to
check the receipt before it is handed to the customer,
SPECIFICATIONS
Size
...............................
Weight
.............................
Power Required
Power Consumed
Size of Receipt and Journal Tape 38mm(width) X 70mm{diameter)
Ambient Temperature
.....................
.....................
................
A60mn(width) x 400fiìh)(depth) x 364mni(height) (SP MODELS)
Approx. 18.5 kg (SP MODELS)
AC 117V 50/60 Hz (Varies depending on each area.)
25 W
o'"c ~ 40°C 10-90X RH
BEFORE CALLING FOR SERVICE
It is your dealer's primary concern to give full satisfaction and better service to our customers.
So if any problem arises in connection with the operation of this register, contact your TEC
representative listed on the page. However, before calling for service, please check the follow
ing points once again,
I In case the register is inoperative with a blank display and the printer will not turn.
. Is the register power switch turned on?
. Is the power cord of the register connected with the wall socket properly?
. Is AC power applied to the outlet? (Plug in a lamp or light fixture to check.)
. Has the fuse blown, or is the circuit breaker turned off?
In case the
outlet.
. Can the coloured lines on the receipt or journal paper be seen?
In this case, replace the receipt or journal paper with a new roll immediately.
. The receipt paper is jammed at the receipt cutter. In this case, remove the printer cower
and check the installation of the receipt paper.
YOUR TEC REPRESEHTATIVE; ____________________________________________________________________________________________
ADDRESS:
PHONE:
receipt or journal is not feeding or the receipt is not coming out of the receipt
Page 42

Page 43

—
PROGRAMMING MANUAL
A
MODEL
ORIGINAL
(REVISED
DOCUMENT NO.
MA-136-100 SERIES
APRIL ,1982
APRIL, 1983 )
E12-01107-A
__ __ _
/
TOKYO ELECTRIC CO.,LTD.
PRINTED IN JAPAN
8304500 ©-©
Page 44

Page 45

INTRODUCTION
This programming manual is provided for salesmen, field engineers, and other
support personnel as a supplemenatary manual for the TEC electronic cash
register Series MA-136-100. Reading through the Owners Manual for the series
is recommended in order to thorougly understand the descriptions in this
manual.
SPECIFICATIONS
MODELS: MA-136-100 Series
Way to assign the several versions of models MA-136-100 Series:
MA-136-1XXXX-XXX-XX
E,
■Nation Code & Tax Spec.
-US: US With Single Tax
- US2: US With Dual Tax
- CA: CA
- SA: SA
-Battery Operation
vacant: None
-BTl: Circuit only
-BT2: Circuit and Battery
SIZE:
WEIGHT:
—Drawer
vacant: SP (Export Standard)
M ; Mini Separate:
D : Deep
N : None (Field Installation)
-Clerk Keys;
vacant: Barrel Locks (Export Standard)
P :' Push-style Keys (optional)
-Number of Departments
02: Standard Keyboard (2 Departments)
-Basic Spec, of ROM
1: for US, CA,. and SA
Standard Model: MA-136-102-US (The standard SFKC's are automatically
set on this model after a RAM Clear
operation.)
460mm(width) x 400mm(depth) x 364mm(height) (SP Size)
Approx. 18.5kg (SP)
POWER REQUIRED:
POWER CONSUMED:
AC117V 50/60HZ (may vary depending on the area)
25W
- 1 -
Page 46

AMBIENT TEMPERATURE: o'^C ~ 40'^C, 10-90% (RH)
COMPOSING ELEMENTS: MOS-LSI, C-MOS IC, etc.
MAXIMUM NUMBER OF KEYS AVAILABLE ON KEYBOARD:
48 keys
PRINTER
Printer Model: LP-701 {TEC Line Printer)
Print Stations: Two Stations (Receipt and Journal)
Printing Speed: 2.3 lines/sec.
Printable Digits: 11 digits/line (for each of Receipt and Journal)
Character Size: 1.7mm(width) x 3.2mm(height)
Character Spacing: Digit Space — 3.0mm
Line Space — 5.4mm(Receipt) 4.,5mm(Journal)
Print Drum Configuration:
0
1
1
1 1
2
!
3
i
4
1
5
1 5
6
1
7
!
8
!
9
1 9
#1d
1 - - i
1
0. 01010.!01010
0
11111.111111
1.
1
2.
2
3
4 4.
6
7
8
12121
3.131313.i31313
141414.1
5.i5
6.
7.
8.
1
616
1
171
81818.i81818
1
9,191919.
r¿
s 1
*
* 1
1
—!—
*1*!*
2.i21212
515.1515
16.!
717.i71717
o
1
tX1Z1cnÌ
—1—
i
1*1★t 1X1
414
616
9
191
1
141g1
5
1
161e1
9
z:)
CJ)
-
i 1
1
1s1
151
i
1Od1
1 i
1 % 1
!
3e:
1
OD
iSi
1
_
1
0
Cl.
O
1
e
s
Of
8
CO
1
+
1
-
1
Receipt and Journal Roll Size:
38mm(width) x 70mm(diameter)
Paper Feed Device: Receipt and Journal have independent feeding devices
from each other.
Store Name/Message Stamp Size:
26mm(width) x llmm(height)
Receipt Cut:
Manual-cut Style
Ink Feeding:
Fed through a Pad Roller
Color — violet
Detectors :
Journal-near-end Detector (optional)
Validation Slip Detector
Drawer-open Detector
Validation Function: Printable Digits — 28 digits(See the SPEC.of LP-701)
- 2 -
Page 47

MEMORY
Totals and Counters:
NAME OF TOTAL
6T
NET GT
GS
TAX 1 8
TAX2
DOLL DISC
NEG SALE 8
MEDIA TL (TL)
CATL
CKTL
CHTL 8 CUS 4
RA 8 CTR
PO 8
CAID
CKID
CHID
VDl
VD2 8
RTN 8 ITEM 4+2
TXBL TLl 8
TXBL TL2 8
OP
PLU ITEM 5+2 (x50)
HOURLY 8 (xl6) CUS 4 {xl5)
DIGITS(O'TY) TYPE OF
COUNTER
16
16
8
8
8 CTR 4
8 (x2)
8
8 CUS TL 4
8
8
8
8 CTR
8
8
8 (xl5)
ITEM 4+2
CTR
CTR 4
ITEM 4+2
CUS 4
CUS 4
CTR 4
CTR 4
CTR 4
CTR
ITEM
NS CTR 4
VALI CTR 4
2..CTR 4
CONS.CTR A
PLU.Z CTR 4
DIGITS(O'TY)
4 (x2)
4
4
4
4+2 (xl5)
REMARKS
optional print
for. Dual-tax Area only
Sum of Negative OPs
Item Correct on DP(+)
Item Correct on other items
for Dual-tax Area only
- 3 -
Page 48

— INDIVIDUAL CASHIER TOTALS—
NAME OF TOTAL DIGITS TYPE OF
GS
NS
CAIO
CKIO
CHID
NEG 1
NEG 2
PO
TAX
Memory Balance:
1. GT = JGS
OIGI
COUNTER
8
8
8
8
8
8
8
8
8
ITEM
ITEM 4+2
TL CUS 4
Z CTR 4
U2
RE MA RK S
2. NET GT = ^TL
3. GS = ^DP + TAXI + TAX2 + (.%+) + {%- on DP+ Items)
+ 5pP(-) + VDl + RTN
4. NS with TAX = ^DP + TAXI + TAX2 + %+
= GS - (%- on DP+ Items) - VlDP{-) - VDl - RTN
*N0TE 1
5. TL = CATL + CKTL + CHTL
= NS with TAX - {%- on ^) - (DOLL DISC)
**N0TE 2
6. 5;H0URLY = NS with TAX (for US Models)
J;;H0URLY = ns without tax (for CA Models)
7. VCLK NEG .1 = NEG SALE + VDl + RTN + {%- on DP+ Items)
*N0TE 1
8, ^CLK NEG 2 = {%- on ^) + (DOLL DISC) + VD2
**N0TE 2
*N0TE 1:
**N0TE
”DP+ Items" describes positive department entries,
2: "ST" describes sub-total entries.
_ 4 -
Page 49

PROGRAMMING OPERATIONS
TABLE OF PROGRAMMING OPERATIONS
RAM CLEAR AND STATUS CLEAR OPERATION ............................. 6
S.F.K.C. SETTING ................................................. 6
MEMORY OPEN ...................................................... 8
KEYBOARD LAYOUT ................................................ 9
SYSTEM OPTION PROGRAMMING
.......................................
pag e
10
SETTING OR CHANGING THE STORE/REGISTER NUMBER
SETTING THE DATE ............................................... 21
SETTING THE TIME ................................................ 21
SETTING INDIVIDUAL DEPARTMENT STATUS ............................ 21
SETTING OR CHANGING DEPARTMENT PRESET PRICE
PROGRAMMING PLU TABLE ........................................... 23
CHANGING PLU PRESET PRICE
PROGRAMMING TAX TABLE ........................................... 24
SETTING NON-TAXABLE LIMIT AMOUNT
SETTING THE LISTING CAPACITY OF DEPARTMENT
SETTING THE PRESET RATES OF gT] AND [|3 KEYS
SETTING HOURLY RANGES .......................................... 27
VERIFICATION OF PROGRAMMED DATA
1. DEPARTMENT PRESET PRICE READ
2. DEPARTMENT LISTING CAPACITY AND STATUS READ
3. PLU TABLE READ .......................................... 29
4. OTHER PRESET DATA READ
5. SYSTEM OPTION READ
6. TESTING TAX CALCULATION
.......................................
...............................
.................................
............................
..................................
......................................
.................................
...................
.....................
......................
....................
..............
21
23
23
25
26
26
28
28
28
29
30
30
- 5 -
Page 50

This page REVISED: April, 1983
RAM CLEAR AND STATUS CLEAR OPERATION
1. Turn the Power Switch to OFF.
2. Turn the RAM Clear Switch to ON.
3. Turn all the Clerk Keys to OFF for a RAM Clear. Or turn one of the
clerk keys to ON for a Status Clear.
4. Turn the Mode Lock to any one of the positions below;
SET, LOCK, MGR, [3t Z
.... ..
(for zero suppress of:0.00)
(NOTE; If the Mode Lock is turned to other positions, the zero
suppress will be as follows:
REG
.........
for zero suppress of 0 as in IT or JA
version
X ........... for zero suppress of 0.0 as in
TA version)
5. Turn the Power Switch to ON.
Now a RAM Clear operation is fininshed and the Standard S.F.K.C. have
automatically been programmed. ("Standard S.F.K.C" is shown as the
STANDARD KEYBOARD LAYOUT in the OWNERS MANUAL.)
6. Keep the RAM Clear Switch to ON if a SFKC programming (to change partly
or entirely from the Standard S.F.K.C. feature) follows. Turn the RAM
Clear Switch to OFF if not.
- 6 A
Page 51

This pa ge R EVIS ED; Apri l, 1 983
S.F.K.C. (Selective Fiinction Key Code) SETTING (Condition: after a Z reset
& a PLU reset)
This operation must be carried out first before any other programming
operations. If a RAM Clear operation has been done prior to this opera
tion, the S.F.K.C.'s of the Standard Keyboard should have automatically
been set; therefore, this operation may not be necessary and the MEMORY
OPEN operation will follow. However, in case any keys or positions are
to be programmed differently from the Standard Keyboard, this S.F.K.C.
operation must be done.
1. Turn the Power Switch to OFF.
2. Turn the RAM Clear Switch to ON.
3. Set the Clerk 2 Key to ON position.
(Please note that if none of the Clerk Keys are set to ON, a RAM Clear
operation will be performed.)
4. Turn the Mode Lock to SET position.
5. Turn the Power Switch to ON.
6. Enter each S.F.K.C. shown in the S.F.K.C. table and then depress the
key to require the function indicated with that S.F.K.C.
Repeat this step until all the required keys to be programmed or changed
with their own S.F.K.C.'s.
Please note:
(1) The key should be programmed first of all,
(2) To enable other programming and registering operation rightly,
the following keys must be programmed regardless of other
key selections:
0. S. IAT/TLI , [ST] , g] or [?7n^| , ITXI/MI (orjTxTMl ),:
and Department Keys.
7. When all the necessary S.F.K.C. *s are set, turn the RAM Clear Switch
to OFF.
NOTE: 1) If a wrong S.F.K.C. has been set on a key, do the operation in
Step 6 again with the correct S.F.K.C. and then depress the key.
The last S.F.K.C. entry into each key will be effective,
2) To cancel and close the use of a key, enter "0" instead of an
S.F.K.C. before depressing the key, in Step 6. The S.F.K.C. of
"0" locks the key and will not allow its use. (In this case,
its memory will be closed also.)
3) To verify the S.F.K.C. already set, simply depress each of the
desired key without any number entry in Step 6 condition. The
S.F.K.C. is displayed but not printed.
- 6 B -
Page 52

4) The memory of each key that has been set in this S.F.K.C.
SETTING operation is automatically opened. If a key's SFKC
is again changed in this operation, the memory of its ild
function is closed and the memory for its new function is
opened.
5) If a key is closed, all the memories of the functions that
have been opened for the key are closed.
IS.F.K.C. KEY SYMBOL
KEY NAME
1 0
1 1 ~ 15
DEPT 1 -
Department
DEPT 15
i 51 ~ 53 — vacant —
1 54
1 55
DOLL DISC jDollar Discount 1DOLL DISC
%- 1
1
1 56
%+ 1
!
1 57
RTN MDSE ¡Returned
{ Merchandise
1 58
ITEM CORR ¡Item Correct
1
1 59-60
1 61
AT/TL j Amount Tendered/
— vacant —
1 Cash Total
1 62
CHK TND 1 Check Tendered
1
1
63 Chg 1 Charge Total
1
1 64 — vacant —
1 65
1 66
1 67
ST
R/A
PO
Sub-total
Received on
Paid Out
MEMORY TO BE OPENED
for non-use, memory is closed
Each DEPT. ITEM COUNT and TOTAL
Keys
%-
%+
RTN
VDl VD2
CATL, CAID
CKTL, CKID
ChgTL, ChgID(optional)
No memory
RA
Account
PO
1 68
1
69
NS
No-sale
PR OPEN Preset Open No memory
1 70 LC OPEN Listing Capacity
Open
1 71
OPEN
Preset/Listirig
Capacity Open
1
72
VALIDATE
Validation
1 73 # or #/CID Non-add Number
1 74
#/NS
Non-add Number/
No-sale
t 75
1 76
PLU
X
Price-Look-Up
Quantity
Extension
- 7 -
NS CTR(optional)
No memory
No memory
VALI .CTR
No memory
NS CTR{optional)
All 50 plus' memories
No memory
Page 53

S.F.K.C. TABLE —Continued—
|S.F;K,C. KEY SYMBOL KEY NAME
1 77
1 78 C Clear No memory
1 79
1 80 TX2/M Tax 2.Modifier TAX2, TXBL TL2
1 81
1 82
¡83-95 -- vacant —
MEMORY OPEN (Condition: after a Z reset )
Mode Lock: SET (RAM Clear. Switch to OFF)
Key Operation
TXl/M
(or TX/M)
TXBL TL
TAX
|n| ^ S ^ [!□ ... CZl
— vacant —
Tax 1.Modifier TAXI, TXBL TLl
Taxable Total No memory
Manual Tax
-----------------
TAX2
^
J
I
Depress the keys to
make its memory opened,
one by one.
MEMORY TO BE OPENED
IAT/TLI
NOTES: 1. If a key with no memory to be opened is depressed in the above
operation, it will not result in an error. However, depressing
the numeric keys or the Q key will result in an error.
2. The keys that have been operated to set their own SFKCs in
the last operation have already their memories opened. Those
keys, therefore, need not be depressed in the above operation.
3. Refer to the S.F.K.C. TABLE as to each key and its memory to
be opened.
4. This operation is provided to open memories of the keys that
have automatically been set by a RAM Clear operation. There
fore , the keys that have been programmed with the SFKC of "0"
(to lock the key and close its memory) or the keys that are
not programmed in the automatic SFKC by the RAM Clear will
not be opened by this operation.
- 8 -
Page 54

KEYBOARD LAYOUT
MA-T36-102-US (Standard Keyboard)
- 9 -
Page 55

SYSTEM OPTION PROGRAMMING (Condition: after a Z reset)
Mode Lock: SET Key Operation
(Bit No.: 87654321)
12
S
Address No.I ^ [st] ^
I I I I I I I I I -
W]
1
_ _ _^_ _ _ _ _
I
Enter a 8-digit number composed of "0" or
”1" on each digit as each Bit status
selection. Top "0"s (on Bit No.8 and/or
thereafter), if any, may be omitted when
entering the 8-digit number,
NOTES: 1. Any Bit No. with the "—vacant—" item will be disregarded
if entered with a "0*’ or "1". However, enter "0" for such
a Bit in order to adjust the position of each Bit.
2. When a RAM Clear is operated, the status of each Bit No. is
automatically set to the side marked with in the "Standard
Status" column of each table below. So, only the Bit status
changes of the required Address(es) may be entered according
to your customer's requirements.
Iat/tlI
Address No.
1
Bit
No.
1
2
3
N
b
6
?
8
I tes
CASH MEDIA KEY
CASH MEDIA KEY
— \/acant —
—vacant—
—vacant—
—vacant—
—vacant—
--vacant—
Contents
MEDIA FUNCTION 1
Selective Status
0
1
TOTAL KEY onlv
0
1
TENDER KEY only
0
1
0
1
0
1
0
1
0
1
0
1
___________________________
SYSTEM OPTION TABLES
Standard
Status
*
*
[TENDER and TOTAL Key.
J
Reaark s
If both " 0 ", it functions as
- 10 -
Page 56
This page REVISED: April, 1983
Address No.
Hi t
No.
1
IRTN HD5EI
2
{m
3
IDOLL DISCI
Negative DEPT
A
—vacant—
b
—vacant —
b
—vacant—
?
—vacant—
"
Ite«
Contents
MGR REQUIREMENT I
Selective Status
0
FREE
1
COMPULSORY
0
FREE
1
COMPULSORY
0
FREE
1
COMPULSORY
0
FREE
1
COMPULSORY
0
1
0
1
0
1
0
1
Standard
Status
*
* —
Reaarks
-Fixed Status {No selection available.)
Add
-ess No.
3
Hit
No.
1
3
3
A
b
6
I tea
IRTN HOSEI
imi
irT^i
ICHK TNDi
1 Chq 1
—vacant—
"
—vacant—
/
8 —vacant—
Contents
VALIOATION COMPULSORY I
Selective Status
0
FREE
COMPULSORY
1
FREE
0
COMPULSORY
1
FREE
0
COMPULSORY
1
FREE
0
1 COMPULSORY
FREE
0 '
COMPULSORY
1
0 '
1
0
1
0
1
Standard
Status
*
Reaarks
- 11 -
Page 57

This page REVISED: April, 1983
Address No.
Bit
No.
1
llIEJj CORRI
?
IDOLL DISCI
3
IV 1
A
Negative DEPT
—vacant—
S
b
—vacant—
1
—vacant—
8
— vacant
Contents
VALIDATION COMPULSORY II
I tea Sel ec ti v e St at us
0
FREE
1
COMPULSORY
0
FREE
1
COMPULSORY
0
FREE
1
COMPULSORY
0
FREE
1
COMPULSORY
0
1
0
1
0
1
0
1
Sta nd ar d
Sta tu s
*
«
»
«
Rea ar ks
Address No.
Contents
FRACTION ROUNDING
Bit
No.
1
?
3
A
b
6
Ì
8
t tea
QUANTITY EXTEN
SION PRODUCT D
QUANTITY EXTENSION PRODUCT D
—vacant—
—vacant—
-- vacant —
—vacant—
vacattt --
— vacant —
Sel ec ti v e St at us
0
1
ROUND UP
0
1
DISCARD
0
1
0
1
0
1
0
1
0
1
0
1
Sta nd ar d
Sta tu s
#
-'.If both '■ 0 ", it will be rounded of£
J
NOTE 0: The rounding rule to be designated here will also applies to the X calculations.
Rea ar ks
- 12 -
Page 58

Address No.
--------------1------------------
Bit
No.
1
2
3
A
b
6
?
6
[tea
[S
E
lOOLL DISCI
—vacant—
—vacant—
-- vacant —
— vacant —
-- vacant —
Contents
TAX I STATUS
Selective Status
0
NON-TAXABLE
1
TAXABLE
0
NON-TAXABLE
1
TAXABLE
0
NON-TAXABLE
1
TAXABLE
0
1
0
1
0
1
0
1
0
1
Standard
Status
*
*
Reaarks
Address No. Contents
7
Bit
No.
1
2
3
i.
b
6
7
8
I tea
l^l
IVI
IDOLL DISCI
—vacant—
—vacant—
— vacant —
-- vacant —
— vacant —
TAX 2 STATUS
0 ■
1
0 ■
1
0
1
0
1
0
1
'0
1
0
1
0
1
Selective Status
NON-TAXABLE
TAXABLE
NON-TAXABLE
TAXABLE
NON-TAXABLE
TAXABLE
For Dual-tax Area Only
Standard
Status
#
«
Reiarks
- 13 -
Page 59

Address No. Contents
This page REVISED: April, 1983
8
Bit
No.
1
2
3
Itei Selective Status
CREDIT BALANCE
(REG MODE)
CREDIT BALANCE
(MGR MODE)
-- vacant —
CHECK CASHING
—vac ant—
S
—vacant—
5
—vacant—
7
8
—vacant—
♦NOTE: The "CREDIT BALANCE" is a balance of sale to result in a negative amount. For
MEDIA FUNCTION I
0 PROHIBIT
1
ALLOW (in REG Mode)
0
PROHIBIT
ALLOW (in MGR Mode)
0
1
0
ALLOW
1
PROHIBIT
0
1
0
1
0
1
0
1
Standard
Status
*
* ^
-Fixed Status (Always allow in MGR mode)1
-Check cashing will also increments the
N6-sale Counter.
Reaarks
♦NOTE
-
example, if an amount exceeding the sale total is discounted through the
lOOLL DISCI key within the sale is entered, the sale balance will then go into
negative.
(However, any negative balance due to the use of the IRTN MDSE I key can be
finalized regardless of the "CREDIT BALANCE" option selection.)
Address No. Contents
9
Bit
No.
1
2
3
h
S
6
7
8
I tea
ST PRINT
Second 1 Sn depression
after additional entries
IIXBL TL 1 deoression
before finalization
R/A FINALIZATION
BY
—vacant—
“-vacant—
—vacant—
—vacant—
FUNCTION I
0
PRINT
1
NON-PRINT
0
Sub-total from the first item
1
Sub-total of additional items
0
FREE
1
COMPULSORY
0
ALLOW
1
PROHIBIT
0
1
0
1
0
1
0
1
Selective Status
Standard
Status
*
*
*
Reaarks
The displayed amount will be the subtotal from the first in either status.
-------------------
- 14 -
Page 60

This page REVISED; April, 1983
Address No.
10
Bit
No.
1
?
3
It
b
6
7
8
1 te«
— vacant --
-- vacant --
—vacant—
—vacant—
—vacant—
—vacant—
—vacant—
■DUAL-TAX PRINT
Contents
FUNCTION II
Selective Status
0
1
0
1
0
1
0
1.
0
1 .
0
1
0
1
0
fTXUTX2) TOGETHER
1
5ШНЙТ£.РШТ
_________
Standard
Status
*
Reaarks
—Fixed Status (Always print TOGETHER.)
Address No.
11
Sit
No.
1
2
3
A
b
TIME PRINT
6
TIME DISPLAY
DRAWER COMPULSORY
?
8
— vacant —
Itea
FREQUENCY
D£PARTM£NT{report)
ITEM COUNTER PRINT
ON RECEIPT
—vacant—
ITEM PRINT ON
JOURNAL
Contents
FUNCTION III
Selective Status
0
ITM CTR and AMOUNT
CUS CTR and AMOUNT
1
NOT PROVIDED
0
1 PROVIDED
0
1
0
IPD (Print)
1
INPD (non-print)
0
PRINT
1
NON-PRINT
0
AVAILABLE
1
NOT AVAILABLE
0
NOT PROVIDED
1
PROVIDED
0
[1
Standard
Status
*
*
*
*
Reiarks
-Displays the time when the Mode Lock
is in the "LOCK" position.
ECR with "DRAWER COMPULSORY" function
can only be set with the " 1 " status.
- 15 -
Page 61

Address No. Contents
This page REVISED: April, 1983
12
Bit
No.
1
— vacant —
2
3
— vacant —
A
S
-- vacant —
6
1
— vacant —
8
— vacant —
FUNCTION IV
I
tei Selective Status
0
1
—vacant—
—vacant—
0
1
0
1
0
1
—vacant—
0
1
0
1
0
1
0
1
Standard
Status
Reaarks
Address No.
13
Bit
No,
1
2
3
A
5
6
1
8
Iten
DATE ORDER
DATE ORDER
CONSECUTIVE No.
PRINT
GT PRINT
NET GT PRINT
NET SALE(WITH TAX]
PRINT
-- vacant —
— vacant —
Contents
PRINT FORHAT I
Selective Status
0
1
HONTH-DAV-YEAR
0
1
DAY-MONTH-YEAR
0
PRINT
1
NON-PRINT
0 '
PRINT
1
NON-PRINT
0 ■
PRINT
1
NON-PRINT
0 ■
PRINT
1
NON-PRINT
0
1
0
1
Standard
Status
*
*
* ^
*
*
’Mr
Renarks
-.If both "0 ", YEAR-HONTH-DAY order.
“Fixed Status (Always PRINT}
-Fixed Status (Always NON-PRINT)
- 16 -
Page 62
Address No. Contents
U
Bit
Ho.
t
2
3
-- vacant —
A
S
6
7
8
Ite«
NET SALE(WITHOLfT
TAX) PRINT
SUM OF NEGATIVE
DEPARTMENTS
Chg-in-drawer
PRINT
—vacant—
— vacant --
-- vacant --
— vacant
PRINT FORMAT II
Selective Status
PRINT
0
NON-PRINT
1
PRINT
0
NON-PRINT
1
PRINT
0
NON-PRINT
1
0
1
0
1
0
1
0
1
0
1
Standard
Status
■K
*
Reaarks
Address No. Contents
15
Bit
Ho.
1
2
3
A
5
b
7
8
Itei Selective Status
SINGLE or MULTI
VALIDATION
DATE PRINT
CONSECUTIVE NO.
PRINT
AMOUNT PRINT
POSITION
—vacant—
—vacant—
—vacant—
— vacant --
VALIDATION
0
SINGLE
1
MULTI
0 PRINT
1
NON-PRINT
0
PRINT
1
NON-PRINT
0
JOURNAL SIDE
1
RECEIPT SIDE
0
1
0
1
0
1
0
1
Standard
Status
*
Reiarks
—Will print MONTH, DAY, and the lowest
3 digits of CONSECUTIVE NO.
If this option is "1 ", Bits No.2 and
No.3 are disregarded.
- 17
Page 63
Address No.
Contents
16
Bit
No.
CLERK 1
I
MEMORY OPEN
CLERK 2
2
MEMORY OPEN
CLERK 3
3
MEMORY OPEN
CLERK
A
MEMORY OPEN
-- vacant --
6
-- vacant —
7
-- vacant --
8
-- vacant —
CLERK SPEC.
Itei Selective Status
0
OPEN
1
CLOSE
0
OPEN
CLOSE
1
0
OPEN
1
CLOSE
0
k
1
OPEN
CLOSE
0
1
0
1
0
1
0
1
Standard
Status
*
*
*
fteaarks
Address No.
17
Bit
No.
1
2
3
A
S
5
1 tea Selective Status
NO-SALE COUNTER
NO-SALE ENTRY
Af [ER NON-ADD
non-add
h
WITHIN A SALE
-- vacant —
-- vacant --
— vacant --
7 -- vacant --
-- vacant —
6
entries
Contents
SECURITY OPTION I
0
NOT PRIVIDED
1
PROVIDED
0
FREE
1
PROHIBIT
H
0
As many tiraes as required
1
Onlv once
0
1
0
1
0
1
, 0 '
1
0^
1
Standard
Status
-it
Reiarks
- 18
Page 64

Address No.
Contents
18
8i t
No.
RECEIPT FEED
1
DÜRING A SALE
2
— vacant —
— vacant --
3
-- vacant --
A
—vacant—
8
— vacant —
6
7
— vacant —
8.
-- vacant —
SECURITY OPITON II
Itei Selective Status
0 FREE
PROHIBIT
1
0
1
0
1
0
1
0
1
0
1
0
1
0
1
Standard
Status
*
Reaarks
Address No. Contents
19
Bit
No.
1
— vacant —
7
3
A
S
6
7
8
1 te* Selective Status
-- vacant —
TAX PRINT ON
CLERK REPORTS
CA BALANCE
CA TAX
(Non-txblItems TL Print)
— vacant —
— vacant —
-- vacant — .
MARKET SPECIALTY
0
1
0 ■
1
NON-PRINT
0
PRINT
1
NOT AVAILABLE
0
AVAILABLE
1
NOT AVAILABLE
0
AVAILABLE
1
0
1
0 ■
1
0^
1
Standard
Status
*
Reaarks
—for CANADA models
—for CANADA models
- 19 -
Page 65

Address No. Contents
This page REVISED: April, 1983
20
Bit
No.
PRINT MOTOR
1
DRIVE TIME
PRINT MOTOR
2
DRIVE TIME
PRINT MOTOR
3
DRIVE TIME
PRINT MOTOR
4
DRIVE TIME
CUSTOMER
5
—vacant—
6
7
— vacant —
8
•— vacant —
HARDWARE TYPE I
I tei Selective Status
0
1
Approx.5 seconds
0
1
Approx.10 seconds
0
1
Approx.20 seconds
0
1
Approx.40 seconds
0
NORMAL
1
DISPLAY
PUT-AWAY
0
1
0
1
0
1
Standard
Status
*
*
*
♦
Reaarks
Maxiitiuin 75 seconds may be obtained
bv combininq those Bits.
Fixed Status. Always NORMAL-Type
disolav. No PUT-AWAY tvoe is possible.
Address No. 'Contents
21 HARDWARE TYPE II
Bit
No.
MULTIPLE
1
2
3
4
5
6
7
0
Itei
DRAWERS
PRINTER FEED
TYPE
RECEIPT FEED
PULSE
—vacant—
-- vacant --
-- vacant --
-- vacant —
-- vacant —
Selective Status
0
SINGLE DRAWER
1
MULTIPLE DRAWERS
0
R.J. FEED
1
RF, JF
0
NOT PROVIDED
1
PROVIDED
0
1
0
1
0
1
0
1
0
1
Standard
Status
-И-
Mr
Remarks
—(LP-701 TYPE)
—(LP-601 TYPE)
—(EP-701 TYPE)
— (LP-601 TYPE)
- 20
Page 66

SETTING OR CHANGING THE STORE/REGISTER NUMBER (Condition: after an AUTO SCAN Z
report)
Mode Lock: SET
Key Operation
NOTE: The [T] key is not
NUMBER I •> [S
^{0 ~ 999999 max,6 digits)
SETTING THE DATE (Condition: anytime outside a sale)
Mode Lock: SET Key Operation
|6[ - 0 I MONTH I DAY ¡YEAR I -t lAT/TLi
1 or 2 digits
(1 ~ 12)
2 digits
2 ‘ digits
(82, 83, etc.)
(01 - 31)
SETTING THE TIME (Condition: aytime outside a sale)
Mode Lock: SET Key Operation
5| [X] ->■ I HOUR ¡MINUTE I j AT7tl1
1 or 2 dig,
(0~23)
2 digits
(00-59)
allowed in the number
entry.
SETTING INDIVIDUAL DEPARTMENT STATUS (Condition: after an AUTO SCAN Z report;
also requires a PLU Z report if the
positive/negative status is to be changed
also)
Mode Lock: SET
Key Operation:
(ITX/MI) -
li
s ->
for single
tax status
change
•^riRTN MDSE I)-» [WtL [TfTnn
for positive/
negative status
-K ITXI/Ml ) -> ( ITX2/M] )-
change
for TAXI for TAX2
status status
change change
(Repeat until all the required DEPTs are set
or changed with the status.)
- 21
Page 67

This page REVISED: April, 1983
NOTES: 1. Among ITXl/Ml i[TX/MI). and ITX27mI keys, depress the key(s)
for the required status change(s) for each department. The
IRTN MDSE I is depressed to set or reset the negative DEPT
status.
2. Depressing any of the three keys above, the related status
reverses. For example, depressing the [TX/M1 reverses a nontaxable DEPT to a taxable, or taxable to non-taxable. Each
department status is read by the number indicated on the
display when each department key is depressed in the above
operation. The numbers and their respective statuses are:
0: Non-taxable
1: Tax 1 only
2: Tax 2 only
3: Tax 1 and Tax 2
Watching the number, adjust the status by depressing those
keys. See the examples below:
STATUS
BEFORE
NUMBER_^
change“*
0
0
KEY-IN FOR CHANGE
PRIOR TO iDEPTl KEY
-
ITXI/Ml -* l(Taxl only)
ITXI/MI1TX2/M1
NEW NUMBER AND
STATUS OBTAINED
3{Taxl and Tax2)
0 1TX2/M! 2(Tax2 only)
etc.
1
iTXl/Ml 0(Non-taxable)
1 -> \TX27m1 3(Taxl and Tax2)
1 Itxi7m1rTX27Ml
-*
2(Tax2 only)
etc.
2 ITX2/MI
2
3
-V
! tkITmI 3(Taxl and Tax2)
ITXI/Ml 2(Tax2 only)
0(Non-taxable)
etc
- 22 -
Page 68

This page REVISED: April, 1983
SETTING OR CHANGING DEPARTMENT PRESET PRICE {Condition: anytime outside a sale)
Mode Lock: SET Key Operation
I New Preset Price | I DEPT I IAT/TLI
max. 6 digits
NOTES:
1. To preset the price of "0",
enter "0" in place of the
Repeat for all the
required departments
price entry in the above
operation.
2. If no price is entered in
the • above operation, the
department is set as an open
department.
PROGRAMMING PLU TABLE (Condition: after a PLU RESET-to renew the PLU table,
or anytime outside a sale to program
additional PLUs)
Mode Lock: SET Key Operation
|3| [x] jPLU Code] iPLUl -f [Preset Price
'max.2 digits max.6 digits
(I'-bO)
To program another PLU
NOTES: 1. No PLUs can be programmed to link a negative department.
2. A maximum of 50 PLUs may be programmed.
3. The PLUS that have not been programmed with a preset price
in the above operation are automatically set as PLUs with
the preset price of "0".
4. The tax status of each PLU is automatically determined
by the status of the linked Department.
CHANGING PLU PRESET PRICE (Condition: anytime outside a sale)
Mode Lock: SET Key Operation
I PLU Code I fPLUl [New Price] -»■ iJ] •> 1 AT/TL 1
max.2 digits max. 6 digits
(1 ~ 50)
— To change the price of another PLU —
NOTE: In this operation, changes of link departments, programming
additional PLUs, etc. are not possible.
[Link DEPT1 -»[AT/TLI
_J
NOTE: E ven if a PLU has been set without its linked department, this PLU Preset Price
Change operation can be done to the PLU. However, no registering into this PLU
will be possible any way because no linked department has been set to this PLU.
- 23 -
Page 69

PROGRAMMING TAX TABLE (Condition: after an AUTO SCAN RESET)
Mode Lock; SET
1) TAX 1 FULL BREAKS
Key Operation: |max. amount non-taxable] —> ITXl/MI
¡max, amount for tax levied] j TXl/M I
¡max, amount for 2.j. tax levied] —»i TXl/M I
Repeat until the "A" Break is entered.
[max, amount for Ngj tax levied [—»fTXl/M I ... ”A'^ Break
[ST I (to indicate the "A" Break entry)
¡max, amount for N+lgi tax levied¡—»|TXI/mI
¡max, amount for N+2g( tax levied |—»| fxi/Ml
Repeat until the ”B" Break is entered,
¡'aW^ (to end)
NOTE: The amount entry may be maximum 4-digit value (up to 9999(i}.
2) TAX 1 *'A’* BREAK AND % RATE COMBINATION
Key Operation: First set the "A" Break following the same operation
up to the "A" Break entry and the I ST| key depression
in "1) TAX 1 FULL BREAKS'* above.
1 TAX RATE applied when exceeding the "A" Break amount
(max. 4 digits, up to 99.99%. Do not use the [Tl
key. The fraction of the amount resulted from this
% rate calculation will be rounded off.)
I
fAT/Tin (to end)
3) TAX 1 % RATE ONLY
Key Operation: 10i lYxi/MI 1~ST1 —► j TAX RATE | —>|~AT/TL |
(The conditions
of the rate are
the same as the
above TAX RATE.)
NOTES: 1. If only one tax modifier key ( I TX/MI ) is installed on the key
board, use the 1TX/M| in place of the FlXl/Ml in the descrip
tion 1) , 2), or 3) above.
- 24 -
Page 70

2. For TAX 2 Table programming, follow the same procedure in the
1), 2), or 3} above, using the 1TX2/M] instead of the ITXl/MI.
3. If both TAX 1 and TAX 2 tables are programmed, the TAX 1 must
be set first. The TAX 1 table entry will automatically reset
both the TAX 1 and TAX 2 tables that have been programmed.
4. No second depression of the |~^t1 key is allowed within one
tax table programming.
SETTING NON-TAXABLE LIMIT AMOUNT (for a certain area only)
(Condition: after an AUTO SCAN RESET)
This may be programmed only when one tax .modifier key ( I TX/M] ) is
installed. The tax levied when exceeding this limit amount will be
calculated by the TAX 1 table.
Mode Lock; SET Key Operation:
l9l™^ . [^ I Non-taxable Limit Amount \ I Àf/TlTI
NOTES: 1. If this program has been set, the tax is calculated and added
to the sale total which exceeds the limit amount even when
the sale is entirely composed of non-taxable items.
2. To reset the limt amount once set, enter "0" in place of the
[Non-taxable Limit Amount] in the above operation.
3. This tax calculation program will be disregarded when the sale
total turns out to be negative.
ex.) In case the limit amount "$3.25" is set:
Case 1: Normal Department Entry: (Mode Lock: REG)
I 326 I —à [non-taxable DEPT] —»■ j AT/TL 1
The entered amount $3.26 is greater than the
limit amount $3.25. It will therefore be taxed.
Case 2: Returned Merchandise Entry: (Mode Lock: REG)
IRTN MDSE|-^|326|-^rnon-taxabIe DEPTi-H»-fAT7TLl
The non-taxable total is negative. The tax
already levied will therefore not be returned.
- 25 -
Page 71

SETTING THE LISTING CAPACITY OF DEPARTMENT (Condition: after an AUTO SCAN RESET)
Mode Lock: SET Key Operation
*(Note 1)
t2j [x] IHALCI ^ 1AT/TLI ... for the common listing capacity
for all the departments
*CNote 1)
l2| [X] I HALC i -> I DEWI -> [ AT/TL 1 ... for individual departments'
I listing capacities
Repeat until all-*
L
the required indiv.
dept. Listing Capacities
are set.
♦Note 1: HALC
.. ..
Might Amount Listing Capacity
'A'
•Number of maximum digits allowed
-Maximum value of the top digit .allowed
ex.) (3 i 4 I ... indicates 3999
4 digits ”
^Value of the
top digit
NOTES: 1. If the individual listing capacity of a department has been
set, it prevails over the common listing capacity of all the
departments.
2. To reset an individual listing capacity, enter "0" before the
[DEPTI key in the above operation. Then the common listing
capacity of all the departments, if pre-programmed, will
prevail.
SETTING THE PRESET RATES OF AND KEYS (Condition: anytime outside a
Mode Lock SET Key Operation
U ..lb
The amount range allowed
to enter will be:
Equal to or smaller than
the HALC (3999 in this case)
sale)
1) To set a rate of integral value:
1 RATE 1 ■ + g+]
I RATE \ ^ \%^
2) To set a rate containing the decimal point:
I Integral Portion | [T] I Decimal Portion j | %+ \
max. 2 digits max. 3 digits } r^—i
(up to 99.999%)
3) To reset the rate once set:
|ol 113
|o! [E3
- 26 -
Page 72

SETTING HOURLY RANGES (Condition: after an AUTO SCAN RESET)
Mode Lock: SET
Key Operation
(0~23) (01-59)
E
I HOUR I MINUTE I
ID -> I AT/TL I
Enter the time to
end each hourly range,
in the 24-hour system.
Repeat until all the
time ranges are entered.
NOTES: 1. A maximum of 16 hourly ranges may be set.
2. To change the table of hourly ranges once set, partially or
entirely, do the entire setting operation over again.
3. To reset the hourly range table once set:
Mode Lock: SET, 141-»PH->l0i-»[atT^
4. Do not set an hourly range accross 24:00, such as "from 23:00
to 1:00".
- 27 -
Page 73

VERIFICATION OF PROGRAMMED DATA
1. DEPARTMENT PRESET PRICE READ
Mode Lock: X Key Operation: il| ->
Thank you
Coll again
Oik-0 2-,8 2
S123
Department Code-
X “
01
02
*25,0
*L0.0
0 0 2 6
11-25
Read Symbol
—Ppeset Department {preset price of $2.50)
2. DEPARTMENT LISTING CAPACITY AND STATUS READ
Mode Lock: X Key Operation: l2| -»
listing Capacity (HALC...High Amount
Listing Capacity)
9 3
^Maximum Number of Digits allowed
-Value of the Top Digit allowed
programmed as a negative department.
NOTE:
The Listing Capacity of "00" indicates that no HALC
has been set on that department.
- 28 -
Page 74

3. PLU TABLE READ
Mode Lock: X Key Operation: ¡3
Thank you
Coll again
0 4 -0 2 -,8 2
S123
PLU Code
0 5 ¿01 '
*10,0
20 ¿1) 1
*200
¿02
25
*15.0 @
¿02
29
A
4 5a0,0
¿0 2
50
*05,0
0 0 2 8
-26
11
4. OTHER PRESET DATA READ
Mode Lock: X Key Operation: |4j |ST]
-Link Department Code
Preset Price
%
@
@
@
Thank you
Call again
04-02-82
il23i
2Q % +
1 a %-
97 @
0 0 2 9
11-26
29 -
%+
Preset Rate:
%-
Preset Rate; 103S
Common Listing Capacity (HALC) of All Depts,
20%
Page 75

5. SYSTEM OPTION READ
Mode Lock: X 19 |
6. TESTING TAX CALCULATION
Mode Lock: X Key Operation:
[AMOUNT TO test! ITXBL TL |
(Repeat this
operation,
alternating the
amount entry
with various
amounts.)
Amount
entered (Taxi and Tax2 together)
{No receipt is issued.)
_____
^ Tax due
I— rii ciml ^
displayed
- 30
Page 76

This page REVISED; April, 1983
REMOTE SLIP PRINTER
The following is the table of the Remote Slip Printer DIP Switches and the
respective print data when each switch is set to the 'ON* side.
DIP SW
0
1
2 Date
3 Consecutive No.
4
5
6
7
8
9
Read{X), Reset(Z), Programming
Store/Register No.
Time
ITEM CORR, DOLL DISC, %+,
DP, PLU, RTN MDSE.,
R/A, PO, POTL
#, ST
A CG
B
CA, AT
PRINT CONTENT AND '
c CHECK
D
Chg
E
F
TAX, TL
NOTE: Validation print data will not be printed on the remote
slip.
- 31 -
 Loading...