

Page 1
TEC Electronic Cash Register
Operators Guide T.O.C.
Manager's Guide T.O.C.
MA-1350-1 SERIES
Owner’s Manual
Page 2
FCC Notice
This equipment has been tested and found to comply with the limits for a Class A digital
device, pursuant to Part15 of the FCC Rules. These limits are designed to provide reasonable protection against harmful interference when the equipment is operated in a commercial
environment. This equipment generates, uses, and can radiate radio frequency energy and,
if not installed and used in accordance with the instruction manual, may cause harmful
interference to radio communications. Operation of this equipment in a residential area is
likely to cause harmful interference in which case the user will be required to correct the
interference at his own expense.
Changes or modification not expressly approved by manufacturer for compliance could void
the user’s authority to operate the equipment.
Caution : Danger of explosion if battery is incorrectly replaced.
Replace only with the same or equivalent type recommended by the manufacturer. Dispose
of used batteries according to the manufacturer’s instructions.
Attention
Il y a danger d’explosion s’il y a remplacement incorrect de la batterie. Remplacer
uniquement avec une batterie de même type ou d’un type recommandé par le constructeur.
Mettre au rébut les batteries usagées conformément aux instructions du fabricant.
The socket-outlet shall be installed near the equipment and shall be easily accessible.
Le socle de prise de courant doit être installé à proximité du matériel et doit être aisément
accessible.
Copyright © 1999
by TOSHIBA TEC CORPORATION
All Rights Reserved
570 Ohito, Ohito-cho, Tagata-gun, Shizuoka-ken, JAPAN
Page 3
Safety Summary
Safety Summary
Personal safety in handling or maintaining the equipment is extremely important. Warnings and Cautions
necessary for safe handling are included in this manual. All warnings and cautions contained in this
manual should be read and understood before handling or maintaining the equipment.
Do not attempt to effect repairs or modifications to this equipment. If a fault occurs that cannot be rectified
using the procedures described in this manual, turn off the power, unplug the machine, then contact your
authorized TOSHIBA TEC representative for assistance.
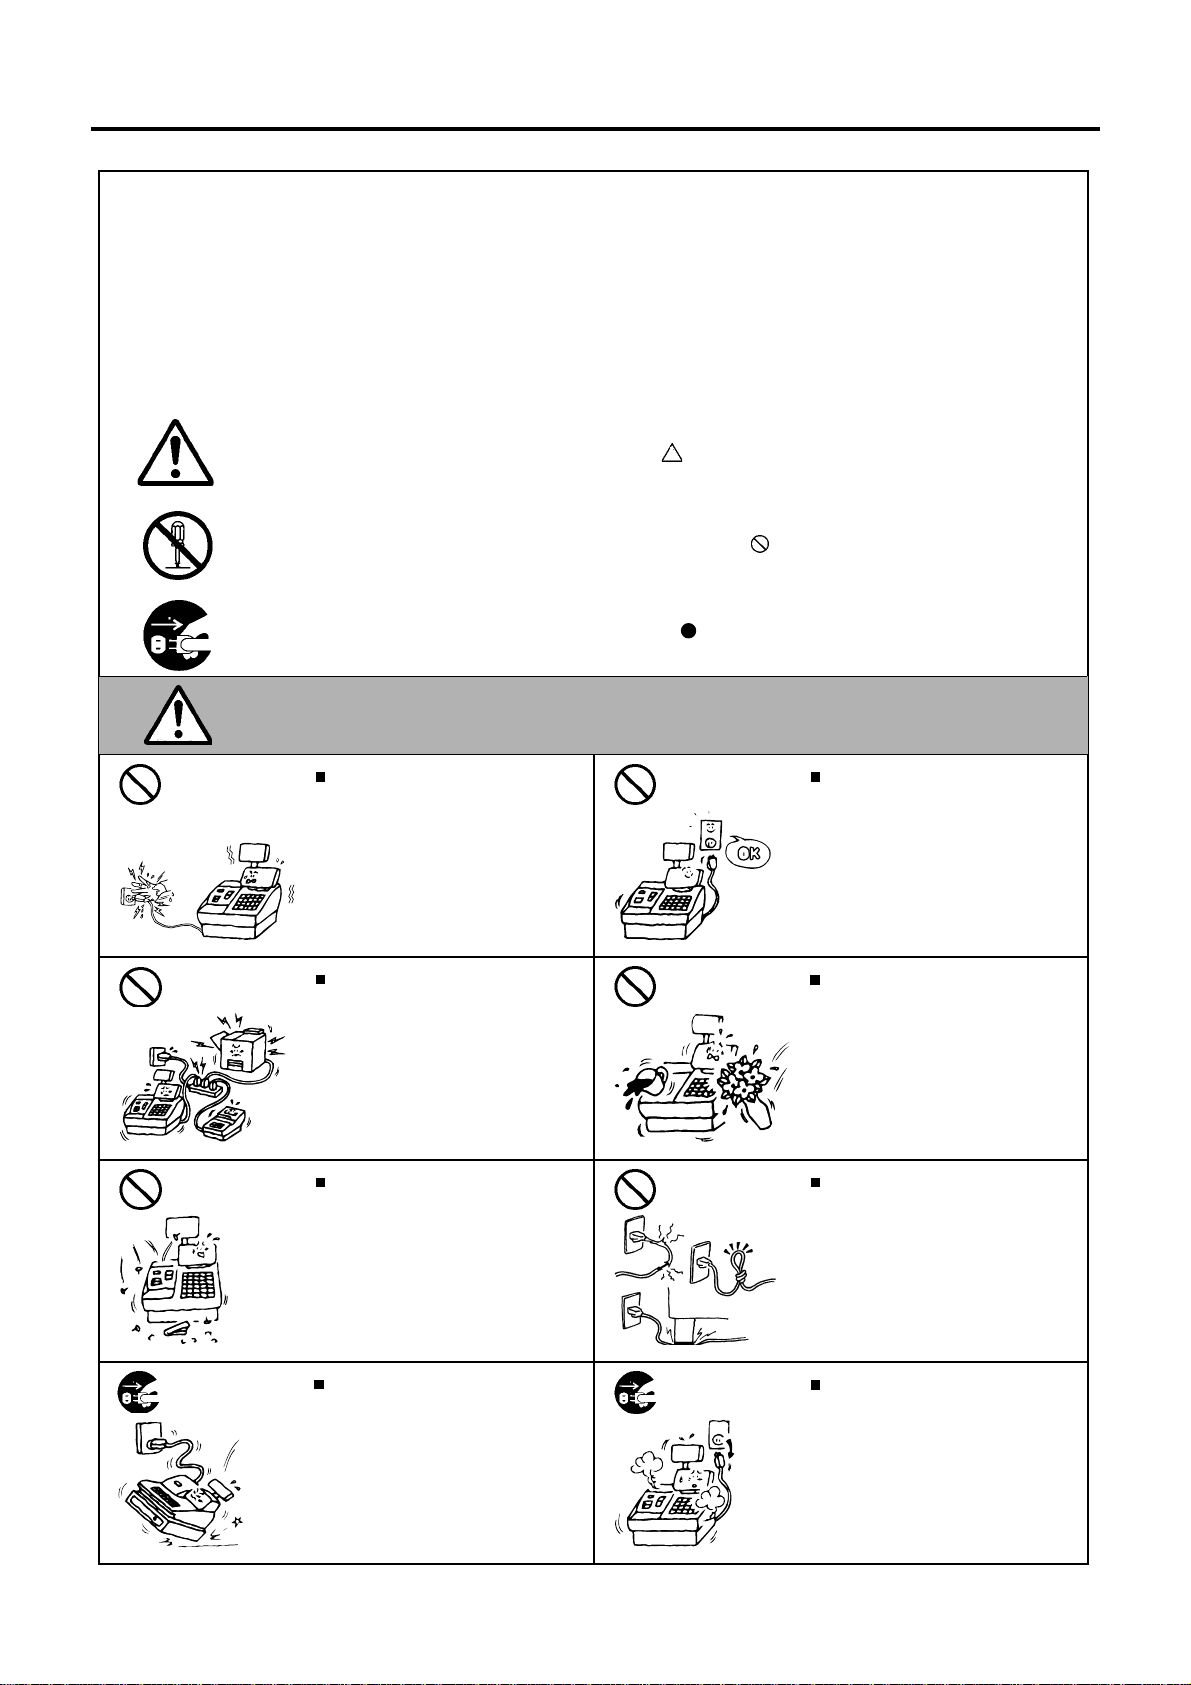
Meanings of Each Symbol
This symbol indicates warning items (including cautions).
Specific warning contents are drawn inside the symbol.
(The symbol on the left indicates a general caution.)
This symbol indicates prohibited actions (prohibited items).
Specific prohibited contents are drawn inside or near the symbol.
(The symbol on the left indicates “no disassembling”.)
This symbol indicates actions which must be performed.
Specific instructions are drawn inside or near the symbol.
(The symbol on the left indicates “disconnect the power cord plug from the outlet”.)
EO1-11131
This indicates that there is the risk of death or serious injury if the
WARNING
Prohibited
Prohibited
Prohibited Prohibited
Do not plug in or unplug the power
cord plug with wet hands as this may
cause electric shock.
If the machines share the same
outlet with any other electrical
appliances which consume large
amounts of power, the voltage will
fluctuate widely each time these
appliances operate. Be sure to
provide an exclusive outlet for the
machine as this may cause the
machines to malfunction.
Do not insert or drop metal,
flammable or other foreign objects into
the machines through the ventilation
slits, as this may cause fire or electric
shock.
machines are improperly handled contrary to this indication.
Any other than the
specified AC voltage
is prohibited.
Prohibited
Do not use voltages other than the
voltage (AC) specified on the rating
plate, as this may cause fire or
electric shock.
Do not place metal objects or
water-filled containers such as flower
vases, flower pots or mugs, etc. on
top of the machines. If metal objects
or spilled liquid enter the machines,
this may cause fire or electric
shock.
Do not scratch, damage or modify
the power cords. Also, do not place
heavy objects on, pull on, or excessively bend the cords, as this may
cause fire or electric shock.
Disconnect
the plug.
If the machines are dropped or their
cabinets damaged, first turn off the
power switches and disconnect the
power cord plugs from the outlet, and
then contact your authorized
TOSHIBA TEC representative for
assistance. Continued use of the
machine in that condition may cause
fire or electric shock.
(i)
Disconnect
the plug.
Continued use of the machines in an
abnormal condition such as when the
machines are producing smoke or
strange smells may cause fire or elec-
tric shock. In these cases, immediately turn off the power switches and
disconnect the power cord plugs from
the outlet. Then, contact your authorized TOSHIBA TEC representative for
assistance.
Page 4
Safety Summary
EO1-11131
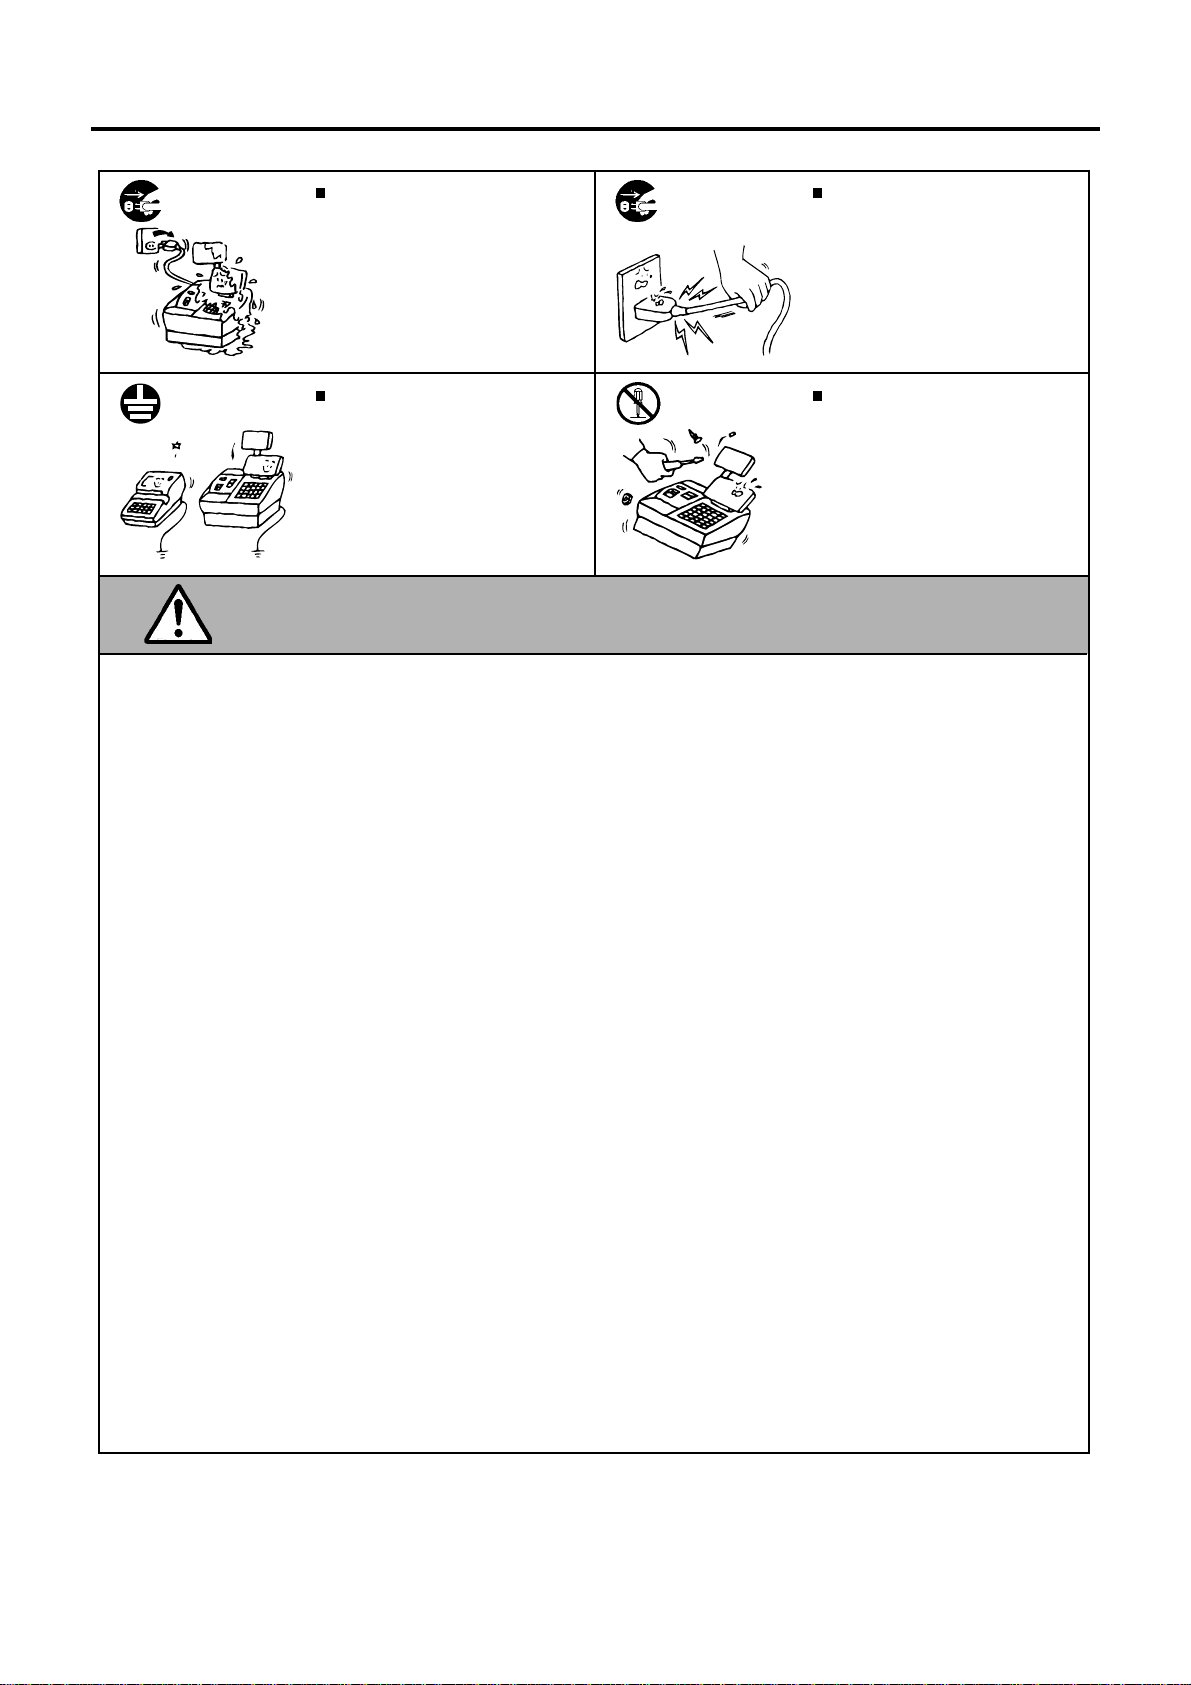
Disconnect
the plug.
Connect a
grounding
wire.
If foreign objects (metal fragments,
water, liquids) enter the machines,
first turn off the power switches and
disconnect the power cord plugs from
the outlet, and then contact your
authorized TOSHIBA TEC representative for assistance. Continued
use of the machine in that condition
may cause fire or electric shock.
Ensure that the equipment is
properly grounded. Extension cables
should also be grounded. Fire or
electric shock can occur on improperly grounded equipment.
Disconnect
the plug.
No
disassembling.
When unplugging the power
cords, be sure to hold and pull on
the plug portion. Pulling on the cord
portion may cut or expose the internal wires and cause fire or electric
shock.
Do not remove covers, repair or
modify the machine by yourself. You
may be injured by high voltage, very
hot parts or sharp edges inside the
machine.
Unauthorized modification is prohibited.
This indicates that there is the risk of personal Injury or damage to
CAUTION
objects if the machines are improperly handled contrary to this indication.
Precaution
The following precautions will help to ensure that this machine will continue to function correctly.
• Try to avoid locations that have the following adverse conditions:
* Temperatures out of the specification * Direct sunlight * High humidity
* Shared power socket * Excessive vibration * Dust/Gas
• Do not subject the machine to sudden shocks.
• Do not press the keys too hard. Keys will operate correctly if they are touched lightly.
• Clean the cover and keyboard, etc. by wiping with a dry cloth or a cloth soaked with detergent and wrung out
thoroughly. Never use thinner or other volatile solvent for cleaning.
• At the end of the day, turn the power OFF, then clean and inspect the exterior of the machine.
• Try to avoid using this equipment on the same power supply as high voltage equipment or equipment likely to
cause mains interference.
• USE ONLY TOSHIBA TEC SPECIFIED consumables.
• DO NOT STORE the consumables where they might be exposed to direct sunlight, high temperatures, high
humidity, dust, or gas.
• When moving the machine, take hold of the drawer and lift the machine.
• Do not place heavy objects on top of the machines, as these items may become unbalanced and fall causing
injury.
• Do not block the ventilation slits of the machines, as this will cause heat to build up inside the machines and
may cause fire.
• Do not lean against the machine. It may fall on you and could cause injury.
Request Regarding Maintenance
• Utilize our maintenance services.
After purchasing the machines, contact your authorized TOSHIBA TEC representative for assistance once per year or
so to have the inside of the machines cleaned. Otherwise, dust will build up inside the machines and may cause fire or
malfunction. Cleaning is particularly effective before humid rainy seasons.
• Our maintenance service performs the periodic checks and other work required to maintain the quality and
performance of the machines, preventing accidents beforehand.
For details, please consult your authorized TOSHIBA TEC representative for assistance.
• Using insecticides and other chemicals
Do not expose the machines to insecticides or other volatile solvents, as this will deteriorate the cabinet or other parts
or cause the paint to peel.
(ii)
Page 5

OPERATOR’S GUIDE
Operators Guide T.O.C.
MA-1350-1 SERIES
EO1-11126
Page 6

MA-1350-1 SERIES
TOC 2
EO1-11126
TABLE OF CONTENTS
Page
1.Introduction..........................................................................................................1
2.Unpacking.............................................................................................................1
3.Outline of Preparation Procedure Before Operating the ECR.........................2
4.Appearance and Nomenclature..........................................................................3
5.Control Lock and Control Keys..........................................................................4
Control Keys........................................................................................................................4
Control Lock........................................................................................................................4
6.Display..................................................................................................................5
Numeric Display..................................................................................................................5
Message Descriptors (Status Lamps).................................................................................6
7.Keyboard...............................................................................................................7
Normal Keyboard Layout.....................................................................................................7
Other Optional Keys:...........................................................................................................7
Flat Keyboard Layout..........................................................................................................8
Other Optional Keys:...........................................................................................................8
Functions of Each Key.........................................................................................................9
8.Installing the Receipt/Journal Roll...................................................................12
Installing the Receipt Roll..................................................................................................12
Installing the Journal Roll..................................................................................................14
9.Installing the Ribbon Cassette..........................................................................15
10.Daily Operation Flow.........................................................................................16
Before Opening the Store..................................................................................................16
During Business Hours......................................................................................................16
After Closing the Store......................................................................................................16
11.Cashier Identifying Operation...........................................................................17
1) Signing Method Cashier Sign ON & Sign OFF.............................................................17
2) Cashier Key Method (Push LED Key)..........................................................................18
3) Cashier Key Method (Barrel Lock)...............................................................................18
4) Cashier Key Method ([CLK] Key)................................................................................19
Cashier Reports.................................................................................................................19
12.Training...............................................................................................................19
Operation for Training Mode Start.....................................................................................19
Entries in Training Mode....................................................................................................20
Operation for Training Mode End......................................................................................20
13.Transaction Entries............................................................................................21
Displaying the Time...........................................................................................................21
Receipt-issue/Non-issue Selection....................................................................................21
Clearing Errors, or Clearing Wrong Declaration Key or Wrong Numeric Entries...............22
No-sale (Exchange)...........................................................................................................22
Received-on-Account Payment.........................................................................................22
Paid Out.............................................................................................................................23
Department Entries............................................................................................................23
PLU Entries.......................................................................................................................26
PLU Price Shift Entry.........................................................................................................28
Preset Price Open.............................................................................................................29
Page 7

MA-1350-1 SERIES
TOC 1
Listing Capacity Open ....................................................................................................... 29
Percent Discount, Percent Charge .................................................................................... 30
Dollar Discount ..................................................................................................................30
Vendor Coupon.................................................................................................................. 31
Store Coupon ....................................................................................................................31
Item Correct (Last Line Voiding) ........................................................................................32
Void (Designated Line Voiding) .........................................................................................32
All Void (Transaction Cancel) ............................................................................................33
Returned Merchandise ......................................................................................................34
Non-add Number Print....................................................................................................... 34
Subtotal Read....................................................................................................................35
Taxable Total Read ............................................................................................................ 35
Finalizing a Sale ................................................................................................................35
Food Stamp Tender ...........................................................................................................37
Previous Balance, Charge Posting....................................................................................38
Check Cashing (Cashing Non-cash Media) ...................................................................... 39
Post-issue Receipt.............................................................................................................40
Tax Status Modification...................................................................................................... 40
Food Stamp Modification...................................................................................................41
Tax Exemption ...................................................................................................................41
Manual Tax Entry ...............................................................................................................42
Sale paid in Foreign Currency ........................................................................................... 42
No-sale Exchange from a Foreign Currency to the Domestic Currency............................ 43
V alidation Print................................................................................................................... 43
Remote Slip Printer (hardware option) Operation ............................................................. 44
EO1-11126
14. Paper Roll Replacement and Other Maintenance ........................................... 46
Replacing the Receipt Roll ................................................................................................ 46
Replacing the Journal Roll................................................................................................. 47
Replacing the Ribbon Cassette ......................................................................................... 48
Replenishing Ink to the Store Name Stamp ...................................................................... 49
Manual Drawer Release and Lock .................................................................................... 51
Removing the Drawer........................................................................................................51
Media Slot..........................................................................................................................52
CDC (Cash Drawer Cover; Option) Lock...........................................................................52
15. In Case of the Power Failure............................................................................. 53
16. Troubleshooting ................................................................................................. 53
17. Specifications..................................................................................................... 57
CAUTION:
1. This manual may not be copied in whole or in part without prior written permission of
TOSHIBA TEC.
2. The contents of this manual may be changed without notification.
3. Please refer to your local Authorized Service representative with regard to any queries
you may have in this manual.
Copyright © 1999
by TOSHIBA TEC CORPORATION
All Rights Reserved
570 Ohito, Ohito-cho, Tagata-gun, Shizuoka-ken, JAPAN
Page 8
MA-1350-1 SERIES
EO1-11126
1. Introduction
Thank you for choosing the TEC electronic cash register MA-1350-1 series. This owner’s manual provides a description of the functions and handling of this register and should be read carefully to ensure optimum performance. Since every consideration has been given to safety and reliability, there is no danger of damaging the
machine by incorrect operation.
Please refer to this manual whenever you have any questions concerning the machine. This machine has been
manufactured under strict quality control and should give you full satisfaction.
• The specifications described in this manual may be modified by TOSHIBA TEC, if necessary.
• Be sure to keep this manual for future reference.
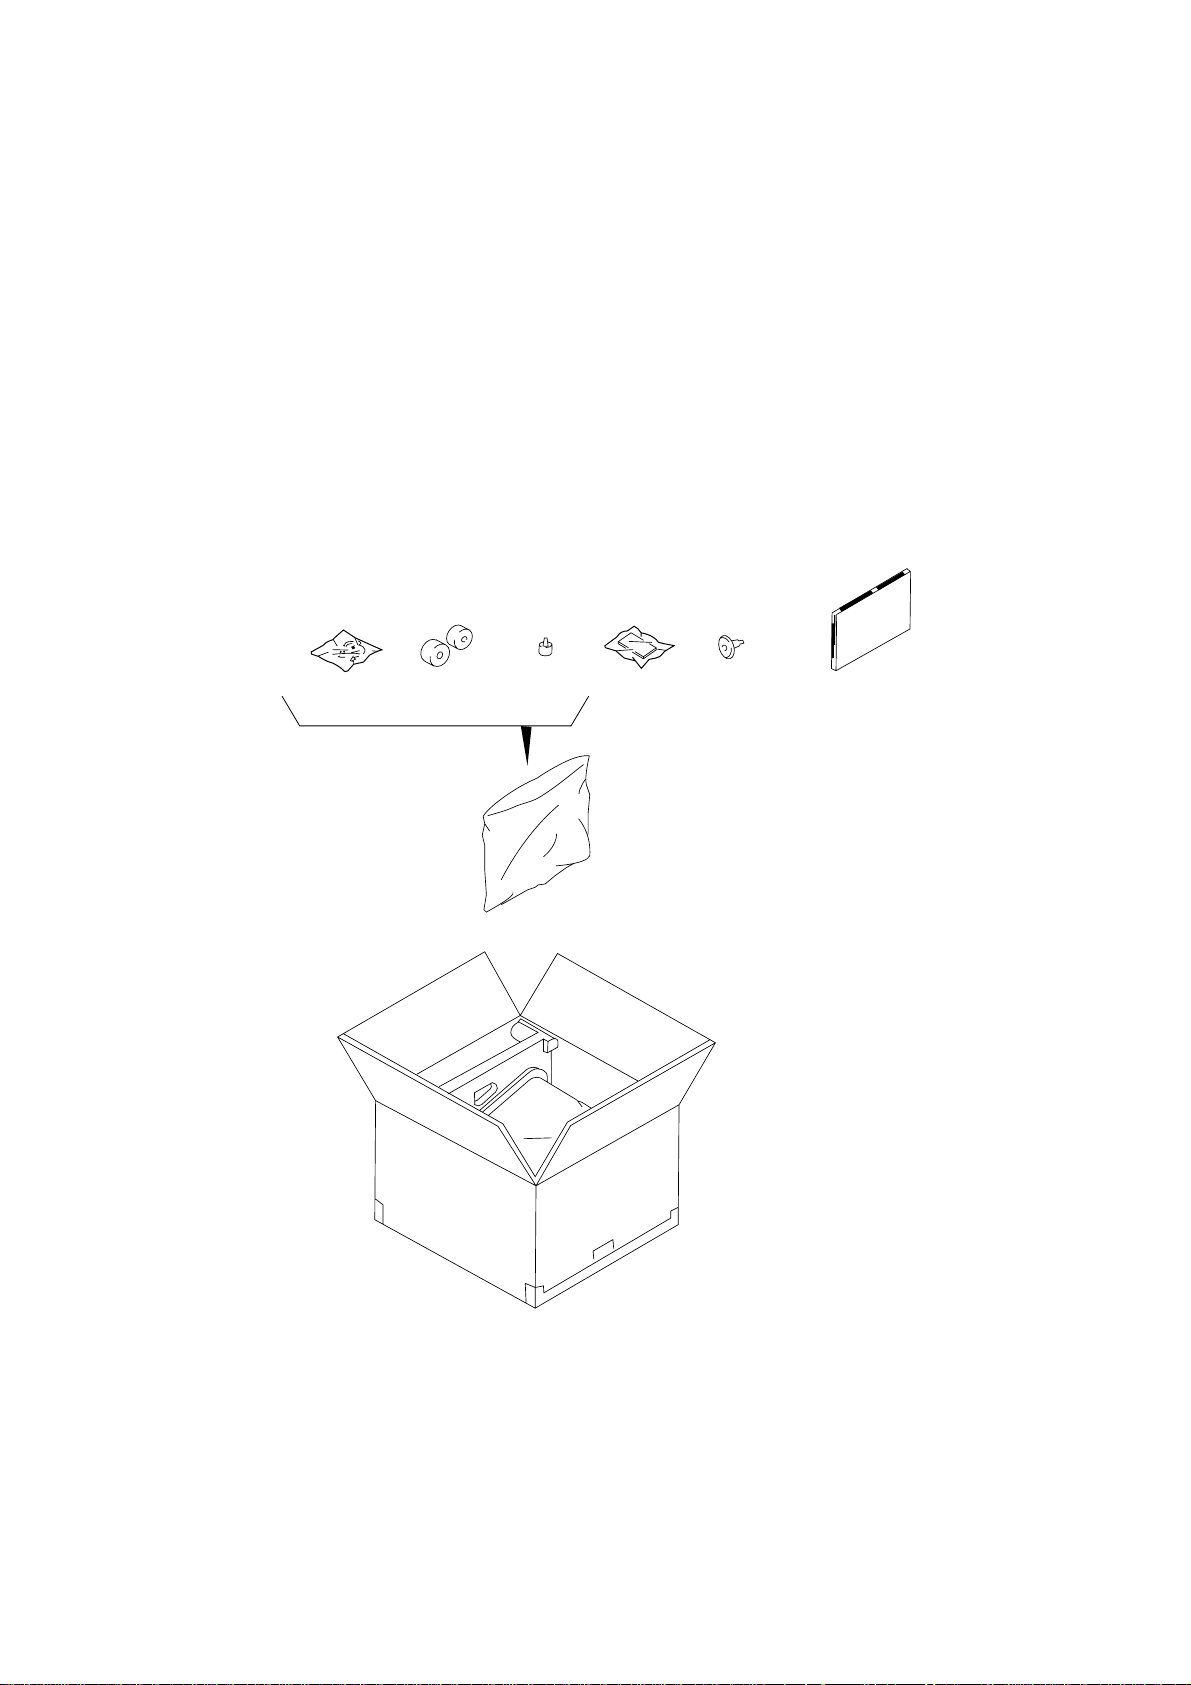
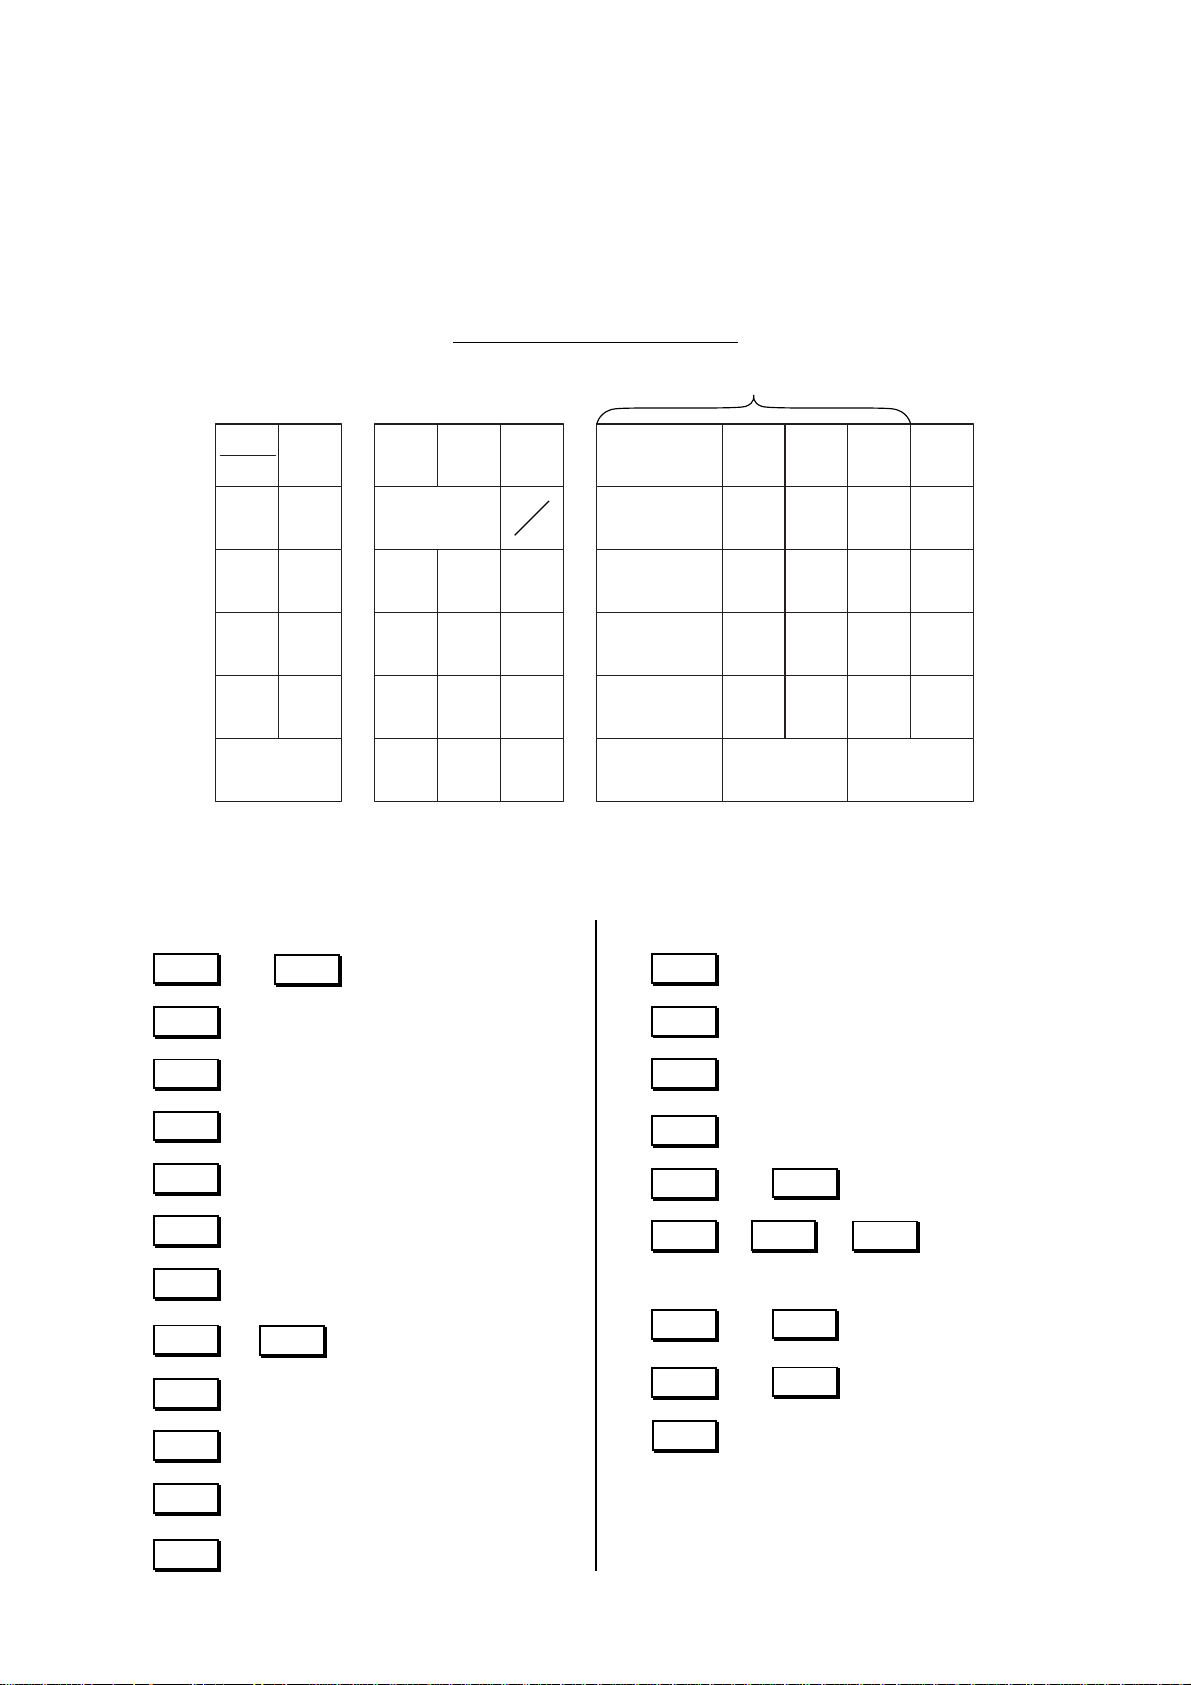
2. Unpacking
(1) (2) (3) (5) (6) (7) (8)(4)
(1) Control Key (REG Key, MGR Key, MA Key,
S Key; 2 pcs. respectively)
(2) Drawer Key (2 pcs.)
(3) Printer Cover Key (2 pcs.)
(4) Paper Roll 45mm x Ø50mm (2 pcs.)
(5) Stamp Ink (1 pc.)
(6) Ribbon Cassette (1 pc.)
(7) Journal Take-up Reel (1 pc.)
(8) Owner’s Manual (1 pc.)
- 1 -
Page 9

MA-1350-1 SERIES
EO1-11126
3. Outline of Preparation Procedure Before Operating the
ECR
This chapter shows the outline of set-up procedure of the ECR before actually starting the ECR operation.
1
Remove the cash register from the carton, referring to Chapter 2. Unpacking on page 1. And take out all the parts and
accessories.
2
Remove the tapes and seals for holding parts or protecting
the register surfaces.
3
Plug the power cord of the register into a wall outlet. Make
sure that the outlet voltage matches that of the power required for the register.
4
Insert the REG key into the Control Lock.
REG
(1) (2) (3) (5) (6) (7) (8)(4)
X
MGR
-
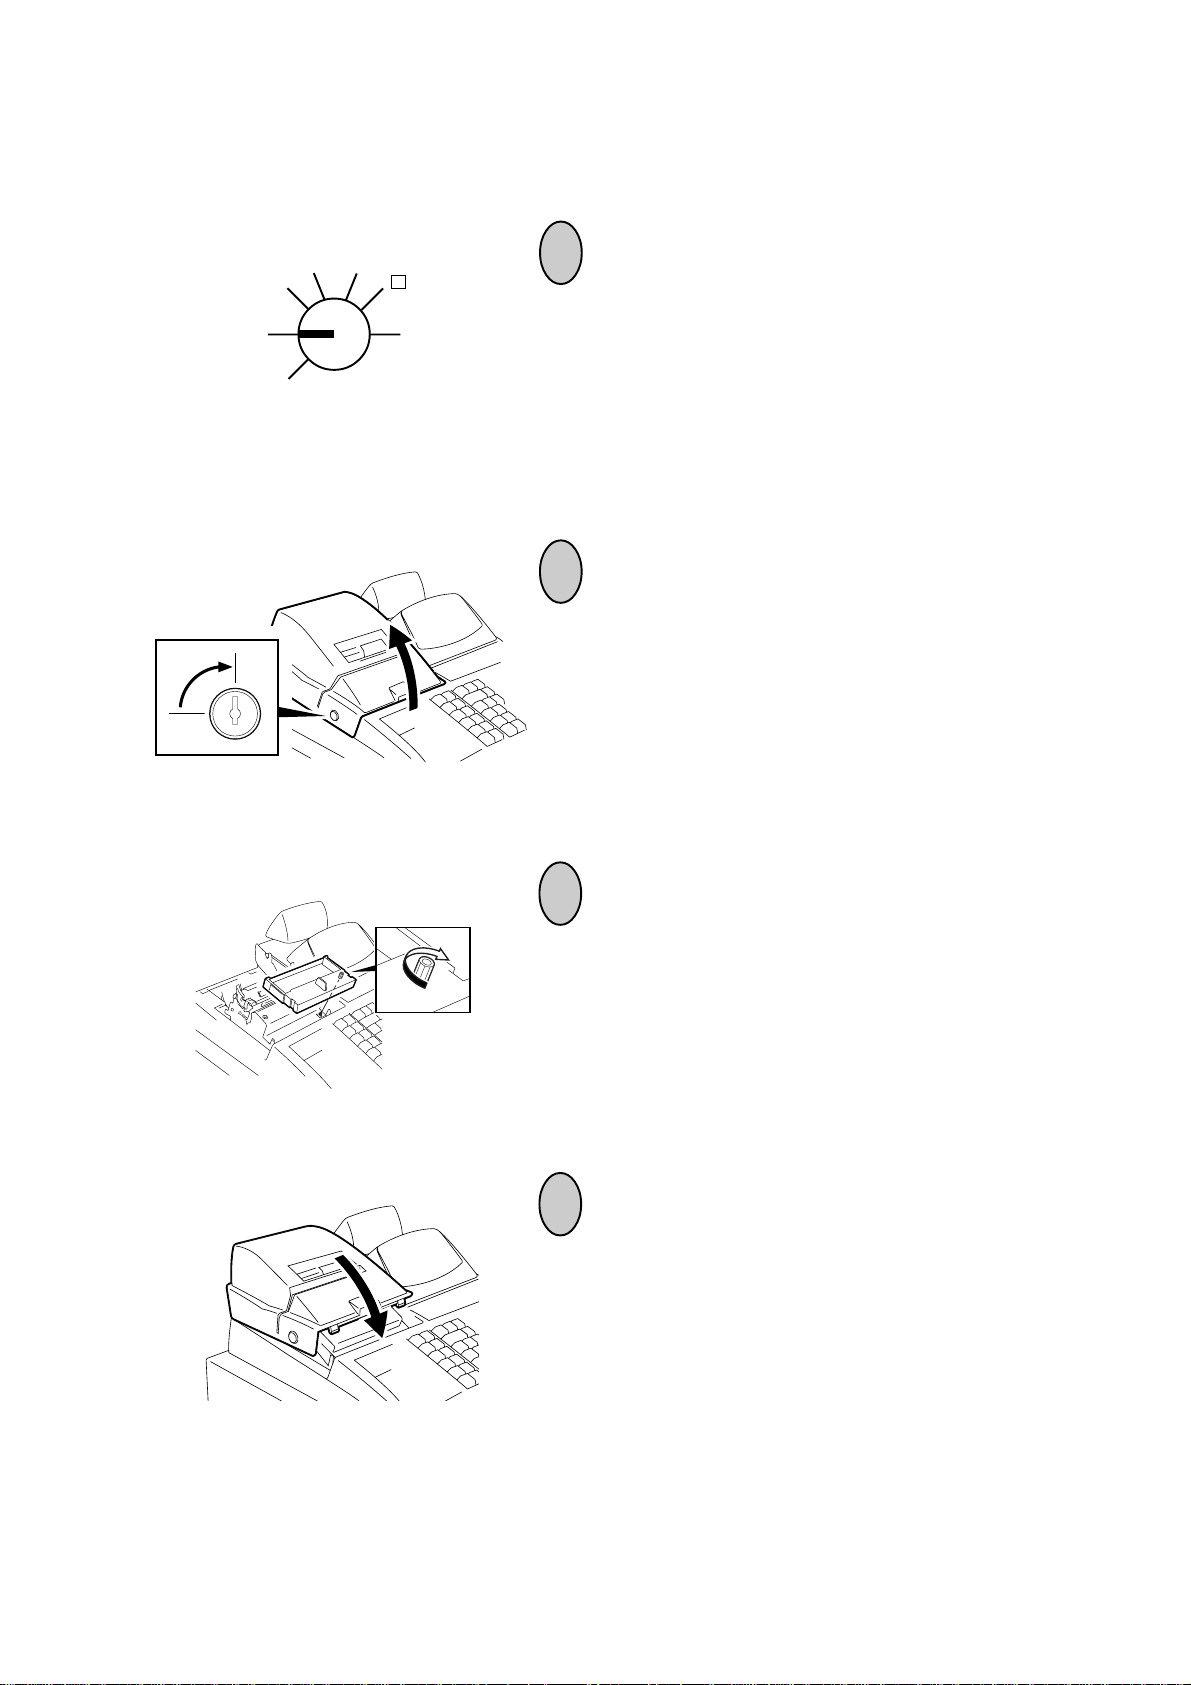
5
Turn the Control Lock to the REG position.
6
Install the paper roll
Receipt/Journal Roll on page 12)
Cassette
sette on page 15)
7
Before starting actual transaction entries on the register, ask
your manager if you need additional setting or the programmed data needs to be changed. For programming, refer
to the following Chapters in Manager’s Guide:
4. Changing the Programmed Data (page 17)
5. Program Data Verification (page 41)
(referring to Chapter 9. Installing the Ribbon Cas-
(referring to Chapter 8. Installing the
. Also, install the Ribbon
.
OFF
SET
REG
OFF
SET
Z
MGR
X
-
Z
- 2 -
Page 10
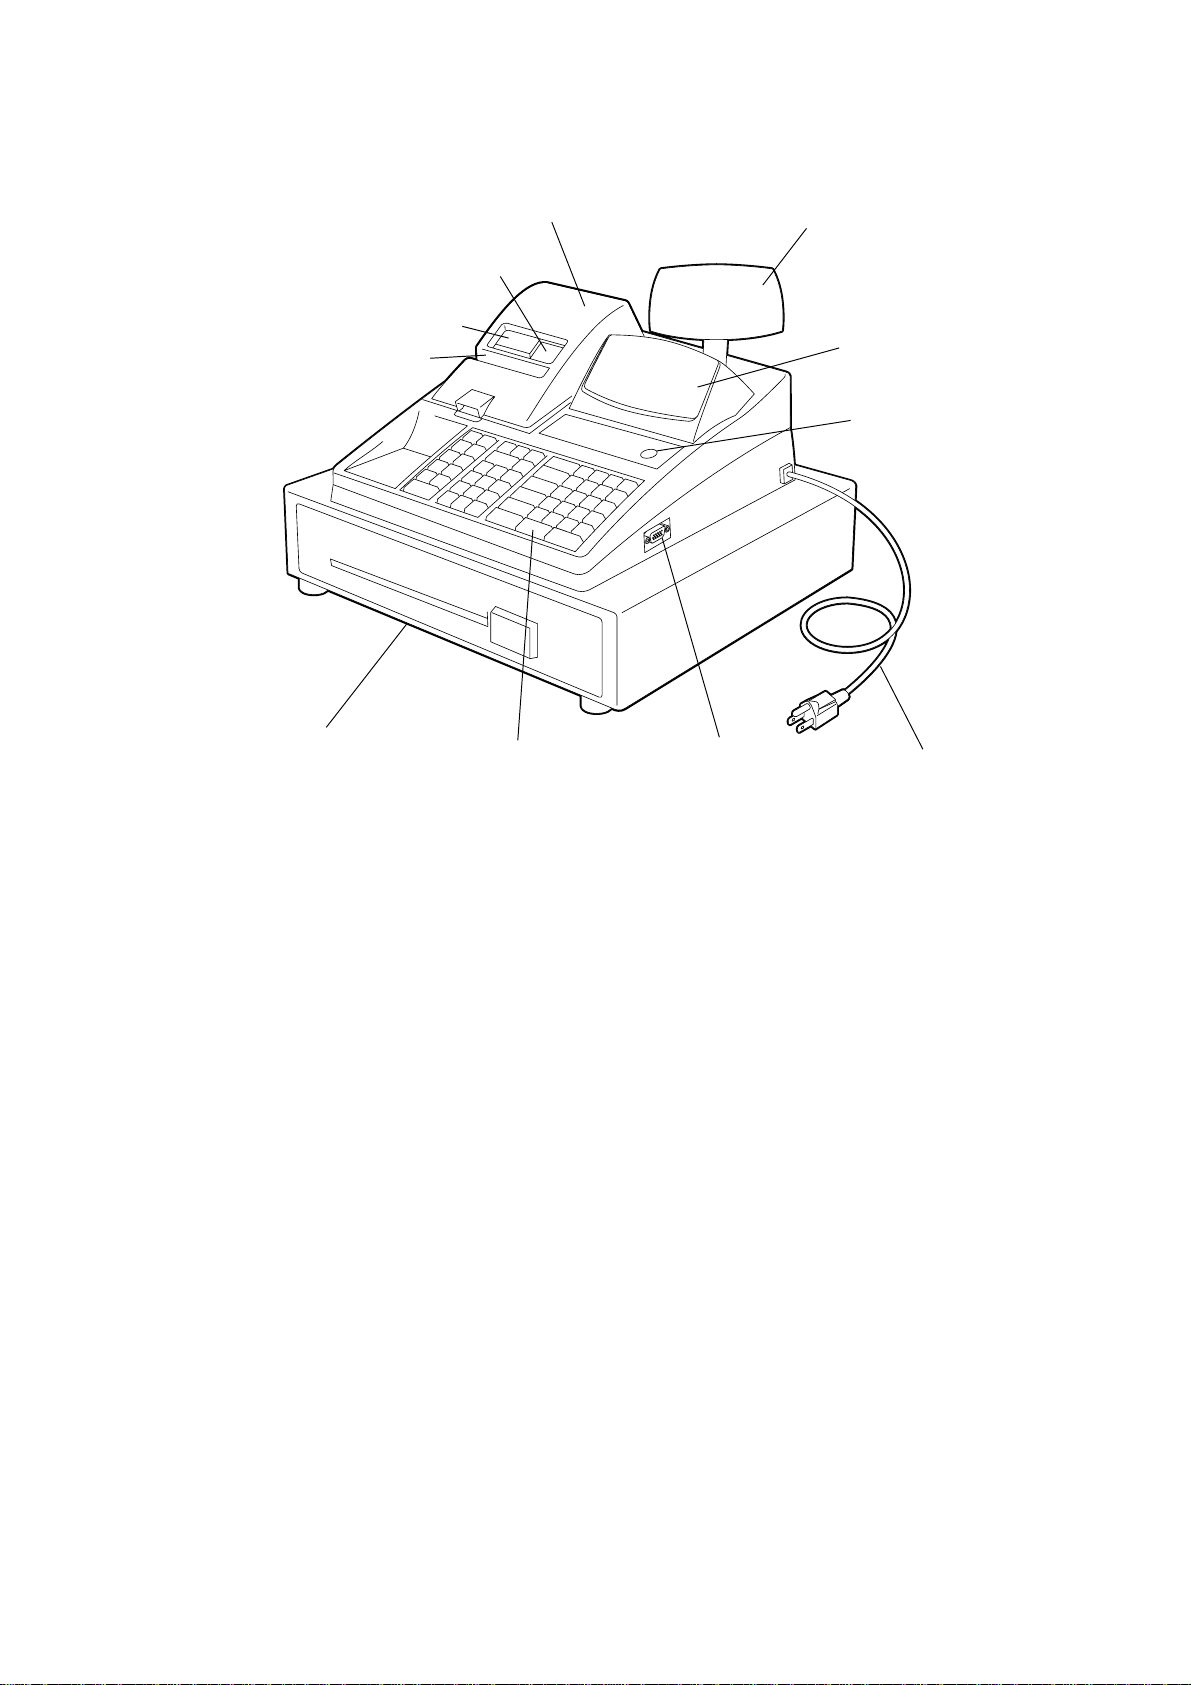
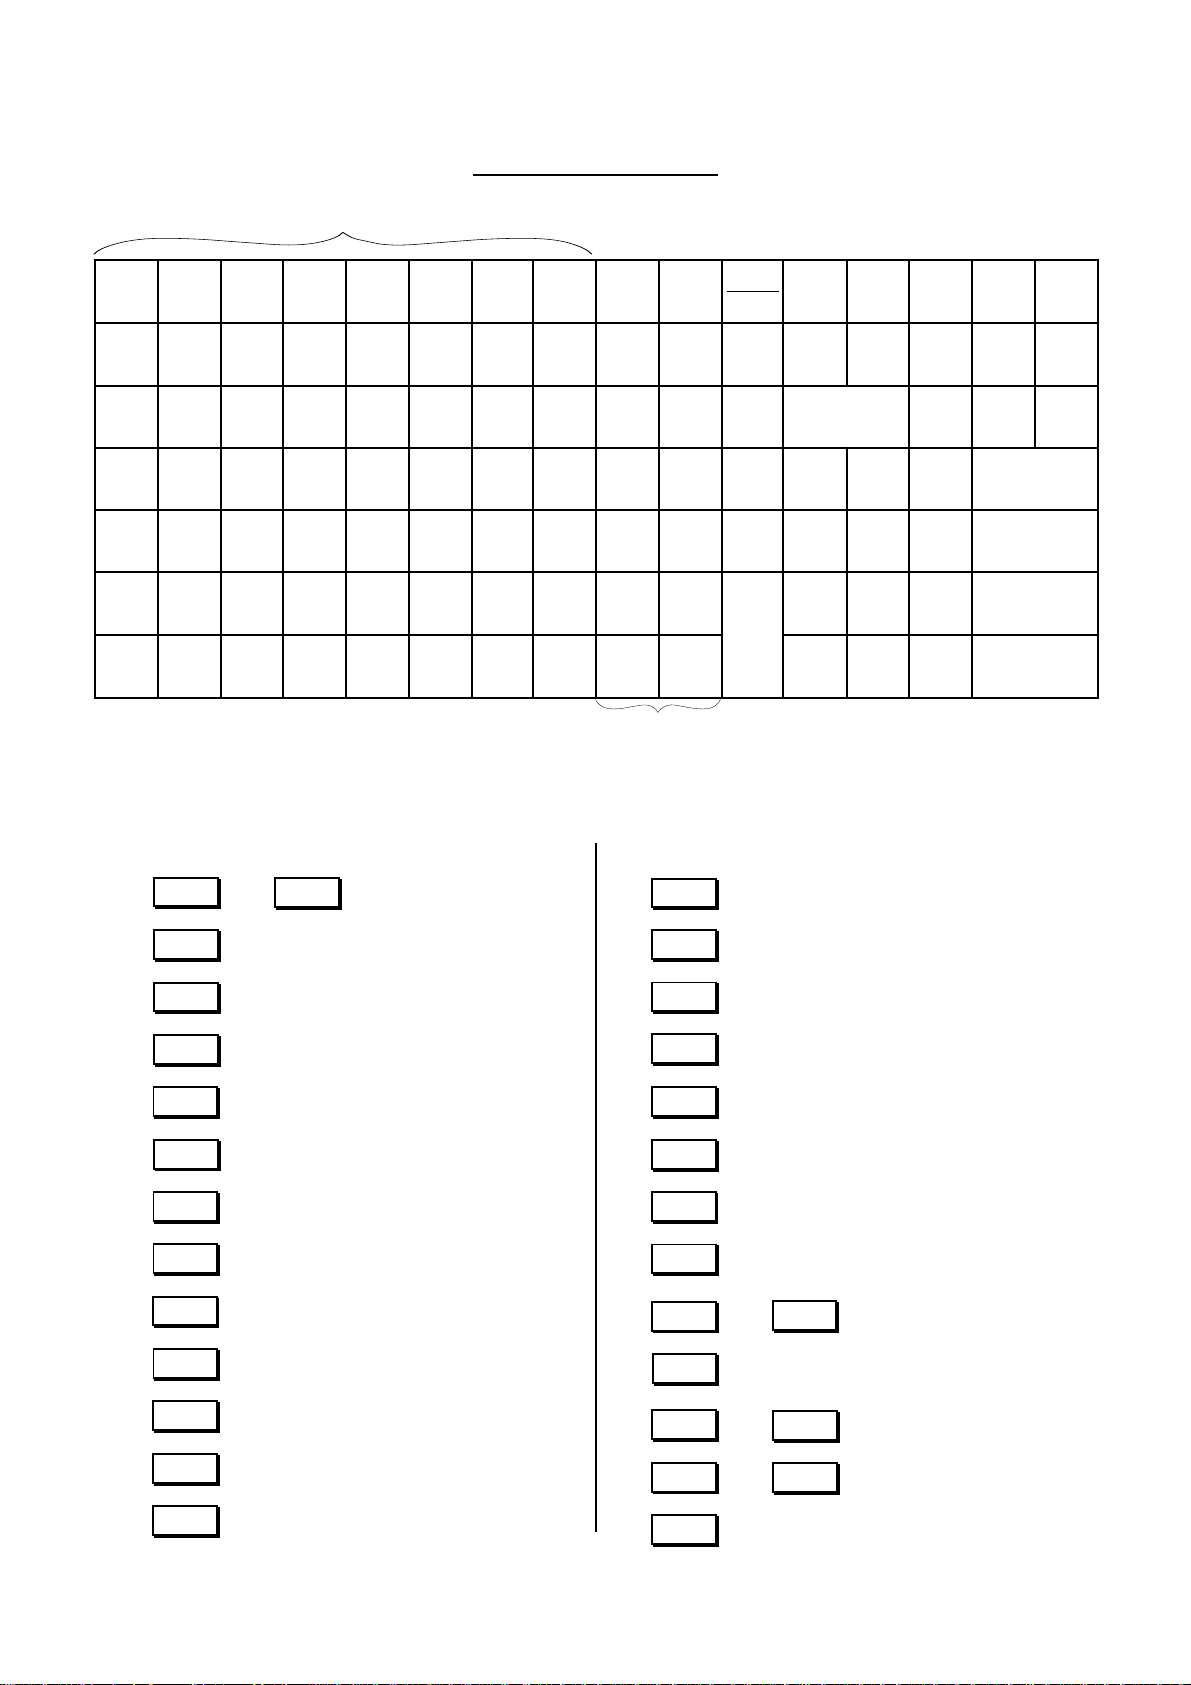
4. Appearance and Nomenclature
MA-1350-1 SERIES
EO1-11126
Drawer
Journal Window
Receipt Outlet
Validation Slot
Printer Cover
Keyboard
PC Interface
Customer’s Display
Operator’s Display
Control Lock
Power Cord
Operator’s Display
Used by the operator to confirm the entry contents and the status of the register. (page 5)
Customer’s Display
Provided for the customer to see the amount entered for each item and sale total. (page 5)
Receipt Outlet
The receipt for the finalized sale is issued.
Journal Window
The operator can see which items have already
been entered through this window.
Validation Slot
Used to print the required item on the validation
slip. (page 43)
Hardware Option
• DRS-207 (Remote Slip Printer)
• PK-2 (PLU Keyboard)
• Push LED Key Kit (Cashier Key)
• Barrel Lock Kit (Cashier Key)
• Expansion Drawer
For details, ask your TOSHIBA TEC representative.
Printer Cover
The cover for the Receipt/Journal printer.
Control Lock
It selects the type of register operations. (page 4)
Keyboard
Used to enter sale items. (page 7)
Drawer
Cash and other media are kept here. It automatically opens on finalizing a sale.
PC Interface
Used to connect a personal computer.
- 3 -
Page 11
MA-1350-1 SERIES
REG
MA
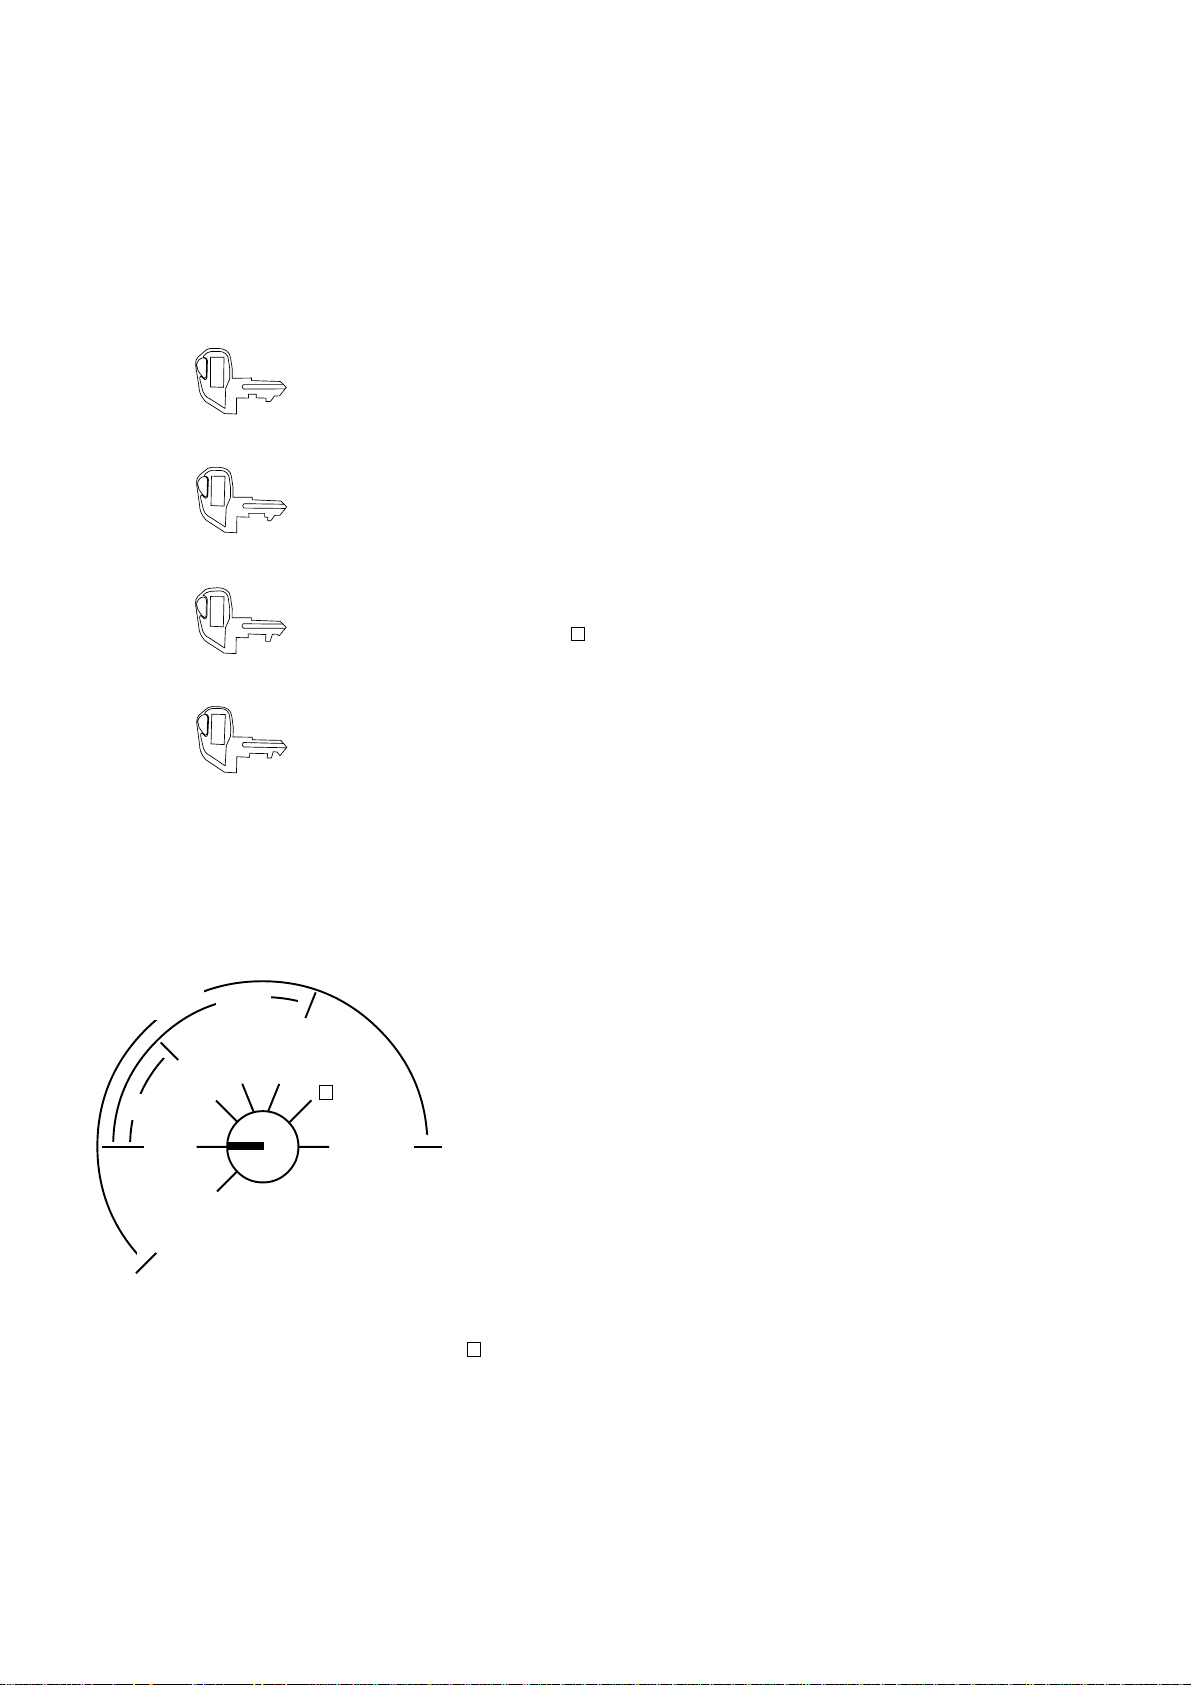
5. Control Lock and Control Keys
Control Keys
There are four types of Control keys: the REG key, the MGR key, the MA key, and the S key.
REG Key: The REG key is used by the cashier or clerk who operates ordinary transaction
entries. This key can access the positions of OFF and REG of the Control Lock.
MGR key: The MGR key is used by the store manager. This key can access the positions
of OFF, REG, X, and MGR.
MGR
MA Key: The MA key is used by the owner who will daily supervise the collection of
money and printout of transactions recorded by the register. This key is also
used when programming the register. This key can access the positions of SET,
OFF, REG, X, MGR, - and Z.
EO1-11126
S Key: The S key is used by the service person from your TOSHIBA TEC
representative to access any position. To prevent programmed data and sales
S
data from being changed or cleared by mistake, do not use this key without
instructions from your TOSHIBA TEC representative.
Control Lock
The Control Lock has seven effective positions for different modes of operation, which are accessed by the
appropriate Control Keys.
(position) (function)
REG
➤
➤
➤
MA
➤
REG
OFF
SET
MGR
X
➤
MGR
-
Z
SET............... The register allows programming and training operations.
OFF............... Nothing appears on the display in this position. However,
the power is being supplied to the register.
REG .............. Transaction entries are carried out in this mode. Displays
➤
the current time while no entries are under way.
X ................. The sale totals in memory can be read (X reports) and
the programmed data can be verified in this position.
MGR .............. This position allows to enter operations requiring Man-
ager Intervention as well as all ordinary transaction entries to be carried out in the “REG” mode.
-.................. This is the “Negative Mode” position, which makes en-
tered data processed reversely to the REG or MGR
mode. It is used to cancel or adjust sales data already
finalized.
Z ................. All the resettable totals and their respective counters in
memory will be read and reset in this position (Z reports)
The keys may be inserted or pulled out at the “OFF” or “REG” position.
- 4 -
Page 12
MA-1350-1 SERIES
EO1-11126
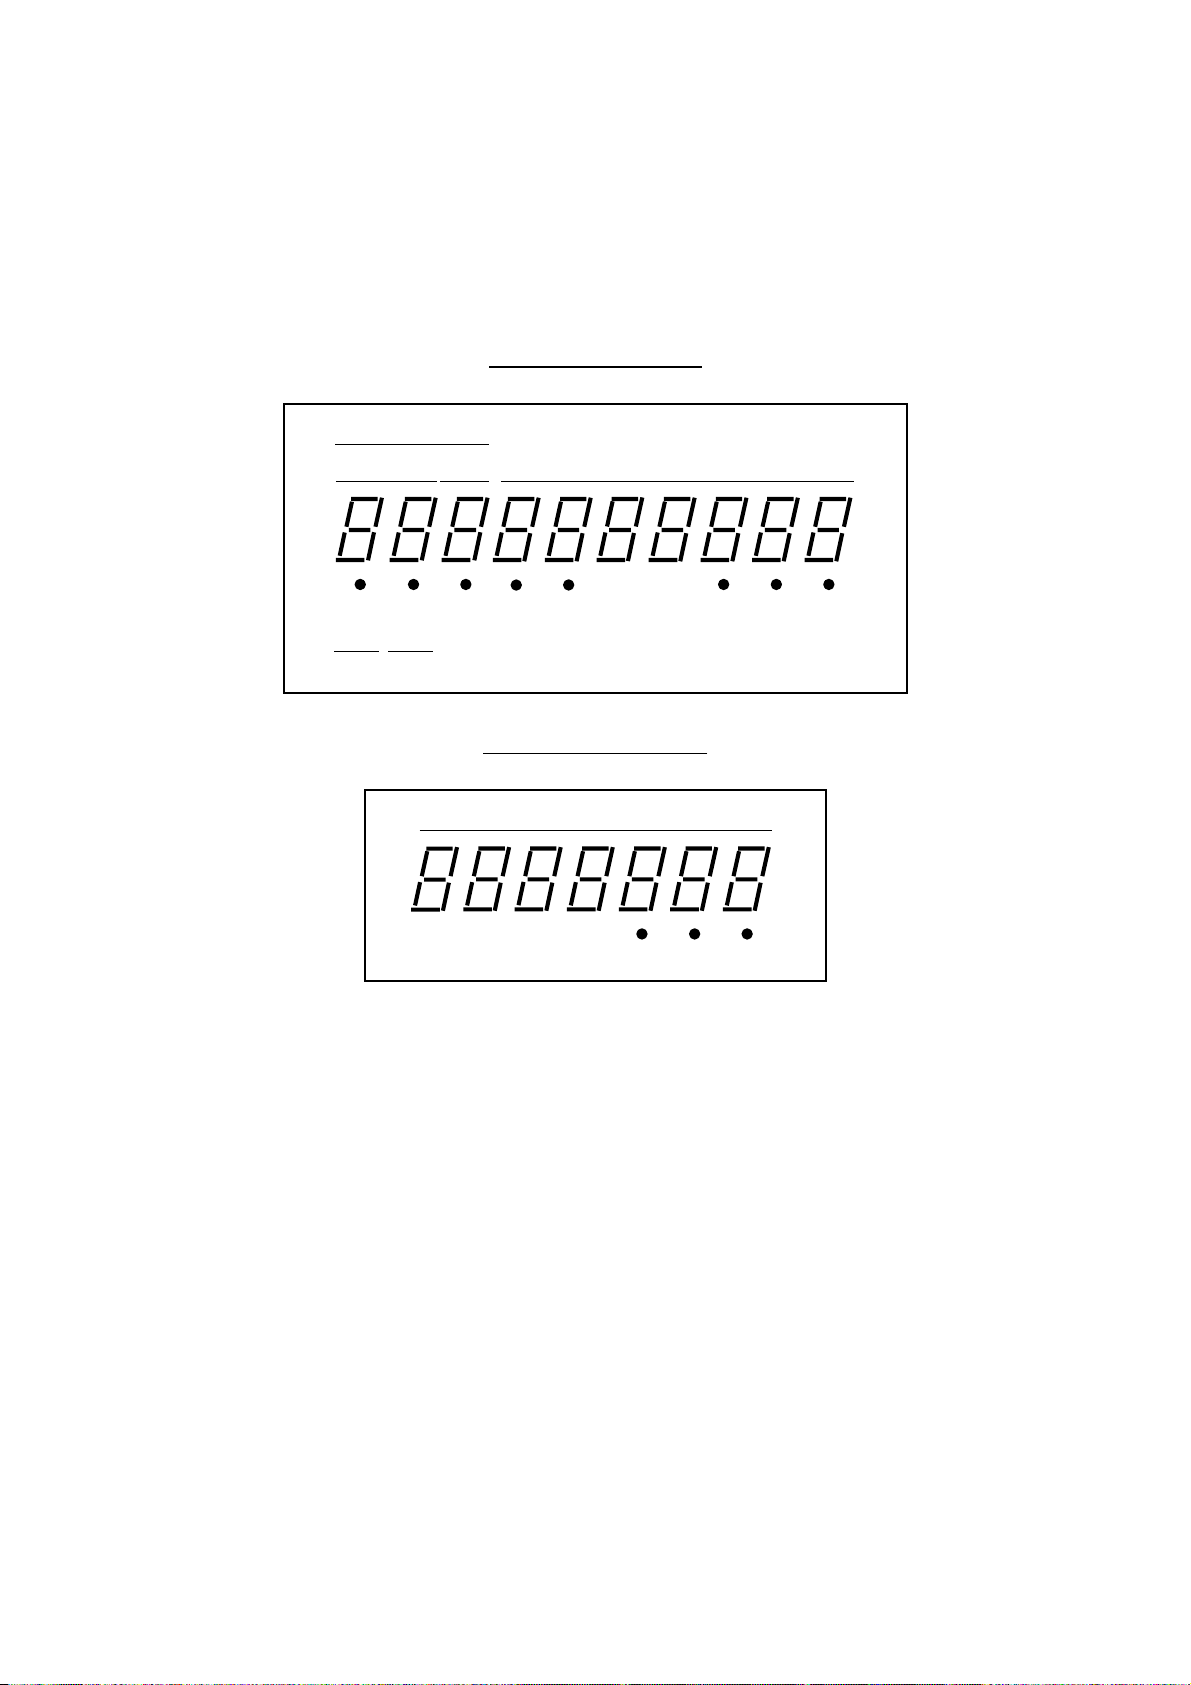
6. Display
The Operator’s Display (front display) is located at the top of the register just above the keyboard. The
Customer’s Display may be used only as a rear display if left in the retracted position or it can be positioned for
viewing at other angles by pulling it upward and turning it to the desired position. The display has two types of
display portions—numeric display and message descriptors (status lamps).
Operator’s Display
PLU
Numeric Display
DPT
PC SLIP R ALM SIGN TL ST CG
I I
CLERK PRICE
RPT
OFF ON
AMOUNT
Customer’s Display
AMOUNT
AMOUNT
TL ST CG
AMOUNT (10 digits for total display, 7 digits for entries):
Displays the numeric data, such as amount, quantity, etc. When the obtained total or
subtotal amount is 10-digit value, the RPT and DPT digits are also used for the amount
display. When no entries are under way and the Control Lock is in the REG position, the
current time is displayed.
DPT (2 digits): Displays the code which represents each Department key. It stays lit when repeating the
same department entry.
RPT (1 digit): Displays the repeat count of the same item. The count is indicated from the second entry
on, and only the last digit will be displayed even if the count exceeds nine.
PLU (3 digits of the DPT and RPT are used for this purpose):
Displays the PLU code when any PLU is entered. It goes out when repeating the same
PLU entry, then only the RPT digit will be displayed for the repeat entry count. When a
sale item of PLU code 1000 or more is entered, only the lowest 3 digits in the 4-digit code
will be displayed.
CLERK (1 digit): Displays a cashier code instead of a department code by the program option. (Ask your
TOSHIBA TEC representative.)
PRICE (1 digit): Displays PLU price shift No. instead of a department code by the program option. (Ask
your TOSHIBA TEC representative.)
- 5 -
Page 13

MA-1350-1 SERIES
EO1-11126
Message Descriptors (Status Lamps)
PC: Illuminates during data communication between the cash register and a personal
computer.
SLIP: Illuminates when a validation slip is properly inserted to allow the validation print. It flickers
to inform that the validation print is required when the validation compulsory status has
been programmed on the last operation.
R OFF: Illuminates when the Receipt-OFF mode is declared by the [LOG/RECEIPT] key. In this
condition, no receipts will be issued for a sale to be entered. To extinguish this lamp (i.e.,
to change into Receipt-ON mode for issuing receipts), simply depress the [LOG/
RECEIPT] key again.
SIGN ON: Illuminates when a cashier signs ON if the cashier signing method has been selected.
ALM: Illuminates with the alarm buzzer to indicate that the last operation or numeric entry was
an error. To clear the error condition, depress the [C] key.
TL: Illuminates with the total amount displayed when a sale is finalized without any amount
tendered.
ST: Illuminates in the following operations or condition.
• The [ST] key is depressed, indicating that the displayed amount is subtotal.
• The [TXBL TL] key is depressed, indicating that the displayed amount is taxable
total.
• The [EX] key is depressed, indicating that the displayed amount is the sale portion
subject to the tax exemption.
• Amount tendered is less than the sale total.
CG: When an amount tendering operation has been performed, this lamp illuminates with the
amount of change due displayed.
- 6 -
Page 14
MA-1350-1 SERIES
EO1-11126
7. Keyboard
The following is the standard keyboard layout, which was initially set at the factory. This register is designed to
be capable of programming most of the keys at desired locations or adding keys, ask your TOSHIBA TEC
representative. (For details about operations, refer to Chapter 13. Transaction Entries on page 21.)
Normal Keyboard Layout
Department Keys 1 to15
LOG
RECEIPT
FS/M
OPEN
OPEN
RTN
MDSE
VOID#/NS
ITEM
CORR
PR
@/FOR
LC
AMT
PLU ST AT/TL
DATE
Other Optional Keys:
• Additional Department Keys
to
16
000
• (Triple Zero Key)
40
VALI
RF
C
7 8 9
4 5 6
1 2 3
0 00
TX
JF
M
1
2
3
4
5
6
11
7
12
8
13
9
14
10
15
•
TAX
• (Manual Tax Key)
PB+
• (Previous Balance + Key)
PO
R/A
VND
CPN
STR
CPN
FSTL
TEND
RECEIPT
ISSUE
DOLL
DISC
%-
EX
chg
CHECK
TEND
%+
• (Percent Charge Key)
ALL
• (All Void Key)
VOID
MISC
• (Miscellaneous Media Key)
CPN
• (Media-coupon Key)
NS
• (No-sale Key)
#
• (or )
OPEN
• (Open Key)
TX2/M
• (Tax 2 Modifier Key)
TX3/M
• (Tax 3 Modifier Key)
TXBL
• (Taxable Total Key)
TL
#/CID
(Non-add Number
Print Key)
PB-
• (Previous Balance - Key)
TRF
• (Transfer Key)
CLERK
• to (Cashier 1 to 8 Keys)
1
$5.00
•,,
CLERK
8
$10.00 CASH3
(Cash Payment 1 to 3 Keys)
CUR 1
•to
PRICE
•to
SHIFT 1
GST/M
• (GST Modifier Key; for Canada)
CUR 4
PRICE
SHIFT 3
(Foreign Currency
1 to 4 Keys)
(PLU Price Shift
1 to 3 Keys)
• PLU Preset-code Keys
- 7 -
Page 15
PLU Preset-code Keys
MA-1350-1 SERIES
EO1-11126
Flat Keyboard Layout
Other Optional Keys:
• Additional Department Keys
LOG
RECEIPT
10
11
12
13
14
8
RECEIPT
9
ISSUE
%-
#
AMT
PLU
1
2
3
4
5
6
7
Department Keys 1 to 14
VOID
TX/M
ITEM
CORR
c
78
4
5
12
000
ALL
VOID
RTN
MDSE
@/FOR
9
6
3
.
RF
R/AEX
chg
$5.00
$10.00
ST
AT / TL
JF
PO
NS
15
to
000
• (Triple Zero Key)
VND
• (Vendor Coupon Key)
CPN
STR
• (Store Coupon Key)
CPN
DOLL
• (Dollar Discount Key)
DISC
%+
• (Percent Charge Key)
CHECK
• (Check Tender Key)
TEND
PR
OPEN
• (Preset Price Open Key)
LC
OPEN
• (Listing Capacity Open Key)
OPEN
• (Open Key)
VALI
• (Validation Print Key)
DATE
#/NS
• (Non-add Number Print/No-sale Key)
40
TX3/M
• (Tax 3 Modifier Key)
TXBL
• (Taxable Total Key)
TL
TAX
• (Manual Tax Key)
PB+
• (Previous Balance + Key)
PB-
• (Previous Balance - Key)
TRF
• (Transfer Key)
FS/M
• (Food Stamp Modifier Key)
FSTL
TEND
• (Food Stamp Total/Tender Key)
CUR 1
•to
CASH3
• (Cash Payment 3 Key)
PRICE
•to
SHIFT 1
CLERK
• to (Cashier 1 to 8 Keys)
1
CUR 4
PRICE
SHIFT 3
CLERK
(Foreign Currency
1 to 4 Keys)
(PLU Price Shift
1 to 3 Keys)
8
TX2/M
• (Tax 2 Modifier Key)
GST/M
• (GST Modifier Key; for Canada)
- 8 -
Page 16
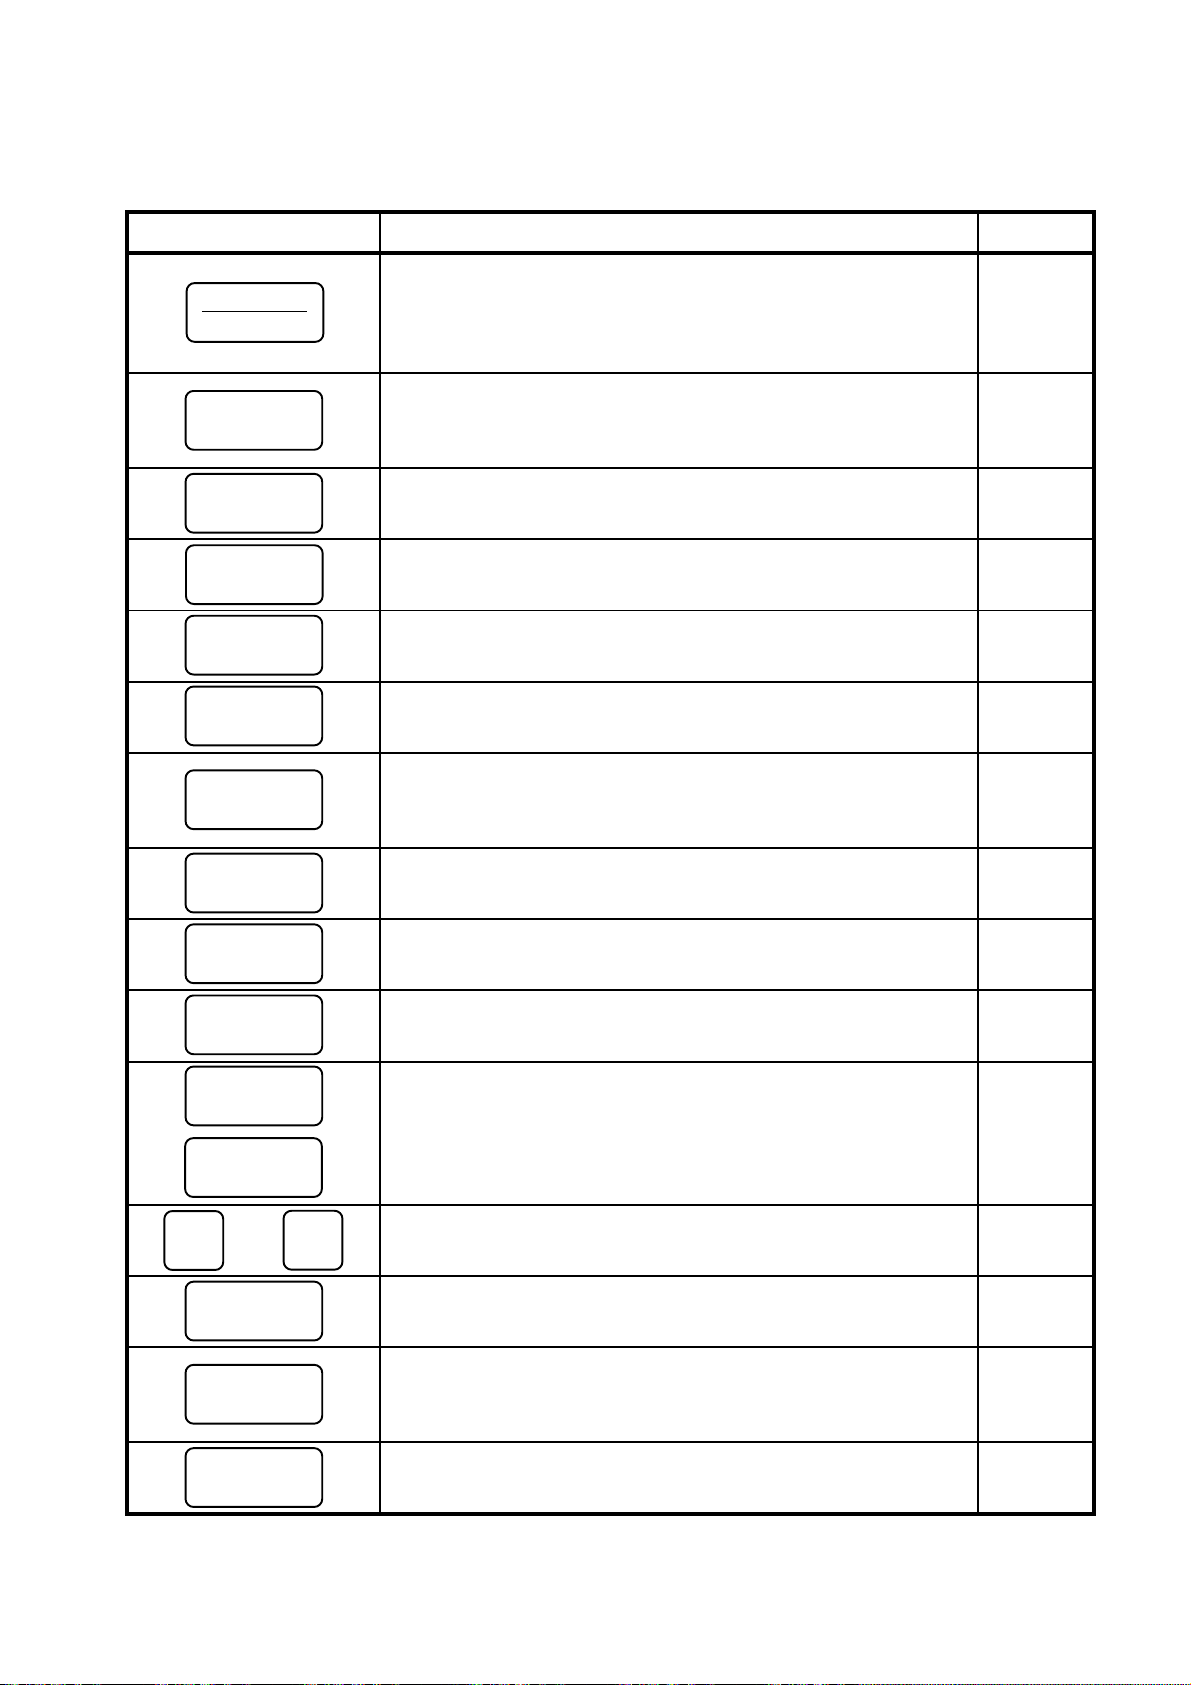
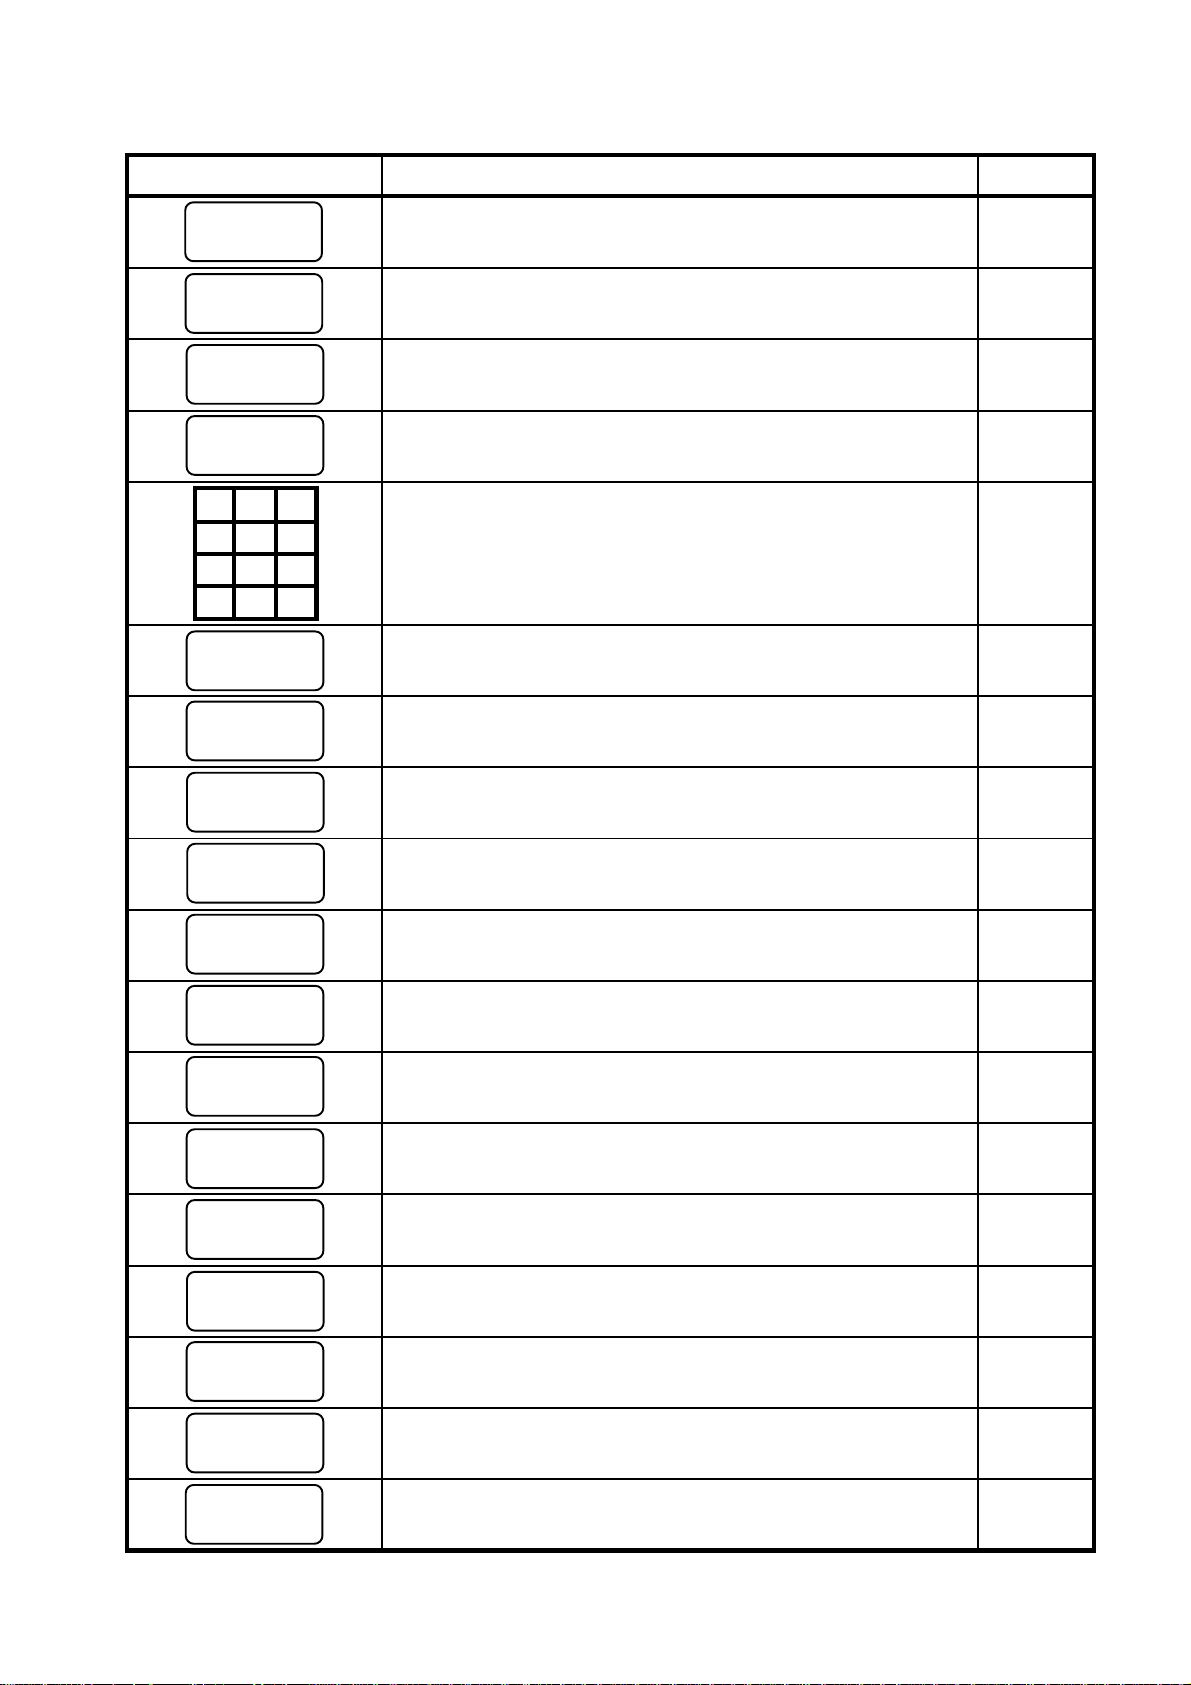
Functions of Each Key
MA-1350-1 SERIES
EO1-11126
KEY FUNCTION
Log/Receipt Key: Used for the cashier sign on/off operation
LOG
RECEIPT
RF
JF
when cashier signing option is selected after entering numbers.
Also, used to select receipt issue or non-issue without entering
numbers.
Receipt Feed Key: Used to advance the receipt roll and
operated by holding it down until the paper is advanced to the ----required position.
Journal Feed Key: Used to advance the journal roll in the same
fashion as the [RF] key is used for receipt roll.
No-sale Key: Used in the no-sale operation.
NS
ALL
VOID
PR
OPEN
LC
OPEN
All Void Key: Used to delete all items in the current sale.
Preset Price Open Key: Used to release the preset-price
department for a manual price entry.
Listing Capacity Open Key: Used to enter an amount which
exceeds the listing capacity programmed for department keys in 29
advance.
REFERENCE
PAGE
17, 21
-----
22, 43
33
29
DOLL
DISC
RTN
MDSE
C
#
(
or )
#/CID
1
to
%-
@/FOR
40
Dollar Discount Key: Used to subtract an amount from a sale.
Returned Merchandise Key: Used for the returned
merchandise operation.
Clear Key: Used to clear a wrong entry or operation error.
Non-add Number Print Key: When depressed with a prior
number entry, this key is used to print the non-add number.
Department Keys 1 to 40: Used to enter department items and
process the amount into appropriate departments.
Percent Discount Key: Used to subtract a percent rate, preset
or manually entered, from a sale or an individual sale item.
At/FOR Key: Used to enter a department or a PLU item by
multiplication. Also used to auto-calculate and enter a split 24, 25, 27
package price.
30
34
22
34
23 ~ 25
30
R/A
Received-on-Account Key: Used to register received-on-
account amount.
- 9 -
22
Page 17
MA-1350-1 SERIES
EO1-11126
KEY FUNCTION
Paid Out Key: Used to register paid out amount.
PO
PLU
PLU (Price-Look-Up) Key: Used to enter a PLU item that is
linked to a department.
Amount Key: Used to enter a manual amount of PLU item.
AMT
ITEM
CORR
7
415
0
ST
TXBL
TL
8
9
6
2
3
.00
Item Correct Key: Used to delete the last item entered within the
current sale.
Numeric Keys: Used to enter numeric data, such as amount,
quantities, and code numbers. The [00] key functions the same
as depressing the [0] key twice. The [ . ] key is used to designate ----the decimal point of a percentage rate or a quantity. The [000]
key functions the same as depressing the [0] key three times.
Subtotal Key: Used to obtain a subtotal of the current
transaction.
Taxable Total Key: Used to obtain the taxable total (the sale
total including taxes due) of the current transaction.
REFERENCE
PAGE
23
26, 27
26, 27
32, 33
35
35
VND
CPN
STR
CPN
MISC
chg
CHECK
TEND
AT/TL
%+
RECEIPT
ISSUE
CPN
Vendor Coupon Key: Used to enter the amount of vendor
coupons received from the customer.
Store Coupon Key: Used to subtract the store coupon amount
redeemed through a department.
Miscellaneous Media Key: Used to finalize a sale as
miscellaneous media.
Charge Key: Used to finalize a sale as charge.
Check Tender Key: Used to finalize a sale as check.
Cash Amount Tender / Total Key: Used to finalize a sale as
cash.
Percent Charge Key: Used to add a percent rate, preset or
manually entered, to a sale or an individual sale item.
Post-issue Receipt Key: Used to print the receipt of a last sale
completed in registration.
Media-coupon Tender Key: Used to finalize a sale as media-
coupon.
31
31
22,35,36,39
22,35,36,39
22,35,36,39
22,23,35,36
30
40
22,35,36,39
V ALIDATE
VOID
Validation Print Key: Used to print a required item on a
validation slip.
Void Key: Used to delete item(s) already entered in the current
sale.
- 10 -
43
32
Page 18
MA-1350-1 SERIES
EO1-11126
KEY FUNCTION
#/NS
OPEN
CLERK 1 CLERK 8
$5.00 $10.00
CUR 1 CUR 4
TX1/M TX3/M
to
,
CASH3
to
to
EX
REFERENCE
PAGE
Non-add Number Print / No-sale Key: It functions as the [#]
(or [#/CID]) key and the [NS] key.
Preset Price & Listing Capacity Open Key: It functions as the
[PR OPEN] key and the [LC OPEN] key.
Cashier 1 to 8 Keys: Used to identify each cashier who
operates the register.
Cash Payment 1 to 3 Keys: Used for cash-tendering operation
with the respective preset amounts. As initial setting, the amount
$5.00 is preset for the [$5.00] key and $10.00 for the [$10.00] 36
key.
Foreign Currency 1 to 4 Keys: Used to finalize a sale with
foreign currency.
Tax Modifier 1 to 3 Keys: Used to reverse the tax status of
required department, PLU, percent discount/charge, dollar 40, 41
discount, vendor coupon or store coupon entry.
Tax Exempt Key: Used to exempt designated tax (es) from the
sale.
22, 34, 43
29
19
42, 43
41
TAX
GST/M
FS/M
FSTL
TEND
PB+ PB-
,
TRF
PRICE
SHIFT 1
to
SHIFT 3
PRICE
Manual Tax Key: Used to enter an irregular tax amount to sale
total.
GST Modifier Key (applicable for Canada only): Used to
reverse the GST status of required department, PLU, percent
discount/charge, dollar discount, vendor coupon, or store coupon
entry.
Food Stamp Modifier Key: Used to reverse the food stamp
status of required department, PLU, percent discount/charge, 41
dollar discount, vendor coupon, or store coupon entry.
Food Stamp Total/Tender Key: Used to read the food
stampable portion amount of a sale and to tender an amount in 37
food stamps.
Previous Balance Keys: Used to enter a previous balance in
charge posting operation.
Transfer Key: Used to transfer an entire balance in charge
posting operation.
Price Shift 1 to 3 Keys: Used in PLU price shift operation.
42
40, 41
38
38
28
PLU Preset-
code Key
PLU Preset-code Keys: Each of these keys is programmed with
a PLU code. Therefore, depressing those keys can directly enter 26, 27
PLU items corresponding to each PLU code.
- 11 -
Page 19
8. Installing the Receipt/Journal Roll
Installing the Receipt Roll
WARNING!
Care must be taken not to injure yourself with the paper cutter.
MA-1350-1 SERIES
EO1-11126
REG
OFF
SET
X
MGR
-
Z
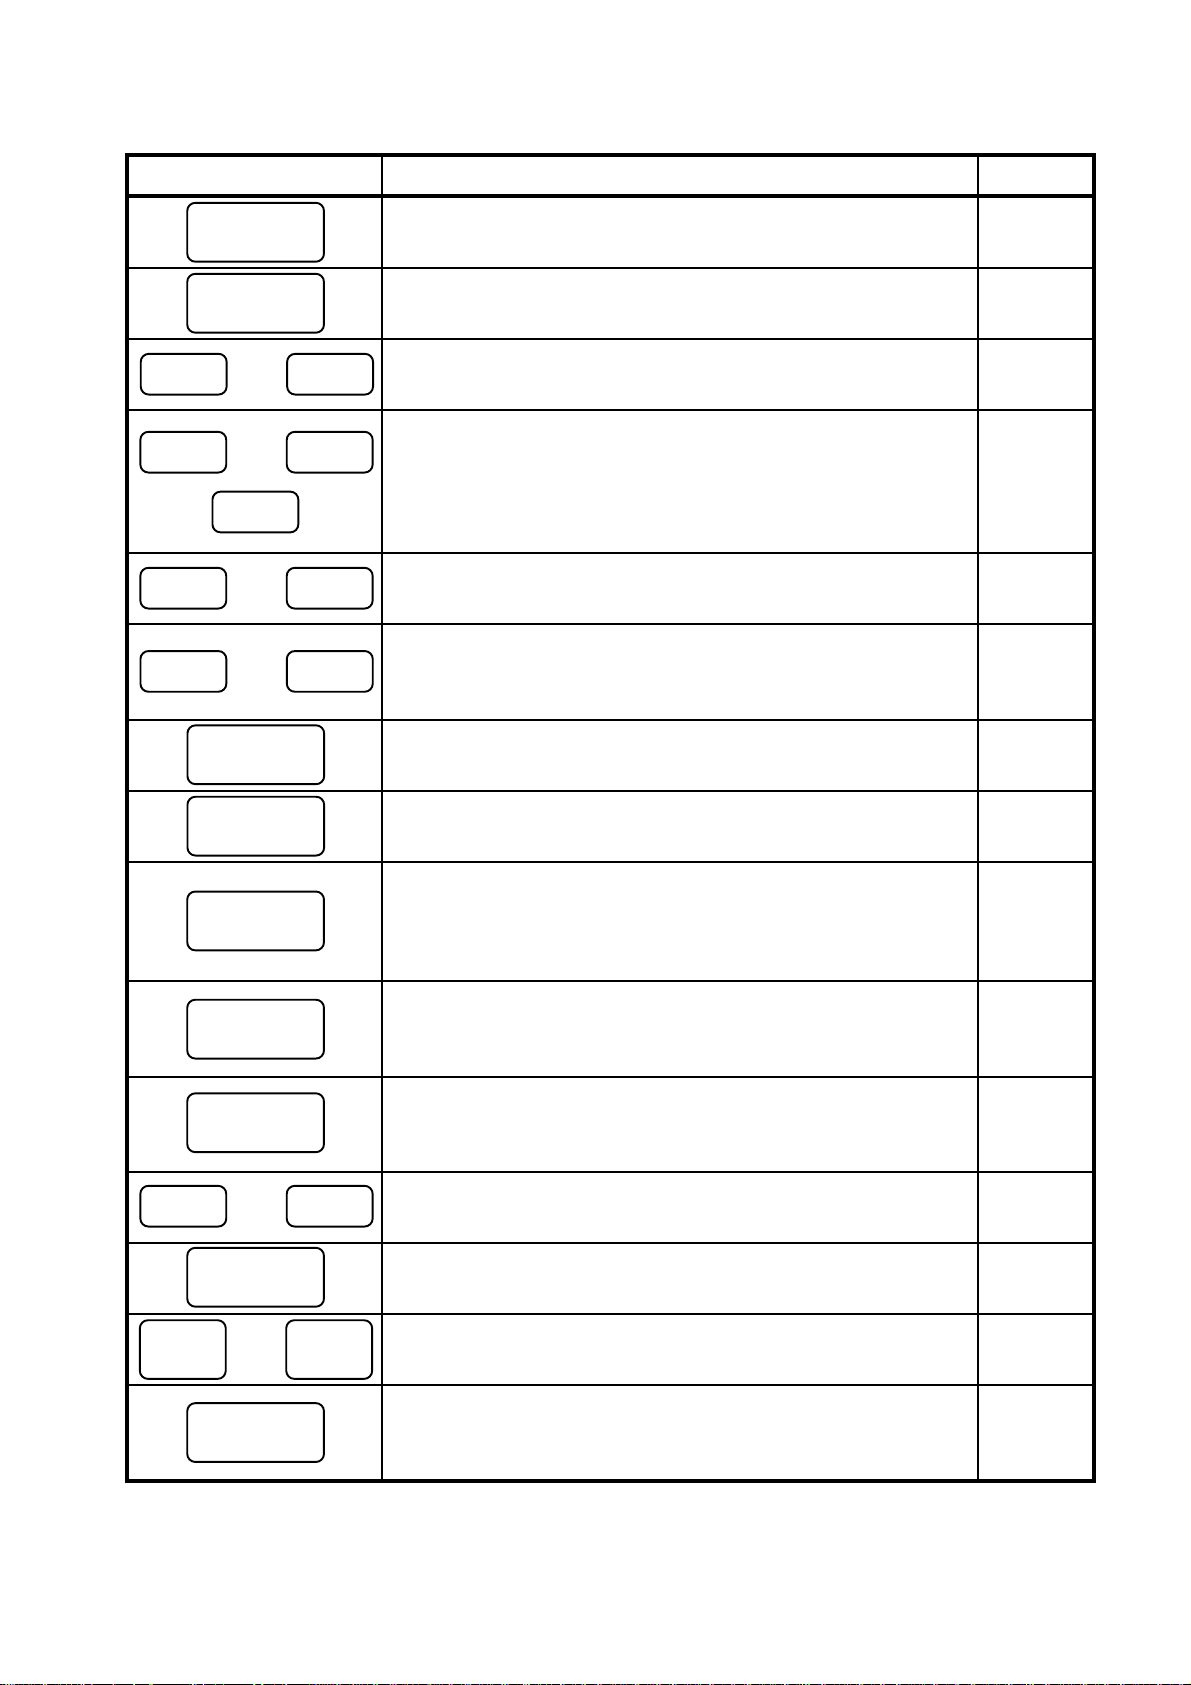
1
Turn the Control Lock to the REG position using a
Control Key.
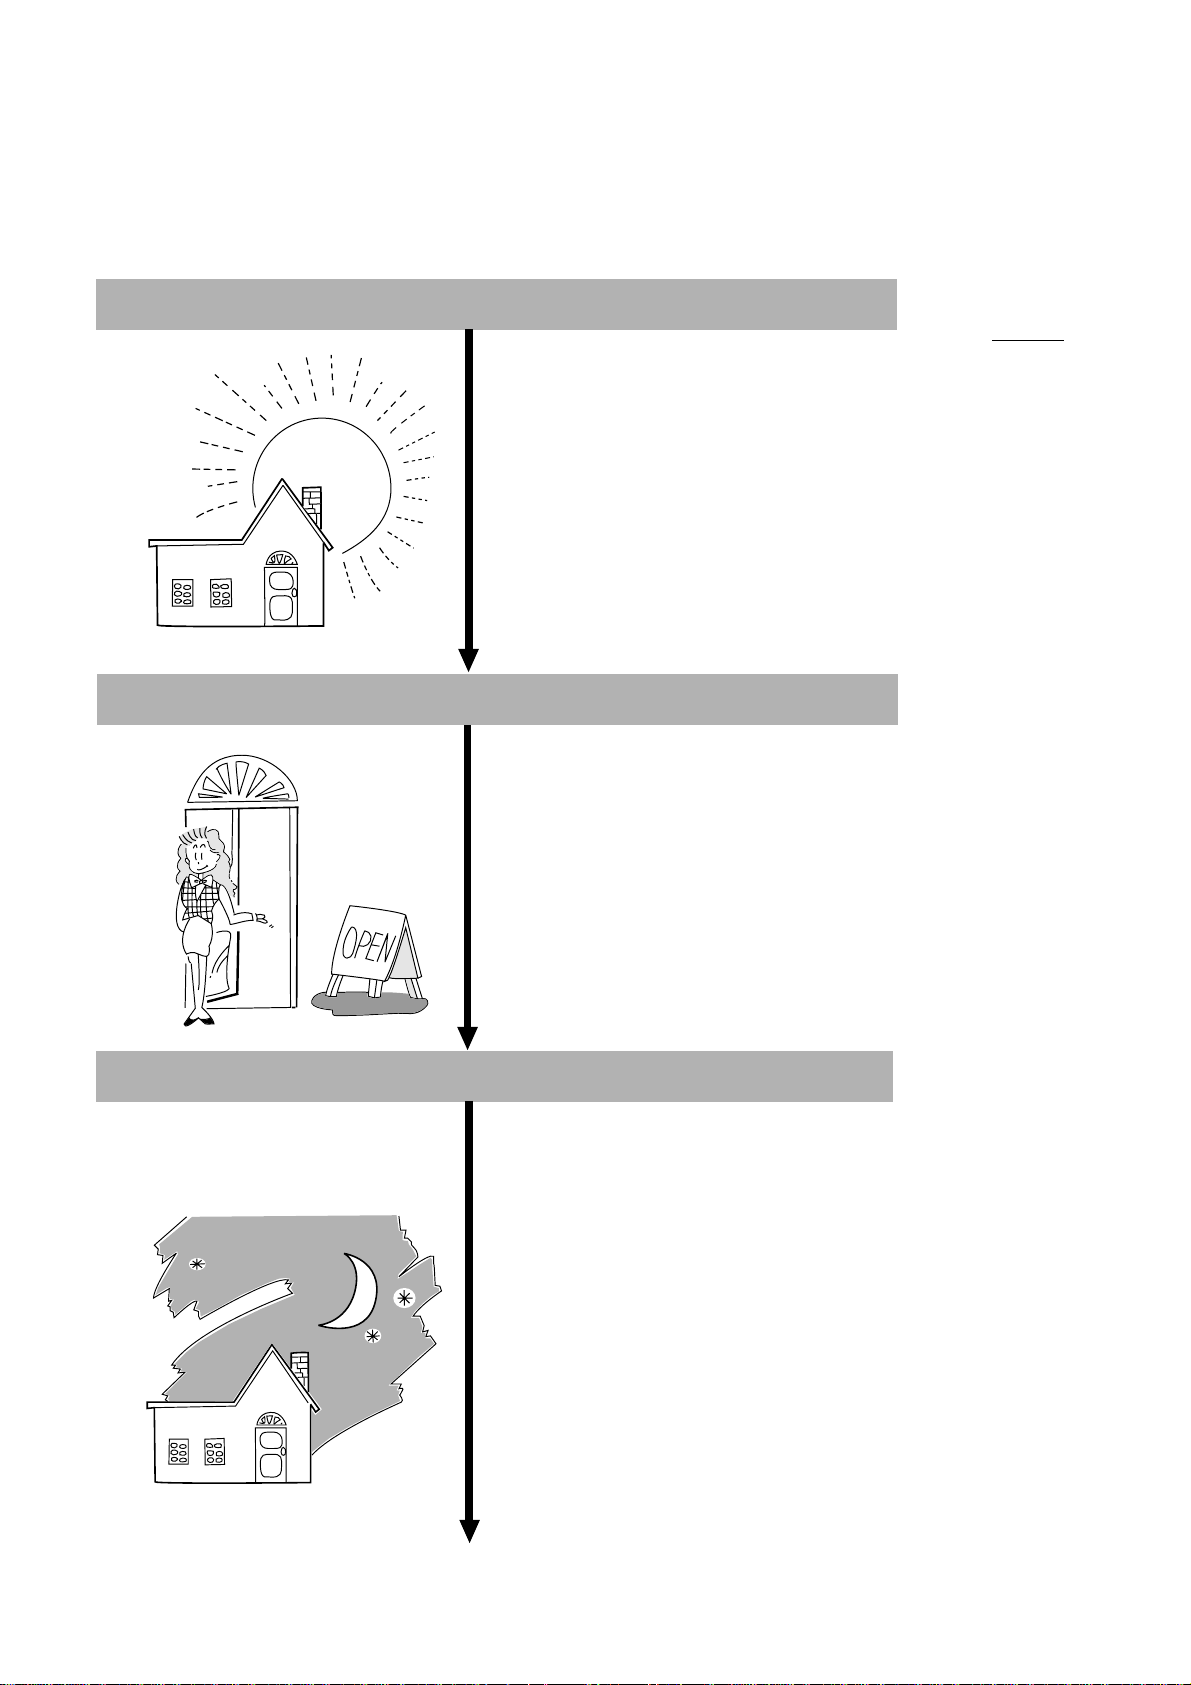
2
To remove the Printer Cover, insert the Printer
Cover Key to the Printer Cover Lock, and then
turn it 90° clockwise.
3
Cut the paper end to make it sharp.
4
Place the paper roll in the outer side holder of the
two roll holders.
Correct Incorrect
- 12 -
Page 20
MA-1350-1 SERIES
EO1-11126
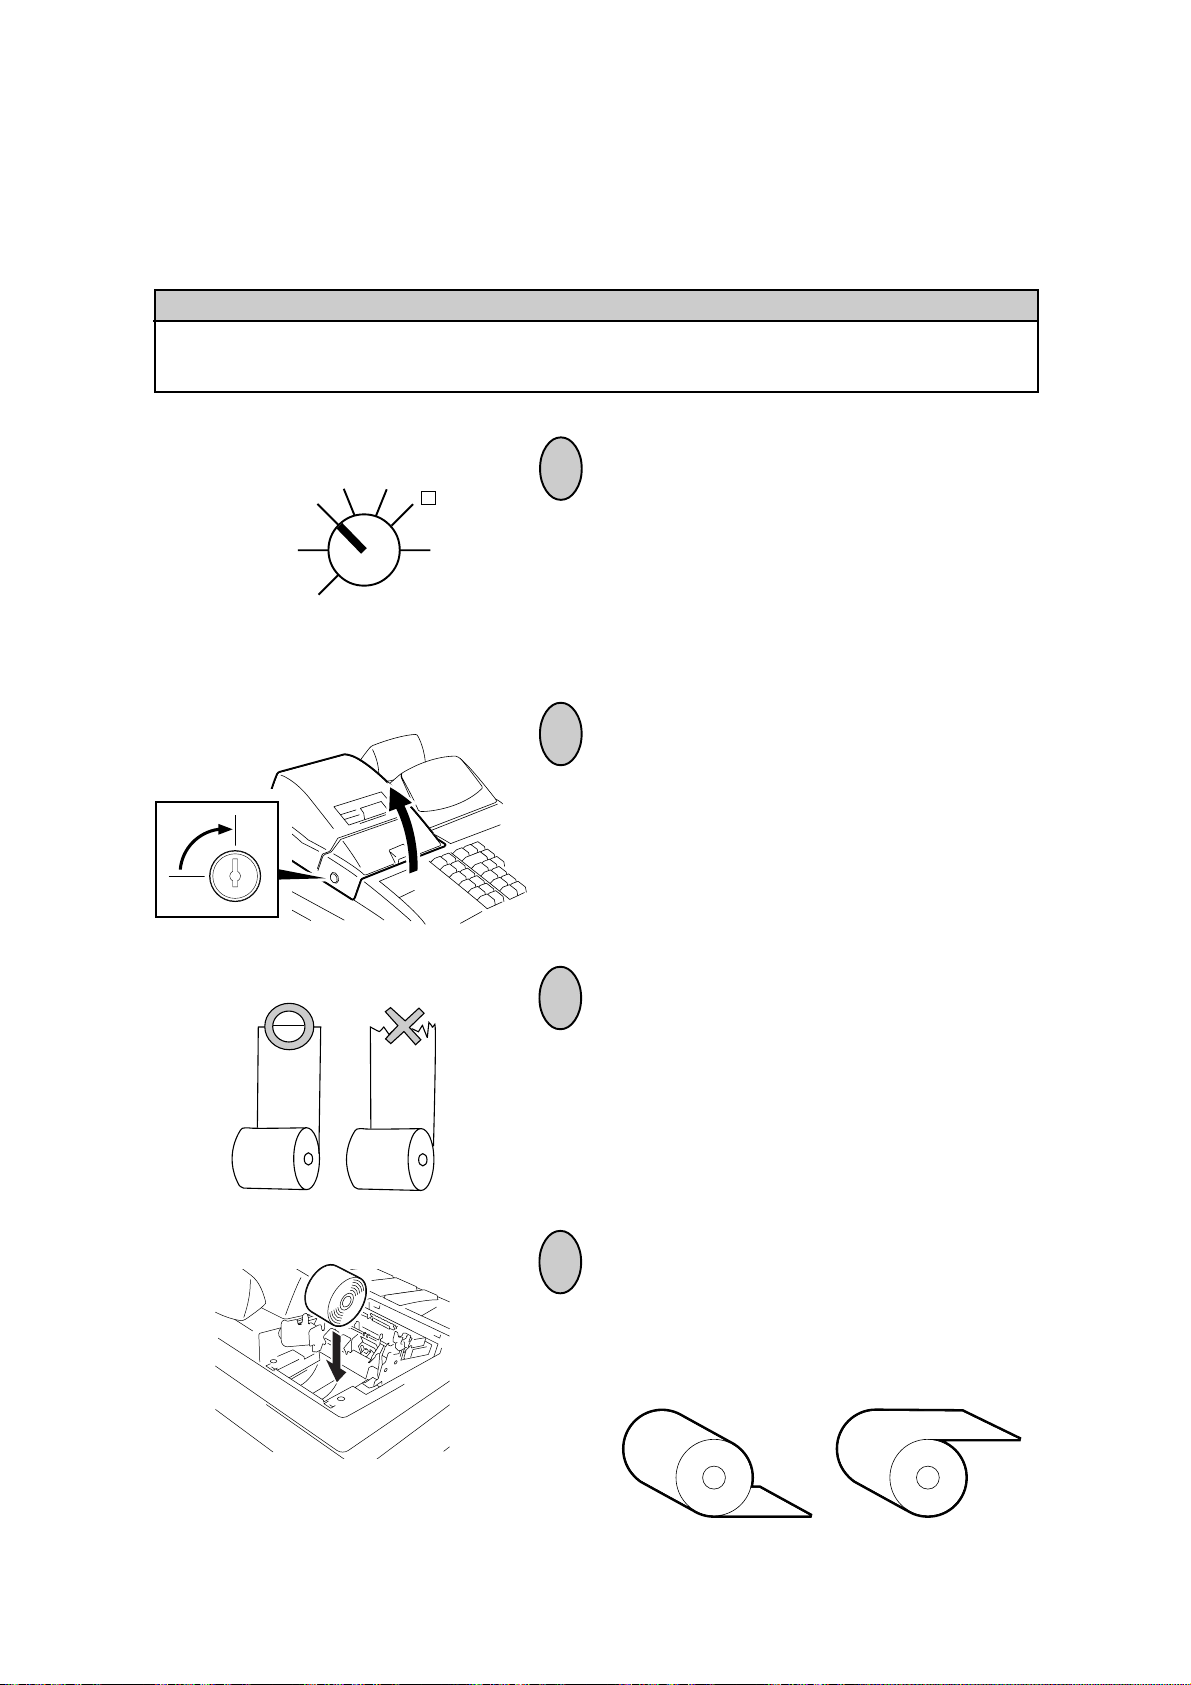
5
Insert the paper end into the receipt inlet behind
the printer. Then, feed the paper by hand into the
VALI
DATE
TX
M
inside of the printer while pressing the [RF] key
provided at the central upper side of the keyboard
until about 4 inches (about 10 cm) of paper comes
out of the printer.
6
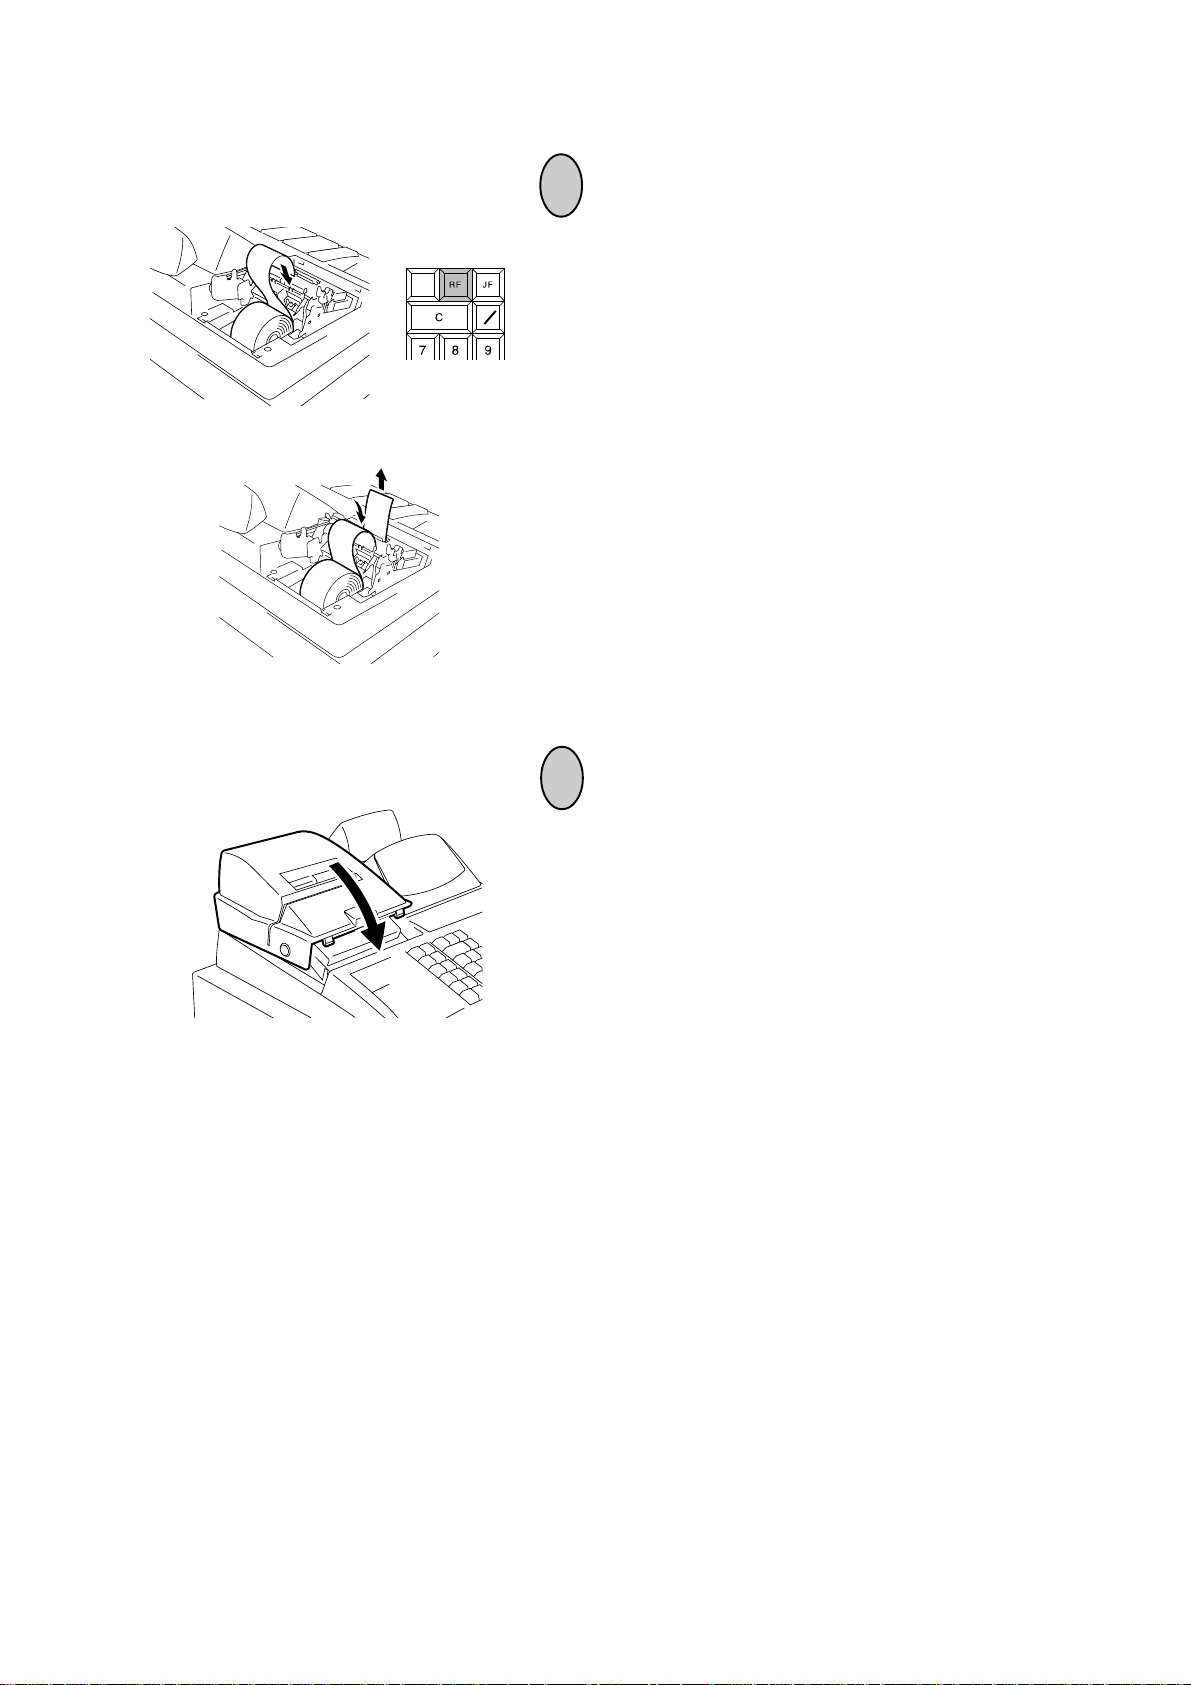
Cut the excess paper with the attached cutter, and
attach the Printer Cover.
After closing the Printer Cover, depress the [#/NS]
key to check print condition.
- 13 -
Page 21
Installing the Journal Roll
MA-1350-1 SERIES
EO1-11126
1
Follow Steps 1 to 5 for “Installing the Receipt Roll”
on the preceding pages, except that the paper roll
should be placed inner side of the two holders and
the [JF] key should be used for the journal roll to
advance about 8 inches (about 20 cm) of paper
out of the printer.
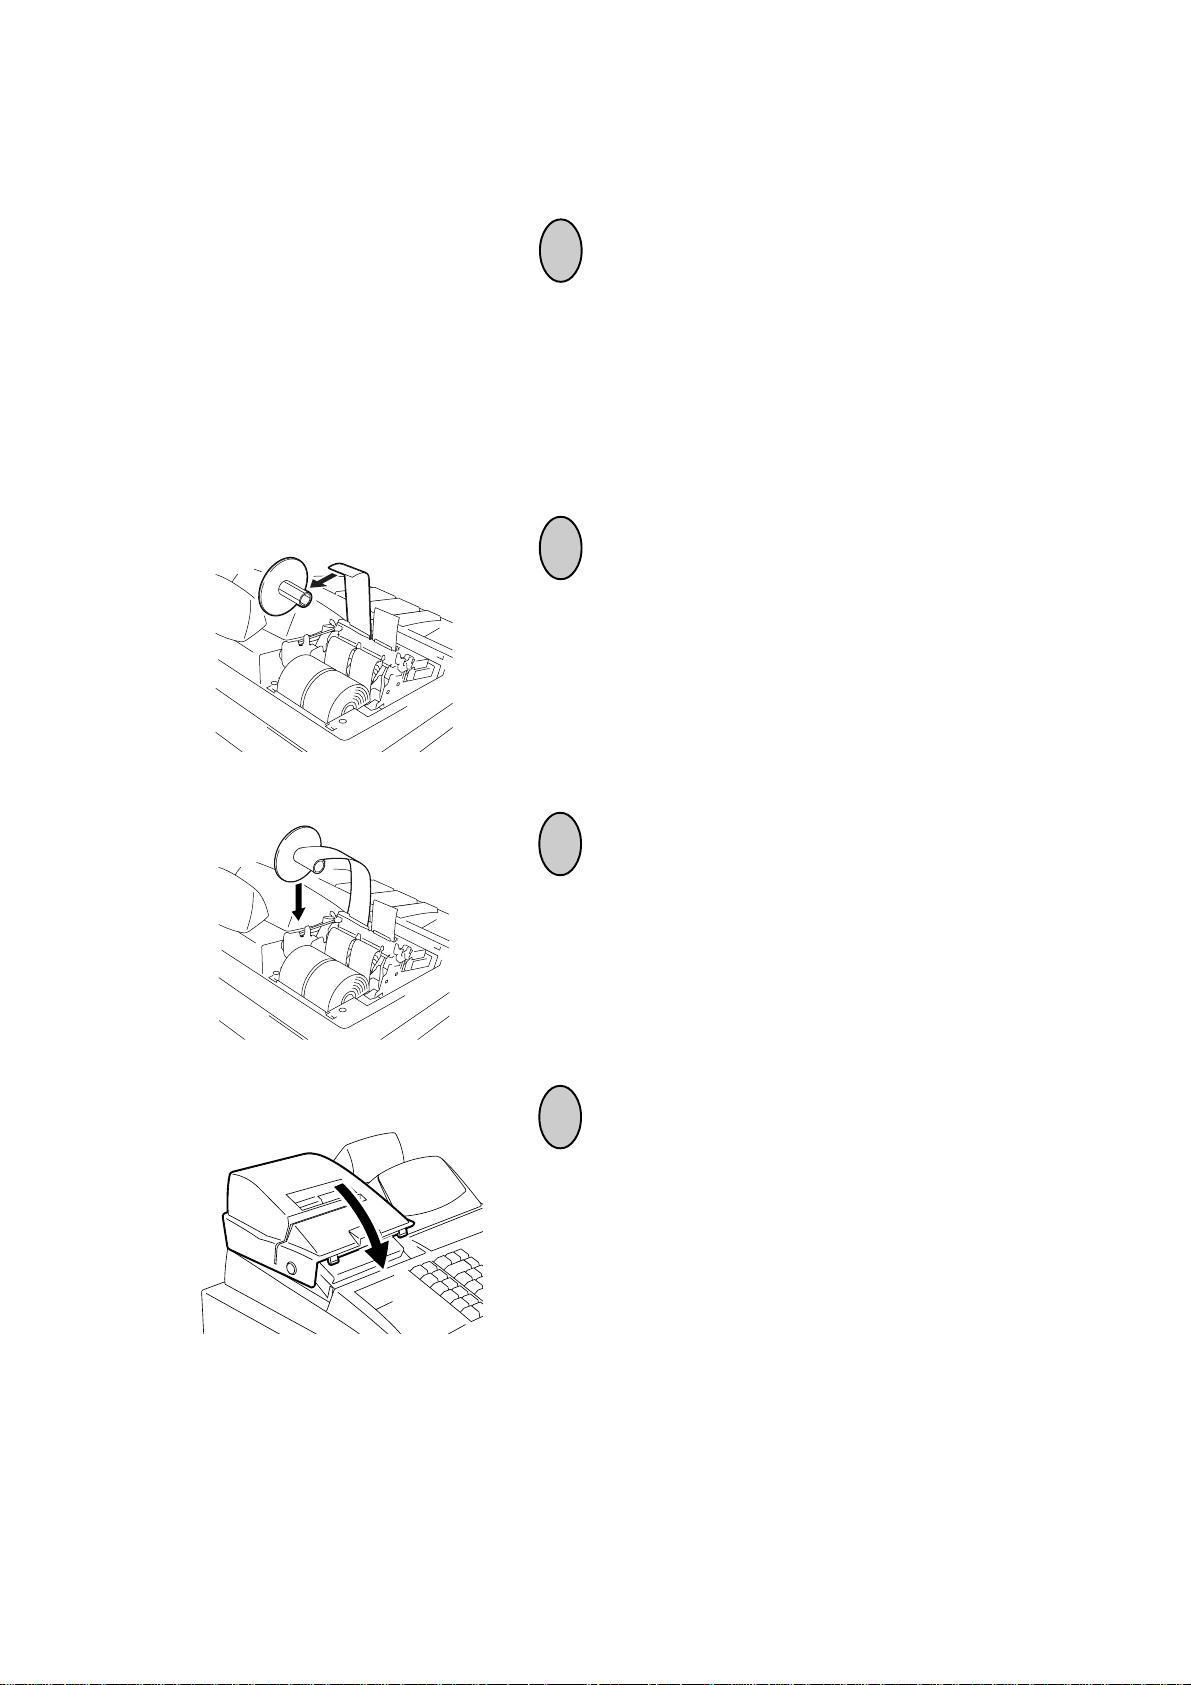
2
Insert the paper end into the slit on the Take-up
Reel and wind it around the reel two or three
times.
3
Set the Journal Take-up Reel into the Reel
Holder.
4
Attach the Printer Cover.
- 14 -
Page 22
9. Installing the Ribbon Cassette
MA-1350-1 SERIES
EO1-11126
REG
OFF
SET
X
MGR
-
Z
1
Turn the Control Lock to the OFF position.
2
To remove the Printer Cover, insert the Printer
Cover Key to the Printer Cover Lock, and turn it
90° clockwise.
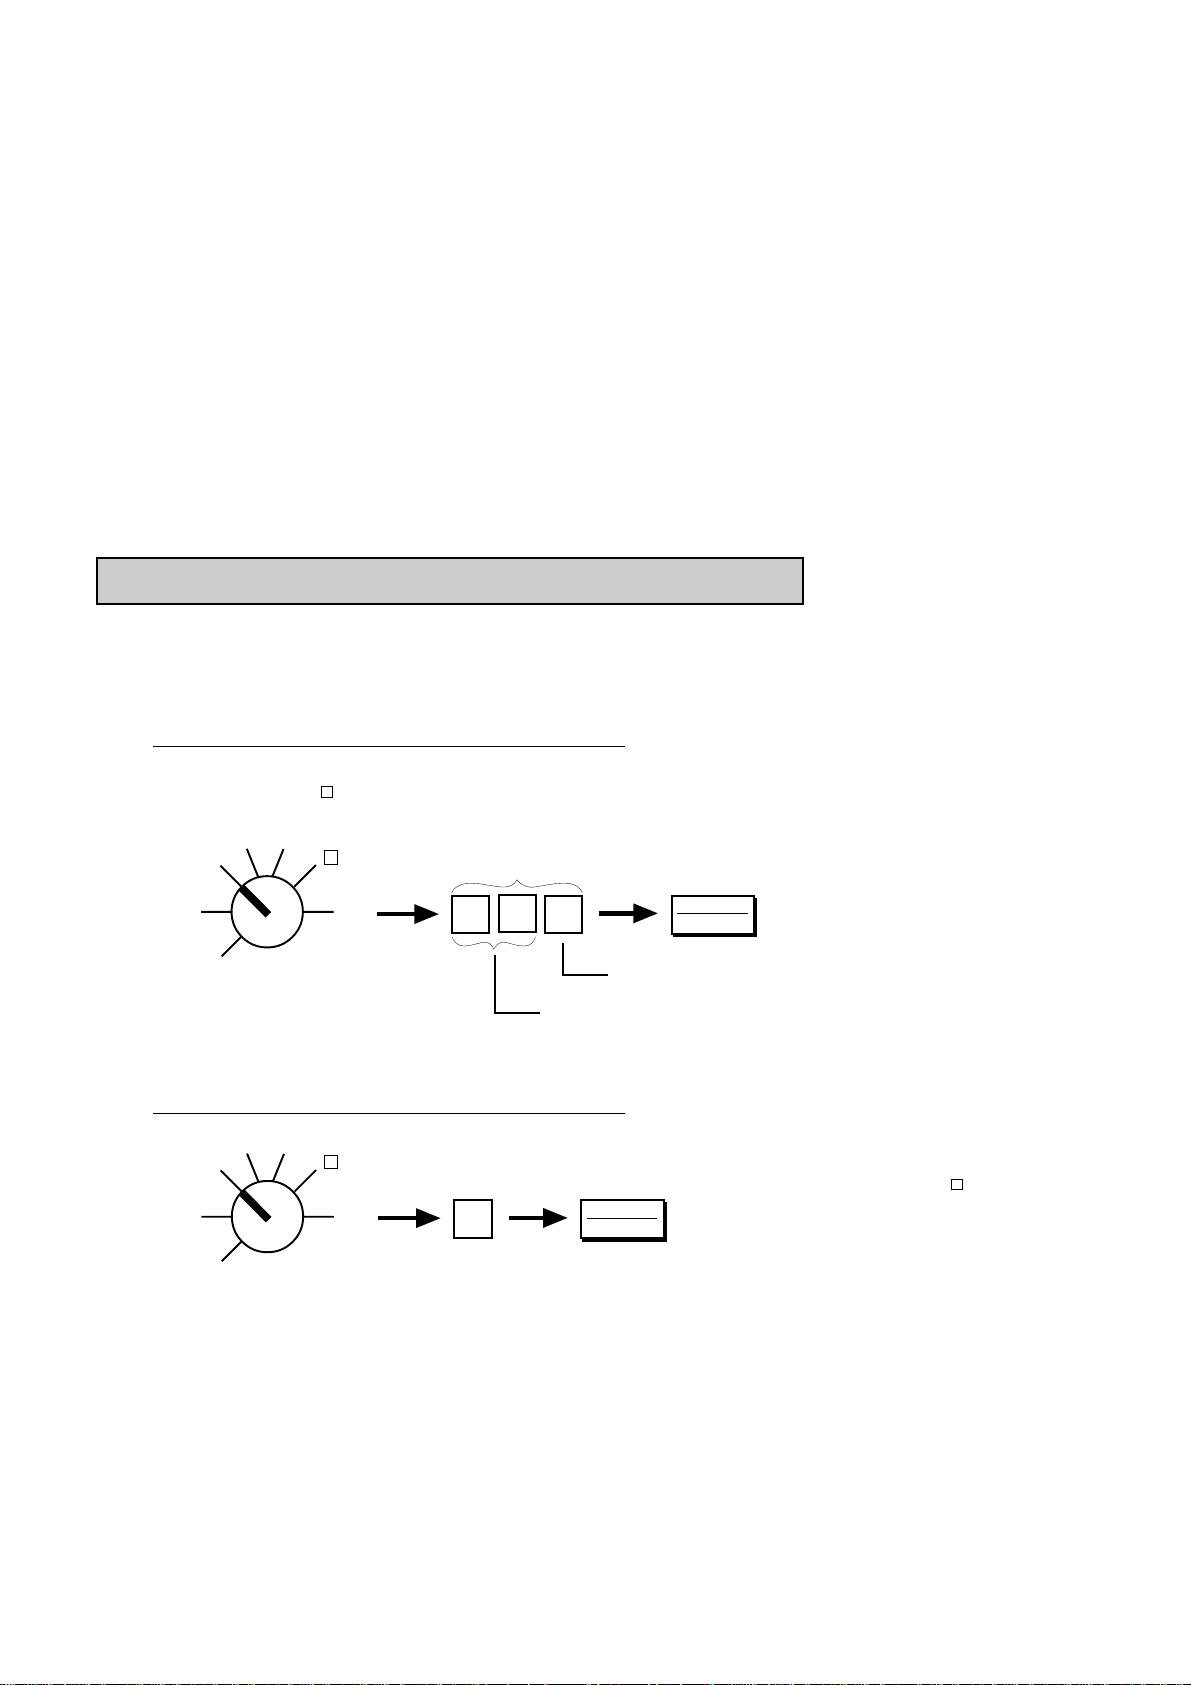
3
Install the Ribbon Cassette as shown in the figure.
After installing the Ribbon Cassette, turn the knob
of the Ribbon Cassette in the direction of the arrow mark several times to remove the slack on
the ribbon.
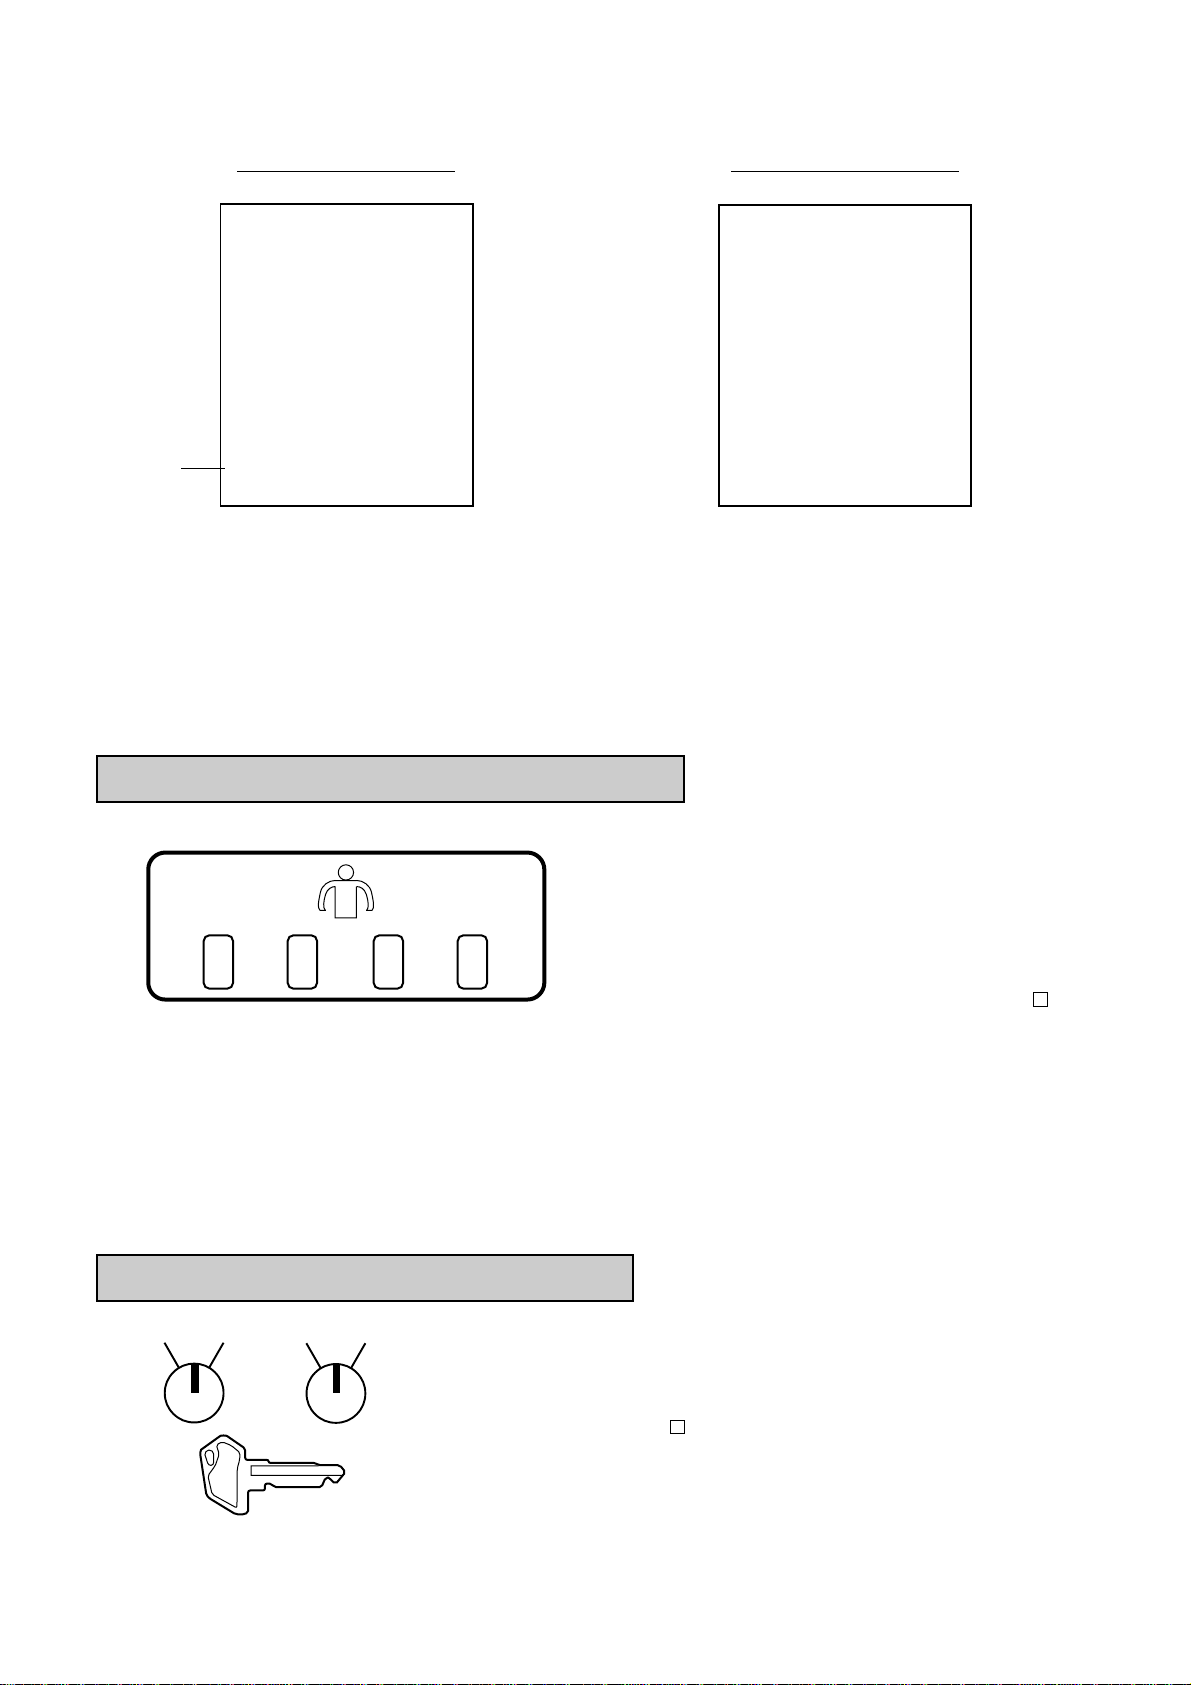
4
Attach the Printer Cover.
- 15 -
Page 23
10.Daily Operation Flow
The following shows a typical daily operation flow on the register.
MA-1350-1 SERIES
EO1-11126
Before Opening the Store ...
During Business Hours ...
• Ensure that the register is firmly
plugged in the wall outlet.
• Check if enough portion of paper roll is
left.
• Check the time, date, and print condition.
Check the time, date, and print by
issuing a No-sale Receipt. ...
Setting the time or date ...
Opening the store
• Transaction entries on the register
Reference
Chapter
3 (O/G)
8 (O/G)
13 (O/G)
4 (M/G)
13 (O/G)
1 (M/G)
2 (M/G)
After Closing the Store ...
• Taking Read (X) Reports periodically.
Closing the store
• Taking Daily Reset (Z) Reports
• Tear off the print portion of Journal Paper (optional).
• Leave the drawer open, and turn the
Control Lock to “OFF”. However, even
in this position, the power is being supplied.
• Take all the cash and other contents
from the drawer to the office with the
torn Journal and printed Reset Reports.
3 (M/G)
3 (M/G)
14 (O/G)
14 (O/G)
14 (O/G)
“O/G” indicates Operator’s Guide, and
“M/G” Manager’s Guide.
- 16 -
Page 24
MA-1350-1 SERIES
EO1-11126
11. Cashier Identifying Operation
The register requires the cashier identifying operation for starting sales entries in initial status. However, the program option allows you to operate the register without the cashier identifying operation. For details, ask your
TOSHIBA TEC representative.
The MA-1350-1 adopts one of the following cashier-identifying methods.
1) Signing Method, using the [LOG/RECEIPT] key
2) Cashier Key Method, using the Push LED Key
3) Cashier Key Method, using the Barrel Lock
4) Cashier Key Method, using the [CLK] key installed on the keyboard
Method 1) is the standard feature. To changed the cashier-identifying method from 1) to 2) or 3), appropriate
program option selection is necessary as well as hardware option. (Ask your TOSHIBA TEC representative.)
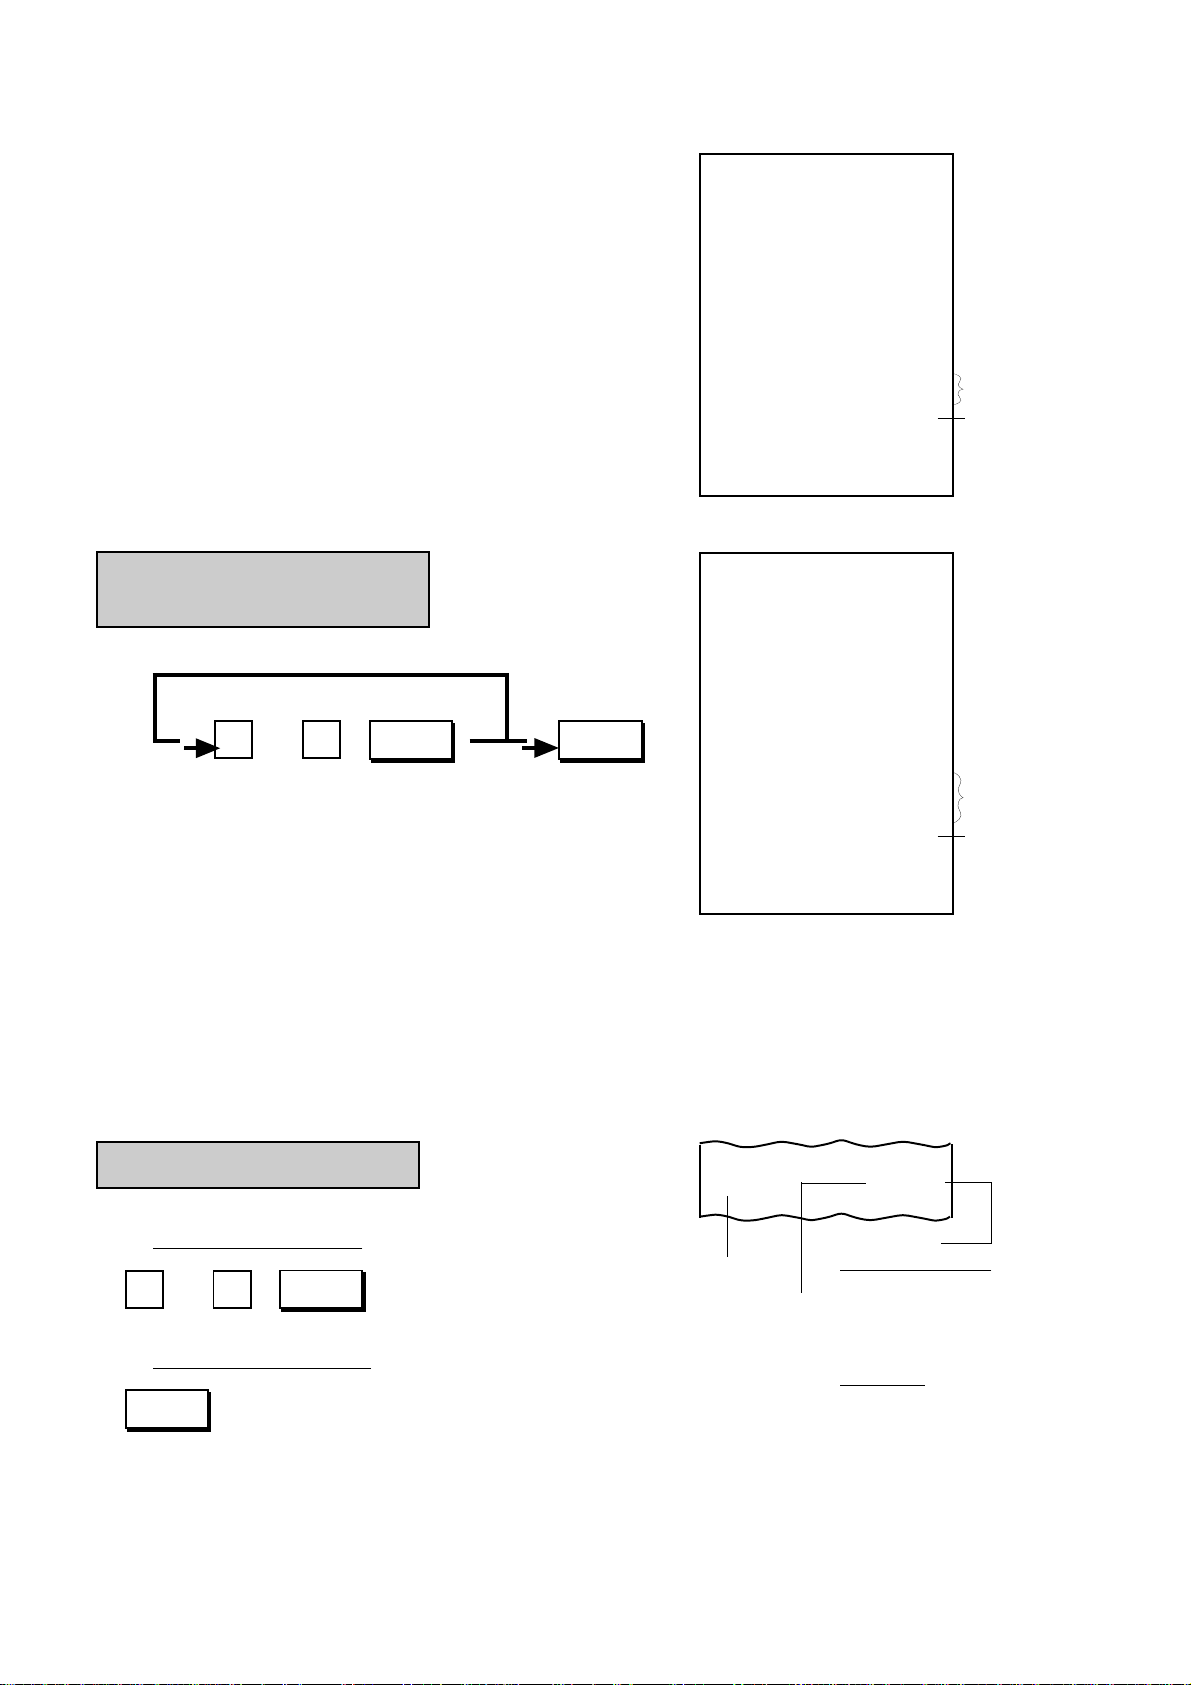
1) Signing Method Cashier Sign ON & Sign OFF
A cashier needs to “sign ON” for starting transaction entries on the register and identifying the operator. The
signed-ON condition is held until a “sign OFF” is operated. A cashier can sign ON only when the register is in
the signed-OFF condition. A maximum of 8 cashiers can be controlled in the signing method.
Sign ON (operable in signed-OFF condition)
Use the REG Key to turn the Control Lock to the REG
position. (or to MGR or - using the MGR or MA key for
operation by manager)
MGR
REG
OFF
X
-
Z
The code being entered is
not displayed.
SET
Secret Code generated by the cashier
(2 digits; any number from 01 to 99)
See NOTE on the next page.
Sign OFF (operable in signed-ON condition)
MGR
X
REG
OFF
SET
-
Z
0
LOG
RECEIPT
The “SIGN ON” lamp illuminates, and a sign ON
receipt is issued.
.
.
.
LOG
RECEIPT
Cashier Code assigned to each cashier by the store (1 digit; 1 to 8)
No operation in REG, MGR or - mode will be allowed until a sign ON is operated by a cashier. (Op-
. . .
.
erations in X, Z, or SET are possible even in this
.
condition.)
.
Transaction entries
. . .
are now possible.
.
The “SIGN ON” lamp is
extinguished, and a sign
OFF receipt is issued.
- 17 -
Page 25
Sign ON Receipt Format Sign OFF Receipt Format
MA-1350-1 SERIES
EO1-11126
Name of a
cashier who
has just signed
ON is printed if
the name has
been programmed. If
not, a cashier
symbol such
as “3CL” is
printed here.
TEC STORE
1343 PEACH DRIVE
PHONE: 87-6437
Open 8:00am to 7:00pm
Closed: every Wednesday
11-28-1997 #112300
∗
SIGN ON
JONES 0117 08:46TM
∗
TEC STORE
1343 PEACH DRIVE
PHONE: 87-6437
Open 8:00am to 7:00pm
Closed: every Wednesday
11-28-1997 #112300
∗
SIGN OFF
JONES 0118 08:46TM
∗
NOTES: 1. The two-digit Secret Code portion, once entered for a cashier’s Sign ON, is set in the memory
of the register. The Secret Code of the same cashier is checked every time his/her Sign ON
is operated until the Daily Cashier Reset Report is taken at the end of the day. Then the
Secret Code is reset and a new Secret Code entry will be allowed. When the Secret Code is
within the range of 01 to 09, it will be omissible to enter the preceding zero.
2. The multi-drawer feature can be adopted on this cashier-identifying method. In this case,
Drawer 1 is assigned to cashiers 1 and 2, and Drawer 2 to cashiers 3 to 8.
2) Cashier Key Method (Push LED Key)
Each Cashier key (1 to 4) is assigned to each cashier. Push the assigned cashier key, and the built-in
light becomes lit, indicating that the key is ON to
identify the cashier. The ON status of the key will be
1432
held until another cashier key is pushed.
Sales entries will be possible only when one of these
key is in the ON status (in “REG”, “MGR”, or “ - ”
mode).
The Key’s ON status will not be cleared even when the Mode Lock is turned to other positions.
NOTES: 1. No receipts are issued on turning ON or OFF a Cashier Key. However, the cashier code (1 to
4) or cashier name is printed near the bottom of every receipt to be issued.
2. The multi-drawer feature can be adopted on this cashier-identifying method. In this case,
Drawer 1 is assigned to cashiers 1 and 2, and Drawer 2 to cashiers 3 and 4.
3) Cashier Key Method (Barrel Lock)
1•2
1
3•4
This method is applied when two barrel locks are installed as cashier
locks. A maximum of 4 cashiers can be identified in this method.
Each key (1 to 4) is assigned to each cashier. The register will not operate in the REG, MGR, or - mode unless one of these keys is inserted
and turned to the position (1 to 4) corresponding to the Cashier Key No.
Each of the keys may be inserted and pulled out in the neutral position
marked with a dot. When the operating cashier changes to another, the
first Cashier Key must be pulled out before inserting another Cashier
Key.Cashier Keys 1 to 4
- 18 -
Page 26
MA-1350-1 SERIES
NOTES: 1. No receipts are issued on turning ON or OFF a Cashier Key. However, the Cashier Code (1
to 4) is printed near the bottom of every receipt to be issued.
2. The multi-drawer feature can be adopted on this cashier-identifying method. In this case,
Drawer 1 is assigned to cashiers 1 and 2, and Drawer 2 to cashiers 3 and 4.
EO1-11126
4) Cashier Key Method ([CLK] Key)
A maximum of 8 cashier keys ([CLK 1] to [CLK 8]) can be installed on the keyboard.
Sale entries will be possible only when one of the [CLK] keys is depressed (in “REG”, “MGR”, or “ - ” mode).
When the same [CLK] key is again depressed, the cashier will go in Cashier OFF status.
NOTES: 1. No receipts are issued on turning ON or OFF a Cashier Key. However, the cashier code (1 to
8) or cashier name is printed near the bottom of every receipt to be issued.
2. When adopting this cashier-identifying method, it is recommended to select the program
option to display cashier code instead of department code. (Ask your TOSHIBA TEC representative.)
3. The multi-drawer feature can be adopted on this cashier-identifying method. In this case,
Drawer 1 is assigned to cashiers 1 and 2, and Drawer 2 to cashiers 3 to 8.
Cashier Reports
By adopting the Cashier Identifying option, Daily Cashier Read and Reset Reports (for individual cashiers)
and Periodical Cashier Read and Reset Reports (for all the cashiers together in one report) are available. For
the report taking operations and print format, see Chapter 3 on page 4 in Manager’s Guide.
12.Training
This chapter describes a training provided for new employed cashiers. After entering the training mode, a cashier may operate the same transaction entries as those in the REG mode. The data in the training mode is not
processed, therefore not affect any actual sales data in business.
• Turn the Control Lock to the SET position using the MA key.
• In the operation patterns, indicates an input through a numeric key, and indicates a depression
of a transaction key.
Operation for Training Mode Start
ST99
................................A training start receipt is issued.
- 19 -
Page 27
MA-1350-1 SERIES
EO1-11126
Entries in Training Mode
When the cashier identifying option is selected, a sign ON or cashier Key ON is required before starting operations. Refer to Chapter 11. Cashier Identifying Operation on page 17.
A trainee can operate all transaction entries described in the next chapter.
except: 1) The drawer will not open.
2) The consecutive No. will not be incremented.
3) Entried contents will not be printed on a validation slip.
When the cashier identifying option is selected, a sign OFF or cashier key OFF is required after completing
operations. Refer to Chapter 11. Cashier Identifying Operation on page 17.
Operation for Training Mode End
ST99
................................A training end receipt is issued.
Training Start Receipt – – – – – – – – – – – – – – – – – – – – – – – – – –
TEC STORE
1343 PEACH DRIVE
PHONE: 87-6437
Open 8:00am to 7:00pm
Closed: every Wednesday
11-28-1997 #112300
∗
TRAINING
ON
0118 09:20TM
Training Mode Symbol
∗
Receipt issued in Training Mode
TEC STORE
1343 PEACH DRIVE
PHONE: 87-6437
Open 8:00am to 7:00pm
Closed: every Wednesday
11-28-1997 #112300
∗
TRAINING
R/A 10.00
R/A 2.50
CASH 12.
∗
TRAINING
JONES 0118 09:21TM
∗
50
∗
Entry Contents
Training End Receipt
→
TEC STORE
1343 PEACH DRIVE
PHONE: 87-6437
Open 8:00am to 7:00pm
Closed: every Wednesday
11-28-1997 #112300
∗
TRAINING
OFF
0118 09:21TM
∗
- 20 -
Page 28
MA-1350-1 SERIES
13.Transaction Entries
This chapter describes individual key operations on transaction entries.
• Turn the Control Lock to the REG position using the REG key.
• In the operation patterns, indicates an input through a numeric key, and indicates a depression
of a transaction key.
WARNING!
When opening the cash drawer, be careful not to let the drawer hit any person.
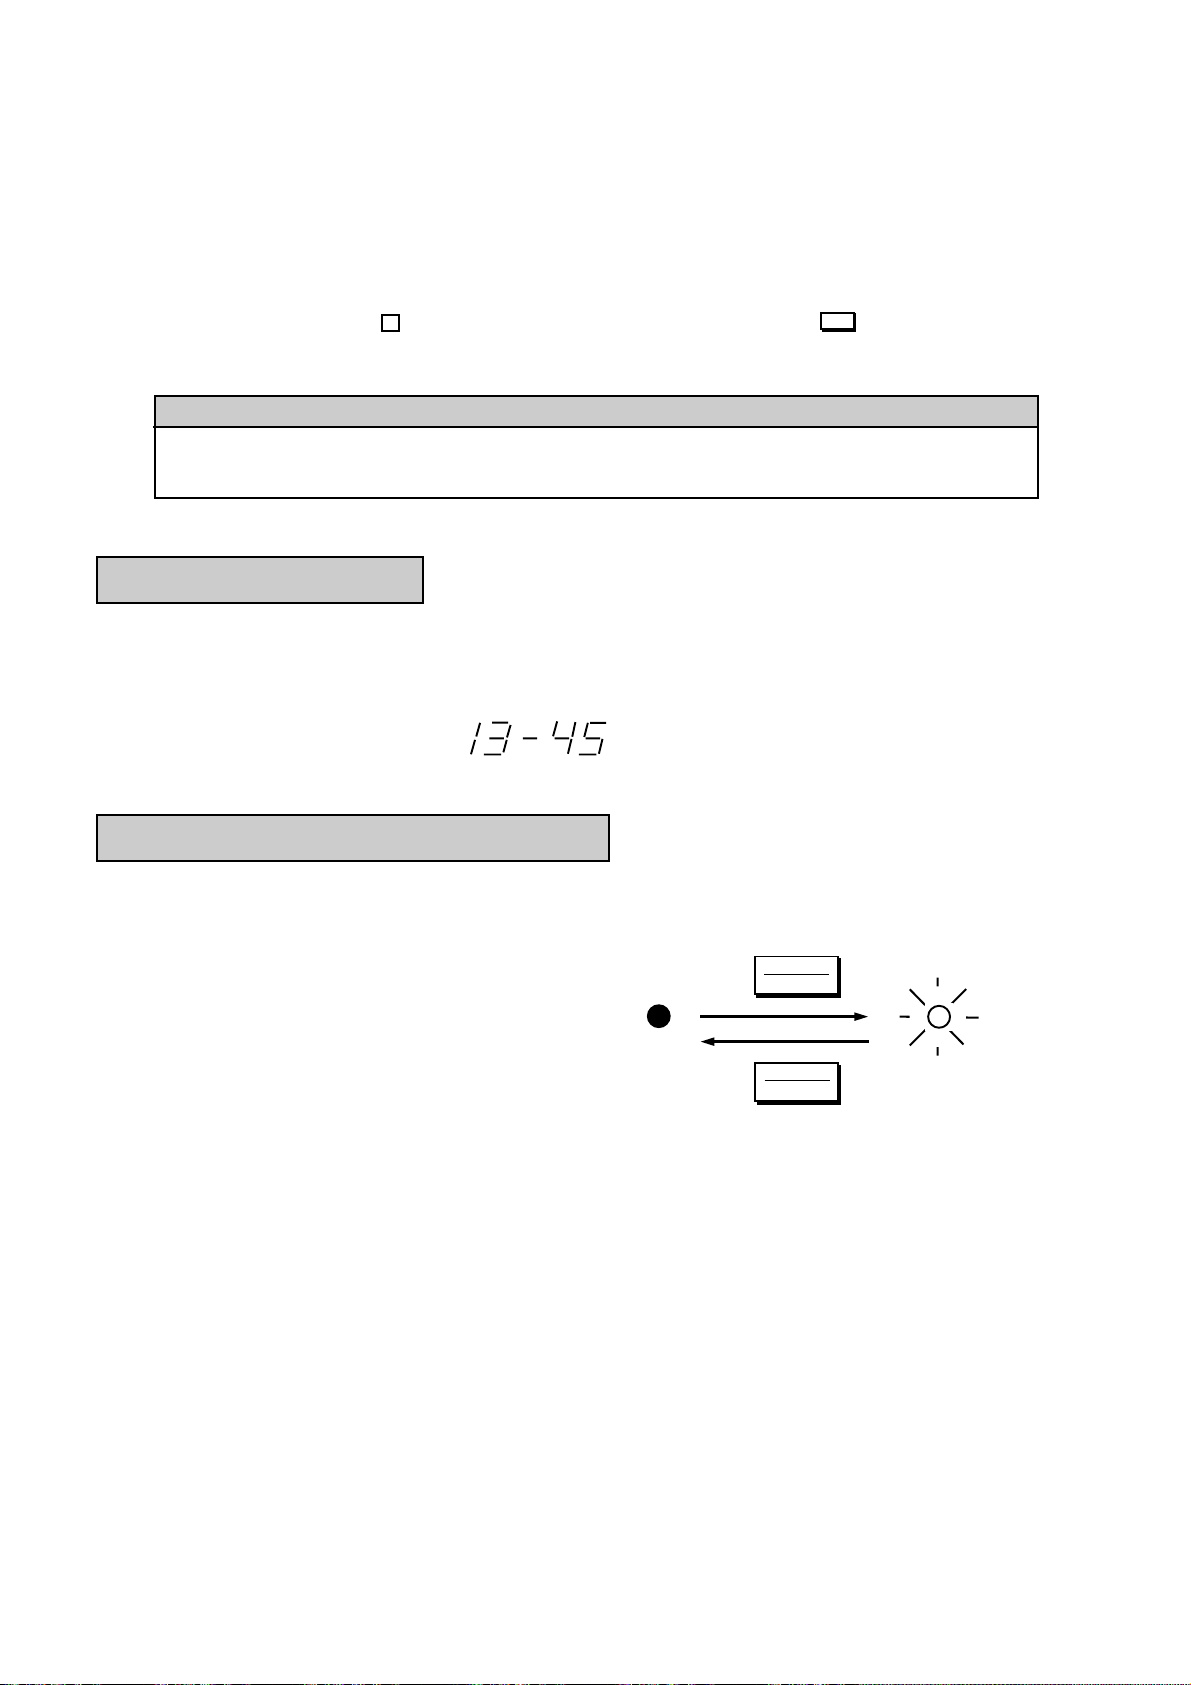
Displaying the Time
The current time is displayed in the “AMOUNT” area when the Control Lock is turned to REG from any other
position. When the Control Lock position is changed or any entry operation starts, the displayed time disappears.
EO1-11126
Time Display Format:
(Example: 1:45 p.m.)
Receipt-issue/Non-issue Selection
Receipts are issued or not issued according to the “R OFF” lamp illuminated/extinguished status on the Operator Display panel.
Control Lock may be in any position except OFF.
Extinguished Illuminated
Receipt ON status Receipt OFF status
......
NOTES: 1. The Control Lock may be in any position (except OFF position) for changing the Receipt ON/
OFF status.
2. The “R OFF” lamp status at the starting of a transaction entry decides whether a receipt will
be issued for the transaction or not. Switching the Receipt ON/OFF status during a transaction will not be effective.
3.
If a transaction is entered with the “R OFF” lamp illuminated and finalized but a receipt is
required, the [RECEIPT ISSUE] key can be operated to issue a receipt. (Refer to “Post-
issue Receipt” on page 40.)
LOG
RECEIPT
LOG
RECEIPT
......
- 21 -
Page 29
MA-1350-1 SERIES
Clearing Errors, or Clearing Wrong
Declaration Key or Wrong Numeric Entries
When in sale entries an error has occurred with an alarm buzzer, a wrong declaration key has been depressed and/or a wrong numeric data has been entered;
EO1-11126
Depress the key to cancel the error condition or the entered data.
C
For details for clearing the error, refer to Chapter 16. Troubleshooting on page 53.
No-sale (Exchange)
<operable outside a sale only>
#/NS
(or )
............................. The drawer opens.
NS
Date
Cashier Name
TEC STORE
1343 PEACH DRIVE
PHONE: 87-6437
Open 8:00am to 7:00pm
Closed: every Wednesday
11-28-1997 #112300
∗
NO SALE
JONES 0123 08:45TM
Max. 4 lines of Store
Message (In initial setting, this area is provided for the Store
Name Stamp)
Max. 3 lines of Commercial Message
Register No.
No-sale Symbol
∗
Time
Receipt Consecutive No.
NOTE: Usually, Non-add Number entries are prohibited at the starting of a No-sale transaction (i.e. Non-
add Numbers cannot be printed on a No-sale receipt). However, a No-sale entry can be programmed to be allowable after a Non-add Number entry (ask your TOSHIBA TEC representative).
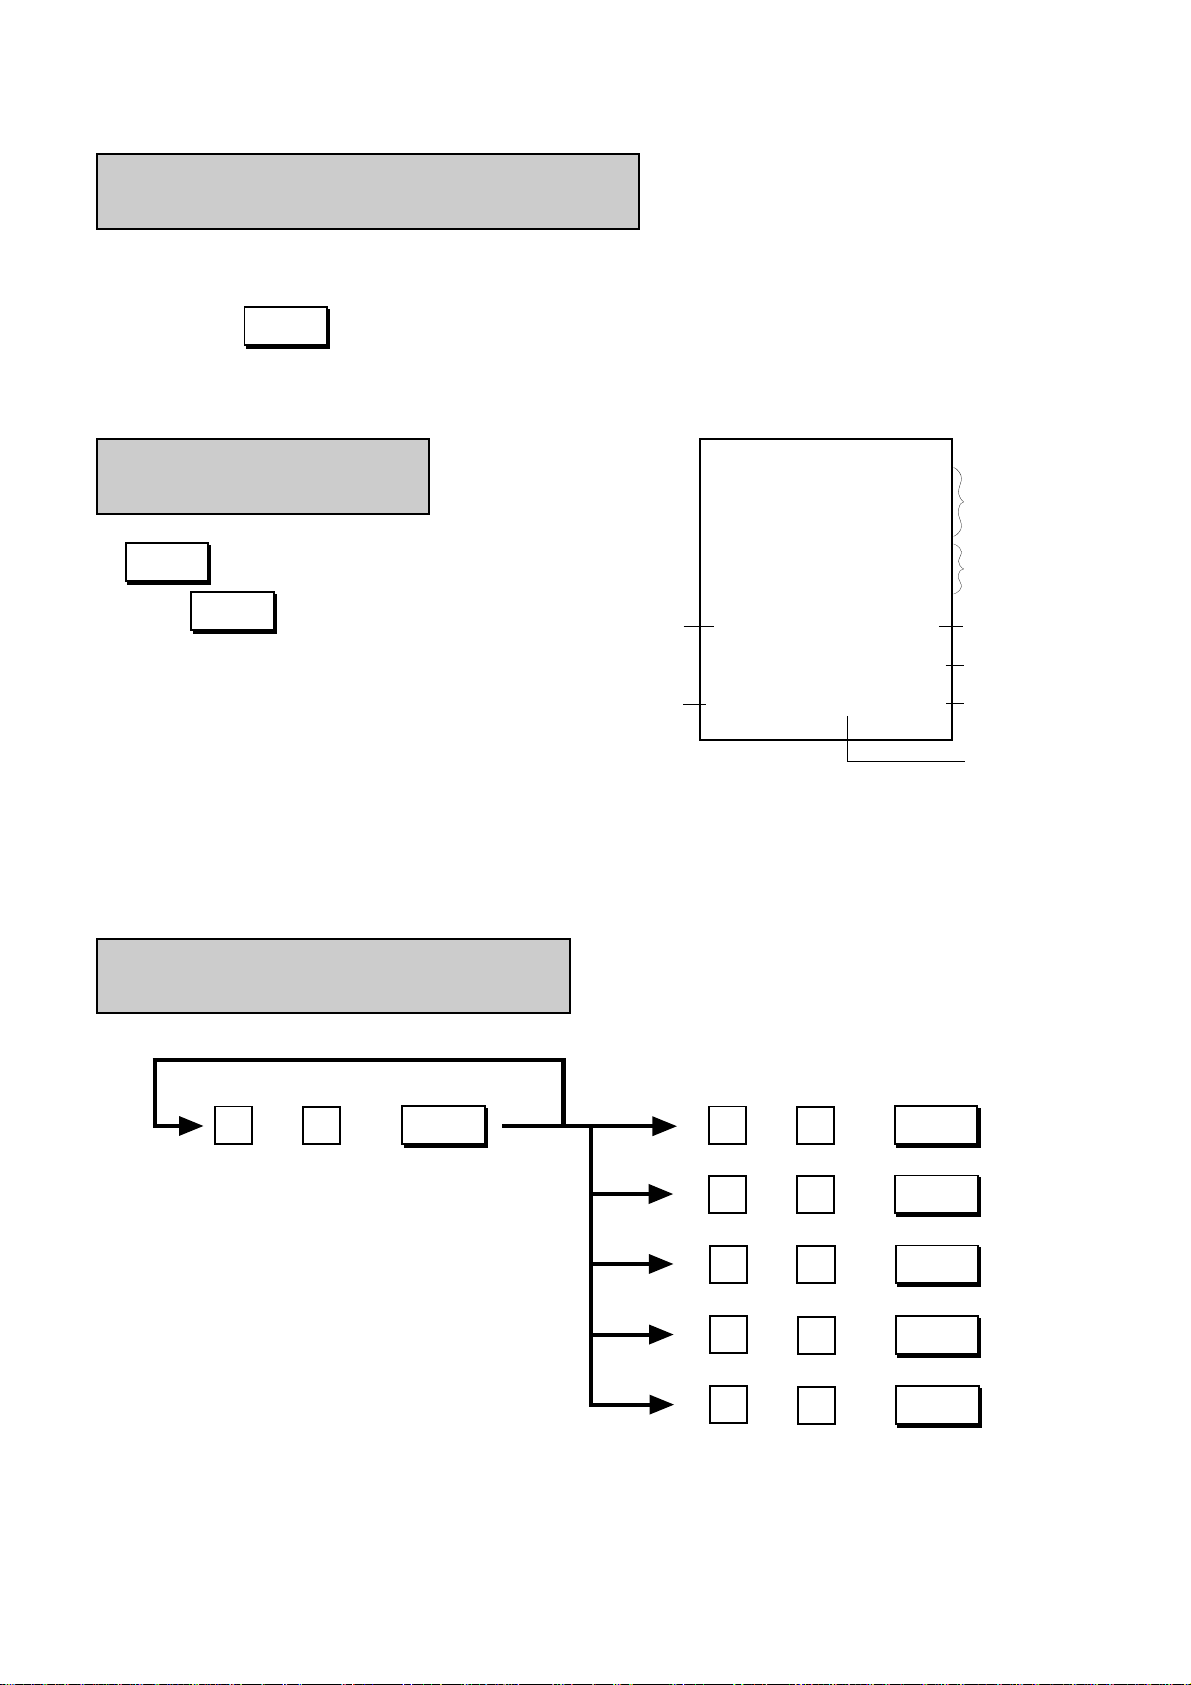
Received-on-Account Payment
<operable outside a sale only>
Repeat if multiple amounts are received.
R/A AT/TL()
Payment Amount Received
(max. 7 digits)
. . .. . .
Total Amount tendered in cash
()
. . .
CHECK
TEND
Total Amount tendered in check
()
. . .
CPN
Total Amount tendered in media-coupon
()
. . .
MISC
Total Amount tendered in miscellaneous media
()
. . .
chg
Total Amount tendered in charge
- 22 -
Page 30
NOTE: As initial setting, all the media keys shown
on the preceding page except the [chg]
key can be used in the Received-onAccount transaction.
MA-1350-1 SERIES
EO1-11126
TEC STORE
1343 PEACH DRIVE
PHONE: 87-6437
Open 8:00am to 7:00pm
Closed: every Wednesday
11-28-1997 #112300
Individual
Amount (cash)
Total Amount
received in cash
Individual Paidout Amounts
Total Amount
Paid-out
Paid Out
<operable outside a sale only>
Repeat if multiple amounts are paid out.
. . .
PO AT/TL
R/A 10.00
R/A 2.50
CASH 12.
JONES 0127 09:12TM
TEC STORE
1343 PEACH DRIVE
PHONE: 87-6437
Open 8:00am to 7:00pm
Closed: every Wednesday
11-28-1997 #112300
PO 3.00
PO 2.00
PO 1.50
TOTAL 6.
JONES 0128 09:22TM
50
50
NOTES: 1. For finalizing the transaction, only the [AT/TL] key can be used. (i.e. only cash can be paid
out)
2. Paid Out transaction can be programmed to require the MGR position of the Control Lock. If
so programmed, an error will occur on depressing the [PO] key in the REG position. In this
case, ask the store manager to turn the Control Lock to the MGR position for the transaction.
(Refer to the chapter 1. Operations in “MGR” Mode on page 1 in Manager’s Guide.)
Department Entries
1) Entry of One Item:
Open-price Department
. . .
Price; Max. 7 digits
Preset-price Department
Dept.
Dept.
- 23 -
MEAT 7.00 TF
Department Name
Entered Price
(or preset price)
Status Symbol
For the United States
T: Taxable
F: Food Stampable
TF: Taxable and Food Stampable
Blank: Not applicable to any of
the above status
For Canada
F: GST Taxable
P: PST Taxable
FP: GST and PST Taxable
Blank: Not applicable to any of
the above status
Page 31

MA-1350-1 SERIES
EO1-11126
NOTE: Entry of a negative department can be programmed to require the MGR position of the Control Lock. If
so programmed, an error will occur on entering the negative department in the REG position. In this
case, ask the store manager to turn the Control Lock to the MGR position for the entry. (Refer to the
chapter 1. Operations in “MGR” Mode on page 1 in Manager’s Guide.).
2) Repeat Entry
Open-price Department
. . .
Price; Max. 7 digits
Dept.
Dept.
Same Department key
MEAT 7.00 TF
MEAT 7.00 TF
Preset-price Department
Dept.
Dept.
Same Department key
NOTE: A negative department cannot be repeated.
3) Quantity Extension (Multiplication)
Open-price Department
. . .
Quantity
@/FOR
. . .
Unit Price
Max. 6 digits
Dept.
Preset-price Department
. . .
Quantity
@/FOR
Dept.
Quantity
Department Name
12X 0.50 @
FISH 6.00 TF
Unit Price
Product
NOTES: 1. Quantity... Max. 6 digits (Max. 3 digits for integer + max. 3 digits for decimal. Use the [ . ] key
if a decimal portion is contained.)
Unit Price ... Max. 6 digits
Product (result of multiplication) ... Must not exceed 7 digits.
2. When the Quantity is 1-digit integer (1 to 9) and a Preset-price Department key follows, the
[@/FOR] key is omissible.
3. The decimal portion of the Quantity entry is processed down to the 2 digits below the decimal
point. The fraction rounding at this time is fixed to ROUND OFF.
4. You can select the rounding process of the fractions of the product —ROUND OFF (initial
setting), ROUND UP, or ROUND DOWN. (Ask your TOSHIBA TEC representative.)
- 24 -
Page 32

4) Department SPP (Split-Package-Pricing)
This operation is used when a customer purchases only part but not all of the items in a package
(example: only two tomatoes in a priced package of three tomatoes.)
Open-price Department
MA-1350-1 SERIES
EO1-11126
@/FOR
Purchased Qty
Department Name Whole Package Price
Purchased Qty
@/FOR
Whole Package Qty
NOTES: 1. Purchased Qty ··· Max. 3 digits (integer only)
Whole Package Qty ··· Max. 3 digits (integer only)
Whole Package Price ··· Max. 6 digits
Product (result of SPP) ··· Must not exceed 7 digits.
2. You can select the rounding process of the fractions of the product - ROUND UP PRODUCT
(initial setting), or ROUND UP ITEM PRICE. (Ask your TOSHIBA TEC representative.)
. . .
Whole Package
Price
Preset-price Department
Dept.
The preset price is regarded
as the Whole Package price
3X 7.00/ 2
MEAT 10.50 TF
Dept.
Whole Package Qty
Product
5) Single-item Department Entry
TEC STORE
If a Department key is programmed with single-item
status, an entry through the key immediately finalizes
the sale as cash without operating a Media key.
The operation is the same as ordinary itemized De-
1343 PEACH DRIVE
PHONE: 87-6437
Open 8:00am to 7:00pm
Closed: every Wednesday
partment keys already described (Entry of One Item,
Quantity Extension, Department SPP).
NOTE: A sale item entry through this key will
automatically finalize the sale as cash
outside a sale (i. e. when no other items
have been entered within one receipt
11-28-1997 #112300
DP
05 2.00-
CASH 2.00-
JONES 0138 10:07TM
sequence). However, it will function just as
an Itemized Key if operated inside a sale.
6) Other Income Department Entry
Department key with other income status programmed is used to enter items which do not directly become
sales for the store, such as lottery, postage, gift wrapping fee, size adjustment fee, utility (payment of electricity and gas), and donation. The operation is the same as ordinary Department keys already described.
- 25 -
Page 33

MA-1350-1 SERIES
EO1-11126
PLU Entries
Entered Price (or preset price)
1) Entry of One Item:
Preset-price PLU
PLU Name
Pork 2.00 TF
PLU
PLU Code; Max.
4 digits 1 to 9999
PLU Preset-
Code Key
Open-price PLU
PLU Code; Max.
4 digits 1 to 9999
. . .
Unit Price;
Max. 7 digits
PLU
PLU Preset-
Code Key
. . .
Unit Price; Max. 7 digits
AMT
Status Symbol
For the United States
T: Taxable
F: Food Stampable
TF: Taxable and Food Stampable
Blank: Not applicable to any of
the above status
For Canada
F: GST Taxable
P: PST Taxable
FP: GST and PST Taxable
Blank: Not applicable to any of
the above status
NOTE: [PLU Preset-code Key] can be provided on the ECR keyboard and/or the PK-2 keyboard (hard-
ware option; PLU Keyboard).
2) Repeat Entry
Preset-price PLU
PLU
To repeat
PLU Code; Max.
4 digits 1 to 9999
PLU Preset-
Code Key
PLU
PLU Preset-
Code Key
To repeat
Open-price PLU
. . .
Unit Price
PLU Preset-
Code Key
To repeat
PLU Code
. . .
Unit Price
PLU
PLU Preset-
Code Key
NOTE: A negative PLU entry cannot be repeated.
Pork 2.00 TF
Pork 2.00 TF
AMT
To repeat
AMT
- 26 -
Page 34

3) Quantity Extension (Multiplication)
Preset-price PLU
MA-1350-1 SERIES
EO1-11126
. . .
Quantity;
Max. 6 digits
. . .
Quantity;
Max. 6 digits
@/FOR
@/FOR
PLU Code
PLU Preset-
Code Key
PLU
Quantity
4X 0.80 @
Coke-A 3.20 T
PLU Name
Unit Price
Product
Open-price PLU
PLU Code
. . .
Quantity
PLU
@/FOR
Quantity
. . .
Unit Price
. . .
@/FOR
PLU Preset-
Code Key
. . .
Unit Price
AMT
NOTES: 1. Quantity... Max. 6 digits (Max. 3 digits for integer + max. 3 digits for decimal. Use the [ . ] key
if a decimal portion is contained.)
Unit Price ... Max. 6 digits
Product (result of multiplication) ... Must not exceed 7 digits.
2. The decimal portion of the Quantity entry is processed down to the 2 digits below the decimal
point. The fraction rounding at this time is fixed to ROUND OFF.
3. You can select the rounding process of the fractions of the product —ROUND OFF (initial
setting), ROUND UP, or ROUND DOWN. (Ask your TOSHIBA TEC representative.)
4) PLU SPP (Split-Package-Pricing)
This operation is used when a customer purchases only part but not all of the items in a package
(example; only two tomatoes in a priced package of three tomatoes.)
(Also, refer to “Department SPP”
on page 25 already described.)
Open-price PLU of SPP Type
. . .
Whole Package
Price
Purchased Qty
@/FOR
PLU Code max.
4 digits; 1 to 9999
. . .
Whole Package
Price
PLU
PLU Preset-
Code Key
Preset-price PLU of SPP Type
PLU
PLU Code max.
4 digits; 1 to 9999
PLU Preset-
Code Key
(The preset price is regarded as the Whole
Package Price.)
AMT
- 27 -
Page 35

MA-1350-1 SERIES
EO1-11126
Purchased Qty
NOTES: 1. Purchased Qty ... Max. 3 digits (integer only)
Whole Package Price ... Max. 6 digits
Product (result of SPP) ... Must not exceed 7 digits.
You can select the rounding process of the fractions of the product - ROUND UP PRODUCT
(initial setting), or ROUND UP ITEM PRICE. (Ask your TOSHIBA TEC representative.)
2. PLU SPP is possible only using the PLUs of SPP Type (i.e. programmed with Whole Package Quantity).
5) Single-item PLU Entry
If a Department key is programmed with Single-item
Status, an entry through a PLU which links to the
Department immediately finalizes the sale as cash
without operating a Media key.
The operation is the same as ordinary Itemized PLU
entries already described (Entry of One Item, Quantity Extension, PLU SPP).
5X 1.50/ 3
Bun-B 2.50 T
PLU Name Whole Package Price
TEC STORE
1343 PEACH DRIVE
PHONE: 87-6437
Open 8:00am to 7:00pm
Closed: every Wednesday
11-28-1997 #112300
PLU500 0.50CASH 0.50-
Whole Package Qty
Product
JONES 0142 10:45TM
PLU Price Shift Entry
Depressing the [PRICE SHIFT] key designates a PLU item, adding the printed number (1 to 3) to an entered
PLU code.
PRICE
SHIFT 1
PRICE
SHIFT 2
PRICE
SHIFT 3
Example) When the PLU Code 200 is designated after the [PRICE SHIFT 2] is depressed,
NOTES: 1. Depressing the [C] key immediately after the [PRICE SHIFT] key results in the cancellation
PLU Entry .......................(To enter a PLU item of the entered code plus 1)
PLU Entry .......................(To enter a PLU item of the entered code plus 2)
PLU Entry .......................(To enter a PLU item of the entered code plus 3)
this sales transaction will result in the sales item entry of the PLU Code 202.
of the PLU Price Shift Entry.
2. The [PRICE SHIFT] key can be depressed any number of times before the PLU Entry. The
last depressed [PRICE SHIFT] key becomes effective.
3. The current PLU Shift No. declared by each [PRICE SHIFT] key can be displayed instead of
Department Code by the program option.
- 28 -
Page 36

MA-1350-1 SERIES
EO1-11126
Preset Price Open
When an open price must be entered through a Preset-price Department, use the [PR OPEN] (or [OPEN])
key to release the preset-price status temporarily.
Depress (or ) prior to or any time during the entry sequence of the following opera-
PR
OPEN
OPEN
tions:
Entry of One Department Item
Department Quantity Extension
Department SPP
Other Income Department Entry
Single-item Department Entry
NOTES: 1. A price entry by Preset Price Open cannot be repeated.
2. The Preset Price Open entry is not possible for any PLUs.
Listing Capacity Open
When an item entry price exceeds the Listing Capacity (programmed for each department) in sale entries,
use the [LC OPEN] (or [OPEN]) key to release the Listing Capacity. The Listing Capacity for the department
or PLU will be exceeded with two higher digits for that entry only. (If a price of further high digits must be entered, call for Manager Intervention. Refer to the chapter 1. Operations in “MGR” Mode on page 1 in
Manager’s Guide.)
Depress (or ) prior to or any time (before the final key at the latest) during the entry
LC
OPEN
OPEN
sequence of the following operations:
Entry of One Department Item
Department Repeat Entry
(NOTE)
Department Quantity Extension
Department SPP
Single-item Department Entry
Other Income Department Entry
Entry of One PLU Item
PLU Repeat Entry
(NOTE)
PLU Quantity Extension
PLU SPP
Single-item PLU Entry
NOTE: When the [OPEN] key is used instead of [LC OPEN], a repeat entry is not possible (because the
[PR OPEN] key function also becomes effective).
- 29 -
Page 37

Percent Discount, Percent Charge
MA-1350-1 SERIES
EO1-11126
Department or (or ) .................................... for the Preset Rate
%-
%+
PLU Item Entry
Positive Previous (or )..........for the Manual Rate
Balance Entry
(debit balance on customer)
Sale Item (or ) .............................. for the Preset Rate
Sale Item (or ) .............................. for the Preset Rate
Entries
Entries
ST
. . .
Manual Rate
%-
. . .
Manual Rate
%-
DRINK 6.00 T
% 5% 0.30-
%+
%+
%-
SUBTL 15.00
%+
10% 1.50
(or ) .... for the Manual Rate
(or ) .... for the Manual Rate
%+
Dep 3 (DRINK) $6.00
5% on $6.00 = $0.30 is dis-
counted.
Subtotal $15.00 obtained
10% on $15.00 = $1.50 is
added.
NOTES: 1. Manual Rate... Max. 5 digits (Max. 2 digits for integer + max. 3 digits for decimal. Use the [ . ]
key if a decimal portion is contained.)
2. When a rate is manually entered through a % key preset with a rate, the manual rate prevails.
3. A % entry will cause an error if operated after a Negative Department entry or an Other
Income Department entry.
4. A % entry after obtaining a Subtotal is usually allowed only once. However, it can be programmed to allow multiple times. (Ask your TOSHIBA TEC representative.)
5. You can select the rounding process of the fractions of the product (result of % calculation) —
ROUND OFF (initial setting), ROUND UP, or ROUND DOWN. (Ask your TOSHIBA TEC
representative.)
6. Each of the % keys has its own Tax (PST) Status, GST Status, and Food Stamp Status
programmed. Refer to “Tax Status Modification” (page 40) and “Food Stamp Modifica-
tion” (page 41) for reversing the status.
7. Percent Discount can be programmed to require the MGR position of the Control Lock. If so
programmed, an error will occur on depressing the [%-] key in the REG position. In this case,
ask the store manager to turn the Control Lock to the MGR position for the entry. (Refer to
the chapter 1. Operations in “MGR” Mode on page 1 in Manager’s Guide.)
Dollar Discount
DISC 0.40-
An amount of $0.40 is
entered as Dollar Discount
Sale Item Entries
()
ST
Amount to be
discounted (max. 7 digits)
. . .
DOLL
DISC
- 30 -
Page 38

MA-1350-1 SERIES
EO1-11126
NOTES: 1. For entering a Dollar Discount that will cause the sale total into negative (credit balance), one
of the following can be selected (ask your TOSHIBA TEC representative):
If status “Credit Balance Prohibited” (initial status) is selected:
Over-subtraction of the sale total by Dollar Discount causes an error.
If status “Credit Balance Allowed” is selected:
Over-subtraction of the sale total by Dollar Discount is possible.
2. The [DOLL DISC] key has its own Tax (PST) Status, GST Status, and Food Stamp Status
programmed. Refer to “Tax Status Modification” (page 40) and “Food Stamp Modifica-
tion” (page 41) for reversing the status.
3. Dollar Discount can be programmed to require the MGR position of the Control Lock. If so
programmed, an error will occur on depressing the [DOLL DISC] key in the REG position. In
this case, ask the store manager to turn the Control Lock to the MGR position for the entry.
(Refer to the chapter 1. Operations in “MGR” Mode on page 1 in Manager’s Guide.)
Vendor Coupon
Sale Item Entries
()
ST
Vendor Coupon
. . .
Amount
VND
CPN
V.CPN 1.00-
An amount of $1.00 is entered as Vendor Coupon.
NOTES: 1. For entering a Vendor Coupon amount that will cause the sale total into negative (Credit
Balance), one of the following can be selected (ask your TOSHIBA TEC representative):
If status “Credit Balance Prohibited” (initial status) is selected:
Over-subtraction of the sale total by Vendor Coupon causes an error.
If status “Credit Balance Allowed” is selected:
Over-subtraction of the sale total by Vendor Coupon is possible.
2. The [VND CPN] key has its own Tax (PST) Status, GST Status, and Food Stamp Status
programmed. Refer to “Tax Status Modification” (page 40) and “Food Stamp Modifica-
tion” (page 41) for reversing the status.
3. Vendor Coupon Entry can be programmed to require the MGR position of the Control Lock. If
so programmed, an error will occur on depressing the [VND CPN] key in the REG position. In
this case, ask the store manager to turn the Control Lock to the MGR position for the entry.
(Refer to the chapter 1. Operations in “MGR” Mode on page 1 in Manager’s Guide.)
4. When a limit amount has been programmed for the [VND CPN] key, an amount exceeding
the limit amount cannot be entered in the REG position. However, in the MGR or - position,
the limit amount programmed is ignored and max. 7-digit amount can be entered through the
[VND CPN] key.
Store Coupon
Depress prior to or any time during the entry sequence of the following operations for Open-price
NOTES: 1. The [STR CPN] key must be pressed, at the latest, before the final key of the required
STR
CPN
or Preset-price Departments already described:
Entry of One Department Item
Department Quantity Extension
Single-item Department Entry
NOTE 3
NOTE 2
Department entry sequence.
2. The Store Coupon amount must be entered inside a sale and must not exceed the sale total
unless the “Credit Balance Allowed” option is selected. (Ask your TOSHIBA TEC representative.)
3. Quantity Extension (multiplication) is permitted with this key, but no decimal quantity will be
accepted.
- 31 -
Page 39

MA-1350-1 SERIES
EO1-11126
4. None of PLUs, Negative Departments, Other Income Departments, Void, Returned Merchandise entries are possible along with the [STR CPN] key within one item.
5. The Store Coupon amount will subtract the Department Amount but will not affect the Department Item Count in the report memory.
6. The [STR CPN] key has its own Tax (PST) Status, GST Status, and Food Stamp Status
programmed. Refer to “Tax Status Modification” (page 40) and “Food Stamp Modifica-
tion” (page 41) for reversing the status.
7. Store Coupon Entry can be programmed to require the MGR position of the Control Lock. If
so programmed, an error will occur on depressing the [STR CPN] key in the REG position. In
this case, ask the store manager to turn the Control Lock to the MGR position for the entry.
(Refer to the chapter 1. Operations in “MGR” Mode on page 1 in Manager’s Guide.)
S.CPN
FISH 1.00-
Store Coupon $1.00
is entered through
the Dept. 2 (FISH).
Item Correct (Last Line Voiding)
Department Entries
(except for Single Item Department Entry)
PLU Entries
(except for Single Item PLU Entry)
ITEM
CORR
Percent Discount or Percent Charge
Dollar Discount
Received-on-Account Item
Paid Out Item
Vendor Coupon
Store Coupon
Previous Balance
Manual Tax
NOTES: 1. When the [ITEM CORR] key is depressed after repeated items, only the last item of the
repeated is deleted, decrementing the “RPT” count in the display.
2. When the [ITEM CORR] key is depressed after a Quantity Extension or Split Package Pric-
ing, the entire product (result of the calculation) is deleted.
BAKERY 6.00 T
--------
Dept 4 (BAKERY) $6.00 is
entered but item-corrected.
CORR
--------
Void (Designated Line Voiding)
Depress prior to or any time during the entry
Department Entries (except for Repeat Entry)
PLU Entries (except for Repeat Entry)
Percent Discount/Charge on a Department or PLU Item
VOID
sequence of the following operations:
- 32 -
(NOTE 1)
VOID
MEAT 7.00-TF
Dept. 1 (MEAT) $7.00
is entered but voided.
Page 40

MA-1350-1 SERIES
EO1-11126
NOTES: 1. When an item previously entered with a Percent Discount or Percent Charge is canceled, the
item can be voided with the Percent Discount/Charge by attaching the [VOID] key to the
same entry procedure as previous entry.
At Entry At Void
MEAT 7.00 TF
% 5% 0.35-
The process of the amount resulted from % calculation is reversed at Void.
VOID
MEAT 7.00-TF
% 5% 0.35
2. The Void entries are usually possible only inside a sale. However, when the option “Credit
Balance Allowed” is selected, they are allowed outside a sale as well and over-subtraction of
the sale is also allowed. (Ask your TOSHIBA TEC representative.)
3. Neither Negative Department nor Negative PLU items can be entered as Void items.
All Void (Transaction Cancel)
Sale Item ....................... Executes the transaction cancel.
Entries
NOTES: 1. The All Void Operation is no longer
2. If Tax Exempt (using the [EX] key) is
3. The All Void function is not effective
4. When more than 20 items have been
5. All Void Transaction can be pro-
ALL
VOID
ITEM
CORR
C
acceptable when any media key
(such as [AT/TL]) is entered including short-tendering.
entered, the sale can no longer be
all-voided.
for Received-on-Account or Paid Out
transactions.
entered in the current sale, the All
Void function is no longer effective.
grammed to require the MGR position of the Control Lock. If so programmed, an error will occur on
depressing the [ALL VOID] key in
the REG position. In this case, ask
the store manager to turn the Control
Lock to the MGR position for the
transaction. (Refer to the chapter 1.
Operations in “MGR” Mode on
page 1 in Manager’s Guide.)
....................... Clears the transaction cancel
(continue the sale).
TEC STORE
1343 PEACH DRIVE
PHONE: 87-6437
Open 8:00am to 7:00pm
Closed: every Wednesday
11-28-1997 #112300
FISH 4.50 TF
14X 0.80 @
Coke-A 11.20 T
Beef 3.00 TF
SUBTL 18.
∗
ALL VD
JONES 0154 15:19TM
70
All Void (Transaction
Cancel) Symbol Line
Items already entered in this sale.
Prints the subtotal
when Transaction
Cancel is executed.
∗
- 33 -
Page 41

Returned Merchandise
MA-1350-1 SERIES
EO1-11126
Depress prior to or any time (before the final
Department Entries
PLU Entries
RTN
MDSE
key at the latest) during the entry
sequence of the following operations:
RTN
MEAT 7.00-TF
Dept. 1 (MEAT) $7.00 is
entered but returned.
Percent Discount/Charge on a Department or
PLU Item
(NOTE 1)
NOTES: 1. When an item once purchased with a Percent Discount or Percent Charge is returned, the
item can be returned with the Percent Discount/Charge by attaching the [RTN MDSE] key to
the same entry procedure as purchase.
At Purchase At Return
MEAT 7.00 TF
% 5% 0.35-
The process of the amount resulted from % calculation is reversed at Return.
RTN
MEAT 7.00-TF
% 5% 0.35
2. The Returned Merchandise entries are possible outside as well as inside a sale. Oversubtraction of the sale is allowed for Returned Merchandise entries.
3. Neither Negative Department nor Negative PLU items can be entered as Returned Merchandise.
4. Returned Merchandise transaction can be programmed to require the MGR position of the
Control Lock. If so programmed, an error will occur on depressing the [RTN MDSE] key in
the REG position. In this case, ask the store manager to turn the Control Lock to the MGR
position for the transaction. (Refer to the chapter 1. Operations in “MGR” Mode on page 1
in Manager’s Guide.)
Non-add Number Print
. . .
Code Number;
Max. 8 digits
NOTES: 1. The preceding zeros, if any, will not be printed. For example, if “0123000” is entered,
“123000” is printed.
2. Usually, Non-add Number entries are prohibited at the starting of a No-sale transaction (i.e.
Non-add Numbers cannot be printed on a No-sale receipt). However, a No-sale entry can be
programmed to be allowable after a Non-add Number entry (ask your TOSHIBA TEC
representative).
3. Usually, Non-add Number entry is allowed multiple times in one sale. However, it can be
programmed to be allowed only once (ask your TOSHIBA TEC representative).
#/NS
(or , )
#
#/CID
#123000
- 34 -
Page 42

Subtotal Read
MA-1350-1 SERIES
EO1-11126
Sale Item
Entries
ST
SUBTL 22.91
Subtotal Amount
NOTES: 1. When the [ST] key is depressed, the sale total is displayed and printed. However, you can
select not to print (display only) by a system option. (Ask your TOSHIBA TEC representative.)
Even if this non-print option is selected, the subtotal amount is automatically printed when a
Percent Charge/Discount or Dollar Discount entry follows a subtotal entry.
2. Usually, both displayed subtotal and printed subtotal include no taxes due (Tax (PST)/GST
exclusive). However, the subtotal amount including taxes due can be displayed by the program option. (Ask your TOSHIBA TEC representative.)
3. If the program option “Taxable Total Compulsory” is selected with the function of subtotal display
including taxes due (refer to NOTE 2 above), the [ST] key must always be depressed before
operating the media keys for finalizing a sale. (Ask your TOSHIBA TEC representative.)
4. When the [ST] key is depressed more than once consecutively, the subtotal amount is only
displayed but no print occurs from the second time on. If the [C] key is depressed to clear a
numeric entry or error, etc. after a subtotal is once obtained, the subtotal amount will be again
displayed.
5. When the [ST] key is depressed during the Previous Balance Entry, the subtotal excluding
the previous balance amount will be displayed.
Taxable Total Read
Sale Item
Entries
TXBL
TL
NOTES: 1. Displayed sale total amount includes taxes due (Tax(PST)/GST). No print occurs.
2. If the program option “Taxable Total Compulsory” is selected, the [TXBL TL] key must
always be depressed before operating the media keys for finalizing a sale. (Ask your
TOSHIBA TEC representative.)
3. If the [C] key is depressed to clear a numeric entry or error, etc. after a taxable total is once
obtained, the taxable total amount will be again displayed.
4. When the [TXBL TL] key is depressed during the Previous Balance Entry, the taxable total
excluding the previous balance amount will be displayed.
Finalizing a Sale
1) Media Total
Sale Item
Entries
TAX 0.36
CASH 3.
(or)
ST
96
TXBL
TL
Tax Amount
Cash Total
AT/TL
CHECK
(or , , , )
TEND
chg
CPN
MISC
JONES 0159 15:40TM
- 35 -
Page 43

2) Media Tender
Sale Item
Entries
TAX 0.36
TLTAL 3.
CATEND 4.00
CHANGE 0.04
JONES 0160 15:42TM
(or)
ST
96
TXBL
TL
Tax Amount
Sales Total
Cash Amount
tendered
Change due
Tendered Amount
CHECK
(or , , , )
TEND
$5.00
3) Multi-Tender (short-tender repeated by the same media)
Example)
. . .
AT/TL
chg
$10.00
,,
CPN
CASH 3
MA-1350-1 SERIES
EO1-11126
MISC
(Cash Payment
1 to 3 Keys)
Sale Item
Entries
TAX 0.52
TOTAL 10.
CATEND 10.00
CATEND 1.00
CHANGE 0.18
JONES 0161 15:45TM
(or)
ST
82
TXBL
TL
Short-tendered Amount
Tax Amount
Sales Total
1st Cash Tendered (Short)
2nd Cash Tendered (Over)
Change due
. . .
4) Split-Tender (short-tender repeated by the different media)
Example)
Sale Item
Entries
TAX 0.52
TOTAL 10.
CHECK 7.00
CASH 3.82
JONES 0162 15:47TM
(or)
ST
82
TXBL
TL
Tax Amount
Sales Total
1st Media (Check)
Tendered (Short)
2nd Media (Cash) Total
. . .
Short-tendered Amount
AT/TL
. . .
()
Equal or over-tendered Amount
CHECK
TEND
. . .
()
Equal or over-tendered Amount
AT/TL
AT/TL
NOTES: 1. Functions of each media key are initially programmed as follows.
[AT/TL] ... Tender/Total, [CHECK TEND] ... Tender only, [chg] ... Total only,
[MISC] ... Tender only, [CPN] ... Tender only
2. When the program option “Taxable Total Compulsory” (ask your TOSHIBA TEC representative)
is selected, the sale is finalized after reading the sale total by the [ST] (or [TXBL TL]) key.
3. When the program option “Shot-tendering Prohibited” (ask your TOSHIBA TEC
representative) is selected, short-tendering using the media keys including the Cash Payment
key is impossible.
4. When a certain amount is not programmed to the Cash Payment key, use of its key for cash
tendering operation will cause an error. Tendering amount $ 5.00 is initially programmed for
the [$5.00] key, and $10.00 for the [$10.00] key.
5. The program option “Over-tendering Prohibited” can be selected individually for the media
keys except the [AT/TL] key. Over-tendering operaiton using a media key to select this
option becomes impossible.
- 36 -
Page 44

6. When the HALC (High Amount Listing Capacity) is programmed to the respective tendering
amounts of the media keys, tendering amount through the media key cannot exceed the
programmed one in the REG position.
Food Stamp Tender
MA-1350-1 SERIES
EO1-11126
All the items are
entered for the
customer.
Displays (and prints) the Food-stampable
Total amount, with the “TL” lamp illuminated.
When the sale is not finalized
(i.e., short-tendered):
FSTL
TEND
........
. . .
Amount of Food Stamps
actually tendered
NOTES 1, 5
FSTL
TEND
NOTE 2
The balance due (shortage amount) is displayed. Operate other media
total/tender operations.
When the sale is finalized
(i.e., equal-or over-tendered):
The sale is finalized, a receipt is issued, and the change amount is dis-
NOTE 3
played.
NOTE 4
NOTES 1. The displayed Food-stampable Total is the limit amount to be paid in food stamps. Accu-
rately, however, the actual limit may become this displayed total + 99¢ due to the combination of changes due refunded in cash.
2. The Amount of Food Stamps actually tendered may exceed the Food-stampable Total
previously displayed. In that case, the exceeding amount (besides refunded as change in
cash of max. 99¢) will be refunded in food stamps. Also refer to NOTE 4.
3. Refer to “Finalizing a Sale” on the preceding pages.
4. The “CG” lamp is illuminated. The change portion by the unit of $1.00 will be returned in food
stamps (1 to 99, indicating dollars, displayed in the “DPT” portion. The change portion less
than $1.00 will be returned in cash (displayed in the “AMOUNT” portion).
5. The “Food-stampable Total” is the total of Department and PLU items that are programmed
to be “Food-stampable” and are entered in the current sale. As for reversing the Food Stamp
status of individual items at the moment of their entries, refer to “Food Stamp Modification”
on page 41.
6. When the HALC (High Amount Listing Capacity) is programmed to the tendering amount of
the [FSTL TEND] key, tendering amount through its key cannot exceed the programmed one
in the REG position.
Food Stamp Tender Print Format Samples
GENERAL Type ILLINOIS Type
FISH 6.00 TF
TAX 0.60
TOTAL 6.
FS/TL 6.60
F-STMP 10.00
CHANGE 0.40
FS CHG 3.00
JONES 0164 16:31TM
60
The customer may pay up
to the food-stampable
amount plus its taxes due
in food stamps.
Food-stampable Item
Food-stampable Total (including tax on Foodstampable Total)
Food Stamp Tendered
Change in Cash
Change in Food Stamps
FISH 6.00 TF
FS/TL 6.00
F-STMP 5.00
TAX 0.10
CASH 1.10
SMITH 0169 16:43TM
- 37 -
The customer may pay up to
the food-stampable amount
in food stamps, and the
amount actually paid in food
stamps is tax-exempted.
Food-stampable Item
Food-stampable Total
(excluding tax on Foodstampable Total)
Food Stamp Tendered
Cash Total
Page 45

MA-1350-1 SERIES
EO1-11126
NEW JERSEY Type
FISH 6.00 TF
DRINK 2.00 T
FS/TL 6.00
F-STMP 6.00
TAX 0.30
CASH 2.30
JONES 0174 16:46TM
The customer may pay up to the food-stampable
amount in food stamps, and the food-stampable
amount is tax-exempted regardIess of the actual
amount paid in food stamps.
Food-stampable Item
Non-stampable Item
Food-stampable Total
(including tax on Food-stampable Total)
Food Stamp Tendered
Cash Total
Previous Balance, Charge Posting
(1)To initiate charge posting for a new customer
0
PB+
(2)Charge posting with a previous balance first entered (pre-select) with or without PAYMENT
. . .
Previous Balance
(or )
PB-
PB+
PB-
Follow the line marked with “*” in operation (2) below.
(for debit balance for customer)
(for credit balance for customer)
* Sale item
entries, if any.
TRF
Display the sale total excluding the previous balance.
............... to transfer all the balance as a new balance.
TXBL
( )
TL
........
chg
........
Finalizes the current sale, displays the entire sale total including the previous balance.
(i.e. no payment for this occasion.)
. . .
Amount Paid for
this occasion
Repeatable if necessary.
PO
............... when the balance is negative (credit balance for customer) and must be paid
R/A
Media key operation.
back to the customer in cash now.
(3)Charge posting with a previous balance entered during a sale (post-select)
A previous balance may be entered not only before sale items but also after or between them if the [chg] key
has not been depressed. Multiple previous balance entries are possible within a sale (for the purpose to sum
up multiple accounts into one, etc.)
- 38 -
Page 46

(4)Percent charge/discount on a previous balance
. . .
PB+
( )
. . .
MA-1350-1 SERIES
EO1-11126
%+
Previous Balance
Rate
NOTES: 1. The [%-] key operates the same for percent discouting.
2. The previous balance entered through [PB-] (credit balance for customer) will not allow %+ or
%- operation.
TEC STORE
1343 PEACH DRIVE
PHONE: 87-6437
Open 8:00am to 7:00pm
Closed: every Wednesday
11-28-1997 #112300
PB+
0.00
MEAT 7.00 TF
3X 1.00 @
Coke-B 3.00 T
SUBTL 10.00
TAX 0.80
Chg 10.
R/A 5.00
CASH 5.00
NEW BAL 5.
80
80
A customer who has no previous balance comes to the
store. He purchases sales
items; Dept.1 (MEAT) and
three items of PLU No. 301
(Coke-B). He pays $5.00 in
this time, and the remainder
of the balance is carried forward to the next time.
TEC STORE
1343 PEACH DRIVE
PHONE: 87-6437
Open 8:00am to 7:00pm
Closed: every Wednesday
11-28-1997 #112300
PB+
5.80
Chg 5.
R/A 5.80
CASH 5.80
NEW BAL 0.
JONES 0180 17:08TM
80
00
The customer comes
again to pay all the previous balance. He pays the
exact amount in cash.
The balance of the customer becomes zero.
JONES 0179 17:05TM
Check Cashing (Cashing Non-cash Media)
<operable outside a sale only>
. . .
Amount to be cashed
Max. 8 digits
(NOTE 2)
NOTES: 1. The [CHECK TEND] key is pro-
grammed to allow cashing as initial
status. It can be programmed to
prohibit cashing.
Similarly, the [chg] , [MISC] and
[CPN] keys are programmed to
prohibit cashing as initial status.
They can be programmed to allow
cashing. (Ask your TOSHIBA TEC
representative.)
2. When the HALC (High Amount
Listing Capacity) is programmed to
the respective tendering amounts of
the media keys, tendering amount
through the media key cannot
exceed the programmed one in the
REG position.
CHECK
TEND
(or , , )
chg
MISC
CPN
......The drawer opens to en-
able exchanging the noncash media into cash.
TEC STORE
1343 PEACH DRIVE
PHONE: 87-6437
Open 8:00am to 7:00pm
Closed: every Wednesday
11-28-1997 #112300
CHECK 10.
JONES 0188 17:19TM
00
- 39 -
Page 47

3. When the program option “Validation Print Compulsory” is programmed to the respective
media keys, the drawer will open after performing the validation print. (Ask your TOSHIBA
TEC representative.)
Post-issue Receipt
MA-1350-1 SERIES
EO1-11126
A sale is finalized with the .................................. The receipt for the last sale is issued.
“R OFF” lamp illuminated.
RECEIPT
ISSUE
NOTES: 1. When a sale has contents of 30 print
lines or less, the post-issue receipt
will be an itemized receipt, just as
the ordinary receipt. When it has
more than 30 print lines, the postissue receipt will be a total-only
TEC STORE
1343 PEACH DRIVE
PHONE: 87-6437
Open 8:00am to 7:00pm
Closed: every Wednesday
Itemized Type
receipt. However, the program
option allows the register to always
issue a total-only receipt regardless
of the number of the print lines. (Ask
your TOSHIBA TEC representative.)
2. The Post-issue receipt function is not
effective for Received-on-Account,
Paid Out, Previous Balance, nor All
Void transaction.
3. If a Non-add Number print is entered
at the top of a sale, the number will
not be printed on the Post-issue
11-28-1997 #112300
MEAT 7.00 TF
MEAT 7.00 TF
SUBTL 14.00
% 10% 1.40TAX 0.70
CASH 13.
JONES 0203 18:21TM
TEC STORE
1343 PEACH DRIVE
PHONE: 87-6437
Open 8:00am to 7:00pm
Closed: every Wednesday
11-28-1997 #112300
TOTAL 13.
30
Total Type
30
Receipt.
4.
Usually, the Post-issue Receipt
JONES 0209 18:23TM
function is available only when a
sale has been entered with the “R
OFF” lamp illuminated. However, the
program option allows the register to
issue a Post-issue receipt regardless
of the “R OFF” status (illuminated or
The Consecutive No. printed on the Postissue Receipt is the same as that of the
normal receipt if it has been issued.
extinguished). (Ask your TOSHIBA
TEC representative.)
Tax Status Modification
Tax status of the Department/PLU or required key is reversed:
Depress to , of which tax status is modified prior to or any time (before
TX1/M
TX3/M
GST/M
the final key at the latest) during the entry sequence of the
following operations. More than one modifier keys can be
depressed for the same item entry:
Department Entries
PLU Entries
Percent Discount/Charge
Dollar Discount
Vendor Coupon
Store Coupon
- 40 -
Page 48

Food Stamp Modification
Food Stamp status of the Department/PLU or the required key is reversed.
MA-1350-1 SERIES
EO1-11126
Depress prior to or any time (before the final key at the latest) during the entry sequence of the
FS/M
following operations:
Department Entries
PLU Entries
Percent Discount/Charge
Dollar Discount
Vendor Coupon
Store Coupon
Tax Exemption
All the items are entered
for the customer.
To exempt the sale from designated taxes:
TX1/M
TX2/M
TX3/M
(or)
ST
EX
EX
EX
TXBL
TL
(Exemption from Tax/PST 1 only)
(Exemption from Tax/PST 2 only)
(Exemption from Tax/PST 3 only)
GST/M
TX1/M
TX2/M
TX1/M
TX2/M
TX1/M
TX2/M
To exempt the sale from all taxes:
EX
or
TX1/M TX3/M
TAX1EX 7.00
TX2/M
Sale portion subject
to the tax exemption
(Tax/PST 1)
EX
(Exemption from GST only)
EX
EXGST/M
EXGST/M
EXTX3/M
EXTX3/M
EXGST/MTX3/M
(Exemption from Tax/PST 1 & Tax/PST 2)
(Exemption from Tax/PST 1 & GST)
(Exemption from Tax/PST 2 & GST)
(Exemption from Tax/PST 1 & Tax/PST 3)
(Exemption from Tax/PST 2 & Tax/PST 3)
(Exemption from Tax/PST 3 & GST)
GST/M
TAX1EX 17.50
TAX2EX 8.50
EX
Sale portion subject
to the Tax/PST 1
Sale portion subject
to the Tax/PST 2
- 41 -
Page 49

MA-1350-1 SERIES
EO1-11126
NOTES: 1. After depressing the [EX] key, the sale must only be finalized (for payment through media
keys including the [CUR] keys).
2. Tax Exemption transaction cannot be item-corrected.
3. If the “Non-taxable Amount Limit” is set for certain areas in Canada, using the [GST/M] key
will cause an error and GST Exemption is not allowed.
Manual Tax Entry
Sale Item
Entries
Tax Amount required
. . .
TAX
....... The entered tax amount is printed and added to the sale.
NOTES: 1. The [TAX] key should be used in the
single tax area. It should not be used
in the dual tax area nor the triple tax
area.
2. A Manual Tax amount entered can
be item-corrected, but cannot be
deleted by [VOID] nor [RTN MDSE]
key.
Sale paid in Foreign Currency
All the items
are entered
for the
customer.
TXBL
TL
NOTE 1
(or )
ST
Displays the sale
total in the domestic currency.
. . . . . . . . .
CUR 1
NOTE 2
Displays the sale
total in the foreign currency.
TAX4 0.12
Can be cleared by the [C] key
. . . . . . . . .
. . .
Foreign Currency
Amount tendered;
max. 8 digits
Displays the amount
as it is entered.
. . . . . . . . .
CUR 1
NOTE 2
Displays the domestic currency
value equivalent
to the tendered
foreign currency.
A Manual Tax of
$0.12 is entered.
The “TAX 4” symbol indicates
Manual Tax.
AT/TL
. . . . . . . . .
(or other
tender-allow
media keys)
NOTE 5
The sale is finalized
if over-tendered, or
not finalized if
short-tendered.
NOTE 3
. . . . . . . . . . .
SUBTL 14.00
TAX 1.22
TOTAL 15.
CATEND 28.00
CHANGE 12.78
JONES 0216 18:55TM
The program option allows the register to print foreign currency tendered amount and
foreign currency exchange rate on the receipt. (Ask your TOSHIBA TEC representative.)
22
Sale total in domestic currency
Domestic currency value equivalent to
the tendered foreign currency
Change due in the domestic currency
NOTES: 1. The [TXBL TL] (or [ST]) key is not required after a short-tender entry. The [ST] key can be
used for this transaction only when the program option “ Taxable Total Display by the [ST]
key” has been selected. (Ask your TOSHIBA TEC representative.)
2. The [CUR2], [CUR3] and [CUR4] keys operate the same fashion as the [CUR1] key for
tendering the foreign currencies 2, 3 and 4 respectively.
- 42 -
Page 50

MA-1350-1 SERIES
3. When over-tendered:
The sale is finalized, the drawer opens, and the change due is displayed in the
domestic currency which is to be returned to the customer.
When short-tendered:
The sale is not finalized. Any other media tendering may follow (refer to the section
“Multi-tender, Split Tender” on page 36).
4. The tendered amount is processed into the following in the report memory:
• Domestic media (of the key operated — Cash, Check, Charge, Miscellaneous Media,
Media-Coupon) total
• Foreign Currency in the foreign currency value.
• The amount is not processed into the corresponding media-in-drawer total.
5. The final media key must be programmed to allow tendering.
6. A negative-balance sale or a sale of zero cannot be finalized with a Foreign Currency key.
7. The Foreign Currency keys cannot be used to finalize Received-on-Account, Paid Out and
Previous Balance entries.
No-sale Exchange from a Foreign Currency to the Domestic Currency
<operable outside a sale only>
EO1-11126
CUR 1
. . .
Amount of Foreign
Currency to be
exchanged
#/NS
(or )
NS
........
The drawer opens to enable exchange. Displays the domestic currency amount equivalent to the entered foreign currency amount.
NOTE: The [CUR2], [CUR3] and [CUR4] keys operate the
same fashion as the [CUR1] key for exchanging the
foreign currencies 2, 3 and 4 to the domestic currency.
Validation Print
A required sale Insert a slip to the
item or media is Validation Slot.
entered.
NOTES: 1. On this register, depressing the
(NOTE 3)
(See the sketch below.)
[VALIDATE] key will execute printing regardless of presence/absence
of a slip. Before depressing the key,
be certain to insert a slip to the
Validation Slot. (If no slip is inserted,
the validation print will occur over the
last printed line on the receipt.)
2. After validation print, be certain to
remove the slip from the Validation
Slot.
CUR1 100.00
CHANGE 140.00
JONES 0222 13:39TM
VALI
DATE
- 43 -
Page 51

MA-1350-1 SERIES
EO1-11126
3. If the “SLIP” lamp flickers during registrations, it indicates that the last item just entered has
been programmed to require validation print. In this case, no other operations can follow until
the validation print of the item is performed.
4. The following options are selective in relation to validation print:
1) Print Format
a) Consecutive No. Print/Non-print
b) Cashier No. Print/Non-print
2) Number of times for validation print of the same item Single-validation (only
once allowed), or Multi-validation (any number of times allowed)
3) Validation Print Content after each non-cash media tender
4) Validation Counter on the Financial Report Print/Non-print
5) Validation Compulsory status on the following keys:
[AT/TL], [CHECK TEND], [chg], [MISC], [CPN], [FS TL TEND], [TRF],
[VND CPN], [STR CPN], [RTN MDSE], [PO], [R/A], [ITEM CORR], [VOID],
[DOLL DISC], [%-], Negative Departments and PLUs.
For details, ask your TOSHIBA TEC representative.
Validation Print
-- Receipt Print --
DP
06 500.00
CASH
JONES 0224 13:57TM
500.00
→
→
Date Receipt Department Amount
(Month-Day-Year) Consecutive No. No.
11-28-1997 1CL 0224 DP06 500.00
Cashier No.
Media Sale Total or
11-28-1997 1CL 0224 CASH
Tendered Amount
500.00
Remote Slip Printer (hardware option) Operation
The TEC Remote Slip Printer DRS-207 may be connected to the MA-1350-1 series ECR as an optional device. The Remote Slip Printer will operate printing if a slip is properly inserted, regardless of the Mode Lock
position (except that no print will occur in the “SET” mode or during program verification in the “X” mode).
1. The remote slip printer will automatically activate printing when the slip has properly been set to the printer
table.
2. The gap of the slip inlet is usually opened, and the slip may be inserted or withdrawn freely outside a
receipt/journal print sequence.
When a slip is properly set to the remote slip printer and the ECR is operated, the gap will be closed and
printing will be performed. When the sale is finalized and the receipt is issued, the gap of the DRS-207 will
be opened to allow the slip withdrawal. (The gap keeps closed during sale item entries.)
3. The RELEASE key on the DRS-207 may be used to open the closed gap in order to withdraw the slip and
skip unnecessary item printer is in a printing action.
4. Printing on the remote slip will be performed alternately with printing on the receipt/journal of the ECR.
- 44 -
Page 52

-- Receipt Print --
TEC STORE
1343 PEACH DRIVE
PHONE: 87-6437
Open 8:00am to 7:00pm
Closed: every Wednesday
11-28-1997 #112300
MEAT 7.00 TF
3X 5.00 @
Salmon 15.00 TF
8X 3.00/ 8
Bun-A 3.00 T
DRINK 15.00 T
SUBTL 40.00
TAX 4.25
Chg 44.
JONES 0225 14:44TM
25
Remote Slip Print
MEAT 7.00 TF
3X 5.00 @
Salmon 15.00 TF
8X 3.00/ 8
Bun-A 3.00 T
DRINK 15.00 T
SUBTL 40.00
TAX 4.25
Chg 44.
11-28-1997 1CL 0224 JONES 0225 14:44TM
25
MA-1350-1 SERIES
EO1-11126
- 45 -
Page 53

MA-1350-1 SERIES
EO1-11126
14.Paper Roll Replacement and Other Maintenance
When a red line appears on the edge of the paper roll, follow the steps below to replace the paper roll with a new
one.
WARNING!
Care must be taken not to injure yourself with the paper cutter.
Replacing the Receipt Roll
REG
OFF
SET
X
MGR
1
Turn the Control Lock to the REG position using
Z
the Control Key.
2
To remove the Printer Cover, insert the Printer
Cover Key to the Printer Cover Lock, and then
turn it 90° clockwise.
3
Cut the paper as shown in the figure.
4
Depress the [RF] key to feed the remaining paper
VALI
DATE
TX
M
end.
CAUTION: Never try to pull out the remaining
paper end by hand. It may cause
a paper jam.
- 46 -
Page 54

Replacing the Journal Roll
MGR
X
REG
-
MA-1350-1 SERIES
EO1-11126
5
Load new paper roll as described in Chapter 8 on
page 12.
1
OFF
SET
Z
Turn the Control Lock to the REG position using
the Control Key.
2
To remove the Printer Cover, insert the Printer
Cover Key to the Printer Cover Lock, and then
turn it 90˚ clockwise.
3
VALI
DATE
TX
M
Depress the [JF] key to wind up enough of the
Journal Paper, then cut the paper as shown in the
figure.
Depress the [JF] key to feed the remaining paper
end.
CAUTION: Never try to pull out the remaining
paper end by hand. It may cause
a paper jam.
- 47 -
Page 55

4
Remove the wound-up portion of the paper by
pulling it sideways.
5
Load new paper roll as described in Chapter 8 on
page 12.
MA-1350-1 SERIES
EO1-11126
Replacing the Ribbon Cassette
This Ribbon Cassette is a consumable part and a TOSHIBA TEC’s exclusive. Ask your TOSHIBA TEC representative about the order of the Ribbon Cassette.
1
Turn the Control Lock to the OFF position using
the Control Key.
REG
OFF
SET
MGR
X
-
Z
2
To remove the Printer Cover, insert the Printer
Cover Key to the Printer Cover Lock, and then
turn it 90° clockwise.
- 48 -
Page 56

3
Remove the old Ribbon Cassette by pulling it in
the direction of the arrow mark.
4
Install a new one as shown in the figure. After installing the Ribbon Cassette, turn the knob of the
Ribbon Cassette in the direction of the arrow mark
several times to remove the slack on the ribbon.
MA-1350-1 SERIES
EO1-11126
REG
OFF
SET
5
After replacing the Ribbon Cassette, attach the
Printer Cover.
MGR
X
-
Z
6
Turn the Control Lock to the REG position using
the Control Key, then depress the [#/NS] key to
check the print condition.
Replenishing Ink to the Store Name Stamp
1
MGR
X
REG
OFF
SET
-
Z
Turn the Control Lock to the OFF position using
the Control Key.
- 49 -
Page 57

2
To remove the Printer Cover, insert the Printer
Cover Key to the Printer Cover Lock, and then
turn it 90° clockwise.
3
Remove the Store Name Stamp by pulling it in the
direction of the arrow mark.
MA-1350-1 SERIES
EO1-11126
Apply ink from the
shaded places.
4
Apply only two or three drops. Stamp may not
print dark immediately. Allow time for ink to saturate the stamp.
5
Install the stamp by inserting it in the direction of
the arrow mark.
6
Attach the Printer Cover.
- 50 -
Page 58

MA-1350-1 SERIES
7
MGR
X
REG
OFF
SET
-
Z
After replenishing ink, depress the [#/NS] key to
check the density of the printed message.
Manual Drawer Release and Lock
The drawer opens automatically when a registration is performed. In the event of a power failure or other
trouble, the drawer can be opened manually in the following manner.
WARNING!
When opening the cash drawer, be careful not to let the drawer hit any person.
EO1-11126
Releasing
Remove the CDC Cap.
Insert the Drawer Release Key into the Drawer
Release Lock, then turn the key clockwise. The
drawer will now open.
The Drawer Release Key can be taken out by returning it to the original position.
Locking
When the drawer is closed, it is automatically locked and will not open without the Drawer Release Key or
transaction entries.
Removing the Drawer
1
Pull the drawer out, and when it stops by the stopper, lift the drawer up and pull it again.
- 51 -
Page 59

MA-1350-1 SERIES
EO1-11126
2
When it stops again by the roller fixed in the
drawer case, lift it and pull it again.
Media Slot
The Media Slot provided at the front of the drawer is used to put non-cash media such as check in the drawer
without opening it. The non-cash media put from this slot are kept under the Money Case, therefore you can
keep them in secret.
Media Slot
Non-cash media are kept here.
CDC (Cash Drawer Cover; Option) Lock
Locking
1
Push the Cash Drawer Cover to the back of the
drawer.
2
Press the cover lightly, insert the key into the key
hole on the cover, and turn it 90° clockwise.
Money Case
Unlocking
Unlock the cover using the key, and lift the front end.
- 52 -
Page 60

MA-1350-1 SERIES
EO1-11126
15.In Case of the Power Failure
If a power failure occurs during business hours, all sales
data stored in the memory are automatically protected
by the batteries installed in the register. When any data
was being printed on the power failure, the same data is
automatically printed at the power recovery. In case of
the power failure, it is suggested to check the receipt
print contents before you hand the receipt to the customer.
The same data
Power Failure Symbol
MEAT 7.00 TF
∗
P.FAIL
MEAT 7.00 TF
∗
16.Troubleshooting
The following are possible causes and measures against typical troubles. When a trouble occurs, refer to this
chapter to find a cause of the trouble, then take appropriate measures. If a trouble not described here occurs, or
a trouble still exists after taking the following measures, ask the store where purchased. In this case, inform the
store where purchased of your trouble in details.
WARNING!
If you cannot solve a problem with the following solutions, do not attempt to repair it yourself.
Turn the power off, then contact your TOSHIBA TEC representative for assistance.
1. Trouble concerning Power Supply
2. Trouble concerning Printer
3. Trouble concerning Keyboard
4. Trouble concerning Drawer
5. Trouble concerning Display
6. Trouble during Normal Operations
7. Trouble in the REG Mode
8. Trouble in the SET Mode
1. Trouble concerning Power Supply
Power is not turned ON.
Cause 1: Register is not plugged in.
Measure: Plug in an outlet.
Cause 2: Control Lock is in the OFF position.
Measure: Turn the Control Lock to the positions other than OFF using the Control Key.
Cause 3: The outlet does not supply the power.
Measure: Use another outlet.
2. Trouble concerning Printer
Printer does not perform the paper feeding.
Cause 1: Paper roll is not placed correctly.
Measure: Place the paper roll correctly. (Refer to page 12.)
Cause 2: Paper fragment or foreign substance blocks the inside of the paper path.
Measure: Printer provided for this register is a precision machine, therefore ask the store where purchased.
Cause 3: Failure of the printer itself
Measure: Ask the store where purchased.
- 53 -
Page 61

Paper roll wrinkles.
Cause 1: Paper roll is not placed correctly, or placed on the skew.
Measure: Place the paper roll correctly. (Refer to page 46.)
Cause 2: Failure of the printer itself
Measure: Ask the store where purchased.
Printer prints nothing.
Cause 1: Ribbon cassette is not installed.
Measure: Install the ribbon cassette. (Refer to page 15.)
Cause 2: Ribbon cassette reaches its life, deteriorates, or is damaged.
Measure: Replace the ribbon cassette with a new one.
Cause 3: Status lamp “R OFF” is illuminated. (In case that nothing is printed on the receipt but not the
journal)
Measure: Depress the [LOG/RECEIPT] key to extinguish the lamp.
Cause 4: Failure of the printer itself
Measure: Ask the store where purchased.
MA-1350-1 SERIES
EO1-11126
Printing as a whole is too light.
Cause 1: Ribbon cassette reaches its life, deteriorates, or is damaged.
Measure: Replace the ribbon cassette with a new one. (Refer to page 48.)
Printing gets stained.
Cause 1: Printer gathers paper dust.
Measure: It is necessary to clean the inside of the printer, therefore ask the store where purchased.
Printing is uneven or too light.
Cause 1: Ribbon cassette reaches its life, deteriorates, or is damaged.
Measure: Replace the ribbon cassette with a new one. (Refer to page 48.)
Abnormal sound generates.
Cause 1: Paper roll or Ribbon cassette is not placed correctly.
Measure: Place the paper roll or ribbon cassette correctly. (Refer to page 46 or 48.)
Cause 2: Failure of the printer itself
Measure: Ask the store where purchased.
Stamp does not work.
Cause 1: Stamp is not installed correctly.
Measure: Install the stamp correctly. (Refer to page 49.)
Cause 2: Failure of the stamp mechanism
Measure: Ask the store where purchased.
Print of the stamp is too light.
Cause 1: Stamp ink is not enough.
Measure: Replenish the ink. (Refer to page 49.)
- 54 -
Page 62

MA-1350-1 SERIES
Paper jam has occurred.
Cause: Paper roll is placed on the skew, or foreign substance exists in the paper path of the inside of the
printer.
Measure: Remove the jammed paper as follows.
1
To open the upper side of the printer, press simultaneously two levers (green) provided on both
sides of the printer in the direction of the arrow.
2
EO1-11126
Raise up the upper side of the printer in the direction of the arrow, then remove the jammed paper.
After removing it, return the upper side of the
printer until it clicks.
3. Trouble concerning Keyboard
Key on the keyboard does not function.
Cause 1: Control Lock is in the OFF position.
Measure: Turn the Control Lock to the positions other than OFF using the Control Key.
Cause 2: Failure of the keyboard itself
Measure: Ask the store where purchased.
4. Trouble concerning Drawer
Drawer does not open.
Cause 1: Drawer catches foreign substance (coin, etc.).
Measure: Try to open the drawer by removing the foreign substance, using a ruler or something. If not
effective, ask the store where purchased.
Cause 2: Failure of the drawer itself
Measure: Ask the store where purchased.
5. Trouble concerning Display
Display displays nothing.
Cause 1: Register is not securely plugged in.
Measure: Securely plug in an outlet.
Cause 2: Control Lock is in the OFF position.
Measure: Turn the Control Lock to the positions other than OFF using the Control Key.
- 55 -
Page 63

MA-1350-1 SERIES
Some segment is not displayed, display shimmers, or illumination of the display is
uneven.
Cause 1: Failure of the LED
Measure: Ask the store where purchased.
6. Trouble during Normal Operations
NOTE on changing the Control Lock position:
Changing the Control Lock position during sales entries or programming causes an error. To clear the error,
return the Control Lock to the original position. However, changing the Control Lock position to the OFF does
not cause an error. Error caused by changing the Control Lock position cannot be cleared by the [C] key.
Normal operations cannot be carried out.
Cause 1: Control Lock position does not correspond to the operation you attempted.
Measure: Check whether or not the Control Lock position corresponds to the operation. (Especially, check
whether or not the operation you attempted requires the MGR position. Ask your manager about
the operations which requires the MGR position.)
Error tone beeps
Cause 1: Operation procedure is incorrect.
Measure: Depress the [C] key to clear the error, then check the operation procedure you attempted.
EO1-11126
Cause 2: Control Lock position is incorrect.
Measure: Turn the Control Lock to the correct position using the Control Key.
Cause 3: Operation in the REG position was attempted while the drawer remained open. (In case that the
Drawer-close Compulsory Option has been selected.)
Measure: Close the drawer, then depress the [C] key.
7. Trouble in the REG Position
Operations in the REG position cannot be carried out.
Cause 1: Control Lock is not in the REG position.
Measure: Turn the Control Lock to the REG position using the Control Key.
Cause 2: Cashier Identifying Operation was not performed when the Cashier Identifying Option has been
selected.
Measure: Perform the sign-ON or set the Cashier Key ON. (Refer to page 17.)
Cause 3: Operation was attempted while the drawer remained open. (In case that the Drawer-close
Compulsory Option has been selected.)
Measure: Close the drawer, then depress the [C] key.
Cause 4: Operation you attempted requires the MGR position.
Measure: Depress the [C] key, and ask your manager whether the operation requires the MGR position. If
required, ask your manager to turn the Control Lock to the MGR position.
Cause 5: You ignored the validation print when the Validation Compulsory Option has been selected to the
last operation you attempted. (In this case, the status lamp “SLP” flickers.)
Measure: Depress the [C] key, and perform the validation print.
Cause 6: After performing the validation print, you attempted the next operation while the validation slip
remained in the validation slot.
Measure: Depress the [C] key, and pull out the validation slip from the validation slot.
- 56 -
Page 64

MA-1350-1 SERIES
8. Trouble in the SET Position
Operations in the SET position cannot be carried out.
Cause 1: Control Lock is not in the SET position.
Measure: Turn the Control Lock to the SET position using the Control Key.
Cause 2: Condition for the programming is not satisfied.
Measure: Check the condition for the programming .
Cause 3: Operation procedure is incorrect.
Measure: Check the operation procedure you attempted.
17.Specifications
Size ...........................................................................460 mm (width) x 400 mm (depth) x 305 mm
(height including rubber feet)
(or 337 mm (height) when Customer’s Display is popped
up.)
Weight ...................................................................... 13.5 kg
Power Required....................................................... 117V ± 10 %, 60Hz ± 10 %
Power Consumed.................................................... 19W ± 20 % (operating), 9W ± 20 % (non-operating)
Ambient Temperature .............................................0°C to 40°C
Relative Humidity ....................................................10% to 90% RH (non-condensing)
Size of Receipt and Journal Rolls ......................... 45 mm (width) x max. 80 mm (diameter)
Validation Slip Spec.
Number of Sheets ............ max. 2 sheets (original + duplicate)
Thickness......................... Non-carbon Slip ........0.07 mm to 0.14 mm
Carbon Slip ............... 0.14 mm or less for total thickness of original sheet and
duplicate sheet
Size .................................. 70 mm or more in height, 135 mm to 210 mm in width
* Use a slip which has no curl (especially on edges), no bend, no wrinkle.
EO1-11126
Memory Protection
Long-lasting rechargeable lithium battery for memory protection.
Specifications are subject to change without notice.
- 57 -
Page 65

MANAGER’S GUIDE
Manager's Guide T.O.C.
MA-1350-1 SERIES
EO1-11126
Page 66

MA-1350-1 SERIES
EO1-11126
TABLE OF CONTENTS
Page
1.Operations in “MGR” Mode..............................................................1
Items programmed to require Manager Intervention...................................1
Listing Capacity Release.............................................................................2
2.Operations in “ - ” Mode.................................................................3
3.Read and Reset Reports...................................................................4
Daily Reports...............................................................................................4
Periodical Reports.......................................................................................5
Report Sample Format................................................................................5
4.Changing the Programmed Data...................................................17
Character Entries for Programming Operations:.......................................17
Character Code Entry Method:..................................................................18
Direct Character Entry Method:.................................................................19
Condition for Programming Operations:....................................................22
Store Message and Commercial Message Programming.........................23
Cashier Name Programming.....................................................................26
Department Status Programming..............................................................27
PLU Table Setting, Changing, or Deletion.................................................29
Time Setting or Adjustment.......................................................................32
Date Setting or Adjustment........................................................................32
PLU Preset-code Key Setting....................................................................33
Department Preset Price Setting or Changing..........................................35
PLU Preset Price Changing......................................................................36
% Key Preset Rate Setting or Changing...................................................37
Register No. Setting..................................................................................38
Foreign Currency Exchange Rate Setting.................................................38
Listing Capacity Setting for Tender Media.................................................39
Vendor Coupon Limit Amount Setting.......................................................40
5.Program Data Verification..............................................................41
Operating Procedure.................................................................................41
Appendix..................................................................................................46
Page 67

MA-1350-1 SERIES
EO1-11126
1. Operations in “MGR” Mode
This chapter describes operations to be performed in the “MGR” position of the Control Lock, which the Store
Manager can access using the MGR or MA key.
Items programmed to require Manager Intervention
During daily sale entry operations, the cashier may call for Manager Intervention. The following is the operation flow of Manager Intervention.
1) During operations, the cashier comes across an item that requires Manager Intervention. The cashier,
already informed of it, may immediately call for Manager Intervention. Or the cashier, without knowing
of it, attempts the operation, and an error results, clears the error by the [C] key, and then calls for
Manager Intervention.
2) The Store Manager goes to the cashier counter with the MGR or MA key.
3) The cashier explains what kind of operation is to be entered and removes the REG key from the Control Lock at the “REG” position.
4) The Store Manager insert the MGR or MA key and turns it to the “MGR” position.
5) The cashier operates the required item.
6) The Store Manager returns the MGR or MA key to the “REG” position and pulls it out.
7) The cashier returns the REG key to the “REG” key position and continues sale entry operations.
The following are the tables of the keys and operations that are programmable with Manager Intervention. Fill
in the tables by marking in the “Not required” or “Required” column of each item.
Keys and Manager Intervention Status
KEY Reference
[RTN MDSE] As for the key status
[PO] change, ask your
[DOLL DISC] TOSHIBA TEC
[%-] (% I, % II) representative.
[EX]
[ALL VOID]
[VND CPN]
[STR CPN]
Not required Required
MGR Position
NOTE: As for the initial status of the respective keys shown above, MGR position “Not Required” status is
programmed to all of them.
- 1 -
Page 68

Operations and Manager Intervention Status
MA-1350-1 SERIES
EO1-11126
OPERATION Reference
Credit Balance (over- As for the status
subtraction of the sale change, ask your
by [DOLL DISC], [VND TOSHIBA TEC
CPN], [STR CPN] and representative.
[VOID] keys)
Negative Department
or negative PLU Entries
Negative-balance Sale
Finalization by Noncash Media Kyes.
Not required Required
MGR Position
NOTES: 1. As for the initial status of the respective operation items shown above, MGR position “Re-
quired” status is programmed only to “Credit Balance”.
2. “Credit Balance” is not applied to the [RTN MDSE] key, negative department, and negative
PLU.
Listing Capacity Release
Listing Capacities (amount limits) may be programmed on Departments (each open-price PLU is ruled by the
Listing Capacity of its link Department) and Tender Media. These LCs (Listing Capacities) are programmed to
check an excessively high amount entry by cashier’s mistake at the earliest stage. Guide your cashiers as in
the following procedure:
1) During sale entries by a cashier, an error occurs when a Department or PLU item has been entered, or
a media key has been depressed.
2) The cashier clears the error by the [C] key. The cashier confirms the amount and operates the item
again.
3) If the same error occurs again, the cashier attempts to enter the amount using the [LC OPEN] or
[OPEN] key.
4) If the operation results in an error again, it means that the amount still cannot be entered by the [LC
OPEN] or [OPEN] key function.
5) The cashier calls for Manager Intervention.
The procedure thereafter is the same as Steps 2) to 7) for the Items programmed to require Manager Intervention on the preceding page.
Reference: For reading the Listing Capacity of each Department:
Chapter 5. Program Data Verification — Department LC and Status Read
For setting the Listing Capacities of specific Departments:
Ask your TOSHIBA TEC representative.
For reading the Listing Capacity of each Tender Media Key:
Chapter 5. Program Data Verification — Other Programmed Data Read
For setting the Listing Capacities of the specific Tender Media Keys:
Chapter 4. Changing the Programmed Data — Listing Capacity Setting for the
Tender Media
- 2 -
Page 69

MA-1350-1 SERIES
EO1-11126
2. Operations in “ - ” Mode
This chapter describes operations to be performed in the “ - ” position of the Control Lock, which the Store
Owner or a person so authorized can access using the MA key.
Instead of using the [RTN MDSE] or [VOID] keys in the “REG” or “MGR” mode for deleting individual sale
items, the “ - ” mode automatically processes positive items into negative and negative into positive. To operate, turn the Mode Lock to the “ - ” position using the MA key, and enter the items, one by one, just as in the
“REG” mode as reading the sale receipt (issued at the time of the purchase) or tracing the returned items as if
the “REG” mode. A positive balance resulted in the “ - ” mode indicates the amount to be paid back to the customer. The “ - ” mode operation may occur from time to time during the day, on the cashier’s request, just as in
the case of ordinary Manager Interventions, when a customer comes to the cashier counter to return or cancel
all the items that were once purchased and finalized (in which case the All Void operation is no longer effective).
Receipt Samples in “REG” and “ - ”
Receipt issued in “REG” or “MGR” Mode Receipt issued in “ - ” Mode
MEAT 7.00 TF
% 5% 0.35FISH 5.50 TF
%+
10% 0.55
SUBTL 12.70
TAX 0.90
CASH 13.
JONES 0240 11:20TM
60
These two receipts contain the
same sale items and media finalization. The operations are also the
same except the Control Lock position.
The cashier merely follows the purchase receipt (on the left) and enters the same items in the
“ - ” mode finalizing with the same
media, in case the customer has
returned or canceled the entire sale
after once finalized that sale.
∗
REG-
MEAT 7.00 TF
% 5% 0.35FISH 5.50 TF
%+
10% 0.55
SUBTL 12.70
TAX 0.90
CASH 13.
∗
REG-
JONES 0243 11:21TM
∗
60
∗
“ - ” mode Receipt Header
NOTE: In the “ - ” mode the Listing Capacities and the status requiring Manager Intervention will all be
released, i.e., the same handing as in the “MGR” mode.
- 3 -
Page 70

MA-1350-1 SERIES
3. Read and Reset Reports
This chapter describes the operation to take each report and its contents.
• The Read (X) reports allow to read the totals but not clear the memory, while the Reset (Z) reports allow to
read the totals and, at the same time, clear all the resettable totals when the report has been taken.
• The symbol “X” is printed at the top of Read Reports, while “Z” is printed on Reset Reports to indicate the
type of report.
• Reset Report Counter is printed on each Reset Report only.
• The daily report covers data obtained during a certain period on that day until the corresponding Reset
Report was printed, while the periodical report covers data obtained during a certain period defined by the
store.
• When you take a read report, the “R OFF” lamp must be extinguished. If it is illuminated, press the [LOG/
RECEIPT] key to extinguish the lamp. As for a reset report, it can be issued even if the “R OFF” lamp is
illuminated.
CAUTION: Whenever you turn the Control Lock to “Z” position, be sure that you are taking Reset Reports
(final reports) and that the sales data will be cleared by the operation to follow.
EO1-11126
WARNING!
When opening the cash drawer, be careful not to let the drawer hit any person.
Daily Reports
Report Name Key Operation Sample
* Financial Read Control Lock: X
* Financial Reset Control Lock: Z
Hourly Sales Read Control Lock: X
Hourly Sales Reset Control Lock: Z
All Department Read
All Department Reset
Department Gross Profit Read
All PLU Sales Read Control Lock: X
All PLU Sales Reset Control Lock: Z
(NOTE 2)
(NOTE 2)
Control Lock: X
Control Lock: Z
Control Lock: X
→
→
→
→
→
AT/TL
01
1
1
21
PLU
AT/TL
AT/TL
AT/TL
Page
6
12
13
14
14
Zone PLU Sales Read Control Lock: X
Zone PLU Sales Reset Control Lock: Z
* Media Sales and In-drawer Read
* Individual Cashier Read
* Individual Cashier Reset
(NOTE 3)
(NOTE 3)
Control Lock: X Cashier Signing Method
Control Lock: Z
- 4 -
→
→
→
Cashier Code:
→
Zone-start
PLU Code
1 to 8
Cashier Key Method
@/FOR
(or , )
LOG
RECEIPT
Set the required Cashier
Key ON, then
Zone-end
PLU Code
#/CID#/NS
1
#
AT/TL
PLU
14
12Control Lock: X
15
Page 71

Periodical Reports
Report Name Key Operation Sample
MA-1350-1 SERIES
EO1-11126
Page
* Financial Read Control Lock: X
* Financial Reset Control Lock: Z
* All Cashier Read
* All Cashier Reset
All Department Read
All Department Reset
Department Gross Profit Read
NOTES: 1. The cash drawer will open on the final key of the key operation for the reports marked with
(NOTE 3)
(NOTE 3)
(NOTE 2)
(NOTE 2)
“*”.
2. All Department Read and Reset Reports can be issued when the program option “Issuing
Department Reports separately from Financial Reports” is selected. (Ask your TOSHIBA TEC
representative.)
3. Cashier Read and Reset Reports can be issued only when the Cashier Identifying Option
(Signing Method; Cashier Sign ON & Sign OFF, Cashier Key Method; Push LED Key, Barrel
Lock, [CLK] Key) is selected. Refer to Chapter 11 on page 17 in Operator’s Guide.
Control Lock: X
Control Lock: Z
Control Lock: X
Control Lock: Z
Control Lock: X
→
→
→
2
4
2
0
AT/TL
AT/TL
1→2
AT/TL
2
AT/TL
6
16
13
14
Report Sample Format
On the following pages are sample formats of respective reports. In referring to those formats, please note
the following conditions:
• In each report format, all the items that can be programmed to print are placed.
• The data contents are merely examples to show the report format. The numeric data may not balance
correctly.
ther the programmed contents nor sales data placed as examples in various operating procedures in
Chapters “13. Transaction Entries” on page 21 in Operator’s Guide and “4. Changing the Programmed Data” on page 17 in Manager’s Guide or any other chapters are related to the numeric data
in the report formats.
(Refer to the “Memory Balance” attached to the Daily Financial Read or Reset Report.) Nei-
- 5 -
Page 72

Financial Read or Reset Report (Daily or Periodical)
TEC STORE
1343 PEACH DRIVE
PHONE: 87-6437
Open 8:00am to 7:00pm
Closed: every Wednesday
11-28-1997 #112300
Date, Register No.
MA-1350-1 SERIES
EO1-11126
X: Daily Read
Z: Daily Reset
GTX: Periodical Read
GTZ: Periodical Reset
NOTE
page 8
GT
10105581.31
NET GT
10106672.51
GS
185
988.46
MEAT 44
31CU 244.10
46.97%
FISH 40
18CU 134.61
25.90%
DRINK 25
31CU 59.90
11.53%
BAKERY 33
12CU 81.11
15.61%
DP
on
05 5
5CU -7.50
DP
06 3
3CU 1200.00
TOTAL 142
512.22
FRESH F 84
22.12% 378.71
DR & BA 58
8.24% 141.01
OTHERS 8
69.65% 1192.50
TOTAL 150
1712.22
Z
Report Type Symbol
Grand Total (non-resettable)
NET GT (non-resettable)
Gross Sale: Item Count
Amount
Department 1 (MEAT): Item Count
Department 2 (FISH) Data
Department 3 (DRINK) Data
Department 4 (BAKERY) Data
Department 5 Data; Negative status department is excluded from the sales ratio calculation.
Department 6 Data; Other income department is excluded from the sales ratio calculation.
Total of all departments (excluding negative and other income depts.): Item Count
(Initial Status: Non-print)
Department Group 1 (FRESH F): Item Count
Department Group 2 (DR & BA) Data
Department Group 3 (OTHERS) Data
Total of all department groups
(Initial Status: Print)
(Initial Status: Non-print)
Customer Count
Sales Ratio
(Initial Status: Print)
(Initial Status: Print)
Sales Ratio
(Initial Status: Non-print)
, Amount
(Initial Status: Print)
: Item Count
Amount
Amount
, Amount
%+ 1
1.50
NS
142
513.72
GST 0.00
TAX1 18.13
TAX2 17.63
TAX3 18.13
TAX4 17.63
EX GST 0.00
NS
142
549.60
HASH TL 3
1200.00
%- 2
2.80
V.CPN 1
1.00
DISC 1
0.40
TOTAL
60CU 1745.40
Percent Charge: Count
Net Sales without Tax
GST (exclusive) Amount
Tax 1 Amount
Tax 2 Amount
Tax 3 Amount
Manual Tax Amount
Exempted GST (inclusive) Amount
Net Sales with Tax
Total of Other Income Departments: Item Count
(Initial Status: Non-print)
Percent Discount on Subtotal: Count
Vendor Coupon: Count
Dollar Discount: Count
All Media Total:Customer Count, Amount
Amount
(Initial Status: Non-print)
(Print for the GST feature)
(Initial Status: Print)
Amount
Amount
Amount
: Item Count
Amount
(Print for the GST feature)
: Item Count
Amount
Amount
- 6 -
Page 73

MA-1350-1 SERIES
EO1-11126
CASH
44CU 773.43
CHECK
3CU 550.88
Chg
8CU 336.36
MISC
1CU 1745.40
CPN
0CU 773.43
FS TL
1CU 550.88
R/A 6
45.00
PO 3
6.50
CASH ID 603.16
CHECK ID 7
572.00
Chg ID 8
336.36
MISC ID 3
23.00
CPN ID 3
15.00
FSID 3
18.00
FS CG 0.40
CORR 2
6.50
VOID 2
14.00
MISC VD 0
0.00
ALL VD 2
37.40
%- 3
1.70
S.CPN 1
1.00
-DP TL 5
7.50
RTN 5
22.10
-TAX 0.45
REG- 1
13.95
TRF TL 20.19
TRF+ GT 20.19
TRF- GT 0.00
TRF+ 20.19
TRF- 0.00
PB TL
3CU 30.99
PB R/A 10.80
PB PO 0.00
NON GST 0.00
GST TXBL 222.43
GST INC 15.57
TXBL1 362.31
TXBL2 85.60
TXBL3 0.00
TAX EX
2CU
GST EX 0.00
TAX1EX 24.50
TAX2EX 8.50
TAX3EX 0.00
Cash Sales: Customer Count, Amount
Check Sales: Customer Count, Amount
Charge Sales: Customer Count, Amount
Miscellaneous Media Sales: Customer Count, Amount
Media-coupon Sales: Customer Count, Amount
Food Stamp Sales
Customer Count, Amount
Received-on-Account: Count
Paid Out: Count
Cash-in-drawer Amount
Check-in-drawer: Count
Charge-in-drawer: Count
Miscellaneous Media-in-drawer: Count
Media-coupon-in-drawer: Count
Food Stamp-in-drawer: Count
Food Stamp Change Amount
Item Correct: Count
Void: Count
Amount
Misc. Void (Item Correct and Void on other items than Departments and PLUs): Count
All Void: Count
Percent Discount on Line Item: Count
Store Coupon: Count
Total of Negative Departments: Item Count
Returned Merchandise: Item Count
Negative Tax Amount
Negative Mode (“ - ” position): Count
Transfer Total (non-resettabale)
Transfer (+) GT (non-resettable)
Transfer (-) GT (non-resettable)
Transfer (+) Daily
Transfer (-) Daily
Previous Balance Sales: Customer Count, Amount
Previous Balance R/A Amount
Previous Balance PO Amount
GST Non-taxable Amount
Sale Total subject to GST
GST (inclusive) Amount
Sale Total subject to Tax 1
Sale Total subject to Tax 2
Sale Total subject to Tax 3
Tax Exempted Customer Count
GST Exempt Amount
Tax 1 Exempt Amount
Tax 2 Exempt Amount
Tax 3 Exempt Amount
(Print for the Food Stamp feature)
Amount
Amount
Amount
(Initial Status: Print)
Amount
(Initial Status: Non-print)
Amount
Amount
Amount
(Initial Status: Print)
(Print for the Food Stamp feature)
(Print for the Food Stamp feature)
Amount
Amount
Amount
Amount
Amount
Amount
Amount
(Print for the GST feature; Initial Status: Print)
(Print for the GST feature)
(Print for the GST feature)
(Print for the GST feature)
:
(Initial Status: Print)
(Initial Status: Non-print)
These items
are printed
on Daily Reports only
but not on
Periodical
Reports.
Amount
- 7 -
Page 74

MA-1350-1 SERIES
EO1-11126
FS EX1 0.00
FS EX2 0.00
FS EX3 0.00
N. NS
CUR1 2
120.00
CUR2 1
15.00
NO SALE 2
VALI CTR 6
MEAT
10.00% 24.41
FISH
15.00% 20.19
DRINK
20.00% 11.98
BAKERY
25.00% 20.27
TOTAL
14.79% 76.85
0006Z
0263 20:37TM
0.00
Food Stamp Tax 1 Exempt Amount
Food Stamp Tax 2 Exempt Amount
Food Stamp Tax 3 Exempt Amount
New Net Sales Amount
Foreign Currency 1-in-drawer: Count
Foreign Currency 2-in-drawer: Count
No-sale Count
Validation Print Count
Department 1 (MEAT)
Gross Profit Rate, Amount
Department 2 (FISH)
Gross Profit Rate, Amount
Department 3 (DRINK)
Gross Profit Rate, Amount
Department 4 (BAKERY)
Gross Profit Rate, Amount
Average Gross Profit Rate, Total of Gross Profit Amount
Reset Count of this Reset Report (printed on Reset Report only)
Receipt Consecutive No., Current Time
(Initial Status: Non-print)
(Print for the GST feature)
(Initial Status: Non-print)
(Printed only when ILLINOIS or
NEW JERSEY type of Food
Stamp feature is selected.)
Amount
Amount
NOTE: Initially, department and department group data is printed on the Financial Report as shown in
the sample. However, the data can be issued separately from the Financial Report. (Refer to All
Departments Read or Reset Report shown on page 13.)
- 8 -
Page 75

- Memory Balance -
Memory Balance applicable to the US Version
Grand Total = Sum of Daily Gross Sales
NET GT = Sum of Daily All Media Sales
MA-1350-1 SERIES
EO1-11126
Gross Sales = (Sum of Depts.;
+ (Percent Discount on Line Item) + (Sum of Negative Depts.) + (Item Correct)
+ (Void) + (Returned Merchandise) + (“ - ” Mode) + (Store Coupon)
+ (All Void; NOTE 2) + (Negative Tax)
Net Sales with Tax = (Sum of Depts.; NOTE 1) + (Sum of Taxes) + (Percent Charge)
= (Gross Sales) - (Item Correct) - (Void) - (Percent Discount on Line Item)
- (Store Coupon) - (Negative Tax) - (Sum of Negative Depts.)
- (Returned Merchandise) - (“ - ” Mode) - (All Void;
All Media Sales = (Net Sales with Tax) - (Percent Discount on Subtotal) - (Vendor Coupon)
- (Dollar Discount) + (Sum of Other Income Depts.)
= (Cash Sales) + (Check Sales) + (Charge Sales)
+ (Miscellaneous Media Sales) + (Media-coupon Sales)
+ (Food Stamp Sales) + (Previous Balance Sales)
Sum of Hourly Range Sales = Net Sales with Tax (US Balance;
Sum of Hourly Range Sales = Net Sales without Tax (CA Balance)
“ - ” Mode = (Gross Sales) in the “ - ” Mode
Sum of NEG 1 = (Percent Discount on Line Item) + (Sum of Negative Depts.) + (Item Correct)
+ (Void) + (Returned Merchandise) + (Negative Tax) + (“ - ” Mode)
+ (All Void;
NOTE 1
NOTE 2
) + (Sum of Taxes) + (Percent Charge)
NOTE 3
) + (Store Coupon)
NOTE 2
)
)
Sum of NEG 2 = (Percent Discount on Subtotal) + (Dollar Discount) + (Misc. Void)
+ (Vendor Coupon)
NOTES: 1. (Sum of Depts.) = (Sum of Positive Depts.) + (Sum of Negative Depts.)
* Other Income Depts. Excluded
2. (All Void) = (Sum of Positive Depts.) + (Manual Tax) + (Percent Charge)
3. Applicable when the Daily Financial Reset Report and the Daily Hourly Range Reset Report
are taken at the same time.
4. The same amount processed into the Gross Sales memory is processed into the All Void
memory.
- 9 -
Page 76

Memory Balance applicable to the CA GST (Exclusive) Version
Grand Total = Sum of Daily Gross Sales
NET GT = Sum of Daily All Media Sales
Gross Sales = (Net Sales with Tax) + (Percent Discount on Line Item)
+ (Sum of Negative Depts.) + (Item Correct) + (Void) + (Returned Merchandise)
+ (“ - ” Mode) + (Store Coupon) + (All Void;
NOTE 2
MA-1350-1 SERIES
EO1-11126
) + (Negative Tax)
Net Sales with Tax = (Sum of Depts.;
NOTE 1
) + (Percent Charge) + (GST) + (PST;
NOTE 3
= (Gross Sales) - (Item Correct) - (Void) - (Percent Discount on Line Item)
- (Store Coupon) - (Negative Tax) - (Sum of Negative Depts.)
- (Returned Merchandise) - (“ - ” Mode) - (All Void;
NOTE 2
)
All Media Sales = (Net Sales with Tax) - (Percent Discount on Subtotal) - (Vendor Coupon)
- (Dollar Discount) + (Sum of Other Income Depts.)
= (Cash Sales) + (Check Sales) + (Charge Sales)
+ (Miscellaneous Media Sales) + (Media-coupon Sales)
+ (Previous Balance Sales)
Sum of Hourly Range Sales = (Sum of Depts.;
NOTE 1
) + (Percent Charge)
= N.NS (New Net Sales)
“ - ” Mode = (Gross Sales) in the “ - ” Mode
Sum of NEG 1 = (Percent Discount on Line Item) + (Sum of Negative Depts.) + (Item Correct)
+ (Void) + (Returned Merchandise) + (Negative Tax) + (“ - ” Mode)
+ (All Void;
NOTE 2
) + (Store Coupon)
Sum of NEG 2 = (Percent Discount on Subtotal) + (Dollar Discount) + (Misc. Void)
+ (Vendor Coupon)
NOTES: 1. (Sum of Depts.) = (Sum of Positive Depts.) + (Sum of Negative Depts.)
* Other Income Depts. Excluded
2. (All Void) = (Sum of Positive Depts.) + (Manual Tax) + (Percent Charge)
3. PST = (Sum of Taxes; Taxes 1 to 3 and Manual Tax)
4. The same amount processed into the Gross Sales memory is processed into the All Void
memory.
)
- 10 -
Page 77

Memory Balance applicable to the CA GST (Inclusive) Version
Grand Total = Sum of Daily Gross Sales
NET GT = Sum of Daily All Media Sales
Gross Sales = (Net Sales with Tax) + (Percent Discount on Line Item)
+ (Sum of Negative Depts.) + (Item Correct) + (Void) + (Returned Merchandise)
+ (“ - ” Mode) + (Store Coupon) + (All Void;
NOTE 2
+ (Exempted GST)
MA-1350-1 SERIES
EO1-11126
) + (Negative Tax)
Net Sales with Tax = (Sum of Depts.;
NOTE 1
) + (Percent Charge) + (PST;
NOTE 3
)
- (Exempted GST)
= (Gross Sales) - (Item Correct) - (Void) - (Percent Discount on Line Item)
- (Store Coupon) - (Negative Tax) - (Sum of Negative Depts.)
- (Returned Merchandise) - (“ - ” Mode) - (All Void;
NOTE 2
)
All Media Sales = (Net Sales with Tax) - (Percent Discount on Subtotal) - (Vendor Coupon)
- (Dollar Discount) + (Sum of Other Income Depts.)
= (Cash Sales) + (Check Sales) + (Charge Sales)
+ (Miscellaneous Media Sales) + (Media-coupon Sales)
+ (Previous Balance Sales)
Sum of Hourly Range Sales = (Sum of Depts.;
NOTE 1
) + (Percent Charge)
- (Exempted GST) - (GST included in Depts.)
= N.NS (New Net Sales)
“ - ” Mode = (Gross Sales) in the “ - ” Mode
Sum of NEG 1 = (Percent Discount on Line Item) + (Sum of Negative Depts.) + (Item Correct)
+ (Void) + (Returned Merchandise) + (Negative Tax) + (“ - ” Mode)
+ (All Void;
NOTE 2
) + (Store Coupon)
Sum of NEG 2 = (Percent Discount on Subtotal) + (Dollar Discount) + (Misc. Void)
+ (Vendor Coupon)
NOTES: 1. (Sum of Depts.) = (Sum of Positive Depts.) + (Sum of Negative Depts.)
* Other Income Depts. Excluded
2. (All Void) = (Sum of Positive Depts.) + (Manual Tax) + (Percent Charge)
3. PST = (Sum of Taxes; Taxes 1 to 3 and Manual Tax)
4. The same amount processed into the Gross Sales memory is processed into the All Void
memory.
- 11 -
Page 78

Daily Hourly Sales Read or Reset Report
TEC STORE
1343 PEACH DRIVE
PHONE: 87-6437
Open 8:00am to 7:00pm
Closed: every Wednesday
11-28-1997 #112300
Z10
Report Type Symbol
MA-1350-1 SERIES
EO1-11126
X10: Daily Read
Z10: Daily Reset
08:00TM
1CU 5.00
09:00TM
4CU 43.35
10:00TM
14CU 78.55
13:00TM
24CU 240.96
16:30TM
18CU 186.74
19:00TM
0001Z
0252 20:04TM
Sales Data in Hourly Range from 19 : 01 yesterday to 8 : 00 No sales recorded
Sales Data (Customer Count & Amount) in Hourly Range from 8 : 01 to 9 : 00
Sales Data (Customer Count & Amount) in Hourly Range from 9 : 01 to 10 : 00
Sales Data (Customer Count & Amount) in Hourly Range from 10 : 01 to 13 : 00
Sales Data (Customer Count & Amount) in Hourly Range from 13 : 01 to 16 : 30
Sales Data (Customer Count & Amount) in Hourly Range from 16 : 31 to 19 : 00
Reset Count of this Reset Report (printed on Reset Reports only)
Receipt Consecutive No., Current Time
Daily Media Sales & In-drawer Read Report
TEC STORE
1343 PEACH DRIVE
PHONE: 87-6437
Open 8:00am to 7:00pm
Closed: every Wednesday
11-28-1997 #112300
TOTAL
X
60CU 1745.40
CASH ID 603.16
CHECK ID 7
572.00
Chg ID 8
336.36
MISC ID 3
23.00
CPN ID 3
15.00
FSID 3
18.00
CUR1 2
120.00
CUR2 1
15.00
0250 20:00TM
Report Type Symbol (Daily Read Report only)
Total Customer Count, All Media Sales Amount
Cash-in-drawer Amount
Check-in-drawer: Count
Charge-in-drawer: Count
Miscellaneous Media-in-drawer: Count
Media-coupon-in-drawer: Count
Food Stamp-in-drawer: Count
Foreign Currency 1-in-drawer: Count
Foreign Currency 2-in-drawer: Count
Receipt Consecutive No., Current Time
Amount
Amount
Amount
(Initial Status: Print)
(Initial Status: Non-print)
Amount
Amount
(Initial Status: Print)
(Initial Status: Print)
(Print for the Food Stamp feature)
Amount
Amount
- 12 -
Page 79

All Departments Read or Reset Report (Daily or Periodical)
TEC STORE
1343 PEACH DRIVE
PHONE: 87-6437
Open 8:00am to 7:00pm
Closed: every Wednesday
11-28-1997 #112300
X11
MEAT 44
31CU 244.10
46.97%
FISH 40
18CU 134.61
25.90%
DRINK 25
13CU 59.90
11.53%
BAKERY 33
12CU 81.11
15.61%
DP
05 5
5CU -7.50
DP
06 3
3CU 1200.00
TOTAL 142
512.22
FRESH F 84
22.12% 378.71
DR & BA 58
8.24% 141.01
OTHERS 8
69.65% 1192.50
TOTAL 150
1712.22
Report Type Symbol
Department 1 (MEAT): Item Count
Customer Count
Sales Ratio
Department 2 (FISH) Data
Department 3 (DRINK) Data
Department 4 (BAKERY) Data
Department 5 Data; Negative status department is excluded from the sales ratio calculation.
Department 6 Data; Other income department is excluded from the sales ratio calculation.
Total of all departments
(excluding negative and other income depts.)
Department Group 1 (FRESH F): Item Count
Sales Ratio (Initial Status: Print), Amount
Department Group 2 (DR & BA) Data
Department Group 3 (OTHERS) Data
Total of all department groups
(Initial Status: Print)
(Initial Status: Print)
(Initial Status: Non-print)
X11: Daily Read
Z11: Daily Reset
GTX21: Periodical Read
GTZ21: Periodical Reset
, Amount
(Initial Status: Non-print)
MA-1350-1 SERIES
EO1-11126
:Item Count
Amount
: Item Count
Amount
(Initial Status:
Print)
NOTE 2
MEAT
10.00% 24.41
FISH
15.00% 20.19
DRINK
20.00% 11.98
BAKERY
25.00% 20.27
TOTAL
14.79% 76.85
0254 20:10TM
Department 1 (MEAT)
Gross Profit Rate, Amount
Department 2 (FISH)
Gross Profit Rate, Amount
Department 3 (DRINK)
Gross Profit Rate, Amount
Department 4 (BAKERY)
Gross Profit Rate, Amount
Average Gross Profit Rate, Total of Gross Profit Amount
Receipt Consecutive No., Current Time
NOTES: 1. Initially, department and department group data is printed on the Financial Report as shown
in the Financial Report sample on page 6. However, the data can be issued separately from
the Financial Report by the program option. (Refer to your TOSHIBA TEC representative.)
2. Data concerning the Department Gross Profit is not printed for the following Departments.
• Negative Status Department
• Other Income Department
• Department which has no sales data
• Department of which sales data is negative
- 13 -
Page 80

Department Gross Profit Read (Daily or Periodical)
MA-1350-1 SERIES
EO1-11126
X12: Daily Read
GTX22: Periodical Read
NOTE
X12
MEAT
10.00% 24.41
FISH
15.00% 20.19
DRINK
20.00% 11.98
BAKERY
25.00% 20.27
TOTAL
14.79% 76.85
0255 20:13TM
Report Type Symbol
Department 1 (MEAT)
Gross Profit Rate, Amount
Department 2 (FISH)
Gross Profit Rate, Amount
Department 3 (DRINK)
Gross Profit Rate, Amount
Department 4 (BAKERY)
Gross Profit Rate, Amount
Average Gross Profit Rate, Total of Gross Profit Amount
Receipt Consecutive No., Current Time
NOTE: Data concerning the Department Gross Profit is not printed for the following Departments.
• Negative Status Department
• Other Income Department
• Department which has no sales data
• Department of which sales data is negative
Daily PLU Read or Reset Report (All or Zone)
Daily All PLU Read or Reset Report
0100 Pork
Z
8 16.00
0101 Beef
3 9.00
0200 Salmon
6 30.00
0201 Shrimp
9 18.00
0300 Coke-A
15 12.00
0301 Boke-B
4 4.00
0400 Bun-A
12 4.51
0401 Bun-B
11 5.50
0500 PLU500
1 -0.50
TOTAL
68 98.51
0001Z
0256 20:15TM
Report Type Symbol
PLU Code 100 (Pork)
Item Count, Amount
PLU Code 101 (Beef)
Item Count, Amount
PLU Code 200 (Salmon)
Item Count, Amount
PLU Code 201 (Shrimp)
Item Count, Amount
PLU Code 300 (Coke-A)
Item Count, Amount
PLU Code 301 (Coke-B)
Item Count, Amount
PLU Code 400 (Bun-A)
Item Count, Amount
PLU Code 401 (Bun-B)
Item Count, Amount
PLU Code 500
Item Count, Amount
Total of all PLUs
Item Count (Positive PLUs only), Amount (Positive PLUs + Negative PLUs)
Reset Count of this Reset Report (including the Zone Reset)
(printed on Reset Reports only)
Receipt Consecutive No., Current Time
X: Daily Read
Z: Daily Reset
Daily Zone PLU Read or Reset Report
The format is the same as “All PLU Read or Reset Report” above. The only difference is that the
Zone Read or Reset Report outputs only the PLUs in the zone designated by the key operation to
take the report.
- 14 -
Page 81

Cashier Read or Reset Report (Daily or Periodical)
Daily Cashier Read or Reset Report
TEC STORE
1343 PEACH DRIVE
PHONE: 87-6437
Open 8:00am to 7:00pm
Closed: every Wednesday
11-28-1997 #112300
MA-1350-1 SERIES
EO1-11126
X: Daily Read
Z: Daily Reset
SMITH
GS
6
26.68
NS
3
18.00
NS
3
18.48
HASH TL 0
0.00
TOTAL
4CU 18.48
CASH ID -2.52
CHECK ID 1
10.00
Chg ID 0
0.00
MISC ID 0
0.00
CPN ID 0
0.00
FSID 2
11.00
NEG1 8.20
NEG2 0.00
PO 0.00
TAX 0.48
0002Z
0258 20:22TM
Z
Report Type Symbol
Cashier Name
Gross Sales: Item Count
Net Sales without Tax
Net Sales with Tax
Other Income Department Sales
Total Customer Count, All Media Sales Amount
Cash-in-drawer Amount
Check-in-drawer: Count
Charge-in-drawer: Count
Miscellaneous Media-in-drawer: Count
Media-coupon-in-drawer: Count
Food Stamp-in-drawer: Count
NEG 1 Data
NEG 2 Data
Paid Out Amount
Tax Amount
Reset Count of this Reset Report (printed on Reset Reports only)
Receipt Consecutive No., Current Time
Amount
(Initial Status: Non-print)
(Initial Status: Print)
(Initial Status: Non-print)
Amount
(Initial Status: Print)
Amount
(Initial Status: Non-print)
Amount
Amount
Amount
(Print for the Food Stamp feature)
(Initial Status: Non-print)
: Item Count
Amount
: Item Count
Amount
: Item Count
Amount
(Initial Status: Print)
(Initial Status: Print)
- 15 -
Page 82

Periodical Cashier Read or Reset Report
TEC STORE
1343 PEACH DRIVE
PHONE: 87-6437
Open 8:00am to 7:00pm
Closed: every Wednesday
11-28-1997 #112300
Z04
JONES
GS
179
627.52
NS
139
495.72
NS
139
531.12
HASH TL 3
1200.00
TOTAL
56CU 1726.92
NEG1 96.40
NEG2 4.20
PO 6.50
TAX 35.40
Report Type Symbol
Sales Data by Cashier 1 (JONES)
(format same as in Daily Report)
MA-1350-1 SERIES
EO1-11126
X04: Periodical All Cashier Read
Z04: Periodical All Cashier Reset
SMITH
GS
6
26.68
NS
3
18.00
NS
3
18.48
HASH TL 0
0.00
TOTAL
4CU 18.48
NEG1 8.20
NEG2 0.00
PO 0.00
TAX 0.48
3CL
4CL
5CL
6CL
7CL
8CL
0002Z
0259 20:24TM
Sales Data by Cashier 2 (SMITH)
When a cashier has no sales data, only cashier No.
(or name if progarmmed) will be printed.
Reset Count of this Reset Report (printed on Reset Reports only)
Receipt Consecutive No., Current Time
- 16 -
Page 83

MA-1350-1 SERIES
EO1-11126
4. Changing the Programmed Data
This chapter is provided for the store programmer or the store manager who may have to change the programmed data of the MA-1350-1 series ECR on a daily, weekly, or monthly basis. Usually, all the basic program
data required for your store should be set before delivering the product by your local TOSHIBA TEC
representative. However, to change or add program data, please refer to this chapter. It is also recommended to
read other chapters in this manual in order to thoroughly understand the descriptions in this chapter. If there are
any unclear points or program data other than listed here that must be changed or added, please contact your
TOSHIBA TEC representative.
Character Entries for Programming Operations:
There are two methods of operations for character settings for names or messages: CHARACTER CODE
ENTRY Method and DIRECT CHARACTER ENTRY Method.
CHARACTER CODE ENTRY Method:
This method is to set a character by entering a Character Code and depressing the [#/NS] key. This
method is allowed on the ECR keyboard.
DIRECT CHARACTER ENTRY Method:
This method is to set a character by directly depressing the Character Key on the following keyboards.
• ECR Normal Keyboard (Setting operations including character entries can be performed after
the key operation “81 [@/FOR].)
• ECR Flat Keyboard using the “SET Mode Key Layout” sheet
• PK-2 Keyboard (PLU Keyboard; hardware option)
By using those character keys, the characters are directly entered. In this manual, sample operations
are attached to most of the programming operations. And at name or message programming portions,
characters are entered by the CHARACTER CODE ENTRY method. Instead of this, you may depress
the Character Keys. For example, instead of entering 11[#/NS] (to enter character “A”), you may simply
depress Character Key “A” on any of three keyboards above.
On the following pages, Character Code Tables under the CHARACTER CODE ENTRY Method and the
three different Keyboards under the DIRECT CHARACTER ENTRY Method are shown. These pages are
to be referred to, every time the “Character Entries” sequence is contained in various programming operations in this manual.
- 17 -
Page 84

Character Code Entry Method:
CHARACTER CODE Table:
Column Code →
MA-1350-1 SERIES
EO1-11126
Row
Code
→
0
1
2
3
4
5
6
01
0@
1A
2B
3C
4D
5E
6F
2
J
K
L
M
N
O
P
34
T<
U>
V{
W|
X}
Y~
Z
5
Ä
Ë
Ö
É
ë
ï
î
67
ì
Ø
1
¢
2
1
÷
4
II
III kg
8
No
–
;
^
910
’,
”
.
:
’
#
*
11
a
b
c
d
e
f
12 13
jt
ku
lv
mw
nx
oy
pz
14
Ü
Æ
Œ
Å
Ñ
15 16
äâ
öê
üÇ
æé
Ϗ
åú
ñá
17
Γ
∆
Θ
Λ
Ξ
18
(
Ψ
)
Ω
7
8
9
7G
8H
9I
Q
R
S
$
£
¥+
ô
û
à
1b
[
II
`
[
&
– !
Example) Character code “12” is assigned to character “B”.
Character code “120” is assigned to character “j”.
g
h
i
q+
rø
s=
%
?
ßí
Dó
∂
→
Space
Π
Σ
Φ
- 18 -
Page 85

MA-1350-1 SERIES
Character Setting Operations
• To set a regular-sized character, enter the COL (column) code and then the ROW code, followed by
the [#/NS] key.
Example) To set “B”, enter 12 and depress [#/NS].
To set “j”, enter 120 and depress [#/NS].
• To set a blank instead of a character, enter 169 and depress [#/NS].
• Depress the [@/FOR] key once prior to a regular-sized character entry, and it will be a double-sized
character (a blank will also be double-sized).
Example) To set “GROUP”, “G” in double-sized, and “ROUP” in regular-sized:
[@/FOR] 17 [#/NS] 28 [#/NS] 25 [#/NS] 31 [#/NS] 26 [#/NS]
G ROUP
• Depress the [@/FOR] key twice prior to the first character code entry to set the entire message line or
enter name with all double-sized characters.
Example) To set “GROUP” all in double-sized:
[@/FOR] [@/FOR] 17 [#/NS] 28 [#/NS] 25 [#/NS] 31 [#/NS] 26 [#/NS]
GROUP
EO1-11126
Direct Character Entry Method:
Using the ECR Normal Keyboard:
Keyboard layout can be changed as shown below by the key operation “81 [@/FOR]” before you enter the
following setting operations.
Character
Keys;
• Space
•/
•–
•,
All Double-sized Declaration
• Store Message and Commercial Message Programming
• Cashier Name Programming
• Department Status Programming
• PLU Table Setting, Changing, or Deletion
LOG
RECEIPT
#
,
–
SPACE
DP#
ITEM
CORR
@/FOR
/
78
45
12
C
RF
JF
9
6
3
A
B
C
D
E
Character Keys; A to Z
F
G L
H
I
J
KU
M
N
O
P
Q
R
S
T
V
W
X
Y
PLU
Characters shown above can be directly entered by depressing the corresponding Character Keys.
* Keyboard layout above in actual size is attached on the last page as appendix. Make a copy and use it
when you perform programming operations executable by this keyboard layout.
0
00
.
- 19 -
ST
AT / TL
Z
Page 86

MA-1350-1 SERIES
EO1-11126
NOTES: 1. Numeric keys are used to enter PLU Codes or numeric values of program data, etc. but
not to enter the numerics as characters.
2. Characters not shown on the keyboard on the preceding page can be entered by the
Character Code Entry Method.
3. After setting operation on this keyboard is completed, operate “82 [@/FOR]” to regain the
keyboard layout for registrations.
To indicate that the keyboard layout has been changed, the following receipts are issued
after the key operation “81 [@/FOR]” or “82 [@/FOR]”.
Receipt issued by the key operation “81 [@/FOR]” Receipt issued by the key operation “82 [@/FOR]”
TEC STORE
1343 PEACH DRIVE
PHONE: 87-6437
Open 8:00am to 7:00pm
Closed: every Wednesday
11-28-1997 #112300
∗
P KB ON
0312 21:31TM
∗
TEC STORE
1343 PEACH DRIVE
PHONE: 87-6437
Open 8:00am to 7:00pm
Closed: every Wednesday
11-28-1997 #112300
∗
P KB OFF
0313 21:32TM
Using the ECR Flat Keyboard:
Use the “SET Mode Key Layout” sheet when you perform the following setting operations
• Store Message and Commercial Message Programming
• Cashier Name Programming
• PLU Table Setting, Changing, or Deletion
Character Keys
#&%
$!@
¢ ★
LOG
(
)
RECEIPT
DP#
ITEM
CORR
∗
RF
JF
q
a
z
A
w
s
x
e
d
c
EWRQ
D
CXNZ
r
f
F
V
t
g
bv
T
GL
B
y
h
n
Y
HS
u
j
m
U
J
i
k
I
O
K
SPACEM
po
l
.
”
#
’
P
;
PLU
/
c
78
4
12
0
5
00
@/FOR
9
6
3
.
Characters shown above can be directly entered by depressing the corresponding Character Keys.
- 20 -
ST
AT / TL
Page 87

MA-1350-1 SERIES
EO1-11126
NOTES: 1. Numeric keys are used to enter PLU Codes or numeric values of program data, etc. but
not to enter the numerics as characters.
2. Characters not shown on the keyboard on the preceding page can be entered by the
Character Code Entry Method.
Using the PK-2 (PLU Keyboard; hardware option):
The PK-2 (hardware option PLU Keyboard) is used to enter the required PLU Code by simply depress the
PLU Preset-code Key on the PK-2 keyboard in the “REG”, “MGR”, or “ - ” mode. In addition, the PK-2
can be used to enter characters directly during the programming operations that require character settings, such as Store Message and Commercial Message Programming, PLU Table Setting, Changing, or
Deletion, etc.
The figure below shows the key indications of the PK-2 keyboard. (A sheet of these character indications
is attached to the PK-2 unit. Insert it between the film layers that cover the PK-2 keyboard for using the
keyboard for this purpose.)
Instead of entering a 2- or 3- digit character code and depressing the [#/NS] key on the ECR keyboard, a
simple depression of the appropriate key on the PK-2 keyboard will be the character entry.
All the function keys, such as [@/FOR], [ST], [#/NS], [AT/TL], etc. must be operated on the ECR side.
Any characters not listed on the template may be entered by the Character Code Entry method on the
ECR keyboard (the characters even listed on the template may be entered as well by that method).
Please note also that the keys “0” to “9” in the figure below function as character keys but do not function
for code entries. Any code entries, for Item Codes, Address Nos, etc. must be entered through the Numeric Keys on the ECR keyboard.
The One Double-size Declaration (by depressing the [@/FOR] key once prior to the required character)
and the All Double-sized Declaration (by depressing [@/FOR] twice before all the characters) are the
same as in the Character Code Entry method.
8
11 21131516141 71 91710181
1119121
5
12 22232526242 72 92410282
1126122
2
13 23333536343 73 93110383
10
4
5
6
7
8
9
@
14#24
w
15e25
s
16d26
x
17c27
W
18E28
S
19D29
X
20C30
$
r
f
v
R
F
V
%
34 54
44
t
35
45
g
36
46
b
37
47 77
T
38
48
G
39
49
B
40
50
&
y
u
55
h
j
56
n
m
57
U
Y
58
H
J
59
N
M
60
64
65
66
67
68
69
70
*
(
74
i
o
75
k
l
76 96 106
)
84
94 104
p
85 115 125
95 105
86
’
97-10787
I
O
78
K
L
79 99:109
SPACE
.
80
P
88
98[108
89 , 119 129
/
100?110
90 120 130
!
q
a
z
Q
A
Z
1133123
0
114 124
+
116 126
=
117 127
]
118 128
- 21 -
Page 88

MA-1350-1 SERIES
EO1-11126
Condition for Programming Operations:
At the top of each programming operation sequence in this chapter, “Condition” is attached. Unless the
register satisfies this condition, the programming operations will not be allowed.
When Condition “After ... Reset” is attached:
“After ... Reset” means that the designated reset report must be taken before entering the programming
(setting) operation. An error will result if the operation is attempted without taking the report.
However, it does not necessarily mean “immediately after ...” When the designated reset report has already been taken and then some operations are performed in the “X”, “Z”, or “SET” mode, the condition
“After ... Reset” is still satisfied and the programming operation is stilled allowed.
On the contrary, when the designated reset report has been taken but then some sales data relating to
that report’s output data are entered in the “REG”, “MGR” or “ - ” mode, the programming operation
will no longer be allowed and the same reset report must be taken again.
Thus, the condition “After ... Reset” indicates that all the sales data relating to the report data must be
zero (except non-resettable memory data). Because of this “Condition” requirement, the report data will
be protected from any inconsistencies of sales data entered in the period from a resetting of the report
to another resetting of the same report next time.
When Condition “Any time outside a sale” is attached:
It means that no condition is specified to a programming (setting) operation, and that the operation is
allowed any time outside a sale (but the cashier must be signed off if the Cashier Signing Method option is selected).
Before changing each setting described in the following pages, be sure to turn the Control Lock to the
SET position using the MA Key.
- 22 -
Page 89

Store Message and Commercial Message Programming
Condition: Any time outside a sale
Programming Procedure:
MA-1350-1 SERIES
EO1-11126
Repeat for
another line.
AT/TL
1 @/FOR
Declaration of Program No. 1
for Store Message and Commercial Message Programming
Character Entries
max. 24 characters/line
(See Character Entries
at the beginning of this
chapter.)
Line No.
1 to 7
NOTE 2
ST
ST
. . .
To complete
this line
(For sequentially
programming lines,
the line number
specification can be
skipped.)
NOTES: 1. For each line, a maximum of 24 regular-sized characters or 12 double-sized characters may
be entered. A combination of both types is also available.
2. The line Nos. available are as follows.
• Store Stamp Feature (Initial status)
Line Nos. for Commercial Message (1 to 3)
• Store Message Print Feature
Line Nos. for Store Message (1 to 4)
Line Nos. for Commercial Message (5 to 7)
3. If any incorrect characters have been programmed, depress the [C] key to clear all the
characters on a line and then re-enter charactrs from the beginning, or end the line with an
[ST] and re-program the entire line. The new data will be active.
4. When all the lines have been programmed, do a check by issuing a receipt. Only the lines
with errors need to be re-programmed; other lines will not be affected.
5. When blanks are programmed for the whole one line, it will cause one line space.
6. As for Commercial Message, if blanks are programmed for all three lines, it will cause line
feed. However, if the message is programmed for one line, remaining two lines will result in
two lines space.
As for the Store Message Print Feature, even if blanks are programmed for all four lines
assigned to Store Message, it will not cause line feed. Those lines will result in four lines
space.
Example) To program the following Store Message and Commercial Message
(under the Store Message Print Feature):
TEC S
1 3 4 3
P H O N E :
O p e n
C l o s e d :
P E A C H D R I V E
8 7 - 6 4 3 7
t o 8 : 0 0 a m
e v e r y W e d n e s d a y
O
T
7 : 0 0 p m
E
R
Line No. 1
Line No. 2
Line No. 3
Line No. 4
Line No. 5
Line No. 6
Line No.7
- 23 -
Page 90

Store Message and Commercial Message Programming Receipt Format:
Key Operation: Control Lock: SET
1
@/FOR
MA-1350-1 SERIES
EO1-11126
1
ST
(Line No. 1)
61
9
#/NS
1
1
ST
#/NS
961
#/NS
@/FOR
@/FOR
@/FOR
96
#/NS
961
#/NS
@/FOR
@/FOR
@/FOR
@/FOR
@/FOR
(to complete Line 1)
(space)
(space)96
(space)
3
0
1
5
1
3
(space)
(space)
2
9
3
0
2
5
2
8
1
5
#/NS
#/NS
#/NS
#/NS
#/NS
#/NS
#/NS
#/NS
(T)
(E)
(C)
() (Line No. 3)
(S)
(T)
(O)
(R)
(E)
1
8
#/NS
961
#/NS
1
4
#/NS
2
8
#/NS
1
9
#/NS
3
2
#/NS
1
5
#/NS
ST
(to complete Line 2)
3
ST
61
#/NS
1
96
#/NS
61
#/NS
1
96
#/NS
61
#/NS
2
6
#/NS
(H)
(space)
(D)
(R)
(I)
(V)
(E)
(space)9
(space)
(space)9
(space)
(space)9
(P)
11-28-1997 #0
P01
1
TEC STORE
2
1343 PEACH DRIVE
3
PHONE: 87-6437
5
Open 8:00am to 7:00pm
6
Closed: every Wednesday
0018 11:55TM
2
() (Line No. 2)
ST
61
#/NS
961
#/NS
61
#/NS
961
#/NS
0
1
#/NS
0
3
#/NS
0
4
#/NS
0
#/NS
1
96
#/NS
2
#/NS6
1
5
#/NS
1
1
#/NS
1
3
#/NS
(space)9
(space)
(space)9
(space)
(1)
(3)
(4)
(3)3
(space)
(P)
(E)
(A)
(C)
1
#/NS8
2
5
#/NS
2
#/NS
1
5
#/NS
0
1
2
#/NS
61
#/NS
0
8
#/NS
0
#/NS7
9
9
#/NS
0
6
#/NS
0
4
#/NS
0
3
#/NS
0
7
#/NS
ST
(to complete Line 3)
(H)
(O)
(N)4
(E)
(:)
(space)9
(8)
(7)
(-)
(6)
(4)
(3)
(7)
- 24 -
Page 91

MA-1350-1 SERIES
EO1-11126
5
ST
(Line No. 5)
2
5
#/NS
21
#/NS
1
51
#/NS
21
#/NS
61
9
#/NS
1
6
9
#/NS
0
8
#/NS
1
0
2
#/NS
00
#/NS
0
0
#/NS
1
1
#/NS
21
3
#/NS
1
6
9
#/NS
(O)
(p)6
(e)
(n)4
(space)
(space)
(8)
(:)
(0)
(0)
(a)1
(m)
(space)
6
() (Line No. 6)
ST
1
3
#/NS
21
#/NS
1
52
#/NS
21
#/NS
11
5
#/NS
1
1
#/NS4
1
0
2
#/NS
1
6
9
#/NS
51
1
1
1
1
#/NS
3
2
#/NS
1
#/NS5
2
8
#/NS
3
#/NS5
(C)
(l)2
(o)
(s)9
(e)
(d)
(:)
(space)
(e)
(v)
(e)1
(r)
(y)
6
3
1
0
#/NS
1
2
5
#/NS
1
6
9
#/NS
0
7
#/NS
1
0
2
#/NS
0
0
#/NS
0
#/NS0
2
1
6
#/NS
21
#/NS
ST
(to complete Line 5)
(t)
(o)
(space)
(7)
(:)
(0)
(0)
(p)
(m)3
1
9
#/NS
3
3
#/NS
1
1
5
#/NS
1
1
#/NS4
1
2
4
#/NS
1
1
5
#/NS
2
1
9
#/NS
1
1
4
#/NS
1
1
#/NS1
31
#/NS
ST
(to complete Line 6)
(space)
(W)
(e)
(d)
(n)
(e)
(s)
(d)
(a)
(y)5
AT/TL
- 25 -
Page 92

Cashier Name Programming
Condition: Any time outside a sale
Programming Procedure:
Repeat for another cashier. (Max. 8 cashiers)
MA-1350-1 SERIES
EO1-11126
2 @/FOR
Declaration of Program No. 2
for Cashier Name
Programming
Character Entries
max. 8 characters
(See Character Entries
at the beginning of this
chapter.)
Cashier No.
1 to 8
NOTE 3
ST
ST
. . .
To complete
this name
AT/TL
NOTES: 1. For each cashier name, a maximum of 8 regular-sized characters or 4 double-sized charac-
ters may be entered. A combination of both types is also available.
2. This programming is available only when the cashier identifying operation option has been
selected.
3. Number of the controllable cashiers differs as follows.
• Max. 4 cashiers for the Push LED Cashier Key and the Barrel Lock
• Max. 8 cashiers for the Cashier Signing and the [CLK] Key
Cashier Name Programming Receipt Format:
TEC STORE
Key Operation: Control Lock: SET
2
@/FOR
1343 PEACH DRIVE
PHONE: 87-6437
Open 8:00am to 7:00pm
Closed: every Wednesday
Cashier Code Name
1
ST
2
#/NS0
2
5
#/NS
2
4
#/NS
1
5
#/NS
2
#/NS9
(J)
(O)
(N)
(E)
(S)
ST
11-28-1997 #0
P02
1CL JONES
2CL SMITH
0019 12:01TM
Cashier Code
Cashier Name
2
AT/TL
ST
2
#/NS9
2
3
#/NS
1
9
#/NS
3
0
#/NS
1
#/NS8
(S)
(M)
(I)
(T)
(H)
ST
- 26 -
Page 93

MA-1350-1 SERIES
EO1-11126
Department Status Programming
Condition: After Daily Financial Reset and Periodical Financial Reset (and All PLU Reset if the positive/
negative status is to be changed)
When the program option “Department Report separately issued from Financial Report” has
been selected: To add to the above conditions, After Daily Department Reset and Periodical Department Reset
Programming Procedure:
3
Declaration of Program No. 3
for Department Status
Programming
@/FOR
Repeat for programming other departments
For Normal Keyboard
For Flat Keyboard or Normal Keyboard of
which layout is changed by 81 [@/FOR]
Department No.
max. 2 digits; 1 to 40
Address No.
NOTE 1
Dept.
DP#
Address 1:
Department Name
1
ST
#/NS
(max. 40 departments).
Character Entries
max. 8 characters (See Character
Entries at the beginning of this chapter.)
ST
Address 2:
Preset Price
. . .
0 to 999999
. . .
NOTE 3
. . .
NOTE 4
#/NS
#/NS
Address 3:
Address 4:
4
ST
Preset Price Max. 6 digits;
To set Open-price Department
ST
Department Status Code
ST
Tax/PST Status Code
2 #/NS
Department Status
3
Tax/PST Status
- 27 -
AT/TL
Page 94

MA-1350-1 SERIES
NOTES: 1. “Address No.” designation located after the key operation “3 [@/FOR]” can be omitted if
unnecessary. When an address No. is designated, the programming of the designated
address will be automatically repeated for multiple departments.
2. For each department name, a maximum of 8 regular-sized characters or 4 double-sized
characters may be entered. A combination of both types is also available.
3. Department status available is as follows.
Status Code Contents Not select Select
1 Single-item Itemized Single-item
2 Negative Status Positive Status Negative Status
3 Other Income Dept. Ordinary Dept. Other Income Dept.
4 Food Stamp/GST Status Without With
• When you select the status codes 1 and 2, enter 12, then depress the [#/NS] key.
• When you select none of the status shown above, enter 0, then depress the [#/NS] key.
4. As for Tax/PST code, more than one code can be entered for combining Tax/PST 1 to 3.
• When you select Tax/PST 1 and 3 as “Taxable”, enter 13, then depress the [#/NS] key.
EO1-11126
However, ask your TOSHIBA TEC representative for further details of the Tax/PST Status
Setting, because its setting directly affects sales data of your store.
Department Status Program Receipt Format:
Key Operation: Control Lock: SET
3 @/FOR
1
Dept.1
ST
2
1
#/NS
51
#/NS
#/NS
03
#/NS
(M)3
(E)
(A)1
(T)
Dept.5
3
ST
1 2
Dept.6
3
() (Line No. 2)
ST
3
ST
AT/TL
2
() (Line No. 2)
() (Line No. 2)
() (Line No. 2)
ST
05
0
#/NS
3
ST
4
#/NS
4
ST
1
#/NS
........
Tax/PST Status
1: Tax/PST 1 taxable
2: Tax/PST 2 taxable
3: Tax/PST 1 & Tax/PST 2 taxable
4: Tax/PST 3 taxable
5: Tax/PST 1 & Tax/PST 3 taxable
6: Tax/PST 2 & Tax/PST 3 taxable
7: Tax/PST 1 & Tax/PST 2 & Tax/PST 3 taxable
0: Non-taxable
Department No.
#/NS
Program Address No.
#/NS
TEC STORE
1343 PEACH DRIVE
PHONE: 87-6437
Open 8:00am to 7:00pm
Closed: every Wednesday
11-28-1997 #0
P03
01 DP01
#01 MEAT
#02 5.00@
#03 00 F
#04 01
02 DP02
#01 FISH
#03 00 F
#04 02
03 DP03
#01 DRINK
#04 03
04 DP04
#01 BAKERY
#04 01
05 DP05
#03 1006 DP06
#03 40
0028 13:03TM
Department
Status
0: Itemized
1: Single-item
4: Other Income
5: Other Income
(Single-item)
Department Name
Preset Price
Food Stamp Status
or GST Status
F: Food Stampable
T: GST Taxable
Positive/Negative
Status
-: Negative
Blank: Positive
- 28 -
Page 95

PLU Table Setting, Changing, or Deletion
Setting or Changing PLUs:
MA-1350-1 SERIES
EO1-11126
Condition:
To change settings of a PLU:
sales are made or after a PLU Reset Report is taken to reset the sales data of the PLU into
zero)
To add new PLUs or to change PLU Name only:
Programming Procedure:
4 @/FOR
Declaration of Program No. 4
for PLU Table programming
PLU Code Max.
4 digits; 1 to 9999
Link Department
1
When the required PLU sales total memory is zero (i.e. when no
#/NS
Address No.
NOTE 1
Repeat for programming other PLUs.
NOTE 3
PLU
Address 1:
ST
Any time outside a sale
(NOTE 2)
#/NS
Address 2:
PLU Name
2
4
Whole Package Quantity
ST
Address 4:
Preset Price
ST
Address 5:
ST
5
Department Code;
1 to 40
Character Entries
max. 12 characters
(See Character Entries at the
beginning of this chapter.)
. . .
Preset Price
Max. 6 digits;
0 to 999999
To set Open-price PLU
#/NS
Whole Package
Quantity; 1 to 99
ST
#/NS
AT/TL
- 29 -
Page 96

MA-1350-1 SERIES
NOTES: 1. “Address No.” designation located after the key operation “4 [@/FOR]” can be omitted if
unnecessary. When an address No. (1, 2, 4 or 5) is designated, the programming of the
designated address will be automatically repeated for multiple PLUs.
2. Max. 500 PLUs are available when the RAM capacity is 32 KB. (Model Name: MA-1350-1-S-XX)
Max. 1000 PLUs are available when the following two conditions have been satisfied.
• RAM capacity is 128KB. (Model Name: MA-1350-1E-S-XX)
• The program option “Expansion of the number of the PLUs” is selected.
(Ask your TOSHIBA TEC representative.)
3. When sequentially programming the PLUs, the code specification can be omitted. When it is
omitted at the very first PLU, PLU Code “1” is automatically assigned.
4. The statuses (Positive/Negative Status, Tax Status, GST or Food Stamp Status and Itemized/Single-item Status) of each PLU is decided by the statuses of the Department to which
the PLU is linked.
5. If a PLU is linked to an Other Income Department, entering the PLU in sales entry will cause
an error.
PLU Table Program Receipt Format:
P04
Key Operation: Control Lock: SET
0100
4 @/FOR
01
0
PLU
1
() (Line No. 1)
() (Line No. 2)
() (Line No. 2)
ST
1
#/NS
2
ST
62
#/NS
21
#/NS
821
#/NS
1
12
#/NS
(P)
(o)5
(r)
(k)
ST
4
ST
02
0
#/NS
........
04
1
PLU
1
() (Line No. 1)
() (Line No. 2)
() (Line No. 2)
ST
4
#/NS
2
ST
1
2
#/NS
1
13
#/NS
21
#/NS
#/NS
1
#/NS
(B)
(u)
(n)4
(-)99
(B)2
ST
4
ST
510
#/NS
5
() (Line No. 2)
() (Line No. 2)
() (Line No. 2)
() (Line No. 2)
ST
3
#/NS
050
PLU
1
ST
5
#/NS
4
ST
05
#/NS
AT/TL
PLU100
#01 1
#02 Pork
#04 2.00@
0101
PLU101
#01 1
#02 Beef
#04 3.00@
0200
PLU200
#01 2
#02 Salmon
#04 4.00@
0201
PLU201
#01 2
#02 Shrimp
#04 2.00@
0300
PLU300
#01 3
#02 Coke-A
#04 0.80@
0301
PLU301
#01 3
#02 Coke-B
#04 1.00@
0400
PLU400
#01 4
#02 Bun-A
#04 1.00@
#05 2
0401
PLU401
#01 4
#02 Bun-B
#04 1.50@
#05 3
0500
PLU500
#01 5
#04 0.50@
PLU Code
Link Department No.
PLU Name
Preset Price
Whole Package Quantity
EO1-11126
Total number of PLUs
set in the memory
- 30 -
009
0029 13:12TM
Page 97

MA-1350-1 SERIES
EO1-11126
Deleting individual PLUs:
Condition: When the required PLU sales total memory is zero (i.e. when no sales are made or after a PLU
Reset Report is taken to reset the sales data of the PLU into zero)
Deleting Procedure:
Repeat for other PLUs to be deleted, if any.
4 @/FOR
Declaration same as PLU Programming on the preceding
pages.
ITEM
CORR
NOTES: 1. Deletions are possible PLU by PLU.
2. If all the PLUs must be deleted (i.e. the PLU system itself is not necessary), close the [PLU]
Key. (Ask your TOSHIBA TEC representative.)
PLU Deletion Receipt Format:
Key Operation: Control Lock: SET
PLU Code of
PLU to be
deleted
4
@/FOR
ITEM
CORR
3
0 0
AT/TL
PLU Code of the PLU
to be deleted
PLU
PLU
TEC STORE
1343 PEACH DRIVE
PHONE: 87-6437
Open 8:00am to 7:00pm
Closed: every Wednesday
11-28-1997 #112300
P04
PLU300
--------
008
0030 13:29TM
CORR
--------
AT/TL
PLU Code deleted
Deletion Symbol
Line
Total number of
PLUs remaining
set in memory
- 31 -
Page 98

Time Setting or Adjustment
Condition for Setting: Any time outside a sale
Setting Procedure:
MA-1350-1 SERIES
EO1-11126
5
Declaration of Program
No. 5 for Time Setting
@/FOR
Time Minute
(00 to 23) (00 to 59)
Examples) ←
1:05 a.m.: 1:32 p.m.:
1 3 30 1 0 5
Issues a receipt.
AT/TL
Date Setting or Adjustment
Condition for Setting: Any time outside a sale
Setting Procedure:
6
@/FOR
TEC STORE
1343 PEACH DRIVE
PHONE: 87-6437
Open 8:00am to 7:00pm
Closed: every Wednesday
11-28-1997 #0
2
P05
08:30TM
0037 08:30TM
Time now set
(8:30 a.m. in this
example)
Current Time
AT/TL
Declaration of Program
No. 6 for Date Setting
Month Day Year
(01 to 12) (01 to 31) (1997, 1998, etc.)
NOTE: To set 15 December 1997, any one of
the following three orders can be selected:
12151997
(Month-Day-Year order, Default setting)
15121997 (Day-Month-Year order)
19971215 (Year-Month-Day order)
If you want to change the order into
Day-Month-Year or Year-Month-Day,
ask your TOSHIBA TEC representative.
NOTE
Issues a receipt.
TEC STORE
1343 PEACH DRIVE
PHONE: 87-6437
Open 8:00am to 7:00pm
Closed: every Wednesday
11-28-1997 #0
P06
12-15-1997
0038 08:31TM
Date
(previous setting)
Date now set
(15 December 1997
in this example)
- 32 -
Page 99

MA-1350-1 SERIES
EO1-11126
PLU Preset-code Key Setting
When there are any keys programmed as PLU Preset-code Keys on the ECR Keyboard, and/or when the
PLU Keyboard PK-2 (hardware option) is connected to the ECR, a PLU code may be preset to each of those
keys in this operation.
Condition: Any time outside a sale
Programming Procedure:
Repeatable for other keys.
2
7
@/FOR
Declaration of Program
No. 27 for PLU Presetcode Key Setting
KEY
PLU Code
Enter through Numeric
Keys on the ECR Keyboard
(Enter 0 to close the key)
AT/TL
NOTES: 1. If the PLU Code entry is skipped and a [KEY] is simply depressed in the above sequence,
the preprogrammed PLU Code of the KEY will be displayed.
2. If “0” is entered as PLU Code in the above sequence, the KEY will be closed. Pressing the
closed KEY in sale entry will cause an error.
PLU Preset-code Key Program Receipt Format:
Key Operation: Control Lock: SET
TEC STORE
2
7
@/FOR
5
0 0 AT/TL
PLU Code
Required
Key
Location Code (left side);
refer to REMARKS 1 and
2 on the next page.
PLU Code assigned to
the key (right side)
1343 PEACH DRIVE
PHONE: 87-6437
Open 8:00am to 7:00pm
Closed: every Wednesday
11-28-1997 #0
P27
#116 0500
0089 12:11TM
- 33 -
Page 100

MA-1350-1 SERIES
PK-2 KEYBOARD
11 21131516141 71 91 10181 111 121
12 22232526242 72 92 10282 112 122
13 23333536343 73 93 10383 113 123
14 24434546444 74 94 10484 114 124
15 25535556545 75 95 10585 115 125
16 26636566646 76 96 10686 116 126
17 27737576747 77 97 10787 117 127
18 288 38
58
6848 78 98 10888 118 128
19 29939596949 79 99 10989 119 129
EO1-11126
20 3010 40 60 7050 80 100 11090 120 130
REMARKS: 1. The Nos. 1 through 130 marked on the PK-2 Keyboard are the KEY Nos. to be printed on the
left side of the program receipt issued in the operation on the preceding page. If each KEY is
not set with a PLU Code, the auto-preset PLU Code identical to the initial KEY No. in the
above figure will be active as its preset PLU Code
ex.) KEY No. 1 ... PLU Code 1
KEY No. 130 ... PLU Code 130
2. When a PLU code is assigned to a PLU Preset-code Key on the ECR Keyboard in the operation on the preceding page, the Hardware Key Code which indicates the absolute location of
the key will be printed to the left of the assigned PLU Code. Since it is hard to explain which
location code corresponds to each key (due to an irregular numbering), it is suggested to
verify the positioning by simply depressing the KEY and reading the code in the display
(described in NOTE 1 on the preceding page). This reading operation is applied to the PK-2
Keyboard as well.
- 34 -
 Loading...