

Page 1
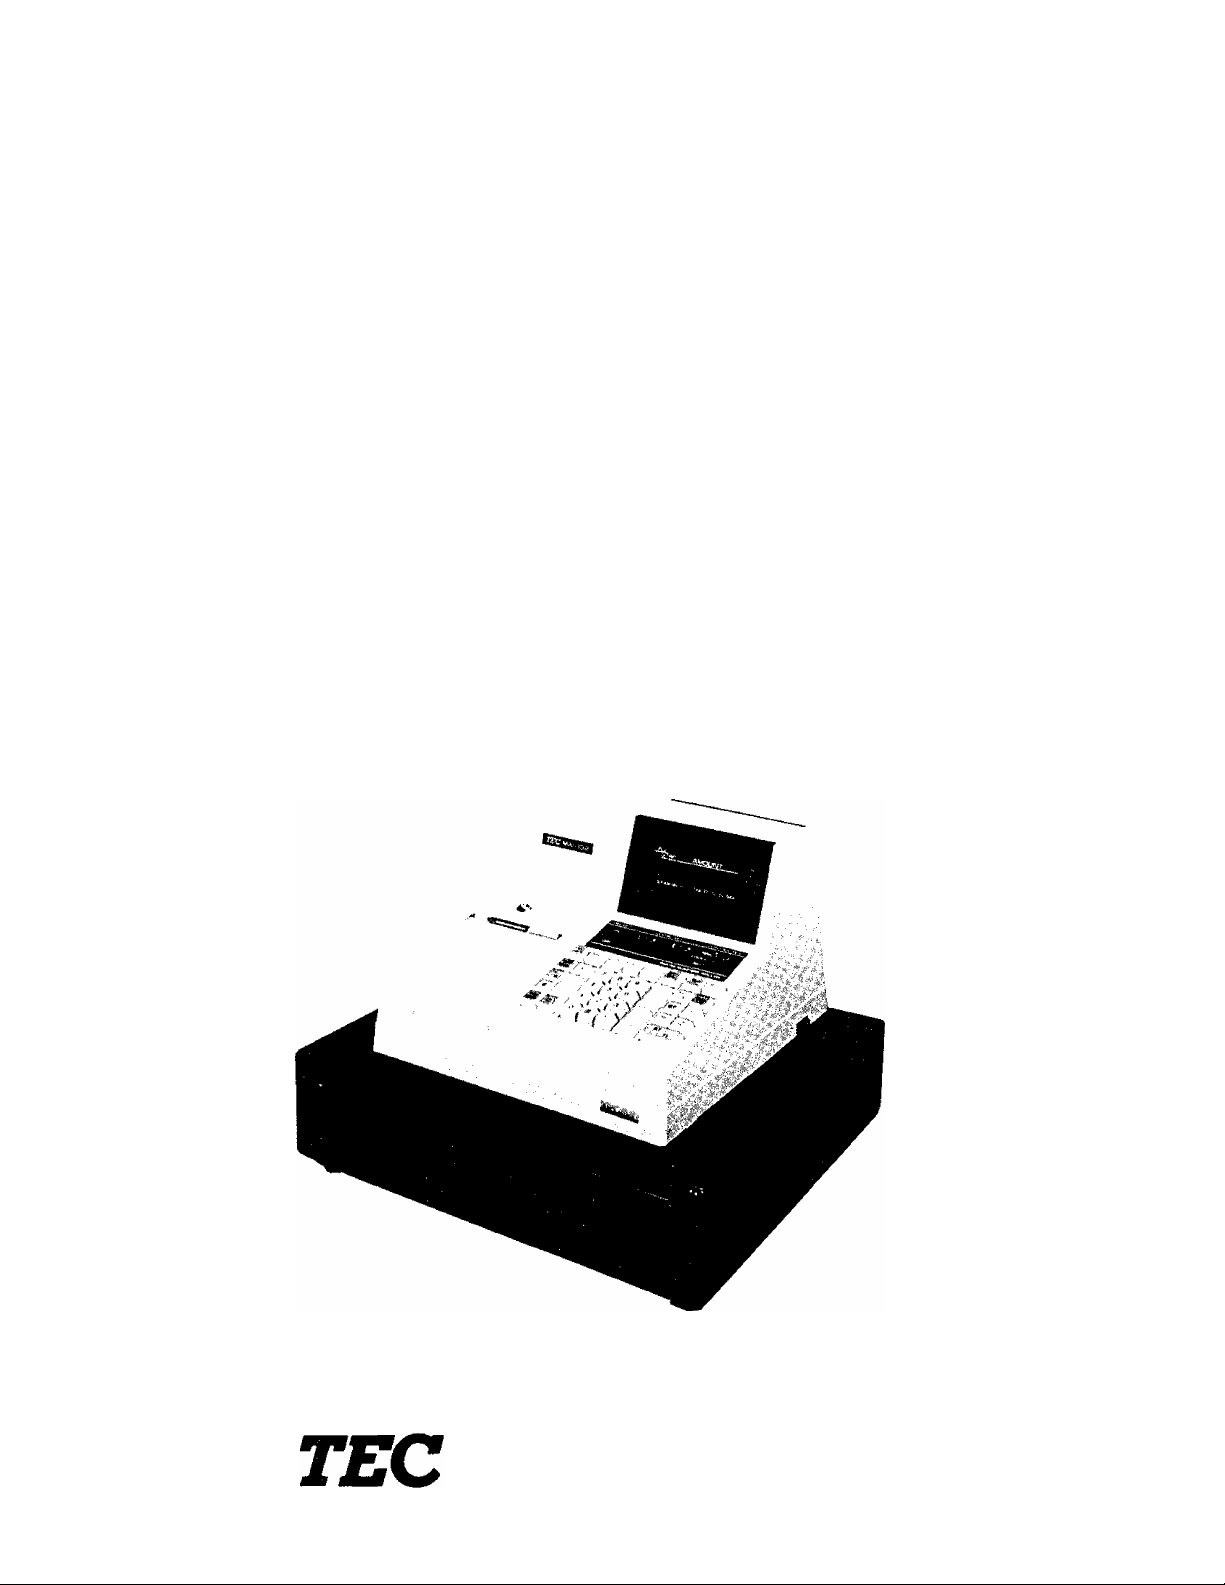
Owners Manual
TEC ELECTRONIC CASH REGISTER
MA-132 SERIES
U.S.A. & CANADA VERSION
TOKYO ELECTRIC CO ITO.
Page 2

WARNING
This equipment generates, uses, and can radiate radio frequency energy and if
not installed and used in accordance with the instructions manual, may cause
interference to radio communications. It has been tested and found to comply
with the limits for a Class A computing device pursuant to Subpart J of Part 15
of FCC Rules, which are designed to provide reasonable protection against
such interference when operated in a commercial environment. Operation of
this equipment in a residential area is likely to cause interference in which cause
the user at his own expense will required to take whatever measures may be re
quired to correct the interference.
Page 3

TABLE OF CONTENTS
(page)
TO OUR CUSTOMERS ..................................................... 1
PRECAUTIONS .......................................................... 1
APPEARANCE AND NOMENCLATURE .......................................... 1
CONTROL LOCKS AND MODE SELECTOR KEYS ................................. 2
DISPLAY .............................................................. 3
KEYBOARD LAYOUT ...................................................... A
FUNCTION OF EACH KEY ................................................. 6
REGISTERING PROCEDURE FOR SALES ..................................... 15
REGISTERING RECEIPT SAMPLES
VALIDATION PRINT SAMPLES .......................................... 25
READ(X) AND RESET(Z) REPORTS ........................................ 26
PROGRAMMING OF THE REGISTER
PROGRAM VERIFICATION
PAPER ROLL REPLACEMENT AND OTHER MAINTENANCE
SPECIFICATIONS ...................................................... 46
...............................................
......................................
........................................
.......................
21
29
41
43
Page 4

Page 5
TO OUR CUSTOMERS
Thank you for choosing a TEC electronic cash register MA-132 series. This
instruction manual provides a description of the functions and handling of
this register and should be read carefully to obtain maximum performance.
Since every consideration has been given to safety, there is no danger of
damaging the machine by incorrect operation.
Please refer to this manual whenever you have any doubts concerning the
machine. This machine has been manufactured under strict quality control
and should give you full satisfaction. However, if the machine is damaged
during transit, or there are any unclear points in this manual, please contact
your local TEC representative.
I The specificati'ons described in this manual may be modified by TEC, if
necessary.
I Be sure to keep this manual for future reference.
PRECAUTIONS
1. The keys on the keyboard work with
too hard.
2.
Avoid bandii ng the machine with
3.
Do not apply
parts.
detergent an
thinner or other volati
If dirty, wipe off with
d squeezed tightly.
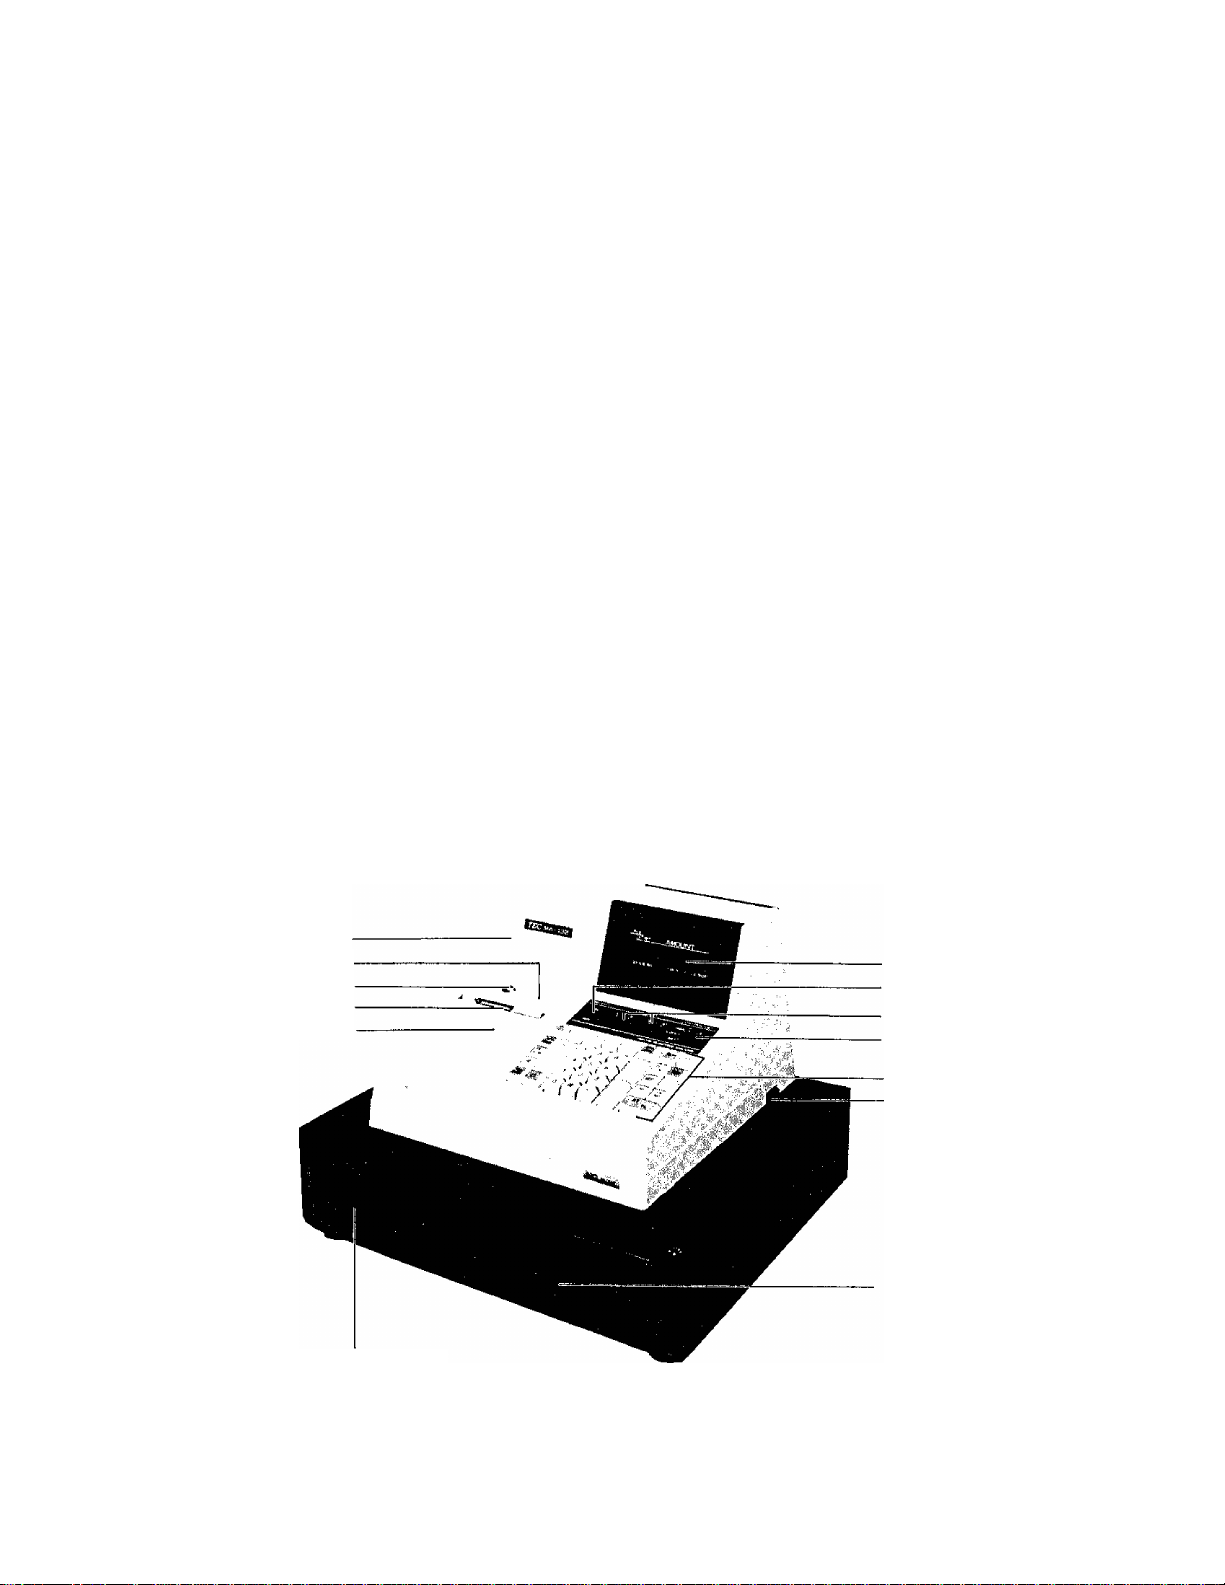
APPEARANCE AND NOMENCLATURE
Receipt Cover
Journal Window
Receipt Cover Lock
Receipt Outlet
Ribbon Cover
a 1ight touch.
han
wet
ds .
le oils
a piece of
to the
Avoid pressing
cabinet or other
cloth soaked in
Display
Receipt ON/OFF Switch
Clerk Lock
Control Lock
Keyboard
Power Switch
the keys
p laStic
neutrai
B Power Switch
Cash Drawer
The Power
The Power Switch is provided at the righthand side of the
cabinet.
pushed to
to OFF.
Swit
The
ON,
Drawer Release Lock
power is turned on when the switch is
d turned off when the switch is pushed
- 1 -
Page 6
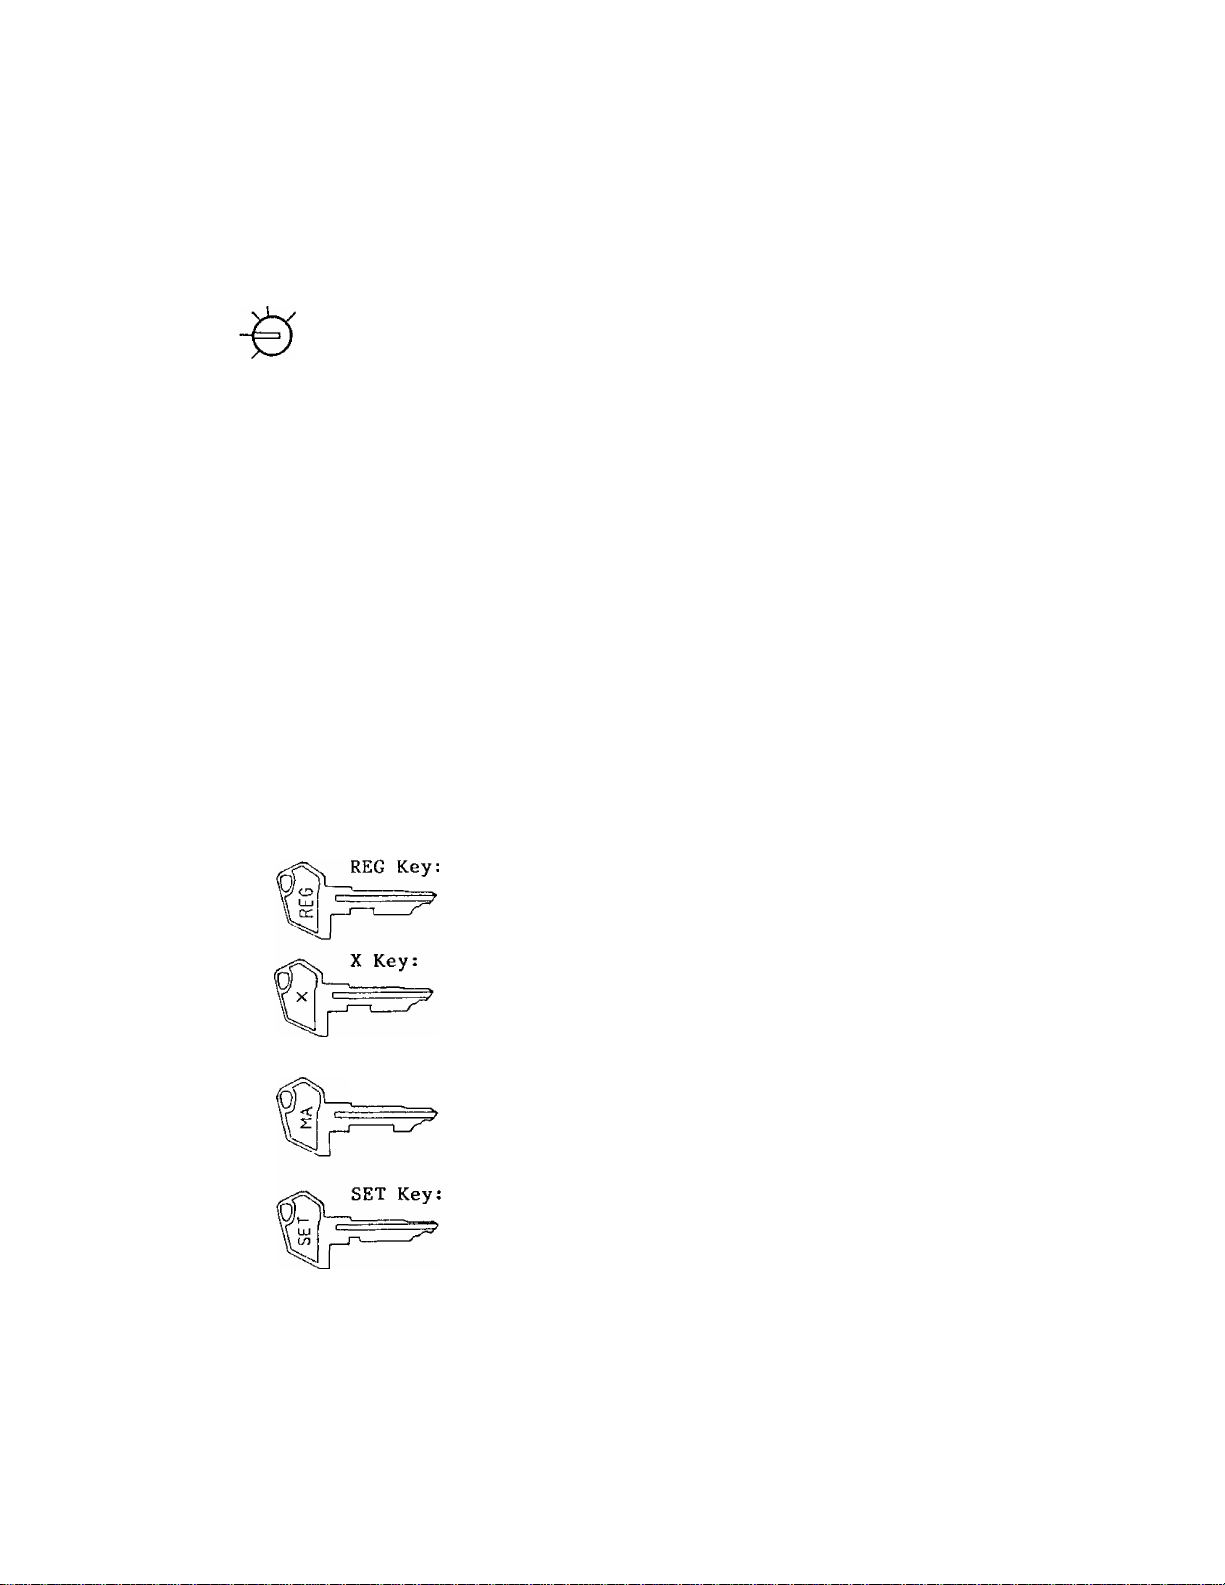
CONTROL LOCKS AND MODE SELECTOR KEYS
CONTROL LOCK
REG
LOCK
SET
X Key
MA Key
t
SET Key
_i_. LOCK
REG Key
(POSITION)
SET .
REG
(FUNCTION)
In this position, the register
will allow programming operations.
The register operations are locked
when the Control Lock is set to
this position. Meanwhile, the
current time is automatica1ly
displayed as standard feature.
Norma 1 cash register operations
are carried out in this mode.
The sale totals can be read and
the programmed data can be
verified in this position. Tax
calculation can also be tested
in this position.
All the resettable totals and
their counters will be read and
reset in this position.
Mode Selector Keys for Control Lock
The REG Key is used by the cashier who operates the
register. This key can access the positions of LOCK
and REG.
The X Key is used by the store manager or a person
authorized to read the sales totals during the day
by the store manager. This key can access the
positions of LOCK, REG, and X.
MA Key:
The MA Key is used by the store manager who will daily
supervise the collection of money and the printing
of transactions recorded by the register. This key
can access the positions of LOCK, REG, X, and Z.
The SET Key is used by the programmer,
access the positions of LOCK and SET.
All the keys can be removed at the "LOCK" or "REG" position.
This key can
- 2 -
Page 7

CLERK LOCKS
Clerk Keys (1> 2, 3, 4)
These locks are used to identify which clerk
or cashier is operating the register.
Each cashier should keep his/her clerk key.
The register will not operate in any position
of the Control Lock unless one of these keys
is inserted and set to the corresponding posi
tion on the Clerk Locks. Each of the keys may
be inserted and pulled out in the neutral
posiiton marked with (point).
DISPLAY
The front display is located at the top of the register just above the key
board .
FRONT DISPLAY
PLU
DP T
RPT
AMOUNT
D /
U
1
NUMERIC DISPLAY
AMOUNT (8 digits):
RPT (1 digit):
DPT (1 digit):
PLU (2 digits; one digit commonly used with the DPT digit):
J
!
L 1
f f f
SLP
ALM RE G
Displays the numeric data, such as amount, quantity,
etc.
Displays the repeat count of a Department or PLU item.
It indicates nothing on the first item entry, showing
2, 3, 4, etc. from the second repeated item entry
on. Since it has only one digit, 0 will be displayed
for count 10, and 1 for 11, etc.
Displays the code No. which represents each Department
Key,
(-)
J 1 1 r r
J ~ l
D
O
f
f f f
TX8 L ST TL
REA R o r R EMO TE DIS PLA Y
n
T
CG
1
o
U
f
SHO RT
Displays the PLU code No. when a PLU item is entered.
- 3 -
Page 8

MESSAGE DESCRIPTORS (TRI-MARKS to appear)
T
SLP:
Appears when a validation slip has been properly inserted to allow
validation.
T
ALM;
Appears with the alarm buzzer to indicate that the last operation
or numeric entry has resulted in an error. To clear the error
condition, depress the key.
T
REG;
T
(-):
Appears when sale items have been entered.
Appears when the |'RTN MDSE] , | DOLL DISC | , [O > oc |TtEM CORK I key
has been operated.
___ __________
It also appears when the j Sf1, 1TXBL TL1, or one of the total keys
have been depressed and the displayed amount is negative.
TXBL;
Appears when a taxable item is entered or the | TXBL TL | key is
depressed.
T
ST:
Appears when the sub-total amount is displayed after the fST] key
has been depressed. Also appears when the [TXBL TL j key has been
depressed.
TL:
Appears on a finalizing operation with the total amount displayed
when a sale is finalized without any amount tendered.
▼
CG:
When an amount tendering operation has been performed, this tri-
mark appears with the change due displayed.
SHORT: Appears when the amount tendered is less than the sale total with
the shortage amount displayed.
KEYBOARD LAYOUT
The following are the Standard Keyboard Layout and two other variations of
the MA-132 series, according to the tax requirements for different areas.
Since this series is designed to be capable of programming many of the keys
in the most desired location on the keyboard, please contact your TEC
representative if any key is to change its location with another.
_ 4 -
Page 9
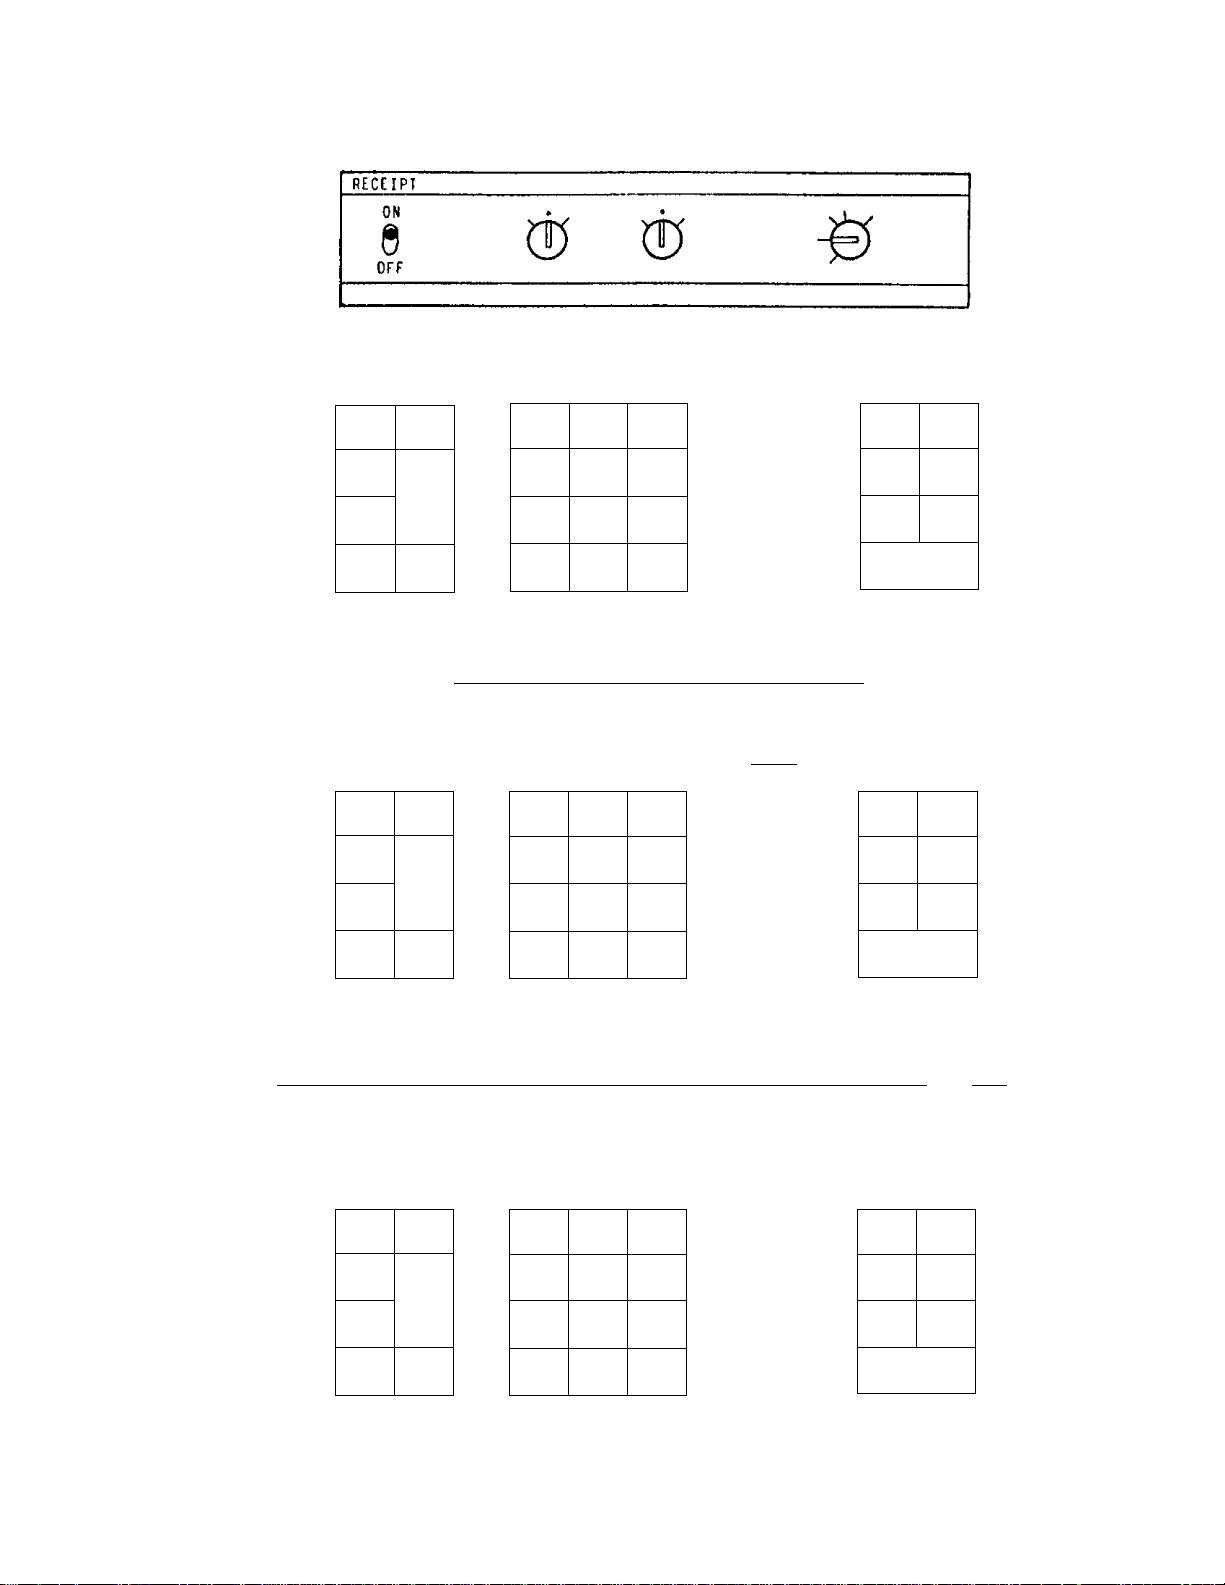
STANDARD KEYBOARD
(for a single-tax area)
VALI
DATE
RTN
MDSE
TX/M
ITEM
CORK
VALI
DATE
RTN
MDSE
TX1./M
TX2/M
ITEM
CORR
NS
X
RF JF
7 8
4
PLU
1
c
TYPICAL KEYBOARD FOR A DUAL-TAX AREA
(Two Tax Modifier Keys Installed)
#/NS
X
0 00
RF JF
7 8 9
RCPT
ISSUE
9
5 6
2 3
<
RCPT
ISSUE
DOLL
DISC
DOLL
DISC
ц 5 6
PLU
1 2 3
C
0 00
■
7o- %+
R/A PO
ST
Chg
TXBLTLCHK
TEND
AT/TL
%-
7o+
R/A PO
ST
Chg
TXBLTLCHK
TEND
AT/TL
TYPICAL KEYBOARD FOR SINGLE-TAX AREA WITH MANUAL TAX ENTRY REQUIRED
(One Tax Modifier Key and Manual Tax Key Installed)
VALI
DATE
RTN
MDSE
TX/M
TAX
ITEM
CORR
#/NS
X
PLU
C
RF JF
7 8 9
4
1 2 3
0 00
5
RCPT
ISSUE
6
1
- 5 -
DOLL
DISC
X~ 7,+
R/A PO
ST Chg
TXBLTLCHK
TEND
AT/TL
Page 10

FUNCTION OF EACH KEY
ON RECEIPT ON/OFF SWITCH
This switch has two positions available: "OFF" and "ON" positions.
OFF
When in the "OFF" position, no receipt is issued from the register
and sales are printed on the journal only. When the switch is set
to the "ON" position, sales are printed on both receipt and journal
rolls, then a receipt is issued which is cut and given to the customer.
Alternating the switch position during a registration will not result
in an error. In this case, the position set at the registration start
ing will rule whether a receipt is issued or not. When a reset (Z)
report is taken, however, the data wij._l be printed also on the receipt
roll regardless of the switch position.
VALI
DATE
NS
VALIDATION KEY
This key is used to print a validation slip.
To operate, insert a slip into the validation slot after registering
the required item, and depress the I VALIDATE | key. The item and the
amount will be printed on the slip.
The system option provides program selections as to single- or multi
validation and consecutive No. print or non-print on the validation
slip.
NO-SALE KEY
This key is used to open the cash drawer while the register is outside
a sale in such occasions as giving change without relating to a sale.
To operate, depress the | NS| key once. This key may also be operated
to check the print condition on the receipt and journal.
Usually, a non-add number cannot be entered prior to a no-sale opera
tion within a receipt. However, it can be programmed to allow a non
add number entry when a no-sale is operated.
RF
RECEIPT FEED KEY
This key is used to advance the receipt roll. It is operated by
depressing the key and holding it in that position until the paper
has advanced to the required position.
This key can be operated in any position of the Control Lock including
the "LOCK" position.
- 6 -
Page 11

JF
JOURNAL FEED KEY
This key is used to advance the journal roll in the same way as the
RF key. This key is useful if the cashier, due perhaps to an
interruption whilst ringing up a sale, is unsure which items have
already been entered. By using this key, the cashier can see which
items have actually been printed.
RCPT
ISSUE
DOLL
DISC
RECEIPT POST-ISSUE KEY
This key is used to issue the receipt of a sale which has already been
finalized with the RECEIPT ON/OFF SWITCH positioned to OFF.
To operate, depress the [~RCPT ISSUE] key without a numeric entry.
The receipt for the last sale is then issued, with only the sale total
printed but not details. This key will not function if another sale
has alreay been under way on the register,
operation is not possible after a Received
The receipt post-issue
on Account or Paid Out
transactions.
DOLLAR DISCOUNT KEY
This key is used to subtract an amount from the sale total such as
a discounting a sale. This key cannot normally be used outside a sale.
Neither can an amount exceeding sale total normally be entered.
However, when the "Credit Balance" option has been selected, this key
can be used inside or outside a sale and over-subtraction of the sale
is allowed.
This key can be programmed with taxable or non-taxable status. When
the tax status of this key must be reversed, depress |TX/M[ (or ITXl/M|
and/or ITX2/MI in a dual-tax area) before this key is depressed.
To operate, enter the discount amount on the numeric keyboard, and
then depress this key.
PERCENT DISCOUNT KEY
This key is used to subtract a percentage rate from the sale or an
item. If the preset rate is to be subtracted, depress this key without
a prior rate entry. If a rate different from the preset one is
required, enter the desired rate on the numeric keyboard and then
depress this key. The manual rate will take priority.
To operate, depress the key either immediately after a department
or PLU entry if only that item requires the percent discount, or after
the |~S TI key has been depressed if required from the total bill. The
percent rate and the discount amount calculated are printed and
subtracted from the sale total.
The percentage rate may be entered within the range from 0.01% to
99.99%. The fraction resulted from the percentage calculation is
usually programmed to be rounded off. However, it can be programmed
to be rounded up or rounded down.
Usually, I %,-j key may operate only once after obtaining a sub-total.
However, it can be programmed to allow any number of times.
7 -
Page 12

Just like the fPOLh DISC| key, this key is also programmed with taxable
or non-taxable status. Use ITX/M | I TXl/Ml and/or ÎTX2/M| in a
dual-tax area) before operate the | % - ] key if the preset tax status
of the r%^] key must be reversed.
7o+
RTN
MDSE
TX/M (for a single-tax area)
TXl/M TX2/M (for a dual-tax area)
PERCENT CHARGE KEY
This key operates in the same way as the |%-| key except that operation
will add to instead of subtracting from a sale.
RETURNED MERCHANDISE KEY
This key is used to make a subtracting entry for a returned item.
This key is also used to invalidate an item entered before the last
entry within a sale, in which case the |ITEM CORRI key cannot
invalidate the designated item.
To operate, depress this key before or after the amount entry, and
depress the department key from which the amount is subtracted. This
key may be operated during a PLU item entry sequence (if before the
IPLUI key) to process the returned amount into the PLU memory.
These keys are used to reverse the taxab le/non-taxab le status on
departments, PLUs, |DOLL DISC 1 ,
However, in a repeat entry by depressing the | PLU | or the same depart
ment key again, the reversed tax status will be held for those repeated
items.
TAX MODIFIER KEY(S)
[H I,
or I% + I key for one entry only.
For dual-tax areas, two keys are provided — | TXl /M | and | TX2/M | —
in place of the i TX/M1 key for single-tax areas. The two tax modifier
keys will function independent ly each with its own tax table pre
programmed for taxable items.
To operate, depress the Tax Modifier Key(s) prior to depressing any
of the above mentioned keys (i.e., before or after the amount entry).
NON-ADD NUMBER PRINT KEY
This key is used to print a non-add number (such as Customer No., Check
No., Credit Card No., etc.) on the receipt and journal for future
reference.
To operate, enter a maximum of 8-digit number and
key. The number is then printed. This operation
any time between items, before or after all the sale items
then depress this
may be performed
- 8 -
Page 13

ITEM
CORK
ITEM CORRECT KEY
This key is used to delete the last item within a transaction.
Depressing this key once will remove the last line item from the bill,
printing a line through the item on the receipt and journal.
The item-correct function is effective even when a numeric entry and
a key depression are performed between the item entry to be
corrected and the | ITEM CORK I key depression. However, if any other
key-in operation including an error comes inbetween, the item-correct
will not function.
The
I
ITEM CORR
through a department, a FLU, the |%-|
TAX
corrected.
QUANTITY EXTENSION (MULTIPLICATION) KEY
This key is used to multiply a department or FLU entry by a quantity.
The multiplication input order is programmed in either of the following
two methods:
I
key may function to correct any last item entered
[m , I DOLL DISC~| , Wa] , [P^ ,
key. But a returned department or FLU item cannot be item-or
PLU
1) QUANTITY X PRICE (standard)
I QUANTITY I -t [X]
max. 3 dig.
integral
value only
2) PRICE X QUANTITY (option)
¡UNIT price! ** [YI Iquantity
PLU Code
PLU (Price-Look-Up) KEY
This key is used to enter a PLU that is linked to a department. Each
PLU is programmed with its code (1 to 32) and preset price. The tax
status of each PLU is ruled by that of the linked department.
To operate, enter the PLU code and then depress the ! PLU! key. The
preset price is automatically read and entered into the department
to which the PLU is linked. To repeat the same PLU price, depress
the 1PLU1 key consecutively after the above operation.
¡UNIT price!
max. 6 dig.
►iPLU Code!
1 ~ 32
Iquantity! ^ !~plu!
DEPARTMENT Key
The product must not
PLU
IDEPARTMENT Key I
exceed 7 digits.
As for quantity extension involving PLUs, refer to the ixl key descrip
tion mentioned above. Also refer to the ! RTN MDSE[ key description
on page 8 as to return entry through a PLU.
If a PLU's link Department Key is programmed as a Single-item Key,
an entry through that PLU also functions as the single-item PLU. That
is, that PLU can only be registered outside a sale and the sale will
immediate ly be finalized as cash on the depression of the fPLU I key
without operating a media key such as |AT/TL!.
- 9 -
Page 14

CLEAR KEY
This key is used to correct a numeric entry error if prior to
depressing any other function key, or to correct any error condition
and cancel an alarm buzzer.
If this key is depressed before depressing the Department Key or j PLU j
in a quantity extension sequence, all of the quantity entry, the {X|
key depression, and the unit price entry are all cleared at a time.
If the [^1 key is depressed after a sub-total is obtained, the sub
total is then displayed.
The r^i key may be operated regardless of the Control Lock positions
except "LOCK".
#/NS
LC
OPEN
|7|8|9l
|9|5|6|
|1|2|3|
lolool - I
NON-ADD NUMBER PRINT / NO-SALE KEY
This key has both functions of [J] ^nd
been described on page 8 and page 6 respectively. It functions as
Non-add Number Print Key with a prior numeric entry, or as No-sale
Key without a prior numeric entry. If this key is installed, the
and the [N^ keys must be eliminated from the keyboard.
LISTING CAPACITY OPEN KEY (optional key)
This key is used to release the listing capacity preset on each Depart
ment key temporarily. To operate, depress this key before depressing
the department key (either before or after the numeric entry).
By depressing the |LC OPEN
to allow a numeric entry with two further digits.
will be possible on a department
used before the department key.
NUMERIC KEYS
These are used to enter numeric
non-add number.
key, the listing capacity will be released
I
NSl keys that have already
Repeat operations
key even
values such as amount, quantity, and
when the jLC OPEN
1 key
is
Depressing the 100*1 key once is
twice consecutively.
The [7] key is used to enter the decimal
rate containing decimal portion. The [7]
other purpose.
The maximum listing capacity for sale item amount through a department
or PLU is 7 digits. If a listing capacity is programmed for a depart
ment, any amount entry exceeding the listing capacity will result in
an error.
The maximum listing capacity for a non-add number or amount tendering
is 8 digits.
- 10 -
the same as depressing the
point of a manua1
key cannot be used
E]
perc
for
key
ent
any
Page 15

DEPARTMENT KEYS
These are department keys through which sales items are registered.
To operate, enter the amount of the item and depress the appropriate
department key. A consecutive depression of the same department key
will repeat the same amount entry, which can be repeated any number
of times. The sale is not finalized after a department entry until
a finalizing key (|AT/TlI, etc.) is operated.
As an option, Department 1 key can be programmed to be used as Single
item Department Key. In this case, the sale will immediately be
finalized as cash after an amount entry and the key depression without
the IAT/TLl key.
The maximum digits for a department entry is limited by the programmed
listing capacity. If no specific listing capacity is set, a maximum
of 7-digit amount can be entered.
Each department is programmed with taxable or non-taxable status.
If reversing the tax status of a department is necessary, use the
ITX/MI (for single-tax area) or ITXl/M| and/or ITX2/M| (for dual-tax
areas). Refer to the description for the Tax Modifier Keys on page
8.
Also refer to the key description on page 9, as to QUANTITY
EXTENSION using department keys.
R/A
PO
RECEIVED ON ACCOUNT KEY
A received-on-account transaction is used to identify money which is
in the drawer but not business. The amount entered is thus included
in the "Cash-in-drawer" total but not in the sales totals.
To operate, enter an amount of payment and then depress the | R/A | key.
Repeat this operation if multiple payments are entered at a time.
The payments thus entered may be finalized by | AT/TL | (for cash pay
ments) or ICHK TEND I (for check payments). The | Chg | key may also
function to finalize payments received on account if not prohibited
in the system option. The above operation can only be done when the
register is outside a sale.
The I ITEM CORR| key is effective to delete a payment jsut recorded
with a depression of IR/A1, if before finalized by a media key.
PAID OUT KEY
A paid-out transaction is used when an amount of money is removed from
the cash drawer without relating to a sale. When the jPO1 key is used,
the amount entered is subtracted from the "Cash-in-drawer" total but
does not affect the sales totals.
To operate, enter an amount taken from the cash draewr and depress
the |1^01 key while the register is in an out-of-sale condition. This
operation may be repeated if multiple paid-out items are registered
at a time. The paid out amounts recorded are finalized by the |AT/TL|
key only.
- 11 -
Page 16

The
I
ITEM CORR| key is effective to delete a payment jsut recorded
with a depression of the | PO1 key, if before finalized by the (AT/TL j
key.
ST
TXBL
TL
TOTAL
SUB-
s key
Thi
this key
a 1 of
tot
the [ST]
If
depression only will print and display the sub-total; further
depressions will only display but not print the sub-total amount.
The system option provides the selection not to print but only display
the sub-total even on the first depression of the I ST I key.
TAXABLE TOTAL KEY
This key is used to obtain the contents of the sale total plus any
taxes due. The amount will display only but not print.
In order to allow add-on operations to follow the use of this key,
the taxes are not added into any totals until actual finalization is
initiated.
Mandatory depression of this key prior to finalizing a sale is a
programmable option.
KEY
is used
depre
is
the sale
key
When
TAX
MANUAL TAX KEY
This key is used to enter an irregular tax amount that cannot be
calculated on the basis of the programmed tax table, and to add it
to the sale total.
To operate, enter the desired amount of tax, and then depress the 1 TAX|
key. The tax amount entered is then printed. This tax amount is
processed into the TAX 2 memory. Therefore, the tax amount auto
matically calculated and printed at finalizing the sale (i.e., TAX
1) does not include a manuaI-entered tax, while the entire sale total
printed on the receipt last line does include the manual-entered tax
also.
This key is also used, if depressed without an amount entry within
a sale, to display the total of only non-taxable items so far entered.
Usually, this non-taxable items total is only displayed; however, it
may be programmed to print also.
- 12 -
Page 17

AT/TL
AMOUNT TENDER / CASH TOTAL KEY
This key is used to finalize a cash sale, received-on-account payments,
or paid-out items.
This key can be programmed to be used as one of the following three
types of keys.
1. AMOUNT TENDER KEY
If so programmed, this key requires a tendered cash amount
entry prior to depressing this key. The tax due is printed
with the "TX" symbol, the sale total with the "TL" symbol (if
fST 1 has not been depressed priorly), the cash tendered amount
with the "AT" symbol, and the change due with the "CG" symbol
on separate lines.
When the tendered amount is less than the sale total, all the
printing sequence above will be the same except that the
balance due is displayed (not printed) instead of the change
due. In this case, the sale is not yet finalized and another
cash tendering must be done, or use other media keys ( 1CHK
TEND I and/or |Chg i) if the balance due is processed as a sale
in that media.
When the sale total is negative, as in some cases with returned
merchandise entries, the |AT/TL| key must be depressed without
a prior amount entry, just as in the case of "2, TOTAK KEY"
be low,
2. TOTAL KEY
If so programmed, this key is depressed without a prior amount
entry for sale finalization. The tax due is printed with thè
"TX" symbol and the sale total is printed with the "CA" symbol
on separate lines.
When the sale total is negative, the sale total is printed
with the was well as the "CA" symbo 1. In this case, the
cashier must refund the amount in cash to the customer.
3. AMOUNT TENDER / TOTAL KEY
If so programmed, this key will function as TENDER KEY (as
described in 1 above) when any
will function as TOTAL KEY (as
depressed without an amount entry
prior amount is
described in 2
entered,
above)
and
when
- 13 -
Page 18

CHK
TEND
CHECK TENDER KEY
This key is used Co cash a check when the register is outside a sale,
or to finalize a sale as check payment.
CHECK CASHING
When the register is outside a sale, enter the check amount and
depress this key. A receipt is issued and the drawer is opened
to enable exchange.
FINALIZING A SALE AS CHECK PAYMENT
On finalizing a sale, enter the amount of the check given by the
customer and depress this key. If the amount received is larger
than the sale total, the receipt is issued with the change due
printed and displayed. Then the change is given to the customer
in cash. If the amount received is smaller than the sale total,
the shortage is displayed, and the customer may pay the additional
amount in cash to finalize the sale by depressing the |AT/TL\.
A total of negative balance cannot be finalized by the ¡CHK TEND
key.
Chg
CHARGE TOTAL KEY
This key may be used to finalize a sale paid in non-cas media such
as credit cards. Thus this key is used as alternative method of pay
ment for media other than cash and check. To operate, depress the
I Chg \ key without a prior amount entry, instead of [aT/TLI , to obtain
the total and finalize the sale.
A total of negative balance cannot be finalized by the j Chg j key
- 14 -
Page 19

REGISTERING PROCEDURE FOR SALES
The following are patterns for actual registering operations. In the follow
ing examples, "|
indicates a depression of the transaction key, and "
registering and/or finalizing operations.
NO-SALE (Control Lock: REG, Clerk Key to ON)
____
j "
indicates and input through the numeric keys, ” [ |"
--------
" indicates other
fÑSI (or [#7ÑSl )
DEPARTMENT ENTRY (Control Lock; REG, Clerk Key to ON)
1 a mou nt! I de pt] —
I
Department Key (1 or 2)
SINGLE-ITEM DEPARTMENT ENTRY (Control Lock: REG, Clerk Key to ON)
am oun t!
PLU ENTRY (Control Lock: REG, Clerk Key to ON)
PLU Code! rPLlTi -?•
1~32
REPEAT ENTRY (Control Lock: REG, Clerk Key to ON)
[AMOUNT I LdEPTJ I dept I I DEPT I ... ^
DEPT 11 ... The sale is immediately finalized as cash.
(This is applied only when the | DEPT 1 [ key has
been programmed to be used as "Single-item” key.)
-
---- -
I
_____1_____
I
I
Repeat depressing the same Dept. Key as many times as
the desired count.
I FLU Code! rPLU] rPLUl rPLUl ... -t
--
I I I
Repeat depressing the [PLU1 key as many times as the
desired count.
QUANTITY EXTENSION (MULTIPLICATION) (Control Lock: REG, Clerk Key to ON)
When Q*TY X PRICE order is programmed:
[quantity! [3 [UNIT price! Idept! —
max. 3 dig. max. 6 dig.
integral (The product must not exceed
portion only 7 digits.)
I QUANTITY I [X] [PLU Code [ ¡TlITI —
- 15 -
Page 20

When PRICE x Q'TY order is programmed:
¡UNIT PRICEI [X| IqUANTITYI I DEPT~|
|PLU Code
NOTE: Return Merchandise entry with multiplication is possible by
depressing | RTN MDSE[ any time before the fPEPT j or 1 PLUj key
during the operation sequences in the above four patterns.
RETURNED MERCHANDISE (Control Lock; REG, Clerk Key to ON)
[RTN MDSE'1 -f
I RTN MDSFI ^ [PLU Code! ^ IPLU j -?■
NOTE: as for Return Merchandise with multiplication, see the "NOTE” above,
RETURNED MERCHANDISE WITH %- OR %+:
ex.) A customer bought a department item with a preset discount, which
I
\X\ [QUANTITY
I
amount!
the casher recorded as in the following operation:
I
AMOUNT 1 [DEPT 1 I I 101 23 —
Now the customer later comes back to return the above item.
The cashier must operate as in the following to make up the
returned merchandise entry correctly:
1
DEPT
I
1 FLU j -t
I
- - - - - - - - - -
Manual rate of 10%
---
-
[RTN MDSE] I AMOUNT I [DEPT Ij |10| |7o-1
T
The same amount recorded in the purchase above.
Thus the item amount and the percent discount is correctly
correctly returned.
DOLLAR DISCOUNT (Control Lock: REG, Clerk Key to ON)
----
> [DISCOUNT amount! fpOLL D^Cl
NON-ADD NUMBER PRINT (Control Lock; REG, Clerk Key to ON)
[number! -> i#]Cor [#7nS| )
[
Max. 8 digits
--
---------
--
- 16
Page 21

PERCENT DISCOUNT (Control Lock: REG, Clerk Key to ON)
(1) To discount from the sub-total:
--
^ 1 ST~| -> 17o-1 --... to discount by the preset rate
---> iH! |R^I - El
(2) To discount from a Department or PLU item:
--
^
I dept"!
PLU
DEPT
----
> PLU
NOTE: Use the key if the rate contains the decimal point,
ex.) To enter 4.57o: operate 4 - Q - 5.
PERCENT CHARGE (Control Lock: REG, Clerk Key to ON)
This operates the same as in the PERCENT DISCOUNT operations above,
except that the |%+ j key is used instead of the |%-1 key.
ITEM CORRECT (LAST-LINE VOID) (Control Lock: REG, Clerk Key to ON)
AMOUNT I \DEPT I I ITEM CORK j -}
---------------
--------
0.01-99.99
l-> 17o-1 *+-... to discount by the preset %- rate
2^ IRATeI . Ell . — ... to di scount by a manual rate
--
... to di scount by a manual rate
oToT-99.99
-----
from the sale.)
(The item marked with is invalidated
amount! IdEPTI I same DEPf] [same DEPf] |ITEM CORRI
(An item-correct after repeat
entries will invalidate only the
last one item of the repeated.)
PLU Code I ¡PLU~| ¡ITEM CORi^
Quantity Extension routine
using [dept I or IPLUI
( [MANUAL RATE I ) ¡E(or
AMOUNT I |R/A| I ITEM COR^
AMOUNT I lEI I ITEM CORR
AMOUNT DOLL DISC ITEM CORR
-?
---
--
ITEM CORR
IE )
I ITEM CORr
(An item-correct after a quantity
extension will invalidate the
product that is resulted from
the multiplication.)
amount! I T A?T| I ITEM CORR
- 17 -
Page 22

TAX MODIFICATION (REVERSING THE TAX STATUS) (Control Lock: REG, Clerk Key
to ON)
Dep ress |TX/M|, ]TXl/M|, o r |TX2/]^ at any one of t he p ositi ons mar ked
wit h in e ach ope ratio n pa ttern .
ITX /MI . .. to reve rse the tax s tatu s of the item in a sing le-t ax
are a (i.e ., fr om taxab le t o no n-ta xable , o r vic e ve rsa)
1TX l/MI ... t o rev erse the Tax 1 s tatus of t he i tem in a dual- tax
are a (i.e ., fr om Tax 1 tax able to n on- taxa ble, or
vic e ver sa)
I
TX2 /MI ... t o re vers e the Tax 2 s tatus of the i tem in a dua l-tax
are a (i.e ., fr om Tax 2 tax able to n on- taxa ble, or
vic e ver sa)
ITX l/MlI TX2/ M1 ... to rev erse both Tax 1 s taus and Tax 2 s tatus
of t he i tem in a dual -tax area )
----
^ I AM OUN T 1 ^ I DE PT I -------------------
----
^ IP LU Cod e
----I QU ANT ITY I i ^ [UN IT PR ICE I ^ I DE PT, j -»-------------------------------------
----
^ I QU ANT ITY 1 ^ [ T1 ^ ¡PL U Co de | ^ r PLU ] ->
I
% fPL U]
----------------------
--------------------------
----
AM OUN T DO LL DISC ->
----
(iRA TEl ) ^ [ Q(or [%g )
REC EIV ED O N A CCO UNT (Co ntro l Lo ck: R EG, Cle rk Ke y to ON )
---------------------------
I P AYMENT_AM0UNT_T0_BE_RECE 1 IR/Ai (I amount_tendered I) -r^ |AT/TL|
t
__
Ma y be repe ated if m ultip le i tems .
(Mu st b e op erat ed o utsid e a sale .)
PAI D O UT ( Cont rol L ock: REG , C lerk Key to O N)
___ ________
_
__________
1 AM OUN T PA ID O UT FRO M TH E C ASH DR AWE R | [M] -> I AT/T L j
t
__________
Ma y be repe ated if m ultip le i tems .
(Mu st b e op erat ed o utsid e a sale .)
SUB -TO TAL (Co ntro l Loc k: R EG, Cler k Ke y to ON)
:::
__________::__________:____
] * UjCHK TEND I
t
Ma y be re peat ed if sho rt-
ten dere d .
i
----
-?■ 1 ST I
---------
... T he sale tota l so far is dis play ed a nd p rinte d,
but the sale is n ot ye t fin alize d.
- 18 -
Page 23

TAXABLE TOTAL READ (Control Lock: REG, Clerk Key to ON')
----
ITX BL T LI - >
NO N-T AXAB LE ITEM S TO TAL RE AD ( Con trol L ock : RE G, C lerk Key to O N)
----
[ T AX^ -i
MA NUA L TA X AD DIT ION (Con trol Loc k: RE G, Clerk Key to O N)
----
[TA X A MOU NT T O B E AD DED | 1 T AX [
CH ECK CAS HIN G (C ontr ol Lo ck; REG , Cle rk K ey t o ON )
----------------
--------------
. , . The am ount of s ale total with tax es d ue s o
far is di spla yed only (bu t not prin ted) .
. .. The non -tax able item s to tal o ut o f the ent ire s ale
is d ispl ayed (als o pr inted if s o pr ogra mm ed).
----
1 AM OUN T O F CH ECK TO BE CASH ED | 1CH K T END
(Mu st b e ou tsid e a s ale)
CA SH T OTA L (C ontr ol Lo ck: REG , Cle rk K eys to O N)
- - -
-> ( i
CA SH T END ERIN G ( Cont rol L ock : RE G, C lerk key to O N)
----
-y ( 1 T XBL TL 1 ) - y [T END ERE D
CH ECK TEN DER ED (Con trol Lock : RE G,
----
( I T XBL TL I ) I TEN DER ED C HEC K A MOU NT! | CH K T END
CH ARG E TO TAL (Co ntro l Loc k: R EG, Cler k Ke y to ON)
REC EIP T PO ST- ISSU E (C ont rol L ock: REG , C lerk Key to O N,
A s ale i s fin alize d -> RC PT I SSUE
TXB L TL l ) I^ T/TL
( ffXBL TL~j ) jCh gj .. . Th e sa me a s CA SH TOT AL a bove .
REC EIP T ON /OF F SW ITC H: O FF)
I
... T he d raw er op ens , the s ale t otal i s dis
pla yed and print ed, and a re ceip t is
CA SH a mou nt!
Cle rk Ke y to ON)
issu ed.
lAT /TLi .
.. A rec eipt with only the sale tota l
am ount prin ted is is sued .
. . The cha nge due
is
the dra we r ope ns,
and a re ceip t
ssu ed.
is i
.. T he s ame as
CA SH T END ERIN G
abo ve.
dis p lay ed,
- 19 -
Page 24

MULTI-TENDERING (Control Lock: REG, Clerk Key to ON)
Short-tendering repeated multiple times by cash
or check (by one media).
( ITXBL Tl71 ) [AMOUNT TENDERED] [AT/TL]
L.^1
AMOUNT tendered] [AT/TL] -,
U([amount tendered 1)]AT/TL1
SPLIT-TENDEIRNG (Control Lock: REG, Clerk Key to ON)
... Short-tendering repeated multiple times by
different medias.
(ITXBL TLI) f [CHECK AMOUNT TENDERED[[CHK TEND]
1
The ÍAT/TL] may be
replaced by the
[CHK TEND] Key.
1
>(lCASH AMOUNT TENDERED])[at/TL] ... Check & Cash
^ \ Chg ] ....................... Check & Charge
>]CASH AMOUNT TENDERED] [AT/~Tr[ -> | Chg'] ... Check, Cash,
--
( ITXBL TL[ ) ^ [CASH AMOUNT TENDERED] |AT/Tr] [Chg| ...Cash & Charge
NOTES: 1. In both MULTI-TENDERING and SPLIT-TENDERING operations, the
sale is finalized, a receipt is issued, and the drawer opens
on reaching the sale total amount.
2. If IChgI is depressed or [AT/TL[ is depressed without an amount
tendered entry (if the ]AT/TL| functi ons as the "Total" key),
the sale is then finalized on that stage processing all the
balance due into that media.
& Charge
VALIDATION PRINT (Control Lock: REG, Clerk key to ON)
After
item through a transaction —*
key or a media
NOTES
entering
.No c )ther
: 1,
2.. The following are the
the required
key.
operations
is wi
set
to validation:
(1) PRINT FORMAT WITH or WITHOUT CONSECUTIVE NO.
(2) MULTI-VALIDATION or SINGLE-VALIDATION
. thdrawn.
(The number of validations available for the same item)
Inser t a
into
Make
tri-mark
disp
can
! sei
- 20 -
validate
the
va 1 idati■on
sure that the "
appears
lay bottom.
ow until
foil
ections that can
^on slip
slot
SLP"
the
on
the vaJ
be
[VALIDATE
Page 25

REGISTERING RECEIPT SAMPLES
KO-SALE
Thank you
Colt again
06 -0 4 -8 4 H
i 3 3 3.3 3 3 -
* ^ ■
ld -0 0 ?. 5
14 -0 5
store Narne/Message Stamp
- Date
— Register No.
~ No-sale Symbol
— Clerk ID / Consecutive No.
— Current Time
CHECK CASHING
Thank you
Call again
0 6.-0 4 - 8 4
g 3 3 3.3 3 3
* I. 0 0 s -
ld -0 0 41
14 -2 1
Check Amount Cashed
NON-ADD NUMBER,
RECEIVED ON ACCOUNT
Thank you
Coll again
0 6. - 0 4. - 8 4
S 7 5 3 . 5 3 3
n5.
”
*1 0. 0 0 S -
*2 50 S -
* 1 2 5 0
* 1 0 . 0 0 s -
*2 50 S ld - 0 0 3 .1
14 -1 0
Non-add Number
— R/A item of $10.00
— R/A item of $2,50
— Sub-toal
— Received in Check
— Received in Cash
PAID OUT,
ITEM CORRECT
Thank you
Call again
Od -0 4 -8 4
g 3 3 3 , 3 3 3
*3 .0 0 g -
*2 00 g -
----
*8 .i 5 -g §-
*1 50
— Paid'Out item $1.50 item-corrected
S -
* 6 5 0 g d -
1 d - 0 0 3 .2
14 -1 1
Paid Out item $3.00
Paid Out item $2.00
- Paid Out item $0.15, but
- 21 -
Page 26

DEPARTMENT ENTRY
DEPARTMENT QUANTITY EXTENSION,
ITEM CORRECT ON DEPARTMENT ITEM
Thank you
Colt again
0 6. - 0 4 - 8 4
S 3 3 3 3 3 3
* 1 2 3
* 4 3 6
*0.5 0
*0.50
*0.50
*0,27
*7.56
5 . *
1 d - 0 0 2.6
1 4 - 0 5
-Tax abl e- I te ra Symb ol
- $ 1.2 3 in to De pt.1
- $4.56 in to Dep t.2 (n on- txb l)
—$0. 50 i nto De pt. l
repe ate d th re e t imes .
Tax due
Tota l P aid in Ca sh
- T ota l I tem Co unt of
the sal e (o pt ion pri nt )
Thank you
Call again
0 6 . - 0 4 . - 8 4
i 3 3 3 . 3 3 3
1 2 . X
0.5 0 @
1 *6.0 0 i
?
----
*4 06- g
5 . X
1.2 0 @
1 — *6e9-i§
* 0.6 0 K
* 6. 6 0 u
12. *
1 d “ 0 0 2 . 7
1 4 - 0 6
12 X $0, 500 = $6. 00
into De pt.l
$4.0 0 in to De pt.2 , b ut
Item -co rrec te d
- 5 X $1.2 0© = $6 .0 0 in to
Dept .2, but It em- cor rec ted
AMOUNT TENDERING,
CHANGE COMPUTAION
Thank you
Coll again
0 6 . - 0 4 . - 8 4
§ 3 3 3 . 3 3 3
1 * 1 . 3 0 f
2 * 2 5 0
* 0 1 3 i -
* 3 . 9 3 d -
* 5 0 . 0 0
* 4
6.
0 7 8 -
2 *
1 d - 0 0 2 8
1 4 - 0 8
- Tax du e
- Sal e T ota l i ncl udi ng Tax
-
Cash $50 .00 Te nde red
-
Chan ge due
NON-ADD NUMBER PRINT,
CHARGE SALE, SUB-TOTAL
Thank you
Call again
0 6 - 0 4 - 8 4
g 3 3 3 , 3 3 3
/ / 1 2 3 4 5 . 6
1 * 0 . 4 5 ^
2 * 1 . 2 3
2 * 1 . 2 3
* 2 . 9 1 f e * a o 5
i
* 2 9 6 5 -
3 . *
1 d - 0 0 2 9
1 4 - 0 9
--
Non -add § (ex . Cu sto me r No .)
Sub- tot al A mo unt
Fina liz ed a s Cha rge
22 -
Page 27

RETURNED HERCHANOISE
PLU ENTRY
Thank
you
Call again
001-04-84
§533.333
1
1
* a 5 0
* 1 . 8 0
* a i 3
* 1 . 4 3
a *
- 0 0 3 . 0
I d
1 4
- 1 0
PERCENT CHARGE,
PERCENT DISCOUNT
-$0. i0 re tur ned into Dept .l
T
-$1. 80 p urc has ed (De pt. 10
1X
h -
—Sal e Ba lan ce
u
Thank you
Call again
O d - 0 4 - 8 4
g 7 5 3 . 3 3 5
0 5 o i * I 0 0
0 5 o ’ * 1 0 0
4
l a o o
3 0 5 : 4 0 . 0 0
*0.20
* 4 2 . 2 0
6
. *
l d - 0 0 3 . 5
1 4 - 1 3
DOLLAR DISCOUNT,
CHECK SALE
—PLU No. 5 $ 1.0 0
J repeated twice
— k X ( PLU No, 30 $10 .00 (9)
= $4 0.0 0
Thank you
Coll again
Thank you
Coll again
0 6 . - 0 4 - 8 4
g 3 3 3 . 3 3 3
0 6 - 0 4 . - 8 4
--
1
* 1.
0 0
*0.1 0
^
la
$1.0 0 in to De pt.1
—j— 1 03s ad ded to th e a bov e
% +
Dept .l item
2 * 2.0 0 1 * 3 5 0 i
* 3 1 0
5.
-(11 6
— Sub -to tal
--
53s dis cou nt fro m t he
%-
[ abo ve sub -to tal am oun t.
*0 .1 0 i
* 3 0 4 5
2. *
ld - 0 0 3 .6
14-14
g 3 3 3 . 3 3 3
1 *3 .5 0 5
-0 .4 0 i
* 0, 6 6 2
*7 .2 6
* 7 5 0 5
*0 .2 4
2 *
1 d - 0 0 3 3
14-12
—Dol lar Dis co unt of $0. 40
-Che ck T end ere d
-Cha nge due
- 23 -
Page 28

HULTI-TENDERIKG»
SPLIT-TENDERING
Thank you
Call again
0 d - 0 4 - 8 4
3 3 3 . 3 3 3
* 4 5 0
* 2 . 5 0
* 0 . 4 5
* 7 . 4 5
* 2 0 0
* 3 0 0
* 2 4 5
2
1 d - 0 0 4
1 4 - 1 2
*
T
\-
X
h
—Sale Total $7.45
h
-Cash-paid Portion $2.00
“Another Cash-paid Portion $3.00
X
------The rest Paid as Charge $2.45
u
RECEIPT POST-ISSUE
JOURNAL PRINT
1 * 1. 0 0
2 * 2 0 0
*0.10
*3.10
*5.00
*1.90
2. *
1 d - 0 0 4 6
1 4 " ? 4
When the register is operated with the RECEIPT OM/OFF SWITCH positioned to
"OFF", no receipt will be issued but the sale content is recorded on the
journal roll only. If the customer claims for the sale receipt in that case,
depress the IRCPT ISSUE I key before going into another sale. Then receipt
with only the sale total printed will be issued, no matter in what media the
sale was finalized.
E
1-
X
(-
J
1—
Y
U
O
u
RECEIPT POST-ISSUED
Thank you
Call again
0 d - 0 4 - 8 4
g 3 3 3 , 3 3 3
*3.10
l d - 0 0 4 6
1 4 - 3 5
- 24 -
Page 29

(RECEIPT PRINT)
VALIDATION PRINT SAMPLES
(VALIDATION PRINT)
RECEIVED ON ACCOUNT
YEAR " ( ex. 06- 04- 84) wi ll be pri nte d h ere .
Page 30

READ(X) AND RESET(Z) REPORTS
The fo llo win g are the key op era tio ns an d pri nt sa mpl es of X and Z re por ts. The pr int cont ent s
of t he both re por ts are the s ame . B ut plea se note that 11 the re se ttab le coun ter s a nd total s
will be res et wh en a Z re port h as been t ake n.
TABL E O F RE PO RTS
REPO RT NAME
PLU REA D RE PO RT
PLU RES ET R EP ORT
AUTO RE AD R EP ORT
AUTO RE SET RE POR T
NOTE S: 1. One o f t he C le rk Keys m ust als o be set to ON fo r t aki ng any of th e r epo rts .
2. Fo r p rog ram med da ta rea din g, ref er to ’.' PRO GRA M V ERI FIC ATI ON" wh ich is de scr ibe d
PLU REA D RE PO RT
CONT ROL LOC K
X
Z
X
Z
near th e en d of this m anu al.
KEY OPE RATI ON
fpnn
1 AT/ TLI
Cont rol Loc k: X or Z,
Cler k K ey t o ON.
All PLU s' S al es Data . PLU s wi th no
sale s r ecor d wil l be s kip ped.
All Sal es D at a e xcep t PLU s.
PRIN T C ONTE NT SAMP LE PAGE
27 - 28
PLU RESET R EPO RT
- -- - --- - - - --
—
26
Thank you
Coll again
06-04-84
§ ? 3 3 . 3 ? 5
0 5
?.
*2 0 0
3 0
4
*4ao 0
1 d - 0 0 4 2
14-22
Depr ess I
Date
Regi ste r No .
X Re por t Sy mb ol ■<-- PLU No.5
— Sa le s I tem Co unt
— Sa le s T otal
Cler k ID / Con sec uti ve No ,
Curr ent Tim e
PLUI.
Z Re por t Sy mb ol
Rese t Co unt -
ion Z R epor t onl y)
Thank you
Call again
0 6 - 0 4 - 8 4
§ 3 3 3 . 3 3 3
0 5
2
.
*2.00
3 0
4
* 4 0 . 0 0
^ 0.0 01Z
1 d - 0 0 4 4
1 4 - 2 2
- 26 -
Page 31

AUTO RESET REPORT AUTO READ REPORT
Thank you
Coll again
0 6,- 0 4.- 8 4
§335333
Z
*
9
6,
5
9
t5
4 3.
* 9 6 .5 9 S
1 2 5,
* 2 7.2 8
2 11.
* 5 6 0 2
I % +
*0. 10
*2. 69
3 6
* 8 6 .0 9
1.
*0, 16
1.
*04 0
D J
2.
4.
5,
5,
7.
1.
U »-
?
D X
u u
3
u u
u u
10
* 8 5 .5 3
* 7 0 .8 6
*9. 26
*5, 41
* 1 5 . 0 0
* 1 3 .5 0
* 5 6 .1 2
* 2 5 5 0
— To be con tin ued —
% +
X
1-
%-
%•
_)
h
<r J
u
X -J
U K
X
I _l
U H
eC
a
s
o
CL
O J
a H
a
u w
X
u
X Q
U M
Z Re por t Sy mb ol
Gran d Total {non-re set tab le)
Gros s S ales I tem Cou nt
— " ■ •' Tot al
Oept .l Sale s Ite m Co un t
— " " Total
Dept .2 S ale s I tem Co unt
~ " " Total
Perc ent Cha rg e C ount
— " " Tot al
A
___________
Tax 1 To tal
Net Sal e (w it h T ax) It em Coun t .
.. ,, , J ~on US -ba lan ce ver sio n
_ H 11
Perc ent Ois co unt (on Su b-t otal ) Cou nt
-
-
Doll ar Disc ou nt Coun t
— " " Tot al
Tota l C usto me r C ount
Tota l o f Al l Med ia S al es
Cash Sa les Cu sto mer Co unt
— » " Tot al
Chec k S ales C ust omer C oun t
— " " Total
Char ge Sale s Cus tome r Cou nt
— " " To tal
Rece ive d on A cco unt Co unt
— " " " T ota l
Paid Ou t Co un t
— " " Tota l
Cash -in -dra we r T otal
Chec k-i n-dr aw er Coun t
— " ” " To tal
(1
It Tota l
X Re por t Sy mb ol
with out Tax )
(Net Sal es It em C oun t and Tot al on CA- ba lanc e Ver sion )
-(Ta x 2 Tot al in a d ual -ta x a rea ]
Tota l
n
~ 01 ~
Page 32

AUTO RESET REPORT
-- Co nti nue d —
AUTO READ REPORT
* 1 0.0 0
2 ].
*0,00
* 0 5 0
1 u * *
1 0
4 3 .
* 9 6 . 5 9
A A
0 8 - 0 0
0 9 - 0 0
10- 00
1 3 - 0 0
* 8 6 . 0 9
1 6 - 0 0
1 8 - 0 0
0 0 0 1 . Z
l d - 0 0 4 5
1 4 - 2 2
2
*0.15
0
.
1.
1 0
Item Co rrec t Cou nt
- " " Total
Item Co rrec t Cou nt
- " " Total
%-
%-
Perc ent Dis co unt (on De par tmen t and PLU i tem s) Cou nt
- " " " Tota l
Retu rne d Me rc han dise I tem Cou nt
CLER K 1 SAL ES DAT A;
_
Tot al C ust om er C oun t
— Ite m C oun t
—' Gr oss Sa les To tal
-HOU RLY DAT A:
No s ale s da ta wa s re co rde d he re .
— Cus tom er Cou nt
- - - -
Hou rly Ran ge Sal es To tal (Ne t Sale s W it h Ta x for US- ba lan ce V er sio n,
^ Net Sal es W it hou t Ta x for CA- ba lan ce V er sio n)
JNo sal es d at a w as r ec ord ed h er e.
-- -
Res et C oun t (on Z r ep orts on ly )
—Cle rk ID / Consecut ive N o.
— Cur ren t T ime
J o n Dep artm en ts and P LUs (VD)
^ on ot her it ems (VD 2)
Tota l
-(No -sa le C ou nt; opt io n p rint )
(Oth er Cler ks ' D ata wi ll also b e p rint ed he re, if
any sal es a re re cord ed .)
- 28 -
Page 33

PROGRAMMING OF THE REGISTER
In this chapter, various programming operations are described. Please follow
the directions of each operation when any data must be changed or newly set.
TABLE OF PROGRAMMING CONTENTS
(PROGRAM ITEM)
DEPARTMENT TAX STATUS SETTING
DEPARTMENT LC SETTING
PLU CODE SETTING AND DELETION
HOURLY RANGE SETTING
TIME SETTING ........................... Anytime
DATE SETTING ........................... Anytime
REGISTER NO. SETTING ................... After Auto Z
7o+, 7o- PRESET RATE SETTING
PLU PRESET PRICE CHANGE
SETTING TAX TABLE ...................... After Auto Z
NON-TAXABLE AMOUNT LIMIT SETTING
PROGRAM VERIFICATION
DEPARTMENT LC & 7 RATE READ
PLU TABLE READ
..................
...................
................
......................................................
..........
..........
...........
.......
.........................................
(CONDITION)
After Auto Z
After Auto Z
After PLU Z for Change,
Anytime for Additional ..3
After an Auto Z
...............
...............
Anytime
Anytime
After Auto Z
..................
..................
(PROG.NO.)(PAGE)
..........
..........
.......
..............
.............
..........
1
2
4
5
6
9
30
32
33
34
35
35
36
.
.
.
36
37
38
40
41
41
TAX CALCULATION TEST
NOTE: If data any other than the listed above must be changed, please contact
your local TEC representative.
................................................
42
- 29 -
Page 34

DEPARTMENT TAX STATUS SETTING
This operation determines the taxable/non-taxable status of each depart
ment .
CONDITION: After an Auto Reset
OPERATION: Control Lock: SET, one of the Clerk Keys must be set to ON.
jEor_sij^e;tax_arj
I
1 B
for dual-tax area
->( ITXI/Ml )
c
ITX2/MI )■
DEPT
I
Repeat for another department status.
NOTES: 1. Among \ TXl /M \
for the required status change(s) for each department.
2. Depressing any of the three keys above, the related status
reverses. For example, depressing the |TX/M| reverses a nontaxable DEPT to a taxable or taxable to non-taxable. Each
department status is read by the number indicated on the dis
play when each department key is depressed in the above opera
tion. The numbers and their respective statuses are:
0: Non-taxable
1 : Tax 1 Taxable
2 : Tax 2 Taxable
3: Tax 1 and Tax 2 both Taxable
Watching the number, adjust the status by depressing those
keys. See the examples below. The | TX/M j (for single-tax
area) operates the same as the iTX2/M|.
STATUS NUMBER KEY-IN FOR CHANGE
BEFORE CHANGE
0 (Non-taxable)
0
0
1 (Taxi)
1
1 1TXl/Ml1TX2/MI
2 (Tax2)
2
3 (Taxi & Tax2)
Press the
required Depart
ment Key for the
tax status.
C
i TX/mI) and
PRIOR TO iDEPTi KEY
1TXl/Ml
|TX1/M||TX2/m1
iTX2/M|
-f
1TXl/Mi
1TX2/M1 3(Taxl & Tax2)
ITX2/MI
1TXl/Ml
-¥
1TXl/Ml 2(Tax2 only)
etc.
I
TX2/M
I
keys, depress the key(s)
1 for sinle-tax area
---
->
->
NEW NUMBER AND
STATUS OBTAINED
1(Taxi only)
3(Taxl & Tax2)
2(Tax2 only)
O(Non-taxable)
2(Tax2 only)
0(Non-taxable)
3(Taxl & Tax2)
for
dual
tax
area
- 30 -
Page 35

OPERATION SAMPLE:
Presumed that all the departments have been set as non-taxable.
To set Dept. 1 as taxable department,
Dept. 2 as non-taxable department
(in a single-tax area)
Control Lock: SET,
Clerk 1 Key to ON.
Enter 1, depress [X| .
Depress
Depress
I
TX/M | and
I
DEPT 2|.
I
DEPT 1~| .
Tfwnk you
Coll again
Depress 1AT/TL1 to end.
0&-04-00
o
z
^0
# - Q l
1 1
2
1 d - 0 0 0 . 6
13-53
0
- 31 -
Page 36

DEPARTMENT LC SETTING
The listing capacity (LC) for each department and the common LC for all
departments can be set in this operation. If the LC for an individual
department is once set, that LC prevails over the common LC. The common
LC becomes effective for entries through a departement which has not
been set with its individual LC.
CONDITION: After an Auto Reset
OPERATION; Control Lock: SET, one of the Clerk Keys must be set to ON.
2 m
2 a
The above two operations may be combined as follows:
2 El
SAMPLE_OPER^ION :
LC for each Dept
Reg. Price
0
Repeat for each dept.
Number of Limit Digits
for Registration Price
1 *v 7; 0 for LC reset,
8 or 9 results
the same as 7.
Repeat for each department.
Number of Limit Digits! |AT/TL|
for Registration Price|
1 ^ 7; 0 for LC reset,
8 or 9 results
the same as 7.
I dept"I
______
jPEPTi
Common LC for! |AT/TLI
All Depts.
0 ~ 7
___
i~AT/TL|
. . for indiviuda1
Departments'
LCs
for the common
LC for all the
departments
j
To set the following LCs:
Dept. 1 : 3 digits
Dept.2; 4 digits
Common LC: 6 digits
Control Lock: SET, Clerk 1 Key to ON
Enter 2, depress .
Enter 3, depress rPEPt 1~1 .
Enter 4, depress [PEPT 2].
Enter 6, depress |AT/TLI.
- 32 -
Thank you
Coll ogoin
0 6 . - 0 4 - 0 0
§0
#-0.2
1
2
1 d - 0 0 0 . 7
1 3 - 5 4
Page 37

PLU CODE SETTING
A maximum of 32 PLUs can be set. Each PLU is programmed with its PLU
Code No. (1 to 32), preset price (max. 6 digits), and its linking Depart
ment No.
CONDITION; After a PLU Reset for changing data with the old PLU Codes,
or any time outside a sale for additional PLU setting.
OPERATION: Control Lock: SET, one of the Clerk Keys must be set to ON.
Repeat alternating PLU data
3 \Y\ i |PLU Code No. [ fPhUl
NOTES:
SAMPLE OPERATION:
PLU CODE DELETION
1. If a PLU is li nke d t o a Si ngl e-i tem De par tm ent,
the PLU wil l als o fu nc tio n as S ing le-i te m P LU.
2.
The tax st at us o f e ac h PL U i s rule d b y that o f
the lin ked de par tmen t.
To set the following PLUs:
PLU Code No. Preset Price Link Dept
5
10
11
30
Control Lock: SET, Clerk 1 Key to ON
Enter 3, depress [XI •
Enter 5, depress 1PLUI.
enter 100, depress j DP 1| ,
Enter 10, depress l~PLU I .
enter 200, depress 1 DP lì,
Enter 11, depress ¡PLU],
enter 12300, depress fOP ^ i.
Enter 30, depress j PLU j ,
enter 1000, depress ¡DP 2|,
Depress j AT/TL| to end.
1 ~ 32
1 .00
2.00
123.00
10.00
[Preset Price j |DEPT[
max, 6 dig. |
Linked Dept. Key
DP 1
DP 1
DP 2
DP 2
I AT/fn
Thank you
Coll again
0- 6. - 0 4 - 0 0
§0
# - 0 . 3
0 5
*10 0
10
¿1
*2 0 0
11
¿2
* 1 2 3 . 0 0
3 0 ¿ 2
* 10.0 0
1 d - 0 0 0, 8
1 3 - 5 5
# - 0 3
10 d
CONDITION: After a PLU Reset
OPERATION: Control Lock: SET,
one of the Clerk Keys
must be set to ON.
3 S [item COKRJ I PLU Code Noj rPLUl
t
__________
__ ____________
- 33 -
[AT/TLI
l d - 0 0 0 . 9
1 3 - 5 6
Print Sample when
PLU No.10 is delet
ed.
Page 38

HOURLY RANGE SETTING
A maximum of 16 hourly ranges may be set. By setting hourly ranges,
the sales data are processed into each hourly range memory which will
be read on Auto X and Z reports.
CONDITION: After an Auto Reset
OPERATION; Control Lock: SET, one of the Clerk Keys must be set to ON.
Repeat (max. 16 hourly ranges)
„ I
4 1X1 I HOUR
Enter the time that ends each
hourly range, in the 24-hour
system. (0 2359)
NOTES: 1. To change the hourly range table once set, partially or
entirely, do the entire setting operation over again.
2. To reset the hourly range table and not to provide any hourly
ranges, operate in the "SET" mode:
MIETEI I # l(orl#/Nsl) -> IAT/TLI
______
1
_________________
,
^ E 0 I # KorlTOsI) ^ Iat/tl'I
3. Do not set an hourly range accross 24:00, such as "from 23:00
to 1:00", If ever set, no data will be processed into that
hourly range.
SAMPLE OPERATION:
To set the following hourly range table:
Table Key Operation
10
13
16
8
9
:00
:00
to 8 00
up
00
~ 9
00 ~ 10
00 - 13
^ 16
- 18
:00
:00
•00
00
.00
Control
Clerk 1
Enter 4
Enter
Enter
Enter
Enter
Enter
Enter
Depress IAT/TLI to end.
Lock: SET.
Key to ON.
depress
800, depress
900, depress
1000, depress
1300, depress
1600, depress
1800, depress
[x ]
•
ffl.
[E ■
Em-
[S .
(1 3.
Thank you
Coil ogoin
0
0 4-
d-
§0
n
a4
0
8 -0 0
0
9
0
-0
0
-0 0
1
1
3
-0 0
6
1
1
1
1
-0
8
-0 0
_]
u
"0
3 -5
0
0
6
1 .0
- 34 -
Page 39

TIME SETTING
A time-of-day clock and standard calendar circuit is installed. There
fore, once the time and the date are properly set, seldom is adjustment
necessary. Neither is a leap year adjustment necessary.
CONDITION: Any time outside a sale
OPERATION: Control Lock: SET, one of the Clerk Keys must be set to ON.
5 [Xl I HOUR I MINUTE I I AT/TL|
0 ~ 23
00 ~ 59
SAMPLE OPERATION:
To set the time to "1:57 p.m." (i.e. "13:57")
Control Lock: SET,
Clerk 1 Key to ON.
Enter 5, depress .
Enter 1357, depress IAT/TLI.
DATE SETTING
CONDITION: Any time outside a sale
OPERATION: Control Lock: SET, one of the Clerk Keys must be set to ON.
b [X]
SAMPLE OPERATION:
To set the date to "June 4th, 1984":
(with date order option MONTH-DAY-YEAR)
1
MONTH I DAY [ YEAR | -i [ AT/TL~I , . . ( if the date order option
I J "MONTH-DAY-YEAR" is selected)
1~12 84,85,etc.
01-31
DAY I MONTH I YEAR( -f IAT/TL1 ...(if the date order option
1-31
01-12
84,85,etc.
1
_________
"DAY-MONTH-YEAR" is selected)
Thank you
Coll again
Control Lock: SET,
Clerk 1 Key to ON.
Enter 6, depress [x].
Enter 60484, depress |AT/TL|.
- 35 -
0 6. - 0 4 - 0 0
go
#-06
06-04-84
1 d - 0 0 1.2
13-57
Page 40

REGISTER NO, SETTING
A maximum of 6-digit number may be set as Register No.
CONDITION: After an Auto Reset
OPERATION: Control Lock: SET, one of the Clerk Keys must be set to ON,
I Register No . [ \ # 1 (or | #/NS | )
0 ~ 999999
SAMPLE OPERATION:
To set Register No. of "333333":
Control Lock: SET,
Clerk 1 Key to ON.
Enter 333333, depress r#/CIDl.
%+, %- PRESET RATE SETTING
Each of the 1X+ \ and | %-1 keys can be set with
a preset rate independent from the other. Once
a rate is preset, a simple depression of the
% key will function with the rate in the REG
mode. If a manual rate is entered before the
% key, it will function with the manual rate
instead. If 07o is preset, the % key will
always require a manual rate entry.
CONDITION: Any time outside a sale
OPERATION: Control Lock: SET, one of the Clerk
Keys must be set to ON,
I
7o+ Preset Rate | ■ &
1
%+
I
Thank you
Call again
0 6. - 0 4 - 8 4
§0
1 d - 0 0 1.5
13-59
Thank you
Colt again
0 6 . - 0 4 - 8 4
g 3 3 3 . 3 3 3
I Preset Rate | -*• | |
0 ^ 99.99
(Use the |T] key
if a decimal point
is contained.)
SAMPLE OPERATIONS:
To set 10% for %+ Preset Rate,
10.5% for %,- Preset Rate:
Control Lock: SET, Clerk 1 Key to ON.
Enter 10, depress |%>+1 .
Enter 10, depress □ , ent.r 5,
depress p/o-l .
- 36 -
#10.
1 d - 0 0 16
13-59
% +
Page 41

PLU PRESET PRICE CHANGE
When only the preset prices of PLUs but not PLU Code No. or linking
Department, you do not have to go through the "PLU CODE SETTING" opera
tion described on page 33, but can easily change the prices in the
following operation:
CONDITION: Any time outside a sale
NOTE: If the preset price of a PLU is changed during the day before
an Auto Reset Report operation, the sales data printed on
the Auto Read or Reset Reports may not result in the correct
total amount, because the report data of each PLU will
be calculated by (Sales Item Count) x (Newest Preset Price).
For this reason, it is suggested that PLU Price Changing be
executed after an Auto Reset as much as possible.
OPERATION: Control Lock: SET, one of the Clerk Keys must be set to ON.
_____
Repeat for another PLU price change, if any.
___
I PLU Code No. | I PLU] ^ | New Price] 1 # ~~1 (or |"17irs~| ) ^ j AT/TL
max. 6 dig.
SAMPLE OPERATION:
To change the preset price of PLU No.11 from $123,00(ol-d price)
to
$12.34(new price):
Control Lock: SET.
Clerk 1 Key to ON.
Enter 11, depress
Enter 1234, dep
Depress lAT/TLl to
ITluI .
ress f
end.
__#__
i
- 37 -
Page 42

SETTING TAX TABLE
The MA-132 model can calculate tax using one of three methods of tax
calculation, which can be set in the programmable memory. The three
methods are:
1. FULL-BREAK METHOD (COMBINATION OF NON-CYCLIC BREAKS AND CYCLIC BREAKS)
(Maximum 64 breaks programmable for Tax 1 and Tax 2 tables altogether)
2. COMBINATION OF NON-CYCLIC BREAKS AND % RATE
(Maximum 64 breaks programmable for Tax 1 and Tax 2 tables altogether)
3. % RATE ONLY
CONDITION: After an Auto Reset
OPERATION: Control Lock: SET, one of the Clerk Keys must be set to ON.
Select one of the following three methods to meet your tax status. Use
ITXI/^ for Tax 1 Table and ITX2'/^ for Tax 2 Table respectively in a
dual-tax area, in place of ITX/M| in the following descriptions for the
single tax table setting operations.
1. FULL-BREAK METHOD
Non-cylic Breaks
1) Enter the first break point of price that is the non-taxable limit,
and depress ITX/m1.
2) Enter the next break point of price that is the limit to collect
the tax amount l*i, and depress | TX/M j .
3) Repeat Step 2) above, with alternating each limit price for
collecting tax amount of 2^, 3il, 4fd ... until the non-cyclic breaks
are all entered.
4) Depress I ST I to end the non-cyclicbreak entries.
Cyclic Breaks
1) Do the same operation as in Step 1) above, entering each limit
price for each tax amount that increases by Iji, followed by the
ITX/MI key. Enter the last price so that the difference between
the last non-cyclic break price already entered and the last cyclic
one will be a multiple of one dollar ($9.00 maximum). Otherwise,
the tax calculation will not function.
2) Depress |AT/TL1 to end the cyclic break entries as well as the
entire tax program.
2. COMINATION OF NON-CYCLIC BREAKS AND % RATE
Non-cylie Breaks
1) Do the same operation stated above in 1 from Steps 1) through 4)
of Non-cyclie Breaks.
7o Rate
1) Enter the tax percentage rate applied to amounts above the non-
cyclic breaks. (The rate may be entered in maximum 4 digits; 2
digits above and 2 digits below the decimal point. For example,
to set 4%, enter 400).
- 38 -
Page 43

2) Depress | AT/TL | to end the percentage rate entry as well as the
entire tax program.
3. °L RATE ONLY
1) Enter "0", depress |TX/M|, and depress |ST|.
2) Enter the percentage rate in the same manner as in 2 - Step 1)
above. Then depress IAT/TL| to end the entire tax program.
NOTES: 1. A maximum of 4 digit value is entered for each break.
2. If any incorrect value is found to have been entered, first
complete the entire tax table program (up to the | AT/TL | key
operation), and do the correct tax table program operation over
again from the frist.
3. In a dual-tax area, program Tax 1 Table first, and then Tax 2
Table. When Tax 1 Table is programmed, Tax 2 Table (if any pre
programmed) will automatically be reset.
SAMPLE OPERATION: To program the following tax table
(in a single-tax area)
1. FULL^BREAK METHOD
Key Operation
Tax Table
Non-cyclie Breaks
(from)
16
( to) ( tax)
Oi
\H
25
oi
1
Control Lock: SET,
Clerk 1 Key to ON.
(Enter) (Depres;
15 1TX/Ml
25 iTX/Mi
[ H I
Cyclic Breaks
26
46
66
86
106
. COMINATION OF NON-CYCLIC BREAKS AND % RATE
Non-cyclie Breaks
0^
20
40
60
80
5% applied to any amount
above Non-eye lie
45 2
65 3
85 4
105
125
39 1
59
79 3
99 4
Breaks
5
6
2
oi
45 rfx/M1
65 ITX/Ml
85 ¡TX/Ml
105 r'TX/Ml
125 1TX/Ml
1AT/TL!
19
39 1tx/mI
59 |tx7m1
79
99
500
i tx/m1
ITX/Ml
[Jx/MJ
I ST I
IAT/TLI
Thank you
Colt again
0 6. - 0 4 - 8 4
§
3 3 3 . 3 3 3
i / 1
0 0
0 1
*
0 . 1 5
* 0 . 2 5 f
^
* 0 . 2 5 S
0 2
0 ?
0 4
0 5
* 0 , 4 5 £
* 0 . 6 5
^
* 0 . 8 5 i
* 1 0 5
£
0 6 * 1 2 5 i
* 1 2 5 d
-0018
I d
1 4
- 0 0
#1
0 0 * 0 . 1 9
0 1
0 2
03
0 4
I d -
- 0 0
1 4 -
- 0 1
^
* 0 . 3 9 i
* 0 . 5 9 ¡ 5
* 0 . 7 9 i
* 0 . 9 9
* 0 . 9 9
5 ,
%
].
9
%
- 39 -
Page 44

3. 7o RATE ONLY
107o applied to any amount
NON-TAXABLE AMOUNT LIMIT SETTING
CONDITION: After an Auto Reset; this program is applied only to
If this program has been set, the tax is calculated and added to the
sale total which exceeds the limit amount even when the sale is
entirely composed of non-taxable items. The tax levied when exceeding
this limit amount will be calculated by the Tax 1 Table which has
just been described.
OPERATION; Control Lock; SET, one of the Clerk Keys must be set to ON.
9 S ^
NOTES: 1. To reset the limit amount once set, enter "0" as the "Non-
I
Non-taxable Limit Amount | -+ | AT/TL I
max. 4 digits ($99.99)
taxable Limit Amount" in the above operation.
D |TX/^|
[m,
_______
1000 lAT/TLl
restaurants in Province of Quebec, Canada.
2. This tax calculation program will be disregarded when the sale
total is negative.
ex.) When the limit amount is set to "$3.25":
Case 1) Norma 1 Department Entry (Control Lock: REG)
1 326 I -f |7ion-taxab le DEPT | -»■ rAtTTL'l
... The entered amount $3.26 is greater than the limit
$3.25, It will therefore be taxed.
Case 2) Returned Merchandise Entry (Control Lock: REG)
RTN MDSE
... The non-taxable total is negative. The tax already
levied will therefore not be returned.
SAMPLE OPERATION;
To set the Non-taxable Amount to $20.00:
Control Lock: SET,
Clerk 1 Key to ON.
Enter 9, depress [x].
Enter 2000, depress |AT/TL|.
3261 Inon-taxable DEPTI I AT/TL
Thank you
Coll again
0 6. - 0 4. - 8 4
go
//-0.9
* 2 0.0 0
1 d - 0 01. ?
13-58
- 40 -
Page 45

PROGRAM VERIFICATION
DEPARTMENT STATUS & LC,
% PRESET RATE READ
ControI Lock: X
Clerk Key to ON.
Enter 1, depress
Thank you
Call again
PLU TABLE READ
Control Lock: X
Clerk Key to ON.
Enter 3, depress [ST 1
Tax Sta tus
Dept . N o.
0:No n-t axab le
l;Ta xl Taxa bl e
2:Ta x2 Taxa bl e
3;Ta xl & Ta x2
Taxa ble
--
0 6. - 0 4 - 8 4
g 3 3 ?. 3 3 3
10.
1 0 5
1 d - 0 0 2.2
1 4 - 0 4
Thank you
Call again
% +
%-
Date
Regi ste r No .
List ing Cap ac ity
Comm on LC fo r All Oep ts .
%+
Pre set Pri ce 10%
%- Pr ese t P ric e 1 0.5 %
Cler k ID / Co ns ecu tiv e No,
Curr ent Tim e
Link ed Dept N o.
PIU Cod e
0 6 . - 0 4 . - 8 4
i 3 3 3 . 3 3 3
\ X
0 5
E*1
*1.0 0
11
¿2
* 1 2 . 3 4
3 0
5*2
* 10,0 0
1 d - 0 0 2.3
1 4 - 0 4
- 41 -
Pres et Pric e
Page 46

TAX CALCULATION TEST
Contro1 Lock: X
Clerk Key to ON.
Repeat this operation,
alternating the amount,
until Che tax table is
found to be correct.
AMOUNT TO TEST)
Amount
entered
— displayed
(No print will occur.)
ITXBL TL
I
Tax due
(Tax 1 and Tax 2
consolidated)
- 42 -
Page 47

PAPER ROLL REPLACEMENT AND OTHER MAINTENANCE
MANUAL DRAWER RELEASE AND LOCK
I Releasing
The drawer opens automatically when
a registration is made. In the event
of a power failure or other troubles
the drawer can be opened in the
following manner,
1) Insert the Drawer Release Key
into the drawer release lock and
turn the key 45 degrees clockwise.
The drawer will now open. (Fig.l)
2) The Drawer Release Key can be
taken out by returning it to the
original position.
Fig. 2
3) When the drawer is closed, it
is automatically locked and will
not open without the Drawer
Re lease Key.
I Removing the Drawer
1) To remove the drawer, lift it
up by the stoppers attached on
both sides and pull it out. (Fig.2)
2) When installing the drawer, the
fit its rollers onto the rails
of the register and push it all
the way in. (Fig.2) The coin
case can be removed from the
drawer, by lifting it up at the
front.
CDC (Cash Drawer Cover) LOCK
I Locking
Push the Cash Dr awe r Cover to the
drawer-end plate so that the arrow
parts of the cover go under and the
rest parts go over the plate. (Fig.6)
Press the cover lightly, insert the
key into the key-hole on the cover,
and turn clockwise. Now the cover
is locked.
I Opening
- 43 -
Release the lock by
lift up the cover tip.
the key, and
Page 48

REPLACING THE RECEIPT OR JOURNAL ROLL
When coloured paper comes to appear, this
indicates that the existing paper is near
the end. In this case, replace the paper
roll with new one immediately.
1) Open Che Paper Cover.
2) While pulling the Paper Free Lever
towards you, remove the used-up roll
upwards. (Fig.8)
To remove the wound-up journal paper
roll from the journal receiving shaft,
pull the wound-up paper sideways.
3) Install the new paper
illustrated. (Fig.9)
4) Insert the folded paper end into the
paper inlet while depressing the IRFI
(for receipt) or IJ F| (for journal)
key. When the paper end comes out of
paper outlet, release pressure from
the key.
In installing the journal paper, wind
the paper on the Journal Receiving Shaft
two or three turns, then set it in
pos it ion.
roll as
- 44 -
Page 49

REPLACING THE INK ROLL
When the receipt and journal paper print
becomes too light to read, replace the
Ink Roll in the iollowing manner.
1) Turn the Control Lock to the "LOCK"
position and remove the Ink Rol 1 Case
"A" part upwards together with the Ink
Roll. (Fig.10)
2) To install the new Ink Roll, turn the
Ink Holder "B" about 1 cm to the front
and set the new roll in position.
REPLENISHING INK TO THE STORE MESSAGE STAMP
When the store message is printed too
lightly, replenish ink in the following
manner. (Fig,11)
1) Pull the section "A" upwards and remove
the stamp with the case.
2) Apply ink to the replenishment pad at
the back of the store message stamp.
The amount of refilling should be
adjusted according to the density of
the printed message, but the limit of
2 cc should not be exceeded. (The
supplied ink bottle contains 5 cc of
ink).
- 45 -
Page 50

SPECIFICATIONS
SIZE .................... 460mm(width) x 400mm(depth) x 329rmnCheight)
WEIGHT
POWER REQUIRED .......... AC 117V 60Hz
POWER CONSUMED .......... O.llA when not operating, 0.3A when operating
SIZE OF RECEIPT AND JOURNAL TAPE
AMBIENT TEMPERATURE
..................
.........
NOTE : A liquid crystal is used as the display indicator in this model
Due to the properties of liquid crystals, the entire surface
of the display will become too dark to read if the ambient
temperature is too high. However, in such cases when the
temperature decreases, the display will return to the normal
state. For this reason, please avoid exposing the unit to
extremely high temperatures. The
temperature for use is between 0 C and 40 C.
16.5kg
38mm(width) x 70rtim(diameter)
.....
0°C ~ 40°C, 15% ~ 90% (Relative Humidity)
^propriate range of
- 46 -
Page 51

Page 52

PRINTED IN JAPAN
El-01256 84062000©
 Loading...