

Page 1

L OPERATING INSTRUCTION
MODEL MA-120 SERIES
ORIGINAL JUNE, 1977
(REVISED )
MATERIALS. NO.E1-0133
PATENT PENDING
ШЕЕ TOKYO ELECTRIC СОЛО.
PRINTED IN JAPAN
77061000 ©
Page 2

CONTENTS
TO OUR CUSTOMERS
1. Preparation for Operation.......................................................................................... 2
2. Arrangement of Keyboard and Uses............................................................................ 3
3. Display Lamp............................................................................................................... 4
4. Control Lock and Control Key
....................................................................................
5. Setting the Date............................................................................................................ 4
6. Registering Procedures of Sales................................................................................... 5
7. Registering during Power Failure................................................................................ 8
8. Examining Sales Total during Business Hour (Read)
.................................................
9. Resetting of Sales.. ................................................................................................... 8
10. Closing of Sales and Preparation of Operation for Next Day...................................... 8
11. Unloading the Journal Paper........................................................................................ 9
12. Loading the Receipt Paper and Journal Paper............................................................10
13. Business Records Give Exact Sales Details................................................................12
14. Releasing the Drawer..................................................................................................13
15. Replacing Ink Ribbon.................................................................................................13
16. Removing the Store Meassage Stamp.........................................................................15
17. Re-Inking to the Store Message Stamp......................................................................16
18. Maintenance and Inspection Requirements
................................................................
16
19. Other Precautions........................................................................................................16
20. Specifications of TEC Electronic Cash Register, Model MA-120 Series...................17
4
8
The specifications described in this manual may be modified by T£C, if necessary.
Be sure to keep this manual for future reference.
Page 3
TO OUR CUSTOMERS
This owners manual provides a description about the functions and handling of the TEC Electronic Cash
Register Model MA-120 Series and should be read carefully to obtain maximum performance from your
register. Since ample consideration has been given to safety devices, there is no danger of damaging the machine
by erroneous operation. Please read this manual whenever you have any doubts concerning the operation of
machine.
This machine has been manufactured under strict quality control and should give you full satisfaction. However,
if the machine is damaged during delivery, or there are unknown points in this manual, please contact your local
TEC dealer where you purchased the machine.
Further, it is recommended to retain this owners manual with you for yom future reference after you have read
through.
PREFACE
TEC Electronic Cash Register, Model MA-120 Series is a small sized and highly efficient electronic cash
register developed through concentration of the latest electronic technology of TEC, with a highly efficient
printer developed by TEC incorporated. MOS-LST (micro computer system) has been incorporated in the
principal parts to provide high reliability as well as durability.
The highly efficient printer issues clearly printed journals as well as receipts with commercial printing printed,
and the memory is wholly protected even during power failure. Although being small in size, Model
MA-120 Series registers have sufficient memory capacity; for instance, Model MA-121S has a 8 digits
memory capacity. In addition, all of functions necessary for an electronic register have been fully incorpo
rated.
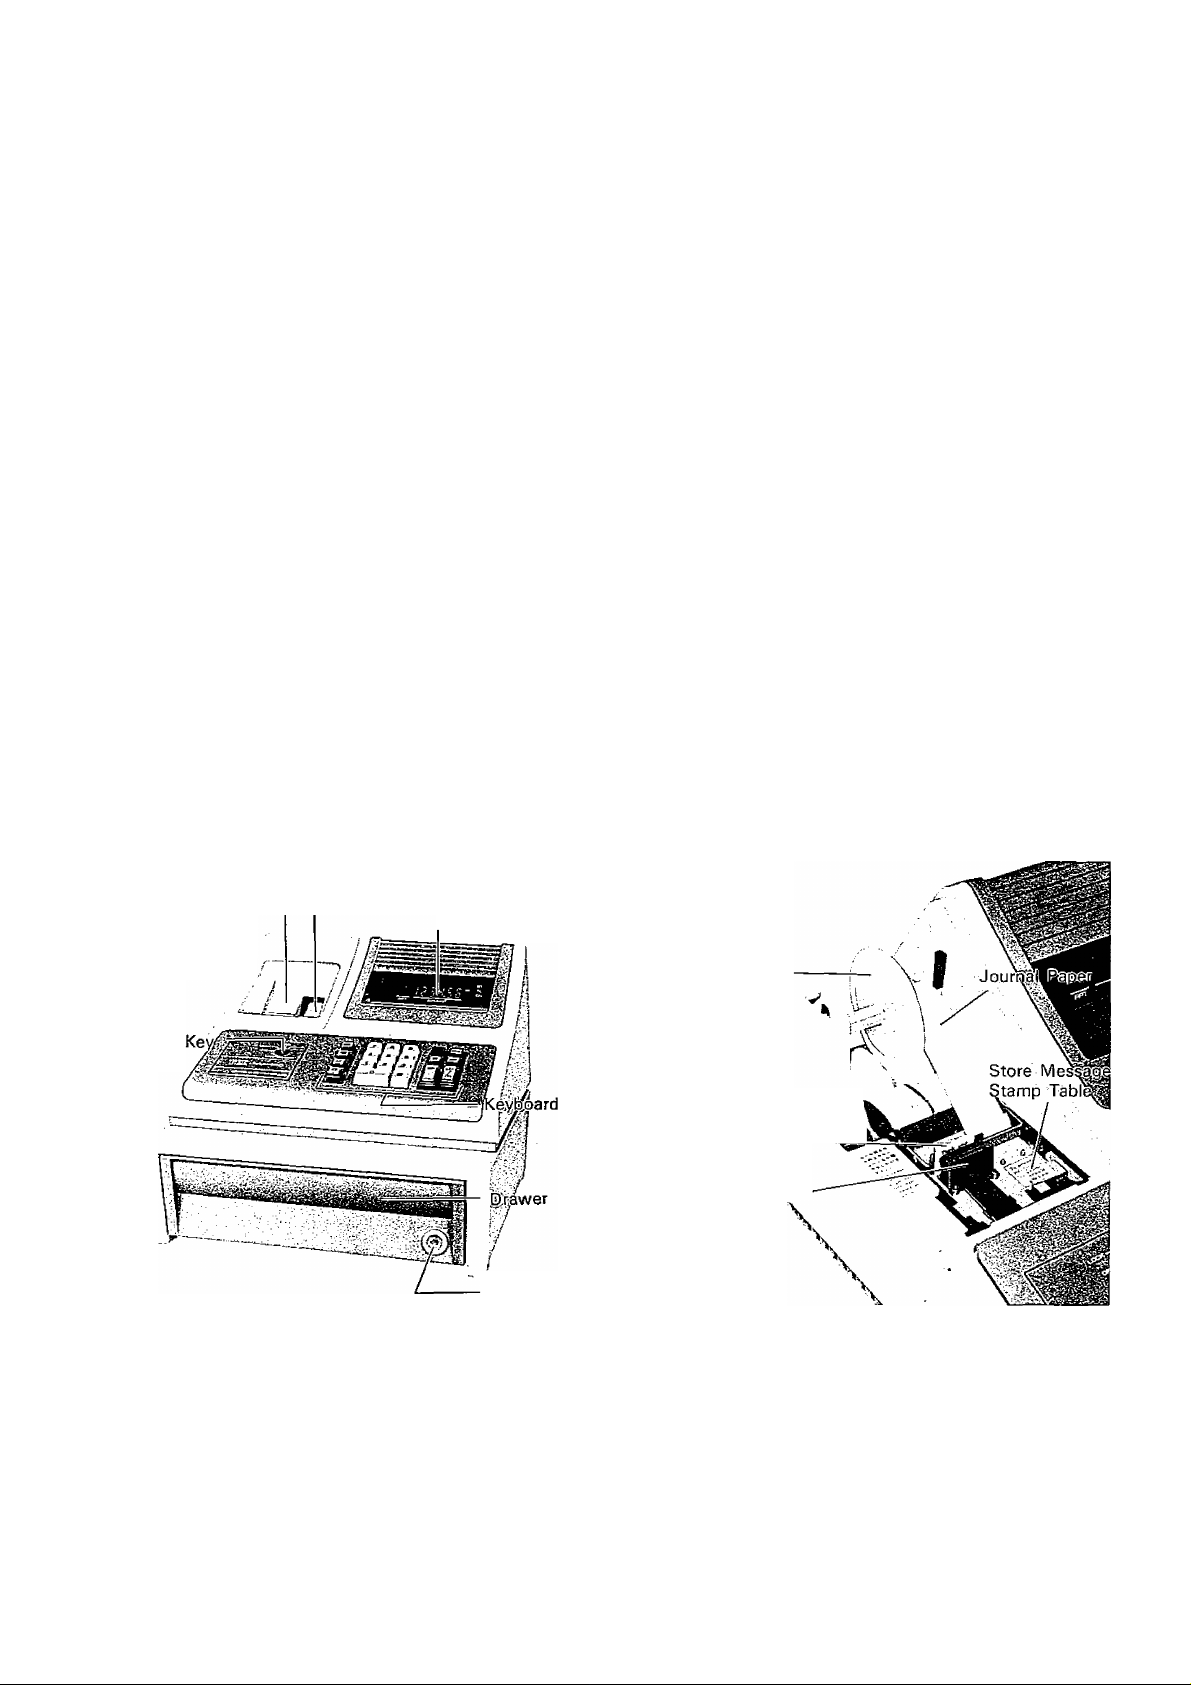
• NOMENCLATURE
Paper Cover
Control
--------
— Receipt Outlet
Journal Window
— Display
Drawer Lock
Paper Winding Shaft
Receipt Paper —
Store Message
Stamp
\
- 1 -
Page 4

1. PREPAI^nON FOR OPERATION
For ensuring proper operation of this electronic register, the following procedures are required to be followed
before operating the register.
(1) Plug the cord of the register into the power source.
(2) Check to ensure that detail tape and receipt tape are properly loaded in place.
(3) Turn the control lock with Ma key and position the lock to access Read (X) mode of operation.
(4) Set date following the procedure described in Paragraph 5.
(5) Turn the control lock to access Register (REG) mode of operation, then press the |nS |key to confirm that
the date is correctly printed on the receipt.
Above completes all preparations required for registration by the register.
FOR ENSURING LONGER SERVICE LIFE OF THE REGISTER, PLEASE OBSERVE
FOLLOWING PRECAUTIONS.
• Operate the register properly with grounding for safety.
• Location of the register
It is inadvisable to place the register at such a location as exposed directly to sun beams for a long hour, ad
jacent to a heater, or in dusty or humid atmosphere.
• Other precautions
Although the TEC Electronic Register Model MA-120 Series have been manufactured under strict quality
control, should any troubles occurred, do not touch the terminals, but unplug the power cord immediately
from the plug socket, and contact your local TEC dealer where you purchased the register as soon as possi
ble. Technical serviceman will be immediately dispatched. When your register is not used, cover it with an
attached dust cover. In addition, it is recommended to keep a record of Model No. and Serial No. of your
register stamped on the name plate provided at the lower right side of the front panel. ,
- 2 -
Page 5

2. ARRANGEMENT OF KEYBOARD AND USES
MA-121S Standard
• Function of keys
(1) Feed key:
FEED
To be employed for feeding journal and receipt papers.
No sale key: @
(2)
To be employed at time of opening the drawer for exchange.
Non add key: U]
(3)
Used as a marking key for code numbers.
Clear key:
(4)
To be employed for correction of a set amount, release from an error, and erasure of display.
Amount key (ten-key type): 0 - (Q^)
(5)
These amount keys are used for setting amount, date, and code number.
Register key: I REG
(6)
To be employed to enter items of a sale. In addition, the repeated registration also can be performed.
(But, no item classification can be made.)
Minus key:
(7)
To be employed for discount registration.
Date key: 1 DATE |
(8)
To be employed for setting date.
Sub-total key: [s^
(9)
To be employed to obtain the sub-total amount during registration.
(10)
Credit sales total key: [CRT|
To be employed for totalling amounts of credit sales.
(11)
Amount TenderedA’otal Key:
AT/TL
This key is used for totalling amount of cash sales. When this key is pressed without any amount set the
total of a transaction is obtained. While this key is pressed with entering the amount tendered, the change
due the customer will be automatically obtained.
- 3 -
Page 6
3. DISPLAY LAMP
MA-121S
3 l334.5Bt
ST
TL
CH
RPT.
Amount:
RPT:
Displays registered amount, total amount, date and code number.
Normally, “1” is displayed when one registration is made. When the same registrations are
repeatedly made, number of repetition is displayed. When number of repeated registrations reaches
to 10, “0” is displayed, and thereafter the last digit only is displayed.
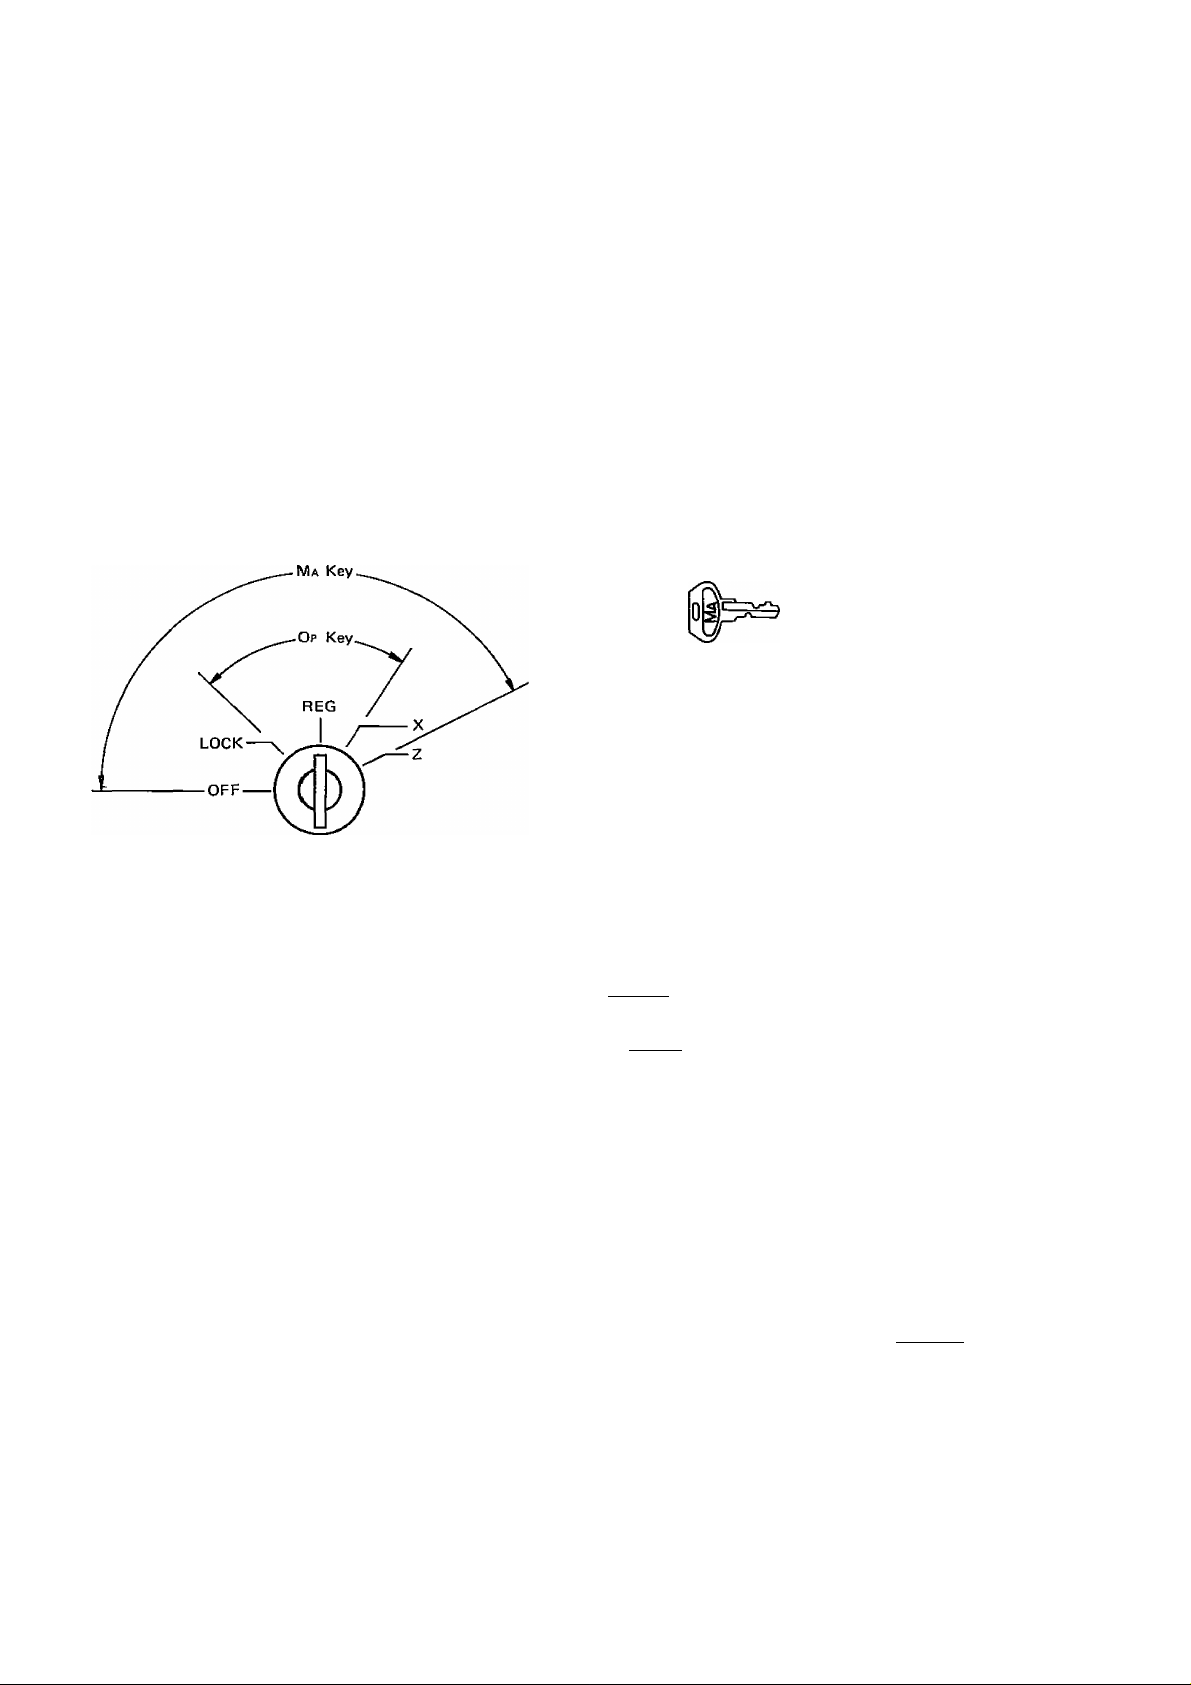
4. CONTROL LOCK AND CONTROL KEY
AMOUNT
Ma key
Op key
Drawer key (o
8^
This key is used by a store message
and can turn the lock to access all
modes of operation.
This key is used by a operator and
can turn the lock to access LOCK,
REG and X modes of operation.
This key is used to lock the
drawer. To lock the drawer insert
this key into the lock, then turn the
lock clockwise by about 180°.
OFF
................
Electric power is turned off at this position.
LOCK............. Provides lock register condition,
X
....................
Describes read mode of operation.
The total of sales can be examined with the |at/TL key and date is set in this mode.
Z
.....................
Dracribes reset mode of operation.
The total of sales can be reset to zero with the AT/TL | key in this mode.
NOTE:
1) Do not put control keys in the drawer when closing it.
2) Do not turn the control lock to “OFF” position before resetting sales total to zero. All memory contents
that has been entered thus far will be cleared.
5. SETTING THE DATE
The date is set in the (X) mode of operation. Insert Op or Ma key and turn the key clockwise to the (X) position.
Enter the date as 6-digits, two for the month, two for the date and two for the year. Depress | DATE | key to com
plete the date entry.
Example: 17 January, 1977
REG
lAAAAAAA/WWWWWWWWWWVV
Thank you
Call again
LOCK\
□ [3E[l][Z][Z](Date)^^ I DATE
Control Lock
1 6. 0 1 - 7 7
1 7. 0 1 - 7 7 ★
\^wwwwwwwwwwwwwW
.
- 4 -
Page 7

6. REGISTERING PROCEDURES OF SALES
Registration of various types of sates shall be made according to following examples of registration.
1. Cash sales registration
(1) Multiple item registration
(Example 1)
Price
Quantity
• Key operation
Amount key
Register key
Amount key
Register key
Register key
Register key
Amount key
Register key
AT/TL key
S5.80
1
S0.85
3 1
5 8 0
REG
8 5
REG
REG
1 REG [
0000
REG
AT/TL
$18.10
/WWWW^MAMAAA/WVWWWVW\
Thank you
Call again
1 7. 0 1 -11
• 5. 8 0
• • • • 0. 8 5
• • • • 0. 8 5
* • • • 0. 8 5
• • • 1 8. 1 0
• • • 2 6. 4 5 CA
.....................1 No.
\AMWWWWWWVWWWWWW
(2) Multiple item registration including change computation
(Example 2)
Price
Quantity
Amount tendered
Change
$12.30
2
$1.50
2
$40.00
$ 6.20
$6.20
1
• Key operation
Amount key
Register key
Register key
Amount key
Register key
Register key
Amount key
Register key
ST key
Amount key
AT/TL key
0000
1 REG 1
|REG 1
000
1 REG 1
REG
6 2 0
REG
ST
4 0 00
AT/TL
NOTE:
When the amount tendered is less than the sub-total of a transaction, an error condition wilt
occur with an amount and the decimal points illuminated.
Depress the key to clear an error and re-enter an amount that is equal to or more than the
sub-total then depress the AT/TL I key.
The alarm buzzer that sounds alarm-tone, when an error condition occurred, is available as a
customer option.
Consult your TEC representative when this is required.
/wwwwwwwwwvwwwww\
Thank you
Call again
1 7.0 1 -11
• 1 2. 3 0
• 1 2. 3 0
• • 1.5 0
• • 1.5 0
• • 6. 2 0
* 3 3. 8 0 O
• 4 0.0 0 AT
- • 6. 2 0 CH
‘ • 2 No.
hA/WW\AAA/WWWWWWVWWW)
- 5 -
Page 8

(3) Multiple item registration with discount
(Example 3)
Price
Quantity
Discount
Amount tendered
Change
• Key operation
Amount key
Register key
Amount key
Register key
Register key
Amount key
Minus key
ST key
Amount key
AT/TL key
2. Credit sales registration For credit sales, use |CRT|
(Example 4)
Price
Quantity
S 18.50
1
S3.20
2
$ 0.50
S 30.00
$ 5.60
[mEE
reg”|
3 2 0
REG
REGj
E®
E
ST
0 00
3
AT/TL
key instead of [ AT/TL | key.
$5.30 $1.30
2 1
Thank you
Call again
1 7.0 1 - 7 7
1 8. 5 0
• 3.2 0
• 3.2 0
• 0. 5 0
2 4.4 0
3 0. 0 0 AT
• 5. 6 0 CH
• • • 3 No.
VWWWV^AAAAMAAAA/WWWWWt
/VWWWW\M/WWWWWWWWV\
e
o
Thank you
Call again
• Key operation
Amount key
Register key
Register key
Amount key
Register key
ST key
CRT key
5 3 0
REG
¡REG 1
Tl®®
LregJ
ST
CRT
3. No sale registration (Example 5)
In case of exchange registration, depress [l^ key.
NOTE:
NS| key can not be pushed with an amount set.
1 7.0 1 - 7 7
• • 5.3 0
• • 5. 3 0
• •1.30
• 11.90 O
• 1 1.9 0 CR
/VWWWWWWWWWVWWWVWl
/wwwwwwwwwwwvwvwv\
Thank you
Call again
1 7.0 1 - 7 7
NS
IWAAWAMM/WWWWWWWWJ
- 6 -
Page 9

• Example of registration for British Standard Register
(Example 6)
Price
Quantity
Amount tendered
Change
£1.20 £0.55 */2 £2.40'/2
1
2 1
£5.00
£0.281/2
• Key operation
Amount key
Register key
Amount key
Register key
Register key
Amount key
Register key
ST key
SH][o]
1 REG [
BE®
IREG 1
1 REG 1
0E0M1
|reg [
1 ST 1
Amount key
ATAL key
1 ATTTLl
• Example of registration for Italian Standard Register
/wwwwwwwwvwwwwww\
Thank you
Call again
1.10 1.-77
• 1.2 0
• 0. 5 5 ’/4
• 0. 5 5
• 2. 4 0
• 4. 7 1 O
• 5. 0 0 AT
• 0. 2 8 Vi CH
• • • • 1 No.
lVWWWWWW\AAAAWWWWWWt
(Example 7)
Price
Quantity
Amount tendered
Change
• Key operation
Amount key
Register key
Amount key
Register key
Register key
Register key
Amount key
Register key
Register key
ST key
Amount key
AT/TL key
LlOO
L!50
LI,000
L 50
[3®
[ REG [
I REG I
REG
REG
00
REG
REG
ST
Fir^loo]
I ata-l I
L200
/\MAAAA/WWWWWWWWWWW\
Thank you
Call again
1.10 1.-77
• 1 0 0
• 1 5 0
• 1 5 0
• 1 5 0
• 2 0 0
• 2 0 0
< 9 5 0 0
1.0 0 0 AT
• • 5 0 CH
< • • 1 No.
wwwwwwwwvwwwwww\
- 7 -
Page 10

7. REGISTERING DURING POWER FAILURE
In the event of power-loss, the memory is protected for nearly one hour.
The interrupted entry of a transaction can be continued after the return of power.
8. EXAMINING SALES TOTAL DURING BUSINESS HOUR (READ)
O Set the total control lock to the position of "X” with O p key.
O Depress Iat/TL| key.
O Total of various sales is printed together with the symbol of “X” and receipt is issued. In addition, the
same printing is also made on the journal paper and the drawer is released.
O Since this operation is the read operation, the total sales amount is kept in the memory of the register and
succeeding registrations are added.
9. RESETTING OF SALES
When business is over, reset sales total accumulated.
O Set the total control lock to the position of “Z” with M Akey.
O Depress
AT/TLj key.
O Total of various sales is printed together with the symbol of “Z” and receipt is issued. In addition, the
same detail is also made on the journal paper and the drawer is released.
O When the reset operation is over, the total amount registered in this register is cleared to “0”.
10. CLOSING OF SALES AND PREPARATION OF OPERATION FOR NEXT DAY
O After resetting, sum up and collate cash in the drawer, and leave the drawer open.
O Reset the total control lock to the position “OFF”, and pull “Ma” key out.
O Remove the paper cover, cut off and keep the printed journal paper.
O Confirm availability of the remaining journal paper and load it to the paper winding shaft.
- 8 -
Page 11

11. UNLOADING THE JOURNAL PAPER
When the register is cleared or the journal paper runs out, the journal paper shall be replaced in the following
manner.
1) Lifting the front end of the paper cover, remove it by lifting rearward.
Paper Cover
2) Remove the paper winding shaft from the shaft holder. While pushing the paper release lever toward you,
unroll the detail paper upwards until the last printed record comes above the edge of writing table.
- 9 -
Page 12

3) Holding the paper winding shaft, cut off the journal paper at the edge of the stamp table.
4) Remove the journal paper from the paper winding shaft.
NOTE:
1) To re-load the journal paper onto the paper winding shaft, pull out the remaining tip of journal paper
while pushing Paper Release Lever towards you.
2) When the printed journal paper is rolled up fully onto the paper winding shaft, the paper can no longer
be rolled up. In this case, cut off the printed paper according to above steps.
12. LOADING THE RECEIPT PAPER AND JOURNAL PAPER
New receipt paper and journal paper shall be loaded on the following steps.
1) When the receipt paper or journal paper runs out, cut off and take out the existing paper core.
2) Then, by depressing IfeedI key, pull the receipt paper or journal paper tip remained out upward.
NOTE:
In case either one of the receipt paper tip or journal paper tip is taken out, use the paper free lever and pull it
out by hand.
3) Load a new receipt paper and journal paper into the paper holder. Tightly fold up the end of paper about 6
inches as illustrated below, insertt it along the paper inlet.
-10-
Page 13

4) Depress iFEEDhkey to feed the receipt or journal paper until the folded end of paper conies out of
printer. Thereafter, pull out the folded end of paper with fingers while pushing the paper release lever toward
you.
Journal Paper ■— i
Paper Release
Lever
5) Insert the end of journal paper into the slit of paper winding shaft.
Roll the paper onto the paper winding shaft about 2, 3 rolls.
Paper Winding Shaft
6) Load the paper winding shaft into the roll holder (push the shaft until it properly seats to the holder).
- n-
Page 14

7) Mount the paper cover by inserting it from the rear and depressing its front side. (At this time the receipt
paper shall be inserted through the window of the cover.)
8) Cut off excess receipt paper with a cutter.
NOTE:
After the loading has been finished, depress [FEED | key to ensure that the journal paper is properly centered
and it is properly taken up.
13. BUSINESS RECORDS GIVE EXACT SALES DETAILS
Business records give you an accurate audit of daily activity of your business. It is advised to thoroughly
analyze and keep them carefully.
Discount sales total (©):
Represents total amount of discount.
Net sales (NS);
Represents net sales total (cash total + credit sales total)
Cash total (CA):
Represent cash total that is equal to the cash in drawer total.
Credit sales total (CR):
Represents credit sales total.
Sample of Auto-Reset Receipt (Model MA-121S)
twwwwwwwwvwwwwww\
Thank you
Call again
1 7.0 1 -11
z . - z •
.16
9 6. 5 5 NS
8 4. 6 5 CA
1 1.9 0 CR
.*500
. - • 4 No.
N/WWWWWWWWWWWWWWt
Date
Reset symbol
Number of items sold
-Net sales total
•Cash total
■Credit sales total
-Discount sales total
Number of customers
-12-
Page 15

14. RELEASING THE DRAWER
When registration is properly made, the drawer is automatically released. Releasing of the drawer during power
failure or machine failure shall be made in the following manner:
O The drawer Release lever is provided in the middle of drawer bottom. To open the drawer push the lever in the
direction of arrow.
15. REPLACING INK RIBBON
1, Remove the Paper Cover.
2. As shown in the photo, lift the front of Store message Stamp Table, then remove it.
- 13 -
Page 16

3. Pulling the Ribbon Retainer toward the direction of arrow, remove the ribbon together with left and right
hand spools.
4. Remove the ink ribbon from the Ink Ribbon Guides at both sides of hammer.
5. To set the ink ribbon spools (with a ribbon), set ±e projections of spool into the sockets while releasing the
ribbon retainer.
spool
-14-
Page 17

6. Set the ribbon in position between Hammer and Print Drum along the Ribbon Guides.
7. With a finger attached to the circumference of the left or right hand spool, that can be turned to wind rib
bon, wind the ribbon several turns to ensure that the ribbon is properly set.
8. Install the Store Message Stamp Table to the original positiion, and firmly set where it was.
NOTE:
Before installing Stamp Table to the screws as illustrated below, make sure to turn off power.
9. Install the Paper cover.
10. Feed journal paper with |FEED| key as long as to allow the paper end to firmly be set on the paper winding
shaft.
NOTE:
For ensuring safety, replace the ribbon after business is over and the power switch is turned off.
16. REMOVING THE STORE MESSAGE STAMP
1. Remove the Paper Cover.
2. While retaining the Stamp Table with a finger of your left hand, pinch the edges of Store Message Stamp
with your right hand fingers, and pull it out.
-15-
Page 18

17. RE-INKING TO THE STORE MESSAGE STAMP
1. According to the Para. 16, remove the Store Message Stamp.
2. supply ink for replenishment over the reverse side of the Store Message Stamp.
NOTE:
If ink is excessively supplied, it may overflow. Therefore, pour it drop for several times until it does no
longer permeate. Use an ink designated by TEC.
18. MAINTENANCE AND INSPECTION REQUIREMENTS
1. Daily requirements
(1) Automatic resetting of the register after closing your shop.
(2) Cut and keep the printed journal paper.
(3) Check and insure availability of receipt paper and journal paper,
(4) Always keep the drawer released after closing your shop.
(5) Turn off the control lock after closing your shop.
2. Periodic requirements
(1) Inspect visibility of printing.
(2) Clean the duster cover.
19. OTHER PRECAUTIONS
1) Do not wipe off the cabinet or other plastic parts with a thinner or other volatile oils. If dirts are hard to
remove, wipe off them with a cloth soaked in neutral detergent and tightly squeezed.
2) Whenever the machine is not in use, cover it with the duster cover.
3) Keep this owners manual after you have read through.
-16-
Page 19

20. SPECIFICATIONS OF TEC ELECTRONIC CASH REGISTER, MODEL MA-120 SERIES
Size:
Weight:
Voi tage:
Power consumption:
Size of receipt paper:
Size of journal paper:
Symbol of receipt and journal papers:
Entry capacity:
Totaling capacity:
Printing speed:
Printing system:
Ambient temperature:
Width 340 mm x Depth 420 mm x Height 288 mm
9.5 kg
ACIOOV, 117V, 220V, 240V (±10V) 50/60 Hz
at time of non-registering
50 Hz 8W
60 Hz 8W
at time of registering
50 Hz SOW
60 Hz 30W
Outer diam. 70 mm x (Hole diam. il.5 mm) x Width 28 mm
Outer diam. 70 mm x (Hole diam. 11.5 mm) x Width 28 mm
28R
6 digits max.
7 digits max.
2.1 lines/sec
Line printer intermittent rotary system
0°C -- 40°C (32°F -- 104°F)
• O
-17-
 Loading...