

Page 1

Owners Manual
TEC ELECTRONIC CASH REGISTER
MAr1190-100 SERIES
TEC
TOKYO ELECTRIC CO., LTD.
Page 2

WARNING
This equipment generates, uses, and can radiate radio frequency energy and if not
installed and used in accordance with the instructions manual, may cause interfer
ence to radio communications. It has been tested and found to comply with the limits
for a Class A computing device pursuant to Subpart J of Part 15 of FCC Rules, which
are designed to provide reasonable protection against such interference when operat
ed in a commercial environment. Operation of this equipment in a residential area
is likely to cause interference in which case the user at his own expense will be re
quired to take whatever measures may be required to correct the interference.
Page 3

TABLE OF CONTENTS
page
TO OUR CUSTOMERS ........................................................................................................... 1
PRECAUTIONS ..................................................................................................................... 1
APPEARANCE AND NOMENCLATURE........................................................................................ 1
CONTROL LOCKS AND MODE SELECTOR KEYS
DISPLAY............................................................................................................................. 4
KEYBOARD LAYOUT .............................................................................................................. 6
FUNCTION OF EACH KEY..................................................................................................... 7
REGISTERING PROCEDURE FOR SALES ............................................................................... JI
......................................................................
2
— REGISTERING RECEIPT SAMPLES — ....................................................................... 47
— VALIDATION PRINT SAMPLES —
READ(X) AND RESET(Z) REPORTS .................................................................................... 58
............................................................................
57
— REPORT PRINT SAMPLES — ..................................................................................... 63
REMOTE SLIP PRINTER (hardware option) OPERATION ................................................ 80
— ENDORSMENT PRINT SAMPLE — ............................................................................... 82
— INVOICE PRINT SAMPLE —
....................................................................................
83
— CUSTOMER FILE (FOR CHARGE POSTING) PRINT SAMPLE — .................................. 84
PLU KEYBOARD (hardware option) ................................................................................ 85
CUTTER BLOCK OPEN DETECTOR AND PAPER NEAR-END DETECTOR ................................... 85
ECR MOTOR LOCK AND REMOTE SLIP PRINTER MOTOR LOCK DETECTORS
PAPER ROLL REPLACEMENT AND OTHER MAINTENANCE OPERATIONS
.......................... 86
..................................
87
WHEN A POWER FAILURE OCCURS ..................................................................................... 91
SPECIFICATIONS .............................................................................................................. 91
Page 4

Page 5
TO OUR CUSTOMERS
Thank you for choosing a TEC electronic cash register MA-1190 series. This
instruction manual provides a description of the functions and handling of
this register and should be read carefully to obtain maximum performance.
Since every consideration has been given to safety, there is no danger of
damaging the machine by incorrect operation.
Please refer to this manual whenever you have any doubts concerning the
machine. This machine has been manufactured under strict quality control and
should give you full satisfaction. However, if the machine is damaged during
transit, or there are any unclear points in this manual, please contact your
local TEC representative.
I] The specifications described in this manual may be modified by TEC, if
necessary.
0 Be sure to keep this manual for future reference.
PRECAUTIONS
1. The keys on the keyboard work with a light touch. Avoid pressing the keys
too hard.
2. Avoid handling the machine with wet hands.
3. Do not apply thinner or other volatile oils to the cabinet or other plastic
parts. If dirty, wipe off with a piece of cloth soaked in neutral
detergent and squeezed tightly.
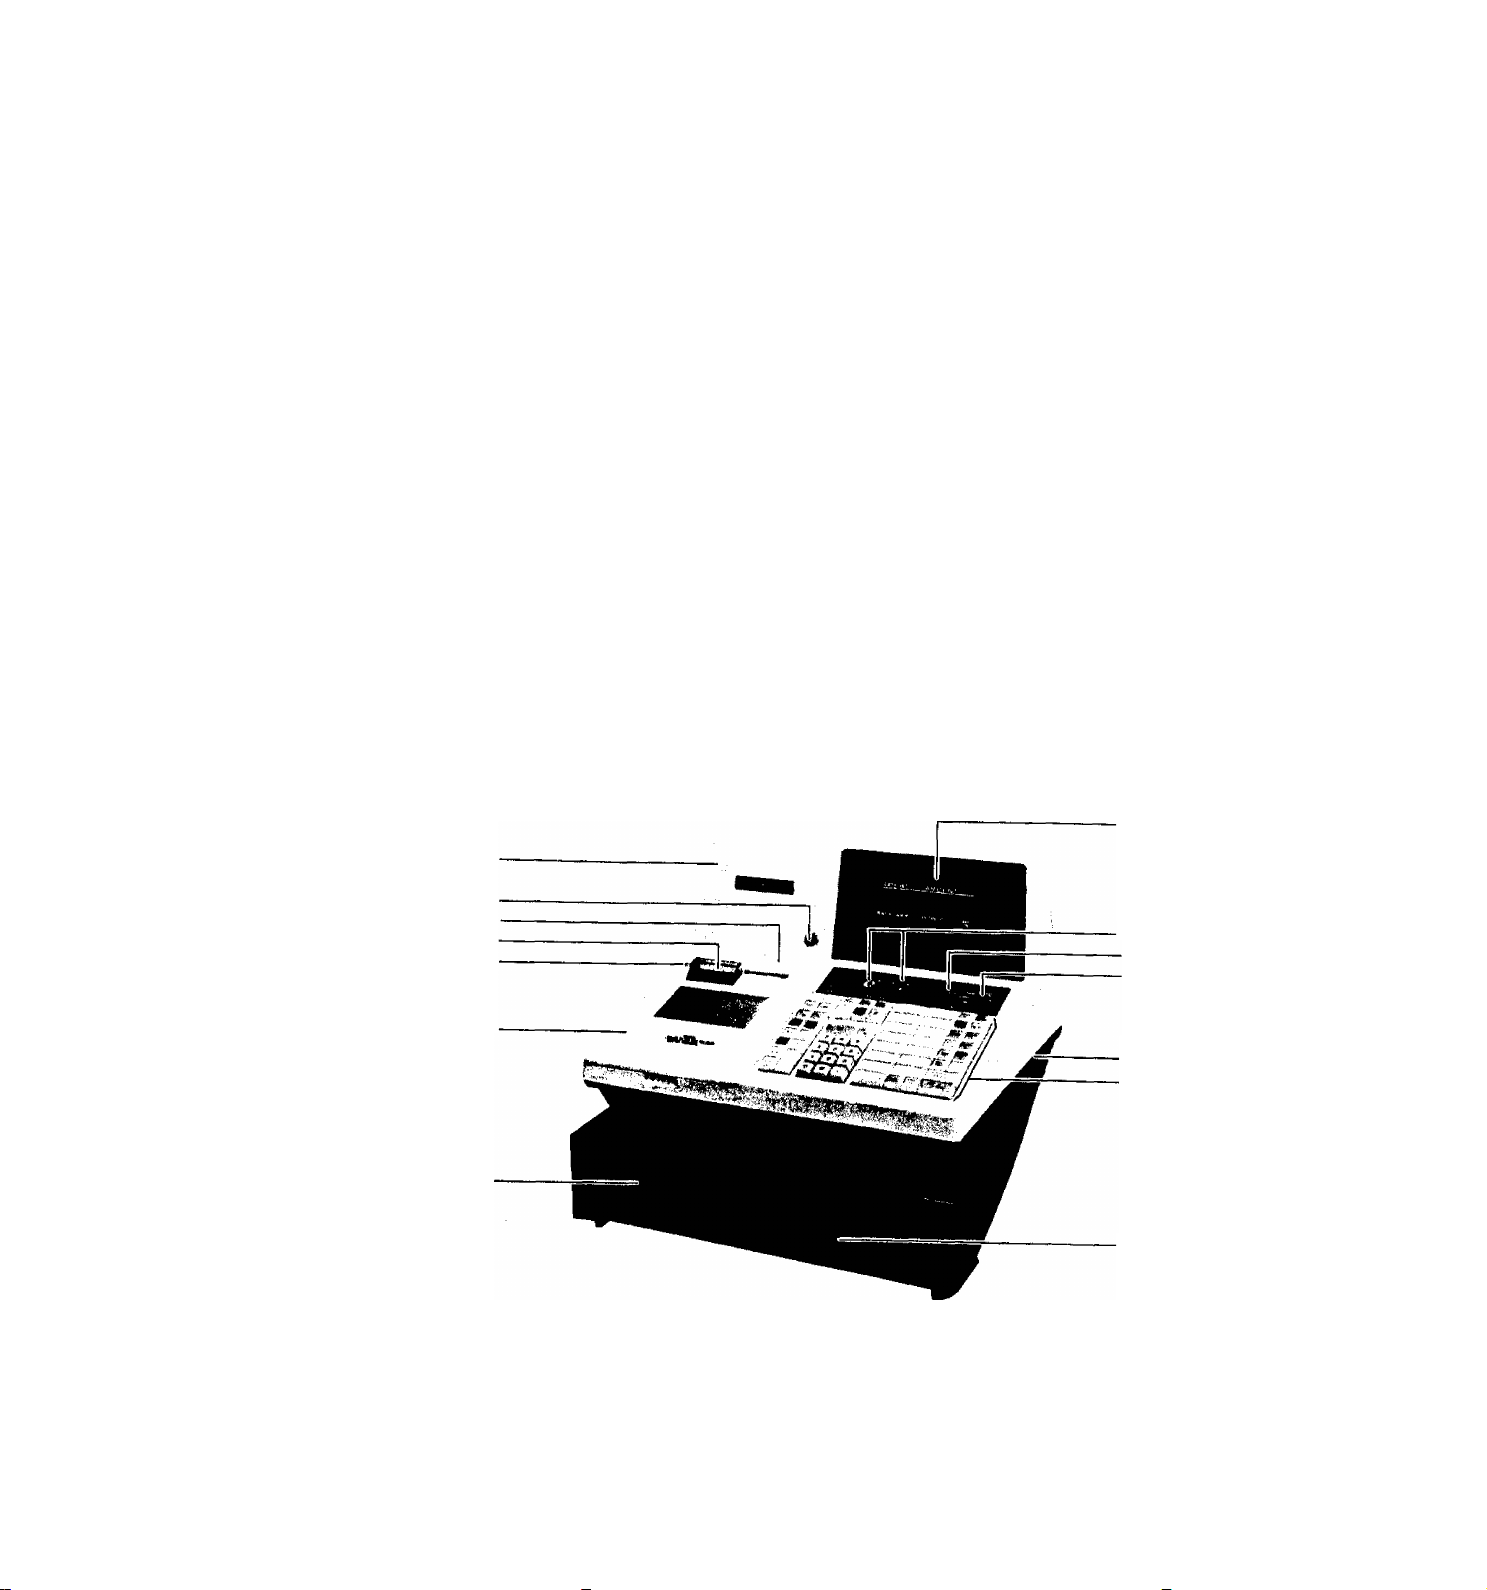
APPEARANCE AND NOMENCLATURE
Receipt Cover
Receipt Cover Lock
Journal Window
Receipt Outlet
Validation Slip
Inlet
Ribbon Cover
Cash Drawer
Display
-Clerk Locks
GT Lock
Control Lock
Power Switch
Keyboard
Drawer Release
Lock
[] Power Switch
The power switch is provided at the righthand side of the
cabinet. The AC power is turned on when the switch is
pushed to ON, and turned off when the switch is pushed to
OFF.
- 1 -
Page 6
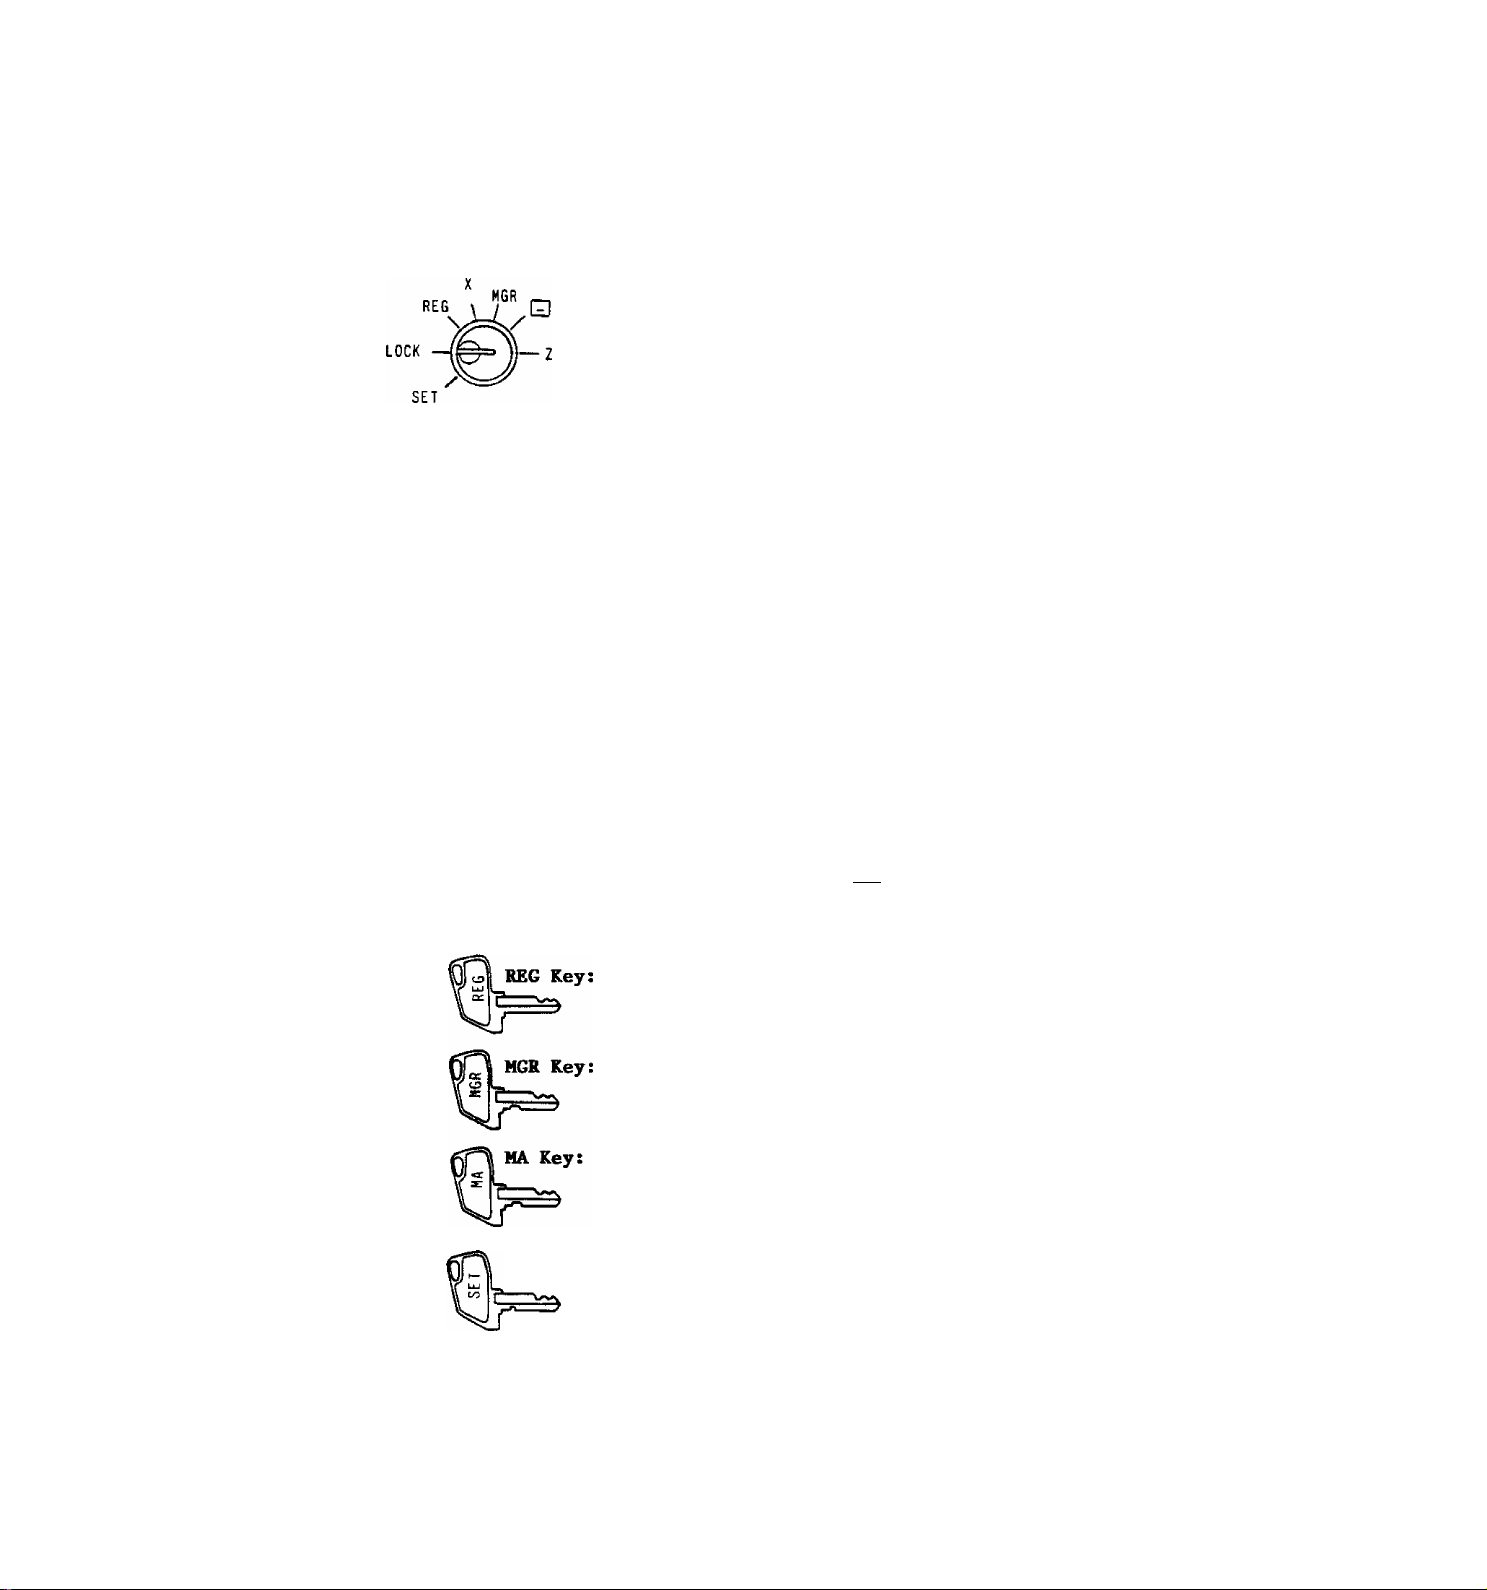
CONTROL LOCKS AND MODE SELECTOR KEYS
MODE LOCK
(POSITION)
LOCK ..
REG
MGR
□
(FUNCTION)
The register operations are locked
when the Mode Lock is set to this
position. Displays the current time
in the front display.
Normal cash register operations are
carried out in this mode. However,
the operations using the keys that
have been programmed to require the
"MGR" position cannot be performed in
this mode.
The sale totals in memory can be read
and the programmed data can be
verified in this position.
This position allows to register all
normal cash register operations to be
carried out in the "REG" mode and the
operations using the keys that have
been programmed to require the "MGR"
position.
This is the "Negative Mode", which
automatically processes all the
entries in the reverse way, i.e.,
positive items into negative, and the
negative into positive.
All the resettable totals and their
respective counters in memory will be
read and reset in this position.
SET
The REG Key is used by the clerk or cashier who
operates the register. This key can access the
positions of LOCK and REG.
The MGR Key is used by the store manager or a person
authorized by the raananger. This key can access the
positions of LOCK, REG, X, and MGR.
The MA Key is used by the store manager who will daily
supervise the collection of money and the printout of
transactions recorded by the register. This key can
access the positions of LOCK, REG, X, MGR, Q, and Z.
SET Key;
The keys may be pulled out or inserted at the "LOCK" or "REG"
position.
The SET Key is used by the programmer. This key can
access the positions of LOCK and SET.
In this position, the register will
allow programming operations.
- 2 -
Page 7
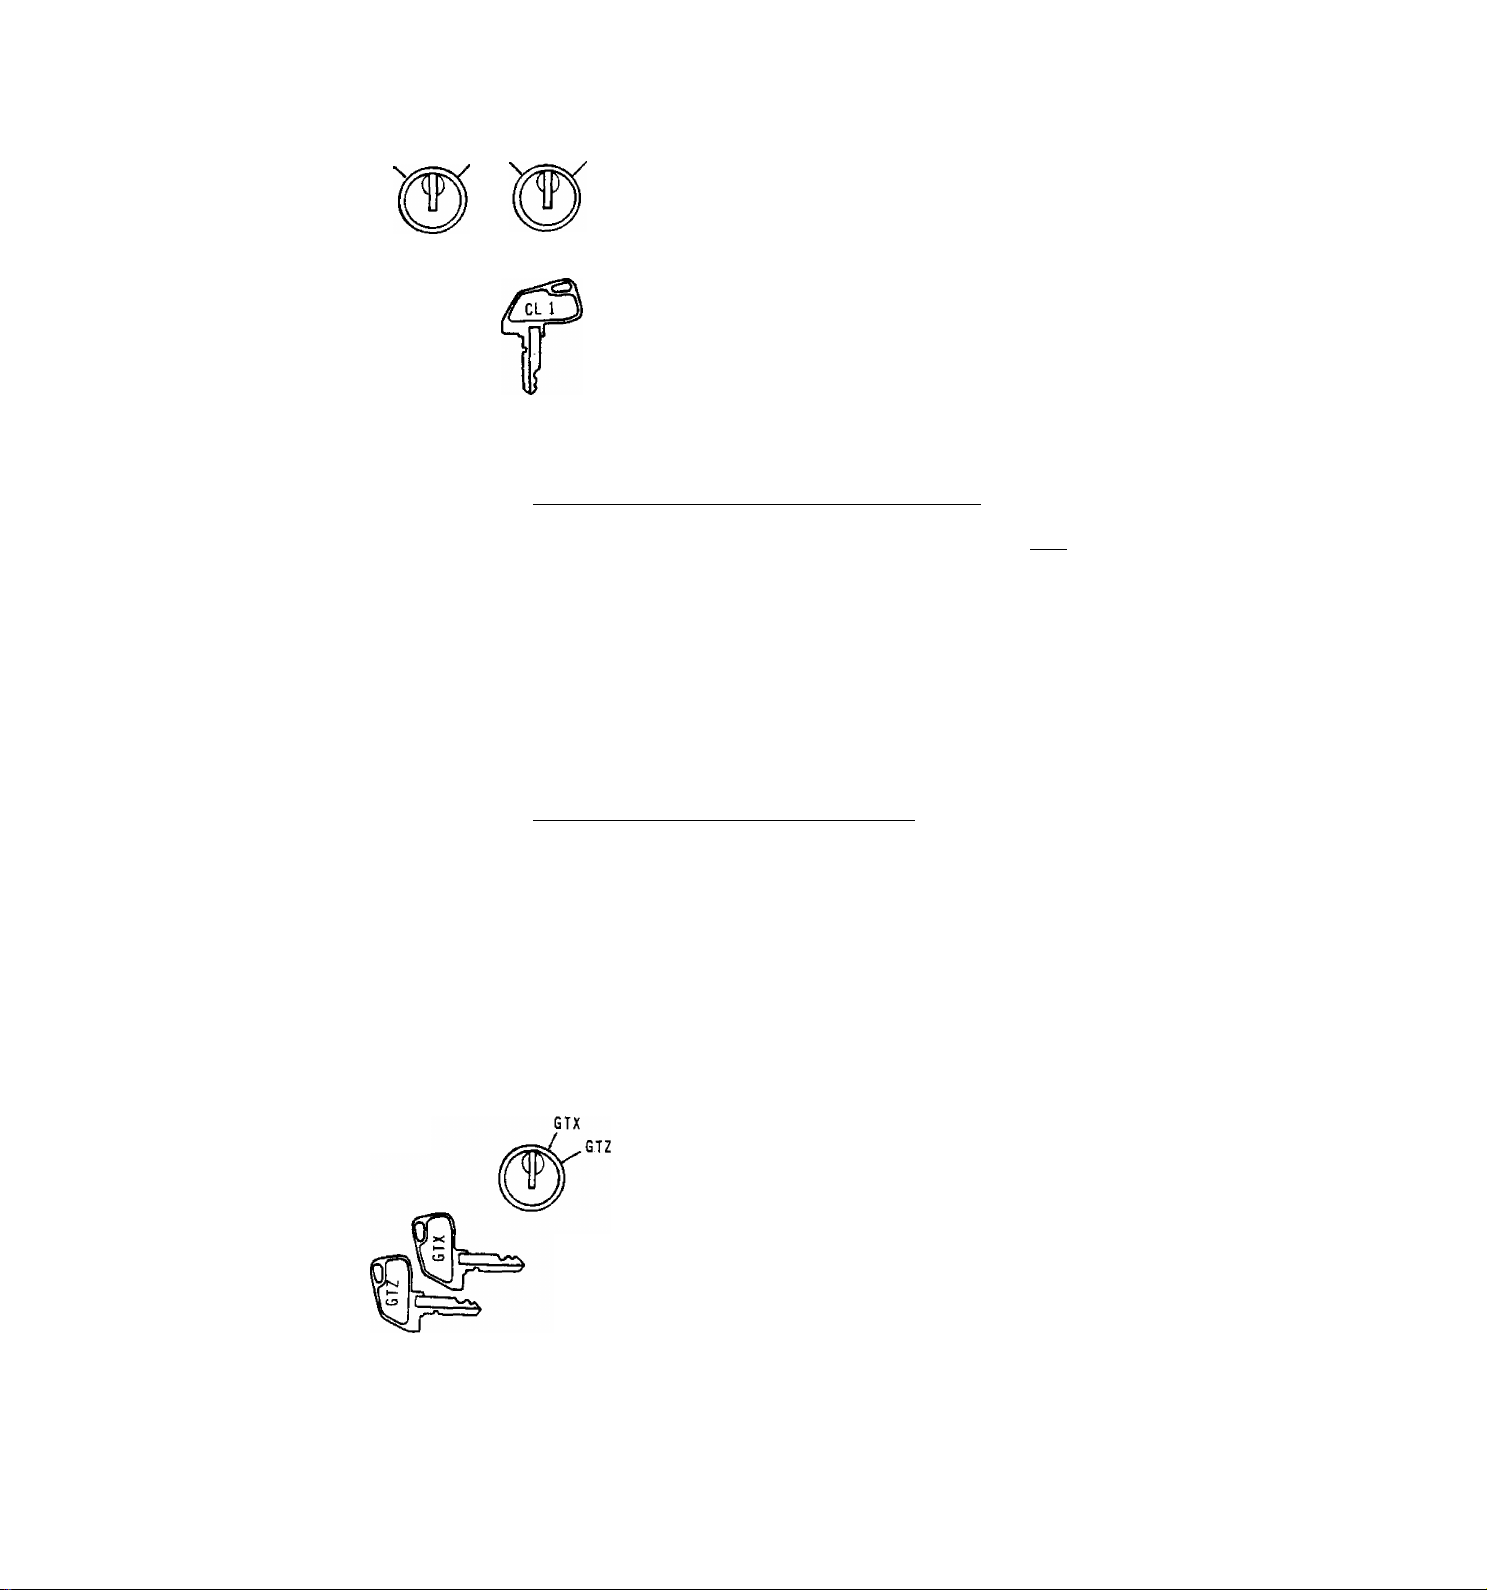
CLERK LOCKS
1.23
These locks are used to identify which clerk is
operating the register.
Clerk Keys (CLl, CL2, CL3, CL4)
Each clerk should keep his/her clerk key.
Each of the keys may be inserted and pulled out in the
neutral position marked with (point).
According to the basic specification of the register, handling
of the Clerk Keys will be different:
On a GP-spec Register (usually for general-purpose stores)
Under the GP-spec., one of the Clerk Keys must be set to its
ON position. The register will not operate without a clerk
key when the Mode Lock is set to the "REG", "MGR", or "Q"
position.
Under this specification, the ID Code (1 to 99) of the sales
person who contributed the sale may (or must) be entered
thorugh the [LOG] key before starting to register the sale.
(Refer to the [LOG] key description and also to the
REGISTERING PROCEDURE FOR SALES section for further
instructions.)
GT LOCK
On a GR-spec Register (usually for grocery stores)
Under the GR-spec,, use or non-use of Clerk Keys in
registering sales is the store's choice. The register will
operate with or without a clerk key.
Under this sepecification, however, a Cashier Sign-On
operation is required for registrations in the "REG",
"MGR", or "QJ" mode. The register will not operate without
any cashier being signed-on. (Refer to the [LOG] key
description and also to the REGISTERING PROCEDURE FOR SALES
section for further instructions.)
This lock is provided to read or reset the
accumulated sales totals not on the daily but on
weekly or monthly basis. This lock will not be
used for any other purpose than report takings.
GTX Position may be accessed by the GTX Key or GTZ Key.
GTZ Position may be accessed by the GTZ Key only.
(Refer to the X AND Z REPORT section for further details.)
NOTE: Please set the GT Lock to the neutral position (marked
with ".") with the GTX or GTZ key removed when reports are
not being taken.
- 3 -
Page 8

DISPLAY
The front display is located at the top of the register just above the
keyboard. The display has two types of indications -- numeric display and
message descriptors.
FRONT DISPLAY
DPT RPT
AMOUNT
n
D 1
» ? f f f
SCALE SLP
Numeric Display
AMOUNT (8 digits)
DPT (2 digits) Displays the code which represents each Department Key.
^ /i?
ALM REG (-)
Displays the numeric data, such as amount, quantity,
etc.
It stays lit when repeating the same department entry.
When a PLU is entered, its linked Department Code is
displayed.
34
T T
FS TXBL
REAR or REHOTE DISPLAY
5 6
f f
ST
TL
CG
/
e
f
SHORT
TRF
f
RPT (1 digit)
When an item of a department which has a Link Department
(sub-link dept.) programmed is entered, the sub-link
Department Code will be displayed along with the "REG"
or "(-)" lamp flickering, indicating that an entry of
the sub-link department is compulsory.
When a food stamp tendered is entered and the change due
equal to or more than a dollar is resulted, the change
amount in food stamps by the unit of dollar (1 to 9) is
displayed in the leftmost digit.
Display the repeat count of the same department. The
count is indicated from the second entry on, and only
the first digit of the repeat count will be displayed
even when the count exceeds nine (such as "0" for 10,
"1" for 11, etc.)
. 4 .
Page 9

Message Descriptors (Trimark Lamps)
SCALE Lights up when the connected scale is used to register the scaled
item.
SLIP Lights up when a validation slip is properly inserted to allow
validation print.
It flickers to require a validation when the validation compulsion
has been programmed on the transaction key just operated. It also
flickers to require a remote slip printing when the remote slip
compulsion has been programmed on the transaction.
ALM Lights up with an alarm buzzer to indicate that the last operation
or numeric entry has resulted in an error. To clear the error
condition, depress the [C] key.
REG Lights up when a sale item has been registered.
If flickers when a head-department item of a dept-to-dept link is
entered, along with the sub-link Department Code displayed in the
"DPT" display portion (in the "REG" or "MGR" mode).
(-) Lights up when a negative item is entered through such keys as
[RTN MDSEl or [DOLL DISC].
It also lights up when the subtotal or total amount displayed is
negative.
If flickers, as the "REG" lamp, when a head-department item of a
dept-to-dept link is entered, along with the sub-link Department
Code displayed in the "DPT" display portion (in the "REG" or "MGR"
mode).
PS Lights up when a Department or PLU item which is Food Stampable
has been entered.
It also lights up, along with the "ST" lamp lit, when the
[FSTL TEND] key is depressed to read the Food Stampable total
amount.
TXBL Lights up when a Department or PLU item which is taxable has been
entered,
It also lights up, along with the "ST" lamp lit, when the
[TXBL TL] key is depressed to read the taxable total (sale total +
taxes due) of the sale.
ST Lights up when the [ST] key has been depressed, indicating that
the displayed amount is subtotal (sale total without taxes).
TL Lights up on a finalizing operation with the total amount
displayed when the sale is finalized without any amount tendered.
CG When an amount tendering operation has been performed, it lights
up with the change due displayed.
SHORT Lights up when the amount tendered is less than the sale total
TRF with the shortage amount displayed.
Lights up also when all the sale balance is transferred as the new
balance for charge posting.
- 5 -
Page 10

KEYBOARD LAYOUT
The following are typical keyboard layouts for the MA-1190 series. Since this
series is designed to be capable of programming most of the keys to be placed
in the desired place on the keyboard, these are merely examples. Please ask
your TEC representative if any other alternative or additional keys must be
installed, referring to the description of the FUNCTION OF EACH KEY section on
the following pages.
GR TYPE (usually for Grocery Stores)
ON
OFF
00
ITEM
CORR
TX/M
8
5
2
9
6
3
.
1
2
3
4
5
6
7
ST
8
TL
10
11
12
13
14
15
9
CARD
NO.
DOLL
DISC
PB+
TRF
R/A
FSTL
TEND
CHECK
TEND
AT/TL
RF JF
NS
SI/M
BTL
RTN
%+
%PR
OPEN
LC
OPEN
LOG
SI/TL
RTN
MDSE
g/FOR
AMT
PLU
VALI
DATE
TARE
NO.
7
4
1
0
VOID
SCALE FS/M
C
VND
CPN
EX
PB-
#
PO
Chg
ON
e
OFF
RF JF
NS
SI/M SI/TL
BTL
RTN
%+
%PR
OPEN
LC
OPEN
LOG
RTN
MDSE
0/FOR
AMT
PLU
GP TYPE (usually for General-Purpose Stores)
VALI
DATE
PB+ PB-
VOID
C
7
4
1
0
00
ITEM
CORR
TX/M
8
5
2
9
6
3
CARD
1
2
3
4
5
6
7
SI
8
TL
10
11
12
13
14
15
9
NO.
DOLL
DISC
PO
R/A
TRF
MISC
TEND
VND
CPN
EX
CREDIT
1
CREDIT
2
CREDIT
3
Chg
CHECK
TEND
AT/TL
- 6 -
Page 11

FUNCTION OF EACH KEY
ON
0
OFF
RECEIPT
RF
JF
RECEIPT ON/OFF SWITCH ([RECEIPT ON/OFF])
This switch has two positions available -- 'OFF' position and 'ON'
position. When in the 'OFF* position, no receipt is issued from the
register and sales are printed on the journal roll only. When the
switch is set to the 'ON' position, sales are printed on both receipt
roll and journal roll, then a receipt is issued which is automatically
cut off and given to the customer.
RECEIPT FEED KEY ([RF])
This key is used to advance the receipt roll. It is operated by
depressing the key and holding it in that position until the paper has
advanced to the required position. This key is effective even when
the [RECEIPT ON/OFF] switch is in the 'OFF' position. It can be
programmed to prohibit receipt feeding during a sale.
JOURNAL FEED KEY ([JF])
This key is used to advance the journal roll in the same fashion as
the [RF] key. These keys are useful if the operator, due perphas to
an interruption whilst ringing up a sale, is unsure which items have
already been entered. By using the feed key the operator can see
which figures have actually been printed.
NS
LOG
The [RF] and [JF] keys can not be operated simultaneously.
NO-SALE KEY ([NS])
This key is used to open the cash drawer while the machine is outside
a sale. To operate, depress this key once. This function is usually
used to give small changes for a big-amount bill, or to check the
receipt and journal print condition,
A non-add number may usually be entered prior to a no-sale operation.
However, it can be programmed to prohibt a no-sale operation after a
non-add number entry.
LOG KEY ([LOG])
This key is used for Sales Person Sign-On (on GP-spec. registers) or
Cashier Sign-On and Sign-Off (on GR-spec. registers).
Sales Person Sign-On (on GP-spec. register)
Enter the Sales Person ID Code given to each sales person, and
depress the [LOG] key, followed by normal sale item regisrations.
(Meanwhile one of the Clerk Keys must be set to ON beforehand.) The
entered Sales Person's ID Code (01 to 99) and his/her name (if
programmed) will be printed on the journal roll only.
- 7 -
Page 12

The Sign-on may be operated only once at starting a sale, or every
time before each item within a sale.
The Sign-on condition will automatically be reset on finalizing the
sale or on another Sales Person Sign-On entry. To reset the sign-on
of a first-entered sales person later within a sale (but no other
sales person need be signed on), enter ID Code "99” (which is the
fixed ID code of "Other Sales Person ID Code”).
The Sales Person Sign-on operation may
compulsory to start a sale registration.
Since the sales data registered under a Sales Person Sing-on are
processed into the sales person's memory, the sales amount which
each sales person has contributed will be outputted in Sales Person
Reports (which are taken in the "X” or ”Z" mode).
Cashier Sign-On and Sign-Off (on GR-spec. register)
. SIGN-ON (in "REG", "MGR”, or "Q" mode):
Enter a 3- or 4-digit code, composed of first 2-digits as any num
ber freely determined by the cashier (1 to 99) and next 2-digits
as the Cashier ID code given to the cashier and pre-programmed in
the cashier table file memory (01 to 99), and then depress the
[LOG] key.
Mill ♦ [LOG]
be programmed to be
•njr*
Manager-assign Cashier ID Code (01 to 99)
Cashier's Own Secret Code (1 to 99)
The Cashier Sign-on code being entered will not be displayed. On
completing the sign-on, a Sign-On receipt is issued with the
cashier's name (if the name is programmed)or the cashier ID (such
as "CLOl”, if the name is not programmed).
The Cashier Sign-On operation is compulsory before starting to
register any sales. The sign-on condition will be held until it
is singed off. Turning the Mode Lock to a different position with
a cashier * s sign-on condition will result in an error. In this
case, return the Mode Lock to the original position, then operate
Sign-Off.
. SIGN-OFF (in the same mode position as the Sign-On was operated):
Enter ”0" and then depress [LOG] when a sign-on condition is held
and the register is outside a sale.
0 -y [LOG]
A Sign-Off receipt is issued. In this condition, turning the Mode
Lock to a different position or signing-on of another cashier will
be allowed.
Since the sales data registered under each cashier's sign-on are
prcessed into the cashier's memory. Cashier Reports are available in
the "X" or "Z" mode.
- 8 -
Page 13

SI/M
SIl/M
SI2/M
(for single-SI machine)
SI (Selective Itenizer) MODIFER KEY(S)
(tSI/M], [SIl/M], [SI2/M])
(for double-SI machine)
These keys are used to reverse the SI (selective itemizer) status
programmed on each Department or PLU.
For double-SI machine, two Si's are provided, and [SIl/M] and [SI2/M]
function independently from the other.
To operate, depress the required SI/M key prior to entering a
department or PLU item. The item is then reversed from SI to non-SI
status, or vice versa.
As for the SI function and applications, refer to the [SI/TL] key
description below.
SI/TL
SI (Selective Itemizer) TOTAL EKY ([SI/TL])
This key is used to display and print the selective itemizer content.
NOTE: Selective Itemizer Function and Applications
The "Selective Itemizer" is a temporary total memory for
each sale and is active separately from the Main Itemizer
(i.e. sale total memory). If certain Department or PLU
items are programmed with the SI (selective itemizer)
status, the Selective Itemizer will function to add up
amounts of the Sl-status items in registering the items,
while the Main Itemizer will function to add up all the
items in the sale. Thus, near the sale finalization, the
operator may read the SI content by depressing the [SI/TL]
key.
A preset % rate may be programmed for each of Sli and SI2,
and whether the calculated amount will add to, subtract
from, or non-affect the sale total is a selective option.
Whether the amount resulted by depressing the [SI/TL] key
will print or non-print is another selective option.
The applications of this function may vary from store to
store. For example, some stores may use it for counting
the service stamps to be issued to the customers according
to the sale amount of service-stampable items. Other
stores may use it for calculating the discount amount for
certain sales items during a special sales period by
presetting the discount
SI status to certain Departments and PLUs which are
subject to the special discount.
% rate on the SI and programming
To operate, depress the [SI/TL] key without a numeric entry during a
sale. At this time, the content of the selective itemizer is
automatically cleared. Therefore, operate it near the end of the sale
when no more additional sale items are to be entered.
- 9 -
Page 14

The [ITEM CORK] key does not function to delete the [SI/TL] key entry.
If the "SI/TL Compulsory" option is selected, no finalizing operation
will be allowed until the [SI/TL] key is depressed to clear the SI
content.
If the "SI/TL Non-print" option is selected, the content of the SI is
displayed and printed on the journal but not on the receipt.
On a dual-SI machine, the SIl and SI2 contents are added up into one
SI total and displayed (and printed) on the [Sl/TL] key depression.
BTL
RTN
BOTTLE RETURN KEY ([BTL RTN])
This is a credit key to enter a bottle return amount. This key can be
programmed either a motorized Inside-sale key or non-motorized
Department-link key.
WHEN PROGRAMMED AS MOTORIZED INSIDE-SALE KEY
To operate, enter the bottle return amount and then depress the
[BTL RTN] key. The [BTL RTN] key functions like a negative
department key.
The amount entered through this key must not exceed the sale total
unless the "Credit Balance" option is selected.
The amount entered through this key will be limited by its own
preset limit amount. To release the limit, the MGR Key is required
to turn the Mode Lock to the "MGR" position. The [LC OPEN] key will
not be effective in this case,
WHEN PROGRAMMED AS N0N-M0T0R12ED DEPARTMENT-LINK KEY
To operate, depress [BTL RTN] before the bottle return amount entry,
and then depress the approriate department key. The [BTL RTN] key
functions like the [RTN MDSE] key.
The amount entered through this key will subtract the department
total memory but not affect the department item count memory.
The bottle return amount must not exceed the sale total unless the
"Credit Balance" option is selected.
A bottle return amount cannot be entered through a PLU item.
The amount entered through the [BTL RTN] key will be limited by the
HALC (High Amount Listing Capacity) of the department thorugh which
the amount is entered.
Quantity extension using the [BTL RTN] key (either type of the above
two) is possible; however, decimal quantity is not allowed. Neither
will split-price entries be allowed with the [BTL RTN] key.
None of the [RTN MDSE], [VOID], and [STR CPN] keys will function with
the [BTL RTN] key.
- 10 -
Page 15

RTN
MDSE
RETURNED MERCHANDISE KEY ([RTN MDSEj)
This key is used to refund money to a customer who has returned items
once purchased to the store.
To operate, depress this key before ringing up the amount to be
refunded, and then depress the approriate department key (the
department operation sequence may be replaced by a PLU item entry
sequence). The amount is automatically printed and deducted from the
bill.
The [RTN MDSE] key can be used outside as well as inside a sale.
This key is also used to enter a negative previous balance of a
Customer File (Check Track) in the " mode. (See the REGISTERING
PROCEDURE FOR SALES for further instructions.)
%+
%-
PERCENT CHARGE KEY ([%+ ] )
This key is used to add a percent rate to a sale. If the preset
percent rate is to be added, depress the [%+] key without a prior
numeric entry. If a rate different from the preset one is to be
added, enter the desired rate on the numeric keyboard and then depress
the [%+] key. The manual rate will take priority.
To operate, use the [%+] key after a department, PLU, or positive
Previous Balance item if only that item requires the percent addition,
or after the [ST] key if required on the total bill. Thfe percentage
rate and the amount are printed and will be added to the sale total.
The percent rae may be within the range from 0.001 to 99.999%. The
fraction resulted from the percentage calculation is usually
programmed to be rounded off. However, it can be programmed to be
rounded up or discarded.
Usually, a % key operation after a subtotal is once obtained is
allowed any number of times. However, it may be programmed to
prohibit more than once.
PERCENT DISCOUNT KEY ([ % +] )
This key operates in the same fashion as the [%+] key except that
operation will subtract from instead of adding to a sale.
Addlitional
[X +]
or [Z-] Keys
A maximum of two % keys including the present % keys may be installed
on the keyboard. That is, if one [%+] key and one [%-] key are
already installed, no other % keys can be added. However, the present
two % keys can be programmed to be used as both %+ or both %- keys.
- 11 -
Page 16

0/FOR
AT-FOR (QUAMTITY EXTENSION AND SPLIT-PACKAGE PRICING) KEY ([(»/FOR])
This key is used to multiply a department or PLU item entry by a
quantity (Multiplication Function). This key is also used to
auto-calculate and enter a split-package price (in such a case as a
customer wants only two of five tomatoes in one package) (Split Price
Function).
The basic order of mutliplcation is:
I QUANTITY I -> [@/FOR] -> |UNIT PRICE |
The quantity can be a maximum of 3 integarl digits and 3 decimal
digits. The price can be a maximum of 6 digiths. The product must
not exceed 8 digits.
As for details of multiplication and split pricing for various cases,
refer to the "REGISTERING PROCEDURE FOR SALES" section.
Usually, the fraction below the least effective digit will be rounded
off. However, it may be programmed to be rounded up or discarded by a
program option.
PLU (Price-Look-Up) KEY ([PLU])
This key is used to enter a PLU that is linked to a department. Each
PLU can be programmed to be a preset PLU (to allow the preset price
only) or an open PLU (to allow a price entry through the numeric keys
each time).
TO ENTER THROUGH PRESET PLU:
PLU Cod^ [PLU]
1 to 4 digits;
(1 to 99999999)
TO ENTER THROUGH OPEN PLU:
I PLU Code! [PLU]
1 to 4 digits;
(1 to 99999999)
As for quantity extension and split pricing involving PLUs, refer to
the "REGISTERING PROCEDURE FOR SALES" section.
Each PLU is programmed with a max. 8-digit PLU Code, a 2-digit linked
Department Code, a max. 6-digit Preset Price or Open Price Status, SI,
Tax, Food Stamp, Scale, Stock, Trade Stamp statuses, and PLU Link
Table No.(if required).
The preset price will automatically be
read and entered.
To repeat the same PLU price, depress the
[PLU] key only, after the above operation.
I
PRICE
.., The price indexed through the numeric keys
will be entered.
To repeat the same PLU price, depress the
[AMT] key only, after the above operation.
[AMT]
- 12 -
Page 17

Link FLD Registration
If a PLU is programmed with a Link PLU Table No., registering the
PLU will automatically register the sub-link PLU programmed in the
Link PLU Table No. This function is useful to enter a bottled
drink plus its bottle deposit, or for similar applications. Using
this function, a maximum of 10 PLU may be linked in one series.
ex.) ntegistering PLU
(Head-link PLU)
PLU Link Table
No. programmed
in the Head-link
.PLU
PLU Link Table
programmed data
PLU No.100 (ex. bottled drink
net price)
Table No.l
Table No.l:
Sub-link PLU No.150
I
Sub-link PLU
to be autoregistered
after the Head-
Llink PLU
(If PLU No.150 in the above example is further programmed with
a PLU Link Table No. and the table is programmed with a
Sub-link PLU, the auto-registration will be repeated. In this
way, linkage of max. 10 PLUs is possible.)
NOTES: 1. If more than 10 PLUs are linked in programming, it will
result in an error at the time of registration.
2. An open PLU may be linked as the last item of the
linkage. If an open PLU comes before the last item, the
linking registration will stop there (the open PLU then
may successfully be entered with the [AMT] key operation,
but the rest of the linked PLUs will not automatically be
registered any more).
3. Repeat, Item Correction, [%+], or [%-] operations are not
accepted for link-PLUs registration. But Return
Merchandise or Void operation is possible (all linked
PLUs will be handled as returned or voided items in this
case).
4. If a Scale PLU is contained in the linkage, it will
result in an errror at the time of registration.
5. Quntity extension is possible (all the linked PLUs will
be multiplied by the same quantity). Split Package
Prcing is also possible if all the linked PLUs are
split-price .PLUs.
5. Modifier keys (such as [TX/M], [FS/M]) will be effective
for the Head-link PLU item only, and the modification
will be disregarded for other linked PLUs. But if the
last PLU is an open PLU, it will allow modifications.
PLU No.150 (ex. bottle deposit
amount)
- 13 -
Page 18

6. If any negative PLU is contained in the linkage, it will
result in an error at the time of registration.
7. If any other error occurs during the auto
recall-and-register routine of the linkage (such as the
"MGR Requirement" status on a PLU, overriding the product
limit amount due to multipliation, etc.), the auto
registration will stop there, no more registration of the
rest of the linked PLUs will be continued.
8. Valiation Compulsory or Remote Slip Compulsory status, if
programmed for any of the linked PLUs, will be disregarded.
FLU Entries Through the PLU Keyboard (hardware option)
Preset PLU: Depress the corresponding KEY on the PLU Keyboard.
Open PLU: First depress the corresponding KEY on the PLU Key
board, then enter the amount through the numeric
keys and depress the [AMT] key on the ECR side.
AMT
PR
OPEN
LC
OPEN
AMOUNT KEY ([AMT])
This key is used to enter an amount or price for an open PLU.
to the description of the [PLU] above.
PRESET OPEN KEY ([PR OPEN])
This key is used to modify the status of preset department keys. When
the [PR OPEN] key is depressed prior to depressing a preset
department key, the preset department key is reversed to an open
department key and allows amount entry through the numeric keyboard
for that item only. (The amount must be entered after the [PR OPEN]
key depression.)
If a preset department is entered with a price through the numeric
keyboard using the [PR OPEN] key, depressing the same department key
again will not repeat the first manual1-entered amount but the
original preset price will be entered instead. The [RPT] (Repeat) key
makes it possible to repeat even the manually-entered price of a
preset department key.
The [PR OPEN] key can not be used for a PLU item entry.
LISTING CAPACITY OPEN KEY ([LC OPEN])
This key is used to release the listing capacity on each Department or
media key. To operate, depress [LC OPEN] before entering the amount
and depressing the department or media key.
Refer
By depressing [LC OPEN], the HALC (High Amount Listing Capacity) will
be released to allow a numeric entry with two further digits, and the
LALC (Low Amount Listing Capacity) will be one digit less than the
programmed value, as to the department keys. As for the media keys,
the HALC will be extended to allow one further digit.
- 14 -
Page 19

The [LC open] key will not fucntion to release the amount limit
setting on each of the [DOLL DISC], [VND CPN], [STR CPN], and
[BTL RTN](motorized inside-sale type) keys.
In order to allow an amount entry beyond the values defined with the
use of the [LC OPEN] key, the Mode Lock must be turned to the "MGR"
position, which position also allows a limit-free amount entry through
[DOLL DISC], [VND CPN], [STR CPN], and [BTL RTN].
OPEN
VALI
DATE
LC-AND-PRESET OPEN KEY ([OPEN])
This is a dual-function key that has both [LC OPEN] and [PR OPEN] key
functions.
VALIDATION KEY ([VALIDATE])
This key is used to over-print a validation slip.
To operate, after registering an item or finalizing a sale, insert the
slip into the validation slot and depress the [VALIDATE] key. The
item and the amount will be printed in one line on the slip. Print or
non-print of the date and/or consecutive No. is a programmable option.
Program selections are also provided as single- or multi-validation,
validation compulsion on certain transaction keys, etc.
If the "SLP" lamp flickers, it means that validation compulsion is
programmed for the last item entered. In this case, insert a slip
into the validation slot and depress [VALIDATE]; no other operations
are allowed until the compulsory validation is executed.
If validation compulsion is programmed on any media key to finalize a
sale, the drawer will not open on finalizing the sale, but will open
on printing the validation slip.
ITEM
CORR
A validation slip attempt after the [TXBL TL] or [EX] key entry will
result in an error. However, if the "Total Validation" option is
selected, validation after the [TXBL TL] key will print the sale total
amount and thereafter only finalizing operation will be allowed.
If the "Endorsement Print Compulsory (on the Remote Slip Printer)" is
on along with the "Validation Compulsory" status on for a media just
operated, valdiation must be operated first.
ITEM CORRECT KEY ([ITEM CORR]
This key is used to remove the last line item from the bill, printing
a line through that item on the receipt and journal.
To operate, simply depress the [ITEM CORR] key immediately after the
wrong item is entered and printed.
The item-correct function is effective when a numeric entry error or
any other operation error and a [C] key depression are inserted
between the line item to be corrected and the [ITEM CORR] key
depression.
- 15 -
Page 20

The [item CORR] key will function to correct any last item entered
through a Department, PLU (except linked PLUs), t%+], [%-]»
[DOLL DISC], [TAXlCManual Tax), [PB+], [PB-], [PICK UP BAL],
[CODE OPEN], [VND CPN], [STR CPN], [BTL RTN], [RTN MDSE] keys, or
Received-on-Account, or Paid-Out items.
However, the [ITEM CORR] key will not function to correct any lines
already entered before the last line (refer to the [VOID] key
description for such a purpose), or even the last line item entered
through media keys, [ST], [#], [VOID], [EX], [SI/TL], [CHECK NO.], or
[ITEM CORR] itself.
VOID
IC/VD
VOID KEY ([VOID])
The [VOID] key is used to delete an item entered previously (before
the last line item) within a sale, in which case the [ITEM CORR] key
will not function.
To operate, depress the [VOID] key before a normal department or PLU
entry sequence.
The [VOID] key will function to void a previous item through a
department or a PLU, or a combination of "department/PLU plus
[%+]/[%-]" entry, but not any other kind of items.
The [VOID] key will not function to delete a Department or PLU along
with using [RTN MDSE], (STR CPN], or [BTL RTN] keys.
ITEM CORRECT / VOID KEY ([IC/VD])
This is a dual-function key that has both [ITEM CORR] and [VOID] key
functions.
If depressed without a prior numeric entry after an item-correctable
entry, it functions as the [ITEM CORR] key.
If depressed with a prior numeric value (PLU code, price, amount, or
quantity), it functions as the [VOID] key. In this case, it is
required to always enter a numeric value before this key's depression;
otherwise, it will result in item-correct operation if the last line
item is item-correctable.
ex.) [DEPT 1] |200| [DEPT2] + [IC/VD]
I I I I
Preset Price Open Functions as
Print Form
DPOl
DP92-
1.00
-2*69
Dept. $2.00 Dept. [ITEM CORR]
($1.00) (Deletes Dept.2
item, the last
line item.)
j— 1 X Dept.l —j
[DEPT 1] -► l_200j [DEPT2] [ij [IC/VD] [DEPT 1]
I
Quantity "1"
for multipli
cation
- 16 -
Functions
as [VOID]
'dpoi
0P02
DPOl
1.00
2.00
1 X 1.000
1.00
Page 21

SCALE
SCALE KEY ([SCALE])
This key is used for various scaled items. To enable to register
weight data from the scale into a PLU, the PLU must be programmed as
Scale-type PLU. But any Department (except negative Depts.) will
allow scale item entries.
To operate, place the item on the scale platter, depress [SCALE],
followed by a normal Department or PLU sequence. (The [SCALE] key may
be omitted when a PLU sequence follows.)
Refer to the "REGISTERING PROCEDURE FOR SALES" section for various
scale opeations.
TARE
NO.
TARE NO. KEY ([TARE NO.])
This key is used to enter the preset tare weight data prior to a
scaled item entry, thus to subtract tare from the gross weight and
obtain the net weight.
If the required tare weight has been progrirmied to match a Tare Table
No. (1 to 9), enter the Tare Table No., and then depress [TARE NO.] A
manual tare weight entry will not be accepted.
Refer to the "REGISTERING PROCEDURE FOR SALES" section for futher
instructions.
NON-ADD NUMBER PRINT KEY ([#])
This key is used to print a non-add number (such as Customer No.) on
the receipt and journal for future reference.
To operate, enter a maximum of 16-digit number (the preceding O'z will
be printed if any entered), and then depress [#]. The number is then
printed. This operation may be performed any time between sales
items, before or after all the sale items if the sale has not been
finalized yet. Usually, non-add numbers may be entered any number of
times within a sale. However, it is programmable to prhobit more than
one non-add number entry within a sale.
FS/M
When the Mode Lock is in the "MGR" position and the register is
outside a sale (and in a Cashier Sign-Off condition on a GR-spec.
machine), the two-digit preprogrammed Training Sign-On Code will
declare the Training Mode, issuing a Training Sign-On receipt. In
this condition, training operations will be allowed. To end the
Training Mode once declared, do the same operation as the declaration.
FOOD STAMP MODIFIER KEY ([FS/M])
This key is used to reverse the food stampable/non-stampable status of
a Department, PLU, [%+], [%-], [DOLL DISC], or [BTL RTN] (inside-sale
type) items.
To operte, depress [FS/M] prior to the numeric entry (if any) and one
of the keys listed above.
- 17 -
Page 22

CLEAR KEY ([C])
This key is used to correct a numeric entry error or a declaration key
(such as [RTN MDSE], [TX/M]) entry error prior to depressing a
motorized key (such as [DEPT], media keys), or to correct any error
condition and cancel the alarm tone.
If the [C] key is depressed after a subtotal is once obtained, the
subtotal amount is again displayed. Similarly, after a taxable total
is once obtained by [TXBL TL], a [C] key depression will regain the
display indication to the taxable total (subtotal + taxes).
TX/M
TXl/M
TXl/M
(for Single-tax Area)
TX2/M
TX2/M
Each of these keys is used to reverse the tax status (taxable/non-
taxable status) on departments or other tax-status-programmable keys
for one entry only. For multi-tax areas, a maximum of three keys
should be provided -- [TXl/M], [TX2/M], and [TX3/M] -- in place of the
[TX/M] key for single-tax areas. The three tax modifier keys will
function independently from the others, with its own tax table
pre-programmed for taxable items.
The tax modifer key(s) will be effective to reverse the tax status
programmed on departments, PLUs, [DOLL DISC], [%+] ^ [%-], [VND CPN] ,
[STR CPN], and [BTL RTN] keys.
To operate, depress the required tax modifier key(s) prior to a
numeric entry (if any) and a depression of any of those function keys
above listed. Please note that in multi-tax areas each tax modifier
key corresponds to its own tax table status. For example, [TXl/M] to
Tax 1 status (e.g. National Tax), [TX2/M] to Tax 2 status (e.g. State
Tax), etc.
(for Dual-tax Area)
TX3/M (for Triple-tax Area)
TAX MODIFIER KEYS ([TX/M])
[TXl/M]
[TX2/M]
[TX3/M])
TAX
The tax modifier keys are also used, along with the [EX] key, to
exempt required taxCes) from the sale. Refer to the [EX] key
description for this purpose.
MANUAL TAX KEY ([TAX])
This key is used to enter an irregular tax amount that cannot be
calculated on the basis of the programmed tax table(s), and to add it
to the sale total.
To operate, enter the desired amount of tax and then depress the [TAX]
key. The amount entered is then printed. This tax amount is
processed into the TAX A memory. Therefore, the tax amount
automatically calculated and printed at finalizing the sale (TAX 1 to
TAX 3) does not include a manual-entered tax, while the entire sale
total printed on the receipt last line includes the manual-tax also.
- 18 -
Page 23

This key is also used, if depressed without an amount entry within a
sale, to display the total of only non-taxable items so far entered.
Usually, this non-taxable total is only displayed but not printed.
However, it may be programmed to print also.
7
4 5
1
0
00
8
6
These keys are used to enter numeric values such as amount, quantity,
3
2
or code number.
Depressing the [00] key once is the same as depressing the [0] key
twice consecutively.
The maximum indexing listing capacity for a Non-add No. is 16 digits,
the maximum registering capacity is 7 digits; but please note that
some amount entries through certain function keys are limited by the
preprogrammed amount limits.
J)
NUMERIC KEYS (
9
DECIMAL POINT KEY ([.])
this key is used, as part of numeric keys, to designate the position
of the decimal point when entering a percent rate (through [%+] or
[%-]) or a quantity (through t@/FOR]). For example, to enter 0.5%,
index 0+[.l+5, or [.]-»5. A maximum of three digits may be entered
below the decimal point.
When entering a price or amount such as $0.25, just index 2*5, In
this case, depression of the t•] hey is not necessary and will cause
an error.
DEPARTMENT KEYS ([DEPT])
1
These are department keys through which sales items are registered.
Each of these keys may be programmed as either 'OPEN' or 'PRESET' key.
OPEN DEPARTEMENT KEY ([Open DEPT])
A department key which has no preset price programmed is an 'OPEN'
key and must enter a price manually each time. The price is rung up
on the numeric keyboard and the appropriate department key is
depressed. The price is then displayed and printed on the receipt
and journal rolls.
When the same department key is depressed more than once
consecutively after a price entry, the price entry is repeated as
many times as the department key is depressed.
To enter a price extended by multiplication, enter the quantity
first, depress the [0/FOR] key, enter the price, and then depress
the appropriate department key. A multiplication entry may not be
repeated by depressing the department key again.
For split-pricing, enter the purchased quantity, depress [0/FOR],
enter the whole package quantity next, depress [@/F0R] again, enter
the whole package price, and then depress the department key.
15
- 19 -
Page 24

PRESET DEPARTMENT KEY ([Preset DEPT])
A preset key is a key which has already a price programmed in it.
It is therefore unnecessary to enter the price of an item; simply
depress the key to register the sale of one item.
To repeat the same preset item, depress the department key as many
times as required.
To multiply a preset department price by a quantity, enter the
quantity first, depress [@/FOR] ([@/FOR] may be omitted if the
preceding quantity is a one-digit value), and then depress the
preset department key.
For split-pricing, enter the purchased quantity first, depress
[@/F0R], enter the whole package quantity next, depress [0/FOR]
again, and then depress the preset department key.
If a price different from the preset one must be entered through
numeric keys into a preset department, depress the [PR OPEN] key
before the price entry, followed by the department key.
Each department is also programmed with positive/negative department
status, a HALC (High Amount Listing Capacity), LALC (Low Amount
Listing Capacity), tax, SI (Selective Itemizer), Food Stamp, Trade
Stamp statuses, and Link Department Code (if required).
Each department may also be programmed with a gross profit rate for a
report purpose.
A department item with [RTN MDSE], [PR OPEN], or [SHIFT] key, or a
negative department item cannot be repeated.
Link Department Registration
If a Department is programmed with a Link Department Code (sub-link
department), on the department entry the sub-link Department Code
will be displayed in the "DPT" portion and the "REG" lamp flickers
(or the "(-)" lamp instead in the " Q" mode), indicating that the
displayed Department must be operated as sub-link department item.
No other operations will be accepted at this time.
This Dept-to-Dept link function may be used to register two
connected items at a time, such as Bottled Drink Department item
(as head-link) and Bottle Deposit Department item (as sub-link).
The link-department entry is effective for one set of a head-link
department item and a sub-link department item. If the sub-link
department is further programmed with another sub-link Department
code, it will be ignored at the time of registration.
Additional Department Keys
A maximum of 60 department keys including the present department keys
may be installed.
Also refer to the [SHIFT] key description on the next page.
- 20 -
Page 25

SHIFT
DEPARTMENT SHIFT KEY ([SHIFT])
This key functions similarly to the "Shift Key" on an ordinary
typewriter keyboard. Two different departments will be programmed on
one Department Key, and shifting is possible from one department to
the other by depressing the [SHIFT] key. For example, Department 1
can be used as Department 31 when the [SHIFT] key is depressed prior
to [DEPT 1] key.
In this case, the number of all the department keys on the keyboard
must be 30 or less. Thus the keyboard can spare space for other
functions keys despite the number of departments.
The [SHIFT] key is effective to shift a department for only one entry;
therefore, the shifted department can only be repeated by depressing
the [RPT] key but not by simply depressing the same department key
again.
ST
TXBL
TL
SUBTOTAL KEY ([ST])
This key is used to obtain the subtotal amount (sale total without
taxes) during a sale. When this key is depressed after all the items
have been rung up, the subtotal of the sale is printed and displayed.
If the [ST] key is depressed more than once consecutively, the first
depression only will print and display the subtotal; further
depressions will only display but not print the subtotal amount.
A programmable option provides the selection not to print but only
display the subtotal even on the first depression of the [ST] key.
In charge posting, a depression of the [ST] key displays the subtotal
amount without the previous balance.
TAXABLE TOTAL KEY ([TXBL TL])
This key is used to display the contents of the sale total plus any
taxes due. The amount will display (and print if so programmed).
In order to allow add-on operation following the use of this key, the
taxes are not added into any total memories until actual finalization
is initiated.
Mandatory depression of this key prior to finalizing a sale is a
programmable option.
If the "TOTAL VALIDATION" option is selected, depressing the
[VALIDATE] key after a [TXBL TL] key depression prints the sale total
on the validation slip, and therefore, only a finalizing operation
then is allowed.
In charge posting, depressing the [TXBL TL] key displays the amount
including taxes but excluding the previous balance.
- 21 -
Page 26

VND
CPN
VENDOR COUPON KEY ([VND CPN])
This is a motorized credit key to subtract vendor coupon amount from
the sale.
To operate, enter the coupon amount and depress the [VND CPN] key.
This operation can only be performed inside a sale. The coupon amount
to be entered must not exceed the sale total unless the "Credit
Balance" option is selected.
This key can be programmed with Amount Limit (max, A-digit value),
tax, food stamp, validation compulsory statuses, and manager
intervention.
To override the programmed amount limit, the "MGR" position of the
Mode Lock is required, but the [LC OPEN] key will not be effective.
Quantity extension using the [VND CPN] is not possible.
STR
CPN
STORE COUPON KEY ([STR CPN])
This is a non-motorized credit key to subtract a store coupon amount
redeemed through a department. Store coupon operations will net the
department through which they are redeemed.
To operate, depress the [STR CPN] key before the coupon amount entry,
then depress the appropriate department key.
If Store Coupon Limit Amount is programmed and a HALC (High Amount
Listing Capacity) is also programmed on the Department, the store
coupon entry amount will be limited to the lower value of the two
settings.
The tax status of the [STR CPN] key is ruled by that of the deparment,
but it may be programmed to be always non-taxable independently from
the department status.
The store coupon amount must be entered inside a sale and must not
exceed the sale total unless the "Credit Balance" option is selected.
The amount entered with the [STR CPN] key will subtract the Department
Total memory, but does not affect the Deparment Item Counter memory.
Quantity extension will be permitted with this key, but no deicmal
quantity will be accepted. No PLU, Void, Returned Merchandise, or
Bottle Return (Department-link Type) entries are possible with the
[STR CPN] key.
DOLL
DISC
DOLLAR DISCOUNT KEY ([DOLL DISC])
This key is used to subtract an amount from the sale such as a
discount during a sale. An amount exceeding the sale total can not be
entered unless the "Credit Balance" option is selected.
To operate, enter the discount amount on the numeric keyboard, and
then depress the [DOLL DISC] key. It may be operated after a [ST] key
depression or any time during a sale before finalizing the sale.
- 22 -
Page 27

This key may be programmed with Amount Limit (max. 4-digit value)t
tax, food stamp, validation compulsory statuses, and manager
intervention.
To override the programmed Amount Limit, the "MGR" position of the
Mode Lock is required, but the [LC OPEN] key will not be effective.
Quantity extension is not possible using the [DOLL DISC] key.
R/A
PO
RECEIVED ON ACCOUNT KEY ([R/A])
A received-on-account transaction is used to identify money which is
in the drawer but not business. The amount entered is thus included
in the In-drawer Total memories but not in the sales total memories.
To operate, enter an amount of pa3rment and then depress the [R/A] key.
Repeat this operation if multiple payments are entered at a time. The
payments entered are finalized by the [AT/TL] key if paid in cash.
Other media keys may also finalize payments received on account if so
programmed. The above operation sequence can only be performed when
the register is outside a sale.
The [R/A] key is also used to declare the payment amount near the end
of a charge posting operation. After depressing the [Chg] key to
obtain the sale total, enter the amount portion to be paid in this
sale and then depress the [R/A] key, followed by media tendering or
totalling operations. The media keys that can be used in this case
are those programmed to allow payments received on account, which is
just described in the above paragraph.
The [R/A] key is also used as the start key for Loan amount entries.
PAID OUT KEY ([PO])
A paid-out transaction is used when an amount of money is removed from
the cash drawer without relating to a sale. When the [PO] key is
used, the amount entered is subtracted from the Cash-in-drawer Total
memory but not sales totals.
To operate, enter an amount to be taken from the cash drawer and
depress the [PO] key whilst the register is in an out-of-sale
condition. This operation may be repeated if multiple paid-out items
are registered in one transaction. The paid-out amounts are finalized
by the [AT/TL] key only (i.e., must always paid out in cash).
In a charge posting operation, this key is depressed to pay back all
the balance to the customer, after once finalizing the account with
the [Chg] key.
The [PO] key is also sued as the start key for Pick Up operation.
- 23 -
Page 28

EX
TAX EXEMPT KEY ([EX])
This key is used to declare the exemption of the taxes from the sale,
displaying the sale total excluding the exempted-tax, printing the
amount of the post-tax-exempted sale portion. Only a finalizing
operation is possible after a [EX] key depression.
The [ITEM CORR] key cannot function to delete a [EX] key entry.
When multiple tax modifier keys are installed, partial tax exemption
as well as all tax exemption may be performed in the following ways:
[TXl/M] ■» [EX] ...................................................................... to exempt TAX 1 only
[TX2/M] -> [EX] ...................................................................... to exempt TAX 2 only
[TX3/M] [EX] ..................................................................... to exempt TAX 3 only
[TXl/M] [TX2/M] ♦ [EX] .................................................. to exempt TAX 1 and TAX 2
[TX2/M] [TX3/M] [EX] .................................................. to exempt TAX 2 and TAX 3
[TXl/M] [TX3/M] ^ [EX] .................................................. to exempt TAX 1 and TAX 3
To exempt all the taxes, simply depress [EX] (or depress all the
tax modifier keys first, and then depress [EX]).
CARD
NO.
CARD NO. KEY ([CARD NO.])
This key is used to enter the code number (1 to 2) which classifies
the credit card company, followed by the sale finalization with the
[Chg] key.
To operate, enter the Credit Card Company Code number (1 to 20), and
depress [CARD N0.] (at this time the code is not printed). Then
operate the [Chg] key to finalize the sale. The sale total will be
processed into the Charge-in-drawer and the Individual
Credit-in-drawer total memories respectively.
A wrong code entry up the [CARD N0.] key but before the [Chg] key
depression can be corrected by the [C] key. But it is not possible to
correct a code entry and print after the [Chg] key depression.
When only the [Chg] key is operated without entering a code and
depressing [CARD N0.] (or when code "20" is entered through
[CARD N0.]), the sale is processed into the "Other Credit Total
(CRT20)" memory instead of a specific Credit Card Company
classification.
If the "Card No. Compulsory*' option is selected, the [Chg] key
operation will not be accepted without a code entry through
[CARD N0.].
Multi-tendering is allowed with multiple codes (if [Chg]is programmed
to allow tendering), by repeating to enter each code before [CARD NO]
and its amount tendered before [Chg].
If the [Chg] key is programmed to allow finalizing Received-on-Account
payment items, the code entry operation described above is allowed
even to finalize Received-on-Account payments or to finalize payment
entries for a sale with previous balance.
- 24 -
Page 29

If a validation, print is performed for a [Chg]‘finalized sale with a
card code, the Company Name (preprogrammed to the code) will be
printed on the validation slip.
AT/TL
CASH AMOUNT TENDER / TOTAL KEY ([AT/TL]) (Media 1 Key)
This key is used to record all cash paid on transactions, and will be
able to finalize a sale operation. Usually this key is programmed to
function as both "Tender" and "Total" key. However, the key may be
programmed to operate with enforced tendering or as a cash total key.
TENDER FUNCTION
After the [ST] or [TXBL TL] key is depressed, enter the amount
tendered by the customer in payment of the sale, and then depress
the [AT/TL] key. The change is automatically computed, displayed,
and printed.
If the amount tendered is smaller than the sale total, it prints the
amount tendered on the receipt with the balance due displayed, but
the drawer is not yet opened. In this case, ask the customer for
additional payment in cash and repeat the same amount-tendering
operation, or use another media key if the balance due is processed
as a sale in that media.
NOTE: If [AT/TL] is programmed to function as "Tender" key only and
the sale total is "0" or negative, no amount tendered can be
entered. In this case, [AT/TL] will function just as the
"Total" key, so just depress [AT/TL] to obtain the total and
finalize the sale. The balance in negative indicates that
the amount must be paid back to the customer in cash.
TOTAL FUNCTION
To obtain the total and finalize a cash sale, depress the [AT/TL]
key only. The sale is finalized with the total printed and
displayed, and the drawer opens.
If the "[TXBL TL] Complsory" option is selected, a
depression is always required before finalizing a sale.
When the sale is finalized by [AT/TL] or other media keys, the Trade
Stamp amount to be issued to the customer will be printed on the
receipt if appropriate options and the Trade Stamp preset rate have
been programmed.
The [AT/TL] key is also used to finalize Received-on-Account payments
or Paid-Out amounts.
The [AT/TL] key can be programmed with the HALC (High Amount Listing
Capacity) of the amount tendered. If it is set, the amount tendered
must not exceed the programmed value; otherwise, it will result in an
error. If the [LC OPEN] key is used in such a case, the HALC will be
extended by one additional digit. If an amount still larger must be
entered, the Mode Lock must be turned to the "MGR" position.
The [AT/TL] key can also be programmed to prohibit short-tendering
operation.
:txBL TL] key
- 25 -
Page 30

CHECK
TEND
CHECK TENDER KEY ([CHECK]) (Media 2 Key)
This key is one of non-cash media keys, and used to cash a check when
the register is outside a sale, or to finalize the transaction as a
check payment.
CHECK CASHING
When the register is outside a sale, enter the check amount and
depress the [CHECK] key. A receipt is Issued and the drawer is
opened to enable exchange. However, this cashing function may be
prohibited if so programmed.
FINALIZING AS CHECK PAYMENT
On finalizing a sale, refer to the [AT/TL] key description. The
[CHECK] key is usually programmed to function as "Tender" key only.
However, it may be programmed to function as "Total" key only or as
both "Tender" and "Total keys, just as [AT/TL].
The [CHECK] key is also used to finalize Received-on-Account payments
when paid in check, if programmed to allow it.
Over-tendering and/or short-tendering using this key may be also
programmed to prohibit (in case this key functions as "Tender" key).
Chg
Along with validation print, Endorsement Print is available by the
Remote Slip Printer (hardware option) after operating the [CHECK] key.
The endorsment data will be printed by depressing the [CHECK NO.] key
(later described in detail).
CHARGE TOTAL KEY ([Chg]) (Media 3 Key)
This key is usually programmed as "Charge Sale Total" key. However,
it may be programmed to be another non-cash media key for such as
payments in credit cards. Thus this key is used as an alternative
method of payments for media other than cash and check. To operate,
depress the [Chg] key, instead of [AT/TL], to obtain the total and
finalize the sale.
This key has exactly the same functions and programmabilities as the
[CHECK] key except that [Chg] is usually programmed as a "Total" key
but not a "Tender" key.
As special function different from other non-cash media keys, this key
may also finalize the current sale of charge posting. In this case,
the amount displayed and printed by the [Chg] key is the sale total
including the previous balance. However, it is programmable to print
the sale total excluding the previous balance. (Always displays the
amount including the previous balance.)
Mise
TEND
MISCELLANEOUS MEDIA TENDER KEY ([MISC]) (Media 4 Key)
This is one of additional non-cash media keys that may be installed
besides [CHECK] and [Chg]. This key has the same functions and
programmabilities as the [CHECK] key, and usually used as a "Tender"
key.
- 26 -
Page 31

MEDIA 5 to 8 KEYS ex:
CPN
MEDIA-COUPON KEY ([CPN]) (Media 5)
FSTL
TEND
PREDIU
CREDIT 1 KEY ([CREDIT 1]) (Media 6)
1
CREDIll CREDIT 2 KEY ([CREDIT 2]) (Media 7)
2
credit! CREDIT 3 KEY ([CREDIT 3l) (Media 8)
3
These are additional non-cash media keys that may be installed besides
other media keys, according to the requirements of each store.
The key indications and the matching media listed above are only
examples. Since each of these keys can have the same functions and
has the same programmabilities as the [CHECK] or [MISC] key, it can be
used for any media tender or total functions.
FOOD STAMP TOTAL READ / TENDER KEY ([PSTL TEND])
This is a multi-purpose function key associated with the food stamp
tendering operation.
FOOD STAMPABLE TOTAL READ
The first depression of this key without a prior amount entry during
a sale displays the food-stampable total, which indicates the
maximum amount the customer may pay in food stamp.
FOOD STAMP TENDERING
Next, the food stamp amount tendered by the customer is entered and
then the [FSTL TEND] key is depressed. If the food stamp amount
tendered is equal to or larger than the food-stampable total and if
there is no non-food-stampable amount included in the sale
(accurately, a maximum non-food-stampable amount of 99q may be
included), the sale is finalized and a receipt is issued. If any
non-food-stampable amount is included or the tendered food stamp
amount is short of the food-stampable total, the balance due is
displayed, expecting for another tendering or totalling operation in
other medias.
The change by the unit of $1.00 will be returned in food stamp
(displayed in the ’'DPT*' portion), but the change portion less than
$1.00 will be returned in cash (displayed in the "AMOUNT" portion).
There are three types of food stamp handlings regarding the tax
payment system for the food stampable items, and the register has been
programmed with the right type for each area:
1) GENERAL TYPE
The customer may pay up to the food-stampable amount plus the
taxes due in food stamp. (The FOOD STAMPABLE TOTAL read in
the display already includes the taxes due in this type.)
- 27 -
Page 32

2) ILLINOIS TYPE
The customer may pay up to the food-stampable amount in food
stamp, and the amount actually paid in food stamp is
tax-exempted. (The FOOD STAMPABLE TOTAL read in the display
does not include the taxes due in this type.)
3) TEXAS TYPE
The customer may pay up to the food-stampable amount in food
stamp, but any taxes due must be paid in cash. (The FOOD
STAMPABLE TOTAL read in the display does not include the taxes
due in this type.)
PB+
PB-
These keys are used to enter a previous balance in a charge posting
operation. If a previous balance is entered, then the operation
becomes a charge posting, and the [Chg] key must be used at the end of
the operation. (See the "REGERISTERING PROCEDURE FOR SALES" section
as to detail operations to follow the [Chg] key.)
A previous balance may be entered anywhere and any number of times
during a sale. The [PB+] key is used to post a debit balance and the
[PB-] key is used to post a credit balance. To initiate a charge
posting operation where no previous balance exists, then enter "0" as
a past balance, followed by [PB+] or [PB-].
If the [TXBL TL] is depressed during a charge posting, the displayed
amount does not include the previous balance. When the [Chg] key is
depressed to end a charge posting sale, the displayed and printed
amount includes the previous balance. However, a program option may
be selected to print the amount excluding the previous balance. (The
displayed amount always include the previous balance.)
The [%+] or [%-] key may be operated after a previous balance entered
through [PB+] but not [PB-j,
PREVIOUS BALANCE KEYS ([PB+] {PB-])
TRF
PICK UP
BAL
TRANSFER KEY ([TRF])
When a charge posting is ended with the [Chg] key, this key is used to
transfer the entire balance with no payment.
To operate, depress the [TRF] key after the [Chg] key. All the
balance is transferred, the transferred amount is printed as the new
balance, and a receipt is issued. In this operation, the [Chg] key
may be omitted.
PICK UP BALANCE KEY ([PICK UP BAL])
This key should be installed in place of the [PB+] key if the
"Customer File" memory option is selected. By entering the Customer
File Code before depressing the [PICK UP BAL] key, the previous
balance of the customer will automatically be recalled and printed
from the Customer File memory and the operation will go into a charge
posting mode.
- 28 -
Page 33

For a new customer, a Customer file Code not in use (or of its balance
"0") may be assigned through the [PICK UP BAL] key, or a new code may
be opened by the [CODE OPEN] key.
The [%+] or [%-] key may be operated to add to or subtract from the
previous balance recalled and printed through [PICK UP BAL].
The [PICK UP BAL] key may operate at the top of the sale or any time
during the sale; however, unlike the [PB+] and [PB-] keys, it can only
operate only once in the sale.
CODE
OPEN
RECEIPT
ISSUE
CUSTOMER FILE CODE OPEN KEY ([CODE OPEN])
This key should be installed in place of the [PB-] key if the
"Customer File" memory option is selected. By entering a new code
(Customer File No.) before depressing this key, the new Customer File
No. is opened and assigned to the new customer for the following
charge po'sting sale. If the [ITEM CORK] is operated immediately after
this, the File No. just opened will be closed.
If certain Customer File Codes have been opened in the "CUSTOMER FILE
CODE OPENING" operation in the "SET" mode, entering one of those codes
and depressing the [CODE OPEN] key (for the purpose of opening a new
customer account and assigning the code) will result in an error. In
that case, enter the code and depress the [PICK UP BAL] key. The new
customer account is then started with the balance "0" if it has not
been used for any other customer.
This key may operate at the top of the sale or any time during the
sale; however, it can operate only once in the sale.
RECEIPT POST-ISSUE KEY ([RECEIPT ISSUE])
This key is used to issue the receipt of a sale when the sale has
already been finalized with the [RECEIPT ON/OFF] switch positioned to
OFF. However, the post-receipt can be issued even when the
[RECEIPT ON/OFF] switch is positioned to ON if so programmed in the
system otpion.
RPT
CHECK
NO.
To operate, depress [RECEIPT ISSUE] without a numeric entry. The
receipt for the last sale (printed with the sale total but not detail
items) is issued. This key will not function if another sale has
already been under way.
REPEAT KEY ([RPT])
This key is used to repeat a department or PLU entry. This key
enables repeat entries not only for normal department or PLU items but
also items modified with [PR OPEN], [SHIFT], etc.
CHECK NO. AND ENDORSEMENT PRINT KEY ([CHECK NO.])
This key is used to print the endorsement data with or without a check
No. print after finalizing a sale with a non-cash media key.
- 29 -
Page 34

To operate, insert the check or required slip into the Remote Slip
Printer, and depress [CHECK NO.]. When a number (maximum 16 digits)
is entered before [CHECK NO.], the number is also printed as Check
No., along with other endorsement data.
Endorsement Print Lines
■ Check No. Line
Endorsement Message
Lines (programmable)
]
Total Amount Line
Consecutive No./Cashier ID/ Media
Line
Reg. No./Date/Time Line
NOTES: 1. The Endorsment Message is programmable with a maximum
of 27 characters x 3 lines.
2. The Endorsement Message Lines and the Total Amount Line
can be programmed to non-print (skip the line with no
line feeding) if they are unnecessary.
The endorsment print is allowed after any non-cash media key entry.
Each non-cash media key may be programmed to require the endorsement
print operation.
The "Check No. Entry" before the [CHECK NO.] key may also be
programmed to be compulsory.
- 30 -
Page 35

REGISTERING PROCEDURE FOR SALES
The following are pattens for actual registering operations. In the following
examples, "|
indicates a depression of the transaction key, and indicates other
registering and/or finalizing operations.
CONDITION SETTING TO START REGISTRATIONS
__________
|" indicates an input through the numeric keys, "[ ]*'
Mode Lock
Clerk Lock
r~—^-------------------^^
Cashier Sign-On
.................
GP-spec. machine
GR-spec. machine
Turn to "REG" position.
For operations that have been programmed to require the
"MGR" position, turn to the "MGR" position by using the
"MA" or "MGR" key.
.......................
......................
......................
The operating cashier must sign-on before starting
Set the Clerk Key of the operating clerk to
ON.
No clerk keys are necessary.
However, if Clerk Reports are required,
set the Clerk Key of the responsible Clerk
to ON.
registrations,
I I I I I [LOG]
Cashier ID Code (Manager-assign 2-digit code 01 to 99)
Cashier's own.secret code (01 to 99)
ex.) If the Cashier ID Code "01" is assigned to a cashier, and
she decides to use "42" as her own secret code, she
operates:
4201^ [LOG]
(The sign-on condition will be held until a sign-off is
operated.)
Cashier Sign-Off .......................... The operating cashier must sign-off when leaving
the register or changing the role to another
cashier.
0 -A- [LOG]
i------------------------------------
Sales person Sign-On
If the store wants to record sales contribution
data of each sales person for report purpose, a
sales person sign-on should be performed every
time a sale registration starts or every time
before each item is entered.
I I I ■* (LOG]
T.
Sales Person ID Code (Manager-assign 2-digit code
- 31 -
01 to 98)
Page 36

(The sales person sign-on is automatically be signed-off by
finalizing the sale or by signing on another sales person.
When an enforced sign-off is required before a sale is
finalized, sign on the fixed code "99" to sign off the
previous sales person. The code "99" is assigned and fixed
for "other sales persons" memory.)
Now the register is ready for the following operations.
NO-SALE (Allowed only outside a sale)
[NS]
DEPARTMENT ENTRY
I PRICE I [Open DEPT]
[Preset DEPT]
[PR OPEN] I PRICE I [Preset DEPT] + ---
NOTES: 1. Use [SHIFT] before the [DEPT] key for a shifted department
FLU ENTRY
[Preset PLU Code| [PLU] + ---
¡Open PLU Code! [PLU] + |PRICE j [AMT]
Using FLU Keyboard:
[KEY]
[KEY] 4 [price] [amt] + (for an
on PLU on ECR
Keyboard
------------------
entry.
2. [LC OPEN] may be operated. In this case, [LC OPEN] may be
depressed at the top (except that it may depressed after
[PR OPEN]).
-------------
------------------
(for a preset PLU item)
open PLU item) which has been program
♦
-------
(NOTE: The "[KEY]" here indi
cates the appropriate
key on the PLU keyboard
med with the required
PLU Code.)
REPEAT ENTRY
I PRICE [ [Open DEPT] •* [same DEPT] -> [same DEPT] ...
[PRESET DEPT] [same DEPT] •+ [same DEPT] ... ^ ~.~
-----
(Repeat depressing the same department key as many times
as the desired count.)
- 32 -
Page 37

[Preset PLU Code! ■* [ PLU ] [ PLU ] [ PLU ] ... -
[Open PLU Code! [PLU] ■» I PRICE j [AMT] [AMT] -> [AMT] ... ^
NOTES: 1. Repeat entry is not possible by the above patterns when the
[PR OPEN], [VOID], [RTN MDSE], [BTL RTN], [STR CPN], or [SHIFT]
key has been operated together. Negative Departmets or PLUs
will not accept a repeat operation, either.
2. The [LC open], Tax Modifier Keys, [SI/M], [FS/M] keys are
effective on repeat operations by the above patterns.
Repeat Opeation Using [RPT] Key:
[Preset DEPT] -► [RPT] [RPT] ...
[price I [Open DEPT] [RPT] •* [RPT] ...
[PR OPEN] [price! [Preset DEPT] [RPT] ^ [RPT] ...
[SHIFT] 4 [Preset DEPT] 4 [RPT] 4 [RPT] ... * —
[SHIFT] 4 [price][OPEN DEPT] [RPT] 4 [RPT] ... *
[preset PLU Code] [PLU] 4 [RPT] -» [RPT] ... 4 ---
[open PLU Code] [PLU] 4 jPRICE[[AMT] 4 [RPT] 4 [RPT] ... 4 ---
QUANTITY EXTENSION (MULTIPLICATION
[quantity! 4 [@/FOR] 4 [Preset DEPT] 4 ---
^— (May be omitted if the QUANTITY is 1-digit.)
[PR OPEN] 4 [quantity! 4 i(3/FOR] 4 |PRICE][OPEN DEPT] 4 ---
[quantity! 4 [@/FOR] 4 [price![Open DEPT] 4 ---
I QUANTITY[ 4 [@/FOR] 4 [Preset PLU Code][PLU] 4 ---
[Open PLU Code][FLU] 4 |QUANTITY I 4 [0/FOR] 4 [PRICE][AMT]
NOTES: 1. QUANTITY ... max. 3-digit integral and 3-digit decimal
PRICE
.................
PRODUCT .... must not exceed 8 digits
(If a PLU is programmed with the "stock" status, the QUANTITY
must always be entered in an integral value.)
max. 6 digits
2. Tax Modifier Keys, [LC OPEN], [Sl/M], [FS/M] keys are
effective if depressed before starting each sequence.
4
These are
only possible
by [RPT] Key.
---
SPLIT PACKAGE PRICING
IpURCHASED Q'ty![0/FOR]4[wHOLE package q'ty][@/F0R]4[Preset DEPT]
[PURCHASED Q'ty![@/F0R]4[wH0LE package q’ty![@/FOR]—j
^IWHOLE PACKAGE PRICE[[Open DEPT]4 ---
- 33 -
4
------
Page 38

iPURCHASED Q'TYI [g/FOR]-»|Split Price Type PLU CodeUPUJl*
(Preset PLU)
-----------------------------------
I Split-Price Type PLU Code | [PLU]-»1 PURCHASED Q'TYI [@/F0R]-
(Open PLU)
L->]wHOLE package PRICE I [amt] •> ---
NOTES: 1. PURCHASED QUANTITY ... max. 3 digits integral only
WHOLE PACKAGE QUANITY ... max. 3 digits integral only
2. Usually, the fraction of the result is rounded up in
split-pricing operation. However, it is programmable to round
up the fraction of each item price (item price = WHOLE PACKAGE
PRICE ♦ WHOLE PACKAGE Q'TY).
3. Only the Split-Price Type PLUs allow split pricing operations,
but not the other ordinary type of PLUs.
RETURNED MERCHANDISE
Follow the operation sequences of DEPARTMENT ENTRY, PLU ENTRY (page 32),
QUANTITY EXTENSION (page 33), and SPLIT PACKAGE PRICING (page 33 to this
page); and depress [RTN MDSE] before the sequence (must be depressed at
the starting).
!□
BOTTLE RETURN (motorized inside-sale type)
--- -> I BOTTLE RETURN AMOUNT] [BTL RTN] --- (Quantity Extension is
BOTTLE RETURN (non-motorized department-link type)
-----
4 [BTL RTN] 4 [Preset DEPT]
--- 4 [BTL RTN] 4 I BOTTLE RETURN AMOUNT[[OPEN DEPT] 4 --- possible.)
DOLLAR DISCOUNT
--- 4 [DISCOUNT amount! [doll DISC] 4 ---
PERCENT DISCOUNT
(1) To discount from the subtotal:
-----
4 [ST] 4 [%-] 4 ... to discount by the preset %- rate
-----
4 [ST] •» I RATE I [ % - ] 4 ,,, to discount by a manual rate
(2) To discount from an individual department or PLU item:
------------------------------
(Quantity
possible.)
Extension is
([PRICE[) 4 [DEPT] 4 [%-] 4
NOTES: 1. The rate may be entered within the rate from 0.001 to
99.999(%). Use the [.] key if the rate contains the decimal
point.
-------------------------
([price!) 4 [DEPT] 4 [rate![%-] 4 — ... to discount by a manual rate
,,, to discount by the preset %- rate
- 34 -
Page 39

2. The above department entry sequence may be replaced by PLU
entry sequences.
3. Percent discount/charge can also be operated on a positive
Previous Balance entry.
PERCENT CHARGE
This operates the same as the PERCENT DISCOUNT operations abovey except
that the [%+] key is used instead of the [%-] key.
STORE COUPON
Follow the operation sequences of DEPARTMENT ENTRY (page 32) and QUANTITY
EXTENSION of Departments (page 33), and depress ISTR CPN] before the
sequence (must be depressed at the starting).
The [STR CPN] key will not function with a PLU entry sequence.
VENDOR COUPON
--- -> I COUPON AMOUNT I [VND CPN] ♦ ---
ITEM CORRECT (Last Line Voiding)
Depress [ITEM CORR] after each sequence, as listed below:
DEPARTMENT ENTRY (page 32) ---------------------------------------------------
PLU ENTRY (page 32)
REPEAT ENTRY (page 32 to 33)
QUANTITY EXTENSION (page 33)
SPLIT PACKAGE PRICING (page 33 to 34)
RETURNED MERCHANDISE (page 34)
BOTTLE RETURN Of both types (page 34)
DOLLAR DISCOUNT (page 34)
PERCENT DISCOUNT/CHARGE (page 34 to this page)PAID OUT: iAMOUNT|[PO]
RECEIVED ON ACCOUNT: |AMOUNT|[R/A]
MANUAL TAX: |AMOUNT|[TAX]
STORE COUPON (this page) -----------------------------VENDOR COUPON (this page)
PREVIOUS BALANCE: IaMOUNTI[PB+](or[PB-])-|
NOTES: 1. When [ITEM CORR] is depressed after a REPEAT ENTRY sequence,
only the last item of the repeated will be deleted.
2. When [ITEM CORR] is depressed after a QUANTITY EXTENSION or
SPLIT PACKAGE PRICING sequence, the entire product resulted
from the calculation will be deleted.
3. The [IC/VD] key will function the same as the [ITEM CORR] key
in all of these patterns.
-------------------------------
----------------------------
--------------------------
I CODE t[PICK UP BAL] —
[CODE![CODE OPEN]
-----------
(Quantity Extension is not
possible.)
[ITEM CORR]
- 35 -
Page 40

VOID (Designated Line Voiding)
Follow the operation sequences of DEPARTMENT ENTRY (page 32), PLU ENTRY
(page 32), QUANTITY EXTENSION (page 33), and SPLIT PACKAGE PRICING (page
33); and depress [VOID] before the sequence (must be depressed at the
starting).
Designated Line Voiding is also possible for a Department or PLU item
plus %+ or %- item sequences, if [VOID] is depressed before the entire
sequence*
NOTE: The [IC/VD] key will function the same as the [VOID] key except
that:
1) [VOID] must be depressed before the sequence, however,
2) [IC/VD] can only be depressed after a numeric entry* If
depressed at the top without a prior numeric entry, it may
item-correct the last item just entered. In voiding a preset
department entry, for example, the quantity must be entered
first (if an ordinary entry of one item, the quantity should be
•"1"), next depress [IC/VD], and then the [Preset DEPT] key,
EXAMPLES OF DESIGNATED LINE VOIDING USING [IC/VD]
[l] 4 [IC/VD] 4 [Preset DEPT] ---
^ Quantity "1" of multiplication
[price to be VOIDED I -* [IC/VD] -> [Open DEPT] 4 --[preset PLU Code I 4 [IC/VD] -> [PLU] 4 ---
[Open PLU Code! 4 [IC/VD] 4 [PLU] 4 jPRICE TO BE VOIDED! 4 [AMT] 4 ---
NON-ADD NUMBER PRINT
[number! [#] ^ ---
L
Customer No., etc.: max. 16 digits
TAX STATUS MODIFICATION
Depress required Tax Modifier Key(s) before the required tax-status
programmable key or item of the following (and before a numeric entry if
any):
Departments, PLUS, [%+] [%-], [DOLL DISC], [BTL RTN], [VND CPN],
[STR CPN].
SELECTIVE ITEMIZER (SI) STATUS MODIFICATION
Depress [SI/M] (or [SIl/M] and/or [SI2/M]) before the entry sequence of
the required Department or PLU (and before a numeric entry if any).
- 36 -
Page 41

FOOD STAMP (FS) STATUS MODIFICATION
Depress [FS/M] before the entry sequence of the required Department, PLU,
t%+], [%-l, [doll disc], or [BTL RTN](motorized inside-sale type) (and
before a numeric entry if any).
SCALE ENTRY, TARE ENTRY
AUTO SCALE WITHOUT TARE (Place the item on the scale platter.)
[SCALE] ^ I UNIT price![Open DEPT] 4 ---
[SCALE] -► [Preset DEPT] ^ ---
([SCALE]) jPreset PLU Code|[PLU] * ---
j
— may be omitted for Scale PLU entry.
([SCALE]) 4 I Open PLU Code 1 [PLU] lUNIT PRICE] [AMT] ---
AUTO SCALE WITH TARE (Place the item on the scale platter.)
*
I Tare Table No.|[TARE NO.]
(1 to 9)
* [unit price![Open DEPT] + ---
> [Preset DEPT] -» ---
* 1 Preset PLU Code! [PLU] ---
I Open PLU Code|[PLU]—j
MANUAL SCALE ENTRY (May be programmed to be prohibited)
¡Net Weight Manual Entry I[SCALE] + To be continued to the sequences
(unit: 1/100 LB or g) marked with *'*" above.
VOID OR RETURN MANUAL SCALE ENTRY (May be programmed to prohibit any
manual scale entry except VOID or
RETURN, or inslcuing VOID and RETURN.)
[RTN MDSEl
NOTES: 1. PLUS operated here must be programmed as "Scale Type"; no other
___
continued to the sequence for "MANUAL SCALE
ENTRY" above. (The Net Weight must entered manually in
this case.)
PLUS may be used for scale entries.
2. In the Negative Mode (i.e., in the position of the Mode
Lock), any scale items must be recorded with a manual net
weight entry. Therefore, follow the "MANUAL SCALE ENTRY" and
"VOID OR RETURN MANUAL SCALE" entry described above. The
manual-scale-prohibited status will be disregarded in the
Negative Mode.
SUBTOTAL READ (Sale Total Without Taxes)
L*|unit price![amt]* ---
-----
[ST] ■>
-----------------
... The sale total of the items so far entered is
displayed (and printed if so programmed), but the
sale is not finalized.
- 37 -
Page 42

TAXABLE TOTAL READ (Sale Total plus Taxes)
-----
■* [TXBL TL] -»
MANUAL TAX ENTRY (only to add irregular tax amount)
--- -» I TAX AMOUNT TO BE ADDED | [TAX] ^ ---
NON-TAXABLE ITEM TOTAL READ
-----
[TAX] *
-------------------
---------------
... The sale total including taxes is displayed (and
printed if so progrannned). The sale is not yet
finalized. Mandatory depression of [TXBL TL]
before finalizing a sale is a programmable
option.
... The total amount of the non-taxable items so far
entered within the sale is displayed. It is
ususally not printed, but programmable to print
also.
TAX EXEMPTION
4 [TXl/M]
4 [TX2/M] 4 [EX]
4 [TX3/M] 4 [EX]
4 [TXl/M][TX2/M]
4 [TX2/M][TX3/M]
4 [TXl/M][TX3/M]
-----
4 [ex] ... to exempt all the taxes (or all the Tax Modifier Keys may
Displays the post-tax-exemption total while prints the tax-exempted
portion of ‘the sale total.
SELECTIVE ITEHIZER (Si) READ
--- 4 [SI/TL] 4 ...
NOTES: 1. If % rate is preset for the SI^ the amount calculated on the
2. If the "SI/TL Compulsory" option is selected, the [SI/TL] key
3. The content of the selective itemizer is cleared at the moment
4. If both SIl and SI2 are programmed, the consolidated total of
4
[EX]
rate is automatically displayed (and printed on the receipt if
so programmed). Whether the calculated amount adds to or
subtracts from or non-affect the sale total is another
programmable option.
is always required before finalizing a sale.
of the depression of the [SI/TL] key, getting ready for the
selective itemization of the next sale.
SIl and SI2 contents is displayed (and printed) on the [SI/TL]
depression.
. to exempt Tax 1 only
. to exempt Tax 2 only
, to exempt Tax 3 only
[EX] ... to exempt Tax 1 and Tax 3
[ex] ... to exempt Tax 2 and Tax 3
[EX] ... to exempt Tax 1 and Tax 3
be depressed before [EX].)
The SI total is displayed (and printed on the
receipt if so programmed).
- 38 -
Page 43

FOOD STAKPABLE TOTAL READ, FOOD STAMP TENDERING
-----
^ [FSTL TEND] 4 [Food Stamp Tendered Amount| [FSTL TEND] 4 ---------------------------------------
Displays the
food-stampable
total.
Tendering in Food Stamp
(This must be operated first of all the
payments in finalizing the sale if food
stamps are part of the payment.)
SALE FINALIZATION BY MEDIA KEYS
--- 4 ([TXBL TL])
NOTES: 1. Whether each Media Key is depressed with a prior tendered
amount entry or not is determined by the option for the Media
Key. If the sale total is "0" or negative, any Media Key must
be depressed without a tendered amount entry even if the key is
programmed as "Tender" key. Each of non-cash media keys may be
programmed to prohibit Negative Sale Fianalization,
Over-tendering, and/or Short tendering.
finalize without tendering
Tendered Amount!
finalize with tendering
and change calculation
[AT/TL]
[CHECK]
[Chg]
[Mise]
Other media keys
SALE FINALIZATION BY CREDIT CARD
--- 4 ([TXBL TLl) ->
Card Code I [CARD NO.]
1 to 20
(Credit Company
Classification Code)
(Correctable by [C] Key)
Repeatable if short-tendering is repeated with same or
different Card Code. In this case, the [Chg] key
must be programmed to allow "Tendering" and "Short
tendering."
without tender
[Tendered Amount I~
with tender and
change
■[Chg]
NOTES; 1. If the "Card No. Compulsory" option is selected, the [Chg] key
must always be operated with a prior Card Code entry sequence.
2. The above sequence from "Icard Code!" to "[Chg]" may be used to
finalize received-on-account payments if the [Chg] key is
programmed to allow received-on-account entries.
MULTI-TENDERING ... Short-tendering repeated multiple times by the same media
(allowed only when the media key is programmed to allow
short-tendering)
ex.)
--- 4 ([TXBL TL]) 4 [amount TENDERED I [CHECK] —|
AMOUNT TENDERED I [CHECK]
U
AMOUNT tendered! [CHECK]
n
- 39 -
Page 44

SPLIT-TENDERING ... short-tendering repeated multiple times by different media
keys (allowed only when the media keys are programmed to
allow short-tendering).
ex. 1)
___
^ ([TXBL TL]) I CHECK AMOUNT TENDERED! [CHECK] —|
(I CASH AMOUNT TENDERED|) [AT/TL] ... Check & Cash
(I Card Code! [CARD NO.]) [Chg] ... Check & Charge
CASH AMOUNT TENDERED I[AT/TL] ^ [Chg]
... Check, Cash, & Charge
ex. 2)
----------
([TXBL TL]) * [cash amount TENDERED|[AT/TL] -► [Chg]
ex. 3)
---------- ([TXBL TL]) -> [FSTL TEND] |FOOD STAMP AMOUNT TENDERED|[FSTL TEND]
“(I CASH AMOUNT TENDERED|) [AT/TL] ... Food Stamp & Cash
»I CHECK AMOUNT TENDERED|[CHECK] ... Food Stamp & Check
^[Chg] ... Food Stamp & Charge
There are many more combinations of medias.
... Cash & Charge
NOTES: 1. In both MUTLI-TENDERING and SPLIT-TENDERING opertions, the sale
is finalized and a receipt is issued on reaching the sale total
amount.
2. If a media key is depressed without an amount tender entry (and
if the key functions as "Total” key), the sale is then
finalized on that stage processing all the balance due into
that media.
CHECK CASHING (Must be operated outside a sale. May be programmed to be
I CHECK AMOUNT TO BE CASHED| [CHECK]
(Other non-cash media keys may be used for this purpose if programmed to
allow no-purchase cashing.)
RECEIVED ON ACCOUNT (Must be operated outside a sale)
[AMOUNT OF PAYMENT 1[R/A]
t.
Repeatable if multi amounts
are received in one tran
saction.
NOTES: 1. The media keys used for this operation must be programmed to
allow received-on-account entries.
2. MULTI-TENDERING (page ¿^0), SPLIT-TENDERING (this page), and
SALE FINALIZATION BY CREDIT CARDS (page 39) are also applicable
to the finalization of received-on-account payments.
J
(I CASH AMOUNT TENDERED I)[AT/TL]
(if paid in cash)
[check amount tendered 1[CHECK]
(if paid in check)
[Chg] (if paid in charge media)
Other Media finalizations
prohibited.)
- 40 -
Page 45

PAID OUT (Must be operated outside a sale.)
[amount to be paid out I[PO]
t
_______,________
Repeatable if multi amounts
to be paid out are recorded
in one transaction.
LOAND (Must be operated outside a sale)
[R/A] -r> [cash AMOUNT TO BE LOANED I[AT/TL] —ar->([ST])
iC
FOOD STAMP AMOUNT TO
BE LOANED
Repeatable by alternating the amount and/or media.
NOTES: 1. Neither [ITEM CORR] nor [VOID] will function to delete a loan
item.
2. No function to check the in-drawer balance turning into
negative (by excessive Paid-Out or Pick-Up entries) is
provided. Negative medias-in-drawer will be read in reports.
PICK UP (Must be operated outside a sale.)
The Mode Lock must be turned to "MGR" position.
----------------------
I
> [AT/TL]
[FSTL TEND] —
NOTE: Only [AT/TL] can
finalize paid-out
amounts (i.e. must
always be paid out in
cash.)
[AT/TL]
PO]
-------
^ [cash AMOUNT PICKED UPj [AT/TL]
I (NOTE 1 below)
Repeatable by alternating the amount and/or media.
NOTES: 1. Pick-up amounts may be recorded through [AT/TL]
[VND CPN] (for vendor coupon), [FSTL TEND] (for
and other media keys whose Media-in-drawer
programmed to be printed in In-drawer Report.
2. An amount must be entered before each media key.
3. Neither [ITEM CORR] nor [VOID] can delete any
pick-up operation.
4. On the depression of the [PO] key, the drawer opens, Pick-ups
may be carried out with the drawer kept open, even if the
"Drawer-close Compulsory" option is selected.
RECEIPT POST-ISSUE (Allowed only outside a sale.)
[RECEIPT issue;
A receipt with the total amount of the last-finalized
sale is issued. A programmable option provides a
selection not to issue the post-receipt if the last
sale has been finalized with the [RECEIPT ON/OFF]
switch positioned to 'ON'.
([ST])
[AT/TL]
(for cash),
food stamp),
Totals are
Items rn a
- 41 -
Page 46

VALIDATION PRINT
After entering the
required item through
a transaction key or
media key.
NOTES: 1. No other operations can follow until the validation slip once
printed is withdrawn.
2. If the "SLP" lamp flickers during registrations, it indicates
that the last item just registered has been programmed to
require validation print. In this case, no other operations
can follow until a validation print is executed.
3. The following are the selections programmable relating to
validation:
(1) PRINT FORMAT:
a) Date Print/Non-print
b) Consecutive No. Print/Non-rpint
(2) MULTI- or SINGLE-VALIDATION
(Number of times of validation print allowed for the same
item)
(3) VALIDATION COMPULSORY status on the following keys:
[AT/TL], [FSTL TEND], other media keys, [RTN MDSE], [PO],
[R/A], [ITEM CORR], [VOID], New Balance in charge Posting,
[DOLL DISC], [%-], Negative Departments/PLUs, [BTL RTN],
[VND CPN], [STR CPN].
Insert a validation
slip into the vali
dation slot. Make
sure that the "SLP"
Imap is steadily lit
[VALIDATE}
ENDORSEMENT PRINT ON REMOTE SLIP PRINTER
After operating the
required non-cash
media key
(Refer to the ENDORSEMENT PRINT in the "REMOTE SLIP PRINTER" section.)
Insert the check
or the required
slip into the
Remote Slip Printer.
Enter the Check No.
(if Check No. print
is necessary), and
then depress
[CHECK NO.]
PREVIOUS BALANCE, CHARGE POSTING
There are two types of charge posting operations; One is the PREVIOUS
BALANCE MANUAL ENTRY type, in which each previous balance is entered
through the numeric keyboard followed by [PB+] or [PB-] key. The other
is the CUSTOEMR FILE (Check Track memory) type, in which a new account
No. is opened and assigned by [CODE OPEN] key or by a "SET" mode
programming operation, and the previous balance is automatically be
recalled by [PICK UP BAL] key from the Customer File memory.
For the convenience of explanation, "TYPE 1" is marked for PREVIOUS
BALANCE MANUAL ENTRY type, and "TYPE 2" for CUSTOMER FILE type, in the
operation procedure patterns on the following pages.
- 42 -
Page 47

TO INITIATE CHARGE POSTING FOR A NEW CUSTOMER
TYPE 1: 1^ [PB+](or [PB-]) ----------------------
Follow the line marked with
TYPE 2; IA Customer File Codel [PICK UP BAL]
(must be one of those already opened
1n set mode and Its balance must
be zero.)
or
|a New Customer File Codel [CODE OPEN] -{any 6-digit code not require "MGR" position if so programmed,
opened in the "SET" mode)
2. CHARGE POSTING WITH A PREVIOUS BALANCE FIRST ENTERED (PRE-SELECT)
TYPE 1: I PREVIOUS BALANCE! -p" [PB+] (for positive balance)—
^ [PB-] (for negative balance)—**
TYPE 2: iThe Customer File Codel [PICK UP BAL]
(the same code used in the above operation 1.)
------------
below.
* ^ Additional
registrations
if any
([TXBL TL])
Displays the sale total
including taxes but
excluding the previous balance.
[TRF] ... to transfer all the balance as a new balance (i.e. no payment for this
occasion) [Chg] key above may be omitted in this case.
¡AMOUNT PAIDI [R/A]
(the amount to be
paid» partially
or entirely, for
this occasion)
repeatable
NOTES: 1. The finalizing operation is basically the same as R/A payment
finalization. The payment opertion is finalized on a "Tender" media
key when the tendered amount reaches the amount declared through the
[R/A] key, or on a "Total" media key depression. The media keys used
for payment must be programmed to allow received-on-account entries.
2. MULTI-TENDERING, SPLIT-TENDERING, and SALE FINALIZATION BY CREDIT CARD
are applicable to the payment operation.
3. When [TRF] key is to be operated to transfer all the balance without
payment, the prior [CWg] key may be omitted.
[Chg]
Finalizes the current sale» displays the
entire sale total including taxes and the
previous balance.
’ (¡Tendered Amount!) [AT/TL] ... if paid in cash
¡Tendered Amount| [CHECK] ... if paid in check
Other media finalizing operations
‘ [PO] ... when the balance is negative and also must be paid back to the customer
in cash now.
NOTE: Also note the special operation patterna relating to previous balance entries in the
"Q" mode, later to be described.
- 43 -
Page 48

3. CHARGE POSTING WITH A PREVIOUS BALANCE ENTERED BURIHG A SALE
(POST-SELECT)
A previous balance may be entered not only before sale items but
also after or between them if the IChg] key has not been depressed
(applicable to both TYPE 1 and TYPE 2). Multiple previous balance
entries are possible within a sale (applicable to TYPE 1 only).
4. PERCENT CHARGE ADDITION TO A PREVIOUS BALANCE
TYPE 1: I PREVIOUS BALANCE 1 [FB+] »(|RATE|) [%+] + ---
TYPE 2: [Customer File Code![PICK UP BAL] (I RATE j) [%+] * ---
NOTES: 1. The [%-] key operates the same for percent discounting.
2,. The previous balance picked up by the TYPE 2 operation
must be a positive amount to allow % charge or discount
entry.
OPERATIONS IN "Q" MODE (Mode Lock: Q )
Instead of using the [RTN MDSE] or [VOID] keys in the "REG" or "MGR" mode
for deleting individual items, the "Q" mode automatically processes
positive items into negative and negative into positive. To operate,
turn the Mode Lock to the "Q" position, and enter the items, one by
one, just as in the "REG" mode, as reading the sales receipt. A positive
balance resulted in the "Q" mode indicates the amount to be paid back
to the customer.
If the "CUSTOMER FILE" type is selected for charge posting, the following
operations should specially be noted, because exceptional procedures are
required in the " mode:
1. Previous Balance Entry Sequence in " Mode
[Customer File Code 1[PICK UP BAL]
Enter the Code
recorded in the
customer's sale receipt
I for positive balance
for negative balance
(In the "131" mode under the CUSTOMER FILE type, the previous
balance must always be entered through the [AMT] key after
entering the Customer File Code through [PICK UP BAL].)
[RTN MDSE]-
Previous
Balance
Enter the previous balance
amount recalled and printed
in the customer's sale
receipt.
[AMT]+ ---
- 44 -
Page 49

2, %+» %- Entry After a Previous Balance Item in JlEL *' Mode
Previous Balance
Entry Sequence
described in
"1" on the previous
page
*' ¡Ra te I [% +] (o r [ %- ])
the same key
as used in
the sale
Enter manually
the same rate
recorded in the
sale receipt when it was
the preset % rate.
----
[Rate I[@/F0R]|Amount[[%+](or [%-])
Enter the
same rate
recroded in
the sale
receipt when
it was a
manul % rate.
(Any %+ or %- item recorded in the **REG" or "MGR" mode must be
entered manually in the "Q" whether it was a preset rate
or manual rate under the CUSTOMER FILE type.)
3. Scale Item Entry in " ["H" Mode
Any scale item entered in the "REG" or "MGR" mode must be entered
manually (Manual Scale Entry but not Auto Scale) in the " " mode
under the CUSTOMER FILE type. (See page 37 for further
instructions.)
Enter the amount which
was calculated out by
the % rate charge or
discount and recorded
in the receipt.
the same key
as used in
the sale
J
- 45 -
Page 50

TRAINING MODE
CONDITION: GP-spec. Machine
GR-spce. Machine ....................... In Cashier Signed-Off condition
Mode Lock must be turned to the "MGR" position.
.......................
Any time outside a sale
+
I I I -► (Training Sign-On)
Enter the 2-digit Training Sign-on Code preprogrammed.
A "TRAIN ON" receipt is issued.
+
Registering operations in the Training Mode are now possible. The
entries are all processed into the TRAINING total memory but will
not affect the real sales totals of the normal operations.
(Since this Training Sign-On replaces a cashier sign-on, no cashier
sign-on operation should be operated nor accepted during the
Training Mode on a GR-spec. machine.)
■| When the Training Mode should be ended:
Do the Training Sign-Off
(the same operation as Training Sign-On)
A "TRAIN OFF" receipt is issued.
- 46 -
Page 51

REGISTERING RECEIPT SAMPLES
CASHIER SIGN-ON
(on GR-spec. Machine only]
TEC STORE
1343 PEACH DRIVE
PHONE: 87-6437
Thank you
Cau again
05-14-86 «123456
ifXXK S X SN
ON
White 0099 14:31TM
_____________________-
CASHIE SIGN-OFF
(on GR-spec. machine only)
Cashier Sign-On
Symbol
Cashier's Name or ID Code
NO-SALE
TEC STORE
1343 PEACH DRIVE
PHONE: 87-6437
Thank you
05-14-86 «123456
hKh«NOSAl_E««xK
White 0102 14:33TH
■\
CHECK CASHING
-
Store Name/Message
(programmable), or
replaced by Store
Name Stamp
Commercial Message
call again
^Consecutive No.
‘Cashier's or Clerk's Name or ID
(progreunmable)
-
Date / Register No.
No-sale Symbol
furrpnt Timp
TEC STORE
1343 PEACH DRIVE
phone: 87-6437
TEC STORE
1343 PEACH DRIVE
phone: 87-6437
Thank you Thank you
Cau again
05-14-86 «123456
«•«•«it SIGN «««*
OFF
Cashier Sign-Off
Symbol
05-15-86 «123456
CHECK iSO.OO
White 0163 09:56TM
White 0109 14:46TM
Cau again
Check Amount cashed
- 47 -
Page 52

PICK UP
DEPARTMEHT, QUAHTITY EXTEHSIOH, REPEAT
TEC STORE
1343 PEACH DRIVE
PHONE! 87-6437
Thank you
Cal 1 again
05-14
-86 #123456
p I CKUP»*»*
CASH
$50.00
V.CPN $10.00
CHECK
TOTAL
Uhite
$5.00
$65.00
0111 14:48TM
Pick Up Header
Picked Up Items
Picked Up Total
TEC STORE
13« PEACH DRIVE
PHONES 87-6437
Thank i^DU
call again
05-14-86 #123456
VEBETABL
FRUIT
FRUIT
FRUIT
5X
NEAT
TAX
CASH
$1.20 TF
$0.65
$0.65
$0.65 TF
0.50 8
$2.50 TF
$0.57
$6.2;:
ITEM 9
White 0112 14I50TM
Department Name
^Taxable Item Symbol
- Food Stampable Item
TF
Repeat Items
TF
5 X $0,500 =
$2.50 into Dept.MEAT ■*
Tax due
Sale Total and
finalized as Cash Sale
Item Count of the Sale
Symbol
LOAN DEPARTMENT SPLIT PACKAGE PRICING
TEC
1343 PEACH DRIVE
PHONE: 87-6437
Thank you
05-14-
FS TL
CASH
SUBTL $25.00
TOTAL $25.00
STORE
Call again
86 #123456
AN
$5.00
$20.00
Loan Header
****
j Loaned Items
Subtotal
Loaned Total
TEC
STORE
1343 PEACH DRIVE
phone: 87-6437
Thank you
Call again
05-14-86 #123456
3X 1.00/ 5
VESETABL $0.60 TF
TAX
CASH
$0.06
$0.66
3 out of 5 at $1.00
= $0.60
ITEM 3
White
0107 14:40TM
White 0133 15!25TM
- 48 -
Page 53

PLU, REPEAT. QUANTITY EXTENSION,
SPLIT PACKAGE PRICING. TRADE STAMP
LINK DEPARTMENT
TEC STORE
1343 PEACH DRIVE
PHONEi
87-6437
Thank you
СзП again
.
5X
«123456
$1.25 TF
$1.20 TF
$1.20 TF
0.50 a)
$2.50 TF
1.00/ 6
$0.50 TF
$0.67
$7'.32:
$0.62
05-14-86
I...
Hi Ik-L
Whi Bread
UhiBread
Tuna C3n
3X
Tomato
TAX
CASH
TRDSTP
ITEM 11
Uhite 0115 14:55TM
—tLU Nsme
1 Repeated Items
5 X $0.500 = $2.50 ^
PLU "Tuna Can"-*
3 out of 6 at $1.00 -
= $0.50 PLU "Tomato"-*
Trade Stamp to be
issued to the customer
TEC
1343 PEACH DRIVE
PHONE:
87-6437
Thank you
Call again
05-14-86
DRINK
BTL DEPOT
TAX
N123456
$2.50 T
$0.60
$0.25
CASH
TRDSTP $0.25
ITEM 2
White 0130 15:17TM
LINK PLU
STORE
$3.33
Head-link Dept.
Sub-link Dept
(Symbol "I" indicates
the Sub-link Dept.)
AUTO SCALE, MANUAL SCALE
TEC STORE
1343 PEACH DRIVE
PHONE: 87-6437
Thank you
Cau again
05-15-86
1.00LB3
MEAT
6.00LB£I
Beef *
TAX
N123456
2.50/IÈLB
$5.00 TF
3.00/I&LB
$36.00 TF
$4.10
CASH
ITEM 2
White 0152 09:30TM
indicates
a manual scale item
(No symbol attached
for an auto scale
item.)
Auto Scale:
11b X $2.50(ilb )
= $5.00 into ^
^ price
Dept,MEAT
] Manual Scale
TEC STORE
1343 PEACH DRIVE
phone: 87-6437
Thank you
call again
05-14-86
6X
Coke
6X
Bottle AT
4X
7-up
4X
Bottle AT
TAX
CASH
TRDSTP
N123456
4.80/ 6
$4.80 T
0.30/ 6
$0.30
4,80/ 6
$3.20 T
0.30/ 6
$0.20
$0.80
$S».30
$0.80
ITEM 20
White 0132 15:20TM
] Head-link PLU
] Sub-link PLU
{Symbol "I" indicates
the Sub-link PLU.)
- 49 -
Page 54

RETURNED MERCHANDISE
*+, %-
TEC
1343 PEACH DRIVE
phone:
STORE TEC
1343 PEACH DRIVE
87-6437 PHONE:
Thank XDU Thank YOU
call again
05-14-86
RTN
FRUIT
RTN
3X
Coke
RTN
3X
Bottle At
TAX
CASH
ITEM -7
Uhite 0134 15:25TM the customer in
N123456
$2.30-TF
4.80/ 6
♦2,40-T
0.30/ 6
>0.15-
$0.47-
$5.3S-
05-14-86
] Dept.FRUIT $2.30
1 is returned
) PLU "Coke"
f 3 out of 6 at $4.80 3X
is returned
1
1 Sub-link PLU to
’ the above "Coke"
also returned
- Negative Balance
(The amount should
be returned to
DAIRY
X-
5%
HardRoil
SUBTL
x+
10%
TAX
CASH
TRDSTP
ITEM 4
cash.)
White 0136 15:28TM
STORE
87-6437
Call again
N123456
$4.50 TF
$0.23-
0.80/ 4
$0.60 TF
$4-87
$0.49
$0.51
$5!.8^
$0.51
5% discount from
the above DAIRY item
] 10% charge to
the above subtotal amount
DOLLAR DISCOUNT
STORE
TEC
1343 PEACH DRIVE
PHONE: 87-6437
Thank YOU
05-14-
86 N123456
FISH
BAKERY
DISC
TAX
CASH
TRDSTP
ITEM
White
2
0135 15:27TM
Call again
$1.30 TF
$3.20 TF
$0.50-
$0.45
$0.32
Discount Amount $0.50
STORE COUPON,
TEC
CASH TENDER
STORE
1343 PEACH DRIVE
PHONE:
87-6437
Thank YOU
Call again
05-14-86
RYeBread
K i u i Jam
N123456
$1.20 TF
$1.90 TF
S.CPN
BAKERY
TAX
TOTAL
CATEND
CHANGE
TRDSTP
$1.00-TF
$0.21
$S.31
$3.00
$0.69
$0.21
ITEM 2
White 0138 15:33TM
, Store Coupon $1,00
into Dept. BAKERY
Sale Total
Cash Amount Tendered
Change due
- 50 -
Page 55

VENDOR COUPON, CHECK TENDER
ITEM CORRECT, VOID, CHARGE TOTAL
TEC
STORE
1343 PEACH DRIVE
phone:
87-6437
Thank you
call again
05-14-86
«123456
IX 1.50/ 6
E99
$0.25 TF
DP13 $1,40
1£X
7-up
4^80/ 6
$9.60 T
12X 0.30/ 6
Eiottte At
V.CPN
TAX
TOTAL
CHECK
CHANGE
TRDSTP
$0.60
$5.00-
$0.99
$7.8^
$10.00
$2.16
$0.99
ITEM 26
White 0139 15:35TM
Vendor Coupon $5.00
TEC STORE
1343 PEACH DRIVE
PHONE: 87-6437
Thank xou
call again
05-14-86 «123456
VEGETABL
FRHiT
----
$1.50 TF
“$£-i3«-TF
VOID
VEGETABL $1.50-TF
FRUIT $2.20 TF
VEGETABL $3.60 TF
SUBTL $5,80
TAX
Chg
$0,58
$¿.38
ITEM 2
White 0146 15:47TM
Item Correct
] The 1st line item voided
Finalized as Charge Sale
BOTTLE RETURN,
Mi se
TEC STORE
1343 PEACH DRIVE
PHONE:
87-6437
Thank xou
Call again
05-14-86 «123456
BTL FOOD
SNACK
BTR
TAX
TOTAL
MISC
CHANGE
$2.60 TF
$3.50 TF
$0,60-
$0.61
$<&. 1 1
$7.00
$0.89
TRDSTP $0.61
ITEM 2
White 0144 15:42TM
TENDER
Bottle Returned $0.60
Sale Total
Mi sc Media Tendered
Change due
FOOD STAMP TENDER
TEC
1343 PEACH DRIVE
PHONE:
87-6437
Thank you
Call again
05-15-86 «123456
VEGETABL
FRUIT
MEAT
TAX
$1.20 TF
$2.30 TF
$4.10 TF
$0.76
TOTAL $8,30
FS/TL
F-STMP
$8.36
$10.00
CHANGE $0.64
FS CHG
$1.00
ITEM 3
White 0155 09:40TM
STORE
Sale Total
Food Stampable Total
Food Stamp Tendered
Change in Cash
Change in Food Stamp
- 51 -
Page 56

MULTI-TENDERIHG
SPLIT-TENDERING
TEC
STO RE
1343 PEACH DRIVE
PHONE: 87-6437
Thank you
cal l ag a in
05-15-86 #123456
CAN FOOD
FISH
$1.20 TF
$6.40 TF
FRUIT $3.00 TF
TAX
TOTAL
CATEND
$1.06
$ 1
$5.00
CASH $6.66
TRDSTP
$0.12
ITEM 3
Whi te 0157 09:44TM
Sale Total
1st Cash Tendered
2nd Cash paid
TEC
STO RE
1343 PEACH DRIVE
PHONE: 87-6437
Thank you
cal l ag a in
05-15-86 #123456
FISH
MEAT
BTL FOOD
TAX
TOTAL
CHECK
CATEND
CRTTLl
TRDSTP
$1.20 TF
$3.30 TF
$6.00 TF
$1.05
$11 .S5
$5.00
$3.00
$3.55
$0.60
ITEM 3
Whi te 0156 09:43TM
Sale Total
Check Tendered Portion
Cash Tndered Portion
Credit 1 Total Portion
SELECTIVE ITEMIZER (IS) READ
TEC ST ORE
13« PEACH DRIVE
PHONE: 87-6437
Thank you
Call again
05-15-86
DRINK
BTL DEPOT
DR13
SII TL
TAX
CASH
TRDSTP
ITEM 3
White 0162 09:54TM
#123456
$2.50 T
$0.30
$1.40
$0.18
$0.25
$0.25
SI 1 Total Read
TAX EXEMPTION
TEC
Ct T n tr. cr
9 IwM
1343 PEACH drive
PHONE: 87-6437
Thank you
call a9ain
05-15-86
6X
E99
CAN FOOD
TAXIEX
CASH
TRDSTP
#123456
1.50/ 6
$1.50 TF
$6.20 TF
$7.70
$7. VO
$0.77
ITEM 7
White 0158 09S47TM
Tax-exempted Sale Portion
Sale Total due
- 52 -
Page 57

NON-ADD NUMBER, CREDIT CARD SALE
TEC
STORE
1343 PEACH DRIVE
PHONE! 87-6437
Thank you
call again
RECEIPT POST-ISSUE ((RECEIPT ISSUE] Key)
TEC
1343 PEACH DRIVE
PHONE! 87-6437
STORE
Norma! Receipt
to be issued for
each sale
Thank you
call again
05-14-
86 «123456
DAIRY $6.20 TF
CAN FOOD $5.20 TF
«123456789
TAX
ABC
TRDSTP
$1.14
$ IS.^4-
$1.14
ITEM
White
0147 15i49Th
ex. Customer ID No.
r (
of the Credit Card
Non-add No.
Credit Card Company
Name and Sale Total
(finalized by
_l
[CARD NO.])
05-15-86 «123456
FISH
MEAT
TAX
TOTAL
$1.20 TF
$6.40 TF
$0.76
$8.30
CATEND $10.00
CHANGE
$1.64
ITEM 2
White
0151 09!27TM
05-15-86 «123456
TOTAL $8.30
White 0151 09:27TM
Post-issued Receipt
for the last sale
Only the Total Amount is
printed.
The Consecutive No. is
identical to that of
the last-finalized sale.
RECEIVED DN ACCOUNT
TEC STORE
1343
PEACH DRIVE
PHONE: 87-6437
Thank you
Call again
05-15-
R/A
R/A
CASH
White
86 «123456
$7.50
$6.00
$ X3.SO
0149 09!25TM
} R/A Items
Total Received in
Cash
PAID OUT
Thank rou
PO
PO
TOTAL
White
- 53 -
TEC STORE
1343 PEACH DRIVE
PHONE! 07-6437
call a9ain
05-15-
-86 «123456
$6,00
$8.00
$14-.OO
0150 09:26TM
I PO Items
Paid-Out Total
Page 58

CHARGE POSTING, PREVIOUS BALANCE MANUAL ENTRY Type
TEC
STORE
1343 PEACH DRIVE
phone:
Thank you
07-6437
Call again
05-15-86
«123456
«3421
PB-i-
VEGETABL
HEAT
$0.00
$3.50 TF
$2-40 TF
TAX $0-59
Chg
N-EAL
$<6-4^9
$<S.4^
ITEM 2
Whi te 0180 10:36TM
05-15-86
«123456
«3421
$6-49 P
3X
soup Can
TAX
Chg
0.45 8 i
$1-35 TF 'a
$0.14
$“7.9S
Debit Balance
1) New Customer
ex. Customer No.
'
----------------
Non-add No,
"0" as PB for new cus.
I Sale Items
Sale Total
New Balance
(All the balance is
transferred in this
case)
2) Additional
Sale
Sale Total (including
□
TEC STORE
1343 PEACH DRIVE
PHONE: 87-6437
Thank you
Call again
05-15-86 «123456
PB-t-
$0.00
VEGETABL $2.50 TF
MEAT
TAX
Chg
R/A
CASH
N-BAL
$3.60 TF
$0.61
$4&.V 1
$10.00
$10.00
$3.2:v-
ITEM
White
PB in this
0168 10:05TM
case)
Credit Balance
1) New Customer
"0" as PB for new cus.
Sale Items
Sale Total
Payment Amount
Received in Cash
New Balance
(credit balance)
N-BAL
TRDSTP
$7.S^S
$0.14
ITEM 3
Whi te 0181 10:37TM
05-15-86
«123456
«3421
PBH H
Chg
R/A
CATEND
CHANGE
N-BAL
$7.98
$7.98
$10.00
$2.02
$0.00
ITEM 0
Whi te 0182 10:38TM
New Balance ~
3) Payment
Previous Balance ^
Sale Total
Total of Payment
Cash Tendered
Change due
No new balance
remains since all
paid.
TEC
STORE
1343 PEACH DRIVE
phone: 87-6437
Thank you
call again
05-15- 86 «123456
PB —
Chg
CHANGE
N-BAL
$3.29-
$3.29-
$3.29
$0.00
ITEM 0
White
0169 10:06TM
2) Balance Paid Back
to the Customer
Previous Balance ^
Sale Total
Amount Refunded
to the customer
No balance remains
4 -
Page 59

CHARGE POSTING, CUSTOMER FILE (CHECK TRACK) MEMORY T^
TEC
STORE
1343 PEACH DRIVE
PHONE! 87-6437
Thank you
call again
»123456
05-15-
»000001
86
$0.00
DPOl $1.20
MEAT $3.50 TF
TAX $0.35
Chg
N-BAL
ITEM
White
0009 13:20TM
$5.05
$5.05
2
call again
05-15-86 »123456
Debit Balance
1) New Customer
Cus.Fi'le Code (PB=0)
! Sale Items
Sale Total
New Balance —
2) Additional
Sale
TEC STORE
1343 PEACH DRIVE
PHONE: 87-6437
Thank rou
call again
05-15-
»000033
MEAT
TAX
Chg
R/A
CASH
N-BAL
ITEM
White
86 »123456
$0.00
$2.00 TF
$0.20
$;2.2;o
$5.00
$5.00
$2.SO-
1
0012 13:22TM
Credit Balance
1) New Customer
Cus.File Code (PB=0)
Sale Item
Sale Total
New Balance
»000001 $5.05 P
IX
Tomato
TAX
Chg
1.00/ 6 1
$0.17 TF J
$0.02
$5.aA
N-BAL
ITEM
White
1
0010 13:20TM
Cal L again
05-15-
»000001
Chg
R/A
CATEND
B6 »123456
$5.24
$5
$5.24
$10.00
CHANGE $4.76
N-BAL
$0.00
PB Recalled <-
Additional Sale Items
New Balance
3) Payment
PB Recalled
Sale Total
Cash Tendered
Change due
No balance remains
TEC STORE
1343 PEACH DRIVE
PHONE! 87-6437
Thank you
Call again
05-15-86
»000033
Chg
CHANGE
N-BAL
«123456
$2.80-
$a.80-
$2.80
$0.00
PB Recalled
Sale Total
Amount Refuned
No balance remains
-----
ITEM
White
0
0011 13!21TM
ITEM 0
White 0013 13:23TM
- 55 -
Page 60

'TRAINING NODE SI6N-0N
TEC ST ORE
13« PEACH DRIVE
PHONE: 87-6437
Thank xou
call again
05-15-86 «123456
Ki(i(itTRAXN »HHt*
ON
JONES 0007 12:46TM
TRAINING NODE SIGN-OFF
Training Sign-On
Symbol
RECEIPT ISSUED DURING TRAINING NODE
TEC ST ORE
1343 PEACH DRIVE
PHONE: 87-6437
Thank you
Call again
05-15-86 «123456
«NNNTR AIN nnnn
DPOl n.20
CASH $1-2:0
ITEH 1
JONES 0007 12:46TM
Training Mode Header
] Registered Items
TEC ST ORE
1343 PEACH DRIVE
phone: 87-6437
Thank you
Call again
05-15-86 «123456
««knTRAIN KJHHt
OF F
JONES 0008 12:47TM
Training Sign-Off
Symbol
- 56 -
Page 61

(RECEIPT)
VALIDATION PRINT SAMPLES
Cashier or
Clerk ID Code
(VALIDATION PRINT)
Item Name
Page 62

READ(X) AND RESET(Z) REPORTS
The following table shows the key operation to take each report. The "X" and
"Z" reports have exactly the same print content if both are available, except
that:
1. The "X" reports allow to read the sales data but not clear memories,
while the "Z" reports allow to read the sales data and at the same
time all the resettable memories will be cleared when the reports have
been Issued.
2. The symbol "X" is printed on the top line of an "X" report, while *'Z”
is printed on a "Z” report, to indicate the type of report.
3. A reset count is printed on the bottom of a "Z" report only.
TABLE OF OPERATIONS FOR X AND Z REPORTS
Daily Reports
REPORT NAME
ALL MEDIA TOTAL AND CASH-IN
DRAWER READ
MEDIA SALES AND IN-DRAWER TOTAL
READ
CUSTOMER FILE READ (available
for CUSTOMER FILE Type only)
. All Files
. Individual Files
. Zero-Balance Files
. Debit-Balance Files
. Credit-Balance Files
CREDIT CARD COMPANY SALES READ
CLERK READ AND RESET (not avail
able for GR-spec. machine with
"Clerk Non-print" option)
. Individual Clerk Read
. Individual Clerk Reset
CASHIER READ AND RESET (for GR-
spec. machine only)
. Individual Cashier Read
. Individual Cashier Reset
SALES PERSON READ AND RESET
(for GP-spec. machine only)
. All Sales Persons Read
. All Sales Persons Reset
HOURLY READ AND RESET
. Hourly Read
. Hourly Reset
DEPARTMENT READ AND RESET
. Individual Department Read
. All Department Read
. All Department Reset
MODE
LOCK
X
[#] (Drawer opens)
9 [AT/TL] (Drawer opens)
X
X
[PICK UP BAL]
¡Customer File Code I[PICK UP BAL]
0 [CODE OPEN]
1 [CODE OPEN]
2 [CODE OPEN]
X 6 [AT/TL]
Xz, Set the required Clerk Key to
^ ON, H [AT/TL].
(Drawer opens.)
r2-digit manager-assign
1 code
X
] [Cashier ID Code! [LOG]
z
(Drawer opens)
X
] 5 [AT/TL]
z
X
] 10 [AT/TL]
z
Depress the required Dept Keys,
X
one by one, [ST] may be used to
obtain subtotal, [AT/TL] to end,
X
] 11 [AT/TL]
2
KEY OPERATION
SAMPLE
PAGE
63
63
64
65
66
67
65
68
69
70
-- To be continued
- 58 -
Page 63

REPORT NAME
MODE
LOCK
KEY OPERATION
SAMPLE
PAGE
Department Gross Profit Read
Department Group and Major
Group Read
PLU READ AND RESET
. Individual PLU Read IPLU Code![PLU] ([ST]) [AT/TL]
Zone PLU
Zone PLU
Sorted PLU Read
Sorted PLU Reset
_________________________
Read
Reset
7 [AT/TL]
8 [AT/TL]
Repeatable
X
z
Zone-
]
start end
PLU
Code
1 I I I I I I I I I iPLUl
PLU-sort Code
[0/FOR]
I
Enter a 8-digit number composed
of at lease one decimal point
([.] key) and any mumerics.
ex.) When inputs
V
outputs PLUS of PLU
codes;
00000002, 00000012 .
... 99999992
When inputs
Zone-
PLU
Code
to end
[PLU]
71
72
73
73
74
All PLU Read
All PLU Reset
Individual PLU Stock Read
(available only for PLUs
with stock status on)
Zone PLU Stock Read
All PLU Stock Read
Non-active PLU Read
] [PLU]
[AMT] IPLU Code I[PLU] [AT/TL]
t
_________
[AMT]
[AMT] [PLU]
-- To be continued --
Zone-
start
PLU
Code
(Only the PLUs with stock status
on in the zone will output.)
(Of all PLUs, only the PLUs with
5 [#] [PLU]
outputs PLUS of PLU
codes:
11000000, 11000001 .
... 11999999
I
Repeatable
[0/FOR] Zone-
end
PLU
Code
stock status on will output.)
_______________________________
[PLU]
74
75
75
75
- 59 -
Page 64

REPORT NAME
DEPARTMENT AND PLU ABC ANALYSIS
READ
. Best Selling Departments
in Quantity
Best Selling PLUs (linked to
the same department) in
Quantity
Best Selling Departments
in Amount
Best Selling PLUs (linked to
the same department) in
Quantity
MODE
LOCK
-- Continued
KEY OPERATION
1[#]([Ending Rank No.1)[AT/TL]
ex.) If "4" is entered,
the best 1 to 4 depts
will output.
(Also see "NOTE 2)" below)
1[DEPT]([Ending Rank No.I)[PLU]
2[#]([Ending Rank No.[)[AT/TL]
2[DEPT]([Ending Rank No.I)[PLU]
SAMPLE
PAGE
76
76
Worst Selling Departments
in Quantity
Worst Selling PLUS (linked
to the same department) in
Quantity
Worst Selling Departments
in Amount
Worst Selling PLUs (linked
to the same department) in
Amount
FINANCIAL READ AND RESET
. Financial Read
. Financial Reset
3[#]([Ending Rank No.[)[AT/TL]
3[DEPT]([Ending Rank No.[)[PLU]
4[#]([Ending Rank No.[[AT/TL]
4[DEPT]([Ending Rank No.|)[PLU]
NOTES 1) Depts or PLUs with
sales data of "0" or
negative value will not
output.
2) If the "Ending Rank No."
is skipped before [PLU]
or [AT/TL], all the
Depts or PLUs (except
those described in NOTE
1) will output in the
rank order.
3) For PLU Analysis
Reports, "[DEPT]"
indicates the linked
Dept Key of the rquired
PLUS.
3 [AT/TL] (Draweropens)
77
- 60 -
Page 65

6T Reports (to be taken on weekly or monthly basis)
REPORT NAME
DEPARTMENT GT READ AND RESET
. All Department GT Read
. All Department GT Reset
. Department Gross Profit
GT Read
. Department Group and Major
Group GT Read
FINANCIAL GT READ AND RESET
. Financial GT Read
. Financial GT Reset
CREDIT CARD COMPANY SALES
GT READ
DEPARTMENT ABC ANALYSIS GT READ
(No PLU reports are available.)
GT
LOCK
Mode Lock: any position
(Except the Mode Lock and GT Lock
positions, the key operation for
each report is the same as its
corresponding daily report.)
GTX
] 11 [AT/TL]
GTZ
GTX
GTX
GTX
GTZ
GTX
GTX
7 [AT/TL]
8 [AT/TL]
] 3 [AT/TL] (Drawer opens.)
6 [AT/TL]
Follow the same key operation
for each type of DEPARTMENT
ABC ANALYSIS READ reports
described on paee 60.
KEY OPERATION
SAMPLE
PAGE
79
Combination Reports
Multiple reports can be programmed to be issued in one operation sequence
The following are reports programmable for combinations:(max. 5 reports in
one table, max. 3
REPORT NAME
Financial Read/Reset
Individual Clerk Read/Reset
Sales Person Read/Reset
Credit Card Company Read
Department Gross Profit Read
Dept Group and Major GP Read
Media Sales and In-drawer
Total Read
Hourly Read/Reset
All Department Read/Reset
KEY OPERATION: Mode Lock: X for Daily Read
Z for Daily Reset
GT Lock: GTX for GT Read
GTZ for GT Reset
I
-------------------------------------------
Enter the Report Coinbination-ID No,
None (simply depress [AT/TL]): Combination Report Table No.l
1: Combination Report Table No.2
2: Combination Report Table No.3
AVALABLE MODE
X, Z, GTX, GTZ
X, z
X, z
X, GTX
X, GTX
X GTX
X
X, Z
X, Z, GTX, GTZ
□ [AT/TL]
tables)
NOTES: When the mode set for taking comination reports does not match the
mode of a report contained in the table, that report will be skipped.
When the Clerk Read/Reset Report is contained in the table, all the
clerks' reports output.
- 61 -
Page 66

If no combination reports data have been programmed, Combination
Report Table Ko.l (which can be issued by depressing the [AT/TL] key
alone) is auto-preset with "Dept Group and Major GP Read" and
"Financial Read/Reset" reports contained.
The report output order is determined by the order programmed in each
table.
The drawer will open when a contained report is ruled to open the
drawer.
NOTES on REPORT TAKINGS
1. No clerk keys are necessary to issue reports except Individual Clerk
Read or Reset Reports. (When those reports are to be taken in a
Combination Report operation, no clerk keys will be necesary.)
2. On a GR-spec, machine, Cashier Sign-Off is required before taking any
reports (an error will result on attempt to turning the Mode Lock to X
or Z or GT Lock to GTX or GTZ, in a cashier sign-on condition).
3. Refer to the report print samples on the following pages, as to detail
contents of each report.
4. Reset reports will be printed on the receipt roll as well as on journal,
and issued regardless of the current [RECEIPT ON/OFF] switch position.
5. The [ITEM CORR] (or [IC/VD]) key may be depressed halfway during
printing a report, for the purpose to abort the receipt issuance (except
for some short reports). When report-abort has been operated for a
reset report, the memories of the report data will not be cleared.
6. The drawer will open at the starting of printing the reports which are
stated with "Drawer opens" in the table on pages 58 to 61. The drawer
remain closed on taking other reports.
7. As for PROGRAMMED DATA VERIFICATION operations, which are also available
in the "X" mode, see the "VERIFICATION OF PROGRAMMED DATA" near the end
of the PROGRAMMING MANUAL separately issued.
- 62 -
Page 67

REPORT PRINT SAMPLES
ALL MEDIA TOTAL AND CASH-IN-DRAUER READ
(Mode Lock: X, depress [#])
TEC STORE
1343 PEACH DRIL^E
PHONE: 87-6437
Thank xou
Call again
05-15-86 «123456
xis
TOTAL 53CU
306.52
CAID 113.11
Report ID Header
Total Customer Count
All-Medias Total
Cash-in-drawer Amount CASH
0196 10:54TM
MEDIA SALES AND IN-DRAUER TOTAL READ
(Mode Lock: X, enter 9, depress [AT/TL])
TEC STORE
1343 PEACH DRIVE
PHONE: 87-6437
Thank you
Call again
05-15-86 «123456
XO^
TOTAL
53CU
306.52
27CU
157.86
CHECK 3CU
28.46
Chg
5CU
35.42
HISC ICU
CRTTLl ICU
CRTTL2 OCU
CRTTL3
OCU
FS TL 2CU
16.72
CAID 113.11
CKID
92.00
MISCID 1
FSID 4
28.00
FS CG
PBTL
14CU
58.40
Total Customer Count
All-Medias Total
Cash Customer Count
" Sales Total
Check Customer Count
" Sales Total
Charge Customer Count
" Sales Total
Misc Customer Count
6.11
3.55
0.00
0.00
5
7.00
1.28
■' Sales Total
Credit 1 Customer Count
" Sales Total
Credit 2 Customer Count
" Sales Total
Credit 3 Customer Count
" Sales Total
Food Stamp Cus. Count
" Sales Total
Cash-in-drawer Amount
Check-in-drawer Count
" Amount
Misc-in-drawer Count
“ Amount
Food Stamp-in-draewer C't
" Amt
Food Stamp Change
Previous Balance Customer
” " Total
- 63 -
0185 10:43TM
Page 68

CUSTOMER FILE READ (Mode Lock: X)
TEC ST ORE
1343 PEACH DRIVE
PHONE: 87-6437
Thank XDU
Can again
05-15-86 «123456
X
«000001 5.60
«000002 0.00
«000003 2.53
«000004 0,00
«000005
«000006
«000007 0.00
«000008 0.00
«000009 0.00
«000033 0.00
«000101
«000102 0.00
«000103 0.00
«000104 0.00
0022 13:27TM
. 0.00
0.00
-8.46
1
All Files
(Depress
[PICK UP BAL])
Balance
Customer File Code
TEC ST ORE
1343 PEACH DRIVE
PHONE: 87-6437
Thank you
CalL again
05-15-86 «123456
X
«000002 0.00
«000004 0.00
«000005 0.00
«000006 0.00
«000007 0.00
«000008 0.00
«000009
»000033 0.00
«000102 0.00
«000103 0.00
«000104 0.00
0024 13:28TM
0.00
Zero-Balance Files
(Enter 0, depress
[CODE OPEN])
TEC ST ORE
1343 PEACH DRIVE
phone: 87-6437
Thank you
call again
05-15-86 «123456
X 19
«000003 2.53
0023 13:27TH
Individual Files
(Enter the required
Customer File Code,
depress [PICK UP BAL])
TEC ST ORE
1343 PEACH DRIVE
phone: 87-6437
Thank you
Call again
05-15-86 »123456
X 19
«000001
«000003
0025 13:28TM
X19
«000101 -8.46
0026 13:28TM
Debit-Balance Files
(Enter 1, depress
[CODE OPEN])
5.60
2.53
Credit-Balance Files
(Enter 2, depress
[CODE OPEN])
- 64 -
Page 69

CREDIT CARD COMPANY SALE READ
(Mode Lock: X, enter 6, depress [AT/TL])
TEC STORE
PEACH DRIVE
1343
PHONE: 87-6437
Thank YOU
Call again
05-15-86 N123456
xo<&
ABC
2
14.70
CRT20
3
20.72
JONES
SALES PERSON READ AND RESET (Mode Lock: X for Read or Z for Reset, enter 5. depress [AT/TL].)
Sales Person Reset Report Sample
0190 10S48TM
Company Name (programmable) / Operation Count
Sales Total Amount
"CRT20" is provided as "Other Credit Company Cards Sales" memory
Into which sales are processed when no company designation (through
[CARD NO.] Key) has been made or when "20" is entered thorugh
[CARD N0.] Key.
NOTE: Sum of all the CREDIT COMPANY SALES is also processed
into the Charge Sales Total Memory
05-15-86 ttO
205
01 BROUN
GS 11
63.77
NS2: 11
63.77
02 CARTER
GS 2
NSa 2
000IZ
0017 15:13TM
6.70
6.70
Sales Person ID Code and Name (The name is programmable)
Gross Sale Item Count
" " Amount
Net Sale (With Tax in this sample) Item Count
" " " Amount
NOTE: As for the Net Sale output, whether "Net Sale Without Tax"
or "Net Sale With Tax" is printed is determined by a
programmable option selection.
- 65 -
Page 70

CLERK READ AND RESET (Mode Lock: X for Read or Z for Reset, Set the required Clerk Key to ON,
enterf^, depress [AT/TL].)
Clerk Reset Report Sample
Sample Opertion: Required Clerk: JONES (Clerk Key 1)
Mode Lock: Z, Clerk Key 1 to ON, H [AT/TL]
TEC ST ORE
1343 PEACH DRIVE
phone: 87-6437
Thank you
Call again
05-15-86 »123456
ZO-ii-
JONES
ss
173
307.63
NSl
161
268.96
Nsa 161
293.48
TOTAL 48CU
287.06
CAID 123.65
CKID
97.00
HISCID 7.00
FSID 23.00
V.CPN 5.00
NE61
14.15
NEG2 1.42
R/A 13.50
PO 14.00
LOAN
25.00
PICKUP 0.00
TAX 24.52
IT/CUS
NS/CUS
NOSALE
3.35
5.60
3
000IZ
Clerk Name (if name programmed) or Clerk ID Code (if name not programmed)
Gross Sale Item Count
" " Amount
Net Sale (Without Tax) Item Count
" " " " Amount
Net Sale (With Tax) Item Count
" *' " '' Amount
All Media Sales Customer Count
" " " Total
Cash-in-drawer Amount
Check-in-drawer Amount
Misc-in-drawer Amount
Food Stamp-in-drawer Amount
Vendor Coupon Total
Negative 1 Total (NOTE 1 below)
Negative 2 Total (NOTE 2 below)
Received-on-Account Total
Paid-Out Total
Loan Total
Pick Up Total
Tax Total
Item Count per Customer
Net Sale per Customer
No-sale Count
Individual Clerk Reset Report Count
JONES
0228 ll:35TH
NOTE 1: Negative 1 Total
= (%- on Item) + (Negative Oepts) + (Item Corr on Positive
Depts) + (Void on Positive Depts) + (Bottle Return
Oept-link) + (Store Coupon) + (Return Merchandise)
+ (Negative Mode Total) + (Negative Tax)
NOTE 2; Negative 2 Total
= (%- on Subototal) + (Dollar Discount) + (Bottle Return
Inside-sale) + (Item Corr or Void on Other Items those
included in "Negative 1 Total")
- 66 -
Page 71

CASHIER READ AND RESET (Mode Lock: X for Read or Z for Reset, enter the 2-dig1t Cashier ID Code
of the required cashier, depress [LOG].)
Cashier Reset Report Sample
Sample Operation: To take the cashier reset report of Cashier "White" (ID Code: 01)
Mode Lock: Z, enter 01, depress [LOG].)
TEC ST ORE
1343 PEACH DRIVE
PHONE: 87-6437
Thank you
call again
05-15-86
N123456
Z 13
01 White
6S
197
327.09
N3 1
185
287.06
NSiZ
185
312.94
TOTAL
53CU
306.52
CAID
CKID
MISCID
FSID
V.CPN
NE61
113.11
92.00
7,00
28.00
-5.00
14.15
NEB2 1.42
R/A 13.50
PO 14.00
LOAN 50.00
PICKUP
TAX
TL HR
IT /HR
65.00
25.88
2:32
61.67
NS /HR 104.00
CUS/HR 18CU
IT/CUS
NS/CUS
NOSALE
3.49
5.90
3
0606Z
Cashier ID Code / Cashier's Name
Gross Sale Item Count
" " Mtount
Net Sale (Without Tax) Item Count
" " " " Amount
Net Sale (With Tax) Item Count
" " " " Amount
All Media Sales Customer Count
" " " Amount
Cash-in-drawer Amount
Check-in-drawer Amount
Misc-in-drawer Amount
Food Stamp-in-drawer Amount
Vendor Coupon total
Negative Total 1 (See "NOTE 1" on the previous page.)
Negative Total 2 (See "NOTE 2" on the previous page.)
Received on Account Total
Paid Out Total
Loan total
Pick Up Total
Tax Total
Total Working Hour
Item Count per Hour
Net Sale per Hour
Customer Count per Hour
Item Count per Hour
Net Sale per Customer
No-sale Count
Individual Cashier Reset Count
0226 U:34TM
- 67 -
Page 72

HOl№LY REW) AND RESET (Mode Lock; X for Read or Z for Reset, enter 10, depress [AT/TL],)
Hourly Reset Report Sample
TEC ST ORE
1343 PEACH DRIVE
PHONE! 87-6437
Thank you
CaLL again
05-15-86 «123456
•^OSiOO
^12!00
32CU
-^15:00
5CU
^19! 00
16CU
000IZ
z xo
91
217.75
24
19.46
70
75.41
0227 ll!35TH
Up to 8:00 (from 19:00 of the previous day)
8:00 to 12:00
Customer Count / Sales Total
12:00 to 15:00
Customer Count / Sales Total
15:00 to 19:00
Customer Count / Sales Total
Hourly Reset Count
,. No sales were recorded.
- 68 -
Page 73

DEPARTMENT READ AND RESET
Individual Departnent Read (Mode Lock: X, depress the required [DEPT] key(s), [ST] may be pressed
for subtotal, depress [AT/TL] to end.)
SAMPLE OPERATION
13A3 PEACH
phone: 87
Thank YOU
TEC STORE
DRIOE
-6437
Mode Lock: X
Call aga in
05-15-86
N123456
X
0E6ETABL 22
31.40
FRUIT 9
22.05
MEAT
18
83.40
SUBTL
49
136.85
FISH 7
20.10
DAIRY
11
18.57
SUBTL
18
38.67
BAKERY
11
12.40
CAN FOOD
18
19.65
BTL FOOD
16.80
SUBTL
35
48.85
Dept.Name / Item Count
Sales Total
Dept.Name / Item Count
Sales Total
Dept.Name / Item Count
Sales Total
— Subtotal of VEGETABL, FRUIT,
. and MEAT depts.
— Subtotal of FISH and DAIRY depts.
6
Subtotal of BAKERY, CAN FOOD, and
BTL FOOD depts.
[DEPT: VEGETABL]
[DEPT: FRUIT]
[DPET: MEAT]
[ST]
[DEPT: FISH]
[DEPT: DAIRY]
[ST]
[DEPT: BAKERY]
[DEPT: CAN FOOD]
[DEPT; BTL FOOD]
[ST]
TOTAL 102
224.37
0206 ll:04TM
Total of all the depts. read
in this report
- 69 -
[AT/TL]
Page 74

TEC ST ORE
1343 PEACH DRIVE
phone: 87-6437
Thank you
cal l ag a in
05-15-86 »123456
2 1 X
VE6ETABL
11.02X
FRUIT
7.74Z
MEAT
29.27%
FISH
7.05%
DAIRY
6.52%
BAKERY
4.35%
CAN FOOD
6.90%
BTL FOOD
5.90%
DRINK
13.51%
BTL DEPO
2.16%
SNACK
1.94%
SPICE
0.00%
DP 13
1.47%
DP14
2.18%
DP 15
22
31.40
22.05
18
83.40
20.10
11
18.57
11
12.40
18
19.65
39
38,50
37
ALL DEPARTMEKT READ AND RESET (Mode Lock: X for Read or Z for Reset.
enter 11, depress [AT/TL].)
All Oepartnent Reset Report Sample
Dept. Name / Item Count
Sales Ratio / Sales Total
9
7
6
16.80
6.15
2
5.53
0
0.00
3
4.20
2
6.20
0
0.00
TOTAL
000IZ
JONES
L
TOTAL
-TOTAL
GPOl
18
185
284.95
0
0.00
10.40
185
284.95
0230 ll:36TM
Positive Depts Total
Negative Depts Total
Department Group and Major Group Report
(Same as the report described on page 72)
All Department Reset Count
- 70 -
Page 75

Department Gross Profit Read Report (Mode Lock: X, enter 7, depress [AT/TL])
TEC STORE
1343 PEACH DRIVE
PHONE: 87-6437
Thank xou
Cau agai n
05-15-86
MEAT
15X
DRINK
182
CAN FOOD
252
DAIRY
202
BTL FOOD
212
VE6ETABL
102
BAKERY
232
FISH
142
FRUIT
122
DR 14
192
SNACK
172
DP 13
152
N123456
X07
12.51
6.93
4.91
3.71
3.52
3.14
2.85
2.81
2.64
1.17
0.94
0.63
Department Name
Gross Profit Rate (preset) / Gross Profit Amount (resulted)
NOTE: Each department is outputted in the
order of the Gross Profit Amount.
TOTAL
16.062
0192
45.76
10S51TM
] Total Profit Amount resulted and Total Gross Profit Rate resulted
- 71 -
Page 76

Departaent Group and Major Group Read (Mode Lock: X, enter 8, depress [AT/TL}.)
STORE
TEC
1343 PEACH
phone: 87
DRIVE
-6437
Thank rou
call again
05-15-86
GPOl
18.76Z
6P02
36.321:
H6P1
55.08%
GP03
6.52%
BP04
4-35%
GP05
12.79%
GP06
15.67%
GP07
1.94%
M13P2
41.27%
GP08
3.65%
H6P3
3.65%
XOB
«123456
■ 31
53.45
25
103,50
56
156.95
11
18.57
11
12.40
24
36.45
76
44.65
2
5.53
124
117.60
5
10.40
5
10.40
Group Name / Item Count
Sales Ratio / Sales Total
-- Major Group Name / Item Count
Sales Ratio / Sales Total
— Major Group Name / Item Count
Sales Ratio / Sale Total
-- Major Group Name / Item Count
Sales Ratio / Sales Total
(Total of GPOl and GP02 in this sample)
(Total of GP03 to GP07 in this sample)
(Total of GP08 in this sample)
TOTAL
0194
185
284.95
10S52TM
Total of all Department Groups
- 72 -
Page 77

PLU READ AND RESET
Individual PLU Read Zone PLU Read or Reset
(Read Report Sanple)
TEC STORE
1343 PEACH DRIVE
PHONE: 87-
-6437
Thank xou
can again
05"15-86 «123456
X
MiIk-L
05000001
MiIk-S
05000002
SUBTL
SoftRoii
06000003
HardRo11
06000004
SUBTL
TOTAL
Mode Lock: X
Enter the required
PLU Code, depress
[PLU] (repeatable).
[ST] may be used
for subtotal.
[AT/TL] to end.
TEC STORE
1343 PEACH DRIVE
PHONE: 87-6437
Thank xou
Call again
05-15-86 «123456
1 X14-I
1
1.25
0
0.00
1
1.25
0
0.00
3
0.60 6.60
3
0.60
4
1.85
PLU Name / Item Count
PLU Code / Sales TL
Subtotal
Subtotal
iWWUI Ql 1 bus« I
read in this report
06000000-^06999999
WhiBread 3
06000001 3.60
RyeBread 2
06000002 2.40
HardRoU 3
06000004 0.60
TOTAL 8
0202 inOlTM
Mode Lock: X (or 2)
Enter the PLU code
to start the zone,
depress [g/FOR].
Enter the PLU code
to end the zone,
depress [PLU].
Zone-start PLU Code
Zone-end PLU Code
Total of all the PLUs
in the zone.
0207
ll:05TM
- 73 -
Page 78

Sorted PLU Read or Reset
(Read Report Sample)
TEC
STO RE
1343 PEACH DRIVE
pho ne:
87-6437
Thank you
Call again
SAMPLE OPERATION
t
[PLU]
All PLU Read or Reset (Mode Loclc; X or Z.
depress [PLU],)
jRese^Repor^aijpj^
TEC ST ORE
13A3 PEACH DRIVE
phone: 87-6A37
Thank you
call 39ain
05-15-86
Rye Br ea d
06000002
Soup can
07000002
Kiw i Ja m
08000002
7-up
09000002
TOTAL
»123456
X
2
2.40
9
4.05
2
3.80
23
18.40
36
28.65
0203 ll:02TM
PLUS with sales data "0"
are skipped in PLU reports.
Sort PLU Code
Total of all the PLUs
read in this report.
05-15-86 «123456
TOMato
01000001
Beef
03000001
6.00LB
36.00
Hilk-L
05000001
Egg
05000021
UhiBread
06000001
RyeBread
06000002
HardRou
06000004
Tuna can
07000001
soup Can
07000002
Strwbjam
08000001
Kiwi Jam
08000002
coke
10
09000001
7-up
09000002
Bottle A
23
18.40
33
10000001
3
0.50
1
1.25
7
1.75
3
3.60
2
2.40
3
0.60
6
3.00
9
4.05
1
1.80
2
3.80
8.00
1.65
— Sales Weight for Scale
PLU instead of Item
Count for Non-scale PLU
- 74 -
TOTAL
000IZ
JONES 0229
103
86.80
ll:35TM
Total of all PLUS
PLU Reset Count
Page 79

Individual PLU Stock Read
(Mode Lock: X, depress [AHT], enter the required
PLU code, depress
TEC ST ORE
1343 PEACH DRIVE
[PLU] (repeatable),
depress [AT/TL]
to end.)
PHONE! 87-6437
Hon-active PLU Read (Mode Lock: X, enter 5, depress
[#], depress [PLU],)
TEC ST ORE
1343 PEACH DRIVE
PHONE! 87-6437
Thank you
call again
05-15-86 »123456
soup Can
07000002
TOTAL
491
491
0205 ll:03TM
All PLU Stock Read
(Mode Lock: X, depress [AMT], and then [PLU].)
PLU Name
PLU Code / Remaining
Stock Q'ty
Total Stock Q'ty
of all the PLUS read
in this report
TEC ST ORE
1343 PEACH DRIVE
PHONE! 87-6437
Thank you
Cau again
05-15-86 «123456
X i :
Tuna Can
07000001
soup can
07000002
1244
491
Thank you
Cau again
05-15-86 «123456
X
potato
01000002
Orange
02000001
Lemon
02000002
APPie
02000003
pork
03000002
Mutton
03000003
salmon
04000001
Cod
04000002
Shrimp
04000003
Mi Ik-S
05000002
CheeseiS!
05000011
SoftRoLl
06000003
pick Us
08000011
P.Chips
11000001
Nutmeg
12000001
0220 1Ü20TM
PLU Name
PLU Code
TOTAL
1735
0204 il:03TM
Total Stock Quantity
of all Stock-type PLUs
- 75 -
Page 80

DEPARTMENT AND PLU ABC ANALYSIS READ
Best Selling Depts in Quantity Report Sample Best Selling PLUs in Quantity Sample
TEC ST ORE
1343 PEACH DRIVE
PHONE! 87-6437
SAMPLE OPERATION
Thank you
call again
Mode Lock: X, 1 [#] 3 [AT/TL]
05-15-86 M123456
X 1<&
«1
DRINK
1
BTL DEPO
2
VEGETABL
3
TOTAL
26.6?%
39
38.50
37
6.15
22
31.40
98
76.05
Analysis Type (#1 for "Best Selling in Quantity")
Rank No.l Dept. Name / Item Count (Sales Quantity)
Rank No. / Sales Amount
Rank No,2 Dept,
Rank No,3 Dept,
Total Item Count of all'^the PLUs read in this report
Sales Ratio to all depts total / Total Sales Amount of all the
0209 11S12TM
Best Selling PLUs in Quantity Report Sample
L
Ending Rank No.
PLUS read in this report
TEC ST ORE
1343 PEACH DRIVE
PHONE! 87-6437
Thank you
Call again
05-15-86 »123456
X
»1 BAKERY
UhiBread 3
1 3.60
TOTAL
54.55%
0214 11:17TM
3
3.60
SAMPLE OPERATION
Mode Lock: X, 1 [DEPT: BAKERY] 1 [PLU]
'— Ending Rank No.
—Required Link Department Key
Analysis Type (#1 for "Best Selling in Quantity") / Linked Dept Name
Rank No.l PLU Name / Item Count (Sales Quantity)
Rank No. / Sales Amount
Total Item Count of all the PLUs read in this report
Sales Ratio to all PLUs linked to the same dept. / Total Sales Amount
of all the PLUS
read in this report
- 76 -
Page 81

FIKAMCIAL READ AND RESET (Mode Lock: X for Read. Z for Reset, enter 3, depress [AT/TL].)
TEC
1343
PEACH DRIVE
STORE
PHONE: 87-6437
Thank rou
call again
05-15-
86 N123456
Z03
BT
327.07
NET GT
306.52
TRAIN
BS
197
327.09
3£+
NS 1
185
287.06
TAXI
NS£
25.88
185
312.94
X-
V.CPN
-5.00
DISC
BTR
TOTAL
53CU
306.52
CASH
27CU
157.86
CHECK
28.46
Chg
35.42
MISC
CRTTLl
CRTTL2
CRTTL3
PS TL
16.72
R/A
13.50
PO
14.00
-- To be continued --
0.00
4
2.11
1
0.32
0
1
0.50
1
0.60
3CÜ
5CU
ICU
6.11
ICU
3.55
OCU
0.00
OCU
0.00
2CU
2
2
Reset Report Sample
Grand Total (non-resettable)
Net GT (non-resettable)
Training Mode GT (non-resettable)
Gross Sale Item Count
" " Amount
Percent Charge Count
" " Total
Net Sale (Without Tax) Item Count
" " “ " Amount
Tax 1 Total
Net Sale (With Tax) Item Count
...............
Percent Discount (on Subtotal) Count
" " ■' Total
Vendor Coupon Count
" " Total
Dollar Discount Count
” " Total
Bottle Return (Inside-sale Type) Item Count
" " " " Total
All Media Sales Customer Count
" " " Total
Cash Sales Cutomer Count
" " Total
Check Sales Customer Count
" " Total
Charge Sales Customer Count
" " Total
Mi sc Sales Customer Count
" " Total
Credit 1 Media Sales Customer Count
" " " Total
Credit 2 Media Sales Customer Count
" " " Total
Credit 3 Meida Sales Customer Count
" ” •' Total
Food Stamp Sales Customer Count
............
Received-on-Account Count
" Total
Paid-Out Count
" Total
Amount
Total
- 77 -
Page 82

— Continued —
LOAN
PICKUP
CAZD
CKID
hlSCIO
FSID
FS C6
CORR
VOID
MS VD
X-
S.CPN
-DP TL
RTN
-TAX
-SALE
REGTF TL
TF+6T
TF-6T
TF+
TF-
PBTL
PBR/A
PBPO
TXBLl
SIl TL
TAX EX
TAXIEX
TRDSTP
IT/CUS
NS/CUS
NOSALE
VALCTR
50.00
65.00
113.n
5
92.00
1
7.00
26.00
1.28
3
4.90
1
1,50
0
0.00
1
0.23
1
1.00
0
0.00
8
6.05
0.47
5CU
5.32
0
0.00
21.94
23.16
1.22
23.16
1.22
14CU
58.40
39.75
3.29
258.53
0.41
2CU
8.90
11.43
3.49
5.42
3
9
Loan Total
Pick Up Total
Cash-in-drawer Total
Check-in-drawer Count
" Total
Misc-in-drawer Count
" Total
Food Stamp-in-drawer Count
" Total
Food Stamp Change Total (Cash-paid Change Portion but not in Food Stamp)
VD 1 (Item Correct on Positive Depts/PLUs) Count
’■ Total
VD 2 (Void on Positive Depts/PLUs) Count
" Total
VD 3 (Item Correct or Void on other items) Count
" Total
Percent Discount (on Items) Count
'■ " Total
Store Coupon Count
" " Total
Negative Oepts Item Count
" ” Total
Returned Merchandise Item Count
" '■ Total
Negative (or returned) Tax Total
Audaction (Negative-balanced Sales) Customer Count
" '• Total
Negative Mode Count
" ” Total
Transfer Balance (non-resettable)
Transfer Positive (non-resettable)
Transfer Negative (non-resettable)
Transfer Positive (Daily*.reset)
Transfer Negative (Daily reset)
Previous Balance Sale Customer Count
" " " Total
" " Payment Total
" " Refunded Total
Taxable 1 Total
Selective Itemizer 1 Total
Tax Exempted Customer Count
Tax 1 Excepted Sales Total
Trade Stamp Total Issued
Item Count per Customer
Net Sale per Customer
No-sale Count
Validation Count
ABC
CRT20
000IZ
2
14.70
3
20.72
0233 li:39TM
Credit Card Card Company Name /i Count
Sales Total
Other Credit Card Company
Financial Reset Count
- 78 -
Page 83

GT REPORTS (The print form and items are the same as its corresponding daily report, except the
following report header portion. Please also note that some items provided in daily
reports are not provided in GT reports.)
All Department GT Read
All Department GT Reset
TEC STORE
1343 PEACH DRIVE
phone: 87-A437
Thank you
cal l ag a in
05-15-86 tt123456
GTX 1 X
GTZ 1 1
Financial GT Read
Financial GT Reset
Department Gross Profit
GT Read
TEC STORE
1343 PEACH DRIVE
PHONE! 87-6437
Thank you
cal l
aga in
05-15-86 »123456
OTXOT
Credit Card Company Sales
GT Read
Department Group and
Major Group GT Read
TEC STORE
1343 PEACH DRIVE
PHONE! 87-6437
Thank you
cal l ag a in
05-15-86 «123456
GTXOS
Department ABC ANALYSIS
GT Read
TEC STORE
1343 PEACH DRIVE
PHONE: 87-6437
Thank you
cal l ag a in
05-15-86 #123456
GTZ03
GTX03
TEC STORE
1343 PEACH DRIVE
PHONE! 87-6437
Thank you
Cal l ag a in
05-15-86 #123456
GTX06
- 79 -
TEC STORE
1343 PEACH DRIVE
PHONE: 87-6437
Thank you
cal l ag a in
05-15-86 #123456
GTX X^
Page 84

REMOTE SLIP PRINTER
The TEC Remote Slip Printer DRS-107 may be connected to the MA-1190 series ECR
as an optional device. The Remote Slip Printer will operate printing if a
slip is properly inserted, regardless of the Mode Lock position of the ECR.
(hardware option)
OPERATION
1. The remote slip printer will automatically activate printing when the slip is properly set to the printer table.
2. The following are selective status progri printer:
SYSTEM OPTION ADDRESS No.11 (REMOTE SLIP CONTROL)
Bit 1: Total Line and Trailer Line Print
RESET: Print only once (SINGLE SLIP PRINT)
SET: Print the Total Line and Trailer Line (Consecutive
No., Time, Date, and Register No.) twice
(DOUBLE SLIP PRINT) except for a sale including a
previous balance.
Bit 4: Remote Slip Print Compulsory for every sale with preivous
balance (under PREVIOUS BALANCE MANUAL ENTRY type)
RESET: FREE (Not Compulsory)
SET: COMPULSORY
Bit 5: Remote Slip Print Compulsory for every sale with previous
balance (under CUSTOMER FILE type)
RESET: FREE (Not Compulsory)
SET: COMPULSORY
Bit 6: Remote Slip Print Compulsory for any sale
ible relating to the remote slip
RESET: FREE.(Not Compulsory)
SET: COMPULSORY (except that Media Cashing With No
Purchase, No-sale, Cashier Sign-On/Off, Training
Sign-On/Off operations will not be compulsory.)
Bit 7: INPS (Items Not Print on Slip) Selection
RESET: NORMAL PRINT (No INPS status)
SET: Follow Bit 8 status.
Bit 8: INPS (Items No Print on Slip) Type Selection
RESET: INPS 1 STATUS
All itemized entries except pre-select PB+, [Chg],
[R/A] totals (R/A items will be non-print anyway),
and [TRF] will be non-print, (in case of PB MANUAL
ENTRY type)
All Itemized entries except pre-select File
Customer Code plus Previous Balance, [Chg], [R/A]
totals (R/A items will be non-print anyway), and
[TRF] will be non-print, (incase of CUSTOMER PILE
type)
- 80 -
Page 85

SET: INPS 2 STATUS
[TRF] will only be printed. All other items will
be non-print, (in case of PB MANUAL ENTRY type)
The Customer File Code and [TRF] will only be
printed. All other items will be non-print. (in
case of CUSTOMER FILE type)
4> The gap of the slip inlet is usually opened, and the slip may be inserted
or withdrawn freely.
When a slip is properly set to the remote slip printer and the ECR is
operated, the gap will be closed and printing will be performed. When
the sale is finalized, the receipt is issued and then the gap of the
DRS-107 will be opened to allow the slip withdrawal. (The gap keeps
closed during registration.)
3. Printing on the remote slip will be performed alteranately with printing on the receipt/journal of the ECR.
6. The EJECT key on the DRS-107 may be used to open the closed gap in order to
withdraw the slip and skip unnecessary item print. The EJECT key will be
disregarded if the slip is set and the ECR receipt/journal printer is in a
printing action.
7. Printing Position and Slip Size:
88.4mro (42 digits)^ i 7.8mm ^
Print Space
Last Line Position
21.2mm minimum*
* NOTE: The space below the "Last Line Position" (i.e. the 21.2mm
area at the bottom) cannot be printed.
As typical applications of remote slip printing, print samples of endorsement,
invoice, and customer file are placed on the following pages.
- 81 -
Page 86

TEC STORE
1343 PEACH DRIVE
PHONE: 87-6437
Thank xou
C3U again
05-15-
-86 «123456
VE6ETABL $2.50 TF
FRUIT
FISH
TAX
TOTAL
CHECK
CHANGE
$6.50 TF
$4.00 TF
$1.30
$14^.30
$15.00
$0.70
ENDORSEMENT PRINT SAMPLE
ITEM
White
3
0172 10:16TM
After the sale is finalized
with the required media, the check
or the slip is set to the Remote
Slip Printer.
Check No. "1234567890123456" is entered
and then [CHECK NO.] Key is depressed.
CHECK«1234567890123456
TEC STORE
1343 PEACH DRIVE» TORRANCE»
CALIFORNIA 90501
TOTAL $14.30
017201CL CHECK $15.00
«123456 LOS-15-86 lOrlSTH
— Check No. Print Line (Non-print if not entered)
Endorsement Message Print Lines
(Message progrogratimiable; or non-print)
— Sale Total Print Line (or non-print)
— Consecutive No., Clerk or Cashier ID, Media
— Register No., Date, Time
NOTE; As for selective options for Endorsement Print, ask your TEC represeotatiye.
Also refer to the PROGRAMMING MANUAL for the Endorsment Message Programming,
- 82 -
Page 87

TEC STORE
1343 PEACH DRIVE
PHONE: 87-6437
Thank you
Cell again
INVOICE PRINT SAMPLE
05-15-86
#123456
ttl442
VE6ETABL *1.30 TF
6X 4.80/ 6
7-up
Bottle AT
SUBTL
6X
*4.80 T
0.30/ 6
*0.30
*6.40
X+
10%
TAX
Chg
*0.64
*0.61
$-7.65
TRDSTP *0.48
ITEM 13
White 0174 10!25TM
6X
6X
4.80/
0.30/
#1442
VE6ETABL
7-up
6
Bottle
6
SUBTL
10% %+
TAX
Chg
TRDSTP
ITEM 13
White
56
*1.30 TF
*4.80 T
AT
*0.30
*6.40
*0.64
*0.61
*7.65
*0.48
0174 10:25TM
- 83 -
Page 88

CUSTOMER FILE (FOR CHARGE POSTING) PRINT SAMPLE
(PB MANUAL ENTRY TYPE)
THC
STORE
1743 PEACH DRIVE
phone:
Thank rou
87-6437
call again
05-15-86
6123456
63421
«0.00
VEGETABL
«3.50 TP
MEAT «2.40 TP
TAX
«0.59
Chg
N-BAL
ITEM 2
White 0180 10:36TM
05-15-86
6123456
63421
PB-f-
3X
Soup Can
TAX
Ch9
N-BAL
«6.49
0.45 a
«1.35 TP
«0.14
«7.98 -
«7.98
05-15-66 6123456
3X 0.45 a
05-15-86 6123456
63421
PB-*“
VE6ETABL ♦3.50 TF
MEAT
TAX
Chg
N-BAL ♦Á.^9
ITEM
Whit*
63421
PB-f-
Soup Can
TAX
Chg
N-BAL ♦7.98
TRDSTP
ITEM 3
White
«0.00
♦2.40 TF
♦0.59
♦<S.-fc-9
2
0180 10X36TM
♦6.49
♦1.35 TF
♦0.14
♦7.98
♦0.14
0181 10337TM
TRDSTP
«0.14
ITEM 3
White 0181 10:37TM
05-15-86
6123456
63421
RB-*-
Chg
R/A
CATEND
CHANGE
N-BAL
«7,98
♦ 7.98
♦7.98
«10.00
«2.02
«0.00
ITEM 0
White 0182 10:38TM
- 84 -
63421
PB-*Chg
R/A
CATEND ♦10.00
CHAN6E
N-BAL ♦0.00
ITEM
White
♦7.98
♦7.98
♦7.98
«2.02
0
0182 10t36TM
Page 89

PLU KEYBOARD
It has 130 keys, each of which corresponds to a PLU code. By simply
depressing a key, the *'!PLU Code i[PLU]" entry sequence is made. Thus it
simplifies PLU operations and saves time. The PLU Keyboard will be connected
to the ECR with a cable and may be placed on the check-out counter table near
the ECR.
As an additional function, the PLU Keyboard may be used to entei^alpha/numeric
characters just as on the ordinary typewriter keyboard, instead of entering 3or 4-digit character code on the ECR, in various programming operations.
(hardware option)
CUTTER BLOCK OPEN DETECTOR AND PAPER NEAR-END DETECTOR
1. CUTTER BLOCK OPEN DETECTOR
(1) This detector is activated when the Cutter Block of the Printer is
opened. It is provided to protect your hands and fingers from
injury and also to protect the printer itself.
(2) While the Block is opened, none of the keys Cincluding [RF] and
[JF]) will be accepted and the AMOUNT portion of the display will
keep flickering
(3) When the Block is closed and the [C] key is depressed, the display
flickering will be cleared and key-in operations will be accepted.
If any printing has been under way and stopped due to the Block
opening, the printing will again be started.
(4) If the Block is opened during printing, the printing will
immediately be stopped.
2. JOURNAL AND RECEIPT PAPER NEAR-END DETECTOR
(1) This detector is activated when either the journal or receipt roll
is coming near the end. It is provided to prompt the operator to
replace the old paper roll with a new one.
(2) When the paper roll comes near the end (or the paper has not been
set properly), no key operation (except [RF] and [JF]) will be
accepted and the AMOUNT portion of the display will keep flickering.
(3) When a new paper roll is set, only the [RF] and [JF[ keys are
allowed to operate. Next, when the [C] key is depressed, the
display flickering will be cleared and normal key-in operations
will be accepted. If any printing has been suspended, it will
continue printing.
(4) If this detector sensed a paper near-end condition during printing,
the printer will stop after the current line printing is completed.
(5) The [RF] and [JF] keys are operative regardless of the detector
ON/OFF condition.
(6) If the [C] key is depressed in the paper near-end condition, it
will be ignored. The [C] key depression will be effective to clear
the display flickering only after the new paper roll is set.
- 85 -
Page 90

ECR PRINTER MOTOR LOCK AND REMOTE SLIP PRINTER MOTOR LOCK DETECTORS
1. PRINTER MOTOR LOCK DETECTOR
(1) This detects the ECR printer motor-lock condition caused by some
trouble.
(2) When such a condition is detected, the front display indicates
"Error" and none of the keys (including [RF] and [JF]) will be
accepted.
(3) To regain the normal condition, turn the power of the ECR to OFF,
remove the cause of the motor-lock condition, and then turn the
power to ON again.
2^ REMOTE SLIP PRINTER MOTOR LOCK DETECTOR
(1) This detects the remote slip printer motor-lock condition caused
by some trouble.
(2) When such a condition is detected, the front display indicates
"Error" and none of the keys (including [RF] and [JF]) will be
accepted.
(3) To regain the normal condition, turn the powers of the ECR and the
remote slip printer to OFF, remove the cause of the motor-lock
condition, and then turn the powers to ON again.
* If the zause can not be found in the remote slip printer and only
the ECR may be required to work without the remote slip printer
temporarily, remove the remote slip printer cable from the ECR, and
turn the power of the ECR to ON.
- 86 -
Page 91

PAPER ROLL REPLACEMENT AND OTHER MAINTENANCE OPERATIONS
INSTALLING THE BECEIFT PAPER
1. Turn the Mode Lock to the "REG" position.
2. Remove the Receipt Cover by pulling it
upward (Fig. 1).
3. Set the new paper roll in the receipt roll
holder with the paper end fed from the
bottom as shown in Fig. 2 (Fig. 3).
4. Insert the paper end into receipt inlet as
holding the [RF] key pushed down (Fig. 4).
5. When the paper comes out of the receipt
outlet for approx. 5cm (or 2 inches),
release the [RF] key (Fig. 5).
6. Attach the Receipt Cover. Meanwhile, the
paper end must be seen outside the cover.
Fig. 2
7. Press the [C] key to clear the paper-end
condition, and depress the [NS] key and
cut the issued receipt to check if the
paper has properly been set.
Fig. 4
REMOVING THE RECEIPT PAPER
1. Remove the Receipt Cover by pulling it
upward (Fig. 1).
2. Pull the Free Lever frontward while
pulling the old paper core upward to
remove the remaining paper tail (Fig. 6).
Free Lever
Fig. 6
- 87 -
Page 92

Fig. 7
INSTALLING THE JOURNAL PAPER
1. Turn the Mode Lock to the *'REG" position.
2. Remove the Receipt Cover by pulling it
upward (Fig. 1 on the previous page).
3. Remove the Journal Winding Reel.
4. Set the new paper roll in the journal roll
holder (righthand side) with the paper end
fed from the bottom (Fig. 7).
5. Insert the paper end into the journal
inlet while holding the [JF] key pushed
down (Fig. 8).
6. When the paper comes out of the journal
outlet for approx. 20cm (or 8 inches),
release the [JF] key (Fig. 9).
7. Wind up the paper end on the Journal
Winding Reel two or three times as shown
in Fig. 10.
8. Set the Journal Winding Reel to the holder
(Fig. 11).
9. Attach the Receipt Cover (Fig. 12).
10. Depress the [C] key before starting
operations.
Fig. 10
REMOVING THE JOURNAL PAPER
1. Remove the Receipt Cover by pulling it
upward (Fig. 1 on the previous page).
2. Depress the [JF] key to wind up enough
portion of the journal paper, and then
tear off the paper, holding the Journal
Winding Shaft.
3. The wound-up portion of the paper can
easily be removed from the Winding Shaft
by pulling it side way (Fig. 13).
4. If enough paper remains on the roll,
follow Steps 6 through 10; if paper is
running out, follow Steps 1 through 10 in
"INSTALLING THE JOURNAL PAPER" above.
- 88 -
Page 93

Ribbon Cover
Fig. 14
REPLACING THE INK RIBBON
When the receipt and journal print is too
light, replace the ink ribbon in the
following manner.
Reaoving the Ribbon
1, Turn the Power Switch to OFF.
2. Remove the Ribbon Cover. (Press the side
inward and the hook will be unlocked.)
(Fig, 14)
3, Open the Cutter Block by pulling it upward
while pressing the leftside lever outward.
(Fig. 15 and Fig. 16)
4. Remove the Ink Ribbon by lifting up the
ribbon spools (Fig. 18).
Installing a new Ribbon
1. Set the ribbon spools so that the ribbon
will be wound to the direction shown by
the arrows respectively. Meanwhile, let
the ribbon go through the Ribbon Guides,
the Tension, and the Dot Head Ribbon Guide
(Fig. 18 and Fig. 19).
2. After setting, make sure that the ribbon
properly goes through respective parts
required, by turning a ribbon spool
several turns.
3. Close the Cutter Block. Make sure that
the leftside lever has locked the block.
4. Turn the Power Switch to ON.
5. Depress the [C] key. The flickering
display will stop and be lit steadily.
6. Attach the Ribbon Cover.
- 89 -
Page 94

Slip Detector /
Receipt
Journal
Ribbon
CLEANING THE VALIDATION SLIP DETECTOR
Clearn the validation slip detector when
replacing the receipt, journal paper, or
ink ribbon.
If the slip detector has not be cleaned for
a long period of time, keys may fail to be
accepted on the ECR. In such a case, the
*'SLP" lamp will be kept on. This is the
same condition as a slip has been inserted,
because of paper dust deposited on the slip
detector.
Dot Head Fig. 20
1. Turn the Power Switch to OFF.
2. Remove the Ribbon Cover (see the pevious
page),
3. Open the Cutter Block (see the previous
page).
4. The slip detector is indicated by the
arrow in Fig. 20. If the dot head is
located on the right side of the machine,
close the Cutter Block and turn the power
on and off again, and the dot head will
move and stop on the left side.
5. Clean the slip detector with a brush.
After cleaning, make sure that the Ink
Ribbon is properly mounted on the Ribbon
Guides. (Fig. 21)
6. Close the Cutter Cover. (Securely hook the
cover on the left side; see the previous
page.)
7. Turn the Power Switch to ON.
8. Depress [NS] key to issue a receipt.
Check that the receipt is printed
normally,
9. Attach the Ribbon Cover.
OPENING THE DRAWER
The drawer opens automatically when a
registration is finalized. In the event of
a power failure or a trouble, however, open
the drawer in the following manner.
Insert the Drawer Release Key into the
Drawer Release Lock and turn the key by 45
degrees clockwise (Fig. 22)
REMOVING THE DRAWER
1. Lift the drawer up and pull it out.
2. Then let it go down and pull it out again,
and it will be removed.
3. When getting back the drawer, fit its
rollers on the rails of the register and
push it all the way in, (Fig. 23)
- 90 -
Page 95

WHEN A POWER FAILURE OCCURS ...
If a power failure occurs, all sales data stored in memory are automatically
protected by the battery installed in the ECR. The battery is rechargeable
and it is recharged when the AC power returns. As the power returns, the
register revives to continue the work. However, please note the following
phenomena to occur on the register when the power is regained:
1. The printer will work to print the entered data without failure after
the power recovery, if any data has been printing before the power
failure. However, one extra line may be fed on the power recovery on
depending on the power failure timing.
2. When the power is recovéred, the register will display the last item
entered before the power failure if the item was entered thorugh a
motorized key (such as [DEPT], media keys, etc.). In this case,
continue the registering operation. However, if the register displays
"fail" when the power is restored, it indicates that the last item
entry was not completed (i.e., only numeric keys and/or a declaration
or modification key such as [RTN MDSE] were operated but not any
motorized key). In this case, first depress the [C] key to clear the
"FAIL" condition, and then do the registering operation again from the
numeric or declaration key entry. In the event of a power failure and
its recovery, be sure to check the receipt before it is handed to the
customer.
SPECIFICATIONS
SIZE
.......................................................................
WEIGHT ................................................................. 22 kg
POWER REQUIRED
POWER CONSUMED .......................................... 0.4A at 117V
AMBIENT TEMPERATURE ................................. 0°C to 40®C, 10% to 90% Releative Humidity
SIZE OF RECEIPT AND JOURNAL ROLL
............................................
.............................
460mm(width) x 445ram(depth) x 405ram(height)
AC 117V 50/60Hz
45mm(width) x lOOmm(diameter)
- 91 -
Page 96

Page 97

Page 98

PRINTED IN JAPAN
El-01333 86061200©
 Loading...