

Page 1
HD DVD player
HD-A30KU
HD-A30KC
Owner’s manual
In the spaces provided below, record the Model and Serial No. located on the rear panel of your player.
Model No. Serial No.
Retain this information for future reference.
HD-A30KUKCEng.indd1HD-A30KUKCEng.indd1 07.10.48:45:02PM07.10.48:45:02PM
Page 2

7
Table of contents
SAFETY PRECAUTIONS .......................................2
IMPORTANT SAFETY INSTRUCTIONS ...............4
Precautions ...........................................................5
Table of contents ...................................................7
Features .................................................................
8
Disc compatibility ........................................................ 8
Customer support ....................................................... 9
Index to parts and controls ................................10
Accessories .........................................................13
Remote control ...................................................13
Loading batteries ...................................................... 13
Preparation ...........................................................14
Resolution and connections ..................................... 14
Step 1: Connecting to a TV ..................................... 15
Step 2: Connecting to audio system ......................... 16
Step 3: LAN connection............................................ 17
Step 4: Power connection ....................................... 17
Step 5: Powering on ................................................. 18
Step 6: Setting up the player .................................... 18
A: Language .............................................. 18
B: Time ...................................................... 19
C: Resolution ............................................. 20
D: Audio output ......................................... 21
E: Ethernet ................................................ 22
Playing ..................................................................24
Playing a disc ........................................................... 24
To pause playback .................................... 25
To stop playback ....................................... 25
To resume playback from the location
last stopped ............................................... 25
To change playback speed ....................... 25
To select the sound .................................. 26
To select subtitles .................................... 26
To select the camera angle ....................... 26
To locate a position .................................. 27
To play repeatedly ..................................... 27
To check the current status ....................... 27
HD DVD playing options in the future ....................... 28
A/B/C/D buttons ........................................ 28
Cursor controls .......................................... 28
Controller port ........................................... 28
Requirements for HD DVD discs/
Web-enabled network content .................. 28
Output sound conversion table .........................29
Customizing the function settings .....................30
Settings ................................................................. 31
Picture ...................................................... 31
Audio ......................................................... 32
Language .................................................. 32
Ethernet . ................................................... 34
General .................................................... 34
Firmware update ....................................... 35
Before calling service personnel ......................36
License information on the software used
in the TOSHIBA HD DVD player ..................... 37
Specifi cation .......................................................43
Limited United States Warranty .........................44
Limited Canadian Warranty ................................46
INFORMATION ON CUSTOMER
SUPPORT .........................................Back cover
HD-A30KUKCEng.indd7HD-A30KUKCEng.indd7 07.10.48:45:04PM07.10.48:45:04PM
Page 3

9
Important notes about HD DVD
HD DVD with high-defi nition content required for HD
viewing. Viewing high-defi nition content and up-converting
DVD content may require an HDCP capable DVI or HDMI
input on your display device. Up-conversion of DVD content
will result in near HD picture quality. Firmware update may
be required for some interactive features depending on
content, which may also require an always-on broadband
internet connection. Some features may require additional
bandwidth. Some recordable media may not be supported.
Dolby Digital Plus, Dolby TrueHD and DTS support for up to
5.1 channels (DTS HD support for DTS core only). MP3/
WMA audio fi les not supported. HDMI audio support for
PCM only. Because HD DVD is a new format that makes
use of new technologies, certain disc, digital connection and
other compatibility and/or performance issues are possible.
This may, in rare cases, include disc freezing while
accessing certain disc features or functions, or certain parts
of the disc not playing back or operating as fully intended. If
you experience such issues, please refer to the FAQ
sections of www.toshibahddvd.com or www.tacp.toshiba.
com for information on possible work-around solutions or the
availability of fi rmware updates that may resolve your
problem, or contact Toshiba Customer Solutions. Some
features subject to delayed availability. 1080p capable
display required for 1080p output resolution. In some cases,
the included remote control may not operate additional
devices or certain features of such devices, in which case, it
is suggested that you use the original remote control for the
applicable device. Use of CE-Link which is a feature based
on HDMI-CEC requires an HDMI-CEC compatible display
device. For 24p output, content that was created in 1080p /
24 frames/sec is required. Viewing 24p output requires an
HD display capable of accepting a 1080p/24Hz signal. While
every effort has been made at the time of publication to
ensure the accuracy of the information provided herein,
product specifi cations, confi gurations, system/component/
options availability are all subject to change without notice.
Note
• The fi rmware in this player can be updated. See
page 35 for
details.
Notes on web-enabled network content
Certain HD DVD discs may contain or have the capability of
downloading studio-provided, web-enabled network content.
To minimize any potential compatibility and/or connectivity
issues, before viewing such content, it is recommended that
you perform the fi rmware update process to ensure that
your HD DVD player is using the latest fi rmware version.
Do not unplug or turn off the player when downloading
studio-provided, web-enabled network content. Doing so
may cause data stored in the player’s persistent storage to
be lost.
HD output jacks
• An HDMI jack for connecting a single cable to output video
and audio signals
• Component jacks
Certain system requirements
For high defi nition video playback:
• HD display (some discs may require HDCP capable input)
• HD DVD disc with HD content
For Dolby® Digital Plus and Dolby TrueHD multi-channel
audio playback:
• A/V Receiver with HDMI™ multi-channel LPCM capable
audio input and 5.1 channel speaker setup.
Customer support
To reach Toshiba Customer Solutions in the U.S., please
call 1 (800) 319-6684, or visit www.toshibahddvd.com or
www.tacp.com/customersupport.
To reach Toshiba Customer Support in Canada, please
call 1 (800) 268-3404 or visit www.toshiba.ca and click on
support.
Before accessing, try updating this player’s fi rmware. For
details on how to update, see “Update (Firmware update)”
( page 35).
This HD DVD player is manufactured under the HD DVD
Format adopted by the DVD Forum. The DVD Forum
approved AACS (Advance Access Content System)
as content protection system for HD DVD format like it
approved CSS (Content Scramble System) for DVD format.
Therefore, certain restrictions are imposed on play, analog
signal output, etc. of AACS protected contents.
When you use pre-recorded contents, the contents may
designate whether or not to apply such restrictions.
As those restrictions may be adopted and/or changed and
announced by AACS after the production of this product, the
operation of this product and restrictions thereon may vary
depending on the time you purchase this product as well as
during the life of this product.
To obtain updated information about AACS and this product,
please contact the following:
* In the U.S., please call 1 (800) 319-6684, or visit www.
toshibahddvd.com or www.tacp.com/customersupport.
* In Canada, please call 1 (800) 268-3404 or visit www.
toshiba.ca and click on support.
HD-A30KUKCEng.indd9HD-A30KUKCEng.indd9 07.10.48:45:04PM07.10.48:45:04PM
Page 4
11
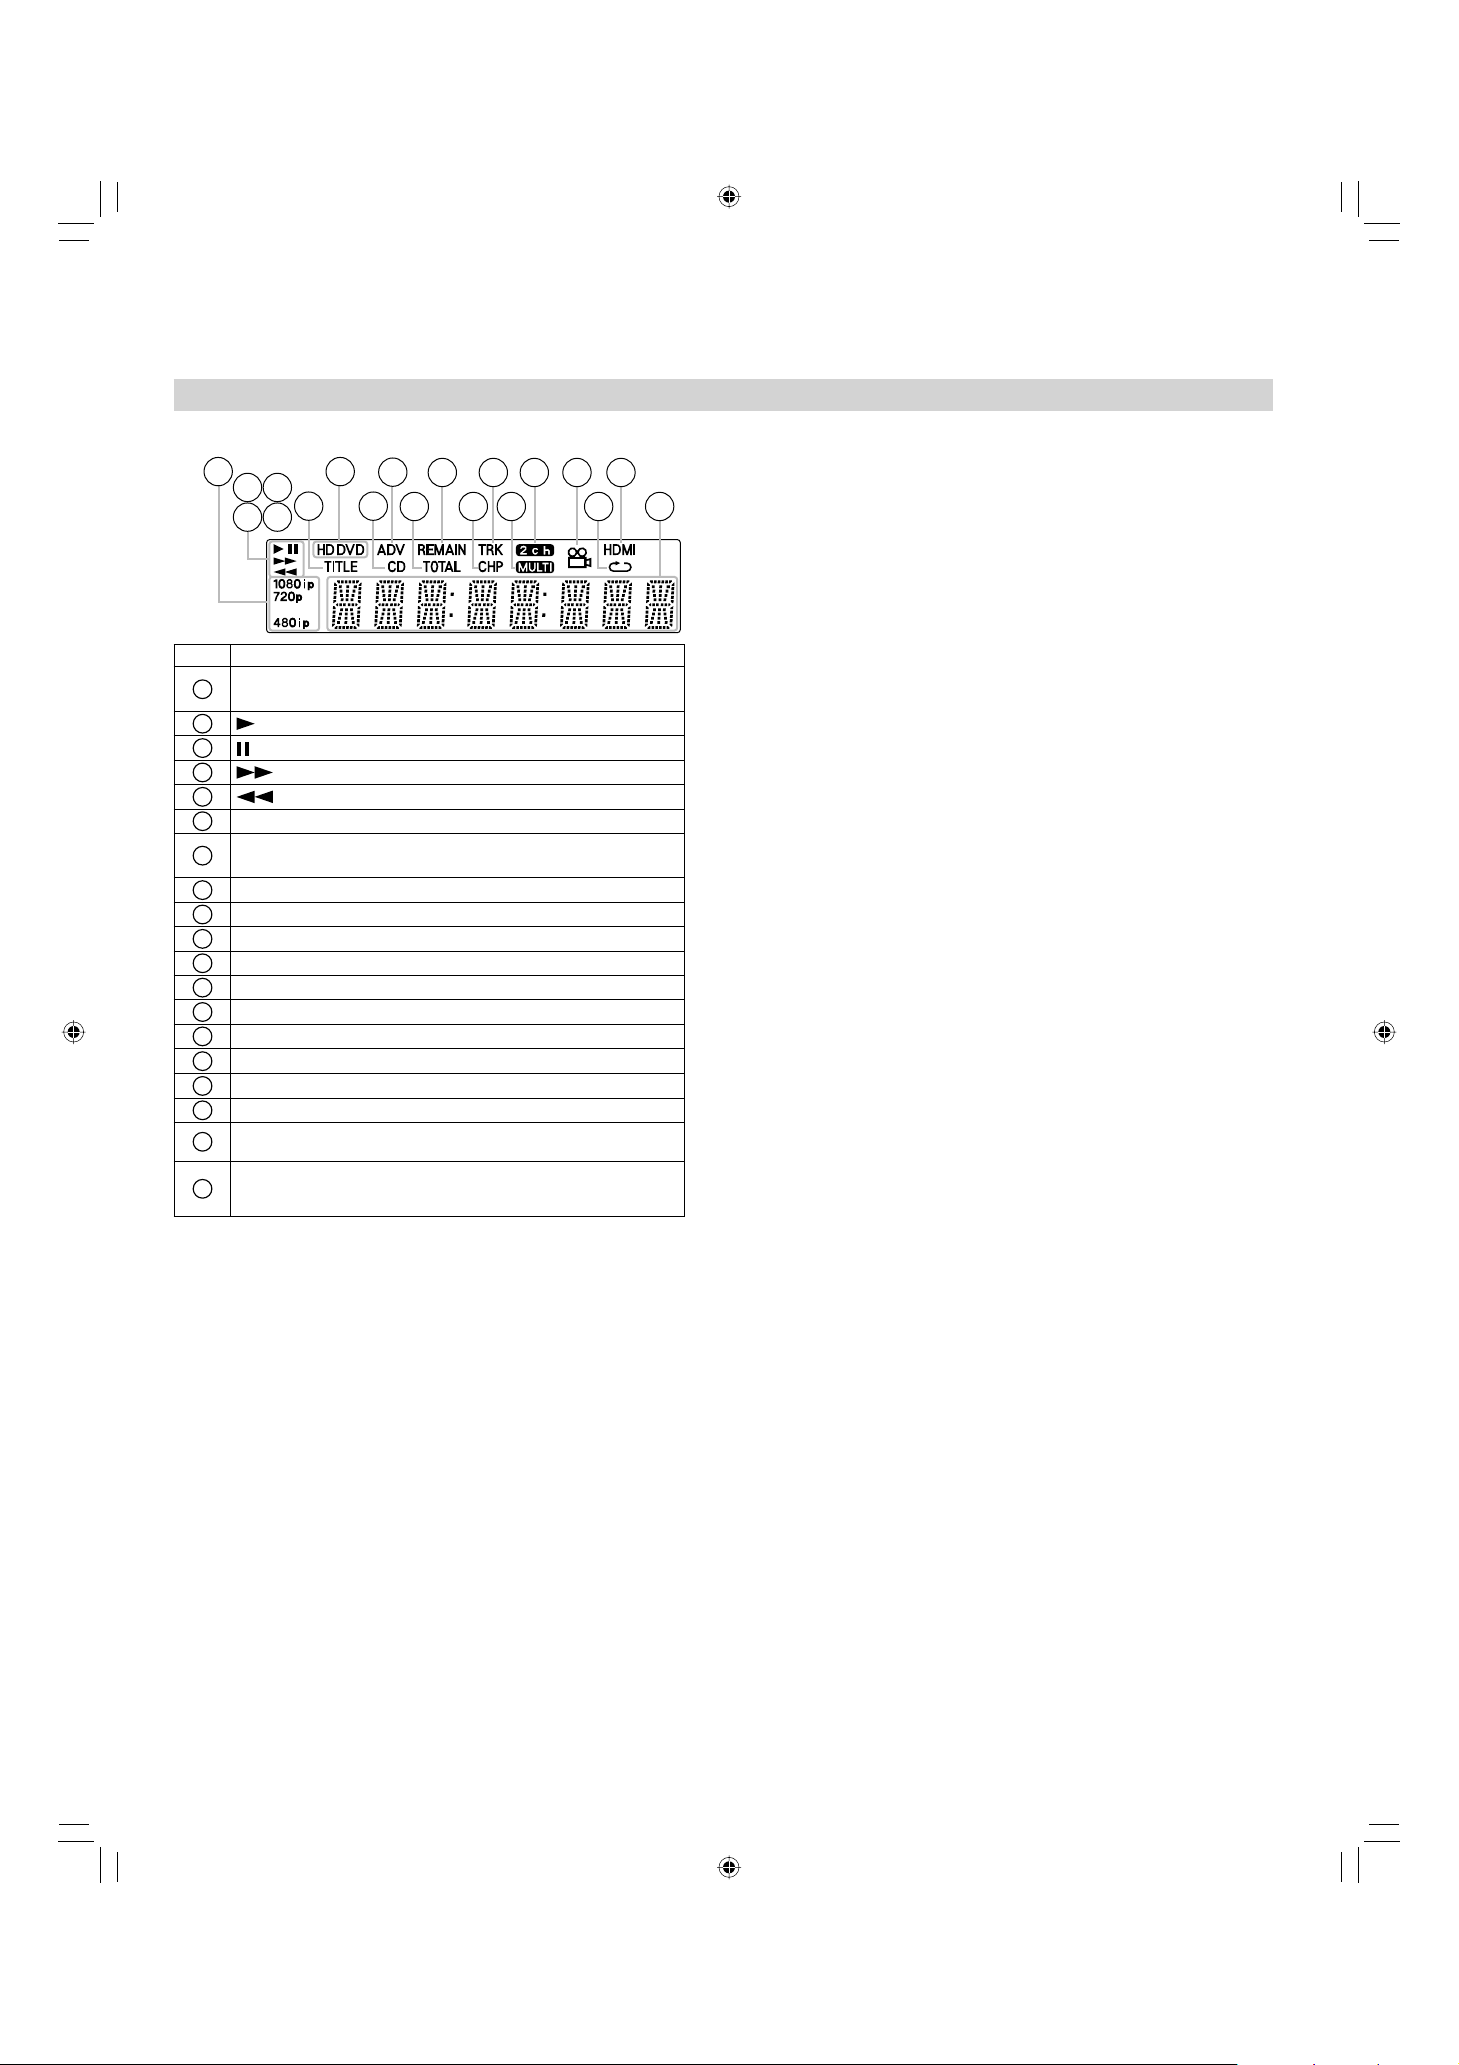
Display
No. Function
1
Displays the video output format currently selected.
(i: interlaced, p: progressive)
2
: Playing
3
: Pausing
4
: Fast forward playback
5
: Fast reverse playback
6
Shows a title number.
7
HD DVD: An HD DVD is loaded.
DVD: A DVD is loaded.
8
A CD is loaded.
9
A disc which contains advanced content is loaded.
10
Total playing time is displayed.
11
Remaining playing time is displayed.
12
Shows a chapter number.
13
Shows a track number.
14
Multi channel sound is output.
15
2ch sound is output.
16
Playing a scene recorded with multi angles.
17
Playing in repeat mode.
18
HDMI connection is verifi ed between the player and
another device.
19
Displays the total playing time of the disc, elapsed
time, remaining time, a number of title, chapter or track,
messages, etc.
1 7
Pressing DIMMER button on the remote control changes the brightness of the display. (Normal / dimmed / off)
• Turning off the power resets this setting.
2 3
4 5
6
9
11 13 15 16 18
8
12 14 17 1910
HD-A30KUKCEng.indd11HD-A30KUKCEng.indd11 07.10.48:45:05PM07.10.48:45:05PM
Page 5
18
Preparation (continued)
Make the settings which are necessary to operate the player.
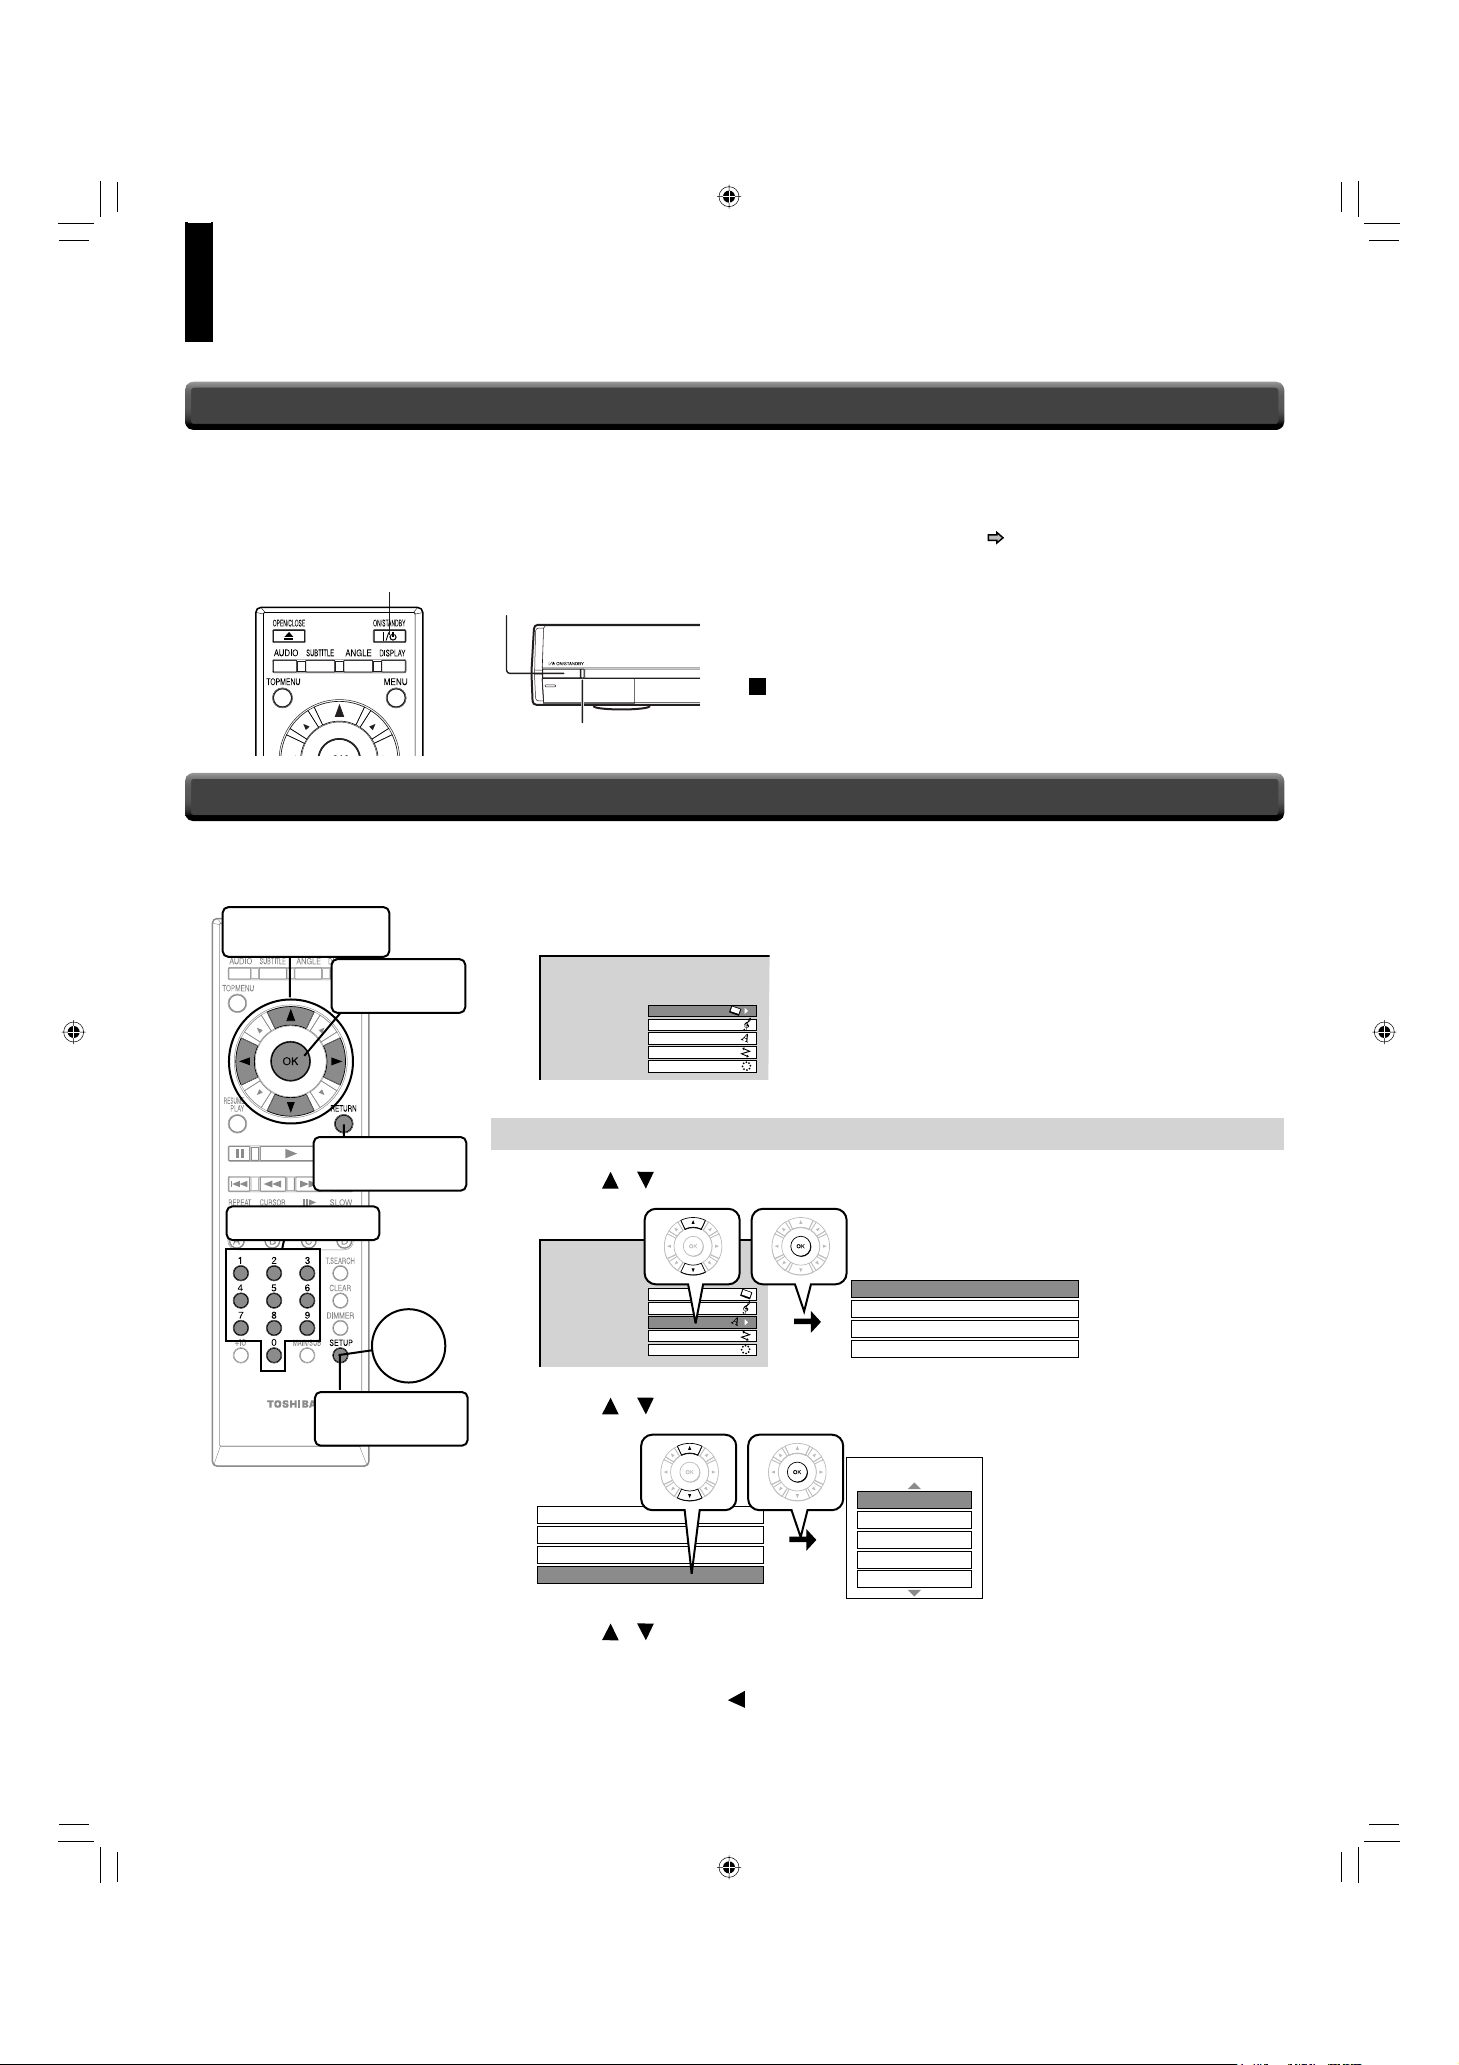
1
Make sure that the following menu is displayed.
(If not, press SETUP to display it.)
SETUP MENU
Picture
Audio
Language
Ethernet
General
A: Language
2
Press / to select “Language”, then press OK.
3
Press / to select “On Screen Language”, then press OK.
4
Press / to select the language you want use for on-screen displays,
then press OK.
5
Press RETURN or to return to the menu of step 1.
When the power turns on, ON/STANDBY indicator on the
front panel changes color from red (standby mode) to blue
(operation).
Start up (and disc loading (
page 24)) may take time.
When you power on this player for the fi rst time, the setting
menu will appear. Go to Step 6 to make the necessary
setup.
To power off the player
Press ON/STANDBY.
1
Turn on the TV or monitor, and select the input
which the player is connected to.
2
Press ON/STANDBY.
Step 5: Powering on
Step 6: Setting up the player
ON/STANDBY indicator
ON/STANDBY button
ON/STANDBY button
To move a cursor
To enter the
selected item
To return to the
previous menu
To input digits
To display the
setting menu
Start
SETUP MENU
Picture
Audio
Language
Ethernet
General
Disc Menu Language English
Subtitle Language
Audio Language English
On Screen Language
None
English
HD-A30KUKCEng.indd18HD-A30KUKCEng.indd18 07.10.48:45:10PM07.10.48:45:10PM
Disc Menu Language English
Subtitle Language
Audio Language English
None
EnglishOn Screen Language
On Screen Language
English
French
German
Spanish
Italian
Page 6
19
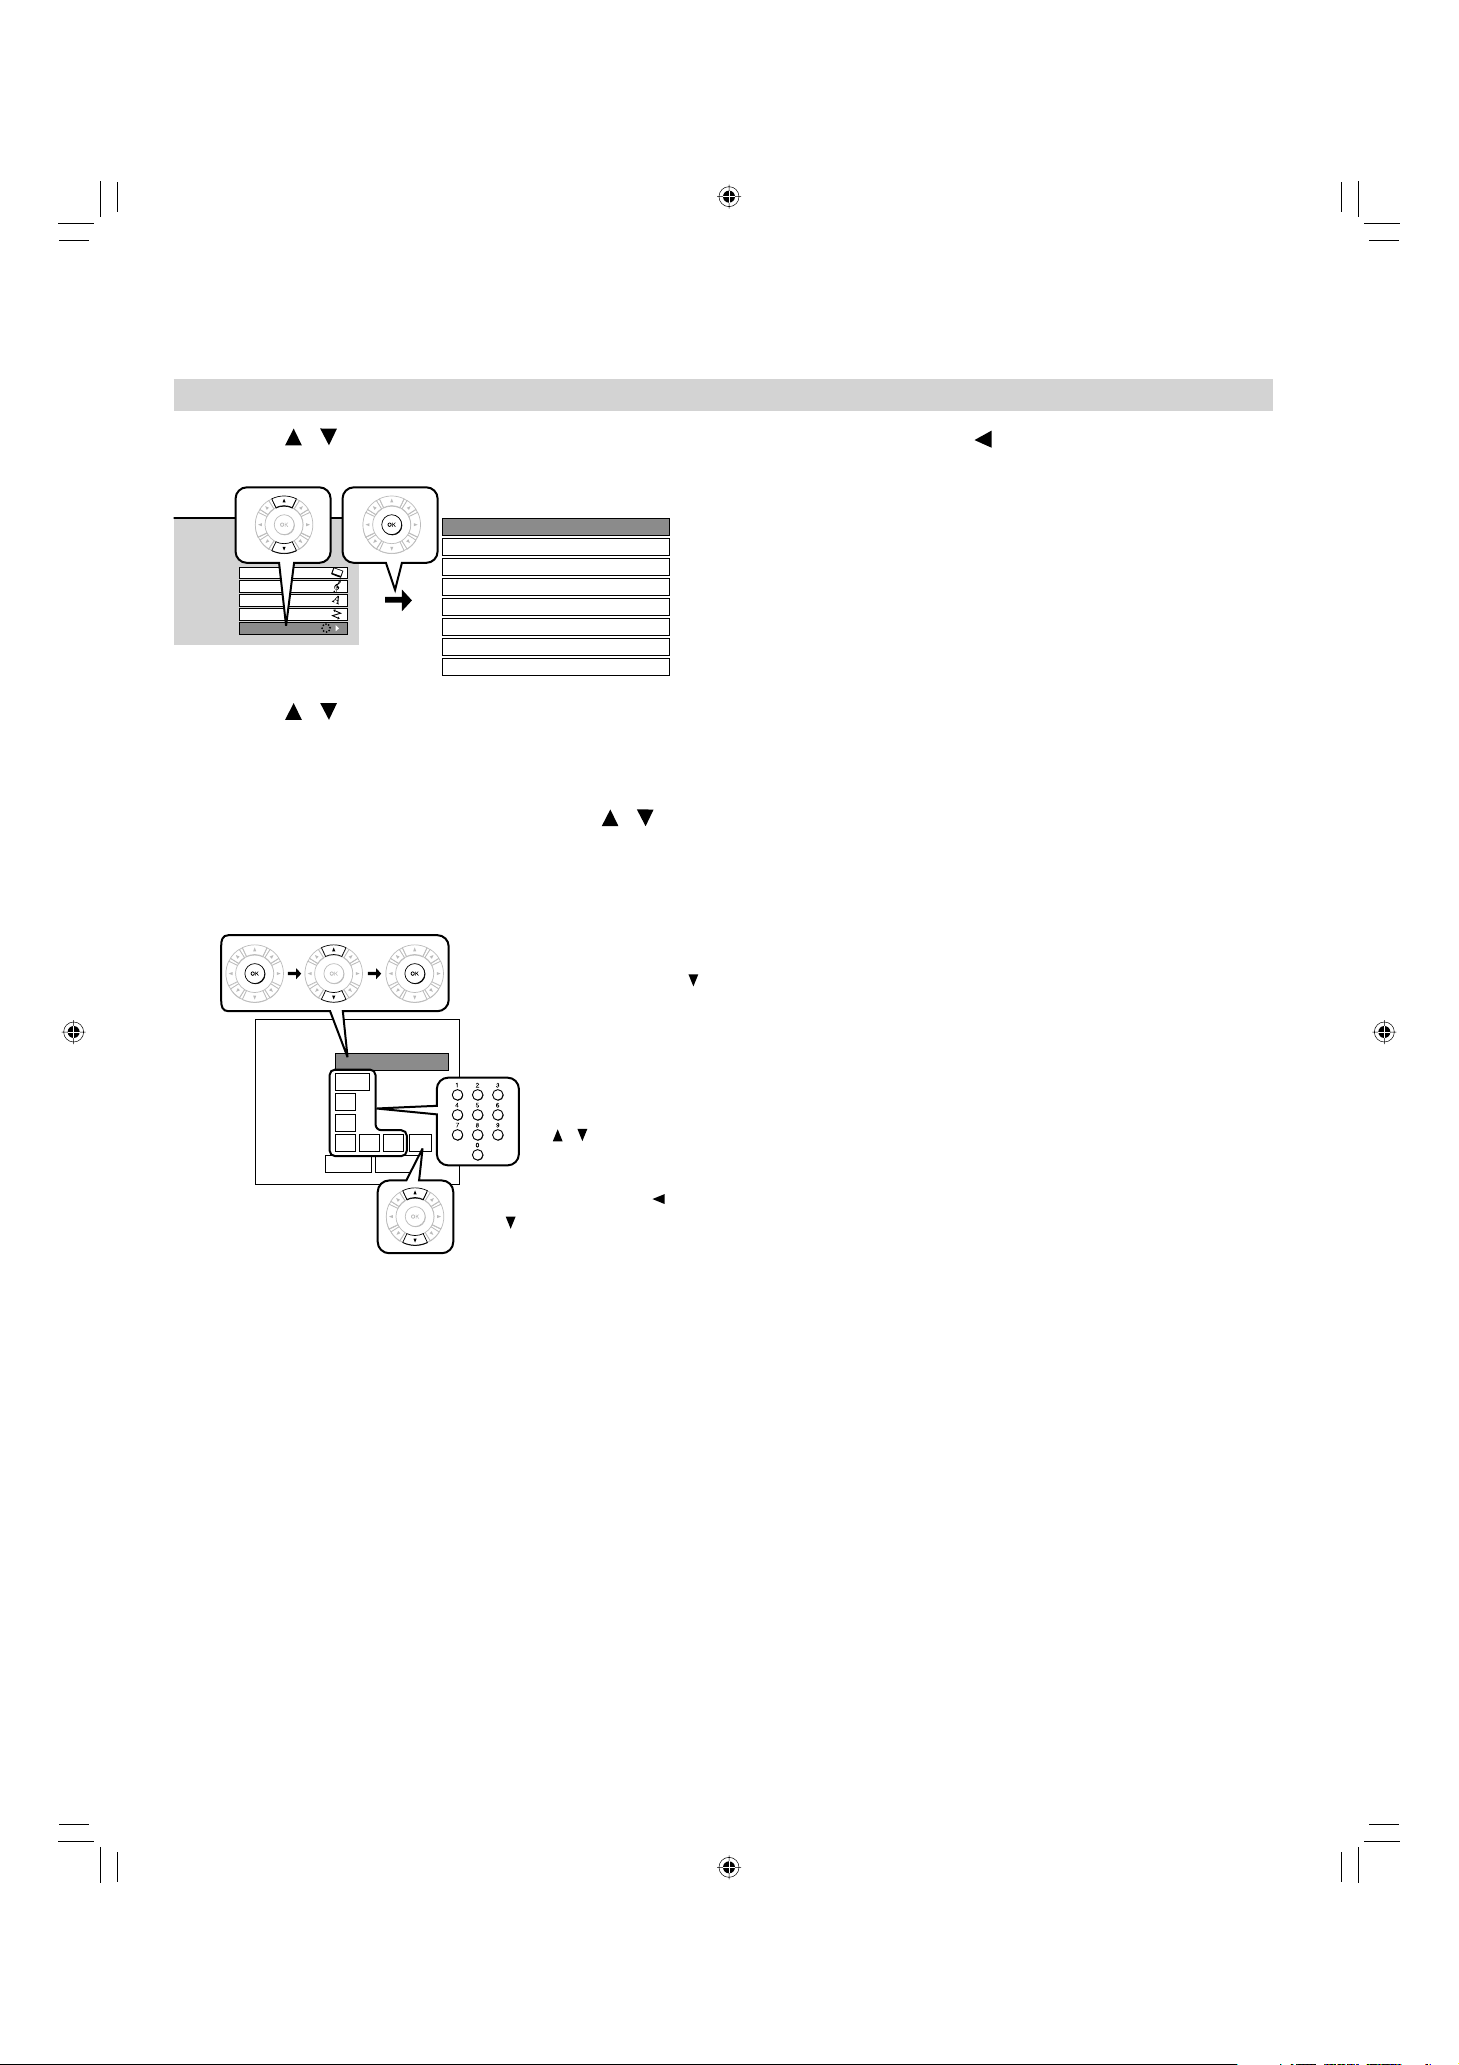
B: Time
(GMT-4:00)Atlantic Time
Time Zone
Year
Clock Set
2007
Month
01
Day
01
Time : :
01
OK Cancel
00 00 AM
After setting this, press
After setting this item, press
To correct the digit,
select the item again
by / then input a
new digit.
.
press OK button.
then to select “OK” then
6
Press / to select “General”, then press
OK.
Picture
Audio
Language
Ethernet
General
OSD On/Off Off
Parental Lock Off
Off
Remote Controller Sound Off
Screen Saver Off
Maintenance
Twin Format Disc HD DVD
Clock Set
HDMI Control
7
Press / to select “Clock Set”, then press
OK.
8
Confi rm the time is correct.
9
If the time is correct, select “OK” by / ,
then press OK to return to the menu of step 6.
When the time needs to be corrected, set each item using the
following buttons.
10
Press RETURN or to return to the menu of
step 1.
HD-A30KUKCEng.indd19HD-A30KUKCEng.indd19 07.10.48:45:11PM07.10.48:45:11PM
Page 7
20
Preparation (continued)
C: Resolution
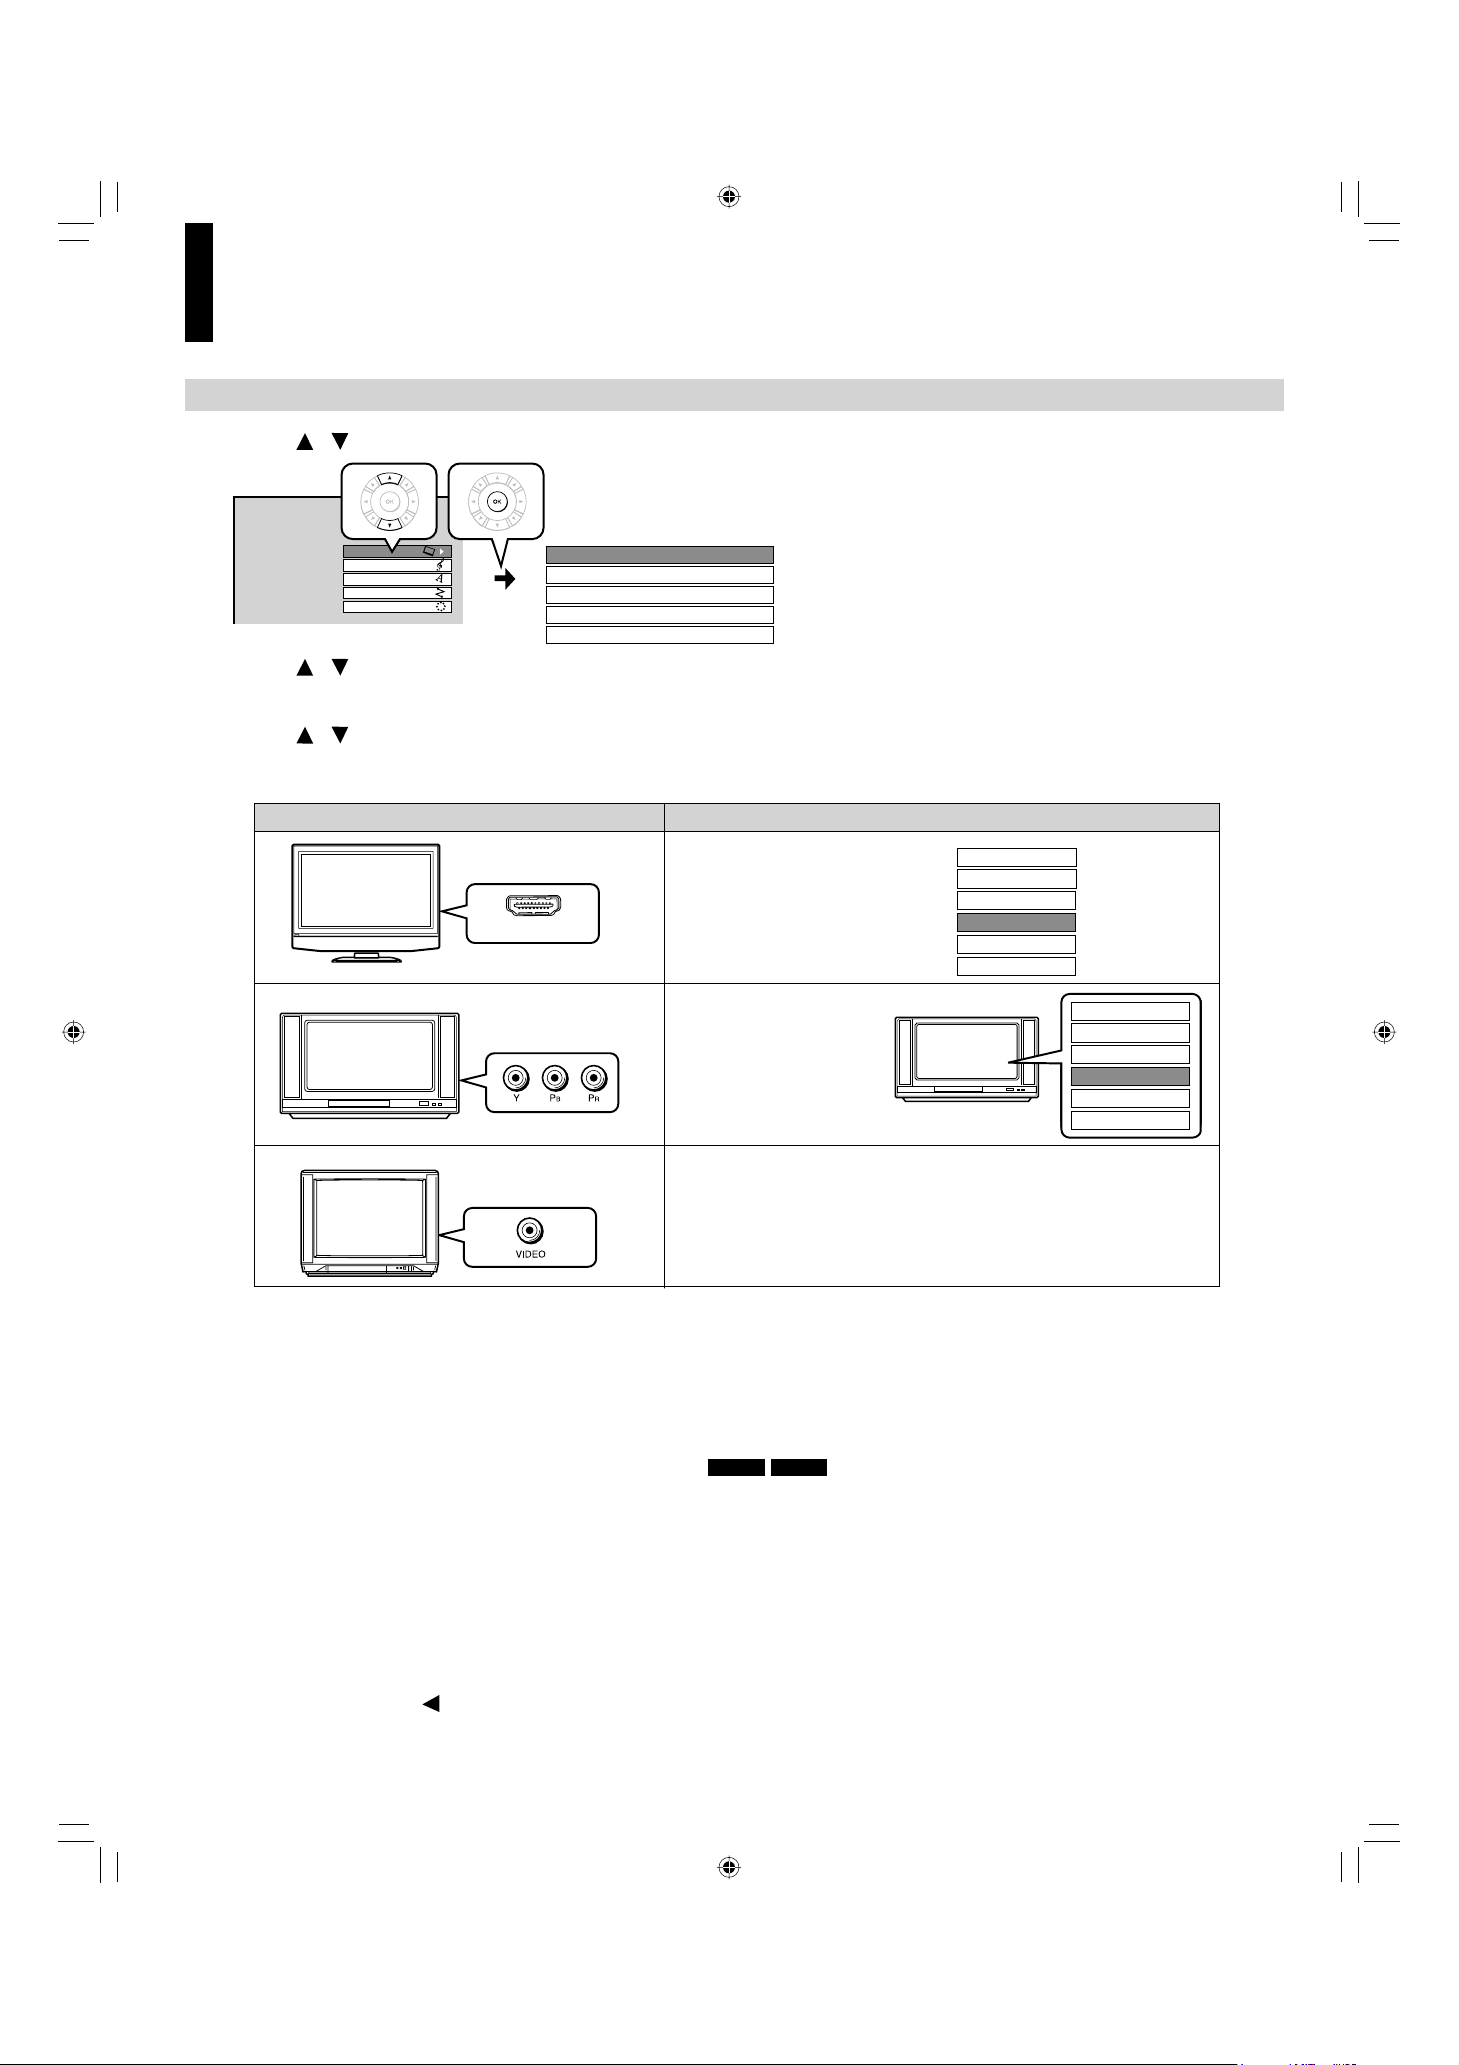
11
Press
/ to select “Picture”, then press OK.
SETUP MENU
12
Press / to select “Resolution Setting”, then press OK.
13
Press / to select the resolution according to the performance of your TV as shown in the table
below, then press OK.
14
Press RETURN or to return to the menu of step 1.
You may fi nd that setting the output resolution of the player to match as closely as possible the native resolution of your
display provides the best picture performance (e.g., 720p for 720p and 1080p for 1080p).
Note
• In case the menu of “Resolution Setting” disappears, make composite video (yellow) connection to restore it, then select the
resolution which is compatible with the connected TV.
For best viewing of fi lm movie material (24p output)
HD DVD DVD-Video
Movies that are produced on fi lm, as opposed to video, are traditionally captured at a frame rate of 24 frames per second.
Your player can maintain the 24 frames per second frame rate of such movies, allowing you to enjoy them in their
native form. To enable this feature, connect an HD display capable of accepting a 1080p/24Hz signal and select “up to
1080p/24Hz.”
Note
• Most fi lm based HD DVDs display images at 24 frames per second and video based HD DVDs display images at 30 frames or
60 fi elds per second. Depending on the content, “up to 1080p/24Hz” may lower smoothness of playback and/or reduce vertical
resolution. In the case of video based HD DVDs, we recommend that “up to 1080p/24Hz” setting is not used.
up to 480p
480i
up to 720p
up to 1080i
up to 1080p
up to 1080p/24Hz
HDMI INPUT
HDMI input
Select the resolution.
e.g.
e.g.
Select the resolution
(except “up to 1080p”
and “up to 1080p/
24Hz”) according to
the performance of
the connected TV.
Component video
input
VIDEO (yellow) input
TV input
“
Resolution Setting”
up to 480p
480i
up to 720p
up to 1080i
up to 1080p
up to 1080p/24Hz
1080i
TV
Select any resolution except “up to 1080p/24Hz”.
Picture
Audio
Language
Ethernet
General
TV Shape 16:9
Enhanced Black Level Off
RGB Output Range Standard
Picture Mode Auto
Resolution Setting up to 1080i
HD-A30KUKCEng.indd20HD-A30KUKCEng.indd20 07.10.48:45:12PM07.10.48:45:12PM
Page 8
21
D: Audio output
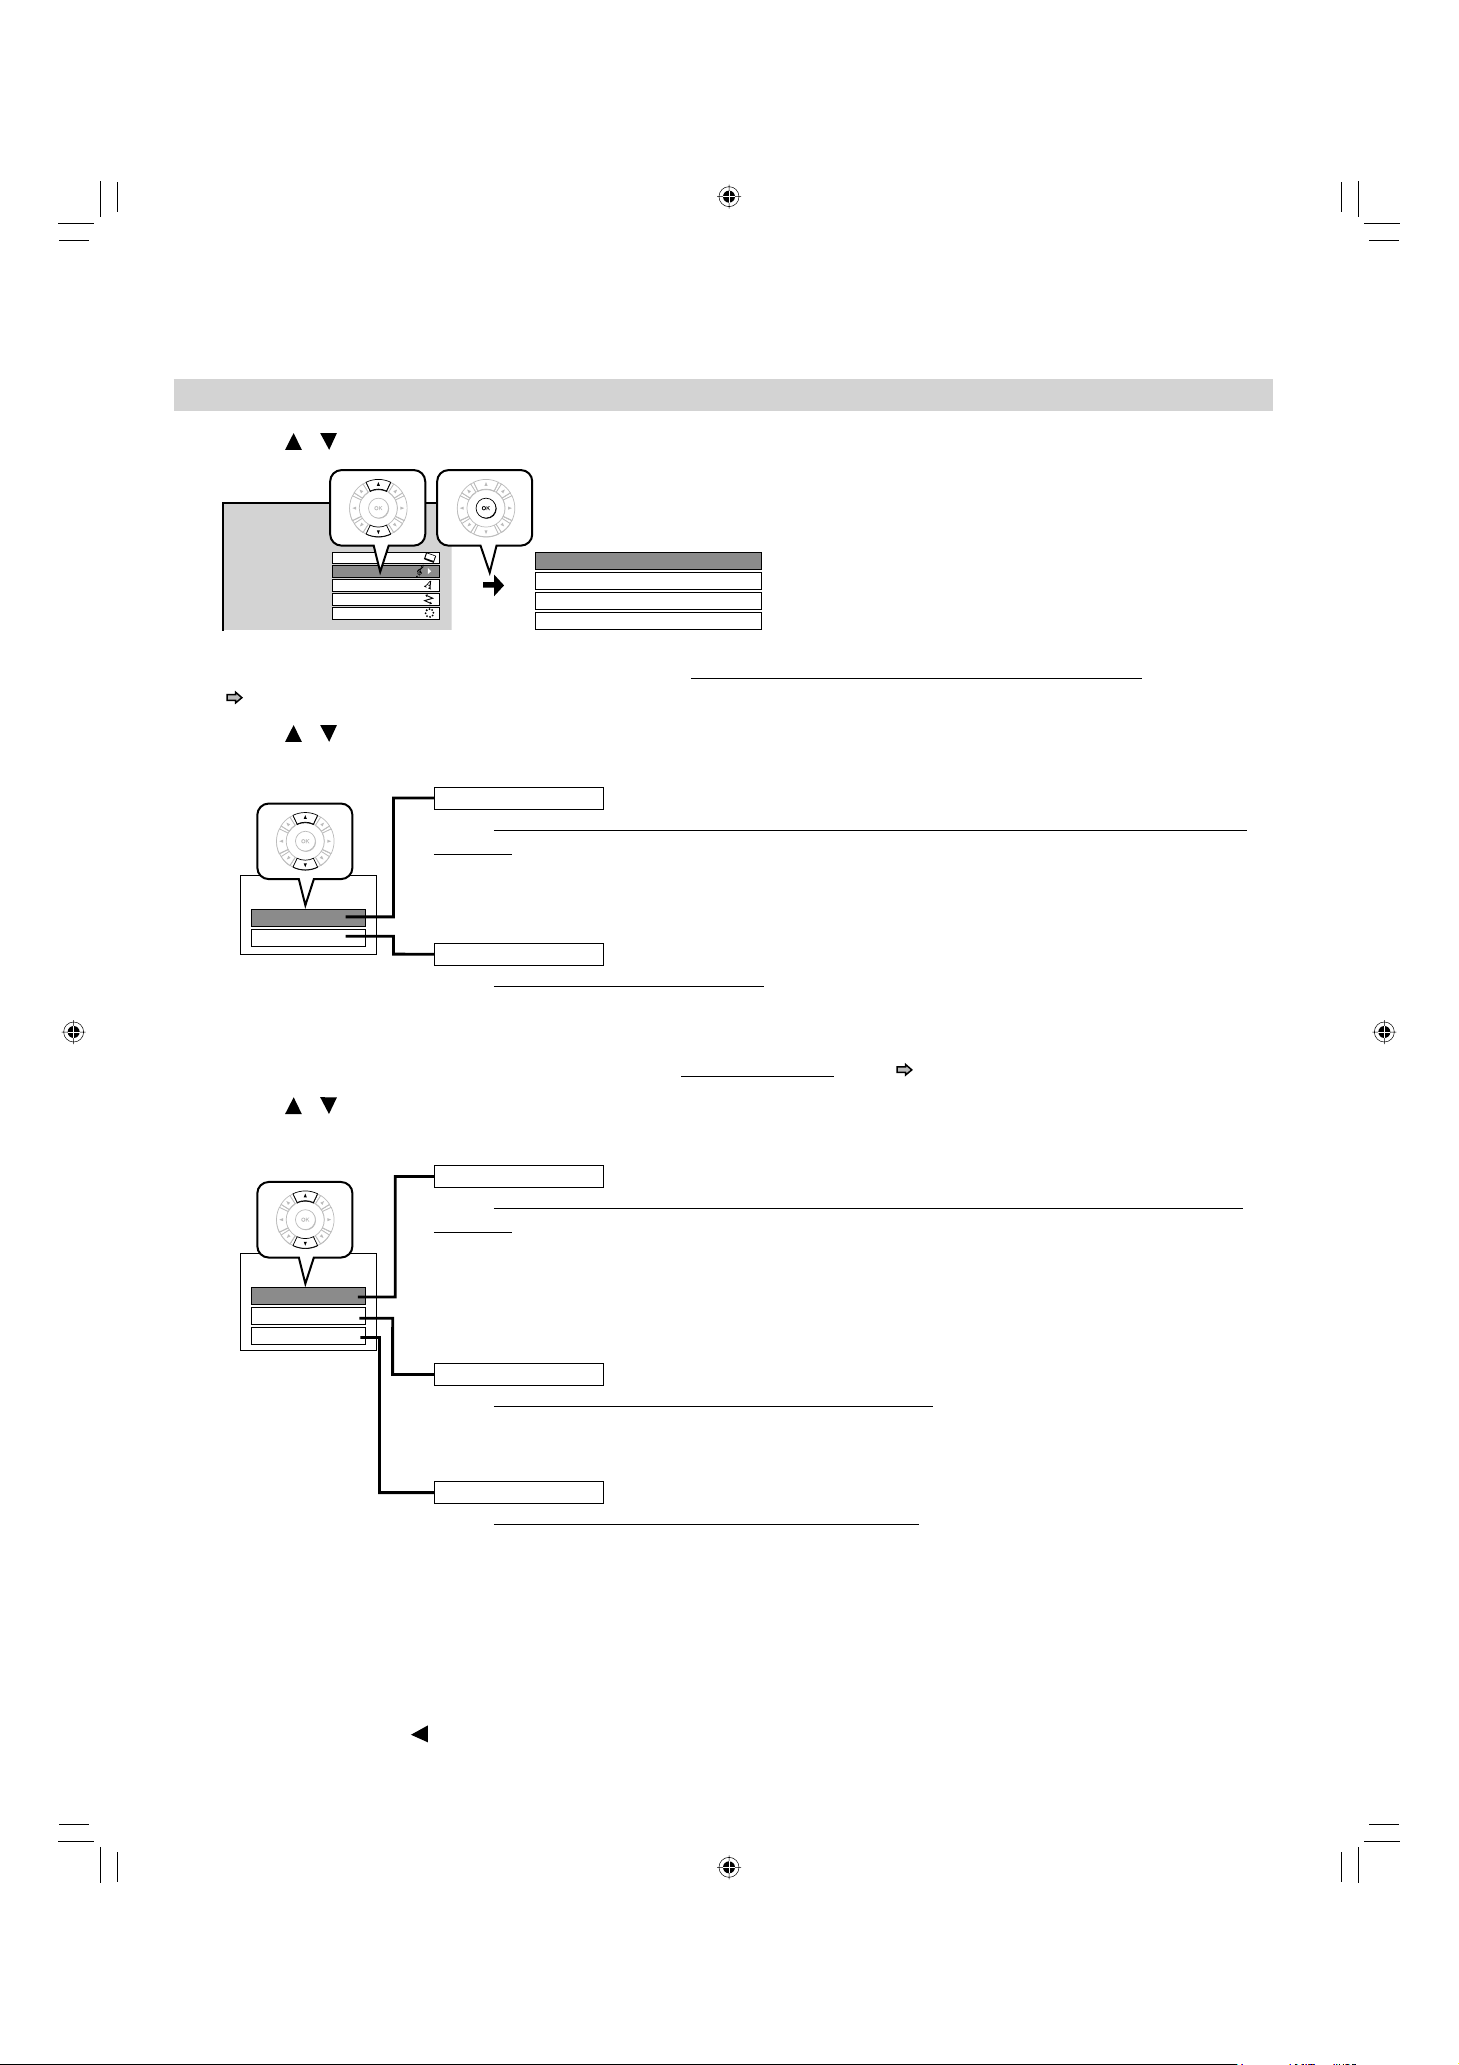
15
Press
/ to select “Audio”, then press OK.
SETUP MENU
16
When you connected an audio system to the DIGITAL AUDIO OUTPUT BITSTREAM/PCM jack
(
page 16):
Press / to select “Digital Out SPDIF”, then press OK.
Select one of the followings according to your connection, and press OK.
Bitstream
When an AV receiver or processor equipped with built-in Dolby Digital, DTS or MPEG
decoder is connected to this player.
When you play a disc recorded in Dolby Digital Plus or Dolby TrueHD format, Dolby Digital sound is
output. When you play a disc recorded in DTS-HD format, the sound is converted to a DTS bitstream. If
the AV receiver or processor does not support DTS, select “PCM”.
PCM
When a 2ch digital stereo amplifi er is connected to this player.
When you play an HD DVD or DVD video disc recorded in Dolby Digital, Dolby Digital Plus, Dolby
TrueHD, DTS or DTS-HD format, sound is converted into PCM (2ch) format.
17
Press RETURN or to return to the menu of step 1.
Select one of the followings according to your connection, and press OK.
Auto
When an HDMI device equipped with built-in Dolby Digital, DTS, MPEG or linear PCM
decoder is connected to this player.
When you play a disc recorded in Dolby Digital Plus, Dolby TrueHD or DTS-HD, PCM is output (core only
for DTS-HD).
When you play a disc recorded in Dolby Digital or DTS format, digital audio signal (bitstream audio) is
output. If a connected HDMI device does not support Dolby Digital, DTS or MPEG, sound is converted
into linear PCM to output.
PCM
When an HDMI device which has multi channel input is connected to this player.
When you play an HD DVD or DVD video disc recorded in multi channel in Dolby Digital, Dolby Digital Plus,
Dolby TrueHD, DTS or DTS-HD format, the sound is decoded and output in multi channel in linear PCM format.
Downmixed PCM
When a 2ch digital stereo AV receiver or processor is connected to this player.
When you play a DVD video disc recorded in Dolby Digital, DTS, MPEG1 or MPEG2 format, sound is
converted into PCM (2ch) format to output.
Note
• Setting “Auto” or “PCM” will reduce output level of multi channel sound from the ANALOG AUDIO OUTPUT
jacks and the DIGITAL AUDIO OUTPUT BITSTREAM/PCM jack if you:
– view the playback picture on an HDMI TV connected to this player.
– play an HD DVD video disc of a certain type, recorded in linear PCM format.
In this case, the output level will be restored by setting to “Downmixed PCM”.
When you connected an HDMI device to the HDMI OUTPUT jack ( page 15, 16):
Press
/ to select “Digital Out HDMI”, then press OK.
Picture
Audio
Language
Ethernet
General
Digital Out SPDIF Bitstream
Digital Out HDMI Auto
Dynamic Range Control Auto
Dialog Enhancement Off
Digital Out SPDIF
Bitstream
PCM
Digital Out HDMI
Downmixed PCM
Auto
PCM
HD-A30KUKCEng.indd21HD-A30KUKCEng.indd21 07.10.48:45:13PM07.10.48:45:13PM
Page 9

22
E: Ethernet
Perform this setting if you connect the player to your LAN ( page 17).
After performing this setting, you need to turn off this player and turn it on again to activate this setting.
If you do not connect, skip to Step 20.
18
Press / to select “Ethernet”, then press OK.
19
Press / to select each of the followings, then press OK.
MAC Address
Off
DHCP Off
Off
Off
NTP Server
Off
Network Speed
56kbps Modem
Cookie Setting Accept
Proxy Setting
To set your network information.
To input proxy server address (when your provider requires the setting).
To display the MAC address of the player. (Fixed. No need to set.)
To adjust the player’s clock via the network time protocol.
To select the speed according to the specification of your LAN.
To select whether you access “Cookies” or not.
On
DHCP
DHCP
IP Address
0... 0 0 0
Subnet Mask
0... 0 0 0
Gateway
0... 0 0 0
Off
Gateway
0... 0 0 0
DNS Server
0 ... 0 0 0
DNS
On
Confirm
OK Cancel
Off
On
DHCP
DHCP
IP Address
192 . ..
168 1 15
Subnet Mask
255 . ..
255 255 0
Gateway
192 . .. 168 1 1
DNS Server
192 . .. 168 1 1
DNS
Off
On
Confirm
OK Cancel
Off
1
2
3
4
5
1
DHCP
2
Proxy Setting
Enter the proxy server address when your provider
requires proxy setting.
3
Skipped when “DHCP”
is set to “On”.
On
Proxy Setting
Proxy
Server
Port
0
Off
Skipped when “DNS”
is set to “On”.
OK Cancel
1 Set “DHCP” to “On” and
press OK button.
The network information is
automatically set.
1 Set “Proxy” to “On” and
press OK button.
3 Select “OK” and press
OK button.
2 Enter the specified data
from the provider.
a) Set “DHCP” to “Off” and
press OK button.
b) Input the addresses using the number buttons.
c) Select “OK” and press OK button.
“IP Address”
This sets a different address within the
same subnet of the PC on your network.
e.g. if the IP address of the PC is
192.168.1.10, set 192.168.1.15 (or some
other unused address.)
“Subnet Mask” This sets the subnet mask of the network
environment that will be connected.
e.g.: 255.255.255.0
“Gateway”
“DNS Server”
This sets the gateway used by the player
(e.g.: 192.168.1.1).
This sets the DNS server to be used by the
player (e.g.: 192.168.1.1).
2 Set “DNS” to “On” and
press OK button.
The DNS server is obtained
automatically from the
DHCP server.
3 Select “Confirm”, then
press OK button.
Confirming starts.
If the setup is successful,
an IP address appears.
Press OK button.
If the setup is not successful:
OK button
CLEAR button
Number buttons
To begin or finish input.
To select a character.
To move to the next character.
To erase to correct.
To input a number.
How to input characters
Refer to the instructions
below for inputting
characters. (Server, Port)
/ buttons
buttons
/
NTP Server
NTP Server
On
Off
Select “On” or “Off” and press OK
button.
“On” The player automatically
accesses an internet server
to adjust time protocol.
“Off” The player does not access
an internet server
to adjust its clock.
Preparation (continued)
HD-A30KUKCEng.indd22HD-A30KUKCEng.indd22 07.10.48:45:13PM07.10.48:45:13PM
Page 10

24
Playing
1
Press OPEN/CLOSE to open the disc tray.
2
Place a disc in the hollow of the disc tray
with the playback side down.
Notes
• Use the button on the front panel or the remote control to open and close the disc tray. Do not push or hold the disc tray while it is moving.
Doing so may cause the player to malfunction.
• Do not load a disc which is unplayable, or any object other than a playable disc.
• Do not apply downforce to the disc tray. Doing so may cause the player to malfunction.
• If the disc tray stops while closing, the mechanical protection system of this player will open it. Do not force it to close. Doing so may
damage the disc tray.
• If the disc tray will not open, turn the player off, and press OPEN/CLOSE on the front panel. This may turn the player on and open the disc
tray. If it still won’t open, contact TOSHIBA Customer Support.
When using a double-sided
disc, turn the label of the
playing side up.
Preparation
• Turn on the TV or audio system and select the corresponding input source that the player is connected to.
• Turn the power on. (
page 18)
Playing a disc
If a loaded disc contains a top menu, a top menu appears when you start playback.
Select a title by / / / (or number buttons), then press OK.
Playback starts from chapter 1 of the selected title.
• Depending on the disc, you may need to press TOP MENU or MENU to display a top menu.
HD DVD
DVD-Video
3
After placing a disc, press OPEN/CLOSE.
Playback starts.
If playback does not start, press
(PLAY).
HD DVD DVD-Video DVD-RW DVD-R CD
Discs recorded on personal devices such as DVD recorders may contain menus, on which items can be
easily selected.
Press MENU, and select a title by / / / , then press OK.
Playback starts from the selected item.
• Discs recorded in DVD VR mode display the recorded contents not in thumbnails but in a list. Select an item on the list
and press OK button.
DVD-RW DVD-R
MENU
OK
3
1
///
3 1
HD-A30KUKCEng.indd24HD-A30KUKCEng.indd24 07.10.48:45:14PM07.10.48:45:14PM
Page 11

25
Note
• If the player freezes for about 15 minutes or more and will not respond to any buttons, holding down ON/STANDBY button on the front panel
for about 10 seconds can force the player to turn off. However, this is an emergency measure, which may cause damage to the player. Avoid
casual use of this measure.
To stop playback
HD DVD DVD-Video DVD-RW DVD-R CD
Press (STOP).
To pause playback
HD DVD DVD-Video DVD-RW DVD-R CD
Press (PAUSE).
To resume press (PLAY).
To resume playback from the location last stopped
HD DVD DVD-Video DVD-RW DVD-R CD
After stopping playback, press RESUME PLAY (
HD DVD
) or (PLAY) (
DVD-Video
DVD-RW DVD-R CD
).
If you want to return to the beginning, press (STOP), then press (PLAY).
Notes
• Pressing
(PLAY) after stopping playback then turning the power off may also resume playback from
the location last stopped.
• Resume feature cannot function when:
- you select a disc menu language (
page 32) or change the parental lock setting ( page 34).
- you open the disc tray.
• There may be a difference in the location where playback resumes depending on the disc.
• It is possible to change the setting from the setup menu while the player retains a location in memory,
however, the new setting can be valid only after the player clears the location memory, i.e., starts resume
playback.
• Some discs or scenes may not permit this operation.
• While the ADV indicator on the front panel illuminates, this feature is not available.
To change playback speed
HD DVD DVD-Video DVD-RW DVD-R CD
Button Function Operation To cancel
Fast reverse playback Pressing this button repeatedly changes
the playback speed.
PLAY
Fast forward playback Pressing this button repeatedly changes
the playback speed.
PLAY
SLOW* Playing in slow-motion Pressing this button repeatedly changes
the playback speed.
PLAY
**
Playing frame by frame
1 Press to pause playback.
2 Press this button repeatedly.
PLAY
To skip to the next
chapter/track
Press this button once. –
To return to the previous
chapter/track
Pressing this button once locates the
beginning of the current chapter or
track.
Pressing this button twice locates the
beginning of the previous chapter or
track.
–
TOP MENU To display a top menu 1 Press this button.
2 Press
/ / / to select a title.
3 Press OK.
TOP MENU
*
Not available in CD playback.
** Some discs may not permit this operation.
TOP MENU
RESUME
PLAY
PAUSE
/
/
SLOW
STOP
HD-A30KUKCEng.indd25HD-A30KUKCEng.indd25 07.10.48:45:15PM07.10.48:45:15PM
Page 12

26
To select the sound
HD DVD DVD-Video DVD-RW DVD-R CD
If a disc contains several languages, you can select a
preferred language from them to hear.
1
During playback, press AUDIO.
The current audio setting appears. (except for some HD DVD
discs)
e.g.
A language code (
page 33) may appear.
2
Press AUDIO while the audio setting is
displayed on the TV screen.
Notes
• Some discs allow you to change audio selections only via the
disc menu. If this is the case, press MENU button and choose the
appropriate language from the selections on the disc menu.
• When you turn on the player or replace a disc, the player returns to
the initial default setting (
page 33). Depending on a disc, a specifi c
type of audio the disc has is output.
• Immediately after you have switched audio output modes, there may
be a temporary discrepancy between the display and actual sound.
Playing (continued)
Audio English 1
To select subtitles
HD DVD DVD-Video DVD-RW DVD-R CD
You can display subtitles on the TV and select a subtitle
language from those included on the disc.
1
During playback, press SUBTITLE.
The current subtitle setting appears. (except for some HD
DVD discs)
e.g.
A language code (
page 33) may appear.
Each time you press
/ , “On” and “Off” alternates. Select
“On” to view subtitles.
2
Press SUBTITLE while the subtitle setting is
displayed on the TV screen.
Subtitle languages which do not appear in the setting are not
included in the disc.
Notes
• Some discs are set to display subtitles automatically.
• Depending on the scene, subtitles may not appear immediately after
you set the subtitle function to on.
• Some discs will allow you to change subtitle languages and turn
subtitles on or off only via the disc menu.
• When you turn on the player or replace a disc, the player returns to
the initial default setting (
page 33). Depending on a disc, a specifi c
type of subtitles the disc has is output.
• Depending on the scene, the subtitle language may not change
immediately after selected.
To select the camera angle
HD DVD DVD-Video DVD-RW DVD-R CD
If the scene was recorded with multiple angles, you can
easily change the camera angle of the scene you are
watching.
1
While playing a scene recorded with multiple
angles (angle icon (
) displayed on the TV
and the front panel), press ANGLE.
The current angle setting appears. (except for some HD DVD
discs)
e.g. Number of angles in the
current title
Angle number
2
While the angle number is displayed, press
ANGLE repeatedly to select the angle number.
Notes
• You can also change the camera angle during still playback. The
camera angle changes to the new setting when you resume normal
playback.
• If you pause a picture immediately after changing a camera angle,
the resumed playback picture may not display the new camera angle.
Angle 1 / 6
ANGLE
DISPLAY
T.SEARCH
CLEAR
SUBTITLE
AUDIO
Number buttons
Subtitle
English 1 Off
HD-A30KUKCEng.indd26HD-A30KUKCEng.indd26 07.10.48:45:16PM07.10.48:45:16PM
Page 13

27
To locate a position
HD DVD DVD-Video DVD-RW DVD-R CD
1
Press T.SEARCH repeatedly to select the
category.
2
Press the number buttons to enter a number.
e.g. To enter 25:
“2”
“5”
e.g. To enter 1 hour, 25 minutes, and 30 seconds:
“1” “2” “5” “3”
“0”
Pressing CLEAR resets the numbers.
3
Press OK.
Playback starts from the specifi ed location.
Notes
• Some discs may not permit these operations.
• While the ADV indicator on the front panel illuminates, these features
are not available.
Category To search by specifying:
Title Title number
Chapter Chapter number
Time Elapsed time of the current title (track)
Track Track number
To play repeatedly
HD DVD DVD-Video DVD-RW DVD-R CD
1
Press REPEAT.
The repeat modes are listed.
(The selections on the list vary depending on category or
status of a disc.)
2
Press / to select the repeat mode.
Mode To repeat:
All Repeat Entire disc
Title Repeat Current title
Chapter Repeat Current chapter
Track Repeat Current track
Disc Repeat Entire disc
A-B Repeat You can specify a segment to repeat.
Select this and press OK.
“
A B Repeat A Point
” appears.
Perform steps 1) and 2) below, and
skip step 3.
1) While the above display appears,
press OK at a start point of a
segment where you want to repeat.
The display changes to
“
A B Repeat B Point
”.
•
To cancel the setting, press REPEAT.
2) Press OK at an end point of a
segment where you want to repeat.
Playback returns to the point A and
repeats between A and B.
3
Press OK.
Repeat playback starts.
Notes
• Some discs may not permit repeat playback operation.
• You can cancel repeat playback also by pressing
(STOP).
To check the current status
HD DVD DVD-Video DVD-RW DVD-R CD
1
Press DISPLAY.
The display on the front panel changes to numbers of a
current title, chapter or track.
e.g.
HD DVD
e.g.
CD
Title number
Chapter
number
Track number
HD DVD DVD-Video DVD-RW
DVD-R
CD
CD
3
Press DISPLAY to turn off the display.
002 00:19:13
00:00:280003
Chapter
Title
Video Codec:
Audio:
Subtitle:
Angle:
Video Output:
Audio Output
:
MPEG4AVC
English 1
None
1/1
1080i
Digital Bitstream
Chapter number
Title number
Elapsed time of a title
Elapsed time of a chapter
Video codec
Language setting
Subtitle setting
Angle number
Definition
Sound output setting
e.g.
CD PLAYER
TRACK 002 00:03:12 / 00:05:16
Track number
Total time of a track
Elapsed time of a track
e.g.
2
Press DISPLAY.
The following on-screen display appears.
HD-A30KUKCEng.indd27HD-A30KUKCEng.indd27 07.10.48:45:17PM07.10.48:45:17PM
Page 14

28
Playing (continued)
A/B/C/D buttons
HD DVD DVD-Video DVD-RW DVD-R CD
Use these buttons as indicated by the video display during HD DVD disc playback.
Depending on the disc contents, the functions of each button may differ.
Cursor controls
HD DVD
DVD-Video DVD-RW DVD-R CD
Future HD DVD discs may include game software and drawing software. If they do you
can use the cursor function for some software.
1
Press CURSOR while a disc with support for cursor use is playing.
2
Use the eight direction buttons to move the cursor.
Move the cursor to select the game target or selection item. For details on actual operations,
also refer to the operations guide for the disc.
Controller port
HD DVD DVD-Video DVD-RW DVD-R CD
The extension port may be used in the future for additional control options.
Requirements for HD DVD discs/Web-enabled network content
• An always-on broadband internet connection
• An HD DVD disc containing or having the capability of downloading studio-provided, web-enabled network content.
Notes
• To minimize any potential compatibility and/or connectivity issues, before attempting to view any studio-provided web-enabled, network content,
it is recommended that you perform the fi rmware update process to ensure that your HD DVD player is using the latest fi rmware version.
• Toshiba is not responsible for any malfunction of the player and/or the internet connection feature due to communication errors/malfunctions
associated with your broadband internet connection, or other connected equipment.
• Toshiba is not responsible for any trouble in your internet connection.
• If you wish to use a wireless network to connect the player, you will need to use a wireless LAN ethernet adapter to connect the player to the
network.
• The features of HD DVD discs made available through the Internet Connection feature are not created or provided by Toshiba, and Toshiba
is not responsible for their functionality or continued availability. Some disc related material available by the Internet Connection may not be
compatible with this player. If you have questions about such content, please contact the producer of the disc.
• Some internet contents may require a higher bandwidth connection.
• Even if the player is properly connected and confi gured, some internet contents may not operate properly because of internet congestion, the
quality or bandwidth of your internet service, problems at the provider of the content or compatibility issues.
• Some internet connection operations may not be possible due to certain restrictions set by the Internet service provider (ISP) supplying your
broadband Internet connection.
• Any fees charged by an ISP including, without limitation, connection charges are your responsibility.
• A 10 Base-T or 100 Base-TX LAN port is required for connection to this player. If your internet service does not allow for such a connection, you
will not be able to connect the player.
• A DSL modem is required to use DSL service and a cable modem is required to use cable modem service. Depending on the access method
of and subscriber agreement with your ISP, you may not be able to use the internet connection feature contained in this player or you may be
limited to the number of devices you can connect at the same time. (If your ISP limits subscription to one device, this player may not be allowed
to connect when a PC is already connected.)
• The use of a “Router” may not be allowed or its usage may be limited depending on the policies and restrictions of your ISP. For details, contact
your ISP directly.
CURSOR
A/B/C/D
HD DVD playing options in the future
Extension port
HD-A30KUKCEng.indd28HD-A30KUKCEng.indd28 07.10.48:45:17PM07.10.48:45:17PM
Page 15

29
Output sound conversion table
Disc
ADV
indicator
Audio format
“Digital Out SPDIF” “Digital Out HDMI”
Bitstream PCM Auto PCM
2
Downmixed PCM
HD DVD Video
Advanced
content
ADV
DD Plus/Dolby
TrueHD
Dolby Bitstream 2ch PCM Depend on HDMI receiver up to 5.1ch PCM
3
2ch PCM
1
dts-HD/L-PCM DTS Bitstream 2ch PCM
HD DVD Video
Standard content
(off)
DD plus Bitstream 2ch PCM Depend on HDMI receiver up to 5.1ch PCM
2
2ch PCM
True HD 48kHz Dolby Bitstream 2ch PCM Depend on HDMI receiver up to 5.1ch PCM 2ch PCM
96kHz Dolby Bitstream 2ch PCM
1
Depend on HDMI receiver up to 5.1ch PCM 2ch PCM
1
192kHz Dolby Bitstream 2ch PCM
1
Depend on HDMI receiver 2ch PCM
1
2ch PCM
1
dts-HD Bitstream 2ch PCM Depend on HDMI receiver up to 5.1ch PCM
2
2ch PCM
L-PCM 48kHz DTS Bitstream 2ch PCM Depend on HDMI receiver up to 5.1ch PCM 2ch PCM
96kHz DTS Bitstream 2ch PCM
1
Depend on HDMI receiver up to 5.1ch PCM
3
2ch PCM
1
192kHz DTS Bitstream 2ch PCM
1
Depend on HDMI receiver 2ch PCM
3
2ch PCM
1
MPEG Bitstream 2ch PCM Depend on HDMI receiver 2ch PCM 2ch PCM
DVD-Video (off)
DD Bitstream 2ch PCM Depend on HDMI receiver up to 5.1ch PCM 2ch PCM
L-PCM 48kHz 2ch PCM 2ch PCM 2ch PCM 2ch PCM 2ch PCM
96kHz 2ch PCM
1
2ch PCM
1
2ch PCM 2ch PCM
3
2ch PCM
1
dts Bitstream 2ch PCM Depend on HDMI receiver up to 5.1ch PCM 2ch PCM
MPEG Bitstream 2ch PCM Depend on HDMI receiver 2ch PCM 2ch PCM
CD (off)
L-PCM 44.1kHz 2ch PCM 2ch PCM 2ch PCM 2ch PCM 2ch PCM
dts 44.1kHz Bitstream 2ch PCM Depend on HDMI receiver up to 5.1ch PCM 2ch PCM
DVD-VR (off)
DD Bitstream 2ch PCM Depend on HDMI receiver 2ch PCM 2ch PCM
L-PCM 2ch PCM 2ch PCM 2ch PCM 2ch PCM 2ch PCM
MPEG Bitstream 2ch PCM Depend on HDMI receiver 2ch PCM 2ch PCM
1: Downsampled PCM.
2: Up to 5.1 channel PCM audio output is possible only when the connected device supports multi channel output.
3: This output format is possible when the resolution setting is “720p”, “1080i” or “1080p”. When the resolution setting is set to “480p”, this output
format depends on HDMI receiver.
Notes
• The main title content of most movie HD DVD discs is “advanced content”. The player turns on the ADV indicator when an HD DVD disc which
includes such content is loaded.
• The DIGITAL AUDIO OUTPUT BITSTREAM/PCM jack may not output sound you select. In this instance, set “Digital Out SPDIF” to “PCM”.
• The ANALOG AUDIO OUTPUT jacks always output 2ch sound only.
HD-A30KUKCEng.indd29HD-A30KUKCEng.indd29 07.10.48:45:18PM07.10.48:45:18PM
Page 16

30
Customizing the function settings
Group Setting Disc Details Page
Picture TV Shape
HD DVD DVD-Video DVD-RW DVD-R CD
To select a picture size according to the aspect
ratio of your TV.
31
Enhanced Black
Level
HD DVD DVD-Video DVD-RW DVD-R CD
To select the black level (0 IRE or 7.5 IRE). 31
RGB Output Range
HD DVD DVD-Video DVD-RW DVD-R
CD
To select the RGB range according to the output
range of the connected DVI monitor.
31
Picture Mode
HD DVD DVD-Video DVD-RW DVD-R CD
To select the system of output signal
corresponding to playback source. (Only when
connected to a PROGRESSIVE TV.)
32
Resolution Setting
HD DVD DVD-Video DVD-RW DVD-R CD
To select the resolution of the player’s output,
according to the connected TV.
20
Audio Digital Out SPDIF
HD DVD DVD-Video DVD-RW DVD-R CD
To select the output sound format when connecting
the DIGITAL AUDIO OUTPUT jack.
21
Digital Out HDMI
HD DVD DVD-Video DVD-RW DVD-R CD
To select the output sound format when connecting
the HDMI OUTPUT jack.
21
Dynamic Range
Control
HD DVD DVD-Video DVD-RW DVD-R CD
To turn on or off a function that makes faint sounds
easier to hear even if you lower the volume during
late-hour playback.
32
Dialog Enhancement
HD DVD DVD-Video DVD-RW DVD-R CD
To turn on or off a function that increases dialog
volume of a disc playback.
32
Language Disc Menu Language
HD DVD DVD-Video DVD-RW DVD-R CD
To select a preferred language for disc menus. 32
Subtitle Language
HD DVD DVD-Video DVD-RW DVD-R CD
To select a preferred language for subtitles. 33
Audio Language
HD DVD DVD-Video DVD-RW DVD-R CD
To select a preferred language for the sound track. 33
On Screen Language
HD DVD DVD-Video DVD-RW DVD-R CD
To select a preferred language for on-screen
displays.
33
Ethernet
HD DVD DVD-Video DVD-RW DVD-R CD
To set up internet connection feature. 22
1
During stop, press SETUP.
“SETUP MENU” appears.
2
Press
/ to select the group that contains a desired item, then press
OK.
3
Press
/ to select the setting item, then press OK.
4
Refer to the explanations on pages beginning from 31, to change the
selection by
/ or other buttons, then press OK.
5
Repeat step 3 and 4 to set other items if necessary.
6
Press SETUP.
“SETUP MENU” disappears and the setting is completed.
You can change the default settings to customize performance to your preference.
To return to the
previous menu
SETUP
OK
/
HD-A30KUKCEng.indd30HD-A30KUKCEng.indd30 07.10.48:45:18PM07.10.48:45:18PM
Page 17

31
Group Setting Disc Details Page
General Parental Lock
HD DVD
DVD-Video
DVD-RW
DVD-R
CD
To turn the parental lock function on or off. 34
Clock Set
HD DVD DVD-Video DVD-RW DVD-R CD
To set the clock of the player. 19
OSD On/Off
HD DVD DVD-Video DVD-RW DVD-R CD
To activate or deactivate the operational status
display on the TV screen.
35
Remote Controller
Sound
HD DVD DVD-Video DVD-RW DVD-R CD
To turn on or off the confi rmation beeper
announcing when each remote command is
received.
35
HDMI Control
HD DVD DVD-Video DVD-RW DVD-R CD
To turn on or off the features offered with CEC
(Consumer Electronics Control).
35
Screen Saver
HD DVD DVD-Video DVD-RW DVD-R CD
To turn on or off the screen saver (screen
protection to prevent image burn).
35
Maintenance
HD DVD DVD-Video DVD-RW DVD-R CD
To reset player options to factory defaults or check
for fi rmware updates.
35
Twin Format Disc
HD DVD DVD-Video DVD-RW DVD-R CD
To select the layer to play of an HD DVD Twin
Format Disc. (Not available while a disc is loaded.)
35
Picture
Note
• Actual effects of these settings may vary depending on performance of connected device.
TV Shape
16:9 Select when a 16:9 wide TV is connected.
4:3 Select when a standard 4:3 TV is connected.
Displays pictures cropped to fi ll your TV screen. Both of the picture’s sides are cut off.
4:3 Letter Box Select when a standard 4:3 TV is connected.
Displays theatrical images with masking bars above and below the picture.
Notes
• When an HD DVD disc or a DVD video disc has a particular available picture shape, the contents may not be compatible with other
picture shapes.
• DVD video discs containing 4:3 picture only always display 4:3 pictures regardless of this setting.
• If “16:9” is selected while connecting a 4:3 TV, playback pictures may be distorted horizontally or shrink vertically. Make this setting
according to your TV shape.
• Actual picture shape may depend on signal types of broadcasts or input sources, or settings on the connected TV. Refer to the owner’s
manual of your TV.
Enhanced Black Level
On To display deeper, richer black than in “Off” setting. (0 IRE)
Off Normal black level. (7.5 IRE)
Note
• Effective only in 480i output from the COMPONENT VIDEO OUTPUT jacks or the VIDEO OUTPUT jack.
RGB Output Range
Standard For a monitor of RGB range 16-235.
Enhanced For a monitor of RGB range 0-255.
Note
• If “Standard” pales black or “Enhanced” blackens too much, change the setting.
Settings
(Continued)
HD-A30KUKCEng.indd31HD-A30KUKCEng.indd31 07.10.48:45:19PM07.10.48:45:19PM
Page 18

32
Customizing the function settings (Continued)
Picture Mode
There are two types of source content in pictures recorded in DVD video discs: fi lm content (pictures recorded from fi lms at 24
frames per second) and video content (video signals recorded at 30 frames per second). Make this selection according to the type
of content being viewed.
Film The player converts fi lm content pictures in the progressive output format appropriately. Suitable for playback
of fi lm content pictures.
Video The player fi lters video signal, and converts it in the progressive output format appropriately. Suitable for
playback of video content pictures.
Auto Select this position normally. The player automatically detects source content, fi lm or video, of playback
source, and converts that signal in the progressive output format in an appropriate method.
Note
• The player may not be able to detect the source (fi lm or video) of some material. If you notice undesirable picture performance, try
selecting “Film” or “Video”.
Resolution Setting
See page 20.
Audio
Digital Out SPDIF
See page 21.
Digital Out HDMI
See
page 21.
Dynamic Range Control
To turn on or off a function that makes faint sounds easier to hear even if you lower the volume during late-hour playback.
Auto While playing an HD DVD video disc recorded in Dolby TrueHD format, this function will be automatically
activated or disabled according to certain command included in the content. For other discs, this function is
activated.
On This function is activated.
Off This function is disabled.
Notes
• This function is effective only in playback of HD DVD or DVD video discs recorded in Dolby Digital, Dolby Digital Plus or Dolby TrueHD
format.
• The effect level of this function vary depending on the disc.
• Not effective in Dolby TrueHD 96 kHz 5.1 channel sound.
Dialog Enhancement
To turn on or off a function that increases dialog volume of a disc playback.
On This function is activated.
Off This function is disabled.
Notes
• This function is effective only in playback of Dolby Digital recorded HD DVD or DVD video discs.
• The effect level of this function vary depending on the disc.
Language
Disc Menu Language
To select a preferred language for disc menus.
English / French / German / Spanish / Italian / Dutch / Russian / Swedish / Finnish / Greek / Turkish
Other To make a further language choice.
Refer to “How to select a language” (
page 33).
Note
• Some discs may be played in a different language from that you selected, as the disc may contain alternate language.
HD-A30KUKCEng.indd32HD-A30KUKCEng.indd32 07.10.48:45:20PM07.10.48:45:20PM
Page 19

33
How to select a language:
1) Obtain the code from the list below.
2) Enter the code as below.
3) Select “OK” and press OK button.
Subtitle Language
To select a preferred language for subtitles.
English / French / German / Spanish / Italian / Dutch / Russian / Swedish / Finnish / Greek / Turkish
None To disable subtitles.
Other To make a further language choice.
Refer to “How to select a language” (
page 33).
Notes
• Some discs may be set to display subtitles in a different language from that you selected, as the disc may contain alternate language.
• Some discs allow you to change subtitle selections only via the disc menu. In this case, press MENU button and choose the appropriate
subtitle language from the selection on the disc menu.
Audio Language
To select a preferred language for the sound track.
English / French / German / Spanish / Italian / Dutch / Russian / Swedish / Finnish / Greek / Turkish
Other To make a further language choice.
Refer to “How to select a language” (
page 33).
Note
• Some discs may be played in a different language from that you selected, as the disc may contain alternate language.
On Screen Language
To select a preferred language for on-screen displays.
English / French / German / Spanish / Italian / Dutch / Russian / Swedish / Finnish / Greek / Turkish
– – –
No alternate
language
CHI (ZH) Chinese
DUT (NL) Dutch
ENG (EN) English
FRE (FR) French
GER (DE) German
ITA (IT) Italian
JPN (JA) Japanese
KOR (KO) Korean
MAY (MS) Malay
SPA (ES) Spanish
AA Afar
AB Abkhazian
AF Afrikaans
AM Amharic
AR Arabic
AS Assamese
AY Aymara
AZ Azerbaijani
BA Bashkir
BE Belorussian
BG Bulgarian
BH Bihari
BI Bislama
BN Bengali, Bangla
BO Tibetan
BR Breton
CA Catalan
CO Corsican
CS Czech
CY Welsh
DA Danish
DZ Bhutani
EL Greek
EO Esperanto
ET Estonian
EU Basque
FA Persian
FI Finnish
FJ Fiji
FO Faroese
FY Frisian
GA Irish
GD Scottish Gaelic
GL Galician
GN Guarani
GU Gujarati
HA Hausa
HI Hindi
HR Croatian
HU Hungarian
HY Armenian
IA Interlingua
IE Interlingue
IK Inupiak
IN Indonesian
IS Icelandic
IW Hebrew
JI Yiddish
JW Javanese
KA Georgian
KK Kazakh
KL Greenlandic
KM Cambodian
KN Kannada
KS Kashmiri
KU Kurdish
KY Kirghiz
LA Latin
LN Lingala
LO Laotian
LT Lithuanian
LV Latvian, Lettish
MG Malagasy
MI Maori
MK Macedonian
ML Malayalam
MN Mongolian
MO Moldavian
MR Marathi
MT Maltese
MY Burmese
NA Nauru
NE Nepali
NO Norwegian
OC Occitan
OM (Afan) Oromo
OR Oriya
PA Panjabi
PL Polish
PS Pashto, Pushto
PT Portuguese
QU Quechua
RM Rhaeto-Romance
RN Kirundi
RO Rumanian
RU Russian
RW Kinyarwanda
SA Sanskrit
SD Sindhi
SG Sango
SH Serbo-Croatian
SI Singhalese
SK Slovak
SL Sovenian
SM Samoan
SN Shona
SO Somali
SQ Albanian
SR Serbian
SS Siswati
ST Sesotho
SU Sundanese
SV Swedish
SW Swahili
TA Tam il
TE Telugu
TG Tajik
TH Thai
TI Tigrinya
TK Turkmen
TL Tagalog
TN Setswana
TO Tongan
TR Turkish
TS Tsonga
TT Tatar
TW Twi
UK Ukrainian
UR Urdu
UZ Uzbek
VI VIetnamese
VO Volapük
WO Wolof
XH Xhosa
YO Yoruba
ZU Zulu
Code Language Code Language Code Language Code Language Code Language
Language code list
SU OK Cancel
to
/
change
e.g.
to shift
/
HD-A30KUKCEng.indd33HD-A30KUKCEng.indd33 07.10.48:45:20PM07.10.48:45:20PM
Page 20

34
Customizing the function settings (Continued)
Ethernet
See page 22.
General
Parental Lock
HD DVD and DVD video discs equipped with the Parental Lock function have a predetermined limitation level. The limitation level or
limitation method may differ depending on the disc. For example the whole contents of a disc may not be played back, or an extreme
violent scene may be cut or replaced automatically by another scene.
Important
• Depending on discs, it may not be evident whether the disc is compatible with Parental Lock function. Make sure that Parental Lock
function you set is activated correctly.
1 Enter a 4-digit password by using the number buttons, then press OK button.
When you use the player for the fi rst time, set a new password of 4-digit. If you make a mistake entering your password, press
CLEAR button before pressing OK button, and re-enter the correct password.
2 Set the details.
a) Select “On” or “Off” by pressing
/ buttons.
b) Enter the code of a country/area whose standards were used to rate a disc, referring to the list below.
Country/Area Code
AUSTRALIA AU
BELGIUM BE
CANADA CA
CHINA CN
CHINA HONG KONG HK
DENMARK DK
FINLAND FI
FRANCE FR
GERMANY DE
Country/Area Code
INDONESIA ID
ITALY IT
JAPAN JP
MALAYSIA MY
NETHERLANDS NL
NORWAY NO
PHILIPPINES PH
RUSSIAN FEDERATION RU
SINGAPORE SG
Country/Area Code
SPAIN ES
SWEDEN BE
SWITZERLAND CH
TAIWAN TW
THAILAND TH
UNITED KINGDOM GB
UNITED STATES US
c) Select the desired limitation level.
Unless the Parental Lock function is set to “Off”, a disc that has a higher limitation level than your selected limitation level cannot
be played back. For example, if you select level 7, discs exceeding level 8 are locked and cannot be played back.
When “US” is selected, its limitation level corresponds to the following settings.
Level 7: NC-17 Level 6: R Level 4: PG13 Level 3: PG Level 1: G
3 Select “OK” then press OK button.
To change the limitation level of Parental Lock function
Follow steps 1 - 3 above.
To change the password
1 At step 1, press STOP button 4 times then press OK button.
The password is cleared.
2 Enter a new 4-digit password by using the number buttons.
3 Press OK button.
On
Select this to activate Parental Lock
function or to change the setting.
Off
Deactivates the Parental Lock function.
Skip b) and c) to go to 3.
/
change
Lock
to
Off
a) b) c)
Parental Lock
Area Code Level
S 8U OK Cancel
/
to shift
HD-A30KUKCEng.indd34HD-A30KUKCEng.indd34 07.10.48:45:21PM07.10.48:45:21PM
Page 21

35
Clock Set
See page 19.
OSD On/Off
On Activates the operational status display (e.g.,
) on the TV screen.
Off Deactivates the operational status display (e.g.,
) on the TV screen.
Remote Controller Sound
On Turns on the beep sound.
Off Turns off the beep sound.
HDMI Control (CE-Link)
To turn on or off the features offered with CEC (Consumer Electronics Control) when an HDMI device is connected to this player.
Use of HDMI Control which is a feature based on HDMI-CEC requires an HDMI-CEC compatible display device.
Enable HDMI
control
Select “On” to control this player using the remote control of your TV.
To disable this function, select “Off”.
OneTouchPlay (Only when “Enable HDMI control” is set to “On”)
Select “On” to turn the connected TV on if it is off and set its input to the player automatically to display the
player’s picture, by pressing one of (PLAY), MENU, RESUME PLAY, TOP MENU buttons.
To disable this function, select “Off”.
SystemStandby (Only when “Enable HDMI control” is set to “On”)
Select “On” to turn off both the player and the connected TV from the TV’s remote control.
To disable this function, select “Off”.
Notes
• Depending on the specifi cations of your TV, this function does not work even when your TV is HDMI-compatible.
• All the above features may not always work on all compatible TVs.
Screen Saver
Auto Power Off Turns the player off if stop mode or picture pausing continues for about 20 minutes.
On Activates the screen saver if stop mode or picture pausing continues for about 20 minutes.
Off Deactivates the screen saver.
Notes
• Toshiba does not guarantee that this function will protect your display.
• To close the screen saver, press any button on the player or the remote control.
• When an HD DVD disc is used, this function activates only in stop mode.
Maintenance
Initialize To reset all the settings listed on
page 30, 31 to factory set default.
Press
/ buttons to select “Yes” then press OK button.
Update (Firmware
update)
If you have a broadband internet service, you may obtain fi rmware update over the internet using the LAN
port on the back of your player.
• BEFORE BEGINNING THE FIRMWARE UPDATE PROCESS, BE SURE TO REMOVE ANY DISCS FROM
YOUR PLAYER.
Please confi gure the LAN port (
page 17). You may need to turn on DHCP and DNS ( page 22).
• Press SETUP and select “General” > “Maintenance”. Follow the instructions on the screen.
• If a fi rmware update is available for your player, the player will download it. Once the fi rmware update
download process has fi nished, the player’s power will automatically switch off. You must wait until this
process has fi nished.
• DO NOT UNPLUG, TURN OFF, OR USE ANY OTHER FEATURE OF YOUR PLAYER DURING THE
FIRMWARE UPDATE PROCESS. Doing so will cause the writing of the fi rmware update to the player to be
halted and the player may no longer operate properly. If the player stops working, please contact Toshiba
Customer Solutions at (800) 319-6684.
• If no fi rmware update is available, the player will quickly exit the fi rmware update process.
Persistent Storage To open the menu to control player’s memory allocated for content.
The menu selections will vary depending on the content. Operate following the instructions displayed on your
screen.
Twin Format Disc
To select a layer to play, HD DVD or DVD of an HD DVD Twin Format Disc. (Not available if a disc is loaded.)
HD DVD Only the HD DVD layer is played.
DVD Only the DVD layer is played.
Note
• For combination discs, select the desired version by disc side (see label for information).
HD-A30KUKCEng.indd35HD-A30KUKCEng.indd35 07.10.48:45:22PM07.10.48:45:22PM
Page 22

36
Before calling service personnel
Before accessing, try updating this player’s fi rmware. For details on how to update, see “Update (Firmware
update)” ( page 35).
If you experience any of the following diffi culties while using this unit, check the list below before consulting your
nearest Toshiba dealer.
Symptom Remedy Page
No power. • Is the power plug disconnected? Check the power connection. 17
No picture. • Is the cable for connecting the player and TV disconnected or not connected properly?
Check the connections.
15
• Switch the input of the connected TV to the signal from the player. –
• Are both the HDMI OUTPUT jack and the COMPONENT VIDEO OUTPUT jacks
connected simultaneously? Select either connection and make the appropriate setting.
15
• In case the menu of “Resolution Setting” disappears, make composite video (yellow)
connection to restore it, then select the resolution which is compatible with the connected
TV.
20
No sound. • Is the audio cable disconnected? 14, 16
• Is the volume of the device turned down to the minimum level? Check the volume. –
• Switch the audio input of the device connected by the audio cable to the input from the
player.
–
• Set “Digital Out SPDIF” or “Digital Out HDMI” properly in accordance with the connected
device and connection procedure.
21
• Change the output resolution so that sound can be heard. 20
• If using the optical digital output for a Dolby Digital Plus, Dolby TrueHD, DTS-HD or DTS
soundtrack, be sure your AV receiver or processor is set to use the input connected to
your player and is set to decode a DTS bitstream. If your AV receiver or processor does
not support DTS, select PCM output on the player.
21
The disc does not play. • Make sure the disc type can be played with the player. 8
• Is the disc dirty or scratched? Check or clean the disc. 8
• If the disc is a DVD-RW or DVD-R disc, fi nalize the disc before attempting to play it with
the player.
–
• If the disc includes parent lock support, playback is restricted while the parent lock of the
player is set. Cancel Parental Lock or change the restriction level.
34
Playback picture has noise. • If video from the player is watched via a video recorder or on a TV with a built-in video
recorder, the copy guard may prevent images from being displayed properly. Be sure to
connect the player directly to the TV.
15
Playback picture does not
move smoothly.
• “Resolution Setting” > “up to 1080p/24Hz” is selected. Change the setting. 20
The remote control does not
work.
• Are the batteries of the remote control dead? Replace the batteries. 13
• Make sure the remote control is within range and pointed in the correct direction. 13
HDMI Control (CE-Link) does
not work.
• Make sure the HDMI cable is fi rmly connected, then turn on both the TV and the player
again.
35
Screen freezes and no buttons
work.
• Pressing ON/STANDBY button on the player for approximately ten seconds forces the
player to turn off. Turn the player off and then on again.
–
After powering on, “Clock Set”
menu appears.
• The power supply to the player may have been disconnected. Reset the clock. 19
HD-A30KUKCEng.indd36HD-A30KUKCEng.indd36 07.10.48:45:22PM07.10.48:45:22PM
Page 23

39
TO USE THE PROGRAM (INCLUDING BUT NOT LIMITED TO LOSS
OF DATA OR DATA BEING RENDERED INACCURATE OR LOSSES
SUSTAINED BY YOU OR THIRD PARTIES OR A FAILURE OF THE
PROGRAM TO OPERATE WITH ANY OTHER PROGRAMS), EVEN
IF SUCH HOLDER OR OTHER PARTY HAS BEEN ADVISED OF THE
POSSIBILITY OF SUCH DAMAGES.
END OF TERMS AND CONDITIONS
How to Apply These Terms to Your New Programs
If you develop a new program, and you want it to be of the greatest
possible use to the public, the best way to achieve this is to make it free
software which everyone can redistribute and change under these terms.
To do so, attach the following notices to the program. It is safest to attach
them to the start of each source fi le to most effectively convey the exclusion of
warranty; and each fi le should have at least the "copyright" line and a pointer
to where the full notice is found.
<One line to give the program's name and a brief idea of what it
does.>
Copyright © 19yy <name of author>
This program is free software; you can redistribute it and/or modify it
under the terms of the GNU General Public License as published by
the Free Software Foundation; either version 2 of the License, or (at
your option) any later version.
This program is distributed in the hope that it will be useful, but
WITHOUT ANY WARRANTY; without even the implied warranty of
MERCHANTABILITY or FITNESS FOR A PARTICULAR PURPOSE.
See the GNU General Public License for more details.
You should have received a copy of the GNU General Public
License along with this program; if not, write to the Free Software
Foundation,Inc., 59 Temple Place, Suite 330, Boston, MA
02111-1307 USA
Also add information on how to contact you by electronic and paper mail.
If the program is interactive, make it output a short notice like this when it
starts in an interactive mode:
Gnomovision version 69, Copyright © 19yy name of author
Gnomovision comes with ABSOLUTELY NO WARRANTY; for
details type `show w'. This is free software, and you are welcome to
redistribute it under certain conditions; type `show c' for details.
The hypothetical commands `show w' and `show c' should show the
appropriate parts of the General Public License. Of course, the commands
you use may be called something other than `show w' and `show c'; they
could even be mouse-clicks or menu items – whatever suits your program.
You should also get your employer (if you work as a programmer) or your
school, if any, to sign a "copyright disclaimer" for the program; if necessary.
Here is a sample; alter the names:
Yoyodyne, Inc., hereby disclaims all copyright interest in the
program `Gnomovision' (which makes passes at compilers) written
by James Hacker.
<signature of Ty Coon>,1 April 1989 Ty Coon, President of Vice
This General Public License does not permit incorporating your program
into proprietary programs. If your program is a subroutine library, you may
consider it more useful to permit linking proprietary applications with the
library. If this is what you want to do, use the GNU Library General Public
License instead of this License.
ExhibitB
GNU LESSER GENERAL PUBLIC LICENSE Version 2.1, February
1999
Copyright ©1991, 1999 Free Software Foundation, Inc. 59 Temple Place,
Suite 330, Boston, MA 02111-1307 USA Everyone is permitted to copy and
distribute verbatim copies of this license document, but changing it is not
allowed.
[This is the fi rst released version of the Lesser GPL. It also counts as the
successor of the GNU Library Public License, version 2, hence the version
number 2.1.]
Preamble
The licenses for most software are designed to take away your freedom
to share and change it. By contrast, the GNU General Public Licenses are
intended to guarantee your freedom to share and change free software – to
make sure the software is free for all its users.
This license, the Lesser General Public License, applies to some specially
designated software packages – typically libraries – of the Free Software
Foundation and other authors who decide to use it. You can use it too, but
we suggest you fi rst think carefully about whether this license or the ordinary
General Public License is the better strategy to use in any particular case,
based on the explanations below.
When we speak of free software, we are referring to freedom of use, not
price. Our General Public Licenses are designed to make sure that you have
the freedom to distribute copies of free software (and charge for this service
if you wish); that you receive source code or can get it if you want it; that you
can change the software and use pieces of it in new free programs; and that
you are informed that you can do these things.
To protect your rights, we need to make restrictions that forbid distributors
to deny you these rights or to ask you to surrender these rights. These
restrictions translate to certain responsibilities for you if you distribute copies
of the library or if you modify it.
For example, if you distribute copies of the library, whether gratis or for a
fee, you must give the recipients all the rights that we gave you. You must
make sure that they, too, receive or can get the source code. If you link other
code with the library, you must provide complete object fi les to the recipients,
so that they can relink them with the library after making changes to the library
and recompiling it. And you must show them these terms so they know their
rights.
We protect your rights with a two-step method: (1) we copyright the library,
and (2) we offer you this license, which gives you legal permission to copy,
distribute and/ or modify the library.
To protect each distributor, we want to make it very clear that there is no
warranty for the free library. Also, if the library is modifi ed by someone else
and passed on, the recipients should know that what they have is not the
original version, so that the original author's reputation will not be affected by
problems that might be introduced by others.
Finally, software patents pose a constant threat to the existence of any free
program. We wish to make sure that a company cannot effectively restrict the
users of a free program by obtaining a restrictive license from a patent holder.
Therefore, we insist that any patent license obtained for a version of the
library must be consistent with the full freedom of use specifi ed in this license.
Most GNU software, including some libraries, is covered by the ordinary
GNU General Public License. This license, the GNU Lesser General Public
License, applies to certain designated libraries, and is quite different from the
ordinary General Public License. We use this license for certain libraries in
order to permit linking those libraries into non-free programs.
When a program is linked with a library, whether statically or using a
shared library, the combination of the two is legally speaking a combined
work, a derivative of the original library. The ordinary General Public License
therefore permits such linking only if the entire combination fi ts its criteria
of freedom. The Lesser General Public License permits more lax criteria for
linking other code with the library.
We call this license the "Lesser" General Public License because it does
Less to protect the user's freedom than the ordinary General Public License.
It also provides other free software developers Less of an advantage over
competing non-free programs. These disadvantages are the reason we use
the ordinary General Public License for many libraries. However, the Lesser
license provides advantages in certain special circumstances.
For example, on rare occasions, there may be a special need to encourage
the widest possible use of a certain library, so that it becomes a de-facto
standard. To achieve this, non-free programs must be allowed to use the
library. A more frequent case is that a free library does the same job as widely
used non-free libraries. In this case, there is little to gain by limiting the free
library to free software only, so we use the Lesser General Public License.
In other cases, permission to use a particular library in non-free programs
enables a greater number of people to use a large body of free software. For
example, permission to use the GNU C Library in non-free programs enables
many more people to use the whole GNU operating system, as well as its
variant, the GNU/Linux operating system.
Although the Lesser General Public License is Less protective of the
users’ freedom, it does ensure that the user of a program that is linked with
the Library has the freedom and the wherewithal to run that program using a
modifi ed version of the Library.
The precise terms and conditions for copying, distribution and modifi cation
HD-A30KUKCEng.indd39HD-A30KUKCEng.indd39 07.10.48:45:23PM07.10.48:45:23PM
Page 24

43
Specifi cation
Power requirement
32.0W
Power supply
120V AC 60Hz
Mass
3.3kg
External dimension
Width 430 x Height 59.5 x Depth 327mm
Signal system
Standard NTSC Color TV system
Laser
Semiconductor laser
Wavelength: 405nm/650nm/780nm
VIDEO output
1.0Vp-p (75Ω), Sync signal negative, Pin jack x 1 system
Component output (Y, PB, PR)
Y output (green), 1.0Vp-p (75Ω),
Pin jack x 1 system
PB, PR output (blue, red), 0.7Vp-p (75Ω),
Pin jack x 1 system each
• Designs and specifi cations are subject to change without notice.
• This model may not be compatible with features and/or specifi cations that may be added in the future.
• The illustrations and screens described in this manual may be exaggerated or simplifi ed for easy recognition and may be slightly
different from the actual unit.
Analog audio output
2.0V (rms), 2.2kΩ or below, pin jack
(L, R) x 1 system
Digital audio output (BITSTREAM/PCM jack)
Optical connector x 1 system
LAN port
100BASE-TX/10BASE-T x 1
Extension port
1 system
HDMI output
19 pin, Type A connector
Remote control
Wireless remote control (SE-R0285)
Operating conditions
Temperature: 41°F ~ 95°F (5°C ~ 35°C)
Position: Horizontal
Clock accuracy
Quartz (monthly deviation: approximately ±30 seconds)
HD-A30KUKCEng.indd43HD-A30KUKCEng.indd43 07.10.48:45:25PM07.10.48:45:25PM
Page 25

INFORMATION ON CUSTOMER SUPPORT
HD DVD is a new and evolving format, so changes and improvements are possible. To obtain updated information about
HD DVD and this product, as well as customer support information about this product, please contact Toshiba
Customer Support:
* In the U.S., please call 1 (800) 319-6684, or visit www.toshibahddvd.com or www.tacp.com/customersupport.
* In Canada, please call 1 (800) 268-3404 or visit www.toshiba.ca and click on support.
Printed in China
.
GX1D00001701
©2007 TOSHIBA CORPORATION
Printed on 70% Recycled Paper
HD-A30KUKCEng.indd48HD-A30KUKCEng.indd48 07.10.48:45:26PM07.10.48:45:26PM
 Loading...