

Page 1
DHCP On
Proxy
Mac Address
User Information
NTP Server
Network Speed
Cookie Setting
Off
Off
Accept
56kbps Modem
Other
1.5Mbps T1
768kbps DSL/Cable
384kbps DSL/Cable
128kbps ISDN
56kbps Modem
28.8kbps Modem
Network Speed
33.6kbps Modem
64kbps ISDN
256kbps DSL/Cable
512kbps DSL/Cable
1 Mbps Cable
Over 1.0Mbps
Cookie Setting
Accept
Not Accept
Disc
Audio Format
Analog out
5.1ch/2ch
Bitstream
PCM
HD DVD Video
Standard
contents
DD plus
5.1ch/2ch
2ch/2ch
2ch/2ch
Bitstream
2ch PCM
Bitstream
2ch PCM
True HD 48kHz
2ch PCM
96kHz 2ch PCM*1 2ch PCM*1
192kHz 2ch/2ch 2ch PCM*1 2ch PCM*1
dts-HD
5.1ch/2ch
2ch PCM
L-PCM 48kHz
2ch PCM 2ch PCM
96kHz
Yes
Yes
2ch PCM*1 2ch PCM*1
192kHz 2ch/2ch 2ch PCM*1 2ch PCM*1
Digital out SPDIF
Advanced con.
5.1ch/2ch DTS Bitstream 2ch PCM
Firmware Update Owner’s Manual Supplement
HD-XA1 / HD-A1 / HD-D1
Firmware Ve
rsion 2.1
5.1 channel Dolby TrueHD output realized.
New setting items added to “Ethernet Setting”.
Select “Ethernet Setting” by / , then press “OK”.
Follow the steps below to make the setting.
Select “Network Speed” by / , then press “OK”.
Press “SETUP” on the remote control.
Select the type of your line by / / / , then press “OK”.
Select “Cookie Setting” by / , then press “OK”.
1
2
3
4
5
6
7
Press “SETUP” to exit.
Thank you for your updating your HD DVD player firmware.
With the update completed, please note the following changes to your Owner’s Manual.
Page 46
OWNER’S MANUAL
Page 59 (revised)
OWNER’S MANUAL
“Network Speed”
“Cookie Setting”
“Accept”: Cookies are used between the player and a Web page server.
“Not Accept”: Cookies are not used. Convenience may be lost for
some pages.
Cookie: A small text file of information that certain web sites attach to a
user’s hard drive while the user is browsing the web site. A Cookie can
contain information such as user ID, user preference, etc.
Select “Accept” or “Not Accept” by / , then press “OK”.
HD DVD Video
Standard
contents
192k 2ch/2ch 2ch PCM*1 2ch PCM*1
Advanced con.
5.1ch/2ch DTS Bitstream 2ch PCM
Disc Audio Format
Digital out HDMI
Auto
Bitstream
PCM Downmixed PCM
DD plus Depend on HDMI receiver Bitstream*2 up to 5.1ch PCM*3 2ch PCM
True HD
48kHz
Depend on HDMI receiver
2ch PCM 2ch PCM 2ch PCM
96kHz
Depend on HDMI receiver
2ch PCM*1
2ch PCM*4
2ch PCM*1
192kHz Depend on HDMI receiver
2ch PCM*1
2ch PCM*4
2ch PCM*1
dts-HD Depend on HDMI receiver
Bitstream*2
up to 5.1ch PCM*3 2ch PCM
L-PCM
48kHz
Depend on HDMI receiver
2ch PCM
Multi PCM 2ch PCM
5.1ch
5.1ch
up to 5.1ch PCM*4
up to 5.1ch PCM
Page 2
Introduction Connections
HD DVD player
Playback
(Basic)
(Advanced)
Playback
connection
Internet
Others
OWNER’S MANUAL
Page 3
Chapter
SAFETY PRECAUTIONS
The lightning flash with arrowhead symbol, within an equilateral triangle, is intended to alert the user to the presence of
uninsulated “dangerous voltage” within the product’s enclosure that may be of sufficient magnitude to constitute a risk
of electric shock to persons.
The exclamation point within an equilateral triangle is intended to alert the user to the presence of important operating and maintenance (servicing) instructions in the literature
accompanying the appliance.
WARNING: TO REDUCE THE RISK OF FIRE OR ELECTRIC SHOCK, DO NOT EXPOSE THISAPPLIANCE
TO RAIN OR MOISTURE. DANGEROUS HIGH VOLTAGES ARE PRESENT INSIDE THE
ENCLOSURE. DO NOT OPEN THE CABINET. REFER SERVICING TO QUALIFIED PERSONNEL
ONLY.
CAUTION: TO PREVENT ELECTRIC SHOCK, MATCH WIDE BLADE OF PLUG TO WIDE SLOT, FULLY
INSERT.
ATTENTION: POUR EVITER LES CHOCS ELECTRIQUES, INTRODUIRE LA LAME LA PLUS LARGE DE LA
FICHE DANS LA BORNE CORRESPONDANTE DE LA PRISE ET POUSSER JUSQU’AU FOND.
CAUTION: This HD DVD player employs a Laser System.
To ensure proper use of this product, please read this owner’s manual carefully and retain for
future reference. Should the unit require maintenance, contact an authorized service location see service procedure.
Use of controls or adjustments or performance of procedures other than those specified herein
may result in hazardous radiation exposure.
To prevent direct exposure to laser beam, do not try to open the enclosure.
Visible and invisible laser radiation when open and interlocks defeated.
DO NOT STARE INTO BEAM.
FCC NOTICE: This equipment has been tested and found to comply with the limits for a Class B digital device,
pursuant to part 15 of the FCC Rule. These limits are designed to provide reasonable protection
against harmful interference in a residential installation.
This equipment generates, uses, and can radiate radio frequency energy and, if not installed
and used in accordance with the instructions, may cause harmful interference to radio
communications.
However, there is no guarantee that interference will not occur in a particular installation.
If this equipment does cause harmful interference to radio or television reception, which can be
determined by turning the equipment off and on, the user is encouraged to try to correct the
interference by one or more of the following measures:
- Reorient or relocate the receiving antenna.
- Increase the separation between the equipment and receiver.
- Connect the equipment into an outlet on a circuit different from that to which the receiver is
connected.
WARNING : TO REDUCE THE RISK OF
ELECTRIC SHOCK, DO NOT REMOVE
COVER (OR BACK). NO USERSERVICEABLE
PARTS INSIDE. REFER SERVICING TO
QUALIFIED SERVICE PERSONNEL.
RISQUE DE CHOC ELECTRIQUE NE
PAS OUVRIR
ATTENTION
CAUTION
RISK OF ELECTRIC SHOCK
DO NOT OPEN
- Consult the dealer or an experienced radio/TV technician for help.
WARNING: Changes or modifications made to this equipment, not expressly approved by Toshiba, or
parties authorized by Toshiba, could void the user’s authority to operate the equipment.
Introduction
1
1
2
Page 4
Introduction Connections
Playback
(Basic)
Playback
(Advanced)
Others
3
Internet
connection
4HEINSTRUCTIONSSHALLSTATETHATAN!,,0/,%-!).337)4#(WITHACONTACTSEPARATIONOFATLEASTMMIN
EACHPOLESHALLBEINCORPORATEDINTHEELECTRICALINSTALLATIONOFTHEBUILDING
#!54)/. 4HESESERVICINGINSTRUCTIONSAREFORUSEBYQUALIFIEDSERVICEPERSONNELONLY4OREDUCETHE
RISKOFELECTRICSHOCKDONOTPERFORMANYSERVICINGOTHERTHANTHATCONTAINEDINTHEOPERATING
INSTRUCTIONSUNLESSYOUAREQUALIFIEDTODOSO
)NTHESPACESPROVIDEDBELOWRECORDTHE-ODELAND3ERIAL.OLOCATEDONTHEREARPANELOFYOURPLAYER
-ODEL.O 3ERIAL.O
2ETAINTHISINFORMATIONFORFUTUREREFERENCE
,OCATIONOFTHEREQUIREDLABEL
02/$5#4)3#%24)&)%$"94(%-!.5&!#452%24/
#/-0,97)4($((325,%#&235"#(!04%2*
).%&&%#4!4$!4%/&-!.5&!#452%
Page 5

Chapter
3!
)-0/24!.43!&%49).3425#4)/.3
2EADTHESEINSTRUCTIONS
+EEPTHESEINSTRUCTIONS
(EEDALLWARNINGS
&OLLOWALLINSTRUCTIONS
$ONOTUSETHISAPPARATUSNEARWATER
#LEANONLYWITHDRYCLOTH
$ONOTBLOCKANYVENTILATIONOPENINGS)NSTALLIN
ACCORDANCEWITHTHEMANUFACTURERS
INSTRUCTIONS
$ONOTINSTALLNEARANYHEATSOURCESSUCHAS
RADIATORSHEATREGISTERSSTOVESOROTHER
APPARATUSINCLUDINGAMPLIFIERSTHATPRODUCE
HEAT
$ONOTDEFEATTHESAFETYPURPOSEOFTHE
POLARIZEDORGROUNDINGTYPEPLUG!POLARIZED
PLUGHASTWOBLADESWITHONEWIDERTHANTHE
OTHER!GROUNDINGTYPEPLUGHASTWOBLADES
ANDATHIRDGROUNDINGPRONG4HEWIDEBLADEOR
THETHIRDPRONGAREPROVIDEDFORYOURSAFETY)F
THEPROVIDEDPLUGDOESNOTFITINTOYOUROUTLET
CONSULTANELECTRICIANFORREPLACEMENTOFTHE
OBSOLETEOUTLET
0ROTECTTHEPOWERCORDFROMBEINGWALKEDONOR
PINCHEDPARTICULARLYATPLUGSCONVENIENCE
RECEPTACLESANDTHEPOINTWHERETHEYEXITFROM
THEAPPARATUS
/NLYUSEATTACHMENTSACCESSORIESSPECIFIEDBY
THEMANUFACTURER
5SEONLYWITHTHECARTSTANDTRIPODBRACKETOR
TABLESPECIFIEDBYTHEMANUFACTURERORSOLDWITH
THEAPPARATUS7HENACARTISUSEDUSECAUTION
WHENMOVINGTHECARTAPPARATUSCOMBINATIONTO
AVOIDINJURYFROMTIPOVER
5NPLUGTHISAPPARATUSDURINGLIGHTNINGSTORMS
ORWHENUNUSEDFORLONGPERIODSOFTIME
2EFERALLSERVICINGTOQUALIFIEDSERVICE
PERSONNEL3ERVICINGISREQUIREDWHENTHE
APPARATUSHASBEENDAMAGEDINANYWAYSUCH
ASPOWERSUPPLYCORDORPLUGISDAMAGEDLIQUID
HASBEENSPILLEDOROBJECTSHAVEFALLENINTOTHE
APPARATUSTHEAPPARATUSHASBEENEXPOSEDTO
RAINORMOISTUREDOESNOTOPERATENORMALLYOR
HASBEENDROPPED
Introduction
1
1
4
Page 6

Introduction Connections
Playback
(Basic)
Playback
(Advanced)
Others
5
Internet
connection
ADDITIONAL SAFETY INSTRUCTIONS
15.Do not overload wall outlets; extension cords,
or integral convenience receptacles as this can
result in a risk of fire or electric shock.
16.Apparatus should not be exposed to dripping or
splashing and no objects filled with liquids, such
as vases, should not be placed on the
apparatus.
17.Keep your fingers well clear of the disc tray as
it is closing. Neglecting to do so may cause
serious personal injury.
18.Do not place anything on top of this unit.
19.Do not place the apparatus on amplifiers or
equipment that may produce heat.
20.Do not cover the ventilating holes for the inside
cooling fan.
21.Do not use a cracked, deformed, or repaired
disc. These discs are easily broken and may
cause serious personal injury and apparatus
malfunction.
22.If the apparatus should smoke or smell,
immediately disconnect the power cord from the
wall outlet. Wait until the smoke or smell stops,
then ask your dealer for a check and repair.
Neglecting to do so may cause fire.
23.During thunderstorms, do not touch the
connecting cables or the apparatus.
24.Handling the cord on this product or cords
associated with accessories sold with this
product, will expose you to lead, a chemical
known to the State of California to cause birth
defects or other reproductive harm.
Wash hands after handling.
Page 7

Chapter
Introduction
1
1
Precautions
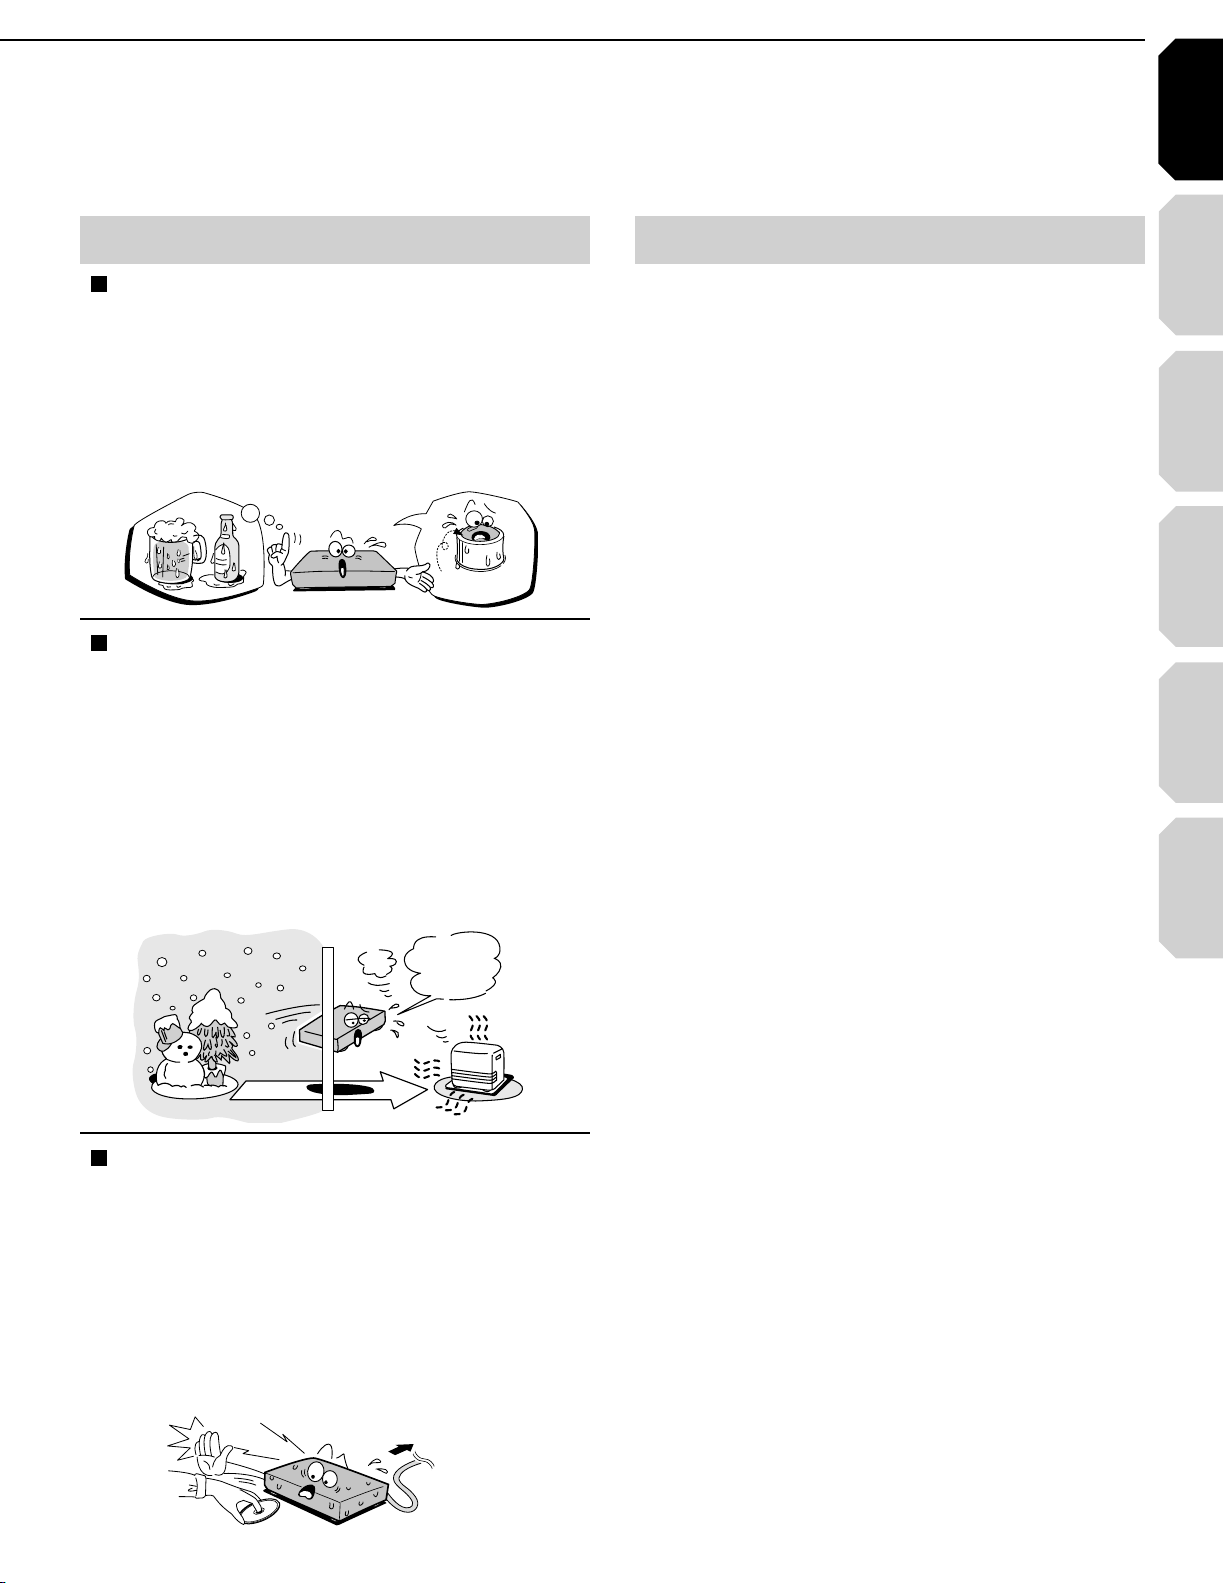
Notes on handling
Never disconnect the power cord from a wall outlet
7
while the player is turned on, unless it is in an
emergency. Doing so may cause malfunction.
When shipping the player, the original shipping
7
carton and packing materials come in handy. For
maximum protection, repack the unit as it was
originally packed at the factory.
Do not use volatile liquids, such as insect spray,
7
near the player. Do not leave rubber or plastic
products in contact with the player for a long time.
They will leave marks on the fi nish.
The top and rear panels of the player may become
7
warm after a long period of use. This is not a
malfunction.
When not in use
For usual absence
7
Be sure to remove the disc from the player and turn
off the power.
Prolonged absence
7
Unplug the player from a wall outlet.
About the volume level
The volume level of some commercial DVD discs may
seem lower than that of audio CDs, other software,
etc. If you turn up the volume of the TV or amplifi er
to play such discs, be sure to turn it back down after
playback fi nishes.
Playback restrictions
This owner’s manual explains the basic instructions
for this player. Some HD DVD discs or DVD video
discs are produced in a manner that allows specifi c or
limited operation during playback. As such, the player
may not respond to all operating commands. This is
not a defect in the player. Please refer to the notes on
compatible discs later in this Introduction and to the
discussion of DVD playback and features later in this
manual.
“ ” may appear on the TV screen during operation.
“ ” means that the operation is not permitted by the
player or the disc.
Notes on locating
Place the player on a level surface. Do not use it on
7
a shaky or unstable surface such as a wobbly table
or inclined stand. The loaded disc may dislodge
from its proper position and cause damage to the
player.
Before placing the player, make sure that the
surface can stand the weight of the player. Never
place the player in a high location to avoid damage
to the product or person by an accidental fall of the
player.
When you place this player near a TV, radio, or VCR,
7
the playback picture may become poor and the
sound may be distorted depending on the condition
and location of said equipment. In such an event,
place the player as far away much as possible from
the TV, radio, or VCR.
To avoid damage to this product, never place or
7
store the unit in direct sunlight; hot, humid areas;
or areas subject to excessive dust, oily smoke,
cigarette smoke or vibration.
Notes on cleaning
Use a soft, dry cloth for cleaning.
Do not use any type of solvent, such as thinner or
7
benzine, as they may damage the surface of the
player.
About software
Because of problems and errors that can occur during
the creation of HD DVD, DVD and CD software and/
or the manufacture of HD DVD, DVD and CD discs,
Toshiba cannot assure that this player will successfully
play every disc bearing the HD DVD, DVD and CD
logos. If you happen to experience any diffi culty
playing an HD DVD, DVD and CD disc on this player,
please contact Toshiba Customer Service.
Some differences
The HD DVD player operates more like a computer
and differently than a standard DVD player, In addition
to containing a microprocessor, it contains an
operating system, random access memory (RAM),
and an HD DVD drive. The operating system includes
software that is transferred to the RAM when the
machine is turned on and at other times during
operation. This transfer can take time. Therefore, when
you turn the HD DVD player on, it may take a little
while before it is ready to use. Likewise, other
functions may not be performed as quickly as they
would on other AV equipment. Please take these
factors into consideration as you use the HD DVD
player.
6
Page 8
Introduction Connections
Playback
(Basic)
Playback
(Advanced)
Others
7
Internet
connection
OOTST)
M
RA
W
Notes on moisture condensation
Moisture condensation damages the unit. Please
read the following carefully.
Moisture condensation occurs, for example, when
you pour a cold drink into a glass on a warm day.
Drops of water form on the outside of the glass.
In the same way, moisture may condense on the
optical pick-up lens inside this unit, one of the most
crucial internal parts of the unit.
F
O
M
E
O
L
P
I
S
M
A
X
%
N
O
C
Moisture condensation occurs during the
following cases.
When you bring the unit directly from a cold place to
7
a warm place.
When you use the unit in a room where you just
7
turned on the heater, or a place where the cold wind
from the air conditioner directly hits the unit.
In summer, when you use the unit in a hot and
7
humid place just after you move the unit from an air
conditioned room.
When you use the unit in a humid place.
7
T
U
R
E
S
N
A
E
T
I
D
O
N
/PTICALPICKUP
LENS
Notes on copyright
The unauthorized recording, use, display,
7
distribution, or revision of television programs,
videotapes, HD DVDs, DVDs, CDs and other
materials, is prohibited under the Copyright Laws
of the United States and other countries, and may
subject you to civil and/or criminal liability.
This product incorporates copyright protection
7
technology that is protected by method claims of
certain U.S. patents and other intellectual property
rights owned by Macrovision Corporation and other
rights owners. Use of this copyright protection
technology must be authorized by Macrovision
Corporation, and is intended for home and other
limited viewing uses only unless otherwise
authorized by Macrovision Corporation. Reverse
engineering or disassembly is prohibited.
Manufactured under license from Dolby Laboratories.
Dolby and the double-D symbol are trademarks of
Dolby Laboratories.
Manufactured under license from Digital Theater
Systems, Inc. U.S. Pat. No's. 5,451,942; 5,956,674;
5,974,380; 5,978,762; 6,226,616; 6,487,535 and other
U.S. and world-wide patents issued and pendling.
"DTS" and "DTS Digital Surround" are registered
trademarks of Digital Theater Systems, Inc.
Copyright 1996, 2003 Digital Theater Systems, Inc. All
Rights Reserved.
Do not use the unit when moisture condensation
may occur.
If you use the unit in such a situation, it may damage
discs and internal parts. Connect the power cord
of the unit to the wall outlet, turn on the unit, remove
the disc, and leave it for two or three hours. After
two or three hours, the unit will have warmed up and
evaporated any moisture. Keep the unit connected
to the wall outlet and moisture condensation will
seldom occur.
A7
I
T
7ALLOUTLET
HDMI, the HDMI logo and High-Defi nition Multimedia
Interface are trademarks or registered trademarks of
HDMI Licensing LLC.
SHARC is a registered trademark and Melody is a
trademark of Analog Devices, Inc.
All other brand and product names mentioned in this
manual are trademarks and/or registered trademarks
of their respective holders.
Page 9

Chapter
Introduction
1
1
Features
Playback of HD DVD video discs
HD DVD video discs are high-density, high-capacity
discs.
The HD DVD disc standard has been approved by
7
the DVD forum.
HD DVD (single layer): 15 GB
7
HD DVD (dual layer): Maximum capacity of 30 GB
A single layer single sided disc (15 GB) has
capacity of about 8 hours in 1125 line high defi nition
picture; about 48 hours in 525 line standard
defi nition picture (depending on bitrate of prerecorded contents).
*1GB means 1,000,000,000 bytes.
HD DVD Twin Format Discs have both HD DVD
7
and DVD layers on one side. HD DVD Combination
DVD Discs have HD DVD material on one side and
standard DVD material on the other side. Because
both disc types are new, such discs may not operate
properly in this player.
To view high-defi nition picture in HD DVD discs,
7
an HDTV display (720p, 1080i) is required.
Connect an HDTV set to the COMPONENT OUTPUT
7
jacks or the HDMI OUTPUT jack on this player.
Some discs may require use of HDMI OUTPUT for
7
viewing of high resolution material.
Compatible with multiple disc types
Playback of commercial HD DVD video disc, DVD
7
video, and Audio CD
Playback of DVD-RAM, DVD-RW (disc recorded in
7
DVD VR mode or DVD video mode), and DVD-R
Playback of CD-RW and CD-R (Audio CD of CD-DA
7
format, MP3 fi le, WMA fi le)
Because HD DVD is a new format, disc compatibility
issues with new and existing format discs are
possible. Not all discs are compatible. If you
experience compatibility problems, please contact
Toshiba Customer Service.
Blu-ray Discs cannot be played on this player.
Internet connection feature (LAN port)
Some HD DVD discs enable you to access special
7
HD DVD sites. If an HD DVD site includes content
such as movie trailers, you can watch the content on
the player via the Internet if your internet connection
provides suffi cient bandwidth.
Compatibility notes
For compatibility, see page 27.
7
Various output jacks
An HDMI jack for connecting a single cable to
7
output video and audio signals
Component jacks
7
5.1 channel surround analog audio jacks
7
Certain system requirements
For high defi nition video playback:
7 High defi nition display (720p and 1080i input
capable).
7 HD DVD disc with high defi nition content.
7 HDMI or HDCP capable DVI input on your display
device required for some content (as specifi ed by
disc authors).
7 For up-conversion of standard defi nition DVD, an
HDMI or HDCP capable DVI input on your display
device is required for copy protected content.
For Dolby® Digital Plus and DTS-HD (DTS core only)
multi-channel audio playback:
7 Receiver or processor/amp combination with 5.1
channel analog input or HDMI™ multi-channel
LPCM capable audio input.
7 Main, center, surround speakers and subwoofer as
necessary for chosen format.
For on-line interactive features:
7 Ethernet connection to customer supplied
always-on broadband internet service.
7 Some features may require higher bandwidth.
8
Page 10
Introduction Connections
Playback
(Basic)
Playback
(Advanced)
Others
9
Internet
connection
Power cord
Caution
• Do not use this power cord with
any device other than this player.
Customer support
To reach Toshiba Customer Support in the U.S., please
call 1 (800) 319-6684 or visit
www.tacp.com/customersupport.
To reach Toshiba Customer Support in Canada, please
call 1 (800) 268-3404 or visit www.toshiba.ca and click
on support.
This HD DVD player is manufactured under the HD
DVD Format adopted by DVD Forum. DVD Forum
approved AACS (Advance Access Content System)
as content protection system for HD DVD Format like
it approved CSS (Content Scramble System) for DVD
Format. Therefore, certain restrictions are imposed on
play, analog signal output, etc. of AACS protected
contents.
When you use pre-recorded contents, the contents
may designate whether or not to apply such
restrictions.
As those restrictions may be adopted and/or changed
and announced by AACS after the production of this
product, the operation of this product and restrictions
thereon may vary depending on the time you
purchase this product.
To obtain updated information about AACS and this
product, please contact the following:
*In the U.S., please call 1 (800) 319-6684 or visit www.
tacp.com/customersupport.
*In Canada, please call 1 (800) 268-3404 or visit www.
toshiba.ca and click on support.
Accessories
Accessories
Check that the following accessories are supplied.
Remote control
Batteries
(AAA)x4
HDMI cable
!UDIOCABLE
Video cable
Page 11

Chapter
Introduction
1
1
Introduction
Table of Contents
SAFETY PRECAUTIONS ........................................................................................ 2
IMPORTANT SAFETY INSTRUCTIONS .................................................................. 4
Precautions ............................................................................................................. 6
Features ................................................................................................................... 8
Accessories ............................................................................................................. 9
Index to parts and controls .................................................................................. 12
Front panel ...................................................................................................................................................12
7
Rear panel ....................................................................................................................................................13
7
Display .........................................................................................................................................................14
7
Remote control .............................................................................................................................................15
7
Preparation of the remote control ....................................................................... 16
Loading batteries .........................................................................................................................................16
7
Operating with the remote control ................................................................................................................16
7
About the remote control backlight ..............................................................................................................16
7
Programming for TV control .........................................................................................................................17
7
Operating your TV with the remote control...................................................................................................17
7
Hint on reading this manual ................................................................................ 18
Icons for disc compatibilty ...........................................................................................................................18
7
Instructions and actual buttons ....................................................................................................................18
7
Connecting to a TV ............................................................................................... 20
Connections
Connecting to a device with an HDMI input ....................................................... 21
Connecting to a TV with component video inputs ............................................ 22
Connecting to an audio system .......................................................................... 23
Disc compatibility ................................................................................................. 26
Playback (Basic)
Powering on/Loading a disc ................................................................................ 28
Playing a disc ........................................................................................................ 29
Stopping playback / Pausing playback .......................................................................................................29
7
Playing from the top menu ...........................................................................................................................30
7
Using A/B/C/D buttons .................................................................................................................................30
7
Playing from a recorded title menu ..............................................................................................................30
7
Selecting the sound .....................................................................................................................................31
7
Selecting the sound of a disc recorded in DVD VR mode ...........................................................................31
7
Selecting subtitles ........................................................................................................................................32
7
Selecting the camera angle .........................................................................................................................32
7
10
Playing at various speeds .................................................................................... 33
Locating by entering a section number .......................................................................................................34
7
Locating by entering elapsed time ..............................................................................................................34
7
Resuming playback from the location last stopped (Title resume) ..............................................................34
7
Page 12

Introduction Connections
Playback
(Basic)
Playback
(Advanced)
Others
11
Internet
connection
Playing repeatedly (Repeat playback) ................................................................ 36
Playback (Advanced)
Playing MP3/WMA fi les on a CD .......................................................................... 37
Playable fi les ................................................................................................................................................37
7
Using EXTENSION ports ...................................................................................... 38
Using the cursor function .................................................................................... 38
Checking the current status and settings .......................................................... 39
Internet connection feature (Outline) .................................................................. 42
Internet connection
Internet connection feature (Preparation) .......................................................... 44
Internet connection feature (Operation) ............................................................. 47
Customizing the function settings ...................................................................... 50
Picture ..........................................................................................................................................................52
Others
7
Audio ............................................................................................................................................................53
7
Language .....................................................................................................................................................54
7
Ethernet ........................................................................................................................................................55
7
General .........................................................................................................................................................56
7
Firmware update ..........................................................................................................................................57
7
Language code list ............................................................................................... 58
Output sound conversion table ........................................................................... 59
Before calling service personnel ........................................................................ 60
Specifi cation ......................................................................................................... 61
Limited United States Warranty ........................................................................... 62
CANADIAN WARRANTY INFORMATION ............................................................. 64
INFORMATION ON CUSTOMER SUPPORT ......................................... Back cover
Page 13

Chapter
Introduction
1
1
See pages with arrows for details.
Front panel
Index to parts and controls
1
12 11
ON/STANDBY button / ON/STANDBY
indicator
Turns the power on/restores the unit to the
standby mode.
Front panel display page 14
page 28
2 3 4 5
10
(STOP) button
Stops playback.
(PAUSE) button
Stops playback momentarily.
(SKIP) button page 33
page 29
page 29
6789
Remote sensor page 16
DOOR button page 28
Opens and closes the front door.
OPEN/CLOSE button page 28
Opens and closes the disc tray.
(PLAY) button page 29
Starts playback.
12
Skips to the next chapter or track.
(SKIP) button page 33
Skips to the previous chapter or track.
Disc tray page 28
Loads a disc into the disc drive.
EXTENSION ports page 38
Page 14
Introduction Connections
Playback
(Basic)
Playback
(Advanced)
Others
13
Internet
connection
Rear panel
1 2 3 4
10
CONTROL (RS-232C)
Used for custom control devices.
LAN port page 44
Use this to connect to a network with an always-
on broadband connection.
Ventilation fan
Do not cover the ventilation holes.
AC IN socket page 20
Connect the supplied power cord.
56789
HDMI OUTPUT jack page 21
Outputs video/audio signals to a connected TV,
monitor or AV amplifi er.
Connect to a TV, monitor or AV amplifi er
equipped with HDMI input.
DIGITAL AUDIO OUTPUT BITSTREAM/PCM
(OPTICAL/COAXIAL) jacks
Outputs digital audio signals.
Connect to a digital audio input on an amplifi er
equipped with digital audio decoder.
When connecting the optional digital cable, fi t
the connector into the jack fi rmly.
page 23
VIDEO OUTPUT (VIDEO, S-VIDEO) page 20
Outputs video and audio signals to a connected
TV or amplifi er.
COMPONENT OUTPUT jacks page 22
Outputs video signals to a connected TV or
monitor.
Connect to a TV or monitor equipped with
component video jacks.
ANALOG AUDIO OUTPUT 5.1 CH SURROUND
jacks page 23
Connect to an amplifi er equipped with 5.1 CH
audio input.
ANALOG AUDIO OUTPUT 2 CH jacks
page 20
Outputs audio signals to a connected TV or AV
amplifi er.
Page 15

Chapter
Introduction
1
1
Index to parts and controls (Continued)
Display
Status indicator
HD DVD : Illuminates when an HD DVD disc is
DVD : Illuminates when a DVD disc is
Illuminates when a title number is displayed.
Illuminates when a chapter number is displayed.
Illuminates when a CD is loaded.
Illuminates when selecting the HDMI output.
Illuminates when a track number is displayed.
Illuminates when the total playing time of the
: Playing
II
: Pausing
Disc indicator
loaded.
loaded.
TITLE indicator
CHP (Chapter) indicator
CD indicator
HDMI Indicator
TRK (Track) indicator
TOTAL indicator
disc is displayed.
REMAIN (Remaining) indicator
Illuminates when a remaining playback time is
displayed.
2ch indicator
Illuminates when 2 channel (L/R) sound is
output.
MULTI indicator
Illuminates when 5.1 channel sound is output.
Repeat mode indicator
Illuminates when playing in repeat mode.
Angle icon indicator
Illuminates when playing a scene recorded with
multi angles.
Multi display
Displays the total playing time of the disc,
elapsed time, remaining time, title number,
chapter number or message, etc.
Video output format indicator
Displays the video output format currently
selected.
480
480
720
1080
: 480 interlace
: 480 progressive
: 720 progressive
: 1080 interlace
Switching the display
Every time you press DISPLAY button on the remote control, the display changes the contents.
The display may not change, depending on the disc conditions.
Dimming the display
Pressing DIMMER button on the remote control changes the brightness of the display.
À> i`
"vv
• Turning off the power resets this setting.
14
Page 16
Introduction Connections
Playback
(Basic)
Playback
(Advanced)
Others
15
Internet
connection
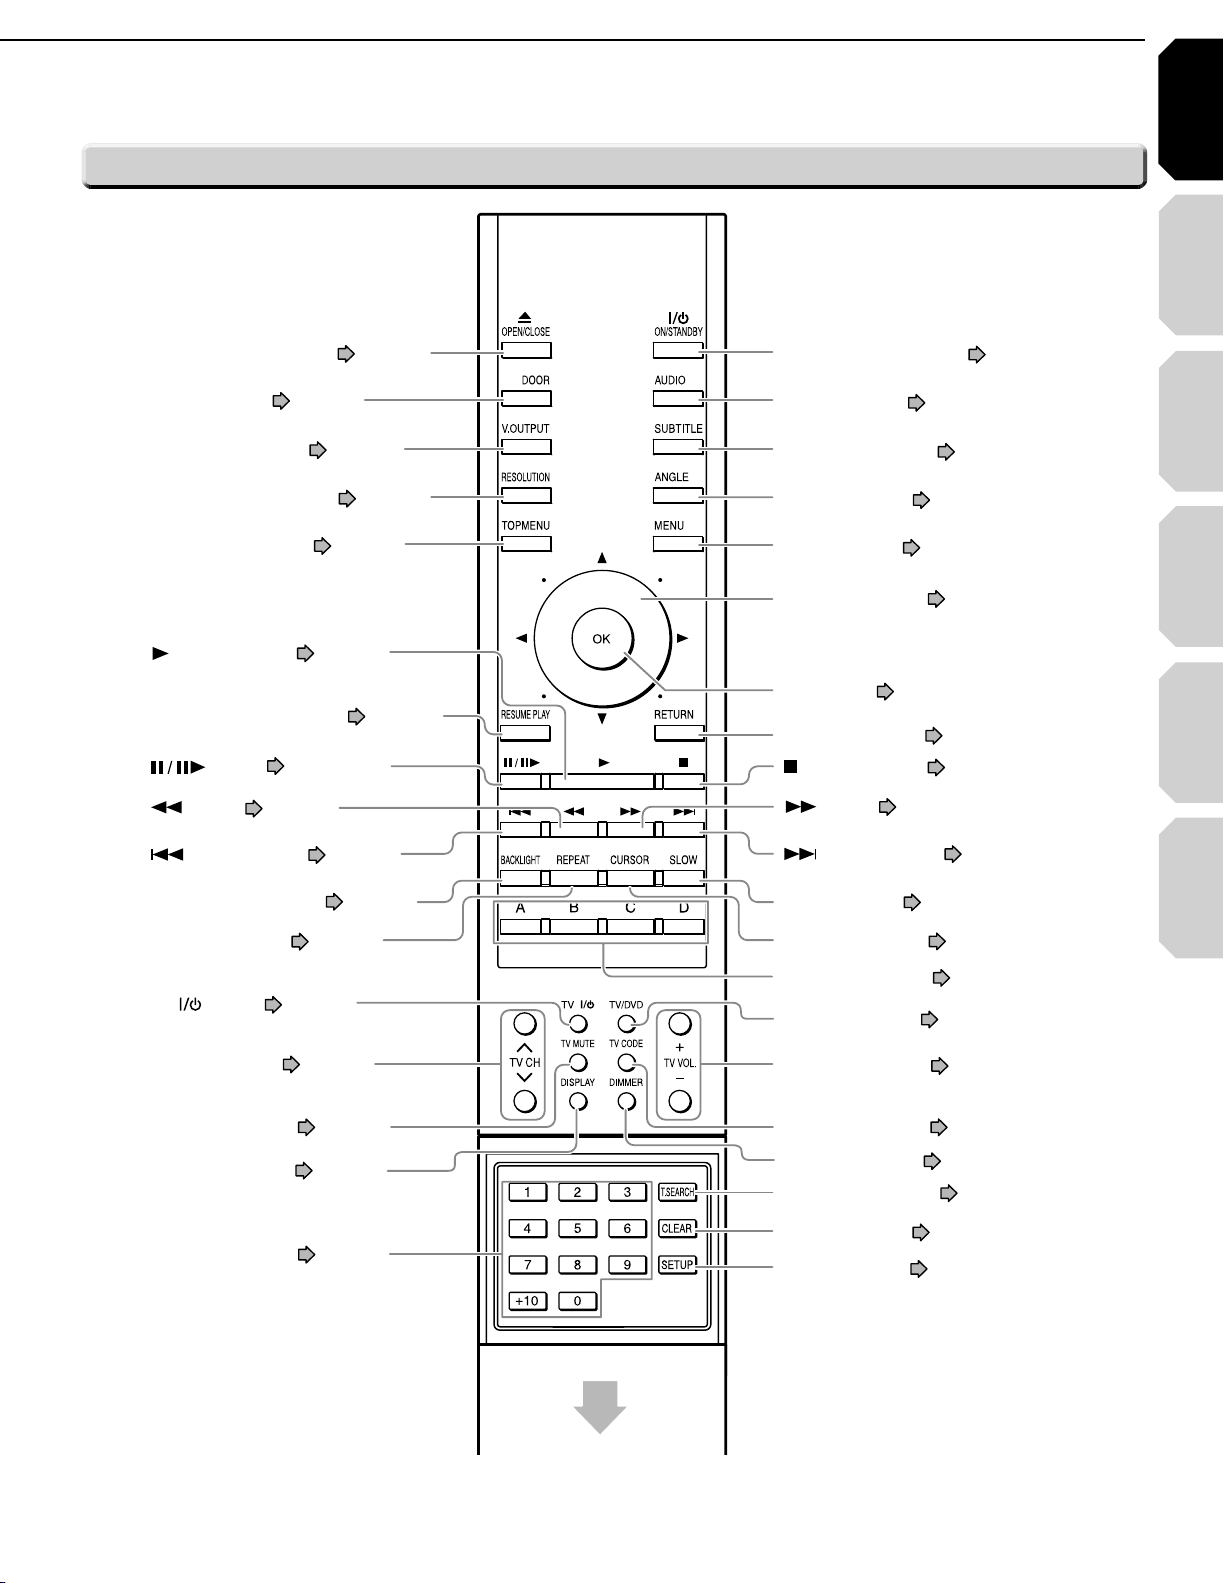
BACKLIGHT button page 16
button page 33
button
page 29, 33
OPEN/CLOSE button page 28
ANGLE button page 32
Direction button page 30, 50
OK button page 30, 50
(STOP) button page 29
MENU button page 30
SUBTITLE button page 32
AUDIO button page 31
ON/STANDBY button page 28
TV VOL. buttons page 17
T.SEARCH button page 34
CLEAR button page 34
SETUP button page 50
TV/ DVD button page 17
TV CODE button page 17
DIMMER button page 14
REPEAT button page 36
(SKIP) button page 34
DOOR button page 28
V.OUTPUT button page 21
RESOLUTION button page 21
TOP MENU button page 30
A, B, C, D button page 30
CURSOR button page 38
SLOW button page 33
(SKIP) button page 33
button page 33
TV button page 17
RETURN button page 50*
RESUME PLAY button page 34
(PLAY) button page 29
TV CH buttons page 17
Number buttons page 34
TV MUTE button page 17
DISPLAY button page 39
Slide down to open.
Remote control
RETURN
*
Returns to the previous screen (the screen
may be specifi ed depending on the disc).
Refer to the instructions of the disc.
Page 17
Chapter
Introduction
1
1
Preparation of the remote control
Set up the remote control to operate the player and your TV.
Loading batteries
Open the cover.
11
Insert batteries.
22
Use 4 batteries (AAA sizes).
7
Make sure to match the + and – on the batteries
7
to the marks inside the battery compartment.
Close the cover.
33
Notes
Do not drop or give the remote control a shock.
Do not leave the remote control near an extremely hot or humid place.
Do not spill water or put anything wet on the remote control.
Do not disassemble the remote control.
Dispose of batteries in a designated disposal area.
Batteries should always be disposed of with the environment in mind.
Always dispose of batteries in accordance with applicable laws and regulations.
If the remote control does not operate correctly, or if the operating range becomes reduced, replace all batteries with
new ones.
When necessary to replace batteries in the remote control, always replace all batteries with new ones. Never mix
battery types or use new and used batteries in combination.
Be sure to use AAA size batteries.
Always remove batteries from remote control if they are dead or if the remote control is not be used for an extended
period of time. This will prevent battery acid from leaking into the battery compartment.
Caution
Never throw batteries into a fi re.
Operating with the remote control
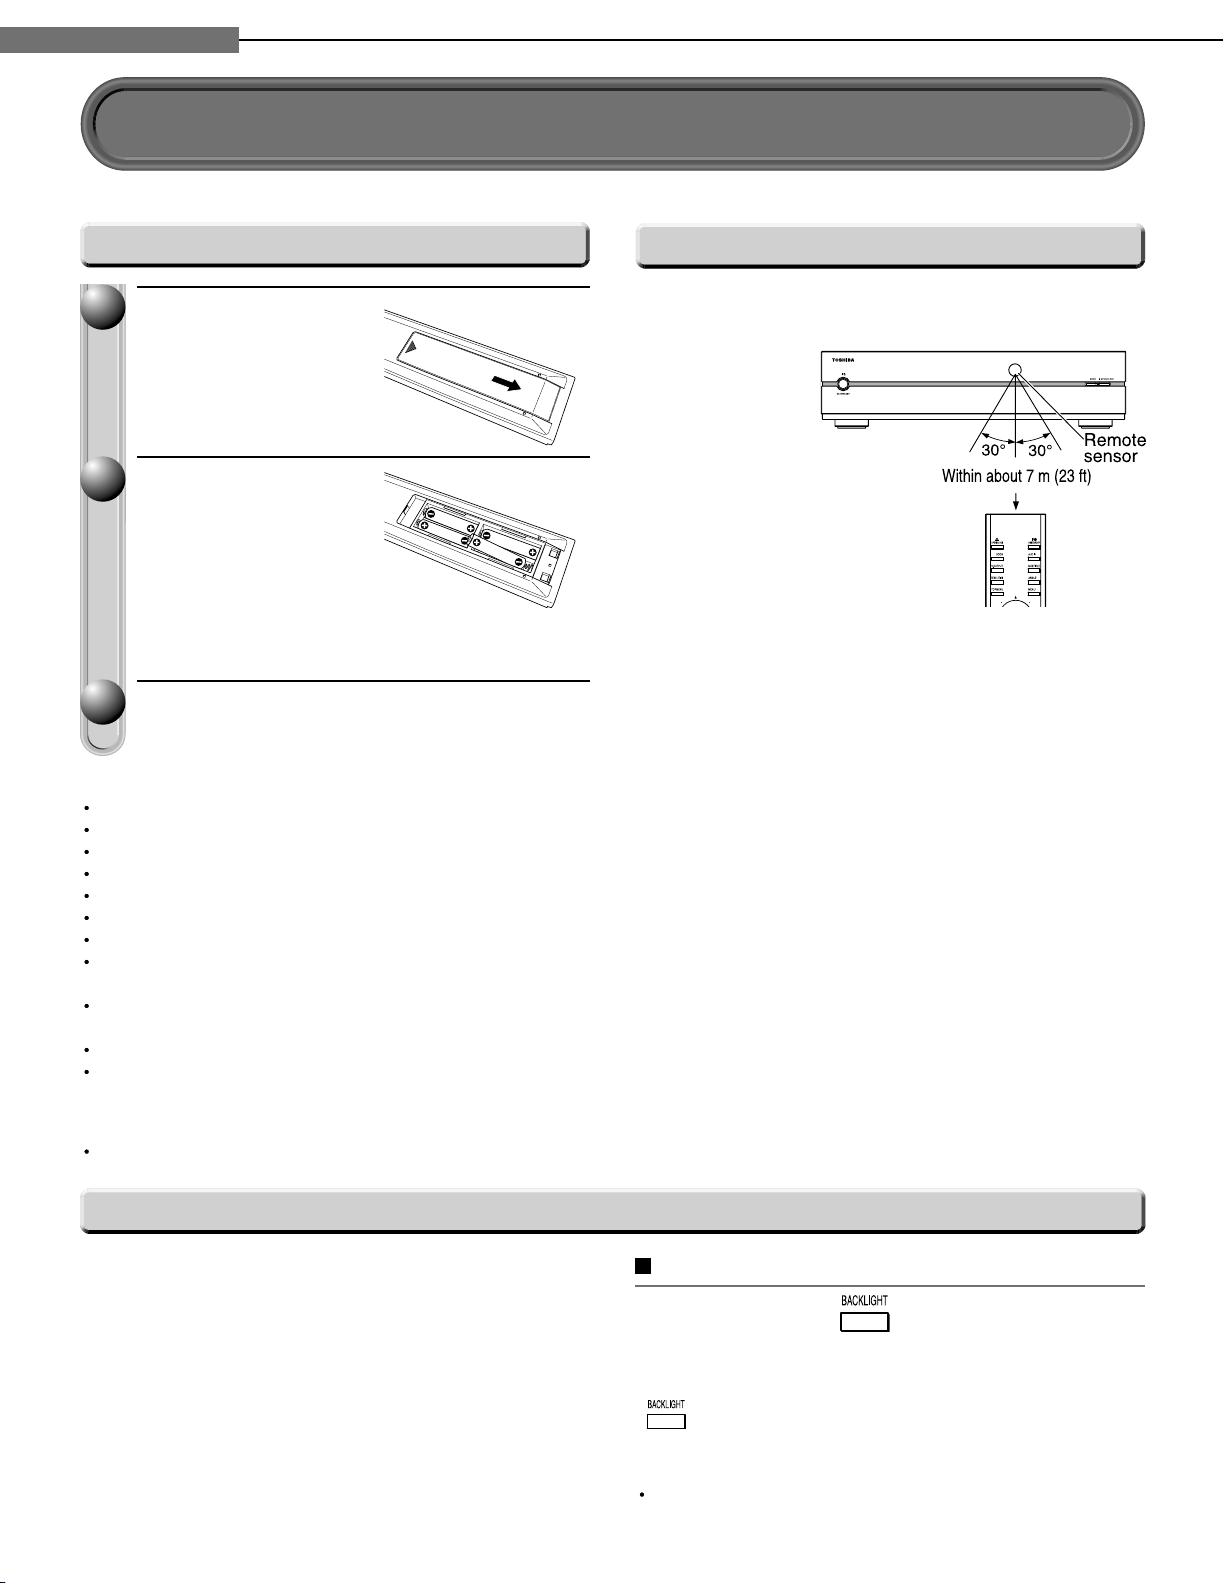
Point the remote control at the remote sensor and
press the buttons.
Distance
Angle
: About 7 m (23 ft) from
the front of the remote
sensor
: About 30° in each
direction of the front
of the remote sensor
About the remote control backlight
The remote control has a backlight function for
conveniently illuminating the buttons when you use the
remote control in a dark room, etc.
Lights for approximately 10 seconds when a button
7
is pressed.
Lights for approximately 10 seconds when the
7
remote control senses a certain amount of vibration
(approximately 1 second for a small amount of
vibration).
16
To turn off the backlight function
Press and hold for at least
approximately three seconds.
To turn back on the backlight function, press and hold
again for at least approximately three seconds.
Note
The backlight function is on by default. Using the
backlight function shortens the lifespan of the batteries.
Page 18
Introduction Connections
Playback
(Basic)
Playback
(Advanced)
Others
17
Internet
connection
46Ê\
/ÊÌÕÀÊÊ>`ÊvvÊÌiÊ/6
46$6$Ê\
/ÊV>}iÊÌiÊÛ`iÊ
«ÕÌ
46#(Ê\
/ÊÃiiVÌÊÌiÊ/6ÊV>i
46-54%Ê\
/ÊÕÌiÊÌiÊ/6
466/,К\
/К>`ХГМКМiКЫХi
Bell & Howell
0081 0431
0841 0851 1341 1611 1621 1781
1951 2121 2491 4371 5951 5971
Toshiba
0001 0021 0071 0411 0431 0831
6041
Emerson
0051 0111 0121 0141 0151 0161
0201 0211 0351 0381
0431 0521
0561 0621 0691 1241 1291 1371
1561 2481 4861
Fisher
0251 0401 0431 1151 2451
GE
0051 0091 0181 0321 0371 0591
0621 0711 0741 1041 1471 1521
2481 4691 4881 4891 6671
Goldstar
0051 0161 0231 0451 0501
0621
0661 0771 0961 1431
1561 2491
Citizen
0051 0381
0851
1561
0471 0551 0621
Curtis Mathes
0051 0431
1521
1561
0531
6671
0621 0851
Infinity
0631
JBL
0631
0621 0641 0671 0811 0951
1061 1241 1361 1651 1711 1731
1741 1751 2051
4961
2131 2381 4121
4731 4911
JVC
0101 0161 0191 0241 0331 0511
0561 0601 0741 1321 1421 2161
2171 4351 4701
5051
4751 4771 4971
5031 5041
LXI
0411 0431 0621 0631 1041 1171
1521 2491 6671
Marantz
0051 0481 0621 0631 0641 2491
Memorex
0081
5251
0431 0501 0621 2491 4421
MGA
0051
0661 0761
0251 0261 0371 0501 0621
Magnavox
0051 0271 0291 0341 0361 0421
0551 0621 0631 0661 0971 0981
2221 5221 5231 5241
Hitachi
0031 0051 0161 0191 0301 0601
1011
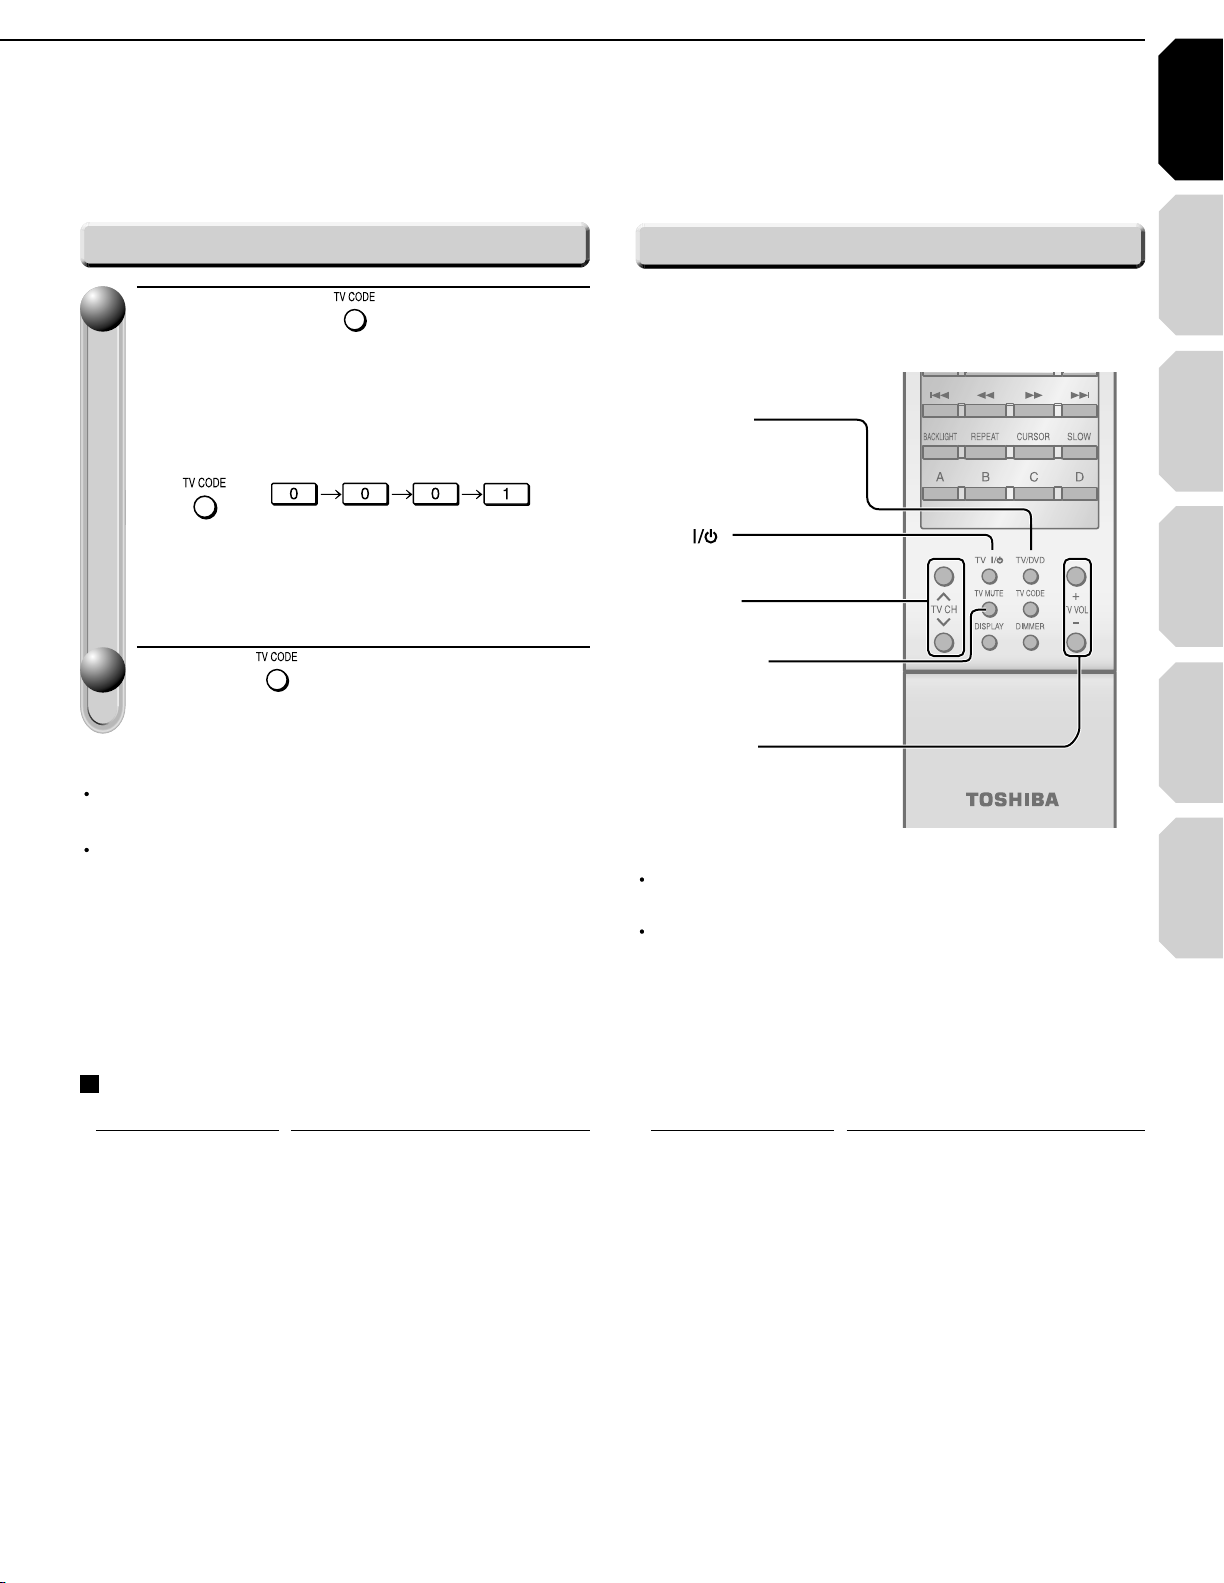
Programming for TV control
While holding , press the
11
number buttons to enter a
corresponding brand code (see
below) of your TV.
e.g. To enter 0001
Hold down.
Some brands have several codes. Try one by
•
one until the remote control can operate your TV.
Release .
22
The brand code is memorized.
Notes
TOSHIBA code is already set when you operate this
player for the fi rst time.
When replacing the batteries of the remote control,
re-enter the brand code of your TV.
Operating your TV with the remote control
Point the remote control to your TV after you have
entered the brand code. Operate your TV with the
buttons below.
Notes
For some TVs, pressing the volume button once may
change the volume by more than one level.
Even after the player's remote control is programmed,
it may not operate some or all of the features on your
other device.
If this happens and you wish to use those features, you
will need to use the device's original remote control.
Brand code table
Brand name Brand code
Brand name Brand code
(Continued)
Page 19
Chapter
Optonica
0541 1101
Panasonic
0631 0711 0741 1271
1801 2111
1351 1501
1701 1791
NAD
0411 0621 1061
MTC
0051 0501 0621 0851
Mitsubishi
0051 0251 0261 0371 0491 0501
0621 0661 0761 2231 5261 5271
2151 2281
56615281 5301
Philco 0051 0161 0271 0291
0621 0631
0361 0421
0661 07110501 0551
Philips 0051 0161 0271 0321
0631 0661
0361 0421
0711 21410461 0551
2351 5221 5401 5411
5501 5531
5431 5451
5541 56015461
5621
5481
1971 4081 41111581
Proton 0051 0161 0621 0651 2491
Pioneer
0051 0621 0681 0721 0751 1061
1241
Runco 0011
Realistic 0431 1521
RCA
0501 0621 0661
0711
0051 0221
0871 0921 0941 1001
1241 1301
1041
1071
1461
1521
1091 1181
1531 2481
6671
4361 4861 4881
5681
6641
Radio Shack 0431 1521 2481
Quasar
0711 0741 0801 1271 2281 5651
5661
Radio Shack/Realistic
1561 6671
0051 0161 0381 0431 0541 0621
1431
Sanyo 0051 0261 0401 0431 0791 0901
1151
Samsung 0051 0161 0501 0531
1021 1141
0621 0661
1431 15610851 0931
1771 1811 1821 18311591 1601
1931 2081 2101 23111841 1851
4011 4061
Sears 0051 0151 0191 0251
0621 0661
0331 0401
1041
2481 6671
10810411 0431
1151 1481 1521
Soundesign 0381 0551 0621 24810051 0151
Sony 1231 1511 19010441 1111
Sharp 0051 0111 0161 0351
0731
1881
0891
0541 0581
1101 15610611 0621
1721 1871
Tandy 1101
Technics 0741
Sylvania 0051 0071 0271 0291
0621
2201
0631
0341 0361
2061
5741 5751
1941 2181
2341
0661
4151 5481
08610421 0551
1441 2191
Teknika
0051 0081 0151 0161
0501
2481
0551
0191 0341
0621 08510381 0471
1271 1561
Wards 0051 0081 0141 0151
0321
0541
0341
0181
0361
0621
2491
6671
0631
0211
0271 0421 0501
15210661 1051
61514821
Zenith 0011
0051
2091 2251
6171 6181
0081 15710781
2361 2441
1281
Introduction
1
1
Preparation of the remote control (Continued)
Brand name Brand code
Brand name Brand code
Hint on reading this manual
Icons for function applicability
The following icons are used in this manual to indicate
features and/or functions that are applicable to various
types of discs.
(For disc compatibility information, see
Icon Disc Icon Disc
HD DVD
DVD Video
DVD-RAM
DVD-RW
18
HD DVD
video disc
DVD video disc
DVD-RAM
DVD-RW
DVD-R
CD
CD-RW
(CD-DA)
CD-R
(CD-DA)
DVD-R
Audio CD
CD-RW
(CD-DA format)
CD-R
(CD-DA format)
page 26.)
Instructions and actual buttons
Most instructions are based on remote control
operation, unless otherwise noted. You can use the
buttons on the remote control and those on the main
unit as well when they have the same function. Some
functions are available only from the remote control.
Page 20

Introduction Connections
Playback
(Basic)
(Advanced)
Playback
Connections
Connect your player to your A/V system.
2
Connecting to a TV
Connecting to a device with an HDMI input
Connecting to a TV with component video inputs
Connecting to an audio system
connection
Internet
Others
Page 21
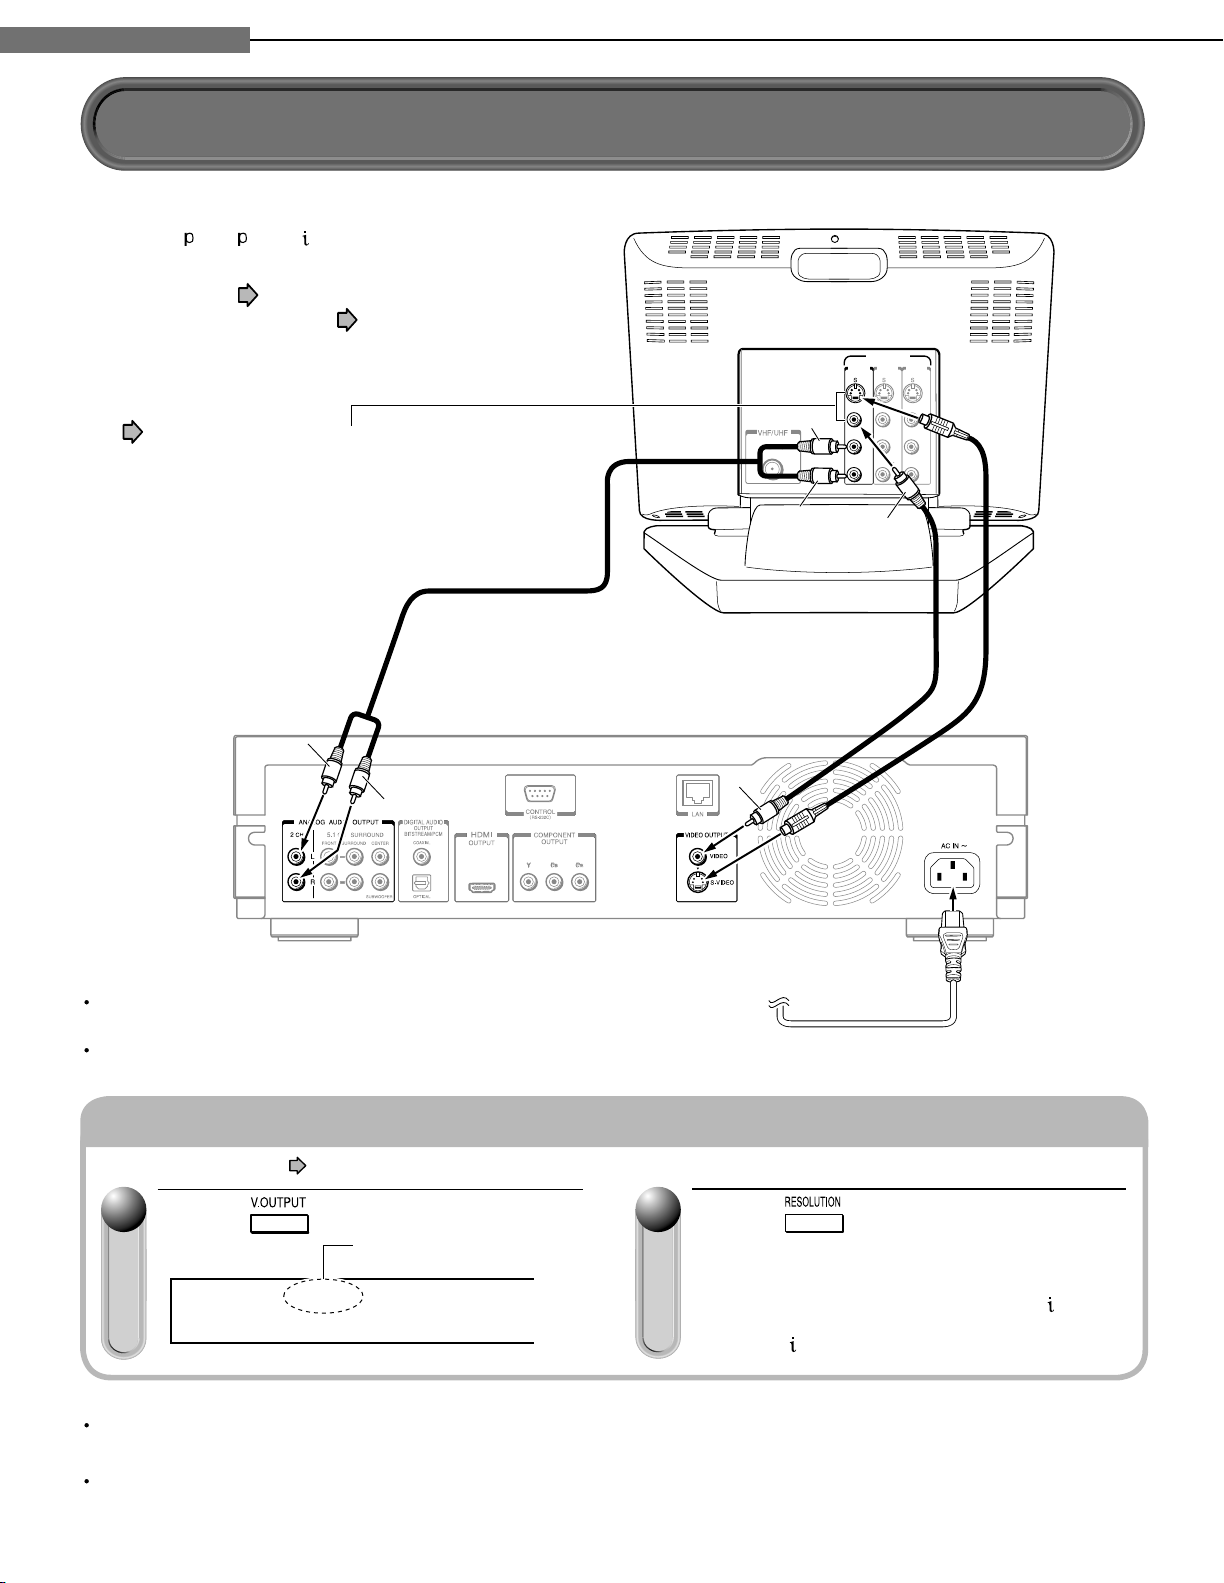
Chapter
INPUT
INPUT
(FROM ANTENNA)
INPUT
VIDEO INPUT
INPUT
White
Yellow
Red
White
Red
Yellow
VIDEO VIDEO VIDEO
L LL
AUDIO AUDIO AUDIO
R RR
Connect the power cord finally
to a 120V AC wall outlet.
If the TV has an S-video input,
connect the player with an
S-video cable. When using an
S-video cable, do not connect
the yellow video cable.
S-video cable
(not supplied)
Video cable
(supplied)
Audio cable (supplied)
Connections
2
2
Connecting to a TV
Connect the player to your TV to view disc contents.
To view 480
, 720 , 1080 pictures, use the HDMI
OUTPUT jack or the COMPONENT OUTPUT jacks to
connect to a TV. ( page 21, “Connecting to a
device with an HDMI input”, page 22, “Connecting
to a TV with component video inputs”). Some discs
may require use of the HDMI OUTPUT for viewing of
high resolution material.
See page 21.
22
Press repeatedly (remote
control).
Set the resolution to output from the player in
accordance with the scanning method (480
the connected TV.
Select “480
” on the player display window.
Caution
Do not power this player using any power cord other
than the one supplied with this player.
Do not use the supplied power cord with any device
other than this player.
Switching output signals and setting the resolution
Turn on the player (
11
page 28) before you confi gure the following setting.
Press (remote control).
Player display window
Make sure the HDMI
indicator TURNS OFF.
HDMI
Notes
When you connect the player to your TV, be sure to turn off the power and unplug both units from the wall outlet
before making any connections.
Connect the player directly to your TV. If you connect the player to a VCR, TV/VCR combination, video selector or AV
amplifi er, the playback picture may be distorted due to copy protection.
20
) of
Page 22

Chapter
HDMI compatible device
HDMI cable (supplied)
Depending on the equipment
connected to this player, such
as a TV or a projector, no
sound may be output by the
display. In this case, set
“Digital out HDMI” ( page
53) to “PCM”. If sound still is
not heard, use analog output.
• Set “Digital out HDMI” ( page 53).
Note on copy protection and high definition viewing
HD DVD and DVD video disc
creators have the option to
include copy protection
instructions in their discs that
prohibit the output of some
standard video or high definition
video (original 720p or 1080i or
up-converted 480i or 480p) from
the COMPONENT OUTPUT
jacks. If such instructions are
present in the disc you are
playing, you must use the HDMI
OUTPUT jack to view the disc in
a high definition format and the
COMPONENT OUTPUT jacks, if
activated, will output video only in
480i or 480p resolution.
HDMI input
HDMI
Make sure the HDMI
indicator
ILLUMINATES
.
Connections
2
2
Connecting to a device with an HDMI input
HDMI stands for High Defi nition Multimedia Interface. HDMI transfers digital audio and uncompressed digital
video on a single cable. As a result, audio cables and video cables don’t need to be connected separately to a
device. The HDMI OUTPUT jack is designed to HDMI Version 1.1.
To view 480 , 720 , 1080 pictures, use the HDMI OUTPUT jack or the COMPONENT OUTPUT jacks to connect
to a TV ( page 22, “Connecting to a TV with component video inputs”). Some discs may require use of the
HDMI OUTPUT for viewing of high resolution material. See note regarding copy protection.
Introduction Connections
Playback
(Basic)
(Advanced)
Playback
Switching output signals (Switching to HDMI output and setting the resolution)
Turn on the player ( page 28) before you confi gure the following setting.
11
Press (remote control).
Player display window
When the HDMI indicator illuminates. signals are
being input from the HDMI OUTPUT jack.
Notes
Refer to the owner’s manual for the TV to be connected to this player for more information concerning HDMI connections.
When the HDMI connection is not verifi ed, the error message appears on the front panel display. In this case, disconnect the
HDMI cable then connect it again, or turn off the connected HDMI device then turn it on.
HDMI output is digital only, DVI analog is not supported.
HDMI is an evolving technology, so it is possible that some devices may not operate properly with this player.
Be sure to use an HDMI cable with the HDMI logo ( ) to connect an HDMI device.
If your display does not support multi-channel audio, to use multi-channel audio you will need to either use an AV receiver that
supports multi-channel audio over HDMI (set “Digital out HDMI” to “Auto” or to match the decoding capability of your equipment)
or use a receiver that has a coaxial or optical SPDIF digital audio input (set “Digital audio SPDIF” to match the decoding capability
of your equipment).
HDMI, the HDMI logo and High-Defi nition Multimedia Interface are trademarks or registered trademarks of HDMI Licensing LLC.
When HDMI output is selected, video cannot be
displayed from the COMPONENT OUTPUT jacks,
S-VIDEO jack, and VIDEO jack (yellow).
22
Press repeatedly (remote
control).
Set the resolution to output from the player in
accordance with the scanning method of the
connected TV.
Pressing the button switches between 480
and 1080
display window.
. The setting is indicated on the player
connection
Internet
Others
, 720 ,
21
Page 23

Chapter
TV
Video cable
(not supplied)
Connect to audio input
jacks on your TV using
the audio cable.
Component video input
Note on copy protection and high definition viewing
HD DVD and DVD video disc
creators have the option to
include copy protection
instructions in their discs that
prohibit the output of some
standard video or high definition
video (original 720p or 1080i or
up-converted 480i or 480p) from
the COMPONENT OUTPUT
jacks. If such instructions are
present in the disc you are
playing, you must use the HDMI
OUTPUT jack to view the disc in
a high definition format and the
COMPONENT OUTPUT jacks, if
activated, will output video only in
480i or 480p resolution.
HDMI
Make sure the HDMI
indicator
TURNS OFF
.
Connections
2
2
Connecting to a TV with component video inputs
If your TV has component video inputs, you can obtain pictures in better quality.
You may also view 480 , 720 , 1080 pictures using the HDMI OUTPUT jack to connect to a TV ( page 21,
“Connecting to a device with an HDMI input”).
Switching output signals (Switching to component video output and setting the resolution)
Turn on the player ( page 28) before you confi gure the following setting.
11
Press (remote control).
Player display window
When the HDMI indicator turns off, signals are being
output from the COMPONENT OUTPUT jacks.
Notes
When 1080i or 720p is selected, video cannot be displayed from the S-VIDEO jack nor VIDEO jack (yellow).
Depending on a combination of the characteristics of the connected TV, resolution of the video source, and video
output resolution of the player, high-resolution output may not provide the best picture. Change the output resolution
according to your preferences.
22
22
Press repeatedly (remote
control).
Set the resolution to output from the player in
accordance with the scanning method of the
connected TV.
Pressing the button switches between 480
720
, and 1080 . The setting is indicated on the
player display window.
, 480 ,
Page 24

Chapter
6Ê>«viÀ
Õ`ÊV>LiÊ
ÌÊÃÕ««i`®
&2/.42
&2/.4,
3522/5.$2
3522/5.$,
ANALOGAUDIOINPUT
#%.4%2
35"7//&%2
or
AV amplifier
Optical digital cable
(not supplied)
75 coaxial
cable
(not supplied)
Digital input
Coaxial
Digital input
Optical
Connections
2
2
Connecting to an audio system
You can enjoy multichannel surround-sound such as 5.1 channel by connecting to an amplifi er compatible with
Dolby® Digital and DTS® sound.
Introduction Connections
Via digital audio output
Set "Digital out SPDIF"
(
page 53).
Via 5.1ch analog audio output
Playback
(Basic)
(Advanced)
Playback
connection
Internet
Others
Caution
When you are connecting (via the DIGITAL AUDIO
OUTPUT BITSTREAM/PCM jack) an AV decoder that
does not have Dolby Digital, DTS or MPEG decoding
capability, be sure to set “Digital out SPDIF” ( page
53) to “PCM”. Otherwise, high volume sound may
damage your hearing as well as the speakers.
Manufactured under license from Dolby Laboratories. Dolby and the
double-D symbol are trademarks of Dolby Laboratories.
Manufactured under license from Digital Theater Systems, Inc.
U.S. Pat. No's. 5,451,942; 5,956,674; 5,974,380; 5,978,762;
6,226,616; 6,487,535 and other U.S. and world-wide patents
issued and pendling. "DTS" and "DTS Digital Surround" are
registered trademarks of Digital Theater Systems, Inc.
Copyright 1996, 2003 Digital Theater Systems, Inc. All Rights
Reserved.
23
Page 25

Chapter
HDMI compatible device
HDMI cable (supplied)
HDMI cable
(not supplied)
You may need to adjust the HDMI
audio output to match the
capabilities of your AV amplifier.
In this case, set “Digital out
HDMI” ( page 53) to “PCM”.
• Set “Digital out HDMI”
( page 53).
AV amplifier
HDMI input
HDMI input
HDMI output
Connections
2
2
Connecting to an audio system
Via HDMI output
(Continued)
Caution
When you are connecting (via the HDMI OUTPUT jack)
an AV decoder that does not have Dolby Digital or DTS
decoding capability, be sure to set “Digital out HDMI”
( page 53) to “PCM” or “Downmixed PCM”.
Otherwise, high volume sound may damage your
hearing as well as the speakers.
Note about audio capabilities
Dolby Digital Plus and DTS-HD (DTS core only)
capability limited to 5.1 channels.
DTS-HD processing of DTS core only. Full DTS-HD is
not supported.
Dolby TrueHD processing for two channels only.
24
Page 26

Introduction Connections
Playback
(Basic)
(Advanced)
Playback
Playback (Basic)
Play your favorite disc.
3
Disc compatibility
Powering on/Loading a disc
Playing a disc
Playing at various speeds
connection
Internet
Others
Page 27

Chapter
!,,
Playback (Basic)
3
3
Disc compatibility
Pre-recorded discs
Disc Specifi cation
HD DVD
video disc
DVD video disc
Audio CD • 12cm (43/4 in.)/
• 12cm (43/4 in.)/
8cm (31/4 in.)
• 12cm (43/4 in.)/
8cm (31/4 in.)
• Region number 1
or ALL
8cm (3
1
/4 in.)
The region number of this HD DVD player is 1.
If region numbers, corresponding to a specifi c
playable area, are printed on your DVD video
disc and you do not fi nd
encoded to permit playback only in regions other
than Region 1, disc playback will not be allowed
by the player.
or
, or the disc is
Recordable discs you can play on this player
Disc Specifi cation
• DVD VR mode recording
(CPRM compatible discs can not be
played.)
• Single sided
4.7GB(12cm (43/4 in.))
DVD-RAM
DVD-RW
Except Ver. 1.0
Notes
Because HD DVD is a new format, disc compatibility issues with new and existing format discs are possible. Not
all discs are compatible. If you experience compatibility problems, please contact Toshiba Customer Service,
See
This player can play pictures of the NTSC color system only.
You cannot play non-standardized discs even if they may be labeled as above.
Discs other than the above cannot be played. Even some of the above discs may not be able to be played
depending on their state.
Blu-ray Discs cannot be played on this player.
• Double sided
9.4GB(12cm (43/4 in.))
Note
The DVD-RAM cartridge format is not
supported. You may be able to remove the
disc from a DVD-RAM cartridge to allow
playback. Check the documentation that
came with your DVD-RAM cartridge for
availability of this option and instructions.
• DVD VR mode recording
(CPRM compatible discs can not be
played.)
• DVD Video mode recording
*Finalized discs only.
page 8 for more information about disc compatibility.
Disc Specifi cation
DVD-R
DVD-R For DL
CD-RW
CD-R
• DVD Video mode recording
• 4.7GB For General
*Finalized discs only.
• CD-DA (audio CD) format
• MP3 fi le ( page 37)
• WMA fi le ( page 37)
*Finalized discs only.
• CD-DA (audio CD) format
• MP3 fi le
• WMA fi le
*Finalized discs only.
26
is a trademark of DVD Format/Logo Licensing Corporation.
Page 28

Introduction Connections
Playback
(Basic)
Playback
(Advanced)
Others
27
Internet
connection
.O
9ES
Compatibility notes
7 Because HD DVD is a new format, certain disc,
digital connection and other compatibility issues are
possible. If you experience compatibility problems,
please contact Toshiba Customer Service.
7 Viewing high-defi nition content and up-converting
standard DVD content may require an
HDMI-capable input or HDCP-capable DVI input on
your display device.
7 Some HD DVD discs and DVD discs may restrict
the use of some operation commands or features.
7 Dolby Digital Plus and DTS-HD (DTS core only)
capability limited to 5.1 channels.
7 DTS-HD processing of DTS core only. Full DTS-HD
is not supported.
7 Dolby TrueHD processing for two channels only.
7 Some DVD-R/DVD-RW and CD-R/CD-RW discs may
be incompatible due to laser pick-up and disc
design.
7 DVD-R/DVD-RW discs must be recorded using
DVD-Video method for video playback.
7 CD-R/CD-RW discs must be recorded using CD-DA
method for CD audio playback.
7 This player may not support some MP3/WMA
recordings due to differences in recording formats,
disc structure or condition. (Use of CD-RW for MP3
fi les is not recommended.)
7 The included remote control may not operate some
or all features of your TV or monitor, so it may be
necessary to use your original remote control.
7 Certain features are subject to delayed availability.
7 This product includes memory that is used to store
some disc related information, including
downloaded on-line content. The disc you are using
will control how long this information is retained.
Note
The fi rmware in this player can be updated.
See page 57 for details.
On handling discs
•
Do not touch the playback
side of the disc.
Yes
Playback side
•
Do not stick paper or tape
to discs.
.O
On cleaning discs
• Fingerprints and dust on the disc cause picture and
sound deterioration. Wipe the disc from the center
outwards with a soft cloth. Always keep the disc
clean.
• Do not use any type of solvent such as thinner,
benzine, commercially available cleaners or antistatic
spray for vinyl LPs. It may damage the disc.
• Refer to the instructions of the disc as well.
On storing discs
• Do not store discs in a place subject to direct sunlight
or near heat sources.
• Do not store discs in places subject to moisture and
dust such as a bathroom or near a humidifi er.
• Store discs vertically in a case. Stacking or placing
objects on discs outside of their case may cause
warping.
• Refer to the instructions of the disc as well.
Page 29

Chapter
/.34!.$"9INDICATOR
/.34!.$"9BUTTON
/.34!.$"9BUTTON
Playback (Basic)
3
3
Powering on/Loading a disc
Turning the power on
11
Press (front panel) or
(remote control).
When the power turns on, ON/STANDBY
indicator on the front panel changes color from
red (standby mode) to green (operation).
Loading a disc
11
Press (front panel) or
(remote control).
The player opens the door and then the disc
tray.
Place a disc in the hollow of the
22
disc tray with the playback side
down.
Turning the power off
Press ON/STANDBY.
11
The power turns off and ON/STANDBY indicator
on the front panel turns red (standby mode).
Note
If the player freezes for about 15 minutes or more
and will not respond to any buttons, holding
down ON/STANDBY button on the front panel for
about 10 seconds can force the player to turn
off. However, this is an emergency measure,
which may cause damage to the player. Avoid
casual use of this measure.
Do not load a disc which is unplayable, or any object
other than a playable disc.
Do not apply downforce to the disc tray. Doing so may
cause the player to malfunction.
If the disc tray stops while closing, the mechanical
protection system of this player will open it. Do not
force it to close. Doing so may damage the disc tray.
If the disc tray will not open, turn the player off, and
press OPEN/CLOSE on the front panel. This may turn
the player on and open the disc tray. If it still won’t
open, contact your nearest TOSHIBA dealer.
After placing a disc, press DOOR (see right) or
OPEN/CLOSE.
Notes
Use the button on the front panel or the remote control
to open and close the disc tray. Do not push or hold
the disc tray while it is moving. Doing so may cause
the player to malfunction.
28
When using a
double-sided disc,
turn the label of the
playing side up.
Opening or closing the door
Press (front panel) or
The door on the front panel opens (closes).
• Use the button on the front panel or the remote control
to open and close the door. Do not pull or push the
door. Doing so may cause the player to malfunction.
• To close the door, unplug USB game controllers from
the EXTENSION ports.
• The door may not be operated in some conditions such
as immediately after powering on.
• The door automatically opens when opening the disc
tray.
(remote control).
Page 30

Chapter
Start
To display a
top menu
To display
a menu
Playback (Basic)
3
3
Introduction Connections
Playing a disc
HD DVD
DVD-RAM DVD-RW DVD-R
CD-RW
(CD-DA)
DVD-Video
CD-R
(CD-DA)
CD
Preparation
1 Turn on the TV or audio system and select the corresponding input
source that the player is connected to.
2 Turn the power on. ( page 28)
11
Load a disc and close the disc tray.
page 28)
(
Playback starts.
If playback does not start
•
Press .
HD DVD
If a loaded disc contains a top menu, a top menu appears when
you start playback.
Depending on the disc, you may need to press
display a top menu.
(“Playing from the top menu”, page 30)
DVD-Video
or
to
Playback
(Basic)
(Advanced)
Playback
connection
Internet
Notes
HD DVD video discs or DVD video discs provide high resolution pictures and a lot of information. Because of this,
you may notice some fi ne picture noise on the TV screen, which you have never seen with a regular broadcast TV
program. While the amount of noise depends on the TV you use with the player, you should generally reduce the
sharpness adjustment on your TV when viewing HD DVD or DVD video discs.
DVD-RAM DVD-RW DVD-R
If a loaded disc contains a title menu, you can display it to select a
desired title.
(“Playing from a recorded title menu”, page 30)
CD
Playback starts automatically.
CD-RW
(CD-DA)
CD-R
(CD-DA)
Stopping playback / Pausing playback
Press
Playback stops.
.
During playback, press
Playback pauses.
To resume, press .
Others
.
29
Page 31

Chapter
Playback (Basic)
3
3
Playing a disc (Continued)
Playing from the top menu
HD DVD
Some DVD video discs may include a top menu, on
which you can view the structure of contents or select a
scene.
11
22
DVD-Video
Press .
A top menu appears.
Press / / / to select the title
you want.
If the titles in the top menu are
assigned a number, you can
directly locate a specifi c title by
pressing its designated number
with the number buttons.
33
Press .
Playing from a recorded title menu
DVD-RAM DVD-RW
Discs recorded on personal devices such as DVD
recorders may contain title menus, on which titles can be
easily selected.
11
Press .
Recorded contents are displayed.
Press / / / to select the title
22
you want.
33
Press
.
Playback starts from chapter 1 of the selected title.
Notes
The instructions above describe basic procedures
which may vary depending on the contents of a disc.
If different instructions appear on the TV screen, follow
those instructions.
If you display the top menu during playback and press
TOP MENU button again without selecting any title,
the player may resume playback from the point where
you fi rst pressed TOP MENU button (depending on the
actual disc.)
This method of locating a title is available only on a
disc that contains a top menu.
Instruction notes of discs may refer to the button that
displays the top menu as TITLE button.
Depending on a disc, MENU button may have to be
pressed instead of TOP MENU button to display the
top menu.
Using A/B/C/D buttons
HD DVD
Playback of the selected title starts.
Notes
Disc menus vary depending on the disc or the
recording device. Some discs may not contain a disc
menu.
Discs recorded in DVD VR mode display the recorded
contents not in thumbnails but in a list. Select a title on
the list and press OK.
Use these buttons as indicated by the video display
during HD DVD disc playback. Depending on the disc
contents, the functions of each button may differ.
30
Page 32

Introduction Connections
Playback
(Basic)
Playback
(Advanced)
Others
31
Internet
connection
Start
Selecting the sound
1ENG
Audio:
e.g.
HD DVD
If a disc contains several languages, you can select a preferred language
from them to hear.
11
22
Notes
Some discs allow you to change audio selections only via the disc menu. If
this is the case, press MENU button and choose the appropriate language
from the selections on the disc menu.
When you turn on the player or replace a disc, the player returns to the initial
default setting ( page 55). Depending on a disc, a specifi c type of audio
the disc has is output.
DVD-Video
DVD-RAM DVD-RW DVD-R
Good
morning!
Bonjour!
¡Buenos
días!
During playback, press .
The current audio setting appears.
The language code appears instead of
the language name. Refer to the list of
languages and their abbreviations.
( page 58)
Press
while the audio setting is
displayed on the TV screen.
Selecting the sound of a disc recorded in DVD VR mode
DVD-RAM DVD-RW
When playing a disc recorded in DVD VR mode, select the sound as follows.
11
During playback, press .
• The current audio setting appears.
• The language code appears instead of the language name. Refer
to the list of languages and their abbreviations. (
Press
22
displayed on the TV screen.
Depending on the disc or the type of broadcast, variation of sound
differs.
DVD-RAM DVD-RW DVD-R
•
Stereo sound contents
"Stereo" or "LR" (Left main channel and right sub channel) . "L" (Left main
channel) . "R" (Right sub channel) . Back to "Stereo" or "LR".
SAP sound contents
"Main" . "Sub" . "Main and Sub" . Back to "Main".
(DVD VR mode)
while the audio setting is
page 58)
Page 33

Chapter
Start
Start
Angle
16/
Angle number
Angle icon
Number of angles in the disc
1ENG
Subtitle:
e.g.
Playback (Basic)
3
3
Playing a disc (Continued)
Selecting subtitles
HD DVD
You can display subtitles on the TV and
select a subtitle language from those
included on the disc.
11
22
DVD-Video
Good evening!
Bonsoir!
¡Buenas tardes!
Press during playback.
• The current subtitle setting appears.
• The language code appears instead
of the language name. Refer to the list
of languages and their abbreviations.
( page 58)
Each time you press / , “On” and “Off” alternate. Select “On” to
view subtitles.
Press
while the subtitle setting is
displayed on the TV screen.
Subtitle languages which do not appear in the setting are not
included in the disc.
Notes
Some DVD video discs are set to display subtitles automatically.
Depending on the scene, subtitles may not appear immediately after you set
the subtitle function to on.
Some DVD video discs will allow you to change subtitle languages and turn
subtitles on or off only via the disc menu.
When you turn on the player or replace a disc, the player returns to the initial
default setting ( page 55). Depending on a disc, a specifi c type of subtitles
the disc has is output.
Depending on the scene, the subtitle language may not change immediately
after selected.
32
Selecting the camera angle
HD DVD
If the scene was recorded with multiple angles, you can easily change the
camera angle of the scene you are watching.
11
DVD-Video
Press while playing a scene recorded
with multiple angles.
• While playing a scene recorded
with multiple angles, the angle icon
appears on the TV screen and on
the front panel. Press ANGLE button
while the angle icon is displayed.
22
While the angle number is displayed, press
repeatedly to select the angle number.
Notes
You can also change the camera angle during still playback. The camera
angle changes to the new setting when you resume normal playback.
If you pause a picture immediately after changing a camera angle, the
resumed playback picture may not display the new camera angle.
Page 34

Chapter
During playback, press .
Picture pauses.
If you press while a picture is
paused, you can play the picture
frame by frame.
• To resume normal playback, press
.
Some discs may not permit this
operation.
Skipping chapters or tracks
Playback starts from the beginning
of the current chapter or track.
When you press twice, playback
starts from the beginning of the
previous chapter or track.
Skipping chapters or tracks
Playback starts from the beginning
of the next chapter or track.
Playing frame by frame
Page 34
Playing in slow-motion
Press during playback.
Picture is played forward in slow-
motion.
• Each time you press the button,
the slow-motion speed changes.
• To resume normal playback, press
.
• Not available in CD playback.
Playing in fast reverse or fast forward
During normal playback,
press / .
: Fast reverse playback
: Fast forward playback
• Each time you press the button,
the playback speed changes.
• To resume normal playback, press
.
Page 34
Playback (Basic)
3
3
Introduction Connections
Playing at various speeds
HD DVD
DVD-RAM DVD-RW DVD-R
CD-RW
(CD-DA)
DVD-Video
CD-R
(CD-DA)
CD
Playback
(Basic)
(Advanced)
Playback
connection
Internet
Others
33
Page 35

Chapter
*>Þ
Ê-Ì«
,iÃÕ}
/ÌiÊ£ /ÌiÊÓ /ÌiÊÎ /ÌiÊ{ /ÌiÊx
…
– – – –
TimeChapter
3
TitleSearch:
– –– –– –
e.g.
– –– –– –
– – – –
Off
To enter a title number
To enter a chapter number
To enter the elapsed time
(See right).
TimeChapter
3
TitleSearch:
– – – –
TimeChapter
3
Title
Search:
– – – –
TimeChapter
3
TitleSearch:
– –– –– –
– –– –– –
• The actual display may vary depending on the disc.
The cursor shifts also by / .
Playback (Basic)
3
3
Playing at various speeds (Continued)
Locating by entering a section number
HD DVD
DVD-R
Normally titles, chapters, and tracks are numbered. By
entering these numbers, you can access a desired section.
11
DVD-Video
CD-RW
(CD-DA)
CD DVD-RAM DVD-RW
CD-R
(CD-DA)
Press repeatedly to select
the area you want to input.
e.g. When you want to locate a chapter.
Press the number buttons to
22
enter a number of the section.
e.g. To enter chapter/track 25:
Press
•
Pressing CLEAR button resets the numbers. To
turn off the display, press T.SEARCH several times
(depending on the disc).
, then press .
Locating by entering elapsed time
HD DVD
DVD-R
11
22
DVD-Video
CD-RW
(CD-DA)
CD DVD-RAM DVD-RW
CD-R
(CD-DA)
Press .
You may have to press repeatedly, depending on
a disc. Press the button until the cursor moves to
"-- -- --" area.
Press the number buttons to
enter the desired time location on
the disc.
e.g. To enter 1 hour, 25 minutes, and 30
seconds
. . . .
•
Pressing CLEAR button resets the numbers.
33
Press .
Playback starts from the specifi ed location.
33
Press .
Playback starts from the selected section.
Note
Some discs may not permit these operations.
Resuming playback from the location last stopped (Title resume)
You can resume playback from the location last
stopped.
If you press
starts from the location last stopped.
If you press after stopping playback, the resume
feature is canceled.
34
after stopping playback, playback
Notes
Resume feature cannot function when:
− you select a disc menu language (
change the parental lock setting (
− you open the disc tray.
There may be a difference in the location where
playback resumes depending on the disc.
It is possible to change the setting from the setup menu
while the player retains a location in memory, however,
the new setting can be valid only after the player clears
the location memory, i.e., starts resume playback.
Some discs or scenes may not permit this operation.
page 54) or
page 56).
Page 36

Introduction Connections
Playback
(Basic)
(Advanced)
Playback
Playback (Advanced)
Playback variations and other functions.
4
Playing repeatedly (Repeat playback)
Playing MP3/WMA fi les on a CD
Using EXTENSION ports
Using the cursor function
Checking the current status and settings
connection
Internet
Others
Page 37

Chapter
Start
Repeat
All Repeat
Title Repeat
Chapter Repeat
A-B Repeat
Cancel
RepeatA B A Point
RepeatA B B Point
All Repeat:
Repeats the entire disc.
(Not available in playback of a disc recorded in
DVD VR mode.)
Title Repeat:
Repeats the same title.
Chapter Repeat:
Repeats the same chapter.
Track Repeat:
Repeats the same track.
Disc Repeat:
Repeats the entire disc.
A-B Repeat:
Repeats the specified segment.
Select and press OK.
Perform step 1) and 2) below and skip
step 3.
1) While the above display appears,
press OK at a start point of a
segment where you want to repeat.
The display changes to “B Point”.
Playback returns to the point A and
repeats between A and B.
2) Press OK at an end point of a
segment where you want to repeat.
e.g.
Playback (Advanced)
4
4
Playing repeatedly (Repeat playback)
HD DVD
DVD-RAM DVD-RW DVD-R
CD-RW
(CD-DA)
DVD-
Video
CD-R
(CD-DA)
CD
You can repeat a desired section.
11
Press
The repeat modes are listed.
.
Press / to select the repeat mode.
22
(The selections on the list vary depending on category or status of a disc.)
36
33
Notes
Some discs may not permit repeat playback operation.
You can cancel repeat playback also by pressing
Press
Repeat playback starts.
.
.
Page 38

Chapter
Start
Playback (Advanced)
4
4
Introduction Connections
Playing MP3/WMA fi les on a CD
CD-RW
(CD-DA)
CD-R
(CD-DA)
You can play MP3/WMA fi les that have been recorded on a CD-RW or CD-R
on this player.
Load a CD that contains MP3/WMA fi les, and
11
close the disc tray.
A menu appears.
Press / to select a fi le.
22
To go to the upper folder, select “Next Level Up” by pressing then
press OK.
33
Notes
Some disc cannot be played.
WMA tracks that are copy-protected cannot be played.
The DIGITAL AUDIO OUT BITSTREAM/PCM jack outputs MP3/WMA sounds in the
linear PCM format regardless of the current “Digital Out” (
Each fi le name is displayed up to 8 characters.
Press
Playback starts.
.
page 53) selection.
Playback
(Basic)
(Advanced)
Playback
connection
Internet
Playable fi les
Playable discs: CD-RW, CD-R
Sampling frequency: 44.1 kHz
Bitrate: WMA: 48 kbps - 192 kbps
MP3: 32 kbps - 320 kbps
Format: MODE 1
File system: ISO9660 Level 1
File name (MP3): A fi le name should be in alphabet and numerals only, and must incorporate “MP3” extension.
(e.g. “********.mp3”)
Less than 50 bytes
File name (WMA): A fi le name should be in alphabet and numerals only, and must incorporate “WMA” extension.
Less than 50 bytes
Total number of fi les: Less than 650
WMA codec version: V7, V8, V9 (Stereo sound only)
This player requires discs/recordings to meet certain technical standards in order to achieve optimal playback quality.
There are many different types of recordable disc formats (including CD-R containing MP3/WMA fi les). Not all recordable discs
will produce optimal playback quality. The technical criteria set forth in this owner’s manual are meant only as a guide. Use of
CD-RW for MP3 fi les is not recommended.
You must obtain any required permission from copyright
owners to download or use copyrighted content. Toshiba
cannot and does not grant such permission.
(e.g. “********.wma”)
Microsoft, Windows Media, and the
Windows Logo are trademarks or
registered trademarks of Microsoft
Corporation in both the United States
and other countries.
Others
37
Page 39

Chapter
Playback (Advanced)
4
4
Using EXTENSION ports
HD DVD
Depending on the features of the disc you
are using, you may be able to connect USB
game controllers to the Extension ports to
use some interactive features. Additional
features may be supported in the future.
Using the cursor function
HD DVD
3TART
EXTENSION ports
Press while a disc with
11
support for cursor use is playing.
Available commercial HD
DVD discs include game
software and drawing
software. You can use the
cursor function for some
software.
Use the eight direction buttons to
22
move the cursor.
Example: Game/drawing software
Move the cursor to select the game target or
selection item. For details on actual operations,
also refer to the operations guide for the disc.
38
Page 40

Chapter
002 00:19:13
00:00:280003
Chapter
Title
Video Codec:
Audio:
Subtitle:
Angle:
Video Output:
Audio Output
:
MPEG4AVC
English 1
None
1/1
1080i
Digital Bitstream
Chapter number
Title number
Elapsed time of a title
Elapsed time of a chapter
Video codec
Language setting
Subtitle setting
Angle number
Definition
Sound output setting
e.g.
CD PLAYER
TRACK 002 00:03:12 / 00:05:16
Track number
Total time of a track
Elapsed time of a track
e.g.
Start
Playback (Advanced)
4
4
Introduction Connections
Checking the current status and settings
HD DVD
DVD-RAM DVD-RW DVD-R
CD-RW
(CD-DA)
DVD-Video
CD-R
(CD-DA)
CD
You can confi rm operational status and setting details.
11
Press .
The following on-screen display appears.
(The actual display varies depending on the disc.)
HD DVD
DVD-Video
DVD-RAM DVD-RW
DVD-R
Playback
(Basic)
(Advanced)
Playback
connection
Internet
*The subtitle setting shows a language code ( page 58).
CD
CD-RW
(CD-DA)
CD-R
(CD-DA)
Others
39
Page 41

Page 42

Introduction Connections
Playback
(Basic)
(Advanced)
Playback
Internet connection
Connect to a network with an always-on broadband connection and
5
Internet connection feature (Outline)
Internet connection feature (Preparation)
Internet connection feature (Operation)
use special content.
connection
Internet
Others
Page 43

Chapter
Internet connection
5
5
Internet connection feature (Outline)
If you connect the player to the Internet via an always-on broadband connection, some HD DVD discs enable
you to access special HD DVD sites, etc. For example, if an HD DVD site includes content such as movie trailers,
you can watch the content on the player via the Internet. On such sites, downloading service of the control
program (fi rmware) updates of the player is also available.
You do not need to connect to a PC to use this function.
You may also use the internet connection feature to update the player’s fi rmware. See
page 57.
TV
Broadband
service
Internet connection
Broadband modem
Player
HD DVD
Special disc
ex.
Movie trailer
Special
HD DVD site
Before using
Before using this feature, please read and understand the important information in “Notes”.
This feature requires always-on broadband internet connection.
An HD DVD disc compatible with this feature (commercially available) is required. Not all HD DVD discs are
compatible.
Connection requirement
Always-on internet broadband internet connection.
Note
The above requirement may change without advance
notice. In addition, all operations are not guaranteed.
Notes
Toshiba is not responsible for any malfunction of the
player and/or the internet connection feature due
to communication errors/malfunctions associated
with your broadband internet connection, or other
connected equipment.
Toshiba is not responsible for any trouble in your
internet connection.
If you use a wireless ethernet network, you will need
to use a wireless LAN ethernet adapter to connect
the player to the network.
The features of HD DVD discs made available
through the Internet Connection feature are not
created or provided by Toshiba, and Toshiba is not
responsible for their functionality or continued
availability. Some disc related material available by
the Internet Connection may not be compatible with
this player. If you have questions about such content,
please contact the producer of the disc.
Some internet contents may require a higher
bandwidth connection.
42
Page 44

Introduction Connections
Playback
(Basic)
Playback
(Advanced)
Others
43
Internet
connection
Even if the player is properly connected and
confi gured, some internet contents may not operate
properly because of internet congestion, the quality
or bandwidth of your internet service, problems at the
provider of the content or compatibility issues.
The communication features of this player comply
with the Institute of Electrical and Electronic
Engineers (IEEE) 802.3.
Some internet connection operations may not be
possible due to certain restrictions set by the
Internet service provider (ISP) supplying your
broadband Internet connection.
Any fees charged by an ISP including, without
limitation, connection charges are your responsibility.
A 10 Base-T or 100 Base-TX LAN port is required for
connection to this player. If your internet service does
not allow for such a connection, you will not be able
to connect the player.
ADSL modem is required to use DSL service and
a cable modem is required to use cable modem
service. Depending on the access method of and
subscriber agreement with your ISP, you may not be
able to use the internet connection feature contained
in this player or you may be limited to the number of
devices you can connect at the same time. (If your
ISP limits subscription to one device, this player may
not be allowed to connect when a PC is already
connected.)
The use of a “Router” may not be allowed or its
usage may be limited depending on the policies and
restrictions of your ISP. For details, contact your ISP
directly.
Page 45

Chapter
Straight cable
Connecting using a router (e.g. ADSL)
To LAN port
To LAN port
Broadband
service
Broadband
service
To LAN port
Broadband modem
(with integrated router)
Broadband modem
Router
Back view
of the player
Internet connection
5
5
Internet connection feature (Preparation)
HD DVD
Connect the player to the Internet via an always-on broadband connection. In addition to accessing
special HD DVD sites, this function is used when updates are available for the control program
(fi rmware) of the player.
Connection
Regarding the cable used:
Use a commercially available straight LAN cable
(Category 5/CAT5 or better with RJ45 connector).
Caution
When plugging or unplugging the LAN cable, hold the plug portion of the cable.
When unplugging, do not pull on the LAN cable but unplug while pressing down
on the lock.
Do not connect the modular phone cable to the LAN port.
Since there are various connection confi gurations, please follow the
specifi cations of your telecommunication carrier or internet service provider.
Note
Depending on the internet service provider (ISP), the number of devices that can receive internet service may be
limited by the applicable terms of service. For details, contact your ISP.
While pressing down
Lock portion
Plug
44
Page 46

Introduction Connections
Playback
(Basic)
Playback
(Advanced)
Others
45
Internet
connection
DHCP
DHCP
IP Address
Subnet Mask
Gateway
DNS
DNS Server
OKOnCancel
0. 0. 0. 0
0. 0. 0. 0
0. 0. 0. 0
0. 0. 0. 0
Confirm
Off
On Off
Skipped when
“DHCP” is set
to “On”.
Internet connection setting procedure (Outline)
1st
DHCP Setting
• Set “DHCP” to “On”.
The network information is automatically set.
• Set “DNS” to “On”.
The DNS server is obtained automatically from the
DHCP server.
If a connection cannot be established even
if “DHCP” is set to “On”.
• Set “DHCP” to “Off”.
Set “IP Address”, “Subnet Mask”, and
“Gateway” manually.
• Set “DNS” to “Off”.
Set the DNS server address manually.
2nd
Proxy Setting
If the provider you are using requires a proxy setting to be
configured, set the corresponding proxy server address.
1st
DHCP Setting
1 Press SETUP button.
“SETUP MENU” appears.
2 Press
/ buttons to select “Ethernet”, then press OK
button.
3 On “Ethernet” menu, press
/ buttons to select “DHCP”
then press OK button.
4 Set “DHCP” to “On”, then press OK button.
DHCP
DHCP
IP Address
Subnet Mask
Gateway
DNS Server
On Off
0. 0. 0. 0
0. 0. 0. 0
0. 0. 0. 0
DNS
0. 0. 0. 0
Confirm
OKOnCancel
Skipped when
“DHCP” is set
to “On”.
Off
5 Set “DNS” to “On”, then press OK button.
3rd
NTP Server Setting
The player automatically accesses an internet server to
adjust its clock via the network time protocol.
6 Select “Confi rm”, then press OK button.
Confi rming starts.
If the setup is successful, an IP address appears.
Press OK button.
If the setup is not successful:
a) Set “DHCP” to “Off” then press OK button.
b) Input the addresses into “IP Address”, “Subnet Mask”
and “Gateway” using the number buttons.
IP Address This sets a different address within
the same subnet of the PC on your
network.
e.g.: If the IP address of the PC is
192.168.1.10, set 192.168.1.15 (or
some other unused address).
Subnet Mask This sets the subnet mask of the
network environment that will be
connected.
e.g.: 225.255.255.0
Gateway This sets the gateway used by the
player (e.g.: 192.168.11).
c) Set “DNS” to “Off” then press OK button.
d) Input the address into “DNS Server”.
This sets the DNS server to be used by the player.
e.g.: 192.168.1.1
e) Press OK button.
Page 47

Chapter
Internet connection
5
5
Internet connection feature (Preparation) (Continued)
2nd
Proxy Setting
Enter the proxy server address when your provider
requires proxy setting.
1 On “Ethernet” menu, press / buttons to select “Proxy
setting” then press OK button.
2 Set “Proxy” to “On” then press OK button.
User information setting
Although not directly related to the Internet
connection, some HD DVD discs may require the
following settings to be confi gured.
1 On “Ethernet” menu, press / buttons to select “User
Information” then press OK button.
Proxy Setting
Proxy
Server
User
Password
3 Press /
Server: Enter the specifi ed data from the provider.
Port: Enter the specifi ed data from the provider.
User: Enter the specifi ed data from the provider.
Password: Enter the specifi ed data from the provider.
4 Select “OK” then press OK button.
3rd
NTP Server Setting (Clock adjustment setting)
1 On “Ethernet” menu, press / buttons to select “NTP
Server” then press OK button.
2 Select “On” or “Off” by pressing
On The player automatically accesses an
Off The player does not access an internet
Port
************
/
/
On Off
OK Cancel
buttons to input.
/
buttons.
internet server to adjust time protocol.
server to adjust its clock.
User information
User
Password
2 Select “User” then press OK button.
3 Input characters by pressing
To shift the position, press
Press OK button.
4 Select “Password” then press OK button.
Input your password in the same manner as step 3.
Press OK button.
5 Select “OK” then press OK button.
• Use a password that others cannot easily guess.
Mac Address
************
OK Cancel
/
/
buttons.
buttons.
Displays the MAC address of the player.
It cannot be changed.
1 On “Ethernet” menu, press / buttons to select “MAC
Address” then press OK button.
The MAC address appears.
3 Select “OK” then press OK button.
Notes
Please contact the router manufacturer when the router DHCP feature is not operating properly (in such a case, an
error will occur since the default gateway and the DNS server IP address cannot be obtained).
The fi rmware in this player is updateable. See page 57 for information.
46
Page 48

Chapter
Start
Internet connection
5
5
Internet connection feature (Operation)
Introduction Connections
HD DVD
Some HD DVD discs enable you to access special HD DVD sites. If an
HD DVD site includes content such as movie trailers, you can watch the
content on the player via the Internet if your internet connection provides
suffi cient bandwidth.
Preparation
Connect and confi gure the player to access the Internet beforehand
( pages 44 to 46).
Insert the HD DVD disc and close the tray.
11
The disc begins to play.
If the disc does not begin to play, press .
Select an item from the menu.
22
• If the menu does not appear, press or .
• To select an item, use the direction buttons to select the item and
press .
Playback
(Basic)
(Advanced)
Playback
connection
Internet
• Use the cursor function for some discs ( page 38).
For example, you can watch the latest trailers on the player via the
Internet.
For details on actual operations, also refer to the operations guide for
the disc.
Others
47
Page 49

Page 50

Introduction Connections
Playback
(Basic)
(Advanced)
Playback
Others
This chapter includes details on setting items and information
6
Customizing the function settings
Language code list
Output sound conversion table
Before calling service personnel
Specifi cation
Limited United States Warranty
CANADIAN WARRANTY INFORMATION
on troubleshooting problems.
connection
Internet
Others
INFORMATION ON CUSTOMER SUPPORT
Page 51

Chapter
SETUP MENU
Picture
Audio
Language
Dialog Enhancement
Dynamic Range Control
Speaker Setting
Digital out HDMI
Digital out SPDIF
Audio Output Setting category.
Ethernet
General
Picture
Audio
Audio
Language
Ethernet
General
SETUP MENU
Dialog Enhancement
Dynamic Range Control
Speaker Setting
Digital out HDMI
Digital out SPDIF
Off
Off
5.1ch
Auto
Bitstream
Select SPDIF Output Format.
Start
Returns to the
previous screen
6
6
Others
Customizing the function settings
You can change the default settings to customize performance to your
preference.
11
22
33
During stop, press .
“SETUP MENU” appears.
Press / to select the group that contains a
desired item, then press
.
Group
Press / to select the setting item, then
press
.
50
44
55
66
Setting item
Refer to the explanations on pages beginning
from 52, to change the selection by
other buttons, then press
.
/
or
Repeat step 3 and 4 to set other items if
necessary.
Press .
“SETUP MENU” disappears and the setting is completed.
Page 52

Introduction Connections
Playback
(Basic)
Playback
(Advanced)
Others
51
Internet
connection
To turn on or off a function that the player automatically
accesses to the server to adjust its clock.
Picture
Audio
Language
Ethernet
General
TV Shape To select a picture size according to the aspect ratio
of your TV.
Details PageDisc
52
52
52
53
53
53
54
54
54
55
55
46
57
57
56
57
57
57
57
SettingGroup
To select the system of output signal corresponding
to playback source. (Only when connected to a
PROGRESSIVE TV.)
To select the output sound format when connecting
the DIGITAL AUDIO OUTPUT jack.
To select various parameters for the analog 5.1ch
output.
To turn on or off a function that increases dialog
volume of a DVD video disc playback.
To turn on or off a function that makes faint sounds
easier to hear even if you lower the volume during
late-hour playback.
To select a preferred language for disc menus.
To select a preferred language for subtitles.
To select a preferred language for the sound
track.
To select a preferred language for on-screen
displays.
To select the black level of playback pictures.
To select the method to acquire network
information.
To display the MAC address of the player.
To set a user name and a password to prevent
improper access.
To enter the proxy server address when your
provider requires proxy setting.
To turn the parental lock function on or off.
To set the clock of the player.
To activate or deactivate the operational status
display on the TV screen.
To turn on or off the confirmation beeper announcing
when each remote command is received.
To select the pattern of the on screen controls.
To select the player conditioning options, such
as initializing of settings or firmware download.
To turn on or off the screen saver (screen
protection to prevent image burn).
Enhanced Black
Level
Picture Mode
Digital out SPDIF
Dynamic Range
Control
Dialog Enhancement
Speaker Setting
Disc Menu
Language
Subtitle Language
Audio Language
On Screen
Language
Mac Address
User Information
Proxy Setting
NTP Server
Parental Lock
Clock Set
OSD On/Off
Remote Controller
Sound
Screen Saver
Skin
Maintenance
DHCP
HD DVD
DVD-R
DVD Video
DVD-RAM
DVD-RW
HD DVD
DVD-RW
DVD Video
DVD-R
CD
CD-RW
(CD-DA)
DVD-RAM
HD DVD
DVD-RW
DVD Video
DVD-R
CD
DVD-RAM
CD-R
(CD-DA)
HD DVD
DVD-RW
DVD Video
HD DVD
DVD Video
HD DVD
DVD Video
HD DVD
DVD Video
HD DVD
DVD Video
DVD-R
CD
CD-RW
(CD-DA)
DVD-RAM
CD-R
(CD-DA)
53To select the output sound format when connecting
the HDMI OUTPUT jack.
Digital out HDMI
HD DVD
DVD-RW
DVD Video
DVD-R
CD
CD-RW
(CD-DA)
DVD-RAM
CD-R
(CD-DA)
HD DVD
DVD-RW
DVD Video
DVD-R
CD
CD-RW
(CD-DA)
DVD-RAM
CD-R
(CD-DA)
HD DVD
DVD-RW
DVD Video
DVD-R
CD
CD-RW
(CD-DA)
DVD-RAM
CD-R
(CD-DA)
HD DVD
DVD-RW
HD DVD
HD DVD
HD DVD
HD DVD
HD DVD
DVD Video
DVD-R
CD
CD-RW
(CD-DA)
DVD-RAM
CD-R
(CD-DA)
HD DVD
DVD-RW
DVD Video
DVD-R
CD
CD-RW
(CD-DA)
DVD-RAM
CD-R
(CD-DA)
DVD-RW
DVD-R
CD
CD-RW
(CD-DA)
DVD-RAM
CD-R
(CD-DA)
HD DVD
DVD-RW
DVD Video
DVD-R
CD
CD-RW
(CD-DA)
DVD-RAM
CD-R
(CD-DA)
DVD-RW
DVD-R
CD
CD-RW
(CD-DA)
DVD-RAM
CD-R
(CD-DA)
HD DVD
DVD-RW
DVD Video
DVD-R
CD
CD-RW
(CD-DA)
DVD-RAM
CD-R
(CD-DA)
DVD-RW
DVD-R
CD
CD-RW
(CD-DA)
DVD-RAM
CD-R
(CD-DA)
HD DVD
DVD-RW
DVD Video
DVD-R
CD
CD-RW
(CD-DA)
DVD-RAM
CD-R
(CD-DA)
DVD-RW
DVD-R
CD
CD-RW
(CD-DA)
DVD-RAM
CD-R
(CD-DA)
HD DVD
DVD-RW
DVD Video
DVD-R
CD
CD-RW
(CD-DA)
DVD-RAM
CD-R
(CD-DA)
HD DVD
DVD-R
DVD Video
DVD-RAM
DVD-RW
HD DVD
DVD-R
DVD Video
DVD-RAM
DVD-RW
46
46
46
46
Page 53

Chapter
Others
6
6
Customizing the function settings (Continued)
Picture
TV Shape
16:9
Select when a 16:9 wide TV is connected.
4:3
Select when a standard 4:3 TV is connected.
Displays pictures cropped to fi ll your TV screen. Either or
both of the picture’s sides are cut off.
4:3Letter Box
Select when a standard 4:3 TV is connected.
Displays theatrical images with masking bars above and
below the picture.
Notes
When an HD DVD disc or a DVD video disc has a particular
available picture shape, the contents may not be compatible
with other picture shapes.
DVD video discs containing 4:3 picture only always display
4:3 pictures regardless of this setting.
If “16:9” is selected while connecting a 4:3 TV, playback
pictures may be distorted horizontally or shrink vertically.
Make this setting according to your TV shape.
Actual picture shape may depend on signal types of
broadcasts or input sources, or settings on the connected
TV. Refer to the owner’s manual of your TV.
Video
The player fi lters video signal, and converts it in the
progressive output format appropriately. Suitable for
playback of video content pictures.
Auto
Select this position normally. The player automatically
detects source content, fi lm or video, of playback source,
and converts that signal in the progressive output format in
an appropriate method.
Note
Depending on a disc, “Auto” setting may not be able to detect
source content. If pictures may be doubled, roughened, or
may show other abnormality, “Film” or “Video” selection is
recommended for possible improvement.
Enhanced Black Level
You can adjust the black level of the output signal.
On
To display deeper, richer black than in “Off” setting. (0 IRE)
Off
Normal black level. (7.5 IRE)
Picture Mode
There are two types of source content in pictures recorded in
DVD video discs: fi lm content (pictures recorded from fi lms
at 24 frames per second) and video content (video signals
recorded at 30 frames per second). Make this selection
according to the type of content being viewed.
Film
The player converts fi lm content pictures in the progressive
output format appropriately. Suitable for playback of fi lm
content pictures.
52
Page 54

Introduction Connections
Playback
(Basic)
Playback
(Advanced)
Others
53
Internet
connection
Audio
Digital out SPDIF
Selects the output sound format when an audio device such as
an amplifi er to the DIGITAL AUDIO OUTPUT BITSTREAM/PCM
jack on this player.
For details about output sound selection, see
Bitstream
Select this when an amplifi er equipped with built-in Dolby
Digital, DTS or MPEG decoder is connected to this player.
When you play a disc recorded in Dolby Digital
digital audio signal (bitstream audio) is output.
PCM
Select this when a 2 channel digital stereo amplifi er is
connected to this player.
When you play an HD DVD or DVD video disc recorded in
Dolby Digital, Dolby Digital Plus, Dolby TrueHD, DTS or DTSHD format, sound is converted into PCM (2 channel) format to
output.
Digital out HDMI
Select the output sound format when a device equipped with
an HDMI terminal is connected to the HDMI OUTPUT jack on
this player.
For details about output sound selection, see
Auto
Select this when an HDMI device equipped with built-in
Dolby Digital, DTS, MPEG or linear PCM decoder is
connected to this player.
When you play a disc recorded in Dolby Digital or DTS
format, digital audio signal (bitstream audio) is output.
If a connected HDMI device does not support Dolby Digital,
DTS or MPEG, sound is converted into linear PCM to output.
Bitstream
Select this when an HDMI device equipped with built-in
Dolby Digital, DTS or MPEG decoder is connected to this
player.
When you play a disc recorded in Dolby Digital, DTS or MPEG
format, digital audio signal (bitstream audio) is output.
page 59.
or DTS
page 59.
format,
Downmixed PCM
Select this when a 2 channel digital stereo amplifi er is
connected to this player.
When you play a DVD video disc recorded in Dolby Digital,
DTS, MPEG1 or MPEG2 format, sound is converted into PCM
(2 channel) format to output.
Dynamic Range Control
To turn on or off a function that makes faint sounds easier to
hear even if you lower the volume during late-hour playback.
On
This function is activated.
Off
This function is disabled.
Notes
This function is effective only in playback of Dolby Digital
recorded HD DVD or DVD video discs.
The effect level of this function vary depending on the disc.
Dialog Enhancement
To turn on or off a function that increases dialog volume of a
DVD video disc playback.
On
This function is activated.
Off
This function is disabled.
Notes
This function is effective only in playback of Dolby Digital
recorded HD DVD or DVD video discs.
This function is effective only when “Speaker Setting” is set to
“2ch”.
The effect level of this function vary depending on the disc.
PCM
Select this when an HDMI device which has multi channel
output is connected to this player.
When you play an HD DVD or DVD video disc recorded in multi
channel in Dolby Digital, Dolby Digital Plus, Dolby TrueHD, DTS
or DTS-HD format, the sound is decoded and output in multi
channel in linear PCM format.
Page 55

Chapter
Others
6
6
Customizing the function settings (Continued)
Audio
Speaker Setting
To select various parameters for the analog 5.1 channel output.
5.1ch
When a 5.1 channel surround system is connected to this
player.
Go to the next step (see below) for detailed selections.
2ch
When a 2 channel stereo system is connected to this player.
When you selected “5.1ch”:
Set the speaker sizes, distance to each speaker and the
crossover frequency.
1 Select a speaker by pressing
press OK button.
2 Select the size by pressing /
button.
Front Left / Front Right
Small: Select if the speaker cannot output low
frequency.
Large: Select if the speaker can output low
frequency.
Center / L Surround / R Surround
Small: Select if the speaker cannot output low
frequency.
Large: Select if the speaker can output low
frequency.
None: When the speaker is not connected.
Subwoofer
Use: When a subwoofer is connected.
Don’t Use: When a subwoofer is not connected.
Crossover Setting
Low frequency under which you set here will be of a
subwoofer. Select one from 80 Hz/100 Hz/120 Hz.
Ft
Select a distance to each speaker from the listening
position.
3 Select “Next” by pressing
OK button.
The next screen appears.
4 Select “Automatic Test Tone” by pressing
buttons, and press OK button.
A test signal is sent to each speaker. Adjust each of the
volumes by pressing /
so that each speaker can sound at the same volume.
For further adjustment, check the channel balance on the
amplifi er.
5 When complete, select “OK” and press OK button.
/ / / buttons, and
buttons, and press OK
/ / / buttons, and press
/ / /
, selecting speakers by / ,
Language
Disc Menu Language
To select a preferred language for disc menus.
English
To display disc menus in English.
French
To display disc menus in French.
Japanese
To display disc menus in Japanese.
Others
To make a further language choice.
After pressing OK button, follow steps 1) – 4) below.
1) Obtain the language code of the preferred language
from the Language code list (
2) Select the fi rst character by pressing /
3) Press
by pressing /
4) Select “OK” and press OK button.
/ buttons to shift. Select the second character
buttons.
Note
Some discs may be played in a different language from that
you selected. A prior language may be programmed by the
disc.
Subtitle Language
To select a preferred language for subtitles.
None
To disable subtitles.
English
To display subtitles in English.
French
To display subtitles in French.
Japanese
To display subtitles in Japanese.
Others
To make a further language choice.
After pressing OK button, follow steps 1) – 4) below.
1) Obtain the language code of the preferred language
from the Language code list (
2) Select the fi rst character by pressing
3) Press /
by pressing
4) Select “OK” and press OK button.
buttons to shift. Select the second character
/ buttons.
page 58).
page 58).
/ buttons.
buttons.
54
Page 56

Introduction Connections
Playback
(Basic)
Playback
(Advanced)
Others
55
Internet
connection
Ethernet
Notes
Some discs may be set to display subtitles in a different
language from that you selected. A prior subtitle language
may be programmed by the disc.
Some discs allow you to change subtitle selections only via
the disc menu. In this case, press MENU button and choose
the appropriate subtitle language from the selection on the
disc menu.
Audio Language
To select a preferred language for the sound track.
English
To display sound tracks recorded in English.
French
To display sound tracks recorded in French.
Japanese
To display sound tracks recorded in Japanese.
Others
To make a further language choice.
After pressing OK button, follow steps 1) – 4) below.
1) Obtain the language code of the preferred language
from the Language code list (
2) Select the fi rst character by pressing
3) Press /
by pressing /
4) Select “OK” and press OK button.
buttons to shift. Select the second character
buttons.
page 58).
/ buttons.
See the “Internet connection” chapter (
page 42).
Note
Some discs may be played in a different language from that
you selected. A prior language may be programmed by the
disc.
On Screen Language
To select a preferred language for on-screen displays.
English
To view on-screen display in English.
French
To view on-screen display in French.
Japanese
To view on-screen display in Japanese.
Page 57

Chapter
Parental Lock
Lock
Off
Area Code Level
S 8U OK Cancel
a) b) c)
to shift
/
to
/
change
Others
6
6
Customizing the function settings (Continued)
General
Parental Lock
HD DVD and DVD video discs equipped with the Parental Lock
function have a predetermined limitation level. The limitation
level or limitation method may differ depending on the disc.
For example the whole contents of a disc may not be played
back, or an extreme violent scene may be cut or replaced
automatically by another scene.
Important
Depending on discs, it may not be evident whether the disc
is compatible with Parental Lock function. Make sure that
Parental Lock function you set is activated correctly.
1 Enter a 4-digit password by using the number buttons,
then press OK button.
When you use the player for the fi rst time, set a new
password of 4-digit. If you make a mistake entering your
password, press CLEAR button before pressing OK button,
and re-enter the correct password.
2 Set the details.
a) Select “On” or “Off” by pressing / buttons.
On
Select this to activate Parental Lock function or to
change the setting.
Off
Deactivate the Parental Lock function.
Skip step 3.
b) Press
area whose standards were used to rate a disc,
referring to the list below.
Country/Area Code
AUSTRALIA AU
BELGIUM BE
CANADA CA
CHINA CN
CHINA HONG KONG HK
DENMARK DK
FINLAND FI
/ buttons to enter the code of a country/
FRANCE FR
GERMANY DE
INDONESIA ID
ITALY IT
JAPAN JP
MALAYSIA MY
NETHERLANDS NL
NORWAY NO
PHILIPPINES PH
RUSSIAN FEDERATION RU
SINGAPORE SG
SPAIN ES
SWEDEN SE
SWITZERLAND CH
TAIWAN TW
THAILAND TH
UNITED KINGDOM GB
UNITED STATES US
c) Select the desired limitation level by pressing /
buttons.
Unless the Parental Lock function is set to “Off”, a disc
that has a higher limitation level than your selected
limitation level cannot be played back. For example, if
you select level 7, discs exceeding level 8 are locked
and cannot be played back.
When “US” is selected, its limitation level corresponds to
the following settings.
Level 7 : NC-17 Level 3 : PG
Level 6 : R Level 1 : G
Level 4 : PG13
4 Select “OK” then press OK button.
To change the limitation level of Parental Lock function
Follow step 1 - 3 above.
To change the password
1 At step 1, press STOP button 4 times then press OK
button.
The password is cleared.
2 Enter a new 4-digit password by using the number
buttons.
3 Press OK button.
56
Page 58

Introduction Connections
Playback
(Basic)
Playback
(Advanced)
Others
57
Internet
connection
Clock Set
To set the clock of the player.
1 Press
/ / / buttons to select the input area.
Clock set
Number buttons
to change
03 / /12 06
09 : :27 48
OK Cancel
(Month/Day/Year)
AM Eastern Time
to change
/
2 Press the number buttons to change the digit to set the
date and time.
3 Press / buttons to select “AM” or “PM” and your
time zone.
4 Select “OK” and press OK button.
The clock starts.
OSD On/Off
To activate or deactivate the operational status display on the
TV screen.
On
Activates the operational status display (e.g.,
) on the TV
screen.
Off
Deactivates the operational status display (e.g., ) on the
TV screen.
Remote Controller Sound
To turn on or off the confi rmation beeper announcing when
each remote command is received.
On
Turns on the beep sound.
Off
Turns off the beep sound.
Skin
To select the pattern of the on screen controls.
1:2:3
Maintenance
(including internet fi rmware update)
Initialize
To reset all the settings listed on
page 51 to factory set
default.
Press
/ buttons to select “Yes” then press OK button.
Update (Firmware update)
You can use Ethernet communication to connect to the
Internet and download the latest fi rmware from the Toshiba
server.
Before you can use this function, the player needs to be
connected to the Internet via an always-on broadband
connection. For details on connecting, refer to the “Internet
connection” chapter.
To update the fi rmware, select “Yes” and press OK. If there
is no update available (in which case your player likely has
the latest fi rmware), a message appears and the process is
canceled after you select “Yes”. Please check the support
section of the Toshiba website for information about fi rmware
updates (including information on how to obtain updates on
disc rather than using the Internet Connection feature of the
player).
Caution
Do not unplug, turn off or use any other feature of the player
during the download. The writing of the software being
downloaded will be halted and the player may no longer
work properly. If the player stops working, contact Toshiba
Customer Service.
Screen Saver
To turn on or off the screen protection function to prevent image
burn caused by prolonged still picture.
Auto Power Off
Turns the player off if picture pausing continues for about 20
minutes.
On
Activates the screen saver if picture pausing continues for
about 20 minutes.
Off
Deactivates the screen saver.
Note
Toshiba does not guarantee that this function protects the TV
screen by all means.
Page 59

Chapter
nnn
#():(
$54.,
%.'%.
&2%&2
'%2$%
)4!)4
*0.*!
+/2+/
-!9-3
30!%3
!!
!"
!&
!!2
!3
!9
!:
"!
"%
"'
"(
")
".
"/
"2
#!
#/
#3
#9
$!
$:
%,
%/
%4
%5
&!
&)
&*
&/
&9
'!
'$
',
.OALTERNATE
LANGUAGE
#HINESE
$UTCH
%NGLISH
&RENCH
'ERMAN
)TALIAN
*APANESE
+OREAN
-ALAY
3PANISH
!FAR
!BKHAZIAN
!FRIKAANS
!MHARIC
!RABIC
!SSAMESE
!YMARA
!ZERBAIJANI
"ASHKIR
"ELORUSSIAN
"ULGARIAN
"IHARI
"ISLAMA
"ENGALI"ANGLA
4IBETAN
"RETON
#ATALAN
#ORSICAN
#ZECH
7ELSH
$ANISH
"HUTANI
'REEK
%SPERANTO
%STONIAN
"ASQUE
0ERSIAN
&INNISH
&IJI
&AROESE
&RISIAN
)RISH
3COTTISH'AELIC
'ALICIAN
'.
'5
(!
()
(2
(5
(9
)!
)%
)+
).
)3
)7
*)
*7
+!
++
+,
++.
+3
+5
+9
,!
,.
,/
,4
,6
-'
-)
-+
-,
-.
-/
-2
-4
-9
.!
.%
./
/#
//2
0!
0,
03
04
15
2-
2.
2/
25
27
3!
3$
3'
3(
3)
3+
3,
3-
3.
3/
31
32
33
34
35
36
37
4!
4%
4'
4(
4)
4+
4,
4.
4/
42
43
44
47
5+
52
5:
6)
6/
7/
8(
9/
:5
'UARANI
'UJARATI
(AUSA
(INDI
#ROATIAN
(UNGARIAN
!RMENIAN
)NTERLINGUA
)NTERLINGUE
)NUPIAK
)NDONESIAN
)CELANDIC
(EBREW
9IDDISH
*AVANESE
'EORGIAN
+AZAKH
'REENLANDIC
#AMBODIAN
+ANNADA
+ASHMIRI
+URDISH
+IRGHIZ
,ATIN
,INGALA
,AOTIAN
,ITHUANIAN
,ATVIAN,ETTISH
-ALAGASY
-AORI
-ACEDONIAN
-ALAYALAM
-ONGOLIAN
-OLDAVIAN
-ARATHI
-ALTESE
"URMESE
.AURU
.EPALI
.ORWEGIAN
/CCITAN
!FAN/ROMO
/RIYA
0ANJABI
0OLISH
0ASHTO0USHTO
0ORTUGUESE
1UECHUA
2HAETO2OMANCE
+IRUNDI
2UMANIAN
2USSIAN
+INYARWANDA
3ANSKRIT
3INDHI
3ANGO
3ERBO#ROATIAN
3INGHALESE
3LOVAK
3LOVENIAN
3AMOAN
3HONA
3OMALI
!LBANIAN
3ERBIAN
3ISWATI
3ESOTHO
3UNDANESE
3WEDISH
3WAHILI
4AM I L
4ELUGU
4AJIK
4HAI
4IGRINYA
4URKMEN
4AGALOG
3ETSWANA
4ONGAN
4URKISH
4SONGA
4AT A R
4W I
5KRAINIAN
5RDU
5ZBEK
6IETNAMESE
6OLAPàK
7OLOF
8HOSA
9O R U B A
:ULU
!BBREVIATION
,ANGUAGE
!BBREVIATION
,ANGUAGE
!BBREVIATION
,ANGUAGE
6
6
Others
Language code list
58
Page 60

Chapter
6
6
Others
Introduction Connections
Output sound conversion table
Disc Audio Format
DD plus 5.1ch/2ch Bitstream 2ch PCM
True HD 48kHz 2ch/2ch 2ch PCM 2ch PCM
HD DVD Video
Standard
contents
Advanced con. 5.1ch/2ch DTS Bitstream 2ch PCM
DVD-Video
CD
DVD-VR
Disc Audio Format
HD DVD Video
Standard
contents
Advanced con. Depend on HDMI receiver DTS Bitstream 96kHzMulti PCM 2ch PCM*1
DVD-Video
CD
DVD-VR
*1: Downsampling PCM.
*2: Bitstream audio output is possible only when the connected HDMI device has bitstream decoding function. If not, sound is output in PCM (48k)
format.
*3: Multi channel PCM audio output is possible only when the connected HDMI device has multi channel decoding function.
dts-HD 5.1ch/2ch Bitstream 2ch PCM
L-PCM 48k Yes 2ch PCM 2ch PCM
DD 5.1ch/2ch Bitstream 2ch PCM
L-PCM 48k 2ch/2ch 2ch PCM 2ch PCM
dts 5.1ch/2ch Bitstream 2ch PCM
MPEG 2ch/2ch Bitstream 2ch PCM
L-PCM 44.1kHz Yes 2ch PCM 2ch PCM
dts 44.1kHz Yes Bitstream 2ch PCM
MP3 2ch/2ch 2ch PCM 2ch PCM
WMA 2ch/2ch 2ch PCM 2ch PCM
DD Yes Bitstream 2ch PCM
L-PCM Yes 2ch PCM 2ch PCM
MPEG Yes Bitstream 2ch PCM
DD plus Depend on HDMI receiver Bitstream*2 upto 5.1ch PCM*3 2ch PCM
True HD 48kHz Depend on HDMI receiver 2ch PCM 2ch PCM 2ch PCM
dts-HD Depend on HDMI receiver Bitstream*2 upto 5.1ch PCM*3 2ch PCM
L-PCM 48k Depend on HDMI receiver 2ch PCM Multi PCM 2ch PCM
MPEG Depend on HDMI receiver Bitstream 2ch PCM 2ch PCM
DD Depend on HDMI receiver Bitstream Multi PCM 2ch PCM
L-PCM 48k Depend on HDMI receiver 2ch PCM 2ch PCM 2ch PCM
dts Depend on HDMI receiver Bitstream Multi PCM 2ch PCM
MPEG Depend on HDMI receiver Bitstream 2ch PCM 2ch PCM
L-PCM 44.1kHz 2ch PCM 2ch PCM 2ch PCM 2ch PCM
dts 44.1kHz Bitstream Bitstream Multi PCM 2ch PCM
MP3 2ch PCM 2ch PCM 2ch PCM 2ch PCM
WMA 2ch PCM 2ch PCM 2ch PCM 2ch PCM
DD Depend on HDMI receiver Bitstream Multi PCM 2ch PCM
L-PCM 2ch PCM 2ch PCM 2ch PCM 2ch PCM
MPEG Depend on HDMI receiver Bitstream 2ch PCM 2ch PCM
96kHz 2ch/2ch 2ch PCM*1 2ch PCM*1
192kHz 2ch/2ch 2ch PCM*1 2ch PCM*1
96k Yes 2ch PCM*1 2ch PCM*1
192k 2ch/2ch 2ch PCM*1 2ch PCM*1
96k 2ch/2ch 2ch PCM*1 2ch PCM*1
96kHz Depend on HDMI receiver 2ch PCM 2ch PCM 2ch PCM*1
192kHz Depend on HDMI receiver 2ch PCM 2ch PCM 2ch PCM*1
96k Depend on HDMI receiver 2ch PCM*1 Multi PCM 2ch PCM*1
192k Depend on HDMI receiver 2ch PCM*1 2ch PCM 2ch PCM*1
96k Depend on HDMI receiver 2ch PCM*1 2ch PCM 2ch PCM*1
Analog out
5.1ch/2ch
Auto Bitstream PCM Downmixed PCM
Digital out SPDIF
Bitstream PCM
Digital out HDMI
Playback
(Basic)
(Advanced)
Playback
connection
Internet
Others
Notes
Some discs allow you to change audio selections only via the disc menu. If this is the case, press MENU button and choose the
appropriate language from the selections on the disc menu.
When you turn on the player or replace a disc, the player returns to the initial default setting. (
Depending on a disc, a specifi c type of audio the disc has is output.
Immediately after you have switched sounds, there may be a temporary discrepancy between the display and actual sound.
The BITSTREAM/PCM jack may not output SAP sound you select. In this instance, set “Digital out SPDIF” to “PCM”.
page 55)
59
Page 61

Chapter
6
6
Others
Before calling service personnel
If you experience any of the following diffi culties while using this unit, check the list below before consulting
your nearest Toshiba dealer.
Symptom
No power.
No picture.
No sound.
Multi channel sound is not
output.
The disc does not play.
Playback picture has noise.
The remote control does not
work.
Screen freezes and no
buttons work.
Remedy
Is the power plug disconnected? Check the power connection.
.
Is the cable for connecting the player and TV disconnected or not connected properly?
.
Check the connections (
Switch the input of the connected TV to the signal from the player.
.
When the TV is connected via the component jacks or HDMI jacks, images from the
.
player may temporarily not be able to be displayed because of the selected output and
resolution. Use the V.OUTPUT and RESOLUTION buttons to change the output and
resolution (
Is the audio cable disconnected? (
.
Is the volume of the device turned down to the minimum level? Check the volume.
.
Switch the audio input of the device connected by the audio cable to the input from the
.
player.
Set “Digital out SPDIF” or “Digital out HDMI” (
.
the connected device and connection procedure.
The volume level is set to the minimum. Adjust the volume. (
.
Is the HDMI output selected? To listen to HDMI audio, press V.OUTPUT and select HDMI
.
output.
Set “Speaker Setting” (
.
Make sure the disc type can be played with the player (
.
Is the disc dirty or scratched? Check or clean the disc. (
.
If the disc is a DVD-RW or DVD-R disc, fi nalize the disc before attempting to play it with
.
the player.
If the disc includes parent lock support, playback is restricted while the parent lock of
.
the player is set. Cancel Parental Lock (
If video from the player is watched via a video recorder or on a TV with a built-in video
.
recorder, the copy guard may prevent images from being displayed properly. Be sure to
connect the player directly to the TV.
Are the batteries of the remote control dead? Replace the batteries. (
.
Make sure the remote control is within range and pointed in the correct direction.
.
Pressing the ON/STANDBY button on the player for approximately ten seconds forces
.
the player to turn off. Turn the player off and then on again.
pages 21 and 22).
page 20 – 23)
page 20)
page 53) properly in accordance with
page 54)
page 53) to “5.1ch.”
page 26).
page 27)
page 56) or change the restriction level.
page 16)
60
Page 62

Chapter
6
6
Others
Introduction Connections
Specifi cation
Power requirement
90.0W
Power supply
120V AC 60Hz
Mass
8.9kg
External dimension
Width 437 x Height 115 x Depth 354mm
Signal system
Standard NTSC Color TV system
Laser
Semiconductor laser, Wavelength: 405nm/650nm/
780nm
VIDEO output
1.0Vp-p (75 ), Sync signal negative,
Pin jack x 1 system
S-VIDEO output
(Y) 1.0Vp-p (75 ), Sync signal negative,
(C) 0.286Vp-p (75 ), 1 at rear
Mini DIN4 Pin x 1 systems
Component output (Y, PB PR)
Y output (green), 1.0Vp-p (75 ),
Sync signal negative, Pin jack x 1 system
PB, PR output (blue, red), 0.7Vp-p (75 ),
Pin jack x 1 system each
Analog audio output
2.0V (rms), 2.2k or below, pin jack
(L, R) x 2 systems
2.0V (rms), 2.2k
Pin jack x 6
Digital audio output (BITSTREAM/PCM jack)
Optical connector x 1 system
Coaxial pin jack x 1 system, 0.5Vp-p (75
LAN port
100BASE-TX/10BASE-T × 1
EXTENSION port
EXTENSION port × 2 systems
RS-232C connector
DSUB 9 pin
HDMI output
19 pin
Remote control
Wireless remote control (SE-R0200)
Operating conditions
Temperature: 41°F ~ 95°F (5°C ~ 35°C),
Position: Horizontal
Clock accuracy
Quartz (monthly deviation: approximately ±30
seconds)
or below, pin jack
)
Playback
(Basic)
(Advanced)
Playback
connection
Internet
Others
This model complies with the above specifi cations.
Designs and specifi cations are subject to change without notice.
This model may not be compatible with features and/or specifi cations that may be added in the future.
The Illustrations and screens described in this manual may be exaggerated or simplifi ed for easy recognition and
may be slightly different from the actual unit.
61
Page 63

Chapter
Limited United States Warranty
Digital Audio Video (“DAV”) Product-Depot Repair Warranty
Toshiba America Consumer Products, L.L.C,. ( “TACP”) makes the following limited warranties to original consumers in
the United States. THESE LIMITED WARRANTIES EXTEND TO THE ORIGINAL CONSUMER PURCHASER OR ANY
PERSON RECEIVING THIS DAV PRODUCT AS A GIFT FROM THE ORIGINAL CONSUMER PURCHASER AND TO
NO OTHER PURCHASER OR TRANSFEREE.
DAV PRODUCTS PURCHASED IN THE U.S.A. AND USED ANYWHERE OUTSIDE OF THE U.S.A., INCLUDING,
WITHOUT LIMITATION, CANADA AND MEXICO, ARE NOT COVERED BY THESE WARRANTIES.
DAV PRODUCTS PURCHASED ANYWHERE OUTSIDE OF THE U.S.A., INCLUDING, WITHOUT LIMITATION,
CANADA AND MEXICO, AND USED IN THE U.S.A., ARE NOT COVERED BY THESE WARRANTIES.
Your Responsibility
THE ABOVE WARRANTIES ARE SUBJECT TO THE
FOLLOWING CONDITIONS:
(1) You must retain your bill of sale or provide other
proof of purchase.
(2) All warranty servicing of this DAV Product must be
made by the Depot Warranty Repair Center
specified by the TACP Consumer Solutions Center.
(3) The warranties from TACP are effective only if the
DAV Product is purchased and operated in the
United States or Puerto Rico.
(4) Labor service charges for set installation, setup,
adjustment of customer controls and installation or
repair of antenna systems are not covered by this
warranty. Reception problems caused by inadequate
antenna systems are your responsibility.
(5) Warranties extend only to defects in materials or
workmanship as limited above and do not extend to
any DAV Product or parts that have been lost or
discarded by you or to damage to DAV Product or
parts caused by fires, misuse, accident, Acts of God,
such as lightning or fluctuations in electric power,
improper installation, improper maintenance or use
in violation of instructions furnished by TACP; use or
malfunction through simultaneous use of this DAV
Product and connected equipment; or to units that
have been modified or had the serial number
removed, altered, defaced, or rendered illegible.
Limited Ninety (90) Day Warranty on Labor*
TACP warrants this DAV Product and its parts against
defects in materials or workmanship for a period of ninety
(90) days after the date of original retail purchase.
DURING THIS PERIOD, TACP WILL, AT TACP’s
OPTION, REPAIR OR REPLACE A DEFECTIVE PART
WITH A NEW OR REFURBISHED PART WITHOUT
CHARGE TO YOU FOR PARTS OR LABOR.
Limited One (1) Year Warranty on Parts*
TACP further warrants the parts in this DAV Product
against defects in materials or workmanship for a period
of one (1) year after the date of original retail purchase.
DURING THIS PERIOD, TACP WILL, AT TACP ’S
OPTION, REPAIR OR REPLACE A DEFECTIVE PART
WITH A NEW OR REFURBISHED PART WITHOUT
CHARGE TO YOU FOR THE PART, PROVIDED THAT IF
A DEFECTIVE PART IS REPAIRED OR REPLACED
AFTER NINETY (90) DAYS FROM THE DATE OF
ORIGINAL RETAIL PURCHASE, THE CONSUMER
SHALL PAY ALL LABOR CHARGES INVOLVED IN THE
REPAIR OR REPLACEMENT THEREOF.
*Rental Units
The warranty for DAV Product rental units begins on the
date of the first rental or thirty (30) days after the date of
shipment to the rental firm, whichever comes first.
*Commercial Units
DAV Products sold and used for commercial purposes
have a limited warranty for all parts and labor, which
warranty begins on the date of original retail purchase
and ends on the date that is ninety (90) days thereafter.
Owner’s Manual and Product Registration Card
Read this owner’s manual thoroughly before operating
this DAV Product.
Complete and mail the enclosed product registration card
or register your DAV Product on-line at
www.tacp.toshiba.com/service as soon as possible. By
registering your DAV Product you will enable TACP to
bring you new products specifically designed to meet
your needs and help us to contact you in the unlikely
event a safety notification is required under the
Consumer Product Safety Act. Failure to complete and
return the product registration card does not diminish
your warranty rights.
6
6
Others
62
Page 64

Introduction Connections
Playback
(Basic)
Playback
(Advanced)
Others
63
Internet
connection
How to Obtain Warranty Services
If, after following all of the operating instructions in this
manual and checking the section “Before calling service
personnel”, you find that service is needed:
(1) For instructions on how to obtain warranty service
for your DAV Product, contact TACP’s Consumer
Solution Center toll-free at 1-800-319-6684.
(2) You must include a copy of original bill of sale or
other proof of purchase along with the entire DAV
Product to the Depot Warranty Repair Center
specified by the TACP Consumer Solutions Center.
You are responsible for all inbound transportation
and insurance charges for the DAV Product to the
Depot Warranty Repair Center specified by the
TACP Consumer Solutions Center.
For additional information, visit TACP’s web site:
www.tacp.toshiba.com.
ALL WARRANTIES IMPLIED BY THE LAW OF ANY
STATE OF THE U.S.A., INCLUDING THE IMPLIED
WARRANTIES OF MERCHANTABILITY AND FITNESS
FOR A PARTICULAR PURPOSE, ARE EXPRESSLY
LIMITED TO THE DURATION OF THE LIMITED
WARRANTIES SET FORTH ABOVE. WITH THE
EXCEPTION OF ANY WARRANTIES IMPLIED BY THE
LAW OF ANY STATE OF THE U.S.A. AS HEREBY
LIMITED, THE FOREGOING WARRANTY IS
EXCLUSIVE AND IN LIEU OF ALL OTHER
WARRANTIES, GUARANTEES, AGREEMENTS, AND
SIMILAR OBLIGATIONS OF TACP WITH RESPECT TO
THE REPAIR OR REPLACEMENT OF ANY PARTS. IN
NO EVENT SHALL TACP BE LIABLE FOR
CONSEQUENTIAL OR INCIDENTAL DAMAGES
(INCLUDING, BUT NOT LIMITED TO, LOST PROFITS,
BUSINESS INTERRUPTION, OR MODIFICATION OR
ERASURE OF RECORDED DATA CAUSED BY USE,
MISUSE OR INABILITY TO USE THIS DAV PRODUCT).
No person, agent, distributor, dealer or company is
authorized to change, modify or extend the terms of
these warranties in any manner whatsoever.The time
within which an action must be commenced to enforce
any obligation of TACP arising under the warranty or
under any statute, or law of the United States or of any
state thereof, is hereby limited to ninety (90) days from
the date you discovered or should have discovered, the
defect. This limitation does not apply to implied
warranties arising under state law.
THIS WARRANTY GIVES YOU SPECIFIC LEGAL
RIGHTS AND YOU MAY ALSO HAVE OTHER RIGHTS
WHICH MAY VARY FROM STATE TO STATE IN THE
U.S.A. SOME STATES OF THE U.S.A. DO NOT ALLOW
LIMITATIONS ON HOW LONG AN IMPLIED
WARRANTY LASTS, WHEN AN ACTION MAY BE
BROUGHT, OR THE EXCLUSION OR LIMITATION OF
INCIDENTAL OR CONSEQUENTIAL DAMAGES, SO
THE ABOVE PROVISIONS MAY NOT APPLY TO YOU
UNDER SUCH CIRCUMSTANCES.
Page 65

Chapter
- IMPORTANT -
CANADIAN WARRANTY INFORMATION
GARANTIE CANADIENNE
STANDARD WARRANTY
TYPE OF SET
WARRANTY PERIOD
DVD Player
DVD/VCR Combination
Home Theatre in a Box
DVD Recorder
Portable DVD
12 MONTHS
GARANTIE NORMALE
TYPE D’APPAREIL
DURÉE DE LA GARANTIE:
Lecteur DVD
DVD/magnétoscope combo
Cinéma maison dans une boîte
Enregistreur DVD
DVD Portatif
12 MOIS
CANADIAN WARRANTY
Toshiba of Canada Limited (TCL) makes the following limited
warranties to original consumers in Canada.
Please retain your “Bill of Sale” as proof of purchase.
To obtain a “Canadian Warranty” please register
online at www.toshiba.ca.
GARANTIE CANADIENNE
1) Toshiba du Canada Limitée (TCL) offre au Canada les
garanties limitées suivantes aux consommateurs originaux.
Veuillez conserver votre « facture » comme preuve d’achat.
Pour obtenir une garantie canadienne, veuillez vous
inscrire en ligne à www.toshiba.ca
Canadian Warranty Information
Should service be required on this unit during the one year
warranty period, TCL’s option will be to repair or exchange the
defective unit. It will be necessary to follow this procedure:
Contact: Toshiba of Canada Limited at the Consumer
Electronics Group, customer support line.
Phone: 1-800-268-3404
Email: ceg_customer_support@toshiba.ca
All in-warranty repairs must be made by an authorized TCL
service centre.
For service exchange TCL will arrange to have the unit picked
up by courier and a replacement unit will be returned via same
courier. (Note: A major credit card number will be required as
a charge of $25.00 will apply if no fault is found with the unit.)
During the first 3 months of ownership, a new unit will be
supplied as a replacement. During the remainder of the
warranty period a service-renewed unit will be supplied.
The original “Bill of Sale” must be provided as proof of
purchase (it will be returned with the replacement unit.)
This 12-month warranty will be strictly adhered to.
Out of warranty units should be repaired by a TCL authorized
service centre.
Note: It is the responsibility of the owner to ensure proper
packaging. Should damage in shipping occur, due to poor
packaging, a charge back for the repair will result.
This warranty applies to the original purchaser only and is not
transferable.
This warranty does not apply to sets that have been subjected
to misuse, neglect, accident, physical damage or acts of
nature.
Sets with the serial number removed, altered, replaced or
defaced will not be covered by this warranty.
The warranties from TCL are effective only if the product is
purchased in Canada from an authorized TCL dealer and
operated in Canada.
Products utilized for rental or commercial purposes are not
covered by this warranty.
This warranty is in lieu of all other warranties, guaranties or
agreements, whether expressed or implied, and no person,
agent distributor, dealer, service centre or company is
authorized to change, modify or extend its terms in any manner
whatsoever.
Information sur la garantie Canadienne
Si vous avez besoin de service sur cet appareil au cours de
l’année de garantie, Toshiba du Canada Limitée aura l’option
de réparer ou échanger l’appareil défectueux. Vous devrez
suivre la procédure suivante:
Contact: Toshiba du Canada Limitée au Groupe
Électronique aux consommateurs, service à la
clientèle.
Tél: 1-800-268-3404
Courriel: ceg_customer_support@toshiba.ca
Toutes les réparations au cours de la garantie doivent être
faites par un centre de service autorisé Toshiba.
Pour un échange TCL s’assurera qu’un service de courrier
ramassera l’unité et qu’un appareil de remplacement soit
expédié par le même service de courrier.
(Note: Un numéro de carte de crédit sera requis car une
charge de 25,00$ sera appliquée si toutefois l’appareil n’avait
aucun problème de fonctionnement.)
Une nouvelle unité sera fournie comme remplacement durant
les premiers 3 mois de propriété. Par contre durant la balance
de la garantie une unité remise à neuf sera fournie.
La «facture originale doit être fournie comme preuve d’achat
(elle vous sera retournée avec l’unité de remplacement.)
Cette garantie de 12 mois sera strictement adhérée.
Les unités hors de garantie devraient être réparées par un
centre de service autorisé Toshiba.
Note: C’est la responsabilité du propriétaire de s’assurer que
l’emballage est adéquat. Vous serez facturé pour toutes
réparations causées par des dommages encourus à cause
d’un emballage non adéquat.
Cette garantie est octroyée à l’acheteur initial et n’est pas
transférable. Cette garantie ne s’applique pas aux appareils qui
ont été sujets aux abus, négligences, accidents, dommages
physiques ou actes naturels.
Les appareils dont le numéro de série a été enlevé, altéré,
remplacé ou barbouillé ne sont pas couverts par cette garantie.
Les garanties de TCL sont valides seulement sur les unités qui
sont achetées et utilisées au Canada d’un marchand autorisé
TCL.
Cette garantie ne couvre pas les produits de location ou
à usage commercial. Cette garantie remplace toutes autres
garanties ou ententes exprimées ou sous-entendues. Aucune
personne, agent, distributeur, concessionnaire ou compagnie
n’est autorisé à changer, modifier ou prolonger les termes de
cette garantie de quelque façon que ce soit.
Toshiba of Canada Limited 191 McNabb Street Markham, Ontario L3R 8H2
6
6
Others
64
Page 66

MEMO
65
Page 67

MEMO
66
Page 68

67
MEMO
Page 69

○
(
Printed on 100% Recycled Paper
INFORMATION ON CUSTOMER SUPPORT
HD DVD is a new and evolving format, so changes and improvements are possible. To obtain updated information
about HD DVD and this product, as well as customer support information about this product, please contact Toshiba
Customer Support:
* In the U.S., please call 1 (800) 319-6684 or visit
www.tacp.com/customersupport.
* In Canada, please call 1 (800) 268-3404 or visit www.toshiba.ca and click on support.
PM0023604010
 Loading...