

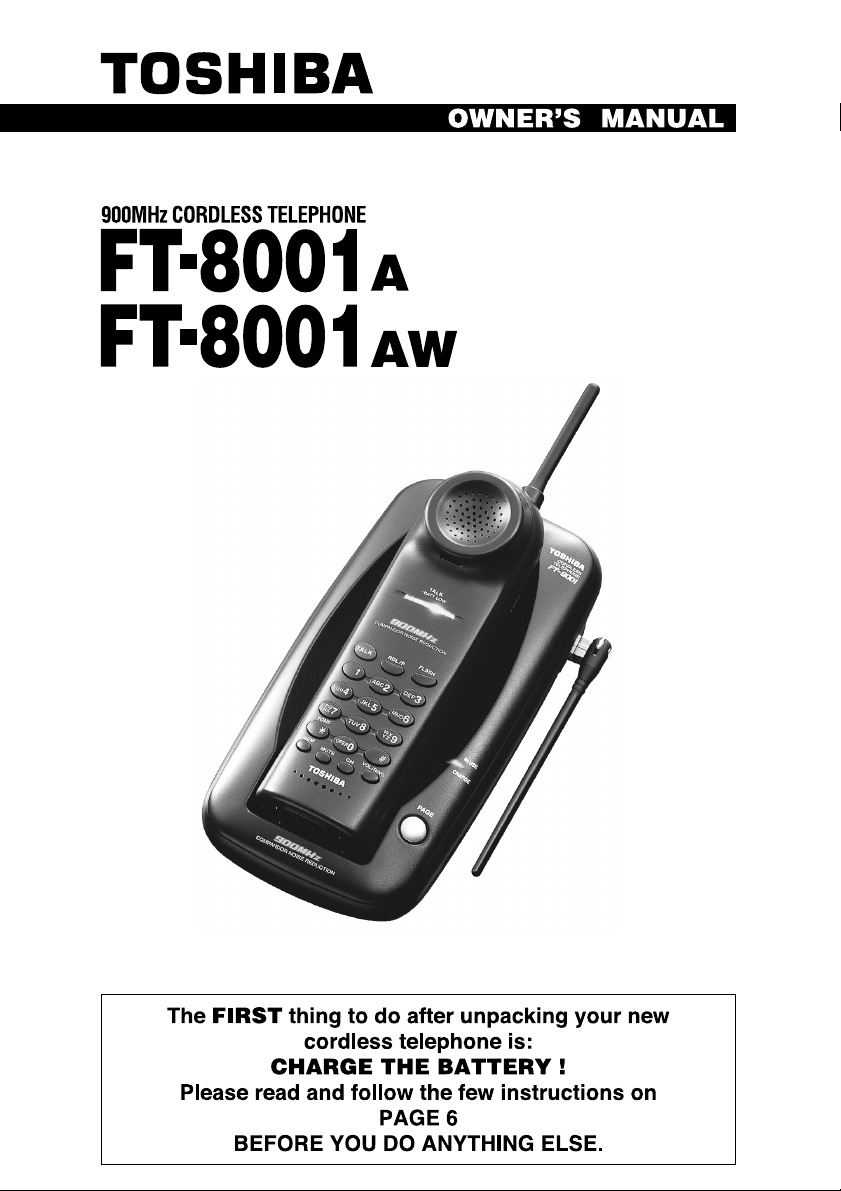
Page 1
Page 2

IMPORTANT SAFETY INSTRUCTIONS
When using your telephone equipment, basic safety precautions should always be followed
to reduce the risk of fire, electric shock and injury to persons, including the following:
1. Read and understand all instructions.
2. Follow all warnings and instructions marked on the product.
3. Unplug this product from the wall outlet before cleaning. Do not use liquid cleaners or
aerosol cleaners. Use a dry cloth for cleaning.
4. Do not use this product near water sources, such as bath tubs, wash bowls, kitchen sinks,
laundry tubs, wet basements, or swimming pools.
5. Do not place this product on an unstable cart, stand, or table. The telephone may fall,
causing serious damage to the telephone.
6. Slots and openings in the cabinet and the back or bottom are provided for ventilation, to
protect the phone from overheating. These openings must not be blocked or covered. The
openings should never be blocked by placing the product on a bed, sofa, rug, or other
similar surface. This product should never be placed near or over a radiator or heat register.
This product should not be placed in a built-in installation unless proper ventilation is provided.
7. This product should be operated only from the type of power source indicated on the marking
label. If you are not sure of the type of power supply to your home, consult your dealer or
local power company.
8. Do not allow anything to rest on the power cord. Do not locate this product where the cord
will be abused by persons walking on it.
9. Do not overload wall outlets and extension cords as this can result in the risk of fire or
electric shock.
10. Never push objects of any kind into this product through cabinet slots as they may touch
dangerous voltage points or short out parts that could result in a risk of fire or electric shock.
Never spill liquid of any kind on the product.
11. To reduce the risk of electric shock, do not disassemble this product, but take it to qualified
service personnel when some service or repair work is required. Opening or removing
covers may expose you to dangerous voltages or other risks. Incorrect reassembly can
cause electric shock when the appliance is subsequently used.
12. Unplug this product from the wall outlet and refer servicing to qualified service personnel
under any of the following conditions:
A. When the power supply cord or plug is damaged or frayed.
B. If liquid has been spilled into the product.
C. If the product has been exposed to rain or water.
D. If the product does not operate normally by following the operating instructions. Adjust
only those controls that are covered by the operating instructions because improper
adjustment of other controls may result in damage and will often require extensive work
by a qualified technician to restore the product to normal operation.
E. If the product has been dropped or the cabinet has been damaged.
F. If the product exhibits a distinct change in performance.
1
Page 3

13. Do not use the telephone in the vicinity of a gas leak.
CAUTION: TO REDUCE THE RISK OF FIRE OR INJURY TO PERSONS BY THE BATTERY,
READ AND FOLLOW THESE INSTRUCTIONS.
1. Use only the appropriate type and size battery pack specified in the instruction manual
provided for this product.
2. Do not dispose of the battery pack in a fire. The cell may explode. Check with State and
local codes for possible special disposal instructions.
3. Do not open or mutilate the battery pack. Released electrolyte is corrosive and may cause
damage to the eyes or skin. It may be toxic if swallowed.
4. Exercise care in handling the battery in order not to short it with conducting materials such
as rings, bracelets, and keys. The battery or conductor may overheat and cause burns.
5. Charge the battery pack provided with or identified for use with this product only in accordance
with the instructions and limitations specified in the instruction manual provided for this
product.
6. Observe proper polarity orientation between the battery pack and the battery charger.
ATTENTION: THE PRODUCT THAT YOU HAVE PURCHASED CONTAINS A
RECHARGEABLE BATTERY. UNDER VARIOUS STATE AND LOCAL LAWS, IT MAY BE
ILLEGAL TO DISPOSE OF THIS BATTERY INTO THE MUNICIPAL WASTE STREAM. PLEASE
CHECK WITH YOUR LOCAL GOVERNMENT FOR DETAILS IN YOUR AREA FOR RECYCLING
OPTIONS OR PROPER DISPOSAL.
SAVE THESE INSTRUCTIONS
TO HELP PROTECT THE ENVIRONMENT, THIS PRODUCT MAY CONTAIN RECYCLED OR
RECONDITIONED PARTS AND MATERIALS.
The RBRCTM Seal
The RBRCTM Seal on the (easily removable) nickel-cadmium battery
(contained in our product) indicates that Toshiba America Consumer
Products, Inc. (TACP) is voluntarily participating in an industry program
to collect and recycle these batteries at the end of their useful lives,
when taken out of service within the United States. The RBRCTM program
provides a convenient alternative to placing used nickel-cadmium
batteries into the trash or municipal waste, which is illegal in some areas.
TACP’s payments to RBRCTM make it easy for you to drop off the spent battery at local retailers
of replacement nickel-cadmium batteries, or at authorized TACP product service centers. You
may also contact your local recycling center for information on where to return the spent battery.
Please call 1-800-8-BATTER for information on Ni-Cd battery recycling in your area. TACP’s
involvement in this program is part of its commitment to protecting our environment and conserving
natural resources.
RBRCTM is a trademark of Rechargeable Battery Recycling Corporation.
2
Page 4

SERVICE REQUIREMENTS
If the cordless telephone should malfunction, or need changes or modifications, all repairs will
be performed by an authorized Toshiba Service Station. This unit has been registered with the
FCC for direct connection to the telephone network. Under the FCC program, no customer is
authorized to repair this unit. This applies to a unit both in and out of warranty. If an unauthorized
repair is performed, the registration of the unit for direct connection to the network will be null
and void. If the unit is still in warranty, the remainder of the warranty period will also be null and
void.
It is the responsibility of users requiring service to report the need for service to their Toshiba
dealer.
IMPORTANT INSTRUCTIONS TO USERS
Your phone has been designed and constructed to conform to federal regulations and can be
connected to the phone line as described in this manual.
Please note that each product connected to the telephone line places a certain load on the line.
We designate this as the unit’s “Ringer Equivalence Number.”
It is most unlikely, but . . . If your phone should cause problems on the phone line, the phone
company has the right to temporarily discontinue your service. If this happens, the phone company
will notify you and give you the opportunity to correct the problem. Also, you need to know that
the phone company does have the right to make changes in their lines and/or equipment.
If these changes might affect your phone (or require changes in the phone or its connection), the
phone company will notify you in writing, so you will have the chance to take whatever action is
necessary to ensure uninterrupted phone service.
FCC REQUIREMENTS
You are no longer required by the FCC to notify your local telephone company of your intent to
connect a new telephone. Your local telephone company may call you and request information
about your phone such as: the brand name, model number, registration number, and ringer
equivalence number. This information is provided on a label located at the bottom of the base
unit and handset.
You may not directly connect your phone to coin telephone services. Check with your local
telephone company if you wish to connect your phone to a party line service. Some party line
services require a special adaptor or modification to your telephone.
Finally, it should be noted that some cordless telephones operate at frequencies that may cause
interference to nearby TVs and VCRs; to minimize or prevent such interference, the base of the
cordless telephone should not be placed near or on top of a TV or VCR; and, if interference is
experienced, moving the cordless telephone farther away from the TV or VCR will often reduce
or eliminate the interference.
3
Page 5

INTRODUCTION
Toshiba America Consumer Products, Inc. takes pride in presenting
your phone, one of the finest cordless telephones available. Intelligent
design, superb craftsmanship, and the latest technological advances
have been combined to provide you with a telephone that is easy to
operate and will provide you with years of dependable service. Please
take the time now to read your Owner’s Manual carefully, so that you
may enjoy the many convenient features of your telephone.
FEATURES
• 900 MHz analog transmission with extended talk range
• 40-channel auto scanning
• Advanced compandor noise reduction system
• Volume control (3 level)
• Ringer volume and tone control
• Digital security code (65,536 codes)
• 10 speed-dial locations, 16 digits each
• Long standby battery life (14 days)
• One way page/Handset locator
• Last number redial (32 digits)
• Mute on handset
• Any-key answer
• Hearing aid compatible/HAC volume
• Desk/Wall mountable (Bracket included)
4
Page 6
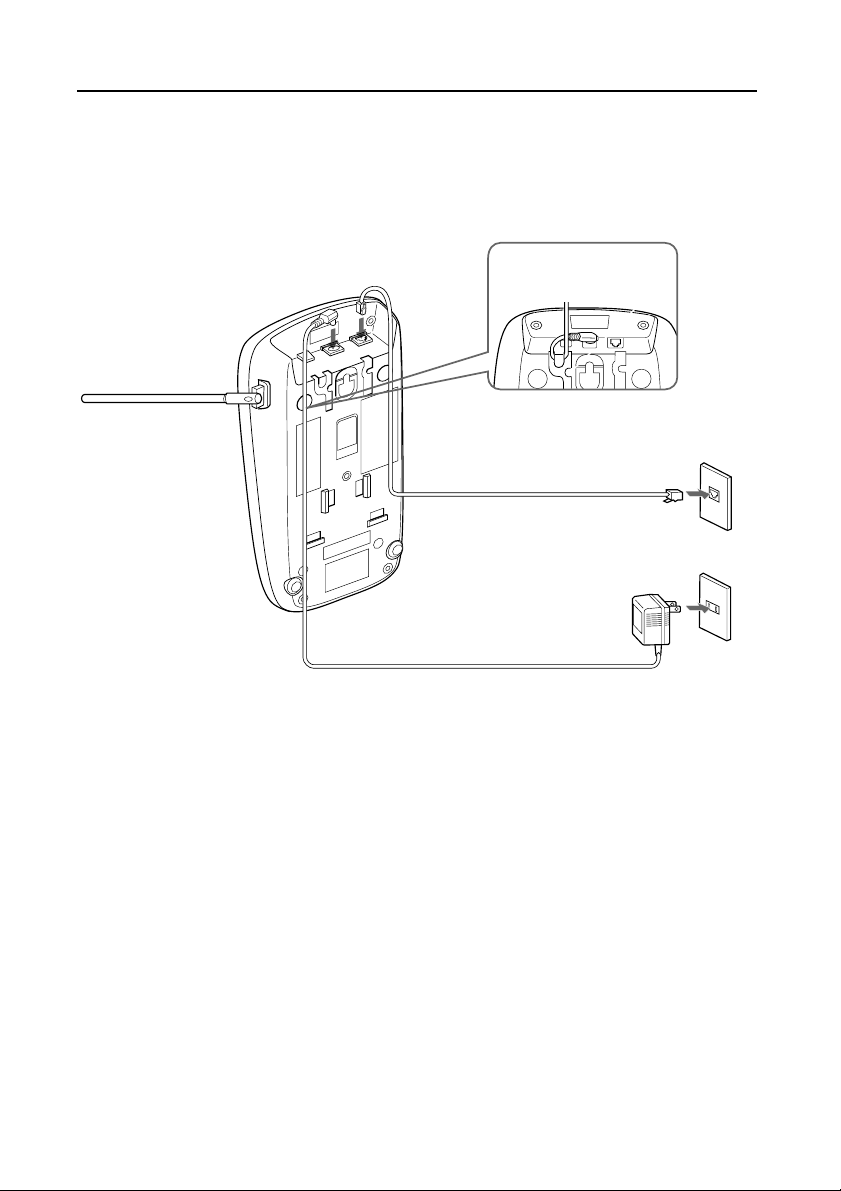
INSTALLATION
1. SETTING UP THE BASE UNIT
For use on a desk or counter top follow the instructions below.
DESKTOP MOUNTING:
Fasten the AC adaptor cord
to prevent it from being
disconnected.
Raise the
antenna
to vertical
position.
Single-Line
Telephone Jack
Telephone Line Cord
AC Adaptor
(RJ11C)
Power Outlet
(AC 120V, 60Hz)
• USE ONLY WITH Supplied AC ADAPTOR (TAC-8001); power source
AC 120V, 60Hz/DC 9V).
• The AC adaptor must remain connected at all times. (It is normal for
the adaptor to feel warm during use).
5
Page 7

2. CHARGE THE BATTERY PACK
Note
Use only the supplied battery pack (TRB-8000 power source
Black
600 mAh, 3.6V).
q Remove the battery compartment cover
on the back of the handset by sliding it
down.
w Plug the battery pack cord into the
connector in the battery compartment by
observing the correct polarity. It fits in only
one way.
e Place the battery pack in the battery
compartment.
r Put the battery compartment cover back
by sliding until it snaps into place. Make
sure not to get the wires of the battery pack
caught in the cover.
t Place the handset on the base unit.
Be sure the IN USE/CHARGE LED lights.
If the IN USE/CHARGE LED does not
light, make sure the AC adaptor is plugged
in securely and that the electrical outlet is
working and not controlled by a light
switch.
It is important to charge the battery for
12 to 16 hours continuously without
any interruption before you use the
handset for the first time.
9
0
0
M
H
z
Charging contacts
Red
IN USE/
CHARGE
LED
Note
The battery pack is not charged properly if the charging contacts are dirty or tarnished. Clean the
contacts occasionally with a dry cloth.
6
Page 8

After the battery pack is fully charged;
Operation Approx. battery life
While in use (Talk mode) up to 7 hours
While not in use (Standby mode) up to 14 days
When TALK/BATT LOW LED blinks, all handset buttons are disabled
and the battery needs to be charged. If this occurs during a call, you
hear short beeps. Finish the call as soon as possible and place the
handset on the base unit.
Note
If a call comes in when the battery is too low to operate properly, you will be unable to answer the
call or the call will be disconnected.
WALL MOUNTING
MOUNTING ON A STANDARD WALL PLATE
Insert the bracket's tab into the
base's lower tab slots, then press
down on the top of the bracket to
snap it into the clip slots.
Flip the switch hook tab
over so the tab holds the
handset.
Raise the antenna.
7
Telephone
Line Cord
AC Adaptor
Single-Line
Telephone Jack
(RJ11C)
Power Outlet
(AC 120V, 60Hz)
Page 9

• Route the cords through the guides.
• Place the base unit on the posts of the wall plate and push down until
it is firmly seated.
• USE ONLY WITH Supplied AC ADAPTOR (TAC-8001 power source
AC 120V, 60Hz/DC 9V).
Notes
• Do not use any outlet controlled by a wall switch.
• If you don’t have a standard wall plate, cut out the template on this page and use it to position
two screws (minimum length of 13/8 inches) into the wall with the heads protruding about 1/4
inch.
CUT CUT
Wall mount template
Before mounting, select a wall area of sufficient
•
strength. If mounting on wallboard or in an area
of questionable strength, locate a stud for
maximum support of your telephone.
Avoid electrical cables, pipes, or other items
•
behind the mounting location that could cause a
hazard.
IMPORTANT:
8
Page 10

LOCATIONS OF CONTROLS
HANDSET CONTROLS
TALK/BATT LOW LED
button
TALK
(Tone) button
TONE/
(Memory) button
MEM
button
MUTE
Charging Contacts
BASE UNIT CONTROLS
DC IN 9V jack
LINE Modular jack
T
A
L
K
B
A
T
T
L
O
W
9
00
M
C
O
H
M
P
z
A
N
D
O
R
N
O
IS
E
R
E
D
U
C
T
IO
N
TALK
F
RDL/P
L
A
S
H
1
ABC
D
E
F
2
G
H
I
4
PQ
RS
7
T
O
N
E
M
E
M
3
JKL
M
NO
5
6
W
X
TUV
8
YZ
9
O
P
E
R
0
#
M
U
T
E
V
O
C
L
/R
H
IN
G
Antenna
Speed Dial Index Card (back)
Write down numbers stored in
memory.
(Redial/Pause) button
RDL/P
button
FLASH
Dialpad
PULSE
/
#
VOL/RING
button
button
Rechargeable
Battery Pack (back)
(Channel) button
CH
COMPANDOR NOISE REDUCTION
9
0
0
M
H
z
PAG
C
O
T
E
R
L
D
E
L
P
F
E
H
S
T
O
S
-8
N
E
0
0
1
IN
U
S
E
C
H
A
R
G
E
Antenna
IN USE/CHARGE LED
E
button
PAGE
Charging Contacts
9
Page 11

Please see “LOCATION OF CONTROLS” for the location of
each button used for the following operations.
SETTING THE DIAL MODE
Most phone systems use tone dialing. But, to use tone dialing, you
must have a tone service dialing system supplied by your telephone
company. Then you must set your telephone dial mode for the type of
service you have. If you are not sure which type of service you have,
do the following steps.
q With the phone in the Standby mode, press and
hold
FLASH
until you hear a confirmation tone.
3
1, 5
6
2
w Press
TONE/
.
You hear a confirmation tone.
e Press
TALK
and listen for a dial tone.
r Press any number other than 0.
If the dial tone stops, you have tone service
and your setting is complete. If the dial tone
continues, you have pulse service and you must
perform steps 5 and 6 below.
t With the phone in the Standby mode, press and
hold
y Press
FLASH
until you hear a confirmation tone.
#
and hear a confirmation tone. Your
setting is complete for pulse service.
10
Page 12

MAKING A CALL
1. MAKING A CALL
q Press
The TALK/BATT LOW LED will light.
w Listen for the dialtone.
1, 4
e Key in the phone number you are calling.
r To hang up, press
3
handset on the base unit. The TALK/BATT
LOW LED turns off.
2. ANSWERING A CALL
q Simply pick up the handset or press any key if
the handset is located away from the base unit.
The TALK/BATT LOW LED will light.
1, 2
w To hang up, press
on the base unit.
The TALK/BATT LOW LED turns off.
TALK
.
TALK
again or place the
TALK
or place the handset
11
Page 13

3. INTERFERENCE OR STATIC
If you hear noise during a call, press CH to select another channel.
The TALK/BATT LOW LED blinks while changing a channel.
4. CHANGING THE RINGER VOLUME
Press
VOL/RING
to select one of four ringer tone and volume combinations
during standby mode.
Each time you press
VOL/RING
, the setting will change.
5. CHANGING THE HANDSET SPEAKER VOLUME
During a telephone call, press
volume levels; Low, Medium and High.
The setting will remain in effect even after you hang up the current call.
Note
The High setting may be too loud because it is set for hearing aid compatibility.
VOL/RING
to select one of three speaker
6. REDIALING
Press
TALK
and then press
called (up to 32 digits) will then be dialed again.
RDL/P
(Redial/Pause). The last number
7. USING THE CALL WAITING SERVICE, ETC.
To use this feature, you must subscribe to the Call Waiting service.
When you hear a call-waiting tone while you are already talking on the
phone, simply press
FLASH
To take the original call back, press
Note
Pressing
FLASH
without receiving a Call Waiting signal may disconnect the current caller.
.
FLASH
again.
12
Page 14

8. SENDING TONE SIGNAL (for Pulse service user)
MUTE
Even if you have Pulse service (the dial mode is set to Pulse), you can
use this phone with banking and other phone services requiring touch
tone signals.
q Dial the service number and wait for the connection.
w Press
TONE/
, then enter the numbers required. You will hear the
tones on the line.
9. MUTING
Press
The TALK/BATT LOW LED blinks. You may speak to someone in the
room without the caller overhearing.
To resume normal conversation, press
MUTE
to turn off the microphone during a conversation.
or
TALK
.
10. PAGING
To locate the handset while it is off the base, press
unit. The handset beeps for 60 seconds, and IN USE/CHARGE LED
PAGE
blinks. To stop paging, press
or any key at the handset, or return
the handset to the base unit.
Note
You cannot page the handset during a call.
PAGE
on the base
11. OUT OF RANGE
During a call, as you begin to move too far from the base, you first hear
a clicking sound. As you travel farther, the noise increases. Then you
should move close to the base unit. If you travel out-of-range, your call
terminates.
13
Page 15

MEMORY DIALING
TALK
You can store up to 10 telephone numbers in memory.
Notes
In memory dialing operation,
• If more than 20 seconds elapse between pressing buttons, the operation will be cancelled and
you must start over again.
• If you press a wrong button, an error tone sounds and the handset returns to standby mode.
• If a call comes in, the operation will be cancelled and you will hear the ring.
1. STORING NUMBERS
You can store up to 16 digits including #, and PAUSE in one memory
address.
q Pick up the handset from the base unit. (Do not press
w Press
MEM
.
).
e Dial the telephone number you wish to store (up to 16 digits).
r Press
MEM
.
t Enter the memory address (0 to 9) at which you wish to store the
phone number dialed in step 3.
You will hear a confirmation tone when the number is successfully
stored.
To store more telephone numbers, repeat steps w to t.
y Return the handset to the base unit or press
MEM
.
u Record the telephone numbers on the SPEED DIAL INDEX CARD,
and place it on the back of the handset.
EXAMPLE: To store 9012345 in memory address 3
MEM
WX
0 1 2 3 4 5
9
MEM
3
14
Page 16

Replacing a telephone number
Just store the new number following the same steps in “1. STORING
NUMBERS.”
The new number will replace the previously stored one.
2. DIALING A STORED NUMBER
q Pick up the handset and press
TALK
.
The TALK/BATT LOW LED lights.
w Press
MEM
.
e Enter the memory address (0 to 9).
The stored number will be dialed.
Note
If you enter a memory address which does not have any stored number, error beeps sound.
3. INSERTING A PAUSE IN MEMORY
RDL/P
Use
long distance. Each time you press
(redial/pause) to make an outgoing call through a PBX or
RDL/P
, a pause of about two seconds
is inserted during the dialing sequence. If more than two seconds is
RDL/P
needed, press
twice.
EXAMPLE: To store “0 PAUSE 1234567890” in memory address 4,
press:
MEM
0
1 2 3 4 5 6 7 8
RDL/P
WX
0
9
MEM
4
4. CHAIN DIALING
Combining ordinary dialing and memory dialing, you can dial a long
telephone number with less steps.
EXAMPLE: Divide the number into two portions and store the first portion
in memory address 1 and the second portion in memory address 2.
When you call, press the following buttons;
TALK
MEM
1
MEM
2
15
Page 17

ACCESSORIES
Rechargeable Battery pack (1) TRB-8000 Part # RC004931
AC Adaptor (1) TAC-8001 Part # RC009790 for
FT-8001
TAC-8001 Part # RC009791 for
FT-8001W
Telephone Cord (1) Part # RC008231
Wall Mount Bracket (1) Part # RC009245 for FT-8001
Part # RC009246 for FT-8001W
Owner’s Manual (1) Part # RC012151
Speed Dial Index Card (1) Part # RC005157
For the purchase of Accessories, please call 1-877-644-7373.
16
Page 18

TROUBLESHOOTING GUIDE
Should any problem occur with the set, make the following simple tests
to determine whether or not servicing is required.
PROBLEM
The handset battery
does not charge.
Battery becomes low
quickly.
Can not make or
receive calls.
Can not hear the dial
tone.
TALK/BATT LOW
LED blinks in the
standby mode.
SOLUTION
•The charging contacts of the handset and base are not
clean.
→Clean them with a dry cloth.
•The battery connector is not connected with correct
polarity.
→Install the battery correctly.
•The battery is several years old.
→Replace with a new battery.
•The battery was not fully charged at the initial charging.
→Charge the battery for 12 to 16 hours without any
interruption.
•The battery is several years old.
→Replace with a new battery.
•The AC adaptor of the base unit is disconnected.
→Plug the AC adaptor into the base unit and the AC
120V outlet.
•The battery is low.
→Place the handset on the base unit to recharge.
•Telephone line cord is disconnected.
→Check both ends of the telephone jack.
•The previous call was not disconnected.
→Press
•Trouble with the telephone line.
→Check an extension line.
•Outlet used is controlled by a wall switch in its OFF
position.
→Relocate to another outlet.
•The handset is too far from the base unit.
→Bring the handset near the base unit.
•Dial setting needs to be changed.
→Press and hold
•The battery is low.
→Recharge the battery.
setting.
TALK
to disconnect the line.
FLASH
then choose the appropriate
17
Page 19

PROBLEM
The handset does
not ring or receive a
page.
CHARGE LED does
not light when the
handset is placed on
the base.
Noise or
interference.
The unit does not
operate properly.
When the handset is
returned to the base
unit with the volume
level set at High, a
momentary squeal
or howling sound
may sometimes be
heard.
SOLUTION
• The handset is located too far away from the base or the
battery has been discharged.
→Return the handset to charge when your call is
finished.
• The digital security code is changed.
→Remove the handset from the base unit and press
PAGE
and hold
. While the handset is emitting, return
the handset to the base unit.
• The battery is low.
→Place the handset on the base unit to recharge.
• The charging contacts of the handset and the base are
not clean.
→Clean them with a dry cloth.
• The AC adaptor of the base unit is disconnected.
→Plug the AC adaptor firmly into the base unit and AC
120V outlet.
• The handset is not on the base.
→Place the handset on the base properly
• The handset is too far from the base unit.
→Bring the handset near the base unit.
• The battery is low.
→Place the handset on the base unit to recharge.
• The base unit is located in a place with high
interference.
→Relocate to another outlet.
• Interference from TV, Microwave oven, Computer and
electrical appliances.
CH
→Press
to select a clearer channel, or relocate the
base unit.
• Excessive line noise.
→Check with another telephone.
• The volume control is set too high.
→Reduce volume to lower setting.
• The base antenna is not in a vertical position.
→Lift the antenna to a vertical position.
• The phone needs to be reset.
→Disconnect the AC adaptor and reconnect it after a
few seconds.
• This is normal.
→It may be prevented by changing the volume setting
to Medium or Low before returning the handset to the
base unit.
Page 20

WARRANTY/SERVICE
TELEPHONE/TELEPHONE ANSWER MACHINE LIMITED WARRANTY
Toshiba America Consumer Products, Inc. (“TACP”), and Toshiba Hawaii, Inc. (“THI”), make the following limited warranties.
These limited warranties extend to the original consumer purchaser or any person receiving this set as a gift from the
original consumer purchaser and to no other purchaser or transferee.
Limited One (1) Year Warranty of Labor
and parts
TACP/THI warrant this product and its parts against
defects in materials or workmanship for a period of one
(1) year after the date of original retail purchase. During
this period, TACP/THI will repair or replace your defective
product with a new or refurbished unit at TACP’s option.
Owner’s Manual
You should read the owner’s manual thoroughly before
operating this product.
Your Responsibility
The above warranties are subject to the following conditions.
(1) You must provide a copy of your bill of sale or other
proof of purchase.
(2) These warranties are effective only if the product is
purchased and operated within the USA or Puerto Rico.
(3) Within the continental U.S.A., if you should find a
defective product within the warranty period please call 1877-644-7373.
(4) Warranties extend only to defects in materials or
workmanship as limited above and do not extend to any
product or parts which have been lost or discarded by you,
or to damage to products or parts caused by misuse,
accident, damage caused by Acts of God, such as lightning
or fluctuations in electric power, improper installation,
improper maintenance or use in violation of instructions
furnished by us; or to units which have been altered or
modified without authorization of TACP/THI, or to damage
to products or parts thereof which have had the serial number
removed, altered, defaced or rendered illegible.
(5) Physically damaged products are not acceptable for
repair or exchange within or after the warranty period
expires.
How to Obtain Warranty Service
In the event a problem should develop with your product, please proceed as follows;
In The Continental United States contact:
www.toshiba.com/tacp
All warranties implied by state law, including the implied warranties of merchantability and fitness for a particular purpose,
are expressly limited to the duration of the limited warranties set forth above. With the exception of any warranties implied
by state law as hereby limited, the foregoing warranty is exclusive and in lieu of all other warranties, guarantees, agreements
and similar obligations of manufacturer or seller with respect to the repair or replacement of any parts. In no event shall
TACP/THI be liable for consequential or incidental damages.
No person, agent, distributor, dealer or company is authorized to change, modify or extend the terms of these warranties in
any manner whatsoever. The time within which an action must be commenced to enforce any obligation of TACP/THI
arising under the warranty or under any statute or law of the United States or any state thereof, is hereby limited to ninety(90)
days from the date you discover, or should have dicovered, the defect. This limitation does not apply to implied warranties
arising under state law.
This warranty gives you specific legal rights and you may also have other rights which may vary from state to state. Some
states do not allow limitation on how long an implied warranty lasts, when an action may be brought, or the exclusion or
limitation of incidental or consequential damages, so the above provisions may not apply to you.
In Hawaii contact:
Toshiba Hawaii, Inc.
327 Kamakee Street,
Honolulu, HI 96814
(808)-591-9281
UCZZ01337BZ RC012151 Printed in China
© 2001 TOSHIBA AMERICA CONSUMER PRODUCTS. INC.
 Loading...