

Page 1

PCWS
PC WorkStation
Owner’s Manual
TEC America, Inc.
FS-3600
Page 2

Page 3

FS-3600 PC Work Station Warranty
TEC AMERICA, INC.
90-DAY LIMITED WARRANTY
FS-3600 PC WORK STATION SOFTWARE
BEFORE USING THIS PRODUCT, YOU SHOULD CAREFULLY READ THE FOLLOWING TERMS AND
CONDITIONS. YOUR USE OF THIS PRODUCT INDICATES YOUR ACCEPTANCE OF THESE TERMS. IF
YOU DO NOT AGREE WITH THEM, YOU SHOULD NOT USE THIS PRODUCT AND SHOULD PROMPTLY
RETURN THE PRODUCT TO THE SELLER.
TEC AMERICA, INC. warrants this product to be free from defects in materials and workmanship for
a period of 90 days from the date of purchase from an authorized TEC AMERICA, INC. dealer. This
warranty is limited to the original purchaser, and to TEC AMERICA, INC. products that are sold and
used within the continental United States and Hawaii. A copy of a valid dated sales receipt must
be submitted with the product for warranty service. Third Party Operating System and Third Party
Application Software are specically excluded from this warranty.
This limited warranty applies only to TEC AMERICA, INC. products that do not function properly
under normal use, within the manufacturer’s specications. It does not apply to products that, in the
sole opinion of TEC AMERICA, INC., have been damaged as a result of accident, misuse, neglect, or
improper packing or shipping. This warranty is void if the TEC AMERICA, INC. label or logo, or the
rating label or serial number have been removed or defaced, or the product has been modied or
serviced by other than TEC AMERICA, INC. or an authorized TEC AMERICA, INC. Service Center.
During the 90-day warranty period, TEC AMERICA, INC. will repair or replace, at its option, any
defective product with no charge for parts or labor.
TEC AMERICA, INC.’S LIABILITY HEREUNDER SHALL BE LIMITED TO REPAIR OR REPLACEMENT OF
THE DEFECTIVE PART OR PARTS AND SUCH CORRECTION SHALL CONSTITUTE A FULFILLMENT OF
ITS WARRANTY HEREUNDER.
TEC AMERICA, INC. MAKES NO WARRANTIES, EXPRESS OR IMPLIED, INCLUDING
MERCHANTABILITY OR FITNESS FOR A PARTICULAR PURPOSE, EXCEPT AS EXPRESSLY STATED
HEREIN.
UNDER NO CIRCUMSTANCES SHALL TEC AMERICA, INC. BE LIABLE TO THE PURCHASER OR ANY
USER FOR ANY DAMAGES, INCLUDING INCIDENTAL OR CONSEQUENTIAL DAMAGES, EXPENSES,
LOST PROFITS, LOST SAVINGS, OR OTHER DAMAGES ARISING OUT OF THE USE OF OR THE
INABILITY TO USE THIS PRODUCT.
To obtain warranty service, contact your TEC AMERICA, INC. dealer. You may also write or phone:
TEC America, Inc., 4401-A Bankers Circle
Atlanta, GA 30360
Phone No.: (770) 449-3040 Fax: (770) 453-0909
If the problem cannot be remedied by telephone, TEC AMERICA, INC. will determine how service will
be provided. Do not ship the equipment to TEC AMERICA, INC. without a return authorization number.
The purchaser must prepay any shipping costs and insurance, and assume the risk of loss during
shipping.
- I -
Page 4

Disclaimer FS-3600 PC Work Station
TEC America, Inc. provides this publication as is without Warranty of any kind,
either expressed or implied. This publication could include technical inaccuracies or typographical errors. Changes are periodically made to the information
herein; these changes will be incorporated in new editions of the publication.
TEC America, Inc. may make improvements and/or changes in the product(s)
and/or program(s) described in this publication at any time.
Copyright 2003 by TEC America, Inc.
4401-A Bankers Circle, Atlanta, GA 30360
All rights reserved.
- II -
Page 5

FS-3600 PC WorkStation Table of Contents
TABLE OF CONTENTS
OVERVIEW ................................................................................................1
Components of PC Workstation .............................................................................1
Sequel 2k MSDE ......................................................................................................... 1
POS Data Services ...................................................................................................... 1
PC Workstation ............................................................................................................ 1
SOFTWARE INSTALLATION .................................................................... 2
System Minimum Requirements.............................................................................2
Conguration............................................................................................................2
Software Installation ................................................................................................6
Sequel 2000 (SQL 2k MSDE) ..................................................................................... 6
PC Workstation ............................................................................................................ 7
GETTING STARTED................................................................................ 12
Downline Database to PCWS ................................................................................12
Resetting Database................................................................................................13
Application Start up...............................................................................................16
Sequel 2000................................................................................................................ 16
POS Data Service ...................................................................................................... 16
PC Workstation .......................................................................................................... 17
PC WorkStation Login............................................................................................... 18
REPORTS ................................................................................................20
Reporting Functions ..............................................................................................21
Sample Reports......................................................................................................22
INVENTORY............................................................................................. 25
Required Programming .........................................................................................25
Inventory Category Setup......................................................................................... 25
Inventory Setup Programming ................................................................................. 26
Menu Setup ................................................................................................................ 27
Recipe Setup Programming ..................................................................................... 28
- i -
Page 6

Table of Contents FS-3600 PC WorkStation
FS-3600 PC WorkStation Table of Contents
- iii -
Managing the Inventory System ...........................................................................29
Entering Initial Stock Quantities.............................................................................. 29
Method 1:.................................................................................................................... 29
Method 2:.................................................................................................................... 29
Enter Inv Receiving ................................................................................................... 30
Inventory Receiving Procedures ............................................................................. 30
Enter Inv Returns....................................................................................................... 31
Inventory Return Procedures ................................................................................... 31
Enter Inv Waste.......................................................................................................... 32
Inventory Waste Procedures .................................................................................... 32
Enter Inv Ending ........................................................................................................ 33
Inv Count Sheet ........................................................................................................ 33
Inventory Ending Quantity Procedures .................................................................. 34
Inventory Reporting ...............................................................................................35
Inv Totals Report ....................................................................................................... 35
Food Cost Report ...................................................................................................... 36
Quick Setup and Reference ..................................................................................37
LABOR.....................................................................................................38
Introduction ............................................................................................................38
Programming Tables..............................................................................................39
Job Code Setup ......................................................................................................... 39
User Setup.................................................................................................................. 39
System Setup ............................................................................................................. 39
System Setup .........................................................................................................40
PDSZ Setup.............................................................................................................40
Labor Reports ........................................................................................................42
Daily Reports ............................................................................................................. 42
Weekly Report............................................................................................................ 43
Monthly Reports (PTD) ............................................................................................. 43
Historical Reports ..................................................................................................... 43
Labor Report Examples.........................................................................................44
Labor Analysis ........................................................................................................... 44
Employee Time Card Report .................................................................................... 45
Tip Report................................................................................................................... 45
Employee Pay Report................................................................................................ 46
Daily Procedure .....................................................................................................47
Clocking In/Out .......................................................................................................... 47
Editing Punch Times ................................................................................................. 47
Open Check Report ................................................................................................... 47
Employee Clock In Report ........................................................................................ 47
- ii -
Page 7

FS-3600 PC WorkStation Table of Contents
Close Time Clock ...................................................................................................48
[Close With Sales] ..................................................................................................... 48
Daily Close Time Clock Report ................................................................................ 48
Weekly Close Time Clock ......................................................................................... 49
Monthly Close Time Clock ....................................................................................... 49
Examples of typical payroll procedures ..............................................................50
Weekly Payroll ........................................................................................................... 50
Bi-Weekly Payroll....................................................................................................... 51
Semi-Monthly Payroll ................................................................................................ 52
Semi-Monthly Payroll (Example 2) .......................................................................... 53
Semi-Monthly Payroll (Example 3) .......................................................................... 54
Manager Edit Functions ........................................................................................55
Edit Punch Times....................................................................................................... 55
Adding a new punch record ..................................................................................... 58
Daily Totals (Edit Tips) .............................................................................................. 59
Procedure ................................................................................................................... 59
Edit WTD Totals ......................................................................................................... 60
Procedure ................................................................................................................... 60
Edit PTD Totals .......................................................................................................... 60
Procedure ................................................................................................................... 60
DATA ENTRY ........................................................................................... 61
Limited Quantity.....................................................................................................62
Deposit ....................................................................................................................64
System ........................................................................................................................ 65
POS CONFIGURATION ........................................................................... 67
System Setup .........................................................................................................69
Location...................................................................................................................... 69
Orders/Labor ............................................................................................................. 72
Flags/Settings ............................................................................................................ 76
Export/Report ............................................................................................................ 80
Network/Colors.......................................................................................................... 83
Files/Memory ............................................................................................................. 86
Working RAM Area Allocation ................................................................................. 87
SRAM Area Allocation .............................................................................................. 88
Formats....................................................................................................................... 89
Training....................................................................................................................... 91
Function Setup .......................................................................................................93
ECR Functions ........................................................................................................... 94
Reports ....................................................................................................................... 95
- iii -
Page 8

Table of Contents FS-3600 PC WorkStation
FS-3600 PC WorkStation Table of Contents
- v -
Printer Setup...........................................................................................................96
Printer Control Codes ............................................................................................... 96
System Printers ......................................................................................................... 98
Tax Setup ..............................................................................................................101
Meal Period Setup ................................................................................................103
Order Type Setup .................................................................................................104
Revenue Center Setup.........................................................................................108
Station Setup ........................................................................................................109
Settings .....................................................................................................................111
Modems/Monitor ......................................................................................................115
Printer Settings.........................................................................................................117
Department Setup ................................................................................................ 119
Category Setup ....................................................................................................120
Tare Table Setup................................................................................................... 123
Menu Setup...........................................................................................................124
Pricing ...................................................................................................................... 125
Flags/Sizes ............................................................................................................... 127
Printers/Modiers.................................................................................................... 130
Recipe Setup .............................................................................................................131
Discount Setup.....................................................................................................132
Media Setup ..........................................................................................................136
Job Code............................................................................................................... 141
User Setup ............................................................................................................144
Inventory Setup ....................................................................................................146
Edit Screens .........................................................................................................148
Tool Bar Operations ................................................................................................ 148
Screens..................................................................................................................... 149
Creating a New Screen............................................................................................ 149
Screen Source ......................................................................................................... 149
‘Add Button’ ............................................................................................................. 150
‘Delete Button’ ........................................................................................................ 150
‘Properties‘............................................................................................................... 150
Format Options ........................................................................................................ 150
‘Align’ ........................................................................................................................ 150
‘Make Same Size’ ..................................................................................................... 150
- iv -
Page 9

FS-3600 PC WorkStation Table of Contents
UTILITIES............................................................................................... 152
Z process ..............................................................................................................152
Congure Reports ................................................................................................... 152
Starting the “Z Process” From PC Workstation................................................154
Error Messages that may appear: ......................................................................158
Running the Z Process with Windows Task Scheduler.................................... 159
STRINGS................................................................................................ 163
- v -
Page 10

Page 11

FS-3600 PC WorkStation Overview
Overview
PC WorkStation (PCWS) is a Reporting and Programming application for the FS-3600 system
running on a personal computer. PCWS is congured with a workstation number therefore it
holds the totals, programming, and reporting information the same as an FS-3600 terminal. A
full array of reporting information is available real-time. You may select from the current active
sales or select from PCWS’s archived database. System resets can be performed manually or
congured in Windows Tasks Manager to accommodate auto resets. The reporting area has
a variety of reports for User, Period, Station, Payroll, System, Listings, Inventory, Labor, and
Deposits. In addition to reports all areas of the database can be programmed, maintained, and
edited. Changes made to the database from PCWS are sent real-time to the FS-3600 terminals.
PCWS does not offer the ability to update the terminal’s APOSTS.exe le or Device Drivers.
NOTE:
* PCWS maintains a single database and can be connected to one sub-network.
** APOSTS version running must be 4-04-03 or newer.
*** NCCNET version running must be 4-04-03 or newer.
PCWS communicates directly with the FS-3600 Terminal(s) via the LAN Network. It can be
directly connected to a terminal using a LAN Crossover Cable or via a Hub, using a Standard
LAN Patch Cable.
This manual will cover all aspects of PCWS from installation of the software, programming and
the reports.
Components of PC Workstation
Sequel 2k MSDE
SQL 2k MSDE will support up to a 2 GB database. Designed to run in the background SQL 2k
MSDE does not have its own user interface. Users interact with SQL 2k MSDE through the PC
Workstation application in which it is embedded.
POS Data Services
The POS Data Services (PDS) is used to establish communications with POS registers. The PDS
utilizes multiple network agents to maintain communication. All data received from the PDS is
stored in the SQL 2k MSDE database.
The PDS must be licensed within 30 days of installation on the site PC, contact your TEC Dealer
for the Site Key to license your software.
PC Workstation
PC Workstation is the user interface to the Sequel 2000 database and the PDS. Direct interaction
to the FS-3600 system is available through the PC Workstation application.
- 1 -
Page 12

Software Installation FS-3600 PC WorkStation
FS-3600 PC WorkStation Software Installation
- 3 -
Software Installation
System Minimum Requirements
Description Value
Operating System MS Windows XP Pro
CPU 733 Mhz
Memory 256Mb RAM
Minimum Screen Resolution 800 x 600
LAN Card 10mb
Conguration
The PC should be connected to the FS-3600 network before the installation starts. An IPX/SPX
protocol is required for the PC to communicate with the FS-3600. Congure the network as
follows.
1. Right click on Local Area Connection and
select properties.
2. Select Properties
- 2 -
Page 13

FS-3600 PC WorkStation Software Installation
3. Select IPX/SPX
Protocol. If IPX/SPX is not
installed go to Step 5.
4. Select Ethernet 802.2
and click OK.
Close network settings. Network is now congured for IPX/SPX.
- 3 -
Page 14

Software Installation FS-3600 PC WorkStation
FS-3600 PC WorkStation Software Installation
- 5 -
5. If the IPX/SPX Protocol
is not installed click on the
“Install”
6. Select “Protocol” and
Click “Add”
- 4 -
Page 15
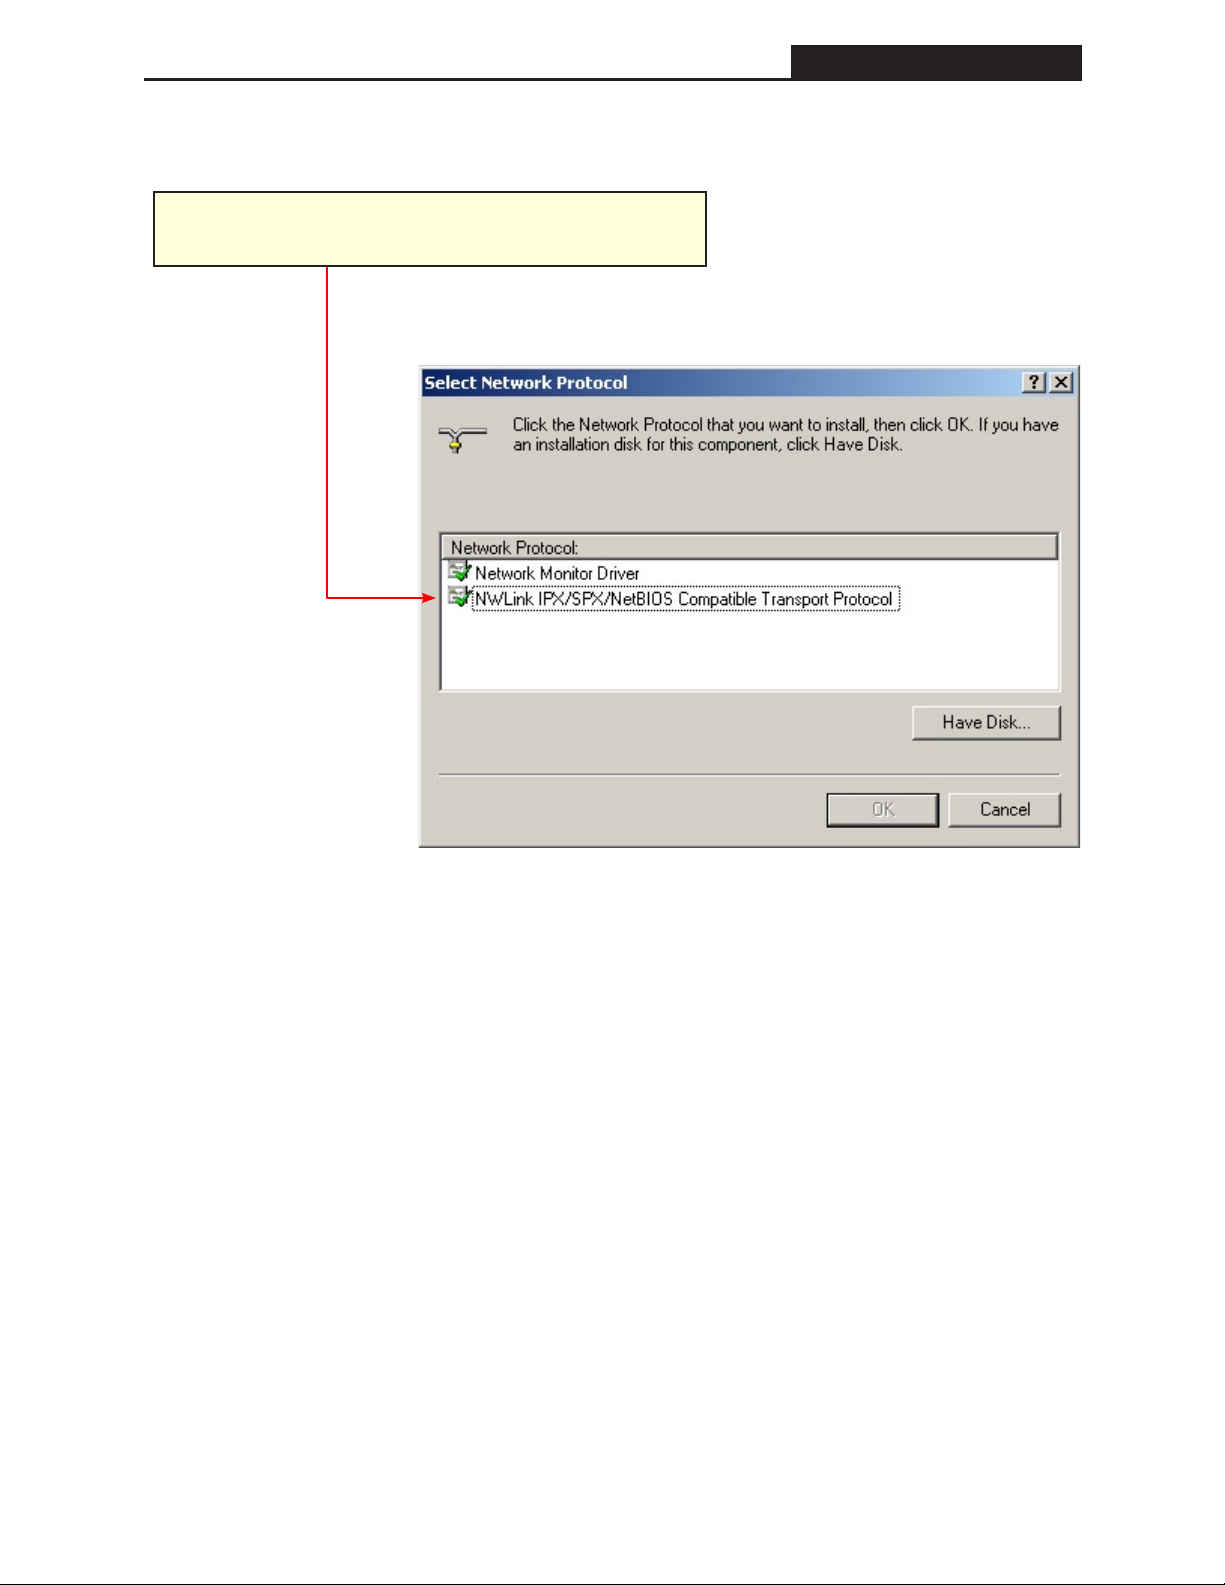
FS-3600 PC WorkStation Software Installation
7. Select “Protocol” and click “OK”
(After Protocol has installed Return to Step 4)
- 5 -
Page 16
Software Installation FS-3600 PC WorkStation
FS-3600 PC WorkStation Software Installation
- 7 -
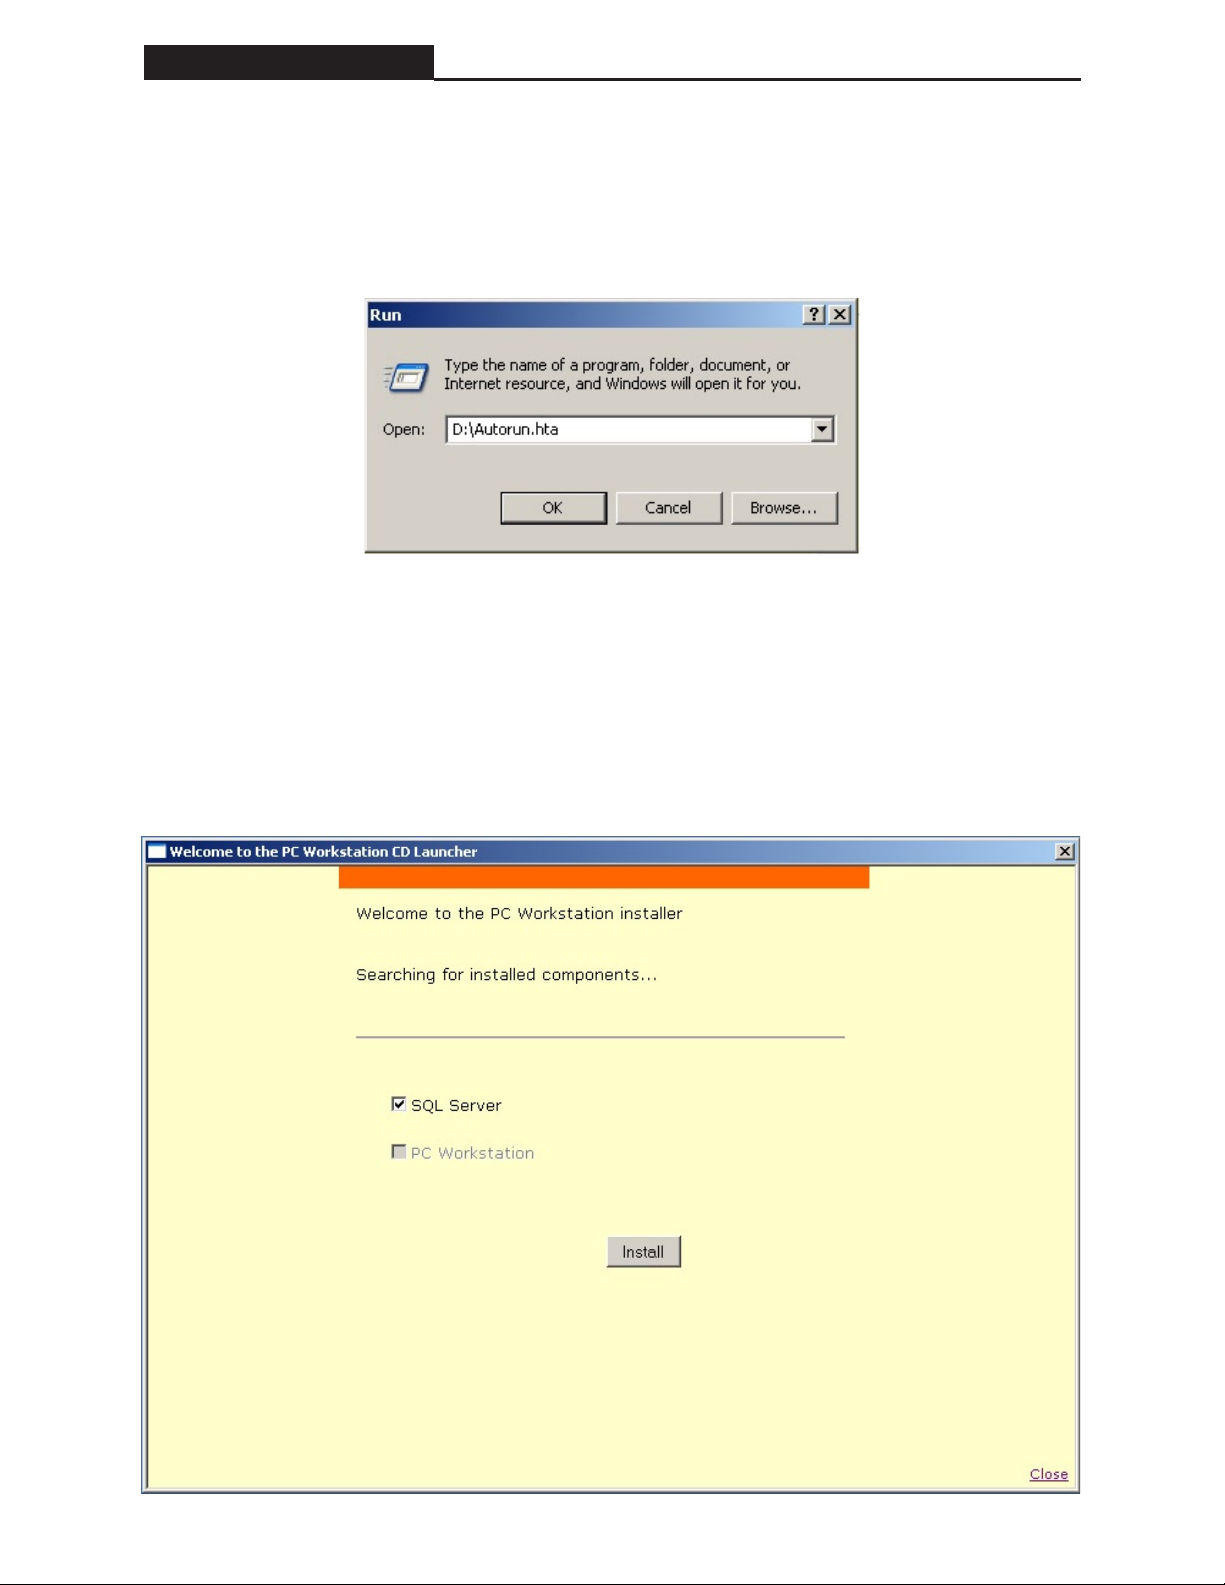
Software Installation
Insert the PC Workstation installation disk. If the installation does not begin automatically run
autorun.hta from the start menu. Install according to the following messages.
Sequel 2000 (SQL 2k MSDE)
Sequel 2000 will be the rst component to install. Should the installer determine SQL Server
has previously been installed the installer will automatically proceed to the next component. To
begin the installation process click “Install”.
- 6 -
Page 17
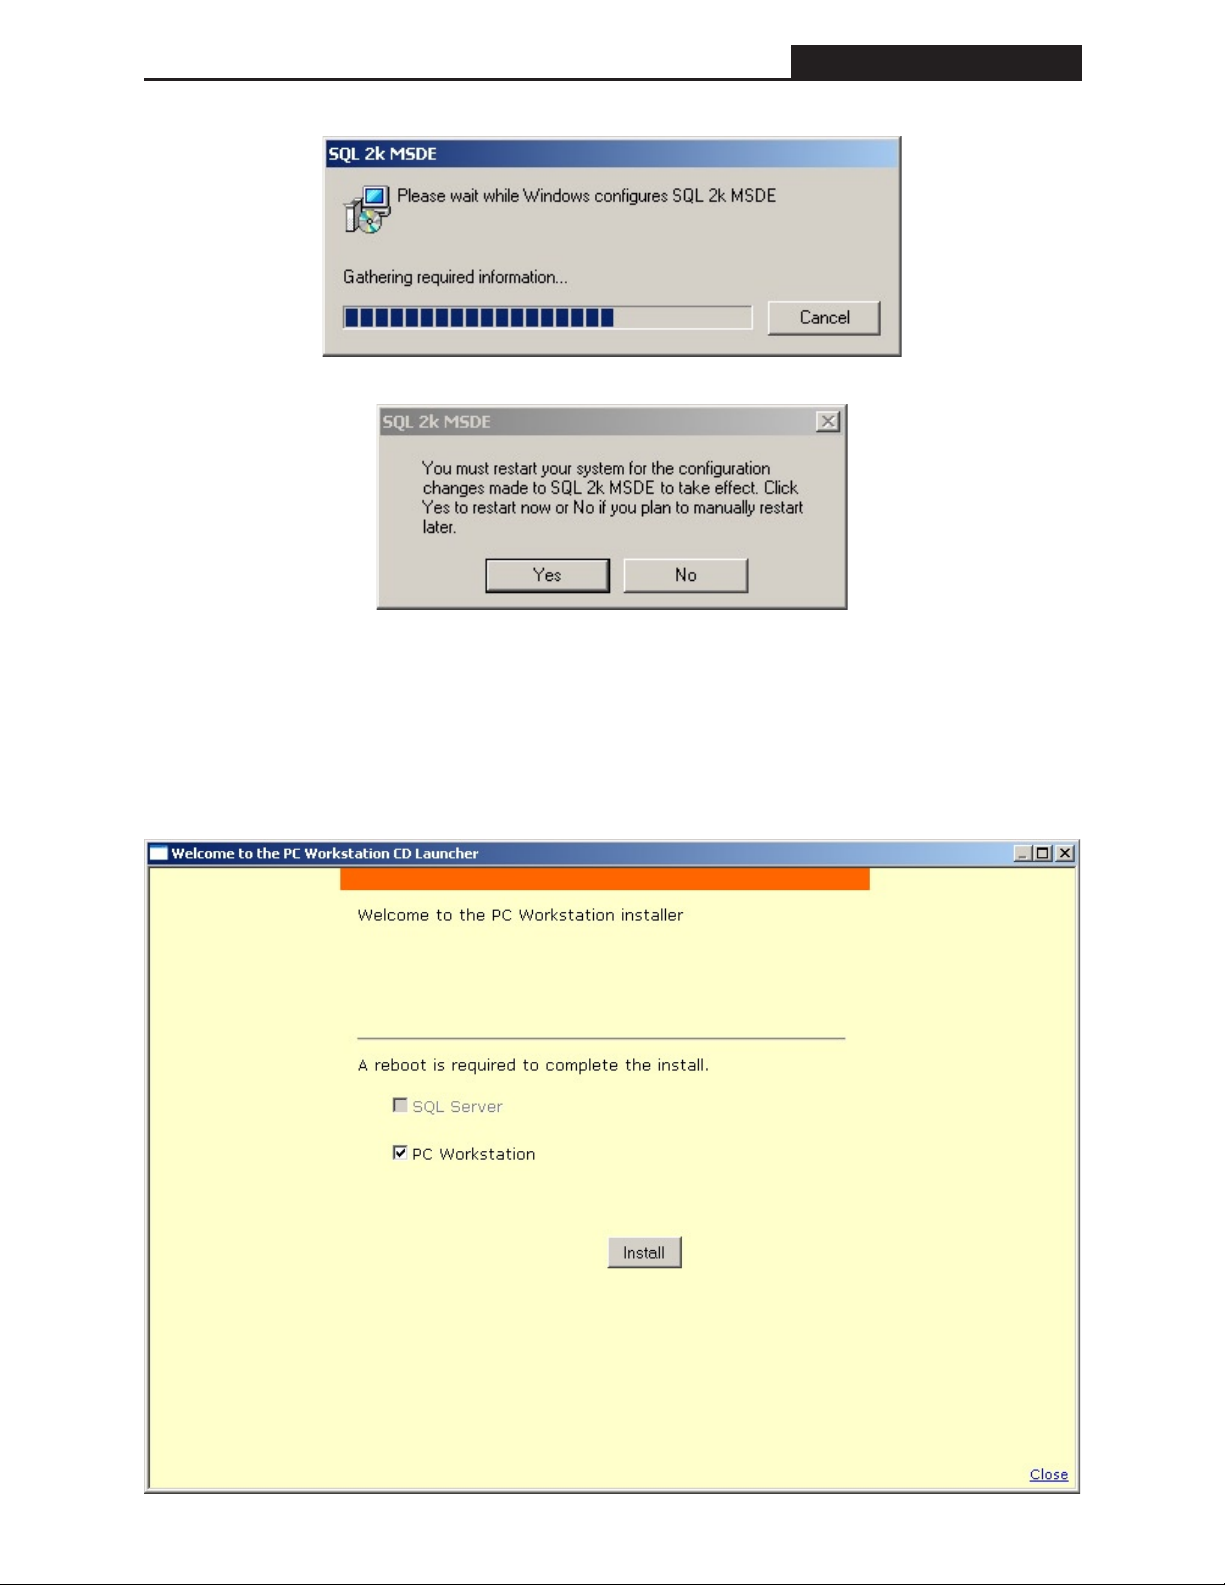
FS-3600 PC WorkStation Software Installation
NOTE: If you are not prompted to restart your system, you must do so at this time.
PC Workstation
Click install to continue with the PC Workstation component.
- 7 -
Page 18

Software Installation FS-3600 PC WorkStation
FS-3600 PC WorkStation Software Installation
- 9 -
- 8 -
Page 19

FS-3600 PC WorkStation Software Installation
Click OK to
Continue.
Click OK to
Continue.
- 9 -
Page 20

Software Installation FS-3600 PC WorkStation
FS-3600 PC WorkStation Software Installation
- 11 -
Click OK to
Continue.
The installation will scout the network for active stations. The PDS will assign itself a station
number one higher than the highest active station. The station Id number for the PDS must exist
in all active station in the form of a station le. In the example below the PDS is Station Id 2
therefore a station le, POSSTN.002, must exist on Station 1. (If there is a need for an additional
Station please contact your local TEC Dealer.) Click “Save” to continue.
Edit the PDS
Station ID here.
- 10 -
Page 21

FS-3600 PC WorkStation Software Installation
Click Finish to close window.
The installation is now complete. Click “Close” to close the PC Workstation installer.
Click Close to close window.
- 11 -
Page 22

Getting Started FS-3600 PC WorkStation
FS-3600 PC WorkStation Getting Started
- 13 -
Getting Started
After completing the software installation and rebooting the PC, the PDS will start automatically
from the Startup menu. The PDS will have the “No Communication Icon” until it establishes
communication; it may take in excess of 1 minute for it to connect. After communication is
established the Icon will alternate between an up and down movement.
The PDS is the Icon in the notication bar moving up and down that identies the PDS is
running on the PC and communicating with the FS-3600.
If PDS is running, but not communicating with the terminal you will see the following red circle
over the PDS Icon.
In the event the PDS fails to communicate, Check networking or call your TEC Dealer.
The PDS will fail to start if the license service is not running, this results in a “Retry” or
“Cancel” prompt.
Select “Retry” to start the license service.
Downline Database to PCWS
The next step is to receive the downline database from the FS-3600. The installation process
prepares the SQL 2k MSDE to receive the database by installing a blank database. Only one
database can exist in PCWS therefore if a database has previously been downlined the SQL 2k
MSDE database must be reset. SEE RESETTING DATABASE.
When the PDS has established communication the FS-3600 database can be downlined. The
database must be downlined from an FS-3600 terminal.
Select Manager Modeà Database SetupàPage DownàPage Down à Downline Database.
This process is performed during the initial setup and will only be repeated if changes are made
from the FS-3600 terminal while the PDS is not communicating. It is recommended once PC
Workstation is installed all changes to the database be made from PCWS.
The length of time to downline the database is dependent on the size of the network and the size
of the database.
The FS-3600 terminal will return to the Database Setup Screen when the downline is complete.
PC Workstation is now congured. Any user previously dened in the FS-3600 terminal
program with a manager level security may login to PCWS. A password is required for users
assigned a password in the FS-3600 User Table.
- 12 -
Page 23
FS-3600 PC WorkStation Getting Started
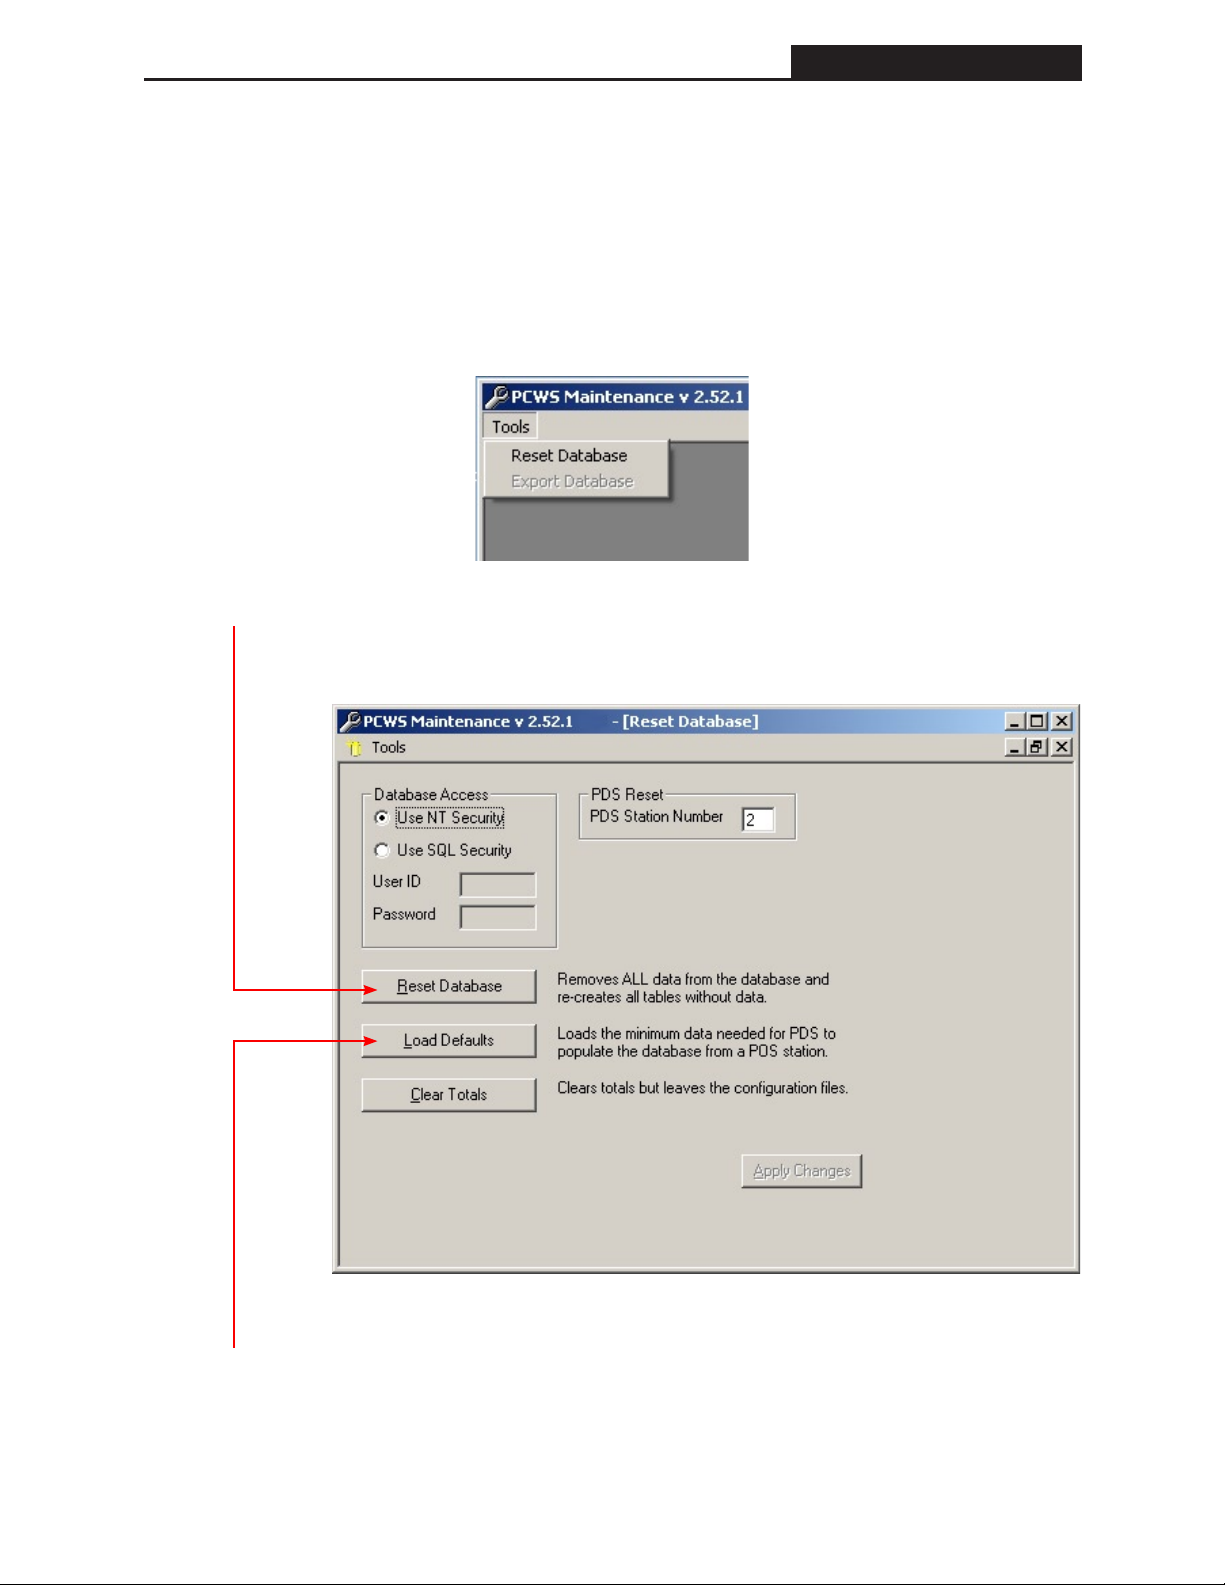
Resetting Database
PCWS Maintenance is available for technicians to reset the database. To run the Maintenance
program, nd the PCWS folder and double click on PCWSMaintence.exe.
WARNING: If a Reset is performed you will lose ALL Archived sales totals as well the
Programmed Database.
• From the PCWS Maintenance window select Tools àReset Database
• Select the “Reset Database” command to reset the database.
• Select the “Load Defaults” command to load necessary minimum parameters.
- 13 -
Page 24

Getting Started FS-3600 PC WorkStation
FS-3600 PC WorkStation Getting Started
- 15 -
• Clear Totals
• Select Clear All Totals (Including history) and Click Ok.
- 14 -
Page 25

FS-3600 PC WorkStation Getting Started
• If needed the PDS Station Number may be changed from the number assigned during the
installation process. To save the changes select “Apply Changes” before closing PCWS
maintenance.
• “Use NT Security” should always be selected.
- 15 -
Page 26
Getting Started FS-3600 PC WorkStation
FS-3600 PC WorkStation Getting Started
- 17 -
Application Start up
Sequel 2000
Sequel 2000 runs as a service at all times on the PC. The Sequel 2000 application runs in the
background and does not have a user interface.
POS Data Service
POS Data Service (PDS) runs from the start up menu each time the PC is started or rebooted.
The PDS must be running for PC to communicate with the FS-3600 system. If the PDS is shut
down start the application as follows.
- 16 -
Page 27

FS-3600 PC WorkStation Getting Started
PC Workstation
PC Workstation is the user interface between the PDS and the FS-3600 system. The PCWS
application need only run when user interaction is required. A full array of reporting
information is available real-time. In addition to reports all areas of the database can be
programmed, maintained, and edited. Changes made to the database from PCWS are sent realtime to the FS-3600 terminals. Manually ran “Z’s” are also available from PCWS.
Start the PCWS application as follows.
- 17 -
Page 28
Getting Started FS-3600 PC WorkStation
FS-3600 PC WorkStation Getting Started
- 19 -
PC WorkStation Login
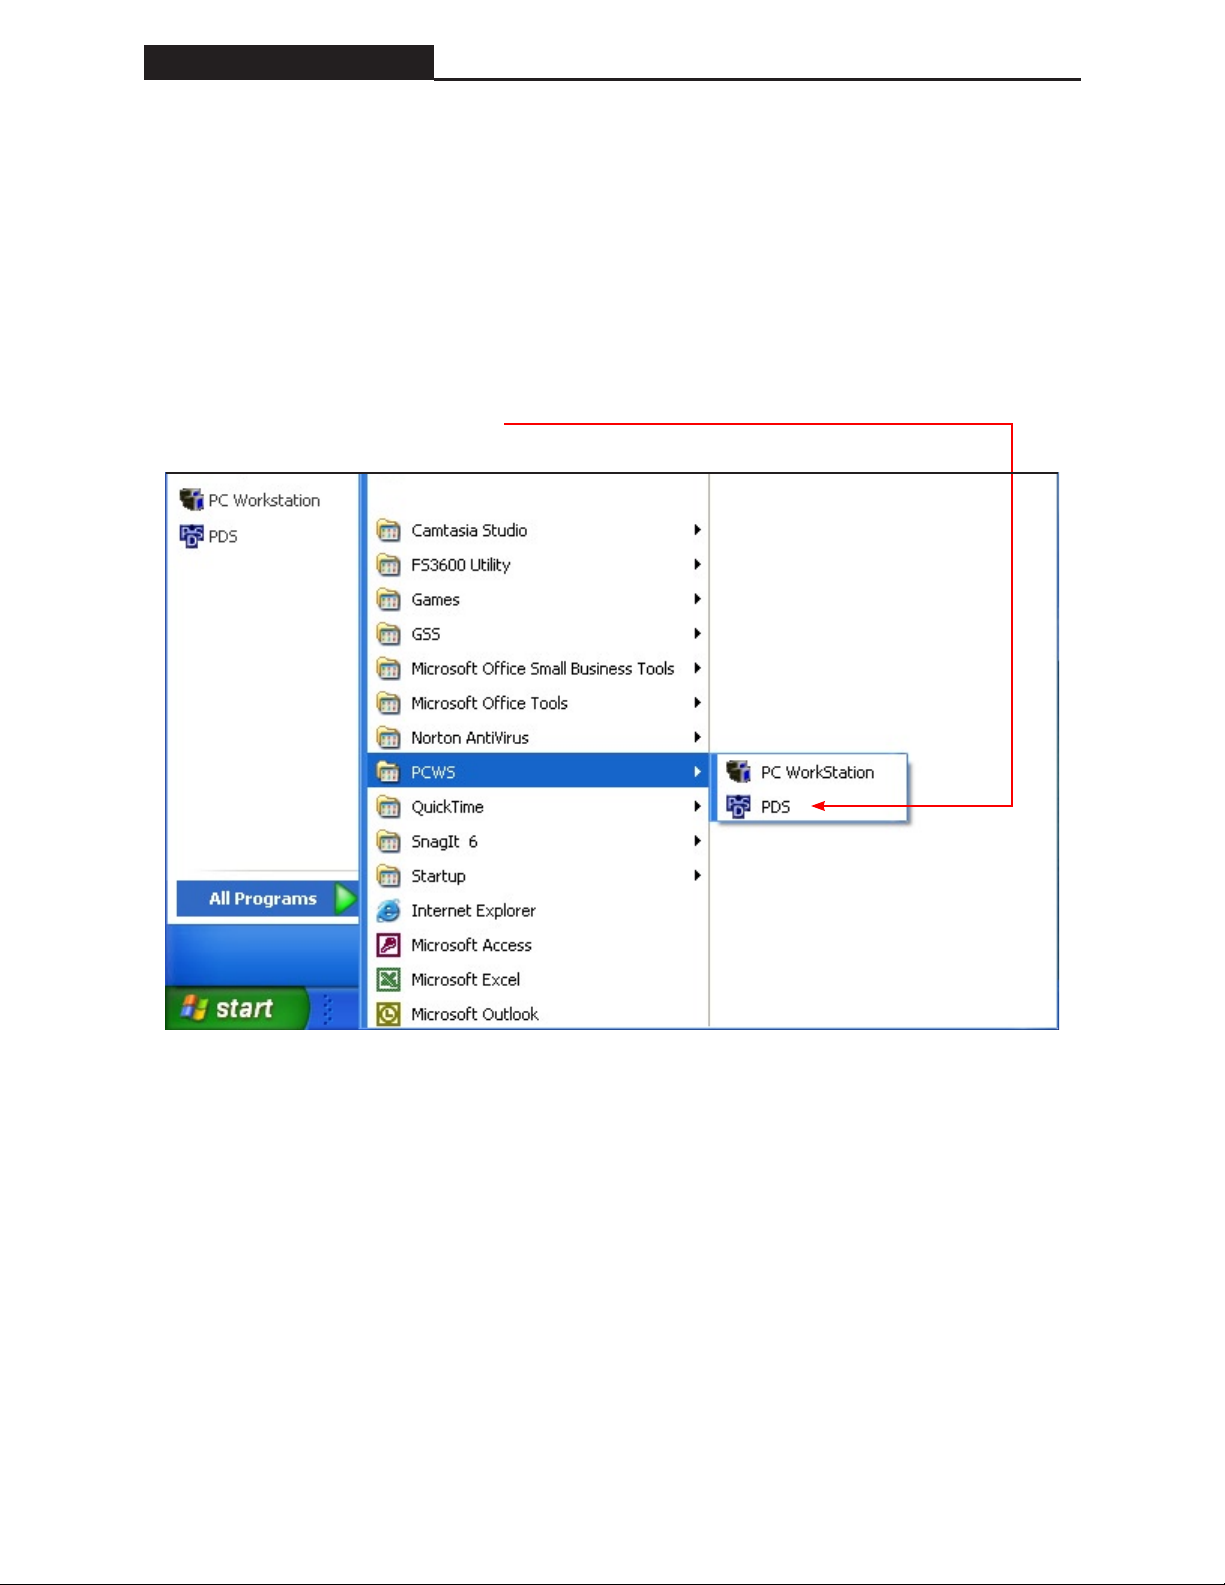
You can start the application by double clicking on the Desktop ICON, or you can click on Start,
Programs, PCWS, and PC WorkStation.
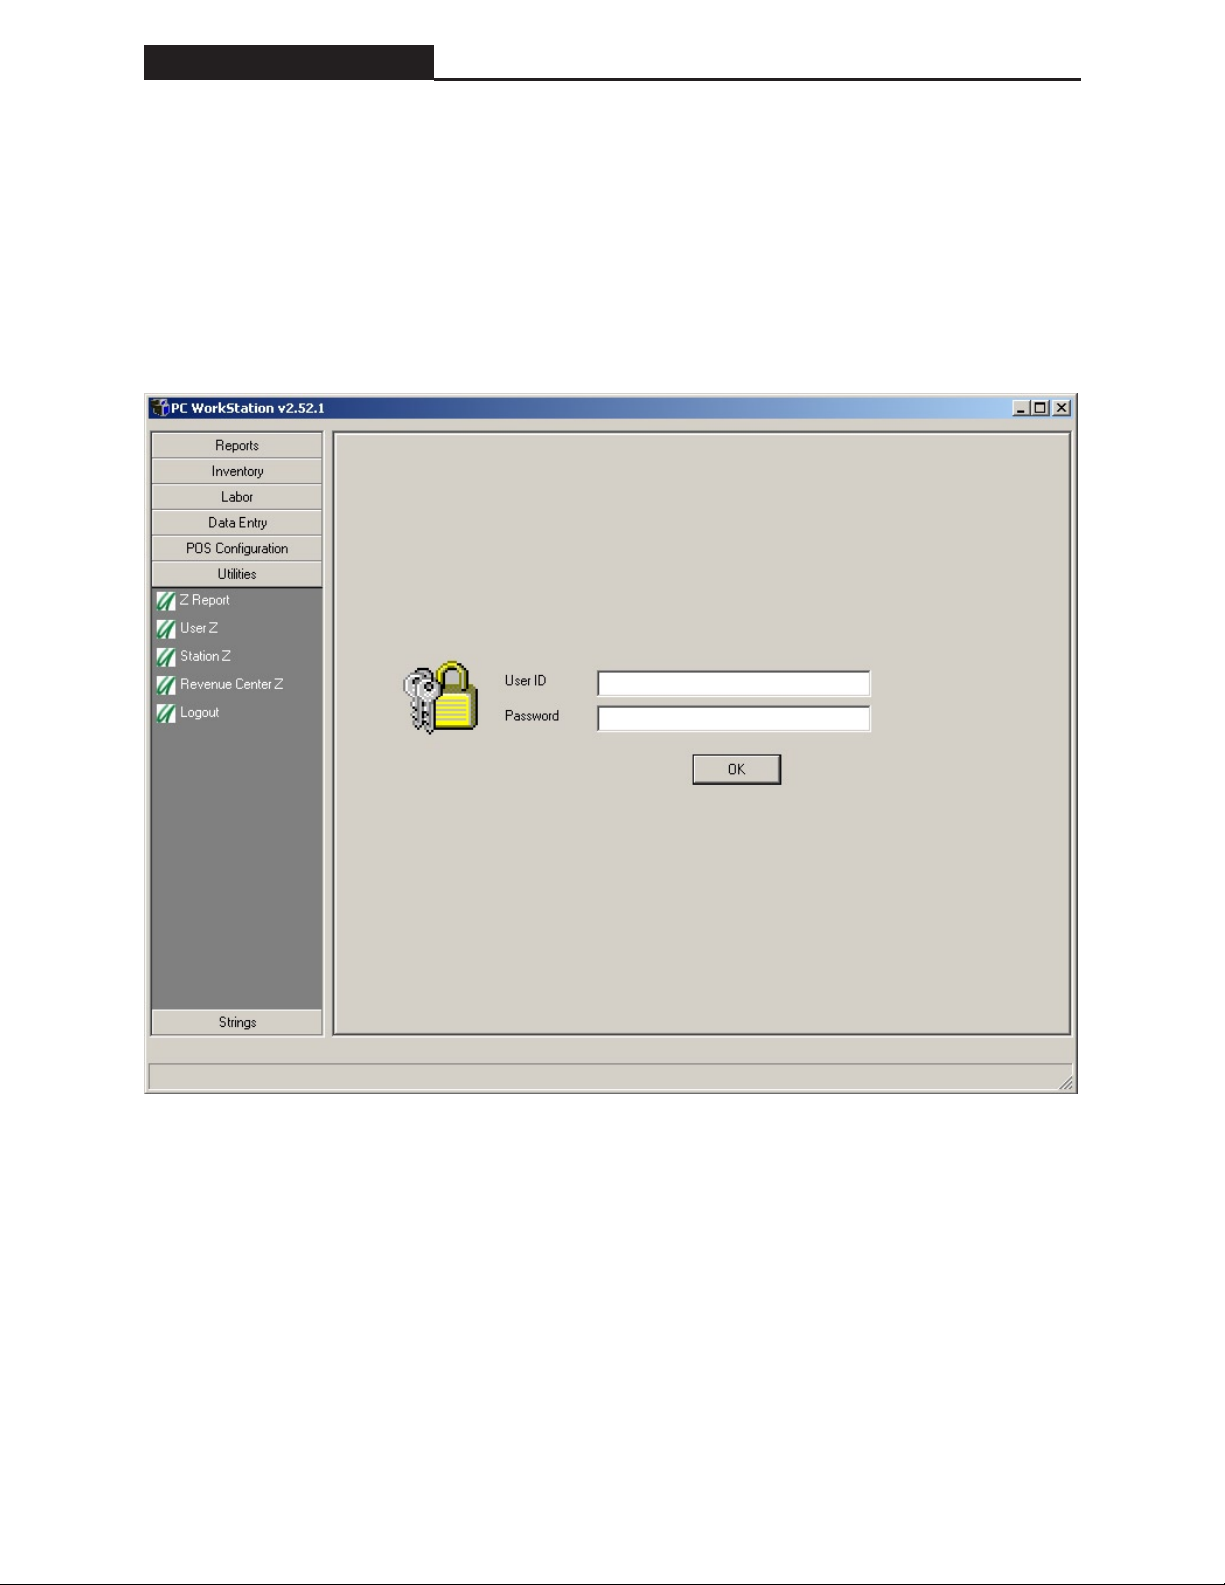
When you start the PCWS, the Login screen will be displayed. You must login with a User
ID and Password if applicable then click OK. The User Table from the FS-3600 denes the
parameters for each user. Only manager level users are allowed to Login PCWS.
- 18 -
Page 29
FS-3600 PC WorkStation Getting Started
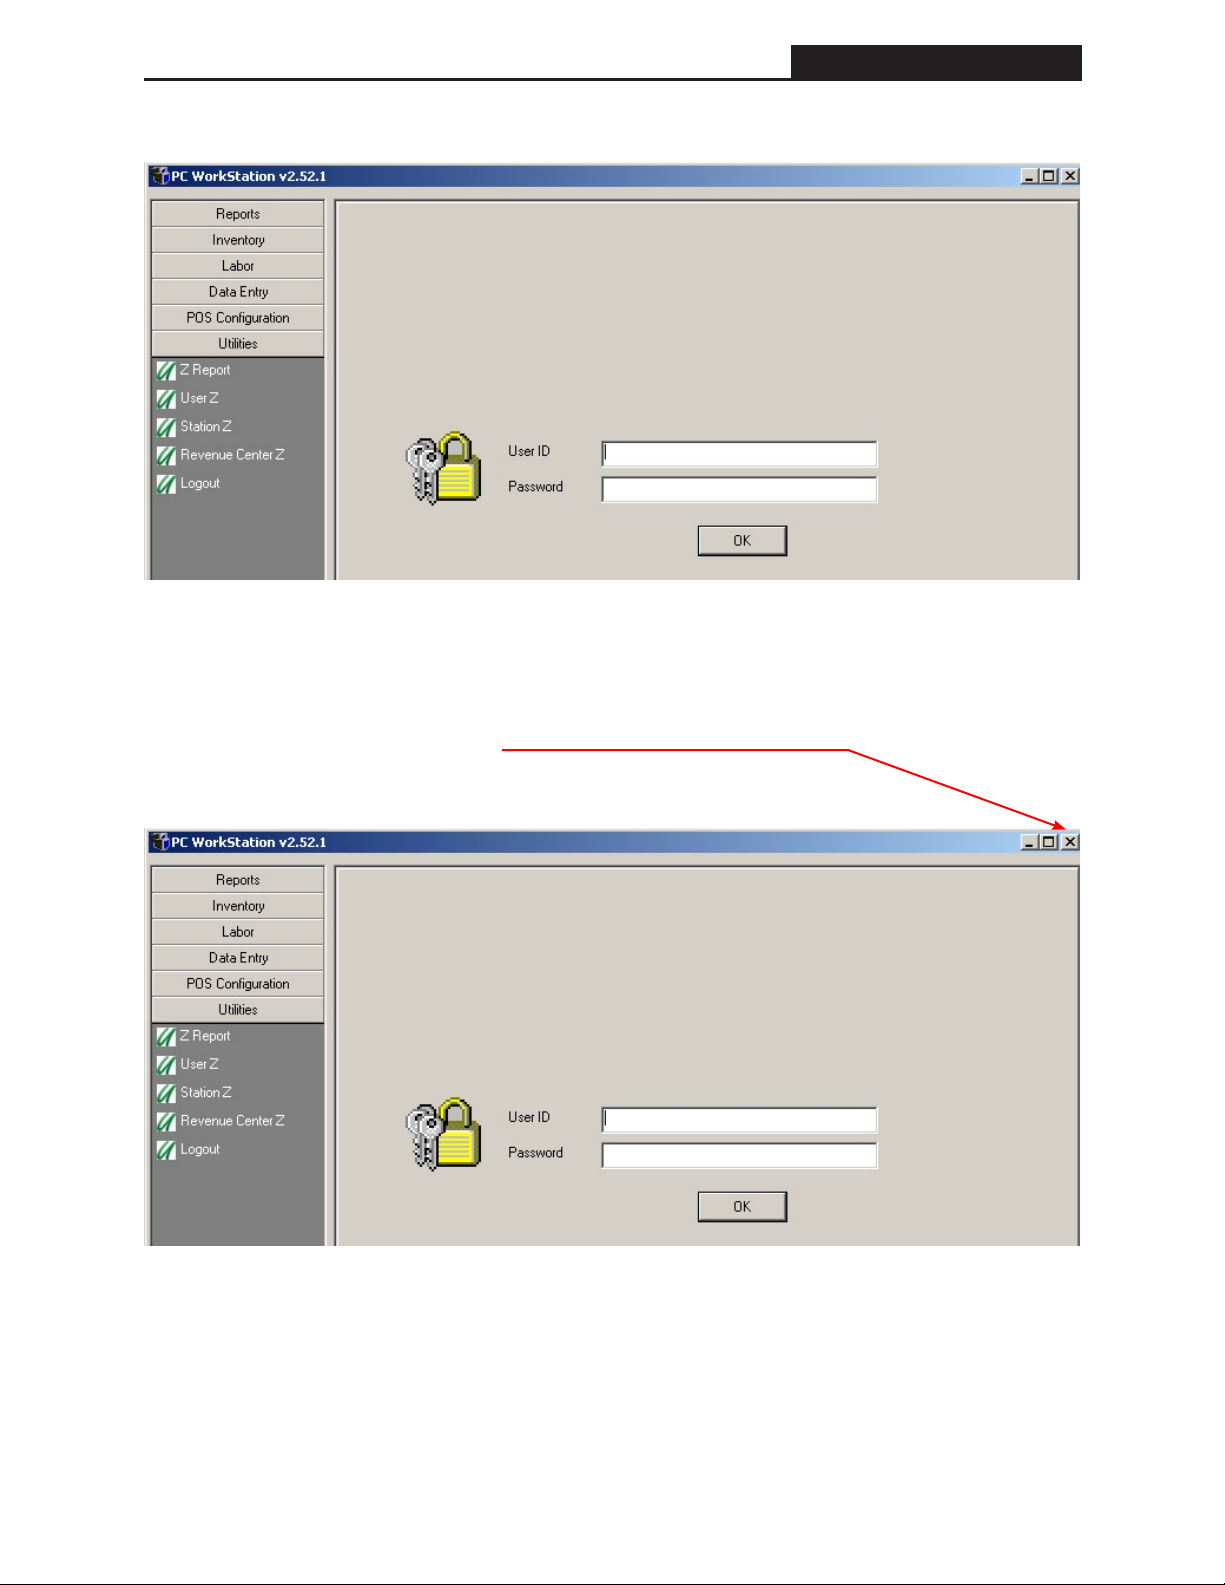
To Logout select Utilities and click on Logout.
The Log In screen will be displayed to allow another user to Log In.
To Exit the program click on the X.
- 19 -
Page 30

FS-3600 PC WorkStation Reports
- 21 -
Reports FS-3600 PC WorkStation
Reports
After you have Logged In, the screen that will be displayed is the Reports Screen.
(System Reports will be displayed in the window until you select another report type)
Under the reports menu you may select from Export, Inventory, Listings, Payroll, Period,
Revenue Center, Station, System, and User Reports. Selecting a report type will generate a list of
reports available. You may run a specic report by double clicking the report or highlighting the
report and clicking “Run Report”.
The individual selections for reports will all use the same functions explained in the next section.
At the bottom left of the screen you have six more selections, Inventory, Labor, Data Entry, POS
Conguration, Utilities and Strings. You can change to any of the six options by clicking on that
selection.
- 20 -
Page 31

FS-3600 PC WorkStation Reports
Reporting Functions
The following is a brief description of the select functions for PCWS.
Start Date
From the drop down menu
select a Start Date. The days
in the list reect a day where
a system Z was performed
on the FS-3600.
End Date
From the drop down menu
select an End Date. The
days in the list reect a
day where a system Z was
performed on the FS-3600.
Show All Users
If checked drop down list
includes ‘Clock In Only’
users.
To Screen
Viewable to the Screen
Printable to the Printer
Revenue Center
From the drop down menu
select a Revenue Center
programmed in the FS-
3600.
Station
From the drop down
menu select a Station
programmed in the FS-
3600.
User
From the drop down menu
select a User programmed
in the FS-3600.
Run Report
Processes the report selected.To Printer
Shift
From the drop down
select a shift for a station.
Shift
From the drop down
select a shift for a user.
The scope of selections available is dependent on the report selected. A select function is grayed
out when it is not available for a particular report.
The scope of the days in the drop down menu is dependent on the report selected. When the
selected report is based only on current totals the Start Dates and End Dates are grayed out.
The dates will be selected automatically by default. When the selected report is based only
on Weekly or Period totals, the dates in the drop down menu will be limited to days where the
respective Z’s were performed.
The selection of a shift report from the archived database is dependent on actual shift resets
performed at that time.
- 21 -
Page 32

FS-3600 PC WorkStation Reports
- 23 -
Reports FS-3600 PC WorkStation
Sample Reports
The following is an example of a Station 2 Financial Report for shift 1 only. A shift report is
only available from the archive if a Z was performed for the respective shift.
Station 2 Shift 1
- 22 -
Page 33

FS-3600 PC WorkStation Reports
The following is an example of a system report from January 28, 2003 at 9:03 am to January 29,
2003 at 9:25 am.
From the Start Date
drop down menu select:
January 28, 2003 9:03
From the End Date drop
down menu select:
January 29, 2003 9:25
- 23 -
Page 34

Reports FS-3600 PC WorkStation
System Financial Report from January 28, 2003 at 9:03 am to January 29, 2003 9:25 am.
- 24 -
Page 35

FS-3600 PC WorkStation Inventory
Inventory
PC WorkStation allows you to perform limited Inventory Control right from your PC.
Recipes are created consisting of Inventory Items (Raw Ingredients), those Recipes are linked to
a Point of Sale Menu Item, and each time you Sell or Waste a Menu Item, the Raw Ingredients in
that linked Recipe are updated accordingly.
Recipes
Inventory Items
(Ingredients)
Point of Sale
Menu Items
Required Programming
There are some programming settings that need to be made within the system to allow for the
inventory routine to work.
From POS Conguration à System Setup à Files/Memory: Current Allocation settings:
You need to allocate how many recipes you will be using. The FS-3600 will allow up to 9,999
Recipes, but that will depend on your settings in other elds (i.e. Menu Items, User’s, etc).
From POS Conguration à System Setup à Flags/Settings àUse Inv System: You will need to
activate the Inventory System.
From POS Conguration à Function Setup: In the Function programming table, you can set
the Security Level that can perform various Inventory Functions, and whether performing these
functions are tracked on the System or User Reports.
Once these are set up, you can begin to create your ingredients and your recipes.
Inventory Category Setup
Path: POS Conguration à Inventory Category
You can program up to 15 Inventory Categories. These are not the same as the Menu Categories
that are programmed in the Category Setup table, these are only for and specic to the Inventory
System. The Inventory Categories are provided as labels for separate areas of your Inventory.
There are no programming elds for these categories, you are simply assigning a name. (Up to 10
characters Alpha Numeric)
Refer to the PC WorkStation POS Conguration section for details.
Once you have setup your Inventory Categories, you can then begin to setup your Inventory
Items (ingredients).
- 25 -
Page 36

FS-3600 PC WorkStation Inventory
- 27 -
Inventory Setup Programming
When setting up the Inventory Items (ingredients), you will be programming up to 255 items that
you stock and use in your recipes. You obviously do not have to program every raw ingredient
you are stocking/using; you can setup and track the items you desire to maintain controls on.
There are 9 Program Fields that you will need to assign within the Inventory Setup mode.
Name: The name of that Ingredient (Up to 15 Characters Alpha Numeric)
Category: The Inventory Category that this Ingredient is associated to.
(You will be picking from a list of the Inventory Categories you setup earlier)
Ref Number: This is an Open Field that you can assign a Reference Number. You may choose
Recv Unit: This is where you will assign the unit of measure that you receive this Ingredient
Inventory FS-3600 PC WorkStation
to use this reference number as the Vendors Part Number for example. (Up to 9
Numeric Digits)
into your inventory. For example if you order/receive this product by the Case, you
may program this as CA, if you order/receive individual units, you may program
this as EA, etc. (2 Characters Alpha Numeric)
Recipe Unit: This eld sets the unit of measure that you will be using this ingredient in your
recipes. For example if you use this ingredient in a recipe in Ounces, you may set
this eld to OU, if you use this ingredient in recipes as individual whole units, you
could set this eld to EA, etc.
NOTE: You must set this for the lowest possible measures that you will be using
this in your recipes. If in one recipe you are using 1 oz. of Flour, but in another
you are using 1 lb. Of Flour, your setting in this eld would have to be 1 oz. In the
recipe table you would assign the quantity of this unit of measure used.
Conversion: In this eld, enter the number of Recipe Units that are contained in each receiving
unit. For example if you are tracking Hamburger Patties, and you set the Receiving
Unit as a Case, How many Patties come in each case.
Price: The price you set here is the price you pay for the Receiving Unit.
Count Freq. You can select when this ingredient appears on the FS-3600 Inventory Count
Sheets. You can set this for Daily, Weekly, or Monthly.
Inactive: This is a Yes or No setting for whether this ingredient is currently active in your
system. You can use this eld to temporarily put an ingredient on hold, rather than
removing it completely form your database. This would be especially used for items
that are seasonal.
- 26 -
Page 37

FS-3600 PC WorkStation Inventory
Perform this setup for each/every ingredient you wish to track, up to 255.
Using the Hamburger Patties again as an example, this would be a typical setup for an inventory
item (ingredient).
Name: Hamburger Patty
Category: The Inventory Category that this Ingredient is associated to.
(Probably earlier dened as Meat or Beef in the Inventory Category Setup)
Ref Number: The Vendors Part Number up to 9 Numeric Digits.
Recv Unit: CA (normally would receive these in case lots)
Recipe Unit: EA (serving them in individual units in our recipes)
Conversion: How many Patties come in each case? Let’s say for example 100. So your input
would be 100.0000
Price: How much do you pay for a Case of these?
Count Freq. When do you wish to perform an Inventory Count on these Daily, Weekly, or
Monthly?
Inactive: No.
Once you have created your ingredients you wish to track, you now would setup your recipes as
to how these ingredients are used in preparation of your menu items.
Menu Setup
Path: POS Conguration à Menu Setup
This is where you will create the actual recipes for the Menu Items you sell. Remember that
the number of available recipes is based on your settings in the FS-3600 Memory allocation as
described earlier.
NOTE: Prior to creating your recipes, it is necessary to have created all of the Ingredients
(Inventory Setup) you will be using in these recipes, as well as all of the Point of Sale Menu
Items that the recipes will be linked to.
- 27 -
Page 38

FS-3600 PC WorkStation Inventory
- 29 -
Recipe Setup Programming
Path: POS Conguration à Menu Setup à [Select Menu Item] à Recipe Setup
When you enter the Recipe Setup mode of Menu Setup, you will have the ability to add new
recipe records, or change existing recipe records.
Click on the rst line of Ingredients. Up to 20 ingredients are available for each recipe. Also for
each ingredient that is included in this recipe select the number of recipe units that it includes.
So if your recipe unit was 1, as it was in the case of the Hamburger Patty, how many hamburger
patties are included in the preparation of this menu item.
Inventory FS-3600 PC WorkStation
• Click on “Save” to save this Recipe.
Once the recipe has been properly set up, any activity to that menu Item will decrement or
increment your stock quantity of the ingredients that are in the recipe.
NOTE: The recipes you create can be as specic as to include each and every ingredient that
goes in to the preparation of that item, or can be just a partial listing of the ingredients that you
wish to maintain control on.
Assuming all of the above areas have been setup properly, the system now has recipes created,
and inventory enabled, and you are ready to begin managing your stock.
- 28 -
Page 39

FS-3600 PC WorkStation Inventory
Managing the Inventory System
From the Inventory Menu you will make any adjustments to your stock, including setting up your
initial stock quantities.
Entering Initial Stock Quantities
There are two different ways you could enter your initial stock quantities. The method you use
will depend on how you want your reports to be printed, and performed.
Method 1:
If you wish to show all beginning quantities as purchases:
From the Inventory Menu you have the options to Enter Inventory Receiving, Returns, Wastes,
and Ending Quantities. To enter your initial stock, select “Enter Inv Receiving”.
Enter the Vendor Number you are receiving from. If you do not wish to enter a Vendor Number
simply leave it blank.
Enter the Invoice # for the order you are receiving. If you do not wish to enter an Invoice
Number simply leave it blank.
A listing of all of your ingredients will be displayed with elds for entering the quantities
received. Input your beginning stock quantities for each ingredient, if you are tracking by vendor
and/or invoice, only input quantities from that invoice/vendor.
From the Inventory Menu you will perform all manual changes to your Stock. The only
automatic adjustments made to your stock quantities is done be selling the Menu Items that have
Recipes linked to them. All Raw Product Wastes, Returns, Physical Counts, and Receipts of
Stock, will be done from this menu.
Method 2:
If you wish to show all of your beginning quantities as beginning, with out showing them as
received in:
After you have set up your raw Ingredients and your recipes, if you enter your ending
Quantities and perform the appropriate system reset (Daily, Monthly, Weekly) as to your count
frequency setting, the ending quantity you entered, will become the beginning quantity for the
next “cycle”.
Enter the actual ending (physical on hand) quantity of each raw ingredient.
Once you have completed entering the entire inventory count, click “Save” to save.
After you have entered the ending quantities, you can run the Inventory Totals report if you want
to print or display the on hand values for these ingredients.
- 29 -
Page 40

FS-3600 PC WorkStation Inventory
- 31 -
Enter Inv Receiving
Enter Inventory Receiving is where you will enter the quantity of all new stock you receive to the
store. It is very important that when new Inventory Items (ingredients) are actually brought in to
the inventory at your store, that they are received in to the FS-3600 System. This is the only way
you can assure proper and valid stock quantities are being maintained and tracked.
All Inventory Receiving is done from the Daily Menu.
The FS-3600 System is set up to Receive Inventory by a Vendor and/or an Invoice Number.
When you start the receiving process you will be asked to enter the Vendor ID, and then the
Invoice Number. However, neither Vendor nor Invoice Number are tracked on any reports or held
in memory for tracking purposes.
Inventory Receiving Procedures
Enter the Vendor Number you are receiving from. If you do not wish to enter a Vendor Number,
simply leave blank and advance to the next eld.
Enter the Invoice # for the order you are receiving. If you do not wish to enter an Invoice Number
simply leave blank.
Inventory FS-3600 PC WorkStation
A listing of all of your ingredients will be displayed with elds for entering the quantities
received. Input your received stock quantities for each ingredient, if you are tracking by vendor
and/or invoice, only input quantities from that invoice/vendor.
Once you have completed entering the entire received inventory, click “Save” to save the entries.
After you have entered the receive quantities, you can run the Inventory Totals report if you want
to print or display the Purchase values for these ingredients.
- 30 -
Page 41

FS-3600 PC WorkStation Inventory
Enter Inv Returns
This function allows you to remove inventory quantities from your stock. If for example, you
agreed to take on a large quantity of a product from a vendor, with agreement that if it didn’t
move they would take it back. Doing an Inventory Return allows you to transfer it out of your
stock.
All Inventory Returns are done from the Daily Menu.
Inventory Return Procedures
Enter the Vendor Number you are returning to. If you do not wish to enter a Vendor Number,
simply leave blank and advance to the next eld.
Enter the Invoice # for the order you are returning from. If you do not wish to enter an Invoice
Number simply leave blank.
A listing of all of your ingredients will be displayed with elds for entering the quantities to
return. Input the quantities to return for each ingredient, if you are tracking by vendor and/or
invoice, only input quantities for that invoice/vendor.
Once you have completed entering the entire inventory to be returned, click “Save” to save your
entries.
- 31 -
Page 42

FS-3600 PC WorkStation Inventory
- 33 -
After you have entered the return quantities, you can run the Inventory Totals report if you want
to print or display the Inventory Returns for these ingredients.
Enter Inv Waste
The Enter Inventory Waste function allows you to perform raw ingredient wastes. If you were
specically wasting an inventory item, not an entire nished product, you would do the waste
from this menu. Wastes on nished products are performed from the Point of Sale mode.
Inventory FS-3600 PC WorkStation
All Inventory Wastes is done from the Daily Menu.
Inventory Waste Procedures
Enter the quantity of the raw ingredient to waste for each and every ingredient you are wasting.
Once you have completed entering the entire inventory to be wasted, click “Save” to save your
entries.
After you have entered the Inventory waste, you can run the Inventory Totals Report if you want
to print or display the Inventory waste or these Ingredients.
- 32 -
Page 43

FS-3600 PC WorkStation Inventory
Enter Inv Ending
Inventory ending quantities are entered as a result of a physical inventory count. Prior to doing a
count you can print out the Inv Count Sheet to give you a worksheet to enter your quantities on
to.
Inv Count Sheet
The Inventory Count Sheet prints a listing of all ingredients that need to be counted depending
on the Count Frequency and the level you entered (Daily, Weekly, Monthly). This is a worksheet
to allow you to take a physical inventory count on those items.
Path: Reports à Inventory à [Daily-Weekly-Period] Count Sheets
In the FS-3600 System the entry of ending inventory quantities must be performed prior to a
system reset. Which items must be counted and entered, at which reset type (Daily, Weekly, or
Monthly) depends on the Count Frequency Setting in the Inventory Setup you performed for each
ingredient. Those items set for Count Frequency Daily, must be counted and the ending inventory
quantity entered prior to or at the Daily System Reset. Those set as Count Frequency Daily or
Weekly, must be counted and the ending inventory quantity entered prior to or at the Weekly
System Reset. ALL inventory items must be counted and the ending inventory quantity entered
prior to or at the Monthly (PTD) System Reset.
NOTE: If you do not enter the ending quantities prior to or at the reset time, all items that’s
count frequency matches that reset level [Daily, Weekly, or Monthly] will have their stock
quantity reset to 0.
- 33 -
Page 44

FS-3600 PC WorkStation Inventory
- 35 -
Inventory Ending Quantity Procedures
Enter the actual ending (physical on hand) quantity of each raw ingredient.
Once you have completed entering the entire inventory count, click “Save” to save your entries.
Inventory FS-3600 PC WorkStation
After you have entered the ending quantities, you can run the Inventory Totals report if you want
to print or display the on hand values for these ingredients.
- 34 -
Page 45

FS-3600 PC WorkStation Inventory
Inventory Reporting
The FS-3600 inventory reports are accessed from Reports à Inventory.
Inv Totals Report
The Inventory Totals Report, is available by [Daily, Weekly and Period] (PTD). This report will
tell you detailed information on each of the raw ingredients.
Waste Value =
Raw Waste Qty (in
recv units) x Price
(from inventory
setup)
Returns = Quantity of
this Ingredient that
was returned.
Purchases =
Quantity of this
Ingredient that was
Received.
Beginning = Quantity
of Beginning
Inventory for this
Cycle (amount
entered as Ending
Quantity for last
cycle)
Name of Inventory
Item (Ingredient)
Calc On Hand =
Beginning Qty +
Purchases Qty.
- Return Qty.
- Raw Item
Waste Qty.
- Finished Waste
Qty.
On Hand =
Value entered as
the
Ending Quantity.
Sales = Quantity
of this Ingredient
that was Sold via
the Menu Item/
Recipe Item
Sales.
Finished Waste =
Quantity of this
Ingredient that
was Wasted via
Finished Product
Waste Function.
Variance =
Calc Usage - Usage
Calc Usage =
Raw Item Waste +
Finished Waste +
Item Sales
Usage =
Beginning Qty +
Purchases Qty.
- Return Qty.
- On Hand Qty.
- 35 -
Page 46

FS-3600 PC WorkStation Inventory
- 37 -
Food Cost Report
The Food Cost Report will tell you your Sales and Wastes vs. your Costs, per recipe, and Total.
Inventory FS-3600 PC WorkStation
Menu Item Number
and Name
* Cost Percentage
Cost Percentage =
1. The food cost for each ingredient in the Recipe.
((Inv. Item Cost divided by Inv. Item Conversion Factor) * Recipe Quantity)*
Menu Item Sales Count
2. The cost of each ingredient is added to get the Total Cost for the Menu Item
3. The total cost for the menu item is divided by the gross revenue for the
menu item to get the Cost %
Sales Qty and Revenue
of the Menu Item
Waste Quantity for the
Menu Item
(Finished Product)
Total Cost for the
Menu Item (Recipe)
Cost Percentage
* (See Below)
- 36 -
Page 47

FS-3600 PC WorkStation Inventory
Quick Setup and Reference
1. Setup the RAM Allocation to allow for Number of Recipes you will require.
(Maximum 9.999)
ü POS Conguration à System Setup à Files/Memory: Current Allocation settings
2. Activate Inventory in the System Conguration Table.
ü POS Conguration à System Setup à Flags/Settings àUse Inv System
3. Set your security levels in the ECR Function table to allow and restrict inventory
functions.
ü POS Conguration à Function Setup
4. Program the Inventory Categories (up to 15)
ü POS Conguration à Inventory Category Setup
5. Program the Inventory Items (Raw Ingredients)
ü POS Conguration à Inventory Setup
6. Program the Recipes
ü POS Conguration à Menu Setup à [Select Menu Item] à Recipe Setup
7. Maintaining Inventory
ü Inventory
A. Enter Inv Receiving
B. Enter Inv Returns
C. Enter Inv Waste (Raw Ingredient Wastes)
A. Enter Inv Ending
8. Inventory Reporting
ü Reportsà Inventory
A. Daily, Weekly, Monthly
B. Inv Count Sheet
C. Inv Totals
D. Food Cost Report
a) Menu Items
b) Category
c) Departments
- 37 -
Page 48

FS-3600 PC WorkStation Labor
- 39 -
Labor FS-3600 PC WorkStation
Labor
Introduction
PC WorkStation incorporates a fully integrated payroll feature that allows tracking of employee
punch times and pay rates. A wide range of reports allow for detailed analysis of employee
punch times, Daily and Weekly overtime, job code labor, labor/sales analysis and tips. With
Daily, Weekly, period to date and historical totals virtually any restaurants labor system can be
accommodated.
This guide will be separated into the following sections.
• Programming
• Reporting
• Daily Procedures
• Manager Edit Functions
- 38 -
Page 49

FS-3600 PC WorkStation Labor
Programming Tables
The following programming must be completed for proper operation of the FS-3600 labor
module.
Job Code Setup
Job codes are used to group employees performing similar functions. The job codes can then be
used for labor reporting and for conguring some system options.
User Setup
The User Table is used to setup employees who will need access to order entry and/or who will
be tracked under timekeeping.
System Setup
Path: POS Conguration à System Setup à Orders/Labor
1. Labor Week End: This sets the day of the week that ends the labor week. On this day,
only a Weekly or Monthly Close Time Clock report can be performed.
2. Labor EOD Time: This sets the time of day that the labor week rolls over to the next week
and ends the requirement to take a Weekly Labor Close report on a
week ending day.
Ex. If the Labor Week End day is set to Sunday and a Weekly Labor
Close is not preformed, the following day (Monday) will only allow a
Weekly Labor Close up to the Rollover time. After this time a Daily
Labor Close is allowed.
3. Weekly OT Hours: Enter the number of hours that an employee can work in a week before
reaching overtime. (Zero equals no over time)
4. Daily OT Hours: Enter the number of hours that an employee can work in a day before
reaching overtime. (Zero equals no over time)
5. OT Rate Factor: Enter the multiplier to apply to an employee’s pay rate to calculate an
overtime pay rate.
Ex. If employees are paid time and a half for overtime, enter 1.50.
6. Close with Sales: This ag determines if the system will close labor
when a System Z is run. If set to “yes” a System Z will run a sales Z
and then a Close Time Clock. If set to “no” a System Z will not run
a Close Time Clock. This is useful when a Daily labor report is not
needed or Daily overtime is not used.
NOTE: When set to Yes, the Labor Z Report does not display on the
Z Process Menu.
- 39 -
Page 50

FS-3600 PC WorkStation Labor
- 41 -
7. Clkout Opn Checks: This ag determines if employees are allowed to clock-out
Labor FS-3600 PC WorkStation
while they still have open guest checks.
System Setup
Path: POS Conguration à System Setup à Export/Report
1. PTD Totals: This ag activates the period to date totalizer. If set to no, the
PTD/monthly reports are not available.
PDSZ Setup
PDSZ.exe: Used to congure which reports print during the “Z” Process
1. From the Start Menu, Run, PDSZ.exe
NOTE: If the “Close With Sales” option is set to Yes, activate the Sales Z
If the “Close With Sales” option is set to No, activate the Labor Z
- 40 -
Select Change
to add or
remove Reports
congured to run.
Page 51

FS-3600 PC WorkStation Labor
2. Time Clock reports are activated by the System Z and Labor Z Process. Use the Add/
Remove button to select which reports print during the System Z or Labor Z.
3. Click Save to Save Changes.
- 41 -
Page 52

FS-3600 PC WorkStation Labor
- 43 -
Labor FS-3600 PC WorkStation
Labor Reports
Path: Reports à Payroll
Labor reports are available from the [Report Menu] under [Payroll]. Daily, Weekly, Period to
Date (PTD) and Historical Reports are available. Reports ran from the “Labor Report” menu are
read only. They do not reset any totals.
Daily Reports
Employee Clock-In Report Provides a print out of all employees clocked on the
system.
Labor Analysis Report Provides labor analysis report that compares sales and
labor by hour range.
Employee Time Cards Provides a detailed report of employee punch times.
- 42 -
Page 53

FS-3600 PC WorkStation Labor
Weekly Report
Employee Time Cards Provides a detailed report of employee punch times.
Tip Reports Provides a detailed listing of employees charge tips and
cash tips by job code.
Employee Pay Provides a report that consists of sales, hours, wage,
charge tip and charge tip reported by job code.
Monthly Reports (PTD)
Period Pay Provides a report that consists of sales, hours, wage,
charge tip and charge tip reported by job code.
Period Tip Provides a detailed listing of employees charge tips and
cash tips by job code.
Historical Reports
Punch Time History Provides a detailed report of employee punch times.
Weekly Pay History Provides a report that consists of sales, hours, wage,
charge tip and charge tip reported by job code.
Period Pay History Provides a report that consists of sales, hours, wage,
charge tip and charge tip reported by job code.
- 43 -
Page 54

FS-3600 PC WorkStation Labor
- 45 -
Labor FS-3600 PC WorkStation
Labor Report Examples
NOTE: The data contents are merely examples to show report format. The numeric data may
not balance correctly.
Employee Clocked In Report
Labor Analysis
- 44 -
Page 55

FS-3600 PC WorkStation Labor
Employee Time Card Report
Tip Report
- 45 -
Page 56

FS-3600 PC WorkStation Labor
- 47 -
Employee Pay Report
Labor FS-3600 PC WorkStation
- 46 -
Page 57

FS-3600 PC WorkStation Labor
Daily Procedure
The Labor Module basic Daily procedure consist of:
• Employees clocking in and out.
• Manager editing punch times and tips if required.
• Open Check Report
• Employee Clock In Report
• Labor Close (Time Clock Close)
Clocking In/Out
Employees can clock in and out on any FS-3600 terminal in a system. The ability to log on a
terminal and run transactions is controlled by the User table setup.
The FS-3600 can track 3000 punch records during a Z period. Each punch record consists of one
set of clock-in and out times. If the limit is reached the system will give a “Table Full” error each
time a clock in is attempted. At this point a Labor Close operation is required.
Refer to the FS-3600 owner’s manual for clock in/out procedures.
Editing Punch Times
PC WorkStation allows punch times and tips to be edited. If an employee clocks in or out
incorrectly or forgets to clock-out a manager can easily adjust the in/out times. If an employee
enters an incorrect tip amount the manager can also change the total charge tip or declared cash
tip amount.
The punch time edit and tip edit can be performed up to the point of a Daily Labor Close has
been done. After the close has been done the punch times and tips are considered posted and
cannot be adjusted. At this point only Weekly and PTD hours, pay and tip total can be adjusted.
See Manager Functions for editing procedures.
Open Check Report
(Optional)
It is recommended that an Open Check Report be run from the System Report Menu prior to a
labor close to determine if there are any remaining open guest checks in the system.
Employee Clock In Report
(Optional)
An Employee Clock In Report can be run from the Payroll Reports Menu prior to closing labor to
determine if any employees are still clock in.
- 47 -
Page 58

FS-3600 PC WorkStation Labor
- 49 -
Labor FS-3600 PC WorkStation
Close Time Clock
Close Time Clock is the procedure that reset a labor period and posts the punch times to properly
account for overtime. There are three different Time Clock Report periods, Daily, Weekly and
monthly (period to date).
The method of taking a Labor Close report is controlled by a system conguration option, close
with sales.
[Close With Sales]
Path: POS Conguration à System Setup à Orders/Labor à Close with Sales [Yes or No]
If the option is set for [Close with Sales = Yes] the Close Time Clock report will automatically be
done as part of the normal sales “Z” process.
Path
Utilities à Z Report à Daily/Weekly/PTD à Start
NOTE: When the [Close With Sales] option is set to [Yes], the Labor Close report is not
available from Utilities à Z Report
If the option is set for [Close with Sales = No] the Close Time Clock report will be enabled under
the Utilities Menu à Labor Report.
In this case the Close Time Clock must be performed as a separate operation and will not close as
part of the System Sales “Z”.
Path
[Utilities] à [Z Report] à [Labor: Daily/Weekly/PTD] à [Start Z]
The FS-3600 Labor Module allows for Daily, Weekly and monthly (PTD) Labor reports.
Daily Close Time Clock Report
The Daily Close Time Clock can be taken each day. It is not a mandatory operation. If Daily
punch times are not desired, this procedure can be skipped.
NOTE 1: If Daily overtime is used a Daily Close Time Clock operation should
always be preformed.
NOTE 2: If the close with sales option is set for yes the Daily Close Time Clock
will always be performed when a System Sales “Z” is done.
NOTE 3: If Employees are clocked in at the time of the Close Time Clock, they
will be automatically clocked out. After the Close Time Clock operation
is complete they will be automatically clocked back in for the next
period.
- 48 -
Page 59

FS-3600 PC WorkStation Labor
Weekly Close Time Clock
• The Weekly Close Time Clock should be performed on the day of the week that ends the
payroll period. This day must be programmed in the System Setup Table [Labor Week
End]
Path:
[System Conguration] à [System Setup] à [Orders/Labor]
NOTE 1: A Daily Close Time Clock operation is NOT available on a labor week
ending day. The Weekly Labor Close operation will automatically
perform a Daily Close Time Clock operation.
NOTE 2: If Weekly overtime is used a Weekly Close Time Clock operation must
be performed on the appropriate Labor Week End day to assure proper
calculation of overtime rates.
Monthly Close Time Clock
• The Monthly Close Time Clock operation can be performed at any time. Commonly it is
used to report bi-Weekly and semi-monthly labor totals.
• The Monthly Close Time Clock operation is used as a “period to date” reporting
operation. The descriptor “Monthly” can be changed to PTD by editing the Literal Table.
Path
[Strings] à [Literals] à [Literal #197 = PTD]
NOTE 1: When a Monthly Close Time Clock is performed it will automatically
perform a Daily Close Time Clock operation.
NOTE 2: When a Monthly Close Time Clock is performed on a week ending day
it will automatically perform a Daily, Weekly and Monthly Close Time
Clock.
- 49 -
Page 60

FS-3600 PC WorkStation Labor
- 51 -
Labor FS-3600 PC WorkStation
Examples of typical payroll procedures
Weekly Payroll
• The following example demonstrates a Weekly payroll operation.
• The pay period is set to run from Monday to Sunday.
• The labor is set to automatically close with the Daily system sales “Z” so only one reset
operation has to be done each day.
• In this case the Weekly/PTD sales and labor are closed on the same day.
• System Daily Z reports are taken each day except for the Week End day.
• On the week end day (Sunday) the Daily sales Z is not available. A Weekly Z will
automatically take a Daily Z.
Conditions:
System Conguration Option [Close with Sale] = Yes
[Week End] = Sunday
Sunday Monday Tuesday Wednesday Thursday Friday Saturday
1
System Weekly Z2System Daily Z3System Daily Z4System Daily Z5System Daily Z6System Daily Z7System Daily Z
8
System Weekly Z
15
System Weekly Z
22
System Weekly Z
29
System Weekly Z
9
System Daily Z10System Daily Z11System Daily Z12System Daily Z13System Daily Z14System Daily Z
16
System Daily Z17System Daily Z18System Daily Z19System Daily Z20System Daily Z21System Daily Z
23
System Daily Z24System Daily Z25System Daily Z26System Daily Z27System Daily Z28System Daily Z
30
System Daily Z31System PTD Z
System Z = Sales and Labor
- 50 -
Page 61

FS-3600 PC WorkStation Labor
Bi-Weekly Payroll
(Two week pay period)
• This pay period runs for two weeks
• Labor is set to close separately from sales to allow for monthly sales PTD and labor PTD
every two weeks.
• When closing labor separately from sales the [Week End] and [Labor Week End] settings
are active.
• When a PTD Labor Close is run on a labor week ending day, a Daily, Weekly and PTD
labor close will automatically run.
Conditions:
System Conguration Option [Close with Sale] = No
[Week End] = Sunday
[Labor Week End] = Sunday
Sunday Monday Tuesday Wednesday Thursday Friday Saturday
1
System Weekly Z
PTD Close
Time Clock
8
System Weekly Z
Weekly Close
Time Clock
15
System Weekly Z
PTD Close
Time Clock
22
System Weekly Z
Weekly Close
Time Clock
29
System Weekly Z
PTD Close
Time Clock
2
System Daily Z
Daily Close
Time Clock
9
System Daily Z
Daily Close
Time Clock
16
System Daily Z
Daily Close
Time Clock
23
System Daily Z
Daily Close
Time Clock
30
System Daily Z
Daily Close
Time Clock
3
System Daily Z
Daily Close
Time Clock
10
System Daily Z
Daily Close
Time Clock
17
System Daily Z
Daily Close
Time Clock
24
System Daily Z
Daily Close
Time Clock
31
System PTD Z
Daily Close
Time Clock
4
System Daily Z
Daily Close
Time Clock
11
System Daily Z
Daily Close
Time Clock
18
System Daily Z
Daily Close
Time Clock
25
System Daily Z
Daily Close
Time Clock
5
System Daily Z
Daily Close
Time Clock
12
System Daily Z
Daily Close
Time Clock
19
System Daily Z
Daily Close
Time Clock
26
System Daily Z
Daily Close
Time Clock
6
System Daily Z
Daily Close
Time Clock
13
System Daily Z
Daily Close
Time Clock
20
System Daily Z
Daily Close
Time Clock
27
System Daily Z
Daily Close
Time Clock
7
System Daily Z
Daily Close
Time Clock
14
System Daily Z
Daily Close
Time Clock
21
System Daily Z
Daily Close
Time Clock
28
System Daily Z
Daily Close
Time Clock
System Z = Sales
Close Time Clock = Labor
- 51 -
Page 62

FS-3600 PC WorkStation Labor
- 53 -
Labor FS-3600 PC WorkStation
Semi-Monthly Payroll
(Two pay periods per month)
• This pay period runs from the 1st of the month through the 15 and the 16th through the last
working do of the month.
• In this case the Daily labor close is run each day, the Weekly labor close is run on the
week ending day and the PTD labor close is run on the 15th and the last working day of
the month.
Conditions:
System Conguration Option [Close with Sale] = No
[Week End] = Sunday
[Labor Week End] = Sunday
Sunday Monday Tuesday Wednesday Thursday Friday Saturday
1
System Weekly Z
Weekly Close
Time Clock
8
System Weekly Z
Weekly Close
Time Clock
15
System Weekly Z
PTD Close
Time Clock
22
System Weekly Z
Weekly Close
Time Clock
29
System Weekly Z
Weekly Close
Time Clock
2
System Daily Z
Daily Close
Time Clock
9
System Daily Z
Daily Close
Time Clock
16
System Daily Z
Daily Close
Time Clock
23
System Daily Z
Daily Close
Time Clock
30
System Daily Z
Daily Close
Time Clock
3
System Daily Z
Daily Close
Time Clock
10
System Daily Z
Daily Close
Time Clock
17
System Daily Z
Daily Close
Time Clock
24
System Daily Z
Daily Close
Time Clock
31
System PTD Z
PTD Close
Time Clock
4
System Daily Z
Daily Close
Time Clock
11
System Daily Z
Daily Close
Time Clock
18
System Daily Z
Daily Close
Time Clock
25
System Daily Z
Daily Close
Time Clock
5
System Daily Z
Daily Close
Time Clock
12
System Daily Z
Daily Close
Time Clock
19
System Daily Z
Daily Close
Time Clock
26
System Daily Z
Daily Close
Time Clock
6
System Daily Z
Daily Close
Time Clock
13
System Daily Z
Daily Close
Time Clock
20
System Daily Z
Daily Close
Time Clock
27
System Daily Z
Daily Close
Time Clock
7
System Daily Z
Daily Close
Time Clock
14
System Daily Z
Daily Close
Time Clock
21
System Daily Z
Daily Close
Time Clock
28
System Daily Z
Daily Close
Time Clock
System Z = Sales
Close Time Clock = Labor
- 52 -
Page 63

FS-3600 PC WorkStation Labor
Semi-Monthly Payroll (Example 2)
(Two pay periods per month)
• This example reects a different calendar month
• This pay period runs from the 1st of the month through the 15 and the 16th through the last
working do of the month.
• In this case the Daily labor close is run each day, the Weekly labor close is run on the
week ending day and the PTD labor close is run on the 15th and the last working day of
the month.
Conditions:
System Conguration Option [Close with Sale] = No
[Week End] = Sunday
[Labor Week End] = Sunday
Sunday Monday Tuesday Wednesday Thursday Friday Saturday
30
System Weekly Z
Weekly Close
Time Clock
6
System Weekly Z
Weekly Close
Time Clock
13
System Weekly Z
Weekly Close
Time Clock
20
System Weekly Z
Weekly Close
Time Clock
27
System Weekly Z
Weekly Close
Time Clock
31
System PTD Z
PTD Close
Time Clock
7
System Daily Z
Daily Close
Time Clock
14
System Daily Z
Daily Close
Time Clock
21
System Daily Z
Daily Close
Time Clock
28
System Daily Z
Daily Close
Time Clock
1
System Daily Z
Daily Close
Time Clock
8
System Daily Z
Daily Close
Time Clock
15
System Daily Z
PTD Close
Time Clock
22
System Daily Z
Daily Close
Time Clock
29
System Daily Z
Daily Close
Time Clock
2
System Daily Z
Daily Close
Time Clock
9
System Daily Z
Daily Close
Time Clock
16
System Daily Z
Daily Close
Time Clock
23
System Daily Z
Daily Close
Time Clock
30
System Daily Z
Daily Close
Time Clock
3
System Daily Z
Daily Close
Time Clock
10
System Daily Z
Daily Close
Time Clock
17
System Daily Z
Daily Close
Time Clock
24
System Daily Z
Daily Close
Time Clock
31
System PTD Z
PTD Close
Time Clock
4
System Daily Z
Daily Close
Time Clock
11
System Daily Z
Daily Close
Time Clock
18
System Daily Z
Daily Close
Time Clock
25
System Daily Z
Daily Close
Time Clock
1
System Daily Z
Daily Close
Time Clock
5
System Daily Z
Daily Close
Time Clock
12
System Daily Z
Daily Close
Time Clock
19
System Daily Z
Daily Close
Time Clock
26
System Daily Z
Daily Close
Time Clock
2
System Daily Z
Daily Close
Time Clock
System Z = Sales
Close Time Clock = Labor
- 53 -
Page 64

FS-3600 PC WorkStation Labor
- 55 -
Labor FS-3600 PC WorkStation
Semi-Monthly Payroll (Example 3)
(Two pay periods per month)
(No Daily overtime)
• This example demonstrates the same semi-monthly payroll as mentioned before, except
Daily over time is not used. This eliminates the need to run a Daily labor close.
• Since a Daily labor close is not run, punch times can be edited up to the point a Weekly is
run.
• The Weekly labor close will automatically run a Daily labor close.
Conditions:
System Conguration Option [Close with Sale] = No
[Week End] = Sunday
[Labor Week End] = Sunday
Sunday Monday Tuesday Wednesday Thursday Friday Saturday
1
System Weekly Z
Weekly Close
Time Clock
8
System Weekly Z
Weekly Close
Time Clock
15
System Weekly Z
PTD Close
Time Clock
22
System Weekly Z
Weekly Close
Time Clock
29
System Weekly Z
Weekly Close
Time Clock
2
System Daily Z3System Daily Z4System Daily Z
9
System Daily Z10System Daily Z11System Daily Z
16
System Daily Z17System Daily Z18System Daily Z
23
System Daily Z24System Daily Z25System Daily Z
30
System Daily Z31System PTD Z
PTD Close
Time Clock
5
System Daily Z6System Daily Z7System Daily Z
12
System Daily Z13System Daily Z14System Daily Z
19
System Daily Z20System Daily Z21System Daily Z
26
System Daily Z27System Daily Z28System Daily Z
System Z = Sales
Close Time Clock = Labor
- 54 -
Page 65

FS-3600 PC WorkStation Labor
Manager Edit Functions
PC WorkStation provides an array of manager functions that allow for easy editing of employee
labor information.
The manger edit functions are accessed from the Payroll Menu àPunch Times.
Edit Punch Times
The Edit Punch Times function provides the ability to edit individual employee punch times
records. Each punch record includes the job code, a punch in date /time and a punch out date/
time.
The punch time edit can be done up to the point a Daily Labor Close has been done. After the
close has been done the punch times and tips are considered posted and cannot be adjusted.
Editing an existing punch record
To select an employee to edit refer to the following example.
1. From the [Labor] à [Punch Times] screen select the employee user number to be edited
or select the desired employee by name.
Ex. [200]
- 55 -
Page 66

FS-3600 PC WorkStation Labor
- 57 -
2. A list of the employee punch times are displayed.
Labor FS-3600 PC WorkStation
3. Select the line to be edited by clicking on the line.
NOTE: A drop down arrow will appear on the Job Code. The Job Code can be changed by
clicking on the arrow and choosing a new Job Code from the selection box.
- 56 -
Page 67

FS-3600 PC WorkStation Labor
4. The “Punch In Date” can be edited by clicking on the In Date cell. A drop down arrow
will appear on the selected In Date. Clicking on the arrow displays a calendar of the
current month. The date can be changed or left the same.
5. The employees punch in time can be edited by clicking on the In Time Cell.
6. The punch out date can be edited by clicking on the Out Date Cell. A drop down arrow
will appear on the selected Out Date. Clicking on the arrow displays a calendar of the
current month.
- 57 -
Page 68

FS-3600 PC WorkStation Labor
- 59 -
7. The employees punch out time can be edited by clicking on the Out Time Cell
8. Click “Save” to save the edited punch times. This completes the edit cycle. The
Labor FS-3600 PC WorkStation
Employee Time Card Report will print an asterisk (*) next to any record that has been
edited.
Adding a new punch record
1. From the punch times screen select the last available line.
(There will be no records)
- 58 -
Page 69

FS-3600 PC WorkStation Labor
2. From this point follow the pervious procedure and enter a completely new punch record.
3. The Employee Time Card Report will print an asterisk (*) next to any record that has
been added.
Daily Totals (Edit Tips)
The Daily Totals function allows for adjusting the recorded Charge Tips and Declared Cash Tips
by each job code of an employee.
NOTE: Editing the tip amounts only updates the labor module reports. System and User
nancial reports will not reect these changes.
Procedure
1. From the Punch Times screen select the employee user number to be edited. Ex. [201]
NOTE: Only employees with a Job Code that has a “Tipped Sales” status set can be
accessed in the Edit Tip operation
2. Click on the “Daily Totals “ tab
3. The Cash Tip and Charge Tips will be displayed. Select the one to be edited by clicking
in the cell
4. The amount will be highlighted. Enter the new amount.
5. Click “Save” to save changes.
- 59 -
Page 70

Labor FS-3600 PC WorkStation
Edit WTD Totals
The edit week to date (WTD) totals provides the ability to adjust the Weekly regular hours and
pay, Weekly overtime hours and pay, and Weekly cash/charge tips.
NOTE: The Weekly totals are not updated until a Daily Close Time Clock operation is
preformed.
Procedure
1. From the Punch Times screen select the employee user number to be edited. Ex. [200]
2. Click on the “Weekly Totals” tab.
3. The Regular Hours, Regular Pay, Overtime Hours, Overtime Pay, Cash Tip and Charge
Tips will be displayed. Select the one to be edited by clicking in the cell
NOTE: When editing hours the pay amount is not automatically adjusted. Independent
editing is allowed.
4. Click “Save” to save changes
Edit PTD Totals
The edit period to date (PTD) totals provides the ability to adjust the PTD regular hours and pay,
PTD overtime hours and pay, and PTD cash/charge tips.
Procedure
Follow the same procedure as the Edit WTD Totals.
- 60 -
Page 71

FS-3600 PC WorkStation Data Entry
Data Entry
From the main menu two types of Data Entry are available.
Limited Quantity: Used to maintain limited quantity menu items.
Deposit Entry: Used to make System, Station and User deposits.
- 61 -
Page 72

FS-3600 PC WorkStation Data Entry
- 63 -
Data Entry FS-3600 PC WorkStation
Limited Quantity
The Limited Quantity ag in Menu Setup signals the system that the menu item has a limited
quantity on hand. To maintain the available quantity select “Limited QTY” from the menu.
PCWS will generate a list of all menu items that have the Limited Quantity ag set. The list
contains the Start, Used and Available Quantity for each menu item. The Start Quantity eld is
used to enter the starting quantity for the menu item. This number can be adjusted during the day
if more of the item becomes available.
NOTE: The Start Quantity resets to “Zero” after a System Reset.
Index the new
quantity available
and select “Save”
- 62 -
Page 73

FS-3600 PC WorkStation Data Entry
The current quantity on hand displays on the Menu Item button of the FS-3600 during order
entry and counts down as the menu item is entered on to checks. The current quantity on hand
displays in the “Available” column of PCWS. To update the current “Used” and “Available”
counts in PCWS select the “Refresh” button.
A Limited Quanity Report is avaiable from PCWS System Reports. From the menu select
“System” and “Limited Quanitiy Report”.
- 63 -
Page 74

FS-3600 PC WorkStation Data Entry
- 65 -
Below is an example of a “Limited Quantity Report”.
Data Entry FS-3600 PC WorkStation
Deposit
PC WorkStations allows for System, Station, and Users deposits to be made from the PC.
All media agged to be in deposit list will require an enrty when a deposit report is ran.
Path: POS CongurationàMedia Setup
- 64 -
Page 75

FS-3600 PC WorkStation Data Entry
Deposits are made from the Data Entry Menu. Selecting Deposit Entry will prompt the user with
a selection box to choose the type of deposit. Select the type of deposit and click “Next”.
System
Media that is set to appear in Deposit List will display. Input the media amount to deposit. The
short or over amount is shown in the Daily Section of the Deposit Entry window.
- 65 -
Page 76

Data Entry FS-3600 PC WorkStation
The deposit information is kept in the “System Cash Report”.
Path: Reports à System à Cash Report
- 66 -
Page 77

FS-3600 PC Work Station POS Conguration
POS Conguration
The FS-3600 Database can be edited from the PCWS application. Using the functions outlined in
the Getting Started section of this manual, you can receive a database from an FS-3600 Terminal.
Detailed explanation of each area of programming will be provided in this section.
POS Conguration is the area that you will do the majority of your Programming. This is where
you will access the normally changed items such as Menu’s, User’s, Categories, Departments,
etc.
Clicking on the POS Conguration button in the left windowpane will open up the menu for each
Program Table that you can create or edit for the FS-3600.
Clicking the box next to the individual Program Table will open up that table in the main window
of POS Edit.
- 67 -
Page 78

POS Conguration FS-3600 PC Work Station
FS-3600 PC Work Station POS Conguration
- 69 -
As you click on a Program Table for example the Printer Control Codes, the table will display in
a “Grid Mode”.
To open a program table in the table view mode, click into any grid and then click on the Edit
Icon. Editing in the Grid mode is not permitted in most tables.
We will cover each of the Program Tables for the FS-3600 Database in detail. Denitions for
each eld of the Program Tables as well as Programming Instructions will be provided.
- 68 -
Page 79

FS-3600 PC Work Station POS Conguration
System Setup
The System Setup Table is used to set the parameters of operations for the entire FS-3600
System. All terminals in the system will use settings made in this table.
Location
Field Name Description Entry Type
Store #
Company
• The Store Number for the establishment. This
eld will be printed at the top of all reports to
assist corporate ofces with chain operations.
• The Company Name. This eld will be printed at
the top of all reports to assist corporate ofces
having more than one operating name.
Up to 4 Digit
Numeric
Up to 20 Character
Alpha-Numeric
- 69 -
Page 80

POS Conguration FS-3600 PC Work Station
FS-3600 PC Work Station POS Conguration
- 71 -
Field Name Description Entry Type
Location
Country Code
Open
Close
Week End
Spv Security
Mgr Security
Remote Psswd
Tip %
Tip Share %
Min Tip %
Tip Share Mode
• The location of the establishment. This eld
will be printed at the top of all reports to assist
corporate ofces with chain operations.
• Country Code of the Keyboard used in
Manager’s Mode.
• 1 = US, Currently No Other Options Available.
• Time that the Hourly Productivity Report starts
reporting sales. Input the earliest time the
establishment opens for business.
• Time that the Productivity Report stops
reporting sales. Input the latest time that the
establishment closes for business.
• Select the last day of the establishments
Business Week.
• The level of Security that requires a Supervisor
Card. If the Mag Cards Field is set to NO this
eld will be ignored.
• The level of Security that requires a Manager
Card. If the Mag Cards Field is set to NO this
eld will be ignored.
• Used to set a password that is used for PC
Polling. The polling PC MUST pass a matching
password before system access will be granted.
• The % that will be automatically calculated when
the TIP key is touched. This would be used to
compute a default tip amount. The % will be
multiplied by the check amount and display
the default tip to the operator. The operator
can override the default amount by entering a
different $ value.
• The % that each person will contribute to the tip
share pool, based on the Tip Share Mode.
• Requires tipped employees to enter a minimum
% when declaring tips at the end of a shift. If
an employee attempts to enter an amount less
than the required % of tipped sales Manager
Approval will be required.
• The formula to be used when calculating the
contribution to the tip share pool for employees.
Up to15 Character
Alpha-Numeric
1 Digit Numeric
4 Digit Numeric
4 Digit Numeric
Pick List for Week
Day
1 Digit Numeric
1 Digit Numeric
9 Digit Numeric
4 Digit Numeric
(2 Place Decimal)
4 Digit Numeric
(2 Place Decimal)
4 Digit Numeric
(2 Place Decimal)
Pick List:
Options are None,
Gross Sales, and
Declared Tips
Grat Msg Print
• If Gratuity Message has been programmed, this
option determines when that message will print
on a guest check.
Pick List:
Options are None
and Gratuity
- 70 -
Page 81

FS-3600 PC Work Station POS Conguration
Field Name Description Entry Type
Gratuity Msg
Tip Fee %
• This Gratuity Message will be printed on the
bottom of a guest check depending on your
setting for Grat Msg Print. This message can
be used to Thank a patron for a gratuity, or to
encourage a gratuity to be given.
• The % that you wish to charge back to servers
for Credit Card processing Fees. This setting
will assign a % fee to all Credit Card Media’s.
Up to 20 Character
Alpha-Numeric
4 Digit Numeric
(2 Place Decimal)
- 71 -
Page 82

POS Conguration FS-3600 PC Work Station
FS-3600 PC Work Station POS Conguration
- 73 -
Orders/Labor
Field Name Description Entry Type
Sort Orders
Server Slip
• Select the sort option for Remote Order Chits.
• Available options are:
• None - the Order Chits will print in the order
they are entered into the system.
• Seat Number - the Order Chits will be sorted by
seat number with the seat number printed above
each group of items.
• Course - the Order Chits will be sorted by
course with the course number printed above
each group of items.
• This eld is used to signal the system to print
a server slip after certain transactions. In
some restaurants, customers place orders at
a precheck station, then nd a table where a
server will wait on them. The server needs a
way of knowing if any items will be coming out
of the kitchen.
- 72 -
Pick List:
Options are None,
Seat, and Course
Pick List:
Options are None,
w/Remote, or
Always
Page 83

FS-3600 PC Work Station POS Conguration
Field Name Description Entry Type
• A server slip can be given to the customer by
the precheck operator, which will be taken to the
table and then picked up by the server.
• The server slip contains the transaction time,
the remote order number, the number of meals
on the check, the number of guests in the
party, and any Menu Items that are linked to a
Category that has the Prnt Serv Slip set in the
Category Table.
• A server slip will only be printed after the last
check in the party has been entered, if the Last
Ticket feature is enabled in the Station Table.
• A sample server slip is shown below this table.
• Valid options for this eld are:
• Never - Disable the server slip feature.
• w/ Remote - Print a server slip only when there
are remote orders.
• Always - Print a server slip after each new
transaction.
Delay After Prn
Qty Halo
BarCode Format
Use Seat #
• This eld is used to set a delay, in 1/1000
second, that the system should wait after
sending a character to a printer.
• On faster stations, this is necessary to avoid
a data overrun condition. Data overruns occur
when the station sends a character to the printer
faster than the printer can turn on the buffer full
indicator line.
• Enter the system-default quantity high-amount
lock out (HALO).
• This is the maximum quantity that can be
entered before selecting a Menu Item, unless
the Menu Item has a programmed Qty HALO.
• Select the Bar Code Format you wish to be able
to Scan on the FS-3600.
• (For UPC Scanning, Not for Guest Check Recall
Scanning)
• Options are:
• XXXXXCPPPP – 5 identier digits, 1 price
check digit, 4 price digits.
• XXXXXPPPPP – 5 identier digits, 5 price
digits.
• XXXXXXPPPP – 6 identier digits, 4 price
digits.
• This ag determines whether seat numbers are
displayed on the operator screen.
Up to 2 Digit
Numeric
Up to 2 Digit
Numeric
Scroll List:
Options are:
XXXXXCPPPP
XXXXXPPPPP
XXXXXXPPPP
Check Box (Toggle
Checked for Yes or
Un-Checked for No)
- 73 -
Page 84

POS Conguration FS-3600 PC Work Station
FS-3600 PC Work Station POS Conguration
- 75 -
Field Name Description Entry Type
Print Voids
• This ag indicates whether voided items on
checks will be printed on remote order devices.
Check Box (Toggle
Checked for Yes or
Un-Checked for No)
Print Add-On
Ofce Copy
One Chk/Tbl
• This ag determines whether the system will
add a message to the bottom of the remote
order ticket indicating that the new items are
Add-On items to an existing check.
• This ag signals to generate an ofce copy of
Voids, Refunds, and Finished Product Waste
checks.
• Determines whether the system will allow more
than one open check to be linked to a table.
Check Box (Toggle
Checked for Yes or
Un-Checked for No)
Check Box (Toggle
Checked for Yes or
Un-Checked for No)
Check Box (Toggle
Checked for Yes or
Un-Checked for No)
Consol Tckt
Print Tbl Chng
Ind Chk Prnted
Tax Dtl on Chk
Chck Cpy Cnt
Suppress Ord #
BarCode on Rct
Labor Week End
• This ag signals to consolidate Menu Items on a
ticket before printing.
• Menu items with the Open Price ag or the
Scaleable ag set will not be consolidated.
• If seat numbers are being used, items will be
consolidated for each seat on the check.
• This ag is used to generate a system message
on the Remote Printers if a table number
changes on an order.
• This ag signals the Table and Check buttons
to be displayed as “pressed” if the guest check
has been printed.
• Cashiers can use this as an indication that the
table will be available soon.
• This ag signals to itemize the sales tax by Tax
Table on the guest check. If this ag is off, the
system consolidates the sales tax into one total
on the guest check.
• This ag signals to include the number of
times the check has been printed in the header
section of the guest check.
• This ag signals to use the check # at the top of
all order tickets rather than the order number.
• This ag has no affect on transactions with
Order Types that require a table number.
• This ag is used to signal to print a bar coded
check number at the top of each guest check.
• This feature can be used in establishments that
have cashier stations equipped with bar code
scanners for recalling checks.
• Select the last day of week for the payroll
period.
• This sets up the End of a Weekly payroll Period.
Check Box (Toggle
Checked for Yes or
Un-Checked for No)
Check Box (Toggle
Checked for Yes or
Un-Checked for No)
Check Box (Toggle
Checked for Yes or
Un-Checked for No)
Check Box (Toggle
Checked for Yes or
Un-Checked for No)
Check Box (Toggle
Checked for Yes or
Un-Checked for No)
Check Box (Toggle
Checked for Yes or
Un-Checked for No)
Check Box (Toggle
Checked for Yes or
Un-Checked for No)
Pick List for Week
Day
- 74 -
Page 85

FS-3600 PC Work Station POS Conguration
Field Name Description Entry Type
Daily OT Hrs
Labor EOD Time
OT Rate Factor
Weekly OT Hrs
Min Break Time
Close w/ Sales
ClkOut Opn Chk
• Enter the number of hours that an employee can
work in a day before reaching overtime.
• Enter the time of day that payroll closes.
• This eld is used to determine whether the prior
day close was performed. If you have Auto Bus
Day set to Yes, then the Labor Business Day will
automatically advance at this time.
• Enter the multiplier to apply to an employee’s
pay rate to calculate an overtime pay rate.
• For example, if an employee is paid time-andone-half for overtime, then enter 1.50.
• Valid entries are from zero to 2.55.
• Enter the number of hours that an employee can
work in a week before reaching overtime.
• This option applies only to a 3rd party
timekeeping system.
• This eld is used to restrict employees from
returning from a break within the specied
number of minutes.
• For this eld to be used, you must also
enable the On-Line TC Svr ag in the System
Conguration table.
• This ag signals to close labor when the System
Z is run. All employees currently clocked in will
be automatically clocked out and back in on the
next business day.
• This ag can allow, or disable Employees from
Clocking Out on the FS-3600 System while they
still have “Open” Guest Checks. Setting No, forces
operator’s to settle or transfer their Open Checks
prior to Clocking Out.
2 Digit Numeric
4 Digit Numeric
3 digit
Numeric (0 to 2.55)
2 Digit Numeric
2 Digit Numeric
Check Box (Toggle
Checked for Yes or UnChecked for No)
Check Box (Toggle
Checked for Yes or UnChecked for No)
- 75 -
Page 86

POS Conguration FS-3600 PC Work Station
FS-3600 PC Work Station POS Conguration
- 77 -
Flags/Settings
Field Name Description Entry Type
Conf Tone Frq
Conf Tone Dur
Err Tone 1 Frq
Err Tone 1 Dur
Err Tone 2 Frq
• Enter the frequency of the tone to be emitted
when a button is pressed.
• Enter the amount of time in milliseconds that
a tone should be emitted when a button is
pressed.
• Enter the frequency of the rst tone to be
emitted when an error occurs.
• Enter the amount of time in milliseconds that
the rst tone should be emitted when an error
occurs.
• Enter the frequency of the second tone to be
emitted when an error occurs.
- 76 -
4 Digit Numeric
4 Digit Numeric
4 Digit Numeric
4 Digit Numeric
4 Digit Numeric
Page 87

FS-3600 PC Work Station POS Conguration
Field Name Description Entry Type
Err Tone 2 Dur
Err Msg Delay
Bkp File
Month Bkp Cycl
• Enter the amount of time in milliseconds that the
second tone should be emitted when an error
occurs.
• Enter the number of seconds that an error
message should display before it clears.
• This ag signals to create a compressed copy of
the database during the System Z process.
• This le can be retrieved by a PC during the
daily polling process.
• If Set to Yes, you must set Month Bkp Cycl to
Yes also.
• This ag signals to purge backup les when
they are one month old.
4 Digit Numeric
1 Digit Numeric
Check Box (Toggle
Checked for Yes or
Un-Checked for No)
Check Box (Toggle
Checked for Yes or
Un-Checked for No)
Rpt Stn Pres
Req Cash Decl
• Set this ag to notify the operator of any stations
not present when a Z Report is taken.
• The operator will have the option of terminating
the Z Report if stations are not present.
• This ag also causes a list of stations not
present in the network at the time a Z Report is
taken to be printed at the top of the Z Report.
• This ag is for reporting the system-wide cash
declaration on the System Financial report.
Check Box (Toggle
Checked for Yes or
Un-Checked for No)
Check Box (Toggle
Checked for Yes or
Un-Checked for No)
Task Debugger
Screen Saver
• This ag displays the status of each task
running on the system stations.
• This status is displayed in the position at the
bottom-right of the screen where the Available
Memory is normally displayed.
• The tasks are M – Main, W – Watchdog, C –
Connect, R – Receive, S – Send, and P – Print
Server.
• The letter representing the active task will be
displayed in this region of the screen.
• This ag signals to blank the screen if a button
is not pressed within 1 minute.
Check Box (Toggle
Checked for Yes or
Un-Checked for No)
Check Box (Toggle
Checked for Yes or
Un-Checked for No)
On-Line CC
Server
On-Line TC
Server
• Set this ag if the stations are connected to a
PC acting as the credit card server.
• If this ag is set, all tenders involving a Media
Type with the Require Auth ag set will attempt
to access the credit card server to request a
dial-up authorization.
• Set this ag if the stations are connected to a
PC acting as the Time Keeping Server.
• Currently this option is not available, so set this
ag to no.
Check Box (Toggle
Checked for Yes or
Un-Checked for No)
Check Box (Toggle
Checked for Yes or
Un-Checked for No)
- 77 -
Page 88

POS Conguration FS-3600 PC Work Station
FS-3600 PC Work Station POS Conguration
- 79 -
Field Name Description Entry Type
Elec Journal
24 Hour
Use Inv System
CC Security
Ticket Purge
Prn Busy T/Out
Decimals in Wt
Dt Forn Curr
Cash Media ID
• This ag signals to maintain an electronic
journal of all transactions that take place on the
system.
• The electronic journal is backed up and
maintained for 365 days for audit purposes.
• This ag prevents the open check le from
being reset during the System Z process.
Setting this to Yes allows Open Checks across
the Reset, Setting to No will cause all Open
Checks to be removed at the Reset.
• This ag is used to activate the Inventory
System.
• This ag must be set to Yes to use the Inventory
System.
• This ag allows for Manager Intervention to be
required when attempting to manually enter a
Credit Card (instead of swiping card).
• This eld is used to indicate how many hours
closed tickets should be stored in memory. The
number is typically between 2 and 4 times the
average table turn time.
• Enter the number of seconds that the system
should retry to print if the printer indicates
that it is busy. A value of 3 seconds is the
recommended setting.
• Enter the number of decimals in scaleable Menu
Items. This eld will normally be set to 2 or 3.
• This eld is used to program a default foreign
currency by entering the ID number of the media
record.
• If this eld has a currency programmed, each
guest check that prints will print the amount
due in foreign currency as well as in the local
currency.
• If a default currency is entered, the media
record selected must have the Foreign ag
enabled and an exchange rate should be
programmed for the media.
• Select the Media to use for posting Loans/
Pickups.
Check Box (Toggle
Checked for Yes or
Un-Checked for No)
Check Box (Toggle
Checked for Yes or
Un-Checked for No)
Check Box (Toggle
Checked for Yes or
Un-Checked for No)
Check Box (Toggle
Checked for Yes or
Un-Checked for No)
1 Digit Numeric
2 Digit Numeric
1 Digit Numeric
Pick List for Media’s
(If you have not
Programmed your
Media Types, you
will have to come
back to this Field
and set after your
Media Types are
dened)
Pick List for Media’s
(If you have not
Programmed your
Media Types, you
will have to come
back to this Field
and set after your
Media Types are
dened)
- 78 -
Page 89

FS-3600 PC Work Station POS Conguration
Field Name Description Entry Type
Sec EC Void
• This ag signals to check the security of the
Void function inside a service round
Check Box (Toggle
Checked for Yes or
Un-Checked for No)
Incl Flag Char
• This ag is used to include the Flag Character
when scanning barcodes.
Check Box (Toggle
Checked for Yes or
Un-Checked for No)
Wrap Journal
• This ag allows the Station Journal to begin
overwriting the oldest entries when the allocated
journal memory is full.
• Setting this ag to NO will cause the system to
alert the operator when the Station Journal is
near full.
* At that point each entry to the Station Journal
will cause the “Journal Full” prompt.
* Then, if the Station Journal is not reset, the
oldest entries will be overwritten as new entries
are made.
Check Box (Toggle
Checked for Yes or
Un-Checked for No)
- 79 -
Page 90

POS Conguration FS-3600 PC Work Station
FS-3600 PC Work Station POS Conguration
- 81 -
Export/Report
Field Name Description Entry Type
Create Export
• This ag determines whether export les are
created during the Daily Z process.
Check Box (Toggle
Checked for Yes or
Un-Checked for No)
Appnd Exp Files
• This ag signals to open the export les in
append mode during the Z process.
• This is useful if there are times when the export
les may not be retrieved by a polling PC every
day. When this ag is on, it is the responsibility
of the polling software to delete the export les
after it has retrieved them.
• If this ag is off, the export les are overwritten
in the Z process.
- 80 -
Check Box (Toggle
Checked for Yes or
Un-Checked for No)
Page 91

FS-3600 PC Work Station POS Conguration
Field Name Description Entry Type
Fxd Pos Exp
Exp Line Hdrs
Prnt L/PU Chit
• Set this ag to create xed position export les
during the Z process.
• Some back ofce applications may require the
elds in a le being imported to be in xed
positions.
• This ag signals to add date and company
information to the front of each record in
the export les created during the System Z
process.
• For more information on creating poll les, see
the Ofce PC in the System Conguration table.
• Set this ag to generate a chit on the receipt
printer after each bank Loan/Pickup.
Check Box (Toggle
Checked for Yes or
Un-Checked for No)
Check Box (Toggle
Checked for Yes or
Un-Checked for No)
Check Box (Toggle
Checked for Yes or
Un-Checked for No)
Prmpt Pkup Inf
Mgr AutoLogout
POS AutoLogout
Use NRGT
Z w/open Chks
• Set this ag to prompt the operator for one line
of information after a bank Loan/Pickup.
• Response entry can be up to 20 alphanumeric
characters.
• This can be useful for recording a bag number
that contains the pickup.
• This ag is only checked if the Prnt Loan/Pkup
Chit ag is enabled.
• Enter the number of minutes that a station can
be idle in Manager Mode before the system
should automatically log the operator out of the
system.
• This security features helps prevent
unauthorized access to manager mode.
• Enter the number of minutes that a station can
be idle in POS mode before the system should
automatically log the operator out of the system.
• This security features helps prevent
unauthorized access to the system because an
operator left a station unattended without rst
logging out of the system.
• This ag signals to maintain and report the
non-resettable grand totals for balancing and
security purposes.
• The NRGT is the OPENING and CLOSING
numbers of the Financial report.
• This ag allows the system totals to be reset if
there are any open checks in the system.
• If this ag is not set, the system totals cannot be
cleared with open checks.
Check Box (Toggle
Checked for Yes or
Un-Checked for No)
2 Digit Numeric
2 Digit Numeric
Check Box (Toggle
Checked for Yes or
Un-Checked for No)
Check Box (Toggle
Checked for Yes or
Un-Checked for No)
- 81 -
Page 92

POS Conguration FS-3600 PC Work Station
FS-3600 PC Work Station POS Conguration
- 83 -
Field Name Description Entry Type
Cut After Rpt
PTD Totals
Rpt Closed Chks
• If this ag is set, the system will send a cut
command to the report printers after printing a
report.
• When printing an auto-sequence report like an
X Report or a Z Report, the system will only
cut the report when it has completed the autosequence.
• Set this ag to enable period-to-date system
totals tracking.
• If this ag is set, the system will update the PTD
totals each time the daily totals are reset.
• If Period-To-Date totals are not used, turn this
option off to save system resources.
• Another selection is made from System Reports
on the Reports Menu.
• The new selection will prompt to select between
Daily Reports and Period Reports.
• Set this ag to print a closed check summary on
the System Financial Report.
Check Box (Toggle
Checked for Yes or
Un-Checked for No)
Check Box (Toggle
Checked for Yes or
Un-Checked for No)
Check Box (Toggle
Checked for Yes or
Un-Checked for No)
Restrict Stn Z
Rpt Svr Sales
• Set this ag to restrict the Z Report from being
run on stations that do not have the Allow Z
Report ag enabled in the Station Table.
• Set this ag to include a summary of sales by
server section on the System Financial Report.
Check Box (Toggle
Checked for Yes or
Un-Checked for No)
Check Box (Toggle
Checked for Yes or
Un-Checked for No)
Blind Deposits
Hour Part
No Sale Req ID
Clr After Tndr
• Set this ag to suppress the Total Due eld on
the deposit screen and to suppress the over/
short conrmation when exiting the deposit
screen.
• Select the format of the Hourly Productivity
Report.
• Available options are Whole Hour, Half Hour,
and Quarter Hour.
• This ag is used to signal to prompt for an ID
before opening the drawer when the No Sale
key is pressed.
• If this ag is set to No, then the drawer will
immediately open.
• This ag signals to clear the change information
immediately after tendering a transaction.
Check Box (Toggle
Checked for Yes or
Un-Checked for No)
Pick List:
Options are:
Whole, Half, and
Quarter
Check Box (Toggle
Checked for Yes or
Un-Checked for No)
Check Box (Toggle
Checked for Yes or
Un-Checked for No)
- 82 -
Page 93

FS-3600 PC Work Station POS Conguration
Network/Colors
Field Name Description Entry Type
Sub-Network
WD Timeout
• Enter the ID number of the network for the
system.
• Enter the number of seconds that the system
should use to monitor a station’s network
activity.
• If a packet is not received from a station within
the number of seconds in this eld, the station is
disconnected from the network.
• A value of 10 is the recommended setting, but
may need to be adjusted depending on network
size and processing speed of the terminals.
8 Digit Numeric
2 Digit Numeric
- 83 -
Page 94

POS Conguration FS-3600 PC Work Station
FS-3600 PC Work Station POS Conguration
- 85 -
Field Name Description Entry Type
WD Interval
ACK Timeout
Resp Timeout
Mail Timeout
Send Retries
Send Buffers
Rcv Buffers
Resp Buffers
System Text
• Enter the number of timer ticks between
broadcasts of the watchdog packet.
• There are approximately 18.2 timer ticks per
second.
• Watchdog packets are sent to let the other
stations in the network know that it is still active.
• A value of 36 (about 2 seconds) is the
recommended setting, but may need to be
adjusted depending on network size and
processing speed of the terminals.
• Enter the number of seconds the system should
wait for an acknowledge packet to be received
from a station before re-sending a data packet.
• A value of 3 seconds is the recommended
setting, but may need to be adjusted depending
on network size and processing speed of the
terminals.
• Enter the number of seconds the system should
wait for a response packet to be received from a
station before re-sending a request packet.
• A value of 8 is the recommended setting, but
may need to be adjusted depending on network
size and processing speed of the terminals.
• Enter the number of seconds the system should
wait for a free mail buffer to become available
before generating a Network Busy message.
• The system will not be able to continue
processing until a free buffer comes available.
• Enter the number of times the system should resend a packet to a station that does not respond
with a packet receipt acknowledgement.
• When the number of retries is exhausted, the
station that is not responding will be removed
from the network.
• Enter the number of send buffers the system
should allocate.
• Each buffer requires 552 bytes of memory.
• Enter the number of receive buffers the system
should allocate.
• Each buffer requires 552 bytes of memory.
• Enter the number of response buffers the
system should allocate.
• Each buffer requires 552 bytes of memory.
• Select the color to use for text displayed in the
Check Detail and Check Summary window.
• This color also will be used as the background
color for the Message Window, the Prompt Line,
and the Status Line.
2 Digit Numeric
2 Digit Numeric
2 Digit Numeric
2 Digit Numeric
2 Digit Numeric
2 Digit Numeric
2 Digit Numeric
2 Digit Numeric
Scroll List for Color
Options
- 84 -
Page 95

FS-3600 PC Work Station POS Conguration
Field Name Description Entry Type
System Bckgrnd
Button Text
Button Color
• Select the color to use for background in the
Check Detail and Check Summary window. This
color also will be used as the text color for the
Message Window, the Prompt Line, and the
Status Line.
• Select the color to use for text on system drawn
buttons.
• Select the color to use for the button color on
system drawn buttons.
Scroll List for Color
Options
Scroll List for Color
Options
Scroll List for Color
Options
- 85 -
Page 96

POS Conguration FS-3600 PC Work Station
FS-3600 PC Work Station POS Conguration
- 87 -
Files/Memory
In the Files/Memory page, you will be allocating the RAM area for your database as well as
your Totals Memory area of the SRAM. The rst area allows you to set the maximum number
of records in certain Program Tables, i.e. Categories, Discounts, etc. The memory allocated here,
for your Program Tables, comes from the working RAM of the FS-3600 System. The second
area allows you to allocate blocks of the SRAM area for your Totals Memory, i.e. Guest Checks,
Check Detail.
Since changing these areas can effect your system dramatically, possibly resulting
in loss of sales data, it is recommended that an Authorized TEC FS-3600 Dealer
only change these settings.
- 86 -
Page 97

FS-3600 PC Work Station POS Conguration
Working RAM Area Allocation
Changes to this area of RAM Allocation can be made at any time, and does not require any type
of RAM Clear or Totals Clear Operation.
Field Name Description Entry Type
Category
• This eld represents the number of Categories
you wish to allocate in the FS-3600 RAM Area.
Up to 3 Digits
Numeric Entry
(Maximum 255)
Discount
• This eld represents the number of Discounts
you wish to allocate in the FS-3600 RAM Area.
Up to 3 Digits
Numeric Entry
(Maximum 255)
Media
• This eld represents the number of Discounts
you wish to allocate in the FS-3600 RAM Area.
Up to 3 Digits
Numeric Entry
(Maximum 255)
PLU
• This eld represents the number of Discounts
you wish to allocate in the FS-3600 RAM Area.
Up to 4 Digits
Numeric Entry
(Maximum 9999)
POSUser
• This eld represents the number of Discounts
you wish to allocate in the FS-3600 RAM Area.
Up to 3 Digits
Numeric Entry
(Maximum 255)
PrinterCode
Recipe
• This eld represents the number of Printer
Types (Actual Models of Printers) you wish to
allocate in the FS-3600 RAM Area.
• This eld represents the number of Inventory
Recipes you wish to allocate in the FS-3600
RAM Area.
- 87 -
Page 98

POS Conguration FS-3600 PC Work Station
FS-3600 PC Work Station POS Conguration
- 89 -
SRAM Area Allocation
Changes to this area of RAM Allocation should not be made while you have active totals in the
FS-3600 Terminal(s). Any changes made to this area of RAM Allocation must be followed by
performing a Totals Clear Operation, and should only be performed by an Authorized TEC FS3600 Dealer.
Field Name Description Entry Type
Stn Sales
Stn Tracking
User Sales
User Tracking
Checks
Check Detail
Punch Times
PTD Payroll
Totals
EJ Lines
• The number of Blocks of SRAM Memory to
allocate for Station Sales Totals.
• The number of Blocks of SRAM Memory to
allocate for Station Tracking Totals.
• The number of Blocks of SRAM Memory to
allocate for User Sales Totals.
• The number of Blocks of SRAM Memory to
allocate for User Tracking Totals.
• The number of Blocks of SRAM Memory to
allocate for Guest Check Header Records.
• The number of Blocks of SRAM Memory to
allocate for Guest Check Detail Lines Records.
• The number of Blocks of SRAM Memory to
allocate for Period to Date Punch Time Records.
• The number of Blocks of SRAM Memory to
allocate for Period to Date Sales Records.
• Number of lines allocated for station journal
1000-25,000.
- 88 -
Page 99

FS-3600 PC Work Station POS Conguration
Formats
Field Name Description Entry Type
Currency Smbl
Currency Dec
Thousands Sep
Data Sep
Date Sep
Time Sep
• The character you wish to be printed and
displayed as the Currency mark.
• The default position for your decimal point in
currency.
• The character you wish to be displayed and
printed as the Thousands place separator.
• Type the character to use to separate data elds
in the export les.
• The character you wish to be displayed and
printed as the separator between elds in the
date.
• The character you wish to be displayed and
printed as the separator between elds in the
time.
1 Digit Alpha/
Numeric or Symbol
1 Digit Numeric
1 Digit Alpha/
Numeric or Symbol
1 Digit Alpha/
Numeric or Symbol
1 Digit Alpha/
Numeric or Symbol
1 Digit Alpha/
Numeric or Symbol
- 89 -
Page 100

POS Conguration FS-3600 PC Work Station
FS-3600 PC Work Station POS Conguration
- 91 -
Field Name Description Entry Type
Decimal Sep
Text Qual
Time Format
• The character you wish to be displayed and
printed as the decimal indicator in numeric
values containing a decimal.
• Type the character to use as the text qualier.
This character will be placed around each string
eld in the export les.
• Select whether time is to be printed and
displayed in 12 or 24 Hour Format.
1 Digit Alpha/
Numeric or Symbol
1 Digit Alpha/
Numeric or Symbol
Radio Boxes
Options: 12 or 24
Hour.
Date Format
• Select the format that the date will be displayed
and printed.
Radio Boxes:
Options:
MM/DD/YY
DD/MM/YY
YY/MM/DD
- 90 -
 Loading...