

Page 1
Manual
TEC ELECTRONIC CASH REGISTER
FS-160 SERIES
TEC
TOKYO ELECTRIC CO., LTD.
Page 2

WARNING
This equipment generates, uses, and can radiate radio frequency energy and if not
installed and used in accordance with the instructions manual, may cause interfer
ence to radio communications. It has been tested and found to comply with the limits
for a Class A computing device pursuant to Subpart J of Part 15 of FCC Rules, which
are designed to provide reasonable protection against such interference when operat
ed in a commercial environment. Operation of this equipment in a residential area
is likely to cause interference in which case the user at his own expense will be re
quired to take whatever measures may be required to correct the interference.
Page 3

TABLE OF CONTENTS
page
TO OUR CUSTOMERS........................................................... 1
PRECAUTIONS
...................................................................
1
APPEARANCE AND NOMENCLATURE ................................................ 1
CONTROL LOOK, CLERK LCOKS, AND MODE SELECTOR KEYS
.....................
2
DISPLAY...................................................................... 4
KEYBOARD LAYOUT ............................................................... 5
FUNCTION OF EACH KEY
.........................................................
6
REGISTERING PROCEDURE FOR SALES ........................................... 14
— REGISTERING PRINT SLIP SAMPLES —
READ (X) AND RESET (Z) REPORTS
— REPORT PRINT SAMPLES —
..............................
.............................................
JOURNAL ROLL REPLACEMENT AND OTHER MAINTENANCE OPERATIONS
SPECIFICATIONS
............................................................
..................................
............. 25
..........
35
21
26
33
Page 4
TO OUR CUSTOMERS
Thank you for choosing a TEC electronic cash register FS-160 series. This
instruction manual provides a description of the functions and handling of the
register and should be read carefully to obtain maximum performance. Since
every consideration has been given to safety, there is no danger of damaging
the machine by incorrect operation.
Please refer to this manual whenever you have any doubts concerning the
machine. This machine has been manufactured under strict quality control and
should give you many years of satisfaction. However, if the machine is
damaged during transit, or there are any unclear points in this manual, please
contact your local TEC representative.
[] The specifications described in this manual may be modified by TEC, if
necessary.
[] Be sure to keep this manual for future reference.
PRECAUTIONS
1. The keys on the keyboard work with a light touch. Avoid pressing the keys
too hard.
2. The keyboard is water-resistant. However, please avoid handling the
machine with wet hands as much as possible.
3. Do not apply thinner or other volatile oils to the cabinet or other plastic
parts. If dirty, wipe off with a piece of cloth soaked in neutral
detergent and squeezed tightly.
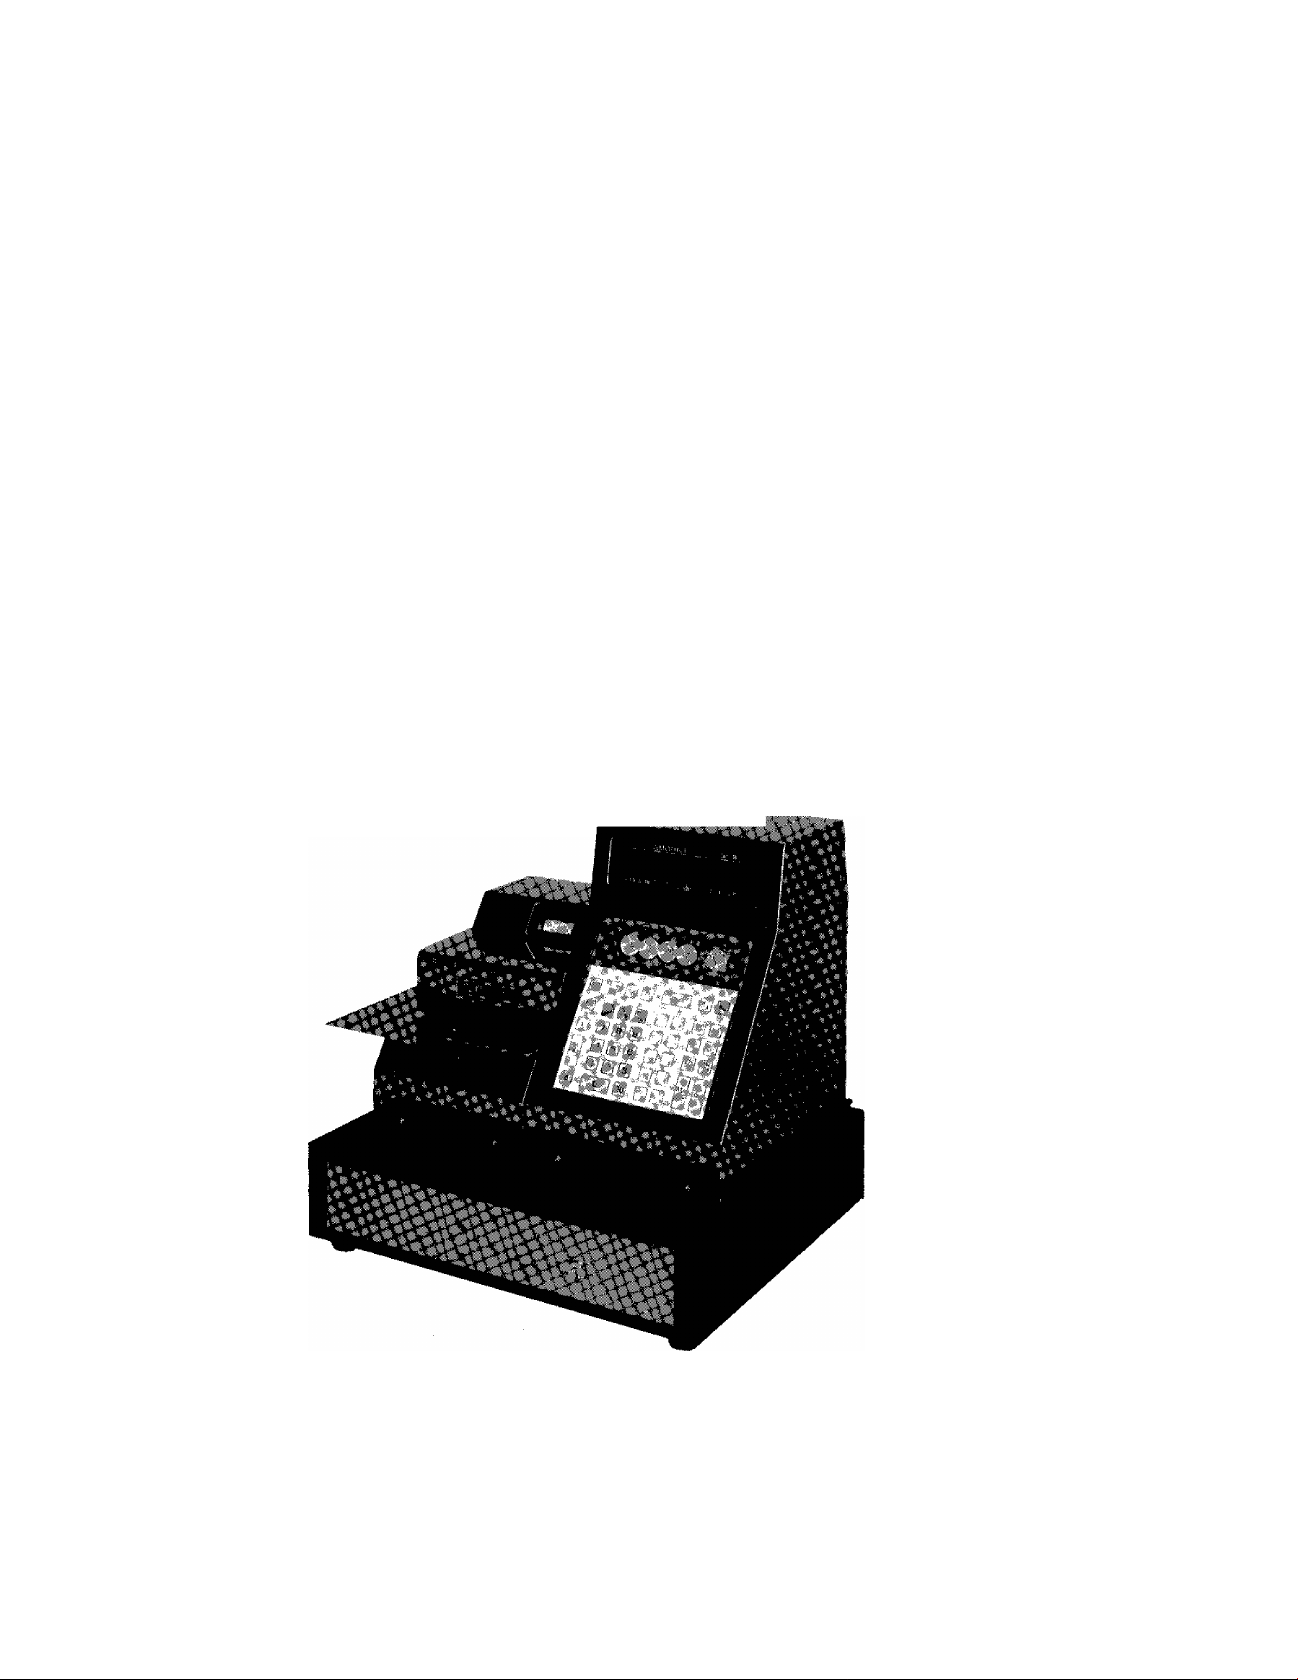
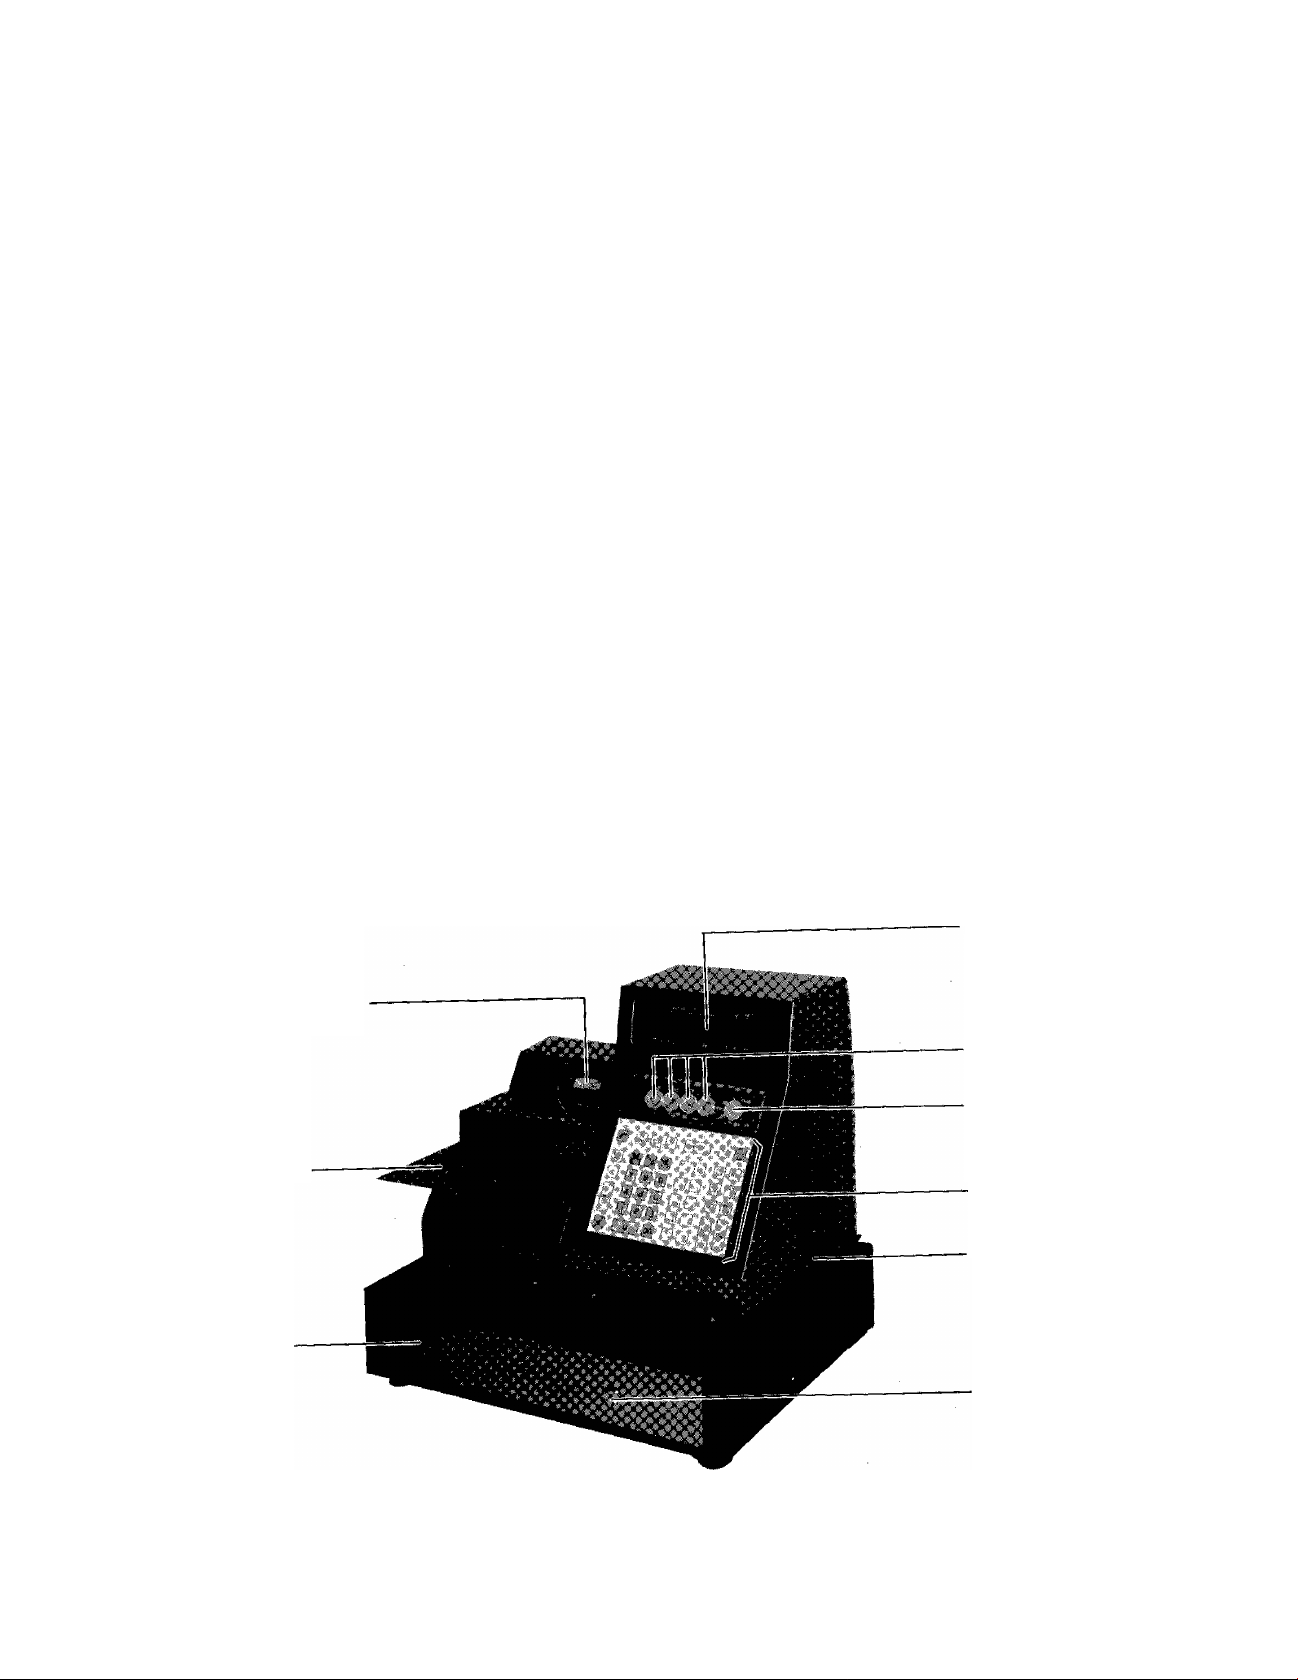
APPEARANCE AND NOMENCLATURE
Journal Window
Slip Table
Drawer
Display
Clerk Locks
Control Lock
Key Board
Power Switch
Drawer Release
Lock
[] Power Switch . . . The power switch is provided at the righthand side of the
cabinet. The AC power is turned on when the switch is
pushed to ON, and turned off when the switch is pushed to
OFF.
- 1 -
Page 5
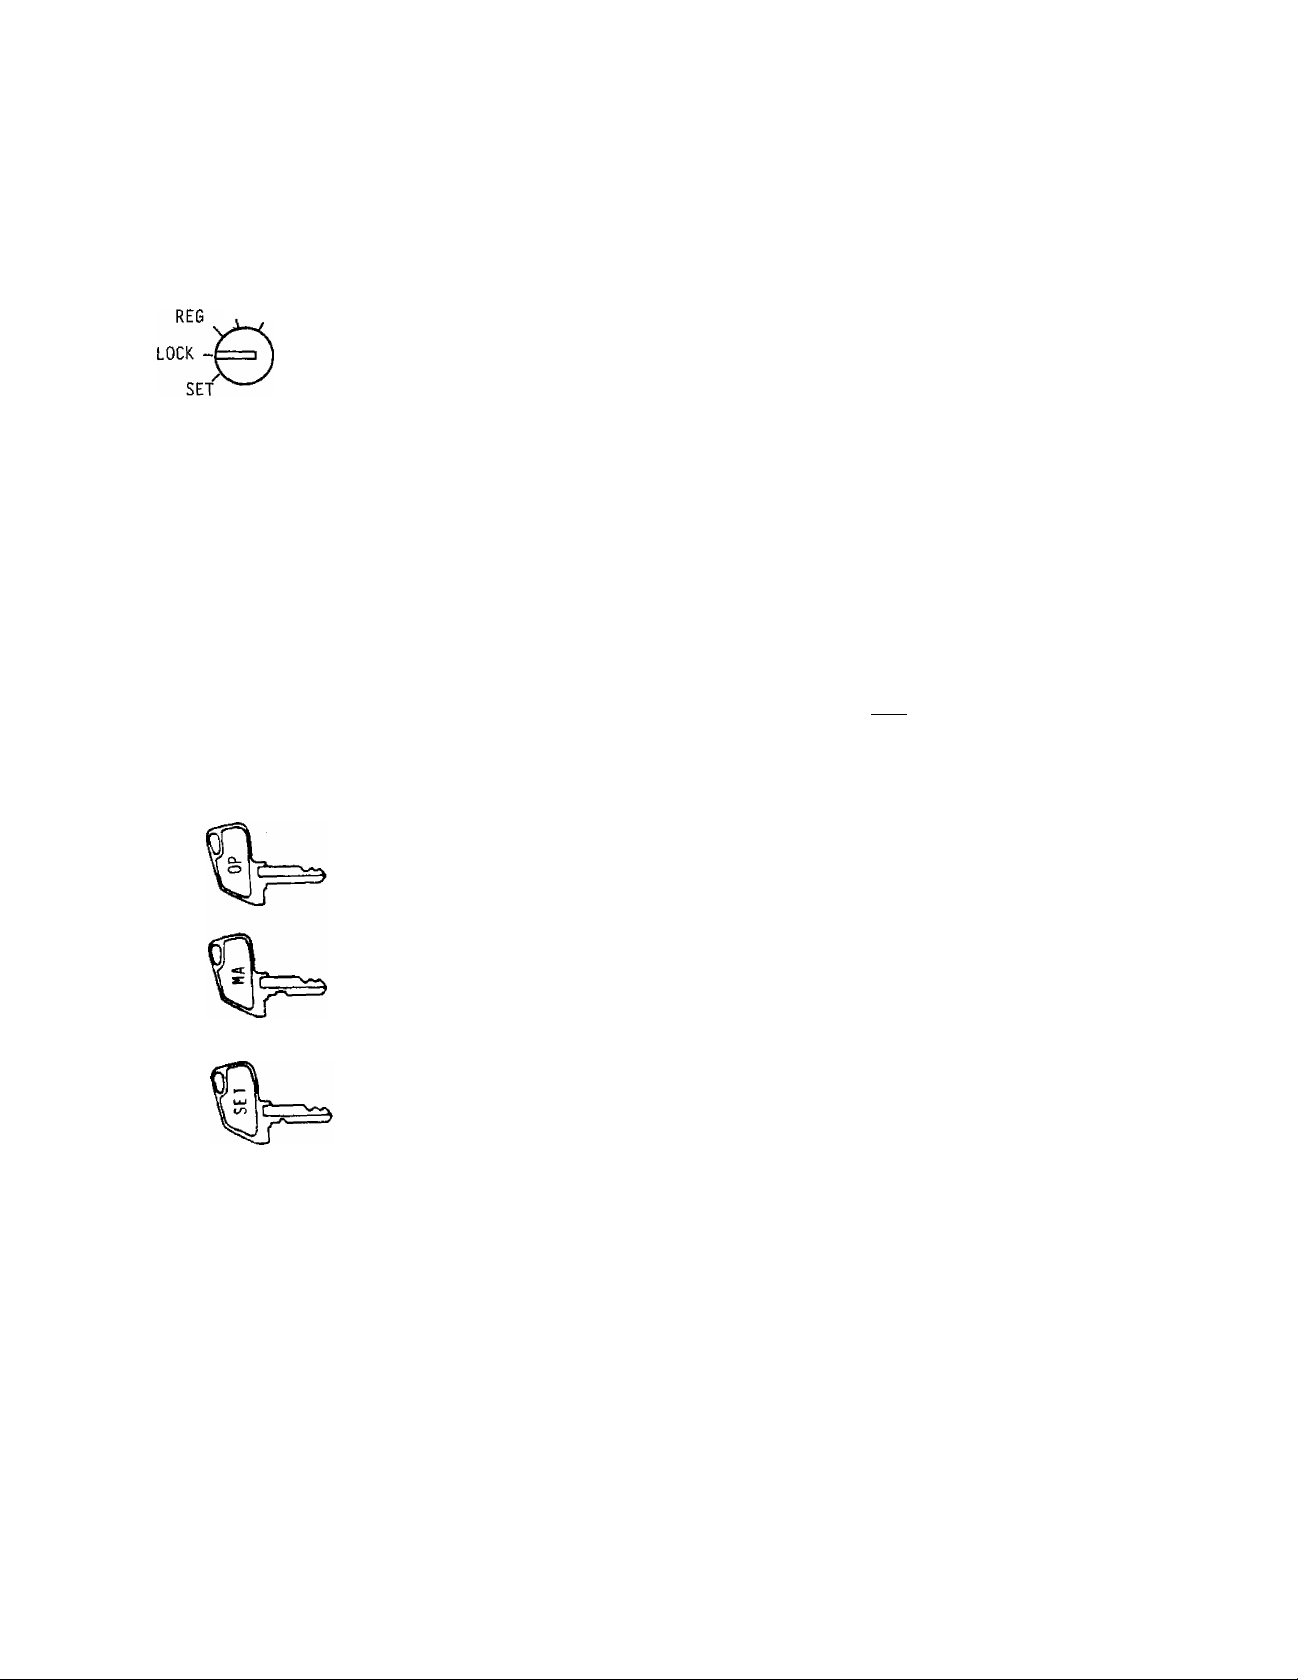
CONTROL LOCK, CLERK LOCKS, AND MODE SELECTOR KEYS
CONTROL LOCK
X VOIO/Z
(POSITION)
LOCK ,..
REG
VOID/2 .
SET
(FUNCTION)
The register operations are locked
when the Control Lock is set to this
position. Displays the current time.
Normal cash register operations are
carried out in this mode. However,
operations that have been programmed
to require the "VOID" position
(Manager Intervention) cannot be done
in this mode.
The sale totals can be read and the
programmed data can be verified in
this position.
Used to allow operations that have
been programmed to require this
position for Manager Intervention.
Also used to read and reset all the
resettable totals and counters.
In this position, the register will
allow programming operations.
OP Key The OP Key is used by the cashier who operates the
register. This key can access the positions of
LOCK, REG, and X.
MA Key The MA Key is used by the store manager who will
daily supervise the collection of money and the
printout of transactions recorded by the register.
This key can access the positions of LOCK, REG, X,
and VOID/Z.
SET Key The SET Key is used by the programmer. This key
can access the positions of LOCK and SET.
The keys can be inserted or pulled out at the LOCK or REG
positions.
- 2 -
Page 6

CLERK LOCKS
©(!)(!)©
Clerk Keys (A, B, D, E)
These locks are used to identify which
clerk is operating the register.
Each clerk should keep his/her clerk key. The
register will not operate in the REG mode unless one
of these keys is inserted and pushed on or
pushed-and-turned at the corresponding Clerk Lock.
When multiple drawers are installed (max. 4
drawers), the clerk key used and the drawer to be
opened on finalizing each sale are usually
programmed to match. On a single-drawer machine,
the drawer opens with any of these clerk keys.
Each of the keys may be inserted and pulled out in
the neutral position marked with ”." (point) in the
above figure, and two ways are provided to set the
Clerk Key to ON status:
1. PUSH-ON
push
(©
stay
When simply pushed on and immediately released,
the Clerk Key is set to ON status. However,
this ON condition will be cleared in any of
the following conditions:
1) when the sale is finalized (with the CLERK
tri-mark lamp still lit).
2) when another Clerk Key is pushed-on or
pushed-and-turned for ON status.
3) when the Control Lock is turned to another
position between sales.
4) when the power is turned off and then
turned on again.
2. PUSH-AND-TURN
When pushed and turned to the right, the ON
status is locked until it is turned back and
released and another Clerk Key is set to ON.
When another Clerk Key is attempted to
set to ON, an error will result.
If a Clerk Key has already set to ON and a sale is
under way, another Clerk Key will cause an error if
attempted to set to ON.
- 3 -
Page 7
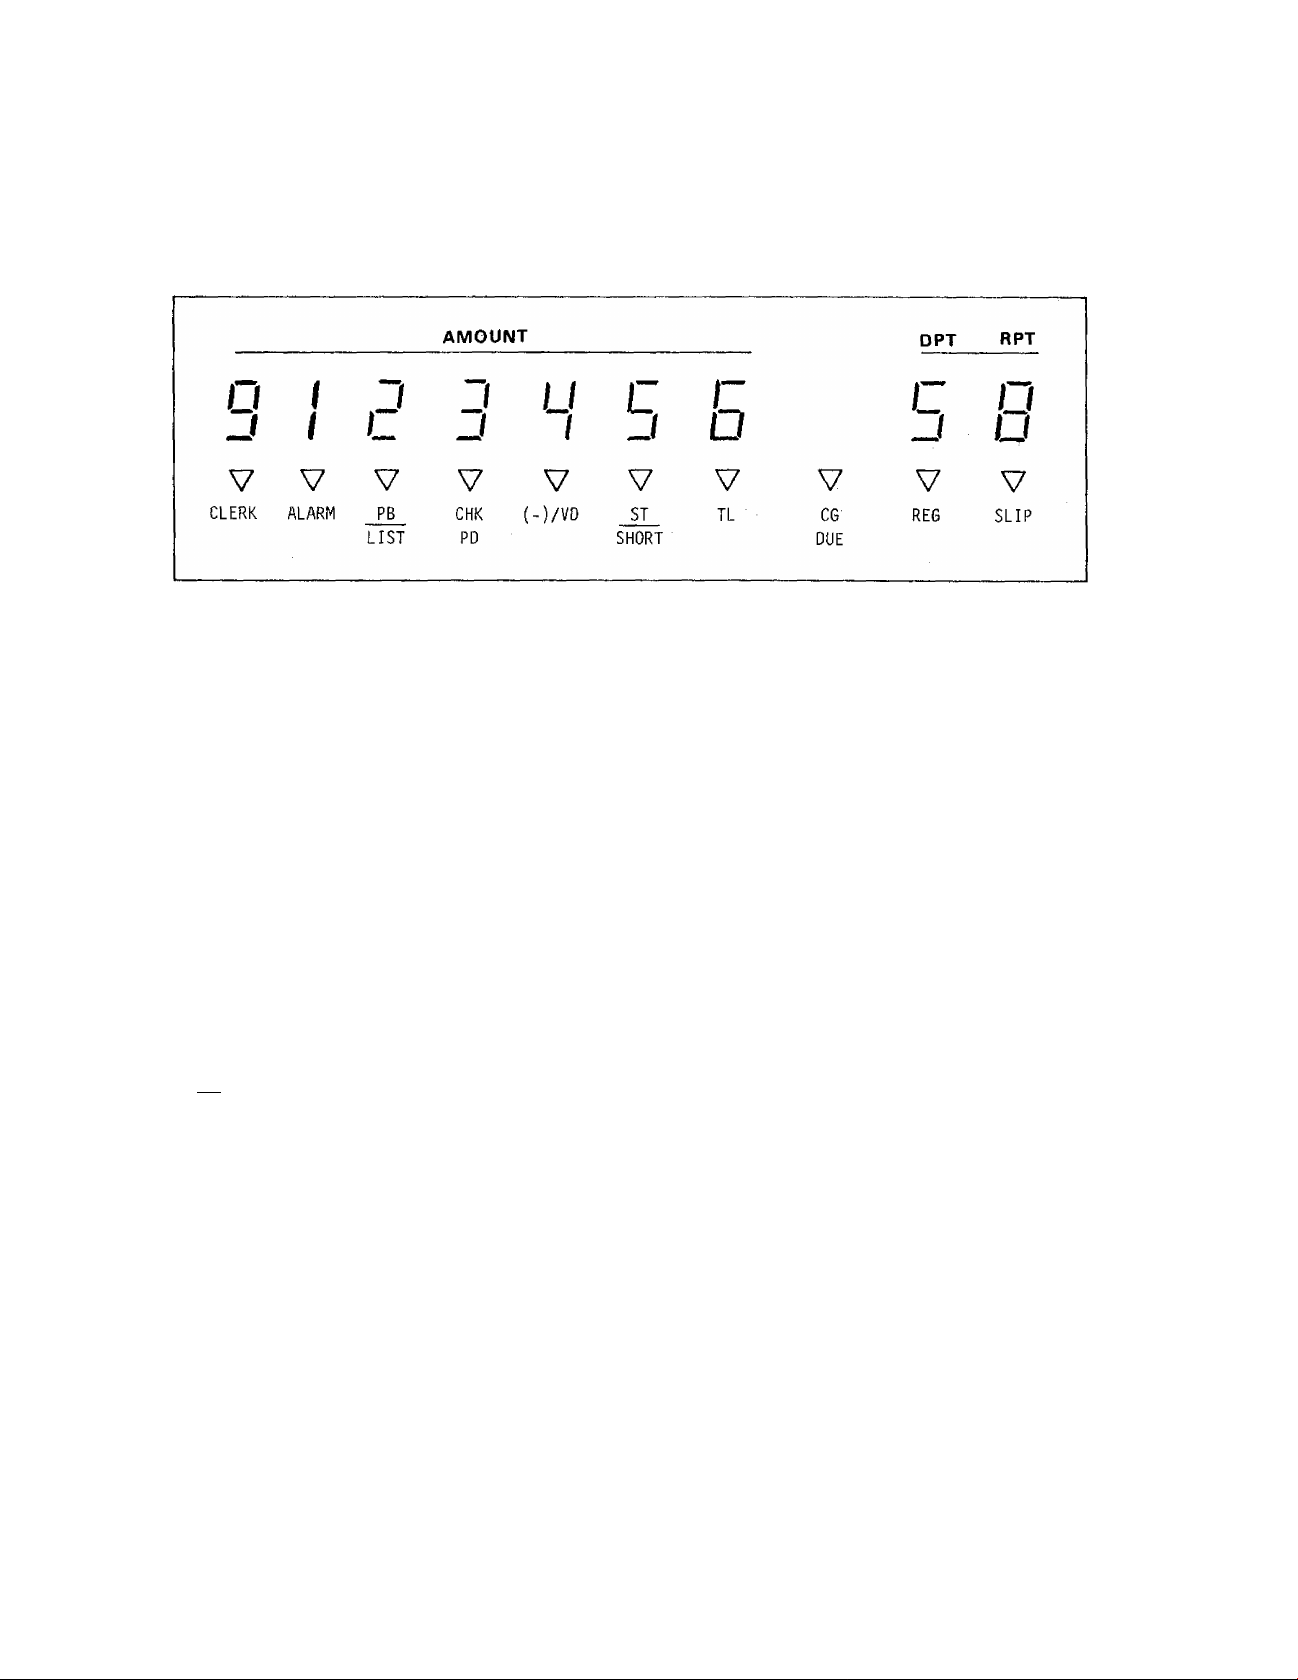
DISPLAY
The front display is located at the top of the register just above the
keyboard. The rear display, located on the back side of the front display,
has the same layout and content as the front display.
NUMERIC DISPLAY
AMOUNT (7 digits):
DPT (1 digit):
RPT (1 digit): Displays the repeat count of the same item.
Displays the numeric data, such as amount.
Displays the code No, (1 to 0) which represents each
Department Key (1 to 10). When Department No. 10 is
used, "0" is displayed instead of ''10".
MESSAGE DESCRIPTIORS (Tri-mark Lamps)
CLERK: Lights up when a Clerk Key is set to ON status.
ALARM: Lights up with an alarm buzzer to indicate that the last operation
or numeric entry has resulted in an error. To clear the error
condition, depress the [c] key,
PE Lights up when a previous balance is entered through the [PB+] key,
LIST* indicating that the sale contains a previous balance. It becomes
unlit when the [SERVICE] key is depressed.
It also lights up when the [LIST] key is depressed, indicating that
the Itemized Sale Mode and the Single-item Sale Mode are shifted
from one to the other.
CHK ^ Lights up when an amount is entered through the [CHK PD] key,
PD * indicating that the amount is to be paid in this sale sequence.
(-)/VD: Lights up when a subtracting amount through such keys as [$ DISC]
or [IC/VD] is entered.
ST
SHORT
Lights up when the [ST/TT] key is depressed and the subtotal amount
of the sale is displayed.
It also lights when a short - tendering is operated with the balance
still due is displayed.
- 4 -
Page 8
TL:
Lights up on a finalizing operation with the total amount displayed
when a sale is finalized without any amount tendered.
CG ,
DUE*
SLIP:
When an amount tendering operation has been performed, this lamp
lights up with the change due displayed.
Lights up when a slip has properly inserted and set to the slip
printer.
KEYBOARD LAYOUT
The following is a typical keyboard layout for the FS-160 series. Since this
series is designed to be capable of programming most of the keys in the most
desired location on the keyboard, this is merely an example. Please contact
your TEC representative if any other alternative or additional keys must be
installed, referring to the description of the "FUNCTION OF EACH KEY"
section. (The number attached to each key indicates the page number for the key description.)
12
11
10
8
11
6
OTHER KEYS THAT MAY BE INSTALLED ALTERNATIVELY OR
ADDITIONALLY:
$ DISC
%-
%+
MANUAL
TAX
12
13
13
9
LIST
TX3/M
AMT
Keyboard Type: MICROMOTION KEYBOARD (Standard Feature)
REGULAR KEYBOARD (Option Feature)
12
10
12
- 5 -
Page 9

FUNCTION OF EACH KEY
JF
JOnUNAL FEED KEY ([JF])
This key is used to feed the journal roll. While the key is
depressed, the paper feeds continously.
This key is operable in any position of the Control Lock except the
"LOCK" position.
CLEAR KEY ([C])
This key is used to cancel the entries (numeric entry, [TXl/M] ,
[TX2/M], [TX3/M] entry, [X] key entry, etc.) performed prior to
depression of a motorized key.
This key is also used to clear the error condition caused by erroneous
operation.
This key is operable in any position of the Control Lock except the
"LOCK" position.
DEPARTMENT KEYS ([DEPT])
10
These are department keys through which sales items are registered, A
maximum of 10 department keys and totalizers are available. Each
of these keys may be programmed as "OPEN" department or "PRESET"
department key.
Each department has the taxable or non-taxable status for each of Tax
1, Tax 2, and Tax 3 tables.
If the system option "Single-item DP" is selected, the depression of
the department key finalizes the sale as a cash transaction.
In department operations, Roman numeral of the department number (I to
X) is printed on slip and journal, and the department number (1 to 0)
is displayed. In case of Department No. 10, "0" is displayed.
OPEN DEPARTMENT ([Open DEPT])
Enter the unit price before depressing the department key.
Re-depressing the same department key causes the previous price
entry to repeat itself except the case of VOID operation or QUANTITY
EXTENSION operation.
This key has the HALC (High Amount Listing Capacity) and the LALC
(Low Amount Listing Capacity).
Quantity extension operation is available by using the [X] key.
The quantity should be from 1 to 99. The unit price should be under
$999.99 in case of quantity extension operation.
- 6 -
Page 10

PRESET DEPARTMENT ([Preset DEPT])
Depress the key without unit price entry. The price has already
been preset on this key (4-digit; $0.00 to $99.99).
Quantity extension operation is available by using the [X] key.
The quantity should be from 1 to 99. In case the quantity is
1-digit, the department key may be depressed after entering the
quantity without a [X] key depression.
By depressing the [PR OPEN] key, the preset department key is
changed into an open deparment temporarily. Thus a price different
from the preset one may be entered through the numeric keys, just as
an open department, if the [PR OPEN] key is depressed prior to the
preset department key.
The repeat operation of the item registered with the [PR OPEN] key
is not allowed.
PLU
PLU (Pirce-Look-Up) KEY ([PLU])
This key is used to register Price-Look-Up items. A PLU item has
3-digit PLU code (1 to 999), taxable or non-taxable status for each of
Tax 1, Tax 2, and Tax 3 tables, 5-digit preset price for a preset PLU,
and 2-digit linked department code (1 to 10). A maximum of 100 PLUs
are programmable.
Depressing the [PLU] key after a PLU code entry causes the
registration by the preset price automatically. In case of an open
PLU item, it will not read the price automatically at the PLU code
entry; after the PLU code entry the price should be entered and the
[AMT] key should be depressed.
By depressing the [PR OPEN] key, a preset PLU is changed into an open
PLU temporarily. In this case, the PLU operation sequence will be the
same as an open PLU described in the above paragraph.
Re-depressing the [PLU[ key causes the previous price entry to repeat
itself in case of a preset PLU; the [AMT] key is re-depressed for the
same purpose in case of an open PLU. The repeat operation is not
possible for a temporarily-open Preset PLU or a VOID or QUANTITY
EXTENSION for any PLU.
AMT
7 8
4 5
1
0
2 3
00
AMOUNT KEY ([AMT])
This key is used to enter the price for an open PLU or a preset PLU
that has temporarily been open by the [PR OPEN] key. Refer to the
description of the [PLU] key above.
9
NUMERIC KEYS (
6
These keys are used to enter numeric values such as amount, quantity,
or code number.
Depressing the [00] key once is the same as depressing the [0] key
twice consecutively.
)
- 7 -
Page 11

IC/VD
ITEM CORRECT / VOID KEY ([IC/VD])
This key has two functions -- Item Correct function and Void function.
ITEM CORRECT FUNCTION (Last Line Void)
Depressing immediately after a department or PLU item entry, it
functions as Item Correct key. All of itemizers and totals/counters
affected by the previous entry to be corrected are restored. The
dotted line is printed on the last printed line on the journal and
the slip.
The [IC/VD] key should be depressed immediately after the department
or PLU item to be corrected, but depressing the [C] key is still
allowed before the item-correction.
Item Correct operation is available for Received on Account, Paid
Out, Previous Balance, Chech Paid, or Manual Tax items,
VOID FUNCTION (Designated Line Void)
Depressing with a prior numeric entry, it functions as Void key.
This key is used to void a previous department or PLU item entry
(not necessarily the last item but also an item entered before the
last item) within a transaction. This operation cannot cause the
main itemizer (i.e. sale total) to go below zero.
Please note, especially when this key is used to void a preset
department item once registered, that quantity "1" must be entered
before the [IC/VD] key; depressing without the quantity will
item-correct the last department or PLU item if any, as described in
the ITEM CORRECT FUNCTION mentioned above.
This key has the option "Void Key MGR (VOID position) Compulsory".
When this option is on, Void operation is allowed only at the VOID/Z
position of the Control Lock.
QUANTITY EXTENSION (MULTIPLICATION) KEY ([X])
This key is used to enter the quantity for department or PLU item.
The quantity should be from 1 to 99.
Enter the quantity, depress [X], then follow the normal department or
PLU entry sequence. In case of a quantity extension using a preset
department and when the quantity is 1-digit, the [X] key may be
omitted.
TXl/M TX2/M TX3/M
TAX MODIFIER KEYS ([TXI/M], [TX2/M], [TX3/M])
These keys are used to reverse taxable or non-taxable status of Tax 1,
Tax 2, and Tax 3 tables respectively for a department or PLU entry.
And each Tax Modifier Key affects its repective tax only.
Depress the required Tax Modifier Key prior to an item of those
mentioned above. The pre-programmed status of the item will be
reversed from taxable to non-taxable, or vice versa.
- 8 -
Page 12

MANUAL
TAX
MANUAL TAX KEY ([MANUAL TAX])
This key is used to enter a tax amount manually. To operate, enter
the tax amount, and depress this key. This tax amount is processed
into the "Tax 3 & Manual Tax Total" of the financial memory and the
clerk memory.
ST/TT
AT/TL
SUBTOTAL / TAXABLE TOTAL KEY ([ST/TT])
This key is used to print and read the total amount in the main
itemizer (i.e. the sale total amount). Depressing repeatedly in the
transaction, printing will occur only one time.
When the transaction has tax amount, this key is used to calculate tax
and display the balance due including tax, while the balance due
excluding the tax is printed on this stage in order to allow other
item entries to follow. The tax amount will actually be printed on
the finalizing stage.
CASH AMOUNT TENUER/TOTAL KEY ([AT/TL])
This key is used to record all cash paid on transactions and can
finalize a sale operation. This key has dual functions that are Cash
Tender Key and Cash Total Key,
Depress the [AT/TL] key without any numeric entry to get the total and
finalize the sale. This i-s a Cash Total key function.
Depress the [AT/TL] key after entering the amount tendered to
calculate the change and finalize the sale. This is a Cash Tender key
function. In this case, when the amount tendered is smaller than the
sale total, it prints the amount tendered and display the balance
still due. If the [AT/TL] key operation results in finalizing the
transaction, the cash drawer will open.
It has selective status as to Total Key Function, Tender Key Function,
Over-tendering, Finalization for R/A, Drawer Open at Short-tendering,
and Slip Compulsory.
CHARGE KEY ([Chg])
This key is used to record all charge total on transactions, and can
finalize a sale operation. This key has the Total Key function and
the Tender Key function.
Depress the [Chg] key without a numeric entry to get the total and
finalize a sale when using as Total Key.
When using as Tender Key, depress this key after entering the amount
tendered to calculate the change and finalize the sale. In this case,
when the tendering amount is smaller than the sale total, it prints
the amount tendered and display the balance still due.
It has the same selective status as described for the [AT/TL] key.
- 9 -
Page 13

LIST
LIST KEY ([LIST])
This key is used to reverse the Single-item DP / Itemized DP operation
option by depressing before department or PLU transaction.
In case of the Single-item DP system, by depressing this key the
itemized department and PLU operation can be done. In case of the
Itemized DP system, by depressing it the single-item department and
PLU operation can be done.
SLIP
DATE/#
SLIP KEY ([SLIP])
This key is used to change the gap condition of the slip printer.
When the gap is closed, depressing this key causes the gap to be
opened; and when it is open, depressing this key causes it to be
closed. To use it for this purpose, this key should be depressed
without numeric entries.
This key is also used to feed the slip paper to the appropriate
position. When the number of lines to be fed is entered before this
key entry, the slip paper is fed as much as the entered number of
lines.
DATE/# KEY ([DATE/#])
This key is a dual function key of Date Key and # Key. If depressed
without numeric entries, this key is the Date Key. And, if depressed
after numeric entries, it is the # Key.
The Date Key function is used to print the date and the register
number on slip and journal. After depressing this key, this
transaction should be the itemized transaction. When the options
"Date Print" and "Consecutive No. Print" are both on, the date and the
consecutive No. print automatically for every transaction; therefore,
the Date Key function is not usuaully necessary.
$ DISC
The # Key function is used to print any non-add numbers on slip and
journal as future referece for Customer No., Table No., Check No.,
etc. The maximum digits of entered numbers are 6 digits. The number
entered is shown by the "#" symbol on the slip and journal.
DOLLAR DISCOUNT KEY ([$ DISC])
This key is used to subtract an amount from the sale total such as a
discount during a sale. The amount more than the sale total is
prohibited.
To operate, enter the discount amount, and depress this key.
- 12 -
Page 14

%-
PERCENT DISCOUNT KEY ([%-])
This key is used to subtract a % rate from a sale. When the % rate that
is pre-programmed is used, this key should be depressed without
numeric entry. When the % rate is different from the pre-programmed
one, this key should be depressed after the manual rate entry.
When the option "% rate manual entry prohibited" is on, this key
functions only with the pre-programmed rate.
Please note the following in entering a manual % rate:
When the option "Integral" % rate manual entry is selected:
Rate range allowed: 1 to 99% ... Enter 1 to 99.
When the option "down to 1 decimal digit" is selected:
Rate range allowed: 0.1 to 99.9% ... Enter 1 to 999.
When the option "down to 2 decimal digits" is selected:
Rate range allowed: 0,01 to 99.99% ... Enter 1 to 9999.
%+
PERCENT CHARGE KEY ([%+])
This key operates the same as the [%-] key except that the % rate will
add to instead of subtracting from the sale.
- 13 -
Page 15

MISC
MISC
TD/1 TD/2
These keys are used to record other medias than cash and charge
(check, charge cards, etc.) paid on transactions, and can finalize a
sale operation.
Operations and selective status for this key are the same as described
for the [AT/TL] or [Chg] key.
MISCELLANEOUS TENDER 1, 2 KEYS ([MISC TD/1], [MISC TD/2])
NS
R/A
NO-SALE KEY ([NS])
This key is used to open the cash drawer for the purpose of making
change. When the multi-drawer function is selected, it will open only
operating clerk's drawer.
RECEIVED ON ACCOUNT KEY ([R/A])
This key is used to record received-on-account payments and will add
the cash-in-drawer total accordingly. Several received-on-account
entries in one receipt are allowed.
Enter the amount and depress [R/A] . This sequence may be operated
multiple times alternating the amount. The entries may be finalized
by [AT/TL] or other media keys that have the status "Finalization for
R/A Allowed". This operation can be done when the register is outside
a sale.
Quantity Extension or Repeat are not operable. Item Correct operation
is allowed for R/A items but Void operation is prohibited.
This key is also used to record the loan total when the Control Lock
is in the VOID/Z position, and will add the cash-in-drawer total
accordingly. This amount affects the "R/A 2" total also.
PO
PAID OUT KEY ([PO])
This key is used to record paid-out items and will reduce the
cash-in-drawer total accordingly. Several paid-out entries in one
receipt are allowed.
Enter the amount and depress [PO] . This sequence may be operated
multiple times alternating the amount. The entries may be finalized
by [AT/TL] (cash) only. This operation can be done when the register
is outside a sale.
Quantity Extension or Repeat are not operable. Item Correction
operation is allowed but Void operation is prohibited.
This key has the option "Paid Out Key MGR (VOID position) Compulsory".
When this option is on, paid-out operation is allowed only in the
VOID/Z position of the Control Lock.
- 10 -
Page 16

PR
OPEN
PRESET OPEN KEY ([PR OPEN])
This key is used to change the preset price of a preset department or
preset PLU item temporarily without affecting the preset price memory.
After depressing this key, only department or PLU entry is allowed.
Refer to descriptions in the [DEPT] and [PLU] keys as to operation
details.
PREVIOUS BALANCE KEY ([PB+])
This key is used to enter the previous balance of any guest check that
has once been registered but not yet to be paid. Depressing with no
numeric entries functions to make a new check. Depressing after
numeric entries (previous balance amount) functions to add the orders
to the customer check.
Multiple PB entries, Item Correct operation, and Void operation are
allowed.
Finalizing this transaction without payment is the [SERVICE] key, and
the [PB+] key can be operated any time before depressing the [SERVICE]
key. As the [PB+] key is used to add the orders, this transaction can
not be finalised by any media key. In case of payment operation, the
[CHK PD] key is used to enter the previous balance amount as top item
of the sale sequence.
SERVICE
CHK
PD
CHG
TIP
SERVICE KEY ([SERVICE])
This key is used to finalize the previous balance operation. When
depressing this key, the new balance (Previous Balance + Total Amount
in This Transaction + Taxes) is printed on journal and slip.
CHECK PAID KEY ([CHK PDl)
This key is used to finalize the guest check sequence. After
depressing this key with an amount entry (the guest's previous balance
amount), only finalizing operation for payment is allowed.
Multiple operation and Item Correction operation are allowed, but Void
operation is prohibited.
CHARGE TIP KEY ([CHG TIP])
This key is used to record the tip amount paid by the [Chg],
[MISC TD/1], or [MISC TD/2] key. This key should be depressed with
numeric entries (tip amount), and after this key entry [AT/TL] key
operation is prohibited.
- 11 -
Page 17

REGISTERING PROCEDURE FOR SALES
The following are patterns for actual registering operations. In the
following examples, "|
"[ ]" indicates a depression of the function key, and "
registering and/or finalizing operations.
For the following operations, set the key-locks as in the following:
Clerk Lock: The operating clerk's Clerk Key must be set to ON.
Control Lock: REG Position ... for normal operations
NO-SALE (Control Lock: REG) Allowed bnly outside a sale
____
]" indicates an input through the numeric keys,
----
" indicats other
VOID/Z Position ... for LOAN Operation
REG ^ VOID/Z ... for: . [IC/VD] used as Void Key
. tPO] Key ^
CT
depending on the program status
for each key.
[NS]
LOAN (Control Lock: VOID/Z) Allowed only outside a sale
^—if in "REG" mode, it will result in Received on
Account operation.
[Loan Amount I[R/A] --^ ( |Amount|) [AT/TL]
j or other media keys.
Repeatable
DEPARTMENT (Control Lock: REG)
When "Single-item DP" option is selected:
1
Price I [Open DEPT]
[Preset DEPT]
[PR OPEN] I Price| [Preset DEPT]
Quantity Extension:
Immediately
finalized as
cash sale
automatically.
I
Quantity I [X] lUnit Price| [Open DEPT]
[Quantity I [X] [Preset DEPT]
-may be omitted when the quantity is 1-digit.
I
Quantity I [PR OPEN] [X] jUnit Pricej [Preset DEPT]
- 14 -
Page 18

NOTE: If itemized sale registration is necessary, depress [LIST]. The
multiple department/PLU items may be entered within one sale. The
sale will then be finalized by media keys, just as in the case of
"Itemized-DP" option described below.
When ”Itemized-DP" option is selected:
Opeations are the same as listed in the case of the ’’Single-item DP"
option described on page 14, except that the sale is not finalized until
a media key is operated. Thus multiple department/PLU items can be
entered within one sale.
NOTE: If [LIST] is depressed first, each department (or PLU) operation
sequence will be a "Single-item DP" operation and immediately
finalized as cash sale, as described in the "Single-item DP" option
on page 14.
PLU (Control Lock: REG)
|Preset-PLU Code! [PLU]
lopen-PLU Code I [PLU] |Price| [AMT] ---
[PR OPEN] |preset-PLU Code! [PLU] |Prlce| [AMT] ^
Qunatity Extension:
[Quantity I [X] |Preset-PLU Code! [PLU] ^
I Quantity
I
[X] lopen-PLU Code! [PLU] [Unit Price| [AMT] •+
I Quantity I [X] [PR OPEN] |Preset-PLU Codel [PLU] [Unit Price! [AMT] ^
NOTE: The sale-finalization rule for PLUs is the same as described for
DEPARTMENT entries. (That is, if the "Single-item DP" option is
selected, the sale is immediately finalized.) The [LIST] key
operation is also applied to PLU opeations.
REPEAT (Control Lock: REG)
Operable in the Itemized sale mode only. (If "Single-item" option is
selected, the [LIST] key must be depressed first.)
----
---
[ Price I [Open dept] [same DEPT] [same DEPT] ... ->
RPT Count
"2"
|Preset-PLU Codel [PLU] [PLU] [PLU] -»■ ---
jOpen-PLU Codel [PLU] jPricel [AMT] [AMT] [AMT] ...
RPT Count
"3"
- 15 -
-
Page 19

SUBTOTAL, TAXABLE TOTAL READ (Control Lock: REG) for Itemized sale only
--
-> [ST/TT]
.....
.....
The sale total of the items registered so far
is displayed. When any tax is due, the sale
total amount displayed includes the tax amount.
SALE FINALIZATION (Control Lock: REG) for Itemized sale only
--
4 ([ST/TT]) (IAmount Tendered!) [AT/TL] (Cash Sale)
--
([ST/TT]) -> ( I Amount Tendered | ) [Chg] (Charge Sale)
--
^ ([ST/TT]) -> ([Amount Tendered]) [MISC TD/1] (depending on the
or payment media)
[MISC TD/2]
Multi-tendering (Short - tendering repeated using the same media)
ex.)
---
-> ([ST/TT]) -> [Amount Tendered] [AT/TL] —
Short-tendering
1
Amount Tendered ] [AT/TL]
still short
( ] Amount Tendered ] ) [ AT/TL]
Split-tendering (Short-tendering repeated using different medias)
ex.)
---
([ST/TT]) -> [Cash Amount Tendered] [AT/TL] —
Short-tendering
jMisc 1 Amount Tendered] [MISC TD/1]
still short
->( ] Charge Amount Tendered ] ) [Chg]
NOTES: 1. In both Multi-tendering and Split-tendering operations, the
sale is finalized on reaching the sale total amount.
2. If a media key is depressed without an amount tendering entry
(if the key functions as Total Key), the sale is then finalized
on that stage processing the balance due into that media.
3. Media keys that are programmed with the status "Short-tendering
Prohibited" cannot be used for short-tendering operations.
- 16 -
Page 20

PREVIOUS BALANCE, CHECK PAID (Control Lock: REG) for Itemized sale only
New Customer Check Open, New Order (with no payment):
[PB+] ^ ---
Additional Order (with no payment):
I Previous Balance) [PB+] -)>
Check Gathering on No-payment Stage (Allowed if "Multi-PB Alowed" option is
_____
Sale items registartion
____ --- > [SERVICE]
........
Additional order registration
....
[SERVICE]
on.)
I Previous Balance | [PB+] | Previous Balance! [PB+] ■>[ Previous Balance! [PB+] —
Account of Table ”A’
i
SERVICE]
Normal Check Paid:
Account of Table "B** | Account of Table '*C" ^
Additional order may be entered, if any.
I
Previous Balance [ [CHK PD] •*’ Sale Finalization follows (refer to page 16)
Check Gathering at Payment (Allowed if "Multi Check Paid" option is on)
[Previous Balance! [CHK PD] -*■ [Previous Balance! [CHK PD] —
Account of Table "A"
Previous Balance [CHK PD]
Account of Table "C
Account of Table "B'
Sale Finalization follows
(refer to page 16)
CHARGE TIP (Control Lock: REG) in Itemized sale only
Sale without PB:
Sale with PB: [Previous Balance! [CHK PD]-*
[Tip Amount[[CHG TIP]
--
------------------
*■
-^( [ST/TT] )-
Sale Finalization follows (page 16)
using [Chg], [MISC TD/1], and/or
[MISC TD/2]. But [AT/TL] cannot
be used in this case.
- 17 -
Page 21

RECEIVED ON ACCOUNT (Control Lock: REG) Allowed only outside a sale.
I
Amount I [R/A] -----^ (|Amount Tendered]) [AT/TL] or other Media Keys
t
__________________
Repeatable alternating
the amount.
NOTES: 1. Multi-tendering and Split-tendering operations (page 16) can
also be applied.
2. Only the media keys that have been programmed to allow R/A
entries can finalize R/A items.
PAID OUT (Control Lock: REG, or VOID/Z if so programmed) Outside a sale only
I
Amount I [PO]
I
----
^ (I Amountj) [AT/TL] (No other media keys can be used.)
t
Repeatable alternating
the amount.
DOLLAR DISCOUNT (Control Lock: REG) in Itemized Sale mode only
--
[Discount Amount I [$ DISC] •>
-----
PERCENT DISCOUNT (Control Lock: REG) in Itemized Sale mode only
To subtract from an individual Department or FLU item:
Department or PLU
item entry
To subtract from the sale total or subtotal:
■ [%-]
--- r> [ST/TT]
‘ I
NOTES on Manual Rate Entry:
1. Manual rate entries may be prohibited by a program option.
2. The digit handling for the manual rate entry differs depending
on the option selected:
With "integral only" option:
Enter 1 (=1%) to 99 (-99%).
With "down to 1 decimal digit" option:
Enter 1 (=0.1%) to 999 (=99.9%).
With "down to 2 decimal digits" option:
Enter 1 (=0.01%) to 9999 (99.99%).
[%-]
--------------
(for preset rate)
I Rate I [%-]
(for manual rate)
---------------------
(for preset rate)
Rate
(for manual rate)
I [ % - ]
- - - -
----
^
*■
PERCENT CHARGE This operates the same as PERCENT DISCOUNT, except that the
rate will add to instead of subtracting from the sale.
- 18 -
Page 22

TAX MODIFICATION (Control Lock: REG)
[TXI/M] ... to reverse the Tax 1 taxable/non-taxable status
[TX2/M] ... " Tax 2 "
[TX3/M] ... " Tax 3
Depress Tax Modifier Key(s) for the requirement as described above, prior
to a department or PLU entry sequence (must be depressed at least before
the last key of the sequence.)
ex.) [TXI/M] 1 Price | [Open DEPT] ■*
[TX/3] [Preset DEPT] ^ ---
|Preset-PLU Code| [TXl/M] [TX2/M] [PLU] -> ---
--
MANUAL TAX (Control Lock: REG) in Itemized sale mode only
--
[Tax Amount! [MANUAL TAX]
ITEM CORRECT (Control Lock: REG) in Itemized sale mode only
DEPARTMENT OPERATION (pages 14 to 15)—^
PLU OPERATION (page 15)
REPEAT OPERATION (page 15)DOLLAR DISCOUNT (page 18)—
MANUAL TAX (this page)
PREVIOUS BALANCE
(I Previous Balance\) [PB+]
CHECK PAID
I
Previous Balance j[CHK PD]
RECEIVED ON ACCOUNT
I
Amount I[R/A]
PAID OUT
I
Amount I[PO]
----------
-----------
----------------
------
[IC/VD]
---------
NOTE: When Item Correct is operated after a REPEAT operation, only the
last item of the repeated will be deleted.
VOID (Control Lock: REG, or VOID/Z if so programmed) in Itemzed sale mode only
To void one item:
--- -> I Price
--- jl I [IC/VD] ( [X] ) [Preset DEPT] ---
--- -> [PR OPEN] ¡Price j [IC/VP] [Preset DEPT] ---
I I
'— Quantity "1"
I
[IC/VD] [Open DEPT] ---
- 19 -
Page 23

--
^ |Preset-PLU Codej[IC/VD][PLU]
--
^ lOpen-FLU Codel[IC/VP][FLU]|Price|[AMT] ---
--- ♦ [PROPEN] [Preset-PLU Code|[IC/VD][PLU]jPrice|[AMT] ^
--
\ Previous Balance | [ IC/VD ] [PB+ ] ->■
To void Quantity Extension operation of Department or PLU:
--
[Quantity! [TC/VD] [X] |Unit Price | [Open DEPT]
--
I
Quantity] [IC/VD] [X] [Preset DEPT]
--
[PR OPEN]
--
I
Quantity
--
I
Quantity
--
[PR OPEN]
NON-ADD NUMBER PRINT (Control Lock: REG)
I
Quantity j [ IC/VD] [X] j Unit Price | [Preset DEPT]
I
[ IC/VD] [X] | Preset-PLU Code j [PLU]
I
[ IC/VD] [X]
I
Quantity j [X] j Preset-PLU Code] [PLUj [Unit price] [AMT]->'
I
Open-PLU Code j [PLU] ¡Unit Price j [AMT]-»
-----
----
---
-----
-
-
(--■?) ] Number ] [DATE/#] ---
max. 6 digits
DATE PRINT (Control Lock: REG)
[DATE/#] ---
SLIP PRINT (Control Lock: REG)
1) Depress [SLIP] to open the gap of the Slip Printer to open it if it is
closed.
2) Insert the slip.
3) Set the slip to the appropriate position, referring to the two lines
carved on the slip print table to indicate the print line position.
4) Make sure that the "SLIP" trimark lamp is lit.
5) The [slip] key may be depressed here to close the gap to secure the
slip. Or, the gap will automatically be closed when registration
starts.
6) Start the registration.
7) Finalize the registration,
enable the slip withdrawal.
NOTES: 1. The slip may be withdrawn between Steps 6) and 7) if only some
designated items but not all are necessary to print. In need
of this, withdraw the slip after depressing the [SLIP] to open
the gap when no more slip printing is necessary.
2. Line feed value may be set between Steps 5) and 6). Enter the
number of lines to be fed above the print start line, and
depress [SLIP]. Then the slip will feed up to the designated
print start position. This feature is useful when one slip is
to be used to record a customer's account from sale to sale.
The gap will automatically be opened to
- 20 -
Page 24

-- REGISTERING PRINT SLIP SAMPLES
(All samples are in Itemized Sale mode.
DEPARTMENT, REPEAT, QUANTITY EXTENSION
03-31-86
I234S
*100i
tt * 15 0 5
a Al50li
a Al50i
5X 130@
H A&50ii
*ao6?ii
*a23i2
Att65ii
*12945Fi
/\ 00.51 S
14-I3f
ft
Date: March 31, 1986
Register No. 1234
Dept.l $1.00 taxable
Dept.2 $1.50 taxable
Repeat of the Dept.2
ti 1(
1 5 X $1.30?
= $6.50 into Dept.3
Tax 1 when "Taxes
Tax 2 Separate Print’
, ^ option is on.
Tax 3 _
Finalized as cash
Clerk ID / Consecutive
Current Time
ITEM CORRECT, VOID
Dept.3 $1.20, Item-corrected
Voiding the third item
(Dept.2 $1.00)
No.
PLU, REPEAT, QUANTITY EXTENSION
3- 31-86
123 4S
^101
A140I
5201
ft
ft
A22 0 S
£201
ft
] Repeat of the above PLU
*22 0J
£301
ft
6X 170@
*ia20s
AttOOiil
*tt22ii2
n0 2 t ^
*n32SFi
0a54 S
1
4- 17f
f t
CHARGE TIP, CHARGE SALE
PLU No.101
Link Dept.l $1.40 txbl
PLU No.202
Link Dept.2 $2.20 txbl
PLU No.301
6 X $1.70? = $10.20
Linked Dept. 3
03-31-86
123 4S
*25 0 1
£301
0 *170f
* 42 0 ^
*a505^
*ai5iil
*ai7ii
* 50 2 5Fi
A 0tt58 S
14-24^
f t
Charge Tip
Finalized as charge
f t
- 21 -
Page 25

NON-ADD NUMBER, MISC 1 MEDIA SALE
Non-add #111111
Finalized as Mise. 1
PERCENT CHARGE, PERCENT DISCOUNT
10% added to the above
^ Dept.5 item {=$0.14)
Subtotal
20% subtracted from
the above subtotal {$0.76]
Mise 1 MEDIA TENDER, CHANGE COMPUTATION
Misc.l $10.00 tendered
Change due $5.99
DOLLAR DISCOUNT
Dollar Discount $0.50
- 22 -
Page 26

PREVIOUS BALANCE. CHECK PAID
- 23 -
Page 27

RECEIVED ON ACCOUNT
03-31-86
1234S
*170Sfi
fl 0066 S #
PAID OUT
03*31-86
L234S
*1100£fí
A 0 016 8 g
U“35f
*35 0 *
*420*
a500£
^60 0 2
it
Payment Item $3.50
Payment Item $4.20
Total Amount of Payment
received in cash
Paid-out Item $5.00
Paid-out Item $6.00
Total Amount Paid Out
LOAN
NO-SALE
04-08-86
12342
A S
A 0a34 2 #
11-10Í
Loan Item Amount
Loan Item Amount
Subtotal
Total Loaned
Amount in Cash
No-sale Symbol
DATE PRINT
Date
Register No.
- 24 -
Page 28

READ (X) AND RESET (Z) REPORTS
The following table shows the key operation to take each report. The *'X" and
"Z" reports have exactly the same print content when both are available,
except that:
1. The "X" reports allow to read the totals but not clear memories, while
the "Z" reports allow to read the totals and at the same time all the
resettable memories will be cleared when the reports have been issued.
2. The symbol "X" is printed on the top line of "X" report, while "Z" is
printed on a "Z” report, to indicated the type of report.
3. A reset count is printed on the bottom of a "Z" report only.
TABLE OF X AND Z REPORTS
REPORT NAME
INDIVIDUAL FINANCIAL READ
. Cash Sales and In-drawer*
. Charge Sales and In-drawer*
. Misc 1 Sales and In-drawer* X
. Misc 2 Sales and In-drawer* X
. Received on Account 1,2
. Paid Out
. Item Correct and Void
. Outstanding Check
. Percent Discount
. Percent Charge
. Dollar Discount
. Charge Tip
. Tax Total and Taxable Total
INDIVIDUAL CLERK READ*
INDIVIDUAL CLERK RESET*
INDIVIDUAL PLU READ
INDIVIDUAL PLU RESET
PLU ZONE READ
PLU ZONE RESET
PLU ENTIRE READ
PLU ENTIRE RESET
INDIVIDUAL DEPARTMENT READ
INDIVIDUAL DEPARTMENT RESET
DEPARTMENT ENTIRE READ
DEPARTMENT ENTIRE RESET
read*
auto'reset*
(DEPT + FINANCIAL + CLERK)
1_ Print/Non-print 1_ Print/Non-
Option print Opt.
1— Control Lock Position(Z=VOID/Z) SAMPLE
KEY OPERATION
(READ only)
X
[NS]
X
[Chg]
[MISC TD/1]
[MISC TD/2]
X
[R/A]
X
[PO]
[IC/VD]
X
X
[PB+]
X
[%-] 27
X
[%+] 27
X [$ DISC]
X
[CHG TIP]
[ST/TT]
X
X
Z
Set fhe Clerk Key of the
required clerk to ON.
[
PAGE
26
26
26
26
26
26
27
27
27
27
28
1 [AT/TL]
X
]^|PLU Codel [PLU] •►([ ST/TT]) —i
z
t
_______________I__________
X
]-»|PLU Codel [X]-»>|PLU= Code] [PLU]
z
(zone start) (zone stop)
X
]> [PLU]
z
n Depress the required Depart
X
z
ment Keys, one by one.
([ST/TT] for subtotal.)
[AT/TL] to end.
X
] 11 [AT/TL]
z
X
] -> [AT/TL]
z
F|
[AT/TL]
29
29
29
30
30
31
- 25 -
Page 29

NOTES: 1. The cash drawer will open on the last key depression for the reports
marked with in the above table.
2. No clerk key is necessary to issue reports except INDIVIDUAL CLERK
READ/RESET reports.
-- REPORT PRINT SAMPLES --
INDIVIDUAL FINANCIAL READ (Control Lock: X Position)
Cash Sales and In-drawer {[NS])
03-31-86
1 2 3 4S
X
n S5f!
* 8 9.1 4 5Fi
* 6 3.8 9 3 S
oa9o
Cash Customer Count
Cash Sales Total
Cash-in-drawer
s ft
15-45f
--------------------
Charge Sales and In-drawer {[Chg])
^
03-31-86
L234S
X
I SSfi
* 5.0 2 o
L 5#
* 5.0 2 58
0a91 S #
15-46^
Charge Customer Count
Charge Sales Total
Charge-in-drawer Count
" Total
Received on Account 1, 2 ([R/A])
03-31-86
12 3 4S
X
2 in
*770S1
a
Att00f2
oa93 g
Received on Account Count
.........
Loan Count
” Total
tt
15-46f
-—----------
Paid Out ([PO])
03-31-86
----
I234S
X
4 Sit
* 2 20 0 Sf^
0a94
S It
Paid Out Count
" " Total
15-46f
Total
Misc 1 Sales and In-drawer ([MISC TD/1])
03-31-86
L234i
X
3. §S1
*H02S?Fi
3. SI
*2497S^8
0a92 i
Misc. 1 Customer Count
Misc. 1 Sales Total
Misc.1-in-drawer Count
" Total
ft
15-46f
Item Correct and Void {[IC/VD])
03-31-86
1234S
*12 0 8
1. g
*400 g
0
.
*aoo£g
0a95 g #
15-47P
- 26 -
Item Corr Count on Dept or
" " Total^ PLU items
Void Count on Dept or
" Totar PLU items
Item Corr/Void Count., on
" " " Totar other
items
Page 30

Outstanding Check ([PB+])
PB Sales Counter
" " Total
Check Paid Counter
Outstanding Check Count
(Outstanding Check
" " Total
" " Total
= PB Sales - Check Paid)
Dollar Discount {[$ DISC])
05-51-86
1254S
X
L
*0.5 0
0a99 i
15-47f
Dollar Disc. Count
" " Total
Percent Discount ([%“])
05-51-86
12 J4i
X
1 %-
*0.16X-
0tt98 S #
15-47i
Percent Charge ([%+])
05-51-86
L254S
X
1 %
A 0.1 4 %
0a97 S if
15-47f
Percent Discount Count
" " Total
Percent Charge Count
" " Total
Charge Tip ([CHG TIP])
05-51-86
I 2 5 4§
X
1 lit
A 0.5 0 5 ^
Charge Tip Count
" " Total
0101 s n
15-50f
,—-—-——
Tax Total and Taxable Total {[ST/TT])
Tax 1 Total
Tax 2 Total
Tax 3 Total
Taxable Total
Taxable Total
Taxable Total
- 27 -
Page 31

INDIVIDUAL CLERK READ
INDIVIDUAL CLERK RESET
Clerk "A" Reset Report Sample (Control Lock: Z, Clerk "A" Key to ON, 1 [AT/TL],)
Control Lock: X
Control Lock: Z
] Set the required Clerk Key to ON, enter 1, depress [AT/TL],
03-M-
* 51
<^114
0106
A
15-53f
1234
Z
6 4
1
a
6 2.
Moa
^2
A 2
6 2
*ioa
2
*1
19.
Moa
15.
*89
1 4 5 pi
4
*19
1
*0.
5 0 5f
2
*9
4
*22
*63,
4
*2 9
1
20
*1
1
* 4
0
*0,
0
ZOO,
86
Clerk ID / Number of Rings
n
Tig
Gross Sales Item Count
148
Percent Charge Count
%
14%
Net Sales {without Tax) Item Count
8422
llPl
33fi2
66P
^.2
Tax 1 Total
Tax 2 Total
Tax 3 Total
Net Sales (with Tax) Item Count
942
Doller Discount and Percent Discount Count
26 -
Total Customer Count
18 pi
045f^
A11 Media Total
^ rJ
Cash Customer Count
u F
Cash Sales Total
Charge + Misc 1 + Misc 2 Customer Count
-X D.
Charge Tip Count
U t-
Received on Account (R/A 1) + Loan (R/A 2) Count
S»
70S1
£#
00£fi
8 98B
5#
Paid Out Count
Cash-in-drawer Total
Charge + Misc.l + Misc.2 -in-drawer Count
995P,
Item Correct Count
«
Void Count
g
00 g
.
8 g
0 0 8g
.
S#
01
i »
Item Correct and Void Count
No-sale Count
Clerk Reset Report Count (not printed on X reports)
Clerk ID / Consecutive No.
Current Time
" " Total
" " Total
" " '' Total
” " " Total
" Total
" " " Sales Total
" " Total
" " " *' " " Total
" " Total
" " " Total
" " Total
” Total
] on Dept or PLU items
] on Dept or PLU items
] on other items (Misc. Void memory)
- 28 -
Page 32

PLU READ AND RESET REPORTS
Individual PLU Read or Reset
Control Lock: X or Z,
Enter the required PLU Code,
depress [PLU]. This may be
repeated. Depress [ST/TT] to obtain
subtotal. Depress
[AT/TL] to obtain
total and end.
Sample Operation (X mode)
101 [PLU]
701 [PLU]
[ST/TT]
201 [PLU]
[AT/TL]
PLU Zone Read or Reset
Control Lock: X or Z,
Enter the zone-start PLU Code, [X],
enter the zone-end PLU Code, [PLU].
PLU Entire Read or Reset
Control Lock: X or Z, depress [PLU].
01
§1.
1.
¿1
9.
A 5.
AO
02
B
90
PLU Code No.101
Item Count
Sales Amount
PLU Code No.102
01
B
*a
80
01
a
E
A 13.
zoa
0L04
15"52i^
27
0.
Aa
2 7.
0.
aO.
22
a29
60
01
E
00
02
E
00
70 Fi
01
g
ft
Total Item County of all
Total Amount ^ PLUs
Reset Count (not print
on X reports)
Sample Operation (X mode)
100 [X] 199 [PLU]
(indicating that the zone to be read is from PLU No.101 to PLU No.199)
PLU Code No.101
Item Count
Sales Amount
PLU Code No.102
Total Item Count
Total Sales Amount
NOTE: PLUs with sales data "0" will not be printed on any
] of all the PLUS in the designated zone
kind of PLU report;
- 29 -
Page 33

DEPARTMENT READ AND RESET REPORTS
Individual Department Read or Reset
Dept. 1 Item Count
Sales Amount
Dept. 2
Subtotal Item Count
" Amount
Dept, 3
Dept. 4
Dept. 5
Subtotal Item Count
" Amount
Total Item County of all the Depts
Total Amount ^ read in this
Control Lock: X or Z, depress the required Department Keys,
one by one. [ST/TT] to obtain subtotal
[AT/TL] to obtain total and to end.
SAMPLE OPERATION
[DEPT 1]
[DEPT 2]
]of Depts 1+2
]of Depts 3+4+5
report.
[ST/TT]
[DEPT 3]
[DEPT 4]
[DEPT 5]
[ST/TT]
[at/tl]
Department Entire Read or Reset Control Lock: X or Z, enter 11, depress [AT/TL]
Dept. 1 Item Count
Sales Amount
Dept. 2
Total Item Count
Total Amount
Department Reset Report Count (not print on X reports)
] of all Departments
- 30 -
Page 34

AUTO READ
AUTO RESET
Auto Reset Report Sample
Control Lock! X
Control Lock: Z
03-31-86
L234S
Z
] depress [AT/TL]
"X" is printed on Read Report
*liU4 t;
66
*1UHS
a 0
*aoo
I 0. ^
A
0. 0 0
I a h
A
0, 0 0
i 0. ti
*
0. 00
0. E
*
0. 00
* a E
*
0.0 0
i 0, E
*
0. 00
L %
* 0, H %
6 6 Eg
*
10 0. 86 52
*211fil
* 2 3 3 2
* 3.6 6 P
64 E5
*108945
I %-
* 0, 7 6 % -
L
*
0. 50
-
21. B pi
*10818 pi
n b3f^
* 8 9.1 4 3 pi
I B5pi
* 5.0 2 5 F
3 SSI
* 1 40 2 Spi
-- to be continued --
] Grand Total (non-resettable)
Gross Sales Item Count
Total
Department Report {refer to page 30)
NOTES: 1. The Department Report portion of the Auto Read/Reset Report
can be programmed to non-print.
2. If DEPARTMENT ENTIRE RESET report has already been taken,
all departments' data show "0" in AUTO READ/RESET report,
as in this sample.
3. The Department Memory can be programmed to reset or non-reset
when the Auto Reset Report has been taken.
Percent Charge Count
Total
Net Sales (without Tax) Item Count
Total
Tax 1 Total
Tax 2 Total
Tax 3 Total
Net Sales (with Tax) Item Count
Total
Percent Discount Count
Total
Dollar Discount Count
Total
Total Customer Count
All Media Sales Total
Cash Customer Count
Cash Sales Total
Charge Customer Count
Charge Sales Total
Misc 1 Customer Count
Misc 1 Sales Total
- 31 -
Page 35

-- Continued --
* 0,5 0 5?:
»■I70S1
* 0, 0 0 S 2
* 2 2 0 0 gpl
*658938
*50258
*249788
* 12 0
* 4 0 0 g
*0008g
* 72 4 gfi
*289658
-2172^
-3.
- 2 17 2 £ fe
A 3 5.3 0 F 1
Md20F2
*3640F
Z 0 0.0 2
A * 0.
0.
*110 OS
Aaoos§
z 0 a 0
0L07 i
15-55F
X (L
U h-
2 S#
0 S#
4 g#
1 6#
5 SI
1 a
a
1 g
0. 8g
1 sa
X o
(J D.
- 3 m
0. Sfi
If
0
.
a 0 0 y
0. ? ?
0, s#
1
ft
Charge Tip Count
Total
Received on Account (R/A 1) Count
Total
Loan (R/A 2) Count
Total
Paid Out Count
Total
Cash-in-drawer Total
Charge-in-drawer Count
Total
Misc 1-in-drawer Count
Total
Item Correct Count.
Void Count.
Item Correct and Void Count.
PB Sales Count
Check Paid Count
Outstanding Check Count.
Non-resettable Outstanding Check Count
Taxable Total 1
Taxable Total 2
Taxable Total 3
No-sale Count
Financial Reset (Auto Reset) Report Count (not print on Read reports)
'] on Dept and PLU items
Total
Total
Total
Individual Clerk Reports (refer to page 28)
NOTES: 1. The Clerk Report portion of the Auto Read/Reset Report
'] on Dept and PLU items
Total
'] on other items (Misc Void)
Total
'] (PB Sales - Check Paid)
Total
Total
can be programmed to non-print.
2. If an INDIVIDUAL CLERK RESET report has already taken,
the clerk's data show ”0" in this report, just as in this
s amp1e.
3. The Clerk Memory can be programmed to reset or non-reset
when the Auto Reset Report has been taken.
- 32 -
Page 36

JOURNAL ROLL REPLACEMENT AND OTHER MAINTENANCE OPERATIONS
REPLACING THE JOURNAL PAPER ROLL
1. Open the Paper Cover.
2. Depress the [JF] key to advance the
journal tape until unprinted part
of paper comes out of the Journal
Paper Guide (the other side of the
Paper Inlet).
3. Lift the printed journal together
with the Journal Receiving Shaft
and cut the journal at the edge of
the Journal Paper Guide.
4. Remove the printed journal out of
the Journal Receiving Shaft by
sliding the roll outward.
5. Replace the existing journal paper
roll with a new one if not enough
unprinted portion remains.
6. Fold the end of the paper squarely
about 6 inches and insert it into
Journal
the Paper Inlet. (Fig, 1)
7. Depress the [JF] key to advance the
tape about 8 inches.
8. Insert the end of the tape into the
slot of the Journal Receiving Shaft
and wrap it on the shaft twice to
secure the tape. (Fig. 2)
9. Place the Journal Receiving Shaft
into the receptacle so that the
shaft gear engages with the journal
take-up motor gear.
Ink Roller Case
REPLACING THE INK ROLLER
When the print data are too light to
read, it is time to replace the ink
roller.
1. Open the Paper Cover.
2. The Ink Roller Case is located at
the rear side of the paper inlet.
3. To remove, hold the protrusion of
the Ink Roller Case and pull it up.
4. Install a new Ink Roller Case into
the receptacle by following the
reverse order to removing. Press
it in until a "click" is heard.
(Fig. 3)
- 33 -
Page 37

MANUAL DRAWER RELEASING
The drawer opens automatically when a
registration is performed. In the
event of a power failure or other
troubles the drawer can be opened
manually in the following manner:
1. Insert the Drawer Release Key into
the drawer release lock and turn
the key clockwise. The drawer will
now open. (Fig. 1)
2. The Drawer Release Key can be taken
out by returning it to the original
position.
3. When the drawer is closed, it is
automatically locked and will not
open without the Drawer Release Key
or normal registering operation.
REMOVING THE DRAWER
1. Pull the drawer out, and when it
stops by the stopper, lift the
drawer up and pull it again,(Fig.2)
When it stops again by the roller
fixed in the drawer case, lift it
and pull it again. (Fig. 3).
2. When returning the drawer, follow
the reverse procedure to removing.
GDC (Cash Drawer Cover) LOCK
Locking (Fig, 4)
1. Push the Cash Drawer Cover to the
drawer-end,
2. Press the cover lightly, insert the
key into the key-hole on the cover,
and turn it to lock.
Opening
Release the lock by the key, and
lift the front end of the cover.
- 34 -
Page 38

SPECIFICATIONS
SIZE ......................... 460mtn(width) x 400mm(depth) x 440mm(height)
18.1" 15.7" 17.7"
WEIGHT
POWER REQUIRED ................... AC117V 50/60Hz
POWER CONSUMED .................. . 0.4A at 117V
SIZE OF JOURNAL TAPE
AMBIENT TEMPERATURE
YOUR TEC REPRESENTATIVE:
ADDRESS:
TELEPHONE:
....................... .
.............
..............
21.5 kg
38mm(width) x 70itim(diameter)
(32°F) to 40°C (104°F)
-- MEMO --
- 35 -
Page 39

Page 40

PRINTED IN JAPAN
El-01330 86041500©
Page 41

+5VSW
The +5VSW circuit receives the
ACLO signal as an input as
shown in Fig, 5.8, VJhen ACLO
goes high, it outputs 5V.
The output is connected to the
pull-up resistor for each out
put port of the CPU and PRC.
The reason why this circuit is
required is described below.
When ACLO is at the low level
(the CPU and PRC are reset),
the output ports of the CPU and
PRC become unstable. So this
circuit stops application of
+5V while the CPU and PRC are
Fig. 5.8
+5VSW Circuit
reset, to prevent malfunction
of the ROM, RAM and printer
due to transmission of unneces
sary signals.
The timing and voltage values of the above outputs are shown in
Fig, 5,9 and Table 5,1, respectively.
AC IN
Pig, 5,9 PS Timing Chart
tl i Sms
t2 ^ 0ms
t3 £ 40ms
t4 *
—— 2. 2
t3 "
{t4=400ms=TYP)
-24-
Page 42

Table 5.1 PS Output Voltage
Symbol Voltage (V) Supplied to:
+5V +4.75^+5.25 ICs
-5V -4.5—5.5 Display control IC
-VD
VF1,VF2 AC4.5/V6.5 Display tube filaments
BATTERY
VM
-38--46
+2.4V min.
AC22'^26 Printer, drawer, buzzer Effective value
Display tube grids
RAM/ timer (at power
failure time)
Note
Effective value
RAM holding voltage
(28 pin voltage):
2.0V min.
(TYP: 24V)
-25-
Page 43

6. DISPLAY
An HMCS-45A is used for the display controller indentified by ICS.
Receiving the 4 bit parallel display data sent through connector
CN3, it displays the same contents (10 digits) on the FIU and BIU
and controls the buzzer.
After being input to the display controller, the display data from
the CPU is output from each port as the segment plate signals and
the grid signal for each digit. These signals are amplified by ICl
to ICG and then sent to the FIU and BIU in parallel. The buzzer
control signal is output from the D1 port and is driven by IC7 and
transistor Ql.
There are six types of power supplies to be delivered to the
display: -5V, +5V, -VD, VFl, VF2, VM. They are sent from the
power supply unit through connector CN3. +5V and -5V are used as
power supplies for the ICs, -VD, VFl, and VF2 as power supplies for
the fluorescent display tube, and VM for driving the buzzer.
Table 6.1 lists the port functions of the printer controller.
Common to FIU and BIU
V p
lOG
1 1 n
1 1
1 J
/ L
V
2G
ICS
D1
S(a)
r
1 L
— y
V
S(g)
(1/2)
t)
(DP)
R20
R2*3
R30
R33
R40
R41
D0
INT0
ROO
ROl
R02
IG
KU J
ACKito CPU)
CS
PA0
PAl
PA2
PA3
D2
D3
/
/
i
\
1
ILMCS
-45A
Fig. 6.1 Display Circuit Block Diagram
-26-
Page 44
Table 6.1 DSP Controller Port Functions
Port
DO ACK
D1
D2 IG
D3 2G
D4 3G
D5 4G
D6 5G
D7
D8 7G
D9
DIO 9G
Dll lOG
D12a,15
ROO
ROl PAl
R02
Signal
Name
BUZZER Buzzer Drive signal
6G
8G
NC
РАО
PA2
Function
Acknowledge signal to be sent to the CPU
У To the grid of each digit of the FIU
/ and BIU
1
1
у 4 bit parallel display data inputs
Active
Level
H/L
H
R03 РАЗ
R10^13
R20
R21
R22
R23
R30 (e)
R31
R32
R33
R4p
R41 (Dp)
R42,43 NC
R5l^53 NC
R60-63 NC
RST ACL
INTO
NC
S (a)
(b)
(c)
(d)
(f)
(g)
(1/2)
(t)
■
CSDSP
J
A
\
у To each segment plate of the FIU and BIU
Auto Clear signal input H
Chip Select signal input
H
NC : Not Connected
“27-
 Loading...