

Page 1
TEC Electronic Cash Register
FDS-50
TEC
TOKYO ELECTRIC CO., LTD,
Page 2
' ■ ■..--V ■/' ■
^ ^ ,t ,.!■': ■ v‘f4;- íl,:* '"^fe
■■ ■■■ . "'’V;■'^
■'ítL'
■■■■:;í.ííí-
¿S^ÈÂiélVir.WT- -, !>j|!
Page 3

TABLE OF CONTENTS
EOl-11005
Chapter No.
1. TO OUR CUSTOMERS.................................................................................................................... 1
2. PRECAUTIONS .............................................................................................................................. 1
3. APPEARANCE AND NOMENCLATURE ......................................................................................... 2
4. CONTROL LOCKS AND MODE SELECTOR KEYS
......................................................................
5. DISPLAY .......................................................................................................................................... 6
6. KEYBOARD LAYOUT .................................................................................................................... 10
7. FUNCTIONS OF EACH KEY ......................................................................................................... 12
8. SYSTEM TYPE VARIATIONS AND OPERATION FLOWS........................................................... 15
9. REGISTERING PROCEDURES .................................................................................................... 18
10. POWER FAILURE PROCESS ....................................................................................................... 70
11. JOURNAL AND RECEIPT PAPER-END DETECTOR
................................................................
12. PRINTER MOTOR LOCK DETECTOR ......................................................................................... 70
13. PAPER ROLL REPLACEMENT AND OTHER MAINTENANCE OPERATIONS ......................... 71
14. SPECIFICATIONS.......................................................................................................................... 75
15. -INDEX- .......................................................................................................................................... 76
page
3
70
Copyright © 1989
by Tokyo Electric Co., Ltd.
All Rights Reserved
1-14'10 Uchikanda, Chlyoda-ku, Tokyo, Japan
Page 4

1. TO OUR CUSTOMERS
Thank you for choosing the TEC electronic cash register FDS-50 series. This instruction manual
provides a description of the functions and handling of this register and should be read carefully to
ensure optimum performance. Since every consideration has been given to safety and reliability,
there is no danger of damaging the machine by incorrect operation.
Please refer to this manual whenever you have any questions concerning the machine. This
machine has been manufactured under strict quality control and should give you full satisfaction.
However, if the machine is damaged during transit, or there are any unclear points in this manual,
please contact your local TEC representative.
• The specifications described in this manual may be modified by TEC, if necessary.
• Be sure to keep this manual available for future reference.
PRECAUTIONS
EOl-11005
The ECR is a precision machine. Please handle it carefully considering the following guidelines.
REMARKS ON THE LOCATION
• Place it where no unusual temperature changes are expected.
• Place it on a fiat and level surface with little dust, humidity, vibration, etc.
• Keep it away from water sources.
• Do not use it in direct sunlight for a long time.
• Ensure proper ventilation so that the machine is not exposed to excessive heat.
• Be certain to connect a grounding wire to prevent the generation of static electricity and
noise troubles. Never share the same power outlet with many other electric appliances.
REMARKS ON OPERATING THE ECR
• The keys on the keyboard function with a light touch. Avoid pressing the keys too hard.
• Do not handle the machine with wet hands, since this may cause electrical malfunctions
and corrosion of parts.
• Do not apply thinner, benzine, or other volatile materials to the cabinet or other plastic
parts. Such liquids will cause discoloration or deterioration of the cover. If dirty, wipe off
with a piece of cloth soaked in a neutral detergent and wrung out thoroughly.
• Turn off the power switch when the operations are over for the day.
• Ask your TEC representative to provide periodical maintenance to ensure the optimum
performance of the machine.
• As for other operations, follow the instructions in this manual.
- 1 -
Page 5
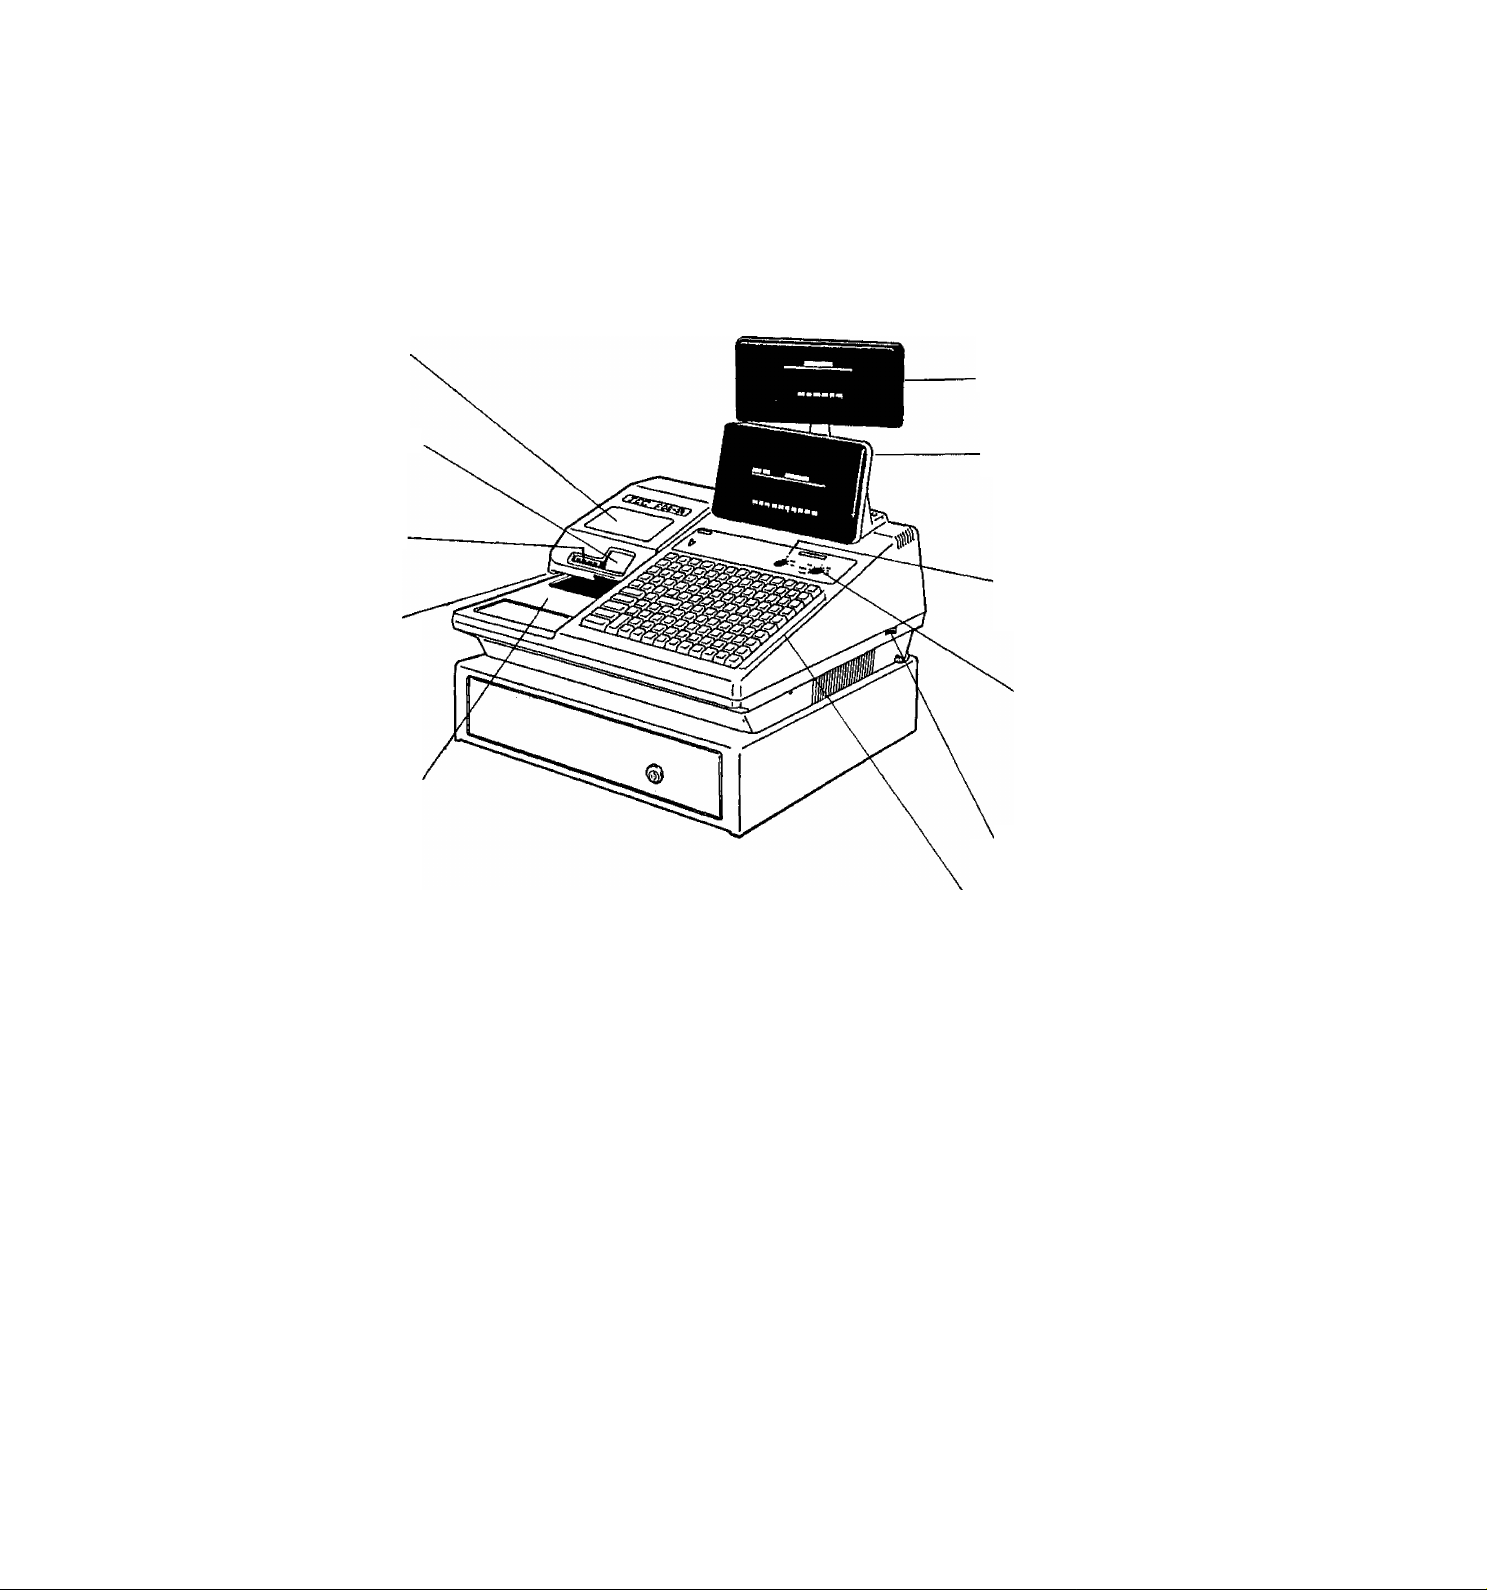
3. APPEARANCE AND NOMENCLATURE
Paper Cover
E01-11005
Customer Display
Journal Window
Receipt Outlet
Validation Slot
Ribbon Cover
Operator Display
GT Lock
(Master Terminal only)
Mode Lock
Power Switch
Keyboard
Power Switch: The power switch is located on the righthand side of the cabinet. The
AC Power is turned on when the switch is pushed to ON, and turned
off when the switch is pushed to OFF.
-2 -
Page 6
4. CONTROL LOCKS AND MODE SELECTOR KEYS
EOl-11005
MODE LOCK
MGR
NOTE:
No indication is marked at
the '‘OFFLINE” position.
(OFFLINE)
it it jjk
MA
Key
SET
Key
MGR
Key
(POSITION) (FUNCTION)
SET: In this position, the register will allow
programming operations.
T
LOCK: The register operations are locked
when the Mode Lock is set to this
REG
Key
REG: Normal cash register operations are
X: The sale totals can be read and the
MGR: This position allows registering of all
(OFFLINE): This position is used, instead of the
position. Only paper feeding (using the
[RF] or [JF] key) is allowed.
carried out in this mode. The
operations programmed to require the
‘MGR’ position cannot be performed in
this position.
programmed data can be verified in this
position.
normal cash register operations to be
carried out in the ‘REG’ mode and the
operations programmed to require the
‘MGR’ position.
REG position, to enter sales data when
any trouble occurs on the Master
Terminal and therefore the terminal
cannot communicate with the Central
File in the Master Terminal.
Z:
- 3 -
All the resettable totals and their
counters are read and reset in this
position.
Page 7
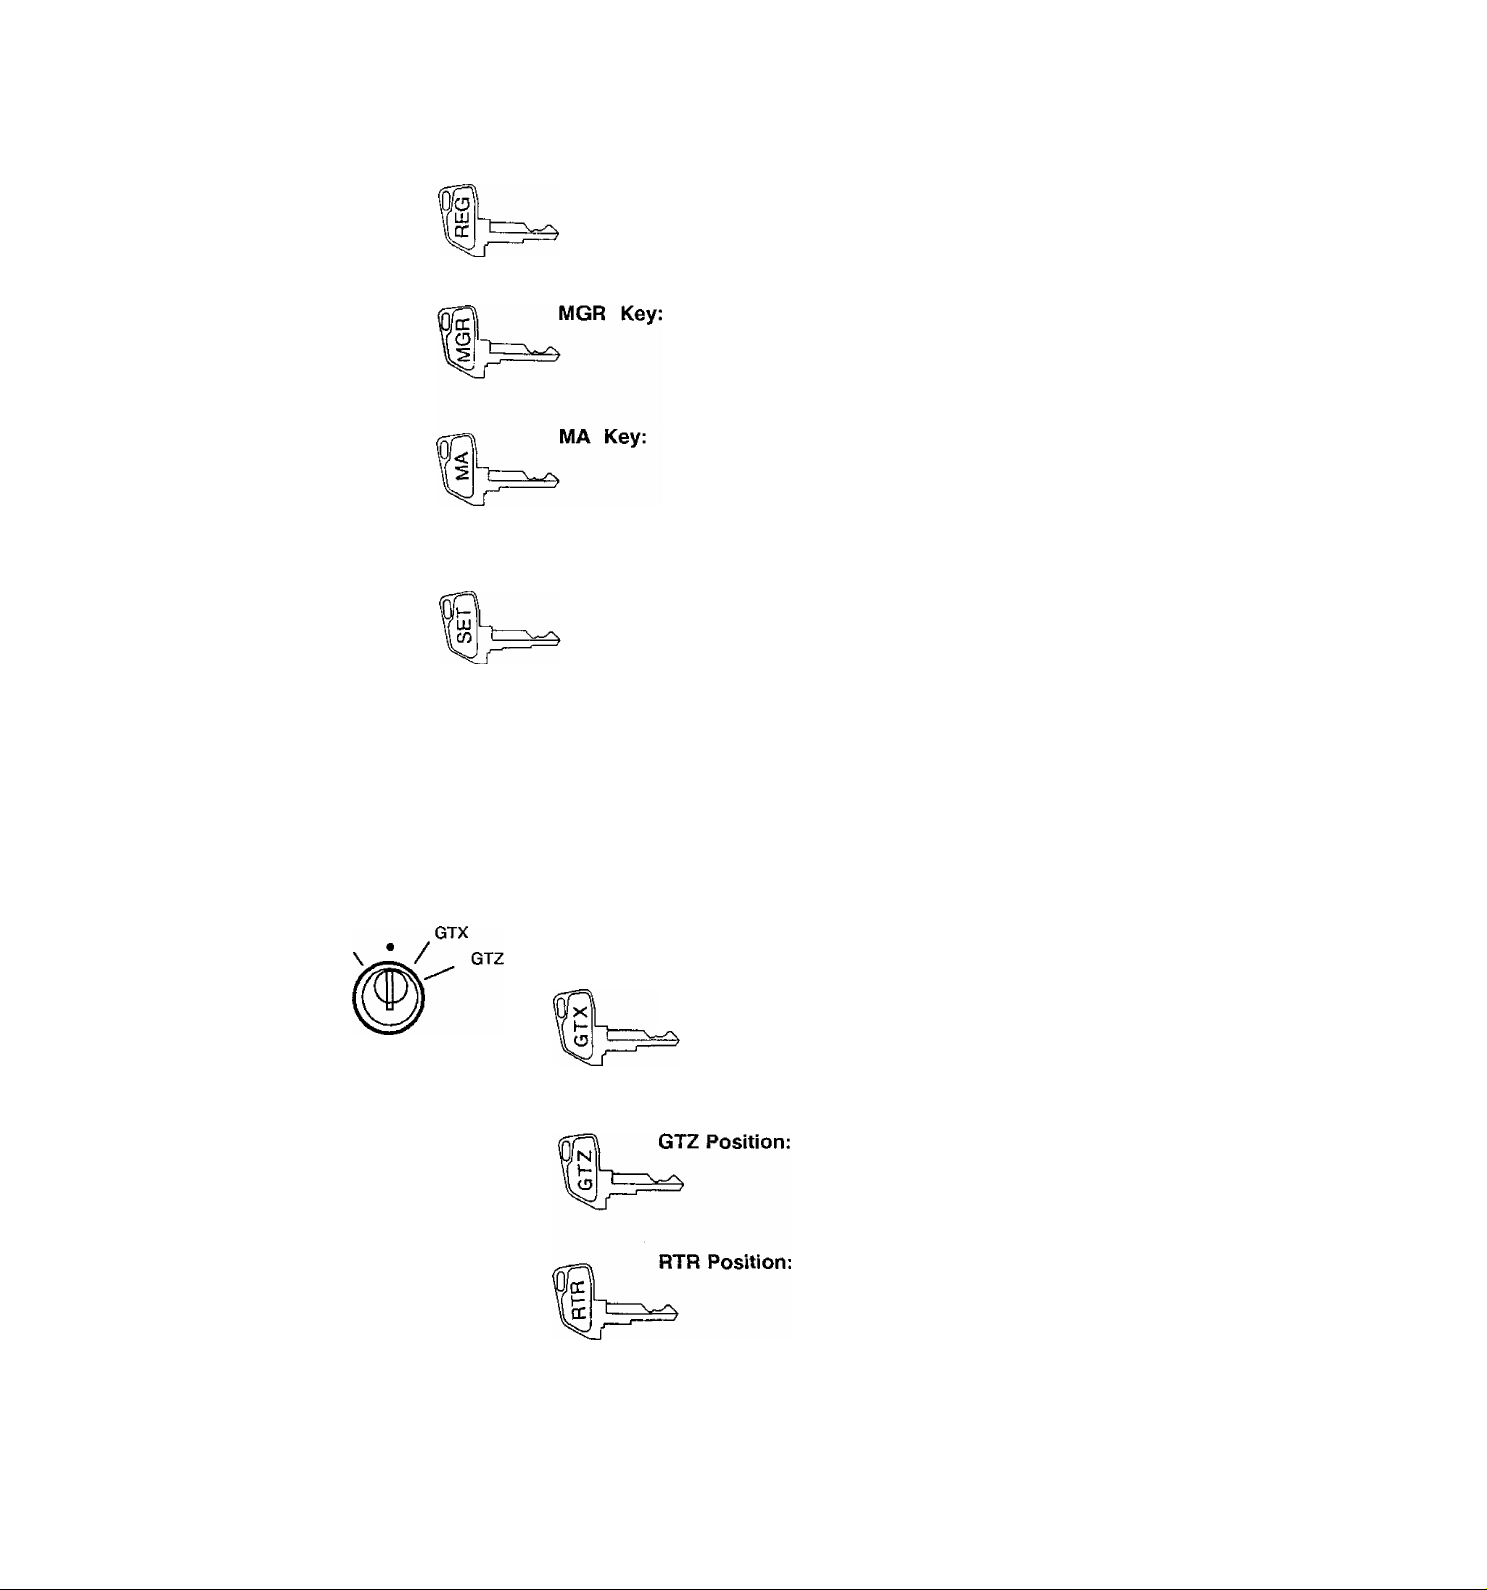
EOl-11005
REG Key: The REG Key is used by the cashier who operates
the register. This key can access the positions of
LOCK and REG.
The MGR Key is used by the manager or a person
authorized by the manager. This key can access the
positions of LOCK, REG, X, and MGR.
The MA Key is used by the manager who will daily
supervise the collection of money and the printout of
transactions recorded by the register. This key can
access the positions of LOCK, REG, X, MGR,
OFFLINE, and Z.
SET Key; The SET Key is used by the programmer. This key
can access the positions of LOCK and SET.
All the keys can be removed from the OFF or REG position.
GT LOCK (on Master Terminal only)
RTR
This lock is provided to read or reset the accumulated
sales not on a daily basis but on a weekly or monthly basis.
GTX Position; This position can be accessed by the
GTX Key or GTZ Key, and allows to
issue GTX reports of consolidated data of
the terminals connected to the in-line
loop.
This position can be accessed by the
GTZ Key, and allows to issue GTZ
reports of consolidated data of the
terminals connected to the in-line loop.
This position can be accessed by the
RTR Key, and allows to operate in-line
service jobs such as reports, Down Line
Loadings, etc.
The keys can be removed and inserted in the neutral
position which is marked with a dot.
-4-
Page 8

CASHIER LOCKS (option)
Light to indicate
ON-status.
E01-11005
These locks are provided as option, to identify the
operating cashier. Each of the keys can be inserted
and pulled out in the neutral position marked with a
No., and two ways are provided to set the Cashier
Lock ON status:
0 0
Oi^
RECEIPT ON/OFF SWITCH
1. PUSH-ON
When simply pushed on and immediately
released, the Cashier Lock is set to ON
status. However, this ON condition will be
cleared automatically cleared when the
following transaction is finalized.
2. PUSH-AND-LOCK
When pushed and turned to the right, the
ON status is locked until it is turned back,
released, and the other Cashier Lock is
set to ON.
As for cashier/server Sign-ON/OFF operations, see
Chapter 9.
RECEIPT
ON
OFF
This key has two positions, OFF and ON. When in
the OFF position, receipts are not issued from the
register and sales are printed on the journal roll only.
When the switch is set to the ON position, sales are
printed on both the receipt roll and journal roll.
(Applicable when the entered data is to be printed on
the receipt roll.)
This switch position selection does not affect any
printing on Remote Kitchen Printers or Guest Check
Printer.
If the [POST RECEIPT] key is installed on the
keyboard, a receipt can be issued even when the
RECEIPT ON/OFF SWITCH is in the OFF position.
(See the Post Receipt description in Chapter 9.)
- 5 -
Page 9
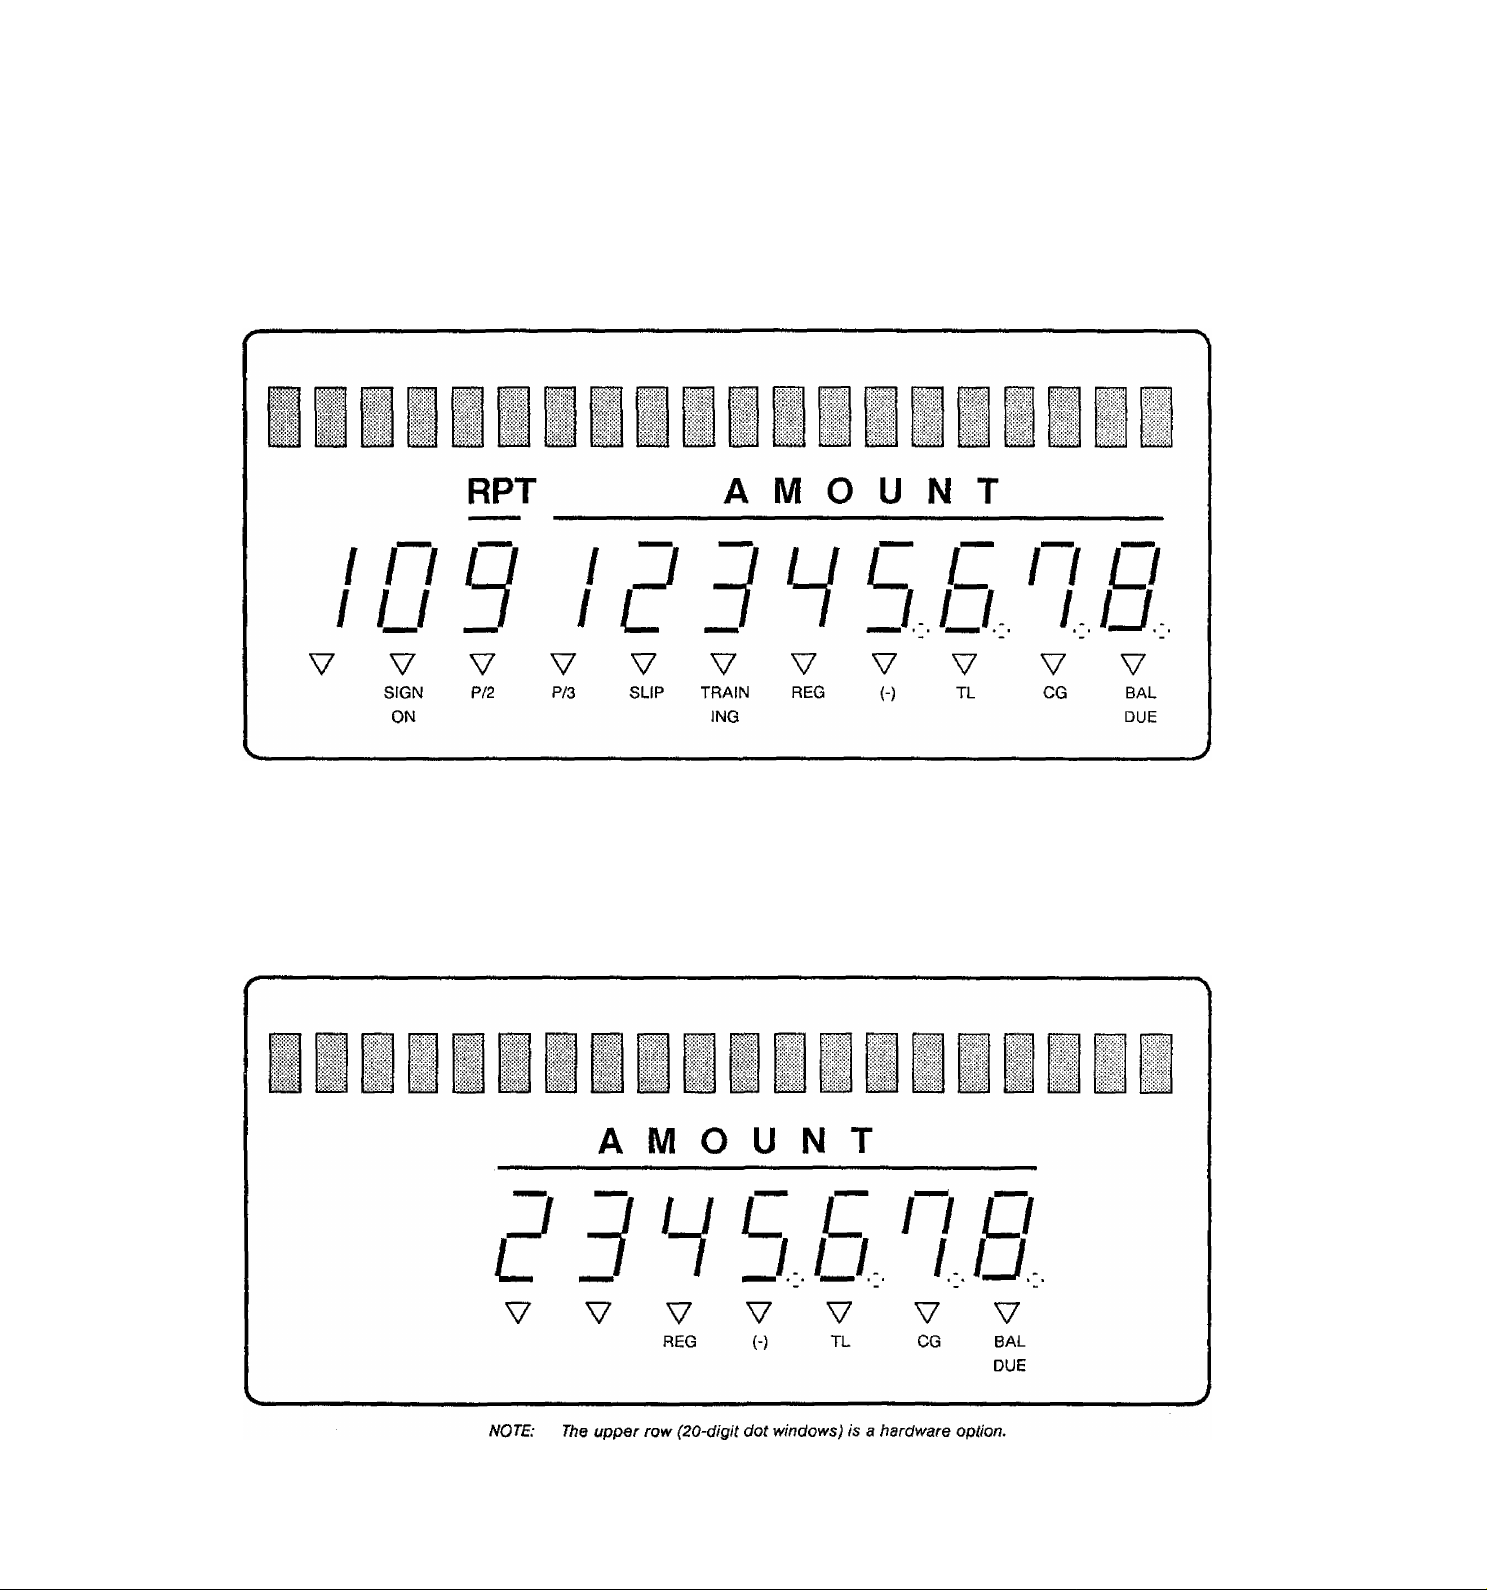
5. DISPLAY
A tilt type is adopted for the operator display, which is adjustable in the up and down direction. The
entered amounts and the obtained total are easy to see.
E01'11005
OPERATOR DISPLAY (Front Display)
The customer display can be fixed as a rear display or moved to form a remote display. It can be
moved up, down, to the right, and to the left, and thus is fully adjustable according to the position of
the customer.
CUSTOMER DISPLAY (Rear or Remote Display)
Page 10

5-1 UPPER ROW (20-digit dot windows)
Alphanumeric characters are displayed here as messages, order item descriptors, prompts for
the operator, etc. depending on the Mode Lock position and the operation sequence.
(1) Mode Indications
“LOCK” Mode
If the display message is programmed, the message is displayed, scrolling from
the right to the left. A maximum of 60 characters can be programmed as the
display message for the purposes of commercial information, welcoming
greetings, etc. At the same time the current time is displayed in the lowest 5
digits of the Lower Row (example: 14-52 for the time 14:52).
“REG”. ”MGR". or “OFFLINE" Mode initial Display
Nothing is displayed as initial display.
EOl-11005
Other Mode Initial Display
The mode symbol of 1 to 3 characters are displayed in the lowest 3 digits:
4
“SET” Mode:
“X” Mode:
“Z” Mode:
“GTX” Mode:
□
□
□
□
□ □
□
□ 0
“GTZ” Mode:
□ 0
(2) Descriptors of Various Sales Items (“REG”, “MGR”, “OFFLINE”)
The descriptor (name) programmed for each menu item, transaction item, etc. is
displayed as the item is entered on the keyboard.
2
3
□
□
0
0
Digit No.
0
0
0
0
0
- 7 -
Page 11
(3) Error Messages {in any mode except “LOCK”)
When an error occurs, a 2-digit error code and its message (programmable) are
displayed, with an error buzzer (a long tone).
Read the Error Code or the Error Message, depress the [C] key to cancel the
error status and tone, operate the sequence again after removing the cause of
the error.
The following table shows the cause of the error corresponding to each Error
Code. Fill in the actual content for the Error Message programmed for your
terminal. (The manager should have the information.)
ERRCR CCDE AND MESSAGE TABLE
EOl-11005
Error
Code
01
02
03
04
06
07
08 Numeric entry compulsory error
09
10
11
12
14
16
17 Scale operation error
18
20
21
22
23
24
25 Server # required
26 Check # required
27 Guest # required
28 Table # required
29 Operator busy
30 Sign ON required
31
32
33
34
35
36
37
38 Transmission Error (on Satellite Terminals)
39 The server still has outstanding checks.
40
Error Message Content or Cause of Error
Operation error
Operation locked
illegal programnning
Incorrect code entry
Numeric entry overflow
Numeric entry inhibit error
Manager intervention required
Validation required
Validation operation error
Drawer -close compulsory
Code entry compulsory error
Scale entry compulsory error
Scale time-out error
Guest Check insertion required
Guest Check removal required
Remote Kitchen Printer busy
Remote Kitchen Printer off-line
Remote Kitchen Printer hardware error
Incorrect operator code
Previous Balance file busy
Previous Balance file full
Incorrect Check #
Check Transfer operation
Communication error
Time-Out Error (on Satellite Terminals)
Power Failure occurred (See Chapter 10.)
It is recommended io prepare a copy of the above table after filling in the messages, and place it
near the register.
-8-
Page 12

5-2 LOWER ROW (11-digit 7-segment Numeric Display and 11 Triangular
Lamps)
Numeric Display
EOl-11005
AMOUNT (8 digits)
RPT (1 digit)
Displays the numeric data, such as amount, quantity, etc.
Displays the repeat count !t indicates nothing on the first
item entry, showing 2, 3, 4, etc., from the second item entry
on. Since it has only one digit, 0 will be displayed for count
10, 1 for 11, etc.
Triangular Lamps
SIGN This lamp lights when a Cashier or Server has signed on (and a cashier or
ON server has entered his/her code if so required), indicating that a sale entries
are now allowed.
P/2 This lamp lights when the prices of Menu items has been shifted to Price 2
by operating the [PRICE SHIFT] key.
P/3 This lamp lights when the prices of Menu Items has been shifted to Price 3
by operating the [PRICE SHIFT] key.
SLIP
Flickers when a validation slip is required to be inserted to the Validation
Slot. It is steadily lit when a validation slip is properly set.
TRAIN
Lights up in the Training Mode.
ING
REG
Lights up in the REG or MGR mode when a sale item has been entered and
goes out when the sale has been finalized.
(‘)
Lights up when an item of negative amount has been entered. It flickers
when the Mode Lock is turned to the OFFLINE position, indicating that the
operations are performed in the OFF-LINE condition.
TL
Lights up when any operation to obtain the total of the entered items has
been performed, indicating that the displayed amount is the total. It goes out
when another motorized key is depressed.
CG
When an amount tendering operation is performed, it lights up with the
change due displayed (including cases when the change due is zero). It
goes out when another motorized key is depressed.
BAL Lights up when an amount tendered is short, indicating that the amount
DUE displayed is the balance due.
- 9 -
Page 13

6. KEYBOARD LAYOUT
The following are typical keyboard layouts for the FDS-50 series. Since this series is designed to be
capable of programming most of the keys in the most desired location on the keyboard, these are
merely examples. The keyboard of your register should have its own layout according to the store’s
requirements.
- Fiat Keyboard Type - (standard feature)
RECEIPT
ON
OFF
SIGN
ON/OFF
PRICE
SHIFT
RF
PO
EOI-11005
JF
R/A
ITEM
if
AMOUNT
NEW
CHECK
GUEST
#
TABLE
SERVER
VOID
TX1/M
7
4
1
CORR
TX2/M
C
ITEM
8
5
2
#
CHECK
COMB.
VOID
CHECK
DISC
ITEM
SERVICE
CHARGE
PR
OPEN
@/FOR
9
6
3
VALI
DATE
CHECK
TRANS
SERVICE
ADJUST
DISC
GIFT
CERT
HOUSE
CHARGE
NS
TIPS
PAID
CHARGE
TIP
COUPON
TX EX
TAB
CASH
PB
CHECK PAID
CASH
CREDIT CARD
0
Other keys that can be installed in addition to the keys in the above figure:
See the description below the ''Ordinary Keyboard Type" on the next page.
- 10 -
00
ST TOTAL
Page 14

EOl -11005
RECEIPT
ON
OFF
RF JF
CHECK
COMB.
VOID
CHECK
GIFT
CERT
HOUSE
CHARGE
CHECK
TRANS
SERVICE
ADJUST
TX EX
TAB
CASH AMOUNT
PB
CHECK PAID
- Ordinary Keyboard Type -- (alternative option)
SIGN
ON/OFF
TIPS
PAID #
CHARGE
TIP
ITEM
PRICE
SHIFT
DISC
ITEM
# VOID
PO
VALt
DATE
DISC
ITEM
CORR
TX1/M TX2/M
NEW
CHECK
GUEST
# 7 8 9
C @/FOR
R/A
NS
COUPON
SERVICE
CHARGE
DQ
OPEN
CASH
CREDIT CARD
TABLE
# 4 5 6
SERVER
1 2
3
*
TOTAL
0 00
ST
Other keys that can be installed in addition to the keys in the above figure:
[POST RECEIPT]
[TX3/M]
[TXBL TL]
[TAX]
[PRESET OPEN]
[SCALE]
Additional Non-cash Media Keys
(besides [CREDIT CARD], [GIFT CERT], & [HOUSE
CHARGE])
Additional %-/COUPON Keys
(besides [COUPON], [DISC], & [DISC ITEM])
Additional Received-on-Account Keys (besides [R/A])
[TARE]
[LINE #]
[CLEAR TRAN]
The keys other than these function keys are usually used as Code-
preset Menu Item Keys.
[TRAY TOTAL]
[FUNCTION]
- 11 -
Page 15
7. FUNCTIONS OF EACH KEY
This section briefly describes functions of each key for your quick reference purposes. See the
reference pages in Section 9: REGISTERING PROCEDURE for detail operation sequences.
TABLE OF KEY FUNCTIONS
EOl-11005
KEY
Numeric Keys
[0] to [9], [00]
[RF]
[JF]
Menu Item Keys
[ITEM #]
[RETURN]
[ITEM CORR]
[VOID]
FUNCTIONS
Used to enter numeric values. Depressing the [00] key
once is the same as depressing the [0] key twice
consecutively-
Receipt Feed Key. Used to advance the receipt roll and
operated by holding it down until the paper has advanced to
the required position.
Journal Feed Key. Used to advance the journal roll in the
same fashion as the [RF] key is used to receipt roil.
These keys are often referred to [Code-preset Menu] keys
in the following chapters. Each of them has its own Item
Code preset and allows the item entry by one-touch
depression of the key.
Used to enter menu items by item Code entries.
Used to enter returned items in Non-tab Mode.
Item Correcf Key. Used to delete the last line item entered
within the current transaction.
Used to delete a menu item entered previously in the current
transaction or guest check.
REFERENCE
PAGE
33
33
41
39
40
[SERVICE ADJUST]
[CASH]
Non-cash Media Keys
[ST]
[TXBL TL]
[VALIDATE]
Used to enter a refund amount to adjust a guest check total
before finalizing the check.
This is the cash media key to finalize a transaction or guest
check for payment.
A maximum of 9 non-cash media keys can be installed and
used to finalize a transaction or guest check for non-cash
payment. The [CREDIT CARD], [HOUSE CHARGE], and
[GIFT CERT] keys on the sample keyboards in the
preceding sections are examples of such keys.
Subtotal Key. Used to obtain subtotal of the current
transaction. It can be programmed to display taxable total
amount.
Taxable Total Key. Used to obtain taxable total (subtotal
+ taxes) of the current transaction. When the [ST] key is
programmed to display taxable total, this key is not
necessary.
Validation Key. Used to print a required item entry on a
validation slip.
48
31
31
51
51
56
- 12-
Page 16
TABLE OF KEY FUNCTIONS (continued)
EOl-11005
KEY
m
[PR OPEN]
[AMOUNT]
[@/FOR]
[POST RECEIPT]
EC]
[TX1/M], [TX2/M],
[TX3/M]
FUNCTIONS
Non-add Number Print Key. Used to print a non-add
numbers for future references.
Preset Open Key. Used to release a preset-price menu
items for a manual price entry.
Amount Key. Used to enter a manual amount of a menu
item.
At/For Key. Used to multiply a menu item entry by a
quantity. It is also used to enter a Purchased Quantity and a
Whole Package Quantity in a Split Package Pricing
sequence.
Used to issue a post receipt of the last transaction finalized.
Clear Key. Used to clear numeric entries, to cancel an
error status, etc.
Tax Modifier Keys. Used to reverse the taxable/non-taxable
status of menu items or function keys. The keys correspond
to Tax 1, Tax 2, Tax 3 tables respectively. They are also
used to exempt a transaction from a specific tax, along with
a use of the [TX EX] key.
REFERENCE
PAGE
55
34
33
34
57
52, 53
[TAX]
[TX EX]
[PB]
[SCALE]
[TARE]
%-/COUPON Keys
[SIGN ON/OFF]
[TIP PAID]
[CHARGE TIP]
Manual Tax Key. Used to enter a tax amount not charged
by automatic tax calculation.
Tax Exempt Key. Used to exempt a transaction from taxes.
Previous Balance Key. Used to pick up the previous
balance of the guest check in an additional order entry
sequence.
Scale Key. Used to enter the weight of a menu item from
the sale automatically or to enter a pre-weighed menu item
manually.
Tare Key. Used to enter a Tare Table Code to specify the
tare subtraction amount from an auto-scale item entry.
A maximum of 5 keys can be installed. Each key can be
programmed as %- key or Coupon (or Dollar Discount) key.
On the typical keyboards in the preceding chapter, [DISC],
[COUPON], and [DISC ITEM] are examples of these keys.
Used for each operator’s sign ON and sign OFF entries.
Used to enter a cash tip amount in transactions in Tab
Mode.
Used to enter a tip amount paid in a non-cash media in Tab
Mode.
52
53
28
35
35
44
20, 21
46
47
[SERVER #]
Used to enter the code of the server or cashier who is
responsible of the transaction.
- 13 -
22, 23
Page 17
TABLE OF KEY FUNCTIONS (continued)
EOl-11005
KEY
[TABLE #]
Used to enter the Table No. of a guest party.
FUNCTIONS
[GUEST #] Used to enter the number of guests in a party.
[TRAY TOTAL]
[TAB CASH]
[CLEAR TRAN]
[VOID CHECK]
Used to obtain the total of an individual guest tray in a guest
party. Used in Non-tab Mode only.
TabICash Mode Change Key. Used to change the original
mode of the terminal for one transaction only.
Clear Transaction Key. Used to clear the entire data
already entered in the current transaction.
Used to clear the entire guest check data in Tab Mode. 43
Used to designate Function Tables 1 to 10, each of which is
[FUNCTION]
programmed with a maximum of 10 key entry sequences
often used as daily business routines.
[PRICE SHIFT]
[SERVICE CHARGE]
[TOTAL]
Used to shift prices of menu items. (A maximum of three
prices can be preset for each menu items.)
Used to add a service or table charge rate to a guest check
in Tab Mode.
Used to finalize menu items for order and obtain the total,
and at the same time, transfer the balance.
REFERENCE
PAGE
27
27
54
65
42
62
37
45
29
[NEW CHECK] Used to open a check for a new guest party in Tab Mode. 27
[CHECK TRANSFER]
[CHECK COMBINE]
[CHECK PAID]
Used to change the Server, Table, and/or Number of Guests
of a check already opened.
Used to merge two different checks into one. 50
Used to declare closing of a guest check and go on to
media entries for payment.
Used, in the OFF-LINE mode, to enter the number of printed
[LINE No.]
lines for accessing the appropriate position to print additional
data on a guest check.
[NS]
/Vo-sa/e Key. Used to open the cash drawer without
relating to a sale.
Received-on-Account Keys. A maximum of 4 keys can be
[R/A] 1 to 4
installed. Used to enter payments received on account, i.e.
not relating to business.
[PO]
Paid-Out Key. Used to record amounts paid out of the
cash drawer not relating to a sale.
49
30
OFF-LINE
Mode,
Manger’s
Guide
59
60
61
- 14 -
Page 18
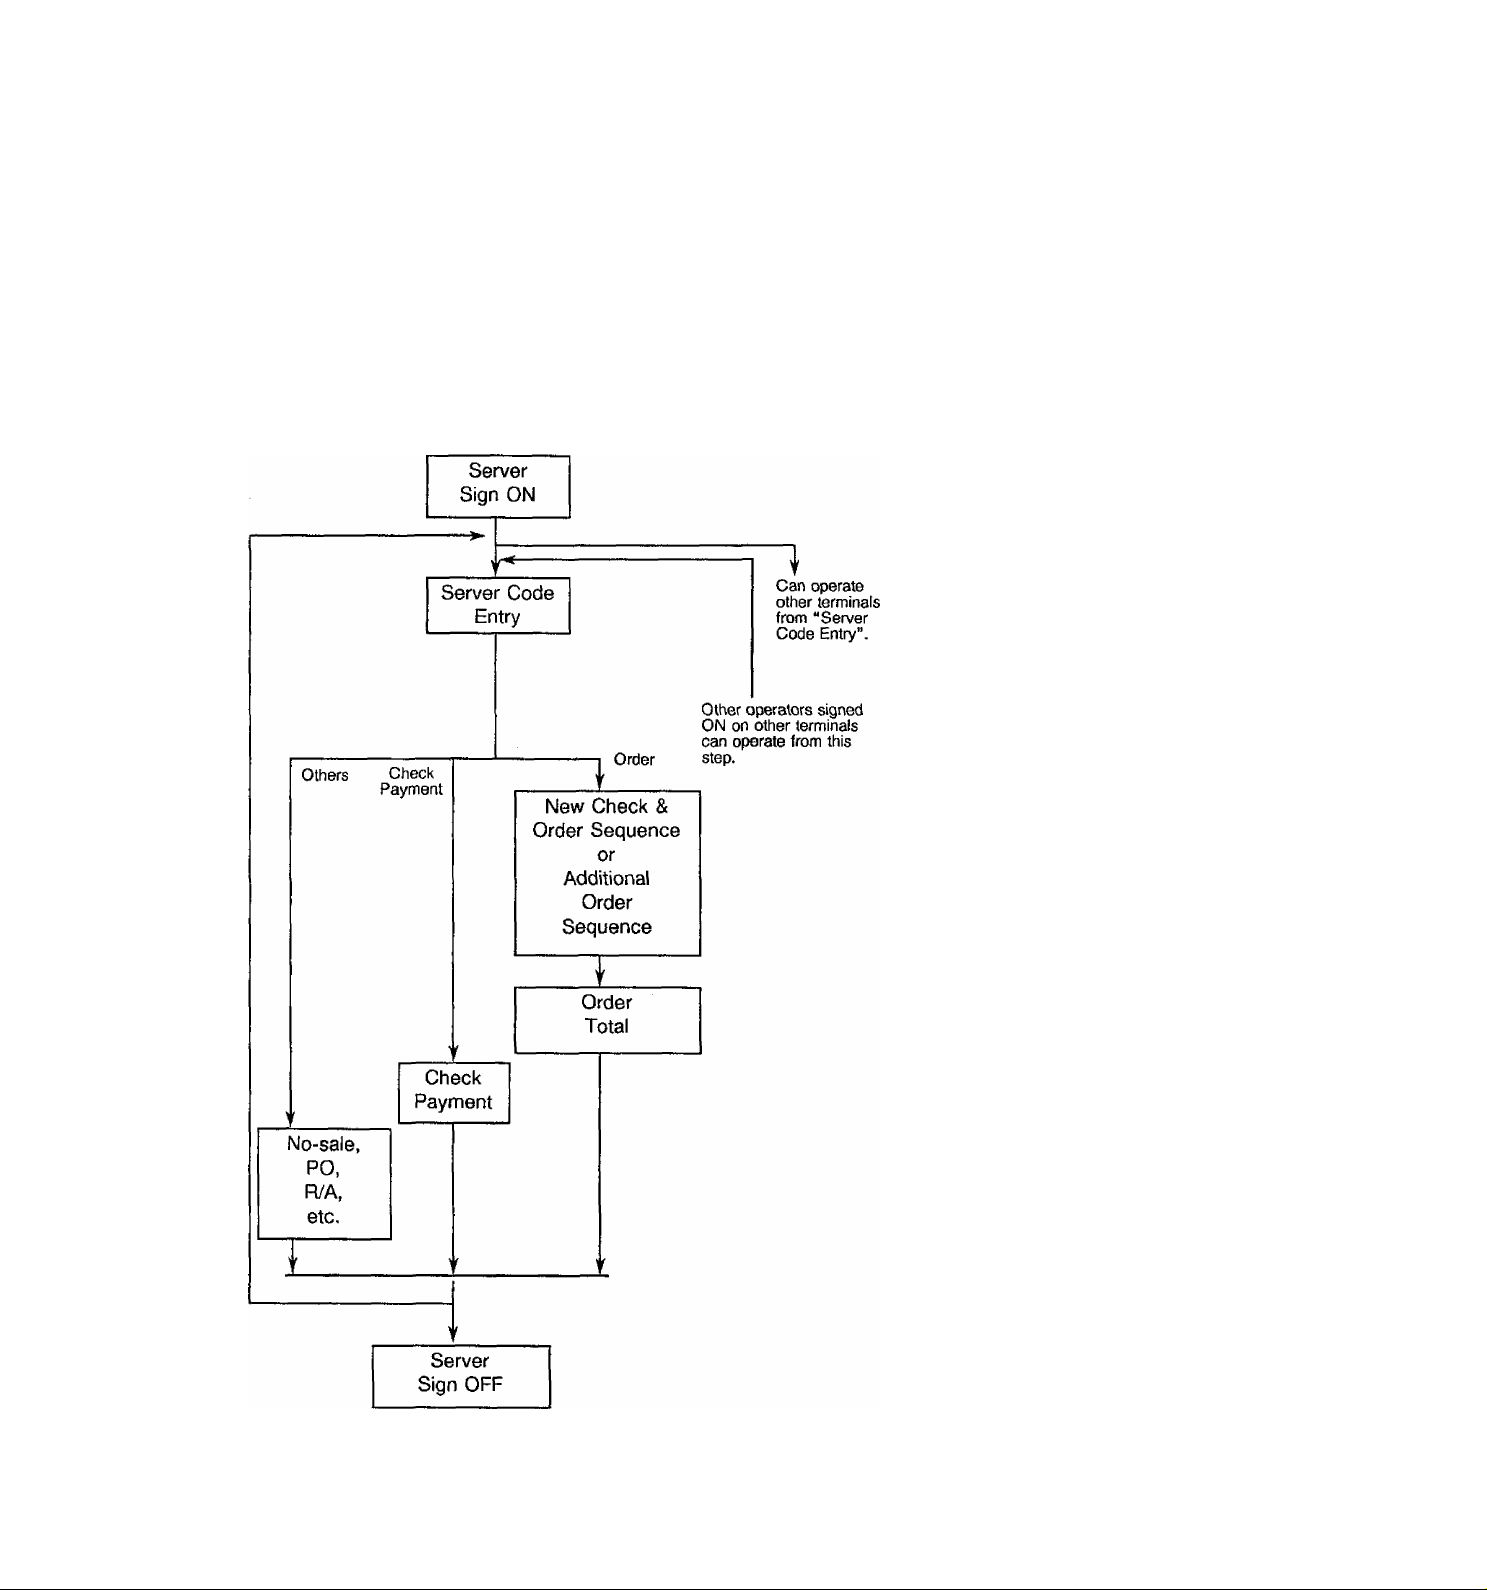
8. SYSTEM TYPE VARIATIONS AND OPERATION FLOWS
The FDS-50 terminal can be programmed to one of the following three types in the aspect of the
store environments. Combining these different types in one in-line system is also possible.
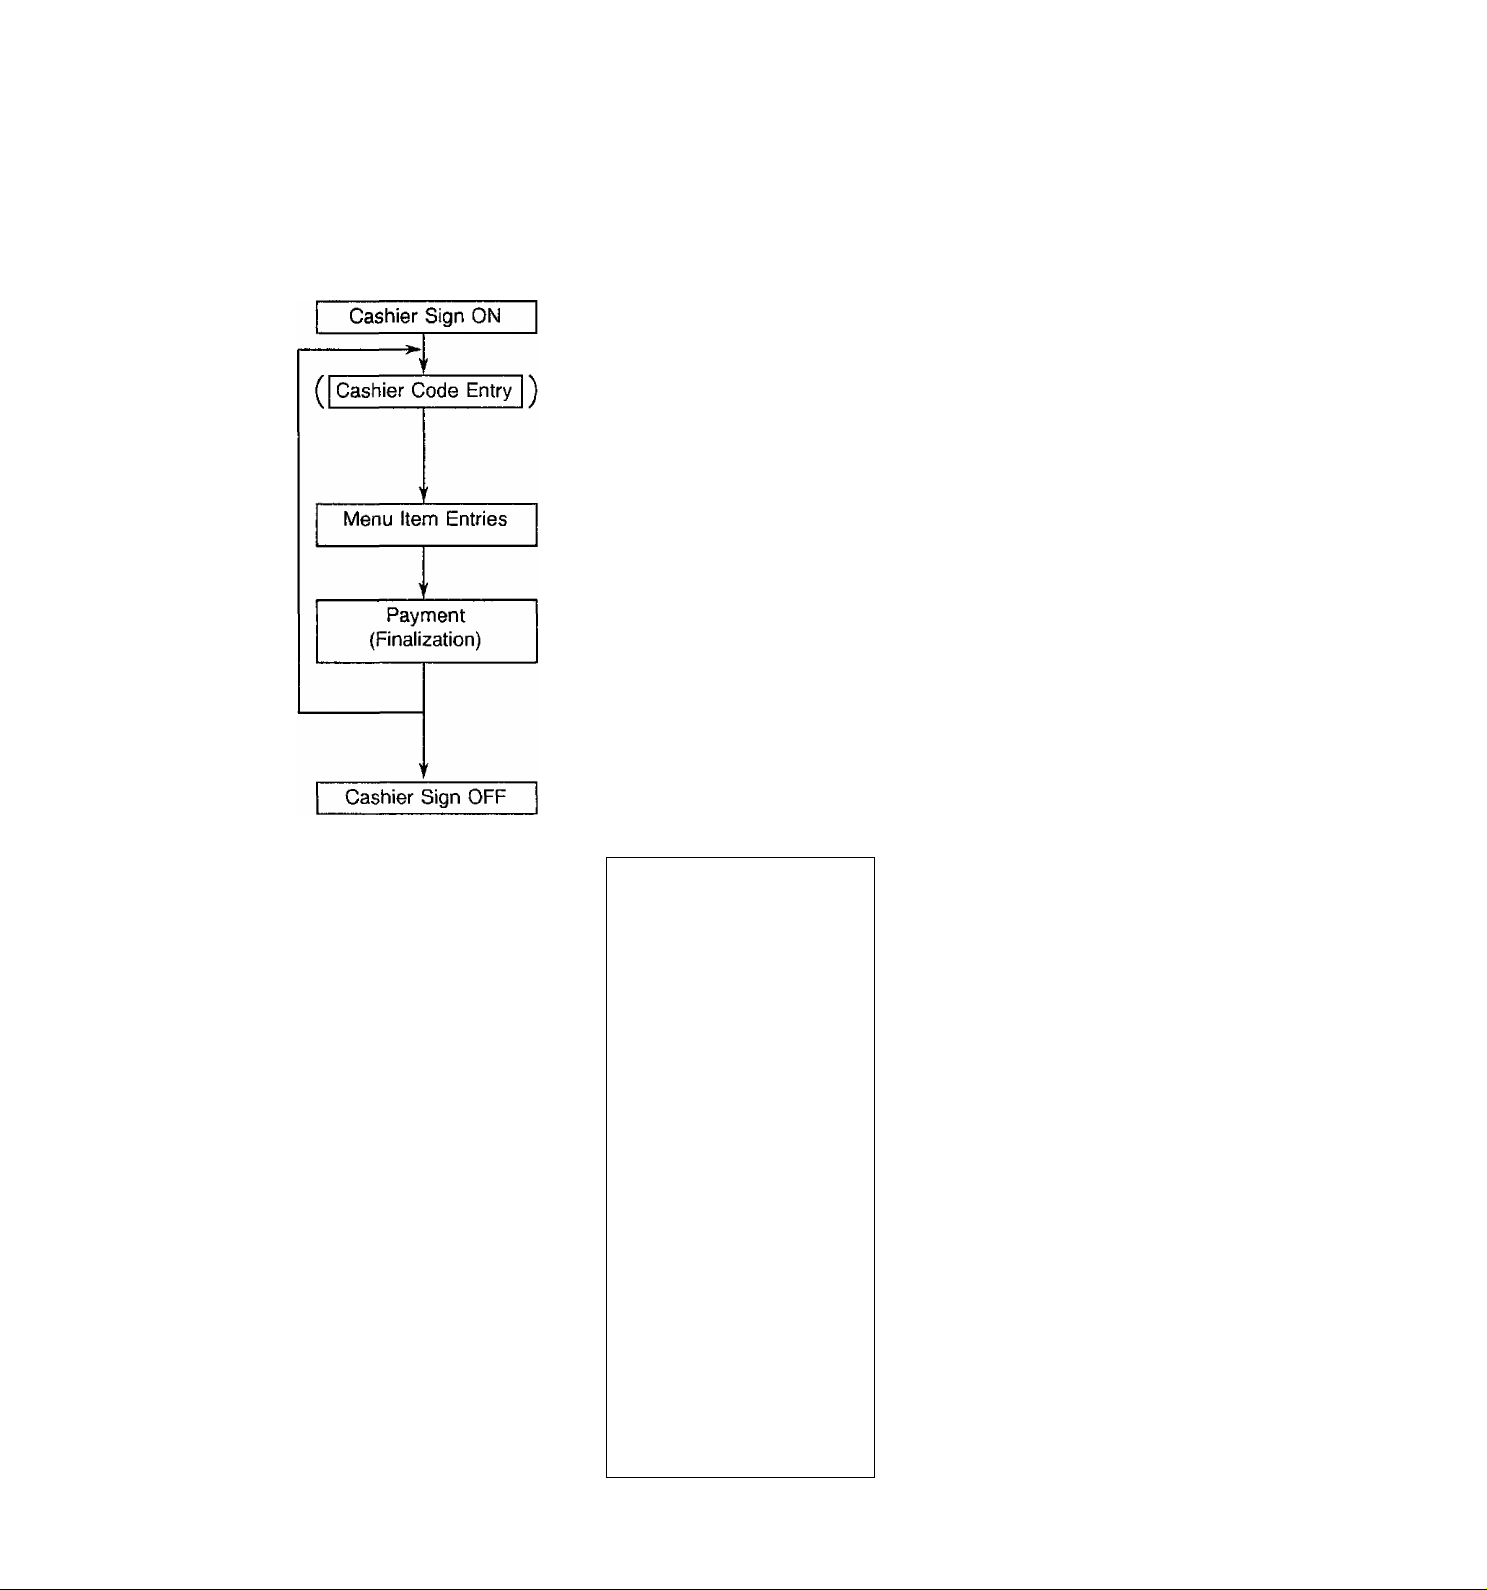
TYPE 1: NON-TAB MODE (Cash Mode)
This type is used for cafeterias, concession stands, etc. where cashiers are responsible of
sales entry operations and the entries are immediately finalized for payment.
- OPERATION FLOVy -
EOl-11005
Terminal Without
Cashier Locks
Terminal With
Cashier Locks
Reference in Chapter 8
(Page No.)
CASHIER SIGN ON/OFF (20)
CASHIER CODE ENTRY (22)
SALE SEQUENCE IN NON
TAB MODE (24)
- 15 -
OPERATIONS NOT
RELATED TO SALES (58)
CASHIER SIGN ON/OFF (20)
Page 19
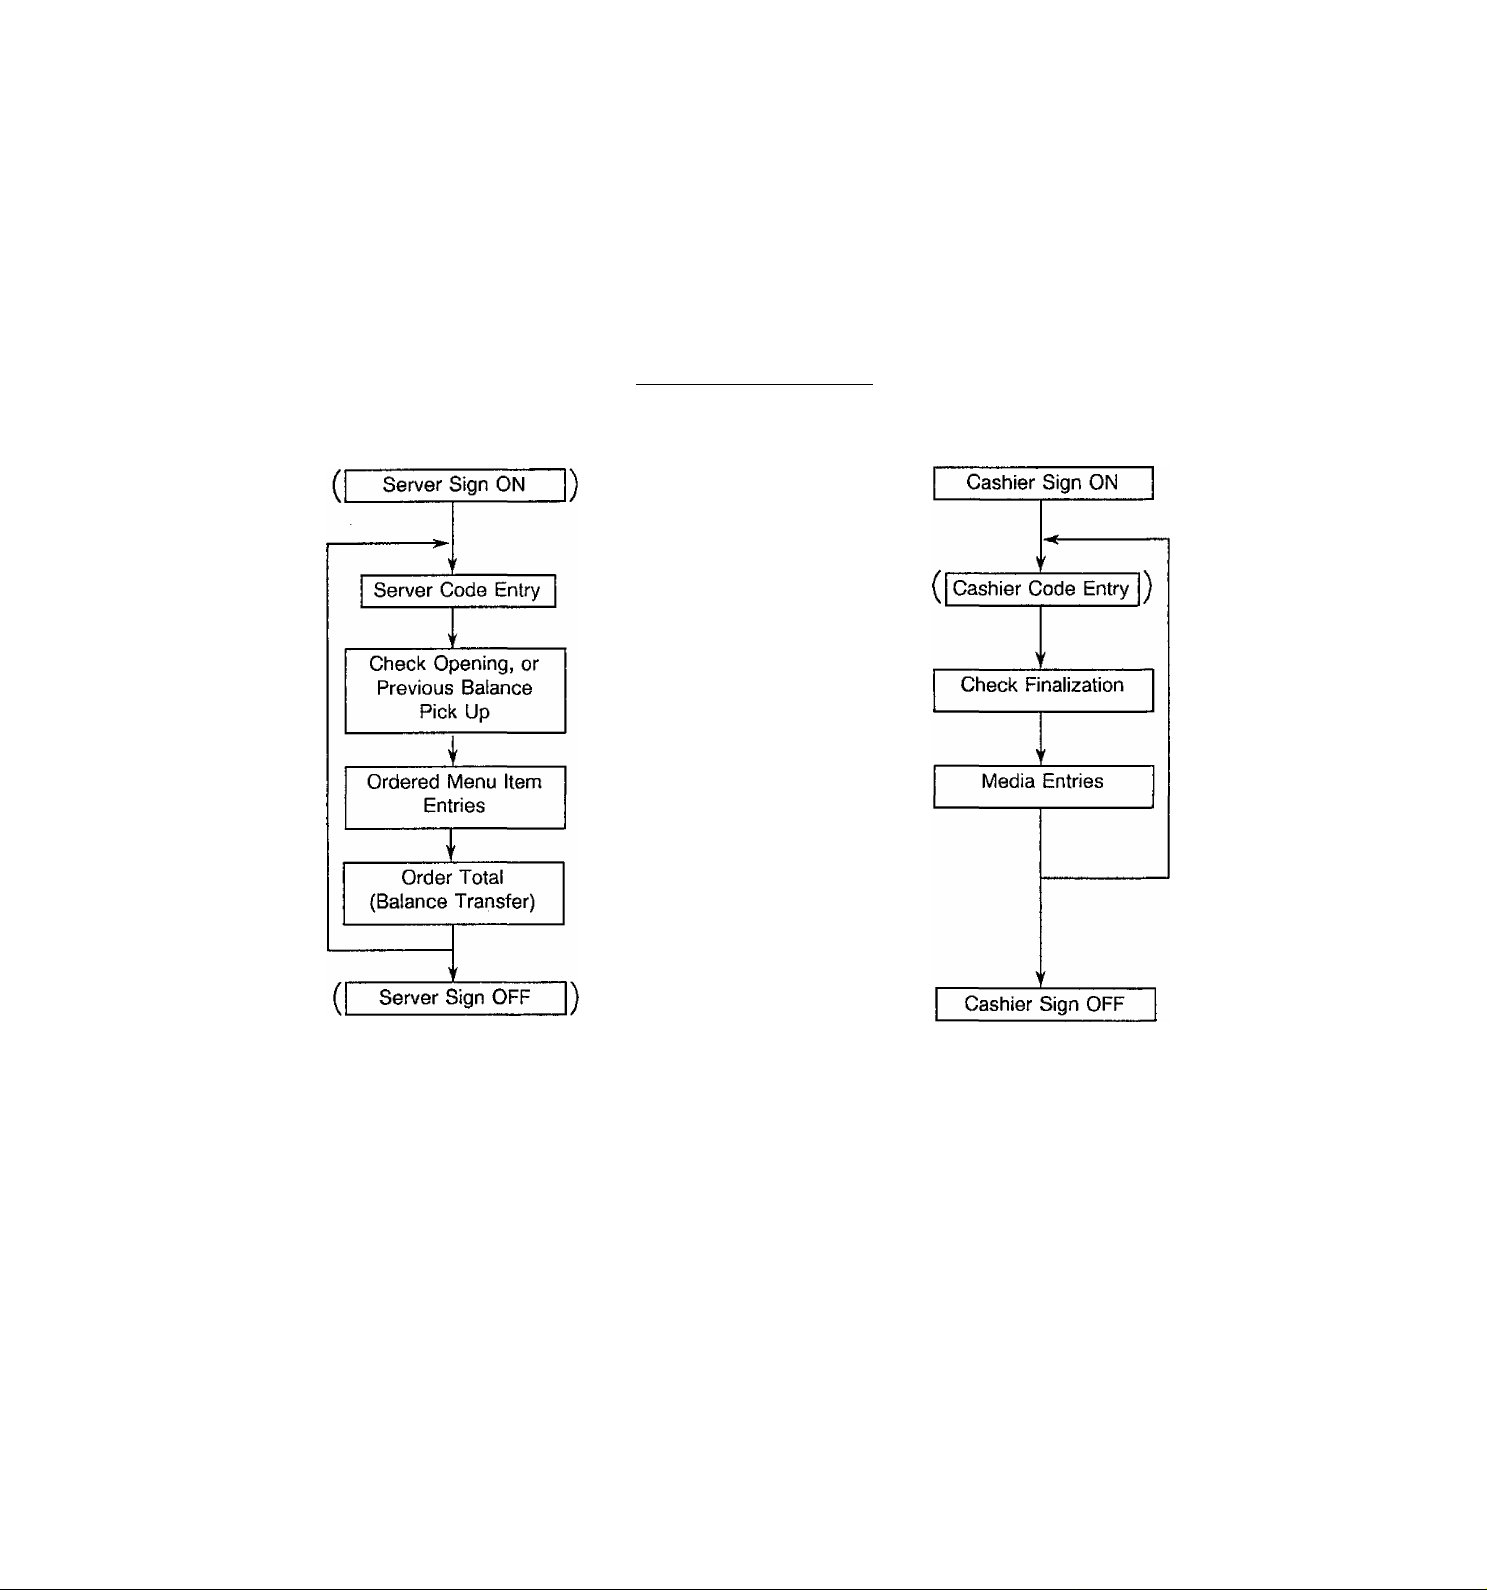
TYPE 2; TAB MODE 1 (Server-Cashier System)
This type is used for fuit-service restaurants where servers are responsible of order entry
operations and cashiers are responsible of check payment operations.
- OPERATION FLOW -
EOl-11005
Terminal Without
Cashier Locks
Terminal With
Cashier Locks
Reference in Chapter 8
(page No.)
CASHIER SIGN ON/OFF
(20)
SERVER SIGN ON/OFF
(21)
CASHIER CODE ENTRY
(22)
SERVER CODE ENTRY
(23)
NOTE 1: When a Server signs ON on a Server-Cashier
System terminal, he/she must sign ON after a
Cashier has already signed ON.
SALE SEQUENCE IN TAB
MODE, Type 1 (25)
OPERATIONS NOT
RELATED TO SALES (58)
CASHIER SIGN ON/OFF
(20)
SERVER SIGN ON/OFF
(21)
-16 -
Page 20
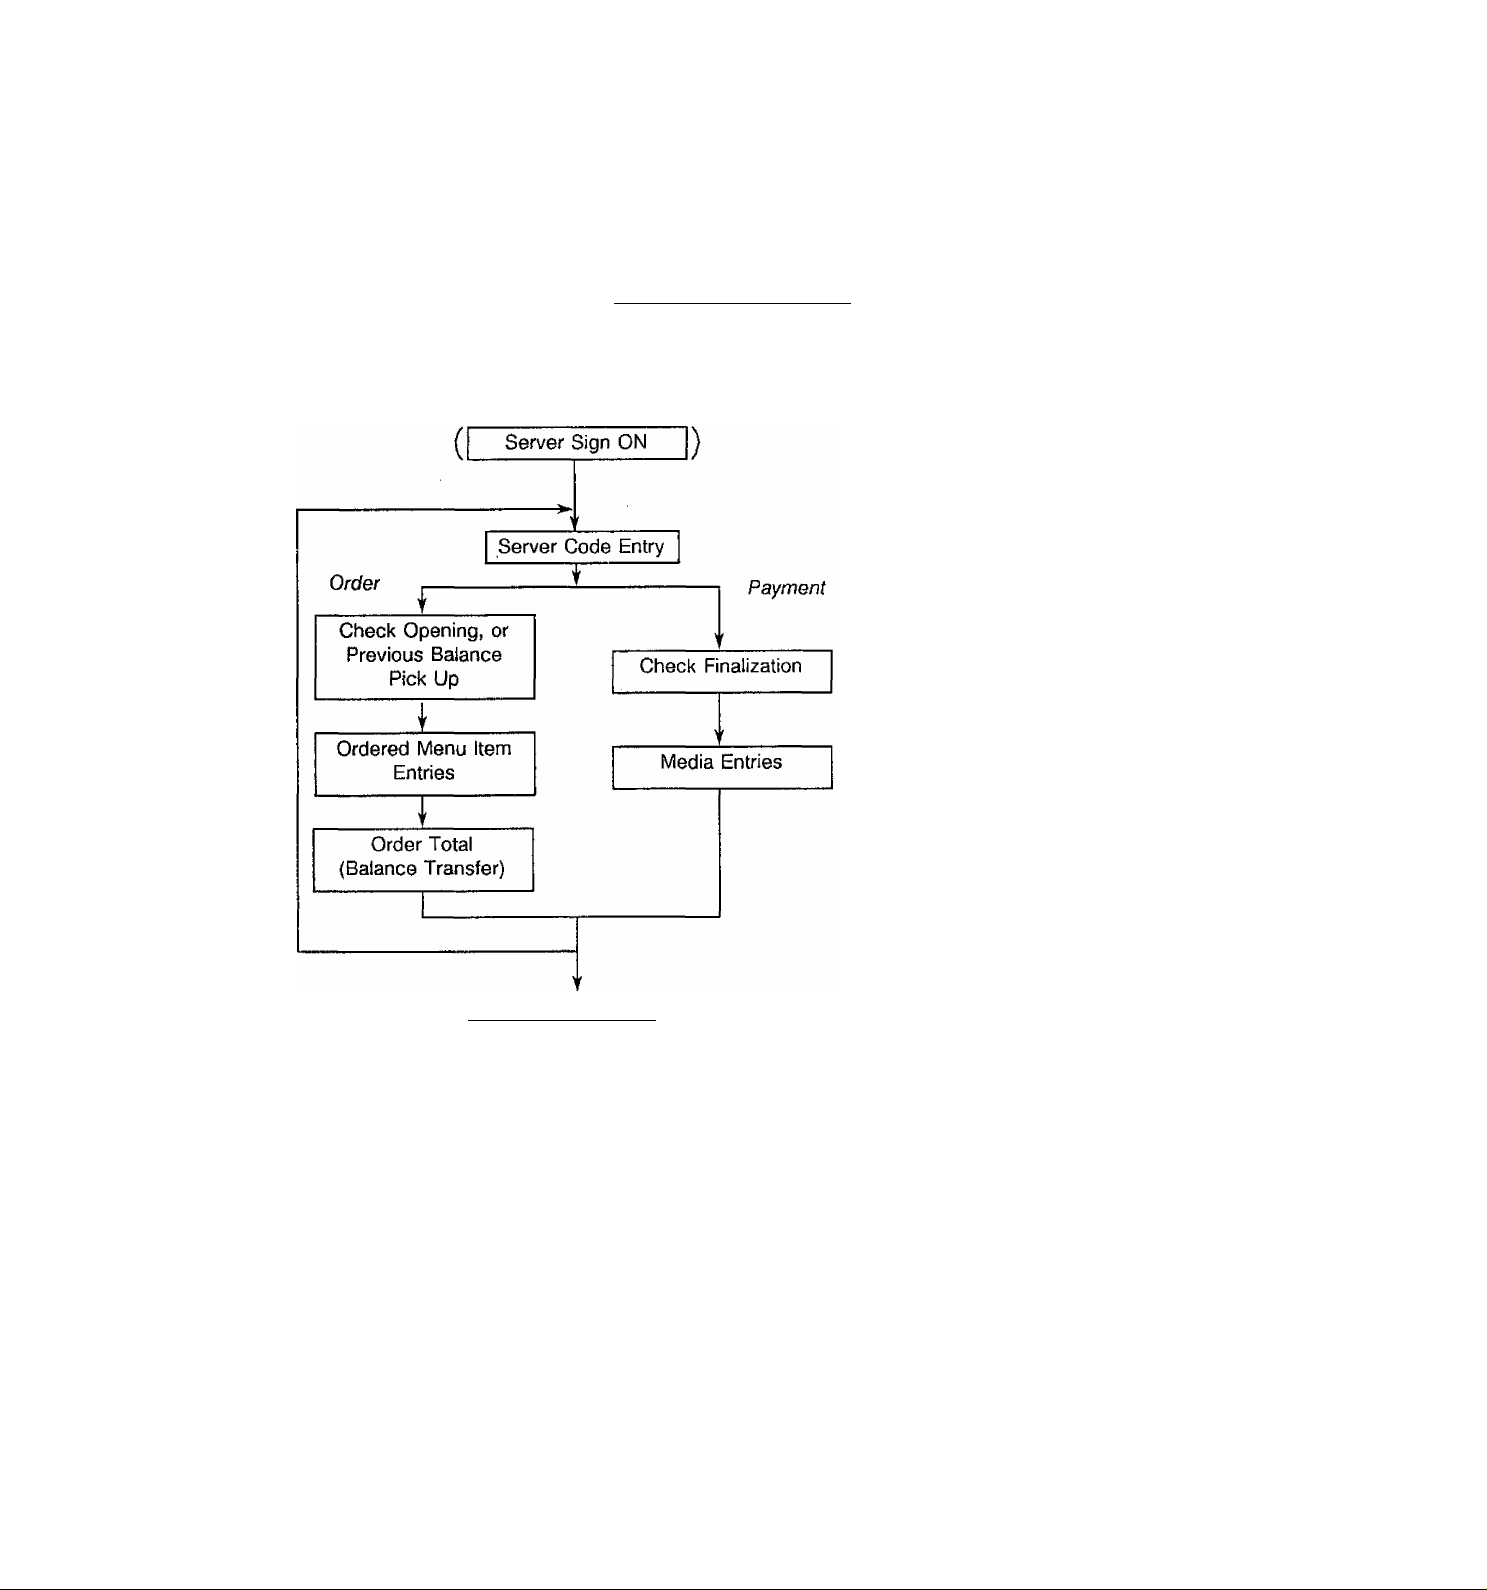
TYPE 3: TAB MODE 2 (Server/Banking System)
This type is used for full-service restaurants where each server is responsible of both order
entry and check payment operations.
OPERATION FLOW ~
Reference in Chapter 8
For this type, Cashier Locks
are not necessary.
y • SERVER SIGN ON/OFF
(21)
> • SERVER CODE ENTRY
(23)
(page No.)
E01-11005
• SALE SEQUENCE IN TAB
MODE, Type 1 (25)
• OPERATIONS NOT
RELATED TO SALES (39)
♦ SERVER SIGN ON/OFF
(21)
- 17 -
Page 21

9. REGISTERING PROCEDURES
9-1 PREPARATION FOR REGISTERING OPERATIONS
The following are registering operation patterns and actual operation samples. In the
patterns, “I
of the transaction key, and “—” indicates other registering and/or finalizing operations, in
referring to the sample operations, please note that the programmed data on some keys or
items (such as individual menu items) may be different from those programmed for your
store.
For the following operations, set the keylocks to the appropriate positions:
_____
I” indicates an input through the numeric keys, “[ ]”indicates a depression
GT LOCK (on Master Terminal only): Neutral Position marked with a dot.
MODE LOCK; REG
Most of the operations can be entered in this position. However, when “E09” errors
occur without your key-in mistakes after any of the following operations, it means
that the operation is programmed to require Manager Intervention. In this case,
depress the [C] key to cancel the error status and call for the store manager. Then
the manager turns the Mode Lock to the MGR position with an appropriate key to
allow the operation.
E01-11005
%-/COUPON Keys (such as [DISC], [COUPON])
[RETURN]
[VOID]
[PO] (Paid-Out)
[R/A] (Received-on-Account)
[CHARGE TIP]
[TIP PAID]
[SERVICE ADJUST]
[SERVICE CHARGE]
[CLEAR TRAN] (Clear Transaction)
[CHECK TRANS] (Check Transfer)
[VOID CHECK]
[TX EX] (Tax Exempt)
[TAX] (Manual Tax)
[PRICE SHIFT]
[SIGN ON/OFF]
[NS] (No-saie)
Over-subtraction of the sale total using:
[RETURN] or [VOID], or
Other negative amount keys
Negative Balance Sale Payment
When an “E06” error occurs, you may have entered an amount through a key
exceeding the programmed limit. Manger Intervention may be required.
A TRAINING MODE IS AVAILABLE ON THIS REGISTER
If you are a beginner in operating this register, ask your manager to allot some time to
train you in the Training Mode.
- 18 -
Page 22

9-2 REGISTERING OPERATIONS
TABLE OF CONTENTS
EOl-11005
OPERATION
CASHIER SIGN ON/OFF ............................................................................................................................................. 20
SERVER SIGN ON/OFF .............................................................................................................................................. 21
CASHIER CODE ENTRY ............................................................................................................................................. 22
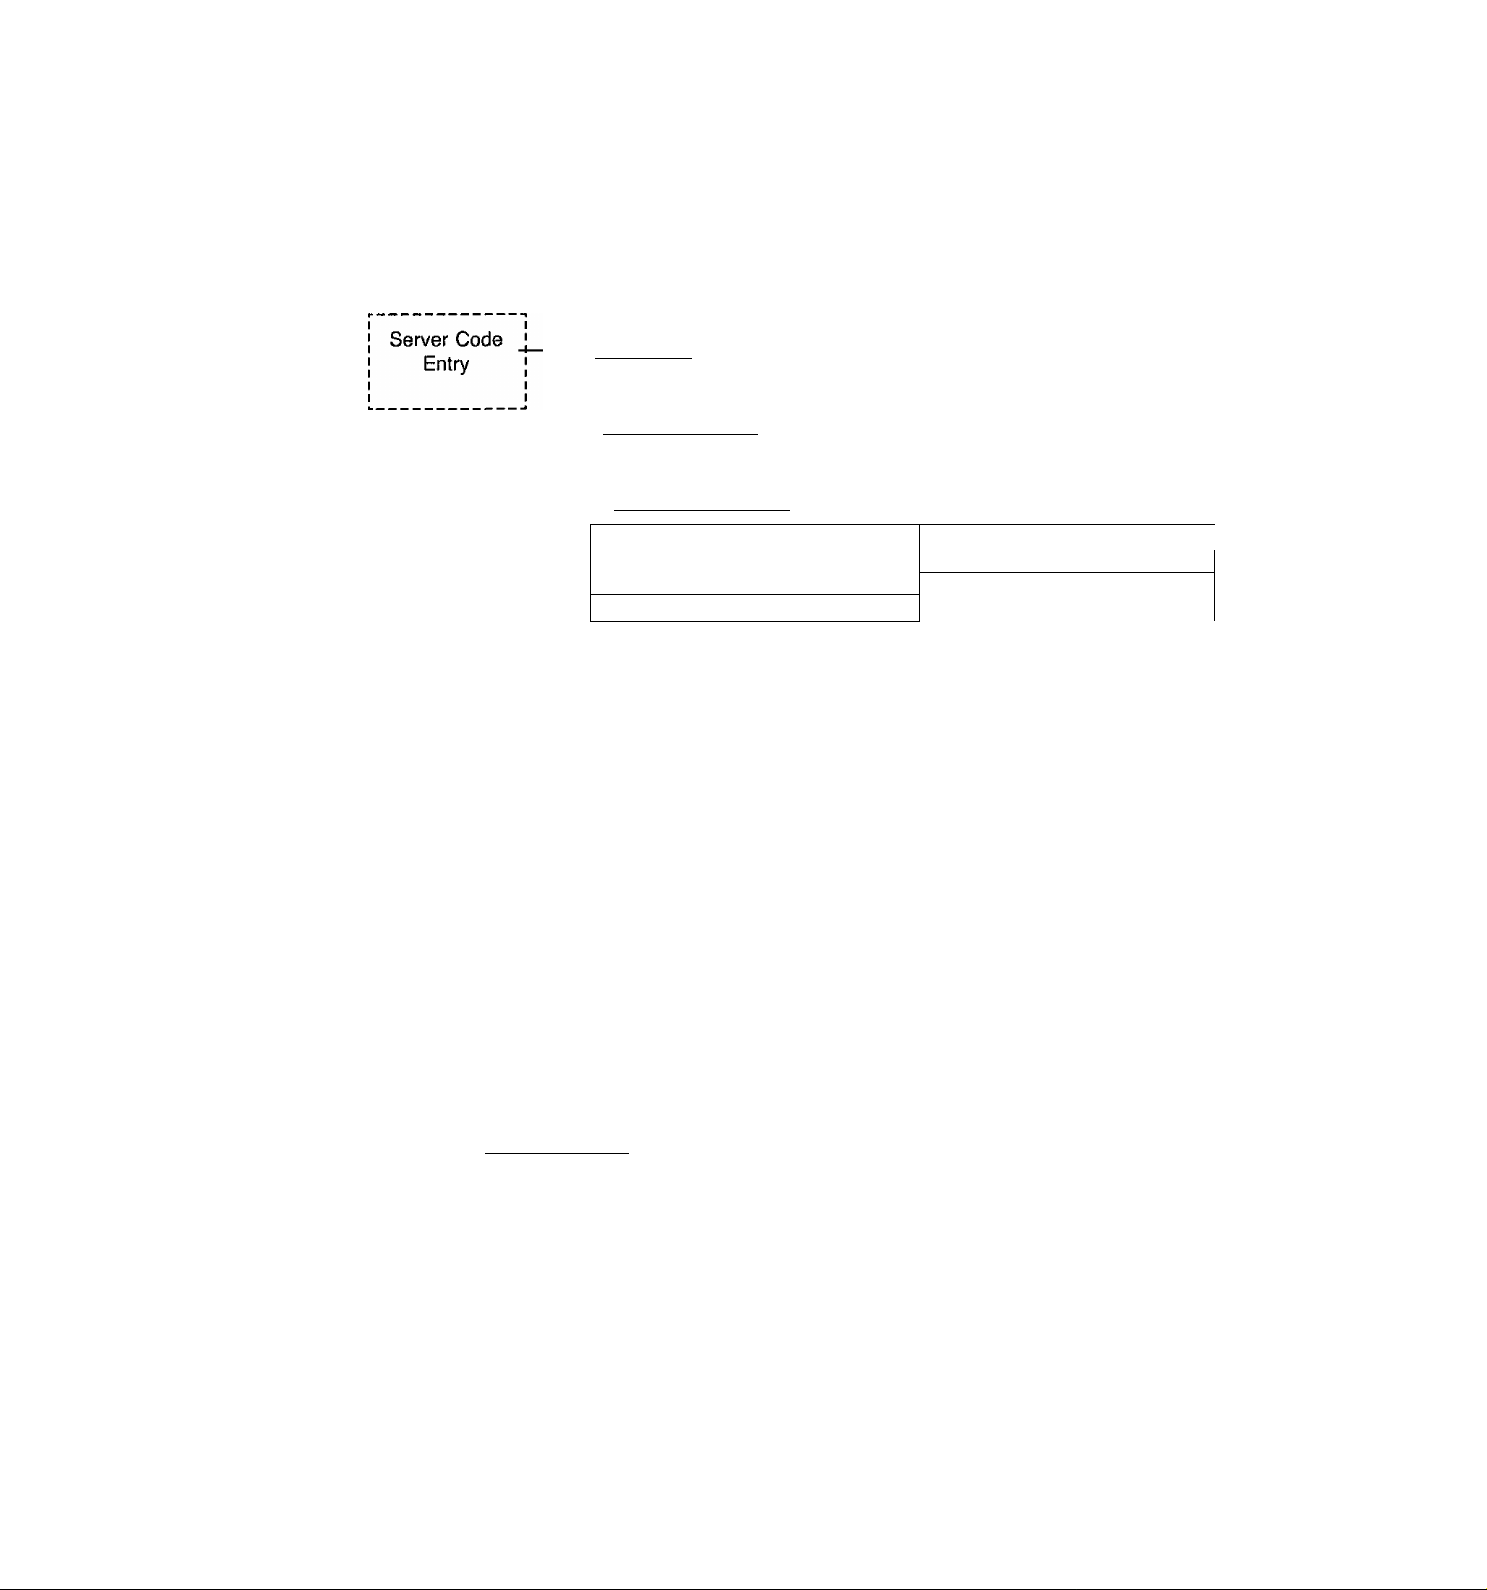
SERVER CODE ENTRY .............................................................................................................................................. 23
SALE SEQUENCE IN NON-TAB MODE ..................................................................................................................... 24
SALE SEQUENCE IN TAB MQDE (Server-Cashier System or Server/Banking System) ........................................... 25
New Check ...................................................................................................................................................... 27
Additional Order ...............................................................................................................................,
Order Total (Balance Transfer) ........................................................................................................................ 29
Check Finalization (Check Paid) ..................................................................................................................... 30
Media Entries (Payment) ................................................................................................................................ 31
MENU ITEM ENTRIES ................................................................................................................................................. 33
Individual Menu Item ...................................................................................................................................... 33
Repeat Entry .................................................................................................................................................... 34
Quantity Extension ........................................................................................................................................... 34
Split Package Pricing ....................................................................................................................................... 34
Scale Item Entry .............................................................................................................................................. 35
Modifier Entry ................................................................................................................................................... 36
Set Menu Entry ................................................................................................................................................ 37
Price Shift ........................................................................................................................................................ 37
Preset Price Open Entry .................................................................................................................................. 38
OPERATIONS RELATED TO ORDER OR PAYMENT ............................................................................................... 39
Item Correct ..................................................................................................................................................... 39
Void .................................................................................................................................................................. 40
Return ............................................................................................................................................................. 41
Clear Transaction ............................................................................................................................................ 42
Void Check ....................................................................................................................................................... 43
%-, Dollar Discount, Coupon ........................................................................................................................... 44
Service Charge (% +) ...................................................................................................................................... 45
Tip Paid ............................................................................................................................................................ 46
Charge Tip ....................................................................................................................................................... 47
Service Adjust .................................................................................................................................................. 48
Check Transfer ................................................................................................................................................ 49
Check Combine ............................................................................................................................................... 50
Subtotal. Taxable Total ................................................................................................................................... 51
Tax Status Modification ................................................................................................................................... 52
Manual Tax Entry ............................................................................................................................................ 52
Tax Exempt...................................................................................................................................................... 53
Tray Total ........................................................................................................................................................ 54
Non-add Number Print ..................................................................................................................................... 55
TAB/CASH Mode Change ...................................................................................................................... 55
Validation Print ................................................................................................................................................ 56
Post Receipt .................................................................................................................................................... 57
OPERATIONS NOT RELATED TO SALES ................................................................................................................ 58
No-sale ............................................................................................................................................................ 59
Received-on-Account ...................................................................................................................................... 60
Paid-Out .......................................................................................................................................................... 61
KEY STRINGS USING THE [FUNCTION] KEY .......................................................................................................... 62
GUEST CHECK PRINTER (GCP) ...................................................................................................................... 63
REMOTE KITCHEN PRINTER (RKP) ......................................................................................................................... 66
............
28
PAGE
- 19 -
Page 23

CASHIER SIGN ON/OFF
In the Non-tab Mode (Type 1) or the Server-Cashier System (Type 2), a sign-ON of the cashier
is required for operations in the REG or MGR position of the Mode Lock. By signing ON, the
cashier is responsible of the terminal until he/she signs OFF on the same terminal. Unlike a
sign-ON of a server (to be described on the next page), a cashier once signed ON on a terminal
cannot operate another terminal until he/she signs OFF on the first terminal and signs ON again
on the second terminal. Signing ON or OFF of a cashier is not possible on a terminal in the
Server/Banking System (Type 3) because the terminal can only be used by servers (i.e.
operators programmed as servers).
(must be operated outside a sale)
EOI'11005
SIGN ON
On Non-tab Mode Terminal
Without Cashier Locks; [Cashier Code| [SIGN ON/OFF]
(see the details below)
With Cashier Locks:
(See NOTE 1 be/ow.)
On Server-Cashier System Terminal
Without Cashier Locks: [Cashier Code[ [SIGN ON/OFF]
With Cashier Locks:
(See NOTE 1 below.)
Cashier Lock 1 or 2 to ON.
[Cashier Code| [SIGN ON/OFF]
Cashier Lock 1 or 2 to ON.
I
[Cashier Code| [SIGN ON/OFF]
SIGN OFF
0 [SIGN ON/OFF]
T
0 (zero) is fixed for Sign
OFF.
0 [SIGN ON/OFF]
Same as Sign ON
0 [SIGN ON/OFF]
Composition of a ‘Vashier Code”:
This 5~digit code will also be used for “CASHIER CODE" entry. The code being
entered on the terminal will not be displayed.
NOTES 1.
When Cashier Locks are installed, a maximum of two cashiers can sign ON on a
terminal at a time. To sign OFF, the Cashier Lock of the Cashier must be in the ON
condition for operating 0 [SIGN ON/OFF]. A cashier once signed ON can turn OFF
the Cashier Lock to allow the other cashier's sign ON or operations. Either of the
cashiers already signed ON simply turns ON his/her own Cashier Lock ON for
operating his/her jobs. Two drawers can be installed with the Cashier Locks; in this
case, Cashier Lock 1 is assigned to Drawer 1 and Cashier Lock 2 to Drawer 2.
------------2-digit Cashier’s Own Secret Code 01 to
99; it can be changed daily
3-digit Manager-assign Code 001 to 999
-20-
Page 24

SERVER SIGN ON/OFF
In the Server-Cashier System (Type 2) and the Server/Banking System (Type 3), a sign-ON of
the server is required for operations in the REG or MGR position of the Mode Lock. By signing
ON, the server can operate any terminal in either of the two systems above until he/she signs
OFF. Signing ON or OFF of a server is not possible on a terminal in the Non-tab Mode System
(Type 1) because the terminal only allows operations by cashiers (i.e. operators programmed as
cashiers). A server with outstanding checks remaining cannot sign OFF (an “E39” error results).
& (must be operated outside a sale)
EOI-11005
NOTE: On a Server-Cashier System terminal, a server Sign-ON or Sign-OFF must be
Composition of a “Server Code”:
This 5-digit code will also be used for “SERVER CODE” entry. The code being
entered on the terminal will not be displayed.
- Sign ON/OFF RecBipt Samples (The print form is common for Cashiers and Servers.) --
operated in a cashier signed-ON condition. When the cashier has already signed
OFF on such a terminal, no server operations are accepted.
SIGN ON
[Server Code|
—I
---------
(see the details below)
------------2-digit Server’s Own Secret Code 01 to 99;
it can be changed daily
[SIGN ON/OFF]
3-digit Manager-assign Code 001 to 999
SIGN OFF
Same as Sign ON
RESTAURANT TEC
12Z^ PEACH DRIUE
PHONE: 87-6437
9=00 - 20:00
SPECIAL. LUNCH MENU
from 11:00 to 13:00
05-05-89 FRI ft555501
xsxew ON X
EDEN 0187 T13:02
RESTAURANT TEC
1234 PEACH DRIVE
phone: 87-6437
9:00 - 20:00
SPECIAL LUNCH HENU
from 11:00 to 13=00
05-05-89 FRI «555501
xSXeN OFE-x
EDEN 0187 T13:03
- 21 -
Page 25

CASHIER CODE ENTRY
In the Non-tab Mode System (Type 1) and the Server-Cashier System (Type 2), a cashier code
entry may be required (depending on the system type and program options) for every cashier
operation on the terminal, besides his/her sign ON to be operated on the first stage.
(must be operated outside a sale on the terminal signed on by the same
cashier. Nothing is displayed and no print occurs.)
On Non-tab Mode Terminal
Without Cashier Locks: “Compulsory” or “Prohibited” by a system option selection.
When “Compulsory"
EOl-11005
Sign ON of the
cashier, or a sale
finalization by the
same cashier.
[Cashier Code| [SERVER #]
(same code used in Sign ON)
Required cashier
operation to follow
When “Prohibited’
With Cashier Locks: No cashier code entry is to be operated; same as “Prohibited” above.
On Server-Cashier System Terminal
Sign ON of the
cashier, or a sale
finalization by the
same cashier.
[Cashier Code| [SERVER #]
—i--------------------
(same code used in Sign ON)
Required cashier
operation to follow
With Cashier Locks; No cashier code entry is to be operated
-22-
Page 26

SERVER CODE ENTRY
In the Server-Cashier System {Type 2) and the Server/Banking System (Type 3), a sever code
entry is required for every server operation on any terminal, besides his/her sign ON to be
operated on the first stage.
EOl-11005
(must be operated outside a sale on any terminal. Noting is displayed and
print occurs)
On Server-Cashier System Terminal
Without Cashier Locks: Must be operated outside a cashier operation.
Sign ON of the
server, or
finalization of a
transaction by
any server or
cashier.
With Cashier Locks: Must be operated when both Cashier Locks 1 and 2 are OFF, i.e.
outside a cashier operation. The operation is the same as above.
On Server/Banking System Terminal: Same as above.
[Server Code| [SERVER #]
(same code used in Sign ON)
no
Required server
operation to follow
Sign ON of the
server, or
finalization of a
transaction by
any server.
[Server Code| [SERVER #]
-------
^--------
(same code used in Sign ON)
Required server
operation to follow
-23 -
Page 27
SALE SEQUENCE IN NON-TAB MODE
in the Non-tab System (Type 1), Previous Balance files are not used and a simple sale sequence
from menu item entries to finalization by media keys is carried out on the terminal. Cashiers (i.e.
operators programmed as cashiers) always operate the terminal.
NOTES
See the preceding
sections.
See the sections:
MENU ITEM ENTRIES,
OPERATIONS RELATED
TO ORDER OR
PAYMENT
1. Menu Item Entries and Payment are
operated in one sequence, and a
receipt of the sale is issued.
2. Usually, Guest Checks are not issued
in this system. However, a Guest
Check Printer can be connected and
guest checks can be printed by
system option.
3. Usually, Remote Kitchen Printers are
not used in this system. However,
they can be connected and print the
ordered menu item by system option.
EOI-11005
A receipt sample issued
in Non-tab Mode:
See the preceding sections.
RESTAURANT
122-A PEACH
phone: 87-
9:00 - 20
SPECIAL LUNCH MENU
frotii 11:00 to 13:00
05-05-89 FRI
FRUIT SALAD
COFFEE
TAXI
TOTAL
CASH
TEIC
DRIUE
6^37
5 00
ÍÍ555501
2.50 T
0.70 T
0,19
3.39
3.39
Store Name/Message and
Commercial Message
(Max. 7 lines programmable)
Date, Day-oi-Week, Register No./Terminal
ID No.
j Menu Items (Sale Items)
Taxes due
Sale Total including Taxes
ITEM 2
EDEN 0191 T13:14-
-24-
Total Item Count of this sale
Cashier Name, Receipt Consecutive No.,
Current Time
Page 28
SALE SEQUENCE IN TAB MODE
In the Tab Mode Systems (Type 2 & Type 3), Previous Balance files are used. The sale
sequence is roughly divided into two parts: order entries and check payment. Once a new
check is generated and assigned to a guest party, the check memory tracks all the order items
until it is finalized by payment. In Type 2 (Server-Cashier System), order entries are operated by
servers and payment by cashiers. For Type 3, see the next page.
Type 2: SERVER-CASHIER
EOl-11005
Server Operation (Order)
> See the preceding sections.
See the sub-sections:
New Check
Additional Order
Order Total
Check Finalization
Media Entries
See the sections:
MENU ITEM ENTRIES,
OPERATIONS RELATED TO
ORDER OR PAYMENT
See the preceding sections.
Cashier Operation (Payment)
NOTES 1. Menu Item Entries are operated in a New Check sequence and an Additional Order
sequence by servers. Payments (Check Finalization and Media Entries) are
operated by cashiers. Receipts can be issued for the respective sequences. (If
receipts are not necessary, turn the [RECEIPT ONIOFF} switch to the OFF
position.) When a Guest Check Printer is connected, all the sequences are printed
on the guest check of a guest party. (Refer to the section of GUEST CHECK
PRINTER.)
2. When RKPs (Remote Kitchen Printers) are connected, each item entry is printed on
the RKPs to which the item is programmed to send the entry data. When an RKP
is down, the item print data can be printed and issued from the terminal receipt
printer as a formatted receipt if so programmed by system option. (Refer to the
section REMOTE KITCHEN PRINTER.)
- 25 -
Page 29
In Type 3 {Server/Banking System), each server operates both order entries and payment for
his/her guest party.
Type 3: SERVER/BANKING
Server Operation
See the preceding sections.
EOl-11005
See the sub-sections:
New Check
Additional Order
Order Total
Check Finalization
Media Entries
See the sections:
MENU ITEM ENTRIES,
OPERATIONS RELATED TO
ORDER OR PAYMENT
(I Server Sign OFF |)
See the preceding sections.
NOTES 1. Menu Item Entries are operated in a New Check sequence and an Additional Order
sequence by servers. Payments (Check Finalization and Media Entries) are also
operated by servers. Receipts can be issued for the respective sequences. (If receipts
are not necessary, turn the [RECEIPT ON/OFF] switch to the OFF position.) When a
Guest Check Printer is connected, all the sequences are printed on the guest check of
a guest party. (Refer to the section of GUEST CHECK PRINTER.)
2. When RKPs (Remote Kitchen Printers) are connected, each item entry is printed on the
RKPs to which the item is programmed to send the entry data. When an RKP is down,
the item data can be printed and issued from the terminal receipt printer as a formatted
receipt if so programmed by system option. (Refer to the section REMOTE KITCHEN
PRINTER.)
-26 -
Page 30
New Check
This operation is applied to Type 2 (Server-Cashier) and Type 3 (Server/Banking) and used
to open a check for a new guest party.
► ( [Table No.| [TABLE#]
1 to 999
EOl-11005
See the preceding
pages.
I—^ f I Number of Guests| [GUEST #] ) —
1 to 99
“Check No. Creation Auto"
!-► [NEW CHECK]
"Check No. Creation Manual”
-------------------------
!-► 1 Check No.l [NEW CHECK] J
1 to 99999;
max. 5 digits
r
--------
1
“-f> MENU ITEM ENTRIES-1
1
1
1
-►Order Total
NOTES 1. Table No. andlor Number-of-Guests must be entered if so programmed.
2. When the “Check No. Creation Auto” option is selected, a number is
automatically given to the new check.
3. When the “Check No. Creation Manual” option is selected, any number from 1
to 99999 not currently in use can be entered.
4. When the “Check Digit Print” option is selected, a Check Digit is calculated
and added to the rightmost of the number. In entering the Check No. for
additional order sequences, the Check Digit must also be entered as part of
the Check No., i.e. the number will be 6 digits maximum.
-P*
---------------------
To be described later.
5. The receipt is issued and the guest check printing is activated at the Order
Total stage but not at the New Check entry.
PRINT SAMPLE -
Terminal Receipt
05-05-89 FRI «555501
CHKi№ OOOOiS
BEEF STEAK L 14.00 T
TAXI
TOTAL
0.84
14.84
ITEH 1
JOHNSON 0192 T13:16
-27-
Page 31

Additional Order
This operation is applied to Type 2 (Server-Cashier) and Type 3 (Server/Banking) and used
to enter additional order items in the check already opened. The operation sequence is
basically the same as that of the New Check sequence, except that the Check No, entry is
mandatory regardless of program option selections and that the [PB] (Previous Balance) key
is used instead of the [NEW CHECK] key. The current balance is recalled from the check
file memory and additional order item entries are accepted.
1 1
} Server Code \
i Entry I
1 1
1 1
See the preceding
pages.
NOTES 1. The Check No. here must be identical to that entered in the New Check
sequence. When the ‘'Check Digit Print" option is selected, enter the entire
number including the Check Digit generated in the New Check sequence.
-------
^
-► I Check No.i [PB]
To be described later.
EOl-11005
2. The check printing is activated on the Order Total stage but not the previous
balance pick-up operation.
3. It is programmable whether the header line is printed on the check at only the
first time of order sequences or at every time.
4. It is also programmable whether the Previous Balance is printed or not at every
additional order sequence.
- PRINT SAMPLE Terminal Receipt
05-05-8? FRI #555501
CHKi# OOOOÓ
PREO-BAL
COFFEE
TAXI
TOTAL
U.OO
0.70 T
0.88
15.58
ITEM 1
JOHNSON 0193 T13:10
-28-
Page 32

Order Total (Balance Transfer)
This operation is applied to Type 2 (Server-Cashier) and Type 3-(Server/Banking) and used
to finalize the order entries and transfer the balance. The Order Total operation is performed
to finalize order entries in a New Check sequence or an Additional Order sequence.
EOl-11005
I New Check
I Sequence
I
*-
-----------T-----------
See the preceding
pages.
I
Insert a slip into the Guest
[TOTAL]
Check Printer. (See the section
Additional
of GUEST CHECK PRINTER.)
Order
Sequence
NOTES 1. By depressing the [TOTAL] key, the order items are entered in the check and
the balance is transferred. The Check No., Server Code, and the new balance
are stored in the check kie memory. At the same time, the order item data are
sent to the Remote Kitchen Printers designated by each menu item print
destination status if they are connected. If not connected, the order data can
be printed as a formatted receipt and issued from the terminal printer if so
programmed.
2. When Guest Check printing is programmed to be compulsory, an error will
result if the [TOTAL] key is depressed without setting a slip to the Guest
Check Printer. In this case clear the error by the [C] key, and set the check,
and then operate the [TOTAL] key.
PRINT SAMPLES -
Terminal Receipt
New Order Sequence
05-05-89 FRI H555501
C HK « 0 0 00 6
BEEF STEAK L 14,00 T
TAXI
TOTAL
I TEH 1
.JOHNSON 0192 T 13:16
0.84
14.84
- 29 -
Additional Order Sequence
05-05-89
CHKi=i
PREO-BAL
COFFEE
TAXI
TOTAL
FRI »555501
00006
14.00
0,70 T
0.88
15.58
ITEH
JOHNSON10193 T13:16
Page 33

Check Finalization (Check Paid)
This operation is applied to Type 2 (Server-Cashier) and Type 3 (Server/Banking) and used
to finalize checks opened and entered with order items. The [CHECK PAID] key declares
the closing of a check and accepts payment using media keys.
Type 2:
•> I Check No.l [CHECK PAID]
See the preceding
sub-sections.
Insert a slip into the Guest
Type 3:
Check Printer. (See the section
of GUEST CHECK PRINTER.)
NOTES 1. No additional order entries are accepted after the [CHECK PAID] key
depression.
Media Entries
To be described later.
EOl-11005
2. When payment is recorded by Media Entries and the check is printed, the
previous balance file of the check is cleared.
PRINT SAMPLE -
Terminal Receipt
RESTAURANT TEC
1234 PEACH DRIVE
PHONE: 87-6437
9:00 " 20:00
SPECIAL LUNCH HENU
from 11:00 to 13:00
05-05-89
FRI H555501
CHKtt OOOOiS
CHK PAID
TAXI
TOTAL
14.70
0.8B
15.58
CASH
EDEN
-30 -
15.58
0194 T13:16
Page 34

Media Entries (Payment)
This operation is applied to all the system types and used to finalize the transaction or check
by entering the payment through media keys.
EOI-11005
Type 1:
Type 2:
Type 3:
i MENU ITEM !
i ENTRIES i
1 1
1 1
To be described
later.
1 Check !
1 Finalization \
1 Sequence 1
1 1
L
___
_____
See the preceding
page.
-----------
_ J
insert a sup into tne truest
Check Printer. {See the section
of GUEST CHECK PRINTER.)
DETAILS:
For obtaining total without change computation (“TOTAL” function^
“► [Media Key]
For tender and change computation ("TENDER” function)
Media Entries
V
________
^
—► ¡Amount Tendered| [Media Key]
NOTES 1. The ''(Media Key}” here indicates such keys as [CASH}, [CREDIT CARD},
[GIFT CERT], or [HOUSE CHARGE]. Some other key labels may be on the
media keys on your terminal. Use the appropriate media key according to the
media tendered for payment.
2. Each media key is programmed with a function of “TOTAL only”, “TENDER
only”, or “TOTAL & TENDER”. Over-tender and/or short-tender are allowed if
the media key is so programmed.
3. When the amount tendered is less than the sale total (i.e. short-tender),
another tender or total operation can follow with the same or different media
key can follow. In this case, the sale is finalized on reaching the sale total
amount.
4. Whether the drawer opens on operating a non-cash media key is determined
by a status selection of the media key. The [CASH] key always has the
“Drawer Open” status. The drawer opens even on a zero-balance sale if so
selected by system option.
-31 -
Page 35

- MEDIA ENTRY PRINT SAMPLES Terminal Receipts
EOI-11005
Cash Total
Non-cash Media Total
([HOUSE CHARGE} KEY)
Cash Tender
TAXI
TOTAL
CASH TND
CHAN.SE
ITEM 2
0.88
15.58
20.00
4,42
EDEN 0198 T14:16
Non-cash Media Tender
([GIFT CERT] KEY)
-32-
TAXI
TOTAL
GIFT CRT
CHANGE
0.88
15.58
20.00
4.42
ITEM 2
EDEN 0197 T14:14
Page 36

MENU ITEM ENTRIES
This section describes how to enter menu items during the order sequence. These item entries
are applied to all system types unless the types are specified.
Described in this section.,
r
Type 1: Cashier
Sign ON
See the preceding sections.
Cashier !
“► Code ¡
MENU ITEM ENTRIES
Entry !
1
\
—► 1
See the preceding section.
Mfrdia
1
Entries
1
1
L -
EOl-11005
Type 2:
Type 3:
Server
Sign ON
Individual Menu Item
Preset-price Menu Items
Using Code^preset Menu Keys
[Code-preset Menu] ... (Each of these keys is l^eled with a specific menu name.)
Server
Code
Entry
See the preceding sections.
New Check Sequence
Additional Order
See the preceding section.
Described in this section.
Using [ITEM #] Key
[Menu Item Code] [ITEM #]
1 to 9999; max. 4 digits
Open-price Menu Items
Using Code-preset Menu Keys
|Prjce| [Code-preset Menu]
Using [ITEM #] Key
|Menu Item Code| [ITEM #] |Price| [AMOUNT]
1 to 9999; max. 4 digits
-33-
Page 37

Repeat Entry
To repeat the same item as the last entry, simply depress the last key of any of the Menu
Item entry sequences on the preceding page.
Quantity Extension (Multipiication)
• |Quantitv| [@/FOR] [Code-preset Menu] ... (for a preset-price item through Code-preset Key)
Max. 9 or 99
depending on a system
option selection
• |Quantitv| [@/FOR] |Menu Item Code| [ITEM #]
... (for a preset-price item through [ITEM #] Key)
• |Quantitv| [@/FOR] [Unit Price| [Code-preset Menu]
... (for an open-price item through Code-preset Key)
E01-11005
• |Quantitv| [@/FOR] [Menu Item Code| [ITEM #] [Unit Price| [AMOUNT]
... (for an open-price item through [ITEM Key)
Split Package Pricing
[Purchased Quantitv| [@/FOR] [Whole Package Quantitv| [@/FOR] —
I Max. 9 or 99
-
....................
depending on a system ■■■■
option selection
-► [Code-preset Menu] - (tor a preset-price item through Code-preset Key)
-► [Menu Item Code| [ITEM #]
... (for a preset-price item through flTEM #] Key)
[Unit Price[ [Code-preset Menu]
... (for an open-price item through Code-preset Key)
>[Menu Item Code[ [ITEM#] [Unit Price| [AMOUNT]
... (for an open-price item through [ITEM #J Key)
-34-
Page 38

Scale Items (applicable only to items set with the “scalable” status)
Auto Scale Without Tare Subtraction (Place the item on the scale platter first.)
• ( [SCALE] ) -► ( [Unit Weight Code| [@/FOR] ) -
^ {1 to 11; see the table
(T) below)
[Code-preset Menu] ... (for a preset-price item through Code-preset Key)
[Menu Item Code| [ITEM #]
... (for a preset-price item through [ITEM #] Key)
[SCALE] ( [Unit Weight Code| [@/FOR] )
□
(T)
|Unit Price| [Code-preset Menu]
... (for an open-price item through Code-preset Key)
[Menu Item Code| [ITEM#] [Unit Price| [AMOUNT]
... (for an open-price item through [ITEM Key)
EOI-11005
Unit Weight Code Table
Unit Weight Code
1
9
10
11
The LB or Kg option is determined by the system option of Unit
Weight selection.
LB Option
1LB
9LB
^LB
^LB
Kg Option
IKg
9Kg
100g
lOOg
NOTES 1. The [SCALE] key depression can be skipped for preset-price scalable Hems.
2. If the Unit Weight Code specification is skipped, the preprogrammed Unit
Weight will be active.
Auto Scale With Tare Subtraction (Place the item on the scale platter first)
[Tare Godei [TARE]
(1 to 9 which
corresponds each
preset tare
weight)
^ to be continued to the the arrows marked with “(T)”
in the above ‘Auto Scale Without Tare” sequences.
The net weight (the gross weight - the preset tare weight) is
displayed here.
-35-
Page 39

Manual Scale Item Entry
EOl-11005
|Net Weiqht|
of the item Without Tare” on the preceding page. In this case, the
----------
► to be continued to the top of each sequence in “Auto Scale
[SCALE] key depression is mandatory.
NOTES 1. The Net Weight must be entered by the unit of 1I100LB (for LB specification)
or grams (for Kg specification),
2. The Manual Scale Item Entries can be prohibited by system option.
RETURN or VOID Scale Item Entry (always by manual weight entry)
[RETURN] (for Void)
► to be continued to the top of the “Manual Scale
[VOID] (for Return)
Item Entry” sequence above.
NOTES 1. The Net Weight must be entered by the unit of 1/100LB (for LB specification)
or g (for Kg specification).
2. The RETURN and VOID Scale Item Entries can be prohibited by system
option.
Modifier Entry
The operation patterns are the same as described for the Preset-price Menu Items in the
Individuel Menu Item sub-section. Each modifier item is entered immediately after a
menu item that requires the modification. The modification descriptor (and the price if
preset) will be printed below the item to be modified on the terminal receipt and on the
Remote Kitchen Printer paper.
Using Code-preset Menu Keys
[Code-preset Menu]
Using [ITEM lif] Key
[Menu Item Code| [ITEM #]
-36-
Page 40

Set Menu Entry
A maximum of 10 Set Menu Tables are programmable, in one table, a maximum of 10
Menu Items can be set. By entering the main menu item of the table, the sub items are
automatically entered in a string. Only the main item will be printed on the guest check
while all the sub items are printed as well on the Remote Kitchen Printer paper.
Using Code-preset Menu Keys
[Code-preset Menu] programmed as Main item of a Set Menu)
Using [ITEM m Key
[Menu item Code| [ITEM #]
(of an item programmed as Main Item of a Set Menu)
NOTES 1, When any of the menu items in a Set Menu Table is programmed with the
“/.OCK" status (order stop), an error results on entering the Main Item.
E01-11005
Price Shift '
Each menu item can be preset with three different prices. The price can be shifted from
one to another by operating the [PRICE SHIFT] key. The triangular lamp “P/2” or “P/3”
turns lit to indicate the current price level. For Price 1 (ordinary price), no such lamps are
lit.
[Price Shift Code| [PRICE SHIFT]
for Price 1
for Price 2
for Price 3
NOTES 1. The above operation is available only after a Cashier Code entry on a Non
tab Mode Terminal, or only after a Server Code entry on a Tab Mode
Terminal.
2. Once a Price Shift is operated, the designated price level is held until
another Price Shift operation is entered.
- 37 -
Page 41

Preset Price Open Entry
When the price of a preset-price menu item is suddenly changed, this operation is available
as a temporary measure.
[PR OPEN] —► Follow the same sequences of “open-price” menu items already
described, using the required “preset-price” menu key or Item
Code. Please note that the Repeat Entry is not possible for a
Preset Price Open Entry using a [Code-preset Menu] Key. (It is
possible when an entry using a Menu Item Code and the [ITEM #]
key.
- RECEIPT PRINT SAMPLES OF VARIOUS MENU ITEM ENTRIES -
E01-11005
individual Menu Item
BEEF STEAK L 14,00 T
Repeat Entry
BEER-A
EER-A
1.40 T
1.40 T
Quantity Extension
5X
0.703
COFFEE
3.50 T
Taxable Symbol
5 (Quantity) X @0.70 (Unit
Price) = $3.50
Auto Scale
0,50LB:ii 7,50/>iLB
BOILED CRAB 15.00 T
Manual Scale
HANUAL
0.50LBoJ 7.50 A LB
BOILED CRAB» 15.00 T
Modifier
BEEF STEAK S
7.50 T
rare
0.50LB of @7.50 per
1/4LB = $15.00
Manual Scale Indication
(The asterisk at the end
of the item name is also
a symbold of Manual
Scale Item Entry.)
Menu item
Modifier
Split Package Pricing
IX
l.BO/ 2
RED WINE
6.70/ 5
3X
FRIED SHRIHP 4.02 T
0.90 T
1/2 of a @1.80 bottle wine
= $0.90
3/5 of a @6.70 package
« $4.02
Set Menu
HAHB.STK SET 9.00 T
TOSSED SALADt
CORN SQUPt
COFFEEt
-38-
“ Main Item (or Set Name)
Sub-items
Page 42

OPERATIONS RELATED TO ORDER OR PAYMENT
This section describes various operations related to order or payment sequence.
Item Correct (Last Line Voiding)
Most items entered last during an order or payment sequence can be deleted. The
following items can be item-corrected, printing an dotted line over the item on the receipt
and journal. For the GCP and RKPs, an item correction deletes the required item within
the buffer memory before sending the order item data, so the deleted item itself will not be
printed.
EOl-11005
Item Entry
Individual Menu Item {including Modifier; Set Menu Item cannot be item corrected)
Repeat Entry ... (Only the last one of the repeated items is deleted.)
Quantity Extension ... (The product of the multiplication is deleted.)
Split Package Pricing ... (The result of the calculation is deleted.)
Scale Item Entry
%-/COUPON Entry
Check Transfer
Check Combine
Service Adjust
Service Charge
Charge Tip
Tip Paid
Received-on-Account Item
Paid-Out Item
Manual Tax
Short-tendered Media Amount
The following items can be item-corrected, resulting in canceling the transaction and
issuing a cancel receipt;
New Check
Previous Balance
Check Paid
[ITEM CORR]
- RECEIPT PRINT SAMPLE -
P0RK-SABTE
-39 -
------
4т5е-Т
Page 43

Void (Designated Line Voiding)
Menu items entered within a transaction or a guest check can be voided even if they are
entered before the last item. A Void entry clears the item when the item to be voided has
been entered within the same order entry sequence, or is printed in red on the RKP paper
when the item to be voided was entered in a past order entry sequence.
[VOID] Menu Item Entry
Individual Menu Item
Repeat Entry
Quantity Extension
Split Package Pricing
Scale Item Entry
Modifier Entry
Set Menu Entry
Preset Price Open Entry
EOl-11005
NOTES 1. A voiding operation to turn the sale total into a credit balance is usually
allowed, but it can be prohibited by system option.
2. By operating the required menu item entry and then entering a %-/COUPON
item after depressing the [VOID] key once, both the menu item and the
attached %-ICOUPON item will be voided.
3. Voiding a menu item included in the last Tray Total is possible.
- RECEIPT PRINT SAMPLE -
xyOIDs
SALMON SLICE
7.50-T
-40-
Page 44

Return
The Return operation is used to record returned items once purchased in a transaction
already finalized with payment in Non-tab Mode. {If an item is returned or canceled within
a transaction, the Void operation is used.) This operation is not possible in Tab Mode
(Server-Cashier or Server/Banking system). The returned item entries will not be printed
on RKP paper.
[RETURN] -► Menu Item Entry
I---------------------
Individual Menu Item
Repeat Entry
Quantity Extension
Split Package Pricing
Scale Item Entry
Modifier Entry
Set Menu Entry
Preset Price Open Entry
EOl-11005
NOTES 1, Return operations to turn the sale total into a credit balance is usually
allowed but it can be prohibited by system option.
2. By operating the required menu item entry and then entering a %~ICOUPON
item after depressing the [RETURN] key once, both the menu item and the
attached %-/COUPON item wHI be voided.
3. Returning a menu item included in the last Tray Total is possible.
- RECEIPT PRINT SAMPLE -
RTN
FRD CHICKEN
4,50-T
- 41 -
Page 45

Clear Transaction
Data entered in the current transaction (one order sequence, for example) can be cleared
in a one-touch key operation. It will not clear the data already entered in previous order
sequences for a guest check. (To clear the entire data of the guest check, see the Void
Check operation on the next page.) When the Clear Transaction is operated in the Non
tab mode, the entire data of the current sale will be cleared.
[CLEAR TRAN]
NOTES 1. A receipt is issued and the transaction ends,
2. ft can be operated in New Check, Additional Order, or Check Paid
sequences in Tab Modes (Server-Cashier, Server/Banking), and in sale
entry sequences in Non-tab Mode.
3. Since it clears the data in the buffer memory, the data itself will not be
printed on the guest check or RKP paper.
EOI-11005
- RECEIPT PRINT SAMPLE -
Non-tab Mode
RESTAURANT TEIC
1234 PEACH DRIVE
PHONE: 87-Ó437
9:00 - 20300
SPECIAL LUNCH MENU
from 11:00 to 13:00
05-05-89 FRI «555501
3X 1.405
BEER-A 4.20 T
VEB.SALAD 2,20 T
CANCEL
EDEN
Ó.40
0206 T14:59
(Additional Order Sequence)
Tab Mode
RESTAURANT TIEC
1234 PEACH DRIVE
PHONE: 87-Ó437
9:00 - 20:00
SPECIAL LUNCH HENU
from 11:00 te 13:00
05-05-89 FRI «555501
CHKM^ 0000!5
PREV-BAL
15.40
3X 1.4ÖS
BEER-A 4.20 T
VE6.SALAD 2.20 T
-42-
CANCEL 6.40
JOHNSON 0207 T12:55
Page 46

Void Check
This operation is used to void the entire data of an outstanding check. When it is
operated, the previous balance v/ill be processed into the VOID CHECK memory
{including taxes).
[Check No.| [CHECK PAID] --------------^ [VOID CHECK]
i
Insert the guest
check slip to the
GCP.
NOTES 1. A receipt is issued and the data of the guest check are all cleared.
2. This operation is not applied to transactions in Non-tab Mode.
EOI-11005
Receipt
RESTAURANT TEC
Ì21A PEACH DRIVE
PHONE: 37-6437
?“.00 - 20:00
SPECIAL LUNCH MENU
frorrt 11:00 to 13:00
05-05-89 FRI »555501
CHK# 00005:
CHK PAID
VOID CHK
15.40
15.40
- PRINT SAMPLE -
Guest Check
JOHNSON
CHK** 00005
CHK PAID 15-40
VOID CHK 15-40
05-05-89 FRI «555501 EDEN 0208 T12:55
EDEN
0208 T12:55
- 43 -
Page 47

%-, Dollar Discount, Coupon
Some credit keys may be installed on your terminal, and they may be labeled with various
names. These are classified into two types -- keys to enter percent discount {to be called
keys here) and keys to enter amount discount (to be called “COUPON” keys here).
Each of the keys is also programmed to discount from individual menu items or from the
subtotal of the sale. A preset rate or amount can be set on each key.
%- Keys:
EOl-11005
Discounting from an item
Menu Item Entry
Discounting from the sale
™ -► [ST]
COUPON (or Dollar Discount) Keys:
Discounting from an item
Menu Item Entry
“C
Discounting from the sale
— -► [ST]
[%-]
lEate] [%-]
1 to 99 (%)
[%“]
|Rate| [%-]
1 to 99 (%)
[COUPON]
... discount by the preset rate
... discount by a manual rate
discount by the preset rate
discount by a manual rate
discount by the preset amount
[Manual Amount| [COUPON]
... discount by a manual amount
[COUPON] ... discount by the preset amount
[Manual Amount! [COUPON]
... discount by a manual amount
NOTES 1. Discount operations to turn the sale total into a credit balance is usually
allowed, but it can be prohibited by system option.
2. For %' keys, a maximum of 2 digits (1 to 99%) can be entered as a manual
rate, but a maximum of 6 digits (0.0001 to 99.9999%) can be set as the
preset rate for each key.
- RECEIPT PRINT SAMPLE -
Discounting from the sale
SUBTOTAL
18.50
DISC TL
Ш
1.85-T
Discounting from an item
BEEF STEAK L
COUPON
14.00 T
5,00-T
-44-
Page 48

Service Charge (% +)
This operation is used to add a service charge rate or table charge rate to the guest
check. The charge rale can be entered in the Additional Order sequence or Check Paid
sequence. It can be operated only in Tab Mode.
ION )
During an Additionai Order Sequence:
¡Check No.| [PB] -► ( |Rate| ) [SERVICE CHARGE] -► —
1 to 99 (%}
During a Check Paid Sequence:
¡Check No.| [CHECK PAID] -► ( |Rate[ ) [SERVICE CHARGE] —
1 to 99 (%)
NOTES 1. When the [SERViCE CHARGE] key is simply depressed, the preset rate
will be active. When a rate is entered manually, the manual rate prevails.
2. A maximum of 2 digits (1 to 99%) can be entered as a manual rate, but a
maximum of 6 digits (0.0001 to 99.9999%) can be set as the preset rate for
each key.
EOI-11005
Receipt
RESTAURANT TEIC
PEACH DRIVE
PHONE: Q7~6AZ7
9:00 - 20:00
SPECIAL LUNCH MENU
from 11:00 to 13:00
05-05-89 FRI S555501
CHK## oooo^
CHK PAID
SERV CHG
15%
TAXI
TAX2 0.08
TOTAL 2.65
2.10
0.32 T
0.15
- PRINT SAMPLE -
JOHNSON
SERV CHS
05-05-89 FRI
Guest Check
енк»
0000-4^
CHK PAID 2Л0
15% 0.32 T
TAX
TOTAL
CASH
0-23
2.65
2.65
Й555501 EDEN 0212 T12:41
CASH 2.65
EDEN 0212 T12:
- 45 -
Page 49

Tip Paid
This operation is used to record a tip amount paid in cash at the terminal register and
clarifies which server will receive the tip. A receipt is issued. This operation is applied
only to Tab Mode terminals.
{must be operated outside a transaction)
EOI-11005
[Cashier or Server Code| [SERVER #]
ol the operator who is operating the
terminal; enter the full code including the
secret code. On a Server-Cashier
teiminal, the operating Cashier Code must
be entered but not a Server Code.
|3-diait Server Code| [SERVER #]
of the server to receive the
tip. Enter only the 3-digit
manager-assign portion of
the Server Code.
Receipt
- PRINT SAMPLE -
> [TIPS PAID]
[Tip Amount] [CASH]
Inert a slip to GCP.
----------
RESTAURANT TEIC
1234 PEACH DRIVE
PHONE: 87-6437
9:00 - 20:00
SPECIAL LUNCH MENU
frori) 11:00 to 13:00
05-05-89 FRI 9555501
TIP PAID JOHNSON
CASH 1.00
EDEN
0213 T15:23
Slip
-46-
Page 50

Charge Tip
This operation is used to record a tip amount paid in other mediae than cash. The
entered tip amount is thus added to the sale total of the guest check, it is operated in a
Check Paid sequence.
EOl-11005
[Check No.| [CHECK PAID]
NOTES 1. The media key to be used here must be a media programmed with the
Receipt
RESTAURANT
1234 PEACH
PHONES 87
9=00 - 2
SPECIAL LUNCH MENU
from 11:00 to 13:00
05-05-89 FRI
TEIC
DRIVE
-6437
0:00
#555501
status ^‘Charge Tip Allowed”.
- PRINT SAMPLE -
Guest Check
JOHNSON
05-05-89 FRI #555501 EDEN 0214 Tll:07
[Tip Amountj [CHARGE TIP]
Payment Entry using
the same media as
the tip.
CHK## 00003
CHK PAID 5.40
CHS TIP 1.00
TAX 0.32
TOTAL 6.72
HOUSE CH 6.72
CHKfHt 0000-3
CHK PAID
CHS TIP
TAXI
TOTAL
HOUSE CH
EDEN 0214 Tll:07
5.40
1.00
0.32
6.72
6.72
- 47 -
Page 51

Service Adjust
This operation is used to refund an amount and adjust the sale total of a guest check. It
is operated in the Additional Order sequence or Check Paid sequence.
[Check No.| [PB] —► [Amount to be refunded) [SERVICE ADJUST]
I
^ ) -► [TOTAL]
[Check No.[ [CHECK PAID]-^ [Amount to be refunded] [SERVICE ADJUST] —
( ) —► Media Entry
NOTES 1. The Service Adjust entries do not affect report memory totals of individual
menu items.
EOl-11005
□
Receipt
RESTAURANT
1234- PEACH
PHONE: 87“
?:00 ~ 20
SPECIAL LUNCH HENU
fron 11:00 to 13:00
05-05-89 FRI
TS^C
DRIVE
6437
:00
H555501
CHKt# oooos:
PREO-BAL
SERV AOJ
TAXI
TAX2
TOTAL
3.50
0.50-T
O.IS
0.04
3.22
- PRINT SAMPLE -
Guest Check
ITEH 0
JOHNSON 0216 T18:55
-48-
Page 52

Check Transfer
This operation is used to change the Server Code, Table No., and/or the number of
guests of a check. The Check No. will not be changed. It is operated in an Additional
Order sequence.
(must be operated outside a transaction)
[Server Code| [SERVER #] —► [CHECK TRANSFER]
of the current
server. Enter the
full code including
the secret code.
|New Server Code| [SERVER #] ^
Enter only the 3digit manager'
assign portion.
[New Table No.| [TABLE #]
□
[New Number of Guests| [GUEST #]
E01-11005
NOTES 1. Of the entries of New Server Code, New Table No., and New Number of
RESTAURANT TEC
1234 PEACH DRIVE
PHONE: 87-6437
9:00 - 20:00
SPECIAL LUNCH MENU
from 11:00 to 13:00
05-05-8? FRI «555501
CHK*#
TABLE«
GUEST
00007
15
4
[Check No.| [PB]
[TOTAL]
t
Insert the guest check.
Guests, unchanged data can be skipped. But the last line (from “Check
No.'’ through the [TOTAL] key) cannot be skipped.
Receipt
- PRINT SAMPLE -
JOHNSON CHK« OOOOV
05-05-89 T15:56 TABLE« 15 6UEST 4
CHK#* 00007
JOHNSON TABLE« 19 GUEST 4
Check Data
before change
Check Data
before change
Check Data
after change
CHK#
TABLE«
GUEST
JOHNSON
00007
19
4
0220 T15:56
Check Data
after change
-49 -
Page 53

Check Combine (Check Merge)
This operation is used to combine two different guest checks into one. The checks to be
combined must be of those handled by the same server.
{must be operated outside a transaction)
IServer Code| [SERVER #] —^ [CHECK COMBINE]
of the responsible
server. Enter the
full code including
the secret code.
i ^
[First Check No.| [PB] —► [Second Check No.| [PB]
□
EOl-11005
□
RESTAURANT
123^ PEACH
PHONES 87
9:00 - 2
SPECIAL LUNCH MENU
frcfiit 11:00 to 13:00
05-05-89 FRI
CHKt*
TABLE»
PREU-BAL
TRANS-CR
NEW-BAL
JOHNSON
CHK#t
TABLE»
PREV-BAL
00007
19
022
Tec
DRIVE
-6437
5:00
»555501
5.60
5.60
0.00
2 T15:56
ooooe
0
0,70
-► [TOTAL]
I
Insert the first
check slip to
print the new
balance of
zero.
NOTES 1. As a result of combining the two checks, the first check is
cleared and the second check is maintained with the total
balance of the first and the second checks.
2. The attached data such as Table No. of the second check
will be active, except that the Number of Guests will be
the sum of the two checks. The print line of the guest
check will be controlled by the second check memory.
" PRINT SAMPLE — (Two receipts are issued.)
JOHNSON CHK« OOOOT'
05-05-89 T15:56 TABLE» 19 GUEST 4
PREV-BAL 5-60
TRANS-CR 5.60
NEW-BAL 0.00
05-05-89 FRI »555501 JOHNSON 0222 T15:56
The AMOUNT display
flickers. Insert the
second check slip to
print the new balance
of 1st check + 2nd
check.
[TOTAL]
I
TRANSFER
NEW-BAL
TAXI
TAX2
TOTAL 6,96
JOHNSON
5.60
6,30
0..38
0,28
0223 T15;:
JOHNSON OHK#* OOOOS
05-05-89 T16:03 TABLE» 0 GUEST
PREV-BAL
TRANSFER
NEW-BAL
TAX
TOTAL
-50-
0.70
5.60
6.30
0.66
6.96
Page 54

Subtotal
Depressing the [ST] key displays (and prints if so programmed) the total of the items so
far entered in the transaction or the guest check. It can be operated in Tab or Non-tab
mode.
--------
► [ST] -
NOTES 1. When the [ST] key is depressed in an Additional Order sequence, the
displayed subtotal amount includes the previous balance.
2. Whether the subtotal amount is printed or not on a [ST] key depression is
determined by a program option. If the “print” status is selected, the
amount is printed on the first depression of the key and consecutive
depressions thereafter will only display the amount.
3. Whether the displayed amount is the subtotal (sale total excluding taxes) or
the taxable total (sale total including taxes) is another program option. The
printed amount is always the subtotal regardless of the option.
EOI-11005
- RECEIPT PRINT SAMPLE -
SUBTOTAL
14.70
Taxable Total
Depressing the [TXBLTL] key displays (and prints if so programmed) the total of the
items so far entered in the transaction or the guest check. It can be operated in Tab or
Non-tab mode. The displayed (and printed) amount includes taxes. When the [ST] key is
programmed to display the taxable total, the [TXBLTL] key need not be installed on the
keyboard.
[TXBL TL]
NOTES 1. The displayed amount includes the previous balance, if any.
- 51 -
Page 55

Tax Status Modification
Each of menu items and some function keys is programmed with the taxable or nontaxable status. The status of a menu item or a function key can be reversed for that entry
only by operating the [TX1/M], [TX2/WI], and/or [TX3/W1] keys.
To reverse the Tax 1 status:
[TXl/M] —► Menu Item Entry or Function Key Entry
To reverse the Tax 2 status:
[TX2/M] —> Menu Item Entry or Function Key Entry
To reverse the Tax 3 status:
[TX3/M] —► Menu Item Entry or Function Key Entry
NOTES 1. If more than one Tax Modifier keys are depressed prior to a required item,
the multiple tax status will be reversed for the item. For example, [TX1/M]
and [TX2/MJ are depressed, both Tax 1 and Tax 2 statuses are reversed.
EOl-11005
Manual Tax
When the [TAX] key is installed, it is used to add a tax amount not charged by automatic
tax calculation. This operation is applicable to certain areas only. The manual tax thus
entered will be processed to the Tax 3 total memory. In such areas, therefore, a
maximum of two tax tables can be programmed - Tax 1 and Tax 2 - but not Tax 3.
[Tax Amount] [TAX]
NOTES 1. A manual tax entry can be item-corrected, but cannot be voided nor
returned.
-52-
Page 56

Tax Exempt
This operation is used to exempt a transaction from auto-taxes.
Selective Tax Exemption:
EOl-11005
--------
...
...
►
[TX1/M] -►
[TX2/M] -►
[TX3/M] -►
'
------
Depressing two
[TX EX]
[TX EX]
[TX EX]
... to exempt from Tax 1 only
... to exempt from Tax 2 only
... to exempt from Tax 3 only
Tax Modifier keys will
transaction from the two taxes.
Alt Tax Exemption:
... ----------------------------------------------------^ [TXEX]
... to exempt from all taxes
-------
► [TX1/M] [TX2/M] [TX3/M1 -► [TX EX]
NOTES 1. On depressing the [TX EX} key, the sale total excluding the exempted-taxes
is displayed, and the pre-taxed amount of the sale portion subject to the tax
exemption is printed.
2. After a Tax Exempt entry, only media entry for payment can be operated.
3. When the taxable total to be tax-exempted is negative, the operation will
result in an error
- RECEIPT PRINT SAMPLE IN NON-TAB MODE -
05-05-89
FRI H555501
BEEF STEAK L U.OO T
COFFEE 0.70 T
TAXIEX 14.70
TOTAL
CASH
14.70
14.70
I Pre-taxed amount of the sale
portion subject to the tax exemption
ITEM
EDEN
0225 T16:l9
- 53 -
Page 57

Tray Total
This operation is used to divide a transaction into individual guests of a party, thus it
obtains separate totals (tray total) for each guest sale. It can be operated in Non-tab
Mode only and is often used in a cafeteria environment.
EOI-11005
Menu Item Entries
[TRAY TOTAL]
Media Entries for Payment
NOTES 1. On a [TRAY TOTAL] key depression, the taxes, the sale item count, and the
Tray Total are printed. Then a dotted line is printed as a separator for
starting another tray data.
2. VOID, RETURN, or %-iCOUPON items can be entered after a Tray Total.
3. For Media Entries for payment, taxes will again be calculated and printed to
the entire sale total.
- RECEIPT PRINT SAMPLE -
FRD CHICKEN 4.50 T
7-up 0.70 T
TAXI
0.31
ITEM
TRAY TIL
5.51
1st Tray Total
Separator Line
FRIED SHRIHP 6.70 T
COCA-COLA 0.70 T
TAXI 0.44
ITEM 2
TRAY TTL 7.84
SUBTOTAL
TAXI
TOTAL
CASH THD
CHANGE
12.60
0.76
13.36
20.00
6.64
ITEH
EDEN
0226 T16323
2nd Tray Total
Separator Line
V Entire Sale Data
J
-54-
Page 58

Non-add Number Print
Non-add numbers can be entered and printed for future references, to indicate codes or
numbers of customers, media checks, credit cards, etc. The entered numbers do not
affect any sale total data.
EO1-11005
(...)
|Number[ [#]
Max. 16 digits. Preceding
zeros, if any, will be printed.
NOTES 1. Non-add numbers can be entered any time between sale items, before or
after all the sale items if the transaction has not been finalized yet.
2. It is programmable whether a No-sale operation is allowed after a Non-add
Number entry.
3. It is also programmable whether Non-add Number can only be entered
once or any number of times within a transaction.
- RECEIPT PRINT SAMPLE -
H123456
TAB/CASH Mode Change
The Tab or Cash (Non-tab) Mode of the terminal can be reversed temporarily.
(must be operated outside a transaction before a Cashier or
Server Code entry. )
[TAB CASH] „
NOTES 1. This operation is not possible on terminals of Type 3 (Tab Mode 2:
Server/Banking System).
2. This operation is possible on a terminal of Type 2 (Tab Mode 1: ServerCashier System) when a cashier has signed ON.
3. When the Tab Mode is accessed on terminals of Type 1 (Non-tab Mode),
Check Transfer and Check Combine operations are accepted, but
OPERATIONS NOT RELATED TO SALES (described in the next section)
are not. They must be operated in the original Non-tab Mode.
4. No print occurs on the [TAB CASH] key depression itself.
The Tab Mode is reversed into Non-tab, and vice versa.
On completing one transaction, the original mode is
regained.
-55 -
Page 59

Validation Print
A single-line validation print is possible for a media entry if the [VALIDATE] key is
installed.
EOI-11005
Each entry of an item
or a Media Entry
Set a validation slip to
the Validation Slot of
the terminal printer.
Make sure that the "SLIP”
triangular lamp is
continuously lit.
NOTES 1. Printing occurs on the bottom side of the
[VALIDATE]
The entry is
printed on the
validation slip.
Withdraw the
validation slip.
The triangular lamp
goes out.
slip. Please be certain to insert the slip
into the validation slot with the print side
downward.
2. No other operations can follow until the
validation slip already printed is
withdrawn.
3. When the “SLIP** lamp flickers, it
indicates that the last key is programmed
with the Validation Compulsory status. In
case a media key is with the Validation
Compulsory status, the drawer opens on
the completion of the validation print
4. When the media is short-tendered, the
tendered amount is printed. When over
tendered, Whether the sale total or the
tendered amount is printed is decided by
the key status.
- VALIDATION PRINT SAMPLE -
05-05-89 555 0£13TIP PAIDCASH 1,00
5. The following are programmable
selections relating to validation:
(1) PRINT FORMAT
a) Date Print/Non-print
b) Consecutive No. Print/Non-print
(2) Single- or Multi-time Validation
(3) Validation Compulsory status on
Media Keys and other transaction
keys.
-56-
Page 60

Post Receipt
A Post Receipt is available if the [POST RECEIPT] key is installed.
EOI-11005
A transaction is finalized.
^ [POST RECEIPT]
Programmable options:
A Post Receipt is available only when a transaction is finalized with
or
[RECEIPTON/OFF] switch positioned to "OFF”.
Available regardless of the switch position {in this case two receipts can be
obtained for a transaction).
A Post Receipt is an itemized receipt for a sale of maximum 30 lines.
or
Exceeding 30 lines, the Post Receipt is total-only receipt.
A Post Receipt is always total-only receipt regardless of the number of print
lines.
NOTES: 1. The Post Receipt operation is not possible for a transaction not related to
sales (No-sale, Received-on-Account, and Paid-out).
2. The Time and Consect/f/Ve No. print on a Post Receipt are the same as
those for the last transaction finalized.
3. When another transaction is already under way on the terminal, the Post
Receipt for the last transaction is no more available.
- PRINT SAMPLES -
(issued on a transaction finalization)
Ordinary Receipt
Post Receipt
(Itemized Type)
(Total-only Type of equivalent contents)
Post Receipt
RESTAURANT TEIC
1234 PEACH DRIOE
PHONE: 87-6437
9:00 - 20:00
SPECIAL LUNCH MENU
ft-'orii 11:00 to 13:00
05-05-89 FRI tf555501
COFFEE 0.70 T
TAXI 0.04
TOTAL 0.74
CASH 0.74
ITEM 1
EDEN 0231 T16:35
RESTAURANT THC
1234 PEACH DRIVE
PHONE: 07-6437
9:00 - 20:00
SPECIAL LUNCH MENU
from il:00 to 13:00
05-05-89 FRI if55550i
COFFEE 0.70 T
TAXI 0.04
TOTAL 0.74
CASH 0.74
ITEM 1
EDEN 0231 T16:35
RESTAURriNT THC
1234 PEACH DRIVE
PHONES ß7“0437
VsOO 2OS00
SPECIAL LUNCH MENU
from 11:00 to 13:00
05-05-89 FRI fi555501
TOTAL 0.7-Mi
eden 0234 T16:39
- 57 -
Page 61

OPERATIONS NOT RELATED TO SALES
This section describes operations not directly related to sales.
EOl-11005
Type 1: Non-tab Mode
Type 2: Server-Cashier System
Type 3: Server/Banking System
NOTES 1, When the option “Check Print Compulsory” is selected for the corresponding
mode (Non-tab or Tab Mode for the terminal), a slip insertion to the GCP will be
required for those operations.
2. No print will occur on Remote Kitchen Printers.
-58-
Page 62

No-sale
The no-sale transaction is used to open the cash drawer without relating to any sales,
such as for giving change, testing the receipt^ournal print condition, etc.
(must be operated outside a transaction)
EOl-11005
[NS]
Insert a slip to GCP.
NOTES 1. A drawer may not be attached to the terminal by option.
The drawer opens and a No-sale receipt is issued.
-- Terminal Receipt Print Sample --
RESTAUl;:ANT TEC
1234 PEACH CirayE
PHONE: 87-6437
9:00 - 20:00
SPECIAL LUNCH MENU
froiii 11:00 to 13:00
05-05-89 FRT ^555501
-x^NO — SALE X
EDEN
0235 T16:42
-69-
Page 63

Received-on-Account
A received-on-account transaction is used to identify money which is in the drawer but not
from the daily business.
(must be operated outside a sale)
E01-11005
lAmount received| [R/Al —► {[ST])
Media Entries
t
Repeat if multiple amounts are received in one
transaction. If multiple (R/AJ Keys are installed, different
[R/A] keys may be used alternately in a transaction to
classify the amounts received.
NOTES 1. Media Keys to finalize R/A entries must be programmed with the status
“R/A operation allowed”.
ex.) To enter the following payments received on
account and $8.00 cash is tendered:
Insert a slip to GCP.
- Terminal Receipt Print --
RESTAURANT TEIC
1234 PEACH DRIVE
PHONE: 87-6437
9:00 ~ 20:00
Amounts Received
$3.50
______
Total $7.80
$4.30
Key Operation
350 [R/A]
430 [R/A]
( [ST] )
800 [CASH]
-60 -
SPECIAL LUNCH HENU
11:00 to 13:00
05-05-89
R ON ACT 3.50
R ON ACT
TOTAL
CASH TND
CHANGE
EDEN 0237 116:45
FRI fl555501
4.30
7.80
8.00
0.20
Page 64

Paid-Out
A paid-out transaction is used when money is removed from the drawer without relating to
a sale.
Q■.{must be operated outside a sale)
EOl-11005
[Amount to be paid out| [PO] —► ([ST])
>[CASH]
t______________________________
Repeat it multiple paid-out amounts are recorded in a
transaction.
Insert a slip to GCP.
NOTES 1. Only the [CASH] key can finalize paid-out transactions. Tendering is not
possible.
ex.) To record the following paid-outs:
A paid-out receipt is
issued.
- Terminal Receipt Print --
RESTAURANT
123^- PEACH
PHONE: 87-
9:00 - 20
TEC
ORIOE
6437
:00
Amounts to be paid out
$2.60
$6.80
Total $9.40
Key Operation
260 [PO]
680 [PO]
{[ST])
[CASH]
- 61 -
SPECIAL LUNCH MENU
front 11:00 to 1-3:00
05-05-89 FRI ft555501
PAID OUT
PAID OUT
TOTAL
2-60
6-80
9.40
CASH 9.40
EDEN 0239
T16:50
Page 65

KEY STRINGS USING THE [FUNCTION] KEY
A maximum of 10 Key String Function Tables can be programmed for the conveniences of
daily operation routines. A maximum of 10 different key sequences can be preset in one table.
A required key string is executed by entering the Table No. (1 to 10) through the [FUNCTION]
key. The preset key sequences will be operated automatically.
|Kev String Function Table No.[ [FUNCTION]
ex.) Presumed that the key sequence of 1111
[ITEM#] is programmed in Key String Function
Table No.1 and that the item No. 1111 is
programmed with a Main item of a Set Menu.
The operator wants to enter this Set Menu
using the [FUNCTION] key in Non-tab Mode;
- Terminal Receipt Print --
EOl-11005
1 [FUNCTION]
The same effect occurs as
operating: 1111 [ITEM#]
[CASH]
RESTAURANT THC
P
EACH DRIVE
PHONE
: 87-6if37
9:00 - 20:00
SPECIAL
LUNCH HEHU
from li:00 to 13:00
05-07-89
HAHB.STK
TOSSED S
SUN И555501
SET 9.00 T
ALADt
CORN SOUPt
COFFEEt
TAXI 0ЛЛ
TOTAL
9.54
CASH 9.54
ПЕН 4
EDEN,
0006 T17:46
-62-
Page 66

GUEST CHECK PRINTER (GCP)
The TEC Guest Check Printer DRS-107 may be connected to the FDS-50 series terminal as
an . optional device. The printer will operate printing if a slip is properly inserted at proper
timings during various operation sequences. {Refer to each operation sequence in the
preceding sections as to when the guest check slip is inserted.)
1. The following are programmabilities as to the Guest Check Printer operations:
PRINT START LINE AND LIMIT LINE SETTING
Appropriate values should be set to meet the guest check slip used by each
store.
SYSTEM OPTIONS
• Check Print in Non-tab Mode: COMPULSORY or NOT COMPULSORY
• Check Print in Tab Mode: COMPULSORY or NOT COMPULSORY
• Line Feed Control for Check Paid: YES or NO
• Print Line Position for Check Paid:
IMMEDIATE or WITH LINE FEED
• Check Total Format on [TOTAL], [PB], [CHECK PAID]:
WITH TAX or WITHOUT TAX
• Header Line Print at [NEW CHECK] & [PB] Key Entries:
ONLY at [NEW CHECK] or EVERY TIME
• Previous Balance: PRINT or NON-PRINT
• Date Print on Checks: PRINT or NON-PRINT
EOl-11005
2. The gap of the slip inlet is opened for insertion and closed while printing. The
EJECT key on the printer can be pressed to open the closed gap. However,
please do not touch this key unless it is really necessary in such cases as
removing a paper Jam, operating a multi-page process, etc.
3. When the system option “Line Feed Control for Check Paid ~ NO” is selected, a
Check Paid entry will print at the top of a guest check. That is, a separate slip is
needed for the Check Paid entry from the slip printed with the New Check and
Addition Order entries.
4. When printing of a check requires more than a page, operate as in the following
for multi-page process:
1) When printing reaches the last line (limit line) of the first page, printing
stops, and the AMOUNT portion of the display flickers.
2) Withdraw the first page, and insert the second page. Then depress the
[C] key on the terminal keyboard. Printing resumes.
5. As for the [LINE No.] key on the terminal, see the chapter of OFF-LINE MODE in
the Manager’s Guide.
Refer to the print samples on the following pages.
- 63 -
Page 67

RESTAURANT TEIC
1234 PEACH DRIVE
phone: B7-Ó437
9:00 - 20:00
SPECIAL LUNCH HENU
frofft 11:00 to 13:00
05-05-89 FRI «555501
EOI-11005
GUEST CHECK PRiNT SAMPLE IN NON-TAB MODE
BEEF STEAK S 7.50 T
PORK SAUTE 4,50 T
COFFEE 0.70 T
BEER-A 1.40 T
SUBTOTAL 14.10
TAXI
TAX2
TOTAL
CASH THD
CHANSE
ITEM
EDEN
0.85
0.07
15.02
20.00
4.98
0241 Ti6:54
BEEF STEAK S
PORK SAUTE
COFFEE
BEER-A
7.50 T
4.50 T
0.70 T
1.40 T
SUBTOTAL
TAX
TOTAL
CASH TND
CHANSE
05-05-89 FRI »555501 EDEN
14.10
0.92
15.02
20.00
4.98
0241 Tló:54
-64-
Page 68

RESTAURANT TBC
1234 PEACH DRIUE
PHONE: 87-6437
9:00 - 20:00
SPECIAL LUNCH MENU
freni 11:00 to 13:00
05-05-89 FRI H555501
CHKt# OOOOSP
BEEF STEAK L 14.00 T
EOI-11005
GUEST CHECK PRINT SAMPLE IN TAB MODE
TAXI
TOTAL
ITEM 1
JOHNSON 0242 T17:i9
CHK# 00009^
PREV-BAL
COFFEE
TAXI
TOTAL
ITEM 1
JOHNSON 0243 T17:19
CHKM
0.84
14,64
14,00
0.70 T
0.88
15.58
00009
1 ^
2 <
3 <
JOHNSON
CHK« OOOOS^
05-05-89 T17:19 TABLEtt 0 GUEST 0
BEEF STEAK L 14.00 T
TAX 0.84
TOTAL 14.84
PREV-BAL
COFFEE
0.70 T
TAX
TOTAL
JOHNSON
CHK#* 00009
CHK PAID
TAX
TOTAL
HOUSE CH
05-05-89 FRI #555501 EDEN
14.00
0.88
15.58
14.70
0.88
15.58
15-58
0244 T17:l9
CHK PAID
TAXI
TOTAL
HOUSE CH
EDEN
14.70
0.88
15.58
15.58
0244 T17:
-65 -
Page 69

REMOTE KITCHEN PRINTER (RKP)
Appearance and Nomenclature
Cutter
EOI-11005
-66-
Page 70

EOl-11005
Power Switch
...................
When the Power Switched is turned ON, the printer starts
initializing, and the print head returns to the home position.
LINE Lamp
.......................
It is lit when the printer is in on-line condition. It goes out
when the printer is in off-line condition. Printing is possible
when the LINE lamp is lit.
ALARM Lamp ................... It lights up when a paper-empty error has occurred, it flickers
when a hardware error such as motor lock has occurred. It
goes out when the cause of the error is removed or cleared.
LF Switch
LINE Switch
.........................
.....................
It must be pressed when paper feeding is necessary.
It must be pressed to reverse the printer condition from on
line to off-line, or vice versa.
Paper End Detector
A paper-end detector is installed in the printer, and a paper-end condition is indicated in
the following steps:
(1) The ALARM lamp turns lit.
(2) The ON LINE lamp goes out.
(3) The alarm buzzer sounds.
When paper is refilled, the alarm buzzer stops and the ALARM lamp goes out.
Print and Cut Positions
Cut Position
Terminal Operation and RKP Printing
A maximum of 4 Remote Kitchen Printers (RKP-50) can be connected to the terminal via
the TIP NET cable. Each of the remote printers should be placed in a preparation area
such as kitchen, pantry, etc. According to the status “Printer Destination 1 to 4” of each
menu item, the menu item entry is printed on the designated remote printer in order
sequences {accurately on depressing the [TOTAL] key to end the order sequence In Tab
Mode or on finalizing the transaction in Non-tab Mode), if multiple menu items data are
sent to one remote printer, the Print Priority set for each item decides the printing order.
- 67 -
Page 71

If the items are set with the same Priority, items of lower Item Code No. will be printed
first.
System Potions relating to RKPs:
Print formatted receipt from Terminal when the RKP is in trouble or disconnected:
YES or NO
Remote Print in Non-tab Mode: PRINT or NON-PRINT
The following are samples printed on Remote Kitchen Printers in Tab Mode.
EOI-11005
Terminal Receipt
RKP Print
NOTE: In actual operations, the Consecutive Nos on the Formatted
Receipt or RKP printout match that of the Terminal Receipt.
-68-
Page 72

Retry and Formatted Receipt Operations
When the designated RKP is in an error status, such as Power OFF, cable disconnection,
etc., a “time-out” occurs in sending the menu item to the designated RKP. The message
“RETRY” is displayed in the 20-dlgit dot windows of the display. In this case, one of the
following operations can be selected:
RETRY: When the RKP is expected to be recovered soon, depress the
[TOTAL] or [CASH] key to retry to send the data again.
FORMATTED RECEIPT ISSUANCE:
When a formatted receipt is expected to be issued from the terminal
printer, instead of printing on the RKP, depress the [ITEM CORR]
key.
For a terminal without any RKPs connected, a formatteii receipt is
automatically issued without a “RETRY” display sequence.
Main Specifications
EOI-11005
External Dimensions:
Weight:
Operating Temperature:
Operating Humidity:
Power Required:
Life:
205mm(width) x 265mm(depth) x 112mm(height)
Approx. 2.5kg
0*^0 to 40°C
10% to 85% RH
AC 117V ±10%: 50/60HZ
Printer 1.5 million lines (MCBF)
Head 50 million characters
Character Size:
Font Components:
Print Speed:
1.25mm(width) x 2.75mm(width) for regular-sized characters
5x7 dots (regular-sized), 11x7 dots (double-sized)
2.7 lines/sec. for full columns, 1.2 lines/sec. for 12 columns
Max. Number of Characters per Line:
20 (regular-sized only), 40 (double-sized only)
Print Direction:
Line Pitch:
Paper Roll Size:
Left to right (one way)
5.5mm
69±1mm(width) x 80mm or less (diameter); High quality
paper 45kg. (Pressure-sensitive paper cannot be used.)
Ink Ribbon:
Dual-color Ribbon (upper: black / lower: red for VOID entry)
Interface:
Data Buffering:
Memory Back-up:
Width 13mm (spool diameter 30mm or 35mm)
TIP-NET
TIP-NET Text of 2 blocks (= max. 48 records)
Received data is not lost even if a power failure occurs.
- 69 -
Page 73

10. POWER FAILURE PROCESS
If a power failure occurs, the sales memory is protected by the back-up battery; registration and
printing will normally be performed on regaining the power. However, please note the following
cases:
(1) The printer will work to print the entered data without failure after the power recovery if any
data was being printed. However, one extra line may be fed on the power recovery
depending on the power failure timing.
(2) The display will indicate, on the power recovery, the content that was displayed before the
power failure. However, if only numeric keys or non-motorized keys {[VOIDl, [TX/WI], [X],
[PR OPEN], [RETURN], etc.) are depressed at the start of a sale registration, and then the
power fails, the entered numeric value or non-motorized key will disappear by the time of
power recovery and the display will indicate the error code “E40”. In this case, perform the
registering operation again from the very first key-in operation.
If a power failure occurs, it is recommended to check the print content before the receipt is handed
to the customer.
EOl-11005
11. JOURNAL AND RECEIPT PAPER-END DETECTOR
(1) This detects when either the journal or receipt paper is running out. It is provided to prompt
the operator to replace the old paper roll with a new one.
(2) When the paper roll is running out (or the paper has not been set properly), no key
operation is accepted and the AMOUNT portion of the display keeps flickering.
(3) When a new paper roil is set, only the [RF] and [JF] keys are allowed to operate. Next,
when the [C] key is depressed, the display flickering will be cleared and normal key-in
operations will be accepted. When any printing has been suspended, it will continue
printing.
(4) If this detector senses a paper-end condition during printing, the printing stops after the
current line printing is completed.
(5) If the [C] key is depressed in the paper-end condition, it is ignored. The [C] key depression
will clear the display flickering only after the new paper roll is set.
12. PRINTER MOTOR LOCK DETECTOR
(1) This detects the printer motor lock condition (for both Terminal Printer and GCP) caused by
some trouble, such as paper jamming.
(2) When such a condition is detected, the operator display indicates "Error” and none of the
keys can be operated (neither can [RF] nor [JF] be operated).
(3) To regain the normal condition, turn the power of the ECR to OFF, remove the cause of the
motor lock, and then turn the power to ON again. (In case the GCP is locked, the terminal
can be made to work by temporarily removing the GCP cable from the terminal.)
- 70 -
Page 74

13. PAPER ROLL REPLACEMENT AND OTHER
MAINTENANCE OPERATIONS
13-1 INSTALLING THE RECEIPT PAPER
1. Turn the Mode Lock to the REG position with the
power ON.
2. Remove the Paper Cover, and remove the Journal
Winding Reel {Fig. 1),
3. Place a new paper roll in the direction shown in Fig. 2
so that the paper end will be fed from the bottom.
4. Fold the paper end as shown in Fig. 3 to ease the
insertion.
5. Place the paper roll in the outer holder of the two roll
holders {Fig. 4).
6. Insert the paper end into the Receipt Inlet, feed the
paper in while pressing down the Free Lever (or feed
Fig. 2
the paper in while pressing the [RF] key). (Fig. 5)
7. When the whole folded portion has come out, tear off
the unnecessary part with an appropriate end length
remaining (approx. 5 cm or 2 inches). (Fig. 6)
E01-11005
Inlet
Free Lever
Fig. 5
8. Go on to INSTALLING THE JOURNAL PAPER steps if
necessary, or go on to Step 9 below if not.
9. Attach the Paper Cover. Please note the paper end
must be visible outside the cover.
10. Press the [C] key to clear the paper-end condition, and
depress the [NS] key to issue a receipt to check if the
paper has been properly set.
NOTE:
The [RF] or [JF] keys function only when both
receipt and journal paper rolls have been placed
in their respective holders.
Approx. 5cm
Fig. 6
71 -
Page 75

EOl-11005
13-2 REMOVING THE RECEIPT PAPER
^. Remove the Paper Cover.
2. Tear the paper end off the paper core and pull the
paper end out while depressing the Free Lever. (Fig. 7)
3. Remove the paper core.
Journal Inlet
Fig. 7 13-3
1.
2.
3.
Fig. 8
4.
5.
6.
Fig. 9
7.
8.
INSTALLING THE JOURNAL
PAPER
Turn the Mode Lock to the
power on.
Remove the Paper Cover by pulling it upward, and
remove the Journal Winding Reel. (Fig. 1)
Follow Steps 3 and 4 of INSTALLING THE RECEIPT
PAPER procedure on the preceding page.
Place the paper roil in the inner roll holder of the two
holders. (Fig. 8)
Insert the paper end into the Journal Inlet, feed the
paper in while pressing down the Free Lever (or feed
the paper in while pressing the [JF] key. (Fig. 9)
When a sufficient amount of paper comes out, wind the
paper around the Journal Winding Reel two or three
times, and set the Journal Winding Reel into the Reel
Holder. (Fig. 10)
Attach the Paper Cover.
Press the [C] key before starting operation.
‘REG” position with the
13-4 REMOVING THE JOURNAL
PAPER
1. Remove the Receipt Cover.
2. Press the [JF] key to wind up enough of the journal
paper, and then tear off the paper, holding the Journal
Winding Reel.
3. The wound-up portion of the paper can easily be
removed from the Reel by pulling it sideways. (Fig. 11)
4. If enough paper remains on the roll, follow Steps 6
through 8 above; if the paper is running out, follow
Steps 1 through 8 above.
NOTE: The [JF] or [RF] keys function only when both
journal and receipt rolls have been placed in their
respective holders.
-72-
Page 76

EOl-11005
13-5 REPLACING THE RIBBON
CARTRIDGE
If either the receipt or journal print is too light, replace the
Ribbon Cartridge in the following manner.
1. Remove the Ribbon Cover (Fig. 1).
2. Remove the old Ribbon Cartridge by pulling it toward
you (Fig. 2).
3. Install a new Ribbon Cartridge in the reverse order to
Step 2 above (Fig. 3).
4. The Ribbon Cartridge is a consumable product. Be
certain to use a genuine Ribbon Cartridge supplied by
your TEC representative.
13-6 REPLENISHING THE STORE
NAME STAMP WITH INK
When the store name stamp is printed too lightly, replenish
the ink in the following manner:
1. Turn the Power Switch to OFF. Remove the Paper
Cover.
2. Withdraw the store name stamp with the protruding
part clasped between your fingers (Fig. 4).
3. Apply ink to the pad on the rear side of the Store
Name Stamp. The amount applied should be adjusted
according to the desired darkness of the printed
message, but the limit of 2 cc should not be exceeded.
(The ink bottle supplied contains 5 cc of ink.) (Ftg.5)
4. Follow the reverse order of the instructions in Step 2,
and then attach the cover.
Ink
Fig. 4
Fig. 5
- 73 -
Page 77

EOl-11005
13-7 MANUAL DRAWER RELEASING
The drawer opens automatically when a registration is
performed. In the event of a power failure or other trouble,
the drawer can be opened manually in the following
manner;
1. Insert the Drawer Release Key into the drawer release
lock and turn the key clockwise. The drawer will then
open. (Fig. 1)
2. The Drawer Release Key can be taken out by returning
it to the original position.
Fig. 1
3. When the drawer is closed, it is automatically locked
and will not open without the Drawer Release Key or a
normal registering operation.
13-8 REMOVING THE DRAWER
1. Pull the drawer out, and when it stops at the stopper,
lift the drawer up and pull it further out {Fig. 2). When
it stops again at the roller fixed in the drawer housing,
lift it and pull it out (Fig. 3).
2. To return the drawer, follow the reverse procedure for
removing.
13-9 CDC (Cash Drawer Cover) LOCK
Locking (Fig, 4)
1. Push the Cash Drawer Cover to the back of the
drawer.
2. Press the cover lightly, insert the key into the key-hole
on the cover, and turn it to lock.
Unlocking
1. Unlock the cover using the key, and lift the front end.
- 74 -
Page 78

14. SPECIFICATIONS
Size ........................................................................ 464mm(width) x 428mm(depth) x 4l1mm(height)
(height including rubber feet)...with SP Drawer
522mm(height) ... when the Customer Display is
popped up.
464mm(width) x 428mm(depth) x 323mm(height)
(height including rubber feet)... without a drawer
Weight .................................................................... 18.5kg (with a SP Drawer)
12.5kg (without drawer)
Power Required ..................................................... AC 117V ± 10%; 50Hz ± 10%
(varies depending on the destination)
Power Consumed .................................................. 15W (standby),
30W (operating)
EOl-11005
Size of Receipt and Journai Tape
Ambient Temperature ............................................ 0°C to 40°C, 10% to 90% Relative Humidity
Validation Slip Specifications
Type of Paper
Thickness ................................................... 0.06mm to 0.2mm (total thickness)
Max. Number of Duplicates
Size of Slip ................................................. Min. 150mm(width) x min. 70mm(height)
............................................
..........................
.......................
45mm(width) x 80mm(diameter)
0.07mm to 0.09mm (thickness)
Non-carbon Paper, or Ordinary Paper + Carbon Sheet
2 sheets (including the original sheet)
- 75 -
t
15mm
Page 79

- tNDEX --
EOl-11005
page
* Additional Order Entry ............................................................ 28
AMOUNT Display
Auto Scale Entries .................................................................. 35
® Balance Transfer ..................................................................... 29
^ Cash Drawer Cover Lock ....................................................... 74
Cash Mode (Non-tab Mode) ................................................... 15
Cash Tip .................................................................................. 46
Cashier Code Entty
Cashier Locks ........................................................................... 5
Cashier Sign ON/OFF
Charge Tip .............................................................................. 47
Check Combine (Check Merge)
Check Digit of Guest Check No............................................... 27
Check Finalizing (Closing) ...................................................... 30
Check No. Creation Auto/Manual ........................................... 27
Check Paid .............................................................................. 30
Check Transfer
Clear T ransaction
Coupon
...................................................................................
Customer Display
^ Discount ................................................................................... 44
Display ...................................................................................... 6
Drawer Open (Manual)............................................................ 74
Drawer Opening by Media Keys ............................................. 3i
Drawer Removing ................................................................... 74
^ Error Code and Messages ......................................................... 8
^ Flat Keyboard Type .................................................................. 10
Formatted Receipt of Order Items
FUNCTION Key Entry
Functions of Each Key
G GTLock ....................................................................................... 4
GTX position ........................................................................... 4
GTZ position ............................................................................. 4
Guest Check Printer (GCP) .................................................... 63
Guest No. (Number of Guests) Entry
* Item Correct .............................................................................. 39
.....................................................................
................................................................
............................................................
.............................................
.......................................................................
..................................................................
.....................................................................
.........................................
............................................................
...........................................................
......................................
22
20
50
49
42
44
68
62
12
27
JF (Journal Feed) Key ............................................................ 12
^ Keyboard Layout ............................................................... 10, 11
9
^ LINE No. Key .............................................................................. 13
LOCK position
..........................................................................
^ MA Key .......................................................................................... 4
Manager Intervention
Manual Scale Entry
Manual Tax ............................................................................. 52
Media Entries (Payment) ....................................................... 31
Media Keys
Menu Item Entries .................................................................. 33
MGR Key .................................................................................. 4
MGR position ............................................................................ 3
Mode Lock ................................................................................ 3
Modifier Entry ......................................................................... 36
Multiplication
..............................................................................
^ New Check Entry
Non-add Number Print
Non-tab Mode (Cash Mode)
6
Non-tab Mode Sale Sequence ............................................... 24
No-sale ................................................................................... 59
Numeric Keys ......................................................................... 12
® OFFLINE position ......................................................................... 3
Open-price Menu Items .......................................................... 33
Opening a Guest Check ......................................................... 27
Operation Flows...................................................................... 15
Operations Not Related to Sales
Operations Related to Order or Payment
Operator Code Entry ......................................................... 22,23
Operator Display ...................................................................... 6
Order Total (Balance Transfer) .............................................. 29
Ordinary Keyboard Type
Over-tender............................................................................. 31
^ Paid-Out (PO)
Paper Changing...................................................................... 71
Paper End (Journal or Receipt)
............................................................................
.............................................................
................................................................
..........................................................................
.........................................................................
...........................................................
...................................................
............................................
......
.......................................................
..............................................
page
3
18
36
3i
34
27
55
15
58
........................ 39
11
61
70
-76-
Page 80

- INDEX - (continued)
EOl-11005
Payment ............................................................................... 31
Percent Charge
......................................................................
Percent Discount .................................................................... 44
Post Receipt ........................................................................... 57
Power Failure
.........................................................................
Power Switch ............................................................................ 2
Preparation for Registering Operations
.................................
Preset Price Open Entry.......................................................... 38
Preset-price Menu Items
........................................................
Previous Balance Pick Up ...................................................... 28
Price Shift ............................................................................... 37
Printer Lock
® Quantity Extension
^ RECEIPT ON/OFF Switch
Received-on-Account (R/A)
............................................................................
.....................................................................
............................................................
...................................................
REG Key ................................................................................... 4
REG position
............................................................................
Registering Operations ........................................................... 20
Remote Kitchen Printer (RKP)
...............................................
Repeat Entry ........................................................................... 34
Retry........................................................................................ 69
Return...................................................................................... 41
Return Scale Item ................................................................... 36
RF (Receipt Feed) Key ........................................................... 12
Ribbon Cartridge Changing .................................................... 73
RPT (Repeat Count) Display .................................................... 9
RTR position
..................................
'....................................... 4
® Sale Sequence ...................................................................... 24,25
Scale items
Secret Code of Cashier/Server
.............................................................................
.........................................
20,21
Server Code Entry .................................................................. 23
Server Sign ON/OFF
Server-Cashier System
.............................................................
..........................................................
Server/Banking System .......................................................... 17
Service Adjust ......................................................................... 48
page
45
70
18
33
70
34
5
60
3
66
35
21
16
page
Service Charge ....................................................................... 45
SET Key .................................................................................... 4
Set Menu Entry ....................................................................... 37
SET position .............................................................................. 3
Short-tender ........................................................................... 31
Sign ON/OFF ................................................................... 21,22
Split Package Pricing .............................................................. 34
Store Name Stamp Ink
Subtotal
....
............................................................................. 51
System Type Variations
............................................................
.........................................................
73
15
Tab Mode 1 16
Tab Mode 2 17
Tab Mode Sale Sequence ...................................................... 25
TAB/CASH Mode Change ...................................................... 55
Table No. Entry ....................................................................... 27
Tare Entry ............................................................................... 35
Tax Exempt ............................................................................. 53
Tax Status Modification .......................................................... 52
Taxable Total
TENDER function of Media Keys
Tip Paid in Cash
Tip Paid in Non-cash Medias
........................................................................
..........................................
.....................................................................
.................................................
51
31
46
47
TOTAL function of Media Keys .............................................. 31
Training Mode ......................................................................... 18
Tray Total
...............................................................................
54
Triangular Lamps....................................................................... 9
Type 1 ......................................................................
... 15
Type 2 ..................................................................................... 16
Type 3 ..................................................................................... 17
Validation Print ....................................................................... 56
Void ......................................................................................... 40
Void Check ............................................................................. 43
Void Scale Item ...................................................................... 36
^ X position ...................................................................................... 3
^ Z position ....................................................................................... 3
77 -
Page 81

■ ■ ' ■ '■' : I 'f' - 'ipift. s^ i, U til-«' ‘^ •" i- ■■’'''= -fi
. • ' • • ••.:••.. -r- ‘i' • •■•:■; •"• ' ■ '*■■''' '' • •■" ^■' ' • ' "
MANAGER^,G UIDE:^« ■
yK:r,:,,fp,j^^
Vr.’ ■'■'■
■V-,'- 0: -. ■'■■
1 niM| Pl.l rifll mi '■! «■>... * 1 ^
*-t^
Page 82

- MANAGER’S GUIDE -
TABLE OF CONTENTS
page
Chapter 1. MANAGER INTERVENTION ................................................................................................... 1
1-1 OPERATIONS PROGRAMMED TO REQUIRE MANAGER INTERVENTION .................... 1
1-2 LISTING CAPACITY RELEASE BY MANAGER INTERVENTION
......................................
3
EOl-11005
Chapter 2. TRAINING MODE ..................................................................................................................... 4
Chapter 3. OFF-LINE MODE ...................................................................................................................... 6
Chapter 4. MANAGER’S OWN OPERATIONS ......................................................................................... 8
Chapter 5. TERMINAL REPORTS.............................................................................................................. 9
Terminal Daily Reports............................................................................................................ 9
Central File Daily Reports...................................................................................................... 10
GT Reports ........................................................................................................................... 10
GENERAL NOTES ON REPORT TAKINGS ....................................................................... 11
REPORT PRINT SAMPLES ................................................................................................. 12
Chapter 6. MASTER-SATELLITE OPERATIONS .................................................................................. 21
Chapter 7. PROGRAMMING OPERATIONS .......................................................................................... 21
Page 83

1. MANAGER INTERVENTION
1-1 OPERATIONS PROGRAMMED TO REQUIRE MANAGER
INTERVENTION
During daily sale entry operations, the operator {cashier or server) may call for Manager
Interventions, The following is the operation flow of a Manager Intervention.
1) During operations, the operator (cashier or server) comes across an item that requires a
Manager Intervention. The operator, already informed of it, may immediately call for a
Manager Intervention. Or the operator, without knowing of it, attempts the operation, and
an error results with the error code of “E09”, clears the error by the [C] key, and then
calls for a Manager Intervention.
i
2) You go to the terminal with the MGR or MA key.
EOl-11005
i
3) The operator explains what kind of operation was attempted, and removes the REG key
from the Mode Lock at the REG position.
ir
4) You insert the MGR or MA key and turn it to the MGR position.
5) The operator performs the required operation.
6) You return the MGR or MA key to the REG position and puli it out.
i
7) The operator sets the REG key to the REG position again and continues registering
operations.
On the following page is the tables of keys and operations that are programmable with
Manager intervention. Fill in the table by marking in the “Not required” or “Required”
column of each item, referring to the documents, etc., listed in the table.
- 1 -
Page 84

If
EOl-11005
Table 1: KEYS/OPERATIONS AND MANAGER INTERVENTION STATUS
..
i ] (%-/COUPON 1)
[ 1 (%-/COUPON 2)
[ ] (%-/COUPON 3)
I ] (%-/COUPON 4)
[ ] (%-/COUPON 5)
[RETURN]
[ITEM CORR]
[VOID]
[PO]
[ ]{R/Ai)
[ ] (R/A 2)
[ ] (R/A 3)
[ ] (R/A 4)
[CHARGE TIP]
[TIP PAID]
[SERVICE ADJUST]
[SERVICE CHARGE]
[CLEAR TRAN]
[CHECK TRANSFER]
[VOID CHECK]
[TX EX]
[TAX]
[PRICE SHIFT]
[SIGN ON/OFF]
[NS]
Credit
Balance
(NOTE 1 on the
next page.)
[RETURN]
[VOID]
Others
Negative Balance Sales
finalization by any media
keys (NOTE 2 on the next page.)
-2 -
■..■sfe
Page 85

NOTES 1. The “Credit Balance** means that amount entries through credit keys (keys
to enter negative amounts such as [RETURN], [VOID], and other
%~/COUPON keys) results in over-subtraction of the sale total at the time
of the entry through any of those keys. If the status “Not required*’ is
selected, over-subtraction using the keys will be allowed in the “REG**
mode. The Credit Balance “Allowed/Prohibited’* status using the
[RETURN] and [VOID] keys are programmed separately from that using
other credit keys.
2. Even when the Credit Balance is allowed, it is another program option
selection whether a negative balance sale can be finalized by media keys.
If “Not required” is selected, the operator can finalize such sales in the
“REG” mode.
1-2 LISTING CAPACITY RELEASE BY MANAGER INTERVENTION
EOl-11005
Listing Capacities (LC) may be programmed for amount entries of Menu Items (Open-price
Item Entry or Preset-price Open Entry), media keys, and several other transaction keys.
These EC's are programmed to check an excessively high amount entry by operator’s
mistake at the earliest stage. The procedure of operators and Manager Intervention for LC
release is same as described in 1-1, except that the error code of “E06” is displayed for an
LC error instead of “E09” for a Manager Intervention requirement error. Fill the LCs in the
table below and guide your operators as to the amount limit through each of the keys. (Ask
your TEC representative as to information or changes of Listing Capacities.)
Table 2: Listing Capacity for Each Item or Kev
Key/ltem
Menu Items Non-cash Media 2 [
%-/Coupon 1 [
%-/Coupon 2 [
%-/Coupon 3 [
%-/Coupon 4 [
%-/Coupon 5 [
[RETURN]
[VOID]
[SERVICE ADJUST]
Listing Capacity
(Limit Digits)
3
]
]
3
3
Key/ltem
Non-cash Media 3 [
Non-cash Media 4 [
Non-cash Media 5 [
Non-cash Media 6 [
Non-cash Media 7 [
Non-cash Media 8 [
Non-cash Media 9 [
[CHARGE TIP]
Listing Capacity
(Limit Digits)
]
3
3
3
]
3
1
3
[PO]
[TAX] (Manual Tax)
[CASH]
Non-cash Media 1 [
R/A 1 [
R/A2 [
R/A3 [
3
R/A4 [
-3 -
3
3
3
3
Page 86

2. TRAINING MODE
When you have newly employed operators, you should provide some time for them to be
trained to operate the FDS-50 terminal. You are to start and end the Training Mode. Once
entering the Training Mode, an operator may operate just as ordinary sale entry operations.
The data in the Training Mode are processed into Training Mode Total memory but not affect
any actual sales data in business.
Outside a sale, in Cashier Signed-OFF condition
|TraininQ Mode Codej [#]
01 to 99; this code is
programmed. Ask your
TEC representative for the
code.
^ {The Mode Lock may be turned to the “REG” position now.)
Registering operations are allowed by the trainees:
EOI-11005
Mode Lock: MGR / GT Lock: Neutral
No cashier/server sign-ONs are necessary. (The Training Mode Start itself is a kind of
sign-ON.)
• Cashier or Server Code Entry is accepted with any 5-digit number.
• All registering operations are possible in the Training Mode except:
1) The drawer will not open,
2) The Consecutive No. on the receipt will not be incremented.
3) The Guest Check printing is possible but the RKP printing is not. Since the
number of guest check print lines is not controlled, print always occurs from the
first line of the slip. A manual number entry through the [NEW CHECK] key is
always required, so is a manual previous balance entry through the [PB] and
[CHECK PAID] key.
4) The “SLIP” triangular lamp flickers to require a validation print on an entry of an
item programmed with the “Validation Compulsory” status. A validation slip must
be inserted and the [VALIDATE] key must be depressed, but no print occurs.
5) Print occurs on receipt, journal, and GCP slip with a Training Mode header or
message.
i
Operate the same as the TRAINING MODE START (in the “MGR” mode).
Now the register is in a Signed-OFF condition. You may turn the Mode Lock to any position
for its corresponding operations.
Refer to the receipt print samples in the Training Mode on the next page.
- 4 -
Page 87

- TRAINING MODE RECEIPT SAMPLES ™
Training ON
RESTAURANT THC
123^ PEACH DRIVE
PHONE: 87-6437
9:00 - 20:00
SPECIAL LUNCH MENU
from 11:00 to 13:00
05-07-89 SUN «555501
-»TRAINING-»
ON
0261 T13:44
E01-11005
Receipt Issued in Training Mode
(Operation in Non-tab Mode)
RESTAURANT TEC
1234 PEACH DRIVE
PHONE: 87-6437
9:00 - 20:00
SPECIAL LUNCH MENU
from 11:00 to 13:00
Training OFF
RESTAURANT TEC
1234 PEACH DRIVE
PHONE: 87-6437
9:00 - 20:00
SPECIAL LUNCH MENU
from 11:00 to 13:00
05-07-89 SUN «555501
-»TRAINING-»
OFF
05-07-89 SUN «555501
-»TRAINING-»
VEB.SALAD 2.20 T
COFFEE
BEER-A
SUBTOTAL
TAXI
TAX2
TOTAL
CASH TND
CHANGE
ITEM
0.70 T
1.40 T
4-30
0.26
0.07
4,63
5.00
0.37
3
-»TRAINING-»
0261 T13:52
Training Mode Header
>■ Sale Data
Training Mode Header
0261 T13:57
- 5 -
Page 88

3. OFF-LINE MODE
The off-line operations are applicable when multiple terminals are connected to the in-line cable
(Master-Satellite System). When any trouble occurs on the in-line cable, the Master Terminal, etc.,
the communication between each Satellite Terminal and the Master Terminal is cut; therefore,
normal operations in the “REG” or “MGR” mode are not accepted. If such a situation happens,
business data must be entered in the “OFFLINE” position of the Mode Lock until the trouble is
recovered. (Though the “OFFLINE” position is provided on the Master Terminal, it is seldom used.)
When an in-line trouble has occurred.
Turn the Mode Lock to the OFFLINE position. { GT Lock: Neutral)
When the Mode Lock is turned to the OFFLINE position, the “(-)” triangular lamp
flickers and remains flickering until the Mode Lock is turned to other positions.
I
Registering operations are allowed in the off-line mode:
EOl-11005
• A cashier sign-ON is necessary. Any 5-digit number is accepted. But once a cashier
signs ON, the entered 5-digit number must be used for Cashier Code Entries. Server
Code Entries are allowed with any 5-digit number (the number is not checked).
• All registering operations are possible in the off-line Mode except:
3) The Guest Check printing is possible but the RKP printing is not (Formatted
Receipts are issued for menu item entries instead). Since the number of guest
check print lines is not controlled, print always occurs from the first line of the slip.
A manual number entry through the [NEW CHECK] key is always required, so is a
manual previous balance entry through the [PB] and [CHECK PAID] key. The
[LINE No.] key can be used to feed the slip to the required position to start
printing.
Operate: [Number of Lines to be fedj -> [LINE No.]
(This must be operated immediately after the Server or Cashier Code Entry in
the off-line mode.)
4) In Tab Mode, taxes are calculated and printed in order entry sequences.
However, in Check Paid sequences, the previous amount always includes taxes
and taxes are not separately printed.
5) Print occurs on receipt, journal, and GCP slip with an off-line mode header or
message.
The signed-ON cashier must sign OFF. The cashier sales data recorded in the off-line mode
are automatically printed as OFF-LINE CASHIER 2 REPORT (Report No. 220) and issued
from the terminal printer. (The data other than cashiers are processed into the terminal
memory and can be read as data included in normal X and 2 reports.)
You can now turn the Mode Lock to other positions.
Refer to the receipt print samples in the off-line mode.
- 6 -
Page 89

vV'^ ' '' "
Sale Entry Receipt
(in Non-tab Mode)
RESTAURANT TE IC
1234 PEACH DRIVE
PHONE: 87-
9:00 " 20
6437
:00
SPECIAL LUNCH MENU
from 11:00 to 13:00
EOl-11005 v&S
OFF-LINE MODE PRINT SAMPLES
Auto Cashier Z Report issued
by Cashier Sign OFF
(The Print Format is same as ordinary
Cashier X or Z report.)
05-07-89 SUN
H555501
-x O F- R- L IN E I-x
COFFEE
BEER-A
TAXI
TAX2
TOTAL
CASH
ITEM 2
0,70 T
1,40 T
0,13
0.07
2,30
2-30
-x o f ^F “I _ in e :-x
EDEN 0025
T15:ll
“Z20” is the fixed header
for the automatic cashier
Z report after Cashier
Sign OFF in OFF-LINE
mode.
- 7 -
Page 90

4. MANAGER’S OWN OPERATIONS
The following are operations to be performed on the terminal by the manager during business hours
or between business shift periods:
PRICE SHIFT
This operation is already described in the Operator’s Guide. However, to prevent operators
from pressing the [PRICE SHIFT) key in the REG mode by mistake, it is recommended to
program the [PRICE SHIFT] to require Manager intervention and operate this key in the MGR
mode.
Any time outside a sale and:
After a Server Code Entry in Tab Mode, or
After a Cash Code Entry in Non-tab Mode
Mode Lock: MGR / GT Lock: Neutral
¡Price Shift Code| [PRICE SHIFT]
i: for Price i
2: for Price 2
3: for Price 3
EOl-11005
KEYBOARD SHIFT (MENU SHIFT)
This operation is used to change the keyboard layout (especially the Code-preset Menu Item
Keys) to match the menu items to be served for the coming business period. A maximum of
three keyboard layouts can be programmed.
Any time outside a sale and in Cashier Signed-OFF condition
Mode Lock: X / GT Lock: Neutral
[NS] —► ¡Keyboard Shift Codej [NS]
1; for Keyboard 1
2: for Keyboard 2
3: for Keyboard 3
fAs for the conienfs of each keyboard, ask your TEC
representative.)
RKP DESIGNATION SWITCHING
This operation is used to change the Remote Kitchen Printer print destinations of Menu Items.
This is also operated usually between different business shift periods when preparation areas
are to be changed.
Any time outside a sale and in Cashier Signed-OFF condition
Mode Lock: X / GT Lock: Neutral
|RKP Designation Table No.j [SERVER #]
1: for Table 1
2: for Table 2
(As for contents of the tables, ask your TEC representative.)
-8-
Page 91

5. TERMINAL REPORTS
The following table shows the key operation to take each report. The “X” and “Z” reports have
exactly the same print content if both are available, except that:
1. The “X” reports allow to read the sales data but not clear memories, while the “Z”
reports allow to read the sales data and at the same time ail the resettable memories wilt
be cleared when the reports have been issued.
2. The symbol “Xnn” is printed on the top line of an “X” report, while “Znn” is printed on a
“Z” report, (“nn” is the Report No.)
3. A reset count is printed on the bottom of a “Z” report only.
4. When multiple terminals are connected on one in-line cable (Master-Satellite System),
Terminal Daily Z reports of each terminal are usually taken by report collection commands
on the Master Terminal. Accordingly, those Z report takings can only be operated on
each terminal with an appropriate system option selection and with an entry of the “Off
line Reset Code” prior to the key operation to take each Z report. (Mode Lock: Z,
|Code| [#D
EOl-11005
TABLE OF OPERATIONS FOR TERMINAL X AND Z REPORTS
Terminal Daily Reports (GT Lock: Neutral)
REPORT
HEADER
X03
Z03
X04
Z04
X05
Z05
X05
X05
X05
X05
FINANCIAL Read
FINANCIAL Reset
CATEGORY & DEPARTMENT Read
CATEGORY & DEPARTMENT Reset
ALL MENU ITEM Read
ALL MENU ITEM Reset
Designated Category Menu Item Read X
Designated Department Menu Item
Read
Zone Menu Item Read X
Individual Menu Item Read X
REPORT NAME
MODE
LOCK
X
z
X
z
X
z
X
KEY OPERATION
3[CASH]
4[CASH]
5 [CASH]
|Cateaorv Code| [#] 5 [CASH]
|Deot Code] fNSl 5 fCASHl
|Zone-start Item Code| fO/FORl
i
|Zone-end Item Code| fi5)/FORl
i
5 [CASH]
[Code-preset Menu]
for Item Code| flTEM #1)
i
([ST] for subtotal)
[CASH] to end
-----------------
---------------
SAMPLE
PAGE
12,13
14
15
16
16
16
16
X06
Z06
HOURLY RANGE Read
HOURLY RANGE Reset
COMBINATION READ REPORTS
COMBINATION RESET REPORTS
X
z
X
z
- 9 -
6 [CASH]
[CASH] ... for Table 1
1 [CASH] ... for Table 2
2 [CASH] ... for Table 3
17
Page 92

Central File Daily Reports {GT Lock; rtr)
These reports can only be taken on the Master Terminal in a Master-Satellite System,
only one terminal is connected to the in-line cable, it is the Master Terminal.)
EOl-11005
(When
REPORT
HEADER
X07
Z07
X07
Z07
X08
Z08
REPORT NAME
ALL OPERATOR Read
ALL OPERATOR Reset
Designated Operator Read
Designated Operator Reset
OUTSTANDING CHECK Read
OUTSTANDING CHECK Reset
MODE
LOCK
X
z
X
Z
X
z
KEY OPERATION
7[CASH]
[Ooerator Code| f3-diait
Programmed Portion) [#]
i
7 [CASH]
8 [CASH]
GT Reports (Mode Lock; Any position) - reports of data accumulated for a certain period
These reports can only be taken on the Master Terminal.
REPORT
HEADER
GTX03
GTZ03
GTX04
GTZ04
GTX05
GTZ05
REPORT NAME
FINANCIAL GT Read
FINANCIAL GT Reset
CATEGORY & DEPARTMENT GT Read
CATEGORY & DEPARTMENT GT Reset
ALL MENU ITEM GT Read
ALL MENU ITEM GT Reset
GT
LOCK
GTX
GTZ
GTX
GTZ
GTX
GTZ
KEY OPERATION
3[CASH]
4 [CASH]
5[CASH]
SAMPLE
PAGE
18,19
18,19
20
SAMPLE
PAGE
12,13
14
15
GTX05
GTX05 Designated Department Menu Item GT Read
GTX05
GTX05
GTX06
GTZ06
GTX07
GTZ07
GTX07
GTZ07
Designated Category Menu Item GT Read GTX
Zone Menu Item GT Read GTX
Individual Menu item Read
HOURLY RANGE Read
HOURLY RANGE Reset
ALL OPERATOR GT Read
ALL OPERATOR GT Reset
Designated Operator Read
Designated Operator Reset
COMBINATION REPORTS
GTX
GTX
GTX
GTZ
GTX
GTZ
GTX
GTZ
GTX
GTZ
|Cateaorv Code| [#] 5 [CASH] 16
|Deot Code| fNSl 5 fCASHl
|Zone-start Item Code| fi3)/FORl
|Zone-end Item Code| fO/FORl
i
5[CASH]
[Code-preset Menu] -----------------
for Item Codej fITEM #1)
i
([ST] for subtotal)
[CASH] to end
6 [CASH]
7 [CASH]
jOoerator Code| f3-diait
Programmed Portion) [#]
i
7 [CASH]
Same as in Daily Terminal Reports
16
16
16
17
18,19
18,19
- 10 -
Page 93

GENERAL NOTES ON REPORT TAKINGS
1. The cashier singed-OFF condition is required for taking any X or Z reports. Otherwise, an
error will result when the Mode Lock is turned to the X or Z position or when the GT Lock
is turned to the GTX or GTZ position.
2. Z and GTZ reports will be printed on the receipt roll as well as on journal, and issued,
regardless of the current [RECEIPT ON/OFF] switch position.
3. The [ITEM CORR] or [VOID] key can be depressed halfway during printing a report, for
the purpose to cancel the receipt issuance (except for some short reports). When a
report cancel has been operated for a Z or GTZ report, the memory of the report data will
not be cleared.
4. The drawer will open at the starting of printing the Financial reports if the system option
“Drawer Open at Financial Reports" is selected.
5. X reports can be taken any number of times during business hours or at the end of the
day. Z reports should be taken only once, usually at the end of the day, since the total
memories will be cleared on taking the Z reports. To take a cashier or server Z report,
the cashier or server must sign OFF beforehand. The “ALL OPERATOR RESET” report
is taken when all the operators ends the business shift together. The “Individual Operator
Reset” report is taken when only one or some operators ends their business shift.
Similarly, GTX reports can be taken any number of time during a certain period (a week,
month, etc.), while GTZ reports should be taken only once at the end of the period.
E01-11005
6. In a Master-Satellite System (i.e. multiple terminals are connected to one TIP-NET cable
loop). Terminal Daily Z reports should not usually be taken. Instead, In-line Daily Z
reports are provided to be operated on the Master Terminal. (Ask your TEC
representative for detailed information). By taking those in-line Z reports, the sales data
are accumulated into GTX/GTZ report memory. In a Master-only System (i.e. only one
terminal is connected to the cable, besides a GCP and RKPs), by taking Terminal Daily Z
Reports and Central File Daily Z Reports, the sales data are accumulated into GTX/GTZ
report memory.
7. When operating a Combination Report taking, all the reports programmed in the
designated Combination Report Table will be issued consecutively. The of type of the
issued reports is determined by the current Mode Lock and GT Lock positions. For
example, when a Combination Report taking is operated with the Mode Lock in “X“ and
the GT Lock in “Neutral", all the reports issued by the operation will be Daily X Reports.
-11 -
Page 94

FINANCIAL READ or RESET (Report No.3)
E01-11005
RESTAURANT TEC
123^ PEACH DRIVE
PHONES 87-6437
?s00 - 20:00
SPECIAL LUNCH MENU
from llsOO to 13:00
05-07-89 SUN «555501
X03
ST
270,21
TRAINING
0.00
GUEST
9CU
CHECK 9
GS
67
270-21
■»VOID« 1
5,00
ITEM COR 1
14,00
SERV AOJ 1
0,30
Mode Lock:
X for Read
Z for Reset
GT Lock:
GTX for GT Read
GTZ for GT Reset
Read Report Sample
Report Header
GT {Grand Total)
Training Grand total
Number of Guests
Number of Guest Checks
Gross Sales Item Count
& Amount
Void Count
& Amount
Item Correct Count
& Amount
Service Adjust Count
& Amount
*■ Enter 3, depress [CASH].
NOTE;
The sample here is a merely example.
Since the print order of the total items is
programmable, the format of Financial
Reports can be made to meet the
requirements of each user. Also note that
the subtotal or total lines {such as “%-
TOTAL" and "MEDIA TL” in this sample)
can also be programmed to print to sum up
certain items in the same group.
COUPON
DISC TL
DISC ITH
%- TOTAL
TAXI
TAX2
TAX3
TOTAL
CHK PAID
4CU
CHG TIP
10,00
1
0.21
0
0.00
10.21
9,96
0.28
0.00
65
241.21
105.34
1
4.00
Coupon Count
& Amount
Total Discount {%-) Count
& Amount
Item Discount {%-) Count
& Amount
Total of the above three items {a line such as this is programmable)
Tax 1 Amount
Tax 2 Amount
Tax 3 Amount
Sales Total Item Count
& Amount
Check Paid
Customer Count & Amount
Charge Tip Count
& Amount
(continued on next page)
- 12-
Page 95

FINANCIAL READ or RESET (Report No.3) - continued -
EOI-11005
SERV CHG
TIP PAID
CASH
CREO CRD
HOUSE CH
SIFT CRT
HEDIA TL
PAID OUT
TRF TL
R ON ACT
RTN
МОЮ CHK
TXBL1
TXBL2
TRACK 1
TRACKS
TRACKS
TRACK4
TRACK5
HISC MD
TAXIEX
TAX2EX
"TAX
NO-SALE
i
2.75
1
4.00
8
83.29
1
39,64
2
71.27
1
12.00
206.20
1
5.60
0
0.00
19.50
0
0-00
0
0.00
166.06
5.41
4
10.72
0
0.00
0
0.00
0
0.00
6
54.00
0
0.00
1
12.00
0
0.00
0
0.00
1
0024 T 18:21
Service Charge Count
& Amount
Tip Paid Count
& Amount
Cash Sales Customer Count
& Amount
Credit Card (Non-cash Media i) Customer Count
& Amount
House Charge (Non-cash Media 2} Customer Count
& Amount
Gift Certificate (Non-cash Media 3) Customer Count
& Amount
Total of the above four media sales (a line such as this is programmable).
Paid-Out Count
& Amount
Transfer In/Out Count
& in/Out Amount Balance
Received-on-Account Count
& Amount
Return item Count
& Amount
Void Check Count
& Amount
Taxable l Amount
Taxable 2 Amount
Item Track i Item Count
& Amount
Item Track 2 Item Count
& Amount
Item Track 3 Item Count
& Amount
item Track 4 Item Count
& Amount
Item Track 5 Item Count
& Amount
Miscellaneous Void Count (Item Correct on others than Menu Items)
& Amount
Tax 1 Exempted Traisaction Count
& Amount
Tax 2 Exempted Transaction Count
& Amount
Negative Tax Count
& Amount
No-sale Operation Count
------------------------------------
Receipt Consecutìve No. & Current Time
Reset Count is added on Z and GT2 reports
- 13 -
Page 96

CATEGORY & DEPARTMENT READ or RESET (Report No.4)
EOl-11005
- 14 -
Page 97

MENU ITEM READ or RESET (Report No.5)
EOl-11005
- 15 -
Page 98

MENU ITEM READ or RESET (Report No.5) -- continued --
Other Menu Item Read Samples
EOI-11005
Designated Category Menu Item Read
RESTAURANT TEC
1234 PEACH DRIVE
PHONE: 87-6437
9:00 - 20:00
SPECIAL LUNCH MENU
from 11:00 to 13:00
05-07-89 SUN #555501
XO^
01 BEEF
Designated Category
BEEF STEAK L 1101
14.001:;) 5
i c:
All the Menu Items
included in the
Category follow.
Designated Department Menu Item Read
RESTAURANT TEC
1234 PEACH DRIVE
PHONE: 87-6437
9:00 - 20:00
SPECIAL LUNCH MENU
from ll:00 to 13:00
05-07-89 SUN #555501
X03
01 MEAT
BEEF STEAK L 1101
14.00«) 5
s e; A A 'r, A
Designated Department
All the Menu Items
and Categories
included in the
Department follow.
Zone Menu Item Read
RESTAURANT TEC
1234 PEACH DRIUE
PHONE: 87-6437
9:00 - 20:00
SPECIAL LUNCH MENU
from U:00 to 13:00
05-07-89 SUN #555501
X03
2000-V.2500
Zone-start Item Code &
Zone-end Item Code
Alt the Menu Items
included in the
zone follow.
individual Menu Item Read
RESTAURANT TEC
1234 PEACH DRIVE
PHONE: 87-6437
9:00 - 20:00
SPECIAL LUNCH MENU
from il:00 to 13:00
05-07-89 SUN #555501
X05
BEEF STEAK L 1101
14,00ii 5
1 K A
Individual Menu Item
designated are read.
- 16 -
Page 99

HOURLY RANGE READ or RESET (Report No.6)
RESTAURANT TEC
1234 PEACH DRIVE
PHONE: B7-6437
9:00 - 20:00
SPECIAL LUNCH HENU
from 11:00 to 13:00
05-07-8? SUN «555501
Mode Lock: X for Read
Z for Reset
GT Lock: GTX for GT Read
GTZ for GT Reset
Read Report Sample
-----------------Report Header
EOl-11005
Enter 6, depress [CASH].
OS:00TM
0.0%
0.0%
0.0%
16i00TH
100,0%
100,0% ¿5
100,0%
23:OOTH
0-0%
0.0% 0
0.0%
TOTAL
0031 T18:28
ocu
0
0,00
9CU
279,52
OCU
0.00
9CU
65
279.52
Time Range of 8:00 to 16:00
Customer Count % to all sales, Customer Count
Item Count % to all sales, Item Count
Sales Amount % to all sales, S^es Amount
Time Range of 16:00 to 23:00
Time Range of 23:00 to 8:00
Total data of Time Ranges
Customer Count Total
Item Count Total
Sales Amount Total
Reset Count is added on Z and GTZ reports.
- 17 -
Page 100

OPERATOR READ or RESET (Report No.7)
RESTAURANT TEC
1234 PEACH DRIVE
PHONE: 87-Ó437
9:00 - 20:00
EOI-11005
Mode Lock: X for Read / GT Lock: RTR
Z for Reset / GT Lock: RTR
GT Lock: GTX for GT Read
GTZ for GT Reset
Read Report Sample Enter 7, depress [CASH]
{for All Operators)
SPECIAL LUNCH HENU
from 11:00 to 13:00
05-07-89 SUN N555501
X07
555 EDEN
CHECK 9
GUEST
9CU
es
109.11
VD/IC
0
0.00
RTN
0
0.00
SERV ADJ
1
0.30
COUPON
10.00
DISC TL
1 Total Discount Count
0.21
DISC ITM
0
0.00
TOTAL
10.21
Enter 3-digit Operator
Code, depress [#],
and depress [CASH]
(for Individual Operator)
^
------------------
Operator Code, Operator Name
Number of Guest Checks handled
Item Count % to all sales, Item Count
Number of Guests
Gross Sates Item Count
& Amount
Void and Item Correct Count The sample here is a merely example.
& Amount
Return Item Count
& Amount
Service Adjust Count
& Amount
Coupon Count
item Discount Count
Total Amount of all the three above discount items (programmable)
Report Header
NOTE:
Since the print order of the total items is
programmable, the format of Operator
Reports can be made to meet the
requirements of each user. Also note that
the subtotal or total lines (such as "MEDIA
TL" in this sample) can also be
programmed to print to sum up certain
items In the same group.
& Amount
& Amount
& Amount
TAX TL
TOTAL
VOID CHK
CHG TIP
(continued on next page)
10.24 Tax Total Amount (Tax l + Tax 2
25
98.81
0
0.00
1
4.00
Sales Total Item Count
& Amount
Void Check Count
& Amount
Charge Tip Count
& Amount
- 18-
+ Tax 3)
 Loading...