

Page 1
DIGITAL COLOUR PLAIN PAPER COPIER
OPERATOR'S MANUAL
FOR COPYING FUNCTIONS
FC15/22
Page 2

WARNING: Changes or modification made to this equipment, not expressly approved by
Toshiba TEC or parties authorized by Toshiba TEC could void the user’s
authority to operate the equipment.
Page 3

Storage of Colour Copies
(1) The copies should be kept in a place which is not exposed to light to prevent fading when
they are stored for a long time.
(2) If copies are kept pressed between plastics made of chloroethylene for a long time, the
toner may melt and stick to the plastic due to high pressure and high temperature. Keep
them in polythene binders.
(3) When a colour copy is folded, the toner at the fold can become separated.
(4) The toner on the copies may melt if it touches solvent. If the ink on the copies is not dried
completely, the toner may also melt. Keep copies away from solvent.
(5) When copies are kept near an extremely high temperature such as a heater, the toner may
melt. Keep them under room temperature which does not vary very much.
Page 4

Forgery Prevention Function
This copier has a forgery prevention function.
Please ensure that your digital full colour copier is not used for making copies of prohibited
items.
Page 5

PREFACE
Thank you for purchasing the Toshiba Digital Colour Copier FC15/22. This Operator’s Manual describes
the following:
• how to use the digital colour copier
• how to inspect and carry out maintenance on the digital copier
• how to remedy mechanical and copying problems.
Before using the digital colour copier, thoroughly read and understand the Operator’s Manual. To
ensure that clean copies are made at all times and to make sure that the digital colour copier is in
optimum working order, keep this Operator’s Manual in a handy place for future reference.
䡵 To ensure correct and safe use of the Toshiba Digital Colour Copier FC15/22, this Operator’s
Manual describes safety precautions according to the following three levels of warning:
The meanings of these signal words are as follows. Before reading this Operator’s Manual, you
should fully understand the meaning and importance of these signal words.
Warning ------ Indicates a potentially hazardous situation which, if not avoided, could result in
death or serious injury, or serious damage or fire in the equipment or surrounding
assets.
Caution ------- Indicates a potentially hazardous situation which, if not avoided, may result in
minor or moderate injury, partial damage of the equipment or surrounding
assets, or loss of data.
Note ------------ Indicates a procedure you should follow to ensure the optimal performance of
the digital colour copier and problem-free copying.
PREFACE
CONTENTS
PRECAUTIONS
Tip -------------- Describes handy information useful to know when operating the digital colour
copier.
Advice --------- Describes an operation you should follow to maintain the digital colour copier in
good working order.
Warning
This is a Class A product. In a domestic environment this product may cause radio interference
in which case the user may be required to take adequate measures.
1. Do not touch the connector terminal when disconnecting the cables of peripheral equipment.
2. Before opening any covers or removing any units from the copier, discharge the static
electricity from your body by touching a metal part of the copier.
This product is carrying the CE-Mark in accordance with the related European Directives.
Responsible for CE-marking is Toshiba Europe GmbH, Hammfelddamm 8,41460 Neuss,
Gemany. Phone +49-2131-158-01.
COPYRIGHT 1999
TOSHIBA TEC CORPORATION
1
Page 6

PREFACE (Cont.)
Features of the FC15/22
The FC15/22 is a plain paper digital colour copier.
The FC15/22 allows you not only to process and edit these digital image data, but also enables
copies to be sorted and grouped quietly, quickly and easily. The FC15/22 incorporates a largesize display with a touch panel and menu keys that graphically represent copier functions. As
a result, anybody can make clear-looking copies quickly and easily.
The FC15/22 also has the following convenient features.
● The first copy is output in 10.3 seconds.
● Full-colour copying speed is 15/22 copies (A4) per minute.
● The original developed 4-beam laser optical unit allows for a compact copier.
● The latest image processing technology reproduces high-resolution real colour.
● A fixing system with less oil reduces the amount of oil stuck to the paper which improves the
transparency of the OHP film.
● Comes with the following digital editing functions:
Trimming, masking, negative/positive reversal, full image,image repeat and mirror image.
● Copy sizes from A5 up to A3 are acceptable. Special paper such as thick paper (60~209g/m
OHP films, labels and A3-wide paper (304.8mm x 457.2mm) are also acceptable as copy sizes.
2
),
Options
● By installing the optional reversing automatic document feeder and automatic duplexer,
duplex copies or single-sided copies can be made automatically from two-sided originals.
Duplex copies can also be made automatically from single-sided originals.
● Adding the optional 20-bin staple sorter permits the quick stapling and sorting of copies.
● The optional advance image enhancement mode automatically analyses the original to
optimally reproduce text, illustrations and photographs.
● Installing an optional printer unit allows additional functions such as scanning images by the
copier and printing out data from the PCs.
If an optional printer controller is installed, this copier can be used as a colour printer or scanner
also.
For purchasing the printer controller, please ask your service centre or distributor.
2
Page 7

TABLE OF CONTENTS
■ PREFACE ....................................................................................................................
■
TABLE OF CONTENTS .............................................................................................
■
PRECAUTIONS ..........................................................................................................
1. INSTALLATION ..................................................................................................................... 5
2. GENERAL PRECAUTIONS ................................................................................................... 6
1. DESCRIPTION OF THE DIGITAL COPIER ...............................................................
1. NAMES OF THE MAIN COMPONENTS ............................................................................ 8
2. DESCRIPTION OF THE OPTIONAL EQUIPMENT ............................................................. 9
3. DESCRIPTION OF THE CONTROL PANEL ...................................................................... 10
4. DESCRIPTION OF THE MESSAGE DISPLAY .................................................................. 13
5. DESCRIPTION OF THE GRAPHIC DISPLAY .................................................................... 15
2. HOW TO MAKE COPIES ........................................................................................
1. PAPER .................................................................................................................................. 18
2. ENERGY-SAVING FUNCTION ........................................................................................... 20
3. TURNING ON THE POWER SWITCH/AUTO JOB START ............................................. 21
4. USING THE REVERSING AUTOMATIC DOCUMENT FEEDER (OPTIONAL) ............... 24
5. COPYING IN THE AUTOMATIC PAPER SELECTION MODE ........................................ 28
6. REDUCTION AND ENLARGEMENT COPYING ................................................................ 32
7. COPYING WITH COPY DENSITY SELECTION ................................................................ 36
8. COPYING BY ORIGINAL MODE SELECTION .................................................................. 38
9. COLOUR MODE .................................................................................................................. 40
10. BYPASS COPYING (THICK PAPER/OHP FILM) ............................................................... 41
11. CASSETTE SETTING FOR THICK PAPER/OHP FILM ..................................................... 47
12. INTERRUPT COPYING ....................................................................................................... 49
17
1
3
5
PREFACE
CONTENTS
PRECAUTIONS
7
DESCRIPTION
OF THE DIGITAL
COPIER
HOW TO
MAKE
COPIES
COLOR EDITING AND
ADJUSTMENT
USING THE
EDITING
FUNCTIONS
3. COLOUR EDITING AND ADJUSTMENT ..............................................................
1. MONOCOLOUR COPYING ................................................................................................ 52
2. HUE ADJUSTMENT ........................................................................................................... 53
3. SATURATION ..................................................................................................................... 54
4. COLOUR BALANCE (YMCK ADJUSTMENT) .................................................................. 55
5. RGB ADJUSTMENT ........................................................................................................... 56
6. ONE-TOUCH ADJUSTMENT ............................................................................................. 57
7. BACKGROUND ADJUSTMENT ......................................................................................... 58
8. SHARPNESS ADJUSTMENT ............................................................................................. 59
4. USING THE EDITING FUNCTIONS .......................................................................
1. IMAGE SHIFT COPYING .................................................................................................... 62
2. EDGE ERASE COPYING .................................................................................................... 64
3. BOOK CENTRE ERASE ...................................................................................................... 66
4. DUAL-PAGE COPYING ...................................................................................................... 68
5. FULL IMAGE COPYING ..................................................................................................... 70
6. 2 IN 1 MODE COPYING .................................................................................................... 71
7. DUPLEX COPYING ............................................................................................................. 73
1
DUPLEXED COPIES FROM SINGLE-SIDED ORIGINALS ............................................. 73
2
DUPLEXED COPIES FROM TWO-SIDED ORIGINALS ................................................. 77
3
SINGLE-SIDED COPIES FROM TWO-SIDED ORIGINALS ........................................... 78
4
DUPLEXED COPIES FROM BOOK ORIGINALS ............................................................ 79
8. X-Y ZOOM .......................................................................................................................... 82
9. TRIMMING/MASKING ........................................................................................................ 83
51
61
USING THE
SPECIAL
FUNCTIONS
USING THE
OPTIONAL
SORTER
WHEN THE
GRAPHIC SYMBOLS
FLASH
MAINTENANCE
SPECIFICATIONS,
ACCESSORIES &
OPTIONS
3
Page 8

TABLE OF CONTENTS (Cont.)
10. MIRROR IMAGE ................................................................................................................. 87
11. NEGATIVE/POSITIVE REVERSAL ...................................................................................... 88
12. CENTRING ........................................................................................................................... 89
13. IMAGE REPEAT .................................................................................................................. 91
5. USING THE SPECIAL FUNCTIONS ....................................................................... 93
5. USING THE SPECIAL FUNCTIONS .......................................................................
1. CALIBRATION OF GRADATION ....................................................................................... 94
1. AUTOMATIC CALIBRATION .............................................................................................. 94
2. SETTING THE DATE AND TIME ...................................................................................... 97
2. SETTING THE DATE AND TIME ....................................................................................... 97
3. WEEKLY TIMER .................................................................................................................. 99
3. WEEKLY TIMER .................................................................................................................. 99
4. MODE MEMORY .............................................................................................................. 101
4. MODE MEMORY .............................................................................................................. 101
5. COPYING USING PAPER OF UNIVERSAL SIZES ........................................................ 103
5. COPYING USING PAPER OF UNIVERSAL SIZES .......................................................... 103
6. ACCESS CODES (ID NUMBERS) .................................................................................... 107
6. ACCESS CODES (ID NUMBERS) .................................................................................... 107
7. TOTAL COUNTER ............................................................................................................ 108
7. TOTAL COUNTER ............................................................................................................. 108
8. DEPARTMENT MANAGEMENT ...................................................................................... 109
8. DEPARTMENT MANAGEMENT ...................................................................................... 109
9. KEY COPY COUNTER ...................................................................................................... 117
9. KEY COPY COUNTER ...................................................................................................... 117
10. CHANGE OF LANGUAGE ON THE DISPLAY PANEL ................................................... 118
10. CHANGE OF LANGUAGE ON THE DISPLAY PANEL .................................................. 118
11. USER SELECTION (INITIAL SETTINGS) ......................................................................... 119
11. USER SELECTION (INITIAL SETTINGS) ........................................................................ 119
93
6. USING THE OPTIONAL STAPLE SORTER ............................................................
1. DESCRIPTION OF THE MAIN COMPONENTS .............................................................. 122
2. NON-SORT COPYING ...................................................................................................... 123
3. SORT OR STAPLE SORT COPYING ............................................................................... 124
4. GROUP COPYING ............................................................................................................ 128
7. WHEN THE GRAPHIC SYMBOLS FLASH .............................................................
1. ADD PAPER SYMBOL ..................................................................................................... 130
2. REPLACE TONER BAG SYMBOL ................................................................................... 134
3. ADD TONER SYMBOL ..................................................................................................... 136
4. CLEAR PAPER SYMBOL .................................................................................................. 138
1
MISFEEDING INSIDE OF THE COPIER ........................................................................ 138
2
MISFEEDING IN THE AUTOMATIC DUPLEXER ......................................................... 143
3
MISFEEDING FROM THE CASSETTES ....................................................................... 145
MISFEEDING IN THE LARGE-CAPACITY FEEDER ..................................................... 146
4
MISFEEDING IN THE AUTOMATIC DOCUMENT FEEDER ........................................ 147
5
MISFEEDING IN THE BYPASS GUIDE ........................................................................ 148
6
MISFEEDING IN THE STAPLE SORTER ...................................................................... 149
5. REPLACING STAPLES ...................................................................................................... 150
6. REMOVING JAMMED STAPLES .................................................................................... 152
7. CALL SERVICE SYMBOL ................................................................................................. 154
8. PERIODIC MAINTENANCE .............................................................................................. 154
■
MAINTENANCE ......................................................................................................
1. DAILY INSPECTION ......................................................................................................... 156
2. SIMPLE TROUBLESHOOTING ........................................................................................ 157
121
129
155
■
SPECIFICATIONS, ACCESSORIES & OPTIONS ...................................................
1. FC15/22 SPECIFICATIONS................................................................................................ 160
2. SPECIFICATIONS OF OPTIONS ...................................................................................... 161
3. PACKING LIST .................................................................................................................. 163
4. COPYING FUNCTION COMBINATION MATRIX ........................................................... 164
5. IMAGE QUALITY ADJUSTMENT COMBINATION MATRIX ........................................ 165
4
4
159
Page 9

PRECAUTIONS
1. INSTALLATION
The FC15/22 should be installed by a qualified service technician.
Note: The packing material should be disposed of properly.
1
To obtain the best possible results, this copier should be used in conjunction with a
dedicated AC power line at the following ratings:
2
220-240 V, 50/60 Hz, 9 A
Notes:
1. The use of other appliances or other equipment on the same line as this copier may adversely
affect performance and copy quality.
2. Be sure to use a 3-conductor, grounded wall outlet.
3. In areas where a 2-pin plug is used, the copier must be grounded for safety.
Never ground it to a gas pipe, a water pipe, or any other object not suitable for grounding.
After a suitable place has been selected for the installation for the FC15/22, please do
not change it. Avoid excessive heat, dust, vibration and direct sunlight. Also, provide
3
proper ventilation as the copier emits a slight amount of ozone.
PREFACE
CONTENTS
PRECAUTIONS
Notes:
1. Recommended environmental range for use is as follows:
• Temperature: 10~30C/50~86F
• Humidity: 20~80%RH
2. To insure optimal operation, allow clearances of at least 80cm on the left, 80cm on the right
and 10cm in the rear.
80 cm
The copier should be located near a wall outlet which should be easily accessible.
10 cm
80 cm
5
Page 10

PRECAUTIONS (Cont.)
2. GENERAL PRECAUTIONS
Handle and use the copier gently and carefully.
Do not place anything on the paper cassettes or original feed tray.
1
Never allow the power cable to be trampled on or pinched between hard objects, otherwise
an accident or electrical trouble might occur.
Do not allow any metal things such as paper clips to fall into the copier.
Be sure to turn OFF the power switch (unless using automatic timer mode):
When you leave your office at night.
2
If a power failure occurs.
Caution: When turning OFF the power switch, be sure to do so only after the machine cycling
has come to a complete stop.
Be sure to disconnect the power-cord plug:
when you do not intend to use the copier for an extended period of time such as during
weekends or the summer vacation.
Be sure to turn OFF the power switch immediately and call for service:
If an unusual noise is heard from the copier.
If the outside of the copier becomes unusually hot.
If any part of this copier is damaged, or if it has been dropped.
If the copier has been exposed to rain or liquid.
It is recommended that only supplies made or designated by Toshiba be used for the
FC15/22 in order to optimize copy quality. All supplies should be stored in a cool,
3
dry area.
Paper of lower quality may contain inherent properties such as excess paper dust and may
lead to premature servicing.
DO NOT LEAN ON, APPLY FORCE OR PLACE HEAVY OBJECTS ON SORTER. PERSONAL
INJURY OR PROPERTY DAMAGE MAY RESULT.
Machine Noise Information
Ordinance 3. GSGV, January 18, 1991: The maximum sound pressure level is equal or less than
70 dB(A) according to EN27779.
6
Page 11

1. DESCRIPTION OF THE DIGITAL COPIER
DESCRIPTION
OF THE DIGITAL
COPIER
1.Names of the Main Components . . . . . . . . . . . 8
2.Description of the Optional Equipment . . . . . . 9
3.Description of the Control Panel . . . . . . . . . . . 10
4.Description of the Message Display . . . . . . . . 13
5.Description of the Graphic Display . . . . . . . . . 15
7
Page 12

1. NAMES OF THE MAIN COMPONENTS
Original scale
Control panel
Exit side cover
(Left side)
Cassette
(The 3rd and 4th
cassettes are
optional.)
Tr ansfer belt unit
Original cover
(Optional)
Original
glass
Copying
Prohibition Label
Key copy
counter slot
Power
switch
Bypass guide
Feed side cover
Paper size indicator
Fuser unit
Operator's manual pocket
(Back side)
Fuser unit
Left-hand
front cover
Tr ansfer belt unit
Used toner bag Transfer belt unit knob
Toner cartridge
Right-hand front cover
Electrophotographic unit
Explanatory Label
CLASS 1 LASER PRODUCT
LASER KLASSE 1
APPAREIL A LASER DE CLASSE 1
8
Page 13

2.
DESCRIPTION OF THE OPTIONAL EQUIPMENT
1 Reversing automatic document feeder
3 Staple sorter
1
Reversing Automatic Document Feeder
Original feed tray
2 Automatic duplexer
5 Key copy counter
4 Large-capacity feeder
DESCRIPTION
OF THE DIGITAL
COPIER
A set of originals can automatically be fed one by one to make copies.
2
Automatic Duplexer
This reverses the copies in order to make duplex copies.
3
Staple Sorter
Up to 20 sets of copies can be automatically sorted. There are the following three modes.
• Sort : The copies can be sorted in the same order as the originals.
• Group : The same pages can be sorted in the same bins.
• Sort/Staple : Each set can be sorted and stapled respectively.
4
Large-Capacity Feeder
You will have an additional paper source which can hold up to 1500 sheets of A4-sized paper
(80 g/m
5
Key Copy Counter
Copies made are recorded (added) according to particular individuals or groups.
2
).
9
Page 14

3.
INFO
1
16
15
2 5 6 73
4
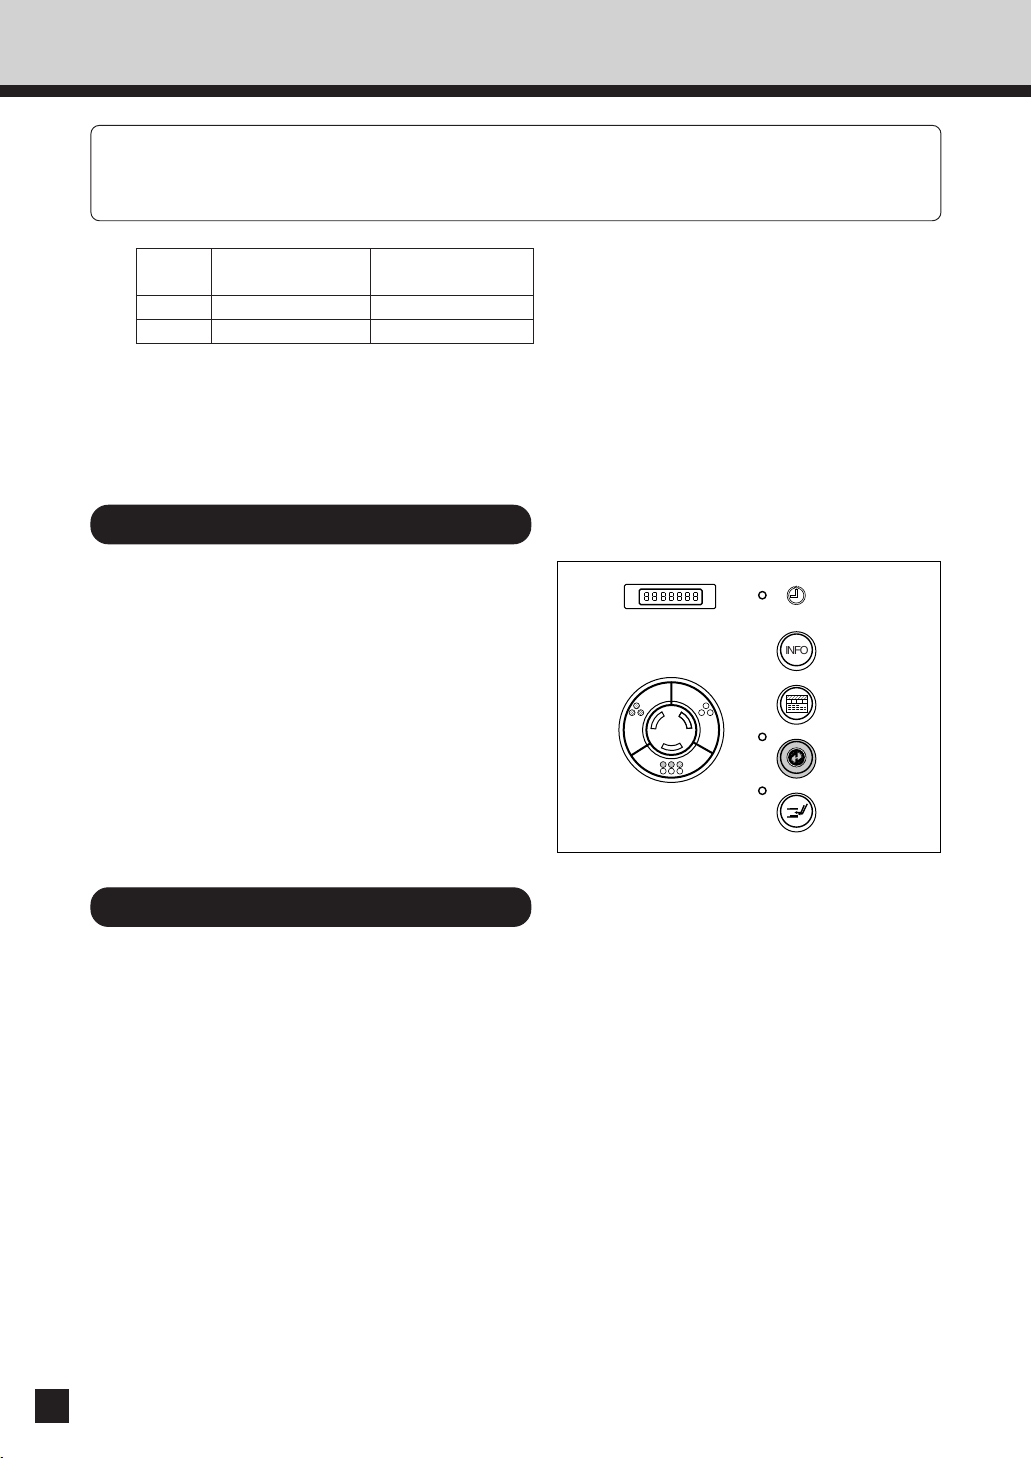
DESCRIPTION OF THE CONTROL PANEL
q MECHANICAL COUNTER
The total number of
copies (converted into
Letter size) made after the
installation of the copier
is shown here.
w TIMER lamp
This lamp lights during
the use of the timer.
e INFO key
Use this key to display the
appropriate operation
procedure.
r SETTINGS key
The current copy modes
or an editing function list
are shown with the
corresponding icons.
See page 12.
t ENERGY SAVER key
When you are not going
to use the copier for a long
period of time, press this
key. The copier enters the
energy-saving mode and
all display lamps go out.
To resume copying, press
this key again. The copier
becomes ready for
copying after a while.
(See page 20)
y INTERRUPT key
When you want to make
a copy of a different
original during a
multicopy run, press this
key. During interrupt
copying, copies can be
made only one by one.
To return to the previous
multicopy run, press this
key again.
u Touch panel
The status of the copier,
operation procedures and
various instructions to the
user are shown in the
pictorials and text.
i COLOUR SAMPLE SEAL
This seal shows samples
of the monocolour mode.
o ACCESS key
Press this key to administer
the users of the copier by
the access code. Press this
key again when you finish
making copies so that the
next person must enter his/
her own access code to
make the copier available
again. (See page 107)
10
Page 15

!0 FUNCTION CLEAR key
When you press this key,
all the modes you have
selected will be cleared to
the default copy status.
!1 STOP key
Press this key to stop a
multicopy run.
!2 START key
Press this key to start
copying.
!3 CLEAR key
Use this key to correct the
entered copy quantity.
!4 DIGITAL keys
Use these keys to enter
the desired copy quantity.
Up to 999 copies can be
set.
!5 COLOUR MODE
SELECTION key
• AUTO COLOUR :
The type of original is
automatically recognized.
Coloured originals are
colour-copied and
monocolour originals are
copied in monocolour.
• FULL COLOUR :
Regardless of colour, all
originals are colourcopied.
• BLACK :
Regardless of colour, all
originals are copied in
monocolour.
!6 CLIP TRAY
Put any paper clips
removed from the
originals here for safe
keeping.
DESCRIPTION
OF THE DIGITAL
COPIER
14 13 12
11
Page 16

3.
DESCRIPTION OF THE CONTROL PANEL(Cont.)
SETTINGS CONFIRMATION function
● If you press the SETTINGS key , the screen
on the right will appear.
The icons displayed on the screen are as follows (some icons may not appear on the screen):
MIXED
ORIGINAL SIZES
MONOCOLOUR
SHARPNESS
LEFT➞LEFT
EDGE ERASE BOOK CENTRE
SPECIAL SHEET
SADF SORT GROUP STAPLE SORT BACKGROUND
HUE SATURATION
1➞22➞22➞1 RIGHT➞RIGHT RIGHT➞LEFT
LEFT➞RIGHT
ERASE
TRIM
ADJUSTMENT
COLOUR
BALANCE
LEFT RIGHT BOOK DUAL PAGE
2 IN 1 2 IN 1
MASK
DUPLEX
MIRROR NEG / POS CENTRING IMAGE REPEAT
RGB
ADJUSTMENT
XY ZOOM FULL
ONE TOUCH
ADJUSTMENT
IMAGE
12
Page 17
4.
DESCRIPTION OF THE MESSAGE DISPLAY
The Message Display panel shows the operation state,error messages and function menus.
䢇 Each icon displayed is shown in the form of a touch key.You can select the function by touching
the key lightly with your finger.
䢇 Turning ON the power switch will show the Basic menu.
The function items shown on the right can be selected directly on the Message Display panel.
1
17
16
15
14
1
Message
The current status of the copier appears here.
2
Reproduction ratio
The selected reproduction ratio appears here.
3
BASIC key
There are setting menus of copy forms, duplex
copying, sort and original modes.
Use this key to return to the BASIC screen. (See “2.
How to make copies” on page 17.)
4
COLOUR key
Use this key to select :
MONOCOLOUR (Page 52)
HUE/SATURATION (Page 53,54)
COLOUR BALANCE (YMCK ADJUSTMENT)
RGB ADJUSTMENT (Page 56)
ONE-TOUCH ADJUSTMENT (Page 57)
BACKGROUND ADJUSTMENT (Page 58)
SHARPNESS (Page 59)
293 4 5 6 7 8
(Page 55)
10
11
12
13
DUAL PAGE (Page 68)
FULL IMAGE (Page 70)
2 IN 1 (Page 71)
2 IN 1 DUPLEX (Page 71)
XY ZOOM (Page 82)
EDITING
TRIMMING/MASKING (Page 83)
MIRROR IMAGE (Page 87)
NEGATIVE/POSITIVE REVERSAL
(Page 88)
CENTRING (Page 89)
IMAGE REPEAT (Page 91)
6
Copy Quantity
The number of copies entered with the
digital keys is displayed here.
7
Copy Paper Type
The icon of the selected mode is displayed
when thick or transparent paper is selected.
DESCRIPTION
OF THE DIGITAL
COPIER
5
EDIT key
Use this key to select :
IMAGE SHIFT (Page 61)
EDGE ERASE (Page 62)
BOOK CENTRE ERASE (Page 66)
SPECIAL SHEET
13
Page 18

4.
DESCRIPTION OF THE MESSAGE DISPLAY(Cont.)
8
Colour Mode
The selected colour mode (AUTO COLOUR, FULL
COLOUR, BLACK or MONOCOLOUR) is displayed
here.
9
PROGRAM key
Use this key to select:
AUTOMATIC DOCUMENT FEEDER (Page 24)
MIXED ORIGINAL SIZES (Page 27)
BYPASS FEED (Page 41)
THICK PAPER (Page 47)
CALIBRATION (Page 94)
DATE/TIME (Page 97)
WEEKLY TIMER (Page 99)
MODE MEMORY (Page 101)
UNIVERSAL (Page 103)
TOTAL COUNTER (Page 108)
DEPT.MANAGEMENT (Page 109)
CHANGE LANGUAGES (Page 118)
USER SELECTION (Page 119)
10
Copy Form key
Use this key to set reproduction, copy size, etc.
How to Cancel the Selected Functions
● Pressing the selected (shaded) key once
again clears the function you have
selected (excluding some functions).
● Pressing nothing will also clear the
settings to the default mode by the
automatic clear function.
Automatic Function Clear Mode
● If you do not press the START key within
about 45 seconds after having set the
desired copy modes, the functions you
have selected are automatically cleared
to the default mode.
● While the Department Management
function is being operated, the display
returns to the access code input screen
(See page 107).
11
Duplexed Copy key
Use this key to make 2-sided copies from 2-sided
(or book) or 1-sided originals. You can also make
1-sided copies from 2-sided originals. (Page 73)
12
SORT/STAPLE Setting key
Use this key to select the sort, group and stapling
modes. An optional sorter must be installed to
display this key. (Page 121)
13
Original Mode Selection key
Use this key to select the suitable copy mode for
the originals.
14
AUTO key
Use this key to make the copier automatically
detect the density and background of the original
and determine the optimum copy density.
15
Manual Density Selection key
Press the keys of both sides to change the copy
density.
16
Cassette Switch key
Use this key to switch cassette (including sheet
bypass).
*Pressing the desired cassette on the Message
Display panel will also select the cassette.
14
17
KEY COPY COUNTER symbol
This symbol flashes when the optional copy
counter is not inserted in the copier.
Insert it to make copies.
(Page 117)
Page 19
5.
DESCRIPTION OF THE GRAPHIC DISPLAY
The graphic on the Message Display panel shows the status of the copier. When one of the graphic
symbols flashes, take the appropriate action referring to the page shown.
q
!3
w
!2
!1
e
r
t
!0
oiu y
DESCRIPTION
OF THE DIGITAL
COPIER
q CHECK ORIGINAL symbol
This symbol flashes when an original is misfed
inside the automatic document feeder. (Page 147)
w BYPASS MISFEED symbol
This symbol flashes when no paper is fed into the
copier in bypass copying. Remove and reset the
sheets on the sheet bypass. (Page 148)
e ADD TONER symbol
This symbol flashes when the toner supply in the
cartridge runs out. (Page 136)
r CLEAR PAPER symbol
This symbol flashes when paper is misfed on the
paper path inside the copier. (Page 138)
t CLEAR PAPER symbol
This symbol flashes when a sheet of paper fed
from the large-capacity feeder is misfed in the
paper feed section. (Page 146)
y CLEAR PAPER symbol
This symbol flashes when a sheet of paper fed
from the selected cassette is misfed in the paper
feeding section. (Page 145)
i CLEAR PAPER symbol
This symbol flashes when paper is misfed
in the automatic duplexer. (Page 143)
o CLEAR PAPER symbol
This symbol flashes when paper is misfed
on the transfer belt. (Page 138)
!0 REPLACE TONER BAG symbol
This symbol flashes when the toner bag
becomes full of used toner. (Page 134)
!1 CLEAR PAPER symbol
This symbol flashes when paper is misfed
in the fuser unit. (Page 138)
!2 SORTER MISFEED symbol
This symbol flashes when paper is misfed
in the optional staple sorter. (Page 149)
!3 CALL SERVICE symbol
This symbol flashes when maintenance
by a service technician is necessary.
(Page 154)
u STACK symbol
This symbol flashes when sheets of paper copied
on one side are stacked in the duplexer. This
symbol also flashes when sheets of paper are left
in the duplexer. In this case, remove paper from
the duplexer.
15
Page 20

MEMO
16
Page 21

2. HOW TO MAKE COPIES
1.Paper . . . . . . . . . . . . . . . . . . . . . . . . . . . . . . . . . 18
2.Energy-Saving Function . . . . . . . . . . . . . . . . . . 20
3.Turning ON the Power Switch/
Auto Job Start . . . . . . . . . . . . . . . . . . . . . . . . . . 21
HOW TO
MAKE
COPIES
4.Using the Reversing Automatic
Document Feeder (Optional) . . . . . . . . . . . . . . 24
5.Copying in the Automatic Paper
Selection Mode . . . . . . . . . . . . . . . . . . . . . . . . . 28
6.Reduction and Enlargement Copying . . . . . . . 32
7.Copying with Copy Density Selection . . . . . . . 36
8.Copying by Original Mode Selection . . . . . . . . 38
9.Colour Mode . . . . . . . . . . . . . . . . . . . . . . . . . . . 40
10. Bypass Copying (Thick Paper/OHP Film) . . . . 41
11. Cassette Setting for Thick Paper/OHP Film . . 47
12. Interrupt Copying . . . . . . . . . . . . . . . . . . . . . . . . 49
17
Page 22
1. PAPER
Acceptable Paper Types and Sizes
Refer to the list below for the acceptable paper.
Use the recommended paper for optimum copy quality.
Feeder
1st
Cassette
2nd
Cassette
3rd
Cassette
4th
Cassette
Sheet
Bypass
Paper Type
Plain paper
Plain paper
THICK1
(91-105g/m
2
OHP film
Plain paper
THICK1
(91-105g/m
2
Plain paper
THICK1
(91-105g/m
2
Plain paper
THICK1
(91-105g/m
2
THICK2
(106-140g/m
Paper Size
(Standard size)
A3,A4,A4-R,A5-R,B4,B5,B5-R,
FOLIO(210X330mm),
LD(11"X17"),LG(8.5"X14"),
LT(11"X8.5"),LT-R(8.5"X11"),
ST-R(5.5"X8.5"),
COMP(10•1/8"X14")
)
(Standard size)
A4
(Standard size)
A3,A4,A4-R,A5-R,B4,B5,B5-R,
FOLIO(210X330mm),
LD(11"X17"),LG(8.5"X14"),
LT(11"X8.5"),LT-R(8.5"X11"),
)
ST-R(5.5"X8.5"),
COMP(10•1/8"X14")
)
(Standard size)
A3,A4,A4-R,A5-R,B4,B5,B5-R,
FOLIO(210X330mm),
A3-wide(12"X18"),
LD(11"X17"),LG(8.5"X14"),
)
LT(11"X8.5"),LT-R(8.5"X11"),
ST-R(5.5"X8.5"),
2
COMP(10•1/8"X14")
)
Maximum Capacity
600 sheets(80g/m2)
500 sheets(90g/m
2
)
600 sheets(80g/m2)
500 sheets(90g/m
2
)
400 sheets (105g/m2)
100 sheets
600 sheets(80g/m2)
500 sheets(90g/m
2
)
400 sheets (105g/m2)
600 sheets(80g/m2)
500 sheets(90g/m
2
)
400 sheets (105g/m2)
50 sheets (80g/m2)
40 sheets (90g/m
2
)
30 sheets
20 sheets
Remarks
This is not available as a
paper source when the
duplexer is installed.
*1
Paper cannot be placed
in the A4-R direction.
*1
*1
*1
18
THICK3
(141-209g/m
Labels
(THICK2,THICK3)
2
)
(Non-standard size)
Length:100-305mm,
Width:148-457mm
OHP film
(Standard size)
20 sheets
A4
LargeCapacity
Plain paper
(Standard size)
A4
1500 sheets (80, 90g/m2)
1250 sheets (105g/m2)
Feeder
1…Duplex copying with the optional automatic duplexer is not available.
*
*1
Paper cannot be placed
in the A4-R direction.
*1
Paper cannot be placed
in the A4-R direction.
Page 23
Recommended Paper
To make copies with a fine image, use of the following sheets is recommended.
If you use copy paper other than the recommended types, ask your service technician.
Paper Type Toshiba Recommendations / Manufacturer Size Mode
Plain Paper Color Copy (90g/m2) / Neusiedler A3, A4 PLAIN
Color Copy (100g/m2) / Neusiedler A3, A4 THICK 1
Thick Paper
Labels 5165 / Zweckfoem-Avery A4 THICK 2
OHP Film CG 3700 / 3M A4 (125µm) OHP FILM
* Be sure to use only the OHP films specified by Toshiba.
Using other types of OHP films may result in the failure of the copier.
Instructions before use
• Using paper with a special process on the surface, paper printed by another copier, or making
a copy on the paper surface that has already been copied once may cause poor copy quality.
• Do not use creased, folded, wrinkled, curled, slippery or stiff paper which may cause paper jams.
Color Copy (120g/m2) / Neusiedler A3, A4 THICK 2
Color Copy (160g/m2) / Neusiedler A3, A4 THICK 3
Color Copy (200g/m2) / Neusiedler A3, A4 THICK 3
BG 78 / Folex
HOW TO
MAKE
COPIES
• Keep the copy paper wrapped. Do not expose it to high humidity after taking the copy paper
out of the wrapping paper.
19
Page 24
2. ENERGY-SAVING FUNCTION
The energy-saving function is to save the power consumption by lowering the fuser temperature
while the copier is not being used.
There are two levels for this function.
Energy saving
efficiency
Level 1 approx.50% (142W) approx.5 minutes
Level 2 approx.20% (227W) approx.2 min. 30 sec.
* Power consumption during normal standby
: approx. 284W
● Level 1 is set as the default mode. You can
switch the initial mode depending on user's
environment (see page 119).
Warm-up time
Forcibly Switching to Energy-saving Mode
Press the ENERGY SAVER key on the
control panel to forcibly switch to the
energy-saving mode (see page 10).
INFO
20
Cancelling the Energy-saving Mode
Press the ENERGY SAVER or START key
on the control panel.
The Energy-saving lamp goes off and the copier
starts warming up again (see page 10).
See the table above for the warm-up time.
Page 25

3. TURNING ON THE POWER SWITCH / AUTO JOB START
Turning ON the Power Switch
Turn ON the power switch.
1
● The following message appears.
Wait Warming Up
HOW TO
MAKE
COPIES
About 9 minutes later, the message
“READY” appears.
2
● This message indicates that you can make
copies at any time.
● If this message appears:
If the copier has not been used for a long
time, the copier automatically goes into the
adjustment mode and the message on the
right appears before warming up.
It will soon start working.
Do not turn OFF the power. Just wait for
a while.
Wait
Performing Auto Calibration
21
Page 26
3. TURNING ON THE POWER SWITCH / AUTO JOB START (Cont.)
Auto Job Start
If you set the desired copying modes and press the START key during warm-up, the copier
automatically starts copying when it becomes READY.
Place the original(s) on the original feed
tray or on the glass.
1
When Using the Automatic Document Feeder
● After aligning the edges of the originals, set
them
face up on the original feed tray and
align the slides to the edges of the originals.
● See page 24 for the number of the originals
you can set up at a time.
Note: Remove any paper clips or staples from
originals before placing them on the
original feed tray.
Slides
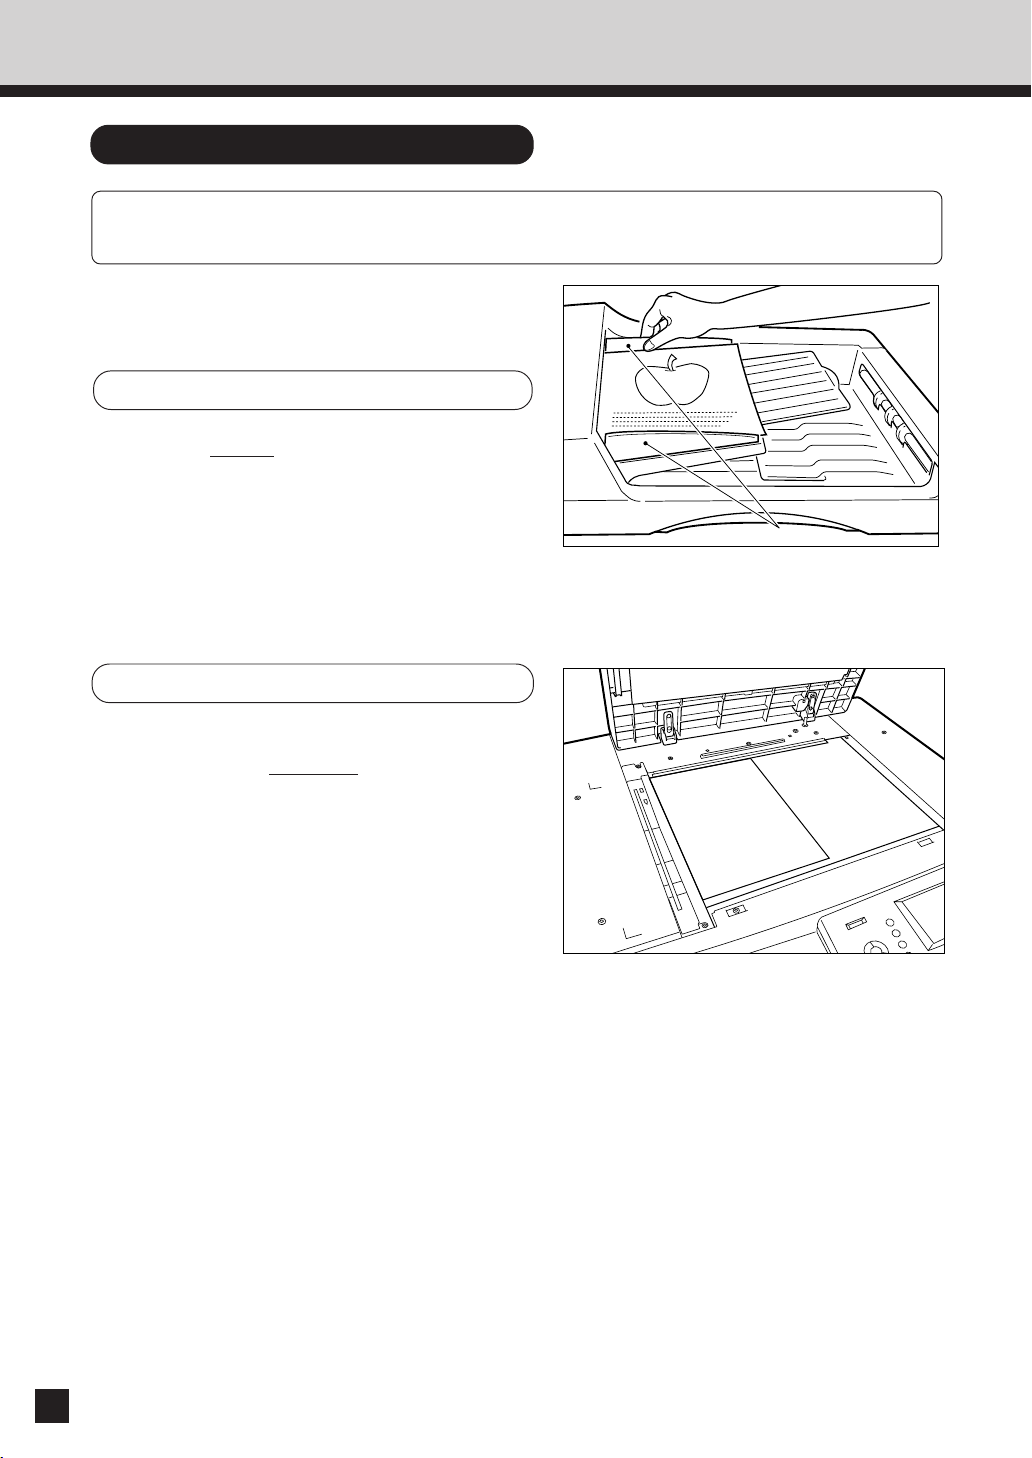
When Placing the Original on the Glass
● Lifting the original cover or the reversing
automatic document feeder, place the original
on the glass
toward you and with its top left aligned against
the original scale on the left side.
● Close the original cover or the reversing
automatic document feeder slowly after the
original size has been detected.
Set the desired copy modes.
● The automatic paper selection (APS) mode
2
and copying of one original are selected as
the default modes, but the original size is not
automatically detected in the auto job start
mode.
face down and with its bottom
22
Page 27

Press the START key.
;
;
3
● The message “Wait Warming Up. Auto Start”
appears. When the copier becomes ready, it
automatically starts copying in the selected
modes.
HOW TO
MAKE
COPIES
Tip: You can change the copying modes even
after pressing the START key. To cancel
the Auto Job Start mode, press the CLEAR
key or the FUNCTION CLEAR key.
23
Page 28

4. USING THE REVERSING AUTOMATIC DOCUMENT FEEDER (OPTIONAL)
The optional Reversing Automatic Document Feeder automatically feeds and copies sheet
paper originals placed on the feeding tray one at a time. This is called the “continuous feed
mode.” You can also manually feed originals in one sheet at a time. This is called the “single
feed mode.” If you feed in two-sided originals, this document feeder automatically reverses
originals after they have been copied so that their reverse sides can be copied.
Precautions When Feeding Originals
Use originals with a paper weight in the range of 60 to 105 g/m2.
1
The number of the originals you can set up at a time differs depending on their size.
2
A4, A4-R, A5-R 50 40
FOLIO 35 25
A3 25 20
Do not use the following types of originals as they tend to misfeed or become damaged
in the reversing automatic document feeder:
3
(1) Badly wrinkled or folded originals. In
particular, originals
whose leading edge
is curled may be
misfed.
(2) Carbon paper
(3) Taped originals (6) Damp originals (7) OHP film originals
Folded or curled originals should be smoothed out before
being set on the reversing automatic document feeder.
4
60~90g/m291~105g/m
(4) Clipped or stapled originals
(5) Torn originals (including those with holes
in them)
2
24
Do not mix originals of different widths at the same time.
5
If the surface of the originals is so rough that they cannot
be moved when two of them are pinched between two
6
fingertips, or if the surface has been processed, these
originals could not be used because the automatic
document feeder may not be able to separate them.
Page 29

Copying in the Continuous Feed Mode
Press the PROGRAM key on the display
panel.
1
Press the ADF key.
2
Press the ADF key on the panel to select
continuous feed.
3
● ADF is highlighted and selected as the default
feed mode.
● The panel returns to the original display.
HOW TO
MAKE
COPIES
Select the desired copy size, reproduction
ratio, image density level and copy quantity.
4
● The automatic paper selection mode is
selected as the default mode.
Place the originals on the original feed tray.
● After aligning the edges of the originals, set
5
6
them
face up on the original feed tray and
align the slides to the edges of the originals.
● For setting A3 or B4 sized paper, pull out the
paper holder in the direction of the arrow.
Press the START key.
● The originals are fed starting with the
lowermost one.
Slides
Holder
25
Page 30

4. USING THE REVERSING AUTOMATIC DOCUMENT FEEDER (OPTIONAL) (Cont.)
Copying in the Single-Feed Mode
Press the PROGRAM key on the display
panel.
1
Press the ADF key.
2
Press the SADF key on the panel to select
single feeding.
3
● SADF is highlighted and selected.
● The touch panel returns to the original display.
Select the desired copy size, reproduction
ratio, image density level and copy quantity.
4
● The automatic paper selection mode is
selected as the default mode.
Align the slides on the original feed tray
to the size of the original.
5
● Set the slides a little wider than the actual
original width.
Insert the original.
● Place the original face up and insert it in
6
straight along the slides.
● When the original starts being pulled in
automatically, let go of the original.
The original is automatically copied.
Slides
26
Page 31

Copying in the Mixed Originals Mode
Press the PROGRAM key on the display
panel.
1
Press the MIXED ORIGINAL SIZES key.
2
As explained on the screen on the right
below, place the originals on the original
3
feed tray.
● Mixed originals of A3 and A4 sized paper can
be copied at the same time.
● After aligning the edges of the originals, set
them
face up on the original feed tray and
align the slides to the edges of the originals.
● The number of the originals you can load at
a time is 25.
Slides
HOW TO
MAKE
COPIES
Press the SET key .
4
Select the Automatic Paper Selection (APS)
mode or Automatic Magnification Selection
5
(AMS) mode. Then select the desired copy
size, reproduction ratio, image density level
and copy quantity as required.
● To make duplexed copies, select the
Automatic Magnification Selection (AMS)
mode.
Press the START key.
6
27
Page 32

5. COPYING IN THE AUTOMATIC PAPER SELECTION MODE
When the power switch is turned ON, the Automatic Paper Selection (APS) mode is selected
as the default mode.
In this mode, if you place an original on the document feeder or on the glass, the copier
automatically detects the size of the original, and selects paper of the same size as the original.
This mode is available only for actual-size (100%) copying.
Procedure
Check that the Automatic Paper Selection
mode is selected.
1
● If APS is not indicated, press the ZOOM
ORG.➞A4 key and select APS .
Place the original(s) on the original feed
tray or on the glass.
2
When Using the Reversing Automatic Document Feeder
● After aligning the edges of the originals, set
them
face up on the original feed tray and
align the slides to the edges of the originals.
● See page 24 for the number of the originals
you can set up at a time.
● When the START key is pressed, the sensor
detects the size of the first original, and selects
the paper size matched to the original.
Note: Remove any paper clips or staples from
the originals before placing them on the
original feed tray.
Slides
28
Page 33

When Placing the Original on the Glass
● Lifting the original cover or the optional
reversing automatic document feeder, place
the original on the glass
its bottom toward you and with its top left
aligned against the original scale on the left
side.
● The sensor unit immediately detects the size
of the original, and selects the paper size
matched to the original.
● Close the original cover or the reversing
automatic document feeder slowly after the
original size has been detected.
● Sometimes the following message appears:
Change direction of original
Change the direction of the original on the
glass.
Or
Set correct cassette
Install the correct-sized cassette.
face down and with
Select the image density level.
● The MANUAL COPY DENSITY mode is
3
selected as the default mode.
● If you want to select the desired image density,
press the or key.
● If the AUTOMATIC COPY DENSITY AUTO is
selected, the optimum image density is
automatically provided according to the
darkness of the original.
HOW TO
MAKE
COPIES
29
Page 34

5. COPYING IN THE AUTOMATIC PAPER SELECTION MODE (Cont.)
;
Key in the desired copy quantity.
● You can key in up to 999.
4
● There is no need for this when making only
one copy.
● When an incorrect quantity is set, press the
CLEAR key and key in the correct number.
● If you press the FUNCTION CLEAR key, all
items that you have set are cleared, and the
copier returns to the default mode and the
Basic menu appears.
Press the START key.
● Copying starts and when the required number
5
of copies are made, the copier automatically
stops.
● If you do not press the START key within
45 seconds after having set the desired copy
modes, the functions you have selected are
automatically cleared to the default mode.
30
Page 35

When the Automatic Paper Selection is not Available
The copier may not be able to detect the size
of the following types of original in the APS
mode:
● Transparent originals such as OHP film
● Entirely blackish originals or originals with
blackish edges
● Non-standard size originals such as
newspapers and magazines.
Select the copy size referring to the following
steps.
Place the original(s) on the original feed
tray or on the glass.
1
● See page 22 for how to set the originals.
Select the desired paper size.
● Press the cassette of the desired copy size
2
on the Basic menu.
● Or press the ZOOM ORG.➞A4 key on the
Basic menu to display the screen on the right,
then press the key of the desired copy size.
HOW TO
MAKE
COPIES
Return to the Basic menu, then select the
image density level and copy quantity as
3
required.
Press the START key.
4
Tip: If there are sheets of paper set on the
sheet bypass, you must press the COPYSIZE key corresponding to the sheets.
See page 41.
31
Page 36

6. REDUCTION AND ENLARGEMENT COPYING
There are three methods available for enlargement and reduction copying.
● Using Automatic Magnification Selection (AMS):
After selecting the AMS mode and the copy size, when you place an original on the glass
or when an original is fed from the reversing automatic document feeder, the copier
automatically detects the size of the original, and calculates the appropriate reproduction
ratio.
● Specifying the original and copy sizes:
When you specify both the original and copy sizes, the copier automatically calculates the
appropriate reproduction ratio.
● Using the ZOOM keys:
The ZOOM keys DOWN and UP allow selection of the desired reproduction ratio
from the range of 25% to 400% at increments by 1%.
* See page 82 for X-Y zoom.
Using Automatic Magnification Selection
Press the ZOOM ORG. A4 KEY.
1
32
Press the AMS key.
● The AMS key gets highlighted.
2
Press the desired COPY-SIZE key.
● The selected COPY-SIZE key gets highlighted.
3
Place the original(s) on the original feed
tray or on the glass.
4
● See page 22 for how to set the originals.
Page 37

● The sensor unit immediately detects the size
of the original, selects the paper size matched
to the original, and calculates the reproduction
ratio based on the detected original size and
the selected copy size. The reproduction ratio
is then displayed.
● If the following message appears:
Change direction of original ,
change the direction of the original on the
glass.
● If the following message appears:
Use reduction cassette ,
install the correct-sized cassette, and start the
procedure all over again.
Select the desired image density level and
copy quantity.
5
Press the START key.
● Reduced or enlarged copies of the selected
6
size will exit.
Tips:
The copier may not be able to detect the following
types of original in the AMS mode:
● Transparent originals such as OHP film
● Entirely blackish originals or originals with
blackish edges
Refer to “Selecting the Original Size and the
Copy Size” on page 34 to make copies of such
originals.
HOW TO
MAKE
COPIES
33
Page 38

6. REDUCTION AND ENLARGEMENT COPYING (Cont.)
Selecting the Original Size and the Copy Size
Press the ZOOM ORG. A4 KEY.
1
Press the ORIGINAL SIZE key of the same
size as the original to be copied.
2
Press the desired COPY-SIZE key.
● The copier calculates the correct reproduction
3
ratio based on the selected original size and
copy size, and displays the reproduction ratio
on the reproduction-ratio display.
(See page 103 for how to use the UNIV key.)
● If the desired size of paper is not in any of
the installed cassettes, the following message
appears:
Set correct cassette
Install the correct-sized cassette or use the
sheet bypass.
Place the original(s) on the original feed
tray or on the glass.
4
● See page 22 for how to set the originals.
Select the desired image density level and
copy quantity.
5
Press the START key.
6
Tip: If there are sheets of paper set on the
sheet bypass, you must press the COPYSIZE key corresponding to the sheets
(see page 41).
34
Page 39

Using the Zoom Keys
Press the desired cassette on the display
panel.
1
Press the ZOOM ORG. A4 KEY.
2
Press the Up or Down key to select
the desired reproduction ratio.
3
● For enlargement, use the UP key. For
reduction, use the DOWN key.
● Each time you press either ZOOM key, the
reproduction ratio charges by 1%. Holding
down the key changes the reproduction ratio
continuously.
● Pressing the 400% key or the 25% key
causes 400% or 25% to be immediately
displayed.
● Pressing the 100% key returns the copier
to actual-size copying.
HOW TO
MAKE
COPIES
Select the desired image density level and
copy quantity if required.
4
Press the START key.
5
35
Page 40

7. COPYING WITH COPY DENSITY SELECTION
There are two modes of adjusting the image density and background level of the copy.
In the manual copy density mode, you can produce lighter or darker copies.
In the automatic copy density mode, the copier automatically detects the density of the original,
and selects the optimum image density and background level. This mode is suitable for originals
containing only text and illustrations. Originals with black areas and halftoned originals should
be copied in the manual copy density mode.
Copying in Manual Density Mode
Press the or key to change the
copy density.
1
● To produce lighter copies, press the key.
Each time you press the key, the densityindicating mark moves one step to the left,
and your copies are produced proportionally
lighter.
● To produce darker copies, press the key.
Each time you press the key, the densityindicating mark moves one step to the right,
and your copies are produced proportionally
darker.
Place the original(s) on the original feed
tray or on the glass.
2
● See page 22 for how to set the originals.
Set the desired copy size, reproduction
ratio and copy quantity if required.
3
Press the START key.
● Copies are made in the selected copy density
4
level.
36
Page 41

Copying in Automatic Density Mode
Press the AUTO key.
1
Place the original(s) on the original feed
tray or on the glass.
2
● See page 22 for how to set the originals.
Set the desired copy size, reproduction
ratio and copy quantity if required.
3
Press the START key.
● The copier automatically detects the density
4
of the original, and makes copies at the
optimum image density and background level.
Tips:
● When copying has been completed, the
FUNCTION CLEAR key flashes.
Press it or press nothing for 45 seconds to
clear the automatic copy density mode to the
default mode (manual copy density).
HOW TO
MAKE
COPIES
● In the automatic copy density mode, the
background level is detected during copying,
so the copying speed becomes slower.
37
Page 42

8.
COPYING BY ORIGINAL MODE SELECTION
You can select the copy mode (Text/Photo, Text, Printed Image, Photo, Map or Advanced Image)
and produce clear copies matched to the type of original.
* Advance Image Enhancement mode is an optional.
* The advance image enhancement mode requires the optional AI board to be installed.
Place the original(s) on the original feed
tray or on the glass.
1
● See page 22 for how to set the originals.
Press the TEXT/PHOTO key on the Basic
menu.
2
Press the TEXT/PHOTO , TEXT , PRINTED
IMAGE , PHOTO , MAP or ADVANCED
3
IMAGE key.
● The screen on the right is displayed.
Select the appropriate mode depending on the
type of original.
Text / Photo : Original with text and photo mixed
together
Text : Original with text only (or text
and line artwork)
Printed Image : Original with printed photos
such as gravure photos of a
magazine
Photo : Original with photos printed on
photographic paper
Map : Original with fine illustrations and text
Advanced Image (Optional) :
The copier automatically recognizes the
contents of the original in each block or
originals in each page and makes copies
in appropriate modes.
This is suitable for copying several types
of originals mixed together.
38
Note: In the Advance Image Enhancement
mode, the patterns of originals are
recognized during copying, so the copying
speed becomes slower.
Page 43

If necessary, press the or key
to adjust the image density.
4
Select the desired copy size, reproduction
ratio and copy quantity.
5
Press the START key.
● Copies are made in the selected copy mode.
6
HOW TO
MAKE
COPIES
39
Page 44

9. COLOUR MODE
This function is to switch the colour copy mode and black-and-white copy mode.
Selecting the Colour Mode
Press the desired colour mode selection key.
● FULL COLOUR : Regardless of colour, all
1
● AUTO COLOUR : The type of original is
● BLACK : Regardless of colour, all
Note: Full colour mode is selected as the default
mode.
See page 119 for changing the initial mode.
● The lamp of the selected key is highlighted
and the selected colour mode is displayed in
the top right corner of the display panel.
originals are colour-copied.
Highlighted
automatically recognized.
Coloured originals are
colour-copied and blackand-white originals are
copied in black-and -white.
originals are copied in
black.
INFO
Tips:
● In the AUTO COLOUR mode, the colours of
originals are recognized during copying, so
the copying speed becomes slower.
● In the AUTO COLOUR mode,if the colour area
is too small or the colours are close to black
or they are too light, colour originals may be
copied in black. In this case, select the FULL
COLOUR mode.
● Yellowish originals or originals with a coloured
background may be automatically copied in
colour even though they are black-and-white.
To be certain to make the copies in the desired
mode, select FULL COLOUR or BLACK.
40
Page 45

10.
BYPASS COPYING (THICK PAPER/OHP FILM)
Bypass copying is convenient when the size of any paper cassettes installed in the copier is
not the size you require or when you want to use special sizes of paper such as A3-wide
(305X457mm) paper or special types of paper such as thick paper and OHP films(transparency
or sticker labels).
Bypass Copy Mode
● This copier has bypass copy modes corresponding to paper types.
Refer to the table below and select the mode corresponding to the sheets. Otherwise, it may
cause paper jams or lower the image quality.
● The number of sheets that can be set at a time differs depending on paper type.
Setting more than specified number of sheets at a time may cause copier failure or paper jams.
Be sure to set within the specified range.
● The range of acceptable paper sizes is from A3-wide to A5-R.
Bypass Copy Mode Corresponding Paper Type Maximum Capacity
PLAIN
305X457mm *A3-wide (64-105g/m2) approx.30 sheets
OHP FILM OHP films approx.20 sheets
THICK 1 Thick paper (91-105g/m2) (excluding A3-wide) approx.30 sheets
THICK 2 Thick paper (106-140g/m2)
THICK 3
*A3-wide paper = 304.8mmX457.2mm
Plain paper (64-80g/m
Plain paper (81-90g/m2) approx.40 sheets
Thick paper (141-209g/m
Thick sticker labels
2
) approx.50 sheets
2
) approx.20 sheets
HOW TO
MAKE
COPIES
41
Page 46

10. BYPASS COPYING (THICK PAPER/OHP FILM) (Cont.)
Procedure
Place the original(s) on the original feed
tray or on the glass.
1
● See page 22 for how to set the originals.
Place the sheets of copy paper on the sheet
bypass and align the slides to the paper
2
size.
● If you put several sheets on the sheet bypass
at a time, fan the paper well before placing
it.
Slides
● For setting horizontally long -sized paper such
as A3, B4 or A4-R sized paper, pull out the
paper holder.
42
Press the PROGRAM key to enter the
Program menu, then press the BYPASS
3
FEED key.
Page 47

● When paper is not set on the sheet bypass,
the display in step 4 also appears if you select
bypass copying by pressing the bypass guide
icon
Select the desired paper type.
● Plain paper is selected as the default mode.
4
Press the PLAIN key, then the SET key.
Select the paper thickness among PLAIN ,
THICK1 , THICK2 and THICK3 keys, press
the 305X457mm key, then the SET key.
on the screen on the right.
Plain Paper
A3-wide(305X457mm)
HOW TO
MAKE
COPIES
Select the desired copy size and set the
other copy modes if required.
5
Tips:
● If A4-R paper is used, press the A4 key twice.
● If the size of the sheets fed from the sheet
bypass is not set, the Automatic Magnification
Selection is cancelled.
Set the copy quantity.
6
43
Page 48

10. BYPASS COPYING (THICK PAPER/OHP FILM) (Cont.)
Press the START key.
7
Tips:
● If the BYPASS MISFEED symbol flashes, pull
out the paper and set it on sheet bypass again.
● When copying is finished, the lamp of the
FUNCTION CLEAR key lights. Press the
FUNCTION CLEAR key, or the bypass copying
mode will automatically return to the default
mode in 45 seconds.
Thick Paper
● Use the recommended thick paper and sticker
labels if possible. Thick paper sold at stores
is also available for this copier, but paper of
some brands may not be suitable to acquire
a clear image. In this case, ask your service
technician.
● It takes about 30 seconds to a few minutes
to switch between "PLAIN" X "A3-wide
(305X457mm)" X "OHP FILM" and "THICK1"X
"THICK2" X "THICK3" for adjustment.
Perform step 1 to 3 on page 42.
1
Check the type of the thick paper and press
the THICK1 , THICK2 or THICK3 key.
2
Tip: For bypass copying mode for thick paper
and sticker labels, see the table on page
41.
44
Page 49

Select the copy size for bypass copying
and set the desired reproduction ratio if
3
required (see page 32).
● Press the COPY-SIZE key corresponding to
the copy paper that is set.
●
If A4-R paper is used, press the A4 key twice.
Tip: If the size of the sheets fed from the sheet
bypass is not set, Automatic Magnification
Selection is cancelled.
Set the copy quantity.
4
Press the START key.
5
HOW TO
MAKE
COPIES
45
Page 50

10. BYPASS COPYING (THICK PAPER/OHP FILM) (Cont.)
OHP Films
● Use the recommended OHP films (A4 only).
Using other kinds of OHP films may cause
jams and copier failure, and image quality
may be lowered as well and copies cannot
be made in clear colour. If you want to use
the other kinds of OHP films, ask your service
technician.
● Set the OHP films on the sheet bypass
vertically (same as A4 placement).
If you set them horizontally (same as A4-R
placement), the following message will
appear:
Set transparency film in A4 direction
● If you select the OHP Film mode, the copy
speed becomes slower.
Perform step 1 to 3 on page 42.
Slides
1
Press the OHP FILM key.
2
A4 is automatically selected for the copy
size.
3
Set the copy quantity.
Tip: Up to 20 OHP films can be set at a time.
4
If you will make copies of more than 20
films, feed them from the exclusive
cassette for OHP (see page 48).
46
Press the START key.
5
Page 51

11. CASSETTE SETTING FOR THICK PAPER/OHP FILM
Thick paper with a weight of 91~105g/m2 can be fed from the cassette or large-capacity feeder,
and OHP film can be fed from the cassette. This is convenient if copies are often made on
special paper.
Setting the Cassette for Thick Paper (91~105g/m
Set the thick paper (91~105g/m2) on the
2nd, 3rd or 4th cassette, or the large-capacity
1
feeder.
● The procedure for changing the paper size
of the cassette for thick paper is the same as
that for normal paper. See page 130.
● Thick paper with a weight of greater than
105g/m
bypass. See page 42.
● Up to 400 sheets (105g/m
time.
● Duplex copying with the optional automatic
duplexer is not available.
Press the PROGRAM key to enter the
Program menu, and press the THICK PAPER
2
key.
2
can be fed only from the sheet
2
) can be set at a
2
)
HOW TO
MAKE
COPIES
Press the cassette you have set the thick
paper on the display.
3
● The top cassette cannot be set for thick paper.
Use the 2
capacity feeder.
Press the SET key.
nd
, 3rd or 4th cassette, or the large-
4
47
Page 52

11.
CASSETTE SETTING FOR THICK PAPER/OHP FILM (Cont.)
Check that THICK 1 is shown on the selected
cassette of the display.
5
Setting the Cassette for OHP Film
Pull out the second cassette slowly until
comes to a stop.
1
● Only the 2nd cassette is available for setting
the cassette for OHP films.
Set the OHP films on the casstte.
● Acceptable size is A4 only. Be sure to set
2
them vertically (same as A4 placement).
● Up to 100 films can be set at a time.
Take out the size mark plate of the cassette
and set that of the OHP film.
3
● "OHP FILM" is shown in the paper size
indicator.
“OHP FILM” is displayed on the second
cassette on the Basic menu.
4
Size mark plate
of OHP film
Paper size indicator
48
Page 53

12
. INTERRUPT COPYING
The interrupt copying mode is convenient when you want to make copies of another set of
originals during a multicopy run. Interrupt copying is possible using the cassettes or the bypass.
Press the INTERRUPT key.
The following message appears:
1
Job interrupted job 1 saved
INFO
Replace the original with a new original.
● See page 22 for how to set the original.
2
Tip: During the interruption, the reversing
automatic document feeder (optional)
and automatic duplexer (optional) are
inoperable.
Select the desired copy size, image density
level, reproduction ratio,etc. if necessary.
3
HOW TO
MAKE
COPIES
Press the START key.
● You can make multiple copies by pressing the
4
5
6
START key once for each copy desired.
After interrupt copying is finished, press
the INTERRUPT key again.
● The following message appears:
Ready to resume job 1
Replace the previous original and press the
START key.
● The remaining number of copies of the
previous multicopy run will be made
automatically.
When the Controller (optional) is installed
Interrupt Copying during Printing
If you press the COPY JOB REQUEST key
while the printer is being used, interrupt
copying becomes available when the
current printing job is completed.
The screen on the right appears during printing.
● If you want to make copies as soon as
printing has been finished,press the
COPY JOB REQUEST key.
● If you want to cancel the copy request, press
the CANCEL REQUEST key
49
Page 54

MEMO
50
Page 55

3. COLOUR EDITING AND ADJUSTMENT
COLOR EDITING AND
ADJUSTMENT
1.Monocolour Copying . . . . . . . . . . . . . . . . . . . . . 52
2.Hue Adjustment . . . . . . . . . . . . . . . . . . . . . . . . . 53
3.Saturation . . . . . . . . . . . . . . . . . . . . . . . . . . . . . 54
4.Colour Balance (YMCK Adjustment) . . . . . . . . 55
5.RGB Adjustment . . . . . . . . . . . . . . . . . . . . . . . . 56
6.One-Touch Adjustment . . . . . . . . . . . . . . . . . . . 57
7.Background Adjustment . . . . . . . . . . . . . . . . . . 58
8.Sharpness Adjustment . . . . . . . . . . . . . . . . . . . 59
51
Page 56

1. MONOCOLOUR COPYING
You can select one colour out of 10 colours of the colour sample seal to make a monocolour
copy.
Procedure
Press the COLOUR key to enter the colour
menu, then press the MONOCOLOUR key.
1
Press the desired copy colour key.
● Press the MAGENTA key for instance.
2
Note: Refer to the colour sample seal above the
touch panel.
Select the desired copy size, image density
level, copy quantity, etc. if necessary.
3
Press the START key.
4
52
Page 57

2. HUE ADJUSTMENT
This function is available to adjust the hue by changing the hue circle.
Procedure
Press the COLOUR key to enter the colour
menu, then press the HUE/SATURATION
1
key.
Press the HUE key, then the + or – key
to adjust the hue.
2
● Pressing the + key brings the colour closer
to the next clockwise colour while pressing
the – key brings it closer to the next anticlockwise colour.
COLOR EDITING AND
ADJUSTMENT
Press the SET key.
3
Select the desired copy size, image density
level, the copy quantity, etc. if necessary.
4
Press the START key.
5
Cancelling the Hue Adjustment
There are two ways for clearing the setting.
1
Press the + or – key on the HUE column to
move the indicator to 0, then press the SET key.
2
Press the DEFAULT key, then the SET key.
*The saturation setting also becomes the default
mode.
53
Page 58

3. SATURATION
This function allows you to adjust the saturation of copies.
Procedure
Press the COLOUR key to enter the colour
menu, then press the HUE/SATURATION
1
key.
Press the SATURATION key, then the +
or – key to adjust the saturation.
2
● Pressing the + key increases the brightness
while pressing the – key decreases the
brightness.
Press the SET key.
3
Select the desired copy size, image density
level, the copy quantity, etc. if necessary.
4
Press the START key.
5
Cancelling the Saturation Adjustment
There are two ways for clearing the setting.
1
Press the + or – key on the SATURATION
column to move the indicator to 0, then press the
SET key.
2
Press the DEFAULT key, then the SET key.
*The hue setting also becomes the default mode.
54
Page 59

4.
COLOUR BALANCE (YMCK ADJUSTMENT)
This function allows you to adjust the colour balance of copies by changing the strength of the primary
colours (Yellow (Y), Magenta (M), Cyan (C) and Black (K)).
Procedure
Press the COLOUR key to enter the colour
menu, then press the COLOUR BALANCE
1
key.
Press the + or – key to adjust the colour
balance.
2
● Pressing the + key enhances the tint of the
colour while pressing the – key decreases
the tint of the colour.
Press the SET key.
3
Select the desired copy size, image density
level, the copy quantity, etc. if necessary.
4
Press the START key.
5
Cancelling the Colour Balance Adjustment
There are two ways for clearing the setting.
1
Press the + or – key on the column you want
to cancel to move the indicator to 0, then press
the SET key.
2
If you want to cancel all the 4 adjustmets, press
the DEFAULT key, then the SET key.
COLOR EDITING AND
ADJUSTMENT
55
Page 60

5. RGB ADJUSTMENT
This function allows you to adjust the colour balance by changing the strength of Red (R),
Green (G) and Blue (B).
Procedure
Press the COLOUR key to enter the colour
menu, then press the RGB ADJUSTMENT
1
key.
Press the + or – key to adjust the colour
balance.
2
● Pressing the + key enhances the tint of the
colour while pressing the – key decreases
the the tint of the colour.
Press the SET key.
3
Select the desired copy size, image density
level, the copy quantity, etc. if necessary.
4
Press the START key.
5
Cancelling the Saturation Adjustment
There are two ways for clearing the setting.
1
Press the + or – key on the column you want
to cancel to move the indicator to 0, then press
the SET key.
2
If you want to cancel all the 3 adjustmets, press
the DEFAULT key, then the SET key.
56
Page 61

6.
ONE-TOUCH ADJUSTMENT
You can make the image quality warm, cool, vivid or clear with one touch.
Procedure
Press the COLOUR key to enter the colour
menu, then press the ONE TOUCH
1
ADJUSTMENT key.
Press the desired mode key.
● Press the WARM key for instance.
2
COLOR EDITING AND
ADJUSTMENT
Select the desired copy size, image density
level, the copy quantity, etc. if necessary.
3
Press the START key.
4
57
Page 62

7. BACKGROUND ADJUSTMENT
This function allows you to emphasize the background of light colour originals or to avoid copying
the background of dark colour originals or rear side of originals.
This function is available in the black or monocolour mode as well.
* Automatic density mode is not available with this function.
Procedure
Press the COLOUR key to enter the colour
menu, then press the BACKGROUND
1
ADJUSTMENT key.
Press the LIGHT or DARK key.
2
Press the SET key.
3
Select the desired copy size, image density
level, the copy quantity, etc. if necessary.
4
Press the START key.
5
Cancelling the Background Adjustment
There are two ways for clearing the setting.
1
Press the LIGHT or DARK key on the
Background column to move the indicator to 0,
then press the SET key.
2
Press the DEFAULT key, then the SET key.
58
Page 63

8. SHARPNESS ADJUSTMENT
This function is available when you want to emphasize the letters and edges of images.
This function is available in the black or monocolour mode as well.
Procedure
Press the COLOUR key to enter the colour
menu, then press the SHARPNESS key.
1
Press the SOFT or SHARP key.
● Pressing SOFT key suppresses the moiré
2
fringes while pressing the SHARP key
emphasizes the letters and sharpens the fine
lines.
Press the SET key.
3
Select the desired copy size, image density
level, the copy quantity, etc. if necessary.
4
Press the START key.
5
Cancelling the Sharpness Adjustment
There are two ways for clearing the setting.
1
Press the SOFT or SHARP key on the
Sharpness column to move the indicator to 0, then
press the SET key.
2
Press the DEFAULT key, then the SET key.
COLOR EDITING AND
ADJUSTMENT
59
Page 64

MEMO
60
Page 65

4. USING THE EDITING FUNCTIONS
1.Image Shift Copying . . . . . . . . . . . . . . . . . . . . . 62
2.Edge Erase Copying . . . . . . . . . . . . . . . . . . . . . 64
3.Book Centre Erase . . . . . . . . . . . . . . . . . . . . . . 66
4.Dual-page Copying . . . . . . . . . . . . . . . . . . . . . . 68
5.Full Image Copying . . . . . . . . . . . . . . . . . . . . . . 70
6.2 IN 1 Mode Copying . . . . . . . . . . . . . . . . . . . . 71
7.Duplex Copying . . . . . . . . . . . . . . . . . . . . . . . . . 73
1
Duplexed Copies from Single-sided
Originals . . . . . . . . . . . . . . . . . . . . . . . . . . . . 73
2
Duplexed Copies from Two-sided
Originals . . . . . . . . . . . . . . . . . . . . . . . . . . . . 77
USING THE
EDITING
FUNCTIONS
3
Single-sided Copies from Two-sided
Originals . . . . . . . . . . . . . . . . . . . . . . . . . . . . 78
4
Duplexed Copies from a Book
Originals . . . . . . . . . . . . . . . . . . . . . . . . . . . . 79
8.X-Y Zoom . . . . . . . . . . . . . . . . . . . . . . . . . . . . . 82
9.Trimming/Masking . . . . . . . . . . . . . . . . . . . . . . . 83
10. Mirror Image . . . . . . . . . . . . . . . . . . . . . . . . . . . 87
11. Negative/Positive Reversal . . . . . . . . . . . . . . . . 88
12. Centring . . . . . . . . . . . . . . . . . . . . . . . . . . . . . . . 89
13. Image Repeat . . . . . . . . . . . . . . . . . . . . . . . . . . 91
61
Page 66

1. IMAGE SHIFT COPYING
You can create margins on the copy. You can specify the position of these margins on either
the right or the left side of the copy. You can also create margins on copies of book originals
by just using the DUAL PAGE mode.
Procedure
Press the EDIT key to enter the Edit menu,
then press the IMAGE SHIFT key.
1
62
Margin on the Left or Right Side
Select on which side the margin is to be
created.
2
● Press one of the LEFT or RIGHT keys to select
the type of margin.
Page 67

After having adjusted the margin, press
the SET key.
3
● The default margin is 7 mm.
● To adjust the margin:
Press the
the desired margin setting, and press the SET
key.
● In duplex copying, margins in the back are
created on the other side of those in the front.
See page 73 for duplex copying.
Margin on the Book Originals
Select on which side the margin is to be
created.
2
● Press the BOOK key.
● If you select the BOOK margin, use it in
conjunction with the DUPLEX COPYING mode
from book originals (page 79) or DUAL PAGE
mode (page 68).
0mm
or
30mm
key to select
After having adjusted the margin, press
the SET key.
3
● The default margin is 14 mm.
● To adjust the margin:
Press the
the desired margin setting, and press the SET
key.
Place the original on the glass.
● The book should be centred on the yellow
4
5
6
indicator line with its bottom toward you.
Select the desired copy size, image density
level, reproduction ratio and copy quantity.
Press the START key.
Tip: Margins can be created also in the bypass
copy mode. To do this, set the paper in the
sheet bypass (see page 42), and press the
desired COPY-SIZE key to select the desired
paper size.
2mm
or
30mm
key to select
Yellow
indicator line
USING THE
EDITING
FUNCTIONS
63
Page 68

2. EDGE ERASE COPYING
If the edges of an original are torn or dirty, they are reproduced as black stains on the copy.
In the edge erase mode, a white border is created along all edges of the copy. The default
edge erase margin is 5 mm, but you can select any margin between 2 and 20 mm.
Edge-erased copyOriginal
Procedure
Press the EDIT key to enter the Edit menu.
1
Press the EDGE ERASE key.
2
How to Change the Edge Erase Margin
● The default edge erase margin is 5mm.
● To change the edge erase margin, press the
2mm
edge erase margin.
● If the setting is OK, press the SET key.
or
20mm
key to select the desired
64
Page 69

Place the original(s) on the original feed
tray or on the glass.
3
● See page 22 for how to set the originals.
Select the desired copy size, image density
level, reproduction ratio, copy quantity,
4
etc. if necessary.
Press the START key.
5
Tip: Edges can be erased also in the bypass
copy mode. To do this, set the paper in
the sheet bypass (see page 42), and press
the desired COPY-SIZE key to select the
desired paper size.
USING THE
EDITING
FUNCTIONS
65
Page 70

3. BOOK CENTRE ERASE
This function allows you to erase the shadow in the centre of a book original.
The default book centre erase margin is 10mm, but you can select any margin between 2 and
50mm.
Centre Erasing
No Centre Erasing
Procedure
Press the EDIT key to enter the Edit menu.
1
Press the Next key to display the panel on
the right.
2
Press the BOOK CENTRE ERASE key.
3
Changing the Erased Margin
●
The default book centre erase margin is 10mm.
● To change the margin to be erased, press
2mm
the
desired margin.
● If the set value is correct, press the SET key.
key or
50mm
key to set the
66
Page 71

Set the original(s) on the glass.
● The book should be centred on the yellow
4
5
indicator line with its bottom toward you.
Select the desired copy size, image density
level, reproduction ratio, copy quantity,
etc. if necessary.
Press the START key.
6
Yellow
indicator line
USING THE
EDITING
FUNCTIONS
67
Page 72

4. DUAL-PAGE COPYING
The facing pages of a book or magazine are copied one at a time onto two separate sheets
of paper at the same time. You need not move the original on the glass.
*The available paper size for this function is A4 only.
Procedure
Press the EDIT key to enter the Edit menu.
1
Press the DUAL-PAGE key.
2
Press the 1 SIDE key for single-sided
copying or the 2 SIDE key for two-sided
3
copying.
68
Page 73

Select the A4 copy size.
4
Place the original on the glass.
● The book should be centred on the yellow
5
6
indicator line with its bottom toward you.
Select the desired image density level,
copy quantity, etc. as required.
● To combine with the reduction and
enlargement function, set the reproduction
ratio before setting the original.
Press the START key.
7
Yellow
indicator line
USING THE
EDITING
FUNCTIONS
69
Page 74

5. FULL IMAGE COPYING
When the image occupies the entire original (to the edge), this function reduces the ratio a
little bit so that the edges of the image will not be missed.
Original Full Image Copying
Copying Procedure
Place the original(s) on the original feed
tray or on the glass.
1
● See page 22 for how to set the original.
Press the EDIT key to enter the Edit menu.
2
Press the FULL IMAGE key.
● The image is automatically reduced by a few
3
4
percent so that the entire image is copied on
a sheet.
Return to the Basic menu, then set the
desired copy size, image density level, copy
quantity, etc. if necessary.
Press the START key.
5
70
Page 75

6. 2 IN 1 MODE COPYING
py
When you set A4 sized originals on the original feed tray and select the 2 in 1 function, the
copier automatically feeds in the originals two at a time and causes them to be copied onto
a single sheet of paper.
If you select the 2 in 1 duplex mode, four originals will be copied onto both sides of a single
sheet of paper.
* This copying mode requires the optional reversing automatic document feeder to be installed.
1st page 2nd page
Procedure
Set the originals on the original feed tray.
● Refer to the illustration below for the order
1
2
and direction of originals.
1
2
1 2
Originals Co
Press the EDIT key to enter the Edit
menu and press the 2 IN 1 key.
● When making a duplex copy, press the 2 IN
1 DUPLEX key.
Note: The 2 in 1 duplex mode requires the
optional automatic duplexer.
USING THE
EDITING
FUNCTIONS
71
Page 76

6. 2 IN 1 MODE COPYING (Cont.)
Enter the number of the originals.
● To have copies arranged in the correct page
3
order in 2 in 1 copying, it is necessary to let
the copier know the number of originals in
one of the following ways:
● When the operator knows the number of
originals:
→ Key in the number of the originals.
● When making the copier count the number
of originals:
→ Press the Original Count key.
The copier starts counting the originals
automatically. When it finishes counting them,
this message appears:
Put originals in doc. feeder
Then reset the originals in the original feed
tray in the same way as described in step 1.
Press the SET key.
4
Set the desired image density level, copy
quantity, etc.
5
● Maximum copy quantity for the 2 in 1 duplex
copying is as shown below.
80g/m2: 50 (all sizes)
2
90g/m
Press the START key.
: 40 (all sizes)
6
Note: For automatic stapling in the 2 in 1 mode,
the stapling position is the right bottom
corner rather than the normal left upper
corner of the copy, as shown on the right.
If you want to staple on the left upper
corner, change the direction when
copying has been finished and use the
manual stapling mode (see page 127).
1
A
Normal stapling position
2
B
Stapling position in 2 in 1
(right bottom corner)
A
B
1
2
72
Page 77

7. DUPLEX COPYING
1
Duplexed Copies from Single-sided Originals
There are three methods of making duplexed copies from single-sided originals:
• Using the reversing automatic document feeder (optional) – For duplex-copying from sheet
originals of the specified sizes and weights.
• Setting originals on the glass – For duplex copying from originals that cannot be handled
by the reversing automatic document feeder, etc.
• Using the dual-page function (See page 68.) – For duplex copying from the facing pages
of a book or two sheet originals (A4 size only) placed on the glass.
Notes: • This copying mode requires the optional automatic duplexer to be installed.
• Duplex copying can be made in the plain paper (64~90g/m
Originals Duplexed copy
When Using the Reversing Automatic Document Feeder
Press the 1→1 key on the Basic menu.
2
) mode only.
1
USING THE
EDITING
FUNCTIONS
Press the 1→2 key to select the function
of single-sided originals to double-sided
2
copies.
73
Page 78

7. DUPLEXED COPYING (Cont.)
Press the EVEN or ODD key according
to the number of originals.
3
When you do not know the number of originals,
set them on the reversing automatic document
feeder and press the Original Count key. The
number of originals will be automatically
counted. When the copier has finished counting
the originals, press the SET key.
Select the desired copy size, image density
level, reproduction ratio, copy quantity,
4
etc. if necessary.
● The maximum number of copies is as
shown below.
80g/m2: 50 (all sizes)
2
90g/m
Place the originals.
● See page 22 for how to set the originals.
5
: 40 (all sizes)
Note: Remove any paper clips or staples from
originals before placing them on the
original feed tray.
● When originals are placed to be fed from
the top (or bottom) as shown on the right,
invert the odd-numbered and evennumbered originals relative to each other
as shown before setting them.
Press the START key.
6
T
B
4
T
3
2B
T
1B
B
T
5
T
B
74
Page 79

When Placing the Original on the Glass
Press the 1→1 key on the Basic menu.
1
Press the 1→2 key to select the function
of single-sided originals to double-sided
2
copies.
Press the EVEN or ODD key according
to the number of originals.
3
Tip: The original counting function is not
available when the originals are placed
on the glass.
Select the desired copy size, image density
level, reproduction ratio, copy quantity,
4
etc. if necessary.
● The maximum number of copies is as
shown below.
80g/m2: 50 (all sizes)
2
90g/m
: 40 (all sizes)
USING THE
EDITING
FUNCTIONS
75
Page 80

7. DUPLEX COPYING (Cont.)
Place the last page of the originals (first
side).
5
● Lifting the original cover or the reversing
automatic document feeder, place the original
on the glass
toward you and with its top left aligned against
the original scale on the left side.
● Copying with the last page first causes the
copies made to be arranged in the correct
page order.
● Close the original cover or the reversing
automatic document feeder slowly.
Press the START key.
face down and with its bottom
6
Place the next original (second side).
● When the first-side original was placed
7
8
9
vertically, the second-side original should be
placed in the same direction.
● When the first-side original was placed
horizontally, the second-side original should
be placed horizontally but in the opposite
direction.
Press the START key.
● The same operation is available if you press
the START key after having pressed the YES
key.
Repeat step 5 to 8 until all the originals are
copied.
Vertical placement
(First side) (Second side)
Horizontal placement
(First side) (Second side)
76
Press the FINISHED key after all the
originals have finished being copied.
10
Page 81

2
Duplexed Copies from Two-sided Originals
Notes: • This copying mode requires the optional automatic duplexer to be installed.
Notes: • Duplex copying can be made in the plain paper (64~90g/m
Original Duplexed copy
Press the 1→1 key on the Basic menu.
2
) mode only.
1
Press the 2→2 key.
2
Select the desired copy size, reproduction
ratio, image density level, copy quantity,
3
etc. if necessary.
● The maximum number of copies is as
shown below.
80g/m2: 50 (all sizes)
2
90g/m
: 40 (all sizes)
USING THE
EDITING
FUNCTIONS
When Using the Reversing Automatic Document Feeder
Place the originals.
● See page 22 for how to set the originals.
4
Press the START key.
●
5
The copier feeds one of the originals and copies
the first side of the original onto a sheet.
The original and the sheet are then turned over
automatically and the second side of the original
is copied onto the other side of the sheet.
When Placing the Original on the Glass
Perform step 5 to 10 on page 76.
4
77
Page 82

7. DUPLEX COPYING (Cont.)
3
Single-sided Copies from Two-sided Originals
Press the 1→1 key on the Basic menu.
1
CopyCopyOriginal
Press the 2→1 key.
2
Select the desired copy size, reproduction
ratio, image density level, copy quantity,
3
etc. if necessary.
● The maximum number of copies is as shown
below.
080g/m2 : 50 (all sizes)
090g/m
When Using the Reversing Automatic Document Feeder
Place the originals.
● See page 22 for how to set the originals.
2
: 40 (all sizes)
4
Press the START key.
● Single-sided copies are output from the copier.
5
When Placing the Original on the Glass
78
Perform step 5 to 10 on page 76.
4
Page 83

4
Duplexed Copies from Book Originals
The copies made will be arranged in the same page order as the book.
Notes: • This copying mode requires the optional automatic duplexer to be installed.
Notes: • Duplex copying can be made in the plain paper (64~90g/m
13
12 15
2
) mode only.
USING THE
EDITING
FUNCTIONS
12 13 15
79
Page 84

7. DUPLEX COPYING (Cont.)
Press the 1→1 key on the Basic menu.
1
Press the BOOK→2 key.
2
Select the start and end page.
● Press the desired key.
3
● RIGHT→RIGHT Copying is started from a
right page of the book and it
ends on a right page.
● RIGHT→LEFT Copying is started from a
right page of the book and it
ends on a left page.
● LEFT→LEFT Copying is started from a left
page of the book and it ends
on a left page.
● LEFT→RIGHT Copying is started from a left
page of the book and it ends
on a right page.
Select the copy size.
● Press the A4 COPY-SIZE key.
4
80
Page 85

Select IMAGE SHIFT if necessary.
● See page 62.
5
Select the desired image density level,
reproduction ratio, copy quantity, etc. if
6
necessary.
● The maximum number of copies is as
shown below.
80g/m2: 50 (all sizes)
2
90g/m
Place the original and press the START key.
● The book should be centred on the yellow
7
8
indicator line with its bottom toward you.
● Copying with the last page first causes the
copies made to be arranged in the correct
page order.
Set the next original.
● Turn over the leaf of the book and set it in
the same way as previously.
: 40 (all sizes)
Yellow
indicator line
USING THE
EDITING
FUNCTIONS
Press the START key.
● Pressing the YES key on the display on the
9
10
11
right also continues copying.
Repeat steps 8 and 9 until you finish copying
the book.
Press the FINISHED key after all the
originals have finished being copied.
Press the COPY FINAL PAGE key if the
last original has only one page.
81
Page 86

8. X-Y ZOOM
This function allows you to make copies of originals with the reproduction ratio of the X and
Y directions changed.
100%
100%
Procedure
Press the EDIT key to enter the Editing
menu, then press the Next key.
1
Press the XY ZOOM key.
2
When the Y zoom ratio
is changed (200%)
When the X zoom ratio
is changed (200%)
200%
200%
82
Specify the X and Y reproduction ratios.
● Press the 25%< or >400% key on the display
3
to select the X reproduction ratio, and press
the upper SET key.
● Select the Y reproduction ratio in the same
way.
Press the lower SET key.
4
Select the desired copy size, image density
level, copy quantity, etc. if necessary.
5
Place the original(s) on the original feed
tray or on the glass and press the START
6
key.
● See page 22 for how to set the originals.
Page 87

9. TRIMMING/MASKING
This function allows you to trim or mask copies.
You can trim originals (extracting inside area only) by selecting the trimming mode, and you
can mask originals (hiding inside area) by selecting the masking mode. You can specify areas
by placing originals on the glass.
* You can specify only one rectangular place on a single original.
* Only the standard size originals are available for this mode.
Original
Trimmed copy
Masked copy
USING THE
EDITING
FUNCTIONS
83
Page 88

9. TRIMMING/MASKING (Cont.)
Specifying an area
X2
Place the original face up on the glass with
its bottom edge towards you and its top
1
left aligned against the top left of the glass.
Align the original with the original scale
on the left.
Y1
Y2
Original scale
X1
Rear scale
84
Page 89

Using the original scale and the rear scale,
specify the values defining the desired area
2
as follows:
● X1 • • Distance from the original scale to the
left edge of the specified area
● X2 • • Distance from the original scale to the
right edge of the specified area
● Y1 • • Distance from the rear scale to the
upper edge of the specified area
● Y2 • • Distance from the rear scale to the
lower edge of the specified area
Specify the area of the original.
(To display the screen on the right, follow steps
3
1-3 in the "Procedure" below.)
● Key in the value X1 using the digital keys and
press the upper SET key. If you key in a
wrong value, press the RESET key.
● Values X2, Y1 and Y2 require the same
procedure as X1.
Press the lower SET key.
4
USING THE
EDITING
FUNCTIONS
Procedure
Press the EDIT key to enter the Editing
menu, and then press the Next key.
1
Press the EDITING key.
2
Press the TRIM or MASK key.
3
Place the original face up on the glass with
its bottom edge towards you and its top
4
left aligned against the top left of the glass.
Tip: Only the standard size originals are
available for this mode.
85
Page 90

9. TRIMMING/MASKING (Cont.)
Following the method of specifying areas
on page 84, key in the size of the area to
5
be trimmed or masked with the digital
keys, then press the SET key.
Place the original on the glass face down
with its bottom toward you and with its
6
top left aligned against the original scale
on the left side.
Select the desired copy size, image density
level, copy quantity, etc. if necessary.
7
Tips:
● If the setting of original size and copy size
is not appropriate, the image may not be
copied completely.
● In bypass copying, the copy size must be
specified.
86
Press the START key.
Trimmed or masked copies exit from the copier.
8
Page 91

10. MIRROR IMAGE
This function allows you to make mirror-imaged copies of the entire original.
Example of mirror image
Procedure
Press the EDIT key to enter the Editing
menu, and then press the Next key.
1
Press the EDITING key.
2
Press the MIRROR key.
3
Select the desired copy size, image density
level, reproduction ratio, copy quantity,
4
etc. if necessary.
Place the original(s) on the original feed
tray or on the glass and press the START
5
key.
● See page 22 for how to set the originals.
USING THE
EDITING
FUNCTIONS
87
Page 92

11. NEGATIVE/POSITIVE REVERSAL
In the full colour mode, this function allows you to reverse both hue and shading of the entire
original when making copies. In the black mode or monocolour mode, only the shading of
the entire original is reversed.
Original
Procedure
Press the EDIT key to enter the Editing
menu, and press the Next key.
1
Press the EDITING key.
2
Copy
88
Press the NEG/POS key.
3
Select the desired copy size, image density
level, reproduction ratio, copy quantity,
4
etc. if necessary.
Place the original(s) on the original feed
tray or on the glass.
5
● See page 22 for how to set the originals.
Press the START key.
6
Page 93

12. CENTRING
This function allows you to trim all of or a part of the original and print it out in the centre
of a copy sheet.
* This mode is available only for the standard size originals.
Procedure
Press the EDIT key to enter the Edit menu,
then press the Next key.
1
Press the CENTRING key.
2
Press the ALL or PART key to select the
area for centring.
3
USING THE
EDITING
FUNCTIONS
89
Page 94

12. CENTRING (Cont.)
When Centring the Entire Image of an Original
Place the original on the glass face down
with its bottom toward you and with its
4
top left aligned against the original scale
on the left side.
Press the BASIC key to return to the Basic
menu, then select the desired copy size,
5
image density level, copy quantity, etc. if
necessary.
Tip: If the setting of original size and copy size
is not appropriate, the image may not be
copied completely.
Press the START key.
6
When Centring a Part of an Original
Place the original on the glass face up with
its bottom toward you and with its top left
4
aligned against the original scale on the
left side.
Following the "Specifying an area" on page
84, key in the size of the area to be centred
5
with the digital keys, then press the SET
key.
Place the original on the glass face down
and with its bottom toward you and with
6
its top left aligned against the original
scale on the left side.
Select the desired copy size, image density
level, copy quantity, etc. if necessary.
7
Tip: If the setting of original size and copy size
is not appropriate, the image may not be
copied completely.
90
Press the START key.
8
Page 95

13. IMAGE REPEAT
This function allows you to repeat the entire original or a part of the area of the original on
the copy.
* This mode is available only for the standard size originals.
Example of mirror image
Standard size
The non-standard size original
can be copied if it is placed on
the standard size original and its
area is specified.
Non-standard size
Procedure
Press the EDIT key to enter the Edit menu,
and then press the Next key.
1
● The display on the right appears.
Press the IMAGE REPEAT key.
2
USING THE
EDITING
FUNCTIONS
91
Page 96

13. IMAGE REPEAT
Place the original on the glass face up with
its bottom toward you and with its top left
3
aligned against the original scale on the
left side.
Following the “Specifying an Area” on page
84, key in the values of the area to be
4
repeated (X1, X2, Y1 and Y2) with the
digital keys and press the lower SET key.
● If the entire original will be repeated:
X1=0(mm), Y1=0(mm)
X2, Y2=arbitrary
Place the original on the glass face down
with its bottom toward you and with its
5
top left aligned against the original scale
on the left side.
Set the repeat number.
● To change the repeat number:
6
Press the 2 or 8 key to select the desired
repeat number, and press the SET key.
(Cont.)
Tip: If the repeat number is not set, the copier
automatically repeats the original once.
Only the length direction is available for
repeat copying, and the original can be
repeated up to 8 times.
Select the desired copy size, image density
level, copy quantity, etc. if necessary.
7
Press the START key.
Tip: If the setting of the paper size or the
8
repeat number is not made appropriately,
the image may not be copied completely.
92
Page 97

5. USING THE SPECIAL FUNCTIONS
1.Automatic Calibration . . . . . . . . . . . . . . . . . . . . 94
2.Setting the Date and Time . . . . . . . . . . . . . . . . 97
3.Weekly Timer . . . . . . . . . . . . . . . . . . . . . . . . . . 99
4.Mode Memory . . . . . . . . . . . . . . . . . . . . . . . . . 101
5.Copying Using Paper of Universal Sizes . . . 103
6.Access Codes (ID Numbers) . . . . . . . . . . . . . 107
7.Total Counter . . . . . . . . . . . . . . . . . . . . . . . . . 108
8.Department Management . . . . . . . . . . . . . . . . 109
9.Key Copy Counter . . . . . . . . . . . . . . . . . . . . . 117
10. Change of Language on the Display Panel . 118
11. User Selection (Initial Settings) . . . . . . . . . . . 119
USING THE
SPECIAL
FUNCTIONS
93
Page 98

1. AUTOMATIC CALIBRATION
This function allows the copier to automatically calibrate the colour gradation when the colour
cannot be adjusted well because the shading or the hue of the image has deviated.
• Set the A3-sized paper in the cassette before starting the calibration.
• Be sure to use the paper recommended by Toshiba. If any other paper is used, the calibration
may not be performed properly.
• If the colour often deviates, call your service technician.
Press the PROGRAM key to enter the
Programme menu.
1
Press the Next key, then press the
CALIBRATION key.
2
Enter the password (4 digits) of your
administrator (key operator), then press
3
the SET key.
Tip: If you do not need the user control by the
password of the administrator, tell your
service technician.
Press the CALIBRATION key.
● The following message appears:
4
WAIT
Wait for a few seconds.
94
Page 99

Press the TEST PRINT key to print out the
chart for calibration.
5
Press the CALIBRATION key after the
chart has been output.
6
When the display on the right appears, set
the chart face down on the glass and with
7
its bottom toward you and its top left
aligned against the original scale on the
left side, in order that the black line comes
to the left side.
Press the START key to start the first
calibration.
8
● If the chart is not properly set, the following
message appears:
Set chart correctly
Repeat the calibration in step 6.
Notes:
● If the glass is dirty or any foreign objects are
stuck to the glass, calibration may not be
operated properly. Keep the glass clean.
● Interrupt copying is not available during
calibration.
USING THE
SPECIAL
FUNCTIONS
95
Page 100

1.
AUTOMATIC CALIBRATION (Cont.
When the message “Scanning and
calibrating” disappears, press the TEST
9
PRINT key to print out the second test
chart.
Press the CALIBRATION key, then set the
printed out chart on the glass in the same
10
way as the first calibration.
Press the START key to start the second
calibration.
11
When the message “Scanning and
calibrating” goes out, all the operation is
12
completed.
)
Tip: If you want to return the image quality
level to the default setting after the
calibration, press the DEFAULT key in
step 4.
96
 Loading...