

Page 1
TEC Bar Code Printer
Table of Contents
B-442
Owner's Manual
Page 2

LIST OF STANDARDS OF CONFORMITY
(EU ONLY)
Manufacturer : Toshoba TEC Corporation
Address : 570 Ohito, Ohito-Cho, Tagata-Gun, Shizuoka-Ken,
410-2392 Japan
declares that following product
Product Name : Bar Code Printer
Model : B-442-QP
Options : All
conforms to the following product specifications
Generic Standard : EN50 082-1
Safety : EN 60 950
EMC : EN 55 022
IEC 801-2
IEC 801-3
IEC 801-4
Harmonics : EN 61000-3-2
EN 61000-3-3
Supplementary Information
The product herewith complies with the requirements of the Low Voltage Directive 73/23/EEC,
and the EMC directive 89/336/EEC.
Page 3

Safety Summary
Safety Summary
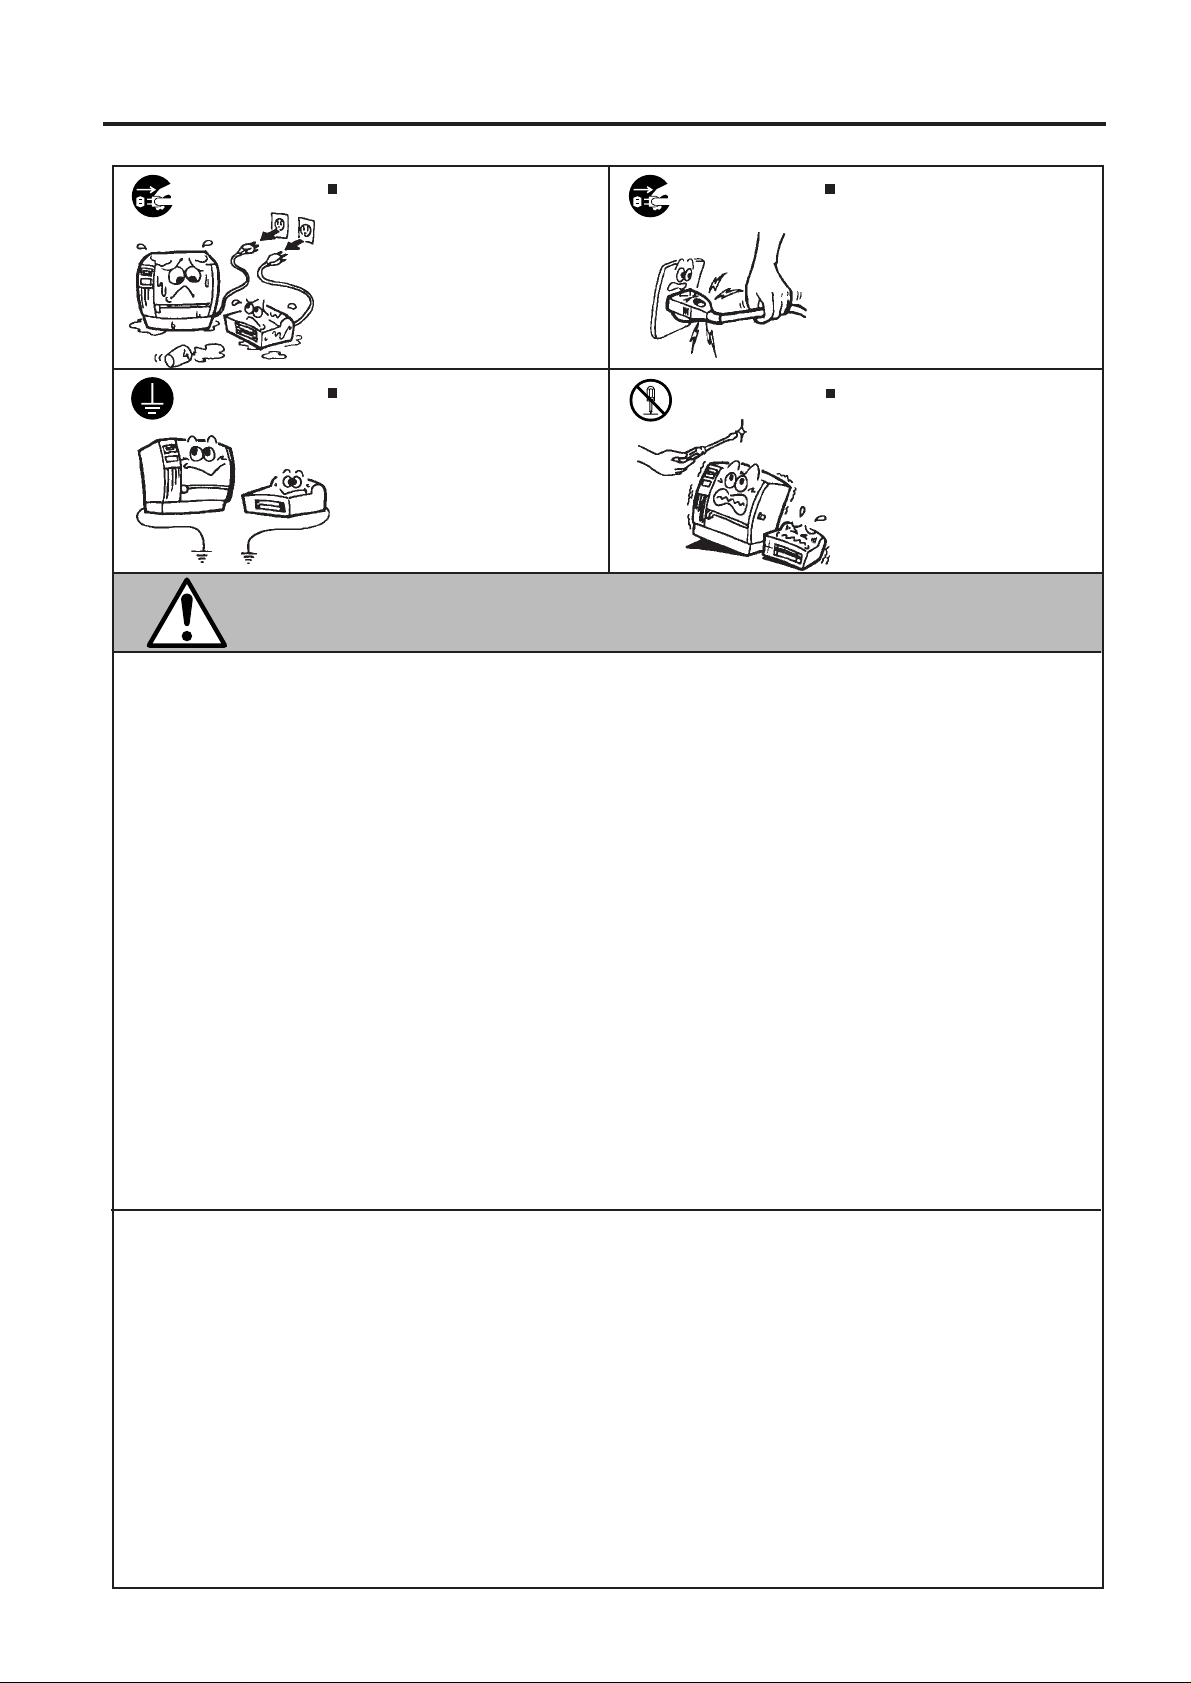
Personal safety in handling or maintaining the equipment is extremely important. Warnings and Cautions
necessary for safe handling are included in this manual. All warnings and cautions contained in this
manual should be read and understood before handling or maintaining the equipment.
Do not attempt to effect repairs or modifications to this equipment. If a fault occurs that cannot be rectified
using the procedures described in this manual, turn off the power, unplug the machine, then contact your
authorized TEC representative for assistance.
Meanings of Each Symbol
This symbol indicates warning items (including cautions).
Specific warning contents are drawn inside the symbol.
(The symbol on the left indicates a general caution.)
This symbol indicates prohibited actions (prohibited items).
Specific prohibited contents are drawn inside or near the symbol.
(The symbol on the left indicates “no disassembling”.)
This symbol indicates actions which must be performed.
Specific instructions are drawn inside or near the symbol.
(The symbol on the left indicates “disconnect the power cord plug from the outlet”.)
EM1-33046A
WARNING
Any other than the
specified AC voltage
is prohibited.
Prohibited
Prohibited
Do not use voltages other than the
voltage (AC) specified on the rating
plate, as this may cause fire or
electric shock.
If the machines share the same
outlet with any other electrical
appliances which consume large
amounts of power, the voltage will
fluctuate widely each time these
appliances operate. Be sure to
provide an exclusive outlet for the
machine as this may cause the
machines to malfunction.
Do not insert or drop metal,
flammable or other foreign objects into
the machines through the ventilation
slits, as this may cause fire or electric
shock.
This indicates that there is the risk of death or serious injury if the
machines are improperly handled contrary to this indication.
Prohibited
Prohibited
Prohibited
Do not plug in or unplug the power
cord plug with wet hands as this may
cause electric shock.
Do not place metal objects or
water-filled containers such as flower
vases, flower pots or mugs, etc. on
top of the machines. If metal objects
or spilled liquid enter the machines,
this may cause fire or electric
shock.
Do not scratch, damage or modify
the power cords. Also, do not place
heavy objects on, pull on, or excessively bend the cords, as this may
cause fire or electrical shock.
Disconnect
the plug.
If the machines are dropped or their
cabinets damaged, first turn off the
power switches and disconnect the
power cord plugs from the outlet, and
then contact your authorized TEC
representative for assistance.
Continued use of the machine in that
condition may cause fire or electric
shock.
(i)
Disconnect
the plug.
Continued use of the machines in an
abnormal condition such as when the
machines are producing smoke or
strange smells may cause fire or elec-
tric shock. In these cases, immediately turn off the power switches and
disconnect the power cord plugs from
the outlet. Then, contact your authorized TEC representative for assistance.
Page 4
Safety Summary
EM1-33046A
Disconnect
the plug.
Connect a
grounding
wire.
If foreign objects (metal fragments,
water, liquids) enter the machines,
first turn off the power switches and
disconnect the power cord plugs from
the outlet, and then contact your
authorized TEC representative for
assistance. Continued use of the
machine in that condition may cause
fire or electric shock.
Ensure that the equipment is
properly grounded. Extension cables
should also be grounded. Fire or
electric shock could occur on
improperly grounded equipment.
Disconnect
the plug.
No disassembling.
When unplugging the power cords,
be sure to hold and pull on the plug
portion. Pulling on the cord portion
may cut or expose the internal wires
and cause fire or electric shock.
Do not remove covers, repair or
modify the machine by yourself. You
may be injured by high voltage, very
hot parts or sharp edges inside the
machine.
This indicates that there is the risk of personal Injury or damage to
CAUTION
objects if the machines are improperly handled contrary to this indication.
Precautions
The following precautions will help to ensure that this machine will continue to function correctly.
• Try to avoid locations that have the following adverse conditions:
* Temperatures below 0°C and above 40°C * Direct sunlight
* Shared power source * Excessive vibration
• The cover should be cleaned by wiping with a dry cloth or a cloth slightly dampened with a mild
detergent solution. NEVER USE THINNER OR ANY OTHER VOLATILE SOLVENT on the plastic
covers.
• USE ONLY TEC SPECIFIED paper and ribbons.
• DO NOT STORE the paper or ribbons where they might be exposed to direct sunlight, high temperatures, high humidity, dust, or gas.
• Ensure the printer is operated on a level surface.
• Any data stored in the memory of the printer could be lost during a printer fault.
• Try to avoid using this equipment on the same power supply as high voltage equipment or equipment likely to cause mains interference.
• Unplug the machine whenever you are working inside it or cleaning it.
• Keep your work environment static free.
• Do not place heavy objects on top of the machines, as these items may become unbalanced and fall
causing injury.
• Do not block the ventilation slits of the machines, as this will cause heat to build up inside the
machines and may cause fire.
• Do not lean against the machine. It may fall on you and could cause injury.
Request Regarding Maintenance
• Utilize our maintenance services.
After purchasing the machine, contact your authorized TEC representative for assistance once a
year to have the inside of the machine cleaned. Otherwise, dust will build up inside the machines
and may cause a fire or a malfunction. Cleaning is particularly effective before humid rainy seasons.
• Our preventive maintenance service performs the periodic checks and other work required to
maintain the quality and performance of the machines, preventing accidents beforehand.
For details, please consult your authorized TEC representative for assistance.
• Using insecticides and other chemicals
(ii)
Page 5

EM1-33046A
TABLE OF CONTENTS
Page
1. INTRODUCTION ................................................................................................ 1- 1
1.1 APPLICABLE MODEL............................................................................... 1-6
1.2 UNPACKING AND INSPECTION.............................................................. 1-6
1.3 EQUIPMENT CHECKLIST........................................................................ 1-6
2. SPECIFICATIONS............................................................................................... 2-1
2.1 PRINTER................................................................................................... 2-1
2.2 OPTIONS .................................................................................................. 2-2
2.3 MEDIA ....................................................................................................... 2-3
2.4 RIBBON..................................................................................................... 2-4
2.5 CARE/HANDLING OF THE MEDIA AND RIBBON ................................... 2-5
3. OVERVIEW ......................................................................................................... 3-1
3.1 PRINTER PARTS...................................................................................... 3-1
3.2 EXTERNAL LABEL ROLL MOUNT........................................................... 3-3
3.3 SWITCHES AND INDICATOR LIGHTS .................................................... 3-4
4. DIP SWITCH FUNCTIONS.................................................................................. 4-1
5. SET UP PROCEDURE........................................................................................ 5-1
5.1 REQUIREMENTS FOR OPERATION....................................................... 5-1
5.2 SETTING UP THE PRINTER .................................................................... 5-1
6. LOADING LABEL AND TAG STOCK .................................................................. 6-1
7. SELF-PEELING FUNCTION ............................................................................... 7-1
8. RIBBON LOADING INSTRUCTIONS.................................................................. 8-1
9. INSTALL EXTERNAL LABEL ROLL MOUNT ..................................................... 9-1
10. INSTALL MEMORY MODULE........................................................................... 10-1
11. SELF TEST........................................................................................................ 11-1
12. DUMP MODE .................................................................................................... 12-1
13. GENERAL MAINTENANCE .............................................................................. 13-1
13.1 CLEANING .............................................................................................. 13-1
13.2 COVERS AND PANELS ......................................................................... 13-2
13.3 REMOVING JAMMED MEDIA ................................................................ 13-2
13.4 DENSITY ADJUSTMENT.........................................................................13-2
14. TROUBLESHOOTING....................................................................................... 14-1
15. ERROR MESSAGES......................................................................................... 15-1
16. HOW TO CONNECT THE PRINTER WITH PORTABLE LCD KEYBOARD..... 16-1
CAUTION:
1. This manual may not be copied in whole or in part without prior written permission of TEC.
2. The contents of this manual may be changed without notification.
3. Please refer to your local Authorized Service representative with regard to any queries
you may have in this manual.
Copyright © 1999
by TOSHIBA TEC CORPORATION
All Rights Reserved
570 Ohito, Ohito-cho, Tagata-gun, Shizuoka-ken, Japan
Page 6

1. INTRODUCTION
EM1-33046A
1. INTRODUCTION
1. INTRODUCTION
Thank you very much for purchasing the TEC B-442 Bar Code Printer. The attractive desktop printer
delivers superior performance at an economical price. Both powerful and easy-to-use, the B-442 printer
is your best choice among industrial direct thermal and thermal transfer label printers.
The B-442 offers both high-resolution thermal transfer and direct thermal printing at selectable speeds
of 1.5 inches and 2 inches per second. It can accept a wide range of media, including roll feed, die-cut,
and fan-fold labels, tags or tickets for both thermal transfer and direct thermal printing. All of the most
frequently used bar code formats are resident in this printer’s memory and can be printed with human
readable bar code interpretations. Character fonts and bar codes can be printed in any one of four
directions. The B-442 provides a choice of five different alphanumeric fonts in variable sizes; by using
font multiplication, an even greater range of sizes is possible. Smooth fonts can be downloaded from
the user-friendly, Windows "Free Label Software".
In addition, the B-442 is capable of independently executing Basic programming functions, including
arithmetic, logical operation, loop, flow-control and file management, among others. This programming
capability provides the greatest efficiency in label printing. This printer also completes its own Self Test,
insuring superior performance at all times. The status of printer and error messages may either be printed
out or viewed on a monitor by means of an RS-232 connection.
Features
• Thermal transfer and direct thermal printing
• High dot density printing (203 dots/inch, 8 dots/mm)
• Selectable print speed of 1.5 inches or 2 inches per second
• Large maximum media width size: 4.53 inches (115 mm)
• International character sets
• Print area is 4.09 inches wide x 4.56 inches long (104 mm x 116 mm). Longer media formats up
to 23.19 inches long (589 mm) may be printed with optional memory module.
• User selectable bar code ratios and heights
• Printing on label, tags or ticket stock
• Black mark sensor (option)
• Self-peeling mode
• Label stock and thermal transfer ribbon easy to load
• Internal label print counter
• Self Test
• Protocol-XON/XOFF; CTS/DTR handshaking
• Downloadable soft fonts from the Windows label and tag design "Free Label Software"
This manual contains general set-up and maintenance information and should be read carefully to help
gain maximum performance and life from your printer. For most queries please refer to this manual and
keep it safe for future reference.
1-1
Page 7

1. INTRODUCTION
1. INTRODUCTION
This equipment has been tested and found to comply with the limits for a Class A digital device,
pursuant to Part 15 of the FCC Rules. These limits are designed to provide reasonable protection
against harmful interference when the equipment is operated in a commercial environment. This
equipment generates, uses, and can radiate radio frequency energy and, if not installed and used in
accordance with the instruction manual, may cause harmful interference to radio communications.
Operations of this equipment in a residential area is likely to cause harmful interference in which case
the user will be required to correct the interference at his own expense. (for USA only)
Changes or modifications not expressly approved by manufacturer for compliance could void the
user's authority to operate the equipment.
"This Class A digital apparatus meets all requirements of the Canadian Interference-Causing
Equipment Regulations."
"Cet appareil numérique de la classe A respecte toutes les exigences du Règlement sur le matériel
brouilleur de Canada."
(for CANADA only)
EM1-33046A
WARNING!
This is a Class A product. In a domestic environment this product may cause radio interference in
which case the user may be required to take adequate measures.
WARNING!
Battery may explode if mistreated. Do not recharge, disassemble or dispose of in fire.
CAUTION:
Do not touch moving parts. To reduce the risk that fingers, jewelry, clothing. etc., be drawn into the
moving parts, push the switch in the "OFF" position to stop movement.
Safety Summary
Personal safety in handling or maintaining the equipment is extremely important. Warnings and
Cautions necessary for safe handling are included in this manual. All warnings and cautions
contained in this manual and written inside or outside of the printer should be read and understood
before handling or maintaining the equipment.
Do not attempt to effect repairs to this equipment. If a fault occurs that cannot be rectified using the
procedures described in this manual, turn off the power, unplug the machine, then contact your
authorised TEC representative for assistance.
1-2
Page 8

1. INTRDUCTION
1.1 APPLICABLE MODEL
EM1-33046A
1.1 APPLICABLE MODEL
B - 4 4 2 - Q Q
Destination Code
QQ: North America
QP: Europe
GH12-GB: UK
Thermal direct/Thermal transfer
1.2 UNPACKING AND INSPECTION
After receiving your B-442 Bar Code Printer, carefully inspect the device and its accessories. The B-442
is specially packaged to withstand damage in shipping. If damage is evident, a damage claim should
be filed immediately with the transportation company. Please save the printer packaging materials in
case you need to reship the printer in the future.
1.3 EQUIPMENT CHECKLIST
• B-442 Bar Code Printer unit
• Ribbon supply/rewind spindle (2 pcs.)
• Ribbon paper core
• Ribbon rewind spindle
• Label supply roll spindle
• External label roll mount
• Power cord
• AC adapter
• RS232C Interface cable
• "Free Label" Software
• "Window Driver" Software
If any parts are missing, contact your TEC representative for assistance.
1-6
Page 9

2. SPECIFICATIONS
2. SPECIFICATIONS
2.1 PRINTER
2.1.1 Printer Block
Type: Direct thermal or thermal transfer
Print Speed: 1.5 inches or 2.0 inches per second
Resolution: 203 dots per inch (8 dots per mm)
Font Styles: Five alphanumeric fonts from 0.059 inches H (1.5 mm) to 0.23 inches (6.0 mm),
expandable vertically and horizontally up to 8 times.
Bar Codes: Code 39, Code 93, Code 128 UCC, Code 128 (Subsets A, B and C), Codabar,
Interleaved 2 of 5, EAN-8, EAN-13, UPC-A, UPC-E, EAN and UPC with 2 or 5
digit add-on, Postnet and Chinese Post Code
2D Codes: Maxi Code, PDF-417
* PDF417 is a trademark of Symbol Technologies, Inc.
EM1-33046A
2.1 PRINTER
2.1.2 Media
Width: 0.98 inches (25 mm) to 4.53 inches (115 mm)
Length: 0.47 inches (12 mm) to 10.75 inches (273 mm)
NOTE:
• Use Windows font in " Free label"
• Download logo, font, program into the printer memory.
Thickness: Thermal Label............ 0.003 inches (0.08 mm) to 0.018 inches (0.46 mm)
Type: Roll-feed, die-cut or fan-fold labels, tags or tickets
Supply Roll Capacity:
Thermal Transfer Ribbon: Black, 300 m long
In below case, effective print length may become shorter than 273 mm.
Tag Paper, Ticket....... 0.006 inches (0.16 mm) to 0.013 inches (0.32 mm)
4.3 inches (110 mm) maximum diameter on a 1 inches (25.4 mm) core. External
roll mount will accommodate larger rolls up to a maximum diameter of 8.4 inches
(214 mm) on a 1 inches (25.4 mm) core or 6.4 inches (163 mm) on a 3 inches
(76.2 mm) core
2.1.3. Indicators and Switches
Indicator Lights: Power, On-line, Error
Switches: Power, Pause, Feed, Rear Dip Switch (Thermal Transfer/Direct Thermal Printing
Switch, Black Mark/Gap Sensing Switch, Communication setting)
NOTE: The functions of Pause, Feed switches and LED indicator lights may be redefined by
command.
2-1
Page 10

2. SPECIFICATIONS
2.1.4 Communications Interface
Communications: RS-232C (DB-9) at 2400, 4800, 9600 or 19200 baud
Character Set: ANSI ASCII character set
Word Length: 7 or 8 data bits, 1 or 2 stop bits, selectable parity
Handshaking: XON/XOFF (on receive mode only) and CTS/DTR
Input Buffer: 2 K bytes
2.1.5 Electrical Parts
Input voltage: Switching power, 100~240 VAC ±10%, single phase 50/60 Hz
Circuit Protection: 2A maximum
Grounding: Unit must be connected to a properly grounded receptacle
2.1.6 Environment
EM1-33046A
2.2 OPTIONS
Operating Temperature: 5°C to 40°C
Storage Temperature:-10°C to 60°C
( )
Humidity: 25% to 85%
2.1.7 Body
Size: 6.14 inches H x 9.13 inches W x 11.73 inches D (15.6 cm H x 23.2 cm W x 29.8 cm D);
with external roll mount 17.95 inches D (45.6 cm D)
Weight: 4.85 lb. (2.2 kg), and with external roll mount 5.38 lb. (2.45 kg)
2.2 OPTIONS
A number of different options may be added to the B-442 Bar Code Printer for even greater convenience
and versatility.
Option Name
Memory Module
Model No.
or Part No.
B-5704-EM-QM
Expandable RAM memory module
(384KB) with Date/Time clock.
Description
Source
See Note 1
Black Mark Sensor
NOTES: 1. Contact TEC H.Q. or your nearest TEC representative.
2. Order from TEC Parts Center.
Part No.
FMYH0013901
Attaching this sensor to the printer alls
a detection of black marks on media.
2-2
See Note 2
Page 11
2. SPECIFICATIONS
2.3 MEDIA
EM1-33046A
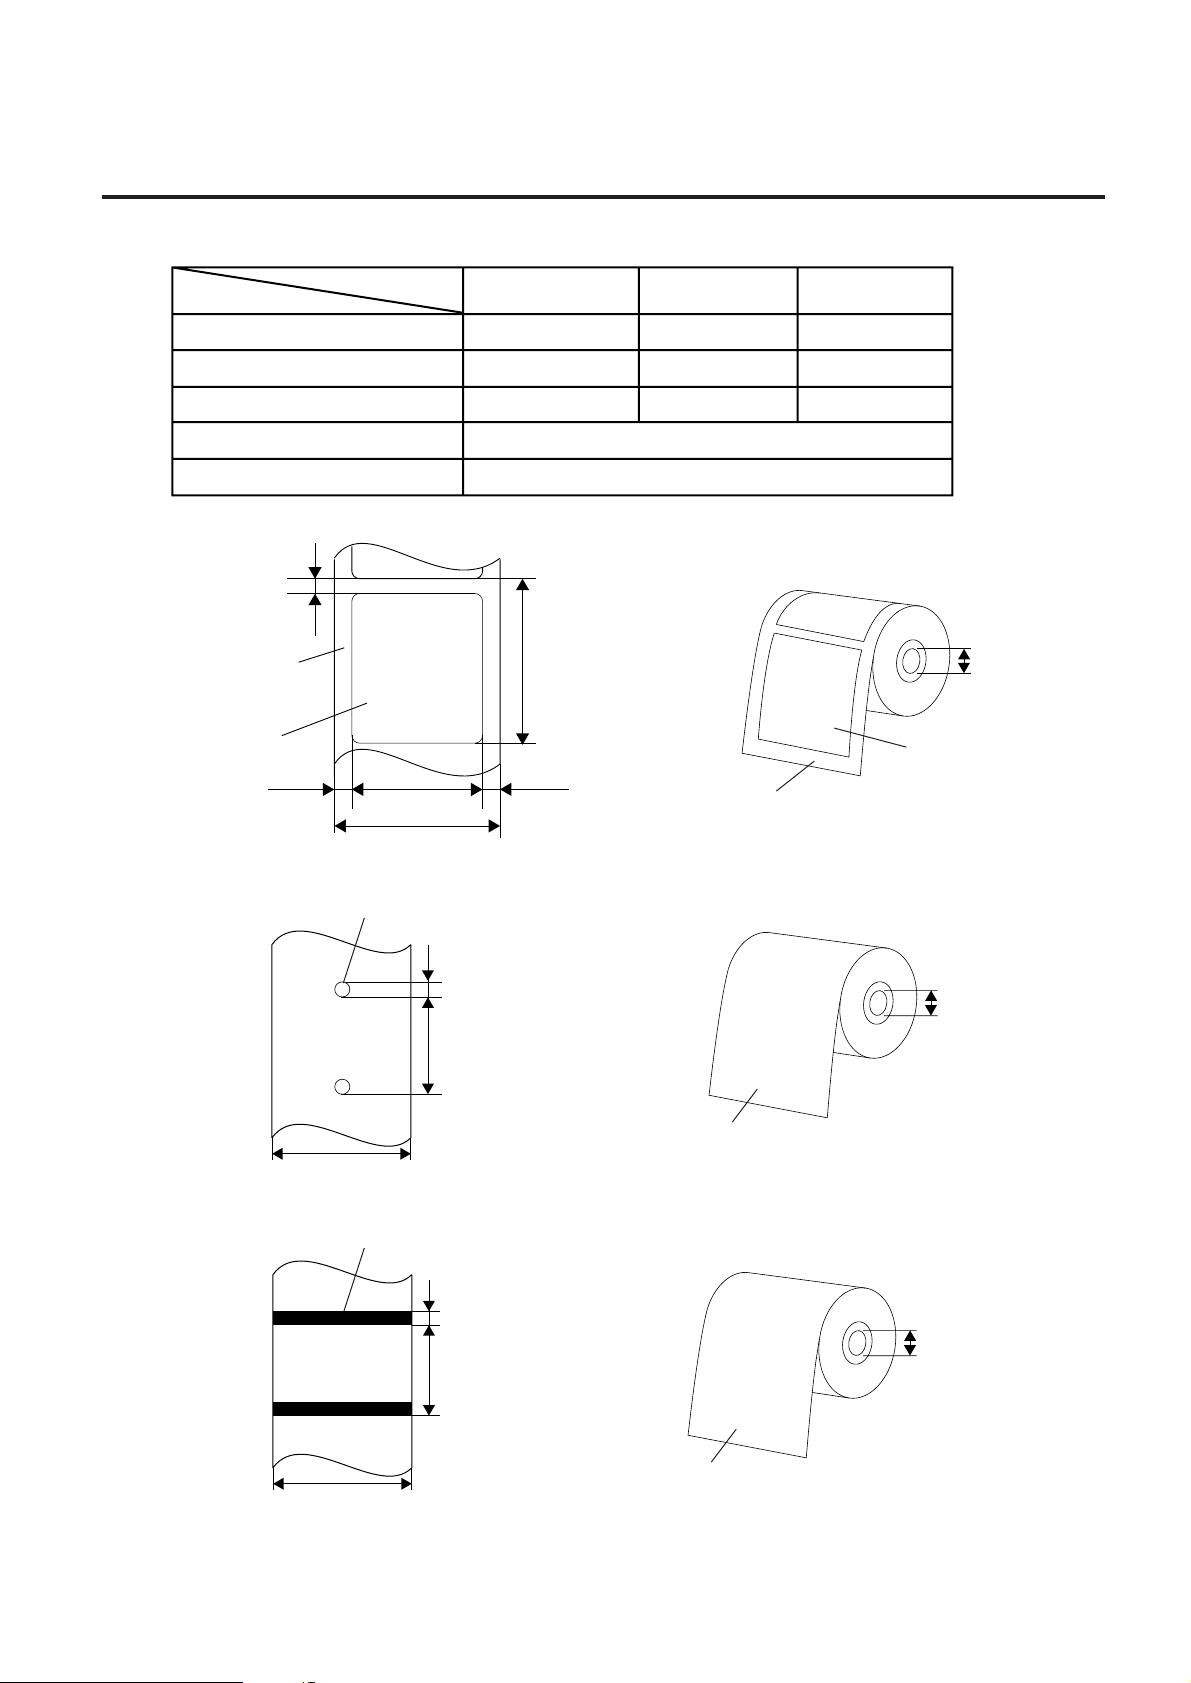
2.3 MEDIA
Item
Width (mm)
Length (mm)
Thickness (mm)
Inner roll diameter (mm)
External roll diameter (mm)
1) Thermal Label
2.5 mm ~ 5.0 mm
Backing
Paper
Label
1.0 mm
Fig. 2-1
2) Tag Paper
Type
23.0 mm~113.0 mm
25.0 mm~115.0 mm
Sensing Hole
Thermal Label Tag Paper
25.0 ~ 115.0
25.0 ~ 115.0
12.0 ~ 273.0 12.0 ~ 273.0
0.08 ~ 0.46
0.16 ~ 0.32
110.0 max.
214.0 max.
<Design>
12.0 mm ~ 273.0 mm
1.0 mm
BackingPaper
<Design>
Ticket
25.0 ~ 115.0
12.0 ~ 273.0
0.16 ~ 0.32
25.7 ± 0.3 mm
Label
Fig. 2-2
Fig. 2-3
3) Ticket
Fig. 2-5
25.0 mm~115.0 mm
Black Line
25.0 mm~115.0 mm
2.5 mm ~ 5.0 mm
12.0 mm ~ 273.0 mm
<Design>
3.0 mm ~ 30.0 mm
12.0 mm ~ 273.0mm
25.7 ± 0.3 mm
Fig. 2-4
Print Side
25.7 ± 0.3 mm
Fig. 2-6
Print Side
2-3
Page 12

2. SPECIFICATIONS
<Non Print Area>
Printing Area
1.0 mm 1.0 mm
Fig. 2-7
4) Relationship between the head effective print width and paper.
Head effective print width
EM1-33046A
2.4 RIBBON
1.0 mm
1.0 mm
2.4 RIBBON
No.
1
Shape
Width
2
Max. OD
3
Winding method
4
Item
104.0 mm
115.0 mm
(Maximum paper width)
Specification
Spool type
40 mm ~ 110.0 mm
Ø67 mm
The ink side is outside of ribbon winding.
2-4
Page 13

2. SPECIFICATIONS
EM1-33046A
2.5 CARE/HANDLING OF THE MEDIA AND RIBBON
<Core Shape>
25.7 ± 0.3 mm
Max. 105 ± 0.5 mm
NOTE: When purchasing ribbon locally, they must meet the above size. There may be TEC-approved
ribbons which do not fall within the above size, however, they have no functional problem.
Fig. 2-8
Base
Adhesive tape
End tape
(Non Transmissive)
Adhesive tape
Treated back side
Core
Ink outside
Adhesive tape
Leader tape
Core
Ink ribbon
Fig. 2-9 Connection between leader tape and ribbon
2.5 CARE/HANDLING OF THE MEDIA AND RIBBON
CAUTION:
Be sure to read carefully and understand the Supply Manual. Use only media and ribbon
which meet specified requirements. Use of non-specified media and ribbon may shorten the
head life and result in problems with bar code readability or print quality. All media and ribbon
should be handled with care to avoid any damage to the media, ribbon or printer. Read the
following guideline carefully.
• Do not store the media and ribbon for longer than the manufactures recommended shelf life.
• Store media rolls on the flat end, do not store them on the curved sides as this might flatten that side
causing erratic media advance and poor print quality.
• Store the media in plastic bags and always reseal after opening. Unprotected media can get dirty
and the extra abrasion from the dust and dirt particles will shorten the print head life.
• Store the media and ribbon in a cool, dry place. Avoid areas where they would be exposed to direct
sunlight, high temperature, high humidity, dust or gas.
• The thermal paper used for direct thermal printing must not have the specifications which exceed
+
Na
800 ppm, K+ 250 ppm and CL- 500 ppm.
• Some ink used on pre-printed labels may contain ingredients which shorten the print head’s product
life. Do not use labels pre-printed with ink which contain hard substances such as carbonic calcium
(CaCO
) and kaolin (Al2O3, 2SiO2, 2H2O).
3
For further information please contact your local distributor or your media and ribbon manufacturer.
2-5
Page 14

3. OVERVIEW
3. OVERVIEW
3.1 PRINTER PARTS
3
EM1-33046A
3.1 PRINTER PARTS
2
5
4
1
Fig. 3-1 Top Front View
1. Cover Release Button
2. Pause Switch
3. Power, On-line and Error Indicator Lights
4. Feed Switch
5. Clear Viewing Window
6. Label Dispense Opening
7. Backing Paper Opening (for use with Self Peel Function)
7
6
3-1
Page 15

3. OVERVIEW
EM1-33046A
3.1 PRINTER PARTS
3
2
5
4
6
1
10
9
11
12
8
4
7
13
Fig. 3-2 Interior View
1. Printer Cover (in open position) 7. Printer Carriage Release Lever
2. Label Supply Roll Spindle 8. Backing Paper Opening
3. Memory Module Insert Slot 9. Removable Front Panel
(cover on) 10. Pause Switch
4. Ribbon Mechanism 11. Power, On-line, Error Indicator Lights
5. Ribbon Supply Spindle 12. Feed Switch
6. Ribbon Rewind Spindle 13. Label Taken Sensor
1
2
Fig. 3-3 Rear View
1. Power On/Off Switch 4. 8 Position Dipswitch
2. Power Supply Connector 5. Label Insert Opening (for use with external labels)
3. RS-232 DB-9 Interface Connector 6. Cover Hinge
5
3
6
4
3-2
Page 16

3. OVERVIEW
3.2 EXTERNAL LABEL ROLL MOUNT
EM1-33046A
3.2 EXTERNAL LABEL ROLL MOUNT
Fig. 3-4 External Label Roll Mount
3-3
Page 17

3. OVERVIEW
3.3 SWITCHES AND INDICATOR LIGHTS
3.3 SWITCHES AND INDICATOR LIGHTS
• INDICATORS
PWR. (Power) Indicator
The green PWR. indicator light will illuminate when the Power Switch is turned on.
On-line Indicator
The green On-line indicator will be on when the printer is ready to print. When the Pause button is
pressed, the On-line light will flash.
ERR. (Error/Paper Empty) Indicator
The red ERR indicator light will illuminate at a printer error, such as memory error, command format
error, and so on. For a full list of error messages, consult Section 15. TROUBLESHOOTING. The
ERR. light flashes when the paper/ribbon has been used up.
• SWITCHES
Pause Switch
The Pause switch allows the user to stop a print job and then continue printing with a second
depression of the switch. By pressing the Pause switch: (1) the printer will stop printing after the label
being printed is complete, (2) the Pause light will flash, and (3) the printer will hold all data in memory.
This allows for trouble-free replacement of label stock and thermal transfer ribbon. A second
depression of the Pause switch will restart the printer.
If the Pause switch is held pressed for longer than 3 seconds, the printer will be reset and all
stored data of last printing job will be deleted.
EM1-33046A
Feed Switch
Pressing the Feed switch will cause the label paper to advance to the first print position of the next
label.
Thermal Transfer/Direct Thermal Printing Switch
Switch 7 on the dipswitch located on the rear of the printer allows the user to switch between thermal
transfer and direct thermal printing. For thermal transfer printing, set the switch to off. For direct
thermal printing, set the switch to on.
Black Mark /Gap Sensing Switch
Switch 8 on the dipswitch located on the rear of the printer allows the user to select either black mark
or gap sensing. For black mark sensing, set the switch to off. For gap sensing, set the switch to on.
3-4
Page 18

4. DIP SWITCH FUNCTIONS
12345678
ON
4. DIP SWITCH FUNCTIONS
The DIP switches are located on the rear of the printer.
EM1-33046A
4. DIP SWITCH FUNCTIONS
WARNING!
Turn the POWER OFF before
changing the DIP switch settings.
Baud 19200 9600 4800 2400
SW-1 OFF ON OFF ON
SW-2 OFF OFF ON ON
Parity None Even Odd
SW-3 OFF ON ON
SW-4 OFF OFF ON
Table 4-2 Parity
<Rear View>
Table 4-1 Baud Rate
Data Bits 8 7
SW-5 OFF ON
Table 4-3 Date Bit
Printing Thermal Direct
Mode Transfer Thermal
SW-7 OFF ON
Table 4-5 Printing Mode
NOTE: The shaded settings are the factory default.
Stop Bits 1 2
SW-6 OFF ON
Table 4-4 Stop Bit
Sensor Through
Black
Mark
SW-8 OFF ON
Table 4-6 Sensor Type
4-1
Page 19

5. SET UP PROCEDURE
5.1 REQUIREMENTS FOR OPERATION
EM1-33046A
5. SET UP PROCEDURE
5.1 REQUIREMENTS FOR OPERATION
The B-442 has the following requirements:
• The host computer must have a serial port.
• To set up the initial printer configuration, use either the keyboard on the printer or the DIP switch.
• To print the format, create the complete program refering to the command manual.
5.2 SETTING UP THE PRINTER
WARNING!
1. Be sure to use the enclosed AC adapter. Use of other AC adapters may cause fire or
machine failure.
2. Do not use the enclosed AC adapter on the other equipment.
3. Be sure to close the printer cover while the printer is in use . Do not insert or drop any
foreign substances or metal object into the printer, as this may cause fire or machine
failure.
CAUTION:
The socket-outlet shall be installed near the equipment and shall be easily accessible.
1. Place the printer on a flat and secure surface.
2. Make sure the power switch is off.
3. Using the enclosed serial RS-232C cable, connect the printer to your computer.
4. Insert the DC plug of the AC adapter into the power supply connector on the printer.
5. Plug the AC adapter power cord into a properly grounded power outlet.
6. Turn on the power switch. The green power indicator light should illuminate. The printer is now ready
to load labels.
n RS-232C SERIAL INTERFACE
Host 9 25
Function Pin Pin
RxD 2 3
TxD 3 2
DTR 4 20
GND 5 7
DSR 6 6
RTS 7 4
CTS 8 5
9 Printer
Pin Function
1 +5 V
2 TxD
3 RxD
4 DSR
5 GND
6 RDY
7N/C
8 RDY
9+5
Table 5-1 RS-232 Interface Connection
5-1
Page 20

6. LOADING LABEL AND TAG STOCK
6. LOADING LABEL AND TAG STOCK
EM1-33046A
6. LOADING LABEL AND TAG STOCK
1. Open the printer cover by pressing the two cover release buttons located on the right and left sides
of the printer. While pressing the buttons, pull up on the printer cover.
2. Insert the label supply roll spindle into the core of a label roll.
3. Open the printer carriage by pulling up the release lever on the forward left side of the front rubber
roller.
4. Place the label stock into the printer cover so that the labels feed from the top of the roll. If printing
on tag stock, place the tag stock into the printer so that the tags feed from the bottom of the roll.
5. Place the label roll into the spindle mounts so that the label roll is positioned at the center of the
spindle. Feed the tip of the label supply roll into the paper feed slot and over the front roller.
6. Adjust the label edge guides so that they just touch the edge of the label media.
CAUTION: The media must be passed from the media roll to the front rubber roller straight.
Failure to do this may result in a media skew.
(Correct) (Incorrect)
Media Roll
Label Edge Guide
Front Rubber Roller
Self-peeling Roller
7. Press down the printer carriage until it hooks the front rubber roller.
CAUTION: Both sides of the printer carriage must be hooked completely, otherwise blurred
print or media skew may be caused.
Fig. 6-1
8. Wind the label roll to take up any excess slack.
9. Close the top cover and press the Feed switch three or four times until the green On-line indicator is
illuminated.
NOTE: Make sure that both sides of the top cover are completely hooked.
10. When a roll of labels or tags run out, the On-line indicator light will not illuminate. Meanwhile, ERR.
indicator will flash. Do not turn off the power to reload. Following the above steps, load a new roll of
label stock and press the Feed switch three or four times until the On-line indicator light illuminates.
Printing will resume without data loss.
6-1
Page 21

6. LOADING LABEL AND TAG STOCK
EM1-33046A
6. LOADING LABEL AND TAG STOCK
2
2
3
Fig. 6-2 Inserting Label Supply Roll into Label Supply Roll Mounts
1. Label Supply Roll Spindle
2. Label Supply Roll Spindle Mount
3. Label Supply Roll
1
2
3
1
4
Fig. 6-3 Feeding Labels through Adjustable Label Edge Guides
1. Printer Carriage Release Lever
2. Label
3. Front Rubber Roller or Platen
4. Adjustable Label Edge Guides
6-2
Page 22

7. SELF-PEELING FUNCTION
7. SELF-PEELING FUNCTION
EM1-33046A
7. SELF-PEELING FUNCTION
1. Remove the printer’s front panel.
CAUTION: When removing the front panel, care must be taken not to damage the label taken
sensor harness.
2. Feed the backing of the label stock between the front rubber roller and the Self-peeling roller just in
front of it, as shown in Fig. 7-1.
3. Feed the backing paper through the Backing Paper Opening in the front panel and replace the panel
as shown in Fig. 7-2.
1
3
4
2
Fig. 7-1 Setting Up Printer for Self-Peeling Function
1. Printer Carriage Release Lever 3. Self-peeling Roller
2. Front Rubber Roller 4. Backing Paper
1
2
1. Printer Carriage Release Lever 4. Backing Paper
2. Printer Front Panel 5. Label
3. Backing Paper Opening
5
Fig. 7-2 Printer Ready for Self-Peeling Function
7-1
4
3
Page 23

8. RIBBON LOADING INSTRUCTIONS
8. RIBBON LOADING INSTRUCTIONS
EM1-33046A
8. RIBBON LOADING INSTRUCTIONS
1. Place an empty roll on the front ribbon rewind spindle.
2. Loosen the tape that secures the ribbon leader and fold it over the end of the leader. The tape will
be used to affix the leader to the ribbon rewind roll.
3. Install the ribbon supply roll on the rear spindle so that the ribbon feeds from the top of the roll toward
the rear. Position the ribbon roll at the center of the spindle. Guide the end of the leader through
the ribbon feed slot.
4. Open the printer carriage by pulling up the release lever on the forward left side of the front rubber
roller. Pull the leader forward and over the ribbon guide roller.
5. Using the tape at the end of the ribbon leader, affix the leader to the top of the rewind roll. Be careful
to align the sides of the leader to the sides of the roll.
6. Wind the ribbon rewind roll until the ribbon leader has wound onto the roll and the black part of the
ribbon is visible. Remove any excess slack.
CAUTION: Center both ribbon supply and rewind rolls on the spindles and parallel these
ribbon rolls with each other. Failure to do this may cause ribbon wrinkle or void
printing.
7. Return the printer carriage to the down position
CAUTION: Both sides of the printer carriage must be hooked completely, otherwise blurred
print, media skew or ribbon wrinkle may be caused.
8. Close the top cover and press the Feed switch until the green On-line indicator light is illuminated.
NOTE: Make sure that both sides of the top cover are completely hooked.
2
4
3
1
Fig. 8-1 Placement of Ribbon Supply Roll
1. Printer Carriage Release Lever 3. Ribbon Rewind Roll
2. Ribbon Supply Roll 4. Thermal Transfer Ribbon
8-1
Page 24

8. RIBBON LOADING INSTRUCTIONS
EM1-33046A
8. RIBBON LOADING INSTRUCTIONS
Fig. 8-2 Proper Placement of Label Stock and Thermal Transfer Ribbon
8-2
Page 25

9. INSTALL EXTERNAL LABEL ROLL MOUNT
9. INSTALL EXTERNAL LABEL ROLL MOUNT
9. INSTALL EXTERNAL LABEL ROLL MOUNT
EM1-33046A
3
2
1
Fig. 9-1 Install External Label Roll Mount
1. External Label Roll Mount
2. Label Supply Roll Spindle
3. External Label Feed Opening
9-1
Page 26

10. INSTALL MOMORY MODULE
10. INSTALL MEMORY MODULE
10. INSTALL MEMORY MODULE
WARNING!
Turn the power OFF when inserting or removing the memory module.
1. Make sure the power is turned off.
2. Take off the cover from memory module .
3. Insert the memory module and press at the end of the slot.
NOTE: Care must be taken not to insert the memory module in wrong orientation.
4. Put the cover on the memory module.
5. Turn on the power.
EM1-33046A
1
2
Fig. 10-1 Install Memory Module (Option)
1. Memory Module
2. Cover
NOTES: 1. Be sure to protect a memory module by putting it in it's protective cover when not in use
in the printer.
2. Do not subject the memory module to any shocks or excessive forces.
3. Do not expose the memory module to direct sunlight or store it close to a heater.
4. Do not expose the memory module to excessive humidity by wiping it with a wet cloth or
storing it in a damp place.
5. Before inserting or removing the memory module, make sure that the power switch is
turned off.
10-1
Page 27

11. SELF TEST
EM1-33046A
11. SELF TEST
11. SELF TEST
To initiate the Self Test Mode, depress the Feed key while turning on the printer.
The printer will first calibrate the label length. If a label edge is not detected within 7", the printer will then
stop attempting to feed labels and treat the media as continuous thermal paper.
Firstly, the printer will print a pattern to check the performance of the print head.
Following the calibration of label length, the printer will print internal settings, including:
1. Print head checking pattern.
2. Printer type and firmware version
3. Head Run Distance
4. Serial port setting
5. Code page
6. Country code
7. Print Speed setting
8. Print Density setting
9. Label Size setting
10. Gap (Bline) Width and Offset Setting
11. Backing Paper Transparence
12. File list
13. Memory available
After the self test is complete, reset the printer for use by turning the Power switch off and on.
<Sample Test Label>
11-1
Page 28

12. DUMP MODE
EM1-33046A
12. DUMP MODE
12. DUMP MODE
After the Self Test Mode, the printer is in Dump Mode. In the Dump mode, any characters sent from the
host computer will be printed in two columns as follows: on the left side of the paper are the characters
received and on the right side are the corresponding hexadecimal value of the characters. This allows
the user to verify programming commands and debug the program. Reset the printer by turning the
Power switch off and on.
12-1
Page 29

13. GENERAL MAINTENANCE
EM1-33046A
13.1 CLEANING
13. GENERAL MAINTENANCE
13.1 CLEANING
WARNING!
1. Be sure to disconnect the power cord prior to performing any maintenance.
2. Do not use any tool that may damage the print head.
3. DO NOT POUR WATER directly onto the printer.
To help retain the high quality and performance of your printer it should be regularly cleaned. The greater
the usage of the printer, the more frequent the cleaning. (i.e. low usage=weekly : high usage=daily).
1. Turn the power off.
2. Open the printer cover.
3. Open the printer carriage by pulling up the release lever on the forward left side of the front rubber
roller.
4. Remove the ribbon and media.
5. Clean the print head element with a head cleaner pen.
6. Clean the front rubber roller with an alcohol moistened cloth.
Print Head
Element
Front Rubber Roller
Head Cleaner Pen
Print Head
Element
Fig. 13-1
NOTE: Order head cleaner pen from TEC Parts Center.
(Part No. 24089500013)
13-1
Page 30

13. GENERAL MAINTENANCE
13.2 COVERS AND PANELS
EM1-33046A
13.2 COVERS AND PANELS
The covers should be cleaned by wiping with a dry cloth or a cloth slightly dampened with a mild detergent
solution.
NOTE: Clean printer cover with an electrostatic free cleaner for automated office equipment.
WARNING!
1. DO NOT POUR WATER directly onto the printer.
2. DO NOT APPLY cleaner or detergent directly onto any cover or panel.
3. NEVER USE THINNER OR OTHER VOLATILE SOLVENT on the plastic covers.
4. DO NOT clean the panel covers or the supply window with alcohol as it may cause them to
discolor, loose their shape or develop structural weakness.
13.3 REMOVING JAMMED MEDIA
1. Turn the power off.
2. Open the printer cover.
3. Open the printer carriage by pulling up the release lever on the forward left side of the front rubber
roller.
4. Remove the ribbon and media.
5. Remove the jammed media. DO NOT USE any sharp implement or tool as these could damage the
printer.
6. Clean the print head and front rubber roller, then remove any further dust or foreign substances.
7. Media jams in the cutter unit can be caused by wear or residual glue from label stock on the cutter.
Do not use unspecified media in the cutter. If you get frequent jams in the cutter contact your
Authorized Service representative.
13.4 DENSITY ADJUSTMENT
Density adjustment may be necessary according to the temperature of environment in use.
(Reference: Interface Command Manual)
13-2
Page 31

14. TOROUBLESHOOTING
14. TROUBLESHOOTING
EM1-33046A
14. TROUBLE SHOOTING
WARNING!
If you cannot solve a problem with the following solutions, do not attempt to repair it yourself.
Turn the power off, unplug the printer, then contact your TEC representative for assistance.
The following table indicates some of the most possible problems that may be encountered while
operating the B-442 bar code printer and provides simple and practical solutions. If the printer still
malfunctions after attempting all the suggested solutions, contact your TEC representative for assistance.
Problem
Ribbon does not advance.
Poor print quality
Only prints diagonal pattern on the
SELF TEST.
Power indicator light does not
illuminate.
Solution
Make sure that DIP switch 7 is set to OFF (Thermal
transfer mode is selected).
Check the ribbon supply/rewind spindles are properly
installed.
Clean the print head.
Adjust the print density setting.
Ribbon and media are incompatible. Use TEC
recommended type of ribbon.
Check the connection of serial port cable
Check the dip switch setting and reset the printer.
Check the power cord is properly connected.
On-line indicator light does not
illuminate.
Error indicator light illuminates.
Out of paper or out of ribbon.
Media sensor is out of adjustment.
Press FEED key. The error message will be printed on
the print media or sent out through RS-232.
14-1
Page 32

15. ERROR MESSAGES
15. ERROR MESSAGES
1 Syntax Error
The command format is incorrect. Check command manual carefully.
The serial port setting is incorrect. Check dip switch and reset the printer.
2 Out of Range
Numeric input is too large to be processed.
The input string is too long to be stored.
The size of the text or Bar Code exceeds that of the label.
3 Download Error
The download file format is incorrect.
There is not enough memory to receive the file.
4 Stack Overflow
EM1-33046A
15. ERROR MESSAGES
A mathematical expression is too complex. Divide it into several expressions.
The nested routine is too deep.
5 Memory Error
Too many variables defined.
6 RS232 Error
The serial port setting is incorrect.
7 File not Found
Cannot open the file specified. Download the file again.
8 Type Mismatch
Variable type mismatch.
9 Gap not Found
Cannot detect label edge. Calibrate the backing paper again.
10 Clock Access Error
Can not Read from / Write to the clock.
15-1
Page 33

16. HOW TO CONNECT THE PRINTER WITH PROTABLE LCD KEYBOARD
16. HOW TO CONNECT THE PRINTER WITH PORTABLE LCD KEYBOARD
EM1-33046A
16. HOW TO CONNECT THE PRINTER WITH PORTABLE
LCD KEYBOARD
To connect a portable LCD keyboard to the printer, we must write a program with particular commands
as below:
Example:
DOWNLOAD "KEYBOARD.BAS"
SIZE 4.00, 5.00
CLS
SPEED 2
DENSITY 8
SET CUTTER OFF
DIRECTION 0
REFERENCE 0,0
GAP 0.10, 0.00
:START
CLS
INPUT "ITEM:" ; ITEMS
:L1
INPUT "QTY:" ; QTY
IF QTY<0 THEN GOTO L1
:2
N=1
INPUT "How many to print:", N
IF N<1 THEN GOTO L2
TEXT 100, 100, "4", 0, 1, 1, "ITEM:"
TEXT 210, 100, "4", 0, 1, 1, ITEM$
TEXT 100, 160, "4", 0, 1, 1, "QTY:"
TEXT 200, 160, "4", 0, 1, 1, STR$ (QTY)
CODE$=ITEM$ + ":" +STR$ (QTY)
BARCODE 100, 240, "39", 96, 1, 0, 2, 4, CODE$
BOX 10, 70, 790, 450, 2
PRINT N
GOTO START
EOP
16-1
Page 34

PRINTED IN TAIWAN
E
EM1-33046A
 Loading...