

Page 1
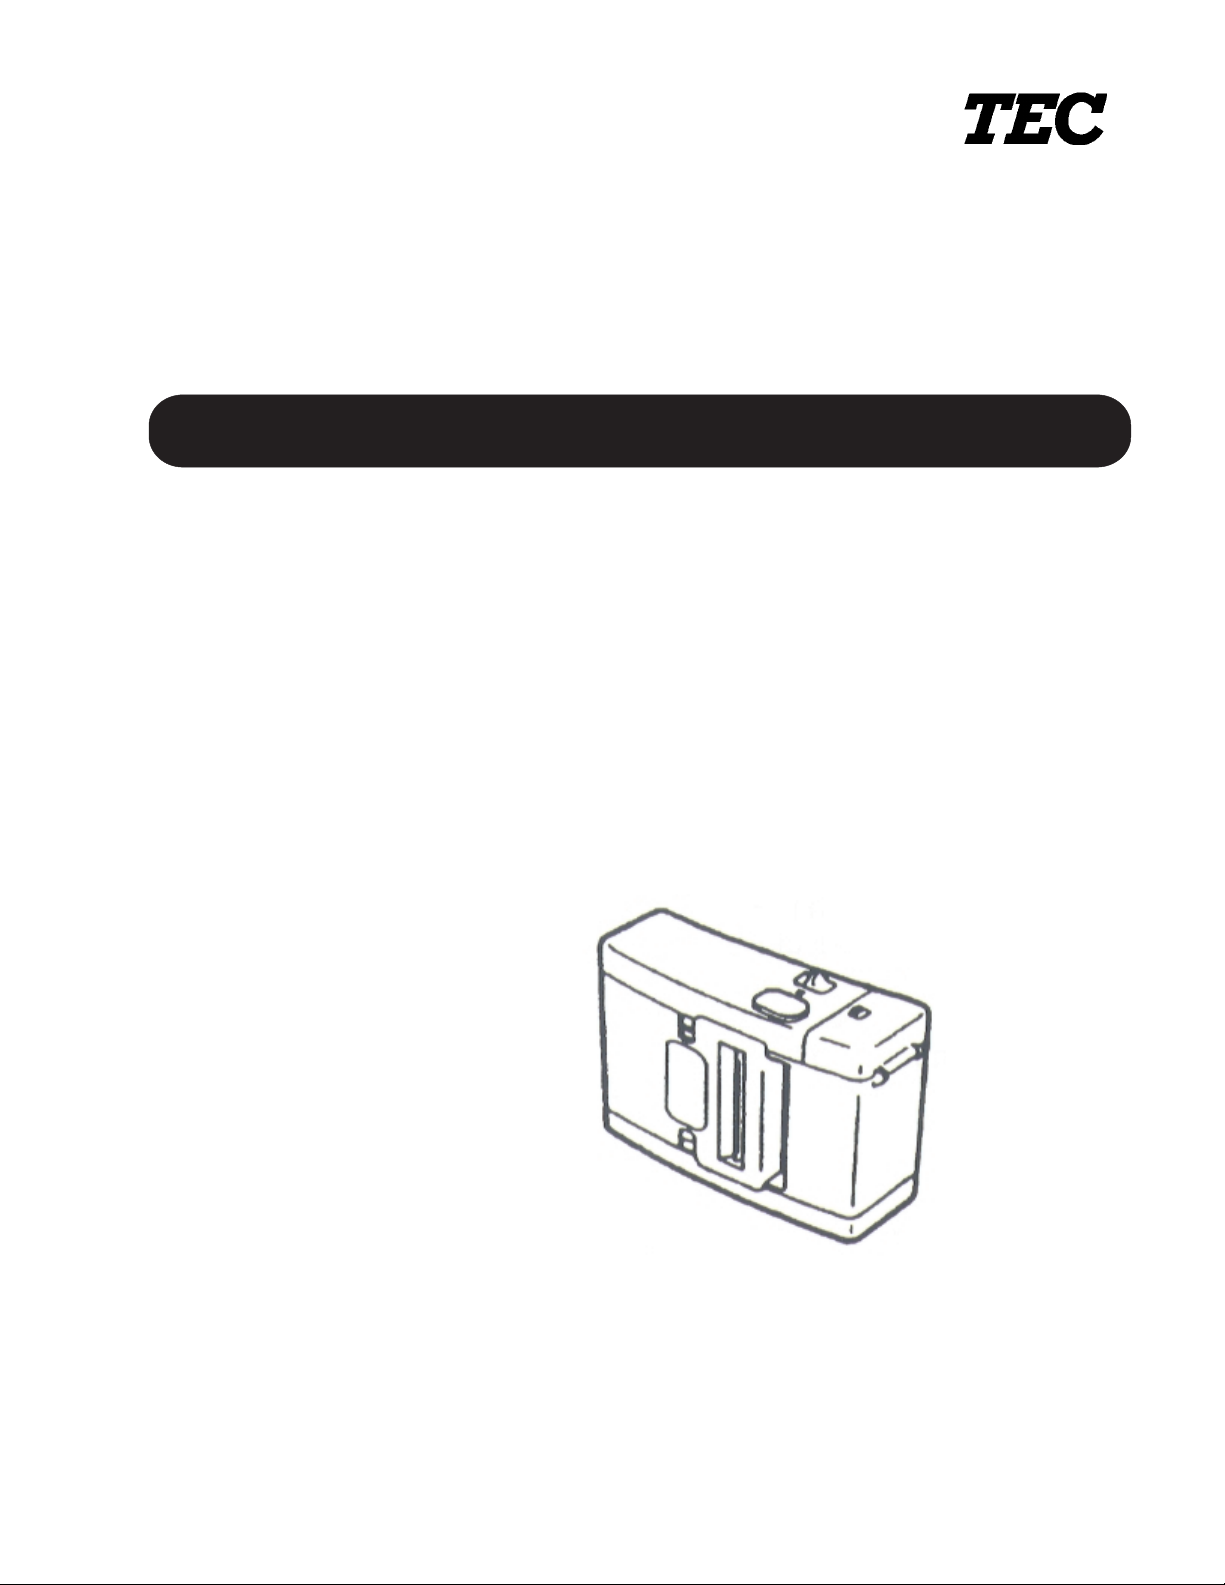
TEC P ortable Printer
Table of Contents
B-210 SERIES
Owner’s Man ual
Document No. EM1-33043D
T O SHIBA TEC C O RPORATION
Page 2

DECLARATION OF
CONFORMI TY
Manufact ur er
Address
Product Nam e
model
options
Safety
EMC
Supplementary Informat ion
The product herewith complies with the
requirements of the Low Voltage Directive 73/
23/EEC. and the E M C directi ve 89/ 336/EEC.
The product was tested in a ty pical set up
1)
TEC personnel advocated.
2) The following technical documentation has
been filed for r eview.
• Factory Inspection Certificate by TUV
Rheinland
• Owner's Manual
• Schematic
• Certificates and Test Repor ts
: TEC Corporat ion
: 570 Ohi t o. Ohito- Cho.
Tagata-Gun, S hizuoka-Ken,
41 D-23 Japan
declares that foll owing
product
: Bar Code Pri nter
: B-210 Seri es
: All
Conforms to the following
Product Specifi c ations
: EN 60 950
: EN 56 022
IEC 801 -2
IEC 801-3
Page 3

EM1-33043A
TOC 2
TABLE OF CONTENTS
Page
1. INTRODUCTION ........................1-1
1.1 APPLICABLE MODEL ...........1-10
1.2 ACCESSORIES .....................1-11
2. SPECIFICATIONS ......................2-1
2.1 PRINTER ..............................2-1
2.2 SERIAL INTERFACE
(RS-232C) ...................................2-2
2.3 RADIO INTERFACE .............2-2
2.4 IrDA INTERFACE...................2-3
2.5 MEDIA ..................................2-4
3. APPEARANCE ............................3-1
3.1 FRONT/REAR VIEW .............3-1
3.2 OPERATION PANEL .............3-2
4. INSTALLING THE PRINTER ......4-1
4.1 LOADING THE BATTERY.....4-1
4.2 INSTALLING THE
MEDIA GUIDE ......................4-3
5. LOADING THE MEDIA ................5-1
6. SECURING THE PRINTER
TO YOUR WAIST ........................6-1
7. ISSUING THE MEDIA ..................7-1
8. CARE/HANDLING
OF THE MEDIA ...........................8-1
Page 4

EM1-33043A
TOC 1
Page
9. GENERAL MAINTENANCE ..........9-1
9.1 CLEANING ............................. 9-1
9.2 COVERS AND
OPERATION PANEL ..............9-3
9.3 REMOVING JAMMED
MEDIA .................................... 9-4
10. TROUBLESHOOTING ................10-1
CAUTION:
1. This manual may not be c opied in whole or in
part without
TEC.
2. The content s of this manual may be c hanged
without not ification.
3. Please refer to your local Author ized Service
representative with regard t o any quer ies y ou
may have in this manual.
Copyright © 1997
by TEC CORPORATI ON
All Rights Reserved
570 Ohito. O hito-cho. Tagat a- gun. Shizuoka-ken. JAPAN
the
prior written permi ssion of
Page 5

1. INTRODUCTION
EM1-33043D
1. INTRODUCTION
1. INTRODUCTION
Thank you for purchasing the TEC B-210
series portable printer.
The B-210 printer displays its high
performance with extraordinarily high
speed printing up to 50.8 mm/sec. It has a
considerably compact and light body of 88
mm in height, 128 mm in width and 50 mm
in depth, weighing about 460 g.
As data communication method, minute
radio communication (for GH11 and
GH12 models) or IrDA (GH24 model),
which requires no cable for data
transmission between a handy terminal
and the printer, is adopted.
Owing to a low power consumption design
and use of a chargeable lithium battery as
a power source, this printer can issue 300
pieces of 40-mm pitch labels with a fullycharged battery.
Loading a label roll is very simple; just put
a label roll into the printer and close the
media cover. A belt holder provided on the
rear of the printer enables the printer to be
held hands-free at your waist for improved
productivity.
This manual contains general set-up and
maintenance information and should be
read carefully to help gain maximum
performance and life from your printer. For
most queries please refer to this manual
and keep it safe for future reference.
1- 1
Page 6

1. INTRODUCTION
EM1-33043D
1. INTRODUCTION
FCC Notice
This equipment has been tested and
found to comply with the limits for a
Class B digital device, pursuant to Part
15 of the FCC Rules. These limits are
designed to provide reasonable
protection against harmful interference
in a residential installation. This
equipment generates, uses, and can
radiate radio frequency energy and, if
not installed and used in accordance
with the instructions, may cause harmful
interference to radio communications.
However, there is no guarantee that
interference will not occur in a particular
installation. If this equipment does cause
harmful interference to radio or television
reception, which can be determined by
turning the equipment off and on, the
user is encouraged to try to correct the
interference by one or more of the
following measures:
• Reorient or relocate the receiving
antenna.
• Increase the separation between the
equipment and receiver.
• Connect the equipment into an outlet
on a circuit different from that to which
the receiver is connected.
• Consult the dealer or an experienced
radio/TV technician for help.
1- 2
Page 7

1. INTRODUCTION
EM1-33043D
1. INTRODUCTION
Changes or modifications not expressly
approved by manufacturer for compliance
could void the user's authority to operate
the equipment.
CAUTION
To avoid injury, be careful not to catch or
jam your fingers while opening or closing
the cover.
CAUTION
Do not touch moving parts. To reduce the
risk that fingers, jewelry, clothing, etc., be
drawn into the moving parts, push the
switch in the "O" position to stop
movement.
Safety Summary
Personal safety in handling or maintaining
the equipment is extremely important.
Warnings and Cautions necessary for
safe handling are included in this manual.
All warnings and cautions contained in
this manual and written inside or outside
of the printer should be read and
understood before handling or maintaining
the equipment.
Do not attempt to effect repairs to this
equipment. If a fault occurs that cannot
be rectified using the procedures
described in this manual, turn off the
power, then contact your authorised
TOSHIBA TEC representative for
assistance.
1- 3
Page 8

1. INTRODUCTION
EM1-33043D
1. INTRODUCTION
Safety Precautions
This Owner's Manual and the products
(machines) which you have purchased
contain indications which should be
observed in order to use the machines
safely and prevent harm to yourself and
others and damage to property. The
meanings of these indications and
symbols are given below.
Read these indications and become
familiar with their contents before reading
this Owner's Manual.
This indicates that there is the risk
WARNING
of death or serious injury if the
machines are improperly handled
contrary to this indication.
• If water or any other liquid enters the
machine, turn off the power.
Continuous use of the machine under
such conditions may cause fire or
electric shock.
• If the enclosure is damaged when
dropped or subject to shock, turn off
the power. Continuous use of the
machine under such conditions may
cause fire or electric shock.
• Avoid continuous exposure to direct
sunlight or high temperature as this
may cause fire.
• Do not remove covers or modify the
machine by yourself. Doing so may
cause fire or electric shock.
1- 4
Page 9

1. INTRODUCTION
EM1-33043D
1. INTRODUCTION
• Avoid water, operation with wet hands
or cleaning with a moistened cloth.
Failure to do this may cause fire or
electric shock.
• Do not wipe the machine with a cloth
moistened with thinner or other volatile
solvent as this may cause fire or electric
shock.
• Use the specified battery only. Failure
to do this may cause fire or electric
shock.
• Danger of explosion if the battery is
incorrectly replaced. Replace the
battery only with 'TOSHIBA TEC
Corporation, Battery Pack Type B-213BT, 7.2 V 1350 mAh Li-ion'.
Discard used batteries according to
the manufacturer's instruction.
• ATTENTION:
II ya denger d'explosion s'il ya
remplacement incorrect de la batterrie.
Remplacer uniquement avec une
batterie du même type ou d'un type
équivalent recommandé par le
constructeur.
Mettre au rebut les batteries usagées
conformément aux instructions du
fabricant.
• Do not disassemble and modify the
battery because it has a protection unit
in it. Doing so may break the protection
unit, causing the battery to heat up,
burst or burn.
1- 5
Page 10

1. INTRODUCTION
EM1-33043D
• If the battery gets wet, dry it completely.
Using a wet battery may cause fire or
electric shock.
• Be aware of the following precautions
when using batteries. Otherwise they
could heat up, burst or burn.
■ Do not throw the battery into fire or
heat it with a microwave or oven,
etc.
■ Do not load the battery with the
electrodes reversed.
■ Do not connect the electrodes with
metal objects like wire. Do not
carry or store the battery along with
metal objects such as necklaces,
hairpins, etc.
■ Do not stick a needle into, hammer,
step on, or drop the battery.
■ Do not solder the battery.
■ Do not leave the battery where the
temperature is more than 60°
centigrade, such as inside a car or
1- 6
Page 11

1. INTRODUCTION
CAUTION
This indicates that there is the risk of
personal injury or damage to objects
if the machines are improperly
handled contrary to this indication.
EM1-33043D
1. INTRODUCTION
• Keep away from flame or other sources
of heat. Failure to do this may cause
fire or machine failure.
• Do not drop or shock the machine as
this may cause machine failure.
• During lightening, turn off and keep
away from the machine because of
danger of electric shock and machine
failure.
• Avoid locations subject to rapid change
in temperature as this causes
condensation, causing electric shock
or machine failure.
• Do not damage the print head, platen
or strip roller with a sharp object. Doing
so may cause machine failure.
• Do not touch or contact the print head
element with a metal object. Doing so
may cause machine failure.
• Use the specified media only. Failure to
do this may cause machine failure.
• Be sure to turn off the machine before
replacing the battery, or machine failure
may occur.
• Do not charge the battery near flame or
under direct sunlight. High temperature
may activate or damage the protection
unit of the battery, disabling the electric
charge or causing it to overheat, burst, or
burn.
1- 7
Page 12

1. INTRODUCTION
EM1-33043D
1. INTRODUCTION
• Unload the battery when the machine will
not be used for a long time. Failure to do
this may cause machine failure.
• Keep the battery away from flame, a heat
source or other locations subject to high
temperature.
Failure to do this may cause it to over
heat or burn.
• Use the specified battery charger only.
Failure to do this may cause the battery
to overheat, burst or burn.
• Do not force the battery into the machine
or battery charger. Doing so may cause
the battery to overheat, burst or burn.
Check for the correct electrode.
• Do not connect the battery to a power
outlet or a car cigarette lighter jack as this
may cause the battery to overheat, burst
or burn.
• Because the B-213-BT battery is
exclusively for the B-210 printer, do not
use the battery in other machines. Doing
so may damage the battery or affect the
performance and life of the battery.
1- 8
Page 13
1. INTRODUCTION
EM1-33043D
1. INTRODUCTION
Precautions
The following precautions will help to
ensure that this machine will continue to
function correctly.
1 Try to avoid locations that have the
following adverse conditions:
* Temperatures below -5°C and
above 40°C
* Direct sunlight
* Excessive vibration
2 The cover should be cleaned by
wiping with a dry cloth or a cloth
slightly dampened with a mild
detergent solution. NEVER USE
THINNER OR ANY OTHER
VOLATILE SOLVENT on the
plastic covers.
3 USE ONLY TOSHIBA TEC
SPECIFIED media.
4 DO NOT STORE the media where
they might be exposed to direct
sunlight, high temperatures, high
humidity, dust, or gas.
5 Any data stored in the memory of
the printer could be lost during a
printer fault.
6 DO NOT open the media cover
and battery cover during operation.
Doing so will stop printer operation.
7 DO NOT scratch the surface of
printed labels or receipt with a sharp
object.
1- 9
Page 14

1. INTRODUCTION
1.1 APPLICABLE MODEL
1.1 APPLICABLE MODEL
• B-210 Series
Model name description
B - 2 1 1 - G H 1 1 - G B
Destination
GB: Great Britain
QP: Europe
QM: Other countries
Interface
11: Radio (418 MHz)
+ RS-232C
12: Radio (433 MHz)
+ RS-232C
23: RS-232C
24: RS-232C + IrDA
Issue mode
H: Batch/Strip mode
Dot density of the print head
G: 8 dots/mm
EM1-33043D
NOTE: The B-211-GH11-GB model is
for exclusive use in Great Britain.
1- 10
Page 15

1. INTRODUCTION
EM1-33043D
1.2 ACCESSORIES
1.2 ACCESSORIES
Owner’s Manual Print Head Cleaner
Battery Media Guide
1- 11
Page 16
2. SPECIFICATIONS
EM1-33043D
2.1 PRINTER
2. SPECIFICATIONS
2.1 PRINTER
Item
Dimensions
Weight
Operating temperature
Operating humidity
Issue mode
Print head
Print method
Print head dot density
Print speed
Effective print width
Fonts
Bar code types
Interface
Power source
∗: Available only on the GH23 model.
Description
128 mm (W) x 88 mm (H)
x 50 mm (D)
Approximate 460 g, 450 g∗
(Including a battery)
-5°C ~ 40°C
25%~ 85% RH
(No condensation)
Batch mode/Strip mode
Thermal print head
Thermal direct
8 dots/mm (203 dpi)
Max. 50.8 mm/sec.
48 mm
Standard characters and
characters under bar codes:
Writable characters:
Times Roman: 21 point
Helvetica: 18 point
Letter Gothic: 14.3 point
Courier: 15 point
Presentation: 27 point
NW7, EAN 8, EAN 13,
CODE 39, Interleave 2 of 5
PDF417, EAN128,
CODE128
• GH11 model
RS-232C or radio (418
MHz)
• GH12 model
RS-232C or radio (433
MHz)
• GH23 model
RS-232C
• GH24 model
RS-232C + IrDA
Lithium ion battery 7.2V
1350mA (official)
12x24 dots
24x24 dots
2- 1
Page 17
2. SPECIFICATIONS
2.2 SERIAL INTERFACE (RS-232C)
EM1-33043D
2.2 SERIAL INTERFACE
(RS-232C)
Item
Baud rate
Protocol
Signals
9600 bps
XON/XOFF, 8 bit data, Even parity,
Stop bit = 1 bit
TXD, RXD, RTS, CTS
Description
2.3 RADIO INTERFACE
The following specification is applicable
only to the GH11 and GH12 models.
Item
Type
Receiving frequency
Communication method
Transmission speed
Protocol
Communicating
distance
∗: GH11 model
∗∗: GH12 model
NOTE: The RS-232C interface cable
must be disconnected when using
the radio communication.
Description
FM superhet UHF radio
telemetry receiver
(Complies with
MPT1340∗, ETS300220∗∗)
418 MHz∗, 433.92 MHz∗∗
Unidirectional
(Receive only)
4800 bps
8 bit data, non parity,
stop bit = 1 bit
3 m
2- 2
Page 18
2. SPECIFICATIONS
EM1-33043D
2.4 IrDA INTERFACE
2.4 IrDA INTERFACE
The following specification is applicable
only to the GH24 model.
Item Description
Type Physical layer
Transmission speed 19200 bps
Communicable distance 0.3 m max.
Peak wavelength of 850 to 900 nm
the infrared ray
Communicable angle ±15° degrees max.
Ambient light immunity 1,000 lx max. (under a
Intensity of emission Min. 36mW/SR (θh,
Receivable infrared ray Min. 7µW/cm2 (θh,
Protocol Start-stop synchroniza-
conforming to IrDA-SIR
V1.0
fluorescent lamp or
incandescent lamp)
θv≤ ± 15°)
θv≤ ± 15°)
tion, Half duplex
transmission
Start bit = 1 bit, Stop bit
= 1 bit, 8 bit data, Non
parity
2- 3
Page 19

2. SPECIFICATIONS
2.5 MEDIA
Label
I
H
G
D
C
Receipt paper
Black Mark
(on reverse side)
EM1-33043D
E
A
B
Feed direction
Receipt
2.5 MEDIA
H
G
D
B
A
F
Fig. 2-1
2- 4
Page 20

2. SPECIFICATIONS
EM1-33043D
2.5 MEDIA
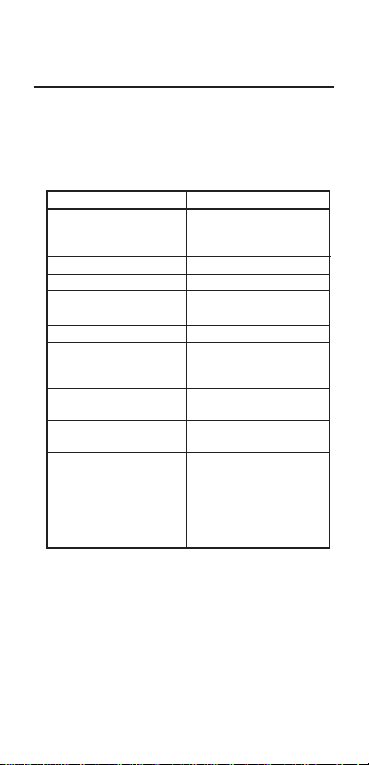
Item
A
B
C
D
E
F
G
H
Outer roll diameter ø34 (Max.)
Roll way The print side facing
Thickness Label 111µm
Issue mode
Label/Receipt 10.0 ~ 167.0 13.0 ~ 67.0
Pitch
Label/Receipt 7.0 ~ 160.0 10.0 ~ 60.0
length
Width including 34, 37, 40, 43, 46, 49,
backing paper 52, 55±0.5
Media width Label 31.0 ~ 52.0
Receipt 34, 37, 40, 43, 46, 49
52, 55±0.5
Gap length 3.0 ~ 7.0
Black mark length 3.0 ~ 7.0
Effective print width ~ 48.0
Effective print length 7.0 ~ 160.0
Margin 1.0 (gap = 7 mm) ~
I
5.0 (gap = 3 mm)
inside
Receipt 65µm
(Unit: mm)
Strip modeBatch mode
NOTE: Do not use media other than the above
to ensure print quality and print head life.
2- 5
Page 21

3. APPEARANCE
3.1 FRONT/REAR VIEW
3. APPEARANCE
3.1 FRONT/REAR VIEW
Front View
IrDA Interface Window
(GH24 model only)
Media Cover
Media Cover
Release Catch
Media Outlet
Rear View
Belt Holder
REPRINT Button
Status Indicator
Backing Paper Outlet
Serial Interface Connector
EM1-33043D
Power Switch
Battery Cover
Release Catch
Battery Cover
3- 1
Fig. 3-1
Page 22

3. APPEARANCE
3.2 OPERATION PANEL
3.2 OPERATION PANEL
REPRINT Button
Each time this button is pressed,
REPRINT
STATUS
the printer issues the same label as
the previous one. When the button
is held, the printer issues labels
continuously.
Receipts are fed for 20 mm by
I
pressing this button once.
STATUS Indicator (Red)
The status indicator lights, and then
goes off at power on.
The indicator which does not light or
stays lit indicates the loaded battery
is uncharged.
Power Switch
A slide power switch
EM1-33043D
3- 2
Page 23

4. INSTALLING THE PRINTER
4.1 LOADING THE BATTERY
EM1-33043D
4. INSTALLING THE
PRINTER
4.1 LOADING THE BATTERY
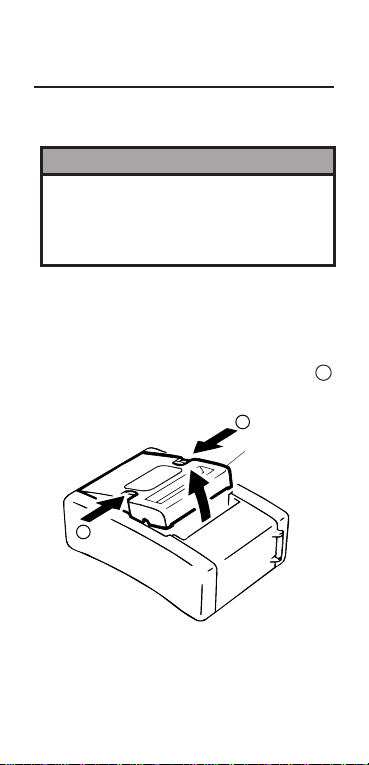
CAUTION:
1. Be sure to turn off the printer before
loading the battery.
2. Use the specified battery only. Failure
to do this may cause fire or electric
shock.
3. In the United States, used lithium ion
batteries should be returned to the
store where you bought the machine.
(USA only)
4. LITHIUM ION BATTERY
DISPOSE OF PROPERLY
Caution: Do not handle damaged or
leaking lithium ion battery.
1) Slide the battery cover release catch
toward the direction indicated by the
arrow and open the battery cover.
4- 1
Battery Cover
Fig. 4-1
Page 24

4. INSTALLING THE PRINTER
4.1 LOADING THE BATTERY
EM1-33043D
2) Load a fully charged battery into the
printer.
NOTE: Remove the battery pack cover
from the battery, and then load
the battery in the correct
orientation as indicated in the
following figure.
Battery
Battery Pack
Cover
Fig. 4-2
3) Close the battery cover completely.
4) Turn on the printer and the status
indicator will blink, then go off. The
status indicator which does not light
or stays lit indicates that the battery is
uncharged.
4- 2
Page 25

4. INSTALLING THE PRINTER
4.2 INSTALLING THE MEDIA GUIDE
EM1-33043D
4.2 INSTALLING THE MEDIA
GUIDE
NOTE: The media guide is not required
1) Slide the media cover release catches
2) Fit the media guide into a slot which
for a 55 mm wide label roll.
and open the media cover.
WARNING!
A cutter is attached to the inside of the
media cover. Care should be take not to
injure your hand with the cutter when
opening the cover.
corresponds to the width of media to
be used. First insert portion 1 , then
2 until it snaps in position.
Media Guide
2
1
4- 3
Fig. 4-3
Page 26

4. INSTALLING THE PRINTER
4.2 INSTALLING THE MEDIA GUIDE
EM1-33043D
Unit: mm
Slot 1st 2nd 3rd 4th 5th 6th 7th
Media 52 49 46 43 40 37 34
Width
3) To remove or relocate the media guide,
push up the pin on the media guide
with a screw driver or equivalent, and
remove the media guide from the
printer.
Media Guide
Pin
Fig. 4-4
4- 4
Page 27
5. LOADING THE MEDIA
5. LOADING THE MEDIA
EM1-33043D
5. LOADING THE MEDIA
WARNING!
A cutter is attached to the inside of the
media cover. Care should be taken not
to injure your hand with the cutter when
opening the cover.
This printer prints both labels and receipts.
1. Turn off the printer.
2. Slide the media cover release catches
in the direction indicated by arrows A
and open the media cover.
A
Media Cover
A
Fig. 5-1
5- 1
Page 28

5. LOADING THE MEDIA
5. LOADING THE MEDIA
EM1-33043D
3. Put a label roll or a receipt roll into the
media holder unit in the orientation as
shown below.
Media Roll
Media Holder Unit
Fig. 5-2
• Batch issue
1. Insert the leading edge of the label
roll into the media outlet.
5- 2
Fig. 5-3
Page 29

5. LOADING THE MEDIA
5. LOADING THE MEDIA
EM1-33043D
2. Close the media cover completely.
Make sure that the media cover
release catches snap back into
position.
Fig. 5-4
3. Turn on the printer and press the
REPRINT button. The printer will
align the print start position for the
label. When using receipts, the
printer will feed for 20 mm.
5- 3
Page 30

5. LOADING THE MEDIA
5. LOADING THE MEDIA
EM1-33043D
• Strip issue
1. Unroll the label roll a little and remove
a label.
Fig. 5-5
2. Close the media cover completely.
Make sure that the media cover
release catches snap back into
position.
5- 4
Fig. 5-6
Page 31

5. LOADING THE MEDIA
5. LOADING THE MEDIA
EM1-33043D
3. Turn on the printer and press the
REPRINT button. The printer will
align the print start position.
NOTES:
1. Be sure to take up any slack in the
media roll before closing the media
cover. An incompletely closed cover
will cause a media skew, print position
misalignment, poor print quality, paper
jam, etc.
2. If the media cover is closed while the
printer is turned on, the printer will
automatically feed a label to align the
print position.
5- 5
Page 32

6. SECURING THE PRINTER TO
YOUR WAIST
6. SECURING THE PRINTER TO YOUR WAIST
6.
SECURING THE PRINTER
EM1-33043D
TO YOUR WAIST
CAUTION:
Care should be taken not to drop the
printer when securing it to your waist.
1) Lift the belt holder.
Belt Holder
2) Insert the belt holder into your belt and
lower the printer to secure it to your
waist.
Belt Holder
6- 1
Belt
Fig. 6-1
Fig. 6-2
Page 33

7. ISSUING THE MEDIA
7. ISSUING THE MEDIA
EM1-33043D
7. ISSUING THE MEDIA
CAUTIONS:
1. Radio communication between a
handy terminal and the B-210 printer
is guaranteed when the handy
terminal is in the operator’s hand and
the printer is secured at the waist.
Proper radio communication may not
be obtained when used in other
conditions and in areas subject to
noise and radio interference.
2. Be sure to disconnect the RS-232C
interface cable from the printer before
performing radio communication or
IrDA.
3. To perform the radio communication
or IrDA, the printer must be
synchronized with the handy terminal.
4. IrDA is available on the condition
indicated below. The following
performance is obtained under the
fluorescent lamp (max. 1000 lx). Care
must be taken to prevent direct
sunlight from coming into the IrDA
interface window.
Handy
Terminal
max. 30 cm
Printer
Printer
Handy
Terminal
max. 30 cm
7- 1
Page 34

7. ISSUING THE MEDIA
7. ISSUING THE MEDIA
EM1-33043D
1. Turn on the printer.
2. Send data from the handy terminal to
the printer. (Regarding the operation
of the handy terminal, please refer to
the handy terminal’s operating manual.)
(Radio Communication Sample)
Fig. 7-1
3. Issuing labels
1) The number of labels are specified
when issuing labels in batch mode.
To re-issue the label, press the
REPRINT button.
2) The printer prints labels one by one
in strip mode by pressing the
REPRINT button.
To issue more than one label,
remove the printed label before
issuing the next one.
NOTE: Trim off the backing paper
coming from the backing paper
outlet.
7- 2
Page 35

7. ISSUING THE MEDIA
7. ISSUING THE MEDIA
EM1-33043D
3) After printing the receipt, press the
REPRINT button to feed it to the
position where it is easily cut. Each
time the REPRINT button is pressed,
the receipt is fed for 20 mm.
4. Trim off the printed media upward or
downward with the cutter.
NOTE: Do not pull the media toward
the feed direction, as this will
misalign the print position of
the next media.
Media
Fig. 7-2
7- 3
Page 36

8. CARE/HANDLING OF
THE MEDIA
8. CARE/HANDLING OF THE MEDIA
EM1-33043D
8. CARE/HANDLING OF
THE MEDIA
CAUTION:
Be sure to read carefully and understand
the Supply Manual. Use only media
which meet specified requirements. Use
of non-specified media may shorten the
head life and result in problems with bar
code readability or print quality. All media
should be handled with care to avoid any
damage to the media or printer. Read the
following guideline carefully.
• Do not store the media for longer than
the manufactures recommended shelf
life.
• Store media rolls on the flat end, do not
store them on the curved sides as this
might flatten that side causing erratic
media advance and poor print quality.
• Store the media in plastic bags and
always reseal after opening.
Unprotected media can get dirty and the
extra abrasion from the dust and dirt
particles will shorten the print head life.
• Store the media in a cool, dry place.
Avoid areas where they would be
exposed to direct sunlight, high
temperature, high humidity, dust or gas.
8- 1
Page 37

8. CARE/HANDLING OF
THE MEDIA
8. CARE/HANDLING OF THE MEDIA
EM1-33043D
• The thermal paper used for direct thermal
printing must not have the specifications
which exceed Ca++ 800 ppm, Na+ 800
ppm, K+ 800 ppm and CL- 600 ppm.
• Some ink used on pre-printed labels
may contain components which shorten
the print head's product life. Do not use
labels pre-printed with ink which contains
hard substances such as carbonic
calcium (CaCO3) and kaolin (Al2O3,
2SiO2, 2H2O).
For further information please contact your
local distributor or your media manufacturer.
8- 2
Page 38

9. GENERAL MAINTENANCE
9.
GENERAL MAINTENANCE
EM1-33043D
9.1 CLEANING
9.1 CLEANING
WARNING!
Care should be taken not to injure your
hand with the cutter when cleaning.
To help retain the high quality and
performance of your printer it should be
regularly cleaned. The greater the usage
of the printer, the more frequent the
cleaning. (i.e. low usage = weekly: high
usage = daily).
1. Turn off the printer.
2. Open the media cover.
3. Remove the media roll from the printer.
4. Clean the print head element with the
print head cleaner.
5. Wipe the cutter platen and strip roller
with a soft cloth moistened with alcohol.
Remove dust or foreign substances from
the internal parts of the printer, if any.
9- 1
Page 39
9. GENERAL MAINTENANCE
EM1-33043D
9.1 CLEANING
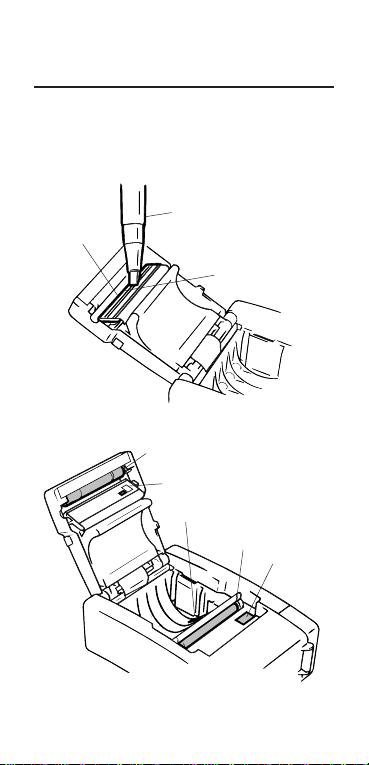
6. Remove paper particles or stains from
the feed gap sensor, black mark sensor,
and the batch/strip sensor with a soft
cloth.
Print Head Cleaner
Cutter
Print Head
Fig. 9-1
Strip Roller
Feed Gap Sensor
Black Mark Sensor
Platen
Strip Mode
Sensor
9- 2
Fig. 9-2
Page 40

9. GENERAL MAINTENANCE
9.2 COVERS AND OPERATION
EM1-33043D
WARNING!
1. Be sure to turn off the printer prior to
performing any maintenance.
2. Do not use any tool that may damage
the print head.
3. DO NOT POUR WATER directly onto
the printer.
9.2 COVERS AND OPERATION
PANEL
The covers should be cleaned by wiping
with a dry cloth or a cloth slightly dampened
with a mild detergent solution.
NOTE: Clean the printer cover with an
electrostatic free cleaner for
automated office equipment.
CAUTION:
1. DO NOT POUR WATER directly onto
the printer.
2. DO NOT APPLY cleaner or detergent
directly onto any cover or panel.
3. NEVER USE THINNER OR OTHER
VOLATILE SOLVENT on the plastic
covers.
4. DO NOT clean the covers or the
operation panel with alcohol as it
may cause them to discolor, loose
their shape or develop structural
weakness.
9- 3
Page 41

9. GENERAL MAINTENANCE
9.3 REMOVING JAMMED MEDIA
EM1-33043D
9.3 REMOVING JAMMED MEDIA
1. Turn off the printer.
2. Open the media cover.
3. Remove the media roll from the printer.
4. Remove the jammed media. DO NOT
USE any sharp implement or tool as
these could damage the printer.
5. Clean the print head and platen, then
remove any further dust or foreign
substances.
9- 4
Page 42

10. TROUBLESHOOTING
10. TROUBLESHOOTING
EM1-33043D
10.TROUBLESHOOTING
WARNING!
If you cannot solve a problem with the
following solutions, do not attempt to
repair it yourself. Turn off the printer,
then contact your TOSHIBA TEC
representative for assistance.
When a problem occurs during operation,
the status indicator will blink or light. Refer
to the following troubleshooting guide and
take corrective action.
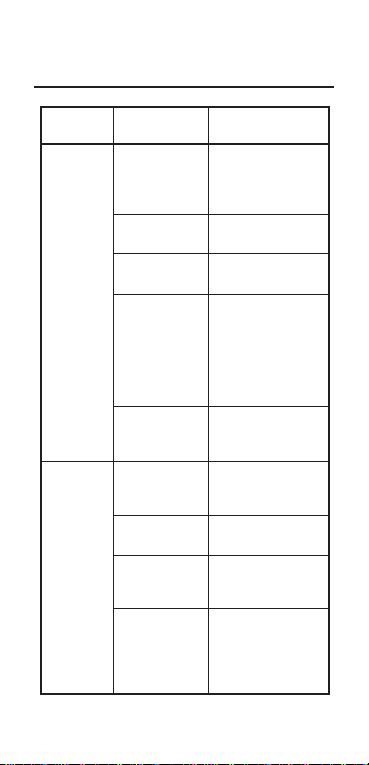
Status
Indicator
Blinks
Lights
Cause
Media end
The media cover
is open.
The printer is
jammed with
media.
The print head
element is broken.
A communication
error occurred.
The battery
voltage is low.
Action
Load a new media
roll.
Close the media
cover completely.
Turn off the printer,
remove the jammed
media, and re-load
the media roll
correctly.
Contact a TOSHIBA TEC
service representative for
repair.
Check that the
interface cable is
connected firmly.
Check the
communication
parameters.
Turn off the printer
and replace the
battery with a fully
10- 1
Page 43
10. TROUBLESHOOTING
EM1-33043D
10. TROUBLESHOOTING
Other
problems
The printer
does not
issue media.
Print failure
Check
Did the status
indicator light
and then go off
at power on?
Is the printer
turned on?
Is the media roll
loaded correctly?
Is the status
indicator blinking
or lighting?
Is the media
cover closed
completely?
Is the print head
dirty?
Is the media
discolored?
Is the specified
media used?
Are the media
cover release
catches locked
completely?
Corrective action
Charge the battery
fully.
Turn on the printer.
Re-load the media
roll correctly.
Check the handy
terminal for an error
status, and take
appropriate action
described in the
handy terminal’s
operating manual.
Close the media
cover completely.
Clean the print head
with the attached
print head cleaner.
Replace the media
roll with a new one.
Replace the media
roll with the proper
one.
Close the media
cover so that the
media cover release
catches snap back
into position.
10- 2
Page 44

Page 45

Page 46

PRINTED IN JAPAN
E
EM1-33043D 99010500 GS
 Loading...