

Page 1

TEC Electronic Computing Scale
SL-6600 (US. Version)
Owner’s Manual
TEC CORPORATION
Page 2

Page 3

EM 1-31059
TABLE OF CONTENTS
Page
1. INTRODUCTION ................................................................................................................................................ 1-1
2. SPECIFICATIONS .............................................................................................................................................. 2-1
3. NAME AND FUNCTION OF EACH PART ......................................................................................................... 3-1
3.1 OVERVIEW .............................................................................................................................................. 3-1
3.2 REMOTE DISPLAY .................................................................................................................................. 3-1
3.3 CONTROL LOCK ...................................................................................................................................... 3-2
3.4 KEY LAYOUT ............................................................................................................................................ 3-3
4. PROCEDURE BEFORE OPERATION ............................................................................................................... 3-8
5. LEVEL ADJUSTMENT ....................................................................................................................................... 5-1
6. REMOVAL AND REPLACEMENT OF LABEL ROLL
........................................................................................
5-1
7. PROGRAMMING PROCEDURES ..................................................................................................................... 6-1
Menu No. 0: Changing Unit Price .............................................................................................................. 7-2
Menu No. 1: Setting PLU Data .................................................................................................................. 7-3
Menu No. 2: Setting Store Address or Commercial Message ................................................................... 7-9
Menu No. 3: Setting Label Format and Adjusting Print Position
Menu No. 4: Setting Date, Time, Machine Number, and Store Number
.............................................................
.................................................
7-10
7-17
Menu No. 5: CMT/PL-3 Operations ......................................................................................................... 7-18
Menu No. 6: Initial Setting.................................................................................................................................. 7-21
Menu No. 7: Changing Bar Code Format ................................................................................................ 7-28
Menu No. 8: Setting Speed Key .............................................................................................................. 7-30
Menu No. 9: Setting Combination Report ............................................................................................... 7-31
Menu No. 10: Changing Displayed Titles .................................................................................................. 7-35
Menu No. 11: Setting Ingredient Description ............................................................................................. 7-42
Menu No. 12: Issuing Confirmation Label ................................................................................................. 7-43
Menu No. 13: Switching In-line/Off-line ............................................................................................................. 7-44
Menu No. 14: Setting Special Information........................................................................................................ 7-45
Menu No. 15: Setting Department Number........................................................................................................ 7-46
Menu No. 16: Transferring Logo Data ....................................................................................................... 7-47
Menu No. 17: Setting Grade Line .............................................................................................................. 7-48
Menu No. 18: Memory Card Operation ..................................................................................................... 7-49
Menu No. 20: Transmitting PLU File, Unit Price, Address or Speed Key
(FUN System) ....................................................................................................................... 7-55
Menu No. 21: Changing Printing Title of Period of Relish ............................................................................... 7-56
Copyright 'Q 1995
by TEC Corporation
All Rights Reserved
1-14-tO Uchikanda, Chlyoda-ku. Tokyo, JAPAN
Page 4

EMI-31059
8. VERIFICATION OF PROGRAMMED REPORTS ........................................................................................... 8-1
9. OPERATING PROCEDURES ......................................................................................................... 9-1
9.1 WEIGHED COMMODITY OPERATION ............................................................................................... 9-1
9.2 FIX PRICE OPERATION ...................................................................................................................... 9-2
9.3 BY COUNT OPERATION ......................................................................................................... 9-3
9.4 PRESET COUNT OPERATION ................................................................................................................ 9-4
9.5 ISSUING LABELS WITH NET WEIGHT STATEMENT ........................................................................ 9-9
9.6 TARE FUNCTION PROCEDURES ........................................................................................................ 9-11
9.7 SAVE KEY OPERATION SAMPLE ........................................................................................................... 9-13
9.8 VOID KEY OPERATION SAMPLE ............................................................................................................ 9-14
9.9 CALLING AND PRINTING GRADE LINE.............................................................................................. 9-14
9.10 SELECTION OF PRINT OR NOT PRrNT ITEM ON LABEL
9.11 DATE CHANGE ...................................................................................................................................... 9-16
9.12 CALLING AND PRINTING LOGO.................................................................................................. 9-17
9.13 FUN AUTOMATIC RECEPTION............................................................................................................. 9-17
..........................................................
9-15
10. TOTAL OPERATION PROCEDURES..............................................................................................................10-1
10.1 HOURLY REPORT.................................................................................................................................10-1
10.2 GRAND TOTAL REPORT .....................................................................................................................10-1
10.3 PLU REPORT ........................................................................................................................................10-1
10.4 COMBINATION REPORT ......................................................................................................................10-4
11. LABEL PRINT FORMATS ...............................................................................................................................11-1
12. ERROR MESSAGE TABLE .............................................................................................................................12-1
13. CLEANING THE PRINT HEAD ........................................................................................................................13-1
14. BEFORE YOU CALL FOR SERVICE ............................................................................................................ 14-1
15. APPENDIX .............................................................................................. 15-1
CAUTION
1. This manual may not be copied in whole or in part without prior written permission.
2. The contents of this manual may be changed without prior notice.
3. Please refer to a TEC representative regarding questions or misprints.
Page 5

1. INTRODUCTION
EMI-31059
1. INTRODUCTION
1. INTRODUCTION
We thank you very much for purchasing the TEC Electronic Computing Scale SL-6600 Series.
This series has been designed with TEC reliability and offers a cost efficient system for a modest
investment.
The Advanced TEC SL-6600 combines a scale and full-feature UPC printer into an integrated,
compact unit with expanded PLU capabilities. The SL-6600 can automatically and instantly program
the printer for 15 different label sizes and formats. Unlike other systems, you do not have to key
select the scale every time you change labels. Each SL-6600 label cassette has 4 binary switches
on the back which you set once to a specific code for each label. The System is quick and
convenient to use for increased productivity, plus it provides a wide range of management controls
and accurate, time-saving reports.
We believe that your needs will now be fully satisfied, and you will have total reliability in price
calculation. Should you have any questions concerning the scale, please refer to this manual. Be
sure to keep this manual for future reference.
This equipment generates, uses, and can radiate radio frequency energy and if not installed and
used in accordance with the instruction manual, may cause interference to radio communications. It
has been tested and found to comply with the limits for a Class A computing device pursuant
Subpart J of Part 15 of FCC Rules, which are designed to provide reasonable protection against
such interference when operated in a commercial environment. Operation of this equipment in a
residential area is likely to cause interference in which case the user at his own expense will be
required to take whatever measures may be required to correct the interference.
The product that you have purchased contains a rechargeable battery.
The battery is recyclable. At the end of it’s useful life, under various state and local laws, it may be
illegal to dispose of this battery into the municipal waste stream. Check with your local solid waste
officials for details in your area for recycling options or proper disposal.
APPLICABLE MODEL
SL-6600-30-C4-US-V
The description of the model number is as follows:
SL-6600-30-C4-US-V
---------Software Spec.
V: Variable Length Label Spec.
Period of Relish
Multi-intervai
Destination Code
Region Number ---------------------
3: North America
Communication Method
0: Stand-alone
Display Type
4; LCD + Remote Display
Max. Capacity
C: 30 lbs
1- 1
Page 6

1. INTRODUCTION
Installing Precaution
Place the TEC Electronic Computing Scale on a flat, stable surface.
EMI-31059
Installing Precaution
1. DON’T SUBJECT the weighing
platter to SUDDEN SHOCKS.
4. NEVER USE THINNER OR
OTHER VOLATILE SOLVENT for
cleaning.
7. When in use, avoid locations subject to vibration and direct sunlight
2. DONT PRESS THE KEYS TOO
HARD.
Keys will operate correctly if they
are merely touched lightly.
5. DON’T POUR WATER directly on
scale.
Clean the cover and platter by
wiping with a dry cloth or a cloth
soaked with detergent and wrung
out thoroughly.
To ensure the scale is CHierating
correctly, place a known weight on
the platter and check for correct
computing.
After the end of daily work, turn the
power OFF, then clean and inspect
the exterior of the scale to allow
you to use the scale at its best
condition.
If the scale uses the same power source as a high voltage electric appliance,
the voltage to the scale will vary each time the appliane is activated.
Use the special power source to avoid an error operation.
1- 2
10. Use a grounded electrical outlet.
(Do not use a adaption plug.)
Page 7
2. SPECIFICATIONS
2. SPECIFICATIONS
Item SL-6600-30-C4-US-V
Maximum Capacity 30 lbs.
Minimum Scale Division 0.01 lbs.
Display Range
Tare Up to 30 lbs.
Unit Price Presettable $ 0.01 ~ 99.99
Minimum Price Display
Remote Display:
Weight 4 digits
Unit Price
Total
LCD (Message Display)
Display Designations NET, PREPACK, INLINE, ERROR
Remote Display Mode
Capacity of PLU Memory
Print Head Thermal Print Head
Available Printing Width
Label Issue Method
Label
Report Paper
Interface
Power Requirement
Current Consumption
Temperature Limits 32°F ~ 104“F
Relative Humidity
Dimensions (approx.)
Weight (approx.)
0 ~ 30.05 lbs.
$ 0.01
4 digits
5 digits
16 characters (5x7 dot matrix)
Dual sides
840 PLUS (standard), 2520 PLUs max. (option)
1.65”
On-demand/Batch
RICOH 120LA or equivalent
RICOH 115F (black) or equivalent
RS-232C
AC 120V ±10%, 60 Hz
120V-1A, 60Hz
35% ~ 85% RH (No condensation)
15.7” (width) X 16.5” (depth) X 18.5” (height)
32 lbs.
EMI-31059
2, SPECIFICATIONS
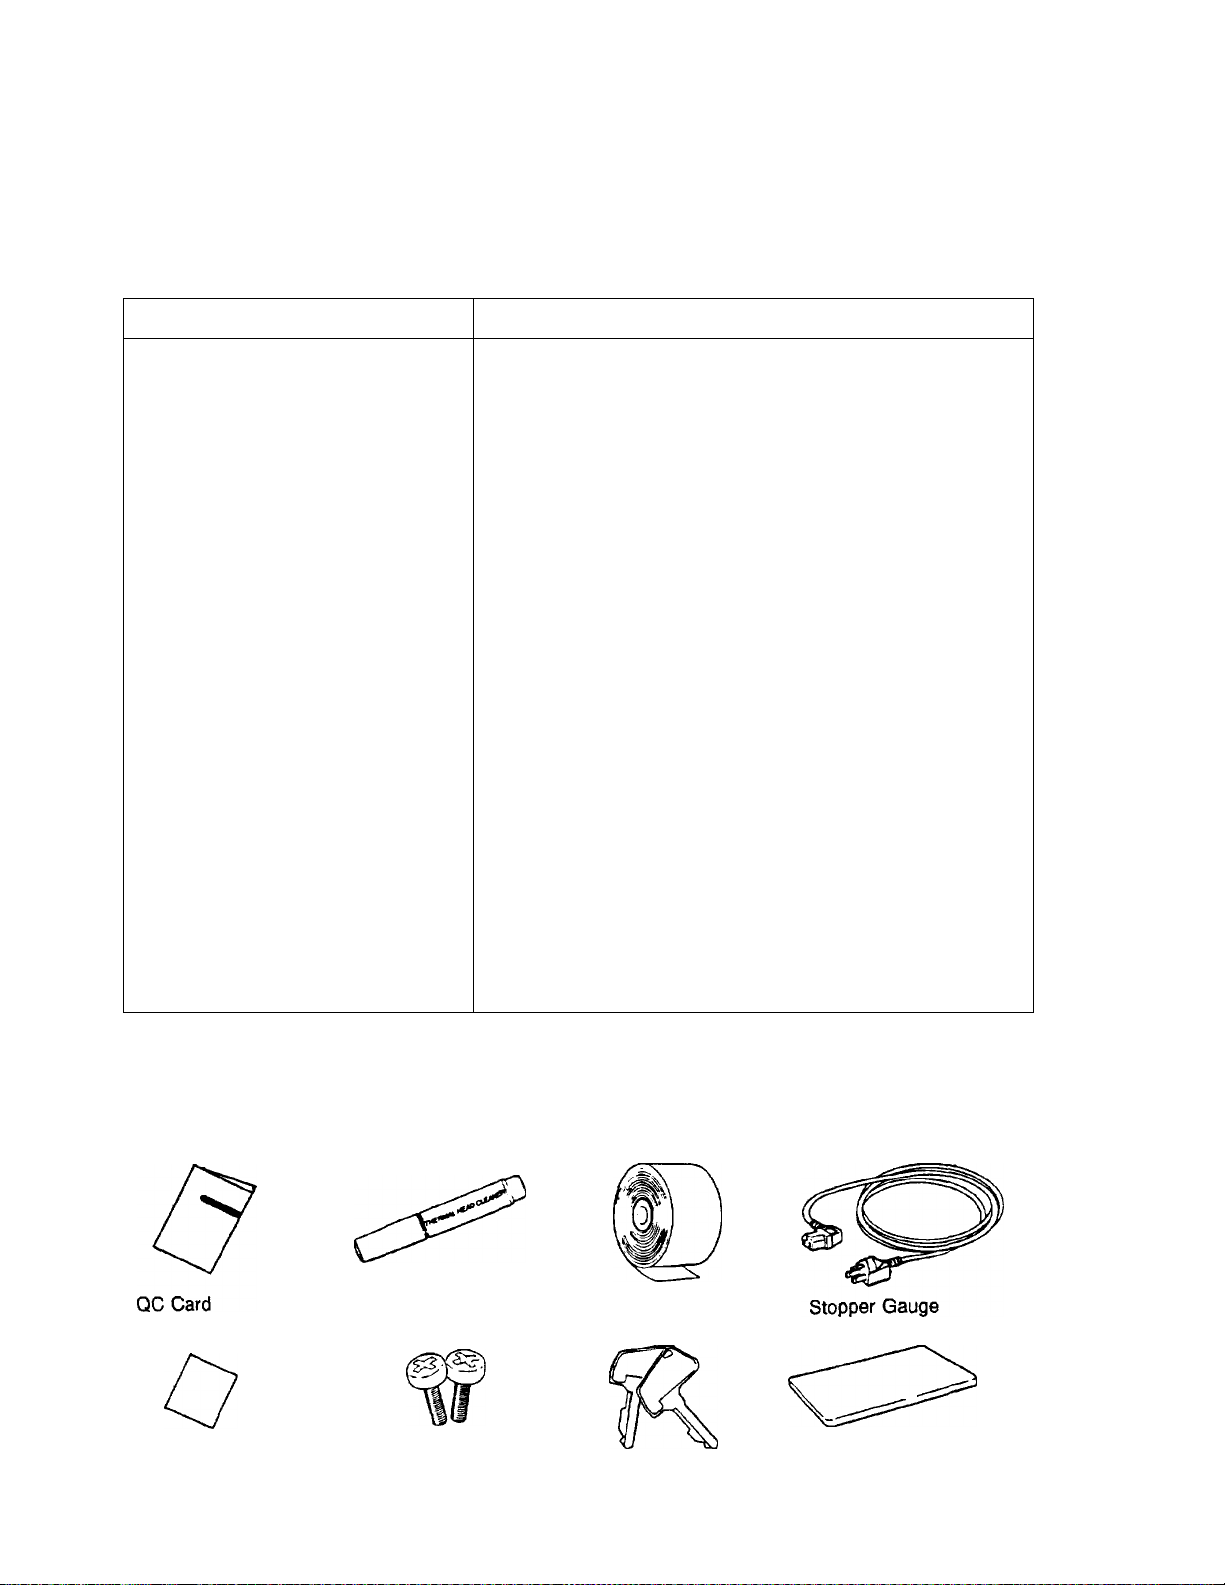
Accessories
Owner’s Manual Thermal Head Cleaner
Remote Attaching Screw
M4x8
MA and SE Keys
2- 1
Label
Power Cord
Page 8
2. SPECIFICATIONS
Option Kit and Device
EM1-31059
Option KH and Device
Model Name
DR-1 CMT Loader Used to load the CMT with PLU file,
PL-3
PL-3S
PC-XT
FKB-2381-001
FKB-2381-101
OP-66-32K Expansion RAM Kit
OP-66-PL
OP-66-PL-TMCC Program Loader Kit with
OP-66-FUN-
TMCC
MC-128-EX
MC-256-EX
OP-66-PCKEY
KS-60-1
Program Loader Used to load the FDK with PLU file,
Scale System FDK and RS232C Cable
PC Keyboard Used to enter the programming menu. IBM
Program Loader Kit
Communication l/F (TMCC-3)
FUN System with
Communication l/F (TMCC-3)
Memory Card
PC Keyboard Adapter
Label Cassette Case
Option KIT Name
Ingredient file and other data.
Ingredient file and other data.
A floppy disk and a cable for the PL-3.
Used to extend PLUs and ingredient
messages. (32KB xi Opes, contained)
PC Board for use of a memory card.
PC Board for use of a memory card
and the In-line system.
PC Board for use of the FUN system
and the In-line system.
Used to load PLU file. Ingredient file
and LOGO file into.
Used to connect a PC Keyboard.
It is convenient to change several kinds
of labels.
Description
Maker
AIWA
TEC
TEC
FUJITSU
FUJITSU
TEC
TEC
TEC
TEC
TEC
TEC
TEC
TEC
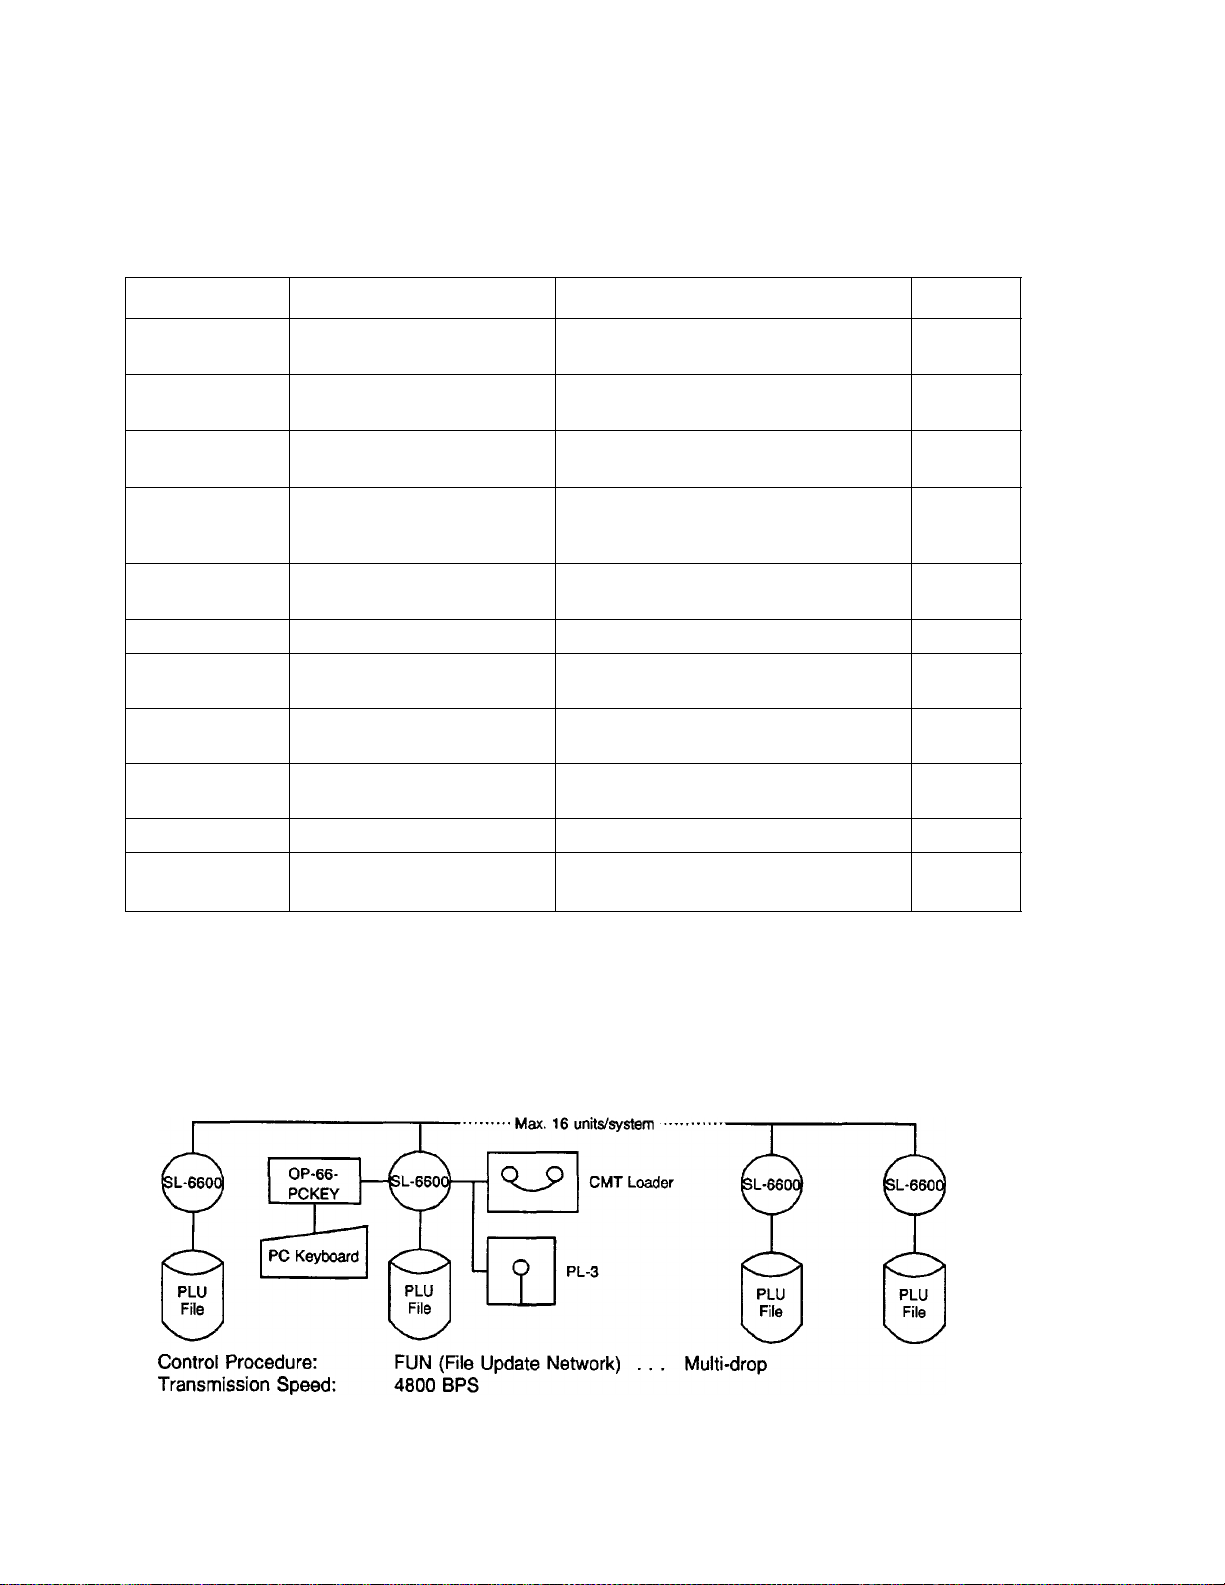
■ FUN System
The File Update Network (F.U.N. System) connector is standard with the SL66. The F.U.N. System
allows up to 16 units to be connected using standard telephone cables for the purpose of PLU file
maintenance. The operator may send PLU and price change information from any scale in the
network to all other scales quickly and simply.
■ System Configuration
Number of unit/system: Max. 16 units
2- 2
Page 9

3. NAME AND FUNCTION OF EACH PART
3. NAME AND FUNCTION OF EACH PART
3.1 OVERVIEW
EMI-31059
3.1 OVERVIEW
3.2 REMOTE DISPLAY
CAPACITY 30x0.01 lbs
WEIGHT lbs
NET PREPACK
UNIT PRICE $
TOTAL PRICE $
INLINE ERROR
TEC
SL-6600
WEIGHT DISPLAY
• NET Lamp: Lights when tare is subtracted
• PREPACK Lamp: Lights when the
depressed.
UNIT PRICE DISPLAY
TOTAL PRICE DISPLAY
• INLINE Lamp: Lights when the scale is in the
IN-LINE mode.
• ERROR Lamp: Lights when this scale is
improperly operated or there is a
function error.
SAVE
key is
3-1
Page 10

3. NAME AND FUNCTION OF EACH PART
3.3 CONTROL LOCK
The control lock has seven marked positions.
There are two control keys which will operate these locks.
Each of the following positions on the control lock serves a
different function.
EM 1-31059
3.3 CONTROL LOCK
Mode Switch
Mode Switch (1)
AUTO
MANUAL
Position
PROG.
CMT.
REG.
M. DOWN
REWRAP
X (Read) This position is used to read all the accumulated
Z (Reset) This position is used to reset all item file totals.
BLANK
“AUTO”
When the weight becomes stable, the label will automatically be issued.
position:
“MANUAL"
eight becomes stable, the label will be issued by depressinc
the
PRT/*
key.
With the manager key in this position, it is available
to program data in the PLU file. Store Address,
Printing Position, Date, Time, Initial Set, and Bar
Code Format, etc., may also be programmed.
This position is the normal control lock position
which allows the issuance of printed label.
In the Markdown position, it is available to
designate an item for discount pricing.
In the Rewrap position, it is available to designate
an item for rewrapping products.
sales totals stored in the total memory.
No function.
position:
Function
Mode Switch (2)
WEIGH
FIX
BY COUNT
“WEIGH”
This position is used in_ the weighing function of the SL-6600.
“FIX”
The Unit Price is entered directly as the Total Price on calling up the
PLU item and that the Total Price cannot be changed by any
subsequent weighing (Fix Price function).
“BY COUNT”
It is available to produce labels which contain information on quantity
pricing, instead of weight.
position:
position:
position:
3-2
Page 11
3. NAME AND FUNCTION OF EACH PART
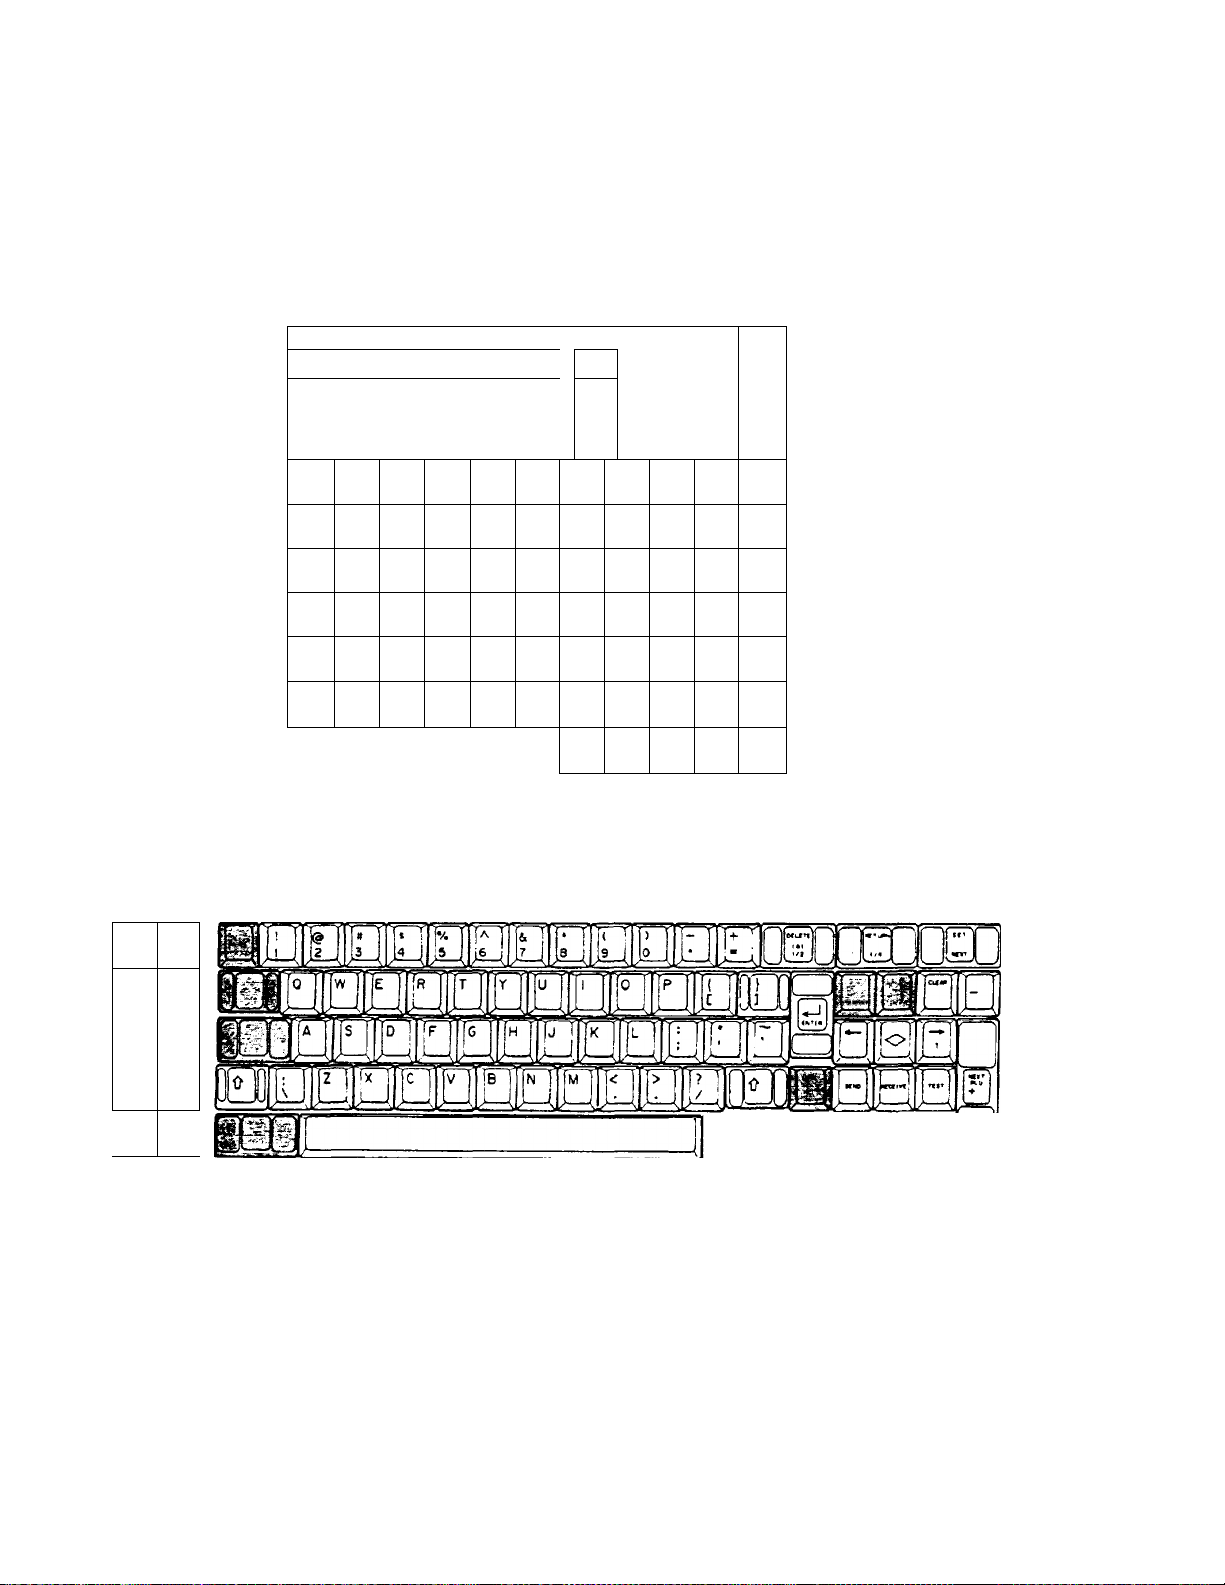
3.4 KEY LAYOUT
■ Programming Keyboard
EMI-31059
3.4 KEY LAYOUT
PC Keyboard
CLEAR
PROG.
1
1 2
Q
!
A\s
ZiX
COMMODITY NAME
SET
SHIFT
NEXT
ENTER
O
#
3
+
W(E)R
]
DAF G{H
A
C
NEXT
AUTO
CODE
PLU
4—
—
%
$
4
5
/
T
£
V B N
SEND
ft
6
Y U
DARK
LIGHT
RECEI
VE
DELE
TE
1/2 (A)
/
7
1
J
i
M
FEED
J-CONTRAST
CHAN
DELE
GE
PLU
DELE
INSERT
TE (B)
\
8
<
I
>
K L
t
SPACE
TE
PLU
7
9
0
T A
TEST
RETU
RN 1/4
<9
0
>
P
la
ZERO
,d
0MMt|
►u- I
J
UT-1
i
NOTE: This key layout is for the keyboard being used with a scale.
3-3
Page 12

3. NAME AND FUNCTION OF EACH PART
• Programming Key Functions
EMI-31059
3.4 KEY LAYOUT
Key
CLEAR
SHIFT
SET
NEXT
NEXT
PLU
AUTO
CODE
CHANGE
DELETE
PLU
PLU
Function
This key allow the clearing of numeric entries prior to the depression of
another function key.
It is also used to release the scale from the error mode.
This key is used to select the upper or lower character indicated on the
keytop when setting a commodity name, ingredient message, etc.
(on scale)
This key use to recall the next PLU# ( +1) of the PLU# currently recalled.
It is also used for label format # setting when labels are issued in
succession. When this key is pressed, three labels are issued
automatically.
This key is used to recall the PLU# which is registered next to the currently
recalled PLU#.
It is also used to skip the digit when setting the bar code format.
This key is used to set the auto code for UPC#.
This key is used to change the PLU# currently recalled.
It is also used to set label format #.
When a PLU is no longer to be maintained in the PLU file, this key is used
to remove it. When an ingredient is no longer to be maintained in the
ingredient file, this key is used to remove it.
TEST
ENTER
DELETE
1/2 (A)
This key is used to print out the data set in the currently recalled PLU.
It is also used to check for the laber print position.
During programming, this key is used to enter data.
This key is used to set the free zone of the auto code for UPC#, back the
digit when setting the bar code format, and return the setting line to the first
line while setting the second line and during the setting of the commodity
name, store address or ingredient message, etc.
This key is used to back the character when setting the commodity name,
ingredient message, etc.
This key is used to skip the character when setting the commodity name,
ingredient message, etc.
When setting the unit price for the weighed PLU, this key is used to select
the unit of weight. (100 g or kg)
This key is used to delete a character when setting the commodity name,
ingredient message, etc.
3-4
Page 13

3. NAME AND FUNCTION OF EACH PART
Key Function
EM1-31059
3.4 KEY LAYOUT
INSERT
PELETE
(B)
RETURN
1/4
t
ISPACE
PROG.
O
SEND
RECEIVE
This key is used to insert a space at the digits when setting the commodity
name, ingredient message, etc.
This key is used to clear all characters on the current setting line when
setting the commodity name, ingredient message, etc.
This key is used to move the setting line when setting commodity name,
store address, or ingredient message, etc.
This key is used to insert blank spaces in descriptors.
This key is used to access each programming menu.
This key is used to select selectable items.
This key is used to store ingredient message setting data temporarily in the
work buffer during setting an ingredient message with programming menu
#11.
This key is used to recall the data, which has been stored in the work buffer
by the [send I key.
While this key is pressed down, press a character key to set the small letter
of alphabet, or upper-case character indicated on the upper area of the
(on PC Key)
Character Keys
keytop. When this key is released, the shifted status is cancelled.
Character keys are used to set the upper or lower-case character indicated
on the keytop.
NOTE: When setting alphabet data such as commodity name, ingredient message, etc., through the
PC Keyboard, either small or capital letters can be selected by pushing CAPS/LOCK key.
Pushing the | ^ | key will reverse the characters.
When the power is turned off or control lock is switched, the PC keyboard will be initialized to
select capital letters.
3- 5
Page 14

3. NAME AND FUNCTION OF EACH PART
Speed Key and Operation Keyboard
EMI-31059
3.4 KEY LAYOUT
COMMODITY NAME
1 2
12
11
22
21
32
31
41 42 43 44 45 46 47
52 53 54
51
4 5 6 7 8
3
14 15
13
24
23
33
25 26
34
35 36
55
16
56
FEED TEST
DARK
LIGHT
17
27
37
57
ONTRAST
9
18 19 20
29 30
28
38 39
49
48
59 60
58
ZERO
NEXT
PROG.
PLU
FOR
o
7
10
8 9 LOGO
4
5 6
1 2 3
40
50
0
T
PLU
WEIGH AUTO
FIX
BfB
;OUNT M
BY COUNT ^ MANUAL
VOID
V
^TM
C
PR^
REG
PROG.,
CMT.
PRESET
COUNT
GRADE
LINE
SAVE
1/2
1/4
RE-I
WRAP
U
NOTE; The characters (1~60) indicated on the speed keys are shown for the convenience of
explanation in this manual. The indications on the actual unit are not as shown in this
illustration
• Operation Key Functions
Name of Key Function
Numeric Keys
CLEAR Key
TARE Key
PLU Key
PRINT Key
PLU
PRT/*
These keys are used to enter numeric data (PLU#, unit price, tare
weight, etc.).
This key is used to ciear an entry of numeric keys, return the scale
condition to the normal weighing mode, release the scale from the
SAVE or ERROR mode, and suspend batch printing.
This key is also used to stop the label issue.
This key is used to subtract tare weight.
This key is used to recall a PLU number or return to the initial display.
This key is used for issuing total reports.
If the Mode Switch (1) is set to the MANUAL position, it has the
function of label issue.
It is also used to resume batch printing if it has been suspended.
3- 6
Page 15

3. NAME AND FUNCTION OF EACH PART
EMI-31059
3.4 KEY LAYOUT
Name of Key
1/2 Key, 1/4 Key
1/2
SAVE Key
SAVE
DATE & TIME Key
DT^
GRADE LINE Key
GRADE
LINE
FOR Key
FOR
VOID Key
VOID
NEXT PLU Key
NEXT
PLU
Function
These Keys are used to calculate the unit price per 1/2 lb or 1/4 lb.
1/4
This key is used after placement of the tare or entry of unit price.
This key is used to indicate the date on the remote display and for
temporary date changes.
TM
This key is used to call the grade line message.
This key is used to generate the zone total report when control lock is
set to the “X” or “Z” position.
This key is used to cancel only one commodity’s data by depressing
this key after its registration.
It is also used to return the operation step to the previous step.
This key is used to call out the next PLU#, and forward the operation
step to the next step.
O
PROGRAM Key
PROG.
PRESET COUNT Key
PRESET
COUNT
LOGO Key
LOGO
SPEED Keys
1
60
In “X” or “Z” control lock position, this key is used to generate the
block total report.
In “REG.” control lock position, this key is used to select whether the
data should be printed on the label or not.
This key Is used to change the unit price and to select a print item for
label print. This key is also used when issuing a combination report
of X (READ) and Z (RESET).
This key is used to preset the number of issuing labels.
This key is used to call the logo data.
These keys are used to call the PLU data of frequently used
commodities.
3- 7
Page 16

3. NAME AND FUNCTION OF EACH PART
EM1-31059
3.4 KEY LAYOUT
Name of Key
FEED Key
TEST Key
ZERO Key
This key is used to feed labels or report paper.
FEED
This key is used to issue test labels.
TEST
This key is used to adjust the ZERO point.
ZERO
Function
4. PROCEDURE BEFORE OPERATION
1. Connect the Power Cord to the AC inlet on the scale and plug in.
2. Adjust the Level Gauge. (See page 5-1.)
3. Connect a PC Keyboard if necessary. (See page 7-1.)
4. Turn on the power.
5. Load the Label or Receipt. (See page 6-1.)
6. Check the status of initial setting and bar code format, then programming menu No. 3, 1 and
4.
If required, execute the programming menu No. 2, 8, 9, 11, 14, 15, 17 and so on.
7. Check the date of the scale before operation every day. (See page 7-17.)
8. Make a test print before operation every day.
(1) Turn the control key to REG. position.
(2) Press
9. Recall the PLU which contains the unit price used in weighing mode, and place a weight on
the platter and check a correct price is displayed for the preset unit price.
10. Label issued is ready.
TEST
Key, and the test label is issued.
3- 8
Page 17
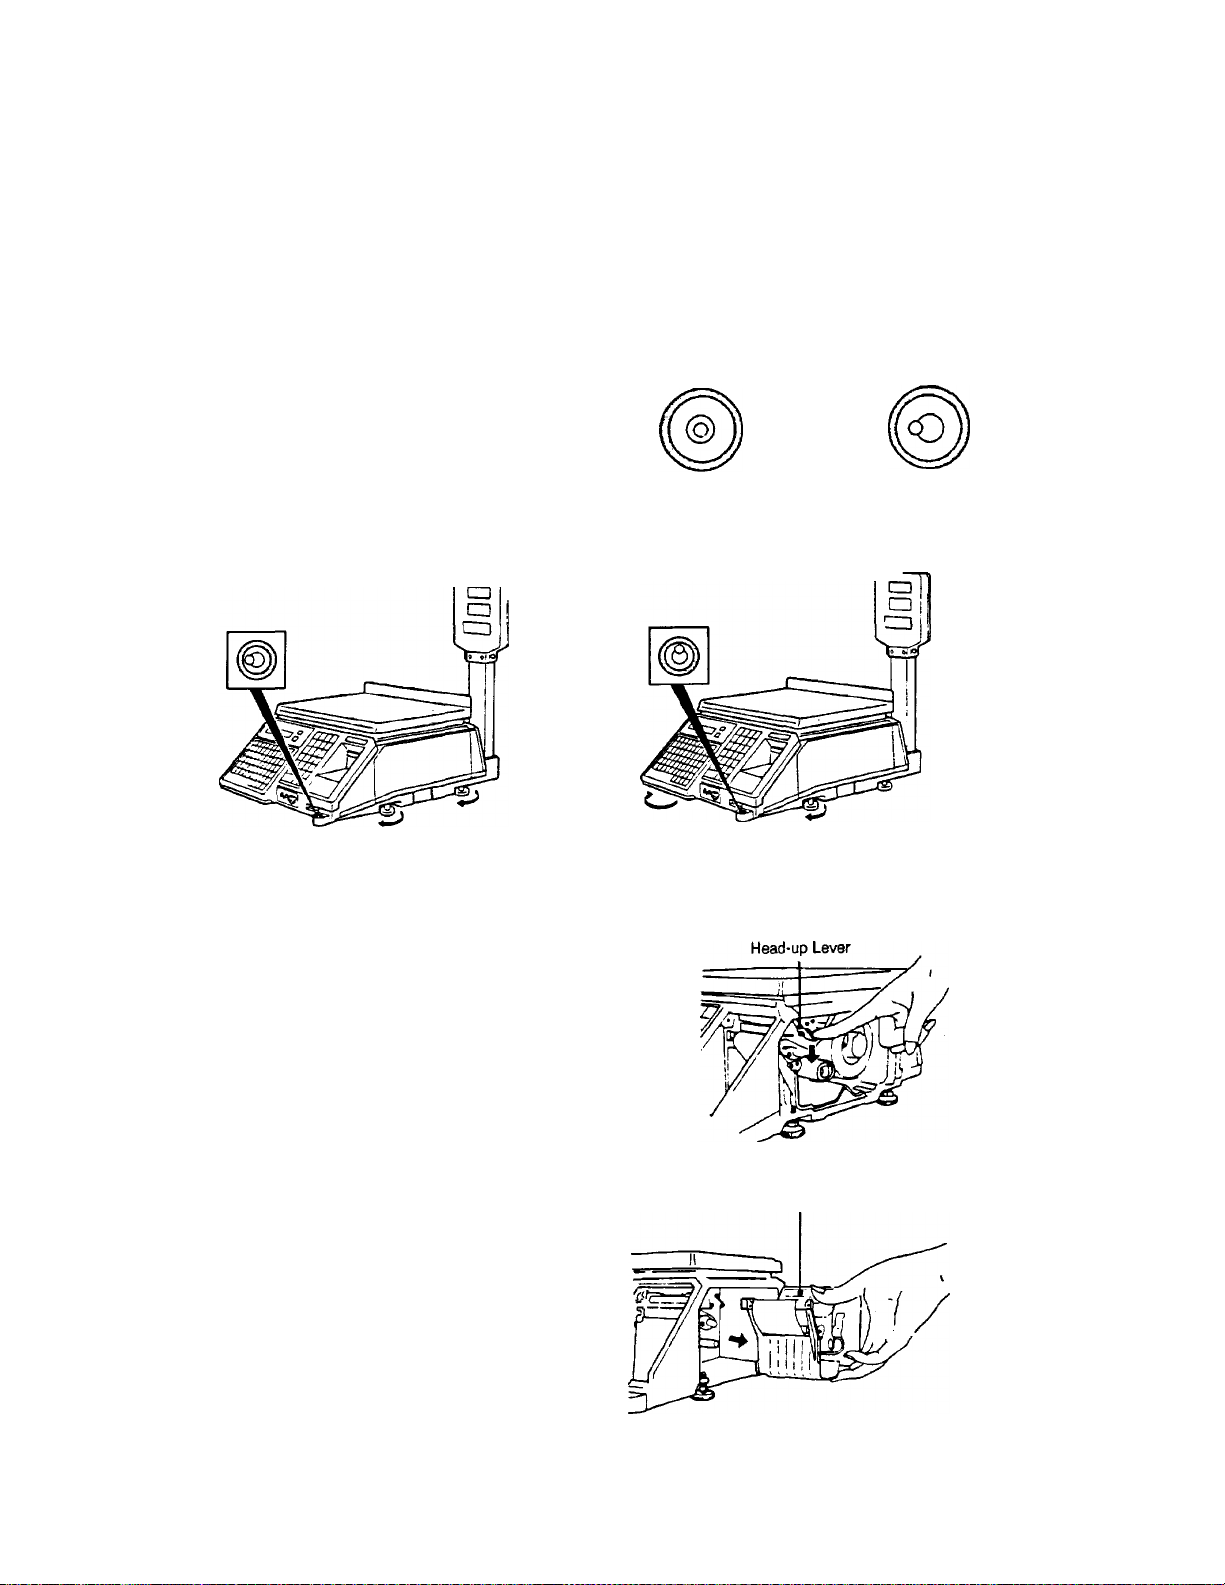
5. LEVEL ADJUSTMENT
5. LEVEL ADJUSTMENT
Set the scale on a stable and level surface.
Level the scale by turning the adjustable legs so
that the air bubble is inside the center circle.
EM1-31059
5. LEVEL ADJUSTMENT
Level Gauge
Correct incorrect
When the air bubble moves toward the left side,
turn the right adjustable legs clockwise.
When the air bubble moves toward rear, turn the
front adjustable legs clockwise.
1
6. REMOVAL AND REPLACEMENT OF LABEL ROLL
1. Remove the printer cover and right side
cover. Then push the head-up lever in the
direction indicated by the arrow.
Pull out the label cassette and remove the
core of the label roll and the label backing
paper.
NOTE:
To remove the label backing paper,
loosen the paper by turning the
paper winding shaft
counterclockwise and remove the
paper stopper.
Label Cassette
5- 1
Page 18

6. REMOVAL AND REPLACEMENT OF LABEL ROLL
REMOVAL AND REPLACEMENT OF LABEL ROLL
EMI-31059
3. Referring to the figure on the right, set the
label roll on the label cassette.
4. Set the label cassette.
Push down the print head, and close the
covers.
NOTE:
When the label roll was replaced,
press the feed key to confirm that
the label is issued correctly.
Roll Stopper
7. PROGRAMMING PROCEDURES
• Selection of Programming Menu
Programming can be done through the Programming Keyboard on the SL-6600 or a PC Keyboard via
the OP-66-PCKEY. The Operation Keyboard cannot be used for programming.
6-1
Page 19
7. PROGRAMMING PROCEDURES
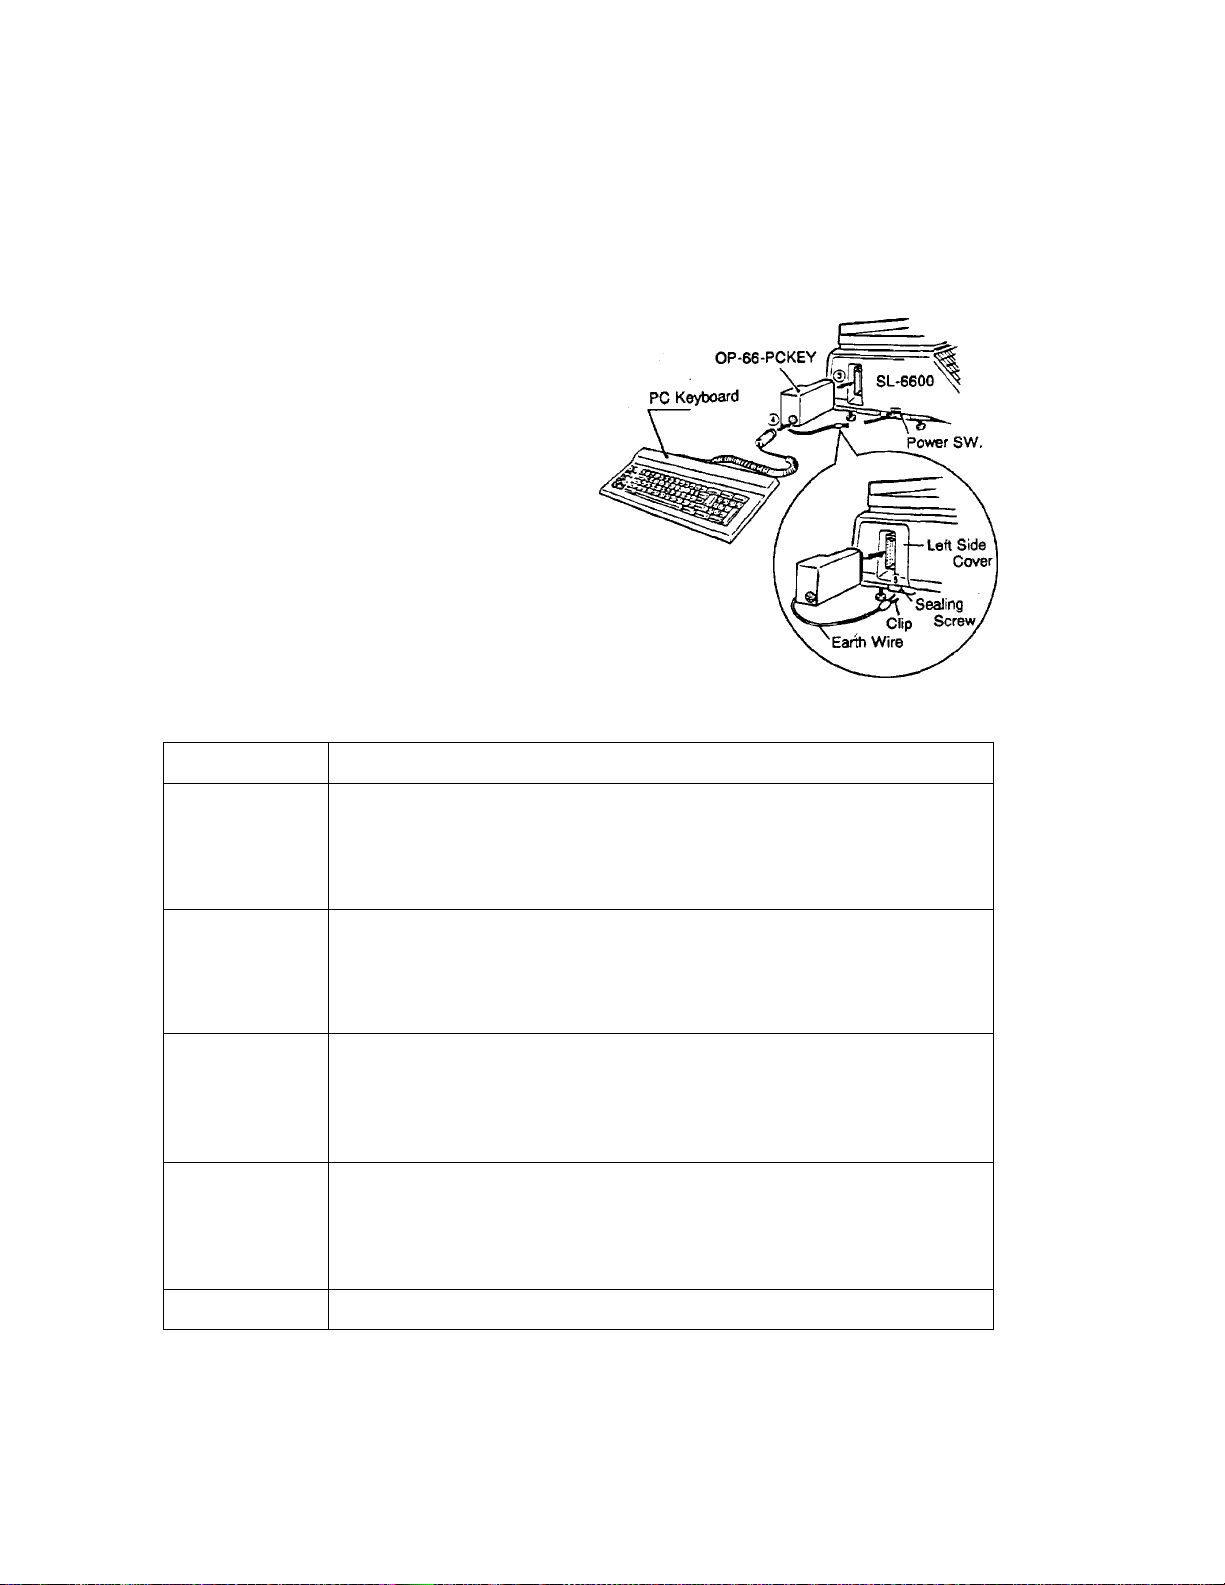
HOW TO CONNECT THE PC KEYBOARD
(1) Prepare option kit “OP-66-PCKEY”.
(2) Turn the power switch of the scale to the
OFF position.
(3) Connect the OP-66-PCKEY to the CMT or
PL-3 connector of the scale.
(4) Connect the PC Keyboard plug into the socket
of the OP-66-PCKEY.
(5) Hook the clip of the earth wire to the sealing
screw.
Table 1: Programming Menu Numbers and Their Items
EMI-31059
HOW TO CONNECT THE PC KEYBOARD
Menu No.
0 Changing Unit Price
1
2 Setting Store Address and Commercial Message
3 Setting Print Format Number and Adjusting Print Position
4
5 CMT/PL-3 Operations
6
7
8 Setting Speed Key
9 Setting Combination Report
10
11 Setting Ingredient Description
12
13 Switching In-iine/Off-line
14
15 Setting Department Number
16
17
18 Memory Card Operation
20
21
Setting PLU Data
Setting Date, Time, Machine Number, and Store Number
Initial Setting
Changing Bar Code Format
Changing Displayed Titles
Issuing Confirmation Label
Setting Special Information
Transferring Logo Data
Setting Grade Line
Transmitting PLU File, Unit Price, Address and Speed Key (FUN System)
Changing Printing Title for Period of Relish
Item
7- 1
Page 20
7. PROGRAMMING PROCEDURES
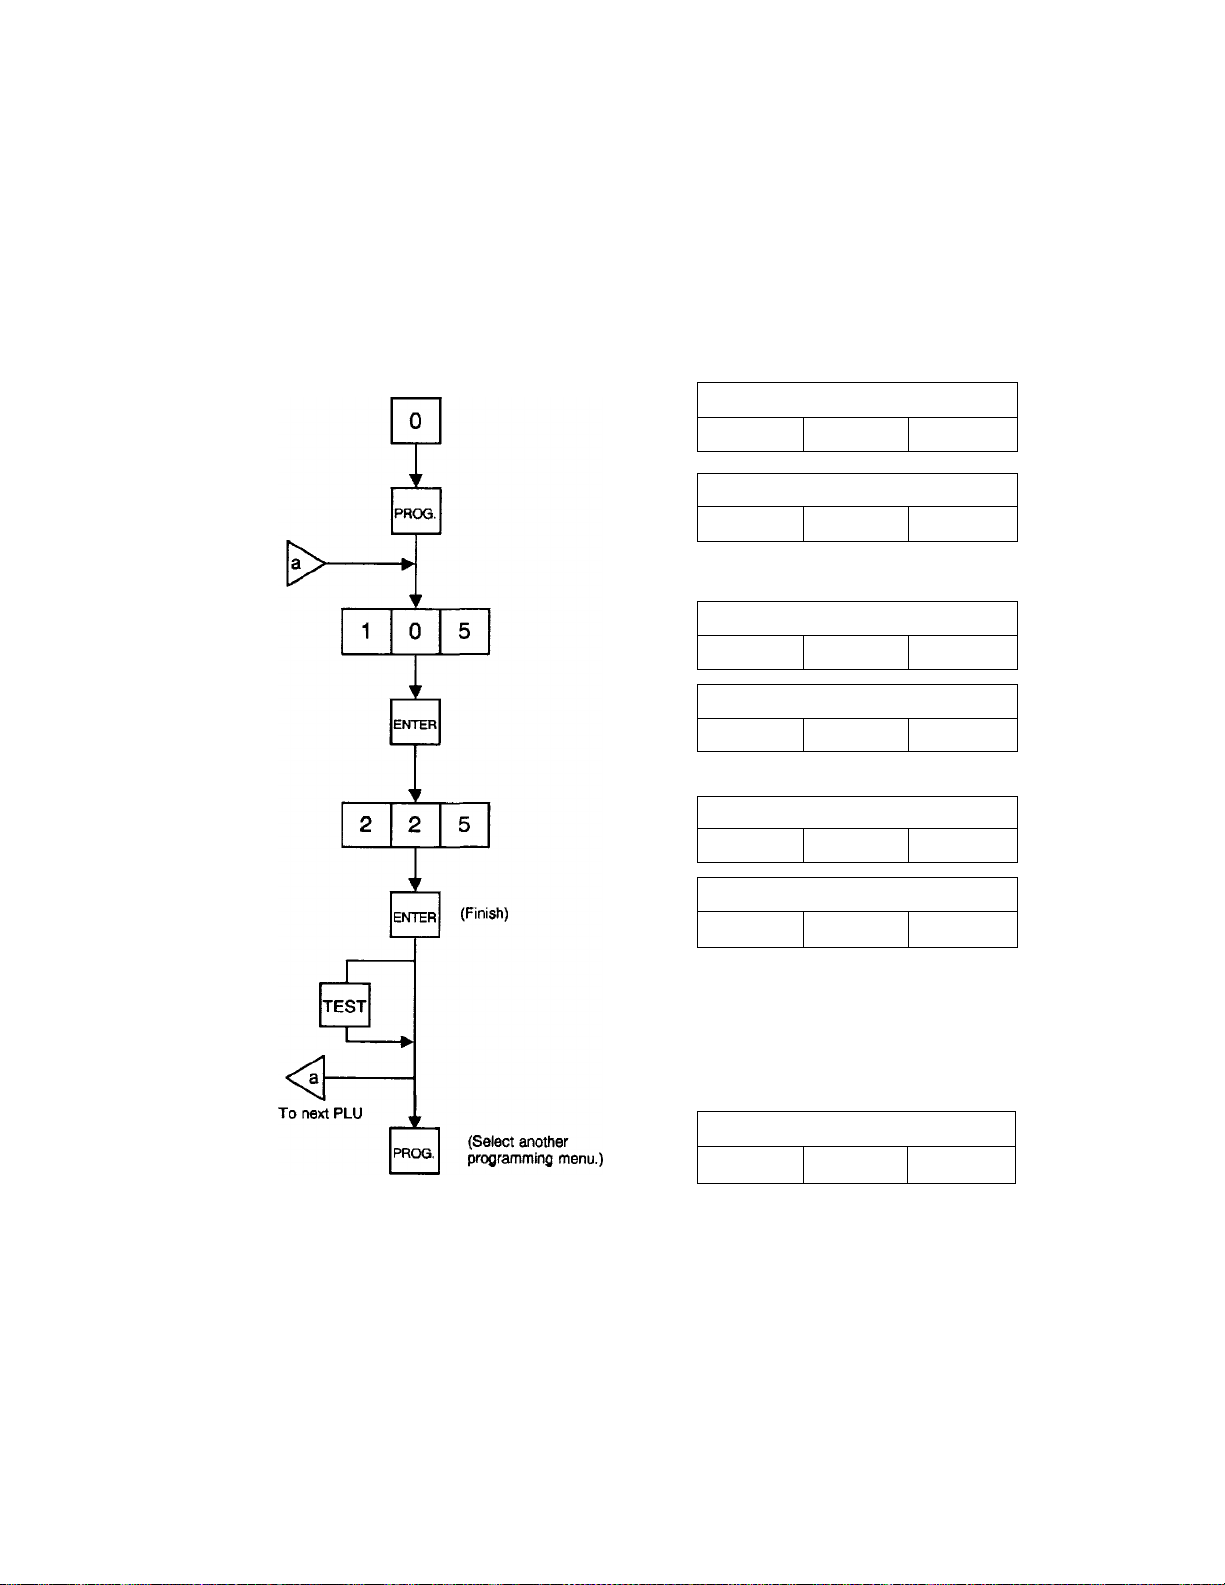
Menu No. 0
• Changing Unit Price
The unit price in the PLU that are previously stored can be changed with this menu.
EM1-31059
Menu No. 0
Select programming
menu #0.
Enter the PLU#.
(Max. 6 digits)
Enter the new unit
price.
(Max. 4 digits)
PLU DATA
EDIT
P
ENTER PLU
#
PO 1
The smaliest PLU# in the
fiie is displayed.
ENTER PLU #
PO
ENTER U.PRICE
PO
Unit price
ENTER U.PRICE
PO
ENTER PLU #
PO 105
_______
2.50
_______
2.25
0
T
105
T
The setting iabel is
issued.
PLU DATA EDIT
NOTES; 1. Recalling a PLU# that has not been stored in the PLU file will result in an error.
2. It is not available to change the unit price of a PLU if it has been set to “open price”.
7- 2
P
0
Page 21

7. PROGRAMMING PROCEDURES
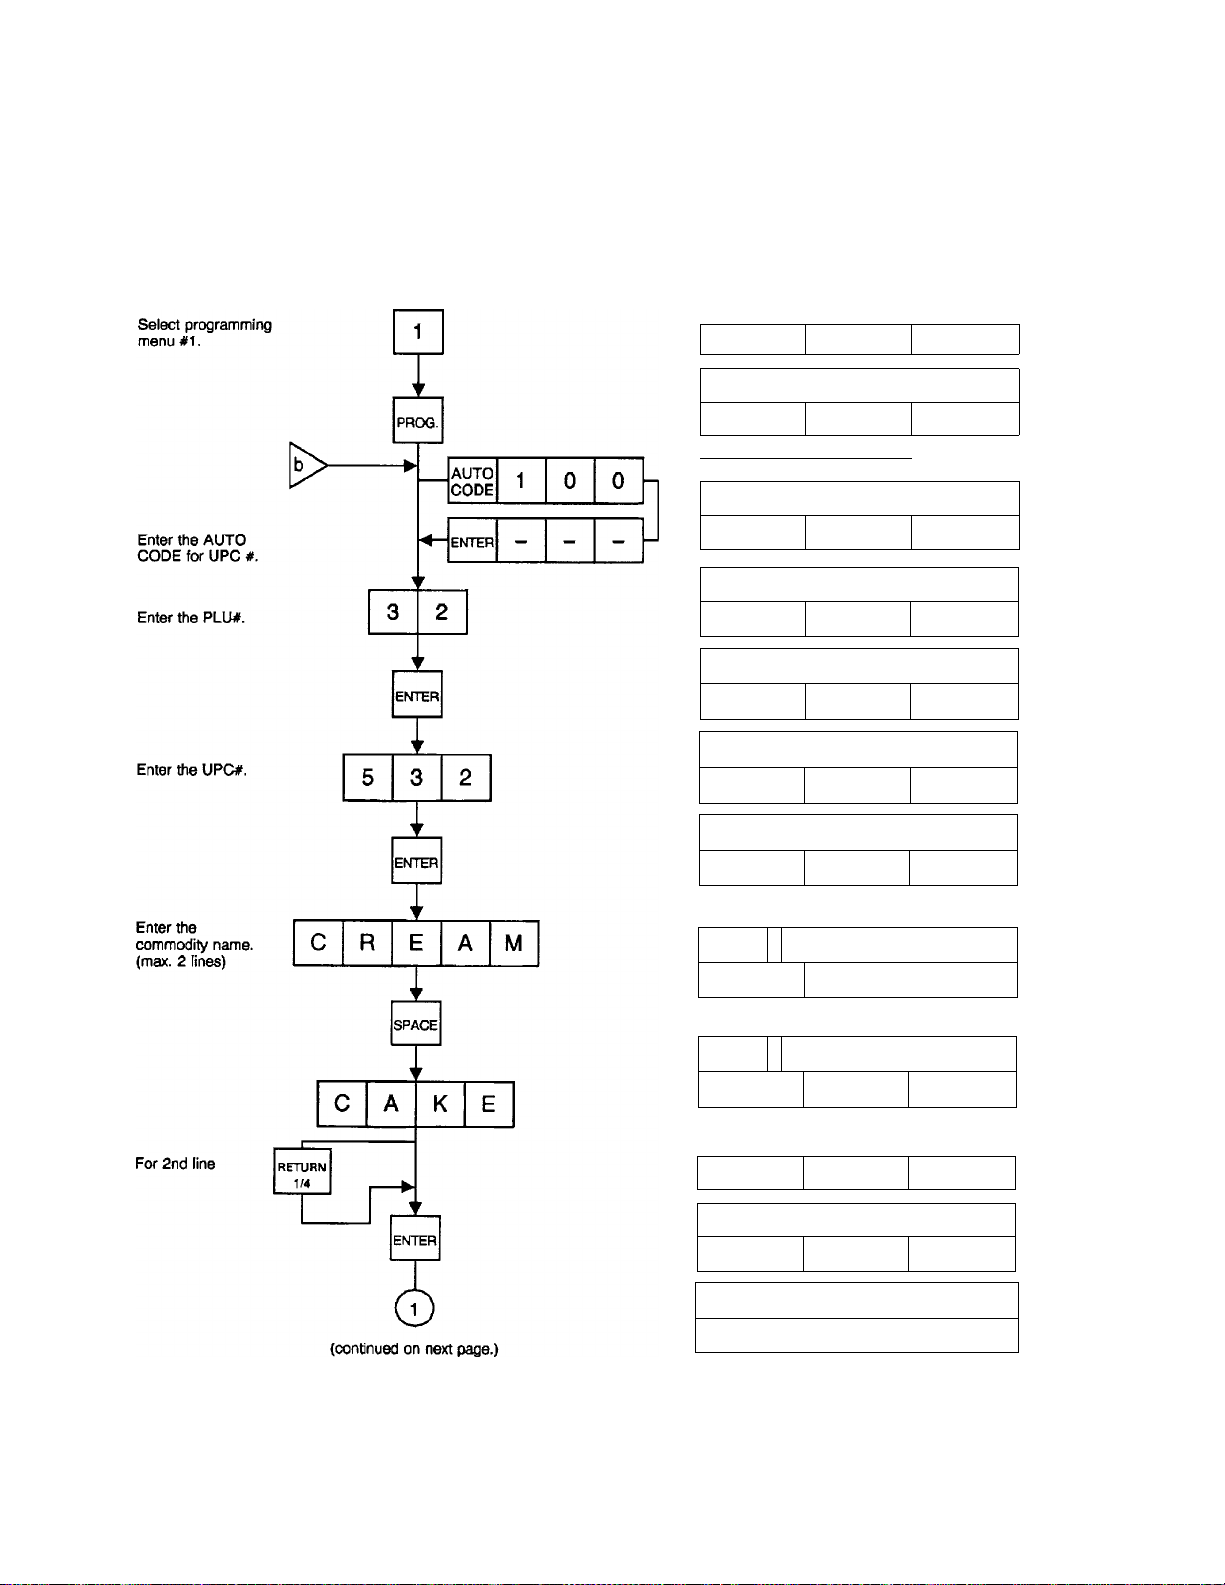
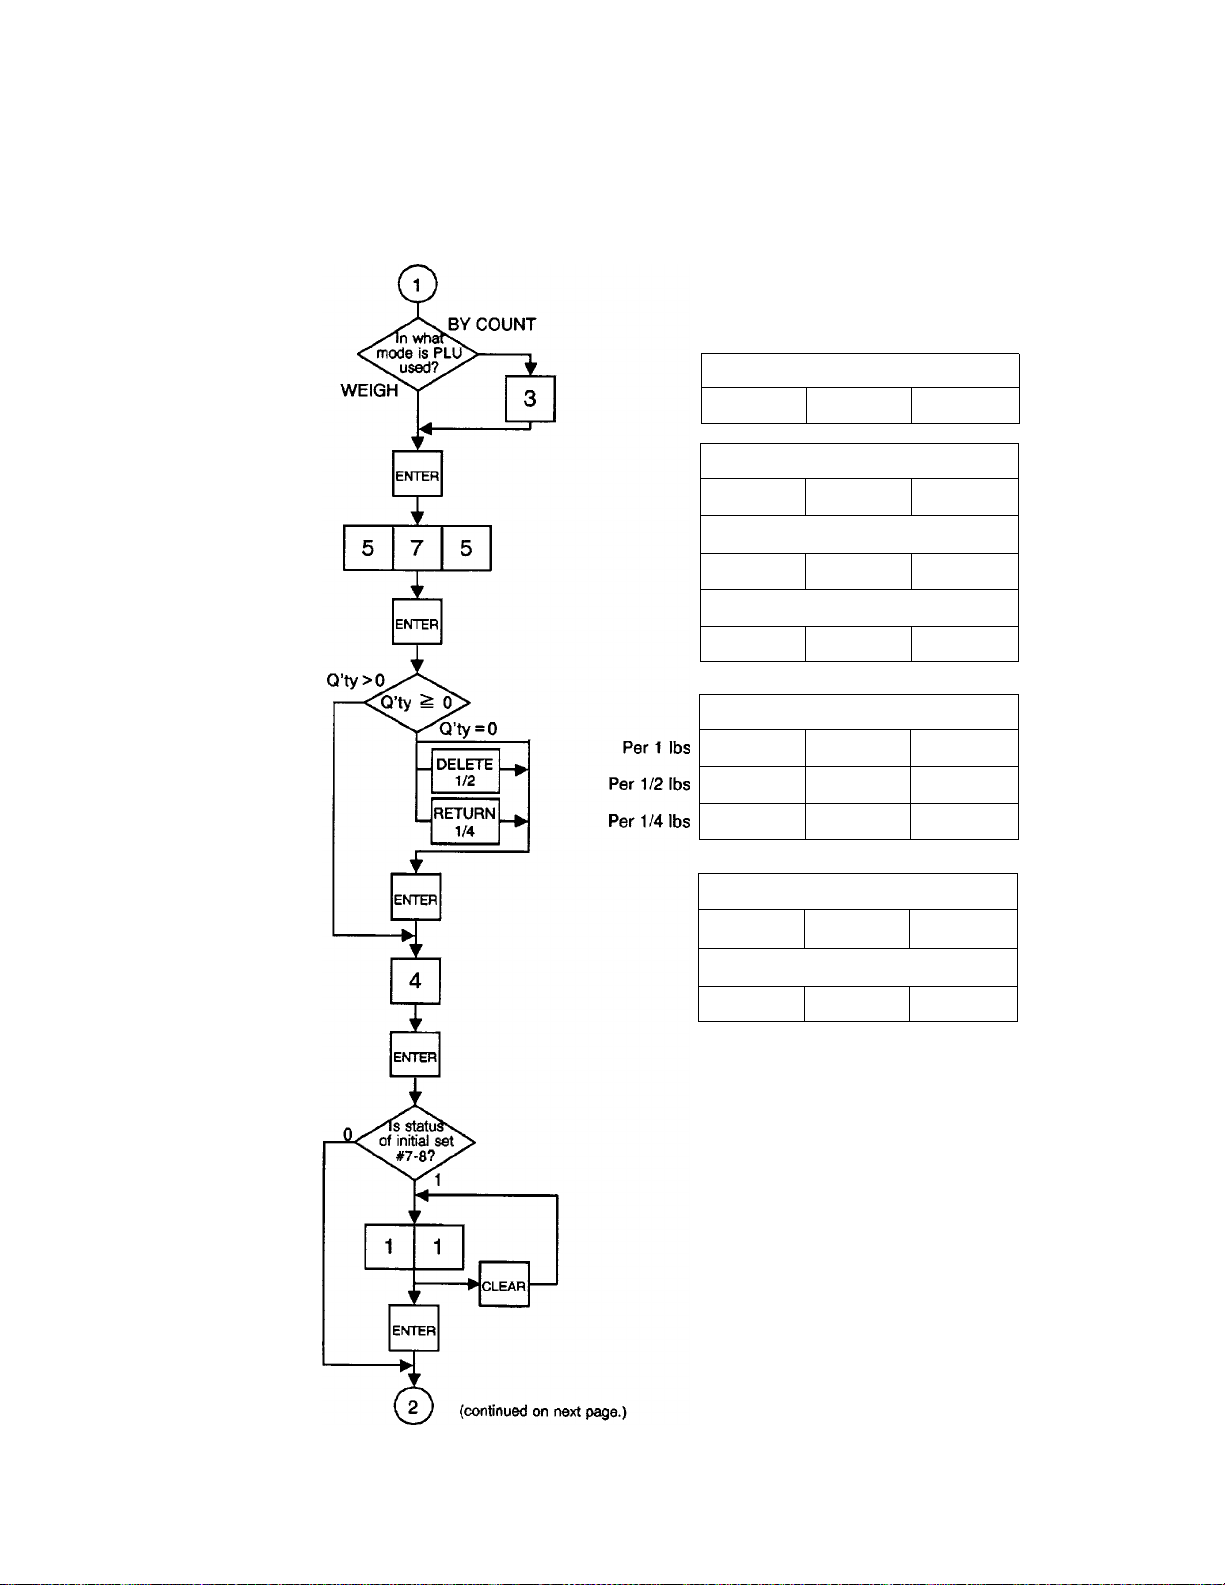
Setting PLU Data
1
PRCX3.
EM1-31059
Menu No. 1
Menu No. 1
->
AUTO Set auto code
CODE
Enter PLU#.
(max. 6 dig.) (max. 6 dig.)
WEIGH
or FIX
CHANGE
PLU
for the UPC #.
ENTER
BY COUNT
Enter quantity for that
price, (max. 2 dig.)
Enter current
PLU #.
ENTER
Enter UPC#.
ENTER
Enter tare weight
Enter new
PLU #.
Enter commodity name.
(mas. 26 chars, x 2 lines)
ENTER - - enter
(max. 4 dig.)
ENTER
(max. 4 dig.)
ENTER
{Refer to Chart ^.)
Enter PERIOD OF
RELISH (Max. 3 dig.)
ENTER
- TEST
◄
PROG.
DELETE
PLU
-----------
(Select another programming menu.)
Enter
PLU #.
The setting iabel is issued.
ENTER
(Refer to chart Z.)
7- 3
Page 22
7. PROGRAMMING PROCEDURES
EM 1-31059
Menu No. 1
[Example]
PLU DATA
P
ENTER PLU #
PI 1 1
AUTO CODE
PI
ENTER PLU #
PI 1
ENTER UPC #
PI 2
ENTER UPC #
PI 2
ENTER 1ST LINE
t
1 100
1
-----
32
532
Line No.
CREAM
Number of characters
CREAM
CREAM CAKE
ENTER 2ND
ENTER PIECES
PI 3
PI 3 1 5
PI 3
PI
LINE
PI
PI
3 1
3
4
1 0
1 6
2
10
0
0
7-4
Page 23
7. PROGRAMMING PROCEDURES
EM 1-31059
Menu No. 1
Enter the quantity,
(max. 2 digits)
Enter the unit price,
(max. 4 digits)
Enter the unit price
Enter the shelf life,
(max. 3 digits)
ENTER PIECES
PI 4
ENTER U.PRICE
PI 4
ENTER U.PRICE
PI 4
ENTER F.PRICING
PI 4
ENTER F.PRICING
PI 4
PI 4 L-2
PI
ENTER SHELF LIFE
PI 5
ENTER SHELF LIFE
PI 5 4
3
0.00
5.75
L-1
L-1
4 L-4
Enter the period of
relish.
(max. 3 digits)
ENTER RELISH
PI 5 h
ENTER RELISH
PI 5 1- 11
7- 5
Page 24
7. PROGRAMMING PROCEDURES
EMI-31059
Menu No. 1
NOTES: 1. UPC# is set after overwriting with the data of AUTO CODE.
Ex. 1) Input : 4 5 6 Ex. 2) Input 4 5 6 7
AUTO CODE : 1 2 3--------------- AUTO CODE : 1 2 3
UPC# 123456 UPC# 123567
In the case that just one line of print is used, it is available to program up to 20
characters, including any space with capital letters.
A two line commodity name can also be printed on a label with up to 52 characters
with capital letter (small size) by using the
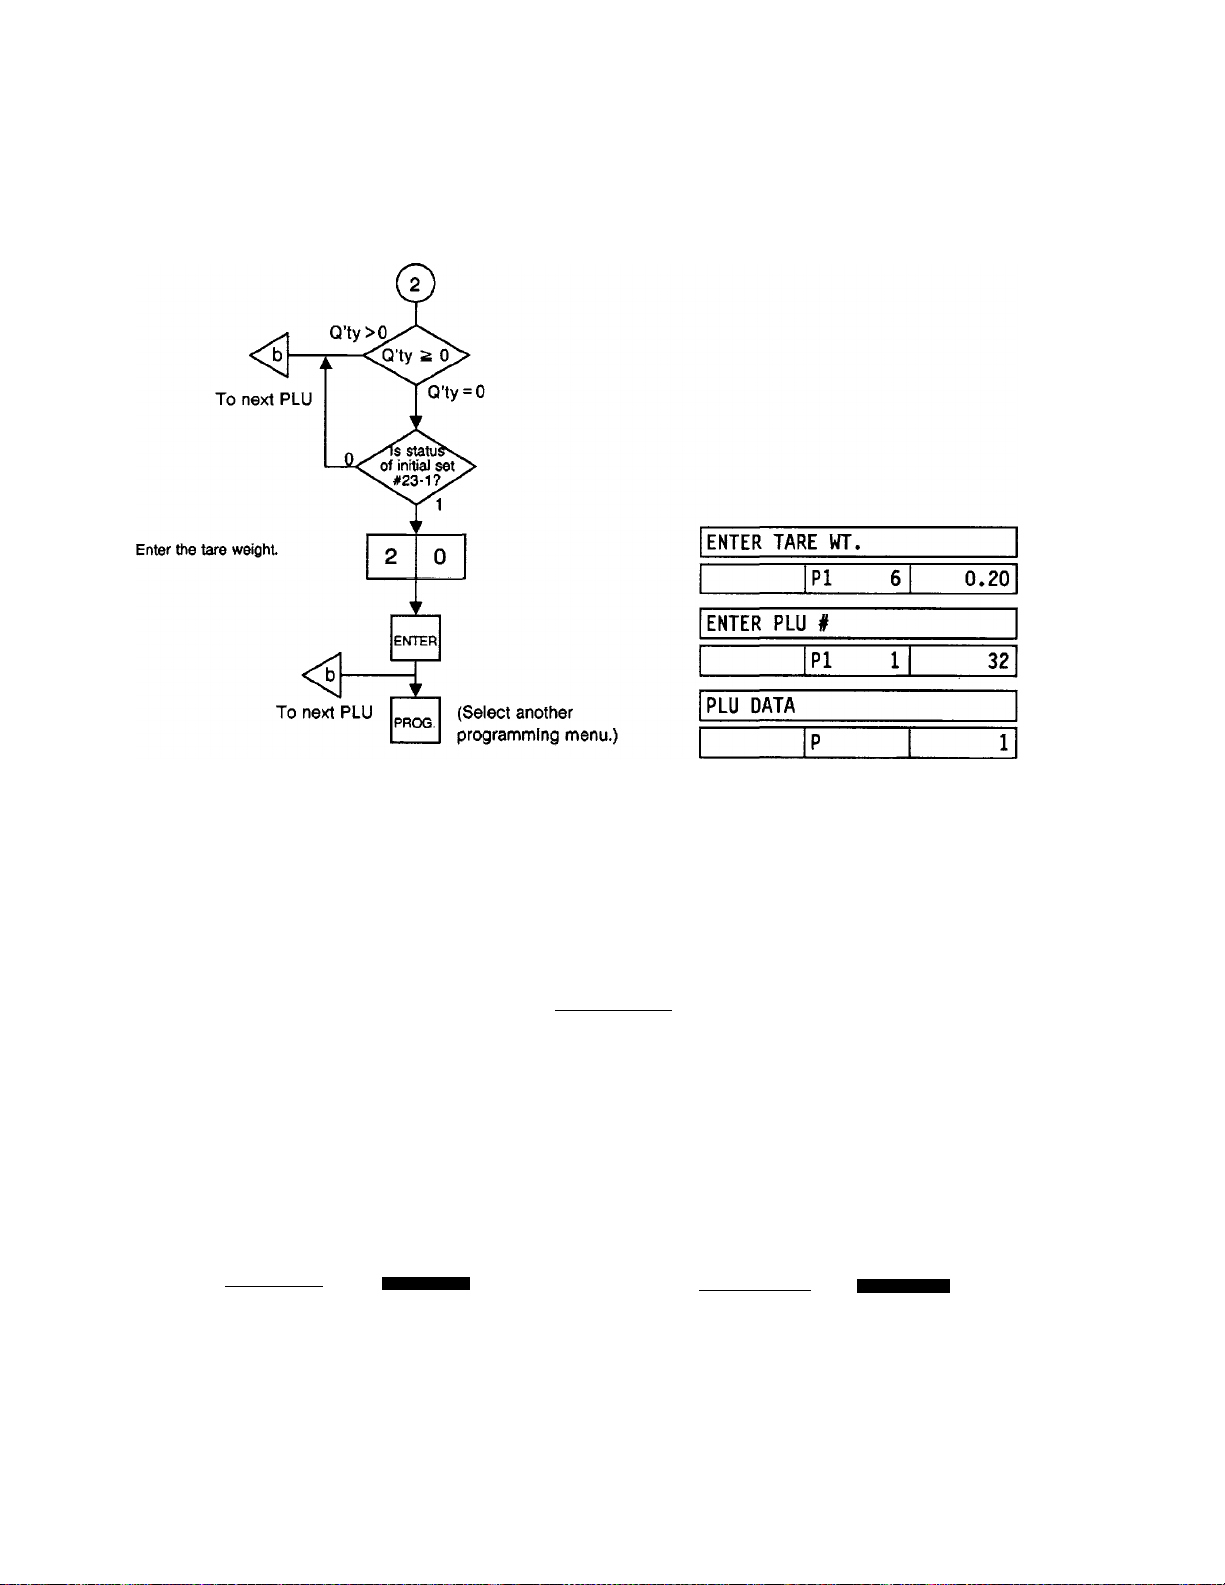
3. PERIOD OF RELISH can be set when the initial set #7-$ is set to 1.
CHEESE 8 ONION BUNS
PACKED 0«
JUL II
sea BY
Quantity
PLU # -J- 000808 1.05 020808 -|- upc # Tare Weieht
(Setting label for PLU of BY COUNT mode)
NETWT Jg PWCE/tta ————^
TEC FOOD MART
\P1A I INCOIN AVF
3 flKB
2
TOTALPRICE^
—Commodity Name
-
Shelf Life
Price per pieces
RETURN 1/4
PLU #
--------------------------------
key.
BEEF LIVER
PACKED ON
JUL II
sai BY
----
000105
— T0.50 0.80 030105-—UPC#
NETWT E? PRICE/lbt3
TEC FOOD MART
I23i LINCOLN AVF
(Setting label for PLU of WEIGHT Mode)
3 -
TOTAL PRICE gg
-Shelf Life
-Unit Price
7- 6
Page 25
7. PROGRAMMING PROCEDURES
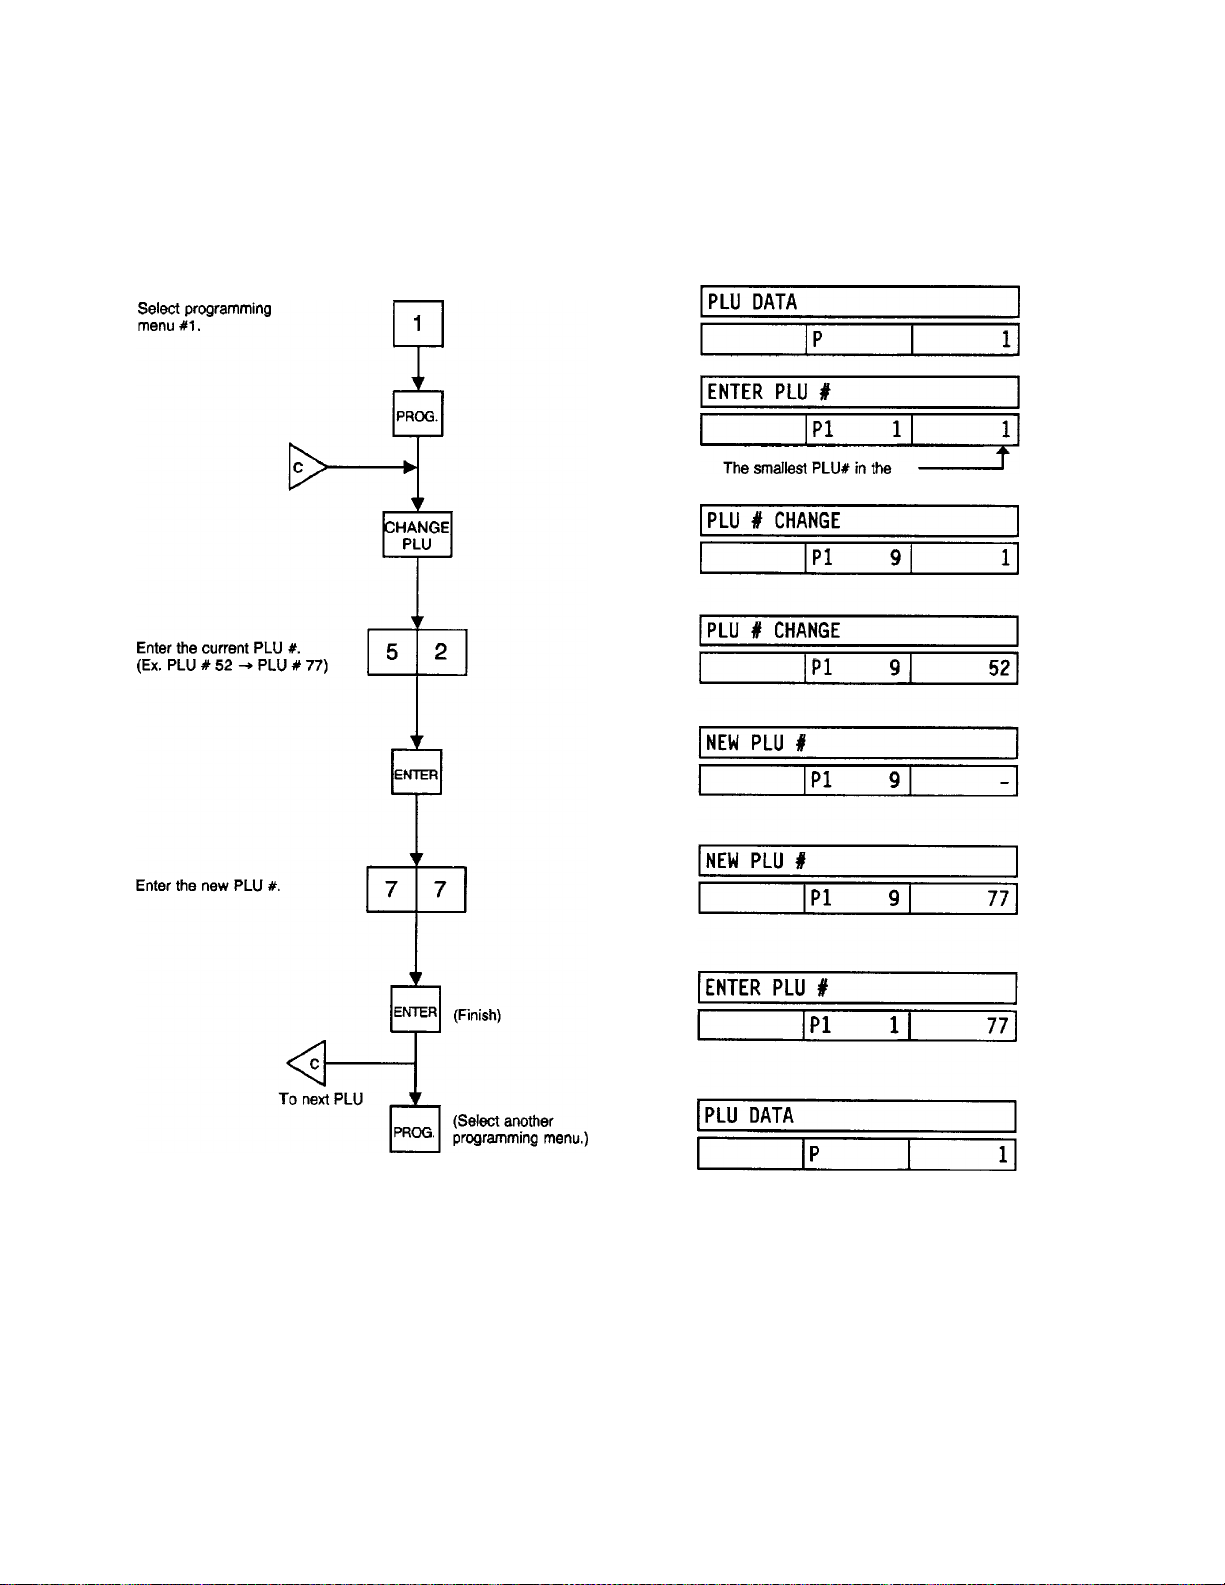
Chart 1: Changing PLU Number
EMI-31059
Menu No. 1
fife is displayed.
NOTE; It is not available to change to a PLU # which has already been used in the PLU file.
7- 7
Page 26

7. PROGRAMMING PROCEDURES
Chart 2: Deleting PLU Data
Ex.) PLU #512 needs to be deleted from the PLU file.
EM1-31059
Menu No. 1
Select programming
menu #1.
Enter the PLU #.
PROG.
DELETE
PLU
ENTER
PROG.
(Finish)
(Select another
programming menu.)
PLU DATA
ENTER PLU #
PLU DELETE
PLU DELETE
ENTER PLU #
PLU DATA
P
PI 1
PI 8
PI 8
PI 1
P
1
1
512
1
1
NOTES: 1. PLU *512 in the PLU We is deleted.
2. If the designated PLU number has not been preset, the procedure will result in an
error.
3. If an error occurs during a PLU deletion, no data will be deleted.
7- 8
Page 27
7. PROGRAMMING PROCEDURES
Menu No. 2
• Setting Store Address or Commercial Message
With the SL-6600 scale, the store address or a commercial message can be set in the memory.
EMI-31059
Menu No. 2
Select programming
menu #2.
Enter the address or
commercial
message.
PROG.
4
C L
RETURN
SHIFT
4 0
I
I
1r
r
1
(
ADDRESS PROG.
ENTER 1ST LINE
P2 1 0
Line No. ^
Number of characters
4 s
440;":
P2 1 3
4401-A BANKERS CIRCLEij
E
ENTER 2ND
P2 1 21
LINE
P2 2
0
ENTER 2ND LINE
P2 2
0
(Li
P2 2
1
r
1
SHIFT
+
T
E
L
(TEL) 404-449-3040
P2
1
0
PROG.
NOTE: The store address or a commercial message can be set in two lines. Each line can contain up to
26 characters including spaces. Before setting the second line, depress the RETURN 1/4 [^ey.
0
(Select another
programming menu.)
7- 9
ADDRESS PROG.
P
18
2
Page 28
EMI-31059
7. PROGRAMMING PROCEDURES
Menu No. 3
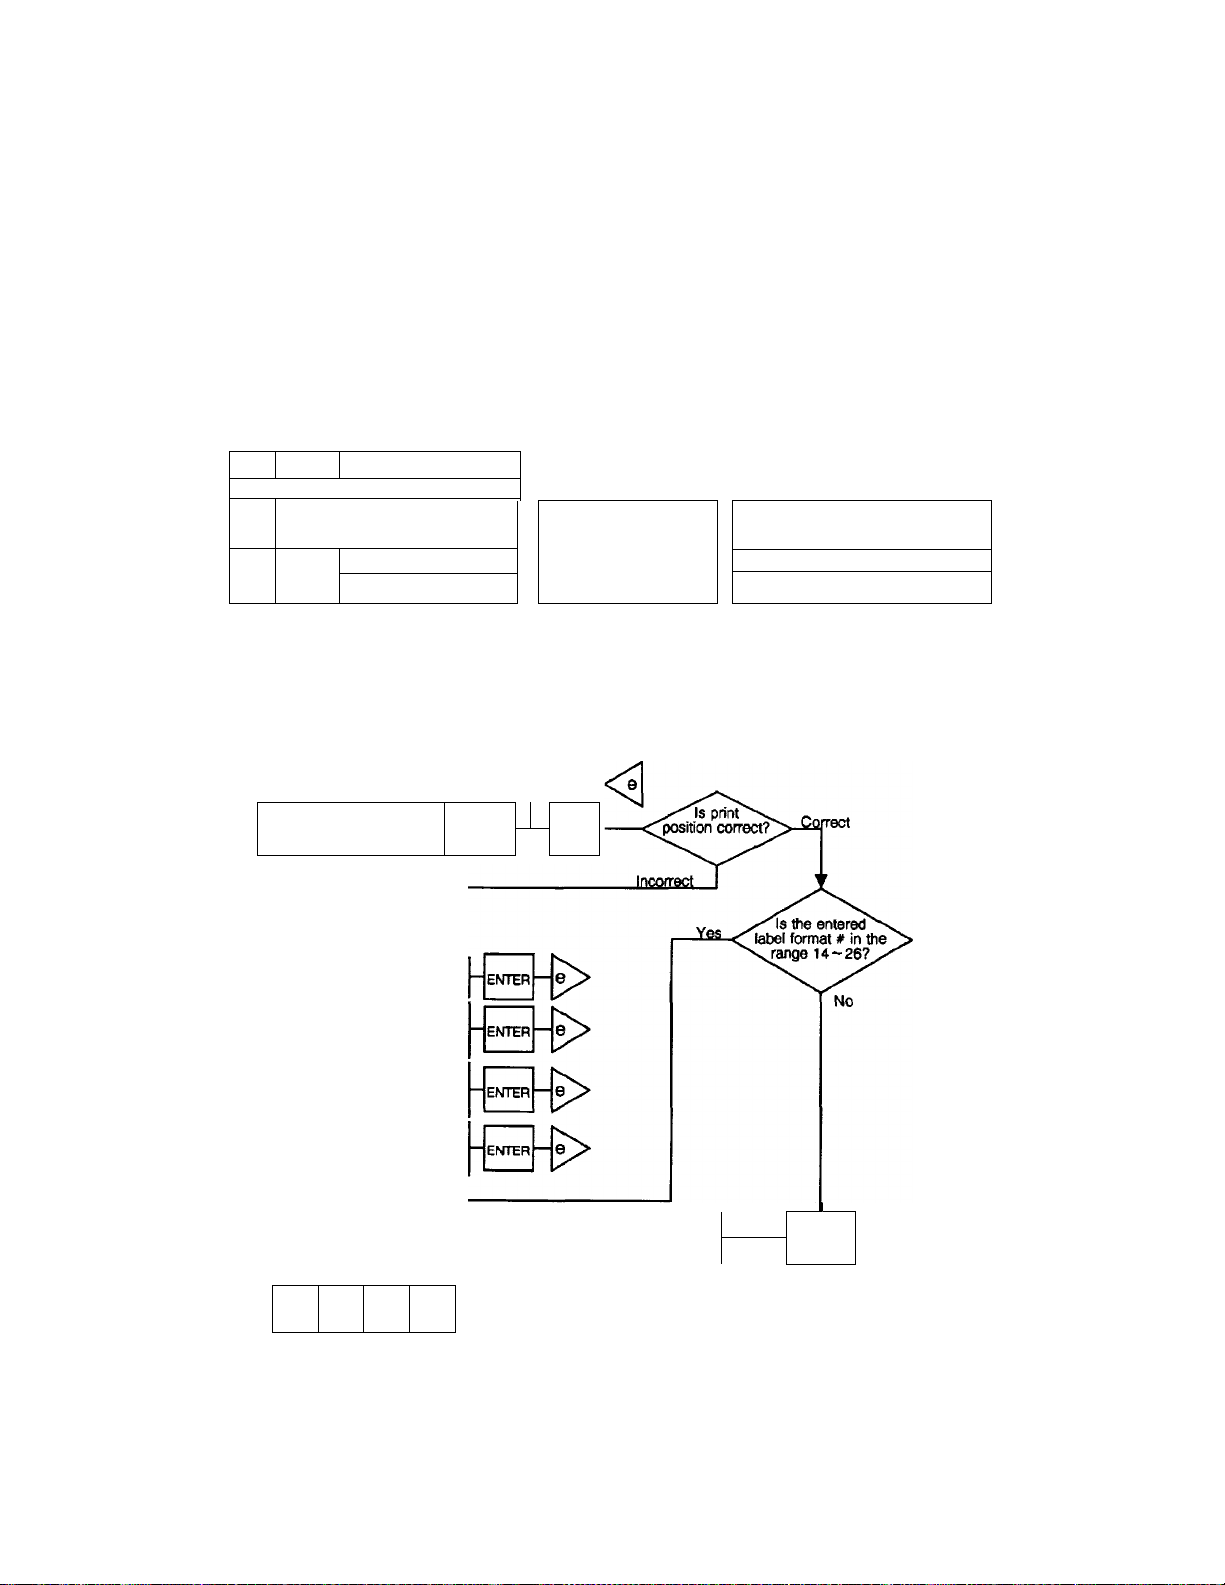
Menu No. 3
• Setting Label Format Number and Adjusting Print Position
When the initial set #4-6 is set to “1”, the label format can be set for each of up to 14 cassette #.
When the label format is set for a cassette #, the print position for the format is also set
automatically.
[Outline]
Switch over the
adjusting position.
1 gradation -
0.154mm (1 dot)
1 gradation ■
0.462mm (3 dots)
1 gradation ■
0.462mm (3 dots)
Only when using
the bar code
change label with
pref^ area
a
— PROG.
Select the cassette # which
allocates the label format #
T
by^
or -
NEXT PLU key
key.
NEXT
key:
PLU
key:
Enter the label format #.
(Refer to table 2.)
o
Enter the comect label feed
value. (Range: 0 ~ 199)
Enter the correct value for
commodity name position.
(Range: 0~9)
Enter the correct value for
address position.
(Range: 0~15)
Enter the correct value for
pre feed area
(Range: 0~65)
|-►C#0
'
-----
C#14
I—C#0 '
l-►C#14
CHANGE
PLU
Set the cassette #
Set the label to the selected
which is selected by cassette and attach it to the
cassette switch. scale. Then press the FEED
(Refer to table 3.)
C#1 —► C#2 —► C#4
C#13 i—C#12 4-
C#1 i—C#2 i—C#4
C#13—►C#12
r
1
TEST
---------------
------------------------
key to issue several labels.
► C#7
C#8^
-C#7 4-1
>08—I
Be sure to
perform this
adjustment when
the label format
# of the batch
printing label is
selected.
O o
(for format# 14-22)
o
o o
(for format # 23 - 26)
o
Three labels are
issued automatically.
Set the next label
format #.
CHA
NGE
PI
-U
o
PROG.
7-10
(Select another
programming menu)
Page 29
7. PROGRAMMING PROCEDURES
EMI-31059
Menu No. 3
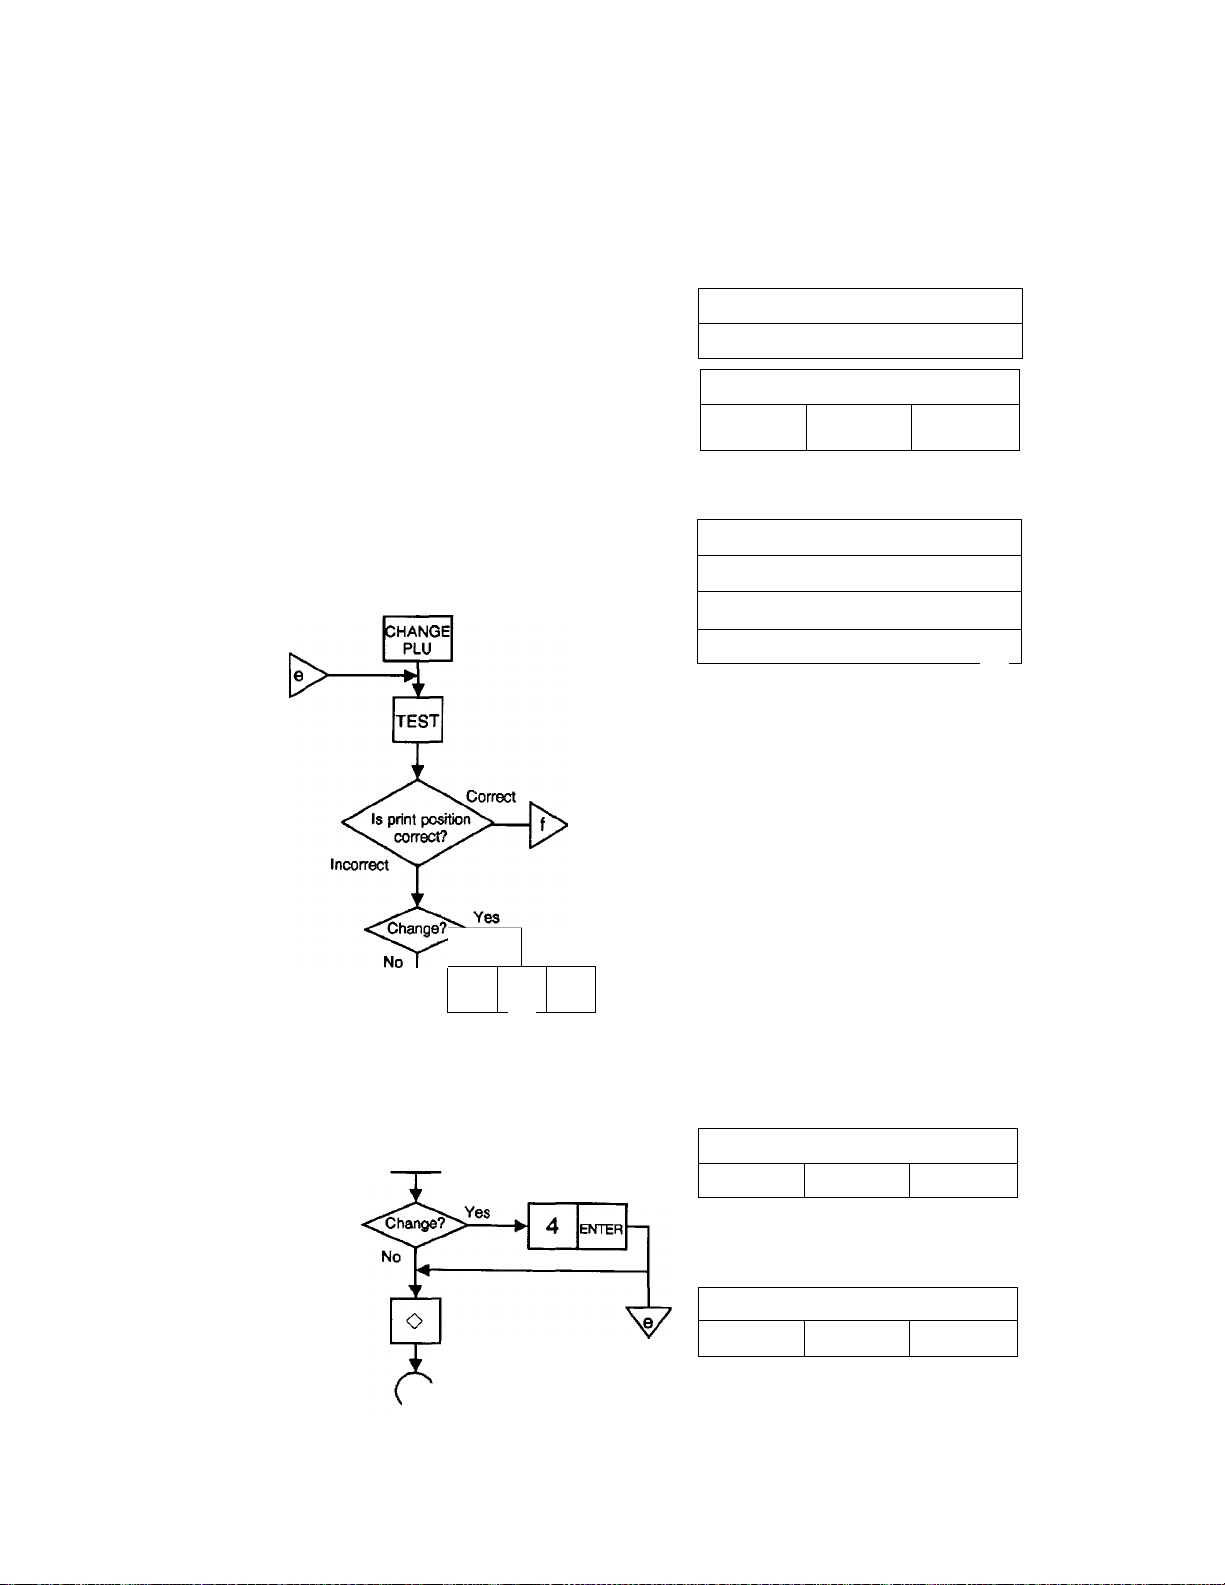
• Rowchart of Print Position Adjustment ®
Select programming
menu #3.
PROG.
Select the cassette #.
Enter the label
format #.
(Refer to table 2)
NEXT
PLU
or
...
In case an initial set #4-6 is set to “1 ”
PRT LOCATION
P
CASSETTE #
Cassette
-------------
Current setting format #.
for cassette #0.
CASSETTE #
P3 2
LABEL FEED
P3 LI
Feed value
(standard)
P3 0
3
d k.
31
A k.
31
100
T
Change the label
feed value?
Switch over the
adjusting position.
Change the
commodity name
position?
r
1
1
1
ENTER
o
2 j (continued on next page.)
(Range; 0~9)
1 gradation - 3 dots
= 0.462 mm
7-11
(Range: 0~199)
0
1 gradation = 1 dot
“0.154 mm
COMMODITY NAME
P3 L2
Standard value
ADDRESS
P3 L3
Standard value
------------
5
Î
5
Page 30

7. PROGRAMMING PROCEDURES
EMI-31059
Menu No. 3
7-12
Page 31

7. PROGRAMMING PROCEDURES
EM 1-31059
Menu No. 3
• Rowchart of Print Position Adjustment ®
Select programming
menu #3.
Change the label
feed value?
................................
In case an initial set #4-6 is set to “0”
Switch over the
adjusting position.
Change the
commodity name
position?
Change the address
position?
7-13
Page 32

7. PROGRAMMING PROCEDURES
PRE FEED
(Range; 0~65)
1 gradation » 3 dots
= 0.462 mm
EMI-31059
Menu No. 3
P3 L4 0
Standard value
7-14
PRT LOCATION
P
3
Page 33

7. PROGRAMMING PROCEDURES
Table 2: Label Format Number Table
Select the label format number for the label to be used by referring to the table below.
EMI-31059
Menu No. 3
NOTES:
1.
Casseffe #3
2.
The pre-feed area adjustment is available only for the bar code change label.
3.
When the label format 10 or ^ 23 is selected, the pre-feed area adjustment value
should be within the range from 0 through 29 or from 56 through
set within the range from 30 through 55, the label cannot be issued with the label
format if 10 onf 23.)
4.
When the label format 11 or ff 24 is selected, the pre-feed area adjustment value
should be within the range from 31 through
from 0 through 30, the label cannot be issued with the label format if 11 or #24.)
5.
When the initial set ff 4-6 is set to “0”, the label format is determined by the initial set
#2-7, 2-8, 4-7, and 5-3. (Refer to the function table of initial set.)
6.
Do not select the label format number other than those listed in Table 2.
is designed for report paper and the labei format if setting is not required.
65.
65.
(If the value is set within the range
(If the value is
7-15
Page 34

7. PROGRAMMING PROCEDURES
Table 3: Cassette Number Table
EM1-31059
Menu No. 3
Cassette
0
(for label)
1
(for label)
2
(for label)
3
(for report
paper)
#
Switching Position Cassette
r
IBBI /7V n
^ o /
8
(for label)
i SBBB /?V n
9
^ o /
f
BBBB /7V
n
(for label)
10
^ o /
i
BBBB /7V
n
(for label)
11
^ o /
(for label)
#
f BBBB /7V n
'
f BBBB /7V n
i
Switching Position
BBBB /7V
n
^ o /
^ o /
^ o /
BBBB //V n
^ o /
4
(for label)
5
(for label)
6
(for label)
7
(for label)
i
BBBB /7V n
^ o /
^ o /
^
BBBB/7V n
^ o /
'o^>/
12
(for label)
13
(for label)
14
(for label)
^ o /
BBBB /7V
^ 0 /
i
BBBB /7V n
^ o /
n
7-16
Page 35

7. PROGRAMMING PROCEDURES
Menu No. 4
• Setting Date, Time, Machine Number, and Store Number
Select programming
menu #4.
DATE
TIME
EM1-31059
Menu No. 4
Set date
(Dec. 15. 1992)
Set time
(13:10)
Set machine No.
(Max. 6 digits)
Set store No.
(Max. 5 digits)
PROG.
ENTER
ENTER
ENTER
DATE
Current setting date
DATE
TIME
Current setting date
TIME
MACHINE #
MACHINE #
STORE #
STORE #
P
P4 1
P4
P4
P4
P4
P4 1
P4 2
P4 2
121092
-------------------
121592
1530
-------------------
1310
4
^
^
88
31
ENTER
(Select another
programming menu.)
NOTES: 1. Express all time in a 24 hour military format.
2. The SL-6600 will check details of date (time) input, and any wrong date (time) will resuh
in error mode. The correct date (time) should be re-entered after depressing the CLEAR
key.
Even when Initial Set 8-4, 8-5 or 8-6 is set to the “Julian Date” side, the way to enter the
date in the date setting operation is the same as in the ordinary case.
PROG.
(Finish)
7-17
DATE
DATE TIME
P4
121592
Page 36

EMI-31059
7. PROGRAMMING PROCEDURES
Menu No. 5
Menu No. 5
• CMT Operations
The SL-6600 is designed to interface with a Cassette Magnetic Tape loader. This loader allows the
transfer of the entire PLU file, ingredient file and other data from the SL-6600 to tapes. This can be
accomplished in a number of operation steps.
In turn, Information from the tape can also be transferred to another SL-6600 or TEC SL-5900 Scale.
CMT
p
ENTER THE NUMBER
P5
WRITE PLU TO CMT
P5
VERFY PLU=CMT
P5 2
READ PLU FM CMT
P5
WRITE PLU TO CMT
P5 11
VERFY PLU
= CMT
P5
READ PLU
FM CMT
P5
5
1
3
12
13
IN PROCESS
P5 nn
through the above steps.
2. Use the metal cassette tape which is commercially available and has a capacity of 45 or
60 minutes recording.
3. For operations of the CMT loader, refer to the instruction manual provided with the CMT
loader.
7-18
P
Page 37

7. PROGRAMMING PROCEDURES
■ PL-3 Operation
Connect the PL-3 to the SL-6600 by using RS-232C Cable, then on turn the power of the SL-6600
and the PL-3.
Insert a data disc into the PL-3 and adjust the transmission rate to the SL-6600 (
or I 713 1: 2400 BPS) by using the rotary SW.
Press the | SAVE key of the PL-3, then check whether the SAVE LED is on.
Program the file number of the data disc by using the rotary switch.
ogra
: File No. 1, : File No. 2,
LLl
: File No. 8,
; File No. 9)
EMI-31059
Menu No. 5
: 4800 BPS
Select programming
menu #5.
Save (SL-6600 -<• PL-3)
Verily
(SL-6600 = PL-3 • SL66 STD)
Load
(SL-6600-^PL-3«-SL66 STD)
Save
(SL-6600 -» PL-3 -► SL-5900)
Verify
(SL-6600 = PL-3 - SL-5900)
Load
(SL-6600*-PL-3'^-SL-5900)
1 1
1 2
1 3
CMT
P
ENTER THE
NUMBER
P5
WRITE PLU TO CMT
P5 1
VERIFY PLU=CMT
P5 2
READ PLU FROM CMT
P5 3
WRITE PLU TO CMT
P5
VERIFY PLU=CMT
P5
READ PLU FM CMT
5
11
12
Press either SAVE
or LOAD key on the
PL-3.
Press ENTER key
on the SL-6600.
(See NOTES: 1)
SAVE
or
i
ENTER
PROG.
LOAD
7-19
P5
SAVE
7 seg. display
LOAD/COMPARE 3
7 seg. display
7 seg. display
13
Page 38

7. PROGRAMMING PROCEDURES
NOTES: 1. In the event Enter Key is not depressed within 10 seconds after] SAVE or LOAD
key is depressed, the Time Out Error results.
2. After depressing the
7 seg. display and LAMP goes off. Remove the data disc and turn the power off.
Be sure to start up the PL-3 before this procedure.
3.
ENTER key, the operation ends when “00” appears in the
Error Code during PL-3 Operations
7SEG. LED
EM 1-31059
Menu No. 5
Error Code
0
FDC ERROR
1
NO FDK ERROR
2 UNAVAILABLE FDK ERROR
1
3 DISCREPANCY ERROR
4 FDK MEMORY FULL ERROR
WRITE PROTECT ERROR
5
NO SEARCH FILE ERROR F
6
LOAD
0
1
TIME OUT ERROR 1
2
LOAD ERROR
3
NOTES: 1. When the error code in FF, this system enters stop status. (Turn the power off Ion
3 FDK ERROR
4 BUSY
5 POWER FAIL ERROR
6
OVERRUN ERROR
for release.)
2. When the error code is F2 or FE, perform the status clear (99).
Phenomena Error Code
0
E 2
C
Phenomena
7
FRAMING ERROR
PARITY ERROR
8
DATA ERROR
0
1 STATUS ERROR
TIME OUT ERROR
3 FDK READAVRITE ERROR
INCORRECT KEY ERROR
0
RAM READ/WRITE ERROR
ROM CRC ERROR
2
RAM BACK UP BATTERY ERROR
3 FDC DIAG LEVEL 0 ERROR
E SYSTEM FDK LOADING ERROR
F SYSTEM ERROR
7-20
Page 39

EMI-31059
7. PROGRAMMING PROCEDURES
Menu No. 6
Menu No. 6
• Initial Setting
The function of this scale depends on initial setting as follows.
Numbers 0 to 26 are available for the initial setting (however, initial set numbers 11 to 19 are not
used at present). The initial setting is available only when the DIP Switch #2-5 installed in the SL6600 is set to the OFF position. To set the initial settings for numbers 20 to 26 DIP Switch #3-2
must be set to the ON position.
Select programming
menu
Select the initial set #.
(#11-19 are not used.)
Select the item #.
(1~8)
Select the status #.
(Refer to function
table.)
PROG.
0 2
ENTER
T
or PLU
(left)
(right)
i
±
EMTER
NEXT
6
(Finish)
INITIAL SET
ENTER THE NUMBER
ENTER THE NUMBER
ex.
INITIAL
ex.
INITIAL
ex.
INITIAL
ex.
ENTER THE NUMBER
P
P6
P6 0
P6 0
Item #
Status # - ■''
P6 0
_____
1-0
T“
4-0
P6 0 4-1
P6
6
INITIAL SET
PROG.
(Select another
programming menu.)
.IMPORTANT.
Be sure to set to “0” for the blank status of the function in the function table.
7-21
P
6
Page 40

■ Table 4: Function Table of Initial Setting
1) Initial set #0
''''''^-„„Status No.
Item
Function
No.
No function
1
No function
2
Dots of thermal head
3
(dots/mm)
CMT baud rate (BPS) 2400 BPS
4
PC Keyboard baud rate
5
#1 (BPS)
PC Keyboard baud rate
6
#2 (BPS)
No function
7
dots/mm
9600 BPS
9600 BPS 9470 BPS 9191 BPS 8929 BPS 8681 BPS 8446 BPS 8224 BPS
7.6
0
□
6 dots/mm
4800 BPS
10080 BPS
0
10416 BPS
3
10776 BPS 11161 BPS 11574 BPS
0
NOTE: When a speed other than 9600 BPS is selected with PC
5 6
Keyboard baud rate #1, the status No. of #2 must be set
to “0”.
When a speed other than 9600 BPS is selected with PC
Keyboard baud rate #2. the status No. of #1 must be set
to “0".
0 0 0
8013 BPS 7813 BPS 7622 BPS
Standard
Status No.
0
0
0
0
0
0
0
■0
31
O
o
31
>
3
S
z
o
TJ
n
o
o
m
O
c
XI
m
(O
No function
8
IV)
to
2) Initial set #1
Item
No.
-------- No.
Function
RAM capacity of PLU
1
file
Setting or Changing of
2
PLU data
Reset operations Available
3
Change of PLU data while the
data is present in total
4
menxMy
Switching of modes
5
(WEIGH/BY COUNT)
The method of inputting
quantity in BY COUNT
6
mode
Entry of the number of
7
NETVVT
Print the unit price on net
8
weight statement labels
0
Available
Not
available
Slide SW.
Input in the
process of
Issuing labels
Not
available
Non (Mint
□
32 KB
Not
available
Not
available
Available
Set mode
flag to PLU
data
Included in
PLU data
Available
Print
2
96 KB
3
160 KB 224 KB
0
5 6
288 KB 352 KB
NOTE: When this unit is to be used on-line system,
set the status No. to “1”.
0 0
416 KB 544 KB
9
672 KB
0
Standard
Status No.
2
0
0
0
0
1
0
0
s
¿>
o
«1
<o
Page 41

u
7J
O
a
73
>
s
s
z
o
TJ
n
o
o
m
o
c
73
m
(O
K)
Oi
4) Initial set #3
Item
Function
No.
1 Print of bar code flag
Print of numerals under
2
bar code
COOKED BY when
3
RELISH is 0
4 Print of “M”, “R" mark Print Non print
Print of sell by date when
5
shelf life data is 0
Printing position of
6
grade line
7 No function
AUTO print condition in
8
weighing mode
0
Non print
Print Non print
Non print
Non print
Lower right
of C/N
T. Price = 0 T. Price >0
Q
Print
Print
Print 0
Upper left
of C/N
2
0 0 0
6
0 0
NOTE: C/N = Commodity Name
9
Status No.
Standard
0
0
0
0
0
0
1
3:
CD
z
o
O
cn
(O
Page 42

ro
5) Initial set #4
Item
"''"-^.^^^atus No.
No.
Function
1
Time mode on print
Temporary charrge of
2
date
No function
3
4 No function
No function
5
Selecting method of
6
label format
7 Label issuing method
Variable length label
8
Print Delay Time
0
12 hrs. 24 hrs.
Available
Initial Set
On-
demand
Standard
0.3 sec.
□
availaUa
Cassette
Number
Batch
0.0 sec. 0.1 sec 0.2 sec.
Not
2
0 0 0
6
0 0 0
Standard
Status No.
1
0
TI
3
O
O
3
>
s
)
s
Z
o
TJ
31
o
o
m
O
c
31
m
(0
0.3 sec.
0.4 sec. 0.5 sec. 0.6 sec.
0
0
0
0
0
0.7 sec. 0.8 sec. 0
2 5
o 2
z>
z 2
o o
Page 43

го
СП
"D
Я
О
а
л
>
г
S
Z
о
■ о
я
о
о
m
О
с
я
m
(О
Z
о
о
сл
(О
Page 44

9) Initial set #8
Item
Function
No.
Each country spree.
Each country spee.
No function
Type of PACKED ON
DATE
Type of SELL BY
DATE
Type of COOKED BY
DATE
No function
No function
Status No.
us
Dominical
year
Dominical
year
Dominical
year
m
CA
Julian Date
Julian Date
Juiian Date
0
US-B CA-B
AU
NOTES: 1. The ‘Julian Dale' means the date expressed in the calendar system that only uses the day
numbers but not months. The Julian Date value corresponds to the month-and-day ol the
dominical year as in the following table.
Dominical year
Month/Day
Ordinary Year
Julian
Date
Leap Year
2. Even when the ‘Julian Date' option is selecled, the way lo enter the date in the dale setting
operation is the same as in the ordinary case.
3. Whan the ‘Julian Dale’ option is selecled, ‘PACKED ON' date, 'SELL BY' data or ‘COOKED
BY' date is automatically calculated from the dale of entry.
4. The Julian Dale value will never exceed 366. Whan ‘SELL BY* dale or ‘COOKED BY' date
turns out to be in the next year, the date value will start from 1 again, (For example, January 1 will
be ‘1*.)
1/2
1/1
1
2
1
2 59 60
0 0
2Ka 2C9 3/1
59 60
61 315 316 366
11/10
314
Others
Others
11/11
315 365
12/31
Standard
Status No.
‘U
3D
O
o
3D
>
s
s
z
o
■o
3D
O
o
m
a
c
3D
m
to
ro
CD
10) Initial set #9
''''''^-..„,__^tus No.
Item
Function
No.
No function
1
No function
2
No function
3
4 No function
Number of TR # digits
5
No function
6
No function
7
No function
8
----------------
____
0 0
3 digits 1 digit
2
3
0
5
6
0
8
9
Standard
Status No.
0
0
0
0
0
0
0
0
s 5
a S
3
Z ¿
o o
o> <o
. 4
Ü1
Page 45

11) Initial set #10
Item
'' No.
Function
No.
1 No function
2 No function
0 CD
2
3
E B
6
B
8 9
standard
Status No.
0
0
■B
3J
O
O
30
>
■vl
'-j
Open PLU
3
Print 13th digit under
4
bar code
No function
5
The number of digits
6
for PLU
7 Logo print Non print
Possible thermal dots per
8
row when printing logo
Not
available
Print Non print
6 digits 4 digits
50 dots or
less
Available
Print 0
100 dots or
less
150 dots or
less
200 dots or
less
No limit
0
0
0
0
0
o
TJ
30
o
o
m
O
c
30
m
</>
<s 3.
3 -b
I
o o
a> <D
Ü1
Page 46

7. PROGRAMMING PROCEDURES
Menu No. 7
• Changing Bar Code Format
With the SL-6600 scale, two kinds of bar code formats are available; Weighing format and the By
Count format. These formats can be changed freely.
BAR CODE FORMAT
EM1-31059
Menu No. 7
ENTER THE NUMBER
WEIGHT
BY COUNT
FIX
01 FLAG FLAG-0
Digit#
Current setting item #
01 UPC #
ex.)
03 UPC # UPC # -2
P
P7
P7
P7 2
P7
P7 1
-------
Item#
Format data
FLAG-0
P7 1
3
7
1
3
1 1-0
1-0
7-28
ex.)
09 UPC # PRICE-1
09 PRICE
ex.)
13 PRICE C/D -1
ex.)
ENTER THE NUMBER
BAR CODE
P7 3
P7 9
PRICE-1
P7 9
P7 13
P7
FORMAT
P
3
3-2
3
5-1
5
5-1
5 7-1
7
Page 47

7. PROGRAMMING PROCEDURES
EMI-31059
Menu No. 7
NOTES;
1.
In this scale, the preciously set bar code format is cleared by RAM clear, and can be
switched to the following formats. Therefore, it is necessary to set the bar code format
again after RAM clear.
Bar Code Format by Initialization:
0 Weighing Format^lX Format
Lo
0 By Count Format
2.
When the ENTER key is depressed, format check is executed, resulting in an error in
the following cases.
2 C2
0 0 C2 C3 C4
0 Check digit (C/D) is at other than digit-13.
0 Price check digit (PC/D) cannot be calculated.
0 Price is not set serially beginning from Pi (Pi to P4, or Pi to P5).
® Weight is not set serially beginning from W1 (Wl to W4, or W1 to W5).
3. Calculated from weight if price is not set for price check digit (PC/D).
4. The usable keys to set the column are as follows:
FLAG
PLU#
UPC#
PC/D
PRICE
WEIGHT
C/D
C3
C4
C5 C6 PC/D PI P2
C5 0 0 0 0
0 -[I]
m -n]
D] -HI
m
HI -'ll]
D] ~[I]
m
P3
P4 C/D 1
C/D
C6
5. Digits and display
PLU# 1 2
i i
Display 2-1 2-2
7. Digits
Price $
Display 5-1 5-2
9. Setting items
and display
1 2 .
i 4
^ 1
* FLAG
of PLU #.
3 4 5
i i i i
2-3 2-4 2-5
of price.
3 4
i i
5-3 5-4
► 2 3 .
* PLU#
C/D .
7 ^
6 UPC# 1 2
2-6
WEIGHT . PRICE .
6
7-29
6. Digits and display of UPC #.
3 4 5 6
1 i
Display
8. Digits and display of weight.
Weight 1 2 .
Display
UPC# '
3-1 3-2
i
6-1
4
PC/D
^ 5
3-3 3-4 3-5 3-6
1 1 ;
6-2
6-3 6-4
1 Ir 1 i
3 4
Page 48

7. PROGRAMMING PROCEDURES
Menu No. 8
• Setting Speed Key
The SL-6600 has 60 PLU speed keys which are very convenient to call a PLU quickly.
Example: Set PLU # 100 to speed key Dl-
EMI-31059
Menu No. 8
Select programming
menu #8.
Enter the speed key
#.
Set PLU# 100.
(Max. 6 digits)
8
PROG.
ENTER
ENTER
(Finish)
SPEED KEY SET
P
SPEED KEY #
P8
SPEED KEY #
P8 12
SPEED KEY #
P8 12
SPEED KEY #
P8 12
SPEED KEY #
P8
8
100
PROG.
NOTE: When “0” is set on the speed key, if this speed key is pressed in the REG, M.DOWN, or
REWRAP mode, the scale enters an error status (PLU NOT FOUND). Press the|
to release the error mode.
(Select another
programming menu.)
SPEED KEY SET
P
c
| key
7-30
8
Page 49

EMI-31059
7. PROGRAMMING PROCEDURES
Menu No. 9
Menu No. 9
• Setting Combination Report
In the Read P<)/Reset (Z) mode on the SL-6600, a format of the report to be printed can be
previously set for operation ease. A format contains 8 tables, and up to 8 kinds of report data can be
set for each table.
Select programming
menu #9.
Select the table #.
(1 ~ 8)
Select the table menu.
(Refer to next page.)
REPORT COMBI.
P
ENTER THE NUMBER
P9
ENTER THE NUMBER
P9 1
Table #
REPORTS
P9 1
9
ENTER THE NUMBER
REPORT COMBI.
CAUTION
When the table # is selected, pressing the ENTER | key clears all report data set in
the table #. For this, it is convenient for the operations above to have all the setting
tables for the combination report listed in the READ
contents of the table.
(X) mode before changing the
7-31
P9
P
9
Page 50

7. PROGRAMMING PROCEDURES
Select a table menu #.
EM 1-31059
Menu No. 9
HOURLY REPORT
Hourly total report.
Grand total report
PLU total report
PLU programmed data report
Commodity description report
Speed key programmed data
report
Combination report format
Commodity and ingredient
description report
Grade line description report.
5
5
5 3
5
5
5
1
GRAND TOTAL
2
PLU REPORT
3
PLU PROG. DATA
1
-0
51
COMMODITY DESCRI
2
52
SPEED KEY REPORT
53
4
REPORT COMBI.
54
5
“0)
COMMO. & INGRE.
55
6
G. LINE REPORT
ENTER
V
56
REPORTS
P9 1
7-32
Page 51

7. PROGRAMMING PROCEDURES
® Set the data of PLU Total Report
EMI-31059
Menu No. 9
Select the total memory.
Mark Down total;
Select the search code.
Day total:
Rewrap total:
PLU #:
UPC #:
A
i
ENTER
£
ENTER
ENTER
PLU REPORT
3
SELECT DATA FILE
3 -
NORMAL
3 1
MARK DOWN
3 2
REWRAP
3 3
SEARCH CODE
3 n-
(n = 1~3)
PLU #
3 n 1
UPC #
3 n2
Individual Total
(EX. PLU # 100)
Block Total
(EX. PLU # 30 ~ 39)
Zone Total
(EX. PLU # 100 ~ 108)
Entire PLU Total
EN1PER
V
1
NEXT
PLU
o
0
1 0
PLU #
3 nx □
(x= 1 or 2)
PLU #
3 n X □
0
PLU #
3 nx □
8
PLU #
3 nx □
100
3-
100
PLU #
3 nx □
108
REPORTS
P9 1
7-33
Page 52

7. PROGRAMMING PROCEDURES
Set the data of Grand Total Report
EM 1-31059
Menu No. 9
GRAND TOTAL
2
SELECT DATA FILE
2 -
NORMAL
2 1
MARK DOWN
2 2
REWRAP
2 3
REPORTS
P9 1
Set the data of Each Programmed Report
Select the individual PLU #.
(Ex. PLU # 100)
Set the block PLU #.
(Ex. PLU # 30 ~ 39)
Set the zone PLU #.
(Ex. PLU# 100 ~ 108)
Set the entire PLU #.
7-34
Page 53

EM 1-31059
7. PROGRAMMING PROCEDURES
Menu No. 10
Menu No. 10
• Changing Displayed Titles
With the SL-6600, the title indicated in each control lock position can be changed. The title changed
with the procedure below will be stored in "EEPROM". When a “All Clear" or “EEPROM Clear” is
executed, all these titles will be cleared and the initial will resume. To allow this programming, initial
set # 7-3 must be set to “1”.
NOTE: These titles are indicated on the message display.
Select programming
menu #10.
TITLE PROG.
P
ENTER THE NUMBER
PIO
ENTER 1ST LINE
PIO
Title#
-------------------
Number of character
10
1
^
9
7-35
Page 54

EMI-31059
7. PROGRAMMING PROCEDURES
Menu No. 10
When the initial set # 6-8 is set to “1”, the “PIECES” field printed on the BY COUNT label can be
changed.
Enter the title # 249.
7-36
Page 55

7. PROGRAMMING PROCEDURES
■ Table 5: Title Number and Name Table
Status clear mode
I N I T I A L S E
0
1 R A M
2 E E
3
4 A R E A
5
6
7 P L
8
9
10
11 D A T E T I M E
12
13
14 B A R
15
16
17 T I T L E P R
18
Not used
19
20
21 INL I N E
22 E N T E R P L U
23 E N T E R
24
25
P R0M
P A N
s
Z E R 0
P A N
S
U
P
L U D A T A
A D D R E
P R T L
M T
C
I N I T I A L
SPE E
R E
P 0
I NGR
G R A D E L I N E
L A
B E L F 0 R M A T
E N T E R
E N T
L E A
C
L E A R
C
D A T A E D I T
S
s
0
c
C 0 D E F 0 R M A T
D
K E Y
R T
D I
E
U •
S H E L F L I F E
E R T A R E
T
R
L E A R
C
P R
0 G •
A T I 0 N
E T
S
s
M
C 0
E
0 G •
N T
P R
B I •
#
I
L R
C
E T
P R 0 G
E
C
W T
•
Programming menu #1
E N T E R UPC
26
27 E N T E R F •
N T E R
E
28
E N T E R T A R E W T •
29
E N T E R D E P T
30
P L
31
32 N E w P L U
33
34 A U T 0 C 0 0 E
Programming menu #5,
35
36
37 M E
38
39
40
41 M E
42 M E
•
43
44 M E
45
46
47 L A B E L F
48 C
49
Programming menu #4 & REG mode
50
Programming menu #4
51
52 M A
53
Programming menu #5
54 w
55
56
u
P L
u
E N T E R THE N U M B E R
A D D R E
S
s
M E
S
s
M E
s s
M E
s s
s s
s s
M E
s s
s s
R0L L
s
C
F I X E D M E
0 M M0D I T
A D D R E
D A T E
T I M E
H I N
c
s
T 0 R E
R I T E P
V E R I
R E A D
P R I
H E L F L I F E
S
C H ANG
#
#
D E L E T E
10 and 11
9.
6.
S S
AGE
AGE
A G E
AGE
A G E
A G E
AGE
A
G E
M ESS A G E
S SAG E
EED
Y N A M E
S S
E
#
#
L u T
F Y P L
P L
U F M
U
EMI-31059
Menu No. 10
#
C
* #
E
0
=
I N
c
c
c
M T
G
M T
M
T
7-37
Page 56

7. PROGRAMMING PROCEDURES
EMI-31059
Menu No. 10
Programming menu #5 & READ/RESET modes
57 I N P R 0 c E
Programming menu #6 Programming menu #9 & READ mode
I N
58
Programming menu #7 & REG mode
W E I
59
Programming menu #7
B Y
60
F I X P R I
61
FLA
62
P
63
64
C
Programming menu #8
65 P R E S s S P E E D K E Y 94 M A R K D 0 W N
66 S
Programming menu #9
67 E N T E R T H E N
68 E N T E R T H E N u M B E R
E N T E R T H E N
69
E N
70
71 E N
72 E N T
E N T E R T H E NuM
73
74 E N T E R
R
75
H
76
Programming menu #9 & READ/RESET modes
77 G R A N D
P L
78
79 SEL E C T D A
80 S E A R
Programming menu #9
81 u P C
Programming menu #9 & READ/RESET modes
82 D E P
Programming menu #9 & READ mode
P
83
84 P L
T I A L
I
H T
G
0
C
G
D
C
/
D D E p T
/
P E E D K E Y
T E R T H E N
T E R T H E N
E
N T
u
R
T H E NuM B
T H E NuM B E R
E p 0 R T
R
0 u
U R E p
A
L
U
U
s
L Y R E P 0 R T
T 0 T A L
H
C
#
R
T M
P
R 0
#
S
s
E
c
p
L u
p R I
R
0
#
E
c
•
#
# 95
uMB
u M B E R
M B
u
M
u
T
A
T
F
C 0 D E
E N T
G • D A T A
U P
W E 92
E R
E R
B E R
E R
B E R
I L E 107
Programming menu #9
M M
C 0
85
86 S
87 R
88 C
89 U
90 G •
91
93
p
E
P
E
0 M M
P
C
L I N E R E p
D E P T
Programming menu #9
D
E P A R T M E N T
Programming menu #9 & READ/RESET modes
N 0 R M A L
D I T Y D E
0
E D K E Y R E P0R T
0 R T C 0 M B I •
0 • &
I N
R E P0R T
R E P0R T
•
R E W R A P
P L
96
97 U P c
Programming menu #9
98
Programming menu #11
99
REG mode
100 E N T E R T H E
101
102 E N T E R T
103
104 P A
105 S E L L 6 Y 0 A T E
106 C 0MM 0 D I T Y N
108
109
110 0 N
u #
#
D E p
A R T M E N T
E N T E R T
E N T E R
E N TER
K E D
c
M E
T H E
U N I T P R I
T
0 T A L P R I
B A
R
C 0
D E
H E
S s
H E L
N
0
E
C
C
G
A
G *
0 A T E
E
G
R T
0
#
P L U
G
0 G 0
A M E
0 F F
S C
R E
L I
E
L I N
R I
•
N E
#
#
#
E
7-38
Page 57

7. PROGRAMMING PROCEDURES
EM 1-31059
Menu No. 10
READ/RESET modes
111 R E P 0 R T S
H
112
C 0 M B I • R
113
114
S
A N A L Y B Y
115
A N A L Y B Y W E I G H T
116
A N A L Y
117
RESET mode
R E P
118
Edit mode
E N T E R L I N
119
120 S
System checking mode
121 W R I T E
122 V E R I F Y E E P
REA
123
REG mode
124
ST0
File sorting mode
125 S0R T I N G P L
READ/RESET modes
126 T A B L E N
Character generator
127
5
7
128
1
129
READ mode
130 G • L I N E R
Resistor Change
P R
131
132 P R
P R
133
NETWT statement
140 E N T
141
E N T E
R L Y R E P0R T
0 U
EQU E NcE R E P 0 R T
R T
0
T N D R D T H
D E E P F M
R
E
X
7
X
1
6
X
0
1
2
1
1 6
7
«
(
7
•
(
6
/
(
E R P
R w
R E A D
E P0R T
Y D0L L A R
B
R EsE T
s
E E P T 0
D E
C 0
M B E
U
C H A R A C T
C H A R A
C
E P 0 R T
6
M M
/
M
6
M M
/
R I
T •
M
)
C0U
=
u
R
H A R A
)
)
C E
(
N T
c
F
c
$
E
M T
C
CMT
M T
I L E
•
T
•
T
c
)
REG mode
142 I
★
143
144 P R
E N T E
145
I NGR E D I E N T
146
NET WT statement
s
147 P R E
E N T E R W T
148
E N T E R w T
149
Programming menu #3
PRE F E E D
150
CAS S E T T E
151
NET WT statement
152
M
L E V E L A D
153
Programming menu #5
154 W R I T E P L
V E R I F Y P L
155
R
156
158 D
Programming menu #0 and 1
159 R E L
•
S S U
I N
L A B E L S
G
T 0 C 0 N T I N U E
E T
E
s
R
s
S
E M W I L
C 0
L INE
★
N T B A L A N
u
T
0
•
•
#
F
L
J U S
u
U
E A D P L
A T
E D I
F M
U
S C R I P T I 0 N
#
P R I N T
I L L
T
T
0
=
c
I
c
c
M T
s
M T
M T
H
7-39
Page 58

7. PROGRAMMING PROCEDURES
EMI-31059
Menu No. 10
Error Message
D A T
160
P
161
162 P L
DUp L I C A T E
163
M
164
M I
165
T I M E 0 U T E
166
167 B A D T A P E 0
R EST0R E T H E p L U
168
169 CAS S
T0T A L
170
171
172 H E A D F A I L U R E
L
173
174 P L U D A T A E R R 0 R
175 C H A R A C T • 0 V E R R U N
P
176
177 N
L A B E
178
Programming menu #12
C 0
180
Programming menu #13
0 N-L I N E/L
181
Programming menu #14
182
s
183 S
184
s
185 s
186 0FF-L I N
187 T 0
T M
188
T M
189
A E N T R Y E R R 0
L u
E M 0 R
A
N0T F0UND
N 0 T R EsE
u
Y F
M A TCH
s
E T T E E R R 0 R
s
B E L 0
U
V E R F L
0
V E R R
L L
S
R T F A I L U R E
R EGI
0
L
N
F I R M L A B E L
T E D
S
N
s
E
S
0 CAL
P E
E L ECT
E L ECT M
E L
I A L
C
INF 0 •
M 0 D E
0 0 E
E C T M0D E
E
L c(I•D
C
c-3(I«D
C c-3{T R
•
#
-
T
p L
u
P E
c
•
R R0R
R
M T
c
0
N
U
E E R R
)
•
#
)
T I M E
W
)
NET WT statement
R
S
«
190
191
192 W E I G H T
193
194
In-line mode
195
Programming menu #15
196
197 E
198
199
Programming menu #16
200
201 W R I T L 0 G 0 T 0 C M T
202 V E R F Y L 0 G 0
203 R E A D L 0 G 0 F M C M T
Error Message
204 N
205
REG mode
206
Error Message
207 L 0
Programming menu #1
208
Programming menu #17
209 G
210
REG mode
211
212 E N T E R T H E T
Programming menu #18
213
Not used
214 M E
215
P R I
W E I G H T
W E I G
E N T K E Y T
E
c
H T
(
$
)
L
(
K
{
{g)
B
0
.
g
)
0
I N L INE
D E P
T
N T E R D E P T
D E p T
K E Y
•
•
K E Y
•
#
D E F A U L T D EPT
L
0 G 0
RAM
0
D A T A E R
F 0 R L 0
R 0 R
E N T E R T H E L
0 N
G
E N T E R PIE
R A D E LIN
E N T E R
ENT E R G
M
E M0R
M 0 R Y
D E P T
•
T
0
G • L I N E
L I N E
•
Y
A R D
c
CAR D
N 0 T F
#
F 0 U
C E
E
Z
)
P R 0 G •
K E Y
•
#
=
C M T
0
G
0 G 0
N
D
s
#
#
I M E
0UN
#
#
D
7-40
Page 59

7. PROGRAMMING PROCEDURES
EM1-31059
Menu No. 10
Programming menu #18
216 W
217
218
219
220
221
222 W R I T E L 0 G 0
223
224
225 C 0
226
227 P L U
228
229 I N
230
231
232 T L
233
234 M 3 2 M 6 4 M 1 2
236
236
237 N 0 F 0 R M T
238
239
240
241 D
242 D A T
243
Not used
244 M S G
246 C 0
REG mode
246
Status clear mode
247 A
R I T E P L U
VER I F Y P L u
R E A D
I T E I N
W R
V ERI F
P L
Y I N
R E A D I N G
V E R I F Y L
R E A D
L
0 G 0
U
G •
•
0 G
F M M c
G •
N T E N T S
M E M C
I N
G *
S
A R D F0R M A T
F
I L E CLE
F I L E C L E A
N0T H E R
A
W R I T E V E R I F
L u
-
-
I N
G •
M
P
P I
A
R E
M E M
N
0
M E M 0 R Y
F0R
IFF
Y
0 U
R Y
0
M E M
M A T E R R
•
A N
c
0 R Y
C
#
T F
0
S
A R D N
A R D F
0
u R E
0 R
F
N 0 R A M F0R L
M B I
C 0
.
M B
I •
P
I ECE
L L
C
L E A
c 0 U N T
R
T
M
0
=
C
M
C
T 0 M C
M
=
F M M
T
0
F M M
c
M
0
=
M
c
A R
R
A R D
C
Y R E
-
L
0 G 0
• C •
-
L
M 2
8
5 6
?
• G •
B A
T T
A R D
C
U L L
R
0
D A T A
0 U N D
0 G 0
N A T I0N
Not used
248
REG mode
249
REG mode
C
C
C
261 C 0 0
Programming menu #1
262
REG mode
263
REG mode
269
Real print
270
271 N E T W T •
272
273
274 P R I
275
276
277
278
279 C 0 U
280
281
282
283
284
285 s
E N T R T 0 c 0
P I ECE S
K E D B Y
E N T E R R E L I S H
C 0 0
I N F 0 •
N E T W T
P R I
P R I
T0T A
P R I N T E D
H E L F L I F E
S
P ACK E D
E L L B Y
s
T0R
K E D B Y
N E T w T
/
•
E/1 b
C
E/k
C
E/1 0 0
C
L
P L
U
#
UPC
W E
D0L L A R
0
E C 0 D E
N T I N U E
D A T E
1
b S
I
k
[
9
9
P R I
#
I G H T
N T
S
0 N
N
•
]
]
9
$
[
]
$
[
]
$
[
]
E
c
7-41
Page 60

7. PROGRAMMING PROCEDURES
Menu No. 11
• Setting Ingredient Description
Up to 45 characters by 22 lines of ingredient message can be printed on a label in small sized letter.
EM 1-31059
Menu No. 11
Select programming
menu #11.
Enter the PLU #.
(Max. 6 digits)
PROG.
ENTER
r
SE
rr
NE
XT
RETURN
1/4
INGREDIENT PROG.
P
11
ENTER PLU #
Pll
The smallest PLU # In the
PLU fie is displayed.
-------------------------
11
^
ENTER PLU #
Pll 35
ENTER 1ST LINE
Pll 1 n n
Line# (1—22)
Number of charac
-------------
_T “
ENTER LINE #
Pll
8
ENTER LINE #
Pll
L I'^E
L l-^ E18
ENTER 18TH LINE
Pll
18 0
Enter the ingredient
messages.
ENTER PLU #
ENTER
Pll
INGREDIENT PROG.
PROG.
NOTE: The number of lines for the ingredient message can be designated in initial set iT2-7 and 4-6
(cassette and label format#, refer to pages 7-15 and 7-16).
(Select another
programming menu.)
7-42
P
35
11
Page 61

EM 1-31059
7. PROGRAMMING PROCEDURES
Menu No. 12
Menu No. 12
• Issuing Confirmation Label
Test labels used to confirm that a PLU previously preset to this scale is present in the master file of
the POS system, can be issued.
Select programming
menu #12.
Set the individual
PLU #.
(Ex. PLU # 100)
Set the block PLU #.
(Ex. PLU # 30-39)
Set the zone PLU #.
(Ex. PLU # 100-108)
Set the entire PLU #.
PROG.
ENTER
- 1
NEXT
PLU
<0
CONFIRM
LABEL
P
12
PLU #
P12
PLU #
P12 100
PLU #
P12
3-
PLU #
P12
100
PLU #
1
0 8
P12
108
IN PROCESS
P12
P
To interrupt label
issue.
To resume label
issue which has
been intemjpted.
To cancel label Issue
which has been
interrupted.
The confirmation
label(s) is(are)
issued.
PROG.
CLEAR
ENTER
CLEAR
(Select another
programming menu.)
7-43
ENTER TO CONTINUE
P12
PLU #
P12
CONFIRM LABEL
P
P
12
Page 62

EMI-31059
7. PROGRAMMING PROCEDURES
Menu No. 13
Menu No. 13
• Switching In-Llne/Off-Llne
When the SL-6600 is used as a satellite in an in-line system, the “ID No.” and “Transmission delay
time” can be set by the following procedure.
Select programming
menu #13.
Select the in-line
system.
The ID # can be set
when initial set #7-5
is “0”.
The transmission
delay time can be
set when In-line
system is selected
for TMCC-3.
1
PROG.
o
r
5 0
ENTER
ENTER
OFF-Line —► TDLC
I—
------
TMCC-3
(Range: 0~255)
(Range; 1 -9)
FDLC -1
i
----
ON-LINE/LOCAL
P
13
OFF-LINE
P13 DF
TMCC-3 (I.D.#)
1
ex.)
P13 b3 Id 0
TMCC-3 (I.D.#)
P13 b3 Id 50
TMCC-3 (TR-TIME)
P13 b3 th
TMCC-3 (TR-TIME)
P13 t3 th 3
TMCC-3 (I.D.#)
P13 b3
Id 50
PROG.
NOTE: • At present, the SL-6600 cannot be used with the in-line system of TDLC.
• The TMCC-3 baud rate is fixed to 4800 BPS.
• To use the SL-6600 in off-line, select OFF-LINE with the key then press the ENTER
key.
(Select another
programming menu.)
Table 6: Transmission Delay Time Table
TR-TIme (ms)
1
2
3 60 - 79
4
5 too ~ 119
20 ~ 39
40 ~ 59 7
80 ~ 99
TR-TIme (ms)
6
8
9
120 - 139
140 ~ 159
160 - 179
180 ~ 199
7-44
ON-LINE/LOCAL
P
13
Page 63

EM 1-31059
7. PROGRAMMING PROCEDURES
Menu No. 14
Menu No. 14
• Setting Special information
When the Net Weight Statement label is selected, 3 lines (26 characters/line) of special information
can be printed in the label position where the weight data is to be printed. The special information
can be printed in the Weight or By count mode. The Net Weight can be printed in FIX mode.
Select programming
menu #14.
PROG.
w
r
EN1FER
Enter character data
for 1 St line.
RETURN
1/4
Enter character data
for 2nd line.
skip
Skip
SPECIAL INFO.
P 14
ENT KEY TO PROG
P14
ENTER 1ST LINE
P14 1 n n
Line # ------------------'
Number of character
ENTER 2ND LINE
P14
2 n n
RETURN
1/4
Enter character data
for 3rd line.
ENTER
PROG.
(Finish)
(Select another
programming menu.)
Skip
7-45
ENTER 3RD LINE
P14
ENT KEY TO PROG
P14
SPECIAL INFO.
P
3 n n
14
Page 64

EM 1-31059
7. PROGRAMMING PROCEDURES
Menu No. 15
Menu No. 15
• Setting Department Number
When initial set #10-6 is set to “1”, the six-digit PLU # is divided into two; the upper two digits are
assigned to department #, and the lower four digits to PLU #.
The present default department # has priority. The department # is automatically added before the
top of the four-digit PLU # and treated as a six-digit PLU #. Any department # other than the default
can be set on the rightmost column of six keys on the Speed Keyboard.
The default department # refers to the department # of a product which the scale essentially handles,
and any other department # to the department # of a product which the scale does not essentially
handle but may handle.
In case of “PROG.”, “X (Read)", and “Z (Reset)” modes, PLU # is treated as a six-digit number. So
the upper two digits are not treated as department #. Consequently the four-digit PLU # is available
only in each mode of “REG.”, “M.DOWN”, and “REWRAP”. For example, in case of setting PLU
data by programming menu #1, a six-digit number must be set for PLU #. At the same time the
upper two digits of PLU # must match one of the department #.
Select programming
menu #15.
Enter the default
department #.
(1~99)
Enter the department
key #. (1 —6)
Enter the department
#. (1-99)
PROG.
ENTER
ENTER
AUTO
CODE
ENTER
2 -I
DEPT. KEY
P
ENTER DEPT. KEY #
P15
DEFAULT DEPT. #
P15
ENTER DEPT. KEY #
P15 dF
DEPT. KEY #
P15 dl 12
DEPT. KEY #
P15
ENTER DEPT. KEY #
P15
dF
dl
dl
15
12
12
20
20
r
1
PROG.
(Select another
programming menu.)
7-46
DEPT. KEY
P
15
Page 65

EM 1-31059
7. PROGRAMMING PROCEDURES
Menu No. 16
Menu No. 16
• Transferring Logo Data
When initial set #10-7 is set to “1”, the logo containing a picture, a mark, a POP message, etc., can
be printed on the ingredient label measuring about 18 mm (118 vertical dots) by about 42 mm (320
horizontal dots) and having 12 lines or more.
Logo data is created on the PC and stored into RAM through the CMT interface. 64K bytes of RAM
memory is required to store logo data, then the RAM will store up to 13 kinds of logos. The RAM
area to store logo data is 64K bytes following the RAM area to store PLU data. When logo data is
stored in RAM, and the RAM capacity to store PLU data (initial set #1-1) is changed, the logo data
will be all cleared.
LOGO
ENTER THE NUMBER
WRIT LOGO TO CMT
VERFY LOGO = CMT
READ LOGO FM CMT
IN PROCESS
ex.)
LOGO
P
P16
P16
P16
P16
P16
Number of logo
16
1
2
3
P 10
NOTES: 1. The error mode can be released by depressing the CLEAR key, and operated again
through the above steps.
2. Use the metal cassette tape which is commercially available and has a capacity of 45
or 60 minutes recording.
3. For operations of the CMT loader, refer to the instruction manual provided with the
CMT loader.
7-47
16
Page 66

EMI-31059
7. PROGRAMMING PROCEDURES
Menu No. 17
Menu No. 17
• Setting Grade Line
The maximum 49 kinds of grade lines can be set (26 characters per line), and call one of them to
print it on the label.
Select programming
menu #17.
Enter the grade line
#. (1-49)
7-48
ENTER G.LINE #
P17
GRADE LINE
P
17
Page 67

7. PROGRAMMING PROCEDURES
Menu No. 18
• Memory Card Operation
The OP-66-PL and OP-66-PL-TMCC option kits were developed to allow the data registered in the
PLU file, Ingredient file, and Logo file in the SL-6600 to be stored in the memory card.
The data stored in the memory card can be transferred to the relevant files in another SL-6600.
Use of the memory card makes the data processing much faster than that achieved by using CMT
(Cassette Magnetic Tape).
EM1-31059
Menu No. 18
7-49
Page 68

EMI-31059
7. PROGRAMMING PROCEDURES
Menu No. 16
BEFORE USING A MEMORY CARD
IMPORTANT
Insert the enclosed battery with the attached screwdriver before using the memory card.
WARNING
A battery may explode if handled improperly. DO NOT recharge, disassemble or dispose of in fire.
Replace battery with Hitachi Maxell Ltd., type CR2016 only. Using another battery may present a
risk of fire or explosion.
CAUTION
The data is protected by a backup battery which is installed inside the memory card. The service
life of the battery is approximately eighteen (18) months. If the memory card is used with an
expired battery, correct operations are not guaranteed.
7-50
Page 69

7. PROGRAMMING PROCEDURES
Chart 3: Initializing the Memory Card
EMI-31059
Menu No. 18
Enter tfie special code
"80”.
Are you sure?
Y: Execute
N: Cancel
NOTE: Be sure to initialize a new memory card before use it.
Chart 4: Transferring the PLU or Ingredient Data
PLU data saving.
(SL-6600 - M. C.)
Verify
(SL-6600 = M. C.)
MEM CARD
FORMAT
P18 80
ARE YOU SURE ?
P18
IN PROCESS
P18 P 80
ENTER THE NUMBER
P18
WRITE PLU TO MC
P18 1
VERIFY PLU = MC
P18 2
5i_il-E
PLU data loading.
(SL-6600 •*- M. C.)
Ingredient data saving.
Verify
Ingredient data loading.
7-51
READ PLU FM MC
P18
WRITE ING TO MC
P18 4
VERIFY ING = MC
P18
READ ING FM MC
P18
3
5
6
Page 70

7. PROGRAMMING PROCEDURES
EM 1-31059
Menu No. 18
IN PROCESS
P18
1
ENTER THE NUMBER
P18
IN PROCESS
P18 P n
P n
(n -1 or 4)
Yes
ENTER THE NUMBER
P18
INS ANOTHER CARD
No'
P18 CHA'^GE
NOTES: 1. When the volume of data to be saved into a memory card is beyond the capacity,
replace the memory card and press the | ENTER Then, the remainder is
saved into the card.
2. In case the scale has gone into an error state while PLU data or ingredient data
is being saved, it is necessary to save all the data again alter the error is cleared.
3. Never remove the memory card when data is being transferred.
7-52
Page 71

7. PROGRAMMING PROCEDURES
Chart 5: Transferring the Logo Data
Logo data saving.
(SL-6600 -<■ M. C.)
Verify
(SL-6600 = M. C.)
WRITE LOGO TO MC
P18
VERIFY LOGO = MC
P18 8
EM 1-31059
Menu No. 18
7
Logo data loading.
(SL-6600 ■<- M. C.)
READ LOGO FM MC
P18 9
IN PROCESS
P18
ENTER THE NUMBER
P18
NOTES: 1. At the beginning of logo data saving, all the Logo area in the memory card is cleared
automatically. Then the data is saved.
2. Logo data which cannot be stored in a memory card cannot be saved.
3. In case the scale has gone into an error state while the logo data is being loaded, the
data already loaded into the logo file is cleared automatically.
P n
(n = 7~9)
7-53
Page 72

7. PROGRAMMING PROCEDURES
Chart 6: Clearing the PLU or Ingredient File
EM 1-31059
Menu No. 18
PLU FILE CLEAR
PLU file clear.
ING. FILE CLEAR
Ingredient file clear.
ARE YOU SURE ?
Are you sure?
Y: Execute
N: Cancel
IN PROCESS
ENTER THE NUMBER
NOTE: When the PLU file is cleared, the ingredient file is also cleared automatically.
Chart 7: Display the contents of the memory card
P18 98
P18 99
P18
Si_.l-E
P18 n n
1
P18
Enter the special code
“20”.
ENTER
(Unit: KB)
V
7-54
Page 73

EM1-31059
7. PROGRAMMING PROCEDURES
Menu No. 20
Menu No. 20
• Transmitting PLU File, Unit Price, Address and Speed Key (FUN System)
Any terminal in the FUN system can transfer the data of its PLU file or unit price, Address and Speed
key. In this case, the destination terminal(s) must be set in the REG mode.
Select programming
menu #20.
Transmit PLU and
Ingredient
Transmit unit price.
Transmit Address
and LOGO.
Transmit Speed Key.
Verify PLU and
Ingredient
Verify unit price.
Verify Address and
LOGO.
FUN SYSTEM
P
ENTER THE #
P20
SEND PLU & ING
P20 1
SEND U.PRICE
P20 2
SEND MISC.l
P20
SEND Mise.2
P20
VERIFY PLU & ING
P20
VERIFY U.PRICE
P20
VERIFY MISC.l
20
3
4
11
12
Verify Speed Key.
7-55
P20
VERIFY Mise.2
P20
IN PROCESS
P20
ENTER THE #
P20 -
FUN SYSTEM
P
13
14
P n n
20
Page 74

7. PROGRAMMING PROCEDURES
EM 1-31059
Menu No. 20
NOTES: 1.
When the PLU data has been changed using menu ff1 and the data is to be
transferred to other terminals through the operating procedure described above, the
PLU file transfer is performed.
2.
When the unit price has been changed using menu #0 and the unit price is to be
transferred to other terminals through the operating procedure described above, the
unit price transfer is performed.
While receiving data, the terminals stop all operations.
3.
Error Code during Transmitting
TOTAL PRICE
n n
A A
All errors occur in the receiving terminal. The error mode can be released by depressing the
key, then attempt to transmit again.
Error Code Phenomena
1~7
8
1
2 BCC error
4
8 Time out error
Hardware error
Verify error
Character over error
Data error
CLEAR
Menu No. 21
• Changing Title of Period of Relish
The title of Period of Relish can be changed by setting the Initial set #7-8 to 1. (COOKED BY DATE)
When new title is entered, the title #263 will be automatically changed.
3rd date title is set to “COOKED BY” when all-clear operation is performed.
Select programming
menu #21.
ex.)
“EATEN BY”
"BEST USED BY”
etc.
7-56
Page 75

EM1-31059
8. VERIFICATION OF PROGRAMMED REPORTS
8. VERIFICATION OF PROGRAMMED REPORTS
8. VERIFICATION OF PROGRAMMED REPORTS
With the SL-6600, the setting data can be listed on report paper. Before listing, set the report paper
on the label cassette and install it correctly in the SL-6600. (Set the initial #4-6 to 1 and cassette # to
3.)
Control lock: X (Read)
Set the table
menu #.
1
5
PLU PROG. DATA
51
5
5 3
5
5
5 6
1 r
PRT/*
2
COMMODITY DESCRI
52
SPEED KEY REPORT
53
4
REPORT COMBI
54
5
COMMO. & INGRE.
55
G. LINE REPORT
56
PLU #
nn □
IN PROCESS
nn P
Table
Menu #
51
52
53
54
55 Commodity and Ingredient
56
Name of Report
PLU Programmed Data Report
Commodity Description Report
Speed Key Programmed Data
Report
Report Combination
Description Report
Grade Line Report
Description
All the preset PLU data are listed in numerical order
(from the smallest number) of the PLU #.
All the preset Commodity Names are listed in numerical
order (from the smallest number) of the PLU #.
PLU # and the Commodity Names preset in all Speed
keys are listed.
All the contents of the Combination Report are listed.
All the preset Commodity Names and Ingredient
Messages are listed in numerical order (from the
smallest number) of the PLU #.
All the preset grade lines are fisted.
8- 1
Page 76

8. VERIFICATION OF PROGRAMMED REPORTS
® Set the data of Each Programmed Report
EM 1-31059
8, VERIFICATION OF PROGRAMMED REPORTS
PLU PROG. DATA
Set the individual PLU#.
(Ex. PLU# 100)
Set the block PLU#,
(Ex. PLU# 30- 39)
Set the zone PLU#.
(Ex. PLU# 100-108)
Set the entire PLU#.
ex.)
PLU #
PLU #
PLU #
PLU #
PLU #
51
51 □
51 □ 100
51
51
□ 3-
□
100
51 □ 108
8- 2
Page 77

8. VERIFICATION OF PROGRAMMED REPORTS
• Sample reports
EMI-31059
8. VERIFICATION OF PROGRAMMED REPORTS
(«NAv/VV'VVN'VVVS'VvN/vNA/vVI yV\AA./'v'\A/sAAAA/NA/WV\^
PLU PROGRAHED DATA
PIOI HI
nmiHI88
5TÜREI 51
COmiOOITY DESdilPIlOH
PLU 1
IHCREOIENT DESCRIPTION
nILD CHEDAR
000015
K 010015 5PER / lb
TARE 0.00 SHELF LIFE
000840
BORER COOKIES
K 02(1840 5PER / lb1.20
lARE 0.00 SHELF LIFE?
INCKEDlENh U5INC FLOU OF SE5l imiTC
uttAr fm... iu
BOTIEK ........ 4 07
5UUB ...
.....
COCOA ...
SALI ....
EGC..... 1.5 07
ACnCNI) ..
WIER ...
1 07
.....
1 07
.... 0.5 07
.....
7 07
.....
7 0?
JUL 10 9U
18:S5
0.80
11
COHHODITY DESCRI
FED 1 HI
waiwt 88
irOil 51
PEU I UPt
G00D15 01ÛÛ15
Ü0ÛB91 Ü100R1
OffllOO OlOlDO
GOOIDI QIOIDI
D0105 050105
0
000205 010205
000505 010505
000858 010856
00G808 020808
CU0815 020815 DONUTS
000818 020818 LENON riERIIfUt PIE
000840 020840 BUTTER COOKIES
000900 05090U NAia ORMES
000900 NfiVEL ÛRAICES
K 0509M 5 PCS. ! 2,50
TARE 0.00 aCLFLIFE
5
JUL 10 YO
18:53
COttlOflliy DESCRIPTION
NlLD IHDH!
SHRIIfS
T BONE STEAK
RIB STEAK
BEEF ElVER
PORK LOIN RIB CHOPS
lAne SIRLOIN
StKKEO SHH0N CHUNKS
CHSTY ROUS
QEESE t ONION B0U5
SPEED KEY REPORT
NHCHIICI 88
5TÛREI 31
KEY I PLU I COttlOOlTY OtSCRIPMON
10OOlOO T BONE STEAK
2 OOOIU1 RIB STEAK
7 000858 SHOKED SHnCH CHUNKS
JOT IÜ 90
18:55
COHHO. & INGRE.
PlU I HE
NACHilOBB
STOiïl 51
IK COmOOlEY DESCRIPTION
PlU I
INGREDIENT DESCRIPTION
01M015 010015 N110 CHEDAR
000091 010091 »RllfS
000818 020818 LENON NERINCOE PIE
UtOiEBIEKT; l«lt)lTFlOUK=3(l:'. Itcill№r
LE«IK=5-/.. WTTEMa:. ECiMi
CNEESE^Si. aW«=T/..
WTEMKi
two 020840 BUTTER COOKIES
i№HEDIEKI:i USI№ FlIMi OF ÌE8T CWUll'
w«t aou«... ( or
Bonn.. <07
vUCM
.......................
.....................
..................
...................
.......................
0.5 07
1,5 07
2 07
2 07
I 07
I 07
COCOA
SAIT
ECO
AEnOW
HAIER
...................
00D90Û 050900 HAVEL ISAHÎS
8-3
JUL 10 90
18:53
GRADE LINE REPORT
NACHINEI 88
SIOREI 51
DESCRIPTION
1
fRESH
01
BARGAIN Sl’tCIH
05
Jll 10 90
18:54
Page 78

9. OPERATING PROCEDURES
EM 1-31059
9.1 WEIGHED COMMODITY OPERATION
9. OPERATING PROCEDURES
NOTES BEFORE STARTING OPERATION
(1) Be sure to plug the power plug into an AC outlet.
(2) When the power switch is turned on, the scale goes through the test scanning sequence, such as
0000,0000,00000, then 1111,1111,11111
(3) While the scale is in the test sequence, do not put anything on the platter.
(4) Do not move the unit while it is in operation. Should it become necessary to move it at any time,
turn the power switch to the OFF position and be sure to readjust the level indicator after
relocating the scale.
(5) Should a power failure occur during operation, remove the commodity from the platter and insert
the power plug into an AC outlet again when power is restored.
(6) If the scale is used with an unrated power source, inaccurate scaling or other errors may occur.
(7) If the zero point has shifted during scaling, and no tare is displayed, adjust the zero point by
depressing the ZERO key.
9.1 WEIGHED COMMODITY OPERATION
Control lock: REG, M.DOWN, or REWRAP
Mode SW (2): WEIGH
In the event that PLU #100 and an unit price of $10.00 are set in the speed key #12.
.....................
and zeros appear on the displays.
(Sample label)
NOTE: Depressing a speed key to which no PLU data has been assigned will result in an error. In this
case, depress the key, then depress a speed key to which PLU data has been assigned.
9-1
Page 79

9. OPERATING PROCEDURES
EMI-31059
9.2 FIX PRICE OPERATION
9.2 FIX PRICE OPERATION
The FIX mode (Fix Price Mode) is used to issue a label for a commodity of a fixed price PLU (i.e. the
price determined by the store), the weight of which may vary from commodity to commodity. In this
mode, the Unit Price of the commodity looked up from the PLU file will be printed as the Total Price
regardless of its actual weight, and the weight is also printed on the label.
Control lock: REG, M.DOWN, or REWRAP
ModeSW(2): FIX
Example) A commodity of SMOKED SALMON CHUNKS is to be weighed and labeled. SMOKED
SALMON CHUNKS has been programmed as PLU #636 with Unit Price of $3.80/lb, and
PLU #636 has been preset on Speed Key #7. The commodity is sold at the fixed price of
$3.80 (which is the preset unit price) regardless of the actual weight.
Enter the PLU #.
Mcxie Switch
AUTO
MANUAL
The label is issued.
Depress:
Place the commodity
on the scale platter.
(Ex. 2.00lbs.)
AUTO
ENTER THE
PLU #
0.00
SMOKED SALMON CH
0.00
SMOKED SALMON CH
2.00
MANUAL:
PRT/*
Mode Switch
AUTO
MANUAL
T
The label is issued.
SNOKED SALHON CHUNKS
PACKED ON
ÄV
200222"003807
2^0
NETWT
PRICE/ib B
ddOI-A BANKERS CIRCLE
(TEL) d0i-il49-3040
(Sample label)
DEC 25
$3.80
P
000636
3.80
3.80
9- 2
Page 80

9. OPERATING PROCEDURES
9.3 BY COUNT OPERATION
Control lock: REG, M.DOWN. or REWRAP
Mode SW (2): BY COUNT
Example A) In the event that a price of $80.00 per 4 pieces is set for PLU #37.
EMI-31059
9.3 BY COUNT OPERATION
Example B) In case of purchasing 10 pieces of commodity at a price of $5.50 per 4 pieces. (In the
event that a price of $5.50 per 4 pieces is set for PLU #33.)
9- 3
....................................
SPLIT PRICE
Page 81

9. OPERATING PROCEDURES
9.4 PRESET COUNT OPERATION
With this procedure, a specified number of the same labels can be issued.
Control lock: REG, M.DOWN, or REWRAP
Mode SW (2): WEIGH, FIX or BY COUNT
EM 1-31059
9.4 PRESET COUNT OPERATION
Example
A)
When Mode SW (2) is at the “WEIGH” position.
Depress;
Set the number of l2tbels.
(Max. 99 labels)
Depress:
Enter the PLU#.
Depress:
PLU data is saved. SAVE
Place a commodity on
(Ex. O.TOIbs.)
PRESET COUNT
Ph
PRESET COUNT
Ph
50 bAL
ENTER THE PLU #
0.00 000000
SHRIMPS
0.00
6.50
SHRIMPS
0.00
' 1 <
-T-
PREPACK
6.50
SHRIMPS
bAL
0.00
0.00
0.70
-T-
PREPACK
MANUAL;
PRT/*
SHRIHPS
Batch
The label is issued with the
backing paper attached.
(continued on next page)
NOTE: Batch issue means continuous print of labels which have backing paper, and on-demand
issue means print of a label one by one.
The label is issued.
9- 4
1
On-demand
2(30555
070
NETWT.tt PRICE/
4401-A BANKERS CIRCLE
(TEL) 404-449-3040
(Sample label)
6.50
80 53
4.55
PACKED Oh
DEC 18
$4.55
Page 82

9. OPERATING PROCEDURES
EM1-31059
9.4 PRESET COUNT OPERATION
9-5
Page 83

9. OPERATING PROCEDURES
9.4 PRESET COUNT OPERATION
NOTE; Procedure to check the remaining number of the specified label during operation or to
cancel the specified number of the label is shown below.
SHRIMPS
1.50 6.50 9.75
EMI-31059
Cancel the
preset count.
9- 6
Page 84

9. OPERATING PROCEDURES
Example B) When Mode SW (2) is at the “FIX” position.
Depress:
EMI-31059
9.4 PRESET COUNT OPERATION
PRESET COUNT
Ph 0 bAL 0
Set the number of labels.
(Max. 99)
Depress:
Enter the PLU#.
Depress, to save
the PLU data:
Place a commodity on
the platter.
{Ex. 1.32lb)
MANUAL:
Batch
PRESET COUNT
Ph 25 bAL 0
ENTER THE PLU #
0.00 P 000000
ENTER THE PLU #
0.00 P
MILD CHEDAR
0.00 0.80
MILD CHEDAR
0.00
' I ^
-T-
PREPACK
MILD CHEDAR
1.32
N I /
-T-
PREPACK
HILD CHEDAR
000015
0.80
0.80
I PACKED ON
Remove the
commodity from
the platter.
Repeat until the
specified number
of labels are
Issued, alternating
the commodify
placed on the
platter.
The label is issued with the
mount paper attached.
MILD CHEDAR
0.00
' I.
-T*
PREPACK
When the last label is issued:
0.80
Depress, to clear
the Preset Count.
Depress, to regain
the initial status.
9- 7
PRT/*
200666
NETWlj^^ PRCE'ibP
4401-A BANKERS CIRCLE
(TEL) 404-449-3040
(Sample label)
MILD CHEDAR
Ph
MILD CHEDAR
Ph
ENTER THE PLU #
0.00
2ÖÖ800
25 bAL
0 bAL
P
I
DEC 26
$
0.80
000000
0
0
Page 85

9. OPERATING PROCEDURES
Example C) When Mode SW (2) is at the “BY COUNT” position.
EM 1-31059
9.4 PRESET COUNT OPERATION
9- 8
Page 86

EM1-31059
9. OPERATING PROCEDURES
9.5 ISSUING LABELS WITH NET WEIGHT STATEMENT
9.5 ISSUING LABELS WITH NET WEIGHT STATEMENT
When appropriate options are selected in the Initial Setting, labels with a Net Weight Statement are
issued (Initial Set #2-7: 1 ~4, Initial Set # 5-3:1). On such labels, the Unit Price and the Tare Weight
pre-programmed in each PLU are regarded and printed as the Price and the Net Weight respectively.
Control lock: REG, M.DOWN, or REWRAP
Mode SW (2): FIX
Example) A label of Net Weight Statement is to be issued for a commodity of LEMON MERINGUE
PIE (PLU #816). The preset Price (programmed as Unit Price) is $2.10 and the preset
Net Weight (programmed as the Tare Weight) is 1 lbs. The store knows that the actual
Net Weight of this commodity is 1 lbs. 10 oz. and decides to sell it at $2.00.
Enter the PLU #.
Enter the new price.
Enter the new weight
(The numeric data is
displayed in the
incremental display
method, i.e., the data
Is shifted to the left
as each digit value is
entered.)
AUTO
Depress:
0
pound data
(0 to 30)
8 1
i
PLU
PRT/*
1 1
PRTr
For no Price change
For no weight change
0
ounce data
(00 to 90)
MANUAL
ENTER THE
PLU #
0.00 P
ENTER PRICE ($)
ENTER PRICE ($)
ENTER WT.
Preset Weight
.....
lbs. ozs.
ENTER WT.
New Weight
....
lbs. ozs.
PRESS * TO PRINT
000816
2.10
Preset Price---------^
2.00
New Price entered —^
1 00
1 00
2.00
2.00
1 00 2.00
The label is issued. (Labels of identical
print data will automatically be issued
consecutively by peeling the label off the
mount paper.)
Press, to cancel label
issue temporarily.
Press, to cancel
label issue.
The label is issued.
Press, to return the
PLU
PLU data to the PLU
file.
9- 9
Page 87

9. OPERATING PROCEDURES
9.5 ISSUING LABELS WITH NET WEIGHT STATEMENT
NOTE: NET WEIGHT PRINT FORMAT
Example 1) When the weight has not been changed, the preset weight data is printed on the label
according to the preset weight data.
EMI-31059
Preset Weight
1 00
Example 2) When the weight has been changed, the new weight data is printed on the label as it is
entered. At this time, the first 1 or 2 digits are regarded as the pound data and the last
2 digits are regarded as the ounce data. Even when the ounce data exceeds “16”, the
data will be printed as it is entered.
Entered Weight Print Format
1 10
1 30 = 1 lb 30 ozs.
= 1 lb
= 1 lb 10 ozs.
NET WT. 16 OZ (1 LB 0 OZ)
NET WT. 26 OZ (1 LB 10 OZ)
NET WT. 46 OZ (1 LB 30 OZ)
Print Format
LEHON HERINGUE PIE
mm\m- ticAT Fiouh:
f€TWT 1
PRiCE/ib
OTAL PRICE E3
NETWI260Z( 1LB100Z)
4H01-A BANKERS CIRCLE
CTEL5 404-449-3040
(Sample label)
9-10
Page 88

9. OPERATING PROCEDURES
9.6 TARE FUNCTION PROCEDURES
9.6 TARE FUNCTION PROCEDURES
Control lock; REG, M.DOWN, or REWRAP
Mode SW (2): WEIGH or FIX
1) Tare are two kinds of tare subtraction procedures, one is “Direct tare", the other is “Preset tare”.
Direct tare subtraction Preset tare subtraction
EMI-31059
NOTES: 1. Tare weight subtraction is available up to 30 lbs. When tare weight subtraction is in
operation, however, the scalable range for net weight becomes less by the amount of
the tare. (Net weight = Gross weight - Tare weight)
2. The entry weight for a preset tear must be integer times of 1.
9-11
Page 89

9. OPERATING PROCEDURES
9.6 TARE FUNCTION PROCEDURES
2) Preset tare subtraction when tare weight is included in PLU data (function by initial setting)
Example: In the event that tare weight of 0.20 lbs is set for PLU #105.
CRUSTY ROLLS
-0.20 5.00
^ I .
-T-
NET
EM1-31059
-y-
NET
CRUSTY ROLLS
-0.25
'T'-
NET
CRUSTY ROLLS
1.00
'I /
-T*
NET
ENTER THE PLU #
5.00
5.00 5.00
9-12
0.000 P
' I '
ZERO
000000
Page 90

EM 1-31059
9. OPERATING PROCEDURES
9.7 SAVE KEY OPERATION SAMPLE
9.7 SAVE KEY OPERATION SAMPLE
Control lock: REG, M.DOWN, or REWRAP
Mode SW (2); WEIGH or FIX
The SAVE key is used to save the tare weight, unit price, and PLU data after taking a commodity from
the piatter.
ENTER THE PLU #
0.20
ENTER THE
P
PLU #
0.00 P
NET
ENTER THE PLU #
0.00 P
■'t'
NET
SHOULDER & BLADE
0.00 3.00
^ I #
-J-
NET
SHOULDER & BLADE
0.00 3.00
V *
"T:
> 1 /
-J-
NET PREPACK
SHOULDER & BLADE
1.00 3.00 3.00
V ^
'I /
‘T*
NET PREPACK
000000
000000
000100
0.00
0.00
9-13
CRUSTY ROLLS
1.00
N /
■T‘
NET
ENTER THE
0.00 P
PLU #
3.00
3.00
000000
Page 91

9. OPERATING PROCEDURES
9.8 VOID KEY OPERATION SAMPLE
9.8 VOID KEY OPERATION SAMPLE
Control lock: REG, M.DOWN, or REWRAP
Mode SW (2): WEIGH, FIX or BY COUNT
On depressing the VOID key, the data of the last registration is subtracted from the memory.
EM 1-31059
9.9 CALLING AND PRINTING GRADE LINE
Control lock: REG, M.DOWN, or REWRAP
Mode SW (2): WEIGH, FIX or BY COUNT
Grade line
0000
20 ms
icrir M PBict/ii B
1401-A BANKERS CIRCLE
(lEL) 404-149-3040
(Sample label)
DONU
lIlHS OFFERED
pr
PACKEOON
000081
$
Enter ttie PLU #.
Enter the grade line #.
DEC 20
5.00
The label is issued.
3
r
1
PLU
Q.LINE
PRir
PRT/*
~T-
1
DONUTS
P
ENTER G.LINE #
G.irE
ENTER G.LINE #
G.LrE
DONUTS
P
20
20
5.00
5
5.00
9-14
Page 92

9. OPERATING PROCEDURES
9.10 SELECTION OF PRINT OR NON PRINT ITEM ON LABEL
9.10 SELECTION OF PRINT OR NON PRINT ITEM ON LABEL
Control lock: REG, M.DOWN, or REWRAP
Mode SW (2): WEIGH, FIX or BY COUNT
EM 1-31 OSS
NOTE:
Depress:
Select the item.
(Refer to NOTE.)
Print»
-----
^0 print
1: Print
0: Non print
Depress:
PROG.
r
7
w
r
O
r
1
PRT/"
9-15
Page 93

9. OPERATING PROCEDURES
9.11 DATE CHANGE
The date can be changed temporarily.
Control lock: REG, M.DOWN, or REWRAP
Mode SW (2): WEIGH, FIX or BY COUNT
EM1-31059
9.11 DATE CHANGE
Depress: dt/TM
Enter the new date.
(Ex. Dec. 18, 1992)
Depress:
When the original date is desired.
PRT/*
► Month
Day
► Year
DATE
dAhE 121592
Current setting date
DATE
dAtE
DATE
dAtE
ENTER THE PLU #
0.00 P
----------------
000012
121892
000000
T
DT/TM
DATE
dAtE
DATE
dAtE
ENTER THE PLU #
PRT/*
0.00 P
NOTE: The scale will check details of date input, and any wrong date will result in an error mode.
The correct date should be re-entered after depressing the C key.
9-16
121892
121592
000000
Page 94

9. OPERATING PROCEDURES
9.12 CALLING AND PRINTING LOGO
9.12 CALLING AND PRINTING LOGO
When the initial set #10-7 is set to “1”, the logo containing a picture, a mark, a POP message, etc.,
can be printed on the ingredient label which having 12 lines or more.
Logo data is created on the PC and stored into the memory through the CMT interface.
Control lock: REG, M.DOWN, or REWRAP
Mode SW (2): WEIGH, FIX or BY COUNT
EMI-31059
9.13 FUN AUTOMATIC RECEPTION
Control lock: REG, M.DOWN, or REWRAP
Mode SW (2): WEIGH, FIX or BY COUNT
ENTER THE PLU #
0.00
IN PROCESS
- F - P
ENTER THE PLU #
0.00 P
DATA ERROR
- F -
ENTER THE
PLU #
0.00 P
ENTER THE PLU #
P
000000
000000
▼
-See NOTE 1.
(Next page)
nn
ERROR
000000
0.00 P
000000
Page 95

9. OPERATING PROCEDURES
NOTES: 1.
EMI-31059
9.13 FUN AUTOMATIC RECEPTION
Description
Error Name
Error Name
HARD ERROR 01
DATA ERROR 08
TIME OUT
ERROR
7-seg.
‘1 P: PLU + ING
Error
Description
P U
Parity error
02 Overrun error
04 Framing error
Verify error
Character over
10
error
BCC error
20
Data error
40
80 Timeout error
*2 O: Error occurs
X: No error occurs
U: UNIT PRICE
M1: MISC. 1 (ADDRESS, LOGO)
M2: MISC. 2 (SPEED KEY)
X
Received Text *1
SEND
Ml М2
VERIFY
P U
О
X
О
X X
о
О О
Ml М2
О
О
о
Cause
Hard Error
Compared contents do
not correspond.
Hard error
BCC is not correct.
X
*3
Text with designated time
has not been received.
^2 When several errors occur at the same time, all relevant data are added and
displayed in the 7-segment display.
*3 Cause of Errors
0 RAM for LOGO does not exist when LOGO is selected in initial set.
<2> Transmitted LOGO data exceeds the number of dots to be colored selected in the
initial set 2.
2. Data is automatically received in registration mode. However, scale operation stops
during reception.
3. After cleaning an error, the registration initial display is shown. Data other than head
data is not received.
4. When the header text is received, all contents previously set are cleared.
9-18
Page 96

EMI-31059
10. TOTAL OPERATION PROCEDURES
10.1 HOURLY REPORT
10.TOTAL OPERATION PROCEDURES
When the control lock is set to the “X” or “Z" position, it is available to issue READ or RESET
reports. Both kinds of reports can be issued on labels or report paper.
Control lock: X or Z
“X” position: READ
The totals will not be cleared as they are printed on labels or report paper.
“Z” position: RESET
The totals will be cleared as they printed on labels or report paper.
10.1 HOURLY REPORT
Ex.) “X” position
1
PRTr
10.2 GRAND TOTAL REPORT
Total memory
10.3 PLU REPORT
Total memory Search Code
Total memory
pT|
: Day total
I 2 I : Mark Down total
[~3~| : Rewrap total
® Individual Total
Ex.) Individual PLU Total (PLU #100)
1 PRT/*
10-1
Page 97

10. TOTAL OPERATION PROCEDURES
Block Total
Ex.) UPC Block Total (UPC #100300-100399)
EMI-31059
10.3 PLU REPORT
1 0 0 3 o o
NOTE: The
appropriate number of the keys.
© Zone Total
Ex.) PLU Zone Total (PLU #100-107)
Entire PLU Total
PRTr
■ Sample Label
® Individual Total
NETWT l5g PRICE/Ibga B
TEC FOOD HART
1231 LINCOLH AVF.
O
key represents 0 through 9. Most significant digit in starting number followed by
PLU TOTAL
PACKED ON
PLU# Ni
000100
25.30 15 63,90
JUL II
SELL BY
OTALPRlCEg3
PRTr
Block Total
NETWT tSS PPICE/ltS3 I
PLU TOTAL
UPC N6
1003--
30.74 17
TEC FOOD MART
l2Td LINCOLN AVE,
PACKED ON
JUL 11
SELL BY
74.78
TOTALPRlCEgg
PLU REPORT
PLU 1 000100 KM.
nfOINEISS
STORE» 31
PLÜ» aw iciCHr D(ia«s
OOOIOG l eoi srEw
15 5.30 63.90 100.0
OFGRM (OOLLI1RS) 32.3
REflU
M II 90
16:0?
10- 2
Page 98

10. TOTAL OPERATION PROCEDURES
EMI-31059
10.3 PLU REPORT
© Zone Total
PLU TOTAL
000100-СЮС107
I EC FOOD HART
Entire PLU Total
PLiia Ni 5EU BY
30.74 17 74.78
NETWT tE3 PRICE/») >3 1 TOTALPRICEg^l
1234 LINCOIM AVE
PLU TOTAL
PLU# N4
AIL
85.48 164
NETWT. PRICE/!bS3 |
TEC FOOD MART
\?7d I.INCOl.N AVE
PACKED ON
JUL II
PACKED ON
JUL 11
SELL BY
197.95
TOTAL PRICE gal
PLU REPORT
PLU 1 Ш100 000107
ndCHIHElSO JUL 1190
SIOREI 31
СОиНГ KIGH1
PIUI
OOOIDOr-BOHf STF*
000101RIB SIE*
rOIDL
15 75.30
17 30.74
tOrURfW
NORIA READ
oainis $‘4
63.90 85.5
2 5.« 10.88
74.78 100.0
(OaLlSS)37.8
16:10
14.5
10-3
Page 99

10. TOTAL OPERATION PROCEDURES
10.4 COMBINATION REPORT
The total reports or setting reports are printed in the order of the specified tables (max. 8 tables).
table #
NOTE: With the control lock set to the “Z” position, only the total reports are printed out.
EM 1-31059
10.4 COMBINATION REPORT
10- 4
Page 100

11. LABEL PRINT FORMATS
11. LABEL PRINT FORMATS
1) Weighing Label 2) By Count Label
EMI-31059
11. LABEL PRINT FORMATS
T-BONE STEAK
PACKED ON
se№U5'
0000
Unit Price ■
Weight •
3) Mark Down/Rewrap Mode Label 4) Ingredient Label
2001 I 1
— 1.00 10.00
NETWT B PRICE/lb B
61
4401'A BANKERS CIRCLE
(TEL) 404-449-3040
DEC 20'
$10.00^
- Commodity Name
- Packed on date
- Sell by date
-Total Price Quantity-
■ Store Address or
Commercial Message
NAVEL ORANGES
• Grade Line
• Mark
0000
5
PIECES
NETWT I
Mark
M: Mark Down
R: Rewrap
PBICEilt B
4401-A BANKERS CIRCLE
(TEL) 404-449-3040
000002
NATURAL
PACKED ON
DEC 20
$2.50
LEHONS
PACKED ON
scPiyS
00007T
PBICE/ib B
4401-A BANKERS CIRCLE
(TEL) 404-449-3040
- 5
NHWT
0000
DEC 23
$1.do-
BUTTER COOKIE -
HKmiEKTS: JSIK A Flow OF №1 «MLIIY. «
'200123
NETWT
COOKED BY
1027
1.32 2.10
PRiCE/lb B
4401-A BANKERS CIRCLE
(TEL) 404-449-3040
DEC 26
PACKED ON
DEC 22
77
$2.77
■ Commodity Name
Total Price
• Commodity name
3rd Date
— Ingredient Message
"READ” markC: RESET)
Total Weight ■
5) Read & Reset Mode
• Hourly Report
HOURLY REPORT
PACKED ON
14-15 0
—► 28.32
KIWT.iES PSICE/»
4401-A BANKERS CIRCLE
(TEL) 404-449-3040
JUL II
sac sr
59.98-
TOTAL PRICE
■ Total Items
■ Total Amounts
11- 1
HOURLY REPORT
PACKED ON
JUL II
TOTAL t SELL BY
96.48 186
KTWT.iSS PRICE/» E5 |
4401-A BANKERS CIRCLE
(TEL) 404-449-3040
229.55
TOIAl PRICE B
 Loading...