

Page 1
Symphony Pro Owners Manual
Revision 1.0a
Distributed By
TOSHIBA TEC AMERICA
© 2005
Page 2

TOSHIBA TEC AMERICA RETAIL INFORMATION SYSTEMS, INC. provides this help file as is
without Warranty of any kind, either expressed or implied. This publication could include technical
inaccuracies or typographical errors. Changes are periodically made to the information herein; these
changes will be incorporated in new editions of the help file. TOSHIBA TEC AMERICA RETAIL
INFORMATION SYSTEMS, INC. may make improvements and/or changes in the product(s) and/or
program(s) described in this publication at any time.
Page 3

Table of Contents
IContents
Part I
Part II
Part III
Limited Warranty
About Symphony Pro application
................................................................................................................................... 71 Navigation
................................................................................................................................... 72 Printing Help as a Manual
................................................................................................................................... 83 Understanding Communications
................................................................................................................................... 94 Data Maintenance
................................................................................................................................... 105 Protecting Your Data
Symphony Pro Main Menus
................................................................................................................................... 111 File Menu
.......................................................................................................................................................... 12Login
.......................................................................................................................................................... 13Logout
.......................................................................................................................................................... 13Language
.......................................................................................................................................................... 14View Internal Process
......................................................................................................................................................... 15Process Viewer Buttons
......................................................................................................................................................... 16Process Viewer Menus
.......................................................................................................................................................... 17View Polling Status
.......................................................................................................................................................... 18Execute Command File
.......................................................................................................................................................... 19Deploy Individual File
.......................................................................................................................................................... 20Configuration Panel
......................................................................................................................................................... 21Company
......................................................................................................................................................... 22Email
......................................................................................................................................................... 22System
......................................................................................................................................................... 25Misc
......................................................................................................................................................... 26Host
......................................................................................................................................................... 29Cleanup
......................................................................................................................................................... 30Load Files
......................................................................................................................................................... 32Security
.......................................................................................................................................................... 34Send urgent message to Symphony Pro
.......................................................................................................................................................... 34Date Conversion
.......................................................................................................................................................... 35Messages
.......................................................................................................................................................... 36Show Tips
.......................................................................................................................................................... 36Exit
................................................................................................................................... 372 Modules Menu
................................................................................................................................... 383 Special
................................................................................................................................... 384 Help
5
6
11
Part IV
© 2005 TOSHIBA TEC AMERICA AMERICA RETAIL SYSTEMS, INC. R1.0a
Maintenance Application
................................................................................................................................... 401 Maintenance Main Menus
................................................................................................................................... 412 Common Data Edit Toolbars
................................................................................................................................... 423 Displaying Data Lists
39
I
Page 4

Symphony Pro User Manual 2.0.2.15II
................................................................................................................................... 444 File Menu
.......................................................................................................................................................... 45Item Options
.......................................................................................................................................................... 48Other File Options
................................................................................................................................... 495 Edit Menu
.......................................................................................................................................................... 49Item Options
.......................................................................................................................................................... 50Other Edit Options
................................................................................................................................... 516 PLU Menu
.......................................................................................................................................................... 52Item Tables
......................................................................................................................................................... 53Quick Tab
......................................................................................................................................................... 54Editing the Quick Tab
......................................................................................................................................................... 55Object Tab
......................................................................................................................................................... 57POS Tab
......................................................................................................................................................... 60Price Tab
......................................................................................................................................................... 69Cost Tab
......................................................................................................................................................... 71Inventory Tab
......................................................................................................................................................... 73Sales Tab
......................................................................................................................................................... 74Picture Tab
......................................................................................................................................................... 75ECL tab
......................................................................................................................................................... 78Kit tab
.......................................................................................................................................................... 81Working With Items
......................................................................................................................................................... 81Filtering and Global Modifications
......................................................................................................................................................... 84Add / Copy / Delete Items
......................................................................................................................................................... 85Deploying Modified Items
......................................................................................................................................................... 86Rental Items
......................................................................................................................................................... 88Item Label Setup
.......................................................................................................................................................... 89Sub-department Table
......................................................................................................................................................... 90Sub-department Programming
.......................................................................................................................................................... 92Department Table
......................................................................................................................................................... 92Department Programming
.......................................................................................................................................................... 94Other Item Related Tables
......................................................................................................................................................... 94Bottle Link Table
......................................................................................................................................................... 96Tare Table
......................................................................................................................................................... 96Category Table
......................................................................................................................................................... 97Price Level Table
......................................................................................................................................................... 97Mix & Match Table
......................................................................................................................................................... 98Vendor Table
......................................................................................................................................................... 98Scale Table
.......................................................................................................................................................... 100Batches
.......................................................................................................................................................... 103Statistics
................................................................................................................................... 1067 Account Related Maintenance
.......................................................................................................................................................... 106Customer
.......................................................................................................................................................... 110Client Level Table
.......................................................................................................................................................... 110Risk Level Table
.......................................................................................................................................................... 112Account view
.......................................................................................................................................................... 112Discount
.......................................................................................................................................................... 113Custom messages
................................................................................................................................... 1148 Register Menu
.......................................................................................................................................................... 115Operator Table
.......................................................................................................................................................... 116Functions Table
.......................................................................................................................................................... 121Totalizer Table
.......................................................................................................................................................... 123Terminal Table
.......................................................................................................................................................... 127Gift Certificates
© 2005 TOSHIBA TEC AMERICA AMERICA RETAIL SYSTEMS, INC. R1.0a
Page 5

................................................................................................................................... 1289 Navigation Menu
................................................................................................................................... 12910 Transfer Menu
................................................................................................................................... 12911 Windows Menu
IIIContents
Part V
Part VI
Part VII
Report System
................................................................................................................................... 1301 Report Types
................................................................................................................................... 1322 Report Selection
................................................................................................................................... 1343 Opening Reports
................................................................................................................................... 1364 Report Viewer
................................................................................................................................... 1375 Report printing
................................................................................................................................... 1386 Printing Labels
................................................................................................................................... 1417 Report Properties
................................................................................................................................... 1448 Report SQL Editor
Entry Module
................................................................................................................................... 1471 Purchase Orders
................................................................................................................................... 1502 Receiving Stock
................................................................................................................................... 1533 Counting and Adjusting Stock
................................................................................................................................... 1544 Transfer
................................................................................................................................... 1545 Other Entry Options
................................................................................................................................... 1556 Pickups and Loans
View Log
130
145
157
Part VIII
Part IX
Part X
Part XI
Part XII
................................................................................................................................... 1581 Logs and Messages
................................................................................................................................... 1592 Urgent Messages
................................................................................................................................... 1593 Unprocessed Files
Electronic Journal (L-Tracker)
................................................................................................................................... 1601 Using the Electronic Journal (L-Tracker)
Events / Tasks
................................................................................................................................... 1651 Programming Events
Monitoring Utility
Form Manager
................................................................................................................................... 1701 Template Editor
................................................................................................................................... 1722 Tools
................................................................................................................................... 1743 Menus
File Maintenance Utility
160
163
168
169
177
© 2005 TOSHIBA TEC AMERICA AMERICA RETAIL SYSTEMS, INC. R1.0a
III
Page 6

Symphony Pro User Manual 2.0.2.15IV
Part XIII
Glossary
181
© 2005 TOSHIBA TEC AMERICA AMERICA RETAIL SYSTEMS, INC. R1.0a
Page 7
1 Limited Warranty
TOSHIBA TEC AMERICA RETAIL INFORMATION SYSTEMS, INC.
90-DAY LIMITED WARRANTY
Symphony POS SOFTWARE
BEFORE USING THIS PRODUCT, YOU SHOULD CAREFULLY READ THE FOLLOWING TERMS AND CONDITIONS.
YOUR USE OF THIS PRODUCT INDICATES YOUR ACCEPTANCE OF THESE TERMS. IF YOU DO NOT AGREE WITH
THEM, YOU SHOULD NOT USE THIS PRODUCT AND SHOULD PROMPTLY RETURN THE PRODUCT TO THE SELLER.
TOSHIBA TEC AMERICA RETAIL INFORMATION SYSTEMS, INC. warrants this product to be free from defects in
materials and workmanship for a period of 90 days from the date of purchase from an authorized TOSHIBA TEC
AMERICA RETAIL INFORMATION SYSTEMS, INC.dealer. This warranty is limited to the original purchaser, and to
TOSHIBA TEC AMERICA RETAIL INFORMATION SYSTEMS, INC. products that are sold and used within the continental
United States and Hawaii. A copy of a valid dated sales receipt must be submitted with the product for warranty
service. Third Party Operating System and Third Party Application Software are specifically excluded from this
warranty.
This limited warranty applies only to TOSHIBA TEC AMERICA RETAIL INFORMATION SYSTEMS, INC. products that do
not function properly under normal use, within the
manufacturer's specifications. It does not apply to products that, in
the sole opinion of
TOSHIBA TEC AMERICA RETAIL INFORMATION SYSTEMS, INC
have been damaged as a result of
accident, misuse, neglect, or improper packing or shipping. This warranty is void if the
TOSHIBA TEC AMERICA
RETAIL INFORMATION SYSTEMS, INC. label or logo, or the rating label or serial number have been removed or
defaced, or the product has been modified or serviced by other than TOSHIBA TEC AMERICA RETAIL INFORMATION
SYSTEMS, INC, or an authorizedTOSHIBA TEC AMERICA RETAIL INFORMATION SYSTEMS, INC. Service Center.
During the 90-day warranty period, TOSHIBA TEC AMERICA RETAIL INFORMATION SYSTEMS. will repair or replace, at
its option, any defective product with no charge for parts or labor.
TOSHIBA TEC AMERICA RETAIL INFORMATION SYSTEMS, INC.'S LIABILITY HEREUNDER SHALL BE LIMITED TO
REPAIR OR REPLACEMENT OF THE DEFECTIVE PART OR PARTS AND SUCH CORRECTION SHALL CONSTITUTE A
FULFILLMENT OF ITS WARRANTY HEREUNDER.
TOSHIBA TEC AMERICA RETAIL INFORMATION SYSTEMS, INC.. MAKES NO WARRANTIES, EXPRESS OR IMPLIED,
INCLUDING MERCHANTABILITY OR FITNESS FOR A PARTICULAR PURPOSE, EXCEPT AS EXPRESSLY STATED
HEREIN.
UNDER NO CIRCUMSTANCES SHALL TOSHIBA TEC AMERICA RETAIL INFORMATION SYSTEMS, INC . BE LIABLE TO
THE PURCHASER OR ANY USER FOR ANY DAMAGES, INCLUDING INCIDENTAL OR CONSEQUENTIAL DAMAGES,
EXPENSES, LOST PROFITS, LOST SAVINGS, OR OTHER DAMAGES ARISING OUT OF THE USE OF OR THE INABILITY
TO USE THIS PRODUCT.
To obtain warranty service, contact your TOSHIBA TEC AMERICA RETAIL INFORMATION SYSTEMS, INC. dealer. You
may also write or phone:
TOSHIBA TEC AMERICA RETAIL INFORMATION SYSTEMS, INC
4401-A BANKERS CIRCLE
ATLANTA, GA 30360
PHONE NO.: (770) 449-3040 FAX: (770) 453-0909
If the problem cannot be remedied by telephone, TOSHIBA TEC AMERICA RETAIL INFORMATION
SYSTEMS, INC. will determine how service will be provided. Do not ship the equipment to TOSHIBA TEC
AMERICA RETAIL INFORMATION SYSTEMS, INC. without a return authorization number. The purchaser
must prepay any shipping costs and insurance, and assume the risk of loss during shipping.
Limited Warranty 5
© 2005 TOSHIBA TEC AMERICA AMERICA RETAIL SYSTEMS, INC. R1.0a
Page 8
Symphony Pro User Manual 2.0.2.156
Overview
The Symphony Pro Software application is designed as the back office controller for Symphony POS
front end terminals and TEC ECRs. Together, they represent
TOSHIBA TEC AMERICA RETAIL
INFORMATION SYSTEMS, INC.'s most recent store
management tools. Symphony Pro is the core
application for back office control, acting as the centralized data storage, programming interface,
communication center, event scheduler, and office application launcher. As the core of the store
system, Symphony Pro is designed to run continuously on at least one station in the network. This
allows it to execute scheduled events, for example sending item prices to all front end Symphony POS
terminals and TEC ECRs.
Data Storage
Symphony Pro uses a relational database system to maintain all system information. Conventional
databases often use single records that contain all information about a specific data type in a set
number of fields. This limits the amount of information that can be kept for a data type. If new
information is required, fields must be added. For example, if you keep customer information, a
conventional database record might have two (2) possible telephone number fields. If a third telephone
number field becomes necessary, the entire database must be changed to accept the new information.
Relational databases use table sets to link information, allowing for far greater flexibility. As with any
database, each data type must have a unique identifier to distinguish it from other data items of the
same type. By combining two or more unique identifiers, it is possible to keep multiple values for a
single data type. For example, if you sell items at different price levels, you need to keep many prices
for the same item. Instead of adding price fields, the relational system allows you to have a price level
table with as many levels as required. By combining the unique item code and the price level, it is
possible to create a new unique record for each price for the item in the price table.
Security
As with any critical data system, security is always an issue. Symphony Pro offers configurable
security "levels" so that users can only access functions that are available to their assigned security
level. For example, you probably want the store manager to be allowed to add / remove items, but
cashiers should not be allowed. When a user logs into the system, they can only activate or use
options that their security level allows them.
2 About Symphony Pro application
© 2005 TOSHIBA TEC AMERICA AMERICA RETAIL SYSTEMS, INC. R1.0a
Page 9
2.1 Navigation
Navigating the Symphony Pro Application
Using the mouse
Throughout the Symphony Pro application you will find drop down menus and main screen icon
groups to navigate through the program or launch utilities. The most commonly used drop down menu
options have been included as icons on the Symphony Pro desktop to facilitate access. In other words,
some drop down menu options lead to the same location as clicking that option's icon counterpart.
Not all options have icons, and must be launched from the drop down menu. Options that are not
often required, or single use setup tools (used to configure the system at installation time) do not have
main screen icons. If an option does not appear to have an icon, use the drop down menus to locate
and launch that option.
Using the keyboard
As with most Windows style applications, the drop down menu titles and options are also accessible
using the keyboard. This can actually be faster than navigating with the mouse, after you've memorized
the keystrokes involved for a specific task. The keystrokes associated with menu titles and options are
underlined. For example, the "File" menu has an underscore under the "F":
·Hold down the [Alt] key on the keyboard.
·Simultaneously, press the [F] key.
·The File menu opens.
The options in the drop down menus also have underscored letters. Once a drop down menu is open,
you can press the letter that is associated with the option you wish to launch. You can also use the [up]
or [down] arrow keys to select the menu option, then press [Enter] to launch the option.
Within applications or utilities, the [Tab] key will move the cursor from one box, window or editable
field to the next, in a pre-set order. Holding down the [Shift] key and pressing the [Tab] key will reverse
the pre-set order. Once the cursor is on an option, press the [Enter] key to launch the option.
Printing help pages as a paper document
Symphony Pro help pages can be printed from the Windows style help viewer. However, when you
print the entire help from the help viewer, the resulting pages will not be indexed (no page numbers or
table of contents). If you wish to print the entire help, you should run the "SYMPHONYOM.pdf" file that
is placed in the Symphony Pro folder at installation time. The LBOSS.pdf document is the manual in a
printable format, with a table of contents, index and page numbers. To view / print the LBOSS.pdf
document requires Adobe Acrobat Reader.
You can download the reader from the Adobe website free
of charge at
http://www.adobe.com/products/acrobat/readstep2.html
To print a single page from the help viewer
·Select the page you wish to print.
About Symphony Pro application 7
2.2 Printing Help as a Manual
© 2005 TOSHIBA TEC AMERICA AMERICA RETAIL SYSTEMS, INC. R1.0a
Page 10

Symphony Pro User Manual 2.0.2.158
·Click the "print" button at the top of the help viewer.
·A panel will open asking if you wish to print all the topics.
·If not already selected, choose "...this topic only".
·Print the page
To print the entire paper manual
·Make sure you have the Adobe Acrobat Reader installed.
·Use Windows explorer to locate the LBOSS folder.
·Select the "SYMPHONYOM.pdf" file, it will open the Acrobat Reader.
·You can view the manual on screen, or use the Reader's print utility.
Polling Process
"Polling" is the act of collecting information from Symphony POS stations and/or TEC ECRs. In most
cases, one back end station collects the sales and other information from the front end stations, storing
the information in the database. In a cash register systems, polling takes place once at the end of each
sales period (often day end). In these types of systems, there is normally a "request" from the back
end, forcing the TEC ECRs to communicate the sales information.
How Polling Works
The Symphony Pro and Symphony POS machines are in constant communication, so the polling
process is constantly running. The Symphony Pro machine that has been designated to retrieve sales
information is constantly checking each Symphony POS station's "outbox" at a set interval, collecting
any information that the Symphony POS stations are producing. The front end stations produce sales
information files (e.g. EJ) after every transaction. After "finalizing" a sale, the information is immediately
placed in a file in the Symphony POS's "outbox". The Symphony POS station then sends a message to
the Symphony Pro station telling it that there is mail to come and get. Even if the back end does not
receive messages from a Symphony POS station, it checks that stations "outbox" for information
regardless.
Secure Information
This method of collecting sales information adds to the system's data integrity. If the back end
Symphony Pro station "crashes", (or the network communication is halted at any time), individual
Symphony POS stations can continue to finalize sales. The sales information collects in each station's
outbox, so when normal network communication resumes, the back end Symphony Pro station collects
the information as usual, "catching up". If a front end Symphony POS terminal goes down, information
continues to be deployed to its "inbox" on the back end, so when the terminal re-starts, all new
information is absorbed.
During a communication failure, each Symphony POS relies on its own database for item prices and
other item information so the store can continue normal sales operations. Several factors are involved
if the front end uses "
floating cashiers
" or
customer accounts
.
2.3 Understanding Communications
© 2005 TOSHIBA TEC AMERICA AMERICA RETAIL SYSTEMS, INC. R1.0a
Page 11

While the network is "down" and Symphony Pro cannot communicate with the front end:
·No new item prices can be obtained, but the Symphony POS front end stations/cash registers work
from their local item database. Local "price override" can be used to modify prices if required.
·Floating cashier balance reports cannot be generated until the system returns to normal operation.
·No customer account balances will be available until the system returns to normal, but the Symphony
POS front end station will prompt the cashier with a "server not available - continue anyway?" error
message. At this point it is up to the store manager to allow or not allow account charges during a
network down.
·No financial reports for the cash register can be taken from the Symphony Pro back end station.
2.4 Data Maintenance
Controlling Database Size
Except for hardware configurations, Symphony Pro keeps all data in database tables. The original size
and growth in size of the database tables depends on the number of items, the amount of transactions
per day, and other factors. Daily transactions which include PLU sales information are probably the
biggest factor, taking up large amounts of space. Large amounts of data can also slow down the
processing times for database operations. Some database types are more robust, but eventually, even
Paradox databases cannot handle the amount of data. These tasks are automated with the Task
Manager, and are included in a default Symphony Pro installation.
Instead of keeping all daily data, Symphony Pro provides automated utilities that consolidate sales
information into weekly, monthly and yearly totals. The consolidation process is also automated by the
Task Manager, and greatly reduces the amount of space the information occupies in the database
report tables.
Daily Maintenance Process
As the front end Symphony POS terminals perform transactions, they place the resulting information in
both their Electronic Journals and "Outbox". The controlling Symphony Pro station picks up this sales
data and posts it to the report tables in the database. This creates many daily records that occupy large
amounts of space in the database. The daily maintenance process consolidates the information from
all Symphony POS lanes, eliminating many of the records. For example: during a daily period, a front
end lane has sold 300 PLU 1. Each time the PLU sold, a record was created. The Daily Maintenance
process will combine all 300 records into a single record, saving database space. It also combines all
front end lanes. Following the PLU 1 example above, if all lanes sold PLU 1, there will be a single
record for all PLU 1 sales that day.
Monthly Maintenance Process
As time passes in an operational situation, data continues to grow. Each month, Symphony Pro runs
another maintenance operation to control database size. The Monthly maintenance process further
reduces the database size by eliminating daily data from the past. In most situations, daily data is not
required after about 90 days. With the exception of daily financial data, the monthly process eliminates
daily data, keeping weekly, monthly and yearly totals. Every month when the process runs, it leaves the
most recent 90 days of daily data untouched, but removes daily data from before the 90 day period.
NOTE:
By default, Symphony Pro keeps the daily financial data for 365 days. The cleanup
period can be defined in the configuration settings. We recommend you consult your
About Symphony Pro application 9
© 2005 TOSHIBA TEC AMERICA AMERICA RETAIL SYSTEMS, INC. R1.0a
Page 12

Symphony Pro User Manual 2.0.2.1510
Authorized TEC Dealer before modifying the values.
Backups Are Important!
Is your sales information important? Is your database important? Is your hardware setup important?
The answer is always YES! What happens if the system crashes? How can I protect my information?
Like any "mission critical" information, your Symphony Pro installation should be archived on a regular
basis. Normally, your Authorized TEC Dealer will suggest ways to protect your information, based on
the type of installation you have, and how much space your data actually takes up. In most situations,
you'll want to backup every night, (or other time when the system is not busy).
Symphony Pro Data Backup
Symphony Pro provides a backup utility that can be programmed to automatically archive all data from
the central database, but it does not provide physical backups that store the data on removable media.
The Symphony Pro utility can extract all data from the tables and store the information in text type "SIL"
(
Standard Interchange Language
) files. The backup files contain information about each table, and the
data to re-populate the tables. It can completely re-build the database from these files. When set as an
automated task, the backup utility works as a "cyclical" backup; it creates a series of folders named for
each day of the week. After the first week, the process replaces each day's existing backup from the
week before. There is always at least one week of data, going back day by day.
This type of backup is used to reconstruct database tables that for some reason have become corrupt,
or have incorrect data. However, once archived, these files should be stored using a disk backup type
utility, in case of a major physical system failure, such as hard disk crash.
Physical Backup
You should definitely consider some kind of physical backup, either on tape, Zip drive, CD or some
other recording media. These "total" backups can be very complete, replicating the entire drive if
necessary, or re-building portions that have been lost. Symphony Pro does not control these types of
backup; you should consult your backup program help to configure your backup / archiving software. It
should include a total backup of everything in the \LBOSS folder, including all sub-folders. This way the
setup can be easily restored.
Restoring from Symphony Pro Archives
The restoration process is somewhat technical and requires that you understand the table names, and
what should be restored. If for some reason the information contained in the data tables has become
corrupt and you need to restore tables, we suggest that you consult your Authorized TEC Dealer. For
more on how to restore using the Symphony Pro file maintenance utility, see the
File Maintenance Utility help page
in this manual.
2.5 Protecting Your Data
© 2005 TOSHIBA TEC AMERICA AMERICA RETAIL SYSTEMS, INC. R1.0a
Page 13
3 Symphony Pro Main Menus
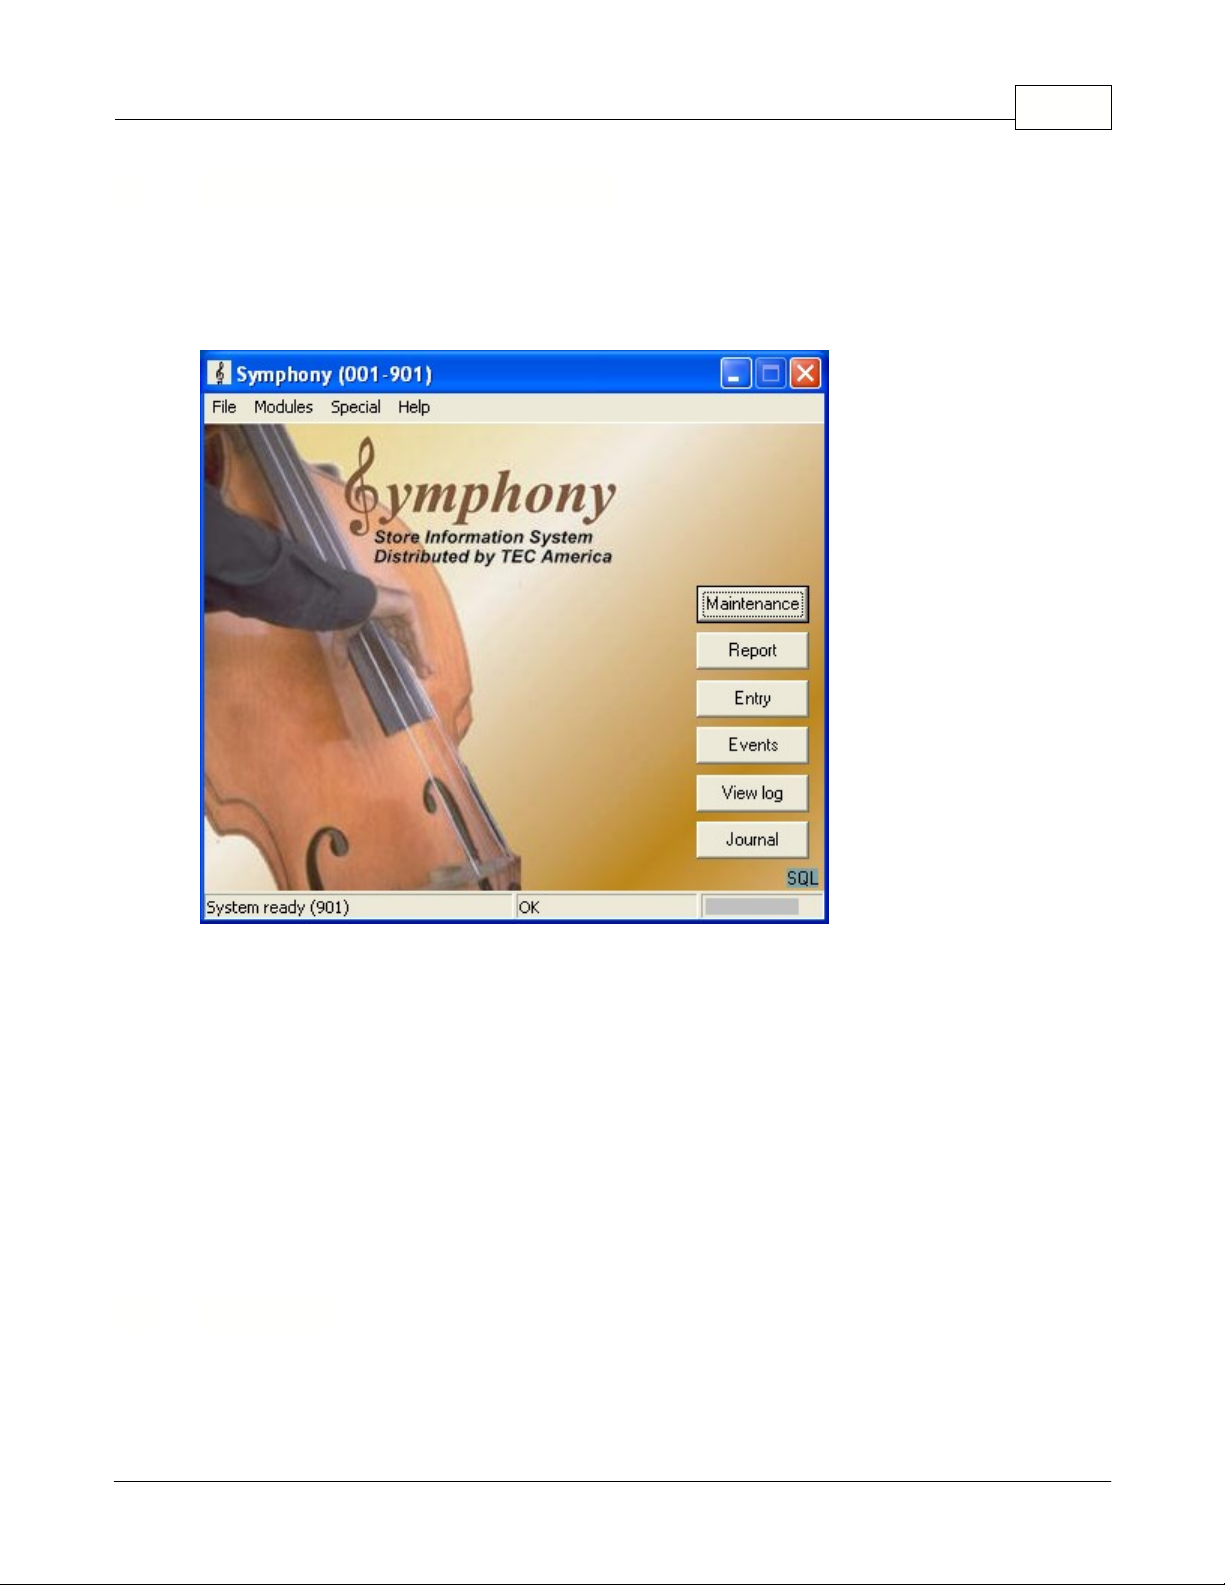
The Main Menu
The Symphony Pro main menu is the host, or central application, to all back-store applications.
This example shows the Symphony Pro "Desktop"
·Click the Symphony Pro icon at the left of the main menu to select whether Symphony Pro will run as
a service from the system-tray or normally as an application from the button-bar.You will be prompted
once to start Symphony Pro every time from the system tray. When this option is selected the EXIT
shortcut changes dynamically to a CLOSE shortcut button.
·This Setting is not maintained when Windows XP restarts / boots.
·This is useful in situations where Symphony Pro is being used as a store controller and thereby
eliminating unnecessay shutdown.
·To return to running the system from the button-bar repeat the operation selecting start Symphony Pro
from button bar.
Note
: You may see a money-bag flashing to the lower left hand corner of the Symphony Pro screen.
This is a warning that cashier drawer limits have been exceeded. Double-click the ison to get a list of
the operator on-line. You can also generate a report that shows cashiers with in-drawer amounts
different than 0.00.
File Menu Options
With the exception of the Login, Logout and Viewer options, the
File
menu option accesses system
Symphony Pro Main Menus 11
3.1 File Menu
© 2005 TOSHIBA TEC AMERICA AMERICA RETAIL SYSTEMS, INC. R1.0a
Page 14

Symphony Pro User Manual 2.0.2.1512
set-up options that are usually configured at installation time and usually not changed.
Symphony Pro File Menu Options
Login
: Allows system operators to gain access to system applications.
Logout
: Security feature that allows the communications to continue while protecting access.
Language
: Change the application's display language (English / French only)
View Internal Process
: Watch what's happening behind the scene.
View Polling Status
: View which machines are "online"
Execute Command File
: Force the system to execute a command or event.
Deploy Individual File
: Send one type of information at a time.
Configuration Panel
: Company information, network and database configuration, security system.
Date Conversion
: A calendar and date conversion utility.
Messages
: Send messages over the network to other Symphony stations but, not to TEC ECRs.
Background
: Change the look of the Symphony Pro desktop.
Show Tips
: Helpful hints at startup?
Exit
: Close the Symphony Pro application, stopping all communications.
Logging into the System
As with any critical data system, security is always an issue. Symphony Pro offers configurable
security "levels" so that users can only access functions that are available to their assigned security
level. For example, you probably want the store manager to be allowed to add / remove items, but
cashiers should not be allowed. When a user logs into the system, they can only activate or use
options that their security level allows them.
When Symphony Pro is first launched, the application runs at the "no user" level. This means that
launching most options or applications will open the login panel. By default, the user "7" is given the
programmer security level, meaning access to all functions and options.
Login:
Use this option to sign onto the system with your user name (and password).
·Open the File menu.
·Selecting the "Login" option opens the "Enter login" panel.
·Enter the user number from the keyboard
*
. (see note below about user
numbers
)
·Press [Enter].
*
You can also double click the data entry area to open an on-screen numeric keypad, useful for touch
screen situations.
3.1.1 Login
© 2005 TOSHIBA TEC AMERICA AMERICA RETAIL SYSTEMS, INC. R1.0a
Page 15
NOTE:
Symphony Pro uses numbers for users; you cannot use alpha characters for users. The users,
their assigned levels, and the security level configuration are accessed in the
Maintenance
application
.
NOTE 2:
Symphony Pro restricts the use if level 7 operator for select entries. It is not permitted to use
an operator assigned level 7 security for continuous operation. Symphony Pro warns against the usage
of level 7 security settings and aborts processing whenever you sign on with an operator using level 7
security.
3.1.2 Logout
Logging off the system
To maintain data security, and to prevent unwanted access to the system, it is important to "logout" or
"log off" the system when you are not working with it.
Logout:
Use this option to sign off the system, leaving the application on the "no user" security level.
NOTE:
Symphony Pro will still execute any scheduled operations, including polling or other
communications, even if no user is logged.
Setting the Language
It is possible to change the language displayed in the Symphony Pro application. At this time there are
two possible languages, English or French.
·Changing the language
does not
affect the way that functions or options behave.
·You
do not
have to re-start the application.
It is also possible to configure Symphony Pro to display a specific language based on user
preferences. When a user (operator) logs in to the system, the application switches immediately to that
user's preferred language. Click here to go to the
Operator Table
help page now.
Language:
Use this option to change the current language displayed in the Symphony Pro application.
After selecting the language menu option:
·A "Select Language" panel opens, displaying a list of the available languages.
·Click the language to change to,
·Press the "OK" button to accept the language change, or
·Press the "Cancel" button (or top right hand window "X") to cancel the language change.
Symphony Pro Main Menus 13
3.1.3 Language
© 2005 TOSHIBA TEC AMERICA AMERICA RETAIL SYSTEMS, INC. R1.0a
Page 16
Symphony Pro User Manual 2.0.2.1514
What's Happening "behind the scenes"
To understand how the TEC ECRs / Symphony POS / Symphony Pro communications work, refer to
the "
Understanding Communications
" help page in this manual.
View internal process
When running, Symphony Pro is constantly performing transactions, exchanging information and
processing commands. The "View Internal Process" option launches the "Viewer", a utility that
monitors the internal exchange system as it functions, tracking activity. This option can be used to view
what the Symphony Pro mail exchange program is doing internally.
The viewer should be used to trouble-shoot; it is very useful in determining communication problems
between the back-end controller and the Sypmphony POS lanes / TEC ECRs.
NOTE:
The options and controls available in the viewer utility control the viewer only, not the actual
internal system processes. In other words, you
cannot
stop or freeze the actual internal processing
system from the internal process viewer.
The Viewer Display
Once the viewer window is open, the utility begins to track the internal process, displaying a line for
every activity being tracked. Each line consists of:
10:12:07.680
Mailslot received: 00190611ACT,SUPPORT3:
- the precise time that the process began, including milliseconds
10:12:07.680
Mailslot received
: 00190611ACT,SUPPORT3:
- a short description of the process
10:12:07.680 Mailslot received:
001
90611ACT,SUPPORT3:
- the three digit store number
10:12:07.680 Mailslot received: 001
906
11ACT,SUPPORT3:
- the three digit terminal number
10:12:07.680 Mailslot received: 001906
11
ACT,SUPPORT3:
- the two digit internal Mailslot line number (internal id)
10:12:07.680 Mailslot received: 00190611
ACT
,SUPPORT3:
- the terminal's status, ACT means "active"
10:12:07.680 Mailslot received: 00190611ACT,
SUPPORT3
:
- the terminal's machine network name
The viewer has both a top bar main menu and buttons to control how the viewer behaves, and to allow
you to determine what exchanges are being traced. The help pages below this topic explain the
functions and controls for the "View Internal Process" viewer utility.
3.1.4 View Internal Process
© 2005 TOSHIBA TEC AMERICA AMERICA RETAIL SYSTEMS, INC. R1.0a
Page 17
3.1.4.1 Process Viewer Buttons
Controlling the Viewer
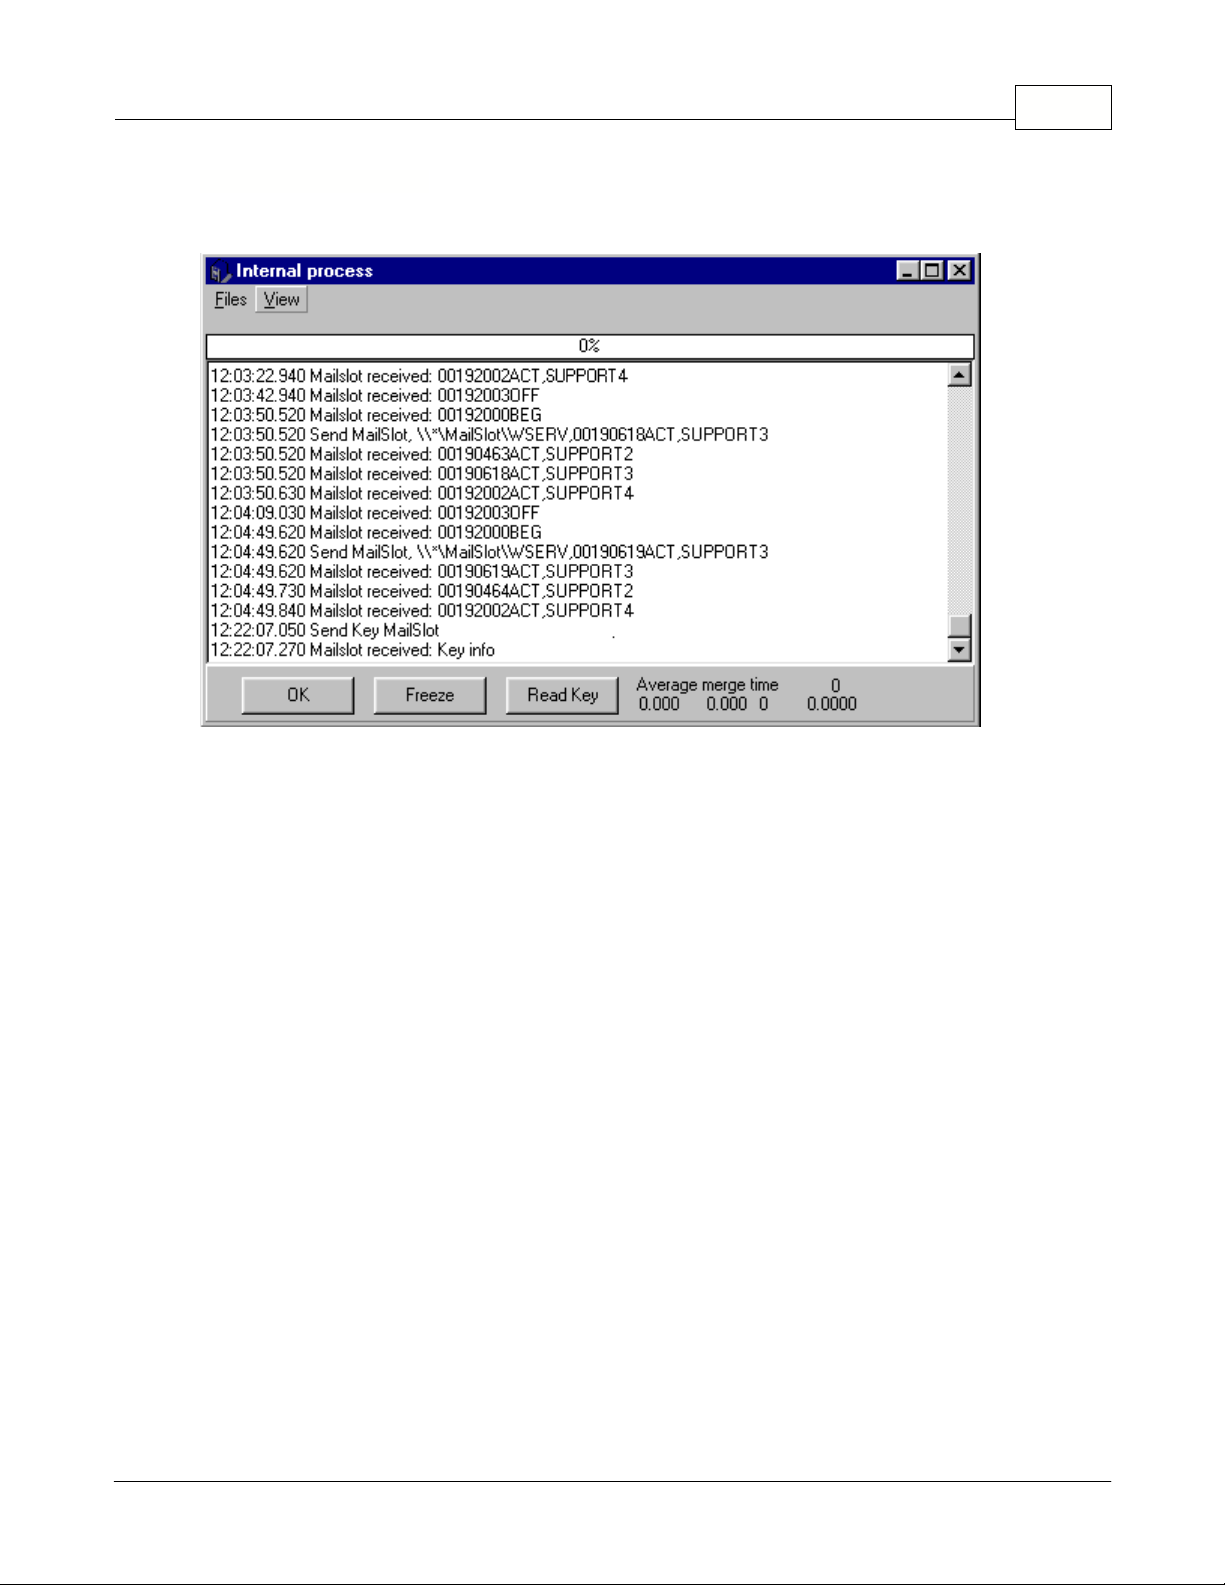
This example shows the Internal Process viewer.
Status bar and control buttons
The options and controls available in the viewer utility control the viewer only, not the actual internal
system processes. In other words, you
cannot
stop or freeze the actual internal processing system
from the internal process viewer.
Status Bar
The status bar is the area at the bottom right of the viewer window, and displays current system
information, such as the "average merge time", the transaction number and more. Hold the mouse
cursor above the status information to find out what the information represents.
Buttons
OK:
The OK button closes the viewer, and is identical to the "Files" menu's "close" option.
FREEZE:
This option "freezes" the viewer at it's current display line. It behaves as a "toggle", in other
words, clicking the first time freezes the display; clicking the second time "unfreezes" the display, which
then continues to display lines. Although similar to the "Files" menu's "stop" option, no lines are
skipped; the viewer continues displaying all activity from the point at which it was frozen. The "stop"
option is explained in the "Process Viewer Menus".
READ KEY:
This option checks the hardware copy protection key and tests it's current communication
status. Only one machine in the system hosts the key, and runs a program that "broadcasts" the key
info. Use this option to determine if the key is functioning properly. The viewer does not show the
content or value the key returns, only that the communication was successful. For example:
11:08:27.300 Send Key MailSlot
11:08:27.520 Mailslot received: Key info
Symphony Pro Main Menus 15
© 2005 TOSHIBA TEC AMERICA AMERICA RETAIL SYSTEMS, INC. R1.0a
Page 18

Symphony Pro User Manual 2.0.2.1516
Controlling the Viewer
Internal process viewer menus
The options and controls available in the viewer utility control the viewer only, not the actual internal
system processes. In other words, you
cannot
stop or freeze the actual internal processing system
from the internal process viewer.
Files Menu
Stop
: This option stops the viewer at it's current display line and behaves as a "toggle". In other words,
clicking the first time stops the viewer from displaying more lines and puts a check mark beside the
menu option. Clicking the second time restarts the viewer, removes the check mark and continues to
display lines. All internal processes continue as usual; this
does not stop
actual internal processing.
Although similar to the "Freeze" button, the "stop" option skips all process lines or activity between the
time it was stopped and when it is restarted. The activity or processes that occurred during the time the
viewer was stopped will not be displayed.
Freeze
: The same as the button found at the bottom of the viewer, this option "freezes" the viewer at
it's current display line. It behaves as a "toggle", in other words, clicking the first time freezes the
display; clicking the second time "unfreezes" the display, which then continues to display lines.
Although similar to the "Files" menu's "stop" option, no lines are skipped; the viewer continues
displaying all activity from the point at which it was frozen. When unfrozen, the viewer displays all
activity lines since frozen.
Reset transaction counter
: This option resets the internal process line count for the viewer only,
not
the actual internal process number
. It is a counter used by the viewer to keep track of which line is
being displayed. The current process line count is displayed at the bottom right of the viewer's status
bar (bottom of viewer window).
Close
: The "Close" option closes the viewer, and is identical to the "OK" button at the bottom left of the
viewer.
View menu
The viewer allows you to control which types of internal processes you wish to track. Checked items in
the list will be tracked and displayed as transaction lines. The option acts as a "toggle"; click to select
or unselect the items to be tracked. In some cases (searching for a specific type of internal process) it
may be easier to follow only one type of process to determine communication problems.
MailSlot
: Information requests to and from the back office, hardware copy protection key information
etc.
EJ
: "Electronic Journal"; actual Symphony POS transactions, as sent to the back end after a tender
key finalizes a transaction. This feature is not supported by the TEC ECR.
Mime
: Other information communicated to and from the POS (such as images, search results). This
feature is not supported by the TEC ECR.
Import
: Information files received from external sources, such as PLU files from another store or head
office.
Export
: Information files sent to external destinations, such as PLU files sent to another store or head
office.
Misc
: Other types of files, messages.
Errors
: Error messages communicated through the system after an error occurs, normal, urgent etc.
3.1.4.2 Process Viewer Menus
© 2005 TOSHIBA TEC AMERICA AMERICA RETAIL SYSTEMS, INC. R1.0a
Page 19
Commands
: Polling requests and other command type files.
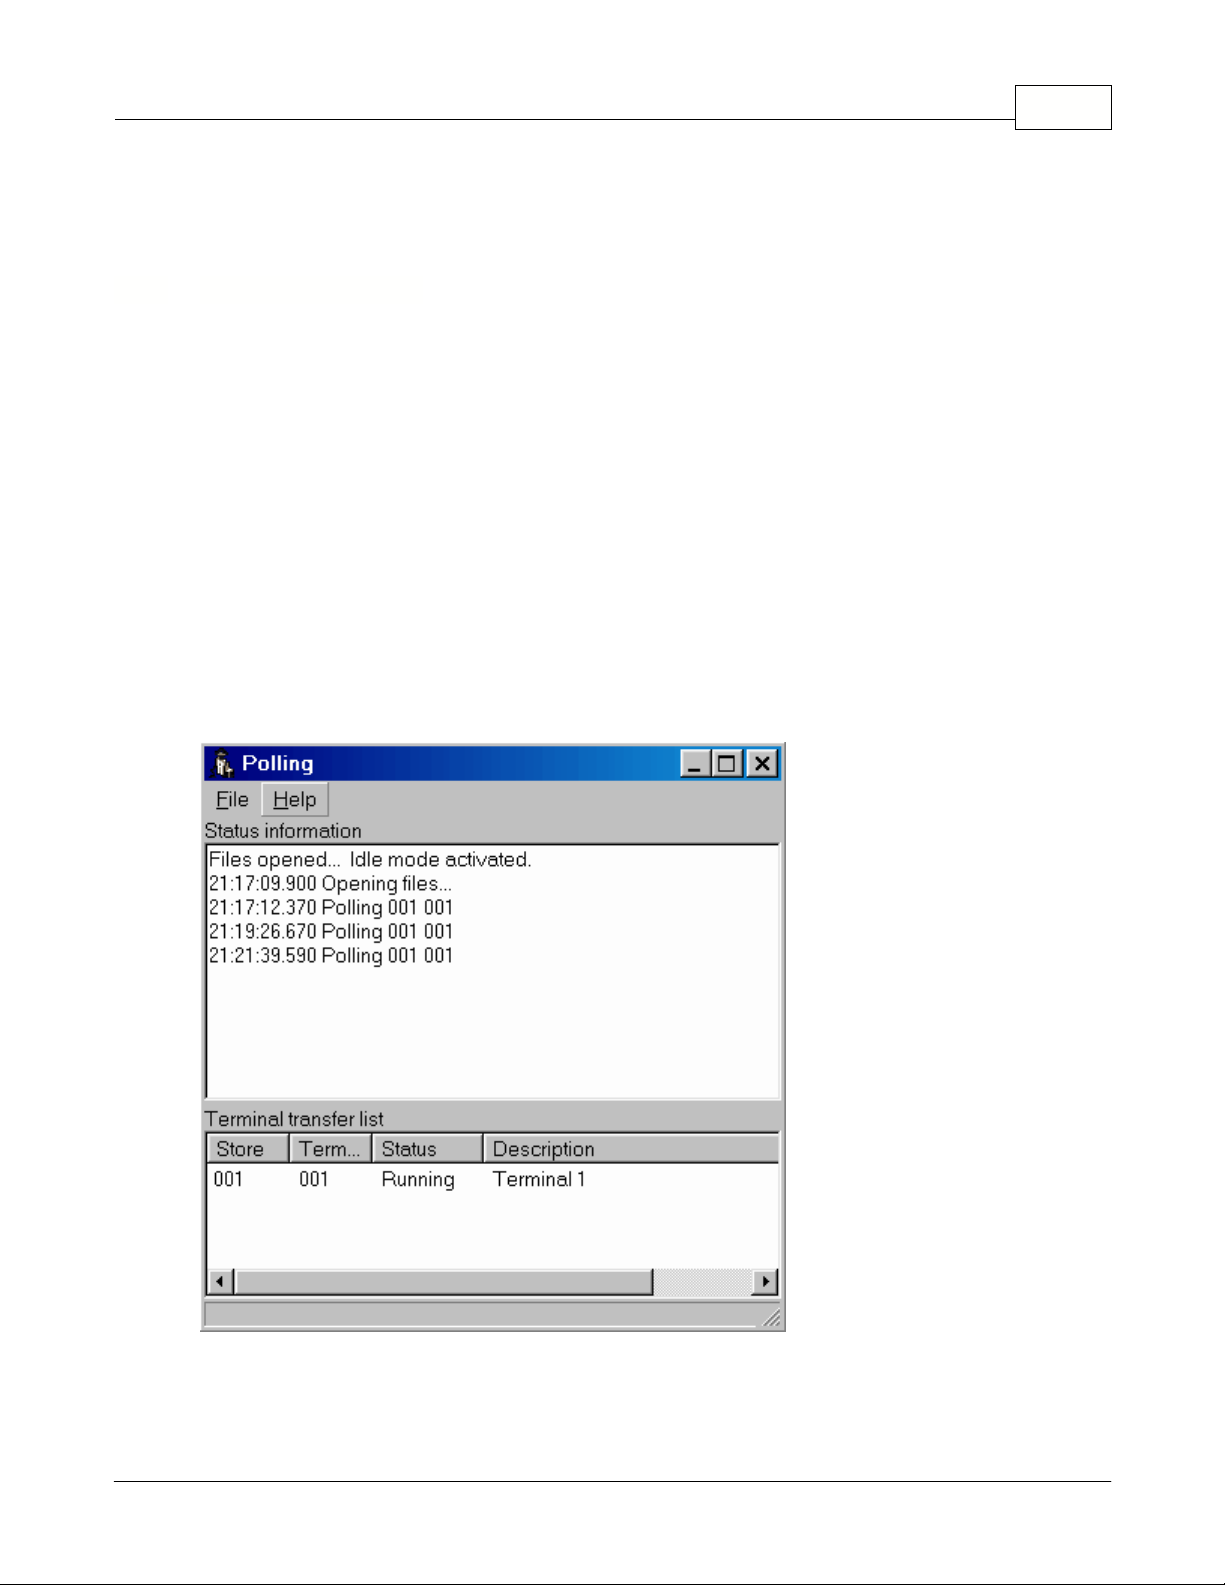
3.1.5 View Polling Status
View Polling Process
This "File" menu option opens a two pane viewer that displays the files being retrieved from, and sent
to, the Symphony POS terminals, along with a list of the stations (or Symphony POS terminals)
involved in the polling process. The viewer is not actually part of Symphony Pro, but a separate utility or
application. When the polling software is running (in the background), it's icon shows in Window's
"System tray" (bottom right corner of the Windows desktop tool bar).
The Polling process can only be displayed on the Symphony Pro terminal that is set as the
Controller
during the initial set-up of the system. This setting is
normally
made for terminal 901. If the Polling
Process can not be viewed it is probably because another backoffice terminal is set as the
Controller
.
NOTE:
The polling viewer uses Window's regional settings to determine language. This means that the
language specified in Symphony
does not
control the language displayed in the viewer. To change
languages, you must change the settings in the Window's Control Panel - Regional Settings utility.
This example shows the Polling Process viewer.
Menu Options
Symphony Pro Main Menus 17
© 2005 TOSHIBA TEC AMERICA AMERICA RETAIL SYSTEMS, INC. R1.0a
Page 20

Symphony Pro User Manual 2.0.2.1518
File Menu:
The "File" menu has two options:
Close
: Closes the viewer, leaving the polling software running, it's icon visible in the Window's System
tray.
Quit polling
: Closes the viewer
and also stops
the communication process. You should only use this
option if you are certain that you want to stop communications all together. Once the polling utility is
stopped, you must exit and re-launch the Symphony Pro application to re-start it.
NOTE:
You can also launch the polling viewer by double clicking the system tray icon, or right clicking it
and selecting the "View status" option. The context menu (right click) also has both the "Close" and
"Quit Polling" options explained above.
Viewer Display windows
Top window:
Each line displayed in the polling viewer includes the exact time to the millisecond, as
well as the store and terminal number. If the server cannot reach a Symphony POS station / TEC
ECRs for sales information, the viewer displays the error.
Example top window line:
13:58:18.130 Polling 001 024
Bottom window:
The polling viewer's bottom window shows all the Symphony POS terminals / TEC
ECRs presently configured in the Symphony Pro station's "terminal list", their store and terminal
number, current status, and machine network name. Selecting a terminal from the list will display that
terminal's location information in the status line at the window's bottom bar.
It is also possible to stop or force the polling process for one or all terminals from the View polling
bottom window. After selecting a terminal from the terminal list, clicking the right mouse button opens a
menu allowing you to:
Pause
: Use this to stop one terminal from communicating.
Communicate now
: Forces that terminal to begin polling immediately.
Stop All
: Stops all terminals in the terminal list from communicating.
Start All
: Forces all terminals to poll immediately.
NOTE:
Symphony Pro controls the Polling cycle internally. In a normal situation data is retrieved
immediately after each sales transaction is complete for Symphony POS terminals. Symphony Pro also
"cycles" through the terminal list every 2 minutes to ensure the on-line status of each terminal. When
Symphony Pro detects that a Symphony POS terminal is not on-line, an error is reported. From that
point and until the error is corrected Symphony Pro will only cycle to that terminal every 15 minutes.
For the TEC ECRs polling occurs at scheduled event times unless initiated manually.
Forcing Commands
Command files contain instructions for Symphony Pro and SQL (Standard Query Language)
commands that when executed bring information into the system database tables. Most internal
commands required for normal operation are executed automatically based on the Symphony Pro
scheduler.
There are some situations that may require you to execute these commands manually. For example,
internal commands that either failed, or could not be executed automatically at the scheduled time,
3.1.6 Execute Command File
© 2005 TOSHIBA TEC AMERICA AMERICA RETAIL SYSTEMS, INC. R1.0a
Page 21
Symphony Pro Main Menus 19
such as in the case of a network "down". These commands should be launched from the "Events /
Tasks" (the scheduler) utility. For help on forcing scheduled tasks manually, please see the
"
Events / Tasks
" help pages.
Other Tasks
There are other internal commands that are not programmed to execute automatically, and are not
setup in the "Events / Tasks" list. For example, commands that re-program front end machines, or
other utilities that maintain the database tables. Use this option to execute a command file manually.
!Warning!
: Y
ou should only use this option if you are certain that you are executing the correct
command. By running an internal command file you can inadvertently or even
severely damage
the
data contained in the system database tables. If you are unsure, you should consult the system
administrator or your Authorized TEC Dealer for technical support.
Execute command file:
This menu option opens a Windows Explorer style window (file browser) to
allow you to select an internal command file for execution. The Symphony Pro internal command files
have a common
.sql
file extension. The file browser's "Files of type" setting (bottom of window) is set
to find .sql files found under the default
\LBOSS\Office
folder. To execute one command file:
·Browse the Office folder to locate the command to execute.
·Select the file and press "open" (or double click the file).
·A confirm execute panel opens.
·Press "Yes" to accept, "no" or "Cancel" to abort the process.
Sending Information From One Database Table
Symphony Pro keeps all data in database "tables", with one table for each specific data type. For
example, system operator information is kept in an operator table within the database. In normal
circumstances, daily routine involves modifications to data within these tables. An automated task is
provided that searches all database tables for modified data and sends all changes to the front end,
set to execute daily. However, in certain situations it may be quicker to select a single table containing
the modified data and send it immediately, without searching all the tables for modifications.
This option allows you to send a single type of information or configuration file to the Symphony POS
stations / TEC ECRs. Sending modifications may interrupt the front end operations, except for item,
operator and customer tables.
NOTE:
It is important to understand the "
Replace
" option before using the deploy individual file utility.
When the "Replace" option is used, the receiving terminal's table must be "
locked
" to avoid multiple
table access during the transfer. It is important to note that the receiving
Symphony
POS terminals /
TEC ECRs
cannot operate
during the replace operation.
NOTE 2:
If the border of the Deploy individual file window is blue, the current operator's security
settings will not allow him to select the replace file option.
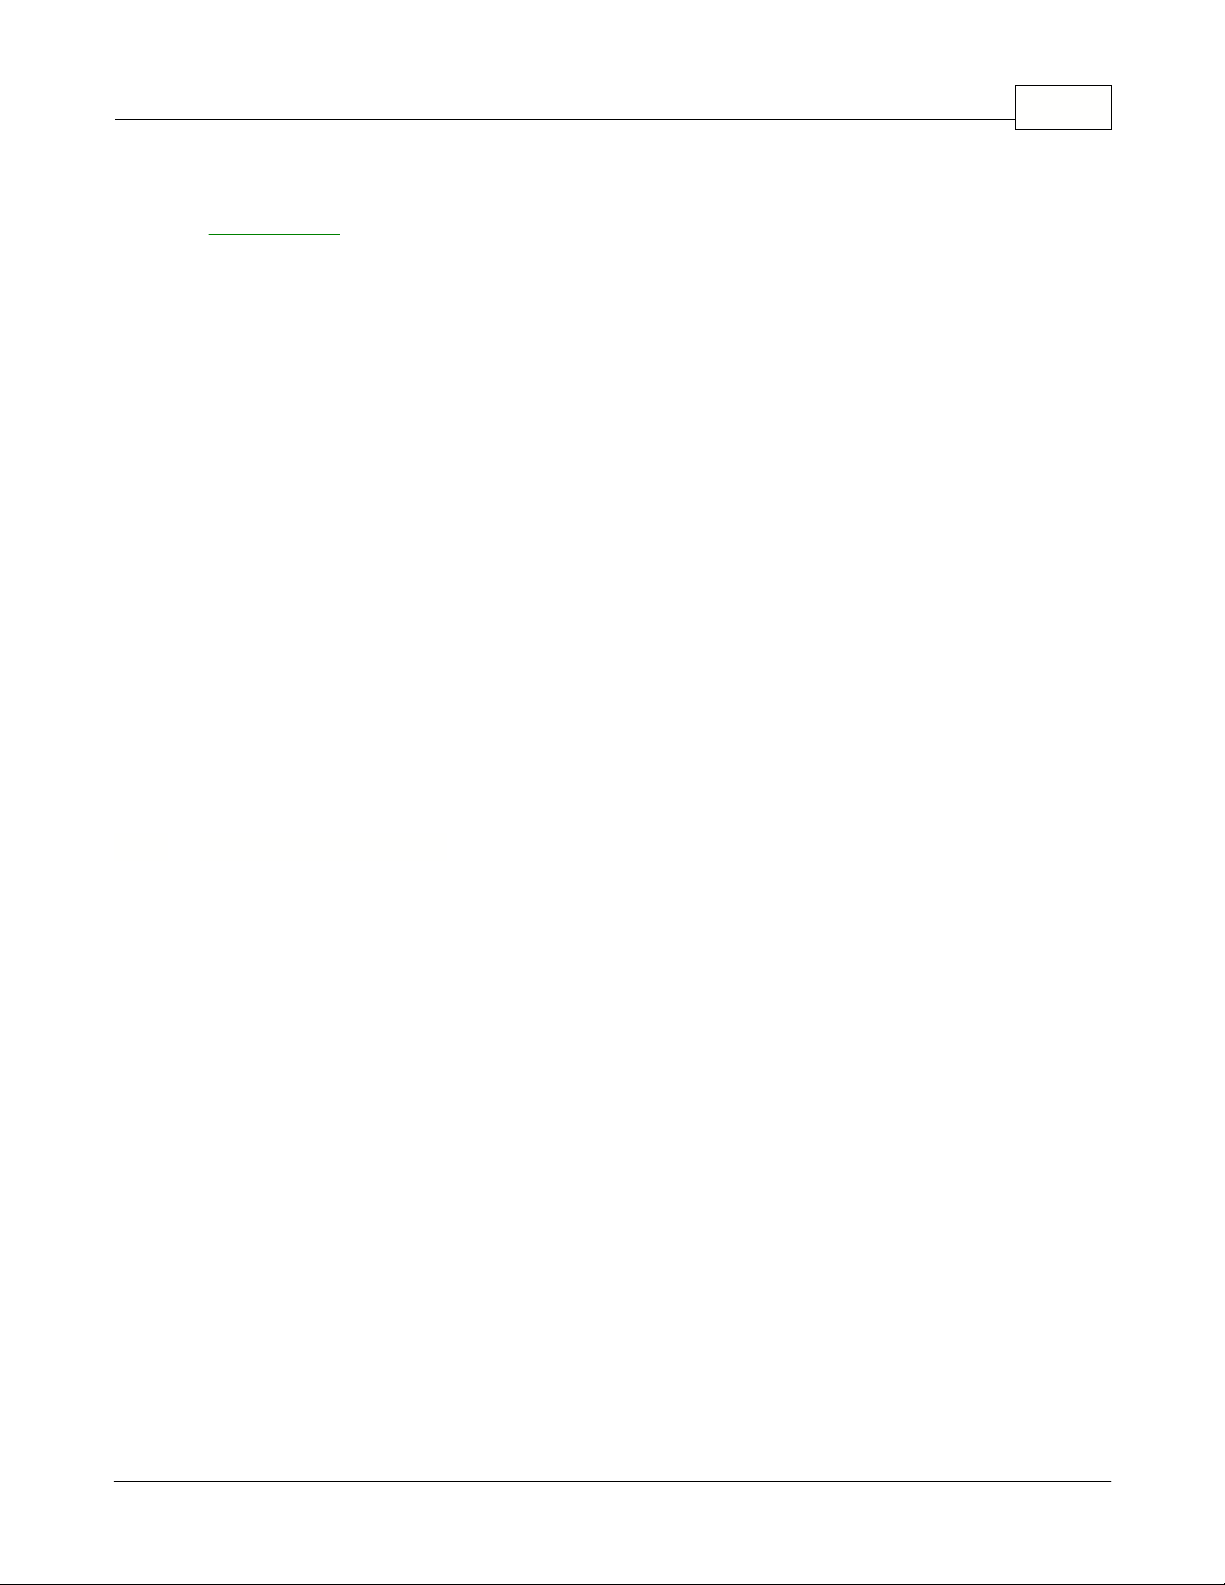
3.1.7 Deploy Individual File
© 2005 TOSHIBA TEC AMERICA AMERICA RETAIL SYSTEMS, INC. R1.0a
Page 22
Symphony Pro User Manual 2.0.2.1520
This example shows the "Deploy one file" table selection tool.
Deploy individual file:
This menu option opens a list of all the data tables and
.ini
(configuration)
files that can sent to the register. When the Events/Tasks are executed, several tables are usually
verified before data is sent to the Symphony POS terminals / TEC ECRs. If you know the specific data
table or configuration file you need to send, use this option for quick results.
·Select the Deploy individual file from the Symphony Pro "File" menu.
·A list window opens, showing all available data tables and configuration files.
·From the list, select the file to deploy.
If you need to
overwrite
the data on the Symphony POS terminal / TEC ECRs with the data from the
back-end database, select
replace
. (see note above)
·Click the "Deploy" button.
·A window opens displaying a list of available terminals and terminal groups (targets).
·Select the destination terminal or group.
·Press the "OK" button to send now, "Cancel" to abort.
Basic Symphony Pro Set Up Information
!!WARNING!!
Most
of the options available in the Configuration panel control how Symphony
Pro behaves. Tampering with these settings can cause serious system failure. Please consult
your Authorized TEC Dealer before changing any settings.
Symphony Pro uses a basic configuration file to keep track of global application information for the
installation. The configuration panel is divided into tabbed sections:
Company
: Company name, address and other information used to personalize report pages etc.
System
: Store number, database type, server and office disk location and other installation setups.
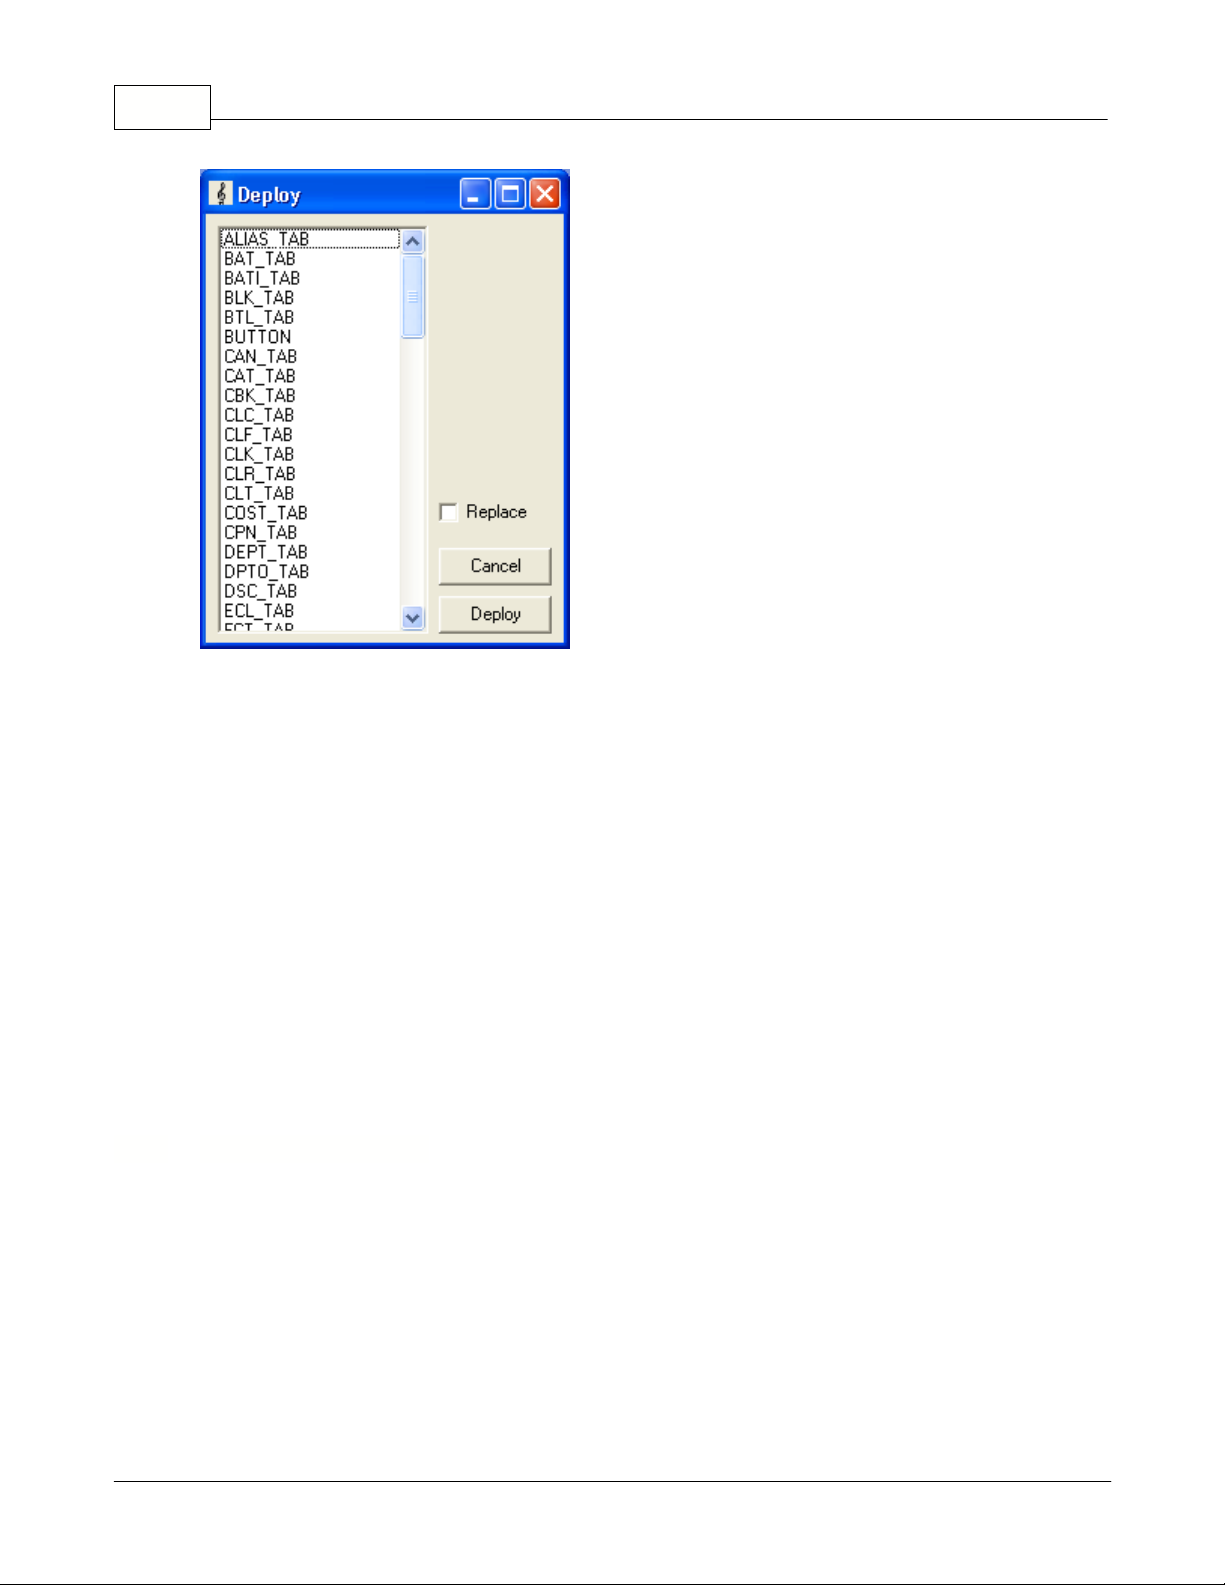
3.1.8 Configuration Panel
© 2005 TOSHIBA TEC AMERICA AMERICA RETAIL SYSTEMS, INC. R1.0a
Page 23
Symphony Pro Main Menus 21
Misc:
Various system options and settings.
Host
: For "multi-store" situations only, used for the "head office".
Cleanup:
Database maintenance options.
Load Files
: Used to bring information into the database from external sources.
Security
: Assign user access levels for functions and tables.
Configuration:
This menu option opens the Symphony Pro configuration menu described in the help
pages below this heading.
This example shows the Symphony Pro "File" menu, "Configuration" panel.
Company Tab Settings
The "Company information" is normally entered the first time you launch the Symphony Pro
application. This information is used throughout the application. For example, when report pages are
generated, Symphony Pro uses the company name and address to personalize the printed and on
screen result.
Enter your company information in the appropriate spaces.
Allow multi-store selection
: This option is used to determine if this Symphony Pro installation will
control multiple stores for pricing, inventory, etc. When selected, this option will affect certain utilities
3.1.8.1 Company
© 2005 TOSHIBA TEC AMERICA AMERICA RETAIL SYSTEMS, INC. R1.0a
Page 24

Symphony Pro User Manual 2.0.2.1522
throughout the Symphony Pro application where multi-store information is required.
NOTE:
If you are not in a multi-store control situation, selecting this option is
not suggested
. Although
it will not harm the installation, it will cause the system to prompt you to select a target store for many
everyday operations, adding unnecessary steps to the operations.
Internally, Symphony Pro can now send an email. There is a tab to set-up for the email information in
the configuration. Email function works as follow:
@EMAIL(TO=email@server.com,TEXT='allo toi')
There my be several TO and several TEXT arguments.
The TO may have different syntaxes:
TO=sales@toshibatecamerica.com
TO=ACC:accountNumber
TO=ACC:AccountNumber;ContactNumber
TO=OPER:OperatorNumber
TO=STORE:103
You may include attachements like: (You may remove the TEXT command)
ATTACH=MyFile1
ATTACH=myfile2
You may use a file instead of typing the message with TEXT (You may remove the TEXT command)
FILE=MyFile
If you wish to send in HTML format instead of PLAIN format, use the command:
HTML
You may enter a subject:
SUBJECT=My Subject (If no subject is entered, the default is 'Info from Symphony Pro')
You may overwrite the FROM address with:
FROMNAME=My Commpany
FROM=company@server.com
PS: If there is no TO, FROM or if the server is not defined, there will be no error generated.
If you are not connected to the internet, you may get an urgent message.
System Tab
Settings
Information in the system tab is
critical
to Symphony Pro operation, and should be fully understood
before making modifications. Settings depend largely on the type of station being installed, such as
server or secondary office station. In network situations, Symphony Pro uses
the same database
for
all back office stations.
3.1.8.2 Email
3.1.8.3 System
© 2005 TOSHIBA TEC AMERICA AMERICA RETAIL SYSTEMS, INC. R1.0a
Page 25
Symphony Pro Main Menus 23
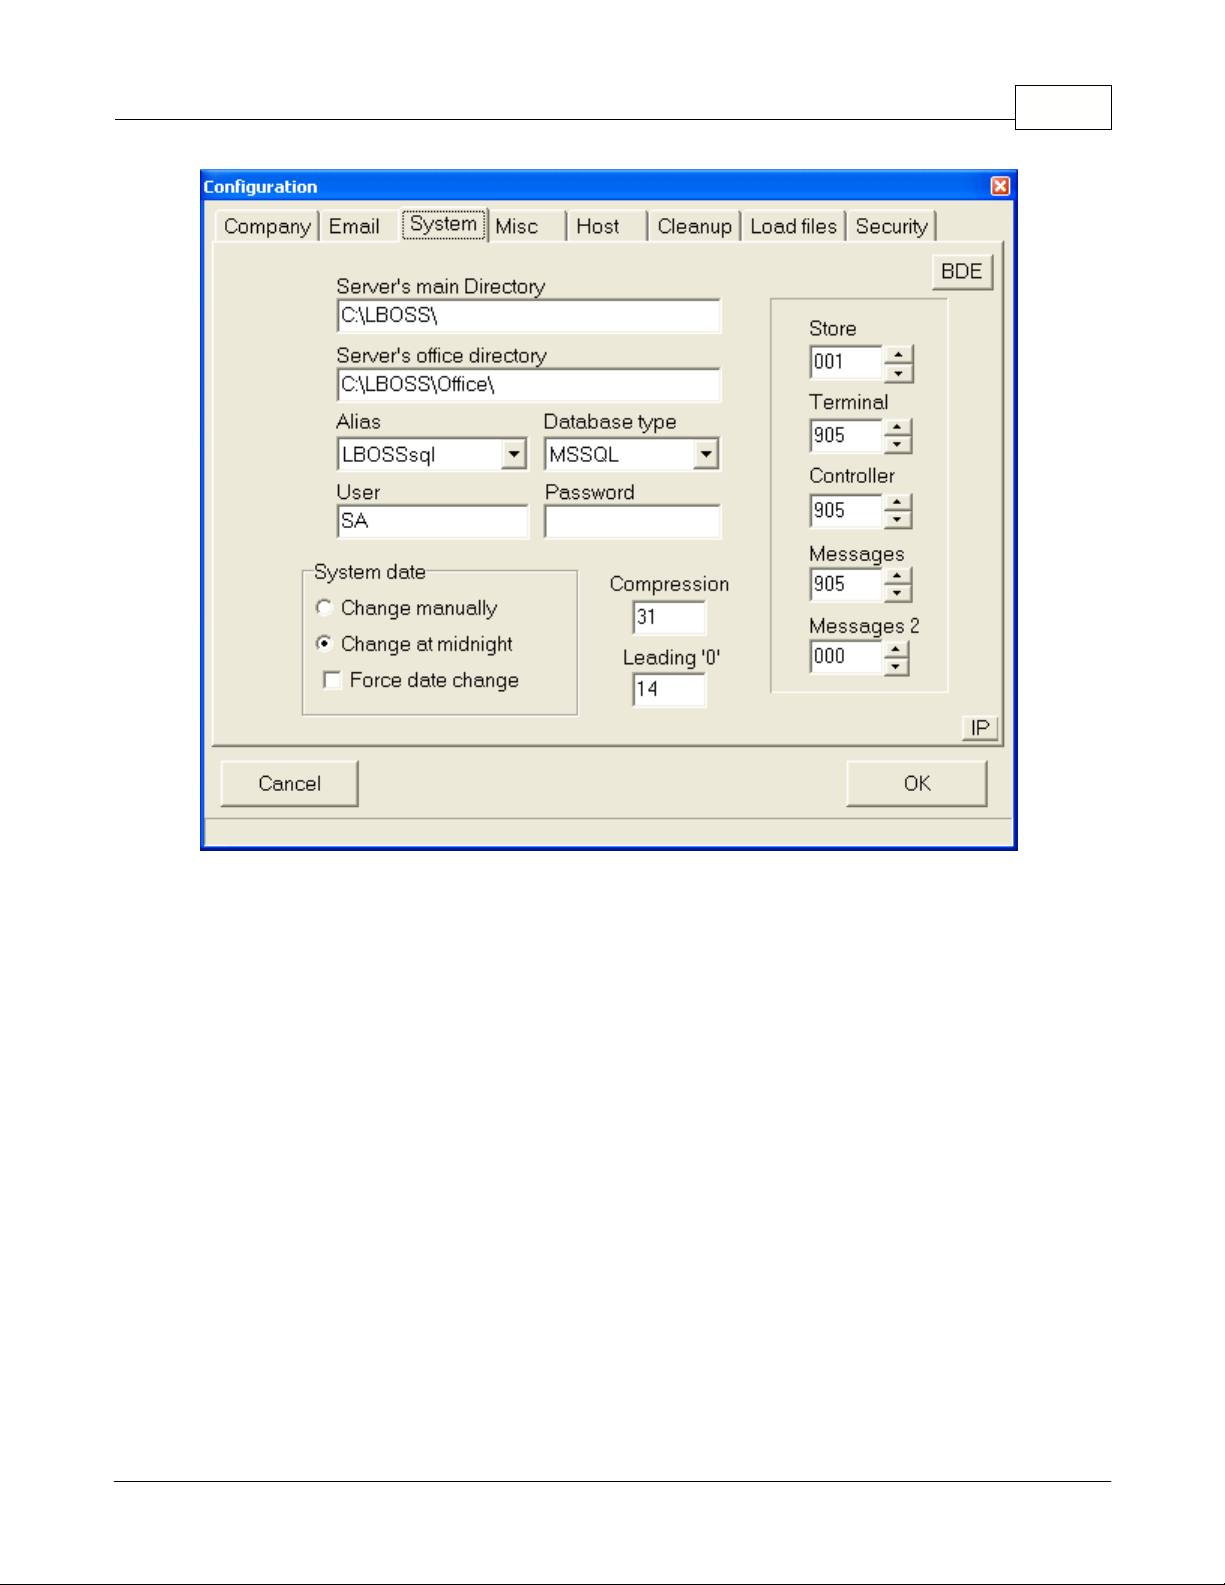
This example shows the Configuration panel's "System" tab.
Server's main directory:
Enter the path that this PC will use to locate the main program directory on
the Symphony Pro server. On the Symphony Pro server this setting should point to
C:\LBOSS\
(including the trailing backslash.) On each Symphony Pro work station you need to use the Window's
networking component to map a connection to the server's drive. If you have mapped to the Symphony
Pro server drive using, for example "F:", the entry for
Server's main directory
would show
F:\LBOSS\
(with the trailing backslash).
Server's office directory:
Enter the path that this PC will use to locate the main data directories on
the Symphony Pro server. On the Symphony Pro server this setting should point to
C:\LBOSS\OFFICE\
(including the trailing backslash.) On each Symphony Pro work station you need to use the Window's
networking component to map a connection to the server's drive. If you have mapped to the Symphony
Pro server drive using, for example "F:", the entry for
Server's office directory
would show
F:\LBOSS\OFFICE\
(including the trailing backslash.)
Alias:
Symphony Pro requires an alias to connect to the database that contains the files used by the
system. The database alias was created during the BDE setup at installation time. If you followed the
default installation, select the Symphony Pro alias.
Database type:
Select Paradox unless you are using MSSQL to manage the database tables.
User:
The user default for the native Paradox database is SA.
Password:
Leave this entry blank with the Paradox database.
© 2005 TOSHIBA TEC AMERICA AMERICA RETAIL SYSTEMS, INC. R1.0a
Page 26

Symphony Pro User Manual 2.0.2.1524
Leading "0":
The Symphony Pro database can be configured to automatically pad (or fill in) the
leading zeroes in the UPC or product code. In some environments this is a desired behavior. Other
environments may not want leading zeroes in their product code. If you enter 13, the numbers entered
will all be at least 13 digits, with zeroes filling in any positions before the PLU number you create if it is
less than 13 digits long. If your system requires alpha-numeric PLU numbers, leave this field blank and
the number you enter will be the PLU number.
Compression:
The Symphony Pro sales data grows very rapidly into a large database. Each
transaction is stored in multiple files for file redundancy, reporting, and for search and review
(electronic journal.) The compression of data becomes an important task that can be automated within
Symphony Pro. Enter the number of days you want to keep all data live on your system for each
transaction entry. The data will not actually be lost, only compressed for more effective storage. The
default entry is 31 days.
System date:
Symphony Pro allows two types of date rollover. In a normal environment, the fact the
date changes at midnight is the ideal situation. All sales made between store opening at 7:00AM, for
example, and up to store close at 10:00PM, for example, belong to the same day and to the same
balancing period. In this type of environment the default selection (
change at midnight)
for
system
date
is correct. In a 24 hour store, or in a store where the balancing period may not correspond to the
sales made within a specific calendar date, the
system date
should be set to
change manually
. Most
24 hour stores will close the daily balancing period at either 7:00AM or 11:00PM. But never exactly at
the same time. Symphony Pro allows you to define that the time-stamp made to a transaction does not
have to be the exact date of the operating system. If the cashier working the last shift is ready to close
at 11:07PM, a command can be issued to force a date rollover at that point. This way the data used to
balance will correspond up to and including the last transaction made by the cashier. Symphony Pro
and Symphony POS also realizes that any other cashiers still signed on while the date rollover
command is executed are actually still working on the previous day's totals until they log out and log in
again. The command to execute the date rollover can be a back-end event executed manually or
automatically or it can be a front-end operator function that sends a request to the back-end to force
the date change. This same option (
change manually
) allows a non 24-hour operation to balance their
cashiers at 3:00PM if they wish, or to allow sales made up to 1:00AM to be included in the previous
day's sales and not included in the calendar day in which they are made.
Store:
Symphony Pro was conceived to operate as part of a multi-store retail chain. The number
entered here will be a part of the data files generated for each transaction. Take care to use a unique
number for each separate location the Symphony Pro is used within the same retail chain.
Terminal:
Each back-office terminal must have a unique number. A numbering protocol has been
established whereby terminals 001 to 799 are Symphony POS / TEC ECRs. Terminals 800 to 899 are
back-end tools such as portable devices, label stations, etc, that may need to be targeted with program
data. Terminals 900 to 999 are all office terminals running the Symphony Pro application. Start the
Symphony Pro terminal numbering at 901 on the first back-end terminal, use 902 on the next back-end
terminal in the same store, terminal 903 on the next one, etc.
Controller:
When Symphony Pro is installed on multiple back-end terminals, one of the back-end
terminals will be used to manage the exchange of data with the Symphony POS sales terminals / TEC
ECRs. Enter the terminal number that should be used as the controller on your system. By default this
terminal number is set to 901. You must be certain that the same terminal number is set for
Controller
on each PC running Symphony Pro.
Messages:
Although terminal 901 may be the machine set as the
controller
, you may wish to direct
all the messages processed by the system to another back-end terminal. This could be the case in a
larger store that uses more than one back-end terminal and that also has many Symphony POS
terminals. If the operator responsible for monitoring the error messages works at the 902 station,
messages
would be set to 902. By default the message terminal is set to 901.
Messages 2:
Use this setting to send a copy of urgent messages received by the Main message
© 2005 TOSHIBA TEC AMERICA AMERICA RETAIL SYSTEMS, INC. R1.0a
Page 27
center to another terminal in a store. The message is sent using the internal email program that allows
inter-terminal messages to be sent. This second message center is sometimes required in stores
where the main message center is left unattended. You would still want to send a copy of each
message to the front of the store where someone is working on a terminal. It is possible to turn on or to
turn off the second message center from the Symphony Pro file menu.
IP:
This is used to record the station's IP address. A pop-up window will appear so you can select the
correct machine IP for internal system communication.
3.1.8.4 Misc
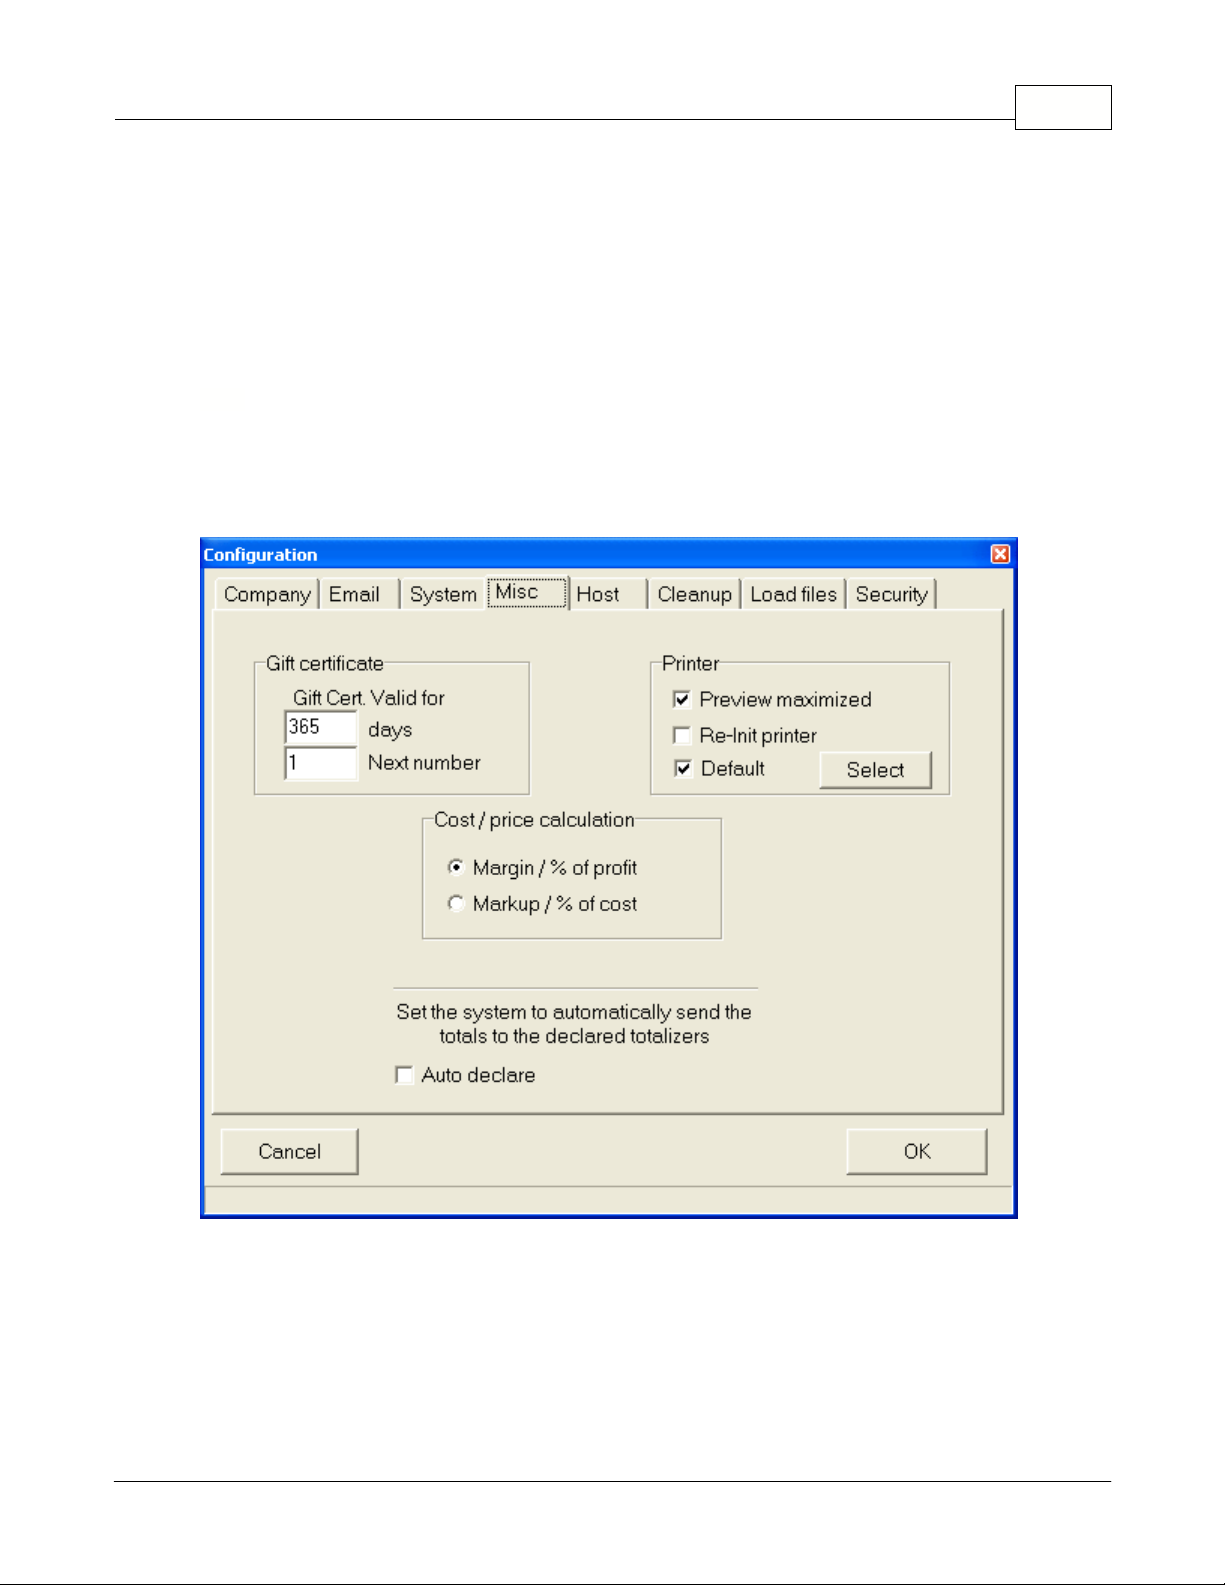
Misc Tab Settings
The "Misc" tab provides several optional settings for the system.
This example shows the Configuration panel's "Misc" tab.
Computer Configuration:
This option is only required when both Symphony POS and Symphony Pro
are running on the same computer, and the computer is not on a network.
Normally, you should
never have to use this option.
It is mostly used for dealers in situations where they want to
demonstrate the programs without being in a network environment.
Gift certificate
section:
Gift cert.valid for
is used to determine the expired date that will be printed on
gift certificates issued by Symphony POS.
Next number
is the number that Symphony Pro will assign
Symphony Pro Main Menus 25
© 2005 TOSHIBA TEC AMERICA AMERICA RETAIL SYSTEMS, INC. R1.0a
Page 28

Symphony Pro User Manual 2.0.2.1526
to the next gift certificate issued. This feature is not supported by the TEC ECR.
Printer section:
The
Preview Maximized
option is set to on by default, and is used to determine the
Report application's default Report Viewer window size. When selected, reports open "Full Screen".
When not selected, reports will open without using the entire screen area.
Re-Init Printer:
Some
printer drivers do not re-initialize the printer between print jobs. For example, this means that if a
previous print job was printed in "Landscape", the next job will also print that way unless the printer is
reset. Select this option to force the printer driver to re-initialize to default settings for every print job it
receives from Symphony Pro. The
Default
selection is used to define that reports will be directed to the
default windows printer. If you prefer using a different printer for reports press the
Select
button and
choose the printer. Note that you can set a specific printer for any report that will override the settings
you make here. Refer to the report properties set-up for information on how to set a different printer for
a specific report.
Auto Declare:
The Auto declare option should be set to on if cashiers or other management
personnel
do not
declare drawer amounts manually. When set to on, the system will force the
declared amounts to be the same as the in drawer amounts collected by the system. This way, reports
will balance by showing the in drawer amounts as the actual declared amounts, leaving no Over /
Short. When the Auto declare is not set to on, reports will show Over / Short amounts, and the report
will not balance until the manual declaration of in drawer amounts is performed from within the Entry
module's Pickup and Loan option. Please see the
Entry module's help section
in this manual for more
about using pickups, loans and manual declarations
Cost / Price Calculation:
This option determines how the Maintenance application will calculate prices
from the cost. Selecting
Markup / % of cost
uses the number indicated in the Price tab's price
calculation field as the percentage of the cost to add on top of the cost to obtain a retail price. The
Margin / % Profit
setting uses the number indicated in the Price tab's price calculation field as the
target profit margin, which is the profit per sale divided by the total sale.
For example: An item costs $1.00, and the item sells for $1.50.
The
Markup
is $0.50 or 50% of the cost.
The
Margin
is the profit ($0.50) expressed as a percentage of the total sale, or 33% of the selling
price.
NOTE:
It is important to remember that if you change this setting, you must close the Maintenance
application before the changes will take effect.
Host Tab Settings
Host data communications
In some situations it is necessary to transfer files from the POS system in a store to a central location
for further processing. The Symphony Pro communication method and set-up is defined under the
Host
tab. Different communication types are supported such as dial up with modem to modem, or
internet enabled data transfer.
3.1.8.5 Host
© 2005 TOSHIBA TEC AMERICA AMERICA RETAIL SYSTEMS, INC. R1.0a
Page 29

Symphony Pro Main Menus 27
This example shows the Configuration panel's "Host" tab.
Merge lane report data together
is usually only used in multi-store situations. Instead of having sales
reports for each lane, the head office will get a consolidated total store report. Instead of terminal
numbers, the reports will be named and listed as the store number. If you do not select this option you
must
create individual terminals for every register in each store (on the headquarters system). This
option should only be set at the headquarters Symphony Pro, not in an individual store.
The
Connection
pull down menu is used to determine how Symphony Pro connects. Any valid choice
you can make will appear in the pull-down menu. For example, if you have installed dial up networking
and defined a connection, the dial up networking definition will appear as a choice for the Symphony
Pro host connection type. If you plan on using modem to modem communications, you will need to
install and configure the calling side for dial up networking and the other side for dial up server. Please
refer to your operating system instructions for further help on these set-up issues.
IP or Domain name
is the identification path to the remote Symphony Pro file system. This would be
entered as the head office IP address if you are connecting to a fixed TCPIP address.
Client Port
and
Host Port
is the actual port number required at each side to open the connection. Try
FTP if you are unsure. Make both sides match.
Host path
is the location on your system that the store Symphony Pro will put the files to be
transferred in before the actual connection with the HQ occurs. This is a location that is used by the
store side (not HQ) Symphony Pro to specify what need to be transferred out of the current location.
This could be called, for example C:\OutBoxHost\ or any other directory you create for this purpose.
The HQ Symphony Pro terminal does not need an entry for host path. Each store that connects must
© 2005 TOSHIBA TEC AMERICA AMERICA RETAIL SYSTEMS, INC. R1.0a
Page 30
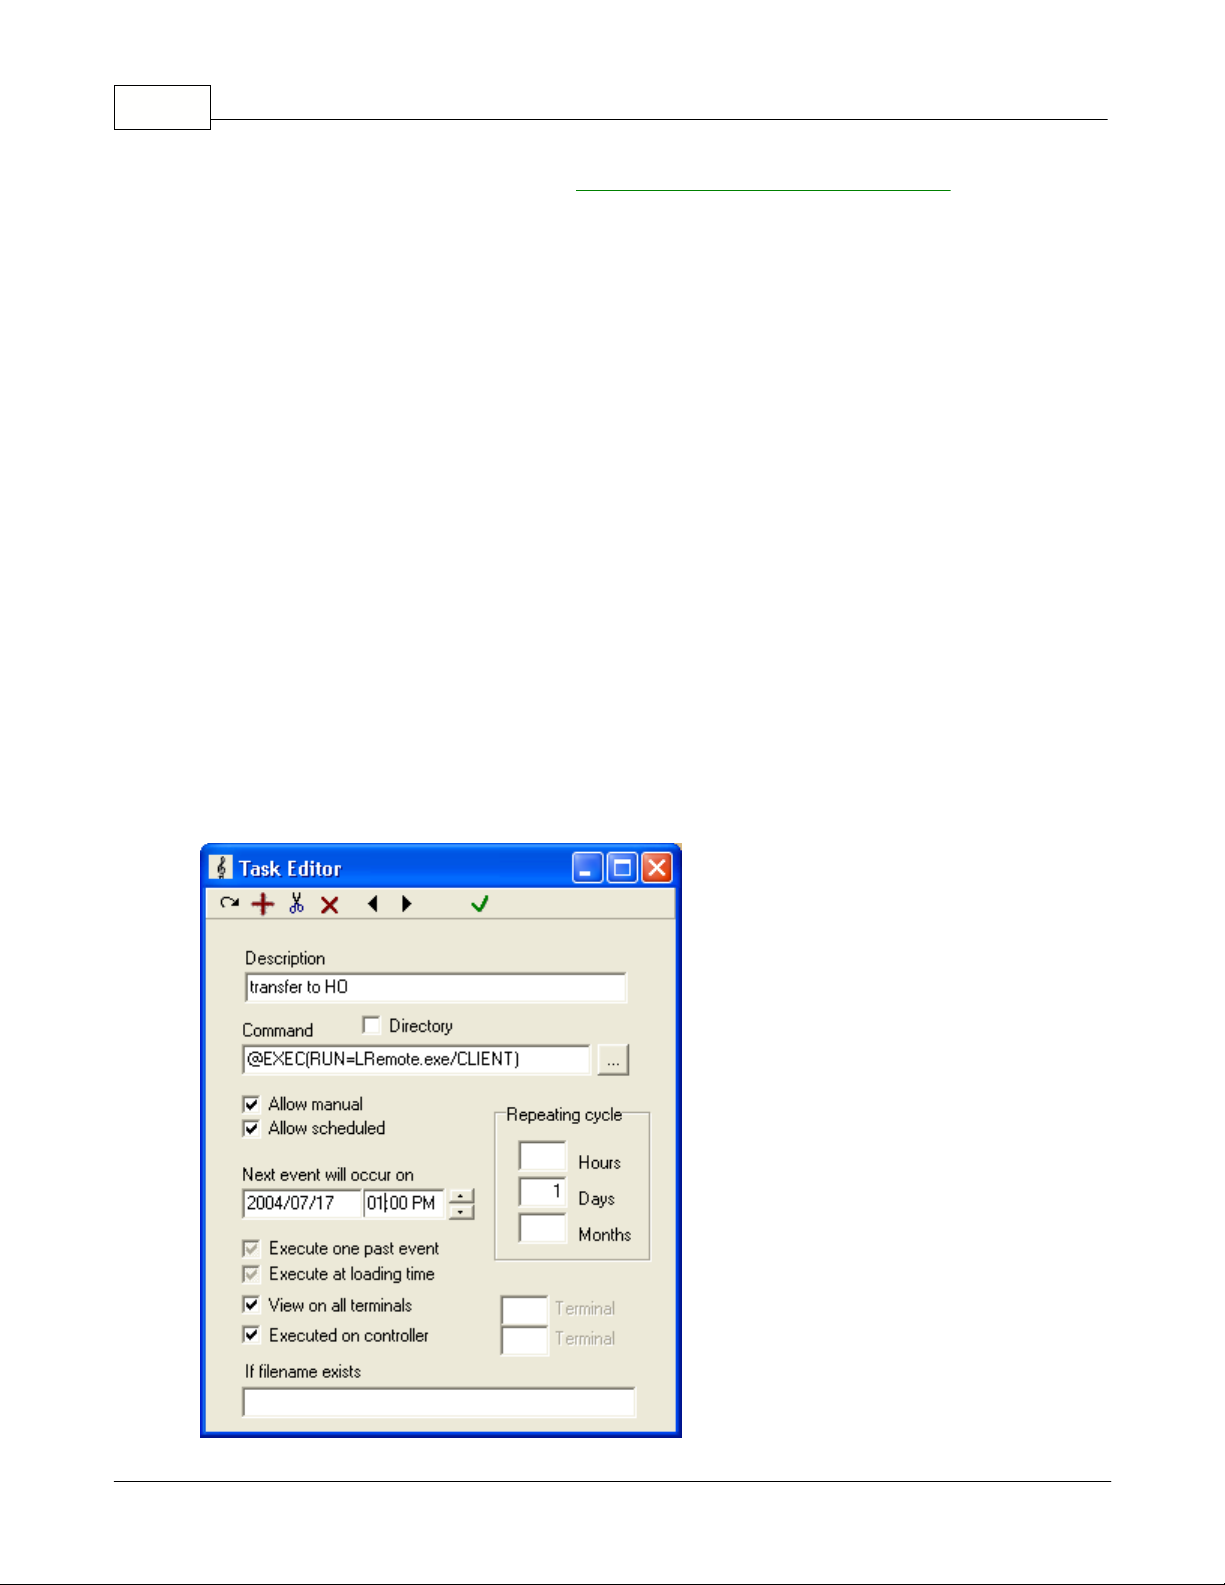
Symphony Pro User Manual 2.0.2.1528
have a back office terminal defined on the
terminal list in the Maintenance application
of the
headquarters Symphony Pro program.
User name
and
Password
are used to secure sign on rights if you are using an FTP server for file
transfer. They must match at the Symphony Pro on each end (store and HQ).
Host active
must be selected at the store(s) that will send data to a headquarters Symphony Pro.
Without this flag setting nothing will be put in the Outboxhost folder.
Keep listening
must be selected on the Symphony Pro terminal that normally waits for calls coming
such as a headquarters system that receives calls. If you want to transfer from the store to the head
office, the head office Symphony Pro must be set to
Keep listening
.
Live communication
is set when you want to transfer data immediately when required and not on a
scheduled basis. When
Live communication
is set, each time the Symphony Pro detects data in the
Host path
directory, the data communication will be activated. Otherwise, the data transfer will be
activated according to the scheduled events programmed in the Task/Event option of the Symphony
Pro program. Scheduled communications would typically occur once per day or once per hour between
the Symphony Pro terminals.
When the flag
Keep listening
is selected LRemote.exe will run automatically in the system Tray and
should not require any user intervention. It is responsible for sending and receiving the files from the
remote Symphony Pro connections.
If you require an event to schedule the communications, you need to select the LRemote.exe program
found in the LBOSS folder. Then set the time and frequency of data transfer. Select automatic for
scheduled communication and allow manual to be able to send data upon request. You will probably
set the store to send the data to the headquarters computer. The event set-up for once a day
automatic communications would be set as follows in each store:
© 2005 TOSHIBA TEC AMERICA AMERICA RETAIL SYSTEMS, INC. R1.0a
Page 31

This example shows the Task Editor scheduled event programming.
NOTE:
For more about scheduling tasks for automatic execution, see the
Events / Tasks Utility
help
pages in this manual.
3.1.8.6 Cleanup
Cleanup Tab Settings
As the Symphony Pro / Symphony POS system functions, it is constantly adding data to the report
tables, and creating log files. After months of use, these tables become quite full, and some of the
information within may not be essential to keep. Cleaning up the tables and log files promotes system
efficiency, and should be carried out on a regular basis.
Symphony Pro is usually set to "cleanup" data automatically based on scheduled events in the Events
/ Tasks list, and pre-set times declared in this tab. Most of the options are set by default to reasonable
values for a normal installation.
This example shows the Configuration panel's "Cleanup" tab.
Number of days to keep individual terminal
This is the number of days to keep individual terminal item sales. Past this number of days, the data
Symphony Pro Main Menus 29
© 2005 TOSHIBA TEC AMERICA AMERICA RETAIL SYSTEMS, INC. R1.0a
Page 32

Symphony Pro User Manual 2.0.2.1530
from all lanes is consolidated into lane 001 (This process is done daily)
Number of days to keep successful log
This is the number of days to keep successful communication log (LO). Please note that the LOG files
MUST be kept small. (This process is done daily)
Number of days to keep all log
This is the number of days to keep all communication log (LO). Please note that the LOG files MUST
be kept small. (This process is done daily)
Number of days to keep processed files
This is the number of days to keep the processed files and the journal files. Past this number of days,
the processed files are archived to the Archived Directory, and the journal files to the journal directory.
Archived journal files can be viewed with the EJ program without any restriction. (This process is done
Monthly)
Number of days to keep daily sales information
This is the number of days to keep the DAILY sales information in the database. Past this number of
days, the information is deleted from the database.
NOTE1:
The weekly, monthly and yearly sales information are never deleted.
NOTE2:
Larger the files are, slower is the system.
Number of days to keep financial daily sales information
This is the same as above, except this is related to the FINANCIAL daily data only. (This process is
done Monthly)
Keep log of all exports in the processed directory
This option is used to keep a copy of each file exported from the Symphony Pro system to the targets,
such as price changes, account data, and all other data sent from the Symphony Pro.
Load Files Tab Settings
During the first time set-up of Symphony Pro a basic screen / keyboard profile was selected to use the
software. The database tables with screen layout, function lists, etc. were all created in the system. If
you need to load a second profile or reload the original set-up, select the
Load files
tab.
3.1.8.7 Load Files
© 2005 TOSHIBA TEC AMERICA AMERICA RETAIL SYSTEMS, INC. R1.0a
Page 33

Symphony Pro Main Menus 31
This example shows the Configuration panel's "Load Files" tab.
The screen is split in two. The choices on the left refer to the default screen layout and function files
that the Symphony POS terminals can be loaded with and some sample product files. Select the profile
that you want to load and then press the
Load selected files
button to execute the load.
Once the required
load files
have been loaded, they will show up on the right hand window of the
Load file tab. The right hand area of the window only displays a list of the files that have been loaded
into the system. If you need to reload a set of files, you need to select it again by clicking on that file in
the left hand side of the window. No action can be executed on a file on the right hand side, it is only
there as an audit trail of what has been loaded.
The program will begin importing the load files you chose and building the database once you press
the OK button. When it is time to create the front-end function lists, you will be prompted for the target
register group. Unless you are installing both touch screen and keyboard in the same store, you should
accept the default PAL target. If you need to install the 2 different register set-up files, enter a target
group for the keyboard version (P01) and when you are prompted enter a different target group for the
touch screen set-up files (P02). You will need to create the registers and the target group once the
system is installed. This is explained in the installation help. After you have designated the correct
target for the screen and function load, the remaining files will be imported and the program will be
ready to operate.
NOTE:
You should not use the
Load files
option unless you want to reload the
initial set-up
files and
destroy all the data entry (
sample files
) and screen modifications (
Keyboard 800X600, Touch
800X600).
If you think you need to use these files in a live installation please
back up your data first
because it will be
overwritten.
© 2005 TOSHIBA TEC AMERICA AMERICA RETAIL SYSTEMS, INC. R1.0a
Page 34

Symphony Pro User Manual 2.0.2.1532
Security Tab Settings
Security System Overview
The Symphony Pro Software offers a security level system to restrict access to most functions,
database tables and configuration type information. In some situations, such as a single owner-
manager Symphony POS / Symphony Pro setup, or if the PC that runs the back office is in a locked
room, you may not need to use the security system. In most cases however, the PC station that runs
Symphony Pro (or networked Symphony Pro stations) is accessible to any passer-by. This means that
your data and system configuration is open to possible damage.
The security system is based on access levels that are assigned to users. There are eight (8) levels,
starting with level 0, called "no user", up to level seven (7), called "programmer". Assigning the "no
user" level to an option or utility means that anybody can access it. Once a security level is assigned to
a function, option or data table, the system verifies the logged in user to make sure that they have
access rights. If the user does not have access rights, the system opens a login panel.
Below is an example of how the security levels might be set.
Level 0
: No User - locked, the default security level when Symphony Pro is launched
Level 1
: New User - able to access certain tables only, for example items, departments etc.
Level 2
: Cashier - access to items, departments and other functions that a cashier would require
Level 3
: Clerk - receive, modify, view certain reports
Level 4
: Assistant Manager - access and modify items, departments. Access to reports
Level 5
: Manager - Access, Modify, Add / Delete, no access to network and programming features
Level 6
: Owner - Access, Modify, Add / Delete all except programming features
Level 7
: Programmer - complete access
Essentially, there are two steps to follow to implement the security system:
·
First
: Establish the
minimum
security level required to access each of the system functions,
options, data tables, and configuration files listed in the Security Tab of the Configuration Panel.
·
Second
: Associate each operator in the operator table with a security level.
Remember that this is the MINIMUM level required. A user with a higher access level has access to all
levels below.
Establishing access levels
The System tab displays a list of data tables, utilities and setup information. The list has four (4)
columns:
Column 1
- the name or description of the option to protect.
Column 2
- "Access" - the minimum security level required to access the option.
Column 3
- "Modify" - the minimum security level required to change data or settings.
Column 4
- "Add / Delete" - the minimum security level required to add or remove data.
3.1.8.8 Security
© 2005 TOSHIBA TEC AMERICA AMERICA RETAIL SYSTEMS, INC. R1.0a
Page 35

Symphony Pro Main Menus 33
This example shows the Configuration panel's "Security" tab.
To assign security levels
:
·Start by assigning security levels in the "Access" column.
·Select an option or table from the "Access" column by clicking on it.
·Right click or double click to open a list of security levels.
·Choose the
minimum
security level required to access the selected option.
Once a security level is associated with accessing an option, continue by associating minimum
security levels to the "Modify" and "Add / Delete" columns of the option. For example, you may want to
allow a cashier to have access to view items, but not modify, add or delete them from the system.
Once the required access level to items is set to "Cashier", assign the security level required to
"Modify" items, then the level required to "Add / Delete".
If an option requires a high security level to access it you may not have to bother assigning security
levels to the "Modify" or "Add / Delete" columns, since
a user must have access to an option before
they can modify, add or delete it
.
Once the required security levels have been assigned to options or data tables, the last step is to
associate a security level to each operator in the system. For help on assigning security levels to
operators, click here to go to the
Operator Table
help page now.
NOTE:
If you are using the security system, be sure to
use the "
logout
" option to sign off the system
when leaving the work station, leaving the application on the "no user" security level. Symphony Pro
will still execute any scheduled operations, including polling or other communications, even if no user is
logged.
© 2005 TOSHIBA TEC AMERICA AMERICA RETAIL SYSTEMS, INC. R1.0a
Page 36

Symphony Pro User Manual 2.0.2.1534
Send urgent message to Symphony Pro /Sypmphony Pos:
Use this setting to send a copy of
urgent messages received by the Main message center to the terminal defined as the second
message center. Selecting this menu option acts as a toggle to activate the second message server
(when the check bar is set) or to turn it off, when the check box does not appear. This feature is not
supported by the TEC ECR.
Calendar and Date Conversion Utility
It is important to note that if you open the Windows Date utility by double clicking the System date /
time icon (usually at the bottom right of the windows desktop) and change the month displayed,
Windows changes the system date even if you haven't pressed "OK" or "Apply". If Symphony Pro is
running, it immediately displays a warning message, then closes. This is because Symphony Pro is
constantly checking the system date / time to see if any "Events" or "Tasks" should be performed. If the
application did not close, it would want to execute events for the new date / time, possibly adversely
affecting the data.
The Symphony Pro "File" menu provides a calendar utility called "Date Conversion", useful for
verifying past or future dates when working within Symphony Pro. The utility also provides a date
format converter, used to verify dates in less common formats. The date formats described below are
commonly used by programs internally, because they simplify mathematical date calculations, making
it possible to subtract one date from another.
This example shows the Symphony Pro "File" menu's "Date Conversion" utility.
Julian Date
3.1.9 Send urgent message to Symphony Pro
3.1.10 Date Conversion
© 2005 TOSHIBA TEC AMERICA AMERICA RETAIL SYSTEMS, INC. R1.0a
Page 37

Some systems use alternate date formats. The Julian date shows the year, followed by the number of
days since the beginning of the year. This format is used in SIL data files, so Symphony Pro needs to
recognize this format. You probably won't need to use this format.
Unix Date
This is the date format used internally by PC's. It is the number of days since December 31st, 1899.
3.1.11 Messages
The Messages Utility
Symphony Pro and Symphony POS software are designed for network use. In some cases, such as
larger installations, there may be several Symphony Pro stations, such as a reception area, price
control station, and manager's station. The message utility provides a quick online messaging method
between Symphony Pro stations and Symphony POS stations, convenient for communicating from the
front to back end of a store. This feature is not supported by TEC ECRs.
This example shows the Symphony Pro "File" menu's "Messages" utility.
Using the Messages Utility
To send a message to another Symphony Pro station or Symphony POS station, select the
"
Messages
" option from the "
File
" menu. The Messages utility window opens, with options buttons
across the bottom of the display. The main window area is for viewing messages only. To send a
message:
·Click the "
Send
" button to open the message edit line.
·After entering a message, press the "
OK
" button to proceed.
·A new panel appears, waiting for the destination for the message.
·In the destination panel, enter the station number to send the message to. (Symphony Pro station
numbers are a three digit numbers, usually starting with 901 as the main back-end station. Symphony
POS lanes are usually numbered starting at 001.)
·You can also enter "ALL" to "broadcast" the message to all stations that are currently online.
Symphony Pro Main Menus 35
© 2005 TOSHIBA TEC AMERICA AMERICA RETAIL SYSTEMS, INC. R1.0a
Page 38

Symphony Pro User Manual 2.0.2.1536
The "
Reply
" button is normally "grayed out", except when the station receives a message from
another station. Use the reply button to return an answer to the sending station.
The
Previous / Next
buttons are used to review messages that have been collected and stored in the
system.
The
Delete
button is used to remove messages that you do not want to keep for future reference.
Show Tips - Symphony Pro File menu Option
Show tips
is used to display helpful tidbits of information that we expect will make your usage of
Symphony Pro more enjoyable. Selecting this option opens a Windows style "hints" window. Once
open, you can browse through the hints, or configure the hints panel to open every time you launch the
Symphony Pro application, handy for new users.
Exit the Symphony Pro Application
The Exit menu option closes the Symphony Pro application. On closing, the application opens a
warning message to let you know that
if you close the application, the back office will not be
available for communications or scheduled events
. Only shut down the application if you are sure
that this will not affect the normal store operations.
Exit:
Use this option to close the Symphony Pro application. Other programs such as Maintenance,
polling, and other sub-applications will also be terminated. Whenever you choose the Exit button,
Symphony Pro warns you that closing the application will terminate the communication with the
Symphony POS terminals and TEC ECRs. This is a normal warning but several issues should be
considered before terminating the Symphony Pro program.
·When Symphony Pro is not operating, the sales data from the Symphony POS terminals is not
processed. The data does continue to accumulate on each lane. When Symphony Pro is re-started,
the data is transferred to the back-office and the report system is brought back up to date without user
intervention.
·Customer account balances cannot be retrieved when Symphony Pro is not operating. Charge sales
can be posted and the account data will be transferred and posted when the Symphony Pro system is
restarted. No store credit limit, etc. is verified.
·No reports can be requested on the Symphony POS front end terminals if Symphony Pro is not
operating.
·Floating cashiers on the Symphony POS terminals have totals that are retrieved from the Symphony
Pro machine whenever a floating cashier logs on. The floating cashier balances are not available when
the Symphony Pro Controller is unavailable.
·No financial reports for the TEC ECR can be taken from the Symphony Pro back end station.
·Scheduled task events will not run until the Symphony Pro software is restarted.
3.1.12 Show Tips
3.1.13 Exit
© 2005 TOSHIBA TEC AMERICA AMERICA RETAIL SYSTEMS, INC. R1.0a
Page 39

3.2 Modules Menu
Modules Menu Options
The
Modules
menu option is used to open other applications available from
Symphony Pro
. These
include:
Pickup:
This choice will open the pickup screen.
Pickups
are also available directly from the Entry
main menu.
Maintenance
: This is the database information editor / viewer. It is used to maintain database tables;
items, operators and other system information.
Reports
: Symphony Pro includes tools to generate, view and print reports, lists, labels etc. It also
includes access to the report configuration settings.
Report system help files
.
PosSetup
:
Common configuration of Symphony POS front end stations; screens, peripherals etc. Use
the
Symphony POS help file
link to access help on the Symphony POS Setup application. The
Poshlp.chm file can also be opened individually from the LBOSS folder or from the lane's POSWIN
folder. A printable version of the file can be obtained from your Authorized TEC Dealer. This feature is
not supported by the
TEC ECR
.
Entry Module
: Receive / Order merchandise, fix inventory quantities etc. Help with
Entry module
.
Events Tasks
: The Event / Task launcher, scheduler. Help on Events/Tasks.
View Logs
: View system events, system in / out boxes contents, etc.
Symphony Pro Main Menus 37
© 2005 TOSHIBA TEC AMERICA AMERICA RETAIL SYSTEMS, INC. R1.0a
Page 40

Symphony Pro User Manual 2.0.2.1538
Monitor
: This utility allows Symphony Pro to view Symphony POS transactions as they occur, used to
monitor cashiers.
Help with Monitoring
.
This feature is not supported by the TEC ECR.
Journal
: Displays the actual sales information from the front end Symphony POS stations in sales
journal format. The EJ also includes powerful search and review functions.
EJ Help file
.
This feature is
not supported by the
TEC ECR
.
Symphony Pro Desktop Icon shortcuts
Several of these menu options have corresponding icons on the Symphony Pro desktop. You can limit
access to these applications or utilities using the security access. For help on configuring the security
system see
the Security help page
.
NOTE:
Although the modules appear and are launched under this menu, their help pages are not
necessarily described under this heading, but are listed in the root of this help manual.
Special Menu Options
What is it for?
Symphony Pro allows users to create menu options for specialized utilities, or as a quick launch for
customized report generation. By default, the menu is empty because Symphony Pro does not ship
with any customized options in this menu.
If you have specialized needs, please consult your Authorized TEC Dealer for more information.
Symphony Pro Help
The Authorized TEC Dealer provides user help in both electronic and printable format. Both the
printable manual and the electronic help describe all the options available in the Symphony Pro at the
time of release.
NOTE:
Designed as a "user manual", the help does not detail how to program Symphony Pro
commands or SQL. Please consult your Authorized TEC Dealer
if you have specialized needs that
require programming.
The Symphony Pro main "Help" menu "
Contents
" option is used to access the "electronic" help file,
an online version of the printable manual. The on screen help file can also be launched at any time by
pressing the [F1] function key. Designed in the standard Windows XP Pro help style, the electronic
help includes a navigational tree (table of contents), and a searchable index to help quickly locate
information. For help on how to use the help file, please read the Windows help, accessed in the
Windows "Start" menu.
If you wish to have a printed copy of the Symphony Pro User Manual, please see the
3.3 Special
3.4 Help
© 2005 TOSHIBA TEC AMERICA AMERICA RETAIL SYSTEMS, INC. R1.0a
Page 41

Printing help as a Manual
section in this manual.
Version numbers
The "
About
" option opens a panel displaying the installed Symphony Pro version number, useful for
obtaining technical support information. Since Symphony Pro contains a number of separate utilities
with version numbers, the about also provides a quick list of all application version numbers. With the
"About" panel open on screen, click the Symphony Pro icon. This opens a list of all the version
numbers for the Symphony Pro programs. This also creates a text file that can be printed and faxed, or
emailed as an attachment to help the technical support process.
4 Maintenance Application
Symphony Pro Maintenance Application Overview
The
Maintenance
application is used to control all data that is used on front-end Symphony POS
terminals. The Maintenance menus provide access to all data tables required for store operations. The
data tables are divided into categories such as item information (PLU), customer account information,
and front end system information, such as operators. The Maintenance application menus are divided
into these categories as well, to simplify user access.
The Maintenance application is also used to control data that is used on the TEC ECRs. The data
tables are divided into categories such as PLU, customer account information, and cashiers. The
Maintenance application menus are divided into these categories as well, to simplify user access.
Like the Symphony Pro desktop, the Maintenance application's title bar displays the application's
name and logged user name. The Maintenance desktop also provides icons that represent the most
commonly used options. In other words, you can access options either by clicking the icon, or opening
the menu and selecting the option from that menu's option list.
The Maintenance application menus are dynamic, and change depending on the category of data that
you are accessing. For example, when no data tables are open for editing, the maintenance "
File
"
menu allows login, logout, bubble-help on / off toggle and execution of an SQL command line.
Launching a data table editor (PLU for example) causes the "
File
" menu to change content to include
options specific to PLU maintenance.
The Maintenance application provides a common set of editing tools, even though the table editor
changes content according to the data table being edited.
NOTE:
If you leave the Maintenance application
open but inactive
(not being used) for more than 10
minutes, it will
automatically close
. This is because the Maintenance application accesses data
tables, locking them to prevent simultaneous access. If there are data tables open and modified, the
changes will be saved
.
Symphony Pro Main Menus 39
© 2005 TOSHIBA TEC AMERICA AMERICA RETAIL SYSTEMS, INC. R1.0a
Page 42

Symphony Pro User Manual 2.0.2.1540
This example shows the Maintenance application's "Desktop".
Maintenance Menus and Icons Overview
The Maintenance application's help pages describe each menu's options in detail by menu name.
File:
The File menu is dynamic and either displays options for the Maintenance application when no
tables are open, or data type utilities, depending on the data tables that are open for editing.
Edit:
This option is not visible until a data table is open for editing and contains editing options that
correspond to the edit tools available on the toolbar.
PLU:
The PLU menu provides access to all item related data types, such as department, sub-
department, bottle links, mix&match, etc.
Account:
Accesses all customer account related tables, such as customer information, client shopper
levels, risk levels and discount table set-up.
Register:
Provides access to all front end specific information, for example Operators, functions,
totalizers etc.
Windows:
Because the Maintenance application is a "multi-window" environment, this menu provides
controls such as tiling or cascading views.
Help:
Launch this help document or view the About for version number and contact information.
4.1 Maintenance Main Menus
© 2005 TOSHIBA TEC AMERICA AMERICA RETAIL SYSTEMS, INC. R1.0a
Page 43

4.2 Common Data Edit Toolbars
Common Data Table Toolbar
Regardless of which data table you edit, the Maintenance application provides a common set of tools
on a toolbar at the top of the data table editor. The Maintenance main menus change as well,
depending on the table you are programming. The toolbar is common to all tables you edit.
NOTE:
If you have the "Bubble help" set to on, you can hold the mouse cursor over a tool to see a
short description of that tool's function. To set the help on or off, close all data tables, then open the
"File" menu. The help bubble option acts as a "toggle", displaying a check mark when set to on.
Top Bar Tools
The
tool allows you to post the changes to the record within the table being accessed.
The
tool is used to add a new blank record to the table you are working with. To copy an existing
item to a new item, or to replace an existing item with a new number, enter the number directly into the
item number field. You will then be prompted for the action you want to take.
The
tool is used to delete an existing record from the table you are working with.
The
tool is used to undo changes that appear on the screen but that have not yet been posted. It
will not undo changes that have been posted.
The
tool is used to
go back
to the previous record in the table you are working with.
The
tool is used to
go forward
to the next record in the table you are working with.
The
tool is used to send the modification made to the current record to the POS terminals
immediately. This icon changes color to green when a modification has been made to a record. When
the record is deployed the icon will return to the normal color displayed here.
The
tool is used to approve all changes and close the tables you are working with.
The
tool only appears on the PLU item screen. It allows you to set a filter on the PLU file in order
to view and modify only the filtered items.
Pressing the
icon toggles it to
view mode and displays the tools used for setting filters and
performing global modifications on the PLU file.
These icons appear to the right of the
and are explained in the
"Filters" section
of this help file.
Maintenance Application 41
© 2005 TOSHIBA TEC AMERICA AMERICA RETAIL SYSTEMS, INC. R1.0a
Page 44

Symphony Pro User Manual 2.0.2.1542
Viewing Data Table Contents
Symphony Pro uses tables to store data. In some cases the information stored in a table has been
indexed so that a rapid search can be performed to locate data you require. As you are navigating
through the fields of different tables you will notice that sometimes a "
?
" (question mark) appears
beside the cursor. This means that the selected field is indexed so that its contents are viewable as a
searchable list. Double clicking the selected field will open a viewable list of the table's contents.
The sequential order that the contents will appear depends on which field you have selected for the
drop down list. For example, if you are editing operators and double click in the operator number field,
the list is in numerical order according to the operator numbers. Double clicking the operator name
field opens the same information, but listed alphabetically according to the operator names. The data
list's left column will contain the data from the field selected.
The Symphony Pro program has 2 different styles of search windows. The first is fixed and the data
and fileds included in the window cannot be changed. Here is a sample of a simple search window:
Once this type of list is open, you can search several ways. You can use the scroll bar to search
manually, or you can enter the first few letters (or numbers if the field is numeric) of the data you are
searching for in the "Locate" box. The search is
left-justified
; which means that when you begin typing
a description in the search table, the cursor will move to the record in the table that meets the search
criteria. For example, searching for the description
bread
in the PLU database "descriptor" field will
move to the section of the file beginning by
b
. Next it will attempt to move ahead to
br
. If it finds
br
, it
will attempt to move to
bre
. As soon as it cannot find the full description you searched for, the cursor
will stop moving and display the first record it finds with as much as possible of the descriptor you
4.3 Displaying Data Lists
© 2005 TOSHIBA TEC AMERICA AMERICA RETAIL SYSTEMS, INC. R1.0a
Page 45

Maintenance Application 43
requested.
To begin a new search you must clear out the search data you entered the first time. Once you find
the data item you are searching for you may want to leave the search window and navigate up or down
the list being displayed. You can do this by clicking with the mouse anywhere on the list. You can also
press
Enter
to move from the Search box to the current list and move up or down the list to select the
record you were searching for.
The second type of search window allows advanced users to define their own search criteria and
result columns. Here is a sampleof the advanced search window available in many of the database
fields related to products:
Once this type of list is open, you can have many more search options. Clicking at the top of any
column will use that column to sort the data. From the example shown above, if you click on the
column header description the list will sort in alphabetical order. If you click again in the same column
the list will sort again in alphabetical order starting from the opposite end of the alphabet. Click in the
PLU number header and the same list will sort numerically. Re-click the PLU number and the list will
sort from the last PLU to the first,etc. You can also use the locate entry window to type data. If you
have sorted the column by clicking in the PLU number field, the locate tool will search the PLU number
field (F01 in the database.) If you have sorted the column by clicking in the description field, the locate
tool will search the item description field (F29 in the database.)
You can also use this type of search window to perform a
wildcard
search (the field you are searching
contains
the data in a continuous string.) For example you want to search for all products that include
the word
berry
anywhere in the description. Type the word
berry
into the locate window. The system
will display the first product it locates beginning with the word berry. Press the
Enh. Search
button. The
system will display every product that includes the word berry. So the first list may show no results
unless there are products that start with Berry. But the second list would show straw
berry
, blue
berry,
rasp
berry
, etc.
© 2005 TOSHIBA TEC AMERICA AMERICA RETAIL SYSTEMS, INC. R1.0a
Page 46

Symphony Pro User Manual 2.0.2.1544
The next major advantage to this type of list is that a customized query can be defined if you
understand the Symphony Pro database structure and you have a minimum knowlegde of sql
commands. Access the
options
menu and select
custom query
. The system will open up an sql
editor window. Add the commands you need to select the data you want to list. If you are unsure how
to do this it is recommended that you inquire with your ealer on how to add custom queries.
Note:
The first type of list displays a record count (the number in brackets at the top of the list.) The
second list type that allows enhanced search does not display the record count at the top of the
window. You must open the
options
menu and choose
record count
.
There are several ways to perform a search. You can use the scroll bar to search manually, or you
can enter the first few letters (or numbers if the field is numeric) of the data you are searching for in the
"Locate" box. The search is
left-justified
; which means that when you begin typing a description in the
search table, the cursor will move to the record in the table that meets the search criteria. For example,
searching for the description
bread
in the PLU database "descriptor" field will move to the section of
the file beginning by
b
. Next it will attempt to move ahead to
br
. If it finds
br
, it will attempt to move to
bre
. As soon as it cannot find the full description you searched for, the cursor will stop moving and
display the first record it finds with as much as possible of the descriptor you requested.
To begin a new search you must clear out the search data you entered the first time. Once you find
the data item you are searching for you may want to leave the search window and navigate up or down
the list being displayed. You can do this by clicking with the mouse anywhere on the list. You can also
press
Enter
to move from the Search box to the current list and move up or down the list to select the
record you were searching for.
File Menu Overview
The Maintenance application's "File" menu contains common options such as login / logout, language
setting etc., but is also
dynamic
. Depending on the table being edited, the options in the "File" menu
change to include utilities designed to test or verify system integrity for the selected data type. For
example, it is important to verify that all items have links to sub-departments. When the item table
editor is open, the "File" menu changes to include an option to check for PLU links. Not all tables have
utilities or additional options in the "File" menu.
NOTE:
As with most Windows style programs, the Maintenance application's desktop supports "Multi-
Windowing", meaning there may be several tables (windows) open at the same time. The dynamic
"File" menu always displays the options for the currently "selected" or "in focus" table. The selected
table will always be on top of the others, its top bar will be different than other "not selected" tables.
The table top bar colors are based on the colors that you have selected for your Windows desktop.
File Menu Options
Login
,
Logout
and
Language
are identical to the same options in the Symphony Pro main
application, described in the
Symphony Pro Main Menus help section
in this manual.
Bubble help:
When toggled on, the Maintenance application will show short help when the mouse
hovers over an area that has hints.
SQL Command
!Warning!
:
This option should only be accessible to programmers!
Y
ou should only use this
4.4 File Menu
© 2005 TOSHIBA TEC AMERICA AMERICA RETAIL SYSTEMS, INC. R1.0a
Page 47

Maintenance Application 45
option if you are certain that you understand SQL and are executing the correct command. By running
an SQL command you can inadvertently or even
severely damage
the data contained in the system
database tables. If you are unsure, you should not use this option, contact your Authorized TEC Dealer
for technical support.
This example shows the Maintenance application's "File" menu, "SQL command" option.
This option allows a programmer to either select an existing SQL command from the drop down list at
the top of the window or manually enter a new SQL command and execute it. It is also possible to
enter new commands, then save them to have them added to the existing list.
Item Maintenance Utilities
The "PLU" desktop icon and the "PLU" menu's "Item" option both open the Item table programming
utility. Once open, the Maintenance application's "File" menu adapts to include options and utilities that
apply specifically to item table. The options and utilities are designed to work with item data entry and
programming integrity.
Item Table File Menu Options
Tests:
This option includes item tests that help control item data integrity, such as sub-department
links, items with no price and other tests, including:
PLU at zero price in level 1:
Items
should
have a price on level 1! This tests the item tables for any
items that do not have a price on price level 1, and opens a list box. If there are no items without a
price, the list is empty. If there are items without a price, you can double click an item to edit it right
away. You can then either edit or delete the item in question. Repeat the process until all items have
been dealt with.
NOTE:
Items can exist without a price. The Maintenance application will not stop you from creating an
item, then leaving the item table without entering a price.
No sub-department:
Items in the database
should
all be linked to a sub-department. Sub-
departments allow for selective reporting and item group programming. For more about sub-
departments, see the
Sub-department help
in this manual. Use this test to find any items that
are not
4.4.1 Item Options
© 2005 TOSHIBA TEC AMERICA AMERICA RETAIL SYSTEMS, INC. R1.0a
Page 48

Symphony Pro User Manual 2.0.2.1546
linked
to a sub-department. Selling items that are not linked to sub-departments will lead to
discrepancies in the item, sub-department and department sales reports. As with the item test, a list
appears allowing you to select the item for immediate editing.
Unreferenced sub-department:
Although the Maintenance application has drop down lists to allow
you to select the correct sub-department for an item, you can also enter the sub-department manually.
This makes it possible to enter a non-existent sub-department as a link. The system will emit a
warning, but does not stop you from continuing. Use this test to find any items that are programmed
with a sub-department number that does not exist in the sub-department table. If there are un-
referenced sub-departments, the items will appear in a list. You can then either correct the entry, or
create a new sub-department table record.
Unreferenced bottle link:
Similar to un-referenced sub-departments, it is possible to assign a non-
existent bottle link to an item that sells with a bottle. Run the test to find any items that have been
incorrectly linked. From the ensuing list, you can either fix the bottle link number, or open the bottle link
table to add a new record.
Unreferenced tare link:
Run this test to discover items in the database that reference a tare table
record that does not exist. If any items appear in the list, double click to edit immediately, correcting the
problem in the item, or programming the tare table to include the unreferenced record.
PLU price over 100.00:
This test looks for items that have prices over $100.00. The system does not
limit item pricing; this utility is included to find items that have probably been incorrectly programmed,
often an undetected "typo". This is handy if your store does not have any items with prices in the
100.00 range.
Show POS targets:
Symphony Pro makes use of "target groups" to know which terminals are to
receive programming. When selected, an information list opens, displaying a list of all POS targets for
the selected item. Normally, all terminals receiving programming will be in the PAL target.
("Programming ALL"). For more about the terminal groups, see the "Register menu",
"Terminal table" help pages
in this manual.
Show Price targets:
The same as the "Show POS targets" utility above, this opens a list of the Price
targets programmed for the selected item.
Auto Update from Batch:
If you are using the "Batch" mode utility, it is possible to automatically
update item programming from a batch, even though the batch has not been deployed. When this
option is selected, Symphony Pro will display the best promotional price in the "sales price" column
(extracted from the active batches). This option does not affect the way that batches behave. For more
about Batch programming, see the
batch programming help pages
in this manual.
Scanner:
The Maintenance application offers a utility to enter item codes from a scanner. This can
make it easy to quickly locate items in the database for programming. The scanner must be
programmed to function properly with the Maintenance application.
Use scanner:
If a scanner will be used to enter item codes for programming, select the "Use scanner"
option.
Configure scanner:
This utility is used to program the Maintenance application for using a scanner.
The utility provides a list of pre-set configurations based on popular manufacturers' models. If your
scanner does not appear in the list, it can be added, programmed and saved. This is usually done by
the Authorized TEC Dealer at installation time. If you are unsure about how to setup the table, please
consult your Authorized TEC Dealer.
© 2005 TOSHIBA TEC AMERICA AMERICA RETAIL SYSTEMS, INC. R1.0a
Page 49

Maintenance Application 47
This example shows the Maintenance application's Scanner Setup panel.
Definition table:
Scanners can be programmed to read different bar code types, and the way that they
are read. The Maintenance application uses the scanner "definition" table when accepting codes from
the device. Use this utility to setup the definition table. This is usually done by the Authorized TEC
Dealer at installation time. If you are unsure about how to setup the table, please consult your
Authorized TEC Dealer.
This example shows the Maintenance application's Scanner Definition Table.
Set quick page
: This option can be used to personalize the home (quick) page of the PLU editing
screens. When the quick page editor is activated, a yellow banner is displayed as a warning. Select a
© 2005 TOSHIBA TEC AMERICA AMERICA RETAIL SYSTEMS, INC. R1.0a
Page 50

Symphony Pro User Manual 2.0.2.1548
field from another tab in the PLU maintenance screen by right-clicking on that field. Return to the quick
page and click on the form to place the selected field. Several fields are only displaying results that
have been calculated. For example, the unit cost is a calculation derived by dividing the base cost by
the case pack size. You cannot place a calculated field by right-clicking it. You must select this type of
field from the drop-down list located in the yellow banner area when the quick page editor is selected.
You may also set your preferred tabbing order for navigation on the quick page.
Other Dynamic File Menu Options
Not all tables have utilities or additional options in the "File" menu. If there are no tests or other options
for a table, the File menu usually only contains the "Close" option to close the table, saving all
modifications.
Sub-departments
: When the sub-department table is open for editing, the Maintenance application's
"File" menu changes to include an option to test the sub-departments
Unreferenced Departments
: Although the Maintenance application has drop down lists to allow you to
select the correct department for a sub-department, you can also enter the department record number
manually. This makes it possible to enter a non-existent department as a link. The system will emit a
warning, but does not stop you from continuing. Use this test to find any sub-departments that are
programmed with a department number that does not exist in the department table. If there are un-
referenced departments, the sub-department will appear in a list. You can then either correct the entry,
4.4.2 Other File Options
© 2005 TOSHIBA TEC AMERICA AMERICA RETAIL SYSTEMS, INC. R1.0a
Page 51

or create a new department table record.
4.5 Edit Menu
Edit Menu Overview
The "Edit" menu is not always visible, and only appears when there are open tables to edit. Like the
"File" menu, the Maintenance application's "Edit" menu is
dynamic
, its options changing depending on
the utility used, or the table being edited. This is because the utilities and tables do not have all the
same options. Some of the "Edit" menu options are alternate links to the same options as the common
table edit toolbar, such as tools to "Add", "Delete" or "Post" records.
Edit Menu Item Options
Once the item table is open on the desktop, the
"Edit" menu changes
to include options that are
specific to the item table. If an option on the menu has an associated "hot key" (quick keyboard
access), it is indicated after the menu option description.
Expand UPC-E (F12):
Use this option so that when entering codes manually in their "E" format (6 digit
short format), the application will automatically convert the UPC-E to a UPC-A. This is convenient if you
are searching for the code in the item table, but only have the short (E) format of the code.
Vendor Code (F5):
Use this option to search for one item in the database using the vendor code for
the item, rather than the UPC.
Search Vendor code (Shift-F5):
If you are unsure of the vendor code for an item, this option opens a
list of all the items in order by their vendor code.
Custom queries:
Symphony Pro allows you to list data records in certain fields such as the item
description. The search is initiated when you double click in the field to be used as the search key. It is
possible that the search criteria you want to use is not available in the standard search lists. You can
modify the sql request made to the database engine and display the results in the search window.
Certain database knowledge is required and changing the standard requests may inhibit the normal
searches you perform. Here is an example of how to add a custom search to the system.
Access the
Custom query
menu option and select
Add.At the prompt enter a short description that will be used to identify this query. (
MM#1
is our example
which will produce a list of the items atached to mix match group 1.)
In the query window enter the sql command to be executed. Example:
SELECT F01,F29,F32 FROM
OBJ_TAB O LEFT OUTER JOIN PRICE_TAB P ON (O.F01=P.F01) WHERE F32=1
You can also set the number of visible columns to be displayed.
Once you press [OK] the query is saved and a new button will appear on the item screen. Press this
button to execute the custom query.
Delete POS Target:
Items are linked to several types of "targets". POS targets are the front end
terminals that require the programming in the POS table, including descriptor, status etc. Often there is
only one POS target for items, (all terminals) except in multi-store situations, for example where some
4.5.1 Item Options
Maintenance Application 49
© 2005 TOSHIBA TEC AMERICA AMERICA RETAIL SYSTEMS, INC. R1.0a
Page 52

Symphony Pro User Manual 2.0.2.1550
stores are under different state taxation laws. You can delete POS targets from an item if they are no
longer sent to the target to delete. Items must have at least one (1) valid POS target.
Delete PRICE Target:
The PRICE targets are the terminals that the price is sent to. Once again, in
most situations there is only one Price target, all the terminals. In multi-store conditions, some store will
not have the same pricing. It is possible to remove unwanted price targets. Items must have at least
one (1) valid PRICE target.
Item List Per POS(also PRICE, COST) Target:
In situations where there are separate targets for
pricing or POS information, you can list the items that are in a specific target, for PRICE, COST, or
POS targets.
Previous, Next, Add, Delete Record:
These options are the same as their toolbar counterparts.
Calculate Price:
Before using this option, items must have a cost, and a value in the "Projected" field.
You must also decide which method Symphony Pro will use to calculate the item price based on cost,
Margin or Markup. For more about Margin and Markup, please read the
Price tab help page below
. To
read about how to set Symphony Pro to use the type of calculation you would like to use, please see
the Symphony Pro,
"File" menu, "Configuration" utility's "Misc" tab help
.
To have Symphony Pro set ALL item prices from their costs based on the type of calculation selected:
·With the Item tables open on the Maintenance application's desktop,
·Open the "Edit" menu and hold the mouse over the "Calculate Price", opening a sub-menu
·From the "Calculate price" sub menu, select "All items".
·You will be warned and before the calculate process runs.
To calculate prices on a specific group of items only, you must select the items using a filter, apply the
filter, then from the Maintenance application's "Edit" menu, "Calculate prices" option you will be able to
select the "
All filtered items
".
It is important to note
that if you use price levels, you should be sure
that there is a target value for all price levels. This is because if you ask Symphony Pro to calculate
prices based on the target value, the prices FOR ALL PRICE LEVELS are calculated.
Ignore Un-posted changes:
This is an Undo option that removes changes made
BEFORE posting
the changes. Note that if you modify an item and move on to the next item, the changes are POSTED
(not to be confused with DEPLOYING). You cannot undo modifications after posting using this option.
Delete All Filtered Records:
This option allows you to select items from the database using a filter
and deleting them as a group.
Move Filtered items to Batch:
This option allows you to select items from the database using a filter,
and have the selected items sent to an existing batch.
Add this Item to Batch:
Send the selected item to an existing batch.
Other Dynamic Edit Menu Options
For most other tables, the edit menu contains the same options and utilities as the toolbar.
Post Record:
is the same as the
tool.
4.5.2 Other Edit Options
© 2005 TOSHIBA TEC AMERICA AMERICA RETAIL SYSTEMS, INC. R1.0a
Page 53

Previous Record:
is the same as the
tool.
Next Record:
is the same as the
tool.
Add New Record:
is the same as the
tool.
Delete Record:
is the same as the
tool.
Ignore Unposted Changes:
This is an Undo option that removes changes made
BEFORE posting
the changes. Note that if you modify a record and move on to the next, the changes are POSTED (not
to be confused with DEPLOYING). You cannot undo modifications after posting using this option.
4.6 PLU Menu
PLU Menu Option
s
The PLU menu provides access to all item related data types. Selecting an option from the PLU menu
opens the corresponding data table. For quick access to the Item table, use the PLU icon found on the
Maintenance application's desktop. Most other item related tables are rarely accessed after the original
configuration and do not have desktop icons.
Item:
Probably the most used option, it opens the PLU (or Item) table that contains the PLU's main
information.
Sub-Department:
PLUs
MUST
be linked to a sub-department. Use this option to program the sub-
department table.
Department:
Sub-Departments
MUST
be linked to Departments. This option opens the Department
table.
Bottle Link:
Opens the Bottle Link table to configure bottle values to link to bottled PLUs that must
collect a deposit.
Tare:
Opens the tare table for editing scale related packaging weights.
Price Level:
The price level table contains a record for every price level PLUs will link to.
Category:
Items can be linked to "categories" for reporting purposes.
Mix & Match:
This option opens the Mix & Match table to configure records for PLUs to link to.
Batch:
Used when prices must be modified at future dates, such as short or long term promotional
pricing.
Vendor:
Use this option to add / modify records in the vendor table so that PLUs can be linked with
suppliers.
Scale:
Opens the scalable items programming interface for electronic scales.
Maintenance Application 51
© 2005 TOSHIBA TEC AMERICA AMERICA RETAIL SYSTEMS, INC. R1.0a
Page 54

Symphony Pro User Manual 2.0.2.1552
Statistics:
A utility to verify item programming and links to other item tables.
Item Table Tabs and Fields
The item related tables are separated into "tabs" containing PLU information. Each tab displays
different aspects of PLU programming. The help pages under the "Item Table" topic explain the PLU
fields in order of the tabs. The
item maintenance screens
are divided into tabs to make viewing
simpler. The top portion of the screen is consistent to all tabs. This includes the item number, the main
item description, the active price and the next price. The
Quick
tab is a shortcut to fields that are also
found on other tabs in the PLU set-up screen.
The relational nature of the Symphony database is easy to understand when you are working in the
PLU maintenance. You may create item 1 as Oreo cookies, attached to sub-department 10 and with a
price of 2.39 as in the example below. You have therefore added a record to the object table (item
0000000000001), but you have also added a record to the POS table (the sub-department link, tax
status, and register flags), and you have added a price record to the Price table. You now have one
record in each of the 3 tables. When you want to add a second price level for Oreo cookies you do not
create a new item, you only add a new price on level 2. So you will have 2 price records but only one
object record and only one POS record. The same would be true in the cost table if you have more
than one supplier for product 1. Multiple cost records can be associated with the item. The PLU
information centres on the object table. It is the the table that contains the unique identifier for each
product in the system.
4.6.1 Item Tables
© 2005 TOSHIBA TEC AMERICA AMERICA RETAIL SYSTEMS, INC. R1.0a
Page 55

Maintenance Application 53
This example shows the Item table editor.
Item (PLU) Maintenance: Quick
T
ab
The PLU (price-look-up) screen contains all the relevant information and parameter flags required to
program an item for use on a front end POS system. The screen is divided into several sub-screens
that can be selected by clicking on the Tab for that sub-screen. By default, Symphony Pro displays the
Quick
tab. This view shows a combination of fields from other tabs. These fields were selected to
make day to day operations easier. The quick tab would be easier to explain last, but since it shows
first... we will continue on.
The
Quick
tab is actually a repetition of fields available on other tabs in PLU maintenance. The
Quick
screen allows you to access the basic information that changes most frequently for a product. The
example below includes the base price field and the package price field from the price table. If you
access the Price tab you see that many of the price table fields are not visible on the
Quick
tab. It is
possible that your
Quick
tab may not resemble the image shown below. In an effort to improve your
productivity your dealer may have selected other fields on your
Quick
tab.
4.6.1.1 Quick Tab
© 2005 TOSHIBA TEC AMERICA AMERICA RETAIL SYSTEMS, INC. R1.0a
Page 56

Symphony Pro User Manual 2.0.2.1554
This example shows the Item table's "Quick" tab.
The
Quick
page fields are explained in the help section for the individual tab they originate on.
Editing the
Quick
Tab
The quick tab fields can be edited to optimize operations in a given store. Business that only use one
tax rate may want to remove the second tax rate that appears on the quick page in PLU programming.
Other businesses may require additional tax rates, or other fields not set on the quick page by default.
To satisfy the varying requirements, Symphony Pro includes a powerful quick page editor. It is used to
capture fields from the other Tabs in the PLU editing screen and place them on the quick page.
Although this operation is not very complicated, we suggest that users not comfortable with the
operation should contact their reseller to have the changes made.
You must open PLU maintenance to edit the Quick Tab settings. When item maintenance is active,
select Set quick page from the File menu. The system will display a warning message that explains the
basic steps to adding a new field to the quick tab.
Moving existing fields within the quick page
To move a field already on the quick page, click in that field to select it. Then drag it to where you
would prefer it to be. To move several fields at the same time click on the first field. While pressing the
[Shift] button on your keyboard click on the next field to be relocated on the quick page. When several
fields are selected at the same time, the frame outline turns grey to show that more than one field has
been selected. Continue selecting the fields to be moved the same way. When all fields are selected,
4.6.1.2 Editing the Quick Tab
© 2005 TOSHIBA TEC AMERICA AMERICA RETAIL SYSTEMS, INC. R1.0a
Page 57

Maintenance Application 55
drag them to the area or the quick page that you want to use them in.
When fields are moved they use a built-in grid and cannot always be moved to the exact position you
want to leave them. To move a field you can also select the field and press Shift-Arrow to move it.
Fields can be streched or shinked the same way by selecting the field and using the Ctrl-Arrow
combination.
Adding fields to the quick page
Open the tab that contains the field to be added. Right click in the field. Return to the quick page and
click on the quick tab in the area that you want to locate the new field.
Other data can be placed on the quick screen by using the pull-down window that displays "
select the
field to add
". If you decide to show more than one price level, you need to select price level n, then
assign the field on the page. When this is done, right-click that new field and adjust the level to the one
you want to view. Only the base price and base price quantity can be shown for levels 2 and greater.
You can also set a tabbing sequence for the fields placed on the quick page. Press the
Set tab order
button and then click in each field in the order you prefer to work in. The greyed fields only display
information, they cannot be edited.
NOTE:
If you are not sure of yourself on this we recommend that you contact your dealer for
assistance.
Object Tab
Previous
Top
Next
4.6.1.3 Object Tab
© 2005 TOSHIBA TEC AMERICA AMERICA RETAIL SYSTEMS, INC. R1.0a
Page 58

Symphony Pro User Manual 2.0.2.1556
Item (PLU) Maintenance:
Object Tab
The Object table contains additional information for each PLU. When combined with the PLU's item
code and descriptor the Object table information provides a detailed identification for each item in the
system.
NOTE:
Remember that some of the settings on the Object tab are also available from the "Quick Tab"
.
Modifying data on the object tab modifies the same data field if it is located on the quick tab.
This example shows the Item table's "Object" tab.
Category
is
not compulsory
. It can be used to link items for reporting purposes only. This can be
used to associate items that are not in the same sub-department (or have no other association in the
system) to get a special report on item sales. Categories are
user defined
; you must program the
Category table before assigning items to categories. This field is
numeric
, up to
6 digits
.
Kit:
Leave this field blank for normal items. Set this field to create a kit only. A kit is used in some
businesses to track multiple inventory items when the kit product is sold. Note that when the Kit field is
selected, the Cost tab becomes a kit tab to allow you to enter the content items that make up the kit.
Family:
Like the Category, the
Family
field is
not compulsory
, but allows you to link similar products
for comparison reporting. For example, if all soft drinks are in one sub-department, you may want a
report comparing sales of different colas, or perhaps the most popular size. The Family field is
user
defined
; enter the
numeric
Family code, up to
6 digits
.
© 2005 TOSHIBA TEC AMERICA AMERICA RETAIL SYSTEMS, INC. R1.0a
Page 59

Maintenance Application 57
Report Code
: This field is
numeric
, up to
6 digits
. The Report code is another
non compulsory
,
user defined
field that allows you to build specific report groups for certain PLUs.
Item
Detail
: box contains item specific information about
·
Brand
: This is the item manufacturer's brand name.
User defined
,
not compulsory
, up to
15
characters
.· Unit of Measure
: If this item is scalable, enter the measure used to calculate sale by weight.
User
defined
,
not compulsory
, up to
4 characters
.· Size Description
: For scalable items, the actual weight in terms of the Unit of Measure. For other
items, the packaging size.
User defined
,
not compulsory
, up to
9 characters
.
The
Comment
field allows you to further describe the item particulars. This is not compulsory, and
user defined. Enter up to
40 characters
.
The object tab also provides access to the
Alias table
links. The alias links are used as alternate
search codes for the PLU on the Symphony POS system. Add or delete an alias link by using the
toolbar located below the Alias window. Note that the alias item links are not available with an ECR
front end terminal. The Symphony POS database receives alias table updates. The ecr based
terminals do not allow alias to be used to search for an item.
NOTE:
Symphony Pro can be configured to generate item sales reports on most of the above fields.
Item (PLU) Maintenance: POS
Tab
NOTE:
Throughout Symphony Pro records from different tables have check-boxes to activate
the
option. When
a
field appears to be
"
grayed out
"
it is not active. This is true whether the check-mark
is selected or not. A check-box with a grayed-out check-mark is the same as a blank check-box. This
is a peculiar default behavior of the database system used with Symphony Pro
.
4.6.1.4 POS Tab
© 2005 TOSHIBA TEC AMERICA AMERICA RETAIL SYSTEMS, INC. R1.0a
Page 60

Symphony Pro User Manual 2.0.2.1558
This example shows the Item table's "POS" tab.
POS
Target:
This field is used in multi-store environments when the status flags for the items are not
the same in all stores. To understand the Terminal table programming,
go to the Terminal table help page
. The default target for items is
PAL
. To change the target for an
item, double click the Target field of the POS table and select the new target from the drop down list.
Targets are only available if they have been programmed as an Item target in the Maintenance
application's "
Register
" menu "
Terminals
" option.
Follow Sub-dept:
This flag can speed up the item creation process and help reduce potential errors.
Selecting this option sets the item flags to those programmed in the sub-department table. (
see Sub-
department table help
) For example, if items in the
automotive supplies
sub-department are all
taxable and non-discountable, you could set those parameters in the sub-department and set items
linked to that sub-department to follow the programming attributes of the sub-department. Selecting
this option will "
gray-out
" the descriptor of options set in the sub-department. All flags with grayed
descriptors will follow the sub-department's status. Item's do not have to follow sub-department
programming; an item in the same sub-department as the example above may be non-taxable. In this
case you would not select the follow sub-dept flag. The item's flag settings will override the default
taxable status of its associated sub-department.
Taxable 1:
Select this flag if tax rate 1 should be applied when this item is used.
Taxable 2:
Select this flag if tax rate 2 should be applied when this item is used.
Taxable 3:
Select this flag if tax rate 3 should be applied when this item is used.
Taxable 4:
Select this flag if tax rate 4 should be applied when this item is used.
Food Stamp:
Select the food stamp flag if this item can be paid for with Food stamps and you are in a
© 2005 TOSHIBA TEC AMERICA AMERICA RETAIL SYSTEMS, INC. R1.0a
Page 61

Maintenance Application 59
jurisdiction that accepts food stamps.
WIC:
(
USA only: Women, Infant, Children
) Select the WIC flag if this item can be paid for by WIC
check.
Prohibit Discount:
Select this flag to stop the POS operator from applying a discount to this item. The
item will also be excluded from the running discountable total or from the account discount subtotal.
Prohibit Quantity:
Select this flag if the POS multiplication function cannot be used with this item.
Operators often use a quantity function for similarly priced items although the products have different
PLU codes. This can falsify the sales and stocking quantities of the related items.
Quantity
Required:
Select this flag if a quantity entry is required before the item can be sold. This is
often the case for items sold, for example, at 3/$1.00 and when the cashiers are unsure whether
scanning one item will ring 3 items for $1.00 or 1 item at 34 cents.
Price Required:
This item status creates an "
open-priced
" item. It means that the item will behave like
a sub-department, forcing the cashier to manually enter a price for the item.
Visual Verify:
Select this flag when price confirmation is required before an item is accepted. The
programmed price is displayed, prompting the cashier to accept or change the price. This can be
helpful in businesses that often negotiate the price of an item at the time of sale.
Not for Sale:
Use this flag to restrict the sale of this item temporarily, as in the case of seasonal items
not available year-round. This allows you to leave the PLU in the Item table, but not allow POS
operators to inadvertently sell the item.
Hash
Item:
This flag is used to exclude the sales of this product from the store's Net and Total sales.
This is sometimes the case for items or departments used for bottle sales, lottery returns, etc.
Gas PLU:
This flag is used to calculate the quantity sold whenever an amount is entered. The result is
computed by dividing the amount entered by the preset price. The gas volume can be changed from
liters to gallons as required.
Scalable:
This flag defines that the product is sold by weight read from the POS scale. This flag
should not be selected for pre-packaged and pre-priced items such as items weighed and labeled for
scanning at the POS.
Manual Weight:
Select this flag to allow a manual weight entry for this product.
Override
Allowed:
Certain situations may require an item price to be changed when it is being rung
through for sale. Select this flag for items that you need to permit price override on. It is possible to
restrict the usage of the price override button by operator level.
No Repeat:
Select this flag to prohibit the repeat function with this item.
No Refund:
Select this flag to prohibit refund of this product code. The POS will prevent the cashier
from entering the item's code and pressing the refund function.
No Return:
Select this flag to prohibit return or exchange of this product code. The point of sale will
prevent the cashier from entering the item's code and using the return function.
Bottle
Return:
This flag is used to determine that the item is used to refund a bottle deposit amount. It
is compulsory to select the
bottle link
flag for this flag to function. The bottle return amount is the
value of the bottle link assigned in the
bottle link
flag. Any price assigned to the item will be ignored.
MPF:
The Multi Purpose Flag (used for varying needs, hence the name multi-purpose.)
© 2005 TOSHIBA TEC AMERICA AMERICA RETAIL SYSTEMS, INC. R1.0a
Page 62

Symphony Pro User Manual 2.0.2.1560
Validation
Req'd:
Set this flag to require a print validation when this item is used.
Vendor Coupon:
This flag is used to set the price of the item to a negative value and to send the data
to the vendor coupon total on reports.
Store Coupon:
This flag is used to set the price of the item to a negative value and to send the data to
the store coupon total on reports.
Divisor:
(Scalable items only) Double-click in this option window when you want to use a different
measure than the default pound or kilogram when this product is sold. The POS will divide the weight
by the divisor you select before calculating the price.
Tare
Link:
This flag is used to define a weight (normally the packaging) to be deducted from the total
weight when the product is sold. To assign a tare value, double-click in the tare link field and select the
correct tare value for the item. The Tare table is programmed using the
Maintenance application's "PLU" menu "Tare Table" option
. If the correct tare value does not exist, you
must open the tare table and add a new record or modify an existing record.
Var Tare:
(Variable tare). This flag should be selected whenever the tare value is a percentage of the
total weight of the item. Enter the percentage of the total weight to use for tare removal.
Bottle
Link:
This flag is available to automate the charge for bottle deposit in areas where deposits
are charged on items like soda, beer, etc. Select the link that is programmed with the appropriate bottle
deposit amount.
Promo ID
: This field contains the identifier for the promotional pricing for the item, based on the
"Promo" tab. When the conditions for the defined promotion are reached, the item sells at the special
price, or an electronic discount is applied based on the promotional programming. See the "
ECL_TAB
"
help in this section for more on how in store electronic coupons are programmed.
Restrictor:
This is a link to the Restrictor table programmed in the POS Setup module. Restrictors are
used to prohibit the sale of products during a certain time period. Select the Restrictor required for this
item
Client
Age:
This flag is available to restrict the sale of age-sensitive products such as tobacco or
alcohol. When this flag is set, the first item entered will prompt for customer age.
Oper Age:
This flag is available to restrict the sale of age-sensitive products such as tobacco or
alcohol. When this flag is set, the POS will verify the age declared in the set-up of the operator signed
on.
Label:
The
Print
flag is used internally by the system. It is selected when a price is changed so that a
label will be printed for this item the next time you print labels. The
Type
window allows you to select a
label type that you want to use for this item. Double click to select from the available labels you have on
your system.
Item (PLU) Maintenance: Price
Tab
The
Symphony POS
PLU pricing is modified in the Item Maintenance screen. If you are using single
item pricing, you should change the price from the
Quick
tab. To modify any other price type you will
need to select the
Price
tab. You can also access the
price
tab using the [Ctrl-4] keyboard shortcut.
4.6.1.5 Price Tab
© 2005 TOSHIBA TEC AMERICA AMERICA RETAIL SYSTEMS, INC. R1.0a
Page 63

Maintenance Application 61
This example shows the Item table's "Price" tab.
Like code
: This field is used to group products with identical pricing formats. For example, jello. The
different flavors are all sold for the same price in most situations. Assign the price for the first item of
the many that are the same. Access the next item that has the same price. Double click in the
Like
code
window and select the UPC code of the first jello that has been given the correct price. When you
select a like code that does not match the current upc code you are programming the like code field
will display green. This is a warning to make you aware that a like code is being used, meaning the
price will be changed for this item if the like code price is changed. If you modify the price of this item
the price of all other items with the same like code will be instantly changed. If you leave this code
blank, the system will place the same UPC code into the Like code when a report is taken that uses
this PLU. So don't be surprised to see a number in that field even though you did not place it there.
Price Target
: In a single store situation, there is normally only one target. However, if you are working
in a Headquarters Symphony Pro system, or the store has different pricing depending on the terminal,
you may need to set different prices for different targets. To learn more about Terminal table
programming,
go to the Terminal table help page
. By default the target for prices is
PAL
which means
"All Lanes". When prices are common to all targets you should not need to change the default PAL
target. If you do need to change targets, double-click the Price Target field and select the appropriate
target for the price. The targets are created using the Maintenance application's "
Register
" menu
"
Terminal
" option. The system allows you to enter both regular and sale prices for as many price levels
as required.
Price Level
: Symphony POS and Symphony Pro support an unlimited number of prices for each item.
Price levels can be used for customer accounts or "preferred shopper" situations, or for special pricing.
To change the price level for an item, double-click the Level field. If the price level exists, it will be
displayed with the related price information. If the price level does not exist, the system allows you to
© 2005 TOSHIBA TEC AMERICA AMERICA RETAIL SYSTEMS, INC. R1.0a
Page 64

Symphony Pro User Manual 2.0.2.1562
create a new level "on the fly". To create a new level, click the small up arrow to the right of the price
level field. If the new level does not exist, a prompt to create the price level will appear. Select
Yes
to
create the next price level for the item. The down arrow returns to the previous level.
If an item does not have a price for the level selected, all the pricing fields will be blank. After selecting
the price level, enter the pricing information as you would for the first level.
You can also create price levels by accessing the Maintenance application's
"PLU" menu "Price level" option
. Items do not require a price in each price level. For example, if there
are four (4) price levels and you want to assign an item to level 4 but not to level 2 or level 3, you can
enter the level number or select level 4 from the price level table. An item with no price on level 2 will
normally sell for the price of level 1 unless you invoke the special flag to prohibit it. This way you need
only maintain prices for the levels actually used by the item. All other items will switch to level 1 when
sold.
Active and Next prices
The Active and Next fields are for information only, and are not editable. The "Active" price shown in
the yellow area is the system's current price for the selected item. The "Next" price is the price due to
be deployed to the target POS lanes and is shown in the pink area along with the date and time that
they are to become active.
Suggested
Retail and Sale price
Programming
Method type:
is a flag used to determine whether the item is for normal retail sale (types A to F) or for
rent (types G and H). Types E and F generate different print messages. For example, if method
E
is
assigned, Symphony POS charges the first item, does not charge the second item, then prints a
Buy
one get one free
message. The price method type
F
is used to limit free items to "Buy one get
only
one
free". Types G and H will set the rental option and allow you to set different rental periods for each
item. Price type
J
is used to limit the number of items a customer can purchase in a transaction. Set
the LQD quantity field to the maximum quantity of the product that can be purchased in a transaction. If
you set type
J
and use a mix and match number, the LQD quantity will apply to all items in the same
mix match group. Note that the package price is not available with type
J
price. Price type
K
is used to
display an extra decimal of price on the customer receipt and in back end maintenance. This is
required for sites that enter a quantity sold for preset price items with more than the standard windows
decimal settings. Price type
L
will display an extra decimal of price on the customer receipt and in back
end maintenance and will also use the Gas Descriptor set in PosSetup>System>PLU. This is required
for sites that enter a quantity of liters of fuel rather than entering the price into a GAS PLU.
NOTE:
If you are using a price Method type
A to D, you do not have to set the Method type
.Entering a price and quantity in the Base,
Package, LQD, or Mix & Match fields sets the Method type
for the POS to follow.
Base:
is used to enter the
regular price
of an item (usually a quantity of one item for that price).
Base
pricing also accepts split priced items (such as lemons priced at 3 for $1.00. The front-end Symphony
POS terminals will sell an item programmed at 3 for $1.00 by registering the first item for .34 cents and
the remaining 2 at .33 cents each (unless of course they were entered with the quantity key.) At the
POS, split priced items do not need to be sold sequentially, they can be sold at any time within the
same transaction and the correct price split will still occur. NOTE:
Although the system allows items
without a base price, items should always have a Base price, even if there are other pricing Methods
programmed for the item.
© 2005 TOSHIBA TEC AMERICA AMERICA RETAIL SYSTEMS, INC. R1.0a
Page 65

Maintenance Application 63
Package:
pricing is normally reserved for items on which you want to offer a price break based on
quantity.
Package
priced items will sell for the
base
price up until they reach the quantity assigned in
the
package
price field. An example of package pricing is where the base price for one can of a soft
drink is set at .79 cents but a six pack is sold for $3.99. If the operator enters a quantity of 6 and keys
or scans the item, the register will ring 6 @ $3.99. If the operator keys or scans each item separately,
the register will ring the first 5 soft drinks at .79 cents for a total of $3.95 and the sixth will ring at .04
cents for a
package
price of $3.99. NOTE:
When an item that is part of a product is sold in a quantity
greater than the package quantity, it reverts back to the base price until the quantity is reached again.
In the example above, the 7th, 8th, 9th, 10th and 11th products would sell for .79 cents each and the
12th would ring up for .04 cents.
LQD
or
limited quantity discount:
is used to limit the number of items that can be obtained for a
certain price. A real world example could be that you want to limit the access to sale items. Setting the
LQD
to .79 cents for quantity 3 means that only the first 3 items purchased qualify for the special
LQD
price. The register will ring any extra items at the
base
price, unless of course there is also a
package
price.
Mix-match table #:
is used to create associations between similarly priced items. For example, setting
a Jello product to use
Base
price of 3/$1.00 will allow that item to sell at .34 for the first and .33 cents
for the second and third. If you want to offer your customer any 3 different Jello products for 3/$1.00
you must attach them to the same mix and match group. That way, instead of ringing each of 3
different Jello flavors at .34 cents, the register will ring the second and third items at .33 because they
are in the same mix-match table. Items can be set to a mix and match table and use all of the price
types shown.
In the
Sale Price
column,
From
is the date and time that a retail price change is to take effect. Placing
the cursor in this field and clicking will pop up a calendar for date selection. Select the date you want to
have the sale price begin on. The next column is to enter the time if the sale price is time sensitive.
To:
is the date the sale price will terminate. It is used for sale periods only. After the sale is over the
price will revert to the regular retail price. If you do not enter an ending date, Symphony Pro will
automatically assign a date 7 days after the start date. NOTE:
If you are using the Batch module DO
NOT enter prices directly into the sale price column because they will be erased by the system.
Symphony Pro updates the sale price column automatically from batches. If any batches exist (even 1
batch), all pricing that is entered directly into the Sale price column of the PLU maintenance will be
erased the next time the system checks to see if all batches are up to date in the price fields.
Points:
is used for customer loyalty building. You can enter a value of points that will be issued when
this product is sold. The points system can be defined to issue in either amount or %
.
Related
programming in the register programming utility (
PosSetup
,
System
,
PLU
.) The default points setting
is to issue the points as an amount, not by percentage. NOTE:
Points can also be issued off the
tendering amount to simplify maintenance requirements. This is set in the
Button and form
programming of the
PosSetup
module under the parameters of the actual tender function.
Disc $:
is used when the price on file should be discounted by a pre-defined dollar amount. For price
levels 2 or greater, a discount entered here will be removed from that level's price. If the price level
being used has no price entered, the discount programmed will be removed from the price of the item
on level one.
%:
is used when the price on file should be discounted by a pre-defined percentage. For price levels 2
or greater, a discount entered here will be removed from that level's price. If the price level being used
has no price entered, the discount programmed will be removed from the price of the item on level one.
S.R.P.
: The suggested retail price can be used to show the customer the price that the item normally
sells for. The POS can be programmed to calculate and display (or print on the receipt) the difference,
showing a "You Save" type message, based on the Suggested Retail Price field.
© 2005 TOSHIBA TEC AMERICA AMERICA RETAIL SYSTEMS, INC. R1.0a
Page 66

Symphony Pro User Manual 2.0.2.1564
Size
: (
This information applies to the Label module only
) This is the size, weight or volume of the item
that will be displayed on labels created using the Label module. (The field must be included in the label
template)
Factor
: (
This information applies to the Label module only
) The factor determines the pricing base
displayed on the labels printed for the item. For example, the item's "size" (above) may be 500 grams,
but the label shows the price based on 100 gram quantities.
Margin (or Markup)
The title of the cost calculation box and
the way the price calculation is performed depends on the
setting selected in the Symphony Pro,
"File" menu, "Configuration" utility's "Misc" tab's "Cost / Price
Calculation" setting, described in the
"Misc" tab's help page
.
It is important to understand
the difference between a
MARKUP
and a
MARGIN, as the
calculation and results are different.
These fields allow you to calculate a price based on a profit
margin, or a percentage markup. To use the Margin fields there must be a cost in the item's cost field.
Each price level has its own target pricing box, and each price level can be set to different values as
the target.
It is also important to note
that if you use price levels, you should be sure that there is a
target value for all price levels. This is because if you ask Symphony Pro to calculate prices based on
the target value, the prices FOR ALL PRICE LEVELS is calculated.
If you have selected to use MARGIN:
The margin is based on the target profit margin, entered in the "
Projected
" field. The "
Actual
" field
shows the true margin after calculation. If the Projected margin calculates evenly, the Projected and
Actual fields will show the same amount. It is also possible to set the "
Last digit
" field to force
Symphony Pro to calculate the margin, then substitute the last digit (for example all prices end in "9").
Symphony Pro
just replaces
the last price digit. For example, you enter 9 in the "Last digit" and the
item's price calculated by margin is $1.81, Symphony Pro will use $1.89. If the "last digit" is 1 and the
price was $1.89, Symphony Pro will use $1.81. Often, this makes the "Projected" and "Actual" margins
different.
The MARGIN calculation decides how much to markup the cost to achieve the target profit margin,
establishing the selling price.
An example of a margin calculation
: An item costs $1.00 and you want
to make 30% profit. Symphony Pro calculates that to make 30% profit, the item's sales price must
$1.43 (note that this is a
MARKUP of 42.9%
)
If you have selected to use MARKUP:
The markup is based on the target markup, entered in the "
Projected
" field. The "
Actual
" field shows
the true markup after calculation. If the Projected markup calculates evenly, the Projected and Actual
fields will show the same amount. It is also possible to set the "
Last digit
" field to force Symphony Pro
to calculate the markup, then substitute the last digit (for example all prices end in "9"). Symphony Pro
just replaces
the last price digit. For example, you enter 9 in the "Last digit" and the item's price
calculated by markup is $1.81, Symphony Pro will use $1.89, or if was is $1.89. If the "last digit" is 1
and the price was $1.89, Symphony Pro will use $1.81. Often, this makes the "Projected" and "Actual"
markups different.
The MARKUP calculation takes a percentage of the cost and adds it to the cost to obtain a selling
price.
An example of a markup calculation
: an item costs $1.00 and you want to markup the item by
30%. Symphony Pro calculates 30% of the cost ($0.30), and adds that to the cost to obtain a sales
price of $1.30 (note that this is a
MARGIN of 23.1%
)
Margin vs. Markup Comparison Chart
Margin
Markup
© 2005 TOSHIBA TEC AMERICA AMERICA RETAIL SYSTEMS, INC. R1.0a
Page 67

Maintenance Application 65
Margin
Markup
Margin
Markup
4.8
5.0
22.0
28.3
37.5
60.0
5.0
5.3
23.1
30.0
39.0
63.9
7.0
7.5
24.0
31.6
39.4
65.0
8.0
8.7
25.0
33.3
40.0
66.7
9.0
9.9
25.9
35.0
41.0
69.5
9.1
10.0
26.0
35.1
41.2
70.0
10.0
11.1
27.0
© 2005 TOSHIBA TEC AMERICA AMERICA RETAIL SYSTEMS, INC. R1.0a
Page 68

Symphony Pro User Manual 2.0.2.1566
37.0
42.0
72.4
11.0
12.4
28.0
38.9
42.9
75.0
12.0
13.6
28.6
40.0
43.0
75.4
13.0
15.0
29.0
40.8
44.0
78.6
14.0
16.3
30.0
42.9
44.4
80.0
15.0
17.6
31.0
45.0
45.0
81.8
16.0
19.0
32.0
47.1
45.9
85.0
16.7
20.0
33.3
50.0
© 2005 TOSHIBA TEC AMERICA AMERICA RETAIL SYSTEMS, INC. R1.0a
Page 69

Maintenance Application 67
46.0
85.2
17.0
20.5
34.0
51.5
47.0
88.7
18.0
22.0
35.0
53.8
47.4
90.0
19.0
23.5
35.5
55.0
48.0
92.3
20.0
25.0
36.0
56.3
48.7
95.0
21.0
26.6
37.0
58.7
49.0
96.1
50.0
100.0
NOTE: To apply price calculations to all items, or to filtered items, please see the Maintenance
application's
"Edit menu", "Item options" help section
.
Rental Items
© 2005 TOSHIBA TEC AMERICA AMERICA RETAIL SYSTEMS, INC. R1.0a
Page 70

Symphony Pro User Manual 2.0.2.1568
NOTE:
Selecting type G rental changes the pricing columns from the normal price methods used in
A,B,C,D,E,F and H. You must also program Symphony POS lanes using the POS setup for rental
items.
For more on rental item programming, and how to use the "POS Setup", please see the
"Working with PLUs" section, "Rental Items"
help page below.
Type G
should be used for rental items that are rented for different periods of time. An example of
type G rental item is a VCR or Nintendo machine that may be rented for a day, a weekend or a week at
a time. Type H is used for all items that share the same rental period. This would often be the case for
most films in a C-store because they are rented for a fixed 24 hour period and no other choice is
available.
This example shows the Item table's "Price" tab with "G" type rental is selected.
Choosing method type G for an item will modify the fields available in the price column. No sale
column is available with type G. Price levels are available. When you select a type G, the pricing
column changes to an editable table. You must add records (lines) to this table to program the prices
for the available time periods.
·The first field is the length of the rental period in hours.
·The next field is a description of the rental period.
·The final field is the price for that period of rental.
Add as many rental periods as required for the item being added. If you select
Default
, the Symphony
POS will use that as the rental period even though multiple periods have been selected. If you do not
select a default period, Symphony POS will open a choice window for the operator to select the proper
period whenever the item is rented. If you select a default rental period, the
Price Modify
button can
be used to override the default status and pop up the list to permit POS operator selection.
Type H
items use the price exactly the way normal items do.
NOTE:
Other information on the rental system is available in the System set-up screen under the
Rent
tab.
© 2005 TOSHIBA TEC AMERICA AMERICA RETAIL SYSTEMS, INC. R1.0a
Page 71

4.6.1.6 Cost Tab
Item (PLU) Maintenance: Cost
Tab
Each PLU can be assigned a cost for each vendor from whom it can be purchased. There is no real
limit as to how many vendors and costs an item can have, but items
must have a "Default" vendor
.
To assign vendors and costs to items, select the
Cost
tab from the PLU maintenance option. The
F7
function key can be used as a shortcut to access the Cost table immediately. The information in the
cost table, such as Case / Cost will define the way this item behaves in the Entry module, when dealing
with orders, receiving and adjusting inventory.
Note:
The cost information is also used to keep track of the actual (or real) cost of the item when it sells
at the POS. This means that any changes made to item costs MUST be "deployed" to the front end to
keep accurate cost information for items.
This example shows the Item table's "Cost" tab.
Cost Target:
The target applies to both the Regular cost and Cost break sections below. In most
situations, the default "PAL" target does not need to be modified, since the item has only one cost per
vendor. However, in multi-store situations costs may vary from store to store, even from the same
vendor, often because of regional differences. The
Cost target
determines which store or cost group
the cost applies to. For items that have more than one cost from the same vendor, select the correct
cost target to modify.
The Cost tab is divided into two (2) sections,
Regular cost
and
Cost break
. The Regular cost section
Maintenance Application 69
© 2005 TOSHIBA TEC AMERICA AMERICA RETAIL SYSTEMS, INC. R1.0a
Page 72

Symphony Pro User Manual 2.0.2.1570
deals with the normal cost for this item, when purchased in the usual quantities. The Cost break
section deals with purchasing options from the selected vendor. Each vendor for an item can have
multiple Cost break setups.
Note:
To work with each section, use the tool bars at the top of that section, not the toolbar across the
top of the PLU maintenance screen.
Regular Cost Section
·To add a cost and vendor for an item, double click in the Vendor # field to select from a list of vendors.
You will be prompted to accept the selection.
·To add additional vendors and costs for the same item, use the "+" button within the Regular cost
section, or hold down the [
Ctrl
] key and press [
A
].
·If there is more than one vendor for an item, use the black left and right arrow buttons at the top of the
Regular Cost section to move to the next or previous vendor.
·To remove a vendor from an item, select the vendor, then press the scissor button at the top of the
Regular Cost section, and accept the prompt that appears asking if the vendor should be removed
from this item.
Vendor #:
This is the number that has been assigned to identify a vendor in the system. Once the
Vendor table has been configured with the list of vendors, you can double click to select from the list of
vendors that exist in the system. For more on how to program vendors in the system, see the
Vendor Table programming
section below in this manual.
Item Code:
Most vendors use their own codes for items, different from the UPC or PLU code. If you
have assigned a vendor's item code for the item, it can be used to retrieve items from the PLU
maintenance by pressing the [
F5
] button, and entering the vendor's item code. You can also search the
vendor code list by pressing [
Shift
] and [
F5
]. A vendor code selection list opens, displaying a list of all
vendor item codes in the system.
Case / Cost:
This is the case quantity for the item, followed by the case base cost. If the item is
purchased by unit from the vendor, enter 1 as the quantity per case, along with the unit cost. After
entering the cost for the default vendor, be sure to enter the cost for any other vendor that supplies this
item. The Case / Cost information will be available in the Entry module when ordering or receiving from
the assigned vendor.
Remark:
Is used to enter a short, meaningful note for the item, up to 30 characters. Often this is to
remind users of some important fact about purchasing the item from the linked vendor, or other special
note about the item.
Default:
As mentioned above, items with a cost
MUST HAVE
a default vendor. There can only be 1
"default" vendor for each item. If you set the Default flag for a vendor, the system removes the Default
flag from all other vendors for the item. The default vendor flag is used by the system when working
with inventory, such as orders generated by the system.
Unit Cost:
The Unit cost field is the
calculated cost
per unit based on the information entered above.
You cannot edit this field directly, and appears as a confirmation.
Cost Break Section
The Cost break section allows you to enter additional cost information from the vendor, notably the
quantity purchase breaks offered by the vendor. Many vendors offer dollar or percent discounts when
certain purchase quantities are reached. Each vendor for an item can have many Cost break entries.
For example, if a vendor offers several cost break levels, they can all be entered, so that when
purchasing items in the Entry module's Order option, the system can alert you that there may be a
© 2005 TOSHIBA TEC AMERICA AMERICA RETAIL SYSTEMS, INC. R1.0a
Page 73

Maintenance Application 71
better cost if you order more.
Note:
Each Cost break record MUST HAVE both start and end dates to be valid. If both dates have not
been selected, the system will prompt you before leaving the record.
·To add a cost break for an item's vendor, enter the purchasing quantity specified by the vendor in the
"Quantity break" field. You will be prompted with a calendar to enter the start date for the cost break.
·To add additional cost breaks for the same vendor, use the "+" button within the Cost break section, or
hold down the [
Ctrl
] key and press [
A
].
·If there is more than one vendor for an item, and they all have cost break information, use the black
left and right black arrow buttons at the top of the
Regular Cost
section to move to the next or previous
vendor. The
Cost break
information changes to reflect that vendor's cost breaks. Then, use the black
left and right black arrow buttons at the top of the
Cost break
section to move to the next or previous
cost break for the selected vendor.
·To remove a cost break from an item, select the appropriate vendor from the Regular cost section,
then select the cost break information to remove and press the scissor button at the top of the Cost
break section. Accept the prompt that appears asking if the cost break information should be removed
from this vendor for this item.
Quantity Break:
The quantity break field is used to enter the case quantities (
or units if purchased that
way
) that must be purchased from this vendor to obtain the cost break. Remember that you can have
different levels of Cost breaks from each vendor. For example if you purchase between 10 and 20
cases, the vendor offers a certain cost, but between 20 and 30 cases, there is a better cost. Each cost
break level is programmed to reflect the purchasing information.
From / To:
Both the from and to fields
must contain
valid dates for the cost break offer. Double click
the date fields to open a calendar utility, making date selection easy. You can also enter the dates
manually, keeping in mind that the date format for these fields follows the Windows "Regional settings"
setup for date formats on the host computer.
$ Discount:
Enter the discount amount in dollars, if the vendor offers a dollar based discount for this
cost break.
% Discount:
Enter the discount amount as a percentage, if the vendor offers a percentage based
discount for this cost break.
Unit Cost:
The Unit cost field is the
calculated cost
per unit based on the information entered above.
You cannot edit this field directly, and appears as a confirmation. This field is handy to quickly see the
difference between the
Regular Cost
unit price, and the
Cost break
unit cost.
Item (PLU) Maintenance: Inventory
Tab
Using the inventory feature
The system can track inventory levels to assist the ordering and receiving process. The first step is to
define whether stock on hand and reordering is being used on the item. These settings are available in
the PLU maintenance. The inventory settings are located in the same column as the regular retail price
on level 1. Note that changing to another level does not affect the inventory settings you make. All price
levels share the same stock on hand.
The table below shows the fields that can be defined in regards to the inventory tracking for each item.
There are four fields to define.
4.6.1.7 Inventory Tab
© 2005 TOSHIBA TEC AMERICA AMERICA RETAIL SYSTEMS, INC. R1.0a
Page 74

Symphony Pro User Manual 2.0.2.1572
This example shows the Item table's "Inventory" tab.
Store number
is needed when you are working on a multi-store inventory system because stock
levels may not be the same at all stores.
Inv. (Inventory tracking)
Select this field to allow the stock to be tracked on this item.
Ord (Reorder item)
Select this field if this is an item that is reordered using the Symphony Pro
ordering system.
Min (Minimum on hand)
Enter the minimum quantity in selling units that should be kept on hand for
this item.
ROQ (Reorder quantity)
Enter the quantity that should be ordered (in multiples of the purchase size.)
This table does not require any entry for items that do not use inventory tracking. For example, if you
are using an item code for miscellaneous sales you will most likely not need to order the item. It is a
non-stock item. No entry is required in the inventory table. The same would be true if you purchased an
end of line or some discontinued products.
Once the inventory flags for a re-order item have been defined it will be possible to set up a link to a
vendor (s) that supplies the item. The vendor link is required to be able to define a cost and a purchase
format for the item. For example, if you sell jars of mustard you probably order the mustard by the
case. In the cost link table you will define the purchase format for the item. In the inventory information
on the item maintenance you will define the minimum number of jars of mustard to keep on hand. In
the reorder quantity you will enter the number of cases you want the system to suggest as an order
when the minimum is reached.
© 2005 TOSHIBA TEC AMERICA AMERICA RETAIL SYSTEMS, INC. R1.0a
Page 75

Maintenance Application 73
The
Parent / child
fields are used to link items together for inventory tracking. For example, you
purchase cartons of 200 cigarettes, packaged as 8 packs of 25 cigarettes each. The cigarettes are
sold by both the carton and by the package. You therefore need to create 2 items with separate UPC
codes so that they both affect a common inventory level. Here is an example for parent - child set-up.
·Create item 1111111111 (the UPC code for a carton of 8 packs of 25 cigarettes of Brand A).
·Set this item 1111111111 to track inventory in the inventory tab. Set the minimum and reorder quantity
to the desired level.
·In the cost tab select the vendor and set the quantity per case as 1 with a case cost of $24 (for our
example of course you can set your real cost here...) Enter the vendor item code if required on your
system. This is the warehouse number for the product. Set the default vendor flag if not already
selected.
·In the Price tab, set the price of item 1111111111 to sell as a carton. For example, 1 quantity for $32.
·Now create item 2222222222 to be able to sell a package of cigarettes of Brand A.
·Price the item 2222222222 to sell for $4.25 for one pack.
·Item 2222222222 would not be set to track inventory.
·Item 2222222222 will have Parent - child set to
Active
.
·Below the active you will enter the item number of the parent product. In this case that field will be set
to item 1111111111 which is the code for the carton of Brand A.
·The parent item would be set to 1111111111 (UPC code of carton Brand A.)
·The quantity in the parent-child window will be set to .125 because when you sell a pack of brand A
you want to reduce the stock level of the carton by one package or 1/8th of a carton.
Now you will able to sell both packages or cartons and reduce inventory for the same item.
NOTE:
You can also decide that you want to maintain the inventory in packages, not in cartons of
cigarettes. In that case you would program the cost on the package of cigarettes (item 2222222222) as
follows: Vendor xxx, units per case would show 8, cost per case would show $24 (as above) and the
vendor item code would be the same as before. Then you would set the inventory to be tracked on this
item. The
"
parent - child
"
relationship would be set to active on the carton (item 1111111111) with a
quantity of 8. This means that when a carton of cigarettes
is sold,
it will remove a quantity of 8
packages from stock on hand. So you are still purchasing cartons of 8 packs of cigarettes and both the
carton UPC and the package UPC will be reducing the same inventory.
Item (PLU) Maintenance: Sales
Tab
The
Sales
tab is available to view sales of this item for the last 7 weeks. If there is no weekly closing
for the last weeks, the Maintenance application shows a warning message asking if you have run the
MAKEWEEK command. Normally, the daily, weekly and monthly closing commands are configured as
events in the Events / Tasks manager at installation to run automatically at appropriate times.
4.6.1.8 Sales Tab
© 2005 TOSHIBA TEC AMERICA AMERICA RETAIL SYSTEMS, INC. R1.0a
Page 76

Symphony Pro User Manual 2.0.2.1574
This example shows the PLU weekly "Sales" tab.
The sales figures (quantity and amount) are displayed in graphic format to give the viewer a quick
overview of recent sales for the item selected.
Item (PLU) Maintenance: Picture Tab
Associating Pictures With Items
It is possible to associate pictures with items, so that when an item is scanned the Symphony POS
terminal displays the item being purchased. There are several factors to consider before using images,
such as system capabilities, including terminal and server processor strength, disk access, POS
display type, network components, etc. The time required to display the image will vary according to
these factors, which might out weigh the benefits of displaying the image.
The "Picture" tab "Browse" button opens the default Symphony Pro "Image" folder, a sub-folder of the
"Office" folder.
Image File Naming Convention
Symphony Pro is programmed to assign the correct name for images that you select for items.
Regardless of the image name you select using the "Browse" button, Symphony Pro will copy and
rename the file with the required internal image file name. The name is actually created from the item
code, so that the POS lane will select the correct image according to the PLU scanned or manually
entered at sale time.
4.6.1.9 Picture Tab
© 2005 TOSHIBA TEC AMERICA AMERICA RETAIL SYSTEMS, INC. R1.0a
Page 77

Image Type and Size Restrictions
Symphony Pro supports two common image file types: "bitmap" (.BMP) or "JPEG" .JPG. Image
resolution and file sizes should be kept as small as possible while maintaining reasonable image
appearance.
Required POS Setup
The POS screen display must be configured to display the image. The size of the screen area "Form"
that displays the image must be determined, as well as how the image will be displayed. If the images
all have a standard size, the form can be set to fit the standard image. If the images vary in size, the
POS screen form can be set to "stretch" the image to fit the screen, but this can lead to unreasonable
image appearance. Use the Symphony Pro "Modules" menu, "POS setup" utility to access the POS
screen setup.
4.6.1.10 ECL tab
Creating Electronic Coupon links
Situations arise where mix and match or other price models do not work for the type of deal you may
want to run. Symphony POS has the ability to trigger a discount when specific criteria have been met in
a transaction.
The "ECL" tab allows the user to create items as electronic coupons linked with a set of rules that
establish when the coupon is issued. The ECL tab displays the records created as the coupon rules. It
is possible to have multiple records programmed with different conditions that must be met to trigger
the coupon. For example, you may want the POS to issue a coupon when a customer purchases a
specific quantity of items ("buy 6, get one free"), or combination of types of items marked with a
"
Promo ID
". The ECL tab records can be used to maintain simple or compound promotional rules.
The ECL tab table is dynamic, meaning that depending on the "Type" field for each rule record, the
fields in the rule record contain values for the related type.
To use the ECL tab you must first create a new unique item code with a description, subdepartment
and value (price) fields. In the POS tab of this item set the flag
store coupon
to yes. The coupon's
value in the price field is positive, but because it is marked as a "store coupon" in the POS tab, the
front end will subtract the coupon's value from the transaction it is applied to. Once the coupon item
has been created, you can determine the set of conditions in the Promo tab that will issue the coupon
during the sale.
Example automatic discount by electronic coupon:
Imagine the case when you want to sell a
coffee and a croissant for a total of $1.99 even though the normal price is 2.48 combined (coffee at .79
and croissant at 1.69). You cannot use a mix match group because 2 of either product would trigger
the 1.99 price and you don't want to allow 2 croissant or 2 coffee to be sold at that deal price. So we
move to the ECL table and create a new item that will give a .49 discount when a coffee and croissant
are sold together.
Set-up:
1-Create a new PLU item called Coffee & Croissant promo.
2-Set the sub-department for this new item to where the discount will be reduced.
3- Set the Store Coupon flag on this item (it will make the price negative so this PLU acts like a
coupon).
4-Set the price of this item to be the price reduction price for this item combination.
Maintenance Application 75
© 2005 TOSHIBA TEC AMERICA AMERICA RETAIL SYSTEMS, INC. R1.0a
Page 78

Symphony Pro User Manual 2.0.2.1576
5-Add a first qualifying record in the ECL tab of the new Coffee & Croissant promo item. Set this to
type ITM and enter the PLU number for the Coffee.
7-Add another record to the ECL table of the Coffee & Croissant promo item. Set this to ITM and enter
the PLU number of the Croissant.
(You have now instructed Symphony POS to sell the Coffee & Croissant promo item automatically
when the 2 products on the ECL tab are entered in the transaction.)
8-Deploy all changes to the POS.
This example shows the "Promo" tab set-up for an in store electronic coupon. The coupon PLU named
Coffee & Croissant promo
will be triggered by the POS once the Large coffee and the Chocolate
Croissant items are entered into the transaction.
Meal deal or Combo pricing
Another scenario exists that occurs when you want to run a combo deal on different products for a
total price where the base price of the items included in the deal is not necessarily the same. Imagine a
combo where
any pastry and a small coffee can be purchased for a total of 1.99 even though
different pastries combined with the coffee give different totals. To use the ECL coupons as mentioned
above would require a new coupon item for each different price combination. But you can create an
item that will replace the individual prices with the price of the combo deal.
Example of Combo deal:
This makes the POS act on meal deal items as follows: when the ECL table
criteria are met the Price of each qualifying item becomes ZERO and the MEAL DEAL item is triggered
and the Meal deal price is used. Purchase any Pastry (pastries may have several different prices) and
a coffee for 1.99 no matter what the total price would have been.
© 2005 TOSHIBA TEC AMERICA AMERICA RETAIL SYSTEMS, INC. R1.0a
Page 79

Maintenance Application 77
Set-up:
1-On each of the qualifying pastry items set the Promo ID (POS Tab F383) to a common id number.
2-Create a new PLU item called Pastry-coffee duo.
3-Set the sub-department for this new item to where the revenue for the sale of the deal will be
tracked.
(This item is not set as Store Coupon or Vendor Coupon because we want to replace the individual
price of each qualifying item to the price of the Pastry-coffee duo)
4-Set the price type of this item to D (package price)
5-Set the price of this item to be the meal-deal price for this combo.
6-Add a first qualifying record in the ECL tab of the new MEAL DEAL item. Set this to type PID (promo
id) and enter the promo id number you set on the pastry items in step 1.
7-Add another record to the ECL table of the MEAL DEAL item. Set this to ITM and entre the PLU
number of the small coffee.
(You have now instructed Symphony POS to sell the MEAL DEAL item automatically when the
products on the ECL tab are entered in the transaction.)
8-Deploy all changes to the POS.
Hint: This can also be useful when you want to sell many UPC2 items (read price from label) for a total
price rather than the scanned price of each package of meat or cheese... Such as on Friday evening
when the meat counter is full and you would like to sell any 5 items in it for 19.99. All the qualifying
items found in the counter would be given a common promo ID. Create a "PICK 5 ITEMS" PLU would
be set as Price type D with a price of 19.99. The ECL tab of this PICK 5 ITEMS PLU needs one record.
The record must have the PID number that was given to each of the individual meat items and the
QTY field must be set to 5. This means that when 5 of the qualifying items are sold the system will
trigger the PICK 5 ITEMS PLU and replace the unit price of each item with the package price of 19.99
NOTE:
Remember that although the Promo tab is displayed for all items, it is only used in conjunction
with items marked as "Store Coupons" in the POS tab.
ECL qualifying record Type
To create the promo rules for the store coupon, select the promo tab, and double click the "type" field.
A list of promo types appears, allowing you to choose the promo type. NOTE:
Depending on the type of
promo, some of the fields may not apply, or the type of values each field contains may vary.
ITM - Item
: Select the ITM type to use an item code and quantity or amount sold as the type of promo.
Once the quantity entered in the "Qty" field is reached during the period established in the "Method"
field, the POS will issue the coupon. In a "buy 6 get one free" example, make the coupon's value the
same as the product's value; when the cashier scans the 6th item, the POS diminishes the amount of
the transaction by the value of the coupon. NOTE:
When ITM is the selected type, the "
Code
" field
contains the item code.
PID - Promo ID
: The Promo ID is used in connection with the Promo ID field on the POS tab. The list
of Promo IDs is user defined, selectable from a drop down list after they have been created. Once a
promo ID record exists, different products can be tagged with the ID. For example, a coupon can be
created and be issued when a customer purchases any three items marked with that promo ID
number, like a bag of chips, a soda, and candy bar. NOTE:
When PID is the selected type, the "
Code
"
field contains the user defined Promo ID number.
SUB - Subdepartment
: This coupon rule checks for items in a specified subdepartment. The coupon
can be set to issue when a pre-determined quantity or amount is purchased. NOTE:
When SUB is the
selected type, the "
Code
" field contains the subdepartment number. (not implemented as of June
2003)
DPT - Department
: Like the subdepartment coupon type, this coupon rule checks for items in a
specified department. The coupon can be set to issue when a pre-determined quantity or amount is
purchased. NOTE:
When DPT is the selected type, the "
Code
" field contains the department
© 2005 TOSHIBA TEC AMERICA AMERICA RETAIL SYSTEMS, INC. R1.0a
Page 80

Symphony Pro User Manual 2.0.2.1578
number. (not implemented as of June 2003)
PTS - Points
: If the POS is set to issue points for items purchased, this coupon rule determines the
amount of points required before the coupon is issued.
(not implemented as of June 2003)
CLF - Client Level
: This coupon rule will limit the use of the coupon to customers assigned to the
customer level (determined in the Customer table) programmed here. This can only be used in
situations where the Accounts Receivable module is registered for the installation.
(not implemented as
of June 2003)
TTL - Total sale
: Use this "type" of coupon to establish the total amount of the transaction required
before the POS will issue the coupon. Enter the total amount required in the "Amount" field.
(not
implemented as of June 2003)
Cumulative Purchases
The "Cum" field is used in conjunction with the
Customer Accounts ONLY
. It is used to establish the
tracking period for the coupon rule. It can be set to issue the coupon every time the rules are met by
transaction, or over a set period of time. In other words, the POS will access the customer account to
find the total purchase over the period determined by the "Cum" field.
(not implemented as of June
2003)
Method Qualifier
The Method determines the amount of times the coupon can be issued during a transaction. If no
Method is set, the default is "Unlimited".
·
Once Only
: The coupon will only be issued once during any transaction.
·
Unlimited Repeat
: The coupon will be issued as many times during a transaction as the coupon's
conditions are met.
·"
Biggest Only
" or "
Smallest Only
" are used to limit the coupon to one item when more than one of
the item are sold during the same transaction. For example, a discount is offered on turkey sold by
weight, but the store only wants to discount the largest turkey purchased if there are more than one
entered in the transaction.
Creating kits
Some stores need to create kits to sell
package deals
. Examples of kits: aquarium, filter, pebbles, etc
in a pet shop. In a sport store it could be the golf clubs, bag and lessons that make up a specially
priced deal or
kit.
A kit is used to sell the kit contents automatically by entering the kit PLU number. To create a kit you
need to start by defining the number that will be entered to sell the kit. When you have chosen the PLU
number add it to the database as you would for a normal PLU item, setting its price, subdepartment
and other information that you normally define. To define the item as a kit, select the kit flag on the
Object tab.
4.6.1.11 Kit tab
© 2005 TOSHIBA TEC AMERICA AMERICA RETAIL SYSTEMS, INC. R1.0a
Page 81

Maintenance Application 79
This will toggle the cost tab to become the kit tab. Access the kit tab to select the items that should be
deducted from inventory when the kit PLU is sold.
© 2005 TOSHIBA TEC AMERICA AMERICA RETAIL SYSTEMS, INC. R1.0a
Page 82

Symphony Pro User Manual 2.0.2.1580
.
Building the kits
The PLU items that make up the kit need to be added to the grid showing on the Kit tab. To
add
an
item to the Kit list, double-click in the PLU number column and select the PLU you want to include. To
remove
an item from the kit list, right-click on the PLU to remove and press delete. The
description
of
the PLU appears automatically. A default
quantity
of 1 will be set. You can modify the quantity to be
used when the kit is sold by accessing the quantity column and entering the correct quantity. The
price
and
amount
fields display the unit price and extended amount of the individual PLU's according to the
quantity you selected and using the current
price level
and
price target
. These fields cannot be edited
here. If you want to change the price of an individual PLU use the normal price change feature in PLU
maintenance for that item. The ratio column displays the revenue that will be attribued to each PLU
based on the price of the kit. This column cannot be edited. The system assigns the revenue to each of
the PLU's on a pro-rata basis. The last column called
No
represents
No void
. This flag is used to
determine whether the item can be removed from the kit by the operator on the POS terminal. This
may be required if you want to remove an item and sell another item in its place. Note that the item is
removed at the
ratio
price. The new item will be entered at it's regualr price.
The bottom of the kit tab displays the total price and cost of all components. The kit profit and profit
percentage are displayed for your convenience.
Note:
The kit tracking feature is not available with all POS systems. It is functional with Symphony
POS front end terminals. Please inquire with your dealer to verify that kits are available with your front-
end terminals.
© 2005 TOSHIBA TEC AMERICA AMERICA RETAIL SYSTEMS, INC. R1.0a
Page 83

4.6.2 Working With Items
Working with Items Overview
In this help section you will find information about:
Filtering and Global Modifications
: Symphony Pro utility that allows you to work with groups of items
by setting a "filter" to extract the items from the database. This means that changes can be applied to
items with similar pricing or other common programming attributes.
Add / Copy / Delete Items
: The correct procedure to follow to create new items, either by manually
entering all the information, or copying information from an existing item (except the item code), and
how to remove items from the database.
Deploying Modified Items
: Once you've made changes to items or other information that affects the
system, the modifications (or additions) must be "deployed" or activated in all existing stations.
Rental Items
: Symphony POS and Symphony Pro can deal with items that are for rent, including
multiples of the original code. Rental items can be controlled with in / out dates.
Printing Labels
: Items can be set to trigger the system to produce labels when there is a price
change.
Extracting Items Using Filters
The Maintenance application includes a "Filtering" option used to select multiple records based on
common criteria, often used in combination with the "Global Modification" feature. For example, it may
be necessary to find all items in a specific sub-department with a price greater than $1.79 AND taxable
3 flag selected. The following explains how to set up and use filters.
Setting a Filter
Start be clicking the filter icon
from the icons area of the PLU maintenance screen. You can also
select the filter option from the Global Modification menu. Once filter mode is active, the additional
filtering will appear on the screen.
Press
to select the fields you want to use to filter the item file to extract records. Next, right-click
on the field to be filtered. If you right click an alpha field (like item description), a new window appears
allowing you to select the "Criteria" used to filter the description. The choices are available by using the
pull-down menu in the Alpha-numeric window as shown below.
Filtering with an Alphanumeric Field
Maintenance Application 81
4.6.2.1 Filtering and Global Modifications
© 2005 TOSHIBA TEC AMERICA AMERICA RETAIL SYSTEMS, INC. R1.0a
Page 84

Symphony Pro User Manual 2.0.2.1582
This example shows the Filter setting tool.
Equal to
will list only the items that
match exactly
with the data you enter in the search field.
Begins with
will list all items that
begin with
the same data you enter in the search field.
Ends with
will list all items that
end with
the same data you enter in the search field.
Includes
will list all items that
include
the same data you enter in the search field.
Not equal to
will list all items that
do not match
the data you enter in the search field.
Filtering with a Currency Field
When you set a filter in a currency field, the search criteria is different as shown below. Right click in a
currency field such as price to obtain the filter window.
This example shows the Filter setting tool.
Equal to
will list only the items that match exactly with the data you enter in the search field.
Greater than
will list only the items whose price is greater than the data you enter in the search field.
Smaller than
will list only the items whose price is less than the data you enter in the search field.
Different than
will list the items whose data is different that the data entered in the filter field.
Between
will list the items that are between the 2 amounts entered.
Filtering with a Logical Field
A "Logical Field" is a field that has only two (2) possible values, for example, On or OFF, True or
False, selected or not selected. When you set a filter by right clicking on a logical field such as taxable,
the window appears like the example below:
© 2005 TOSHIBA TEC AMERICA AMERICA RETAIL SYSTEMS, INC. R1.0a
Page 85

Maintenance Application 83
This example shows the Filter setting tool.
In a logical field, if you mark the selection box, the filter will list the items that have the field selected as
well. If you leave the selection empty, only the items that do not have the field selected will be listed.
Filters may be set on several fields to pinpoint exactly the items you are searching for. When a filter is
activated, the field being filtered becomes yellow.
To view the fields that are currently filtered press the
icon. The system will display the list of fields
currently being filtered.
To activate the search on the filtered items, press the
icon. The system will create a table and list
the items which respond to the search.
When you need to clear the filter, press the
icon.
While the filter is active, the next record icon and the previous record icon will move ahead to the next
record that responds to the active filter.
Combining Filters and Global Modifications
It is also possible to perform
Global Modifications
on the item file. To use global modifications, you
must first establish a filter, explained above. Several tools are provided to set the modification.
Press the
to enter the Modification mode. Right click each field to modify.
When you have completed the modifications it is possible to view the modifications that are about to
be applied by clicking the
icon.
To apply the modifications to the list of filtered items, press the
icon.
To clear the modifications at any time, press the
icon.
You can perform global modifications on logical fields by either selecting or clearing the flag set in that
field. A global modification in an alphanumeric field such as the description will replace all descriptions
with the one you entered. A global modification performed on a currency field such as the price allows
you to replace and increase or decrease by amount or by percentage. When you make a global
modification on a currency field based on a percentage increase or decrease you also have the option
to set the last digit the price will be rounded up to. If you want all the prices to end with a 7, enter it in
the
ending with
column. All prices will be calculated and then rounded up to numbers ending with 7,
such as 1.37, 1.47, 1.57, etc.
© 2005 TOSHIBA TEC AMERICA AMERICA RETAIL SYSTEMS, INC. R1.0a
Page 86

Symphony Pro User Manual 2.0.2.1584
C reating and Removing Items
Adding New Items
There are several options to create new items, depending on the circumstances. Sometimes it is
easier to create a new item and fill in all the required information manually. To create a new,
blank
PLU code in the system, use the "+" toolbar button. Clicking the plus tool opens a "New PLU" window
that prompts you for the new code. After entering the new code, the standard PLU edit screen appears,
allowing you to enter the complete item information.
Adding New Items by Copying
Often, new items contain much of the same information as an existing item. For example, a
manufacturer decides to distribute a new flavour of an existing product. This means that the new item's
format, vendor and price are probably identical as existing items, with the only difference being the
UPC (item code) and descriptor. In these cases, it is much easier to create the item by copying the
information from an existing PLU. To create a new item by copying from an existing one:
Instead of pressing the "+", enter the new code directly in the "Item Number" field, just as you would to
extract an existing PLU from the database. Because the Maintenance application doesn't find the new
code, it opens a
QueryForm
panel with the following options:
This example shows the item creation options.
Options
Cancel
to abandon the operation if you have entered a non-existing item code in error.
New
creates the new item and blank all the existing data fields, following the same procedure as
described above for creating items with the "+" toolbar button.
Always New
creates the new item and blanks all the existing data fields,
and continues
using the
same process for every new item code entered. The QueryForm panel
will not be presented
again
until the Maintenance application is restarted
. This will save time by reducing the operator prompting.
Copy
uses the item on the screen as a
template
for the new item being added.
All
data fields will be
4.6.2.2 Add / Copy / Delete Items
© 2005 TOSHIBA TEC AMERICA AMERICA RETAIL SYSTEMS, INC. R1.0a
Page 87

Maintenance Application 85
copied to the new item. This is time saving when creating items that have common information.
Always copy
uses the item on the screen as a
template
for
all
new items being added. All data
fields will be copied to the new items. The QueryForm panel
will not be presented
again
until the
Maintenance application is restarted
.
Modify existing
actually
replace
s the item number (UPC) for the item on the screen. Once
deployed, the old code
will no longer exist in the database
.
Please read the warning below before
using the Modify option.
Always modify
replaces the UPC for
all
subsequent items being modified. The QueryForm panel
will
not be presented until the Maintenance application is restarted
.
Please read the warning below before
using the Modify option.
!WARNING!
: Be
extremely careful
when using this option. This option is normally used in situations
where an error has been made while creating a new item code. The new item has been created and
programmed, but with the wrong code. Since the new item has not been sold in the system, there are
no serious effects.
Before using this action, you should consider these factors:
·Although occasionally necessary because manufacturers sometimes change their product's UPC, the
repercussions of this action are serious. In such cases, you should use the
Copy
option, creating a
new code with the same information as the old code. In this way, you can continue to sell the old code.
·The item's sales history is linked to the old code. The Modify option actually deletes the old code from
the database, so when you view item sales reports that contain the old code, the code will appear
without a description.
Removing Items
When you are sure that you will no longer sell an item (or the item is never used), you can remove it
from the database. When items that have sales are removed from the database, they will still show up
in the item sales reports, but the deleted items will have no descriptor. To remove items from the
database:
Extract the item, then use the
delete tool on the toolbar to remove it.
Sending Changes to Targets
Modified records
need to be transferred to the Symphony POS terminals. The toolbar's
icon
changes from gray to green
to advise the operator that changes have been programmed on this
record but they have not been transferred to the front end database(s). Using the instant deploy tool
from the item programming window will send any modifications to the target terminals (or stores in a
multi-store situation).
By default, the Symphony Pro task scheduler is set up to automatically send all modifications
(including items) to targets at a pre-set time. This means you can also force all changes to be sent by
manually executing the "Deploy All Changes" event from the "Events / Tasks" main menu option.
NOTE:
When you first create items, some of the option check boxes will appear to be "grayed out" or
4.6.2.3 Deploying Modified Items
© 2005 TOSHIBA TEC AMERICA AMERICA RETAIL SYSTEMS, INC. R1.0a
Page 88

Symphony Pro User Manual 2.0.2.1586
selected but gray. You do not have to select and
un
select them. The grayed out check boxes indicate
that the database has no value for these fields (neither yes, nor no.)
Controlling Rental Items
Symphony POS
can control
rental items
by setting the items as rental, and defining the rental
parameters. Symphony POS rental items could include video films in a c-store, VCR machines,
strollers in a zoo, etc. There are 2 types of rental items in Symphony POS and they must be defined in
the item maintenance.
Method type
must be set to G or to H for rental items.
Type G should be used for rental items that are rented for different periods of time. Example of type G
rental item is a VCR or Nintendo machine that may be rented for a day, a weekend or a week at a time.
Type H is used for items that share the same rental period. This would often be the case for most films
in a C-store because they are rented for a fixed 24 hour period and no other choice is available.
Choosing method type G for an item will modify the fields available in the price column. No "
S ale
"
column is available with type G. Price levels are available. Type H items use the price exactly the way
normal items do.
This example shows the Item table's "Price" tab with "G" type rental is selected.
The first field available in Method type G items is the length of the rental period in hours. The next field
is a description of the rental period. The final field is the price for that period of rental. Add as many
rental periods as required for the item being added. If you select
Default
, Symphony POS will use it as
the default rental period, even though multiple periods have been selected. If you do not select a
default period, Symphony POS will open a choice window for the operator to select the proper period
whenever the item is rented. If you select a default rental period, the
Price Modify
button can be used
to override the default status an pop up the list to permit operator selection.
4.6.2.4 Rental Items
© 2005 TOSHIBA TEC AMERICA AMERICA RETAIL SYSTEMS, INC. R1.0a
Page 89

Maintenance Application 87
If you have
multiple copies
of the same item, you will need to create different PLU codes for each
item. This way Symphony POS can track all copies of each item and the due time or reservation date
of the product. In cases where you need to monitor return times for different copies of the same
product, it is important to follow some basic rules to be able to track the information for the multiple
copies. Here is a practical example.
You have 3 copies of the film Titanic. Create the first PLU number using 1234561. The PLU number
for the film is really 123456 and the last digit identifies it as the first copy. Then create the second copy
as item 1234562 exactly the same way you set up the first copy. Finally create 1234563 as the third
copy. Now you will be able to define, as shown below, the position of the copy identifier within the PLU
record. Reservation reports and reports that show the time films are due could report on the items
123456x together instead of requiring you to search all 3 items.
Other information on the rental system is defined in the Possetup module System set-up screen under
the
Rent
tab.
Rent Tab
Rental items can be controlled by Symphony POS when the system is used with the Symphony Pro
backend system. The rental tab includes general programming that defines how the rental system will
operate. To access the
POS rental tab
, select "POS setup" from the Symphony Pro "Modules" menu.
The rental item programming is found in the Symphony Pro system under PLU programming.
The Symphony POS Setup module showing the Rent Tab.
Return time
: Symphony POS can control return time for rental items two ways. The more popular
application for rental with Symphony POS is controlling films in a c-store type application. In this type of
environment, the return time is usually determined as being 6:00 pm or thereabouts. If this is your
case, leave the Check box for
Based on the period
as a blank. An item rented today at 3PM will be
due at the return time tomorrow. Same thing for an item rented at 11PM tonight, it will be due tomorrow
at 6:00PM if a return time is specified.
© 2005 TOSHIBA TEC AMERICA AMERICA RETAIL SYSTEMS, INC. R1.0a
Page 90

Symphony Pro User Manual 2.0.2.1588
When Symphony Pro is used for rental that is based on time, you need to place a check mark next to
Based on the period
. This would be used in an application where something is rented for an hour, 2
hours, 8 hrs, etc. An example would be strollers rented to customers by the hour in an amusement
park. When you select this option, any time that shows in the Return time will be ignored.
Late fee
: In situations where you want to charge a fee for late returns, select whether or not
Symphony POS should
open the account
for the customer that rented the item. If a fee should be
charged, check the
Charge late fee
box. Then press the
button
in the
Late fee
area. You will be
promoted to select a button from the button list that was programmed in Buttons and forms. So you
can assign a preset PLU, an open PLU or Subdept, or any other button to be executed when a rental
item is returned after the prescribed time.
Grace period
: To permit an automatic grace period beyond the return time, enter the grace time in
hours (probably as a fractional amount) or in percentage of the rental period. Selecting a percentage of
the rental period (such as 10%) would obviously extend a 30 day rental by 3 days (such as a pair of
crutches in a pharmacy.)
Copy identifier
: When several copies of the same item are available, you can determine with
Symphony POS the copies rented by different customers. Without doing this, Symphony POS will not
know who has a specific copy of the same item, such as a film. You can determine which digits
represent the copy number within the PLU number entered to rent the item. The copy identifier digits
can be placed at the start or at the end of the PLU number created in Symphony Pro. Choose
First x
digits = copy
to place the copy identifier digits at the start of the PLU number. Or select
Last x digits
= copy
to place the copy identifier at the end of the actual PLU number.
You may also determine that the PLU number itself is a specific length and the remaining digits are
used as the copy number following the same logic as above. Select
First x digits = Item
or
Last x
digits = copy
if this is the case.
You can also define how many digits are required to identify the copy. If you never have more than 9
of the same item, select 1 in the
#digits
entry. This field corresponds to the value
x
referred to in the
First
x digits = copy
field.
Type H period
is used to define the fixed period used by price type H PLU items. These are rental
items that do not have variable rental periods like the price type G items. This would be most common
for items like films in a c-store that are always rented for the same time period.
Linking Items with Labels
Symphony Pro can also generate item or shelf labels if the Label printing utility is registered for use.
To modify or create label templates you must also register the Form Manager. Please consult your
TEC Dealer if you require more information concerning labels.
The label format(s) for the item are programmed within the item, using the Maintenance application's
desktop "PLU" icon to access the item tables. Once an item has been associated with a printable label,
the Report application's Selection utility provides label printing choices. This means that there are two
steps to complete to be able to print labels.
Items must be programmed with an associated label type. To link items to use a specific label
template, access the item table programming in the Maintenance application. At the bottom right of the
"POS" tab, there is a section titled "Label", which includes a label type selection tool. Double click in the
"
Type
" box to open the label selection tool. Symphony delivers 3 default label types. Type A uses
4.6.2.5 Item Label Setup
© 2005 TOSHIBA TEC AMERICA AMERICA RETAIL SYSTEMS, INC. R1.0a
Page 91

Maintenance Application 89
labels sized 4" by 1.5" (Avery 5159). Types B & C use labels sized 2.625" by 1" (Avery 5160). Label
type D prints a ½ page label as a sample shelf sign. It also does a conversion of the retail price from
kilogram to pound in the case of scalable items. The price descriptor is taken from the object table size
description field unless the fields is blank. Then we use the word each as size description. Your dealer
can modify labels for you so consult him for further assistance.
This example shows the Item table's "POS" tab, with the label selection tool.
The available label types appear in the list within the label selection utility. Each type of label in the list
has a selection box beside it. To associate a label type with the current item, place a check mark in
one or more of the label types. This associates a label type with the item.
Items can be associated with a label type without necessarily printing. To enable the item to be
selected at label printing time, the item must also be set to "
Print
". Clicking the "Print" box in the label
section of the POS table sets the item as selectable at label printing time. Symphony Pro automatically
selects the "Print" box when a price is modified for the item.
To print labels, access the "Report" application from the Symphony Pro desktop. For help on printing
labels, refer to the
Printing Labels help page
under the Report System section in this manual.
Sub-department Overview
Symphony POS requires the linking of an item to a sub-department for several reasons. Rather than
taking a daily list of each product sold which be very lengthy for certain types of stores, a sub-
department report is used as an overview of what each area in the store is doing. Sub-departments are
in-turn linked to departments to provide a more consolidated view overall. Examples of departments
may be Grocery, services, etc. The Grocery department could in turn be broken down to many more
sub-departments: grocery, taxable grocery, meat, diary, etc.
Sub-departments all have individual flags for taxability, scale, etc. Once programmed, item
programming time can be reduced by associating the item with a sub-department using the "Follow
sub-department" option available in the item's "Quick" or "POS" tab. This way you only need to manage
the exceptions within a sub-department.
4.6.3 Sub-department Table
© 2005 TOSHIBA TEC AMERICA AMERICA RETAIL SYSTEMS, INC. R1.0a
Page 92

Symphony Pro User Manual 2.0.2.1590
Sub-Department Table Settings
This example shows a Sub-department table record.
Sub-Department
is used to enter the record number this sub-department will use.
Department
is a compulsory link that associates the product to a larger group for reporting purposes.
POS target
: Use this filed to select the target for this sub-department when you are working on a
headquarters system. For example, when you need to send different tax programming to different
target zones this will be how you do it.
Main Description
is used to set a main item descriptor used on the report system.
POS Description
field allows you to enter 2 descriptions that are used to give a description which will
appear on register receipts if the sub-department is used for manual sale entry.
Taxable 1
: Select this flag if tax rate 1 should be applied when this item is used.
Taxable 2
:Select this flag if tax rate 2 should be applied when this item is used.
Taxable 3
:Select this flag if tax rate 3 should be applied when this item is used.
Taxable 4
:Select this flag if tax rate 4 should be applied when this item is used.
Food stamp
: Select the food stamp flag if this item can be paid for with Food stamps and you are in a
jurisdiction that accepts food stamps.
4.6.3.1 Sub-department Programming
© 2005 TOSHIBA TEC AMERICA AMERICA RETAIL SYSTEMS, INC. R1.0a
Page 93

Maintenance Application 91
WIC
: Select the WIC flag if this item can be paid for by WIC check.
Prohibit discount
: Select this flag to stop the operator from applying a discount to this item. The item
will also be excluded from the running discountable total or from the account discount subtotal.
No refund
: Select this flag to prohibit refund of this product code. The point of sale will prevent the
cashier from entering the item's code and pressing the refund function.
No return
: Select this flag to prohibit return or exchange of this product code. The point of sale will
prevent the cashier from entering the item's code and pressing the return function.
Scalable
: This flag defines that the product is sold by weight read from the POS scale. This flag
should not to be selected for prepackaged and pre-priced items or those weighed and labeled for
scanning at the POS.
Manual weight
: Select this flag to allow a manual weight entry for this product.
Not in gross
: This flag is used to exclude the sales of this sub-department from the Net sales and
Total sales of the store. This is sometimes the case for sub-departments used for bottle sales, lottery
returns, etc.
Restrictor code
allows the user to decide whether on not sales into this department should be
restricted at certain times. This could be the case, for example, of alcoholic beverages that cannot be
sold after 11:00PM. The restrictor number is used with this sub-department is assigned here. The
restrictor table is maintained in the PosSetup under System, Restrictors.
Customer age
: This flag is available to restrict the sale of age-sensitive products such as tobacco or
alcohol. When this flag is set, the first item entered will prompt for customer age.
Operator age
: This flag is available to restrict the sale of age-sensitive products such as tobacco or
alcohol. When this flag is set, the POS will verify the age declared in the set-up of the operator signed
on.
Max amount
is used to set the maximum dollar value that can be keyed into the sub-department
during a register transaction.
Min amount
is used to set the lowest amount that can be keyed into the sub-department during a
register transaction.
Max void
will control the highest void amount that can be used without manager approval. Note that
the approval warning will flash and manager approval will be required before tendering can begin, not
to continue entering or scanning items. To prohibit a cashier from using the void function entirely,
change the function authorization rights in function setup.
Max refund
will control the highest refund amount that can be used without manager approval. Note
that the approval warning will flash and manager approval will be required before tendering can begin,
not to continue entering or scanning items. To prohibit a cashier from using the refund function entirely,
change the function authorization rights in function setup.
As with Item programming, the toolbar's
Modified icon is used to advise the operator that changes
have been programmed on this sub-department but they have not been transferred to the front end
database. Using the
instant deploy tool will send any modification that was made to the sub-
department.
© 2005 TOSHIBA TEC AMERICA AMERICA RETAIL SYSTEMS, INC. R1.0a
Page 94

Symphony Pro User Manual 2.0.2.1592
Department
Table O
verview
Symphony Pro requires that a sub-department be linked to a department. This is used only for the
reporting hierarchy within the system. Because the Sub-departments often provide more detail than a
certain level of management may require, you can create a more general level to which item
movement and Sub-department keyboard entries are reported. Because sales can be recorded into
departments directly (department key on the POS), they have flags for taxability, amount entry limits,
etc.
Department Table Settings
This example shows a Department table record.
Department
is the number that will be used to identify this department.
Group
is a optional link that associates the product to a larger group, used for filtering and reporting
purposes.
POS target:
Use this filed to select the target for this department when you are working on a
headquarters system. For example, when you need to send different tax programming to different
target zones this will be how you do it.
Main Description
is used to set a main item descriptor used on the report system.
4.6.4 Department Table
4.6.4.1 Department Programming
© 2005 TOSHIBA TEC AMERICA AMERICA RETAIL SYSTEMS, INC. R1.0a
Page 95

Maintenance Application 93
POS Description
field allows you to enter 2 descriptions that are used to give a description which will
appear on register receipts if the department is used for manual sale entry.
Taxable 1:
Select this flag if tax rate 1 should be applied when this item is used.
Taxable 2:
Select this flag if tax rate 2 should be applied when this item is used.
Taxable 3:
Select this flag if tax rate 3 should be applied when this item is used.
Taxable 4:
Select this flag if tax rate 4 should be applied when this item is used.
Food stamp:
Select the food stamp flag if this item can be paid for with Food stamps and you are in a
jurisdiction that accepts food stamps.
WIC:
Select the WIC flag if this item can be paid for by WIC check.
Prohibit discount:
Select this flag to stop the operator from applying a discount to this item. The item
will also be excluded from the running discountable total or from the account discount subtotal.
Override allowed:
Select this flag to allow price overrides on this department.
No refund:
Select this flag to prohibit refund into this department.
Scalable:
This flag defines that the department is sold by weight read from the POS scale.
Manual weight:
Select this flag to allow a manual weight entry for this department.
Not in gross:
This flag is used to exclude the sales of this department from the Net sales and Total
sales of the store. This is sometimes the case for departments used for bottle sales, lottery returns,
etc.
Restrictor code
allows the user to decide whether on not sales into this department should be
restricted at certain times. This could be the case, for example, of alcoholic beverages that cannot be
sold after 11:00PM. The restrictor number used with the department is assigned here. The restrictor
table is maintained in the
PosSetup
under
System, Restrictors.
Customer age:
This flag is available to restrict the sale of age-sensitive products such as tobacco or
alcohol. When this flag is set, the first item entered will prompt for customer age.
Operator age:
This flag is available to restrict the sale of age-sensitive products such as tobacco or
alcohol. When this flag is set, the POS will verify the age declared in the set-up of the operator signed
on.
Max amount
is used to set the maximum dollar value that can be keyed into the department during a
register transaction.
Min amount
is used to set the lowest amount that can be keyed into the department during a register
transaction.
Max void
will control the highest void amount that can be used without manager approval. Note that
the approval warning will flash and manager approval will be required before tendering can begin, not
to continue entering or scanning items. To prohibit a cashier from using the void function entirely,
change the function authorization rights in function setup.
Max refund
will control the highest refund amount that can be used without manager approval. Note
that the approval warning will flash and manager approval will be required before tendering can begin,
not to continue entering or scanning items. To prohibit a cashier from using the refund function entirely,
change the function authorization rights in function setup.
Modified
is used to advise the operator that changes have been programmed on this department but
© 2005 TOSHIBA TEC AMERICA AMERICA RETAIL SYSTEMS, INC. R1.0a
Page 96

Symphony Pro User Manual 2.0.2.1594
they have not been transferred to the front end database. Using the instant deploy
tool will send
any modifications that were made to the department.
Table Programming Overview
Besides the Sub-department and Department tables, there are other tables that contain information
that links to, or is used by items. Each of these tables is editable, using the common tools from the
table toolbar. Once a table is selected for programming, (as with other tables in the Maintenance
application), the "File" and "Edit" menus may contain specialized options for that table.
Bottle Link Table:
Keeps track of all amounts collected from sales of items that are linked with a
bottle.
Tare Table:
Scaled items are sometimes wrapped or packaged. The Tare table keeps a record for
each tare amount that must be removed from the total weight of a scalable item.
Category Table:
An alternate reporting group, the Category table contains a record for every
Category in the system.
Price Level Table:
Items may have multiple prices based on price levels. Edit this table to create,
remove or modify price levels.
Mix & Match Table:
to associate items for pricing deals. The Mix & Match table stores the records for
the pricing deals, but is not actually sent to, or used by the Symphony POS front end terminals. It helps
the item programmer select the correct record for special deals.
Vendor Table:
To keep track of all vendors in the system.
Scale Table:
Special table that contains information for items that are scaled, then pre-packed with a
label that contains the price of the bulk in a code that is scanned at the POS. The Maintenance
application does not communicate with these electronic scales by default. See the scale table help
page for more about communicating with this type of scale.
Bottle Link Programming
Certain regions require that products sold in glass, plastic or other types of containers be levied with a
deposit or an environmental fee amount to encourage the return / recycling of empty containers.
4.6.5 Other Item Related Tables
4.6.5.1 Bottle Link Table
© 2005 TOSHIBA TEC AMERICA AMERICA RETAIL SYSTEMS, INC. R1.0a
Page 97

Maintenance Application 95
This example shows a Bottle Link table record.
Link #
is the number you wish to assign to the value being programmed.
Description:
Enter the description you want to use for this bottle link. This description will not be used
on the POS, it is only a reference on the back-end system. The description used for the bottle deposit
is taken from the totalizer 510, unless a different totalizer is specified in the set-up on an individual
record in this table.
Amount:
Enter the amount to be assigned to this bottle link.
Totalizer number:
If you do not want to use the default bottle deposit number for all deposit amounts,
enter the totalizer number to use here. The related totalizer must be created with the proper values in
the Totalizer set-up. If you add a totalizer in the bottle link table set-up you must remove the totalizer
set for Bottle sale from the Symphony POS Posetup, System, Totalizer tab. Otherwise the bottles sold
will be posted to the system twice causing an out of balance situation.
Environmental fee
In some areas, non-returnable bottles (no deposit) carry an additional fee to help pay for the handling
(re-cycling).
Description:
Enter the description you want to use for this fee. This description will not be used on the
POS, it is only a reference on the back-end system. The description used for the Environment Fee is
taken from the totalizer you assign to this record.
Totalizer number:
Set the totalizer you want to use for this fee. It will be both printed on the register
© 2005 TOSHIBA TEC AMERICA AMERICA RETAIL SYSTEMS, INC. R1.0a
Page 98

Symphony Pro User Manual 2.0.2.1596
receipt and used on all reports for this fee.
Tax flags:
Set the taxes required on this item.
Tare Table Programming
Some products sold by weight (scalable) are sold in empty containers or other wrapping that may add
to the weight of the product when scaled. This does not include pre-packed products that have a label
with the weight and price in the code. The Tare table allows you to create a record for each weight
amount that must be deducted form the total weight when the product is sold.
This example shows a Tare table record.
Enter the tare number, description and weight for each record.
Category Table Programming
Categories are used to create associations for sales tracking / reporting purposes. If you want to
measure the performance of specific items against other similar items you could create a category.
Normally the category is a more detailed grouping than are sub-departments or departments. For
example, you may want to monitor performance of one style of cookies against all other cookies.
Create a category called cookies and associate all the cookie PLU's with that category.
This example shows a Category table record.
4.6.5.2 Tare Table
4.6.5.3 Category Table
© 2005 TOSHIBA TEC AMERICA AMERICA RETAIL SYSTEMS, INC. R1.0a
Page 99

NOTE:
Category is not a required value in the PLU setup.
4.6.5.4 Price Level Table
Price Level Table Programming
Price levels allow you to store different prices for the same item. You may create as many price levels
as required. Price levels are often associated with the notion of discount cards given to frequent
shoppers. Other reasons for price levels may be to allow selling different quantities for different prices.
This example shows a Price Level table record.
NOTE:
You
must
create price level one (1) when importing data into Symphony Pro from external
sources.
Mix & Match Table Programming
Mix and match should be used when you need to associate items for pricing deals. For example, if you
want to price packages of Jello at $0.50 each and 3 for $1.39 you would use the package price feature.
To take it further, you can associate similar UPC codes by mix and match number. Symphony POS will
accumulate the quantity of all items in a common mix match group to give the quantity discount. So
associating the strawberry, orange and lemon Jello into the same mix match group means the
consumer could buy one of each flavor to get the deal.
This example shows a Mix & Match table record.
NOTE:
The price is entered into the PLU table. The description of the Mix Match is only used as a
Maintenance Application 97
4.6.5.5 Mix & Match Table
© 2005 TOSHIBA TEC AMERICA AMERICA RETAIL SYSTEMS, INC. R1.0a
Page 100

Symphony Pro User Manual 2.0.2.1598
reference field, it does not print on the register receipt.
Vendor Table Programming
In order to track the stock level or cost of each item, you will need to create the vendor from whom it is
purchased. From the
Maintenance
menu, access the
Item
option and open the
Vendor
table to add
the information required for each vendor. You may add as many vendors as you require. Item cost
records must have a default vendor.
This example shows a vendor table record.
Scalable Item Table Programming
NOTE:
The Maintenance application does not include native drivers for electronic scale devices.
Electronic scales interfaced with the Maintenance application must have their own communication
"drivers". There must also be a proprietary conversion utility to determine the electronic scale data
format. To configure communications requires customization not included with the standard Symphony
4.6.5.6 Vendor Table
4.6.5.7 Scale Table
© 2005 TOSHIBA TEC AMERICA AMERICA RETAIL SYSTEMS, INC. R1.0a
 Loading...