

Page 1

Messaging
Messaging allows you to send and receive text messages, pictures, sounds, vObjects and other
data via the Vodafone live! Service Centre.
In This Chapter
❍ Messaging Capabilities
❍ MMS
❍ SMS
❍ MMS/SMS Common Operations
❍ Email
❍ Postcard
❍ live! Studio
Page 2
Messaging Capabilities
Your phone is equipped with messaging functions for sending and receiving messages.
Via the Service Centre, you can exchange text messages, pictures, sounds, vObjects
and other data with other phones or PCs and other devices connected to the Internet.
For details on the messaging service, contact your service provider.
The network service is only available
while or is displayed on
the display.
Note
Message Menu
You can access the Message menu by pressing ( ) from standby mode.
◆ Create Message: Allows you to create and send an MMS, SMS or postcard
message (pages 133, 144, 165).
◆ Inbox: Allows you to check received messages (pages 138, 147).
◆ Drafts: Allows you to save created messages (page 155).
◆ Sent Messages: Allows you to check sent messages (pages 140, 149).
◆ Unsent Messages: Stores messages that could not be sent (page 156).
◆ Email: Allows you to use email (page 157).
◆ live! Studio: Allows you to upload MMS messages, images and sounds to the
live! Studio album on the Web and organise uploaded data (page 169).
◆ Tem pl at es : Allows you to create messages easily using preset templates (pages
136, 146).
◆ Settings: Allows you to set various MMS, SMS and email settings (pages 141,
149, 150, 162).
132
Messaging
Alternatively, you can press
from standby mode and select
Messaging to access the Message
menu.
Tip
Page 3

Note
Although the MMS functions vary by
country, the main functions are
basically the same.
Create MMS Message Screen
Note
Another file may not be able to be
added after attaching some types of
file.
Messaging
MMS
About MMS
The Multimedia Messaging Service (MMS) allows you to exchange multimedia
messages containing data such as text, pictures, sounds, animations and video clips.
For details on MMS, contact your service provider.
Creating & Sending an MMS Message
You can send a message up to 300 KB including the address, subject, body text and
attachment files.
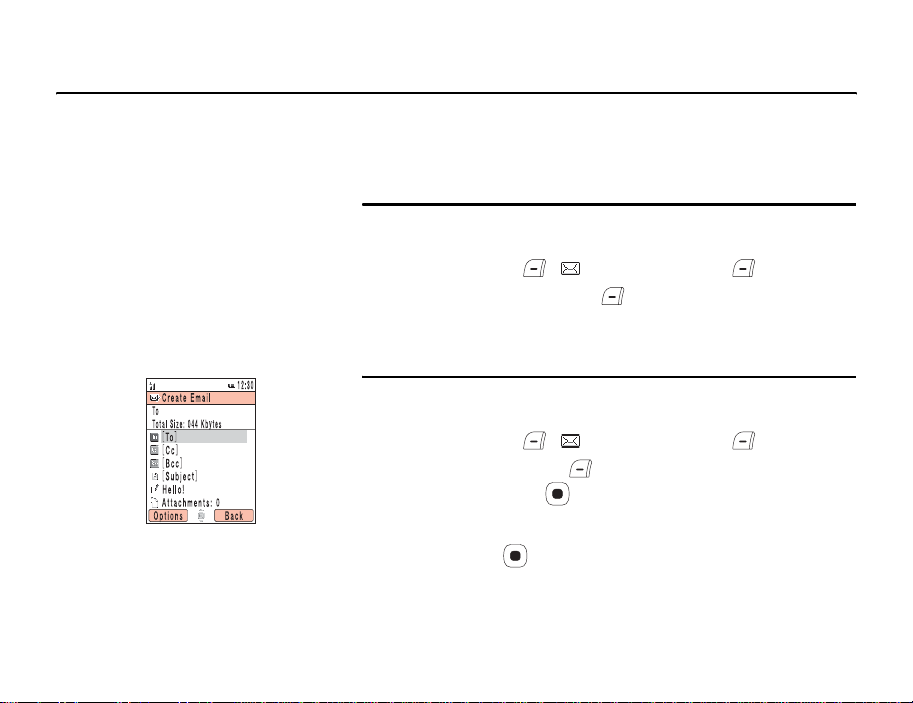
1. In standby mode, press ( ), select Create Message and press
(Select).
2. Select MMS and press (Select).
The Create MMS Message screen appears.
3. Select the item you want to enter and press .
◆ Add Picture: Allows you to attach a picture in My Pictures. Y ou can also activate
the camera and take a picture to attach.
◆ Add Text: Allows you to enter a message. To set the text colour or font size,
select the text you entered, press (Options) and select Te xt O pti o ns.
◆ Add Sound: Allows you to attach a sound in Sounds & Ringtones.
◆ Add Video: Allows you to attach a video in My Videos. You can also activate the
camera and record a video to attach.
◆ Add Other Files: Allows you to attach files such as vCard files in Other
Documents.
133
Page 4
4. Select Send to and press .
5. Select From Contacts, Enter Recipient or From Group List and press
(Select).
◆ From Contacts: Allows you to specify an address from the Contacts list (page
74).
◆ Enter Recipient: Allows you directly enter an address. You can enter up to 256
characters for the address.
◆ From Group List: Allows you to specify a group as the address from the Group
list (page 70).
6. Specify an address and press .
The Recipient list appears.
7. Select Send and press .
The message is sent and then saved to Sent Messages.
Recipient List Screen
Tip
Any message that could not be sent
is saved to Unsent Messages.
134
Messaging
Page 5

Note
Some items do not appear depending
on the position of the cursor.
Recipient List Operations
You can perform the following operations if you press (Options) from the Recipient
list.
◆ Send: Allows you to send the message.
◆ Edit Recipient: Allows you to edit addresses.
◆ Add Recipients: Allows you to add addresses. Y ou can enter up to 30 addresses
for each of To, Cc and Bcc.
◆ Delete Recipient: Allows you to delete addresses.
◆ Edit Message: Allows you to edit the message.
◆ Save to Contacts: Allows you to save an address to the Contacts list.
◆ Set as To/Cc/Bcc: Allows you to switch To/Cc/Bcc for an address.
◆ Save to Drafts: Saves the message as a draft message to Drafts.
◆ Preview Message: Displays the message in the message preview screen.
◆ Edit Subject: Allows you to enter a subject. You can e nter up to 512 characters.
◆ Sending Options: Allows you to set the following sending options: Delivery
Report, Read Report, Delivery Time, Expiry Time and MMS Priority. You
can preset these settings in “Sending Settings” (page 142) of the MMS settings.
Messaging
135
Page 6

Using an MMS Template to Create a Message
You can use MMS templates that have preset pictures and sounds to create messages.
You can also edit MMS templates.
1. In standby mode, press ( ), select Tem pla te s and press (Select).
2. Select MMS Templates and press (Select).
3. Select a template and press .
For details on the following procedure, see “Creating & Sending an MMS Message”
(page 133).
Managing Pages
You can add, delete and replace pages. Yo u can set up to 20 pages for each message.
1. From the Create MMS Message screen (page 133), press (Options).
2. Select Add Page and press (Select).
A page is added.
When there is more than one page, you can perform the following operations if you
select Page Control in Step 2.
◆ Add Page: Adds a page.
◆ Delete Page: Deletes a page.
◆ Previous/Next Page: Takes you to the previous or next page.
◆ Move Page: Moves a page to a specified position.
Tip
• If you press (Options) in Step
3, you can edit or delete the
template or upload the template to
live! Studio, etc.
• If preset templates have been
deleted or edited, you can return
them to their initial state by
clearing the memory (page 253).
Tip
To set the page duration or
background colour of the page,
select Page Options in Step 2.
136
Messaging
Page 7
Note
A start time and display duration that
exceeds the page duration (page
136) cannot be set.
Setting the File Playback Time
You can set the playback time for the text and attached files.
1. From the Create MMS Message screen (page 133), select text or an attached file
and press (Options).
2. Select Item Duration and press (Select).
3. Select Start Time and press (Select).
4. Enter the start time and press (OK).
5. Select Duration and press (Select).
6. Enter the display duration and press (OK).
Messaging
137
Page 8

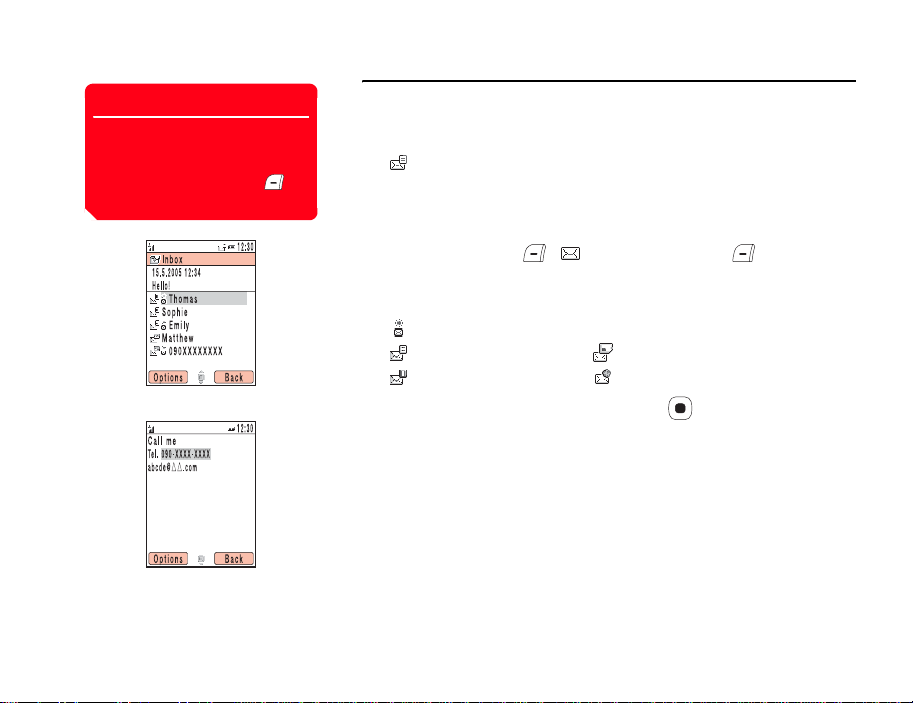
Checking MMS Messages in Inbox
When a message is received in standby mode, an animation is displayed while the
ringtone is playing and your phone is vibrating. If your phone is closed, the animation is
displayed on the external display.
The indicator appears at the top of the display. Received messages are saved to
Inbox.
For details on the operations you can perform from the Inbox list or a message, see
page 151.
1. In standby mode, press ( ), select Inbox and press (Select).
The list appears.
The following indicators appear for MMS messages.
appears for unread messages.
MMS message ( high priority level, low priority level)
MMS notification ( high priority level, low priority level)
Delivery report message
Note
Some attached files cannot be
displayed/played unless the
corresponding content key (content
usage right) is downloaded. When a
content key is being downloaded, the
indicator appears at the top of
the display.
Tip
To display the Inbox list so as you can
check a message after it has been
received, select New MMS in the
information prompt and press
(Select).
List Screen
138
Messaging
Page 9
2. Select the message you want to check and press .
The message appears.
If you receive an MMS message with multiple pages set, pictures, sounds and text
are presented in a slideshow-like format. Whether an attached file displays/plays
depends on the Auto-extract File setting of “Receiving Settings” (page 141). If
there is an attached video or other file, the file icon is displayed.
Messaging
Message Screen
Receiving Complete MMS Messages
When Retrieve Mode of “Receiving Settings” (page 141) is set to Deferred or Always
Ask, messages are not received automatically. Notifications are received instead.
When a notification is received, the indicator appears at the top of the display. The
notification contains the first part of the message. The complete MMS message is
stored temporarily at the service centre.
In the notification message, select <Retrieve MMS> and press .
139
Page 10
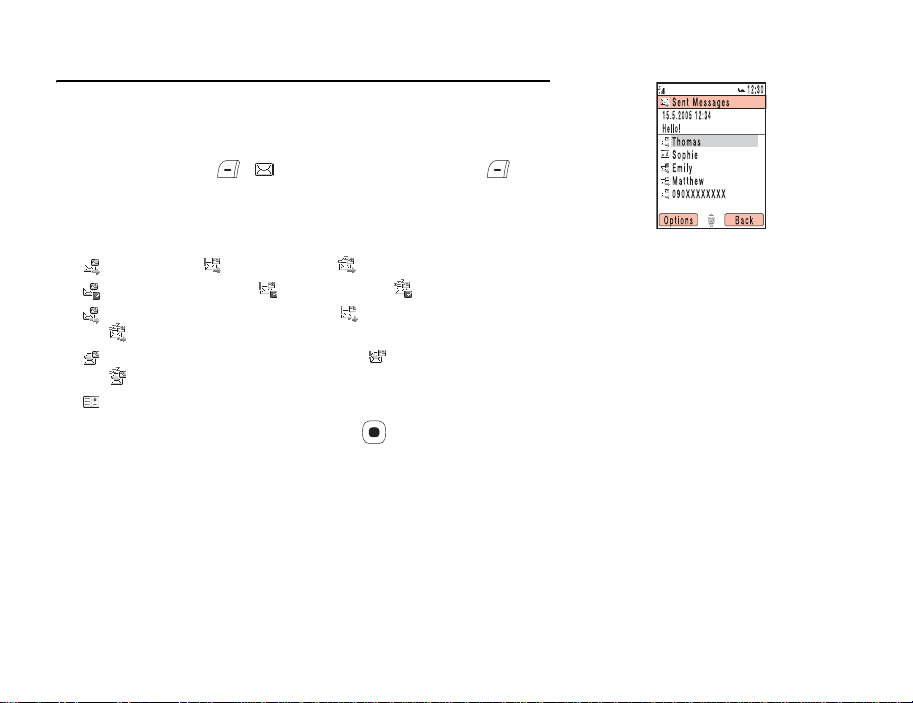
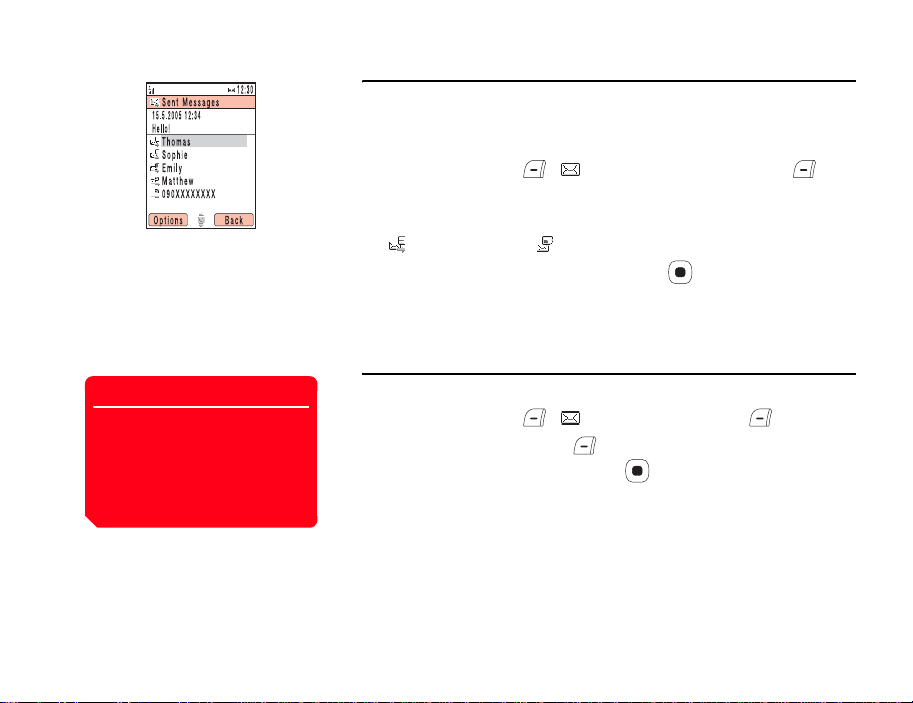
Checking MMS Messages in Sent Messages
Sent messages are saved to Sent Messages of the mailbox.
For details on the operations you can perform from the Sent Messages list or a
message, see page 153.
1. In standby mode, press ( ), select Sent Messages and press
(Select).
The list appears.
The following indicators appear for MMS messages.
MMS message ( high priority level, low priority level)
Delivered MMS message ( high priority level, low priority level)
MMS message for which delivery failed ( high priority level,
low priority level)
MMS message for which opening confirmed ( high priority level,
low priority level)
Postcard
2. Select the message you want to check and press .
The message appears.
List Screen
140
Messaging
Page 11

MMS Settings
You can set various MMS settings.
Receiving Settings
1. In standby mode, press ( ), select Settings and press (Select).
2. Select MMS Settings and press (Select).
3. Select Receiving Settings and press (Select).
4. Select the item you want to set and press (Select).
◆ Retrieve Mode: Allows you to set whether to automatically retrieve messages
received by the mail server. There are two settings: Home Network and
Roaming Network. For each of the settings, you can select Immediate,
Deferred or Always Ask.
◆ Auto-extract File: Allows you to set whether to automatically display/play
picture and sound files attached to messages.
◆ Reply for Delivery: Allows you to set whether to reply to requests for delivery
confirmation.
◆ Anonymous Msg.: Allows you to set whether to receive anonymous messages.
Messaging
141
Page 12

Sending Settings
1. After Step 2 of “Receiving Settings” (page 141), select Sending Settings and
press (Select).
2. Select the item you want to set and press (Select).
◆ Sender Visibility: Allows you to set whether to notify recipients of your address.
◆ Delivery Report: Allows you to receive delivery reports to confirm whether sent
messages were delivered to recipients.
◆ Delivery Time: Allows you to specify a time up to seven days in the future for
delivering messages from the service centre to recipients.
◆ Read Report: Allows you to receive read reports to confirm whether sent
messages were read by recipients.
◆ Expiry Time: Allows you to set the length of time a sent message is stored on the
mail server.
◆ MMS Priority: Allows you to set the message priority level to High, Normal or
Low.
142
Messaging
Page 13
Setting the Default Recipient
You can set the default recipient you want to send a picture to when your phone is in the
turnover style.
1. After Step 2 of “Receiving Settings” (page 141), select Default Recipient and
press (Select).
2. Press .
3. Select From Contacts or Enter Recipient and press (Select).
◆ From Contacts: Allows you to specify an address from the Contacts list (page
74).
◆ Enter Recipient: Allows you directly enter an address. You can enter up to 256
characters for the address.
4. Specify an address and press .
5. Press (Options).
6. Select Save and press (Select).
Messaging
143
Page 14
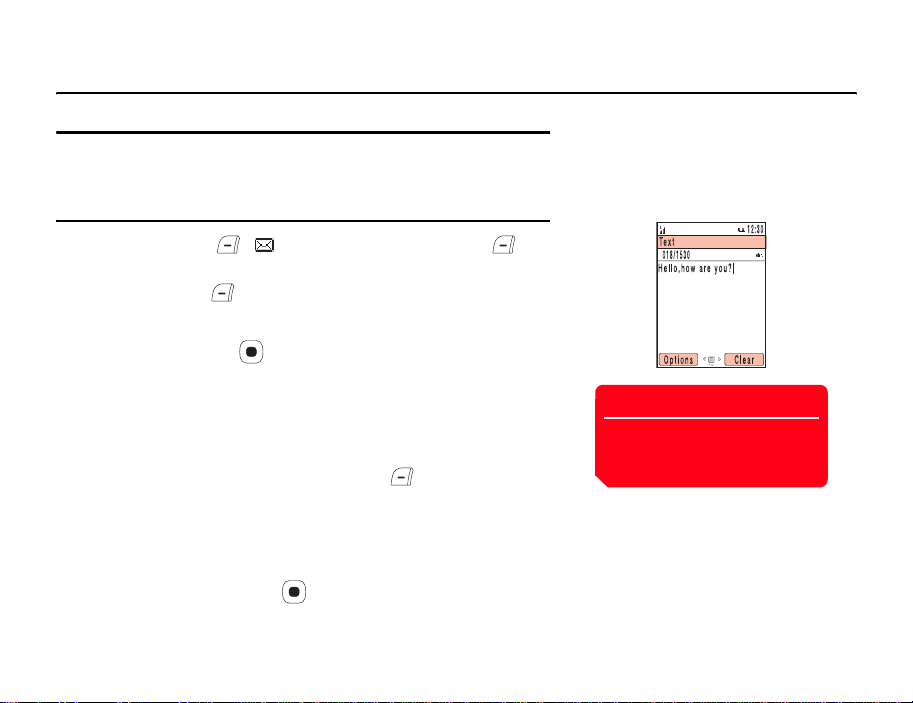
SMS
About SMS
The Short Message Service (SMS) allows you to exchange text message with other
phones. For details on SMS, contact your service provider.
Creating & Sending an SMS Message
1. In standby mode, press ( ), select Create Message and press
(Select).
2. Select SMS and press (Select).
The Create Message screen appears.
3. Enter a message and press .
The maximum number of characters for one SMS message is 160. If you enter
more than 160 characters, the message is split into linking SMS messages when it
is sent. Up to ten linking SMS messages can be sent at one time (equivalent to
1530 characters).
4. Select From Contacts or Enter Recipient and press (Select).
◆ From Contacts: Allows you to specify a phone number from the Contacts list
(page 74).
◆ Enter Recipient: Allows you directly enter a phone number. You can enter up to
20 digits.
5. Specify a phone number and press .
The Recipient list appears.
Tip
Any message that could not be sent
is saved to Unsent Messages (page
156).
144
Messaging
Page 15
Note
Some items do not appear depending
on the position of the cursor.
6. Select Send and press .
The message is sent and then saved to Sent Messages.
Recipient List Operations
You can perform the following operations if you press (Options) from the Recipient
list.
◆ Send: Allows you to send the message.
◆ Edit Recipient: Allows you to edit the address.
◆ Delete Recipient: Allows you to delete the address.
◆ Add Recipient: Allows you to add an address. You can enter up to ten
addresses.
◆ Edit Message: Allows you to edit the message.
◆ Save to Contacts: Allows you to save an address to the Contacts list.
◆ Save to Drafts: Saves the message as a draft message to Drafts.
◆ Sending Options: Allows you to set the following sending options: Delivery
Report and Expiry Time. You can preset these settings in “SMS Settings” (page
149).
Messaging
145
Page 16

Using an SMS Template to Create a Message
Templates allow you to enter messages easily. You can also save frequently used
messages as templates.
1. In standby mode, press ( ), select Tem pla te s and press (Select).
2. Select SMS Templates and press (Select).
3. Select a template and press .
For details on the following procedure, see “Creating & Sending an SMS Message”
(page 144).
Tip
To perform an operation such as
editing and deleting a template
(except for a preset SMS template),
press (Options) in Step 3.
146
Messaging
Page 17
Tip
To display the Inbox list so as you can
check a message after it has been
received, select New SMS in the
information prompt and press
(Select).
List Screen
Message Screen
Checking SMS Messages in Inbox
When a message is received in standby mode, an animation is displayed while the
ringtone is playing and your phone is vibrating. If your phone is closed, the animation is
displayed on the external display.
The indicator appears at the top of the display. Received messages are saved to
Inbox.
For details on the operations you can perform from the Inbox list or a message, see
page 151.
1. In standby mode, press ( ), select Inbox and press (Select).
The list appears.
The following indicators appear for SMS messages.
appears for unread messages.
SMS Message SMS message in the SIM card
Delivery report message WAP Push message
2. Select the message you want to check and press .
The message appears.
Messaging
147
Page 18

Checking WAP Push Messages
WAP Push is an information delivery service that allows you to receive notifications in
real time from the Web server. When you receive a message, the indicator appears
at the top of the display. If Auto Launch (page 180) of the browser settings is set to On,
your phone accesses the specified URL as soon as the message is received. Some push
messages are just saved to the Inbox.
148
Messaging
Page 19
Note
Do not change the centre number for
the Message Centre unless your
service provider informs you that it
has been changed. Otherwise, you
will no longer be able to use the
service.
Checking SMS Messages in Sent Messages
Sent messages are saved to Sent Messages of the mailbox.
For details on the operations you can perform from the Sent Messages list or a
message, see page 153.
1. In standby mode, press ( ), select Sent Messages and press
(Select).
The following indicators appear for SMS messages.
SMS message SMS message in the SIM card
2. Select the message you want to check and press .
The message appears.
SMS Settings
You can set various SMS settings.
1. In standby mode, press ( ), select Settings and press (Select).
2. Select SMS Settings and press (Select).
3. Select the item you want to set and press .
◆ Delivery Report: Allows you to receive delivery reports to confirm whether sent
messages were delivered to recipients.
◆ Expiry Time: Allows you to set an expiry time for messages.
◆ Message Centre: Allows you to edit the centre number for SMS. The centre
number is saved to the SIM card.
◆ SMS Type: Allows you to set the SMS type for outgoing messages to Tex t,
Email, Fax Group 3, Fax Group 4 or Pager.
Messaging
149
Page 20

MMS/SMS Common Operations
Common Settings
You can set various settings common to MMS and SMS.
1. In standby mode, press ( ), select Settings and press (Select).
2. Select Common Settings and press (Select).
3. Select the item you want to set and press (Select).
◆ Reply Settings: Allows you to set whether to quote received messages when
replying to them.
◆ Font Size: Allows you to select a message font size from Large, Standard and
Small.
◆ Page Scroll: Allows you to select the scroll unit of the message display screen
from 1 Line, Half Screen and Full Screen.
150
Messaging
Page 21

Note
Some items do not appear depending
on the message type or screen.
Inbox Operations
You can perform the following operations if you press (Options) from the Inbox list
or a message.
◆ View: Allows you to check the contents of the message.
◆ Play: Plays the MMS message from the first page.
◆ Reply: Allows you to reply to the message.
◆ Delete: Deletes one message.
◆ Save Sender: Allows you to save the phone number of the sender to the
Contacts list.
◆ Select Multi: Allows you to specify multiple messages and then retrieve or delete
them.
◆ Forward: Allows you to forward the message.
◆ Call Sender: Makes a call to the sender of the message.
◆ Send to live! Studio: Allows you to upload the MMS message to a media album
on the Web (page 169).
◆ Sort by: Changes the order that messages appear. You can select a sort option
from Date from Latest, Date from Oldest, Sender, Unread to Read and
Message Type.
◆ Delete All: Deletes all messages in Inbox.
◆ Extract: Allows you to use a phone number, email address, URL or file (MMS
message only) in the message.
◆ View Item: Allows you to view all files attached to the MMS message. You can
also play, display and save files.
Messaging
151
Page 22

◆ Save as Template: Allows you to save the message as a template.
◆ Copy Text: Allows you specify a range of text in any part of the message and
then copy the text.
◆ Move to SIM/Phone: Allows you to move the SMS message to your SIM card or
phone.
◆ Details: Displays the message details (time stamp, priority, address, size, etc.).
152
Messaging
Page 23
Note
Some items do not appear depending
on the message type or screen.
Sent Messages Operations
You can perform the following operations if you press (Options) from the Sent
Messages list or a message.
◆ View: Allows you to check the contents of the message.
◆ Play: Plays the MMS message from the first page.
◆ Resend: Allows you to edit the message and then resend it.
◆ Delete: Deletes one message.
◆ Select Multi: Allows you to specify multiple messages and then delete them.
◆ Forward: Allows you to forward the message.
◆ Extract: Allows you to use a phone number, email address, URL or file (MMS
message only) in the message.
◆ Call Recipient: Makes a call to the recipient of the message.
◆ Send to live! Studio: Allows you to upload the MMS message to a media album
on the Web (page 169).
◆ Sort by: Changes the order that messages appear. You can select a sort option
from Date from Latest, Date from Oldest, Recipient and Message Type.
◆ Delete All: Deletes all messages in Sent Messages.
◆ View Item: Allows you to view all files attached to the MMS message. You can
also play, display and save files.
Messaging
153
Page 24

◆ Save as Template: Allows you to save the message as a template.
◆ Copy Text: Allows you specify a range of text in any part of the message and
then copy the text.
◆ Move to SIM/Phone: Allows you to move the SMS message to your SIM card or
phone.
◆ Details: Displays the message details (time stamp, priority, address, size, etc.).
154
Messaging
Page 25

Using Drafts
You can save the messages you create to Drafts.
1. In standby mode, press ( ), select Drafts and press (Select).
2. Select a message and press (Options).
3. Select the item you want to use and press (Select).
◆ Edit: Allows you to edit the message.
◆ Delete: Allows you to select from One, All or Select Multi for deleting
messages.
◆ Send: Allows you to send the message.
◆ Call Recipient: Makes a call to the recipient of the message.
◆ Send to live! Studio: Allows you to upload the MMS message to a media album
on the Web (page 169).
◆ Sort by: Changes the order that messages appear. You can select a sort option
from Date from Latest, Date from Oldest, Recipient and Message Type.
Messaging
155
Page 26
Using Unsent Messages
Messages that could not be sent are saved to Unsent Messages.
1. In standby mode, press ( ), select Unsent Messages and press
(Select).
2. Select a message and press (Options).
3. Select the item you want to use and press (Select).
◆ Edit: Allows you to edit the message.
◆ Send: Allows you to send the message.
◆ Delete: Deletes the message.
◆ Select Multi: Allows you to specify multiple messages and then send or delete
them.
◆ Call Recipient: Makes a call to the recipient of the message.
◆ Send to live! Studio: Allows you to upload the MMS message to a media album
on the Web (page 169).
◆ Sort by: Changes the order that messages appear. You can select a sort option
from Date from Latest, Date from Oldest, Recipient and Message Type.
◆ Delete All: Deletes all messages.
Note
Some items do not appear depending
on the message type.
156
Messaging
Page 27
Create Email Screen
Email
You can exchange long text messages and picture, video and melody attachments with
email compatible devices. A separate subscription is required to use email. For details,
contact your service provider.
Receiving Email
Unlike MMS and SMS, you need to check whether you have any new messages on the
email server and then download them. Received messages are saved to Inbox of Email.
1. In standby mode, press ( ), select Email and press (Select).
2. Select Sync. New Emails and press (Select).
Your phone connects to the email server and receives your email messages.
Creating & Sending an Email Message
You can send an email message up to 300 KB including the recipient address, subject,
body text and attachment files.
1. In standby mode, press ( ), select Email and press (Select).
2. Select Create Email and press (Select).
3. Enter a message and press .
You can enter up to 15,000 characters.
4. Select To and press .
You can also set an address for Cc or Bcc.
Messaging
157
Page 28

5. Select From Contacts, Enter Recipient or From Group and press (Select).
◆ From Contacts: Allows you to specify an address from the Contacts list (page
74).
◆ Enter Recipient: Allows you to directly enter an address.
◆ From Group: Allows you to specify a group as the address from the Group list
(page 70).
6. Specify an address and press twice.
7. Select Subject and press .
8. Enter a subject and press .
You can enter up to 512 characters.
9. Select Attachments and press .
10. Specify an attachment file and press .
The Attachment File list appears.
To add another file, press (Options) and select Add File.
11. Press and (Options).
12. Select Send and press (Select).
The message is sent and then saved to Sent Messages.
Tip
• To save the email message you are
creating to Drafts, press
(Back) in the Create Email screen.
• Any email message that could not
be sent is saved to Unsent
Messages.
158
Messaging
Page 29

List Screen
View Message Screen
Checking Email Messages in Inbox
Checking Received Messages
Received messages are saved to Inbox.
1. In standby mode, press ( ), select Email and press (Select).
2. Select Inbox and press (Select).
The list appears.
The following indicators appear in the list.
Unread Read
3. Select the message you want to check and press . The View Message screen
appears. If Headers Only is set for Sync. Option (page 163) of the email settings,
only the header is received. To download the message, select Message and press
. After the message is downloaded, it appears.
Messaging
159
Page 30
Inbox Options
You can perform the following operations if you press (Options) from the Inbox list,
the View Message screen or a message.
◆ View: Allows you to check the contents of the email message.
◆ Reply: Allows you to reply to the email message.
◆ Reply All: Allows you to reply to all senders of the email message.
◆ Forward: Allows you to forward the email message.
◆ Save to Contacts: Allows you to save the email address of the sender to the
Contacts list.
◆ Delete: Deletes the email message.
◆ Sort by: Changes the order that email messages appear. You can select a sort
option from Date from Latest, Date from Oldest and Sender.
◆ Move: Allows you to move the email message to a my folder.
◆ Extract URL: Allows you display a URL of a link included in the email message.
To connect to the URL, select the link and press .
◆ Extract Numbers: Allows you display a phone number included in the email
message. To make a call to the phone number or add it to the Contacts list, select
it and press .
Note
Some items do not appear depending
on the screen type.
Tip
To display the Attachment File list
while the View Message screen is
displayed, select Attachments and
press . To save an attachment
file to the phone or memory card,
press (Options) and select
Save.
160
Messaging
Page 31

Note
Some items do not appear depending
on the screen type.
Checking Email Messages in Sent Messages
Checking Sent Messages
Successfully sent messages are saved to Sent Messages.
1. In standby mode, press ( ), select Email and press (Select).
2. Select Sent Messages and press (Select).
3. Select the message you want to check and press .
The message appears.
Sent Messages Options
You can perform the following operations if you press (Options) from the Sent
Messages list or the Email Confirmation screen.
◆ View: Allows you to check the contents of the email message.
◆ Reply: Allows you to reply to the email message.
◆ Reply All: Allows you to reply to all senders of the email message.
◆ Forward: Allows you to forward the email message.
◆ Save to Contacts: Allows you to save the email address of the recipient to the
Contacts list.
◆ Delete: Deletes the email message.
◆ Sort by: Changes the order that email messages appear. You can select a sort
option from Date from Latest, Date from Oldest and Recipient.
Messaging
161
Page 32

Email Settings
You can set various email settings.
1. In standby mode, press ( ), select Settings and press (Select).
2. Select Email Settings and press (Select).
3. Select the item you want to set and press (Select).
◆ Email Accounts: Allows you to add and edit an email account (page 163).
◆ Vodafone Mail: Allows you to connect to the Web to set Vodafone Mail settings.
You can also change your email address. Follow the on-screen instructions.
Note
Some email settings are saved on the
SIM card. Replacing the SIM card
may change your email settings.
162
Messaging
Page 33

Note
• You can add up to three email
accounts. However, after you
switch email accounts, the
messages received for the previous
account are no longer displayed in
Inbox.
• If you delete an email account, the
messages received for the accoun t
are also deleted. To retain
messages, move them to My
Folder1/2/3 before switching email
accounts.
Tip
To delete an email account, select the
email account you want to delete in
Step 2, press (Options) and
select Delete.
Email Accounts
You can add and edit email accounts or switch the active email account.
1. After Step 3 of “Email Settings” (page 162), select Email Accounts and press
(Select).
2. Select Add Account and press .
To switch email accounts, select an account and press .
3. Enter an account name and press .
4. Select the item you want to set and press (Select).
◆ General Settings: Allows you to set and edit general settings. To edit the
account name, select (Account Name). To edit the delete settings for
messages on the server, select Delete on Server.
◆ Receiving Emails: Allows you to set and edit settings for receiving email
messages. To set the protocol type, select (Protocol) and then select POP3
or IMAP4. To edit the server address, port, user name or password, select
Server Address, (Port), Username or Password. To set limi ts for rece iving
messages, select (Sync. Option).
◆ Sending Options: Allows you to set and edit sending options. To edit the server
address, port, sender name or sender address, select Server Address,
(Port), Sender Name or Sender Address.
Messaging
163
Page 34

To set whether to use authentication when connected to the server, select
(Authentication). To set whether to add a signature automatically or edit the
signature, select Signature. You can enter up to 256 characters for the signature.
To set sent messages to be saved automatically to Sent Messages, select Auto
Save.
164
Messaging
Page 35

Postcard
This function is dependent on the
network.
Messaging
Note
Postcard is a service that allows you to create an actual postcard by adding a message
to a picture taken with the camera or a picture saved to My Items, and then send it to
the postal address of a specified recipient. For details on the Postcard service, contact
your service provider.
Postcard and MMS/SMS share the same Sent Messages, Unsent Messages and Drafts
folders.
165
Page 36

Creating & Sending a Postcard
1. In standby mode, press ( ), select Create Message and press
(Select).
2. Select live! Postcard and press (Select).
The Create Postcard screen appears.
3. Select Add Picture and press .
4. Select My Pictures or Take Pic ture and press (Select).
◆ My Pictures: Allows you to select a picture from My Items.
◆ Tak e Pic tur e: Activates the camera so as you can to take a new picture.
After you select a picture for the postcard, press .
5. Select Greeting Message and press .
6. Enter a message and press .
You can enter up to 200 characters.
7. Select Send to and press .
Create Postcard Screen
166
Messaging
Page 37

Add Recipient Screen
Note
The postcard cannot be sent if a
picture was not selected or the
necessary recipient information was
not entered.
Tip
• You can also create a postcard if
you select live! Postcard from the
following functions.
• Camera (page 103)
• Pictures folder (page 196)
• Contacts list (page 75)
• You can send the postcard without
entering a greeting message.
8. Select Enter Recipient or From Contacts and press (Select).
◆ Enter Recipient: Allows you directly enter an addr ess.
◆ From Contacts: Allows you to specify an address from the Contacts list (page
74).
The Add Recipient screen appears.
9. Specify an address.
You can specify up to three addresses.
10. Select Send and press .
11. Select Send and press .
The postcard is sent and then saved to Sent Messages.
Messaging
167
Page 38

Create Postcard Screen Operations
You can perform the following operations if you press (Options) while the Create
Postcard screen is displayed.
◆ Edit: Allows you to edit the message.
◆ View Picture: Displays the picture.
◆ Edit Picture: Allows you to specify a picture from My Items. You can als o activate
the camera to take a picture.
◆ Delete Picture: Deletes the picture.
◆ Send to: Confirms an address and displays the address list. If no address was
entered, the Add Recipient screen appears.
◆ Preview: Displays the postcard preview screen.
◆ Save to Drafts: Saves the postcard to Drafts.
Add Recipient Screen Operations
You can perform the following operations if you press (Options) while the Add
Recipient screen is displayed.
◆ Edit: Allows you to edit the address.
◆ Send: Confirms the address and displays the Recipient list.
◆ Clear: Clears the selected input item.
◆ Clear All Fields: Clears all address input items.
◆ Add Recipient: Allows you to add another address. Select Enter Recipient or
From Contacts.
◆ Import Contact: Allows you add an address from the Contacts list.
◆ Export Contact: Allows you to save an address to the Contacts list.
Note
Some items do not appear depending
on the position of the cursor.
168
Messaging
Page 39

live! Studio
Note
A name other than live! Studio may
appear depending on the type of SIM
card.
Note
Copyright protected images and
sounds cannot be selected.
Tip
To upload an MMS message, select
the MMS message, press
(Options) and select Send to live!
Studio.
Messaging
live! Studio allows you to upload MMS messages, picture and other files in My Items
and pictures taken with the camera to Web pages. Some Web pages allow you to share
the pictures you have taken and exchange files. For details on live! Studio, contact your
service provider.
Uploading a File to live! Studio
1. Press (Options) after taking a picture with the camera or selecting a file to
upload and press (Options).
2. Select Send and press (Select).
3. Select To live! Studio and press (Select).
4. Select Move or Copy and press (Select).
Uploading begins.
Checking live! Studio Files
1. In standby mode, press ( ), select live! Studio and press (Select).
The browser starts and the live! Studio page appears.
Follow the on-screen instructions.
169
Page 40

170
Messaging
Page 41

Vodafone live!
Vodafone live! is an online service that allows you to use the Internet to access various genres of
content. You can browse information or download pictures, melodies and applications.
In This Chapter
❍ Accessing Vodafone live!
❍ Bookmarks
❍ Operations for Web Pages
❍ Browser Settings
❍ Games & More
❍ Media Player
Page 42

Accessing Vodafone live!
You can access Vodafone live! to search for and obtain information.
A separate subscription is required to use the Vodafone live! service. For details,
contact your service provider.
1. In standby mode, press , select Vodafone live! and press (Select).
The Vodafone live! menu appears.
2. Select the item you want to use and press (Select).
The indicator appears at the top of the display during communication.
3. Press to end Vodafone live!.
172
Vodafone live!
The network service is only available
while or is displayed on
the display.
To display the Vodafone live! home
page, press ( ) from
standby mode.
Note
Tip
Page 43

Vodafone live! Menu
You can perform the following operations via the Vodafone live! menu.
◆ Vodafone live!: Displays the Vodafone live! home page.
◆ Enter URL: Allows you to access a Web page by directly entering the address.
◆ Bookmarks: Allows you to bookmark your favourite Web pages and access
bookmarked Web pages (page 175).
◆ What's New: Allows you to obtain the latest information.
◆ Games: Allows you to download games and other applications.
◆ Ringtones: Allows you to download melodies and ringtones.
◆ Pictures: Allows you to download images, animations and wallpaper.
◆ News: Allows you to obtain the latest news, weather reports and other
information.
◆ Sport: Allows you to obtain sports news, results, latest scores and other
information.
◆ History: Displays the addresses of accessed Web pages in the order of newest to
oldest.
◆ Browser Settings: Allows you to set various browser settings (page 180).
Vodafone live!
173
Page 44
Key Assignments for Browsing the Web
The following shows the key assignments for browsing the Web.
In Open Style
: Selects an item or displays the Option menu.
: Takes you back to the previous screen.
: Selects an item.
: Scrolls up or down.
: Scrolls left or right.
: Ends communication. If your phone is not connected, takes you back to standby
mode.
to : Acts as a shortcut to a link with a number.
and : Acts as a shortcut to a link with or #. You can also use these
keys to perform supported operations.
Side Key ( ): Increases the volume level.
Side Key ( ): Decreases the volume level. To set the volume to mute, press and hold
the key.
In Turnover Style
Side Key ( ), ( ):Scrolls up or down.
Side Key ( ): Takes you back to the previous screen.
Side Key ( ): Selects an item.
174
Vodafone live!
Page 45

Bookmarks
If you bookmark frequently accessed pages, you can access them quickly and easily.
Adding a Bookmark
1. Display the page you want to bookmark and press (Options).
2. Select Bookmarks and press (Select).
3. Select Add Bookmark and press (Select).
4. Select the title field and press .
5. Edit the title and press .
6. Press (OK).
7. Select Root Folder and press (OK).
Vodafone live!
175
Page 46

Accessing a Page from a Bookmark
1. In standby mode, press , select Vodafone live! and press (Select).
2. Select Bookmarks and press (Select).
3. Select the title of the page you want to access and press (Options).
To access the page of the selected title, press .
4. Select the item you want to use and press (Select).
◆ Go to URL: Allows you to enter a URL and display the Web page for the URL.
◆ Send: Allows you to send the URL as an SMS, MMS or email message.
◆ New Entry: Allows you to enter a new URL to add as a bookmark. You can also
create a new folder.
◆ Delete: Deletes one or all bookmarks.
◆ Move: Moves a bookmark to another folder.
◆ Select Multi: Allows you to select multiple bookmarks and then delete or move
them.
◆ Edit: Allows you to edit a bookmark title, URL or folder name.
◆ Create Folder: Allows you to create a folder.
176
Vodafone live!
Page 47

Operations for Web Pages
While a Web page is displayed, you can perform operations such as saving the page,
registering it to the Contacts list and copying text.
You can perform the following operations if you press (Options) while a Web page
is displayed.
◆ Select: Confirms the item at the cursor position.
◆ Bookmarks: Adds a bookmark for the displayed Web page or references existing
bookmarks. You can also create a folder.
◆ My Saved Pages: Saves the displayed page to My Saved Pages.
◆ Previous Page: Takes you back to the previous page.
◆ Next Page: Takes you to the next page (if one exists in cache).
◆ Go to URL: Allows you to enter a URL or select information to display from access
history.
◆ Send Page: Allows you to send the displayed page as an SMS, MMS or email
message.
◆ Reload Page: Updates the information.
◆ Object Select Mode: Selects a file in the information.
◆ Page Details: Allows you to confirm details such as the title, file size and transfer
permission of the displayed information.
◆ Other Settings: Allows you to clear the cache, copy text in the information or
display details on the server certificates.
◆ Do Actions: Allows you to perform the action specified in the displayed Web
page.
Vodafone live!
177
Page 48

Using Files in Web Pages
You can perform various operations such as saving and displaying/playing picture and
animation files in Web pages.
1. Display a Web page containing a file and press (Options).
2. Select Object Select Mode and press (Select).
3. Select a file and press (Options).
4. Select the item you want to use and press (Select).
◆ Object Details: Allows you to confirm details such as the file name, file size,
save permission and transfer permission.
◆ Save Object: Saves the file to My Items.
◆ Play/View: Plays or displays the file data.
◆ Paging Mode: Takes you back to paging mode.
◆ Exit Browser: Ends the browser.
Note
• Copy restrictions may prevent
some files from being saved.
• Some downloaded files may not be
able to be displayed/played
properly.
178
Vodafone live!
Page 49

Note
• Copy restrictions may prevent
some files from being saved.
• Some downloaded files may not be
able to be displayed/played
properly.
Downloading Files from Links
You can download files from links set for character strings and other objects in some
Web pages.
1. Display a Web page, select a character string for which a link is set and press .
2. Press (Yes).
Downloading begins.
3. Select the item you want to use and press (Select).
◆ Play: Plays the file.
◆ Save: Saves the file to My Items.
◆ Object Details: Allows you to confirm details such as the file name, file size and
file type.
Vodafone live!
179
Page 50

Browser Settings
You can set various browser settings.
1. In standby mode, press , select Vodafone live! and press (Select).
2. Select Browser Settings and press (Select).
3. Select the item you want to set and press (Select).
◆ Memory Manager: Clears the access history, Cookies, Web cache and DNS
(Domain Name Server) cache. You can also enable or disable the storing of
cookies.
◆ Certification: Allows you to confirm details on a certificate issued from a
certificate authority.
◆ Auto Launch: Allows you to set whether to start the browser automatically when
WAP push message is received.
180
Vodafone live!
Page 51

Note
• When you use a network Java™
application, a communication fee is
charged each time the application
connects to the network. The
communication fee is the same as
that for using the Web.
• When offline mode is set (page
236), some network Java™
applications may not run properly.
Games & More
From Web pages, you can download a variety of Java™ compatible applications such
as games and applications that obtain information in real time.
Applications
In addition to ordinary applications that run solely on your phone, some applications
need to connect to the network (Web).
Vodafone live!
181
Page 52

Games&More Menu
1. In standby mode, press , select Games&More and press (Select).
2. Select the item you want to use and press (Select).
◆ Applications: Stores Java™ applications downloaded from the Web and
preinstalled Java™ application.
◆ Screensavers: Stores standby mode Java™ applications downloaded from the
Web. You can also set which Java™ application runs in standby mode or switch
the standby setting on or off (page 184). To set the Java™ application start time
or length of time the application runs before pausing, select Set Time.
◆ Settings: Allows you to set various Java™ application settings (page 185).
◆ Java Information: Displays an explanation on the Java™ licence.
182
Vodafone live!
Page 53

Note
• If the battery level is low at the start
of downloading, the application
may not be completely
downloaded. Charging the battery
beforehand is recommended.
• If you replace the SIM card,
downloaded Java™ applications
will no longer be available. This
does not apply to preinstalled
Java™ applications.
Downloading Java™ Applications
You can download Java™ applications. Before downloading a Java™ application, you
can confirm details such as the download size and storage size.
1. In standby mode, press , select Games&More and press (Select).
2. Select Applications and press (Select).
3. Select More Games and press (Select).
An application download site appears.
4. Select the Java™ application you want to download and press .
The application details screen appears.
5. Press (Downld.).
Downloading begins.
6. Press (Yes).
The Java™ application list appears.
Vodafone live!
183
Page 54

Starting a Java™ Application
You can run one Java™ application in standby mode.
1. In standby mode, press , select Games&More and press (Select).
2. Select Applications and press (Select).
3. Select the Java™ application you want to start and press .
The indicator appears at the top of the display and the Java™ application
starts. If you close your phone, the Java™ application stops.
4. Press , select Quit in the confirmation screen that appears and press to
end the Java™ application.
Setting the Screensaver
1. In standby mode, press , select Games&More and press (Select).
2. Select Screensavers and press (Select).
3. Select Screensavers and press (Select).
To cancel the screensaver, select Off.
4. Select the Java™ application you want to set and press .
To download a screensaver, select More Screensavers. Follow the on-screen
instructions.
5. Press (Yes).
Tip
To pause or return to the Java™
application, select Pause or
Resume after pressing in Step
4.
184
Vodafone live!
Page 55

Java™ Application Settings
• You can also change the volume
level while a Java™ application is
running. Press the side key ( ) to
increase the volume level and
press the side key ( ) to
decrease the volume level.
• If the memory is cleared, any
preinstalled Java™ applications
that were deleted are reinstalled
and returned to their initial state.
Vodafone live!
Tip
1. In standby mode, press , select Games&More and press (Select).
2. Select Settings and press (Select).
3. Select the item you want to set and press (Select).
◆ Priority Settings: Allows you to set the priority for when there is an incoming
call, incoming message or alarm while a Java™ application is running. To give
priority to a voice calls, video calls, messages or alarm and pause the Java™
application, select Voice Calls, Video Calls, Messages or Alarms. To display a
notification at the top of the display without pausing the Java™ application,
select Notification.
◆ Backlight: If you select Backlight, you can set the display lighting setting for
when a Java™ application is running. If you select Blinking, you can set
whether to enable the preset backlight blinking operation of a Java™ application.
◆ Volume: Allows you to adjust the volume for when a Java™ application is
running. You can also set the volume to mute.
◆ Vibration: Allows you to set whether to enable the preset vibration operation of a
Java™ application.
◆ Reset Settings: If you select Master Reset, you can reset all Java™
application function settings. If you select Clear Memory, you can reset all
Java™ application function settings and delete all downloaded Java™
applications.
185
Page 56

Managing Java™ Applications
1. In standby mode, press , select Games&More and press (Select).
2. Select Applications and press (Select).
3. Select a Java™ application and press (Options).
4. Select the item you want to use and press (Select).
◆ Start: Runs the Java™ application.
◆ Delete: Deletes the Java™ application.
◆ Select Multi: Allows you to select multiple Java™ applications and then delete
them.
◆ Details: Allows you to confirm details on the Java™ application.
◆ Security Settings: Allows you to set the display method for the confirmation
screen that appears when you attempt to use certain functions while a Java™
application is activated.
186
Vodafone live!
Page 57

Media Player
Media Player allows you to play video and audio files attached to MMS messages,
connect to a streaming server to stream files and add files to Favourites. You can also
play video and audio files downloaded from the Web or videos recorded with the
camera.
Media Player supports the following file formats: MP3, MP4, Real Video and Real Audio.
Media Player Menu
1. In standby mode, press , select Media Player and press (Select).
2. Select the item you want to use and press (Select).
◆ My Sounds: Displays a list of audio files in My Items.
◆ My Videos: Displays a list of video files in My Items.
◆ Playlist: Allows you to create a playlist and play files (page 190).
◆ Favourites: Allows you to add up to ten files and streaming URLs to Favourites.
◆ History: Displays the history for file and streaming playback.
◆ Enter URL: Allows you to enter a URL for streaming playback or starting the
browser.
◆ Settings: If you select Backlight, you can set the display lighting for playback to
Always On, Always Off or Same as Phone. If you select Visualisations, you
can set a graphic to appear for the playback of audio files. You can also select the
picture or animation file to display.
Vodafone live!
187
Page 58

Playing Audio Files
Display Indications
1 6
List name Bit rate
2 7
Title Real logo (Real Audio file playing)
3 8
Artist Progress bar
4 9
Elapsed play time/total play time Play status (icon)
5 10
Play mode Volume level
Playback
You can play files attached to MMS messages and downloaded audio files, or connect
to a streaming server to stream audio files.
1. In standby mode, press , select Media Player and press (Select).
2. Select My Sounds and press (Select).
3. Select the audio file you want to play and press .
The playback screen of Media Player appears and playback begins.
To stop playback, press (Stop).
Press to increase the playback volume level and press to decrease the
playback volume level.
Tip
To start the browser and connect to
an audio file download site, select
More Sounds in Step 3.
188
Vodafone live!
Page 59

Tip
To start the browser and connect to a
video file download site, select More
Videos in Step 3.
Playing Video Files
Display Indications
1 5
Title and elapsed play time/total play time Progress bar
2 6
Video display Play status (icon)
3 7
Subtitles area Volume level
4
Real logo (Real Video file playing)
Playback
You can play files attached to MMS messages, videos recorded with the camera and
downloaded video files, or connect to a streaming server to stream video files.
1. In standby mode, press , select Media Player and press (Select).
2. Select My Videos and press (Select).
3. Select the video file you want to play and press .
The playback screen of Media Player appears and playback begins.
To stop playback, press (Stop).
Press to increase the playback volume level and press to decrease the
playback volume level.
Vodafone live!
189
Page 60

Creating a Playlist
This feature allows you to create a list of files that you want to play as a set. You can
also change the playback order of files in a playlist.
1. In standby mode, press , select Media Player and press (Select).
2. Select Playlist and press (Select).
3. Select Create Playlist and press (Select).
4. Enter the name of the playlist and press .
5. Select My Sounds or My Videos and press (Select).
6. Press (Options).
7. Select Select Multi and press (Select).
8. Select a file you want to add to the list and press .
To add another file, repeat Step 8.
9. Press (Options).
10. Select Add Files and press (Select).
Note
A combination of audio and video
files cannot be added to the same
playlist.
190
Vodafone live!
Page 61

Note
Some items do not appear depending
on the screen type.
Playing a Playlist
1. In standby mode, press , select Media Player and press (Select).
2. Select Playlist and press (Select).
3. Select the playlist you want to play and press .
Media Player Operations
You can perform the following operations if you press (Options) while a file list,
history, favourites or playlist is displayed or a file is playing.
◆ Pause/Play: Pauses or plays a file.
◆ View List: Displays a list of files in the playlist.
◆ Send: Allows you to send a file attached to an MMS message or send a file by
infrared.
◆ Delete: Deletes a file or playlist.
◆ Delete All: Deletes all files.
◆ Rename: Allows you to change the name of a file or playlist.
◆ Select Multi: Allows you to select multiple files and then delete or play them or
copy or move them to the memory card or phone.
◆ Manage File: Allows you to add a file to a playlist or Favourites. You can also
confirm details.
Vodafone live!
191
Page 62

◆ Play Mode: Plays files repeatedly or in random order.
◆ Mute/Unmute: Allows you to set or cancel mute.
◆ Search Time: Allows you to specify a file playback start time.
◆ Full Screen/Normal Screen: Allows you to change the size of the playback
screen.
◆ Hide Controller/Show Controller: Hides or shows the controller.
◆ Memory Card/Phone Memory: Switches the file list display between your
phone and memory card.
◆ Thumbnail View/List View: Switches between thumbnails view and list view.
◆ Sort by: Changes the order that files appear. You can select a sort option from
Filename, Size, Date from Latest and Date from Oldest.
◆ Add: Allows you to add a file to Favourites or a playlist.
◆ Add to Favourites: Allows you to add a file to Favourites.
◆ Change Order: Allows you to change the order of files in the playlist.
◆ Details: Displays file details.
192
Vodafone live!
Page 63

Key Assignment while a File is Playing/Paused
: Pauses/plays the file.
: Increases/decreases the volume.
: Rewinds frame-by-frame a paused file (MP4 file (.3g2) only).
: Forwards frame-by-frame a paused file. You can also slow forward a paused file
by pressing and holding the key (MP4 file (.3g2) only).
: Jumps to the next file.
: Jumps to the previous file.
Streaming Playback of Audio/Video
If you select a streaming URL from a Web page or body text of a message, Media Player
automatically starts and streams playback so as you can listen to the music or watch
the video. The indicator appears at the top of the display during streaming. For
details on the display indications that appear during playback, see pages 188 and 189.
Vodafone live!
193
Page 64

194
Vodafone live!
Page 65

My Items
The data you save in your phone is stored in My Items. You can move the data stored in the folders
of My Items and edit it for use with other functions.
In This Chapter
❍ My Items
❍ Using Files & Folders
❍ Displaying Files on a TV
❍ Using vObjects
❍ Using the Memory Card
❍ Using the SIM Card
Page 66

My Items
My Items of your phone contains ten preinstalled folders for storing files. In addition to
these, you can create your own folders (personal folders). My Items can store up to a
total of a combination of approximately 500 files and personal folders. You can also use
My Items of the memory card (page 30). The ability to store the maximum amount of
files will depend on available space in the memory card.
Structure of My Items
1. In standby mode, press , select My Items and press (Select).
The following folders are preinstalled in your phone.
◆ Pictures: Contains pictures and the Digital Camera folder. Pictures you take in
Landscape mode are saved in DCF format to the Digital Camera folder.
◆ Videos: Contains videos.
◆ Sounds&Ringtones: Contains sound files and the Recordings folder. Recordings
you record with the voice recorder are saved to the Recordings folder.
◆ Games&More: Contains Java™ applications.
◆ My Saved Pages: Contains URLs and Web pages.
◆ Tem pl at es : Contains the SMS Templates folder to store templates for use with
SMS messages and the MMS Templates folder to store templates for use with
MMS messages.
◆ Other Documents: Contains vCard, vCalendar, SVG and text files, as well as files
of unknown types.
196
My Items
• There are no My Saved Pages and
Templates folders in My Items of
the memory card.
• There are no Java™ applications
in Games&More of the memory
card.
• If you select live! Studio, you can
upload MMS messages, pictures
and sounds to the live! Studio
album on the Web. A name other
than live! Studio may appear
depending on the type of SIM card.
• To display the memory usage
status, select Memory Status.
• DCF format files comply with the
“Design Rule for Camera File
System.” This standard was
developed for the purpose of
facilitating the exchange of digital
camera pictures with various
devices.
Note
Tip
Page 67

Files Storable in My Items
Folder File Format (Icon)
Pictures JPEG ( ), GIF ( ), WBMP ( ), PNG ( )
Digital Camera JPEG ( )
Videos MP4 ( ), Real Video ( )
Sounds&Ringtones AMR/MP3/MP4 ( ), Real Audio ( ),
SMF/SP-MIDI ( ), SMAF ( ) , XMF ( )
Recordings AMR ( )
Games&More Java ( )
My Saved Pages HTML/XHTML ( )
SMS/MMS Templates Text ( / )
Other Documents vCard ( ), vCalendar ( ), SVG ( ),
Text ( ), Unknown File Types ( )
My Items
197
Page 68

Using Files & Folders
Connecting to the Web from Folders
You can connect to the Web from within preinstalled folders in My Items.
◆ More Pictures: Allows you to download picture files.
◆ More Videos: Allows you to download video files.
◆ More Sounds: Allows you to download sound files.
◆ More Games: Allows you to download Java™ applications.
Editing Files & Folders
You can perform the following operations if you press (Options) while viewing files
or folders in My Items.
◆ View: Displays the selected file.
◆ Open: Opens the selected folder.
◆ Connect: Connects to the preset Web page.
◆ Play/Pause: Plays or pauses a file.
◆ Start: Runs the Java™ application.
◆ Send: Allows you to send the selected file as an MMS attachment or postcard.
You can also upload the file to a media album, or send it by infrared or
Bluetooth™. Some send functions are unavailable depending on the SIM card
inserted.
Note
• Some items do not appear
depending on the selected file or
folder.
• Some files may not be able to be
displayed, played or sent
depending on their file size,
contents and type.
• Some files saved to the memory
card from a PC or other device may
not be able to be displayed/played.
Tip
To copy characters selected in a
displayed text file to the clipboard
(page 60), press (Copy).
198
My Items
Page 69

◆ Delete: Allows you to delete just the selected file or all files within the folder.
Select One to delete the selected file and select All to delete all files. However, if
the folder contains a personal folder, the files within the personal folder are not
deleted even if you select All.
◆ Select Multi: Allows you to select multiple files and then simultaneously delete,
copy or move them.
◆ Memory Card/Phone Memory: Switches the display between My Items in your
phone and My Items in your memory card.
◆ Details: Displays the properties of the selected file.
◆ Thumbnail View/List View: Switches the display of files and folders between
thumbnails view (icons and images) and list view (text and guide).
◆ Slideshow: Displays the pictures within the folder in sequence automatically.
◆ Manage Folder: Allows you to create a new folder or edit the selected folder . Y o u
can select from Create Folder, Rename Folder and Delete Folder.
◆ Sort by: Changes the order that files within the selected folder appear. You can
select a sort option from Filename, Size, Date from Latest and Date from
Oldest.
◆ Take Picture: Activates the camera for you to take a picture. The pictures you
take are saved to the Pictures folder.
My Items
199
Page 70

◆ Record Video: Activates the camera for you to record a video. The videos you
record are saved to the Videos folder.
◆ Record Voice: Activates the voice recorder. The recordings you record are saved
to the Recordings folder.
◆ Create Folder: Allows you to create a new folder.
◆ Create Message: Displays the Create Message screen for MMS or SMS.
◆ Create Template: Allows you to create a new template.
◆ Edit Template: Allows you to edit the selected template.
◆ Rename: Allows you to change the name of the selected file.
◆ Mute/Unmute: Mutes the playback sound.
◆ Search Time: Allows you to specify a file playback start time and start playback.
◆ Full Screen/Normal Screen: Switches the screen display.
◆ Hide Controller/Show Controller: Hides or shows the controller.
◆ Zoom: Enlarges or reduces the selected picture.
◆ Advanced: Allows you to edit the selected picture.
◆ Save to Contacts/Save to Calendar: Allows you to save vObjects to the
Contacts list or Calendar.
◆ Rewind: Returns the play position of the video being played to the beginning.
◆ Reset: Returns a file to the state directly after it was read.
◆ Save: Allows you to save a file to your phone or memory card.
◆ Show Guidance/Hide Guidance: Shows or hides the key guidance.
◆ Security Settings: Allows you to set the display method for the confirmation
screen that appears when you attempt to use certain functions while a Java™
application is activated.
◆ Send to live! Studio: Allows you to upload the MMS message to a media album
on the Web.
200
My Items
Page 71

Tip
The use of a TV as a display for the
camera is only possible while you are
using the external camera.
Displaying Files on a TV
TV Display Compatible Functions
You can display pictures and videos saved to My Items, screens while the camera is
activated and TV display compatible Java™ applications (page 183) on a TV. Also, the
camera allows you to use a TV as the display when you take pictures and record videos
(page 101).
Switching TV Systems
The TV systems supported by your phone are the NTSC and PAL systems. The SECAM
system is not supported.
1. In standby mode, press , select Settings and press (Select).
2. Select Phone Settings and press (Select).
3. Select AV Output and press (Select).
4. Select NTSC or PA L and press (Select).
My Items
201
Page 72

TV Display
You can display the screens of TV display compatible functions on a TV if you use the
supplied video output cable to connect your phone to the video input jacks of the TV.
1. Foll ow the procedure below to connect your phone to a TV.
1) Open the AV OUT/earphone microphone jack cover of your phone.
2) Insert the plug of the video output cable into the AV OUT/earphone microphone
jack.
3) Connect the video output cable to the video input jacks of the TV.
2. In the main display, open the screen you want to display on the TV, then press and
hold .
A confirmation screen appears.
3. Press (Yes). The screen display switches from the main display to the TV.
To switch the screen display from the TV back to the main display, press and hold
.
Note
• The screen display cannot be
switched while you are recording a
video or when the delay timer is
activated.
• Any of the following may
automatically end TV display.
• Closing your phone
• Pressing the shutter
• Ending recording of a video
• Displaying a submenu or dialog
box
• Displaying the Multi Task screen
(page 276)
• Receiving a voice/video call
• Receiving a message/Web
information or reaching an alarm
time up
202
My Items
Page 73

Using vObjects
About vObjects
vObject is a collective name for file formats that enable your phone and other vObject
compatible phones, PCs and other devices to exchange and mutually use data such as
Contacts list entries and Calendar da ta.
You can send and receive vObjects as mail attachments (page 157) or transfer them by
Bluetooth™, infrared or via a USB cable. Received files can be used on your phone. If
you save vObjects to the memory card, you can use them directly from other memory
card compatible phones, PCs and other devices. Similarly, vObjects saved to the
memory card from other phones, PCs and other devices can be used on your phone.
◆ vObject compatible software is required to use the data of vObjects on a PC or
other device.
◆ Depending on the software used, vObjects may not be able to be displayed
properly.
◆ Depending on the contents of vObjects, the exchange of vObjects between a
vObject compatible phone and PC or other device may not be possible.
◆ When vObjects include many characters, all vObject may not be able to be sent or
received.
My Items
203
Page 74

Creating a vObject
1. Display the data for which you want to create a vObject.
For details on displaying the Contacts list, see page 79.
For details on displaying Calendar, see page 266.
2. Press (Options).
3. Select Send vCard or Send vCalendar and press (Select).
4. Select a storage place and press (Select).
◆ To M y It ems : Saves the data in vCard/vCalendar format to the Other Documents
folder in My Items of your phone.
◆ To M emor y Car d: Saves the data in vCard/vCalendar format to the Other
Documents folder in My Items of your memory card.
204
My Items
Page 75

Importing a vObject into a Function
You can add data imported in vObject format from another phone or PC to the Contacts
list or Calendar of your phone.
1. In standby mode, press , select My Items and press (Select).
2. Select Other Documents and press (Select).
3. Select a vObject and press .
4. Press (Options).
5. Select Save to Contacts or Save to Calendar and press (Select).
My Items
205
Page 76

Using the Memory Card
You can check and edit pictures and other data saved to the memory card. You can also
save a backup of My Items, Contacts list and other data in your phone to the memory
card.
Formatting the Memory Card
You can use your phone to format the memory card.
◆ If the memory card is removed while reading or writing data, the data may be lost
or the memory card may be damaged.
◆ If the memory card is formatted by another device, it may not work proper ly with
your phone. Be sure to use your phone to format the memory card.
◆ Formatting the memory card deletes all data in the memory card.
1. Insert the memory card in the slot of your phone.
2. In standby mode, press , select Settings and press (Select).
3. Select Memory Settings and press (Select).
4. Select Memory Card and press (Select).
5. Select Format Card and press (Select).
206
My Items
Page 77

6. Enter your security code (page 38).
A confirmation screen appears.
7. Press (Yes).
Confirming the Memory Card Usage Status
You can confirm the volume label, total memory size, used memory size and available
memory size.
1. In standby mode, press , select Settings and press (Select).
2. Select Memory Settings and press (Select).
3. Select Memory Card and press (Select).
4. Select Card Details and press (Select).
My Items
207
Page 78

Using the SIM Card
You can move or copy Contacts list entries from your phone or memory card to the SIM
card, as well as move SMS messages from your phone to the SIM card. An indicator at
the top of the Contacts list screen (page 74) indicates the storage place of the Contacts
list entry. Although the number of Contacts list entries you can save to the SIM card
depends on the amount of available memory space, the maximum number of entries is
250.
Moving Contacts List Entries
Moving Entries to the SIM Card
You can move the name and default phone number (page 78) of an entry.
1. In standby mode, press , select Contacts and press (Select).
2. Select Contacts List and press (Select).
3. Press (Options).
4. Select Select Multi and press (Select).
5. Select the Contacts list entry with you want to move from your phone and press
.
To select another Contacts list entry, repeat Step 5.
6. Press (Options).
7. Select Move and press (Select).
Tip
To move Contacts list entries in the
memory card to the SIM card, select
Memory Card after Step 3. After the
Contacts list in the memory card
appears, proceed from Step 3.
208
My Items
Page 79

8. Select To SIM and press (Select).
◆ To P hone Mem ory: Moves Contacts list entries with a check mark to the
Contacts list of your phone.
◆ To Memory Card: Moves Contacts list entries with a check mark to the Contacts
list of your memory card.
Moving Entries from the SIM Card
1. After Step 4 of “Moving Entries to the SIM Card” (page 208), select the Contacts list
entries with you want to move from the SIM card and then perform the rest of
the Steps.
My Items
209
Page 80

Copying Contacts List Entries
Copying Entries to the SIM Card
You can copy the name and default phone number (page 78) of an entry.
1. In standby mode, press , select Contacts and press (Select).
2. Select Contacts List and press (Select).
3. Press (Options).
4. Select Select Multi and press (Select).
5. Select the Contacts list entry with you want to copy from your phone and press
.
To select another Contacts list entry, repeat Step 5.
6. Press (Options).
7. Select Copy and press (Select).
8. Select To SIM and press (Select).
◆ To P hone Mem ory: Copies Contacts list entries with a check mark to the
Contacts list of your phone.
◆ To Memory Card: Copies Contacts list entries w ith a check mark to the Contacts
list of your memory card.
Tip
To copy Contacts list entries in the
memory card to the SIM card, select
Memory Card after Step 3. After the
Contacts list in the memory card
appears, proceed from Step 3.
210
My Items
Page 81

Copying Entries from the SIM Card
1. After Step 4 of “Copying Entries to the SIM Card” (page 210), select the Contacts
list entries with you want to copy from the SIM card and then perform the rest
of the Steps.
Moving SMS Messages
You can move messages in the Inbox (page 147) and Sent Messages (page 149) of your
phone and messages in your SIM card. Although the number of messages you can save
to the SIM card depends on the amount of available memory space, the maximum
number of sent and received messages is 50.
Moving Messages to the SIM Card
1. In the Inbox or Sent Message, select the message you want to move from your
phone and press .
2. Press (Options).
3. Select Move to SIM and press (Select).
◆ Move to Phone: Moves messages in the SIM card to your phone.
My Items
211
Page 82

Moving Messages from the SIM Card
1. In Step 1 of “Moving Messages to the SIM Card” (page 211), select the messages
with you want to move from the SIM card and then perform the rest of the
Steps.
212
My Items
Page 83

You can make various settings to personalise your phone.
In This Chapter
❍ Display Settings
❍ Phone Profiles
❍ Language Setting
❍ Shortcut Menu
❍ Shortcut Keys
❍ External Light Settings
❍ Flight Mode Setting
❍ Call Settings
❍ Using the Stereo Handsfree Headset
❍ Security Settings
❍ Network & Internet
Settings
Page 84

Display Settings
Setting the Wallpaper
You can set a picture preinstalled in your phone or taken with the camera as the
wallpaper for standby mode.
1. In standby mode, press , select Settings and press (Select).
2. Select Display Settings and press (Select).
3. Select Main Display or External Display and press (Select).
4. Select Wallpaper and press (Select).
5. Select the type of picture you want to set and press (Select).
◆ Wallpaper List: Allows you to select from pictures preinstalled in your phone.
◆ My Pictures: Allows you to select from pictures stored in the Pictures folder of
My Items.
◆ Off: Sets no picture.
6. Select the picture you want to set and press .
7. Press (Set).
Tip
If the picture you want to set as the
wallpaper does not fit the screen,
press (Options) after Step 6 and
perform one of the following
operations.
• Cut: Allows you to trim the picture
to fit the screen.
• Zoom: Enlarges or reduces the
picture and then allows you to
position and trim the picture.
• Fit to Width: Reduces the picture
to fit the width of the screen.
• Fit to Length: Reduces the picture
to fit the height of the screen.
• Rotate Image: Rotates the picture
90° anticlockwise and then allows
you to trim the picture.
214
Settings
Page 85
Note
• You can set a picture of QVGA
(W240 × H320) size or smaller for
the incoming picture.
• The display area for the incoming
picture is W240 × H112.
Tip
For details on the editing (changing
the size, etc.) of a picture saved to
My Items, see “Editing a Picture”
(page 110).
Setting the Incoming Display
You can set a picture to appear on the main display for incoming calls. You can also set
whether the other party’s name and phone number appear on the external display for
incoming calls.
1. In standby mode, press , select Settings and press (Select).
2. Select Call Settings and press (Select).
3. Select Voice Call or Video Call and press (Select).
4. Select Caller Details and press (Select).
5. Select the item you want to set and press (Select).
◆ Incoming Picture: Allows you to set the incoming picture. Set Preset Picture
(default picture) or select the picture you want to set from My Pictures (pictures
saved to the Pictures folder in My Items).
◆ Caller Picture: Allows you to display a picture associated with a caller in the
Contacts list when a call is received from that caller. Select On or Off and press
(Select). If you want to also display the picture on the external display, set
Caller Info to On.
◆ Caller Info: Allows you to set the display of the name and phone number set for
a caller in the Contacts list on the external display when a call is received from
that caller. Select On or Off and press (Select).
Settings
215
Page 86

Setting the Clock Display
You can select the clock display for the main display from six types. You can also set
whether to display the time on the external display.
Setting the Clock Display for the Main Display
1. In standby mode, press , select Settings and press (Select).
2. Select Display Settings and press (Select).
3. Select Main Display and press (Select).
4. Select Clock Type Display and press (Select).
5. Select the type of display you want to set and press (Select).
◆ 1-line Digital: Displays the time and date in one-line digital view.
◆ 2-line Digital: Displays the time and date in two-line digital view.
◆ Analog Clock: Displays an analog clock.
◆ Digital + Calendar: Displays the calendar and time in digital view.
◆ World Clock: Displays the city name and the time and date in one-line digital
view for both the home city and alternate city if the Alternate City setting is set for
the world clock (page 35).
◆ Off: Displays no time and date.
216
Settings
Page 87

Note
You cannot switch the clock that
appears in the upper right of the
display to the 12-hour clock.
Setting the Clock Display for the External Display
1. In standby mode, press , select Settings and press (Select).
2. Select Display Settings and press (Select).
3. Select External Display and press (Select).
4. Select Time Display and press (Select).
5. Select On or Off and press (Select).
Switching between the 12-hour and 24-hour Clock
1. In standby mode, press , select Settings and press (Select).
2. Select Phone Settings and press (Select).
3. Select Date&Time and press (Select).
4. Select 12 hour/24 hour and press (Select).
5. Select 12 hour or 24 hour and press (Select).
Settings
217
Page 88

Setting the Date Format
1. In standby mode, press , select Settings and press (Select).
2. Select Phone Settings and press (Select).
3. Select Date&Time and press (Select).
4. Select Date Format and press (Select).
5. Select the format you want to set and press (Select).
Setting the Display Power Saving
You can save battery power by setting the phone to turn off the display after a specified
time of inactivity elapses. You can set the display time to 30 seconds, 1 minute or 3
minutes.
1. In standby mode, press , select Settings and press (Select).
2. Select Display Settings and press (Select).
3. Select Main Display or External Display and press (Select).
4. Select Power Saving and press (Select).
5. Select a display time and press (Select).
218
Settings
Page 89

Setting the Backlights
You can adjust the brightness and lighting time of the display backlights.
1. In standby mode, press , select Settings and press (Select).
2. Select Display Settings and press (Select).
3. Select Main Display or External Display and press (Select).
4. Select Backlight and press (Select).
5. Select the item you want to set and press (Select).
◆ Brightness: Allows you to set the brightness. Select Dark or Bright and press
(Select).
◆ Lighting Time: Allows you to set the lighting time. Enter a time (0 to 60 seconds)
and press (OK).
Settings
219
Page 90
Setting the Display of Cell Information
You can set whether the cell information sent from a base station is displayed in
standby mode when you use your phone on a mobile phone network based on Micro
Cellular Network (MCN) technology.
1. In standby mode, press , select Settings and press (Select).
2. Select Display Settings and press (Select).
3. Select Main Display and press (Select).
4. Select Cell Information and press (Select).
5. Select On or Off and press (Select).
220
Settings
Page 91

Adjusting the Contrast of the External Display
You can adjust the contrast of the external display to one of nine levels.
1. In standby mode, press , select Settings and press (Select).
2. Select Display Settings and press (Select).
3. Select External Display and press (Select).
4. Select Contrast and press (Select).
5. Close your phone.
A screen for adjusting the contrast appears on the external display.
6. Use the side keys ( and ) to adjust the contrast, open yo ur phone and press
(OK).
Settings
221
Page 92

Phone Profiles
This feature allows you to change the sound and vibration to match your surrounding
conditions. Your phone has four preset profiles. Y ou can change the sound and vibration
settings of each profile.
Normal: Profile for ordinary use.
Silent: Profile for when you do not want your phone to emit any sound.
Car: Profile for using handsfree while you are driving.
Meeting: Profile for meetings, etc.
Switching Profiles
1. In standby mode, press , select Settings and press (Select).
2. Select Phone Profiles and press (Select).
3. Select the profile you want to set and press .
If a profile other than Normal is set, the indicator ( / / ) for the profile
appears at the top of the display.
222
Settings
When your phone is connected to an
in-car device or a wireless headset
via Bluetooth™, the incoming
ringtone for Bluetooth™ plays and
your phone does not vibrate for
incoming calls regardless of the
phone profile settings.
• To temporarily switch the phone
profile to Silent, press and hold
back to previous profile, press and
hold in standby mode.
• You can also set the ringtone and
vibration individually for each
Contacts list entry (page 67) and
each Contacts list category (page
69). When the ringtone and
vibration are set for both individual
entries and categories, the settings
for individual entries take priority
over the settings for individual
categories. However, when the
phone profile is set to Silent, the
ringtone does not play.
Note
Tip
in standby mode. To switch
Page 93

Tip
• Only the vibration and alarm
settings can be changed for Silent
profile.
• When the ringtone and vibration
are set for both individual Contacts
list entries and Contacts list
categories, the settings for
individual entries take priority over
the settings for individual
categories. However, when the
phone profile is set to Silent, the
ringtone does not play.
Personalising Profiles
Personalising the Ringtone Volume
For any profile except Silent, you can set the ringtone volume.
1. After Step 2 of “Switching Profiles” (page 222), select Normal, Car or Meeting
and press (Options).
2. Select Personalise and press (Select).
3. Select Ringtone Volume and press (Select).
4. Select Voice Call, Video Call or Received Message and press (Select).
5. Use to adjust the volume and press (OK).
Use or to increase the volume and use or to decrease the
volume.
Settings
223
Page 94

Personalising the Ringtone
For any profile except Silent, you can set a preinstalled sound in your phone or a sound
or video in My Items as the ringtone.
1. After Step 2 of “Switching Profiles” (page 222), select Normal, Car or Meeting
and press (Options).
2. Select Personalise and press (Select).
3. Select Assign Ringtone and press (Select).
4. Select Voice Call, Video Call or Received Message and press (Select/
Options).
If you selected Received Message, select Ringtone and press (Select).
5. Select the type of tone you want to set and press (Select).
◆ Preset Patterns: Allows you to select from patterns preinstalled in your phone.
◆ Preset Sounds: Allows you to select from melodies and sound effects
preinstalled in your phone.
◆ My Sounds: Allows you to select from sound and video files stored in My Items.
6. Select the tone you want to set and press .
7. Press (Assign).
Note
• A video file or a sound file including
pictures cannot be set as the
ringtone for incoming messages.
• If a video file is set as the ringtone,
the video is displayed for incoming
calls and the picture set as the
incoming picture (page 215) is not
displayed.
Tip
To set the ringtone duration for
incoming messages, select
Received Message in Step 4, press
(Options) and select Ringtone
Duration.
224
Settings
Page 95

Personalising the Vibration
1. After Step 2 of “Switching Profiles” (page 222), select the profile you want to set
and press (Options).
2. Select Personalise and press (Select).
3. Select Vibration and press (Select).
4. Select Voice Call, Video Call or Received Message and press (Select).
If you selected Silent in Step 1, select On or Off and press (Select).
5. Select the vibration pattern you want to set and press .
Personalising the Keypad Tone Volume
For any profile except Silent, you can set the keypad tone volume.
1. After Step 2 of “Switching Profiles” (page 222), select Normal, Car or Meeting
and press (Options).
2. Select Personalise and press (Select).
3. Select Keypad Volume and press (Select).
4. Use to adjust the volume and press (OK).
Use or to increase the volume and use or to decrease the
volume.
Settings
225
Page 96

Personalising the Keypad Tone
For any profile except Silent, you can set the keypad tone.
1. After Step 2 of “Switching Profiles” (page 222), select Normal, Car or Meeting
and press (Options).
2. Select Personalise and press (Select).
3. Select Keypad Tones and press (Select).
4. Select Original 1 or Original 2 and press (Select).
Personalising the Sound Effects Volume
For any profile except Silent, you can set the volume level of each of the sound effects
for turning on/off the power, opening/closing your phone and errors.
1. After Step 2 of “Switching Profiles” (page 222), select Normal, Car or Meeting
and press (Options).
2. Select Personalise and press (Select).
3. Select Sound Effects Vol. and press (Select).
4. Select the item you want to set and press (Select).
5. Use to adjust the volume and press (OK).
Use or to increase the volume and use or to decrease the
volume.
226
Settings
Page 97

Personalising the Sound Effects Tones
For any profile except Silent, you can set each of the sound effects for turning on/off the
power and opening/closing your phone.
1. After Step 2 of “Switching Profiles” (page 222), select Normal, Car or Meeting
and press (Options).
2. Select Personalise and press (Select).
3. Select Sound Effects and press (Select).
4. Select the item you want to set and press (Select).
5. Select the type of tone you want to set and press (Select).
◆ Preset Pattern: Allows you to set the default sound effect.
◆ Preset Sounds: Allows you to select from melodies and sound effects
preinstalled in your phone. Select the sound you want to set, press and then
press (Assign).
◆ My Sounds: Allows you to select from sound files stored in My Items. Select the
sound you want to set, press and then press (Assign).
Settings
227
Page 98

Personalising the Multimedia Volume
For any profile except Silent, you can set the volume level for games, messaging,
Vodafone live! and playing sound data in My Items.
1. After Step 2 of “Switching Profiles” (page 222), select Normal, Car or Meeting
and press (Options).
2. Select Personalise and press (Select).
3. Select Multimedia Volume and press (Select).
4. Use to adjust the volume and press (OK).
Use or to increase the volume and use or to decrease the
volume.
Personalising the Battery Alarm Tone
When the battery level is very low and your phone is about to run out of power, the
battery alarm tone plays. For any profile except Silent, you can set whether to play the
battery alarm tone.
1. After Step 2 of “Switching Profiles” (page 222), select Normal, Car or Meeting
and press (Options).
2. Select Personalise and press (Select).
3. Select Battery Alarm and press (Select).
4. Select On or Off and press (Select).
228
Settings
Page 99

Note
Whether an alarm tone plays in
Normal profile and Car profile
depends on the alarm (page 267) and
Calendar (page 263) settings.
Personalising the Alarm Tone
You can set whether the alarm tone plays for Silent profile and Meeting profile.
1. After Step 2 of “Switching Profiles” (page 222), select Silent or Meeting and press
(Options).
2. Select Personalise and press (Select).
3. Select Alarm and press (Select).
4. Select On or Off and press (Select).
Resetting Profiles
You can reset the settings of each profile.
1. After Step 2 of “Switching Profiles” (page 222), select the profile you want to reset
and press (Options).
2. Select Set to Default and press (Select).
3. Enter your security code (page 38).
A confirmation screen appears.
4. Press (Yes).
Settings
229
Page 100

Language Setting
You can change the display language.
1. In standby mode, press , select Settings and press (Select).
2. Select Phone Settings and press (Select).
3. Select Language and press (Select).
4. Select the language you want to set or Automatic and press (Select).
Tip
If the language is set to Automatic,
the language is set automatically in
accordance with the language priority
setting of the SIM card. If your phone
does not support the language set for
the SIM card, the default language of
your phone is selected.
230
Settings
 Loading...