

Page 1

User’s Manual
Camileo BW10
EN
CZ
DE
DK
ES
FI
FR
GR
HR
HU
IT
NL
NO
PL
PT
RS
RU
SE
SK
SL
TR
AR
Page 2

INTRODUCTION
Welcome and thank you for choosing a TOSHIBA product.
For your convenience, your TOSHIBA product is furnished with two guides:
a) Quick Start Guide, and
b) this comprehensive PDF User’s Manual.
Please read these instructions carefully before using the camcorder. Keep
this Manual in a safe place for later reference.
Symbols used in this manual
HINT Points giving some extended instructions or special points to pay
CAUTION Points that require special attention.
(page xx) Refer to the page indicated for detailed information.
attention to.
EN i User’s Manual
Page 3

SHOOT, PLAY BACK AND SAVE
Slot cover
Terminal cover
BEFORE RECORDING IN WATER
Make sure that the slot cover and the terminal cover are closed.
If a cover is open, water will get inside the camcorder and damage it.
When closing the slot cover and terminal cover, make sure that no foreign
object such as sand, hair, dust, etc. is caught in the rubber seal.
There are places in the camcorder where water might accumulate, but this
will not affect its waterproof properties.
User’s Manual ii EN
Page 4

PREPARE THE BATTERY PACK AND CARD
When using for the first time
The battery pack is already installed in the camcorder. Remove the battery
pack from the camcorder, remove the insulating seal, and reinstall the battery
pack in the camcorder.
EN iii User’s Manual
Page 5

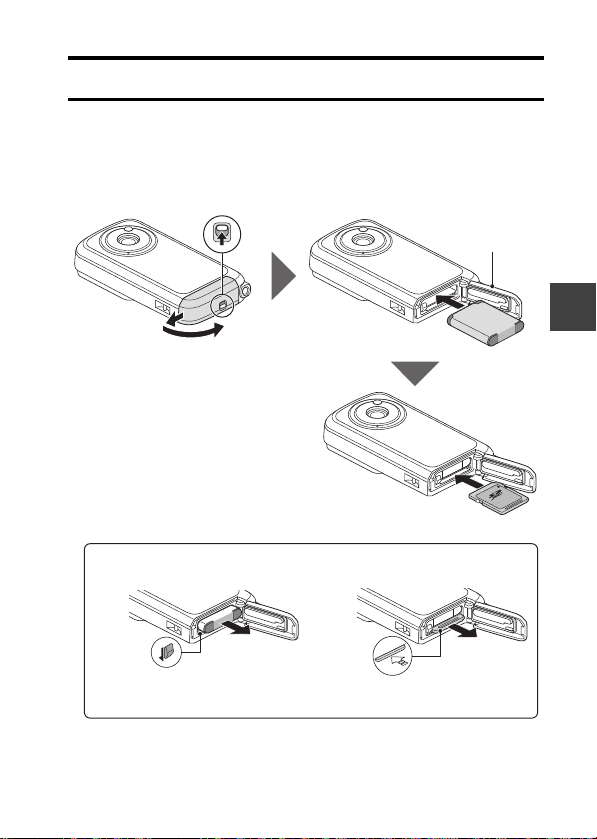
Installing the battery pack and card
3 Open
2 Pull out
1 While pressing...
6 Close
4 Insert
5 Insert
<Remove the battery pack> <Remove the card>
2 Pull out
1 Press
2 Pull out
1 Push in
Install the card and the supplied battery pack.
i The card is not an included accessory. Please purchase a commercially
sold card.
i The camcorder has an internal memory, which means that you can record
and save the recorded data even if no card is installed.
User’s Manual iv EN
Page 6

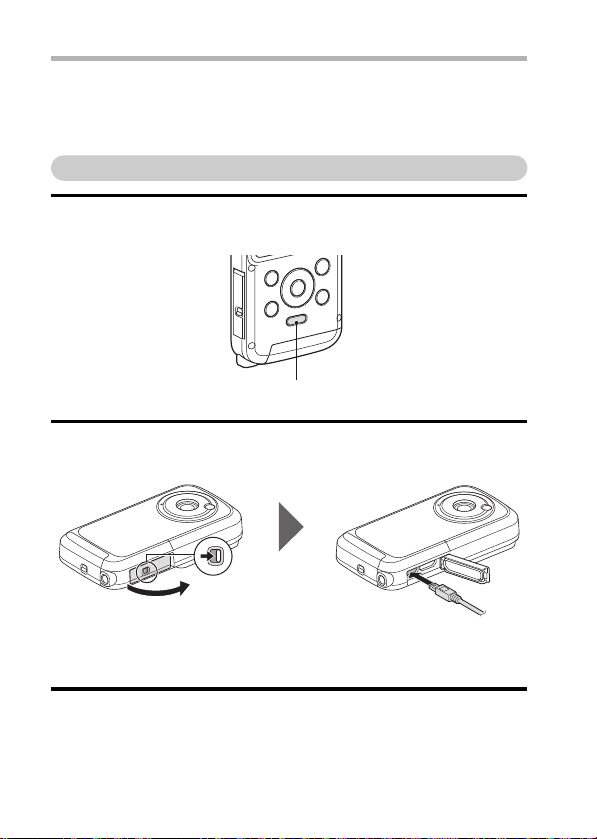
CAUTION
POWER button
1 While pressing
2 Open
3 Connect
→To USB connector
on computer
Close the slot cover and terminal cover securely
i If any cover is not closed or is not closed completely, the camcorder will no
longer be waterproof. When closing a cover, make sure that no foreign
object such as sand, hair, dust, etc. is caught in the rubber seal.
Charging the battery pack
1 Press the power button to turn off the camcorder.
h It is not possible to charge the battery pack while the camcorder is on.
2 Use the dedicated USB interface cable (supplied) to connect the
camcorder to a computer.
3 Turn on the computer.
h Charging begins.
h During charging, the multi-indicator is lit orange.
h When charging is completed, the indicator turns off.
h The charging time is approx. 220 minutes.
EN v User’s Manual
Page 7

CAUTION
During charging...
i Do not turn on the camcorder while the battery pack is charging. It is not
possible to charge the battery pack while the camcorder is on.
i Do not turn off the computer while the battery pack is charging. It is not
possible to charge the battery pack while the computer is off.
i With certain computers, it may be possible to charge the battery pack even
when the computer is turned off.
Your BW10 camcorder was supplied with a USB cable to be able to charge
the battery through the USB connection on your PC. If you want to charge
your camera battery via an AC wall socket, please acquire a standard USB
AC adaptor (not supplied by Toshiba) with the following minimum
specifications:
Output DC5V more than 500mA
User’s Manual vi EN
Page 8

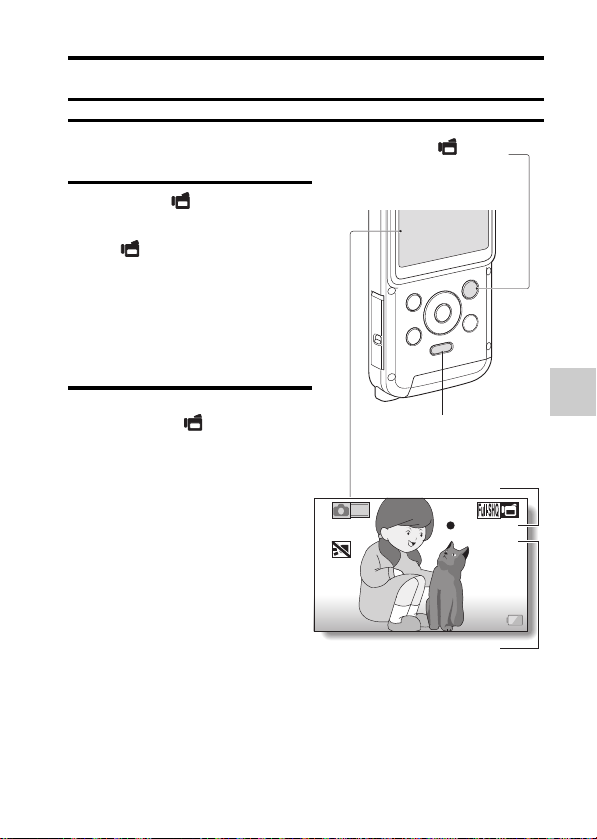
Shooting
REC 00:00:09
5
2
M
POWER button
[ ] button
(Video recording button)
Available recording
time remaining
Recording time
[ ] button
(Photo shooting button)
MENU button
1 Press the POWER button for at
least 1 second to turn the
camcorder on.
h If the screen to set the date
and time appears, press the
MENU button 2 times to
cancel it.
For how to set the date and
time, see page 16.
2 Record.
EN vii User’s Manual
To record a video clip:
h Press the [ ] button to
begin recording a video clip.
h Press the [ ] button again
to end the recording.
To take a photo:
h Press the [ ] button.
h A still image is captured.
Page 9

Playback
2010.12.24 14:25 100-0011
Remaining battery
power indication
Orange frame
[
=
] button
(Play button)
Arrow keys
OK button
MENU button
1 Press the play [=] button.
h The display changes to the
Playback Screen.
2 Select the image to play back.
h Use the arrow keys to move
the orange frame to the
image you wish to play back.
h The image information for the
framed image is shown in the
bottom part of the monitor.
3 Press the OK button.
h The file you selected is
played back.
<To return to the recording
mode>
h Press the play [=] button.
User’s Manual viii EN
Page 10

Deleting files
1 On the screen in step 2, move the orange frame to the file you wish
to delete, and press the MENU button.
2 Select “DELETE SINGLE”, and press the OK button.
h If you press [G] or [H], the screen to delete a different file will appear.
3 When you are finished deleting files, press the MENU button.
When you are finished using the camcorder...
Press the
POWER
button for at least 1 second to turn the camcorder off.
EN ix User’s Manual
Page 11

Copy data from your camcorder to the
Supplied dedicated
USB interface cable
To USB terminal
To USB connector
USB CONNECTION
COMPUTER
PRINTER
CANCEL
OKCANCEL
OK
computer
Connect your camcorder to a computer, and copy the desired data to the
computer.
1 Turn on the computer, and use the supplied dedicated USB interface
cable to connect your camcorder to the computer.
h Connect the cable between the camcorder ’s USB terminal and the
computer’s USB connector.
2 Turn on the camcorder (page
13).
h The USB Connection Screen
appears on the camcorder’s
monitor.
User’s Manual x EN
Page 12

3 Select “COMPUTER”, and press
OK
USB CONNECTION
CARD READER
YouTube
MTP
PC CAMERA
CANCEL
OKCANCEL
the OK button.
h The screen to select the
computer connection mode
appears.
4 Select “CARD READER”, and press the OK button.
5 Copy data from your camcorder to a computer.
EN xi User’s Manual
Page 13

Dismounting the camcorder
CAUTION
i To disconnect your camcorder, be sure to follow the procedure below.
Failure to follow this procedure may cause faulty operation of your
computer or corrupt the files in your camcorder.
1 Left-click on the icon for safely removing hardware in the task tray.
h A list appears showing the devices connected to the computer’s USB
connector.
2 Left-click on the camcorder drive (E:).
h The camcorder can now be disconnected.
h The drive name (E:) may be different on your computer.
HINT
About the application software
Concerning the application software, the following software is bundled in the
supplied DVD-ROM.
i CAMILEO Uploader
With application installed, when your camcorder is connected to your
computer in the YouTube mode, the camcorder is ready to upload to
YouTube.
i MAGIX Video deluxe 15 Plus Trial Software
For editing movies. 30-day trial version.
User’s Manual xii EN
Page 14

CONTENTS
INTRODUCTION .................................................................................... i
CHECKING THE INCLUDED ACCESSORIES ...................................... 3
SAFETY INSTRUCTIONS ..................................................................... 4
ABOUT THE CARD ............................................................................... 5
Media cards that can be used with this camcorder ......................... 5
What “card” means in this manual .................................................. 5
SETUP
PARTS NAMES ..................................................................................... 6
Installing the battery pack and card ....................................................... 8
About recharging .......................................................................... 12
About the temperature alert icon \ .......................................... 12
TURNING THE CAMCORDER ON AND OFF ..................................... 13
Turning on the camcorder ............................................................. 13
Turning off the camcorder ............................................................. 13
Turning on the camcorder when the power save (sleep)
mode is active ............................................................................... 14
DATE AND TIME SETTING ................................................................. 16
ACCESSING THE MENU SCREEN .................................................... 18
SHOOTING
VIDEO CLIP RECORDING .................................................................. 20
SHOOTING SINGLE SHOTS .............................................................. 22
SHOOT A STILL IMAGE WHILE RECORDING A VIDEO CLIP .......... 25
MACRO-PHOTOGRAPHY (ZOOM) .................................................... 27
PLAYING BACK VIDEO CLIPS AND STILL IMAGES ......................... 28
How to save one frame from a video clip as a still image ............. 31
EN 1 User’s Manual
Page 15

CONNECTING TO A TV
CONNECTING TO A TV .......................................................................32
Connecting to the HDMI terminal ..................................................33
PLAYING BACK ON A TV ....................................................................34
APPENDICES
FREQUENTLY ASKED QUESTIONS ..................................................35
OVERVIEW OF THE MENU SCREEN .................................................40
SPECIFICATIONS ................................................................................42
Camcorder .....................................................................................42
Concerning the multi-indicator .......................................................43
Others ............................................................................................44
TOSHIBA SUPPORT ............................................................................45
REGULATORY INFORMATION ...........................................................46
ADDITIONAL INFORMATION ..............................................................49
User’s Manual 2 EN
Page 16

CHECKING THE INCLUDED ACCESSORIES
i Software DVD + User’s
Manual (DVD-ROM): 1
i Dedicated USB interface
cable (page v, x, 9): 1
i Soft case: 1 i Quick Start Guide
i Li-ion battery pack: 1
i Handstrap: 1
i Warranty Leaflet
EN 3 User’s Manual
Page 17

SAFETY INSTRUCTIONS
1. Do not drop, puncture or disassemble the camcorder; otherwise the
warranty will be voided.
2. Do not expose the camcorder to high temperature or leave it in direct
sunlight. Doing so may damage the camcorder.
3. Use the camcorder with care. Avoid pressing hard on the camcorder
body.
4. For your own safety, avoid using the camcorder when there is a storm or
lighting.
5. Do not use batteries of different specifications. Doing so may lead to the
potential for serious damage.
6. Remove the battery during long periods between usages, as a
deteriorated battery may affect the functionality of the camcorder.
7. Remove the battery if it shows signs of leaking or distortion.
8. Use only the accessories supplied by the manufacturer.
9. Keep the camcorder out of reach of infants.
CAUTION
10. Risk of explosion if battery is replaced by an incorrect type.
11. Dispose of used batteries according to the instructions.
User’s Manual 4 EN
Page 18

ABOUT THE CARD
Media cards that can be used with this camcorder
The type of card that can be inserted into and used with this camcorder is:
i SD Memory Card
i SDHC Memory Card
i SDXC Memory Card
What “card” means in this manual
i In this manual, SD Memory Cards, SDHC Memory Cards and SDXC
Memory Cards that can be used in this camcorder are referred to as
“card”.
EN 5 User’s Manual
Page 19

PARTS NAMES
Lens
Terminal cover
Microphone
Speaker
LED light
Slot cover
Front
SETUP
SETUP
SETUP
User’s Manual 6 EN
Page 20

Rear
Multi-indicator
Monitor
OK button
Arrow keys
[ ] button
(Photo shooting
button)
[ ] button
(Video recording
button)
POWER button
[=] button
(Play button)
MENU button
[]
EN 7 User’s Manual
Page 21
Installing the battery pack and card
3 Open
2 Pull out
1 While pressing...
6 Close
4 Insert
5 Insert
<Remove the battery pack> <Remove the card>
2 Pull out
1 Press
2 Pull out
1 Push in
Install the card and the supplied battery pack.
i The card is not an included accessory. Please purchase a commercially
sold card.
i The camcorder has an internal memory, which means that you can record
and save the recorded data even if no card is installed.
SETUP
User’s Manual 8 EN
Page 22
CAUTION
POWER button
1 While pressing
2 Open
3 Connect
→To USB connector
on computer
Close the slot cover and terminal cover securely
i If any cover is not closed or is not closed completely, the camcorder will no
longer be waterproof. When closing a cover, make sure that no foreign
object such as sand, hair, dust, etc. is caught in the rubber seal.
Charging the battery pack
1 Press the power button to turn off the camcorder.
h It is not possible to charge the battery pack while the camcorder is on.
2 Use the dedicated USB interface cable (supplied) to connect the
camcorder to a computer.
3 Turn on the computer.
h Charging begins.
h During charging, the multi-indicator is lit orange.
h When charging is completed, the indicator turns off.
h The charging time is approx. 220 minutes.
EN 9 User’s Manual
Page 23

CAUTION
During charging...
i Do not turn on the camcorder while the battery pack is charging. It is not
possible to charge the battery pack while the camcorder is on.
i Do not turn off the computer while the battery pack is charging. It is not
possible to charge the battery pack while the computer is off.
i With certain computers, it may be possible to charge the battery pack even
when the computer is turned off.
HINT
To format a card
1 Insert the card in the camcorder, and press the POWER button (pages 8
and 13).
2 Press the MENU button.
3 Select “FORMAT” and press the OK button.
i The Format Screen appears. Follow the instructions on the screen to
format the card.
Shooting without a card installed
i When a card is installed, images are recorded to and played back from the
card. When no card is installed, images are recorded to and played back
from the camcorder ’s internal memory. When the camcorder is turned on
with no card installed, the internal memory icon is shown on the monitor
to let you know that the images you capture will be saved to the
camcorder’s internal memory.
User’s Manual 10 EN
SETUP
Page 24

CAUTION
Do not charge the battery pack immediately after the camcorder has
been in continuous use for a long time
i The battery pack becomes hot when the camcorder is used continuously
for a long time. If you attempt to charge the battery pack in this state, the
multi-indicator may flash orange and it may not be possible to charge the
battery pack. Wait until the battery pack has cooled down before
attempting to charge it.
Does the battery pack appear swollen?
i The lithium-ion battery used in this camcorder may expand slightly when
stored in a hot environment or repeatedly used, but this is not a safety
hazard. However, a battery that is difficult to insert because it has become
swollen may then be impossible to extract from the battery compartment.
In this case, please discontinue its use and replace it with a new battery.
Do not use the battery with the outer covering or label removed
i Doing so may result in malfunction.
HINT
About the internal backup battery
i This camcorder’s internal battery serves to maintain the date and time
settings, as well as the shooting settings. The backup battery will be fully
charged when the battery pack is kept in the camcorder continuously for
about 2 days. In the fully charged state, the backup battery will maintain
the camcorder settings for about 7 days.
When not using the camcorder for a long time, remove the battery pack
i A small amount of power is still used even if the camcorder is turned off,
and it is therefore recommended that the battery pack be removed from
the camcorder if it is not going to be used for a long time. Note that when
the battery pack is removed for a long period, the time and date settings
may be cleared. Before using your camcorder again, be sure to confirm
that the camcorder settings are correct.
Recharging when connected to the USB terminal
i The battery can be recharged while the camcorder is connected to a
computer.
i Note, however, that the time it takes to recharge will differ depending on
the camcorder’s operating condition.
i Connect the dedicated USB interface cable to the USB connector on your
computer. Do not connect it to the USB connector on the monitor or the
keyboard, or to the USB hub.
i If the camcorder is not going to be used for an extended period of time,
please disconnect the dedicated USB interface cable from the camcorder.
EN 11 User’s Manual
Page 25

About recharging
Recharging takes place only when the camcorder is turned off, or when the
power save function or the sleep function has been activated. Recharging
does not take place when the camcorder is in the recording mode or playback
mode.
About the temperature alert icon \
During camcorder use, if the temperature of the battery or inside the
camcorder (excluding the battery) rises, a temperature alert icon \ will
appear as described below.
k When the battery or internal camcorder (excluding battery)
temperature rises during use
h During camcorder use, if the temperature of the battery or inside the
camcorder (excluding the battery) rises, a \ icon lights on the
monitor. It is still possible to record and play back even when the \
icon is lit; however it is advised that you discontinue use as soon as
possible and turn the camcorder off.
h If the temperature rises further, the \ icon will start to flash, and the
camcorder will turn off automatically.
The camcorder cannot be turned on until the temperature has dropped
(or as long as the \ icon remains flashing). Please wait until the
temperature has dropped before resuming use.
h During video recording, a countdown indicator will show the time
starting about 15 seconds before shutdown. When the indicator shows
0 seconds, recording stops.
h If the camcorder is turned off while the temperature is high (that is, while
the \ icon is flashing), it cannot be turned on again until the
temperature has dropped (or as long as the \ icon remains flashing).
SETUP
User’s Manual 12 EN
Page 26

TURNING THE CAMCORDER ON
POWER button
AND OFF
Turning on the camcorder
1 Press the POWER button for at least
1second.
h If you briefly press the POWER
button, once, the camcorder will
switch to the power save mode.
h When the [I] arrow key is used to
turn on the camera, the screen to set
the operation sounds appears.
Turning off the camcorder
1 Press the POWER button for at least 1 second.
h The camcorder turns off.
HINT
To adjust the operation sounds
i If you turn on the camcorder by pressing the POWER button while holding
down the [I] arrow key, the screen to change the operation sounds will
appear.
EN 13 User’s Manual
Page 27

Turning on the camcorder when the power save (sleep) mode is active
In order to preserve battery pack power, the power save (sleep) function will
automatically turn off the camcorder after about 1 minute of no use during
shooting, or about 5 minutes of no use during playback (factory-preset
setting).
i When the power save mode is active, you can restore the power by any of
the following methods:
h Press the POWER button.
i After the power save mode has been active for about 10 minutes, the
camcorder will switch to the standby mode. In this case, you can restore
the power by pressing the POWER button.
i When the camcorder is connected to a computer or printer, the camcorder
turns off after about 12 hours.
SETUP
User’s Manual 14 EN
Page 28

HINT
i Due to the characteristics of the camcorder, the outer surface may
become warm during use, but this does not indicate a malfunction.
i If the camcorder starts to feel uncomfortably hot during use, you
might temporarily discontinue use until it cools down, or try holding it
in your other hand for a while.
Please use a tripod or other support when using the camcorder for a
long time.
<Caution>
To immediately activate the power save mode
i Press the POWER button briefly to activate the power save function.
CAUTION
If the K icon appears...
i When a picture is taken, the date and time it was captured are recorded
with it. If the date and time settings have not been completed (page 16),
the date and time cannot be recorded with the captured images. For this
reason, immediately after the camcorder is turned on, the “Set date and
time” reminder briefly appears, after which the K icon is shown on the
Recording Screen. To have the date and time recorded with the images,
please complete this setting before capturing images.
EN 15 User’s Manual
Page 29

DATE AND TIME SETTING
OK
CLOCK SET
DATE
2010/06/01
00:00
D / M / Y
OK
TIME
DISP
POWER button
OK button
Arrow keys
When the camcorder is first turned on after purchase, the Clock Set Screen
appears. Proceed from step 4 to set the date and time.
1 Press the power button to turn on the camcorder.
2 Press the MENU button.
h The Setting Menu appears.
3 Use the [I] and [J] arrow keys
to select “CLOCK SET”, and
press the OK button.
h The Clock Set Screen
appears.
4 Set the date and time.
h To select the desired setting:
Press the [G] and [H] arrow
keys.
h To change the assigned
value: Press the [I] and [J]
arrow keys.
5 Press the OK button.
h Assign the desired value to
each setting.
6 Press the MENU button.
h The date and time settings
are completed, and you are
returned to the Setting Menu.
User’s Manual 16 EN
SETUP
Page 30

HINT
i Under normal conditions, while the battery pack is being replaced, an
internal battery will maintain the date and time settings. However, there is a
small chance the settings may be lost (the backup will last for about
7 days). It is recommended to check that the date and time settings are still
correct after replacing the battery pack and before shooting or recording of
any type (follow step 1).
To correct the date and time settings
1 Turn on the camcorder.
2 Press the MENU button.
3 Select “CLOCK SET” and press the OK button.
h The screen to set the date and time appears.
h The current date and time settings are shown.
4 Select the line you wish to change, and make the correction.
EN 17 User’s Manual
Page 31

ACCESSING THE MENU SCREEN
MENU
LED LIGHT
FACE CHASER
PHOTO VIEW
LANGUAGE
CLOCK SET
TV OUTPUT
OK
MENU button
1 Turn on the camcorder (page 13).
2 Press the MENU button.
h The Menu Screen appears.
h To cancel the Menu Screen, press the MENU button.
SETUP
User’s Manual 18 EN
Page 32

3 Press [I] or [J] to select the item you wish to change, and press the
OK
MENU
LED LIGHT
FACE CHASER
PHOTO VIEW
LANGUAGE
CLOCK SET
TV OUTPUT
OK
FACE CHASER
ON
OFF
Select an item
to change
Applicable mode
<Setting Screen>
Press OK button
Press
[I]/ [J]
OK button.
h The Setting Screen for the selected item appears.
h To return to the Menu Screen, press the MENU button.
EN 19 User’s Manual
Page 33
SHOOTING
REC 00:00:09
5
2
M
POWER button
[ ] button
(Video recording button)
Available recording
time remaining
Recording time
SHOOTING
VIDEO CLIP RECORDING
1 Turn on the camcorder
(page 13).
2 Press the [ ] button.
h Recording begins.
h It is not necessary to keep the
[ ] button pressed while
recording.
h When the re maining recording
time available for the currently
recording clip becomes little, a
countdown of the remaining
recording time appears on the
display.
3 End the recording.
h Press the [ ] button again
to stop recording.
SHOOTING
User’s Manual 20 EN
Page 34

HINT
To change the video settings
1 With the Recording Screen displayed, press the [H] arrow key.
h The screen to change the video settings appears.
h To return to the Recording Screen without changing the settings, press
the MENU button.
VIDEO
1920x1080 30fps SHQ
2 Use the [G] and [H] keys to select a setting, and press the OK button.
h The video settings are changed, and you are returned to the recording
screen.
To record using the action mode (video self-timer)
1 Press and hold the [ ] button until the Action Mode Screen appears.
h About 10 seconds after the Action Mode Screen appears, recording
begins.
h After recording begins, it ends in about 60 seconds.
EN 21 User’s Manual
Page 35

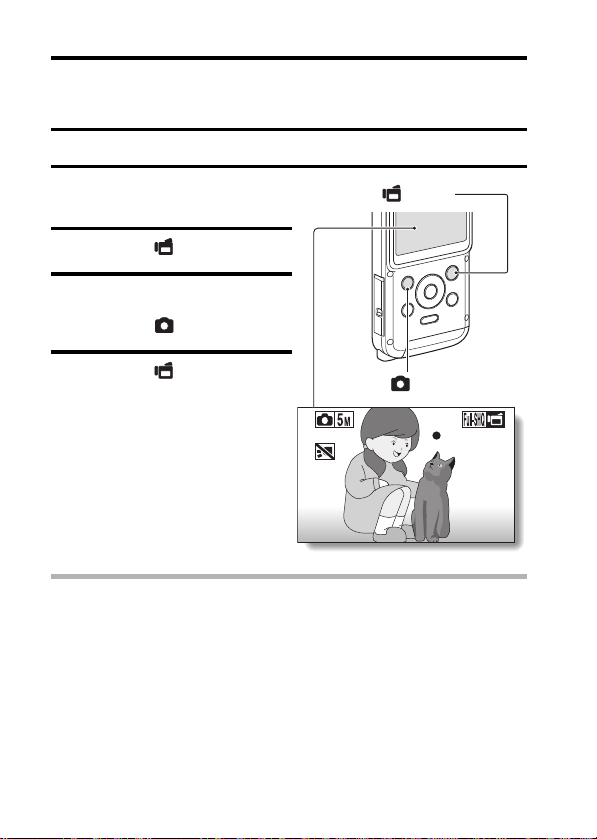
SHOOTING SINGLE SHOTS
00:00:1900:00:1900:00:1913
[ ] button
(Photo shooting
button)
POWER button
Capture a still image (single-shot).
1 Turn on the camcorder
(page 13).
2 Press the [ ] button.
h The shutter releases and
the image is captured.
h You can view the captured
image on the monitor by
keeping the [ ] button
depressed when you
capture the image.
SHOOTING
User’s Manual 22 EN
Page 36

To change the photo settings
1 With the recording screen displayed, press the [G] arrow key.
h The screen to change the photo settings appears.
h To return to the recording screen without changing the settings, press
the MENU button.
PHOTO
2592x1944
2 Use the [G] and [H] keys to select a setting, and press the OK button.
h The photo settings are changed, and you are returned to the recording
screen.
EN 23 User’s Manual
Page 37

HINT
Camcorder shake icon
If the camcorder shake icon >
appears...
i During still image shooting, if the
shutter speed is slow and the
possibility that the image may be
blurred due to camcorder shake
becomes high, the camcorder shake
icon may appear on the monitor. In
this case, use a tripod to stabilize the
camcorder when shooting.
Does it seem to take a long time to
save images?
i When shooting in dimly lit conditions, it may take some time to save the
data to the card.
SHOOTING
User’s Manual 24 EN
Page 38
SHOOT A STILL IMAGE WHILE
REC 00:00:09
[ ] button
[ ] button
RECORDING A VIDEO CLIP
You can capture a still image (a single-shot) while recording a video clip.
1 Turn on the camcorder
(page 13).
2 Press the [ ] button.
3 When you see a scene you’d
like to capture as a still image,
press the [ ] button.
4 Press the [ ] button to end
the video clip recording.
HINT
i When the remaining video recording time becomes approximately
50 seconds, it will no longer be possible to capture a still image while
recording a video clip. The exact remaining recording time at which this
occurs will differ depending on the subject and on the recording size, as
well as on the video clip recording mode. If you intend to capture a still
image while recording a video clip, it is suggested that you take note of the
remaining video recording time.
EN 25 User’s Manual
Page 39

About the recording size of still images
i The size of a still image captured during video clip recording depends on
the video clip recording size.
Video clip recording size setting Still image recording size
Y 1920 × 1080 pixel
& 1280 × 720 pixel
) 640 × 480 pixel
SHOOTING
User’s Manual 26 EN
Page 40

MACRO-PHOTOGRAPHY (ZOOM)
Press [I]/[J]
Monitor
1 Point the camcorder lens at the
subject.
2 Press [I] or [J].
[I]: Zoom in on the subject.
[J]: Zoom out.
h When the zoom switch is
pushed, the zoom bar appears
on the monitor.
3 Take the picture.
For video clip recording, see
page 20.
For shooting single shots, see
page 22.
EN 27 User’s Manual
Page 41

PLAYING BACK VIDEO CLIPS AND
2010.12.24 14:25 100-0011
MENU button
Remaining battery
power indication
Orange frame
[
=
] button
(Play button)
Arrow keys
OK button
STILL IMAGES
1 Press the play [=] button.
h The display changes to
the Playback Screen.
2 Select the image to play back.
h Use the arrow keys to
move the oran ge frame to
the image you wish to
play back.
h The image in formation for
the framed image is
shown in the bottom part
of the monitor.
3 Press the OK button.
h The file you selected is
played back.
<To return to the recording
mode>
h Press the play [=] button.
SHOOTING
HINT
Slideshow playback
i In step 3, if you press the OK button for about 1 second or more, a
slideshow playback will start.
i The slideshow playback will stop when any button is pressed.
User’s Manual 28 EN
Page 42

Deleting files
1 On the screen in step 2, move the orange frame to the file you wish
to delete, and press the MENU button.
2 Select “DELETE SINGLE”, and press the OK button.
h If you press [G] or [H], the screen to delete a different file will appear.
3 When you are finished deleting files, press the MENU button.
EN 29 User’s Manual
Page 43

Video clip playback operation
To do this... Do this
Normal forward playback Press the OK button.
Stop playback During playback, press [J].
Pause During playback, press the OK button.
To p l ay
back one
image at a
time (single-
frame step)
Slow
playback
To
accelerate
playback
Return to normal playback
Adjusting the volume
HINT
If the a appears on the playback Screen...
i The a icon appears when playing back a file that was saved in
segments.
speed
Forward
playback
Reverse
playback
Forward
playback
Reverse
playback
Forward
playback
Reverse
playback
After pausing playback, press [H].
After pausing playback, press [G].
After pausing playback, press and hold [H].
After pausing playback, press and hold [G].
During forward playback, press [H].
h The playback speed changes each time
[H] is pressed, as follows:
Normal playback → 2× → 5× → 10× → 15×
Press [G] to resume normal playback speed.
During forward playback, press [G].
h The playback speed changes each time
[G] is pressed, as follows:
15× ← 10× ← 5× ← 2×
Press [H] to resume normal playback speed.
Press the OK button.
Louder: During playback, press [ ].
Softer: During playback, press [ ].
SHOOTING
User’s Manual 30 EN
Page 44

How to save one frame from a video clip as a still image
1 Play back the video clip. Pause the playback at the point you wish to
“snap” a photo.
2 Press the [ ] button.
h The screen to select the aspect ratio of the still image appears. Select
the desired aspect ratio, and press the [ ] button. Note, however,
that if the video clip aspect ratio is 4:3, you cannot select 16:9.
HINT
The file size for a video clip is very large
i Therefore, be aware that if the video clip is uploaded to a computer to be
played back, the computer may not be able to play back the video fast
enough, making it appear jerky. (The video will always be displayed
properly on the camcorder monitor or a television.)
i Depending on the card, recording may end even before the possible
recording time indicated.
Display the video clip playback point
i During video clip playback, press the MENU button for at least 1 second to
display a bar showing the current playback point in the video clip.
i Press the MENU button for about 1 second to cancel the bar.
CAUTION
During video clip playback, the sound of a motor is audible...
i During recording, the sound of the optical zoom movement or autofocus
movement was recorded. This is not a malfunction.
If no audio is heard...
i The audio is not played back when the video clip is played back in the
frame-by-frame, slow-motion, fast playback or reverse playback mode.
EN 31 User’s Manual
Page 45

CONNECTING TO A TV
CONNECTING TO A TV
CONNECTING TO A TV
By connecting the camcorder to a TV, you can play back the recorded files on
the TV.
CAUTION
Insert and pull out the cable carefully
i When connecting the cables, make sure that the cable plugs are correctly
oriented and that they match the shapes of the terminal sockets on the
devices. Push the plugs in straight when connecting them. If undue force is
used to connect a cable, it may permanently damage the connector pins in
the terminal socket.
i Do not use excessive force when connecting and disconnecting cables.
About image output: The image output destination differs depending on the
camcorder status.
Connection
cable
HDMI cable*
m: Images are output n: Images are not output
* When an HDMI cable is used to connect the camcorder to a TV, 1080p
video mode images are output as 1080i images.
Separately sold or commercially available mini-HDMI cable.
Image output
destination
Camcorder
monitor
TV mnm
Recording mode
Standby Recording
nmn
Playback
mode
CONNECTING TO A TV
User’s Manual 32 EN
Page 46

Connecting to the HDMI terminal
Set the input to [HDMI]
To HDMI terminal
To HDMI terminal
on the TV
Mini HDMI cable
Use a separately sold or commercially available mini-HDMI cable to connect
to a TV.
EN 33 User’s Manual
Page 47

PLAYING BACK ON A TV
i After connecting the camcorder to the television, switch the TV input to the
terminal to which the camcorder is connected.
i The playback method is the same as when viewing images on the
camcorder’s monitor. (Use the TV controls to adjust the volume.)
i The same playback procedure as when playing back with the camcorder is
used to play back audio recordings as well.
CAUTION
Insert and pull out the cable carefully
i When connecting the cables, make sure that the cable plugs are correctly
oriented and that they match the shapes of the terminal sockets on the
devices. Push the plugs in straight when connecting them. If undue force is
used to connect a cable, it may permanently damage the connector pins in
the terminal socket.
i Do not use excessive force when connecting and disconnecting cables.
CONNECTING TO A TV
User’s Manual 34 EN
Page 48

APPENDICES
APPENDICES
FREQUENTLY ASKED QUESTIONS
If you have a question about the camcorder operation, you might find the
answer in this compilation of frequently asked questions.
Question Answer Action
Power
Shooting
Why doesn’t the
power turn on?
Why is the battery
pack consumed
so quickly even
after it was fully
recharged?
Why doesn’t
recharging end?
Why does the
icon
appear?
Why does the
multi-indicator
flash orange?
Due to cold
temperatures, the
battery pack
temporarily lost its
power.
The ambient
temperature is
very low.
The battery pack
life has expired.
The battery pack
life has expired.
The remaining
battery pack
power is low.
A recorded file is
being saved on
the card.
Place the camc order
in your pocket to
warm it up before
using it.
Keep the battery
pack in an
environment of 10 to
40 °C (50 to 104 °F).
If a battery becomes
depleted quickly even
after it was sufficiently
charged, it should be
assumed that the
battery has reached
the end of its service
life. Please replace it
with a new battery.
Replace with a new
battery pack. If this
is not effective,
consult your dealer.
Recharge the
battery pack.
Not a malfunction.
Wait until the multiindicator turns off.
EN 35 User’s Manual
Page 49

Shooting
Monitor
Question Answer Action
Are the settings
retained even
after the
camcorder is
turned off?
Which resolution
setting should I
use?
When used in
cold weather, why
does the image
seem to leave
traces as it
moves?
Why does the
displayed image
contain some red,
blue and green
dots, or why are
black spots
visible?
— The settings are
— Select the resolution
Condition due to
the monitor
characteristics.
retained even after
the camcorder is
turned off.
setting according to
the intended use.
f: Appropriate for
printing letter-size or
larger, and for
printing a close-up
of part of a photo
(trimming).
+: For printing
standard photo
(photo service)
sizes.
,, [: For
photos displayed on
a web page, or sent
as e-mail
attachments.
Not a malfunction.
Spots that appear in
the monitor only
appear in the
monitor and will not
be recorded with the
images.
APPENDICES
User’s Manual 36 EN
Page 50

Viewing
images
Question Answer Action
Why is the image
too bright?
Why is there no
image (z is
shown)?
Why is the
playback image
distorted?
Why isn’t the
magnified image
clear?
Can I play back
image and sound
files that I edited
using my
computer?
The subject was
too bright.
This may happen
when trying to
play back images
stored on a card
from a different
digital camcorder.
If the subject
moves or the
camcorder is
moved during
recording, a
distorted image
may sometimes
occur.
Due to the
characteristics of
the camcorder,
magnified images
appear less clear.
— We cannot
When capturing an
image, devise a way
to compensate for a
bright subject, for
example, by
changing the
shooting angle.
Play back images
that were recorded
on a card using this
camcorder.
Not a malfunction.
This is a
characteristic of the
CMOS sensor.
Not a malfunction.
guarantee the
accurate playback of
files that have been
edited using a
computer.
EN 37 User’s Manual
Page 51

Viewing
images
Connecting
to a TV
Printing
Misc.
Question Answer Action
Why is there a
motor-like sound
during video clip
playback?
Why is there no
sound?
Why does a
message appear
during PictBridge
printing?
Why does the
“Insufficient card
memory” or
“Insufficient
internal memory”
message appear?
Why does the
“Card is
protected”
message appear?
Why can’t the
camcorder be
operated?
A problem such
as inability to
record or play
back occurs.
The sound of the
camcorder’s
mechanical action
was recorded.
The volume on
the TV is set to
the minimum.
There is a
problem with the
printer.
There is no more
available memory
on the card or in
the camcorder’s
internal memory.
The lock switch
on the card is in
the locked
(protect) position.
A temporary
internal circuitry
problem may be
the cause.
The card contains
files that were
saved using a
device other than
this camcorder.
Not a malfunction.
Adjust the volume
on the TV.
Please refer to the
instruction manual
for your printer.
Delete unnecessary
files, or use a card
that has more
memory available.
Move the lock
switch to the
unlocked position.
Remove the battery
pack from the
camcorder, wait a
few minutes, then
reinstall the battery
pack and try again.
After saving your
files to a different
medium, format the
card.
APPENDICES
User’s Manual 38 EN
Page 52

Misc.
Question Answer Action
Can I use my
camcorder
abroad?
Why does the
“System error”
message appear?
— When the
A problem has
occurred within
the camcorder or
card.
camcorder is
connected to a TV,
you can switch the
camcorder’s video
output to NTSC or
PAL. If you have
questions about
accessories etc.,
please consult with
a dealer near you for
advice.
Check the following
items:
1 Remove the
2 Remove the
3 Install a different
If “System error” still
appears after
performing the
above steps, then
take the camcorder
to the dealer for
service.
card and then
install it again.
battery pack and
then install it
again.
card.
EN 39 User’s Manual
Page 53
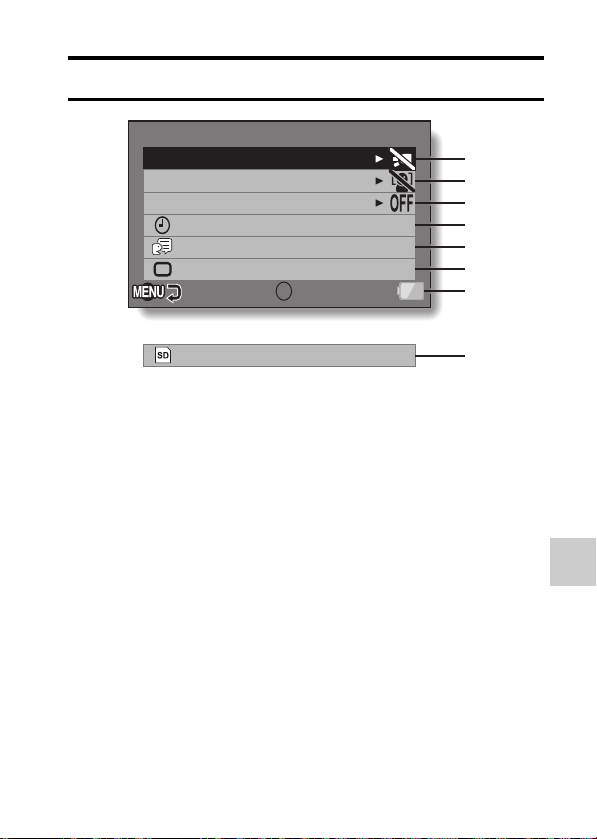
OVERVIEW OF THE MENU SCREEN
OK
MENU
LED LIGHT
FACE CHASER
PHOTO VIEW
LANGUAGE
CLOCK SET
TV OUTPUT
OK
FORMAT
5
4
3
2
1
6
7
8
APPENDICES
User’s Manual 40 EN
Page 54

1 LED light setting
2 Face chaser
3 PHOTO VIEW
h Switch the field of view.
4 CLOCK SET setting
h Set the camcorder’s clock.
5 LANGUAGE setting
h Select the language in which
the monitor messages are
displayed.
6 TV output setting
7 FORMAT
8 Remaining battery power
indication
/: The LED light operates
regardless of the shooting
conditions.
.: The LED light is disabled
regardless of the shooting
conditions.
-: Enable face chaser.
.: Disable face chaser.
EN 41 User’s Manual
Page 55

SPECIFICATIONS
Camcorder
Image Sensor 5Mega Pixel CMOS Sensor
Operation Modes Movie Record, Picture Record
Lens f=4.1mm;F2.8
Focus Range (wide) Normal:30cm~infinite
Zoom 10×Digital
Shutter Electronic
LCD monitor 2.0"LCD
Storage Media SD/SDHC/SDXC
Image Resolution
Movie Resolution
White Balance Auto
Exposure Auto
Light On/Off
File-Format
Image play Single Image/Slideshow
PC interface USB 2.0 Port
TV out mini HDMI
Battery Lithium-ion Rechargeable Battery
Dimension 55.0(H)*22.8(W)*107.0(D) mm
Weight 98.5g(Without battery)
Li-ion battery pack Type name PX1686
Water-resistant
2592 × 1944
1920 × 1080
1280 × 720 0.9M(16:9)
640 × 480 0.3M
<HD>1920 × 1080p 30fps
<HD>1280 × 720p 30fps
<VGA>640 × 480p 30fps
Picture:JPEG
Movie:Mpeg-4 AVC/H.264
Compliant with JIS protection grade 8
standards (according to tests conducted
in-house by manufacturer)
Can be submerged at a maximum depth of
2.0m (6.56ft.), for up to 60 minutes.
Camileo BW10
5M
2M(16:9)
APPENDICES
User’s Manual 42 EN
Page 56

Concerning the multi-indicator
The camcorder’s multi-indicator will light, flash, or be off, depending on the
different camcorder operations.
Multi-indicator status Camcorder status
Lit
Slow
Slow/Fast During sleep mode
Flashing
Fast
Very fast Accessing card
Connected to a computer or printer
Charging
Battery charge error or rise in internal
temperature
Connected to a computer or printer
Connected to a TV
During self-timer photography
EN 43 User’s Manual
Page 57

Others
Mac OS is a trademark of Apple Inc., registered in the U.S. and other
countries.
Microsoft and Windows are registered trademarks of Microsoft Corporation in
the USA and other countries.
Intel and Pentium are registered trademarks of Intel Corporation (USA).
In this manual, the Microsoft
®
Windows
system, and Microsoft
XP operating system, Microsoft® Windows® Vista operating
referred to as “Windows”.
Software Red Eye by FotoNation
Inc.
Red Eye software
by U.S. Patent No. 6,407,777. Other patents Pending.
©
SDXC logo is a trademark of SD-3C, LLC.
All other company and product names are registered trademarks or
trademarks of their respective owners.
CAUTION
i It is forbidden to copy this manual, whole or in part, without prior written
permission.
i All images and illustrations given in this manual are for explanation
purposes and may differ slightly from that of the actual product. Also,
actual specifications are subject to change without prior notice and
therefore may differ from the contents of this manual.
®
Windows® 2000 operating system, Microsoft®
®
Windows® 7 operating system are collectively
TM
2003-2005 is a trademark of FotoNation®
2003-2005 FotoNation In Camcorder Red Eye - covered
APPENDICES
User’s Manual 44 EN
Page 58

TOSHIBA SUPPORT
Need help?
For the latest driver updates, User’s Manuals & FAQs please have a look at
the TOSHIBA options & services support page:
computers.toshiba.eu/options-support
Please see
computers.toshiba.eu/options-warranty
for the TOSHIBA hotline numbers.
EN 45 User’s Manual
Page 59

REGULATORY INFORMATION
CE compliance
This product is CE marked in accordance with the requirements of the
applicable EU Directives. Responsible for CE marking is Toshiba Europe
GmbH, Hammfelddamm 8, 41460 Neuss, Germany. A copy of the official
Declaration of Conformity can be obtained from following website:
http://epps.toshiba-teg.com.
Working Environment
The Electromagnetic Compliance (EMC) of this product has been verified
typically for this product category for a so called Residential, Commercial &
Light Industry Environment. Any other working environment has not been
verified by Toshiba and the use of this product in these working environments
is maybe restricted or cannot be recommended. Possible consequences of
the use of this product in non verified working environments can be:
Disturbances of other products or of this product in the nearby surrounding
area with temporarily malfunction or data loss/corruption as result. Example
of non verified working environments and related advices:
Industrial environment (e.g. where 3-phase 380V mains is being used
mainly): Danger of disturbances of this product due to possible strong
electromagnetic fields especially near to big machinery or power units.
Medical environment: The compliance to the Medical Product Directive has
not been verified by Toshiba, therefore this product cannot be used as a
medical product without further verification. The use in usual office
environments e.g. in hospitals should be no problem if there is no restriction
by the responsible administration.
Automotive environment: Please search the owner instructions of the related
vehicle for advices regarding the use of this product (category).
Aviation environment: Please follow the instructions of the flight personnel
regarding restrictions of use.
APPENDICES
User’s Manual 46 EN
Page 60

Additional environments not related to EMC
Outdoor use: As a typical home/office equipment this product has no special
resistance against ingress of moisture and is not strong shock proofed.
Explosive atmosphere: The use of this product in such special working
environment (Ex) is not allowed.
REACH
Following information is only valid for EU-member States:
REACH - Compliance Statement
The new European Union (EU) chemical regulation, REACH (Registration,
Evaluation, Authorization and Restriction of Chemicals), entered into force on
1 June 2007.
Toshiba will meet all REACH requirements and is committed to provide our
customers with information about the chemical substances in our products
according to REACH regulation.
Please consult the following website http://www.toshiba-europe.com/
computers/info/reach for information about the presence in our articles of
substances included on the candidate list according to article 59(1) of
Regulation (EC) No 1907/2006 (“REACH”) in a concentration above 0.1 %
weight by weight.
WEEE
Following information is only valid for EU-member States:
Disposal of products
The crossed out wheeled dust bin symbol indicates that
products must be collected and disposed of separately from
household waste. Integrated batteries and accumulators can
be disposed of with the product. They will be separated at the
recycling centres.
The black bar indicates that the product was placed on the
market after August 13, 2005.
By participating in separate collection of products and batteries, you will help
to assure the proper disposal of products and batteries and thus help to
prevent potential negative consequences for the environment and human
health.
EN 47 User’s Manual
Page 61

For more detailed information about the collection and recycling programmes
available in your country, please visit our website (http://
eu.computers.toshiba-europe.com) or contact your local city office or the
shop where you purchased the product.
Disposal of batteries and/or accumulators
The crossed out wheeled dust bin symbol indicates that
batteries and/or accumulators must be collected and
disposed of separately from household waste.
If the battery or accumulator contains more than the specified
values of lead (Pb), mercury (Hg), and/or cadmium (Cd)
defined in the Battery Directive (2006/66/EC), then the
chemical symbols for lead (Pb), mercury (Hg) and/or
cadmium (Cd) will appear below the crossed out wheeled dust bin symbol.
By participating in separate collection of batteries, you will help to assure the
proper disposal of products and batteries and thus help to prevent potential
negative consequences for the environment and human health.
For more detailed information about the collection and recycling programmes
available in your country, please visit our website (http://
eu.computers.toshiba-europe.com) or contact your local city office or the
shop where you purchased the product.
APPENDICES
User’s Manual 48 EN
Page 62

ADDITIONAL INFORMATION
© 2010 TOSHIBA Europe GmbH. All rights reserved.
TOSHIBA reserves the right to make technical changes. TOSHIBA assumes
no liability for damages incurred directly or indirectly from errors, omissions or
discrepancies between this product and the documentation.
EN 49 User’s Manual
Page 63

BW10_UM__AB_V02_0910
For more information, please visit:
www.toshiba-multimedia.com
 Loading...