

Page 1
E8EB6CD_SD-V398KC_EN_v1.indd 1 2009/01/29 17:04:54
BDX2000KB
© 2009 Toshiba Corporation
INTRODUCTION CONNECTIONS PLAYBACK FUNCTION SETUP OTHERS
Blu-ray Disc Player
OWNER’S MANUAL
Owner’s Record
The model number and serial number are on the back
of this unit. Record these numbers in the spaces
below. Refer to these numbers whenever you communicate
with your Toshiba dealer about this unit.
Model number:
Serial number :
E5RJ0BD_EN.book Page 1 Tuesday, October 20, 2009 3:53 PM
Page 2
2EN
INTRODUCTION
1. Do not attempt to open the cabinet. There are no
parts inside you can service. Refer all servicing to
qualified service personnel.
2. Slots and openings in the cabinet at the sides and
underneath are provided for ventilation. To ensure
reliable operation and to protect the unit from
overheating, these openings must not be blocked or
covered.
Avoid installation in enclosed spaces such as
bookcases unless suitable ventilation is provided.
3. Keep the unit away from radiators and other heat
sources.
4. Avoid use near strong magnetic fields.
5. Do not push objects of any kind into the unit through
the cabinet slots or openings as they could touch
electrically live parts or short circuit parts resulting in
a fire or electric shock.
6. To prevent fire or shock hazard, do not expose this
apparatus to dripping or splashing, no objects filled
with liquids, such as vases, should be placed on the
apparatus.
7. Do not stand the unit vertically. Use the unit in a
horizontal (flat) position only.
8. This product is in Stand-by mode when turned off
while the mains cable is connected.
9. Do not place a flaming object such as a burning
candle on the apparatus.
10. Before moving the unit, be sure to remove any media
and unplug the mains cable from the AC outlet.
11. Disconnect the mains plug to shut off the unit, if you
suspect a fault has developed, or if it will not be used
for an extended period.
12. The mains plug shall remain readily operable and
accessible.
13. Read both instruction manuals to ensure correct and
safe installation and interconnection of the unit in
multimedia systems.
14. Keep a distance of 20 cm around the ventilation
openings of the apparatus.
15. Do not overload wall outlets; extension cords, or
integral convenience receptacles as this can result in a
risk of fire or electric shock.
16. Do not use a cracked , deformed, or repaired disc.
These discs are easily broken and may cause serious
personal injury and apparatus malfunction.
17. If the apparatus should smoke or smell, immediately
disconnect the power cord from the wall outlet.Wait
until the smoke or smell stops, then ask your dealer
for a check and repair. Neglecting to do so may cause
fire.
18. While it is thundering, do not touch the connecting
cables or the apparatus.
This unit employs a laser. Only a qualified service person should
remove the cover or attempt to service this device, due to
possible eye injury.
CAUTION:
USE OF CONTROLS OR ADJUSTMENTS OR PERFORMANCE OF
PROCEDURES OTHER THAN THOSE SPECIFIED HEREIN MAY
RESULT IN HAZARDOUS RADIATION EXPOSURE.
CAUTION:
CLASS 2 LASER RADIATION WHEN OPEN
DO NOT STARE INTO THE BEAM
LOCATION:
• INSIDE, NEAR THE BD
MECHANISM
• Do not handle the mains cable with wet hands.
• Do not pull on the mains cable to disconnect it from AC outlet.
Grasp it by the plug.
• If, by accident, water is spilled on the unit, unplug the mains
cable immediately and take the unit to an authorised service
centre for servicing.
Moisture condensation may occur inside the unit when it is
moved from a cold place to a warm place, after heating a cold
room, or under conditions of high humidity. Do not use the unit
for at least 2 hours to allow the inside to dry.
Safety Instructions
WARNING:
TO REDUCE THE RISK OF FIRE OR ELECTRIC SHOCK, DO NOT EXPOSE THIS
APPARATUS TO RAIN OR MOISTURE.
CAUTION:
TO REDUCE THE RISK OF ELECTRIC SHOCK, DO NOT
REMOVE COVER (OR BACK). NO USER SERVICEABLE
PARTS INSIDE. REFER SERVICING TO QUALIFIED
SERVICE PERSONNEL.
CAUTION
RISK OF ELECTRIC SHOCK
DO NOT OPEN
The exclamation point within an equilateral triangle is
intended to alert the user to the presence of important
operating and maintenance (servicing) instructions in
the literature accompanying the appliance.
The lightning ash with arrowhead symbol, within an
equilateral triangle, is intended to aler t the user to the
presence of uninsulated “dangerous voltage” within the
product’s enclosure that may be of sucient magnitude
to constitute a risk of elec tric shock to persons.
The important note is located on the rear or bottom of
the cabinet.
The symbol for CLASS ll (Double Insulation)
Caution
Laser Safety
Avoid the Hazards of Electrical Shock and Fire
Moisture Condensation Warning
E5RJ0BD_EN.book Page 2 Tuesday, October 20, 2009 3:53 PM
Page 3
3EN
INTRODUCTION
Before Switching on make sure that the voltage of your electricity
supply is the same as that indicated on the rating plate.
Power Supply
The power supply is connected and the unit is live when the
mains cable is plugged into a 220 - 240 V~, 50 Hz AC outlet.
To operate the unit, press [ON/STANDBY Q].
Mains Cord
This apparatus may be fitted with a non-rewireable plug. If it is
necessary to change the fuse in a nonrewireable plug the fuse
cover must be refitted. If the fuse cover is lost or damaged, the
plug must not be used until a replacement available from the
apparatus manufacturer is obtained.
It is important that the colour of the replacement fuse cover
corresponds with the rating marking on the base of the plug.
If the plug has to be changed because it is not suitable for your
socket, or becomes damaged, it should be cut off and an
appropriate plug fitted following the wiring instructions below.
The plug removed must be disposed of safely as insertion into a
13A socket is likely to cause an electrical hazard.
For your own safety read the following instructions carefully
before attempting to connect this unit to mains.
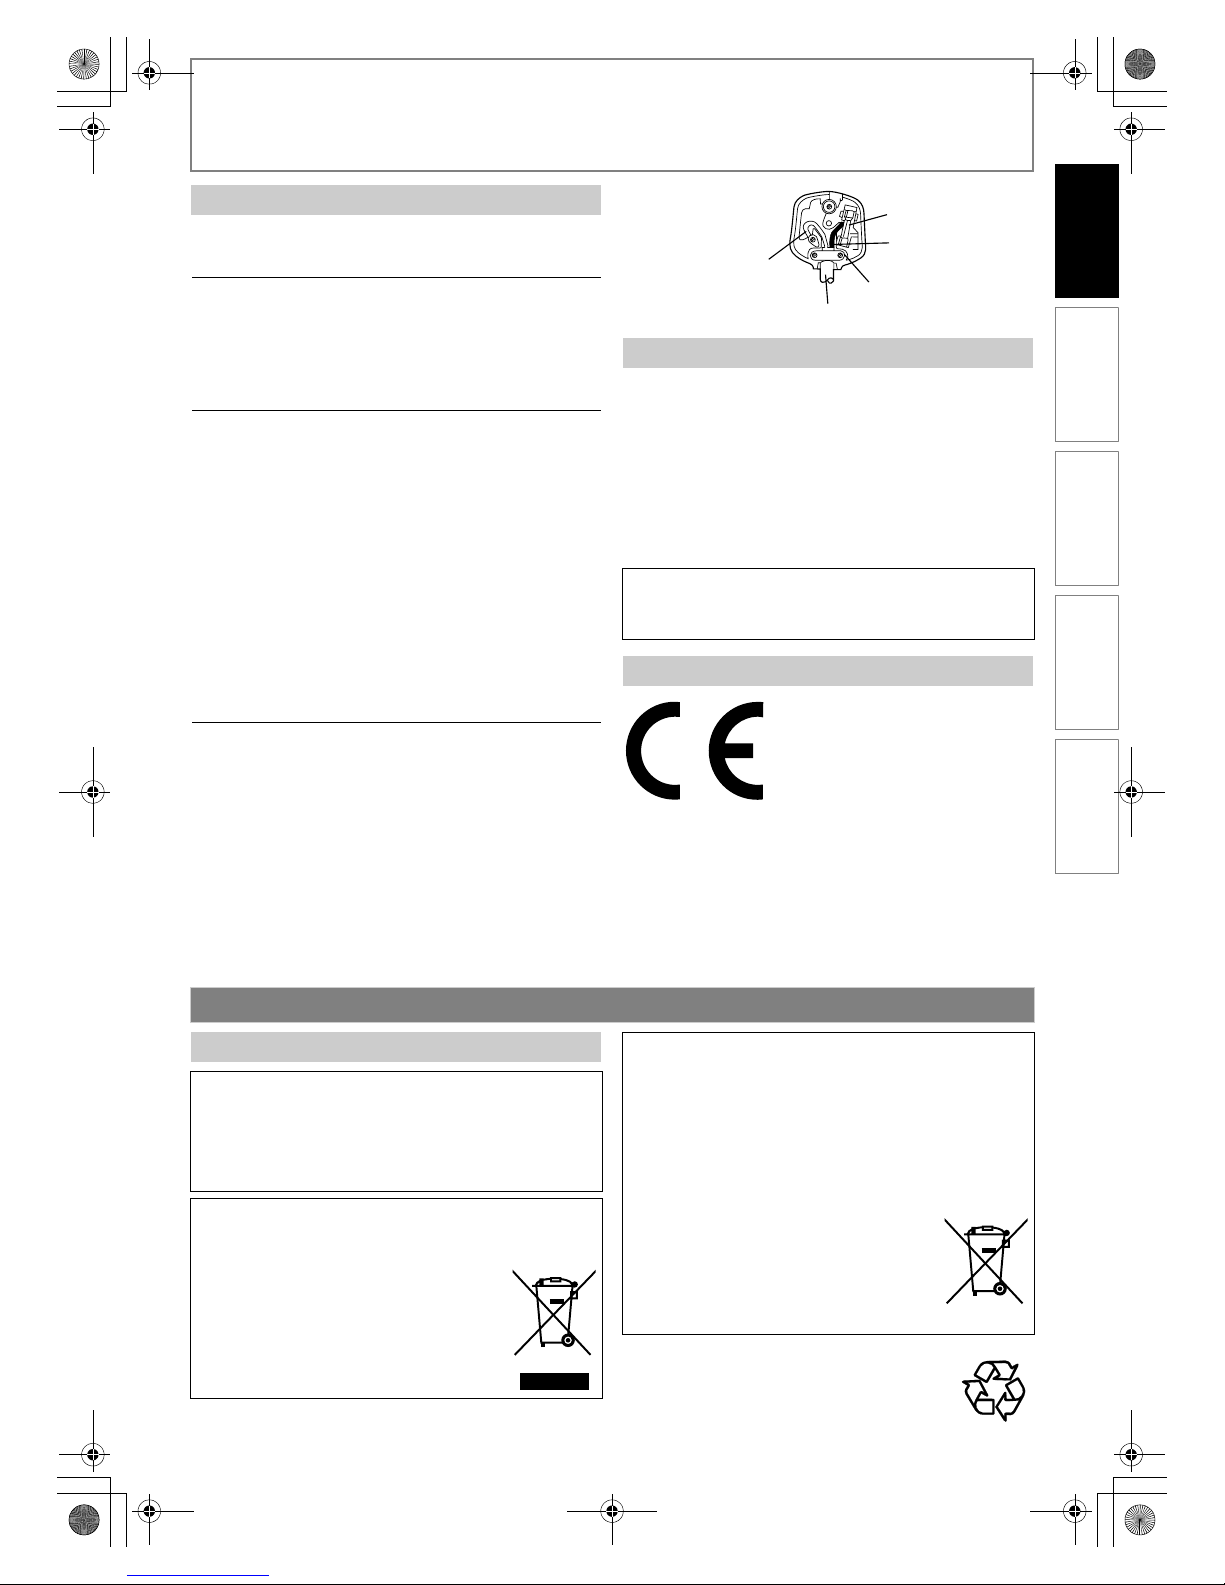
The wires in this mains lead are coloured in accordance with the
following code:
BLUE=NEUTRAL, BROWN=LIVE
Important
As the colours of the wires in the mains lead of this apparatus may
not correspond with the coloured markings identifying the
terminals in your plug, proceed as follows:
The wire which is coloured blue must be connected to the
terminal which is marked with the letter N or coloured black.
The wire which is coloured brown must be connected to the
terminal which is marked with the letter L or coloured red.
No connection is to be made to the earth terminal of the plug.
If a 13 Amp (BS 1363) Plug is used, a 5 Amp Fuse must be fitted, or
if any other type of Plug is used a 3 or 5 Amp Fuse must be fitted,
either in the Plug or Adaptor, or on the Distribution Board.
Mains Supply: 220 - 240 V~ 50 Hz - AC only
Do not make any connection to the larger pin marked with the
letter “E” or by the symbol or coloured green or green and yellow.
For safety and optimum performance of this unit:
• Install the unit in a horizontal and stable position.
• Keep the unit away from electronic equipment such as an
amplifier, TV, etc. to prevent warping, damage, fire and
malfunction.
• Do not place anything directly on top of the unit.
• Shield the unit from direct sunlight and keep away from sources
of intense heat. Avoid dusty or humid locations. Avoid locations
with insufficient ventilation for suitable heat dissipation. Do not
block the ventilation holes on the sides of the unit. Avoid
locations subject to strong vibration or strong magnetic fields.
• Do not locate near water.
“This product is marked with “CE” and complies therefore with the
applicable harmonised European standards listed under the Low
Voltage Directive 2006/95/EC and the EMC Directive 2004/108/EC.”
Responsible for CE-marking is
TOSHIBA INFORMATION SYSTEMS (U.K.) LTD, Toshiba Court,
Weybridge Business Park, Addlestone Road, Weybridge, Surrey,
KT15 2UL, United Kingdom
Make your contribution to the environment!!!
• Exhausted batteries do not belong in the dustbin.
• You can dispose of them at a collection point for
exhausted batteries or special waste.
• Contact your council for details.
Connection to Power
WARNING: LIVE PARTS INSIDE.
DO NOT REMOVE ANY SCREWS.
Installation Location
Do not place the unit on the furniture that is capable of being
tilted by a child and an adult leaning, pulling, standing or
climbing on it. A falling unit can cause serious injury or even
death.
EU Conformity Statement
BLUE
(Neutral)
CORD GRIP
BROWN
(Live)
FUSE
OUTER SHEATH OF THE WIRE
Other Precautions
About Recycle
A NOTE ABOUT RECYCLING
This product’s packaging materials are recyclable and can be
reused. Please dispose of any materials in accordance with your
local recycling regulations.
This product consists of materials which can be recycled and
reused if disassembled by a specialised company.
Following information is only for EU-member states:
The use of the symbol indicates that this product may not be
treated as household waste. By ensuring this product is
disposed of correctly, you will help prevent
potential negative consequences for the
environment and human health, which could
otherwise be caused by inappropriate waste
handling of this product. For more detailed
information about recycling of this product,
please contact your local city office, your
household waste disposal service or the shop
where you purchased the product.
Following information is only valid EU-member States:
Disposal of batteries and/or accumulators
The crossed out wheeled dust bin symbol indicates that
batteries and/or accumulators must be collected and disposed
of separately from household waste. If the battery or
accumulator contains more than the specified values of lead
(Pb), mercury (Hg), and/or cadmium (Cd) defined in the Battery
Directive (2006/66/EC), then the chemical symbols for lead (Pb),
mercury (Hg) and/or cadmium (Cd) will appear below the
crossed out wheeled dust bin symbol. By participating in
separate collection of batteries, you will help to assure the
proper disposal of products and batteries and
thus help to prevent potential negative
consequences for the environment and human
health. For more detailed information about the
collection and recycling programmes available in
your country, please contact your local city office
or the shop where you purchased the product.
Pb, Hg, Cd
INTRODUCTION CONNECTIONS PLAYBACK FUNCTION SETUP OTHERS
E5RJ0BD_EN.book Page 3 Tuesday, October 20, 2009 3:53 PM
Page 4
4EN
INTRODUCTION
Unauthorised copying, broadcasting, public performance and
lending of discs are prohibited. This product incorporates
copyright protection technology that is protected by U.S. patents
and other intellectual property rights. Use of this copyright
protection technology must be authorised by Macrovision, and is
intended for home and other limited viewing uses only unless
otherwise authorised by Macrovision. Reverse engineering or
disassembly is prohibited.
Cleaning the Unit
Use a soft cloth slightly moistened with a mild detergent solution.
Do not use solutions containing alcohol, spirits, ammonia or
abrasive.
Cleaning Discs
If a disc becomes dirty, clean it with a cleaning cloth. Wipe the disc
from the centre out. Do not wipe in a circular motion.
Do not use solvents such as benzine, thinner, commercially
available cleaners, detergent, abrasive cleaning agents or
antistatic spray intended for analogue records.
Disc Handling
Handle the discs so that fingerprints and dust do not adhere to
the disc surfaces.
Always store the disc in its protective case when it is not in use.
Servicing
If the unit becomes inoperative, do not try to correct the problem
by yourself. There are no user serviceable parts inside. Turn the
unit off, unplug the mains cable, and consult your dealer or an
authorised service centre.
Cleaning the Disc Lens
If the unit does not perform correctly even though you have
referred to “Troubleshooting” and the relevant sections in the
Owner’s Manual, the laser optical pickup unit may be dirty.
Consult your dealer or an authorised service centre for inspection
and cleaning of the laser optical pickup unit.
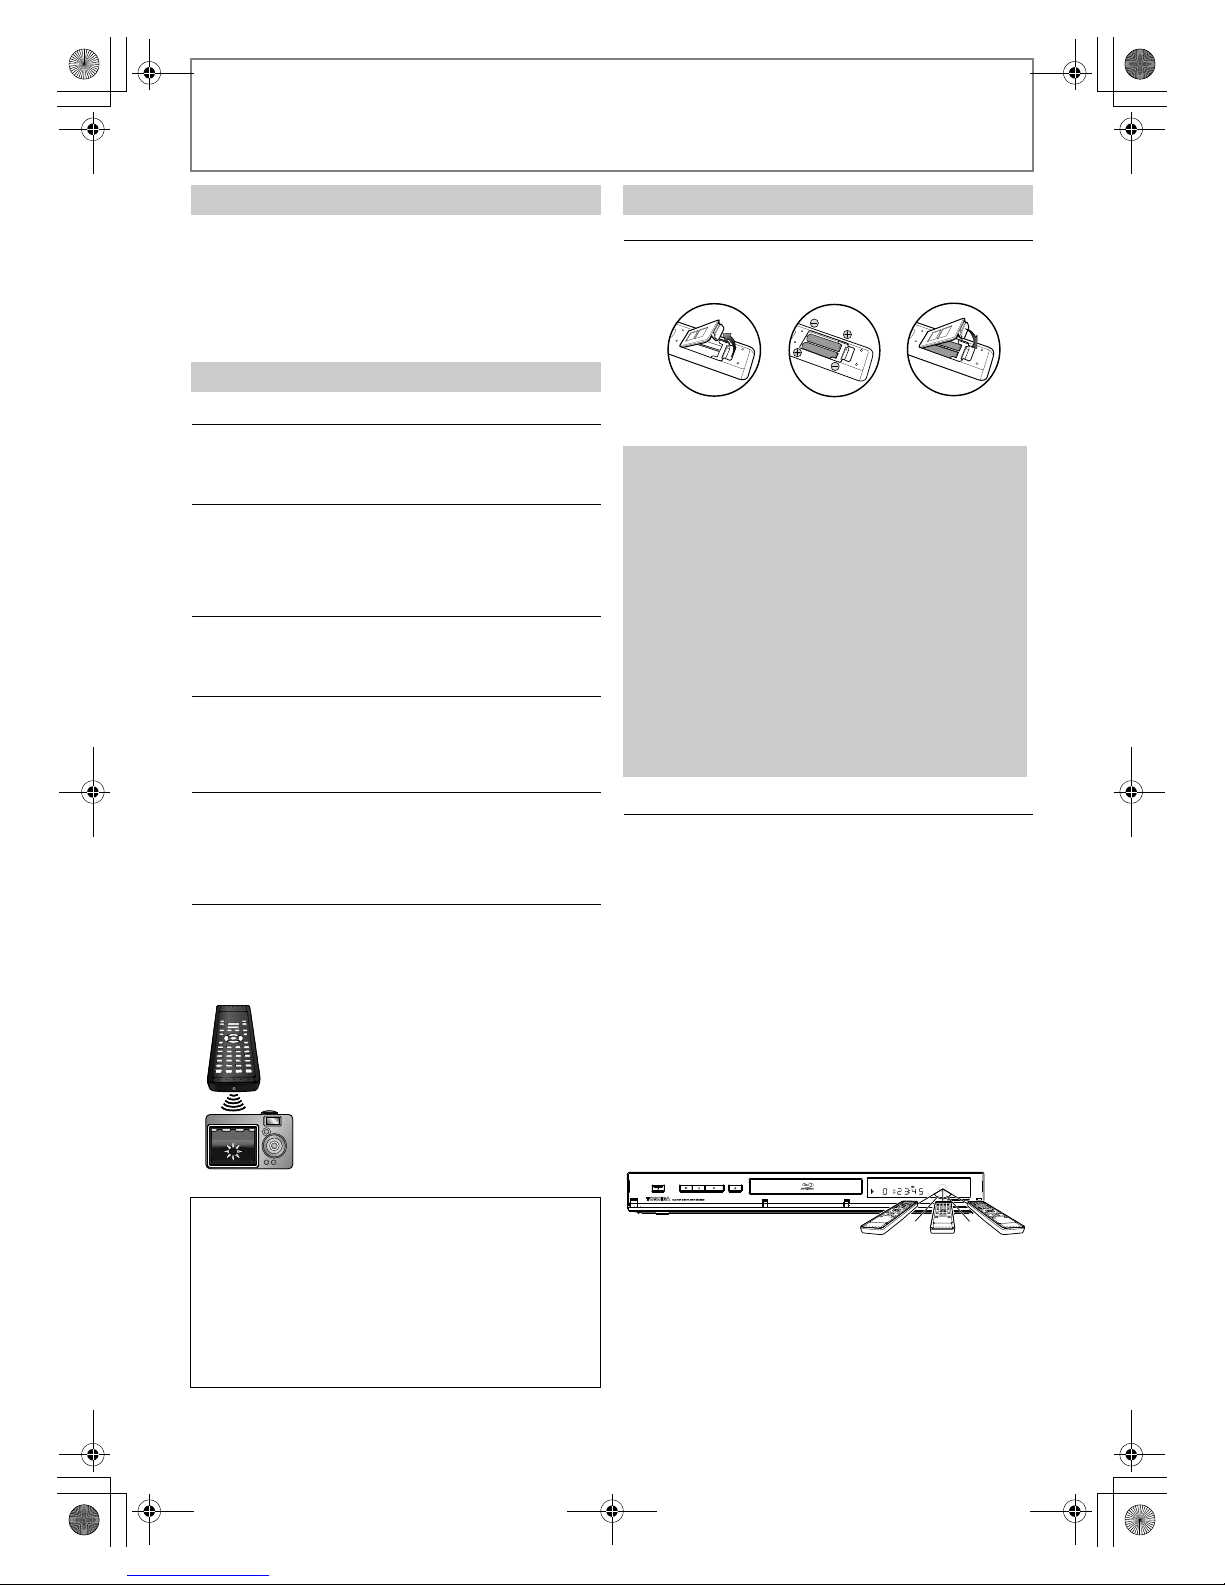
IR Signal Check
• If the remote control is not working properly, you can use
a digital camera (including a cellular phone with built-in
camera) to see if it is sending out an infrared signal.
With a digital camera
(including built-in cell phone cameras):
Point a digital camera towards the
remote control. Push any button on the
remote control and look through the
digital camera. If the infrared light
appears through the camera, the remote
control is working.
Installing the Batteries in the Remote Control
Install 2 R6 (1.5V) batteries matching the polarity indicated
inside battery compartment of the remote control.
Make sure to match + and - on the batteries to the marks
indicated in the battery compartment.
Using a Remote Control
Keep in mind the following when using the remote
control:
• Make sure that there are no obstacles between the
remote control and the infrared sensor window on the
unit.
• Remote operation may become unreliable if strong
sunlight or fluorescent light is shining on the infrared
sensor window of the unit.
• Remote control for different devices can interfere with
each other. Avoid using remote control for other device
located close to the unit.
• Replace the batteries when you notice a fall off in the
operating range of the remote control.
• The maximum operable ranges from the unit are as
follows.
About Copyright
About Maintenance
Because of problems and errors that can occur during
the creation of DVD and CD software and/or the
manufacture of DVD and CD discs, Toshiba cannot
assure that this Blu-ray Disc Player will successfully play
every disc or every feature of every disc bearing the
DVD logo and/or every CD bearing the CD logo. As one
of the creators of DVD technology, Toshiba DVD players
are manufactured using the highest standards of
quality, and as a result, such incompatibilities are rare.
About Remote Control
Caution
Incorrect use of batteries can result in hazards such
as leakage and bursting. Please observe the
following:
• Do not mix new and old batteries together.
• Do not use different kinds of batteries together.
Although they may look similar, different batteries
may have different voltages.
• Make sure that the + and - ends of each battery
match the indications in the battery compartment.
• Remove batteries from battery compartment that
are not going to be used for a month or more.
• When disposing of used batteries, please comply
with governmental regulations or environmental
public rules that apply in your country or area. (Refer
to page 3.)
• Do not recharge, short-circuit, heat, burn or
disassemble batteries.
- Line of sight: approx. 7 m
- Either side of the centre: approx. 5 m within 30°
- Above: approx. 5 m within 15°
- Below: approx. 3 m within 30°
2)1) 3)2)1) 3)
ON/STANDBY
OPEN/CLOSE
PAUSE STOP PLAY
30˚30˚
5 m 7 m 5 m
E5RJ0BD_EN.book Page 4 Tuesday, October 20, 2009 3:53 PM
Page 5
5EN
INTRODUCTION
• Remote control with R6 (1.5V) battery x 2
• HDMI cable (High Speed HDMI Cable)
•Owner’s manual
•Quick start guide
• Helpline sheet
INTRODUCTION
Safety Instructions ........................................................................2
Caution........................................................................................2
Laser Safety................................................................................2
Avoid the Hazards of Electrical Shock and Fire ............2
Moisture Condensation Warning ......................................2
Connection to Power.............................................................3
Installation Location...............................................................3
EU Conformity Statement ....................................................3
Other Precautions .........................................................................3
About Recycle...........................................................................3
About Copyright......................................................................4
About Maintenance................................................................4
About Remote Control..........................................................4
Supplied Accessories ...................................................................5
Trademark Information...............................................................6
Features ............................................................................................7
Functional Overview ....................................................................8
Front Panel.................................................................................8
Rear Panel ..................................................................................8
Remote Control........................................................................8
Front Panel Display.................................................................9
Symbols Used in this Manual..............................................9
CONNECTIONS
Connection to the TV................................................................ 10
Connection to an Audio System ...........................................12
Network Connection with LAN .............................................12
Finding the Video Channel on Your TV.............................. 12
PLAYBACK
Information on Playback.......................................................... 13
Playable Media...................................................................... 13
Unplayable Media ................................................................ 14
Colour Systems...................................................................... 14
Region Codes......................................................................... 14
Structure of Media Contents............................................14
On-Screen Display................................................................ 14
Preparing to Play Back..............................................................16
How to Insert a Disc............................................................. 16
How to Insert an SD Card ..................................................16
Selecting the Media............................................................. 16
Basic playback .............................................................................16
Playing Back (BD, DVD or a Disc with
AVCHD files) ...........................................................................16
Playing Back (Audio CD or a Media with
DivX®/MP3/Windows Media™ Audio/JPEG Files)...... 17
Reading an SD Card............................................................. 18
Kodak Picture CD.................................................................. 18
Special Playback..........................................................................19
About DivX® and DivX® VOD.............................................19
Playing Back a DivX® with DivX® External
Subtitle .....................................................................................19
Fast Forward / Fast Reverse...............................................20
Slow Motion Playback.........................................................20
Step by Step Playback.........................................................20
Repeat Playback ....................................................................20
A-B Repeat...............................................................................21
Programme Playback ..........................................................21
Random Playback .................................................................22
Rapid Playback.......................................................................22
Useful Function............................................................................22
Noise Reduction ....................................................................22
Virtual Surround....................................................................23
PIP (BONUSVIEW) Setting...................................................23
Camera Angle.........................................................................23
Enjoying BD-Live Discs with Online Content..............23
Search........................................................................................24
Switching Subtitles ..............................................................25
Switching Audio Soundtrack............................................25
Setting the BD Audio Mode ..............................................26
FUNCTION SETUP
How to Navigate through the Setup Menus.....................27
List of Setup Menus....................................................................27
TV Aspect .......................................................................................32
HDMI Audio Out..........................................................................33
Digital Out .....................................................................................34
Parental...........................................................................................35
HDMI CEC (REGZA - LINK).........................................................35
One Touch Play......................................................................35
Standby ....................................................................................35
System Information..............................................................35
Network Connection .................................................................36
Connection Test ....................................................................36
Enable(Easy)............................................................................36
Enable(Custom).....................................................................36
Disable ......................................................................................38
Software Update .........................................................................39
Current Version......................................................................39
Disc Update.............................................................................39
Initialise...........................................................................................39
OTHERS
Language Code List....................................................................40
Troubleshooting..........................................................................41
Specifications ...............................................................................42
Supplied Accessories
Content
INTRODUCTION CONNECTIONS PLAYBACK FUNCTION SETUP OTHERS
E5RJ0BD_EN.book Page 5 Tuesday, October 20, 2009 3:53 PM
Page 6

6EN
INTRODUCTION
Trademark Information
HDMI, the HDMI logo
and High-Definition
Multimedia Interface are
trademarks or registered
trademarks of HDMI
Licensing LLC.
Manufactured under
license from Dolby
Laboratories. Dolby and
the double-D symbol are
trademarks of Dolby
Laboratories.
Manufactured under license
under U.S. Patent #’s:
5,451,942; 5,956,674;
5,974,380; 5,978,762;
6,226,616; 6,487,535;
7,392,195; 7,272,567;
7,333,929; 7,212,872 & other
U.S. and worldwide patents
issued & pending. DTS is a
registered trademark and
the DTS logos, Symbol, DTSHD and DTS-HD Master
Audio | Essential are
trademarks of DTS, Inc.
©1996-2008 DTS, Inc. All
Rights Reserved.
“x.v.Color” and
“x.v.Color” logo are
trademarks of Sony
Corporation.
“Blu-ray Disc” and are trademarks.
is a trademark of DVD Format/Logo Licensing
Corporation.
“AVCHD” and the
“AVCHD” logo are
trademarks of Panasonic
Corporation and Sony
Corporation.
“BONUSVIEW” is
trademark of Blu-ray Disc
Association.
“BD-LIVE” logo is
trademark of Blu-ray Disc
Association.
Java and all other Java
trademarks and logos are
trademarks or registered
trademarks of Sun
Microsystems, Inc. in the
United States and/or
other countries.
DivX
®
, DivX Certified®,
and associated logos are
trademarks of DivX, Inc.
and are used under
license.
Windows Media and the
Windows logo are
trademarks or registered
trademarks of Microsoft
Corporation in the
United States and/or
other countries.
is trademark of Eastman Kodak Company.
THIS PRODUCT IS LICENSED UNDER THE MPEG-4 VISUAL
PATENT PORTFOLIO LICENSE FOR THE PERSONAL AND
NON-COMMERCIAL USE OF A CONSUMER FOR (i)
ENCODING VIDEO IN COMPLIANCE WITH THE MPEG-4
VISUAL STANDARD (“MPEG-4 VIDEO”) AND/OR (ii)
DECODING MPEG-4 VIDEO THAT WAS ENCODED BY A
CONSUMER ENGAGED IN A PERSONAL AND NONCOMMERCIAL ACTIVITY AND/OR WAS OBTAINED FROM
A VIDEO PROVIDER LICENSED BY MPEG LA TO PROVIDE
MPEG-4 VIDEO. NO LICENSE IS GRANTED OR SHALL BE
IMPLIED FOR ANY OTHER USE. ADDITIONAL
INFORMATION INCLUDING THAT RELATING TO
PROMOTIONAL, INTERNAL AND COMMERCIAL USES AND
LICENSING MAY BE OBTAINED FROM MPEG LA, L. L. C.
SEE HTTP://WWW.MPEGLA.COM
MPEG Layer-3 audio coding technology licensed from
Fraunhofer IIS and Thomson.
E5RJ0BD_EN.book Page 6 Tuesday, October 20, 2009 3:53 PM
Page 7
7EN
INTRODUCTION
BD-Java
With some BDs which support Java applications, you can
enjoy the interactive functions such as games or interactive
menus.
BD-Live
BD-Live (BD-ROM version 2 Profile 2.0) that allows interactive
functions to be used when this unit is connected to the
Internet in addition to the BONUSVIEW function. The various
functions differ depending on the disc.
Full High-Definition Video Playback
Watch movies in the highest picture quality available for your
HDTV. This unit offers full high-definition video playback up to
1080p resolution for an amazing viewing experience. A highly
detailed picture and increased sharpness delivers a more trueto-life picture.
DVD Upconversion for Enhanced Picture Quality
Your current DVD will look even better than before thanks to
video upconversion. Upconversion will increase the
resolution of standard definition DVD to high definition up to
1080p over an HDMI connection. The picture will be less
jagged and more realistic for a near high-definition
experience.
Enjoy Your Content on Different Kinds of Media
Full backwards compatibility with BD, DVD, CD and SD card
ensures that you can continue to enjoy your current audiovideo collection. Additionally, you can enjoy AVCHD/DivX
®
/
MP3/WMA/JPEG files.
Experience Rich Multi-Channel Surround Sound
Multi-channel surround sound, which recognises real-to-life
sound and makes you feel like you are really there.
PIP (BONUSVIEW)
Some BD-video have the PIP function which enables you to
display the secondary video in the primary video. You can call
up the secondary video by pressing [PIP] whenever the scene
contains the secondary video.
Pop-up Menu
Some BD-videos have pop-up menu which is a navigation
menu that can be called up and be operated on the TV screen
without interrupting the playback. You can call up the pop-up
menu by pressing [POP MENU / MENU]. Contents in the
pop-up menu vary depending on the disc.
Rapid Playback
Playback in slightly faster speed while keeping the sound
output.
Rapid playback is available only on discs recorded in the
Dolby Digital format.
Playback of Content from an SD Card
You can play back AVCHD/MP3/WMA/JPEG stored in an SD
card.
You can store picture-in-picture commentary, subtitles or
other extras for BD-ROM ver. 2 (Profile 2.0 / Profile 1.1) files in
an SD card and play them back with the BD-video.
Playing Back AVCHD Files
This unit supports playback of AVCHD format files (new
format for high definition video camcorders) recorded on
disc/SD card. Your high definition personal archive is playable
in HD quality.
x.v.Color
This unit supports playback of video contents on discs
recorded with “x.v.Color” technology. To watch this video
content with the “x.v.Color”, a TV or other display device
supporting both video image reproduction using the
“x.v.Color” standard and capable of manually switching it’s
colour setting is required. Please refer to the owner’s manual
of your display device for further information.
Easy and Simple Connection to Your HDTV via HDMI
You can connect this unit to your HDTV with one single HDMI
(High-Definition Multimedia Interface) cable. It is
recommended to use a High Speed HDMI Cable for optimal
compatibility. The high definition video output signal will be
transferred to your HDTV without conversion to analogue
signals, so you will get excellent picture and sound quality,
completely free from noise.
HDMI Deep Colour
Deep Colour reduces the posterisation effect of the playback
image. Refer to “HDMI Deep Color” in “FUNCTION SETUP” on
page 28.
HDMI CEC (Consumer Electronics Control) (REGZA - LINK)
This unit supports HDMI CEC, which allows integrated system
control over HDMI and is part of the HDMI standard.
This function may not work properly on some devices.
HDMI 1080p24 Output (BD Only)
This unit is equipped with a feature which can provide the
smooth movement in the playback of film originated material
with the frame rate of 24 frames per second with progressive
scan. (Available only when the TV is connected by an HDMI
cable and compatible with 1080p24 frame input.)
Refer to “HDMI Video Resolution” in “FUNCTION SETUP” on
page 28.
HDCP Compatible
To play back the digital video images of a BD / DVD via an
HDMI connection, it is necessary that both the unit and the TV
(or an AV amplifier) support a copyright protection system
called HDCP (high-bandwidth digital content protection
system). HDCP is copy protection technology that comprises
data encryption and authentication of the connected AV
device. This unit supports HDCP. Please read the operating
instructions of your TV (or AV amplifier) for more information.
Features
INTRODUCTION CONNECTIONS PLAYBACK FUNCTION SETUP OTHERS
E5RJ0BD_EN.book Page 7 Tuesday, October 20, 2009 3:53 PM
Page 8
8EN
INTRODUCTION
(*) The unit can also be turned on by pressing these buttons.
1. ON/STANDBY Q button
• Press to turn on the unit, or to
turn the unit into the standby
mode. (To completely turn off
the unit, you must unplug the
mains cable.)
2. ON/STANDBY Q indicator
3. PAUSE F button
4. STOP C button
5. PLAY B button*
6. OPEN/CLOSE A button*
7. Disc tray
8. Display
9. Infrared sensor window
10. SD card slot
1. LAN terminal
2. HDMI OUT jack
3. AUDIO OUT jacks
4. COMPONENT VIDEO OUT jacks
5. Mains cable
6. DIGITAL OUT (OPTICAL /
COAXIAL) jacks
7. VIDEO OUT jack
(*) The unit can also be turned on by pressing
these buttons.
1. HDMI button
2. OPEN/CLOSE A button*
3. Number buttons
4. SEARCH button
5. Red / Green / Yellow / Blue
buttons
6. TOP MENU button
7. K / L / s / B buttons
8. SETUP button
9. REV E button
10. SKIP H button
11. PLAY B button*
12. MODE button
13. REPEAT button
14. PIP button
15. ON/STANDBY Q button
• Press to turn on the unit, or to
turn the unit into the standby
mode. (To completely turn off
the unit, you must unplug the
mains cable.)
16. ANGLE button
17. AUDIO button
18. SUBTITLE button
19. DISPLAY button
20. CLEAR button
21. POP MENU / MENU button
22. ENTER button
23. RETURN button
24. FWD D button
25. SKIP G button
26. STOP C button
27. PAUSE F button
28. A-B button
Functional Overview
Front Panel
ON/STANDBY
OPEN/CLOSE
PAUSE STOP PLAY
12
3
4 5* 7 8 96*
10
Rear Panel
PR/C
R
PB/C
B
YL
R
COMPONENT
VIDEO OUT
AUDIO
VIDEO
COAXIALOPTICAL
HDMI
OUT
LAN
DIGITAL OUT
PCM/BITSTREAM
OUT
5
7
6
3
21
4
Caution
• Do not touch the inner pins of
the jacks on the rear panel.
Electrostatic discharge may
cause permanent damage to the
unit.
Remote Control
16
17
18
2*
3
19
21
23
24
26
25
27
28
6
4
5
8
9
12
13
10
11*
7
1
14
15
20
22
E5RJ0BD_EN.book Page 8 Tuesday, October 20, 2009 3:53 PM
Page 9
9EN
INTRODUCTION
1. Displays repeat icon. (Appears during repeat
playback.)
2. Displays media icon (disc mode or SD card mode).
3. Displays playback status icon. Refer to the table
below.
4. Displays various kinds of information such as title
number, elapsed playing time, repeat type, menu
type, etc.
Example of Display Message
To specify for which media type each function is, we put the
following symbols at the beginning of each item to operate.
If you do not find any of the symbols listed above under the
function heading, the operation is applicable to all media.
Front Panel Display
Playback status icon Mode
Playback is in progress
Stop mode
Pause mode
Fast forward mode
Fast reverse mode
Slow motion mode
Title is being played
back.
Indicating the current
title number and the
elapsed time.
Current chapter is in
chapter repeat mode.
Loading a disc.
Dolby Digital audio is
being played back.
DTS audio is being
played back.
1 2
3
4
* Brightness of the display can be adjusted. Refer to “Panel Display” in
“FUNCTION SETUP” on page 30.
Symbols Used in this Manual
Symbol Description
Description refers to BD-video and BD-RE
(ver.2.1) / BD-R (ver.1.1/1.2/1.3) recorded in
BDMV format
Description refers to DVD-video
Description refers to audio CD / DTS-CD
Description refers to DVD-RW/-R and SD card
with AVCHD files
Description refers to BD-RE/-R, DVD-RW/-R
and CD-RW/-R with DivX
®
files
Description refers to BD-RE/-R, DVD-RW/-R,
CD-RW/-R and SD card with MP3 files
Description refers to BD-RE/-R, DVD-RW/-R,
CD-RW/-R and SD card with Windows Media™
Audio files
Description refers to BD-RE/-R, DVD-RW/-R,
CD-RW/-R and SD card with JPEG files
INTRODUCTION CONNECTIONS PLAYBACK FUNCTION SETUP OTHERS
E5RJ0BD_EN.book Page 9 Tuesday, October 20, 2009 3:53 PM
Page 10

10 EN
CONNECTIONS
• When you change the connections, all devices should be turned off.
• Refer also to the manual of the devices to be connected.
1 Choose the appropriate connection, then proceed to the corresponding instruction (A, B
or C) on the next page.
(Supports up to 1080i / 1080p, 1080p24 resolution.)
(Supports up to 1080i resolution.)
(Supports only 480i/576i resolution.)
• Connect this unit directly to the TV. If the composite audio / video cables are connected to a VCR, pictures may be
distorted due to the copy right protection system.
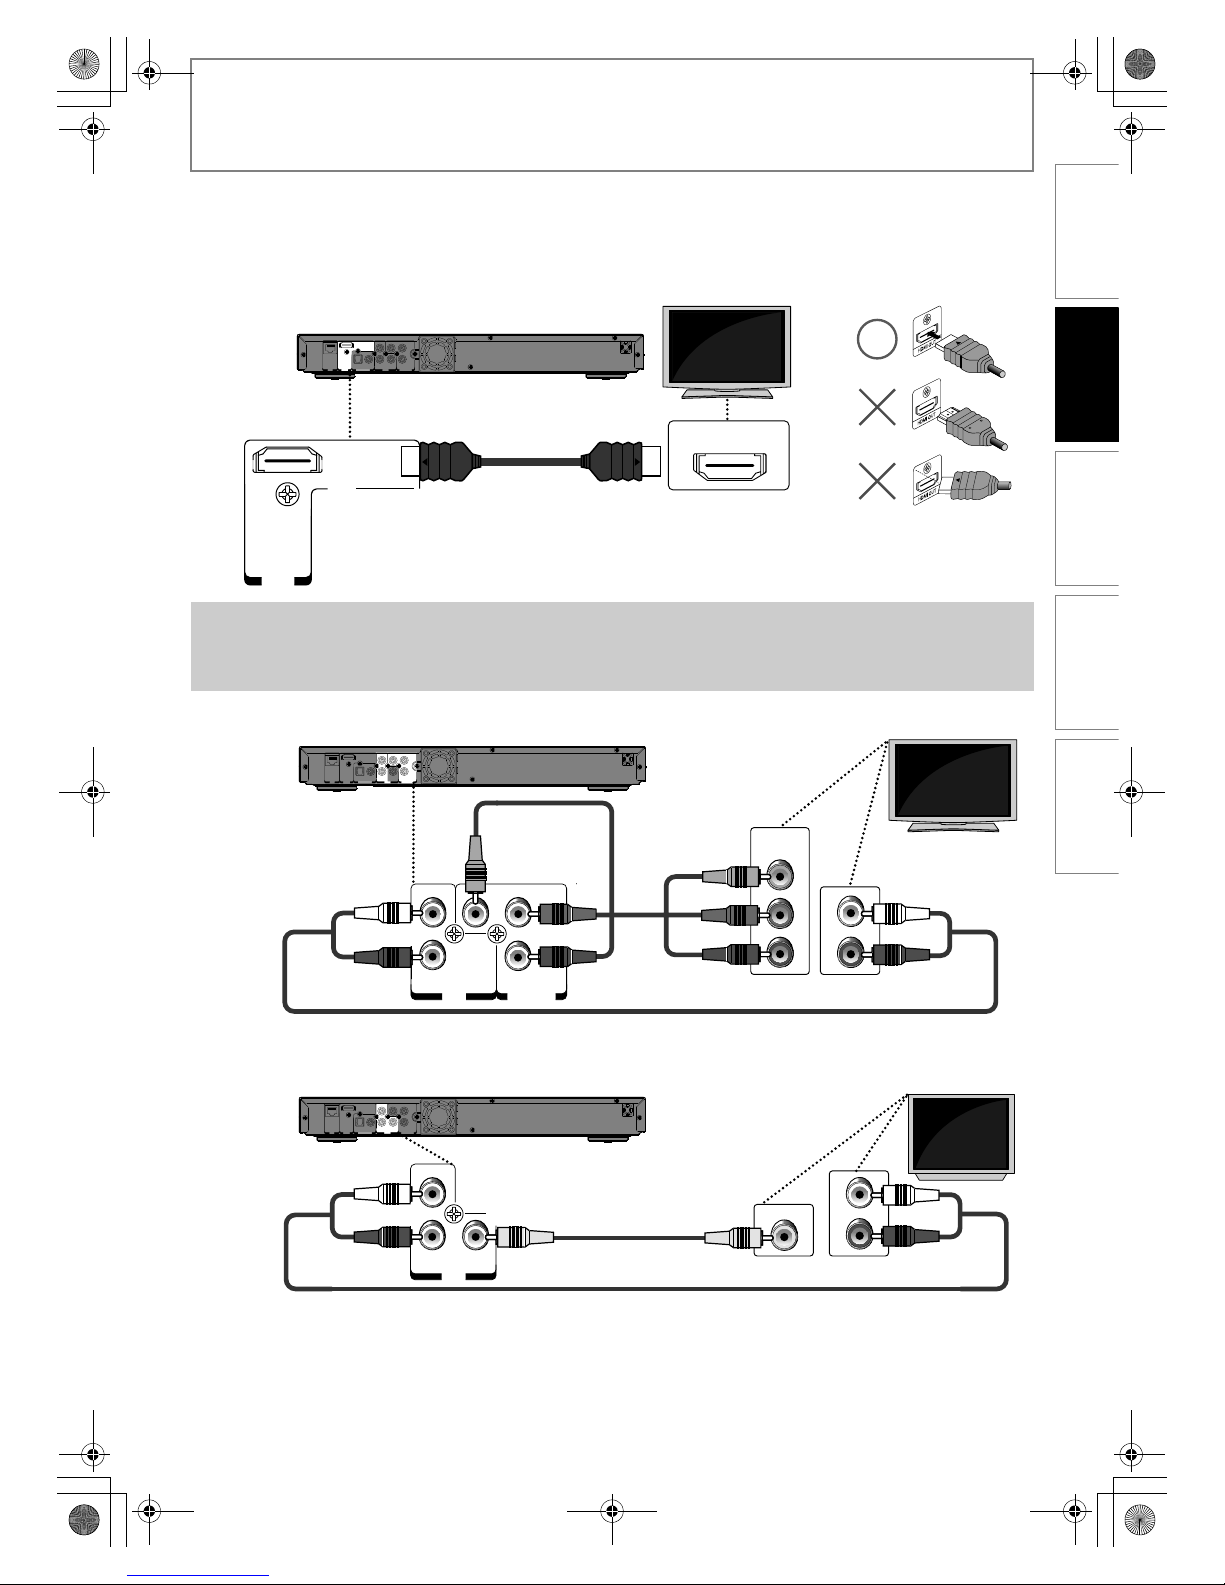
Connection to the TV
Best
HDMI IN
A
Video
Audio
HDMI cable
Your TV
No analogue audio connection required.
Go To
High
Definition
TV
High Speed HDMI Cable (also known as HDMI category 2 cable) included
Better
B
COMPONENT
VIDEO IN
Y
PB/CB
PR/CR
AUDIO IN
R
L
+
Video
Audio
component video cable
Your TV
Go To
composite audio cable
High
Definition
TV
Component video cable and composite audio cable NOT INCLUDED
Basic
C
AUDIO IN
R
L
VIDEO IN
+
Video
Audio
composite video cable
Your TV
Go To
composite audio cable
Standard
Definition
TV
Composite audio / video cables NOT INCLUDED
E5RJ0BD_EN.book Page 10 Tuesday, October 20, 2009 3:53 PM
Page 11
11EN
CONNECTIONS
2 Connect the cables by following the descriptions below.
HDMI Video / Audio Connection
Component Video + Standard Audio Connection
Standard Video + Standard Audio Connection
A
HDMI IN
($-)
/54
02#
2
0"#
"
9,
2
#/-0/.%.4
6)$%//54
!5$)/
6)$%/
#/!8)!,/04)#!,
($-)
/54
,!.
$)')4!,/54
0#-")4342%!-
/54
HDMI cable
Your TV
Note
• Do not tilt the connector when inserting it into the HDMI jack, and make sure the shapes of the jack and the
connector are matched.
• When using non-HDCP compatible TV, the image may not be displayed properly.
02#
2
0"#
"
9,
2
#/-0/.%.4
6)$%//54
!5$)/
/54
B
COMPONENT
VIDEO IN
Y
PR/CR
PB/CB
AUDIO IN
R
L
02#
2
0"#
"
9,
2
#/-0/.%.4
6)$%//54
!5$)/
6)$%/
#/!8)!,/04)#!,
($-)
/54
,!.
$)')4!,/54
0#-")4342%!-
/54
component
video cable
Your TV
composite audio cable
,
2
!5$)/
6)$%/
/54
C
AUDIO IN
R
L
VIDEO IN
02#
2
0"#
"
9,
2
#/-0/.%.4
6)$%//54
!5$)/
6)$%/
#/!8)!,/04)#!,
($-)
/54
,!.
$)')4!,/54
0#-")4342%!-
/54
Your TV
composite video cable
composite audio cable
INTRODUCTION CONNECTIONS PLAYBACK FUNCTION SETUP OTHERS
E5RJ0BD_EN.book Page 11 Tuesday, October 20, 2009 3:53 PM
Page 12
12 EN
CONNECTIONS
• You can use a disc which offers BD-Live function by
connecting the unit to the Internet.
(For BD-Live information, please refer to page 23.)
After you have completed all the connections, you must
find the correct video channel (external input channel) on
your TV.
1 After you have made all the necessary
connections, turn on the unit and your TV.
2 Press the button on the TV’s remote
control that accesses the external input
channel repeatedly until you see the
opening screen. It may be labelled
“F (for TOSHIBA TV)”, “SOURCE”, “AV”
or “INPUT” (refer to your TV’s user
manual).
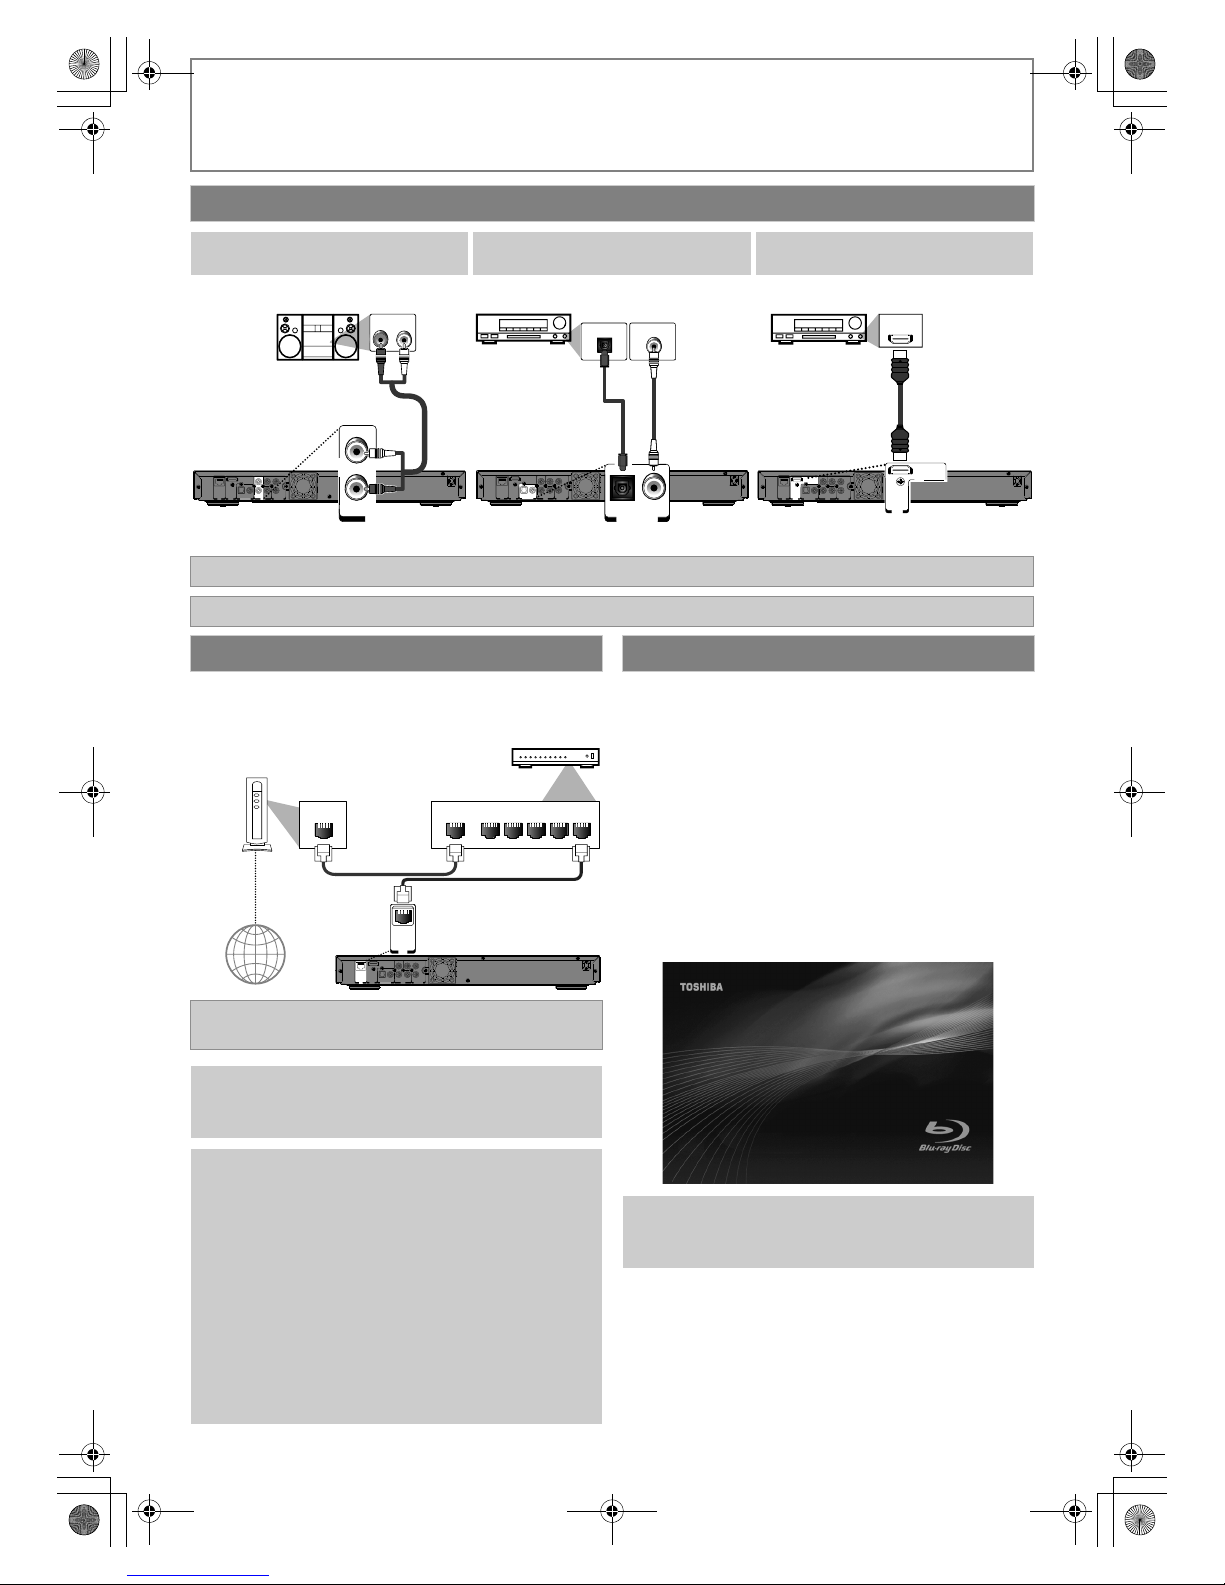
Connection to an Audio System
2-Channel Analogue Audio
Connection
Digital Audio Connection HDMI Audio Connection
• Refer to page 34 for digital audio setting. • Refer to page 33 for HDMI audio setting.
Digital audio optical / coaxial cable and composite audio cable NOT INCLUDED
PR/C
R
PB/C
B
YL
R
COMPONENT
VIDEO OUT
AUDIO
VIDEO
COAXIALOPTICAL
HDMI
OUT
LAN
DIGITAL OUT
PCM/BITSTREAM
OUT
L
R
AUDIO
OUT
AUDIO IN
LR
Stereo system
composite audio cable
PR/C
R
PB/C
B
YL
R
COMPONENT
VIDEO OUT
AUDIO
VIDEO
COAXIALOPTICAL
HDMI
OUT
LAN
DIGITAL OUT
PCM/BITSTREAM
OUT
COAXIALOPTICAL
DIGITAL OUT
PCM/BITSTREAM
COAXIAL
DIGITAL AUDIO INPUT
OPTICAL
DIGITAL AUDIO INPUT
AV receiver / amplifier
digital audio optical
cable
digital audio
coaxial cable
HDMI IN
PR/C
R
PB/C
B
YL
R
COMPONENT
VIDEO OUT
AUDIO
VIDEO
COAXIALOPTICAL
HDMI
OUT
LAN
DIGITAL OUT
PCM/BITSTREAM
OUT
HDMI
OUT
AV receiver / amplifier with an
HDMI input jack
HDMI cable
High Speed HDMI Cable (also known as HDMI category 2 cable) included
Network Connection with LAN
Networking equipment, hub or broadband router and
cables NOT INCLUDED
Caution
• Do not insert any cable other than a LAN cable to the
LAN terminal to avoid damaging the unit.
Note
• After connecting a LAN cable, set up necessary
network settings.
• If your network equipment (modem, etc.) does not
have broadband router functions, connect a
broadband router.
• If your network equipment (modem, etc.) has
broadband router functions but there is no vacant
port, use a hub.
• For a broadband router, use a router which supports
10BASE-T/100BASE-TX.
• Do not connect your PC directly to the LAN terminal
of this unit.
• For the network setup, refer to “Network Connection”
on pages 36-38.
LAN
WAN LAN
12345
LAN
PR/C
R
PB/C
B
YL
R
COMPONENT
VIDEO OUT
AUDIO
VIDEO
COAXIALOPTICAL
HDMI
OUT
LAN
DIGITAL OUT
PCM/BITSTREAM
OUT
Internet
Networking equipment
(modem, etc.)
Hub or broadband router
LAN cable
LAN cable
Finding the Video Channel on Your TV
Note
• If the TV is connected by an HDMI cable, please allow
a few minutes for the opening screen to display.
E5RJ0BD_EN.book Page 12 Tuesday, October 20, 2009 3:53 PM
Page 13
13EN
PLAYBACK
Before you start playing back a disc, read the following information.
This unit is compatible to play back the following discs / files.
To play back a disc / file, make sure that it meets the
requirements for region codes and colour systems as
described below. You can play back discs that have the
following logos.
Other disc types are not guaranteed to play back.
• ABOUT DIVX VIDEO: DivX® is a digital video format
created by DivX, Inc. This is an official DivX Certified
device that plays DivX video. Visit www.divx.com for
more information and software tools to convert your files
into DivX video.
• ABOUT DIVX VIDEO-ON-DEMAND: This DivX Certified
®
device must be registered in order to play DivX Video-onDemand (VOD) content. To generate the registration
code, locate the DivX VOD section in the device setup
menu. Go to vod.divx.com with this code to complete the
registration process and learn more about DivX VOD.
• Official DivX
®
Certified product; Plays all versions of
DivX
®
video (including DivX®6) with standard playback
of DivX
®
media files.
• Discs containing the DivX
®
files with the DivX® GMC
(Global Motion Compensation) playback feature, which is
DivX
®
supplemental function, cannot be played back on
this unit.
It is recommended that files to be played back in this
unit are recorded under the following specifications:
DivX
®
Official DivX Certified® product
MP3/Windows Media™ Audio
JPEG
Information on Playback
Playable Media
Playable discs Logos
Blu-ray Disc
- BD-video (single / dual layer)
- BD-RE ver. 2.1 (single / dual layer)
(Recorded in BDMV format)
- BD-R ver. 1.1 / 1.2 / 1.3 (single / dual layer)
(Recorded in BDMV format) (Unclosed
discs may not be played back.)
DVD-video
DVD-RW
DVD-R
CD-DA (audio CD)
CD-RW
CD-R
Kodak Picture CD
DTS-CD
-
Playable files Media
AVCHD
DVD-RW/-R, SD Memory Card
(including SDHC), miniSD Card,
microSD Card
DivX
®
BD-RE/-R, DVD-RW/-R, CD-RW/-R
MP3
BD-RE/-R, DVD-RW/-R, CD-RW/-R,
SD Memory Card (including SDHC),
miniSD Card, microSD Card
Windows Media™ Audio
JPEG
• Playable codec of AVI files :
DivX
®
3.x, DivX®4.x,
DivX
®
5.x, DivX®6.x
• Maximum size of a video : 720 x 480 @30 fps
720x576@25fps
• Sampling frequency of
audio
: 16 kHz - 48 kHz
• Audio type : MPEG1 audio layer 3
(MP3), MPEG1 audio layer
2, Dolby Digital
• Sampling frequency : 32 kHz, 44.1 kHz or 48 kHz
• Constant bit rate : 112 kbps - 320 kbps (MP3),
48 kbps - 192 kbps
(Windows Media™ Audio)
• Upper limit : 2,560 x 1,900 dots (sub
sampling is 4:4:4)
5,120 x 3,840 dots (sub
sampling is up to 4:2:2)
• Lower limit : 32 x 32 dots
• File size of image
maximum
:12 MB
Readable cards Playable files / data
SD Memory Card (8 MB - 2 GB) AVCHD, MP3, Windows
Media™ Audio, JPEG,
picture-in-picture
commentary, subtitles or
other extras for BD-ROM
ver. 2 (Profile 2.0 / Profile 1.1)
SDHC Memory Card (4 GB - 8 GB)
miniSD Card (8 MB - 2 GB)
microSD Card (8 MB - 2 GB)
INTRODUCTION CONNECTIONS PLAYBACK FUNCTION SETUP OTHERS
E5RJ0BD_EN.book Page 13 Tuesday, October 20, 2009 3:53 PM
Page 14
14 EN
PLAYBACK
The following discs will not be played back in this unit.
• BD-RE (ver.1.0)
• BD-RE (ver.2.1) (Recorded in BDAV format)
•SD card contains DivX
®
files.
• BD / DVD hybrid disc (played back as a BD-video only)
• BD that contains AVCHD files
• BD-R (ver.1.1 / 1.2 / 1.3) (Recorded in BDAV format)
• DVD-RW/-R recorded in non compatible recording
format.
• Super Audio CD - Only the sound on the CD layer can be
heard. The sound on the high-density Super Audio CD
layer cannot be heard.
• Playability of dual discs are not guaranteed.
• This unit cannot play back the disc contents protected by
Windows Media™ Digital Rights Management (DRM).
BD and DVD are recorded in different colour systems
throughout the world. The most common colour system,
used primarily in the U.K. and other EU countries, is PAL.
This unit uses the PAL system. However, it is also possible
to play back BD and DVD using other colour systems, such
as NTSC.
The contents of BD / DVD / AVCHD are generally divided
into titles. Titles may be further subdivided into chapters.
Audio CD is divided into tracks.
Data discs or SD cards containing DivX
®
/ MP3 / WMA /
JPEG are divided into folders, and the folders are
subdivided into files.
You can check information about the current disc by
pressing [DISPLAY].
To call the on-screen display menu, press [DISPLAY]
during playback. Every time you press [DISPLAY], the
information changes. Depending on the media, available
information varies.
OFF A Title / Chapter information
A Title information (elapsed time)
A Title information (remaining time)
A Decoding format information A OFF
Note for SD cards
• This unit supports SD Memory Card with FAT12/ FAT16
file system, and SDHC Memory Card with FAT32 file
system.
• This unit does not support NTFS file system.
• This unit may not read the SD cards formatted on a
computer. If that is the case, please reformat the SD
cards in this unit and try again.
• This unit does not support miniSDHC and microSDHC
Memory Card.
• For miniSD Card and microSD Card, the adapter is
necessary.
• Portions of this unit are protected under copyright
law and are provided under license by ARIS / SOLANA
/ 4C.
• Please keep the SD cards in their cases when you are
not using them.
• Do not try to open or modify the card.
• Do not touch the terminal surface with your fingers or
any metals.
• Do not attach additional labels or stickers to cards.
• Do not remove the label of the SD cards.
• This unit recognises up to 8 characters of file name in
the SD card. Characters after 8th will not be displayed.
Unplayable Media
• CD-ROM • CD-I (compact disc-interactive)
•DVD-RAM •VSD (video single disc)
•DVD-audio •Video CD
• HD DVD • SVCD
• Unfinalised disc
Colour Systems
miniSD Card
adapter
miniSD Card
microSD
Card
microSD Card
adapter
Region Codes
This unit has been designed to play back
BD-video with region “B” and DVD-video
with region “2” or “ALL”. You cannot play
back BD-video or DVD-video that are
labelled for other regions. Look for the
symbols on the right on your BD-video or
DVD-video. If these region symbols do
not appear on your BD-video or DVDvideo, you cannot play back the disc in
this unit. The letter or number inside the
globe refers to region of the world. A BDvideo or DVD-video labelled for a specific
region can only play back on the unit with
the same region code.
BD-video
DVD-video
Structure of Media Contents
On-Screen Display
BD / DVD / AVCHD
title 1 title 2
chapter 1
chapter 2 chapter 2chapter 1 chapter 3
audio CD
track 1 track 2 track 3 track 4 track 5
DivX® / MP3 / WMA / JPEG
folder (group) 1
folder (group) 2
file 1
file 2 file 3 file 4 file 5
E5RJ0BD_EN.book Page 14 Tuesday, October 20, 2009 3:53 PM
Page 15
15EN
PLAYBACK
OFF A Chapter information (elapsed time)
A Chapter information (remaining time)
A Title information (elapsed time)
A Title information (remaining time)
A Decoding format information A OFF
OFF (Track information(elapsed time))
A Track information (remaining time)
A Disc information* (elapsed time)
A Disc information* (remaining time)
A OFF (Track information(elapsed time))
(* not available during programme / random playback)
OFF A File information (elapsed time)
A File information (remaining time)
A File name information A OFF
OFF (File information (elapsed time))
A File name information
A OFF (File information (elapsed time))
OFF (File information (elapsed time))
A File name information
A Tag information (title name)
A Tag information (artist name)
A OFF (File information (elapsed time))
OFF A File information A File name information A OFF
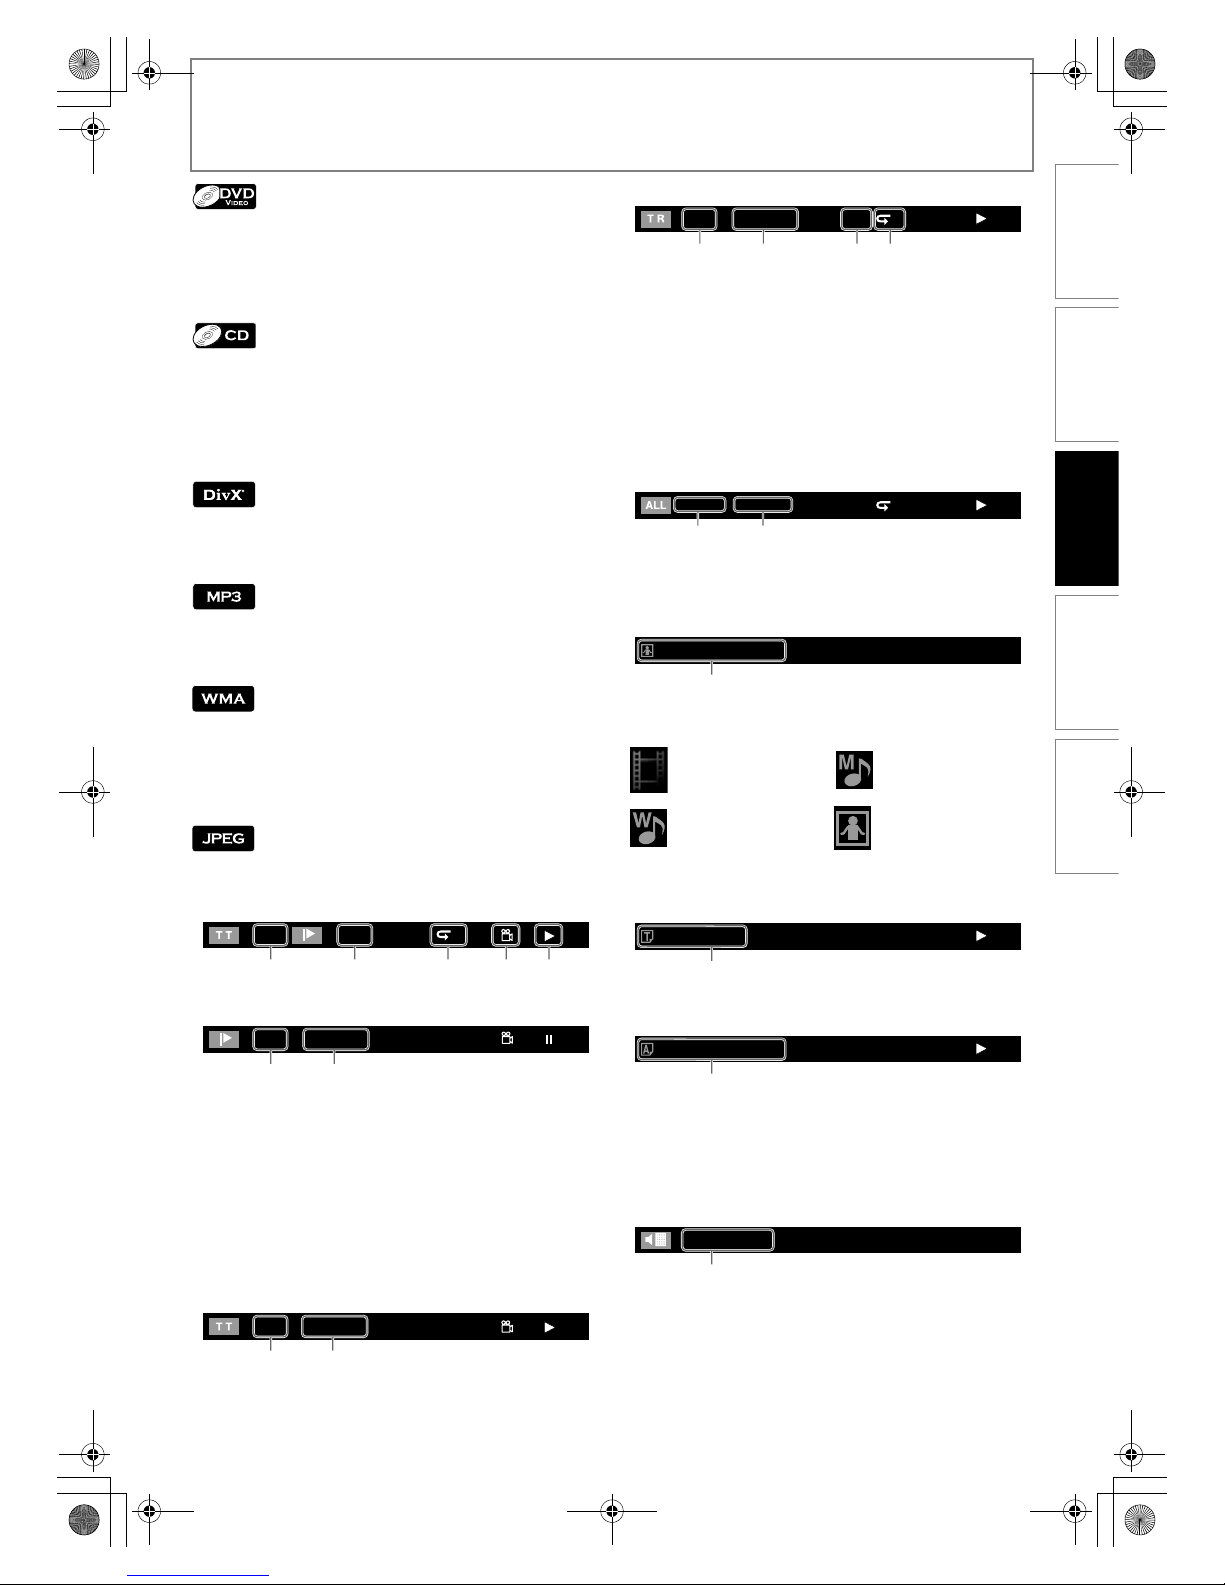
<Title / Chapter information (BD / AVCHD)>
<Chapter information (DVD)>
1. Current title number
2. Current chapter number / Total number of chapters
3. Current repeat setting (Only when repeat setting is
active)
(C:Chapter repeat,T:Title repeat,AB:A-B repeat)
4. Indicates that the multi camera angle images are
available on the scene
5. Current playback status
6. Elapsed time (or Remaining time) of the current chapter
<Title information (BD / DVD / AVCHD)>
1. Current title number / Total number of titles
2. Elapsed time (or Remaining time) of the current title
<Track (File) information (CD / DivX® / MP3 / WMA / JPEG)>
1. Current track (file) number / Total number of track
(file)
2. Elapsed time (or Remaining time) of the current
track / file (except for JPEG files)
3. Indication of SD card playback
4. Current repeat setting
(Only when repeat setting is active)
(T: Track repeat, G: Group repeat,
A: All repeat, AB: A-B repeat)
<Disc information (CD)>
1. Current track number / Total number of tracks
2. Elapsed time (or Remaining time) of the current disc
<File name information (MP3 / WMA)>
1. Media icon and file name
<Tag information (WMA)>
1. Title name based on tag information of current
Windows Media™ Audio file
2. Artist name based on tag information of current
Windows Media™ Audio file
<Decoding format information>
1. Decoding format
1 1/10
T
132 45
1 / 10 0 : 01 : 02
26
3 / 5 0 : 01 : 02
12
: DivX® files : MP3 files
: WMA files : JPEG files
SD1 / 14 0 : 00: 51
G
1342
1 / 14 0 : 00: 51
T
12
File_name_001
1
TITLE
ARTIST NAME
1
2
Title name information
Artist name information
Dolby Digital
1
INTRODUCTION CONNECTIONS PLAYBACK FUNCTION SETUP OTHERS
E5RJ0BD_EN.book Page 15 Tuesday, October 20, 2009 3:53 PM
Page 16

16 EN
PLAYBACK
1 Press [OPEN/CLOSE A] to open the disc
tray.
2 Place the disc on the disc tray with its
label side facing up.
• Make sure the disc is compatible with this unit.
(Refer to page 13 for the list of compatible discs.)
3 Press [OPEN/CLOSE A] to close the disc
tray.
To eject the disc:
Press [OPEN/CLOSE A].
1 Gently push in the SD card, with its label
side facing up, into the SD card slot until it
clicks.
To remove the SD card:
In stop mode, gently push in the SD card, then pull it
out slowly.
When an SD card is inserted, the correct media should be
selected in advance. You can switch the media by
following the steps below. “Media Select” is available
only when an SD card is inserted.
1 In stop mode, press [SETUP].
2 Use [K / L] to select , then press
[ENTER] .
3 Use [K / L] to select “Media Select”.
4 Press [ENTER] repeatedly to select the
desired media.
5 Press [SETUP] to exit.
Even if you turn the unit to the standby mode in “SD Card”
mode, it will be in “Disc” mode the next time you turn it on.
1 Insert a disc.
2 Playback may start automatically.
If not, press [PLAY B].
• Some discs may show a title or a disc menu.
In such case, refer to “Using the Title / Disc / Pop-up
Menu” on page 17.
To pause playback:
Press [PAUSE F].
To return to the normal playback:
Press [PLAY B].
To stop playback:
Press [STOP C].
Playback will be in Resume-On-Stop mode.
Preparing to Play Back
How to Insert a Disc
How to Insert an SD Card
Selecting the Media
Align the disc to the
disc tray guide.
Please allow time for the disc to load.
SD card
ON/STANDBY
OPEN/CLOSE
PAUSE STOP PLAY
M
Basic playback
Playing Back
(BD, DVD or a Disc with AVCHD files)
Resume-On-Stop mode
If a playback is in Resume-On-Stop mode, when you press
[PLAY B] next time, the playback will start from the point
where it has been stopped.
Note
• Resume playback may not be available for the BD that
supports Java applications (BD-Java).
• In “Disc” mode, the resume information will be cleared
when;
- [STOP C] is pressed while in the Resume-On-Stop
mode.
- the parental level is changed.
- the disc tray is opened.
• In “SD Card” mode, the resume information will be
cleared when;
- [STOP C] is pressed while in the Resume-On-Stop
mode.
- the SD card is removed.
- the unit is turned into the standby mode.
Note
• may appear at the top-right on the TV screen
when the operation is prohibited by the disc or this
unit.
• During the playback of 2-layered disc, pictures may
stop for a moment. This happens when the 1st layer
switches to the 2nd layer. This is not a malfunction.
• The operation may vary when you play back BDvideo and DVD-video with disc menu. Refer to the
manual accompanying the disc for details.
• Set “Still Mode” setting to “Field” in “Video” menu if
pictures in the pause mode are blurred. Refer to “Still
Mode” on page 28.
E5RJ0BD_EN.book Page 16 Tuesday, October 20, 2009 3:53 PM
Page 17

17EN
PLAYBACK
Using the Title / Disc / Pop-up Menu
Many of BD-video and DVD-video discs contain title menu
(BD-video / DVD-video / AVCHD), disc menu (DVD-video)
or pop-up menu (BD-video) which guides you through the
available functions in the disc. The contents of the menus
may differ depending on the discs.
Title menu (BD-video / DVD-video / AVCHD)
1 Press [TOP MENU].
2 Use [K / L / s / B] to select an item, then press
[ENTER].
3 Press [TOP MENU] to exit.
Disc menu (DVD-video)
1 Press [POP MENU / MENU].
2 Use [K / L / s / B] to select an item, then press
[ENTER].
3 Press [POP MENU / MENU] to exit.
Pop-up menu (BD-video)
• This is a special feature available for some BD-videos.
When you press [POP MENU / MENU], a menu pops
out on the TV screen during the playback.
1 During the playback of BD-video, press
[POP MENU / MENU].
2 Use [K / L / s / B] to select an item, then press
[ENTER].
3 Press [POP MENU / MENU] to exit.
1 Insert an audio CD or a media with DivX
®
(not available for SD card), MP3, WMA or
JPEG files.
• Media filter screen will appear.
• For audio CD and a disc contains only one type of file,
skip to step 3.
2 Select the type of the file you want to play
back in the media filter screen. Then press
[ENTER] to display the file list.
3 Use [K / L] to select a desired track, folder
or file, then press [ENTER].
Use [s / B] to go in and out of folders.
(only for DivX
®
/ MP3 / WMA / JPEG files).
•If you press [ENTER] on the desired track / file,
playback will start.
To stop playback:
Press [STOP C].
Note
• Contents of menus and corresponding menu
operations may vary among discs. Refer to the
manual accompanying the disc for details.
• Title menu is also available for SD card with AVCHD
files.
Playing Back (Audio CD or a Media with DivX®/
MP3/Windows Media™ Audio/JPEG Files)
1. Audio CD
Track information
DivX
®
/ MP3 / WMA / JPEG
File information
2. Audio CD
“CD-DA” will be displayed
DivX® / MP3 / WMA / JPEG
Current Disc, SD card, or folder name will be displayed
3. Audio CD
List of the track number and time
DivX® / MP3 / WMA / JPEG
List of the folder or file names in the current disc or
folder
4. Operation guide
Press [Red] to go to the previous page
Press [Green] to go to the next page
Press [Yellow] to call up the subtitle list
Press [Blue] to select “Media Mode”
5. Current page / Total page number
6. Playback status
7. Media icon
: Folder : audio CD tracks
:
DivX
®
files
: MP3 files
: WMA files : JPEG files
- - / 20
Folder_1
Folder_2
Folder_3
JPEG_A
JPEG_B
JPEG_C
JPEG_D
JPEG_DISC
1
7
3
4
562
File List
Page Up Page Down Media Mode
e.g.) JPEG
INTRODUCTION CONNECTIONS PLAYBACK FUNCTION SETUP OTHERS
E5RJ0BD_EN.book Page 17 Tuesday, October 20, 2009 3:53 PM
Page 18

18 EN
PLAYBACK
With SD card, you can enjoy the following functions in
addition to playing back AVCHD / MP3 / WMA / JPEG files
stored in the card.
- Special additional contents for BD-ROM Profile 1 ver.1.1.
(For more information about the special additional
contents, refer to the instruction book that came with
the disc.)
- BD-Live function (BD-ROM ver. 2 Profile 2.0).
(For more information about BD-Live, refer to page 23.)
1 Insert an SD card (refer to page 16 on how
to insert a disc).
If no disc is in operation, “Media Select” screen will
appear on the TV screen.
2 Use [K / L] to select “SD Card”, then press
[ENTER].
• When the SD card contains only one type of file, skip
to step 4.
3 Select the type of the file you want to play
back. Then press [ENTER] to display the
file list.
• For AVCHD files, the playback will start right after you
select “Video”. (The file list is not available for AVCHD
files.)
4 Use [K / L] to select a desired folder or
file, then press [ENTER].
Use [s / B] to go in and out of folders.
• If you press [ENTER] on the desired file, playback will
start.
This unit can also run JPEG files stored on Kodak Picture
CD. You can enjoy picture images on the TV set by playing
back the Kodak Picture CD. This unit conforms to ver.7.0 of
Kodak Picture CD. For details of Kodak Picture CD, contact
a shop that provides developing service of Kodak Inc.
1 Insert a Kodak Picture CD. Kodak Picture
CD menu will appear automatically on the
TV screen.
Note
• Unrecognisable characters will be replaced with
asterisks.
• Some unplayable folders or files may be listed due to
the recording status.
• High-resolution JPEG files take longer to be displayed.
• Progressive JPEG files (JPEG files saved in progressive
format) cannot be played back in this unit.
• The system can recognise up to 255 folders / 999 files
for CD, 999 folders / 9,999 files for BD, DVD and SD
card.
• The 9th and deeper hierarchies cannot be displayed
for CD. The 10th and deeper hierarchies cannot be
displayed for DVD and SD card.
• For the SD card playback, refer to “Reading an SD
Card” on page 18.
• Extensions other than listed below cannot be
recognised.
-DivX
®
: .avi / .AVI / .divx / .DivX
-MP3 :.mp3
-WMA:.wma
- JPEG : . jpg / jpeg*
* The extension “.jpeg” is not available for SD card.
• If a disc contains AVCHD files, the playback of other
files which are in the same disc is not available.
• With regard to the multi-border BD-RE/-R, additionally
recorded sections cannot be recognised.
• With regard to the multi-border DVD-RW/-R,
additionally recorded sections may not be recognised.
Reading an SD Card
Please select the media to play back.
Video
Audio
Picture
Caution
• Do not remove the SD card or turn the unit to the
standby mode while the contents of the card are in
playback. It may result in malfunction or loss of the
card’s data.
Note
• “Media Select” screen will disappear under the
conditions listed below:
- when the screen saver is activated.
- when [RETURN] is pressed.
- when the setup menu is called up.
• If “Media Select” screen disappears before you make
the selection, refer to “Selecting the Media” on page
16.
• Do not delete the folders or files in the SD card with
your computer. This unit may not read the SD cards
formatted on a computer.
• If a folder or file name includes one of the following
unrecognisable characters, the folder or file name
may not be displayed correctly.
- Unrecognisable characters :
Kodak Picture CD
1. File information
2. Current page / Total page number
3. Operation guide
Press [Yellow] to go to the previous page
Press [Blue] to go to the next page
4. Playback status
. , " = + [ ] ; / \ : | ¥
㪉㩷 㩷 㪆㩷 㩷 㪊
T R
--/16
41
23
Thumbnail
Pictures
Page Prev Page Next
E5RJ0BD_EN.book Page 18 Tuesday, October 20, 2009 3:53 PM
Page 19

19EN
PLAYBACK
INTRODUCTION CONNECTIONS PLAYBACK FUNCTION SETUP OTHERS
2 Use [K / L / s / B] to select a desired file
to be played back, then press [PLAY B] or
[ENTER].
• An image will be played back from the selected file
and go to the next one in turn.
To stop playback:
Press [STOP C].
To return to the first item:
Press [TOP MENU].
To return to the file played back last:
Press [POP MENU / MENU].
Hint for the purchased or rented official DivX
®
Certified
product
• When you purchase or rent a DivX® file through the
official site of DivX
®
video which is called DivX® Video OnDemand (VOD) services, a registration code is required
every time you get the new file from the DivX
®
VOD
services. Refer to “DivX
®
VOD” in “FUNCTION SETUP” on
page 30.
Possible Errors
“This rental has c views left. Do you want to use one of
your c views now?”
Some DivX
®
VOD files are restricted with the limited
playable times. You cannot play them back beyond the
limit.
“This player is not authorized to play this video.”
You cannot play back the DivX
®
VOD files obtained with
different registration codes on this unit.
“This rental is expired.”
You cannot play back the DivX
®
VOD files with the expired
rental period.
“This player does not support this video format.”
You cannot play back the DivX
®
files whose image size
exceeds 720 x 576.
“This player does not support this audio format.”
For DivX
®
files with audio format other than MPEG1 audio
layer 3 (MP3), MPEG1 audio layer 2 and Dolby Digital,
audio will not be output and only the video will be output.
“This player does not support this video frame rate.”
You cannot play back the DivX
®
files whose frame rate
exceeds 30 fps.
Subtitles created by the user can be displayed during
DivX
®
playback.
1 Follow steps 1 to 3 in “Playing Back (Audio CD
or a Media with DivX®/MP3/Windows Media™
Audio/JPEG Files)” on page 17.
2 Select a file you want to play back, then press
[Yellow].
Subtitle list will appear.
• “DivX Subtitle” appears next to “Yellow” icon only when
DivX® subtitle is available for the selected file.
•If you press [PLAY B] or [ENTER] instead of [Yellow],
playback without subtitle will start.
3 Select the desired subtitle file, then press
[PLAY B] or [ENTER].
Playback of the DivX® file with DivX® subtitle will start.
Tips for JPEG / Kodak Picture CD Playback
•Every press on [ANGLE] will turn the image
clockwise by 90 degrees when an image is displayed.
• To change the visual effect for switching the
playback image, press [MODE] once, then use
[s / B] or [ENTER] to switch between “Cut In/Out”
and “Fade In/Out”.
• During JPEG / Kodak Picture CD playback, press
[MODE] twice to change the size of the playback
image, then use [s / B] or [ENTER] to switch
between “Normal” (100 %) and “Small” (95 %).
The size change may have no effect on some files
(e.g. files with a small picture size).
Special Playback
About DivX® and DivX® VOD
Note
• A file with an extension of “.avi” and “.DivX” is called
as a DivX
®
file. All files with “.avi” extension are
recognised as MPEG4.
• For CD-RW/-R, maximum of 255 group (folder) or 999
files may be recognised.
• For BD-RE/-R and DVD-RW/-R, maximum of 999
group (folder) or 9,999 files may be recognised.
• The 10th and deeper hierarchies cannot be
displayed.
• Unrecognisable characters will be replaced with “*”.
• When playing back the files recorded in high bit
rates, the images can be interrupted in some
occasions.
• Although DivX
®
logo has been obtained for this unit,
it may not be able to play back some data,
depending on the characteristics, bit rates, or audio
format settings, etc.
• If a large-sized DivX
®
file is selected, please allow
time for the file to start the playback (over 20
seconds sometimes).
•If DivX
®
files written on a CD-RW/-R cannot be played
back, rewrite them on a BD-RE/-R or DVD-RW/-R, and
try playing it back again.
• For more information for DivX
®
, please visit
http://www.divx.com.
Playing Back a DivX® with DivX® External
Subtitle
- / 9
[ASS]
[SMI]
[SRT]
[SSA]
[SUB]
[TXT]
T R
Subtitle List
File List
[Off]
DivX_File
E5RJ0BD_EN.book Page 19 Tuesday, October 20, 2009 3:53 PM
Page 20

20 EN
PLAYBACK
1 During playback, press [FWD D] repeatedly
for fast forward.
During playback, press [REV E] repeatedly for fast
reverse.
Every time you press [FWD D] or [REV E], the
playback speed will change.
2 Press [PLAY B] to return to normal playback.
1 During playback, press [PAUSE F], then press
[FWD D].
Every time you press [FWD D], playback speed will
change.
2 Press [PLAY B] to return to normal playback.
1 In pause mode, press [PAUSE F] repeatedly.
Every time you press [PAUSE F], playback will
advance one step at a time.
2 Press [PLAY B] to return to normal playback.
Available repeat functions vary depending the discs.
1 During playback, press [REPEAT] repeatedly to
select the desired repeat mode.
Note
• To utilise this function, the following conditions
must meet.
- Playback file and the subtitle file must have the
same name.
- Playback file and the subtitle file must locate in the
same folder.
- Only the subtitle files with the following extensions
are supported; .smi (.SMI), .srt (.SRT), .sub (.SUB),
.ass (.ASS), .ssa (.SSA), .txt (.TXT). (.sub (.SUB) and .txt
(.TXT) may not be recognised.)
- The subtitles that exceeds the playback time of the
DivX
®
file will not be displayed.
Fast Forward / Fast Reverse
Note
• For BD, DVD and AVCHD, speed changes in 5
different levels.
• For audio CD, DivX
®
, MP3 and Windows Media™
Audio, speed changes in 3 different levels.
• For audio CD, fast forward / fast reverse search
between different tracks are not available during
programme and random playback.
•For DivX
®
, MP3 and Windows Media™ Audio, fast
forward / fast reverse search between different files
are not available.
•For some DivX
®
files, fast forward/fast reverse may
not function.
Slow Motion Playback
Note
• Slow motion speed changes in 3 different levels.
• Only slow forward is available.
• Set “Still Mode” setting to “Field” in “Video” menu if
pictures in the slow motion playback mode are
blurred. Refer to “Still Mode” on page 28.
•For some DivX
®
files, slow forward may not function.
Step by Step Playback
Note
• Only step by step forward is available.
• Set “Still Mode” setting to “Field” in “Video” menu if
pictures in step by step playback mode are blurred.
Refer to “Still Mode” on page 28.
Repeat Playback
Repeat mode Available media
Chapter repeat
The current chapter will be played
back repeatedly.
Title repeat
The current title will be played back
repeatedly.
Track repeat
The current track will be played back
repeatedly.
Group repeat
The current folder will be played
back repeatedly.
All repeat
All tracks or files in the media will be
played back repeatedly.
Note
• The repeat setting will be cancelled when you stop
playback.
• The chapter, title, track or group repeat will be
cleared when moving to another chapter, title, track /
file or folder.
• Repeat playback does not function during A-B repeat
playback.
• Chapter and title repeat are not available with some
scenes.
• When the repeat setting is set for a MP3 or WMA
folder (file), the repeat setting will be cancelled if you
select other MP3 or WMA folder (file) to play back.
E5RJ0BD_EN.book Page 20 Tuesday, October 20, 2009 3:53 PM
Page 21

21EN
PLAYBACK
You can play back the specific part (between point A and
point B) repeatedly.
1 During playback, press [A-B] at the desired
starting point A.
2 During playback, press [A-B] at the desired
ending point B.
As soon as you set the point B, the part between point
A and point B will start playback repeatedly.
• To cancel the A-B repeat, press [A-B] again.
You can play back the disc/card in your desired order.
1 In stop mode, press [MODE].
2 Use [K / L] to select a track / folder / file, then
press [ENTER].
3 Press [PLAY B] to start programme playback.
• The programme playback will start.
To exit from the programme playback mode:
•Press [RETURN] in stop mode.
A-B Repeat
Note
• Point B should be set within the same title or track as
point A.
• A-B repeat is not available with some scenes.
• To cancel the A point which was set, press [CLEAR].
• A-B repeat does not function during repeat playback.
•For some DivX
®
files, A-B repeat playback may not
function.
Programme Playback
1. Audio CD
Track information
DivX
®
/ MP3 / WMA / JPEG
File information
2. Audio CD
“CD-DA” will be displayed
DivX® / MP3 / WMA / JPEG
Current disc, SD card, or folder name will be displayed
3. Track / Folder / File list
Track / Folder / File list in the original order
4. Programmed list
Track / File list in the programmed order
5. Cumulative playback time of all tracks in the
programmed list (audio CD only)
0 : 26 : 24
CD-DA
0:36
1:14
0:45
0:50
0:53
0:20
0:54
8
9
10
11
12
13
14
1:14
0:50
1:14
0:50
0:53
0:54
0:36
2
4
9
11
12
14
8
- - / 16
Page Up Page Down Page Prev Page Next
Program
Total
1623 475
8
e.g.) audio CD
6. Playback status
7. Current page / Total page number
8. Operation guide
Press [Red] to go to the previous page in the track /
folder / file list
Press [Green] to go to the next page in the track /
folder / file list
Press [Yellow] to go to the previous page in the
programmed list
Press [Blue] to go to the next page in the
programmed list
•For DivX®, MP3, WMA or JPEG files, use [K / L] to
select a folder, then press [ENTER] first, and then use
[K / L] to select a file, then press [ENTER].
•Press [CLEAR] to erase the last file of the
programme.
•Use [K / L] to select “All Clear” at the bottom of the
list to erase all the tracks / files in the programme.
•Use [s / B] to go back / forward between the
hierarchy of folders.
Note
• During programme playback, press [STOP C] once
to set the resume point, and then press [PLAY B] to
resume programme playback from where [STOP C]
was pressed (audio CD) or from beginning of the file
where [STOP C] was pressed (MP3 / WMA / JPEG).
• During programme playback, press [STOP C] twice
to display the programme screen. To go back to the
normal programme playback, press [RETURN] to exit
from the programme screen, then press [PLAY B].
• Up to 99 tracks / files can be entered.
• To repeat the current track / file in the programme,
press [REPEAT] repeatedly until “ Track”
appears during playback. To repeat the entire
programme, press [REPEAT] repeatedly until
“ All” appears during playback.
• Playback from a desired track / file and random
playback are not available during programme
playback.
• Press
[MODE]
to switch to the random playback mode.
• The programme will be cleared when;
- the unit is turned into the standby mode.
- the media is switched.
- the disc / card is removed (as for “Disc” mode, just
opening the disc tray will clear the programme
info).
Before
you
begin
INTRODUCTION CONNECTIONS PLAYBACK FUNCTION SETUP OTHERS
E5RJ0BD_EN.book Page 21 Tuesday, October 20, 2009 3:53 PM
Page 22

22 EN
PLAYBACK
This function shuffles the playback order of tracks / files.
1 In stop mode, press [MODE] twice.
2 Press [PLAY B] to start random playback.
To exit from the random playback mode:
•Press [MODE] in stop mode.
This function plays back approximately at 1.3 times the
normal playback while keeping the sound output. This
function is available only on discs recorded in the Dolby
Digital format.
1 During playback, press [MODE] repeatedly
until appears.
2 Press [ENTER] or [s / B] to change the setting.
3 Press [PLAY B] to return to normal playback.
Reduces the noise of the playback picture.
1 During playback, press [MODE] repeatedly
until appears.
2 Use [s / B] to change the setting.
3 Press [RETURN] to exit.
Random Playback
1. Audio CD
Track information
MP3 / WMA / JPEG
File information
2. Audio CD
“CD-DA” will be displayed
MP3 / WMA / JPEG
Current disc, SD card, or folder name will be displayed
3. Track / File list
Track / File list in the original order will be displayed
4. Operation guide
Press [Red] to go to the previous page in the track /
file list
Press [Green] to go to the next page in the track / file
list
5. Total playback time of all tracks (audio CD only)
6. Playback status
Note
• During the random playback, press [STOP C] once to
set the resume point, and then press [PLAY B] to
resume random playback from where [STOP C] was
pressed (audio CD) or from beginning of the file
where [STOP C] was pressed (MP3 / WMA / JPEG).
• To repeat the current track / file in the random
selection, press [REPEAT] repeatedly until
“ Track” appears during playback. To repeat the
entire random selection press [REPEAT] repeatedly
until “ All” appears during playback.
• Playback from a desired track / file is not available
during random playback.
• In stop mode, press [RETURN] to switch to the
programme playback mode.
• For a disc containing mixed MP3 and Windows
Media™ Audio files, random playback of those files
will be performed.
1 : 13 : 29
CD-DA
1 0:36
1:14
0:45
0:50
0:53
0:20
0:54
2
3
4
5
6
7
- - / 16
Random
Total
Page Down
1623 4 5
e.g.) audio CD
Rapid Playback
“Off” : Plays back in normal speed.
“”
: Plays back approximately at 1.3 times of normal
playback.
Note
• Picture adjustment and audio language setting
cannot be changed during this function.
• Virtual surround does not work during this function.
• This function may not work at some points on a disc.
• During this function, 2ch LPCM will be output from
HDMI OUT jack and DIGITAL OUT jack.
Useful Function
Noise Reduction
“Off” : Shows the original picture as recorded.
“1” :Executes 3D noise reduction which detects and
deletes the noise by comparing each picture
frames.
“2” :Executes MPEG noise reduction which reduces
the block noise and mosquito noise on the
subtitles on the movie.
“3” :Executes both MPEG noise reduction and 3D
noise reduction.
Note
• The setting will remain the same even if the unit is
turned to the standby mode.
• You cannot adjust the setting during rapid playback.
E5RJ0BD_EN.book Page 22 Tuesday, October 20, 2009 3:53 PM
Page 23

23EN
PLAYBACK
You can enjoy stereophonic virtual space through your
existing 2-channel stereo system.
1 During playback, press [MODE] repeatedly
until appears.
2 Use [K / L] to change the setting.
3 Press [RETURN] to exit.
Some BD-videos have the PIP function which enables you
to display the secondary video in the primary video. You
can call up the secondary video by pressing [PIP]
whenever the scene contains the secondary video.
1 During playback, press [PIP].
2 Use [K / L] to select the secondary video you
want.
3 Press [RETURN] or [PIP] to remove the PIP
information.
Some BD-videos and DVD-videos contain scenes which
have been shot simultaneously from various angles. You
can change the camera angle when appears on the TV
screen.
1 During playback, press [ANGLE].
2 Use [K / L] to select your desired angle.
3 Press [RETURN] to exit.
You can enjoy the BD-Live functions which enable you to
use the interactive functions when the unit is connected to
the Internet. (For the Network connection, refer to
page 36.)
Examples for BD-Live interactive functions:
• Download the additional contents such as the movie’s
trailer, subtitles and BD-Java, etc.
• While downloading, special video data may be played
back.
Service and functions differ depending on the disc.
Follow the instructions given by the disc when using
the BD-Live function.
Virtual Surround
“Off” : No surround effect
“1” :Natural surround effect
“2” :Stronger surround effect
Note
• Set the virtual surround setting to “Off” or lower the
volume if the sound is distorted.
• Virtual surround does not function during rapid
playback.
• For virtual surround, audio signal will always be
2-channel LPCM.
PIP (BONUSVIEW) Setting
Note
• The secondary audio will not be output when the
secondary audio is set to “Off ” or when “BD Audio
Mode” is set to “HD Audio Output”. Refer to
“Switching Audio Soundtrack” on page 25 and
“Setting the BD Audio Mode” on page 26.
primary
video
secondary
video
3 / 32
Camera Angle
Note
• If “Angle Icon” setting is “Off” in “Others” menu,
will not appear. Refer to page 30.
Enjoying BD-Live Discs with Online Content
Note
• You must connect the unit to the Internet and set up
necessary settings in order to use the BD-Live
function.
• For certain discs, setting for “BD-Live Setting” may
need to be changed.
• Depending on your connection environment, it may
take time to connect to the Internet or the Internet
may not be connected.
• When BD-Live functions are used and the unit is
connected to the Internet, you may be charged for
this communication.
• While connecting to BD-Live, sometimes it can take
awhile before the next page is downloaded or
refreshed.
• You must insert an SD card when using the BD-Live
function. (SD card of 1GB is recommended.)
• Do not remove the SD card when using the BD-Live
function.
Note for AACS Online
• The player or disc IDs may be sent to the content
provider when playing back a disc with BD-Live
function.
• If you save your viewing history on the server by
using these IDs, you will be introduced to other
similar movies.
• You can save game score histories.
1 / 3
INTRODUCTION CONNECTIONS PLAYBACK FUNCTION SETUP OTHERS
E5RJ0BD_EN.book Page 23 Tuesday, October 20, 2009 3:53 PM
Page 24

24 EN
PLAYBACK
Using [SKIP H / G]
1 During playback, press [SKIP G] to move to
the next track / title / chapter / file. Press it
repeatedly to skip to subsequent tracks. Press
[SKIP H] once to go back to the beginning of
the current track. Press it repeatedly to go to
the previous tracks.
• For JPEG files, press [SKIP H] to go back to the
previous file.
Using [SEARCH]
By using [SEARCH], you can select the following search
modes.
1 During playback, press [SEARCH] repeatedly
until your desired search mode appears.
2 Enter the desired chapter, title, track, file
number or time to search for using
[Number buttons].
• Chapter, title, track or time search will start.
•Press [CLEAR] to erase an incorrect input.
Using [Number buttons] (Direct Search)
Title Search
In stop mode, enter the title number you want to
search using [Number buttons].
Playback of the title will start in a few seconds.
Chapter Search
During playback of a title, enter the chapter number
you want to search using [Number buttons].
Playback of the chapter will start in a few seconds.
Track / File Search
Enter the track / file number you want to search
using [Number buttons].
Playback of the track / file will start in a few seconds.
Search
Note
• If title contains no chapters, [SKIP H / G]
changes the title.
• For JPEG files, [s / B] is also available.
Search mode Available media
/
Chapter / Title search
Track search
Time search
Note
• During programme and random playback, search
functions are not available except the search using
[SKIP H / G].
• Time search is available only in the same track, file or
title.
• For BD and AVCHD, chapter and time search are
available only during playback.
•For some DivX
®
files, time search may not function.
Note
• As for the BD-video, how it performs will be strongly
determined by the disc, and may not perform as
described here.
E5RJ0BD_EN.book Page 24 Tuesday, October 20, 2009 3:53 PM
Page 25

25EN
PLAYBACK
You can select the format of audio and video as you prefer depending on the contents of the disc you are playing back.
Some BD, DVD and AVCHD materials may have subtitles in
1 or more languages. For commercially available discs, the
supported languages can be found on the disc case.
Follow the steps below to switch the subtitle languages
during playback.
1 During playback, press [SUBTITLE].
2 Use [K / L] to select the desired item to set,
then press [ENTER].
3 Use [K / L] to select your desired subtitle or
style.
•Use [s / B ] to switch between current subtitle
setting and “Off”.
4 Press [SUBTITLE] to exit.
1 During playback, press [SUBTITLE].
2 Use [K / L] to select your desired subtitle.
•Use [s / B] to switch between current subtitle
setting and “Off”.
3 Press [SUBTITLE] to exit.
Some BD, DVD, audio CD and AVCHD materials contain
multiple audio streams. Those are often in different audio
languages or audio formats. For BD, available audio varies
depending on “BD Audio Mode” setting. Refer to page 28
for more information.
1 During playback, press [AUDIO].
2 Use [K / L] to select the desired item to set,
then press [ENTER].
3 Use [K / L] to select your desired audio stream
channel.
• For “Secondary”, use [s / B] to switch between
current audio setting and “Off”.
4 Press [AUDIO] to exit.
1 During playback, press [AUDIO].
2 Use [K / L] to select your desired audio stream
channel.
• For audio CD, you can select following options.
3 Press [AUDIO] to exit.
• For DTS-CD (5.1 music disc), “DTS” will be displayed.
(Selecting audio streams or channels is not available.)
Switching Subtitles
“Primary Subtitle” : Sets the subtitle for the
primary video.
“Secondary Subtitle” : Sets the subtitle for the
secondary video.
“Subtitle Style” : Sets style of the subtitle.
Note
• Some discs will only allow you to change the
subtitles from the disc menu or pop-up menu. Press
[TOP MENU] or [POP MENU / MENU] to display the
disc menu or pop-up menu.
• If 4-digit-language code appears in the subtitle
menu, refer to “Language Code List” on page 40.
• If the disc has no subtitle language or subtitle style,
“Not Available” will be displayed on the TV screen.
• During playback of the secondary video, the primary
subtitle setting is not available except when there is
no subtitle for the secondary video.
• If you select a language that has a 3-letter-language
code, the code will be displayed every time you
change the subtitle language setting. If you select
any other languages, “---” will be displayed instead.
(Refer to page 40.)
•For DivX
®
external subtitle, refer to “Playing Back a
DivX® with DivX® External Subtitle” on page 19.
1 / 4
Switching Audio Soundtrack
“Primary” : Sets the audio for the primary video.
“Secondary” : Sets the audio for the secondary video.
“Stereo” : Both right and left channels are active
(stereo).
“L-ch” : Only left channel is active.
“R-ch” : Only right channel is active.
/ 31 48k
ENG
Dolby D
3/2.1ch
e.g.) DVD-video
INTRODUCTION CONNECTIONS PLAYBACK FUNCTION SETUP OTHERS
E5RJ0BD_EN.book Page 25 Tuesday, October 20, 2009 3:53 PM
Page 26

26 EN
PLAYBACK
There are 2 options for “BD Audio Mode” setting; either by
setting the output to the secondary and interactive audio
accompanied by the primary audio or by setting only the
primary audio. (Refer to pages 33-34 for more
information.)
1 In stop mode, press [MODE] repeatedly until
appears .
2 Use [K / L] to change the setting.
“Mix Audio Output”:
If it is available, BD-video’s secondary and interactive
audio will be output with the primary audio.
• The secondary audio is the audio for the secondary
video (Director’s commentary, etc.) and the interactive
audio is the audio for the interactive application
(Button click sounds etc.).
“HD Audio Output”:
Only the primary audio will be output. Set this mode in
order to output , Dolby Digital Plus, Dolby TrueHD, or
DTS-HD audio of BD through HDMI connection.
3 Press [RETURN] to exit.
Note
• The secondary audio will not be output when the
secondary video is not displayed or when “BD Audio
Mode” is set to “HD Audio Output”. (For some BDs,
secondary audio will be output even when
secondary video is off.)
• The sound mode cannot be changed during
playback of discs not recorded in multiple audio.
• Some discs allow changing the audio language
setting on the disc menu. (Operation varies
depending on the discs. Refer to the manual
accompanying the disc.)
• [AUDIO] may not work on some discs with multiple
audio streams or channels (e.g. DVDs that allow
changing audio setting on the disc menu).
• If you select a language that has a 3-letter-language
code, the code will be displayed every time you
change the audio language setting. If you select any
other languages, “---” will be displayed instead.
(Refer to page 40.)
• Audio Language selection cannot be made during
rapid playback. (Refer to page 22.)
• If 4-digit-language code appears in the audio menu,
refer to page 40.
• If the disc has no audio language, “Not Available” will
be displayed on the TV screen.
Setting the BD Audio Mode
Note
• You can also set “BD Audio Mode” from the setup
menu. Refer to page 28.
• Refer to “Audio signals output from HDMI OUT jack”
on page 33 and “Audio signals output from DIGITAL
OUT (OPTICAL / COAXIAL) jack” on page 34 for how
BD Audio will be output.
• In “Mix Audio Output” mode, if there is no secondary
and interactive audio, the audio will be output as
“HD Audio Output” mode.
E5RJ0BD_EN.book Page 26 Tuesday, October 20, 2009 3:53 PM
Page 27

27EN
FUNCTION SETUP
In the setup menu screen, you can access various kinds of menus, and customise them as you prefer. To call up the setup
menu screen, press [SETUP]. Then follow the instructions below to navigate through the screen.
< Setup menu screen >
1. Quick menu
Contains only the frequently used menus.
2. Custom menu
Contains all the available setup menus.
3. Initialise menu
Contains the menus that relates to the initialisation of
the unit or the SD card.
4. Menu window
Displays the available items for the selected menu.
•Use [K / L] to move the highlight up and down.
•Press [ENTER] to access the options of an item, to switch settings, or to confirm the selection.
•Use [s / B] to switch settings in some menus.
•Press [RETURN] to go back to the previous screen.
•Press [SETUP] to exit.
Items with (*) can be accessed from “Quick” menu also.
The items highlighted in grey are the default setting.
3
4
2
1
Quic
k
Media Select
HDMI Audio Out
HDMI Video Resolution
Component Output
Disc
HDMI Multi(Normal)
Auto
480i/576i
How to Navigate through the Setup Menus
List of Setup Menus
Category Menus / Options Description
Custom
Language Audio Original Chinese
Japanese
Korean
Danish
Finnish
Norwegian
Icelandic
Hungarian
Romanian
Turkish
Greek
Irish
Portuguese
Polish
Czech
Slovak
Bulgarian
Other
Sets the audio language for BD-video, DVD-video or
AVCHD file playback.
“Original”:
Activates the disc’s original language.
“Other”:
If you select “Other”, enter 4-digit-code for the desired
language (refer to page 40).
English
German
French
Italian
Spanish
Dutch
Swedish
Russian
Subtitle
Off Chinese
Japanese
Korean
Danish
Finnish
Norwegian
Icelandic
Hungarian
Romanian
Turkish
Greek
Irish
Portuguese
Polish
Czech
Slovak
Bulgarian
Other
Sets the subtitle language for BD-video, DVD-video or
AVCHD file playback.
“Other”:
If you select “Other”, enter 4-digit-code for the desired
language (refer to page 40).
English
German
French
Italian
Spanish
Dutch
Swedish
Russian
Disc Menu
English Japanese
Korean
Danish
Finnish
Norwegian
Icelandic
Hungarian
Romanian
Turkish
Greek
Irish
Portuguese
Polish
Czech
Slovak
Bulgarian
Other
Sets the language for disc menu.
“Other”:
If you select “Other”, enter 4-digit-code for the desired
language (refer to page 40).
German
French
Italian
Spanish
Dutch
Swedish
Russian
Chinese
DivX Subtitle
English Portuguese
Polish
Sets the language for DivX® subtitle. If the DivX®
subtitle file contains more than one subtitle language,
you can toggle those by pressing [SUBTITLE]
repeatedly.
German
French
Italian
Spanish
Dutch
Swedish
Russian1
Russian2
INTRODUCTION CONNECTIONS PLAYBACK FUNCTION SETUP OTHERS
E5RJ0BD_EN.book Page 27 Tuesday, October 20, 2009 3:53 PM
Page 28

28 EN
FUNCTION SETUP
Category Menus / Options Description
Custom
Video TV Aspect
• Refer to page 32
for more
information.
16:9 Wide Sets the aspect ratio of the playback image to fit your
TV.
4:3 Pan & Scan
4:3 Letter Box
16:9 Squeeze
HDMI Video
Resolution*
•This feature is
available only
when the display
device is
connected by an
HDMI cable.
• Refer to page 32
for more
information.
Auto Sets the resolution of the video signal being output
from the HDMI OUT jack.
480p/576p
720p
1080i
1080p
1080p24
HDMI Deep Color
•This feature is
available only
when the display
device is
connected by an
HDMI cable, and
when it supports
Deep Colour
feature.
Auto Reduces the posterisation effect of the playback
picture.
“Auto”:
Reduces the posterisation effect by automatically
outputting up to 12 bit colour whenever the unit
recognises the connected display device supports
Deep Colour feature.
“Off”:
Outputs the standard 8 bit colour.
Off
Component
Output*
480i/576i Sets the resolution for the component output picture.
480p/576p
720p
1080i
Progressive Mode
Auto “Auto”:
The progressive mode will detect 24-frame film
material (movies) and automatically select
appropriate progressive mode.
“Video”:
Suited for playing back video material discs (TV shows
or animation).
Video
Still Mode
Auto Adjusts picture resolution and quality in still mode.
“Auto”:
Automatically selects the best resolution setting
(“Frame” or “Field”) based on the data characteristics
of the pictures.
“Field”:
Stabilises the pictures, although the picture quality
may become coarse due to the limited amount of
data. Select “Field” when the pictures are still unstable
even if “Auto” is selected.
“Frame”:
Displays relatively motionless pictures in higher
resolution. “Frame” improves the picture quality,
although it may unstabilise the pictures due to
alternate output of 2-field data.
• An individual picture on the TV screen is called
“Frame”, which consists of two separate images
called “Field”. Some pictures may be blurred at the
auto setting in “Still Mode” setting due to their data
characteristics.
Field
Frame
Audio BD Audio Mode
Mix Audio Output For BD, selects whether to output the secondary and
interactive audio with primary audio if it is available or
only the primary audio. Refer to “Setting the BD Audio
Mode” on page 26.
“Mix Audio Output”:
The audio for the secondary video and the interactive
application will be output together with the audio for
the primary video.
“HD Audio Output”:
Outputs only the primary audio. Set this mode in order
to output Dolby Digital, Dolby Digital Plus, Dolby
TrueHD, DTS or DTS-HD audio of BD through HDMI
connection.
HD Audio Output
E5RJ0BD_EN.book Page 28 Tuesday, October 20, 2009 3:53 PM
Page 29

29EN
FUNCTION SETUP
Category
Menus / Options Description
Custom
Audio HDMI Audio Out*
•This feature is
available only
when the display
device is
connected by an
HDMI cable.
• Refer to page 33
for more
information.
HDMI Multi
(Normal)
Outputs the multi-channel
audio signals from HDMI
OUT jack with bitstream or
LPCM.
Sets the audio format for
the sound output from the
HDMI OUT jack.
• For “Speaker Size” and
“Delay Time”, if you
change the setting of
one speaker, the rest of
the speakers will be set
automatically.
For “Delay Time”,
difference of the values
among “Front”,
“Surround” and
“Surround Back” cannot
exceed 4.5m (15 ft), and
between “Front” and
“Center” it cannot exceed
1.5m (5 ft).
• For “Delay Time”, the
value of “Center”,
“Surround” and
“Surround Back” cannot
exceed the value of
“Front”.
HDMI Multi
(LPCM)
Speaker
Size
Front Large Sets the speaker
configuration to suite the
size/number of your
speakers.
Press [ENTER] to change
the setting.
Center Small
Subwoofer
On
Surround
Large
Surround
Back
Small
Default
Channel
Level
Test Tone Off Outputs the test tone from
each speaker.
Use [s / B] to switch
options, then press
[ENTER] to confirm.
•Test tone will be output
automatically.
• To stop the test tone,
press [RETURN].
“Manual”:
Allows you to manually
select the speaker to test.
Use [K / L] to select the
speaker.
Use [s / B] to adjust the
volume.
“Auto”:
Automatically tests all
speakers.
Use [s / B] to adjust the
volume.
Manual
Auto
Front Lch -12 to
0dB
(Default
0dB)
Sets the volume level for
each speaker to get the
ideal audio balance.
Use [s / B] to change the
setting.
Center
Subwoofer
Front Rch
Surround
Rch
Surround
Back Rch
Surround
Back Lch
Surround
Lch
Default
Delay
Time
Distance Feet Sets the desired measure
system. This measure
system will be used for
“Delay Time” setting.
Use [s / B] to change the
setting.
Meters
Front
0 to 18m
(Default
3.6m)
Sets the distance from the
listening point to the
speaker to get the ideal
delay time.
Use [s / B] to change the
setting.
Center
Surround
0 to 18m
(Default
3.0m)
Surround
Back
Default
Audio Mute
• Refer to
“Digital
Out”
setting on
page 34
for setting
options.
Digital
Out
Bitstream “Bitstream”:
When playing back discs
recorded in Dolby Digital,
Dolby Digital Plus, Dolby
TrueHD, DTS or DTS-HD,
the corresponding core
stream (Dolby Digital or
DTS) are output.
“LPCM”:
LPCM signal will be output
from DIGITAL OUT jack.
Sets the audio format
output from DIGITAL OUT
jack.
LPCM
INTRODUCTION CONNECTIONS PLAYBACK FUNCTION SETUP OTHERS
E5RJ0BD_EN.book Page 29 Tuesday, October 20, 2009 3:53 PM
Page 30

30 EN
FUNCTION SETUP
Category Menus / Options Description
Custom
Audio Down Sampling On Sets the digital audio output when playing back BD or
DVD recorded in LPCM.
“On”:
LPCM signals are converted to 48 kHz for output.
Set to “On” when using digital connections to an AV
amplifier that is not compatible with sampling
frequencies of 96 kHz.
“Off”:
For BD and DVD recorded in LPCM without copyright
protection, 2-channel audio signals up to 192 kHz are
output as LPCM signals with no conversion.
Off
DRC
Auto Sets whether to compress the range of sound volume
(dynamic range control) when Dolby Digital, Dolby
Digital Plus or Dolby TrueHD audio is played back.
On
Off
Parental
• Refer to
page 35 for
more
information.
Password input field BD Rating
Level
All Sets the rating level for the disc playback.
Age Setting
DVD Rating
Level
All Sets the rating level for the disc playback.
8
to
1
Password
Change
Password input field Sets the new password for “Parental” setting.
Others Angle Icon
On Sets whether to display the angle icon on the TV when
playing back the scene with various angles.
Off
Auto Power Off
On Sets whether to turn off the unit (to the standby mode)
automatically after 30 minutes of no action.
Off
Panel Display
Auto Sets the brightness of the front panel display.
When “Auto” is selected, the front panel display
automatically goes dim during playback.
Bright
Dimmer
DivX
®
VOD
Registration
Code
Your registration code is :
cccccccccc
To learn more visit
www.divx.com/vod
This menu item provides you with the DivX® VOD
registration code. The DivX
®
registration code is
required when downloading the DivX
®
VOD files from
the Internet. To learn more about DivX
®
VOD, visit
www.divx.com/vod.
Deactivation
Code
Your deactivation code is :
cccccccc
To learn more visit
www.divx.com/vod
This menu item provides you with the DivX
®
VOD
deactivation code. The DivX
®
deactivation code is
required when re-downloading the DivX
®
VOD files
from the Internet after deactivating. To learn more
about DivX
®
VOD, visit www.divx.com/vod.
Deactivation
No This menu deactivates the DivX® VOD files and
provides you with new registration code and
deactivation code in order to download the DivX
®
VOD
files from the Internet.
Yes
HDMI CEC
•This feature is
available only
when the display
device is
connected with an
HDMI cable, and
when it supports
HDMI CEC feature.
• Refer to page 35
for more
information.
On Sets whether to utilise the HDMI CEC function.
Off
Media Select*
Disc Select the media to play back.
SD Card
E5RJ0BD_EN.book Page 30 Tuesday, October 20, 2009 3:53 PM
Page 31

31EN
FUNCTION SETUP
Category Menus / Options Description
Custom
Others Network
Connection
• Refer to pages 3638 for more
information.
Connection
Test
Performs the network connection test. After you
change the IP Address or DNS Setting, always perform
this test.
Enable
(Easy)
If you select “Enable(Easy)”, Connection test will
automatically start.
Enable
(Custom)
IP Address
Setting
Auto (DHCP) Sets the IP Address.
In most cases, you can connect to the Internet without
making any changes to the default setting.
Manual
IP Address Input field Allows you to set “IP Address”, “Subnet Mask” and
“Default Gateway” manually.
• Available only when “Manual” is selected in “IP
Address Setting”.
Subnet
Mask
Default
Gateway
DNS
Setting
Auto (DHCP) Sets the DNS Setting.
In most cases, you can connect to the Internet without
making any changes to the default setting.
Manual
Primary
DNS
Input field Allows you to set “Primary DNS” and “Secondary DNS”
manually.
• Available only when “Manual” is selected in “DNS
Setting”.
Secondary
DNS
Proxy
Setting
Do Not Use Sets the proxy server.
In most cases, you can connect to the Internet without
using proxy server.
Use
Proxy
Address
Input field Allows you to set “Proxy Address” and “Proxy Port”
manually.
• Available only when “Use” is selected in “Proxy
Setting”.
Proxy Port
Connection
Speed
Auto Sets the connection speed.
In most cases, you can connect to the Internet without
making any changes to the default setting.
10BASE Half
10BASE Full
100BASE Half
100BASE Full
BD-Live
Setting
Allow You can restrict Internet access when BD-Live
functions are used.
Limited
Allow
Prohibit
MAC Address You can check the MAC Address.
Disable Deactivates the network connection.
Software Update
• Refer to page 39
for more
information.
Current
Version
Indicates the current firmware version.
Disc
Update
No Allows you to update this unit’s firmware using a disc.
Yes
Initialize
Setup No
• Refer to page 39 for more information.
Resets all the settings, except for “Parental” and
“Network Connection” to the factory default.
Yes
Format SD
Card
No Re-formats SD card.
Yes
Erase Saved
BD-ROM
Data (Player)
No Re-formats local storage (Player) used for BD-Java.
Yes
Erase Saved
BD-ROM
Data (SD
Card)
No Re-formats local storage (SD card) used for BD-Java.
Yes
Network
Settings
No Initialises network settings.
Yes
INTRODUCTION CONNECTIONS PLAYBACK FUNCTION SETUP OTHERS
E5RJ0BD_EN.book Page 31 Tuesday, October 20, 2009 3:53 PM
Page 32

32 EN
FUNCTION SETUP
Use this feature to adjust the aspect ratio of the video source which is different from your TV’s ratio to fit your TV monitor
without distorting the picture. Descriptions of each setting are as follows:
TV Aspect
[Setup] A “Custom” A “Video” A “TV Aspect”
Video source Your TV Option Description
16:9
4:3
4:3 Letter Box To enjoy 16:9 picture on 4:3 monitor:
16:9 picture is scaled down until both sides of the picture fits the 4:3 TV.
4:3 Pan & Scan To enjoy 16:9 picture on 4:3 monitor:
Both sides of the picture are trimmed to fit the 4:3 TV without distorting
the aspect ratio of the picture.
16:9
16:9 Wide To enjoy 16:9 picture on 16:9 monitor:
Select this setting when you want to enjoy 16:9 picture on the 16:9 TV.
4:3
16:9 Squeeze To enjoy 4:3 picture on 16:9 monitor:
Use this setting to display 4:3 picture on the 16:9 TV without distorting
the aspect ratio of the picture.
Note for “HDMI Video Resolution” and “Component Output”
• The selected resolution must also be supported by your display device.
• Even if you set “HDMI Video Resolution” setting to “Auto”, when this unit is connected to a DVI compatible display
devices with an HDMI-DVI cable, 480p/576p signal will be output.
• Video and audio signals may be distorted temporarily when switching to / from the HDMI output mode.
• You cannot change the video resolution during playback of BDs or AVCHD files. To change the resolution, stop
playback.
• In order to get natural and high quality film reproduction of 24-frame film material, use an HDMI cable (High Speed
HDMI Cable is recommended) and select “Auto” if the connected TV is compatible with 1080p24 frame input.
• For AVCHD / DivX
®
files, and for discs with the contents which are not compatible with 1080p24 frame, 1080p60
frame will be output even if the connected TV is compatible with 1080p24 frame input and you set “HDMI Video
Resolution” setting to “Auto” or “1080p24”.
•Pressing [PLAY B] on the front panel for 5 seconds changes the setting back to its default.
• When you change the resolution, the TV monitor temporarily goes blank and then comes back again. This is not a
malfunction.
• If you have selected the resolution not supported by your TV by mistake and the picture gets disturbed or goes
blank and does not come back, press and hold [PLAY B] on the front panel for 5 seconds to change the setting
back to its default.
• When HDMI cable is connected, only “480i/576i” and the resolution selected in “HDMI Video Resolution” will be
available for “Component Output”.
• If the video resolution for the component output and HDMI video resolution do not match, the video resolution for
the component output will be switched to “480i/576i”.
• If you play back copy-protected DVD-video, 480p/576p signal will be output from COMPONENT VIDEO OUT jacks,
even when “Component Output” setting is set to “720p” or “1080i”.
• With some copy-protected BD-video, the video image may only be output from HDMI OUT jack.
• Refer also to your TV’s manual.
E5RJ0BD_EN.book Page 32 Tuesday, October 20, 2009 3:53 PM
Page 33

33EN
FUNCTION SETUP
Audio signals output from HDMI OUT jack
*1) Full decoded.
*2) Only the independent substream is decoded.
*3) Dolby TrueHD stream is decoded.
*4) Only the Dolby Digital substream is decoded.
*5) Only the core substream is decoded.
*6) When audio source is Multi-channel, decoded as 7.1ch. However, number of the output audio channel will depend
on the number of the connected speakers.
• If the connected device is not compatible with the HDMI BITSTREAM, audio will be output as multi LPCM or 2-channel
down-mixed LPCM depending on the capability of the connected device even if you select “HDMI Multi(Normal)” in
“HDMI Audio Out” setting.
• When playing back a BD-video which only contains the primary audio, the audio output will be the same case as the
“HD Audio Output” even if the “BD Audio Mode” is set to “Mix Audio Output”.
HDMI Audio Out
[Setup] A “Quick” A “HDMI Audio Out”
Device to be connected “HDMI Audio Out” setting Output HDMI audio signal
Device compatible with Dolby Digital,
Dolby Digital Plus, Dolby TrueHD, DTS or
DTS-HD decoding
HDMI Multi(Normal) Dolby Digital, Dolby Digital Plus, Dolby TrueHD,
DTS, or DTS-HD bitstream are output from HDMI
OUT jack. Make the speaker settings on the
connected AV amplifier, etc.
Device compatible with 3 or more channels
of audio inputs (not Dolby Digital, Dolby
Digital Plus, Dolby TrueHD, DTS or DTS-HD
compatible)
HDMI Multi(LPCM) Multi-channel audio signals are output from
HDMI OUT jack. Make the speaker settings with
the speaker setting items appear after you select
“HDMI Multi(LPCM)”. Refer to page 29.
HDMI connection to a TV and digital audio
connection (optical / coaxial) to an AV
amplifier
Audio Mute HDMI audio will be mute, and Dolby Digital / DTS
bitstream or LPCM will be output from DIGITAL
OUT jack depending on “Digital Out” setting.
Refer to page 34.
Media Recording format
“HDMI Audio Out” setting
HDMI Multi(Normal) HDMI Multi(LPCM)
When “BD Audio
Mode” is set to “HD
Audio Output”
When “BD Audio
Mode” is set to “Mix
Audio Output”
When “BD Audio
Mode” is set to “HD
Audio Output”
When “BD Audio
Mode” is set to “Mix
Audio Output”
BD-video
Dolby Digital Dolby Digital Dolby Digital Multi LPCM Multi LPCM
Dolby Digital Plus Dolby Digital Plus Dolby Digital
*2
Multi LPCM
*1
Multi LPCM
*2
Dolby TrueHD Dolby TrueHD Dolby Digital
*4
Multi LPCM
*3
Multi LPCM
*4
DTS DTS DTS Multi LPCM
*6
Multi LPCM
*6
DTS-HD DTS-HD DTS
*5
Multi LPCM
*1, *6
Multi LPCM
*5, *6
LPCM Multi LPCM Multi LPCM Multi LPCM Multi LPCM
DVD-video
Dolby Digital Dolby Digital Multi LPCM
DTS DTS Multi LPCM
LPCM 2ch LPCM 2ch LPCM
MPEG MPEG Multi LPCM
AVCHD
Dolby Digital Dolby Digital Multi LPCM
LPCM 2ch LPCM Multi LPCM
DivX
®
Dolby Digital Dolby Digital Multi LPCM
MP3 / MP2 2ch LPCM 2ch LPCM
audio CD / MP3 /
Windows Media™ Audio
2ch LPCM 2ch LPCM
DTS-CD DTS Multi LPCM
Note
• The audio signals from HDMI OUT jack (including the sampling frequency, the number of channels and bit length)
maybe limited by the device that is connected.
• Among the devices that support HDMI, some do not support audio output (e.g. projectors). In connections with
device such as this unit, audio signals are not output from HDMI OUT jack.
• Video and audio signals may be distorted temporarily when switching to / from the HDMI output mode.
INTRODUCTION CONNECTIONS PLAYBACK FUNCTION SETUP OTHERS
E5RJ0BD_EN.book Page 33 Tuesday, October 20, 2009 3:53 PM
Page 34

34 EN
FUNCTION SETUP
When “Audio Mute” is selected in “HDMI Audio Out” setting, HDMI audio signal will be mute and the audio signals
output from DIGITAL OUT jack changes depending on “Digital Out” setting.
Audio signals output from DIGITAL OUT (OPTICAL / COAXIAL) jack
• When playing back a BD-video which only contains the primary audio, the audio output will be the same case as the
“HD Audio Output” even if the “BD Audio Mode” is set to “Mix Audio Output”.
Digital Out
[Setup] A “Quick” A “HDMI Audio Out” A “Audio Mute” A “Digital Out”
Media Recording format
“Digital Out” setting
Bitstream LPCM
When “BD Audio
Mode” is set to “HD
Audio Output”
When “BD Audio
Mode” is set to “Mix
Audio Output”
When “BD Audio
Mode” is set to “HD
Audio Output”
When “BD Audio
Mode” is set to “Mix
Audio Output”
BD-video
Dolby Digital Dolby Digital Dolby Digital 2ch Downmix LPCM 2ch Downmix LPCM
Dolby Digital Plus Dolby Digital Dolby Digital 2ch Downmix LPCM 2ch Downmix LPCM
Dolby TrueHD Dolby Digital Dolby Digital 2ch Downmix LPCM 2ch Downmix LPCM
DTS DTS DTS 2ch Downmix LPCM 2ch Downmix LPCM
DTS-HD DTS DTS 2ch Downmix LPCM 2ch Downmix LPCM
LPCM 2ch Downmix LPCM 2ch Downmix LPCM 2ch Downmix LPCM 2ch Downmix LPCM
DVD-video
Dolby Digital Dolby Digital 2ch Downmix LPCM
DTS DTS 2ch Downmix LPCM
LPCM 2ch LPCM 2ch LPCM
MPEG MPEG Multi LPCM
AVCHD
Dolby Digital Dolby Digital 2ch Downmix LPCM
LPCM 2ch Downmix LPCM 2ch Downmix LPCM
DivX
®
Dolby Digital Dolby Digital 2ch Downmix LPCM
MP3 / MP2 2ch LPCM 2ch LPCM
audio CD / MP3 /
Windows Media™ Audio
2ch LPCM
2ch LPCM
DTS-CD DTS 2ch Downmix LPCM
Note
• In order to output LPCM signal from DIGITAL OUT jack while outputting the HDMI audio signal, set “HDMI Audio
Out” setting to “HDMI Multi(LPCM)”.
E5RJ0BD_EN.book Page 34 Tuesday, October 20, 2009 3:53 PM
Page 35

35EN
FUNCTION SETUP
Some BD-videos or DVD-videos feature a parental lock
level.
Playback will stop if the ratings exceed the levels you set, it
will require you to enter a password before the disc will
play back. This feature prevents your children from
viewing inappropriate material.
1. With “ ” selected press [ENTER].
Password input field appears.
2. If a password has not been set, follow A).
If a password has already been set, follow B).
If you want to change the password, follow B) and
C).
If you forget the password, follow D).
A) Enter 4 digit password using [Number buttons].
• “4737” cannot be used.
B) Enter 4 digit password
C) Select “Password Change”, then press [ENTER].
Enter the new password.
D) Enter “4737”. Current password and “Parental”
settings are now cleared. Enter a new password.
3. Select the desired item to set the rating level for,
then press [ENTER].
4. Select the desired rating level, then press [ENTER].
<BD rating level>
<DVD rating level>
To Cancel Parental Lock Temporarily
Some discs allow you to cancel the parental lock
temporarily. With those discs, the message below will
appear when you try to play them back.
“Enter current password.”
Follow the instruction which appears on the TV screen to
cancel the parental lock.
You can control all HDMI CEC compatible components
connected via an HDMI cable by simple button operations
of the remote control of this unit. In order to enable the
function, you need to set “HDMI CEC” to “On”.
When the operations with following buttons of the remote
control of this unit are performed, the TV will automatically
be turned on and switched to the appropriate input
channel.
Buttons for one touch play:
- [PLAY B]
- [TOP MENU], or [POP MENU / MENU] (when a disc is
inserted in the unit)
When you press and hold [ON/STANDBY Q] for 2 seconds,
it turns off the power of the TV first and then turns off the
power of this unit.
When the connected HDMI CEC compatible display device
is turned off, this unit may also turn off together.
Receiving Operational Signal from TV’s Remote
Control
You can operate this unit with TV’s remote control. Check
your TV owner’s manual for details.
• This function may not work properly depending on the
connected TV.
• The available operation may differ depending on the TV’s
remote control you use.
• Other components must be compatible with HDMI CEC
in order to use this function.
Parental
[Setup] A “Custom” A “Parental”
All Sets no limit.
Age Setting Allows you to enter the age to limit, and
prohibits the playback of a disc whose
rating level exceeds the age setting
entered here.
• Enter the age as a 3-digit-number.
(e.g., For age 15, enter [0], [1], [5].)
All Parental control is inactive; all discs can be
played back.
8 DVD software of any grades (adult /
general / children) can be played back.
7 [NC-17] No one under 17 admitted.
6 [R] Restricted; under 17 requires
accompanying parent or adult guardian.
5 [PGR] Parental Guidance Recommended.
4 [PG13] Unsuitable for children under 13.
3 [PG] Parental Guidance suggested.
2 [G] General audience.
1 Suitable for children.
HDMI CEC (REGZA - LINK)
[Setup] A “Custom” A “Others” A “HDMI CEC”
One Touch Play
Standby
System Information
INTRODUCTION CONNECTIONS PLAYBACK FUNCTION SETUP OTHERS
E5RJ0BD_EN.book Page 35 Tuesday, October 20, 2009 3:53 PM
Page 36

36 EN
FUNCTION SETUP
Set up the network connection settings in order to use the
BD-Live function with a BD-Live disc.
After you made IP address/DNS settings or when a LAN
cable is connected, always perform the connection test to
check if the connection is correctly made.
1 In stop mode, press [SETUP].
2 Use [K / L] to select , then press [ENTER].
3 Use [K / L] to select “Others”, then press
[ENTER].
4 Use [K / L] to select “Network Connection”,
then press [ENTER].
5 Use [K / L] to select “Connection Test”, then
press [ENTER].
Connection test will start automatically and the test result
will appear right after the connection test finishes.
• “Testing...” : The test is in progress.
• “Pass” : Connection test is successfully
completed.
• “Fail” : Connection test failed.
Check the connection settings.
Press [ENTER] to go to the list of network status
confirmation screen.
6 Press [ENTER] to go back to the previous
screen, or press [SETUP] to exit.
Network settings are set to the following settings initially.
(In most cases, you can connect to the Internet without
making any changes to the default settings.)
If you want to set the network settings back to the default
settings as above (except “BD-Live Setting”), follow the
procedure below.
1 Follow steps 1 to 4 in “Connection Test” on
page 36.
2 Use [K / L] to select “Enable(Easy)”, then press
[ENTER].
• The unit will start the connection test automatically
and the test result will appear right after the test
finishes.
• After the connection test finishes, press [ENTER] to go
to network status confirmation screen.
3 Press [ENTER] to activate the network settings
and set the network connection automatically.
Press [SETUP] to exit.
In following cases, select “Enable(Custom)” to set each
setting as necessary.
- When connection test failed with the setting of
“Enable(Easy)”.
- When instructed by your Internet service provider to
make specific settings in accordance with your
network environment.
IP Address Setting / DNS Setting
1 Follow steps 1 to 4 in “Connection Test” on
page 36.
2 Use [K / L] to select “Enable(Custom)”, then
press [ENTER].
3 Use [K / L] to select “IP Address Setting”, then
press [ENTER] repeatedly to select the desired
setting.
Network Connection
Connection Test
[Setup] A “Custom” A “Others” A
“Network
Connection”
A
“Connection
Test”
Note
• If the connection test passes, you can enjoy the
BD-Live functions using the Internet without making
any extra settings.
• If the connection test fails, you may need to change
the MAC address settings of your router. You can
check the MAC address of this unit on
“Enable(Custom)” screen.
• “Connection Test” is not available when “Disable” is
selected in “Network Connection”.
xxx.xxx.xxx.xxx
xxx.xxx.xxx.xxx
xxx.xxx.xxx.xxx
xxx.xxx.xxx.xxx
xxx.xxx.xxx.xxx
Others
Connection Test
IP Address
Subnet Mas
k
Default Gateway
Primary DNS
Secondary DNS
then press ‘ENTER’.
Enable(Easy)
[Setup] A “Custom” A “Others” A
“Network
Connection”
A
“Enable
(Easy)”
- IP Address Setting Auto(DHCP)
- DNS Setting Auto(DHCP)
- Proxy Setting Do Not Use
- Connection Speed Auto
- BD-Live Setting Allow
Note
• The setting of “BD-Live Setting” will not be set back
to the default, even if you follow the procedure.
Enable(Custom)
[Setup] A “Custom” A “Others” A
“Network
Connection”
A
“Enable
(Custom)”
“Auto(DHCP)” : If your router has DHCP server
function, select “Auto(DHCP)”.
“Manual” : If your router does not have DHCP
server function, select “Manual”.
E5RJ0BD_EN.book Page 36 Tuesday, October 20, 2009 3:53 PM
Page 37

37EN
FUNCTION SETUP
If you select “Manual”, follow the following
instruction to set the IP address and DNS.
1) Use [K / L] to select “IP Address”, “Subnet Mask”
or “Default Gateway”, then press [ENTER]. IP
address setting screen will appear. Enter IP
address, subnet mask and default gateway with
cursor buttons and number buttons.
• Enter the IP address number after checking the
specifications of your router.
• If the IP address number is unknown, check the
IP address number of other devices (e.g. PC
connected via LAN cable) and assign a different
number from those of other devices.
2) After you enter all correctly, press [ENTER].
• Confirmation message will appear. Select “Yes”
to complete the settings.
3) Use [K / L] to select “Primary DNS” or “Secondary
DNS”, then press [ENTER]. DNS setting screen will
appear. Enter primary DNS and secondary DNS
with cursor buttons and number buttons.
• Enter the numbers instructed by your Internet
provider.
• If the number is unknown, check the number of
other devices (e.g. PC connected via LAN cable)
and assign the same number.
4) After you enter all correctly, press [ENTER].
• Confirmation message will appear. Select “Yes”
to complete the settings.
4 Press [RETURN] to go back to the previous
screen, or press [SETUP] to exit.
Proxy Setting
1 Follow steps 1 to 4 in “Connection Test” on
page 36.
2 Use [K / L] to select “Enable(Custom)”, then
press [ENTER].
3 Use [K / L] to select “Proxy Setting”, then
press [ENTER] repeatedly to select the desired
setting.
• For default settings, select “Do Not Use”.
• If you need to change the proxy setting as instructed
by your Internet service provider to set the designated
proxy address and port, select “Use”.
If you select “Use”, follow the following instructions
to set the proxy address and proxy port.
1) Use [K / L] to select “Proxy Address”, then press
[ENTER]. Proxy address setting screen will appear.
Enter proxy address.
• The keyboard screen will appear.
2) After you enter proxy address correctly, press
[Blue].
• Confirmation message will appear. Select “Yes”
to complete the settings.
3) Use [K / L] to select “Proxy Port” , then press
[ENTER]. Proxy port setting screen will appear.
Enter proxy port number with number buttons.
4) After you enter proxy port correctly, press
[ENTER].
4 Press [RETURN] to go back to the previous
screen, or press [SETUP] to exit.
Note
• The range of input number is between 0 and 255.
• If you enter a number larger than 255, the number
will automatically be 255.
• The manually entered number will be saved even if
you change the setting to “Auto(DHCP)”.
• When you enter a wrong number, press [CLEAR] to
cancel. (The number will be back to “0”.)
• If you want to enter 1 or 2 digit number in one cell,
press [B] to move on to the next cell.
• If the entered IP address or the default gateway or
primary DNS number is same as the default setting,
IP address setting will be set to “Auto(DHCP)”.
(The manually entered number will be saved.)
• When IP address setting is set to “Manual”, the
setting of DNS setting will automatically be “Manual”
and when IP address setting is set to “Auto(DHCP)”,
you can set either “Auto(DHCP)” or “Manual” for DNS
setting.
xxx . xxx . xxx . xxx
xxx . xxx . xxx . xxx
xxx . xxx . xxx . xxx
Others
IP Address Setting
IP Address
Subnet Mas
k
Default Gateway
then press ‘ENTER’.
[K / L / s / B] : Move the highlight.
[Number buttons] :Enter number.
[ENTER] : Enter the highlighted number/word.
[Red] : Clear the entered number or word.
[Green] : Clear all the entered numbers or words.
[Yellow] : Switch between abc ? ABC ? @!?
[Blue] : Set the entered number or word.
Note
• The range of input number for the port number is
between 0 and 65535. (If you enter a number larger
than 65535, it will be regarded as 65535.)
• For proxy port, the selected ports may be blocked
and not be able to use depending on your network
environment.
INTRODUCTION CONNECTIONS PLAYBACK FUNCTION SETUP OTHERS
E5RJ0BD_EN.book Page 37 Tuesday, October 20, 2009 3:53 PM
Page 38

38 EN
FUNCTION SETUP
Connection Speed
You can set connection speed as your preference.
(The default setting is “Auto”.)
1 Follow steps 1 to 4 in “Connection Test” on
page 36.
2 Use [K / L] to select “Enable(Custom)”, then
press [ENTER].
3 Use [K / L] to select “Connection Speed”, then
press [ENTER].
4 Use [K / L] to select the desired setting, then
press [ENTER].
“Auto”:
Set the appropriate connection speed automatically, in
accordance with your network environment.
5 Press [RETURN] to go back to the previous
screen, or press [SETUP] to exit.
BD-Live Setting
You can limit the Internet access from the BD-Live
functions. (The default setting is “Allow”.)
1 Follow steps 1 to 4 in “Connection Test” on
page 36.
2 Use [K / L] to select “Enable(Custom)”, then
press [ENTER].
3 Use [K / L] to select “BD-Live Setting”, then
press [ENTER].
4 Use [K / L] to select the desired setting, then
press [ENTER].
“Allow”:
Internet access is permitted from all BD-Live contents.
“Limited Allow”:
Internet access is permitted only for BD-Live contents
which have content owner certificates. Internet access
without the certificates are prohibited.
“Prohibit”:
Internet access is prohibited from all BD-Live contents.
5 Press [RETURN] to go back to the previous
screen, or press [SETUP] to exit.
Deactivate all the network connection and settings.
1 Follow steps 1 to 4 in “Connection Test” on
page 36.
2 Use [K / L] to select “Disable”, then press
[ENTER].
3 Press [RETURN] to go back to the previous
screen, or press [SETUP] to exit.
“10BASE Half” : Set the connection speed to
“10BASE Half”.
“10BASE Full” : Set the connection speed to
“10BASE Full”.
“100BASE Half” : Set the connection speed to
“100BASE Half”.
“100BASE Full” : Set the connection speed to
“100BASE Full”.
Note
• Choose a connection speed in accordance with your
network environment.
• The network connection may be disabled depending
on the device, when the settings are changed.
Disable
Note
• The network connection can be reactivated by
setting the network connection to “Enable(Easy)” or
“Enable(Custom)”.
E5RJ0BD_EN.book Page 38 Tuesday, October 20, 2009 3:53 PM
Page 39

39EN
FUNCTION SETUP
You can confirm the current software version.
1 Follow steps 1 to 3 in “Connection Test” on
page 36.
2 Use [K / L] to select “Software Update”, then
press [ENTER].
3 Use [K / L] to select “Current Version”, then
press [ENTER].
4 Press [ENTER] or [RETURN] to exit.
You can upgrade the software by using disc.
1 Follow steps 1 to 3 in “Connection Test” on
page 36.
2 Use [K / L] to select “Software Update”, then
press [ENTER].
3 Use [K / L] to select “Disc Update”, then press
[ENTER].
4 Use [K / L] to select “Yes”, then press [ENTER].
5 Disc tray will open automatically.
• Insert the disc for software update and then press
[OPEN/CLOSE A].
6 After completing loading disc, confirmation
message will appear. Select “Yes” and press
[ENTER] to start upgrading.
• It may take awhile to complete the updating. (Please
wait until “100%” appears on the front panel display.)
7 After the disc upgrade finishes, this unit will
restart and eject the disc.
Initialise the setting or SD card.
1 In stop mode, press [SETUP].
2 Use [K / L] to select , then press
[ENTER].
3 Use [K / L] to select a desired option, then
press [ENTER].
• Confirmation message will appear.
“Setup”:
Resets the setup menu to the default.
The setting for “Parental”, “Network Connection” and
“Media Select” will not be reset.
“Format SD Card”
(Available only when an SD card is inserted.):
Initialises the SD card.
“Erase Saved BD-ROM Data (Player)”:
Clears the data saved for the BD-ROM contents,
such as BD-ROM game scores, from this player.
“Erase Saved BD-ROM Data (SD Card)”
(Available only when an SD card is inserted.):
Clears the supplemental data for the BD-ROM
playback, such as subtitle data, from the SD card.
“Network Settings”:
Resets the Network Settings menu to the default.
4 Select “Yes”, then press [ENTER].
•Press [ENTER] again to complete the settings.
5 Press [SETUP] to exit.
Software Update
Current Version
Note
• Please visit http://www.toshiba-om.net to download
the latest firmware version.
Disc Update
Note
• You can check the current firmware version in
“Current Version” in “Software Update” menu.
• Please do not unplug the mains cable while
executing “Disc Update”.
• All settings will remain the same even if you update
the firmware version.
Initialise
Caution
• Do not remove the SD card while executing “Format
SD Card” or “Erase Saved BD-ROM Data (SD Card)”. It
damages the card.
INTRODUCTION CONNECTIONS PLAYBACK FUNCTION SETUP OTHERS
E5RJ0BD_EN.book Page 39 Tuesday, October 20, 2009 3:53 PM
Page 40

40 EN
OTHERS
Language Code List
Language Code
A-B
Abkhazian 4748
Afar 4747
Afrikaans 4752
Albanian 6563
Amharic 4759
Arabic 4764
Armenian 5471
Assamese 4765
Aymara 4771
Azerbaijani 4772
Bashkir 4847
Basque 5167
Bengali;Bangla 4860
Bhutani 5072
Bihari 4854
Bislama 4855
Breton 4864
Bulgarian [BUL] 4853
Burmese 5971
Byelorussian 4851
C-E
Cambodian 5759
Catalan 4947
Chinese [CHI] 7254
Corsican 4961
Croatian 5464
Czech [CZE] 4965
Danish [DAN] 5047
Dutch [DUT] 6058
English [ENG] 5160
Esperanto 5161
Estonian 5166
F-H
Faroese 5261
Fiji 5256
Finnish [FIN] 5255
Language Code
French [FRE] 5264
Frisian 5271
Galician 5358
Georgian 5747
German [GER] 5051
Greek [GRE] 5158
Greenlandic 5758
Guarani 5360
Gujarati 5367
Hausa 5447
Hebrew 5569
Hindi 5455
Hungarian [HUN]
5467
I-K
Icelandic [ICE] 5565
Indonesian 5560
Interlingua 5547
Interlingue 5551
Inupiak 5557
Irish [IRI] 5347
Italian [ITA] 5566
Japanese [JPN] 5647
Javanese 5669
Kannada 5760
Kashmiri 5765
Kazakh 5757
Kinyarwanda 6469
Kirghiz 5771
Kirundi 6460
Korean [KOR] 5761
Kurdish 5767
L-N
Laothian 5861
Latin 5847
Latvian;Lettish 5868
Lingala 5860
Lithuanian 5866
Language Code
Macedonian 5957
Malagasy 5953
Malay 5965
Malayalam 5958
Maltese 5966
Maori 5955
Marathi 5964
Moldavian 5961
Mongolian 5960
Nauru 6047
Nepali 6051
Norwegian [NOR]
6061
O-R
Occitan 6149
Oriya 6164
Oromo (Afan) 6159
Panjabi 6247
Pashto;Pushto 6265
Persian 5247
Polish [POL] 6258
Portuguese
[POR]
6266
Quechua 6367
Rhaeto-
Romance
6459
Romanian
[RUM]
6461
Russian [RUS] 6467
S
Samoan 6559
Sangho 6553
Sanskrit 6547
Scots Gaelic 5350
Serbian 6564
Serbo-Croatian 6554
Sesotho 6566
Setswana 6660
Shona 6560
Sindhi 6550
Singhalese 6555
Language Code
Siswat 6565
Slovak [SLO] 6557
Slovenian 6558
Somali 6561
Spanish [SPA] 5165
Sundanese 6567
Swahili 6569
Swedish [SWE] 6568
T
Tagalog 6658
Tajik 6653
Tamil 6647
Tatar 6666
Telugu 6651
Thai 6654
Tibetan 4861
Tigrinya 6655
Tonga 6661
Tsonga 6665
Turkish [TUR] 6664
Turkmen 6657
Twi 6669
U-Z
Ukrainian 6757
Urdu 6764
Uzbek 6772
Vietnamese 6855
Volapuk 6861
Welsh 4971
Wolof 6961
Xhosa 7054
Yiddish 5655
Yoruba 7161
Zulu 7267
Note
• If you choose a language that has a 3-letter-language code (written in bracket), the code will be displayed every
time you change the audio or subtitle language setting on page 25. If you choose any other languages, “---” will be
displayed instead.
E5RJ0BD_EN.book Page 40 Tuesday, October 20, 2009 3:53 PM
Page 41

41EN
OTHERS
If the unit does not perform properly when operated as instructed in this manual, check the unit, consulting the
following checklist.
Troubleshooting
Problem Solution
No power - Check if the mains cable is properly connected.
- Unplug the mains cable once, and wait for 5-10 seconds and then plug it in again.
No sound or picture - Check if the connected TV is turned on.
- Check if the connections are made securely and correctly.
- Check whether the connected TV or other device supports HDCP. (This unit will not
output a video signal unless the other device supports HDCP.)
- Check whether the output format of this unit (HDMI FORMAT) matches the
supported input format of other connected device.
Distorted picture - Sometimes a small amount of picture distortion may appear.
This is not a malfunction.
- Connect this unit directly to the TV. If the composite audio / video cables are
connected to a VCR, pictures may be distorted due to the copy right protection
system.
Completely distorted picture
or black / white picture with
BD / DVD
- Make sure the disc is compatible with this unit.
No sound or distorted sound - Adjust the volume.
- Check if speakers are connected correctly.
- Check the HDMI connections.
- Check the settings in “Audio” menu.
Picture freezes momentarily
during playback
- Check the disc for fingerprints / scratches and clean with a soft cloth wiping from
centre to edge.
-Clean the disc.
Disc cannot be played back - Clean the disc.
- Ensure the disc label is facing up.
- Check if the disc is defective by trying another disc.
- Cancel the ratings control or change the control level.
- Insert a correct disc that can be played back on this unit.
SD card cannot be read - The format of the card does not match that accepted by this unit or the card is not
compatible.
No return to start-up screen
when disc is removed
- Reset this unit by turning it off, then on again.
The unit does not respond to
the remote control
- Aim the remote control directly at infrared sensor window on the front panel.
- Reduce the distance to infrared sensor window.
- Replace the batteries in the remote control.
- Re-insert the batteries with their polarities (+ / - signs) as indicated.
Buttons do not work or the
unit stops responding
- To completely reset the unit, press and hold [ON/STANDBY Q] on the front panel
for 10 seconds to shut down the unit or unplug the mains cable from the AC outlet
for 5-10 seconds.
The unit does not respond to
some operating commands
during playback
- Operations may not be permitted by the disc.
Refer to the instructions of the disc.
The unit cannot read BD /
DVD/ CD
- Dew condensation may form inside the unit. Do not use this unit for at least a few
hours until its inside gets dry.
- You are attempting to play back a disc other than one with one of the logos on
page 13.
- Wipe the dirt off the disc or replace the disc.
Angle does not switch - The angle cannot be switched for BD / DVD which do not contain multiple angles.
In some cases multiple angles are only recorded for specific scenes.
Playback does not start when
the title is selected
- Check the settings in “Parental” menu.
The password for rating level
has been forgotten
- Enter the default password “4737”, then your forgotten password will be cleared.
INTRODUCTION CONNECTIONS PLAYBACK FUNCTION SETUP OTHERS
E5RJ0BD_EN.book Page 41 Tuesday, October 20, 2009 3:53 PM
Page 42

42 EN
OTHERS
Problem Solution
Cannot connect to the
network
- Check if the LAN cable connection is properly made.
- Turn on the modem or broadband router.
- Check the network setting.
- Check if the broadband router and/or modem is correctly connected.
- Check “BD-Live Setting”.
Cannot connect to the
network while my PC is
connected to the network
- Check the content of your Internet service contract to see if your Internet service
provider prevents multiple terminals connecting at the same time.
Cannot use the BD-Live
function
- Use an SD card with enough space.
The playback of BD-video or
download of data does not
perform properly
- Che ck if an SD card is correct ly inse rted. Do not remove the card during playback as
some BD-videos require an SD card for playback.
Note
• Some functions are not available in specific modes, but this is not a malfunction. Read the description in this
manual for details on correct operations.
• Some functions are prohibited on some discs.
Specifications
General
Signal system NTSC/PAL colour
Power requirements 220-240 V AC, 50 Hz
Power consumption 22 W (standby: 0.5 W)
Dimensions (width x height x depth) 435 x 56 x 218 mm
Weight 2.4 kg
Operating temperature 5°C to 35°C
Operating humidity Less than 80 % (no condensation)
Terminals
Rear
Video output
RCA jack x 1 1 Vp-p (75Ω)
Component video output
RCA jack x 3 Y: 1 Vp-p (75Ω) P
B/CB: 700 mVp-p (75Ω) PR/CR: 700 mVp-p (75Ω)
HDMI output
HDMI jack x 1 Video: 480p/576p, 720p, 1080i, 1080p, 1080p24 / Audio
Audio output (Analogue)
RCA jack x 2 L/R: 2 Vrms (output impedance: more than 1kΩ)
Audio output (Digital)
RCA jack x 1
Optical jack x 1
500 mVp-p (75Ω)
Digital connector
LAN terminal 10BASE-T/100BASE-TX
Note
• The specifications and design of this unit are subject to change without notice.
E5RJ0BD_EN.book Page 42 Tuesday, October 20, 2009 3:53 PM
Page 43

43EN
OTHERS
License Information on the Software Used in This Product
This document is statement purpose only. Not concerned with operation of this product.
Exhibit A
GPL
GNU GENERAL PUBLIC LICENSE
Version 2, June 1991
Copyright (C) 1989, 1991 Free Software Foundation, Inc.,
51 Franklin Street, Fifth Floor, Boston, MA 02110-1301 USA
Everyone is permitted to copy and distribute verbatim copies of this licen se document, but changing it
is not allowed.
Preamble
The licenses for most software are designed to take away your freedom to share and change it. By
contrast, the GNU General Public License is intended to guarantee your freedom to share and change free
software--to make sure the software is free for all its users. This General Public License applies to most of
the Free Software Foundation's software and to any other program whose authors commit to using it.
(Some other Free Software Foundation software is covered by the GNU Lesser General Public License
instead.) You can apply it to your programs, too.
When we speak of free software, we are referring to freedom, not price. Our General Public Licenses are
designed to make sure that you have the freedom to distribute copies of free software (and charge for this
service if you wish), that you receive source code or can get i t if you want it, that you can change the
software or use pieces of it in new free programs; and that you know you can do these things.
To protect your rights, we need to make restrict ions that forbid anyone to deny you these rights or to ask
you to surrender the rights. These restrictions translate to certain responsibilities for you if you distribute
copies of the software, or if you modify it.
For example, if you distribute copies of such a program, whether gratis or for a fee, you must give the
recipients all the rights that you have. You must make sure that they, too, receive or can get the source
code. And you must show them these terms so they know their rights.
We protect your rights with two steps: (1) copyright the software, and (2) offer you this license which gives
you legal permission to copy, distribute and/or modify the software.
Also, for each author's protection and ours, we want to make certain that everyone understands that there
is no warranty for this free software. If the software is modified by someone else and passed on, we want
its recipients to know that what they have is not the orig inal, so that any problems introduced by others
will not reflect on the original authors' reputations.
Finally, any free program is threatened constantly by software patents. We wish to avoid the danger that
redistributors of a free program will individually obtain patent licenses, in effect making the program
proprietary. To prevent this, we have made it clear that any patent must be licensed for everyone's free
use or not licensed at all.
The precise terms and conditions for copying, distribution and modification follow.
GNU GENERAL PUBLIC LIC ENSE
TERMS AND CONDITIONS FOR COPYING, DISTRIBUTION AND MODIFICATION
0. This License applies to any program or other work which contains a notice placed by the copyrigh t
holder saying it may be distributed under the terms of this General Public License. The "Program",
below, refers to any such program or work, and a "work based on the Program" means either the
Program or any derivative work under copyright law: that is to say, a work containing the Program or a
portion of it, either verbatim or with modifications and/or translated into another language.
(Hereinafter, translation is included without limitation in the term "modification".) Each licensee is
addressed as "you".
Activities other than copying, distribution and modification are not covered by this License; they are
outside its scope. The act of running the Program is not restricted, and t he output from the Program is
covered only if its contents constitute a work based on the Program (independent of having been made
by running the Program). Whether that is true depends on wha t the Program does.
1. You may copy and distribute verbatim copies of the Program's source code as you receive it, in any
medium, provided that you conspicuously and appropriately publish on each copy an appropriate
copyright notice and disclaimer of warranty; keep intact all the notices that refer to this License and to
the absence of any warranty; and give any other recipients of the Program a copy of this License along
with the Program.
You may charge a fee for the physical act of transferring a copy, and you may at your option offer
warranty protection in exchange for a fee.
2. You may modify your copy or copies of the Program or any portion of it, thus forming a work based on
the Program, and copy and distribute such modifications or work under the terms of Section 1 above,
provided that you also meet all of these conditions:
a) You must cause the modified files to carry prominent notices stating that you changed the files and
the date of any change.
b) You must cause any work that you distribute or publish, that in whole or in part contains or is derived
from the Program or any part thereof, to be licensed as a whole at no charge to all third parties under
the terms of this License.
c) If the modified program normally reads commands interactively when run, you must cause it, when
started running for such interactive use in the most ordinary way, to print or display an
announcement including an appropriate copyright notice and a notice that there is no warranty (or
else, saying that you provide a warranty) and that users may redistribute the program under these
conditions, and telling the user how to view a copy of this License. (Exception: if the Program itself is
interactive but does not normally print such an announcement, your work based on the Program is
not required to print an announcement.)
These requirements apply to the modified work as a whole. If identifiable sections of that work are not
derived from the Program, and can be reasonably considered independent and separate works in
themselves, then this License, and its terms, do not apply to those sections when you distribute them as
separate works. But when you distribute the same sections as part of a whole which is a work based on
the Program, the distribution of the whole must be on the terms of this License, whose permissions for
other licensees extend to the entire whole, and thus to each and every part regardless of who wrote it.
Thus, it is not the intent of this section to claim rights or contest your rights to work written entirely by
you; rather, the intent is to exercise the r ight to control the distribution of derivative or collectiv e works
based on the Program.
In addition, mere aggregation of another work not based on the Program with the Program (or with a
work based on the Program) on a volu me of a storage or distribution medium does not bring the other
work under the scope of this License .
The software pre-installed in this product consists of multiple, independent software components. Each software component is copyrighted
by a third party.
This product uses software components that are distributed as freeware under a third-party end-user license agreement or copyright notice
(hereinafter referred to as a “EULA”).
TOSHIBA provides a warranty for this product you have purchased under conditions set forth by TOSHIBA. However, some of the software components
distributed under an EULA are made available for use by the user on the assumption that they are not copyrighted or warranted by a third party. These
software components are licensed to the user free of charge and therefore not covered by any warranty within the scope of the applicable laws. These
software components are not subject to any copyrights or other third-party rights and are provided in “as is” condition without any warranty, whether
express or implied. “Warranty” here includes, but not limited to, an implied warranty for marketability or tness for specic uses. All risks associated
with the quality or performance of these software components are assumed by the user. TOSHIBA shall not be liable whatsoever for any cost of repair
or correction or other incidental expense incurred in connection with a defect found in any of these software components. Unless specied under the
applicable laws or in a written agreement, a party who changes or redistributes the software with consent from the copyright holders or based on the
aforementioned licenses shall not be held liable whatsoever for any loss arising from the use of or inability to use such software components. The
same applies even when the copyright holders or relevant third parties have been informed of the possibility of such loss. “Loss” here includes normal,
special, incidental and indirect loss (including, but not limited to, the loss of data or its accuracy; loss incurred by the user or any third party; and
interface incompatibility with other software). Please read each EULA for details on the use conditions and items that must be observed regarding
these software components.
The table below lists the software components pre-installed in this product, which are subject to EULAs. The user should read the applicable EULAs
carefully before using these software components. The EULAs are exhibited in their original text (English) as exactly written by the respective parties.
Program name EULA
e2fsprogs
linux
module-init-tools
mount
netkit
nettools
sash
util-linux
Exhibit A
Exhibit A
Exhibit A
Exhibit A
Exhibit A
Exhibit A
Exhibit A
Exhibit A
Program name EULA
directfb
glibc
Free Type
LibJPEG
Open SSL
Exhibit B
Exhibit B
Exhibit C
Exhibit C
Exhibit C
• Reverse engineering, disassembling, decompiling, dismantling, or otherwise attempting to analyze or modify the software included in this product is
prohibited.
INTRODUCTION CONNECTIONS PLAYBACK FUNCTION SETUP OTHERS
E5RJ0BD_EN.book Page 43 Tuesday, October 20, 2009 3:53 PM
Page 44

44 EN
OTHERS
3. You may copy and distribute the Program (or a work based on it, under Section 2) in object code or
executable form under the terms of Sections 1 and 2 above provided that you also do one of the
following:
a) Accompany it with the complete corresponding machine-readable source code, which must be
distributed under the terms of Sections 1 and 2 above on a medium customarily used for software
interchange; or,
b) Accompany it with a written offer, valid for at least three years, to give a ny third party, for a charge no
more than your cost of physically performing sou rce distribution, a complete machine-readable copy
of the corresponding source code, to be distributed under the terms of Sections 1 and 2 above on a
medium customarily used for software interchange; or,
c) Accompany it with the information you received as to the offer to distribute corresponding source
code. (This alternative is allowed only for noncommercial distribution and only if you received the
program in object code or executable form with such an offer, in accord with Subsection b above.)
The source code for a work means the preferred form of the work for making modifications to it. For an
executable work, complete source code means all the source code for all modules it contains, plus any
associated interface definition files, plus the scripts used to control compilation and installation of the
executable. However, as a special exception, the source code distributed need not include anything
that is normally distributed (in either sou rce or binary form) with the major components (compiler,
kernel, and so on) of the operating system on which the executable runs, unless that component itself
accompanies the executable.
If distribution of executable or object code is made by offering access to copy from a designated place,
then offering equivalent access to copy the source code from the same place counts as distribution of
the source code, even though third parties are not compelled to copy the source along with the object
code.
4. You may not copy, modify, sublicense, or distribute the Program except as expressly provided under
this License. Any attempt otherwise to copy, modify, sublicense or distribute the Program is void, and
will automatically terminate your rights unde r this License. However, parties who have received copies,
or rights, from you under this License will not have their licenses terminated so long as such parties
remain in full compliance.
5. You are not required to accept this License, since you have not signed it. However, nothing else grants
you permission to modify or distribute the Program or its derivative works. These actions are prohibited
by law if you do not accept this License. Therefore, by modifying or distributing the Program (or any
work based on the Program), you indicate your acceptance of this License to do so, and all its terms and
conditions for copying, distributing or modifying the Program or works based on it.
6. Each time you redistribute the Program (or any work based on the Program), the recipient automatically
receives a license from the original licensor to copy, distribute or modify the Program subject to these
terms and conditions. You may not impose any further restrictions on the recipients' exercise of the
rights granted herein. You are not responsible for enforcin g compliance by third parties to this License.
7. If, as a consequence of a court judgment or allegation of patent infringement or for any other reason
(not limited to patent issues), conditions are imposed on you (whether by court order, agreement or
otherwise) that contradict the conditions of this License, they do not excuse you from the conditions of
this License. If you cannot dist ribute so as to satisfy simultaneously your obligations under this License
and any other pertinent obligations, then as a consequence you may not distribute the Program at all.
For example, if a patent license would not permit royalty-free redistribution of the Program by all those
who receive copies directly or indirectly through you, then the only way you could satisfy both it and
this License would be to refrain entirely from distribution of the Program.
If any portion of this section is held invalid or unenforceable under any particular circumstance, the
balance of the section is intended to apply and the section as a whole is intended to apply in other
circumstances.
It is not the purpose of this section to induce y ou to infringe any patents or other property right claims
or to contest validity of any such claims; this section has the sole purpose of protecting the integrity of
the free software distribution system, which is implemented by public license practices. Many people
have made generous contributions to the wide range of software distributed through that system in
reliance on consistent application of that system; it is up to the author/donor to decide if he or she is
willing to distribute software through any other system and a licensee cannot impose that choice.
This section is intended to make thoroughly clear what is believed to be a consequence of the rest of
this License.
8. If the distribution and/or use of the Program is restricted in certain countries either by patents or by
copyrighted interfaces, the original copyright holder who places the Pro gram under this License may
add an explicit geographical distribution limitation ex cluding those countries, so that distribution is
permitted only in or among countries not thus excluded. In such case, th is License incorporates the
limitation as if written in the body of this License.
9. The Free Software Foundatio n may publish revised and/or new versions of the General Public Lic ense
from time to time. Such new versions will be similar in spirit to the presen t version, but may differ in
detail to address new problems or concerns.
Each version is given a distinguishing version number. If the Program specifies a version number of this
License which applies to it and "any later version", you have the option of following the terms and
conditions either of that version or of any later version published by the Free Software Foundation. If
the Program does not specify a version number of this License, you may choose any version ever
published by the Free Software Foundation.
10. If you wish to incorporate parts of th e Program into other free programs whose distribution conditions
are different, write to the author to ask for permission. For software which is copyrighted by the Free
Software Foundation, write to the Free Software Foundation; we sometimes make exceptions for this.
Our decision will be guided by the two goals of preserving the free status of all derivatives of our free
software and of promoting the sharing and reuse of software generally.
NO WARRANTY
11. BECAUSE THE PROGRAM IS LICENSED FREE OF CHARGE, THERE IS NO WARRANTY FOR THE PROGRAM,
TO THE EXTENT PERMITTED BY APPLICABLE LAW. EXCEPT WHEN OTHERWISE STATED IN WRITING THE
COPYRIGHT HOLDERS AND/OR OTH ER PARTIES PROVIDE THE PROGRAM "AS IS" WITHOUT WARRANTY
OF ANY KIND, EITHER EXPRESSED OR IMPLIED, INCLUDING, BUT NOT LIMITED TO, THE IMPLIED
WARRANTIES OF MERCHANTABILITY AND FITNESS FOR A PARTICULAR PURPOSE. THE ENTIRE RISK AS
TO THE QUALITY AND PERFORMANCE OF THE PROGRAM IS WITH YOU. SHOULD THE PROGRAM
PROVE DEFECTIVE, YOU ASSUME THE COST OF ALL NECESSARY SERVICING, REPAIR OR CORRECTION.
12. IN NO EVENT UNLESS REQUIRED BY APPLICABLE LAW OR AGREED TO IN WRITING WILL ANY
COPYRIGHT HOLDER, OR ANY OTHER PARTY WHO MAY MODIFY AND/OR REDISTRIBUTE THE
PROGRAM AS PERMITTED ABOVE, BE LIABLE TO YOU FOR DAMAGES, INCLUDING ANY GENERAL,
SPECIAL, INCIDENTAL OR CONSEQUENTIAL DAMAGES ARISING OUT OF THE USE OR INABILITY TO USE
THE PROGRAM (INCLUDING BUT NOT LIMITED TO LOSS OF DATA OR DATA BEING RENDERED
INACCURATE OR LOSSES SUSTAINED BY YOU OR THIRD PARTIES OR A FAILURE OF THE PROGRAM TO
OPERATE WITH ANY OTHER PROGRAMS), EVEN IF SUCH HOLDER OR OTHER PARTY HAS BEEN ADVISED
OF THE POSSIBILITY OF SUCH DAMAGES.
END OF TERMS AND CONDITIONS
How to Apply These Terms to Your New Programs
If you develop a new program, and you want it to be of the greatest possible use to the pu blic, the best
way to achieve this is to make it free software which everyone can redistribute and change under these
terms.
To do so, attach the following notices to the program. It is safest to attach them to the start of each source
file to most effectively convey the exclusion of warranty; and each file should have at least the "copyright"
line and a pointer to where the full notice is found.
<one line to give the program's name and a brief idea of what it does.>
Copyright (C) <year> <name of author>
This program is free software; you can redistribute it and/or modify it under the terms of the GNU
General Public License as published by the Free Software Foundation; either version 2 of the License, or
(at your option) any late r version.
This program is distributed in the hope that it will be useful, but WITHOUT ANY WARRANTY; without
even the implied warranty of MERCHANTABILITY or FITNESS FOR A PARTICULAR PURPOSE. See the GNU
General Public License for more details.
You should have received a copy of the GNU General Public License along with this program; if not,
write to the Free Software Foundation, Inc., 51 Franklin Stree t, Fifth Floor, Boston, MA 02110-1301 USA.
Also add information on how to contact you by electronic and paper mail.
If the program is interactive, make it output a short notice like this when it starts in an interactive mode:
Gnomovision version 69, Copyright (C) year name of author
Gnomovision comes with ABSOLUTELY NO WARRANTY; for details type `show w'.
This is free software, and you are welcome to redistribu te it under certain conditions; type `show c' for
details.
The hypothetical commands `show w' and `show c' should show the appropriate parts of the General
Public License. Of course, the commands you use may be called something other than `sh ow w' and
`show c'; they could even be mouse-clicks or menu items--whatever suits your prog ram.
You should also get your employer (if you work as a programmer) or your school, if any, to sign a
"copyright disclaimer" for the program, if necessary. Here is a sample; alter the names:
Yoyodyne, Inc., hereby disclaims all copyright interest in the prog ram `Gnomovision' (which makes
passes at compilers) written by James Hacker.
<signature of Ty Coon>, 1 April 1989
Ty Coon, President of Vice
This General Public License does not permit incorporating your program into proprietary programs. If
your program is a subroutine library, you may consider it more usefu l to permit linking proprietary
applications with the library. If this is what you want to do, use the GNU Lesser General Public License
instead of this License.
Exhibit B
LGPL
GNU LESSER GENERAL PUBLIC LICENSE
Version 2.1, February 1999
Copyright (C) 1991, 1999 Free Software Foundation, Inc.
51 Franklin Street, Fifth Floor, Boston, MA 02110-1301 USA
Everyone is permitted to copy and distribute verbatim copies of this license documen t, but changing it
is not allowed.
[This is the first released version of the Lesser GPL. It also counts as the successor of the GNU Library Public
License, version 2, hence the version number 2.1.]
Preamble
The licenses for most software are designed to take away your freedom to share and change it. By
contrast, the GNU General Public Licenses are intended to guarantee your freedom to share and change
free software--to make sure the software is free for all its users.
This license, the Lesser General Public License, applies to some specially designated software packages-typically libraries--of the Free Software Foundation and other authors who decide to use it. You can use it
too, but we suggest you first think carefully about whether this license or the ordinary General Public
License is the better strategy to use in any particular case, based on the explanations below.
When we speak of free software, we are referring to freedom of use, not price. Our General Public Licenses
are designed to make sure that you ha ve the freedom to distribute copies of free softwa re (and charge for
this service if you wish); that you receive source code or can get it if you want it; that you can change the
software and use pieces of it in new free programs; and that you are informed that you can do these
things.
To protect your rights, we need to make restrictions that forbid distribut ors to deny you these rights or to
ask you to surrender these rights. These restrictions translate to certain responsibilities for you if you
distribute copies of the library or if you modify it.
For example, if you distribute copies of the library, whether gratis or for a fee, you must give the recipients
all the rights that we gave you. You must make sure that they, too, receive or can get the source code. If
you link other code with the library, you must provide complete object files to the recipients, so that they
can relink them with the library after making changes to the library and recompiling it. And you must
show them these terms so they know their rights.
We protect your rights with a two-step method : (1) we copyright the library, and (2) we offer you this
license, which gives you legal permission to copy, distribute and/or modif y the library.
To protect each distributor, we want to make it very clear that there is no warranty for the free library.
Also, if the library is modified by someone else and passed on, the recipients should know that what they
have is not the original version, so that the original au thor's reputation will not be affected by problems
that might be introduced by others.
Finally, software patents pose a constant threat to the existence of any free program. We wish to make
sure that a company cannot effectively restrict the users of a free program by obtaining a restrictive
license from a patent holder. Therefore, we insist that any patent license obtained for a version of the
library must be consistent with the fu ll freedom of use specified in this license.
Most GNU software, including some libraries, is covered by the ordinary GNU General Public License. This
license, the GNU Lesser General Public License, applies to certain designated librarie s, and is quite
different from the ordinary General Public License. We use this license for certain libraries in order to
permit linking those libraries into non-free programs.
E5RJ0BD_EN.book Page 44 Tuesday, October 20, 2009 3:53 PM
Page 45

45EN
OTHERS
When a program is linked with a library, whether statically or using a shared library, the combination of
the two is legally speaking a combined work, a derivative of the original library. The ordinary General
Public License therefore permits such linking only if the entire combination fits its criteria of freedom. The
Lesser General Public License permits more lax criter ia for linking other code with the library.
We call this license the "Lesser" General Public License because it does Less to protect the user's freedom
than the ordinary General Public License. It also provides other free software developers Less of an
advantage over competing non-free programs. These disadvantages are the reason we use the ordinary
General Public License for many libraries. However, the Lesser license provides advantages in certain
special circumstances.
For example, on rare occasions, there may be a special need to encourage the widest possible use of a
certain library, so that it becomes a de-facto standard. To achieve this, non-free programs must be allowe d
to use the library. A more frequent case is that a free library does the same job as widely used non-free
libraries. In this case, there is little to gain by limiting the free library to free software only, so we use the
Lesser General Public License.
In other cases, permission to use a particular library in non-free programs enables a greater number of
people to use a large body of free software. For example, permission to use the GNU C Library in non-free
programs enables many more people to use the whole GNU operating system, as well as its variant, the
GNU/Linux operating system.
Although the Lesser General Public License is Less protective of the users' freedom, it does ensure that the
user of a program that is linked with the Library has the freedom and the wherewithal to run that program
using a modified version of the Library.
The precise terms and conditions for copying, distri bution and modification follow. Pay close attention to
the difference between a "work based on the library" and a "work that uses the library". The former
contains code derived from the library, whereas the latter must be combined with the library in order to
run.
GNU LESSER GENERAL PUBLIC LICENSE
TERMS AND CONDITIONS FOR COPYING, DISTRIBUTION AND MODIFICATION
0. This License Agreement applies to any soft ware library or other program which contains a notice pla ced
by the copyright holder or other authorized party saying it may be distributed under the terms of this
Lesser General Public License (also called "this License"). Each licensee is addressed as "you".
A "library" means a collection of software functions and/or data prepared so as to be conveniently
linked with application programs (which use some of those functions and data) to form executables.
The "Library", below, refers to any such software library or work which has been distributed under these
terms. A "work based on the Library" means either the Lib rary or any derivative work under copyright
law: that is to say, a work containing the Library or a portion of it, either verbatim or with modifications
and/or translated straightforwardly into another language. (Hereinafter, translation is included without
limitation in the term "modification".)
"Source code" for a work means the preferred form of the work for making modifications to it. For a
library, complete source code means all the source code for all modules it contains, plus any associated
interface definition files, plus the scripts used to control compilation and installation of the library.
Activities other than copying, distribution and modification are not covered by this License; they are
outside its scope. The act of running a program using the Library is not restricted, and output from such
a program is covered only if its contents constitute a work based on the L ibrary (independent of the use
of the Library in a tool for writing it). Whether that is true depends on what the Library does and what
the program that uses the Library does.
1. You may copy and distribute verbatim copi es of the Library's complete source code as you receive i t, in
any medium, provided that you conspicuously and appropriately publish on each copy an appropriate
copyright notice and disclaimer of warran ty; keep intact all the notices that refer to this License and to
the absence of any warranty; and distribute a copy of this License along with the Library.
You may charge a fee for the physical act of transferring a copy, and you may at your option offer
warranty protection in exchange for a fee.
2. You may modify your copy or copies of the Library or any portion of it, thus forming a work based on
the Library, and copy and distribute such modifications or work under the terms of Section 1 above,
provided that you also meet all of these conditions:
a) The modified work must itself be a software library.
b) You must cause the files modified to carry prominent notices stating that you changed the files and
the date of any change.
c) You must cause the whole of the work to be licensed at no charge to all third parties under the terms
of this License.
d) If a facility in the modified Library refers to a function or a table of data to be supplied by an
application program that uses the facility, other than as an argument passed when the facility is
invoked, then you must make a good faith effort to ensure that, in the event an application does not
supply such function or table, the facility still operates, and performs whatever part of its purpose
remains meaningful.
(For example, a function in a library to compute square roots has a purpose that is entirely welldefined independent of the application. Therefore, Subsection 2d requires that any applicationsupplied function or table used by this function must be optional: if the application does not supply
it, the square root function must still compute square roots.)
These requirements apply to the modified work as a whole. If identifiable sections of that work are not
derived from the Library, and can be reasonably considered independent and separate works in
themselves, then this License, and it s terms, do not apply to those sections when you dis tribute them as
separate works. But when you distribute the same sections as part of a whole which is a work based on
the Library, the distribution of the whole must be on th e terms of this License, whose permissions for
other licensees extend to the entire whole, and thus to each and every part regardless of who wrote it.
Thus, it is not the intent of this section to claim rights or contest your rights to work written entirely by
you; rather, the intent is to exercise the right to control the distribution of derivative or collective works
based on the Library.
In addition, mere aggregation of another work not based on the Library with the Library (or with a work
based on the Library) on a volume of a storage or distribution medium does not bring the other work
under the scope of this License.
3. You may opt to apply the terms of the ordinary GNU General Public License instead of this License to a
given copy of the Library. To do this, you must alter all the not ices that refer to this License, so tha t they
refer to the ordinary GNU General Public License, version 2, instead of to this License. (If a newer version
than version 2 of the ordinary GNU General Public License has appeared, then you can specify that
version instead if you wish.) Do not make any other change in these notices.
Once this change is made in a given copy, it is irreversible fo r that copy, so the ordinary GNU General
Public License applies to all subsequent copies and derivative works made from that copy.
This option is useful when you wish to copy part of the code of the Library into a program that is not a
library.
4. You may copy and distribute the Library (or a portion or derivative of it, under Se ction 2) in object code
or executable form under th e terms of Sections 1 and 2 above provi ded that you accompany it with the
complete corresponding machine-readable source code, which must be distributed under the terms of
Sections 1 and 2 above on a medium customarily used for software interchange.
If distribution of object code is made by offering access to copy from a designated place, then offering
equivalent access to copy the source code from the same place satisfies the requirement to distribute the
source code, even though third parties are not compelled to copy the source along with the object code .
5. A program that contains no derivative of any portion of the Library, but is designed to work with the
Library by being compiled or linked with it, is called a "work that uses the Library". Such a work, in
isolation, is not a derivative work of the Library, and therefore falls outside the scope of this License.
However, linking a "work that uses the Library" with the Library creates an executable that is a derivative
of the Library (because it contains portions of the Library), rather than a "work that uses the library". The
executable is therefore covered by this License. Section 6 states terms for distribution of such
executables.
When a "work that uses the Library" uses material from a header file that is part of the Lib rary, the object
code for the work may be a derivative work of the Library even though the source code is not. Whether
this is true is especially significant if the work can be linked without the Library, or if the work is itself a
library. The threshold for this to be true is not precisely defined by law.
If such an object file uses only numerical parameters, data structure layouts and accessors, and small
macros and small inline functions (ten lines or less in length), then the use of the object file is
unrestricted, regardless of whether it is legally a derivative work. (Executables containing this object
code plus portions of the Library will still fall under Section 6.)
Otherwise, if the work is a derivative of the Library, you may distribute the object code for the work
under the terms of Section 6. Any executables containing that work also fall under Section 6, whether or
not they are linked directly with the Library itself.
6. As an exception to the Sectio ns above, you may also combine or link a "w ork that uses the Library" with
the Library to produce a work containing portions of the Library, and distribute that work under terms
of your choice, provided that the te rms permit modification of the work for the custom er's own use and
reverse engineering for debugging such modifications.
You must give prominent notice with each copy of the work that the Library is used in it and that the
Library and its use are covered by this License. You must supply a copy of this License. If the work during
execution displays copyright notices, you must include the copyright notice for the Library among
them, as well as a reference directing the user to the copy of this License. Also, you must do one of these
things:
a) Accompany the work with the complete corresponding machine-readabl e source code for the Library
including whatever changes were used in the work (which must be distributed under Sections 1 and 2
above); and, if the work is an executable linked with the Library, with the complete machine-readable
"work that uses the Library", as object code and/or source code, so that the user can modify the
Library and then relink to produce a modified executable containing the modified Library. (It is
understood that the user who changes the contents of definitions files in the Library will not
necessarily be able to recompile the application to use the modified definit ions.)
b) Use a suitable shared library mechanism for linking with the Library. A suitable mechanism is one that
(1) uses at run time a copy of the library already present on the user's computer system, rather than
copying library functions into the executable, and (2) will operate properly with a modified version of
the library, if the user installs one, as long as the modified version is interface-compatible with the
version that the work was made with.
c) Accompany the work with a written offer, valid for at least three years, to give the same user the
materials specified in Subsection 6a, above, for a charge no more than the cost of performing this
distribution.
d) If distribution of the work is made by offering access to copy from a designated place, offer
equivalent access to copy the above specified materials from the same place.
e) Verify that the user has already received a copy of these materials or that you have already sent this
user a copy.
For an executable, the required form of the "work that uses the Library" must include any data and
utility programs needed for reproducing the executable from it. However, as a special exception, the
materials to be distributed need not include anything that is normally distributed (in either source or
binary form) with the major components (compiler, kernel, and so on) of the operating system on which
the executable runs, unless that component itself accompanies the executable.
It may happen that this requirement contradicts the license restrictions of other proprietary libraries
that do not normally accompany the operating system. Such a contradiction means you cannot use
both them and the Library together in an executable that you distribute.
7. You may place library facilities that are a work based on the Library side-by-side in a single library
together with other library facilities not covered by this License, and distribute such a combined library,
provided that the separate distribution of the work based on the Library and of the other library
facilities is otherwise per mitted, and provided that you do these two t hings:
a) Accompany the combined library with a copy of the same work based on the Library, uncombi ned
with any other library facilities. This must be distributed under the terms of the Sections above.
b) Give prominent notice with the combined library of the fact that part of it is a work based on the
Library, and explaining where to find the accompanying uncombined form of the same work.
8. You may not copy, modify, sublicense, link with, or distribute the Library except as expressly provided
under this License. Any attempt otherwise to copy, modify, sublicense, link with, or distribute the
Library is void, and will automatically terminate your rights under this License. However, parties who
have received copies, or rights, from you under this License will not have their licenses terminated so
long as such parties remain in full compliance.
9. You are not required to accept this License, since you have not signed it. However, nothing else gran ts
you permission to modify or distribute the Lib rary or its derivative works. These actions are prohibited
by law if you do not accept this License. Therefore, by modifying or distributing the Library (or any work
based on the Library), you indicate your acceptance of this License to do so, and all its terms and
conditions for copying, distributing or modify ing the Library or works based on it.
10. Each time you redistribute the Library (or any work based on the Library), the re cipient automatically
receives a license from the original licensor to copy, distribute, link with or modify the Library subject
to these terms and conditions. You may not impose any further restrictions on the recipients' exercise
of the rights granted herein. You are not responsible for enforcing compliance by third partie s with
this License.
INTRODUCTION CONNECTIONS PLAYBACK FUNCTION SETUP OTHERS
E5RJ0BD_EN.book Page 45 Tuesday, October 20, 2009 3:53 PM
Page 46

46 EN
OTHERS
11. If, as a consequence of a court judgment or allegation of patent infringement or for any other reason
(not limited to patent issues), conditions are imposed on you (whether by court order, agreement or
otherwise) that contradict the conditions of this License, they do not excuse you from the conditions
of this License. If you cannot distribute so as to satisfy simultaneously your obligations under this
License and any other pertinent oblig ations, then as a consequence you may not distrib ute the Library
at all. For example, if a patent license would not permit royalty-free redistribution of the Library by all
those who receive copies directly or indirectly through you, then the only way you could sati sfy both it
and this License would be to refrain entirely from distribution of the Library.
If any portion of this section is held invalid or unenforceable under any particular circumstance, the
balance of the section is intended to apply, and the section as a whole is intended to apply in other
circumstances.
It is not the purpose of this section to induce y ou to infringe any patents or other property right claims
or to contest validity of any such claims; this section has the sole purpose of protecting the integrity of
the free software distribution system which is implemented by public license practices. Many people
have made generous contributions to the wide range of software distributed through that system in
reliance on consistent application of that system; it is up to the author/donor to decide if he or she is
willing to distribute software through any other system and a licensee cannot impose that choice.
This section is intended to make thoroughly clear what is believed to be a consequence of the rest of
this License.
12. If the distribution and/or use of the Library is restricted in certain countr ies either by patents or by
copyrighted interfaces, the origi nal copyright holder who places the Library under this License may
add an explicit geographical distribution limitation excluding those countries, so that distribution is
permitted only in or among countries not thus excluded. In such case, this License incorporates the
limitation as if written in the body of this License.
13. The Free Software Foundation may publish revised and/or new versions of the Lesser General Public
License from time to time. Such new versions will be simila r in spirit to the present version, but may
differ in detail to address new problems or concerns.
Each version is given a distinguishing version number. If t he Library specifies a version number of this
License which applies to it and "any later version", you have the option of following the terms and
conditions either of that version or of any later version published by the Free Software Foundation. If
the Library does not specify a license version number, you may choose any version ever published by
the Free Software Foundation.
14. If you wish to incorporate parts of the Library into other free programs whose distribution conditions
are incompatible with these, write to the author to ask for permission. For software which is
copyrighted by the Free Software Foundation, write to the Free Software Foundation; we sometimes
make exceptions for this. Our decision will be guided by the two goals of preserving the free status of
all derivatives of our free software and of promoting the sharing and reuse of software generally.
NO WARRANTY
15. BECAUSE THE LIBRARY IS LICENSED FREE OF CHARGE, THERE IS NO WARRANTY FOR THE LIBRARY, TO
THE EXTENT PERMITTED BY APPLICABLE LAW. EXCEPT WHEN OTHERWISE STATED IN WRITING THE
COPYRIGHT HOLDERS AND/OR OTHER PARTIES PROVIDE THE LIBRARY "AS IS" WITHOUT WARRANTY
OF ANY KIND, EITHER EXPRESSED OR IMPLIED, INCLUDING, BUT NOT LIMITED TO, THE IMPLIED
WARRANTIES OF MERCHANTABILITY AND FITNESS FOR A PARTICULAR PURPOSE. THE ENTIRE RISK AS
TO THE QUALITY AND PERFORMANCE OF THE LIBRARY IS WITH YOU. SHOULD THE LIBRARY PROVE
DEFECTIVE, YOU ASSUME THE COST OF ALL NECESSARY SERVICING, REPAIR OR CORRECTION.
16. IN NO EVENT UNLESS REQUIRED BY APPLICABLE LAW OR AGREED TO IN WRITING WILL ANY
COPYRIGHT HOLDER, OR ANY OTHER PARTY WHO MAY MODIFY AND/OR REDISTRIBUTE THE LIBRARY
AS PERMITTED ABOVE, BE LIABLE TO YOU FOR DAMAGES, INCLUDING ANY GENERAL, SPECIAL,
INCIDENTAL OR CONSEQUENTIAL DAMAGES ARISING OUT OF THE USE OR INABILITY TO USE THE
LIBRARY (INCLUDING BUT NOT LIMITED TO LOSS OF DATA OR DATA BEING RENDERED INACCURATE
OR LOSSES SUSTAINED BY YOU OR THIRD PARTIES OR A FAILURE OF THE LIBRARY TO OPERATE WITH
ANY OTHER SOFTWARE), EVEN IF SUCH HOLDER OR OTHER PARTY HAS BEEN ADVISED OF THE
POSSIBILITY OF SUCH DAMAGES.
END OF TERMS AND CONDITIONS
How to Apply These Terms to Your New Libraries
If you develop a new library, and you want it to be of the greatest possible use to the pu blic, we
recommend making it free software that everyone can redistribute and change. You can do so by
permitting redistribution under these terms (or, alternatively, under the terms of the ordinary Gener al
Public License).
To apply these terms, attach the following notices to the library. It is safest to attach them to the start of
each source file to most ef fectively convey the exclusion of warranty; and each file sho uld have at least the
"copyright" line and a pointer to where the full notice is found.
<one line to give the library's name and a brief idea of what it does.>
Copyright (C) <year> <name of author>
This library is free software; you can redistribute it and/or modify it under the terms of the GNU Lesser
General Public License as published by the Free Software Foundation; either version 2.1 of the License,
or (at your option) any later version.
This library is distributed in the hope t hat it will be useful, but WITHOUT ANY WARRANTY; without even
the implied warranty of MERCHANTAB ILITY or FITNESS FOR A PARTICULAR PURPOSE. See the GNU
Lesser General Public License for more details.
You should have received a co py of the GNU Lesser General Public Licen se along with this library; if not,
write to the Free Software Foundation, Inc., 51 Franklin Street, Fifth Floor, Boston, MA 02110-1301 USA.
Also add information on how to contact you by electronic and pap er mail.
You should also get your employer (if you work as a programmer) or your school, if any, to sign a
"copyright disclaimer" for the library, if necessary. Here is a sample; alter the names:
Yoyodyne, Inc., hereby disclaims all copyright interest in the library `Frob' (a library for tweaking knobs)
written by James Random Hacker.
<signature of Ty Coon>, 1 April 1990
Ty Coon, President of Vice
That's all there is to it!
Exhibit C
Free Type
The FreeType Project LICENSE
2006-Jan-27
Copyright 1996-2002, 2006 by
David Turner, Robert Wilhelm, and Werner Lemberg
Introduction
The FreeType Project is distributed in several archive packages; some of them may contain, in addition
to the FreeType font engine, various tools and contributions which rely on, or relate to, the FreeType
Project.
This license applies to all files found in such packages, and which do not fall under their own explicit
license. The license affects thus the FreeType font engine, the test programs, documen tation and
makefiles, at the very least.
This license was inspired by the BSD, Artistic, and IJG (Independent JPEG Group) licenses, which all
encourage inclusion and use of free software in commercial and freeware products alike. As a
consequence, its main points are that:
• We don't promise that this software works. However, we will be interested in any kind of bug
reports. (`as is' distribution)
• You can use this software for whatever you want, in parts or full form, without having to pay us.
(`royalty-free' usage)
• You may not pretend that you wrote this software. If you use it, or only parts of it, in a program, you
must acknowledge somewh ere in your documentation that you have used the FreeType code.
(`credits')
We specifically permit and encourage the inclusion of this software, with or without modifications, in
commercial products. We disclaim all warranties covering The FreeType Project and assume no liability
related to The FreeType Project.
Finally, many people asked us for a preferred form for a credit/disclaimer to use in compliance with this
license. We thus encourage you to use the following text:
"""
Portions of this software are copyright©
<year> The FreeType Project (www.freetype.org). All rights
reserved.
"""
Please replace <year> with the value from the FreeType version you actually use.
Legal Terms
0. Definitions
Throughout this license, the terms `package', `FreeType Project', and `FreeType archive' refer to the set
of files originally distributed by the authors (David Turner, Robert Wilhelm, and Werner Lemberg) as the
`FreeType Project', be they named as alpha, beta or final release.
`You' refers to the licensee, or person using the project, where `using' is a generic term including
compiling the project's source code as well as linking it to form a `program' or `executable'. This
program is referred to as `a program using t he FreeType engine'.
This license applies to all files distributed in the original FreeType Project, including all source code,
binaries and documentation, unless otherwise stated in the file in its original, unmodified form as
distributed in the original archive. If you are uns ure whether or not a particular file is covered by this
license, you must contact us to verify this.
The FreeType Project is copyright (C) 1996-2000 by David Turner, Robert Wilhelm, and Werner Lemberg.
All rights reserved except as specified below.
1. No Warranty
THE FREETYPE PROJECT IS PROVIDED `AS IS' WITHOUT WARRANTY OF ANY KIND, EITHER EXPRESS OR
IMPLIED, INCLUDING, BUT NOT LIMITED TO, WARRANTIES OF MERCHANTABILITY AND FITNESS FOR A
PARTICULAR PURPOSE. IN NO EVENT WILL ANY OF THE AUTHORS OR COPYRIGHT HOLDERS BE LIABLE
FOR ANY DAMAGES CAUSED BY THE USE OR THE INABILITY TO USE, OF THE FREETYPE PROJECT.
2. Redistribution
This license grants a worldwide, royalty-free, perpetual and irrevocable right and license to use, execute,
perform, compile, display, copy, create derivative works of, distribute and sublicense the FreeType
Project (in both source and object code forms) and derivative works thereof for any purpose; and to
authorize others to exercise some or all of the rights granted herein, subject to the following conditions:
• Redistribution of source code must retain this license file (`FTL.TXT') unaltered; any additions,
deletions or changes to the original files must be clearly indicated in accompanying
documentation. The copyright notices of the una ltered, original files must be preserved in all copies
of source files.
• Redistribution in binary form must provide a disclaimer that states that th e software is based in part
of the work of the FreeType Team, in the distribution documentation. We also encourage you to put
an URL to the FreeType web page in your documentation, though this isn't mandatory.
These conditions apply to any software derived from or based on the FreeType Project, not just the
unmodified files. If you use our work, you must acknowledge us. However, no fee need be paid to us.
3. Advertising
Neither the FreeType authors and contributors nor you shall use the name of the other for commercial,
advertising, or promotional purposes without specific prior written permission.
We suggest, but do not require, that you use one or more of the following phrases to refer to this
software in your documentation or advertising materials: `FreeType Project', `FreeType Engine',
`FreeType library', or `FreeType Distribution'.
As you have not signed this license, you are not required to accept it. However, as the FreeType Project
is copyrighted material, only this license, or another one contracted with the au thors, grants you the
right to use, distribute, and modify it. Ther efore, by using, distributing, or modifying the FreeType
Project, you indicate that you understand and accept all the terms of this license.
E5RJ0BD_EN.book Page 46 Tuesday, October 20, 2009 3:53 PM
Page 47

47EN
OTHERS
4. Contacts
There are two mailing lists related to FreeType:
• freetype@nongnu.org
Discusses general use and applications of FreeType, as well as future and wanted additions to the
library and distribution. If you are looking for support, start in this list if you haven't found anything
to help you in the documentation.
• freetype-devel@nongnu.org
Discusses bugs, as well as engine internals, design issues, specific licenses, porting, etc.
Our home page can be found at
http://www.freetype.org
LibJPEG
In plain English:
1. We don't promise that this software works. (But if you find any bugs, please let us know!)
2. You can use this software for whatever you want. You don't have to pay us.
3. You may not pretend that you wrote this software. If you use it in a program, you must acknowledge
somewhere in your documentation that you've used the IJG code.
In legalese:
The authors make NO WARRANTY or representation, either express or implied, with respect to this
software, its quality, accuracy, merchantability, or fitness for a particular purpose. This software is
provided "AS IS", and you, its user, assume the entire risk as to its quality and accuracy.
This software is copyright (C) 1991-1998, Thomas G. Lane.
All Rights Reserved except as specified below.
Permission is hereby granted to use, copy, modify, and distribute this software (or portions thereof) for
any purpose, without fee, subject to these conditions:
(1) If any part of the source code for this software is distributed, then this README file must be included,
with this copyright and no-warranty notice unaltered; and any additions, deletions, or changes to the
original files must be clearly indicated in accompanying d ocumentation.
(2) If only executable code is distributed, then the accompanying documentation must state that "this
software is based in part on the work of the Independent JPEG Group".
(3) Permission for use of this software is granted only if the user accepts full responsibility for any
undesirable consequences; the authors accept NO LIABILITY for damages of any kind.
These conditions apply to any software derived from or based on the IJG code, not just to the unmodif ied
library. If you use our work, you ought to acknowledge us.
Permission is NOT granted for the use of any IJG author's name or company name in advertising or
publicity relating to this sof tware or products derived from it. Th is sof tware m ay be r eferre d to on ly as " the
Independent JPEG Group's software".
We specifically permit and encourage the use of this software as the basis of commercial products,
provided that all warranty or liability claims are assumed by the product vendor.
Open SSL
OpenSSL License
/*
Copyright (c) 1998-2008 The Open SSL Project. All rights reserved.
Redistribution and use in source and binary forms, with or without modification, are permitted provided
that the following conditions are met:
1. Redistributions of source code must retain the above copyright notice, this list of conditions and the
following disclaimer.
2. Redistributions in binary form must reproduce the above copyrigh t notice, this list of conditions and
the following disclaimer in the documentation and/or other materials provided with the distribution.
3. All advertising materials mentioning features or use of this software must display the following
acknowledgment:
"This product includes softwa re developed by the OpenSSL Project for use in the OpenSSL Toolkit.
(http://www.openssl.org/)"
4. The names "OpenSSL Toolkit" and "OpenSSL Project" must not be used to endo rse or promote products
derived from this software without prior written permission. For written perm ission, please contact
openssl-core@openssl.org.
5. Products derived from this software may not be called "OpenSSL" nor may "OpenSSL" appear in their
names without prior written permission of the OpenSSL Project.
6. Redistributions of any form whatsoever must retain the following acknowledgment:
"This product includes softwa re developed by the OpenSSL Project for use in the OpenSSL Toolkit
(http://www.openssl.org/)"
THIS SOFTWARE IS PROVIDED BY THE OpenSSL PROJECT ``AS IS'' AND ANY EXPRESSED OR IMPLIED
WARRANTIES, INCLUDING, BUT NOT LIMITED TO, THE IMPLIED WARRANTIES OF MERCHANTABILITY AND
FITNESS FOR A PARTICULAR PURPOSE ARE DISCLAIMED. IN NO EVENT SHALL THE OpenSSL PROJECT OR
ITS CONTRIBUTORS BE LIABLE FOR ANY DIRECT, INDIRECT, INCIDENTAL, SPECIAL, EXEMPLARY, OR
CONSEQUENTIAL DAMAGES (INCLUDING, BUT NOT LIMITED TO, PROCUREMENT OF SUBSTITUTE GOODS
OR SERVICES; LOSS OF USE, DATA, OR PROFITS; OR BUSINESS INTERRUPTION) HOWEVER CAUSED AND ON
ANY THEORY OF LIABILITY, WHETHER IN CONTRACT, STRICT LIABILITY, OR TORT (INCLUDING NEGLIGENCE
OR OTHERWISE) ARISING IN ANY WAY OUT OF THE USE OF THIS SOFTWARE, EVEN IF ADVISED OF THE
POSSIBILITY OF SUCH DAMAGE.
This product includes cryptographic software written b y Eric Young (eay@cryptsoft.com). T his product
includes software written by Tim Hudson (tjh@cryptsoft.com).
*/
Original SSLeay License
/* Copyright (C) 1995-1998 Eric Young (eay@cryptsoft.com) All rights reserved.
This package is an SSL implementation written by Eric Young (eay@cryptsoft.com).
The implementation was written so as to conform with Netscapes SSL.
This library is free for commercial and non-commercial use as long as the following conditions are
adhered to. The following conditions apply to all code fo und in this distribution, be it the RC4, RSA, lhash,
DES, etc., code; not just the SSL code. The SSL documentation included with this distribution is covered
by the same copyright terms except that the holder is Tim Hudson (tjh@cryp tsoft.com).
Copyright remains Eric Young's, and as such any Copyright notices in the code are not to be removed.
If this package is used in a product, Eric Young should be given attribution as the author of the parts of the library used.
This can be in the form of a textual message at program startup or in documentation (online or textual)
provided with the package.
Redistribution and use in source and binary forms, with or without modification, are pe rmitted provided
that the following conditions are met:
1.
Redistributions of source code must retain the copyright notice, this list of c onditions and the following disclaimer.
2. Redistributions in binary form must reproduce the above copyrigh t notice, this list of conditions and
the following disclaimer in the documentation and/or other materials provided with the distribution.
3. All advertising materials mentioning features or use of this software must display the following
acknowledgement:
"This product includes cryptographic software written by Eric You ng (eay@cryptsoft.com)"
The word 'cryptographic' can be left out if the routines from the library being used are not cryptographic related :-).
4. If you include any Windows specific code (or a derivative thereof) from the apps directory (application
code) you must include an acknowledgement:
"This product includes software written by Tim Hudson (tjh@cryptsoft.com)"
THIS SOFTWARE IS PROVIDED BY ERIC YOUNG ``AS IS'' AND ANY EXPRESS OR IMPLIED WARRANTIES,
INCLUDING, BUT NOT LIMITED TO, THE IMPLIED WA RRANTIES OF MERCHANTABILITY AND FITNESS FOR A
PARTICULAR PURPOSE ARE DISCLAIMED. IN NO EVENT SHALL THE AUTHOR OR CONTRIBUTORS BE LIABLE
FOR ANY DIRECT, INDIRECT, INCIDENTAL, SPECIAL, EXEMPLARY, OR CONSEQUENTIAL DAMAGES
(INCLUDING, BUT NOT LIMITED TO, PROCUREMENT OF SUBS TITUTE GOODS OR SERVICES; LOSS OF USE,
DATA, OR PROFITS; OR BUSINESS INTERRUPTION) HOWEVER CAUSED AND ON ANY THEORY OF LIABIL ITY,
WHETHER IN CONTRACT, STRICT LIABILITY, OR TORT (INCLUDING NEGLIGENCE OR OTHERWISE) ARISING IN
ANY WAY OUT OF THE USE OF THIS SOFTWARE, EVEN IF ADVISED OF THE POSSIBILITY OF SUCH DAMAGE.
The licence and distribution terms for any publically available version or derivative of this code cannot be
changed. i.e. this code cannot simply be copied and put under another distribution licence [including the
GNU Public Licence.]
*/
INTRODUCTION CONNECTIONS PLAYBACK FUNCTION SETUP OTHERS
E5RJ0BD_EN.book Page 47 Tuesday, October 20, 2009 3:53 PM
Page 48

Printed in China
1VMN28553 / E5RJ0BD
E5RJ0BD_EN.book Page 48 Tuesday, October 20, 2009 3:53 PM
 Loading...