

Page 1

FILE NO. 020-200415
REVISION 2
SERVICE MANUAL
Integrated HD Projection Television
51H94
57H94
DOCUMENT CREATED IN JAPAN, Mar., 2005
Page 2

TABLE OF CONTENTS
CHAPTER 1 GENERAL ADJUSTMENTS
SAFETY INSTRUCTIONS .............................................................................................................................................. 3
CRT ASSEMBLY REPLACEMENT AND MOUNTING ................................................................................................... 4
PICTURE TUBE COMPONENTS ADJUSTMENT.......................................................................................................... 6
REPLACEMENT OF THE CRT....................................................................................................................................... 9
SERVICE MODE .......................................................................................................................................................... 10
ELECTRICAL ADJUSTMENT ...................................................................................................................................... 12
CONVERGENCE ADJUSTMENT ................................................................................................................................ 15
SCREEN AND MIRROR ALIGNMENTS ...................................................................................................................... 18
CIRCUIT CHECKS ....................................................................................................................................................... 19
CHAPTER 2 SPECIFIC INFORMATIONS
SETTING & ADJUSTING DATA .................................................................................................................................... 20
LOCATION OF CONTROLS ......................................................................................................................................... 21
ADDING CHANNELS TO THE TV'S MEMORY ............................................................................................................ 23
MECHANICAL DISASSEMBLY .................................................................................................................................... 24
CHASSIS REPLACEMENT PARTS LIST ..................................................................................................................... 26
PC BOARDS TOP & BOTTOM VIEW ......................................................................................................................... 37
TERMINAL VIEW OF TRANSISTORS ......................................................................................................................... 51
CIRCUIT BLOCK DIAGRAM ........................................................................................................................................ 54
SPECIFICATIONS .................................................................................................................................................... END
APPENDIX:
CIRCUIT DIAGRAM
-
2
-
Page 3

CHAPTER 1 GENERAL ADJUSTMENTS
SAFETY INSTRUCTIONS
WARNING: BEFORE SERVICING THIS CHASSIS, READ THE “X-RAY RADIATION PRECAUTION”, “SAFETY PRECAU-
TION” AND “PRODUCT SAFETY NOTICE” INSTRUCTIONS BELOW.
X-RAY RADIATION PRECAUTION
1. Excessive high voltage can produce potentially hazardous
X-RAY RADIATION. To avoid such hazards, the high voltage must not be above the specified limit. The nominal
value of the high voltage of this receiver is (A) kV at zero
beam current (minimum brightness) under a 120V AC
power source. The high voltage must not, under any circumstances, exceed (B) kV.
Refer to table-1 for high voltage (A), (B).
(See SETTING & ADJUSTING DATA on page 20)
Each time a receiver requires servicing, the high voltage
should be checked following the HIGH VOLTAGE CHECK
procedure in this manual. It is recommended that the reading of the high voltage be recorded as a part of the service
record. It is important to use an accurate and reliable high
voltage meter.
SAFETY PRECAUTION
WARNING : Service should not be attempted by anyone unfamiliar with the necessary precautions on this receiver. The following are the necessary precautions to be observed before
servicing this chassis.
1. An isolation Transformer should be connected in the power
line between the receiver and the AC line before any service is performed on the receiver.
2. Always discharge the picture tube anode to the CRT conductive coating before handling the picture tube. The picture tube is highly evacuated and if broken, glass fragments
will be violently expelled. Use shatter proof goggles and
keep picture tube away from the unprotected body while
handling.
3. When replacing a chassis in the cabinet, always be certain that all the protective devices are put back in place,
such as; non-metallic control knobs, insulating covers,
shields, isolation resistor-capacitor network etc.
4. Before returning the set to the customer, always perform
an AC leakage current check on the exposed metallic parts
of the cabinet, such as antennas, terminals, screwheads,
metal overlays, control shafts etc. to be sure the set is safe
to operate without danger of electrical shock. Plug the AC
line cord directly into a 120V AC outlet (do not use a line
isolation transformer during this check). Use an AC voltmeter having 5000 ohms per volt or more sensitivity in the
following manner:
PRODUCT SAFETY NOTICE
2. This receiver is equipped with a Fail Safe (FS) circuit which
prevents the receiver from producing an excessively high
voltage even if the B+ voltage increases abnormally. Each
time the receiver is serviced, the FS circuit must be checked
to determine that the circuit is properly functioning, following the FS CIRCUIT CHECK procedure in this manual.
3. The only source of X-RAY RADIATION in this TV receiver
is the picture tube. For continued X-RAY RADIATION protection, the replacement tube must be exactly the same
type tube as specified in the parts list.
4. Some part in this receiver have special safety-related characteristics for X-RAY RADIATION protection. For continued safety, parts replacement should be undertaken only
after referring to the PRODUCT SAFETY NOTICE below.
Connect a 1500 ohm 10 watt resistor, paralleled by a 0.15
µ
F, AC type capacitor, between a known good earth ground
(water pipe, conduit, etc.) and the exposed metallic parts,
one at a time. Measure the AC voltage across the combination of 1500 ohm resistor and 0.15 µF capacitor. Re-
verse the AC plug at the AC outlet and repeat AC voltage
measurements for each exposed metallic part. Voltage
measured must not exceed 0.675 volts rms. This corresponds to 0.45 milliamp. AC. Any value exceeding this limit
constitutes a potential shock hazard and must be corrected
immediately.
AC VOLTMETER
0.15 µF
Place this probe on
Good earth ground
such as a water
pipe, conduit, etc.
1500 ohm
10 watt
each exposed
metallic part.
Many electrical and mechanical parts in this chassis have special safety-related characteristics. These characteristics are
often passed unnoticed by a visual inspection and the protection afforded by them cannot necessarily be obtained by using
replacement components rated for higher voltage, wattage, etc. Replacement parts which have these special safety characteristics are identified in this manual and its supplements; electrical components having such features are identified by the
international hazard symbols on the schematic diagram and the parts list.
Before replacing any of these components, read the parts list in this manual carefully. The use of substitute replacement
parts which do not have the same safety characteristics as specified in the parts list may create shock, fire, X-ray radiation or other hazards.
-
3
-
Page 4

CRT ASSEMBLY REPLACEMENT AND MOUNTING
CAUTION : DO NOT LOOSEN THE HEX HEAD BOLTS WITH SPRINGS (12 PCS), BECAUSE THOSE ARE FOR
SEALING OF CRT COOLANT.
Lens Assembly
R
GB
Attention Serviceman
The Hex Head
Bolts with
Springs. (see
sketch) used on
CRT assembly,
are NOT
Adjustment Screws
DO NOT LOOSEN-FLUID
LEAKAGE WILL OCCUR.
4 Screws
4 Screws
CRT Assembly
S.V.M. Coil
CRT DRIVE Board
Deflection Yoke and Conver Yoke
Lens and Neck Components View
-
4
-
CRT Mounting
Page 5

TO REMOVE CRT (Same procedure for R, G, B)
1. Remove CRT DRIVE Board, S. V. M. COIL and
DEF. YOKE from CRT.
2. Remove Lens Assembly.
3. Detach CRT Anode Cap from CRT.
4. Remove CRT Assembly from CRT Mounting.
CRT REPLACEMENT (Same procedure for R, G, B)
Reverse the removal procedures except the followings.
1. Anode Cable should be replaced with new one.
See “SERVICING PRECAUTIONS” shown below.
2. Install silicon (T461B) to the CRT, replace the Anode
cable and put enough silicon again on around the Anode Cap as illustrated.
Anode Cap
CAUTION: Align the Anode cable as illustrated on page
4.
ADJUSTING PROCEDURE IN REPLACING CRT
1. R.G.B. FOCUS ADJUSTMENT (page 7.)
2. PICTURE TILT ADJUSTMENT (page 7.)
3. USER CONVERGENCE CENTER CHECK
(See owner's manual.)
4. CENTERING ADJUSTMENT (page 7.)
5. CONVERGENCE ADJUSTMENT (page 15.)
6. WHITE BALANCE ADJUSTMENT (page 12.)
Adjustments are complete.
Silicon
(On shaded area)
TSE3843W #23960136
2 ~ 5 mm
15 ~ 25 mm
SERVICING PRECAUTIONS
Do not use a magnetized screw driver for screws
of Deflection Yoke and Velocity Modulation Coil to
avoid magnetization of electron gun.
Magnetization of electron gun will degrade basic
function and result in unbalance of right and left
shift of user static convergence, and result in no
variable quantity.
Screw for
D.Y
Screw for SVM coil
When replacing the anode cap assembly (CRT) or
anode lead assembly (F.B.T.), remove the anode
lead holder from old one and attach the holder
again to new anode lead.
Check the point of anode lead in a straight
line, if it is winding, please revise it.
Anode lead holder
-
5
-
Page 6
WARNING : BEFORE SERVICING THIS CHASSIS, READ THE “X-RAY RADIATION PRECAUTION”, “SAFETY PRECAUTION” AND “PRODUCT SAFETY NOTICE” ON PAGE 3 OF THIS MANUAL.
PICTURE TUBE COMPONENTS ADJUSTMENT
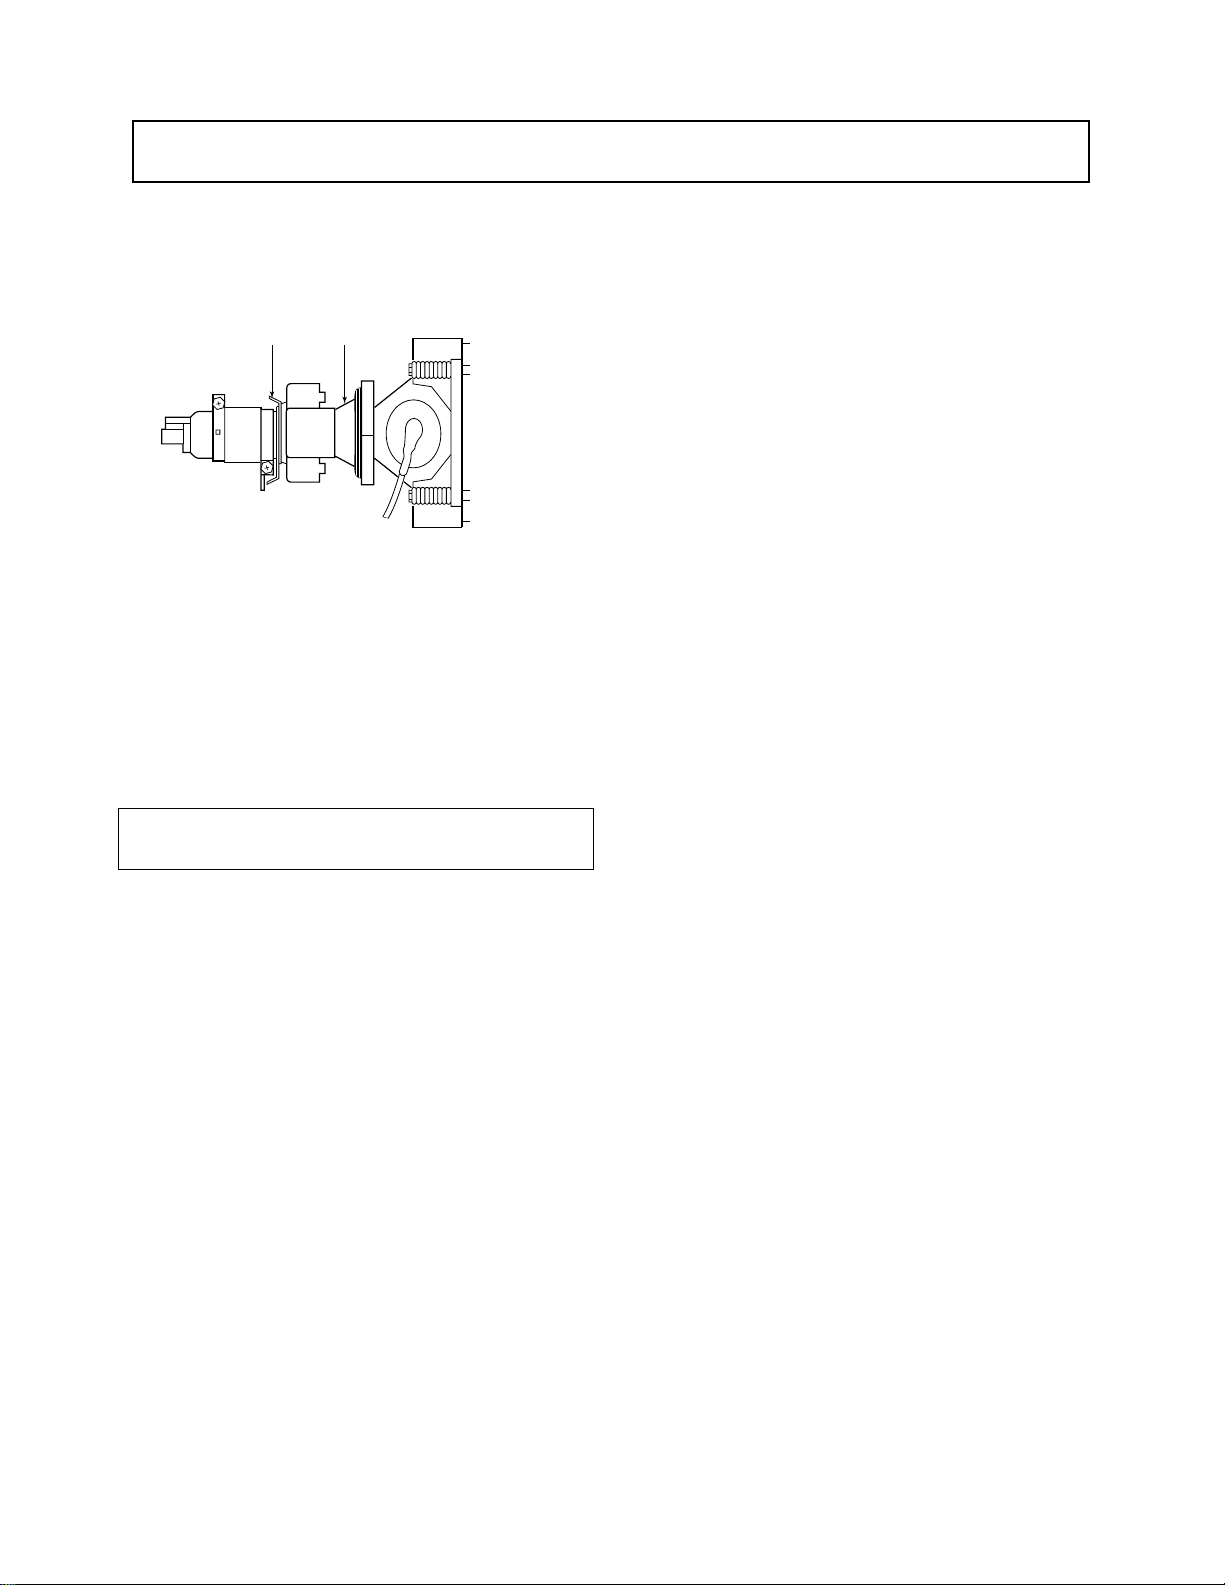
DESCRIPTION OF NECK COMPONENTS
Deflection yoke and convergence yoke
The position on the neck is required most front
(CRT funnel side) and the screw is fastened after
rotating yoke adjusting picture tilt.
Centering magnet
After adjusting picture tilt, picture position is finally
fixed by this magnet.
In order to get maximum margin of user convergence control for center of screen, this magnet
have to be used for center convergence adjustment.
PREPARATION
Operate the receiver for at least 5 minutes.
-
6
-
Page 7
R, G, B FOCUS ADJUSTMENT
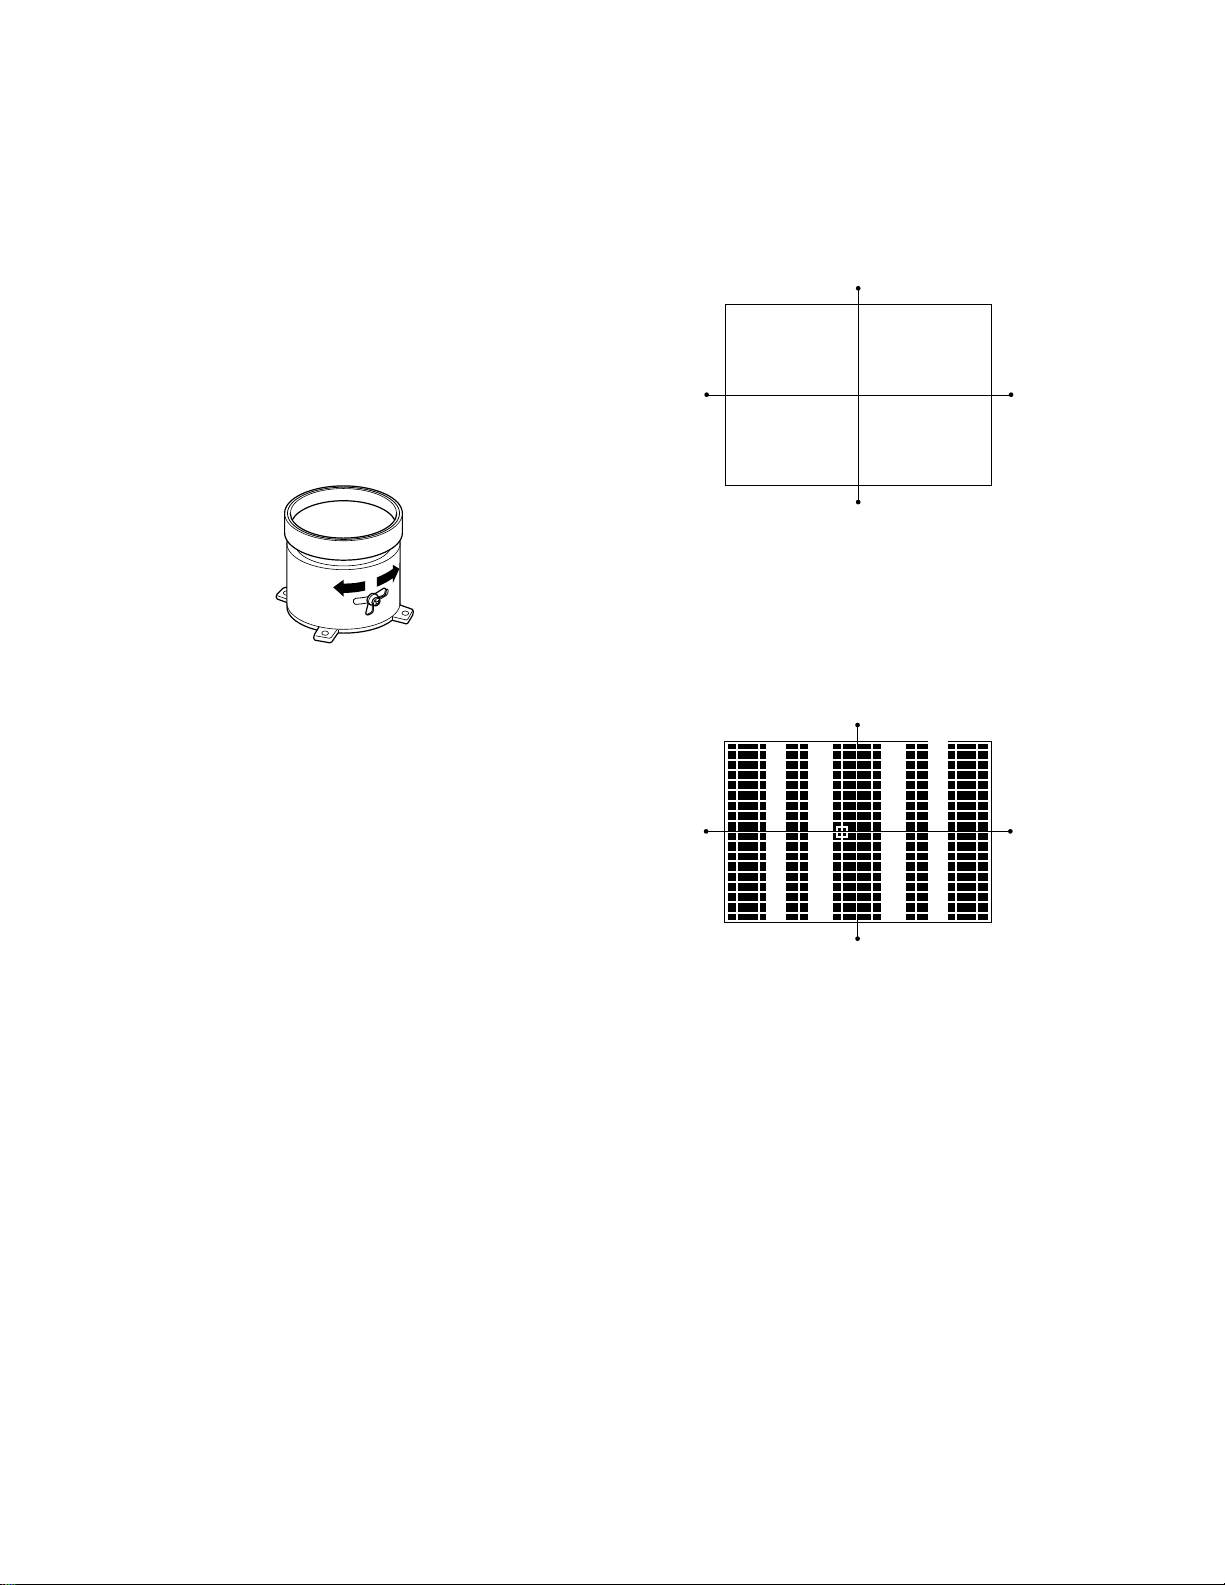
1. Before adjusting the R, G, B FOCUS, remove the 4 screws
of Lens Assembly which is fixed on the CRT Assembly.
(See page 4.)
Then turn around the Lens Assembly by 180 to adjust
the fastening screw (Fig. a) and fasten the 4 screws to
secure Lens Assembly.
2. Select the adjustment mode. (See page 10.)
3. Press “7” button to display the built-in cross-hatch.
4. Press “0” and “RTN” buttons to make the picture a single
Red color.
100 button ................ to erase Red color
0 button .................... to erase Green color
RTN button .............. to erase Blue color.
5. Loosen the fasten screw and adjust Red lens focus to best
focusing point of picture center. Then fasten the screw.
(See Fig. a.)
Fig. a
6. Adjust FOCUS VR “R” of FOCUS PACK to find best focusing point of picture center.
7. Repeat steps 3 to 5 for Green and Blue colors.
TILT ADJUSTMENT
Rotate R, G, B deflection yoke so that picture becomes horizon, then fasten screw.
CENTERING ADJUSTMENT
1. Stretch a thread between two center of screen edge (top
and bottom, left and right).
2. Receive NTSC.
Then select SERVICE MODE. (See Page 10.)
3. Select CONVERGENCE ADJUSTING mode, and press
"7" button to display the internal net pattern.
Move Cursol and recognize horizontal line indicated Y:4.
This line is vertical center. Push "9" button to display the
vertical stripes, and recognaize horizontal center.
4. Perform VCEN adjustment. (See page 16.)
5. Adjust G centering magnet so that the cross-bar pattern
center comes to screen center.
6. Perform HEIGHT adjustment .
7. Perform VERT. LINEARITY adjustment.
8. Perform WIDTH adjustment. (See page 16.)
9. Check whole quality of green line.
10
. Adjust R, B centering magnet so that the cross-bar pat-
tern center comes to screen center.
-
7
-
Page 8
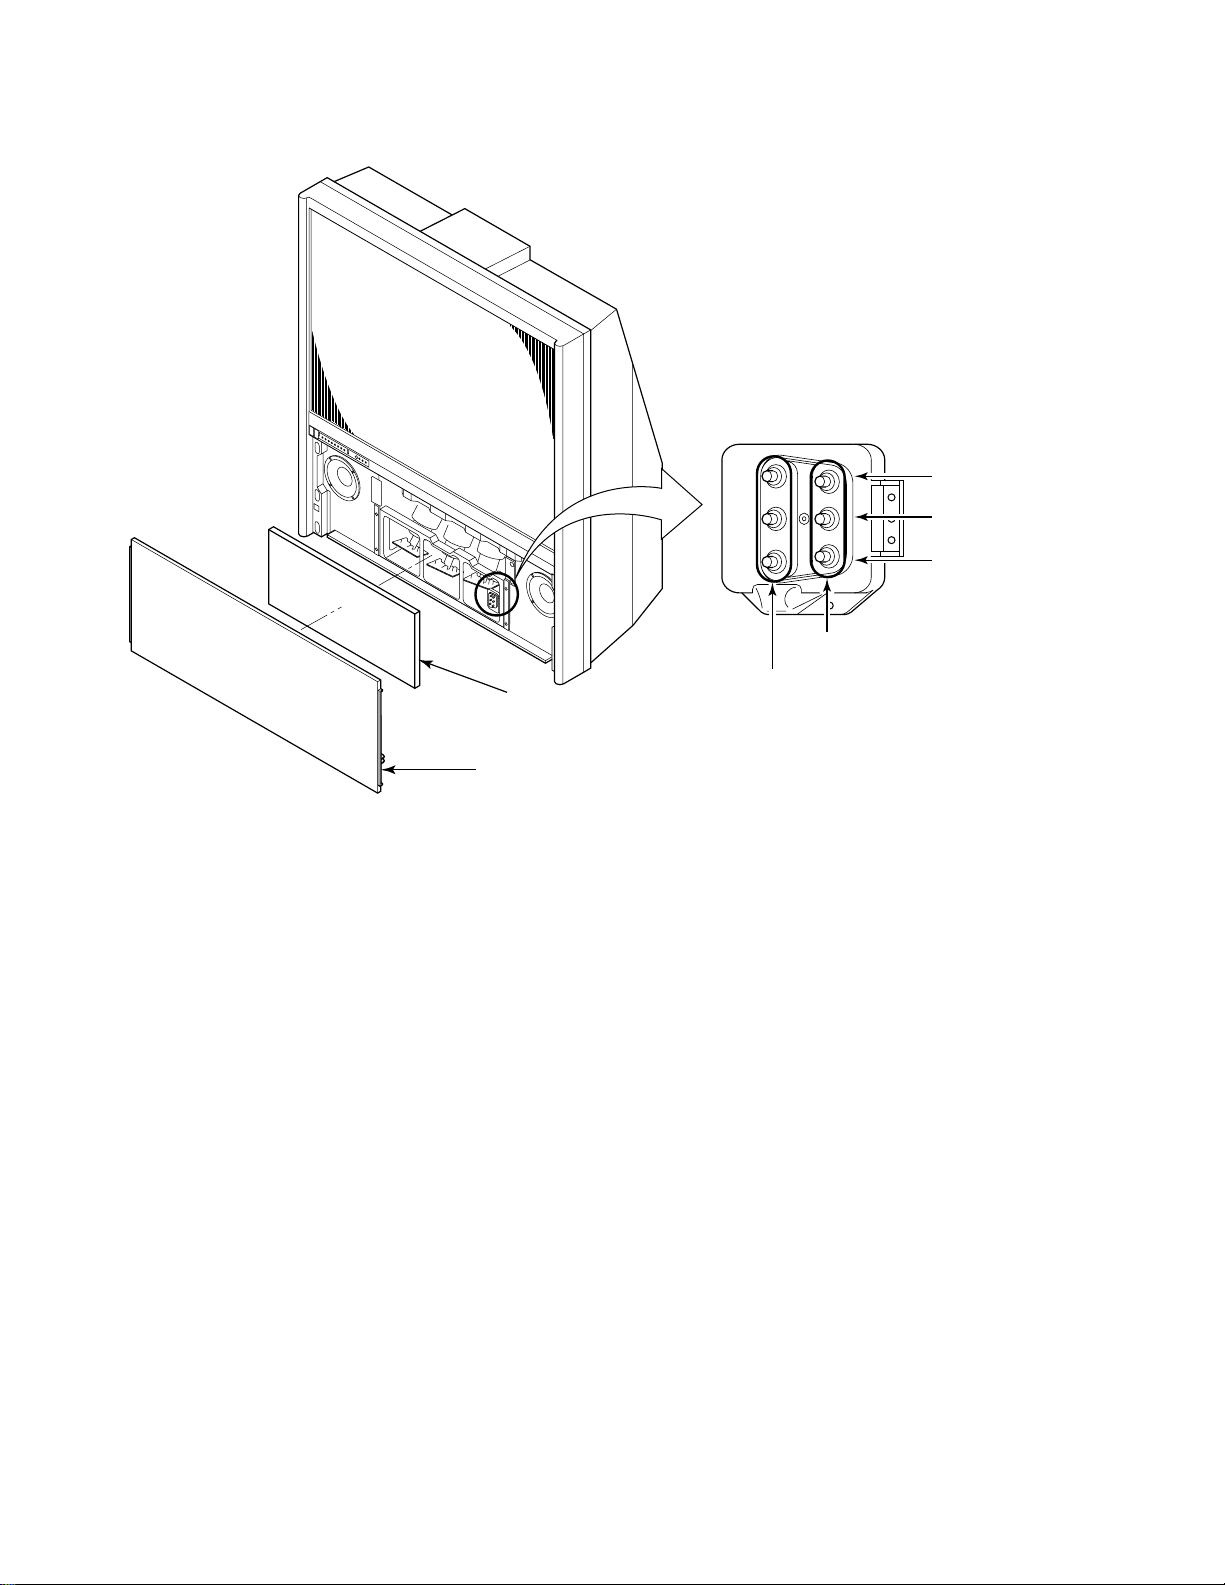
LOCATION OF SCREEN AND FOCUS VR’S
R
G
B
SCREEN
COVER
Speaker grille
FOCUS
-
8
-
Page 9
REPLACEMENT OF THE CRT
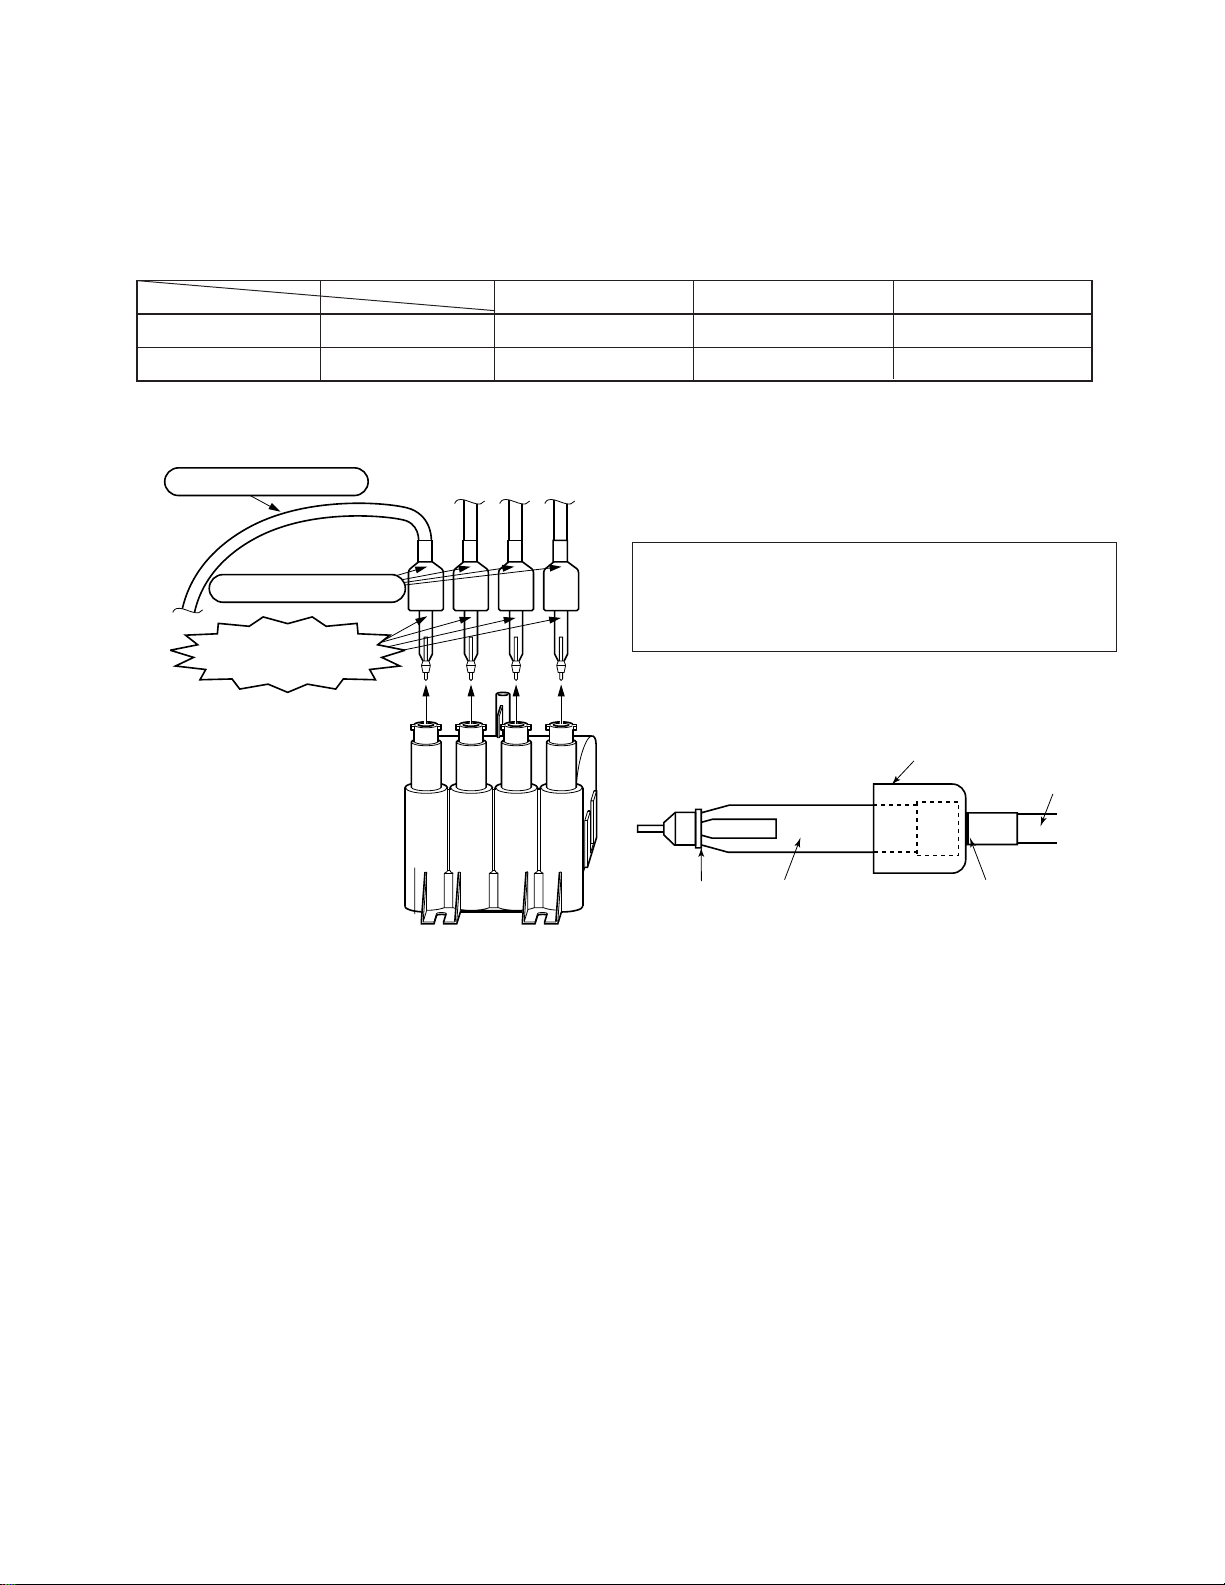
Service parts are provided for each R, G and B.
The contents of the parts are as follows.
RG B
57H94 HOKUTO
51H94 HITACHI 2334122
REPLACEMENT OF HIGH VOLTAGE CABLE
ANODE LEAD
RUBBER BOOT
LEAD HOLDER
Z450 TPA5011
Fig. a
2334118
2334119
2334123
1. When replacing Anode Lead or Anode Cap with new one,
remove Lead Holder from old lead as shown in figure
below, and put it on new lead. Do not throw away Lead
Holder.
NOTE : THE LEAD HOLDER IS ATTACHED TO TPA5011
(Z450), BUT IS NOT ATTACHED TO ANODE
LEAD AND ANODE CAP. RUBBER BOOT IS ATTACHED TO ANODE LEAD AND ANODE CAP.
2. Detaching Lead Holder
RUBBER BOOT
LOCK LEAD HOLDER
Fig. b
2334120
2334124
OLD
ANODE LEAD
or
ANODE CAP
Cut here rubber boot
and lead together to
detach Lead Holder.
-
9
-
Page 10

SERVICE MODE
1. ENTERING TO SERVICE MODE
1) Press MUTE button twice
on Remote Control.
MUTE
2. DISPLAYING THE ADJUSTMENT MENU
1) Press MENU button on TV.
Service mode
S
3. KEY FUNCTION IN THE SERVICE MODE
The following key entry during display of adjustment menu provides special functions.
2) Press MUTE button
again to keep pressing.
Adjustment mode
Press
Press
3) While pressing the MUTE button,
press MENU button on TV set.
S
(Service mode display)
Item
Data
Screen adjustment mode ON/OFF: TV (ANT)/VIDEO button (on TV)
Selection of the adjustment items : Channel / (on TV or Remote)
Change of the data value : Volume / (on TV or Remote)
Adjustment menu mode ON/OFF : MENU button (on TV)
Initialization of the memory (QA02) : RECALL+Channel button on TV ( )
Initialization of the self diagnostic data: RECALL+Channel button on TV ( )
“RCUT” selection : 1 button
“GCUT” selection : 2 button
“BCUT” selection : 3 button
“SCNT” selection : 4 button
“COLC” selection : 5 button
Convergence adj : 7 button
Self diagnostic display : 9 button
-
10
-
Page 11

4. SELECTING THE ADJUSTING ITEMS
1) Every pressing of CHANNEL button in the service mode changes the adjustment items in the order of table-2.
( button for reverse order)
Refer to table-2 for preset data of adjustment mode.
(See SETTING & ADJUSTING DATA on page 20)
5. ADJUSTING THE DATA
1) Pressing of VOLUME or button will change the value of data in the range from 00H to FFH. The variable range
depends on the adjusting item.
6. EXIT FROM SERVICE MODE
1) Pressing POWER button to turn off the TV once.
INITIALIZATION OF MEMORY DATA OF QA02
After replacing QA02, the following initialization is required.
1. Enter the service mode, then select any register item.
2. Press and hold the RECALL button on the Remote, then press the CHANNEL button on the TV. The initialization of QA02
has been complated.
3. Check the picture carefully. If necessary, adjust any adjustment item above.
Perform “Programming Channel Memory” on the owner's manual.
CAUTION: Never attempt to initialize the data unless QA02 has been replaced.
7. SELF DIAGNOSTIC FUNCTION
1) Press “9” button on Remote Control during display of adjustment menu in the service mode.
The diagnosis will begin to check if interface among IC’s are executed properly.
2) During diagnosis, the following displays are shown.
SELF CHECK
NO. 23 * * * * * *
POWER : 000
BUS LINE : OK
BUS CONT : OK
BLOCK : MAIN SUB
SET ID : 01
EEP VER : 02
OPT1 : 05 OPT2 : 70
HDMI
NO * * * * * * * *
ERR CODE :
Part number of microprocessor (QA01)
Operation number of protection circuit (current limiter) . . . . “000” is normal.
BUS line check “OK” ................... Normal
“SCL-GND” or “NG” ........... SCL-GND short circuit
“SDA-GND” or “NG” ........... SDA-GND short circuit
“SCL-SDA” or “NG” ............ SCL-SDA short circuit
BUS line ACK (acknowledge) check
“OK” ..................... Normal
Display of Location Number . . . . NG
(Display example)
“QA02 NG”, “H001 NG”, “Q501 NG” etc.
Note: The indication of failure place is only one place though failure places are plural. When
repair of a failure place finishes, the next failure place is indicated. (The order of priority of
indication is left side.)
Sync. signal check Green display ..... Normal
Red display ........ NG
MAIN ........ Main sync
SUB .......... Sub sync (when turn on the PIP)
ID code for TV Set
Version of "EEP"
Data for "OPT"
Part number of HDMI microprocessor
HDMI error code
-
11
-
Page 12
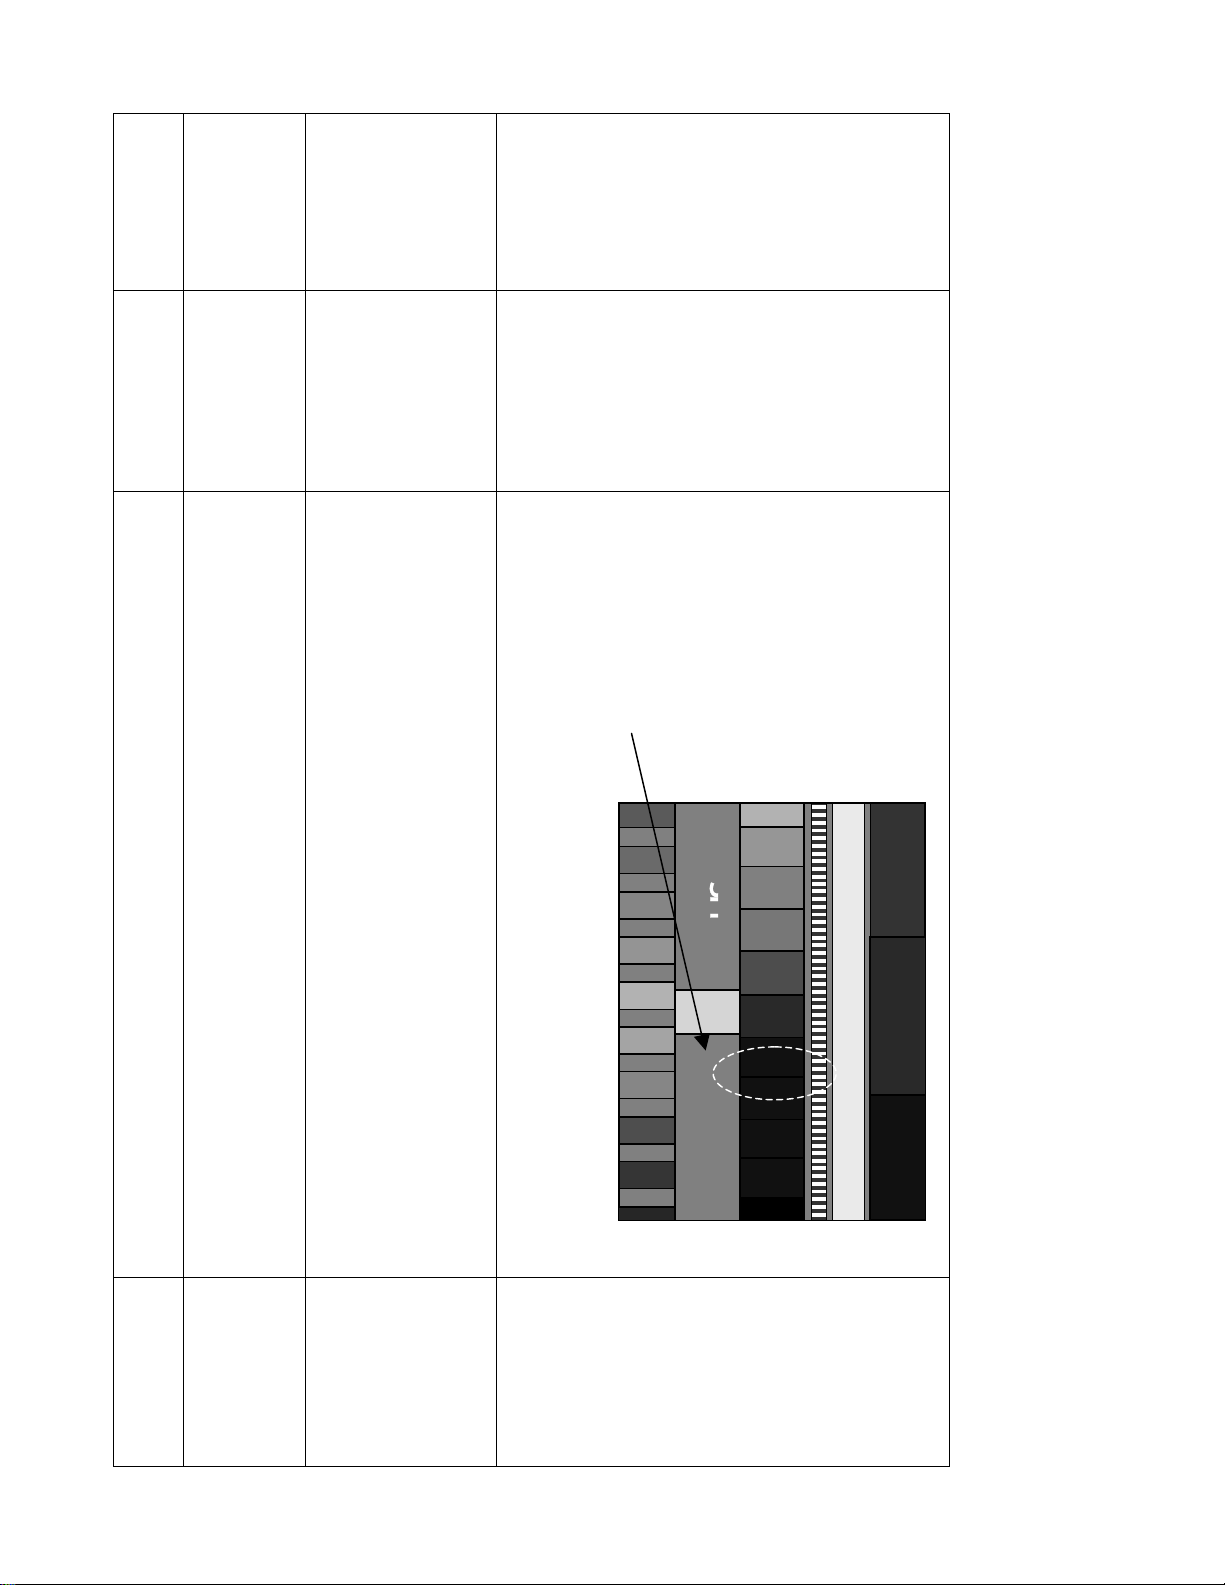
ADJUSTMENT
SPECIFICATION
ELECTRICAL ADJUSTMENT
10500k+0UV
Same spec is ap-
plied on dark area
and bright area.
1
+
-
5TH
BAR SUNK
SIGNAL
White luster signal
(Valuable input level)
CHANNEL 3
SUB-BRIGHT
SIGNAL
5th bar sunk
PROCESS INSTRUCTIONS
ADJUSTING
1. Heart run minimum 15minutes.
2. Go into screen adjustment mode.
ITEM
SCREEN ADJUST
Adjust Focus pack Screen VR of Red, Green, and Blue by looking directly into each
CRT and adjusting each screen VR until CRT is just lit on left side of CRT.
area.
BLUE DRIVE, RED BIAS and BLUE BIAS.
Adjust RED DRIVE, BLUE DRIVE for bright area, and adjust RED BIAS and BLUE
BIAS for dark area.
1. Adjust white luster level to get 4.3cd/m2 on dark area, and get 264.3cd/m2 on bright
2. Using the data up and down keys, cycle through the adjustments for RED DRIVE,
WHITE BARANCE
ADJUSTMENT
3. Continue to make adjustments color temperature to spec on each area.
1. Receive channel 3 Sub-Bright pattern.
2. Go into BRTC of service mode.
3. Press DATA UP/DOWN to adjust Sub-Bright level to spec.
SUB-BRIGHT
ADJUSTMENT
-
12
-
Page 13

G Dot cross (NTSC)
B Dot cross (NTSC)
Electrical Focus : R Dot cross (NTSC)
• User Adjustment : SPORTS (CONTRAST MAX, BRIGHTNESS CENTER)
• Adjust after Centering Magnet adjusts.
• Signal : Lens Focus : R Dot cross (NTSC)
ADJUSTMENT METHOD
(Condition)
G Dot cross (NTSC)
B Dot cross (NTSC)
1) Rough Adjust the lens focus and electrical focus of each color(R, G, B).
(Adjustment)
1. Common Items
Adjust Green electrical focus VR on focus pack (Z410) for best center focus.
1) Receive green single color by shielding jig.
2) Receive the Dot Cross pattern.
3) Adjust Green electrical focus.
2. Green Adjustment
Red flare width : 1mm
If the focus blur on screen center and circumference, adjust the electrical focus is best point on all of screen.
Receive the Dot Cross pattern. Adjust Green lens for best center focus.
Green lens focus adjustment target
Dot-cross has red flare (red flare width :1mm)
4) Adjust Green lens focus.
5) Repeat (3)~(4),and adjust best focus point.
ITEM
FOCUS ADJUSTMENT (1/2)
Focus Adjustment
-
13
-
Page 14

Adjust Red electrical focus VR on focus pack (Z410) for best center focus.
Receive the Dot Cross pattern. Adjust Red lens for best center focus.
1) Receive Red single color by shielding jig.
2) Receive the Dot Cross pattern.
3) Adjust Red electrical focus.
4) Adjust Red lens focus.
ADJUSTMENT METHOD
3. Red Adjustment
ITEM
FOCUS ADJUSTMENT (2/2)
Focus Adjustment
5) Repeat (3)~(4),and adjust best focus point.
1) Receive Blue single color by shielding jig.
2) Receive the Dot Cross pattern.
4. Blue Adjustment
3) Adjust Blue electrical focus.
Adjust Blue electrical focus VR on focus pack (Z410) for best center focus.
(The Brightness is minimum point of Blue.)
-
14
Receive the Dot Cross pattern. Adjust the Blue lens for best center focus.
After easy lens adjustment, turn to right side lens focus screw,
and so dot-cross has flare.
Next turn left focus screw, so flare disappears in Dot-Cross and Dot-Cross become blur.
This point is blue lens focus adjustment target. (flare disappear and become blur)
4) Adjust Blue lens focus.
-
Page 15

CONVERGENCE ADJUSTMENT
1. Receive NTSC signal.
2. Enter to the service mode. (See Page 10.)
RCUT
40H
3. Press "7" button to enter the convergence adjusting mode,
and the internal net pattern will be displayed. Then, press
"9" button to display veritcal stripes.
4. Select the point and the color by pressing following buttons. (Cursor should be blinking.)
"2", "8", "4", "6" : To select point
"3" : To select color
5. Then press "5" button, and adjust the convergence by
pressing following buttons. (Cursor should not be
blingking.)
"2", "8", "4", "6" : To adjust convergence
"3" : To select color
6. Repeat from steps 3 to 4 until the convergence and the
geometry become fine. (See Page 14.)
7. Press "7" button to memorize the adjusted data.
8. Message of "PLEASE PUSH TOUCH FOCUS" will be displayed, and press TOUCH FOCUS button which is located
on the front panel.
9. TOUCH FOCUS CALIBRATION will start.
10. Soon message of "CALIBRATION FINISHED" will be displayed, and then a normal picture will be displayed.
11. Then push TOUCH FOCUS button again, and confirm that
the convergence does not change.
EXPLANATION OF KEY-FUNCTION IN THE CONVERGENCE ADJUSTMENT MODE
Load BACK UP DATA: 1 button
Up : button
Selet Green color:
Left : button
Blinking of cursor ON/OFF: 5 button
Right:
Adjust mode ON/OFF: 7 button
Down: 8 button
Vertical stripe ON/OFF 9 button
Erase Green line: 0 button
Erase Red line: 100 button
Erase Blue line: ENT button
Note: The following message will appear while pressing
"1" button.
ENTER: TO LOAD BACKUP DATA
MUTE: TO LOAD INITIAL DATA
EXIT: TO EXIT
BACKUP DATA sets in factory by performing
CALIBRATION. BACKUP DATA updates by performing CALIBRATION again. INITIAL DATA
uses the seed data on this model. Thus, it cannot
updates. INITIAL DATA is not adjusted. Therefore, convergence data operates incorrectly. Normally, BACKUP DATA operates as base data on
this model. If BACKUP DATA is incorrectly operated, INITIAL DATA is operated instead of BACKUP DATA.
2
3
button
4
6
button
Note: If message of "TOUCH FOCUS ERROR" is displayed,
1) Check the connection between four sensors and
Convergence Unit.
2) Check the geometry of internal net pattern. (See Page
14.)
If any problem cannnot be found, hardware might have
problem.
-
15
-
Page 16
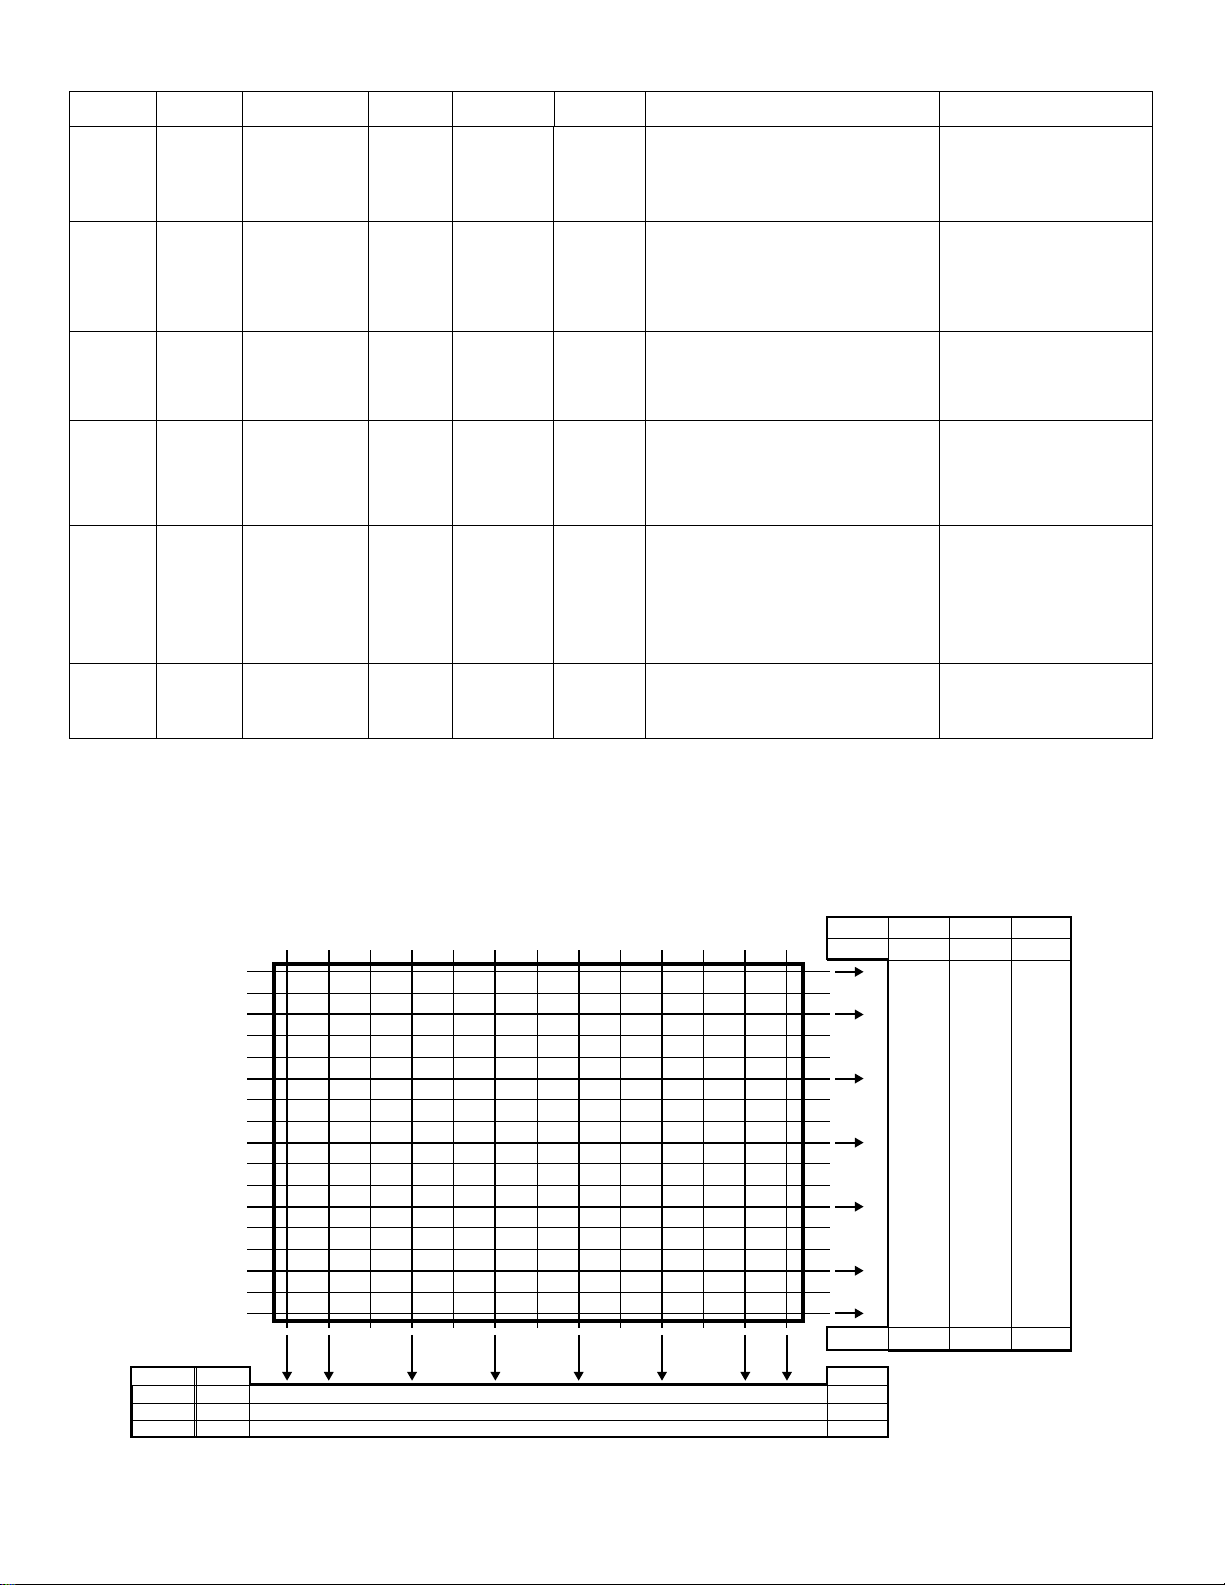
DEFRECTION and CONVERGENCE
ITEM NAME SETTING
VCEN VERTICAL
Raster
centeing
Adjustment
CONTRAST :MAX
BRIGHTNESS:CNT
COLOR :CNT
TINT :CNT
INPUT
SIGNAL
Retma
Signal
TEST POIN
Between TP-G
to TP-V
MEASURING
INSTRUMENT
Dig
ital Volt
Meter
ADJUSTMENT METHOD ADJUSTMENT SPEC
+
0
Adjust the voltage between TP-G and TP-V.
10 mV
-
DY Tilt
Adjustment
Centering
magnet
Adjustment
WID Horizontal
Adjustment
(FULL)
HIT
(VLIN)
Vertical
Adjustment
(FULL)
Convergence
CONTRAST: MAX
BRIGHTNESS:CNT
COLOR :CNT
TINT :CNT
PIC SIZE :FULL
CONTRAST: MAX
BRIGHTNESS:CNT
COLOR :CNT
TINT :CNT
PIC SIZE :FULL
CONTRAST :MAX
BRIGHTNESS:CNT
COLOR :CNT
TINT :CNT
PIC SIZE : FULL
C-MUTE :ON
CONTRAST :MAX
BRIGHTNESS: CNT
COLOR :CNT
TINT :CNT
PIC SIZE : FULL
C-MUTE : ON
D-Cross
Pattern
Retma
Signal
Retma
Signal
Retma
Signal
Retma
Signal
Picture
Adjustment
Picture
Adjustment
Picture
Adjustment
Picture
Adjustment
Picture
Adjustment
Picture
Adjustment
Picture
Adjustment
Picture
Adjustment
Picture
Adjustment
Picture
Adjustment
After roughly the green centering magnet
alignment, adjust the green yoke so that
the D-cross is as close as possible to the
dummy screen cross. Adjust the Red and
Blue in the same manner as Green.
Adjust the green center to the screen
center with the centering magnet on Retma signal. And adjust the Red and Blue
center to the green center each.
Adjust the Horizontal width by WID on
the green raster only.
After finishing Convergence adjustment,
make sure that the width is the same as
the spec.
Adjust the Vertical height by HIT(VLIN)
on the green raster only.After finishing
Convergence adjustment, make sure that
the height is the same as the spec with
C-MUTE OFF.
Refer to the following (Convergence Net
Geometry)
The dummy screen cross
and D-cross Gap
Color gap at the screen
center is within
+
1 bar
11
-
In case of C-MUTE OFF is
+
-
+
-
3mm.
5mm.
the same spec as well.
In case of Convergence mute.
Upper left...5
Bottom right...5
In case of C-MUTE OFF.
Upper left...4
Bottom right...4
+
-
+
-
0.5 bar
+
0.5 bar
-
0.5 bar
+
0.5bar.
-
CONVERGENCE (46 / 51 / 57 WIDE)
Net Pattern Geometry
Model H size H span
46WIDE 1018.4 485.0 404.1 242.5 80.8 0.0 80.8 242.5 404.1 485.0 80.8
51WIDE 1129.0 537.6 448.0 268.8 89.6 0.0 89.6 268.8 448.0 537.6 89.6
57WIDE 1260.0 600.0 500.0 300.0 100.0 0.0 100.0 300.0 500.0 600.0 100.0
Model 46WIDE 51WIDE 57WIDE
V size 572.850 635.085 708.750
278.4 308.0 344.0
208.8 231.0 258.0
104.4 115.5 129.0
0.0 0.0 0.0
104.4 115.5 129.0
208.8 231.0 258.0
278.4 308.0 344.0
V span 34.8 38.5 43.0
UNIT: mm
-
16
-
Page 17

NOTES
In many cases, color misconvergence may be corrected by returning HIT and WID data in main deflection side to initial adjusting
values. Following cases will surely require readjustment of convergence.
CRT REPLACEMENT
When CRT is replaced, main deflection readjustment and color matching are required.
Perform following procedures.
1. Replace two CRT’s of blue and red.
2. Perform horizontal adjustment for blue and red yokes on base of green CRT data. Mount yoke and velocity mod. coil alignment, pushing towards CRT without gap.
3. Adjust alignment of blue and red. (Refer Alignment adjustment for details.)
4. Rotating centering magnet, adjust CRT centers of red and blue to CRT center of green.
(Picture position adjustment)
5. Adjust HIT and WID data of main deflection, and decide data at the most precise screen comparing to green data.
6. Adjust convergence of screen picture for color matching. Do not move green one at this time.
7. After convergence adjustment of screen picture finishes, replace green CRT.
For green CRT as well, repeat steps 2 to 5 above on bases of red and blue color matching to adjust convergence.
8. Execute TOUCH FOCUS following instructions displayed on the screen after finishing convergence adjustments of all the
colors.
Note: Press button "7" again after "PLEASE PUSH TOUCH FOCUS" has been displayed. Then, TOUCH FOCUS will not be
executed, and the current state of convergence will be displayed.
-
17
-
Page 18
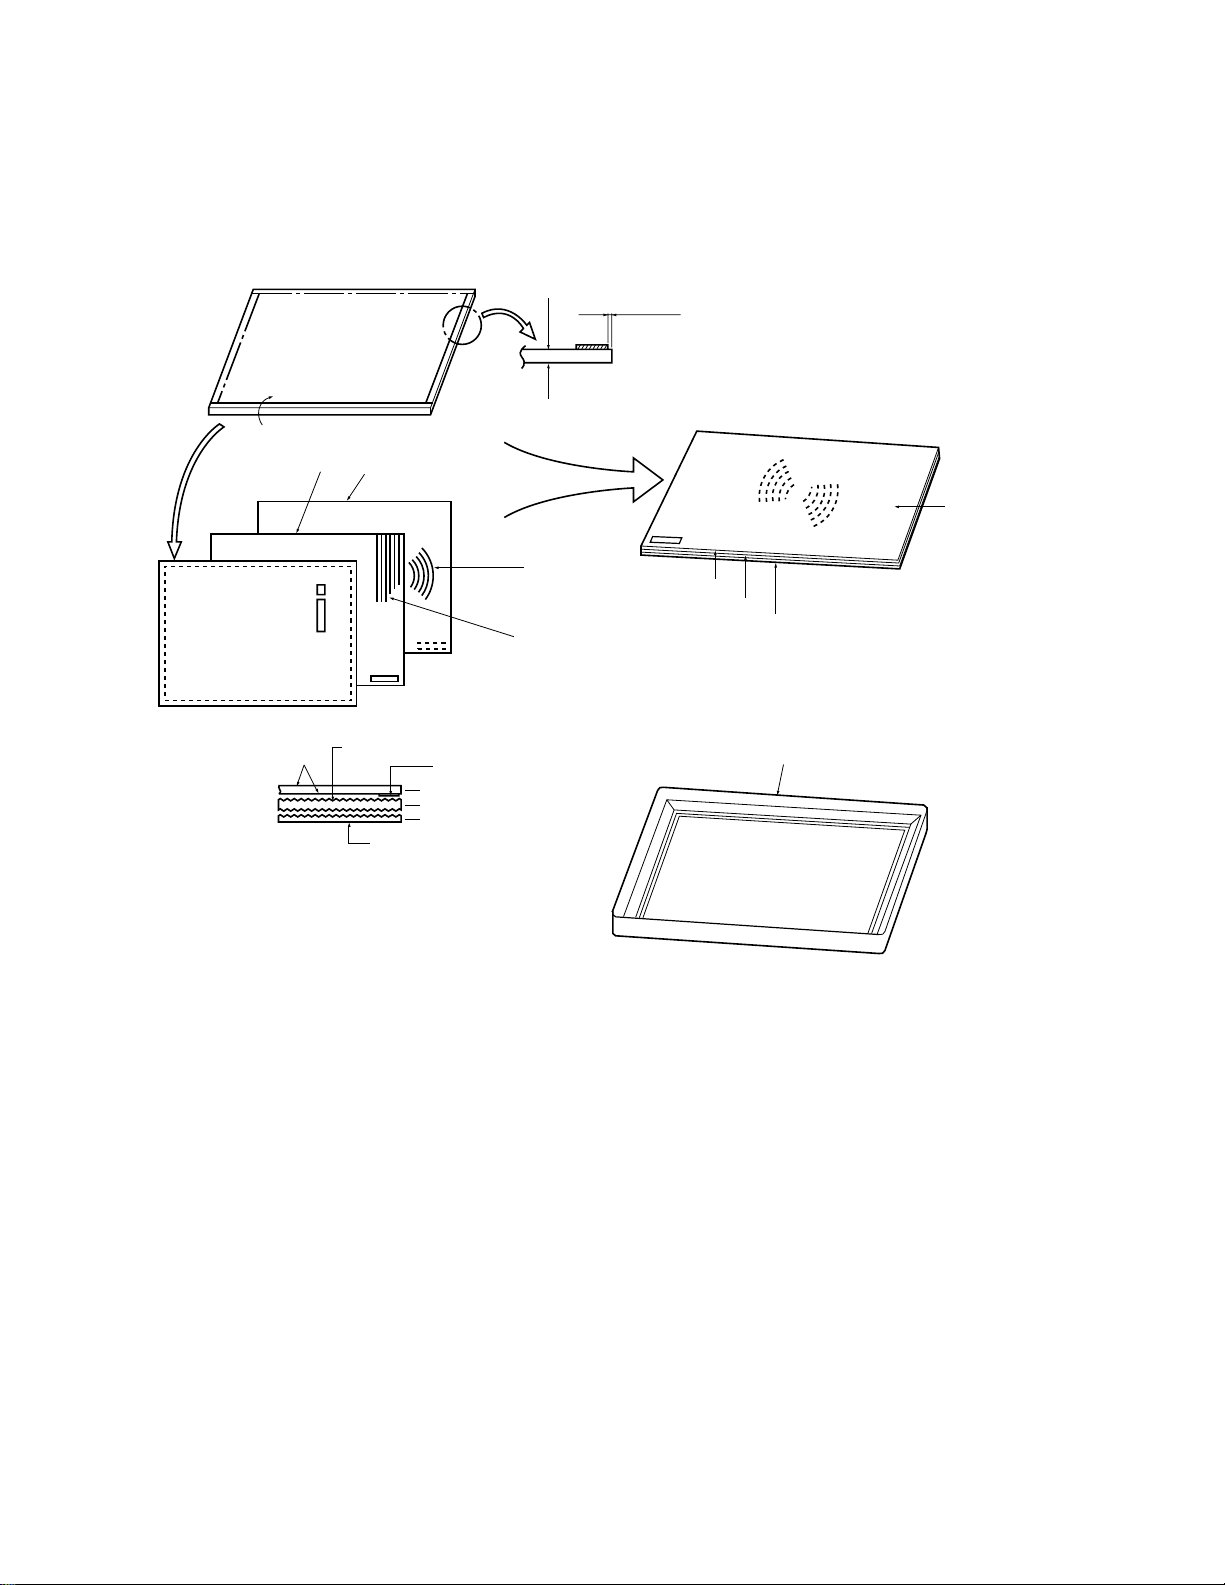
SCREEN AND MIRROR ALIGNMENTS
ASSEMBLING OF FRONT SCREEN
K503 FRONT PANEL
LENTICULAR
K501
<OUTSIDE>
SMOOTH
K502
FRESNAL
BLACK STRIPES
SMOOTH
<INSIDE>
SPACER
FRONT PANEL
LENTICULAR
FRESNEL
INSIDE
OUT SIDE
LENS
BLACK STRIPES
0 to 1 mm
MOUNTING OF FRONT SCREEN
SMOOTH
FRESNEL
LENTICULAR
FRONT PANEL
BEZEL
CAUTION : Do not hold the optical system parts (lens and
mirror) with bare hand to avoid finger-prints on
the surface of those parts.
HOW TO CLEAN LENS AND MIRROR
1. Be sure to remove sand dust with an air brush, etc.
2. When it is stained slightly, breathe upon it and wipe away
with the specified cleaning cloth.
For other stains than the above, wipe the stains away with
the specified cloth into which a cleaning liquid has been
soaked.
Cleaning liquid.................... LENS LUSTER (Manufac-
tured by Edmund Scientific
Co.), etc.
HOW TO CLEAN SCREEN
When cleaning the screen, use a soft cloth so as not to
damage the screen.
1. Wipe the screen with a dry cloth to remove moisture on
the screen.
Note : Absolutely do not use detergent, water, alcohol,
benzine, thinner, etc. for cleaning in order not to
wipe away the black print on the surface.
-
18
-
Page 19
CIRCUIT CHECKS
HIGH VOLTAGE CHECK
CAUTION: There is no HIGH VOLTAGE ADJUSTMENT on
this chassis. Checking should be done following
the steps below.
1. Connect an accurate high voltage meter to the anode of
the picture tube.
2. Turn on the receiver. Set the BRIGHTNESS and CONTRAST to minimum (zero beam current).
3. High voltage must be measured below (B) kV.
Refer to table-1 for high voltage (B).
(See SETTING & ADJUSTING DATA on page 20)
4. Vary the BRIGHTNESS to both extremes to be sure the
high voltage does not exceed the limit under any conditions.
CAUTION:
When the following parts fail, check the High Voltage after
replacing.
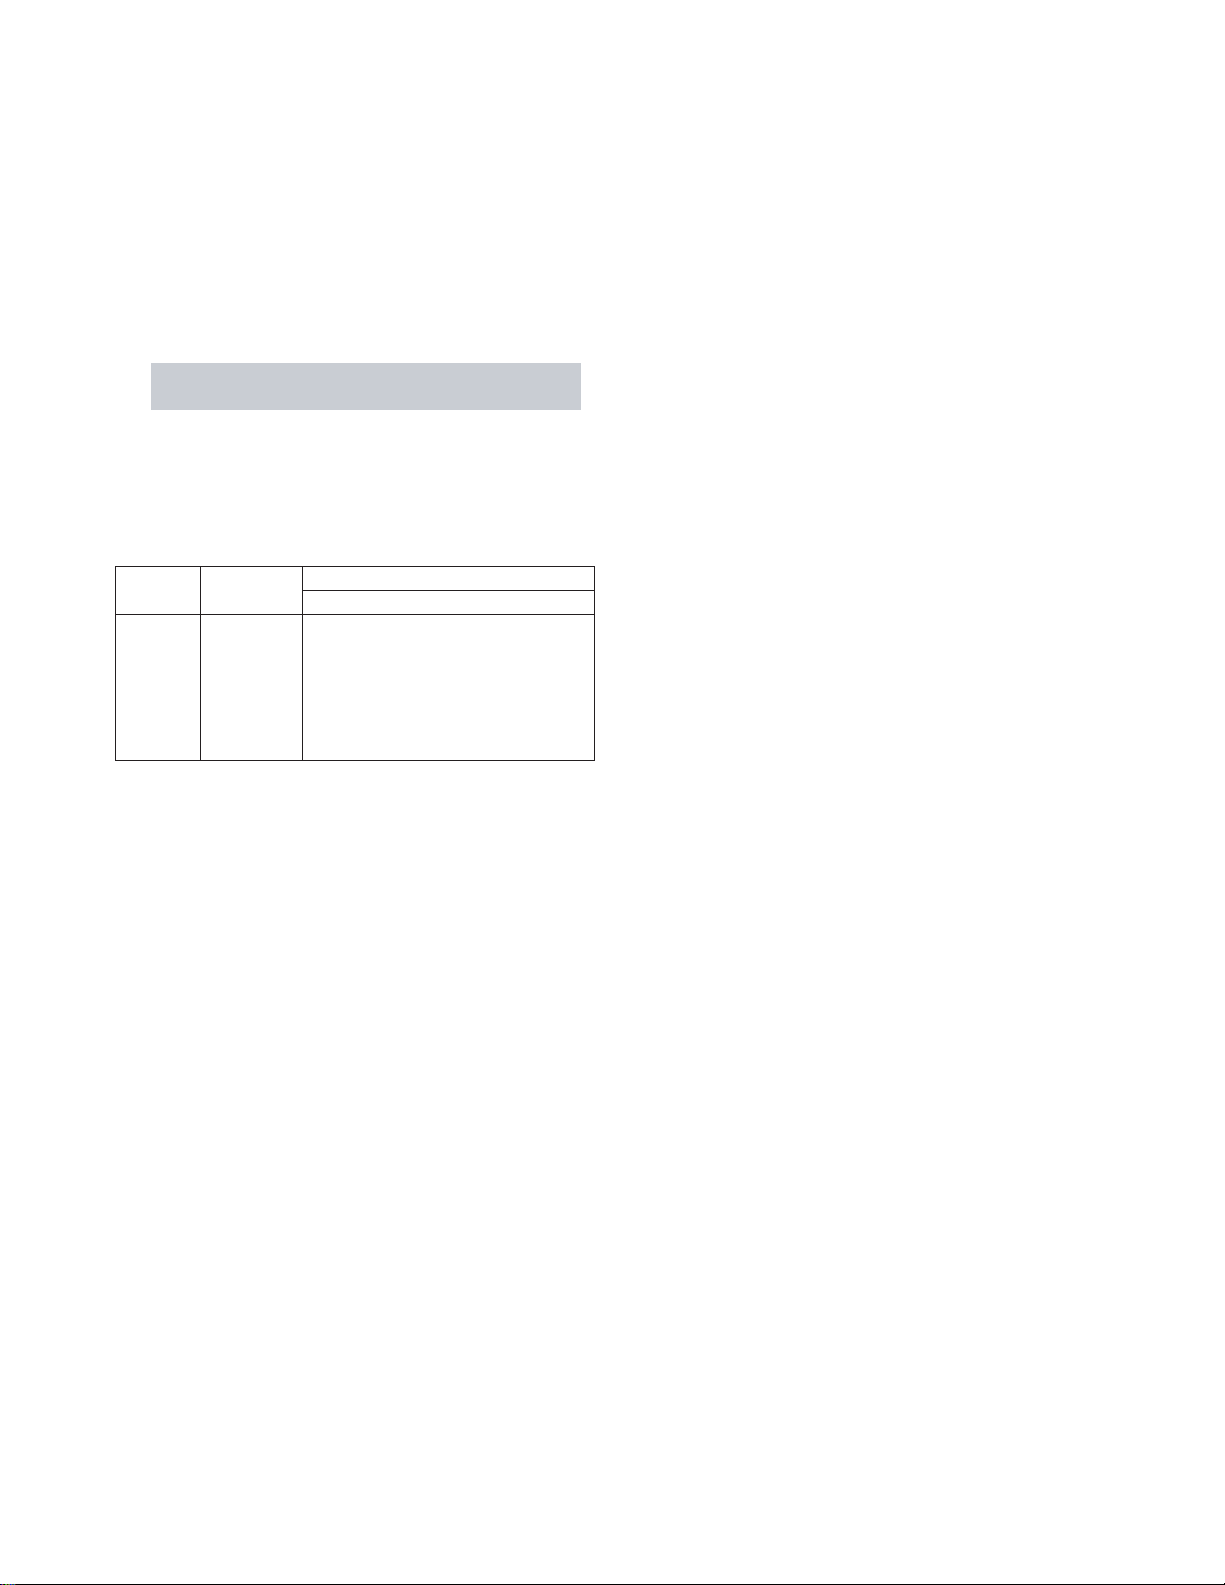
Location
No.
T461
C440
C443
C444
C467
C468
Name
Flyback
Capacitor
Capacitor
Capacitor
Capacitor
Capacitor
Descriptions
51", 57"
TFB3094AD
1000pF, ±3%
4700pF, ±3%
3600pF, ±3%
5600pF, ±5%
6800pF, ±5%
FS CIRCUIT CHECK
The Fail Safe (FS) circuit check is indispensable for the final
check in servicing. Checking should be done following the
steps below.
1. Turn the receiver on.
2. Temporarily short TP- (R) and TP- (X) on the DEF/POWER
Board with a jumper wire.
Raster and sound will disappear.
3. The receiver must remain in this state even after removing
the jumper wire. This is the evidence that the FS circuit is
functioning properly.
4. To obtain a picture again, temporarily turn the receiver off
and allow the FS circuit more than 5 seconds to reset. Then
turn the receiver on to produce a normal picture.
ANODE VOLTAGE MEASURING METHOD
CAUTION: Take extra precaution when measuring this high
voltage. High voltages are also present in
surrounding circuit boards (CRT DRIVE assembly, DEFLECTION assembly, and POWER
SUPPLY assembly).
1. Disconnect the FBT anode cable as outlined below. Measure high voltage at the point where the cable enters the
FBT.
2. Holding the rubber cover firmly, turn it counterclockwise
and check that the lock has been disengaged. (See Fig. b
on page 9.)
3. Determine the extent of the rubber cover before disconnecting the cable.
4. Pull straight up the anode cable to disconnect.
5. When reconnecting the cable, proceed in the reverse order.
After reconnecting, tug on the cable to check that it is secure.
-
19
-
Page 20
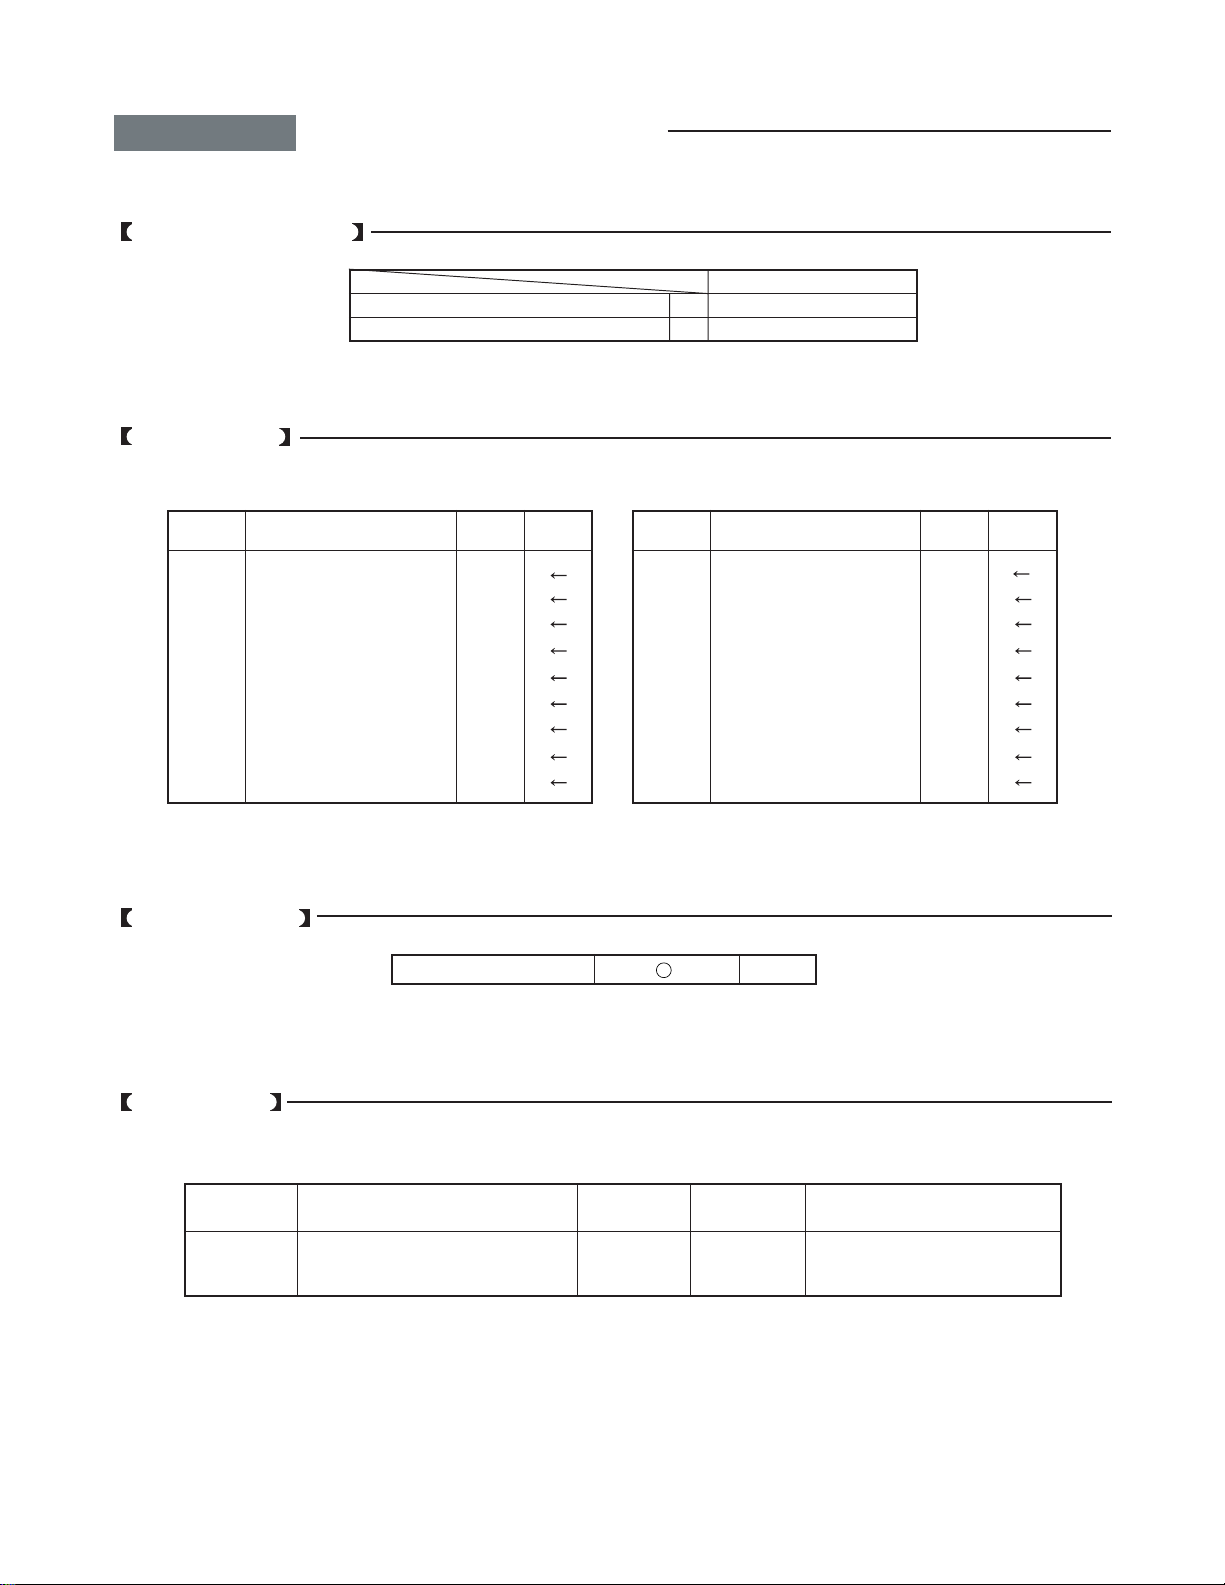
CHAPTER 2 SPECIFIC INFORMATIONS
SETTING & ADJUSTING DATA
SAFETY INSTRUCTIONS
HIGH VOLTAGE AT ZERO BEAM:
MAX HIGH VOLTAGE:
Table-1
SERVICE MODE
ADJUSTING ITEMS AND DATA IN THE SERVICE MODE:
(A)
(B)
51", 57"
32.8 kV
33.9 kV
Item Name of adjustment
RCUT
GCUT
BCUT
GDRV
BDRV
BRTC
HIT
LIN
VSC
CIRCUIT CHECKS
DESIGN MODE
R CUT OFF
G CUT OFF
B CUT OFF
G DRIVE
B DRIVE
BRIGHT CENTER
PICTURE HIT
V LINEARITY
V S CORRECTION
Preset Data
80H
80H
80H
40H
40H
80H
30H
12H
29H
HIGH VOLTAGE DET
Item Name of adjustment Preset Data
WID
COLC
VCP
PARA
CNR
HCP
VFC
VCEN
TVOP
Table-2
Q306 # 8 pin-GND
Table-3
PICTURE WIDTH
COLOR CENTER
V COMPENSATION
EW PARABOLA
EW M CORRECTION
H COMPENSATION
V f CORRECTION
V CENTERRING
TV OPTION
9.0 V
48H
4BH
06H
0FH
10H
00H
00H
7AH
40H
ADJUSTING ITEMS AND DATAS IN THE DESIGN MODE:
Item Name of adjustment Preset Data 51", 57" Remarks
OPT0
OPT1
TV SET OPTION 0
TV SET OPTION 1
0CH
80H
Table-4
-
20
←
←
-
Page 21
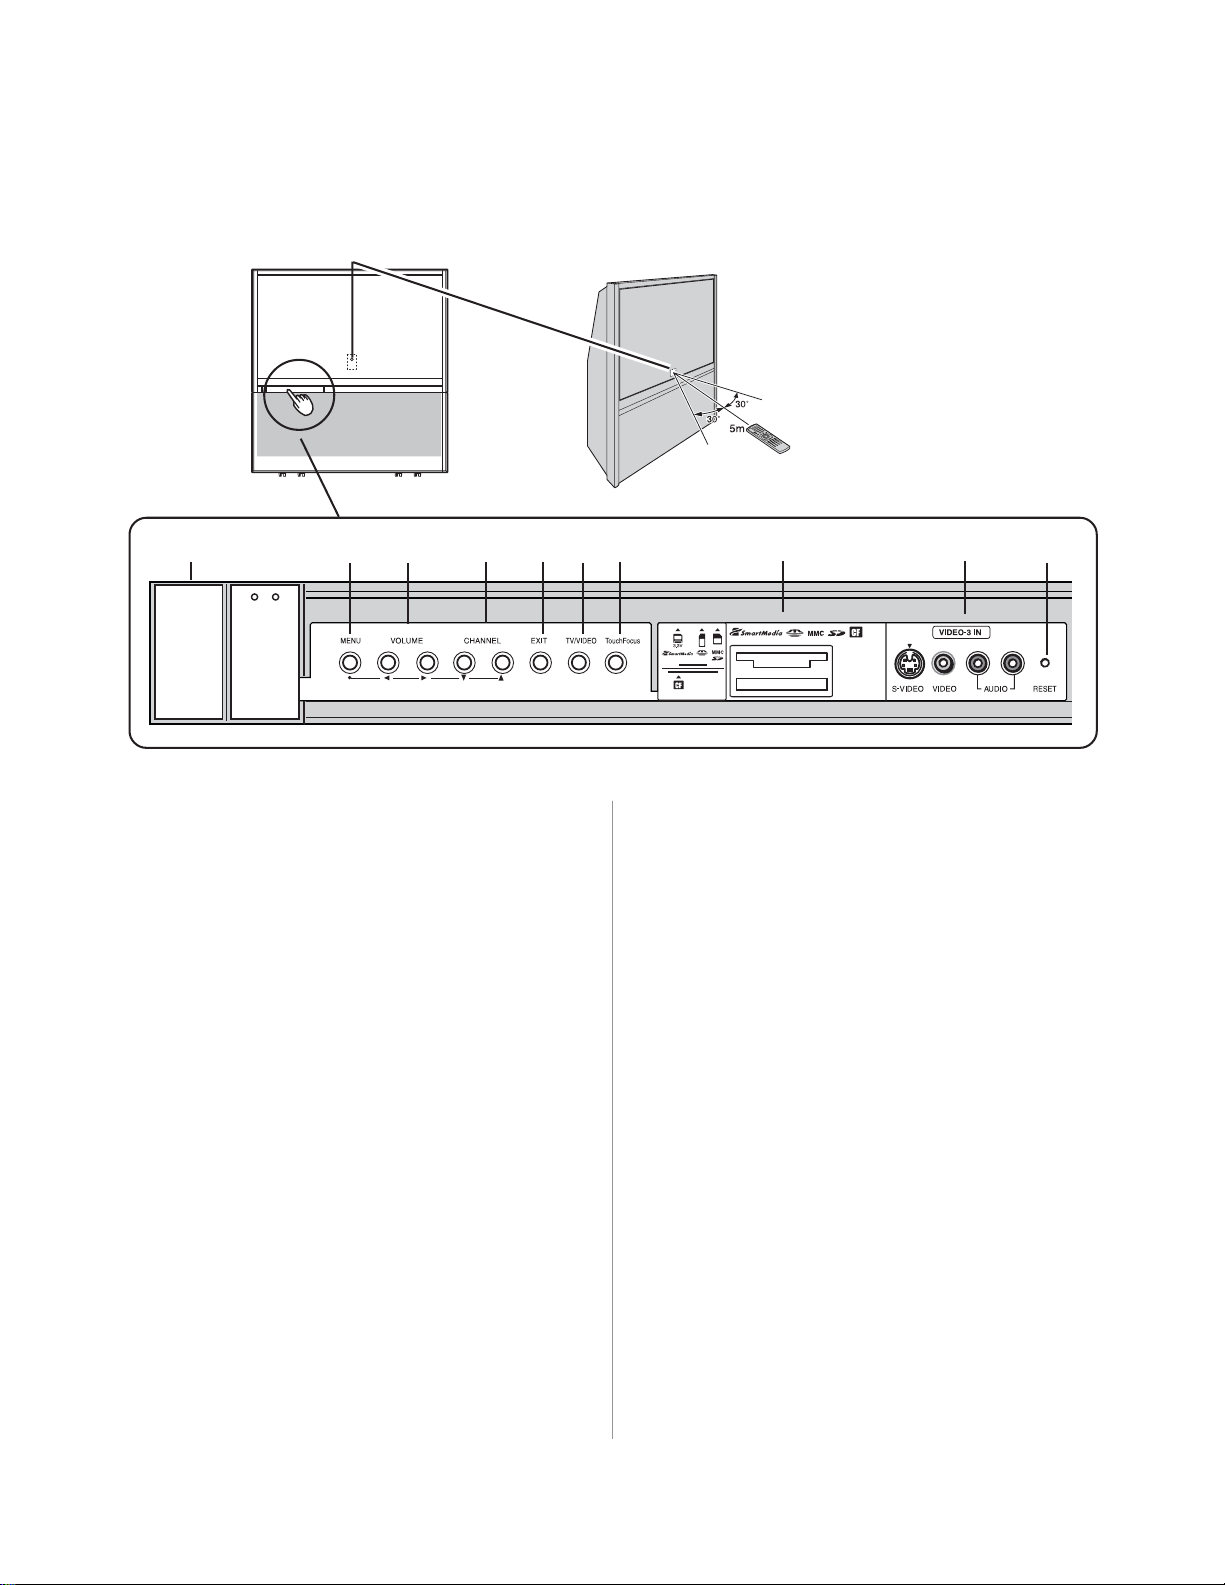
LOCATION OF CONROLS
FRONT
Press/lift to open
control panel door.
2 3
POWER
1
Remote control sensor
the remote control toward this area of the TV screen.
2
POWER
3
Red and Green LEDs
blinking), it indicates that the TV power cord is plugged in
and the power is OFF. This is called standby mode.
When red lights solid (not blinking), it indicates that the
TV power cord is plugged in and the POWER is ON.
4
MENU
When a menu is on-screen or the TV Guide On Screen
program guide is open, this button functions as the ENTER
button.
5
VOLUME
buttons adjust the volume level. When a menu is on-screen,
these buttons function as left/right menu navigation
buttons.
— Press to turn the TV on and off.
NOTE: When you first plug in the power cord, the green LED
will blink 3 times. After approximately 30 seconds, the green
LED will light continuously, at which point you can press
POWER to turn ON the TV.
— Press to access the menu system.
{
x• — When no menu is on-screen, these
1
4 5
(behind the screen)
— When green lights solid (not
{
6 7 8 9 0
{
— Point
Remote control effective range
!¡
{
DO NOT REMOVE
MEMORY CARD
PUSH TO
REMOVE
6
CHANNEL
buttons change the channel (programmed channels only.
When a menu is on-screen, these buttons function
as up/down menu navigation buttons.
7
EXIT
8
TV/VIDEO
viewing (ANT 1, ANT 2, VIDEO 1, VIDEO 2, VIDEO 3,
HDMI, ColorStream HD1, ColorStream HD2).
9
TouchFocus
convergence.
0
Memory card slots
SmartMedia,
one of the memory card slots to view JPEG files (such as
photos) as a “slide show” on your TV.
!¡
VIDEO-3
to as “VIDEO 3” and include standard A/V connections
plus optional S-video. (The VIDEO 1 and VIDEO 2 A/V
connections are on the TV’s back panel.)
!™
RESET
the remote control or TV front panel and you cannot turn
off the TV, press this button to reset the TV.
NOTE: The RESET button is recessed, so you will need to use
the end of a paper clip or similar object to press the button.
yz — When no menu is on-screen, these
— Press to close an on-screen menu instantly.
— Repeatedly press to change the source you are
®
— Press to automatically adjust the color
™
MMC, Memory Stick,™ CompactFlash®) into
— The front panel A/V connections are referred
— If the TV stops responding to the controls on
WHILE VIEWING
PICTURES.
— Insert a memory card (SD,
{
L/MONO R
!™
-
21
-
Page 22
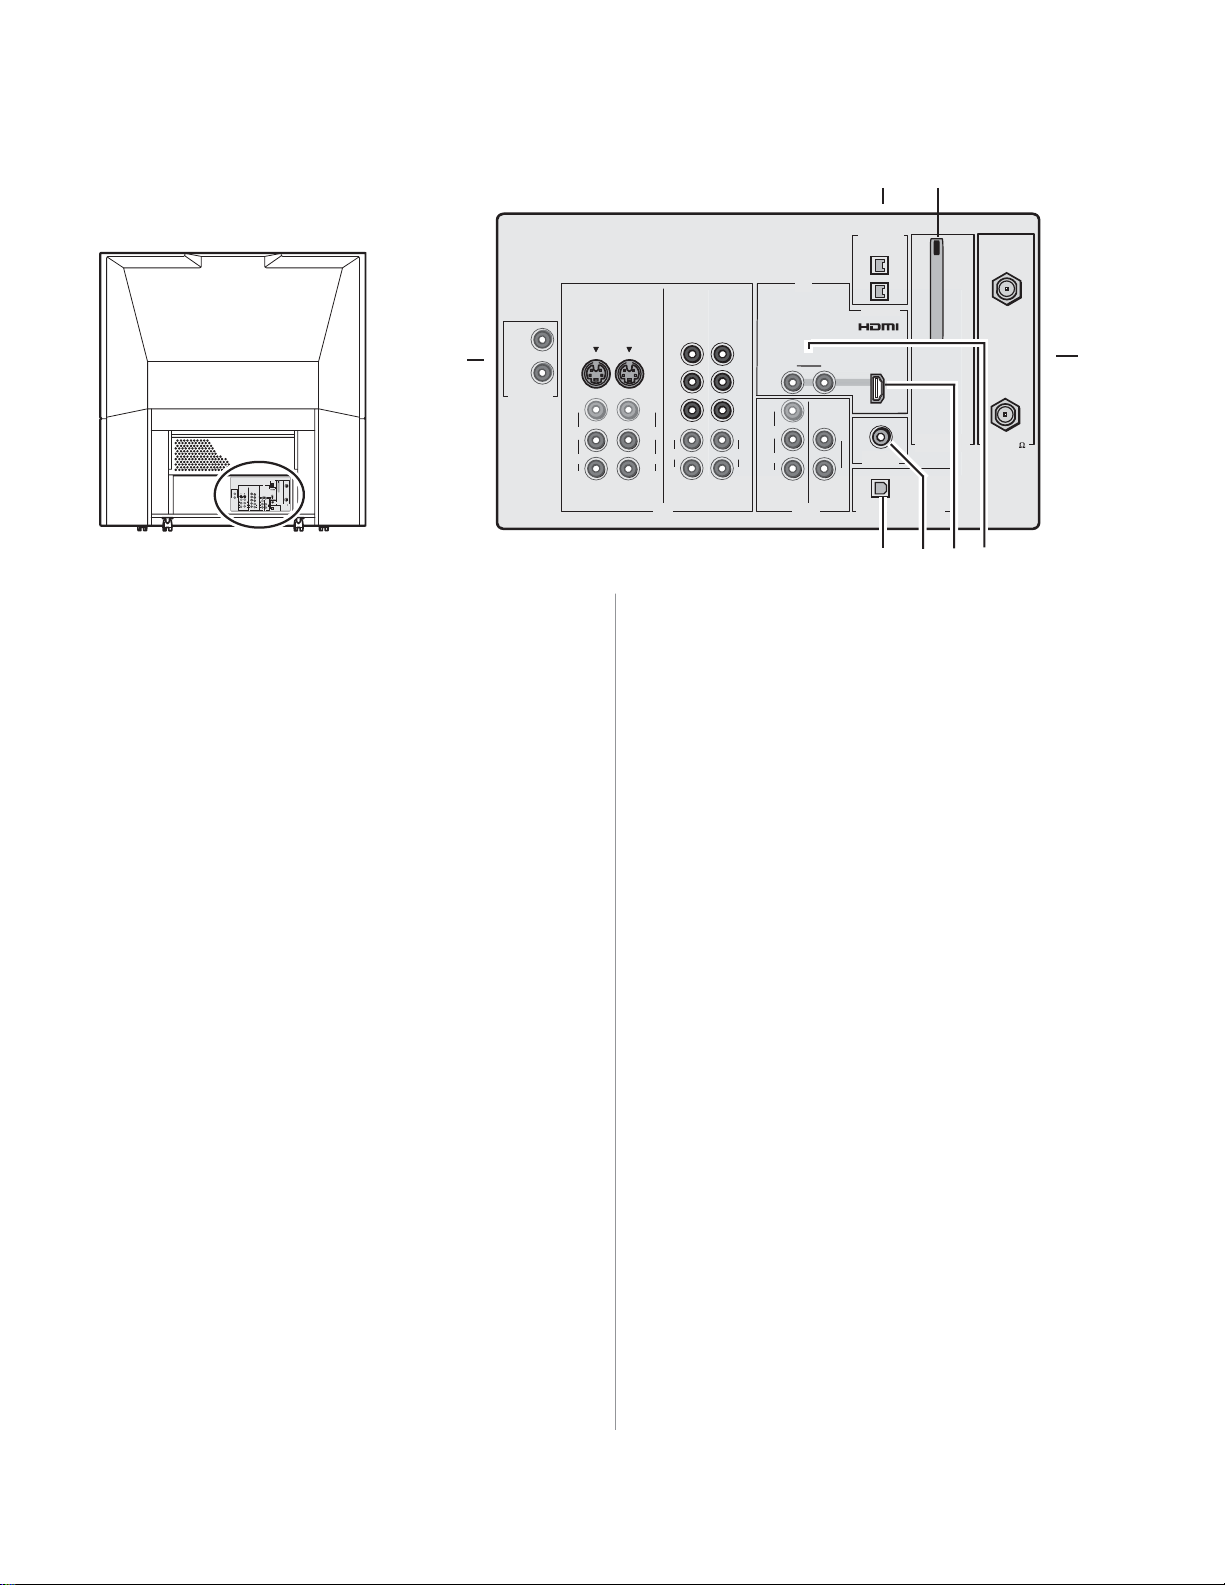
BACK
For an explanation of cable types.
VIDEO 1 VIDEO 2
OUT 1
!º
OUT 2
{
TheaterNet
TheaterNet
IEEE1394
EJECT
ANT1
1
IN
(CABLE)
AUDIO
2
COLOR
COLOR
VIDEO 1VIDEO 2
HDMI IN
STREAM
STREAM
S-VIDEO
HD-1
HD-2
OUT 1
S-VIDEO
Y
Y
RL
OUT 2
P
B
P
B
ANT2
TheaterNet
VIDEO
VAR
VIDEO
VIDEO
P
R
P
R
AUDIO
L/
L/
L/
MONO
MONO
L
MONO
L
L
)
CableCARD™
ANT(75
AUDIO
AUDIO
AUDIO
AUDIO
AUDIO
G-LINK
R
R
R
R
R
R
OUT
IN
DIGITAL AUDIO OUT
S-VIDEO
VIDEO
L/
MONO
AUDIO
R
1 ANT-1 (CABLE) IN and ANT-2 IN — Two inputs that
support analog (NTSC) and digital (ATSC) off-air antenna
signals and analog and digital (QAM) Cable TV signals.
Note: If you have an antenna only, connect it to ANT-1. If you have
both Cable TV and an antenna, connect the Cable TV to ANT-1 and
the antenna to ANT-2.
2 VIDEO 1 IN and VIDEO 2 IN — Two sets of standard
(composite) video and standard audio inputs plus optional
S-video inputs for connecting devices with composite video
or S-video output.
NOTE: Standard (composite) video and S-video cables carry
only video information; separate audio cables are required for a
complete connection.
3 ColorStream® HD-1 and ColorStream® HD-2 — Two sets
of ColorStream
®
high-definition component video and
standard stereo audio inputs for connecting devices with
component video output, such as a Toshiba DVD player
with ColorStream.
Note: Component video cables carry only video information;
separate audio cables are required for a complete connection.
®
4 A/V OUT — Standard composite video and analog audio
outputs for connecting a VCR for editing and dubbing.
5 Variable Audio OUT — Standard analog audio outputs for
connecting an analog amplifier with external speakers.
6 Digital Audio OUT — Optical audio output in Dolby
Digital or PCM (pulse-code modulation) format for
connecting an external Dolby Digital decoder, amplifier,
AV receiver, or home theater system with optical audio
input.
7 G-LINK
G-LINK cables to enable the TV Guide On Screen
™
— For use with one of the enclosed IR blaster/
®
recording features.
!¡ !™
{
TheaterNet
COLOR
COLOR
STREAM
STREAM
HD-2
HD-1
S-VIDEO
Y
P
B
VIDEO
P
R
L/
MONO
L
AUDIO
AUDIO
R
R
IN
{
23
8 HDMI
™
AUDIO
Y
RL
P
B
VIDEO
P
R
L/
MONO
L
AUDIO
AUDIO
R
R
{
4
IN — High-Definition Multimedia Interface
IN
{
{
OUT
{
IEEE1394
1
2
HDMI IN
VAR
AUDIO
L
G-LINK
R
DIGITAL AUDIO OUT
{
5
6789
EJECT
CableCARD™
ANT1
(CABLE)
ANT2
ANT(75
}
)
input receives digital audio and uncompressed digital video
from an HDMI device or uncompressed digital video from a
DVI device.
NOTE: NEVER CONNECT THIS TV TO A PERSONAL
COMPUTER (PC). This TV is not intended for use with a PC.
9 Standard Audio IN — For use when connecting a DVI
device with analog audio output to the HDMI input.
!º TheaterNet
™
(IR) OUT — For controlling infrared
remote-controlled devices through the TV. You can connect
up to two devices with either one of the enclosed IR blaster
cables, and then control the devices using the TV’s IR passthrough or TheaterNet
™
(on-screen device control) features.
!¡ IEEE-1394 — Two bi-directional digital IEEE-1394 ports
for connecting multiple devices with compressed digital
video. Because these ports are bi-directional, they can be
used for playback and recording. You can control your
IEEE-1394 devices using the TV’s TheaterNet on-screen
control icons.
NOTE:
• IEEE-1394 cable carries both audio and video information;
no separate audio cables are required for a complete connection.
• NEVER CONNECT THIS TV TO A PERSONAL
COMPUTER (PC). This TV is not intended for use with a PC.
!™ CableCARD™ slot — For use with a digital security card
and digital Cable TV service (provided by your local Cable
operator) to view encrypted digital programming.
___________
HDMI, the HDMI logo, and High-Definition Multimedia Interface are trademarks
or registered trademarks of HDMI Licensing, LLC.
CableCARD is a trademark of Cable Television Laboratories, Inc.
1
-
22
-
Page 23
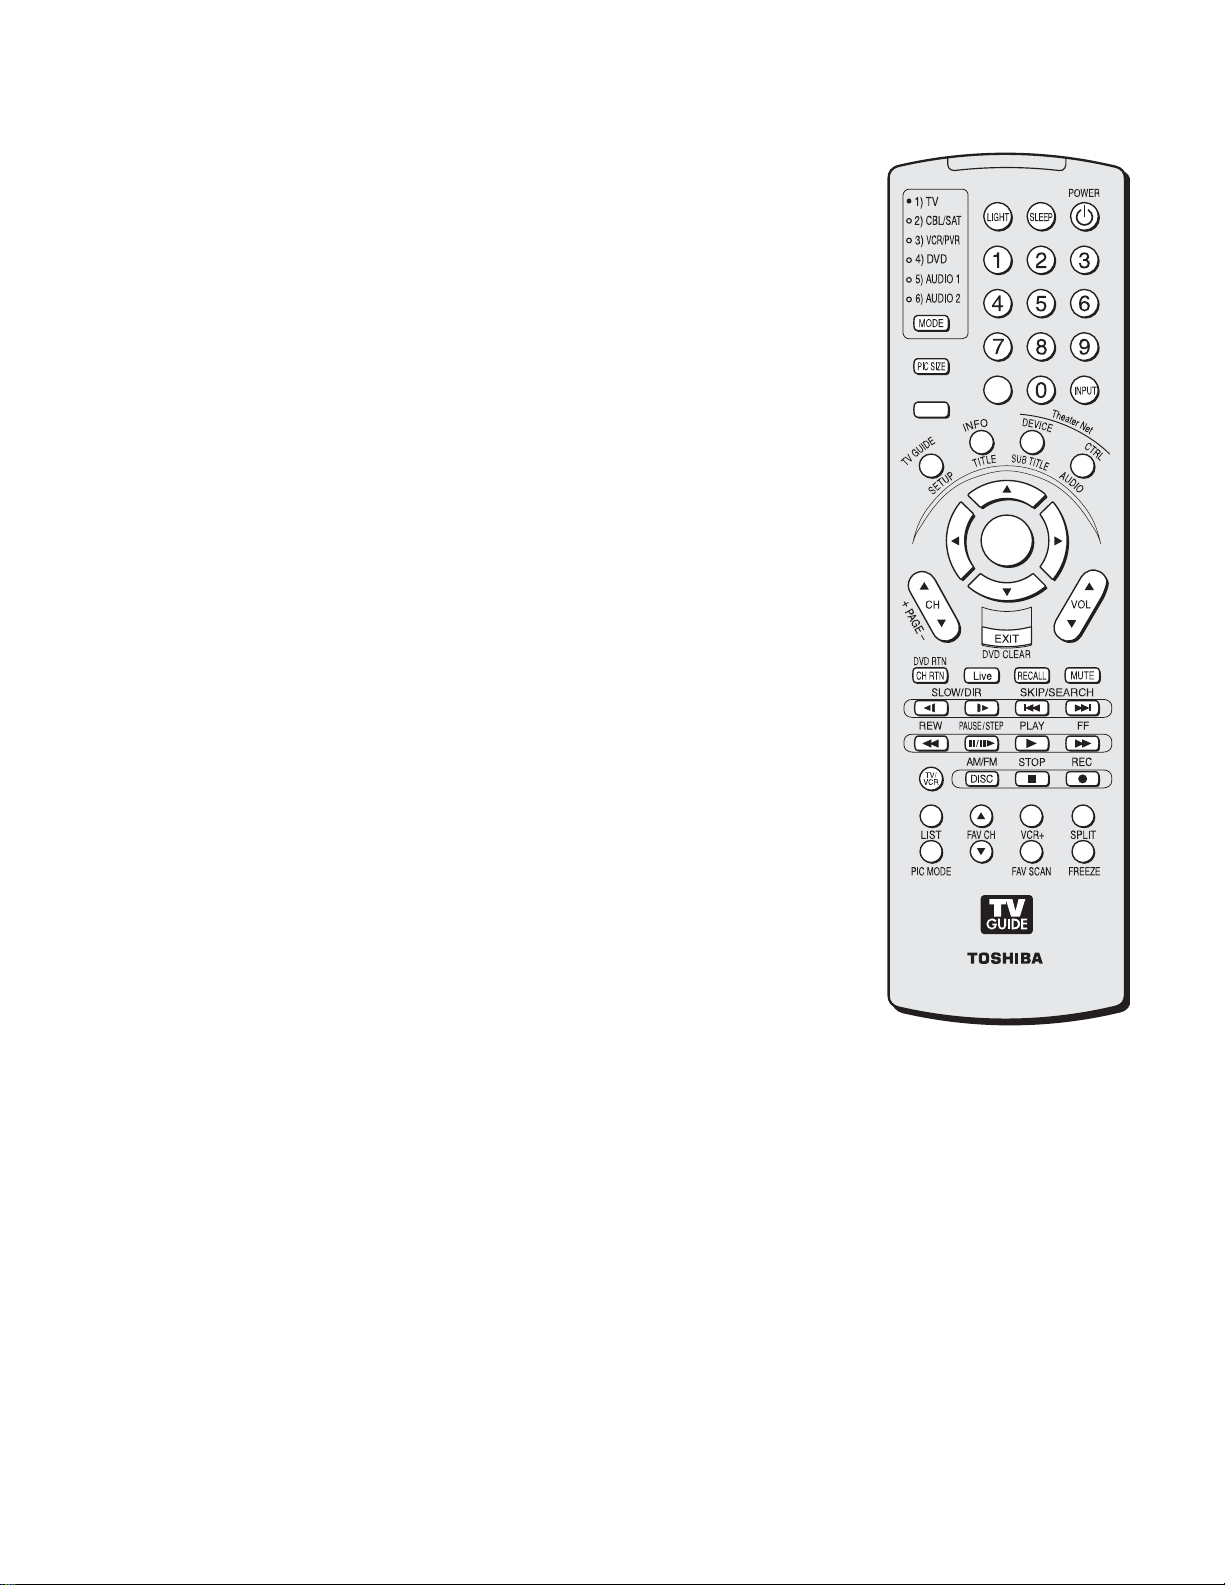
REMOTE CONTROL
POWER
turns the TV on and off.
SLEEP
accesses the sleep timer.
LIGHT
The first press of the LIGHT button lights the keypad and turns on the
Illumination mode. With the Illumination mode on, pressing any other key lights the
keypad for 5 seconds (10 seconds if you’re in programming mode). Subsequent presses of
the LIGHT button toggle between turning the Illumination mode on and off.
Channel Numbers (0–9, –/100)
channels.
INPUT
selects the video input source.
MODE
cycles through the six device modes: TV, CBL/SAT, VCR/PVR, DVD, AUDIO1,
and AUDIO2. The mode indicator light will remain lit for a few seconds.
PIC SIZE
cycles through the five pictures sizes: Natural, TheaterWide 1/2/3, and Full.
directly tune channels. The “–” button is used to tune digital
ACTION
MENU
100
+10
–
TheaterNet DEVICE
TheaterNet CTRL
MENU
accesses the menu system.
TV GUIDE
INFO
opens the TV Guide On Screen system (Chapter 7).
provides detailed information on highlighted items in the TV Guide On Screen
displays a list of available TheaterNet devices.
accesses the on-screen IR device control icons.
system (Chapter 7).
ENTER
activates highlighted items in the main menu system and the TV Guide On Screen
system.
Arrow buttons (
CH yz
cycles through programmed channels when no menu is on-screen (41);
yzx •
) select or adjust programming menus.
functions as page up/down when a menu is on-screen or when the TV Guide
On Screen system is open (Chapter 7).
VOL yz
EXIT
CH RTN
Live
Toshiba Symbio
RECALL
MUTE
TV/VCR
SKIP/SEARCH SS
adjusts the volume level.
closes on-screen menus and the TV Guide On Screen system.
returns to the last viewed channel, or stops the picture viewer slide show.
returns viewing of the TV back to the live program, while continuing to record to the
™
AVHD.
displays TV setting information on-screen.
reduces or turns off the sound.
selects TV mode to view one program while recording another.
|
|
and
TT
jump forward and backward one day in the
TV Guide On Screen listings (Chapter 7).
LIST
displays the Toshiba Symbio™AVHD play list (if available).
FAV CH yz
VCR+
SPLIT
PIC MODE
FAV SCAN
FREEZE
tunes to the next higher/lower favorite channel.
accesses the TV Guide On Screen manual recording function.
turns the POP feature on and off.
selects the picture mode.
accesses the favorite channel search function.
freezes the main picture in the double-window.
ENTER
CT-90216
Note:
The error message “Not Available”
will appear if you press a key for a
function that is not available.
-
23
-
Page 24

PRGRAMMING CHANNELS INTO THE TV’s CHANNEL MEMORY
When you press CHANNEL y or z on the remote control or
TV front panel, your TV will stop only on the channels stored
in the TV’s channel memory.
Follow the steps below to program channels into the TV’s
channel memory.
Programming channels automatically
Your TV can automatically detect all active channels in your
area and store them in its memory. After the channels are
programmed automatically, you can manually add or erase
individual channels.
Note:
• You must configure the antenna input sources before
programming channels.
• The automatic channel programming process does NOT erase
channels that were previously programmed into the TV’s
memory, but adds newly found channels to the existing set of
programmed channels. To remove a channel from the memory,
you must manually delete it .
• To tune the TV to a channel not programmed in the channel
memory, you must use the Channel Number buttons on the
remote control.
• Programming channels for an antenna input configured for
CABLE will take substantially longer than for an antenna input
configured for ANTENNA. This is normal; however, once
channel programming is completed, you should not have to
repeat the programming process again unless your Cable TV
service lineup changes significantly.
• If you have a CableCARD inserted , channel
programming for ANT 1 is disabled because the CableCARD
automatically loads the Cable channel list in the TV’s channel
memory.
To program channels automatically:
1. Make sure you have configured the antenna input sources.
2. Press MENU and open the SETUP menu.
3. Highlight INSTALLATION and press ENTER. (A new set
of INSTALLATION menu icons will appear on-screen.
4. Open the TERRESTRIAL menu, highlight CHANNEL
PROGRAM, and press ENTER.
5. Highlight ANT 1 or ANT 2, depending on which antenna
input you want to program channels for, and then press
ENTER to start automatic channel programming.
ANT 1 Antenna
Terrestrial
Input Configuration
Channel program
/
Delete
Channel Add
Signal Meter
Navigate Select Back Exit
DVD RTN
CH RTN
EXIT
Scanning channels,please wait ...
Abort
39%
The TV will automatically cycle through all the channels
for the antenna input you selected, and store all active
channels in the channel memory. While the TV is cycling
through the channels, the message “Scanning channels,
please wait” appears (as shown above right).
To cancel channel programming, either press EXIT or
highlight ABORT in the on-screen display and press
ENTER.
6. When channel programming is done, press
CHANNEL y or z to view the programmed channels.
Channel
Numbers
ACTION
MENU
+10
–
100
ENTER
Setup
Installation
Sleep Timer
On/Off Timer
HDMI Audio Selection
Side Show Interval
AVHD Skip Time
Convergence
Navigate Select Back Exit
Auto
2 Sec
15 min
DVD RTN
CH RTN
CHANNEL
y
z
TV front panel
EXIT
CHANNEL z / y
-
24
-
Page 25
Manually adding and deleting channels
in the channel memory
After you have programmed the channels automatically, you can
manually add or delete individual channels in the channel
memory.
To add or delete channels in the channel memory:
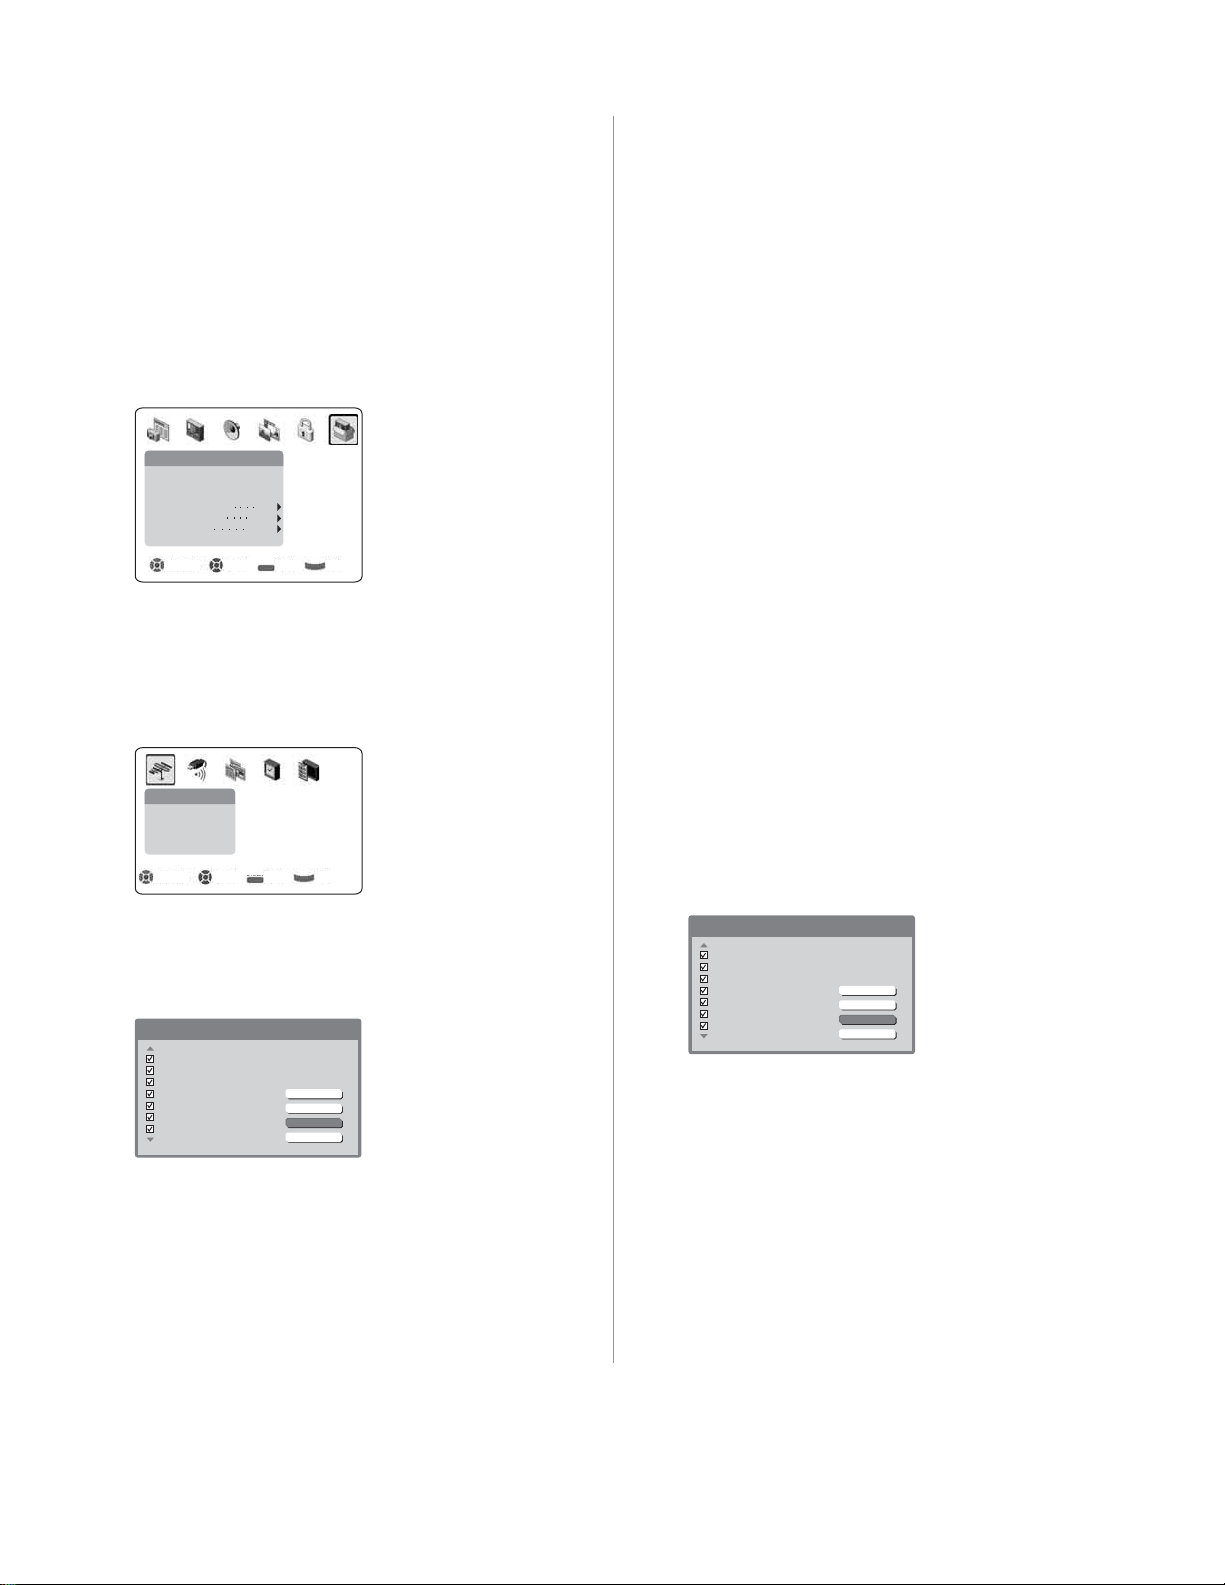
1. Press MENU and open the SETUP menu.
2. Highlight INSTALLATION and press ENTER. (A new set
of INSTALLATION menu icons will appear on-screen, as
shown in step 3).
To add a channel to the channel memory:
Highlight the unchecked box next to the channel number
you want to add, and then press ENTER to check the box.
To manually add digital subchannels on a physical channel:
Use the Channel Numbers and the Dash (–/100) on the
remote control to enter the channel number (for example,
56–1).
If the channel is found, the number will be added to the list
and the box will be checked.
If the channel is not found, a message will appear.
Setup
Installation
Sleep Timer
On/Off Timer
HDMI Audio Selection
Side Show Interval
AVHD Skip Time
Convergence
Navigate Select Back Exit
Auto
2 Sec
15 min
DVD RTN
CH RTN
EXIT
3. Open the TERRESTRIAL menu, highlight CHANNEL
ADD/DELETE, and then press ENTER.
Note: If you have a cable box connected to ANT 1 during
TV Guide On Screen setup, the TERRESTRIAL menu will not
be accessible and you must then use the TV Guide
On Screen channel editor to add/delete channels.
Terrestrial
Input Configuration
Channel program
/
Delete
Channel Add
Signal Meter
Navigate Select Back Exit
DVD RTN
CH RTN
EXIT
4. The illustration below shows channels programmed for the
ANT 1 antenna input. To view the list of channels
programmed for the ANT 2 antenna input, highlight
CHANGE ANTENNA and press ENTER.
Channel Add/Delete
Channel Signal Antenna
2 Analog 1
3 Analog 1
4 Analog 1
5 Analog 1
6 Analog 1
7 Analog 1
8 Analog 1
Change Antenna
Clear All
Save
Cancel
To remove a channel from the channel memory:
Highlight the checked box next to the channel number you
want to remove, and then press ENTER to uncheck the
box.
To save your new settings:
Highlight SAVE and press ENTER.
To revert to your original settings:
Highlight CANCEL and press ENTER before saving.
To remove all channels from the channel memory:
Highlight CLEAR ALL and press ENTER, and then
highlight SAVE and press ENTER.
Note:
• This action applies to the current antenna input only.
To delete/add channels on the other input, highlight
CHANGE ANTENNA and press ENTER.
• This action cannot be cancelled unless you highlight
CANCEL and press ENTER before saving your changes.
Channel Add/Delete
Channel Signal Antenna
2 Analog 1
3 Analog 1
4 Analog 1
5 Analog 1
6 Analog 1
7 Analog 1
8 Analog 1
Change Antenna
Clear All
Save
Cancel
-
25
-
Page 26
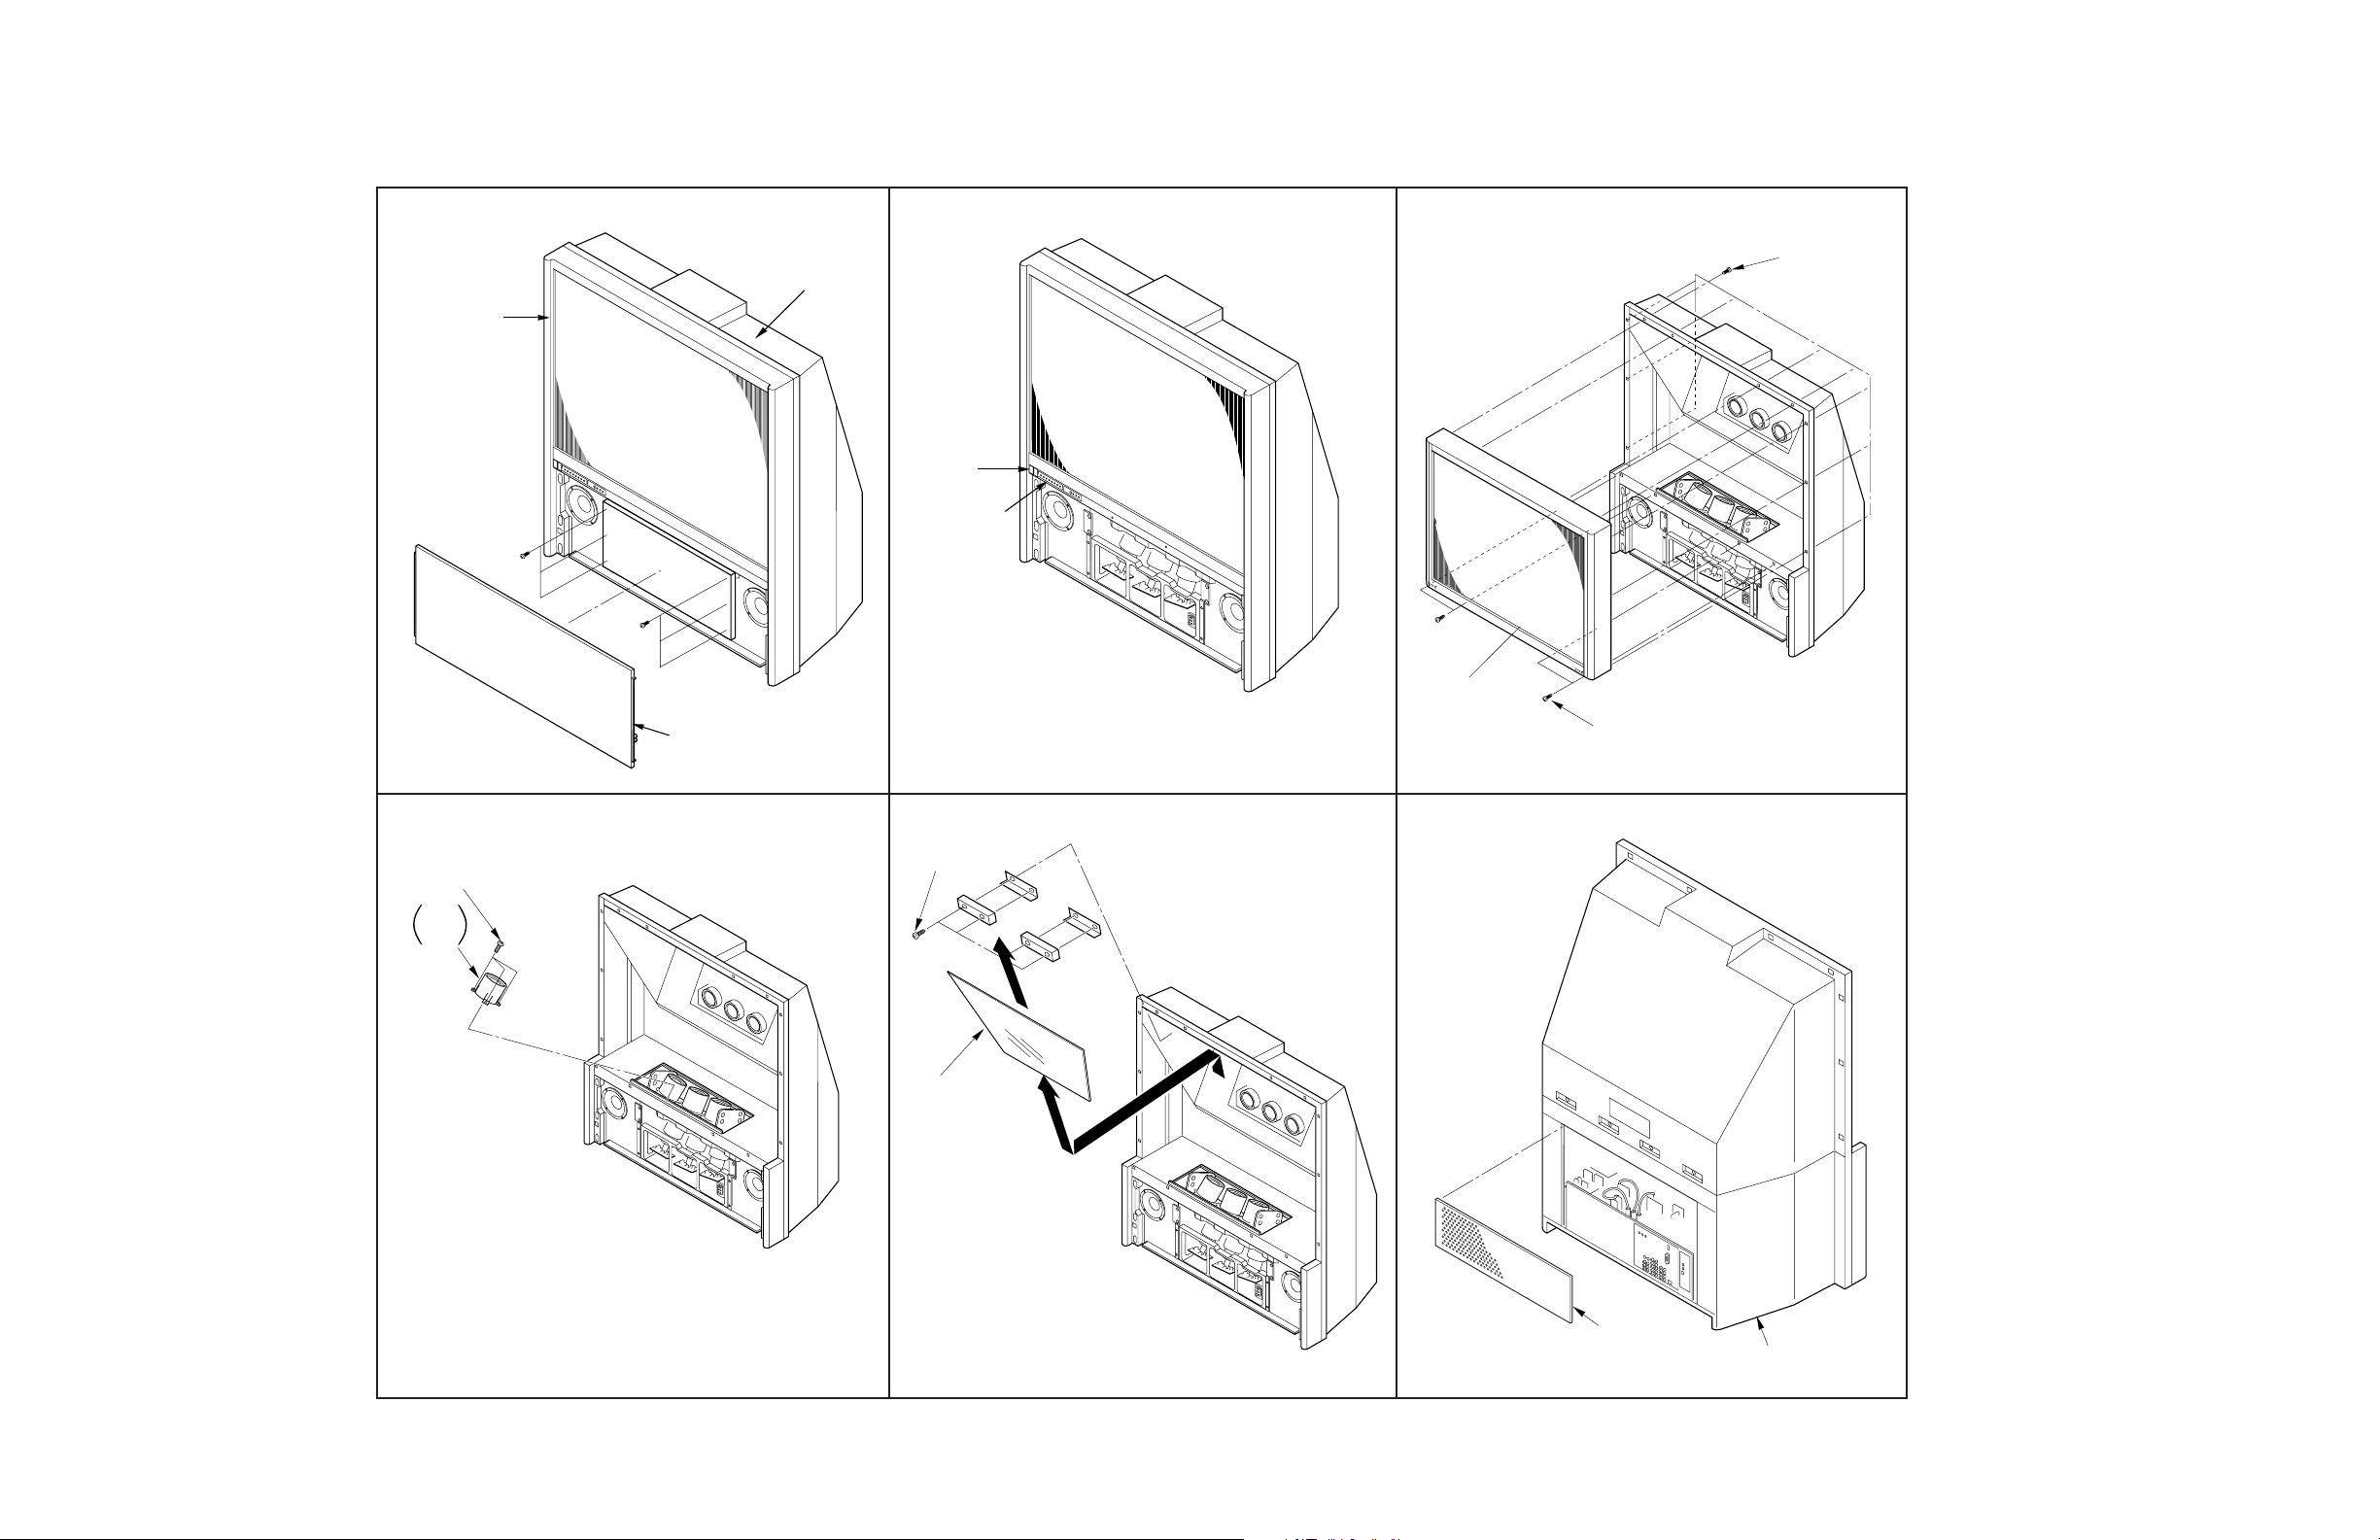
MECHANICAL DISASSEMBLY
1 Speaker Grille Removal 2 Control Panel Removal
A001
A201
A223
A202
A102
3 Front Mask Removal
K501
K502
K503
10 screws
4 screws
4 Shield Plate, Lens Removal 5 Mirror Removal
4 screws
K111
K112
K113
4 screws
K601
6 Back Board Removal
A421
(A424)
A160 (CASTER)
-
26
- -
27
-
Page 27

TOSHIBA
Shutdown Troubleshooting Guide
Use This Flowchart For
The Following Models:
Technical Support Guide 2004-1
Rev 1
2004 HDTV Proje c tio n Mod els
Flowchart One
Start.
46H14
46H84
46H84C
51H14
51H84
51H84C
57H84
57H84C
65H14
65H84
Replace defective resistors.
51HX84
57HX84
65H84C
65NH84
51H94
57H94
51HX94
57HX94
65H94
65HX94
Lift the plug on connector
PH001 on the Scan Converter/
Digital Convergence Module,
U001.
After
applying power, does the
set run?
No
No
and resistor R7744
Does
resistor R7743
measure exactly
0.33 ohms?
Yes
Yes
Suspect the Scan Converter /
Digital Convergence Module,
U001.
Un-solder fuses F851 and
F852 on the power/deflection
board and apply power.
Caution:
Disconn ect power from the
television before adding or
removing components.
Always use an isolation
transformer when
troubleshooting.
Refer to
flowchart two on page
two of this guide
© 2004 Toshiba America Consumer Products, L.L.C.
No
Does the
power supply run and
regulate at 120 volts,
measured at
F470?
Yes
Suspect convergen ce output
IC chips Q751 or Q752.
Page 1 of 4
Page 28
TOSHIBA
Technical Support Guide 2004-1
Rev 1
Shutdown Troubleshooting Guide
2004 HDTV Proje c tio n Mod els
Flowchart Two
Use This Flowchart For
The Following Models:
46H14
46H84
46H84C
51H14
51H84
51H84C
57H84
57H84C
65H14
65H84
Caution:
Disconn ect power from the
television before adding or
removing components.
Always use an isolation
transformer when
troubleshooting.
51HX84
57HX84
65H84C
65NH84
51H94
57H94
51HX94
57HX94
65H94
65HX94
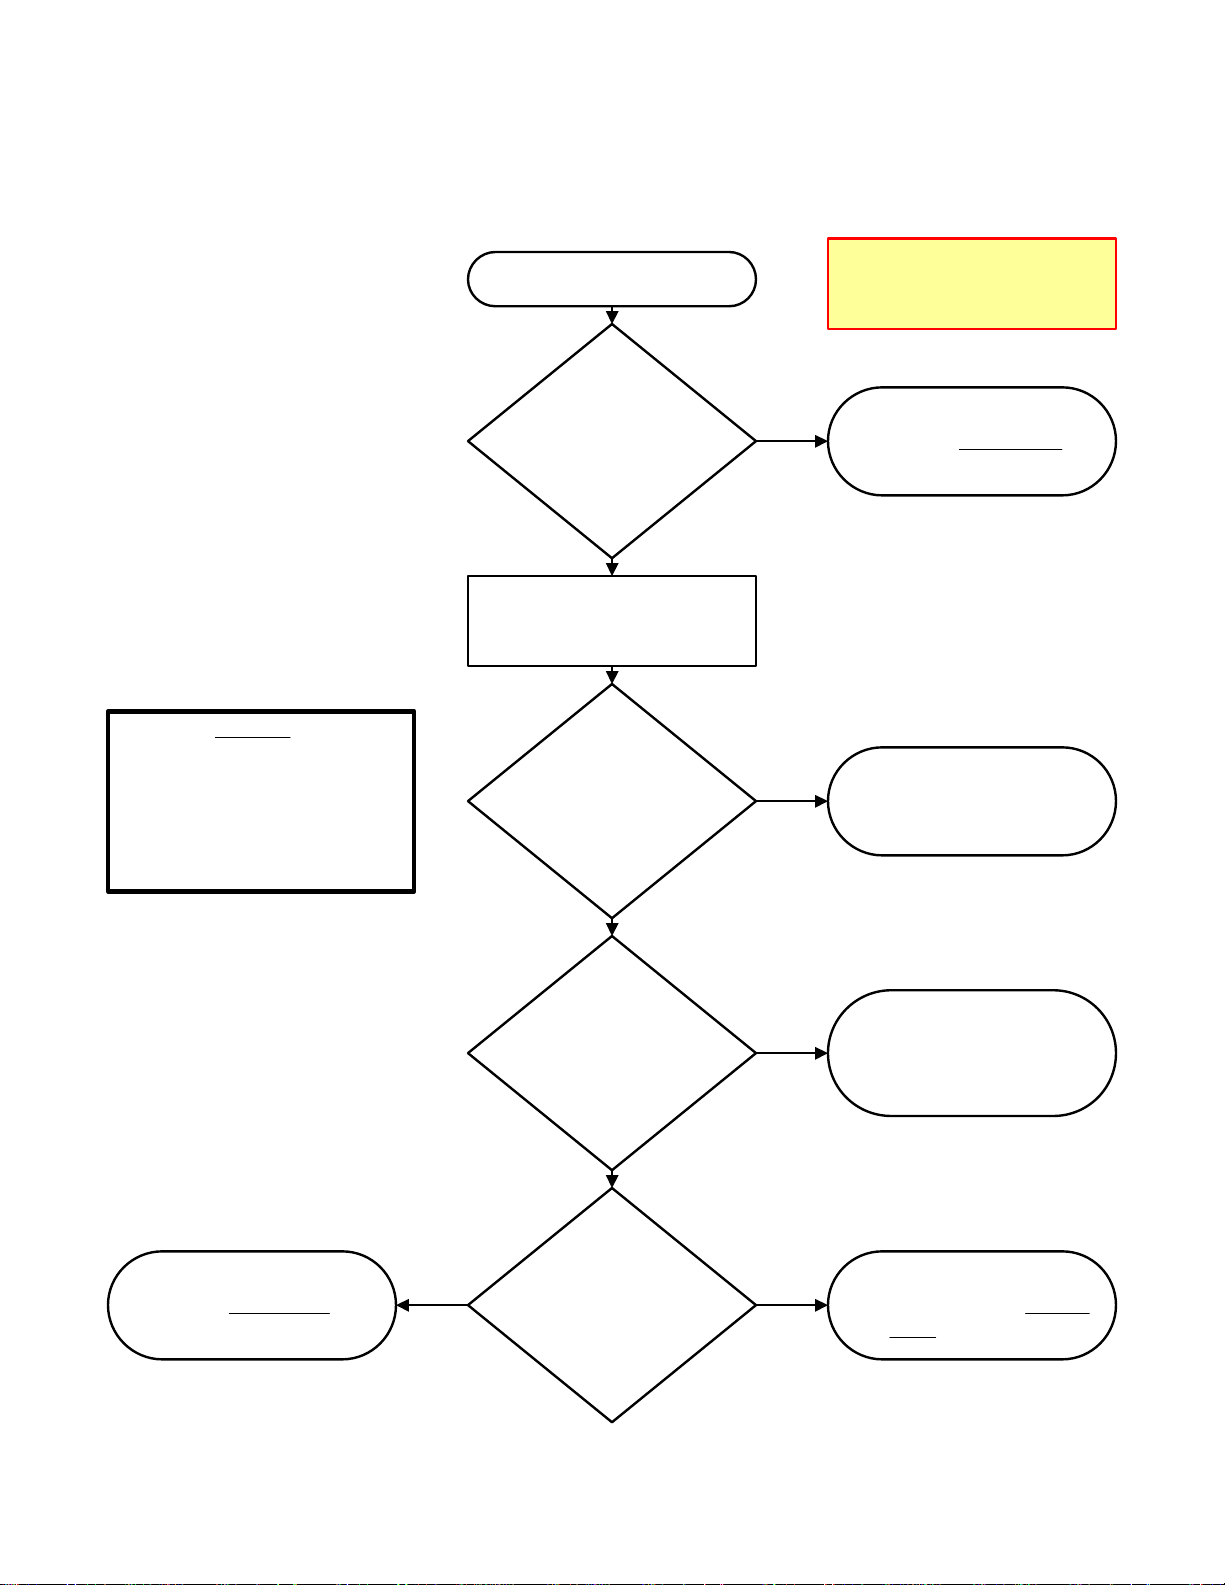
Start.
Does
the voltage
at X-ray test point “X”
exceed 6.65 volts at
the po int of
shutdown?
No
Un-solder fuse F470 on the
power/deflection board.
Does
resistor R470 measure
exactly 0.47 ohm?
Be sure to use the flowchart on
page one of this guide before
proceeding.
Yes
No
X-ray protect.
Refer to section one
of this guide
Replace resistor R470.
Over-curren t shutdown.
Refer to section two of
this guide.
Yes
Yes
After
applying power,
does the power supply
run? (Measured at
F470).
Yes
Does
the voltage at F470
regulate at 120
volts?
© 2004 Toshiba America Consumer Products, L.L.C.
No
No
Return to the beginning of
flowchart one. A step in the
flowchart might have been
missed or misinterpreted.
Power supply regulation
problems. Refer to section
three of this guide.
Page 2 of 4
Page 29
TOSHIBA Technical Support Guide 2004-1
Rev-1
Shutdown Troubleshooting Guide
2004 HDTV Projection Models
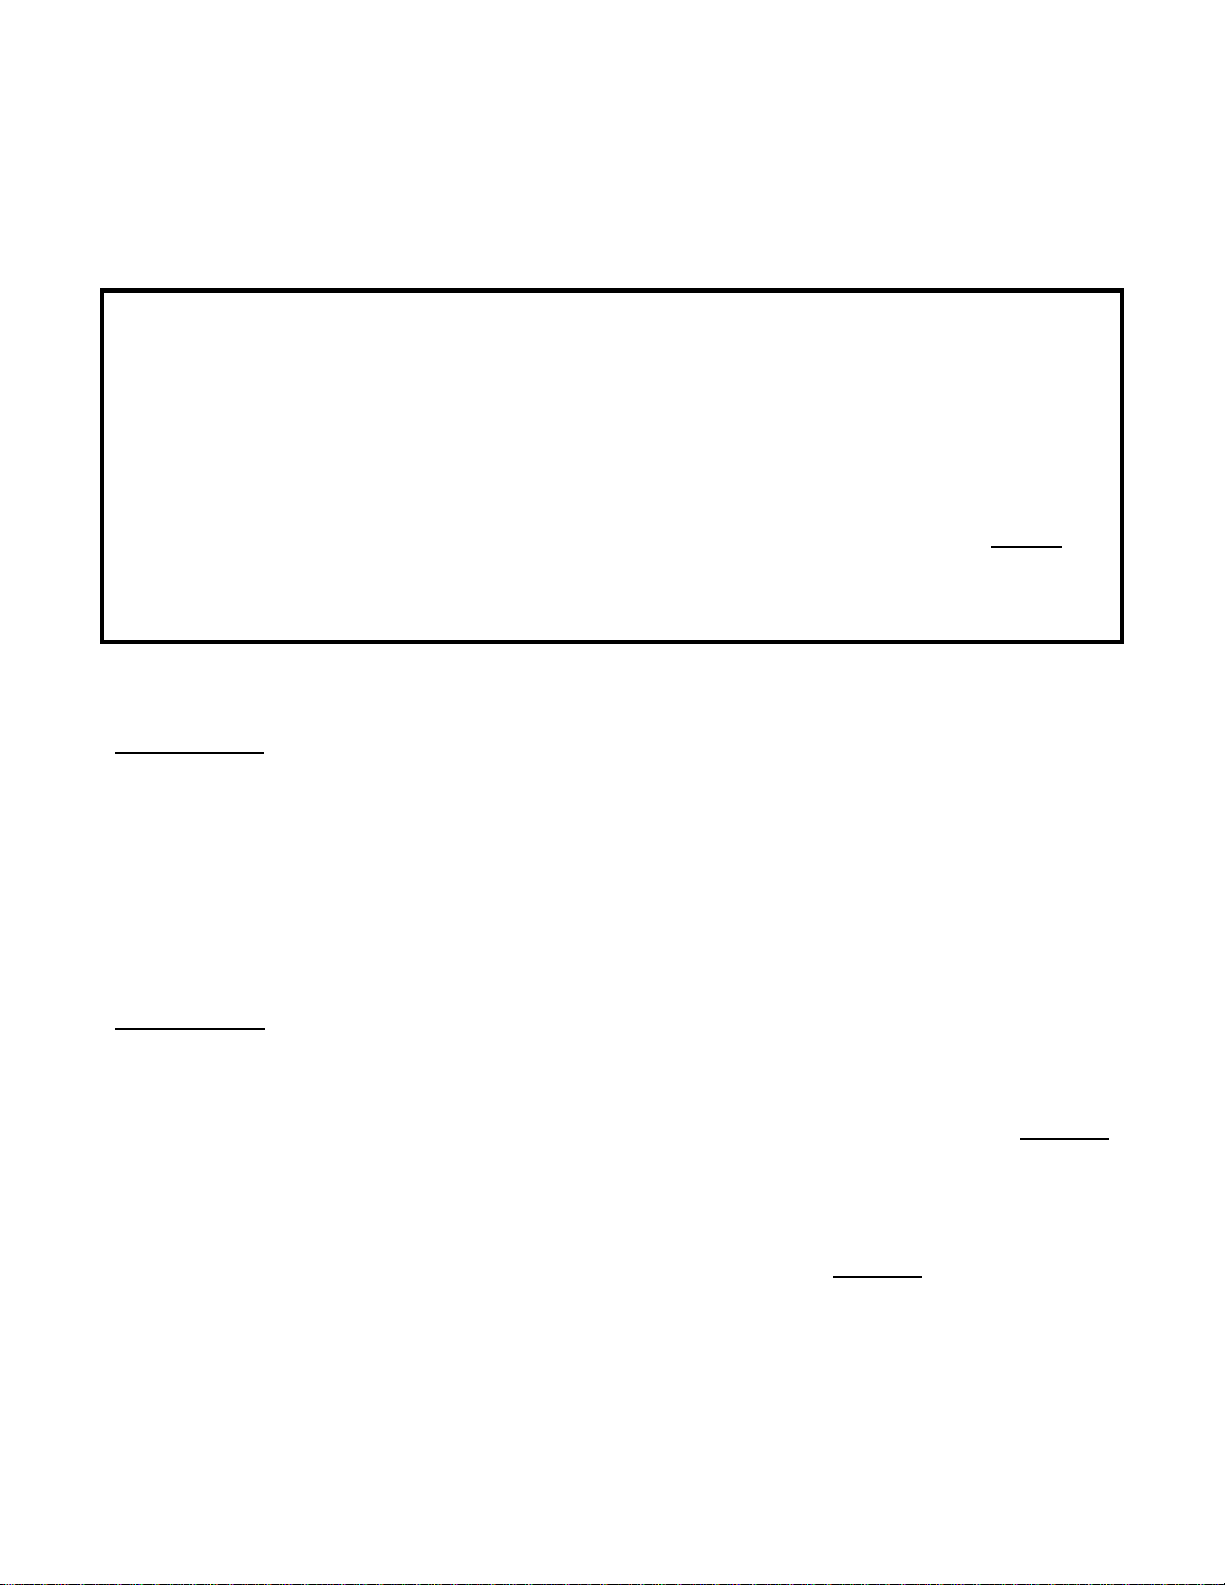
Protective shutdown in these models will be indicated by the power relay disengaging and the
red power LED blinking at a half second rate. The power cord must then be unplugged and
plugged back in to restore operation. The purpose of this guide is to help narrow the cause of
the shutdown to a single section or circuit. Refer to the correct service manual for additional
information.
The voltage test points indicated in this guide should be measured with a peak-response
meter or an oscilloscope set to DC input. If a peak-response (or min-max meter) is used, set
the sampling time to one millisecond. A higher sampling time could cause errors. Do not use
a normal digital meter because the sampling time will be too long. Since you are attempting
to measure the peak voltage just at the point of shutdown, a normal digital meter might not
give correct readings.
Section One: X-ray protection. The high voltage is sampled at the reference pin of the CR
block, Z450 (at the white wire). This voltage passes through the blue CRT board and is
applied to pin 4 of connector P404 on the DEF/POW board. From there it goes to pin 10 of
Q306 and exits at pin 8. Q306 is a quad op amp that is used for current buffering. The
sampled voltage is then applied to the emitter of Q408 and on to Q409. If the voltage at the
emitter of Q408 exceeds the reference voltage across D490, Q408 and Q409 will be turned
on. This will cause the circuit of Q471, Q472 and Q473 to latch the set into shutdown.
For X-ray shutdown suspect the following components: T461, Z450, C440, C443, C444,
deflection yokes and other components in the horizontal output section.
Section Two: Over-current shutdown. Transistor Q470 and resistor R470 are part of the
over-current sensing circuit for the horizontal output section. The current for the horizontal
output transistor passes through R470. The base to emitter junction of Q470 monitors the
voltage drop across R470. If the current draw of the horizontal output circuit increases, the
voltage drop across R470 will increase. Shutdown will occur when this voltage drop
1.5 volts. (This voltage is very difficult to measure reliably. Since the voltage is measured
across the resistor and neither side of the meter is at ground potential, voltages induced into
the meter leads affect the measurement).
Measure the voltage at resistor R474 on the power/deflection board. Take this measurement
on the end of the resistor toward the rear of the set. If this voltage
exceeds 13.2 volts at the
point of shutdown, then the set is going into over-current shutdown.
For over-current shutdown, suspect components in the horizontal deflection area such as:
Q404, D461, T461, C440, C443, C444, etc.
exceeds
© 2004 Toshiba America Consumer products, L.L.C.
Page 3 of 4
Page 30
TOSHIBA Technical Support Guide 2004-1
Rev-1
Shutdown Troubleshooting Guide
2004 HDTV Projection Models
Section three: Power supply regulation. Problems with the main power supply regulation
can cause the secondary voltages to go too high. If the secondary supply voltage to the
horizontal output section rises above 120 volts, the output transistor will draw excessive
current and indirectly cause an over-current shutdown.
For main power supply regulation problems, suspect components such as: Q801, Q862,
Q881, D880, etc.
Major Parts List:
Model Red CRT Green CRT Blue CRT Scan Converter Bd.
46H14 23078432 23078430 23078431 23148103
46H84 23078432 23078430 23078431 23148103
46H84C 23078360 23078358 23078359 23148103
51H14 23078357 23078358 23078359 23148103
51H84 23078357 23078358 23078359 23148103
51H84C 23078357 23078358 23078359 23148103
51H94 23078429 23078430 23078431 23148111
51HX84 23078357 23078358 23078359 23148103
51HX94 23078357 23078358 23078359 23148111
57H84 23078433 23078430 23078434 23148103
57H84C 23078361 23078358 23078362 23148103
57H94 23078361 23078358 23078362 23148111
57HX84 23078361 23078358 23078362 23148103
57HX94 23078361 23078358 23078362 23148111
65H14 23079126 23079128 23879128 23148103
65H84 23078363 23078358 23078364 23148103
65NH84 23079126 23079127 23079128 23148103
These parts are common to all models:
Anode Lead
Deflection Yoke
T461, Flyback
Z450
Q404
Q751
Q752
23192972
23231390
23236816
24083014
23205149
23135048
23135048
R470
R7743
R7744
F470
F851
F852
24322478
24322338
24322338
23144624
23144714
23144714
© 2004 Toshiba America Consumer products, L.L.C.
Page 4 of 4
Page 31
CHASSIS AND CABINET REPLACEMENT PARTS LIST
WARNING: BEFORE SERVICING THIS CHASSIS, READ THE “X-RAY RADIATION PRECAUTION”, “SAFETY PRECAUTION”
AND “PRODUCT SAFETY NOTICE” ON PAGE 3 OF THIS MANUAL.
CAUTION: The international hazard symbols " " in the schematic diagram and the parts list designate com-ponents which
have special characteristics important for safety and should be replaced only with types identical to those in the original
circuit or specified in the parts list. The mounting position of replacements is to be identical with originals. Before replacing
any of these components, read carefully the PRODUCT SAFETY NOTICE. Do not degrade the safety of the receiver through
improper servicing.
NOTICE:
•
The part number must be used when ordering parts, in order to assist in processing, be sure to include the Model
number and Description.
•
The PC board assembly with ∗ mark is no longer available after the end of the production.
Model : 51H94/57H94
Capacitors ............. CD : Ceramic Disk PF : Plastic Film EL : Electrolytic
Resistors ............... CF : Carbon Film CC : Carbon Composition MF : Metal Film
OMF : Oxide Metal Film VR : Variable Resistor FR : Fusible Resistor
(All CD and PF capacitors are ±5%, 50V and all resistors, ±5%, 1/6W unless otherwise noted.)
Location
No.
Parts No. Description
[#1:51H94]
[#2:57H94]
CAPACITORS
C101 24797339 ELECTROLYTIO CE04G, 50V 3.3UF M
C102 24665221 ELECTROLYTIC CE04Q, 10V 220UF M 3A
C105 24100102 CERAMIC CHIP, 50V F 1000PF Z
C106 24669479 ELECTROLYTIC, 50V 4.7UF M 3A
C107 24666221 ELECTROLYTIC 04Q, 16V 220UF M 3A
C108 24665221 ELECTROLYTIC CE04Q, 10V 220UF M 3A
C109 24100104 CERAMIC CHIP, 25V F 0.1UF Z
C110 24794101 ELECTROLYTIC, 16V 100UF M
C221 24503041 PLASTIC FILM , 63V 0.1UF J
C301 24503053 PLASTIC FILM, 63V 1UF J
C302 24669010 ELECTROLYTIC, 50V 1UF M 3A
C303 24503053 PLASTIC FILM, 63V 1UF J
C308 24567223 PLASTIC FILM, 50V 0.022UF J
C309 24109102 CERAMIC CHIP, 50V B 1000PF K
C310 24073053 ELECTROLYTIC, 25V 100UF M 3A
C311 24109103 CERAMIC CHIP, 50V B 0.01UF K
C312 24109332 CERAMIC CHIP, 50V B 3300PF K
C314 24503037 MT PLA CAP 63V 0.047UF J
C315 24073020 ELECTROLYTIC, 10V 1000UF M 3A
C320 24669101 ELECTROLYTIC, 50V 100UF M 3A
C321 24669101 ELECTROLYTIC, 50V 100UF M 3A
C323 24109473 CERAMIC CHIP, 25V B 0.047UF K
C324 24503053 PLASTIC FILM, 63V 1UF J
C325 24082057 PLASTIC FILM, 100V 0.22UF J
C327 24092730 CERAMIC CHIP, 16V B 0.1UF K
C328 24082256 PLASTIC FILM, 100V 2200PF J
C330 24073034 ELECTROLYTIC, 16V 10UF M 3A
C332 24669101 ELECTROLYTIC, 50V 100UF M 3A
C333 24082272 PLASTIC FILM, 100V 0.047UF J
C334 24109471 CERAMIC CHIP, 50V B 470PF K
C338 24666100 ELECTROLYTIC, 10V 10UF M 3A
C340 24073037 ELECTROLYTIC, 16V 47UF M 3A
C361 24092730 CERAMIC CHIP, 16V B 0.1UF K
C362 24109473 CERAMIC CHIP, 25V B 0.047UF K
C370 24669229 ELECTROLYTIC, 50V 2.2UF M 3A
C371 24092730 CERAMIC CHIP, 16V B 0.1UF K
C401 24214332 CERAMIC DISC, 500V B 3300PF K
Location
No.
C402 24214391 CERAMIC DISC, 500V B 390PF K
C405 24503041 PLASTIC FILM , 63V 0.1UF J
C412 24828124 PLASTIC FILM, 200V 0.12UF J
C415 24092484 CERAMIC DISC, 2KV B 1500PF K
C416 24676220 ELECTROLYTIC, 04Q 100V 22UF M 3A
C417 24503334 PLASTIC FILM CF92 T 250V 1R5UF J
C419 24105331 CERAMIC CHIP, 50V CH 330PF J
C420 24503041 PLASTIC FILM , 63V 0.1UF J
C422 24109102 CERAMIC CHIP, 50V B 1000PF K
C423 24503252 PLASTIC FILM, 400V 0.3UF J
C425 24503142 PLASTIC FILM, 400V 0.27UF J
C426 24211222 CERAMIC DISC, 2KV B 2200PFK
C432 24567333 PLASTIC FILM, 50V 33000PF J
C440 24503059 PLASTIC FILM, 1800VH 1000PF H
C443 24503099 PLASTIC FILM, 1800VH 4700PF H
C444 24503347 PLASTIC FILM, 1800VH 3600PF H
C445 24828473 PLASTIC FILM, 200V 0.047UF J
C446 24073120 ELECTRPLYTIC, 250V 33UF, 250YXF33M
C448 24073118 ELECTROLYTIC, 160V 33UF M
C449 24214221 CERAMIC DISC, 500V B 220PF K
C450 24073057 ELECTROLYTIC, 25V 1000UF M 3A
C460 24678220 ELECTROLYTIC, 200V 22UF M
C463 24109682 CERAMIC CHIP, 50V B 6800PF K
C464 24503149 PLASTIC FILM, 250V 3.3UF
C467 24820562 PLASTIC FILM, 630V 5600PF J
C468 24820682 PLASTIC FILM, 630V 6800PF J
C473 24092730 CERAMIC CHIP, 16V B 0.1UF K
C481 24092784 CERAMIC CHIP CK83B 10V 0.33UF K
C482 24109822 CERAMIC CHIP, 50V B 8200PF K
C483 24105470 CERAMIC CHIP, 50V CH 47PF J
C490 24073037 ELECTROLYTIC, 16V 47UF M 3A
C491 24666100 ELECTROLYTIC, 10V 10UF M 3A
C496 24503049 PLASTIC FILM, 63V 0.47UF J
C497 24085022 ELEC. NONPOLAR CE04R 16V 100UF M NP 3A
C499 24666220 ELECTROLYTIC, 16V 22UF M 3A
C601 24109681 CERAMIC CHIP, 50V B 680PF K
C602 24109681 CERAMIC CHIP, 50V B 680PF K
C603 24073084 ELECTROLYTIC, 50V 4.7UF M 3A
C604 24073084 ELECTROLYTIC, 50V 4.7UF M 3A
C605 24073084 ELECTROLYTIC, 50V 4.7UF M 3A
C606 24073084 ELECTROLYTIC, 50V 4.7UF M 3A
Parts No. Description
-
28
-
Page 32
Location
No.
C607 24073053 ELECTROLYTIC, 25V 100UF M 3A
C608 24073086 ELECTROLYTIC, 50V 10UF M 3A
C612 24073039 ELECTROLYTIC, 16V 220UF M 3A
C661 24073084 ELECTROLYTIC, 50V 4.7UF M 3A
C662 24073086 ELECTROLYTIC, 50V 10UF M 3A
C663 24073086 ELECTROLYTIC, 50V 10UF M 3A
C665 24109103 CERAMIC CHIP, 50V B 0.01UF K
C666 24073084 ELECTROLYTIC, 50V 4.7UF M 3A
C667 24794100 ELECTROLYTIC, 16V 10UF M
C680 24073073 ELECTROLYTIC, 35V 2200UF M 3A
C681 24109103 CERAMIC CHIP, 50V B 0.01UF K
C682 24073082 ELECTROLYTIC, 50V 2.2UF M 3A
C683 24795101 ELECTROLYTIC, 25V 100UF M
C684 24795470 ELECTROLYTIC 04G, 25V 47UF M
C801 24503004 PLASTIC FILM, AC275V 0.47UF M
C805 24092281 CERAMIC DISC, AC250V E 4700PF
C809 24086067 ELECTROLYTIC 692Q 200V 1000UF M 3F
C810 24086067 ELECTROLYTIC 692Q 200V 1000UF M 3F
C811 24092595 CERAMIC DISC, AC250V E 2200PF M
C812 24092595 CERAMIC DISC, AC250V E 2200PF M
C849 24073038 ELECTROLYTIC, 16V 100UF M 3A
C850 24073187 ELECTROLYTIC CE04P 35V 560UF M 3A
C851 24073187 ELECTROLYTIC CE04P 35V 560UF M 3A
C852 24073169 ELECTROLYTIC CE04P 25V 470UF M 3A
C853 24073169 ELECTROLYTIC CE04P 25V 470UF M 3A
C854 24667470 ELECTROLYTIC CE04Q, 25V 47UF M 3A
C860 24214103 CERAMIC DISC, 500V B 0.01UF K
C862 24092341 CERAMIC DISC, 2KV R 470PF K
C863 24503045 PLASTIC FILM, 63V 0.22UF J
C866 24503053 PLASTIC FILM, 63V 1UF J
C867 24591472 PLASTIC FILM, 50V 4700PF J
C868 24669470 ELECTROLYTIC, 50V 47UF M 3A
C869 24678229 ELECTROLYTIC, 200V 2.2UF M 3A
C870 24503565 PLASTIC FILM CQ32 T 800V 100000PF H
C871 24092343 CERAMIC DISC, 2KV 680PF K
C873 24503045 PLASTIC FILM, 63V 0.22UF J
C874 24092337 CERAMIC DISC, 2KV 220PF K
C876 24503049 PLASTIC FILM, 63V 0.47UF J
C877 24092344 CERAMIC DISC, 2KV 820PF K
C879 24214102 CERAMIC DISC, 500V B 1000PF K
C880 24092339 CERAMIC DISC, 2KV 330PF K
C881 24092339 CERAMIC DISC, 2KV 330PF K
C884 24086916 ELECTROLYTIC, 160V 330UF M 3D
C885 24668102 ELECTROLYTIC, 35V 1000UF M 3A
C888 24503045 PLASTIC FILM, 63V 0.22UF J
C891 24073155 ELECTROLYTIC CE04P 16V 1000UF M 3A
C898 24092730 CERAMIC CHIP, 16V B 0.1UF K
C901 24211102 CERAMIC DISC, 2KV B 1000PF K
C902 24794101 ELECTROLYTIC, 16V 100UF M
C903 24232103 CERAMIC DISC, 50V F 0.01UF Z
C904 24109471 CERAMIC CHIP, 50V B 470PF K
C906 24679220 ELECTROLYTIC, 250V 22UF M 3A
C907 24214101 CERAMIC DISC, 500V B 100PF K
C911 24211102 CERAMIC DISC, 2KV B 1000PF K
C912 24794101 ELECTROLYTIC, 16V 100UF M
C913 24232103 CERAMIC DISC, 50V F 0.01UF Z
C914 24109471 CERAMIC CHIP, 50V B 470PF K
C915 24679220 ELECTROLYTIC, 250V 22UF M 3A
C917 24214101 CERAMIC DISC, 500V B 100PF K
C921 24211102 CERAMIC DISC, 2KV B 1000PF K
C922 24794101 ELECTROLYTIC, 16V 100UF M
C923 24109471 CERAMIC CHIP, 50V B 470PF K
C924 24232103 CERAMIC DISC, 50V F 0.01UF Z
C925 24679220 ELECTROLYTIC, 250V 22UF M 3A
C926 24214101 CERAMIC DISC, 500V B 100PF K
C934 24092731 CERAMIC CHIP, 16V B 1UF K
Parts No. Description
Location
No.
C944 24092731 CERAMIC CHIP, 16V B 1UF K
C954 24092731 CERAMIC CHIP, 16V B 1UF K
C961 24763101 ELECTROLYTIC, 16V 100UF M
C962 24203100 ELECTORLYTIC, 16V 10UF M 7L 3A
C4430 24073034 ELECTROLYTIC, 16V 10UF M 3A
C7101 24797470 ELECTROLYTIC 04G, 50V 47UF M
C7102 24109103 CERAMIC CHIP, 50V B 0.01UF K
C7103 24206479 ELECTROLYTIC, 50V 4.7UF M 7L 3A
C7104 24108330 CERAMIC CHIP, 50V SL 33PF J
C7105 24092730 CERAMIC CHIP, 16V B 0.1UF K
C7106 24797470 ELECTROLYTIC 04G, 50V 47UF M
C7107 24790470 ELECTROLYTIC, 160V 47UF M
C7108 24214472 CERAMIC DISC, 500V B 4700PF K
C7109 24214472 CERAMIC DISC, 500V B 4700PF K
C7110 24666470 ELECTORLYTIC, 16V 47UF M 3A
C7111 24666470 ELECTORLYTIC, 16V 47UF M 3A
C7112 24435560 CERAMIC DISC, 500V SL 56PF J
C7113 24790100 ELECTROLYTIC, 160V 10UF M
C7114 24092730 CERAMIC CHIP, 16V B 0.1UF K
C7701 24503047 PLASTIC FILM, 63V 0.33UF J
C7704 24073053 ELECTROLYTIC, 25V 100UF M 3A
C7705 24073037 ELECTROLYTIC, 16V 47UF M 3A
C7706 24503047 PLASTIC FILM, 63V 0.33UF J
C7722 24105331 CERAMIC CHIP, 50V CH 330PF J
C7724 24073091 ELECTROLYTIC, 50V 220UF M 3A
C7725 24073091 ELECTROLYTIC, 50V 220UF M 3A
C7727 24105331 CERAMIC CHIP, 50V CH 330PF J
C7730 24105331 CERAMIC CHIP, 50V CH 330PF J
C7733 24105331 CERAMIC CHIP, 50V CH 330PF J
C7735 24073091 ELECTROLYTIC, 50V 220UF M 3A
C7736 24073091 ELECTROLYTIC, 50V 220UF M 3A
C7738 24105331 CERAMIC CHIP, 50V CH 330PF J
C7741 24105331 CERAMIC CHIP, 50V CH 330PF J
C7750 24073015 ELECTROLYTIC, 10V 47UF M 3A
C7751 24073089 ELECTROLYTIC, 50V 47UF M 3A
C7752 24073089 ELECTROLYTIC, 50V 47UF M 3A
C7753 24073093 ELECTROLYTIC, 50V 470UF M 3A
C7761 24073015 ELECTROLYTIC, 10V 47UF M 3A
C7762 24073015 ELECTROLYTIC, 10V 47UF M 3A
C7765 24667220 ELECTROLYTIC, 25V 22UF M 3A
C7784 24667220 ELECTROLYTIC, 25V 22UF M 3A
C7785 24092730 CERAMIC CHIP, 16V B 0.1UF K
C7786 24092730 CERAMIC CHIP, 16V B 0.1UF K
C7800 24666220 ELECTROLYTIC, 16V 22UF M 3A
CB01 24794470 ELECTROLYTIC, 16V 47UF M
CB51 24590103 PLASTIC FILM, 50V 0.01UF J
CB52 24794470 ELECTROLYTIC, 16V 47UF M
CB53 24503041 PLASTIC FILM , 63V 0.1UF J
CB54 24436221 CERAMIC DISC, 50V SL 220PF J
CB55 24797010 ELECTROLYTIC, 50V 1UF M
CB56 24794470 ELECTROLYTIC, 16V 47UF M
CB58 24794470 ELECTROLYTIC, 16V 47UF M
CB59 24590103 PLASTIC FILM, 50V 0.01UF J
CB60 24794100 ELECTROLYTIC, 16V 10UF M
CB61 24503041 PLASTIC FILM , 63V 0.1UF J
CB504 24794100 ELECTROLYTIC, 16V 10UF M
CB505 24092398 CERAMIC DISC, 25V 0.1UF Z
CC01 24092730 CERAMIC CHIP, 16V B 0.1UF K
CC02 24092730 CERAMIC CHIP, 16V B 0.1UF K
CC03 24092730 CERAMIC CHIP, 16V B 0.1UF K
CC04 24619100 ELECTROLYTIC, 16V 10UF M
CC05 24092730 CERAMIC CHIP, 16V B 0.1UF K
CC06 24092730 CERAMIC CHIP, 16V B 0.1UF K
CC07 24619100 ELECTROLYTIC, 16V 10UF M
CC08 24092730 CERAMIC CHIP, 16V B 0.1UF K
CC09 24092730 CERAMIC CHIP, 16V B 0.1UF K
Parts No. Description
-
29
-
Page 33

Location
No.
CC10 24092730 CERAMIC CHIP, 16V B 0.1UF K
CC11 24619100 ELECTROLYTIC, 16V 10UF M
CC12 24092538 CERAMIC CHIP, 10V F 1UF Z
CC13 24092730 CERAMIC CHIP, 16V B 0.1UF K
CC14 24092730 CERAMIC CHIP, 16V B 0.1UF K
CC15 24619100 ELECTROLYTIC, 16V 10UF M
CC16 24092730 CERAMIC CHIP, 16V B 0.1UF K
CC17 24619100 ELECTROLYTIC, 16V 10UF M
CC18 24092730 CERAMIC CHIP, 16V B 0.1UF K
CC19 24092730 CERAMIC CHIP, 16V B 0.1UF K
CC20 24619100 ELECTROLYTIC, 16V 10UF M
CC22 24092538 CERAMIC CHIP, 10V F 1UF Z
CC24 24092538 CERAMIC CHIP, 10V F 1UF Z
CC25 24092538 CERAMIC CHIP, 10V F 1UF Z
CC26 24092730 CERAMIC CHIP, 16V B 0.1UF K
CC27 24092730 CERAMIC CHIP, 16V B 0.1UF K
CC28 24619102 ELECTROLYTIC, 16V 47UF M
CC30 24619100 ELECTROLYTIC, 16V 10UF M
CC31 24092730 CERAMIC CHIP, 16V B 0.1UF K
CC32 24619100 ELECTROLYTIC, 16V 10UF M
CC33 24092730 CERAMIC CHIP, 16V B 0.1UF K
CC34 24092730 CERAMIC CHIP, 16V B 0.1UF K
CC35 24092730 CERAMIC CHIP, 16V B 0.1UF K
CC36 24619100 ELECTROLYTIC, 16V 10UF M
CC40 24092538 CERAMIC CHIP, 10V F 1UF Z
CC41 24092730 CERAMIC CHIP, 16V B 0.1UF K
CC42 24109103 CERAMIC CHIP, 50V B 0.01UF K
CE01 24503002 PLASTIC FILM, AC275V 0.22UF M
CE04 24092281 CERAMIC DISC, AC250V E 4700PF
CE05 24092281 CERAMIC DISC, AC250V E 4700PF
CE07 24092565 CERAMIC DISC, AC250V B 470PF K
CE08 24092565 CERAMIC DISC, AC250V B 470PF K
CE09 24092565 CERAMIC DISC, AC250V B 470PF K
CE10 24073217 ELECTROLYTIC 692Q 200V 560UF M
CE11 24591332 PLASTIC FILM, 50V 3300PF J
CE12 24073053 ELECTROLYTIC, 25V 100UF M 3A
CE13 24503213 PLASTIC FILM CF92 T 1500VH 1500PF H
CE14 24591471 PLASTIC FILM, 50V 470PF J
CE15 24092339 CERAMIC DISC, 2KV 330PF K
CE16 24212102 CERAMIC DISC, 50V B 1000PF K
CE17 24503041 PLASTIC FILM , 63V 0.1UF J
CE43 24503041 PLASTIC FILM , 63V 0.1UF J
CE50 24676100 ELECTROLYTIC CE04Q, 100V 10UF M 3A
CE51 24073155 ELECTROLYTIC CE04P 16V 1000UF M 3A
CE52 24503041 PLASTIC FILM , 63V 0.1UF J
CE53 24214221 CERAMIC DISC, 500V B 220PF K
CE54 24503041 PLASTIC FILM , 63V 0.1UF J
CE55 24617006 ELECTROLYTIC 04CH, 25V 820UF M
CE56 24665221 ELECTROLYTIC CE04Q, 10V 220UF M 3A
CE57 24073038 ELECTROLYTIC, 16V 100UF M 3A
CE58 24073038 ELECTROLYTIC, 16V 100UF M 3A
CE59 24666331 ELECTROLYTIC 04Q, 16V 330UF M 3A
CE61 24073020 ELECTROLYTIC, 10V 1000UF M 3A
CE63 24666470 ELECTORLYTIC, 16V 47UF M 3A
CE64 24567334 PLASTIC FILM, 50V 0.33UF J
CE65 24666470 ELECTORLYTIC, 16V 47UF M 3A
CE66 24666470 ELECTORLYTIC, 16V 47UF M 3A
CE67 24567334 PLASTIC FILM, 50V 0.33UF J
CE68 24073017 ELECTROLYTIC, 10V 220UF M 3A
CE69 24669339 ELECTROLYTIC, 50V 3.3UF M
CE71 24214331 CERAMIC DISC, 500V B 330PF K
CE72 24214331 CERAMIC DISC, 500V B 330PF K
CE73 24214331 CERAMIC DISC, 500V B 330PF K
CE74 24214331 CERAMIC DISC, 500V B 330PF K
CE75 24214331 CERAMIC DISC, 500V B 330PF K
CE76 24214331 CERAMIC DISC, 500V B 330PF K
Parts No. Description
Location
No.
CE79 24669220 ELECTROLYTIC, 04Q 50V 22UF M 3A
CE80 24073157 ELECTROLYTIC CE04P 16V 1500UF M 3A
CE81 24073157 ELECTROLYTIC CE04P 16V 1500UF M 3A
CE82 24676470 ELECTROLYTIC, 100V 47UF M 3A
CE83 24073155 ELECTROLYTIC CE04P 16V 1000UF M 3A
CE84 24073141 ELECTROLYTIC CE04P 10V 1000UF M 3A
CE85 24073158 ELECTROLYTIC CE04P 16V 2200UF M 3A
CE86 24073133 ELECTROLYTIC CE04P 6.3V 3300UF M 3A
CE87 24073141 ELECTROLYTIC CE04P 10V 1000UF M 3A
CE88 24073155 ELECTROLYTIC CE04P 16V 1000UF M 3A
CF01 24073152 ELECTROLYTIC CE04P 16V 330UF M 3A
CV14 24212102 CERAMIC DISC, 50V B 1000PF K
CV27 24762471 ELECTROLYTIC, 04G 10V 470UF M
CV29 24763101 ELECTROLYTIC, 16V 100UF M
CV30 24232103 CERAMIC DISC, 50V F 0.01UF Z
CV38 24212102 CERAMIC DISC, 50V B 1000PF K
CV39 24212102 CERAMIC DISC, 50V B 1000PF K
Parts No. Description
RESISTORS
R150 24011101 CHIP, METAL FILM, 1/20W 100 OHM J
R153 24366101 CARBON FILM, 1/6W 100 OHM J
R240 24367153 CARBON FILM, 1/6W 15K OHM G
R241 24367183 CARBON FILM, 1/6W 18K OHM G
R242 24367183 CARBON FILM, 1/6W 18K OHM G
R243 24367273 CARBON FILM, 1/6W 27K OHM G
R244 24366124 CARBON FILM, 1/6W 120K OHM J
R245 24366472 CARBON FILM, 1/6W 4.7K OHM J
R246 24366472 CARBON FILM, 1/6W 4.7K OHM J
R247 24366102 CARBON FILM, 1/6W 1K OHM J
R249 24366104 CARBON FILM, 1/6W 100K OHM J
R264 24366750 CARBON FILM, 1/6W 75 OHM J
R265 24366750 CARBON FILM, 1/6W 75 OHM J
R266 24366750 CARBON FILM, 1/6W 75 OHM J
R286 24366750 CARBON FILM, 1/6W 75 OHM J
R287 24366750 CARBON FILM, 1/6W 75 OHM J
R288 24366750 CARBON FILM, 1/6W 75 OHM J
R302 24366101 CARBON FILM, 1/6W 100 OHM J
R305 24322109 OXIDE METAL FILM, 1W 1 OHM J
R306 24011822 CHIP, METAL FILM, 1/20W 8.2K OHM J
R307 24011101 CHIP, METAL FILM, 1/20W 100 OHM J
R308 24011101 CHIP, METAL FILM, 1/20W 100 OHM J
R311 24366563 CARBON FILM, 1/6W 56K OHM J
R312 24011123 CHIP, METAL FILM, 1/20W 12K OHM J
R313 24011102 CHIP, METAL FILM, 1/20W 1K OHM J
R314 24011473 CHIP, METAL FILM, 1/20W 47K OHM J
R315 24011681 CHIP, METAL FILM, 1/20W 680 OHM J
R321 24011472 CHIP, METAL FILM, 1/20W 4.7K OHM J
R322 24011101 CHIP, METAL FILM, 1/20W 100 OHM J
R325 24011472 CHIP, METAL FILM, 1/20W 4.7K OHM J
R330 24000633 METAL FILM, 1/4W 10K OHM F
R331 24000633 METAL FILM, 1/4W 10K OHM F
R334 24011102 CHIP, METAL FILM, 1/20W 1K OHM J
R335 24011102 CHIP, METAL FILM, 1/20W 1K OHM J
R336 24011102 CHIP, METAL FILM, 1/20W 1K OHM J
R337 24321129 OXIDE METAL FILM, 1/2W 1.2 OHM J
R338 24011153 CHIP, METAL FILM, 1/2OW 15K OHM J
R340 24366103 CARBON FILM, 1/6W 10K OHM J
R341 24011183 CHIP, METAL FILM, 1/20W 18K OHM J
R343 24011102 CHIP, METAL FILM, 1/20W 1K OHM J
R344 24382151 OXIDE METAL FILM, 1W 150 OHM J
R345 24000445 CHIP JUMPER, 1608TYPE
R346 24382391 OXIDE METAL FILM, 1W 390 OHM J
R348 24011473 CHIP, METAL FILM, 1/20W 47K OHM J
R349 24011392 CHIP, 1/20W 3.9K OHM J
R350 24011123 CHIP, METAL FILM, 1/20W 12K OHM J
R355 24366103 CARBON FILM, 1/6W 10K OHM J
-
30
-
Page 34
Location
No.
R360 24011562 CHIP, METAL FILM, 1/20W 5.6K OHM J
R361 24011104 CHIP, METAL FILM, 1/20W 100K OHM J
R362 24011473 CHIP, METAL FILM, 1/20W 47K OHM J
R363 24011103 CHIP, METAL FILM, 1/20W 10K OHM J
R364 24011331 CHIP, METAL FILM, 1/20W 330 OHM J
R365 24011682 CHIP, METAL FILM, 1/20W 6.8K OHM J
R366 24366222 CARBON FILM, 1/6W 2.2K OHM J
R367 24011392 CHIP, 1/20W 3.9K OHM J
R369 24366103 CARBON FILM, 1/6W 10K OHM J
R370 24366102 CARBON FILM, 1/6W 1K OHM J
R371 24011823 CHIP, METAL FILM, 1/20W 82K OHM J
R372 24011332 CHIP, METAL FILM, 1/20W 3.3K OHM J
R373 24011823 CHIP, METAL FILM, 1/20W 82K OHM J
R374 24011104 CHIP, METAL FILM, 1/20W 100K OHM J
R375 24011153 CHIP, METAL FILM, 1/2OW 15K OHM J
R376 24011333 CHIP, METAL FILM, 1/20W 33K OHM J
R378 24011103 CHIP, METAL FILM, 1/20W 10K OHM J
R390 24382561 OXIDE METAL FILM, 1W 560 OHM J
R391 24382561 OXIDE METAL FILM, 1W 560 OHM J
R392 24382561 OXIDE METAL FILM, 1W 560 OHM J
R403 24553101 OXIDE METAL FILM, 1W 100 OHM J
R404 24011182 CHIP, METAL FILM, 1/20W 1.8K OHM J
R405 24366101 CARBON FILM, 1/6W 100 OHM J
R406 24382682 OXIDE METAL FILM, 1W 6.8K OHM J
R407 24381100 OXIDE METAL FILM, 1/2W 10 OHM J
R409 24555220 OXIDE METAL FILM, 3W 22 OHM J
R410 24555220 OXIDE METAL FILM, 3W 22 OHM J
R411 24323229 OXIDE METAL FILM, 2W 2.2 OHM J
R412 24383153 OXIDE METAL FILM, 2W 15K OHM J
R413 24366101 CARBON FILM, 1/6W 100 OHM J
R414 24019259 FUSIBLE, 1/4W 27 OHM G
R415 24011102 CHIP, METAL FILM, 1/20W 1K OHM J
R416 24383151 OXIDE METAL FILM, 2W 150 OHM J
R417 24366222 CARBON FILM, 1/6W 2.2K OHM J
R418 24011103 CHIP, METAL FILM, 1/20W 10K OHM J
R419 24011103 CHIP, METAL FILM, 1/20W 10K OHM J
R420 24366103 CARBON FILM, 1/6W 10K OHM J
R421 24366223 CARBON FILM, 1/6W 22K OHM J
R422 24011223 CHIP, METAL FILM, 1/20W 22K OHM J
R423 24942102 CARBON COMPOSITION, 1/2W 1K OHM J
R424 24376104 CARBON FILM, 1/2W 10OK OHM J
R425 24376104 CARBON FILM, 1/2W 10OK OHM J
R426 24366101 CARBON FILM, 1/6W 100 OHM J
R427 24011101 CHIP, METAL FILM, 1/20W 100 OHM J
R428 24377224 CARBON FILM, 1W 220K OHM J
R429 24942102 CARBON COMPOSITION, 1/2W 1K OHM J
R431 24383102 OXIDE METAL FILM, 2W 1K OHM J
R432 24376274 CARBON FILM, 1/2W 270K OHM J
R433 24376274 CARBON FILM, 1/2W 270K OHM J
R434 24376274 CARBON FILM, 1/2W 270K OHM J
R435 24366332 CARBON FILM, 1/6W 3.3K OHM J
R436 24366473 CARBON FILM, 1/6W 47K OHM J
R437 24011223 CHIP, METAL FILM, 1/20W 22K OHM J
R438 24011102 CHIP, METAL FILM, 1/20W 1K OHM J
R439 24011103 CHIP, METAL FILM, 1/20W 10K OHM J
R440 24011103 CHIP, METAL FILM, 1/20W 10K OHM J
R441 24533331 FUSIBLE, 2W 330 OHM J
R443 24310109 OXIDE METAL FILM, 1/2W 1 OHM J
R444 24322398 OXIDE METAL FILM, 1W 0.39 OHM J
R446 24011103 CHIP, METAL FILM, 1/20W 10K OHM J
R447 24382473 OXIDE METAL FILM, 1W 47K OHM J
R448 24366562 CARBON FILM, 1/6W 5.6K OHM J
R449 24366152 CARBON FILM, 1/6W 1.5K OHM J
R466 24366433 CARBON FILM, 1/6W 43K OHM J
R467 24011221 CHIP, METAL FILM, 1/20W 220 OHM J
R469 24011101 CHIP, METAL FILM, 1/20W 100 OHM J
Parts No. Description
Location
No.
R470 24322478 OXIDE METAL FILM, 1W 0.47 OHM J
R471 24366224 CARBON FILM, 1/6W 220K OHM J
R472 24011101 CHIP, METAL FILM, 1/20W 100 OHM J
R473 24011223 CHIP, METAL FILM, 1/20W 22K OHM J
R474 24376393 CARBON FILM, 1/2W 39K OHM J
R475 24366101 CARBON FILM, 1/6W 100 OHM J
R476 24011471 CHIP, METAL FILM, 1/20W 470 OHM J
R477 24998331 CHIP, METAL FILM, 1/16W 330 OHM D
R478 24011102 CHIP, METAL FILM, 1/20W 1K OHM J
R480 24011473 CHIP, METAL FILM, 1/20W 47K OHM J
R481 24366103 CARBON FILM, 1/6W 10K OHM J
R482 24011103 CHIP, METAL FILM, 1/20W 10K OHM J
R483 24000445 CHIP JUMPER, 1608TYPE
R485 24011681 CHIP, METAL FILM, 1/20W 680 OHM J
R486 24011472 CHIP, METAL FILM, 1/20W 4.7K OHM J
R487 24552271 OXIDE METAL FILM, 1/2W 270 OHM J
R488 24552151 OXIDE METAL FILM, 1/2W 150 OHM J
R489 24011102 CHIP, METAL FILM, 1/20W 1K OHM J
R490 24552331 OXIDE METAL FILM, 1/2W 330 OHM J
R491 24011222 CHIP, METAL FILM, 1/20W 2.2K OHM J
R492 24998102 CHIP, 1/16W 1K OHM
R493 24998391 CHIP, 1/16W 390 OHM
R494 24998471 CHIP, 1/16W 470 OHM
R495 24011333 CHIP, METAL FILM, 1/20W 33K OHM J
R496 24011103 CHIP, METAL FILM, 1/20W 10K OHM J
R497 24011100 CHIP, METAL FILM, 1/20W 10 OHM J
R498 24011103 CHIP, METAL FILM, 1/20W 10K OHM J
R499 24011102 CHIP, METAL FILM, 1/20W 1K OHM J
R513 24366101 CARBON FILM, 1/6W 100 OHM J
R515 24366103 CARBON FILM, 1/6W 10K OHM J
R601 24011822 CHIP, METAL FILM, 1/20W 8.2K OHM J
R602 24011822 CHIP, METAL FILM, 1/20W 8.2K OHM J
R603 24011102 CHIP, METAL FILM, 1/20W 1K OHM J
R604 24011102 CHIP, METAL FILM, 1/20W 1K OHM J
R609 24011563 CHIP, METAL FILM, 1/20W 56K OHM J
R610 24011273 CHIP, 1/20W 27K OHM J
R611 24011103 CHIP, METAL FILM, 1/20W 10K OHM J
R612 24011222 CHIP, METAL FILM, 1/20W 2.2K OHM J
R613 24011223 CHIP, METAL FILM, 1/20W 22K OHM J
R614 24011103 CHIP, METAL FILM, 1/20W 10K OHM J
R615 24011104 CHIP, METAL FILM, 1/20W 100K OHM J
R616 24011822 CHIP, METAL FILM, 1/20W 8.2K OHM J
R626 24011223 CHIP, METAL FILM, 1/20W 22K OHM J
R627 24011223 CHIP, METAL FILM, 1/20W 22K OHM J
R661 24011102 CHIP, METAL FILM, 1/20W 1K OHM J
R662 24011333 CHIP, METAL FILM, 1/20W 33K OHM J
R663 24011822 CHIP, METAL FILM, 1/20W 8.2K OHM J
R665 24011223 CHIP, METAL FILM, 1/20W 22K OHM J
R666 24011473 CHIP, METAL FILM, 1/20W 47K OHM J
R667 24011223 CHIP, METAL FILM, 1/20W 22K OHM J
R668 24011473 CHIP, METAL FILM, 1/20W 47K OHM J
R671 24011102 CHIP, METAL FILM, 1/20W 1K OHM J
R672 24011333 CHIP, METAL FILM, 1/20W 33K OHM J
R673 24011822 CHIP, METAL FILM, 1/20W 8.2K OHM J
R674 24011472 CHIP, METAL FILM, 1/20W 4.7K OHM J
R676 24011104 CHIP, METAL FILM, 1/20W 100K OHM J
R677 24011104 CHIP, METAL FILM, 1/20W 100K OHM J
R681 24011222 CHIP, METAL FILM, 1/20W 2.2K OHM J
R682 24011473 CHIP, METAL FILM, 1/20W 47K OHM J
R683 24011223 CHIP, METAL FILM, 1/20W 22K OHM J
R684 24011223 CHIP, METAL FILM, 1/20W 22K OHM J
R687 24011103 CHIP, METAL FILM, 1/20W 10K OHM J
R688 24011224 CHIP, METAL FILM, 1/20W 220K OHM J
R693 24000445 CHIP JUMPER, 1608TYPE
R697 24553221 OXIDE METAL FILM, 1W 220 OHM J
R698 24011103 CHIP, METAL FILM, 1/20W 10K OHM J
Parts No. Description
-
31
-
Page 35
Location
No.
R699 24011103 CHIP, METAL FILM, 1/20W 10K OHM J
R810 24007061 CERAMIC COVERED, 2W 1.8 OHM K
R818 24011471 CHIP, METAL FILM, 1/20W 470 OHM J
R819 24011103 CHIP, METAL FILM, 1/20W 10K OHM J
R842 24376563 CARB0N FILM, 1/2W 56K OHM J
R843 24376563 CARB0N FILM, 1/2W 56K OHM J
R844 24011103 CHIP, METAL FILM, 1/20W 10K OHM J
R845 24366102 CARBON FILM, 1/6W 1K OHM J
R849 24011101 CHIP, METAL FILM, 1/20W 100 OHM J
R854 24381150 OXIDE METAL FILM, 1/2W 15 OHM J
R860 24383473 OXIDE METAL FILM, 2W 47K OHM J
R862 24321689 OXIDE METAL FILM, 1/2W 6.8 OHM J
R864 24552102 OXIDE METAL FILM, 1/2W 1K OHM J
R865 24552390 OXIDE METAL FILM, 1/2W 39 OHM J
R866 24366472 CARBON FILM, 1/6W 4.7K OHM J
R867 24366223 CARBON FILM, 1/6W 22K OHM J
R868 24552470 OXIDE METAL FILM, 1/2W 47 OHM J
R870 24381151 OXIDE METAL FILM, 1/2W 150 OHM J
R871 24382680 OXIDE METAL FILM, 1W 68 OHM J
R873 24552100 OXIDE METAL FILM, 1/2W 10 OHM J
R874 24366150 CARBON FILM, 1/6W 15 OHM J
R881 24011102 CHIP, METAL FILM, 1/20W 1K OHM J
R883 24381102 OXIDE METAL FILM, 1/2W 1K OHM J
R885 24366471 CARBON FILM, 1/6W 470 OHM J
R893 24011472 CHIP, METAL FILM, 1/20W 4.7K OHM J
R894 24011103 CHIP, METAL FILM, 1/20W 10K OHM J
R899 24010001 CARBON FILM, 1/2W 3.9M OHM J
R900 24000892 FUSIBLE, 1W 1.2 OHM J
R901 24366331 CARBON FILM, 1/6W 330 OHM J
R903 24552101 OXIDE METAL FILM, 1/2W 100 OHM J
R905 24872180 CHIP, 1/16W 18 OHM J
R906 24872271 CHIP, 1/16W 270 OHM J
R908 24872560 CHIP, 1/16W 56 OHM J
R909 24872270 CHIP, 1/16W 27 OHM J
R910 24322568 OXIDE METAL FILM, 1W 0.56 OHM J
R911 24366331 CARBON FILM, 1/6W 330 OHM J
R913 24552101 OXIDE METAL FILM, 1/2W 100 OHM J
R915 24872270 CHIP, 1/16W 27 OHM J
R916 24872271 CHIP, 1/16W 270 OHM J
R918 24872560 CHIP, 1/16W 56 OHM J
R919 24872180 CHIP, 1/16W 18 OHM J
R920 24366222 CARBON FILM, 1/6W 2.2K OHM J
R921 24366331 CARBON FILM, 1/6W 330 OHM J
R923 24552101 OXIDE METAL FILM, 1/2W 100 OHM J
R925 24872330 CHIP, 1/16W 33 OHM J
R926 24872271 CHIP, 1/16W 270 OHM J
R928 24872680 CHIP, 1/16W 68 OHM J
R929 24872180 CHIP, 1/16W 18 OHM J
R930 24366222 CARBON FILM, 1/6W 2.2K OHM J
R931 24568272 CERAMIC COVERED G 7W 2.7K J
R938 24366150 CARBON FILM, 1/6W 15 OHM J
R944 24568272 CERAMIC COVERED G 7W 2.7K J
R945 24366150 CARBON FILM, 1/6W 15 OHM J
R948 24366222 CARBON FILM, 1/6W 2.2K OHM J
R950 24366222 CARBON FILM, 1/6W 2.2K OHM J
R951 24568272 CERAMIC COVERED G 7W 2.7K J
R958 24366150 CARBON FILM, 1/6W 15 OHM J
R961 24872222 CHIP, 1/16W 2.2K OHM J
R962 24872182 CHIP, 1/16W 1.8K OHM J
R963 24872100 CHIP, 1/16W 10 OHM J
R964 24872332 CHIP, 1/16W 3.3K OHM J
R965 24872101 CHIP, 1/16W 100 OHM J
R966 24872122 CHIP, 1/16W 1.2K OHM J
R967 24872122 CHIP, 1/16W 1.2K OHM J
R968 24366222 CARBON FILM, 1/6W 2.2K OHM J
R969 24872122 CHIP, 1/16W 1.2K OHM J
Parts No. Description
Location
No.
R970 24872122 CHIP, 1/16W 1.2K OHM J
R971 24872152 CHIP, 1/16W 1.5K OHM J
R978 24366222 CARBON FILM, 1/6W 2.2K OHM J
R987 24872101 CHIP, 1/16W 100 OHM J
R988 24366222 CARBON FILM, 1/6W 2.2K OHM J
R991 24366222 CARBON FILM, 1/6W 2.2K OHM J
R992 24366222 CARBON FILM, 1/6W 2.2K OHM J
R4430 24381150 OXIDE METAL FILM, 1/2W 15 OHM J
R4431 24366102 CARBON FILM, 1/6W 1K OHM J
R7102 24872101 CHIP, 1/16W 100 OHM J
R7103 24872102 CHIP, 1/16W 1K OHM J
R7104 24872102 CHIP, 1/16W 1K OHM J
R7105 24871221 CHIP, 1/8W 220 OHM J
R7106 24871221 CHIP, 1/8W 220 OHM J
R7107 24872101 CHIP, 1/16W 100 OHM J
R7108 24872332 CHIP, 1/16W 3.3K OHM J
R7109 24872333 CHIP, 1/16W 33K OHM J
R7110 24872273 CHIP, 1/16W 27K OHM J
R7111 24872333 CHIP, 1/16W 33K OHM J
R7112 24872151 CHIP, 1/16W 150 OHM J
R7113 24872751 CHIP, 1/16W 750 OHM J
R7114 24872681 CHIP, 1/16W 680 OHM J
R7115 24871471 CHIP, 1/8W 470 OHM J
R7116 24871471 CHIP, 1/8W 470 OHM J
R7117 24872101 CHIP, 1/16W 100 OHM J
R7118 24872101 CHIP, 1/16W 100 OHM J
R7119 24871100 CHIP, 1/8W 10 OHM J
R7120 24871100 CHIP, 1/8W 10 OHM J
R7121 24871100 CHIP, 1/8W 10 OHM J
R7122 24871100 CHIP, 1/8W 10 OHM J
R7123 24871100 CHIP, 1/8W 10 OHM J
R7124 24871100 CHIP, 1/8W 10 OHM J
R7125 24871100 CHIP, 1/8W 10 OHM J
R7126 24871100 CHIP, 1/8W 10 OHM J
R7127 24552331 OXIDE METAL FILM, 1/2W 330 OHM J
R7128 24872751 CHIP, 1/16W 750 OHM J
R7129 24872122 CHIP, 1/16W 1.2K OHM J
R7130 24872683 CHIP, 1/16W 68K OHM J
R7131 24872683 CHIP, 1/16W 68K OHM J
R7132 24872751 CHIP, 1/16W 750 OHM J
R7133 24872122 CHIP, 1/16W 1.2K OHM J
R7134 24872102 CHIP, 1/16W 1K OHM J
R7135 24553100 OXIDE METAL FILM, 1W 10 OHM J
R7136 24321229 OXIDE METAL FILM, 1/2W 2.2 OHM J
R7137 24553100 OXIDE METAL FILM, 1W 10 OHM J
R7138 24322229 OXIDE METAL FILM, 1W 2.2 OHM J
R7139 24554221 OXIDE METAL FILM, 2W 220 OHM J
R7140 24872220 CHIP, 1/16W 22 OHM J
R7141 24872220 CHIP, 1/16W 22 OHM J
R7701 24011392 CHIP, 1/20W 3.9K OHM J
R7702 24000445 CHIP JUMPER, 1608TYPE
R7707 24011472 CHIP, METAL FILM, 1/20W 4.7K OHM J
R7708 24011472 CHIP, METAL FILM, 1/20W 4.7K OHM J
R7710 24383221 OXIDE METAL FILM, 2W 220 OHM J
R7711 24339189 METAL FILM 2W 1R8 J
R7712 24011472 CHIP, METAL FILM, 1/20W 4.7K OHM J
R7713 24011472 CHIP, METAL FILM, 1/20W 4.7K OHM J
R7715 24383221 OXIDE METAL FILM, 2W 220 OHM J
R7716 24339189 METAL FILM 2W 1R8 J
R7717 24011472 CHIP, METAL FILM, 1/20W 4.7K OHM J
R7718 24011472 CHIP, METAL FILM, 1/20W 4.7K OHM J
R7720 24383221 OXIDE METAL FILM, 2W 220 OHM J
R7721 24339189 METAL FILM 2W 1R8 J
R7722 24011472 CHIP, METAL FILM, 1/20W 4.7K OHM J
R7723 24011472 CHIP, METAL FILM, 1/20W 4.7K OHM J
R7725 24383221 OXIDE METAL FILM, 2W 220 OHM J
Parts No. Description
-
32
-
Page 36
Location
No.
R7726 24339189 METAL FILM 2W 1R8 J
R7727 24011472 CHIP, METAL FILM, 1/20W 4.7K OHM J
R7728 24011472 CHIP, METAL FILM, 1/20W 4.7K OHM J
R7730 24383221 OXIDE METAL FILM, 2W 220 OHM J
R7731 24339189 METAL FILM 2W 1R8 J
R7732 24011472 CHIP, METAL FILM, 1/20W 4.7K OHM J
R7733 24011472 CHIP, METAL FILM, 1/20W 4.7K OHM J
R7735 24383221 OXIDE METAL FILM, 2W 220 OHM J
R7736 24339189 METAL FILM 2W 1R8 J
R7743 24322338 OXIDE METAL FILM, 1W 0.33 OHM J
R7744 24322338 OXIDE METAL FILM, 1W 0.33 OHM J
R7745 24011101 CHIP, METAL FILM, 1/20W 100 OHM J
R7746 24011101 CHIP, METAL FILM, 1/20W 100 OHM J
R7747 24011221 CHIP, METAL FILM, 1/20W 220 OHM J
R7748 24011221 CHIP, METAL FILM, 1/20W 220 OHM J
R7749 24011102 CHIP, METAL FILM, 1/20W 1K OHM J
R7750 24011332 CHIP, METAL FILM, 1/20W 3.3K OHM J
R7751 24011153 CHIP, METAL FILM, 1/2OW 15K OHM J
R7752 24011822 CHIP, METAL FILM, 1/20W 8.2K OHM J
R7753 24011101 CHIP, METAL FILM, 1/20W 100 OHM J
R7754 24011333 CHIP, METAL FILM, 1/20W 33K OHM J
R7755 24011153 CHIP, METAL FILM, 1/2OW 15K OHM J
R7756 24011153 CHIP, METAL FILM, 1/2OW 15K OHM J
R7757 24011681 CHIP, METAL FILM, 1/20W 680 OHM J
R7758 24011332 CHIP, METAL FILM, 1/20W 3.3K OHM J
R7760 24011682 CHIP, METAL FILM, 1/20W 6.8K OHM J
R7761 24011123 CHIP, METAL FILM, 1/20W 12K OHM J
R7762 24011682 CHIP, METAL FILM, 1/20W 6.8K OHM J
R7763 24011123 CHIP, METAL FILM, 1/20W 12K OHM J
R7765 24011103 CHIP, METAL FILM, 1/20W 10K OHM J
R7766 24366103 CARBON FILM, 1/6W 10K OHM J
R7767 24011103 CHIP, METAL FILM, 1/20W 10K OHM J
R7768 24011103 CHIP, METAL FILM, 1/20W 10K OHM J
R7769 24011103 CHIP, METAL FILM, 1/20W 10K OHM J
R7770 24011103 CHIP, METAL FILM, 1/20W 10K OHM J
R7771 24011103 CHIP, METAL FILM, 1/20W 10K OHM J
R7772 24011473 CHIP, METAL FILM, 1/20W 47K OHM J
R7773 24011103 CHIP, METAL FILM, 1/20W 10K OHM J
R7774 24011103 CHIP, METAL FILM, 1/20W 10K OHM J
R7801 24383471 OXIDE METAL FILM, 2W 470 OHM J
R7802 24383681 OXIDE METAL FILM, 2W 680 OHM J
R7880 24011221 CHIP, METAL FILM, 1/20W 220 OHM J
R7881 24011472 CHIP, METAL FILM, 1/20W 4.7K OHM J
R7882 24011103 CHIP, METAL FILM, 1/20W 10K OHM J
R7883 24011103 CHIP, METAL FILM, 1/20W 10K OHM J
R7884 24011103 CHIP, METAL FILM, 1/20W 10K OHM J
R7885 24366472 CARBON FILM, 1/6W 4.7K OHM J
R7886 24011104 CHIP, METAL FILM, 1/20W 100K OHM J
R7887 24366103 CARBON FILM, 1/6W 10K OHM J
R7890 24011331 CHIP, METAL FILM, 1/20W 330 OHM J
R7891 24011331 CHIP, METAL FILM, 1/20W 330 OHM J
R7892 24366472 CARBON FILM, 1/6W 4.7K OHM J
R7893 24011472 CHIP, METAL FILM, 1/20W 4.7K OHM J
R7910 24011221 CHIP, METAL FILM, 1/20W 220 OHM J
R7911 24011221 CHIP, METAL FILM, 1/20W 220 OHM J
R7912 24011101 CHIP, METAL FILM, 1/20W 100 OHM J
R7913 24011101 CHIP, METAL FILM, 1/20W 100 OHM J
R7931 24000445 CHIP JUMPER, 1608TYPE
R9501 24872101 CHIP, 1/16W 100 OHM J
R9503 24872122 CHIP, 1/16W 1.2K OHM J
R9504 24872122 CHIP, 1/16W 1.2K OHM J
R9607 24872101 CHIP, 1/16W 100 OHM J
R9608 24872122 CHIP, 1/16W 1.2K OHM J
R9609 24872122 CHIP, 1/16W 1.2K OHM J
RA71 24366273 CARBON FILM, 1/6W 27K OHM J
RA72 24366153 CARBON FILM, 1/6W 15K OHM J
Parts No. Description
Location
No.
RA73 24366822 CARBON FILM, 1/6W 8.2K OHM J
RA76 24366822 CARBON FILM, 1/6W 8.2K OHM J
RA77 24366153 CARBON FILM, 1/6W 15K OHM J
RA78 24366273 CARBON FILM, 1/6W 27K OHM J
RA79 24366823 CARBON FILM, 1/6W 82K OHM J
RB08 24366331 CARBON FILM, 1/6W 330 OHM J
RB09 24366331 CARBON FILM, 1/6W 330 OHM J
RB10 24366103 CARBON FILM, 1/6W 10K OHM J
RB11 24366222 CARBON FILM, 1/6W 2.2K OHM J
RB12 24366103 CARBON FILM, 1/6W 10K OHM J
RB13 24366222 CARBON FILM, 1/6W 2.2K OHM J
RB15 24366471 CARBON FILM, 1/6W 470 OHM J
RB19 24366470 CARBON FILM, 1/6W 47 OHM J
RB51 24366224 CARBON FILM, 1/6W 220K OHM J
RB52 24366123 CARBON FILM, 1/6W 12K OHM J
RB53 24366123 CARBON FILM, 1/6W 12K OHM J
RB54 24366123 CARBON FILM, 1/6W 12K OHM J
RB55 24366224 CARBON FILM, 1/6W 220K OHM J
RB56 24366151 CARBON FILM, 1/6W 150 OHM J
RB57 24366103 CARBON FILM, 1/6W 10K OHM J
RB58 24366103 CARBON FILM, 1/6W 10K OHM J
RB59 24366122 CARBON FILM, 1/6W 1.2K OHM J
RB60 24366224 CARBON FILM, 1/6W 220K OHM J
RB61 24366100 CARBON FILM, 1/6W 10 OHM J
RB62 24366272 CARBON FILM, 1/6W 2.7K OHM J
RB63 24366271 CARBON FILM, 1/6W 270 OHM J
RB67 24366221 CARBON FILM, 1/6W 220 OHM J
RB69 24366272 CARBON FILM, 1/6W 2.7K OHM J
RB70 24366331 CARBON FILM, 1/6W 330 OHM J
RB504 24366104 CARBON FILM, 1/6W 100K OHM J
RB505 24366101 CARBON FILM, 1/6W 100 OHM J
RB506 24366390 CARBON FILM, 1/6W 39 OHM J
RB558 24366223 CARBON FILM, 1/6W 22K OHM J
RB559 24366223 CARBON FILM, 1/6W 22K OHM J
RB561 24366101 CARBON FILM, 1/6W 100 OHM J
RB562 24366104 CARBON FILM, 1/6W 100K OHM J
RB563 24366390 CARBON FILM, 1/6W 39 OHM J
RB567 24366223 CARBON FILM, 1/6W 22K OHM J
RC01 24011223 CHIP, METAL FILM, 1/20W 22K OHM J
RC02 24011220 CHIP, METAL FILM, 1/20W 22 OHM J
RC03 24011220 CHIP, METAL FILM, 1/20W 22 OHM J
RC04 24011220 CHIP, METAL FILM, 1/20W 22 OHM J
RC05 24011220 CHIP, METAL FILM, 1/20W 22 OHM J
RC06 24011220 CHIP, METAL FILM, 1/20W 22 OHM J
RC07 24011220 CHIP, METAL FILM, 1/20W 22 OHM J
RC08 24011220 CHIP, METAL FILM, 1/20W 22 OHM J
RC09 24011270 CHIP, 1/20W 27 OHM J
RC10 24011270 CHIP, 1/20W 27 OHM J
RC13 24000824 CHIP JUMPER, 2125TYPE
RC14 24000824 CHIP JUMPER, 2125TYPE
RC15 24000824 CHIP JUMPER, 2125TYPE
RC17 24000824 CHIP JUMPER, 2125TYPE
RC18 24000824 CHIP JUMPER, 2125TYPE
RC19 24000824 CHIP JUMPER, 2125TYPE
RC20 24000824 CHIP JUMPER, 2125TYPE
RC27 24011102 CHIP, METAL FILM, 1/20W 1K OHM J
RC32 24011331 CHIP, METAL FILM, 1/20W 330 OHM J
RC33 24011103 CHIP, METAL FILM, 1/20W 10K OHM J
RC34 24011331 CHIP, METAL FILM, 1/20W 330 OHM J
RC35 24011103 CHIP, METAL FILM, 1/20W 10K OHM J
RC36 24011331 CHIP, METAL FILM, 1/20W 330 OHM J
RC37 24011103 CHIP, METAL FILM, 1/20W 10K OHM J
RC38 24011331 CHIP, METAL FILM, 1/20W 330 OHM J
RC39 24011103 CHIP, METAL FILM, 1/20W 10K OHM J
RC40 24011102 CHIP, METAL FILM, 1/20W 1K OHM J
RC41 24011105 CHIP, METAL FILM, 1/20W 1M OHM J
Parts No. Description
-
33
-
Page 37
Location
No.
RC49 24011103 CHIP, METAL FILM, 1/20W 10K OHM J
RC50 24011123 CHIP, METAL FILM, 1/20W 12K OHM J
RC51 24011103 CHIP, METAL FILM, 1/20W 10K OHM J
RC52 24011103 CHIP, METAL FILM, 1/20W 10K OHM J
RC53 24011103 CHIP, METAL FILM, 1/20W 10K OHM J
RC54 24011220 CHIP, METAL FILM, 1/20W 22 OHM J
RC58 24000445 CHIP JUMPER, 1608TYPE
RC60 24011103 CHIP, METAL FILM, 1/20W 10K OHM J
RC61 24011564 CHIP, METAL FILM, 1/20W 560K OHM J
RC62 24011103 CHIP, METAL FILM, 1/20W 10K OHM J
RE10 24382223 OXIDE METAL FILM, 1W 22K OHM J
RE11 24322568 OXIDE METAL FILM, 1W 0.56 OHM J
RE12 24322568 OXIDE METAL FILM, 1W 0.56 OHM J
RE13 24381681 OXIDE METAL FILM, 1/2W 680 OHM J
RE14 24383330 OXIDE FILM 2W 33. J
RE15 24383330 OXIDE FILM 2W 33. J
RE16 24366682 CARBON FILM, 1/6W 6.8K OHM J
RE17 24366152 CARBON FILM, 1/6W 1.5K OHM J
RE18 24381101 OXIDE METAL FILM, 1/2W 100 OHM J
RE22 24366102 CARBON FILM, 1/6W 1K OHM J
RE40 24366471 CARBON FILM, 1/6W 470 OHM J
RE43 24366102 CARBON FILM, 1/6W 1K OHM J
RE44 24000529 METAL FILM, 1/4W 6.8K OHM F
RE45 24000356 METAL FILM, 1/4W 820 OHM F
RE46 24000529 METAL FILM, 1/4W 6.8K OHM F
RE48 24366222 CARBON FILM, 1/6W 2.2K OHM J
RE50 24000147 METAL FILM, 1/4W 470 OHM F
RE51 24000155 METAL FILM 1/4W 15 F
RE52 24000169 METAL FILM 1/4W 68 F
RE53 24000135 METAL FILM 1/4W 120 F
RE54 24000220 METAL FILM, 1/4W 390 OHM F
RE55 24366223 CARBON FILM, 1/6W 22K OHM J
RE60 24382332 OXIDE FILM 1W 3.3K J
RE80 24000245 METAL FILM, 1/4W 33K OHM F
RE81 24000250 METAL FILM, 1/4W 56K OHM F
RE82 24000364 METAL FILM, 1/4W 1.8K OHM F
RF01 24366103 CARBON FILM, 1/6W 10K OHM J
RF02 24366122 CARBON FILM, 1/6W 1.2K OHM J
RF03 24366103 CARBON FILM, 1/6W 10K OHM J
RF04 24366472 CARBON FILM, 1/6W 4.7K OHM J
RV20 24366750 CARBON FILM, 1/6W 75 OHM J
RV21 24366750 CARBON FILM, 1/6W 75 OHM J
RV22 24366750 CARBON FILM, 1/6W 75 OHM J
RV23 24366101 CARBON FILM, 1/6W 100 OHM J
RV33 24366750 CARBON FILM, 1/6W 75 OHM J
RV34 24366750 CARBON FILM, 1/6W 75 OHM J
RV35 24366750 CARBON FILM, 1/6W 75 OHM J
RV36 24366750 CARBON FILM, 1/6W 75 OHM J
RV37 24366750 CARBON FILM, 1/6W 75 OHM J
RV40 24366750 CARBON FILM, 1/6W 75 OHM J
RV61 24366101 CARBON FILM, 1/6W 100 OHM J
RV85 24366471 CARBON FILM, 1/6W 470 OHM J
RV86 24366471 CARBON FILM, 1/6W 470 OHM J
RV89 24366680 CARBON FILM, 1/6W 68 OHM J
Parts No. Description
COIL & TRANSFORMERS
L101 23289845 COIL, PEAKING, TRF4680AT
L103 23289844 COIL, PEAKING, TRF4470AT
L302 23248073 COIL, CHOKE, TLN3299D
L303 23248073 COIL, CHOKE, TLN3299D
L304 23103145 FERRITE CHOKE, TEM2011AA
L305 23103248 FERRITR CHOKE, TEM2014AA
L310 23289846 COIL, PEAKING, TRF4101AT
L401 23289560 COIL, PEAKING, TRF4560AF
L402 23248345 COIL, CHOKE EI24 120MMH TLN3534AH
L403 23103145 FERRITE CHOKE, TEM2011AA
Location
No.
L406 23248191 COIL, CHOKE, TLN3351AD
L407 23103248 FERRITR CHOKE, TEM2014AA
L408 23103248 FERRITR CHOKE, TEM2014AA
L441 23233116 COIL, LIN X22H37 5.6MMH TLN2222AH
L462 23231390 DEFLECTION YOKE, TDY707RD TDY707RD
L463 23231390 DEFLECTION YOKE, TDY707RD TDY707RD
L464 23231390 DEFLECTION YOKE, TDY707RD TDY707RD
L472 23102542 COIL, CPM29.1VM6TMAG MAG-1135
L473 23102542 COIL, CPM29.1VM6TMAG MAG-1135
L474 23102542 COIL, CPM29.1VM6TMAG MAG-1135
L490 23280019 COIL, PEAKING, TRF4330AZ
L850 23103145 FERRITE CHOKE, TEM2011AA
L851 23103145 FERRITE CHOKE, TEM2011AA
L852 23103145 FERRITE CHOKE, TEM2011AA
L854 23103145 FERRITE CHOKE, TEM2011AA
L861 23103145 FERRITE CHOKE, TEM2011AA
L862 23103145 FERRITE CHOKE, TEM2011AA
L864 23103145 FERRITE CHOKE, TEM2011AA
L880 23103145 FERRITE CHOKE, TEM2011AA
L881 23103145 FERRITE CHOKE, TEM2011AA
L885 23248073 COIL, CHOKE, TLN3299D
L886 23103145 FERRITE CHOKE, TEM2011AA
L887 23103145 FERRITE CHOKE, TEM2011AA
L888 23248321
L891 23103145 FERRITE CHOKE, TEM2011AA
L894 23248247 COIL, CHOKE, TLN3499AH
L902 23289159 COIL, PEAKING, TRF41R5AF
L904 23289120 COIL, PEAKING, TRF4120AF
L905 23289689 COIL, PEAKING, TRF46R8AF
L911 23289220 COIL, PEAKING, TRF4220AF
L913 23289159 COIL, PEAKING, TRF41R5AF
L915 23289689 COIL, PEAKING, TRF46R8AF
L916 23289120 COIL, PEAKING, TRF4120AF
L923 23289159 COIL, PEAKING, TRF41R5AF
L924 23289120 COIL, PEAKING, TRF4120AF
L925 23289689 COIL, PEAKING, TRF46R8AF
L7101 23289840 COIL, PEAKING, TRF4100AT
L7102 23103894 FILTER, FERRITE BEAD, TEM2011AW
L7103 23103894 FILTER, FERRITE BEAD, TEM2011AW
L7104 23261974 COIL, FERRITE BEAD, HC5-035
L7710 23248073 COIL, CHOKE, TLN3299D
L7711 23248073 COIL, CHOKE, TLN3299D
LB51 23237987 COIL, PEAKING, TRF4100AC
LC02 23103887 INDUCTOR, CHIP BEAD, TEM2130AM
LC03 23103271 FILTER, EMI 2012 201OHM 0.35A TEM2033AD
LC04 23103271 FILTER, EMI 2012 201OHM 0.35A TEM2033AD
LC05 23103887 INDUCTOR, CHIP BEAD, TEM2130AM
LC06 23103887 INDUCTOR, CHIP BEAD, TEM2130AM
LE11 23103145 FERRITE CHOKE, TEM2011AA
LE12 23103145 FERRITE CHOKE, TEM2011AA
LE13 23103145 FERRITE CHOKE, TEM2011AA
LE50 23289843 COIL, PEAKING, TRF4330AT
LE51 23280019 COIL, PEAKING, TRF4330AZ
LE53 23248358 COIL, CHOKE EI22 100MMHK TLN3540AH
LE54 23248213 COIL, CHOKE, TLN3481AH
LE55 23248247 COIL, CHOKE, TLN3499AH
LE56 23280016 COIL, PEAKING, TRF4100AZ
LE57 23248320
LE58 23248247 COIL, CHOKE, TLN3499AH
LE59 23280019 COIL, PEAKING, TRF4330AZ
LE60 23248247 COIL, CHOKE, TLN3499AH
LE71 23103145 FERRITE CHOKE, TEM2011AA
LE72 23103145 FERRITE CHOKE, TEM2011AA
LE73 23103145 FERRITE CHOKE, TEM2011AA
LE74 23103145 FERRITE CHOKE, TEM2011AA
LE75 23103145 FERRITE CHOKE, TEM2011AA
Parts No. Description
COIL, CHOKE 15X23H 22MMH 4.2A TLN3462AH
COIL, CHOKE 15X23H 100MMH 2.5A TLN3441AH
-
34
-
Page 38

Location
No.
LE76 23103145 FERRITE CHOKE, TEM2011AA
LF01 23280022 COIL, PEAKING, TRF4101AZ
LF02 23280022 COIL, PEAKING, TRF4101AZ
LV13 23289100 COIL, PEAKING, TRF4100AF
LV20 23238705 COIL, PEAKING, TRF4560AJ
LV36 23289560 COIL, PEAKING, TRF4560AF
LV37 23289560 COIL, PEAKING, TRF4560AF
T400 23224386 TRANSFORMER, FOCUS, TLN2220AH
T401 23224371 TRANSFORMER, HORIZ DRIVE, TLN1080AH
T461 23236816
T461A 23192972 ANODE CAP ASSY, TCC5609AT
T461Z 23236820
T801 23211778 COIL, LINE FILTER 37X44H 3.5MH TRF3209AH
T862 23217669 TRANSFORMER, CONVERTER TPW3549AS
TE01 23211725 COIL, LINE FILTER, TRF3228AQ
TE60 23217662 TRANSFORMER, CONVERTER TPW3547AS
Parts No. Description
TRANSFORMER, FLY-BACK TFB3094AD (NO SERVICE PART)
TRANSFORMER FLYBACK SERVICE TFB3094ZD
SEMICONDUCTORS
Q241 23114756 TRANSISTOR, 2SC2482
Q301 23319787 IC, LA7833S
Q302 23000711 IC, TA1317AN
Q305 23205005 TRANSISTOR, KTA2014Y
Q306 70119059 IC, OP AMP, TA75902P(J)
Q370 23205006 TRANSISTOR, KTC4075Y
Q371 23205005 TRANSISTOR, KTA2014Y
Q372 23205006 TRANSISTOR, KTC4075Y
Q400 23205079 TRANSISTOR, 2SC4686A
Q402 23205166 TRANSISTOR, FET, 2SK2962
Q404 23205149 TRANSISTOR, 2SC5859(FA)
Q405 23205005 TRANSISTOR, KTA2014Y
Q406 23205006 TRANSISTOR, KTC4075Y
Q408 23205005 TRANSISTOR, KTA2014Y
Q409 23205006 TRANSISTOR, KTC4075Y
Q410 23205006 TRANSISTOR, KTC4075Y
Q411 23205006 TRANSISTOR, KTC4075Y
Q420 23114756 TRANSISTOR, 2SC2482
Q425 23205031 TRANSISTOR, FET, 2SK2920
Q428 23205006 TRANSISTOR, KTC4075Y
Q470 23114541 TRANSISTOR, 2SA1320
Q471 23314993 TRANSISTOR, 2SC4081 Q
Q472 23314993 TRANSISTOR, 2SC4081 Q
Q473 23314994 TRANSISTOR, 2SA1576A106
Q601 23009603 IC, BTL AUDIO AMP AN7580
Q612 23205005 TRANSISTOR, KTA2014Y
Q613 23205006 TRANSISTOR, KTC4075Y
Q614 23205236
Q661 23205204
Q662 23205204
Q663 23906596 IC, BA4558
Q664 23205246
Q681 23205204
Q682 23205204
Q711 23205269 TRANSISTOR, VCBO-160V IC-1.5A 2SA2005
Q712 23205270 TRANSISTOR, VCBO 160V 1.5A 2SC5511
Q751 23135048 IC, CONVERGENCE OUT STK394-250A
Q752 23135048 IC, CONVERGENCE OUT STK394-250A
Q765 23205006 TRANSISTOR, KTC4075Y
Q766 23205006 TRANSISTOR, KTC4075Y
Q767 23205006 TRANSISTOR, KTC4075Y
Q768 23205006 TRANSISTOR, KTC4075Y
Q769 23906164 IC, TA75S393F
Q782 23319894 IC, NJM79M05FA
Q784 23009188 IC, KIA7805API
Q785 70129444 IC, PST994D
Q794 23906164 IC, TA75S393F
Q795 23000044 IC, TC4066BP(N)
TRANSISTOR, NPN R1=4.7K R2=47K KRC106S (SOT-23)
TRANSISTOR, NPN VEBO=25V KTC2875B-RTK
TRANSISTOR, NPN VEBO=25V KTC2875B-RTK
TRANSISTOR, PNP R1=R2=47K KRA104S (SOT-23)
TRANSISTOR, NPN VEBO=25V KTC2875B-RTK
TRANSISTOR, NPN VEBO=25V KTC2875B-RTK
Location
No.
Q796 23205006 TRANSISTOR, KTC4075Y
Q801 23135028 IC, STR-Z4479
Q841 23009270 IC, PHOTO COUPLER, PS2581L1(D)
Q843 23205006 TRANSISTOR, KTC4075Y
Q844 23205006 TRANSISTOR, KTC4075Y
Q862 23009270 IC, PHOTO COUPLER, PS2581L1(D)
Q881 23319693 IC, SE116N, LF4
Q894 23205006 TRANSISTOR, KTC4075Y
Q901 23205159 TRANSISTOR, 2SC3942
Q902 23205165 TRANSISTOR, 2SC3950E
Q911 23205159 TRANSISTOR, 2SC3942
Q912 23205165 TRANSISTOR, 2SC3950E
Q913 23205054 TRANSISTOR, KTA1504Y
Q921 23205159 TRANSISTOR, 2SC3942
Q922 23205165 TRANSISTOR, 2SC3950E
Q961 23205057 TRANSISTOR, KTC3875Y
Q962 23205054 TRANSISTOR, KTA1504Y
Q973 23205054 TRANSISTOR, KTA1504Y
Q4430 23314164 TRANSISTOR, 2SC2236-Y(C))
Q7101 23205057 TRANSISTOR, KTC3875Y
Q7102 23205057 TRANSISTOR, KTC3875Y
Q7103 70114402 TRANSISTOR, 2SC3437-Y
Q7104 23114432 TRANSISTOR, 2SC1815-GR
Q7105 23205057 TRANSISTOR, KTC3875Y
Q7106 23205057 TRANSISTOR, KTC3875Y
Q7107 23205054 TRANSISTOR, KTA1504Y
Q7108 23205057 TRANSISTOR, KTC3875Y
Q7109 23205054 TRANSISTOR, KTA1504Y
Q7761 23205005 TRANSISTOR, KTA2014Y
Q7762 23205006 TRANSISTOR, KTC4075Y
Q7763 23205006 TRANSISTOR, KTC4075Y
Q7764 23205005 TRANSISTOR, KTA2014Y
QB01 23314962 TRANSISTOR, KTA1266 Y
QB02 23314962 TRANSISTOR, KTA1266 Y
QB51 23319808 IC, M5218AP
QB52 23314965 TRANSISTOR, KTC3198 Y
QB53 23314962 TRANSISTOR, KTA1266 Y
QB502 23114422 TRANSISTOR, 2SA562TM-Y
QB508 23114422 TRANSISTOR, 2SA562TM-Y
QB509 23114623 TRANSISTOR, 2SC2878-A
QB510 23114460 TRANSISTOR, RN1204
QB511 23114460 TRANSISTOR, RN1204
QB512 23114623 TRANSISTOR, 2SC2878-A
QB513 23114460 TRANSISTOR, RN1204
QC01 23085057 IC, USB CONTROLLER
QC02 23085062 IC, UPA1813
QC03 23085062 IC, UPA1813
QC04 23085062 IC, UPA1813
QC05 23085062 IC, UPA1813
QC08 23085061 IC, REG PQ033EZ01ZP
QE01 23135010 IC, STR-G6653
QE05 23009270 IC, PHOTO COUPLER, PS2581L1(D)
QE40 23000701 IC, NJM431L
QE50 23000806 IC, SI-8033SS
QE52 23009998 IC, ADJ REG. VO=1.5V-12.0V BA00JC5WT-V5
QE53 23000469 IC, PQ5EV3
QE54 23314141 TRANSISTOR, 2SC3852
QF01 23114735 TRANSISTOR, 2SA102-Y(C)
QF02 23314965 TRANSISTOR, KTC3198 Y
QH301 23900003 SENSOR, PHOTOSENOR SS-2109Y @E051Z
QV48 23114528 TRANSISTOR, 2SC1740S
D450 23357365 DIODE, 1N4004A-B5
D461 23224366 DIODE, FMQ-3GU
Parts No. Description
23900003 SENSOR, PHOTOSENOR SS-2109Y @E052Z
23900003 SENSOR, PHOTOSENOR SS-2109Y @E053Z
23900003 SENSOR, PHOTOSENOR SS-2109Y @E054Z
-
35
-
Page 39
Location
No.
D101 23316755 DIODE, ZENER, MTZJ33C
D301 23316581 DIODE, ZENER 7.51-7.89 MA8075-H, TX
D302 23357366 DIODE, FR105-B5
D303 23316726 DIODE, ZENER, MTZJ15C
D304 23316794 DIODE, SC570A
D305 23357365 DIODE, 1N4004A-B5
D306 23357365 DIODE, 1N4004A-B5
D327 23316715 DIODE, ZENER, MTZJ11A
D333 23316715 DIODE, ZENER, MTZJ11A
D334 23316715 DIODE, ZENER, MTZJ11A
D336 23316571 DIODE, ZENER, MA8056-M
D337 23316571 DIODE, ZENER, MA8056-M
D365 23316581 DIODE, ZENER 7.51-7.89 MA8075-H, TX
D370 23316231 DIODE, 1SS355
D401 23118056 DIODE, AG01
D402 23357366 DIODE, FR105-B5
D404 23316254 DIODE, ERC06-15
D406 23357366 DIODE, FR105-B5
D411 23316610 DIODE, ZENER CHIP 17.55-18.45V MA8180-M
D412 23118707 DIODE, RP-1H
D413 23118707 DIODE, RP-1H
D414 23357366 DIODE, FR105-B5
D415 23357366 DIODE, FR105-B5
D418 23316755 DIODE, ZENER, MTZJ33C
D419 23316231 DIODE, 1SS355
D420 23118859 DIODE, 1SS133
D421 23357366 DIODE, FR105-B5
D425 23357366 DIODE, FR105-B5
D426 23316610 DIODE, ZENER CHIP 17.55-18.45V MA8180-M
D470 23316596
D490 23316574 DIODE, ZENER CHIP VZ6.05-6.36V MA8062-M
D491 23316231 DIODE, 1SS355
D492 23316591 DIODE, ZENER, MA8100-M
D505 23316747 DIODE, ZENER, MTZJ27C
D601 23316231 DIODE, 1SS355
D602 23316231 DIODE, 1SS355
D603 23316231 DIODE, 1SS355
D604 23316231 DIODE, 1SS355
D605 23316231 DIODE, 1SS355
D606 23316231 DIODE, 1SS355
D607 23316231 DIODE, 1SS355
D608 23316231 DIODE, 1SS355
D609 23316231 DIODE, 1SS355
D611 23316231 DIODE, 1SS355
D612 23316231 DIODE, 1SS355
D613 23316231 DIODE, 1SS355
D614 23316231 DIODE, 1SS355
D615 23316231 DIODE, 1SS355
D616 23316231 DIODE, 1SS355
D617 23316231 DIODE, 1SS355
D628 23316597 DIODE, ZENER, MA8120-M
D751 23357012 DIODE, 1SS244
D752 23357012 DIODE, 1SS244
D801 23316393
D844 23316571 DIODE, ZENER, MA8056-M
D845 23316231 DIODE, 1SS355
D848 23316231 DIODE, 1SS355
D851 23357216 DIODE, D4SBL20U
D852 23316714 DIODE, RL2Z
D853 23316714 DIODE, RL2Z
D854 23357366 DIODE, FR105-B5
D862 23357366 DIODE, FR105-B5
D864 23357366 DIODE, FR105-B5
D873 23316747 DIODE, ZENER, MTZJ27C
D875 23316688 DIODE, ZENER, MTZJ9.1C
D876 23316759 DIODE, ZENER, MTZJ36C
Parts No. Description
DIODE, ZENER CHIP 11.40-11.96V MA8120-L, TX
DIODE, VRM=600V IO=6A SIP D5SB60, 4009 F05
Location
No.
D878 23316686 DIODE, ZENER, MTZJ9.1A
D879 23316747 DIODE, ZENER, MTZJ27C
D880 23316663 DIODE, ZENER, MTZJ4.3B
D881 23316231 DIODE, 1SS355
D883 23357018 DIODE, RL2
D884 23357018 DIODE, RL2
D885 23357214 DIODE, D4SBS4
D891 23357434
D894 23316231 DIODE, 1SS355
D895 23316574 DIODE, ZENER CHIP VZ6.05-6.36V MA8062-M
D899 24019485 VARISTOR, TNR10V431K
D901 23118859 DIODE, 1SS133
D906 23357012 DIODE, 1SS244
D907 23357012 DIODE, 1SS244
D908 23357012 DIODE, 1SS244
D909 23357012 DIODE, 1SS244
D912 23118859 DIODE, 1SS133
D913 23115337 DIODE, 1S1834
D916 23357012 DIODE, 1SS244
D917 23357012 DIODE, 1SS244
D918 23357012 DIODE, 1SS244
D919 23357012 DIODE, 1SS244
D921 23118859 DIODE, 1SS133
D926 23357012 DIODE, 1SS244
D927 23357012 DIODE, 1SS244
D928 23357012 DIODE, 1SS244
D929 23357012 DIODE, 1SS244
D936 23115337 DIODE, 1S1834
D940 23118859 DIODE, 1SS133
D941 23118859 DIODE, 1SS133
D942 23118859 DIODE, 1SS133
D943 23118859 DIODE, 1SS133
D944 23118859 DIODE, 1SS133
D945 23118859 DIODE, 1SS133
D962 23316574 DIODE, ZENER CHIP VZ6.05-6.36V MA8062-M
D967 23115337 DIODE, 1S1834
D4430 23357365 DIODE, 1N4004A-B5
D4431 23316593 DIODE, ZENER CHIP 10.40-10.94V MA8110-L
D7101 23118859 DIODE, 1SS133
D7102 23118859 DIODE, 1SS133
D7730 23118538 DIODE, ZENER, RD6.2ESA B2
D7731 23118538 DIODE, ZENER, RD6.2ESA B2
D7760 23316231 DIODE, 1SS355
D7761 23118520 DIODE, ZENER, RD8.2ES B2
D7762 23118520 DIODE, ZENER, RD8.2ES B2
D7763 23316231 DIODE, 1SS355
D7764 23316231 DIODE, 1SS355
D7766 23316231 DIODE, 1SS355
D7790 23316231 DIODE, 1SS355
D7791 23316231 DIODE, 1SS355
D7792 23316231 DIODE, 1SS355
D7793 23316585 DIODE, ZENER, MA8082-M
D7806 23316231 DIODE, 1SS355
DB01 23358493 DIODE, LED, SPR54MVWFLMN, RED-GRN
DB03 23358522 DIODE, LED, SIR-56SB3F
DB51 23358573 PHOTO DIODE, PIN 940NM HPI-2FER4
DB52 23118859 DIODE, 1SS133
DB54 23118859 DIODE, 1SS133
DB55 23118859 DIODE, 1SS133
DB56 23118859 DIODE, 1SS133
DB501 23118859 DIODE, 1SS133
DB504 23118859 DIODE, 1SS133
DE01 23316391 DIODE, D3SB60(4103)
DE10 23316672 DIODE, ZENER, MTZJ5.6B
DE12 23118859 DIODE, 1SS133
DE13 23118859 DIODE, 1SS133
Parts No. Description
DIODE, VRRM=40V IO=5A TO-220F15 YG801C04RF119
-
36
-
Page 40
Location
No.
DE14 23118859 DIODE, 1SS133
DE15 23357366 DIODE, FR105-B5
DE18 23316269 DIODE, AK04
DE19 23316746 DIODE, ZENER, MTZJ27B
DE52 23118213 DIODE, RK44,
DE54 23316734 DIODE, ZENER, MTZJ20B
DE55 23316746 DIODE, ZENER, MTZJ27B
DE60 23357366 DIODE, FR105-B5
DE61 23118052 DIODE, RU4Z LF-L1
DE71 23357434
DE72 23316714 DIODE, RL2Z
DE73 23357434
DE74 23357434
DE75 23316184 DIODE, FML-G12S
DE76 23357434
DE79 23316666 DIODE, ZENER, MTZJ4.7B
DH301 23316672 DIODE, ZENER, MTZJ5.6B @E051Z
KB01 23000852
Parts No. Description
DIODE, VRRM=40V IO=5A TO-220F15 YG801C04RF119
DIODE, VRRM=40V IO=5A TO-220F15 YG801C04RF119
DIODE, VRRM=40V IO=5A TO-220F15 YG801C04RF119
DIODE, VRRM=40V IO=5A TO-220F15 YG801C04RF119
23316672 DIODE, ZENER, MTZJ5.6B @E052Z
23316672 DIODE, ZENER, MTZJ5.6B @E053Z
23316672 DIODE, ZENER, MTZJ5.6B @E054Z
IC, REMOTE PHOTO RECEIVER, PIC-37043TE2
MISCELLANEOUS
BB10 23903022 CONNECTOR, BASE B-B 8P 2.5 JST
BB11 23903022 CONNECTOR, BASE B-B 8P 2.5 JST
BB20 23903022 CONNECTOR, BASE B-B 8P 2.5 JST
BB21 23903022 CONNECTOR, BASE B-B 8P 2.5 JST
BB60 23713014 CONNECTOR, BRIDGE PLUG 16P 1.5
BB70 23713309 PLUG , TAC-A46P-B1
BB100 23368627
BB200 23368627
D461B 72471082 SCREW, 3X10MM
E918 #1 23737007 BOLT, BOLT ASSY 50A60
E929 23969684
E948 #1 23737007 BOLT, BOLT ASSY 50A60
E959 23969684
E978 #1 23737007 BOLT, BOLT ASSY 50A60
E989 23969684
F470 23144624 FUSE, AXIAL 125V 2.0A
F801 23144684 FUSE, CARTRIDGE 5X20 125V 8.0A
F801A 23165433 FUSE HOLDER, 5.2 SOC
F801B 23165433 FUSE HOLDER, 5.2 SOC
F850 23144712 FUSE, AXIAL 125V 3.0A
F851 23144714 FUSE, AXIAL 125V 4.0A
F852 23144714 FUSE, AXIAL 125V 4.0A
F860 23144626 FUSE, AXIAL 125V 4.0A
F885 23144715 FUSE, AXIAL 125V 5.0A
F891 23144714 FUSE, AXIAL 125V 4.0A
FE01 23144710 FUSE, AXIAL 125V 2.0A
FE72 23144708 FUSE, AXIAL 125V 1.0A
FE73 23144715 FUSE, AXIAL 125V 5.0A
FE74 23144715 FUSE, AXIAL 125V 5.0A
FE75 23144714 FUSE, AXIAL 125V 4.0A
FE76 23144715 FUSE, AXIAL 125V 5.0A
FE77 23144715 FUSE, AXIAL 125V 5.0A
FE79 23144709 FUSE, AXIAL 125V 1.5A
G101 24011151 CHIP, METAL FILM, 1/20W 150 OHM J
G102 24011151 CHIP, METAL FILM, 1/20W 150 OHM J
GJ101 24000445 CHIP JUMPER, 1608TYPE
GJ102 24000445 CHIP JUMPER, 1608TYPE
GJ105 24000445 CHIP JUMPER, 1608TYPE
GJ107 24000445 CHIP JUMPER, 1608TYPE
GJ108 24000445 CHIP JUMPER, 1608TYPE
GJ150 24000445 CHIP JUMPER, 1608TYPE
GJ151 24000445 CHIP JUMPER, 1608TYPE
GJ170 24000445 CHIP JUMPER, 1608TYPE
CONNECTOR, BRIDGE B-B 8P 2.5JST 08TM-2.5FJ-E
CONNECTOR, BRIDGE B-B 8P 2.5JST 08TM-2.5FJ-E
TAPE, GLASS-CLOTH, W/ADHESIVE W=90 T=0.18
TAPE, GLASS-CLOTH, W/ADHESIVE W=90 T=0.18
TAPE, GLASS-CLOTH, W/ADHESIVE W=90 T=0.18
Location
No.
GJ911 24000445 CHIP JUMPER, 1608TYPE
GR103 24000445 CHIP JUMPER, 1608TYPE
GR31 24000445 CHIP JUMPER, 1608TYPE
GR32 24000445 CHIP JUMPER, 1608TYPE
GR602 24000445 CHIP JUMPER, 1608TYPE
H002 23148084 IF MODULE, US WOW MSP4440G MVUS53
H003 23344497 SWITCH, 2I3O US POD JALCO RSU142
H003A 23740989 NUT, F-CONNECTOR 2H BS
K501 #1 23311088 SCREEN, 51KP LENTICULAR SHEET
K502 #1 23311016 SCREEN, 51KN FRESNEL SHEET
K503 #1 23311019 SCREEN, PROTECTOR 51RN
K601 #1 23405249 MIRROR, 51WL
K913 23306531 REMOCON IR, BLASTER GLINK VTR CONT
MF01 23389209 CABLE, FFC P1.25-16-200
MF03 23389208 CABLE, FFC P1.25-29-70
P105 23368578
P404 23367069
P701 23368577
P710 23368578
P711 23368578
P712 23368578
P800 23368013 CONNECTOR, PLUG, 2P 11.88MM W VT-JST
P801 23372209 POWER CORD, U/C FL 125V7A CMC042P JST
P802 23164965 CONNECTOR, PLUG 4P, W-P3504-#02
P880A 23367068
P880B 23367068
P900 23164563 CONNECTOR, PLUG 3P @E051Z
P913 23368578
P915A 23367069
P915B 23367069
P917 23367069
P918 23368578
P919 23368577
P920 23164965 CONNECTOR, PLUG 4P, W-P3504-#02
PB22 23368578
PB501 23365772 JACK, EARPHONE, HSJ1406-01-020
PB502 23365772 JACK, EARPHONE, HSJ1406-01-020
PB503 23368584
PB51 23368577
PC01 23368579
PE05 23367069
PE06 23367071
PE55A 23368577
PF01 23368581
PF02 23368577
PV01 23023132 JACK, PIN 2S6P SMK LAP5030-0111GC
PV02 23023205 JACK, PIN 10P SMK KARI2
PV03 23023211 JACK, PIN 7P SMK KARI04
PV05 23365819 JACK, 1S3P
PV60 23367070 PLUG , NP 2.5MM G JST-EH B10B-EH-F1A
Q404B 72471082 SCREW, 3X10MM
S701 23145227 SWITCH, PUSH, 1C1P
SA01 23145226 SWITCH, 1C1P, PUSH
SA02 23145226 SWITCH, 1C1P, PUSH
SA03 23145226 SWITCH, 1C1P, PUSH
SA04 23145226 SWITCH, 1C1P, PUSH
SA05 23145226 SWITCH, 1C1P, PUSH
SA06 23145226 SWITCH, 1C1P, PUSH
SA07 23145226 SWITCH, 1C1P, PUSH
Parts No. Description
#2 23311013 SCREEN, 57KNH LENTICULAR SHEET
#2 23311014 SCREEN, 57KN FRESNEL SHEET
#2 23311862 SCREEN, PROTECTOR 57RL
#2 23405028 MIRROR, 57WL 1070/770*600*3
CONNECTOR, PLUG 4P, 2.5MM G JST-EH, B4B-EH-F1-TV4
CONNECTOR, PLUG, NP 2.5MM G JST-EH, B9B-EH-F1A
CONNECTOR, PLUG, 3P 2.5MM G JST-EH, B3B-EH-F1-TV4
CONNECTOR, PLUG 4P, 2.5MM G JST-EH, B4B-EH-F1-TV4
CONNECTOR, PLUG 4P, 2.5MM G JST-EH, B4B-EH-F1-TV4
CONNECTOR, PLUG 4P, 2.5MM G JST-EH, B4B-EH-F1-TV4
CONNECTOR, PLUG 8P, 2.5MM G JST-EH B8B-EH-F1-TV4
CONNECTOR, PLUG 8P, 2.5MM G JST-EH B8B-EH-F1-TV4
23164563 CONNECTOR, PLUG 3P @E052Z
23164563 CONNECTOR, PLUG 3P @E053Z
23164563 CONNECTOR, PLUG 3P @E054Z
CONNECTOR, PLUG 4P, 2.5MM G JST-EH, B4B-EH-F1-TV4
CONNECTOR, PLUG, NP 2.5MM G JST-EH, B9B-EH-F1A
CONNECTOR, PLUG, NP 2.5MM G JST-EH, B9B-EH-F1A
CONNECTOR, PLUG, NP 2.5MM G JST-EH, B9B-EH-F1A
CONNECTOR, PLUG 4P, 2.5MM G JST-EH, B4B-EH-F1-TV4
CONNECTOR, PLUG, 3P 2.5MM G JST-EH, B3B-EH-F1-TV4
CONNECTOR, PLUG 4P, 2.5MM G JST-EH, B4B-EH-F1-TV4
CONNECTOR, PLUG, 3P2.5MM W EH-JST S3B-EH
CONNECTOR, PLUG, 3P 2.5MM G JST-EH, B3B-EH-F1-TV4
CONNECTOR, PLUG 5P, 2.5MM G JST-EH, B5B-EH-F1-TV4
CONNECTOR, PLUG, NP 2.5MM G JST-EH, B9B-EH-F1A
CONNECTOR, PLUG, NP 2.5MM G JST-EH, B11B-EH-F1A
CONNECTOR, PLUG, 3P 2.5MM G JST-EH, B3B-EH-F1-TV4
CONNECTOR, PLUG 7P, 2.5MM G JST-EH B7B-EH-F1-TV4
CONNECTOR, PLUG, 3P 2.5MM G JST-EH, B3B-EH-F1-TV4
-
37
-
Page 41
Location
No.
SA08 23145226 SWITCH, 1C1P, PUSH
SA09 23145226 SWITCH, 1C1P, PUSH
SR81 23146577 RELAY, DLS5D1-O(M)0.25W DLS5D1-O(M)0.
SR82 23146564 RELAY, DC12V, TV5, DG-3
UF02 23125924 DC FAN, D06A-12TM 05B(K) D06A-12TM05B(K)
V901A 23903180 SOCKET, ISHM62S-WE ICE ISHM62S-WE
V902A 23903180 SOCKET, ISHM62S-WE ICE ISHM62S-WE
V903A 23903180 SOCKET, ISHM62S-WE ICE ISHM62S-WE
W661 23351242 SPEAKER, 160X160 8-OHM 20W SPK-1424AW
W662 23351242 SPEAKER, 160X160 8-OHM 20W SPK-1424AW
XC01 23153589 CRYSTAL RESONATOR, XTAL 12MHZ
Z401 23140203
Z410 23110841 FOCUS PACK, TPA6030
Z450 24083014 COMPOSITE PARTS, CR-BLOCK TPA5011AH
Z450A 23501755 ANODE CABLE, 400LD FBT-C
ZC01 24019479 CHIP BLOCK, 1/32W 22 OHM J X-8
ZC02 24019479 CHIP BLOCK, 1/32W 22 OHM J X-8
ZC03 24019479 CHIP BLOCK, 1/32W 22 OHM J X-8
ZC04 24019479 CHIP BLOCK, 1/32W 22 OHM J X-8
ZC05 24019479 CHIP BLOCK, 1/32W 22 OHM J X-8
ZC06 24019479 CHIP BLOCK, 1/32W 22 OHM J X-8
ZC07 24019479 CHIP BLOCK, 1/32W 22 OHM J X-8
ZC08 24019479 CHIP BLOCK, 1/32W 22 OHM J X-8
ZC09 24019479 CHIP BLOCK, 1/32W 22 OHM J X-8
ZC10 24019479 CHIP BLOCK, 1/32W 22 OHM J X-8
ZC11 24019479 CHIP BLOCK, 1/32W 22 OHM J X-8
ZC12 24019479 CHIP BLOCK, 1/32W 22 OHM J X-8
ZC13 24019479 CHIP BLOCK, 1/32W 22 OHM J X-8
ZC19 24019404 CHIP BLOCK, 1/16W P-8 10K OHM J
ZC20 24019404 CHIP BLOCK, 1/16W P-8 10K OHM J
ZC21 24019404 CHIP BLOCK, 1/16W P-8 10K OHM J
ZH04 23103778 FERRITE CORE, TFE1008
ZH05 23103840 FERRITE CORE, TFE1013
Parts No. Description
SPARK GAP, 2.0-3.0KV C-010, AG20PC152F-L3N
PC BOARD ASSEMBLIES
E021Z 23762345
*
E022Z 23762346
*
E023Z 23762347
*
E024Z 23762348
*
E031Z 23762349
*
E032Z 23762350
*
E033Z 23762351
*
E034Z 23762352
*
E045Z 23788823 PC BOARD ASSY, IR BLASTER PU PD1289
*
E051Z 23762004 PC BOARD ASSY, CONV-SEN PU PD0079B
*
E052Z 23762005 PC BOARD ASSY, CONV-SEN2 PU PD0079B2
*
E053Z 23762006 PC BOARD ASSY, CONV-SEN3 PU PD0079B3
*
E054Z 23762007 PC BOARD ASSY, CONV-SEN4 PU PD0079B4
*
U001 23148111 SCAN CONVERTER MODUL, MHSU21
*
U401 #1 23762342
*
*
*
*
*
*
*
*
*
#2 23762476
U601 23762344
U711 23762343
UB11 23762851
UC01 23762334
UE01 23762333
UF01 23762779
UZ01 23148112 MODULE, DIGITAL SHU153 SHU153
PC BOARD ASSY, BACK/AV 51H94 PU PD1735B1
PC BOARD ASSY, FRONT-CON 51H94 PU PD1735B2
PC BOARD ASSY, FRONT-IN 51H94 PU PD1735B3
PC BOARD ASSY, REMOTE 51H94 PU PD1735B4
PC BOARD ASSY, CRT/SVM/R 51H94 PU PD1733D1
PC BOARD ASSY, CRT/SVM/G 51H94 PU PD1733D2
PC BOARD ASSY, CRT/SVM/B 51H94 PU PD1733D3
PC BOARD ASSY, SVM/DIV 51H94 PU PD1733D4
PC BOARD ASSY, DEFPOWER 51H94 PU PD1730H
PC BOARD ASSY, DEFPOWER 57H94 PU PD1730J
PC BOARD ASSY, IF/AUDIO 51H94 PU PD1731B2
PC BOARD ASSY, CONVER 51H94 PU PD1731B1
PC BOARD ASSY, FRONT CONT51H94 PU PD1971A
PC BOARD ASSY, MULTICARD 51H94 PU PD1821A
PC BOARD ASSY, SUB POWER 51H94 PU PD1820A
PC BOARD ASSY, FAN UNIT 51H94 PU PD1953A
PICTURE TUBE
V901R #1 23078429 OTHER BLOCK, COUPLING R
#2 23078361 OTHER, COUPLING R
V902G #1 23078430 OTHER BLOCK, COUPLING G
#2 23078358 OTHER, COUPLING G
V903B #1 23078431 OTHER BLOCK, COUPLING B
#2 23078362 OTHER, COUPLING B
Location
No.
Parts No. Description
TUNER
H001 23321495
TUNER, US864M IIC PH 5V PANA ENV56DF3G3F
ACCESSORIES
A701 #1 23067099 CARTON, CARTON
#2 23067100 CARTON, CARTON
A703 #1 23946479 PACKING, TOP PACKING
#2 23946481 PACKING, TOP PACKING
A708 #1 23946478 PACKING, BOTTOM PACKING
#2 23946480 PACKING, BOTTOM PACKING
A709 #1 23946483 PACKING, BOTTOM TRAY
#2 23946187 PACKING, BASE TRAY
K912 23306562 REMOCON HAND UNIT IR, DTVUSA CT-90216
Y101 23566378 OWNERS MANUAL, ENGLISH 51H94
Y101F 23566379 OWNERS MANUAL, FRENCH 51H94
CABINET PARTS
A001 #1 23429055 CABINET, WOOD CABI SHIP
#2 23429091 CABINET, WOOD CABINET SHIP
A102 #1 23527268 GRILLE, SPEAKER GRILLE 51 REG
#2 23527269 GRILLE, SPEAKER GRILLE 57 REG
A160 23469228 CASTER, TP50H60
A201 #1 23530779 COVER, BEZEL
#2 23532728 COVER, BEZEL ASSEY
A202 23450836 PANEL, CONTROL PANEL ASSEY
A213 23428201 DOOR, DOOR
A215 23929911 PIECE, SNAP-IN GEAR DAMPER CONNON
A222 23929910 PIECE, FILTER
A223 23445705 BUTTON, POWER BUTTON
A268 #1 23530772 COVER, FRONT COVER
#2 23530770 COVER, FRONT COVER
A331 #1 23929897 PIECE, POLE BOTTOM LEFT
#2 23929899 PIECE, POLE BOTTOM LEFT
A332 #1 23929898 PIECE, POLE BOTTOM RIGHT
#2 23929900 PIECE, POLE BOTTOM RIGHT
A401 #1 23530781 COVER, BACK COVER
#2 23429132 CABINET, BACK COVER ASSEY
A421 23530812 COVER, REAR BOARD
A424 23429059 CABINET, BACK BOARD
A510 23030815 SCREW, WOOD, PTD #6 X 3/4
A721 23943628 PLYETHLENE COVERING 46GM88T
-
38
-
Page 42
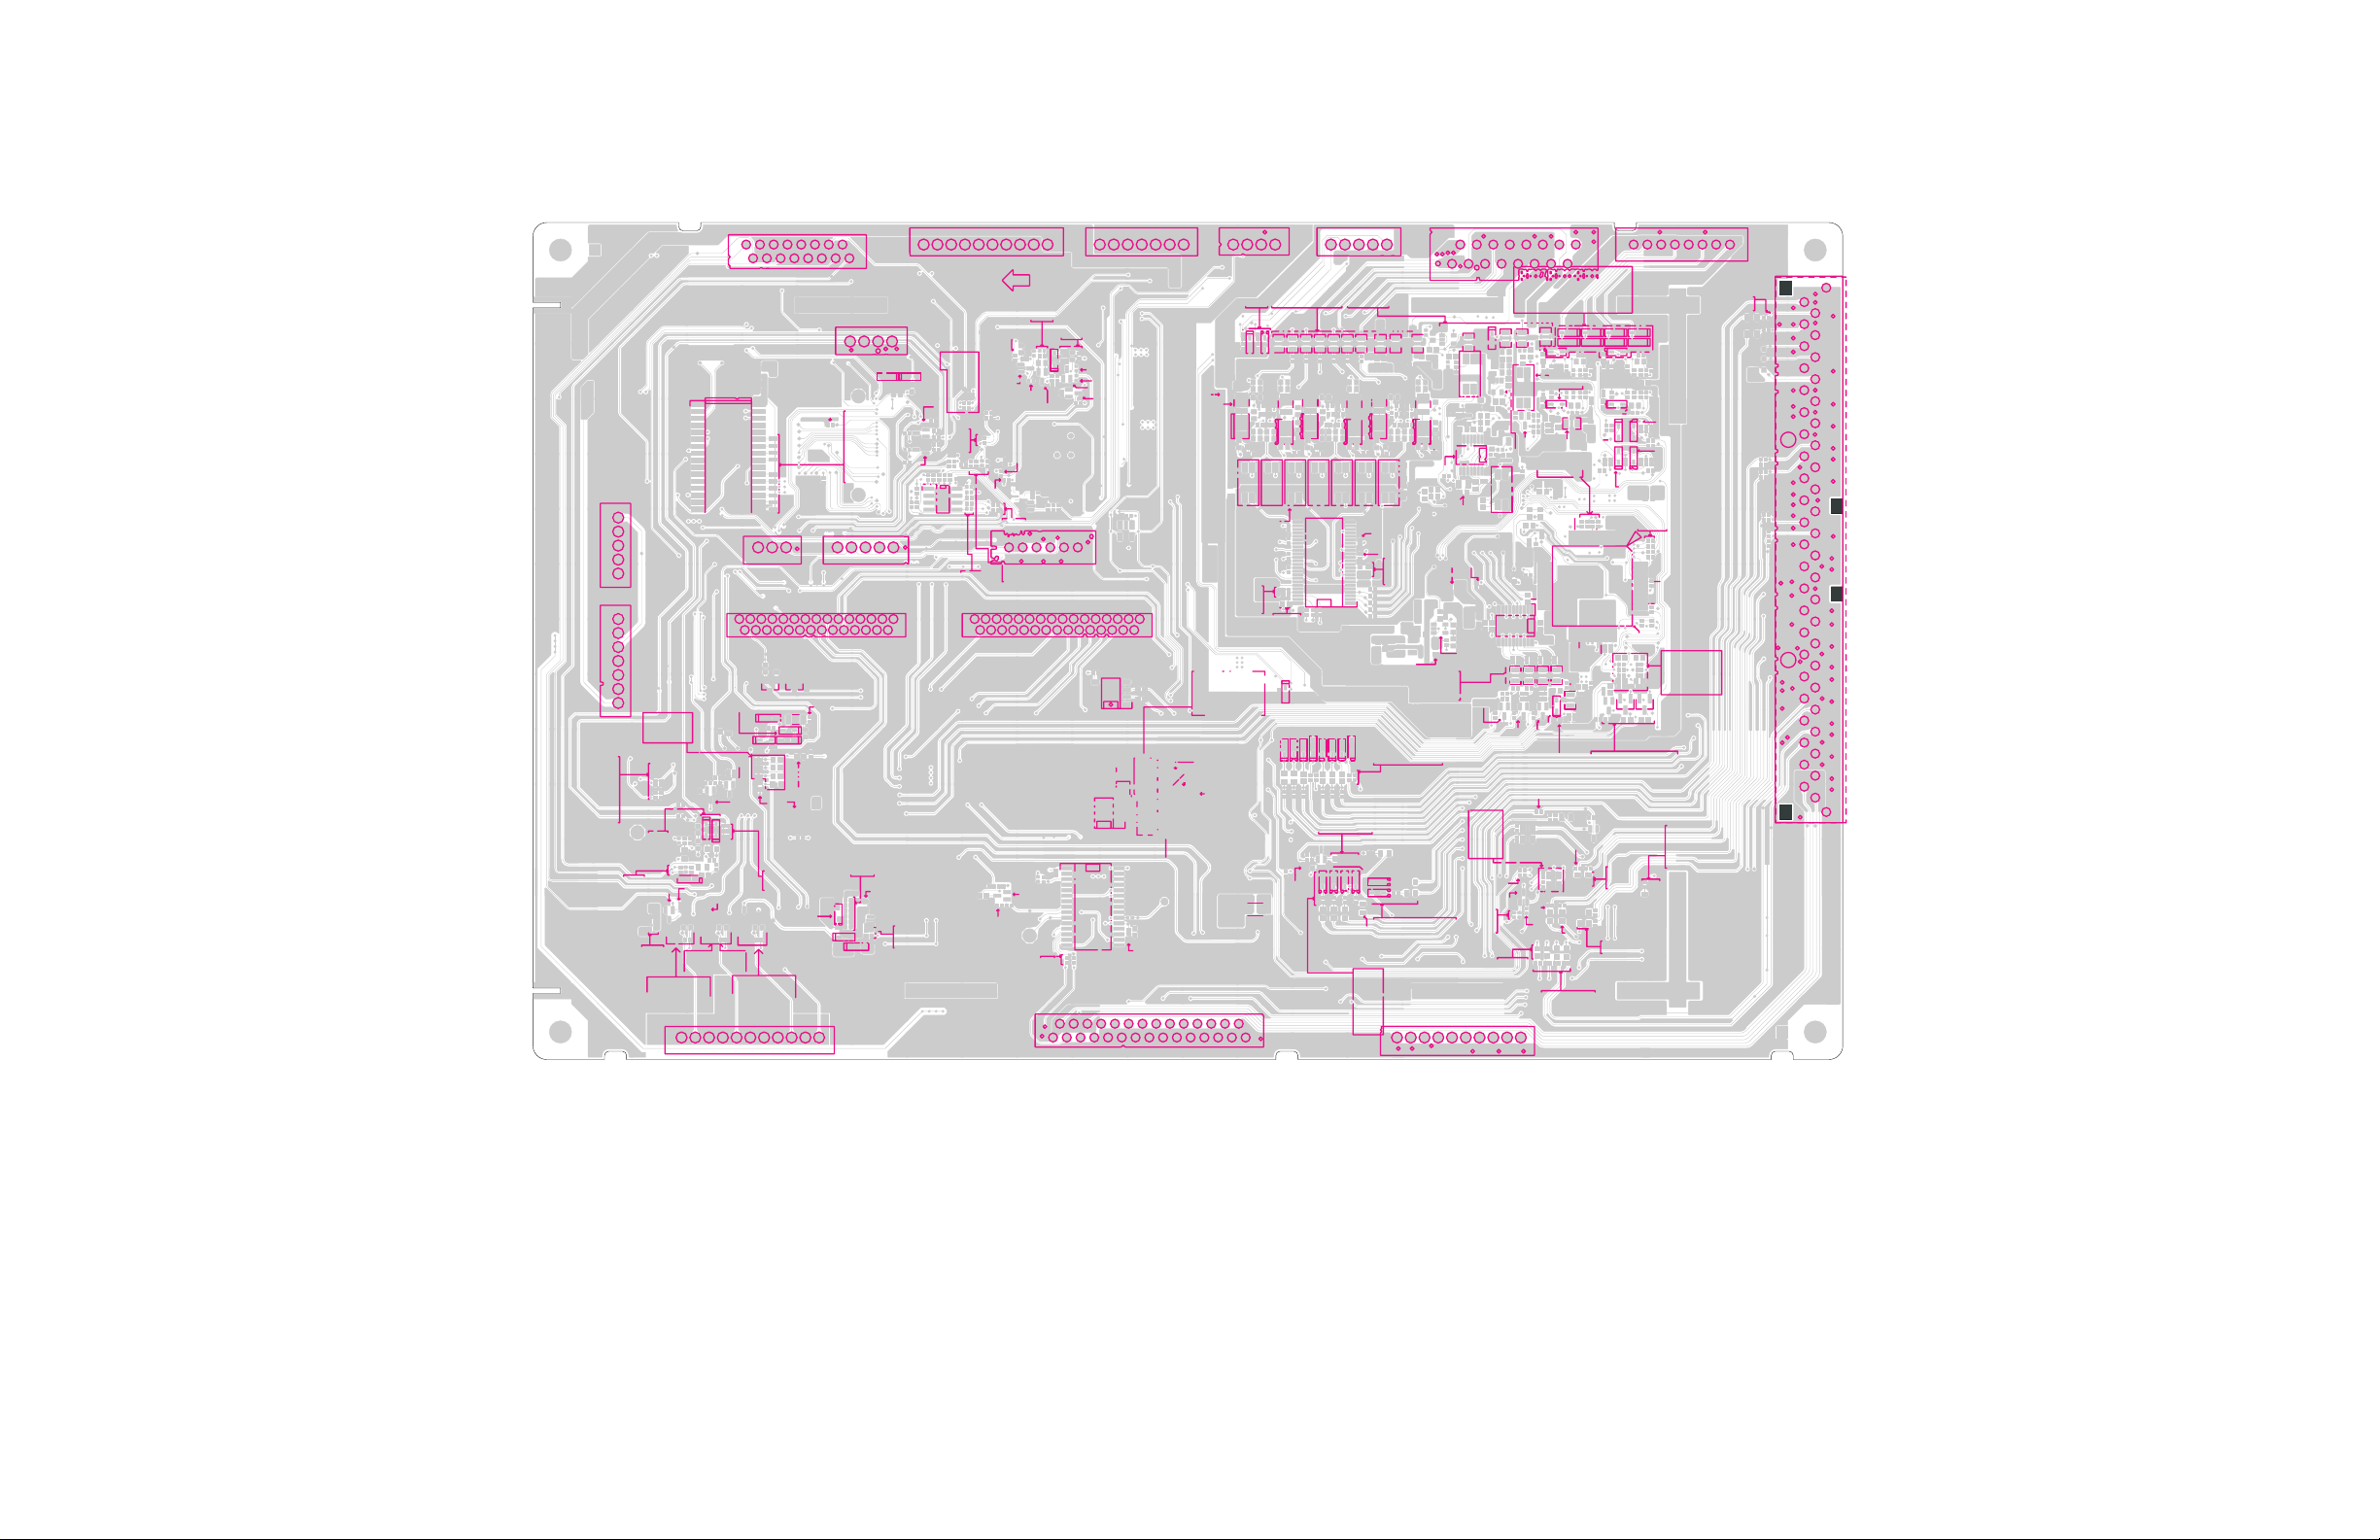
SCAN CONVERTER MODUL, MHSU21 PD1819 (U001 )
BOTTOM (FOIL) SIDE
GJ908
GJ906
GJ906
GJ908
C532
C533
C534
CC25CC26
CC27
R4413
R4405
C572
R572
R571
C539
C531
C537 C538
C535
C536
C530
C532
C533
CC25 CC26
C534
CC27
D4606
D4604
D4605
Q524
C4405
Q524
C572
R572
R5103 R5106
R571
R5104
R5103
R5104
R555
R554
C4404
C505
R4401
C4031
C4403
R4405
C4405
R4413
D4605
R549
R2155
R2149
R5106
R5107
R2155
R2149
QB501
C565
R528
C4603
R4407
L4010
R4414
Q525
R549
Q525
C563
C565
R523
R527
Q531
R4605
C4602
D4604
D4606
R4606
C4010
R4409
R4409
R4411
R2156
R5107
R2150 R2151
R2156
R2150
QB501
C205
C563
C205
D512
Q530
R522
Q530
Q531
C4010
R4411
Q526
D502
R521
Q526
R5109
R5110
R5109
R5110
CB502
CB501
LA24
RA207
RA209
D540
D512 D513
C531
C537
C536
GJ110
R5102
R2157
LB19
LB19
CB502
CB501
RB516
RB529
RB528
RB517
RB519
RB520
RB521
RB522
RB523
RB524
LA24
D540
R245
R4715
C539
C538
C535
C530
CR15
CR16
CR17
CR12
CR13
CR14
R4605
C4602
R4606
R5102
R5101
R2157
R2151
LA23
LA23
RA206
C520
D502
D513
GJ110
R5101
QA206QA207
C520
C513
R520
R520
C513
CR15
CR16
CR17
CR12
CR13
CR14
RA208
R513
C515
R7866
L503
C2110
C540
D536
RA50
CA34
R513
C515
R7866
L503
D532
RA50
CA34
C2110
D532
C540
RB516
RB529
RB528
RB517
RB519
RB520
RB521
RB522
RB523
RB524
R546
R545
R544
R543
R542
R541
D536
D531
R546
R545
R544
R543
R542
R541
D531
R539
Q523
R538
GJ912
DA51
R539
R537
GJ912
CA302
RA302
RA114
RA85
RA87
RA302
Q523
DA50DA51
CA301
RA301
RA301
RA114
RA85
RA87
RA48
RA49
RA67
R537
R538
DA50
CA301CA302
RA80
RA71
RA48
RA49
RA67
RA80
RA71
RA303
QA17
QA08
QA08
CA24
RA41
RA23
RA38
RA86
RA22
RA39
QA02
CA13
QA17
RA113
RA37
RA99
QA02
CA10
RA94
RA93
RA96
RA115
RA35
RA036
R581
CA13
RA94
RA93
CA08
CA15
RA95
RA28
RA42
RA90
CA10
CA11
CA15
RA95
RA28
RA42
RA90
RA08
R580
CA09
R581
RA06
RA06
RA05
RA05
CA11
RA10
RA12
RB52
GJ33
R580
R579
CA28
RA100
RA02
RA01
GJ33
R582
R582
GJ910
RA100
CA28
RA20
RA20
RA121
RB52
RA01
Q517
R578R579
R578
RA98
CA31
RA98
QA13
RA77
RA121
RA02
RA08
GJ910
RA74
CA38
RA73
CA33
RA74
QA13
RA77
QA16
QA09
QA09
CA09
Q517
RA78
CA38
RA78
RA73
CA33
QA16
RA43
RA47
QA10
R570
B
QA10
RA10
R585
RA97
CA25
RA47
RA15
RA16
RA12
GJ34
GJ34
R570
R516
DA41
DA41
RA118
RA43
RA14
C508
C508
R585
R514
CA39
CA39
QA20
RA62
RA061
RA62
RA16
CV28
Q501
R516
RA72
RA72
RA120
RA119
QA14
RA061
RA15
R514
RA062
RA062
QA20
RA14
CV17
CV17
QV05
QV04
RA120
RA119
RV44
RV43
RV42
CV28
QV04
Q501
QA14
QV05
GJ35
GJ35
CB44
CB44
QB44
RV44
RV43
RV42
C501
DH307
ZH725
ZH001
CH051
QH005
LH001
QH011
QR16
GJH94
LH985
LH062
CH053
GJH86
GJH84
CH007
CH007
LH001
CS30
RS42
CS29
RS41
DH013
LH071
QH010
RH017
GJH95
GJH85
CH062
RH061
RH051
CH250
ZH051
ZH051
GJH84
QH004
RH705
RH704
RR56
RS23
RS24
QS02
RS25
RS26
ZH724
CH801
LH067
GJH90
CH802
GJH87
CH061
CH052
RR63
RR57
QR15
CS18
DH308
DH312
CH410
RH011
ZH408
RH422
QH406
QH010
LH061
GJH80
GJH98
QH004
CH044
RH044
ZH704
RH055
RR62
RR55
QR15QR16
RR54
RS21
RS21
RS22
RS22
RS23
RS24
QS02
RS26
RS25
CS17
ZH712
LH411
RH450
RH421
RH420
RH428
RH427
QH406
CH004
GJH97
RH013
RH430
CH005
RH721
CH043
RH043
ZH703
RH056 RH057
QR14
RS33
CS21
CS22
RS27
CS15
CS16
RH339
RH316
ZH408
RH315
RH338
RH355
GJH04
GJH03
GJH07
RH404
CH020
12
22
RH723
RH042
ZH700
RR61
RR53
QR14
RR52
RH059
RS33
CS21
CS22
RS42
RS41
RS11
RS27
CS18
RS18
RS18
CH328
CH352
RS11 RS12
DH002
ZH729
ZH730
ZH731
ZH732
ZH723
DH003
RH209
RH210
ZH723
DH003
ZH729
ZH730
DH002
CH015
CH016
RH782
CH667
RH669
CH664
RH666
CH679
CH990
CH663
RH665
RH664
ZH121
ZH122
RH566
CH579
CH563
RH565
RH564
CH567
RH569
LH562
LH561 LH562
RH561
RH783
LH642
CH992
CH564
CH562
RH641
CH565
ZH141
CH518
QB44
LH995
LH987
RH996
LH992
LH992
LH995
LH662
LH661 LH662
LH661
RH661
ZH500 ZH121 ZH122
LH987
RH996
ZH500
CH662
CH665
CH518
CH511 CH512CH513
CH513
CH511 CH512
RH509
CH517
CH507
RH512
CH517
RH509
RH504
CH507
RH512
RH504
RH063
RV003
RV005
RV001
DH007
RH063
DH007
DV01
DV03
DV05
DV01
DV03
DV05
CV01
CV03
CV04
RV01
RV03
RV06
RV01
RV03
RV06
RV04
RV04
RV05
RV05
CV10
CV71
CV71
CV10
LV502
LV501
RV009
RV010
RV012
QV008
RV025
RV023
RV023
RV011
QV002
QV008
RV024
RV025
QV010
QV011
RV013
QV009
RV010
RV024
LV502
LV501
RV004
RV006
RV002
GJ40
GJ40
RV80
RV80
RV79
RV79
GJ41
QV001
RV004
RV009
QV010
QV001
RV003
RV006
RV011
QV011
QV002
RV005
RV013
RV002
QV003
QV009
RV001
QV003
C501
R501
R501
C504
C511
C511
C504
ZH728
ZH733
ZH731
RH770
CH647
RH649
CH644
RH646
CH991
CH643
LH641 LH642
RH645
RH644
CH642
CH645
ZH141 ZH142
QH501
RH505
RH506
RH506
RH505
GJ90
DV07
DV07
DV09
RV32
CV05
RV07
RV08
CV46
QV80
QV80
RV02
DV258
RV348
CV247
CV247
ZH720
ZH721
ZH732
RH771
RH546
CH659
CH559
CH543
RH545
RH544
ZH142
DV09
DV10
DV10
CV11
RV11
RV08
RV11
CV46
DV257
RV347
CV246
CV246
ZH722
ZH733
RH784
CH547
RH549
RH541
QH501
DV11
DV14
DV11
RV14
CV13
RV12
RV12
RV146
RV147
RV146
DV256
RV346
CV245
CV245
QH002
ZH725
ZH728
RH781
LH542
LH541
CH545
ZH161 ZH162
ZH161
CH514 CH515CH516
DV14
RV33
RV147
RV02
DV243
RV325
CV251
DV258
RV348
DH013
ZH724
CH032
LH122
LH542
CH994
LH621 LH622
CH544
CH542
RH621
CH515
LH980
RH507
RH508
RH501
RH502
RH503
LH701
DV241
DV242
DV242
DV241
CV251
DV256
DV257
RV346
RV347
ZH712
ZH713
ZH720
LH004
CH627
RH629
CH624
RH625
RH624
CH622
CH625
ZH162
CH516
RH507
RH508
RH501
RH502
RH503
CH702
CH702
LH701
CV01
CV03
CV02
CV02
RV323
RV324
DV243
RV325
ZH721
RH626
RH526
CH639
CH539
CH993
CH523
CH623
RH525
RH524
LH994
LH997
RH510
CH514
LH980
QH570
RV07
CV04
RV323
RV324
CH035
QH570
RV32
CV249
CV250
CH033
ZH722
CH527
RH529
LH522
RH521
LH002
LH702
CH703
LH073
CV05
RH030
CH037
RH001
LH005
LH123
LH522
LH521
CH525
QH005
GJH05
GJH06
RH722
CH008 CH009
CH008 CH009
CV11
CV13
CV249
CV250
CH995
CH524
CH522
CH001
RH025
QH011
LH073
ZH704
RV14
RV33
QH002
LH066
CH066
ZH001
CH071
RH068
CH068
RH069
LH521
LH800
RH800
CH247
CH247
LH002
CH025
RH010
RH012
CH026
ZH700
ZH703
GJH12
CH416
RH052 RH053
LH800
RH800
ZH705
DH304
DH306
DH310
DH307
ZH713
DH308
DH312
CH318
CH312
CH309
RH311
RH312
DH311
CH308
RH307
RH308
DH311
CH311
CH317
ZH714
LH306
ZH714
RH413
RH401
RH402
CH006
11 1
23
CH041
CH042
RH041
ZH705
ZH706
LH065
RH058
CH048
CH014
ZH706
DH010
RH059
CH060
RH060
DH010
CH060
RS40
RS39
CS27
CS27
RS39
RS40
RS07
RS07
CS30
CS29
RS12
CS11
CS12
CS12
CS11
CS15
CS16
CS17
RS15RS16RS17
RS16
RS15
RS17
DH305
DH306
RH345
CH310
RH346
CH307
LH302
LH982
RH412
RH413
RH402
QH401
RH060
RS34
QS09
RS08
RS08
CS08
CS07
CS13
CS14
CH325CH326
DH309
CH331
DH315
RH328
RH412
RH401
RH008
RH365
CH364
QH364
RH365
RS34
QS09
RS13RS14
DH302
DH303
DH304
DH310
RH337
RH314
RH305
RH313
RH302
DH309
RH336
RH331
RH321
RH319
RH327
RH431
RH407
RH368
RH364
QH364
CS07
RS13RS14
CS13
CS14
CH303
CH302
CH305
CH315
CH314
DH315
DH313
CH313
DH313
QH401
33
RH418 RH419
RH416
RH002
RH004
RH362
RH362
CS08
DH301
DH302
CH316
CH306
RH306
RH301
DH316
DH314
RH414
RH003
RH005
LH063LH064
CH017CH018
CH304
LH988
CH301
RH333
RH329
RH440
RH441
RH442
RH443
34
QH362QH363
RH363
CH323
RH343RH344
CH324
DH316
RH323
RH324
RH334
RH332
RH317
RH318
RH330
RH994
LH993
RH440
RH441
RH442
RH443
44
CH407
RH408
RH211
RH212
RH418RH419
RH416
RH002
RH004
QH362QH363
RH363
RS05
RS06
CS05
CS06
DH314
RH994
LH993
CH407
RH408
RS06
CS06
GJ93
RS05
CS05
GJ93
RH414
RH003
RH005
LH063LH064
CH017CH018
CS31
CS32
LA28
LA27
LA26
RC01
CC01
RC02
CC02
RC03
CC03
RS74
RS75
RS74
CS31
RS75
CS32
LA28
LA27
LA26
RC01
CC01
RC02
CC02
RC03
CC03
CC04
CC04
RC04
RC04
DH301
DH303
DH305
-
39
- -
40
-
Page 43
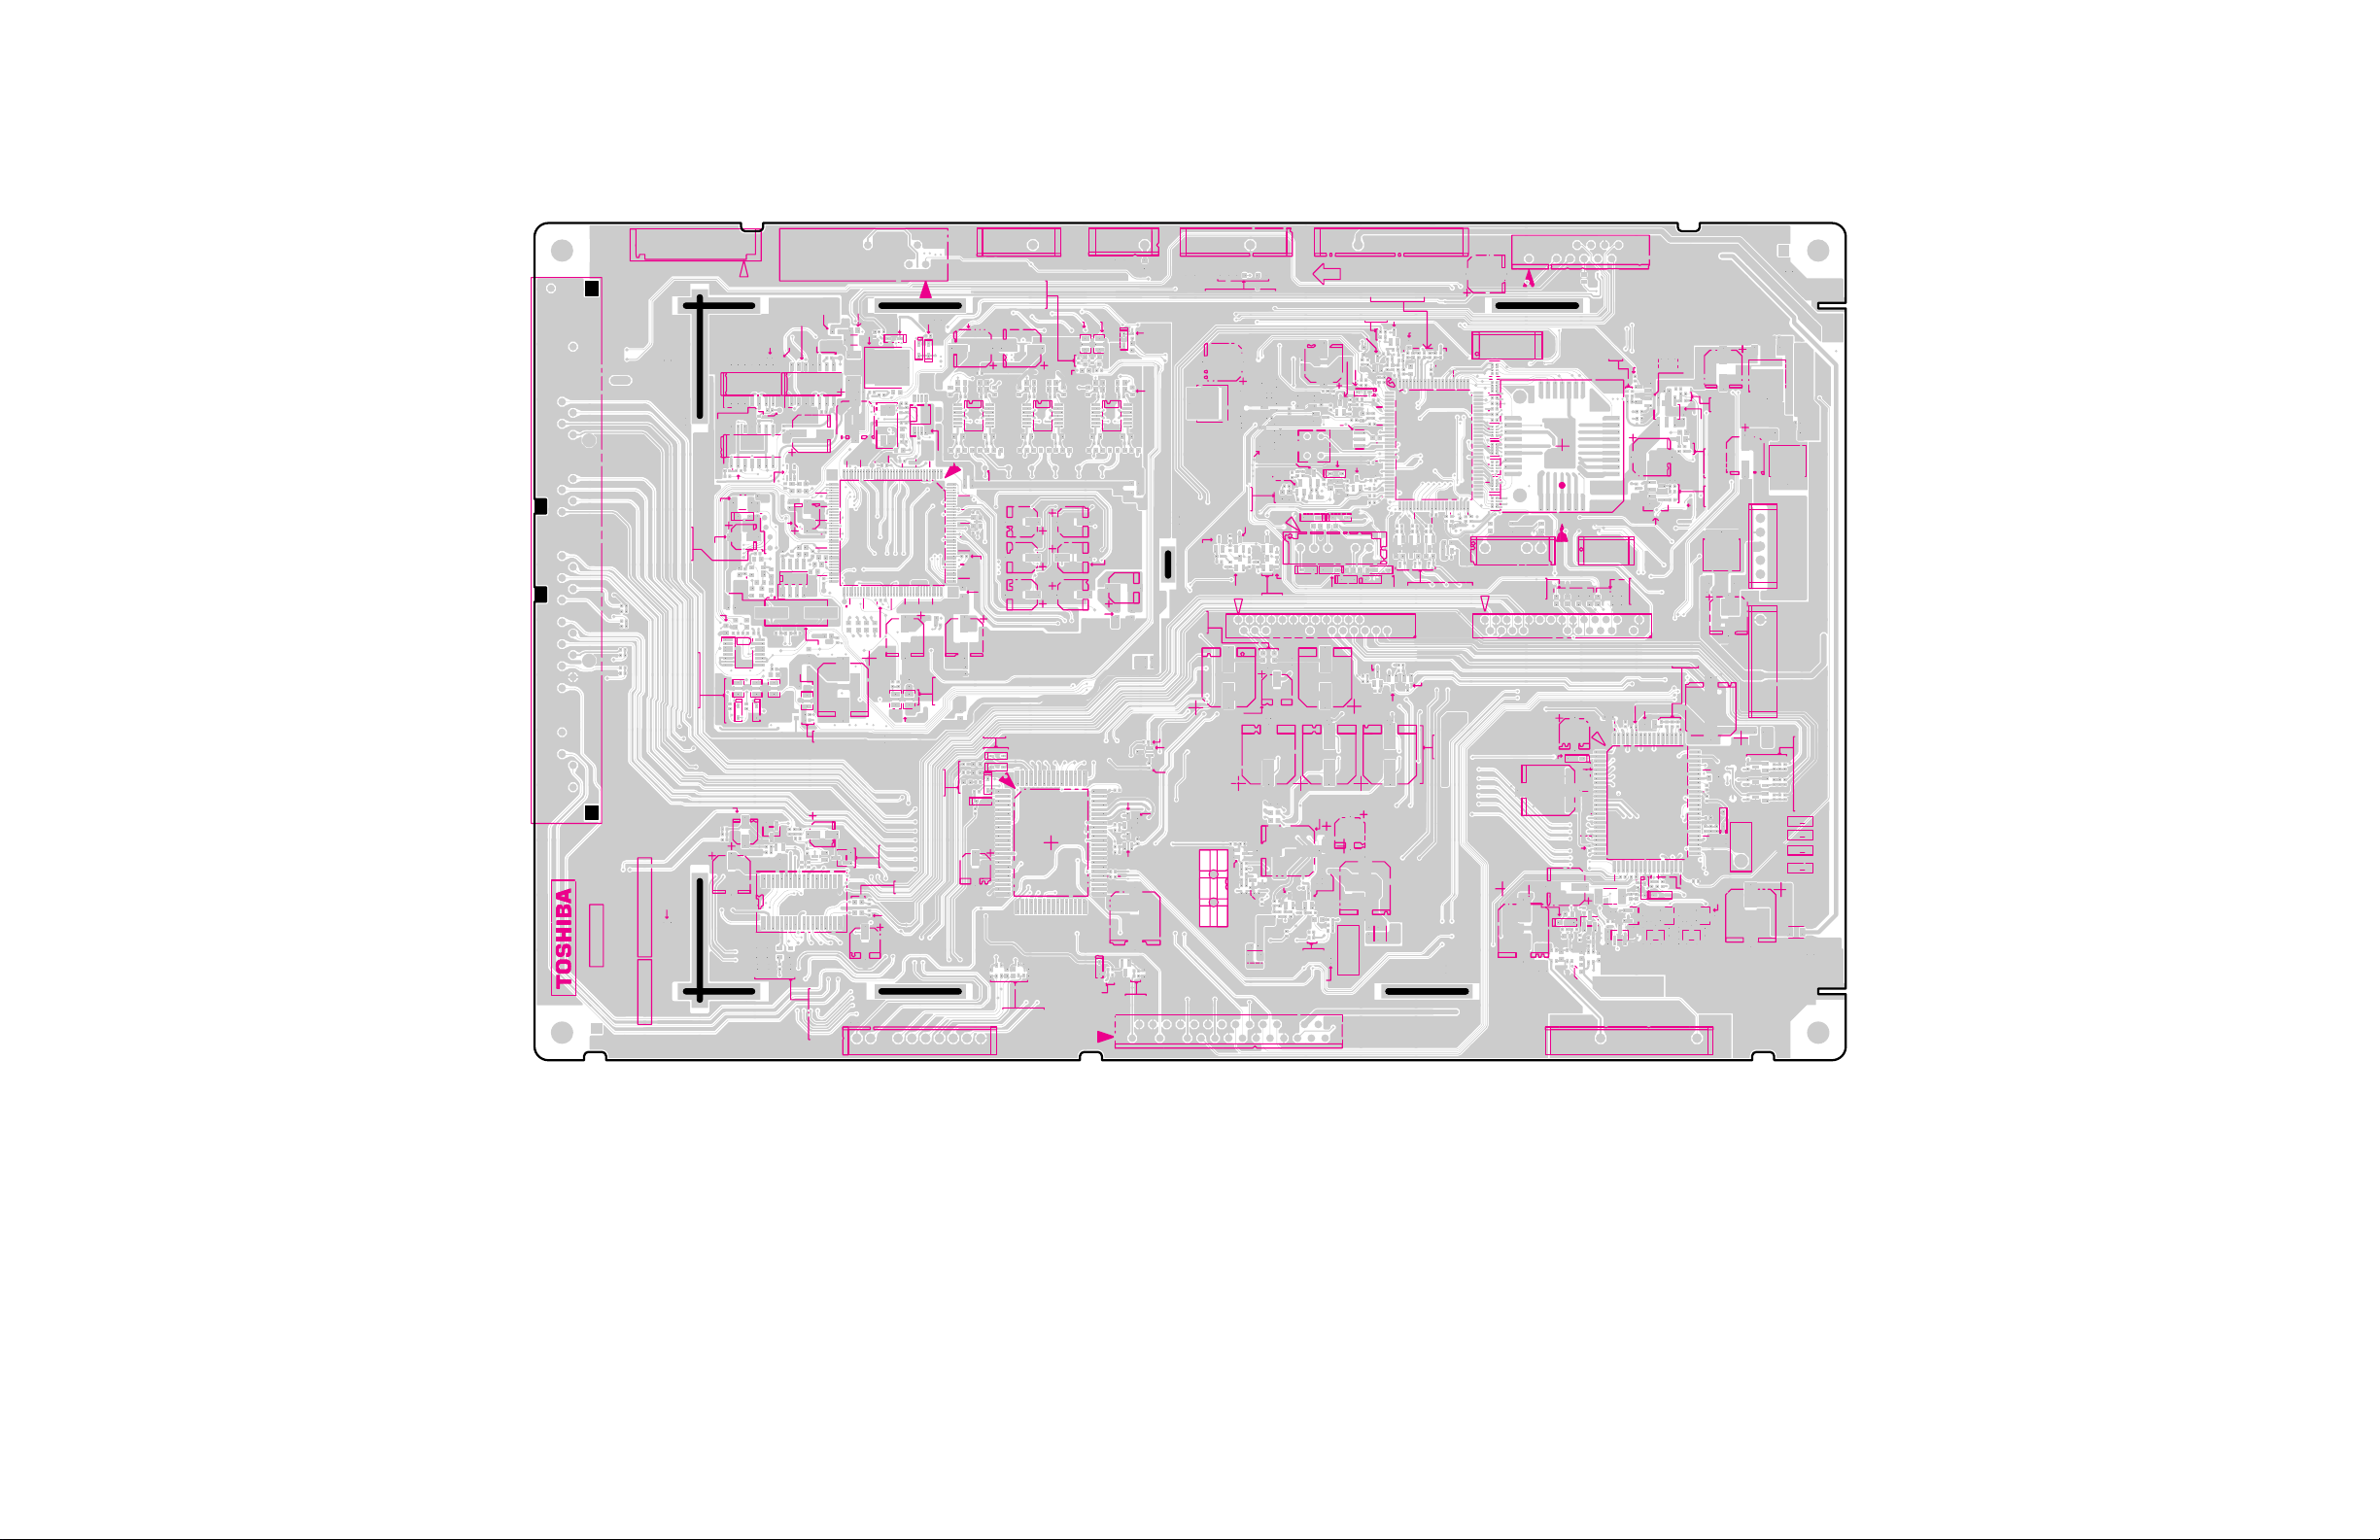
SCAN CONVERTER MODUL, MHSU21 PD1819 (U001 )
TOP (COMPONENT) SIDE
PB71
8
GJ909
PB71
RC05
RC05
CC05
CC05
RC06
RC06
CC06
CC06
RC07
RC07
CC07
CC07
RC08
RC08
CC08
CC08
MHSU21
Hyper-Signal-TypeC
PH004
PH004
GJ909
GJ91
TPBM1
GJ91
RH326
RH347
LH401
DH401
TPTP2
TPBM2
CH408
TPLT2
TPRT2
QH173
LH404
ZH701
ZH707
ZH709
DH005
DH006
RH366
RH367
RS32
CC11
RC09
GJ901
GJ901
PD1819 23590041B
QH305
QH307
RH326
RH347
RH325
LH404
RH411
RH411
QH404
RS32
CC11
RC09
CS23
RH325
LH401
DH401
CH408
QH407
RH410
RH415
ZH701
RH367
DH005
CS25
CS23
QS01
RH304
QH305
QH307
LH412
CH421
RH409
RH417
QH404
RH366
CS25
RH304
RH303
RH322
QH810
LH405
CH409
TPTP2
TPBM2
CH420
RH432
QH407
RH425
RH433
LH413
CH414
ZH709
DH006
QS08
CS02
RS02
TPLT2
TPRT2
CH045
LH704
QS08
RS30
RS37
QS03
CS01
RS01
QH306
TPTP1
TPTP1
TPBM1
RH320
QH810
CH241
RH435
RH434
RH429
CH402
ZH707
QS03
CS09
RS09
RH853
RH851
RH009
CH003
RH201
QH173
XH401
CH401
LH003
LH986
LH986
RC10
CC12
RC10
RS29
QS01
CS10
RS10
RH361
TPLT1
QH306
CH321
CH321
RH854
RH855
CH003
RH867
RH868
RH842
RH843
LH126
CH031
ZH711
ZH711
RH020
CH030
CC12
RS31
RS31
RS38
RS35
RS36
RH309
37
RH202
RH850
TPUFO0
LH125
XH401
RH020
CH030
CS26
QS04
CS02
RS02
RH361
RH310
TPRT1
36
CH010
RH860
72
CS09
CS01
RS09
RS01
CH366
CH362
TPLT1
CH363
73
TPUFO1
TPUFO1
CH040
CH011
CS26
QS07
CS10
1
RS10
PH001
PH001
CH366
CH362
CH365
CH363
ZH002
RH018
RH016
CH022
CS19
CS20
CS24
GJ902
RH034
QH361
RH035
CH028
CH029
TPEXHR
RH014
RH015
RS19
RS20
CS24
GJ902
DH012
DH012
QH361
ZH002
CH023
QH001
CH022
CH011
GJ92
QS04
RS19
LH070
RH072
RH062
CH019
ZH708
RV15
RV17
CV15
QS07
CS19
CS20
RS20
CH036
CH067
CH070
RH073
RH071
RH070
CH002
RH007
DH014
RH066
QH006
RH067
QH006
QH001
LH012
ZH710
CV14
CV08
RV19
RV34
PB60
PB60
GJ911
GJ911
CH036
DH015
DH014
DH015
LH072
CH027
CH002
RH991
108
GJH63
GJH62
1
144
CH701
ZH708
ZH710
DV21
RH528
RH527
CH526
RH523
CH521
CH021
109
CV32
CH013
CH013
RH522
LH981
LH991
CH102
CH101
CH021
GJH89
CH701
LH707
LH124
RV15
RV17
CV15
RH628
RH627
CH626
QH520
RH622
TPBV
TPBV
LH010
LH009
CH506
LH707
LH124
CV14
CV08
RV19
RV34
DV21
RV21
RV21
CV32
10
PH005
GJH73
RH623
CH621
GJH72
TPBH
GJH89
DV15
DV02
DV19
DV15
DV02
DV19
GJ89
CH012
QH520
TPBH
CH505
CH504
QV02
GJ88
GJ89
PH005
CH012
CH505
CH506
CH504
LV02
GJ87
LV03
CH415
RH548
RH547
GJH66
CH546
RH543
CH541
GJH65
TPGV
TPGV
GJ88
LH708
RH542
GJ86
GJ87
CH793
LH794
RH648
RH647
CH646
QH540
RH642
TPGH
LV02
GJ86
RH643
CH641
TPGH
QV02
15
RH424
GJH76
GJH75
TPRV
CH502
CH502
CH503
CH501
CH501
PA06
ZH726
CH415
RH424
QH540
TPRV
RV60
CV07
ZH726
LH708
GJH69
RH563
CH561
GJH68
TPRH
ZH727
ZH727
CH793
LH794
RH796
RH568
RH567
CH566
RH562
TPRH
LH996
LH989
CH503
DV06
LA03
LA03
RH796
QH560
TPOUTC
LH983
LH990
RH997
RV35
RV35
RV70
RV71
RV74
RV75
RV09
RV10
DV06
RV60
CV07
QV06
PA06
DH001
DH001
RH668
RH667
CH666
RH663
CH661
RH662
TPOUTC
CH707
LH983
QV70
QV70
QV71
QV71
QV06
RV41
CC18
RH208
RH852
GJH79
RH663
GJH78
LH996
LH989
LH984
RV09
RV10
CV70
RV41
CC18
PA03A
14
71
LA01
LA01
RH208
RH852
QH560
CH661
GJH78
CH707
LH984
LH990
RH997
RV016
RV016
QV03
RV018
RV73
RV76
RV76
GJH79
RV73
GJ913
GJ913
QV03
RV018
LA15
Q832
QB92
RB90
RB91
LA12
C835
RV77
RV78
CV19
X501
PA03A
LA12
C835
Q832
QA204
QB93
QB92
RB90
RB91
QB94
R518
R517
X501
LA13
CB90
RB98
RB96
CV19
R517R518
LA13
C834
QB93
QB94
GJ31
R507
C524
R534
R547
C529
Q511
R548
CV70
L521
RV61
RV61
L520
PF03B
PF03B
C834
CB45
CV16
GJ32
Q511
LA04
LA04
QA202
QA203
QA205
QB46
RB43
RB44
RB92
RB92
RB97
RB94
RB94
GJ30
Q516
C512
Q516
L521
L520
RA201
CA201
RA204
QA205
QA204
QB95
QB96
RB97
QB95
QB96
RV77
GJ42
RV47
C502
10 1
CA26
CA27
CA26
CA27
QA202
RA88
RA88
QA201
QA201
RA202
QA203
RA203
QA03
QA03
RA205
LB02
LB02
QB47
RB46
CB47
RB45
QB47
RB48
RB43
QB46
RB47
CB48
RB44
CB45
CB46
DA04
DA05
DA04
LA07
LA08
RB93
RB93
RB95
DA03
DA06
DA03
RB95
DA06 DA07
PJ900B
PJ900B
RV78
GJ43
CV18
CV16
RV46
RV47
CV27
GJ30
GJ31
C542
GJ32
C542
Q502
R508
RY576
QS10
R506
Q502
QS10
R505
RY575
R504
R509
R583
R584
R576
R577
R500
C517
C518
C510
R502
C582
R503
R502
C582
R503
R562
CA42
QA12
RA61
DA25
DA25
RB49
DA05
PA02
RV46
CV26
R562
XA01
QB48
CB49
LA14
DA08
F
QA11
QA12
RA63
RA69
RA55
QB48
RB50RB51
CV29
X500
DA02
RA03
RA04
DA02
RA101
RA07
XA01
LA16
CV18
R212
R210
X500
RA31
RA36
CA35
RA56
RA89
RA019
DA01
Q210
R211
CR509
RA57
CA14
RA64
RA19
RA509
RA26
RA29
RA30
DA01
L523
QA11
RA81
RA09
RA13
Q210
R211
Q211
L523
RA24
RA31
RA36
CA36
CA29
1
30
6
DA07
CV29
L522
P831B
CA03
CA04
QA30
QA30
RA27
CA07
RA58
RA25
CA17
RA59
RA60
CA19
31
RA32 RA33 RA34
QA07
RA52
R214
R213
Q211
RV45
CV25
L522
P831B
CA40
RA117
RA24
CA18
RA65
RA18
RA52
RA18
R214
R213
Q212
RV45
CR509
CA41
CA05
CA05
CA03
CA04
CA06
QA05 QA06
RA53
RA51
RA116
CA40
RA117
CA101
RA44RA45RA46
RA17
RA54
QA05QA06QA07
RA53
RA51
Q212
CA41
RA116
QA01
RA91
QA01
CV27
GJ907
LA06
CA16
CA20
RA514
RA513
RA200
CA20
RA17
RA54
CV26
GJ907
RA40
CV25
1
81
50
RA515
CA100
PF01B
CA23
CA23
PA07
4
PA07
20
ZA07
80
ZA07
ZA06
RA79
RA83
RA75
RA102
RA103
ZA05
ZA04
ZA03
29
ZA02
51
ZA01
LA10
15
PB14
LA10
PB14
LA05
LA21
30
LA05
LA19
LA11
LA20
LA11
LA25
QA04A
LA19
LA21
PJ901B
PJ901B
C206
C206
D533
D533
C5090
C5090
C548
D530
C548
C541
GJ111
D530
R558
R559
C541
C555
L511 L513
GJ37
GJ36LV03
TPG2
GJ36
L511
GJ37
TPG2
111
14
4
LA20
Q510
R531
R2022
GJ38
GJ44
LA09
R2020
Q201
L513
LA09
P701A
LA25
LA101
R531
24
R561
R2060
R2061
L510
L510
P701A
1
GJ39
GJ39
R225
R561
C2201
Q201
LA100
80
25
R2107
Q2106
C2104
RB556
RB557
RB557
RB555
13
31
LA29
C5020
R2104
R2104
R5020
C2104
Q2106
P101
P101
RB556
5
C5020
R5030
R4713
RB40
RB40
QB504 QB505
RB554
RB502
CA22
RB518
RB518
QB507
QB506
LA101
C564
C564
C547
D4703
R4714
Q2109
R2111R2112
R2106
R5111
C2103
TP46B
TP46B
R5111
PF01B
XB501
QB505
CA22
LA100
Q510
R532
Q2105
C2103
CA02
CA02
QA29
QB507
QB506
R569
R533
D520
Q2105
XB501
R4412
RB562
RB558
RB561
RB559
C543
Q2107
R5108
CA45
RA21
RA11
CA01
RB527
CB503
RB503
RB562
C832
R569
C544
C545
D520
Q2107
R2110
R2105
C2102
R5108
C2102
RB526
C543
65
40
C4406
Q2104
QB504
QA29
RB527
CB503
C832
C544
C545
64
C558
41
R5105
Q2104
RA21
RA11
RB503
RB558
RB561
RB559
Q831
Q831
C5030
C5080
C5080
C4412
R4406
C4402
C4407
C4420
D4703
Q2108
TP46R
TP46R
C837
C837
RB526
C833
C833
D4401
R4403
R4403
Q2108
R5105
GJ904
GJ904
C836
C836
Q833CH034
Q833
C830
C831
Q830
C831
Q830
P882A
P882A
15
71
PE50B
C5030
L501
L501
R567
R568
C575
Q520
R560
R564
C573 C574
Q521 Q522
R565
R566
R573 R574R575
TP_Y
D4401
TP Y
TP_G
TP G
TP_B
X4402
TP B
X4402
TP_R
TP R
C4401
L4401
L4401
GJ905
C4401
C830
PE50B
R567
R560
R565
GJ905
Q522
Q520
Q521
R574R575
R573
C574C575
C573
R568
R564
R566
-
41
- -
42
-
Page 44
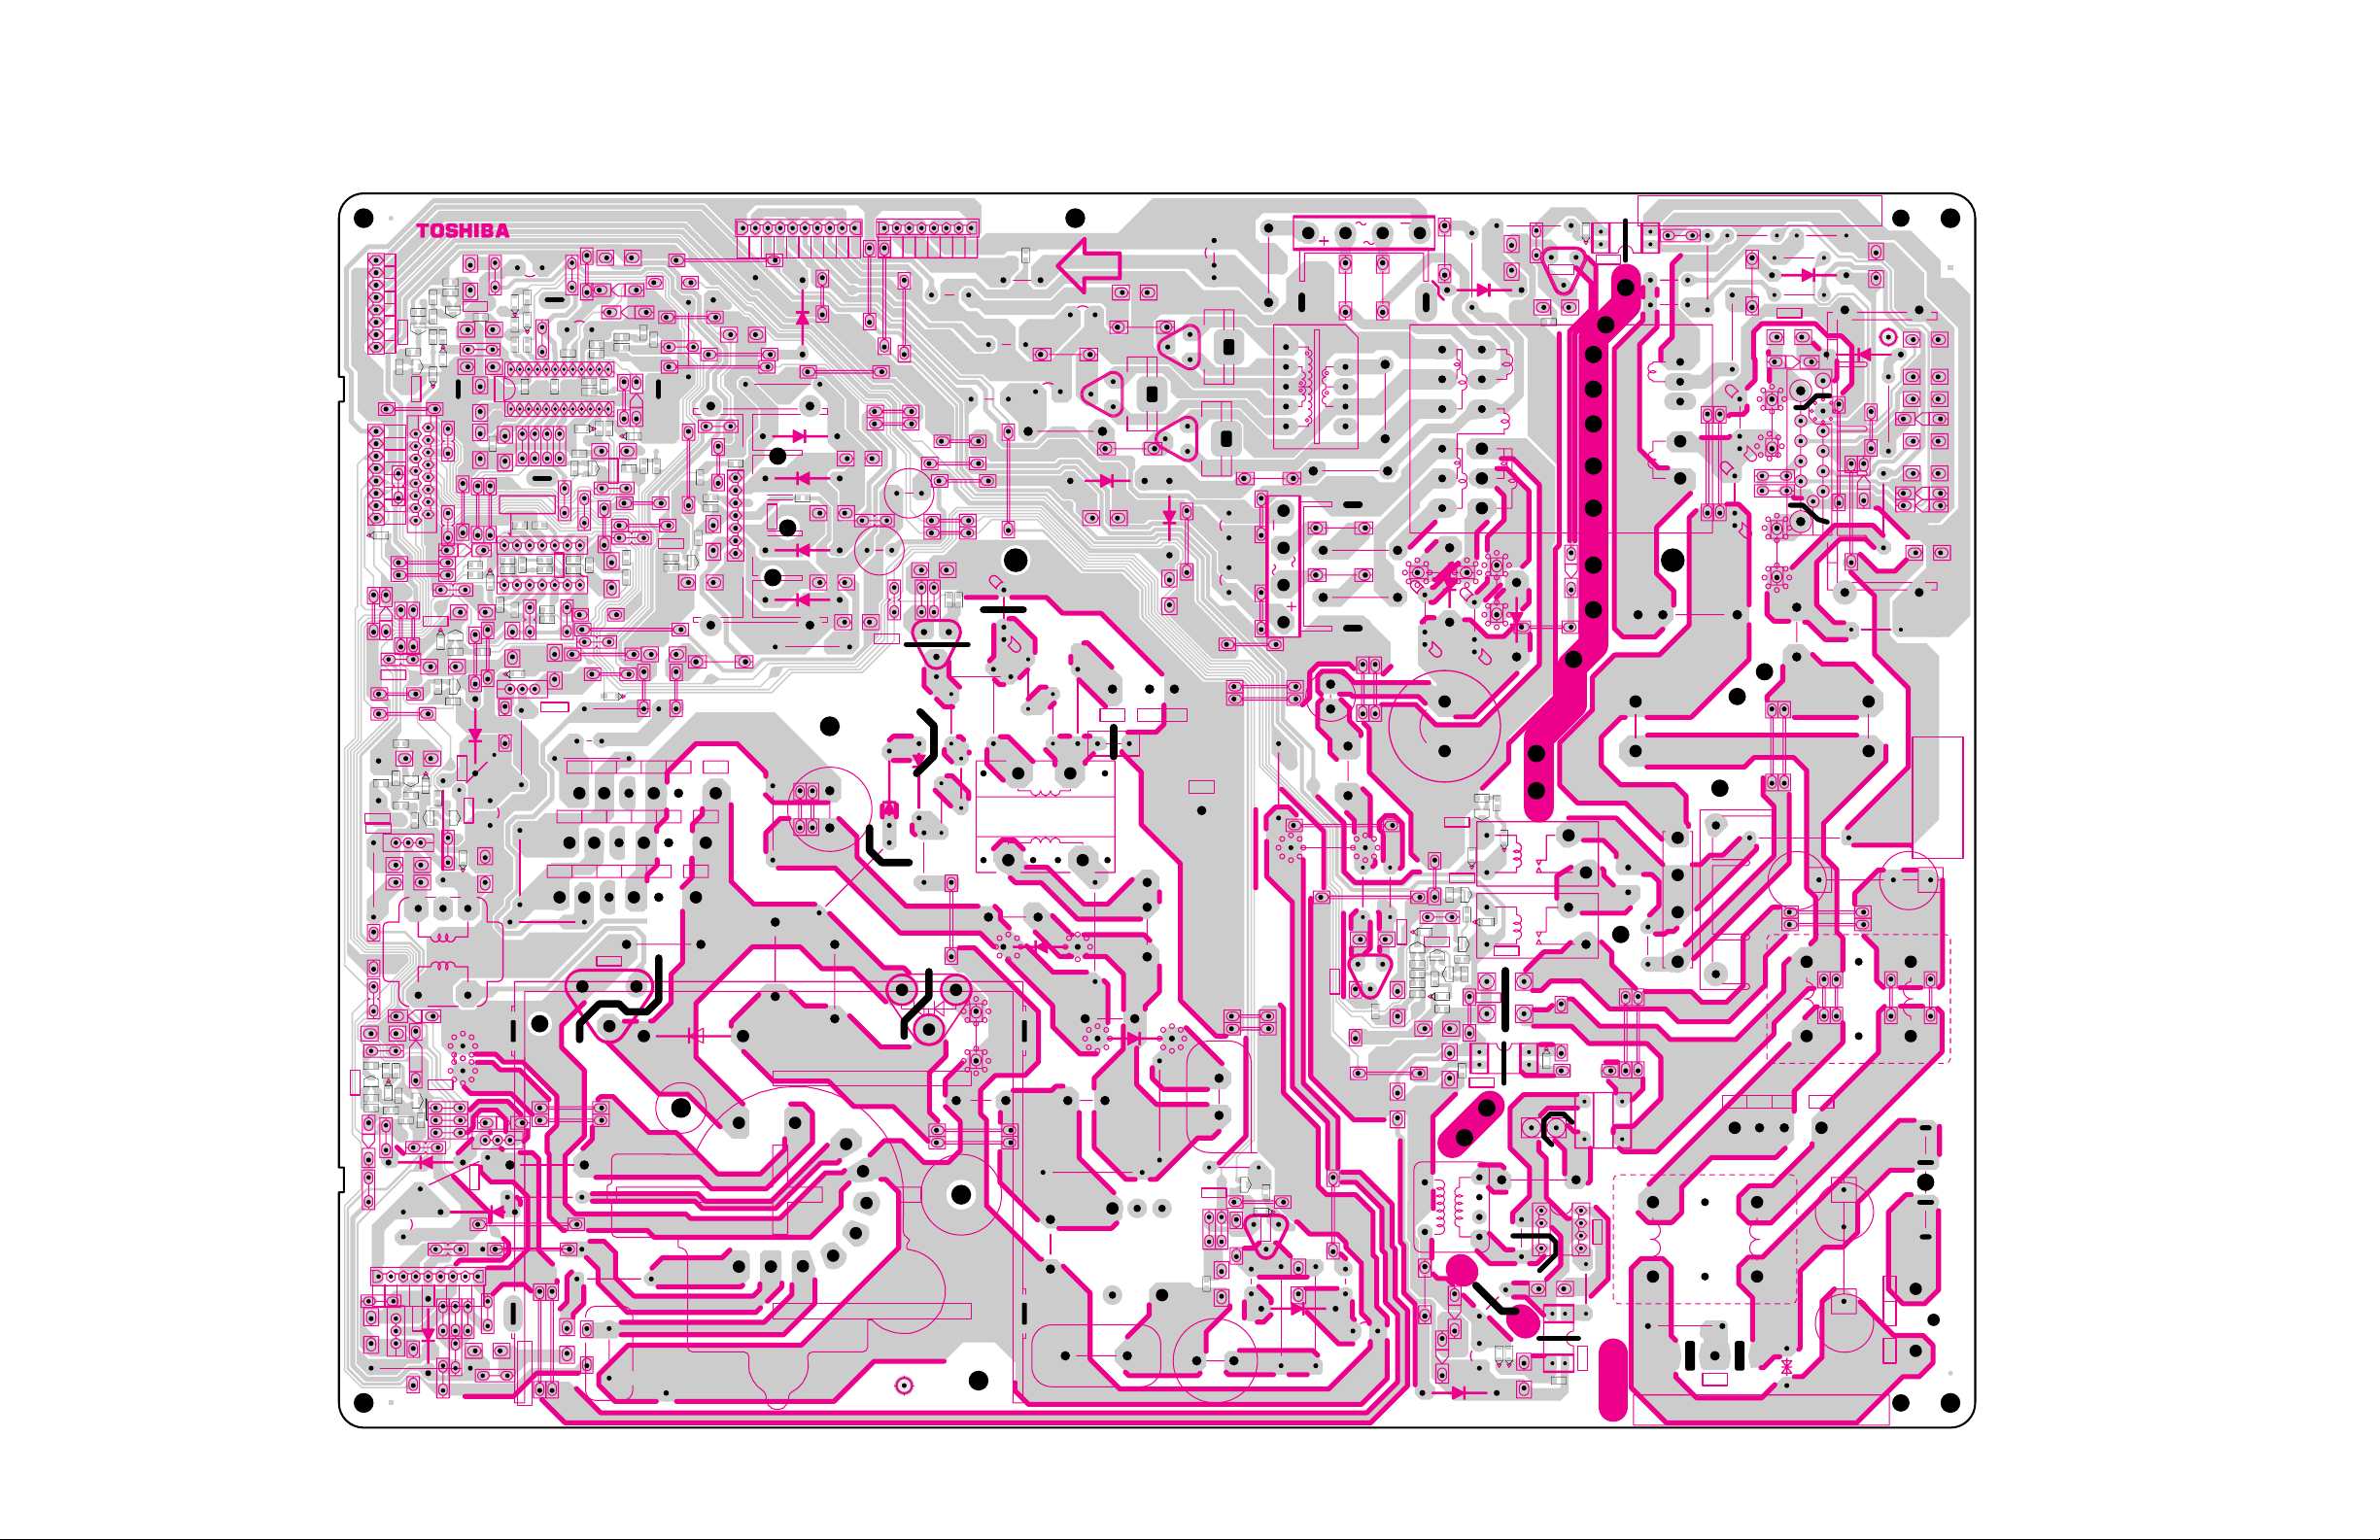
DEFPOWER BOARD (51H94:PD1730H 57H94:PD1730J) (U401)
BOTTOM (FOIL) SIDE
T862
C811
D848
G
C
R881
D848
8
2
B
Q881
C888
D880
R842
+
F840
125V 200mA
1
4
C842
43
1
R841
R841
R843
D881
Q842
D881
Q862
32
4
1
R874
C862
C874
R864
R870
L864
R871
12
35
C871
4
C877
R867
R866
D875
L862
Q801
R868
R873
D864
R865
C863
14
1
D876
C868
+
D862
15
R862
Q801A
R872
C867 C879
C873
D873
+
C869
C866
D879
D878
C876
B801
L861
C870
C860
F860
C810
125V 4A
+
C809
+
CAUTION
LIVE AREA
C802
125V 8A
F801
2
1
BLK
P800
WHT
Q840
R840
D840
R810
C805
D801
P805B
R899
T801
AA01
D801A
4
P802
R860
T802
1
C801
D899
R894
Q843
D843
L854
R485
R883
C854
R854
+
R885
D854
R881
16
12 14
8
610
D883
L881
C881
D884
+
C884
R893
R894
R893
Q894
D895
SR82
D894
D895
D894
Q843
SR81
R818
D845
D845
R818
Q844
Q844
R485
R486
R486
Q473
D470
C812
1
4
R844
2
3
Q841
R844
C840
C843
5
C814
D847
D841
D842
C841
D842
C845
D841
+
+
C316
CCP-3400S
8
7
6
5
4
3
2
1
R376
8
7
6
BB21
5
4
3
2
1
D378
D378
D371
Q798
R496
R496
TE481
R494
R494
R497
R497
R495
R492
R492
TE482
Q405
Q402
S
C402
R403
R249
C515
R417
C419
R438
R438
R440
C419
Q411
Q411
D419
D419
R419
R419
R418
R418
R437
D418
D421
R421
+
C446
R436
P404
R245
98
E
C221
B
R406
C370
R371
R371
R372
R372
BB11
R374
Q371
R375
R376
Q372
1
D303
+
Q408
R495
R493
G
D
C401
R440
R439
R439
Q410
R437
R422
R422
R404
6
7
R246
Q371
R375
Q372
R404
Q241
+
C371
C371
Q370
R374
Q370
R367
R373
R373
C302
R364
R366
R378
R364
R378
D365
C314
D370
D365
D370
B301
C301
16
C303
PF01A
R313
R313
R477
R477
D301
+
C318
Q409
Q409
D492
D492
R498
R498
C491
Q798
R7931
R7931
R7932
R7932
C497
Q408
D490
D490
R414
R415
R415
R493
Q406
Q406
Q405
D411
R416
D411
C416
R413
T401
D505
C448
D401
+
Q410
R515
R513
E
R420
7
4
4
R
Q420
D406
5
1234
R248
R243
R240
R244
R405
R242
R241
D402
+
R370
R330
GR31
D308
GR31D309
D308
D309
R367
GR32
GR32
R331
R325
R322
+
+
R325
R322
1
C482
C312
R321
7
C310
R315
R312
D4431
R4431
R482
24
C312
R321
R379
R340
R311
R302
GR30
R341
R362
C362
R361
R360
C309
R349
C309
R349
R314
R362
C311
C362
Q306
C361
C361
R315
R365
R365
R369
D4431
C4430
+
E
Q4430
L305
R4430
Q302
R306
C308
R306
R314
C311
814
D301
R312
+
R499
R499
B
D450
C315
L310
D327
D334
R483
C483
C483
R484
R467
R484
R491
R491
R480
R480
R467
R483
12
C482
C481
R482
C481
13
R308
R307
D336
D336
D337
R308
R307
R347
+
R347
R345
R345
R481
R341
R360 R361
R390
C330
R338
Q341
R348
Q341
R348
R342
R350
+
R350
C323
R343
R343
R336
R363
R363
C340
1
R368
D491
D491
R344
3
5
6
+
6
5
3
C405
R443
4
3
5
B
Q404
C
R407
C445
R247
D420
L401
C450
64
R391
+
R392
E
Q404A
B
R444
R910
R475
C463
R466
C463
R355
D333
D337
C327
C327
R338
Q305
R336
+
C333
C440
D404
P831A
10987 5432
6
TP-G
TP-V
Q301A
C338
P401
D4430
R346
7
R335
Q301
1
D304
R442
C444
T461
+
R305
R380
R381
R380
R381
C334
C334
C331
C331
R334
C328
R334
C323
Q305
C320
L304
14
1
1
P402
P403
+
R337
D306
R335
D305
D302
C443
R431
C332
C325
1
8
+
C321
L303
L302
R426
C324
E
Q400
C
D413
L442
D412
D461
23547588
P499
C420
L896
C426
R435
R427
2467
R432
P880A
135
C422
C422
B
R428
R434
R427
R433
L894
C415
R423
L895
L403
C425
L888
D414
C898
C898
C892
+
L892
C891
+
F891
125V 4A
D853
C853
D892
B
C893
+
L893
D892A
L891
+
B802
P405
R429
13
R411
C423
L441
L402
C464
C468
T400
R424
C467
R425
R441
+
Z401
D415
R412
D852
C852
C412
D891
D893
P810
+
R449
R446
C417
C885
Q428
R448
R446
D893A
D891A
+
C432
L406
R490
R471
D885
D885A
L886
F470
C496
F850
125V 3A
L852
L851
125V 4A
125V 2A
R470
R488
E
Q470
R410
+
C460
125V 4A
F851
R474
F852
L407
L887
T865
R487
15 17
125V 2A
F892
13
119
7
L880
C880
Q894
R819
R819
R845
D844
D844
Q472
Q471
Q472
R476
Q471
B
R476
Q473
R472
R478
R478
C473
C473
R472
D470
R849
C
R489
C849
R473
R849
R473
+
R489
L840
C499
+
+
C846
T840
L841
D846
F885
125V 5A
L850
C851
C850
+
D851
D851A
L885
R101
Q428
R469
R469
D426
S
D426
G
Q425
C449
D
L408
D425
R409
-
43
- -
44
-
Page 45
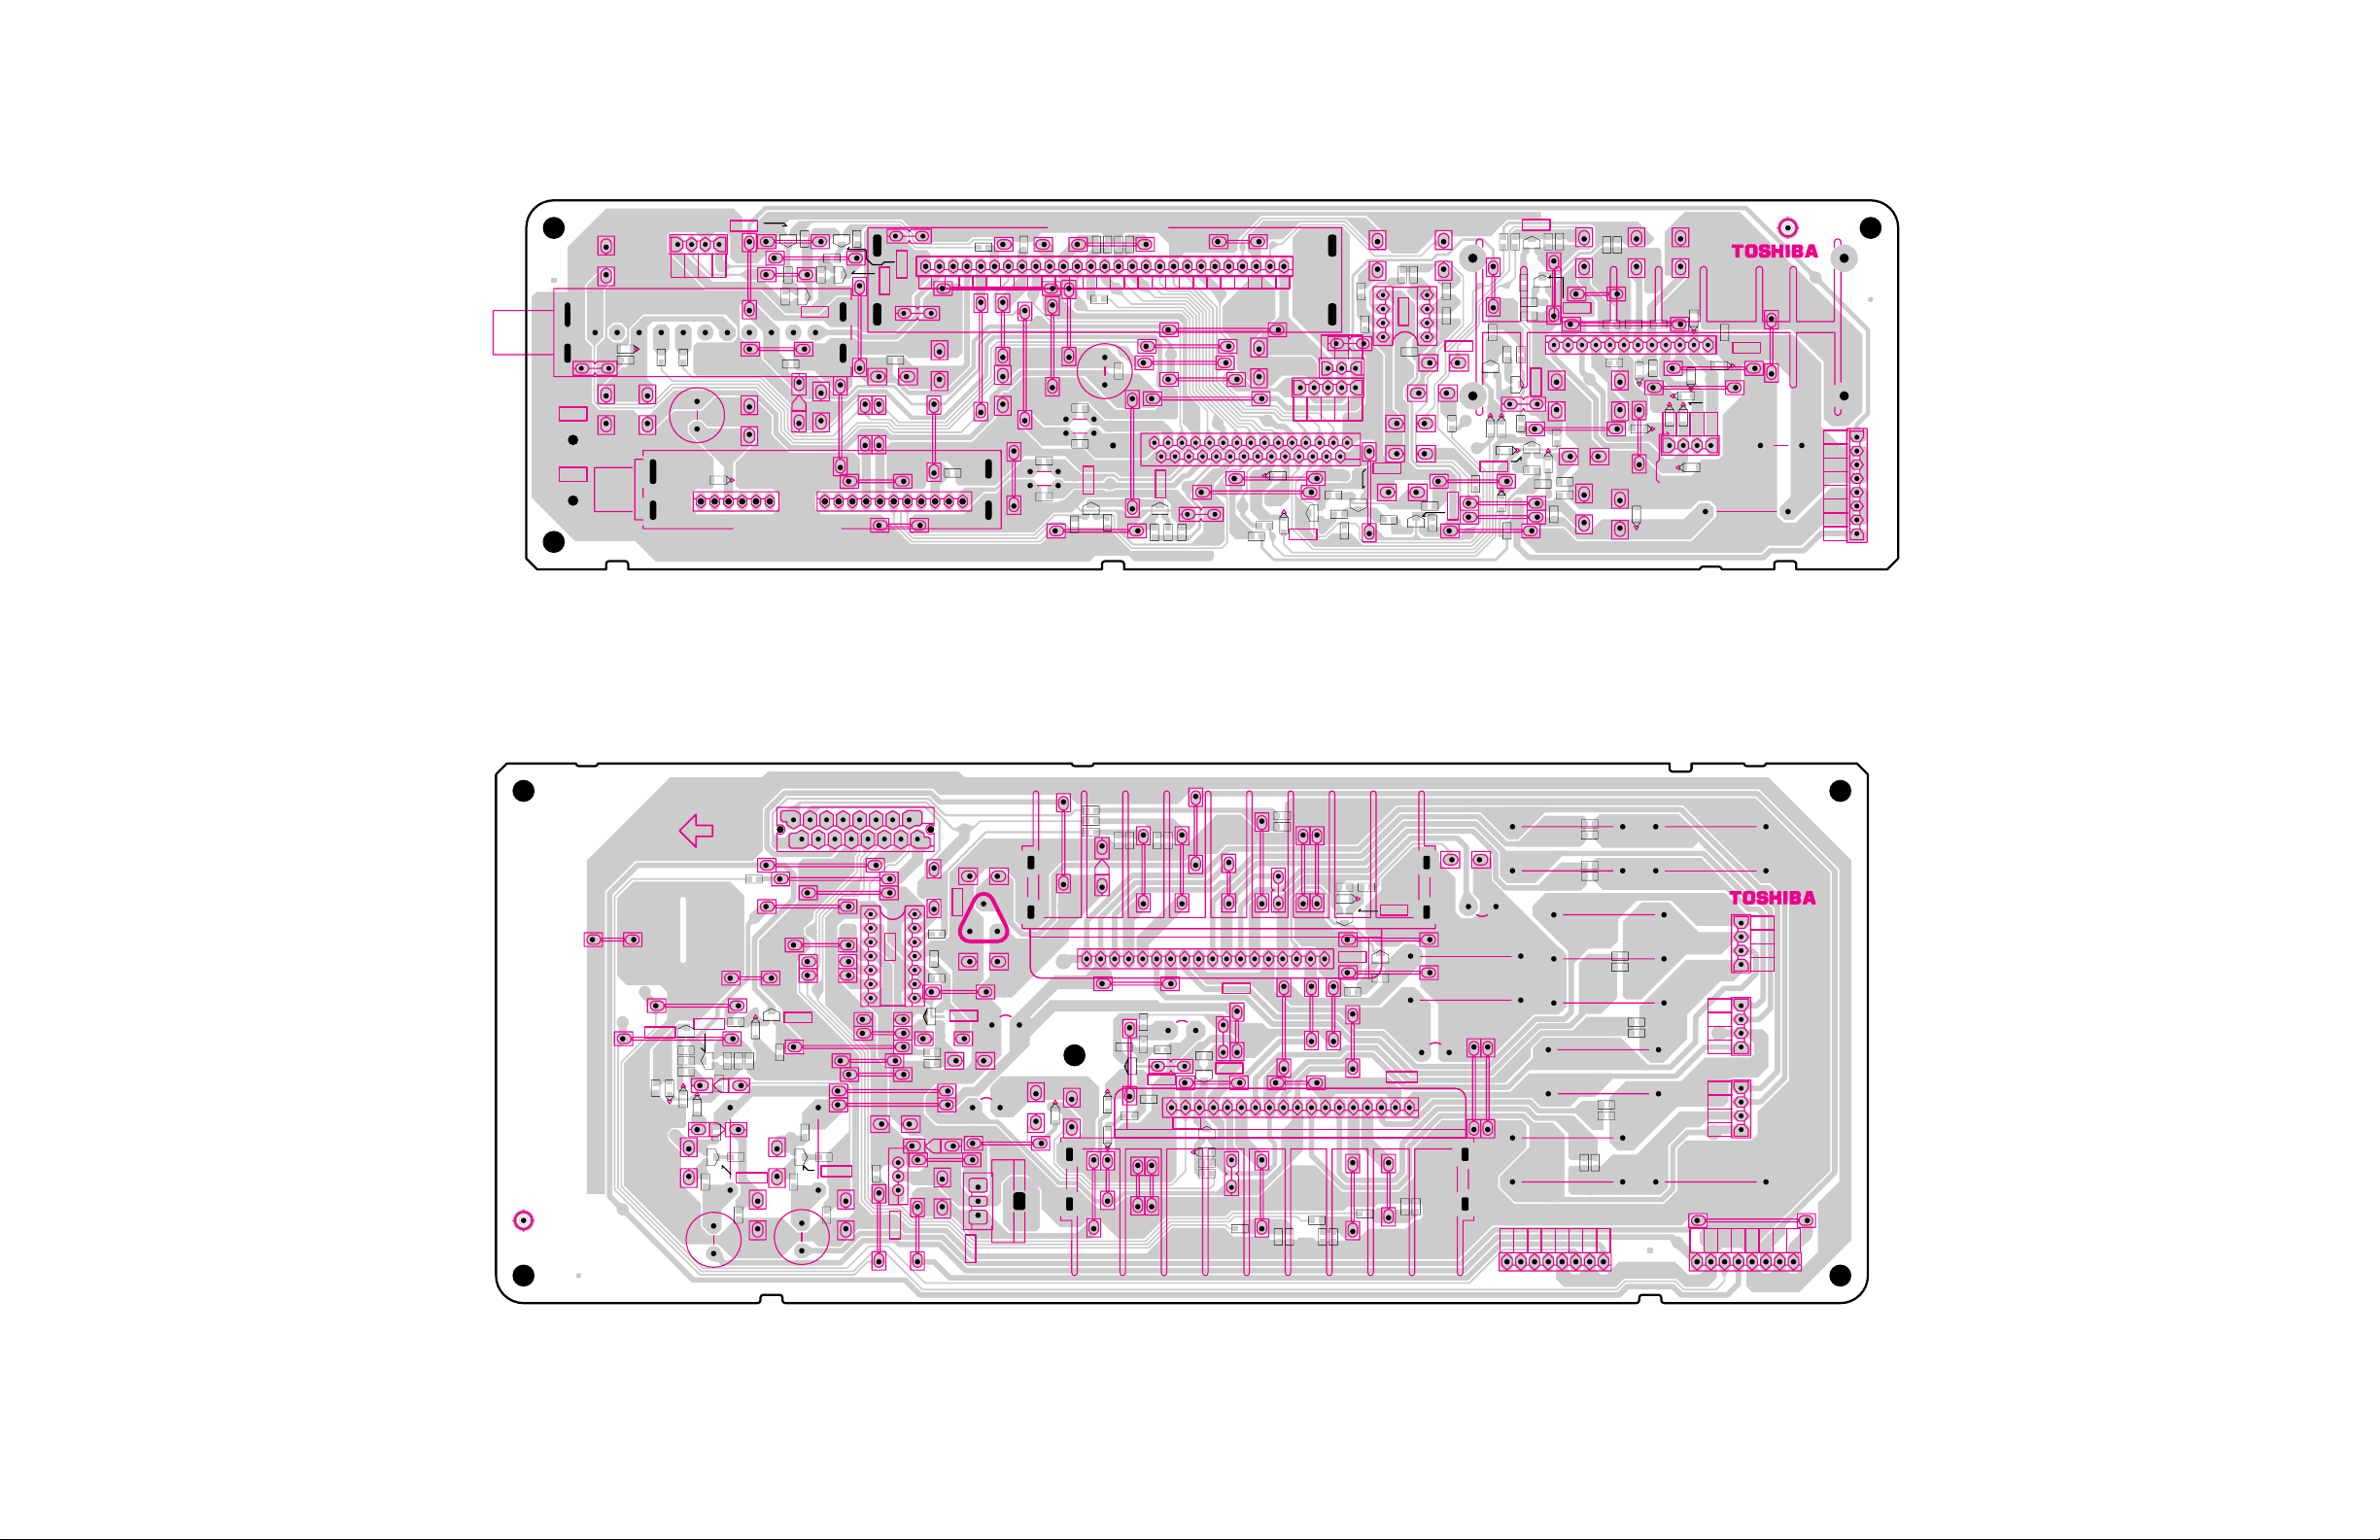
IF/AUDIO BOARD PD1731B2 (U601)
BOTTOM (FOIL) SIDE
PV35
P514
CY102
C105
GJ151
Q153
R152
R154
R154
R155
R155
NC
32V
C105
D101
Q153
1
P105
C101
423
+
H001
Vt
AGC
ADR
D102
D102
C103GR02
C103
G101
NC
SCL
SDA
+5V
NC
G101
G102
G102
+
C102
L101
LY101
+
DY102
DY102
23547589
R151
Q154
Q154
HY01
GJ151
C106
GJ150
Q152
GJ150
R151
Q151
R152
IF
+
LY102
GR02
Q151
L103
LY103
Q152
C107
CY105
H002
+
CY105
R150
R153
GJ103
C109
R150
C109
+
C108
L105
GJ108
GJ108
LY105
GJ107
GJ107
CY160
GJ102
GJ102
GJ101
GJ101
CY160
L104
GJ104
QY160
GJ103
GJ170
QY160
TP12
RY160
RY160
14 13 12 11 10 9 8 7 6 5 4 3 2 1
GJ170
GJ106
GJ104
GR103
GR103
GJ106
GJ105
GJ105
GR175
GR175
R665
C663
R666
R668
R666
R668
+
5
4
Q663
8
1
C665
C665
C603
+
+
C666
C604
C661
+
C667
R674
R674
Q661
R665
R676
R676
C662
27 26 25 24 23 22 21 20 19 18 17 16 15
+
P881B
C110
P882B
+
R663
R663
R662
R662
1
32
54321
PF03A
D614
GR602
R693
D613
GR602
D614
Q662
D613
R693
Q662
Q172
Q172
R173
R173
R174
R174
+
+
Q664
R675
R675
Q664
R667
R667
R677
R677
R671
R601
R602
R602
R673
R673
R672
R672
Q614
R671
R661
Q661
D615
R661
D611
GR601
D617
Q612
R684
R613
R613
R611
R611
Q614
D616
D616
D617
R616
D615
R687
D611
GR601
R601
R683
R612
R603
C601
Q681
Q681
R683
R684
R682
R682
R614
R614
Q613
R616
Q612
R612
Q613
R687
R604
C601
Q682
12
C682
D612
R698
R698
C602
R603
R604
C606
C602
+
Q682
R627
R615
C608
+
+
R681
R681
D612
C612
+
R688
R688
R699
C684
C683
R699
+
C607
C605
+
+
D605
R610
R626
R626
R627
R615
D609
R609
D609
D608
1
D608
D604
D628
D628
+
C681
R610
D605
D606
D604
D602
D603
2
R609
D606
D607
1
C681
Q601
D601
D601
D602
D603
P106
43
D607
CCP-3400
R697
C680
Q601A
+
P880B
8
7
6
5
4
3
2
1
CONVER BOARD PD1731B1 (U711)
BOTTOM (FOIL) SIDE
B
Q7764
C7786
R7756
23547589
R7754
R7758
R7758
D7766
+
D7766
D7764
C7761
Q7764
R7756
D7764
R7745
R7880
Q7763
C7786
Q7763
R7754
D7763
D7761
Q7761
R7745
L7710
R7753
R7753
R7747
R7880
C7785
C7785
R7743
R7747
R7751
R7755
D7763
R7749
Q7761
+
R7751
R7702
R7702
D7806
R7755
R7757
R7749
C7765
D7806
D7762
R7757
Q796
+
C7762
R7881
Q796
R7881
R7748
R7744
R7746
L7711
R7892
R7748
Q7762
R7746
R7887
R7750
Q7762
R7752
R7752
R7896
R7750
C7784
D7760
D7760
+
Q784A
C7750
R7911
R7891
R7890
R7911
R7891
R7890
18
D7792
D7792
R7732
D7793
R7732
D7730
R7772
R7772
R7771
D7793
C7740
R7769
R7722
Q752A
Q767
5
Q752
R7913
5
C7721
R7722
C7732
C7721
C7732
Q751A
R7707
C7752
R7762
R7763
R7762
R7763
D7791
D7791
Q766
Q766
Q768
Q768
1
R7767
R7767
R7768
R7768
C7725
+
C7735
+
R7802
R7801
+
C7726
C7726
R7912
15
R7912
Q751
18
C7729
C7729
R7717
R7717
876 54
10
R7910
R7910
R7712
R7707
R7712
C7737
C7740
R7727
C7737
R7727
15
R7773
Q769
R7770
R7770
R7769
R7771
+
R7774
Q769
R7773
C7753
1
D7790
R7774
Q765
R7760
R7761
10
R7766
D7790
R7761
R7765
R7765
Q767
Q765
R7760
R7913
R7725
R7730
R7710
R7720
R7711
C7730
C7733
R7723
R7728
R7716
C7733
R7723
R7728
C7738
C7738
C7730
BB20
R7736
R7708
C7722
R7718
123
R7735
C7741
R7715
R7718
C7741
R7733
R7733
R7708
C7722
R7713
C7727
R7713
C7727
CCP-3400
R7726
R7731
4
3
1
1
2
3
4
R7721
654
87
1
2
RED
3
4
P712
P711
GREEN
P710
BLUE
3
2
11
BB10
BB60
C7706
R7895
Q782
R7882
R7883
R7882
R7893
R7884
D7731
+
IN
R7893
OUT
GND
+
R7884
R7886
C7704
R7886
C7800
C7701
C7724
+
R7885
C7751
+
C7736
+
Q784
Q794
Q794
+
1
14
Q795
7
8
R7883
+
C7705
R7701
R7701
Q785
+
-
45
- -
46
-
Page 46
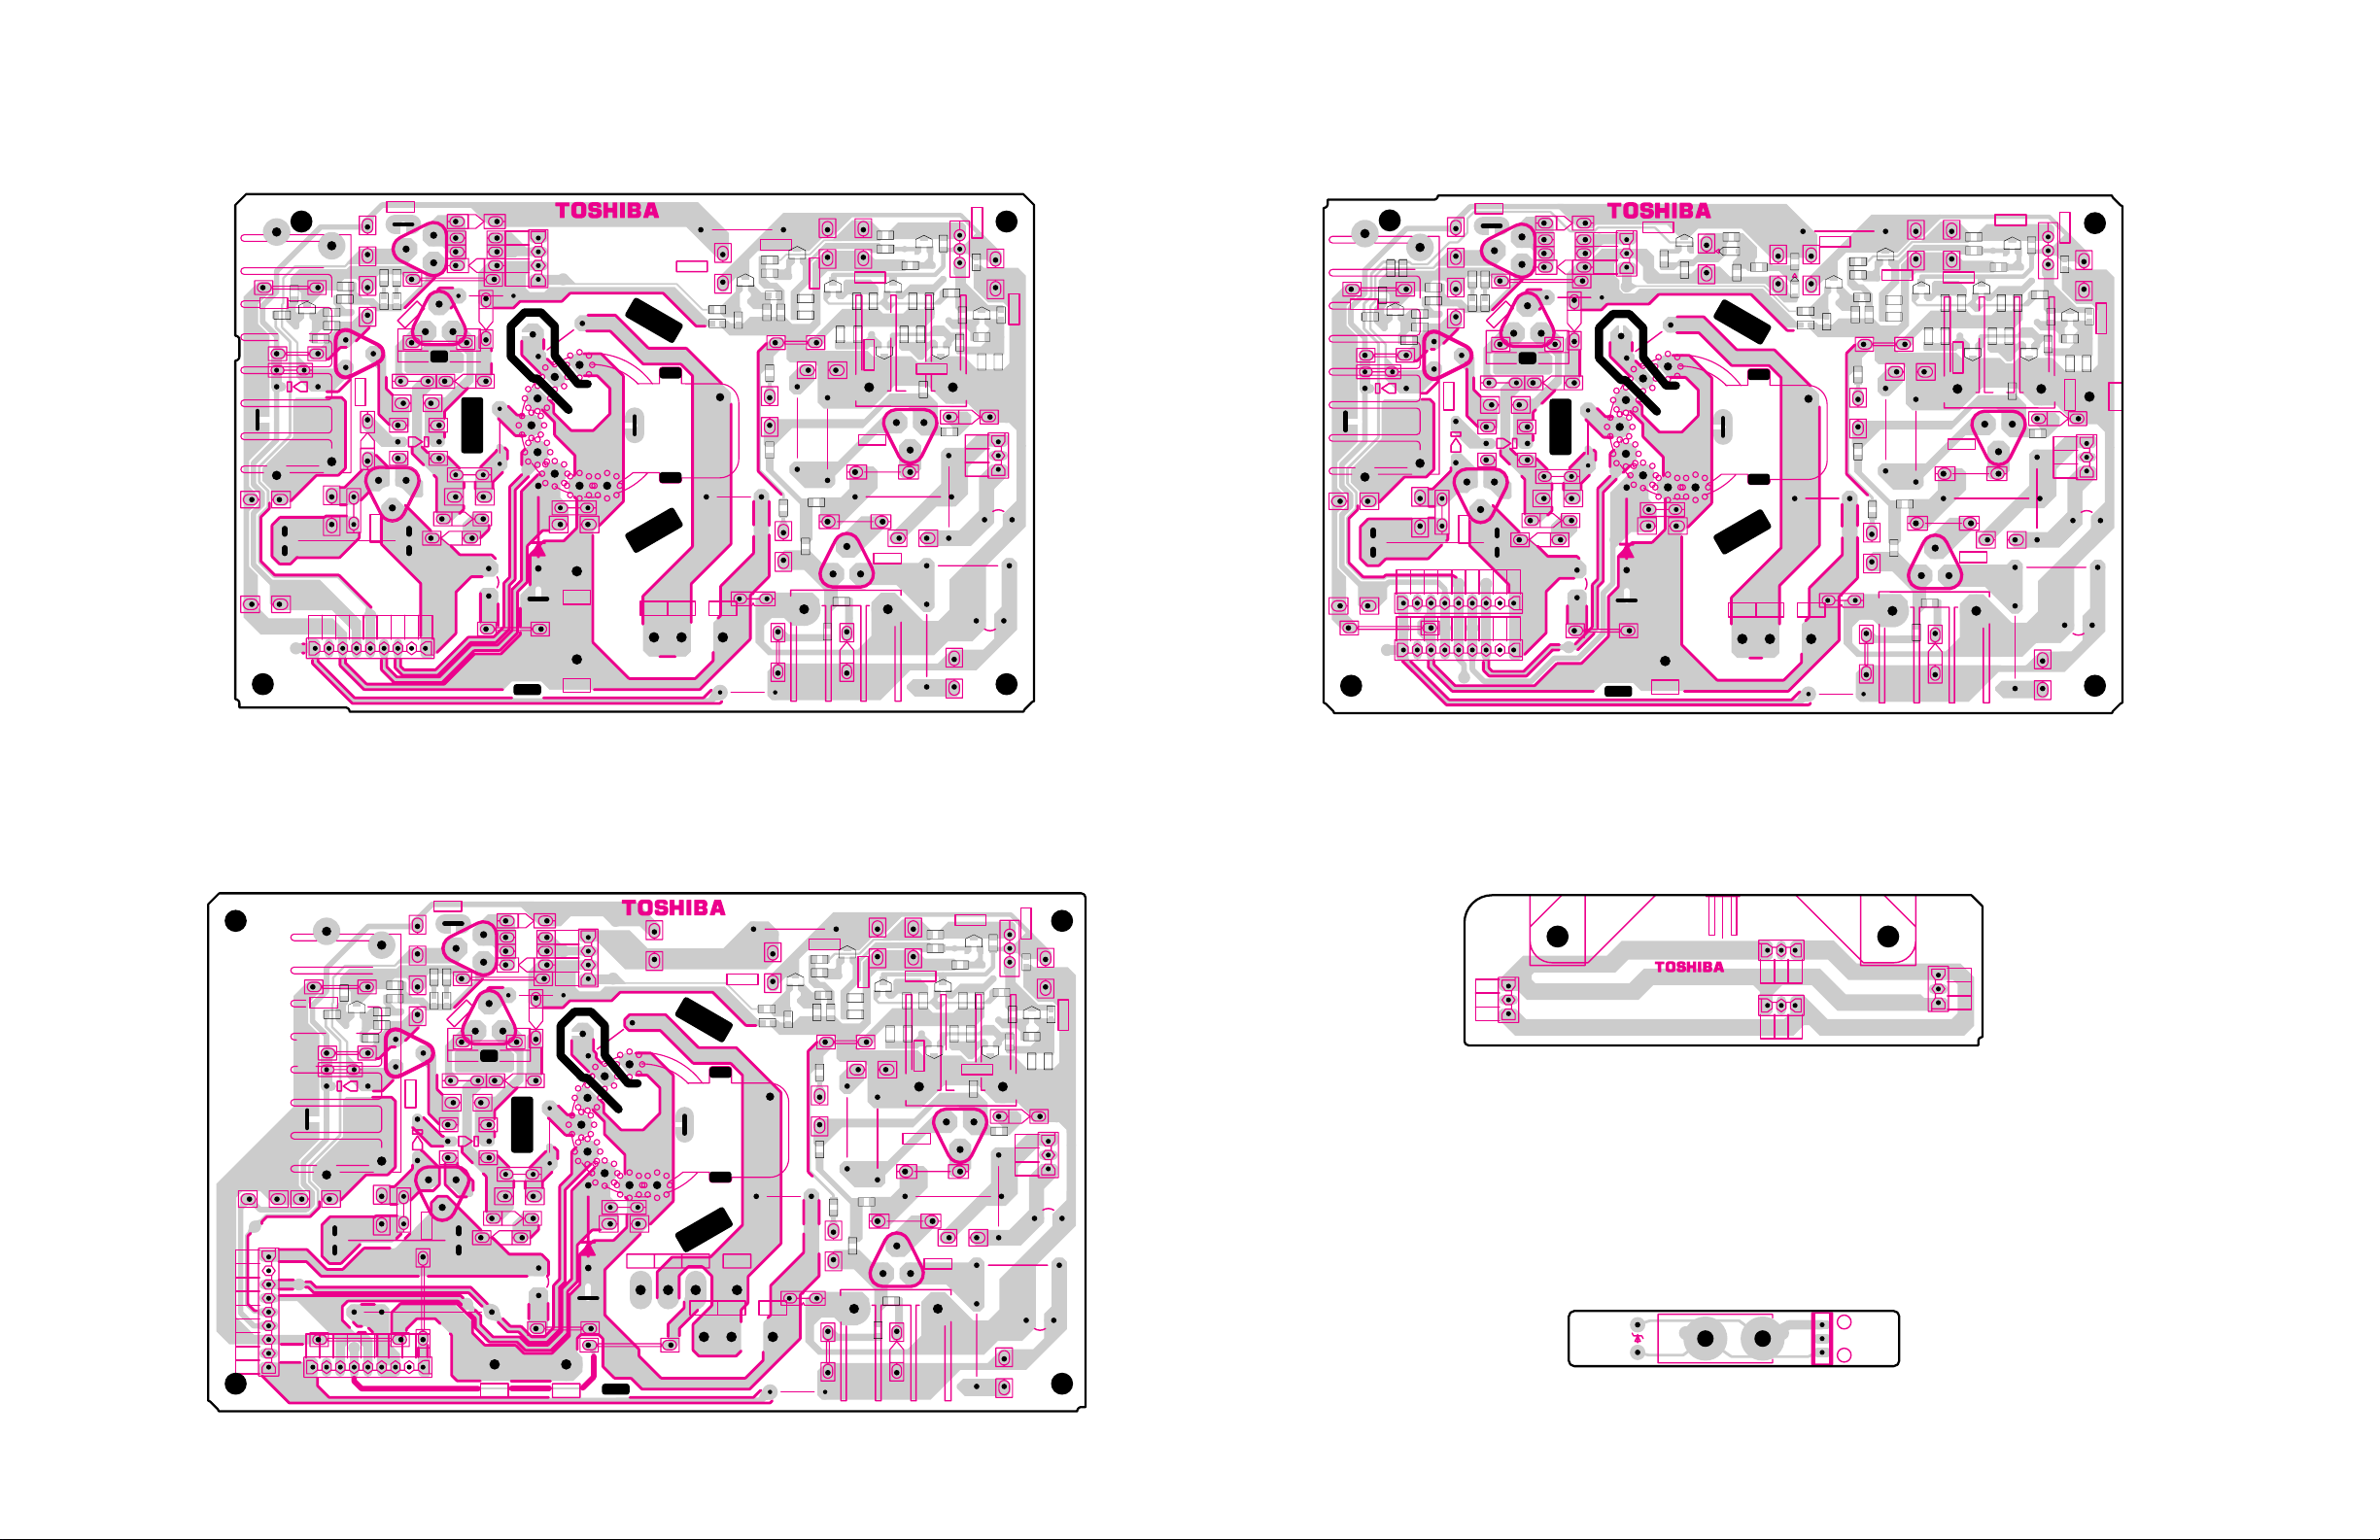
23547591
+
CCP-3400S
123
+
1
2
3
+
+
+
+
B
+
+
E
C
B
+
B
E
E
+
C
C
+
R915
R916
C914
Q962
C944
R966
R969
R7103
D918
D912
GJ911
L917
C943
B902
R943
D919
R913
C7109
R914
R962
Q
9
1
5
G911
R950
L915
R7127
C935
D916
C7104
D961
C915
C911
Q961
D942
Q915A
R7110
R978
L913
G914
P915B
R911
C7108
C913
R971
R7104
R967
R9507
R7101
R944
P919
P901
D943
R7102
R963
R7111
R918
C961
C912
G915
R919
L7101
P909
R7141
D917
R961
C962
L916
R7131
R987
R948
C7102
D913
C9100
R964
Q914
R965
P916A
Q7101
R945
C917
D962
R970
V902A
Q911A
Q912
G944
Q911
R9086
7
E
C
B
E
G1
H
H
CRT-D/G
G2
GREEN
SCREEN
B
B
E
C
K
C
B
C
E
3
4
6
8
9
2
1
98
75
2
1
P911
Q7109
R7114
R7115
R7116
D7102
P705
D7101
Q712A
R7118
L7102
Q7107
R7126
C7107
R7133
R7108
C7110
Q7103
R7107
C7113
R7120
Q712
R7122
R7139
Q7105
R7109
R7128
R7135
R7132
R7112
C7106
L7103
R7124
R7105
R7134
R7123
R7136
Q7102
L7104
Q7104
R7106
R7129
R7140
R7125
C7111
C7105
R7130
Q7108
R7117
R7119
R7138
R7113
R7137
Q711
C7101
C7114
Q711A
C7103
Q7106
R7121
C7112
3
2
1
R915
R916
C914
Q962
C944
R966
R969
R7103
GJ911
R962
C7104
D961
Q961
R7110
R971
R7104
R967
R9507
R7102
R963
R7111
R918
R7140
R919
R7141
R961
R7131
R987
C7102
C9100
R964
R965
Q7101
D962
R970
Q7109
R7114
R7115
R7116
R7118
Q7107
R7126
R7133
R7108
Q7103
R7107
R7120
R7122
Q7105
R7109
R7128
R7132
R7112
R7124
R7105
R7134
R7123
Q7102
R7106
R7129
R7125
C7105
R7130
Q7108
R7117
R7119
R7113
C7114
Q7106
R7121
CRT/SVM/R BOARD PD1733D1 (E031Z)
BOTTOM (FOIL) SIDE
CRT/SVM/G BOARD PD1733D2 (E032Z)
BOTTOM (FOIL) SIDE
R9501
R904
D901
G901
Q913
R9501
C902
+
C934
R9504
R9503
C934
Q913
Q901A
R931
R905
R9503
1
R905
R9504
L905
R906
R909
Q902
C
C933
R908
R995
R995
R908
C903
R906
R909
C967
C904
9
B
E
Q
C904
C967
E
C
G934
Q901
R968
G904
B
R991
C
Q904
432
876
5
P915A
D941
B
4
L907
R901
Q905A
L902
R9085
C906
R903
D909
D908
D907
+
3
2
1
G1
K
H
H
E
D940
C
5
0
B
L904
G905
R992
R933
E
D906
R938
D967
CCP-3400S
P913
23547591
RED
SCREEN
G2
1
0
9
C
V901A
C907
P908
P906
32
L7001
Q7001
R7002
B901
GJ901
CRT-D/R
R7001
Q7002
R7010
R7010
R7004
R7004
Q7001
R7002
C7002
GJ901
C7014
C7014
R7003
C930
1
C7002
R7003
R7011
R7041
R7031
C7008
R7005
R7011
R7041
Q7002
+
C7009
R7031
R7040
R7006
R7040
+
R7030
C7006
R7005
R7006
C7011
R7038
R7034
R7034
B
9
P907
R7027
Q7008
Q7008
R7030
R7029
R7029
R7021
R7022
R7028
C7003
R7021
R7037
L7002
+
R7024
Q7006
R7024
R7022
Q702A
Q702
C
R7028
R7009
R7007
R7009
R7007
R7012
R7023
Q7007
E
L7003
L7004
Q701
E
Q701A
D7001
Q7006
C
R7023
Q7007
R7012
R7020
R7025
R7025
C7012
Q7003
R7019
R7020
R7026
R7033
Q7003
R7026
Q7009
R7033
R7036
R7019
B
R7008
R7032
R7039
R7008
E
R7017
Q7009
B
R7017
R7013
R7018
R7032
R7035
+
C7004
Q7005
R7014
R7018
D7002
1
2
3
+
C7007
C7010
Q7004
R7013
R7015
C7013
C7004
C7005
R7014
R7016
+
C7001
C7005
Q7005
R7016
R7015
P703
+
CRT/SVM/B BOARD PD1733D3 (E033Z)
BOTTOM (FOIL) SIDE
Q7206
Q7207
R7225
R7212
R7220
R7225
R7226
L7204
C7212
Q7203
R7219
R7220
Q7209
R7233
R7236
R7233
Q7203
R7226
R7219
B
R7239
R7208
R7208
E
R7232
+
R7217
Q7209
B
R7217
R7213
R7218
R7232
R7235
R7218
C7210
Q7204
C7214
R7213
Q7205
R7214
D7202
1
2
3
C7207
C7214
R7215
+
C7213
C7201
C7205
R7214
R7216
+
Q7205
R7215
P704
C7205
R7216
+
Q922
R9620
C953
R928
C
R926
C924
R925
C954
23547591
P916B
R9607
R924
G921
D921
Q973
R9607
21
R9609
R9608
+
C922
9
8
7
6
5
4
3
2
1
C954
Q973
R9608
Q921A
4
3
R929
L925
5
R9609
R926
R925
R929
B
E
Q921
G924
B
R951
6
87
E
R9620
R928
C923
C9200
5
C923
C9200
2
9
Q
E
C
G954
L924
R988
R953
R920
Q924
C
R900
P917
9
E
D926
B
C
B
G925
P905
D945
4
L927
R921
3
2
D944
R930
1
R9028
D929
Q925A
D928
G1
R923
K
H
L923
D927
+
C925
P910
-
Q7208
R7222
R7221
R7237
R7229
R7228
+
C7203
R7224
R7222
L7202
Q7206
R7224
R7221
Q722A
Q722
C
R7228
Q7207
L7203
D7201
R7209
R7207
R7209
R7207
R7212
R7223
R7223
E
C
Q721
E
Q721A
CRT-D/B
P903
L7201
Q7201
B903
R7202
14
GJ903
R7202
R7204
GJ903
1
R7201
R7210
Q7201
C7204
C7204
C936
R7227
R7203
P918
L911
CCP-3400S
BLUE
SCREEN
32
3
2
G2
C921
V903A
R958
H
D936
C926
47
P920
- -
R7210
R7204
C7202
Q7202
C7202
R7203
R7211
R7241
R7231
C7208
R7206
R7241
C7209
R7231
R7211
+
R7240
Q7202
R7205
R7238
R7240
R7230
+
C7206
Q7208
R7206
R7205
C7211
R7234
R7234
R7230
B
R7229
SVM/DIV BOARD PD1733D4 (E034Z)
BOTTOM (FOIL) SIDE
23547591
P706
1
2
3
P704A
CCP-3400S
123
P705A
321
P703A
3
2
1
CONV-SEN BOARD PD0079 (E051Z-E054Z)
BOTTOM (FOIL) SIDE
DH301
QH301
B1-V-O
48
+
P900
-
-
Page 47
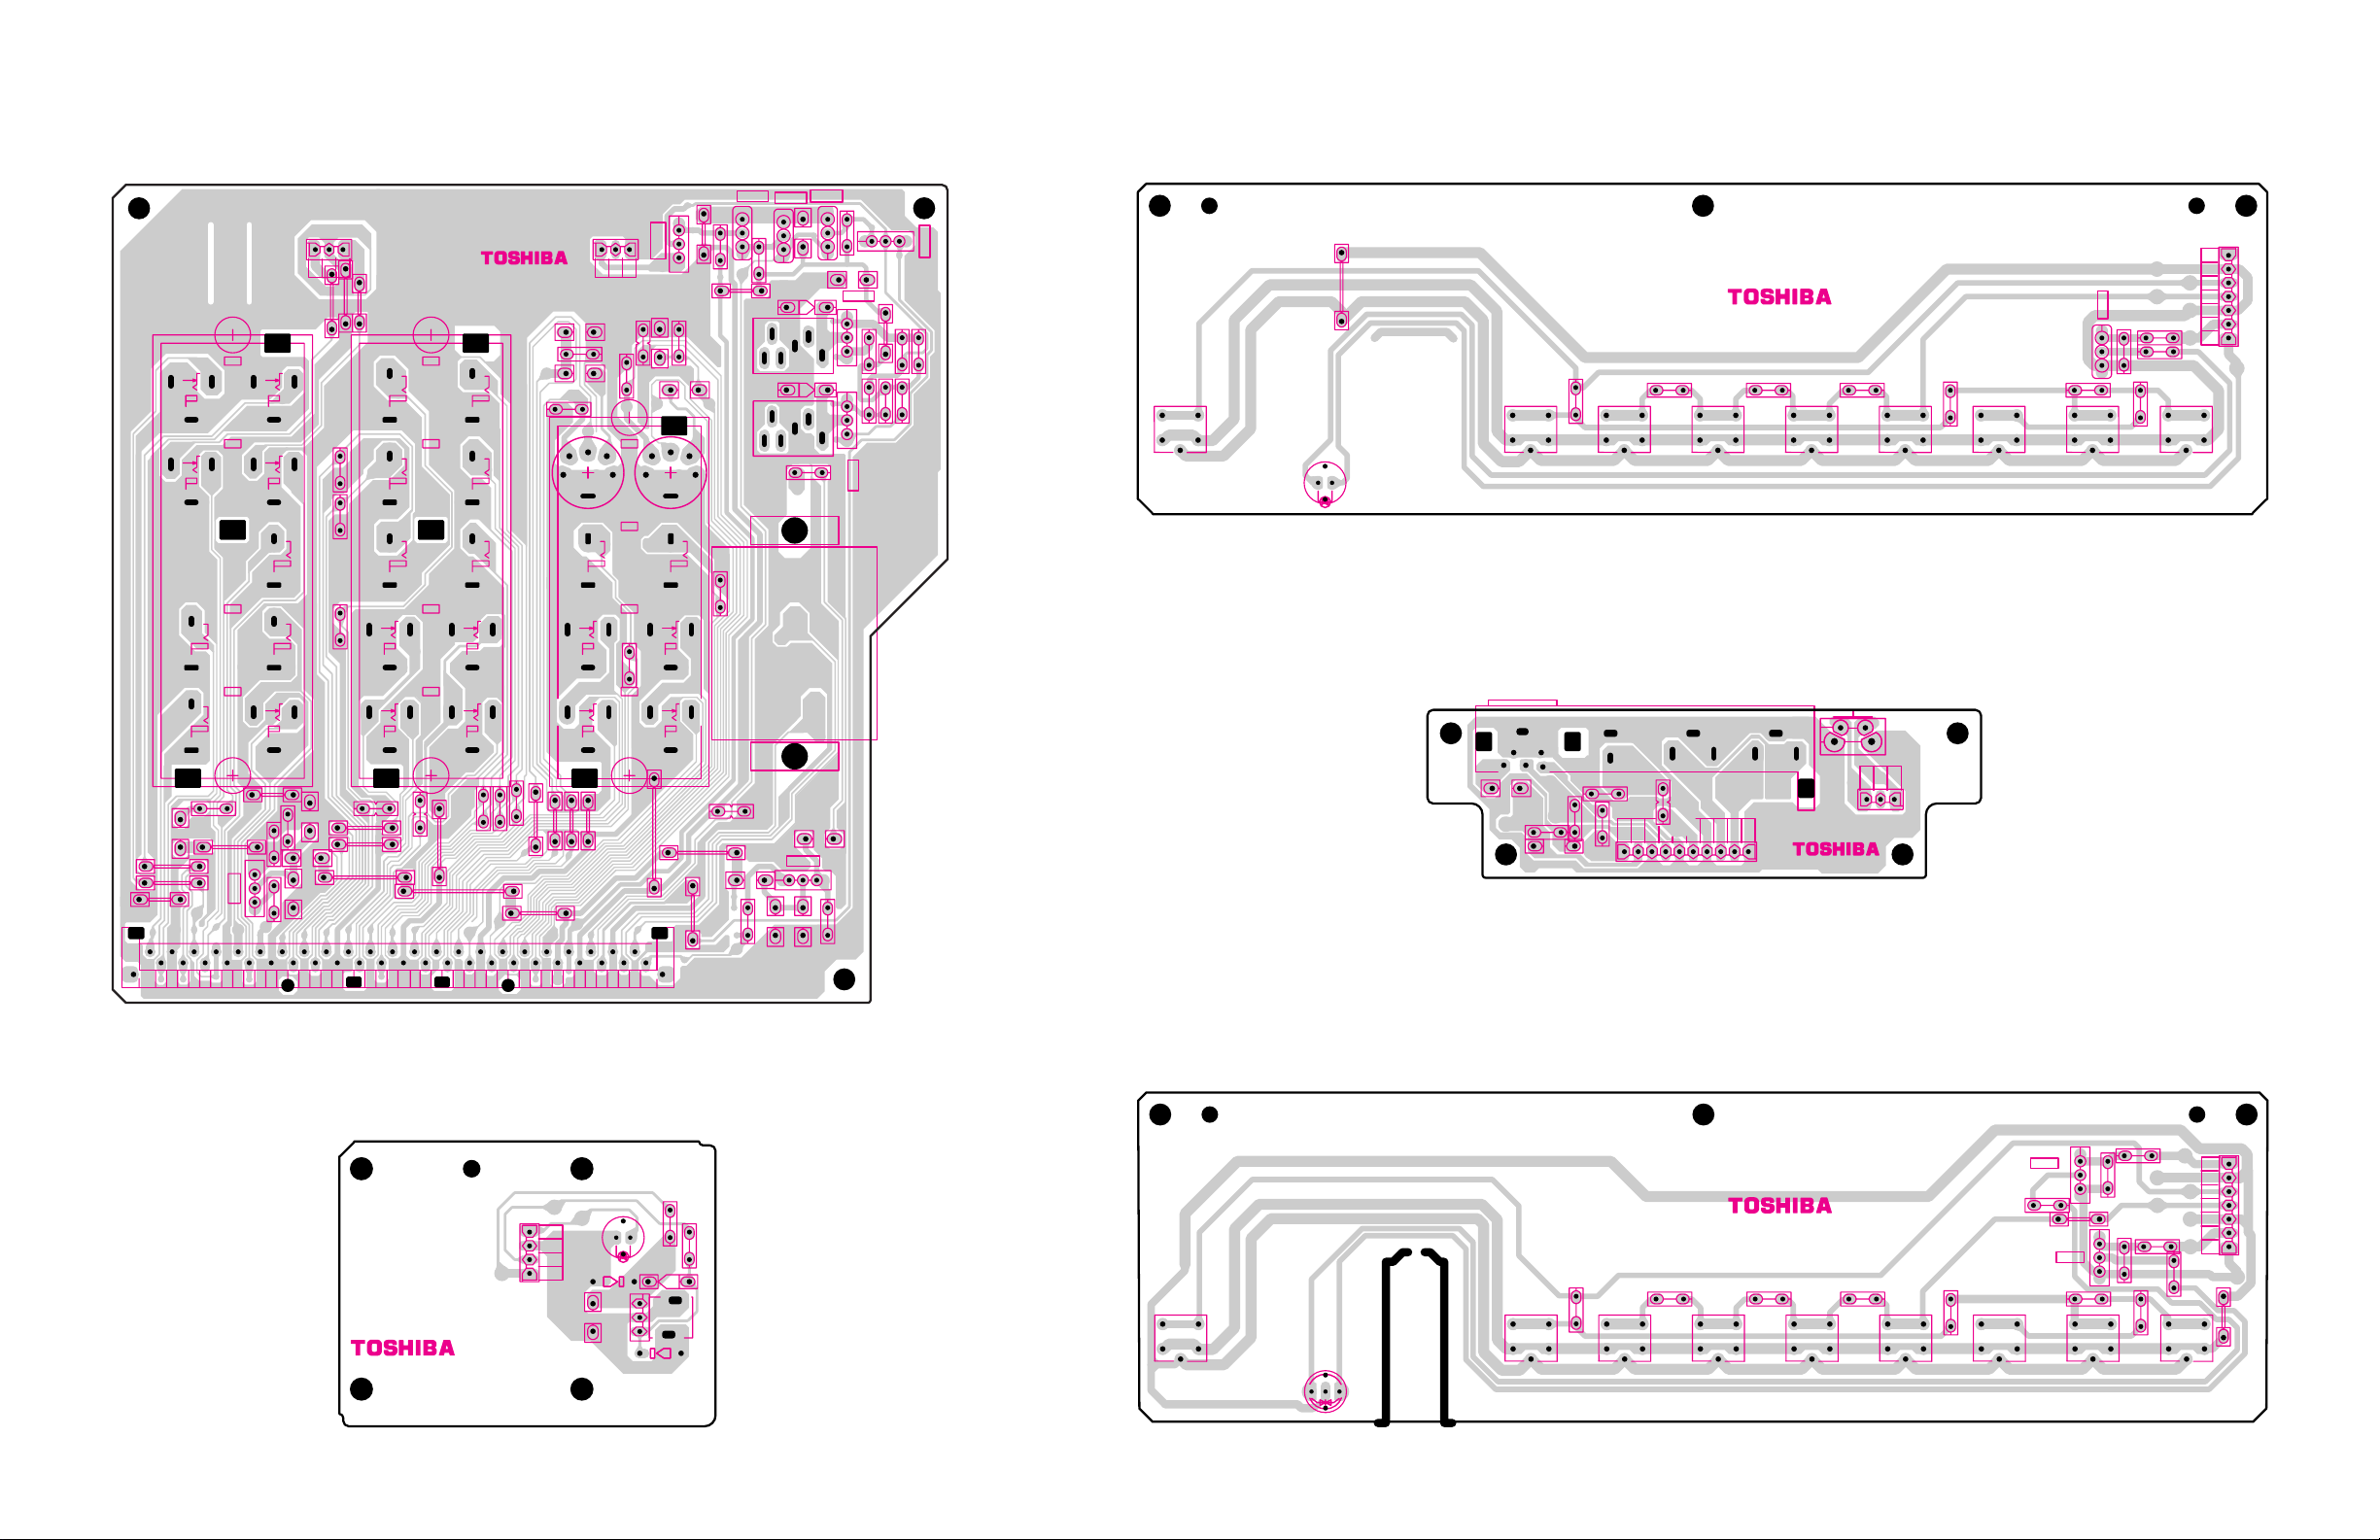
PV03
BACK/AV BOARD PD1735B1 (E021Z)
BOTTOM (FOIL) SIDE
RB567
QB510
E
B
QB509
PS01
3
2
R266
R265
23547592
1
B1-V-0
RV36
CV39
RV35
PB503
231
LV36
RV33
SW
C
Y
G
GG
E
RV37
LV3 7
CV38
SW
C
Y
G
DB504
PB501
DB501
PB502
G
RB559
RV189
FRONT-CON BOARD PD1735B2 (E022Z)
BOTTOM (FOIL) SIDE
QB513
QB511
E
B
CB505
RB558
E
E
B
B
CB504
-
+
QB508
RB561
RB563
EB
BE
RB506
RB504
RB505
QB502
QB512
RB562
SA05
DB01A
DB01
RA76
7
FOCUS
TOUCH
SA08
PB11
6
5
4
3
2
1
23547592
QB01
RB04
RB05
RB01
RA79
RA78
B
E
ANT/VIDEOEXITCH UPCH DNVOL UP
SA07SA09
B1-V-0
RA71
VOL DNMENUPOW
SA04SA06
RA72
SA03
RA73
RA77
SA01SA02
PV01
R264
PV02
RV34
FRONT IN BOARD PD1735B3 (E023Z)
BOTTOM (FOIL) SIDE
RV40
PV05
B1-V-0
23547592
S701
P701
31
2
-
+
CV27
RV89
E
QV48
B
RV85
RV86
RV61
-
CV29
+
CV129
CV127
+
QV148
B
CV130
-
E
RV185
R286
R287
+
LV13
CV30
BB70
R288
LV113
RV161
CV14
RV21
LV20
RV20
RV23
RV22
1234679108
PV60
5
-
1
5
15
10
25
20
35
30
40
46
45
FRONT CONT BOARD PD1971A (UB11)
BOTTOM (FOIL) SIDE
REMOTE BOARD PD1735B4 (E024Z)
BOTTOM (FOIL) SIDE
RB10
B
B1-V-0
23547592
PB22
DB03
DB03A
12
3
DB05
4
DB31
RB19
RB15
CCP-3400S
+
23547731
CB01
KB01
-
DB30
DB01A
G
R
DB01
RA76
RA71 RA72 RA73
VOL DNMENUPOW
SA04SA06SA05
RA77
QB01
RB08
QB02
RA78
SA09SA02 SA01
RB11
E
B
E
ANT/VIDEOEXITCH UPCH DNVOL UP
SA07SA03
RB12
RB13
RA79
RB09
FOCUS
TOUCH
SA08
PB11
7
6
5
4
3
2
1
-
49
- -
50
-
Page 48
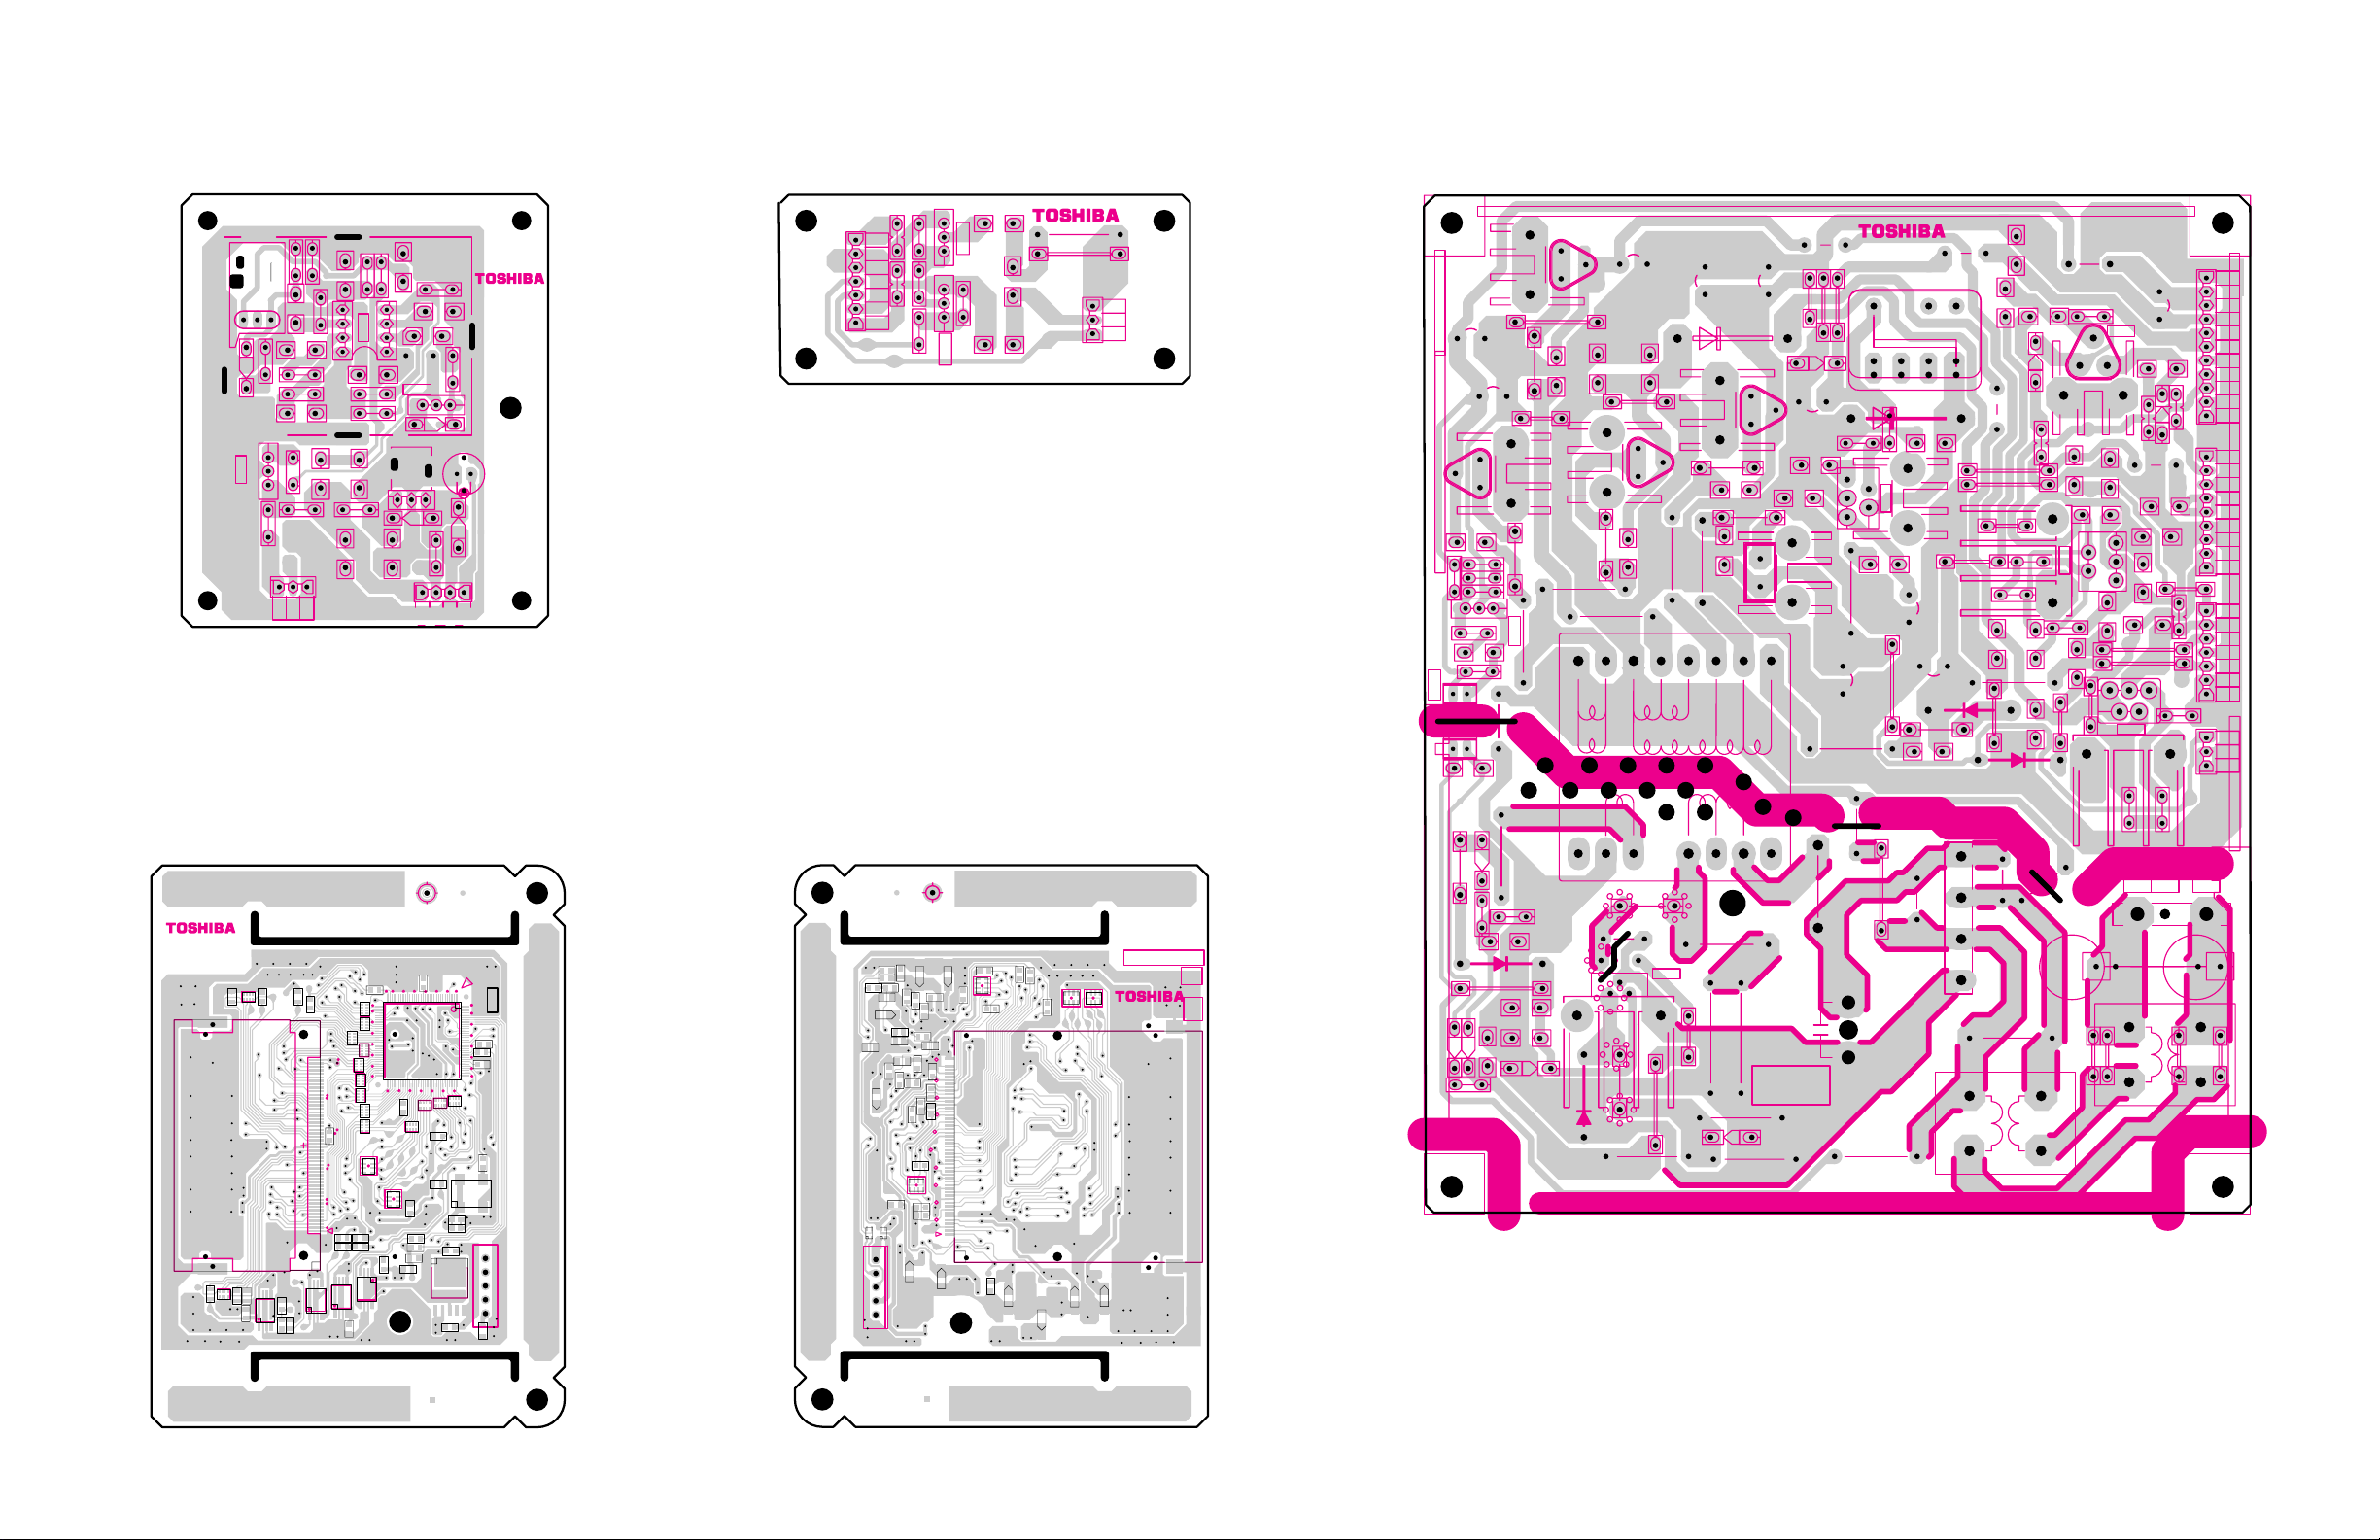
IR BLASTER BOARD PD1289 (E045Z)
BOTTOM (FOIL) SIDE
RB52
CB54
RB56
3
RB51
CB51
RB69
2
CCP-3400
RB54
CB52
RB55
+
4
RB53
5
4
QB51
CB53
RB67
1
1
CB61
RB57
+
RB59
LB51
1
RB58
CB56
RB19
CB58
RB63
8
+
+
CB01
5
CB60
8
E
DB54
+
+
QB52
KB01
DB55
RB62
CB59
RB15
4
CB55
32
RB60
DB03
DB03A
RB61
B
DB56
PB22
1
DB51
DB51A
DB52
QB53
EB
RB70
23547370
PB51
MULTICARD BOARD PD1821A (UC01)
BOTTOM (FOIL) SIDE
B
DS-7405
PC02
23547649
RC18
RC17
RC16
RC17
RC16
RC15
ZC16
RC04
ZC16
RC20
ZC18
RC18
ZC18
PC02
RC20
CC13
RC19
CC13
RC19
8
QC04
RC15
CC25
5
QC04
CC25
RC38
41
RC39
RC38
RC39
RC04
8
1
QC02
ZC06
ZC05
ZC07
ZC07
ZC08
50
25
ZC09
ZC10
45
ZC11
20
CC14
40
15
CC14
35
10
530
26
RC27
1
RC27
CC22
RC33
RC32
RC32
RC33
4
8
5
5
QC03
QC02
5
1
4
4
QC03
RC37
RC37
ZC09
35
40
ZC10
ZC11
QC05
ZC06
ZC05
45
50
ZC08
ZC12
ZC13
ZC21
ZC19
CC22
ZC21
RC08
60
64
QC05
55
ZC12
ZC13
1
8
RC08
25 20 15 10 5 1
30
32
33
ZC01
ZC19
RC34
CC24
CC24
CC02
CC02
128
QC01
125
120
115
QC01
858065 70 75
ZC02
CC08
CC08
ZC04
ZC01
ZC02
RC23
RC23
RC26
RC26
CC35
CC42
CC35
CC41
RC36
RC36
RC34
RC35
RC35
CC40
CC40
RC09
RC09
110
RC10
RC10
105
RC50
RC50
100
97
95
90
ZC03
ZC04
ZC03
RC54
RC54
4
3
XC01
XC01
2
1
CC42
CC41
PC01
CC27
CC27
QC08
43
51
521
QC08
LC05
CC34
CC34
LC05
FAN UNIT BOARD PD1953A (UF01)
BOTTOM (FOIL) SIDE
E
LF01
QF01
PF01
RF01 RF02
321
7654
RF04
QF02
BBE
RF03
LF02
CF01
+
-
RF05
CCP-3400S
PF02
23547716
1
32
MULTICARD BOARD PD1821A (UC01)
TOP (COMPONENT) SIDE
F
CC11
CC36
RC22
RC06
RC40
RC14
LC06
RC53
RC40
CC07
LC06
RC13
CC03
CC04
LC04
LC04
CC26
RC52
CC06
RC52
RC53
CC04
PC01
CC09
CC09
CC11
RC41
RC58
RC49
RC14
RC41
RC01
CC12
RC01
CC07
CC12
RC49
RC58
RC62
CC06
RC62
CC05
LC02
CC05
CC01
CC01
50
RC13
CC03
CC18
RC51
CC18
CC31
CC16
RC51
45
CC16
CC31
CC19
RC25
40
RC02
RC25
RC02
35
CC19
30
25
RC60
RC60
20
ZC17
ZC17
15
10
CC26
RC61
RC61
RC21
5
RC21
LC03
LC03
CC30
CC17
21
3
CC17
CC30
54
RC05
RC22
ZC20
CC36
CC10
LC02
1
RC05
2
RC06
RC07
RC03
RC07
CC33
CC20
ZC15
1
7
RC03
CC20
CC28
CC32
CC28
CC32
CC10
ZC20
CC33
23590043A
PD1821
88
2
ZC15
ZC14
ZC14
7
1
PC03
PC03
CC15
CC15
2
QE05
RE40
4
1
RE43
CE43
SUB POWER BOARD PD1820A (UE01)
BOTTOM (FOIL) SIDE
23547648
FE76
LE13
CE86
CE74
CE84
+
DE74
TE60
LE11
RE13
-
-
5A 125V
FE73
QE01
QE01A
CE76
DE76
+
FE74
5A 125V
CE15
DE18
CE87
DE74A
+
-
LE74
5A 125V
DE76A
-+
LE76
CE80
CE71
LE12
RE17
DE71
DE12
CE14
2
3
CE81
RE48
CE17
RE18
DE13
-
DE71A
LE71
RE45
RE44
RE46
3
QE40
5A 125V
FE77
CE09
RE16
DE15
CE16
CE12
-+
DE19
+
1
CE11
DE14
RE22
-
DE73A
4A 125V
B1-V-0
-
LE60
DE61
CE73
DE75
DE73
LE75
CE83
+
-
AK
CE52
DE79
CE55
RE50
CE54
+
DE75A
1.5A 125V
LE51
FE79
QE50
CE88
+
LE73
CE75
FE75
+
CE85
-
FE72
1A 125V
-
RE51
+
-
LE53
QE50A
DE52
CE53
CE51
CE82
CE72
LE72
LE54
+
RE52
+
CE63
+
DE72
-
RE10
CE04
+
CE05
DE01
-
CE13
RE14
RE12
DE10
RE15
RE11
2A 125V
CAUTION
LIVE AREA
CE07
FE01
CE10
-+
LE50
RE60
CE02
-
CE56
LE57
+
+
LE56
CE68
QE54A
+
CE59
CE61
PE06
QE54
-
CE79
E
DE55
54321
-
+
876
11109
-
CE58
+
-
+
1
3
-
+
3
1
2
QE52
QE52A
PE05
-
LE55
-
+
CE57
CE66
-
CE67
5
CE65
5
4
987654321
1
-
23
4
56
PE50A
7
RE80
1
PE55A
32
RE81RE82
3
1
PE01
CE01
TE02
CE50
RE55
+-
C
DE54
B
LE58
+
QE53A
QE53
RE53
-
DE60
TE01
+
CE69
CE64
2
4
RE54
-
LE59
CE08
-
51
- -
52
-
Page 49
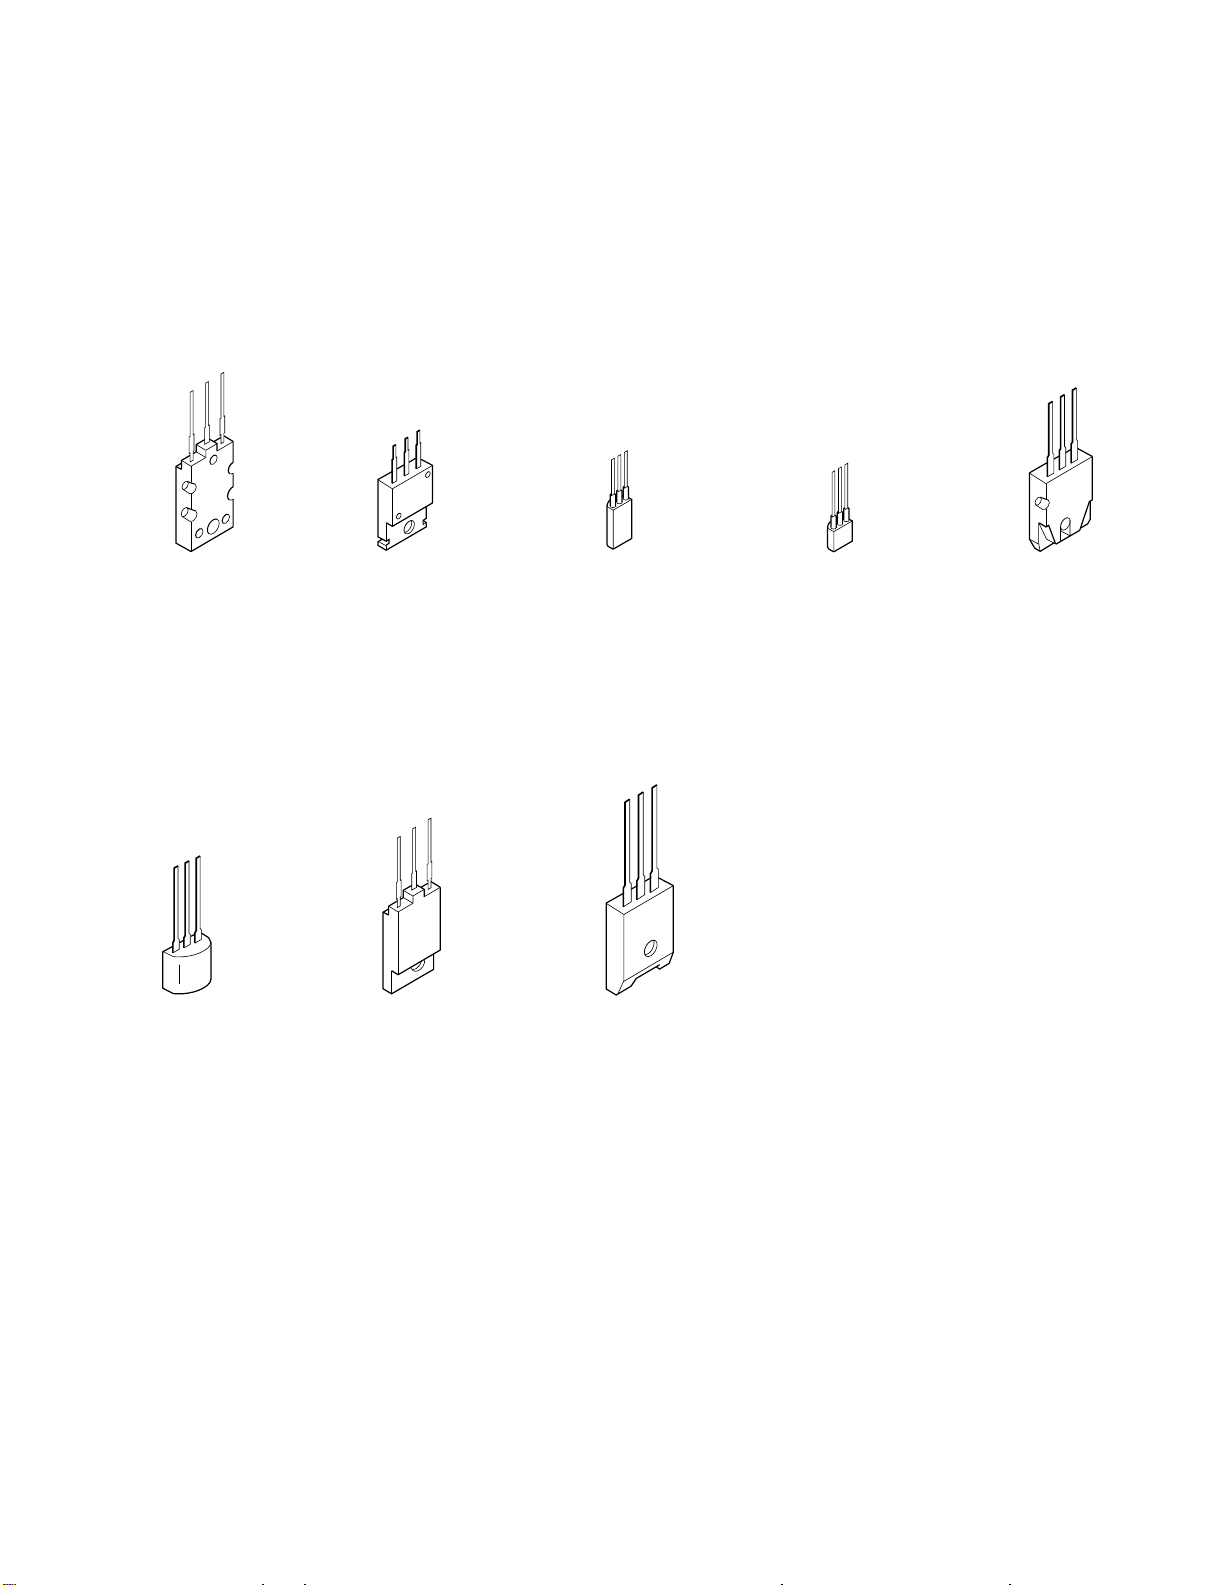
TERMINAL VIEW OF TRANSISTORS
2SC5144
2SC5859
B
C
E
RN2203
RN2201
RN2004
RN1203
RN1204
RN2204
RN1205
RN1202
RN1201
B
C
E
2SC3852
2SD1763A
2SC1569
2SC4544
2SA1788
2SA1306
2SA1186A
B
C
E
2SD1554
2SD2253
2SD1556
2SD2553
2SC5143
B
C
E
2SC752GTM
2SC2482
2SC2655
2SC4721P
E
C
B
ON4409
B
C
E
2SC752
2SA562TM
2SA1015
2SC1815
2SC2878
2SC1740S
2SC2120
2SA9335
E
C
B
2SA1788
B
C
E
-
53
-
Page 50
SCHEMATIC DIAGRAM
MODEL : 51H94/57H94
WARNING: BEFORE SERVICING THIS CHASSIS, READ THE "X-RAY RADIATION PRECAUTION", "SAFETY
PRECAUTION" AND "PRODUCT SAFETY NOTICE" ON THE MANUAL FOR THIS MODEL.
CAUTION: The international hazard symbols " " in the schematic diagram and the parts list designate components
which have special characteristics important for safety and should be replaced only with types identical to those in the
original circuit or specified in the parts list. The mounting position of replacements is to be identical with originals.
Before replacing any of these components, read carefully the PRODUCT SAFETY NOTICE on the MANUAL for this
model. Do not degrade the safety of the receiver through improper servicing.
NOTE:
1. RESISTOR Resistance is shown in ohm [K = 1.000, M = 1.000.000]. All resistors are 1/6W and 5% tolerance
carbon resistor, unless otherwise noted as the following marks.
1/2R = Metal or Metal oxide of 1/2 watt 1/2S = Carbon compsistion of 1/2 watt
1RF = Fuse resistor of 1 watt 10W = Cement of 10 watt
±
10% G = ±2% F = ±1%
K =
2. CAPACITOR Unless otherwise noted in schematic, all capacitor values less than 1 are expressed in
the values more than 1 in pF.
All capacitors are ceramic 50V, unless otherwise noted as the following marks.
Electolytic capacitor
Mylar capacitor
µ
F, and
3. The parts indicated with "
4. Voltages read with DIGITAL MULTI-METER from point indicated to chassing ground, using a color bar signal with
all controls at normal, line voltage at 220 volts.
5. Waveforms are taken receiving color bar signal with enough sensitivity.
6. Voltage reading shown are nominal values and may vary
" have special characteristics, and should be replaced with identical parts only.
±
20% except H.V.
-
54
-
Page 51
SCHEMATIC DIAGRAM STRUCTURE:
AUDIO SELECT (HYPER SIGNAL)...................................................... 1/58
FRONT AV (FRONT CONTROL) [SHEET-1/2].................. 2/58
(FRONT IN/REMOTE) [SHEET-2/2].................. 3/58
BACK AV (1/2) [SHEET-1/2].................. 4/58
(IR BLASTER) [SHEET-2/2].................. 5/58
CONVER IF AUDIO (1/4) [SHEET-1/4].................. 6/58
(CONVER OUT) [SHEET-2/4].................. 7/58
(IF) [SHEET-3/4].................. 8/58
(SOUND) [SHEET-4/4].................. 9/58
CONNECTION (HS AV).................................................................... 10/58
CRT-D SVM (B) [SHEET-1/2]................ 11/58
(R, G) [SHEET-2/2]................ 12/58
DEF POWER (CONNECTION) [SHEET-1/3]................ 13/58
(DEF) [SHEET-2/3]................ 14/58
(POWER) [SHEET-3/3]................ 15/58
FAN CONTROL................................................................................................................ 16/58
IR BLA OUT...................................................................................................................... 17/58
MULTI CARD (1/4) [SHEET-1/4]................ 18/58
(2/4) [SHEET-2/4]................ 19/58
(3/4) [SHEET-3/4]................ 20/58
(4/4) [SHEET-4/4]................ 21/58
REGULATOR (HYPER SIGNAL).................................................... 22/58
SUB POWER (1/2) [SHEET-1/2]................ 23/58
(2/2) [SHEET-2/2]................ 24/58
HYPER SIGNAL (BACK AV SOCKET) [SHEET-1/34].............. 25/58
(AV1) [SHEET-2/34].............. 26/58
(AV2) [SHEET-3/34].............. 27/58
(AUDIO SWITCH) [SHEET-4/34].............. 28/58
(AV3) [SHEET-5/34].............. 29/58
(6/34) [SHEET-6/34].............. 30/58
(7/34) [SHEET-7/34].............. 31/58
(8/34) [SHEET-8/34].............. 32/58
(9/34) [SHEET-9/34].............. 33/58
(MICON1) [SHEET-10/34]............ 34/58
(MICON2) [SHEET-11/34]............ 35/58
(MICON3) [SHEET-12/34]............ 36/58
(MICON4) [SHEET-13/34]............ 37/58
(MICON5) [SHEET-14/34]............ 38/58
(MICON6) [SHEET-15/34]............ 39/58
(MICON7) [SHEET-16/34]............ 40/58
(MICON8) [SHEET-17/34]............ 41/58
(MICON9) [SHEET-18/34]............ 42/58
(REGULATOR) [SHEET-19/34]............ 43/58
(MAICON9) [SHEET-20/34]............ 44/58
(DIGITAL-CONVER1) [SHEET-21/34]............ 45/58
(DIGITAL-CONVER2) [SHEET-22/34]............ 46/58
(DIGITAL-CONVER3) [SHEET-23/34]............ 47/58
(DIGITAL-CONVER4) [SHEET-24/34]............ 48/58
(DIGITAL-CONVER5) [SHEET-25/34]............ 49/58
(DIGITAL-CONVER6) [SHEET-26/34]............ 50/58
(DIGITAL-CONVER7) [SHEET-27/34]............ 51/58
(DIGITAL-CONVER8) [SHEET-28/34]............ 52/58
(CONVER-REG) [SHEET-29/34]............ 53/58
(30/34) [SHEET-30/34]............ 54/58
(31/34) [SHEET-31/34]............ 55/58
(32/34) [SHEET-32/34]............ 56/58
(33/34) [SHEET-33/34]............ 57/58
(34/34) [SHEET-34/34]............ 58/58
-
55
-
Page 52

CIRCUIT BLOCK DIAGRAM
IF & AUDIO board
BACK AV
E1
E2
E3
VAL_L
VAL_R
monitor out
Rec out
CS-1
CS-2
L,R
Y,Pb,P
YPbP
Q601
H001 IMA
TV1 L,R in
A_MUTE
RST
L,R
out
W
out
Q663
VARI-AMP
AUDIO OUT
W in
L in
R in
W out
L out
R out
SP_MUTE MUTE_A EXT_MUTE
MAIN_AFT PIP_AFT
Video Device
51H94
Digital Device
L,R
V
V
V,Y,C
V,Y,C
VYC
YPbP
YPbP
V
L,
LR
LR
LR
LR
L,
L
HD,VD
LR
LR
LR
LR
QV01
MM1630XQ
V6(TV1)
V8(DB_SD_OU
VYC1(E1
VYC2(E
VYC3(E3)
CY1(CS1)
CY2(CS
IN1(TV1)
IN2(TV2)
V(Y),C
IN3(E1)
IN4(E2)
IN5(E3)
IN6(CS1)
IN7(CS2)
IN8(HDMI1)
IN9(HDMI2)
IN10(seine_audio)
QS01
MM1631XJBE
VIDEO SW
O1
OUT1
OUT
OUT4
(MON)
HD,VD
OUT1
(SPK)
OUT2
(MON)
OUT3
(1394)
V(Y)CCbCr
V(Y),C
QV04
BA7623
F
BOARD
75_ Driver
Y,Pb,P
V(Y)CCbCr
QZ01
TC90A92F 16bit(601)
TC90A92AFG
sync on g
Y
Cb,Cr
HD,VD,CLP
SAA7115
Y
Q501
TA1383
V,(Y)
To C/C slicer(WSS
SYNC_DET(main)
Seine
Board
AD****
VBI SLCE
To V-chip slicer
(sub)
SYNC_DET(sub)
flash
E2P
ROM
L,R D
HD,VD
24bit(4:4:4)
HD,VD
I2Bus
SW
Micro
Processer
QA01
M306V2ME
(Micro)
TC81420
reset
Ys,Ym,R,G,
SD_VIDEO
Pb,P
Y
HD,VD
RGB
Processer
Q510
TA1360AFG
SIGNAL
CRT-D board
H: WIDE BAND
TYPE
or
HX: NORMAL BAND
TYPE
Frequency Detecter
Synchronized Signal
Decorder
R,G,B,VM
Micro-P Device
H_OUT
VP
V_OUT_BLK
V_STOP_BLK
AFC
ABL
H_PHA_COM
ABL_SW
To
Power/De
f
DVI
AUDIO
HDMI
IEEE1394
POD
TMDS
TC90700
MB8619
DAC
L,R_BS
AD
uPD61051
SW
AD
TS
TS
M-PEG
EXT BUS
3DYCS, Color Decorder
Analog/Digital Converter
TS Decorder, MPEG Decorder
UP CON, Multi Window, Scaler
Video Signal Processer
-
56
- -
57
-
Page 53

Specifications
NOTE:
• This model complies with the specifications listed below.
• Designs and specifications are subject to change without notice.
• This model may not be compatible with features and/or specifications that may be added in the future.
Television System
NTSC standard
ATSC standard (8VSB)
Digital Cable (64 QAM, 256 QAM; in-the-clear, unencrypted*)
*Encrypted channels can be viewed on this TV
using a CableCARD. See page 12 for details.
Channel Coverage
VHF: 2 through 13
UHF: 14 through 69
Cable TV: Mid band (A-8 through A-1, A through I)
Super band (J through W)
Hyper band (AA through ZZ, AAA, BBB)
Ultra band (65 through 94, 100 through 125)
Power Source
120 V AC, 60 Hz
Power Consumption
220 W (average)
45 W in standby mode (power cord plugged in and power OFF)
Audio Power
15 W + 15 W
Speaker Type
Two 6-5/16 inches (16 cm) round
Video/Audio Terminals
S-VIDEO INPUT:
Y : 1 V(p-p), 75 ohm, negative sync.
C : 0.286 V(p-p) (burst signal), 75 ohm
VIDEO/AUDIO INPUT:
VIDEO: 1 V(p-p), 75 ohm, negative sync.
AUDIO: 150 mV(rms) (30% modulation equivalent,
22 k ohm or greater)
®
ColorStream
(component video) HD INPUT:
Y : 1V(p-p), 75 ohm
PR: 0.7 V(p-p), 75 ohm
PB: 0.7 V(p-p), 75 ohm
AUDIO: 150 mV(rms), 22 k ohm or greater
Suggested resolutions: 1080i, 480p, 480i, 720p
NOTE: This TV does not provide ColorStream HD OUTPUT.
Video/Audio Terminals (continued)
™
HDMI
INPUT:
HDMI compliant (type A connector)
HDCP compliant
E-EDID** compliant
Suggested scan rates: 1080i, 480p, 480i, 720p
HDMI Audio: 2-channel PCM; 32/44.1/48 kHz sampling
frequency; 16/20/24 bits per sample
NOTE: This TV does not provide HDMI OUTPUT.
VIDEO/AUDIO OUTPUT (also for recording):
VIDEO: 1 V(p-p), 75 ohm, negative sync.
AUDIO: 150 mV(rms) (30% modulation equivalent,
2.2 k ohm or less)
VARIABLE AUDIO OUTPUT:
0–300 mV(rms) (30% modulation equivalent,
2.2 k ohm or less)
™
G-LINK
and IR OUTPUT:
3 V(p-p), 3.5 mm mono socket (IR blaster cables supplied)
IEEE-1394 INPUT/OUTPUT:
IEEE-1394 compliant
Dimensions
51H94: Width: 47-9/16 inches (1208 mm)
Height: 50-1/2 inches (1283 mm)
Depth: 22-1/2 inches (572 mm)
57H94: Width: 52-3/4 inches (1340 mm)
Height: 55-3/4 inches (1416 mm)
Depth: 23-7/8 inches (606 mm)
Weight
51H94: 169 lbs (76.6 kg)
57H94: 204 lbs (92.5 kg)
Supplied Accessories
• Two dual-wand IR blaster cables
• Remote control with two size “AA” alkaline batteries
-
END
-
Page 54

TOSHIBA CORPORATION
1-1, SHIBAURA 1-CHOME, MINATO-KU, TOKYO 105-8001, JAPAN
 Loading...