

Toshiba 53HX71, 43HX71 Owner’s Manual
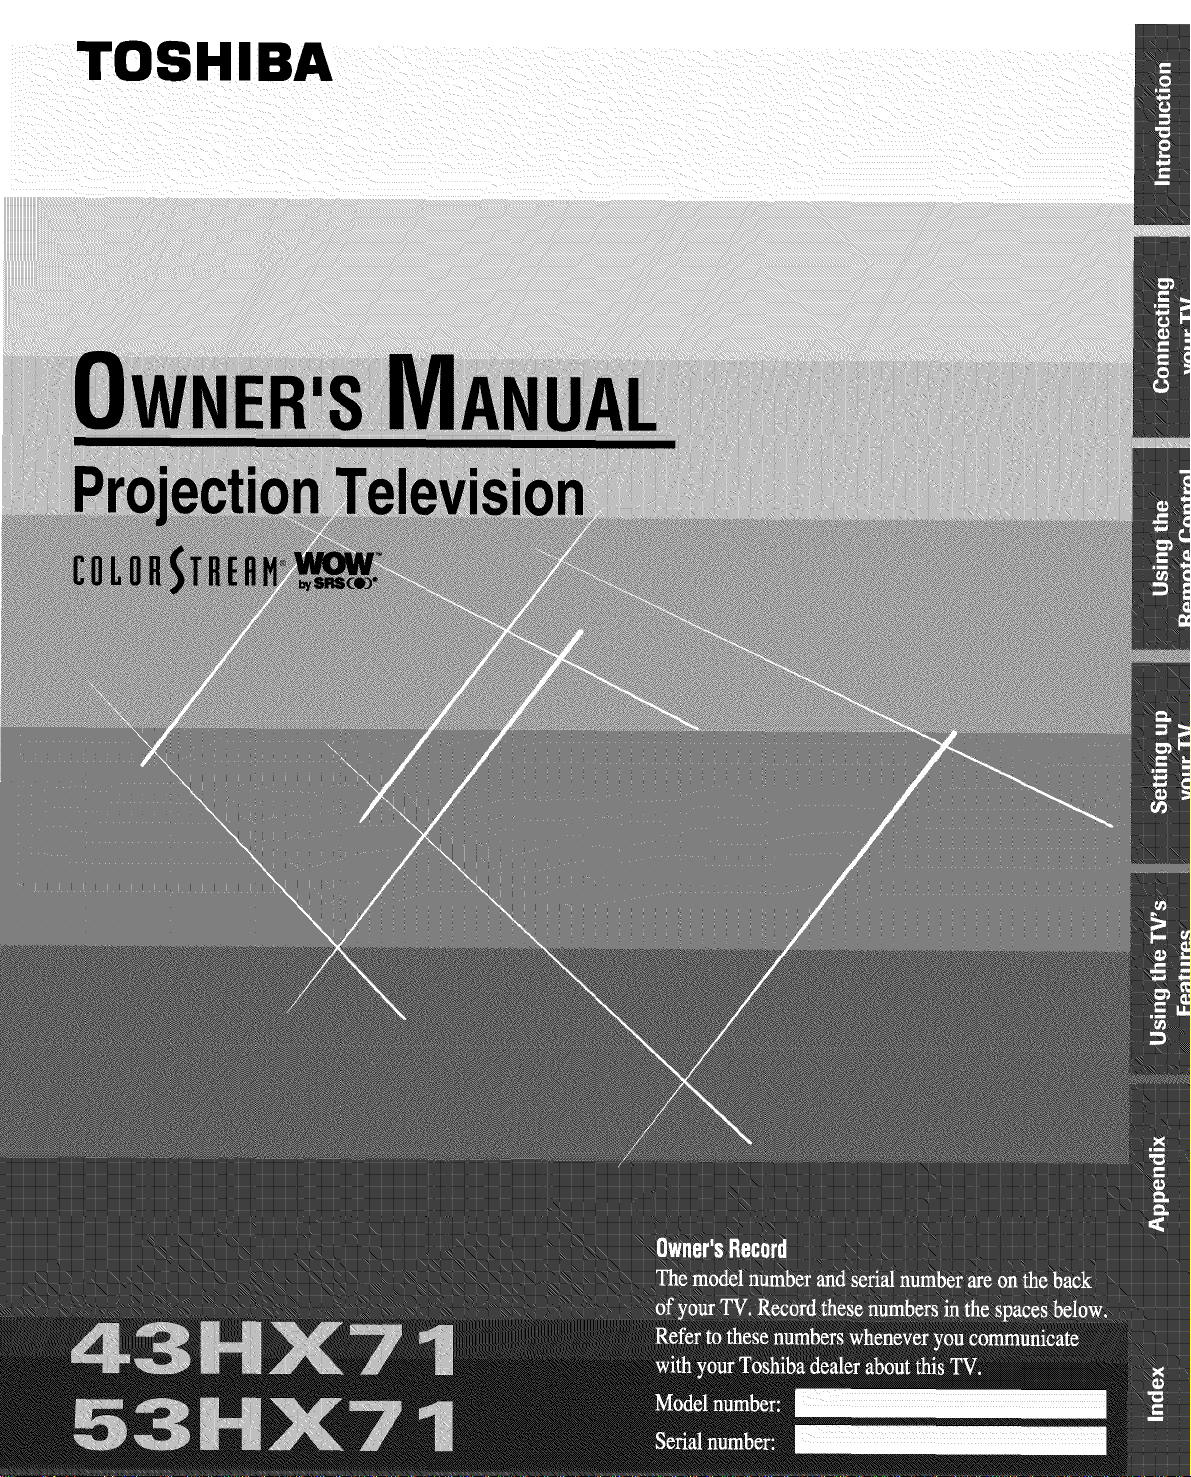
TOSHIBA
Important Information
Precautions
WARNING
TO REDUCE THE RISK OF FIRE OR ELECTRIC SHOCK, DO
NOT EXPOSE THIS APPLIANCE TO RAIN OR MOISTURE.
WARNING
WARNING: TO REDUCE THE RISK OF
ELECTRIC SHOCK, DO NOT REMOVE
COVER (OR BACK). NO USER-
SERVICEABLE PARTS INSIDE. REFER
SERVICING TO QUALIFIED SERVICE
PERSONNEL.
The lightning symbol in the triangle tells you that the
voltage inside this product may be strong enough to
cause an electric shock. DO NOTTRYTO SERVICE
THIS PRODUCTYOURSELF.
The exclamation mark in the triangle tells you that
important operating and maintenance instructions
follow this symbol.
CAUTION
TO PREVENT ELECTRIC SHOCK, DO NOT USE THIS
POLARIZED PLUG WITH AN EXTENSION CORD
RECEP_EACLE OR OTHER OUTLET UNLESS THE
PRONGS CAN BE FULLY INSERTED INTO THE
OUTLET TO PREVENT ANY EXPOSURE OF THE
PRONGS ON THE POLARIZED PLUG.
ATTENTION
POUR PRt_VENIR LES CHOCS t_LECTRIQUES NE PAS
UTILISER CETTE FICHE POLARISt_E AVEC UN
PROLONGATEUR, UNE PRISE DE COURANT OU UNE
AUTRE SORTIE DE COURAN_I, SAUF SI LES LAMES
PEUVENT t2TRE INSt_Rt_SA FOND SANS EN LAISSER
AUCUNE PARTIE A Dt_COUVEKE
CAUTION
The plug has one prong wider than the other and will fit only
one way into a standard
electrical outlet (120 volt AC, Wideprong
60 Hz). If the plug does not
fit into the outlet, try turning
it around. If the plug still does
not fit, the outlet is probably
non-standard and must be
replaced by a qualified electrician. Do not tamper with the plug
or try to force it into a non-standard outlet.
Note to CATVsystem installers in the USA
This reminder is provided to call the CATV system installer's
attention to Article 820-40 of the NEC, which provides
guidelines for proper grounding, and, in particular, specifies that
the cable ground shall be connected to the grounding system of
the building, as close to the point of cable entry as practical.
InstallingyourTV
• Place the TV on the floor or on a sturdy platform. The
mounting surface should be flat and steady. If you install the
TV on a soft floor, make sure that the floor is not damaged
by the weight of the TV.
• Place the TV far enough away from the walls to allow proper
ventilation. This will prevent the TV from overheating and
avoid possible damage to the TV. Avoid dusty areas too.
• Damage may occur ifyou leave the TV in direct sunlight or
near a heater. Avoid areas subject to extremely high
temperatures or humidity, and temperatures of 41 °F(5°C) or
lower.
UsingyourTV
• Do not stand or climb on the TV.
• Do not put any heavy object on top of the TV.
• Do not place containers with liquids such as drinl_s or
cosmetics on the TV. If any foreign material or water leal_s
into the TV, unplug the AC cord and contact your dealer.
• If the room temperature suddenly rises, condensation may
occur on the lenses resulting in picture distortion or color
fading. In such a case, simply wait a while (with the power
on) and the condensation will evaporate.
• Avoid displaying stationary images on your TV screen for
extended periods of time. Stationary patterns generated by a
PlP/double-window display, computer displays, video games,
stock market reports, etc., can become permanently
engrained on the picture tube. This damage is not protected
by your warranty because it is the result of misuse. If you wish
to useyour TV to display still images, reduce brightness and
contrast settings. Never leavea PIP/double-window,
computer, or video game display unattended.
• Sit approximately 10-25 feet away from the TV. Sitting too
far to the left or right of the screen will cause the picture to
appear dull as will direct sunlight and room lights. _Ihrn the
TV off to check for reflections on the screen. Then remove
the source of any reflections while viewing.
Cleaningyourn/
• Clean the TV with a soft, dry cloth. Never use strong solvents
such as thinner or benzine which might damage the finish of
the cabinet. If the cabinet is very dirty, use a damp cloth to
wipe the cabinet clean, then finish with a dry cloth.
NOTICEOFPOSSIBLEADVERSEEFFECTSONTVPICTURETUBE
Extensive viewing of fixed (non-moving) images or patterns can
cause uneven aging of the picture tube, and leave a subtle but
permanent ghost image in the picture. This type of damage is
NOTCOVEREDBYYOUR WARRANTY. Never leave the TV on
and unattended for long periods of time while the following
formats or images are displayed:
- Fixed images, such as PIP/POP windows, stock tickers, video
game patterns, TV station logos, and websites.
- Special formats that do not use the entire screen. For
example, viewing letterbox style 06:9) media on a normal
(4:3) display (bars at top and bottom of screen), or viewing
normal (4:3) media on a widescreen (16:9) display (bars on
left and right sides of screen).
2
Introduction ..................................... 4
Welcome to "Ibshiba ......................................................... 4
Exploring your newTV ............................................. 4
Connecting your TV ..................... 5
Connecting a VCR .......................................................... 5
Connecting a cable converter box .................................... 6
Connecting a cable converter box and VCR ..................... 6
Connecting a DVD player or satellite receiver and
a VCR ....................................................................... 7
Connecting a DVD player (with or without
component video) and a VCR .......................................... 8
Connecting a DTV receiver/set-top box (with or
without component video) and a VCR ............................ 9
Connecting two VCPvs................................................... 10
Connecting a camcorder ................................................ 10
Connecting an audio system .......................................... 11
Connecting an A/V receiver ........................................... 11
Using the remote control ...................................... 12
Preparing the remote control for use .............................. 12
Installing the remote control batteries ............................ 12
Remote Control functional key chart ...................... 13
Programming the remote control for use with your
audio/video devices ........................................................ 15
Device code setup ................................................... 15
Searching and sampling the code of a device (991) . 15
Verifying the device code (990) ............................... 16
Using the volume lock feature (993) ....................... 16
Operational feature reset (980) ............................... 16
Device code table ............................................ 17-20
Learning about the remote control ............................. 21
Setting up your TV ................................................. 22
Learning about the menu system .............................. 22
Changing the on-screen display language ..................... 23
Sdecting the antenna input ............................................ 23
Adding channds to the TV's memory ......................... 24
Programming channels automatically ...................... 24
Adding and erasing channels manually .................... 25
Changing channels .................................................. 25
Adjusting the color convergence ..................................... 26
Using the TV's features .......................... 28
Adjusting the channel settings ........................................ 28
Switching between two channds ............................. 28
Programming your favorite channels ....................... 28
Labeling channels ............................................ 29
Viewing the wide-screen picture formats ........................ 31
Sdecting the image shape .................................... 31
Watching PIP/double-window ................................... 32
Switching the main and sub-pictures ..................... 33
Changing the position of the small picture .............. 33
Freezing the sub-picture ..................................... 33
Using the multi-window feature ..................................... 34
Using the faxorite function ................................ 34
Using the strobe function ........................................ 34
Using the LOCKS menu ........................................ 35
Entering the PIN code ..................................... 35
Using the V-CHIP menu .......................................... 36
ENABLE BLOCKING .................................... 36
TV RATING (Independent rating system for
broadcasters) ........................................................... 36
MPAA RATING (Independent rating system for
movies) ........................................................... 37
BLOCKING OPTION .......................................... 37
Unlocking programs temporarily ............................ 38
Loddng channels ........................................................... 38
Loddng video inputs .................................................... 39
Using the front panel lock feature ............................. 40
Changing the PIN code ........................................... 40
Adjusting the picture .............................................. 41
Sdecting the picture mode ................................. 41
Adjusting the picture quality .............................. 41
Saving new preference ............................................. 42
Using the flesh tone feature ................................. 42
Using the Digital Noise Reduction (DNR) feature .. 42
Sdecting the cinema mode ...................................... 43
Sdecting the color temperature ............................... 43
Resetting picture adjustments ............................. 43
Sdecting the video input source ................................ 44
Labding the video input sources .................................... 44
Using the dosed caption feature ................................ 45
Setting the ,sleeptimer .................................................... 46
Setting the dock ......................................................... 46
Adjusting the sound ............................................... 47
Muting the sound ................................................. 47
Sdecting stereo/SAP broadcasts ........................... 47
Using the WOW TM surround sound feature .......... 48
Adjusting the sound quality ................................. 48
Resetting audio adjustments ............................... 49
Using the sub-bass system (SBS) ............................ 49
"Ihrning off the built-in speakers ........................... 50
Sdecting the Audio OUT sound ............................ 50
Using the StableSound TM feature ......................... 50
Selecting the background of the menu display ............ 51
Displaying on-screen information ............................. 51
Viewing the demonstration mode ............................. 51
Understanding the auto power off feature ................... 51
Understanding the last mode memory feature .............. 51
Appendix .............................. 52
Specifications ................................................................. 52
_I_oubleshooting ............................................................. 53
Limited United States Warranty ..................................... 54
Index ............................... 55
3
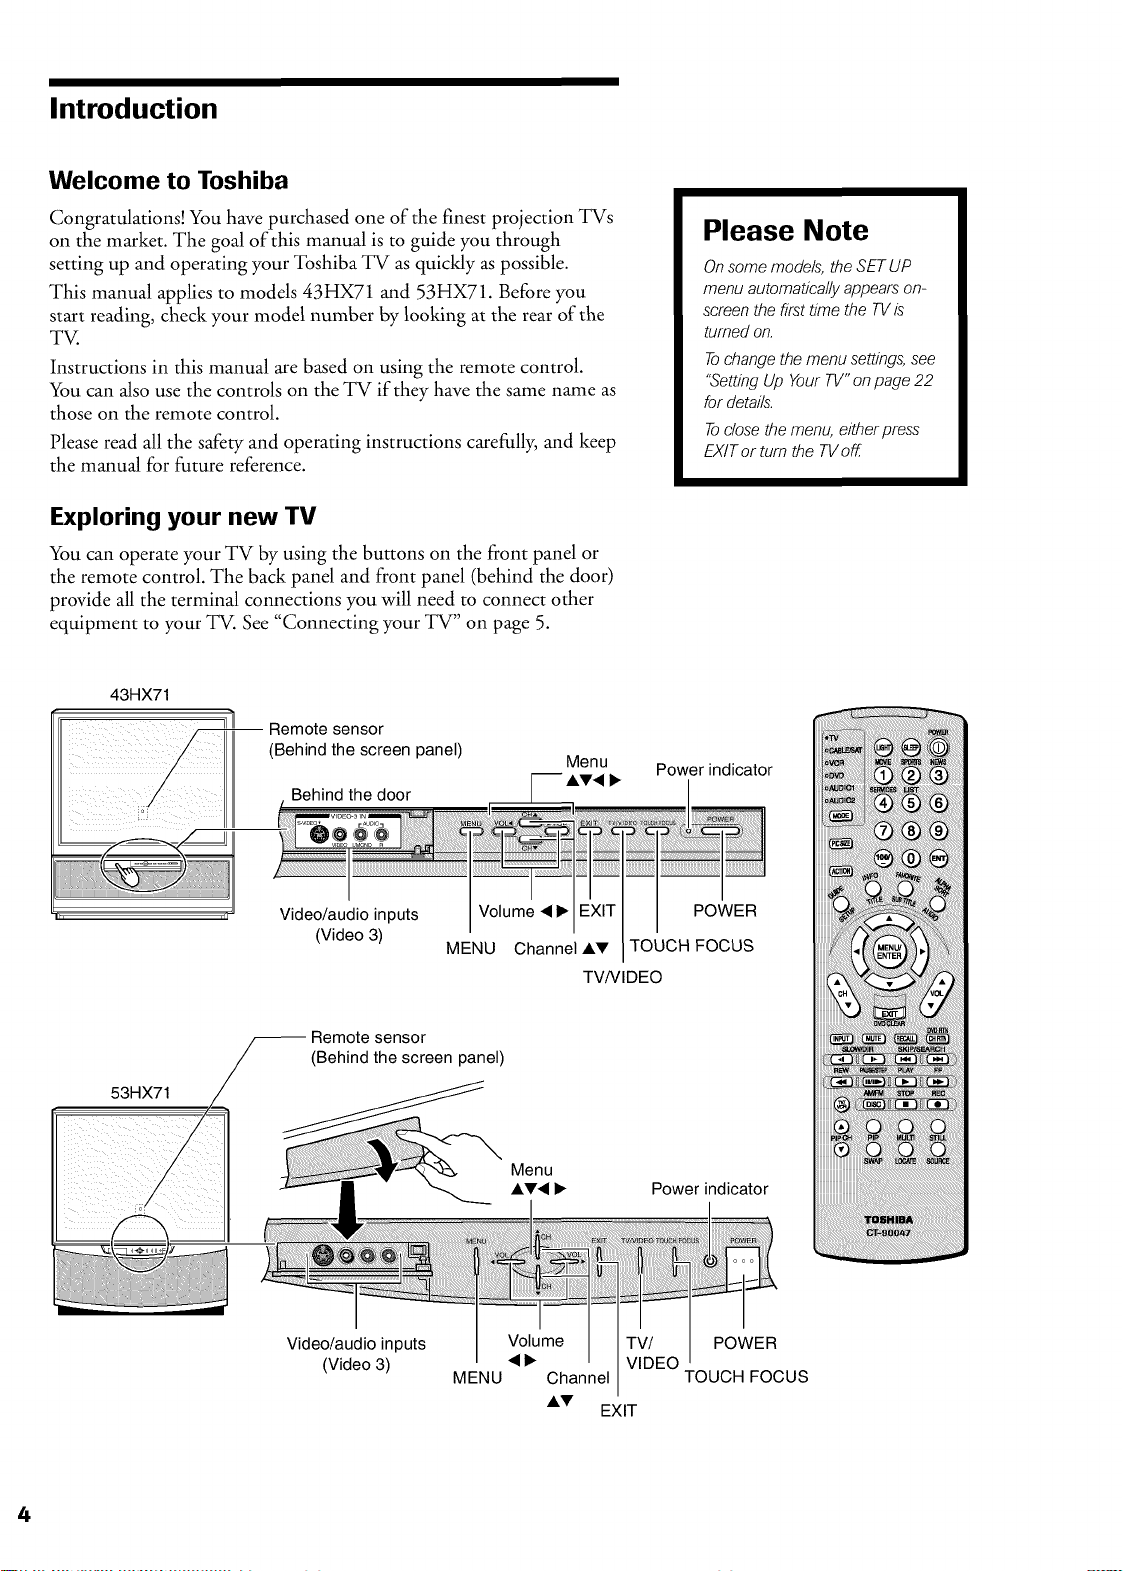
Introduction
Welcome to Toshiba
Congratulations! You have purchased one of the finest projection TVs
on the market. The goal of this manual is to guide you through
setting up and operating your Toshiba TV as quickly as possible.
This manual applies to models 43HX71 and 53HX71. Before you
start reading, check your model number by looking at the rear of the
TV.
Instructions in this manual are based on using the remote control.
You can also use the controls on the TV if they have the same name as
those on the remote control.
Please read all the safety and operating instructions carefully, and keep
the manual for future reference.
Exploring your new TV
You can operate your TV by using the buttons on the front panel or
the remote control. The back panel and front panel (behind the door)
provide all the terminal connections you will need to connect other
equipment to your _. See "Connecting your TV" on page 5.
43HX71
-- Remote sensor
(Behind the screen panel)
Behind the door
Menu
Please Note
Onsomemodels, the SETUP
menu automaticallyappearson-
screen the firsttime the TVis
turned on.
Tochangethe menu settings,see
"SettingUp YourTV"on page 22
fordetails.
Toclosethemenu, eitherpress
EXITor turn the TVoff
Power indicator
l/, ,IF
53HX71
Video/audio inputs Volume • I_ POWER
(Video 3)
Remote sensor
(Behind the screen panel)
Video/audio inputs
(Video 3)
MENU Channel AT TOUCH FOCUS
TVNIDEO
Power indicator
MENU
Volume
•p,.
Channel
AT
EXIT
POWER
TOUCH FOCUS
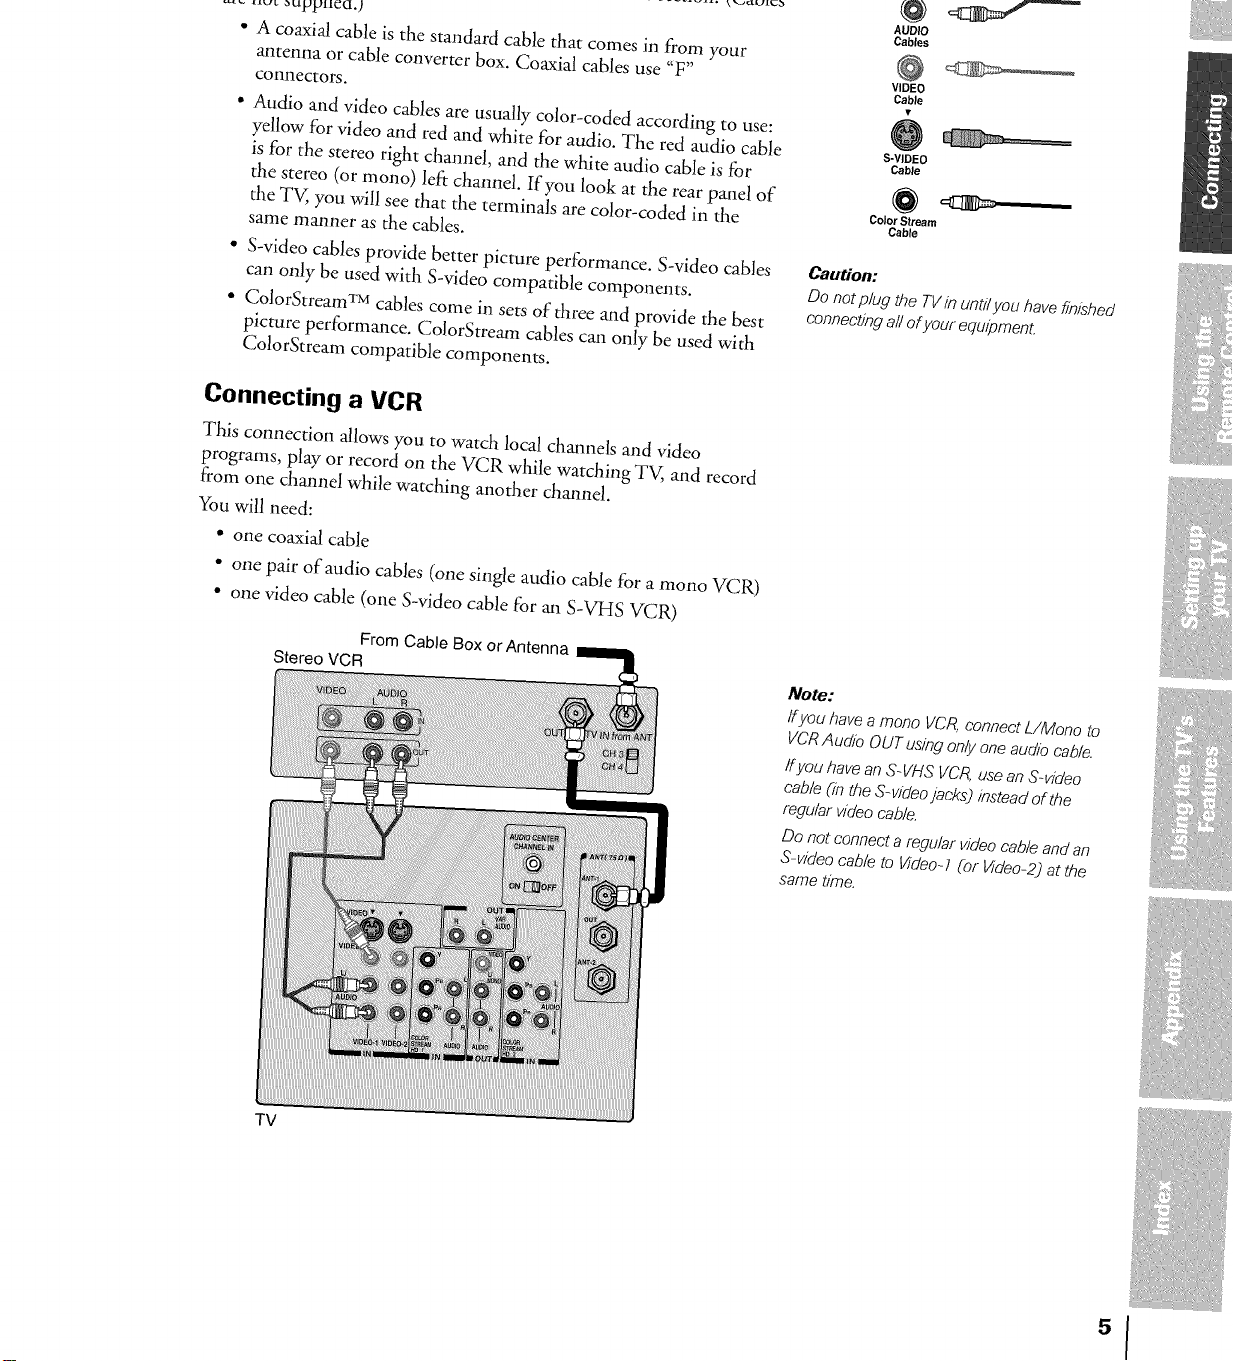
• A coaxial cable is the standard cable that comes in from your
antenna or cable converter box. Coaxial cables use "F"
connectors.
• Audio and video cables are usually color-coded accoMing to use:
yellow for video and red and white for audio. The red audio cable
is for the stereo right channel, and the white audio cable is for
the stereo (or mono) left channel. If you look at the rear panel of
the TV,,you will see that the terminals are color-coded in the
same maimer as the cables.
• S-video cables provide better picture performance. S-video cables
can only be used with S-video compatible components.
• ColorStream TMcables come in sets of three and provide the best
picture performance. ColorStream cables can only be used with
ColorStream compatible components.
Connecting a VCR
This connection allows you to watch local channels and video
programs, play or record on the VCR while watching TV, and record
from one channel while watching another channel.
You will need:
• one coaxial cable
• one pair of audio cables (one single audio cable for a mono VCR)
• one video cable (one S-video cable for an S-VHS VCR)
VIDEO
Cable
S-VIDEO
Cable
Color Stream
Cable
Caution:
Do not plug the TVinuntilyou havefinished
connectingall of your equipment.
iiiiiz:,i,,iiii
iiiiiii!!_iiiii
Stereo VCR
TV
From Cable Box or Antenna
Note:
tf you have a mono VCR, connect L/Mono to
VCR Audio OUT using only one audio cable.
ff you have an S-VHS VCR, use an &video
cable (in the S-video jacks) instead of the
regular video cable.
Do not connect a regular video cable and an
S-video cable to Video-7 (or Video-2) at the
same time.
iii!!;X@i{{{{_)
51
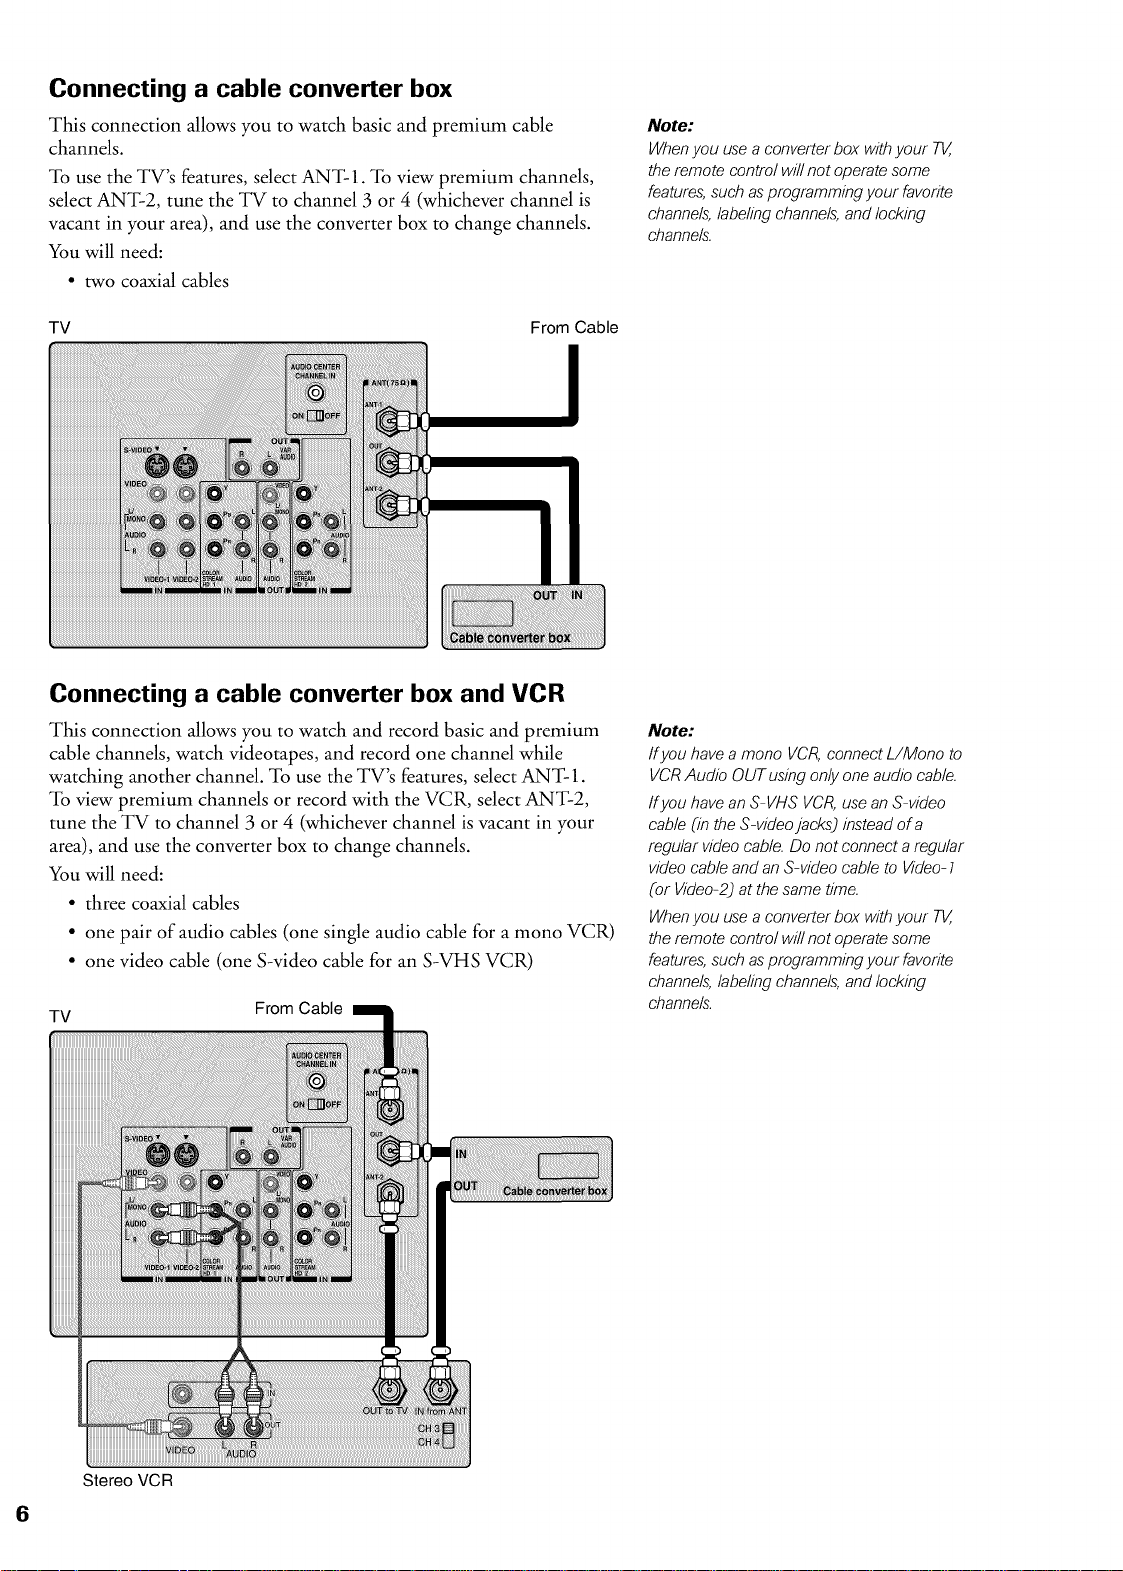
Connecting a cable converter box
This connection allows you to watch basic and premium cable
channels.
To use the TV's features, select ANT- 1. To view premium channels,
select ANT-2, tune the TV to channel 3 or 4 (whichever channel is
vacant in your area), and use the converter box to change channels.
You will need:
• two coaxial cables
TV From Cable
I
Note:
When you use a converter box with your TK,
the remote control will not operate some
features, such as programming your favorite
channels, labeling channels, and locking
channels.
Connecting a cable converter box and VCR
This connection allows you to watch and record basic and premium
cable channels, watch videotapes, and record one channel while
watching another channel. To use the TV's features, select ANT-1.
To view premium channels or record with the VCR, select ANT-2,
tune the TV to channel 3 or 4 (whichever channel is vacant in your
area), and use the converter box to change channels.
You will need:
• three coaxial cables
• one pair of audio cables (one single audio cable for a mono VCR)
• one video cable (one S-video cable for an S-VHS VCR)
TV
From Cable
Note:
Ifyou have a mono VCR, connect L/Mono to
VCR Audio OUT using only one audio cable.
ffyou have an S-VHS VCR, use an S-video
cable (in the S-video jacks) instead of a
regular video cable. Do not connect a regular
video cable and an S-video cable to Video- ]
(or Video-2) at the same time.
When you use a converter box with your TK,
the remote control will not operate some
features, such as programming your favorite
channels, labeling channels, and locking
channels.
Stereo VCR
6
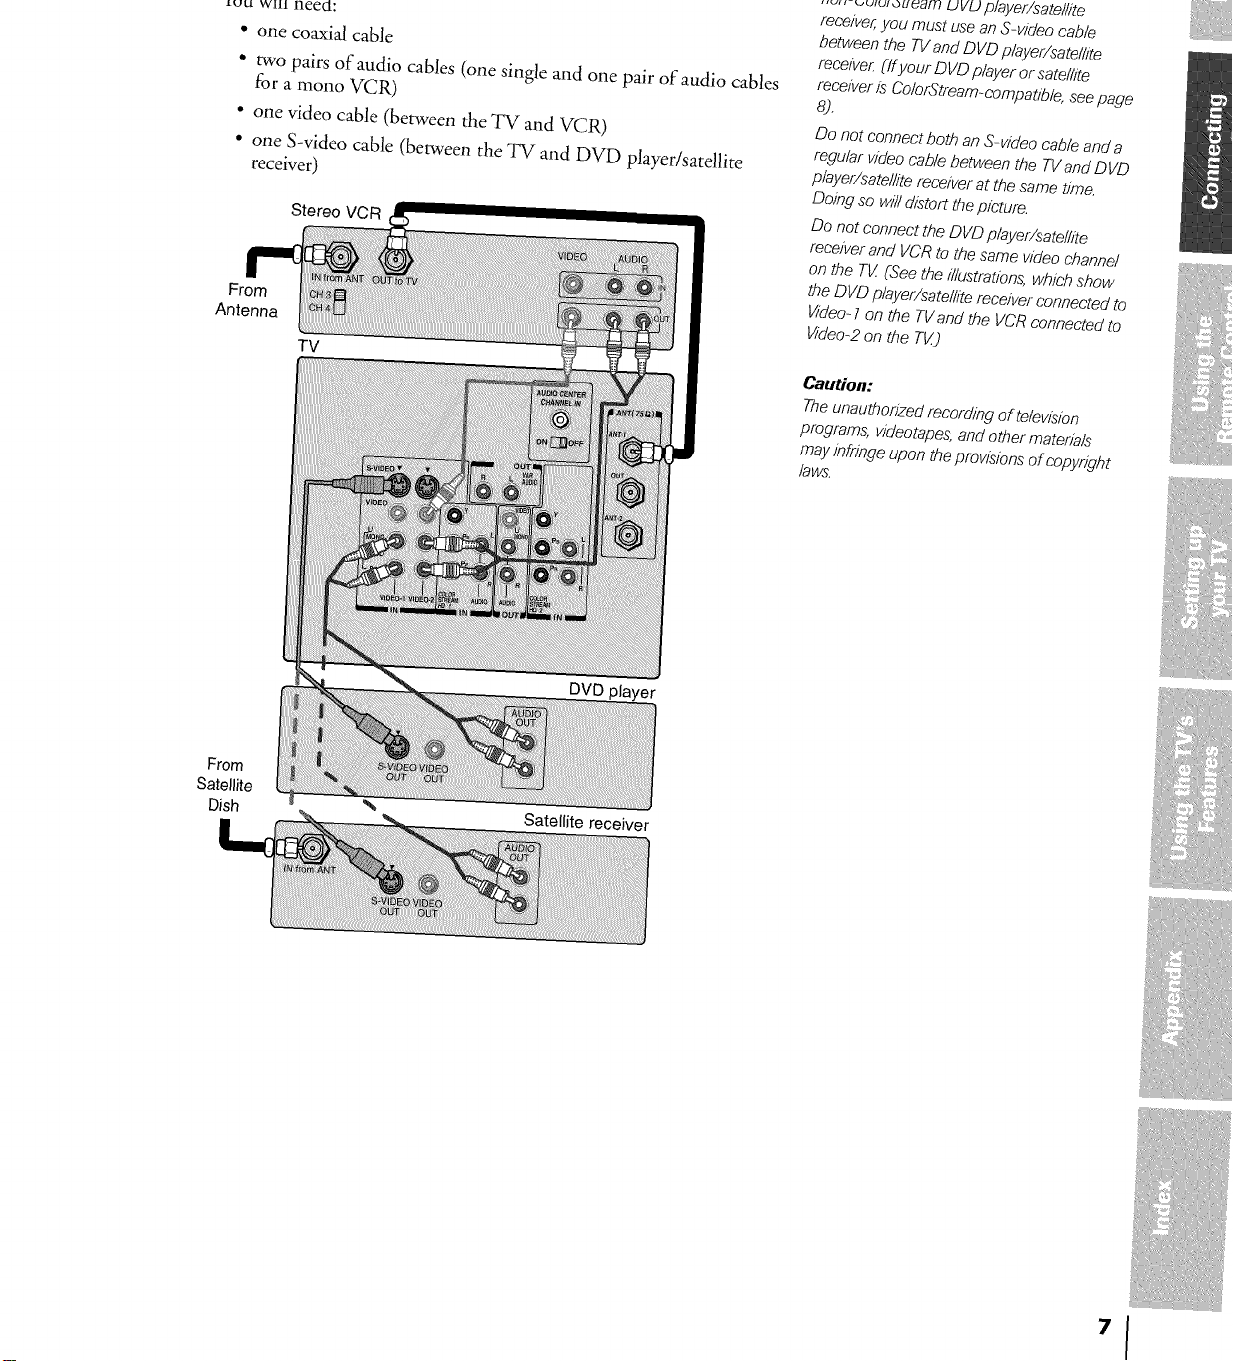
- one coaxial cable
• two pairs of audio cables (one single and one pair of audio cables
for a mono VCR)
° one video cable (between the TV and VCR)
° one S-video cable (between the TV and DVD player/satdlite
receiver)
Stereo VCR
From
Antenna
TV
oetween the / v and uvu p/ayer/satefflte
receive_[ffyour DVD playeror satellite
receiveris ColorStream-compatlb/e,seepage
8).
Do not connectboth an S-video cable and a
regular videocable between the TVandDVD
player/satellite receiverat the sametime.
DoJndso willdistort thepicture.
Do not connect theDVD player/satellite
receiverand VCRto the same videochannel
on the TI/ (See the illustrations,whichshow
the DVD player/satellitereceiver connected to
Video-1on the TVand the VCRconnectedto
Video-2on the Tg)
Caution"
Theunauthorized recording of television
programs, videotapes,and other materials
may infringe upon theprovisionsof copyright
laws.
DVD
From
Satellite
Dish Sate{lite receiver
i !i_!i
'1
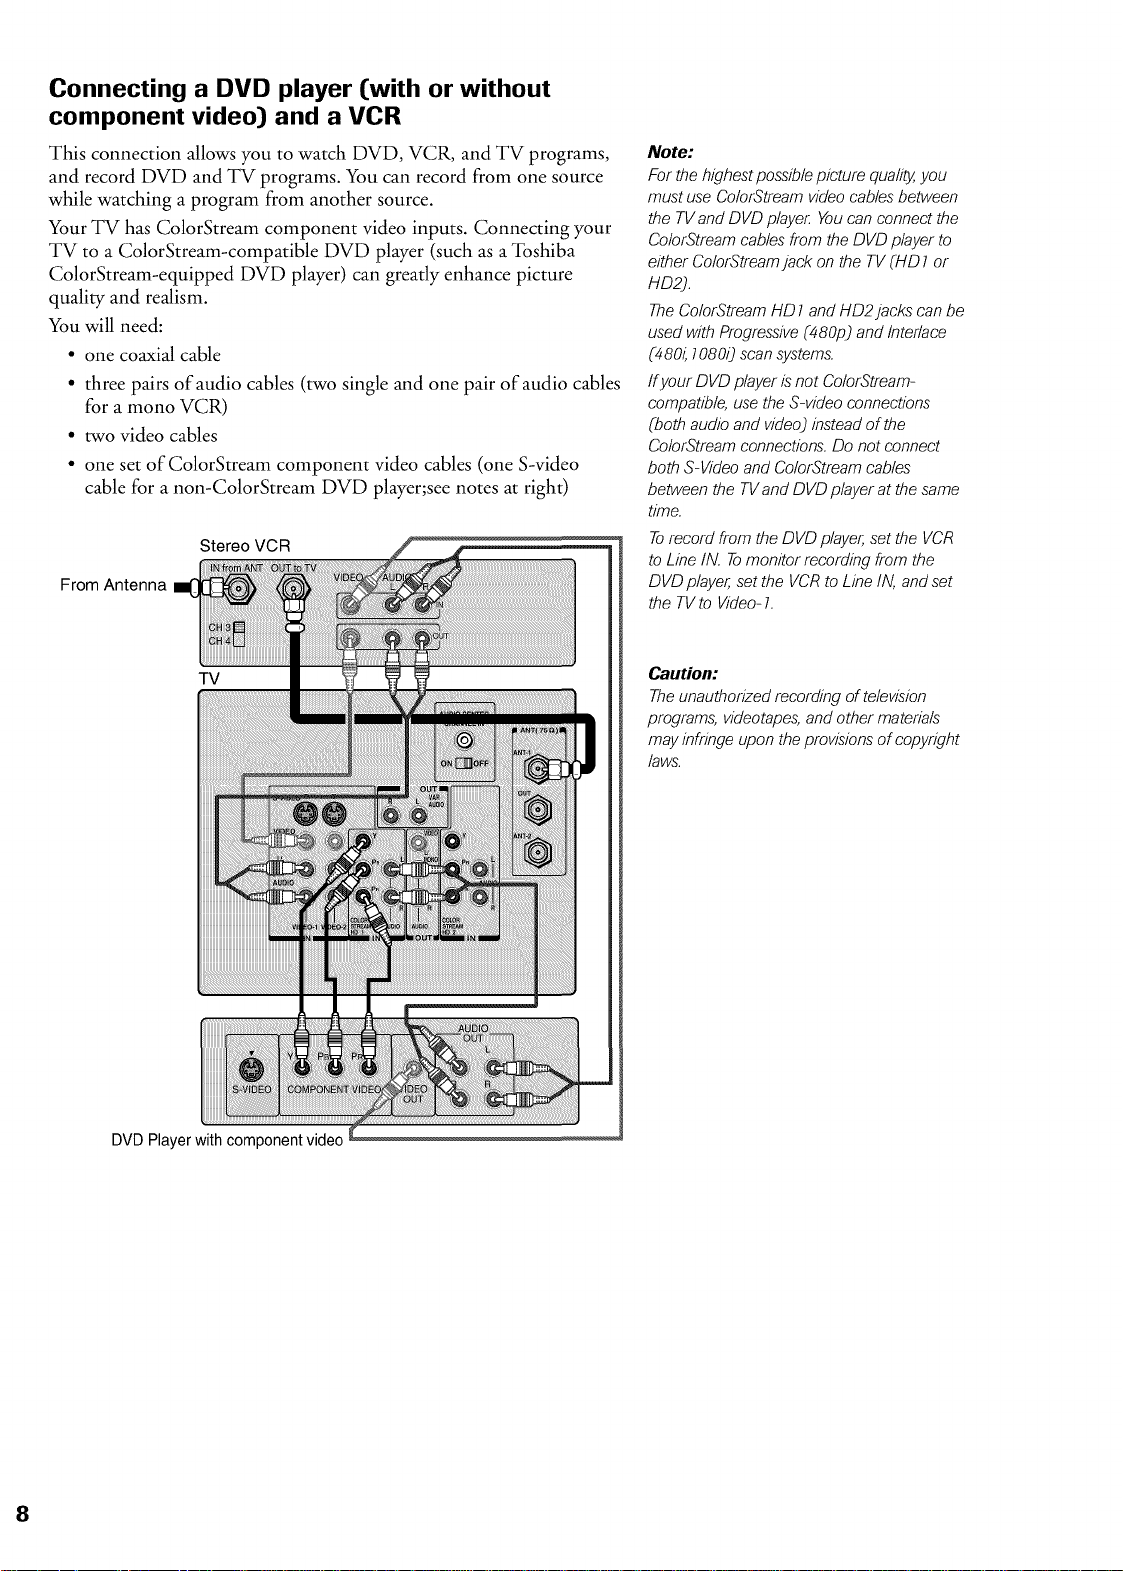
Connecting a DVD player [with or without
component video) and a VCR
This connection allows you to watch DVD, VCR, and TV programs,
and record DVD and TV programs. You can record from one source
while watching a program from another source.
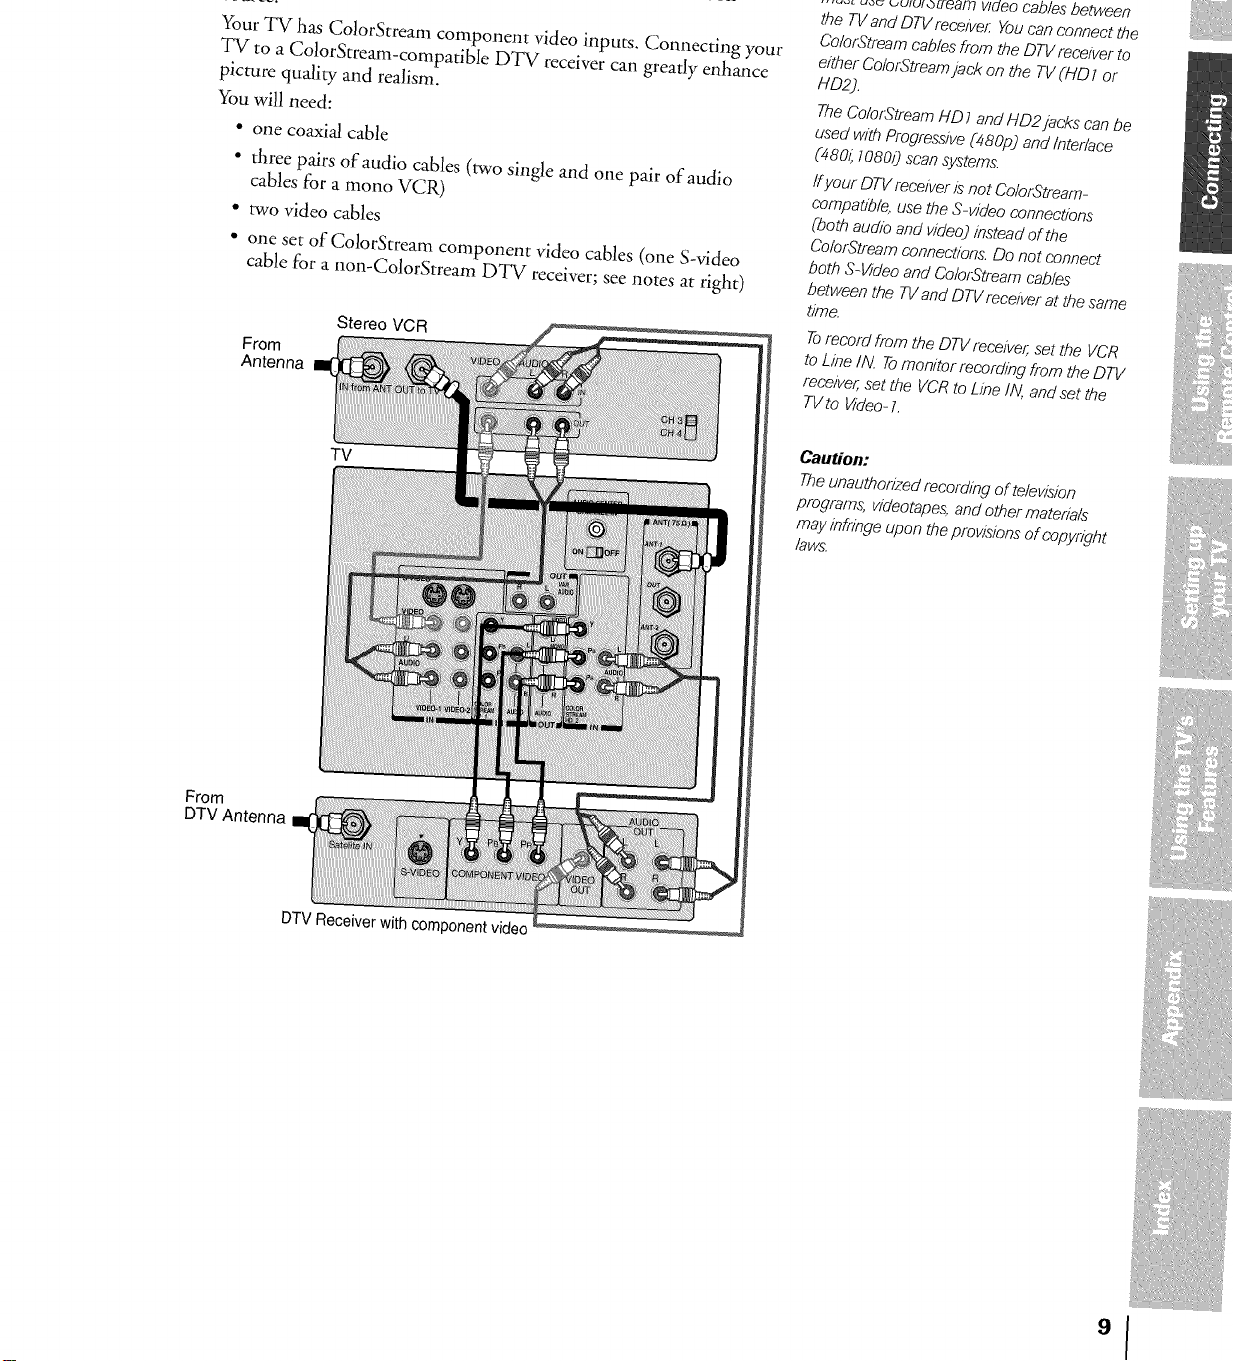
Your TV has ColorStream component video inputs. Connecting your
TV to a ColorStream-compatible DVD player (such as a Toshiba
ColorStream-equipped DVD player) can greatly enhance picture
quality and realism.
You will need:
• one coaxial cable
• three pairs of audio cables (two single and one pair of audio cables
for a mono VCR)
• two video cables
• one set of ColorStream component video cables (one S-video
cable for a non-ColorStream DVD player;see notes at right)
Stereo VCR
From Antenna
Note:
Forthe highestpossiblepicture qua/i_ you
must use ColorStreamvideocablesbetween
the TVand DVD playeLYoucan connect the
ColorStreamcablesfrom the DVD playerto
either ColorStreamjack on the TV(HD 7or
HD2).
TheColorStreamHD 1 and HD2 jacks canbe
usedwith Progressive(480pj and Interlace
(480L10800 scansystems.
ffyour DVD player is not Co/orStream-
compatible,use the S-video connections
(both audio and video)insteadof the
Co/orStreamconnections.Do not connect
both S-Video and Co/orStreamcables
between the TVand DVDplayer at the same
time.
Torecord from the DVD player,set the VCR
to Line IN. Tomonitor recording from the
DVDp/ayer,set the VCRto Line IN, andset
the TVto Video-1.
TV
DVD Player with component video
Caution:
Theunauthorized recordingof television
programs, videotapes,and other materials
mayinfringe upon theprovisionsof copyright
laws.
Your TV has ColorStream component video inputs, Connecting your
TV to a ColorStream-compatible DTV receiver can greatly enhance
picture quality and realism.
You will need:
• one coaxial cable
• three pairs of audio cables (two single and one pair of audio
cables for a mono VCR)
• two video cables
• one set of ColorStream component video cables (one S-video
cable for a non-ColorStream DTV receiver; see notes at right)
Stereo VCR
From
Antenna
Uolor,_'tream cables trom the 12/V receiver to
either Co/orStream jack on the TV (HD f or
HD2],
The Co!oiStream HDJ and HD2 jacks can be
used with Progressive (0SOp) and Interlace
(4801110800 scan systems.
ff your DTV receiver is not ColorStream-
compatible, use the S-video connections
(both audio and videoJ instead of the
Co/orStream connections. Do not connect
both S-Video and ColorStream cables
between the 7q/ and DTV receiver at the same
time.
Torecord from the DTV receiver, set the VCR
to Line IN. 70monitor recording from the DTV
receiver, set the VCR to Line IN, and set the
TV to Video- 7.
Caution:
Theunauthorized recording of television
programs, videotapes,,and other materials
may infringe upon theprovisionsof copyright
laws.
From
DTV Antenna
DTV Receiver with component video
°1

Connecting two VCRs
This connection allows you to record (dub/edit) from one VCR to
another VCR while watching a videotape. You can also record from
one TV channel while watching another TV channel.
You will need:
• one coaxial cable
• two pairs of audio cables (two single audio cables for mono
VCRs)
• two video cables (two S-video cables for S-VHS VCRs)
Caution:
Theunauthorizedrecording of television
programs, videotapes,andother materials
may infringe upon the provisionsof copyright
laws.
From Antenna
VCR1
TV
VCR2
Note:
Ifyou have S-VHS VCRs, use S-video cables
instead of regular video cables. Do not
connect both a regular video cable and an S-
video cable to Video- 7 or Video-2 at the same
time.
Do not connect the same VCR to the output
and input jacks on the TV at the same time.
To dub or edit, VCR 2 mustselect Line IN,
and the TV must select Video- 1.
* TheVideo OUTjack does not output the
PIPpicture.
** TheAudio OUTjacks can output the sound
of either the Main or PIPpicture (see
"SelectingtheAudio OUT sound" on page
50).
Connecting a camcorder
This connection allows you to watch video materials recorded on a
camcorder.
You will need:
• one pair of audio cables
• one video cable (one S-video cable for an S-VHS camcorder)
Video-3 (front panel)
Caution:
Ifyou haveanS-VHS camcorder,usean S-
video cable between the S-videojacks on the
camcorder and T_ Do not connectboth a
regular video cableand an S-video cable at
the same time.
on page 50).
You will need:
• one pair of audio cables
Note:
Tohearsound whenusing an externalaudio amplifier,the
volume ofboth the TVand the amplifier must be set
above0 (zeroj.
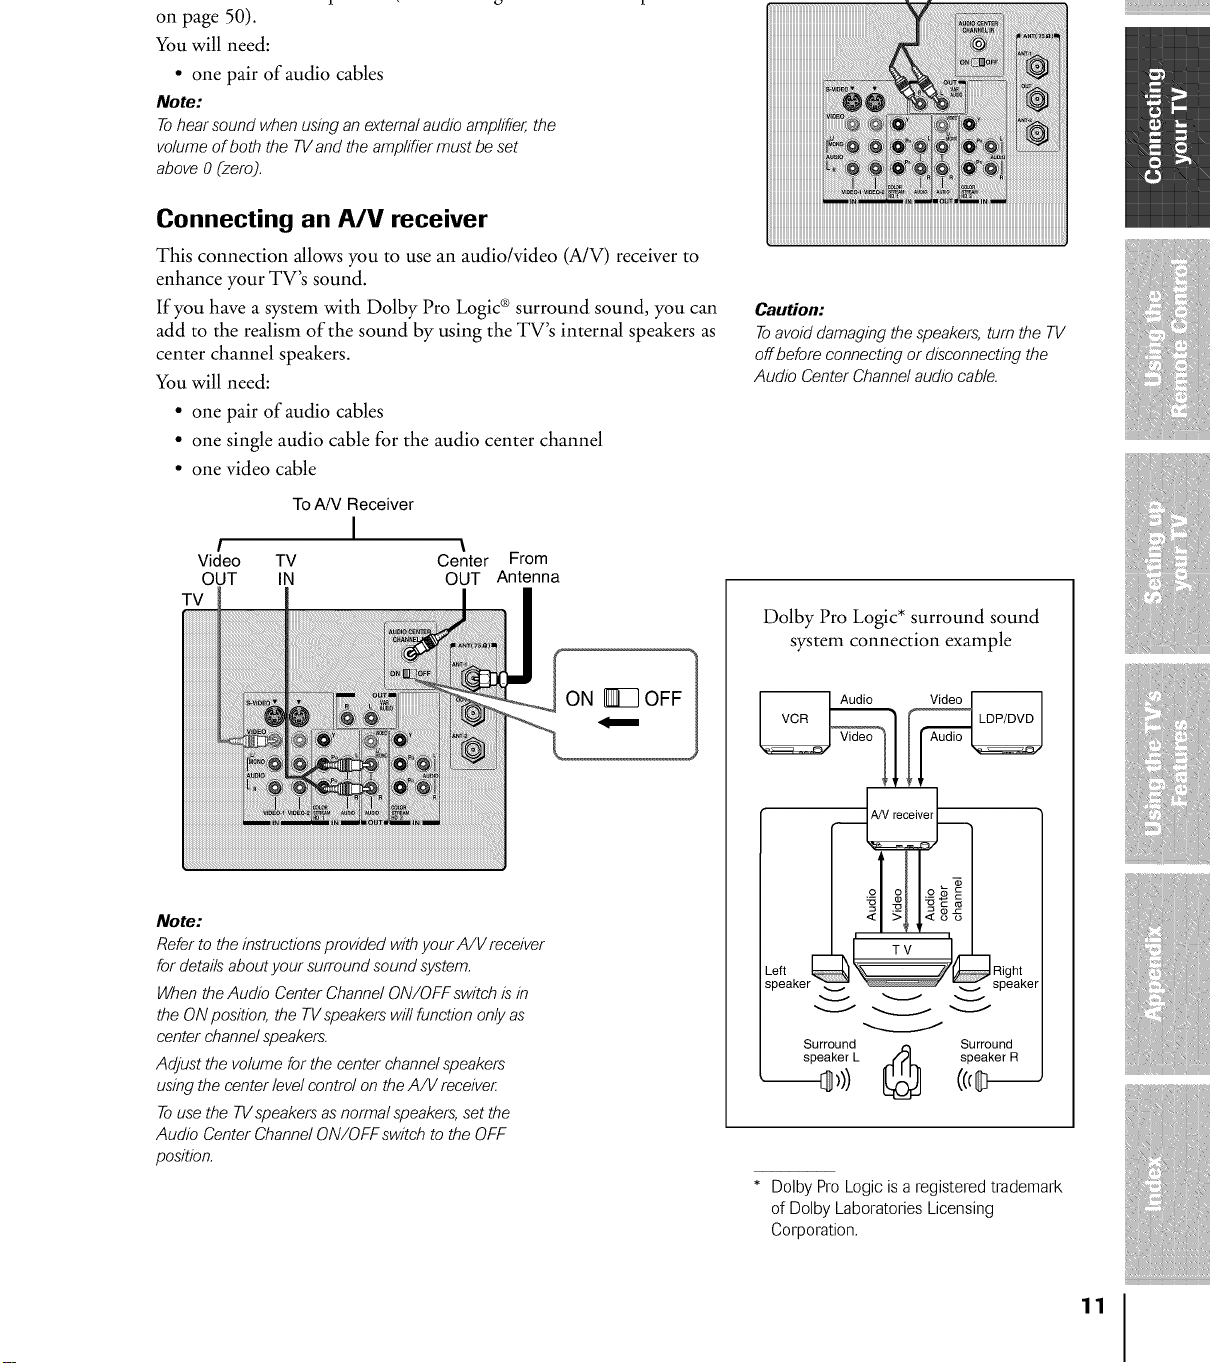
Connecting an A/V receiver
This connection allows you to use an audio/video (A/V) receiver to
enhance your TV's sound.
If you have a system with Dolby Pro Logic®surround sound, you can
add to the realism of the sound by using the TV's internal speakers as
center channel speakers.
You will need:
• one pair of audio cables
• one single audio cable for the audio center channel
• one video cable
To A/V Receiver
I
I \
Video TV Center From
OUT IN OUT Antenna
TV
iiiiiiiiiiiiiiiiiiiiiiiiii!
iiiiiiiiiiiiiiiiiiiiiiiiii
iiiiiiiiiiiiiiiiiiiiiiiiii!
iiiiiiiiiiiiiiiiiiiiiiiiiii
iiiiiiiiiiiiiiiiiiiiiiiiii!
iiiiiiiiiiiiiiiiiiiiiiiiii_
Caution:
Toavoiddamaging thespeakers,turn the TV
off beforeconnecting or disconnectingthe
Audio Center Channelaudiocable.
Dolby Pro Logic* surround sound
system connection example
Note:
Refer to the instructions provided with your A/V receiver
for details about your surround sound system.
When the Audio Center Channel ON/OFF switch is in
the ON position, the TVspeakers will function only as
center channel speakers.
Adjust the volume for the center channel speakers
using the center level control on the A/V receive£
Touse the TVspeakers as normal speakers, set the
Audio Center Channel ON/OFF switch to the OFF
position.
m ; , m
C
o c oo--
TV
_e,t ,oht
_peaker_ '_" _speake
Surround m Surround
speaker L _t/?L speaker R
* Dolby ProLogic is a registered trademark
of Dolby Laboratories Licensing
Corporation.
11
Using the remote control
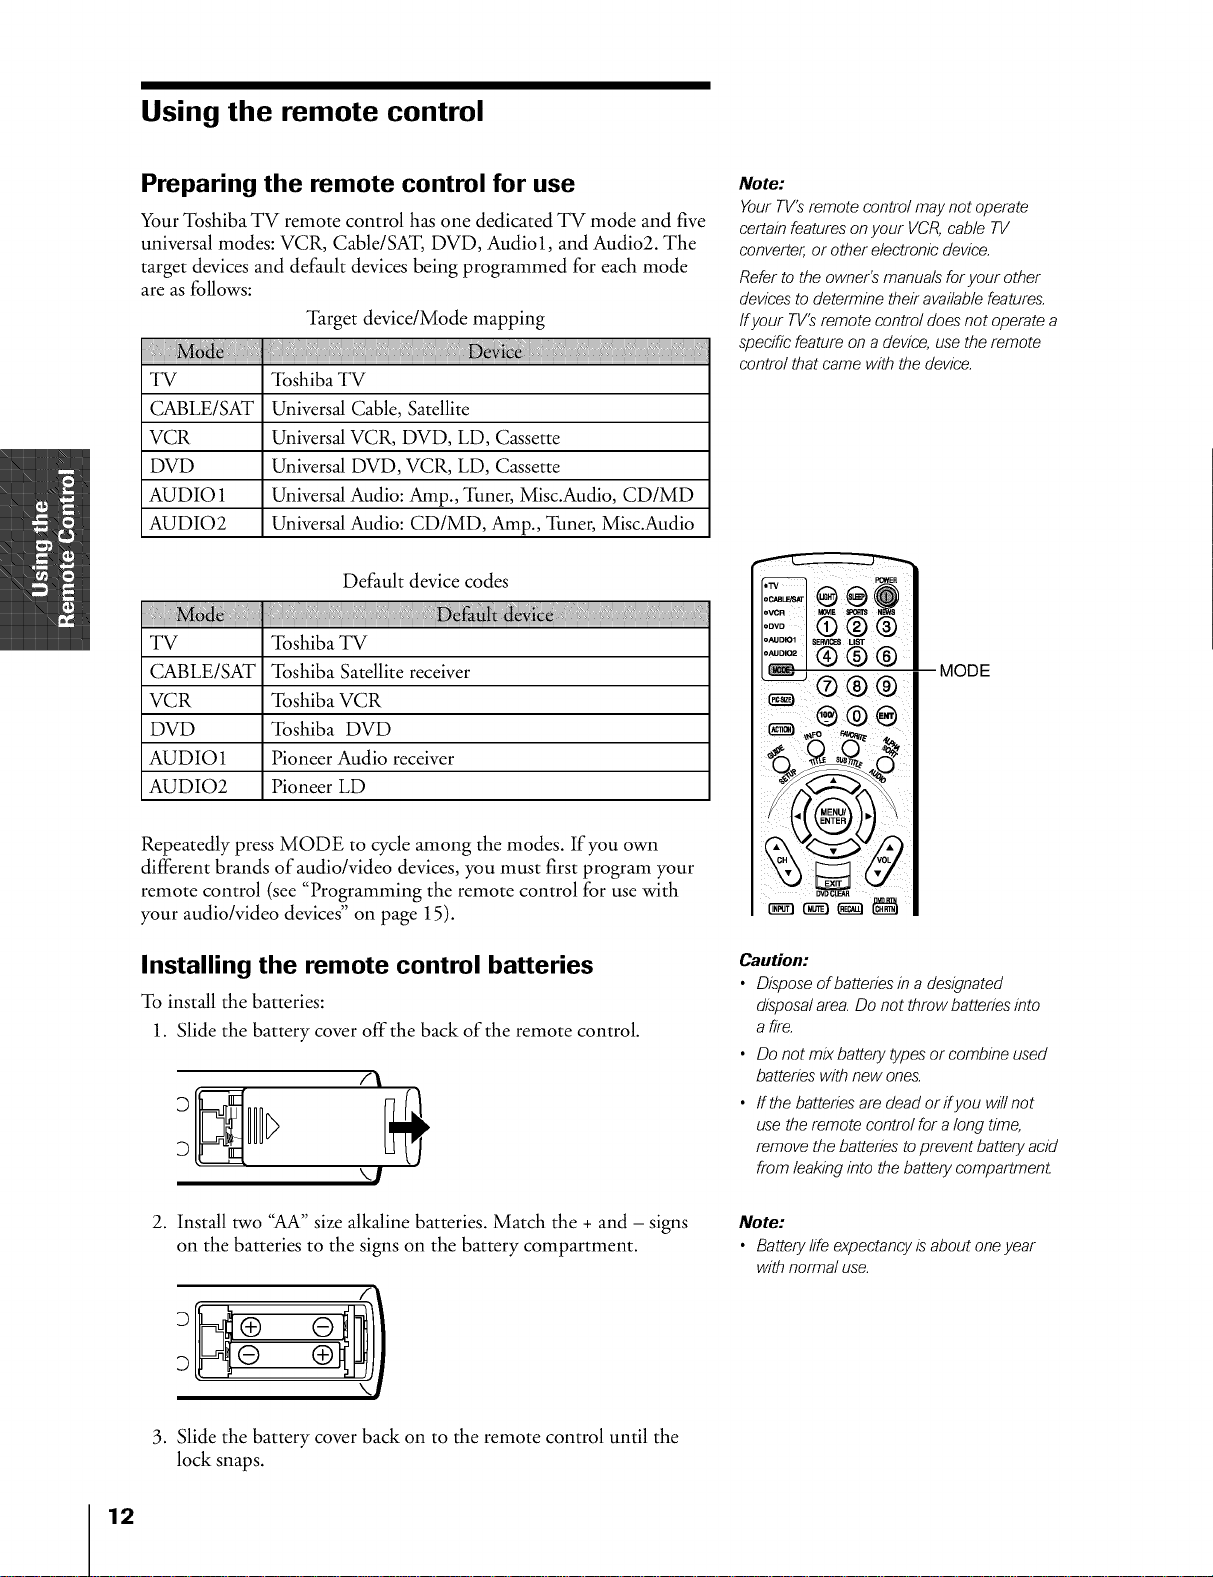
Preparing the remote control for use
Your Toshiba TV remote control has one dedicated TV mode and five
universal modes: VCR, Cable/SAT, DVD, Audiol, and Audio2. The
target devices and default devices being programmed for each mode
are as follows:
Target device/Mode mapping
TV _[bshiba TV
CABLE/SAT Universal Cable, Satellite
VCR Universal VCR, DVD, LD, Cassette
DVD Universal DVD, VCR, LD, Cassette
AUDIO 1 Universal Audio: Amp., _[hner, Misc.Audio, CD/MD
AUDIO2 Universal Audio: CD/MD, Amp., _[hner, Misc.Audio
Default device codes
TV Toshiba TV
CABLE/SAT Toshiba Satellite receiver
VCR Toshiba VCR
DVD Toshiba DVD
AUDIO1 Pioneer Audio receiver
AUDIO2 Pioneer LD
Note:
Your TV'Sremote control may not operate
certain features on your VCR, cable TV
converter, or other electronic device.
Refer to the owner's manuals for your other
devices to determine their available features.
ffyour TV's remote control does not operate a
specific feature on a device, use the remote
control that came with the device.
MODE
Repeatedly press MODE to cycle among the modes. If you own
different brands of audio/video devices, you must first program your
remote control (see "Programming the remote control for use with
your audio/video devices" on page 15).
Installing the remote control batteries
To install the batteries:
1. Slide the battery cover off the back of the remote control.
/\
\1
2. Install two "AA" size alkaline batteries. Match the + and - signs
on the batteries to the signs on the battery compartment.
® ®
DVDCLEAR
Caution:
• Disposeof batteries in adesignated
disposalarea.Do not throw batteries into
afire.
• Do not mix battery typesor combine used
batterieswith new ones.
• ffthe batteriesare dead orifyou willnot
use the remote control fora long time,
removethe batteriesto preventbatteryacid
from leaking into the battery compartment
Note:
• Battery life expectancy is about one year
with normal use.
3. Slide the battery cover back on to the remote control until the
lock snaps.
12
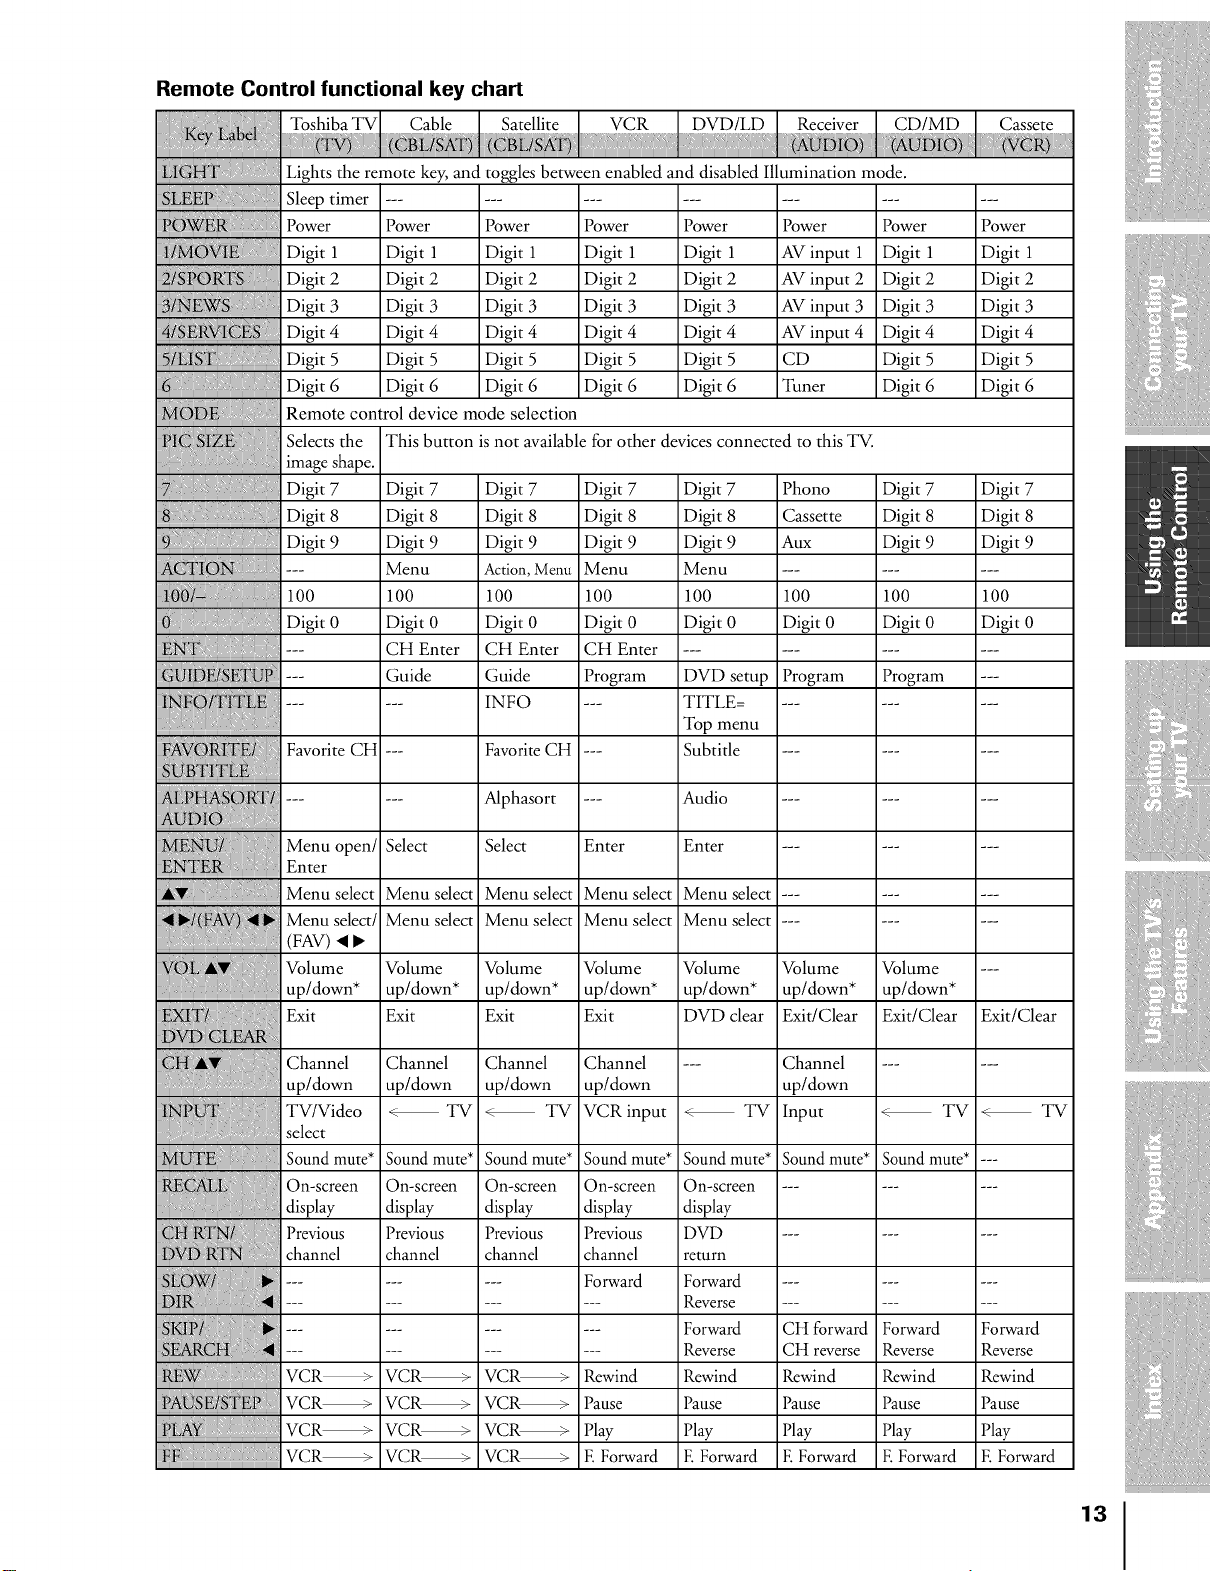
Remote Control functional key chart
DVD!LD Receiver CD!MD Cassete
Lights the remote key, and
Sleeptimer
iiii i:iiiii!_iili,iiiiiiiiiill!!!!!iiPower
Digit 1
!!!}_!_!:!{_!!!,!!_!:!!,!Digit2
!!!! Digit3
!!!_ :!!!!!_i!Digit4
!!!,5 Digit5
Digit6
Remote control device mode selection
Selects the
................image shape.
Digit 7
,8 1 1 11 DigitS
Digit 9
100
Digit 0
N_ ---
FavoriteCH
toggles between enabled and disabled Illumination mode.
Power
Digit 1
Digit 2
Digit 3
Digit 4
Digit 5
Digit 6
This button isnot available for other devices connected to this TM.
Digit 7
Digit 8
Digit 9
Menu
100
Digit 0
CH Enter
Guide
Power
Digit 1
Digit 2
Digit 3
Digit 4
Digit 5
Digit 6
Digit 7
Digit 8
Digit 9
Action, Menu
100
Digit 0
CH Enter
Guide
INFO
Favorite CH
Power
Digit 1
Digit 2
Digit 3
Digit 4
Digit 5
Digit 6
Digit 7
Digit 8
Digit 9
Menu
100
Digit 0
CH Enter
Program
Power
Digit 1
Digit 2
Digit 3
Digit 4
Digit 5
Digit 6
Digit 7
Digit 8
Digit 9
Menu
100
Digit 0
DVD setup
TITLE=
Top menu
Subtitle
Power
AV input 1
AV input 2
AV input 3
AV input 4
CD
Tuner
Phono
Cassette
aux
100
Digit 0
Program
Power
Digit 1
Digit 2
Digit 3
Digit 4
Digit 5
Digit 6
Digit 7
Digit 8
Digit 9
100
Digit 0
Program
Power
Digit 1
Digit 2
Digit 3
Digit 4
Digit 5
Digit 6
Digit 7
Digit 8
Digit 9
100
Digit 0
___
Alphasort
Audio
_ }}}{{{:{='_{{:
:{::{{ Menu open/
{{ Enter
Menu select
_!( Menu select!
(FAV) •
_{{{{{?'_{{{{'?{{Volume
up/down*
Exit
_ _ Channel Channel Channel Channel --- Channel ......
...................up/down up/down up/down up/down up/down
N: TV!Video _ TV _ TV VCRinput _ TV Input _ TV _ TV
Select
Menu select
Menu select
Volume
up/down*
Exit
Select
Menu select
Menu select
Volume
up/down*
Exit
Enter
Menu select
Menu select
Volume
up/down*
Exit
Enter
Menu select
Menu select
Volume
up/down*
DVD clear
Volume
up/down*
Exit/Clear
Volume
up/down*
Exit/Clear
Exit/Clear
select
Sound mute* Sound mute* Sound mute* Sound mute* Sound mute* Sound mute* Sound mute....
On-screen On-screen On-screen On-screen On-screen .........
display display display display display
Previous Previous Previous Previous DVD .........
channel channel channel channel return
......... Forward Forward .........
......... Reverse .........
:{{[[{ ............ Forward CH forward Forward Forward
......... Reverse CH reverse Reverse Reverse
{{{}{{{ VCR_ VCR_ VCR_ Rewind Rewind Rewind Rewind Rewind
VCR_ VCR_ VCR_ Pause Pause Pause Pause Pause
VCR_ VCR_ VCR_ Play Play Play Play Play
VCR_ VCR_ VCR_ F.ForwardF.ForwardF.ForwardF.ForwardF.Forward
13
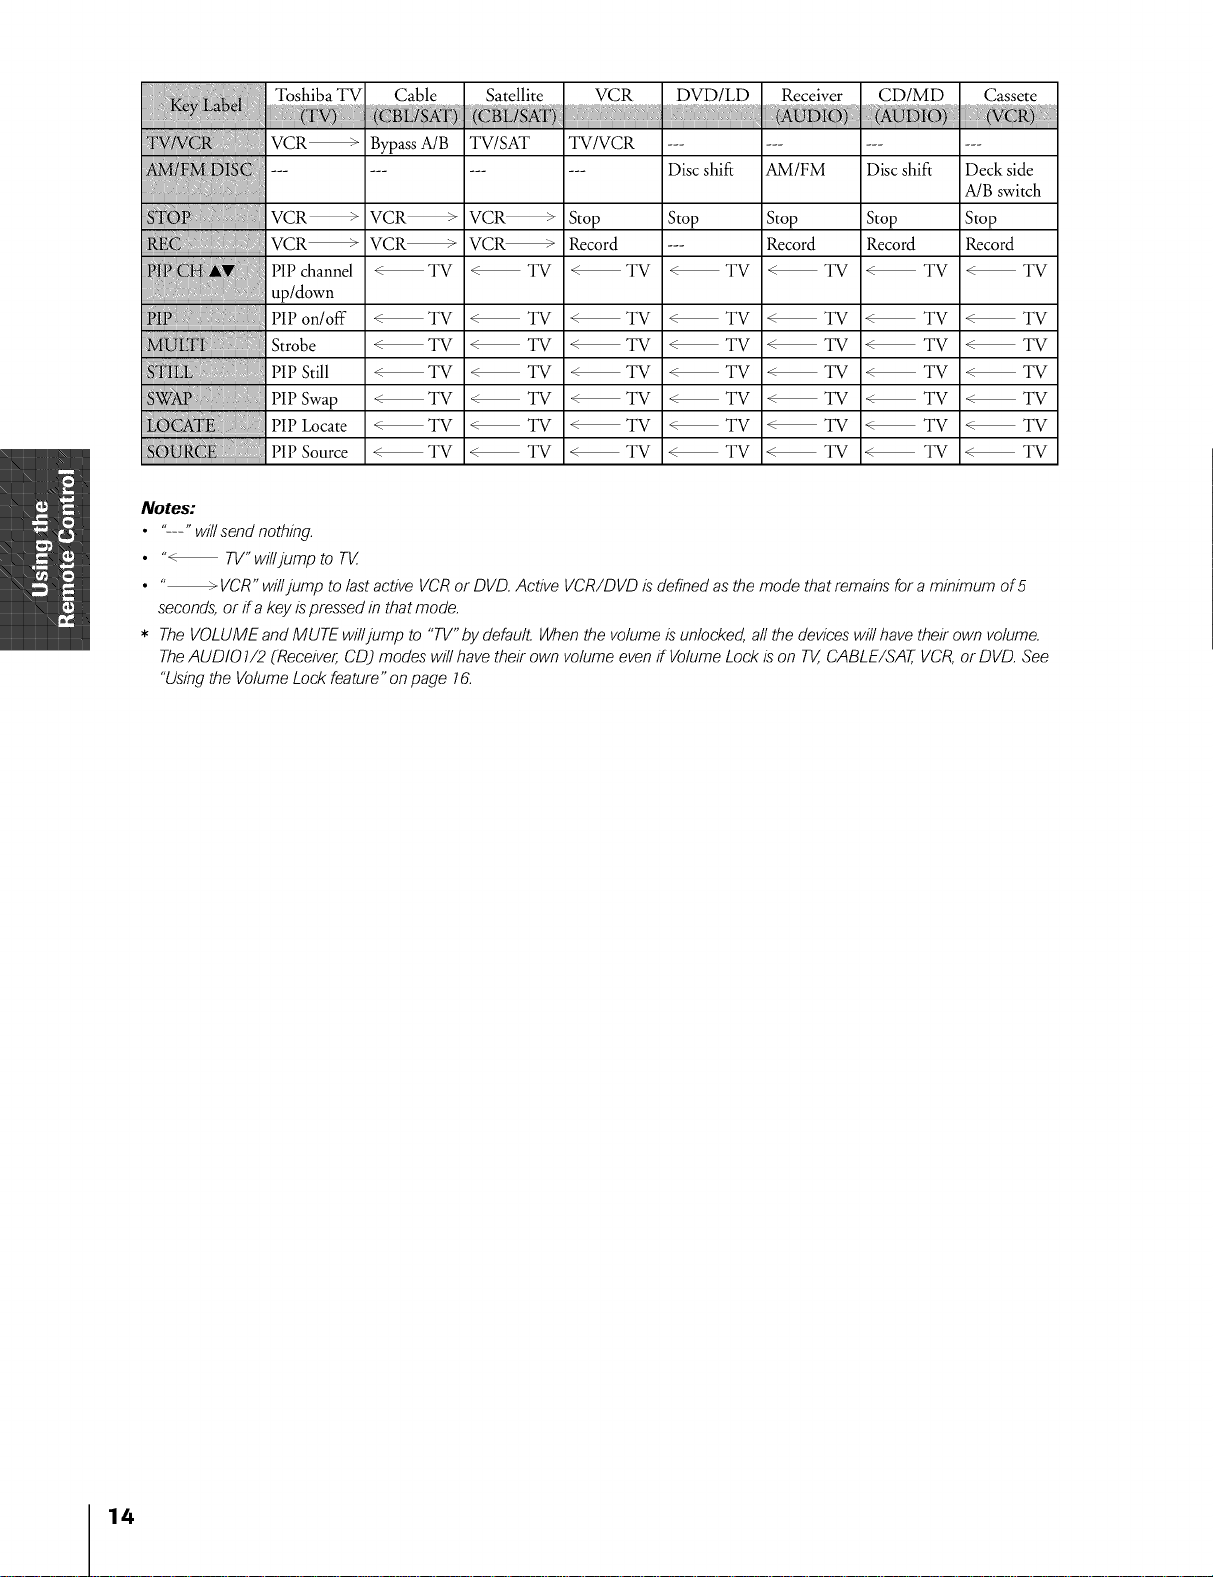
iiiiiiiii iiiiiiii ReceiverCD,MDCa sete
............................................................................................................................iiiillil i: iiiHli {i:Liillliiiiil,!,
: i:: VCR_ BypassA/B TV/SAT TV/VCR ............
............ Disc shift AM/FM Disc shift Deck side
A/B switch
VCR_ VCR_ VCR_ Stop Stop Stop Stop Stop
VCR_ VCR_ VCR_ Record --- Record Record Record
PIP channel _TV _TV _TV _TV _TV _TV _TV
up/down
PIP on/off _TV _TV _TV _TV _TV _TV _TV
Strobe _TV _TV _TV _TV _TV _TV _TV
S_':_:_ PIP Still _TV _TV _TV _TV _TV _TV _TV
PIP Swap _TV < TV _TV _TV _TV _TV _TV
PIP Locate _TV _TV _TV _TV _TV _ TV _TV
PiP Source _TV _TV _TV _TV _TV _ TV _TV
Notes:
• "--" willsend nothing.
• "_ TV"willjump to TV
• " _ VCR"willjump to lastactive VCRor DVD.Active VCR/DVD isdefined asthe mode that remainsfor a minimum of 5
seconds,or if akeyispressedin that mode.
* The VOLUME and MUTE willjump to "TV"by default. Whenthe volumeis unlocked, all thedeviceswill have their own volume.
TheAUDIO7/2 (Receiver,CDJ modes will have their own volumeevenif VolumeLockis on TK,CABLE/SAT,VCR,or DVD. See
"Usingthe VolumeLock feature" onpage 76.
11.1
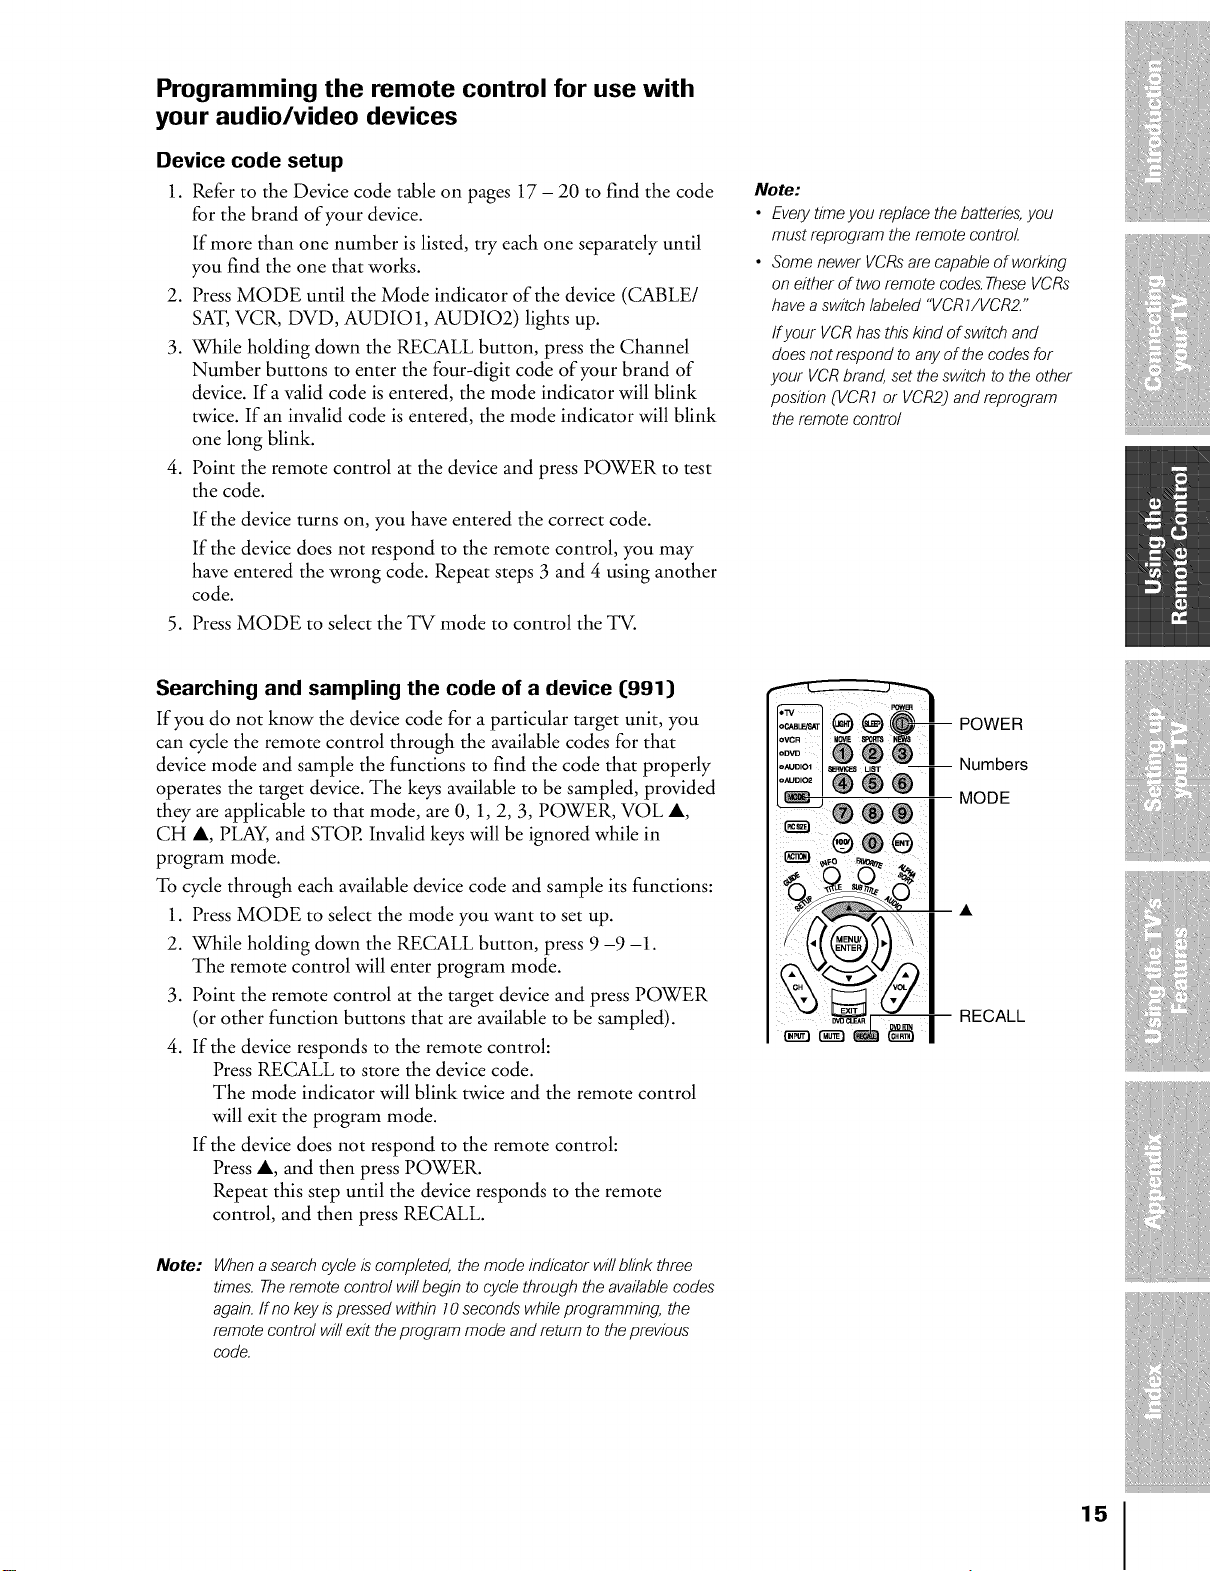
Programming the remote control for use with
your audio/video devices
Device code setup
1. Refer to the Device code table on pages 17 - 20 to find the code
for the brand of your device.
If more than one number is listed, try each one separately until
you find the one that works.
2. Press MODE until the Mode indicator of the device (CABLE/
SAT, VCR, DVD, AUDIO1, AUDIO2) lights up.
3. While holding down the RECALL button, press the Channel
Number buttons to enter the four-digit code of your brand of
device. If a valid code is entered, the mode indicator will blink
twice. If an invalid code is entered, the mode indicator will blink
one long blink.
4. Point the remote control at the device and press POWER to test
the code.
If the device turns on, you have entered the correct code.
If the device does not respond to the remote control, you may
have entered the wrong code. Repeat steps 3 and 4 using another
code.
5. Press MODE to select the TV mode to control the _.
Note:
• Every timeyou replace the batteries,you
must reprogram the remote control
• Some newer VCRsare capableof working
on either of two remote codes.TheseVCRs
havea switch labeled "VCR1/VCR2."
ffyour VCRhas thiskind ofswitch and
doesnot respond to any of the codesfor
your VCRbrand,set theswitch to the other
position (VCR1 or VCR2j and reprogram
the remote control
Searching and sampling the code of a device {991)
If you do not know tile device code for a particular target unit, you
can cycle the remote control through the available codes for that
device mode and sample the functions to find the code that properly
operates the target device. The keys available to be sampled, provided
they are applicable to that mode, are 0, 1, 2, 3, POWER, VOL A,
CH A, PLAY, and STOP. Invalid keys will be ignored while in
program mode.
To cycle through each available device code and sample its functions:
1. Press MODE to select the mode you want to set up.
2. While holding down the RECALL button, press 9 -9 -1.
The remote control will enter program mode.
3. Point the remote control at the target device and press POWER
(or other function buttons that are available to be sampled).
4. If the device responds to the remote control:
Press RECALL to store the device code.
The mode indicator will blink twice and the remote control
will exit the program mode.
If the device does not respond to the remote control:
Press A, and then press POWER.
Repeat this step until the device responds to the remote
control, and then press RECALL.
Note:
Whena searchcycle is completed, the mode indicator will blink three
times. Theremote control willbegin to cycle through the availablecodes
again,ff no key ispressed within 10seconds whileprogramming, the
remote control will exit theprogram mode and return to theprevious
code.
_T POWER
I@ ® I Numbers
MOOE
b3 l
22ggl
15
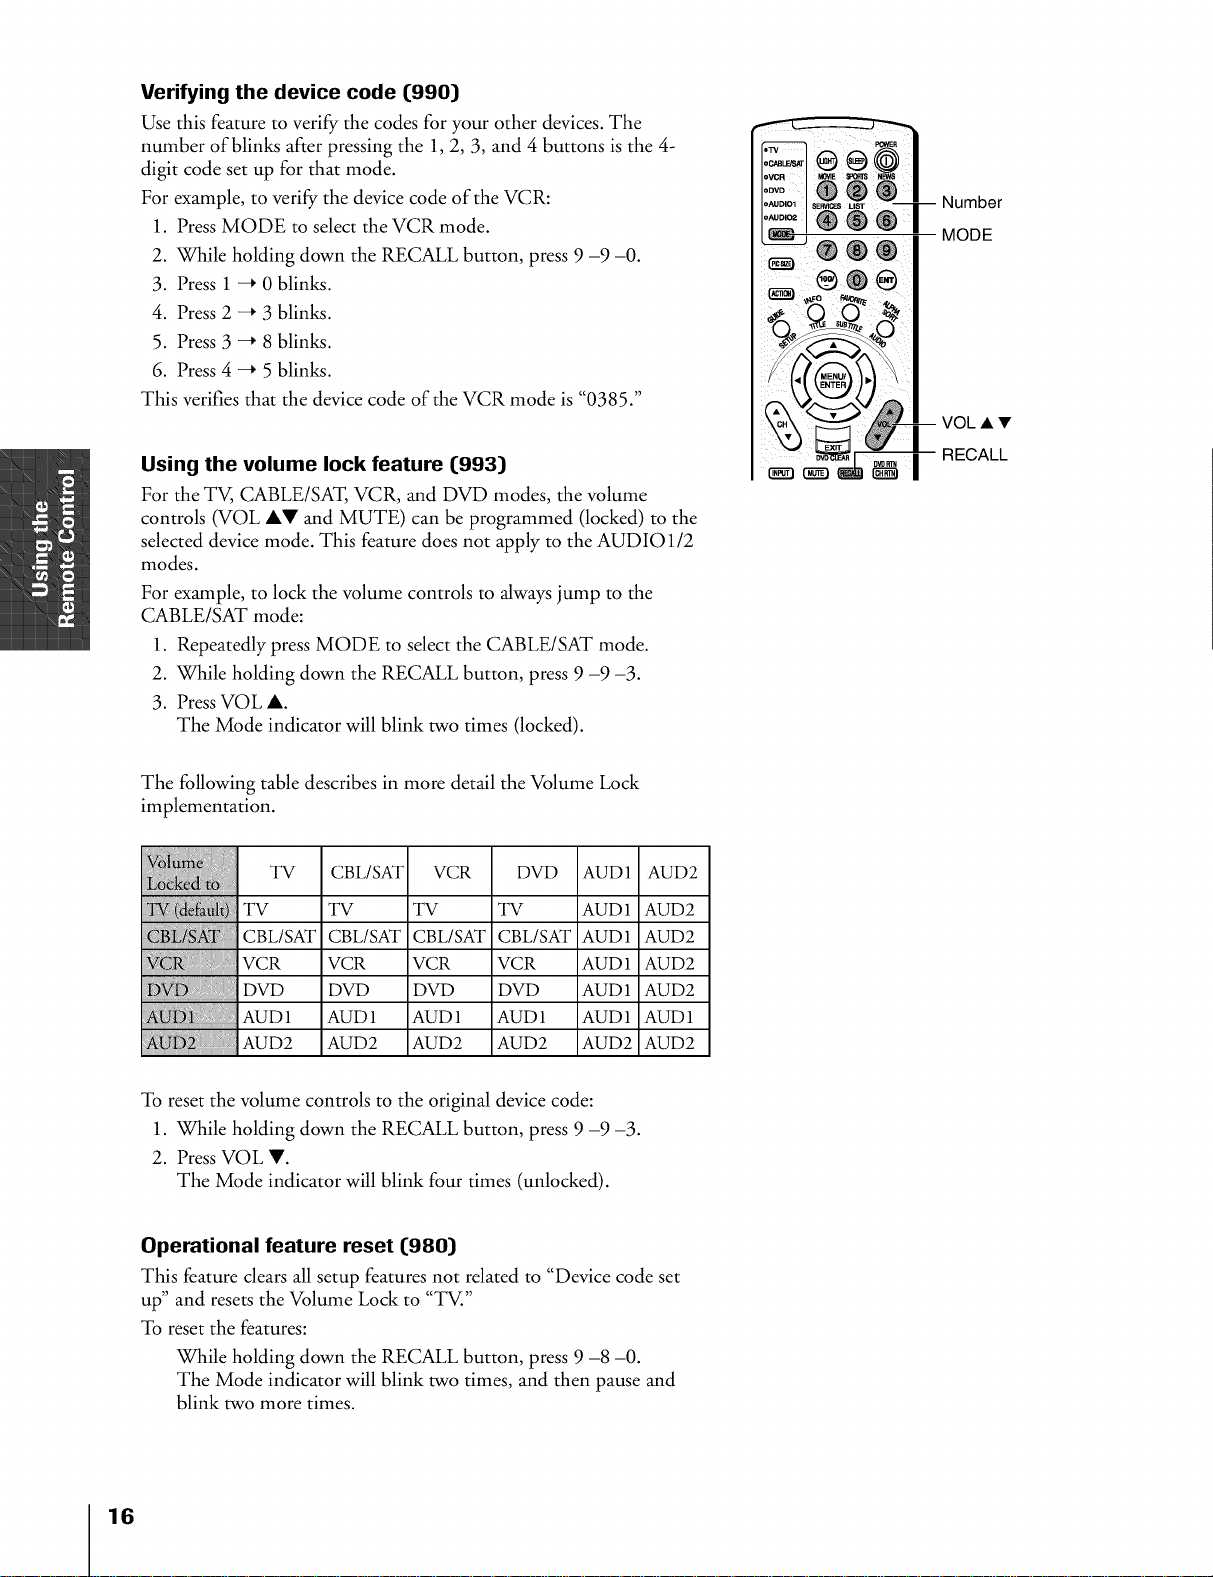
Verifying the device code (990)
Use this feature to verify the codes for your other devices. The
number of blinks after pressing the 1, 2, 3, and 4 buttons is the 4-
digit code set up for that mode.
For example, to verify the device code of the VCR:
1. Press MODE to select the VCR mode.
2. While holding down the RECALL button, press 9 -9 -0.
3. Press 1 -+ 0 blinks.
4. Press 2 -+ 3 blinks.
5. Press 3 -+ 8 blinks.
6. Press 4 -+ 5 blinks.
This verifies that the device code of the VCR mode is "0385."
Using the volume lock feature (993)
For the TV, CABLE/SAT, VCR, and DVD modes, the volume
controls (VOL AV and MUTE) can be programmed (locked) to the
selected device mode. This feature does not apply to the AUDIO1/2
modes.
For example, to lock the volume controls to always jump to the
CABLE/SAT mode:
1. Repeatedly press MODE to select the CABLE/SAT mode.
2. While holding down the RECALL button, press 9 -9 -3.
3. Press VOL A.
The Mode indicator will blink two times (locked).
-- Number
MODE
VOL • •
RECALL
The following table describes in more detail the Volume Lock
implementation.
TV CBL/SAT VCR DVD AUD1 AUD2
TV TV TV TV AUD1 AUD2
CBL/SAT CBL/SAT CBL/SAT CBL/SAT AUD1 AUD2
_R _ i VCR VCR VCR VCR AUD1 AUD2
{{; : DVD DVD DVD DVD AUD1 AUD2
{:i{7 AUD1 AUD1 AUD1 AUD1 AUD1 AUD1
AUD2 AUD2 AUD2 AUD2 AUD2 AUD2
To reset the volume controls to the original device code:
1. While holding down the RECALL button, press 9 -9 -3.
2. Press VOL V.
The Mode indicator will blink four times (unlocked).
Operational feature reset (980)
This feature dears all setup features not related to "Device code set
up" and resets the Volume Lock to "TV."
To reset the features:
While holding down the RECALL button, press 9 -8 -0.
The Mode indicator will blink two times, and then pause and
blink two more times.
16
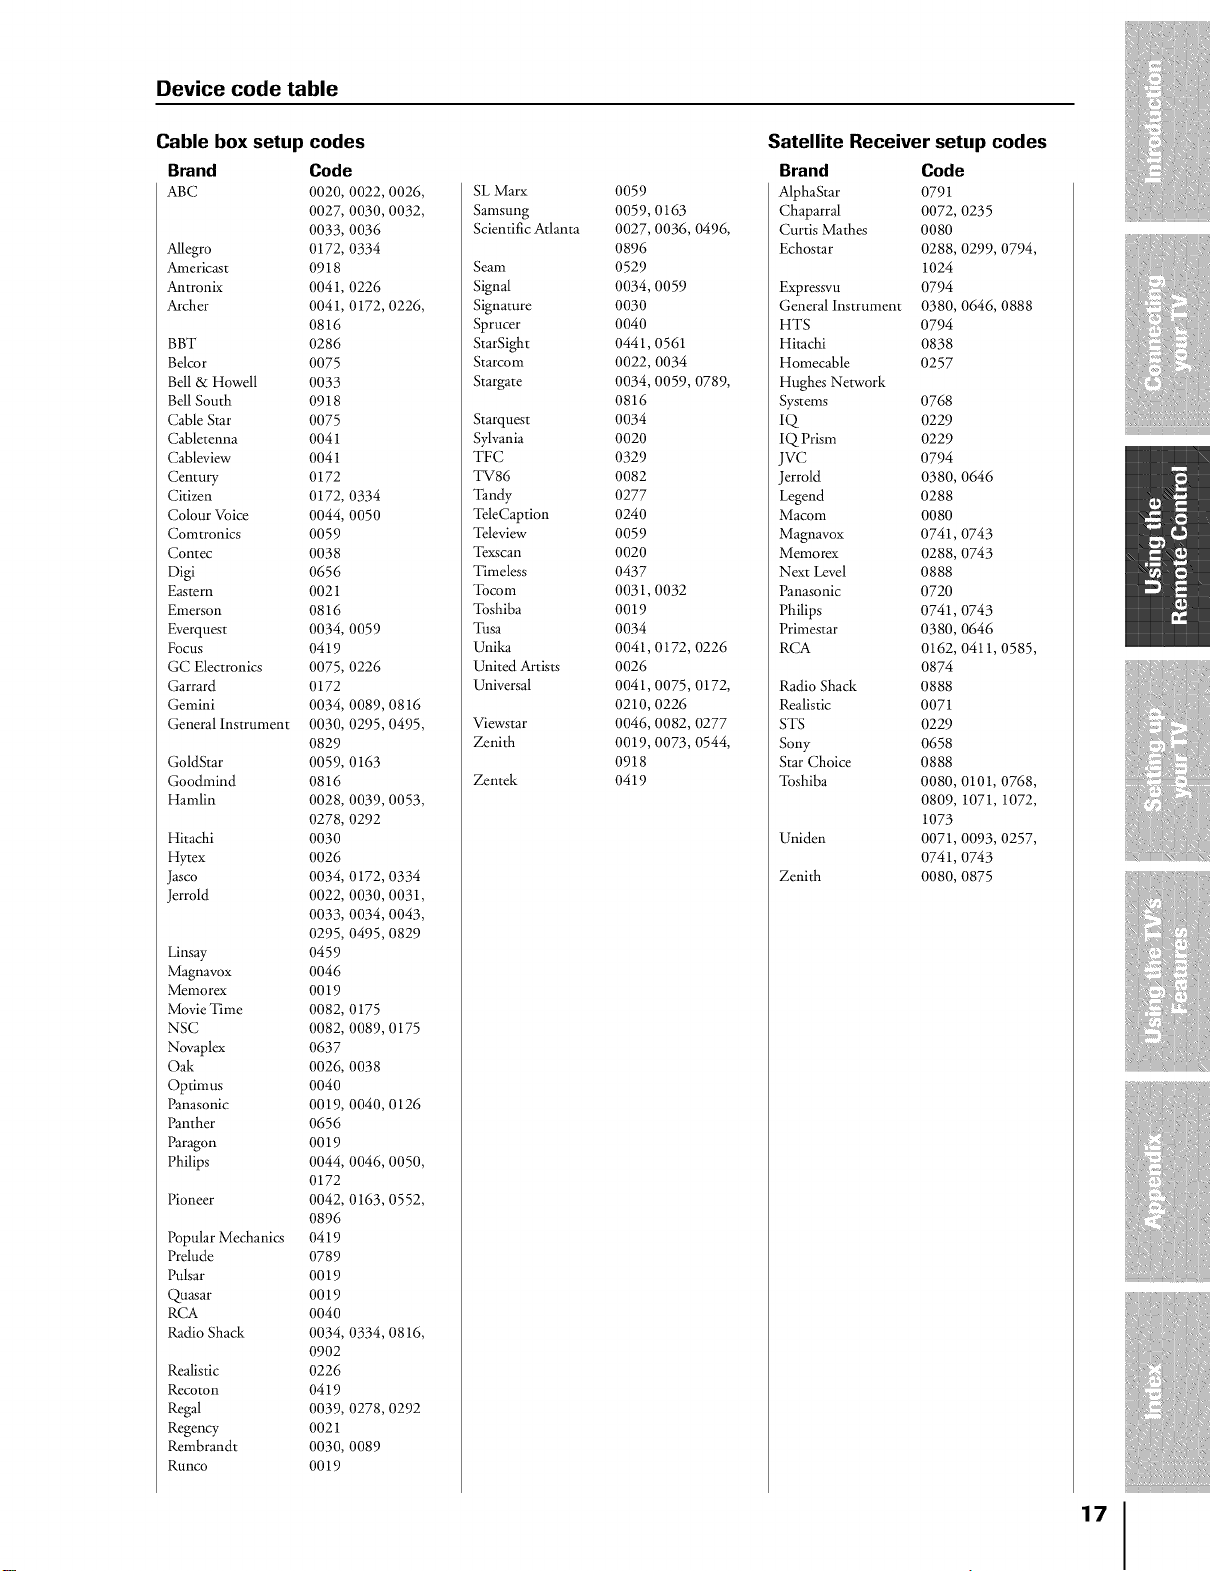
Device code table
Cable box setup
Brand
ABC
Allegro
Americast
Antronix
Archer
BBT
Belcor
Bell & Howell
Bell South
Cable Star
Cabletenna
Cableview
Centre T
Citizen
Colour Voice
Comtronics
Contec
Digi
Eastern
Emerson
Everquest
Focus
GC Electronics
Garrard
Gemini
General Instrument
GoldStar
Goodmind
Hamlin
Hitachi
Hytex
Jasco
Jerrold
Linsay
Magnavox
memorex
Movie Time
NSC
Novaplex
Oak
Optimus
Panasonic
Panther
Paragon
Philips
Pioneer
Popular Mechanics
Prelude
Pulsar
Quasar
RCA
Radio Shack
Realistic
Recoton
Regal
Regency
Rembrandt
Runco
codes
Code
0020, 0022, 0026,
0027, 0030, 0032,
0033, 0036
0172, 0334
0918
0041, 0226
0041, 0172, 0226,
0816
0286
0075
0033
0918
0075
0041
0041
0172
0172, 0334
0044, 0050
0059
0038
O656
0021
0816
0034, 0059
0419
0075, 0226
0172
0034, 0089, 0816
0030, 0295, 0495,
0829
0059, 0163
0816
0028, 0039, 0053,
0278, 0292
0030
0026
0034, 0172, 0334
0022, 0030, 0031,
0033, 0034, 0043,
0295, 0495, 0829
0459
0046
0019
0082, 0175
0082, 0089, 0175
0637
0026, 0038
0040
0019, 0040, 0126
O656
0019
0044, 0046, 0050,
0172
0042, 0163, 0552,
0896
0419
0789
0019
0019
0040
0034, 0334, 0816,
0902
0226
0419
0039, 0278, 0292
0021
0030, 0089
0019
SL Marx
Samsung
Scientific Atlanta
Seam
Signal
Signature
Sprucer
StarSight
Starcom
Stargate
Starquest
Sylvania
TFC
TV86
Tandy
TeleCaption
Teleview
Wexscan
Timeless
Tocom
Toshiba
Tusa
Unika
United AMsts
Universal
Viewstar
Zenith
Zentek
0059
0059,0163
0027,0036,0496,
0896
0529
0034,0059
0030
0040
0441,0561
0022,0034
0034,0059,0789,
0816
0034
0020
0329
0082
0277
0240
0059
0020
0437
0031,0032
0019
0034
0041,0172,0226
0026
0041,0075,0172,
0210,0226
0046,0082,0277
0019,0073,0544,
0918
0419
Satellite Receiver setup codes
Brand
AlphaStar
Chaparral
Curtis Mathes
Echostar
Expressvu
General Instrument
HTS
Hitachi
Homecable
Hughes Network
Systems
Iq
IQ Prism
jvc
Jerrold
Legend
Macom
Magnavox
Memorex
Next Level
Panasonic
Philips
Primestar
RCA
Radio Shack
Realistic
STS
Sony
Star Choice
Toshiba
Uniden
Zenith
Code
0791
0072,0235
0080
0288,0299,0794,
1024
0794
0380,0646,0888
0794
0838
0257
O768
0229
0229
O794
0380,0646
0288
0080
0741,0743
0288,0743
0888
0720
0741,0743
0380,0646
0162,0411,0585,
0874
0888
0071
0229
O658
0888
0080,0101,0768,
0809,1071,1072,
1073
0071,0093,0257,
0741,0743
0080,0875
17
 Loading...