

Toshiba 50AX60A, 50AX60, 43AX60A, 43AX60 Owner’s Manual
Important Information
Precautions
WARNING
TO REDUCE THE RISK OF FIRE OR ELECTRIC SHOCK, DO
NOT EXPOSE THIS APPLIANCE TO RAIN OR MOISTURE.
WARNING
WARNING: TO REDUCE THE RISK OF
ELECTRIC SHOCK, DO NOT REMOVE
COVER (OR BACK). NO USER-
SERVICEABLE PARTS INSIDE. REFER
SERVICING TO QUALIFIED SERVICE
PERSONNEL.
The lightning symbol in the triangle tells you that the
voltage inside this product may be strong enough to
cause an electric shock. DO NOT TRY TO SERVICE
THIS PRODUCT YOURSELF.
The exclamation mark in the triangle tells you that
important operating and maintenance instructions
follow this symbol.
CAUTION
TO PREVENT ELECTR/( SHO( K, DO NOT USE THIS
POI ARIZED PLUG WITH AN EXTENSION CORD
RECEPTACLE OR OTHER OUTI.ET UNLESS THE
I'RONGS CAN BE FULIX INSERTED INTO THE
OUTLET TO PREVENT ANY EXPOSURE OF THE
PRONGS ON THE POLARIZED PLUG.
ATTENTION
I'OUR PREVEN[R LES CHO(_S ELECTRIQUES NE PAS
UTILISER CFTFTE FICHE POIARISEE AVEC UN
PROLONGATEUR, UNE PRISE DE COURANT OU UNE
AUTRE SORTIE DE ( OURAN_I, SAUF SI LES LAMES
PEUVENT ETRE INSERt'S }, FOND SANS EN LAISSER
AIJCIJNE PARTIE }, DECOUVERI[
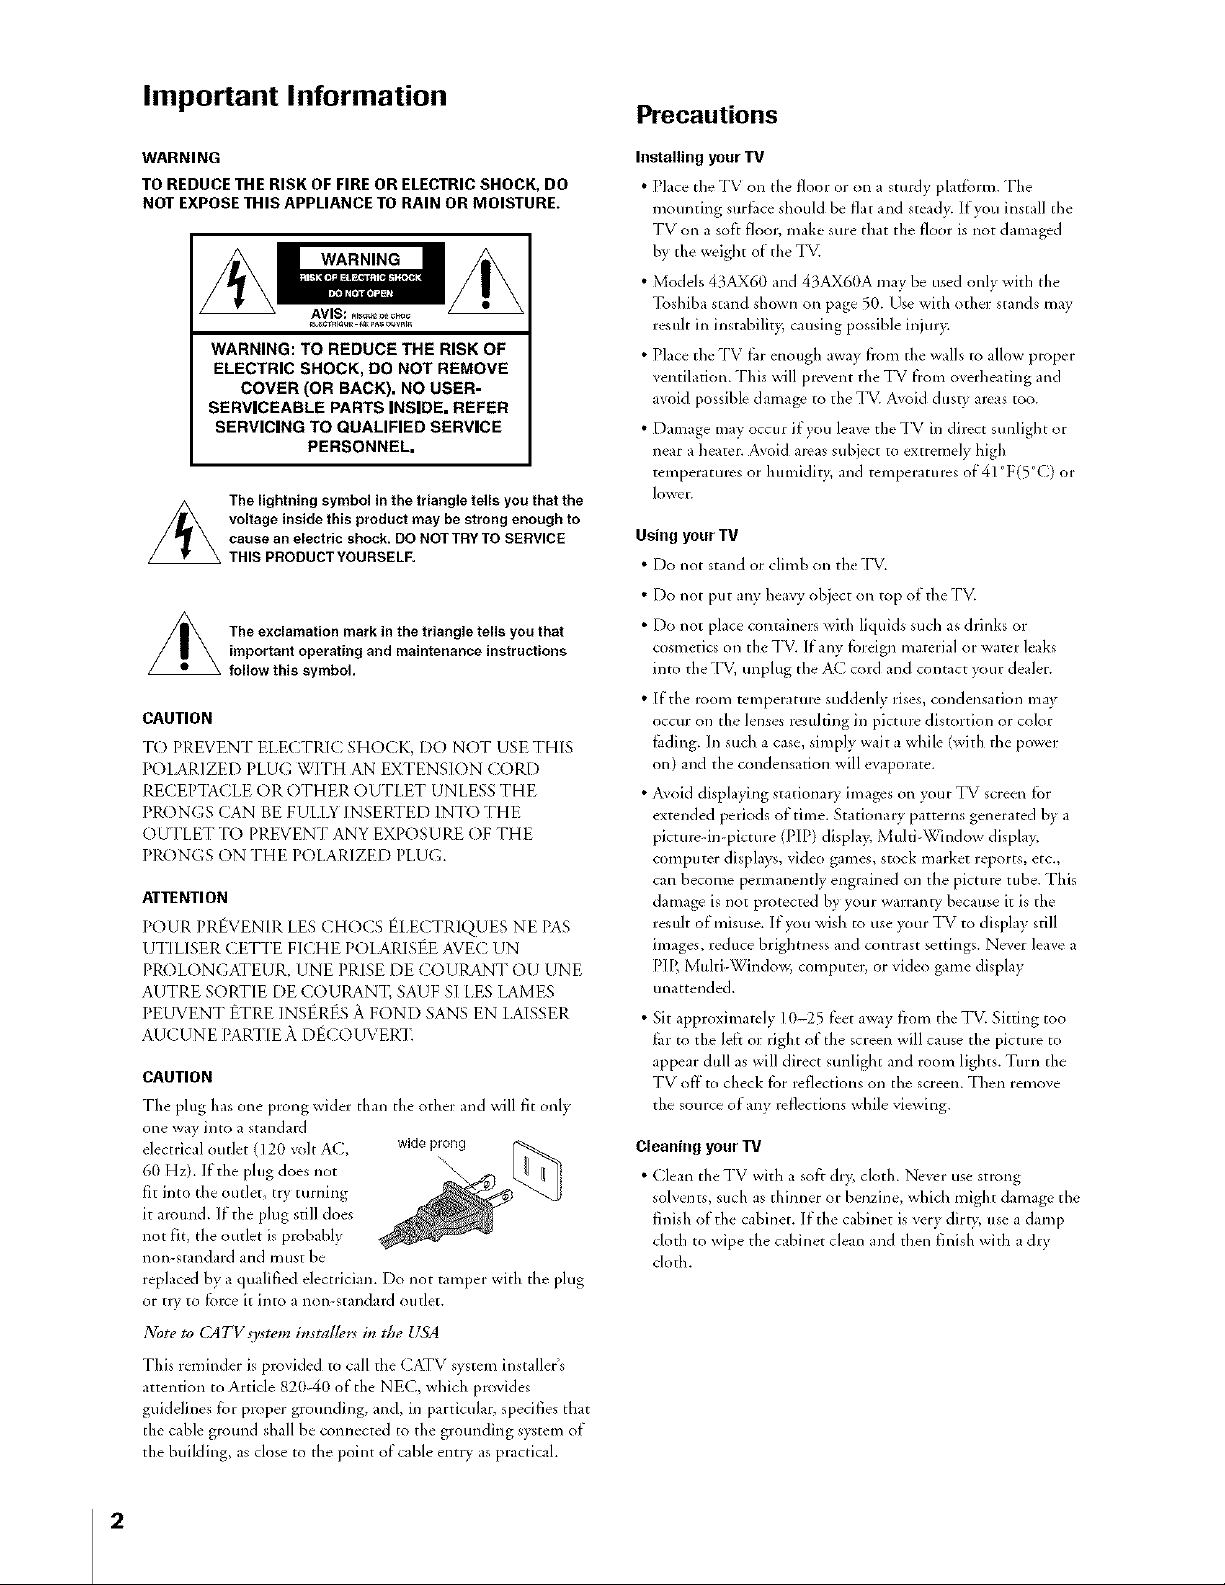
CAUTION
[File plug has one prong wider than tile other and will fit only
one way into a standard
electrical outlet (120 volt AC, wide prong
60 Hz). If the plug does not \
fit into the outlet, tly turning
it alound. If'the plug still does
not fit, tile outlet is probably
non-standard and must be
replaced by a qualified electrician. Do not tamper with the plug
or tlv to t_lve it into a non-standald outlet.
Installing your TV
• Place the TV on tile floor or on a sturdy platfi_rm. "Pile
mounting slirf_ce should be flat and stead),. If you install the
TV on a soft floor, make sure that the floor is not damaged
by the weight of the TV.
• Models 43AX60 md 43AX60A may be used onl) with the
Toshib _stand shown on page 50. Use ,aith other stands may
result in illstabilitv causing possible injur)<
• Pllce the TV fi_renough awl t fi'om tile walls to allow proper
_entilation. This will prevent tile TV from overheating md
avoid possible damage to the TV. Avoid dust_ aleas too.
• Damage may occur if you leave the TV in direct sunlight or
near a heate_. Avoid areas subject to e×tremely high
temperatules or humidity, and temperatules of 4] °F(5°C) or
Iowe_.
Using your TV
• Do not stand or climb ou the TV.
• Do not put ;ill) heavy object on top of tile TV_
• Do not place containers with liquids such as drinks or
cosmetics on tile TV. If any fi)reign material or water leaks
into the [1_ unplug the AC cord and contact your dealer.
• If the room temperatm'e suddenly rises, condensation may
occur on the lenses resulting in picttu_ distortion or color
fliding. In such a case, simply wait a while (with the power
on) and the condensation will evaporate.
• Avoid displaying stationary images on your TV screen f[_r
extended periods of time. Stationary patterl*s generated b) a
picmre-in-pictule (PIP) displa> Multi-\_mdow display,
computer displays, video games, stock market reports, etc.,
can become permanently engrained on tile pictmv tube. This
damage is not protected by your warranty because it is tile
result of misuse. If you wish to use your TV to display still
images, reduce brighmess and contrast settings. Never leave a
PIP, Multi-Window, computer, or vide() game display
unattended.
• Sit approximately 10-25 t_et ax<ly from the TV. Sitting too
t_lrto tile left or right of the screen will cause tile picture to
appeal: dull as will direct sunligfit and i:oom lights. Turn the
TV <)If"to check fi_r reflection s on the screen. Then remove
the source of any leflections while viewing.
Cleaning your IV
• Clean theTV with a soft dry, cloth. Never use smmg
solvents, such as thim/er or benzine, which might damage the
finish of the cabinet. If the cabinet is very dirg, use a damp
cloth to wipe tile cabinet clean and then finish with a dry
cloth.
Note to (,_TV.wwm in_talle*:_i1_the USA
This reminder is provided to call the CATV system installer's
attention to Article 820-40 of the NEC, which provides
guidelines for proper grotmdillg, and, in particular, specifies that
the cable ground shall be connected to the glounding system of
tile building, as close to the point of cable ent U as practicah
2
Introduction ................................................................ 4
Welcome to Toshlba ......................................................... 4
E ploring your new TV ................................................... 4
Connecting your IV .................................................. 5
(-olmecting a VCR .......................................................... 5
Connecting a cable converter box .................................... 6
(onnecting acable converter box and a V(R .................. 6
(onnecting aDVD/satellite receiver and a VCR .............. 7
Connecting a I)VI) with ColorStream c_and a VCR ......... 7
( onnecting t_vo V(_Rs ..................................................... 8
( onlmcting a camcorder .................................................. 9
Connecting an audio system ............................................ 9
Connecting an A/V Ivceiver ........................................... 10
Using the remote control ...................................... 11
Prepaling tile remote contlol t_l: use .............................. 11
Installing the remote control batteries ............................ 11
R_mote ( ontrol fimctional key chart ............................. 12
Programming the lemote control f[_r use with your
audio/video devices ........................................................ 14
Device code setup ................................................... 14
Searching and sampling the code of a device (991) ..... 14
V_ri_dng the device code (990) ............................... 15
Using the Volmne Lock fbatmv (993) ..................... 15
Operational f_atttre Reset (980) .............................. ] 5
Device code table .................................................... 16
Learning about the remote control ................................. 20
Setting up your TV .................................................. 21
Learning about the naentl s!stem ................................... 21
Changing the on-screen display language ....................... 22
Selecting tile antenna input ............................................ 22
Using theTV/VIDEO button oil theTV .............. 22
Adding channels to theTV's memory ............................ 23
Ploglamming channels atttomatically ...................... 23
Adding and erasing channels manually .................... 24
Changing channels ........................................................ 24
Adj usting tile color convergence ..................................... 24
Using the TV's features .......................................... 26
Adjusting tile channel settings ........................................ 26
Switching between two channels ............................. 26
Programming your t_vorite channels ....................... 26
Labeling channels ................................................... 27
Watching picture-in-picture (][qP) .................................. 29
Switching the main and small pictmvs .................... 30
Changing the position of tile snlall picture .............. 30
Flvezing the small picture ....................................... 30
Using Multi-Window tbature ......................................... 30
Using the preview fimction ..................................... 31
Using tile f_rorite fimction ..................................... 31
Using the strobe fimction ........................................ 31
Using the I£)CKS menu ............................................... 32
Entering the PIN code ............................................ 32
Using the V-CHIP menu ............................................... 33
ENABLE BLOCKING .......................................... 33
TV RKFING
(Independent rating system fbr broadcasters) .......... 33
MPAA RATIN(', (Independent rating system for
movies) ................................................................... 34
BLOCKING OPT/ON .......................................... 34
Unlocking plograms temporarily ............................ 35
Locking channels ........................................................... 35
Locking video inputs ..................................................... 36
Changing the PIN code ................................................. 36
Adjusting the picture ..................................................... 37
Selecting tile pictmv mode ...................................... 37
Adjusting the picture quality ................................... 37
Saving new preference ............................................. 38
Using the flesh tone fbattne ..................................... 38
Using the noise reduction t_atttre ............................ 38
Selecting the color temperature ............................... 39
Resetting your picture adjustments ......................... 39
Watching video input .................................................... 40
Selecting tile video label ................................................. 40
Using the closed caption f_'ature ..................................... 41
Setting the sleep timer .................................................... 42
Setting the clock ............................................................ 42
Adjusting tile sound ....................................................... 43
Muting the sotmd ................................................... 43
Selecting stereo/SAP broadcasts .............................. 43
Using tile surround sound t_ature ........................... 44
Adjusting the sound quality .................................... 45
Resetting your audio adiustments ........................... 45
Using the Sub-Bass System (SBS) ............................ 46
Turning off'the built-il_ speakers ............................. 46
Selectillg the Audio OUT sound ............................. 47
Using the StableSound _" t_'ature .............................. 47
Selectillg the background of tile menu display ............... 48
Displaying on-screen il/t[_rmatioll .................................. 48
Viewing the demonstration mode .................................. 48
Understanding tile auto power off'f_ature ...................... 49
Understanding tile last mode memory feature ................ 49
Appendix ................................................................... 50
Sp_'cificatkms ................................................................. 50
_l]:oubleshootin g............................................................. 51
Limited United States _larranD ..................................... 52
Index .......................................................................... 53
3
Introduction
Welcome to Toshiba
Congratulations! You have purchased one of the finest projection TVs
on the market. The goal of this manual is to guide you through
setting tip and operating your Toshiba TV as quickly as possible.
This manual applies to models 43AX60, 43AX60A, 50AX60, and
50AX60A. Before you start reading, check vour model number by
looking at the rear of the TV.
Instructions in this manual are based on using the remote controh
You can also use the controls on the TV if they have the same name as
those on the remote control.
Please read all the safeD_and operating instructions carefully, and keep
the manual for flmkre reference.
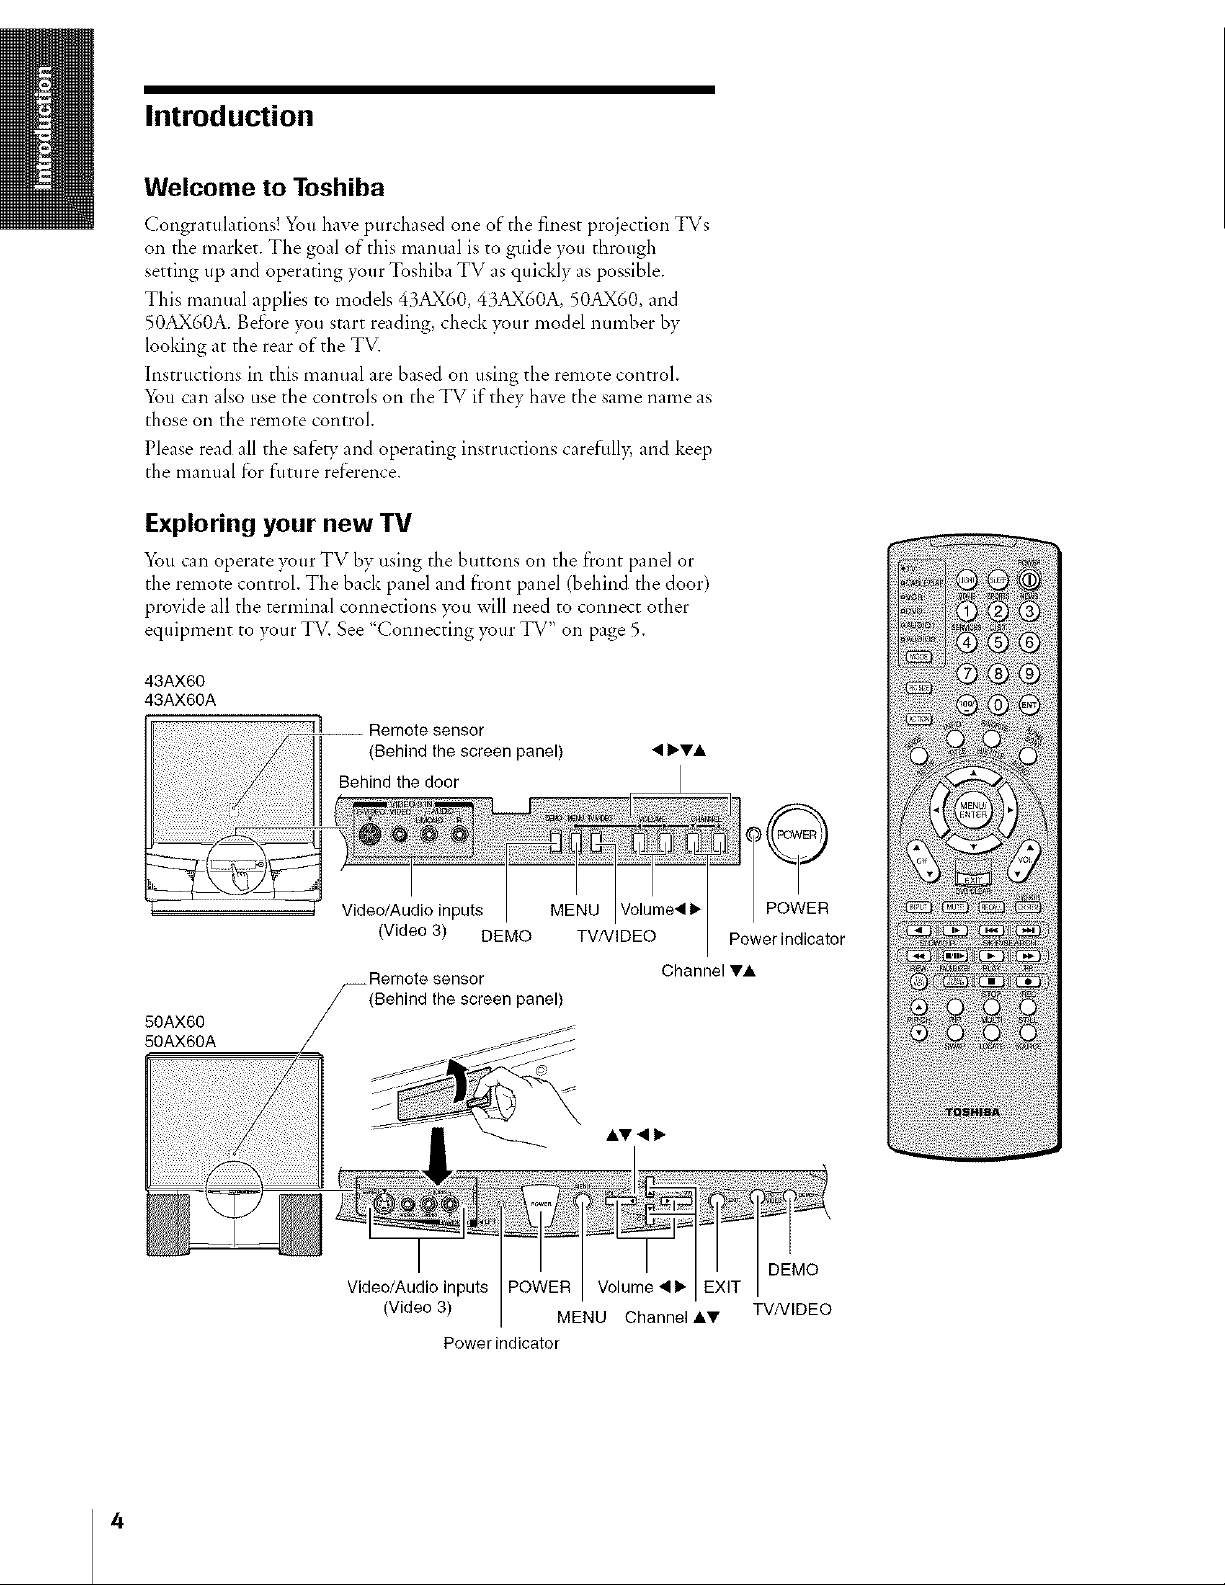
Exploring your new TV
You can operate your TV by using the buttons on the front panel or
the remote control. The back panel and front panel (behind the door)
provide all the terminal connections you will need to connect other
equipment to >_ur TV. See "Connecting your TV" on page 5.
43AX60
43AX60A
Remote sensor
(Behind the screen panel) • IbTA
50AX60
50AX60A
Video/Audio inputs
(Video 3) DEMO TV/VlDEO Power indicator
__ Remote sensor
(Behind the screen panel)
Video/Audio inputs Volume • I_
(Video 3) MENU Channel AV
Power indicator
MENU Volume_ I_
Channel V&
DEMO
TV/VIDEO
4
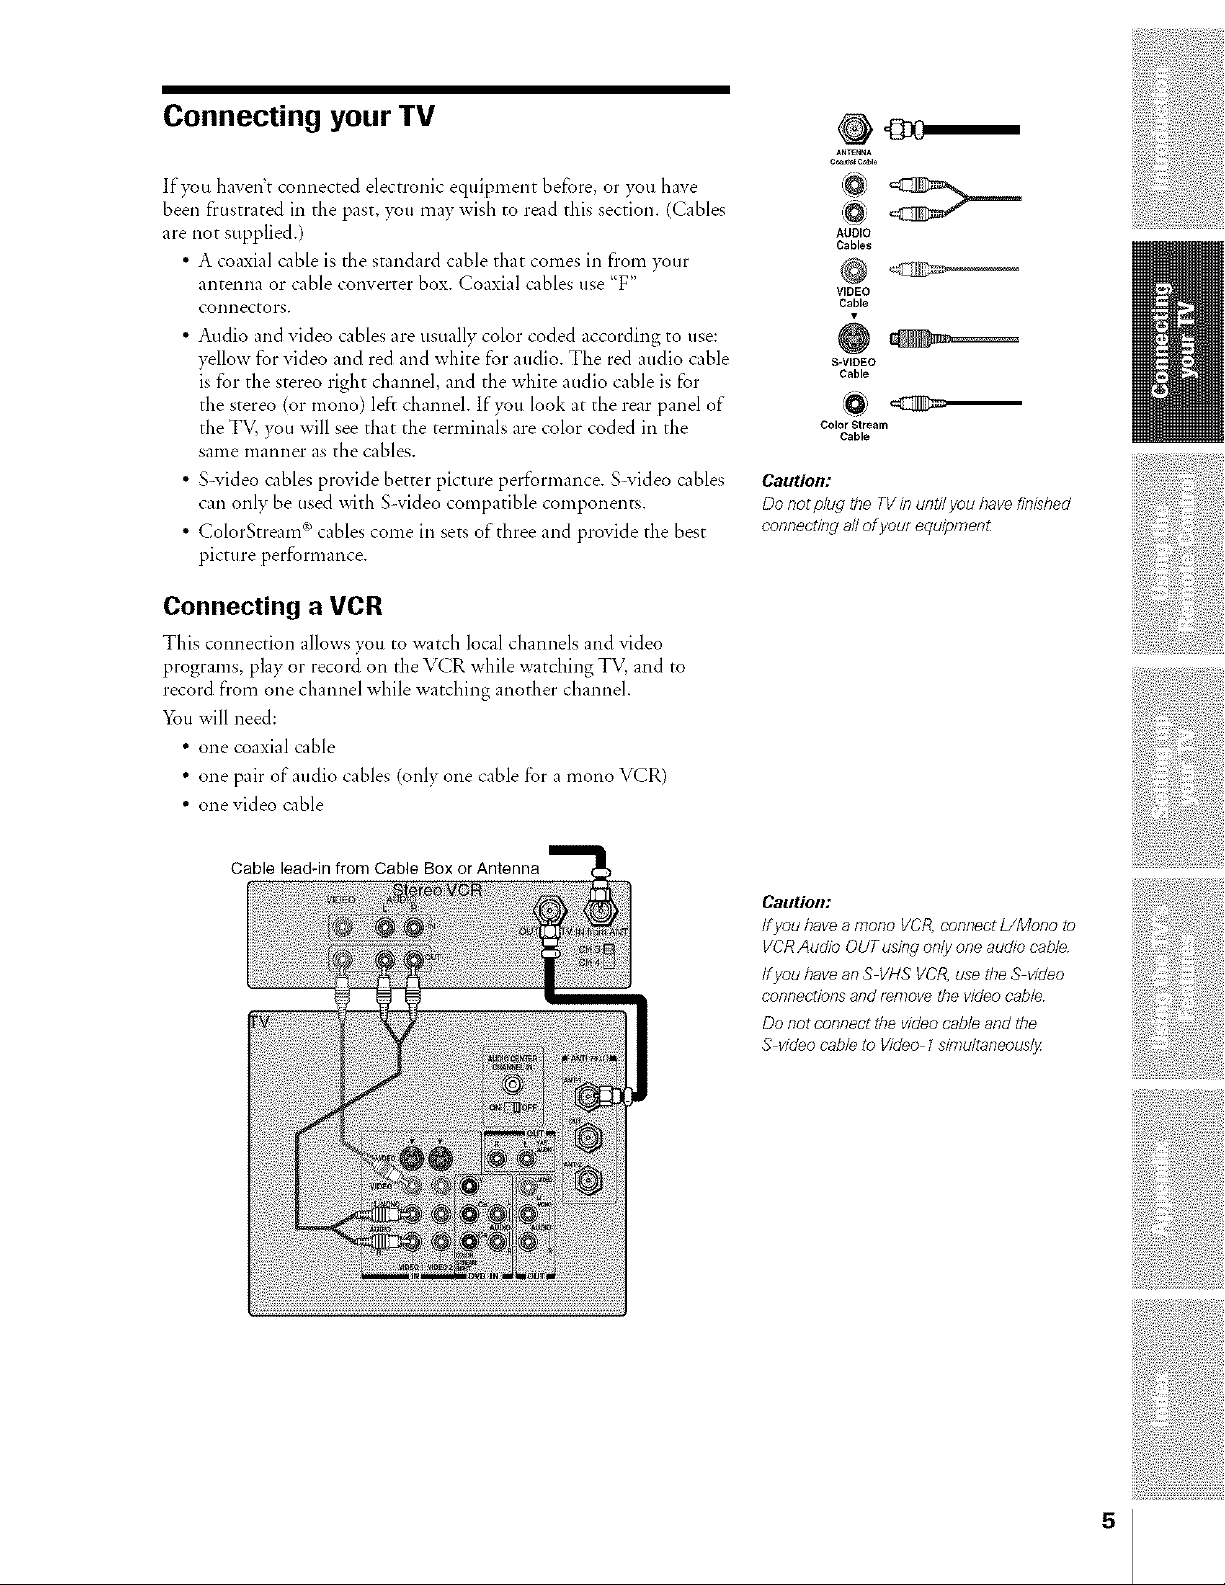
Connecting your TV
If you haven't connected electronic equipnlent before, or you have
been frustrated in the past, you may wish to read this section. (Cables
are not supplied.)
• A coaxial cable is the standard cable that comes in flom }_ur
antenna or cable converter box. Coaxial cables use "F"
connectors,
• Audio and video cables are usually color coded according to use:
yellow for video and red and white for audio. The red audio cable
is for the stereo fight channel, and the white audio cable is for
the stereo (or mono) left channeh Ifvou look at the rear panel of
the TV, you will see that the terminals are color coded in the
same manner as the cables.
• S-video cables provide better picture performance. S video cables
can only be used with S-video compatible components.
• ColorStream ®cables come in sets of three and provide the best
picture performance.
Connecting a VCR
This connection allows you to watch local channels and video
programs, play or record on the VCR while watching TV, and to
record from one channel while watching another channeh
You will need:
• one coaxial cable
• one pair of audio cables (only one cable for a mono VCR)
• onevideo cable
ANI_NNA
AUDIO
Cables
VIDEO
Cable
÷
S-VIDEO
Cable
Color Stream
Cable
Caution:
Do not plug the TVinuntil you bavefJ?_ished
connectieg allof you/equ_omen£
Cable lead-in from Cable Box or Antenna
CallUon:
ffyou bavea mono VCR,connectL/Mono to
VCRAudio OUTusing only one audio cable
ffyou baveanS VHSVCR,use tbe S video
connectionsand remove the video cable
Do not connect the videocable and tbe
S videocable to Video 1simultaneously
5
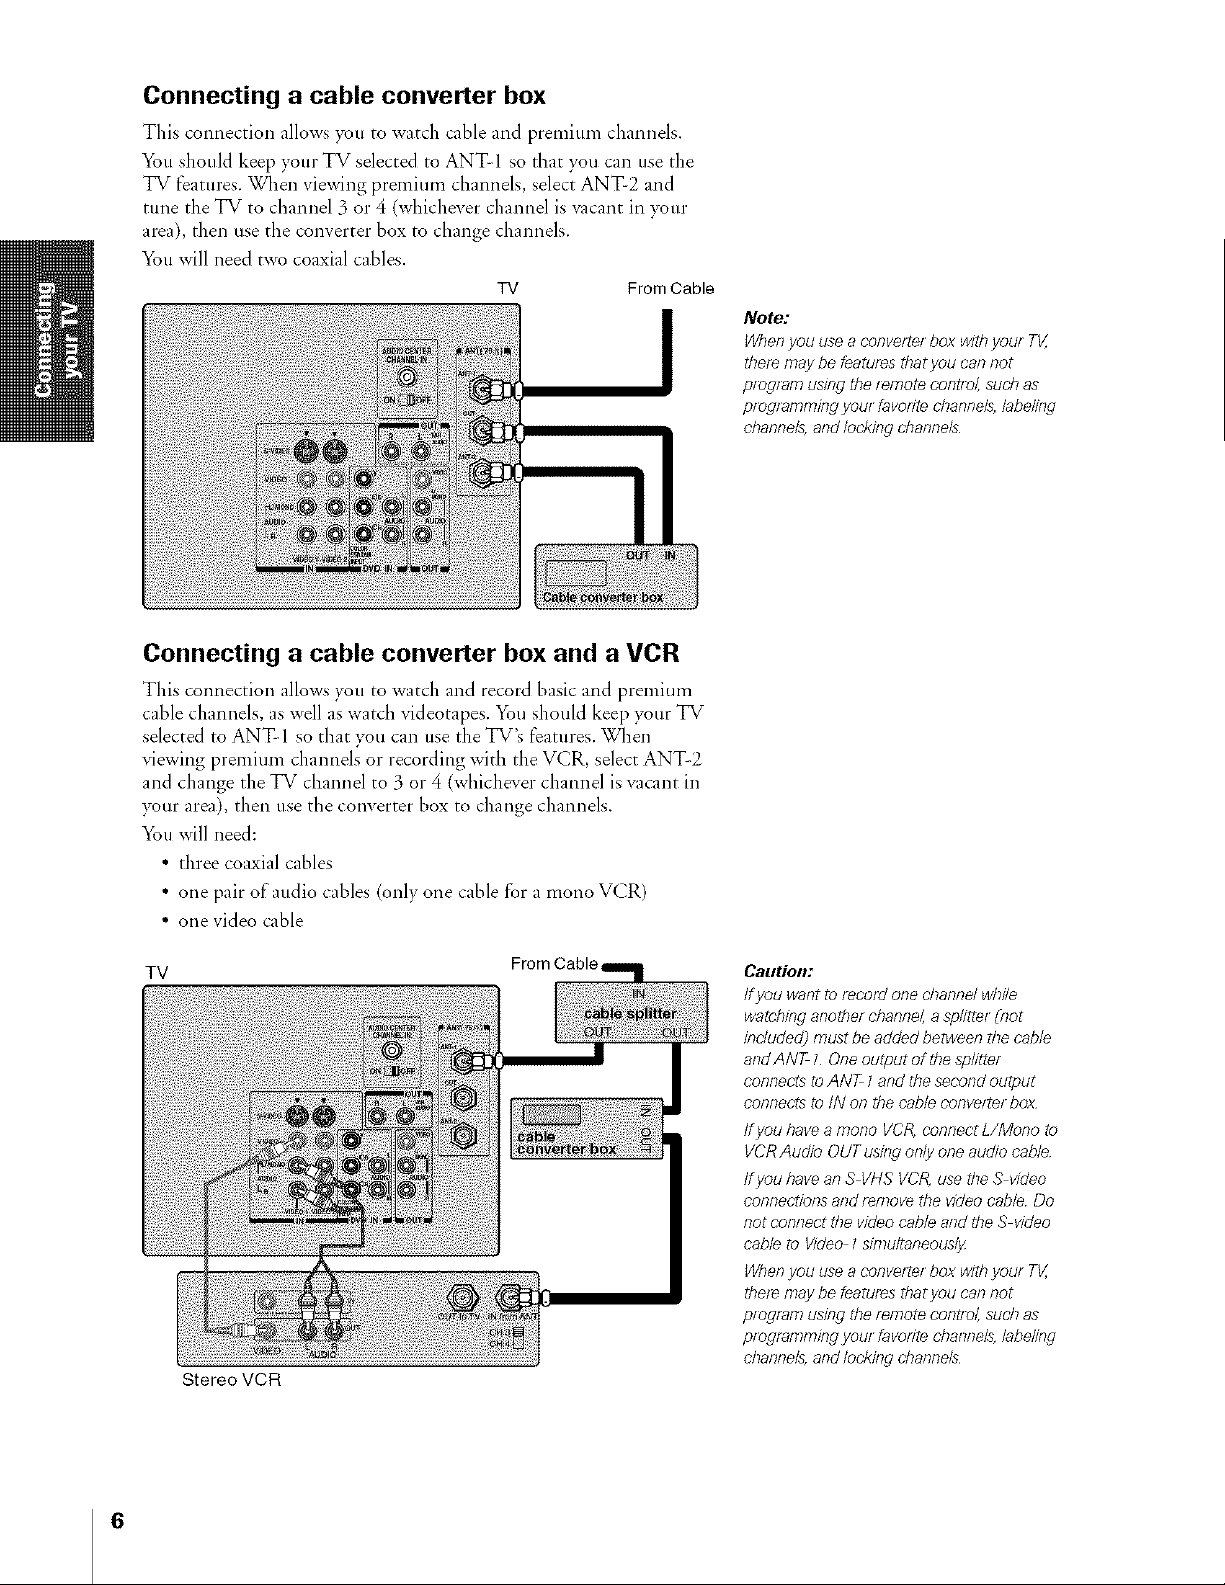
Connecting a cable converter box
This connection allows you to watch cable and premium channels.
You should keep your TV selected to ANTI so that you can tlse the
TV features. When viewing premium channels, select ANT-2 and
tune the TV to channel 3 or 4 (wbiches'er channel is ,_acant in your
area), then use the converter box to change channels.
You will need two coaxial cables.
TV From Cable
I
Connecting a cable converter box and a VCR
This connection allows you to watch and record basic and premium
cable channels, as well as watch videotapes, x*_tlshould keep your TV
selected to ANT-I so that you can use the TV's f'eatures. When
viewing premium channels or recording with the VCR, select ANT2
and change the TV channel to 3 or 4 (wbiches'er channel is vacant in
your area), then use tbe converter box to change channels.
5%u will need:
• three coaxial cables
• one pair of"attdio cables (only one cable for a mono VCR)
• one video cable
Note:
lichenyou use a conve/te/ box with your 71/,,
tber_ maybe featu/_s thatyou can not
ping/am using the remote con/m/, sucb as
pro/lamming you/favorite channels,labeling
channels,andlocking cbannels
TV
Stereo VCR
6
From Cable
CaeUon:
ffyou wantto record one d?annd wb#e
watehing anotbel d}anne/, asp/itte/ (not
included] must be added between/be cable
andANT t Oneoutput of the splitter
connects toANT 1and dTesecondoutput
connects to iN on the cable conve/ter box
Ifyou bavea mono VCR,connectL/Mono to
VCRAudio OUTusing only one audio cable
ffyou bavean S VHSVCR,use tbe S video
connectionsand remove the video cable Do
not connect the videocable and the S video
cable to Video 7simultaneously
Whenyou use a converte/ box witb you/ TV,
tbe/e may be features thatyou can not
pie/ram usingthe/emote control, sud_ as
programming youl favodte abanne& labeling
d}anne/s,and locking d}annels
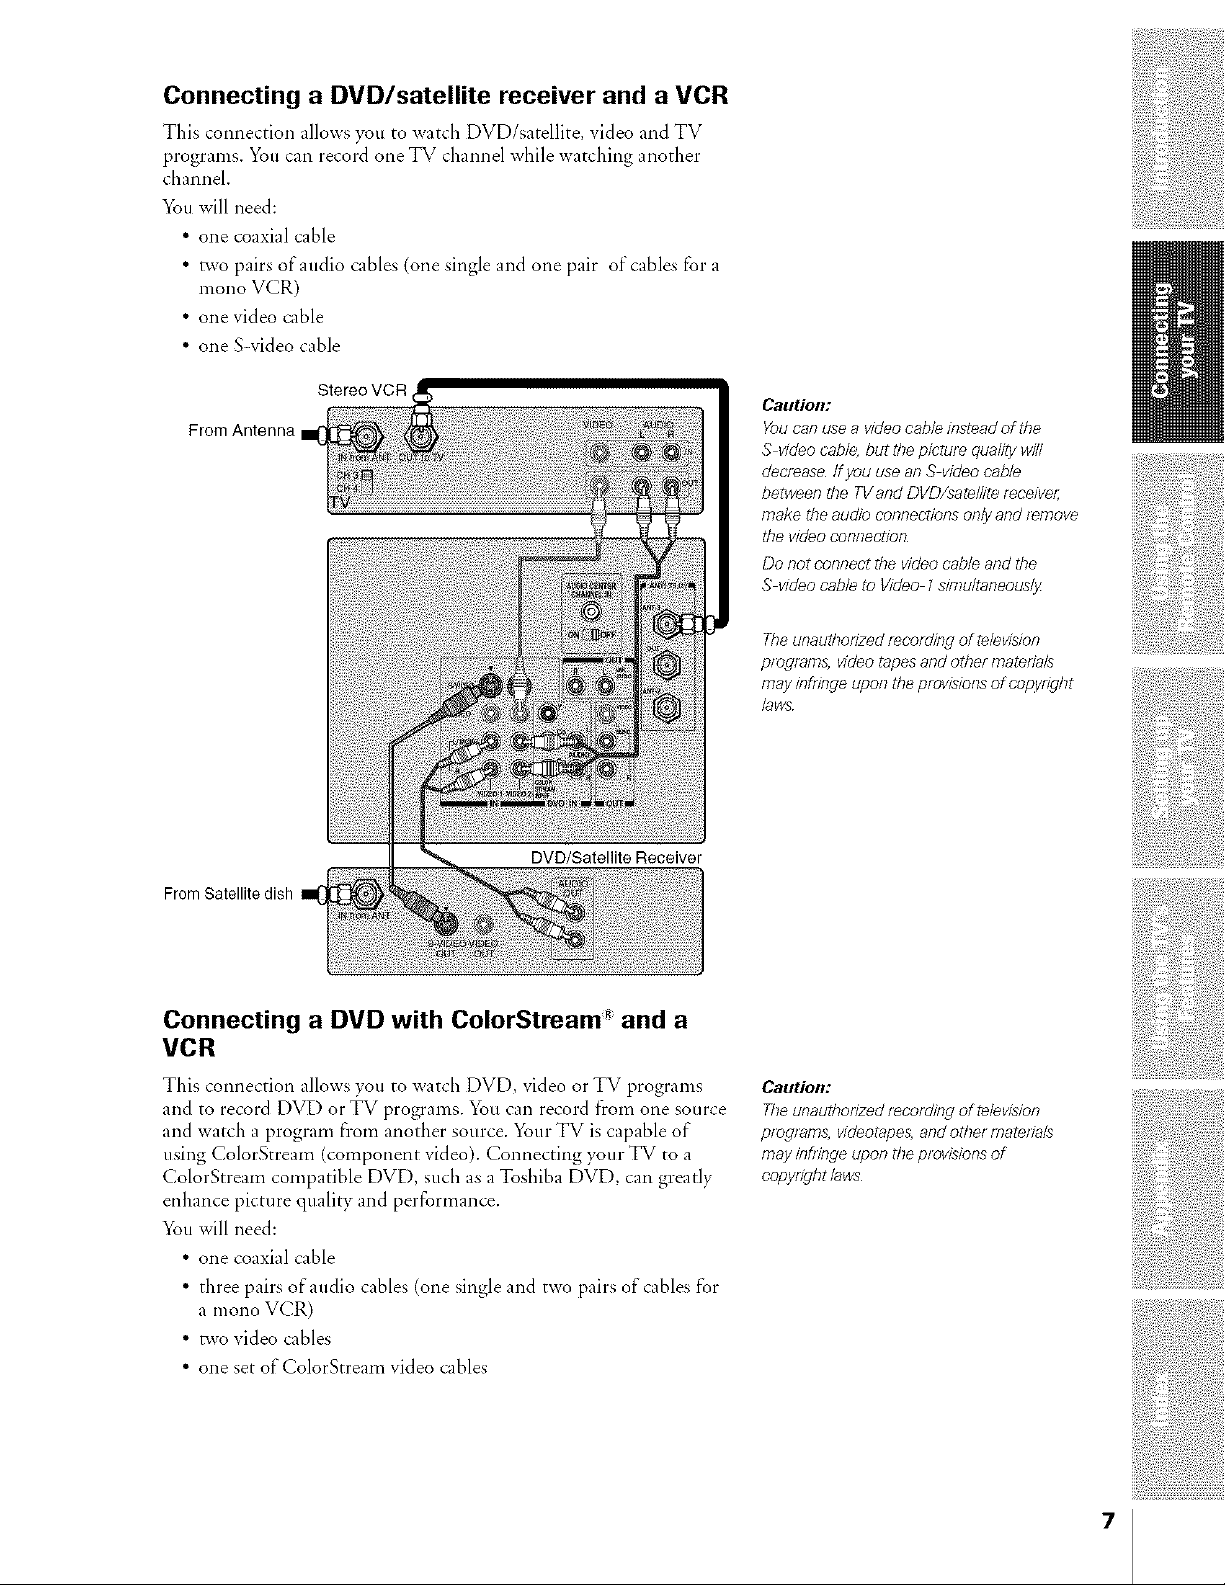
Connecting a DVD/satellite receiver and a VCR
This connection allows you to watch DVD/satellite, video and TV
programs. You can record one TV channel while watching another
channel.
You will need:
• one coaxial cable
• two pairs of audio cables (one single and one pair of cables for a
mono VCR)
• one video cable
• one S-video cable
From Antenna
FromSatellite dish
Stereo VCR
CalltiOll:
Youcanusea videocableinsteadofthe
S videocab/e,butthepicturequalitywin
decreaseIfyouuseanSvideocable
betweentheTVandDVD/sate//iter_ceive_
maketheaudioconnectionsonlyand_move
thevideoconnection
Donotconnectthevideocableandthe
S videocableto Video1simu/taneous/y
Theunauthorized/_cording of television
program& videotapesand other matefla/s
may infringe upon the provisionsof cot_yright
bws
DVD/Satellite Receiver
Connecting a DVD with ColorStream _ and a
VCR
This connection allows you to watch DVD, video or TV programs
and to record DVD or "FV programs. You can record from one source
and watch a program from another source. Your TV is capable of
using ColorStream (component video). Connecting your TV to a
ColorStream compatible DVD, such as a Toshiba DVD, can greatly
enhance picture quality and performance.
You will need:
• one coaxial cable
• three pairs of audio cables (one single and two pairs of cables for
a mono VCR)
• _vo video cables
• one set of ColorStream video cables
Caution:
Theunauthorizedr_cording of television
pmglams, videotape&andother materials
may infiTngeupon the provisionsof
copyrightbws
7
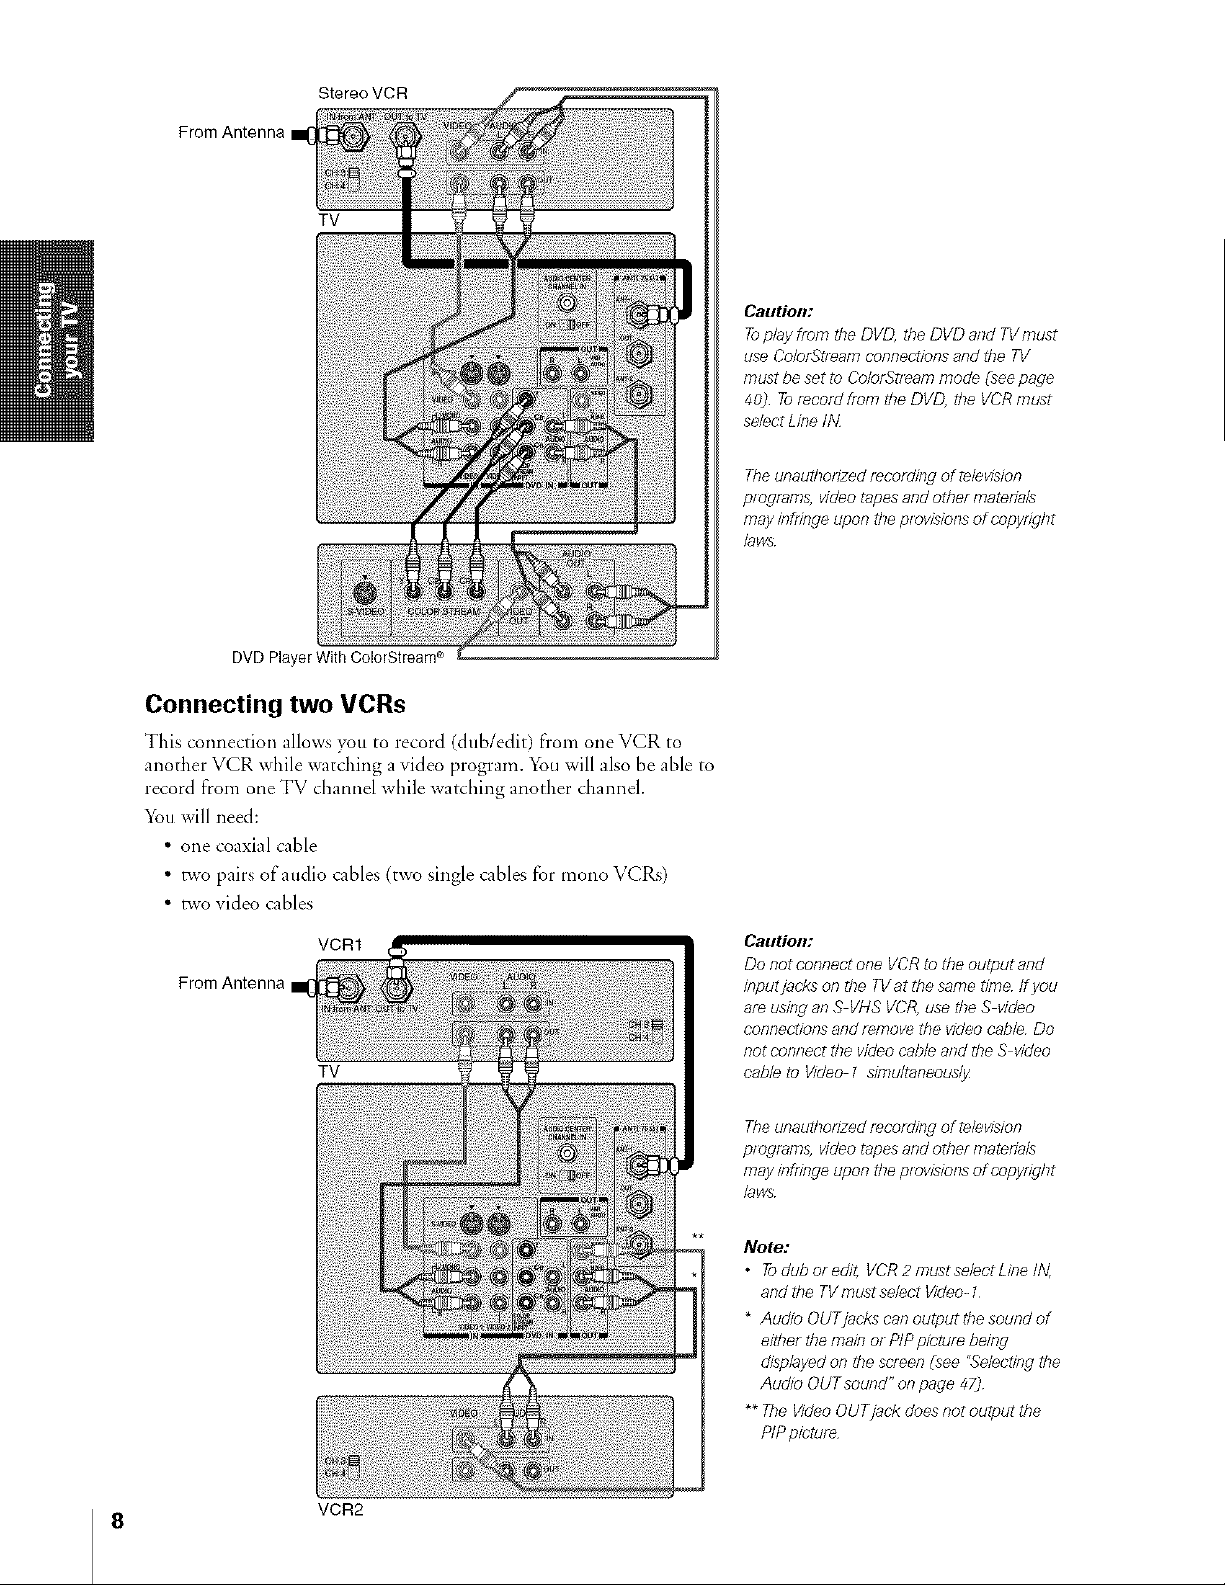
Stereo VCR
From Antenna
TV
DVDPlayerWith ColorStream÷
Caution:
Toplayfrom the DVD, the DVD and TVmust
use ColorStreamconnectionsand the TV
mustbe set to ColorSti_am mode (seepage
40) Tor_cord fmm the DVD, the VCRmust
selectLine IN
Theunauthorizedrecording of television
programs, videotapesand othel materTa/s
may infringe upon the provisionsof copyright
bws
Connecting two VCRs
This connection allows you to record (dub/edit) from one VCR to
another VCR while watching a video program. You will also be able to
record from one TV channel while watching another channel.
_%uwill need:
• one coaxial cable
• two pairs of audio cables (two single cables for mono VCRs)
• two video cables
VCR1
From Antenna
TV
CautiOll:
Do not connect one VCRto the output and
inputjacks on the TVat the same time ff you
areusieg an S VHSVCR,use theS video
connectionsand remove the video cable Do
not connect the videocable and the S video
cable to Video I simultaneously
Theunauthorizedrecording of television
programs, videotapesand othel materTa/s
may infringe upon the provisionsof copyright
bws
Note:
• Todub or edit, VCR2 must selectLine IN,
andthe TVmustselect Video-1
* Audio OUTjacks can output the sound of
either the main or PIPpieture being
displayedon the screen _see°Selectingthe
Audio OUTsound" on page 47)
** The VideoOUTjack doesnot output the
PIPpicture
8
VCR2
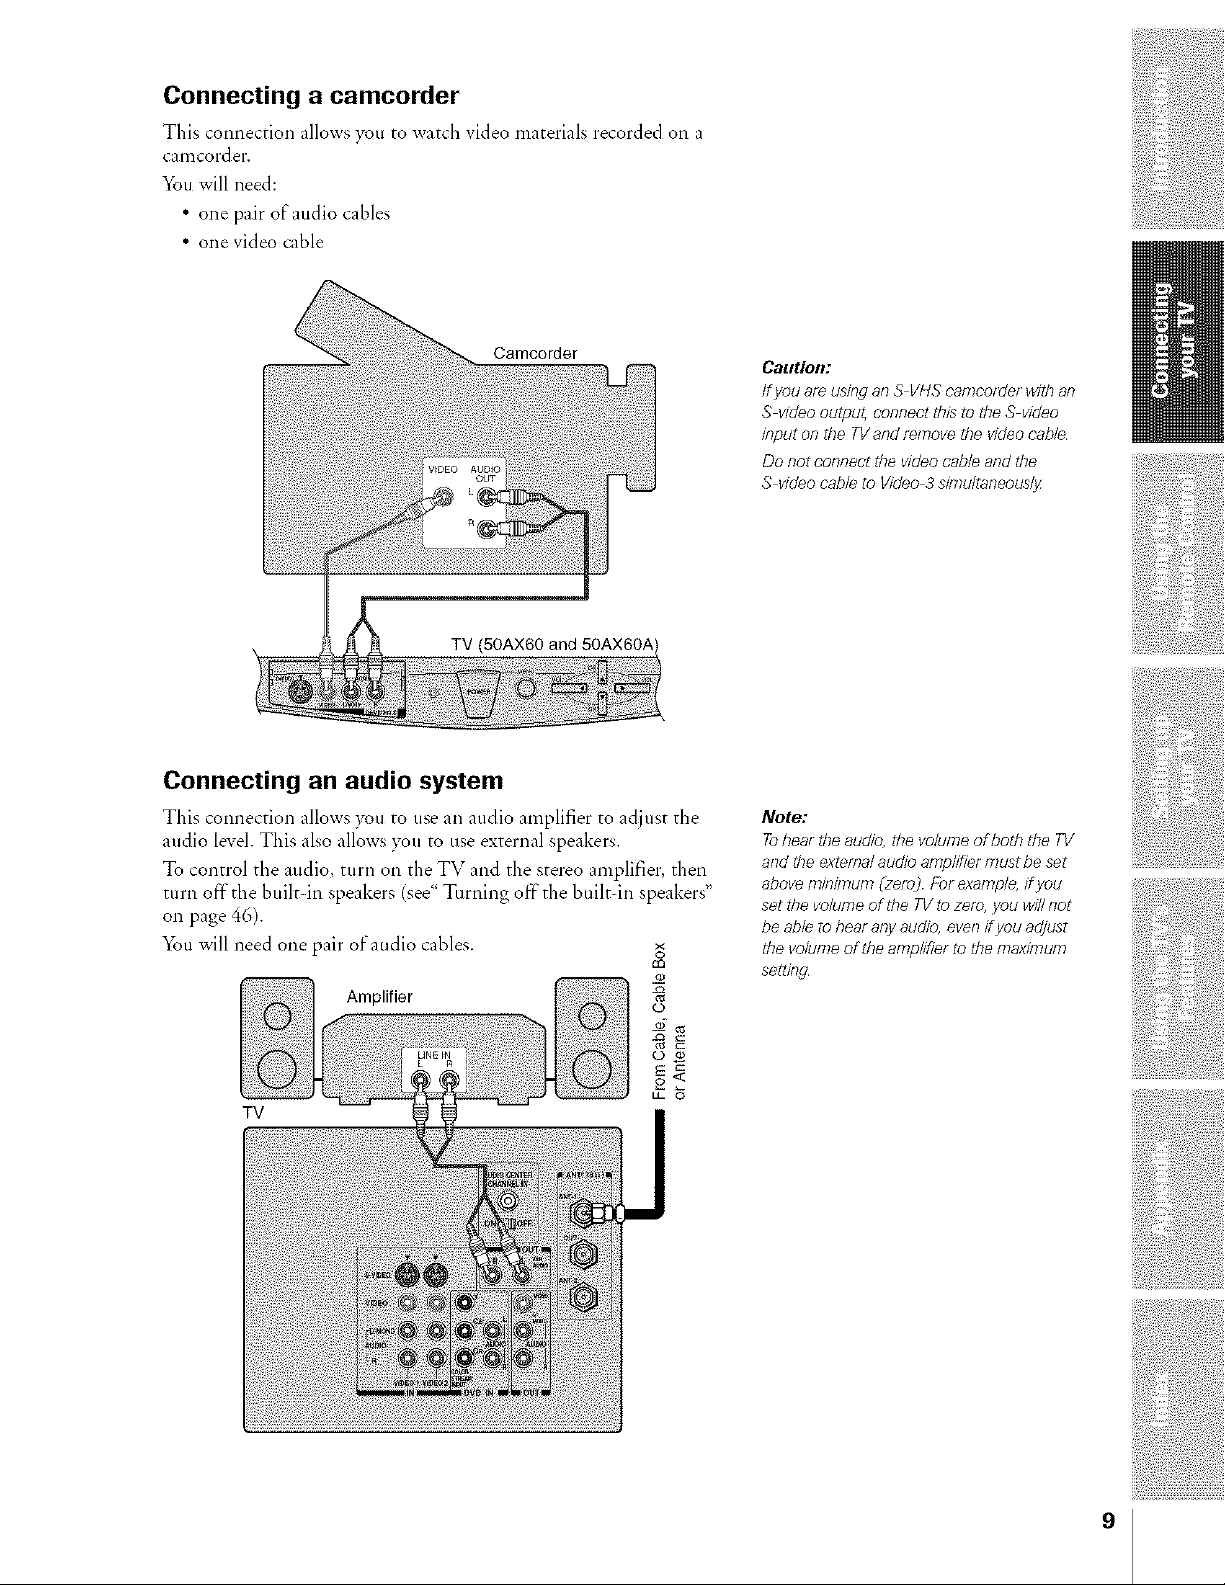
Connecting a camcorder
This connection allows you to watch video materials recorded on a
carncord eF,
You will need:
• one pair of audio cables
• one video cable
CaeUoe:
ffyou are usingan S VI-/Scamcorder witb an
S videooutpu{ connect this to the Svideo
input on tbe TVand remove the videocable
Do not connect the videocable and the
S videocable to Video 3simultaneously
Connecting an audio system
This connection allows you to use an audio amplifier to adiust the
audio level. This also allows )_tl to use external speakers.
To control the audio, turn on the TV and the stereo amplifier, then
turn off-the built in speakers (see <`Turning off" the built=in speakers"
on page 46).
You will need one pair of audio cables, g
Amplifier
TV
co
Note:
Tobeartbe audio, tbe volumeof both tbe TV
and tbe externalaudio amplifier must be set
aboveminimum Czero)Fer example,ifyou
set the volume of the TV to zero, you winnot
be able to bear anyaudio, evenif you adjust
&e volumeof tbe amplifier to the maximum
setting
9

Connecting an A/V receiver
If you use a system that delivers Dolby Pro Logic* surround sound,
you will probably want to use tbe TV speakers as center channel
speakers.
A center channel speaker adds to tbe realism of a surround sound
system sttch as Dolby Pro Logic.
You will need:
• one pair of audio cables
• one video cable
• one audio cable for audio center channel
ToA/V receiver
I \
Video TV Center From
out in out Antenna
Connection example of Dolby Pro Logic surround system
1
Audio Video
Caution:
Make sure d_eTVis turned off betor_
connecting oJdisconnectingan audiocable to
the Audio Center ChannelINjack to avoid
damaging the speaker:
Note:
Referto the instructionsfurnishedwith the
connectedA/V r_ceiver for detailedsurround
system
WhentheAudio Center ChannelON/OFF
switch b b theON position, the TVspeaker_
winfunction onlyas the center channd
speakers
Adjust the volume for center channel
speakerswith the center bve/ control on the
A/V r_cdvel:
ffyou use the TVspeakelsasnorrnd
speakers,set theAudio Center Channel
ON/OFF switch to the OFFposition
* "Dolby Pro Logic"is a I_gistel_d tl_,derT_al?
of De/byLabomtolies Licensing
Colporation
10
A/Vreceiver
TV
speaker L speaker R
Surround _ Surround
|
• NlgnI
Using the remote control
Preparing the remote control for use
Yotu" Toshiba remote control has one dedicated TV mode and 5
universal modes: VCR, Cable/SAT, DVD, Audio 1, and Audio2. The
target devices and dei_ault devices being programmed for each mode
are as follows:
Target device/Mode mapping
TV
CABLE/SAT
VCR
DVD
AUDIOI
AUDIO2
TV
CABLE/SAT
VCR
DVD
AUDIOI
AUDIO2
Toshiba TV
Universal Cable, Satellite
Universal VCR, DVD, LD, Cassette
Universal DVD, VCR, LD, Cassette
Universal Audio: Amp., Tuner, Mist.Audio, CD/MD
Universal Audio: CD/MD, Amp., Tuner, Mist.Audio
DelCaultdevice codes
Toshiba TV
Toshiba Satellite receiver
Toshiba VCR
Toshiba DVD
Pioneer Audio receiver
Pioneer LD
Note:
Thisi_mote contm/_ functionsmay of may
not operate your audio/video devices
Refe[ to tbe owne['s manualssupplied witb
the devicesto see wbicb featuresare
available In addition, the odg[na/contro//e[s
may bave featuresnot avaffab/eon thisiemote
cont[oZIf you wouldlike tocontinue _ouse
thesefeatures,you may wantto use the
odgina/remote controZ
The Mode selection button, when pressed, cycles among each mode.
If>_u own different brands ofaudio/video de,'ices, you first have to
program your remote control. (See "Programming the remote control
for use with audioNideo devices" on page 14.)
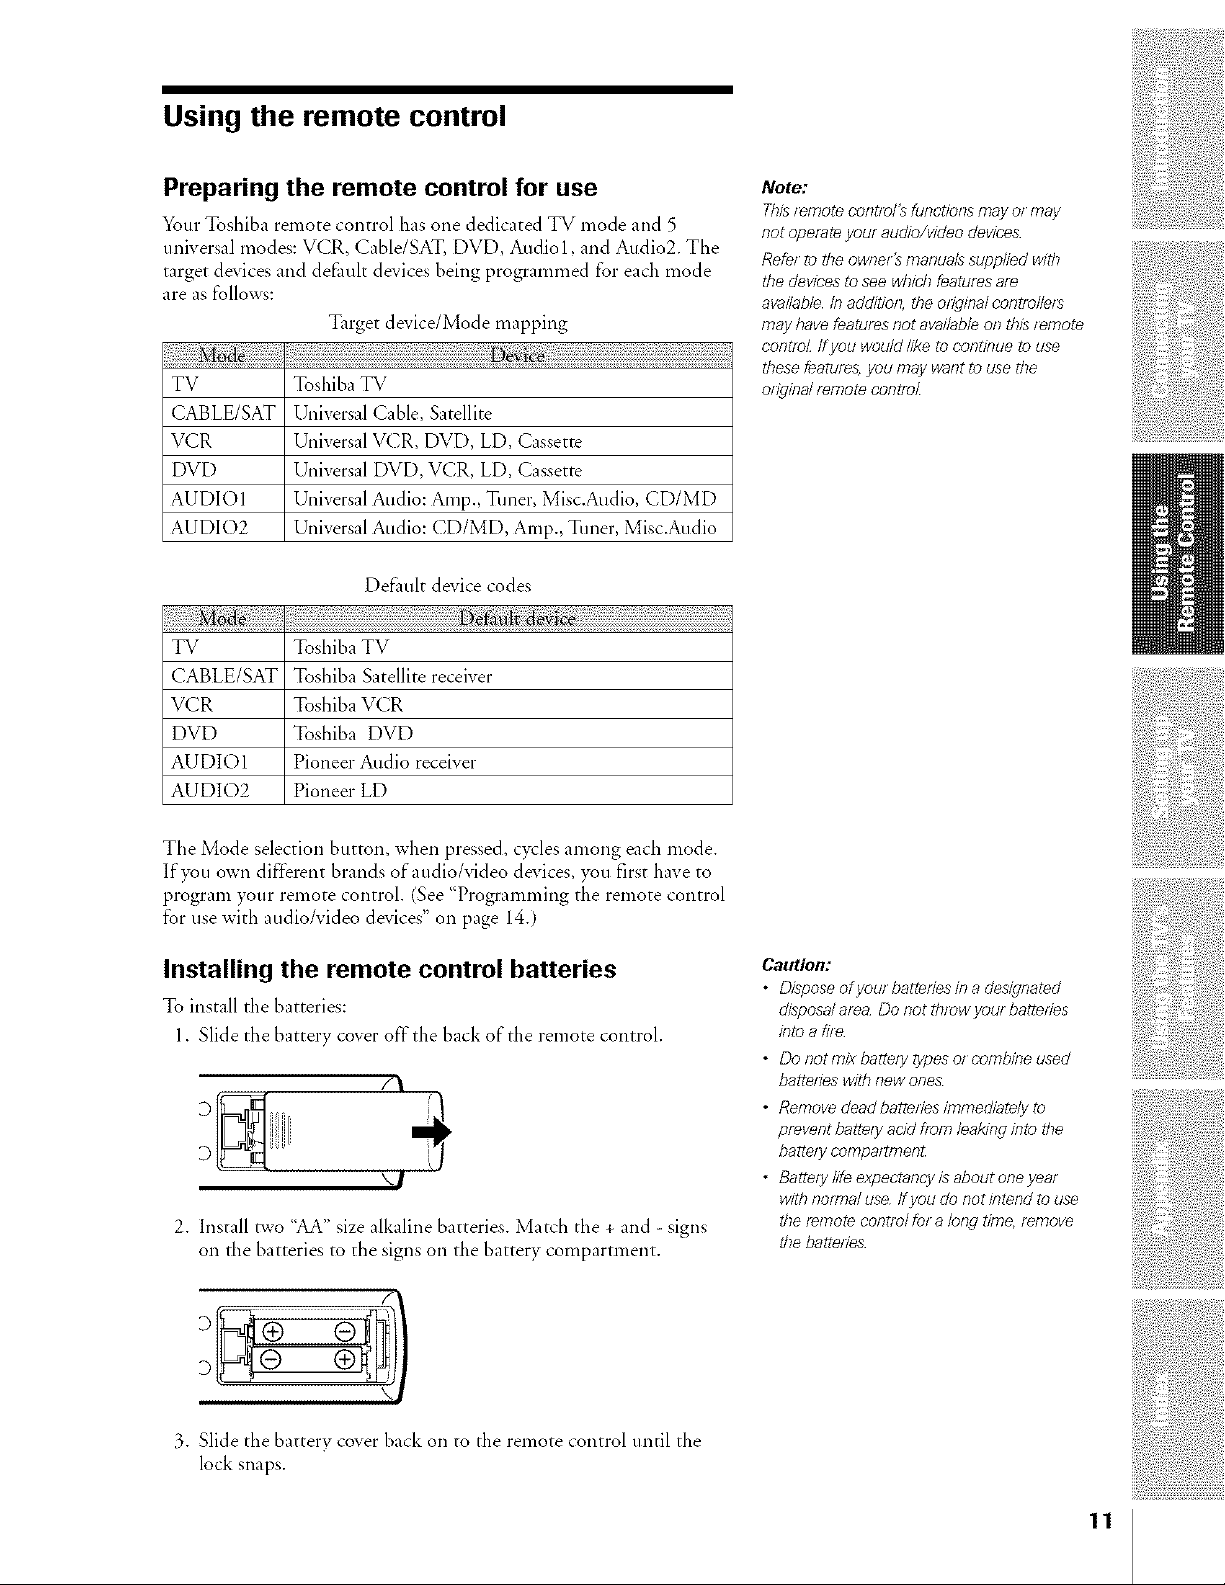
Installing the remote control batteries
To install the hatteries:
1. Slide the battery cover off the back of the remote control.
F\
'-I
2. Install two 'IAA" size alkaline batteries. Match the + and - signs
on the batteries to the signs on the battery compartment.
Caution:
• Disposeofyou[bagedesinadesignated
disposala[ea Do not tb[_w your barrettes
intoa f#e
• Donotmtxbattelytypesolcombineused
batterieswith newones
• Removedeadbatteriesimmediatelyto
prevent hat,ely acidfrom leaking into tbe
battely compaltmen_
• Batte[ylife expectancyis about one yeal
with normal use ff you do [}atintend to use
the [_mote control for a long time,,remove
the battedes
3. Slide the battery cover back on to the remote control until the
lock snaps.
11

Remote Control functional key chart
llhmllnates the remote
Sleep timer -....................
Power Power Power Power Power Power Power Power
Digit 1 Digit I Digit I Digit 1 Digit 1 AViuput 1 Digit 1 Digit 1
Digit 2 Digit 2 Digit 2 Digit 2 Digit 2 AVinput 2 Digit 2 Digit 2
Digit _ Digit 3 Digit 3 Digit 3 Digit 3 AViuput 3 Digit 3 Digit 3
Digit 4 Digit 4 Digit 4 Digit 4 Digit 4 AVinput 4 Digit 4 Digit 4
Digit 5 Digit 5 Digit 5 Digit 5 Digit 5 CD Digit 5 Digit 5
Digit 6 Digit 6 Digit 6 Digit 6 Digit 6 Tuner Digit 6 Digit 6
Device mode selectiou fknthe remote coutrol
This button is not availablefor thls TV model or an other device connected to thls TV.
Digit 7 Digit 7 Digit 7 Digit 7 Digit 7 Phono Digit 7 Digit 7
Digit 8 Digit 8 Digit 8 Digit 8 Digit 8 Cassette Digit 8 Digit 8
Digit 9 Digit 9 Digit 9 Digit 9 Digit 9 Aux Digit 9 Digit 9
:--- w.nt, M -nt, Menu .........
1O0 1O0 1O0 1O0 1O0 ]O0 1O0 ]O0
Digit 0 Digit 0 Digit 0 Digit 0 Digit 0 Digit 0 Digit 0 Digit 0
--- CH Enter CH Enter CH Ente,.............
:,:DE;Ti,--- Guld, erog ,mD\'DsetupProgramProgm ---
TVpreview < TV INFO < TV TITLE= < TV < TV _ TV
Top nlel-t tl
F_vorlteCE --- F_orlte CH --- Subtitle ...........
RT ...... pl, ,. ort--- at,dlo .........
asDi { :{{
Menu open_ Select Select Enter Enter .......
Enter
Melm select Melm select Menu select Menu select Menu select .........
J_enu select Menu select Menu select Menu select Menu select ...........
FAV•
Volunle Volume Vohlme Vohune Volmne Volume \rolun/e ---
up/down* up/down* up/down* up/down* up/down* up/down* up/down*
Exit Exit Exit Exit DVD clear Exit/Clear Exit/Clear Exit/Clear
Channel Channel Channel Channel --- Ch mnel ......
up/down up/down up/down up/down up/down
TV/Video < TV < TV VCR input < TV Input < TV < TV
select
Soundmute* Soundmute_ S,ound mute* Soundmute* Sound mute* Soundmute_ Sound mute* ---
On-screen On-screen On-screen On-screen On-screen ...........
display display display display display
Previous Previous Prexious Previous DVD .........
channel chmnel channel channel return
.......... Forward Forward .........
......... Reverse ...............
............. Forward CH fbrward Forward Forward
......... Reverse CH reverse Reverse Reverse
VCR_ VCR_ \/CR_ Rewind Revdnd Revdnd Rewind Revdnd
VCR_ VCR_ VCR_ Pause Pause Pause Pause Pause
VCR_ VCR_ VCR_ Pla) Phv Phy Ph) Pla)_
VCR_ VCR_ VCR_ E Forward E Folward E Forward E Forward E Fol_'ard
T-VTVC : : VCR_ BypassA/B TV/SAT TV/VCR ...............
12
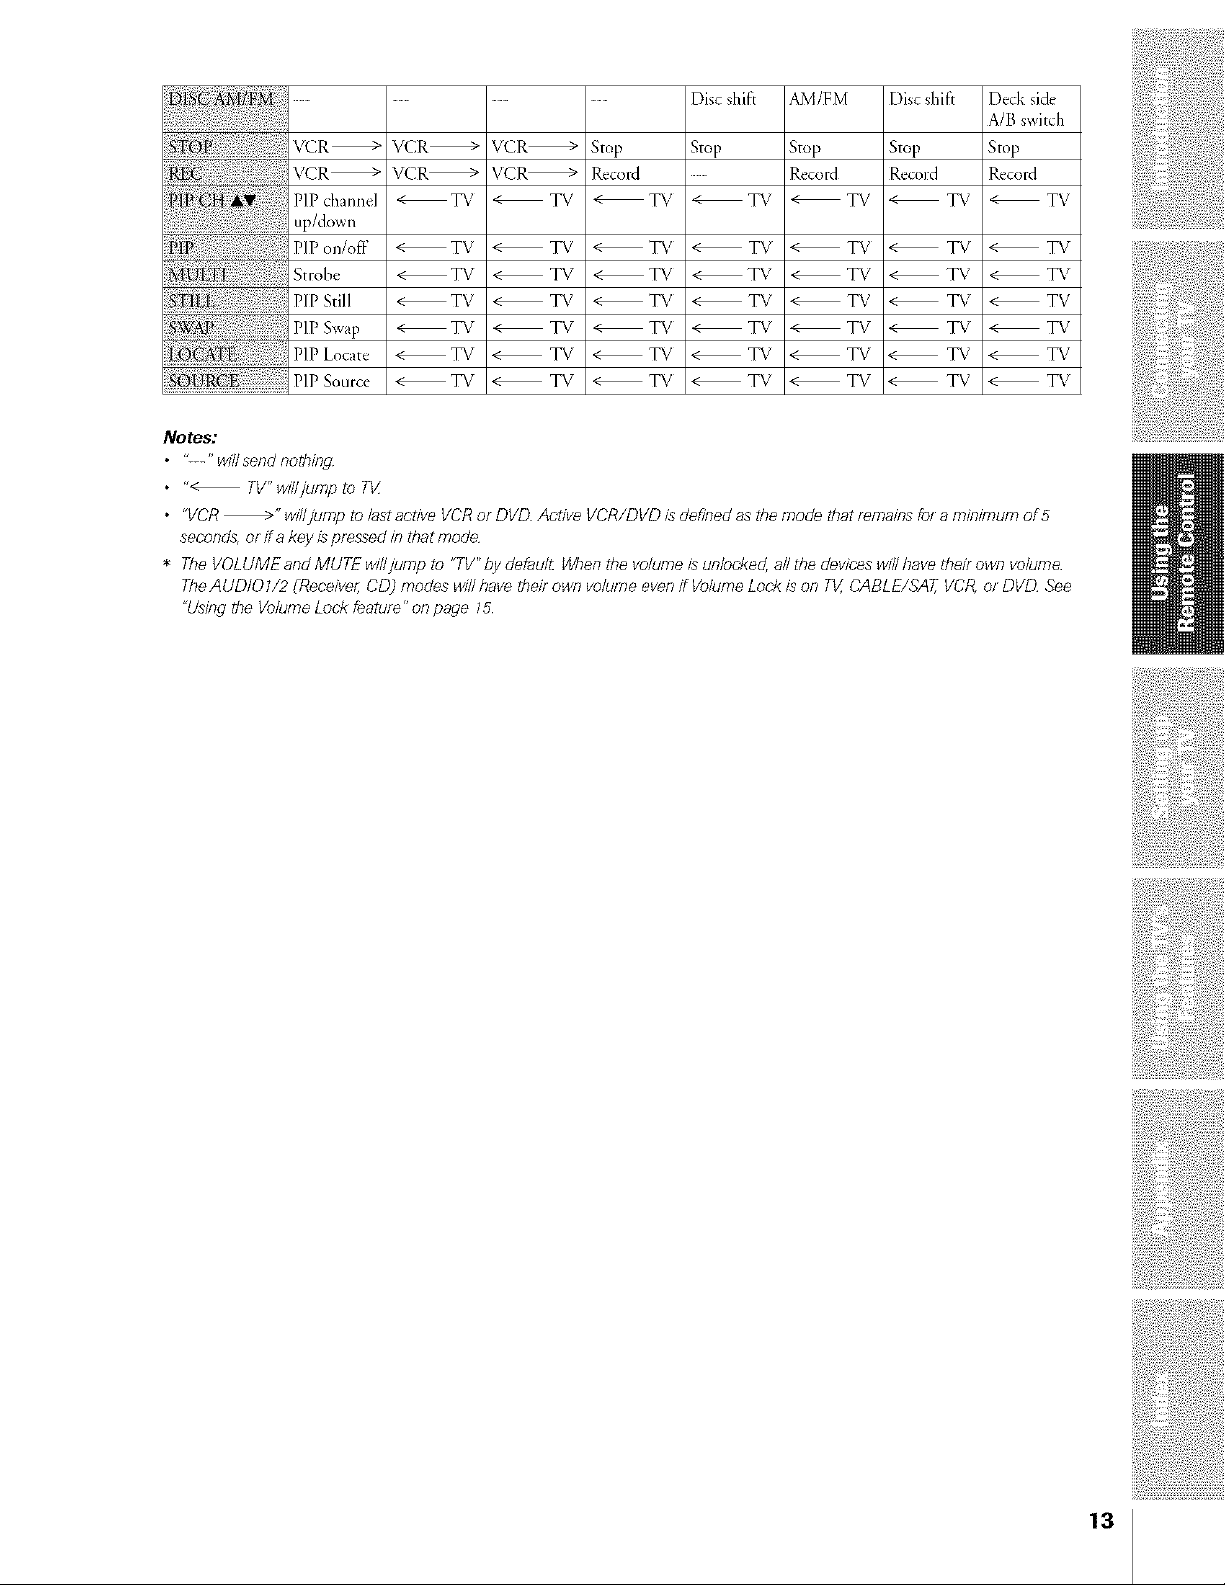
............... Disc shift AM/FM Disc shift Deck side
{{ {{ {: { { A/Bswitch
VCR_ VCR_ VCR_ Stop Stop Stop Stop Stop
VCR _ VCR_ VCR_ Record ...... Record Record Record
P]P channel < TV < TV < TV < TV < TV < TV < TV
up/down
PlPon/off < TV < TV < TV < TV < TV < TV < TV
Strobe < TV < TV < TV < TV < TV < TV < TV
PlPStill < TV < TV < TV _TV < TV < TV < TV
P]PSwap < TV < TV < TV < TV < TV < TV < TV
PiP Locate < TV < TV < TV < TV < TV _ TV _ T\ /
g RC {: P]PSourct- < TV < TV < TV < T\ < TV < T\ < TV
Notes:
• "---" will send nothing
• "< TV"willjump to Tg
• "VCR_" wil/jump to lastactive VCRol DVD Active VCR/DVD is defined asthe mode that lemains fol a minimum of 5
seconds,or ira key ispressedin that mode
* The VOLUME and MUTE willjump to "TV"by detau/£Whenthe volumeis unlocked,all the deviceswinhavetheil own volume
TheAUDIO 1/2 (Receiver;CD) modes will/}ave theirown volume even if VolumeLocl_ison TV,CABLE/SAT,VCR,oJDVD See
"Usingthe VolumeLoek featule"on page 15
13
Programming the remote control for use with
your audio/video devices
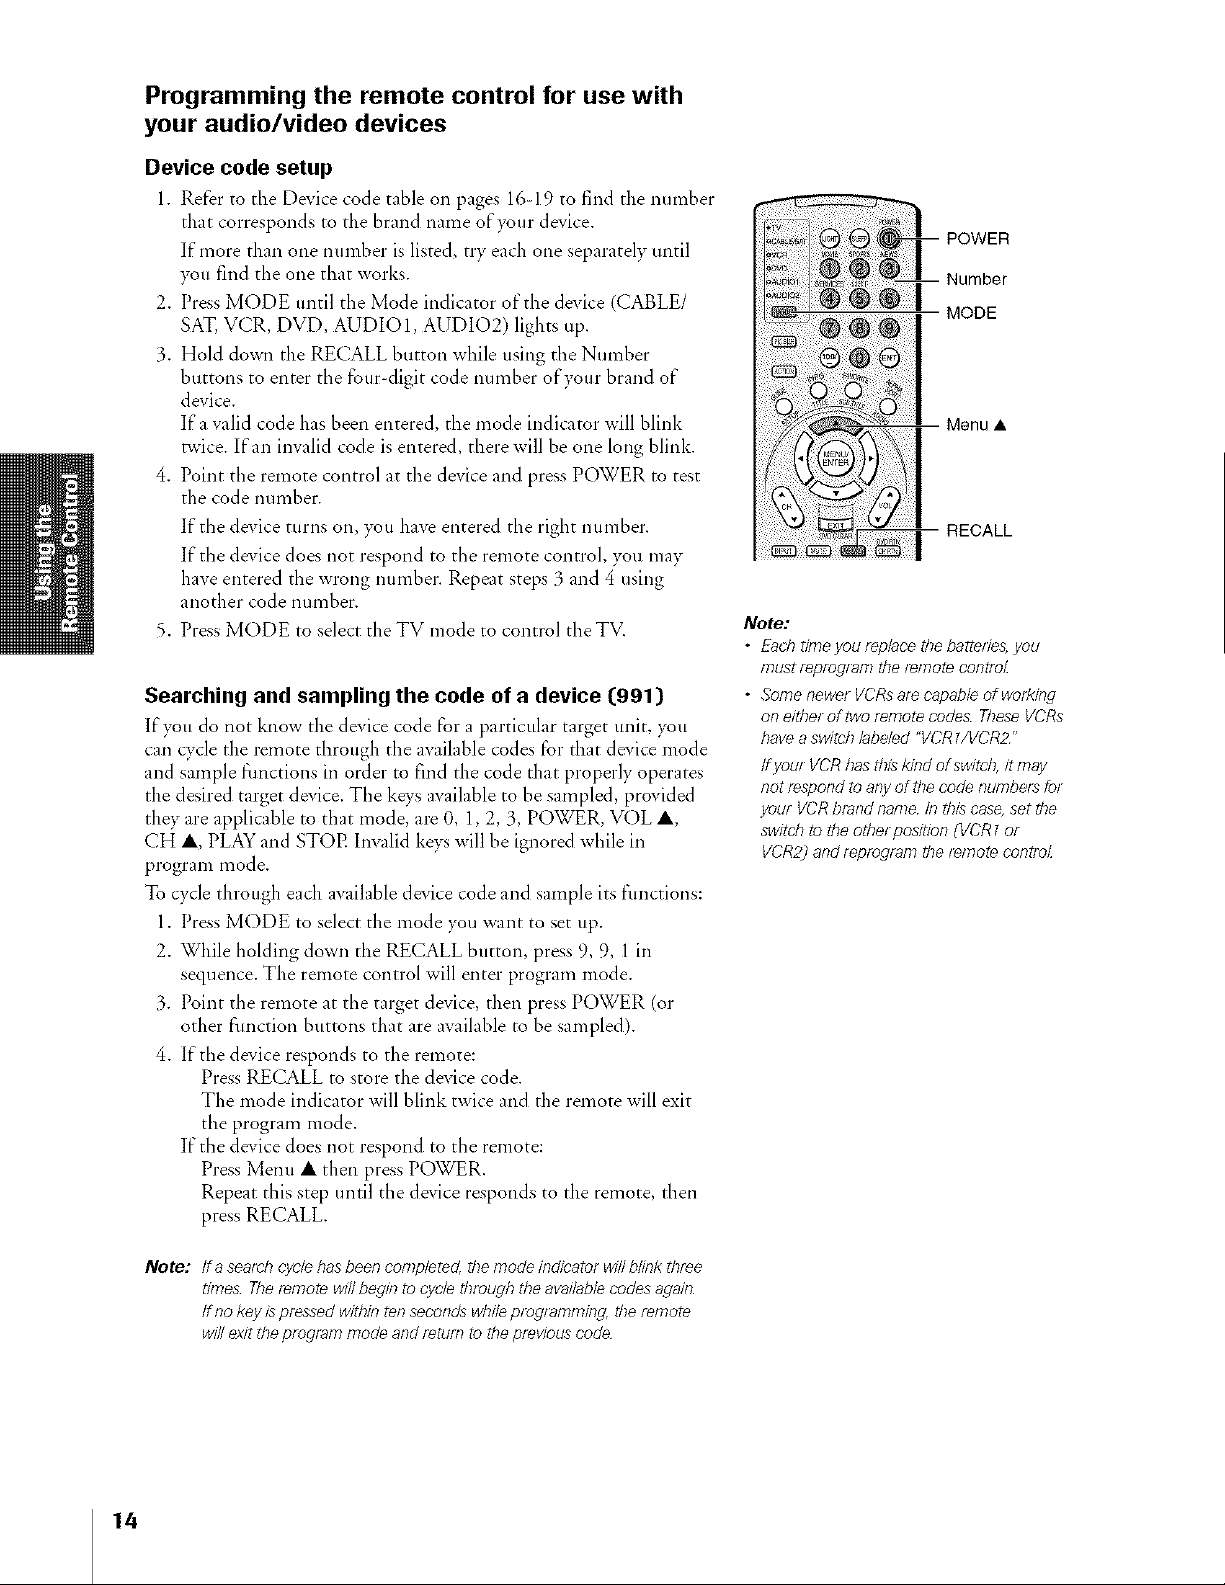
Device code setup
1. Refer to the Device code table on pages 16-19 to find the number
that corresponds to the brand name of your device.
If more than one number is listed, try each one separately until
you find tbe one that works.
2. Press MODE until tbe Mode indicator of the device (CABLE/
SAT, VCR, DVD, AUDIO 1, AUDIO2) lights up.
3. Hold down the RECALL button wbile using the Number
buttons to enter tile four digit code number of your brand of
device.
If a valid code has been entered, the *node indicator will blink
twice. If an invalid code is entered, there will be one long blink.
4. Point tile remote control at the device and press POWER to test
the code number.
If the device turns on, ?_u have entered the right number.
If the device does not respond to the remote control, you may
have entered the wrong number. Repeat steps 3 and 4 using
another code number.
5. Press MODE to select theTV mode to control the TV.
Searching and sampling the code of a device ([991}
If you do not know the de_'ice code for a particular target unit, }_u
can cycle the remote through the available codes _or that de_'ice mode
and sample functions in order to find the code that properly operates
the desired target device. Tbe keys available to be sampled, provided
they are applicable to tbat mode, are 0, 1,2, 3, POWER, VOL A,
CH A, PLAY and STOE Invalid keys will be ignored wbile in
program mode.
To cycle through each available device code and sample its fimctions:
1. Press MODE to select the mode you want to set up.
2. While holding down the RECALL button, press 9, 9, 1 in
sequence. The remote control will enter program mode.
3. Point the remote at *be target device, then press POWER (or
other flmction buttons that are available to be sampled).
4. If*be device responds to the remote:
Press RECALL to store the device code.
The mode indicator will blink twice and the remote will exit
the program mode.
If the device does not respond to the remote:
Press Mere= • then press POWER.
Repeat this step until the device responds to the remote, tben
press RECALL.
POWER
Number
MODE
Menu •
RECALL
Note:
• Ead_timeyou rep/ace *bebatteries,you
mustt_ptogt_m theI_mote contro_
• Somenewer VCRsaf_ capable of working
on either of two remote codes TheseVCRs
/}avea switcb labeled "VCRZ/VCR2 _
ffyouf VCRbasthiskind of switch,it may
not i_spond to any of *becode numbers for
your VCRbrand name letbis case,set the
switch to the other position (VCR[ or
VCR2) and fepfogf_m the/_mote controZ
Note: ff a seard} cycle hasbeen completed, *bemode indicator wi//b/ink three
times Theremote wi//beginto cycle through the availablecodesagain
ff no key is pressedwitbin ten secondswbi/eprogramming, the remote
will exit*heprogram mode and return to thepreviouscode
14
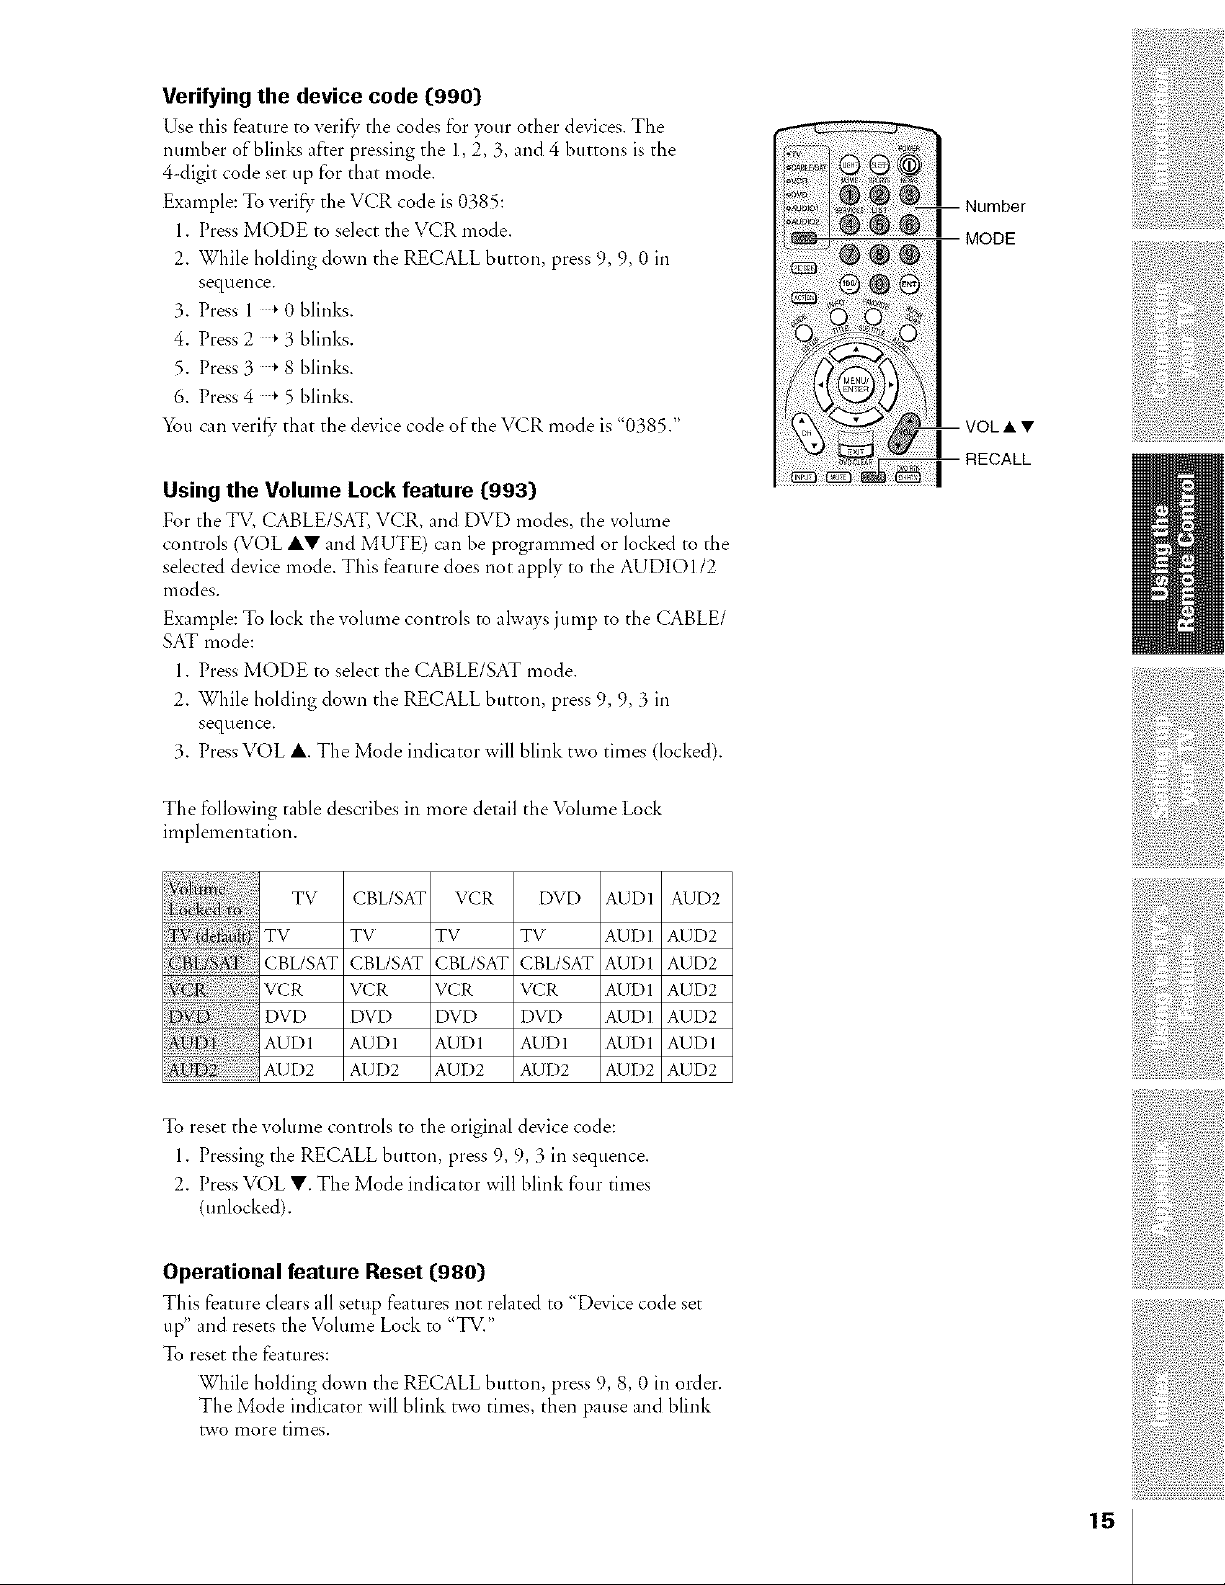
Verifying the device code {990)
Use this feature to yetiS, the codes for your other devices. The
number of blinks after pressing the 1,2, 3, and 4 buttons is the
4 digit code set up for that mode.
Example: To veri_ the VCR code is 0385:
1. Press MODE to select the VCR mode.
2. While holding down the RECALL button, press 9, 9, 0 in
sequence.
3. Press 1 _0 blinks.
4. Press 2 _3 blinks.
5. Press 3 _ 8 blinks.
6. Press 4 _5 blinks.
You can veri_ Tthat the device code of the VCR mode is "0385."
Using the Volume Lock feature {993)
For the TV, CABLE/SAT, VCR, and DVD modes, the volume
controls (VOL AV and MUTE) can be programmed or locked to the
selected device mode. This feature does not apply m the AUDIOI/2
modes.
Example: To lock the volume controls m always jump to the CABLE/
SAT mode:
1. Press MODE to select the CABLE/SAT mode.
2. While holding down the RECALL button, press 9, 9, 3 in
sequence.
3. PressVOL A. The Mode indicator will blink two times (locked).
@@1
Number
"-- NODE
C2£
The following table describes in more detail the _lume Lock
implementation.
TV CBL/SAT VCR L)VD AUD] AUD2
TV TV TV TV AUD1 AUD2
CBL/SAT CBL/SAT CBL/SAT CBL/SAT AUD1 AUD2
VCR VCR VCR VCR AUDI AUD2
DVD DVD DVD DVD AUD] AUD2
AUDI AUD] AUDI AUD] AUDI AUDI
U][7) £ AUD2 AUD2 AUD2 AUD2 AUD2 AUD2
To reset the volume controls to the original device code:
1. Pressing the RECALL button, press 9, 9, 3 in sequence.
2. Press VOL V. The Mode indicator will blink four times
(unlocked).
Operational feature Reset {980)
This feature clears all setup features not related to "Device code set
tip" and resets the Volume Lock to "TV."
To reset the features:
While holding down the RECALL button, press 9, 8, 0 in order.
The Mode indicator will blink two times, then pause and blink
two more times,
15
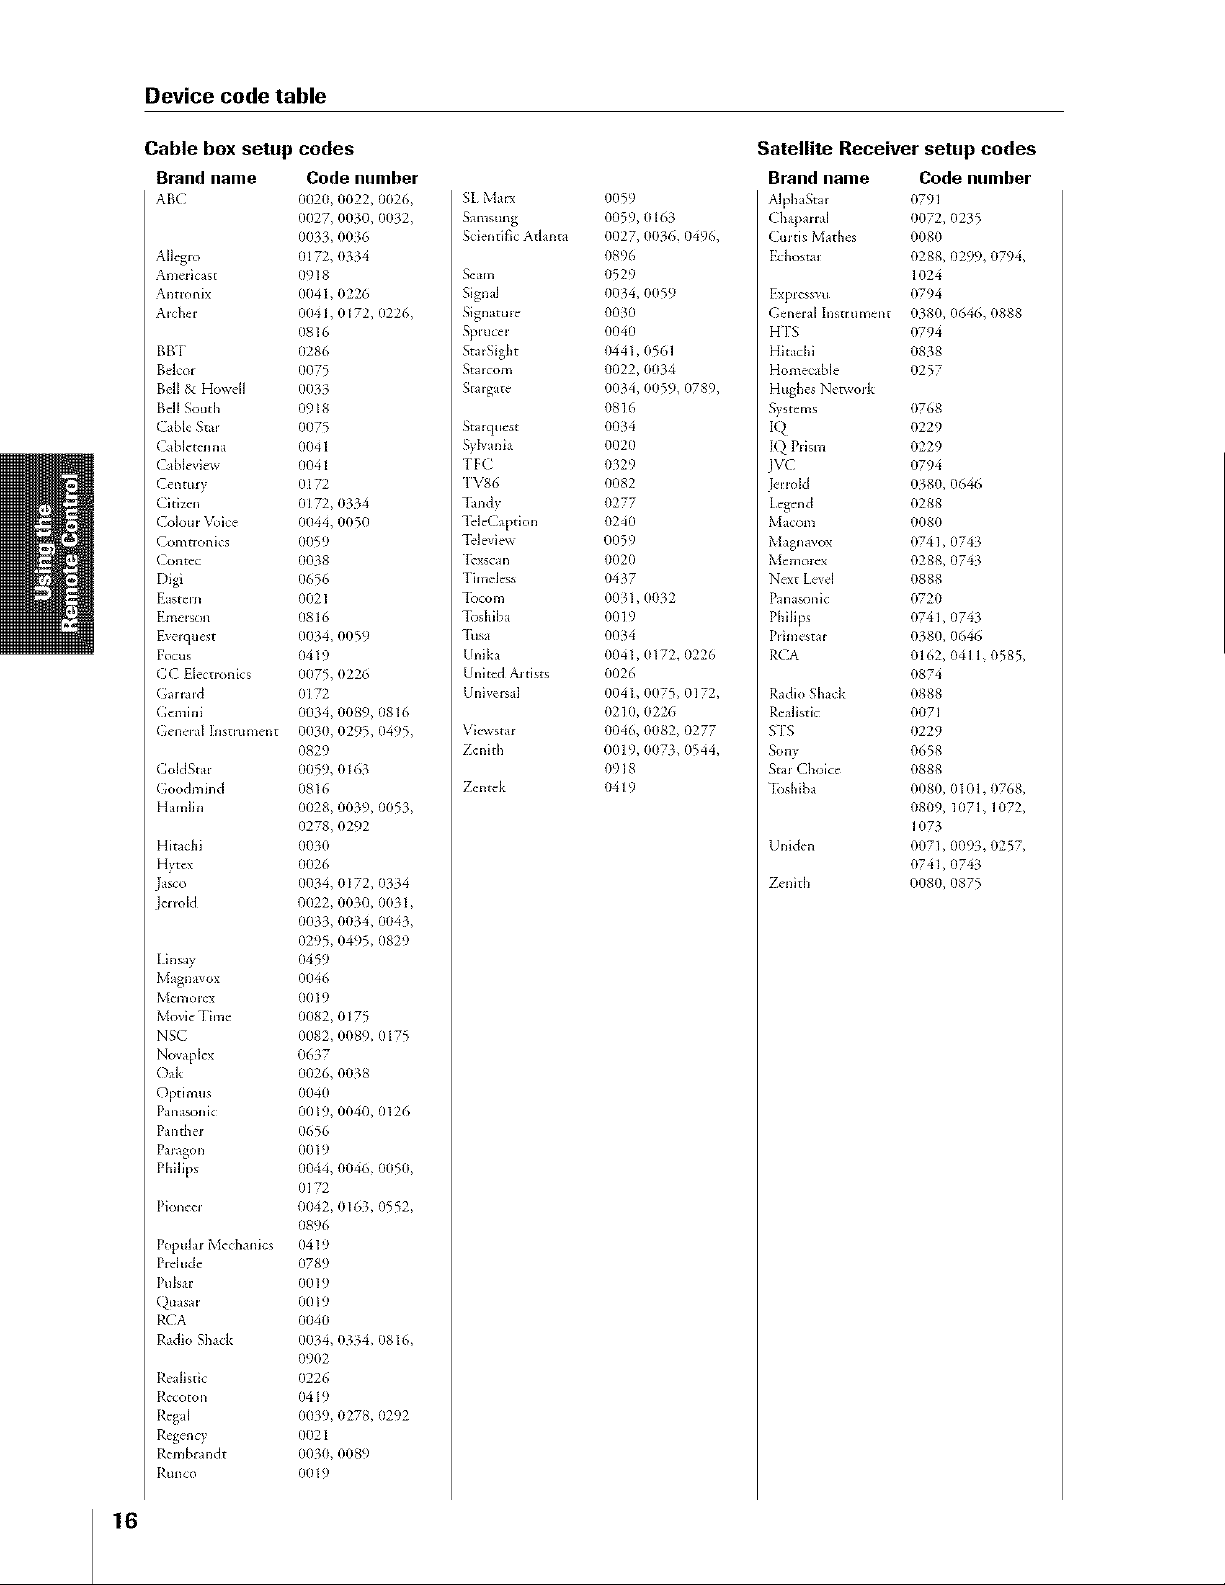
Device code table
Cable box setup codes
Brand name Code number
AB( O020, 0022, 0026,
0027, 0030, 0032,
0033, 00_6
Allegro 0172, 0334
Anmlcast 0918
Antromx 0041, 0226
Aicber 0041, 0172, (1226,
(1816
BBT 0286
Belcor 0075
Bell & Howdl 0033
Bell Soudl 0918
Cable Sml 0075
Cabbtemla (1041
Cablevlm_ 0041
Century 0172
Cidzcn 0172, 0334
Co]ore Voice 0(144,(1050
Comtronlcs (1059
( ont_c 0038
Digl 0656
E _stem 0021
Eme=son 0816
E.elqtaest 0034, 0059
Focus 0419
CC Elecnonlcs 0(175, 0226
Ga.ald 0172
Gcml.i 0034, 0089, (1816
( Chela[ hlstltunent 0030, 0295, 0495,
0829
ColdStar 0059, 0163
( oodmind 081(,
Hamlin 0028, 0039, 0053,
0278, 0292
Hitachi 0030
Hytex 0026
Jasco 0034, 0172, 0334
enoid 0022, 0030, 0(131,
0033, 0034, 0043,
0295, 0495, 0829
Jnsay 0459
Magnavox 0046
Memorex 0019
Movb Thne 0082, (1175
NSC 0082, 0089, 0175
Novaplex 0637
Oak 0026, 0(138
Optlmus 0040
Panason k 0019, 0040, 0126
l?antheJ 0656
Paragon 0019
Phlllps 0044, 0046, 0050,
0172
Plo:_eel 0042, 0163, 0552,
0896
PopulaJ MechaMcs 0419
Prd ude 0789
Pulsar 0019
Q0asal 0019
RCA 0040
Radio Shack 0034, 0334, 0816,
0902
Realistic 0226
Rccoron 0419
Regal 00_9, (1278, (1292
Regency 0021
Rembrandt 0030, 0089
Run co 0019
SI_Marx
Samsung
Scientific Atlanta
Scare
Signal
Signatme
Sprucer
StaiSight
StaJcom
Sraig_te
StaJqtmst
Sylvmla
I'F(
7V86
]hndy
TdeCaptlon
]_']evlexx
]%xscan
Fhndcss
3bcom
3bshlba
]hsa
Unika
Unlt_d Aitisrs
Unlver_al
VicwstaJ
Zenith
Zentek
0059
0059, 0163
0027, 0036, 0496,
0896
0529
0034, 0059
0030
0040
0441,0561
0022, 0034
0034, 0059, 0789,
0816
O034
0020
0329
0082
0277
0240
0059
0020
0437
0031,0O32
0019
0034
0041, (1172, (1226
0026
0041, 0075, 0172,
0210, 0226
0046, 0082, 0277
0019, 0073, 0544,
0918
0419
Satellite Receiver setup codes
Brand name Code number
AJphaSta= 0791
(bapamd 0072, 0235
<mils Mathes 0080
Fd,ostar 0288, 0299, 0794,
1024
Fzpressvu 0794
( €hera[ Instrument 0380, 0646, 0888
HTS 0794
Hitachi 0838
Homecabie 0257
Hughes NetwoJk
S_sterns 0768
IQ 0229
IQ PJlsm 0229
IVC 0794
erJold 0380, 0646
Legend 0288
Macom 0(18(I
Magnavox 0741,0743
Memorex 0288, 0743
Next [evd 0888
Panasonk 0720
Phillps 0741,0743
Pdnlestal 038(I, 0646
RCA (1162, 041 1, 0585,
0874
Radio Shack 0888
Realistic 0(171
STS 0229
Sony 0658
StaJ Cboice 0888
"Ibshiba 0080, 010 h 0768,
08(19, 1(171, 1(172,
1073
Uniden 0071,0093, 0257,
0741,0743
Zenith 0080, 0875
16
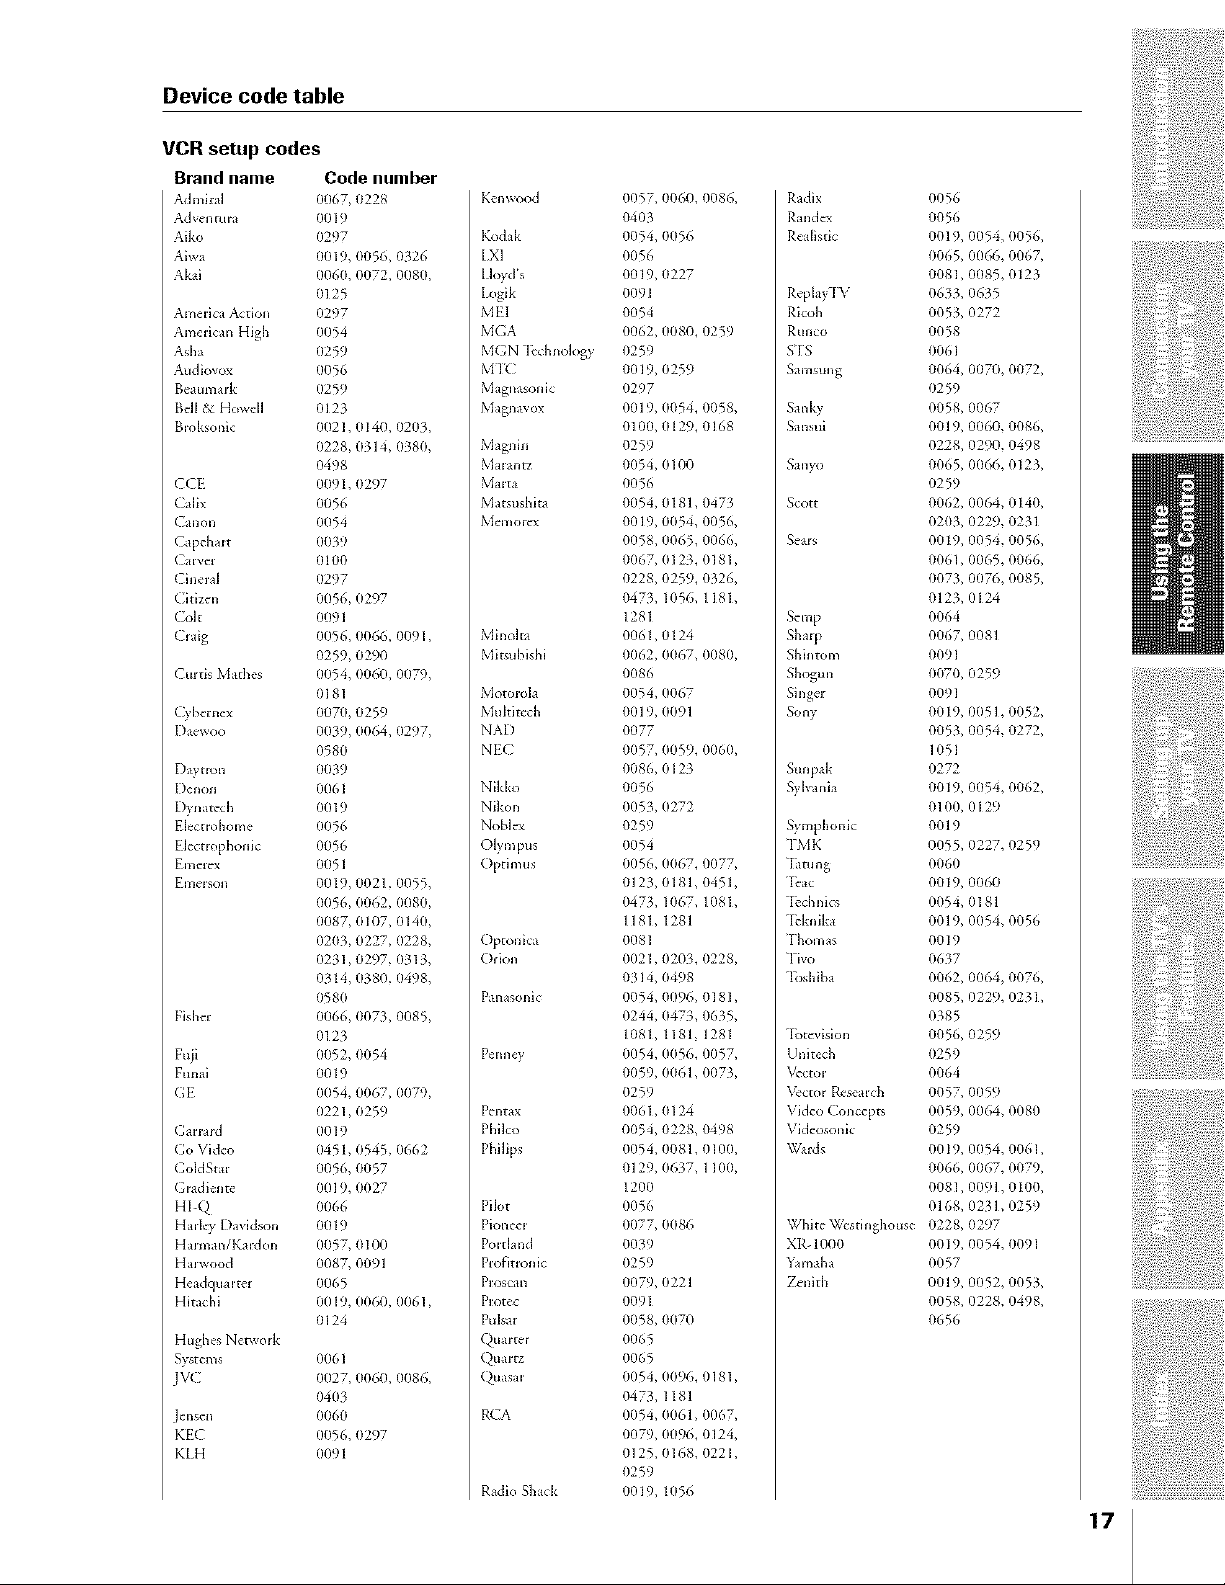
Device code table
VCR setup codes
Brand name Code number
AdmJlal 0067, 0228
Adw'n mla 111119
Aiko 0297
Aiwa (11119,0056 {}32(,
Akal 0060, 0072, 0080,
0125
America Action 0297
American High 0054
Asha (1259
AtMiovox (1056
BeaumaJk 0259
Ball & HowdI 0123
Bwksonlc 0(121, 0140, 0203,
0228, 0314, (1380,
0498
CCE 0(191, 0297
Calls 0056
Carton 0054
Capch;ut 003q
Carver (1100
Cinm'al 0297
(-idz_n 0056, 0297
Colt 0091
Galg 0056, 0066, 0091,
0259, 0290
Curds Mathes 0054, 0060, 0079,
0181
Cvberncx 0070, 0259
I)aewoo 0039, 0064, 0297,
0580
E)avtB-m 0039
I)enon 0061
Du];_tcch 0019
EIcct=ohom{ (}056
Elecn ophonlc 0056
Emclex 0051
EmeJson 0019, 0021,0055,
0056, 0062, 0080,
0087, (1107, 0140,
0203, 0227, (1228,
0231,0297, (1313,
0314, 0380, 0498,
0580
Fisher 0066, 0073, 0085,
0123
Fuil 0052, 0054
Funal 0019
G[ 0(}54, 0067, (}079,
0221,0259
Garrard 0019
Go Vi&'o 0451, 0545 0662
GoldStar 0056, 0057
G=adi_ntc 0019, 0027
HI-Q 0066
Hadev Davldson 0019
Ham_an/Kardon 0057, 0100
HaJwood 0087, 0091
Headqualtcr 0065
Hitachi 0019, 0060, 0061,
0124
Hughes NetwoJk
S_,stems 0061
JVC 0(127, (1060, (1086,
0403
0060
KE:( 0056, 0297
KLH 0091
Kenwood
Kodak
iX1
lloyd's
Logik
MEI
M(A
MGN -lichnok)gy
M'I(
Magnasonic
Magnavox
Magnin
Maiantz
MaJta
Matsushlm
J_'morex
Minolm
Mitsublshl
Motorola
Muldtcch
NAD
NtC
Nikko
Nikon
Nobl_
Olym pus
Opdmus
Optomca
Orlon
Panasonic
Penncy
Pentax
Philco
Philips
Pilot
PkmeeJ
PoMand
Profitronic
Proscan
Protec
Pulsar
Quarter
Q)uasal
RCA
Radio Shack
0057, 0060, 0086,
0403
0054, 0056
0056
0019, (}227
0091
0054
0062, 0080, 0259
0259
0019, 0259
(}297
0019, (1054, (1058,
0100, 0129, 0168
0259
0054, 0100
0056
0054, 0181,0473
0019, 0054, 0056,
0058, 0065, 0066,
0067, 0123, 0181,
0228, 0259, 0326,
0473, 1056, 1181,
1281
0061,0124
0(162, 0(167, 0(180,
0086
0054, (1067
0019, 0091
0077
(}057, 0059, 0060,
0086, 0123
0056
0053, 0272
0259
0054
0056, 0067, 0077,
0123, 0181, 0451,
0473, 1067, 1081,
1181, 1281
0081
0021, 0203, 0228,
(1_14, (1498
(1054, 0(196, 0181,
0244, 0473, 0635,
1081, 1181, 1281
0054, 0056, 0057,
0059, 0(}61, 0(}73,
0259
0061, (}124
(1054, 0228, 0498
0054, 0081,0100,
0129, 0637, 1100,
1200
0056
0077,0086
0039
0259
(1079, 0221
(1091
0058, 0070
0065
0065
0054, 0096, 0181,
0473, 1181
0054, (1061, 0067,
0079, 0096, (1124,
0125, 0168, 0221,
0259
0019, 1056
Radix
Randex
ReaIisdc
Repla}-[V
Ricoh
RLIliCO
SIS
Samsung
Sank}
Sanafi
Sanyo
Scott
SeAls
Setup
ShaJp
Shintom
Shogun
Singer
Sony
Stmpak
S}Ivania
Symphonic
TM K
"Ihmng
Dac
"Dchnics
"Dkmka
l'homas
Tivo
Toshiba
"IStevlsion
Unk¢ch
Vector
\_'cto r R_search
Video Concept_
Videosonlc
Wards
White Wcsd nghouse
XR° 1000
Yamaha
Zenkh
0056
(1056
(1019, 0054,
0065, 0066,
0081,0085,
0633, 0635
(1053, 0272
0058
0061
(}064, 0070,
0259
0058, 0067
0(119, 0060,
0228, 0290,
0065, 0066,
0259
OO62, 0064,
O203, 0229,
0019, 0054,
0061,0065,
0073, 0076,
0123,0124
0064
0067, 0081
0091
0070, 0259
0091
0019, 0051,
0053, 0054,
1(}51
(}272
0019, 0(154,
0] 0(1, (1129
0019
0(}55, 0227,
006(}
0019, 0060
0054, 0181
0019, 0054,
0019
0637
0(}62, 0064,
0085, 0229,
0385
0O56, 0259
0259
0(164
(1057, 0059
0059, 0064,
0259
0019, 0054,
0066, 0067,
0081,0091,
0168, 0231,
0228, 0297
0019, 0054,
0057
(1(119, 0052,
OO58, 0228,
0656
0056,
0067,
0123
0072,
(1086,
0498
0123,
(1140,
0231
0056,
0066,
0085,
0052,
0272,
0(162,
0259
0056
0076,
0231,
0080
006 I,
0079,
0100,
0259
0091
0053,
(1498,
17
 Loading...