

Toshiba 24 L18 Series, 40 L18 Series, 48 L18 Series, 43 L18 Series, 24 W18 Series Operating Instructions Manual
...
24/40/43/48/49 L18 Series
24/28/32 W18 Series
OPERATING INSTRUCTIONS

Contents
Safety Information ................................................... 2
Markings on the Product.......................................... 2
Environmental Information....................................... 4
Disposal Information ................................................ 4
REACH information ................................................. 5
EU Conformity Statement ........................................ 5
Features .................................................................. 6
Accessories Included............................................... 6
Standby Notications ............................................... 6
TV Control Switch & Operation................................ 6
Using Main TV Menu ............................................... 7
Inserting the Batteries into the Remote ................... 8
Power Connection ................................................... 8
Antenna Connection ................................................ 8
License Notication ................................................. 9
Remote Control ..................................................... 10
Connections........................................................... 11
Switching On/Off .................................................... 12
First Time Installation............................................. 12
Using Satellite Channel Table Feature .................. 13
Media Playback via USB Input .............................. 13
USB Recording (Optional) ..................................... 14
Media Browser....................................................... 15
CEC ....................................................................... 15
Settings Menu Contents ........................................ 16
General TV Operation ........................................... 20
Using the Channel List .......................................... 20
Conguring Parental Settings ................................ 20
Electronic Programme Guide ................................ 20
Teletext Services ................................................... 21
Software Upgrade.................................................. 21
Troubleshooting & Tips .......................................... 21
PC Input Typical Display Modes ............................22
AV and HDMI Signal Compatibility ........................22
Supported File Formats for USB Mode ................. 23
Supported DVI Resolutions ................................... 24
DVD Mode (Depending on the model) ..................25
Safety Information ................................................. 25
Notes on Discs ...................................................... 25
How to Watch a DVD ............................................. 25
DVD Control Panel Buttons ................................... 25
General Playback .................................................. 25
DVD Troubleshooting ............................................ 26
Disc Types Compatible with This Unit ...................27
Specications ........................................................ 27
English - 1 -
Overview of the Remote Control ........................... 28
General DVD Operation ........................................ 29
Safety Information
i
CAUTION
RISK OF ELECTRIC SHOCK
DO NOT OPEN
CAUTION: TO REDUCE THE RISK OF ELECTRIC SHOCK DO
NOT REMOVE COVER (OR BACK).
NO USER-SERVICEABLE PARTS INSIDE. REFER
SERVICING TO QUALIFIED SERVICE PERSONNEL.
In extreme weather (storms, lightning) and long inactivity
periods (going on holiday) disconnect the TV set from the
mains.
The mains plug is used to disconnect TV set from the mains
and therefore it must remain readily operable. If the TV set is
not disconnected electrically from the mains, the device will
still draw power for all situations even if the TV is in standby
mode or switched off.
Note: Follow the on screen instructions for operating the related
features.
IMPORTANT - Please read these instructions
fully before installing or operating
WARNING: This device is intended to be used
by persons (including children) who are
capable / experienced of operating such a device
unsupervised, unless they have been given
supervision or instruction concerning the use of
the device by a person responsible for their safety.
• Use this TV set at an altitude of less than 2000 meters
above the sea level, in dry locations and in regions
with moderate or tropical climates.
• The TV set is intended for household and similar
general use but may also be used in public places.
• For ventilation purposes, leave at least 5cm of free
space around the TV.
• The ventilation should not be impeded by covering
or blocking the ventilation openings with items, such
as newspapers, table-cloths, curtains, etc.
• The power cord plug should be easily accessible. Do
not place the TV, furniture, etc. on the power cord.
A damaged power cord/plug can cause re or give
you an electric shock. Handle the power cord by the
plug, do not unplug the TV by pulling the power cord.
Never touch the power cord/plug with wet hands as
this could cause a short circuit or electric shock.
Never make a knot in the power cord or tie it with
other cords. When damaged it must be replaced, this
should only be done by qualied personnel.
• Do not expose the TV to dripping or splashing of
liquids and do not place objects lled with liquids,
such as vases, cups, etc. on or over the TV (e.g., on
shelves above the unit).
• Do not expose the TV to direct sunlight or do
not place open ames such as lit candles on
the top of or near the TV.
• Do not place any heat sources such as electric
heaters, radiators, etc. near the TV set.
• Do not place the TV on the floor and inclined
surfaces.
• To avoid danger of suffocation, keep plastic bags
out of the reach of the babies, children and domestic
animals.
• Carefully attach the stand to the TV. If the stand is
provided with screws, tighten the screws rmly to
prevent the TV from tilting. Do not over-tighten the
screws and mount the stand rubbers properly.
• Do not dispose of the batteries in fire or with
hazardous or ammable materials.
Warning: Batteries must not be exposed to excessive
heat such as sunshine, re or the like.
WARNING - excessive sound pressure from earphones
or headphones can cause hearing loss.
ABOVE ALL - NEVER let anyone, especially
children, push or hit the screen, push anything
into holes, slots or any other openings in the case.
Caution
Risk of electric shock
Maintenance
Serious injury or death risk
Dangerous voltage risk
Important maintenance
component
Markings on the Product
The following symbols are used on the product as
a marker for restrictions and precautions and safety
instructions. Each explanation shall be considered
where the product bears related marking only. Note
such information for security reasons.
Class II Equipment: This appliance is
designed in such a way that it does not require
a safety connection to electrical earth.
Hazardous Live Terminal: The marked
terminal(s) is/are hazardous live under normal
operating conditions.
Caution, See Operating Instructions: The
marked area(s) contain(s) user replaceable
coin or button cell batteries.
Class 1 Laser Product: This
CLASS 1
LASER PRODUCT
product contains Class 1
laser source that is safe under
reasonably foreseeable
conditions of operation.
English - 2 -

WARNING
Do not ingest the battery, Chemical Burn Hazard
This product or the accessories supplied with the
product may contain a coin/button cell battery. If the
coin/button cell battery is swallowed, it can cause
severe internal burns in just 2 hours and can lead
to death.
Keep new and used batteries away from children.
If the battery compartment does not close securely,
stop using the product and keep it away from
children.
If you think batteries might have been swallowed or
placed inside any part of the body, seek immediate
medical attention.
WALL MOUNTING WARNINGS
• Read the instructions before mounting your TV
on the wall.
• The wall mount kit is optional. You can obtain from
your local dealer, if not supplied with your TV.
• Do not install the TV on a ceiling or on an inclined
wall.
• Use the specied wall mounting screws and other
accessories.
• Tighten the wall mounting screws rmly to prevent
the TV from fall. Do not over-tighten the screws.
WARNING
Never place a television set in unstable or inclined
locations. A television set may fall, causing serious
personal injury or death. Many injuries, particularly
to children, can be avoided by taking simple
precautions such as;
• Using cabinets or stands recommended by the
manufacturer of the television set.
• Only using furniture that can safely support the
television set.
• Ensuring the television set is not overhanging the
edge of the supporting furniture.
• Not placing the television set on tall furniture
(for example, cupboards or bookcases) without
anchoring both the furniture and the television set
to a suitable support.
• Not standing the television set on cloth or other
materials placed between the television and
supporting furniture.
• Educating children about the dangers of climbing
on furniture to reach the television set or its
controls. If your existing television set is being
retained and relocated, the same considerations
as above should be applied.
WARNING
Apparatus connected to the protective earthing
of the building installation through the MAINS
connection or through other apparatus with a
connection to protective earthing – and to a
television distribution system using coaxial cable,
may in some circumstances create a re hazard.
Connection to a television distribution system has
therefore to be provided through a device providing
electrical isolation below a certain frequency range
(galvanic isolator, see EN 60728-11)
Using the special functions to change the size of the
displayed image (i.e. changing the height/width ratio)
for the purposes of public display or commercial gain
may infringe on copyright laws.
The LCD display panels are manufactured using an
extremely high level of precision technology; however,
sometimes some parts of the screen may be missing
picture elements or have luminous spots. This is not
a sign of a malfunction.
The set should be operated only from a 220-240 V
AC 50 Hz outlet. Ensure that the television is not
standing on the mains lead. Do not cut off the mains
plug from this equipment, this incorporates a special
Radio Interference Filter, the removal of which will
impair its performance. It should only be replaced by
a correctly rated and approved type. IF IN DOUBT
PLEASE CONSULT A COMPETENT ELECTRICIAN.
English - 3 -
Specication is subject to change without notice
Environmental Information
This television is designed to be environment friendly. To reduce energy consumption, you can follow these steps:
If you set the Energy Saving to Minimum, Medium, Maximum or Auto the TV will reduce the energy
consumption accordingly. If you like to set the Backlight to a xed value set as Custom and adjust the
Backlight (located under the Energy Saving setting) manually using Left or Right buttons on the remote. Set
as Off to turn this setting off.
Note: Available Energy Saving options may differ depending on the selected Mode in the Settings>Picture menu.
The Energy Saving settings can be found in the Settings>Picture menu. Note that some picture settings will
be unavailable to be changed.
If pressed Right button or Left button consecutively, “Screen will be off in 15 seconds.” message will be
displayed on the screen. Select Proceed and press OK to turn the screen off immediately. If you don’t press
any button, the screen will be off in 15 seconds. Press any button on the remote or on the TV to turn the screen
on again.
Note: Screen Off option is not available if the Mode is set to Game.
When the TV is not in use, please switch off or disconnect the TV from the mains plug. This will also reduce
energy consumption.
Disposal Information
The following information is only for EU-member states:
Disposal of products
The crossed out wheeIed dust bin symbol indicates that products must be collected and disposed of separately
from household waste. Integrated batteries and accumulators can be disposed of with the product. They will be
separated at the recycling centres.
The black bar indicates that the product was placed on the market after August 13, 2005.
By participating in separate collection of products and batteries, you will help to assure the proper disposal of
products and batteries and thus help to prevent potential negative consequences for the environment and human
health.
For more detailed information about the collection and recycling programmes available in your country, please
contact your local city ofce or the shop where you purchased the product.
Disposal of batteries and/or accumulators
The crossed out wheeled dust bin symboI indicates that batteries and/or accumulators must be collected and
disposed of separately from household waste.
If the battery or accumulator contains more than the specied values of lead (Pb), mercury (Hg), and/or cadmium
(Cd) dened in the European Battery Directive, then the chemical symbols for lead (Pb), mercury (Hg) and/or
cadmium (Cd) will appear below the crossed out wheeled dust bin symbol.
By participating in separate collection of batteries, you will help to assure the proper disposal of products and
batteries and thus help to prevent potential negative consequences for the environment and human health. For
more detailed information about the coIIection and recycling programmes available in your country, please contact
your local city ofce or the shop where you purchased the product.
English - 4 -

REACH information
The European Union (EU) chemical regulation, REACH (Registration, Evaluation, Authorization
and Restriction of Chemicals), entered into force on 1 June 2007, with phased deadlines to 2018.
Toshiba will meet all REACH requirements and is committed to provide our customers with information
about the presence in our articles of substances included on the candidate list according to REACH
regulation.
Please consult the following website www.toshiba-tv.com for information about the presence in our
articles of substances included on the candidate list according to REACH in a concentration above
0.1 % weight by weight.
EU Conformity Statement
This product is carrying the CE-Mark in accordance with the related European Directives.
Responsible for CE-Marking is Vestel UK, Langley, Berkshire, SL3 6EZ.
This product is labelled with the CE Mark in accordance with the related European Directives, notably
RoHS Directive 2011/65/EU. Furthermore the product complies with the Ecodesign Directive 2005/32/
EC (EuP) and 2009/125/EC (ErP) and its related implementing measures.
This equipment corresponds to requirements of the Technical Regulation on limitation of usage of certain
dangerous substances in electrical and electronic equipment.
English - 5 -
Features
• Remote controlled colour TV
• Fully integrated digital terrestrial/cable/satellite TV
(DVB-T-T2/C/S-S2)
• Fransat Installation Option
• HDMI inputs to connect other devices with HDMI
sockets
• USB input
• OSD menu system
• Scart socket for external devices (such as DVD
Players, PVR, video games, etc.)
• Stereo sound system
• Teletext
• Headphone connection
• Automatic programming system
• Manual tuning
• Automatic power down after up to eight hours
• Sleep timer
• Child lock
• Automatic sound mute when no transmission
• NTSC playback
• AVL (Automatic Volume Limiting)
• PLL (Frequency Search)
• PC input
• Game Mode (Optional)
• Picture off function
• Programme recording (Optional)
• Programme timeshifting (Optional)
Accessories Included
• Remote Control
• Batteries: 2 x AAA
• Quick Start Guide
• Product Fiche
• Side AV Connection Cable(**)
(**) Limited Models Only
Some features may not be available dependant on your
TV model, please check the product fiche for your
product specifications
For more detailed information on installation,
function and control refer to the full manual on our
the website at http://www.toshiba-tv.com
English - 6 -
Standby Notications
an aerial or HDMI source) for 3 minutes, it will go
into standby. When you next switch-on, the following
message will be displayed: “TV switched to stand-by
mode automatically because there was no signal
for a long time.”
The Auto TV OFF option(in the Settings>System
>More menu) could have been set to a value between
1 and 8 hours by default. If this setting is not set as Off
and the TV has been left on and not been operated
during the set time, it will switch into standby mode
after the set time has expired. When you next switch-on
the TV, the following message will be displayed. “TV
switched to stand-by mode automatically because
no operation was made for a long time.” Before the
TV switches into standby mode a dialogue window will
be displayed. If you do not press any button the TV
will switch into the standby mode after a waiting period
of about 5 minutes. You can highlight Yes and press
OK to switch the TV into standby mode immediately.
If you highlight No and press OK, the TV will remain
on. You can also choose to cancel the Auto TV OFF
function from this dialogue. Highlight Disable and
press OK, the TV will remain on and the function will
be cancelled. You can enable this function again by
changing the setting of the Auto TV OFF option from
the Settings>System>More menu.
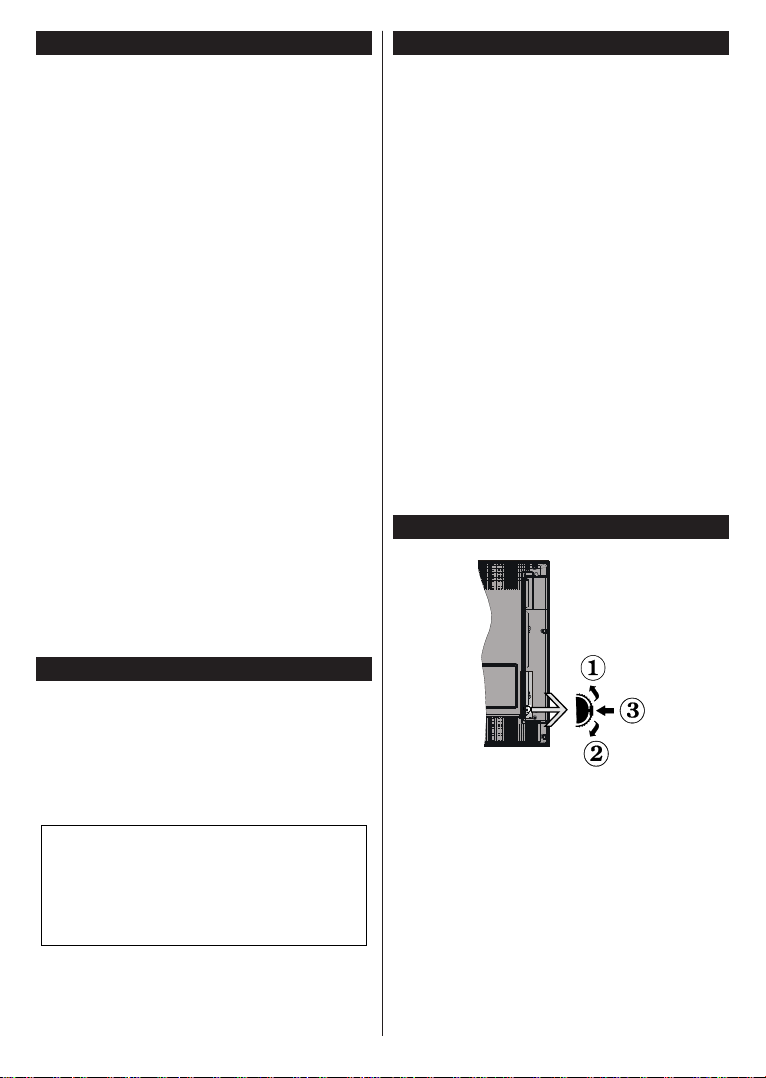
TV Control Switch & Operation
1. Up direction
2. Down direction
3. Volume / Info / Sources List selection and
Standby-On switch
The Control button allows you to control the Volume
/ Programme / Source and Standby-On functions of
the TV.
To change volume: Increase the volume by pushing
the button up. Decrease the volume by pushing the
button down.
To change channel: Press the middle of the button
in, the information banner will appear on the screen.
Scroll through the stored channels by pushing the
button up or down.

To change source: Press the middle of the button in
twice(for the second time in total), the source list will
appear on the screen. Scroll through the available
sources by pushing the button up or down.
To turn the TV off: Press the middle of the button in
and hold it down for a few seconds, the TV will turn
into standby mode.
To turn on the TV: Press the middle of the button in,
the TV will turn on.
Notes:
• If you turn the TV off, this cycle starts again beginning
with the volume setting.
• Main menu OSD cannot be displayed via control
button.
Operation with the Remote Control
Press the Menu button on your remote control to
display main menu. Use the directional buttons and
OK button to navigate and set. Press Return/Back
or Menu button to quit a menu screen.
Input Selection
Once you have connected external systems to your
TV, you can switch to different input sources. Press the
Source button on your remote control consecutively
to select the different sources.
Changing Channels and Volume
You can change the channel and adjust the volume
by using the Programme +/- and Volume +/- buttons
on the remote.
Using Main TV Menu
When the Menu button is pressed, the main TV menu
will appear at the bottom of the screen. You can
navigate through the menu items using the directional
buttons on the remote. To select an item or see the
sub-menu options of the highlighted menu press OK
button. When you highlight a menu option some of the
sub-menu items of this menu may appear on the upper
side of the menu bar for quick access. To use a quick
access item highlight it, press OK and set as desired
using the Left/Right directional buttons. When nished
press OK or Back/Return button to exit.
Press Exit button to close the main menu.
1. Home
When main menu is opened Home menu bar will
be highlighted. The content of the Home menu can
be customised by adding options from other menus.
Just highlight an option and press the Down direction
button on the remote. If you see Add to Home option
you can add it to the Home menu. Same way you can
delete or change the position of any item in the Home
menu. Press the Down direction button and select the
delete or move icon and press OK. In order to move
a menu item use the Right and Left direction buttons
to select the position that you want the item to move
to and press OK.
2. TV
2.1. Guide
You can access the electronic programme guide menu
using this option. Refer to Electronic Programme
Guide section for more information.
2.2. Channels
You can access the Channels menu using this option.
Refer to Using the Channel List section for more
information.
2.3. Timers
You can set timers for future events using the options of
this menu. You can also review the previously created
timers under this menu.
To add a new timer select the Add Timer tab using the
Left/Right buttons and press OK. Set the sub-menu
options as desired and when nished press OK. A new
timer will be created.
To edit a previously created timer, highlight that timer,
select the Edit Selected Timer tab and press OK.
Change the sub-menu options as desired and press
OK to save your settings.
To cancel an already set timer, highlight that timer,
select Delete Selected Timer tab and press OK. A
conrmation message will be displayed. Highlight Yes
and press OK to proceed. The timer will be cancelled.
It is not possible to set timers for two or more events
that will broadcasted in different channels at the same
time interval. In this case you will be asked to choose
one of these timers and cancel others. Highlight the
timer you want to cancel and press OK, Options menu
will be displayed. Then highlight Set/Cancel and press
OK to cancel that timer. You will have to save changes
after that. In order to do that press OK, highlight Save
Changes and press OK again.
2.4. Recordings (Optional)
You can manage your recordings using the options
of this menu. You can playback, edit, delete or sort
previously recorded events. Highlight a tab by using
the Left or Right direction button and press OK to see
available options.
Recording Settings
You can also congure your recording preferences
using the Settings tab in the Recordings menu.
Highlight Settings tab by using Left or Right button
and press OK. Then select the desired item in the
sub-menu and set by using Left or Right button.
Start early: You can set recording timer’s starting
time to start earlier by using this setting.
End late: You can set recording timer’s end time to
end later by using this setting.
English - 7 -
Max Timeshift: This setting allows you to set the
maximum duration for the timeshift recording.
Available options are approximate and the actual
recording time may change in practice depending on
the broadcast. The reserved and free storage space
values will change according to this setting. Make
sure that you have enough free space otherwise
instant recording may not be possible.
Auto discard: You can set the Discard type as
None, Oldest, Longest or Shortest. If it is not
set to None, you can set the Unplayed option as
Included or Excluded. These options determine
the preferences for deleting the recordings in order
to obtain more storage space for ongoing records.
Hard disk information: You can view detailed
information about the USB storage device connected
to your TV. Highlight and press OK to see and press
Back/Return to close.
Format Disk: If you want to delete all les on the
connected USB storage device and convert the disk
format to FAT32, you can use this option. Press OK
button while the Format Disk option is highlighted.
A menu will appear on the screen, requiring you
to enter the PIN(*). After you enter the PIN, a
conrmation message will be displayed. Select Yes
and press OK to start formatting the USB storage
device. Select No and press OK to cancel.
(*) Default PIN could have been set to 0000 or 1234. If you
have dened the PIN(is requested depending on the country
selection) during the First Time Installation use the PIN
that you have dened.
3. Settings
You can manage the settings of your TV using the options of this menu. Refer to Settings Menu Contents
section for more information.
4. Sources
You can manage your input source references using
the options of this menu. To change the current source
highlight one of the options and press OK.
4.1. Source Settings
Edit the names, enable or disable selected source
options.
Inserting the Batteries into the Remote
Remove the back cover to reveal the battery
compartment. Insert two size AAA batteries. Make
sure the (+) and (-) signs match (observe correct
polarity). Do not mix old and new batteries. Replace
only with same or equivalent type. Place the cover back
on. A message will be displayed on the screen when
the batteries are low and must be replaced.
Note that when the batteries are low, the performance
of the remote control may be impaired.
Power Connection
IMPORTANT: The TV set is designed to operate on a
220-240V AC, 50 Hz supply. After unpacking, allow the
TV set to reach the ambient room temperature before
you connect the set to the mains. Plug the power cable
to the mains socket outlet.
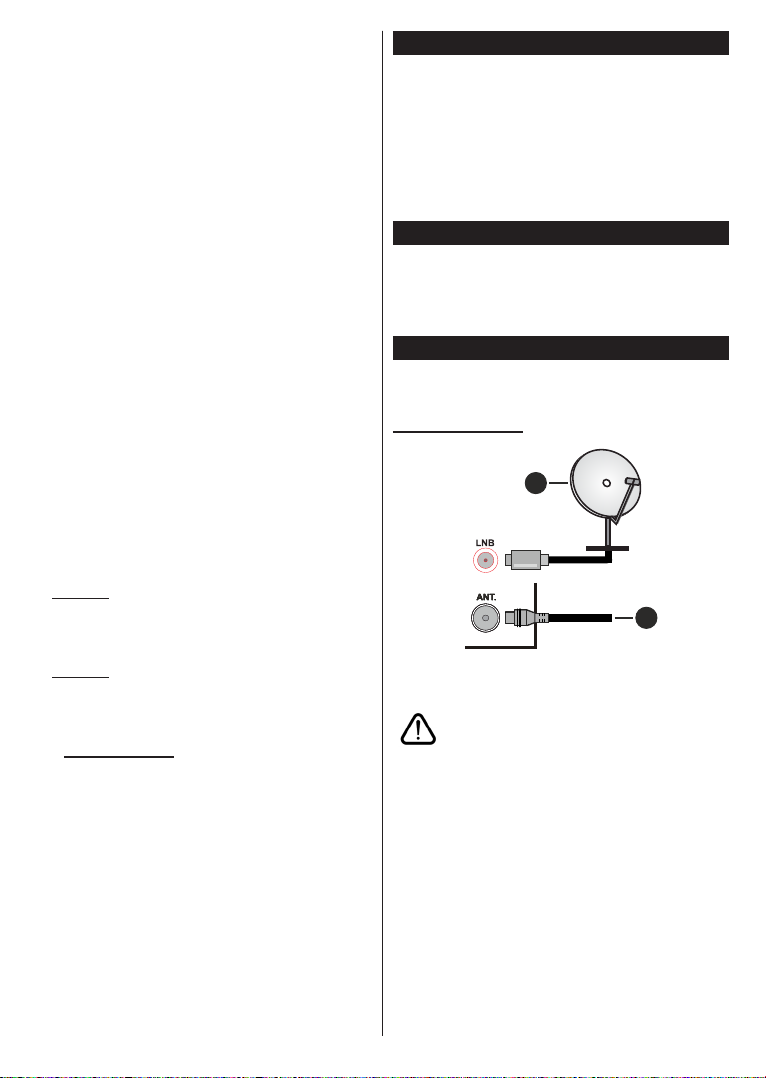
Antenna Connection
Connect the aerial or cable TV plug to the AERIAL
INPUT (ANT.) socket or satellite plug to the SATELLITE
INPUT (LNB) socket located on the rear side of the TV.
Rear side of the TV
1
2
1. Satellite
2. Aerial or cable
If you want to connect a device to the TV, make sure
that both the TV and the device are turned off before
making any connection. After the connection is done,
you can turn on the units and use them.
English - 8 -

License Notication
The terms HDMI and HDMI High-Denition Multimedia
Interface, and the HDMI Logo are trademarks or
registered trademarks of HDMI Licensing Administrator,
Inc. in the United States and other countries.
Manufactured under license from Dolby Laboratories.
Dolby Audio and the double-D symbol are trademarks
of Dolby Laboratories.
Dolby Audio™ (supporting Dolby Digital Plus™)
For DTS patents, see http://patents.dts.com.
Manufactured under license from DTS Licensing
Limited. DTS, the Symbol, & DTS and the Symbol
together are registered trademarks, and DTS
TruSurround is a trademark of DTS, Inc.© DTS, Inc.
All Rights Reserved.
For DTS patents, see http://patents.dts.com.
Manufactured under license from DTS Licensing
Limited. DTS, the Symbol, & DTS and the Symbol
together are registered trademarks, and DTS 2.0+Digital
Out is a trademark of DTS, Inc.© DTS, Inc. All Rights
Reserved.
DVB is a registered trademark of the DVB Project.
[1] EIA/CEA-861-D compliance covers the transmission
of uncompressed digital video with high-bandwidth
digital content protection, which is being standardized
for reception of high-denition video signals. Because
this is an evolving technology, it is possible that some
devices may not operate properly with the television.
This product incorporates copyright protection
technology that is protected by U.S. patents and
other intellectual property rights. Use of this copyright
protection technology must be authorized by Rovi
Corporation, and is intended for home and other limited
viewing uses only unless otherwise authorized by Rovi
Corporation. Reverse engineering and disassembly
are prohibited.
The “CI Plus” Logo is a trademark of CI Plus LLP.
For DTS patents, see http://patents.dts.com.
Manufactured under license from DTS Licensing
Limited. DTS, DTS-HD, the Symbol, & DTS or DTS-HD
and the Symbol together are registered trademarks of
DTS, Inc.© DTS, Inc. All Rights Reserved.
English - 9 -

Remote Control
2
1
4
6
5
7
8
9
10
12
13
14 15
16
17
18
19
20
21
22
11
3
1. Standby: Switches On / Off the TV
2. Source: Shows available broadcast and content
sources
3. Numeric buttons: Switches the channel, enters
a number or a letter in the text box on the screen.
4. Language: Switches among sound modes
(analogue TV), displays and changes audio/subtitle
language and turns subtitles on or off (digital TV,
where available)
5. Menu: Displays TV menu
6. Volume +/-
7. Info: Displays information about on-screen content,
shows hidden information (reveal - in TXT mode)
8. Directional buttons: Helps navigate menus, content
etc. and displays the subpages in TXT mode when
pressed Right or Left
9. OK: Conrms user selections, holds the page (in
TXT mode), views Channels menu (DTV mode)
10. Back/Return: Returns to previous screen, previous
menu, opens index page (in TXT mode)
11. Coloured Buttons: Follow the on-screen
instructions for coloured button functions
12. Rewind: Moves frames backwards in media such
as movies
13. Record: Records programmes (if available)
14. Pause: Pauses the media being played, starts
timeshift recording (if available)
15. Play: Starts to play selected media
16. Stop: Stops the media being played
17. Fast Forward: Moves frames forward in media
such as movies
18. Exit: Closes and exits from displayed menus or
returns to previous screen
19. Guide: Displays the electronic programme guide
20. Programme +/-
21. Text: Displays teletext (where available), press
again to superimpose the teletext over a normal
broadcast picture (mix)
22. Mute: Completely turns off the volume of the TV
English - 10 -

Connections
Connector Type Cables Device
VGA
Connection
(back)
AUDIO IN(**)
AUDIO IN(**)
YPBPR
SIDE AV(**)
SIDE AV(**)
SPDIF(**)
PC/YPbPr
Audio
Connection
(side)
PC/YPbPr
Audio
Connection
(side)
HDMI
Connection
(back)
Scart
Connection
(back)
YPbPr Video
Connection
(back)
Side AV
(Audio/Video)
Connection
(side)
Side AV
(Audio/Video)
Connection
(side)
SPDIF
(Optical Out)
Connection
(back)
YPbPr/PC Audio Cable
Side Audio/Video
Connection Cable
PC to YPbPr Connection Cable
Side Audio/Video
Connection Cable
YPbPr/PC Audio
Audio/Video Cable
Cable
Audio/Video
Cable
See the illustrations on the l eft si de. You
can use YPbPr to VGA cable to enable
YPbPr signal via VGA input. You cannot
use VGA and YPbPr at the same time.
(**)To enable PC/YPbPr audio, you will
need to use the side audio inputs with
a YPbPr/PC audio cable for audio
connection.
audio, you will need to use the Side AV
input with a YPbPr/PC audio cable for
audio connection, using the Side AV
connection cable’s Red and White ends.
If an external device is connected via the
SCART socket, the TV may automatically
switch to EXT1 mode. When receiving
DTV channels (Mpeg4 H.264, H.265) or
while in Media Browser mode, output will
not be available via the scart socket. When
using the wall mounting kit (ava ilabl e
from a third party in the market, if not
sup plied ), we recommend that you plug all
your cables into the back of the TV before
mounting on the wall. Insert or remove the
CI module only when the TV is SWITCHED
OFF. You should refer to the module instruction manual for details of the settings.
The/Each USB input of your TV supports
devices up to 500mA. Connecting devices
that have current value above 500mA
may damage your TV. When connecting
equipment using a HDMI cable to your TV,
to guarantee sufcient immunity against
parasitic frequency radiation, you have to
use a high speed shielded (high grade)
HDMI cable with ferrites.
off before making any connection. After
the connection is done, you can turn on
the units and use them.
(**)To enable PC/YPbPr
If you want to connect a device
to the TV, make sure that both
the TV and the device are turned
SPDIF(**)
HEADPHONE
SPDIF
(Coaxial Out)
Connection
(back)
Headphone
Connection
(side)
USB
Connection
(side)
CI
Connection
(side)
English - 11 -
(**) Depending on the model
CAM
module

Switching On/Off
To Switch the TV On
Connect the power cord to a power source such as a
wall socket (220-240V AC, 50 Hz).
To switch on the TV from standby mode either:
• Press the Standby button, Programme +/- or a
numeric button on the remote control.
• Press the middle of the side function switch on the
TV in.
To Switch the TV Off
Press the Standby button on the remote control or
press the middle of the side function switch on the
TV in and hold it down for a few seconds, the TV will
switch into standby mode.
To power down the TV completely, unplug the
power cord from the mains socket.
Note: When the TV is switched into standby mode, the standby
LED can blink to indicate that features such as Standby
Search, Over Air Download or Timer is active. The LED can
also blink when you switch on the TV from standby mode.
First Time Installation
Note: If you are going to perform FRANSAT installation, insert
the FRANSAT card (optional) into the Conditional Access
terminal of your TV before switching on your TV.
When turned on for the first time, the language
selection screen is displayed. Select the desired
language and press OK. In the following steps of
the installation guide, set your preferences using the
directional buttons and OK button.
On the second screen set your country preference.
Depending on the country selection you may be asked
to set and conrm a PIN at this point. The selected PIN
cannot be 0000. You have to enter it if you are asked
to enter a PIN for any menu operation later.
Note: M7(*) operator type will be dened according to the
Language and Country selections that you made in the First
Time Installation.
(*) M7 is a digital satellite service provider.
You can activate Store Mode option in the next step.
This option will congure your TV’s settings for store
environment and depending on the TV model being
used, the supported features of it may be displayed on
the side of the screen as an info banner. This option
is intended only for store use. It is recommended to
select Home Mode for home use. This option will be
available in Settings>System>More menu and can
be turned off/on later. Make your selection and press
OK to continue.
On next screen you can set broadcast types to be
searched, set your encrypted channel searching
and time zone (depending on the country selection)
preferences. Additionally you can set a broadcast
type as your favourite one. Priority will be given to the
English - 12 -
selected broadcast type during the search process
and the channels of it will be listed on the top of the
channel list. When nished, highlight Next and press
OK to continue.
About Selecting Broadcast Type
To turn a search option for a broadcast type highlight
it and press OK. The checkbox next to the selected
option will be checked. To turn the search option off
clear the checkbox by pressing OK after moving the
focus on the desired broadcast type option.
Digital Aerial: If D. Aerial broadcast search option
is turned on, the TV will search for digital terrestrial
broadcasts after other initial settings are completed.
Digital Cable: If D. Cable broadcast search option
is turned on, the TV will search for digital cable
broadcasts after other initial settings are completed.
A message will be displayed before starting to search
asking if you want to perform cable network search. If
you select Yes and press OK you can select Network
or set values such as Frequency, Network ID and
Search Step on the next screen. If you select No
and press OK you can set Start Frequency, Stop
Frequency and Search Step on the next screen.
When nished, highlight Next and press OK button
to continue.
Note: Searching duration will change depending on the
selected Search Step.
Satellite(**): If Satellite broadcast search option
is turned on, the TV will search for digital satellite
broadcasts after other initial settings are completed.
Before satellite search is performed some settings
should be made. A menu will be displayed where you
can select to start M7 or Fransat operator installation
or a standard installation.
To start an M7 operator installation set the Install Type
as Operator and the Satellite Operator as the related
M7 operator. Then highlight Preferred Scan option
and set as Automatic channel scan and press OK
to start the automatic search. These options can be
preselected depending on the Language and Country
selections that you made in the earlier steps of the rst
time installation process. You may be asked to select
HD/SD or country specic channel list according to
your M7 operator type. Select one and press OK to
proceed.
Wait till the scan is nished. Now the list has been
installed.
While performing an M7 operator installation, if you
want to use the satellite installation parameters that
differ from the default settings select the Preferred
Scan option as Manual channel scan and press the
OK button to proceed. Antenna Type menu will be
displayed next. After selecting the antenna type and
the desired satellite in the following steps press OK
in order to change the satellite installation parameters
in the sub-menu.

To start a Fransat installation set the Install Type as
Operator and then set the Satellite Operator as the
related Fransat operator. Then press the OK button
to start Fransat installation. You can select to start an
automatic or manual installation.
Press OK to proceed. Fransat Installation will be
performed and broadcasts will be stored (if available).
If you set the Install Type as Standard, you can
continue with regular satellite installation and watch
satellite channels.
You can start a Fransat installation at any time later
from the Settings>Installation>Automatic channel
scan> Satellite menu.
In order to search for satellite channels other than
M7 or Fransat channels you should start a standard
installation. Select the Install Type as Standard and
press the OK button to proceed. Antenna Type menu
will be displayed next.
There are three options for antenna selection. You can
select Antenna Type as Direct, Single Satellite Cable
or DiSEqC switch by using Left or Right buttons.
After selecting your antenna type press OK to see
the options to proceed. Continue, Transponder list
and Congure LNB options will be available. You can
change the transponder and LNB settings using the
related menu options.
• Direct: If you have a single receiver and a direct
satellite dish, select this antenna type. Press OK to
continue. Select an available satellite on the next
screen and press OK t o scan for services.
• Single Satellite Cable: If you have multiple
receivers and a single satellite cable system, select
this antenna type. Press OK to continue. Congure
settings by following instructions on the next screen.
Press OK to scan for services.
• DiSEqC switch: If you have multiple satellite dishes
and a DiSEqC switch, select this antenna type. Then
set the DiSEqC version and press OK to continue.
You can set up to four satellites (if available) for
version v1.0 and sixteen satellites for version v1.1
on the next screen. Press OK button to scan the rst
satellite in the list.
(**) If this feature is supported by your TV
Analogue: If Analogue broadcast search option is
turned on, the TV will search for analogue broadcasts
after other initial settings are completed.
A dialogue screen asking to activate parental control
will be displayed. If you select Yes, parental restriction
options will be displayed. Congure as desired and
press OK when nished. Select No and press OK
to advance, if you don’t want to activate parental
restrictions.
English - 13 -
After the initial settings are completed TV will start
to search for available broadcasts of the selected
broadcast types.
While the search continues current scan results will
be displayed at the bottom of the screen. After all the
available stations are stored, Channels menu will be
displayed. You can edit the channel list according to
your preferences using the Edit tab options or press
the Menu button to quit and watch TV.
While the search continues a message may appear,
asking whether you want to sort channels according
to the LCN(*). Select Yes and press OK to conrm.
(*) LCN is the Logical Channel Number system that organizes
available broadcasts in accordance with a recognizable
channel number sequence (if available).
Notes:
To search for M7 channels after the First Time Installation,
you should perform the rst time installation again. Or press the
Menu button and enter the Settings>Installation>Automatic
channel scan>Satellite menu. Then follow the same steps
mentioned above in the satellite section.
Do not turn off the TV while initializing rst time installation.
Note that, some options may not be available depending on
the country selection.
Using Satellite Channel Table Feature
You can perform these operations using the Settings>Installation>Satellite Settings>Satellite
Channel Table menu. There are two options regarding
to this feature.
You can download or upload satellite channel table
data. In order to perform these functions a USB device
must be connected to the TV.
You can upload current services and related satellites
& transponders in TV, to a USB device.
Additionally you can download one of the satellite
channel table les stored in USB device, to the TV.
When you select one of these les, all services and
related satellites and transponders in the selected
le will be stored in the TV. If there are any installed
terrestrial, cable and/or analogue services, they will
be kept and only satellite services will be removed.
Afterwards, check your antenna settings and make
changes if necessary. An error message stating “No
Signal” may be displayed if the antenna settings are
not congured properly.
Media Playback via USB Input
You can connect 2.5” and 3.5” inch (HDD with external power
supply) external hard disk drives or USB memory stick to your
TV by using the USB inputs of the TV.
IMPORTANT! Back up the les on your storage devices
before connecting them to the TV. Manufacturer will
not be responsible for any le damage or data loss.
Certain types of USB devices (e.g. MP3 Players)
or USB hard disk drives/memory sticks may not be
compatible with this TV. The TV supports FAT32 and

NTFS disk formatting but recording (Optional) will not
be available with NTFS formatted disks.
While formatting USB hard drives which have
more than 1TB (Tera Byte) storage space you may
experience some problems in the formatting process.
Wait a little while before each plugging and unplugging
as the player may still be reading les. Failure to do
so may cause physical damage to the USB player
and the USB device itself. Do not pull out your drive
while playing a le.
You can use USB hubs with your TV’s USB inputs.
External power supplied USB hubs are recommended
in such a case.
It is recommended to use the TV’s USB input(s)
directly, if you are going to connect a USB hard disk.
Note: When viewing image les the Media Browser menu
can only display 1000 image les stored on the connected
USB device.
USB Recording (Optional)
Recording a Programme
IMPORTANT: When using a new USB hard disk
drive, it is recommended that you rst format the
disk using your TV’s Format Disk option in the
TV>Recordings>Settings menu.
To record a programme, you should rst connect a USB
disk to your TV while the TV is switched off. You should
then switch on the TV to enable the recording feature.
To use recording your USB drive should have 2 GB free
space and be USB 2.0 compatible. If the USB drive
is not compatible an error message will be displayed.
To record long duration programmes such as movies, it
is recommended to use USB Hard disk drives (HDD’s).
Recorded programmes are saved into the connected
USB disk. If desired, you can store/copy recordings
onto a computer; however, these les will not be
available to be played on a computer. You can play
the recordings only via your TV.
Lip Sync delay may occur during the timeshifting. Radio
record is supported. The TV can record programmes
up to ten hours.
Recorded programmes are split into 4GB partitions.
If the writing speed of the connected USB disk is not
sufcient, the recording may fail and the timeshifting
feature may not be available.
It is recommended to use USB hard disk drives for
recording HD programmes.
Do not pull out the USB/HDD during a recording. This
may harm the connected USB/HDD.
Multipartition support is available. A maximum of two
different partitions are supported. The rst partition
of the USB disk is used for USB Recording ready
features. It also must be formatted as the primary
partition to be used for the USB Recording ready
features.
Some stream packets may not be recorded because
of signal problems, as a result sometimes videos may
freeze during playback.
Record, Play, Pause, Display (for playlist dialogue) keys
can not be used when teletext is on. If a recording starts
from timer when teletext is on, teletext is automatically
turned off. Also teletext usage is disabled when there
is an ongoing recording or playback.
Timeshift Recording
Press Pause button while watching a broadcast to
activate timeshifting mode. In timeshifting mode, the
programme is paused and simultaneously recorded to
the connected USB disk.
Press Play button again to resume the paused
programme from where you stopped. Press the Stop
button to stop timeshift recording and return to the
live broadcast.
Timeshift cannot be used while in radio mode.
You can use the timeshift rewind feature after resuming
normal playback or fast forward option.
Instant Recording
Press Record button to start recording an event
instantly while watching a programme. You can press
Record button on the remote control again to record
the next event after selecting the next programme from
within the electronic programme guide. Press Stop
button to cancel instant recording.
You can not switch broadcasts during the recording
mode. While recording a programme or during the
timeshifting, a warning message appears on the screen
if your USB device speed is not sufcient.
Watching Recorded Programmes
Select Recordings from the TV menu. Select a
recorded item from the list (if previously recorded).
Press the OK button to view the Options menu. Select
an option then press OK button.
Note: Viewing main menu and menu items will not be
available during the playback.
Press the Stop button to stop a playback and return
to the Recordings.
Slow Forward
If you press Pause button while watching recorded
programmes, the slow forward feature will be available.
You can use Fast Forward button to slow forward.
Pressing Fast Forward button consecutively will
change slow forwarding speed.
Recording Conguration
Select the Settings tab in the TV>Recordings menu
to congure the recording settings and press OK.
Format Disk: You can use the Format Disk option for
formatting the connected USB disk. Your PIN will be
required to use the Format Disk feature.
English - 14 -

Note: Default PIN could have been set to 0000 or 1234. If you
have dened the PIN(is requested depending on the country
selection) during the First Time Installation use the PIN that
you have dened.
IMPORTANT: Formatting your USB drive will erase
ALL the data on it and it’s le system will be converted
to FAT32. In most cases operation errors will be xed
after a format but you will lose ALL your data.
If “USB disk writing speed too slow to record”
message is displayed on the screen while starting a
recording, try restarting the recording. If you still get
the same error, it is possible that your USB disk does
not meet the speed requirements. Try connecting
another USB disk.
Media Browser
You can play back music and movie les and display
photo files stored on a USB storage device by
connecting it to your TV. Connect a USB storage device
to one of the USB inputs located on the side of the TV.
After connecting a USB storage device to your TV
Media Browser menu will be displayed on the screen.
You can access the content of the connected USB
device any time later from the Sources menu. Select
the related USB input option from this menu and press
OK. Then select the le of your choice and press OK
to display or play it back.
You can set your Media Browser preferences by using
the Settings menu. Settings menu can be accessed
via the information bar which is displayed on the
bottom of the screen when pressed the Info button
while playing back a video le or displaying a picture
le. Press the Info button, highlight the gear wheel
symbol positioned on the right side of the information
bar and press OK. Picture Settings, Sound Settings,
Media Browser Settings and Options menus will be
available. The contents of these menus may change
according to the type of the currently open media le.
Only Sound Settings menu will be available while
playing back audio les.
Loop/Shufe Mode Operation
All les in the list will be
Start playback and activate
Start playback and activate
Start playback and activate
Start playback and activate
continuously played in
original order
The same le will be
played continuously
(repeat)
All les in the list will be
played once in random
order
All les in the list will be
continuously played in
,
the same random order
To use the functions on the information bar highlight the
symbol of the function and press OK. To change the
status of a function highlight the symbol of the function
and press OK as much as needed. If the symbol is
marked with a red cross, that means it is deactivated.
CEC
This function allows to control the CEC-enabled
devices, that are connected through HDMI ports by
using the remote control of the TV.
The CEC option in the Settings>System>More menu
should be set as Enabled at rst. Press the Source
button and select the HDMI input of the connected
CEC device from the Sources List menu. When
new CEC source device is connected, it will be listed
in source menu with its own name instead of the
connected HDMI ports name(such as DVD Player,
Recorder 1 etc.).
The TV remote is automatically able to perform the
main functions after the connected HDMI source has
been selected. To terminate this operation and control
the TV via the remote again, press and hold the “0Zero” button on the remote control for 3 seconds.
You can disable the CEC functionality by setting the
related option under the Settings>System>More
menu accordingly.
The TV supports ARC (Audio Return Channel). This
feature is an audio link meant to replace other cables
between the TV and an audio system (A/V receiver or
speaker system).
When ARC is active, the TV does not mute its other
audio outputs automatically. You will need to decrease
TV volume to zero manually if you wish to hear the
ARC audio only (same as optical or co-axial digital
audio outputs). If you want to change connected
device’s volume level, you should select that device
from the source list. In that case volume control keys
are directed to connected audio device.
Note: ARC is supported only via the HDMI1 input.
System Audio Control
Allows an Audio Amplier/Receiver to be used with
the TV. The volume can be controlled using the
remote control of the TV. To activate this feature set
the Speakers option in the Settings>System>More
menu as Amplier. The TV speakers will be muted
and the sound of the watched source will be provided
from the connected sound system.
Note: The audio device should support System Audio Control
feature and CEC option should be set as Enabled.
English - 15 -

Settings Menu Contents
Picture Menu Contents
Colour
Picture Zoom
Skin Tone
Colour Shift
PC Position
Autoposition
H Position
Reset
Mode
Contrast
Brightness
Sharpness
Energy Saving
Backlight
You can change the picture mode to suit your preference or requirements. Picture mode can
be set to one of these options: Cinema, Game(optional), Sports, Dynamic and Natural.
Adjusts the light and dark values on the screen.
Adjusts the brightness values on the screen.
Sets the sharpness value for the objects displayed on the screen.
Sets the colour value, adjusting the colours.
For setting the Energy Saving to Custom, Minimum, Medium, Maximum, Auto,
Screen Off or Off.
Note: Available options may differ depending on the selected Mode.
This setting controls the backlight level. The backlight function will be inactive if the
Energy Saving is set to an option other than Custom.
Advanced Settings
Dynamic
Contrast
Noise Reduction
Colour Temp
White Point
Picture Shift
Film Mode
HDMI Full Range
V Position
Dot Clock
Phase
While in VGA (PC) mode, some items in Picture menu will be unavailable. Instead, VGA mode settings will be added to the Picture menu
while in PC mode.
You can change the dynamic contrast ratio to desired value.
If the signal is weak and the picture is noisy, use the Noise Reduction setting to reduce
the amount of noise.
Sets the desired colour temperature value. Cool, Normal, Warm and Custom options
are available.
If the Colour Temp option is set as Custom, this setting will be available. Increase the
‘warmth’ or ‘coolness’ of the picture by pressing Left or Right buttons.
Sets the desired image size format.
This option may be available depending on the Picture Zoom setting. Highlight and
press OK, then use directional buttons to shift the picture upwards or downwards.
Films are recorded at a different number of frames per second to normal television programmes.
Turn this feature on when you are watching lms to see the fast motion scenes clearly.
Skin tone can be changed between -5 and 5.
Adjust the desired colour tone.
While watching from a HDMI source, this feature will be visible. You can use this feature
to enhance blackness in the picture.
Appears only when the input source is set to VGA/PC.
Automatically optimizes the display. Press OK to optimize.
This item shifts the image horizontally to the right hand side or left hand side of the screen.
This item shifts the image vertically towards the top or bottom of the screen.
Dot Clock adjustments correct the interference that appear as vertical banding in dot
intensive presentations like spreadsheets or paragraphs or text in smaller fonts.
Depending on the input source(computer etc.) you may see a hazy or noisy picture on
the screen. You can use phase to get a clearer picture by trial and error.
Resets the picture settings to factory default settings (except Game mode).
English - 16 -

Sound Menu Contents
Volume
Adjusts the volume level.
Equalizer
Balance
Headphone
Sound Mode
AVL (Automatic
Volume Limiting)
Headphone/Lineout
Dynamic Bass
DTS TruSurround
Digital Out
Selects the equalizer mode. Custom settings can be made only when in User mode.
Adjusts whether the sound comes from the left or right speaker.
Sets headphone volume.
Please ensure before using headphones that the headphone volume is set to a low
level, to prevent damage to your hearing.
You can select a sound mode (If the viewed channel supports).
Sets the sound to obtain xed output level between programmes.
When you connect an external amplier to your TV using the headphone jack, you can
select this option as Lineout. If you have connected headphones to the TV, set this
option as Headphone.
Please ensure before using headphones that this menu item is set to Headphone. If it
is set to Lineout, the output from the headphone socket will be set to maximum which
could damage your hearing.
Enables or disables the Dynamic Bass.
Enables or disables the DTS TruSurround.
Sets digital out audio type.
Installation Menu Contents
Automatic channel
scan (Retune)
Manual channel
scan
Network channel
scan
Analogue ne tune
Satellite Settings(**)
Installation Settings
(optional)
Setup Home
Transponder (*)
Clear Service List
Displays automatic tuning options. D. Aerial: Searches and stores aerial DVB stations.
D. Cable: Searches and stores cable DVB stations. Analogue: Searches and stores
analogue stations. Satellite: Searches and stores satellite stations.
This feature can be used for direct broadcast entry.
Searches for the linked channels in the broadcast system. D. Aerial: Searches for aerial
network channels. D. Cable: Searches for cable network channels. Satellite: Searches
for satellite network channels.
You can use this setting for ne tuning analogue channels. This feature is not available
if no analogue channels are stored and if currently watched channel is not an analogue
channel.
Displays satellite settings. Satellite list: Displays available satellites. You can Add,
Delete satellites or Edit satellite settings on the list. Antenna installation: You can
change satellite antenna settings and/or start a satellite scan. Satellite Channel Table:
You can upload or download satellite channel table data using the related options.
Displays installation settings menu. Standby Search (*): Your TV will search for new or
missing channels while in standby. Any new found broadcasts will be shown. Dynamic
Channel Update(*): If this option is set as Enabled, the changes on the broadcasts
such as frequency, channel name, subtitle language etc., will be applied automatically
while watching.
(*) Availability depends on model.
Using this menu, you can edit the main and backup home transponder parameters,
including the Pid of the related M7 operator, which are used to download the channel
list. Set your preferences and press the Green button to save the settings. Then start
an M7 operator installation using the Automatic channel scan>Satellite menu.
(*) This menu option will only be available if an M7 operator installation is performed.
Use this setting to clear channels stored. This setting is visible only when the Country
option is set to Denmark, Sweden, Norway or Finland.
English - 17 -

Select Active
Network
Signal Information
First time installation
Fransat Options(**)
This setting allows you to select only the broadcasts within the selected network to be
listed in the channel list. This feature is available only for the country option of Norway.
You can use this menu item to monitor signal related information such as signal level/
quality, network name etc for available frequencies.
Deletes all stored channels and settings, resets TV to factory settings.
Displays Fransat options.
Parental Control
System
Information
Reception
Information
CAS-Module
Upgrade
Displays parental control options. Enter the PIN number you have dened in the initial
installation to view current settings.
Displays system information.
Displays current satellite reception information.
Displays current CAS module information.
Displays software upgrade options.
(**) If this feature is supported by your TV
English - 18 -

System Menu Contents
Conditional Access
Controls conditional access modules when available.
Language
Date/Time
Sources
Accessibility
Hard of Hearing
Menu Timeout
Standby LED
Upgrade
You may set a different language depending on the broadcaster and the country.
Enter correct password to change parental settings. You can easily adjust Menu Lock,
Maturity Lock, Child Lock or Guidance in this menu. You can also set a new PIN
Parental
Audio
Description
More
Software
Application
Version
Subtitle Mode
Auto TV OFF
Biss Key (**)
Store Mode
Power Up Mode
CEC
CEC Auto Power
On
Speakers
OSS
or change the Default CICAM PIN using the related options.
Note: Some menu options may not be available depending on the country selection in the First Time
Installation. Default PIN could have been set to 0000 or 1234. If you have dened the PIN(is requested
depending on the country selection) during the First Time Installation use the PIN that you have dened.
Sets date and time.
Edit the names, enable or disable selected source options.
Displays accessibility options of the TV.
Enables any special feature sent from the broadcaster.
A narration track will be played for the blind or visually impaired audience. Press OK
to see all available Audio Description menu options. This feature is available only if
the broadcaster supports it.
Note (Optional): Audio description sound feature is not available in recording or time shifting mode.
Displays other setting options of the TV.
Changes timeout duration for menu screens.
If set as Off the standby LED will not light up when the TV is in standby mode.
Ensures that your TV has the latest rmware. Press OK to see the menu options.
Displays current software version.
This option is used to select which subtitle mode will be on the screen (DVB subtitle /
Teletext subtitle) if both is available. Default value is DVB subtitle. This feature is available
only for the country option of Norway.
Sets the desired time for the TV to automatically go into standby mode when not being
operated.
Biss is a satellite signal scrambling system that is used for some broadcasts. If you
need to enter Biss key on a broadcast, you can use this setting. Highlight Biss Key and
press OK to enter keys on the desired broadcast.
Select this mode for store display purposes. Whilst Store Mode is enabled, some items
in the TV menu may not be available.
This setting congures the power up mode preference. Last State and Standby options
are available.
With this setting you can enable and disable CEC functionality completely. Press Left
or Right button to enable or disable the feature.
This function allows the connected HDMI-CEC compatible device to turn on the TV
and switch to its input source automatically. Press Left or Right button to enable or
disable the feature.
To hear the TV audio from the connected compatible audio device set as Amplier.
You can use the remote control of the TV to control the volume of the audio device.
Displays Open Source Software license information.
(**) If this feature is supported by your TV
English - 19 -

General TV Operation
Using the Channel List
The TV sorts all stored stations in the channel list. You
can edit this channel list, set favourites or set active
stations to be listed by using the Channels menu
options. Press the OK button to open the channel list.
You can lter the listed channels or make advanced
changes in the current list using the Filter and Edit
tab options. Highlight the tab you want and press OK
to see available options.
Note: The commands Move, Delete and Edit name in the
TV>Channels>Edit menu are not available for channels that
are being broadcasted from an M7 operator.
Managing the Favourite Lists
You can create four different lists of your favourite
channels. Enter the TV>Channels menu or press
the OK button in order to open the Channels menu.
Highlight the Edit tab and press OK to see the editing
options and select the Tag/Untag channel option.
Select the desired channel on the list by pressing the
OK button while the channel is highlighted. You can
make multiple choices. You can also use the Tag/
Untag all option to select all channels on the list.
Then press Back/Return button to return to the Edit
menu options. Select Add/Remove Favourites option
and press the OK button again. Favourite channel list
options will be displayed. Set the desired list option
to On. The selected channel/s will be added to the
list. In order to remove a channel or channels from a
favourite list follow the same steps and set the desired
list option to Off.
You can use the ltering function in the Channels menu
to lter the channels in the channel list permanently
according to your preferences. For instance, using the
options of the Filter tab, you can set one of your four
favourite lists to be displayed every time the channel
list is opened.
Conguring Parental Settings
The Parental menu options can be used to prohibit
users from viewing of certain programmes, channels
and using of menus. These settings are located in the
Settings> System>Parental menu.
To display parental lock menu options, a PIN should be
entered. After coding the correct PIN, Parental menu
will be displayed.
Menu Lock: This setting enables or disables access
to all menus or installation menus of the TV.
Maturity Lock: If this option is set, TV gets the maturity
information from the broadcast and if this maturity level
is disabled, prohibits access to the broadcast.
Note: If the country option in the First Time Installation is
set as France, Italy or Austria, Maturity Lock’s value will be
set to 18 as default.
English - 20 -
Child Lock: If this option is set to On, the TV can only
be controlled by the remote control. In this case the
control buttons on the TV will not work.
Set PIN: Denes a new PIN number.
Default CICAM PIN: This option will appear as greyed
out if no CI module is inserted into the CI slot of the
TV. You can change the default PIN of the CI CAM
using this option.
TV PIN(*): By enabling or disabling this option you can
allow or restrict some M7 operator channels to send
PIN queries. These PIN queries provide an access
control mechanism for related channels. If this option
is set as On, the channels which send PIN queries can
not be accessed without entering the right PIN rst.
(*) This menu option will only be available if an M7 operator
installation is performed.
Note: Default PIN could have been set to 0000 or 1234. If you
have dened the PIN(is requested depending on the country
selection) during the First Time Installation use the PIN that
you have dened.
Some options may not be available depending on the model
and/or on the country selection in the First Time Installation.
Electronic Programme Guide
By means of electronic programme guide function of
your TV you can browse the event schedule of the
currently installed channels on your channel list. It
depends on the related broadcast whether this feature
is supported or not.
To access the programme guide, press the Guide
button on your remote. You can also use the Guide
option under TV menu.
There are 2 different types of schedule layouts
available, Timeline Schedule and Now/Next. To
switch between these layouts highlight the tab with
the name of the alternative layout on the upper side
of the screen and press OK.
Use the directional buttons to navigate through the
programme guide. Use the Back/Return button to
use the tab options on the upper side of the screen.
Timeline Schedule
In this layout option, all events of the listed channels will
be displayed by timeline. You can use the directional
buttons to scroll through the list of the events. Highlight
an event and press OK to display event options menu.
Press Back/Return button to use available tab options.
Highlight Filter tab and press OK to see the ltering
options. To change the layout highlight Now/Next and
press OK. You can use the Previous Day and Next
Day options to display the events of the previous and
next day.
Highlight Extras tab and press OK to access below
options.
Highlight Genre: Displays Highlight Genre menu.
Select a genre and press OK. The events in the

programme guide matching the selected genre will
be highlighted.
Guide Search: Displays searching options. Using
these options, you can search the programme guide
database in accordance with the selected criteria.
Matching results will be listed.
Now: Displays current event of the highlighted
channel.
Zoom: Highlight and press OK to see events in a
wider time interval.
Now/Next Schedule
In this layout option, only the current and next events
of the listed channels will be displayed. You can use
the directional buttons to scroll through the list of the
events.
Press Back/Return button to use available tab options.
Highlight Filter tab and press OK to see the ltering
options. To change the layout highlight Timeline
Schedule and press OK.
Event Options
Use the directional buttons to highlight an event
and press OK button to display Options menu. The
following options are available.
Select Channel: Using this option, you can switch
to the selected channel in order to watch it. The
programme guide will be closed.
More Info: Display detailed information on the selected
event. Use up and down directional buttons to scroll
through the text.
Set Timer on Event / Delete Timer on Event: Select
Set Timer on Event option and press OK. You can set
timers for future events. To cancel an already set timer,
highlight that event and press the OK button. Then
select Delete Timer on Event option. The timer will
be cancelled.
Record / Delete Rec. Timer (Optional): Select the
Record option and press the OK button. If the event
is going to be broadcasted at a future time, it will be
added to Timers list to be recorded. If the selected
event is being broadcasted at the moment, recording
will start immediately.
To cancel an already set record timer, highlight that
event and press the OK button and select the option
Delete Rec. Timer. The record timer will be cancelled.
IMPORTANT: Connect a USB disk to your TV while the TV
is switched off. You should then switch on the TV to enable
the recording feature.
Notes: You cannot switch to any other channel while there is
an active recording or timer on the current channel.
It is not possible to set timer or record timer for two or more
individual events at the same time interval.
Teletext Services
Press the Text button to enter. Press again to activate
mix mode, which allows you to see the teletext page
and the TV broadcast at the same time. Press once
more to exit. If available, sections in the teletext pages
will become colour-coded and can be selected by
pressing the coloured buttons. Follow the instructions
displayed on the screen.
Digital Teletext
Press the Text button to view digital teletext information.
Operate it with the coloured buttons, cursor buttons
and the OK button. The operation method may differ
depending on the contents of the digital teletext. Follow
the instructions displayed on the digital teletext screen.
When the Text button is pressed again, the TV returns
to television broadcast.
Software Upgrade
Your TV is capable of nding and updating the rmware
automatically via the broadcast signal.
Software upgrade search via user interface
On the main menu select Settings>System and then
More. Navigate to Software upgrade and press the
OK button. Then select Scan for upgrade and press
OK button to check for a new software upgrade.
If a new upgrade is found, it starts to download the
upgrade. After the download is completed, a warning
will be displayed, press OK button to complete software
upgrade process and restart TV.
3 AM search and upgrade mode
Your TV will search for new upgrades at 3:00 o’clock
if Automatic scanning option is set to Enabled and
if the TV is connected to an aerial signal. If a new
software is found and downloaded successfully, it will
be installed at the next power on.
Note: Do not unplug the power cord while led is blinking during
the reboot process. If the TV fails to come on after the upgrade,
unplug, wait for two minutes then plug it back in.
All updates are automatically controlled. If a manual search
is carried out and no software is found then this is the current
version.
Troubleshooting & Tips
TV will not turn on
Make sure the power cord is plugged in securely to a
wall outlet. Press the Power button on the TV.
Poor picture
• Check if you have correctly tuned the TV.
• Low signal level can cause picture distortion. Please
check antenna connections.
• Check if you have entered the correct channel
frequency if you have performed manual tuning.
English - 21 -

No picture
6
• TV is not receiving any signal. Make sure the correct
source has been selected.
• Is the antenna connected properly?
• Is the antenna cable damaged?
• Are suitable plugs used to connect the antenna?
• If you are in doubt, consult your dealer.
No sound
• Check if the TV sound is muted. Press the Mute
button or increase the volume to check.
• Sound is coming from only one speaker. Check the
balance settings from Sound menu.
Remote control - no operation
• The batteries may be exhausted. Replace the
batteries.
• The batteries maybe inserted incorrectly. Refer to
the section “Inserting the Batteries into the Remote”.
No signal on an input source
• It is possible that no device is connected.
• Check the AV cables and connections from your
device.
• Check the device is switched on.
Recording unavailable (Optional)
To record a programme, you should rst correctly
connect a USB storage device to your TV, while the
TV is switched off. You should then switch on the TV
to enable the recording feature. If you cannot record,
check the storage device is correctly formatted and
there is sufcient space.
USB is too slow (Optional)
If a “USB storage device writing speed too slow to
record” message is displayed on the screen while
starting a recording, try restarting the recording. If you
still get the same error, it is possible that your USB
storage device does not meet the speed requirements.
Try using a different USB storage device.
English - 22 -
PC Input Typical Display Modes
The following table is an illustration of some of the
typical video display modes. Your TV may not support
all resolutions.
Index Resolution Frequency
1 640x480 60 Hz
2 800x600 56 Hz
3 800x600 60 Hz
4 1024x768 60 Hz
5 1024x768 66 Hz
1280x768 60 Hz
7 1280x960 60 Hz
8 1280x1024 60 Hz
9 1360x768 60 Hz
10 1400x1050 60 Hz
11 1600x1200 60 Hz
12 1920x1080 60 Hz
AV and HDMI Signal Compatibility
Source Supported Signals Available
PAL 50/60 O
EXT
(SCART)
Side AV
PC/YPbPr
HDMI
(X: Not Available, O: Available)
In some cases a signal on the TV may not be displayed
properly. The problem may be an inconsistency with standards
from the source equipment (DVD, Set-top box, etc.). If you do
experience such a problem please contact your dealer and also
the manufacturer of the source equipment.
NTSC 60 O
RGB 50 O
RGB 60 O
PAL 50/60 O
NTSC 60 O
480I, 480P 60Hz O
576I, 576P 50Hz O
720P 50Hz,60Hz O
1080I 50Hz,60Hz O
1080P 50Hz,60Hz O
480I 60Hz O
480P 60Hz O
576I, 576P 50Hz O
720P 50Hz,60Hz O
1080I 50Hz,60Hz O
1080P
24Hz, 25Hz
30Hz, 50Hz,
60Hz
O

Supported File Formats for USB Mode
Media Extension Format Notes
Video .mpg,
Audio .mp3 MPEG1 Layer
Picture
Subtitle .sub, .srt - -
.mpeg
.vob MPEG2
.mp4 MPEG4, Xvid,
.mkv H.264,
.avi MPEG2,
.v H.264/VP6/
.mp4, .mov,
.3gpp, .3gp,
MPEG
transport
stream,
.ts,.trp, .tp,
.mkv
.3gp MPEG4 , H.264 1920x1080 @ 30P
(works
only with
video
les)
.jpeg
.bmp
MPEG1-2 MPEG1: 768x576 @ 30P, MPEG2:1920x1080 @ 30P
H.264
MPEG4,VC-1
MPEG4, Xvid,
H.264
Sorenson
HEVC/H.265 1080P@60fps - 50Mbps
2/3
AC3 32Kbps ~ 640Kbps (Bit rate) / 32kHz, 44.1kHz, 48kHz (Sampling rate)
AAC 16Kbps ~ 576Kbps (Bit rate) / 48kHz, 44.1kHz, 32kHz, 24kHz, 22.05kHz,
EAC3 32Kbps ~ 6Kbps (Bit rate) / 32kHz, 44.1kHz, 48kHz (Sampling rate)
LPCM Unsigned 8bit PCM, Signed/Unsigned 16bit PCM (big / little endian), 24bit
IMA-ADPCM/
MS-ADPCM
LBR 32Kbps ~ 96Kbps (Bit rate) / 32kHz, 44.1kHz, 48kHz (Sampling rate)
Baseline Resolution(WxH): 17000x10000
Progressive Resolution(WxH): 4000x4000
- Resolution(WxH): 5760x4096
1920x1080 @ 30P
H.264/VP6: 1920x1080 @ 30P
Sorenson: 352x288 @ 30P
Layer2: 32Kbps ~ 448Kbps (Bit rate) / 32kHz, 44.1kHz, 48kHz, 16kHz,
22.05kHz, 24kHz (Sampling rate)
Layer3: 32Kbps ~ 320Kbps (Bit rate) / 32kHz, 44.1kHz, 48kHz, 16kHz,
22.05kHz, 24kHz, 8kHz, 11.025kHz, 12kHz (Sampling rate)
16kHz, 12kHz, 11.025kHz, 8kHz (Sampling rate)
PCM (big endian), DVD LPCM 16/20/24bit (Bit rate)
/ 6kHz, 8kHz, 11.025kHz, 12kHz, 16kHz, 22.05kHz, 24kHz, 32kHz,
44.1kHz, 48kHz , 88.2kHz, 96kHz, 176.4kHz, 192kHz (Sampling rate)
384Kbps (Bit rate) / 8KHz ~ 48Khz (Sampling rate)
English - 23 -

Supported DVI Resolutions
When connecting devices to your TV’s connectors by using DVI converter cable(DVI to HDMI cable - not
supplied), you can refer to the following resolution information.
56Hz 60Hz 66Hz 70Hz 72Hz 75Hz
640x400 x
640x480 x x x x
800x600 x x x x x
832x624 x
1024x768 x x x x x
1152x864 x x x
1152x870 x
1280x768 x x
1360x768 x
1280x960 x x
1280x1024 x x
1400x1050 x x
1440x900 x x
1600x1200 x
1680x1050 x
1920x1080 x
English - 24 -

DVD Mode (Depending on the model)
Safety Information
CAUTION
DVD Player is a class 1 laser product. However this
product uses a visible laser beam which could cause
hazardous radiation exposure. Be sure to operate the
player correctly as instructed.
CLASS 1
LASER PRODUCT
RISK OF ELECTRIC SHOCK
The lightning ash with arrowhead symbol, within an
equilateral triangle, is intended to alert the user to the
presence of uninsulated “dangerous voltage” within the
product’s enclosure that may be of sufcient magnitude
to constitute a risk of electric shock of persons.
The exclamation point within an equilateral triangle is
intended to alert the user to the presence of important
operating and maintenance (servicing) instructions in
the literature accompanying the appliance.
Notes on Discs
On handling discs
• To keep the disc clean, handle the disc by its edge.
Do not touch the surface.
• Do not stick paper or tape on the disc.
• If the disc is contaminated with any substance like
glue remove before using it.
• Do not expose the disc to direct sunlight or heat
sources such as hot air ducts, or leave it in a car
parked in direct sunlight as the temperature can rise
quickly and damage the disc.
• After playing, store the disc in its case.
On cleaning
• Before playing, clean the disc with a cleaning cloth.
Wipe the disc from the centre out.
• Do not use solvents such as benzine, thinner,
commercially available cleaners or anti-static spray
intended for vinyl LPs.
How to Watch a DVD
When placing a disc into the loader, labelled side of
the disc should be on the front.
When TV set is turned on, rst switch to DVD source by
using the Source button on the remote control. Press
play on the remote control, or directly press play button
on the side panel. If there is no disc inside the loader,
place a DVD rst and press play.
Note: If you switch to another source by pressing Source or
Programme +/- buttons on the remote control, DVD playback
will be paused automatically. You should press Play button and
resume the playback manually when you switch to DVD mode.
DVD Control Panel Buttons
/ (Play / Pause)
Plays/pauses the disc. When DVD menu (root menu) is
active, this button functions as “button select” (selects
the highlighted item in menu) if this is not prohibited
by the disc.
/ (Stop / Eject)
Stop playing disc / Eject or Load the disc.
Note:
You cannot eject the disc via the remote control.
While playing a le, you should press Stop button three
times to eject.
General Playback
Basic Play
1. Press the Standby button
2. Insert a disc into the loader.
The disc will be automatically loaded and play will
commence if the disc does not have any menus
recorded on it.
A menu may appear on the TV screen after a few
moments or the film may start immediately. This
behaviour depends on the disc content and may
change.
Note: Step 3 and 4 are available only when a menu is recorded
on the disc.
3. Press Down / Up / Left / Right or the numeric
button (s) to select the preferred title.
4. Press OK to conrm the selected item.
The played item may be a motion picture, a still picture
or another submenu depending on the disc content.
For your reference
If an action corresponding to a button is prohibited the
“ ” symbol appears.
English - 25 -

Notes on Playback
1. No sound will be heard during fast forward or
rewind.
2. No sound will be heard during slow motion play.
3. Reverse slow motion play may not be available
depending on the DVD content.
4. In some cases, the subtitle language is not
changed immediately to the selected one.
5. When the preferred language is not selected even
after pressing the button several times, it means
that the language is not available on the disc.
6. When the player is restarted or the disc is
changed, the subtitle selection is automatically
changed back to the initial settings.
7. If a language is selected, not supported by the
disc, the subtitle language will automatically be
set to the disc’s priority language.
8. Usually a circulation will happen while switching to
another subtitle, that is you can cancel the subtitle
by pressing the Text button a number of times until
“Subtitles Off” appears on the screen.
9. When the power is turned on or the disc is
removed, the language heard is the one selected
at the initial settings. If this language is not
recorded on the disc, only the available language
on the disc will be heard.
10. Some DVDs may not contain root and/or title
menus.
11. Reverse stepping is not available.
12. For your convenience:
If you attempt to enter a number greater than
the total time of the current title, the time search
box disappears and “ Input Invalid” message
appears on upper-left corner of screen.
13. Slide Show is disabled when the ZOOM mode is on.
• Wrong type of disc. The machine cannot play CDROMS etc. The region code of the DVD must match
the player.
Wrong OSD language
• Select the language in the set-up menu.
• The language for the sound or subtitles on a DVD
cannot be changed.
• Multilingual sound and/or subtitles not recorded on
the DVD.
• Try to change the sound or subtitles using DVD’s title
menu. Some DVD’s do not allow the user to change
these settings without using the disc’s menu
• These functions are not available on the DVD.
No picture
• Make sure you have pressed the correct buttons on
the remote control. Try once more.
No sound
• Check if volume is set to an audible level.
• Make sure the sound isn’t turned off by mistake.
Distorted sound
• Check that the appropriate listening mode setting
is correct.
If nothing works
If you have tried the above solutions and none seem
to work, try switching your TV-DVD off and on again.
If this does not work, contact your supplier or TV-DVD
repair technician. Never attempt to repair a defective
TV-DVD yourself.
DVD Troubleshooting
Poor picture quality (DVD)
• Make sure the DVD disc surface is not damaged.
(Scratch, ngerprint etc.)
• Clean the DVD disc and try again.
See instructions described in “Notes on Discs” to clean your
disc properly.
• Ensure that the DVD disc is in the tray with the label
facing forward.
• A damp DVD disc or condensation may affect the
equipment. Wait for 1 to 2 hours in Stand-by to dry
the equipment.
Disc does not play
• No disc in the machine. Place a disc into the loader.
• Disc incorrectly loaded.
Note: Ensure that the DVD disc is in the tray with the label
facing forward.
English - 26 -

Disc Types Compatible with This Unit
Line resolution more than 500 lines
LPCM
24 bit /48, 44.1kHz down-sampling DAC
Disc Types
(Logos)
DVD
Recording
Types
Audio
+
Disc
Size
12 cm
Video
AUDIO-CD
Audio 12 cm 74 min.
MP3-CD
PICTURE-CD
For proper operation, only 12 cm discs must be used.
Audio
(xxxx.mp3)
Video
(still picture)
12 cm
12 cm
Specications
Max. Playing
Time
Single-
sided; 240 min.
Double-
sided; 480 min.
It depends
on MP3
quality.
It depends
on JPEG
quality.
Characteristics
• DVD contains excellent sound and video
due to Dolby Digital and MPEG-2 System.
• Various screen and audio functions can
be easily selected through the on screen
menu.
• An LP is recorded as an analog signal
with more distortion. CD is recorded as a
digital signal with better audio quality, Iess
distortion and less deterioration of audio
quality over time.
• MP3 is recorded as a digital signal with
better audio quality, less distortion and
less deterioration of audio quality over
time.
• JPEG is recorded as a digital signal with
better picture quality over time.
DVD: SS/SL 4.7” (DVD-5)
Types of Discs
Supported
Video Type
Audio Type
Audio Output
SS/DL 4.7” (DVD-9)
DS/SL 4.7” (DVD-10)
DS/DL 4.7” (DVD-18)
MPEG-2 Video Standard Decoding (MPEG-1 supported)
Full-Screen Video Display of 720 x 576 (PAL) & 720 x 480 (NTSC) pixels
50 and 60 Hz frame refresh rates (PAL & NTSC)
Digital bit-stream processing rate up to 108Mbits/sec
MPEG Multichannel Decoding
Analog Outputs:
CD-DA
CD-R
CD-RW
MP-3/JPEG
English - 27 -

Overview of the Remote Control
1
2
3
4
5
6
7
8
9
10
11
12
13 14
20
19
18
17
16
15
1. Standby
2. Source selection
3. Numeric buttons
4. Audio language selection
5. TV Menu
6. Volume Up / Down
7. Time
8. Navigation buttons
9. OK / Select
10. Back / Previous menu
11. Coloured buttons;
Red button - Zoom
Green button - Repeat
Yellow button - Root
Blue button - Title
12. Rewind
13. Pause
14. Play
15. Stop
16. Fast forward
17. Exit
18. DVD menu
19. Subtitle language selection
20. Mute
English - 28 -

General DVD Operation
You can operate DVD, movie CD, music or picture CD’s content by using the proper buttons on your remote
control. Below are main functions of commonly used remote control buttons.
Buttons DVD Playback Movie Playback Picture Playback Music Playback
Play Play Play Play
Pause Pause Pause Pause
Stop Stop Stop Stop
/
/
/
GUIDE Displays time / Views main setup menu
INFO Time counter mode selection (during playback). Press repeatedly to switch between modes.
LANGUAGE
MENU Displays TV menu.
OK Enter / View / Play
GREEN BUTTON Displays repeat options.
RETURN/BACK Returns back to the previous menu (if available).
YELLOW BUTTON Goes back to the root folder (if available).
TEXT
BLUE BUTTON
RED BUTTON Zooms picture. Press repeatedly to switch between zoom options.
Skip backward/
forward
Highlights a menu item / Shifts the zoomed picture up or down (if available).
Press Language button to change the
Press Text button to change the subtitle
Displays disc menu
audio language.
language or turn off the subtitles.
(if available).
Skip backward/
forward
Displays disc menu
(if available).
Rotate Skip backward/forward
Rapid advance / Rapid reverse
X X
X X
X X
Other Functions – Button Combinations (During playback)
+
) +
(
+
+
+
+
Slow forward
Sets slow forward speed
Sets rapid advance speed
Sets rapid reverse speed
Conrms stop command
(*) You can switch to title by pressing numeric keys directly. You need to press 0 and then digit key to switch
one digit titles (example: to select 5, press 0 and 5).
English - 29 -

 Loading...