

Toshiba 46TL933G Schematic

LCD Color Television
Стр. 1 из 1TOSHIBA
03.11.2015
file://C:\Documents and Settings\Alexsandr\Local Settings\Temp\Rar$EXa0.569\TOS
...
Home
46TL933G
Ver. 1.01
ADJUSTMENT
↓↓↓↓
↓↓↓↓
Стр. 1 из 2TOSHIBA
03.11.2015
file://C:\Documents and Settings\Alexsandr\Local Settings\Temp\Rar$EXa0.103\TOS
...
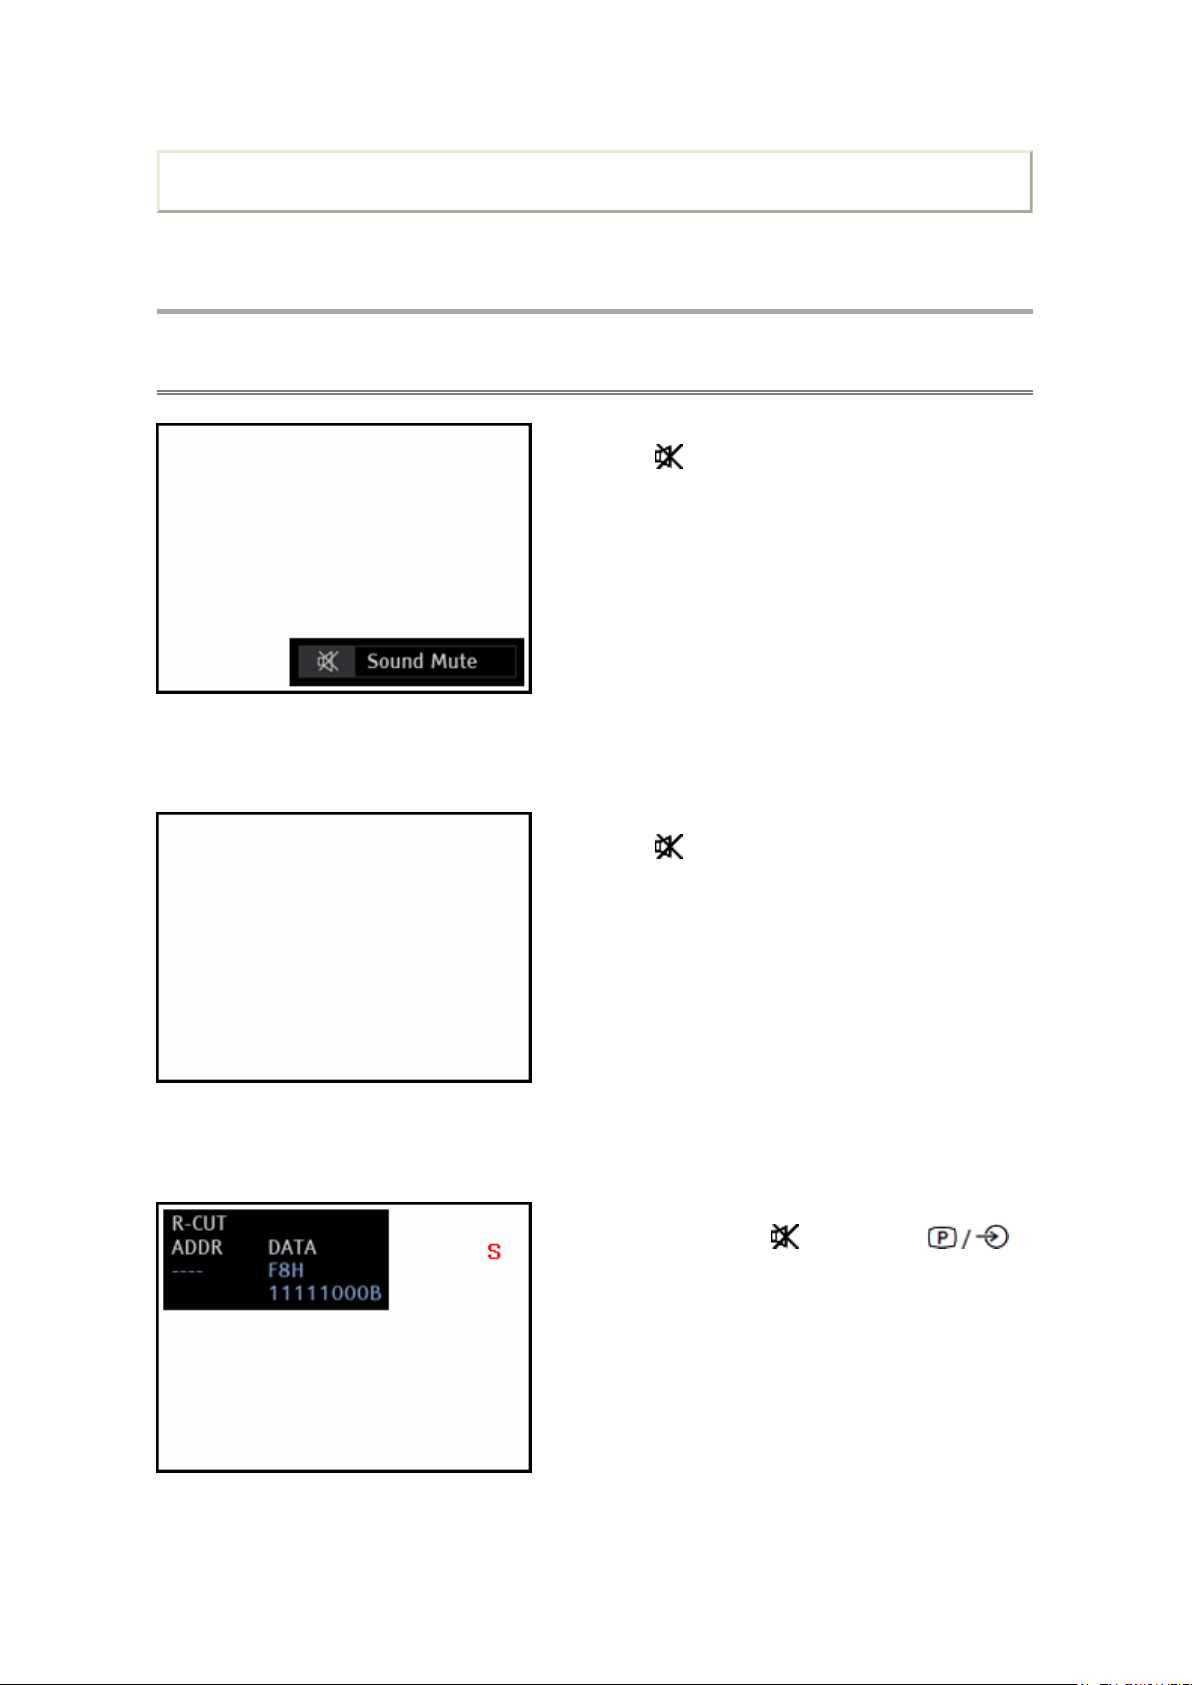
Service Mode
Entering Service Mode
(Sound Mute display)
Print this page
1. Press button once on Remote Control.
2. Press button again and keep pressing.
(Sound Mute display is canceled)
(Service Mode display)
3. While pressing the button, press
button on TV control panel.

TOSHIBA WEB-ZEUS
Стр. 2 из 2TOSHIBA
03.11.2015
file://C:\Documents and Settings\Alexsandr\Local Settings\Temp\Rar$EXa0.103\TOS
...
>> terms and conditions >> privacy policy
Copyright © 1995-2012 TOSHIBA Corporation, All Rights Reserved.
Print this page
↑↑↑↑ ↓↓↓↓
Стр. 1 из 1TOSHIBA
03.11.2015
file://C:\Documents and Settings\Alexsandr\Local Settings\Temp\Rar$EXa0.962\TOS
...
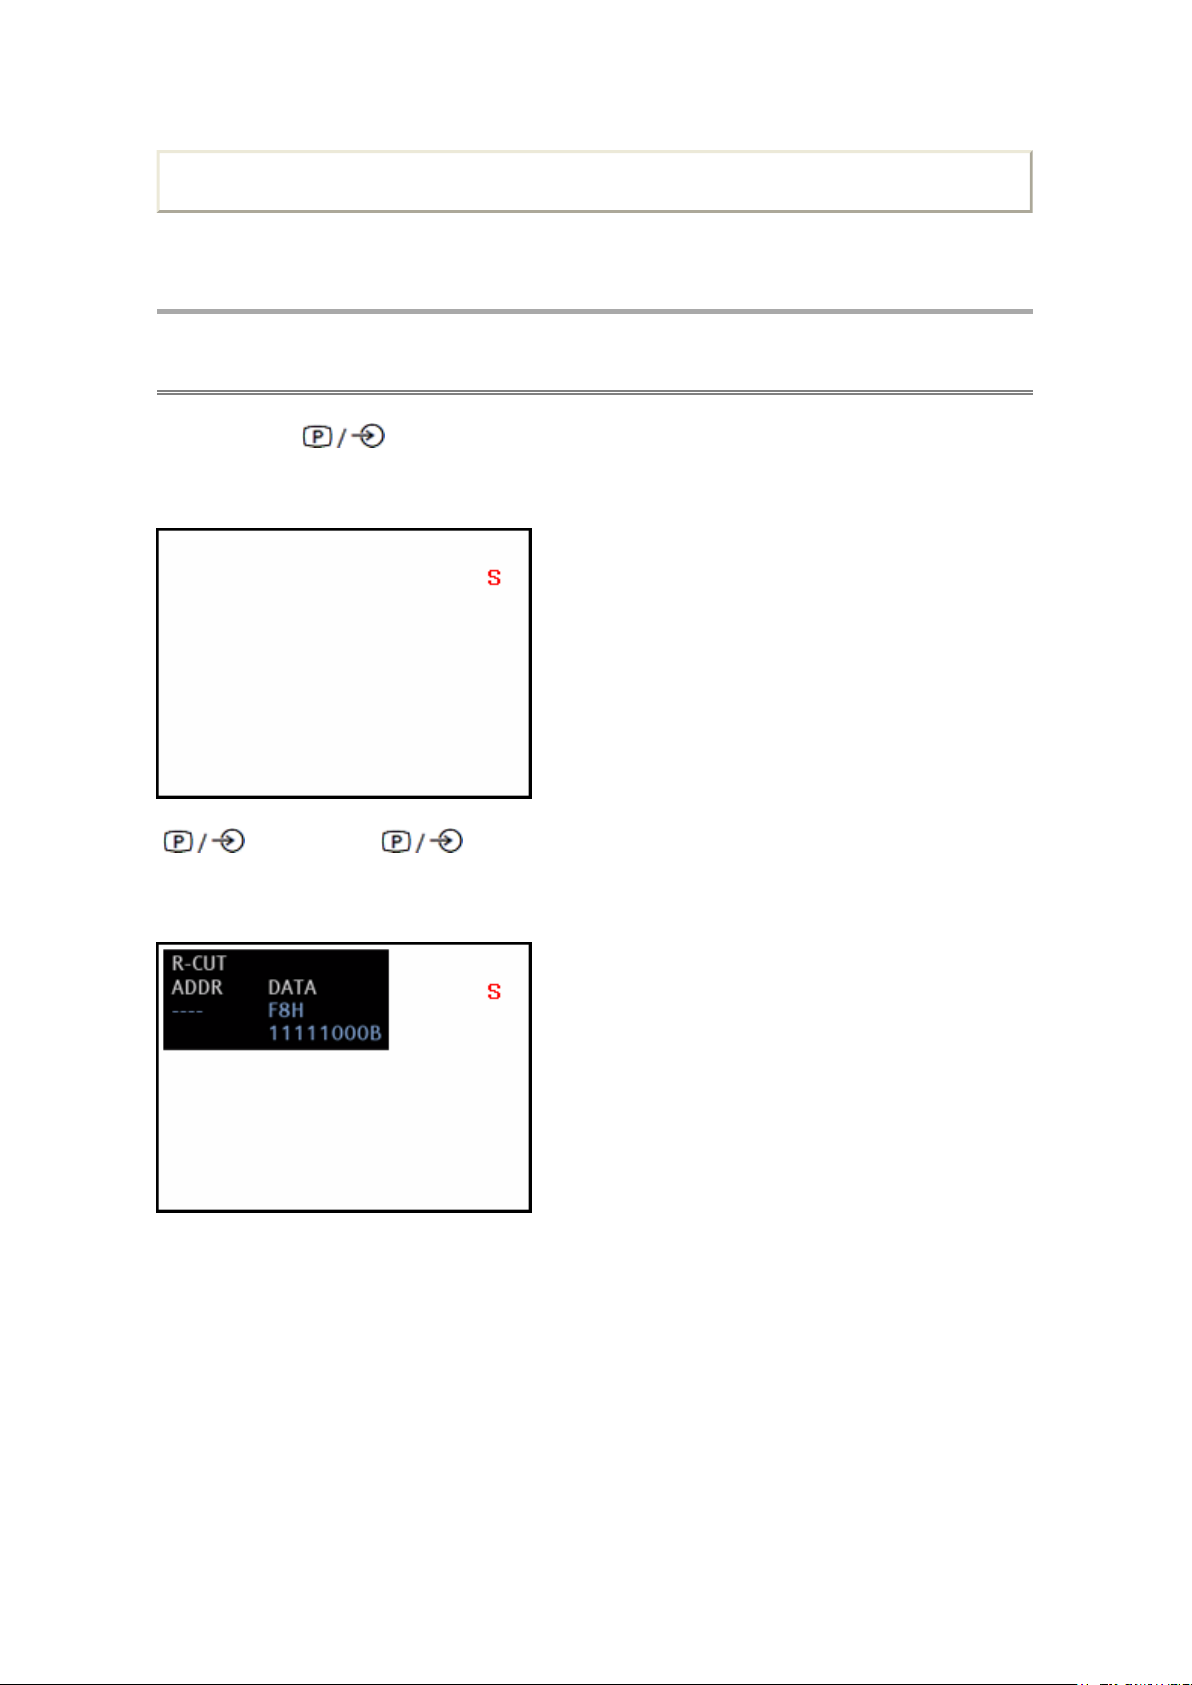
ADJUSTMENT
Service Mode
Displaying the Adjustment Menu
By pressing the button on TV control panel during Service Mode, Adjustment menu is
switched off/on.
Adjustment menu = Off
button
on control panel
Adjustment menu = ON
button
on control panel
TOSHIBA WEB-ZEUS
>> terms and conditions >> privacy policy
Copyright © 1995-2012 TOSHIBA Corporation, All Rights Reserved.
Print this page
Стр. 1 из 1TOSHIBA
03.11.2015
file://C:\Documents and Settings\Alexsandr\Local Settings\Temp\Rar$EXa0.869\TOS
...
ADJUSTMENT
Service Mode
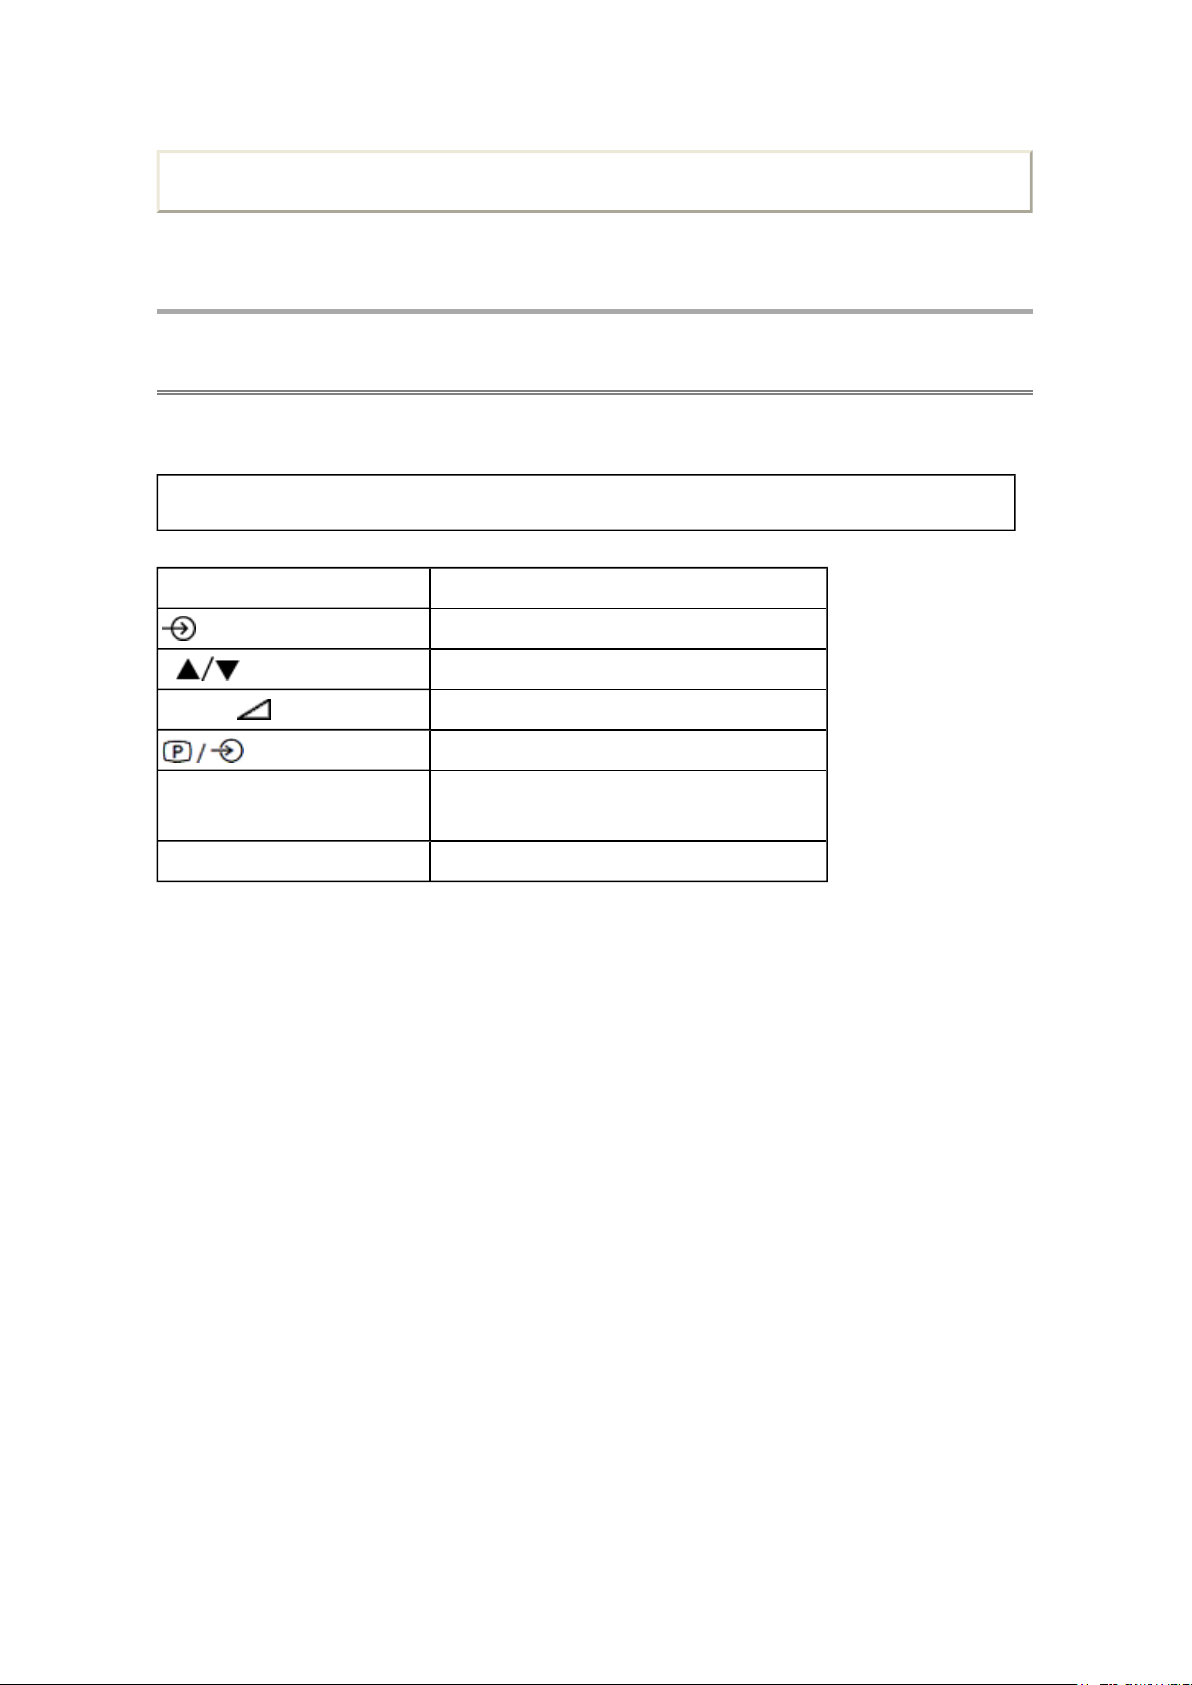
Key Function in the Service Mode
The following key entry during display of adjustment menu provides special functions.
CAUTION: Never try to perform initialization unless you have changed the memory IC.
Button Function
button (on Remote) Test signal selection
P (on Remote) Selection of the adjustment items
Volume +/− (on Remote) Change of the data value
button (on TV) Adjustment menu ON/OFF
7 button
9 button Self Check display ON/OFF
TOSHIBA WEB-ZEUS
Automatic A/D Adjustment
(PC, Component, Composite(PAL, NTSC))
>> terms and conditions >> privacy policy
Copyright © 1995-2012 TOSHIBA Corporation, All Rights Reserved.

Print this page
Стр. 1 из 1TOSHIBA
03.11.2015
file://C:\Documents and Settings\Alexsandr\Local Settings\Temp\Rar$EXa0.959\TOS
...
ADJUSTMENT
Service Mode
Selecting the Adjusting Items
While displaying the adjustment menu, press the P button to cycle through the adjustment
items in the order of table. (P button for reverse order)
TOSHIBA WEB-ZEUS
>> terms and conditions >> privacy policy
Copyright © 1995-2012 TOSHIBA Corporation, All Rights Reserved.

Print this page
Стр. 1 из 1TOSHIBA
03.11.2015
file://C:\Documents and Settings\Alexsandr\Local Settings\Temp\Rar$EXa0.130\TOS
...
ADJUSTMENT
Service Mode
Adjusting the Data
While displaying the adjustment menu, press the VOLUME +/− button to change the value of
data in the range from 00H to FFH. The variable range depends on the adjusting item.
TOSHIBA WEB-ZEUS
>> terms and conditions >> privacy policy
Copyright © 1995-2012 TOSHIBA Corporation, All Rights Reserved.

ADJUSTMENT
Стр. 1 из 1TOSHIBA
03.11.2015
file://C:\Documents and Settings\Alexsandr\Local Settings\Temp\Rar$EXa0.556\TOS
...
Service Mode
Exit from Service Mode
Press the POWER button once to turn off the TV.
Print this page
TOSHIBA WEB-ZEUS
>> terms and conditions >> privacy policy
Copyright © 1995-2012 TOSHIBA Corporation, All Rights Reserved.
Print this page
Стр. 1 из 1TOSHIBA
03.11.2015
file://C:\Documents and Settings\Alexsandr\Local Settings\Temp\Rar$EXa0.213\TOS
...
ADJUSTMENT
Service Mode
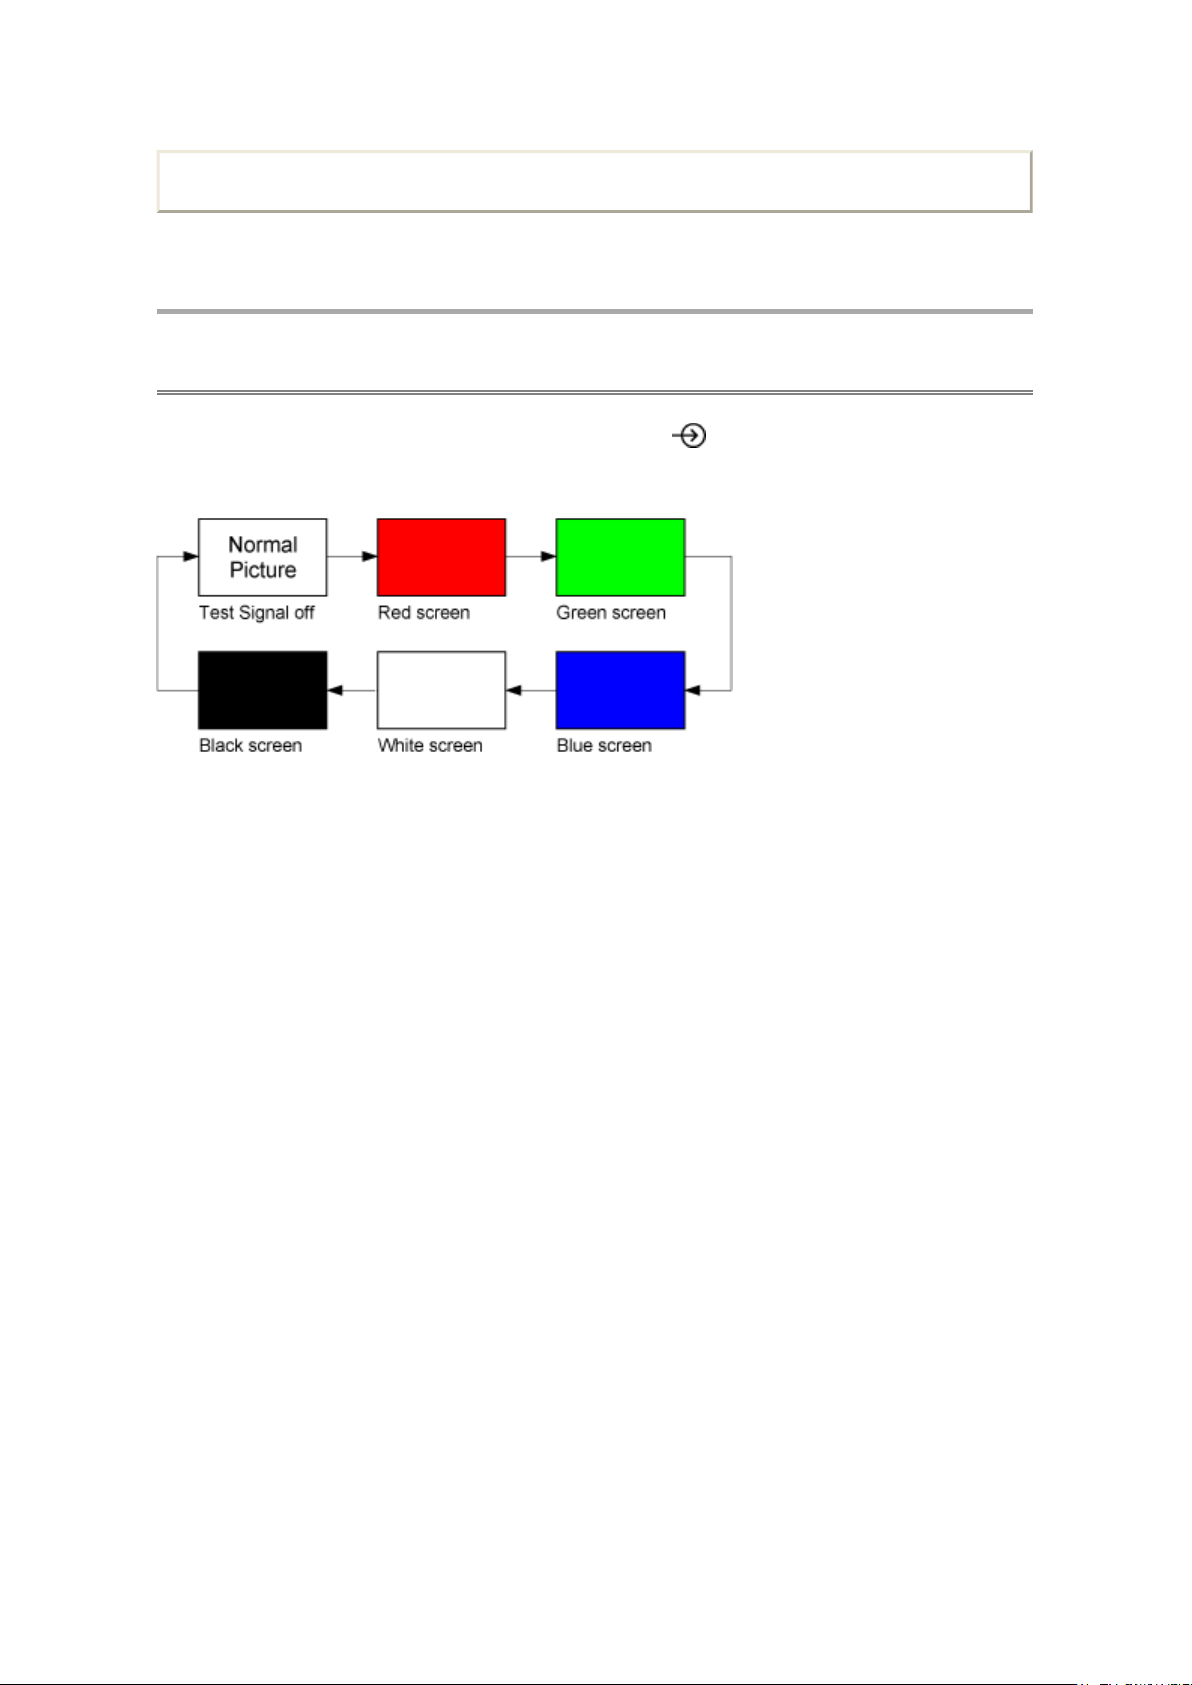
Test Signal Selection
While displaying the adjustment menu, every pressing of button on the Remote Control
changes the built-in test patterns on screen as described below.
TOSHIBA WEB-ZEUS
>> terms and conditions >> privacy policy
Copyright © 1995-2012 TOSHIBA Corporation, All Rights Reserved.
Print this page
For Service SW Upgrade in Successful
Стр. 1 из 1TOSHIBA
03.11.2015
file://C:\Documents and Settings\Alexsandr\Local Settings\Temp\Rar$EXa0.929\TOS
...
ADJUSTMENT
Service Mode
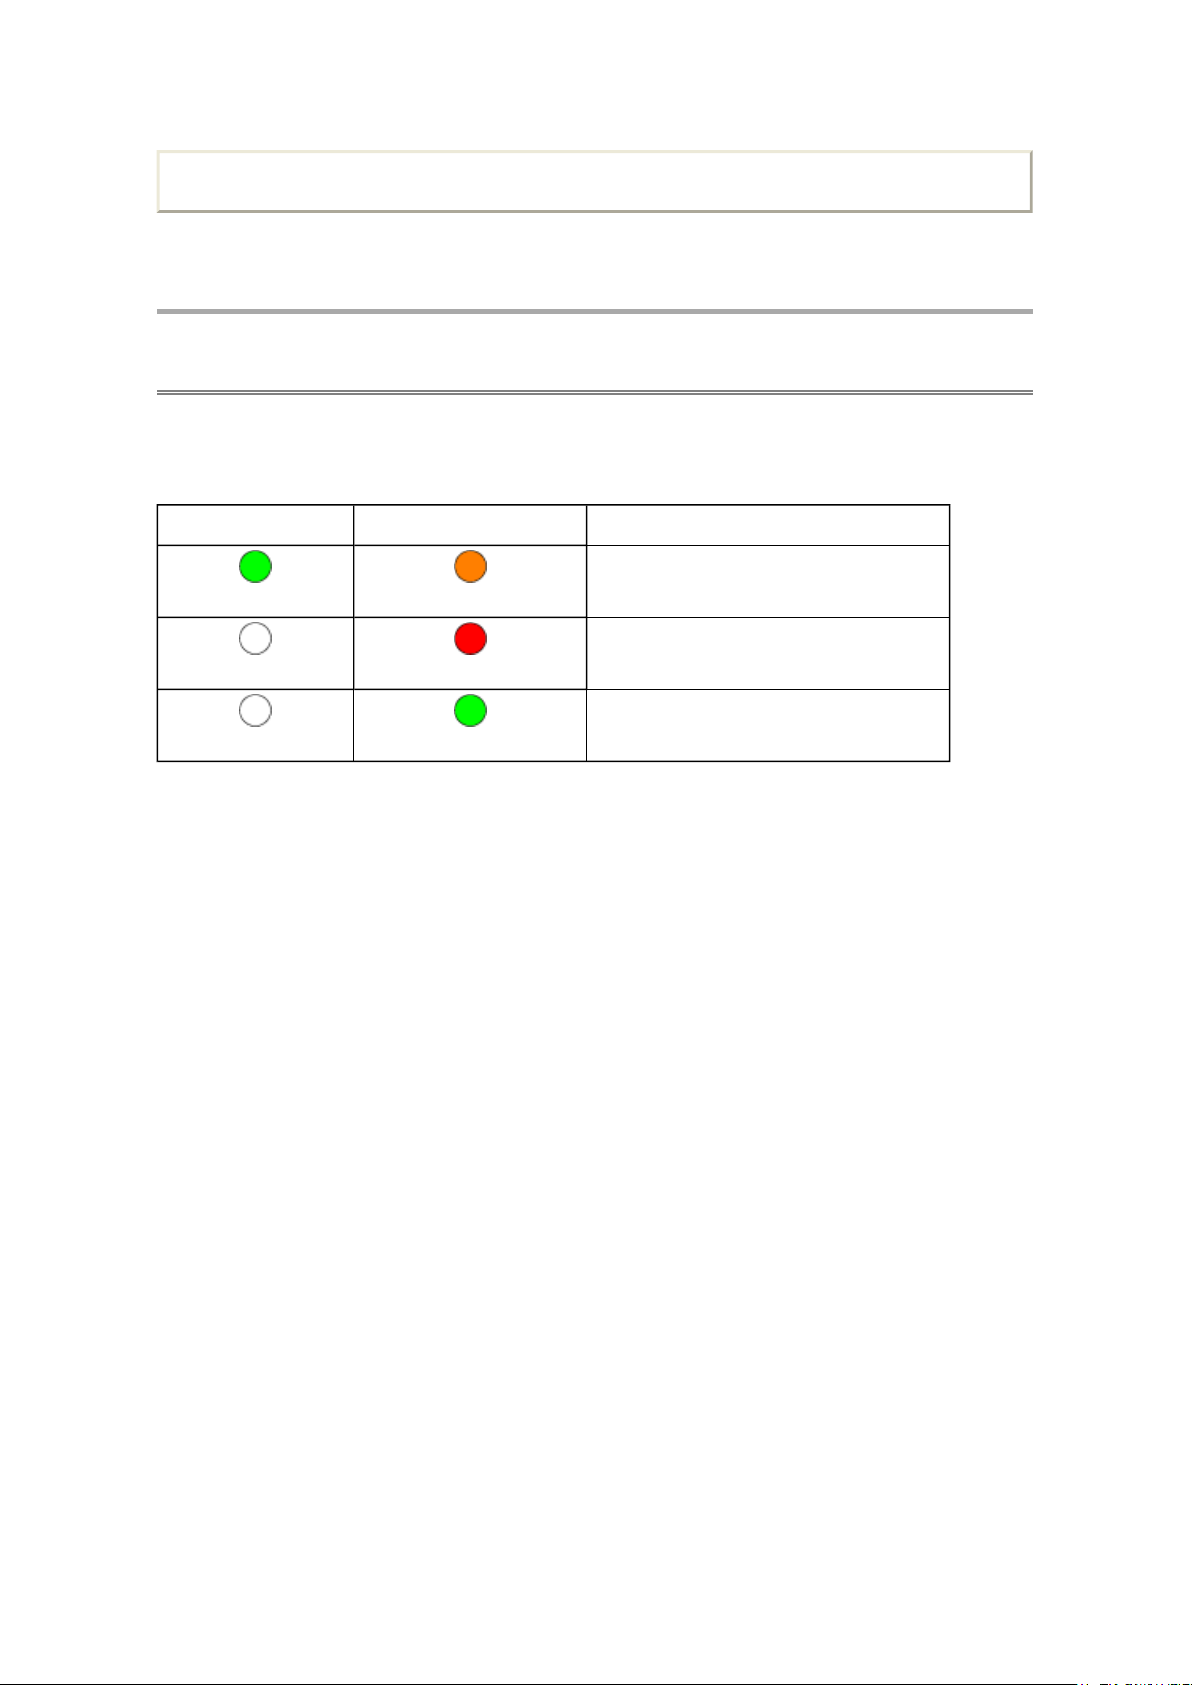
LED Indications
SW Upgrade and Error conditions indicated by the PowerOn/Standby and ProgrammeTimer
LEDs are described below.
ProgramTimer LED PowerOn/Standby LED
Green
Off
Off
Refer to the Owner's Manual about LED indications for general operations.
TOSHIBA WEB-ZEUS
Orange
Red
Green
>> terms and conditions >> privacy policy
Copyright © 1995-2012 TOSHIBA Corporation, All Rights Reserved.
For Service SW Upgrade in Progress
For Service SW Upgrade in Failed
ADJUSTMENT
Стр. 1 из 5TOSHIBA
03.11.2015
file://C:\Documents and Settings\Alexsandr\Local Settings\Temp\Rar$EXa0.703\TOS
...
Service Mode
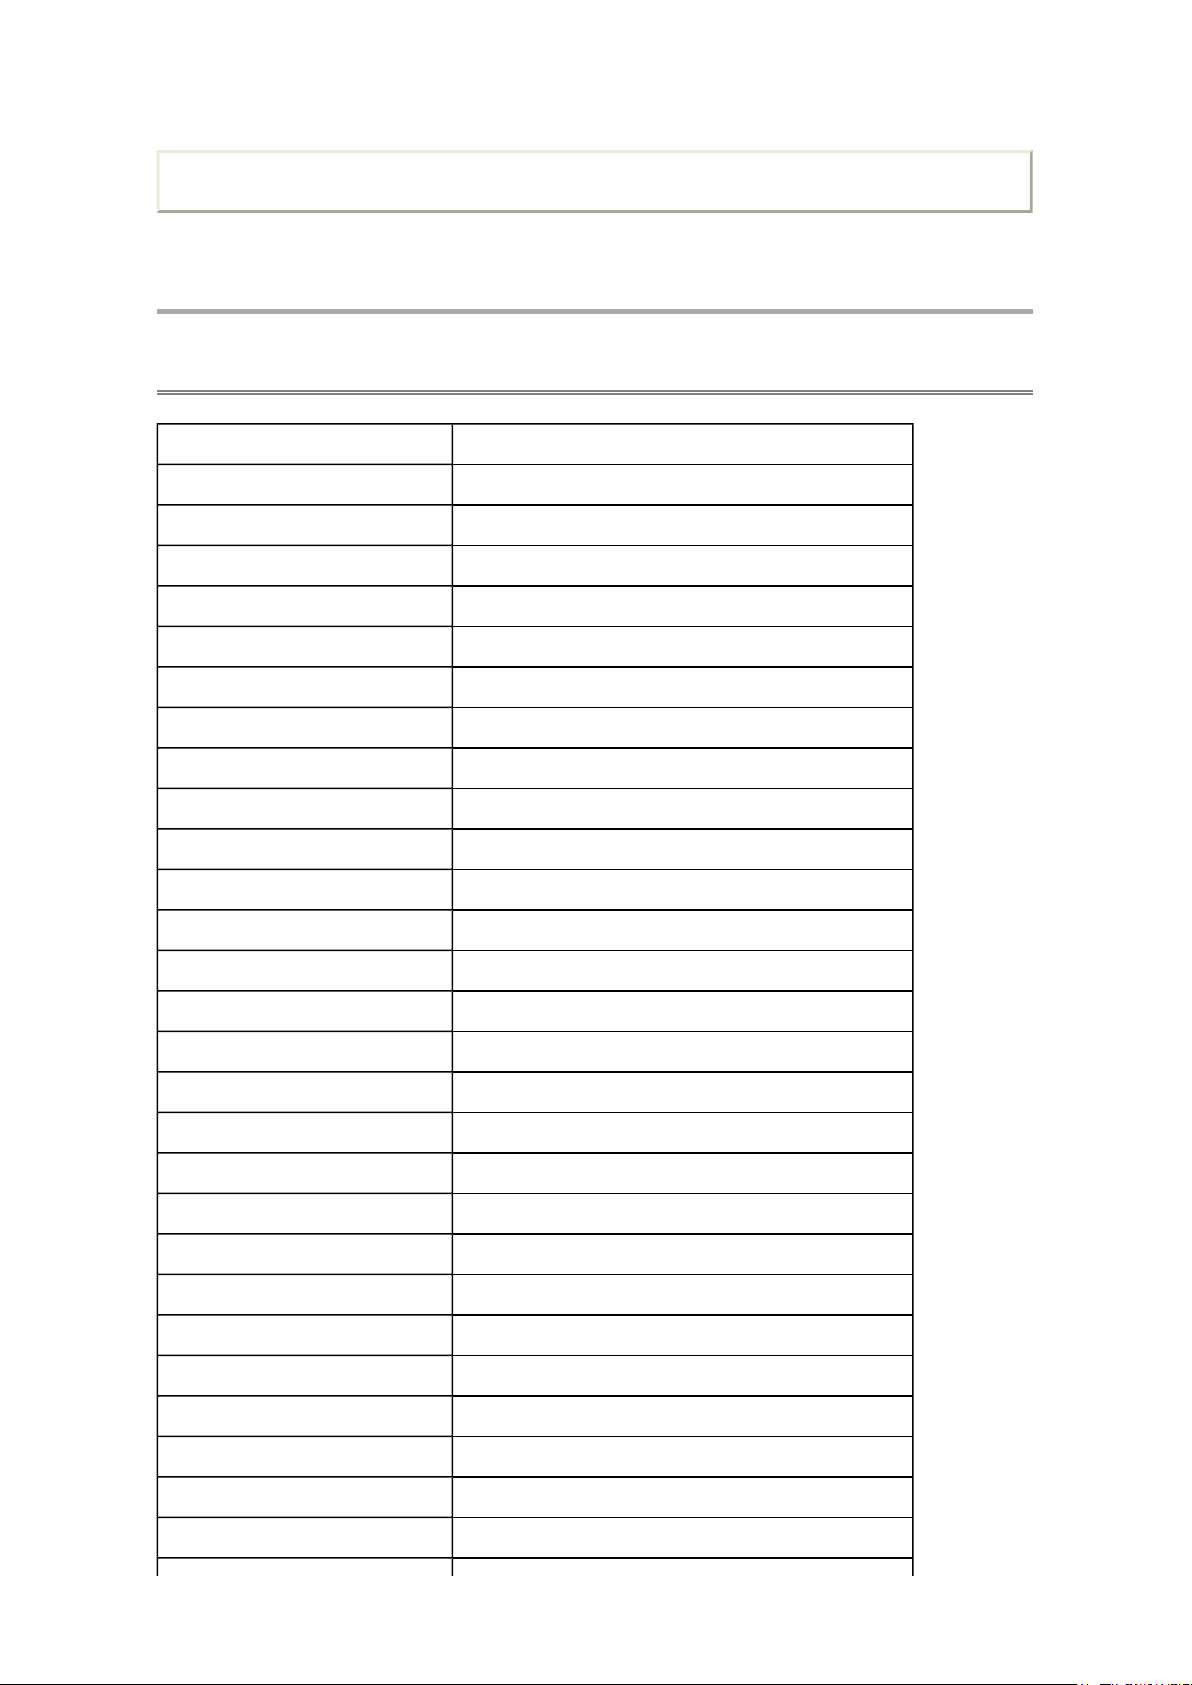
Adjusting Items in the Service Mode
Item Description
RCUT RED CUTOFF
GCUT GREEN CUTOFF
BCUT BLUE CUTOFF
RDRV RED DRIVE
GDRV GREEN DRIVE
BDRV BLUE DRIVE
Print this page
OSRC COOL R-CUTOFF-OFFSET for COOL
OSRC NATURAL R-CUTOFF-OFFSET for NATURAL
OSRC WARM R-CUTOFF-OFFSET for WARM
OSGC COOL G-CUTOFF-OFFSET for COOL
OSGC NATURAL G-CUTOFF-OFFSET for NATURAL
OSGC WARM G-CUTOFF-OFFSET for WARM
OSBC COOL B-CUTOFF-OFFSET for COOL
OSBC NATURAL B-CUTOFF-OFFSET for NATURAL
OSBC WARM B-CUTOFF-OFFSET for WARM
OSRD COOL R-DRIVE-OFFSET for COOL
OSRD NATURAL R-DRIVE-OFFSET for NATURAL
OSRD WARM R-DRIVE-OFFSET for WARM
OSGD COOL G-DRIVE-OFFSET for COOL
OSGD NATURAL G-DRIVE-OFFSET for NATURAL
OSGD WARM G-DRIVE-OFFSET for WARM
OSBD COOL B-DRIVE-OFFSET for COOL
OSBD NATURAL B-DRIVE-OFFSET for NATURAL
OSBD WARM B-DRIVE-OFFSET for WARM
OSRD 3D COOL R-DRIVE-OFFSET for COOL (3D)
OSRD 3D NATURAL R-DRIVE-OFFSET for NATURAL (3D)
OSRD 3D WARM R-DRIVE-OFFSET for WARM (3D)

OSGD 3D COOL
G-DRIVE
-
OFFSET for COOL (3D)
OSGD 3D NATURAL G-DRIVE-OFFSET for NATURAL (3D)
Стр. 2 из 5TOSHIBA
03.11.2015
file://C:\Documents and Settings\Alexsandr\Local Settings\Temp\Rar$EXa0.703\TOS
...
OSGD 3D WARM G-DRIVE-OFFSET for WARM (3D)
OSBD 3D COOL B-DRIVE-OFFSET for COOL (3D)
OSBD 3D NATURAL B-DRIVE-OFFSET for NATURAL (3D)
OSBD 3D WARM B-DRIVE-OFFSET for WARM (3D)
OPT1 OPTION DATA 1
OPT2 OPTION DATA 2
OPT3 OPTION DATA 3
OPT4 OPTION DATA 4
OPT5 OPTION DATA 5
OPT6 OPTION DATA 6
OPT7 OPTION DATA 7
OPT8 OPTION DATA 8
VOLUX VOLUM MAX
CNTX VIDEO CONTRAST MAX VIDEO
CNTX YPBPR HD CONTRAST MAX YPBPR HD
CNTX YPBPR SD CONTRAST MAX YPBPR SD
CNTX HDMI PC CONTRAST MAX HDMI PC
CNTX HDMI PC PC CONTRAST MAX HDMI PC PC
CNTX HDMI HD CONTRAST MAX HDMI HD
CNTX HDMI HD PC CONTRAST MAX HDMI HD PC
CNTX HDMI SD CONTRAST MAX HDMI SD
CNTX HDMI SD PC CONTRAST MAX HDMI SD PC
CNTX ATV CONTRAST MAX ATV
CNTX DTV CONTRAST MAX DTV
BRTC VIDEO DYNAMIC BRIGHTNESS CENTER VIDEO DYNAMIC
BRTC VIDEO STANDARD BRIGHTNESS CENTER VIDEO STANDARD
BRTC VIDEO MOVIE BRIGHTNESS CENTER VIDEO MOVIE
BRTC YPBPR HD DYNAMIC BRIGHTNESS CENTER YPBPR HD DYNAMIC
BRTC YPBPR HD STANDARD BRIGHTNESS CENTER YPBPR HD STANDARD
BRTC YPBPR HD MOVIE BRIGHTNESS CENTER YPBPR HD MOVIE
BRTC YPBPR SD DYNAMIC BRIGHTNESS CENTER YPBPR SD DYNAMIC
BRTC YPBPR SD STANDARD BRIGHTNESS CENTER YPBPR SD STANDARD
BRTC YPBPR SD MOVIE BRIGHTNESS CENTER YPBPR SD MOVIE
BRTC HDMI PC DYNAMIC BRIGHTNESS CENTER HDMI PC DYNAMIC

BRTC HDMI PC STANDARD
BRIGHTNESS CENTER HDMI PC STANDARD
BRTC HDMI PC MOVIE BRIGHTNESS CENTER HDMI PC MOVIE
Стр. 3 из 5TOSHIBA
03.11.2015
file://C:\Documents and Settings\Alexsandr\Local Settings\Temp\Rar$EXa0.703\TOS
...
BRTC HDMI PC PC BRIGHTNESS CENTER HDMI PC PC
BRTC HDMI HD DYNAMIC BRIGHTNESS CENTER HDMI HD DYNAMIC
BRTC HDMI HD STANDARD BRIGHTNESS CENTER HDMI HD STANDARD
BRTC HDMI HD MOVIE BRIGHTNESS CENTER HDMI HD MOVIE
BRTC HDMI HD PC BRIGHTNESS CENTER HDMI HD PC
BRTC HDMI SD DYNAMIC BRIGHTNESS CENTER HDMI SD DYNAMIC
BRTC HDMI SD STANDARD BRIGHTNESS CENTER HDMI SD STANDARD
BRTC HDMI SD MOVIE BRIGHTNESS CENTER HDMI SD MOVIE
BRTC HDMI SD PC BRIGHTNESS CENTER HDMI SD PC
BRTC ATV DYNAMIC BRIGHTNESS CENTER ATV DYNAMIC
BRTC ATV STANDARD BRIGHTNESS CENTER ATV STANDARD
BRTC ATV MOVIE BRIGHTNESS CENTER ATV MOVIE
BRTC DTV DYNAMIC BRIGHTNESS CENTER DTV DYNAMIC
BRTC DTV STANDARD BRIGHTNESS CENTER DTV STANDARD
BRTC DTV MOVIE BRIGHTNESS CENTER DTV MOVIE
COLC VIDEO DYNA COLOR CENTER VIDEO DYNA
COLC VIDEO STANDARD COLOR CENTER VIDEO STANDARD
COLC VIDEO MOVIE COLOR CENTER VIDEO MOVIE
COLC YPBPR HD DYNAMIC COLOR CENTER YPBPR HD DYNAMIC
COLC YPBPR HD STANDARD COLOR CENTER YPBPR HD STANDARD
COLC YPBPR HD MOVIE COLOR CENTER YPBPR HD MOVIE
COLC YPBPR SD DYNAMIC COLOR CENTER YPBPR SD DYNAMIC
COLC YPBPR SD STANDARD COLOR CENTER YPBPR SD STANDARD
COLC YPBPR SD MOVIE COLOR CENTER YPBPR SD MOVIE
COLC PC DYNAMIC COLOR CENTER PC DYNAMIC
COLC PC STANDARD COLOR CENTER PC STANDARD
COLC PC MOVIE COLOR CENTER PC MOVIE
COLC PC PC COLOR CENTER PC PC
COLC HDMI HD DYNAMIC COLOR CENTER HDMI HD DYNAMIC
COLC HDMI HD STANDARD COLOR CENTER HDMI HD STANDARD
COLC HDMI HD MOVIE COLOR CENTER HDMI HD MOVIE
COLC HDMI HD PC COLOR CENTER HDMI HD PC
COLC HDMI SD DYNAMIC COLOR CENTER HDMI SD DYNAMIC
COLC HDMI SD STANDARD COLOR CENTER HDMI SD STANDARD
COLC HDMI SD MOVIE COLOR CENTER HDMI SD MOVIE

COLC HDMI SD PC COLOR CENTER HDMI SD PC
Стр. 4 из 5TOSHIBA
03.11.2015
file://C:\Documents and Settings\Alexsandr\Local Settings\Temp\Rar$EXa0.703\TOS
...
COLC ATV DYNAMIC COLOR CENTER ATV DYNAMIC
COLC ATV STANDARD COLOR CENTER ATV STANDARD
COLC ATV MOVIE COLOR CENTER ATV MOVIE
COLC DTV DYNAMIC COLOR CENTER DTV DYNAMIC
COLC DTV STANDARD COLOR CENTER DTV STANDARD
COLC DTV MOVIE COLOR CENTER DTV MOVIE
UVTT VIDEO DYNAMIC TINT CENTER VIDEO DYNAMIC
UVTT VIDEO STANDARD TINT CENTER VIDEO STANDARD
UVTT VIDEO MOVIE TINT CENTER VIDEO MOVIE
UVTT YPBPR HD DYNAMIC TINT CENTER YPBPR HD DYNAMIC
UVTT YPBPR HD STANDARD TINT CENTER YPBPR HD STANDARD
UVTT YPBPR HD MOVIE TINT CENTER YPBPR HD MOVIE
UVTT YPBPR SD DYNAMIC TINT CENTER YPBPR SD DYNAMIC
UVTT YPBPR SD STANDARD TINT CENTER YPBPR SD STANDARD
UVTT YPBPR SD MOVIE TINT CENTER YPBPR SD MOVIE
UVTT HDMI PC DYNAMIC TINT CENTER HDMI PC DYNAMIC
UVTT HDMI PC STANDARD TINT CENTER HDMI PC STANDARD
UVTT HDMI PC MOVIE TINT CENTER HDMI PC MOVIE
UVTT HDMI PC PC TINT CENTER HDMI PC PC
UVTT HDMI HD DYNAMIC TINT CENTER HDMI HD DYNAMIC
UVTT HDMI HD STANDARD TINT CENTER HDMI HD STANDARD
UVTT HDMI HD MOVIE TINT CENTER HDMI HD MOVIE
UVTT HDMI HD PC TINT CENTER HDMI HD PC
UVTT HDMI SD DYNAMIC TINT CENTER HDMI SD DYNAMIC
UVTT HDMI SD STANDARD TINT CENTER HDMI SD STANDARD
UVTT HDMI SD MOVIE TINT CENTER HDMI SD MOVIE
UVTT HDMI SD PC TINT CENTER HDMI SD PC
UVTT ATV DYNAMIC TINT CENTER ATV DYNAMIC
UVTT ATV STANDARD TINT CENTER ATV STANDARD
UVTT ATV MOVIE TINT CENTER ATV MOVIE
UVTT DTV DYNAMIC TINT CENTER DTV DYNAMIC
UVTT DTV STANDARD TINT CENTER DTV STANDARD
UVTT DTV MOVIE TINT CENTER DTV MOVIE
SHPC VIDEO DYNAMIC SHARPNESS CENTER VIDEO DYNAMIC
SHPC VIDEO STANDARD SHARPNESS CENTER VIDEO STANDARD

SHPC VIDEO MOVIE SHARPNESS CENTER VIDEO MOVIE
Стр. 5 из 5TOSHIBA
03.11.2015
file://C:\Documents and Settings\Alexsandr\Local Settings\Temp\Rar$EXa0.703\TOS
...
SHPC YPBPR HD DYNAMIC SHARPNESS CENTER YPBPR HD DYNAMIC
SHPC YPBPR HD STANDARD SHARPNESS CENTER YPBPR HD STANDARD
SHPC YPBPR HD MOVIE SHARPNESS CENTER YPBPR HD MOVIE
SHPC YPBPR SD DYNAMIC SHARPNESS CENTER YPBPR SD DYNAMIC
SHPC YPBPR SD STANDARD SHARPNESS CENTER YPBPR SD STANDARD
SHPC YPBPR SD MOVIE SHARPNESS CENTER YPBPR SD MOVIE
SHPC HDMI PC DYNAMIC SHARPNESS CENTER HDMI PC DYNAMIC
SHPC HDMI PC STANDARD SHARPNESS CENTER HDMI PC STANDARD
SHPC HDMI PC MOVIE SHARPNESS CENTER HDMI PC MOVIE
SHPC HDMI PC PC SHARPNESS CENTER HDMI PC PC
SHPC HDMI HD DYNAMIC SHARPNESS CENTER HDMI HD DYNAMIC
SHPC HDMI HD STANDARD SHARPNESS CENTER HDMI HD STANDARD
SHPC HDMI HD MOVIE SHARPNESS CENTER HDMI HD MOVIE
SHPC HDMI HD PC SHARPNESS CENTER HDMI HD PC
SHPC HDMI SD DYNAMIC SHARPNESS CENTER HDMI SD DYNAMIC
SHPC HDMI SD STANDARD SHARPNESS CENTER HDMI SD STANDARD
SHPC HDMI SD MOVIE SHARPNESS CENTER HDMI SD MOVIE
SHPC HDMI SD PC SHARPNESS CENTER HDMI SD PC
SHPC ATV DYNAMIC SHARPNESS CENTER ATV DYNAMIC
SHPC ATV STANDARD SHARPNESS CENTER ATV STANDARD
SHPC ATV MOVIE SHARPNESS CENTER ATV MOVIE
SHPC DTV DYNAMIC SHARPNESS CENTER DTV DYNAMIC
SHPC DTV STANDARD SHARPNESS CENTER DTV STANDARD
SHPC DTV MOVIE SHARPNESS CENTER DTV MOVIE
TOSHIBA WEB-ZEUS
>> terms and conditions >> privacy policy
Copyright © 1995-2012 TOSHIBA Corporation, All Rights Reserved.
Print this page
Стр. 1 из 4TOSHIBA
03.11.2015
file://C:\Documents and Settings\Alexsandr\Local Settings\Temp\Rar$EXa0.650\TOS
...
ADJUSTMENT
Service Mode
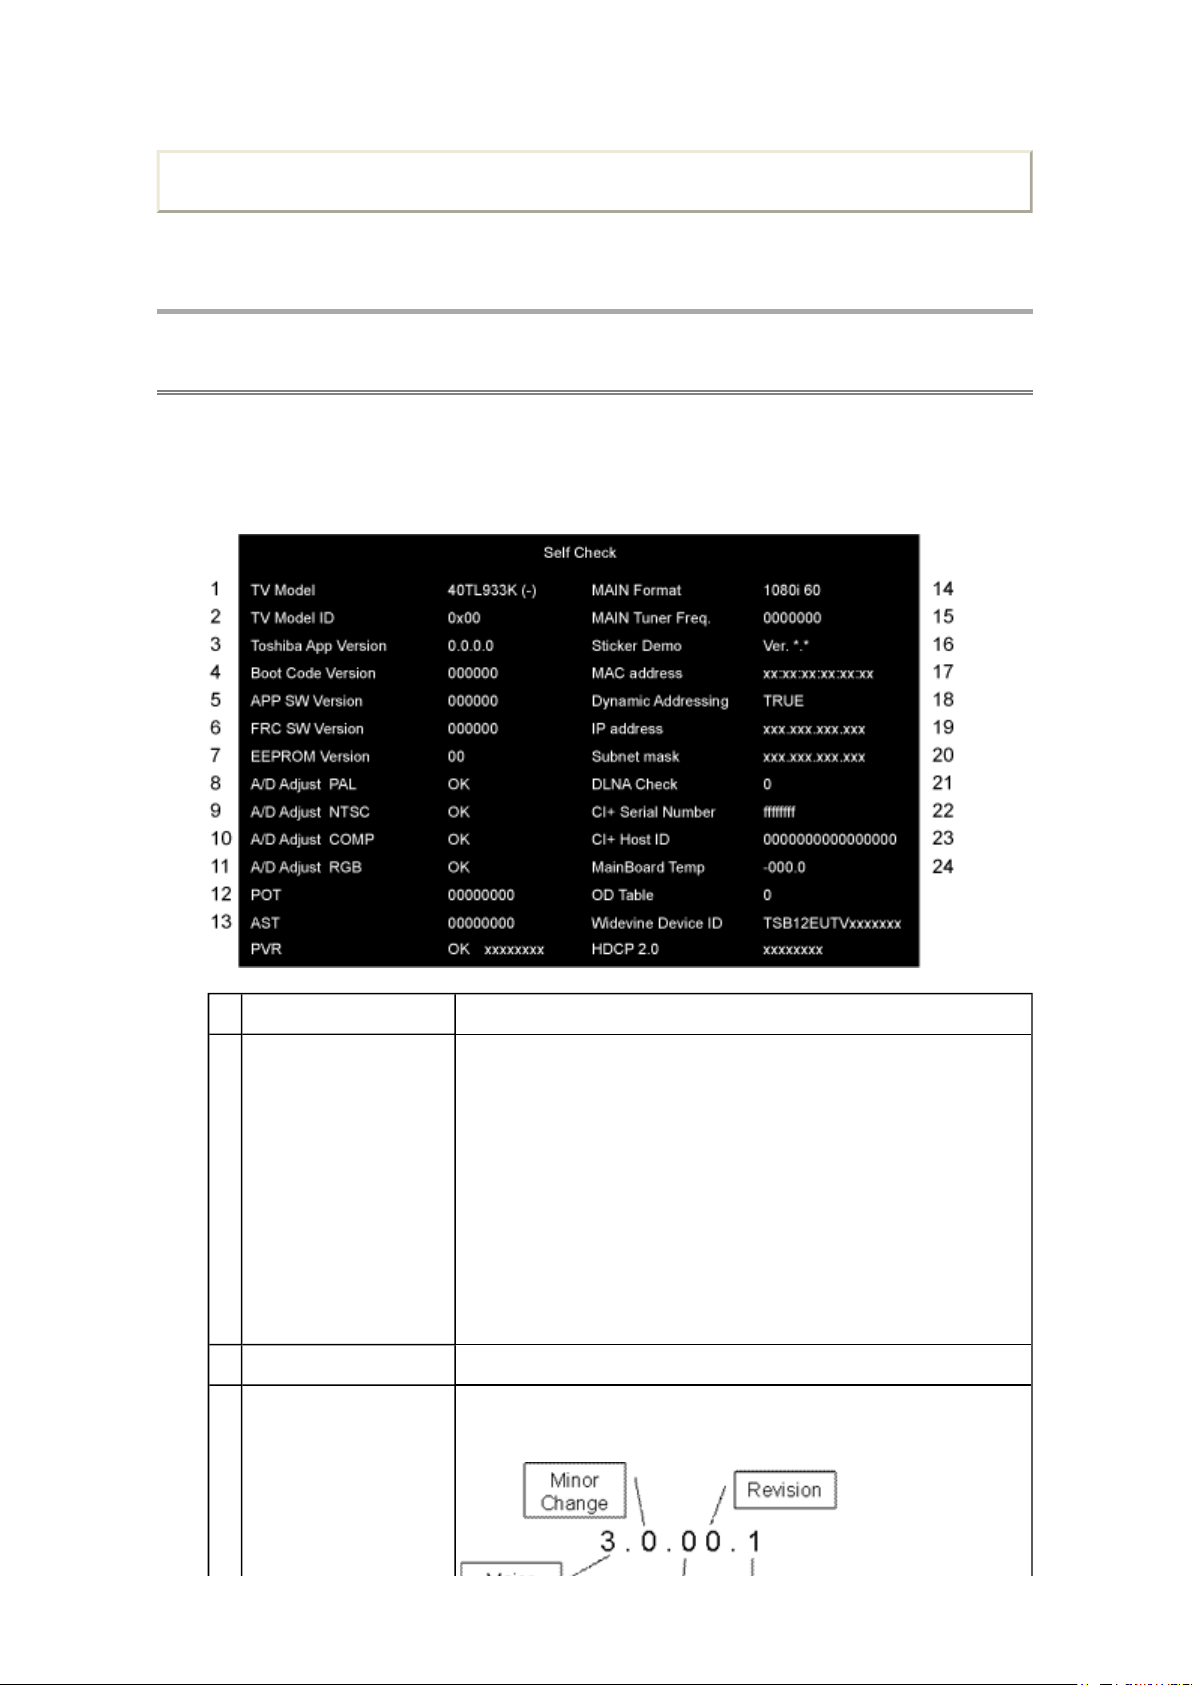
Self Check
1. "Self Check" screen is shown by pressing "9" button on Remote Control during display of
Adjustment menu in the service mode.
2. The size of characters in "Self Check" screen should be same as the user menu.
1 TV Model Model name, Panel vender and Shipout
2 TV Model ID No function of this change.
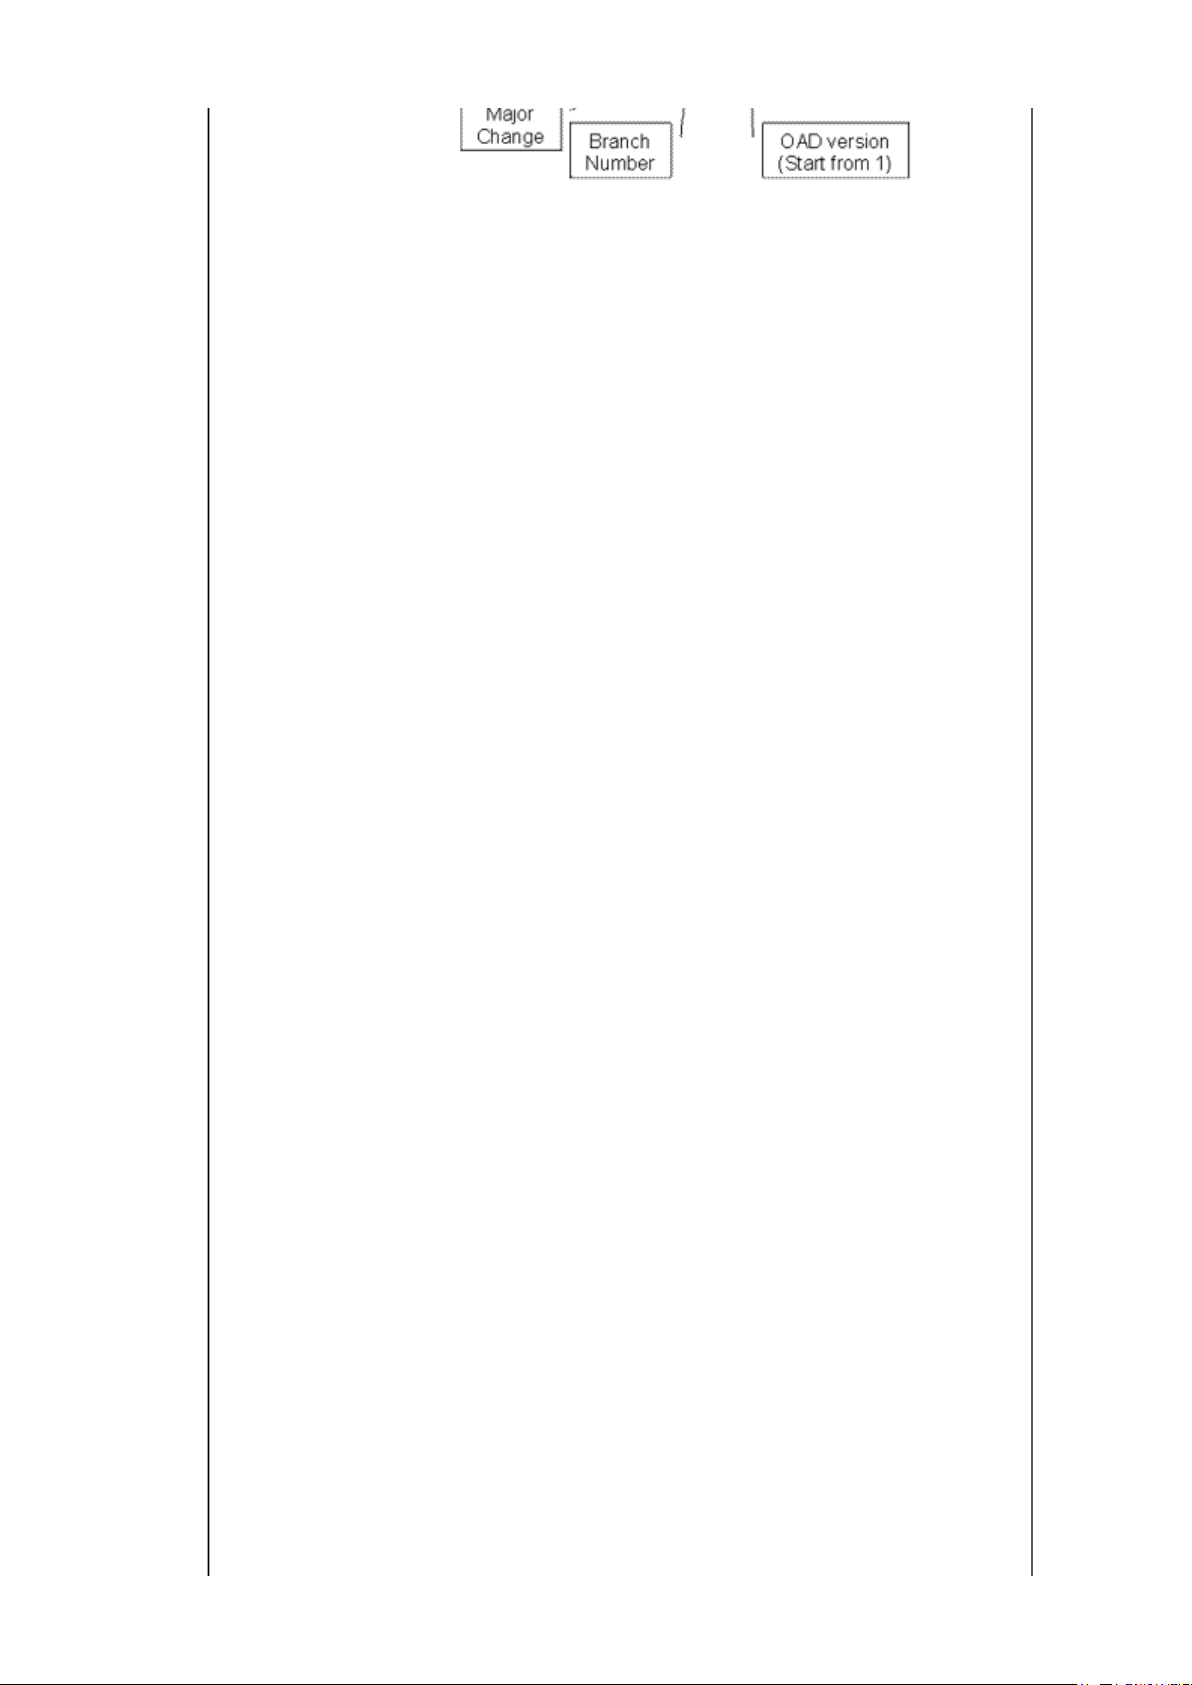
3 Toshiba App Version This version corresponds to APP SW Version, but the
Item Explanation/Data Format
Panel vender
K : SAMSUNG A : AUO L : LGD C:CMI
Shipout
B : UK F : France G : Continental R : Russia N : Nordic
[Example]
TV Model 40TL933K (B)
If any shipout code has not been received, then (-) shall be
shown for Shipout.
Shipout will be implemented in running change.
depiction is different. The naming rule is as follows.
4 Boot Code Version Version information of boot code.
A/D adjustment is not needed because the picture format
A/D adjustment is not needed because the picture format
A/D adjustment is not needed because the picture format
A/D adjustment is not needed because the picture format
displayed if no PVR key is written. "ecbb4b55" represents the
Стр. 2 из 4TOSHIBA
03.11.2015
file://C:\Documents and Settings\Alexsandr\Local Settings\Temp\Rar$EXa0.650\TOS
...
5 APP SW Version Version information of Application SW.
6 FRC SW Version Version information of FRC SW.
7 EEPROM Version Version information of EEPROM data.
Display 1 byte data. (Hex)
8 A/D Adjust PAL A/D adjustment status for PAL signal
OK : A/D adjustment is set correctly.
NG : A/D adjustment is not set correctly.
— :
is not used.
9 A/D Adjust NTSC A/D adjustment status for NTSC signal
OK : A/D adjustment is set correctly.
NG : A/D adjustment is not set correctly.
— :
is not used.
10 A/D Adjust COMP A/D adjustment status for Component input
OK : A/D adjustment is set correctly.
NG : A/D adjustment is not set correctly.
— :
is not used.
11 A/D Adjust RGB A/D adjustment status for SCART and PC input
OK : A/D adjustment is set correctly.
NG : A/D adjustment is not set correctly.
— :
is not used.
12 POT (Power On Time) Total time the TV has been powered on. (Unit: Hours)
(Decimal)
Stand by mode (AC is on, but Panel is off) is not included.
The value is reset to 0 only when receiving the ship out code.
After power on, count up when 1 hour passed.
No need to memory the 0-59 minutes.
13 AST (AC Supply time) Total time the TV has been plugged in. (Unit: Hours) (Decimal)
Stand by mode (AC is on, but Panel is off) is included.
Others are same as POT
PVR The status of PVR key.
CRC is used to judge whether the PVR key is valid, or invalid.
If a valid PVR key is written in the set, then "OK xxxxxxxx"
shall be displayed. "xxxxxxxx" represents CRC.
If an invalid PVR key is written in the set, then "NG xxxxxxxx"
shall be displayed.
The default PVR key is invalid, so "NG ecbb4b55" shall be

displayed if no PVR key is written. "ecbb4b55" represents the
CRC for the default PVR key.
"FFFFFFFF", so "FFFFFFFF NG" is displayed if no key is
Стр. 3 из 4TOSHIBA
03.11.2015
file://C:\Documents and Settings\Alexsandr\Local Settings\Temp\Rar$EXa0.650\TOS
...
14 MAIN Format Video Format Information
15 MAIN Tuner Freq. Displays tuned frequency (Unit: kHz) (Decimal)
16 Sticker Demo Version information of Sticker Demo data
17 MAC address Media Access Control (MAC) address.
Display is in the format: xx:xx:xx:xx:xx:xx (Hex)
18 Dynamic Addressing Status of Dynamic Host Configuration Protocol (DHCP)
Configuration.
TRUE: IP address will be automatically configured if the TV is
connected to a network that supports DHCP
false : IP address must be manually set to a static IP address
19 IP address Current Internet Protocol (IP) address.
Display *.*.*.* format (* is decimal)
20 Subnet mask Current Subnet Mask.
Display *.*.*.* format (* is decimal)
21 DLNA Check Total Number of Successful DLNA factory tests. (Decimal)
22 CI+ Serial Number Serial Number of CI+ data
Display 4 byte data.(Hex)
23 CI+ Host ID Host ID of CI+
Display 8 byte data.(Hex)
24 MainBoard Temp Temperature of MainBoard
The value from temperature sensor.
Display -040.0−125.0 (Decimal)
OD TABLE Status of temperature compensation control for 3D cross talk
of the panel. This item is only displayed for TL933/963.
Display 0 ~ 3 (Decimal)
Widevine Device ID Device ID which used by Widevine.
CRC is used to judge whether Widevine key is valid or invalid.
If a valid Widevine key is written in the set, then the Device ID
shall be displayed with 16 ASCII codes.
If an invalid Widevine key is written in the set, then 16 ASCII
codes of the Device ID and "NG" shall be displayed.
The default Widevine key is invalid. "---------------- NG" is
displayed if no Widevine key is written.
HDCP 2.0 Serial number for HDCP2.0.
CRC is used to judge whether HDCP2.0 key is valid, or
invalid.
If a valid HDCP2.0 key is written in the set, then the serial
number shall be displayed with 8 hexadecimal digits.
If an invalid HDCP2.0 key is written in the set, then 8
hexadecimal digits of the serial number and "NG" shall be
displayed.
The default key is invalid and the serial number is

"FFFFFFFF", so "FFFFFFFF NG" is displayed if no key is
written.
Стр. 4 из 4TOSHIBA
03.11.2015
file://C:\Documents and Settings\Alexsandr\Local Settings\Temp\Rar$EXa0.650\TOS
...
TOSHIBA WEB-ZEUS
>> terms and conditions >> privacy policy
Copyright © 1995-2012 TOSHIBA Corporation, All Rights Reserved.

Print this page
Стр. 1 из 4TOSHIBA
03.11.2015
file://C:\Documents and Settings\Alexsandr\Local Settings\Temp\Rar$EXa0.071\TOS
...
ADJUSTMENT
Service Mode
Initialization of Main PCB
Whenever replacing the Defective Main Board with new one, perform the Model ID installation.
< Models >
32/40/46TL933, 32/40/46TL936, 32/40/46TL963, 32/40/46TL966, 32/40/46UL975,
23/32/40RL933, 23/32/40RL936, 23/32/40SL970, 32/40RL953, 42/47/55VL963, 42/47/55XL975,
40/46ML933
Model ID Installation
< Preparation >
Copy the required Model ID file on USB according to the model.
The Model ID files are uploaded on the CP-Portal.
Model name Part# for Main Board Model ID setting file
32TL933 G/F
40TL933 G/F 40TL933K_xxxxxx_WOAP.bin
46TL933 G/F 46TL933K_xxxxxx_WOAP.bin
32TL936 G 32TL933K_xxxxxx_WOAP.bin
32TL933K_xxxxxx_WOAP.bin
32TL933C_xxxxxx_WOAP.bin
40TL933C_xxxxxx_WOAP.bin
46TL933A_xxxxxx_WOAP.bin
75028636
32TL933C_xxxxxx_WOAP.bin
40TL936 G 40TL933K_xxxxxx_WOAP.bin
40TL933C_xxxxxx_WOAP.bin
46TL936 G 46TL933K_xxxxxx_WOAP.bin
46TL933A_xxxxxx_WOAP.bin
32TL963 G/B/N
40TL963 G/B/N 40TL963K_xxxxxx_WOAP.bin
46TL963 G/B/N 46TL963K_xxxxxx_WOAP.bin
32TL966 G/B/N 32TL963K_xxxxxx_WOAP.bin
40TL966 G/B/N 40TL963K_xxxxxx_WOAP.bin
32TL963K_xxxxxx_WOAP.bin
32TL963C_xxxxxx_WOAP.bin
40TL963C_xxxxxx_WOAP.bin
46TL963A_xxxxxx_WOAP.bin
32TL963C_xxxxxx_WOAP.bin

75028637
40TL963C_xxxxxx_WOAP.bin
Стр. 2 из 4TOSHIBA
03.11.2015
file://C:\Documents and Settings\Alexsandr\Local Settings\Temp\Rar$EXa0.071\TOS
...
46TL966 G/B/N 46TL963K_xxxxxx_WOAP.bin
46TL963A_xxxxxx_WOAP.bin
32UL975 G 32TL963K_xxxxxx_WOAP.bin
32TL963C_xxxxxx_WOAP.bin
40UL975 G 40TL963K_xxxxxx_WOAP.bin
40TL963C_xxxxxx_WOAP.bin
46UL975 G 46TL963K_xxxxxx_WOAP.bin
46TL963A_xxxxxx_WOAP.bin
23RL933 G/F/B/N
23RL936 G 23RL933L_xxxxxx_WOAP.bin
23SL970 G 23RL933L_xxxxxx_WOAP.bin
32RL933 G/F
40RL933 G/F 40RL933K_xxxxxx_WOAP.bin
32RL936 G 32RL933K_xxxxxx_WOAP.bin
40RL936 G 40RL933K_xxxxxx_WOAP.bin
32SL970 G 32RL933K_xxxxxx_WOAP.bin
40SL970 G 40RL933K_xxxxxx_WOAP.bin
32RL953 B/N
40RL953 B/N 40RL953K_xxxxxx_WOAP.bin
32TL933RB
40TL933RB 40TL933K_xxxxxx_WOAP.bin
75028638
75028639
75028640
23RL933L_xxxxxx_WOAP.bin
32RL933K_xxxxxx_WOAP.bin
32RL953K_xxxxxx_WOAP.bin
32TL933K_xxxxxx_WOAP.bin
32TL933C_xxxxxx_WOAP.bin
40TL933C_xxxxxx_WOAP.bin
46TL933RB 46TL933K_xxxxxx_WOAP.bin
40ML933RB 40TL933K_xxxxxx_WOAP.bin
46ML933RB 46TL933K_xxxxxx_WOAP.bin
23RL933RB 75030077 23RL933L_xxxxxx_WOAP.bin
32RL933RB
40RL933RB 40RL933K_xxxxxx_WOAP.bin
42VL963B
47VL963B 47VL963L_xxxxxx_WOAP.bin
55VL963B 55VL963L_xxxxxx_WOAP.bin
42VL963 G/R/F/N 42VL963L_xxxxxx_WOAP.bin
47VL963 G/R/F/N 47VL963L_xxxxxx_WOAP.bin
75030075
75030076
75030016
46TL933A_xxxxxx_WOAP.bin
40TL933C_xxxxxx_WOAP.bin
46TL933A_xxxxxx_WOAP.bin
32RL933K_xxxxxx_WOAP.bin
42VL963L_xxxxxx_WOAP.bin
75030017
55VL963 G/R/F/N
55VL963L_xxxxxx_WOAP.bin
Стр. 3 из 4TOSHIBA
03.11.2015
file://C:\Documents and Settings\Alexsandr\Local Settings\Temp\Rar$EXa0.071\TOS
...
42XL975 G 42VL963L_xxxxxx_WOAP.bin
47XL975 G 47VL963L_xxxxxx_WOAP.bin
55XL975 G 55VL963L_xxxxxx_WOAP.bin
For some models, there are 2 types depending on panel.
K: Samsung, C: CMO, A: AUO, L: LG
For those models, 2 kinds of Model ID setting file are prepared.
"xxxxxx" represents Application Version.
< Procedure >
1. Turn power on and then unplug the AC power.
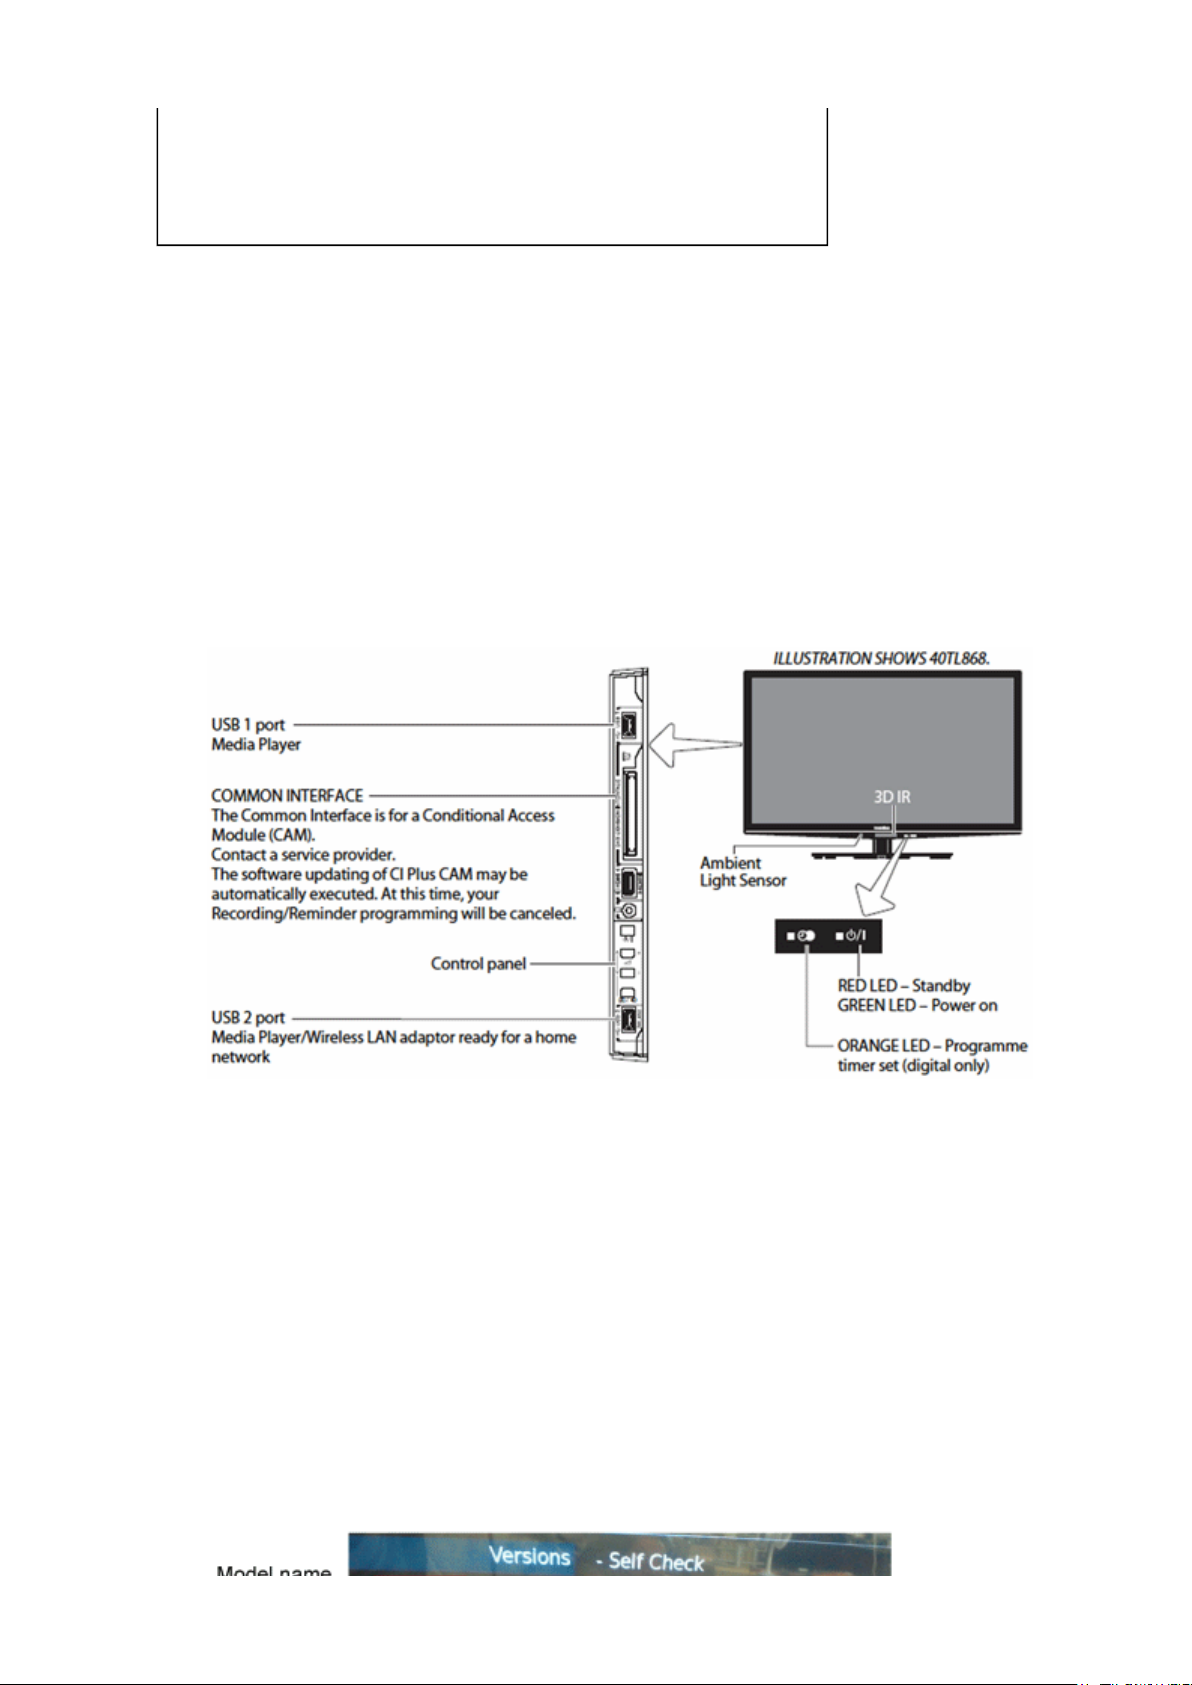
2. The USB reader is located on the left or light of the cabinet near the side control/jack
assembly as shown figure1.
Figure.1
3. Insert "USB drive" containing the Model ID into the USB slot.
4. Plug the AC.
5. The installation of Model ID will be automatically commenced.
while the installation of Model ID, no indication will appear.
Note:
6. After about 60 seconds, unplug the AC connector.
7. Remove the USB drive form USB slot of the TV.
8. To check the Model ID version, press the "Menu" button on the remote controller and go
"SET UP" and "System information" in sequence.
9. Press the bottom on the remote controller in the sequence of "3", "5", "7" and "4".
10. Confirm if mode name is subject to the model in Self check menu as shown figure.2.

Figure.2
Стр. 4 из 4TOSHIBA
03.11.2015
file://C:\Documents and Settings\Alexsandr\Local Settings\Temp\Rar$EXa0.071\TOS
...
TOSHIBA WEB-ZEUS
>> terms and conditions >> privacy policy
Copyright © 1995-2012 TOSHIBA Corporation, All Rights Reserved.
ADJUSTMENT
Стр. 1 из 1TOSHIBA
03.11.2015
file://C:\Documents and Settings\Alexsandr\Local Settings\Temp\Rar$EXa0.853\TOS
...
Service Mode
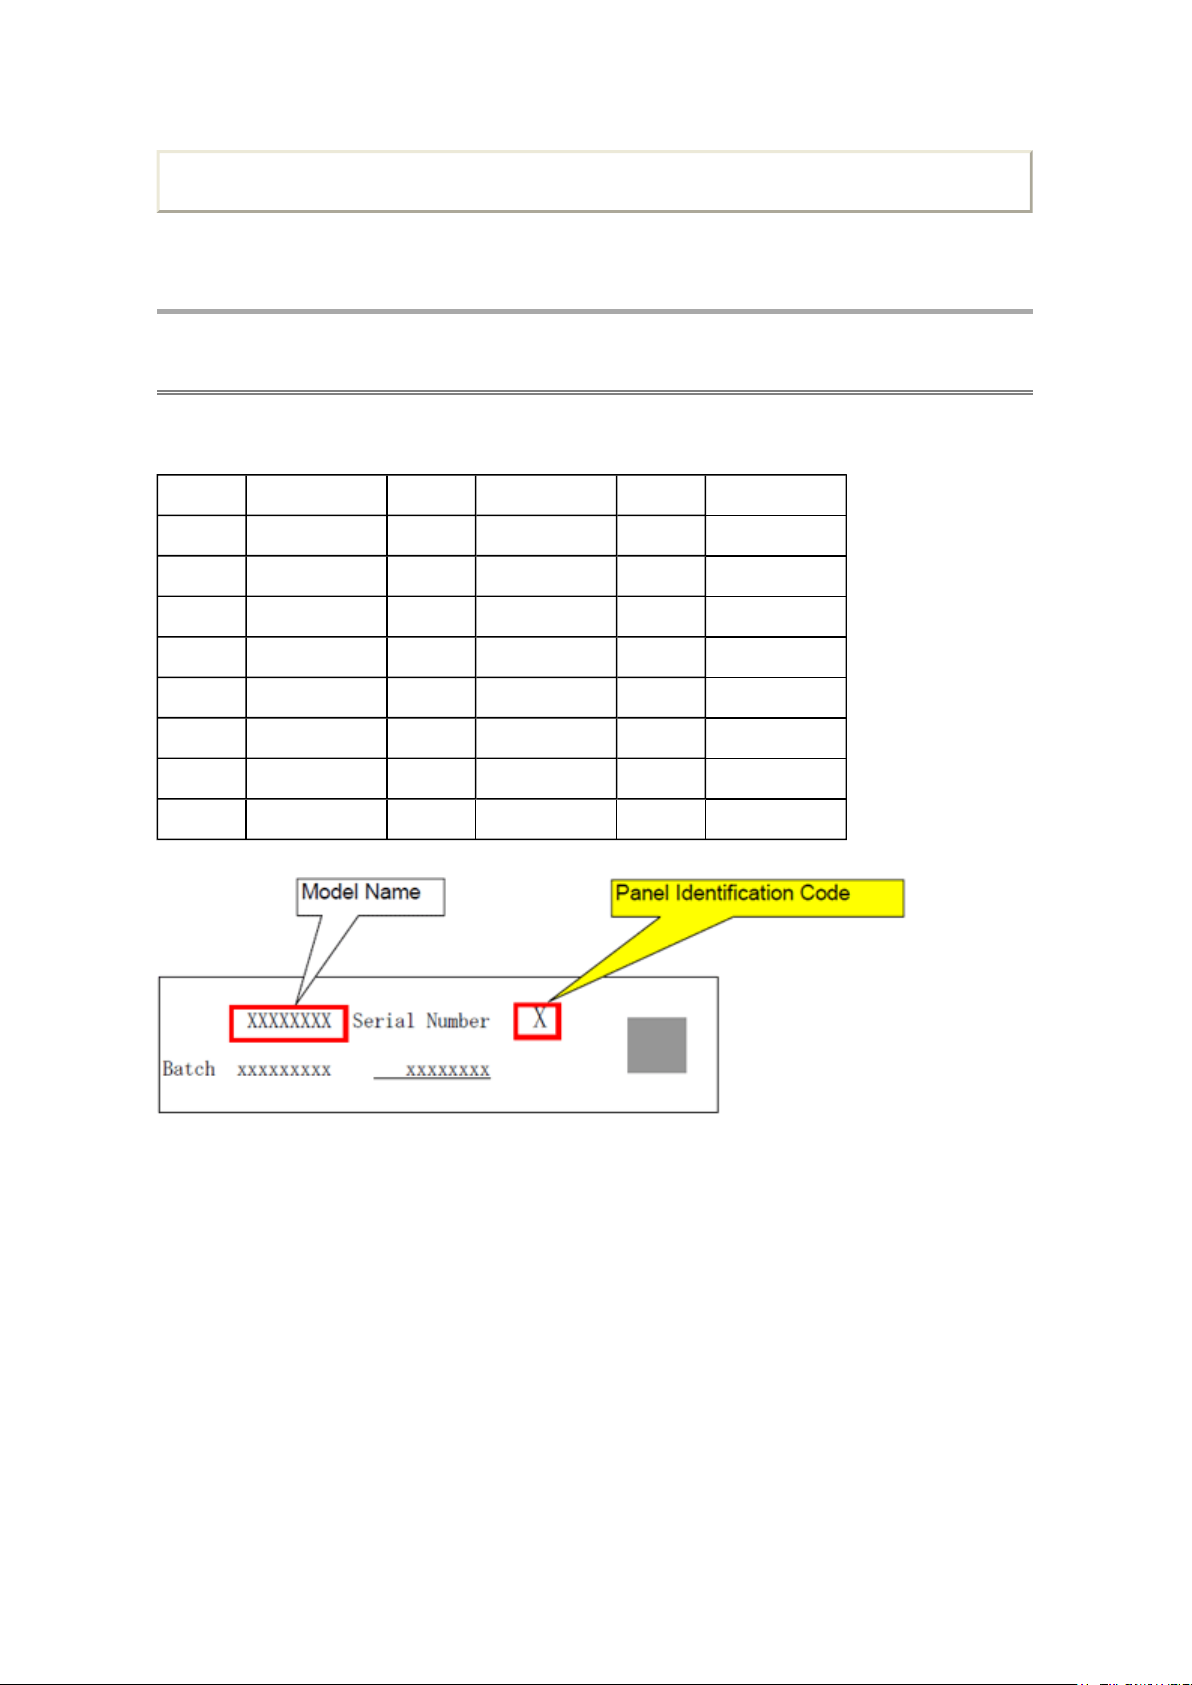
Panel Identification
Print this page
Panel vendor
Marking Panel Vendor Marking Panel Vendor Marking Panel Vendor
A AUO J S SHARP
B K SAMSUNG T
C CMO L LPL/LGD U
D M V
E N W
F P CPT X
G Q Y
H IPS R Z
(Serial No. part printed on Rating Label)
TOSHIBA WEB-ZEUS
>> terms and conditions >> privacy policy
Copyright © 1995-2012 TOSHIBA Corporation, All Rights Reserved.

Print this page
Стр. 1 из 1TOSHIBA
03.11.2015
file://C:\Documents and Settings\Alexsandr\Local Settings\Temp\Rar$EXa0.427\TOS
...
ADJUSTMENT
Service Mode
Setting Hotel Mode
Hotel mode allows for customizing specified TV operations that are suitable for hotel use.
TOSHIBA WEB-ZEUS
>> terms and conditions >> privacy policy
Copyright © 1995-2012 TOSHIBA Corporation, All Rights Reserved.
ADJUSTMENT
↓↓↓↓
↓↓↓↓
Стр. 1 из 2TOSHIBA
03.11.2015
file://C:\Documents and Settings\Alexsandr\Local Settings\Temp\Rar$EXa0.921\TOS
...
Service Mode
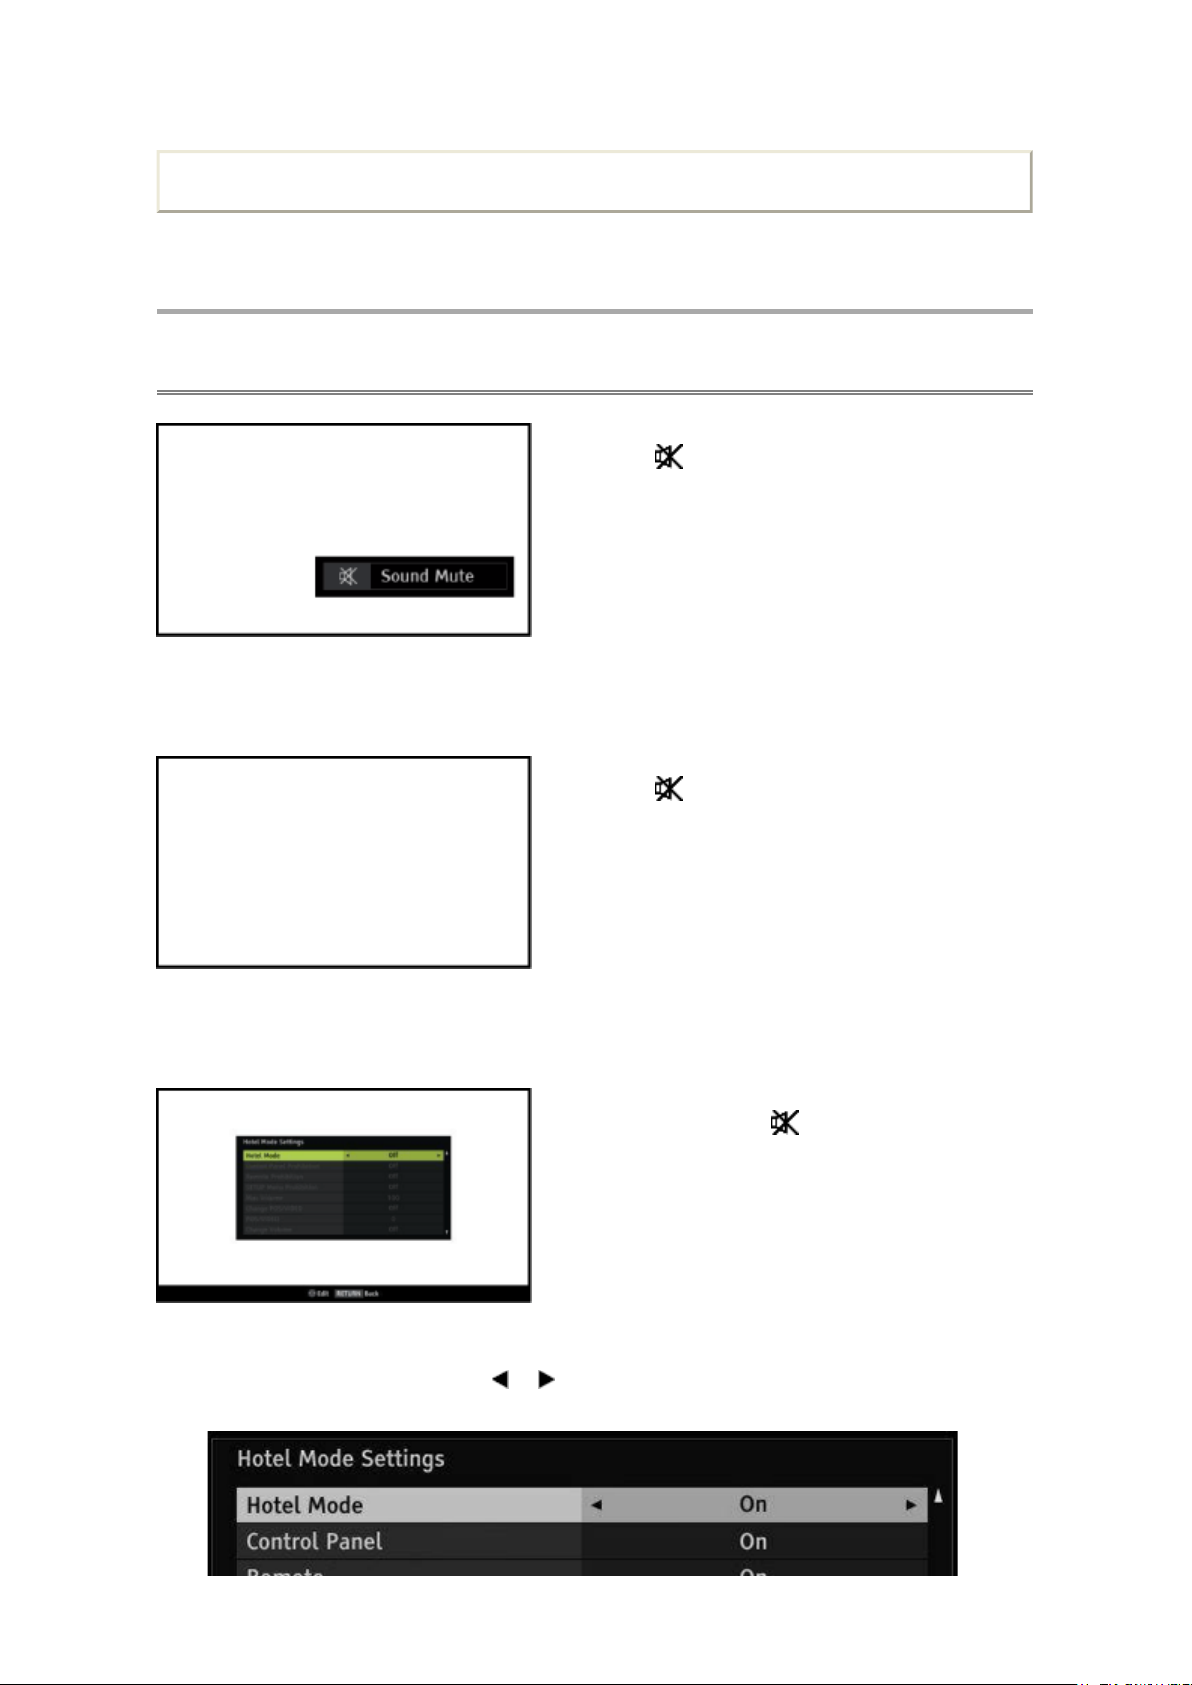
Entering Hotel Mode Menu
(Sound Mute display)
Print this page
1. Press button once on Remote Control.
2. Press button again and keep pressing.
(Sound Mute display is canceled)
3. While pressing the button, press "+" button
on TV control panel.
(Hotel Mode Settings Menu)
4. To enable Hotel Mode, use the or arrow keys while "Hotel Mode" item is highlighted to
select "On". Once Hotel Mode is on, the Hotel Mode settings will be enabled for adjusting.
Стр. 2 из 2TOSHIBA
03.11.2015
file://C:\Documents and Settings\Alexsandr\Local Settings\Temp\Rar$EXa0.921\TOS
...
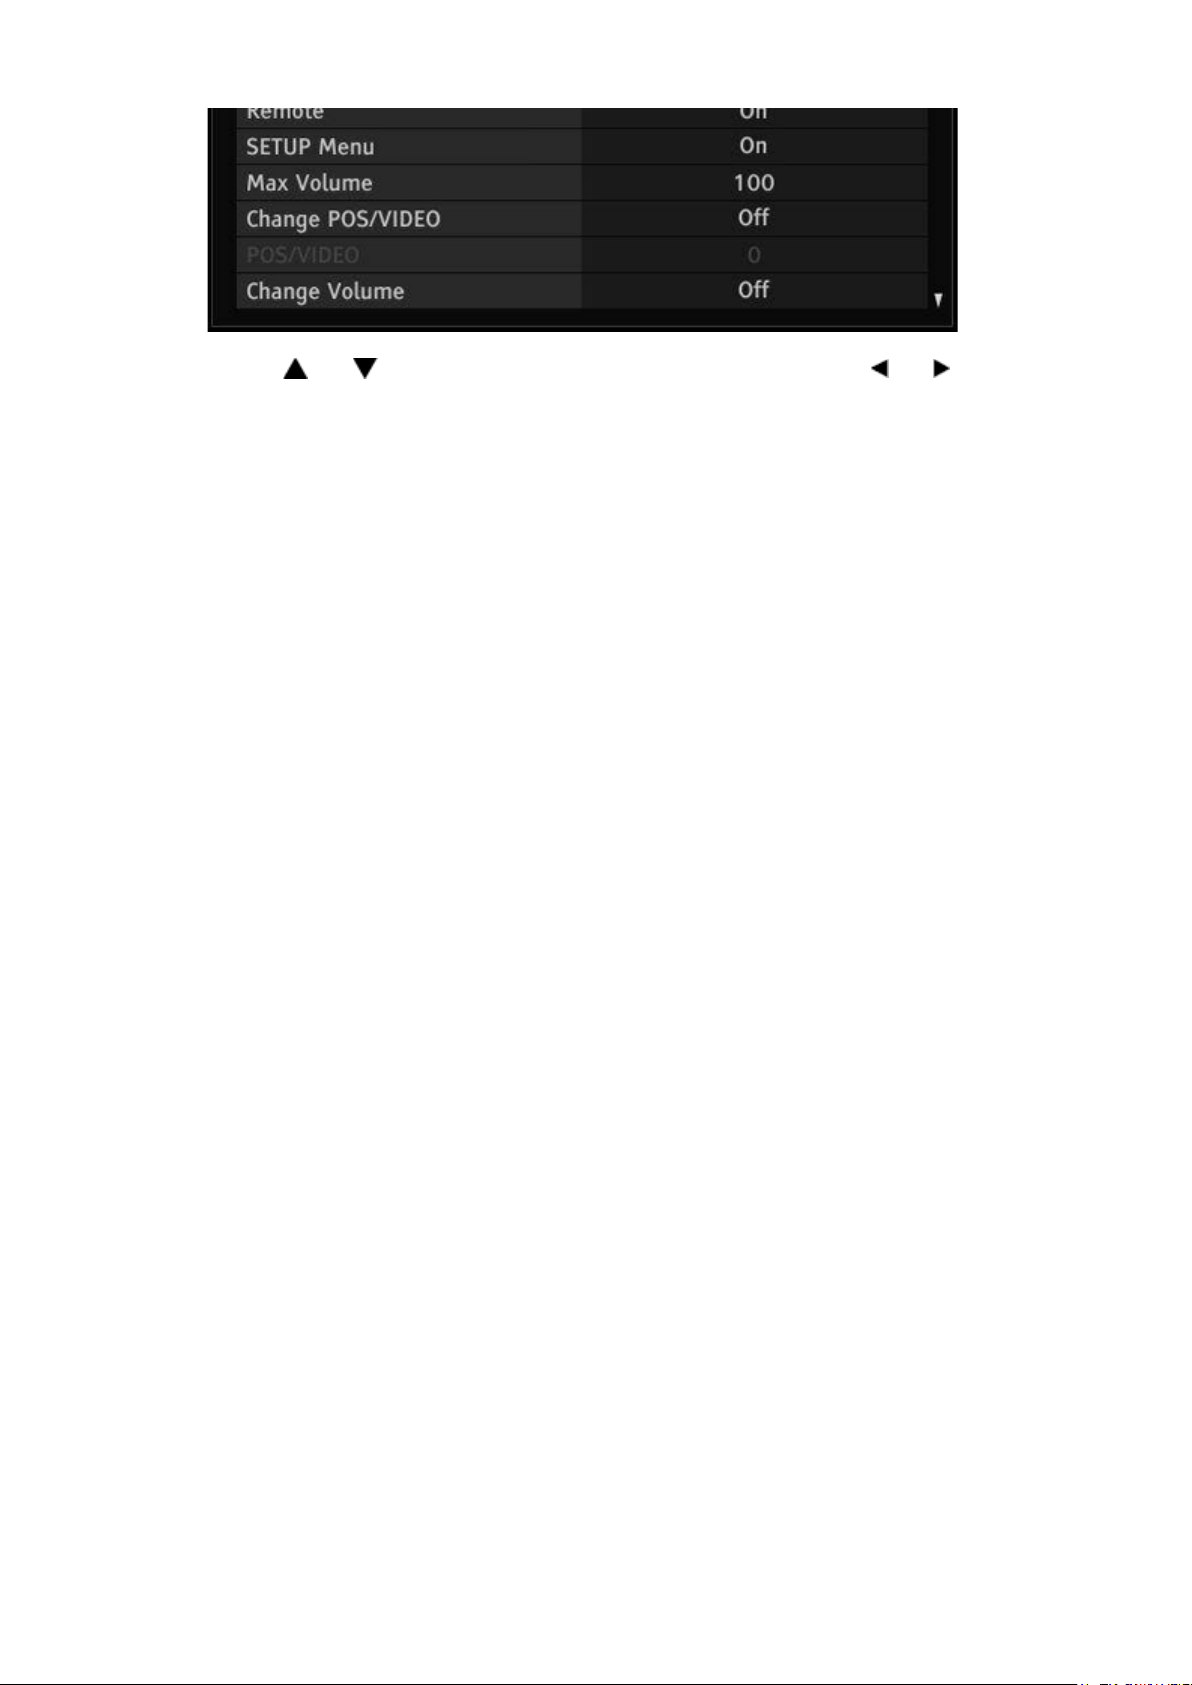
5. Use the and arrow keys to access the hotel mode settings. Use the and arrow
keys to change the settings. See SETTING_HOTEL MODE OPTION DATA for explanation
of hotel mode settings.
6. Press Exit when finished adjusting the settings.
TOSHIBA WEB-ZEUS
>> terms and conditions >> privacy policy
Copyright © 1995-2012 TOSHIBA Corporation, All Rights Reserved.
ADJUSTMENT
* When Remote Control is set
Стр. 1 из 4TOSHIBA
03.11.2015
file://C:\Documents and Settings\Alexsandr\Local Settings\Temp\Rar$EXa0.501\TOS
...
Service Mode
Setting Hotel Mode Menu Settings
Print this page
Item Options Description
Hotel Mode Off Disable Hotel Mode.
All the settings of Hotel Mode
are disabled.
On Enable Hotel Mode
Control Panel On Allow use of all Control panel
buttons
Off Prohibit use of all control
panel buttons.
But, Power Off → On by
control panel POWER button
is not prohibited.
(Power On → Off is
prohibited.)
* Entering Service
mode/Hotel mode
Menu/Hotel Clone is not
prohibited.
* Control panel buttons are
available during Service
mode.
Factory
settings
Off -
On - Grayed out
Gray Out
Conditions
when "Hotel
Mode" = [Off]
Remote Control On Remote Enabled On - Grayed out
Off Remote Disabled
* The following remote codes
are not disabled.
- SOUND MUTE (40BF10)
- Super User mode (40BFFE)
- S mode (40EEC3)
* Remote Enabled during
Service mode/Hotel mode
Menu/Hotel Clone.
to "Off", the [Panel Lock]
setting in the main menu will
be grayed out and forced to
when "Hotel
Mode" = [Off]

"Off".
Стр. 2 из 4TOSHIBA
03.11.2015
file://C:\Documents and Settings\Alexsandr\Local Settings\Temp\Rar$EXa0.501\TOS
...
Setup Menu On Allow access to SETUP
menu
Off Prohibit access to the setup
menu.
SETUP menu icon is grayed
out and it is prohibited to
select (skip).
(If gray-out of SETUP menu
icon is difficult, skipping
without gray-out is
acceptable )
Off (Except
Language)
Max Volume 0-100 Set maximum volume level.
Prohibit access to all items in
the setup menu except for
the Language setting.
The prohibited items are not
shown on the menu. (Gray-
out instead of erasing is
acceptable)
It limits the volume level
which can be set by Volume
button.
If you set it to 70, Volume bar
can not go to 71 or higher.
On - Grayed out
when "Hotel
Mode" = [Off]
100 - Grayed out
when "Hotel
Mode" = [Off]
Change
POS/VIDEO
POS/VIDEO
* only available
when "Change
POS/VIDEO" is On
* The input which
does not exist on
the model should
Off TV Tunes to the last channel
or input viewed when
powered on
On TV tunes to preset
"POS/VIDEO" (channel or
input) when TV is powered
on.
On (AC) TV tunes to preset
"POS/VIDEO" (channel or
input) only when AC power is
applied.
When TV is powered on by
power button, tune to the last
channel or input.
0-99 0-99 (ATV Channel Position) 0 - Grayed out
DTV DTV (DTV channel number
can not be set. The last
selected channel is shown.)
VIDEO1 VIDEO1
VIDEO2 VIDEO2
Off - Grayed out
when "Hotel
Mode" = [Off]
when Hotel
Mode = [Off]
- Grayed out
when "Change
POS/VIDEO" =
[Off]

not be shown. (eg.
"DTV" is not shown
Picture setting mode is forced
to "Picture Mode" mode when
Стр. 3 из 4TOSHIBA
03.11.2015
file://C:\Documents and Settings\Alexsandr\Local Settings\Temp\Rar$EXa0.501\TOS
...
on ATV models.)
VIDEO3 VIDEO3
HDMI1 HDMI1
HDMI2 HDMI2
HDMI3 HDMI3
HDMI4 HDMI4
PC PC
Change Volume Off TV volume level does not
change when TV powers on
On TV volume level is forced to
"Volume" level when TV is
powered on
Volume
(only available
when "Change
Volume" is On)
Change Picture
Mode
Picture Mode
(only available
when "Change
Picture Mode" is
On)
0-100 Volume level when TV is
powered on
Off Picture setting mode does
not change when TV is
powered on
On
TV is powered on
AutoView AutoView AutoView - Grayed out
Dynamic Dynamic
Standard Standard
Movie 1
(EU:Hollywood
1)
Movie 1
(EU:Hollywood 1)
Off - Grayed out
when "Hotel
Mode" = [Off]
30 - Grayed out
when "Hotel
Mode" = [Off]
- Grayed out
when "Change
Volume" = [Off]
Off - Grayed out
when "Hotel
Mode" = [Off]
when "Hotel
Mode" = [Off]
- Grayed out
when "Change
Selectable
Picture" = [Off]
Movie 2
(EU:Hollywood
2)
TV Power Disabled TV returns to previous
Force On Power TV on when AC power
Force Standby Put TV in Standby when AC
Position Change
on HDMI Input
On
Movie 2
(EU:Hollywood 2)
Standby/On State when AC
power is applied
is applied
power is applied
RF tuning via P , P ,
RETURN, and number
buttons is allowed. (Normal
Disabled - Grayed out
On - Grayed out
when "Hotel
Mode" = [Off]
when "Hotel
Mode" = [Off]
 Loading...