

Page 1

43" 2160p (4K), 60Hz, LED Google Cast™ TV
49" 2160p (4K), 60Hz, LED Google Cast™ TV
55" 2160p (4K), 60Hz, LED Google Cast™ TV
65" 2160p (4K), 60Hz, LED Google Cast™ TV
43L621U / 49L621U / 55L621U / 65L621U
Before using your new product, please read these instructions to prevent any damage.
Page 2
Contents
CHILD SAFETY . . . . . . . . . . . . . . . . . . . . . . . . . . . . . . . . . . . . . . . . . . . . . . . . . . . . . . . . . . . . . . . 1
Important Safety Instructions . . . . . . . . . . . . . . . . . . . . . . . . . . . . . . . . . . . . . . . . . . . . . . . . 2
WARNING . . . . . . . . . . . . . . . . . . . . . . . . . . . . . . . . . . . . . . . . . . . . . . . . . . . . . . . . . . . . . . . . . . . . . . . . . . 2
CAUTION . . . . . . . . . . . . . . . . . . . . . . . . . . . . . . . . . . . . . . . . . . . . . . . . . . . . . . . . . . . . . . . . . . . . . . . . . . 3
Introduction . . . . . . . . . . . . . . . . . . . . . . . . . . . . . . . . . . . . . . . . . . . . . . . . . . . . . . . . . . . . . . . . . 5
Google Cast . . . . . . . . . . . . . . . . . . . . . . . . . . . . . . . . . . . . . . . . . . . . . . . . . . . . . . . . . . . . . . . . . . . . . . . . 5
HDMI®CEC Control . . . . . . . . . . . . . . . . . . . . . . . . . . . . . . . . . . . . . . . . . . . . . . . . . . . . . . . . . . . . . . . . . 5
DTS Studio Sound® . . . . . . . . . . . . . . . . . . . . . . . . . . . . . . . . . . . . . . . . . . . . . . . . . . . . . . . . . . . . . . . . . 5
GameTimer™ . . . . . . . . . . . . . . . . . . . . . . . . . . . . . . . . . . . . . . . . . . . . . . . . . . . . . . . . . . . . . . . . . . . . . . . 5
Installing the stands or wall-mount bracket . . . . . . . . . . . . . . . . . . . . . . . . . . . . . . . . . . . 6
Installing the stands (43" or 65" model) . . . . . . . . . . . . . . . . . . . . . . . . . . . . . . . . . . . . . . . . . . . . . . 6
Installing the stands (49" or 55" model) . . . . . . . . . . . . . . . . . . . . . . . . . . . . . . . . . . . . . . . . . . . . . . 7
Installing a wall-mount bracket . . . . . . . . . . . . . . . . . . . . . . . . . . . . . . . . . . . . . . . . . . . . . . . . . . . . . 9
TV components . . . . . . . . . . . . . . . . . . . . . . . . . . . . . . . . . . . . . . . . . . . . . . . . . . . . . . . . . . . . 12
Package contents . . . . . . . . . . . . . . . . . . . . . . . . . . . . . . . . . . . . . . . . . . . . . . . . . . . . . . . . . . . . . . . . . 12
Front . . . . . . . . . . . . . . . . . . . . . . . . . . . . . . . . . . . . . . . . . . . . . . . . . . . . . . . . . . . . . . . . . . . . . . . . . . . . . 12
Power/INPUT button . . . . . . . . . . . . . . . . . . . . . . . . . . . . . . . . . . . . . . . . . . . . . . . . . . . . . . . . . . . . . . 13
Side jacks . . . . . . . . . . . . . . . . . . . . . . . . . . . . . . . . . . . . . . . . . . . . . . . . . . . . . . . . . . . . . . . . . . . . . . . . . 14
Back jacks . . . . . . . . . . . . . . . . . . . . . . . . . . . . . . . . . . . . . . . . . . . . . . . . . . . . . . . . . . . . . . . . . . . . . . . . . 15
Remote control . . . . . . . . . . . . . . . . . . . . . . . . . . . . . . . . . . . . . . . . . . . . . . . . . . . . . . . . . . . . . . . . . . . 16
Virtual Remote control . . . . . . . . . . . . . . . . . . . . . . . . . . . . . . . . . . . . . . . . . . . . . . . . . . . . . . . . . . . . 17
What connection should I use? . . . . . . . . . . . . . . . . . . . . . . . . . . . . . . . . . . . . . . . . . . . . . . 19
Connecting a cable or satellite box . . . . . . . . . . . . . . . . . . . . . . . . . . . . . . . . . . . . . . . . . . 20
HDMI (best) . . . . . . . . . . . . . . . . . . . . . . . . . . . . . . . . . . . . . . . . . . . . . . . . . . . . . . . . . . . . . . . . . . . . . . 20
DVI (same as HDMI but requires an audio connection) . . . . . . . . . . . . . . . . . . . . . . . . . . . . . 21
AV (good) . . . . . . . . . . . . . . . . . . . . . . . . . . . . . . . . . . . . . . . . . . . . . . . . . . . . . . . . . . . . . . . . . . . . . . . . 22
Coaxial (good). . . . . . . . . . . . . . . . . . . . . . . . . . . . . . . . . . . . . . . . . . . . . . . . . . . . . . . . . . . . . . . . . . . . 23
Connecting an antenna or cable TV (no box) . . . . . . . . . . . . . . . . . . . . . . . . . . . . . . . . . 24
Connecting a DVD or Blu-ray player . . . . . . . . . . . . . . . . . . . . . . . . . . . . . . . . . . . . . . . . . 25
HDMI (best) . . . . . . . . . . . . . . . . . . . . . . . . . . . . . . . . . . . . . . . . . . . . . . . . . . . . . . . . . . . . . . . . . . . . . . 25
AV (good) . . . . . . . . . . . . . . . . . . . . . . . . . . . . . . . . . . . . . . . . . . . . . . . . . . . . . . . . . . . . . . . . . . . . . . . . 26
Connecting a game console . . . . . . . . . . . . . . . . . . . . . . . . . . . . . . . . . . . . . . . . . . . . . . . . 27
HDMI (best) . . . . . . . . . . . . . . . . . . . . . . . . . . . . . . . . . . . . . . . . . . . . . . . . . . . . . . . . . . . . . . . . . . . . . . 27
AV (good) . . . . . . . . . . . . . . . . . . . . . . . . . . . . . . . . . . . . . . . . . . . . . . . . . . . . . . . . . . . . . . . . . . . . . . . . 28
Connecting a network router . . . . . . . . . . . . . . . . . . . . . . . . . . . . . . . . . . . . . . . . . . . . . . . 29
ii
www.tv.toshiba.com
Page 3

Contents
Connecting a computer . . . . . . . . . . . . . . . . . . . . . . . . . . . . . . . . . . . . . . . . . . . . . . . . . . . . . 30
HDMI (best) . . . . . . . . . . . . . . . . . . . . . . . . . . . . . . . . . . . . . . . . . . . . . . . . . . . . . . . . . . . . . . . . . . . . . . 30
DVI (same as HDMI but requires an audio connection) . . . . . . . . . . . . . . . . . . . . . . . . . . . . . 31
Connecting a USB flash drive . . . . . . . . . . . . . . . . . . . . . . . . . . . . . . . . . . . . . . . . . . . . . . . . 32
Connecting headphones . . . . . . . . . . . . . . . . . . . . . . . . . . . . . . . . . . . . . . . . . . . . . . . . . . . . 33
Connecting external speakers or a soundbar . . . . . . . . . . . . . . . . . . . . . . . . . . . . . . . . 34
Digital audio . . . . . . . . . . . . . . . . . . . . . . . . . . . . . . . . . . . . . . . . . . . . . . . . . . . . . . . . . . . . . . . . . . . . . 34
Analog audio . . . . . . . . . . . . . . . . . . . . . . . . . . . . . . . . . . . . . . . . . . . . . . . . . . . . . . . . . . . . . . . . . . . . . 35
Connecting a home theater system with multiple devices . . . . . . . . . . . . . . . . . . . . 36
Connecting power . . . . . . . . . . . . . . . . . . . . . . . . . . . . . . . . . . . . . . . . . . . . . . . . . . . . . . . . . . 37
Using the remote control . . . . . . . . . . . . . . . . . . . . . . . . . . . . . . . . . . . . . . . . . . . . . . . . . . . 38
Installing remote control batteries . . . . . . . . . . . . . . . . . . . . . . . . . . . . . . . . . . . . . . . . . . . . . . . . . 38
Aiming the remote control . . . . . . . . . . . . . . . . . . . . . . . . . . . . . . . . . . . . . . . . . . . . . . . . . . . . . . . . 38
Programming universal remote controls . . . . . . . . . . . . . . . . . . . . . . . . . . . . . . . . . . . . . . . . . . . 39
Turning on your TV for the first time . . . . . . . . . . . . . . . . . . . . . . . . . . . . . . . . . . . . . . . . . 40
Using an Android mobile device . . . . . . . . . . . . . . . . . . . . . . . . . . . . . . . . . . . . . . . . . . . . . . . . . . 40
Using an iOS (Apple) mobile device . . . . . . . . . . . . . . . . . . . . . . . . . . . . . . . . . . . . . . . . . . . . . . . 47
Casting a video, movie, or TV show . . . . . . . . . . . . . . . . . . . . . . . . . . . . . . . . . . . . . . . . . . 54
Setting up the ANT / CABLE IN jack . . . . . . . . . . . . . . . . . . . . . . . . . . . . . . . . . . . . . . . . . . 55
Understanding the basics . . . . . . . . . . . . . . . . . . . . . . . . . . . . . . . . . . . . . . . . . . . . . . . . . . . 55
Turning your TV on or off . . . . . . . . . . . . . . . . . . . . . . . . . . . . . . . . . . . . . . . . . . . . . . . . . . . . . . . . . . 55
Selecting the video input source . . . . . . . . . . . . . . . . . . . . . . . . . . . . . . . . . . . . . . . . . . . . . . . . . . . 56
On-screen menu overview . . . . . . . . . . . . . . . . . . . . . . . . . . . . . . . . . . . . . . . . . . . . . . . . . . . . . . . . 57
Navigating the menus . . . . . . . . . . . . . . . . . . . . . . . . . . . . . . . . . . . . . . . . . . . . . . . . . . . . . . . . . . . . . 58
Adjusting the volume . . . . . . . . . . . . . . . . . . . . . . . . . . . . . . . . . . . . . . . . . . . . . . . . . . . . . . . . . . . . . 58
Selecting a channel . . . . . . . . . . . . . . . . . . . . . . . . . . . . . . . . . . . . . . . . . . . . . . . . . . . . . . . . . . . . . . . 58
Viewing channel information . . . . . . . . . . . . . . . . . . . . . . . . . . . . . . . . . . . . . . . . . . . . . . . . . . . . . . 59
Controlling CEC-compatible devices . . . . . . . . . . . . . . . . . . . . . . . . . . . . . . . . . . . . . . . . 59
Turning HDMI-CEC Control on or off . . . . . . . . . . . . . . . . . . . . . . . . . . . . . . . . . . . . . . . . . . . . . . .60
Turning TV Auto Power on or off . . . . . . . . . . . . . . . . . . . . . . . . . . . . . . . . . . . . . . . . . . . . . . . . . . . 60
Turning Auto Standby on or off . . . . . . . . . . . . . . . . . . . . . . . . . . . . . . . . . . . . . . . . . . . . . . . . . . . . 61
Turning Amplifier Control on or off . . . . . . . . . . . . . . . . . . . . . . . . . . . . . . . . . . . . . . . . . . . . . . . . 61
Selecting the audio output . . . . . . . . . . . . . . . . . . . . . . . . . . . . . . . . . . . . . . . . . . . . . . . . . . . . . . . . 62
Using the TV remote to control CEC-compatible devices . . . . . . . . . . . . . . . . . . . . . . . . . . . . 62
Using the TV menu to control CEC-compatible devices . . . . . . . . . . . . . . . . . . . . . . . . . . . . . 62
Selecting the HDMI Input mode . . . . . . . . . . . . . . . . . . . . . . . . . . . . . . . . . . . . . . . . . . . . . . . . . . . 63
Using the Media Player . . . . . . . . . . . . . . . . . . . . . . . . . . . . . . . . . . . . . . . . . . . . . . . . . . . . .64
Supported photo file formats . . . . . . . . . . . . . . . . . . . . . . . . . . . . . . . . . . . . . . . . . . . . . . . . . . . . . . 64
Opening the Photos viewer . . . . . . . . . . . . . . . . . . . . . . . . . . . . . . . . . . . . . . . . . . . . . . . . . . . . . . . 64
Viewing photos . . . . . . . . . . . . . . . . . . . . . . . . . . . . . . . . . . . . . . . . . . . . . . . . . . . . . . . . . . . . . . . . . . . 64
www.tv.toshiba.com
iii
Page 4

Viewing photos in a slideshow . . . . . . . . . . . . . . . . . . . . . . . . . . . . . . . . . . . . . . . . . . . . . . . . . . . . 65
Adjusting the picture . . . . . . . . . . . . . . . . . . . . . . . . . . . . . . . . . . . . . . . . . . . . . . . . . . . . . . . 65
Adjusting the TV picture . . . . . . . . . . . . . . . . . . . . . . . . . . . . . . . . . . . . . . . . . . . . . . . . . . . . . . . . . . . 65
Adjusting the picture size . . . . . . . . . . . . . . . . . . . . . . . . . . . . . . . . . . . . . . . . . . . . . . . . . . . . . . . . . 67
Scrolling the TheaterWide™ picture . . . . . . . . . . . . . . . . . . . . . . . . . . . . . . . . . . . . . . . . . . . . . . . . 68
Automatically adjusting the aspect ratio . . . . . . . . . . . . . . . . . . . . . . . . . . . . . . . . . . . . . . . . . . . 69
Using the 4:3 Stretch . . . . . . . . . . . . . . . . . . . . . . . . . . . . . . . . . . . . . . . . . . . . . . . . . . . . . . . . . . . . . . 69
Adjusting the sound . . . . . . . . . . . . . . . . . . . . . . . . . . . . . . . . . . . . . . . . . . . . . . . . . . . . . . . . 70
Adjusting sound settings . . . . . . . . . . . . . . . . . . . . . . . . . . . . . . . . . . . . . . . . . . . . . . . . . . . . . . . . . . 70
Playing TV audio only . . . . . . . . . . . . . . . . . . . . . . . . . . . . . . . . . . . . . . . . . . . . . . . . . . . . . . . . . . . . . 71
Changing channel settings . . . . . . . . . . . . . . . . . . . . . . . . . . . . . . . . . . . . . . . . . . . . . . . . . . 71
Automatically scanning for channels . . . . . . . . . . . . . . . . . . . . . . . . . . . . . . . . . . . . . . . . . . . . . . .71
Manually adding channels to the channel list . . . . . . . . . . . . . . . . . . . . . . . . . . . . . . . . . . . . . . 72
Hiding channels . . . . . . . . . . . . . . . . . . . . . . . . . . . . . . . . . . . . . . . . . . . . . . . . . . . . . . . . . . . . . . . . . . 73
Setting parental controls . . . . . . . . . . . . . . . . . . . . . . . . . . . . . . . . . . . . . . . . . . . . . . . . . . . .73
Setting a new PIN . . . . . . . . . . . . . . . . . . . . . . . . . . . . . . . . . . . . . . . . . . . . . . . . . . . . . . . . . . . . . . . . . 74
Changing or deleting the PIN . . . . . . . . . . . . . . . . . . . . . . . . . . . . . . . . . . . . . . . . . . . . . . . . . . . . . . 74
Blocking TV programs and movies (for USA region) . . . . . . . . . . . . . . . . . . . . . . . . . . . . . . . . 75
Downloading rating information (for USA region) . . . . . . . . . . . . . . . . . . . . . . . . . . . . . . . . . . 76
Temporarily unlocking programs . . . . . . . . . . . . . . . . . . . . . . . . . . . . . . . . . . . . . . . . . . . . . . . . . . 78
Locking video inputs . . . . . . . . . . . . . . . . . . . . . . . . . . . . . . . . . . . . . . . . . . . . . . . . . . . . . . . . . . . . . . 78
Locking channels . . . . . . . . . . . . . . . . . . . . . . . . . . . . . . . . . . . . . . . . . . . . . . . . . . . . . . . . . . . . . . . . . 78
Setting the GameTimer™ . . . . . . . . . . . . . . . . . . . . . . . . . . . . . . . . . . . . . . . . . . . . . . . . . . . . . . . . . . 79
Contents
Using closed captioning . . . . . . . . . . . . . . . . . . . . . . . . . . . . . . . . . . . . . . . . . . . . . . . . . . . .79
Turning closed captioning on or off . . . . . . . . . . . . . . . . . . . . . . . . . . . . . . . . . . . . . . . . . . . . . . . . 80
Selecting the analog closed captioning mode . . . . . . . . . . . . . . . . . . . . . . . . . . . . . . . . . . . . . . 80
Selecting the closed captioning mode with the CCD button . . . . . . . . . . . . . . . . . . . . . . . . 81
Customizing digital closed captioning settings . . . . . . . . . . . . . . . . . . . . . . . . . . . . . . . . . . . . . 81
Adjusting time settings . . . . . . . . . . . . . . . . . . . . . . . . . . . . . . . . . . . . . . . . . . . . . . . . . . . . . 82
Setting the time zone and Daylight Saving Time status . . . . . . . . . . . . . . . . . . . . . . . . . . . . . 82
Setting the sleep timer . . . . . . . . . . . . . . . . . . . . . . . . . . . . . . . . . . . . . . . . . . . . . . . . . . . . . . . . . . . . 82
Adjusting menu settings . . . . . . . . . . . . . . . . . . . . . . . . . . . . . . . . . . . . . . . . . . . . . . . . . . . . 83
Selecting the menu language . . . . . . . . . . . . . . . . . . . . . . . . . . . . . . . . . . . . . . . . . . . . . . . . . . . . . 83
Labeling a video input source . . . . . . . . . . . . . . . . . . . . . . . . . . . . . . . . . . . . . . . . . . . . . . . . . . . . . 83
Turning the input sensor on or off . . . . . . . . . . . . . . . . . . . . . . . . . . . . . . . . . . . . . . . . . . . . . . . . . 84
Maintaining . . . . . . . . . . . . . . . . . . . . . . . . . . . . . . . . . . . . . . . . . . . . . . . . . . . . . . . . . . . . . . . . 84
Cleaning the TV cabinet . . . . . . . . . . . . . . . . . . . . . . . . . . . . . . . . . . . . . . . . . . . . . . . . . . . . . . . . . . . 84
Cleaning the TV screen . . . . . . . . . . . . . . . . . . . . . . . . . . . . . . . . . . . . . . . . . . . . . . . . . . . . . . . . . . . . 84
Troubleshooting . . . . . . . . . . . . . . . . . . . . . . . . . . . . . . . . . . . . . . . . . . . . . . . . . . . . . . . . . . . . 84
Viewing support information . . . . . . . . . . . . . . . . . . . . . . . . . . . . . . . . . . . . . . . . . . . . . . . . . . . . . . 85
Restoring settings to the defaults . . . . . . . . . . . . . . . . . . . . . . . . . . . . . . . . . . . . . . . . . . . . . . . . . . 85
Turning off the automatic power-off feature . . . . . . . . . . . . . . . . . . . . . . . . . . . . . . . . . . . . . . . 86
iv
www.tv.toshiba.com
Page 5

Contents
Making your TV turn on faster . . . . . . . . . . . . . . . . . . . . . . . . . . . . . . . . . . . . . . . . . . . . . . . . . . . . . 86
Cast TV FAQ . . . . . . . . . . . . . . . . . . . . . . . . . . . . . . . . . . . . . . . . . . . . . . . . . . . . . . . . . . . . . . . . . . . . . . . 87
Video and audio . . . . . . . . . . . . . . . . . . . . . . . . . . . . . . . . . . . . . . . . . . . . . . . . . . . . . . . . . . . . . . . . . . 88
Remote control . . . . . . . . . . . . . . . . . . . . . . . . . . . . . . . . . . . . . . . . . . . . . . . . . . . . . . . . . . . . . . . . . . . 90
General . . . . . . . . . . . . . . . . . . . . . . . . . . . . . . . . . . . . . . . . . . . . . . . . . . . . . . . . . . . . . . . . . . . . . . . . . . . 91
CEC-compatible devices . . . . . . . . . . . . . . . . . . . . . . . . . . . . . . . . . . . . . . . . . . . . . . . . . . . . . . . . . . . 92
Specifications . . . . . . . . . . . . . . . . . . . . . . . . . . . . . . . . . . . . . . . . . . . . . . . . . . . . . . . . . . . . . . 94
43" model (43L621U) . . . . . . . . . . . . . . . . . . . . . . . . . . . . . . . . . . . . . . . . . . . . . . . . . . . . . . . . . . . . . . 94
49" model (49L621U) . . . . . . . . . . . . . . . . . . . . . . . . . . . . . . . . . . . . . . . . . . . . . . . . . . . . . . . . . . . . . . 95
55" model (55L621U) . . . . . . . . . . . . . . . . . . . . . . . . . . . . . . . . . . . . . . . . . . . . . . . . . . . . . . . . . . . . . . 96
65" model (65L621U) . . . . . . . . . . . . . . . . . . . . . . . . . . . . . . . . . . . . . . . . . . . . . . . . . . . . . . . . . . . . . . 97
Legal notices . . . . . . . . . . . . . . . . . . . . . . . . . . . . . . . . . . . . . . . . . . . . . . . . . . . . . . . . . . . . . . .98
One-year limited warranty - Toshiba Televisions . . . . . . . . . . . . . . . . . . . . . . . . . . . . . 99
www.tv.toshiba.com
v
Page 6

CHILD SAFETY
PROPER TELEVISION PLACEMENT MATTERS
THE CONSUMER ELECTRONICS INDUSTRY CARES
•
Manufacturers, retailers and the rest of the consumer electronics industry are
committed to making home entertainment safe and enjoyable.
•
As you enjoy your television, please note that all televisions - new and old - must be
supported on proper stands or installed according to the manufacturer's
recommendations. Televisions that are inappropriately situated on dressers, bookcases,
shelves, desks, speakers, chests, carts, etc., may fall over, resulting in injury.
TUNE IN TO SAFETY
•
ALWAYS follow the manufacturer’s recommendations for the safe installation of your
television.
•
ALWAYS read and follow all instructions for proper use of your television.
•
NEVER allow children to climb on or play on the television or the furniture on which the
television is placed.
•
NEVER place the television on furniture that can easily be used as steps, such as a chest
of drawers.
•
ALWAYS install the television where it cannot be pushed, pulled over or knocked down.
•
ALWAYS route cords and cables connected to the television so that they cannot be
tripped over, pulled or grabbed.
WALL OR CEILING MOUNT YOUR TELEVISION
•
ALWAYS contact your retailer about professional installation if you have any doubts
about your ability to safely mount your television.
•
ALWAYS use a mount that has been recommended by the television manufacturer and
has a safety certification by an independent laboratory (such as UL, CSA, ETL).
•
ALWAYS follow all instructions supplied by the television and mount manufacturers.
•
ALWAYS make sure that the wall or ceiling where you are mounting the television is
appropriate. Some mounts are not designed to be mounted to walls and ceilings with
steel studs or cinder block construction. If you are unsure, contact a professional
installer.
•
Televisions can be heavy. A minimum of two people is required for a wall or ceiling
mount installation.
MOVING AN OLDER TELEVISION TO A NEW PLACE IN YOUR
HOME
•
Many new television buyers move their older CRT televisions into a secondary room
after the purchase of a flat-panel television. Special care should be made in the
placement of older CRT televisions.
•
ALWAYS place your older CRT television on furniture that is sturdy and appropriate for
its size and weight.
•
NEVER place your older CRT television on a dresser where children may be tempted to
use the drawers to climb.
•
ALWAYS make sure your older CRT television does not hang over the edge of your
furniture.
https://www.cta.tech/Consumer-Resources.aspx
1
Page 7
Important Safety Instructions
CAUTION
RISK OF ELECTRIC SHOCK
DO NOT OPEN
CAUTION: TO REDUCE THE RISK OF ELECTRIC
SHOCK, DO NOT REMOVE COVER (OR BACK). NO
USER-SERVICEABLE PARTS INSIDE. REFER
SERVICING TO QUALIFIED SERVICE PERSONNEL.
The lightning flash with arrowhead
symbol within an equilateral triangle
is intended to alert the user to the
presence of uninsulated “hazardous
voltage” within the product's
enclosure, which may be of sufficient
magnitude to induce a risk of electric
shock to persons.
The exclamation point within an
equilateral triangle is intended to
alert the user to the presence of
important operating and
maintenance (servicing) instructions
in the literature accompanying the
appliance.
1 Read these instructions.
2 Keep these instructions.
3 Heed all warnings.
4 Follow all instructions.
5 Do not use this apparatus near water.
6 Clean only with dry cloth.
7 Do not block any ventilation openings. Install in
accordance with the manufacturer's instructions.
8 Do not install near any heat sources such as
radiators, heat registers, stoves, or other apparatus
(including amplifiers) that produce heat.
9 Do not defeat the safety purpose of the polarized
or grounding-type plug. A polarized plug has two
blades with one wider than the other. A grounding
type plug has two blades and a third grounding
prong. The wide blade or the third prong are
provided for your safety. If the provided plug does
not fit into your outlet, consult an electrician for
replacement of the obsolete outlet.
10 Protect the power cord from being walked on or
pinched particularly at plugs, convenience
receptacles, and the point where they exit from
the apparatus.
11 Only use attachments/accessories specified by the
manufacturer.
12 Use only with the cart, stand, tripod,
bracket, or table specified by the
manufacturer, or sold with the
apparatus. When a cart is used, use
caution when moving the
cart/apparatus combination to
avoid injury from tip-over.
13 Unplug this apparatus during lightning storms or
when unused for long periods of time.
14 Refer all servicing to qualified service personnel.
Servicing is required when the apparatus has been
damaged in any way, such as power-supply cord
or plug is damaged, liquid has been spilled or
objects have fallen into the apparatus, the
apparatus has been exposed to rain or moisture,
does not operate normally, or has been dropped.
15 The wall plug is the disconnecting device. The plug
must remain readily operable.
16 Remote control batteries should not be exposed
to excessive heat such as sunshine, fire, or the like.
17 The apparatus should not be exposed to dripping
or splashing, and no objects filled with liquids,
such as vases, should be placed on the apparatus.
18 Your TV has four VESA mounting holes on the
back. If you attach a wall-mount bracket or TV
stand to the back of your TV, the bracket or stand
must be securely attached using all four holes.
If you do not use all four mounting holes, your TV
may fall and cause property damage or personal
injury. See the documentation that came with
your wall mount or TV stand for complete
mounting instructions.
WARN ING
Electric shock hazard
To reduce the risk of fire or electric shock, do not
remove any cover or expose the device to rain or
moisture. No user-serviceable parts are inside. Refer
servicing to qualified service technicians.
Lightning
For added protection for your device receiver during a
lightning storm, or when it is left unattended and
unused for long periods of time, unplug it from the
power outlet and disconnect any antenna or cable
system. This helps prevent property damage and
personal injury from lightning and power line surges.
Power lines
An outside antenna system should not be located in
the vicinity of overhead power lines or other electric
light or power circuits, or where it can fall into such
power lines or circuits. When installing an outside
antenna system, take extreme care to keep from
touching such power lines or circuits as contact with
them might be fatal.
2
www.tv.toshiba.com
Page 8
43L621U / 49L621U / 55L621U / 65L621U
Handling the LCD panel
• Your TV’s screen is made of glass. Do not drop your
TV or hit, jolt, or press hard against the LCD panel. If
the screen breaks, be careful of broken glass.
• If the LCD panel is broken, make absolutely sure that
you do not touch the liquid in the panel. This may
cause skin inflammation.
• If the liquid gets in your mouth, immediately gargle,
rinse, and consult with your doctor. Also, if the liquid
gets in your eyes or touches your skin, consult with
your doctor after rinsing for at least 15 minutes or
longer in clean water.
Replacement parts
When replacement parts are required, make sure that
the service technician uses replacement parts
specified by the manufacturer that have the same
characteristics as the original part. Unauthorized
substitutions may result in fire, electric shock,
personal injury, or other hazards.
Safety check
After completing any service or repair to this device,
ask the service technician to perform routine safety
checks to determine that your TV is in correct
operating condition.
Power source
Operate your TV only from the type of power source
indicated on the marking label. If you are not sure of
the type of power supplied to your home, consult an
electrician or your local power company.
Servicing
These servicing instructions are for use by qualified
service personnel only. To reduce the risk of electric
shock, do not perform any servicing other than that
contained in the operating instructions unless you are
qualified to do so.
CAUTION
Damage requiring service
Unplug this TV from the power outlet and refer
servicing to qualified service personnel under the
following conditions:
• When the power supply cord or plug is damaged or
frayed.
• If liquid has been spilled or objects have fallen into
your TV.
• If your TV has been exposed to rain or water.
• If your TV does not operate normally by following
the operating instructions. Adjust only those
controls covered by the operating instructions
because incorrect adjustment of other controls may
result in damage and will often require extensive
work by a qualified technician to restore your TV to
its normal operation.
• If your TV has been dropped or damaged in any
way.
• When your TV exhibits a distinct change in
performance.
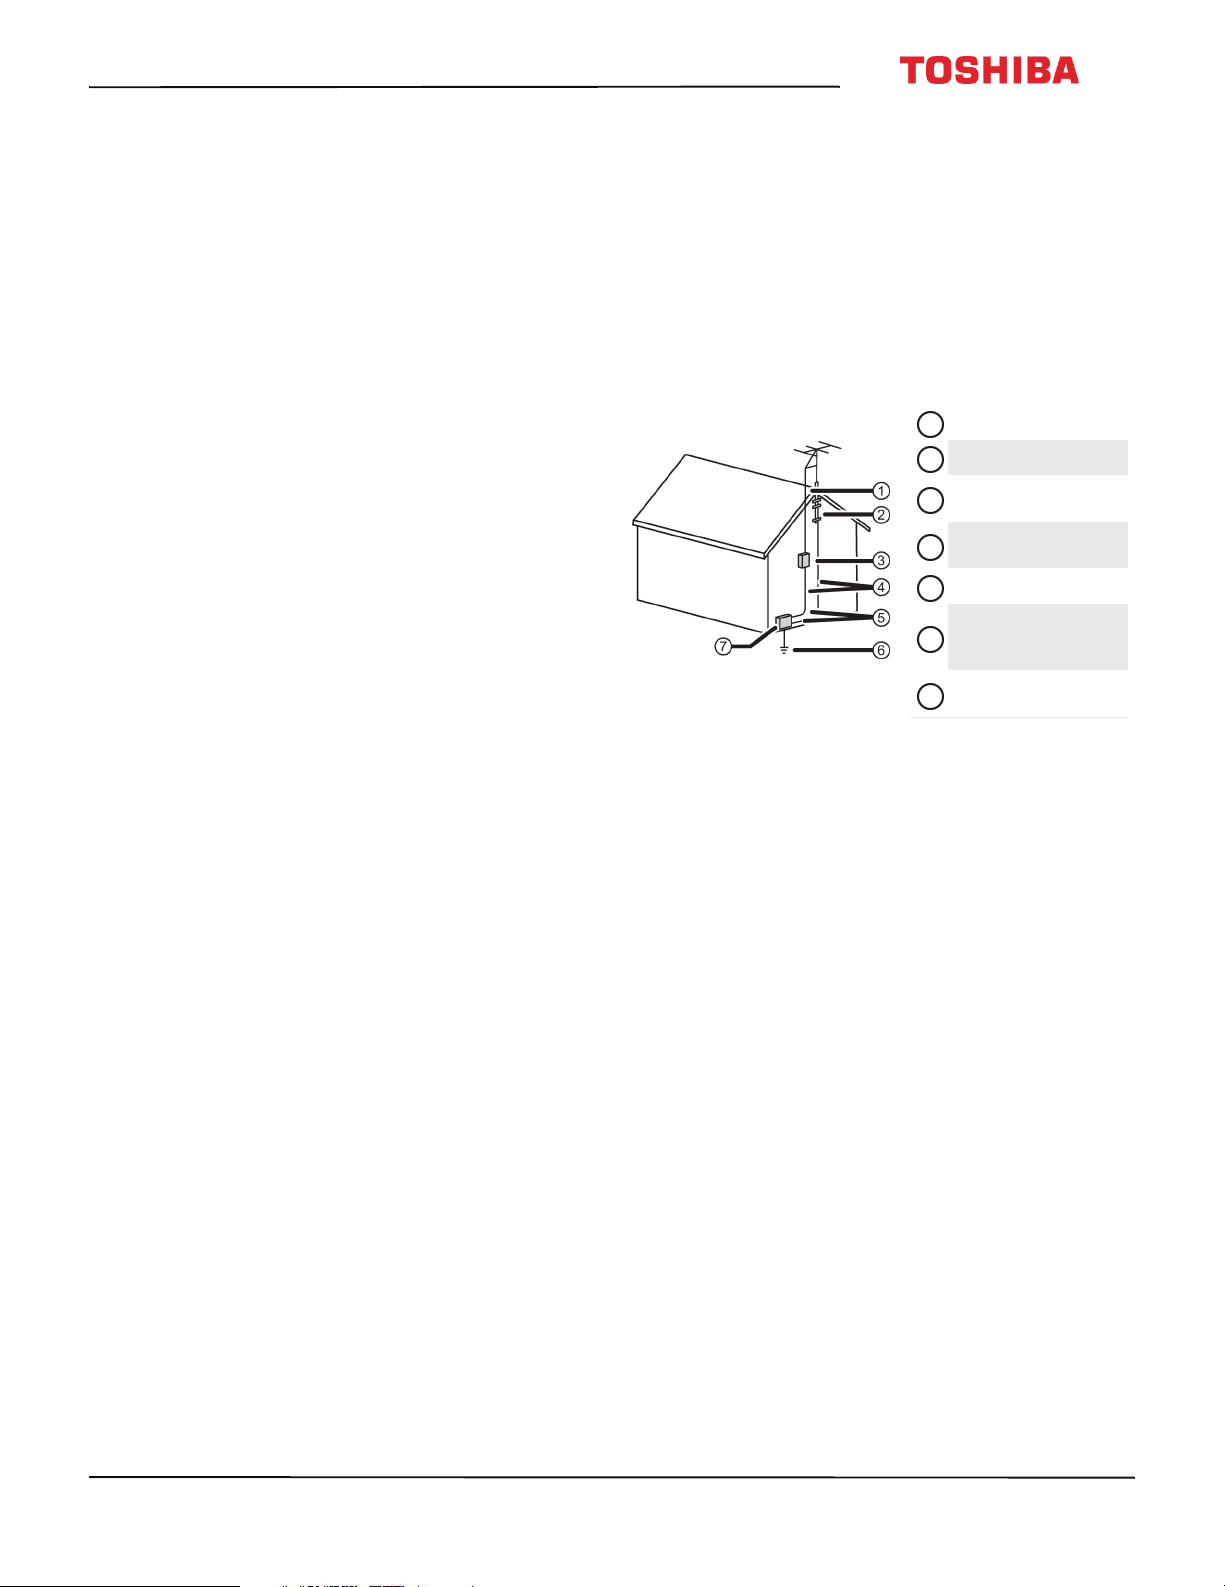
Outdoor antenna grounding
If an outside antenna or cable system is connected to
your T V, make sure that the antenna or cable system is
grounded to provide some protection against voltage
surges and built-up static charges. Article 810 of the
National Electrical Code, ANSI/NFPA No. 70, provides
information with respect to correct grounding of the
mast and supporting structure, grounding of the
lead-in wire to an antenna discharge unit, size of
grounding conductors, location of the
antenna-discharge unit, connection to grounding
electrodes, and requirements for the grounding
electrode.
1
Antenna lead-in wire
2
Grounding clamp
Antenna discharge
3
unit
Grounding
4
conductors
5
Ground clamps
Power service
grounding elec trode
6
system
Electric service
7
equipment
Note to CATV system installer
Article 820 of the National Electrical Code, ANSI/NFPA
No. 40 provides guidance for correct grounding.
Specifically, it states that the cable ground must be
connected to the grounding system of the building as
close to the point of cable entry as practical.
Condensation
Moisture will form on the TV if the TV is brought from
cool surroundings into a warm room or if the
temperature of the room rises suddenly. When this
happens, the TV's performance may be impaired. To
prevent this, let the TV stand in its new surroundings
for about an hour before switching it on, or make sure
that the room temperature rises gradually.
Condensation may also form during the summer if
the TV is exposed to the breeze from an air
conditioner. In such cases, change the location of the
TV.
Mobile telephone warning
To avoid interference with your TV picture and sound,
operating problems, or even damage, keep your
cordless and cellular telephones away from the TV.
www.tv.toshiba.com
3
Page 9

End of life directives
Your TV may contain materials that are regulated for
environmental reasons. Your TV also contains
materials that can be recycled and reused. To help
protect the environment, contact your local
authorities for information about disposal or recycling
and about finding a recycler in your area before you
dispose of your TV.
Non-active pixels
The LCD panel contains almost 3 million thin film
transistors, which provide exceptionally sharp video
quality. Occasionally, a few non-active pixels may
appear on the screen as a fixed blue, green, or red
point. These non-active pixels do not adversely affect
the performance of your TV, and are not considered
defects.
4
www.tv.toshiba.com
Page 10
43L621U / 49L621U / 55L621U / 65L621U 43" / 49" / 55" / 65" 2160p 60Hz LED Google Cast™ TV
43" / 49" / 55" / 65" 2160p 60Hz LED
Google Cast™ TV
Introduction
Congratulations on your purchase of a high-quality
Toshiba product. Your 43L621U, 49L621U, 55L621U, or
65L621U represents the state of the art in LED TV
design and is designed for reliable and trouble-free
performance.
Google Cast
UNLIMITED ENTERTAINMENT, ALL ON YOUR
SCHEDULE
• With Google Cast™, you are in command. Access
more than 200,000 TV shows and movies,
millions of songs and more through apps like
Netflix, YouTube, and Google Play. Discover new
content, with more apps being added all the
time at g.co/castapps.
USE YOUR PHONE AS A REMOTE
• By using your phone, there's nothing new to
learn—cast your apps, your playlists, your TV
shows—without new log-ins or downloads. It's
simple to search, browse, queue, and control
from anywhere in the home.
MULTI-TASK WITHOUT INTERRUPTING WHAT’S
PLAYING
• While you are casting, you can keep using your
phone for other things without disrupting what
is playing on the TV.
HDMI®CEC Control
Enjoy the benefit of having HDMI CEC-compatible
products plug and play! No setup is needed! CEC
technology lets different devices discover and
communicate with each other. (See page 59 for
instructions on how to use HDMI® CEC Control.)
DTS Studio Sound®
DTS Studio Sound is an advanced surround sound
solution suite that accurately extracts and places
audio cues for an immersive surround experience
over the TV’s built-in speakers. To complete the audio
experience, post processing and psychoacoustic
techniques are implemented to provide 3D audio
rendering to match 3D video content, for bass and
dialog enhancement and to deliver consistent and
level volume across content.
GameTimer™
Use the GameTimer™ to set a time limit for playing a
video game (from 30 to 120 minutes). When the
GameTimer expires, your TV locks out the input
source for the video game device.
www.tv.toshiba.com
5
Page 11

43" / 49" / 55" / 65" 2160p 60Hz LED Google Cast™ TV
Installing the stands or wall-mount bracket
• If you want to place your TV on a table or in an entertainment center, go to Installing the stands (43" or 65" model) or
Installing the stands (49" or 55" model).
• If you want to mount your TV on a wall, go to Installing a wall-mount bracket.
Notes
• If you plan to wall-mount your TV, do not install the stands.
• Store the stands and stand screws in case you decide to use the stands
in the future.
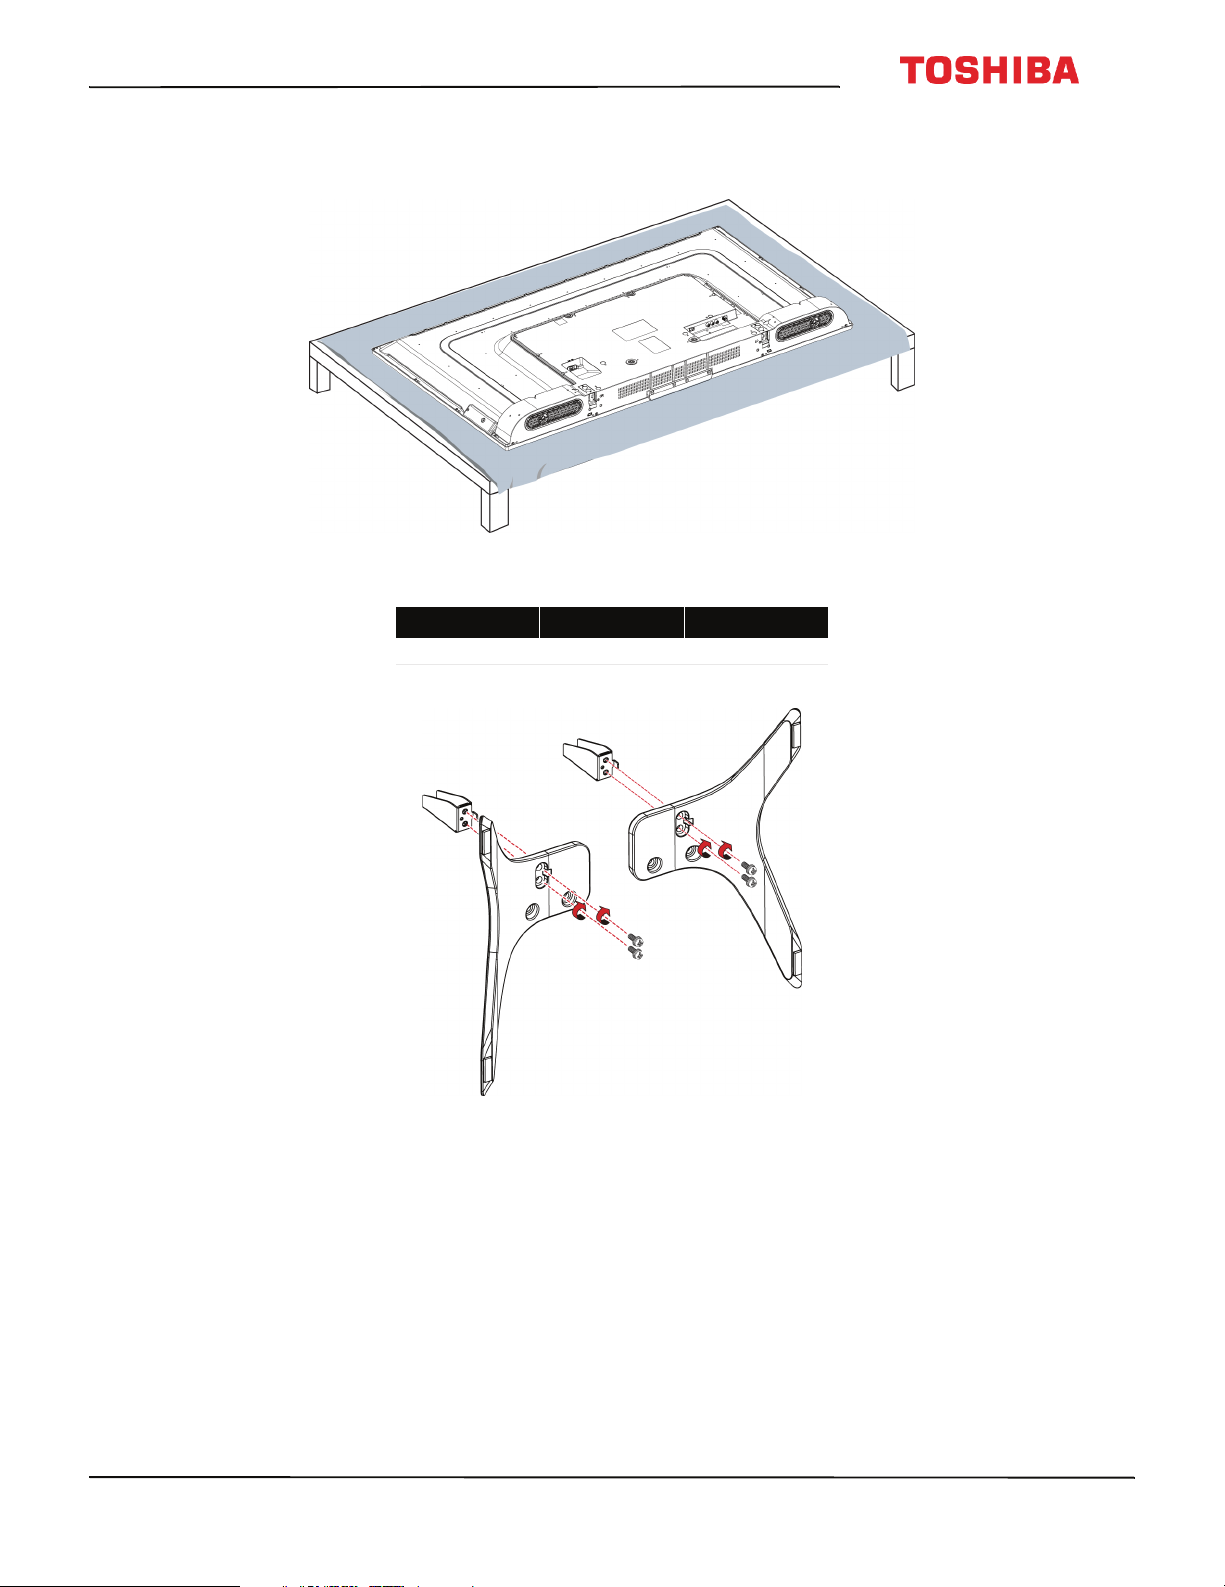
Installing the stands (43" or 65" model)
1 Carefully place your TV face-down on a cushioned, clean surface to protect the screen from damages and scratches.
2 Secure each TV stand leg to the back of your TV with two of the provided screws.
Screw type Screw length # of screws
43" M5 27 mm 4
65" M5 20 mm 4
6
www.tv.toshiba.com
Page 12
43L621U / 49L621U / 55L621U / 65L621U 43" / 49" / 55" / 65" 2160p 60Hz LED Google Cast™ TV
Installing the stands (49" or 55" model)
1 Carefully place your TV face-down on a cushioned, clean surface to protect the screen from damages and scratches.
2 Attach a stand neck to each of the stand legs with two of the provided 12 mm screws (the long screws).
Screw type Screw length # of screws
M4 12 mm 4
www.tv.toshiba.com
7
Page 13
43" / 49" / 55" / 65" 2160p 60Hz LED Google Cast™ TV
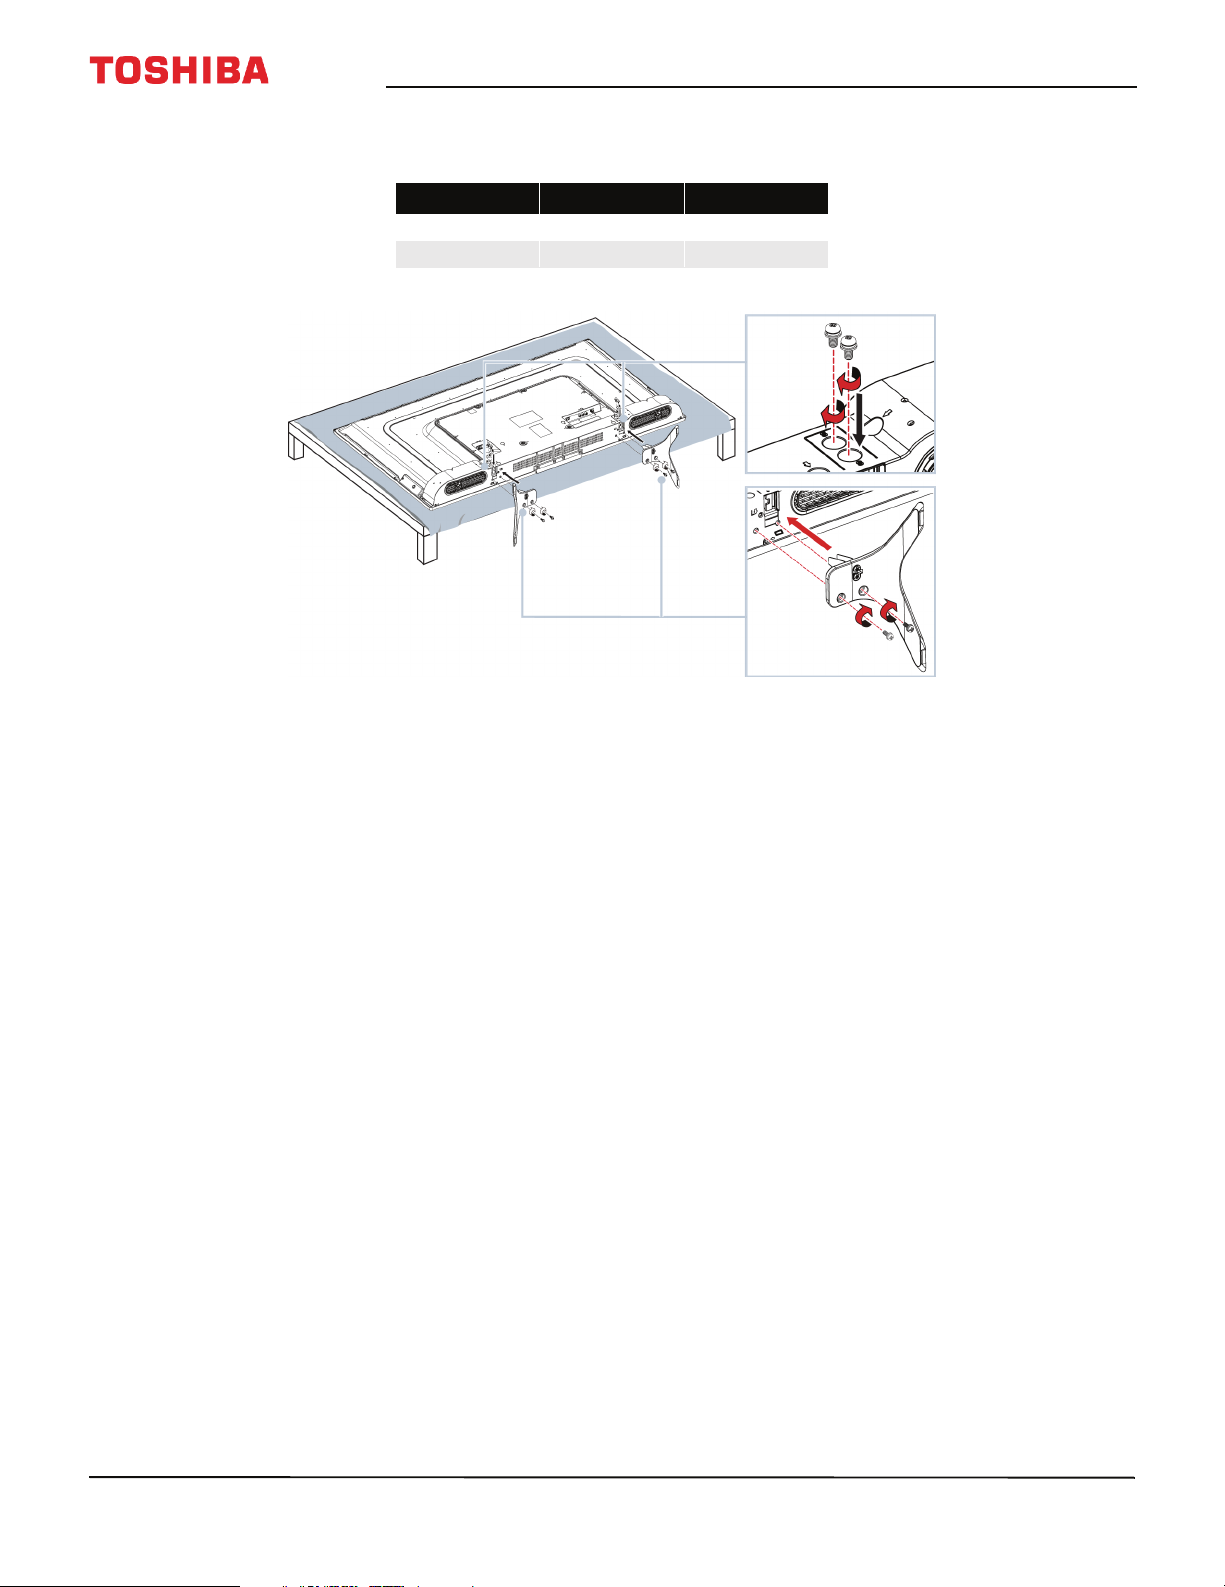
3 Slide the stand necks into the slots on the bottom of your TV. Secure the necks to the back of your TV using two of
the provided 10 mm screws (the short screws) and to the bottom of your TV using two of the 12 mm screws.
Screw type Screw length # of screws
M4 12 mm 4
M5 10 mm 4
8
www.tv.toshiba.com
Page 14
43L621U / 49L621U / 55L621U / 65L621U 43" / 49" / 55" / 65" 2160p 60Hz LED Google Cast™ TV
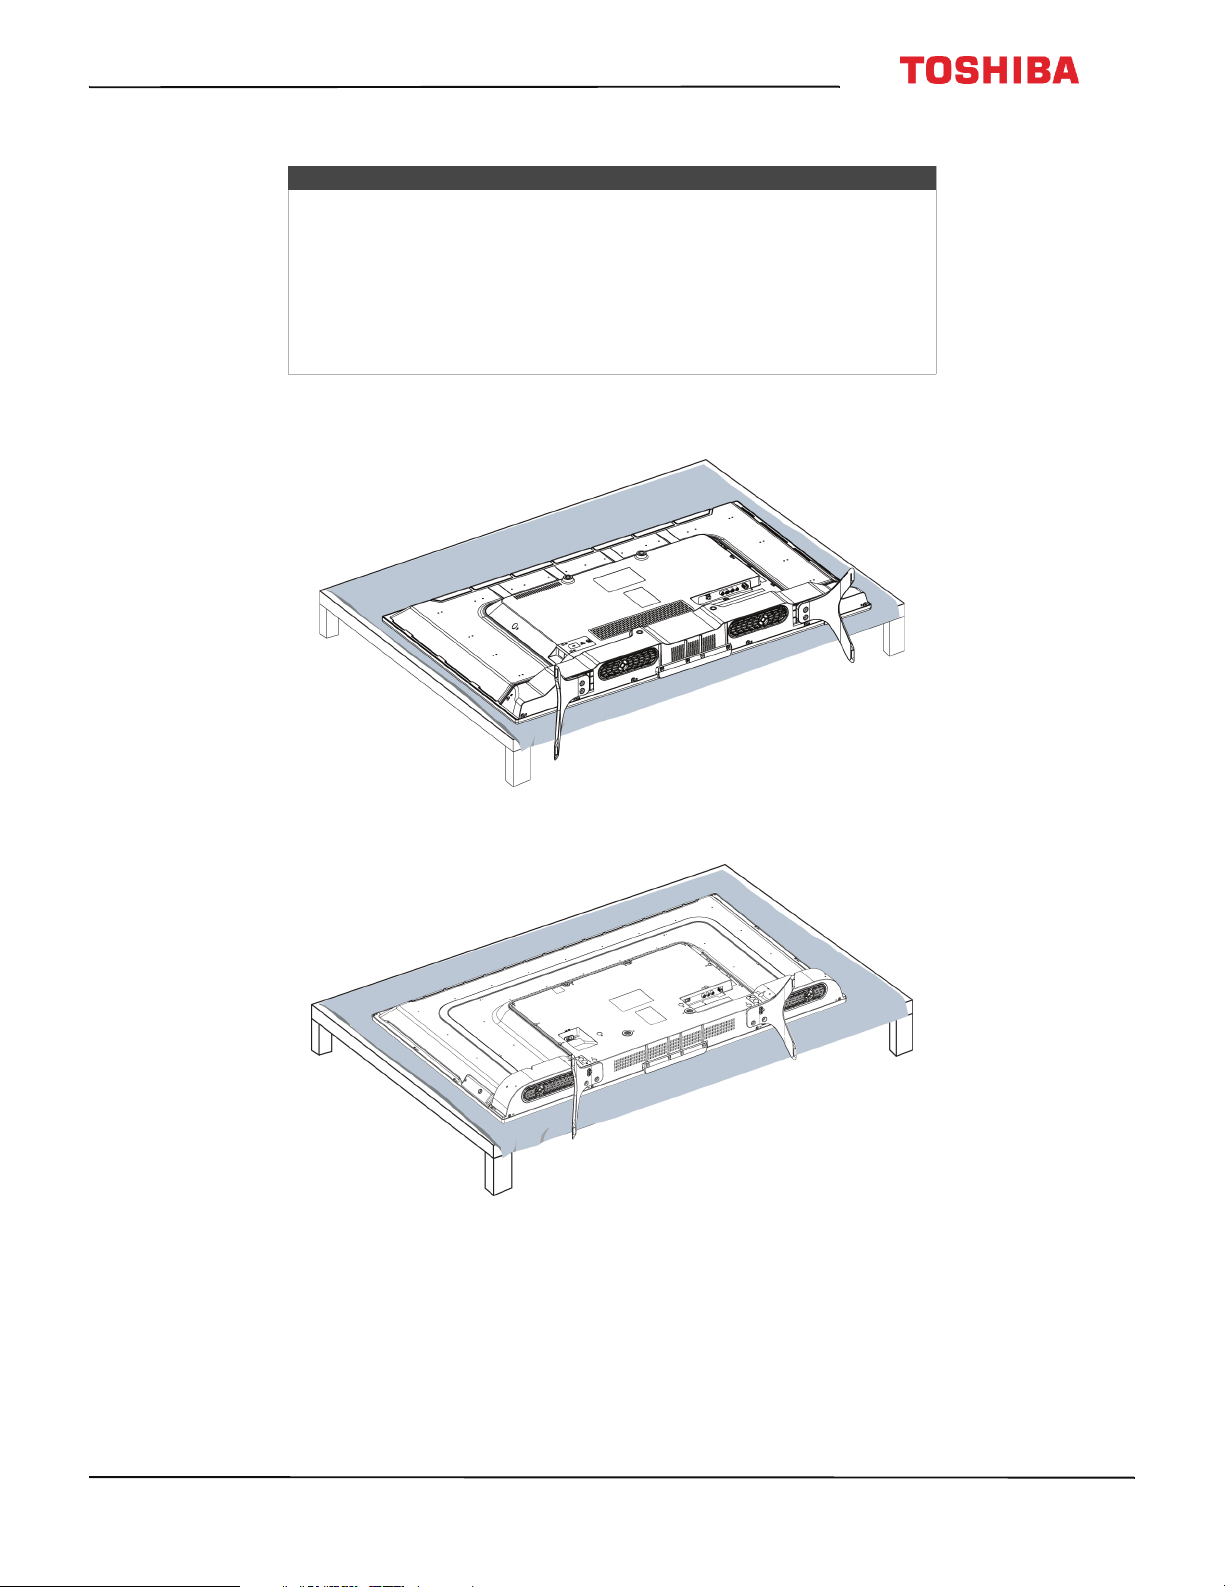
Installing a wall-mount bracket
Warning
• Your TV has four VESA mounting holes on the back. If you attach a
wall-mount bracket to the back of your TV, the bracket must be
securely attached, using all four holes. If you do not use all four
mounting holes, your TV may fall and cause property damage or
personal injury. See the documentation that came with your wall mount
for complete mounting instructions.
• This TV is intended to be supported by a UL Listed wall mount bracket
with suitable weight/load. (See Miscellaneous on page 94, 95, 96, or 97.)
1 Carefully place your TV face-down on a cushioned, clean surface to protect the screen from damages and scratches.
43" or 65" model
49" or 55" model
www.tv.toshiba.com
9
Page 15

43" / 49" / 55" / 65" 2160p 60Hz LED Google Cast™ TV
2 If the stands are installed, remove the screws that secure each stand to your TV, then remove the stand.
43"or 65" model
49" or 55" model
10
www.tv.toshiba.com
Page 16
43L621U / 49L621U / 55L621U / 65L621U 43" / 49" / 55" / 65" 2160p 60Hz LED Google Cast™ TV
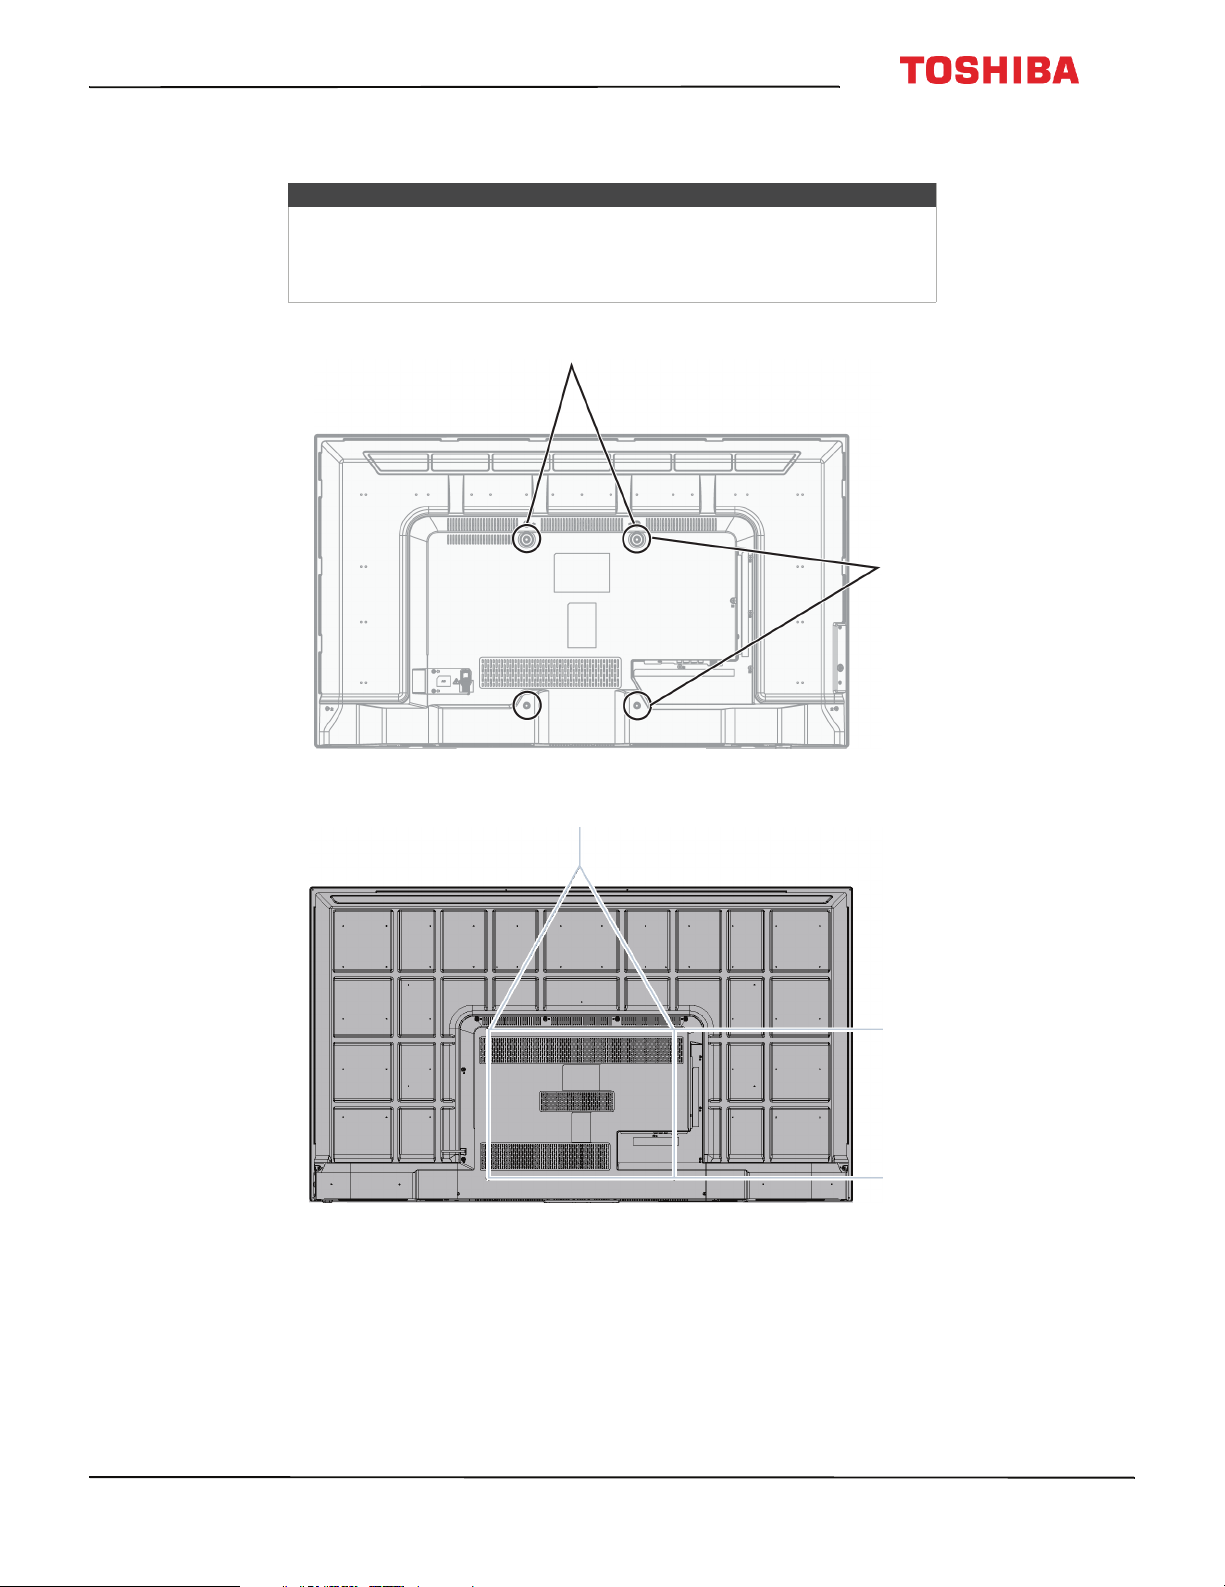
3 See the instructions that came with the wall-mount bracket for information about which screws to use and how to
correctly hang your TV.
Notes
• The length of the wall-mount screws vary depending on the wall-mount
bracket you purchased. See the instructions that came with the
wall-mount bracket for screw lengths.
• The mounting holes on the back of all the models take type M6 screws.
43" 49" or 55" model
65"model
7.87 in. (200 mm)
11.81 in. (300 mm)
19.69 in. (500 mm)
www.tv.toshiba.com
15.74 in. (400 mm)
11
Page 17
43" / 49" / 55" / 65" 2160p 60Hz LED Google Cast™ TV
TV components
This section contains information about:
•Package contents
•Front
• Power/INPUT button
•Side jacks
•Back jacks
• Remote control
Package contents
• 43", 49", 55", or 65"LED Google Cast™ TV
• Remote control and batteries (2 AAA)
• 43"/65" models: TV stands (2) and screws (4)
• 49"/55" models: TV stands (2), stand necks (2), M4
screws (8), and M5 screws (4)
• 49"/55" models: Power cord
• Quick Setup Guide
• Important Information
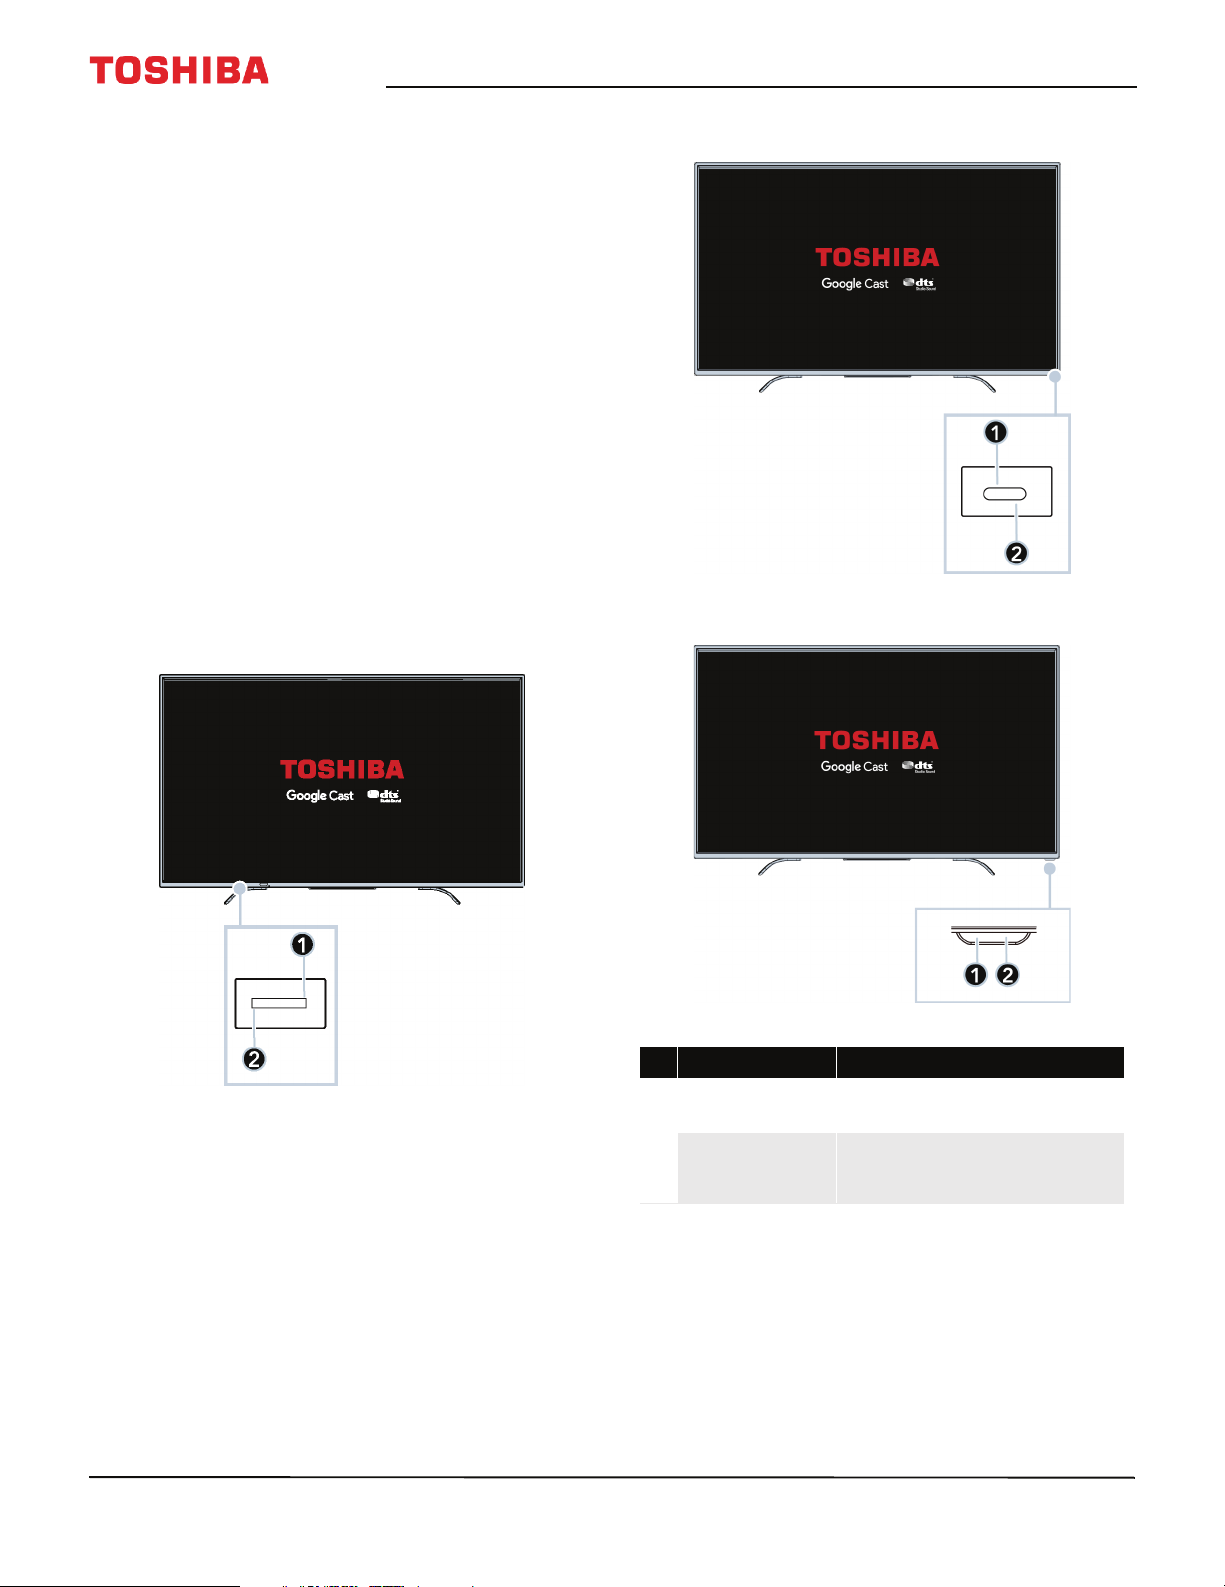
Front
43" model
49"/55" models
65" model
12
# Item Description
1
2
www.tv.toshiba.com
Remote control
sensor
Power indicator
Receives signals from the remote
control. Do not block.
Turns off when your TV is on.
Lights red when your TV is off
(standby mode).
Page 18
43L621U / 49L621U / 55L621U / 65L621U 43" / 49" / 55" / 65" 2160p 60Hz LED Google Cast™ TV
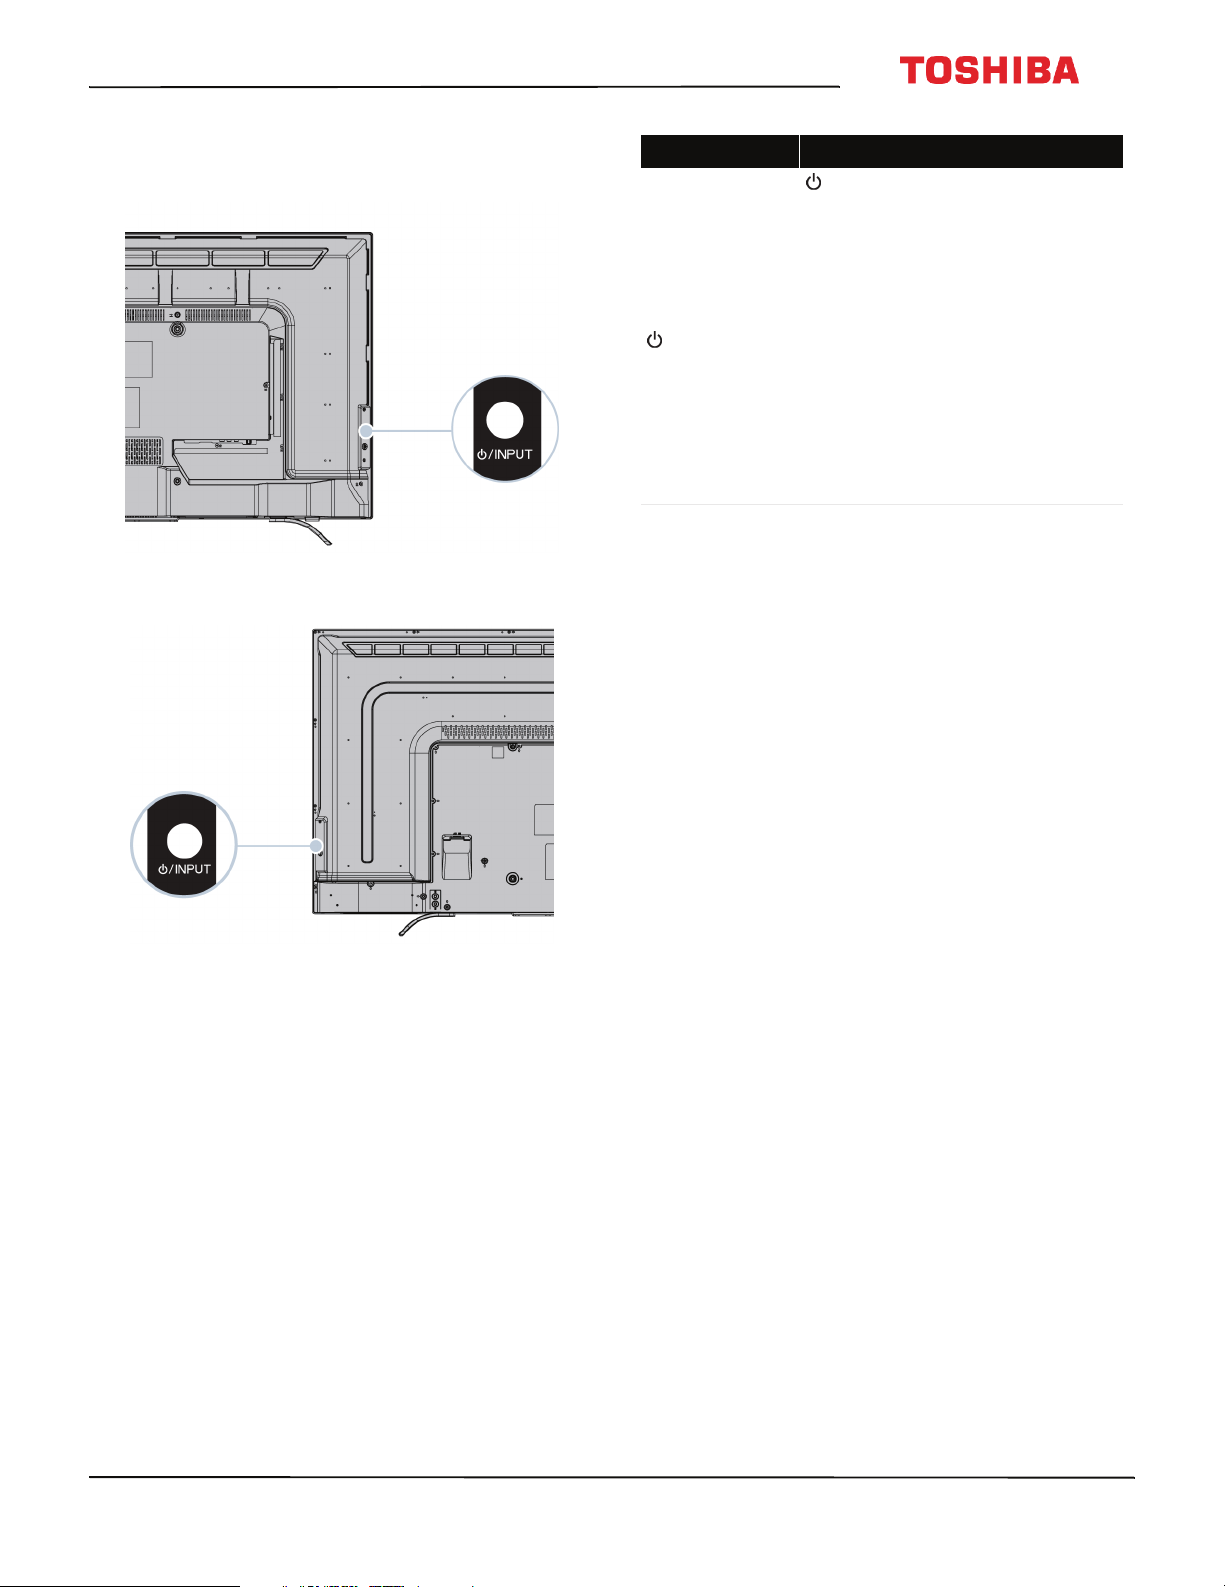
Power/INPUT button
43" model
49"/55"/65" models
Item Description
—Press to turn on your TV when
your TV is off (in standby mode). Press
and hold to turn off your TV when
your TV is on.
War ning: When your TV is off, power
still flows through it. To completely
disconnect power, unplug the power
/INPUT
cord.
INPUT—When your TV is on, quickly
press and release to open the Input
Selection list, press one or more times
to select a video input source, then
wait a few seconds. Your TV switches
to the source you selected. For more
information, see Selecting the video
input source on page 56.
www.tv.toshiba.com
13
Page 19

43" / 49" / 55" / 65" 2160p 60Hz LED Google Cast™ TV
Side jacks
43"/65" models
49"/55" models
# Item Description
Connect a USB flash drive to this
jack to view compatible JPEG
picture files. For more
1 USB
HDMI IN 1 (ARC)
2
3 HDMI IN 2
4
HDMI IN 3
DIGITAL OUTPUT
5
(Optical)
6
information, see Connecting a
USB flash drive on page 32 and
Using the Media Player on
page 64.
Connec t an HD MI or DVI device to
this jack. For more information,
see HDMI (best) on page 20, 25,
27, or 30 or DVI (same as HDMI
but requires an audio connection)
on page 21 or 31.
OR
Connect an ARC-enabled home
theater receiver to this jack.
Connec t an HD MI or DVI device to
this jack. For more information,
see HDMI (best) on page 20, 25,
27, or 30 or DVI (same as HDMI
but requires an audio connection)
on page 21 or 31.
Connec t an HD MI or DVI device to
this jack. For more information,
see HDMI (best) on page 20, 25,
27, or 30 or DVI (same as HDMI
but requires an audio connection)
on page 21 or 31.
Connect a soundbar, digital
speaker system, or home theater
system to this jack to listen to TV
audio through external speakers.
For more information, see
Connecting external speakers or a
soundbar on page 34.
Connect headphones to this jack.
See Connecting headphones on
page 33.
OR
Connect an analog soundbar,
speaker system, or home theater
system to this jack to listen to TV
audio through external speakers.
For more information, see Analog
audio on page 35.
14
www.tv.toshiba.com
Page 20
43L621U / 49L621U / 55L621U / 65L621U 43" / 49" / 55" / 65" 2160p 60Hz LED Google Cast™ TV
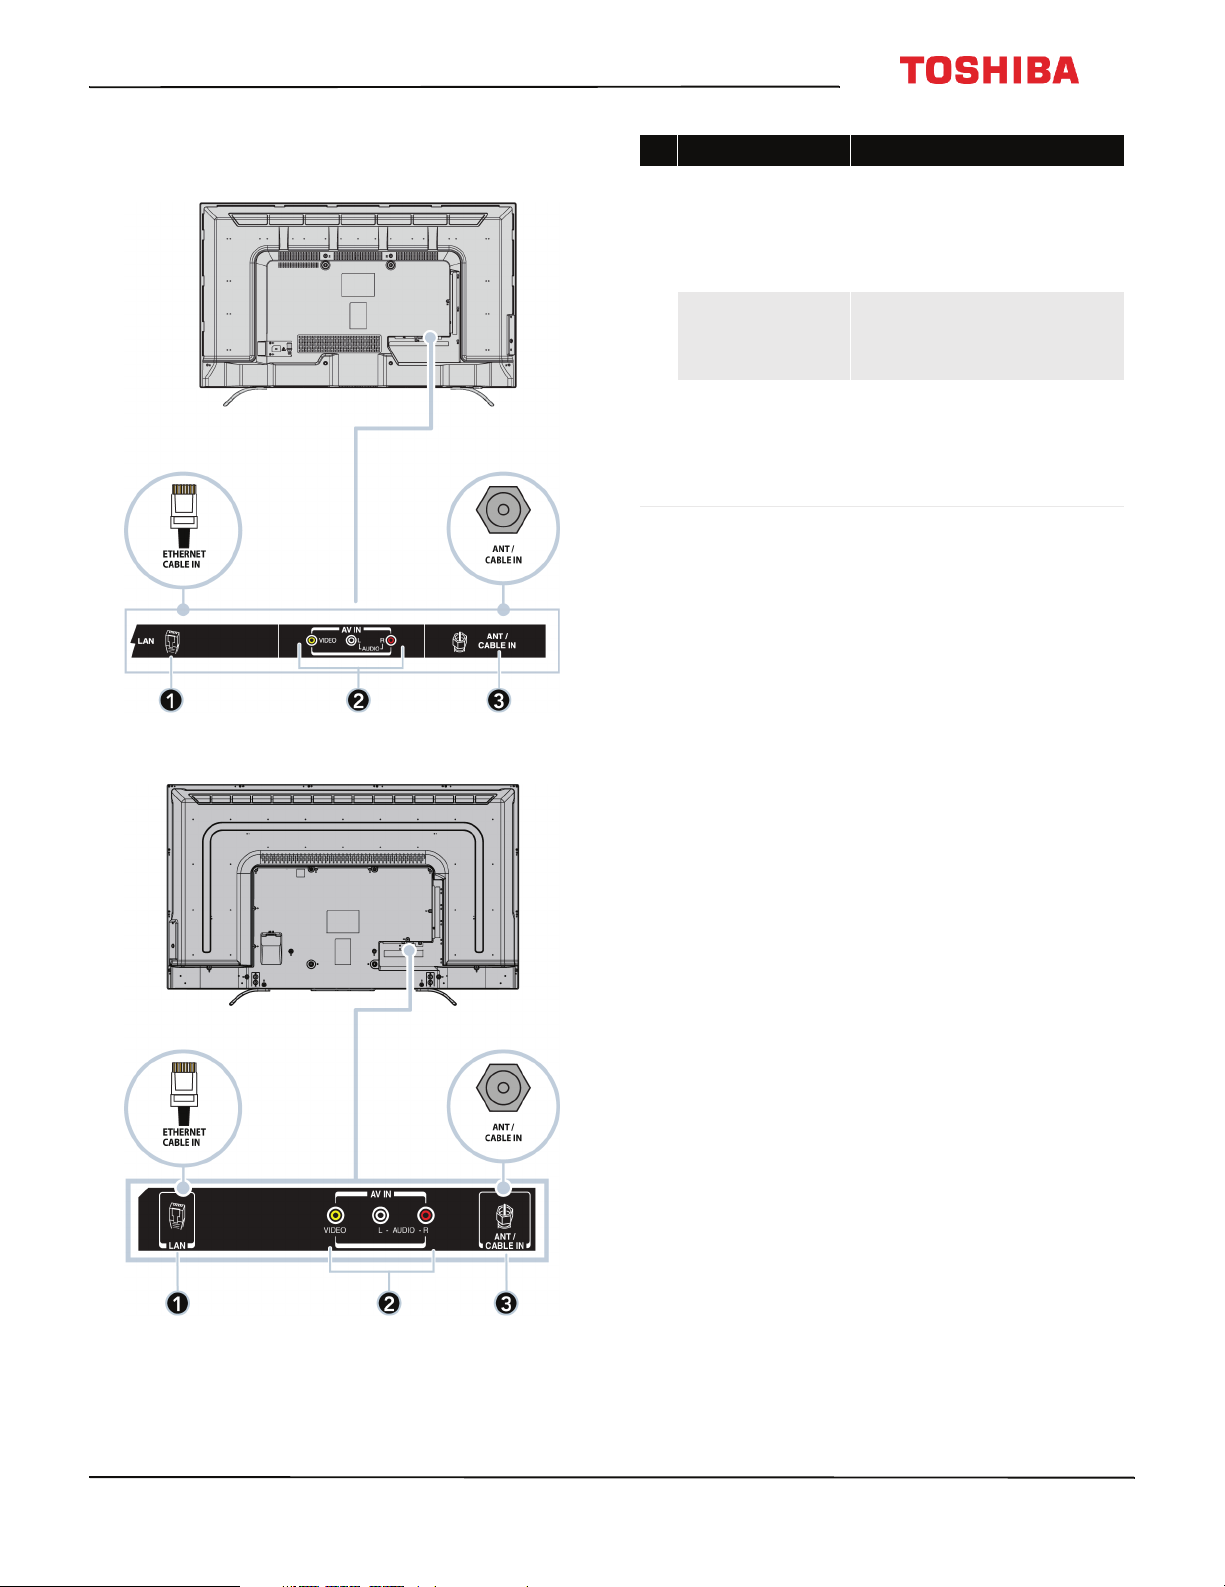
Back jacks
43" model
# Item Description
Connect a network router to
this jack to use a wired network
1 LAN
VIDEO and
2
AUDIO L and R
3 ANT / CABLE IN
connection to access your
Google Cast account. For more
information, see Connecting a
network router on page 29.
Connect the video and audio for
an AV device to these jacks. For
more information, see AV
(good) on page 22, 26, or 28.
Connect an antenna or cable TV
to this jack. For more
information, see Coaxial (good)
on page 23 or Connecting an
antenna or cable TV (no box) on
page 24.
49"/55"/65" models
www.tv.toshiba.com
15
Page 21
43" / 49" / 55" / 65" 2160p 60Hz LED Google Cast™ TV
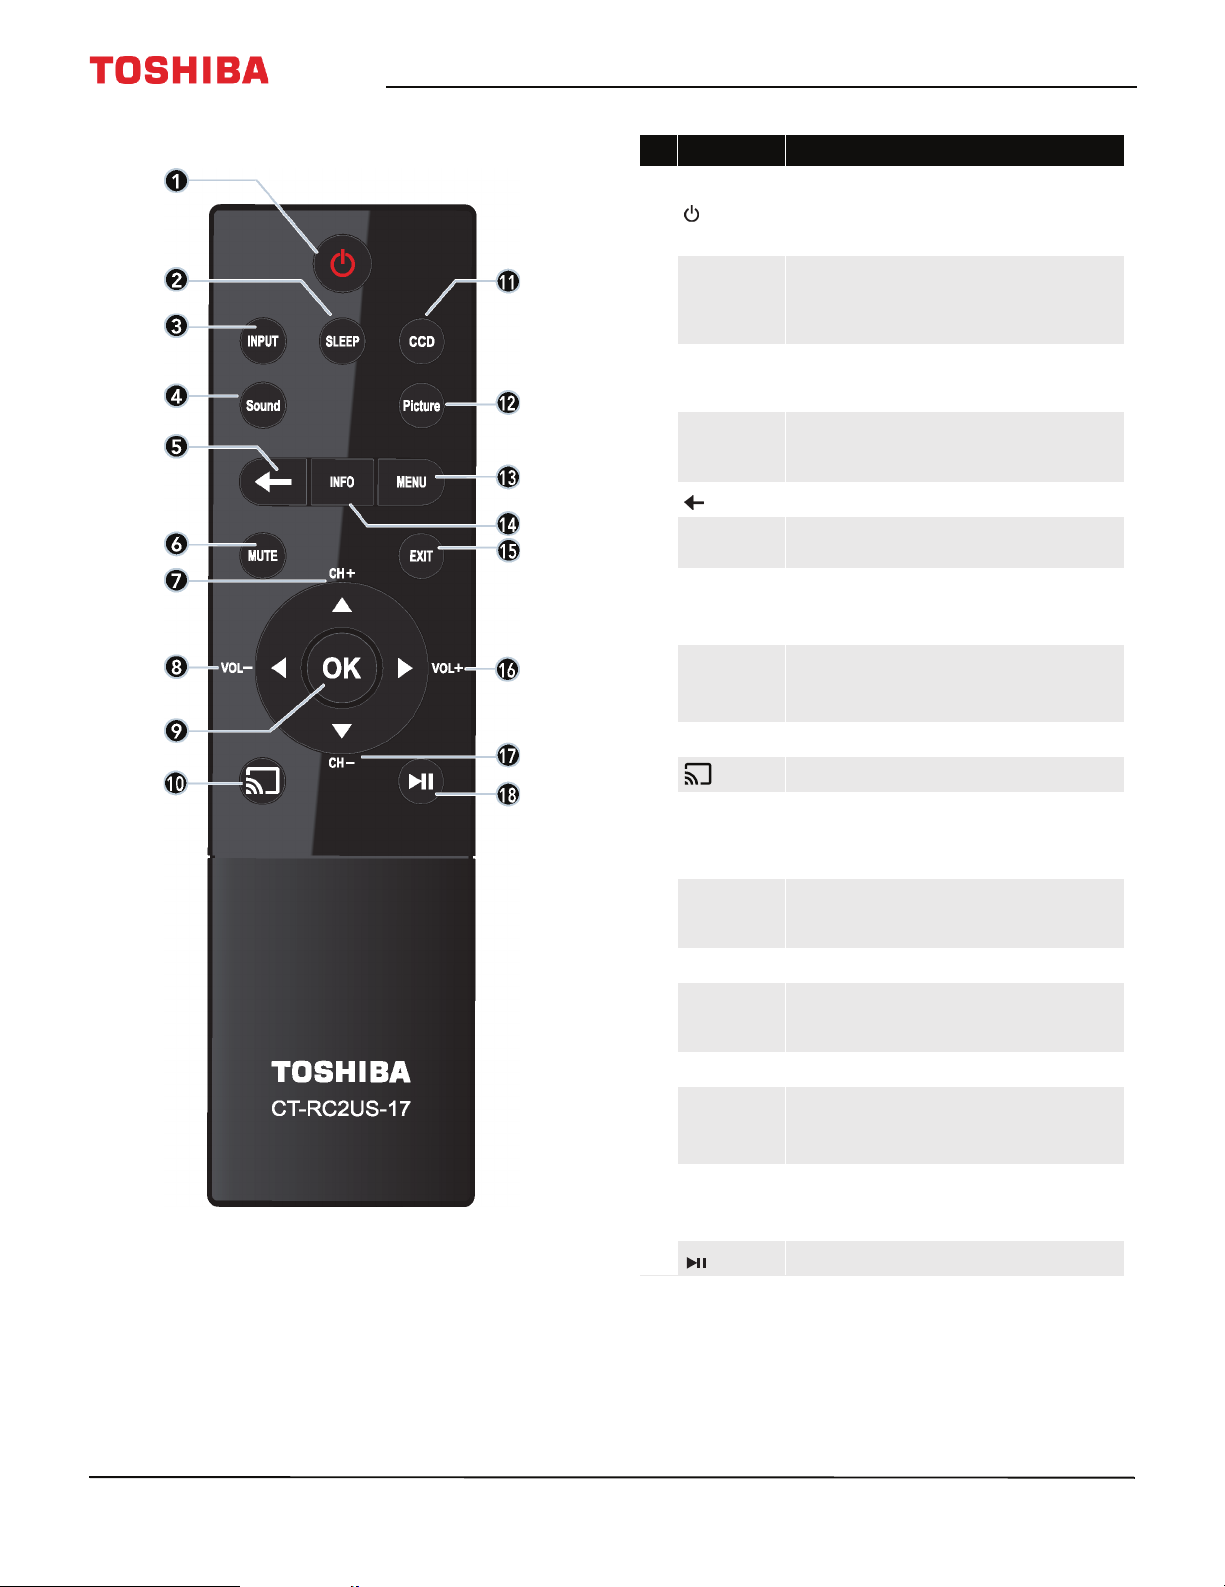
Remote control
# Button Press to...
Turn your TV on or off (standby mode). When your TV is off,
(power)
1
SLEEP
2
INPUT
3
Sound
4
(back) Return to the previous level or channel.
5
MUTE
6
CH+/
S
7
VOL–/
8
9
W
OK Confirm selecti ons or changes in TV menus.
the power indicator lights red.
Warn ing: When your TV is off, power still flows through it.
To disconnect power, unplug the power cord.
Set the sleep timer. You can select Off, 5min, 10 min,
15 min, 30 min, 60 min, 90min, 120 min, 150 min,
180 min, or 240 min. See Setting the sleep timer on
page 82.
Open the Input Selection list. Press INPUT one or more times
or press S or T to select the video input source, then press
OK. See Selecting the video input source on page 56.
Select the sound mode. You can select Standard, Music,
Movie, Clear Voice, or Enhanced Bass. See the Sound
Mode option in Adjusting sound settings on page 70.
Mute the sound or un-mute the sound. S ee Adjusting the
volume on page 58.
TV: Change to the next higher channel in the channel list.
TV menu: Navigate up.
USB: Rotate a photo counter-clockwise in a slideshow.
TV: Decrease the volume.
TV menu: Navigate left.
USB: Go to the previous photo in a slideshow.
10
CCD
11
Picture
12
MENU Open the on-screen menu.
13
INFO
14
EXIT Close the on-screen TV menu.
15
VOL+/
16
17
18
X
CH–
T
(play/pause) Start or stop playback.
Switch to Google Cast.
Turn closed captioning on or off. Select the language (like
English) to turn on closed captioning or Off to turn off
closed captioning. See Turning closed captioning on or off on
page 80.
Select the picture mode. You can select Dynamic,
Standard, Natural, Movie, Game, or PC. See the Picture
Mode option in Adjusting the TV picture on page 65.
Display TV status information, such as the channel number,
channel name (if available), or signal source. See Vie win g
channel information on page59 .
TV: Increase the volume.
TV menu: Navigate right.
USB: Go to the nex t photo in a slideshow.
TV: Change to the next lower channel in the channel list.
TV menu: Navigate down.
USB: Rotate a photo clockwise in a slideshow.
16
www.tv.toshiba.com
Page 22
43L621U / 49L621U / 55L621U / 65L621U 43" / 49" / 55" / 65" 2160p 60Hz LED Google Cast™ TV
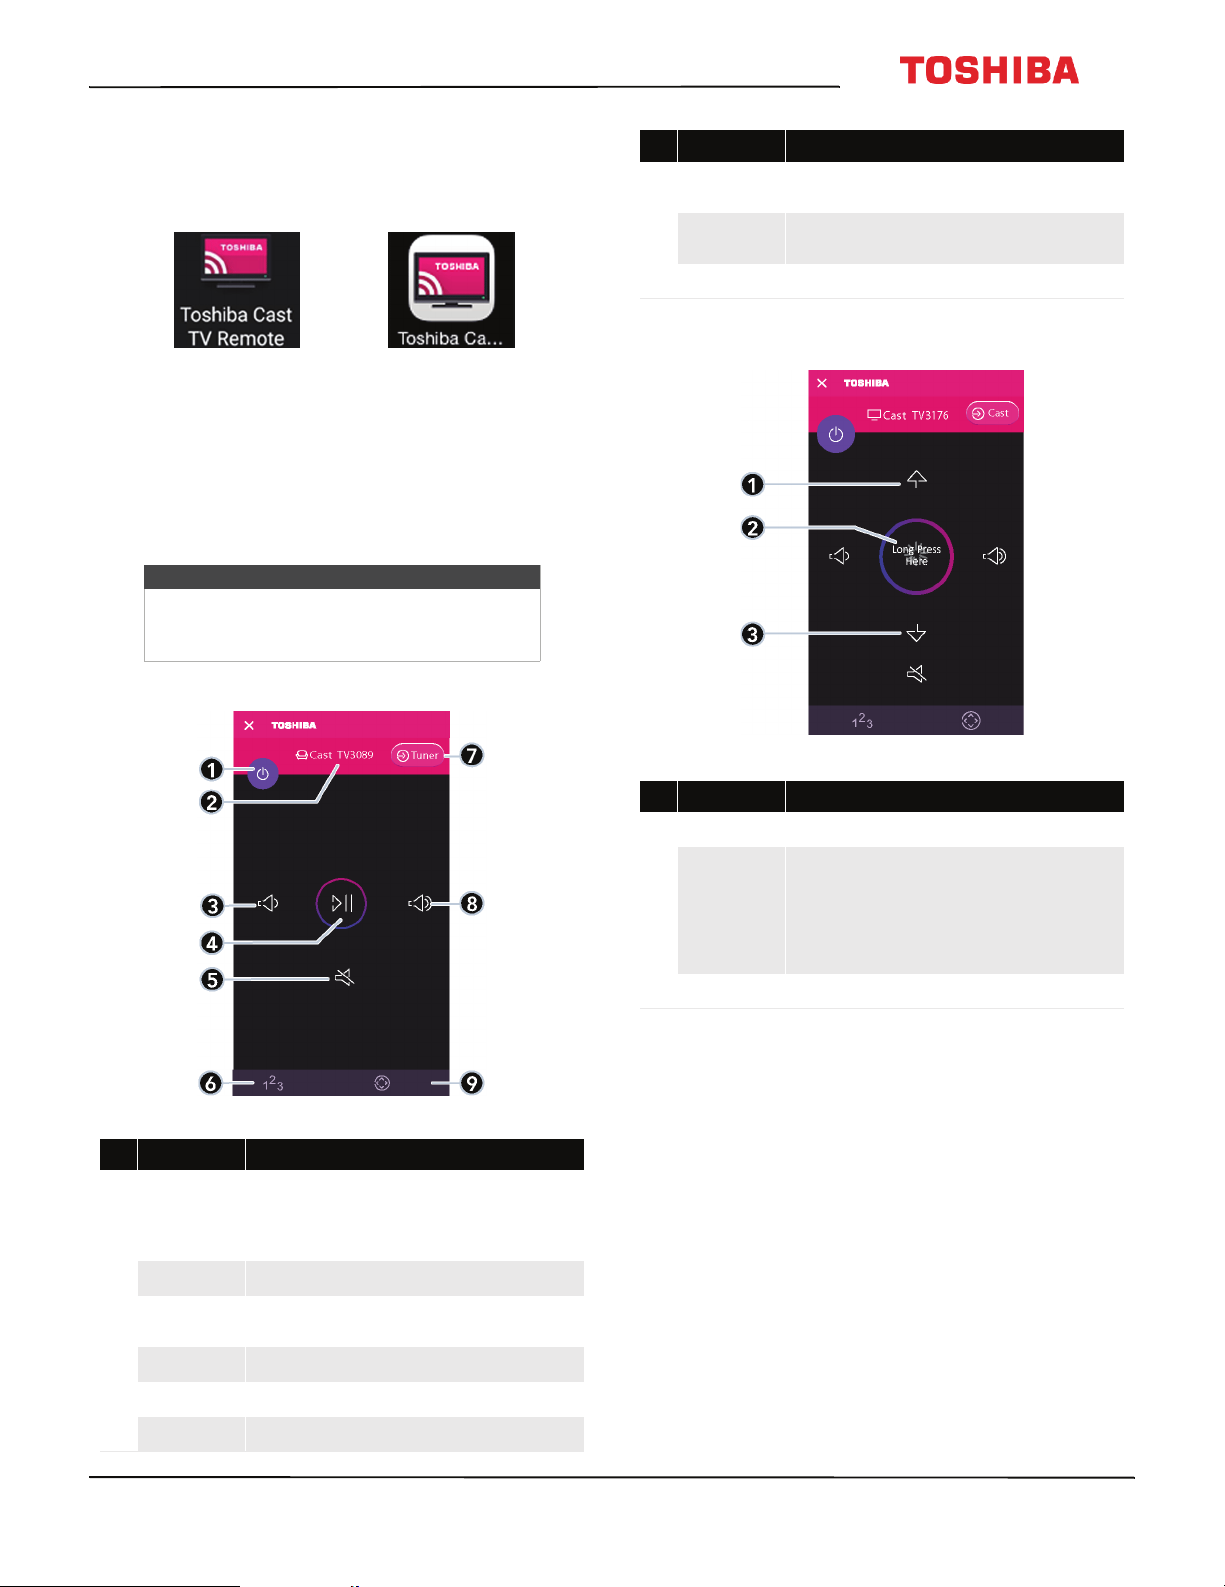
Virtual Remote control
To download the Toshiba Cast TV Remote App on your
mobile phone or tablet, search for the app in your
device's store app and install it.
Toshiba T V
Remote icon on
Android device.
The buttons on the Toshiba TV remote function the
same as the corresponding buttons on the remote
control that came with your TV. For more information,
see Remote control on page 16.
Note
When performing tasks, you can use either
your physical remote control or the virtual
remote control.
Main page
Tosh iba T V
Remote icon on
iOS device.
# Item Description
Input source
7
Volu me up
8
D-Pad Tap to got to the D-Pad page. See D-Pad page on page 18.
9
Tap to switch to the video input source to the TV tuner and
go to the Channel and Long Press page.
Tap to increase the volume one step. Touch and hold to
continuously increase the volume.
Channel and Long Press page
# Item Description
Tap to turn your TV on or off (standby mode). When your TV
Power
1
TV name Displays your TV’s name and icon.
2
Vol ume do wn
3
Play/Pause Tap to pause casting video. Tap again to resume playback.
4
is off, the power indicator lights red.
Warn ing: When your TV is off, power still flows through it.
To disconnect power, unplug the power cord.
Tap to decrease the volume one step. Touch and hold to
continuously decrease the volume.
# Item Description
Channel up Tap to go to the next channel in the channel list.
1
Touch and hold this button, then tilt your mobile device to
continuously change a value continuously.
Long Press
2
Channel down Tap to go to the previous channel in the channel list.
3
For example, to decrease the volume, press and hold this
button then tilt your mobile device to the left (volume down
button). Or to change channels, press and hold this button,
then tilt your mobile device toward your TV.
Mute Tap to mute the sound or un-mute the sound.
5
Number Tap to go to the Number page and enter channel numbers.
6
www.tv.toshiba.com
17
Page 23
43" / 49" / 55" / 65" 2160p 60Hz LED Google Cast™ TV
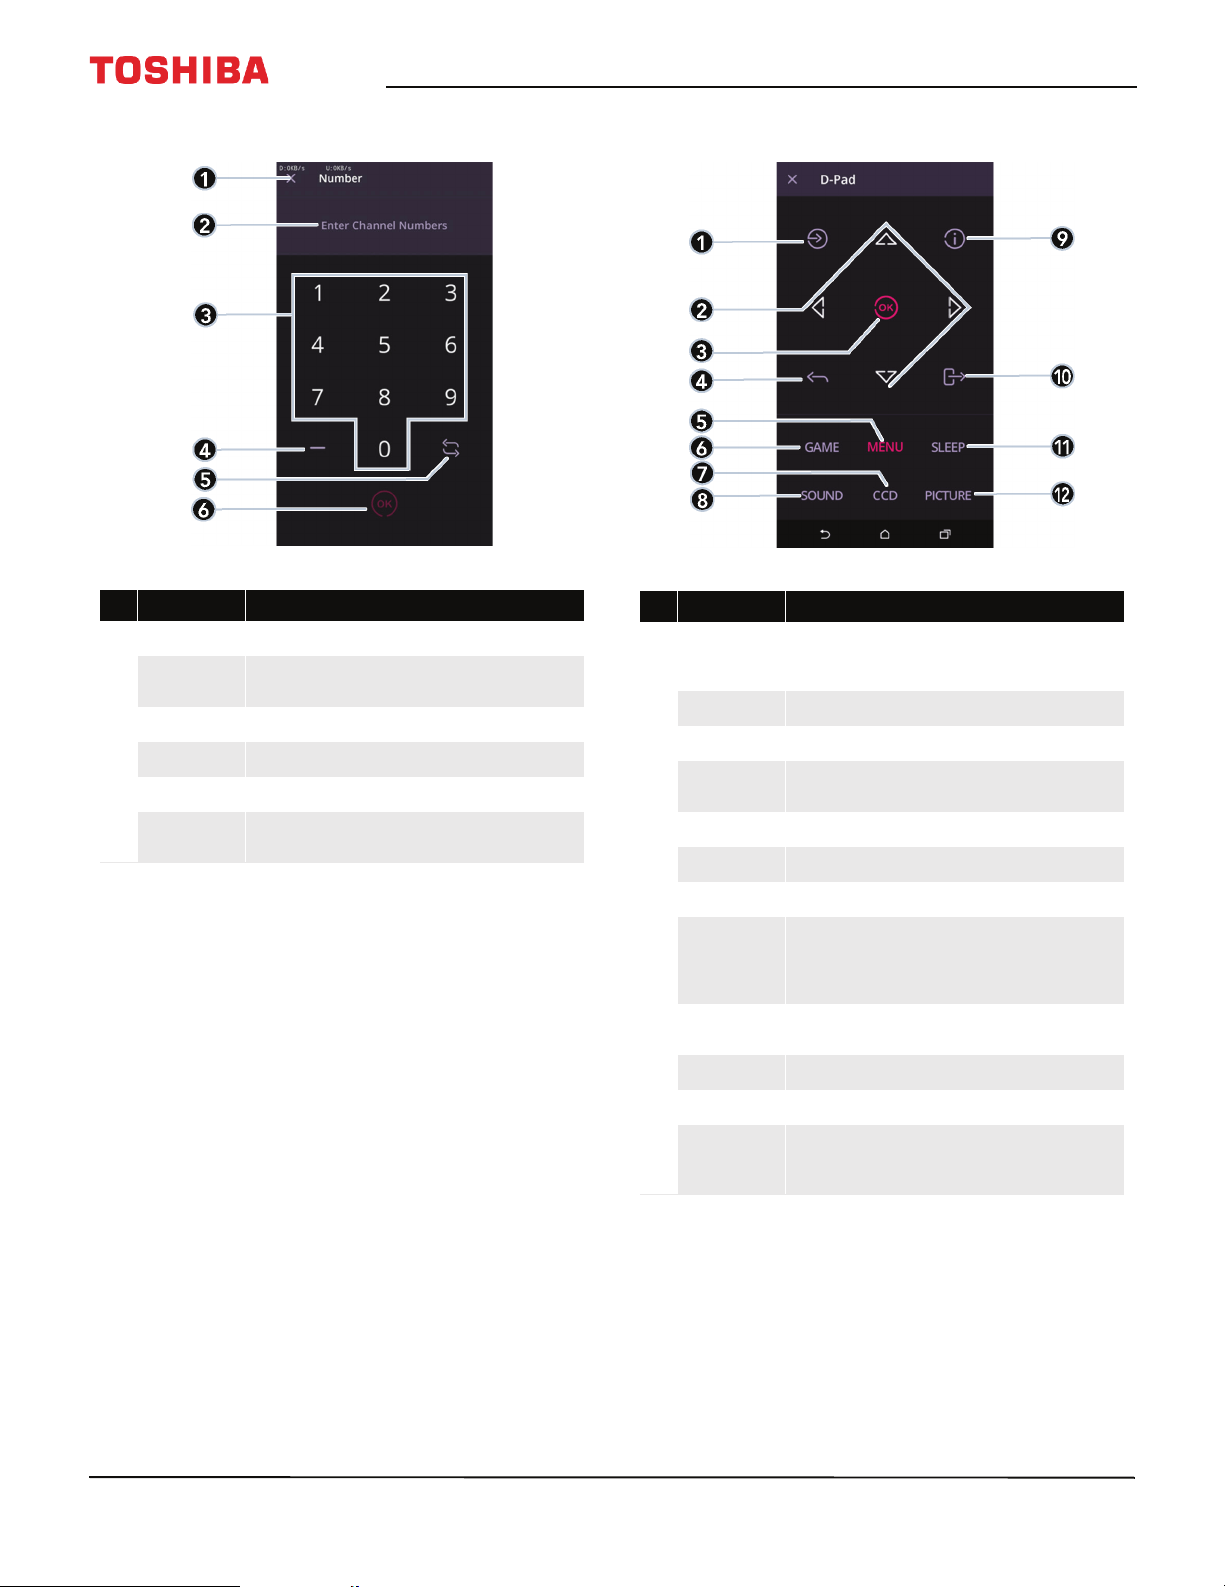
Number page D-Pad page
# Item Description
Close Tap to close this page and return to the Main page.
1
Channel number
2
Number pad Tap numbers to enter channel numbers.
3
Dash Tap to enter a sub-channel number.
4
Return Tap to return to the previous channel.
5
OK
6
Displays the channel or s ub-channel numbers (up to three
numbers) you enter with the number buttons.
Tap to confirm the channel number you entered and go to
that channel.
# Item Description
Input source
1
Arrows Use these buttons to browse through on-screen menus.
2
OK Tap to confirm selections or changes in TV menus.
3
Back
4
Menu Tap to open on-screen menus.
5
Game Tap to turn Game mode on or off.
6
Closed captioning Tap to turn closed captioning on or off.
7
Sound mode
8
Info
9
Exit Tap to exit the on-screen menus.
10
Sleep Tap to set the sleep timer.
11
Picture m ode
12
Tap to open the Input Selection list. Press this button one or
more times or press S or T to select the video input
source, then press OK.
Tap to go to the previous channel or go back to the previous
step.
Tap to select the sound mode. You can select Standard,
Music, Movie, Clear Voice, or Enhanced Bass. See the
Sound Mode option in Adjusting sound settings on
page 70.
Tap to display information on your TV about the currently
selected channel.
Tap to select the picture mode. You can select Dynamic,
Standard, Natural, Movie, Game, or PC. See the Picture
Mode option in Adjusting the TV picture on page 65.
18
www.tv.toshiba.com
Page 24
43L621U / 49L621U / 55L621U / 65L621U 43" / 49" / 55" / 65" 2160p 60Hz LED Google Cast™ TV
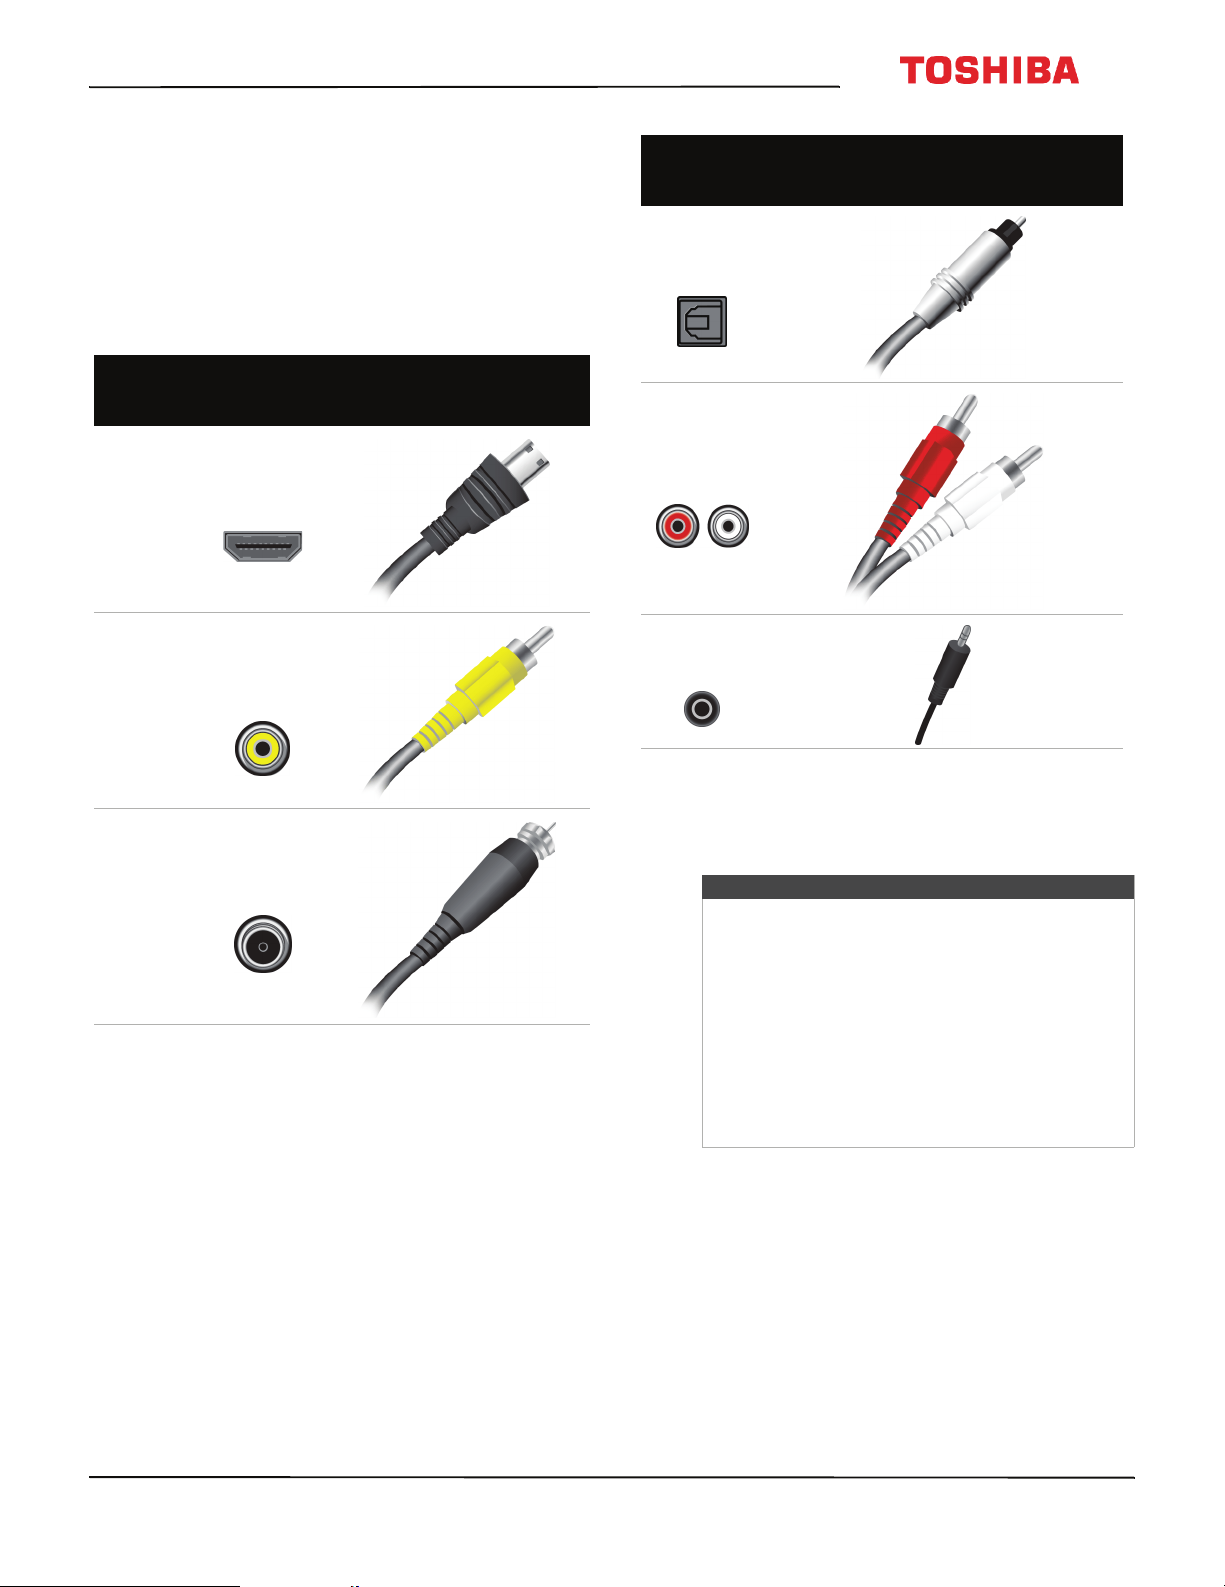
What connection should I use?
Your TV has several connection types for connecting
devices to your TV.
For the best video quality, you should connect a
device to the best available connection.
Use the following tables to identify cables:
Video
quality
Best (use this
if your devices
have HDMI)
Good
Connection
type and
jack
HDMI
video/audio
AV (requires an
audio
connection)
Cable connector
Connection
type and
jack
Optical digital
audio output
Analog audio
input
3.5mm analog
audio output
Cable connectors
Good
Coaxial
video/audio
You can use an HDMI IN jack on your TV to connect a
DVI device to your TV. For more information, see DVI
(same as HDMI but requires an audio connection) on
page 21 or 31.
Cautions
• Check the jacks for position and type before
making any connections.
• Loose connections can cause poor audio or
video quality. Make sure that all connections
are tight and secure.
• The external audio/video equipment shown
may be different from your equipment. If you
have questions, refer to the documentation
that came with your equipment.
• Always unplug the power cord when
connecting external equipment.
www.tv.toshiba.com
19
Page 25
43" / 49" / 55" / 65" 2160p 60Hz LED Google Cast™ TV
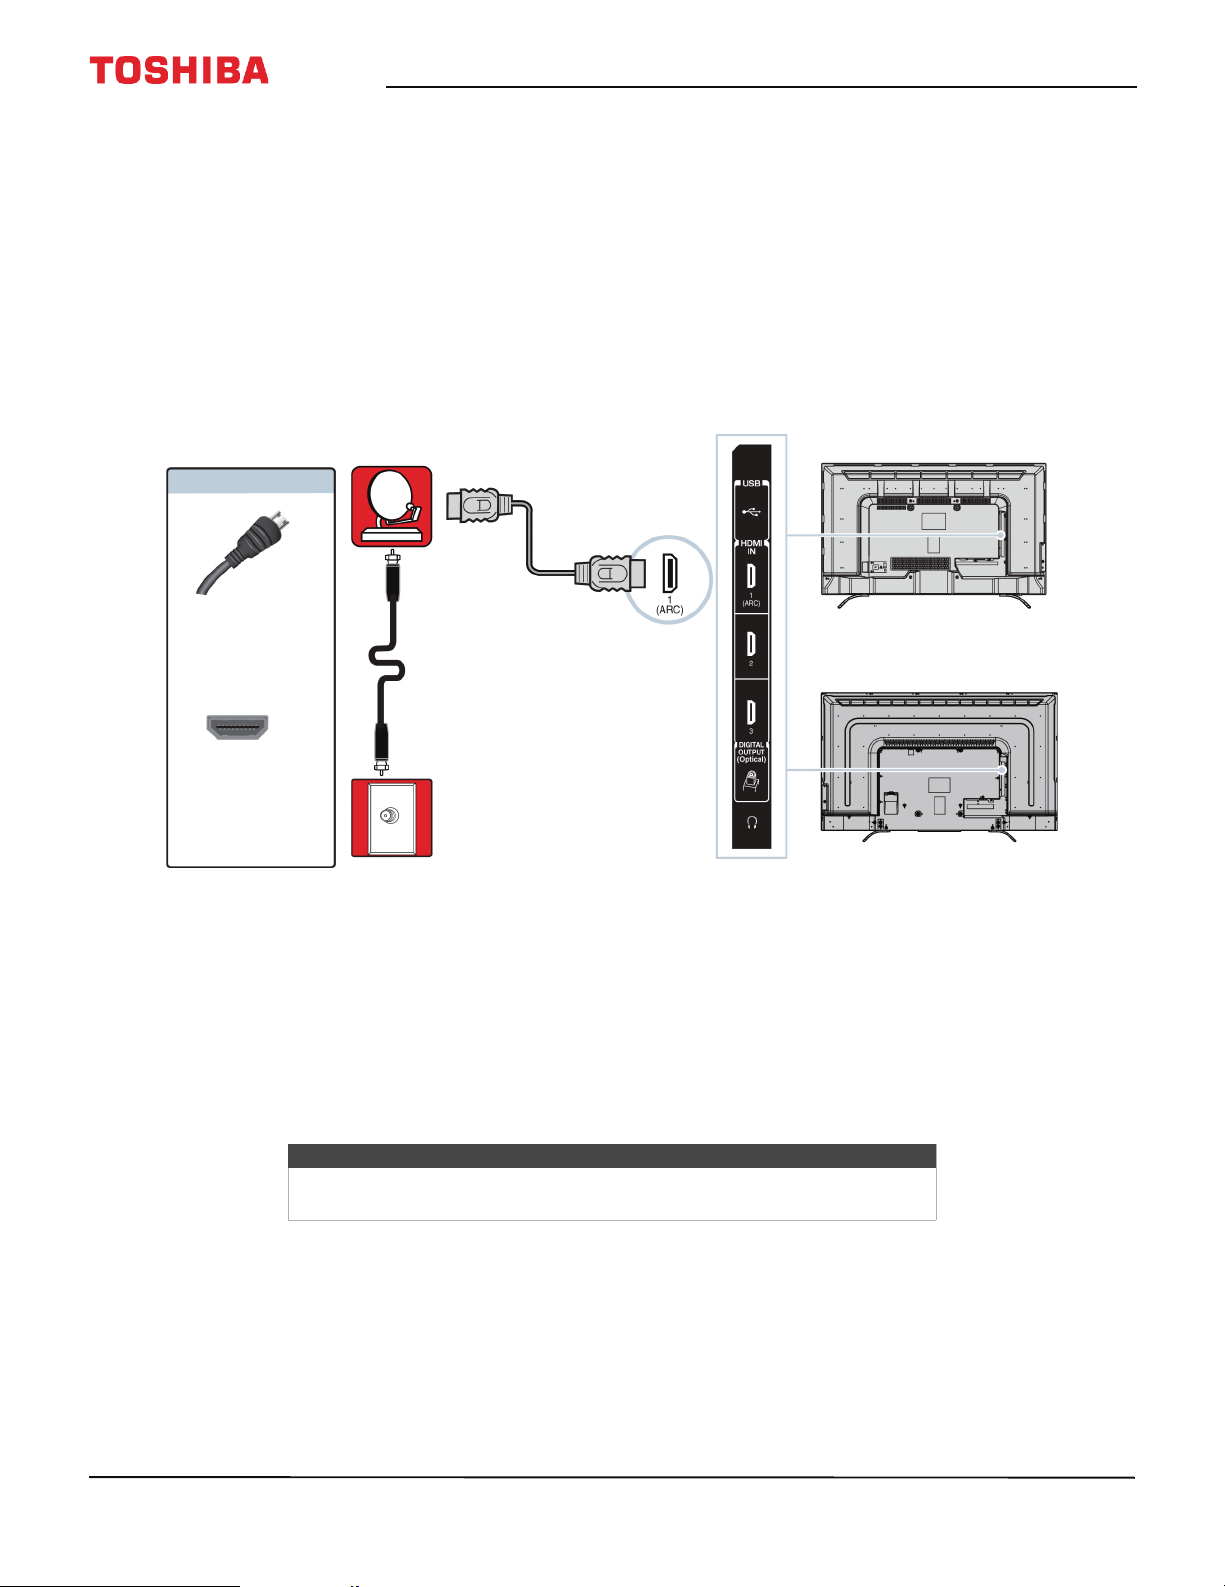
Connecting a cable or satellite box
Many cable or satellite TV boxes have more than one connection type. To get the best video, you should use the best
connection type available. For more information, see What connection should I use? on page 19.
You can connect a cable or satellite box using:
•HDMI (best)
• DVI (same as HDMI but requires an audio connection)
•AV (good)
• Coaxial (good)
HDMI (best)
Cable or
satellite box
On your TV
HDMI cable
connector
HDMI IN jack
Cable wall
jack
1 Make sure that your TV’s power cord is unplugged and all connected equipment is turned off.
2 Connect the incoming cable from the cable wall jack to the cable-in jack on the cable or satellite box.
3 Connect an HDMI cable (not provided) to one of the HDMI IN jacks on the side of your TV and to the HDMI OUT jack
on the cable or satellite box.
4 Plug your TV’s power cord into a power outlet, turn on your TV, then turn on the cable or satellite box.
5 Press INPUT to open the Input Selection list.
6 Press
S
or T to highlight HDMI 1, HDMI 2, or HDMI 3, then press OK.
HDMI cable
Side of TV
43"/65" models
49"/55" models
20
Note
An HDMI cable carries both audio and video. You do not need to use any
audio cables.
www.tv.toshiba.com
Page 26

43L621U / 49L621U / 55L621U / 65L621U 43" / 49" / 55" / 65" 2160p 60Hz LED Google Cast™ TV
DVI (same as HDMI but requires an audio connection)
Note
Your TV supports DVI video only. To add sound for a DVI connection,
connect external speakers or a soundbar to the cable or satellite box.
Cable or
satellite box
On your TV
HDMI cable
connector
HDMI IN jack
Cable
wall jack
1 Make sure that your TV’s power cord is unplugged and all connected equipment is turned off.
2 Connect the incoming cable from the cable wall jack to the cable-in jack on the cable or satellite box.
3 Connect an HDMI-DVI adapter (not provided) to one end of an HDMI cable (not provided), then connect the adapter
to the DVI OUT jack on the cable or satellite box.
4 Connect the other end of the cable to one of the HDMI IN jacks on the side of your TV.
5 Plug your TV’s power cord into a power outlet, turn on your TV, then turn on the cable or satellite box.
6 Press INPUT to open the Input Selection list.
7 Press
S
or T to highlight HDMI 1, HDMI 2, or HDMI 3, then press OK.
HDMI cable with
HDMI-DVI adapter
Side of TV
43"/65" models
49"/55" models
www.tv.toshiba.com
21
Page 27
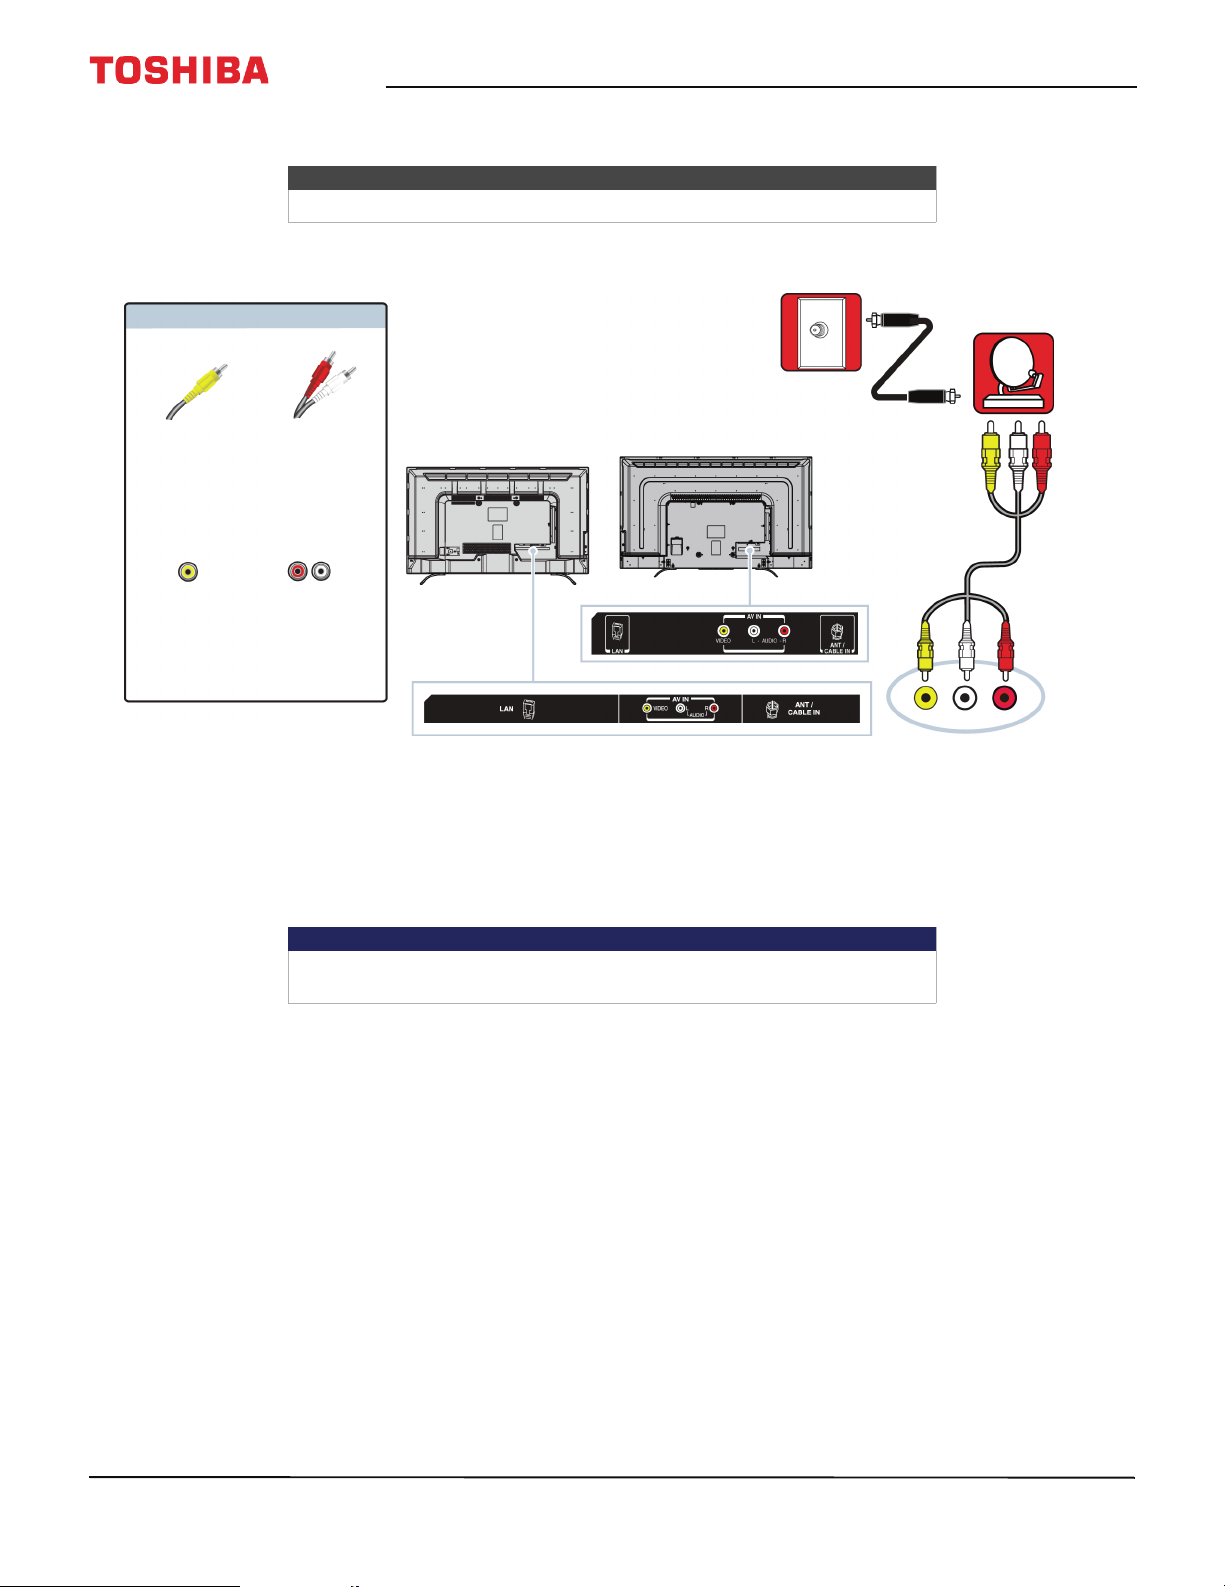
AV (good)
On your TV
43" / 49" / 55" / 65" 2160p 60Hz LED Google Cast™ TV
Notes
Cables are often color-coded to match color-coded jacks.
Cable
wall jack
Cable or
satellite box
AV cable
connector
AV jack
1 Make sure that your TV’s power cord is unplugged and all connected equipment is turned off.
2 Connect the incoming cable from the cable wall jack to the cable-in jack on the cable or satellite box.
3 Connect an AV cable (not provided) to the VIDEO jack and AUDIO L and R jacks on the back of your T V and to the AV
and audio out jacks on the cable or satellite box.
Audio cable
connectors
Analog
audio jacks
Important
When you connect the audio using the AUDIO L and R jacks, the audio
output is analog.
43" model
49"/55"/65" models
AV cable
Back of TV
22
4 Plug your TV’s power cord into a power outlet, turn on your TV, then turn on the cable or satellite box.
5 Press INPUT to open the Input Selection list.
6 Press
S
or T to highlight AV , then press OK.
www.tv.toshiba.com
Page 28
43L621U / 49L621U / 55L621U / 65L621U 43" / 49" / 55" / 65" 2160p 60Hz LED Google Cast™ TV
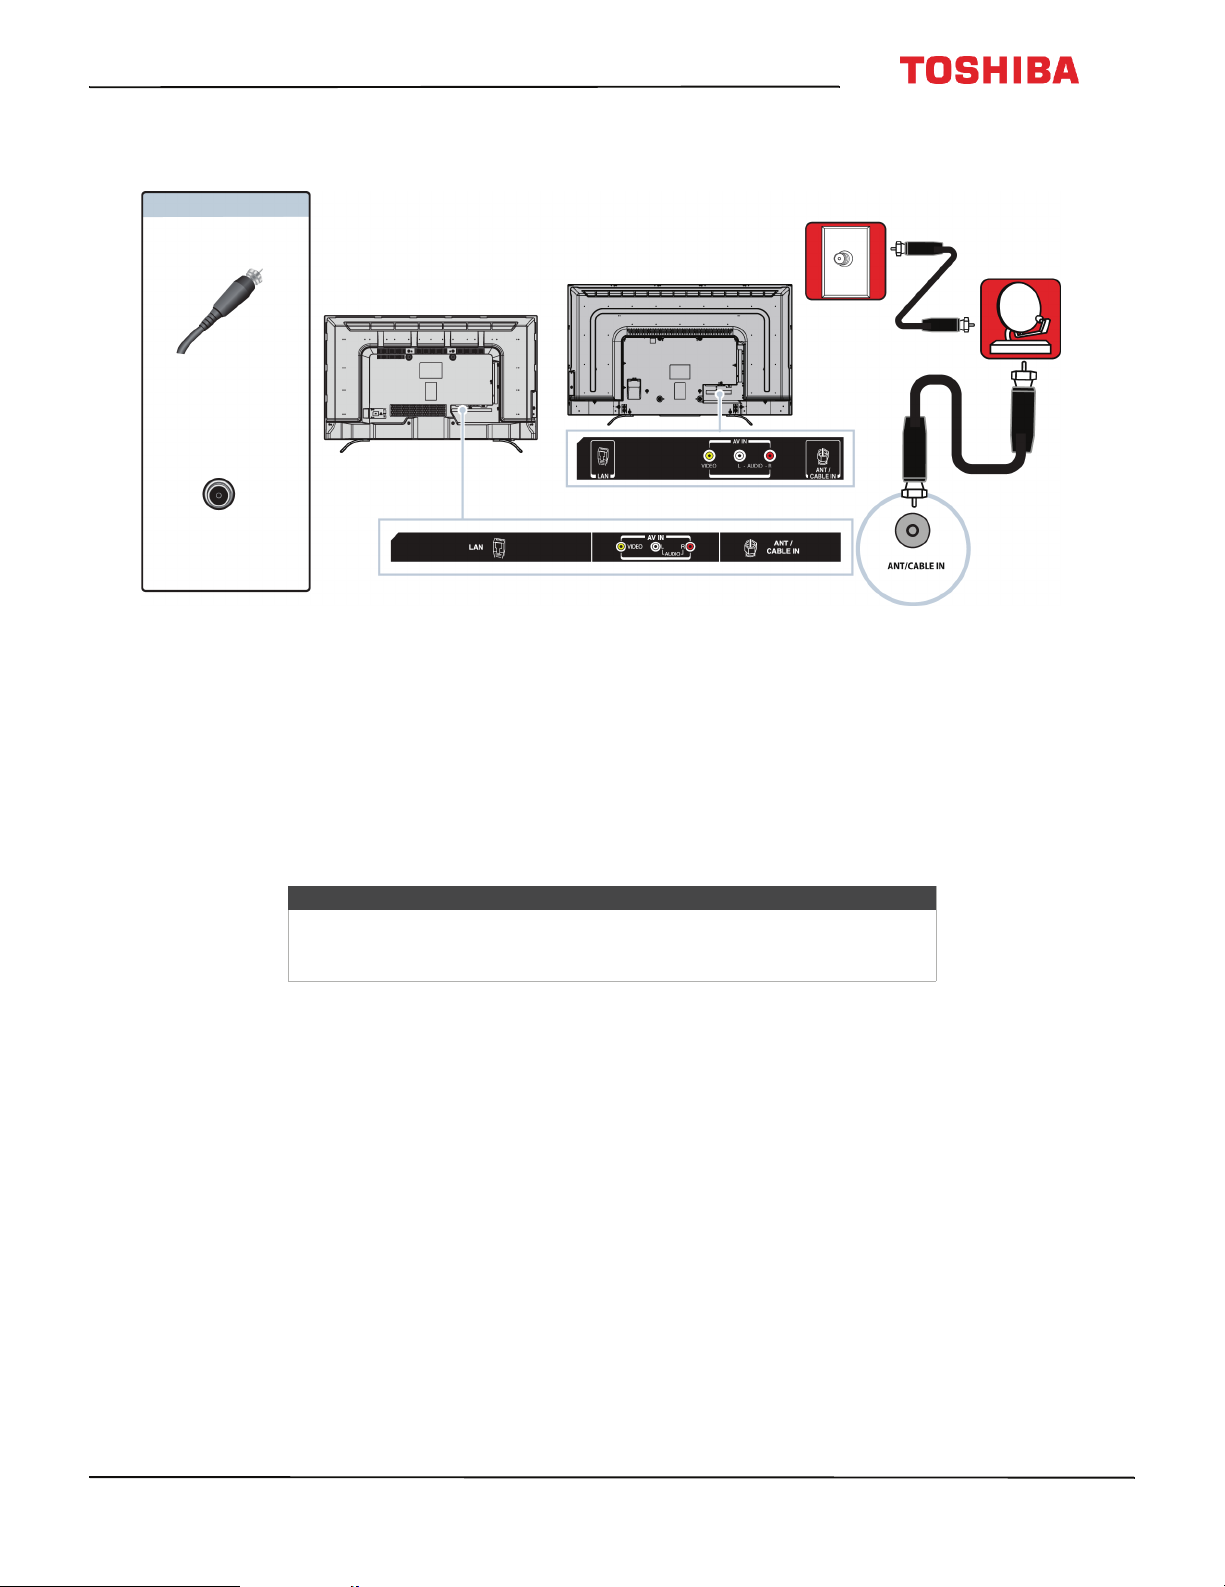
Coaxial (good)
Cable
On your TV
49"/55"/65" models
43" model
Coaxial cable
connector
ANT / CABLE IN
jack
Back of TV
wall jack
Cable or
satellite box
Coaxial
cable
1 Make sure that your TV’s power cord is unplugged and all connected equipment is turned off.
2 Connect the incoming cable from the cable wall jack to the cable-in jack on the cable or satellite box.
3 Connect a coaxial cable (not provided) to the ANT / CABLE IN jack on the back of your TV and to the coaxial out jack
on the cable or satellite box.
4 Plug your TV’s power cord into a power outlet, turn on your TV, then turn on the cable or satellite box.
5 Press INPUT to open the Input Selection list.
6 Press
7 If you cannot tune to channels you know exist, scan for channels. See Automatically scanning for channels on
S
page 71.
or T to highlight ANT / CABLE, then press OK.
Notes
• Use a coaxial cable to eliminate interference and noise from radio
waves.
• Do not bundle the coaxial cable with the power cord or other cables.
www.tv.toshiba.com
23
Page 29
43" / 49" / 55" / 65" 2160p 60Hz LED Google Cast™ TV
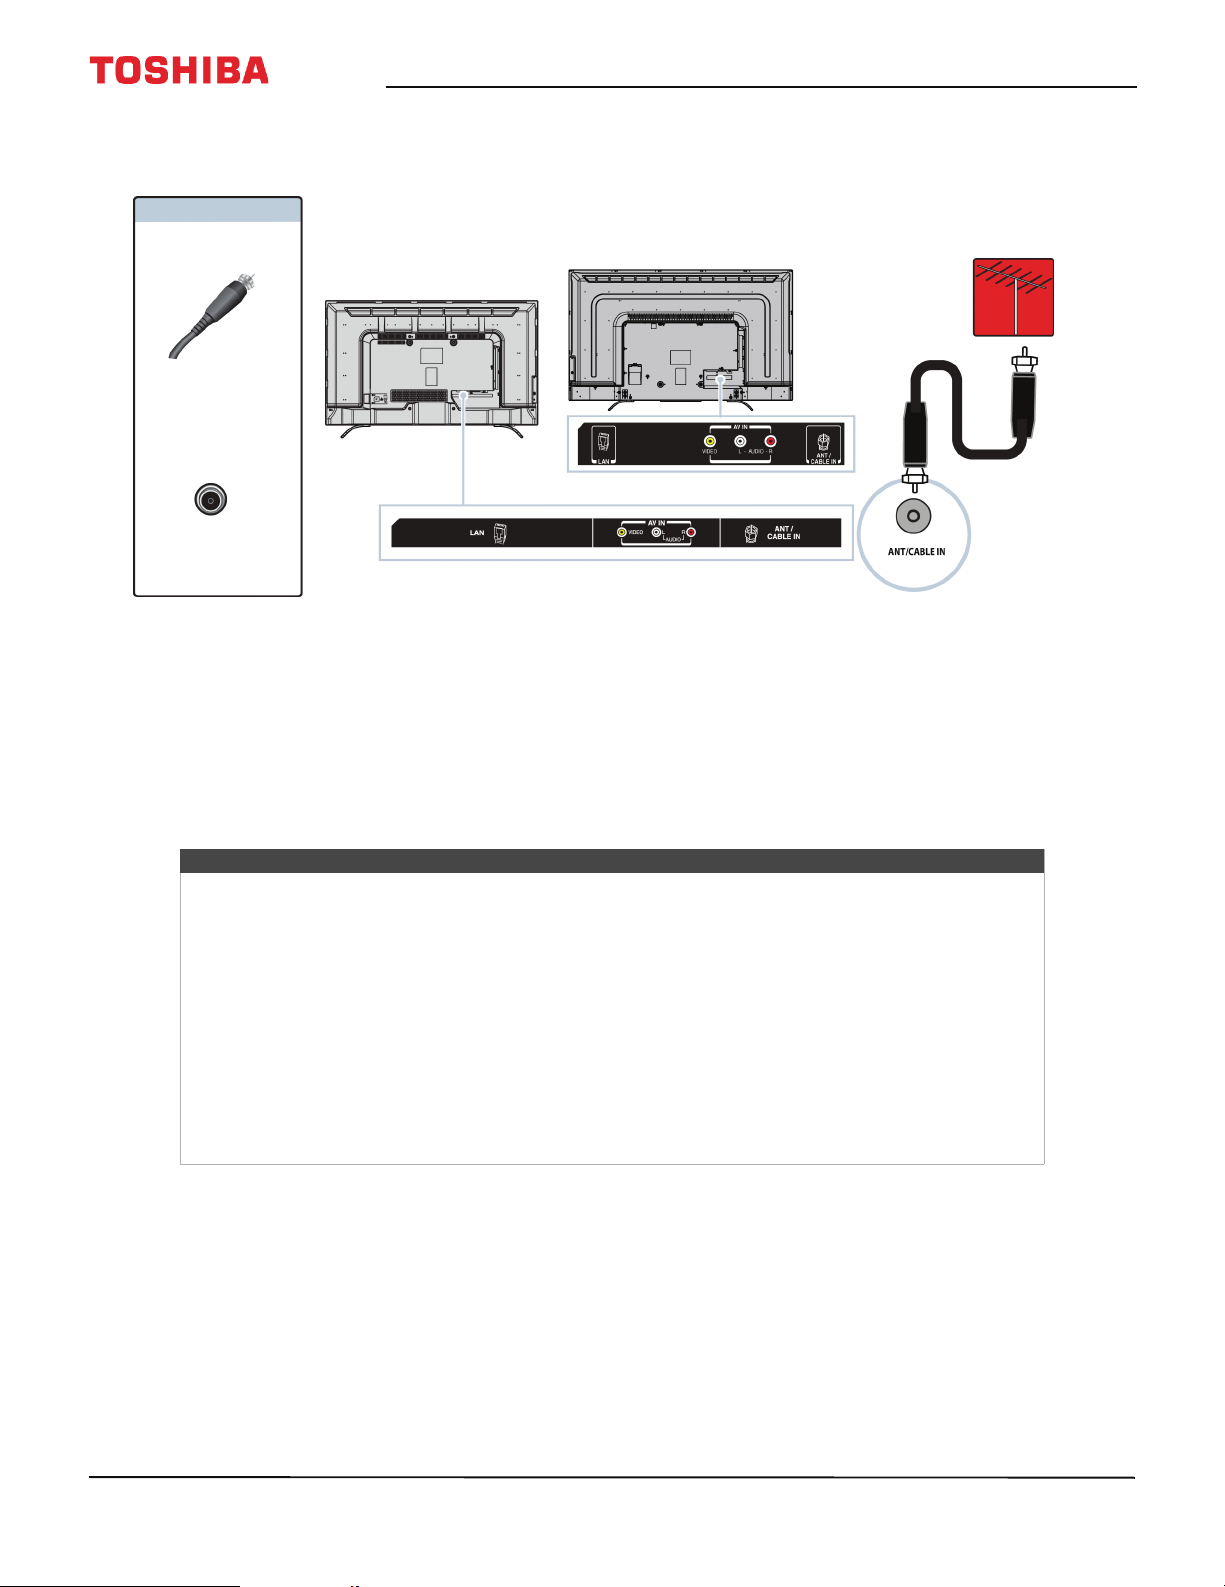
Connecting an antenna or cable TV (no box)
On your TV
49"/55"/65" models
43" model
Coaxial cable
connector
ANT / CABLE IN
jack
1 Make sure that your TV’s power cord is unplugged and all connected equipment is turned off.
2 Connect a coaxial cable (not provided) to the ANT / CABLE IN jack on the back of your TV and to the antenna or
cable TV wall jack.
3 Plug your TV’s power cord into a power outlet, then turn on your TV.
4 Press INPUT to open the Input Selection list.
5 Press
6 If you cannot tune to channels you know exist, scan for channels. See Automatically scanning for channels on
S
page 71.
or T to highlight ANT / CABLE, then press OK.
Back of TV
Antenna or cable TV
(no box)
Coaxial
cable
Notes
• Use a coaxial cable to eliminate interference and noise from radio waves.
• Do not bundle the coaxial cable with the power cord or other cables.
• If the antenna is not installed correctly, contact qualified service personnel to correct the problem.
• If the signal level for a channel is weak, the picture may be distorted. Adjust the antenna or use a
highly directional outdoor or set-top antenna with a built-in amplifier.
• If the picture quality is good on some channels and poor on others, the problem may be caused by
a poor or weak signal from the broadcaster or cable TV provider.
• If you connect to cable TV without a set-top box and experience poor picture quality, you may
need to install a set-top box to improve signal reception and picture quality. Contact your cable TV
provider about upgrading to a set-top box.
• Many high-definition (HD) channels upscale standard-definition (SD) content. The picture
displayed on your TV is still displayed as SD, thus the picture quality will not be as clear or crisp as it
would be if the content was originally recorded in HD.
24
www.tv.toshiba.com
Page 30
43L621U / 49L621U / 55L621U / 65L621U 43" / 49" / 55" / 65" 2160p 60Hz LED Google Cast™ TV
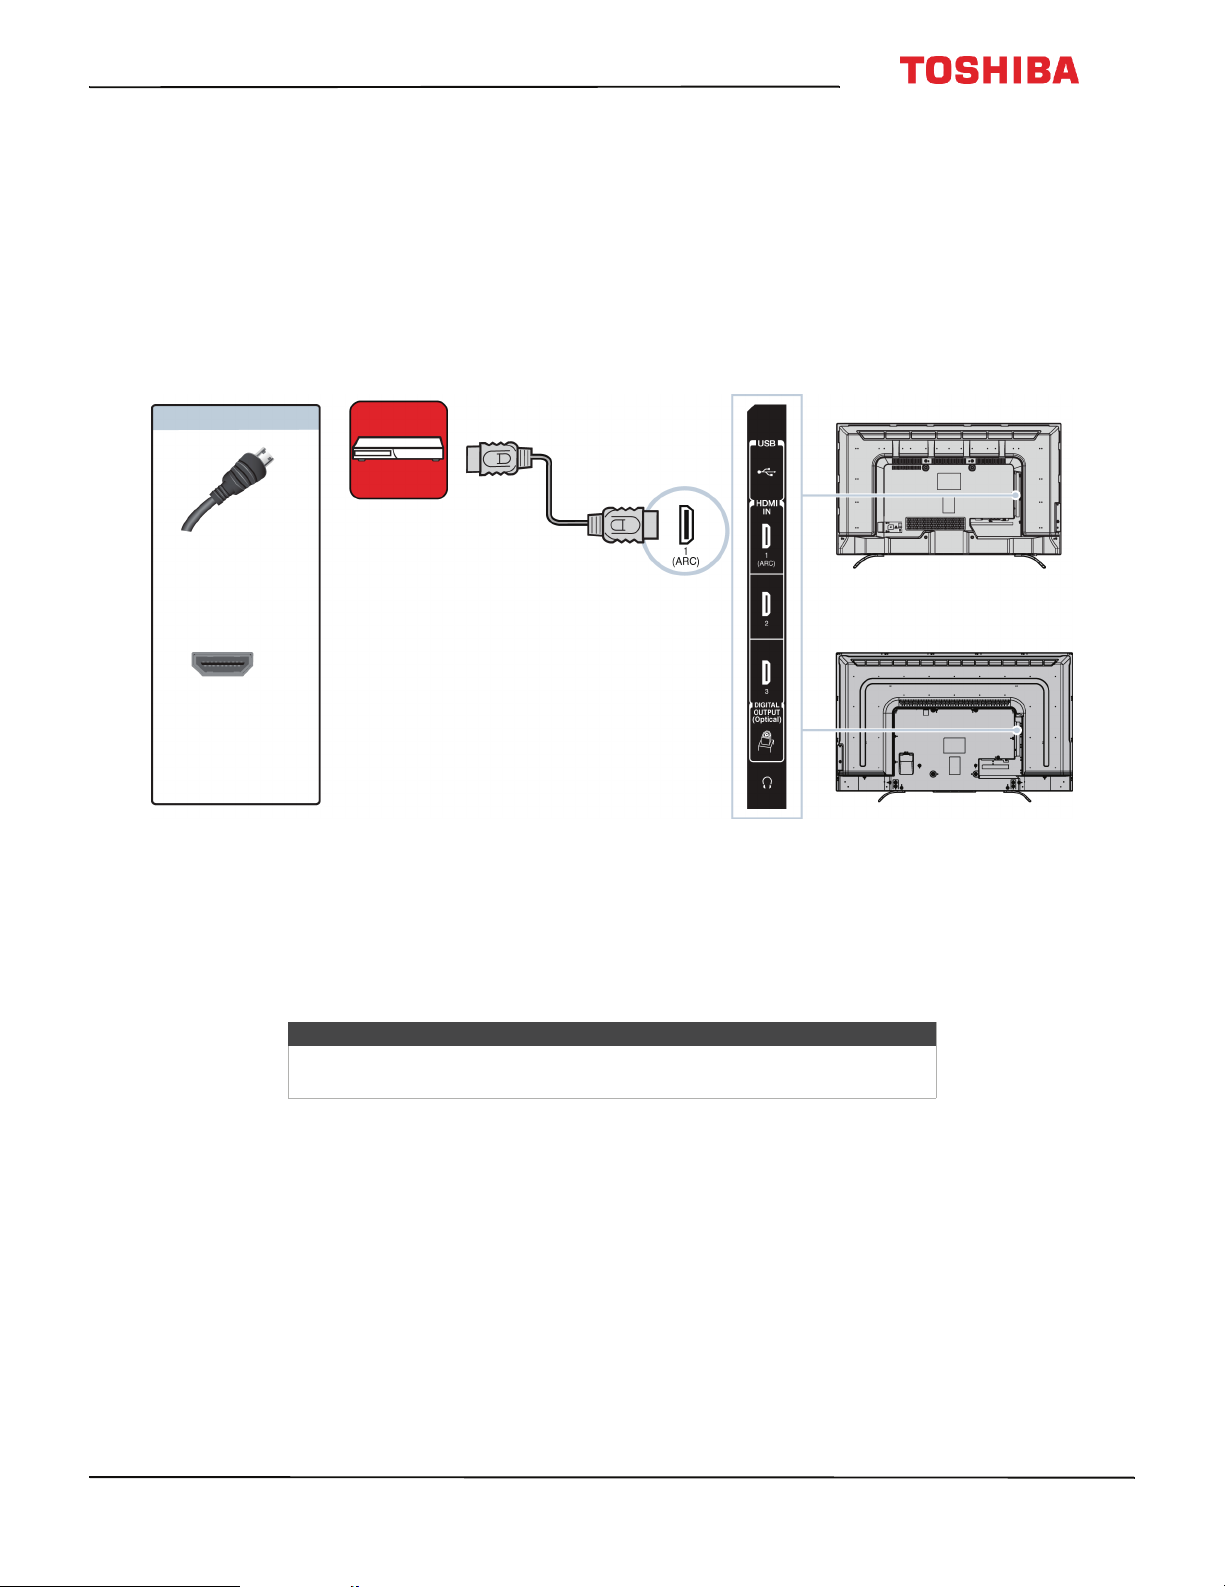
Connecting a DVD or Blu-ray player
Many DVD or Blu-ray players have more than one connection type. To get the best video, you should use the best
connection type available. For more information, see What connection should I use? on page 19.
You can connect a DVD or Blu-ray player using:
•HDMI (best)
•AV (good)
HDMI (best)
DVD or Blu-ray
player
On your TV
HDMI cable
connector
HDMI IN
jack
1 Make sure that your TV’s power cord is unplugged and the DVD or Blu-ray player is turned off.
2 Connect an HDMI cable (not provided) to one of the HDMI IN jacks on the side of your T V and to the HDMI OUT jack
on the DVD or Blu-ray player.
3 Plug your TV’s power cord into a power outlet, then turn on your TV and DVD or Blu-ray player.
4 Press INPUT to open the Input Selection list.
5 Press
S
or T to highlight HDMI 1, HDMI 2, or HDMI 3, then press OK.
HDMI cable
Side of TV
43"/65" models
49"/55" models
Note
An HDMI cable carries both audio and video. You do not need to use any
audio cables.
www.tv.toshiba.com
25
Page 31

AV (good)
43" / 49" / 55" / 65" 2160p 60Hz LED Google Cast™ TV
Note
Cables are often color-coded to match color-coded jacks.
DVD or Blu-ray
player
On your TV
AV cable
connector
AV jack
1 Make sure that your TV’s power cord is unplugged and the DVD or Blu-ray player is turned off.
2 Connect an AV cable (not provided) to the VIDEO jack and AUDIO L and R jacks on the back of your TV and to the
AV OUT jacks on the DVD or Blu-ray player.
3 Plug your TV’s power cord into a power outlet, then turn on your TV and DVD or Blu-ray player.
4 Press INPUT to open the Input Selection list.
5 Press
Audio cable
connectors
Analog
audio jacks
Important
When you connect the audio using the AUDIO L and R jacks, the audio
output is analog.
S
or T to highlight AV , then press OK.
43" model
49"/55"/65" models
AV c able
Back of TV
26
www.tv.toshiba.com
Page 32

43L621U / 49L621U / 55L621U / 65L621U 43" / 49" / 55" / 65" 2160p 60Hz LED Google Cast™ TV
Connecting a game console
You can connect a game console using:
•HDMI (best)
•AV (good)
HDMI (best)
Side of TV
Game console
On your TV
HDMI cable
HDMI cable
connector
43"/65" models
49"/55" models
HDMI IN
jack
1 Make sure that your TV’s power cord is unplugged and the game console is turned off.
2 Connect an HDMI cable (not provided) to one of the HDMI IN jacks on the side of your T V and to the HDMI OUT jack
on the game console.
3 Plug your TV’s power cord into a power outlet, then turn on your TV.
4 Turn on the game console, then set it to the correct output mode. For more information, see the documentation that
came with the console.
5 Press INPUT to open the Input Selection list.
6 Press
S
or T to highlight HDMI 1, HDMI 2, or HDMI 3, then press OK.
Note
An HDMI cable carries both audio and video. You do not need to use any
audio cables.
www.tv.toshiba.com
27
Page 33

AV (good)
43" / 49" / 55" / 65" 2160p 60Hz LED Google Cast™ TV
Notes
Cables are often color-coded to match color-coded jacks.
Game console
On your TV
43" model
AV cable
connector
AV jack Analog
1 Make sure that your TV’s power cord is unplugged and the game console is turned off.
2 Connect the video and audio connectors on the game console’s AV cable (not provided) to the VIDEO jack and
AUDIO L and R jacks on the back of your TV and to the composite jack(s) on the game console.
Audio cable
connectors
audio jacks
Important
• Some older game consoles come with a special AV cable. See the
documentation that came with your game console or check the
manufacturer’s website.
• When you connect the audio using the AUDIO L and R jacks, the audio
output is analog.
49"/55"/65" models
Console-specific
AV cable
Back of TV
28
3 Plug your TV’s power cord into a power outlet, then turn on your TV.
4 Turn on the game console, then set it to the correct output mode. For more information, see the documentation that
came with the console.
5 Press INPUT to open the Input Selection list.
6 Press
S
or T to highlight AV , then press OK.
www.tv.toshiba.com
Page 34

43L621U / 49L621U / 55L621U / 65L621U 43" / 49" / 55" / 65" 2160p 60Hz LED Google Cast™ TV
Connecting a network router
You can connect your TV to a network router using an Ethernet cable and the LAN jack on the back of your TV.
On your TV
Network router
43" model
Ethernet
cable
connector
LAN jack
1 Make sure that your TV’s power cord is unplugged and the router is turned off.
2 Connect an Ethernet cable (not provided) to the LAN jack on the back of your TV and to an Ethernet jack on the
router.
3 Plug your TV’s power cord into a power outlet, then turn on your TV and the router.
49"/55"/65" models
Ethernet
cable
Back of TV
www.tv.toshiba.com
29
Page 35

Connecting a computer
You can connect a computer using:
•HDMI (best)
• DVI (same as HDMI but requires an audio connection)
HDMI (best)
Computer
On your TV
HDMI cable
HDMI cable
connector
43" / 49" / 55" / 65" 2160p 60Hz LED Google Cast™ TV
Side of TV
43"/65" models
49"/55" models
HDMI IN
jack
1 Make sure that your TV’s power cord is unplugged and the computer is turned off.
2 Connect an HDMI cable (not provided) to one of the HDMI IN jacks on the side of your TV and to the HDMI OUT jack
on the computer.
3 Plug your TV’s power cord into a power outlet, then turn on your TV and the computer.
4 Press INPUT to open the Input Selection list.
5 Press
6 Adjust the display properties on the computer, if necessary.
S
or T to highlight HDMI 1, HDMI 2, or HDMI 3, then press OK.
30
www.tv.toshiba.com
Page 36

43L621U / 49L621U / 55L621U / 65L621U 43" / 49" / 55" / 65" 2160p 60Hz LED Google Cast™ TV
DVI (same as HDMI but requires an audio connection)
Notes
Your TV supports DVI video only. To add sound for a DVI connection,
connect external speakers or a soundbar to the computer.
Side of TV
Computer
On your TV
HDMI cable with
HDMI cable
connector
HDMI IN jack
HDMI-DVI adapter
43"/65" models
49"/55" models
1 Make sure that your TV’s power cord is unplugged and the computer is turned off.
2 Connect an HDMI-DVI adapter (not provided) to one end of an HDMI cable (not provided), then connect the adapter
to the DVI OUT jack on the computer.
3 Connect the other end of the cable to one of the HDMI IN jacks on the side of your TV.
4 Plug your TV’s power cord into a power outlet, then turn on your TV and the computer.
5 Press INPUT to open the Input Selection list.
6 Press
7 Adjust the display properties on the computer, if necessary.
S
or T to highlight HDMI 1, HDMI 2, or HDMI 3, then press OK.
www.tv.toshiba.com
31
Page 37

Connecting a USB flash drive
Side of TV
USB flash
drive
43" / 49" / 55" / 65" 2160p 60Hz LED Google Cast™ TV
43"/65" models
49"/55" models
1 Plug a USB flash drive into the USB port on the side of your TV.
Caution
Do not remove the USB flash drive or turn off the TV while using the USB
flash drive. You may lose data or damage the USB flash drive.
2 Press INPUT, press
S
or T to highlight USB, then press OK. The Media Player menu opens.
Note
For information about supported file types, see Supported photo file
formats on page 64.
32
www.tv.toshiba.com
Page 38

43L621U / 49L621U / 55L621U / 65L621U 43" / 49" / 55" / 65" 2160p 60Hz LED Google Cast™ TV
Connecting headphones
If the TV Speakers option on the Sound menu is set to Auto, the TV speakers are muted when you connect
headphones.
Warning
Loud noise can damage your hearing. When using headphones, use the
lowest volume setting on your headphones that still lets you hear the sound.
Side of TV
43"/65" models
49"/55" models
1 Make sure that your TV is turned on, then connect the headphones to the jack on the side of your TV.
2 In the Headphones/Audio Output screen that opens, press
then press OK.
Note
The Headphones/Audio Output screen closes after 30 seconds without any
action. To open the screen again, unplug the headphones, then plug them
back in.
W
or X to highlight Headphones/Audio Out Variable,
www.tv.toshiba.com
33
Page 39

43" / 49" / 55" / 65" 2160p 60Hz LED Google Cast™ TV
Connecting external speakers or a soundbar
You can connect external speakers using:
• Digital audio
•Analog audio
Digital audio
Digital speaker system
On your TV
Soundbar
Digital optical
audio cable
connector
Digital opt ical
audio jack
1 Make sure that your TV’s power cord is unplugged and the digital speaker system or soundbar is turned off.
2 Connect a digital optical audio cable (not provided) to the DIGITAL OUTPUT (Optical) jack on the side of your TV
and to the optical AUDIO IN jack on the digital speaker system or soundbar.
3 Plug your TV’s power cord into a power outlet, then turn on your TV.
4 Turn on the digital speaker system or soundbar, then set it to the correct source. For more information, see the
documentation that came with the digital speaker system or soundbar.
5 On your TV’s Sound menu, highlight Digital Audio Output, then press OK. Highlight Audio Format, then press OK.
Press
S
page 70.
or T to select PCM, then press OK. See the Digital Audio Output option in Adjusting sound settings on
Digital optical
audio cable
Side of TV
43"/65" models
49"/55" models
34
www.tv.toshiba.com
Page 40

43L621U / 49L621U / 55L621U / 65L621U 43" / 49" / 55" / 65" 2160p 60Hz LED Google Cast™ TV
Analog audio
Note
If the TV Speakers option on the Sound menu is set to Auto or Off, the TV
speakers are muted when you connect an analog sound system or
soundbar.
Analog speaker
system
On your TV
Soundbar
Audio cable
connector
Side of TV
43"/65" models
49"/55" models
jack
1 Make sure that your TV is turned on and the analog speaker system or soundbar is turned off.
2 Connect an audio cable (not provided) to the jack on the side of your TV and to the AUDIO IN jacks on the analog
speaker system or soundbar.
3 In the screen that opens, press
Note
If you want to mute the TV speakers, set the TV Speakers option on the
Sound menu to Off or Auto.
4 Turn on the analog speaker system or soundbar, then set it to the correct source. For more information, see the
documentation that came with the analog speaker system or soundbar.
Audio cable
W
or X to highlight Audio Output Fixed, then press OK.
www.tv.toshiba.com
35
Page 41

43" / 49" / 55" / 65" 2160p 60Hz LED Google Cast™ TV
Connecting a home theater system with multiple devices
DVD or Blu-ray player
Cable or satellite box
AV receiver
Antenna or cable
TV connected
directly to the
wall jack
The connections you make depend on the video and audio jacks available on your devices. Refer to the documentation
that came with your devices for connection information.
Just remember to use the best connection types available for the best picture and sound. For information about
connection types, see What connection should I use? on page 19.
36
www.tv.toshiba.com
Page 42

43L621U / 49L621U / 55L621U / 65L621U 43" / 49" / 55" / 65" 2160p 60Hz LED Google Cast™ TV
Connecting power
43"/65" models
• Connect the power cord to a power outlet.
Cautions
• Your TV should only be operated from the power source indicated on
the label.
• Always unplug the power cord from the power outlet when you will not
be using your TV for an extended period of time.
• The power cord is permanently attached to your TV. Do not try to
unplug it from the back of your TV.
49"/55" models
1 Connect one end of the power cord to the power connector on the back of your TV.
2 Connect the other end of the cord to a power outlet.
Cautions
• Your TV should only be operated from the power source indicated on
the label.
• Always unplug the power cord from the power outlet when you will not
be using your TV for an extended period of time.
www.tv.toshiba.com
37
Page 43

43" / 49" / 55" / 65" 2160p 60Hz LED Google Cast™ TV
Using the remote control
This section includes topics about:
• Installing remote control batteries
• Aiming the remote control
• Programming universal remote controls
Installing remote control batteries
1 Slide the battery compartment cover open, then
lift the cover off the remote control.
2 Insert two AAA batteries into the battery
compartment. Make sure that you match the +
and – symbols on the batteries with the + and –
symbols in the battery compartment.
3 Replace the battery compartment cover.
Cautions
• Batteries should not be exposed to
excessive heat, such as sunshine, heat
registers, or fire.
• Battery chemicals can cause a rash. If the
batteries leak, clean the battery
compartment with a cloth. If chemicals
touch your skin, wash immediately.
• Make sure that batteries are disposed of
correctly. Do not burn or incinerate.
Aiming the remote control
• Point the remote control towards the remote
control sensor on the front of your TV.
43" model
Remote control
sensor
49"/55"/65" models
38
Notes
• Do not mix batteries of different types.
• Do not mix old and new batteries.
• Remove batteries when the charge is
depleted.
• If the remote control is not going to be
used for an extended period of time,
remove the batteries.
Remote control
sensor
www.tv.toshiba.com
Page 44

43L621U / 49L621U / 55L621U / 65L621U 43" / 49" / 55" / 65" 2160p 60Hz LED Google Cast™ TV
Programming universal remote controls
You can operate your Toshiba TV with a new or
existing universal remote control.
1 See the table in Common universal remote control
codes on page 39 for common codes.
If you have problems programming your remote
or need a different remote control code:
Contact the universal remote control maker.
OR
Contact the cable or satellite company that
provided the remote control you are trying to
program.
2 Follow your universal remote control’s instructions
to enter the TV code you found in Step 1.
Tips
• If your universal remote control has a
code search feature, run a code search
to identify a code that matches your
TV. See your universal remote control’s
instructions for details.
• If your universal remote control has a
“Learn” feature, you can manually
program it using the Toshiba TV
remote to “teach” the commands one
at a time. See your universal remote
control’s instructions for details.
Common universal remote control codes
The following is a list of the most common remote
control codes.
Brand Remote control codes
1127, 1179, 1203, 1204, 1222, 1223, 1332, 1340, 1341,
1345, 1353, 1010, 1098, 1104, 1147, 1148, 1149, 1150,
AT&T U -ve rse
Cablevision 015, 101, 045, 030, 007, 040, 062, 142, 137, 382, 703
Charter
1151, 1173, 1174, 1210, 1215, 1256, 1257, 1263, 1267,
1272, 1302, 1311, 1312, 1322, 1343, 1376, 1585, 1589,
1592, 11524, 12724, 10156, 11935, 11704, 11959,
10650, 11343, 11369, 10060
11524, 10822, 10845, 11656, 12006, 10154, 11256,
10156, 11265, 10060, 10650, 11156, 11356, 11704,
0154, 0156, 0060, 1256, 0832, 1704, 1936, 0650, 1156,
1656, 1935, 0845, 1356, 1918, 1945, 015, 030, 007, 040,
062, 101, 142, 045, 137, 138, 325, 258, 031, 038, 039,
423, 571
Brand Remote control codes
DirecTV
Dish Network
RCA
Rogers 1524
Time Warner
Verizo n
10156, 11656, 11256, 11704, 11356, 10060, 10650,
10154, 10765, 10178, 10700, 10702
617, 631, 590, 618, 635, 680, 688, 750, 847, 800, 526,
851, 852, 595, 908, 757, 850, 802, 785, 743, 849, 622,
789, 771, 744, 243, 117
11524, 11656, 10156, 11156, 11256, 12006, 11265,
11704, 11945, 10845, 1356, 12724
0156, 0060, 0154, 1042, 1060, 1061, 1062, 1087, 1091,
1097, 1098, 1130, 1131, 1172, 1173, 1183, 1286, 1317,
1325, 1327, 1334, 1345, 1346, 1355, 1364, 1365, 0016,
0017, 0090, 0096, 0117, 0118, 0129, 0131, 0180, 0206,
2001, 0011, 0021, 0041, 0051, 0061, 0081, 0101, 0111,
0171, 0191, 0211, 0471, 0701, 0411, 0501, 1301, 1351,
1441, 1781, 1951, 2021, 0341, 2341, 2481, 0861, 2351,
3671, 2801, 3821, 4151, 3921, 3931, 1256, 1265, 1945,
1935, 1704, 1656, 1635, 1356, 1343, 1306, 1156, 0845,
0832, 0650, 0149, 0036, 1190, 1014, 1015, 1127, 1007,
1252, 1246, 1219, 1212, 1168, 1163, 1018, 1114, 1028,
1071, 1300, 1338, 1353, 1369, 030, 007, 040, 062, 101,
045, 015, 062, 142, 137, 703, 138, 230, 258, 325
0087, 0181, 0183, 0677, 0859, 0872, 1172, 1183, 1283,
1292, 1383, 1683, 1731, 3015, 3022, 3023, 3051, 3052,
3053, 3055, 3059, 3062, 3066, 3072, 3074, 3078, 3080,
3087, 3089, 3093, 3147, 3167, 3168, 3169, 3171, 3173,
3182, 3187, 3188, 3207, 3214, 3220, 397
Tips
• The brand name is often visible on the
front of the universal remote control,
and the model number is often visible
on the back.
• If your universal remote control isn’t
listed in the table, refer to your
universal remote control’s instructions
and try codes for the brands Orion,
Emerson, Memorex, Sansui, Sylvania,
or Zenith. You may need to try several
codes before finding a match.
Comcast
Cox
11656, 11156, 11256, 11704, 10845, 11356, 10060,
10650, 11265, 10154, 10765, 10767, 10178, 11314,
10700, 10702, 11935, 10832, 11959, 10036, 10149,
11343, 11369, 10781, 10003, 10250, 10156, 0060, 003,
0154, 0156
074, 168, 170, 822, 093, 991, 156, 060, 154, 093, 030,
031, 038, 039 , 0170, 0074, 0168, 1270 , 0060, 0154, 0156,
1256, 1265, 1945, 1704, 1656, 1635, 1356, 1343, 1325,
1306, 1156, 0845, 0832, 0650, 0149, 0036, 1369, 1042,
1060, 1061, 1062, 1087, 1091, 1097, 1098, 1130, 1131,
1183, 1524, 1935, 2006, 1959, 1936, 1164, 2724
www.tv.toshiba.com
39
Page 45

43" / 49" / 55" / 65" 2160p 60Hz LED Google Cast™ TV
Turning on your TV for the first time
The first time you turn on your TV, the initial setup wizard opens. The wizard guides you through setting up your TV
including the Google Cast setup, menu language, time zone, TV signal source, and the channel list.
• If you are using an Android mobile device, go to Using an Android mobile device.
• If you are using an iOS (Apple) mobile device, go to Using an iOS (Apple) mobile device.
Using an Android mobile device
1 Make sure that you:
• Install the remote control batteries. (See page 38.)
• If you plan to watch standard broadcast TV channels using a cable box, satellite box, or external antenna, connect
an antenna, cable TV, or satellite TV. (See page 20 through 24.)
• Connect the power cord. (See page 37.)
• Know the Wifi network name and password if you are using a wireless network to set up your TV.
Note
If you want to use a wired connection instead of Wifi to set up your TV, connect your
TV to an Internet router using the LAN jack. For more information, see Connecting a
network router on page 29.
2 Turn on Wifi on your mobile device and connect it to your home Wifi network.
3 Press (power) to turn on your TV. The Set me up screen opens.
40
www.tv.toshiba.com
Page 46

43L621U / 49L621U / 55L621U / 65L621U 43" / 49" / 55" / 65" 2160p 60Hz LED Google Cast™ TV
4 Type google.com/cast/setup in the search bar of your device’s browser.
5 Tap Get it on Google Play.
6 Tap Install. The app installs.
7 Tap Open. Google cast opens.
8 Tap ACCEPT to agree to the Terms of Service and Privacy Policy.
9Optional: Sign in to your Google account to personalize your casting experience.
OR
Tap SKIP to start casting right away.
www.tv.toshiba.com
41
Page 47

10 Tap Devices.
Note
43" / 49" / 55" / 65" 2160p 60Hz LED Google Cast™ TV
• If you have not turned on Wifi on your mobile device, a message tells you to turn
on Wifi. After you turn on Wifi, the following screen may appear.
• If you device is detected, go to Step 12.
11 Tap Chromecast.
42
www.tv.toshiba.com
Page 48

43L621U / 49L621U / 55L621U / 65L621U 43" / 49" / 55" / 65" 2160p 60Hz LED Google Cast™ TV
12 Tap SET UP for the Cast TV number you want to set up.
www.tv.toshiba.com
43
Page 49

13 Tap SET ME UP.
43" / 49" / 55" / 65" 2160p 60Hz LED Google Cast™ TV
44
www.tv.toshiba.com
Page 50

43L621U / 49L621U / 55L621U / 65L621U 43" / 49" / 55" / 65" 2160p 60Hz LED Google Cast™ TV
14 Make sure the code on your device matches the code on your TV, then on your mobile device, tap ISee the Code.
15 Optional: To change the name of your TV to something distinct, delete the current name, type in a new one, then
tap SET NAME.
www.tv.toshiba.com
45
Page 51

43" / 49" / 55" / 65" 2160p 60Hz LED Google Cast™ TV
16 Choose the Wifi network you want to connect to your TV, enter the Wifi password (if necessary), then tap SET
NETWORK. Your TV connects to the network and is ready to cast.
Note
When your TV connects to Wifi, it may receive an automatic software update.
Wait for the update to finish.
17 Tap BROWSE YOUR CAST APPS.
46
www.tv.toshiba.com
Page 52

43L621U / 49L621U / 55L621U / 65L621U 43" / 49" / 55" / 65" 2160p 60Hz LED Google Cast™ TV
18 Tap What's On.
After setting up Google Cast, your TV's menu language, time zone, and daylight savings time settings should be set
automatically to match the settings on your mobile device.
If the settings are not correct or you want to change the settings, see:
• Setting the time zone and Daylight Saving Time status on page 82.
• Selecting the menu language on page 83.
If you connected cable TV without a box or an external antenna to the ANT / CABLE IN jack, set up the ANT / CABLE IN
jack and scan for channels. See:
• Setting up the ANT / CABLE IN jack on page 55
• Automatically scanning for channels on page 71.
Using an iOS (Apple) mobile device
1 Make sure that you:
• Install the remote control batteries. (See page 38.)
• If you plan to watch standard broadcast TV channels using a cable box, satellite box, or external antenna, connect
an antenna, cable TV, or satellite TV. (See page 20 through 24.)
• Connect the power cord. (See page 37.)
• Know the Wifi network name and password if you are using a wireless network to set up your TV.
Note
If you want to use a wired connection instead of Wifi to set up your TV, connect your
TV to an Internet router using the LAN jack. For more information, see Connecting a
network router on page 29.
2 Turn on Wifi on your mobile device and connect it to your home Wifi network.
3 Turn on Bluetooth on your mobile device.
4 Press (power) to turn on your TV. The Set me up screen opens.
www.tv.toshiba.com
47
Page 53

43" / 49" / 55" / 65" 2160p 60Hz LED Google Cast™ TV
5 Type google.com/cast/setup in the search bar of your device’s browser.
6 Tap Download on the App Store.
7 Tap Get, then Install. The app installs.
8 Tap Open. Google cast opens.
9 Tap ACCEPT to agree to the Terms of Service and Privacy Policy.
10 Optional: Sign in to your Google account to personalize your casting experience.
OR
Tap SKIP to start casting right away.
48
www.tv.toshiba.com
Page 54

43L621U / 49L621U / 55L621U / 65L621U 43" / 49" / 55" / 65" 2160p 60Hz LED Google Cast™ TV
11 Tap Devices.
Note
• If you have not turned on Wifi on your mobile device, a message tells you to turn
on Wifi. After you turn on Wifi, the following screen may appear.
• If you device is detected, go to Step 12.
12 Tap Chromecast.
Note
If you have not turned on Bluetooth on your mobile device, you will not see this
screen. Turn on Bluetooth. After you turn on Bluetooth, the following screen appears.
www.tv.toshiba.com
49
Page 55

13 Tap SET UP for the Cast TV number you want to set up.
43" / 49" / 55" / 65" 2160p 60Hz LED Google Cast™ TV
50
www.tv.toshiba.com
Page 56

43L621U / 49L621U / 55L621U / 65L621U 43" / 49" / 55" / 65" 2160p 60Hz LED Google Cast™ TV
14 Tap NEXT.
www.tv.toshiba.com
51
Page 57

43" / 49" / 55" / 65" 2160p 60Hz LED Google Cast™ TV
15 Make sure the code on your device matches the code on your TV, then on your mobile device, tap ISee the Code.
16 Optional: To change the name of your TV to something distinct, delete the current name, type in a new one, then
tap NEXT.
52
www.tv.toshiba.com
Page 58

43L621U / 49L621U / 55L621U / 65L621U 43" / 49" / 55" / 65" 2160p 60Hz LED Google Cast™ TV
17 Choose the Wifi network you want to connect to your TV, enter the Wifi password (if necessary), then tap SETUP.
Your TV connects to the network and is ready to cast.
Note
When your TV connects to Wifi, it may receive an automatic software update.
Wait for the update to finish.
18 Tap BROWSE YOUR CAST APPS.
www.tv.toshiba.com
53
Page 59

43" / 49" / 55" / 65" 2160p 60Hz LED Google Cast™ TV
19 Tap What's On.
After setting up Google Cast, your TV's menu language, time zone, and daylight savings time settings should be set
automatically to match the settings on your mobile device.
If the settings are not correct or you want to change the settings, see:
• Setting the time zone and Daylight Saving Time status on page 82.
• Selecting the menu language on page 83.
If you connected cable TV without a box or an external antenna to the ANT / CABLE IN jack, set up the ANT / CABLE IN
jack and scan for channels. See:
• Setting up the ANT / CABLE IN jack on page 55
• Automatically scanning for channels on page 71.
Casting a video, movie, or TV show
After you set up Google Cast on your TV and mobile device, you are ready to cast videos, movies and TV shows.
1 On your mobile device, make sure that Wifi is turned on.
2 Open a Google Cast-enabled app.
3 Tap the video, movie, or TV program you want to cast, then tap (Google Cast button).
4 Tap the device you want to cast to.
5 To stop casting, tap , then tap Stop casting.
54
www.tv.toshiba.com
Page 60

43L621U / 49L621U / 55L621U / 65L621U 43" / 49" / 55" / 65" 2160p 60Hz LED Google Cast™ TV
Setting up the ANT / CABLE IN jack
If you connect an antenna or cable TV without a box
to the ANT / CABLE IN jack, you need to set up the
jack so your TV correctly displays channels.
1 Press MENU, press
Installation, then press OK.
2 Highlight Channel Tuning, then press OK.
S
or T to highlight
Understanding the basics
This section covers basic information for:
• Turning your TV on or off
• Selecting the video input source
• On-screen menu overview
• Navigating the menus
•Adjusting the volume
• Selecting a channel
• Viewing channel information
Turning your TV on or off
1 Make sure that the power cord is connected
securely and correctly. For more information, see
Connecting power on page 37.
2 Press (power) to turn on your TV. The power
indicator turns off.
3 Press (power) to turn off your TV. Your TV enters
standby mode, and the power indicator turns red.
Warning
When your TV is in standby mode, it is still
receiving power. To completely disconnect
power, unplug the power cord.
Note
If your TV does not receive an input signal
for 15 minutes, it automatically goes into
standby mode.
3 Highlight ANT/CABLE In, then press OK.
4 Highlight your TV input source, then press OK.
Select:
• Antenna if you connected an antenna to the
ANT / CABLE IN jack
• Cable if you connected cable TV without a box
to the ANT / CABLE IN jack
5 Press EXIT to close the menu.
Last Mode Memory
If power is interrupted while you are viewing TV, the
Last Mode Memory feature automatically turns on
your TV when the power is restored.
www.tv.toshiba.com
55
Page 61

43" / 49" / 55" / 65" 2160p 60Hz LED Google Cast™ TV
Selecting the video input source
1 Press INPUT. The Input Selection list opens.
2 Do one of the following:
• Press INPUT one or more times until the video
input you want is selected.
S
• Press
want, then press OK.
Note
If you have not scanned for channels, Google
Cast appears at the top of the Input Selection list.
or T to highlight the video input you
3 Press EXIT to close the menu.
Notes
• If a CEC-compatible device is connected
to an HDMI jack, the HDMI® CEC icon
appears in the list.
• If a connected CEC-compatible device
has CEC-compatible devices connected
to it, a separate device selection pop-up
window appears. For example, the
pop-up window for a CEC-compatible
DVD player with a CEC-compatible audio
receiver connected might appear as
follows:
• If you press INPUT to select a
CEC-compatible device from the pop-up
window, the device may turn on.
Note
You can also change the video input source using
the virtual remote control. On the D-Pad page, tap
(input source), then use the arrows to select
the video input source. See D-Pad page on
page 18.
56
www.tv.toshiba.com
Page 62

43L621U / 49L621U / 55L621U / 65L621U 43" / 49" / 55" / 65" 2160p 60Hz LED Google Cast™ TV
On-screen menu overview
Notes
• Depending on the signal source selected,
you may see different options on your
screen.
• Menu items that are not selectable are
grayed out.
Picture menu
Options menu
Installation menu
Sound menu
Tim ers menu
www.tv.toshiba.com
57
Page 63

43" / 49" / 55" / 65" 2160p 60Hz LED Google Cast™ TV
Get Help menu
Navigating the menus
Press MENU to open the on-screen menu.
Press the right or left arrow to move the cursor on the
screen or to adjust a selected item.
Press the up or down arrow to select menu options.
Adjusting the volume
• Press VOL+ or VOL– to increase or decrease the
volume.
• Press MUTE to mute the sound. Press MUTE again
to turn the sound back on.
Note
If you adjust a setting on the Sound menu
while the mute is active, the mute feature
is cancelled.
Selecting a channel
• Press CH+ or CH– to go to the next or previous
channel on the memorized channel list.
• To select a channel from the Channel List, press
MENU, select Installation > Channel Tuning >
Channel List. Press CH+ or CH– to go to the next or
previous channel on the memorized channel list.
• To select a digital sub-channel, press the CH+ or
CH– button to select the sub-channel or select the
sub-channel from the channel list.
Note
• Button presses must be within two
seconds of each other.
• You can also use the virtual remote
control to select a sub-channel. On the
Number page, tap the main channel
number, the dash, the sub-channel
number, then tap OK. See Number
page on page 18.
• On the virtual remote control on your mobile
device, tap the number buttons to enter the
channel number you want, then tap OK to
immediately change the channel. See Number page
on page 18.
• Press (back) to go to the last viewed channel.
58
Press OK to confirm a selection or enter a sub-menu.
Press EXIT to close the menu.
www.tv.toshiba.com
Page 64

43L621U / 49L621U / 55L621U / 65L621U 43" / 49" / 55" / 65" 2160p 60Hz LED Google Cast™ TV
Viewing channel information
Press INFO. The following status information is
displayed:
• Current video input (for example ANT/CABLE or
AV )
• If ANT/CABLE is the current video input, either
CABLE (for cable TV) or ANT (for over-the-air
broadcasts)
• If ANT/CABLE is the current video input, channel
number
• Digital signal strength indicator
• If the audio mode is analog, Stereo, Mono, or
SAP analog audio status
• If the input mode is HDMI®, Dolby® Digital, or
PCM
• Video resolution
• Aspect ratio of incoming video signal (4:3 or
16:9)
• TV program or movie rating
•GameTimer (if set)
Pressing INFO also displays the following status
information for digital channels:
•Title
•Duration
• Detailed program description
Note
If you pressed INFO, press INFO again to
close the banner.
Controlling CEC-compatible devices
This section covers:
• Turning HDMI-CEC Control on or off
• Turning TV Auto Power on or off
• Turning Auto Standby on or off
• Turning Amplifier Control on or off
• Selecting the audio output
• Using the TV remote to control CEC-compatible
devices
• Using the TV menu to control CEC-compatible
devices
• Selecting the HDMI Input mode
HDMI CEC Control lets you control HDMI
CEC-compatible devices connected to the HDMI jacks
on your TV using the remote control that came with
your TV. To use HDMI CEC Control, you must set the
Enable HDMI CEC Control setting on the HDMI CEC
Control Setup menu to On.
Notes
• HDMI cables must be used to connect
HDMI CEC-compatible devices to your TV.
• The connected device’s HDMI CEC feature
must be turned on.
• If you connect an HDMI device that is not
HDMI CEC-compatible, none of the
HDMI CEC Control features work.
• Depending on the connected HDMI
device, some HDMI CEC Control features
may not work.
Note
When you press INPUT, the Input Selection list
opens. If you select a CEC-compatible video
device connected to an HDMI jack and that
device is connected to a CEC-compatible
audio device, a second selection list opens
that shows both devices.
For example, if you connect a
CEC-compatible Blu-ray player to an HDMI
jack and the Blu-ray player is connected to a
CEC-compatible soundbar, the second input
selection list might appear as follows:
See Selecting the video input source on
page 56.
www.tv.toshiba.com
59
Page 65

43" / 49" / 55" / 65" 2160p 60Hz LED Google Cast™ TV
Turning HDMI-CEC Control on or off
Note
If Enable HDMI CEC Control is set to Off, the
other options on the menu are grayed and
cannot be used.
1 Press MENU, press S or T to highlight Options,
then press OK.
2 Highlight HDMI CEC Control Setup, then press
OK.
Turning TV Auto Power on or off
TV Auto Power automatically turns on your TV when
an HDMI CEC device is turned on, if the device has this
feature.
1 Press MENU, press
then press OK.
2 Highlight HDMI CEC Control Setup, then press
OK.
3 Make sure that Enable HDMI CEC Control is set to
On.
S
or T to highlight Options,
60
3 Highlight Enable HDMI CEC Control, then press
OK.
4 Highlight On or Off, then press OK.
5 Press EXIT to close the menu.
www.tv.toshiba.com
4 Highlight TV Auto Power, then press OK.
5 Highlight On or Off, then press OK.
6 Press EXIT to close the menu.
Page 66

43L621U / 49L621U / 55L621U / 65L621U 43" / 49" / 55" / 65" 2160p 60Hz LED Google Cast™ TV
Turning Auto Standby on or off
Auto Standby automatically turns off HDMI CEC
devices when you turn off your TV.
1 Press MENU, press
then press OK.
2 Highlight HDMI CEC Control Setup, then press
OK.
3 Make sure that Enable HDMI CEC Control is set to
On.
S
or T to highlight Options,
Turning Amplifier Control on or off
Amplifier Control lets you use your TV’s remote
control to control the volume and mute the sound on
an audio receiver.
1 Press MENU, press
then press OK.
2 Highlight HDMI CEC Control Setup, then press
OK.
3 Make sure that Enable HDMI CEC Control is set to
On.
S
or T to highlight Options,
4 Highlight Auto Standby, then press OK.
5 Highlight On or Off, then press OK.
6 Press EXIT to close the menu.
www.tv.toshiba.com
4 Highlight Amplifier Control, then press OK.
5 Highlight On or Off, then press OK.
6 Press EXIT to close the menu.
61
Page 67

43" / 49" / 55" / 65" 2160p 60Hz LED Google Cast™ TV
Selecting the audio output
Initial Speaker Setting lets you select whether your
TV’s remote control controls the TV speakers or a
connected audio receiver.
1 Press MENU, press
then press OK.
2 Highlight HDMI CEC Control Setup, then press
OK.
3 Make sure that Enable HDMI CEC Control is set to
On.
S
or T to highlight Options,
Using the TV remote to control CEC-compatible devices
When Enable HDMI CEC Control on the HDMI CEC
Control Setup menu is set to On, you can use the
remote control that came with your T V to control a
CEC-compatible device (such as a DVD or Blu-ray
player).
Button Press to...
(play/pause) Start or pause playback.
S T W X
OK Enter menu options.
EXIT Return to the previous menu.
W
Navigate menu options.
or X
Note
These functions depend on the devices
connected.
Press and hold to adjust the
volume.
Using the TV menu to control CEC-compatible devices
When Enable HDMI CEC Control on the HDMI CEC
Control Setup menu is set to On, you can use the TV
menu to turn on a CEC-compatible device (such as a
DVD or Blu-ray player) and access features on the
device.
Notes
These functions depend on the devices
connected.
The HDMI CEC Player Control option is grayed if:
• A non-HDMI input is currently selected.
•The Enable HDMI CEC Control option is set to
Off.
62
4 Highlight Initial Speaker Setting, then press OK.
5 Highlight TV or Receiver, then press OK.
6 Press EXIT to close the menu.
www.tv.toshiba.com
1 Make sure that Enable HDMI CEC Control is set to
On. See Turning HDMI-CEC Control on or off on
page 60.
2 Press MENU, press
then press OK.
S
or T to highlight Options,
Page 68

43L621U / 49L621U / 55L621U / 65L621U 43" / 49" / 55" / 65" 2160p 60Hz LED Google Cast™ TV
3 Highlight HDMI CEC Player Control, then press
OK.
4 Highlight an option, then press OK. You can select:
• Power—Turns the selected device on or off.
• Root Menu—Accesses the root menu of the
selected device.
• Contents Menu—Accesses the contents list of
the device. When you press OK, the HDMI CEC
Player Control menu closes.
• Setup Menu—Accesses the setup menu of a
selected device.
• Top Menu —Accesses the top menu of a
selected device.
• Menu—Accesses the menu of a selected device.
5 Press EXIT to close the menu.
Selecting the HDMI Input mode
The HDMI jacks on your TV are Ultra HD (UHD) jacks.
Depending on the UHD device you connect to the
HDMI jack or the streaming content you watch, you
may need to adjust the timing.
Mode 1
Mode 2
1 Make sure that Enable HDMI CEC Control is set to
On. See Turning HDMI-CEC Control on or off on
page 60.
2 Press MENU, press
then press OK.
YCbCr 422/444 (supports timing limit on
3840x2160@30Hz)
YcbCr 420 (supports timing up to
3840x2160@60Hz)
S
or T to highlight Options,
3 Highlight HDMI Input Mode, then press OK.
4 Highlight Mode 1 or Mode 2, then press OK.
www.tv.toshiba.com
63
Page 69

43" / 49" / 55" / 65" 2160p 60Hz LED Google Cast™ TV
Using the Media Player
You can connect a USB flash drive to your TV to view
photos stored on the flash drive.
This section includes topics about:
• Supported photo file formats
• Opening the Photos viewer
• Viewing photos
• Viewing photos in a slideshow
Supported photo file formats
Your TV supports the following photo file formats:
• Data type: JPEG EXIF ver 2.1
•File format: JPEG
• Maximum photo size: 6 MB
• Maximum number of files: 500/folder
• Maximum photo resolution: 4096 × 4096 pixels
Notes
• Connectivity is not guaranteed for all devices.
• Connect the USB flash drive to the TV directly.
Do not use a USB Hub.
• You must obtain any required permission
from copyright owners to use copyright
content.
• Depending on the file size and amount stored
on the USB flash drive, it may take some time
to load before content is viewable.
• Only limited types of U3 USB devices are
supported. We recommend that you not use
U3 USB with the Media Player.
• Non-supported characters are replaced with
squares.
Opening the Photos viewer
1 Make sure that you have connected a USB flash
drive to the USB port on the side of your TV.
S
2 Press MENU, press
then press OK.
or T to highlight Options,
3 Highlight Photos, then press ENTER. The Photos
viewer opens.
Note
You can also select USB from the Input Selection
list to open the Photos viewer. For more
information, see Selecting the video input source
on page 56.
Viewing photos
When you connect a USB flash drive that has photos
on it and open the Media Player, a thumbnail index
screen opens that shows the files and folders on the
flash drive.
To navigate the thumbnail index screen:
• Press
To navigate on a full-screen photo:
• Press
• Press
• Press EXIT to close the Media Player. In the message
S T W
press OK.
• If you select a folder and press OK, the folder
opens and displays thumbnails of the photos in
the folder. Press to return to the previous
thumbnail screen or folder.
• If you select a photo and press OK, the photo is
displayed full-screen.
• If all the photos do not fit on one screen:
press
that appears, use
press OK.
or X to highlight a folder or photo, then
• Highlight the top left thumbnail, then press
W
to move to the previous screen.
• Highlight the bottom right thumbnail, then
press
X
to move to the next screen.
W
or X to view the previous or next photo.
S
to rotate the photo 90° counter-clockwise or
T
to rotate the photo 90° clockwise.
W
or X to select Ye s , then
64
www.tv.toshiba.com
Page 70

43L621U / 49L621U / 55L621U / 65L621U 43" / 49" / 55" / 65" 2160p 60Hz LED Google Cast™ TV
Viewing photos in a slideshow
When viewing photos in a slideshow, you can:
• Skip backward or forward through the photos in the
current folder
• Set the time interval between photo displays
• Repeat the slideshow
To view photos in the slideshow:
1 Select a photo, then press OK to view it full-screen.
Press OK again to start a slideshow in the current
folder.
2 Press
3 To stop the slideshow, press OK again.
To set the time interval:
You can specify how long a slideshow photo is
displayed.
1 Press MENU, then press
W
or X to view the previous or next photo in
the slideshow.
S
or T to highlight
Interval Time.
Adjusting the picture
This section covers:
• Adjusting the TV picture
• Adjusting the picture size
• Scrolling the TheaterWide™ picture
• Automatically adjusting the aspect ratio
• Using the 4:3 Stretch
Adjusting the TV picture
You can adjust various settings to improve the quality
of the TV picture. Also, you can reset all picture
settings to the factory default.
1 Press MENU, press
then press OK.
S
or T to highlight Picture,
W
2 Press
3 Press to close the menu.
To set the repeat mode:
You can repeat the slideshow when it reaches the end.
1 Press MENU, then press
2 Press
3 Press to close the menu.
or X to select the time interval.
Repeat.
W
or X to select On.
S
or T to highlight
2 Highlight an option, then press OK. You can select:
• Picture Mode—Selects the picture mode. You
can select:
• Dynamic—Significantly increases the
contrast, color saturation, sharpness, gray
scale, and brightness to create more vivid
and dynamic images.
• Standard—Uses the default settings.
• Natural—Preserves the original video
content without image enhancement.
• Movie—Lowers the contrast for a darkened
room.
• Game—Reduces controller delay for faster
video gaming action.
• PC—Optimizes the image of a connected
computer.
Note
The PC option is only available for HDMI.
The option is grayed for other input
sources.
www.tv.toshiba.com
65
Page 71

43" / 49" / 55" / 65" 2160p 60Hz LED Google Cast™ TV
• Store—T he Store picture mode is only
available if you selected Store Mode during
initial setup. This option is hidden in the
Home mode.
Notes
• When your TV is set to Store Mode
(during the initial setup or from the
Installation menu), your TV will always
revert to Store Mode when you turn it
on.
• You can also press Picture to select the
Picture Mode.
• Reset—Resets all picture settings to the factory
default.
• Backlight—Sets the overall brilliance of the
screen.
• Contrast—Adjusts the brightness of the light
areas of the picture.
• Brightness—Adjusts the brightness of the dark
areas of the picture.
• Color—Adjusts the color intensity of the picture.
A low setting may make the color look faded. A
high setting may make the color look artificial.
• Tint—Adjusts the color balance of the picture.
Use this control to make skin tones look more
natural.
• Sharpness—Adjusts the color detail of images.
If you set this control too high, dark images may
appear with light or white edges.
• Advanced Picture Settings—Opens the
Advanced Picture Settings menu where you can
adjust additional video options.
C Highlight Red Intensity, Green
Intensity, or Blue Intensity, then press
OK. Press
W
or X to adjust the setting,
then press OK.
D Highlight Done, then press OK.
• Gamma Mid Luminance—lets you adjust
the levels of black in the picture.
A Highlight this option, then press OK.
B Press
W
or X to decrease or increase the
black level detail.
• Dynamic Backlight—Automatically
strengthens the black coloring of dark areas
in the video according to the level of
darkness. You can select High, Low, or Off.
• Dynamic Contrast—Automatically detects
changes in picture quality that affect the
appearance of your contrast settings and
automatically adjusts the video. You can
select High, Middle, Low, or Off.
• MPEG Noise Reduction—Reduces blocking
artifacts noise and mosquito noise by MPEG
encoding. You can select On or Off.
• Dynamic Noise Reduction—Reduces
picture noise (snow). You can select Off, Low,
or High
• Edge Enhancer—Adjusts the picture to
achieve a sharper image. You can select On
or Off.
• ClearFrame—Smooths the video motion
when watching a movie on DVD. You can
select Standard, Smooth, Cinema, or Off.
(This option is available for the 65" model.)
• Reset—Resets all advanced picture settings
to factory defaults.
• Display Settings—Opens the Display Settings
menu where you can adjust how the picture is
displayed on the screen.
66
• White Balance—Adjusts the color
temperature.
A Highlight this option, then press OK.
B Press
W
or X to select Cool (to enhance
the blues), Medium (to select a neutral
color temperature), or Warm (to enhance
the reds).
www.tv.toshiba.com
Page 72

43L621U / 49L621U / 55L621U / 65L621U 43" / 49" / 55" / 65" 2160p 60Hz LED Google Cast™ TV
A Highlight Picture Size, then press OK.
Press
S
or T to select an available picture
size. See Adjusting the picture size on
page 67.
B Highlight Auto Aspect, then press OK.
Press
S
or T to select On or Off. See
Automatically adjusting the aspect ratio
on page 69.
C Highlight 4:3 Stretch, then press OK.
S
Press
or T to select On or Off. See
Using the 4:3 Stretch on page 69.
D Highlight Picture Position, then press
or X to adjust the vertical picture
position. See Scrolling the TheaterWide™
picture on page 68.
Note
The Picture Position option may be
grayed and unavailable for some Picture
Size settings.
3 Press
W X S
or T to adjust the option or select a
setting, then press OK.
4 Press EXIT to close the menu.
Notes
• Picture setting adjustments affects the
current video input only. You can
adjust the picture quality separately
for each input.
• Depending on the Sharpness setting,
the Edge Enhancer effect may be
reduced.
3 Press OK or EXIT to close the menu.
Picture size Example
Full
Displays the picture in a 16:9 format
(aspect ratio). If the picture is in a 4:3
format, the picture is stretched
horizontally to fill the width of the
screen but is not stretched vertically.
The edges of the picture may be hidden.
TheaterWide 1
W
The center of the picture remains close
to its original proportion, but the left
and right edges are stretched
horizontally to fill the screen.
TheaterWide 2
This setting is for viewing letter box
(4:3) programs.
TheaterWide 3
This setting is for viewing letter box
programs with subtitles.
The top and bottom edges of the picture
are hidden.
4:3
Displays the picture in letter box format.
Some program formats will display with
sidebars and/or bars at the top and
bottom.
Adjusting the picture size
1 Press MENU, then select Picture, Display
Settings, Picture Size, then press OK.
2 On the Picture Size menu, press
picture size. You can select Full, TheaterWide 1,
TheaterWide 2, TheaterWide 3, 4:3, Native,
Normal, or Dot by Dot.
Note
Depending on the receiving signal format,
some of the picture sizes may not be
available.
S
or T to select a
Native:
If the program is a 1080i, 1080p, 720p,
480i (HDMI®), or 480p (HDMI®)
program, the picture is scaled to display
the entire picture within the borders of
the screen (no overscanning).
This picture size is especially useful for
viewing external HD sources, such as
DVD movies, video games, or computer
graphics.
www.tv.toshiba.com
67
Page 73

43" / 49" / 55" / 65" 2160p 60Hz LED Google Cast™ TV
Picture size Example
Normal
Displays the image in the original
aspect ratio. You may see black bars if
the original content is not widescreen.
This setting is for viewing VGA, SVGA,
XGA, WXGA, and SXGA sources.
Note: This option adjusts the timing
when a computer is connected to an
HDMI IN jack using an HDMI-DVI
adapter.
Dot by Dot
Dot by Dot is a non-scaling display.
Depending on the input signal format
(VGA, for example), the picture may
appear with sidebars and/or bars at the
top and bottom. This setting is for
viewing VGA, SVGA, XGA, WXGA, and
SXGA sources. This option is only
available when the video input source is
HDMI and the video signal is VGA, SVGA,
XGA, WXGA, or SXGA.
Notes
• Some of the picture sizes may not be
available depending on the receiving signal
format.
•The Native mode is supported only for HDMI®
(1080i, 1080p, 720p, 480i, and 480p), and
ANT/CABLE (digital) inputs (1080i, 1080p, and
720p).
•In Native mode, the picture’s border may be
hidden, displayed in black, or noisy,
depending on the input signal.
Scrolling the TheaterWide™ picture
You can set separate scroll settings for the
TheaterWide 2 and TheaterWide 3 picture size
modes. For more information about pictures sizes, see
Adjusting the picture size on page 67.
1 Press MENU, press
then press OK.
2 Highlight Display Settings, then press OK.
3 Highlight Picture Position, then press OK.
S
or T to highlight Picture,
68
www.tv.toshiba.com
W
4 Press
or X to move the picture up and down as
needed, then press OK. To save the new settings,
press
S
or T to highlight Done, then press OK.
OR
To revert to the factory defaults, highlight Reset
then press OK.
5 Press EXIT to close the menu.
Page 74

43L621U / 49L621U / 55L621U / 65L621U 43" / 49" / 55" / 65" 2160p 60Hz LED Google Cast™ TV
Automatically adjusting the aspect ratio
When the Auto Aspect option is set to On, your TV
automatically selects the picture size when one of the
following input sources is received:
• 480i, 480p, 720p, 1080i digital signal from the
ANT / CABLE IN jack
• 480i, 480p, 720p, 1080i, 1080p, or VGA (60Hz) signal
from an HDMI jack
Aspect Ratio of Signal
Source
4:3 Normal 4:3
4:3 Letter Box TheaterWide 2
16:9 Full
Not defined (no ID-1
data or HDMI® aspect
data)
1 Press MENU, press
then press OK.
2 Highlight Display Settings, then press OK.
Auto Aspect is set to
On)
The current picture size
you selected, see
Adjusting the picture
size on page 67.
S
or T to highlight Picture,
Using the 4:3 Stretch
When 4:3 Stretch is turned on, your TV displays 4:3
programs as a full-screen picture.
1 Press MENU, press
then press OK.
2 Highlight Display Settings, then press OK.
3 Highlight 4:3 Stretch, then press OK.
4 Highlight On, then press OK. (To turn off 4:3
Stretch, select Off.)
5 Press EXIT to close the menu.
S
or T to highlight Picture,
3 Highlight Auto Aspect, then press OK.
4 Highlight On, then press OK. (To turn off Aspect
Ratio, select Off.)
5 Press EXIT to close the menu.
www.tv.toshiba.com
69
Page 75

43" / 49" / 55" / 65" 2160p 60Hz LED Google Cast™ TV
Adjusting the sound
This section covers:
• Adjusting sound settings
• Playing TV audio only
Adjusting sound settings
You can adjust sound settings to improve the sound
quality.
S
1 Press MENU, press
then press OK.
2 Highlight an option, then press OK. You can select:
• Sound Mode—Selects the sound mode. You
can select Standard, Music, Movie, Clear Voice,
or Enhanced Bass.
Note
You can also press Sound to select the
Sound Mode.
or T to highlight Sound,
• TruVolume—Keeps the volume level
consistent when switching between content
types, for example when switching between
a progam and a commercial. You can select
On or Off.
• TV Speakers—Turns your TV’s speakers on or
off. You can select:
• Auto—Turns off the TV speakers when you
connect a device to the jack.
• On—Keeps the TV speakers on when you
connect a device to the jack.
• Off—Turns off the TV speakers.
• MTS—(Analog channels received through the
ANT / CABLE IN jack only) Selects the audio
mode. You can select:
• Stereo—Select this option for programs
broadcast in stereo. You can typically leave
your TV in Stereo mode because Stereo
outputs the type of sound being broadcast
(stereo or mono).
• Mono—Select this option if there is noise or
static on weak stereo broadcasts.
• SAP—Select this option to listen to a
secondary audio program, if available. If you
select this option and no secondary audio
program is available, you may not hear
sound. Change the MTS option to Stereo.
• Digital Audio Selection—Lets you
conveniently switch between audio tracks on a
digital channel (when available). This option
temporarily overrides the Primary Audio
Language option on the Sound menu.
• Primary Audio Language—Selects the
language for digital channels.
• Digital Audio Output—Opens the Digital Audio
Output menu where you can adjust digital audio.
70
• Reset—Resets all sound settings to the factory
default.
• Balance—Adjusts the balance between the left
and right audio channels.
• Bass—Adjusts the low sounds.
• Tre ble —Adjusts the high sounds.
• Advanced Sound Settings—Opens the
Advanced Sound Settings menu where you can
adjust additional sound options.
• Dialog Clarity—Adjusts the volume of
dialog when watching movies or TV
programs. You can select Off, Low, or High.
• Surround—Delivers clear, crisp, and natural
sound over front facing speaker
configurations, complete with rich bass, high
frequency detail, and clear dialog. You can
select Off or TruSurround.
www.tv.toshiba.com
• Audio Format—Selects the digital audio
format sent to an external audio system. You
can select:
• PCM (to convert and output sound as
PCM (pulse-code modulation) format).
• Auto (to pass through the original digital
sound).
Page 76

43L621U / 49L621U / 55L621U / 65L621U 43" / 49" / 55" / 65" 2160p 60Hz LED Google Cast™ TV
• Audio Delay—Fine tunes the audio when it
is not in sync with the video. You can select
Auto or Manual.
• Delay adjustment—Lets you set the
amount of delay to manually sync the audio
with the video. To use this option, Audio
Delay must be set to Manual.
3 Press
4 Press EXIT to close the menu.
W X S
setting, then press OK.
or T to adjust the option or select a
Playing TV audio only
You can turn off the picture on your TV and listen to
the program audio only.
1 Press MENU, press
then press OK.
2 Highlight Power Management, then press OK.
S
or T to highlight Options,
4 Highlight On or Off, then press OK.
5 Press EXIT to close the menu.
Notes
• The picture turns off in about five
seconds.
• Press any button to turn on the picture
for about five seconds.
• To exit audio only mode, repeat this
task and select Off.
Changing channel settings
This section covers:
• Automatically scanning for channels
• Manually adding channels to the channel list
•Hiding channels
Automatically scanning for channels
When you scan for channels, your TV searches for
channels with signals and stores the channel
information in the channel list. When you press CH+
or CH–, your TV goes to the next or previous channel
in the channel list. The channel scan may take several
minutes.
Note
When you scan for channels, your TV
erases any channels already stored in the
channel list.
If a channel is not stored in the channel
list, you can:
• Use the number buttons on the virtual
remote control to enter the channel
number. See Number page on page 18.
• Manually add the channel to the
channel list if the channel has a good
signal strength. See Manually adding
channels to the channel list on page 72.
3 Highlight Audio Only, then press OK.
www.tv.toshiba.com
1 Make sure that you have set up the
ANT / CABLE IN jack before programming
channels. See Setting up the ANT / CABLE IN jack
on page 55.
71
Page 77

43" / 49" / 55" / 65" 2160p 60Hz LED Google Cast™ TV
2 Press MENU, press S or T to highlight
Installation, then press OK.
3 Highlight Channel Tuning, then press OK.
Manually adding channels to the channel list
Channels with weak signals may not be added to the
channel list when you scan for channels. You can
manually add a channel to the channel list if you
know the channel number and the channel has a
good signal strength. (Use the number buttons on
virtual remote control to enter the channel number.)
1 Press MENU, press
Installation, then press OK.
S
or T to highlight
4 Highlight Auto Tuning, then press OK. Press OK
again to start the scan. Your TV scans for available
channels. The scan may take several minutes.
Notes
• If you created a 4-digit PIN, enter your
PIN to start scanning. For more
information, see Setting a new PIN on
page 74.
• You can press EXIT to stop the auto
channel search, but you will need to
run the auto channel search again to
create a channel list.
5 When the scan is complete, press EXIT to close the
menu. Your TV tunes to the first scanned channel.
2 Highlight Channel Tuning, then press OK.
3 Highlight Manual Tuning, then press OK.
72
www.tv.toshiba.com
Page 78

43L621U / 49L621U / 55L621U / 65L621U 43" / 49" / 55" / 65" 2160p 60Hz LED Google Cast™ TV
4 Use the number buttons on the virtual remote
control to enter the channel number, then press
OK. See Channel and Long Press page on page 17.
OR
Press
W
or X to select previous or next channel,
then press OK.
5 Press OK to start manual tuning.
6 Press EXIT to close the menu.
Hiding channels
You can hide channels in the channel list. When you
press CH+ or CH–, your TV skips the hidden channels.
You can still tune to a hidden channel by pressing the
number buttons on the virtual remote control. See
Virtual Remote control on page 17.
1 Press MENU, press
then press OK.
S
or T to highlight Options,
3 Highlight a channel you want to hide, then press
OK. A check appears in the box next to the
channel.
Notes
• Channels labeled ATV are analog
channels. Channels labeled DTV are
digital channels.
• To un-hide a channel, highlight the
channel, then press OK to remove the
check.
• You can also lock specific channels so
that they cannot be tuned until you
unlock them. See Locking channels on
page 78.
4 Press EXIT to close the menu.
Setting parental controls
Parental controls let you prevent your children from
watching inappropriate material on TV. When set,
parental controls read the rating of the program (with
some exceptions, such as news and sports) and deny
access to programs that exceed the ratings level you
select.
Parental controls let you:
• Set ratings for TV programs and movies so you can
prevent your children from watching inappropriate
material on TV
• Lock video input sources
• Set a timer to limit how long you can play a game
Note
To watch blocked programs, you must
enter a PIN.
2 Highlight Channel Options, then press OK.
www.tv.toshiba.com
Parental control topics include:
• Setting a new PIN
• Changing or deleting the PIN
• Blocking TV programs and movies (for USA region)
• Downloading rating information (for USA region)
• Temporarily unlocking programs
•Locking video inputs
• Locking channels
• Setting the GameTimer™
73
Page 79

43" / 49" / 55" / 65" 2160p 60Hz LED Google Cast™ TV
Setting a new PIN
A PIN is necessary for some menus. The Parental
Control and Locks menu is grayed out if no PIN has
been set.
1 Press MENU, press
then press OK.
2 Highlight Parental PIN Setup, then press OK.
S
or T to highlight Options,
Changing or deleting the PIN
1 Press MENU, press S or T to highlight Options,
then press OK.
2 Highlight Parental PIN Setup, then press OK.
W
3 Press
4 Enter your PIN again to confirm, then press OK.
5 Press EXIT to close the menu.
or X on the number bar at the bottom of
the screen to select a number, then press OK.
Repeat this step to enter the other three numbers
in your PIN.
After you enter the fourth number, a confirmation
screen opens.
The Parental PIN Setup menu opens.
Note
If you forget your PIN, open the screen
where you enter your PIN, highlight Done,
then press INFO four times within five
seconds. The PIN is cleared and you can
enter a new PIN.
3 Press
4 Highlight Change PIN or Delete PIN, then press
W
or X on the number bar at the bottom of
the screen to select the first number of your PIN,
then press OK. Repeat this step to enter the other
three numbers in your PIN.
OK.
74
www.tv.toshiba.com
Page 80

43L621U / 49L621U / 55L621U / 65L621U 43" / 49" / 55" / 65" 2160p 60Hz LED Google Cast™ TV
5 If you select Change PIN, enter your new PIN, then
enter it again.
OR
If you select Delete PIN, press
then press OK.
6 Press EXIT to close the menu.
W
or X to select Ye s ,
Blocking TV programs and movies (for USA region)
Some TV programs and movies include ratings that
classify the content of the program as unsuitable for
younger viewers. Your TV detects the ratings and
blocks the programs and movies according to the
ratings you select.
Notes
• You must create a PIN before you can
block TV programs and movies. See
Setting a new PIN on page 74.
• To view a program or movie rating,
tune to the program or movie, then
press INFO.
TV rating levels
U.S. TV ratings
TV-MA Mature audiences only. May contain:
• L—Crude or indecent language
• S—Explicit sexual activity
•V—Graphic violence
TV-14 Parental guidance strongly suggested.
May contain:
• D—Intensely suggestive dialog
• L—Strong, coarse language
• S—Intense sexual situations
• V—Intense violence
TV-PG Parental guidance suggested. May
TV-G General audiences
TV-Y7
TV-Y7FV
TV-Y Suitable for all children.
contain:
• D—Some suggestive dialog
• L—Infrequent coarse language
• S—Some sexual situations
• V—Moderate violence
Suitable for children 7 and older.
Note: Programs in which fantasy violence
may be more intense or more combative
than other programs in this category are
designated TV-Y7FV.
Movie rating levels
U.S. movie (MPAA) ratings
X Adults only
NC-17 Not suitable for children under 17
R Restricted (Under 17 requires
PG-13 Parents Strongly Cautioned (Some
PG Parental guidance suggested
G General audiences (Appropriate for all
None Rated Content is not rated. Selecting this option
1 Press MENU, press
2 Highlight Parental Control and Locks, then press
accompanying parent or adult)
material may be inappropriate for
children under 13)
ages)
may block emergency messages.
S
then press OK.
OK.
or T to highlight Options,
www.tv.toshiba.com
75
Page 81

43" / 49" / 55" / 65" 2160p 60Hz LED Google Cast™ TV
3 Press W or X on the number bar at the bottom of
the screen to select the first number of your PIN,
then press OK. Repeat this step to enter the other
three numbers in your PIN.
4 Highlight Enable Rating Blocking, then press OK.
5 Highlight On, then press OK.
6 Press
OK.
T
to highlight Edit Rating Limits, then press
Downloading rating information (for USA region)
In the future, an additional rating system may become
available for use in selectively blocking TV programs
and movies.
The currently tuned station must be receiving a digital
signal before an additional rating system can be
downloaded.
1 Tune to the channel you want to download ratings
for.
2 Press MENU, press
then press OK.
S
or T to highlight Options,
7 Press
8 When you have finished, highlight Done, then
9 Press EXIT to close the menu.
S T W
or X to highlight a rating then press
OK.
Notes
• As you highlight a rating, a definition
for the rating appears at the bottom of
the screen.
• A blocked rating has an X next to it.
press OK to save your changes.
3 Highlight Parental Control and Locks, then press
OK.
76
www.tv.toshiba.com
Page 82

43L621U / 49L621U / 55L621U / 65L621U 43" / 49" / 55" / 65" 2160p 60Hz LED Google Cast™ TV
4 Press W or X on the number bar at the bottom of
the screen to select a number, then press OK.
Repeat this step to enter the other three numbers
in your PIN.
5 Highlight Enable Rating Blocking, then press OK.
6 Highlight On, then press OK.
7 Press
T
to highlight Edit Rating Limits, then press
OK.
8 Highlight Alt RS, then press OK.
Notes
•The ALT RS option is only available if
an additional rating system is
currently available.
• Your TV may take several minutes to
download the additional rating
system.
• The information displayed in the
Alternate Ratings screen depends on
the rating system available at the time
of download.
S T W
9 Press
or X to highlight a rating then press
OK.
Notes
• A blocked rating has an X next to it.
• You can only download the additional
rating system one time.
• To view a program or movie rating,
tune to the program or movie, then
press INFO.
• You will not be able to download any
updates to the rating system should
such updates become available.
• The available rating information is
controlled by the broadcaster.
Content and format may vary.
10 When you have finished, highlight Done, then
press OK.
11 Press EXIT to close the menu.
www.tv.toshiba.com
77
Page 83

43" / 49" / 55" / 65" 2160p 60Hz LED Google Cast™ TV
Temporarily unlocking programs
If you try to tune to a program that exceeds the rating
limits you have set, your TV enters program lock
mode and a warning message appears on the screen.
You can temporarily unlock the program.
1 Press MUTE.
2 Enter your four-digit PIN, then press OK.
The program is unlocked and the normal picture
appears. The program is locked again when you
change the channel.
Locking video inputs
You can use the Input Lock option to lock the video
inputs (AV, HDMI 1, HDMI 2, and HDMI 3).
1 Press MENU, press
then press OK.
S
or T to highlight Options,
4 Press
5 Highlight a video input locking level, then press
6 Press EXIT to close the menu.
T
to highlight Input Lock, then press OK.
OK. You can select:
• Video—Locks AV, HDMI 1, HDMI 2, and
HDMI 3.
• Off—Unlocks all video inputs.
Locking channels
Note
You must create a PIN before you can
block channels. See Setting a new PIN on
page 74.
1 Press MENU, press S or T to highlight Options,
then press OK.
78
2 Highlight Parental Control and Locks, then press
OK.
3 Press
W
or X on the number bar at the bottom of
the screen to select the first number of your PIN,
then press OK. Repeat this step to enter the other
three numbers in your PIN.
www.tv.toshiba.com
2 Highlight Channel Options, then press OK.
Page 84

43L621U / 49L621U / 55L621U / 65L621U 43" / 49" / 55" / 65" 2160p 60Hz LED Google Cast™ TV
3 Highlight a channel, press W or X to move to the
column with the padlock icon, then press OK.
Notes
• Channels labeled ATV are analog
channels.
• Channels labeled DTV are digital
channels.
4 Press
5 Press EXIT to close the menu.
W
or X on the number bar at the bottom of
the screen to select the first number of your PIN,
then press OK. Repeat this step to enter the other
three numbers in your PIN.
Note
To unlock a channel, highlight the
channel, then press OK to remove the
check.
Setting the GameTimer™
You can use the GameTimer™ to set a time limit for
playing a video game (30–120 minutes). When the
GameTimer expires, your TV locks out the input
source for the video game device.
1 Press MENU, press
then press OK.
S
or T to highlight Timers,
2 Highlight Game Timer, then press OK.
W
3 Press
the screen to select the first number of your PIN,
then press OK. Repeat this step to enter the other
three numbers in your PIN.
4 Highlight the amount of time you want to let the
game run before it turns off, then press OK. You
can select Off, 30 min, 60 min, 90 min, or
120 min.
5 Press EXIT to close the menu.
Notes
or X on the number bar at the bottom of
Note
To turn off the game timer, select Off.
• A message appears when 10 minutes, 3
minutes, and 1 minute are remaining.
• If your TV loses power with time remaining,
your TV enters input lock mode when power
is restored (as if the GameTimer had been
activated). To resume use, you must
deactivate the input lock. See Locking video
inputs on page 78.
Using closed captioning
Closed captioning displays a text version of the TV
program audio or displays information provided by
the broadcaster.
Closed caption controls include:
• Turning closed captioning on or off
• Selecting the analog closed captioning mode
• Selecting the closed captioning mode with the CCD
button
• Customizing digital closed captioning settings
www.tv.toshiba.com
79
Page 85

43" / 49" / 55" / 65" 2160p 60Hz LED Google Cast™ TV
Turning closed captioning on or off
Note
You may not see closed captioning when:
• A program or video has been dubbed
• Signal reception is weak or
non-standard
1 Press MENU, press S or T to highlight Options,
then press OK.
Selecting the analog closed captioning mode
Analog channels usually have one or more closed
captioning modes. The CC1 mode usually displays a
text version of the TV program audio in a small
banner. The other CC modes display information
provided by the broadcaster. The Text modes display
information in a box that covers half of the screen.
1 Press MENU, press
then press OK.
S
or T to highlight Options,
2 Highlight Closed Captions, then press OK.
3 Highlight Closed Captions Display, then press
OK.
4 Highlight On (turns on closed captioning) or Off
(turns off closed captioning), then press OK.
5 Press EXIT to close the menu.
Note
You can also press CCD to turn closed
captioning on or off.
2 Highlight Closed Captions, then press OK.
3 Highlight Analog CC Mode, then press OK.
4 Highlight an analog captioning mode, then press
OK. You can select:
• CC1 through CC4—Closed captioning appears
in a small banner across the bottom of the
screen. CC1 is usually the “printed” version of the
audio. CC2 through CC4 display content
provided by the broadcaster.
• T1 through T4—Closed captioning covers half
or all of the screen. T1 through T4 display
content provided by the broadcaster.
80
www.tv.toshiba.com
Page 86

43L621U / 49L621U / 55L621U / 65L621U 43" / 49" / 55" / 65" 2160p 60Hz LED Google Cast™ TV
5 Press EXIT to close the menu.
Notes
If the program or video you are watching
does not have closed captioning, no
captions are displayed.
If T1 through T4 is not available in your
area, a black rectangle may appear.
Selecting the closed captioning mode with the CCD button
Press CCD. The CC bar appears:
• If you are tuned to an analog channel (or a video
device with a 480i signal), you can select CC1
through CC4 or T1 through T4.
• If you are tuned to a digital channel, the
available closed captioning modes vary for
digital channels.
Customizing digital closed captioning settings
1 Press MENU, press S or T to highlight Options,
then press OK.
3 Highlight Digital CC Settings, then press OK.
W
4 Highlight an option, then press
the setting. You can select:
• Caption Size—Selects the font size.
• Caption Text Type—Selects the font type.
• Caption Text Edge—Selects the style of the
letter edge.
• Caption Text Color—Selects the color for the
words.
• Text Foreground O p acity—Selects the opacity
level for the words.
• Background Color— Selects the color for the
background.
• Text Background O pacity—Selects the opacity
level of the background.
• Caption Text Edge Color—Selects the color of
the letter edge.
5 To adjust another option, press
the option, then press W or X to adjust the setting.
6 Press EXIT to close the menu.
or X to adjust
S
or T to highlight
2 Highlight Closed Captions, then press OK.
www.tv.toshiba.com
81
Page 87

43" / 49" / 55" / 65" 2160p 60Hz LED Google Cast™ TV
Adjusting time settings
This section includes:
• Setting the time zone and Daylight Saving Time
status
• Setting the sleep timer
Setting the time zone and Daylight Saving Time status
Your TV uses the Time Zone and Daylight Saving
Time settings to correctly display program and
channel status information.
1 Press MENU, press
Installation, then press OK.
2 Highlight Time Zone, then press OK.
S
or T to highlight
Setting the sleep timer
You can specify the amount of time before your TV
automatically turns off.
1 Press MENU, press
then press OK.
2 Highlight Sleep Timer, then press OK.
S
or T to highlight Timers,
3 Highlight a time zone, then press OK. The
Installation menu opens.
4 Highlight Daylight Saving Time, then press OK.
5 Highlight Auto (if your viewing area observes
Daylight Saving Time) or Off (if your viewing area
does not observe Daylight Saving Time), then
press OK.
6 Press EXIT to close the menu.
S
3 Press
Off, 5min, 10 min, 15 min, 30 min, 60 min,
90 min, 120 min, 150 min, 180 min, or 240 min.
4 Press EXIT to close the menu.
or T to set the sleep time. You can select
Notes
• You can also press SLEEP to set the
sleep timer.
• To display the time remaining until the
TV turns off, press SLEEP.
• To cancel the sleep timer, press SLEEP,
then press
• If a power failure occurs, the sleep
timer setting should be cleared.
T
to select Off.
82
www.tv.toshiba.com
Page 88

43L621U / 49L621U / 55L621U / 65L621U 43" / 49" / 55" / 65" 2160p 60Hz LED Google Cast™ TV
Adjusting menu settings
You can adjust how the TV menus look by:
• Selecting the menu language
• Labeling a video input source
Selecting the menu language
You can choose from three different menu language
settings (English, Français, and Español) for the
on-screen display of menus and messages.
S
1 Press MENU, press
Installation, then press OK.
2 Highlight Menu Language, then press OK.
3 Press
4 Press EXIT to close the menu.
S
or T to select a language, then press OK.
Labeling a video input source
You can add a label to a video input source to make it
easier to identify.
You can also hide a video input source so that it is
grayed on the Input Selection list and your TV skips the
video input source when you press INPUT.
1 Press MENU, press
then press OK.
or T to highlight
S
or T to highlight Options,
2 Highlight Input Labeling, then press OK.
3 Highlight the video input source you want to
label, then press
list.
Note
If you are not using an input, you can select
Hide for the label. Hide grays the input in the
Input Selection list and skips the input when
you press INPUT on the remote control.
4 Repeat Step 3 to label another input.
5 Press
6 Press EXIT to close the menu.
S
save the label.
OR
Highlight Reset, then press OK to reset the label
to the factory default.
or T to highlight Done, then press OK to
Notes
To reset the input labels to the default
labels, highlight Reset, then press OK.
W
or X to select a label from the
www.tv.toshiba.com
83
Page 89

43" / 49" / 55" / 65" 2160p 60Hz LED Google Cast™ TV
Turning the input sensor on or off
When the Input Sensor feature is turned on, your TV
automatically detects which video jacks have devices
connected to them and turned on. Your TV uses this
information to determine what options you can select
on the Input Selection list when you press INPUT.
1 Press MENU, press
then press OK.
S
or T to highlight Options,
Maintaining
• Do not use your TV in areas that are too hot or too
cold, because the cabinet may warp or the screen
may malfunction. Your TV works best in
temperatures that are comfortable to you.
• Storage temperatures are 32° to 122°F (0° to 50°C).
• Working temperatures are 41° to 104°F (5° to 40°C).
• Do not place your TV in direct sunlight or near a
heat source.
This sections includes topics about:
• Cleaning the TV cabinet
• Cleaning the TV screen
Cleaning the TV cabinet
Clean the cabinet with a soft, lint-free cloth. If the
cabinet is especially dirty, moisten a soft, lint-free
cloth in a weak detergent solution, squeeze the
excess moisture from the cloth, then wipe the cabinet
with the cloth. Use a clean cloth to dry the cabinet.
Cleaning the TV screen
Clean the screen with a soft, lint-free cloth.
2 Highlight Auto Input Sensing, then press OK.
3 Highlight On or Off, then press OK.
Troubleshooting
Use the following troubleshooting information to
solve common problems.
War ning
Do not try to repair your TV yourself.
Contact authorized service personnel.
Troubleshooting topics include:
•Cast TV FAQ
• Viewing support information
• Restoring settings to the defaults
• Turning off the automatic power-off feature
• Making your TV turn on faster
• Video and audio problems
• Remote control problems
• General problems
• CEC-compatible devices problems
84
www.tv.toshiba.com
Page 90
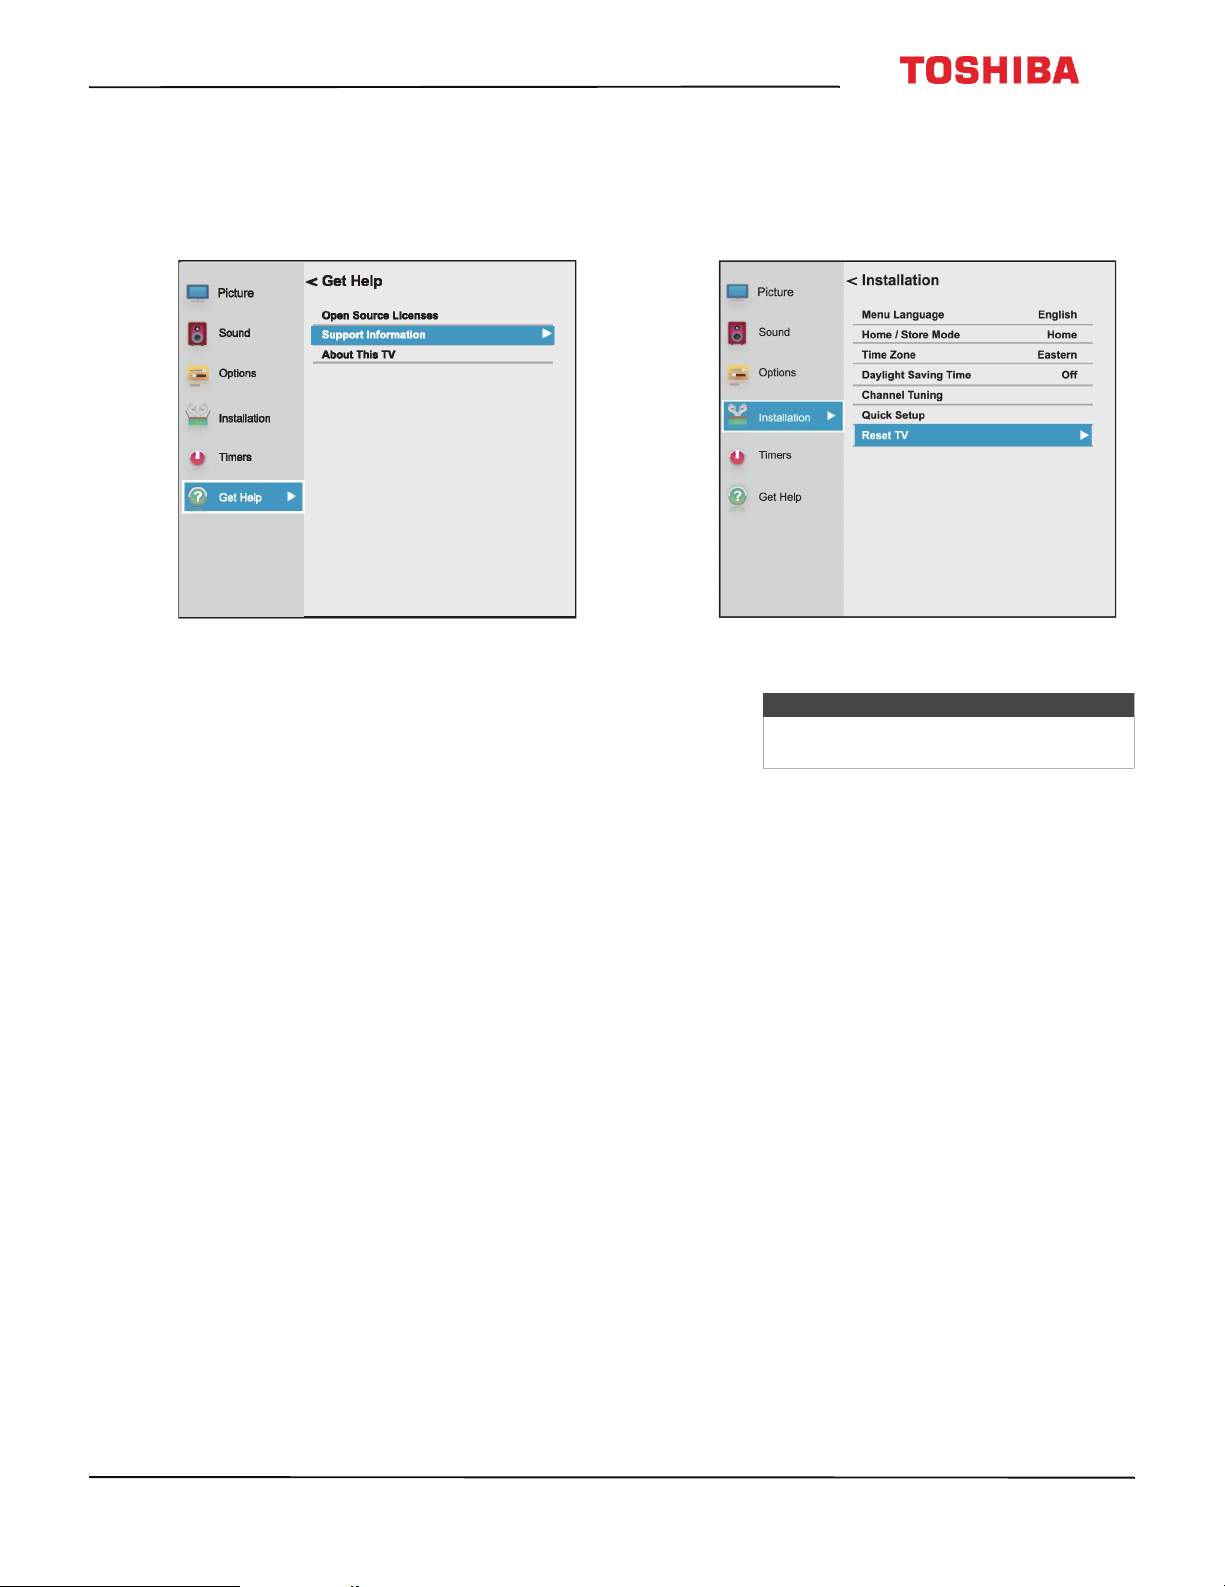
43L621U / 49L621U / 55L621U / 65L621U 43" / 49" / 55" / 65" 2160p 60Hz LED Google Cast™ TV
Viewing support information
You may need to view support information during
troubleshooting.
1 Press MENU, press
then press OK.
2 Highlight Support Information, then press OK.
Your TV displays information about your TV and
support phone numbers and websites for
different regions.
3 To close the screen and return to the GetHelp
menu, press OK.
OR
To close the menu, press EXIT.
S
or T to highlight Get Help,
Restoring settings to the defaults
When you restore default settings, all the settings you
have customized are reset.
1 Press MENU, press
Installation, then press OK.
I
2 Press S or T to highlight Reset TV, then press OK.
Note
If you have created a PIN, use the number
bar to enter it, then press OK.
A confirmation screen opens.
3 Highlight Yes (to reset) or No (to not reset), then
press OK.
If you select Ye s , your TV turns off, then turns on
again. Complete the initial setup wizard and set up
the video input jacks. For more information, see
Turning on your TV for the first time on page 40
and Setting up the ANT / CABLE IN jack on
page 55.
OR
If you do not want to reset your TV to the factory
defaults, highlight No, then press OK.
S
or T to highlight
www.tv.toshiba.com
85
Page 91

43" / 49" / 55" / 65" 2160p 60Hz LED Google Cast™ TV
Turning off the automatic power-off feature
Your TV automatically turns off after 15 minutes when
no video signal is detected.
You might want to change this setting to Off if:
• The incoming signal for an analog channel is too
weak for your TV to detect.
• You connected an audio-only device (such as a
CD player) to the AUDIO L and R jacks to listen to
music through the TV speakers.
1 Press MENU, press
then press OK.
S
or T to highlight Options,
Making your TV turn on faster
When you turn off your TV, it normally goes into a
power savings mode to conserve energy. When you
turn your TV back on, it takes several seconds to exit
the power saving mode and display a picture.
You can turn on your TV faster by bypassing the
power savings mode.
1 Press MENU, press
then press OK.
S
or T to highlight Options,
2 Highlight Power Management, then press OK.
3 Highlight No Signal Power Down, then press OK.
4 Highlight On or Off, then press OK.
5 Press EXIT to close the menu.
2 Highlight Power Management, then press OK.
3 Highlight Active Standby Mode, then press OK.
4 Highlight On (to turn off the power savings mode
or Off (to turn on the power savings mode), then
press OK.
86
www.tv.toshiba.com
Page 92

43L621U / 49L621U / 55L621U / 65L621U 43" / 49" / 55" / 65" 2160p 60Hz LED Google Cast™ TV
Cast TV FAQ
Problem Solution
My TV will not
connect to the
network.
How do I prevent
others from
casting to my TV?
• Make sure your router’s firewall
• You may have entered incorrect
• By design, anyone who has
is configured to accept new
devices. See your router's
documentation for more
information. If you are renting a
router, you may need to contact
your ISP. If you are on a private
network, such as a university
network, you may need to
contact your network
administrator.
information during setup. Reset
your TV, then set up your TV
again. See Restoring settings to
the defaults on page 85.
access to your Wifi network can
cast to your TV. This makes
devices with Google Cast
built-in great for sharing videos
between friends! If you want to
prevent people from casting to
your TV, make sure that your
Wifi network is password
protected and only give out the
password to people you trust.
Problem Solution
I see the error “No
Cast Devices
Found.”
• Make sure that your TV and
mobile device are set up
correctly and connected to Wifi.
You should see Google Cast on
your TV, with its assigned name
and the current time, and a
photo slideshow playing.
• Try casting from the Google
Cast app to see if the device is
correctly connected or requires
setup.
• If you're using an iOS device,
turn on Bluetooth when setting
up your TV.
• Try rebooting your Wifi router
by unplugging the power cord
and turning off your TV. Plug
your router back in and turn on
your TV.
• Try uninstalling and reinstalling
the Google Cast app.
• Certain operating system
settings and installed
applications can conflict with
the use of Google Cast. If other
devices (such as phones or
tablets) are also unable to cast
successfully, the problem is
likely an issue with your router
or network.
• Try rebooting your Wifi
router by unplugging the
power cord, then
plugging it back in.
• Make sure that Google
Cast, your TV, and your
mobile device are
connected to the same
network. After Google
Cast starts, the network
name displayed on your
TV should be the same
network name selected in
your mobile device’s
available Wifi list.
• Make sure that firewall
and antivirus software on
your router are
up-to-date and are not
blocking connections to
Google Cast. If you are
renting a router, contact
your Internet service
provider about firewall
settings. If you purchased
the router, check your
network firewall settings.
www.tv.toshiba.com
87
Page 93

43" / 49" / 55" / 65" 2160p 60Hz LED Google Cast™ TV
Problem Solution
Content is cut off
when casting.
Audio and video
are out of sync.
I don't see the
Cast button in the
youtube.com
player.
The YouTube
video quality
keeps changing
throughout the
video.
Netflix.com does
not cast.
• Try changing the picture size on
your mobile device to a lower
resolution
• The full screen mode is
optimized for screens with 16:9
aspect ratio. To change this, go
to the Cast settings page.
• Restart your TV and mobile
device, then try again.
• Try decreasing the distance
between your TV, router, and
mobile device.
• Make sure your TV is connected
to your Wifi network and make
sure that Google Cast is set up
on your mobile device and the
device is connected to the same
network.
• Disconnect from a Virtual
Private Network (VPN) or proxy
server, if applicable. Google
Cast cannot communicate with
your TV over these networks.
• Because YouTube uses adaptive
bitrate streaming, videos may
appear at lower quality at first
but quickly switch to the
highest possible quality after a
few seconds.
Note: Not all videos on
YouTube are available in HD.
Videos recorded in SD play in
the same quality it was
recorded. If the video does not
buffer at playback speed, the
video is downgraded to a lower
quality allowing for smoother
playback.
• Make sure that your TV is
connected to your Wifi network
and make sure that you set up
Google Cast on your mobile
device and connected the
device to the same network.
• Disconnect what you're
currently casting from Netflix.
Try casting again.
• Disconnect from a Virtual
Private Network (VPN) or proxy
server, if applicable over these
networks.
• If you are seeing an error, such
as Error 16003 or16001, try
setting up and casting from
another mobile device.
Video and audio
Problem Solution
Picture does not
fill the screen.
There are black
bars around the
picture.
No picture (screen
is not lit) and no
sound.
• Change the picture size (aspect
• Press on the TV or the
• Make sure that the Audio Only
• Make sure that the video cables
• Adjust the contrast and
• Make sure that the power cord
• Press INPUT and make sure that
• Try another channel. The station
• Make sure that the incoming
• Make sure that the antenna or
• Check the closed caption
ratio). See Adjusting the picture
size on page 67.
remote control.
option is set to Off. See Playing
TV audio only on page 71.
are connected correctly and
securely to your TV.
brightness. See Adjusting the
TV picture on page 65.
is plugged into a working
outlet.
the correct video input source is
selected. See Selecting the
video input source on page 56.
may be experiencing problems.
signal is compatible.
cable TV is connected correctly
and securely. See Connecting a
cable or satellite box on
page 20 or Connecting an
antenna or cable TV (no box) on
page 24.
settings. Some TEXT modes can
block the screen. See Using
closed captioning on page 79.
88
www.tv.toshiba.com
Page 94

43L621U / 49L621U / 55L621U / 65L621U 43" / 49" / 55" / 65" 2160p 60Hz LED Google Cast™ TV
Problem Solution
Dark, poor, or no
picture (screen is
lit), but sound is
good.
No color, dark
picture, or color is
not correct.
Only snow (noise)
appears on the
screen.
• Try another channel. The station
may be experiencing problems.
• Make sure that the antenna or
cable TV is connected correctly
and securely. See Connecting a
cable or satellite box on
page 20 or Connecting an
antenna or cable TV (no box) on
page 24.
• Adjust the brightness. See
Adjusting the TV picture on
page 65.
• If you are using an antenna and
the signal strength is low, adjust
the antenna or use a highly
directional outdoor antenna or
set-top antenna with a built-in
amplifier.
• Make sure that the video cables
are connected correctly and
securely to your TV.
• The video cable(s) you are using
may be bad. Try a new set.
• Try another channel. The station
may be experiencing problems.
• Adjust the color settings. See
Adjusting the TV picture on
page 65.
• Make sure that the video cables
are connected correctly and
securely to your TV.
• Make sure that the antenna or
cable TV is connected correctly
and securely. See Connecting a
cable or satellite box on
page 20 or Connecting an
antenna or cable TV (no box) on
page 24.
• If you are using an antenna and
the signal strength is low, adjust
the antenna or use a highly
directional outdoor antenna or
set-top antenna with a built-in
amplifier.
• Try another channel. The station
may be experiencing problems.
• Make sure that the antenna or
cable TV is connected correctly
and securely. See Connecting a
cable or satellite box on
page 20 or Connecting an
antenna or cable TV (no box) on
page 24.
• If you are using an antenna and
the signal strength is low, adjust
the antenna or use a highly
directional outdoor antenna or
set-top antenna with a built-in
amplifier.
Problem Solution
Picture quality is
good on some
channels and poor
on others. Sound
is good.
Dotted lines or
stripes appear on
the screen.
Double images.
The picture has a
few bright or dark
spots.
• The problem may be caused by
a poor or weak signal from the
broadcaster or cable TV
provider.
• If you connect to cable without
a set-top box and experience
poor picture quality, you may
need to install a set-top box to
improve signal reception and
picture quality. Contact your
cable TV provider about
upgrading to a set-top box.
• Make sure that the antenna or
cable TV is connected correctly
and securely. See Connecting a
cable or satellite box on
page 20 or Connecting an
antenna or cable TV (no box) on
page 24.
• If you are using an antenna and
the signal strength is low, adjust
the antenna or use a highly
directional outdoor antenna or
set-top antenna with a built-in
amplifier.
• Make sure that the video cables
are connected correctly and
securely to your TV.
• The video cable(s) you are using
may be bad. Try a new set.
• Other devices (for example, a
surround sound receiver,
external speakers, fans, or hair
dryers) may be interfering with
your TV. Try turning off one
device at a time, then back on
to determine which device is
causing interference. After you
have determined which device
is causing interference, move it
further from the TV to eliminate
the interference.
• Use a highly directional outdoor
antenna, cable TV, or satellite
TV.
• A few bright or dark spots on an
LCD screen is normal. It does
not affect the operation of
your TV.
www.tv.toshiba.com
89
Page 95

43" / 49" / 55" / 65" 2160p 60Hz LED Google Cast™ TV
Problem Solution
Good picture, but
no sound.
Poor picture.
Good sound, but
poor color.
•Increase the volume.
• Make sure that the sound is not
muted.
• Make sure that you do not have
headphones connected. When
headphones are connected, the
TV speakers are muted.
• Make sure that the TV
Speakers option on the Sound
menu is not set to Off.
• If you are using a home theater
system, soundbar, or external
speaker system, make sure it is
turned on and is not muted.
• If you are using a home theater
system, soundbar, or external
speaker system, make sure that
you have selected the correct
output mode.
• If you are using a home theater
system, soundbar, or external
speaker system and have
connected it with a digital
optical cable, go to the Sound
menu, highlight Digital Audio
Output, then press OK.
Highlight Audio Format, then
press OK. Press
PCM, then press OK. See the
Digital Audio Output option in
Adjusting sound settings on
page 70.
• Make sure that the audio cables
are connected correctly and
securely to your TV.
• Make sure that the antenna or
cable TV is connected correctly
and securely. See Connecting a
cable or satellite box on
page 20 or Connecting an
antenna or cable TV (no box) on
page 24.
• The audio cables you are using
may be bad. Try a new set.
• Make sure that the room is not
too bright. Light reflecting off
the screen can make the picture
difficult to see.
• If an S-VHS camera or a
camcorder is connected while
another connected device is
turned on, the picture may be
poor. Turn off one or more
devices.
• Adjust the contrast, color, and
brightness settings. See
Adjusting the TV picture on
page 65.
S
or T to select
Problem Solution
Audio noise.
No output from
one of the
speakers.
After images
appear.
• Other devices (for example, a
• Adjust the audio balance. See
• Make sure that the audio cables
• Do not display a still image,
Remote control
Problem Solution
Remote
control does
not work.
• Make sure that the power cord is
plugged into a working outlet.
• Make sure that there are no
obstructions between the remote
control and the remote control
sensor on the front of the TV.
• Point the remote control directly at
the remote control sensor on your
TV. For the location of the remote
control sensor, see Aiming the
remote control on page 38.
• The supplied batteries are wrapped
tightly in clear plastic. Make sure
that you have removed this plastic
from the batteries.
• Make sure that the batteries are
installed correctly. See Installing
remote control batteries on
page 38.
• Replace dead batteries with new
batteries. See Installing remote
control batteries on page 38.
surround sound receiver,
external speakers, fans, or hair
dryers) may be interfering with
your TV. Try turning off one
device at a time to determine
which device is causing
interference. After you have
determined which device is
causing interference, move it
further from the TV to eliminate
the interference.
Adjusting sound settings on
page 70.
are connected correctly and
securely to your TV.
such as a logo, game, or
computer image, for an
extended period of time. This
can cause a permanent
after-image to be burned into
the screen. This type of damage
is not covered by your warranty.
90
www.tv.toshiba.com
Page 96

43L621U / 49L621U / 55L621U / 65L621U 43" / 49" / 55" / 65" 2160p 60Hz LED Google Cast™ TV
General
Problem Solution
No power.
“No video” error
message is
displayed.
After Auto
Channel Search,
there are no
channels.
When I press
INPUT, I cannot
select my
device (it is
grayed out).
• Make sure that the power cord
is plugged into a working
outlet.
• Unplug the power cord, wait 60
seconds, then plug the cord
back in and turn on your TV.
• Other devices (for example, a
surround sound receiver,
external speakers, fans, or hair
dryers) may be interfering with
your TV. Try turning off one
device, at a time, then turning
on your TV to determine which
device is causing interference.
After you have determined
which device is causing
interference, move it further
from the TV to eliminate the
interference.
• Press INPUT and make sure that
you have selected the correct
input for the device or service
you are trying to use.
• If you are using a cable or
satellite box, use the remote
that came with that box to
change channels.
• Reception can vary by channel
depending on the broadcast
power level of a given station.
Contact your cable or satellite
TV provider.
• Make sure that the antenna or
cable/satellite TV is connected
securely to your TV.
• Try replacing the cable between
the antenna/cable or
cable/satellite box and your TV.
• Make sure that the video input
source for the device is not
hidden. See Labeling a video
input source on page 83.
• Make sure that the video input
sources are not locked. See
Locking video inputs on
page 78.
Problem Solution
One or more
channels do not
display.
Password is lost.
Some settings
cannot be
accessed.
TV cabinet
creaks.
Control buttons
do not work.
TV keeps
turning off.
A retail banner
is displayed.
• Make sure that the channels are
not blocked. See Locking
channels on page 78.
• Make sure that the channels are
not hidden. The channel may
have been deleted from the
channel list. You can tune to the
channel by pressing the
number buttons on the virtual
remote control or you can add
the channel back to the channel
list. See Hiding channels on
page 73.
• If you are using a cable or
satellite box, use the remote
that came with that box to
change channels.
• Press INPUT and make sure that
you have selected the correct
input for the device or service
you are trying to use.
• If you forget your PIN, open the
screen where you enter your
PIN, highlight Done, then press
INFO four times within five
seconds. The PIN is cleared and
you can enter a new PIN. See
Setting a new PIN on page 74.
• If a setting is grayed, the setting
is not available in the current
video input mode (for example
TV mode). Change to a different
video input source. See
Selecting the video input
source on page 56.
• When the TV is in use, the
temperature rises naturally and
may cause the cabinet to
expand or contract which can
cause a creaking noise. This is
not a malfunction.
• Unplug the power cord, wait a
few seconds, then plug the cord
back in and turn on your TV.
• Make sure that the sleep timer
is not turned on. See Setting the
sleep timer on page 82.
• You selected Store Mode when
you ran the Initial Setup wizard.
Go to the Installation menu,
highlight Store / Home Mode,
then press
Home, then press OK.
W
or X to select
www.tv.toshiba.com
91
Page 97

43" / 49" / 55" / 65" 2160p 60Hz LED Google Cast™ TV
CEC-compatible devices
Problem Solution
My TV is not
displaying the
video from the
connected CEC
device.
• Make sure that the HDMI cable
is connected securely to your
TV and the device.
• Make sure that the device is
connected to your TV with an
HDMI cable.
• Make sure that the device is a
CEC device. See the
documentation that came with
the device for more
information.
• Press INPUT and make sure that
the correct video input source is
selected. See Selecting the
video input source on page 56.
• Make sure that the HDMI-CEC
Control feature is turned on.
See Turning HDMI-CEC Control
on or off on page 60.
• Try adjusting the TV picture. See
Adjusting the TV picture on
page 65.
Problem Solution
My TV is not
playing the
audio from the
connected CEC
device.
• Make sure that the HDMI cable
is connected securely to your
TV and the device.
• Make sure that the device is
connected to your TV with an
HDMI cable.
• Make sure that the device is a
CEC device. See the
documentation that came with
the device.
• Make sure that the TV volume is
turned up and not muted.
• Try adjusting the TV sound. See
Adjusting sound settings on
page 70.
• Make sure that the TV speakers
are turned on and not muted.
See Adjusting sound settings
on page 70.
• Make sure that the HDMI-CEC
Control feature is turned on.
See Turning HDMI-CEC Control
on or off on page 60.
•If you have connected an
HDMI CEC audio receiver, adjust
the volume on the receiver.
When your TV detects an audio
receiver, the TV speakers may
turn off and sound plays
through receiver speakers only.
• If you are using a home theater
system, soundbar, or external
speaker system, make sure that
it is turned on and is not muted.
• If you are using a home theater
system, soundbar, or external
speaker system, make sure that
you have selected the correct
output mode.
• If you are using a home theater
system, soundbar, or external
speaker system and have
connected with a digital optical
cable, go to the Sound menu,
highlight Digital Audio
Output, then press OK.
Highlight Audio Format, then
press OK. Press
PCM, then press OK. See the
Digital Audio Output option in
Adjusting sound settings on
page 70.
S
or T to select
92
www.tv.toshiba.com
Page 98

43L621U / 49L621U / 55L621U / 65L621U 43" / 49" / 55" / 65" 2160p 60Hz LED Google Cast™ TV
Problem Solution
My TV’s remote
control does
not control the
device.
The device does
not show up in
the list of CEC
devices.
My device does
not turn off
when I turn off
my TV.
• Make sure that there are no
obstructions between the
remote control and the remote
control sensors on your TV and
the device.
• Depending on the device, all
the buttons may not work.
• Make sure that the HDMI-CEC
Control feature is turned on.
See Turning HDMI-CEC Control
on or off on page 60.
• If you are trying to control the
volume on an HDMI CEC audio
receiver using your TV remote
control, make sure that the
Amplifier Control option is set
to On. See Turning Amplifier
Control on or off on page 61.
• The device may not support this
feature. See the documentation
that came with the device for
more information.
• Make sure that the device is
turned on.
• Make sure that the HDMI cable
is connected securely to your
TV and the device.
• Make sure that the device is
connected to your TV with an
HDMI cable.
• Make sure that the HDMI-CEC
Control feature is turned on.
See Turning HDMI-CEC Control
on or off on page 60.
• Make sure that the device is a
CEC device. See the
documentation that came with
the device.
• Make sure that the HDMI-CEC
Control feature is turned on.
See Turning HDMI-CEC Control
on or off on page 60.
•Make sure that Auto Standby is
set to On. See Turning Auto
Standby on or off on page 61.
• The device may not support this
feature. See the documentation
that came with the device for
more information.
Problem Solution
My TV does not
turn on when I
turn on my
device.
I cannot select
the Root Menu
option.
OR
The device’s
root menu does
not open when
I select Root
Menu.
Note
If the problem is not solved by using these
troubleshooting instructions, turn off your
TV, then turn it on again.
• Make sure that the HDMI-CEC
Control feature is turned on.
See Turning HDMI-CEC Control
on or off on page 60.
•Make sure that TV Auto Power
is set to On. See Turning TV
Auto Power on or off on
page 60.
• The device may not support this
feature. See the documentation
that came with the device for
more information.
• The device may not support this
feature. See the documentation
that came with the device for
more information.
www.tv.toshiba.com
93
Page 99

43" / 49" / 55" / 65" 2160p 60Hz LED Google Cast™ TV
Specifications
Specifications are subject to change without notice.
43" model (43L621U)
Dimensions and weight
Without stand
H × W × D
With stand
Screen
Screen size meas ured
diagonally
Panel LCD
Panel backlight type LED
Screen refresh rate 60Hz
Display resolution 2160p
Panel resolution 3840 (H) × 2160 (V)
Aspect ratio 16:9
Contrast ratio
(typical)–panel
TV Brightness (typical)
2
cd/m
Comb filter 3d y/c digital
Response time 8 ms
Horizontal viewing angle 178°
Vertical viewing angle 178°
Display resolutions
HDMI suggested resolutions 2160p, 1080p, 1080i, 720p, 480p, 480i
Tun er
Analog NTSC
Digital ATS C, 8 -VSB , Cl ear- QAM
22.4 × 38.1 × 3.4 in. (56.9 × 96.8 × 8.7 cm)
18.5 Ibs (8.4 kg)
24.3 × 38.1 × 9.8 in (61.7 × 96.8 × 24.9cm)
19.4 lbs. (8.8 kg)
42.5 in. (108 cm)
4,000:1
250 nits
Digital audio 1 (optical) (side)
WiFi Yes
LAN Yes
Audio
DTS Tuning Package DTS Studio Sound
Speakers
Number: 2
Watts per channel: 10W
Power
Power consumpt ion
Power input AC120V 60Hz, 1.1A
On: 94.1W
Standby: <0.5W
Miscellaneous
OSD languages English, French, Spanish
HDMI CEC Yes
Game Mode Yes
GameTimer™ Yes
ENERGY STAR qualified No
Google Cast Yes
TV base screws M5 type (27 mm length) (4 pcs)
V-Chip
(version 2.0)
Sleep timer Yes
Channel labeling No
VESA mount (mm)
(hor. × ver.)
VESA mount screws M6 type
Yes
200 × 300
Note
The length of the wall-mount screws vary
depending on the wall-mount bracket you
purchased. See the instructions that came
with the wall-mount bracket for screw
lengths.
Inputs
HDMI
Component video No
Composite video 1 (back)
Shared audio No
PC/VGA No
3.5mm PC audio input No
DVI (shared with HDMI) HDMI IN
USB
Antenna/Cable 1 (back)
EDID compliant
HDCP compliant
Supports JPEG
Outputs
Video No
Analog audio/Headphone Yes (s id e)
94
3 (side)
1 (side)
www.tv.toshiba.com
Page 100

43L621U / 49L621U / 55L621U / 65L621U 43" / 49" / 55" / 65" 2160p 60Hz LED Google Cast™ TV
49" model (49L621U)
Dimensions and weight
Without stand
H × W × D
With stand
Screen
Screen size meas ured
diagonally
Panel LCD
Panel backlight type LED
Screen refresh rate 60Hz
Display resolution 2160p
Panel resolution 3840 (H) × 2160 (V)
Aspect ratio 16:9
Contrast ratio
(typical)–panel
TV Brightness (typical)
2
cd/m
Comb filter 3d y/c digital
Response time 6 ms
Horizontal viewing angle 178°
Vertical viewing angle 178°
Display resolutions
HDMI suggested resolutions 2160p, 1080p, 1080i, 720p, 480p, 480i
Tun er
Analog NTSC
Digital ATS C, 8 -VSB , Cl ear- QAM
Inputs
HDMI
Component video No
Composite video 1 (back)
Shared audio No
PC/VGA No
3.5mm PC audio input No
DVI (shared with HDMI) HDMI IN
USB
Antenna/Cable 1 (back)
25.6 × 43.7 × 3.7 in. (65.1 × 111 × 9.6 cm)
24.9 Ibs (11.3 kg)
27.4 × 43.7 × 9.7 in (69.7 × 111 × 24.7cm)
25.8 lbs. (11.7 kg)
48.5 in. (123.2 cm)
1,200:1
350 nits
3 (side)
EDID compliant
HDCP compliant
1 (side)
Supports JPEG
Outputs
Video No
Analog audio/Headphone Yes (s ide )
Digital audio 1 (optical) (side)
WiFi Yes
LAN Yes
Audio
DTS Tuning Package DTS Studio Sound
Speakers
Number: 2
Watts per channel: 12W
Power
Power consumpt ion
Power input AC120V 60Hz, 1.5A
On: 129.9W
Standby: <0.5W
Miscellaneous
OSD languages English, French, Spanish
HDMI CEC Yes
Game Mode Yes
GameTimer™ Yes
ENERGY STAR qualified No
Google Cast Yes
TV base screws M4 type (12 mm length) (8 pcs)
M5 (10 mm length) (4 pcs)
V-Chip (version 2.0) Ye s
Sleep timer Yes
Channel labeling No
VESA mount (mm)
(hor. × ver.)
VESA mount screws M6 type
200 × 300
Note
The length of the wall-mount screws vary
depending on the wall-mount bracket you
purchased. See the instructions that came
with the wall-mount bracket for screw
lengths.
www.tv.toshiba.com
95
 Loading...