

Page 1

TOSHIBA
Leading
Innovation
LE~TL.J
»>
Page 2

Dear
Thank
manual will help you usethe many exciting featuresofyour
new
read this manual completely,
future
Customer,
you
for
purchasing this Toshiba LCD
LCD
lV.
Before operating your LCD TV, please
and keep it nearby
reference.
Safety
WARNING: TO REDUCE THE RISK OF FIRE OR
ELECTRIC SHOCK, DO NOT EXPOSE THIS
APPLIANCE TO RAIN OR MOISTURE.
WARNING: TO REDUCE THE RISK OF ELECTRIC
SHOCK, DO NOT REMOVE COVER (OR BACK).
NO USER-SERVICEABLE PARTS INSIDE. REFER
SERVICING TO QUALIFIED SERVICE PERSONNEL.
Precautions
The lightning flash with arrowhead
symbol, within an equilateral triangle, is
intended
of
the
sufficient magnitudetoconstitute a risk
electric shocktopersons.
The exclamation
equilateral triangle is intended
usertothe presenceofimportant
operating and maintenance (servicing)
instructions in the literature
accompanying
to
uninsulated
product's
alert
the
usertothe presence
"dangerous
enclosure
point
the
appliance.
lV.
voltage" within
that
may be
within an
to
This
alert
for
of
of
the
WARNING
To
prevent injury, this apparatus
attachedtothe
installation instructions. See item26on p. 4 and
instructions on p. 5.
If television is not positioned in a sufficiently stable
location, it can be potentially hazardous
floor/wall in
mustbesecurely
accordance
with
the
duetofalling.
CHILD
It
MakesADifference
Panel
Display
SAFETY:
How
Congratulationsonyour
new
product,
The
Issue
•
The
home
and
larger
flat
panel
or
installed
Tune
Into
•
One
size
for
the
•
Carefully
proper
•
Don't
allow
television
•
Don't
place
that
can
asachestofdrawers.
•
Remember
become
program,
than
life"
shouldbetakentoplaceorinstall
the
display
pushed,
•
Care
shouldbetakentoroute
cables
pulledorgrabbedbycurious
please
theater
flat
panel
displays
accordingtothe
keep
entertainment
displays
are
not
always
•
Flat
entertainment
Safety
does
NOT
fit
all.
Follow
safe
installation
read
useofthis
childrentoclimbonor
sets.
flat
easilybeusedassteps,
that
excited
especiallyona
flat
whereitcannot
pulled
connectedtothe
and
useofyour
and
understand
product.
panel
displaysonfurniture
children
while
panel
over,orknocked
can
watching
"larger
display.
flat
panel
situatedondressers,
and
Where
You
purchase!Asyou
these
safety
tipsinmind:
experienceisa
are
popular
manufacturer's
shelves,
carts
injury.
TOSHIBA
•
The
is
committedtomaking
the
all
a
Care
be
down.
all
panel
children.
purchases.
supportedonthe
recommendations.
displays
desks,
may
fall
that
over
are
speakers,
Cares!
consumer
manufacturer's
enclosed
play
such
cords
displaysothat
enjoyable
flat
panel
with
and
electronics
display.
instructions
furniture
.......
__
Use
Your
Flat
enjoy
your
growing
bookcases,
recommendations
trend
However,
proper
stands
inappropriately
chests
and
cause
industry
home
and
safe.
for
and
........
they
cannot
or
be
WARNING:
television, always use a UL Listed wall
appropriate
The
useofany wall bracket other than a UL Listed wall
bracket
television
in serious bodily injury
"Removing
NOTETOCATV
This is a remindertocall the
attentiontoArticle 820-40ofthe
guidelines
that
systemofthe
as practical. For additional antenna grounding information,
see
appropriate
for
the
cable ground shall be
items34and 35 on p. 4.
If
you
decidetowall
for
the
size and weightofthis television.
for
the size and weightofthis
for
wall mounting this television could result
and/or
the
Pedestal
Stand"
property
(w
p. 6).
mount
this
bracket
damage. See
INSTALLERS
CAlV
system installer's
U.S. NEC, which provides
propergroundingand, in particular, specifies
connectedtothe grounding
building, as closetothe
pointofcable entry
2
Wall
Mounting:Ifyou
flat
panel
•
Useamount
manufacturer
as
Ul,
CSA,
•
Follow
all
instructions
manufacturers.
•Ifyou
have
flat
panel
display,
installation.
•
Make
sure
that
appropriate.
to
walls
with
are
unsure,
• A
minimumoftwo
required
displays
for
canbeheavy.
decidetowall
display,
that
ETl).
any
Some
steel
contactaprofessional
installation.
has
and/or
doubts
contact
the
wall
studsorold
always:
been
recommendedbythe
listedbyan
suppliedbythe
about
your
your
wall
where
mounts
people
are
Flat
panel
retailer
you
cinder
mount
independent
display
abilitytosafely
about
professional
are
mounting
are
not
designedtobe
block
construction.Ifyou
installer.
www.CE.org/safety
your
display
laboratory
and
wall
install
the
display
(such
mount
your
is
mounted
Page 3
Important
1)
Read these instructions.
2) Keep these instructions.
3) Heed all warnings.
4)
Follow all instructions.
Do not use this apparatus near water.
5)
6)
Clean only with dry cloth.
Do not block any ventilation openings. Install in
7)
accordance
8)
Do not install near any heat sources such as
radiators, heat registers, stoves,
(including amplifiers)
9)
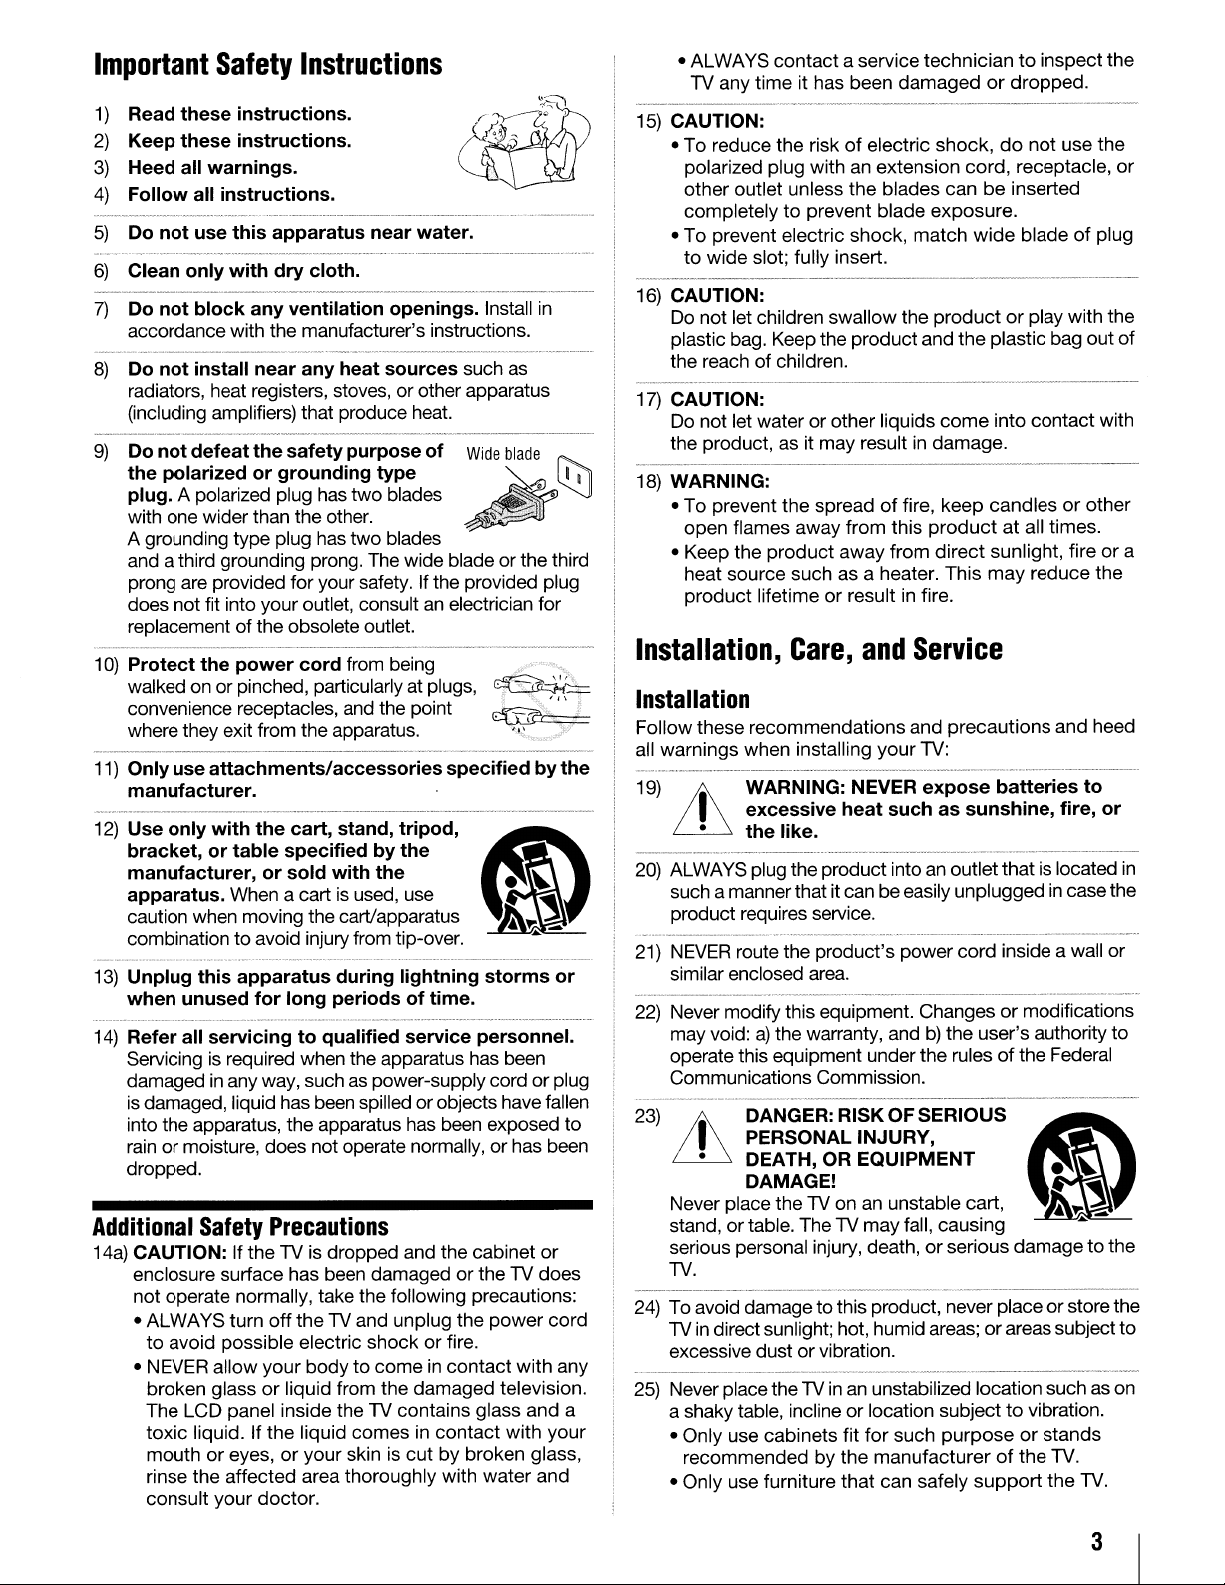
Do notdefeatthesafetypurposeof
Safety
with
the
Instructions
manufacturer's instructions.
or
other apparatus
that
produce heat.
Wide
the polarized or grounding type
plug.
A polarized plug has
with one
A grounding
and a third grounding prong. The
prong are provided
does
replacementofthe
10) Protect the power cord from being
walked on
convenience receptacles, and
where they exit from
11)
Only use attachments/accessories specified by the
not
wider
than
type
plug has
for
fit into
your
obsolete outlet.
or
pinched, particularly atplugs,
two
blades
the
other.
two
blades
wide
bladeorthe
your safety. If
outlet, consult an electrician
the
apparatus.
the
the
point
provided plug
manufacturer.
12) Use only with the cart, stand, tripod,
bracket, or table specifiedbythe
c&)
~
manufacturer, or sold with the •
apparatus. When a cart is used, use
caution when moving the cart/apparatus
combinationtoavoid injuryfrom tip-over.
13)
Unplug this apparatus during lightning storms or
when unused for long periods of time.
14)
Refer all servicing to qualified service personnel.
Servicing is required
damaged
is damaged, liquid
into
rainormoisture,
dropped.
Additional
14a) CAUTION: If
enclosure
not
ALWAYS
•
to
• NEVER
broken
The
toxic
mouthoreyes,oryour
rinse
consult
in any way, such as
the
apparatus,
Safety
surface
operate normally,
avoid
possible
allow
glassorliquid
LCD
liquid.Ifthe
the
affected
your
turn
panel
when
the apparatus has been
power-supply
has
been spilledorobjects havefallen
the
apparatus has been exposed
does
not
operate normally,orhas been
Precautions
the
TV is
dropped
has
been
damagedortheTVdoes
take
the
off
the
TV and
electric
your
inside
liquid
area
doctor.
shockorfire.
bodytocomeincontact
from
theTVcontains
comesincontact
skin is
thoroughly
cordorplug
and
the
cabinet
following precautions:
unplug
the
the
power
damaged
cutbybroken
with
television.
glass
water
blade
~
~
~~-!
""
with
and
with
glass,
third
for
..
or
cord
your
and
~
~
,
to
any
a
•
ALWAYS
TV
15) CAUTION:
•Toreduce
polarized
other
completelytoprevent
•Toprevent
to
wide
16)
CAUTION:
Do
not
plastic bag. Keep
the
reachofchildren.
17)
CAUTION:
Do
not
the
product,
18)
WARNING:
•Toprevent
open
•
Keep
heat
product
Installation,
contactaservice
any
time
it has
the
plug
outlet
unless
electric
slot;
fully
let children
let
waterorother
as it
the
flames
the
source
away
product
such
lifetimeorresult
Care,
techniciantoinspect
been
damagedordropped.
riskofelectric
withanextension
the
shock,
insert.
swallow
the
product
may
result in
spreadoffire,
from
away
as a heater.
and
shock,donot
blades
blade
exposure.
match
the
productorplay
and
liquids
damage.
this
productatall
from
direct
in fire.
Service
cord,
receptacle,
canbeinserted
wide
bladeofplug
the
plastic
come
keep
candlesorother
sunlight,
This
may
into
bag
contact
times.
reduce
use
with
out
fireora
Installation
Follow
all
19)
these
warnings
it
recommendations
when
installing
your
and
precautions
TV:
and
WARNING: NEVER expose batteries to
heed
I excessive heat such as sunshine, fire, or
• the like.
20) ALWAYS plug
such a manner
product
21) NEVER route
similar enclosed area.
22) Never
23)
modify
may
void:a)the
operate this
Communications
it
• DEATH, OR EQUIPMENT •
Never place the TV
stand,ortable.
serious personal injury, death,orserious
TV.
24)
To
avoid
TV in direct sunlight; hot,
excessive
25) Never placetheTVin an unstabilized location such as
a shaky table, inclineorlocation
Only
use
•
recommendedbythe
•
Only
use
the
product
that
requires service.
the
product's
this equipment.
warranty,
equipment
Commission.
into an
itcanbeeasily
power
Changesormodifications
andb)the
under
the
outlet
unpluggedincase
cord
user's
rulesofthe
DANGER:RISKOFSERIOUS
PERSONAL INJURY,
DAMAGE!
on
an unstable cart. I
TheTVmay
damagetothis
dustorvibration.
cabinets
furniture
fit
that
fall,
causing
product,
humid
for
manufacturerofthe
can
never
areas;orareas
subjecttovibration.
such
purposeorstands
safely
support
that
is located in
inside a wall
authority
Federal
c&)
~
""
damagetothe
placeorstore
subject
TV.
the
TV.
the
the
or
the
of
with
the
the
or
to
the
to
on
3
Page 4
• EnsurethattheTV is
supporting furniture.
• Never place
cupboardsorbookcases) without anchoring both the
furniture and
• Neverstand
between the TV and supporting furniture.
The TV may
damage.
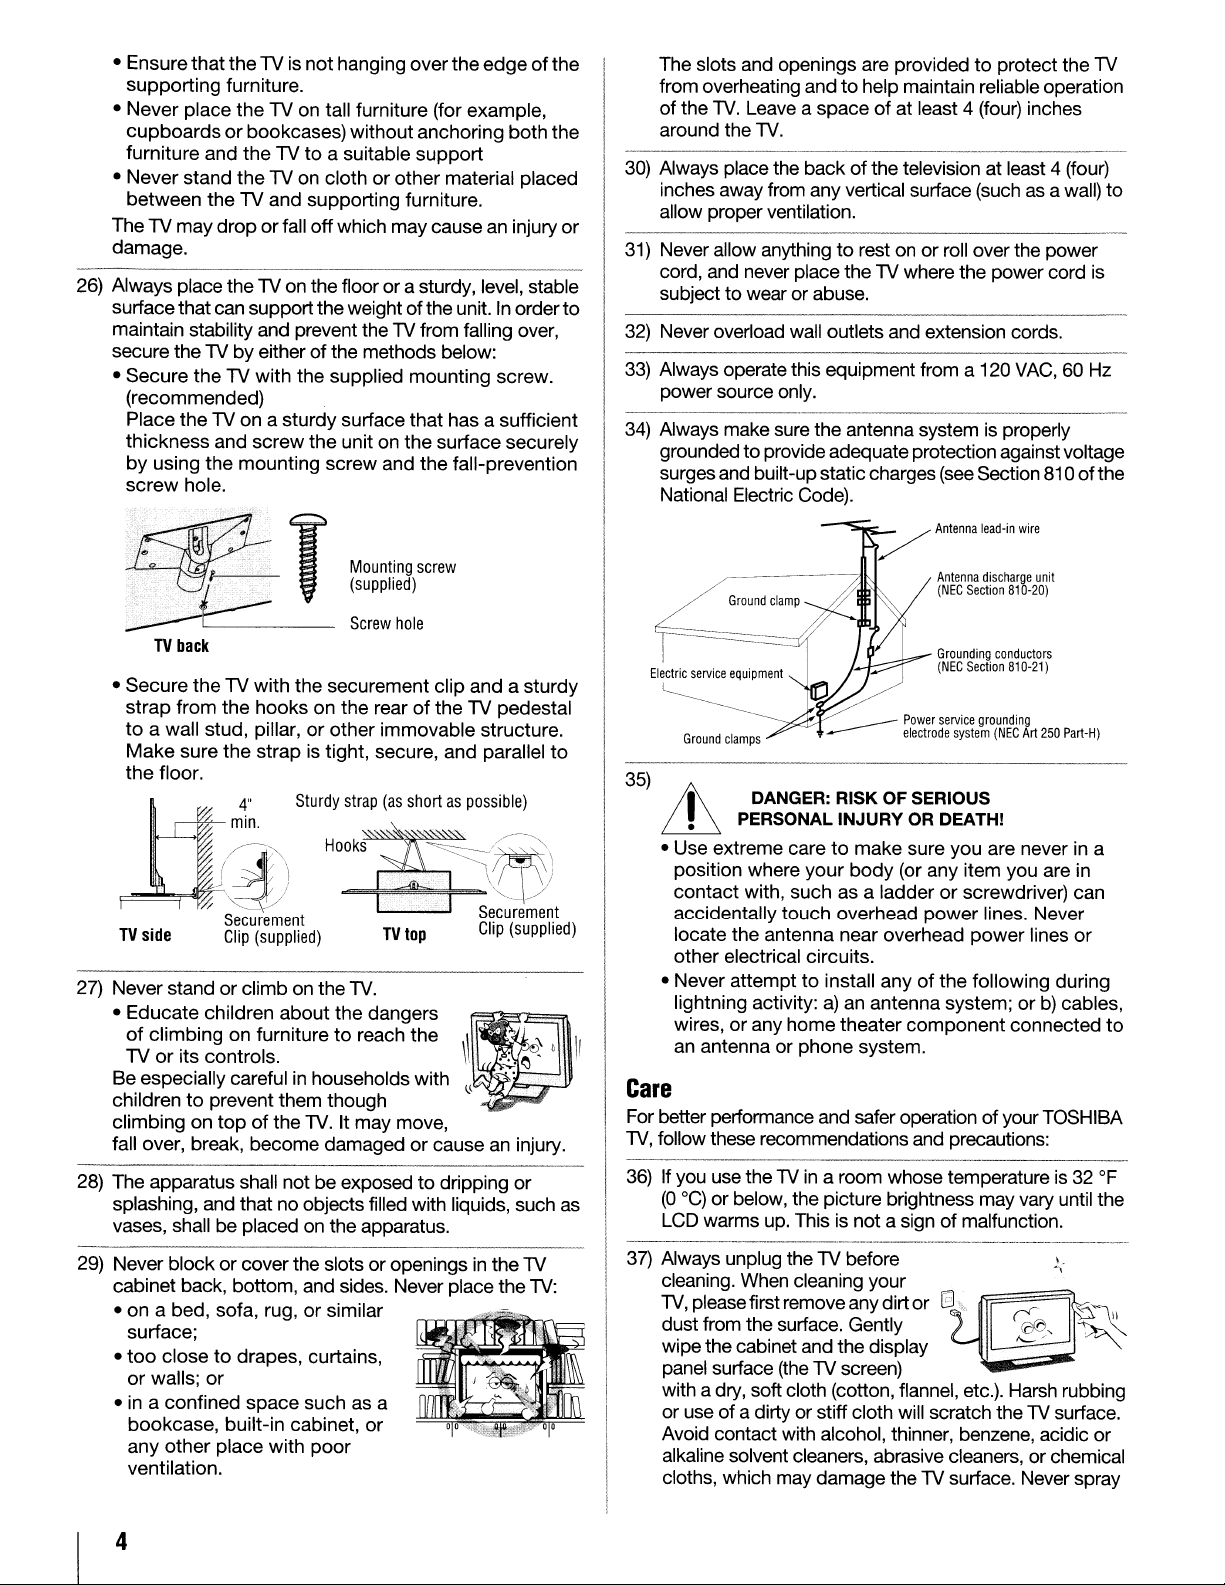
26) Always place the TV on the floor or a sturdy, level, stable
surfacethat can support the weight
maintain stability and prevent the TV from falling over,
secure theTV
• Secure
(recommended)
Place the
thickness and screw the unit on the surface securely
by
using the mounting screw and
screw
the
theTVto
the
droporfall offwhich maycausean injury
by
the
TV with the supplied mounting screw.
TV
on a sturdy surface that has a sufficient
hole.
not
hanging overthe edgeofthe
TV on tall furniture (for example,
a suitable support
TV on cloth or other material placed
of
theunit.Inorder
either ofthe methods below:
the
fall-prevention
or
to
to
Antenna
(NEC
Section
protect the
as
VAC,
is
properly
discharge
unit
810-20)
a wall) to
60 Hz
of
The slots and openings are provided
from overheating andtohelp maintain reliable operation
of the
TV.
Leave a spaceofat least 4 (four) inches
around the
30) Always place the back of the television at least 4 (four)
inches away from any vertical surface (such
allow proper ventilation.
31) Never allow anything
cord, and never place the TV where the power cord is
subject to wear or abuse.
32) Never overload wall outlets and extension cords.
33) Always operate this equipment from a 120
power source only.
34) Always make sure the antenna system
grounded toprovide adequateprotection against voltage
surgesand built-upstatic charges (see Section 810
National Electric Code).
TV.
to
rest on or roll overthe power
TV
the
• Secure the TV with the securement clip and a sturdy
of
strap from the hooks on the rear
to
a wall stud, pillar,orother immovable structure.
Make
sure
the
strap is tight, secure, and parallel
the
floor.
Sturdy
"
4
/"~~in
...
.
!
J'
I \
. ;
'//
ti
TV
side
27) Never stand or climb on the
• Educate children about the dangers
of
climbing on furnituretoreach the
TVorits controls.
Be especially careful
childrentoprevent them though
climbing
fall over, break, become damaged or causeaninjury.
28) The apparatus shall not be exposed to dripping or
splashing, and that no objects filled with liquids, such as
vases, shall be placed on the apparatus.
29) Never block or coverthe slots oropenings in the TV
cabinet back, bottom, and sides. Never place the
• on a bed, sofa, rug, or similar
surface;
•
too
closetodrapes, curtains,
or walls; or
• in a confined space such as a
bookcase, built-in cabinet,
any other place with
ventilation.
"::_',/
Securement
Clip
on
top
(supplied)
of the
strap
\
HOok~.
TV.
in
households with
TV.
It may move,
or
poor
the TV pedestal
(as
shortaspossible)
~.~.~,W!
,.
.'
\ I
"'-.
J
Securement
Clip
(supplied)
TV
.'
top
TV:
to
Grounding
conductors
(NEC
Section
810-21)
Ground
clamps
35)
t
~
• Use extreme caretomake sure you are never in a
position where your
contact with, such as a ladder
accidentally touch overhead
locate the antenna near overhead power lines or
other electrical circuits.
• Never attempt
lightning activity:
wires, or any home theater component connected
an
DANGER: RISK OF SERIOUS
PERSONAL
antenna or phone system.
INJURY
to
install anyofthe following during
a)anantenna system; orb)cables,
OR DEATH!
body
(or any item you are in
or
screwdriver) can
power
lines. Never
Care
For better performance and safer operation ofyour TOSHIBA
TV,
follow these recommendations and precautions:
36)
If you use theTVin a room whose temperatureis32
(DoC)
or below, the picture brightness may vary until the
LCD warms up. This is nota signofmalfunction.
37)
Always unplug the TV before
cleaning. When cleaning
TV.
pleasefirst remove anydirt
dust from the surface. Gently
wipethe cabinet and the display
panel surface (the TV screen)
with a dry, soft cloth (cotton, flannel, etc.). Harsh rubbing
or use of a dirty or stiff cloth will scratch theTVsurface.
Avoid contact with alcohol, thinner, benzene, acidic or
alkaline solvent cleaners, abrasive cleaners, or chemical
cloths, which may damage the
your.
Of
8~)\"
TV
surface. Never spray
((jl),
"-
OF
,"
~
' -~"-
to
(
4
Page 5
volatile compounds suchasinsecticideonthe
surface. Such products may damage or discolor the
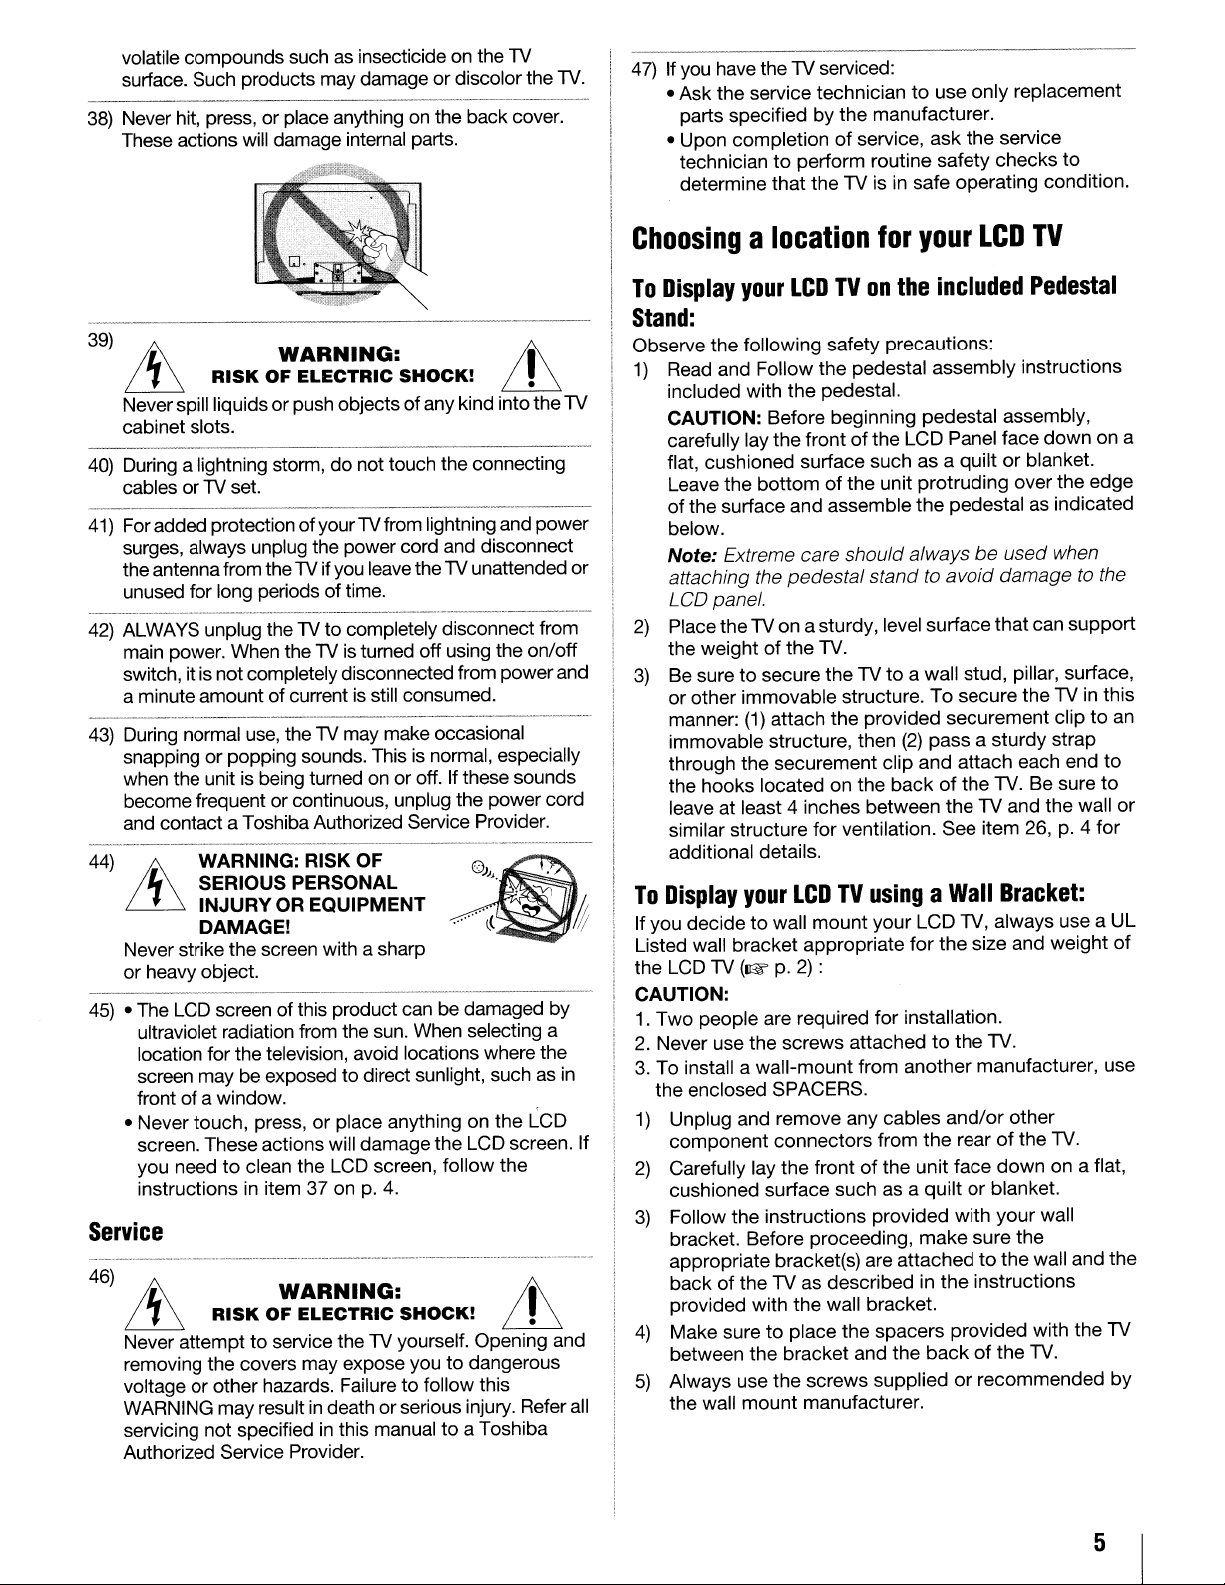
38)
Never hit, press, or place anythingonthe back cover.
These actions will damage intemal parts.
lV
lV.
47)Ifyou
have thelVserviced:
• Ask the service technician
parts specified by the manufacturer.
• Upon completion
technician
determine that the
to
of
service, ask the service
perform routine safety checks to
lVisin
to
use only replacement
safe operating condition.
39)
~
ili
Neverspill liquids orpush objectsofany kind intothe
cabinet slots.
40)
During a lightning storm, do not touch the connecting
cables or
41)
Foradded protection ofyourlVfrom lightning and power
surges, always unplug the power cord and disconnect
the antennafrom the
unused for long periods of time.
42)
ALWAYS unplug thelVto completely disconnect from
main power. When the
switch, it
a minute amount of current
43)
During normal
snapping or popping sounds. This
when the unit
become frequent or continuous, unplug the power cord
and contact a Toshiba Authorized Service Provider.
44)
ih
~
Never strike the screen with a sharp
or heavy object.
-----_._------------------------
45)
• The LCD screen of this product can be damaged by
ultraviolet radiation from the
location for the television, avoid locations where the
screen may be exposed to direct sunlight, such
frontofa window.
• Never touch, press,
screen. These actions will damage the LCD screen. If
you need to clean the LCD screen, follow the
instructions in item 37
RISKOFELECTRIC
lV
is
notcompletelydisconnected from powerand
WARNING: RISK OF
SERIOUS PERSONAL
INJURY OR EQUIPMENT
DAMAGE!
WARNING: !I\
SHOCK!
set.
lV
ifyou leavethelVunattended or
lVisturned off using the on/off
is
still consumed.
use,
thelVmay make occasional
is
normal, especially
is
being turnedonor off.Ifthese sounds
sun.
When selecting a
or
place anything on the LCD
onp.4.
Service
46)
~
~
Never attempt to service thelVyourself. Opening and
removing the covers may expose you to dangerous
voltage or other hazards. Failure to follow this
WARNING may result
servicing not specified
Authorized Service Provider.
RISKOFELECTRIC
WARNING:
SHOCK!
in
deathorserious injury. Refer all
in
this manual to a Toshiba
ill
as
Jt
~
Choosingalocation
To
Display
your
LCDTVon
for
the
your
LCD
included
TV
Pedestal
Stand:
Observe the following safety precautions:
1)
Read and Follow the pedestal assembly instructions
lV
in
included with the pedestal.
CAUTION: Before beginning pedestal assembly,
of
carefully lay the front
flat, cushioned surface such as a quilt
Leave the bottom
of
the surface and assemble the pedestalasindicated
below.
Note:
Extreme care should alwaysbeused when
attaching the pedestal stand
LCD panel.
2)
Place thelVon asturdy, level surface that can support
the weight
3)
Be
sure to secure thelVto
or other immovable structure. To secure the
manner:
immovable structure, then
through the securement clip and attach each end to
the hooks located on the back
leave at least 4 inches between thelVand the wall
similar structure for ventilation. See item 26,p.4 for
additional details.
To
Display
If you decidetowall mount your LCD
Listed wall bracket appropriate for the size and weight
the LCD
CAUTION:
1.
Two people are required for installation.
2.
Never use the screws attached to the
3.
To install a wall-mount from another manufacturer, use
the enclosed SPACERS.
1)
Unplug and remove any cables
component connectors from the rear
2)
Carefully lay the frontofthe unit face down on a flat,
cushioned surface such as a quilt
3)
Follow the instructions provided with your wall
bracket. Before proceeding, make sure the
appropriate bracket(s) are attached
back
provided with the wall bracket.
4)
Make sure to place the spacers provided with the
between the bracket and the backofthe
5)
Always use the screws suppliedorrecommended by
the wall mount manufacturer.
your
lV
(1&
of
thelVas
of
the
(1)
attach the provided securement cliptoan
LCDTVusingaWall
p.2):
the LCD Panel face down on a
or
blanket.
of
the unit protruding over the edge
to
avoid
damagetothe
lV.
a wall stud, pillar, surface,
lVinthis
(2)
pass a sturdy strap
of
the
lV.
Be sure
Bracket:
lV,
always use a UL
lV.
and/or
describedinthe instructions
other
of
the
lV.
or
blanket.
to
the wall and the
lV.
to
or
of
lV
5
Page 6
USA·Federal
Communications
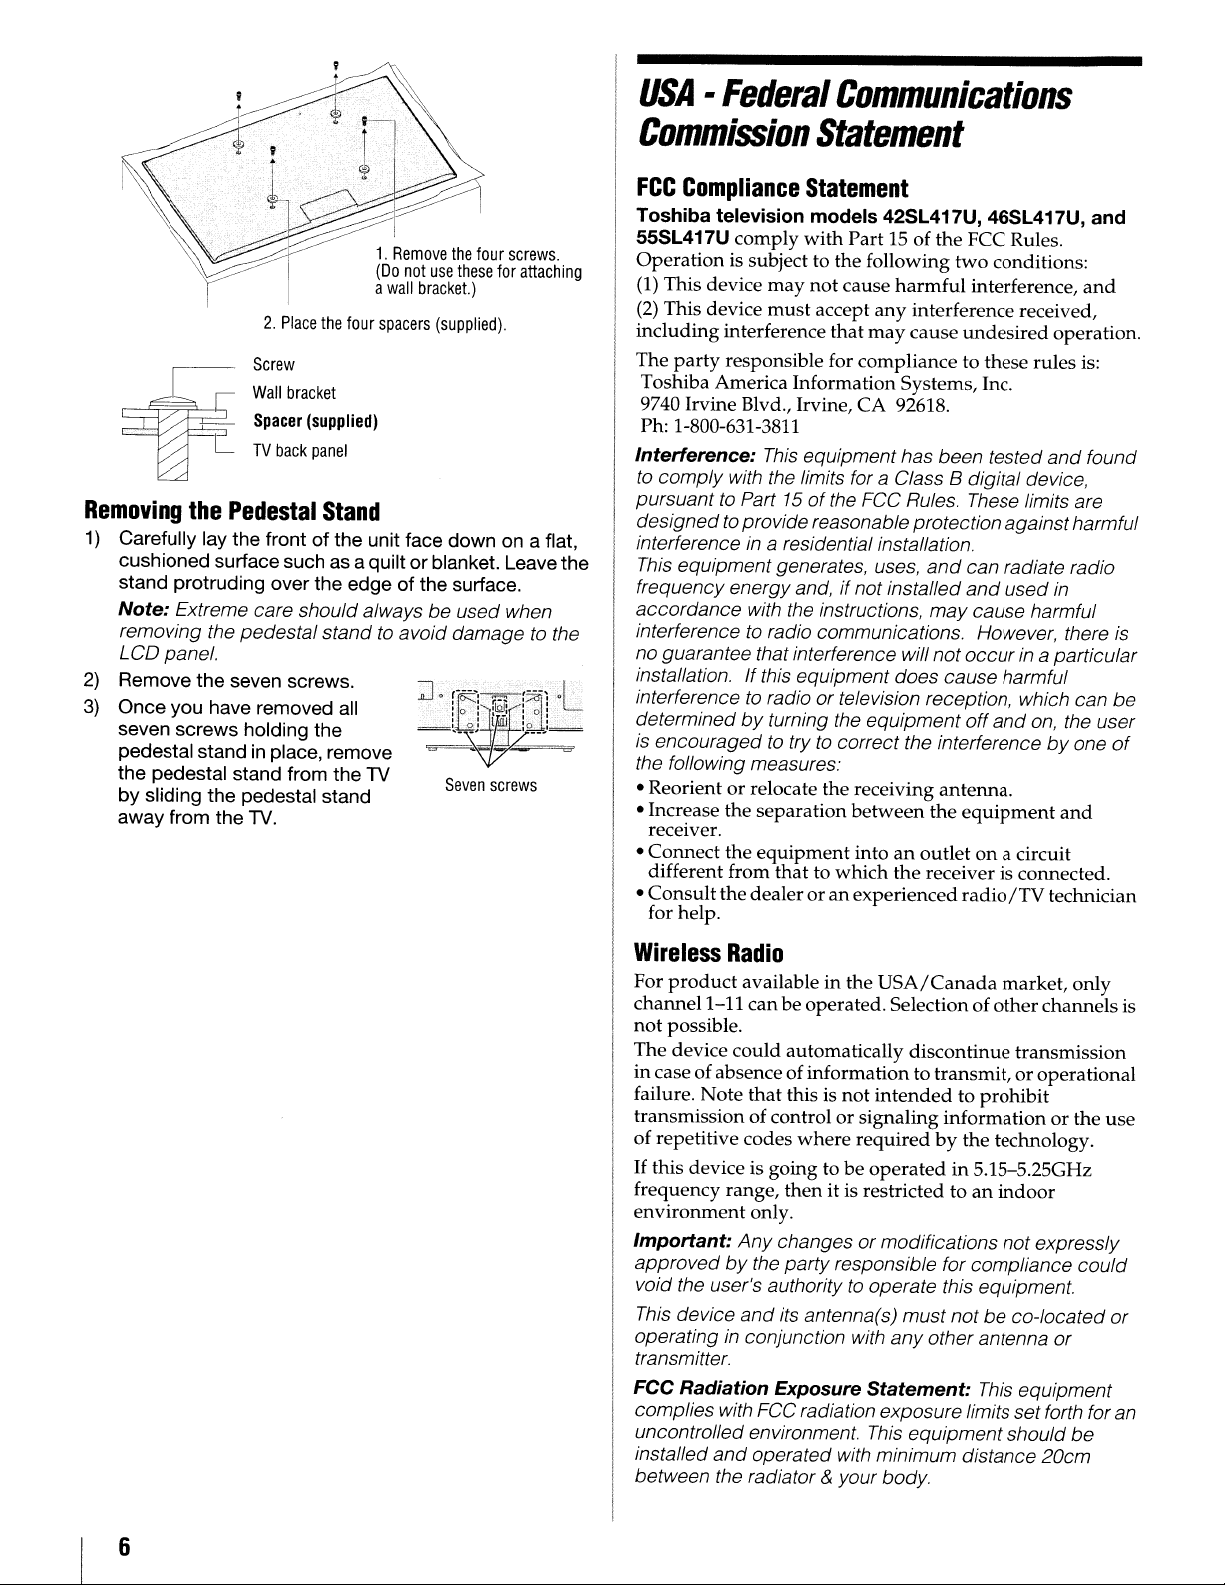
1.
Remove
the
(Do
not
a
wall
2.
Place
the
four
spacers
Screw
Wall
bracket
Spacer
(supplied)
TV
back
panel
Removing
1)
Carefully lay the frontofthe unit face down on a flat,
cushioned surface such as a quilt
stand protruding over the edge
Note:
removing the pedestalstand
LCD panel.
2)
Remove the seven screws.
3)
Once you have removed all
seven screws holding the
pedestal stand
the pedestal stand from the
by sliding the pedestal stand
away from the
the
Pedestal
Extreme care should always be used when
in
TV.
Stand
place, remove
TV
or
of
to
avoid damage to the
four
use
these
bracket.)
(supplied).
blanket. Leavethe
the surface.
~.;r£-~--g:
"'.'"
II,..
~.
~_.~:
~
Seven
screws.
for
attaching
f'r!6
,lj-,J4L
1
'1.
,
1
..
IO..:~)~
_ w
screws
Commission
FCC
Compliance
Toshiba
55SL417U
Operation
(1)
I (2) This device
including
The
television
comply
is subject to
This device
interference
party
responsible for compliance to these rules is:
Statement
Statement
models
with
Part15of
the
following
may
not
cause
must
accept
any
that
may
42SL417U, 46SL417U,
the
FCC Rules.
two
conditions:
harmful
interference,
interference received,
cause
undesired
operation.
Toshiba America Information Systems, Inc.
9740 Irvine Blvd., Irvine,
CA
92618.
Ph: 1-800-631-3811
Interference:
to
comply with the limits for a Class B digital device,
pursuant
designedto provide reasonable protectionagainst harmful
interference
This
equipmentgenerates, uses,
frequency energy and, if not installed
accordance with
interference
no guarantee that interference will not
instal/ation.
interference
determined
is
encouragedtotrytocorrect the interferencebyone
the fol/owing measures:
• Reorientorrelocate the receiving
• Increase the
This
equipment has been tested
to
Part 15ofthe FCC Rules. These limits are
in
a residential installation.
and
can radiate radio
and
used
the
instructions, may cause harmful
to
radio communications. However, there
occur
in
a particular
Ifthis equipment does cause harmful
to
radioortelevision reception, which can be
by
turning the equipment off
and
on,
antenna.
separation
between
the
equipment
and
in
the user
and
receiver.
•
Connect
different from that to
Consult
•
the
equipment
the
dealeroran
intoanoutletona circuit
which
the
receiver is
experienced
radio
/TV
connected
technician
for help.
and
and
found
is
of
.
Wireless
For
channel
not
The
product
1-11
possible.
device
Radio
available in the
canbeoperated. Selection of
could
automatically
USA/Canada
discontinue
market,
other
channelsis
transmission
only
incase of absence of information to transmit,oroperational
Note
that
this is
not
failure.
transmission of controlorsignaling
of
repetitive codes
If
this
device is going tobeoperated
frequency range,
environment
Important:
approved
void the user's authoritytooperate this equipment.
This
operatinginconjunction with
transmitter.
FCC Radiation Exposure
complies with FCC radiation exposure limits setforth foran
uncontrolled environment.
installed and operated with minimum distance 20cm
between the radiator
by
device
where
then
only.
Any
changesormodifications not expressly
the party responsible for compliance
and
its antenna(s) must notbeco-located
intendedtoprohibit
informationorthe
requiredbythe
in 5.15-5.25GHz
it is restrictedtoan
any
other antenna
Statement:
This
equipment should
& your body.
technology.
indoor
This
equipment
use
could
or
or
be
6
Page 7
Canada
This device complies
Operation
(1)
This device may not cause
(2)
This device
including interference that
of the device.
This device
operating
transmitter.
Wireless
For
product
channell-II
not
possible.
The device could automatically discontinue transmission
in case ofabsenceofinformation to transmit,
failure.
transmission of controlorsignaling informationorthe
of repetitive codes
Important: Any changes or modifications not expressly
approved
void the user's authority
IMPORTANTNOTE:
IC Radiation Exposure Statement:
complies with IC RSS-l02 radiation exposure limits set
forth for an uncontrolled environment.
should
20cm between the radiator
-Industry
with
is subject to the following
must
accept
and
its antenna(s)
in conjunction
Canada
RSS-21O.
two
harmful
any
interference received,
may
cause
undesired
must
not
with
any
other
Statement
conditions:
interference,
be co-located
antenna
Radio
available in the
canbe operated.Selection of
Note
that this is
where
by
the party responsible for compliance could
be
installed
and
USA/Canada
not
intendedtoprohibit
requiredbythe technology.
to
operate this equipment.
This
operated with minimum distance
& your body.
market,
other
equipment
This
and
operation
or
only
channels
or
operational
equipment
or
use
ENERGY
ENERGY STAR User InformationStatement: the factory
default settings of this television
requirements. Enablingorchanging
functionality (e.g. PictureSettings,
may
increase
limits required for ENERGY STAR qualification.
ensure
To
efficiency, select [Home]
return
mode,
[AutoView]
is
l§ijlj;@TJiHi'
•
Important
The
following
LCD
Display
malfunction;
perceived
1)
An afterimage (ghost) may appear on the screen if a
fixed, non-moving image is displayed
of time. The afterimage is
disappear in a short periodoftime.
2)
The LCD panel containedinthis TV is manufactured
usinganextremely high levelofprecision technology;
however, there may beanoccasional pixel (dotoflight)
that does not operate properly (does
constantly lit, etc.). This is a structural propertyofLCD
technology, is
covered under your warranty. Such pixels are
visible when the picture is viewed from a normal
viewing distance.
Note: Interactive video games that involve shooting a
"gun" typeofjoystickatan on-screen target may not work
with this
STAR8J
energy
your
television is
to [Home]
and
mode
set Auto Brightness Sensor to [On] mode.
modeisrecommended
ENERGY
earn
the
gas emissions by meeting strict guidelines set
U.S.
by the
ENERGY
are
registered
notes
symptoms
technology
therefore,
issues
resulting
not
TV.
User
consumption,
mode
settings, select [Auto View] picture
STAR®
ENERGY
Environmental Protection Agency.
STAR
U.S.
about
are technical
and
Toshibaisnot
a signofmalfunction, and is not
Information
meet
ENERGYSTAR®
certain features
Auto
BrightnessSensor)
possibly
operatingatoptimal energy
during
qualified
STAR
and the
marks.
initial activation. To
for
normal
TV.
Products that
prevent green house
ENERGY
your
limitations
are
notanindication
responsible
from
these
symptoms.
for
not
permanent and will
not
and
beyond
STAR
LCD
a long period
light, remains
home
mark
not
the
use.
TV
of
of
for
7
Page 8

Trademark
•
[I]
DOLBY.
DIGITAL PLUS I Laboratories.
• fWIl··
..
i§ID
DYNAMIC
VOLUME
ttiii·
...
i§ID
EQ
• Manufactured under license from Audyssey Laboratories.
U.S. and foreign patents pending. Audyssey
Audyssey Dynamic Volume are registered trademarks of
Audyssey Laboratories.
Information
Manufactured under license from Dolby
Dolby and the double-D symbol are registered
trademarks of Dolby Laboratories.
Audyssey Dynamic Volume® controls volume
levelstoeliminate loud spikes and raise soft
dialog for more enjoyable television and movie
viewing.
accurate and natural sound right out of the
box. Together, these technologies ensure you
enjoy your audio experience as much as your
video.
Audyssey
EQ®
provides
clear,
EO
and
•t!lBmf HDMI, the HDMI Logo, and High-Definition
or
Multimedia Interface are trademarks
trademarks of HDMI Licensing LLC
other countries.
• Blu-ray
the Blu-ray Disc Association.
• I
Silicon Image, Inc.inthe United States and other countries.
• MPEG Layer-3 audio coding technology licensed from
Fraunhofer liS and Thomson.
• VUDU
• YouTube is a registered trademarkofGoogle, Inc.
• Netflix
• Yahoo!
• CinemaNow
• Pandora
• Blockbuster
• This product contains Adobe® Flash® Player software
underlicense from Adobe SystemsIncorporated. Copyright
Disc™,
NSTAPORr
is
is
is
Blu_rayTM,
M
and INSTAPORT logo are trademarks
a trademarkofVUDU,
a registered trademarkofNetflix, Inc.
a registered trademarkofYahoo! Inc.
is
a registered trademarkofBest Buy, Inc.
is
a registered trademarkofPandora Media, Inc.
is
a registered trademark of Blockbuster, Inc.
and the logos are trademarks
Inc.
© 1995-2009Adobe Systems Incorporated.
reserved. Adobe and Flash are trademarks of Adobe
Systems Incorporated.
• This product contains technology subject to certain
intellectual property rights
of
this technology outsideofthis productisprohibited
without the appropriate license(s) from Microsoft.
• This product includes technology owned by Microsoft
Corporation and can not be used
license from Microsoft Licensing, GP.
• THIS PRODUCT
PORTFOLIO LICENSE FOR THE PERSONAL AND NONCOMMERCIAL USE OF A CONSUMER TO
IN
VIDEO
("AVC ViDEO") AND/OR
WAS ENCODED BY A CONSUMER ENGAGED
PERSONAL AND NON-COMMERCIALACTIVITY AND/OR
WAS OBTAINED FROM A VIDEO PROVIDER LICENSED
TO PROVIDE AVC VIDEO. NO LICENSE
SHALL BE IMPLIED FOR ANY OTHER USE. ADDITIONAL
INFORMATION MAY BE OBTAINED FROM MPEG LA,LLC.
SEE HTTP://WWW.MPEGLA.COM
COMPLIANCE WITH THE AVC STANDARD
IS
of
Microsoft. Useordistribution
LICENSED UNDER THE AVC PATENT
(ii)
DECODE AVC VIDEO THAT
registered
in
the United States and
All
rights
or
distributed without a
(i)
ENCODE
IN
IS
GRANTED OR
of
A
of
• THIS PRODUCTISLICENSED UNDER THE VC-1 PATENT
FOR
PORTFOLIO LICENSE
COMMERCIAL USE
IN
VIDEO
(''VC-1 VIDEO") AND/OR
WAS ENCODED BY A CONSUMER ENGAGED
PERSONAL AND NON-COMMERCIAL ACTIVITY AND/OR
WAS OBTAINED FROM A VIDEO PROVIDER LICENSED
TO
SHALL BE IMPLIED
INFORMATION MAY BE OBTAINED FROM MPEG LA,LLC.
SEE HTTP://WWW.MPEGLA.COM
• THIS PRODUCT
VISUAL PATENT PORTFOLIO LICENSE
PERSONAL AND NON-COMMERCIAL USE OF A
CONSUMER
WITH THE MPEG-4 VISUAL STANDARD ("MPEG-4
VIDEO") AND/OR
WAS ENCODED BY A CONSUMER ENGAGED
PERSONALAND NON-COMMERCIALACTIVITY AND/OR
WAS OBTAINED FROM A VIDEO PROVIDER LICENSED
BY MPEG LA TO PROVIDE MPEG-4 VIDEO. NO LICENSE
IS
GRANTEDORSHALL BE IMPLIED FOR ANY OTHER
USE. ADDITIONAL INFORMATION INCLUDING THAT
RELATING TO PROMOTIONAL,INTERNAL AND
COMMERCIAL USES AND LICENSING MAY BE
OBTAINED FROM MPEG LA,LLC. SEE HTTP://
WWW.MPEGLA.COM
COMPLIANCE WITH THE VC-1 STANDARD
PROVIDE
OF
VC-1
VIDEO. NO LICENSEisGRANTED
FOR
IS
LICENSED UNDER THE MPEG-4
FOR
(i)
(ij)
DECODING MPEG-4 VIDEO THAT
THE PERSONAL AND NON-
A CONSUMER TO
(ii)
DECODE VC-1 VIDEO THAT
ANY OTHER USE. ADDITIONAL
ENCODING VIDEOINCOMPLIANCE
FOR
(i)
ENCODE
IN
THE
IN
A
OR
A
8
Page 9

Front
panel
control
Examples
Brightness
This sensor will detect the ambient light conditions to optimize the
backlighting levels.
Back
show
MocleI42SL417U.
Power
LED Service LED
Sensor
panel
TV
front
connections
Remote Sensor
Touch Sensor
Touch
- These are available when touched.
- POWER - To
- A
- + -- To adjust the volumelevel. When
- MENU - To
-INPUT
key
function:
turn
theTVon and off.
....
- To change the channel. When a
menuis onscreen, these keys function
as
up/down
buttons.
a menu is onscreen, these keys
function
navigationbuttons.
menu is onscreen, the
the TV's control panel functions
RETURN button.
viewing. When a menu is onscreen,
INPUT
the
panel functions
menu navigation
as
left/
right
menu
access
the menu. When a
MENU
- To change the source
key on the TV's control
as
the
OK
button.
key on
as
the
you
are
For
explanationsofcable connections,
TV
back
""~
ANT/CABLE PC/COLORSTREAM
DIGITAL AUDIO OUT
See "Connecting a digital audio system"
....
=l
~
!Ail
"if{
Jil.
M1
)!o(
1--1---
LAN
port To configure for use, see "SharedPCInput"
PCI~
:,
111--"---1
-
1
see
p. 10-14.
"'iJE
-
",,!,O.A·
•
11
HD2IN*
(I&'p.13).
USB
terminal
COLORSTREAM HD1 IN**
To configure for use (for audio), see
"Side Shared Audio"
VIDEO 2 IN**
FIXED
AUDIO
HDMI®
PC/COLORSTREAM
HD2IHDMI4IN
input)
To configure for use, see
"Rear Shared Audio"
IN
(~p.18).
(Video input)
(~
p.
18).
VIDEO 1 IN**
To configure for use, see "Side
Shared Audio"
(Audio
* To use PC/COLORSTREAM
HD2
adapter (not supplied) is
necessary.
**
To use COLORSTREAM
(~
p.
18).
HD1
VIDEO 2
adapter (supplied)
necessary.
(~
p.
18).
IN,anappropriate
IN,
VIDEO 1
IN,
an appropriate
IN,
or
is
9
Page 10
Connectingtoa
-----
Satellite
_
...
__
._-------_._-----_..-
dish
Satellite
y~
satellite
IN
Component
video cable
ps
e
dish,
~~
(?~)
VIDEO
OUT
an
-----------_._._------
Standardaud
cable .
Antenna,orCable
~
R I
~
1-
--
-
----_._
..
__
._------.
-.-_.-
i~I~
~
~
~
io
<Illllflll
AVadapter
cable
(supplied)
Component adapter
cable (supplied)
TV
...-_..
..
=CI])DDD-..,
.. '""1....JaJJ'WLr-J
---_._---
.
TV
back
panel
You
VHF/UHF
will
Cable
Antenna
TV
need:
• Coaxial cables
adapter
• AV
•
Standard
•
Component
•
Component
audio
Cable
cable (supplied)
cable
adapter
cable
(supplied)
video cable
box
Coaxial cable
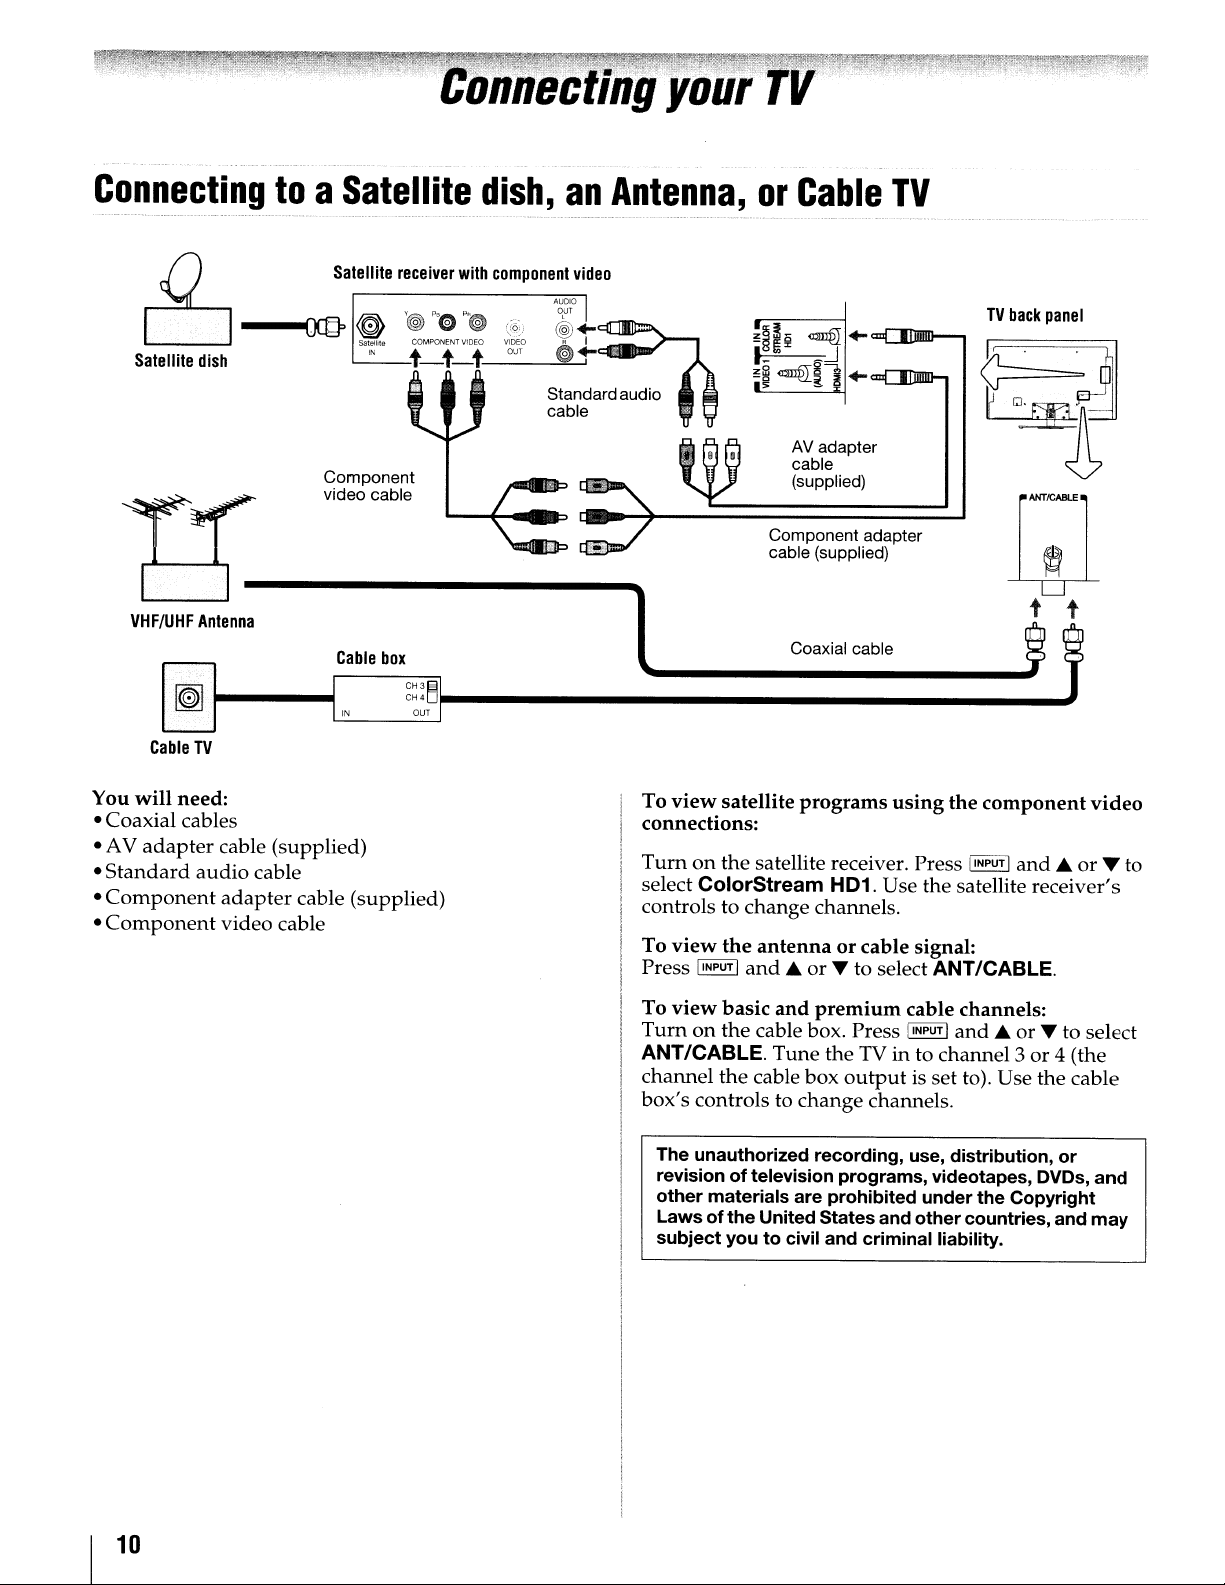
To
view
satellite
programs
using
the
component
connections:
Turnonthe
select
controls to
To
view
Press
To
view
Turnonthe
ANT/CABLE.
channel
box's
The unauthorized
revisionoftelevision programs, videotapes, DVDs,
other
Laws
subject
satellite receiver. Press IINPUT I
ColorStream
change
the
antennaorcable signal:
!INPUTI
and..or'"
basic
HD1. Use the satellite receiver's
channels.
to select ANT/CABLE.
and
premium
cable box. Press IINPUT I
Tune
the
TVinto
the
cable
box
output
controls to
materials
ofthe
youtocivil and
change
are
United Statesand
channels.
recording,
prohibited
criminal
and..or
cable channels:
and..or'"
channel3or
is set to). Use the cable
use, distribution,
under
the
Copyright
other
countries, and
liability.
video
T to
to select
4 (the
or
and
may
10
Page 11
Connecting
~-_
..
_.--
-
------
--_
.._..•
_--------_.~..
HOMI
device
OVI
device
an
HDMI®orDVI
_._._.
- _.. --".
__
.-
----~--_._-
device
- _--------
to
the
"-
_
-_._--_
..
_--_.._-.
HDMI
-
------
- -
inpu_~
--..-
TV
back
_
panel
t~~i·~'
~~1'
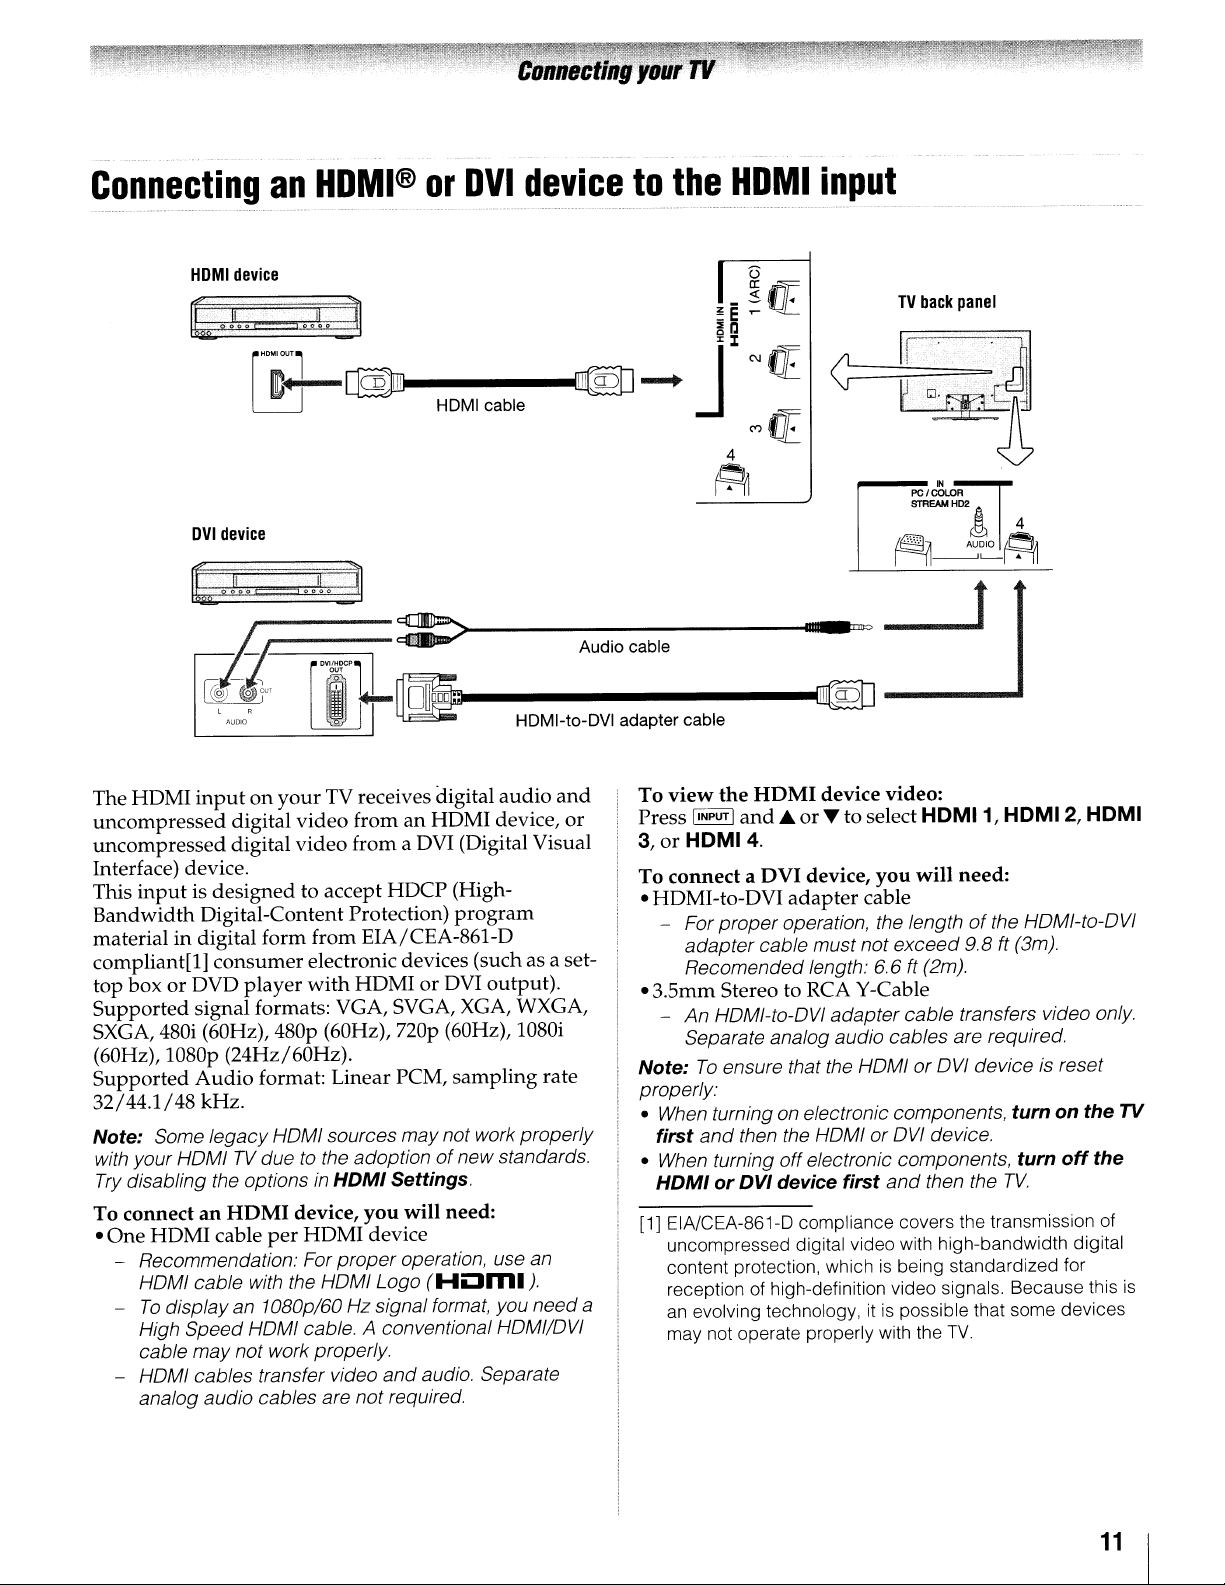
The HDMI
uncompressed
un
compressed digital
inputonyourTVreceives digital
--,·-,il-,·--]-:>).-----A-Ud-io-ca-b-Ie-----
-~LrtDF---.
~
digital
II
video
video
~
fromanHDMI device,
from a DVI (Digital Visual
HDMI-to-DVI adapter cable
audio
Interface) device.
This
inputisdesigned
Bandwidth
Digital-Content Protection)
to accept
HDCP
(High-
program
material in digital form from EIA/CEA-861-D
compliant[l]
top boxorDVD
Supported
consumer
player
electronic devices (such as a set-
with
HDMIorDVI output).
Signal formats: VGA, SVGA, XGA, WXGA,
SXGA, 480i (60Hz), 480p (60Hz), nop (60Hz), 1080i
(60Hz), 1080p (24Hz/60Hz).
Supported
32/44.1/48
Note: Some
with your HOMITVdue
Try disabling the optionsinHDMI
To connectanHDMI
•
One
- Recommendation' For
-
- HOMI cables transfer video
Audio
format: Linear PCM,
sampling
kHz.
legacy
HDMI cable
HOMI
cable
To
displayan1080p/60 Hz signal format, you
High
Speed
cable
may
analog
audio
HOMI sources
to the adoptionofnew
device,
per
HDMI device
proper
with the HOMI Logo
HOMI cable. A conventional HOMI/OVI
not work
properly
cables are
may
Settings.
you
will need:
operation, use an
(HOm.
and
audio. Separate
not
required,
not work
rate
properly
standards,
J-
need
and
or
...
i--~,
, 1
---~@
To
view
the
HDMI
IINPUTI
Press
3,orHOMI4.
To connect a
and.A.orT
DVI
• HDMI-to-DVI
- For
proper
adapter
Recomended
cable
device video:
device,
adapter
operation, the lengthofthe HOMI-to-OVI
must
length: 6.6 ft (2m).
--_
to select
you
cable
not
exceed
HOMI1,
will
need:
9,8
• 3.5mm Stereo to RCA Y-Cable
-
An
HOMI-to-OVI
Separate analog audio
Note:
To
ensure that the HOMIorOVI
properly:
• When turning on electronic components,
first
and
then the HOMIorOVI device.
• When turning
HDMIorDVI
[1] EIA/CEA-861-D compliance covers the transmission of
uncompressed digital video with high-bandwidth digital
content protection, which
of
a
reception
an
evolving technology, itispossible that some devices
may not operate properly with the
high-definition video signals. Because this
adapter
off
electronic components,
device
first
cable
cables
and
then the
is
being standardized for
transfers video
are required.
device
TV.
..
HOMI2,
ft (3m).
is reset
turnonthe
turn
off
TV.
HOMI
only
TV
the
is
11
Page 12

ConnectingaVCRorDVD
t t f t t
Yellow White Red Green Blue
DVD
t·
player
L
VlO::O
@
t-1-1
AUDIO
, e
@~
Component
video cable
VCR
COMPONENT
Y@/'0
1-1-1-1-1
player
VIDEO
AUDIO
OUT
""@'J)
@'
~
with
Standard
audio cable
ColorStream®
AV
adapter
cable
(supplied)
(component
r---miII:J=
---II!!I!OU=
video)
TV
back
panel
Light green
--+
~~I~
1-
--+
Light yellow N _
"""".......,---+~~
Light yellow
~~
~~
> -
~~
5'
~
o~
1
~
Standard
IVV cable
You
will
need:
•
Standard
• AV
•
Standard
•
Component
•
Component
-
A/V
cable
adapter
You
the OVO player
the
use the
Progressive (480p, 720p, 1080p)
(480i, 1080i) video. Check the owner's manual
OVO
signalavailable (1080p
not supported).
If
your OVO player does not have component video,
connect
side panel.
p.
cable (supplied)
audio
cable
adapter
video
can connect the component video cables from
TV.
Separate audio cables are required.
ColorStream
playerinordertodetermine the
cable
(supplied)
cable
to
the
ColorStream
HD1 terminal to display
24
Hz/30 Hz/50 Hz/25 Hz are
and
a composite video cable
If
your OVD playerhas HOMI video, see
11.
HD1 terminal on
You
Interlaced
of
best
output
to
VIDEO 2 on the
can
the
Component adapter
cable (supplied)
To
view
the
DVD
Turnonthe
DVD
player.
ColorStream HD1.
See "Side
Shared
ColorStream HD1.
To
view
the
VCRorview
Turnonthe VCR.
want
to watch.
The
unauthorized
revisionoftelevision
other
materials
Lawsofthe
may
subject
Press
are
United
youtocivil
player:
Audio
Audio"
Tune
the
IINPUT I
recording,
programs,
prohibited
States
AV adapter cable
(supplied)
Press
(INPUT I
and'"or...toselect
configuration
(1&
p.
18),
and
and
record
VCRinto
and
...or...toselectVideo
use,
under
and
other
and
criminal
antenna-sourced:
the
distribution,
videotapes, DVDs,
the
countries,
liability.
is required.
select
channel
or
Copyright
and
you
2.
and
12
Page 13
Connectingadigital
audio
system
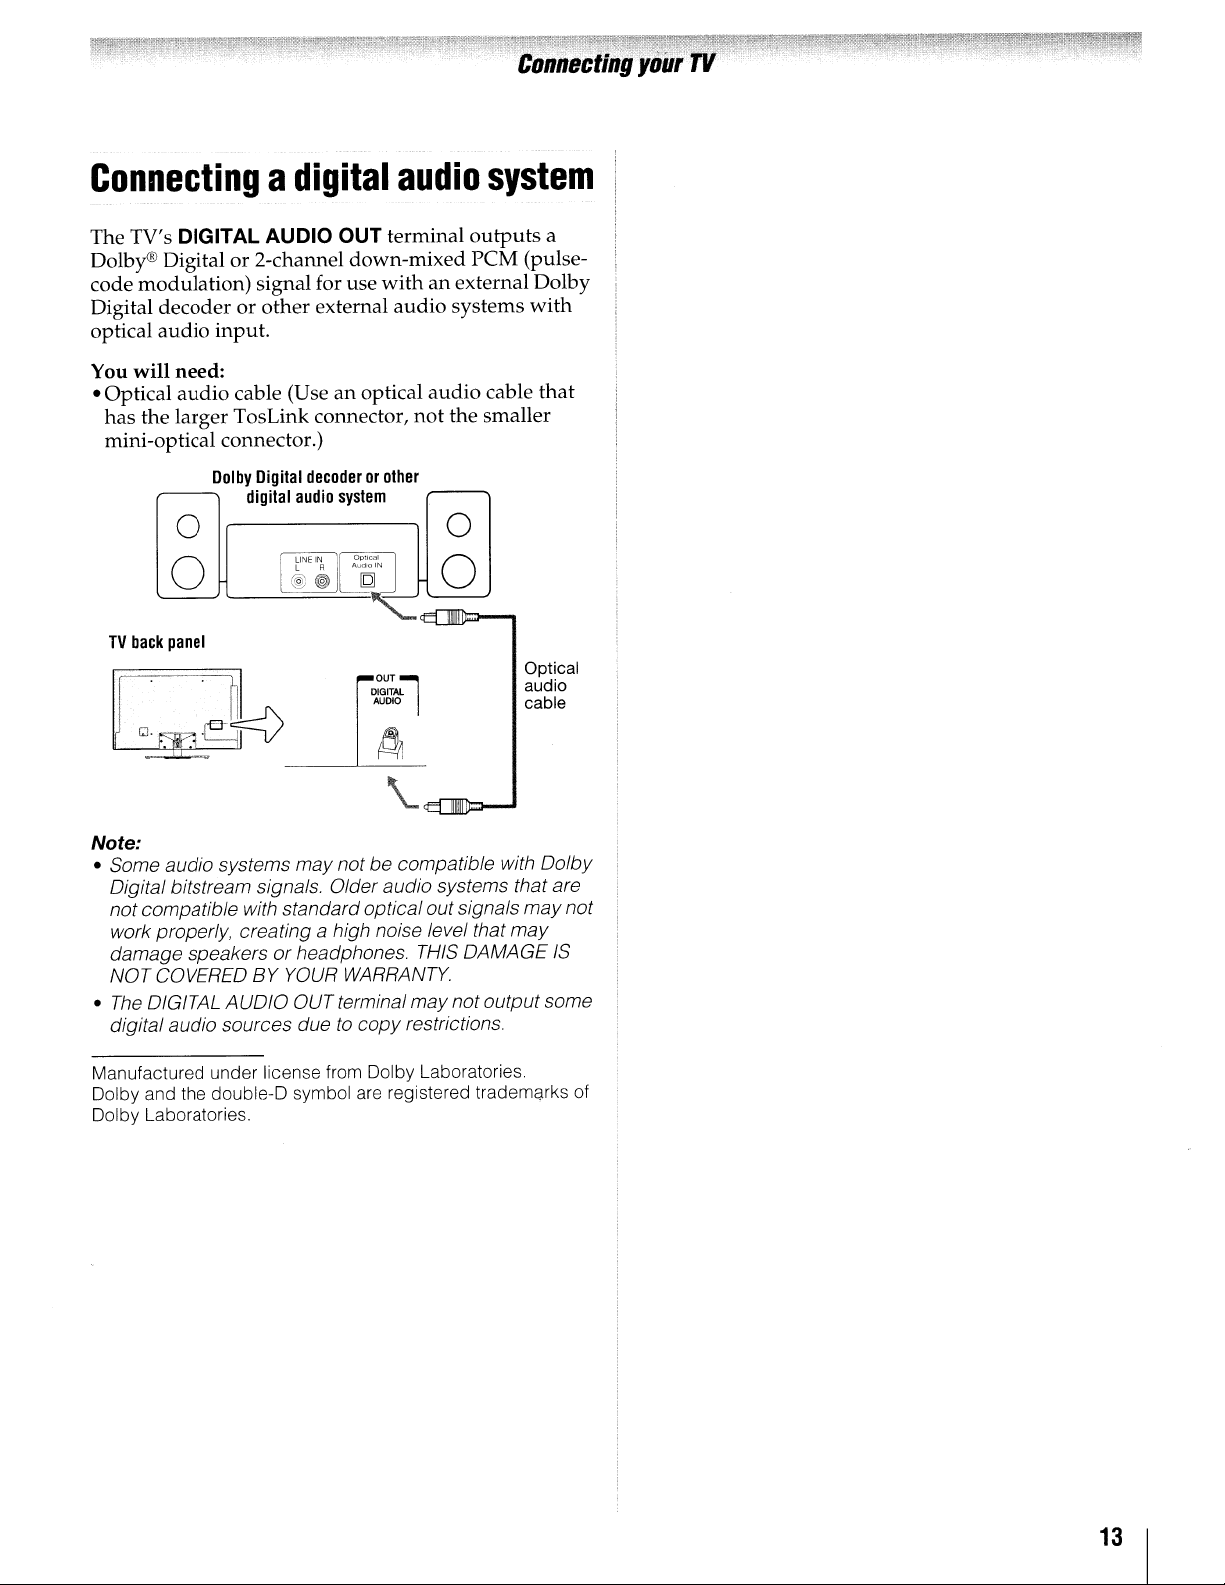
The TV's DIGITAL AUDIO OUT terminal
or
Dolby® Digital
modulation)
code
Digital
optical
You
• Optical
decoderorother
audio
will
need:
audio
has
the larger TosLink connector,
mini-optical connector.)
2-channel
signal for use
input.
cable (Useanoptical
Dolby
Digital
digital
0
l
0
TV
back
panel
down-mixed
external
decoderorother
audio
system
l A
ALdIO
LINE
IN
Jl
@®~
OP'~'
DIGITAL
AUDIO
withanexternal Dolby
audio
audio
not
0
IN
J
0
OUT~
\..
outputs
reM (pulse-
systems
cable
the
smaller
Optical
audio
cable
a
with
that
Note:
• Some audio systems may notbecompatible with Dolby
Digital bitstream signals. Older audio systems that are
notcompatible with standard optical out signals
work properly, creating
damage speakersorheadphones.
NOT COVEREDBYYOUR
•
The
DIGITAL AUDIO OUT terminal may not outputsome
digital audio sources due
Manufactured under license from Dolby Laboratories
Dolby and the double-D symbol
Dolby Laboratories.
a high noise level that
THIS
DAMAGE
WARRANTY.
to
copy restrictions
are
registered trademarks
may
may
not
IS
of
13
Page 14

Connectingtoa
The
LAN
port
allows
your
home
network.
Connecting
Internet
You
will
-Coaxialortelephone
modem
-
Standard
-
Router
•
Modem
Modem
Lo
[1]
theTVtoahome
connection·
need:
type)
LAN
with
Hub
(DSLorcable)
(DSLorcable)
OJ
r:J
U
cables
Router
~
your
Wired
cable
CD
home
Toshiba TV to
network
network
(dependingonyour
with
Hub
j
oo
[O
9
connect
with
an
TV
back
to
panel
Connecting
Internet
You
will
-Coaxialortelephone cable
modem
-
Standard
• Wireless LAN access
-
Modem
Modem
theTVtoahome
connection-Wireless
need:
type)
LAN
cables
point
(DSLorcable)
Wireless
(DSLorcable)
LAN
~rLJ
~
Cable
phone
or
jack
[2]
network
(dependingonyour
access
point
with
Built-in WLAN system:
It is
not
connectanadapter
the
necessary
TV.
an
to
to
§
Cable
or
phone
jack
[1] Coaxialortelephone cable (dependingonyour modem
type)
[2] Standard
[3]DoNOT connect a phone jack directly to the TV's LAN port.
LAN
(2)
(2)
(3)
cable
The transmission
distance
dependingonsurrounding
environment,
configuration,
hardware
speed
speed.
[1] Coaxial or telephone cable (dependingonyour modem
[2] Standard
over
configurations. The actual transmission
willbelower
type)
speed
over
which
wireless
obstacles, access
and
client
than
LAN
cable
the
wireless
LAN
can
electromagnetic
point
design
the
and
software/
theoretical
LAN
reach
design
maximum
and
may
and
the
vary
14
Page 15
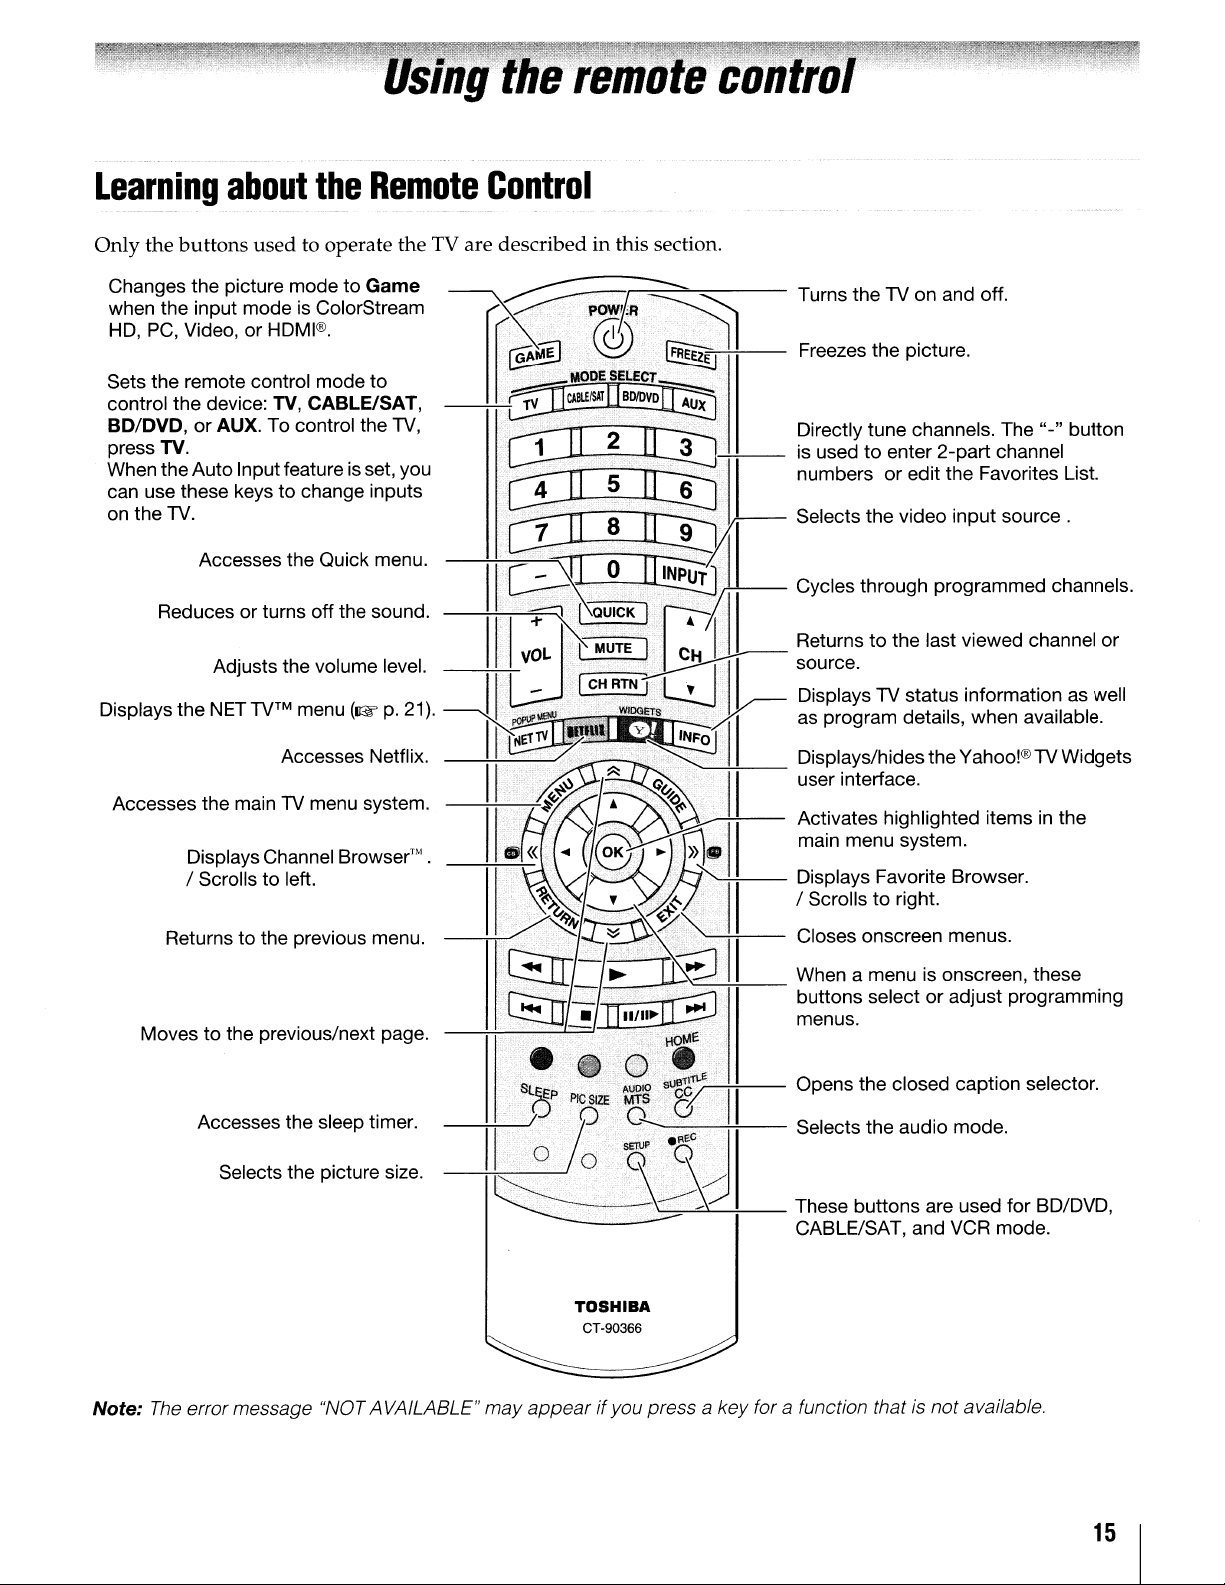
Learning
Only
the
Changes the picture mode
about
buttons
used
the
Remote
to operate
to
Game
the
TV are
Control
describedinthis section.
~.
r--:---==-
..
-=""'"""=---
Turns theTVon and off.
~~~~~eJi:~~
Sets
the
control
~~~~'.
the
:;~i~~~:~::~~~~~~k:e~~U
Reduces or turns off the sound.
DIsplays
Accesses the main
the
~ro~~~I~.olorStream
remote
Displays
/ Scrolls to left.
control
device:
or
AUX. To control the
NET
TV
mode
TV,
CABLE/SAT,
menu(wp.
Accesses Netflix. •
TV
menu system.
Channel
to
Browser'"
----r&r~~~
r
.••.
~od~~~,--H---
~.~*~
TV,
21).
----lllj
.
ttJI.2
••
~
•...••.
r:.:...
.,.;;<.~
II
II:.
~~v
«
~~".'.
....•......
...
..•.•.~..•...
.••
JI:tJ.
....:~ETS
...
'
..~~!J~"
-.!..-
....•.•.
···.'.·
•.
~
.•
·.,;Plj
I
:~~~)
II
11
"..
...
...
....'X...
.·······;t.i•...
11
Freezes the picture.
~i~esc;~
t~~~t~~~~~:I~.
:~::::h:rV::t:::::::::
as
program details, when available.
Displays/hidesthe Yahoo!®TVWidgets
user interface.
~~ii~~~Sn~i;~~;eh~~d
Displays Favorite Browser.
/ Scrolls to right.
~~~~~'I
button
List.
itemsinthe
Returnstothe
Moves to the previous/next page.
Accesses the sleep timer.
Selects the picture size.
Note:
The
error message "NOT AVAILABLE" may
previous
menu
~~'II
---i-i---:----L--=
~~::sa
..
~
I
~l~~r",,/,-j_I+-'
•
~
.'
••
...HbtA
.• •
s.....
appearifyou press a key for a function that is notavailable.
{;b
..••....
·i····
TOSHIBA
CT-90366
E
e
•
··sueT\T~i-..
--Tii---
~~~~~~
Opens the closed caption selector
__
:~::~:o:::~e
CABLE/SAT, and VCR mode.
o~::~~sn
selectoradjust programming
o:::n,
~:for
these
BD/DVD,
15
Page 16
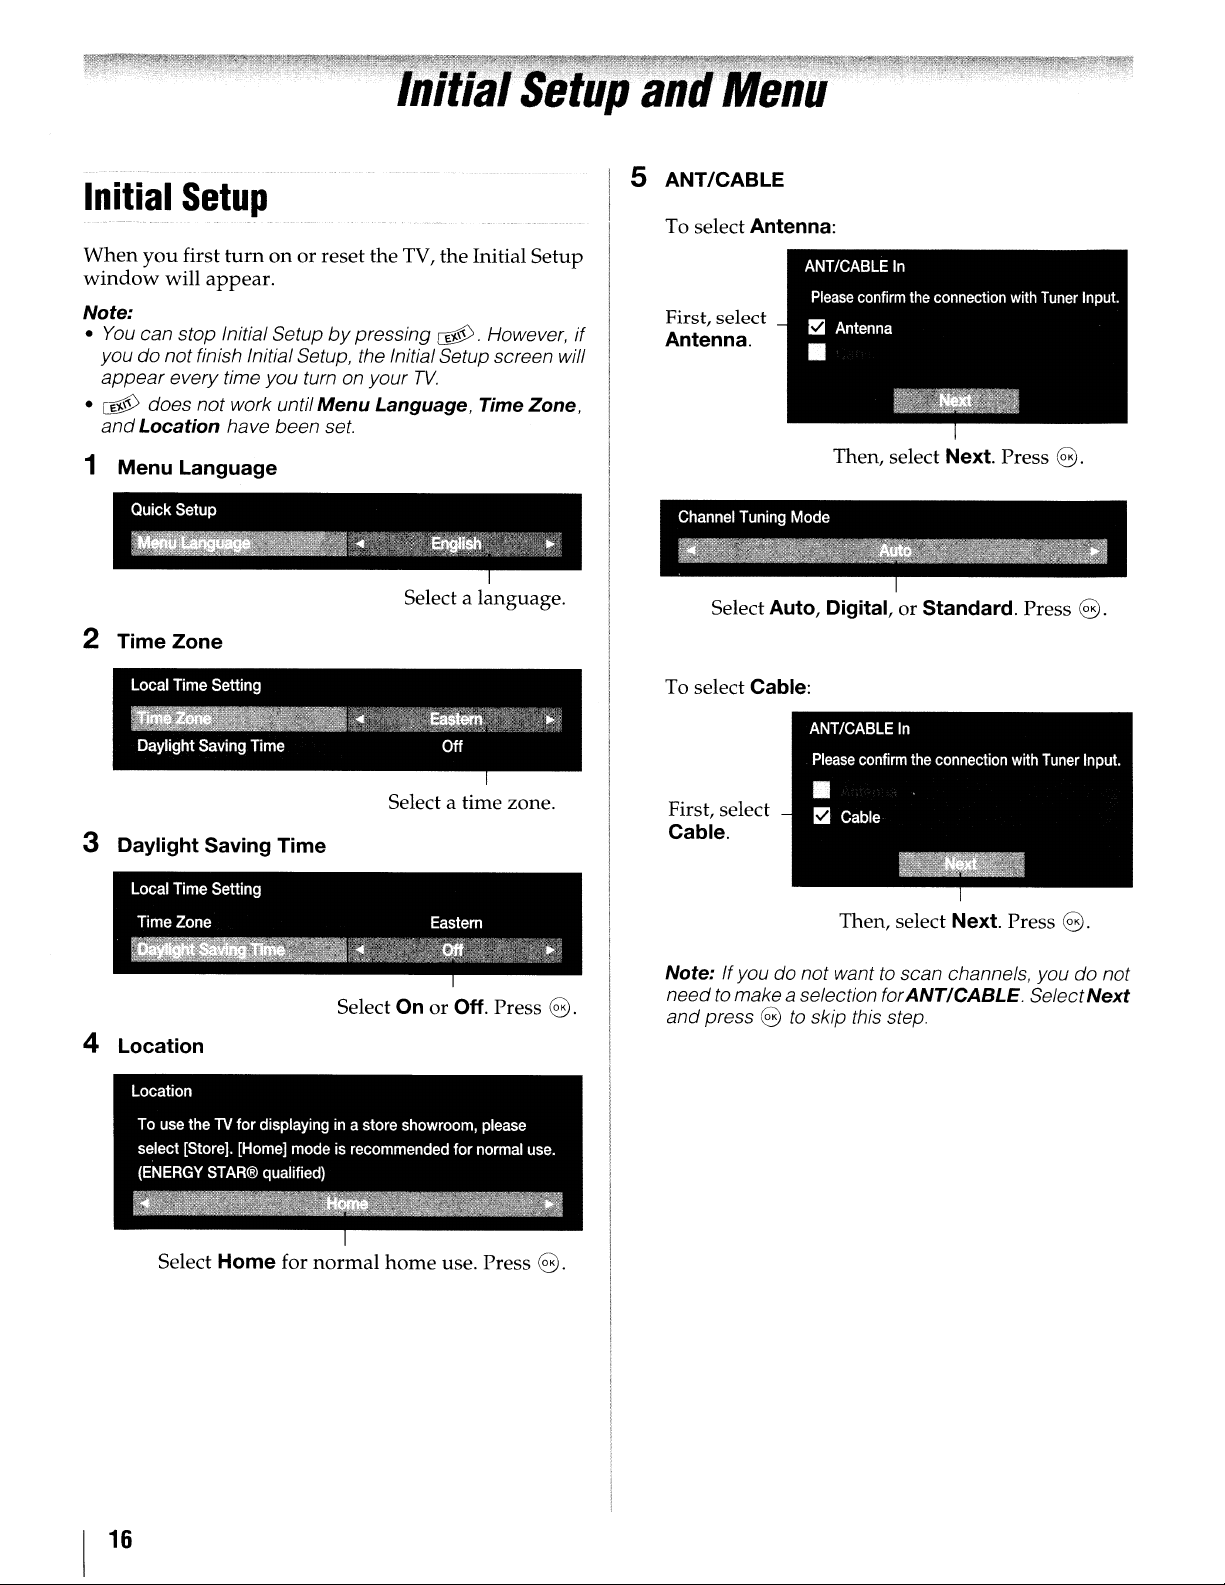
Initial
When
window
you
Setup
first
turnonor
will
appear.
reset the TV,
the
Initial
5 ANT/CABLE
To select Antenna:
Setup
Note:
•
You
can stop Initial Setupbypressing
@.
However,
if
First, select
Antenna.
youdonotfinish Initial Setup, the InitialSetup screen will
appear
• @ does not work until
and
every time you turn on your
Menu
Location have been
set
TV.
Language, Time Zone,
1 Menu Language
Channel Tuning Mode
~~~4¥~~~!,~';'"1'l
~~~ii~~~~
Select a language.
2
TimeZone
Local Time Setting
~_
Daylight Saving TIme Off
I
-l!i"'''''''''1ii
~~,,';;""""
f~~~~",~
.."..
,<t,."
,
'r:._::
-'J\.~~tem-,,,
,~,
~'-
.~
:','
•
'
,,:
...
:
Select a time zone.
3 Daylight Saving Time
Local Time Setting
Time Zone Eastern
~~_~~~t'·':/{':r,"
_~~~-:1it;:itl~~:~t~*mfN~tJ}~~:3Tt;!t'~
Select OnorOff. Press
..
~\f">"i"'~~"«b!"""
J"
8.
To select Cable:
First, select
Cable.
Note: Ifyou do not wanttoscan channels, you do not
need
and
4 Location
I
Then, select Next. Press
Select Auto, Digital,
or
Standard. Press
8.
Then, select Next. Press
to
makea selection forANT/CABLE. SelectNext
press 8
to
skip this step.
8.
8.
Location
use
theTVfor displaying in a store showroom, please
To
select [Store]. [Home] mode is recommended for normal use.
(ENERGY
~w~~~~~~~~
~~Qi.~:~~~~~~~~~~r-~
STAR® qualified)
Select Home for
normal
home
use. Press
16
8.
Page 17
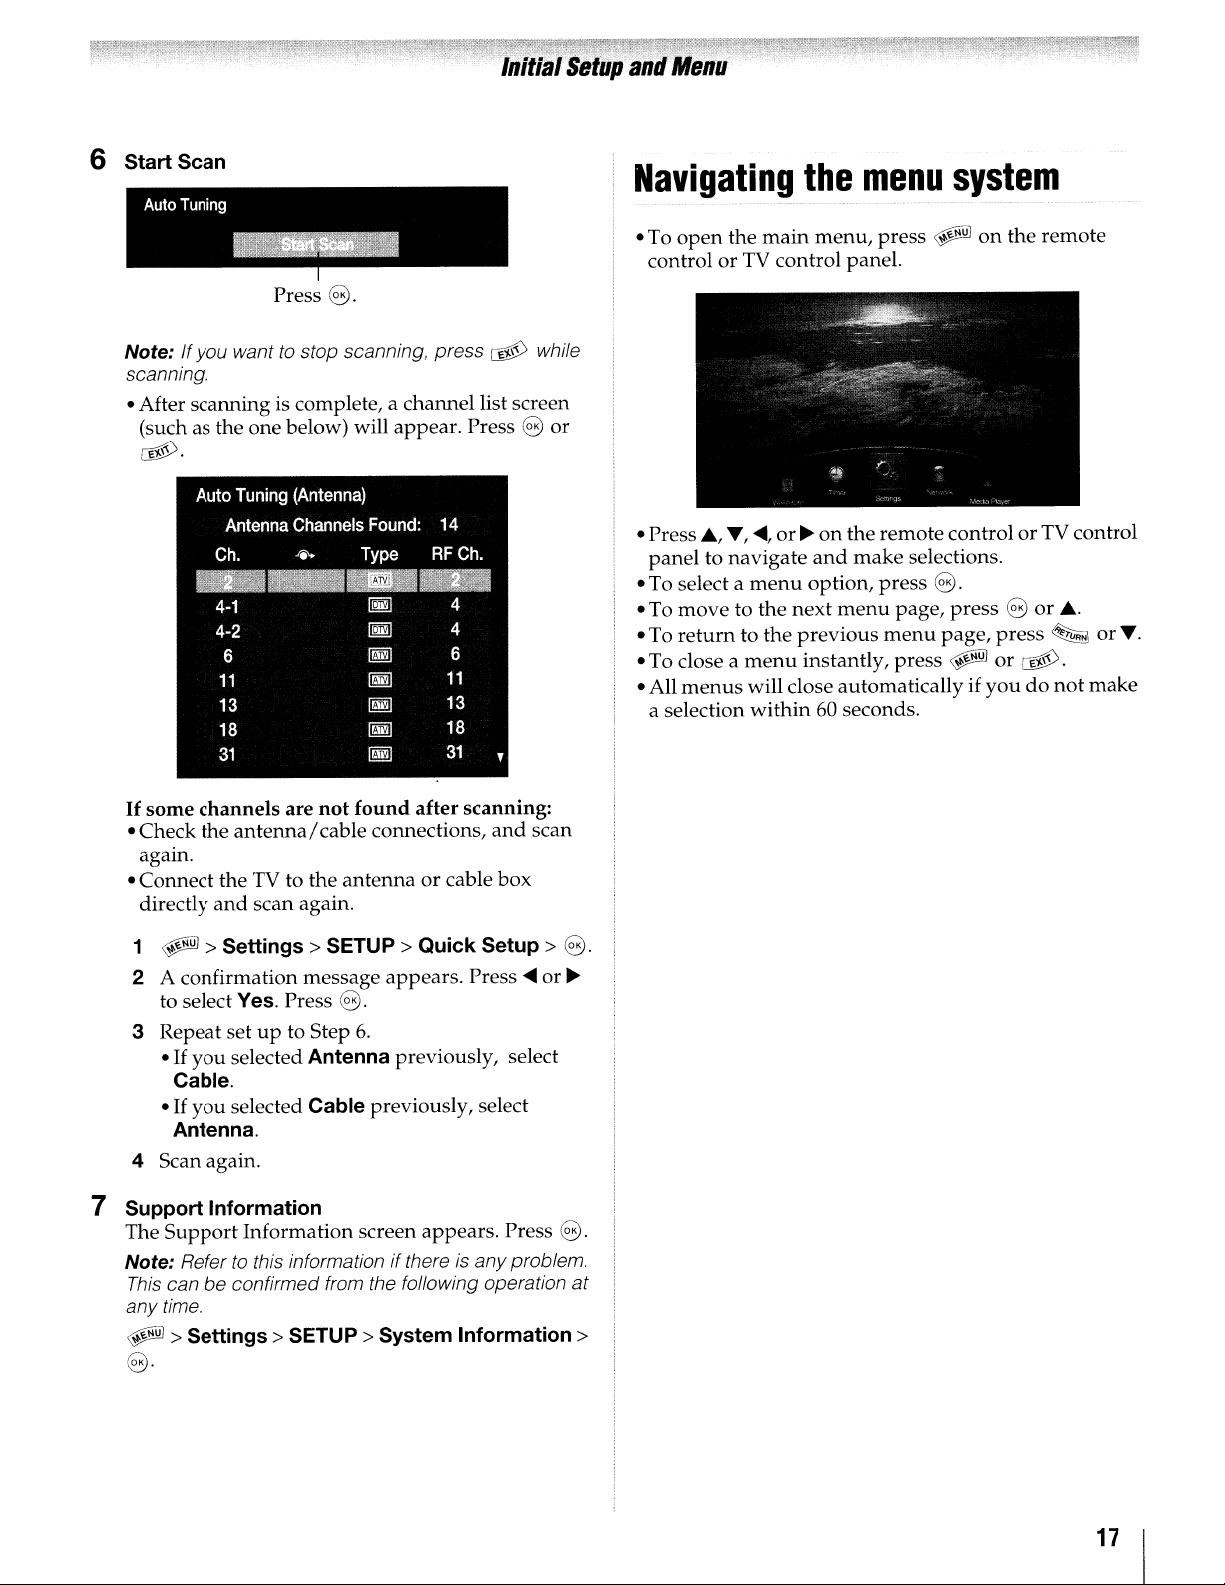
6
Start
Scan
Auto
Tuning
--
Press
8.
Navigating
• To
open
the
controlorTV control panel.
main
the
menu,
menu
press
~
system
on
the
remote
Note: If you want
scanning.
• After scanning is complete, a channel list screen
(such as the one below) will appear. Press
~.
Auto Tuning (Antenna)
Ch.
to
stop scanning, press
Antenna Channels Found: 14
~
Type
RF
Ch.
~
while
8
~~~~B
4-1
4-2
6
11
13
18
31
If
some
channels
• Check the
again.
• Connect the TV to the
directly
and
are
antenna/
scan again.
~
~
~
~
~
~
~
not
found
cable connections,
antennaorcable box
after
4
4
6
11
13
18
31
scanning:
,
and
scan
or
•
Press"',
paneltonavigate
• To select a
• To
• To
• To close a
• All
a selection
...,~,or~on
menu
movetothe
return
menus
to the
menu
will close automatically if
within60seconds.
the
and
option,
next
menu
previous
instantly,
remote
make
press
menu
controlorTV control
selections.
8.
page,
press8or
page,
press
press
~
or
youdonot
~.
~
....
or
....
make
1
~
>
Settings>
2 A confirmation message
to select Yes. Press
3 Repeat setupto Step
·If
you
selected Antenna previously, select
Cable.
·If
you
selected Cable previously, select
Antenna.
4 Scan again.
7
Support
The
Note: Refer
This
any
~
Information
Support
can be confirmed from the following operation at
time.
>
Information
to
this information ifthereisanyproblem.
Settings>
8·
SETUP>
8.
6.
SETUP>
appears.
screen
System
Quick
appears.
Setup>
Press~or
Information>
Press
8.
~
8.
17
Page 18

Configuring
Side
Shared
1
~
Connection>
2 Press
3 Press
or
HDMI3.
Rear
Shared
1
~
Connection>
2 Press
3 Press
HDMI4.
SharedPCInput
1
~
Connection>
2 Press
3 Press
Audio
> Settings> PREFERENCES> AV
e.
..or... to select Side Shared Audio.
....
or~to select ColorStream HD1, Video
Audio
> Settings> PREFERENCES> AV
e.
..or... to select Rear Shared Audio.
....
or~to select PC (ColorStream HD2)
> Settings> PREFERENCES> AV
e.
..
or'"
to select Shared PC Input.
....
or~to select PC
shared
or
inputs
1,
or
ColorStream HD2.
I
18
Page 19
Using
Internet connection,
network
Change the
up
the
If
you
before
Third
Toshiba,
and
makes
about
party
may
a
computer
time
When
Wireless:
Wireless LAN
Wireless LANproducts, like other radio devices, emitradio
frequency electromagnetic energy. However, the level
energyemittedbyWireless LAN devices.ismuch less than
the electromagnetic energy emitted
like mobile phones.
Because Wireless LANproducts operate within the
guidelines found
recommendations, Toshiba believes Wireless LANissafe
for use
recommendations reflect the consensus
community
committeesofscientists who continually review
interpret the extensive research literature.
In
some situations or environments, the useofWireless
LANmay be restricted
responsible representatives
restrictions may
interferencetoother devicesorservicesisperceived or
identified as harmful.
Ifyou are uncertain
wireless devices
you are encouraged
Wireless LAN device prior to turning on the equipment.
your
settingsonyour
Network"onp.
use
Internet
home
network
network
you
will
have
to configure the
TV.
settingsifnecessary
20).
services,
see
the
(I@f
following
use.
party
internet
may
changeorbe
maybesubject to
no
warranties, representations,orassurances
the content, availability,orfunctionality of
contentorservices.
require the creationofa
with
and/orrecurring charges.
you
enjoy
and
by
consumers. These standards and
and
services are
third
Third
internet
your
your
in
radio frequency safety standards
result from deliberationsofpanels
applyinenvironments where the risk
of
in
a specific organization or environment,
access,
network
Health:
by
the proprietorofthe building or
the policy that applies on the use
to
ask for authorizationtouse the
not
provided
discontinuedatany
party
restrictions. Toshiba
party
internet services
separate
connection
of
the organization. Such
account
and
payment
by
wireless devices
of
the scientific
through
"Setting
note
by
time,
third
through
of one-
of
and
and
and
of
of
Usingina
•
It
is
802.llnon5
• It is
HO
•
It
is
contentbe20
•
It
is
video
•
Content
interference.
wireless
recommendedtouse
recommendedtouse
video
streaming.
recommended
not
recommended
streaming.
playback
LAN
environment:
IEEE
802.llaorIEEE
GHz
for
audio
andSOvideo
IEEE
802.llnon5
that the
Mbpsorless.
maybeinterruptedbysurrounding
encoding
to use 2.4
GHz
rate of
for
streaming.
GHz
for
video
audio
and
19
Page 20
)1'~t::l''''1n~{IT;~~rrr;T~i!'l;m€~'l;:?';;)',}~i~'<;:'~'!rm;,t*-'',-F'":.;;'-;fm~~""""-'';:~'''f1I;~'·
Advanced
Setting
You
can
1
~
Setup>
(Another:
2
Press..or
3
Press'"
4
If
you
(1&
If
you
Wireless
Note:
• ContinuedAP(Access Point) connection is not
guaranteed. Connection maybelost while watching
Easy
Setup
up
the
select
the
Network
>
Settings>
PREFERENCES>
e.
~
>
Network>
....tohighlight
or~to select
selectWired,
p.
20).
select Wireless, see
see"
Setup
using
PBC
Network
Type.
Network
Network
WiredorWireless.
Advanced
the
(Push
Button
Type.
Network
next
section.
Configuration)
Network
Setup>
Setup"
·~c1':;~":'F"""W.':"·
:"1'W"~'~;;;"
;'j~;'~J;c"F'F=;~:,:,,~,,~'~';';i"\fWi
featureS
Easy
Setup
usingaPIN
Number)
1
~
>
e.)
TV.
Settings>
Setup>
2 Press
3 Press
4
Press'"
5 Press
e.
..
or
..
or
or~to select PIN.
....
to select
6 Scan screen
this
screen
7 Press
Note: Check the MAC address
manualoftheAPand
8
Whenascreen
succeeded
To
cancel
~
Press
appear.
Press'"
into
..or....toselect
appears,
searching
while
PREFERENCES>
to select
to select Easy Setup. Press
Start
appears.
yourPCor
reporting
press
for
the
searching
or~to select Yes. Press
(Personal
Wireless
Scan. Press
Enter
the
AP.
the
desired
select an
that
e.
AP:
for
the
Y'i";.'C<'~!i"""C"';'ll':~:;~::;;Sl'
Identification
Network
Setup. Press
e·
8.
e.
PIN
displayed
AP. Press
on
the label orinthe
AP.
the
setup
AP. A
message
8.
on
e.
has
will
1
~
Setup>
2
Press..or
3
Press..or
4
Press'"
S
Press
6
Following
appropriate
7
When
succeeded
To
cancel
Press
appear.
>
Settings>
e.
....
to select
T to select Easy Setup.
or~to select PBC.
....
to select
the
buttononyour
a screen
appears,
searching
~
while
Press'"
or~to
PREFERENCES>
Wireless
Start
Scan.
onscreen instructions,
reporting
for
searching
that
press
the
AP:
for
select Yes.
8.
the
Setup.
Press
AP.
the
AP. A
Press
Press
e.
push
setup
e.
Network
Press
e.
the
has
message
e.
will
Advanced
Note:
•
When
the
TVisOn,
set ittoOn.)
•
When
the DHCP functionofthe routerisOff,
Setup
IP
Note:
in
Auto Setupinthe ONS Setup menu will also be settoOn.
Auto
1
2 Press
3 Press
4 Select
to Off,
Address.
Address
The
the DNS Setup
Setup:
~
>
Setup>
Press
Network
DHCP functionofthe router connectedtothis
you can set
and
Auto
manually set theIPAddress or DNS
Setup
Setup
to
OnorOff.
(Usually
set
Auto
Setup
settingsinAuto Setupislinkedtothat selected
menu
Settings>
IfAuto SetupissettoOn,
PREFERENCES>
Network
then
8.
..or....
to select
Advanced
Network
Setup.
8.
..or....
Auto
to select IP
Setup.
Press'"
Address
or~to select On.
Setup. Press
e.
20
Note:
Other items will be grayed out when
settoOn.
Auto
Setup
is
Page 21

Advanced
DNS
Setup
Note:
•
When
the DHCP functionofthe router connectedtothis
TVisOff,
DNS address(es). Your internetservice providershould
have provided these
The
•
IP Address Setup menu.
Auto Setup
settoOn.
Auto
1
~
Setup>
2
Press.
Press
3
Press.
4 Select
Note:
set
to
set
Auto
Setup
settingsinAutoSetup is linkedtothatselectedinthe
in
the UP Address Setup menu will also
setup:
>
Settings>
to
Off,
and
manually set the
to
you.
If
Auto Setup is settoOn,
PREFERENCES>
Network
e.
or
... to select
Advanced
Network
Setup.
e.
or'"
to select DNS Setup. Press
Auto
Setup. Press
Other items willbegrayed out when
On.
....
or
~
to select On.
Auto
e.
Setup
then
be
is
features
Using
Note:
•
You
feature
• Services
• User registration
services.
NET
1 Press
2 Press
the
needtoconnecttothe Internet before using this
(1&
p.
may
TV
menu
INETTVI.
(From
the
....
or~to
NET
14).
notbecurrently availableinyour area.
Menu:
TlrMfeature
or
login
mayberequiredtouse some
~
>
Network>
selectanicon. Press
NET TV >
e.
e.)
Network
This function checks
1
~
Setup>
2
Press.
Press
Note:
connection was successful or not.
Note:
Favorable Network Connection Test results do not
guarantee an Internet Connection. Depending on the
situation, some Internet features maynot
To
cancel
Press
~
Viewing
The Licenses for
available for viewing.
1
~
Connection
>
Settings>
Internet
PREFERENCES>
Test
connectivity.
Network
e.
or'"
to select
Network
Connection
e.
A message will appeartoindicate whether the
be
available.
Network
while
>
Settings>
Connection
searching
the
Software
the
software
for
SETUP>
Test:
the
Internet
connection.
Licenses
usedinthis TV
Software
Licenses>
are
e.
A screen will
information
appear
required
displaying
for
the
television's software.
all
the
licensing
Test.
Note:
When
•
•
• NET
Guided
The
step
1 Select
2 Follow
After
•
•
you access the NETTVmenu for the first
welcome screen appears
Aftersetup is complete, this feature is available.
If
the displayofthe date
TV,
and
turn it on again.
TV
menu items may changeinthe upgrade
process.
(1&
"Guided Setup" below).
and
time is wrong, turn
Setup
first
time
you
use
wizard
If
you
the
completing
When
the
NET TV
When
Menu,
begins
Let's
select
next
time
the
you
press
you
press
theTVWidgets
with
get
Exit
you
onscreen
the
INETTVlor
menuisdisplayed.
IO!1
Yahoo! TV
the
started!
Setup
press
instructions.
Guided
select NETTV
or
select
user
Widgets
Welcome Screen.
now,
this
step
IO!I.
Setup:
from
Widgets
interface is
from
displayed.
time,
a
off
the
this step-by-
will
resume
the
Menu,
the
21
Page 22

Specifications
Note:
• This
• This
Television
Channel
Power
Power
Audio
Video/Audio
model
below.
•
Designs
without
model
or
specifications
complies
and
specifications
notice.
may
with
notbecompatible
that
maybeaddedinthe
System
NTSC
ATSC
Digital
standard
standard
Cable
(8VSB)
(64
QAM,
unencrypted)
256 QAM; in-the-clear,
Coverage
VHF: 2
UHF: 14
Cable
through
through
TV:
Mid
Super
Hyper
Ultra
13
69
band
(A-8
band(Jthrough
band
(AA
band
(65
Source
120 V AC, 60
Hz
Consumption
42SL417U: 1.1 A (rms)
0.4 Winstandby
46SL417U: 1.2 A (rms)
0.4 W
55SL417U: 1.4 A (rms)
0.4 W
in
standby
in
standby
(maximum
(maximum
(maximum
Power
Main: 10 W + 10 W
Speaker
Main:
Type
Four
13/16x2-9/16
Terminals
VIDEO/AUDIO
VIDEO: 1 V(p-p), 75
AUDIO: 200 mV(rms) (-20dBFS)
ColorStream®
VIDEO:Y:1V(p-p),75ohm
PR:
PB:
Suggested
480p,480i
AUDIO: 200 mV(rms), 22 k
INPUT:
ohm,
(component
0.7 V(p-p),75ohm
0.7 V(p-p),75ohm
formats: 1080p, 1080i, 720p,
the
specifications
are
subjecttochange
with
through
through
inches
video)
A-I, A
W)
through
94,100
current)
mode
current)
mode
current)
mode
(20
negative sync.
ohmorgreater
features
through
ZZ, AAA,
through
x 65
HD
INPUT:
listed
future.
mm)
and/
I)
BBB)
135)
HDMI® INPUT:
HDMI
HDCP
HDMI
DIGITAL
Optical
PC
IS-Pin D-sub Analog RGB
compliant
compliant
Audio: 2-channel
AUDIO
type
INPUT:
44.1/48
16/20/24
OUTPUT:
Linear-PCM/
kHz
sampling
bits
per
AC-3;
frequency;
sample
Wireless connection
•
Standard:
•
Host
• Frequency Range: 5.15-5.35 GHz,5.47-5.725
5.725-5.850 GHz, 2.412-2.462
• Security: WEP64/128, TKIP, AES,
PSK, WPS,
IEEE
802.11a/b/g/n
Interface: USB2.0
None
compatible
GHz
WPA/WPA2-
Ethernet
• IEEE 802.3.
USB
• Universal Serial Bus Specification,Revison1.1.
• Universal Serial Bus Specification,Revison2.0.
Dimensions
42SL417U: Width: 38-15/16 inches (989 rom)
46SL417U: Width: 42-15/32 inches (1,078 rom)
55SL417U: Width: 49-13/16 inches (1,265
(include foot stand)
Height: 26-19/32 inches (675
Depth:
Height: 28-19/32 inches (726 rom)
Depth:
Height:
Depth:
11-5/16
11-5/16
33-3/32
14-7/32
inches (287
inches (287
inches (840
inches
(361
mm)
mm)
mm)
mm)
rom)
Mass (weight)
42SL417U: 45.2 lbs (20.5 kg)
46SL417U: 49.71bs (22.5 kg)
55SL417U: 67.3 lbs (30.5 kg)
Operating
Temperature: 32°F - 95°F
Humidity:20- 80% (no
conditions
(O°C
- 35°C)
moisture
condensation)
32/
GHz,
mm)
I
22
Page 23
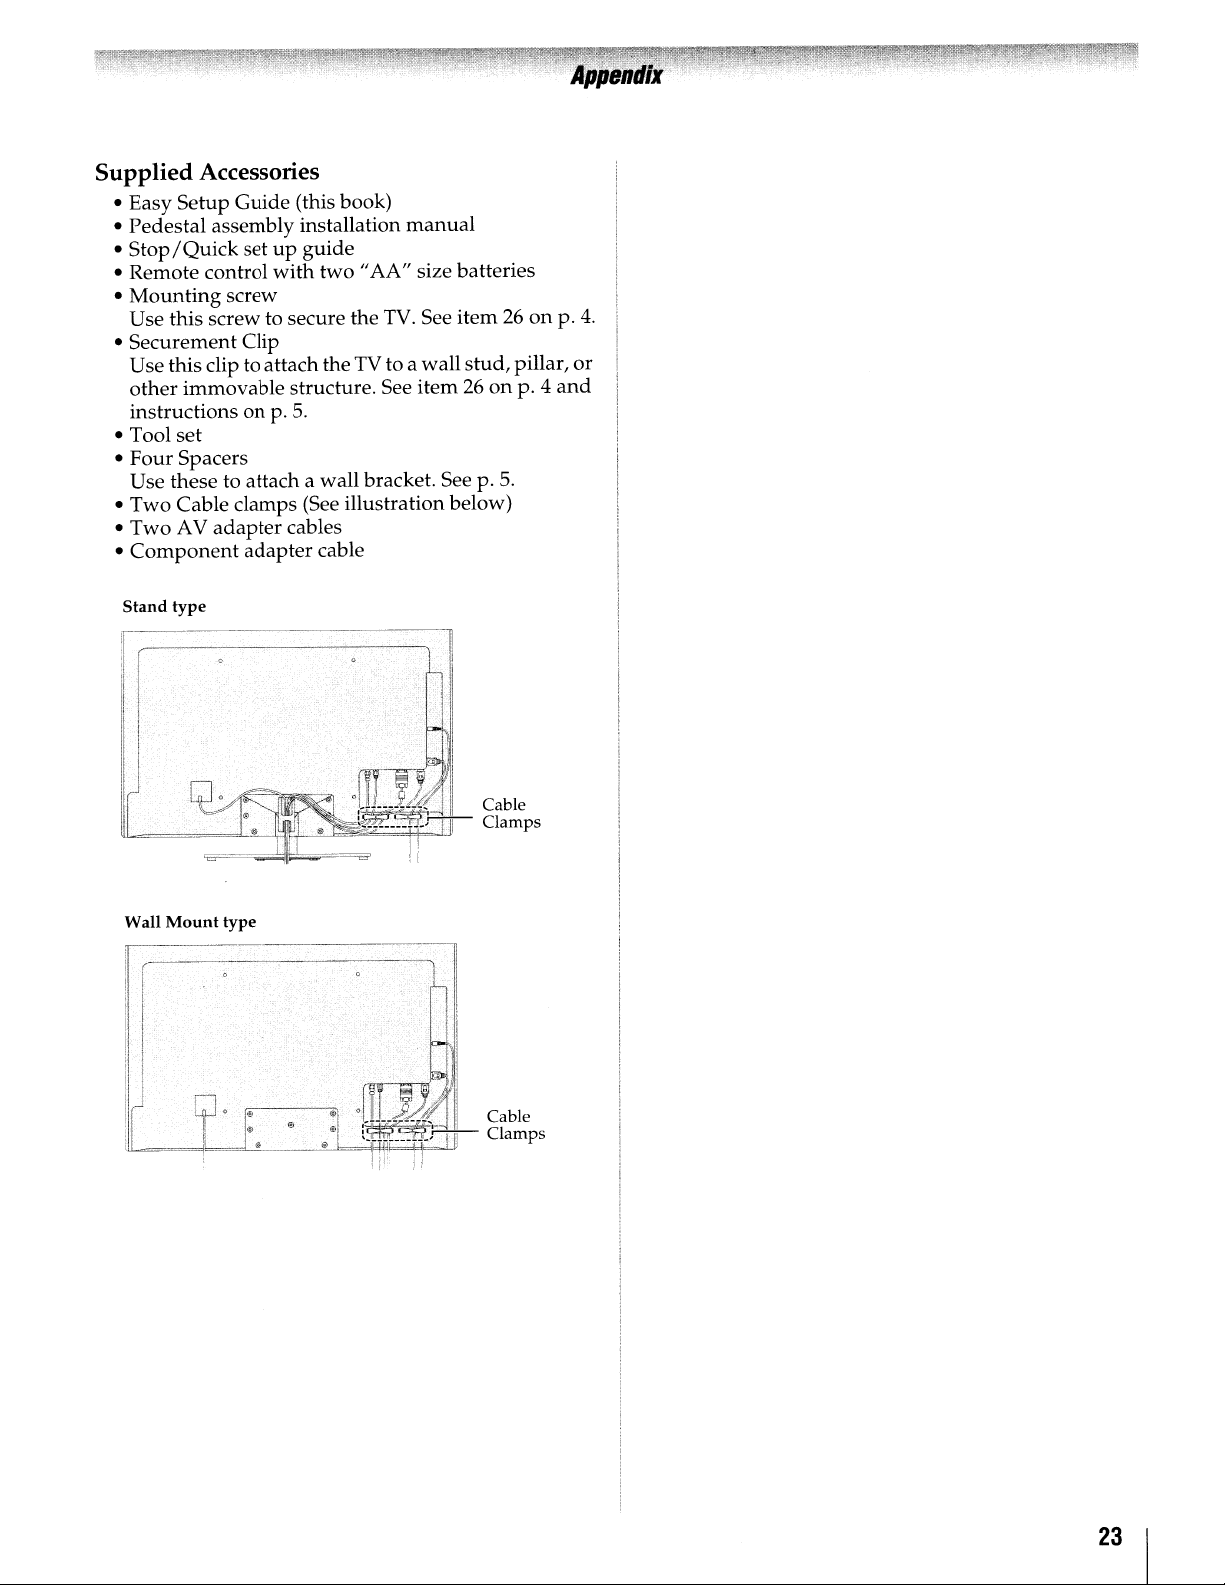
Supplied Accessories
• Easy
• Pedestal assembly installation
•
• Remote control
•
• Securement Clip
• Tool
•
• Two Cable clamps (See illustration below)
•
•
Setup
Guide
(this book)
manual
Stop/Quick
Mounting
Use this screw to secure the
setupguide
with
screw
two"
AA"
size batteries
TV.
See item26onp.4.
Use this clip to attach theTV to a wall
other
immovable
instructionsonp.
structure. See
5.
item26on
set
Four
Spacers
Use these to attach a wall bracket. See p.
Two
AV
adapter
Component
Stand
type
-----------------,
cables
adapter
cable
stud,
pillar,
p. 4
5.
or
and
Wall
Mount
type
23
Page 24

Limited
for
LCD
Toshiba
the
following
United
THESE
CONSUMER
THIS
CONSUMER
PURCHASERORTRANSFEREE.
PURCHASEDINTHE
ANYWHERE
INCLUDING,
MEXICO,
LCD
THE
LIMITATION,
TAIS
AGAINST
ORIGINAL
TAIS
THE
States.
LCD
TELEVISIONS
U.S.A.ORPUERTO
U.S.A.,
Limited
WARRANTS
FORAPERIODOFONE
WILL,
REPLACEADEFECTIVE
REFURBISHED
YOU
FOR
REPLACED
PROPERTYOFTAIS.INSOME
RESPONSIBLE
SERVICE
Rental
The
limited
rentalorthirty
firm,
whichever
Your
Responsibility
Read
the
operating
enclosed product
your
LCD
Registrationofyour
contact
required
Failuretocomplete
does
not
THE
ABOVE
FOLLOWING
(1)
This
purchaser
(2)Apurchase
dateisrequired
United
States
Televisions
America
LIMITED
ARE
ARE
One
PROVIDER.
Units
owner's
youinthe
under
diminish
Limited
Information
limited
warrantiestooriginal
WARRANTIES
PURCHASERORANY
TELEVISIONASA
PURCHASER
U.S.A.ORPUERTO
OUTSIDEOFTHE
WITHOUT
NOT
COVEREDBYTHESE
PURCHASED
CANADA
NOT
COVEREDBYTHESE
(1)
Year
THIS
DEFECTSINMATERIALSORWORKMANSHIP
RETAIL
ATTAIS'
PARTSORLABOR.
warranty
this
Television
PURCHASE.
SOLE
PART/PRODUCT
UNDER
WARRANTIES
THIS
FOR
DELIVERING
period
(30)
days
comes
manual
LCD
Television.
registration
onlineatwww.supporUoshiba.com.
LCD
unlikely
the
U.S.
and
your
CONDITIONS:
Warrantyisextended
and
only
receiptorother
for
Systems,
EXTENDTOTHE
GIFT
ANDTONO
U.S.A.ORPUERTO
LIMITATION,
RICO,
INCLUDING,
AND
MEXICO,
WarrantyonParts
LCD
TELEVISION
(1)
YEAR
DESCRETION,
PART/PRODUCT
ANY
LIMITED
beginsonthe
after
the
first.
thoroughly
Complete
card
Television
eventasafety
Consumer
return
the
warranty
ARE
covers
warranty
product
proofofthe
Warranty
Inc.
("TAIS")
consumersinthe
PERSON
FROM
THE
OTHER
LCD
TELEVISIONS
RICO
CANADA
WARRANTIES.
ANYWHERE
AND
USEDINTHE
WARRANTIES.
and
AND
FROM
THE
DURING
WITHOUT
THE
dateofshipmenttothe
product
rights.
SUBJECTTOTHE
service.
THIS
REPAIR
WITHANEW
PARTORPRODUCT
WARRANTY
CASES,
PRODUCTTOA
dateofthe
before
and
(if
provided)orregister
will
enable
notification
Product
Safety
registration
onlytothe
purchasedasnew.
original
makes
ORIGINAL
RECEIVING
ORIGINAL
AND
RICO,
AND
OUTSIDE
WITHOUT
Labor
ITS
PARTS
DATE
PERIOD,
OR
CHARGE
BECOMES
YOU
MAY
installing
mail
the
TAIS
Act.
original
purchase
USED
OF
TO
first
rental
or
to
is
card
OF
OR
BE
(3)
All
warranty
performedbyan
(4)
The
warranties
Televisionispurchased
Puerto
(5)
Removal
suchamannerasto
covered
mounts,
thatdonot
product
set
installation,
and
installationorrepairofantenna,
systems
(6)
Receptionorother
antenna
installed
sources
this
limited
(7)
This
limited
the
rangeofthe
operating
specification
productisexposedtoexcessive
airborne
(8)
Warranties
workmanshipaslimited
LCD
by
youorto
causedbyfires,
(suchaslightningorfluctuationsinelectric
improper
violationofinstructions
malfunction
Television
have
altered,
(9)
Product
or
problems"
(10)Product
and
resoldisnot
(11)
Product
under
HowtoObtain
After
following
Manual,
Customer
you
provided
Solution
upon
purchase
ALL
THE
MERCHANTABILITY
PURPOSE,
OF
review
find
that
Center
request
WARRANTIES
U.S.A.,
THE
servicingofthis
Authorized
from
TAIS
Rico.
and
reinstallationofproduct
impede
under
these
custom
for
are
systems,
cable
are
contaminantsorenvironmental
Televisionorparts
been
defaced,orrendered
purchased
previously
thatisrefurbished
this
Support
on
the
including
INCLUDING
ARE
LIMITED
cabinets
provide
warranty.
conditionsasoutlinedinthe
extend
installation,
and
modifiedorhad
limited
allofthe
serviceisneeded,
your
for
service
warrantyisvoidifthe
the
toll
purposes.
setup,
not
coveredbythis
problems
misaligned
dropsoruse
your
responsibility
temperature
listedinthe
onlytodefectsinmaterials
damagetothe
misuse,
through
Warranty
web
EXPRESSLY
simultaneous
connected
"AS-IS"or"With
are
not
ownedorregisteredbya
coveredbythis
warranty,
operating
section
Web
siteatwww.support.toshiba.com.
siteorplease
freeat1-800-631-3811.
original
the
serial
IMPLIEDBYTHE
AND
WARRANTIES
LCD
TAIS
are
and
operatedinthe
normal
warranties.
and
direct
and
adjustmentofcustomer
causedbyinadequate
satellite
with
(heat/cold)
Owner's
above,
that
have
LCD
abuse,
improper
furnishedbyT
equipment;orto
the
coveredbythis
and
Service
entitled
follow
billofsaleorother
number
THE
IMPLIED
FITNESS
LIMITEDTOTHE
SET
effective
other
Labor
and
anddonot
maintenance,oruse
illegible.
instructionsinthe
"Concierge"
Television
Service
serviceisnot
This
installation
immediate
satelliteorcable
limited
non-standard
are
productisused
manual,orif
smoke,
been
Televisionorparts
accident,
useofthis
serial
known
limited
resoldisnot
the
contact T
for
LAWOFANY
WARRANTIES
FORAPARTICULAR
FORTH
must
Provider.
onlyifthis
thatismounted
includes
service
warranty.
dishes,
not
and/or
product's
dust,orother
conditions.
lostordiscarded
AIS;
number
limited
warranty.
instructions
AIS'
You
in-warranty
LCD
U.S.A.
wall
methods
accesstothe
charges
controls,
improperly
signals
covered
outside
moisture
the
or
extendtoany
ActsofGod
power),
use
or
LCD
units
that
removed,
faults,
defects
warranty.
consumer
covered
Owner's
locatedonour
Consumer
must
present
proof
of
STATE
DURATION
ABOVE.
be
service.
or
in
for
or
by
in
If
OF
OF
WITH
I
24
Page 25
THE
EXCEPTIONOFANY
LAWOFANY
THE
FOREGOING
IN
LIEUOFAll
AGREEMENTS,
RESPECTTOTHE
PARTS.INNO
CONSEQUENTIALORINCIDENTAL
(INCLUDING,
BUSINESS
ERASUREOFRECORDED
OR
INABILITYTOUSE
No
person,
authorizedtochange,
warrantiesinany
an
action
TAIS
arising
or
lawofthe
limitedtoninety
should
applytoimplied
of
the
U.S.A.
THIS
LIMITED
RIGHTS
WHICH
SOME
STATESOFTHE
LIMITATIONSONTHE
WARRANTY,
THE
EXCLUSIONORLIMITATIONOFINCIDENTAL
CONSEQUENTIAL
PROVISIONS
CIRCUMSTANCES.
STATEOFTHE
LIMITED
OTHER
AND
REPAIRORREPLACEMENTOFANY
EVENT
BUT
NOT
INTERRUPTION,ORMODIFICATION
agent,
distributor,
manner
mustbecommencedtoenforce
under
this
United
(90)
have
discovered,
warranties
WARRANTY
AND
YOU
MAY
MAY
VARY
WHENANACTION
DAMAGES.
MAY
NOT
WARRANTIES
U.S.A.ASHEREBY
WARRANTYISEXCLUSIVE
WARRANTIES,
SIMILAR
SHAll
modifyorextend
limited
Statesorany
days
FROM
DURATIONOFAN
OBLIGATIONS
TAISBELIABLE
DAMAGES
LIMITED
THIS
whatsoever.
the
ALSO
U.S.A.DONOT
APPLYTOYOU
TO,
DATA
CAUSEDBYUSE,
LCD
TELEVISION).
dealerorcompany
warrantyorunder
state
from
the
date
defect.
arising
STATETOSTATEINTHE
under
GIVES
YOU
HAVE
MAYBEBROUGHT,
THEREFORE,
GUARANTEES,
lOST
the
The
thereof,ishereby
you
This
SPECIFIC
OTHER
IMPLIEDBYTHE
LIMITED,
OFTAIS
PROFITS,
termsofthese
time
any
obligation
discover
limitation
the
lawofany
RIGHTS
AllOW
IMPLIED
THE
UNDER
FOR
OR
is
within
any
lEGAL
SUCH
WITH
MISUSE
which
statute,
or
does
U.S.A.
OR
OR
ABOVE
AND
of
not
state
Limited
for
Toshiba
ToshibaofCanada
limited
LIMITED
CONSUMER
THIS
TOSHIBA
"TElEVISION(S)"or"Television(s)")ASA
ORIGINAL
PURCHASERORTRANSFEREE.
TELEVISIONS
ANYWHERE
LIMITATION,
COVEREDBYTHESE
TELEVISIONS
CANADA,
STATES
COVEREDBYTHESE
Limited
TCl
warrants
defectsinmaterialsorworkmanship
Television
original
AT
TCl'S
DEFECTIVE
WITHOUT
Rental
The
warranty
first
rentalorthirty
rental
firm,
Your
Responsibility
Read
the
LCD
Television.
supporuoshiba.ca/warranty/.
Television
of
aproduct
registration
THE
ABOVE
FOllOWING
(1)
You
purchase.
(2)
All
warranty
performedbya
(ASP).
(3)
The
Televisionis(i)
TClorfrom
resellers
(4)
Removal
suchamannerasto
covered
mounts,
Canadian
Brand
warrantiestooriginal
WARRANTIES
PURCHASERORANY
BRAND
CONSUMER
PURCHASEDINCANADA,
OUTSIDEOFCANADA
THE
PURCHASED
INCLUDING,
AND
MEXICO,
One
(1)
Year
the
failing
foraperiodofone
retail
purchase.
SOLE
OPTION,
PART
CHARGETOYOU
Units
for
Television
whichever
Owner's
Register
will
enable
safety
does
WARRANTIES
CONDITIONS:
must
provide
servicingofthis
warranties
TCl's
("ADR's")
and
under
custom
Flat
Limited
EXTENDTOTHE
FLAT
PURCHASER
UNITED
WARRANTIES.
WITHOUT
AND
WARRANTIES.
WarrantyonParts
Television
DURING
REPAIRORREPLACE
WITHANEWORRECERTIFIED
(30)
days
comes
Manual
your
TCltocontact
notice.
not
diminish
your
Toshiba
from
TCl
purchasedasnew
authorized
and
reinstallationofproduct
impede
these
warranties.
cabinets
Warranty
Panel
("TCl")
STATES
and
rental
from
thoroughly
Failuretocomplete
ARE
billofsaleorother
(ii)
makes
consumersinCanada.
PERSON
PANEL
ANYWHERE
USEDINCANADA,
FOR
first.
LCD
Registrationofyour
your
Authorized
are
and
TELEVISION
INCLUDING,
AND
LIMITATION,
its
parts
that
(1)
THIS
PARTSORLABOUR.
units
begins
the
dateofshipmenttothe
before
Television
youinthe
warranty
SUBJECTTOTHE
Television
effective
distributors,
located/operatedinCanada.
normal
This
other
Televisions
the
following
THESE
ORIGINAL
RECEIVING
(the
GIFT
FROM
ANDTONO
AND
MEXICO,
OUTSIDE
and
against
resultinthe
year
after
PERIOD,
rights.
must
Service
onlyifthe
and
unopened
thatismounted
serviceisnot
includes
installation
OTHER
USED
WITHOUT
ARE
OF
THE
UNITED
ARE
Labour
material
the
date
TCl
Will,
A
PART
with
the
date
operating
onlineathttp://
LCD
unlikely
the
product
proof
of
be
Provider
dealers
wall
methods
THE
NOT
NOT
of
of
this
event
from
or
in
25
I
Page 26

thatdonot
product
installation,
installationorrepairofantenna
by
these
inadequate
(5)
Warranties
workmanshipaslimited
a.
Service,
accident,
neglect,
improper
cleaning,
tear,
prolonged
aging,orany
omission
theft,
surgesorpower
faults,orrepairs,
persons
the
b.
Replacementofmissing,
provisionofretrofits,orpreventive
c.
Repairofdamage
affect
tear,
d.
ServiceonToshiba-branded
accessory
warranty);
e.
Serviceonthird
necessarybyuseofincompatible
f.
Service
this
g.
Modificationstothe
by
installationofnon-Toshiba
Television;
h.
Serviceofa
logo,
or
i.
Damagetothe
the
and/or
Disclaimer
TO
THE
EXPRESS
REPRESENTATIONS
THE
IMPLIED
REPRESENTATIONSOFMERCHANTABILITY
FORAPARTICULAR
AND
EXCLUDED.IFTHE
OR
OTHERWISE,
IMPLIED
REPRESENTATIONS
CONDITIONS
LIMITEDINDURATIONTOTHE
provide
for
warranties.
extend
repairsorreplacement
accident,
screen
actsofGod,
other
Television;
the
scratches
made
Television
TCl,
and
rating
removed;
specifications,
storage.
and
EXTENT
AND
WARRANTIES,
WARRANTIES,
AND
for
service
setup,
adjustmentofcustomer
antenna
onlytomaterial
misuse,
installation,
improper
burnorimage
displayofstatic
other
outside
than
Television
and
items
party
necessarybythe
and
service
Televisiononwhich
labelorserial
Television
LimitationofRemedy
NOT
PRECLUDEDBYLAW,
IMPLIED
FOR
PURPOSE,
PRECLUDES
THEN
REPRESENTATIONS
direct
and
immediate
purposes.
Reception
systems
abuse,
damage,
maintenance,
external
the
alteration,
shortages,
modificationsorreplacements
those
thatiscosmetic
functionality,
dents;
maybecoveredbytheir
connected
Television
User
WARRANTIES,
THIS
APPLICABLE
CONDITIONS
labour
are
above,
moisture,
improper
retention
images
controlofTCl,
authorizedbyTCltoservice
discardedorlost
productsorservice
made
necessarybythe
modificationstothe
number
causedbyfailuretofollow
manualsorguidesasto
TELEVISION,
CONDITIONS
ARE
THE
SUCH
TERMOFTHIS
charges
systems
problems
your
responsibility.
defectsinmaterials
anddonot
made
liquids,
24/7
applications,
operation,
normal
caused
and/or
causeorevent,
including
power
failures,
lightning,
maintenance;
onlyordoes
suchaswear
accessory
third
simultaneous
equipment;
not
approvedinwriting
the
TOSHIBA
have
CONDITIONS
HEREBY
LAW,
EXCLUSIONOFANY
AND
IMPLIED
ARE
accesstothe
for
set
controls,
are
not
caused
extend
necessary
improper
wear
other
items
own
party
been
ALL
INCLUDING
AND
AND
DISCLAIMED
STATUTORY
WARRANTIES,
OTHERWISE
and
covered
by
to:
by
dust,
dirt,
and
by
phosphor
act
or
fire,
power
electrical
by
parts,
the
not
and
(such
made
products;
use
of
use
or
label
defaced
usage
OTHER
AND
FITNESS
EXPRESS
or
WRITTEN
PRECLUDEDBYLAW,
WRITTEN
DISCLAIMS
REPRESENTATION
WHETHER
THEIR
ORALLYORIN
ANY
ADVERTISEMENT,
YOU
INSTRUCTIONSINTHE
OR
MANUALS.IFYOU
MAY
DAMAGE.
SERVICE
RESULTOFANY
USAGE
APPLY
TELEVISIONISOPENED,
PERSONS
SERVICEORREPAIR
IF
THE
ABOVE,
REPAIRORREPLACEMENTOFTHE
NO
EVENT
AFFILIATES,
LIABLETOYOUORANY
DAMAGES,
EXPENSES.
MONEY,
KIND
INDIRECT
PERSON,
INCONVENIENCEOROTHER
EXEMPLARYORCONSEQUENTIAL
FOR
or
TORT
UNDER
WHETHER
USE
PARTIES
SUCH
PARTY.
No
person,
authorizedtochange,
warrantiesinany
Arbitration
To
the
controversyordisagreement
breachofcontract,
statuteorunder
of
the
(i)
this
representations,
advertising,
LIMITED
WARRANTY
MADEBYTCL,
AFFILIATES,
BROCHURE,
MUST
READ
NOT
FUNCTION
THIS
THATISREQUIRED,INPARTORIN
INSTRUCTIONS.
AND
OTHER
TELEVISION
YOUR
Will
REIMBURSEMENT,
WHATSOEVER
DAMAGES,
lOST
BREACHOFWARRANTY,
(INCLUDING
ANY
ARISING
THE
TELEVISION,
HAS
DAMAGESOROF
agent,
extent
Related
warranty;
WARRANTY.TOTHE
STATUTORYOROTHERWISE,
SUPERCEDES
ANY
OTHER
WRITING
WARRANTY
FAilURETOFOllOW
SHAllBEVOID
SOLE
TCl,
ADRsORASPs
MONEY,
THIS
LIMITATION
PROFITS,
OTHER
BEEN
manner
and
Dispute
not
precludedbylaw,
any
Parties
(ii)
statements,
announcement,
WARRANTY,
NOT
STATEDINTHIS
ADRs
AND
(INCLUDING
PRESS
POINTOFSALE
AND
THAN
distributor,
RELEASE,
FOllOW
APPLICABLE
FAilTODO
PROPERLY
THIS
SERVICED,ORREPAIRED
THOSE
THE
TELEVISION.
FAilSTOWORKASWARRANTED
AND
EXCLUSIVE
TOSHIBA
THIRD
REIMBURSEMENT,
INCLUDING
DAMAGETOPROPERTY
lOST
NEGLIGENCE),
LAWORFORMORACTION,
OUTOFTHE
EVENIFANYOFTHE
ADVISEDOFTHE
ANY
modifyorextend
whatsoever.
Resolution
tort
(including
other
laworformofaction)
arising
the
Television;
TOSHIBA
ASPs
All
AND
Will
WARRANTY
AND
UNENFORCEABLEIFTHE
AUTHORIZEDBYTCl
CORPORATION,
(THE
PARTY
APPLIESTODAMAGES,
COSTSOREXPENSESOFANY
SAVINGS,
SPECIAL,
BREACHOFCONTRACT,
CLAIMBYANY
dealerorcompany
(whether
out
of,orotherwise
brochures,
pointofsale
EXTENT
AND
CONDITION
WARRANTY,
CORPORATION,
AND
WHETHER
ANY
ANNOUNCEMENT,
DISPLAY,
SET-UP
USER
SO,
THIS
YOU
NOT
COVER
THE
REMEDY
DEFECTIVE
"RELATED
FOR
COSTS
ANY
DIRECT
INCIDENTAL,
DAMAGES,
UNDERASTATUTE
USEOFOR
POSSIBILITY
the
any
claim,
for
breachofwarranty,
negligence),
(iii)
any
oralorwritten
press
display,
NOT
SPECIFICALLY
STATEMENT
ETC.).
AND
GUIDES
TELEVISION
MAY
SUFFER
ANY
WHOLE,ASA
SET-UP
DOES
SHAll
PART.
THEIR
PARTIES")
ANY
OR
OR
OR
WHETHER
OR
INABILITY
RELATED
OTHER
is
termsofthese
dispute,
under
against
relating
releases,
or
THIS
OR
MADE
IN
USAGE
AND/
AND
NOT
BY
TO
BE
M
BE
OR
TO
OF
a
any
to:
I
26
Page 27
promotional
relationships
claims,
collectively
and
resolvedbyfinal
of
the
to
waive
participateinany
the
Related
applicable
agreetoopt
proceedings.
the
forum
TCl.
conductedbyone
relatingtoarbitration
which
extent
disagreementofany
with
any
TCl.
Critical
The
Television
"critical
support
implanted
nuclear
Television
or
catastrophic
IF
THE
CRITICAL
ITS
AFFILIATES,
RESPONSIBILITY
RIGHTTOREFUSETOSERVICE
A
CRITICAL
AND
ASPs
DAMAGES
SERVICEORREFUSALTOSERVICE
AND
FURTHER
CONSEQUENCES
RESULT
CRITICAL
General
If
andtothe
should
unenforceable
and
deemed
provisionsofthis
enforceable.Ifandtothe
limited
foundtobe
(the
"Excluded
tobeseveredorexcluded
provision
respectofthe
material
that
disputes
referredtoas
courts).Tothe
any
right
Parties
andtothe
outofany
andinthe
Failing
such
you
resideatthe
not
precludedbylaw,noclaim,
Disputebyyou,
Applications
applications."
systems,
medical
facilitiesorsystemsorany
failure
CUSTOMER
APPLICATION,
APPLICATION.
HEREBY
AND
FROM
APPLICATIONS,
Provisions
extent
generallybefoundtobe
nottoform
warrantyasit
invalidorunenforceableinrespectofthat
shall
otherorremaining
relatingtothe
result
from
controversies
the
and
binding
extent
that
you
may
representativeorclass
relatingtoany
extent
not
such
Arbitrationofany
mannerasagreedtobetween
agreement,
arbitrator
generallyinforceinthe
time
other
person
without
you
have
purchasedisnot
"Critical
medical
devices,
could
property
ADRsORASPs-ASSUME
FOR
CONSEQUENCES
DISCLAIM
AND
THE
that
provision
warranty
Party")
remain
applications,
leadtoinjurytopersonsorlossoflife
damage.
USES
THE
THE
SUCH
DISCLAIM
ANY
DAMAGES
USEOFTHE
any
provisionofthis
shallbesevered
partofthe
shallbeand
extent
relatestoanyofthe
the
Excluded
from
valid.
enforceable
Television;
this
warranty,
and
"Dispute"),
arbitration
not
precludedbylaw,
havetocommence
Dispute.Ifand
precludedbylaw,
representativeorclass
Dispute
the
arbitration
pursuanttothe
that
the
maybejoinedorcombined
the
applications"
commercial
other
TELEVISIONINANY
CUSTOMER
USE.
ANY
TCl,
ITS
ANY
AND
TELEVISIONINANY
unenforceable,
warranty.
that
the
provision,
Related
(iv)
(the
foregoing
disagreements
shallbereferred
(to
the
proceeding
willbeconducted
will
be
laws
jurisdiction
Dispute
dispute,
prior
TCl
AND
ARISING
SUCH
All
THAT
any
Party
arises.Tothe
controversy
written
consent
designed
means
connections
transportation,
applications
AND
SOLE
RESERVES
TELEVISION
AFFILIATES,
All
LIABILITY,
OUTOFTHE
TELEVISION
LIABILITY,
MAY
ARISE
limited
the
from
the
The
remain
valid
provisionofthis
Related
shallbedeemed
and
and
applicable
Parties.
the
are
exclusion
you
agree
or
against
where
you
further
you
and
and
rules
in
of
for
any
life
to
where
NOT
TCl,
AND
FUll
THE
USED
ADRs
OR
warranty
warranty
remaining
and
Parties
is
party
the
in
to
IN
or
To
the
extent
permittedbylaw,
governed
Ontario.
If
thereisany
the
Televisionorin
the
other
prevail.
HowtoObtain
If,
in
after
manual,
visited
information,
TCl
Foratleast
the
Toshiba
chargeofno
source
copyofthe
source
thatwedistributedtoyouinthis
WMDRM
Content
management
intellectual
uses
content.Ifthe
content,
software's
content.
When
agree
licenses.
WMDRMtoaccess
upgrade,
requires
and
construedinaccordance
inconsistency
one
hand,
and
any
statementinthe
any
other
contextofthe
hand,
following
checked
www.toshiba.ca/support
Customer
this
product,
Consumer
code
code
owners
WMDRM
content
you
that
the
promotionorsale
the
provisionsofthis
Warranty
allofthe
the
"Troubleshooting"
you
find
that
Support
three
more
distribution,acomplete
complete
for
End
technology
property,
abilitytouse
Revocation
download
Microsoft
Content
you
will
upgrade.
toll
(3)
years
Toshiba
Solutionsat(800)
than
corresponding
the
versionofthe
User
Notice
use
Windows
including
softwaretoaccess
WMDRM
owners
does
licenses
may
owners
their
notbeabletoaccess
this
limited
warranty
with
the
between
document
Services
operating
serviceisneeded,
freeat1
from
will
our
costofphysically
(WMDRM)toprotect
software
may
WMDRMtoplayorcopy
not
includearevocation
may
content.Ifyou
this
limited
packagingofthe
enclosed
of,
the
Television,onthe
limited
warranty
instructionsinthis
section,
for
additional
800
268-3404.
the
dateofdistribution
givetoanyone
631-3811,
machine-readable
GPl
GPl
and
product.
Media
digital
copyrights.
WMDRM-protected
failstoprotect
ask
Microsofttorevoke
affect
unprotected
for
protected
require
youtoupgrade
decline
content
with,orused
please
who
and
lGPl
rights
This
content,
shall
laws
of
warranty,
shall
and
have
contact
contacts
for
a
performing
lGPl
code
their
device
the
the
protected
content.
you
list
with
the
an
that
be
on
in
of
27
I
Page 28

TOSHIBA
Corporate Headquarters: 9740 IRVINE
VISUAL PRODUCTS SERVICE AND
AMERICA
SUPPORT:
BLVD,
IRVINE, CA 92618
1420-B TOSHIBA DRIVE, LEBANON,TN37087, U,S,A,
INFORMATION
SYSTEMS.
INC.
TOSHIBA
HEAD OFFICE
MANUFACTURED
TOSHIBA
AutoView, ColorStream, GameTimer and TheaterWide are registered trademarks of Toshiba America Information Systems,
Inc,
Channel Browser, ClearFrame, DynaLight, ColorMaster, NET
America Information Systems, Inc,
PRINTEDINMEXICO
(11-02)
191
OF
McNABB
BY
CANADA
STREET,
ELECTROMEX,
LTD.
MARKHAM, ONTARIO,
S.A.
DE
L3R
8H2, CANADA
C.V.
TV,
SurfLock and TheaterLock are trademarks of Toshiba
Page 29

Integrated High Definition
LCD Television
42SL417U
46SL417U
55SL417U
For an overview of steps for setting up your new TV, see page 11.
Note: To display a High Definition picture, the TV must be receiving a
High Definition signal (such as an over-the-air High Definition TV
broadcast, a High Definition digital cable program, or a High
Definition digital satellite program). For details, please contact your
TV antenna installer, cable provider, or satellite provider.
© 2011 TOSHIBA CORPORATION
All Rights Reserved
Owner’s Record
The model number and serial number are on the back
and side of your TV. Record these numbers in the
spaces below. Refer to these numbers whenever you
communicate with your Toshiba dealer about this TV.
www.support.toshiba.com
Model number:
Serial number:
TD/M
VX1A00205000
Page 30
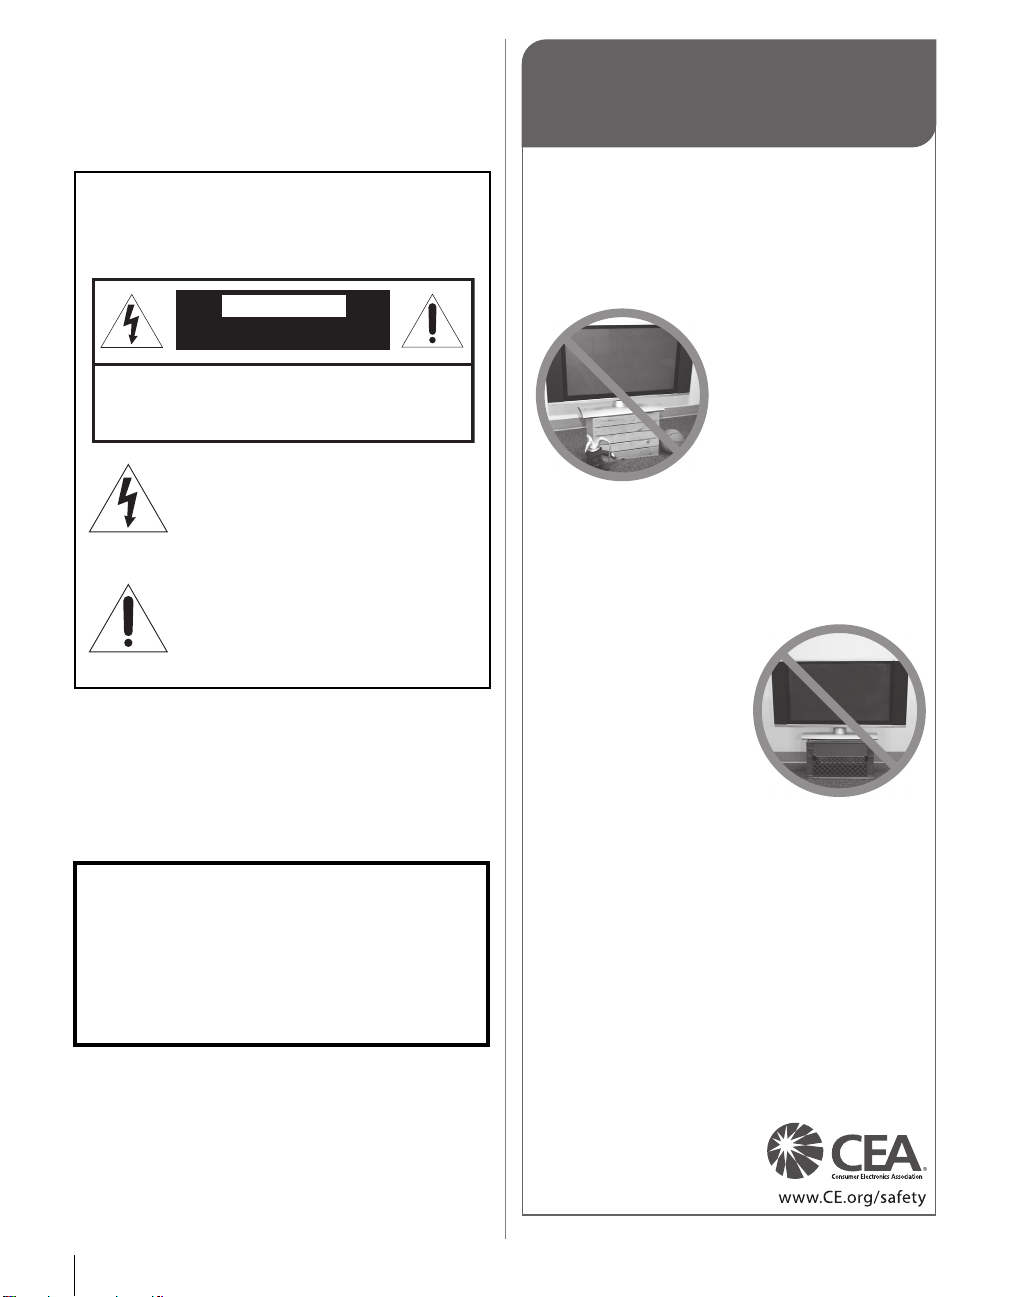
Dear Customer,
Thank you for purchasing this Toshiba LCD TV. This
manual will help you use the many exciting features of your
new LCD TV. Before operating your LCD TV, please
read this manual completely, and keep it nearby for
future reference.
Safety Precautions
WARNING: TO REDUCE THE RISK OF FIRE OR
ELECTRIC SHOCK, DO NOT EXPOSE THIS
APPLIANCE TO RAIN OR MOISTURE.
WARNING
RISK OF ELECTRIC SHOCK
DO NOT OPEN.
WARNING: TO REDUCE THE RISK OF ELECTRIC
SHOCK, DO NOT REMOVE COVER (OR BACK).
NO USER-SERVICEABLE PARTS INSIDE. REFER
SERVICING TO QUALIFIED SERVICE PERSONNEL.
The lightning flash with arrowhead
symbol, within an equilateral triangle, is
intended to alert the user to the presence
of uninsulated “dangerous voltage” within
the product’s enclosure that may be of
sufficient magnitude to constitute a risk of
electric shock to persons.
The exclamation point within an
equilateral triangle is intended to alert the
user to the presence of important
operating and maintenance (servicing)
instructions in the literature
accompanying the appliance.
WARNING
To prevent injury, this apparatus must be securely
attached to the floor/wall in accordance with the
installation instructions. See item 26 on p. 4 and
instructions on p. 5.
If television is not positioned in a sufficiently stable
location, it can be potentially hazardous due to falling.
WARNING: If you decide to wall mount this
television, always use a UL Listed wall bracket
appropriate for the size and weight of this television.
The use of any wall bracket other than a UL Listed wall
bracket appropriate for the size and weight of this
television for wall mounting this television could result
in serious bodily injury and/or property damage. See
“Removing the Pedestal Stand” (- p. 6).
NOTE TO CATV INSTALLERS
This is a reminder to call the CATV system installer’s
attention to Article 820-40 of the U.S. NEC, which provides
guidelines for proper grounding and, in particular, specifies
that the cable ground shall be connected to the grounding
system of the building, as close to the point of cable entry
as practical. For additional antenna grounding information,
see items 34 and 35 on p. 4.
CHILD SAFETY:
It Makes A Difference How and Where You Use Your Flat
Panel Display
Congratulations on your purchase! As you enjoy your
new product, please keep these safety tips in mind:
The Issue
• The home theater entertainment experience is a growing trend
and larger flat panel displays are popular purchases. However,
flat panel displays are not always supported on the proper stands
or installed according to the manufacturer’s recommen
• Flat panel displays that are inappropriately
situated on dressers, bookcases,
shelves, desks, speakers, chests or
carts may fall over and cause
injury.
TOSHIBA Cares!
• The consumer electronics industry
is committed to making home
entertainment enjoyable and safe.
Tune Into Safety
•
One size does NOT fit all. Follow the manufacturer’s recommendations
for the safe installation and use of your flat panel display.
• Carefully read and understand all enclosed instructions for
proper use of this product.
• Don’t allow children to climb on or play with furniture and
television sets.
• Don’t place flat panel displays on furniture
that can easily be used as steps, such
as a chest of d
• Remember that children can
become excited while watching a
program, especially on a “larger
than life” flat panel display. Care
should be taken to place or install
the display where it cannot be
pushed, pulled over, or knocked down.
• Care should be taken to route all cords and
cables connected to the flat panel display so that they cannot be
ulled or grabbed by curious children.
p
rawers.
Wall Mounting: If you decide to wall mount your
flat panel display, always:
• Use a mount that has been recommended by the display
manufacturer and/or listed by an independent laboratory (such
as UL, CSA, ETL).
• Follow all instructions supplied by the display and wall mount
manufacturers.
• If you have any doubts about your ability to safely install your
flat panel display, contact your retailer about p
installation.
• Make sure that the wall where you are mounting the display is
appropriate. Some wall mounts are not designed to be mounted
to walls with steel studs or old cinder block construction. If you
are unsure, contact a professional installer.
• A minimum of two people are
ed for installation. Flat panel
requir
displays can be heavy.
dations.
rofessional
2
Page 31

Wide blade
Important Safety Instructions
1) Read these instructions.
2) Keep these instructions.
3) Heed all warnings.
4) Follow all instructions.
5) Do not use this apparatus near water.
6) Clean only with dry cloth.
7) Do not block any ventilation openings. Install in
accordance with the manufacturer’s instructions.
8) Do not install near any heat sources such as
radiators, heat registers, stoves, or other apparatus
(including amplifiers) that produce heat.
9) Do not defeat the safety purpose of
the polarized or grounding type
plug. A polarized plug has two blades
with one wider than the other.
A grounding type plug has two blades
and a third grounding prong. The wide blade or the third
prong are provided for your safety. If the provided plug
does not fit into your outlet, consult an electrician for
replacement of the obsolete outlet.
10) Protect the power cord from being
walked on or pinched, particularly at plugs,
convenience receptacles, and the point
where they exit from the apparatus.
11) Only use attachments/accessories specified by the
manufacturer.
12) Use only with the cart, stand, tripod,
bracket, or table specified by the
manufacturer, or sold with the
apparatus. When a cart is used, use
caution when moving the cart/apparatus
combination to avoid injury from tip-over.
13) Unplug this apparatus during lightning storms or
when unused for long periods of time.
14) Refer all servicing to qualified service personnel.
Servicing is required when the apparatus has been
damaged in any way, such as power-supply cord or plug
is damaged, liquid has been spilled or objects have fallen
into the apparatus, the apparatus has been exposed to
rain or moisture, does not operate normally, or has been
dropped.
Additional Safety Precautions
14a) CAUTION: If the TV is dropped and the cabinet or
enclosure surface has been damaged or the TV does
not operate normally, take the following precautions:
• ALWAYS turn off the TV and unplug the power cord
to avoid possible electric shock or fire.
• NEVER allow your body to come in contact with any
broken glass or liquid from the damaged television.
The LCD panel inside the TV contains glass and a
toxic liquid. If the liquid comes in contact with your
mouth or eyes, or your skin is cut by broken glass,
rinse the affected area thoroughly with water and
consult your doctor.
• ALWAYS contact a service technician to inspect the
TV any time it has been damaged or dropped.
15) CAUTION:
• To reduce the risk of electric shock, do not use the
polarized plug with an extension cord, receptacle, or
other outlet unless the blades can be inserted
completely to prevent blade exposure.
• To prevent electric shock, match wide blade of plug
to wide slot; fully insert.
16) CAUTION:
Do not let children swallow the product or play with the
plastic bag. Keep the product and the plastic bag out of
the reach of children.
17) CAUTION:
Do not let water or other liquids come into contact with
the product, as it may result in damage.
18) WARNING:
• To prevent the spread of fire, keep candles or other
open flames away from this product at all times.
• Keep the product away from direct sunlight, fire or a
heat source such as a heater. This may reduce the
product lifetime or result in fire.
Installation, Care, and Service
Installation
Follow these recommendations and precautions and heed
all warnings when installing your TV:
19) WARNING: NEVER expose batteries to
excessive heat such as sunshine, fire, or
the like.
20) ALWAYS plug the product into an outlet that is located in
such a manner that it can be easily unplugged in case the
product requires service.
21) NEVER route the product’s power cord inside a wall or
similar enclosed area.
22) Never modify this equipment. Changes or modifications
may void: a) the warranty, and b) the user’s authority to
operate this equipment under the rules of the Federal
Communications Commission.
23) DANGER: RISK OF SERIOUS
PERSONAL INJURY,
DEATH, OR EQUIPMENT
DAMAGE!
Never place the TV on an unstable cart,
stand, or table. The TV may fall, causing
serious personal injury, death, or serious damage to the
TV.
24) To avoid damage to this product, never place or store the
TV in direct sunlight; hot, humid areas; or areas subject to
excessive dust or vibration.
25) Never place the TV in an unstabilized location such as on
a shaky table, incline or location subject to vibration.
• Only use cabinets fit for such purpose or stands
recommended by the manufacturer of the TV.
• Only use furniture that can safely support the TV.
3
Page 32

26) Always place the TV on the floor or a sturdy, level, stable
TV back
Mounting screw
(supplied)
Screw hole
TV side
TV top
4"
min.
Securement
Clip (supplied)
Sturdy strap (as short as possible)
Hooks
Securement
Clip (supplied)
Ground clamp
Antenna discharge unit
(NEC Section 810-20)
Grounding conductors
(NEC Section 810-21)
Power service grounding
electrode system (NEC Art 250 Part-H)
Ground clamps
Antenna lead-in wire
Electric service equipment
27) Never stand or climb on the TV.
28) The apparatus shall not be exposed to dripping or
29) Never block or cover the slots or openings in the TV
• Ensure that the TV is not hanging over the edge of the
supporting furniture.
• Never place the TV on tall furniture (for example,
cupboards or bookcases) without anchoring both the
furniture and the TV to a suitable support
• Never stand the TV on cloth or other material placed
between the TV and supporting furniture.
The TV may drop or fall off which may cause an injury or
damage.
surface that can support the weight of the unit. In order to
maintain stability and prevent the TV from falling over,
secure the TV by either of the methods below:
• Secure the TV with the supplied mounting screw.
(recommended)
Place the TV on a sturdy surface that has a sufficient
thickness and screw the unit on the surface securely
by using the mounting screw and the fall-prevention
screw hole.
• Secure the TV with the securement clip and a sturdy
strap from the hooks on the rear of the TV pedestal
to a wall stud, pillar, or other immovable structure.
Make sure the strap is tight, secure, and parallel to
the floor.
• Educate children about the dangers
of climbing on furniture to reach the
TV or its controls.
Be especially careful in households
with children to prevent them from
climbing on top of the TV. It may move,
fall over, break, become damaged or cause an injury.
splashing, and that no objects filled with liquids, such as
vases, shall be placed on the apparatus.
cabinet back, bottom, and sides. Never place the TV:
• on a bed, sofa, rug, or similar
surface;
• too close to drapes, curtains,
or walls; or
• in a confined space such as a
bookcase, built-in cabinet, or
any other place with poor
ventilation.
4
The slots and openings are provided to protect the TV
from overheating and to help maintain reliable operation
of the TV. Leave a space of at least 4 (four) inches
around the TV.
30) Always place the back of the television at least 4 (four)
inches away from any vertical surface (such as a wall) to
allow proper ventilation.
31) Never allow anything to rest on or roll over the power
cord, and never place the TV where the power cord is
subject to wear or abuse.
32) Never overload wall outlets and extension cords.
33) Always operate this equipment from a 120 VAC, 60 Hz
power source only.
34) Always make sure the antenna system is properly
grounded to provide adequate protection against voltage
surges and built-up static charges (see Section 810 of the
National Electric Code).
35)
DANGER: RISK OF SERIOUS
PERSONAL INJURY OR DEATH!
• Use extreme care to make sure you are never in a
position where your body (or any item you are in
contact with, such as a ladder or screwdriver) can
accidentally touch overhead power lines. Never
locate the antenna near overhead power lines or
other electrical circuits.
• Never attempt to install any of the following during
lightning activity: a) an antenna system; or b) cables,
wires, or any home theater component connected to
an antenna or phone system.
Care
For better performance and safer operation of your TOSHIBA
TV, follow these recommendations and precautions:
36) If you use the TV in a room whose temperature is 32 °F
(0 °C) or below, the picture brightness may vary until the
LCD warms up. This is not a sign of malfunction.
37) Always unplug the TV before
cleaning. When cleaning your
TV, please first remove any dirt or
dust from the surface. Gently
wipe the cabinet and the display
panel surface (the TV screen)
with a dry, soft cloth (cotton, flannel, etc.). Harsh rubbing
or use of a dirty or stiff cloth will scratch the TV surface.
Avoid contact with alcohol, thinner, benzene, acidic or
alkaline solvent cleaners, abrasive cleaners, or chemical
cloths, which may damage the TV surface. Never spray
Page 33

volatile compounds such as insecticide on the TV
surface. Such products may damage or discolor the TV.
38) Never hit, press, or place anything on the back cover.
These actions will damage internal parts.
39)
Never spill liquids or push objects of any kind into the TV
cabinet slots.
40) During a lightning storm, do not touch the connecting
cables or TV set.
41) For added protection of your TV from lightning and power
surges, always unplug the power cord and disconnect
the antenna from the TV if you leave the TV unattended or
unused for long periods of time.
42) ALWAYS unplug the TV to completely disconnect from
main power. When the TV is turned off using the on/off
switch, it is not completely disconnected from power and
a minute amount of current is still consumed.
43) During normal use, the TV may make occasional
snapping or popping sounds. This is normal, especially
when the unit is being turned on or off. If these sounds
become frequent or continuous, unplug the power cord
and contact a Toshiba Authorized Service Provider.
44) WARNING: RISK OF
SERIOUS PERSONAL
INJURY OR EQUIPMENT
DAMAGE!
Never strike the screen with a sharp
or heavy object.
45) • The LCD screen of this product can be damaged by
ultraviolet radiation from the sun. When selecting a
location for the television, avoid locations where the
screen may be exposed to direct sunlight, such as in
front of a window.
• Never touch, press, or place anything on the LCD
screen. These actions will damage the LCD screen. If
you need to clean the LCD screen, follow the
instructions in item 37 on p. 4.
WARNING:
RISK OF ELECTRIC SHOCK!
Service
46)
Never attempt to service the TV yourself. Opening and
removing the covers may expose you to dangerous
voltage or other hazards. Failure to follow this
WARNING may result in death or serious injury. Refer all
servicing not specified in this manual to a Toshiba
Authorized Service Provider.
WARNING:
RISK OF ELECTRIC SHOCK!
47) If you have the TV serviced:
• Ask the service technician to use only replacement
parts specified by the manufacturer.
• Upon completion of service, ask the service
technician to perform routine safety checks to
determine that the TV is in safe operating condition.
Choosing a location for your LCD TV
To Display your LCD TV on the included Pedestal
Stand:
Observe the following safety precautions:
1) Read and Follow the pedestal assembly instructions
included with the pedestal.
CAUTION: Before beginning pedestal assembly,
carefully lay the front of the LCD Panel face down on a
flat, cushioned surface such as a quilt or blanket.
Leave the bottom of the unit protruding over the edge
of the surface and assemble the pedestal as indicated
below.
Note: Extreme care should always be used when
attaching the pedestal stand to avoid damage to the
LCD panel.
2) Place the TV on a sturdy, level surface that can support
the weight of the TV.
3) Be sure to secure the TV to a wall stud, pillar, surface,
or other immovable structure. To secure the TV in this
manner: (1) attach the provided securement clip to an
immovable structure, then (2) pass a sturdy strap
through the securement clip and attach each end to
the hooks located on the back of the TV. Be sure to
leave at least 4 inches between the TV and the wall or
similar structure for ventilation. See item 26, p. 4 for
additional details.
To Display your LCD TV using a Wall Bracket:
If you decide to wall mount your LCD TV, always use a UL
Listed wall bracket appropriate for the size and weight of
the LCD TV (- p. 2) :
CAUTION:
1. Two people are required for installation.
2. Never use the screws attached to the TV.
3. To install a wall-mount from another manufacturer, use
the enclosed SPACERS.
1) Unplug and remove any cables and/or other
component connectors from the rear of the TV.
2) Carefully lay the front of the unit face down on a flat,
cushioned surface such as a quilt or blanket.
3) Follow the instructions provided with your wall
bracket. Before proceeding, make sure the
appropriate bracket(s) are attached to the wall and the
back of the TV as described in the instructions
provided with the wall bracket.
4) Make sure to place the spacers provided with the TV
between the bracket and the back of the TV.
5) Always use the screws supplied or recommended by
the wall mount manufacturer.
5
Page 34

Removing the Pedestal Stand
1. Remove the four screws.
(Do not use these for attaching
a wall bracket.)
2. Place the four spacers (supplied).
Screw
Wall bracket
Spacer (supplied)
TV back panel
Seven screws
1) Carefully lay the front of the unit face down on a flat,
cushioned surface such as a quilt or blanket. Leave the
stand protruding over the edge of the surface.
Note: Extreme care should always be used when
removing the pedestal stand to avoid damage to the
LCD panel.
2) Remove the seven screws.
3) Once you have removed all
seven screws holding the
pedestal stand in place, remove
the pedestal stand from the TV
by sliding the pedestal stand
away from the TV.
USA - Federal Communications
Commission Statement
FCC Compliance Statement
Toshiba television models 42SL417U, 46SL417U, and
55SL417U comply with Part 15 of the FCC Rules.
Operation is subject to the following two conditions:
(1) This device may not cause harmful interference, and
(2) This device must accept any interference received,
including interference that may cause undesired operation.
The party responsible for compliance to these rules is:
Toshiba America Information Systems, Inc.
9740 Irvine Blvd., Irvine, CA 92618.
Ph: 1-800-631-3811
Interference: This equipment has been tested and found
to comply with the limits for a Class B digital device,
pursuant to Part 15 of the FCC Rules. These limits are
designed to provide reasonable protection against harmful
interference in a residential installation.
This equipment generates, uses, and can radiate radio
frequency energy and, if not installed and used in
accordance with the instructions, may cause harmful
interference to radio communications. However, there is
no guarantee that interference will not occur in a particular
installation. If this equipment does cause harmful
interference to radio or television reception, which can be
determined by turning the equipment off and on, the user
is encouraged to try to correct the interference by one of
the following measures:
•Reorient or relocate the receiving antenna.
•Increase the separation between the equipment and
receiver.
•Connect the equipment into an outlet on a circuit
different from that to which the receiver is connected.
• Consult the dealer or an experienced radio/TV technician
for help.
6
Wireless Radio
For product available in the USA/Canada market, only
channel 1–11 can be operated. Selection of other channels is
not possible.
The device could automatically discontinue transmission
in case of absence of information to transmit, or operational
failure. Note that this is not intended to prohibit
transmission of control or signaling information or the use
of repetitive codes where required by the technology.
If this device is going to be operated in 5.15–5.25GHz
frequency range, then it is restricted to an indoor
environment only.
Important: Any changes or modifications not expressly
approved by the party responsible for compliance could
void the user's authority to operate this equipment.
This device and its antenna(s) must not be co-located or
operating in conjunction with any other antenna or
transmitter.
FCC Radiation Exposure Statement: This equipment
complies with FCC radiation exposure limits set forth for an
uncontrolled environment. This equipment should be
installed and operated with minimum distance 20 cm
between the radiator & your body.
Page 35

Canada - Industry Canada Statement
This device complies with RSS-210.
Operation is subject to the following two conditions:
(1) This device may not cause harmful interference, and
(2) This device must accept any interference received,
including interference that may cause undesired operation
of the device.
This device and its antenna(s) must not be co-located or
operating in conjunction with any other antenna or
transmitter.
Wireless Radio
For product available in the USA/Canada market, only
channel 1–11 can be operated. Selection of other channels is
not possible.
The device could automatically discontinue transmission
in case of absence of information to transmit, or operational
failure. Note that this is not intended to prohibit
transmission of control or signaling information or the use
of repetitive codes where required by the technology.
Important: Any changes or modifications not expressly
approved by the party responsible for compliance could
void the user's authority to operate this equipment.
IMPORTANT NOTE:
IC Radiation Exposure Statement: This equipment
complies with IC RSS-102 radiation exposure limits set
forth for an uncontrolled environment. This equipment
should be installed and operated with minimum distance
20 cm between the radiator & your body.
ENERGY STAR® User Information
ENERGY STAR User Information Statement: the factory
default settings of this television meet ENERGY STAR
requirements. Enabling or changing certain features and
functionality (e.g. Picture Settings, Auto Brightness Sensor)
may increase energy consumption, possibly beyond the
limits required for ENERGY STAR qualification.
To ensure your television is operating at optimal energy
efficiency, select [Home] mode during initial activation. To
return to [Home] mode settings, select [AutoView] picture
mode, and set Auto Brightness Sensor to [On] mode.
[AutoView] mode is recommended for normal home use.
For more information, see p. 48.
ENERGY STAR® qualified TV. Products that
earn the ENERGY STAR prevent green house
gas emissions by meeting strict guidelines set
by the U.S. Environmental Protection Agency.
ENERGY STAR and the ENERGY STAR mark
are registered U.S. marks.
®
Important notes about your LCD TV
The following symptoms are technical limitations of
LCD Display technology and are not an indication of
malfunction; therefore, Toshiba is not responsible for
perceived issues resulting from these symptoms.
1) An afterimage (ghost) may appear on the screen if a
fixed, non-moving image is displayed for a long period
of time. The afterimage is not permanent and will
disappear in a short period of time.
2) The LCD panel contained in this TV is manufactured
using an extremely high level of precision technology;
however, there may be an occasional pixel (dot of light)
that does not operate properly (does not light, remains
constantly lit, etc.). This is a structural property of LCD
technology, is not a sign of malfunction, and is not
covered under your warranty. Such pixels are not
visible when the picture is viewed from a normal
viewing distance.
Note: Interactive video games that involve shooting a
“gun” type of joystick at an on-screen target may not work
with this TV.
7
Page 36

Trademark Information
®
• Manufactured under license from Dolby
• Audyssey Dynamic Volume
• Manufactured under license from Audyssey Laboratories.
U.S. and foreign patents pending. Audyssey EQ and
Audyssey Dynamic Volume are registered trademarks of
Audyssey Laboratories.
• HDMI, the HDMI Logo, and High-Definition
Multimedia Interface are trademarks or registered
trademarks of HDMI Licensing LLC in the United States and
other countries.
• Blu-ray Disc
the Blu-ray Disc Association.
• INSTAPORT
Silicon Image, Inc. in the United States and other countries.
• MPEG Layer-3 audio coding technology licensed from
Fraunhofer IIS and Thomson.
•DLNA
are registered trademarks, trademarks, service marks, or
certification marks of the Digital Living Network Alliance.
• VUDU is a trademark of VUDU, Inc .
• YouTube is a registered trademark of Google, Inc.
• Netflix is a registered trademark of Netflix, Inc.
• Yahoo! is a registered trademark of Yahoo! Inc.
• CinemaNow is a registered trademark of Best Buy, Inc.
• Pandora is a registered trademark of Pandora Media, Inc.
• Blockbuster is a registered trademark of Blockbuster, Inc.
• This product contains Adobe
under license from Adobe Systems Incorporated. Copyright
© 1995-2009 Adobe Systems Incorporated. All rights
reserved. Adobe and Flash are trademarks of Adobe
Systems Incorporated.
• This product contains technology subject to certain
intellectual property rights of Microsoft. Use or distribution
of this technology outside of this product is prohibited
without the appropriate license(s) from Microsoft.
• This product includes technology owned by Microsoft
Corporation and can not be used or distributed without a
license from Microsoft Licensing, GP.
• THIS PRODUCT IS LICENSED UNDER THE AVC PATENT
PORTFOLIO LICENSE FOR THE PERSONAL AND NONCOMMERCIAL USE OF A CONSUMER TO (i) ENCODE
VIDEO IN COMPLIANCE WITH THE AVC STANDARD
(“AVC VIDEO”) AND/OR (ii) DECODE AVC VIDEO THAT
WAS ENCODED BY A CONSUMER ENGAGED IN A
PERSONAL AND NON-COMMERCIAL ACTIVITY AND/OR
WAS OBTAINED FROM A VIDEO PROVIDER LICENSED
TO PROVIDE AVC VIDEO. NO LICENSE IS GRANTED OR
Laboratories.
Dolby and the double-D symbol are registered
trademarks of Dolby Laboratories.
®
controls volume
levels to eliminate loud spikes and raise soft
dialog for more enjoyable television and movie
viewing. Audyssey EQ
®
provides clear,
accurate and natural sound right out of the
box. Together, these technologies ensure you
enjoy your audio experience as much as your
video.
™
, Blu-ray™, and the logos are trademarks of
™
and INSTAPORT logo are trademarks of
®
, DLNA® Certification Logo, and DLNA CERTIFIED™
®
Flash® Player software
SHALL BE IMPLIED FOR ANY OTHER USE. ADDITIONAL
INFORMATION MAY BE OBTAINED FROM MPEG LA,LLC.
SEE HTTP://WWW.MPEGLA.COM
• THIS PRODUCT IS LICENSED UNDER THE VC-1 PATENT
PORTFOLIO LICENSE FOR THE PERSONAL AND NONCOMMERCIAL USE OF A CONSUMER TO (i) ENCODE
VIDEO IN COMPLIANCE WITH THE VC-1 STANDARD
(“VC-1 VIDEO”) AND/OR (ii) DECODE VC-1 VIDEO THAT
WAS ENCODED BY A CONSUMER ENGAGED IN A
PERSONAL AND NON-COMMERCIAL ACTIVITY AND/OR
WAS OBTAINED FROM A VIDEO PROVIDER LICENSED
TO PROVIDE VC-1 VIDEO. NO LICENSE IS GRANTED OR
SHALL BE IMPLIED FOR ANY OTHER USE. ADDITIONAL
INFORMATION MAY BE OBTAINED FROM MPEG LA,LLC.
SEE HTTP://WWW.MPEGLA.COM
• THIS PRODUCT IS LICENSED UNDER THE MPEG-4
VISUAL PATENT PORTFOLIO LICENSE FOR THE
PERSONAL AND NON-COMMERCIAL USE OF A
CONSUMER FOR (i) ENCODING VIDEO IN COMPLIANCE
WITH THE MPEG-4 VISUAL STANDARD (“MPEG-4
VIDEO”) AND/OR (ii) DECODING MPEG-4 VIDEO THAT
WAS ENCODED BY A CONSUMER ENGAGED IN A
PERSONAL AND NON-COMMERCIAL ACTIVITY AND/OR
WAS OBTAINED FROM A VIDEO PROVIDER LICENSED
BY MPEG LA TO PROVIDE MPEG-4 VIDEO. NO LICENSE
IS GRANTED OR SHALL BE IMPLIED FOR ANY OTHER
USE. ADDITIONAL INFORMATION INCLUDING THAT
RELATING TO PROMOTIONAL,INTERNAL AND
COMMERCIAL USES AND LICENSING MAY BE
OBTAINED FROM MPEG LA,LLC. SEE HTTP://
WWW.MPEGLA.COM
8
Page 37

Contents
Important Safety Instructions . . . . . . . . . . . . . . . . . . . . . . 3
Installation, Care, and Service . . . . . . . . . . . . . . . . . . . . . 3
Choosing a location for your LCD TV . . . . . . . . . . . . . . . . . 5
Chapter 1: Introduction. . . . . . . . . . . . . . . . . . . . . . . . . . .11
Features . . . . . . . . . . . . . . . . . . . . . . . . . . . . . . . . . . . . . . . . 11
Overview of installation, setup, and use . . . . . . . . . . . . 11
Front panel control . . . . . . . . . . . . . . . . . . . . . . . . . . . . . . 12
Back panel connections . . . . . . . . . . . . . . . . . . . . . . . . . . . 12
Bundling the cables . . . . . . . . . . . . . . . . . . . . . . . . . . . . . . 13
Chapter 2: Connecting your TV . . . . . . . . . . . . . . . . . . . . .14
Overview of cable types . . . . . . . . . . . . . . . . . . . . . . . . . . 14
About the illustrations . . . . . . . . . . . . . . . . . . . . . . . . . 14
Connecting to a Satellite dish, an Antenna, or Cable
TV . . . . . . . . . . . . . . . . . . . . . . . . . . . . . . . . . . . . . . . . . . 15
Connecting an HDMI® or DVI device to the HDMI
input . . . . . . . . . . . . . . . . . . . . . . . . . . . . . . . . . . . . . . . . 16
Connecting a VCR or DVD player with ColorStream®
(component video) . . . . . . . . . . . . . . . . . . . . . . . . . . . . 17
Connecting a digital audio system . . . . . . . . . . . . . . . . . 18
Using the TV remote and HDMI® CEC Control to
control other devices. . . . . . . . . . . . . . . . . . . . . . . . . . . 19
Connecting an HDMI audio system . . . . . . . . . . . . . . . . 19
Connecting a PC. . . . . . . . . . . . . . . . . . . . . . . . . . . . . . . . . 20
Connecting to a home network . . . . . . . . . . . . . . . . . . . . 21
Chapter 3: Using the remote control. . . . . . . . . . . . . . . . . .22
Controlling other devices . . . . . . . . . . . . . . . . . . . . . . . . . 22
Installing batteries . . . . . . . . . . . . . . . . . . . . . . . . . . . . . . . 22
Learning about the Remote Control . . . . . . . . . . . . . . . . 23
Chapter 4: Initial Setup and Menu . . . . . . . . . . . . . . . . . . .24
Initial Setup. . . . . . . . . . . . . . . . . . . . . . . . . . . . . . . . . . . . . 24
Navigating the menu system . . . . . . . . . . . . . . . . . . . . . . 25
Main menu layout . . . . . . . . . . . . . . . . . . . . . . . . . . . . . . . 26
Quick menu . . . . . . . . . . . . . . . . . . . . . . . . . . . . . . . . . . . . 27
Chapter 5: Setting up your TV . . . . . . . . . . . . . . . . . . . . . .28
Changing Initial settings. . . . . . . . . . . . . . . . . . . . . . . . . . 28
Menu language . . . . . . . . . . . . . . . . . . . . . . . . . . . . . . . 28
Local Time Setting. . . . . . . . . . . . . . . . . . . . . . . . . . . . . 28
Location . . . . . . . . . . . . . . . . . . . . . . . . . . . . . . . . . . . . . 28
ANT/CABLE IN . . . . . . . . . . . . . . . . . . . . . . . . . . . . . . 28
Storing channels in memory (optional) . . . . . . . . . . . . . 28
Auto Tuning. . . . . . . . . . . . . . . . . . . . . . . . . . . . . . . . . . 28
Manual Tuning . . . . . . . . . . . . . . . . . . . . . . . . . . . . . . . 29
Skipping channels . . . . . . . . . . . . . . . . . . . . . . . . . . . . . . . 29
Skipping video inputs . . . . . . . . . . . . . . . . . . . . . . . . . . . . 29
Labeling channels . . . . . . . . . . . . . . . . . . . . . . . . . . . . . . . 30
Labeling video inputs . . . . . . . . . . . . . . . . . . . . . . . . . . . . 30
Configuring shared inputs . . . . . . . . . . . . . . . . . . . . . . . . 30
Setting the Auto Input feature . . . . . . . . . . . . . . . . . . . . . 31
Chapter 6: Basic features . . . . . . . . . . . . . . . . . . . . . . . . .32
Tuning channels. . . . . . . . . . . . . . . . . . . . . . . . . . . . . . . . . 32
Setting the Channel Tuning Mode . . . . . . . . . . . . . . . 32
Tuning in to the next programmed channel . . . . . . . 32
Tuning in to a specific channel
(programmed or unprogrammed). . . . . . . . . . . 32
Using the Channel Browser™ . . . . . . . . . . . . . . . . . . . 32
Using Channel Return . . . . . . . . . . . . . . . . . . . . . . . . . 34
Using SurfLock
Selecting the video input to view . . . . . . . . . . . . . . . . . . 34
Using closed captions . . . . . . . . . . . . . . . . . . . . . . . . . . . . 35
Analog CC mode . . . . . . . . . . . . . . . . . . . . . . . . . . . . . . 35
Digital CC settings . . . . . . . . . . . . . . . . . . . . . . . . . . . . 35
™
. . . . . . . . . . . . . . . . . . . . . . . . . . . . . . 34
Setting the PIN code . . . . . . . . . . . . . . . . . . . . . . . . . . . . . 36
Entering a new PIN code . . . . . . . . . . . . . . . . . . . . . . . 36
Changing or deleting your PIN code . . . . . . . . . . . . . 36
Forgotten PIN code . . . . . . . . . . . . . . . . . . . . . . . . . . . . 36
Using parental controls . . . . . . . . . . . . . . . . . . . . . . . . . . . 36
Blocking TV programs and movies by rating
(V-Chip) . . . . . . . . . . . . . . . . . . . . . . . . . . . . . . . . .36
Downloading an additional rating system . . . . . . . . 37
Displaying ratings . . . . . . . . . . . . . . . . . . . . . . . . . . . . .38
Unlocking programs . . . . . . . . . . . . . . . . . . . . . . . . . . .38
Locking specific channels . . . . . . . . . . . . . . . . . . . . . . . . . 38
Locking video input . . . . . . . . . . . . . . . . . . . . . . . . . . . 38
Setting a time limit for games . . . . . . . . . . . . . . . . . . . 39
Locking the control panel . . . . . . . . . . . . . . . . . . . . . . . 39
Using HDMI
Controlling HDMI® CEC playback devices. . . . . . . . 40
HDMI® CEC Control input source selection . . . . . . . 40
Adjusting the amplifier’s audio. . . . . . . . . . . . . . . . . . 41
Other HDMI® CEC Control functions . . . . . . . . . . . . 41
Using the HDMI® settings feature. . . . . . . . . . . . . . . . . . 41
Viewing the HDMI® signal information. . . . . . . . . . . . . 41
Using your PC with the TV . . . . . . . . . . . . . . . . . . . . . . .42
Adjusting the image . . . . . . . . . . . . . . . . . . . . . . . . . . . 42
Setting the PC audio . . . . . . . . . . . . . . . . . . . . . . . . . . . 42
Setting the timer to turn on the TV . . . . . . . . . . . . . . . . . 42
Setting the sleep timer . . . . . . . . . . . . . . . . . . . . . . . . . . . . 43
Setting Automatic Power Down . . . . . . . . . . . . . . . . . . . 43
Setting No Signal Power Down . . . . . . . . . . . . . . . . . . . .43
Displaying TV status information . . . . . . . . . . . . . . . . . . 44
Viewing support information. . . . . . . . . . . . . . . . . . . . . . 44
Resetting to Factory Defaults . . . . . . . . . . . . . . . . . . . . . . 44
Power failure. . . . . . . . . . . . . . . . . . . . . . . . . . . . . . . . . . . . 44
®
CEC Control . . . . . . . . . . . . . . . . . . . . . . . 39
Chapter 7: Picture and sound controls . . . . . . . . . . . . . . . .45
Selecting the picture size. . . . . . . . . . . . . . . . . . . . . . . . . . 45
Scrolling the picture. . . . . . . . . . . . . . . . . . . . . . . . . . . . . . 47
Using the Auto Aspect feature . . . . . . . . . . . . . . . . . . . . . 47
Using the 4:3 Stretch . . . . . . . . . . . . . . . . . . . . . . . . . . . . . 47
Freezing the picture . . . . . . . . . . . . . . . . . . . . . . . . . . . . . . 47
Adjusting the picture. . . . . . . . . . . . . . . . . . . . . . . . . . . . . 48
Selecting the picture mode . . . . . . . . . . . . . . . . . . . . . . 48
Adjusting the picture quality . . . . . . . . . . . . . . . . . . . . 48
Using the advanced picture settings features . . . . . . . . 49
Edge Enhancer . . . . . . . . . . . . . . . . . . . . . . . . . . . . . . . .49
Dynamic Contrast . . . . . . . . . . . . . . . . . . . . . . . . . . . . . 49
DynaLight™ . . . . . . . . . . . . . . . . . . . . . . . . . . . . . . . . . . 49
Static Gamma . . . . . . . . . . . . . . . . . . . . . . . . . . . . . . . . .49
Film Stabilization . . . . . . . . . . . . . . . . . . . . . . . . . . . . . . 49
ClearFrame™. . . . . . . . . . . . . . . . . . . . . . . . . . . . . . . . . . 50
MPEG NR . . . . . . . . . . . . . . . . . . . . . . . . . . . . . . . . . . . . 50
DNR . . . . . . . . . . . . . . . . . . . . . . . . . . . . . . . . . . . . . . . . . 50
Auto Brightness Sensor. . . . . . . . . . . . . . . . . . . . . . . . . 50
Backlight Adjustment Pro . . . . . . . . . . . . . . . . . . . . . . 50
ColorMaster
Base Color Adjustment . . . . . . . . . . . . . . . . . . . . . . . . . 51
Color temperature . . . . . . . . . . . . . . . . . . . . . . . . . . . . . 51
Resetting to the factory default . . . . . . . . . . . . . . . . . . 51
Setting the Expert Picture Settings . . . . . . . . . . . . . . . . . 51
Test Pattern. . . . . . . . . . . . . . . . . . . . . . . . . . . . . . . . . . . 51
RGB Filter . . . . . . . . . . . . . . . . . . . . . . . . . . . . . . . . . . . . 51
White Balance. . . . . . . . . . . . . . . . . . . . . . . . . . . . . . . . . 51
Resetting to the factory default . . . . . . . . . . . . . . . . . . 52
Locking the picture settings . . . . . . . . . . . . . . . . . . . . . . . 52
Adjusting the audio . . . . . . . . . . . . . . . . . . . . . . . . . . . . . . 52
Muting the sound . . . . . . . . . . . . . . . . . . . . . . . . . . . . . 52
™
. . . . . . . . . . . . . . . . . . . . . . . . . . . . . . . . .51
9
Page 38

Selecting stereo/SAP broadcasts . . . . . . . . . . . . . . . . 52
Adjusting the audio balance . . . . . . . . . . . . . . . . . . . . 53
Adjusting the range . . . . . . . . . . . . . . . . . . . . . . . . . . . 53
Selecting the optical audio output format . . . . . . . . . 53
Using the Dolby® Digital Dynamic Range Control
feature . . . . . . . . . . . . . . . . . . . . . . . . . . . . . . . . . . 53
Using Audyssey Dynamic Volume® . . . . . . . . . . . . . 53
Using advanced sound features . . . . . . . . . . . . . . . . . . . 54
Using surround sound . . . . . . . . . . . . . . . . . . . . . . . . . 54
Chapter 8: Advanced features . . . . . . . . . . . . . . . . . . . . . .55
Using your home network . . . . . . . . . . . . . . . . . . . . . . . . 55
Setting up the Network. . . . . . . . . . . . . . . . . . . . . . . . . . . 56
Wireless Setup . . . . . . . . . . . . . . . . . . . . . . . . . . . . . . . . 56
Advanced Network Setup . . . . . . . . . . . . . . . . . . . . . . 58
Network Connection Test . . . . . . . . . . . . . . . . . . . . . . 59
Using the software keyboard . . . . . . . . . . . . . . . . . . . . . . 59
Performing a Software Upgrade . . . . . . . . . . . . . . . . . . . 60
Viewing the Software Licenses . . . . . . . . . . . . . . . . . . . . 60
Using the NET TV™ feature . . . . . . . . . . . . . . . . . . . . . . . 60
NET TV menu . . . . . . . . . . . . . . . . . . . . . . . . . . . . . . . . 60
Netflix . . . . . . . . . . . . . . . . . . . . . . . . . . . . . . . . . . . . . . . 61
VUDU™. . . . . . . . . . . . . . . . . . . . . . . . . . . . . . . . . . . . . . 61
YouTube™. . . . . . . . . . . . . . . . . . . . . . . . . . . . . . . . . . . . 61
CinemaNow . . . . . . . . . . . . . . . . . . . . . . . . . . . . . . . . . . 62
Blockbuster. . . . . . . . . . . . . . . . . . . . . . . . . . . . . . . . . . . 62
Pandora. . . . . . . . . . . . . . . . . . . . . . . . . . . . . . . . . . . . . . 62
Yahoo!® TV Widgets . . . . . . . . . . . . . . . . . . . . . . . . . . . 62
Using the Media Player. . . . . . . . . . . . . . . . . . . . . . . . . . . 64
Media Player Specifications. . . . . . . . . . . . . . . . . . . . . 64
Basic operation. . . . . . . . . . . . . . . . . . . . . . . . . . . . . . . . 64
Viewing Movie files . . . . . . . . . . . . . . . . . . . . . . . . . . . 65
Playing Music files . . . . . . . . . . . . . . . . . . . . . . . . . . . . 66
Viewing Photo files . . . . . . . . . . . . . . . . . . . . . . . . . . . . 67
Using the Wallpaper feature . . . . . . . . . . . . . . . . . . . . . . 69
Chapter 9: Troubleshooting. . . . . . . . . . . . . . . . . . . . . . . .70
General troubleshooting . . . . . . . . . . . . . . . . . . . . . . . . . . 70
LED indications . . . . . . . . . . . . . . . . . . . . . . . . . . . . . . . . . 72
Chapter 10: Appendix. . . . . . . . . . . . . . . . . . . . . . . . . . . .73
Specifications . . . . . . . . . . . . . . . . . . . . . . . . . . . . . . . . . . . 73
Acceptable signal formats for PC IN and HDMI
terminals . . . . . . . . . . . . . . . . . . . . . . . . . . . . . . . . . . . . . 75
PC IN signal formats. . . . . . . . . . . . . . . . . . . . . . . . . . . 75
HDMI signal formats . . . . . . . . . . . . . . . . . . . . . . . . . . 76
Remote control functional key chart . . . . . . . . . . . . . . . . 77
Operating other devices . . . . . . . . . . . . . . . . . . . . . . . . . . 79
Programming the remote to operate other devices . . . 79
Device code setup . . . . . . . . . . . . . . . . . . . . . . . . . . . . . 79
Searching for a device code . . . . . . . . . . . . . . . . . . . . . 80
Locking the volume keys . . . . . . . . . . . . . . . . . . . . . . . 80
Clearing the remote’s programming . . . . . . . . . . . . . 80
Resetting to the factory default . . . . . . . . . . . . . . . . . . 80
Operating the TV with combination buttons. . . . . . . . . 81
Remote control codes . . . . . . . . . . . . . . . . . . . . . . . . . . . . 82
Limited United States Warranty
for LCD Televisions . . . . . . . . . . . . . . . . . . . . . . . . . . . 88
Limited Canadian Warranty
for Toshiba Brand Flat Panel Televisions . . . . . . . . . 89
Index . . . . . . . . . . . . . . . . . . . . . . . . . . . . . . . . . . . . . . .92
10
Page 39

Chapter 1: Introduction
Features
•Integrated digital tuning (8VSB ATSC and QAM)
eliminates the need for a separate digital converter
set-top box (in most cases).
•1080p output resolution.
•Four HDMI
Interfaces with 1080p input support (- p. 16).
•HDMI capabilities
ARC (Audio Return Channel) enables the audio
signal of the TV to be sent to an AV amplifier via an
HDMI cable.
HDMI INSTAPORT
when switching HDMI sources.
RGB Range adjusts RGB full range signal
automatically.
•HDMI
devices from the TV remote via HDMI connection (p. 39).
•ColorStream
input.
•Digital Audio Out optical audio connection with
Dolby
•PC IN (Analog RGB) computer terminal (- p. 20).
•Built-in WLAN Allows the television to access your
home wireless network without an external Dual
Band WLAN Adapter.
•Yahoo!
designed to run on your TV (- p. 62).
•ColorMaster
(- p. 51).
•ClearFrame
•AutoView
settings based on ambient light conditions and input
signal content (- p. 48).
•Dynamic Volume (Audyssey Dynamic Volume
eliminates inconsistent TV volume when changing
channels or viewing commercials (- p. 53).
•Media Player lets you view photo files and play music
or movie files (- p. 64).
®
digital, High-Definition Multimedia
™
technology reduces lag time
®
CEC Control allows control of external
®
HD high-resolution component video
®
Digital optical output format (- p. 53).
®
TV Widgets are Internet applications
™
lets you adjust the TV’s standard colors
™
120 Hz anti-blur feature (-p. 50).
®
lets you automatically adjust picture
®
)
Overview of installation, setup,
and use
Follow these steps to set up your TV and begin using its
many exciting features.
1 To choose a location for the TV:
•Read “Important notes about your LCD TV”
(- p. 7).
•Place the TV in an appropriate location (- p. 2–6).
2 Do not plug in any power cords until AFTER you
have connected all cables and devices to your TV.
3 BEFORE connecting cables or devices to the TV,
learn the functions of the TV’s connections and
controls (- p. 12).
4 Connect your other electronic device(s) to the TV
(- p. 14–21).
5 See “Chapter 3: Using the remote control” (- p. 22)
for an overview of the buttons on the remote
control, installing the batteries, and preparing to
operate your other device(s).
6 AFTER connecting all cables and devices, plug in
the power cords for your TV and other devices.
When you turn on the TV, the Initial Setup menu
appears.
7 See “Chapter 4: Initial Setup and Menu” for a quick
overview of navigating the TV’s menu system (p. 24).
8 Program channels into the TV’s channel memory
(- p. 28).
9 See Chapters 6, 7 and 8, for details on using the TV’s
features.
10 For help, refer to “Chapter 9: Troubleshooting” (-
p. 70).
11 See “Chapter 10: Appendix”, for technical
specifications and warranty information (- p. 73).
• ENERGY STAR
®
qualified
11
Page 40

Front panel control
TV front
Brightness Sensor
This sensor will detect the ambient light conditions to optimize the
backlighting levels (- p. 50).
Touch Sensor
Effective range: 16.4 ft (5m)
Remote Sensor
Power LED
(- p. 72)
Touch key function:
– These are available when touched.
•POWER – To turn the TV on and off.
•B b – To change the channel. When a
menu is onscreen, these keys function
as up/down menu navigation
buttons.
•+ - – To adjust the volume level. When
a menu is onscreen, these keys
function as left/right menu
navigation buttons.
•MENU – To access the menu. When a
menu is onscreen, the MENU key on
the TV’s control panel functions as the
RETURN button.
•INPUT – To change the source you are
viewing. When a menu is onscreen,
the INPUT key on the TV's control
panel functions as the OK button.
Service LED
(- p. 72)
TV back
Power cord
VIDEO 1 IN**
To configure for use, see “Side
Shared Audio” (- p. 30).
COLORSTREAM HD1 IN**
To configure for use (for audio), see
“Side Shared Audio” (- p. 30).
HDMI
®
IN
DIGITAL AUDIO OUT
See “Connecting a digital audio system” (- p. 18).
ANT/CABLE
* To use PC/
COLORSTREAM HD2 IN,
an appropriate adapter
(not supplied) is
necessary.
** To use COLORSTREAM
HD1 IN, VIDEO 1 IN, or
VIDEO 2 IN, an
appropriate adapter
(supplied) is necessary.
PC/COLORSTREAM HD2/
HDMI 4 IN (Audio input)
To configure for use, see
“Rear Shared Audio”
(- p. 30).
PC/COLORSTREAM HD2 IN* (Video input)
To configure for use, see “Shared PC Input” (- p. 30).
USB
terminal
LAN port
VIDEO 2 IN**
FIXED AUDIO
Examples show Model 42SL417U.
Chapter 1: Introduction
Back panel connections
For explanations of cable types and connections, see p. 14–21.
12
Page 41

Chapter 1: Introduction
Cable Clamps
Cable Clamps
Bundling the cables
Install the cable clamps and bundle the cables in them.
Stand type
Wall Mount type
13
Page 42

Chapter 2: Connecting your TV
VIDEO
AUDIO
LR
Red
White
Yellow
P
B
PR
Red
Blue
Green
Overview of cable types
Before purchasing cables, know the connector types
your devices require.
You can purchase cables from most stores that sell
audio/video devices.
Coaxial cable (F-type)
(F-type) Connects your antenna, cable TV service, or
cable converter box to your TV.
Standard A/V cables (composite video)
Use with video devices with analog audio and
composite video output. These cables (and the related
inputs on your TV) are often color-coded.
Component video cables
Use with video devices with component video output.
Separate audio cables are required. (ColorStream
Toshiba brand.)
Note: Component video cables provide better picture
quality than composite video cables.
®
is a
Optical audio cable
Connects receivers with Dolby Digital or PCM (pulsecode modulation) optical audio input to the TV’s
DIGITAL AUDIO OUT terminal (- p. 18).
Analog RGB (15-pin) computer cable
Connects a PC to the TV’s PC IN terminal (- p. 20).
Note: Separate audio cables are required.
Standard/Crossover LAN cable
Standard LAN cable is used to connect the TV to your
home network (- p. 21).
Crossover LAN cable is used to connect the TV directly
to a PC (- p. 21).
About the illustrations
Note: The connection illustrations shown are
representative of typical device connections only. The
input/output terminals on your devices may differ. See
each device’s owner’s manual.
HDMI® cable ( )
Use it with devices built-in HDMI output. An HDMI
cable delivers digital audio and video in its native
format. Separate audio cables are not required
(- p. 16, 19–20).
Note: HDMI cables provide the best audio and picture
quality.
14
Page 43

Chapter 2: Connecting your TV
TV back panel
VHF/UHF Antenna
Cable TV
Satellite dish
Cable box
Coaxial cable
Component adapter
cable (supplied)
Component
video cable
Standard audio
cable
Satellite receiver with component video
AV adapter
cable
(supplied)
INPUT
INPUT
Connecting to a Satellite dish, an Antenna, or Cable TV
AUDIO
VIDEO
OUT
OUT
L
R
Y
P
R
P
B
COMPONENT VIDEO
Satellite
IN
CH 3
CH 4
OUT
IN
You will need:
•Coaxial cables
•AV adapter cable (supplied)
•Standard audio cable
•Component adapter cable (supplied)
•Component video cable
To view satellite programs using the component video
connections:
Turn on the satellite receiver. Press and B or b to
select ColorStream HD1. Use the satellite receiver’s
controls to change channels.
To view the antenna or cable signal:
INPUT
Press and B or b to select ANT/CABLE.
To view basic and premium cable channels:
Turn on the cable box. Press and B or b to select
ANT/CABLE. Tune the TV to channel 3 or 4 (the
channel the cable box output is set to). Use the cable
box’s controls to change channels.
The unauthorized recording, use, distribution, or
revision of television programs, videotapes, DVDs, and
other materials are prohibited under the Copyright
Laws of the United States and other countries, and may
subject you to civil and criminal liability.
15
Page 44

Chapter 2: Connecting your TV
HDMI OUT
DVI/HDCP
OUT
AUDIO
R
L
OUT
TV back panel
HDMI device
HDMI cable
DVI device
HDMI-to-DVI adapter cable
Analog audio cable
INPUT
Connecting an HDMI® or DVI device to the HDMI input
The HDMI input on your TV receives digital audio and
uncompressed digital video from an HDMI device, or
uncompressed digital video from a DVI (Digital Visual
Interface) device.
This input is designed to accept HDCP (HighBandwidth Digital-Content Protection) program
material in digital form from EIA/CEA-861-D
compliant[1] consumer electronic devices (such as a settop box or DVD player with HDMI or DVI output).
Supported signal formats: VGA, SVGA, XGA, WXGA,
SXGA, 480i (60Hz), 480p (60Hz), 720p (60Hz), 1080i
(60Hz), and 1080p (24Hz/60Hz). For signal
specifications, see p. 76.
Supported Audio format: Linear PCM, sampling rate
32/44.1/48 kHz.
Note:
• For connecting a PC to the HDMI input, see p. 20.
• Some legacy HDMI sources may not work properly with
your HDMI TV due to the adoption of new standards. Try
disabling the options in HDMI Settings. (- p. 41).
To connect an HDMI device, you will need:
•One HDMI cable per HDMI device
– Recommendation: For proper operation, use an
HDMI cable with the HDMI Logo ( ).
– To display an 1080p/60 Hz signal format, you need a
High Speed HDMI cable. A conventional HDMI/DVI
cable may not work properly.
– An HDMI cable transfers video and audio. Separate
analog audio cables are not required.
To view the HDMI device video:
Press and B or b to select HDMI 1, HDMI 2, HDMI
3, or HDMI 4.
Note: For programming the TV remote control to operate
other devices, see p. 79.
To connect a DVI device, you will need:
•HDMI-to-DVI adapter cable
– For proper operation, the length of the HDMI-to-DVI
adapter cable must not exceed 9.8 ft (3 m).
Recomended length: 6.6 ft (2 m).
•3.5mm Stereo to RCA Y-Cable
– An HDMI-to-DVI adapter cable transfers video only.
Separate analog audio cables are required.
Note: To ensure that the HDMI or DVI device is reset
properly:
• When turning on electronic components, turn on the TV
first and then the HDMI or DVI device.
• When turning off electronic components, turn off the
HDMI or DVI device first and then the TV.
[1] EIA/CEA-861-D compliance covers the transmission of
uncompressed digital video with high-bandwidth digital
content protection, which is being standardized for
reception of high-definition video signals. Because this is
an evolving technology, it is possible that some devices
may not operate properly with the TV.
16
Page 45

Chapter 2: Connecting your TV
TV back panel
DVD player
Component adapter
cable (supplied)
Standard
audio cable
Component
video cable
VCR
Standard
A/V cable
AV
adapter
cable
(supplied)
Light green
Light yellow
Yellow
White
Red
Green
Blue
AV adapter cable
(supplied)
Light yellow
INPUT
Connecting a VCR or DVD player with ColorStream® (component video)
R
G
VIDEO
Y
AUDIO
LR
W
COMPONENT VIDEO
Y
P
B
B
OUT
AUDIO
LR
P
R
R
W
Y
W
Y
W
R
GB
You will need:
•Standard A/V cable
•AV adapter cable (supplied)
•Standard audio cable
•Component adapter cable (supplied)
•Component video cable
– You can connect the component video cables from
the DVD player to the ColorStream HD1 terminal on
the TV. Separate audio cables are required. You can
use the ColorStream HD1 terminal to display
Progressive (480p, 720p, 1080p) and Interlaced
(480i, 1080i) video. Check the owner’s manual of the
DVD player in order to determine the best output
signal available (1080p 24 Hz/30 Hz/50 Hz/25 Hz are
not supported).
– If your DVD player does not have component video,
connect a composite video cable to VIDEO 2 on the
side panel. If your DVD player has HDMI video, see
p. 16.
R
R
W
R
W
R
B
G
To view the DVD player:
Turn on the DVD player. Press and B or b to select
ColorStream HD1. Audio configuration is required.
See “Side Shared Audio” (- p. 30), and select
ColorStream HD1.
To view the VCR or view and record antenna-sourced:
Turn on the VCR. Tune the VCR to the channel you
want to watch. Press and B or b to select Video 2.
INPUT
Note: For programming the TV remote control to operate
other devices, see p. 79.
The unauthorized recording, use, distribution, or
revision of television programs, videotapes, DVDs, and
other materials are prohibited under the Copyright
Laws of the United States and other countries, and
may subject you to civil and criminal liability.
17
Page 46

Chapter 2: Connecting your TV
Dolby Digital decoder or other
digital audio system
TV back panel
Optical
audio
cable
Connecting a digital audio system
The TV’s DIGITAL AUDIO OUT terminal outputs a
®
Digital or 2-channel down-mixed PCM (pulse-
Dolby
code modulation) signal for use with an external Dolby
Digital decoder or other external audio systems with
optical audio input.
You will need:
•Optical audio cable (Use an optical audio cable that
has the larger TosLink connector, not the smaller
mini-optical connector.)
Optical
Audio IN
LINE IN
LR
Before controlling the audio:
•See “Selecting the optical audio output format”
Note:
• Some audio systems may not be compatible with Dolby
• The DIGITAL AUDIO OUT terminal may not output some
• The Dolby Digital format is available in the following
Manufactured under license from Dolby Laboratories.
Dolby and the double-D symbol are registered trademarks of
Dolby Laboratories.
(- p. 53).
Digital bitstream signals. Older audio systems that are
not compatible with standard optical out signals may not
work properly, creating a high noise level that may
damage speakers or headphones. THIS DAMAGE IS
NOT COVERED BY YOUR WARRANTY.
digital audio sources due to copy restrictions.
situations:
- When tuned to a digital RF channel.
- When an HDMI input is used.
- When DLNA Certified products or widgets are used.
18
Page 47

Chapter 2: Connecting your TV
TV back panel
Audio receiver
Playback device
(HDMI
®
CEC DVD player,etc.)
Playback device
(HDMI
®
CEC DVD player,etc.)
HDMI cable
HDMI cable
TV back panel
HDMI
cable
AV amplifier that
supports ARC
HDMI's ARC (Audio Return Channel) feature
This feature enables the audio signal of the TV to
be sent to an AV amplifier via the HDMI cable.
It will not be necessary to connect a cable from
the audio output of the TV to the audio input of
the AV amplifier to reproduce the audio
received from the tuner of the TV through the
AV amplifier.
Note: Only HDMI 1 supports ARC.
Using the TV remote and HDMI® CEC Control to control other devices
To control the basic functions of connected audio/video devices using the TV’s remote control, connect an HDMI®
CEC compatible audio receiver or playback device. The HDMI
®
CEC Control feature uses CEC technology as
regulated by the HDMI standard.
HDMI OUT HDMI
IN
HDMI OUT
HDMI OUT
To connect an audio receiver and playback devices, you will need:
•HDMI cables (- p. 14)
Note:
• If several devices are connected, the HDMI
®
CEC Control feature may not operate properly.
• For proper operation, it is recommended that you use HDMI cables with the HDMI Logo ( ).
Before controlling the devices:
•For an explanation of setup and operations, see “Using HDMI
®
CEC Control” (- p. 39).
•Configure the connected devices. See each device’s operation manual.
Note: This feature is limited to models incorporating Toshiba’s HDMI® CEC Control feature. However, Toshiba is not liable
for those operations. See the individual instruction manuals for compatibility information.
When using an external AV amplifier:
The picture and sound may not be properly synchronized. In this case, adjust the delay time of the sound on the AV
amplifier.
Note: The control range of the delay time differs according to the device you use.
Connecting an HDMI audio system
If your HDMI amplifier supports ARC, audio from the TV can be sent to the amplifier via an existing HDMI cable.
You will need:
•HDMI cable
19
Page 48

Chapter 2: Connecting your TV
TV back panel
PC
PC audio
output
Analog
audio
cable
Conversion adapter
(if necessary)
Analog
RGB
computer
cable
TV back panel
PC
Analog
audio
cable
PC audio
output
HDMI-toDVI
adapter
cable
Connecting a PC
You can view your PC’s display on the TV and hear the
sound from the TV’s speakers.
Connecting to the TV’s PC IN terminal
You will need:
•Analog RGB (15-pin) computer cable
•Analog audio cable
Signal names for mini D-sub 15-pin connector
Pin
Signal
No.
name
1R 6Ground11NC
2G 7Ground12NC
3B 8Ground13H-sync
4NC * 9NC 14V-sync
5 NC 10Ground15NC
* NC=Not connected
Pin
No.
Signal
name
Pin
No.
Signal
name
Connection to the TV’s HDMI terminal
You will need:
If your PC has DVI terminal:
•HDMI-to-DVI adapter cable
•Analog audio cable
If your PC has an HDMI terminal:
•HDMI cable
Before using the PC:
See “Using your PC with the TV” (- p. 42).
To use a PC:
• Set the monitor output resolution on the PC before
connecting it to the TV.
•Supported signal formats: VGA, SVGA, XGA, WXGA,
and SXGA. For signal specifications, see p. 75.
Note:
• The PC audio input terminal on the TV is shared with the
HDMI 4 and ColorStream HD2 terminal. For
configuration, see “Setting the PC audio” (- p. 42).
• Some PC models cannot be connected to this TV.
• If the PC has a compatible mini D-sub15-pin terminal, an
adapter is not required.
• Depending on the content's title and the PC’s
specifications, some scenes may be skipped or you may
not be able to pause during multi-angle scenes.
20
Supported signal formats: VGA, SVGA, XGA, WXGA,
SXGA, 480i (60Hz), 480p (60Hz), 720p (60Hz), 1080i
(60Hz), and 1080p (24Hz/60Hz). For signal
specifications, see p. 76.
Note:
• The edges of the picture may be hidden.
• The PC audio input terminal on the TV is shared with the
HDMI 4 and ColorStream HD2 terminal. For
configuration, see “Setting the PC audio” (- p. 42).
Page 49

Chapter 2: Connecting your TV
TV back panel
PC
Router with Hub
TV back panel
PC
NAS
Modem (DSL or cable)
Router with Hub
Cable or
phone jack
TV back panel
PC
[1]
[2]
[2]
[2]
[3]
Wireless LAN access point
PC
Modem (DSL or cable)
Cable or
phone jack
[1]
[2]
[2]
Built-in WLAN system:
It is not necessary to
connect an adapter to
the TV.
Connecting to a home network
The LAN port allows your Toshiba TV to connect to
your home network.
You can use this home network to access photos,
movies, and music files that are stored on a DLNA
CERTIFIED
Connecting the TV directly to a PC without an
Internet connection
You will need:
•Crossover LAN cable
Connecting the TV to a home network without an
Internet connection
You will need:
•Standard LAN cables
•Router with Hub
™
Server and play them on your TV.
[1] Coaxial or telephone cable (depending on your modem
type)
[2] Standard LAN cable
[3] Do NOT connect a phone jack directly to the TV's LAN port.
Connecting the TV to a home network with an
Internet connection - Wireless
You will need:
•Coaxial or telephone cable (depending on your
modem type)
•Standard LAN cables
•Wireless LAN access point
•Modem (DSL or cable)
Connecting the TV to a home network with an
Internet connection - Wired
You will need:
•Coaxial or telephone cable (depending on your
modem type)
•Standard LAN cables
•Router with Hub
•Modem (DSL or cable)
The transmission speed over the wireless LAN and the
distance over which wireless LAN can reach may vary
depending on surrounding electromagnetic
environment, obstacles, access point design and
configuration, and client design and software/
hardware configurations. The actual transmission
speed will be lower than the theoretical maximum
speed.
[1] Coaxial or telephone cable (depending on your modem
type)
[2] Standard LAN cable
21
Page 50

Chapter 3: Using the remote control
Controlling other devices
The TV’s remote control can operate other devices such
as cable converter boxes, satellite receivers, VCRs, DVD
players, and HTIBs (home theater in a box).
Toshiba devices:
The remote is programmed to operate a variety of
devices (- p. 79).
Non-Toshiba devices or Toshiba devices that the remote
control is not programmed to operate:
Program the remote (- p. 79).
Installing batteries
1 Pull up to open the cover.
2 Install two AA size batteries.
Note: Use carbon zinc batteries or alkaline batteries.
3 Slide on the cover.
Caution: Do not expose batteries to excessive heat such
as sunshine, fire, or the like.
Note:
• Every time you change the batteries, you must
reprogram the remote.
• Dispose of batteries in a designated disposal area.
• Always consider the environment when disposing of
batteries. Always follow applicable laws and regulations.
• If the remote does not operate correctly, or if the
operating range is reduced, replace the batteries.
• Always replace both batteries with new ones. Never mix
battery types or use new and used batteries together.
• Always remove batteries from the remote if they are dead
or if the remote control is not to be used for an extended
period of time. This prevents battery acid from leaking
into the battery compartment.
22
Page 51

Chapter 3: Using the remote control
Changes the picture mode to Game
when the input mode is ColorStream
HD, PC, Video, or HDMI
®
(- p. 48).
Sets the remote control mode to
control the device: TV, CABLE/SAT,
BD/DVD, or AUX. To control the TV,
press TV.
When the Auto Input feature is set, you
can use these keys to change inputs
on the TV (- p. 31).
Accesses the sleep timer (- p. 43)
Directly tune channels. The “-” button
is used to enter 2-part channel
numbers (- p. 32) or ed it the Fav orites
List (- p. 33).
Selects the video input source
(- p. 34).
Displays/hides the Yahoo!
®
TV Widgets
user interface (- p. 62).
When a menu is onscreen, these
buttons select or adjust programming
menus.
Cycles through programmed channels.
Closes onscreen menus.
Displays TV status information as well
as program details, when available
(- p. 44).
Selects the audio mode.
Opens the closed caption selector
(- p. 35).
Displays the NET TV™ menu (- p. 60).
Activates highlighted items in the
main menu system.
Adjusts the volume level.
Accesses the Quick menu.
Selects the picture size (- p. 45)
.
Freezes the picture (- p. 47).
Turns the TV on and off.
Accesses the main TV menu system
(- p. 25–27).
Reduces or turns off the sound
(- p. 52).
Returns to the last viewed channel or
source (- p. 34).
Returns to the previous menu.
Accesses Netflix (- p. 61).
Displays Favorite Browser (- p. 33).
/ Scrolls to right.
Displays Channel Browser
™
(-p. 32).
/ Scrolls to left.
Moves to the previous/next page.
These buttons are used for BD/DVD,
CABLE/SAT, and VCR mode.
Learning about the Remote Control
The buttons described in this section operate the TV only.
For the HDMI
®
CEC Control functions, see “Using HDMI® CEC Control” (- p. 39).
For a complete list of the remote’s functions, see “Remote control functional key chart” (- p. 77–78).
Note: The error message “NOT AVAILABLE” may appear if you press a key for a function that is not available.
23
Page 52

Chapter 4: Initial Setup and Menu
Select a language.
Select a time zone.
Time Zone
Daylight Saving Time
Eastern
Off
Local Time Setting
Select On or Off. Press .
OK
To use the TV for displaying in a store showroom, please
select [Store]. [Home] mode is recommended for normal use.
(ENERGY STAR® qualified)
Home
Location
Select Home for normal home use. Press .
OK
Antenna
Next
ANT/CABLE In
Please confirm the connection with Tuner Input.
Cable
First, select
Antenna.
Then, select Next. Press .
OK
Auto
Channel Tuning Mode
Select Auto, Digital, or Standard (- “Setting
the Channel Tuning Mode” on p. 32). Press .
OK
First, select
Cable.
Then, select Next. Press .
OK
Initial Setup
When you first turn on or reset the TV, the Initial Setup
window will appear.
Note:
• You can stop Initial Setup by pressing . However, if
you do not finish Initial Setup, the Initial Setup screen will
appear every time you turn on your TV. To finish Initial
Setup, see “Changing Initial settings” (- p. 28).
• does not work until Menu Language, Time Zone,
and Location have been set.
1 Menu Language
Quick Setup
Menu Language English
2 Time Zone
Local Time Setting
Time Zone
Daylight Saving Time
Eastern
Off
5 ANT/CABLE
To select Antenna:
To select Cable:
ANT/CABLE In
Please confirm the connection with Tuner Input.
Antenna
Cable
3 Daylight Saving Time
4 Location
24
Next
Note: If you do not want to scan channels, you do not
need to make a selection for ANT/CABLE. Select Next
and press to skip this step.
OK
Page 53

Chapter 4: Initial Setup and Menu
Press .
OK
DTV
ATV
ATV
ATV
ATV
ATV
DTV
ATV
Antenna Channels Found: 14
Auto Tuning (Antenna)
Ch. Type RF Ch.
2
4-1
4-2
6
11
13
18
31
2
4
4
6
11
13
18
31
OK
OK
Settings
Timer
Wallpaper
Network
Media Player
6 Start Scan
Auto Tuning
Start Scan
Note: If you want to stop scanning, press while
scanning.
After scanning is complete, a channel list screen
•
(such as the one below) will appear. Press or
.
Navigating the menu system
•To open the main menu, press on the remote
control or TV control panel.
OK
•Press B, b, C, or c on the remote control or TV control
panel to navigate and make selections.
•To select a menu option, press .
•To move to the next menu layer, press or B.
•To return to the previous menu layer, press or b.
•To close a menu instantly, press or .
•All menus will close automatically if you do not make
a selection within 60 seconds.
OK
OK
Note: Encrypted channels cannot be registered
though these are displayed in the above list.
If some channels are not found after scanning:
•Check the antenna/cable connections, and scan
again.
•Connect the TV to the antenna or cable box
directly and scan again.
1 > Settings > SETUP > Quick Setup > .
2 A confirmation message appears. Press C or c
to select Yes. Press .
3 Repeat set up to Step 6.
•If you selected Antenna previously, select
Cable.
•If you selected Cable previously, select
Antenna.
4 Scan again.
7 Support Information
The Support Information screen appears. Press .
Note: Refer to this information if there is any problem
and you need to contact Customer Support. This can
be confirmed from the following operation at any time.
> Settings > SETUP > System Information >
OK
.
OK
25
Page 54

Chapter 4: Initial Setup and Menu
Main menu layout
To open the main menus (illustrated below), press
on the remote control or TV control panel.
1st Layer 2nd Layer 3rd Layer Page
Network NET TV 60
Network Setup 56
Wireless
Information
Media
Player
Wallpaper 69
Timer On Timer 42
Settings PICTURE Picture Mode 48
Photo (Device select) 67
Movie (Device select) 65
Music (Device select) 66
Sleep Timer 43
Game Timer 39
Reset 48
Backlight 48
Contrast 48
Brightness 48
Color 48
Tint 48
Sharpness 48
Advanced
Picture Settings
Expert Picture
Settings
TheaterLock 52
SOUND MTS 52
Balance 53
Bass 53
Treble 53
Advanced
Sound Settings
Dynamic
Volume
(Audyssey
Dynamic
®
Volume
Dynamic
Range Control
)
57
49
51
54
53
53
1st Layer 2nd Layer 3rd Layer Page
Settings
APPLICATIONS
PREFERENCES
Widgets 62
NET TV 60
Media Player 64
Channel
Browser
Favorites
Browser
On Timer 42
Sleep Timer 43
HDMI-CEC
Control Setup
Network Setup 56
Netflix Setup 61
VUDU
Deactivation
Wallpaper
Setup
Channel
Browser Setup
PIN Setting 36
Parental
Control and
Locks
Display
Settings
AV Connection
Auto Input 31
Energy Saving
Settings
HDMI
Information
Display
32
33
39
61
69
32
36
42,
47
29,
30,
41,
53
43
41
26
Page 55

Chapter 4: Initial Setup and Menu
QUICK
1st Layer 2nd Layer 3rd Layer Page
Settings SETUP Menu
Language
ANT/CABLE
In
Auto Tuning 28
Manual Tuning 29
TV Settings
Quick Setup 28
Location 28
Software
Upgrade
Software
Licenses
System
Information
Reset TV 44
28
28
28,
29,
32,
35,
38
60
60
44
Quick menu
Quick menu helps you access some options more
quickly.
Press to display the Quick menu and press B or b
to select an option.
Note: Quick menu items differ depending on the current
mode.
Quick menu Item Page
PICTURE 45–52
Picture Mode 48
Repeat 66, 67, 68
SOUND 52–54
Background Music 68
Speakers 41
HDMI-CEC Player Control 40
Interval Time 68
Device Information 65
Wireless Information 57
27
Page 56

Chapter 5: Setting up your TV
OK
OK
CH
How to navigate the menu:
> Settings > Main menu > Submenu >
Format Description
Press the MENU button.
Settings Press C or c to select Settings.
Press C or c to select a menu
> Main menu
> Submenu Press B or b to select a menu.
OK
> Press the OK button
icon (PICTURE, SOUND,
APPLICATIONS,
PREFERENCES, SETUP)
Changing Initial settings
From Quick Setup:
1 > Settings > SETUP > Quick Setup > .
2 A confirmation message appears. Press C or c to
select Yes. Press .
OK
3 For changing settings, see “Initial Setup” (- p. 24).
From individual settings:
OK
Location
You can select Home or Store for the TV location. For
normal home use, select Home.
1 > Settings > SETUP > Location.
2 Press C or c to select Home. Press .
ANT/CABLE IN
This setting configures the antenna input source for the
ANT/CABLE terminal.
1 > Settings > SETUP > ANT/CABLE In.
2 Press C or c to select the input source (Antenna or
Cable) for the ANT/CABLE input. Press .
Storing channels in memory
(optional)
To make sure your TV stops only on the channels you
want when you press or on the remote control or
the control panel, store those channels in the TV’s
memory.
Auto Tuning
CH
Note: You must set up the antenna/cable input source first.
Menu language
You can choose from three different language settings
(English, Français, and Español) for menus and
messages
1 > Settings > SETUP > Menu Language.
2 Press C or c to select your preferred language. Press
.
Local Time Setting
This setting allows you to specify the correct time zone
for your region.
1 > Settings > SETUP > TV Settings > .
2 Press B or b to select Local Time Setting. Press .
3 Select an option:
• Time Zone
• Daylight Saving Time
OK
See “Initial Setup” (-p. 24).
You can set up the TV to detect all active channels in
your area and store them in its memory. Then you can
manually store or skip individual channels from
memory.
Option Description
Note: If you select Cable, auto tuning
deletes previously stored channels from
memory.
Cable
Antenna
This setup requires some time, but you
do not need to repeat the setup unless
your cable TV service’s lineup changes
significantly.
Auto tuning retains stored channels and
stores newly found channels into
memory.
To skip an antenna source channel from
memory, set the channel to be skipped.
See “Skipping channels”.
4 Press C or c to select your time zone or to select On
to activate Daylight Saving Time. Press .
28
Note: To tune channels not stored in memory, use buttons
0–9 and on the remote control.
-
Page 57

Chapter 5: Setting up your TV
CH
CH
OK
OK
OK
CH
CH
1 > Settings > SETUP > Auto Tuning > .
OK
A confirmation screen appears.
2 Press to start Auto Tuning or to abort.
OK
The TV cycles through all the channels and stores all
active channels in memory.
To view the programmed channels, press or .
Manual Tuning
After storing channels in memory, you can manually
enter channels if the channel number is known.
1 > Settings > SETUP > Manual Tuning > .
2 Use buttons 0–9 on the remote control to enter the
channel number (for example, 56). Press .
3 Press to start Manual Tuning.
The channels found are listed at the center of the screen.
Type Description
ATV Analog channel
DTV Digital channel
OK
Skipping channels
To prevent a channel from being viewed, you can set it
to be skipped.
1 > Settings > SETUP > TV Settings > .
2 Press B or b to select Channel Options. Press .
The list of channels appears.
Channel Options
Ch.
5-1
6-1
10
11
12
Label
Type
DTV
ATV
6
DTV
ATV
8
ATV
9
ATV
ATV
ATV
OK
3 Move to the 8 column. Press B or b to select a
channel to skip. Press . The box is selected. To
clear the selection, press .
Note: You cannot tune skipped channels using or .
Use buttons 0–9 and on the remote control.
OK
OK
-
Skipping video inputs
You can set video inputs to be skipped when selecting
inputs in the Input selection window.
To turn on skip:
1 > Settings > PREFERENCES > AV
Connection > .
2 Press B or b to select Input Labeling. Press .
OK
OK
3 Press B or b to select the item you want to be
skipped. Press the RED button to turn on Skip.
To turn off skip:
Press again the RED button to turn off Skip.
29
Page 58

Chapter 5: Setting up your TV
OK
Labeling channels
You can label analog TV channels.
1 > Settings > SETUP > TV Settings > .
OK
2 Press B or b to select Channel Options. Press .
The list of channels appears.
Channel Options
Ch.
5-1
6-1
10
11
12
Label
Type
DTV
ATV
6
DTV
ATV
8
ATV
9
ATV
ATV
ATV
3 Press B or b to select a channel to label.
4 Press . The Software Keyboard window appears.
OK
5 Input a name using the Software Keyboard
(- p. 59).
6 Press the BLUE button.
Note: Input the desired analog channel label up to 7
characters.
Labeling video inputs
Configuring shared inputs
Side Shared Audio
1 > Settings > PREFERENCES > AV
Connection > .
2 Press B or b to select Side Shared Audio.
3 Press C or c to select ColorStream HD1, Video 1,
or HDMI 3.
Rear Shared Audio
1 > Settings > PREFERENCES > AV
Connection > .
2 Press B or b to select Rear Shared Audio.
3 Press C or c to select PC (ColorStream HD2) or
HDMI 4.
Shared PC Input
1 > Settings > PREFERENCES > AV
Connection > .
2 Press B or b to select Shared PC Input.
3 Press C or c to select PC or ColorStream HD2.
OK
OK
OK
The input labels are shown in the input selector, and in
the Channel Browser and banner displays. You can
label video inputs according to the devices you have
connected to the TV.
1 > Settings > PREFERENCES > AV
Connection > .
2 Press B or b to select Input Labeling. Press .
OK
OK
3 Press B or b to select the item you want to label.
Press C or c to select --, Amplifier, Cable, DVD,
Game, PC, Recorder, Satellite, or VCR or press
the GREEN button to select User Input.
Note: When User Input is selected by pressing the
GREEN button, the Software Keyboard window will
appear. Input the desired characters (up to 10
characters) using the Software Keyboard (- p. 59) or
the number buttons for a number input. To save your
settings, press the BLUE button.
4 Repeat Step 3 for other video inputs.
30
Page 59

Chapter 5: Setting up your TV
Setting the Auto Input feature
You can change TV inputs using the MODE SELECT
buttons on the remote control: TV, CABLE/SAT, BD/
DVD, AUX. After setting an input for a specific MODE
SELECT button, the TV automatically switches to the
input when you press and hold the MODE SELECT
button for about 3 seconds and release it.
Auto Input settings options for each MODE SELECT
button:
Mode Inputs
TV ANT/CABLE
ANT/CABLE, Video 1, Video 2,
CABLE/SAT
BD/DVD
AUX
ColorStream HD1, HDMI 1, HDMI 2,
HDMI 3, HDMI 4, PC (ColorStream
HD2)
Video 1, Video 2, ColorStream HD1,
HDMI 1, HDMI 2, HDMI 3, HDMI 4,
PC (ColorStream HD2)
ANT/CABLE, Video 1, Video 2,
ColorStream HD1, HDMI 1, HDMI 2,
HDMI 3, HDMI 4, PC (ColorStream
HD2)
Note: The TV mode select button will be restricted to the
ANT/CABLE input.
To set Auto Input:
1 > Settings > PREFERENCES > Auto Input >
OK
.
2 Set Enable Auto Input to On.
3 Press B or b to select the mode you want to set.
4 Press C or c to select an input source for that mode.
5 Repeat the procedure for other modes.
To turn off Auto Input:
Select Off in Step 2.
To reset Auto Input:
Select Reset. Press .
OK
31
Page 60

Chapter 6: Basic features
CH
CH
CH
OK
Tuning channels
Setting the Channel Tuning Mode
You can select how tuning is handled for analog and
digital channels when the TV is in Antenna mode.
Note: To use this feature, ANT/CABLE In must be set to
Antenna (- p. 28).
1 > Settings > SETUP > TV Settings > .
2 Press B or b to highlight Channel Tuning Mode.
Mode Description
Standard
Auto
(default)
Digital You can only tune digital channels.
You can tune both analog and digital
channels normally.
Digital channels have priority when
manually entering a channel number
using the 0-9 buttons on the remote. To
tune analog channels, use / if
available.
3 Press C or c to select a mode. Press .
Note: The Channel Options screen and the Channel
Browser ANT/CABLE List are updated when you change
the mode. The History List is cleared, but the Favorites List
is saved.
Tuning in to the next programmed
channel
Press or on the remote control or TV control
CH
panel.
Note: This feature does not work unless you store
channels in the TV’s channel memory (- p. 28).
Tuning in to a specific channel
(programmed or unprogrammed)
Channel Description
Use the 0–9 buttons on the remote
Analog
Digital
control. (For example, to select
channel 125, press 1, 2, 5.) Press .
Use the 0–9 buttons on the remote
control to enter the major channel
number. Press the dash ( ) button.
Enter the sub-channel number. (For
example, to select digital channel 1251, press 1, 2, 5, –, 1.) Press .
OK
OK
-
OK
Using the Channel Browser
The Channel Browser™ is a helpful navigational
interface for all of your channels and inputs.
Features:
•Navigate the contents of all of your inputs.
•Keep a list of your favorite channels.
•Keep a history of the last 32 channels or inputs
viewed.
•Quickly surf and tune to your recently viewed
channels/inputs from the Channel Browser
List.
•Surf via Browse mode (to immediately tune to
channels as you highlight them in the
Channel Browser
in the Channel Browser
to).
•Quickly change inputs from the Inputs List.
•Quickly select HDMI
CEC List.
To set up the Channel Browser
™
) or Select mode (to surf channels
™
before you select one to tune
®
CEC devices from the HDMI-
™
:
™
™
History
1 > Settings > PREFERENCES > Channel
Browser Setup > .
2 Press b or B to highlight Navigation.
3 Press C or c to select Select Mode or Browse
Mode.
4 Select a list.
•History List
•ANT/CABLE List
•Inputs List
•Favorites List
•HDMI-CEC List
Note:
•The History List will be cleared every time the TV is
powered off.
•The HDMI-CEC List is not available when Enable
HDMI-CEC Control is set to Off (- p. 39).
5 Select On or Off.
6 To return to factory defaults, highlight Reset and
OK
press .
™
To open the Channel Browser
• > APPLICATIONS > Channel Browser > .
•Press or .
:
OK
32
Page 61

Chapter 6: Basic features
-
CH
CH
Elements of the Channel Browser
™
1
4
3
2
VCR
ANT/CABLE
Channel Browser
Video 1 ColorStream HD HDMI 1
History List
5
Video 2
ANT
9
88
1080i
abs
6
1 Channels stored in the current list
2 Channel or input that is currently highlighted in the
browser
3 Inputs or channels labels
4 Input type
5 Current list (History, ANT/CABLE, Inputs,
Favorites, or HDMI-CEC)
6 Channel or input currently being viewed
To cycle through the available lists:
1 Open the Channel Browser
™
.
2 Press B or b.
Note:
• The History List opens by default. After selecting
another list, the Channel Browser
™
will open in the last
selected list.
• If all lists are turned off,
Channel Browser
pressing
™
. If Favorites List is turned off,
will not display the Favorites Browser.
• Pressing opens the Channel Browser
list regardless of the last selected list in the Channel
™
Browser
.
or will not display the
™
Favorites
To tune to a channel or input in Browse mode:
1 Highlight an item. The TV tunes to the channel or
input.
2 Press to close the Channel Browser
™
.
To tune to a channel or input in Select mode:
1 Highlight the item you want to tune to.
2 Press .
3 Press to close the Channel Browser
OK
™
.
Favorites Browser
You can quickly create a favorite channels/inputs list
that is integrated into the Channel Browser
To add a favorite channel or input:
™
.
1 Tune to the channel or input.
2 Press and hold for 3 seconds.
Note: Additions are added to the beginning of the
Favorites list on the left side of the Channel Browser
To delete a favorite channel or input:
™
.
1 Press . The Favorites Browser list appears.
2 Select a channel or input by pressing C or c.
3 Press and hold for 3 seconds.
Adding and clearing channels and inputs in the
History List
Adding channels to the History List:
As a channel or input is tuned, the Channel Browser
adds it to the History List and displays it on the right
side of the Channel Browser
™
.
Previously tuned channels and inputs shift to the left.
Press C to surf back through the previously tuned
channels and inputs.
The Channel Browser
™
stores these channels:
•Channels that are tuned using the numeric buttons on
the remote control.
•Channels that are tuned for at least 5 seconds using
or .
To clear channels from the History List:
•Reconfigure the ANT/CABLE input.
•Turn off the TV.
™
33
Page 62

Chapter 6: Basic features
CH RTN
CH RTN
CH RTN
CH RTN
CH RTN
INPUT
INPUT
Inputs
ANT/CABLEANT/CABLE
0
1
Video 1
5
HDMI 2
6
HDMI 3
3
ColorStream HD1
HDMI 1
4
2
Video 2
7
HDMI 4
8
PC
INPUT
OK
Using Channel Return
You can switch between two channels without entering
a channel number each time. This feature also works for
external inputs.
1 Select the first channel you want to view.
2 Select a second channel using the Channel Number
buttons (and the dash ( ) button if needed).
3 Each time you press , the TV switches back
and forth between the last two channels that were
tuned.
Using SurfLock
The SurfLock™ feature temporarily memorizes one
channel to the button, so it can be quickly
returned to from any other channel. This feature also
works for external inputs.
To memorize a channel to the button:
1 Tune to the channel you want to program to the
CH RTN
button.
2 Press and hold for about 2 seconds until the
message “Memorized” appears. The channel has
been programmed to the button.
3 You can then change channels repeatedly, and
when you press , the memorized channel will
be tuned.
After pressing and then changing channels again,
the memory is cleared and the button functions as
Channel Return.
34
CH RTN
-
™
CH RTN
Selecting the video input to view
To select the video input to view:
1 Press on the remote control or TV control
panel.
2 Change the input:
•Press 0–8.
•Repeatedly press B or b. Press .
•Repeatedly press .
Note:
• You can label the video input sources according to the
specific devices you have connected to the TV
(- “Labeling video inputs” on p. 30).
• You can skip sources (- “Skipping video inputs” on p.
29).
• Inputs that are set to be skipped will not be available and
will be skipped when selecting inputs by repeatedly
pressing or B or b.
• You can select inputs that are set to be skipped using the
number buttons.
• If one or more HDMI
®
CEC devices are connected to an
HDMI input, the icon ( ) appears in the input selector.
In this case, the label (- p. 30) will not appear on the
input selector.
• When the Auto Input feature is set, you can select a video
input source with the remote control by pressing and
holding the corresponding MODE SELECT button for 2
seconds (- p. 31).
To select an HDMI® CEC device:
1 Press B or b to select an HDMI input.
2 Press c. The list of HDMI
input appears.
3 If the input has multiple HDMI
B or b to select a device.
4 Press .
OK
®
CEC devices for that
®
CEC devices, use
Page 63

Chapter 6: Basic features
OK
WORLD WEATHER
Temps Current
F C Weather
LONDON 51 11
MOSCOW
PARIS
ROME
TOKYO
57 14
53 12
66 19
65 18
Cloudy
Clear
Cloudy
Rain
Clear
OK
OK
Using closed captions
To turn on the closed caption mode:
1 > Settings > SETUP > TV Settings > .
2 Press b or B to select Closed Captions Settings.
OK
Press .
3 Press b or B to select Closed Captions.
4 Press C or c to select On.
Note: If Closed Captions is set to Off, Analog CC Mode
and Digital CC Settings will be not available.
Analog CC mode
The closed caption mode has two options:
Mode Description
Displays the dialogue, narration, and sound
Captions
Text
To view captions or text:
1 > Settings > SETUP > TV Settings > .
2 Press b or B to select Closed Captions Settings.
Press .
3 Press b or B to select Analog CC Mode.
•To view captions:
effects of TV programs and videos that are
closed captioned (usually marked “CC” in
program guides).
Displays information not related to the
current program, such as weather or stock
data (when provided by individual stations).
OK
Press C or c to highlight CC1, CC2, CC3, or CC4.
OK
Note: A closed caption signal may not display when a
videotape is dubbed, signal reception is weak, or signal
reception is non-standard.
Digital CC settings
You can customize the closed caption display
characteristics.
Note:
• These settings are available for digital channels only.
• You cannot set Caption Text and Background as the
same color.
Mode Description
Caption Size Auto, Small, Standard, Large
Caption Text
Type
Caption Text
Edge
Caption Text
Color
Text Foreground
Opacity
Background
Color
Text
Background
Opacity
Caption Text
Edge Color
To customize the closed captions:
Auto, Mono w. Serif, Prop. w. Serif,
Mono w/o Serif, Prop. w/o Serif,
Casual, Cursive, Small Capitals
Auto, None, Raised, Depressed,
Uniform, Left Drop Shadow, Right
Drop shadow
Auto, Black, White, Red, Green, Blue,
Yellow, Magenta, Cyan
Auto, Transparent, Translucent,
Flashing, Solid
Auto, Black, White, Red, Green, Blue,
Yellow, Magenta, Cyan
Auto, Transparent, Translucent,
Flashing, Solid
Auto, Black, White, Red, Green, Blue,
Yellow, Magenta, Cyan
Giant pandas eat leaves.
Note: If the program or video you have selected is
not closed captioned, no captions will be displayed.
To view text:
•
Press C or c to highlight T1, T2, T3, or T4.
Note: If text is not available in your area, a black
rectangle may appear on the screen. You may set
Closed Captions Settings to Off.
1 > Settings > SETUP > TV Settings > .
2 Press b or B to select Closed Captions Settings.
Press .
3 Press B or b to select Digital CC Settings. Press .
OK
4 Press B or b to select a characteristic. Press C or c
to select the format for that characteristic.
Using the Closed Caption button
If you press when an analog channel is tuned or
from an external input (480i signal from the video
input):
•The CC bar will appear and will display CC1-4, T1-4,
and Off as the options.
If you press when a digital channel is tuned:
•The CC bar will appear and will display the available
caption options (available languages) for that channel
or service.
CC
CC
35
Page 64

Chapter 6: Basic features
OK
OK
OK
OK
Setting the PIN code
A PIN code is necessary for some menus.
Note: The Parental Control and Locks menu is grayed
out if no PIN has been set.
Entering a new PIN code
1 > Settings > PREFERENCES > PIN Setting >
OK
.
2 Use the number buttons to enter a 4-digit number.
Confirm the code.
Note: The PIN code cannot be set to “0000”.
Changing or deleting your PIN code
1 > Settings > PREFERENCES > PIN Setting >
OK
.
2 Use the number buttons to enter your 4-digit PIN
code.
3 Select Change PIN or Delete PIN. Press .
Note:
•The PIN code cannot be set to “0000”.
•If you delete the PIN code, the settings of Parental
Controls and Locks are reset.
Forgotten PIN code
Using parental controls
Blocking TV programs and movies by
rating (V-Chip)
Some TV programs and movies include signals that
classify the content of the program as unsuitable for
younger viewers. The V-Chip feature in this TV
detects the signals and blocks the programs according
to the ratings you select.
Note: The V-Chip feature in this TV supports the U.S. VChip system only.
1 > Settings > PREFERENCES > Parental
Control and Locks > .
2 Enter your 4-digit PIN code.
3 Press B or b to highlight Enable Rating Blocking.
4 Press C or c to select On.
5 Press b to select Edit Rating Limits. Press .
The Edit Rating Limits screen appears.
6 Press B, b, C or c.
7 Press to select a level of blocking.
A box with an “5” indicates a rating that will be
blocked. As you highlight a rating, the rating’s
definition appears at the bottom of the screen.
Note: This feature will be not available if no PIN code is
set.
OK
1 > Settings > PREFERENCES > PIN Setting >
.
2 Press Q 4 times within 5 seconds. The code is
cleared.
3 Enter a new PIN code.
36
Page 65

Chapter 6: Basic features
Downloading an additional rating
system
In the future, an additional rating system may become
available for use in selectively blocking TV programs and
movies.
Note: The currently tuned station must be receiving a
digital signal before an additional rating system can be
downloaded.
1 > Settings > PREFERENCES > Parental
Control and Locks > .
2 Enter your 4-digit PIN code. The Parental Control
and Locks screen appears.
3 Press B or b to highlight Enable Rating Blocking.
4 Press C or c to select On.
5 Press b to select Edit Rating Limits. Press . The
Edit Rating Limits screen appears.
6 Select Alt RS. Press . The Edit Alternate Ratings
screen appears.
Note:
•The Alt RS button is only available if an additional
rating system is currently available.
•The download may take several minutes.
•The information displayed on the Alternate Ratings
screen depends on the configuration of the
additional rating system available at the time of
download.
7 Press B, b, C, or c.
8 Press to select the desired level of blocking. A
Note:
• You can only download the additional rating system
once. You cannot download updates if they become
available.
• The additional rating system is not designed,
transmitted, or controlled by the TV or Toshiba, nor is the
availability of an additional rating system determined or
controlled by Toshiba. Similarly, the rating of programs in
an additional rating system is not determined,
transmitted, or controlled by the TV or Toshiba.
• The additional rating system is an evolving technology;
therefore, availability, content, and format may vary.
OK
box with an “5” indicates the rating that will be
blocked.
OK
OK
OK
Rating system
Independent rating system for broadcasters
Ratings Description and Content themes
Mature Audience Only (This program is
specifically designed to be viewed by
TV-MA
TV-14
TV-PG
TV-G
TV-Y7,
TV-Y7FV
TV-Y
Independent rating system for movies
Ratings Description and Content themes
X X-rated (For adults only)
NC-17 Not intended for anyone 17 and under
R
PG-13
PG
G General Audience (Appropriate for all ages)
adults and therefore may be unsuitable for
children under 17.)
L) Crude or indecent language S) Explicit
sexual activity V) Graphic violence
Parents Strongly Cautioned (This program
contains some material that many parents
would find unsuitable for children under
14 years of age.)
D) Intensely suggestive dialogue L)
Strong, coarse language S) Intense sexual
situations V) Intense violence
Parental Guidance Suggested (This
program contains material parents may
find unsuitable for younger children.)
D) Some suggestive dialogue L)
Infrequent coarse language S) Some
sexual situations V) Moderate violence
General Audience (Most parents would
find this program suitable for all ages.)
Directed to Older Children (This program
is designed for children age 7 and above.
Note: Programs in which fantasy violence
may be more intense or more combative
than other programs in this category are
designated TV-Y7FV.)
All Children (This program is designed to
be appropriate for all children.)
Restricted (Under 17 requires
accompanying parent or adult)
Parents Strongly Cautioned (Some material
may be inappropriate for children under 13)
Parental Guidance Suggested (Some
material may not be suitable for children)
37
Page 66

Chapter 6: Basic features
OK
DTV
ATV
DTV
ATV
ATV
ATV
ATV
ATV
6
5-1
6-1
8
9
10
11
12
Ch.
Type
Label
Channel Options
OK
OK
OK
Indication other than rating system
Display Description
NONE The program is rated None.
(No rating appears)
No rating information is
provided.
Note:
• If you place an “5” in the box next to “Rated “None””,
programs rated “None” or “Not Rated” will be blocked;
Programs that do not provide any rating information will
not be blocked.
Displaying ratings
To display the rating of the program you are watching,
press Q on the remote control.
Unlocking programs
If you try to tune to a program that exceeds the rating
limits you have set, the TV will enter program lock
mode and a warning message will appear onscreen.
Follow the instructions to temporarily unlock the
program.
Locking specific channels
A channel that is configured as Locked cannot be
viewed unless the PIN code is entered first (- “Setting
the PIN code” on p. 36).
1 > Settings > SETUP > TV Settings > .
2 Press B or b to select Channel Options. Press .
The list of channels appears.
3 Press c and then B or b to select a channel in the
lock column, then press .
4 You must enter your PIN code to be able to lock
channels.
Note: If no PIN code has been set, a warning appears.
5 The box is selected. To clear the selection, press .
Locking video input
You can lock video inputs and channels 3 and 4. You
cannot view the input sources or channels until you
unlock the inputs by entering the PIN code.
OK
38
1 > Settings > PREFERENCES > Parental
Control and Locks > .
2 Enter your 4-digit PIN code.
3 Press B or b to highlight Input Lock.
4 Press C or c to select Video, Video+, or Off.
Mode Description
Video
Video
Off Unlocks all video inputs and channels 3 and 4.
Locks Video 1, Video 2, ColorStream HD1,
ColorStream HD2, HDMI 1, HDMI 2, HDMI 3,
HDMI 4, and PC.
Locks Video 1, Video 2, ColorStream HD1,
ColorStream HD2, HDMI 1, HDMI 2, HDMI 3,
HDMI 4, PC, and channels 3 and 4.
+
• Select Video+ if you are playing video tapes
via the ANT/CABLE input.
Page 67

Chapter 6: Basic features
OK
Setting a time limit for games
You can use the GameTimer® to set a time limit for
playing a video game. When the time expires, the TV
locks all external inputs.
1 > Settings > PREFERENCES > Parental
Control and Locks > .
(Another: > Timer > GameTimer > .)
OK
OK
2 Enter your 4-digit PIN code.
3 Press B or b to select GameTimer.
4 Press C or c to select 30, 60, 90, or 120 minutes.
5 To cancel the timer, select Off.
®
To deactivate the Input Lock once the GameTimer
activated it:
Set the Input Lock to Off (- “Locking video input” on
p. 38).
Note:
• A message appears when 10 minutes, 3 minutes, and 1
minute remaining.
• If the TV loses power with time remaining, the TV will
enter Input Lock mode when power is restored (as if the
GameTimer had been activated). You must deactivate
the Input Lock (- “Locking video input”).
has
Locking the control panel
You can lock the control panel to prevent your settings
from being changed accidentally (by children, for
example). When Panel Lock is set to On, none of the
controls on the control panel operate except POWER.
Using HDMI® CEC Control
This feature uses CEC technology and allows you to
control Toshiba HDMI
the TV remote control via HDMI connection.
When Enable HDMI-CEC Control in the HDMI-CEC
Control Setup menu is set to On, the following HDMI
CEC Control functions are enabled.
To set HDMI
®
1 > Settings > PREFERENCES > HDMI-CEC
Control Setup > .
2 Press B or b to highlight Enable HDMI-CEC
Control.
3 Press C or c to select On.
Note: If you set Enable HDMI-CEC Control to Off,
the other items under HDMI-CEC Control Setup will be
grayed out.
4 Press B or b to select an item. Press C or c to select
On or the desired mode.
•TV Auto Power: On/Off
•Auto Standby: On/Off
•Amplifier Control: On/Off
•Speaker Preference: TV Speakers/Amplifier
Note: These functions depend on the connected devices.
®
CEC compatible devices from
CEC Control Setup:
OK
®
1 > Settings > PREFERENCES > Parental
Control and Locks > .
2 Enter your 4-digit PIN code.
3 Press B or b to select Panel Lock.
4 Press C or c to select On.
Note: When Panel Lock is set to On, “Panel Lock”
appears onscreen when the buttons on the TV control
panel are pressed. If the POWER button is pressed,
the TV turns off and you must use the remote control to
turn it on.
To unlock the control panel:
Select Off in Step 4 above.
39
Page 68

Chapter 6: Basic features
OK
QUICK
OK
Controlling HDMI® CEC playback
devices
With your TV’s remote control, you can control the
connected HDMI
etc.) you are watching.
Available remote control key functions:
Before using these key functions, set the MODE
SELECT switch on the remote control to TV.
Button Description
B b C c Navigates contents menu, etc.
Closes the menu.
RED,
GREEN,
YELLOW,
BLUE
Note: These functions depend on the connected devices.
®
CEC playback device (DVD player,
Begins playback.
Stops playback.
Pauses the picture during play or record
mode.
Skips forward.
Skips backward.
Fast-forwards.
Rewinds/reverses.
Enters contents menu, etc.
Controls various operations
HDMI® CEC Player Control menu functions:
1 Press to open the Quick menu.
2 Select HDMI-CEC Player Control. Press .
OK
3 Press B or b to select the item you want to control
and press .
Item Description
Power Turns the selected device on and off.
Root Menu Accesses the selected device’s top menu.
Contents
Menu
Setup Menu Accesses the device’s setup menu.
Note:
• These functions depend on the connected devices.
• The HDMI-CEC Player Control item is not available under
these conditions:
- A non-HDMI input is selected.
- The Enable HDMI-CEC Control item is set to Off.
- The connected HDMI
recording device.
OK
Accesses the contents list when you press
.
®
CEC device is not a playback or
HDMI® CEC Control input source
selection
If an HDMI® CEC device with HDMI switching
capability (e.g. an amplifier) is connected to the HDMI
input, you can select another HDMI
connected to the master HDMI device.
INPUT
Use on the remote control or the control panel
(- p. 34).
®
CEC device that is
40
Page 69

Chapter 6: Basic features
OK
Adjusting the amplifier’s audio
Using the TV’s remote control, you can adjust or mute
the sound volume of your amplifier.
VOL
• adjust the volume level.
VOL
• turns off the sound.
Note: This feature is available when Amplifier Control is set
to On.
1 > Settings > PREFERENCES > HDMI-CEC
Control Setup > .
OK
2 Press B or b to highlight Speaker Preference.
3 Press C or c to select Amplifier.
Note: Confirm that a connected HDMI® CEC device
(such as DVD player, etc.) is selected for the Amplifier
input source.
Note:
• You can also use this function when the amplifier is
connected to the TV’s DIGITAL AUDIO OUT terminal
(not HDMI connection). Select a digital audio input mode
on the amplifier.
• These functions depend on the device connected.
Other HDMI® CEC Control functions
When Enable HDMI-CEC Control and all items in the
HDMI-CEC Control Setup menu are set to On, the
following functions will be enabled.
Item Description
®
TV Auto
Power
Auto Standby
Amplifier
Control
Speaker
Preference
Note: When you turn on the amplifier, change its input
source, or adjust the sound volume, the sound will be
output from the amplifier’s speakers even if TV Speakers
has been selected. Turn the TV off and on again to output
the sound from the TV speakers.
If a HDMI
TV turns on automatically.
If the TV is turned off, it will send a
message to turn off all of the HDMI
devices connected to the TV.
If Amplifier Control is set to On, you can
adjust the sound volume or turn off the
sound using the remote control.
From this item, you can set your audio
output preference to the TV speakers or
the amplifier. When this item is set to
Amplifier, the remote control can be used
to adjust or mute the volume of the
audio. This item will not be available and
set to TV Speakers automatically unless
a HDMI
is connected.
CEC device is turned on, the
®
CEC
®
CEC compatible audio receiver
Using the HDMI® settings feature
Note: If some HDMI legacy sources do not work properly
with your HDMI TV, set INSTAPORT
setting should allow your HDMI legacy source to operate
properly with your TV.
Mode (default setting) Description
INSTAPORT
™
RGB Range: Auto
Reduces the lag time when
: On
switching HDMI sources.
Adjusts the RGB full range signal
automatically.
When Limited is selected, the RGB
output signal is output in the range
of 16 to 235. When Full is selected,
the RGB output signal is output in
the range of 0 to 255.
The RGB Range setting requires appropriate HDMI
source devices. If your HDMI source device does not
support this feature, the TV may not work properly
when it is enabled.
Note: If your HDMI connection is capable of 1080p and/or
your TV is capable of refresh rates greater than 60 Hz, you
will need a High Speed HDMI
DVI cables may not work properly with this mode.
1 Select the appropriate HDMI input mode (HDMI 1,
HDMI 2, HDMI 3, or HDMI 4).
2 > Settings > PREFERENCES > AV
Connection > .
OK
3 Press B or b to select HDMI Settings. Press .
4 Press B or b to select an item.
5 Press C or c to select a setting.
™
to Off. Adjusting this
®
cable. Conventional HDMI/
Viewing the HDMI® signal
information
1 > Settings > PREFERENCES > HDMI
Information Display.
2 Press C or c to select On. Press Q. The normal
banner and signal information banner appear.
Note:
• The signal information banner will appear when this
feature is set to On and you watch an HDMI input.
• If you press
normal banner will appear.
Q when this feature is set to Off, only the
41
Page 70

Chapter 6: Basic features
OK
OK
OK
OK
OK
Using your PC with the TV
Adjusting the image
If the edges of the picture are hidden, readjust
Horizontal Position and Vertical Position. If the
picture is affected by interference, readjust Clock
Phase and Sampling Clock.
1 Select PC input mode (- “Selecting the video input
to view” on p. 34).
2 > Settings > PREFERENCES > Display
Settings > .
3 Press B or b to select PC Settings. Press .
Note: If a PC is not connected or there is no PC input
signal, this menu will not be available.
4 Press B or b to select an item.
5 Press C or c to make adjustments.
Note: The screen is disrupted momentarily when
adjusting the PC settings. This is not a sign of
malfunction.
Mode Description Adjustment range
Horizontal
Position
Vertical
Position
Clock Phase
Sampling
Clock
* The default settings and /or adjustment ranges vary
depending on the input signal format.
To reset PC Settings:
Select Reset. Press .
Setting the PC audio
You can output sound from your PC when connecting
it to your TV, using the AUDIO IN terminal and PC
audio cable.
OK
Moves the picture left/
right.
Moves the picture up/
down.
Helps to reduce noise
and sharpen the picture.
Helps to reduce noise
and minimize periodic
vertical stripes on the
screen.
OK
within ±10 from
center.*
within ±10 from
center.*
within ±15 from
center.
within ±5 from
center.
Setting the timer to turn on the TV
You can set the on timer to turn on the TV to a preset
channel or input at a preset time.
To activate the timer:
1 > Settings > APPLICATIONS > On Timer >
.
(Another: > Timer > On Timer > .)
2 Press B or b to select Enable On Timer.
3 Press C or c to select On.
Note: If the Enable On Timer is set to Off, other menus
under On Timer cannot be changed.
To set the timer:
1 > Settings > APPLICATIONS > On Timer >
.
2 Set these options to your preference:
Item Description
Input Video input source.
Channel Channel to view.
Volume Volume level.
Desired length of time until the TV
Time until
Power On
3 Select Done. Press .
Note: If you do not operate the TV for 1 hour after it is
powered on by the On Timer feature, it turns off.
To cancel the timer:
1 > Settings > APPLICATIONS > On Timer >
.
2 Press B or b to select Enable On Timer.
3 Press C or c to select Off.
turns on.
minimum= 00:10, maximum= 12:00
•
Press C or c.
• Use the number buttons.
OK
1 > Settings > PREFERENCES > AV
Connection > .
OK
2 Press B or b to select Rear Shared Audio.
3 Press C or c to select PC.
Note: Set Shared PC Input to PC to make the PC item
selectable (- p. 30).
42
Page 71

Chapter 6: Basic features
OK
OK
OK
Setting the sleep timer
You can set the TV to turn off after a specific amount of
time (maximum = 12 hours).
Using the remote control:
1 Press [
2 Set the time until the TV turns off.
•Repeatedly press [ to increase the time.
•Press B or b to increase or decrease the time.
Using the onscreen menus:
1 > Settings > APPLICATIONS > Sleep Timer.
(Another: > Timer > Sleep Timer > .)
2 Enter the time until the TV turns off.
•Use the number buttons.
•Press C or c to increase or decrease the time.
Note: If a power failure occurs, the sleep timer setting may
be cleared.
To display the time remaining until the TV turns off:
Press [.
To cancel the sleep timer:
Press [ repeatedly or press B or b until it is set to 0
minutes.
Setting Automatic Power Down
The TV can be configured to automatically turn itself off
after 4 hours if you do not operate the TV either from
the remote control or the TV control panel.
1 > Settings > PREFERENCES > Energy
Saving Settings > .
2 Press B or b to select Automatic Power Down.
3 Press C or c to select On. Press .
Note: When the following features are set, the feature that
is set for the nearest time will function.
– Automatic Power Down
– Sleep Timer
– Wallpaper/Auto Power Off
– Auto shutdown after 1 hour of inactivity (after powering
on by On Timer)
– No signal auto power off (after 14 minutes of no signal)
Setting No Signal Power Down
When an input's setting in this feature is set to On, The
TV will automatically turn itself off after 14 minutes if
no signal is detected.
You can change each input's setting to Off: ANT/
CABLE, Video 1, Video 2, ColorStream HD1,
ColorStream HD2, HDMI 1, HDMI 2, HDMI 3, HDMI 4,
PC
1 > Settings > PREFERENCES > Energy
Saving Settings. Press .
OK
2 Press B or b to select No Signal Power Down.
Press .
3 Press B or b to highlight the item you want to
change.
4 Press C or c to select On or Off. Press .
Note:
• Default setting for each input is On.
• A warning message will appear 1 minute before turning
off.
43
Page 72

Chapter 6: Basic features
2-2
ANT
Nashville WX Channel
Nashville WX Channel provides Middle Tenessee and Southern Kentucky
weather.
8:59am - 4:59pm EST
480i
4:3
NONE
Displaying TV status information
To display TV status information:
Press Q.
The following information will be displayed
(if applicable):
•Current input (ANT/CABLE, Video, etc.)
•Either “CABLE” (for cable TV) or “ANT” (for overtheair broadcasts), if ANT/CABLE is the current input.
•Channel number (if in ANT/CABLE mode)
•Input label (if set)
•Digital signal strength indicator (bar graph in lower
right corner of box; for ATSC signals only)
•Stereo, Mono, or SAP audio status (when in HDMI
input mode, PCM)
•Video resolution
•Aspect ratio of incoming video signal (4:3 or 16:9)
•V-Chip rating status (if available)
•GameTimer (if set)
•Channel Label (if set or received)
To close the screen:
Press Q again.
The following additional information (only available
for ANT/CABLE input) will display for off-air digital
channels (if applicable):
•Title
•Duration
•Detailed description
Viewing support information
1 > Settings > SETUP > System Information.
2 Press to display support information containing
OK
Web/Customer service numbers for US, Canada,
and Mexico.
Resetting to Factory Defaults
You can reset all settings and channels.
1 > Settings > SETUP > Reset TV > .
OK
2 Enter your PIN code (if a PIN code has been set).
3 A confirmation screen appears. Select Yes, and
OK
press . The TV will turn off automatically.
To cancel the reset:
Press C or c to select No. Press .
OK
Power failure
If power is lost while you are watching the TV, the
Last Mode Memory feature automatically turns on the
TV when power is restored.
To display the next program's information for digital
channels, press Q again. Pressing Q a third time will
remove the entire banner.
44
Page 73

Chapter 7: Picture and sound controls
Selecting the picture size
You can view many program formats in several picture
sizes—Native, 4:3, Full, TheaterWide 1, TheaterWide
2, TheaterWide 3, Normal, and Dot by Dot.
Note: The picture size illustrations are examples only. The
format of the image (in any of the picture sizes) depends
on the format of the signal you are currently watching.
Select the picture size that displays the current program in
the way that looks best to you.
You can save separate picture size preferences for each
input on your TV.
To select the picture size:
1 Press I.
2 While the Picture Size screen is open, do one of the
following:
•Repeatedly press I.
•Press the corresponding number button.
•Press B or b and .
Note: Some picture sizes may not be available depending
on the format of the signal being received.
Using these functions to change the picture size (i.e.,
changing the height/width ratio) for any purpose other
than your private viewing may be prohibited under the
Copyright Laws of the United States and other
countries, and may subject you to civil and criminal
liability.
OK
Note: If you select a TheaterWide
and bottom edges of the picture (including subtitles or
captions) may be hidden. To view these edges, adjust the
Picture Position (-”Scrolling the picture” on p. 47) or try
viewing the program in 4:3 or Full.
®
picture size, the top
45
Page 74

Chapter 7: Picture and sound controls
A B C D E F G - - - - - - - - - - - - - - - -
A B C D E F G - - - - - - - - - - - - - - - - - - - - - - - - - -
Picture Size
Native
(for 480i (HDMI), 480p (HDMI), 720p, 1080i, and 1080p signal
programs)
•
If receiving a 1080i, 1080p, 720p, 480i (HDMI), or
480p (HDMI) signal program, the video is scaled to
display the entire picture within the borders of the
screen (i.e. no overscanning).
• This is especially useful for external HD sources
such as DVHS movies, Video Games, or PC
graphics.
• None of the picture is hidden.
Note:
• This mode is supported only for HDMI (1080i, 1080p,
720p, 480i, and 480p), ColorStream
®
(1080i and
720p), and ANT/CABLE (digital) inputs (1080i, 1080p,
and 720p).
• Depending on the input signal, the picture’s border
may be hidden, displayed in black, or noisy.
4:3
Picture Size
TheaterWide 1
(for 4:3 format programs)
The center of the picture remains close to its original
proportions, but the left and right edges are stretched
horizontally to fill the screen.
TheaterWide 2
(for letter box programs)
A B C D E F G - - - - - - - - - - - - - - - -
The picture’s top and bottom edges may be hidden*.
TheaterWide 3
(for letter box programs with subtitles)
The picture’s top and bottom edges are hidden*.
Normal
(for SVGA, XGA, WXGA, and SXGA sources)
Some program formats will display with sidebars and/or
bars at the top and bottom.
Full
(for 16:9 [480i, 480p] source programs only)
If receiving a squeezed 4:3 format program, the picture is
stretched horizontally to fill the width of the screen but
not stretched vertically.
(for 1080i, 1080p, and 720p program sources)
The edges of the picture may be hidden.
46
This size is a non-stretched display. Some input signal
formats will display with sidebars and/or bars at the top
and bottom.
Dot by Dot
(for SVGA, XGA, WXGA, and SXGA sources)
“Dot by Dot” is a non-scaling display. Depending on the
input signal format, the picture is displayed with sidebars
and/or bars at the top and bottom. (Example: SVGA
input source)
* To view the hidden areas (such as subtitles or captions), see
“Scrolling the picture” (- p. 47).
Page 75

Chapter 7: Picture and sound controls
Scrolling the picture
If the edges of the picture are hidden, you can adjust the
image’s position.
Note:
• You can adjust the picture position when the picture size
is set to TheaterWide 2 or TheaterWide 3.
• When viewing DTV, NET TV, or Media Player, this feature
is not available.
1 > Settings > PREFERENCES > Display
Settings > .
2 Press B or b to select Picture Position. Press .
OK
OK
3 Press B or b to select Vertical Position.
4 Press C or c to make the appropriate adjustments.
The adjustment range is from -5 to +10. Press .
Using the Auto Aspect feature
When this feature is set to On, the TV will automatically
select the picture size when one of the following input
sources is received:
•A 480i, 480p, 720p, 1080i digital signal from the ANT/
CABLE input
•A 480i signal from the ColorStream HD or Video
input
•A 480i, 480p, 720p, 1080i, 1080p, or VGA (60/72/75
Hz) signal from the HDMI 1/2/3/4 input
Note: The auto aspect ratio feature is not applicable to the
PC input.
Using the 4:3 Stretch
When 4:3 Stretch is activated, the TV displays 4:3
programs as a full-screen picture.
Note: This feature is available when Auto Aspect is set to
On.
1 > Settings > PREFERENCES > Display
Settings > .
OK
2 Press B or b to select 4:3 Stretch.
3 Press C or c to select On. Press .
Freezing the picture
1 When watching the TV, press B to freeze the
picture.
2 To unfreeze the picture, press B again.
Note: After 15 minutes, the picture will unfreeze
automatically.
Using the FREEZE function for any purpose other than
your private viewing may be prohibited under the
Copyright Laws of the United States and other
countries, and may subject you to civil and criminal
liability.
1 > Settings > PREFERENCES > Display
Settings > .
OK
2 Press B or b to select Auto Aspect.
3 Press C or c to select On. Press .
47
Page 76

Chapter 7: Picture and sound controls
Adjusting the picture
Selecting the picture mode
You can select your desired picture settings from the
modes described below.
Mode Description
Automatically adjusts picture settings
®
AutoView
Sports Bright and dynamic picture.
Standard Standard picture settings.
Movie 1
Movie 2
Game
PC
Note:
• PC mode is available for HDMI and PC inputs only (not
displayed for other input sources).
• Game mode cannot be turned on when the ANT/CABLE
input is selected.
1 > Settings > PICTURE > Picture Mode.
2 Press C or c to select a mode. Press .
Note:
• The picture mode you select affects the current input
only. You can select a different picture mode for each
input.
• The picture mode can be changed to Game mode by
pressing when the input mode is ColorStream HD,
PC, VIDEO, or HDMI.
based on ambient light conditions and
input signal content.
Lower contrast for darkened room.
Designed for playing a video game
requiring split-second timing between
the screen display and input from the
controller.
Designed for the viewing of PC tables
and documents.
Adjusting the picture quality
The adjustments you make to picture quality under a
picture mode are saved to that picture mode.
Selection Pressing C Pressing c
Backlight* darker lighter
Contrast lower higher
Brightness darker lighter
Color paler deeper
Tint reddish greenish
Sharpness softer sharper
* Backlight: Adjusts the brightness of the entire screen. When
in video mode and no signal is input, this selection is set to 0.
(Settings are stored in memory.)
Note: Some settings cannot be adjusted in any of the
following cases.
• AutoView is selected.
• TheaterLock is set to On.
To adjust the picture quality:
1 > Settings > PICTURE > the setting you
would like to adjust (Backlight, Contrast,
Brightness, Color, Tint, or Sharpness).
2 Press C or c to adjust the setting. Press .
Note:
• Any picture settings that you adjust affect the current
input only. You can adjust the picture quality separately
for each input.
• Depending on a Sharpness value, the Edge Enhancer
effect may be reduced.
To reset to the factory defaults:
1 Select the picture mode you want to reset.
2 > Settings > PICTURE > Reset > . A
confirmation screen appears.
3 Press C or c to select Yes. Press .
OK
OK
48
Page 77

Chapter 7: Picture and sound controls
OK
OK
Using the advanced picture
settings features
Note: Some of the Advanced Picture Settings features will
not be available for adjustment when the Picture Mode is
set to AutoView.
Edge Enhancer
The Edge Enhancer feature lets you adjust the levels for
your desired picture settings and achieve a sharper
picture.
To set Edge Enhancer:
1 > Settings > PICTURE > Advanced Picture
Settings > .
2 Press B or b to select Edge Enhancer. Press .
3 Press C or c to select On.
4 Press B or b to highlight Level. Press C or c to
select either 1, 2, 3, 4, or 5. Press .
Note:
• When the Picture Mode is set to AutoView, the level
range is from -2 to +2.
• If the Picture Mode is set to Game or PC, Edge
Enhancer is not available.
• This feature may not work properly depending on the
content.
• Noise may appear on the image depending on the
device connected to the TV (e.g. a device with a specific
enhancer function).
Dynamic Contrast
Dynamic Contrast detects changes in picture quality
that affect the appearance of your contrast settings and
then automatically adjusts the video.
OK
OK
DynaLight
The DynaLight™ feature automatically strengthens the
black coloring of dark areas in the video according to
the level of darkness.
™
1 > Settings > PICTURE > Advanced Picture
Settings > .
OK
2 Press B or b to select DynaLight.
3 Press C or c to select On or Off. Press .
Static Gamma
The static gamma feature lets you adjust the levels of
black in the picture.
To adjust the static gamma settings:
1 Y > Settings > PICTURE > Advanced Picture
Settings > .
OK
2 Press B or b to select Static Gamma.
3 Press C or c to adjust the level. The adjustment
range is within ±15 from center. Press .
Film Stabilization
This feature helps to eliminate video shaking.
1 > Settings > PICTURE > Advanced Picture
Settings > .
2 Press B or b to select Film Stabilization.
3 Press C or c to select Smooth, Standard, or Off.
Press .
Note: If the Picture Mode is set to Game, this feature will be
set to Off automatically and grayed out.
1 > Settings > PICTURE > Advanced Picture
Settings > .
2 Press B or b to select Dynamic Contrast.
3 Press C or c to adjust the level. The adjustment
range is from 0 to 10. Press .
Note: When the Picture Mode is set to AutoView, the level
range is from -5 to +5.
49
Page 78

Chapter 7: Picture and sound controls
OK
OKOKOK
OK
OK
OK
ClearFrame™
The ClearFrame 120 Hz anti-blur technology doubles
the frame rate from 60 frames per second to 120 frames
per second, virtually eliminating motion blur without
adding flicker or reducing image brightness.
1 > Settings > PICTURE > Advanced Picture
Settings > .
OK
2 Press B or b to select ClearFrame.
3 Press C or c to select On. Press .
Note: If the Picture Mode is set to Game, this feature is not
available.
MPEG NR
The MPEG noise reduction feature allows you to reduce
visible interference caused by MPEG compression.
1 > Settings > PICTURE > Advanced Picture
Settings > .
2 Press B or b to select Noise Reduction. Press .
3 Press B or b to highlight MPEG NR.
4 Press C or c to select either Low, Middle, High, or
Off. Press .
Note: If the Picture Mode is set to Game or PC, this feature
is not available.
DNR
DNR lets you soften the screen representation of a weak
signal to reduce the noise effect.
1 > Settings > PICTURE > Advanced Picture
Settings > .
2 Press B or b to select Noise Reduction. Press .
3 Press B or b to select DNR.
4 Press C or c to select Low, Middle, High, Auto, or
Off. Press .
Note:
• If the Picture Mode is set to Game or PC, this feature is
not available.
• The differences may not always be noticeable. For the
best results, use lower settings, as picture quality may be
greatly reduced if the setting is too high.
Auto Brightness Sensor
When the Auto Brightness function of Auto Brightness
Sensor Settings is set to On, the TV optimizes the
backlighting levels to suit ambient light conditions.
1 > Settings > PICTURE > Advanced Picture
Settings > .
OK
2 Press B or b to select Auto Brightness Sensor
Settings. Press .
OK
3 Press B or b to select Auto Brightness Sensor.
4 Press C or c to select On or Off. Press .
Note: When the Picture Mode is set to AutoView, this
feature is automatically set to On and will not be available.
Backlight Adjustment Pro
This feature adjusts the backlight so that it can change
to match the ambient light conditions.
1 > Settings > PICTURE > Advanced Picture
Settings > .
2 Press B or b to select Auto Brightness Sensor
Settings. Press .
3 Press B or b to select Backlight Adjustment Pro.
Press . The Backlight Control Level screen
appears.
4 Press to display the adjustment window. Press C
or c to select the point. Press B or b to adjust the
level. The adjustment range is from 0 to 100.
5 Press to fix the adjustment.
To cancel the adjustment when selecting a point,
select Cancel on the screen.
To reset the adjustments of all points to the factory
defaults, select Reset on the screen. Press .
Note: If the Auto Brightness Sensor is set to Off, this
feature will not be available.
OK
OK
Backlight Adjustment Pro
Backlight Control Level
100
Control
Level
0
Ambient Light
37
Cancel
Reset
OK
50
Page 79

Chapter 7: Picture and sound controls
OK
OK
OK
ColorMaster
The ColorMaster™ feature allows you to adjust
standard colors.
™
1 > Settings > PICTURE > Advanced Picture
Settings > .
OK
2 Press B or b to select ColorMaster, press C or c to
select On. Press .
Base Color Adjustment
When ColorMaster™ is set to On, the list of base colors
appears. You can select a base color to adjust.
1 > Settings > PICTURE > Advanced Picture
Settings > .
OK
2 Press B or b to select Base Color Adjustment.
OK
Press . The Base Color Adjustment screen
appears.
3 Press B or b to select a color. Press c.
4 Press C or c to select Hue, Saturation, or
Brightness.
5 Press B or b to adjust the setting.
6 Repeat Steps 3 through 5 to adjust other colors.
To reset the adjustments to the factory defaults,
select Reset on the screen. Press .
Color temperature
1 > Settings > PICTURE > Advanced Picture
Settings > .
2 Press B or b to select Color Temperature.
3 Press C or c to adjust the level. The adjustment
range is 0 (warm) to 10 (cool). Press .
Note: When the Picture Mode is set to AutoView, the
adjustment range is -5 to +5.
Resetting to the factory default
1 > Settings > PICTURE > Advanced Picture
Settings > .
2 Press B or b to select Reset. Press .
A confirmation screen appears.
3 Select Yes. Press .
OK
OK
OK
Setting the Expert Picture Settings
Test Pattern
When the test pattern is on screen, you can navigate the
Picture submenus without removing the image. When
you move to a non-Picture menu, or close the menus,
regular video will be restored.
1 > Settings > PICTURE > Expert Picture
Settings > .
2 Select Test Pattern.
3 Press C or c to select On.
4 Adjust picture settings.
RGB Filter
This feature individually enables or disables the red,
green, and blue components of the picture to allow for
more accurate adjustment of each color.
1 > Settings > PICTURE > Expert Picture
Settings > .
2 Press B or b to select RGB Filter. Press .
3 Press B or b to select Red, Green, or Blue to adjust.
4 Press C or c to select On.
5 Press b to select Color or Tint, press C or c to
adjust. Press .
Note: It is not possible to turn off all three colors
simultaneously.
White Balance
Window Display
This feature displays the Window Pattern to adjust the
white balance with a measuring device.
1 > Settings > PICTURE > Expert Picture
Settings > .
2 Press B or b to select White Balance. Press .
3 Press B or b to select Window Display.
4 Press C or c to select On.
5 Adjust picture settings.
OK
OK
OK
OK
51
Page 80

Chapter 7: Picture and sound controls
OK
OK
OK
OK
OK
OK
Setting Type
You can adjust the white balance setting.
1 > Settings > PICTURE > Expert Picture
Settings > .
OK
2 Press B or b to select White Balance. Press .
3 Press B or b to select 2P White Balance. Press .
OK
4 Press B or b to select Red-Offset, Green-Offset,
Blue-Offset, Red-Gain, Green-Gain, or BlueGain. Press C or c to adjust. Press .
Copy to All Inputs
This feature copies White Balance on the current input
to all other inputs. Individual settings that are not
allowed for a specific input will not be copied.
1 > Settings > PICTURE > Expert Picture
Settings > .
OK
2 Press B or b to select White Balance. Press .
3 Press B or b to select Copy to All Inputs. Press .
A confirmation screen appears.
4 Select Yes. Press .
Resetting to the factory default
1 > Settings > PICTURE > Expert Picture
Settings > .
2 Press B or b to select Reset. Press .
A confirmation screen appears.
OK
3 Select Yes. Press .
Locking the picture settings
The TheaterLock™ feature lets you lock items in the
PICTURE menu that affect the picture’s display. These
items cannot be modified when TheaterLock is set to
On.
1 > Settings > PICTURE > TheaterLock.
2 Press C or c to select On. Press .
Adjusting the audio
Muting the sound
Press to partially reduce (1/2 Mute) or turn off
(Mute) the sound. Each time you press , the mute
mode changes in the following order:
Volume1/2 Mute Mute
If the closed caption mode is set to Off when you select
MUTE mode, the closed caption feature becomes active
if the TV program is closed-captioned. To mute the
audio without activating the closed captioning, press
VOL
to set the volume to 0.
Note: If you modify items in the SOUND menu while Mute
is active, Mute is cancelled.
Selecting stereo/SAP broadcasts
The MTS (multi-channel TV sound) feature is only
available for analog signals on the ANT/CABLE input.
When the TV receives a stereo or SAP (second audio
program) broadcast, the icon STEREO or SAP appears
onscreen when Q is pressed.
To listen in stereo sound:
1 > Settings > SOUND > MTS.
2 Press C or c to select Stereo. Press .
Note:
• You can typically leave the TV in Stereo mode because
it outputs the type of sound being broadcast (stereo or
monaural).
• If the sound is noisy, select Mono.
To listen to a second audio program on an analog
station (if available):
If provided by individual analog stations, you can listen
to a second audio program containing another
language, music, or other audio information.
For example, you will hear the other language instead
of the program’s normal audio.
1 > Settings > SOUND > MTS.
2 Press C or c to select SAP. Press .
Note: If there is no sound in SAP mode, select Stereo.
52
Page 81

Chapter 7: Picture and sound controls
Using the MTS button
If you press when an analog channel is tuned:
•The Analog Audio bar will appear and display Stereo,
SAP, Mono as the options.
If you press when a digital channel is tuned:
•The Digital Audio bar will appear and offer different
audio choices for the digital channel.
If you press when an external input is selected:
•No Audio bar is displayed.
Adjusting the audio balance
You can adjust the audio balance.
1 > Settings > SOUND > Balance.
2 Press C or c to adjust. Press .
Adjusting the range
You can adjust bass and treble.
1 > Settings > SOUND > Bass or Treble.
2 Press C or c to adjust. Press .
Selecting the optical audio output
format
You can select the optical audio output format when
you connect a Dolby Digital decoder or other digital
audio systems to the TV’s DIGITAL AUDIO OUT
terminal.
1 Tune to a digital source on the ANT/CABLE input.
2 > Settings > PREFERENCES > AV
Connection > .
3 Press B or b to select Digital Audio Output.
4 Press C or c to select Auto or PCM. Press .
Option Description
Auto
PCM
OK
Outputs Dolby Digital to the digital
audio output if it is being broadcast;
otherwise, it outputs PCM.
Outputs PCM format to the digital audio
output socket.
Using the Dolby® Digital Dynamic
Range Control feature
You can further compress Dolby Digital and Dolby
Digital Plus dynamic range so you can switch from
digital to analog broadcasts at the same dynamic range.
1 > Settings > SOUND > Dynamic Range
Control.
2 Press C or c to select On.
Note:
• This feature is available when Dolby Digital or Dolby
Digital Plus is input to the TV in the following situations:
- When tuned to a digital RF channel.
- When an HDMI input is used.
- When DLNA Certified products or widgets are used.
• This feature is automatically set to Off when Dynamic
Volume (Audyssey Dynamic Volume
High.
• This feature will also affect Digital Audio Output when
the optical audio output format is set to PCM.
Using Audyssey Dynamic Volume
This feature provides a consistent sound volume
between television programs, commercials, and
between the loud and soft passages of movies.
1 > Settings > SOUND > Dynamic Volume.
2 Press C or c to select Low, High, or Off.
Note:
• If Dynamic Range Control is set to On, this feature is
automatically set to Off.
• This feature does not affect the audio signal output from
the DIGITAL AUDIO OUT terminal.
®
) is set to Low or
®
53
Page 82

Chapter 7: Picture and sound controls
Using advanced sound features
Using surround sound
Voice Enhancement and Dynamic Bass Boost help to
create a thrilling surround sound experience with deep,
rich bass from stereo sound sources. Your TV’s audio
will sound fuller, richer, and wider.
Note: Surround features are only available for Stereo
mode (- “Selecting stereo/SAP broadcasts” on p. 52).
1 > Settings > SOUND > Advanced Sound
Settings > .
OK
2 Press b or B to highlight the feature to adjust. Press
C or c to adjust the item.
Mode Description
Voice
Enhancement
Dynamic Bass
Boost
Turns the vocal emphasis effect On or
Off.
Selects a bass expansion level (Off, Low,
or High).
54
Page 83

Chapter 8: Advanced features
Using your home network
•This TV is a DLNA CERTIFIED™ Player. It can play
digital content stored on a DLNA CERTIFIED
product with server functions.
If you want to use this TV as a DLNA CERTIFIED
Player, you will have to configure the network
settings on your TV (- p. 21).
•If you want to use your home network with an
Internet connection, you will have to configure the
network settings on your TV (- p. 21).
Change the network settings if necessary (- “Setting
up the Network” on p. 56).
If you use Internet services, see the following note
before use.
Third party Internet services are not provided by
Toshiba, may change or be discontinued at any time,
and may be subject to third party restrictions. Toshiba
makes no warranties, representations, or assurances
about the content, availability, or functionality of third
party content or services. Third party internet services
may require the creation of a separate account through
a computer with internet access, and payment of onetime and/or recurring charges.
Certain features currently not available in Canada/
Mexico.
When using a Wireless network connection:
Wireless LAN and your Health:
Wireless LAN products, like other radio devices, emit radio
frequency electromagnetic energy. However, the level of
energy emitted by Wireless LAN devices is much less than
the electromagnetic energy emitted by wireless devices
like mobile phones.
Because Wireless LAN products operate within the
guidelines found in radio frequency safety standards and
recommendations, Toshiba believes Wireless LAN is safe
for use by consumers. These standards and
recommendations reflect the consensus of the scientific
community and result from deliberations of panels and
committees of scientists who continually review and
interpret the extensive research literature.
In some situations or environments, the use of Wireless
LAN may be restricted by the proprietor of the building or
responsible representatives of the organization. Such
restrictions may apply in environments where the risk of
interference to other devices or services is perceived or
identified as harmful.
If you are uncertain of the policy that applies to the use of
wireless devices in a specific organization or environment,
you are encouraged to ask for authorization to use the
Wireless LAN device prior to turning on the equipment.
™
™
Using in a wireless LAN environment:
•It is recommended to use IEEE 802.11a or IEEE
802.11n on 5 GHz for audio and SD video streaming.
•It is recommended to use IEEE 802.11n on 5 GHz for
HD video streaming.
•It is recommended that the encoding rate of video
content be 20 Mbps or less.
•It is not recommended to use 2.4 GHz for audio and
video streaming.
•Content playback may be interrupted by surrounding
interference.
55
Page 84

Chapter 8: Advanced features
OK
OK
OK
OK
OK
OK
OK
OK
OK
OK
OK
OK
Setting up the Network
You can select the Network Type.
1 > Settings > PREFERENCES > Network
Setup > .
(Another: > Network > Network Setup > .)
2 Press B or b to highlight Network Type.
3 Press C or c to select Wired or Wireless.
4 If you select Wired, see “Advanced Network Setup”
(- p. 58).
If you select Wireless, see the next section.
Wireless Setup
Note:
• Continued AP (Access Point) connection is not
guaranteed. Connection may be lost while watching TV.
There are 3 methods for wireless setup:
•Easy Setup (WPS)
If the AP supports WPS, this can be used.
– WPS is a standard designed to simplify the
connection of wireless LAN equipment and the setup
of network security features.
•Assisted Setup (setup using the AP's notification
information)
Network Name, Authentication, and Encryption are
decided based on information from the AP. You need
to manually set the Security Key.
•Manual Setup (to input all settings)
Easy Setup using PBC (Push Button Configuration)
1 > Settings > PREFERENCES > Network
Setup > .
2 Press B or b to select Wireless Setup. Press .
3 Press B or b to select Easy Setup. Press .
4 Press C or c to select PBC.
5 Press b to select Start Scan. Press .
6 Following the onscreen instructions, push the
appropriate button on your AP.
7 When a screen reporting that the setup has
succeeded appears, press .
To cancel searching for the AP:
Press while searching for the AP. A message will
appear. Press C or c to select Yes. Press .
OK
OK
Easy Setup using a PIN (Personal Identification
Number)
1 > Settings > PREFERENCES > Network
Setup > .
OK
2 Press B or b to select Wireless Setup. Press .
3 Press B or b to select Easy Setup. Press .
4 Press C or c to select PIN.
5 Press b to select Start Scan. Press .
OK
6 Scan screen appears. Enter the PIN displayed on
this screen into your PC or AP.
7 Press B or b to select the desired AP. Press .
Note: Check the MAC address on the label or in the
manual of the AP and select an AP.
OK
8 When a screen reporting that the setup has
succeeded appears, press .
To cancel searching for the AP:
Press while searching for the AP. A message will
appear. Press C or c to select Yes. Press .
Assisted Setup
OK
1 > Settings > PREFERENCES > Network
Setup > .
2 Press B or b to select Wireless Setup. Press .
3 Press B or b to select Assisted Setup. Press .
OK
4 Press B or b to select the desired AP. Press .
Note: Check the MAC address on the label or in the
manual of the AP and select an AP.
5 Select Security Key. Press . The Software
Keyboard appears.
OK
6 Input the Security Key using the Software Keyboard
(- p. 59). To save your settings, press the BLUE
button.
Note: The Security Key must adhere to these
conditions:
-TKIP/AES: 8-63 ASCII or 64 Hex characters
-WEP: 5 or 13 ASCII or 10 or 26 Hex characters
7 Select Done. Press .
Note: Settings are not saved if is pressed before
Done is selected.
OK
56
Page 85

Chapter 8: Advanced features
OK
OK
OK
OK
OK
QUICK
OK
Manual Setup
1 > Settings > PREFERENCES > Network
Setup > .
OK
2 Press B or b to select Wireless Setup. Press .
3 Press B or b to select Manual Setup. Press .
4 Press B or b to select Network Name. Press .
The Software Keyboard window appears.
5 Input the Network Name using the Software
Keyboard (- p. 59). To save your settings, press
the BLUE button.
6 Press B or b to highlight Authentication. Press C
or c to select Open/Shared, WPA-PSK, or WPA2-
PSK.
7 Press B or b to highlight Encryption. Press C or c
to select None, WEP, TKIP, or AES.
Note:
•Certain encryption types are only compatible with
specific authentication types.
-When Authentication is Open/Shared, only WEP or
None are compatible.
-When Authentication is WPA-PSK or WPA2-PSK,
only TKIP or AES are compatible.
•When incompatible Authentication/Encryption
pairings are attempted, a warning message will be
displayed, and no connection attempt will be made
until the incompatibility is resolved.
8 Press B or b to select Security Key. Press . The
OK
Software Keyboard window appears.
9 Input the Security Key using the Software
Keyboard (- p. 59). To save your settings, press
the BLUE button.
Note: This item is grayed out when Encryption is
None.
10 Select Done. Press .
Note: When Encryption is None, a message will
appear. Press C or c to select Yes. Press .
Note: Settings are not saved if is pressed before
Done is selected.
OK
Wireless Information
The settings configured in Wireless Setup can be
confirmed.
1 > Network > Wireless Information > .
2 A Wireless Information screen will appear.
Note: Press the RED button to check the availability of
surrounding APs.
Note: This feature is available from the Quick menu while
using Media Player or NET TV feature.
> Wireless Information > .
Item Description
Connected is displayed when the TV is
Status
Signal
Speed The link speed with the AP
Mode
Channel The channel in use (1-165)
Network Name SSID set
Authentication Authentication set
Encryption Encryption set
Security Key Security Key set
AP MAC
Address
TV MAC
Address
DHCP
IP Address
Subnet Mask
Default
Gateway
DNS
connected to the AP.
Disconnected is displayed when the
TV is disconnected from the AP.
Connection signal strength with the AP
(STRONG/MEDIUM/WEAK)
Working mode (11a, 11b, 11g, 11n)
The AP's MAC address is displayed
when the TV is connected to the AP.
The TV’s MAC address
Enabled is displayed when you use
DHCP.
Disabled is displayed when you do not
use DHCP.
The TV's IP address
Value of the Subnet Mask
Default GATEWAY’s address
DNS’s address
Note: Even if an AP for IEEE 802.11n is used when
Encryption is set to WEP or TKIP, the Speed value might
be low. We recommend that the Encryption setting be
changed to AES (Under manual setup).
57
Page 86

Chapter 8: Advanced features
OK
OK
OK
OK
OK
OK
OK
OK
OK
OK
Advanced Network Setup
Note:
• When the DHCP function of the router connected to this
TV is On, you can set Auto Setup to On or Off. (Usually
set it to On.)
• When the DHCP function of the router is Off, set Auto
Setup to Off, and manually set the IP Address or DNS
Address.
IP Address Setup
Note: The settings in Auto Setup are linked to those
selected in the DNS Setup menu. If Auto Setup is set to On,
then Auto Setup in the DNS menu will also be set to On.
Auto Setup:
1 > Settings > PREFERENCES > Network
Setup > .
2 Press B or b to select Advanced Network Setup.
3 Press B or b to select IP Address Setup. Press .
4 Select Auto Setup. Press C or c to select On.
Note: Other items will be grayed out when Auto Setup is
set to On.
Manual Setup:
1 > Settings > PREFERENCES > Network
2 Press B or b to select Advanced Network Setup.
3 Press B or b to select IP Address Setup. Press .
4 Select Auto Setup. Press C or c to select Off.
5 Press B or b to highlight IP Address.
6 Press C or c to highlight the field you want to
7 Press B or b to highlight Subnet Mask, and edit in
8 Press B or b to highlight Default Gateway, and
Note: If you manually set the IP address, you must not use
the same IP address for any other device. The IP address
you use should be a private address. If you do not know
the correct values to use, please contact your network
administrator or internet service provider.
OK
Press .
OK
Setup > .
OK
Press .
change and use the number buttons to input the IP
address. To save the setting, press .
Note:
•IP address field numbers must be between 0 and
255. If you input an incompatible number and press
, the field number will be reset to the previous
value.
the same way as IP Address.
edit in the same way as IP Address.
DNS Setup
Note:
• When the DHCP function of the router connected to this
TV is Off, set Auto Setup to Off, and manually set the
DNS address(es). Your internet service provider should
have provided these to you.
• The settings in Auto Setup are linked to those selected in
the IP Address Setup menu. If Auto Setup is set to On,
then Auto Setup in the IP Address Setup menu will also
be set to On.
Auto setup:
1 > Settings > PREFERENCES > Network
Setup > .
OK
2 Press B or b to select Advanced Network Setup.
Press .
3 Press B or b to select DNS Setup. Press .
4 Select Auto Setup. Press C or c to select On.
Note: Other items will be grayed out when Auto Setup is
set to On.
Manual setup:
1 > Settings > PREFERENCES > Network
Setup > .
OK
2 Press B or b to select Advanced Network Setup.
Press .
3 Press B or b to select DNS Setup. Press .
4 Select Auto Setup. Press C or c to select Off.
5 Press B or b to highlight Primary DNS Address.
6 Press C or c to highlight the field you want to
change, and then use the number buttons to input
the Primary DNS Address. To save the setting,
OK
press .
Note:
•DNS address field numbers must be between 0 and
255. If you input an incompatible number and press
OK
, the field number will be reset to the previous
value.
7 Press B or b to highlight Secondary DNS
Address, and edit in the same way as Primary DNS
Address.
MAC Address
You can view the fixed MAC address for the TV.
1 > Settings > PREFERENCES > Network
Setup > .
OK
2 Press B or b to select Advanced Network Setup.
Press .
3 Press B or b to select MAC Address. Press .
OK
58
Page 87

Chapter 8: Advanced features
OK
OK
Network Connection Test
This function checks Internet connectivity.
1 > Settings > PREFERENCES > Network
Setup > .
2 Press B or b to select Network Connection Test.
Note: Favorable Network Connection Test results do not
guarantee an Internet Connection. Depending on the
situation, some Internet features may not be available.
To cancel Network Connection Test:
Press while searching for the Internet connection.
OK
Press .
Note: A message will appear to indicate whether the
connection was successful or not.
Using the software keyboard
You can enter text using the Software Keyboard. The
Software Keyboard window will appear when you
OK
press on a field that accepts character input.
Note: When using the NET TV feature, software keyboard
availability depends on the internet service being
accessed.
To enter text using the software keyboard:
1 Highlight the desired character on the onscreen
software keyboard.
2 Press .
3 Repeat Steps 1 and 2 until you have entered all
desired text.
4 Press the BLUE button to save your settings and
return to the previous screen.
Note: If is pressed, changes are not saved and
the software keyboard window is closed.
A a1
@
AAA|
B
A
CDEFG
HIJKL
VWX YZ
M
N
UTSRQPO
Input operation on the remote control:
Button Description
OK
0–9 Inputs the number directly.
Inputs the selected character.
B b C c Moves the character highlight.
RED
GREEN
YELLOW
BLUE
Moves the cursor.
Moves the cursor to the head of a
character string.
Moves the cursor to the end of a
character string.
Deletes 1 character to the left of the
cursor.
Cycles through upper case, lower case,
numbers, and symbols, if available.
Chooses an accented version of the
current letter, if applicable.
Saves changes and closes the Software
Keyboard window.
Closes the Software Keyboard window
without saving changes.
59
Page 88

Chapter 8: Advanced features
Performing a Software Upgrade
TOSHIBA may offer upgrades for the TV's software in
the future. The TV's software is upgraded via Internet
connection.
Before downloading software:
Configure your TV to connect to the Internet.
Note:
• You will not be able to use the TV set while the upgrade
is being performed.
• Do not turn off the TV during the upgrade.
• By upgrading, the factory default values may be
changed.
1 > Settings > SETUP > Software Upgrade >
OK
.
2 Network Upgrade is displayed. Press .
Note: If the network is not available, a warning
message will appear.
OK
3 After a successful download, the TV software
upgrade will start automatically.
Viewing the Software Licenses
The Licenses for the software used in this TV are
available for viewing.
1 > Settings > SETUP > Software Licenses >
OK
.
A screen will appear displaying all the licensing
information required for the television’s software.
Using the NET TV™ feature
Note:
• You need to connect to the Internet before using this
feature (- p. 21).
• Services may not be currently available in your area.
• User registration or login may be required to use some
services.
•
is not available while using the NET TV feature.
NET TV menu
1 Press .
(From the Menu: > Network > NET TV > .)
2 Press C or c to select an icon. Press .
Note:
• When you access the NET TV menu for the first time, a
welcome screen appears (- “Guided Setup” below).
After setup is complete, this feature is available.
• If the display of the date and time is wrong, turn off the
TV, and turn it on again.
• NET TV menu items may change in the upgrade
process.
OK
Guided Setup
The first time you use Yahoo! TV Widgets this step-bystep wizard begins with the Welcome Screen.
1 Select Let's get started!
If you select Exit Setup now, this step will resume
the next time you press .
OK
60
2 Follow the onscreen instructions.
After completing the Guided Setup:
•When you press or select NET TV from the Menu,
the NET TV menu is displayed.
•When you press or select Widgets from the
Menu, the TV Widgets user interface is displayed.
Page 89

Chapter 8: Advanced features
OK
OK
OK
OK
OK
OK
OK
Netflix
Watching movies with Netflix
1 Press (S Step 3) or press .
(From the Menu: > Network > NET TV > .)
2 Press C or c to select Netflix icon. Press .
3 Follow the onscreen instructions.
After having activated Netflix player and prepared
Instant Queue, movies and TV episodes in your Instant
Queue will appear on the TV screen. Select the desired
content using the remote control.
Note:
• The resolution of video content streamed from Netflix
varies depending on the communication speed and bitrate.
• Future upgrades can change the screens and messages
displayed in the Netflix feature.
To close Netflix:
Press .
To confirm the Netflix ESN (Electronic Serial Number):
1 > Settings > PREFERENCES > Netflix Setup
OK
> .
2 Press B or b to select ESN. Press .
Netflix ESN is displayed.
To deactivate your device:
1 Y > PREFERENCES > Netflix Setup > .
2 Press B or b to select Deactivation. Press .
3 Press C or c to select Yes. Press .
VUDU
VUDU™ is an on-demand service that offers highdefinition movies on the Web.
™
1 Press .
(From the Menu: > Network > NET TV > .)
2 Press C or c to select VUDU. Press .
Note: Use of VUDU requires a working broadband internet
connection (1 to 2 Mbps for SD video, 2.25 to 4.5 Mbps for
HD video, and 4.5 to 9 Mbps for HDX video).
To close VUDU:
Press .
OK
OK
OK
OK
YouTube
™
YouTube is a video-sharing service managed by
YouTube, LLC.
This TV allows you to view YouTube video content.
1 Press .
(From the Menu: > Network > NET TV > .)
OK
2 Press C or c to select YouTube. Press .
3 Press B, b, C or c to select the file you want to view.
Press .
To close YouTube:
Press .
Note:
• YouTube contents have been independently managed
by YouTube, LLC.
• Not all YouTube contents that can be accessed by
computer may be viewed with this TV.
• This TV may not be able to do some operations that
computer can do.
• Depending on network environment and the use
situation, content may be difficult to view.
• Though the same volume value, an actual volume might
be greatly different depending on contents.
• This TV might take time during start-up and the playback
of contents.
• Content that the user may feel is improper or offensive
may be included in the contents of YouTube.
• We do not assume any responsibility for contents that
YouTube offers.
• If you have any questions about YouTube contents,
please contact YouTube, LLC.
• The content of service and the screen that can be used
may be changed without notice.
• You cannot post videos to YouTube from this TV. Please
use a PC to post videos.
• Not all contents can be viewed normally when you
access websites other than YouTube Leanback through
this TV.
To deactivate your device:
1 > PREFERENCES > VUDU Deactivation >
OK
.
2 Press C or c to select Yes. Press .
61
Page 90

Chapter 8: Advanced features
OK
OK
OK
The Dock is the horizontal list of snippets
appearing at the bottom of your TV screen.
A snippet is a shortcut which launches
a TV Widget.
OK
The TV Widget logo and
Home button
The currently focused
button is highlighted.
The sidebar's bottom
toolbar includes four
color-coded buttons
that map to the colored
keys on the remote
control.
CinemaNow
CinemaNow is an on-demand service that offers high
definition movies on the Web.
1 Press .
(From the Menu: > Network > NET TV > .)
2 Press C or c to select CinemaNow. Press .
To close CinemaNow:
Press .
OK
Blockbuster
Blockbuster is an on-demand service that offers high
definition movies on the Web.
1 Press .
(From the Menu: > Network > NET TV > .)
2 Press C or c to select Blockbuster. Press .
To close Blockbuster:
Press .
OK
Pandora
Pandora is an on-demand service that offers music on
the Web.
1 Press .
(From the Menu: > Network > NET TV > .)
2 Press C or c to select Pandora. Press .
To close Pandora:
Press .
OK
Yahoo!® TV Widgets
Yahoo!® TV Widgets provide an integrated Internet and
TV experience powered by the Yahoo! Connected TV
platform. Yahoo!
•Track your stocks and stay current with financial
news.
•Share photos with friends and family.
•Watch your favorite web videos.
1 Press .
(From the Menu: > Settings >
APPLICATIONS > Widgets > .)
2 Focus is located in the leftmost region (the
highlighted snippet). The dock scrolls snippets
under this focal point. Press C or c to focus on a
snippet. Press to select a snippet.
3 The TV Widget sidebar appears. Press B or b to
select a menu item. Press .
®
TV Widgets allow you to:
OK
OK
62
Page 91

Chapter 8: Advanced features
OK
Button Description
RED Closes the widget.
GREEN Changes the widget’s settings.
YELLOW Adds or deletes a snippet.
BLUE
Resizes the video to fit onscreen, or to
make it fullscreen.
To close Yahoo!® TV Widgets:
Press .
Note: To use Yahoo!® TV Widgets you must first complete
the “Guided Setup” (- p. 60).
Using the Profile Widget
•The Profile Widget
configures your user
profile.
•You can set up multiple
profiles for multiple users.
•Each profile maintains its
own list of TV Widgets.
•The Switch Profile menu
allows you to switch to a
different user profile.
•The Profile Settings menu
allows you to customize
and protect your profile.
•The System Settings
menu allows you to change
your Location, Repeat
the Tutorial, and Restore Factory Settings, which
deletes all profiles and TV Widget settings (not TV
settings).
•The Administrative Controls menu allows you to set
the Screen Saver timeout, create the Owner PIN, and
to Create a Profile.
•The Sign in to Yahoo! menu allows you to
personalize your experience using your Yahoo! ID.
•Visit http://www.yahoo.com to create a Yahoo! ID.
Using the Widget Gallery
•The Widget Gallery allows you to browse and
discover new TV Widgets.
•The featured TV Widgets are highlighted in the
display case at the top of the sidebar.
•You can also browse available TV Widgets by
category.
•To install a widget, select Add Widget to My Profile
and press .
•The Owner PIN is needed to install widgets for
profiles that have been protected through the Limit
Profile indicator under the Profile Widget S Profile
Settings menu.
•Refer to the Profile Widget S Administrative
Controls menu to set the Owner PIN.
Using other Yahoo! Widgets
•The Yahoo! News Widget provides the latest headline
news for business, entertainment, politics, sports, top
stories, and many other categories.
•The Yahoo! Weather Widget provides updates on
your local and favorite weather locations.
•View the latest stock news with the Yahoo! Finance
Widget.
•The flickr Widget enables slideshows of family and
friends’ photos on your TV.
63
Page 92

Chapter 8: Advanced features
OK
OK
OK
OK
Using the Media Player
This TV allows you to access photos, movies, and music
files stored on a USB device.
Moreover, you can also access photos, movies, and
music files from your TV or PC by connecting the TV to
your home network.
Term meaning:
DMP: DLNA CERTIFIED
DMS: DLNA CERTIFIED
•DMP: The TV can control and play content on a DMS.
– DMS is a device with server functions that stores
media content for playback on a DMP.
Note:
• Do not insert/remove USB device while in use.
• is not available while using the Media Player
feature.
Media Player Specifications
Device
USB device:
USB Mass Storage Class devices (MSC)
Note:
•Connectivity is not guaranteed for all devices.
•Incorrect behavior may occur with a USB HUB
connection.
DLNA CERTIFIED™ Server:
NAS, your PC (for example)
Supported file system
FAT12, FAT16 and FAT32
You must obtain any required permission from copyright
owners to download or use copyrighted content.
Toshiba cannot and does not grant such permission.
™
Player
™
Server
Basic operation
Using Media Player with USB
When Auto Start is enabled, you will be asked if you
want to start the Media Player when a USB device is
inserted. If Auto Start is disabled (or if you want to
connect to a DMS on the network), you must manually
start the Media Player from the menu.
To change the Auto Start setting:
1 > Settings > APPLICATIONS > Media Player
OK
> .
2 Press B or b to select Setup. Press .
3 Press B or b to highlight USB Auto Start. Press C
or c to select On or Off.
Auto Start:
1 Insert a USB device into the USB terminal.
A prompt appears.
2 Press C or c to select Yes. Press .
3 Press B or b to select Photo, Movie, or Music. Press
. The thumbnail (for Photo) or list of files (for
Movie and Music) appears.
4 Press B or b to select the USB device if the selection
screen appears.
Note: If Auto Start is set to Off, you can start the Media
Player manually.
Manual Start:
1 Insert a USB device into the USB terminal.
2 > Settings > APPLICATIONS > Media Player
OK
> .
(Another: > Media Player > .)
3 Press B or b to select Photo, Movie, or Music.
(When Another in Step 2, press C or c to select
Photo, Movie, or Music.)
Press . The thumbnail (for Photo) or list of files
(for Movie and Music) appears.
4 Press B or b to select the USB device if the selection
screen appears.
To select a file in the list of contents:
1 Press B, b, C, or c to select a file or folder.
2 Press to move to the next layer, or press to
To close the Media Player:
Press . The TV will return to the last-viewed
channel or video input.
OK
return to the previous layer.
OK
64
Page 93

Chapter 8: Advanced features
™
Using Media Player with DLNA CERTIFIED
You need to configure a home network before using this
feature (- p. 21).
Server
1 > Settings > APPLICATIONS > Media Player
OK
> .
(Another: > Media Player > .)
OK
2 Press B or b to select Photo, Movie, or Music.
(When Another in Step 1, press C or c to select
Photo, Movie, or Music.)
OK
Press . The thumbnail (for Photo) or list of files
(for Movie and Music) appears.
3 Press B or b to select the server you want to use if
a server list is displayed, and press .
To select a file in the list of contents:
OK
1 Press B, b, C, or c to select a file or folder.
2 Press to move to the next layer, or press to
To close the Media Player:
Press . The TV will return to the last-viewed
channel or video input.
To display the device information:
1 Press to open the Quick menu in list mode or
OK
return to the previous layer.
QUICK
Multi View mode.
2 Press B or b to select Device Information.
Viewing Movie files
Basic Playback:
1 Select a file (- “To select a file in the list of
contents” on p. 64). Press or to begin
playback.
Note: Depending on the file size, it may take some
time to start playback.
2 Press to stop playback.
3 If playback finishes before is pressed, the
screen returns to the list.
Note: When the repeat mode is set to All, the next file
will start playing automatically.
To pause playback:
Press during playback.
To resume normal playback, press .
Note: PAUSE or operations during PAUSE may not be
operable depending on the content or DMS.
To play in fast reverse or fast forward:
Press or during playback. Each time you press
or , the playback speed changes.
• : Fast reverse playback
• : Fast forward playback
To locate a specific file:
Press or repeatedly to access the desired file.
• : Playback starts from the beginning of the current
file or previous file.
• : To locate subsequent files.
Note:
• If the previous or next file is not compatible, it is skipped
automatically.
• These features may not be operable depending on the
content or DMS.
To select a language:
• If subtitles are available in the video file, you can
select it.
1 Press during playback.
CC
2 Press C or c to select your preferred language.
• If audio information is available in the video file, you
can select it.
1 Press during playback.
2 Press C or c to select your preferred language.
OK
65
Page 94

Chapter 8: Advanced features
OK
To set the repeat mode:
1 Press . The current repeat setting appears.
QUICK
2 Press C or c to select Off, All, or 1.
3 Press . The setting is effective until the TV is
turned off.
Mode Description
Off The content is played back only once.
All
1 The same content is repeatedly played back.
To display the file status information:
Contents in the same folder are repeatedly
played back.
1 Press Q during playback. The information will be
displayed at the bottom of the screen.
2 Press Q again to hide the information.
Note: The information may not be correctly displayed
depending on the content or DMS.
File specifications:
USB use
File format: MPEG2 PS, MPEG2 TS, MP4
Video: MPEG2, MPEG4, H.264
Audio: MPEG1-Layer2 / MPEG1-Layer3 / AC3 /
Maximum number of files: 1000 per folder
Content on DLNA CERTIFIED™ Server
File format: MPEG2 PS, MPEG2 TS, MP4, WMV
Maximum number of files: 1000 per folder
Note: Some files may not be played.
LPCM
Video: MPEG2(PS) PAL, MPEG2(TS) PAL,
MPEG2(PS) NTSC, MPEG2(TS) NTSC,
H.264
Audio: LPCM / MPEG1-Layer1 / MPEG1-Layer2 /
MPEG2-Layer2 / AC3 / AAC
Playing Music files
Basic Playback:
1 Select a file (- p. 64). Press or to begin
playback.
Note: Depending on the file size, it may take some
time to start playback.
2 Press to stop playback.
If playback finishes before is pressed, the next
file will start playing automatically.
To pause playback:
Press during playback.
To resume normal playback, press .
Note: PAUSE or operations during PAUSE may not be
operable depending on the content or DMS.
To play in fast reverse or fast forward:
Press or during playback. Each time you press
or , the playback speed changes.
• : Fast reverse playback
• : Fast forward playback
Note: These features may not be operable depending on
the content or DMS.
To locate a specific file:
Press or repeatedly to access the desired file.
• : Playback starts from the beginning of the current
file or previous file.
• : To locate subsequent files.
Note: If the previous or next file is not compatible, it is
skipped automatically.
66
Page 95

Chapter 8: Advanced features
OK
OK
OK
OK
OK
To set the repeat mode:
1 Press . The current repeat setting appears.
QUICK
2 Press C or c to select Off, All, or 1.
3 Press . The setting is effective until the TV is
turned off.
Mode Description
Off
All
1 The same content is repeatedly played back.
To display the file status information:
Contents in the same folder are played back
once.
Contents in the same folder are repeatedly
played back.
1 Press Q during playback. The information will be
displayed at the bottom of the screen.
2 Press Q again to hide the information.
Note: The information may not be correctly displayed
depending on the content or DMS.
File specifications:
USB use
File format: MP3, MP4 (AAC), LPCM
Sampling frequency: 32 kHz, 44.1 kHz, 48 kHz
Bit rate: from 32 to 320 kbps
Maximum number of files: 1000 per folder
Content on DLNA CERTIFIED™ Server
File format: MP3, LPCM, WMA
Sampling frequency: 32 kHz, 44.1 kHz, 48 kHz
Bit rate: from 32 to 320 kbps
Maximum number of files: 1000 per folder
Note: Some files may not be played.
Viewing Photo files
Multi View mode:
This view mode allows you to search for photos in a
grid format.
These pictures are displayed using thumbnail data in
each image file.
1 Press B, b, C, or c to move the highlight by one
window.
•If all of the photos will not fit in one screen, when
pressing C at the top left thumbnail, the screen will
move to the previous page. Similarly, when pressing
c at the bottom right thumbnail, the screen will move
to the next page.
2 When you select a folder, press to move to the
next layer. Press to move back to the previous
layer.
3 Press to view the selected photo in Single View
mode.
Note: Displaying thumbnail data may take time.
Single View mode:
In this view mode, only files located in the selected
directory are displayed. When moving from Multi
View mode to Single View mode, the currently selected
photo is displayed.
1 On Multi view mode, press B, b, C, or c to select a
file. Press .
2 Press C or c to view the next or previous file.
Note:
• If the previous or next file is not compatible, it will be
skipped automatically.
• Single view mode is changed to Multi View mode when
is pressed.
Slideshow mode:
This view allows you to watch a slideshow of the
photos. In this mode, only files located in the selected
directory will be displayed.
1 To switch to Slideshow mode, press while in
Single View mode.
To return to Single View mode, press again.
2 Press C or c to view the next or previous file.
Note: If the previous or next file is not compatible, it is
skipped automatically.
67
Page 96

Chapter 8: Advanced features
OK
OK
To set the mode settings:
1 Press to open the Quick menu while in Single
QUICK
View mode or Slideshow mode.
2 Press B or b to select the item (SOUND, Interval
Time, Repeat, Background Music, or Speakers).
3 Press C or c to adjust the setting.
4 Press to return to Single View mode or
Slideshow mode.
Item Description
Interval Time
Repeat
To set the background Music:
1 Press to open the Quick menu while in
Slideshow mode.
Sets a time interval to view photos at
(3sec, 5sec, 10sec, 15sec, 30sec, 60sec, or
90sec).
Displays photos in the same directory
repeatedly. On/Off
QUICK
2 Press B or b to select Background Music. Press .
3 Highlight Background Music. Press C or c to
select On.
4 Press b to select Select Music. Press .
5 Select a music file.
Note:
• The music must be selected from the USB or DMS from
which the picture files will be played.
• This feature is not available when there is no music that
can be selected.
To rotate the image:
While viewing the image in Single View mode or
Slideshow mode, press B or b to rotate the image 90
degrees.
To return to the thumbnail:
Press while in Single View mode or Slide Show
mode.
To display file status information:
1 Press Q. The information will be displayed at the
bottom of the screen.
2 Press Q again to hide the information.
Note: The information may not be correctly displayed
depending on the content or DMS.
File specifications:
USB use
Data compatibility: JPEG Exif ver 2.2
File format: JPEG
Maximum viewable resolution:
Maximum photo size: 9 MB
Maximum number of files: 2000 per folder
Content on DLNA CERTIFIED™ Server
Data compatibility: JPEG EXIF Ver.1.x or later,
File format: JPEG
Maximum photo resolution: 4096 x 4096
Maximum photo size: 6 MB
Maximum number of files: 2000 per folder
Note: Some files may not be played.
× 4096 (HW decode)
4096
× 16384 (SW decode)
16384
JFIF 1.02a
68
Page 97

Chapter 8: Advanced features
OK
OK
OK
OK
OK
Using the Wallpaper feature
This feature allows you to display a photo file stored on
the TV.
•Only one photo file can be stored on the TV.
•The photo file can be overwritten with a file from an
external device (USB, DMS).
1 > Settings > PREFERENCES > Wallpaper
Setup > .
(Another: > Wallpaper > .)
The preview screen will appear.
2 Press c to select Start. Press .
To close the Wallpaper:
Press .
Photo Select
1 > Settings > PREFERENCES > Wallpaper
Setup > . The preview screen will appear.
2 Press B or b to select Photo Select. Press . The
device selection screen appears.
Note: This screen will not appear when there is only
one device connected.
3 Press B or b to select the appropriate device. Press
OK
.
4 Press B, b, C, or c to select the photo you want to
copy from the USB or DMS to the TV. Press .
OK
OK
OK
OK
Auto Power Off
1 > Settings > PREFERENCES > Wallpaper
Setup > . The preview screen appears.
OK
2 Press B or b to highlight Auto Power Off.
3 Press C or c to select Off, 00:30, 01:00, 02:00, 04:00,
06:00, or 12:00.
•If the Wallpaper window is left open, the TV will
automatically turn off after the set length of time
(maximum 12 hours).
4 Press .
Photo Edit
1 > Settings > PREFERENCES > Wallpaper
Setup > . The preview screen appears.
2 Press B or b to select Photo Edit. Press .
3 Press B or b to select Rotate or Delete.
4 Set the following items as required.
•Rotate - Press to rotate the image 90°clockwise.
•Delete - Press . A confirmation screen appears.
Select YES. Press .
Note: The Factory default image cannot be deleted.
OK
OK
5 Press .
69
Page 98

Chapter 9: Troubleshooting
INPUT
INPUT
General troubleshooting
Before calling a service technician, please check this
chapter for a possible cause of the problem and some
solutions you can try.
Black box onscreen
• The closed caption feature is set to one of the Text modes
(T1, T2, T3, or T4). Set the closed caption feature to Off
(- p. 35).
TV stops responding to controls
• If the TV stops responding to the remote control or TV control
panel and you cannot turn off the TV, unplug the power cord
to reset the TV. After 1 minute, plug it in and turn the TV on.
Other problems
• If your TV’s problem is not addressed in this Troubleshooting
section or the recommended solution has not worked, do one
of the following:
1) Turn off your TV. After 30 seconds, turn it on.
2) Turn off the TV and unplug the power cord. After 1 minute,
plug the power cord in and turn
3) Perform the Reset Factory Defaults procedure (- p. 44).
TV will not turn on
• Ensure the power cord is plugged in. Press p.
• Replace the remote control’s batteries.
• Try the control panel buttons.
Picture problems
General picture problems
• Check the antenna/cable connections (-p. 15).
• Press on the remote control or on the TV and select a
• Antenna r
• The station may be having broadcast difficulties. Try another
• Adjust the picture quality (- p. 48).
• If the Edge Booster does not achieve a sharper picture,
INPUT
valid video input source (- p. 34). If no device is connected
to an input on the TV, nopicture appears when you select that
particular input source. Check device connections (- p. 16–
21).
eception may be poor. Use a highly directional
outdoor antenna (if applicable).
channel.
change the Sharpness value to increase the sharpness level
(- p. 48).
Video Input Selection problems
• If the Input Selection window does not appear when you
press on the remote control or the TV control panel,
press a second time. The TV displays the next video
input source and the Input Selection screen.
Cannot view external signals or channel 3 or 4
• If you cannot view signals from external devices connected to
VIDEO 1, VIDEO 2, ColorStream HD1, ColorStream HD2,
HDMI 1, HDMI 2, HDMI 3, HDMI 4, PC, or from channel 3 or
4, ensure the Input Lock is set to Off (- p. 38).
Poor color or no color
• The station may be having broadcast difficulties. Try another
channel.
on the TV.
• Check the Input mode when you use Shared Inputs
(- p. 30).
• Adjust the Tint and/or Color (- p. 48).
Poor composite picture
• If the TV is connected to an external A/V device (e.g. DVD
player, video game system, set-top box, etc.) try using a
ColorStream or HDMI video connection instead.
Picture and sound are out of sync
• As with all products that contain a digital display, this may
occur in rare instances when viewing certain content (e.g.
television broadcasts, video games, DVDs). Possible causes
may include, without limitation, video processing within the
TV, video processing in an attached gaming system, an
video processing or different compression rates used by
broadcasters in their programming. Try the following
procedures:
– If the TV is connected to an A/V receiver that has a
programmable audio delay feature, use this feature to
help synchronize the sound to the picture.
– If the problem occurs
your local broadcast, cable, or satellite provider.
• The settings of Side Shared Audio and Rear Shared Audio
may be not correct. Ensure the settings (- p. 30).
only on certain TV channels, inform
Sound problems
• Check the antenna/cable connections (- p. 15–20).
• The station may be having broadcast difficulties. Try another
channel.
• The sound may be muted. Press VOLUME.
• If you hear no sound, try setting the MTS feature to
Stereo mode (- p. 52).
• If you are not receiving a second audio program f
known SAP source, make sure the MTS feature is set to SAP
mode (- p. 52).
• If you hear audio that seems incorrect for the program you
are watching (such as music or a foreign language), the SAP
mode may be on. Set the MTS feature to Stereo mode
(- p. 52).
• If you connect a PC using either the PC IN termi
HDMI terminal, ensure that the Rear Shared Audio setting is
properly set (- p. 42).
rom a
nal or an
Remote control problems
• Ensure the remote control is set to the correct device mode
(- p. 79).
• Remove all obstructions between the remote control and the
TV.
• Replace the remote control’s batteries (- p. 22).
• Your TV’s remote control may not operate certain features o n
your external device. Refer to the owner’s manual for your
other
device to determine its available features. If your TV
remote control does not operate a specific feature on another
device, use the remote control that came with the device
(- p. 82–87).
• If the TV still does not act as expected, perform the Reset
Factory Defaults procedure (- p. 44).
Channel tuning problems
• Ensure the remote control is set to the correct device mode
(- p. 79).
d
70
Page 99

Chapter 9: Troubleshooting
• The Auto Tuning feature may have erased the channel from
memory. Add the channel to the channel memory (- p. 28).
• The Lock feature may have blocked the channel. Unblock the
channel (- p. 38).
• If you cannot tune digital channels, check the antenna
configuration (- p. 28). If the problem persists, clear all
channels from the channel list and reprogram channels into
memory (- p. 28). If the problem persists, use the Reset
Factory Defaults procedure (- p. 44). See “TV stops
responding to controls” and “Other problems” (- p. 70).
Closed caption problems
• If the program or video you have selected is not closedcaptioned, no captions appear.
• If text is not available, a black rectangle may appear. If this
happens, turn off the closed-caption feature (- p. 35).
• A closed-caption signal may not display correctly under the
following circumstances: a) the videotape is dubbed; b) the
signal reception is weak; or c) the signal reception is
nonstandard (- p. 35).
Rating blocking (V-Chip) problems
• If you forget your PIN code: While the PIN code entering
screen is displayed, press
old PIN code is cleared (- p. 36).
• The V-Chip feature is available for U.S. V-Chip systems only
(- p. 36).
Q 4 times within 5 seconds. The
No HDMI® CEC Control operation
• HDMI® CEC Control feature is available for Toshiba HDMI®
CEC compatible devices.
• Ensure HDMI cables with the HDMI Logo ( ) are
used.
• When the connected HDMI
correctly after you have changed the device’s settings, turn
off your TV and unplug the power cord. After 1 minute, plug
it in and turn it on again.
• If several devices are connected, HDMI
may not operate properly.
• Read the instruction manual of the connected HDMI
device.
®
CEC device does not work
®
CEC Control feature
®
HDMI problems
For HDMI cables
• Ensure HDMI cables with the HDMI Logo ( ) are
used (- p. 14).
For Legacy HDMI sources
• Some legacy HDMI sources may not work properly with the
latest HDMI TV products due to new standards. Turn off
INSTAPORT™ (- p. 41).
Network problems
Cannot connect to the Internet
• Check the modem and its incoming cable/telephone
connections (- p. 21).
• Confirm your modem’s operation.
• Ensure your IP address is set up correctly.
No network connection
• If using a wired network connection, check to ensure the LAN
cables are connected properly (- p. 21).
CEC
• Ensure the modem and router power cords are plugged in
and the devices are operating properly.
• Ensure your IP address is set up correctly. See Section
(- “Setting up the Network”).
• Check to ensure proper operation of other network connected
devices.
Network Setup fails (Auto)
• Check to ensure the LAN cables are connected properly
(- p. 21).
• DHCP is not enabled on the router, or no router is present.
Refer to your router’s documentation for instructions on
enabling DHCP. If your router does not support DHCP, you
must manually set up the IP address.
• Internet service is not available. Check your cable/DSL
modem or contact your ISP for Internet service issues.
Network Setup fails (Manual)
• Ensure the TV IP address is not the same as any other device
on the network.
Example: IP address 192.168.0.100 and IP address
192.168.0.101 are different addresses on the same network.
• Make sure the TV IP address is on the same subnet as the
networked PC.
Example of proper setup: The PC has the IP address
192.168.0.100 with the Subnet mask 255.255.255.0, the TV
has the IP address 192.168.0.101 with the Subnet mask
255.255.255.0; both are on the same subnet.
Example of improper setup: The PC has the IP address
192.168.1.100 with the Subnet mask 255.255.255.0, the TV
has the IP address 192.168.0.101 with the Subnet mask
255.255.253.0; they are on different sub-nets.
Unstable network connection
• When using a wired home-network connection, unplug the
LAN cables, and then reconnect them.
• When using a wireless home-network connection:
– Remove AC power from the router and the television for
1 minute.
•Reconnect AC power to the router.
•Reconnect AC power to the television and turn it
– Connect with LAN cables, if possible, and check
– Repeat the wireless network setup procedure and check
ON. After 2 minutes, check connection stability.
connection stability.
connection stability.
The DMS name is not displayed
• The LAN cables, if used, are not connected properly
(- p. 21).
• The WLAN, if used, is not configured properly.
• The network setup on the Server is incorrect. Make sure both
the DMS and TV are using the same network type (DHCP/
manual) and have compatible network settings.
• Too many DMSs are connected. You cannot connect more
than 32 sharing devices at one time.
• The DMS is not turned ON.
• The “server” is not a DMS device.
• Check the firewall and streaming settings on the DMS.
(continued)
71
Page 100

Chapter 9: Troubleshooting
TV front
Wireless network problems
• Check that the router/AP (Access point) power is ON.
• After starting wireless network setup, confirm that the
network is configured properly by performing the network
connection test (- p. 59).
• Check the router/AP’s connection status (- p. 57).
• If the route
(PBC) will not work even if the push-button is pressed.
• If the available router/AP list is not displayed in Easy Setup
(PBC) or Assisted Setup, the power of the router/AP may be
OFF. Check that it is ON, and then try re-starting the scan for
available rou
• Refer to the router/AP’s instruction manual.
r/AP does not support PBC or WPS, Easy Setup
ters/APs.
NET TV or Widget problems
• If the date and time display on the NET TV menu is wrong,
turn off the TV, and turn it on again.
• NET TV or Widgets may not be immediately available after
turning the TV on while the system is booting.
• When NET TV or Widgets doesn't operate properly, do one of
the following:
1) Turn off your TV. After 30 seconds, turn it on.
2) Turn off the TV and unplug the power co
plug the power cord in and turn on the TV.
3) Perform the Reset Factory Defaults procedure (- p. 44).
• Content delivered by NET TV or Widgets are the responsibility
of the Content Service Provider. Contact the Service Provider
to discuss any content issues.
rd. After 1 minute,
Media Player problems
• Ensure that the devices (Display and Server) are connected
correctly.
• Incorrect behavior may occur when using a USB HUB
connection.
• Photo files that were processed and edited using the PC’s
application software may not be viewable.
• When viewing content that supports two or more formats the
display may select one for
• Copyright protected content stored on the DMS may not be
playable on the display.
• Content playback stability may be affected by heavy network
traffic.
• Content originally recorded on a PC may not play correctly.
• Set the media sharing of the DMS correctly, according to the
DMS instruction manual.
• Confirm that the contents of either the DMS or the USB
s
torage device are in formats that are supported by this TV
(- p. 66, 67, or 68).
• Depending on the DMS, access may be limited by the MAC
address. Set the server according to the DMS’s instruction
manual. This TV’s MAC Address can be confirmed in the
Network Setup portion of the User Menu (- p. 58).
mat automatically.
For DLNA CERTIFIED™ Player
• Depending on the DMS, it may take time to display the list.
LED indications
The POWER and service LED lights on the front of the
TV indicate the TV’s status, as described below.
Power LED
POWER On/Standby LED
• Green
The TV is operating properly.
•RED
The TV is on standby.
• Green blinks
System booting. After a while, the screen appears.
•Red blinks
Power-On Failure. Turn off the TV and unplug the
power cord. After 1 minute, plug the power cord in
again and turn on the TV.
Service LED
• Green
Software is being upgraded.
•Green blinks (if applicable)
Abnormal operation of BUS line. Turn off the TV and
unplug the power cord. After 1 minute, plug the
power cord in again and turn on the TV.
If the problem persists after trying the solutions:
•In the U.S., visit TAIS Consumer Solutions on the web
at www.support.toshiba.com or call 1-800-631-3811.
•In Canada, locate the nearest Toshiba authorized
service depot by directing your web browser to
www.toshiba.ca; click “Home Entertainment,” and
then click “Support.”
Service LED
72
 Loading...