

Page 1
TOSHIBA
Leading
Owner's
Innovation
»>
Manual·
REGZ~
Page 2

Dear
Thank you for purchasing this Toshiba LCD
manual will helpyou usethe manyexciting features
new LCD
read this manual completely, and keep it nearby for
future reference.
Customer,
TV.
This
TV.
Before operating your LCD TV, please
Safety
WARNING: TO REDUCE THE RISK OF FIRE OR
ELECTRIC SHOCK, DO
APPLIANCE TO RAIN OR MOISTURE.
WARNING: TO REDUCE THE RISK OF ELECTRIC
SHOCK, DO NOT REMOVE COVER (OR BACK).
NO USER-SERVICEABLE PARTS INSIDE. REFER
SERVICING TO QUALIFIED SERVICE PERSONNEL.
Precautions
NOT
EXPOSE THIS
The lightning flash with arrowhead
symbol, within an equilateral triangle, is
to
intended
of
uninsulated "dangerousvoltage" within
the
product's
sufficient magnitudetoconstitute a risk
electric shocktopersons.
The exclamation point within
equilateral triangle is intendedtoalert the
to
user
operating and maintenance (servicing)
instructions in the literature
accompanying the appliance.
alert theusertothe presence
enQlosure that may be
an
the presenceofimportant
of
your
of
of
WARNING
To prevent injury, this apparatus must be securely
attached
installation instructions. See item 23 on page 3 and
instructions on page
WARNING:
television, always use a
appropriate for the size and weight
The use
bracket appropriate for the size and weight
television for wall mounting this television could result
in
"Removing the Pedestal Stand"
NOTETOCATV
This is a remindertocall the CATV system installer's
attention
guidelinesfor proper grounding and, in particular, specifies
that the cable ground shall be connected
system
as practical. For additional antenna grounding information,
see items 30 and
to
the floor/wallinaccordance with the
5.
If you decidetowall mountthis
UL
Listed wall bracket
of
this television.
of
any wall bracket other than a UL Listed wall
of
this
serious bodily injury and/or property damage. See
(1rW
page
5).
INSTALLERS
to
Article 820-40ofthe U.S. NEC, which provides
to
the grounding
of
the building, as closetothe pointofcable entry
31
on page
4.
Congratulationsonyour
new
product,
The
Issue
•
The
home
and
larger
flat
panel
or
installed
Tune
Into
•
One
size
for
the
safe
•
Carefully
proper
•
Don't
allow
television
•
Don't
place
that
can
asachestofdrawers.
•
Remember
become
program,
than
life"
shouldbetakentoplaceorinstall
the
display
pushed,
•
Care
shouldbetakentoroute
cables
pulledorgrabbedbycurious
Wall
Mounting:Ifyou
flat
panel
•
Useamount
manufacturer
as
UL,
•
Follow
manufacturers.
•Ifyou
have
flat
panel
installation.
•
Make
sure
appropriate.
to
walls
are
unsure,
• A
minimumoftwo
required
displays
please
theater
entertainment
flat
panel
displays
are
accordingtothe
Safety
does
NOT
fit
installation
read
and
understand
useofthis
sets.
easilybeusedassteps,
excited
especiallyona
flat
pulled
connectedtothe
prodUCt.
childrentoclimbonor
flat
panel
that
children
while
panel
display.
whereitcannot
over,orknocked
display,
that
has
and/or
CSA,
ETL).
all
instructions
any
doubts
display,
with
for
canbeheavy.
contact
that
the
wall
Some
wall
steel
studsorold
contactaprofessional
people
installation.
purchase!Asyou
keep
displays
not
always
•
Flat
panel
situatedondressers,
•
entertainment
all.
Follow
and
useofyour
displaysonfurniture~__
can
watching
"larger
Care
be
flat
panel
decidetowall
always:
been
recommendedbythe
listedbyan
suppliedbythe
about
your
where
mounts
are
Flat
these
safety
experienceisa
are
popular
manufacturer's
displays
shelves,
carts
injury.
TOSHIBA
The
is
committedtomaking
the
all
such
a
down.
all
cords
children.
independent
your
retailer
you
are
cinder
panel
purchases.
supportedonthe
recommendations.
that
desks,
speakers,
may
fall
over
Cares!
consumer
manufacturer's
flat
enclosed
play
displaysothat
abilitytosafely
are
not
installer.
electronics
enjoyable
panel
instructions
with
furniture
and
display
about
professional
mounting
designedtobe
block
construction.Ifyou
enjoy
your
tipsinmind:
growing
are
bookcases,
recommendations
display.
mount
laboratory
and
trend
However,
proper
stands
inappropriately
chests
and
cause
industry
home
and
safe.
for
and
~
they
cannot
your
display
(such
wall
mount
install
your
the
display
mounted
or
be
is
www.CE.org/safety
2
Page 3

Important
Read these instructions.
1)
2) Keep these instructions.
3)
Heed all warnings.
4)
Follow all instructions.
Do not use this apparatus near water.
5)
Clean only with dry cloth.
6)
Do not block any ventilation openings. Install in
7)
accordance with the manufacturer's instructions.
8)
Do not install near any heat sources such as
radiators, heat registers, stoves,
(including amplifiers) that produce heat.
9)
Do not defeat the safety purpose of
the polarized or grounding type
plug.
with one wider than the other.
A grounding type plug has
and a third grounding prong. The wide blade
prong are provided for your safety. If the provided plug
does not fit into your outlet, consult an electrician for
replacement
10) Protect the power cord from being
walked on or pinched, particularly at plugs,
convenience receptacles, and the point
where they exit from the apparatus.
11) Only use attachments/accessories specified by the
manufacturer.
Use only with the cart, stand, tripod, •
12)
bracket, or table specified by the
manufacturer, or sold with the •
apparatus. When a cart is used, use
caution when moving the cart/apparatus
combinationtoavoid injury from tip-over.
13)
Unplug this apparatus during lightning storms or
when unused for long periods of time.
14) Refer all servicing
Servicing is required when the apparatus has been
damaged in any way, such as power-supply cord or plug
is damaged, liquid has been spilled orobjects have fallen
into the apparatus, the apparatus has been exposed
rain or moisture, does notoperate normally, orhas been
dropped.
Additional
14a) CAUTION: If thelVis droppAd and the cabinet
enclosure surface has been damaged or thelVdoes
not
• ALWAYS turn
to
• NEVER allow your
broken glass
The LCD panel inside
toxic
mouth
rinse
consult
Safety
A polarized plug has
of
Instructions
or
two
blades
two
blades
the obsolete outlet.
.......•..............................................................................................................................
other apparatus
Wide
blade
or
the third
~
~
.1
~
~~-a
to
qualified service personnel.
Safety
operate normally, take the following precautions:
avoid possible electric
liquid. If the liquid
or
the
Precautions
off
thelVand unplug the
shockorfire.
bodytocomeincontact
or
liquid from
eyes,oryour skin is
affected area thoroughly with water and
your
doctor.
the
damaged television.
thelVcontains glass and a
comesincontact
cutbybroken glass,
power
with any
with your
or
cord
to
• ALWAYS
lV
15)
CAUTION:
• To reduce the riskofelectric shock,donot
polarized plug with an extension cord, receptacle,
other
completely
• To prevent electric shock, match wide blade
to
wide slot; fully insert.
16)
WARNING:
To prevent the spreadoffire, keep candles or other
open flames away from this product at all times.
Installation,
contact
any time it has been damagedordropped.
outlet unless
to
a service techniciantoinspectthe
the
blades can be inserted
prevent blade exposure.
Care,
and
Service
use the
of
or
plug
Installation
Follow these recommendations and precautions and heed
all warnings when installing your
17) WARNING: NEVER expose batteries to
Jj\
~
18) ALWAYS plug the product into
such a mannerthat it can beeasily unplugged in case the
product requires service.
19) NEVER route the product's power cord inside a wall
similar enclosed area.
20)
Never modify this equipment. Changes or modifications
may void:
operate this equipment underthe rulesofthe Federal
Communications Commission.
21)
Lh
Never place the
stand,ortable. ThelVmay fall, causing
serious personal injury, death, or serious damagetothe
lV.
22) To avoid damage
lVindirectsunlight; hot, humid areas; orareas subject
excessive dust or vibration.
23) Always place thelVon the floor or a sturdy, level, stable
surfacethat can supportthe weight
the
the
structure. Make sure the strap is tight, secure, and
parallel
Ii
24)
The apparatus shall not be exposedtodripping or
splashing, and that no objects filled with liquids, such as
vases, shall be placed on the apparatus.
excessive heat such as sunshine, fire or
the
like.
a)
the warranty, andb)the user's authority
DANGER:RISKOFSERIOUS
PERSONAL INJURY,
• DEATH, OR EQUIPMENT •
DAMAGE!
"TV
on
to
this product, never place or store the
lV,
use a sturdy strap from the hooks on the rear of
lV
pedestaltoa wall stud, pillar, or other immovable
to
the floor.
...
~...
4"
Sturdy strap (as short.as possible)
.
~
min.
,
Securement
v/
Clip
i'0
TV
side
lV:
an
outletthatislocated in
•
an unstable cart, I
of
the unit. To secure
H
~j
00
~
S
,\
TV
top
vcy--
Securement
Clip
or
to
~
:0;:
to
3
Page 4
25) Never
•
•
• in a
The
from
of
the
26) Always place
27) Never allow anything
28) Never overload wall outlets
29) Always operate
30)
blockorcover
cabinet
onabed,
surface;
too
walls;
any
ventilation.
inches
allow
cord,
subjecttowearorabuse.
power
Always
groundedtoprovide
surges
of
back,
bottom,
sofa,
closetodrapes,
or
confined
bookcase,
other
slots
overheating
the
TV. Leave a
TV.
the
built-in
place
and
openings
the
away
from any vertical surface (suchasa wall)
proper
and
ventilation.
never
source
make
sure
and
built-up
National Electric Code).
the
and
rug,orsimilar
curtains,
space
suchasa
cabinet,
with
poor
andtohelp
spaceofat
backofthe
to
place
the TV where
this
equipment
only.
the
antenna
adequate
static charges (see Section
are
restonor
slotsoropeningsinthe
sides. Never
or
or
providedtoprotect
maintain reliable
least4 (four)
television at least
and
extension cords.
from a 120 VAC,60Hz
system
protection
place
roll over
the
power
is properly
the
operation
inches
the
againstvoltage
TV
TV:
the
around
four
power
cord
810
TV
(4)
is
to
Care
For better performance and safer operationofyour
TV, follow these recommendations and precautions:
32) If you use
(0
0c)
LCD
33)
Always
cleaning. Gently
panel surtace (the1Vscreen)
uSing a dry,
(cotton, flannel, etc.). A hard
cloth
the
acidicoralkaline solvent cleaners, abrasive cleaners,
chemical cloths,
spray volatile
cabinet.
cabinet.
34)
~
~
Never
cabinet
35) Whileit isthundering,donot
or
apparatus.
36) For
surges, always
the
unused
the
TV in a
or
below,
warms
up. This is
unplug the TV before "
room
whose
the
picture brightness
not
a signofmalfunction.
wipe
the
display
temperatureis32
may
o~.
soft
cloth
only
may
damage
panel. Avoid
Such
RISK
spill
liquidsorpush
slots.
added
protectionofyour
antennafrom
for
long periodsoftime.
the
surface
contact
which
compounds
products
of
with
alcohol, thinner, benzene,
may
damage
such
may
damageordiscolor
the
as insecticideonthe
WARNING: ;j\
OF
unplug
the
ELECTRIC
objectsofany
the
TV if
you
SHOCK!
touch
the
connecting
TVfrom lightning
power
cord
leave
theTVunattended
vary until
;2'""
surface. Never
kind
and
disconnect
TOSHIBA
OF
the
J~-\il
'~
.
or
the
~
into
the
TV
cables
and
power
or
31)
;j\
~
•
Use
position
contact
accidentally
the
electrical
•
Never
lightning
wires,orany
an
,
"
ti
,J
....
DANGER: RISK OF SERIOUS
PERSONAL INJURY OR DEATH!
extreme
antenna
antennaorphone
caretomake
where
your
with,
suchasa
touch
near
overhead
circuits.
attempttoinstall
activity:a)an
home
....•..........•..._...•..•..........................•..
body
(or
ladderorscrewdriver)
overhead
anyofthe
antenna
theater
system.
Antenna
(NEG
Section
I
Grounding
(NEG
Section
sure
you
any
item
power
power
component
lines.
linesorother
following
system;orb)
discharge
810·20)
conductors
810·21)
are
never
you
Never
connected
unit
are
during
in a
in
can
locate
cables,
to
37)
ALWAYS
mains power. When
switch, it is
a
minute
38) During normal use,
snappingorpopping
when
become
and
39) WARNING: RISK OF
unplug
amountofcurrent is still
the
unit is being turnedonor
frequentorcontinuous, unplug
contact
theTVto
not
completely
theTVmay
a Toshiba Authorized Service Center.
completely
the
TV is turned
disconnected
sounds. This is normal, especially
;j\ SERIOUS PERSONAL
~
Never
or
40) •The
ultraviolet radiation
location
screen
frontofa
•
Never
screen.
you
instructions
INJURY OR EQUIPMENT
DAMAGE!
strike
the
screen
heavy
object.
LCD
screenofthis
from
for
the
television, avoid locations where
maybeexposedtodirect
window.
touch,
needtoclean
press,orplace
These
actions
in item33on
the
withasharp
product
the sun. When selecting a
will
damage
LCD
this
disconnect
off
using
from
consumed.
make
occasional
off. If
these
the
canbedamaged
sunlight, suchasin
anythingonthe
the
LCD
screen,
follow
page.
the
power
sounds
power
LCD
screen. If
the
from
on/off
and
cord
by
the
4
Page 5
Service
41)
~
ill
Never attempttoservice thelVyourself. Opening and
removing the covers may expose you to dangerous
voltage or other hazards. Failure
may result in death or serious injury. Refer all servicing
not specified
Service Center.
42)
If you have thelVserviced:
• Ask the service technician
parts specified by the manufacturer.
• Upon completion
technician
determine that thelVis in safe operating condition.
43)
The fluorescent lamp(s)inthe LCD panel contain a small
amount
When the
ofthe used
ask a qualified service technician
the
lV.
RISK
of
mercury.
lV
lV
Note:
I mercury. Disposal
Lh
• environmental considerations. For disposal
recycling information, contactyour local authorities
the Electronics Industries Alliance (wwweiae.org).
WARNING:
OF
ELECTRIC
in
this manualtoa Toshiba Authorized
of
service, ask
to
perform routine safety checks
reaches the end of its useful life, dispose
bythe approved method for yourarea, or
The
lamp(s) inside this
SHOCK!
to
follow this WARNING
to
use only replacement
the
to
properly dispose
mayberegulated due
ill
service
product
ffi
to
contain
to
of
or
or
To
Display
If you decidetowall mount your LCD
listed wall bracket appropriate for the size and weight
the LCD
1)
CAUTION:
2)
Unplug and remove any cables and/or other
component
3)
Follow the instructions provided with your wall
bracket. Before proceeding, make sure the
appropriate bracket(s) are attached
back
provided with the wall bracket.
4)
After attaching the appropriate bracket(s)tothe wall
and the
from thelVas described below.
Removing
1)
Carefully lay the frontofthe unit face
cushioned surface such as a quilt
stand protruding over
Note:
removing the pedestal stand to avoid damagetothe
LCD panel.
2)
Remove the four screws shown in the diagram below.
This will allow removal
3)
Once you have removed all four screws holding the
pedestal stand in place, remove the pedestal stand
from the
the
your
LCDTVusingaWall
lV
(1& page
of
thelVas described in the instructions
backofthe
the
Extreme care should alwaysbeused when
lVbysliding the pedestal stand away from
lV.
2)
:
Two
people are required
connectors from the rearofthe
lV,
remove the pedestal stand
Pedestal
Stand
the
edgeofthe surface.
of
the pedestal stand.
Bracket:
lV,
always use a
for
installation.
to
the wall and the
down
or
blanket. Leave the
lV.
on a flat,
UL
of
Choosingalocation
To
Display
your
LCDTVon
for
the
your
LCD
included
TV
Pedestal
Stand:
Observe the following safety precautions:
1)
Read and Follow the pedestal assembly instructions
included with the pedestal.
CAUTION: Before beginning pedestal assembly,
carefully lay the front
flat, cushioned surface such as a quilt
the
Leave
of
the surface and assemble
below.
Note:
attaching the pedestal stand to
LCD panel.
2)
Place thelVon a sturdy, level surfacethat can
the weightofthe
3)
Be suretosecure thelVto
or other immovable structure. To secure the
manner:
immovable structure, then
through the securement clip and attach each end
the hooks located on the
leave at least 4 inches between
similar structure for ventilation. See item 23, page 3 for
additional details.
bottomofthe unit protruding over the edge
Extreme care should alwaysbeused when
(1)
attach the provided securement cliptoan
of
the LCD Panel face
lV.
a wall stud, pillar, surface,
(2)
backofthe
down
or
blanket.
the
pedestal as indicated
avoid
damage to the
pass a sturdy strap
lV.
thelVand the wall
Be sure
support
lV
in this
on a
to
to
or
Four screws
5
Page 6
FCC
DeclarationofConformity
Important
notes
about
your
LCD
TV
Compliance
The
Toshiba
Televisions
Operation
this device
device
interference
The
party
Toshiba America
82
Totowa
Ph: ]-800-631-3811
Note:
comply
to
Part 15ofthe FCC rules. These limits are designed
provide reasonable protection against harmful
interference
generates, uses,
and,
if
instructions,
communications. However, there
interference will not
equipment does cause harmful interferencetoradio or
television reception, which can
removing
is
encouragedtotry to correct the interferencebyone
moreofthe following measures:
• Reorientorrelocate the receiving
• fncrease the
receiver.
•
Connect
different from
•
Consult
technician for help.
comply
is subject to
may
must
accept
that
responsible for
Rd. Wayne, NJ 07470.
This equipmenthas been tested
with the limits for a Class Bdigital device, pursuant
in
not
installed
may
and
the
the
Statement
40XV645U, 46XV645U
with
Part]5ofthe
the
not
cause
any
may
Consumer
following
harmful
interference received,
cause
undesired
compliance
Products,
a residential installation.
and
can radiate radio frequency energy
and
usedinaccordance with the
cause harmful interferencetoradio
occurina particular installation. If this
applying
separation
equipment
dealeroran
powertothe equipment, the user
between
that
intoanoutlet
to which the receiver is connected.
experienced
(Part
and
52XV645U
FCC rules.
two
interference,
is
be
conditions:
operation.
to these rules is:
L.L.c.
and
This
no guarantee that
determined
antenna.
the
equipment
on a circuit
radio/TV
15):
(1)
and
(2) this
including
found
to
equipment
by
and
the
The
following
LCD
Display
malfunction;
perceived
1)
An
afterimage
fixed,
of
time.
disappear
2)
The
LCD
usinganextremely
however,
that
does
constantly
technology,isnotasignofmalfunction,
covered
to
visible
viewing
Note:
Interactive video games that involve shooting a
"gun" type
with this
Trademark
or
• Manufactured
and
Dolby
Laboratories.
• HDMI, the
Interface are trademarks
Licensing LLC.
• INSTAPORTTM
Silicon Image, Inc. in
symptoms
technology
therefore,
issues
resulting
non-moving
when
of
TV.
(ghost)
The
afterimageisnot
in a
short
panel
containedinthis
there
maybean
not
operate
lit, etc.).
under
your
the
distance.
joystickatan on-screen target
are
technical
and
are
Toshibaisnot
from
these
may
imageisdisplayed
high levelofprecision
This
pictureisviewed
appearonthe
periodoftime.
occasional
properly
is a
structural
warranty.
Information
under
license from Dolby Laboratories.
the
double-D
HDMIIogo
and
symbol are trademarksofDolby
and
High-Definition Multimedia
or
registered trademarksofHDMI
INSTAPORT logo are trademarks
the
United States
limitations
notanindication
responsible
symptoms.
screenifa
permanent
(does
Such
foralong
and
TV is
manufactured
technology;
pixel
(dotoflight)
not
light,
propertyofLCD
andisnot
pixels
fromanormal
and
are
may
other countries.
of
of
for
period
will
remains
not
not work
of
Caution: Changes or modifications
expressly
authority
ENERGY
ENERGY STAR
default
requirements.
functionality (e.g. Picture Settings,
Power-On
possibly
qualification.
ensure
To
efficiency, select [Home]
return
mode,
the
is
recommended
For
'UIj;lri\,r.!;,
•
approvedbyToshiba
to
operate this equipment.
STAIfBJ
User
settings of this television
to [Home]
set
Power-On
more
Enablingorchanging
Mode)
beyond
your
the
Auto
mode
information, see
ENERGY
earn the ENERGY STAR prevent green house
gas emissions by meeting strict guidelines set
by the U.S. Environmental Protection Agency.
ENERGY STAR and the ENERGY STAR mark
are registered U.S. marks.
Information
may
the limits
television is
mode
BrightnessSensor to [On]
to [Power-Saving]. [AutoView]
for
normal
STAR®
could
User
meet
increase
settings, select [AutoView]
energy
required
operatingatoptimal
mode
during
home
page30and
qualified
to
this equipment not
void the user's
Information
Statement: the factory
ENERGY ST
certain features
Auto
BrightnessSensor,
consumption,
for ENERGY STAR
initial activation. To
use.
39.
TV.
Products that
mode,
AR@i
and
energy
picture
and
mode
set
6
Page 7
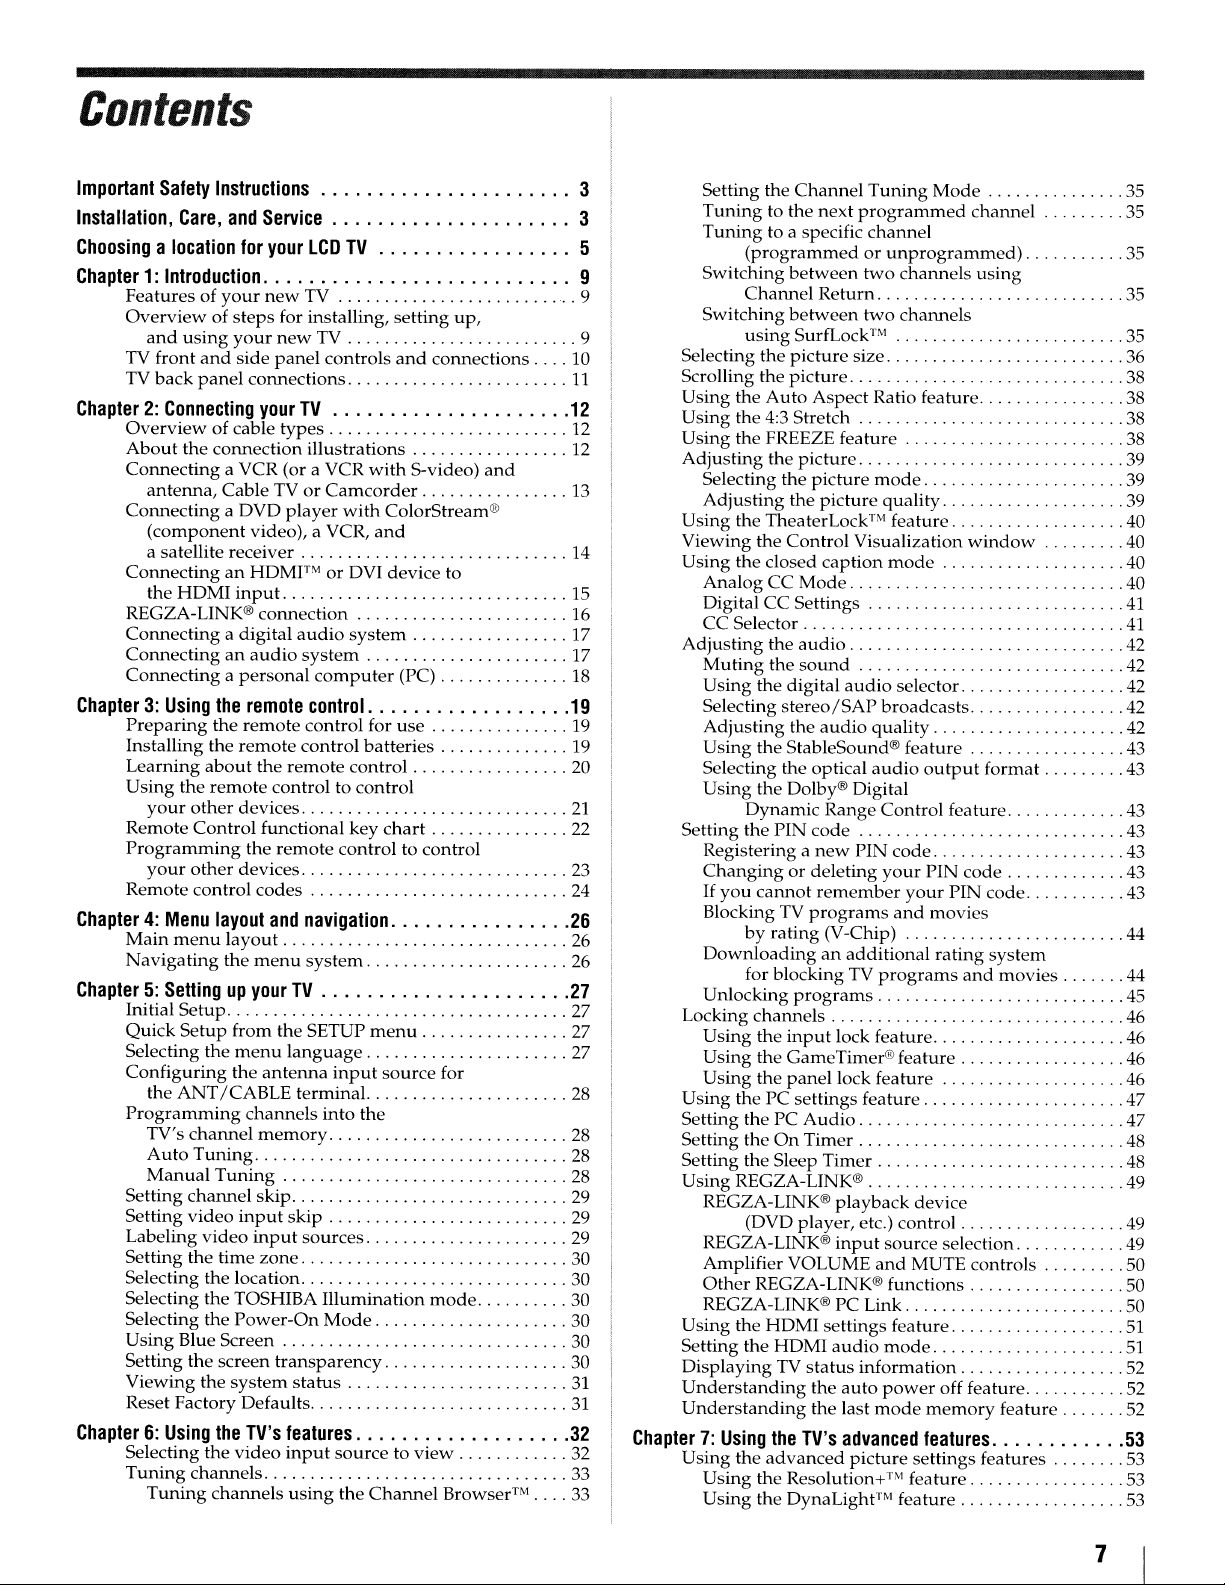
Contents
Important
Installation,
Choosingalocation
Chapter1:Introduction.
Chapter2:Connecting
Chapter3:Using
Chapter4:Menu
Chapter5:Settingupyour
Chapter6:Using
Safety
Instructions... . . . . . . . . . . . . . . . . . . . 3
Care,
and
Service
for
your
LCDTV..
. . . . . . . . . . . . ...5
. . . . . . . . . . . . . . . . . . . . . . . .
Featuresofyour
Overviewofsteps
and
using
TV
front
and
back
TV
Overviewofcable types
About
Connecting
Connecting
ConnectinganHDMFMorDVI device to
REGZA-LINK®
Connectingadigital
Connectinganaudio
Connectingapersonal
Preparing
Installing
Learning
Using the
Remote
Programming
Remote control codes
Main
Navigating
panel
the
antenna,
(component
a satellite receiver 14
HDMI
the
your
other
Control
your
other
menu
new
TV 9
for installing, setting
your
new
TV
side
panel
controls
connections
your
TV
connection illustrations 12
a VCR (or a VCR
Cable TVorCamcorder
a DVD
player
video), a VCR,
input
connection
audio
system
the
remote
the
the
remote
about
remote
devices
devices
layout
layout
the
remote
control for
control batteries 19
the
remote
control to control
functional key
the
remote
and
navigation
menu
system
with
with
ColorStream®
and
system
computer
control
control
chart
control to control
up,
and
connections 10
S-video)
(PC)
use
TV
Initial
Setup
Quick
Setup
from the SETUP
menu
Selecting the
Configuring
ANT/CABLE
the
Programming
TV's
channel
Auto
Tuning
Manual
Setting
Setting
Labeling
Setting the
Selecting the location 30
Selecting
Selecting the
Using
Setting
Viewing
Reset Factory Defaults
Tuning
channel
video
video
time
the
Blue Screen 30
the
screen
the
the
Selecting
Tuning
Tuning
the
channels
channels
language
the
antenna
channels
memory
skip
input
skip
input
zone
TOSHIBA
Power-On
transparency
system
TV's
video
status
features
input
using
terminal. 28
sources
menu
input
source
into the
Illumination
Mode
sourcetoview
the
Channel
for
mode
Browser™
and
Setting the
3
..
9
9
11
12
12
13
15
16
17
17
18
19
19
20
21
22
23
24
26
26
26
27
27
27
27
28
28
28
29
29
29
30
30
30
30
31
31
32
32
33
33
Chapter7:Using
Tuning
Tuning
Switching
Switching
Selecting
Scrolling the
Using the
Using the 4:3 Stretch 38
Using the FREEZE feature 38
Adjusting
Selecting the
Adjusting
Using
Viewing the
Using the closed
AnalogCCMode
Digital
CC
Selector
Adjusting
Muting
Using
Selecting
Adjusting
Using
Selecting the optical
Using
Setting
Registering a
Changingordeleting
If
you
BlockingTVprograms
Downloadinganadditional
Unlocking
Locking
Using
Using the GameTimer® feature 46
Using
Using
Setting
Setting the
Setting the Sleep
Using
REGZA-LINK® playback device
REGZA-LINK®
Amplifier VOLUME
Other
REGZA-LINK® PC Link 50
Using the
Setting the
DisplayingTVstatus
Understanding
Understanding
Using
Using
Using
Channel
to the
to a specific
(programmedorunprogrammed)
between
Channel
between
using
SurfLock™
the
picture
picture
Auto
the
picture
the
the
TheaterLock'Mfeature 40
Control
CC
Settings
the
audio
the
sound
the digital
stereo/SAP
the
the
StableSound® feature 43
the
Dolby® Digital
Dynamic
the
PIN
cannot
by
rating(V-Chip) 44
for blocking TV
programs
channels
the
input
the
panel
the
PC settings feature 47
thePCAudio
On
Timer
REGZA-LINK® 49
(DVD player, etc.) control 49
REGZA-LINK® functions 50
HDMI
HDMI
the
the
TV's
advanced
the
Resolution+™ feature 53
the DynaLight™ feature 53
Tuning
next
programmed
channel
two
Return
two
size 36
Aspect Ratio feature 38
picture
picture
Visualization
caption
audio
audio
Range
code
new
PIN
remember
lock feature 46
lock feature 46
Timer
input
settings feature
audio
information
the
auto
the last
advanced
picture
Mode
channel
channels
channels
............••....•......
mode
quality
mode
selector 42
broadcasts
quality
audio
Control
code
your
your
and
programs
source
and
MUTE controls 50
mode
power
mode
using
window
output
format
feature 43
PIN
code
PIN
code
movies
rating
system
and
movies
selection
off feature 52
memory
feature 52
features
settings features 53
35
35
35
35
35
38
39
39
39
40
40
40
41
41
42
42
42
42
43
43
43
43
43
44
45
46
47
48
48
49
51
51
52
53
7
Page 8
Using the
Using the Static
Using the Film Stabilization
Using
Using
Using the MPEG NR feature 54
Using the
Using
Using
Using the ColorMaster™ feature 55
Using
Selecting
Using
Using the
Media
Basic operation. . . . . . . .
Viewing JPEG files 58
Dynamic
the Expert
the
ClearFrame™ feature 54
DNR
the
Auto
the
Backlight
the Base Color Adjustment. 55
the
the
advanced
Media
Player Specifications 57
Contrast
Gamma
Mode
feature 54
Brightness Sensor 55
Adjustment
color
temperature
sound
setting features 56
Player. 57
..
Pro
. 57
Chapter8:Troubleshooting
General troubleshooting
LED indications
Chapter9:Appendix
Specifications 62
Acceptable signal formats for
PC IN
and
HDMI
terminals
PC IN signal formats 63
HOMI signal formats
Limited
Limited
United
States
Warranty
for LCD Televisions 26"
Canadian
for Toshiba Brand Flat Panel Televisions
Warranty
and
Larger. 65
Index
53
53
53
54
55
56
59
59
61
62
63
64
66
69
Page 9
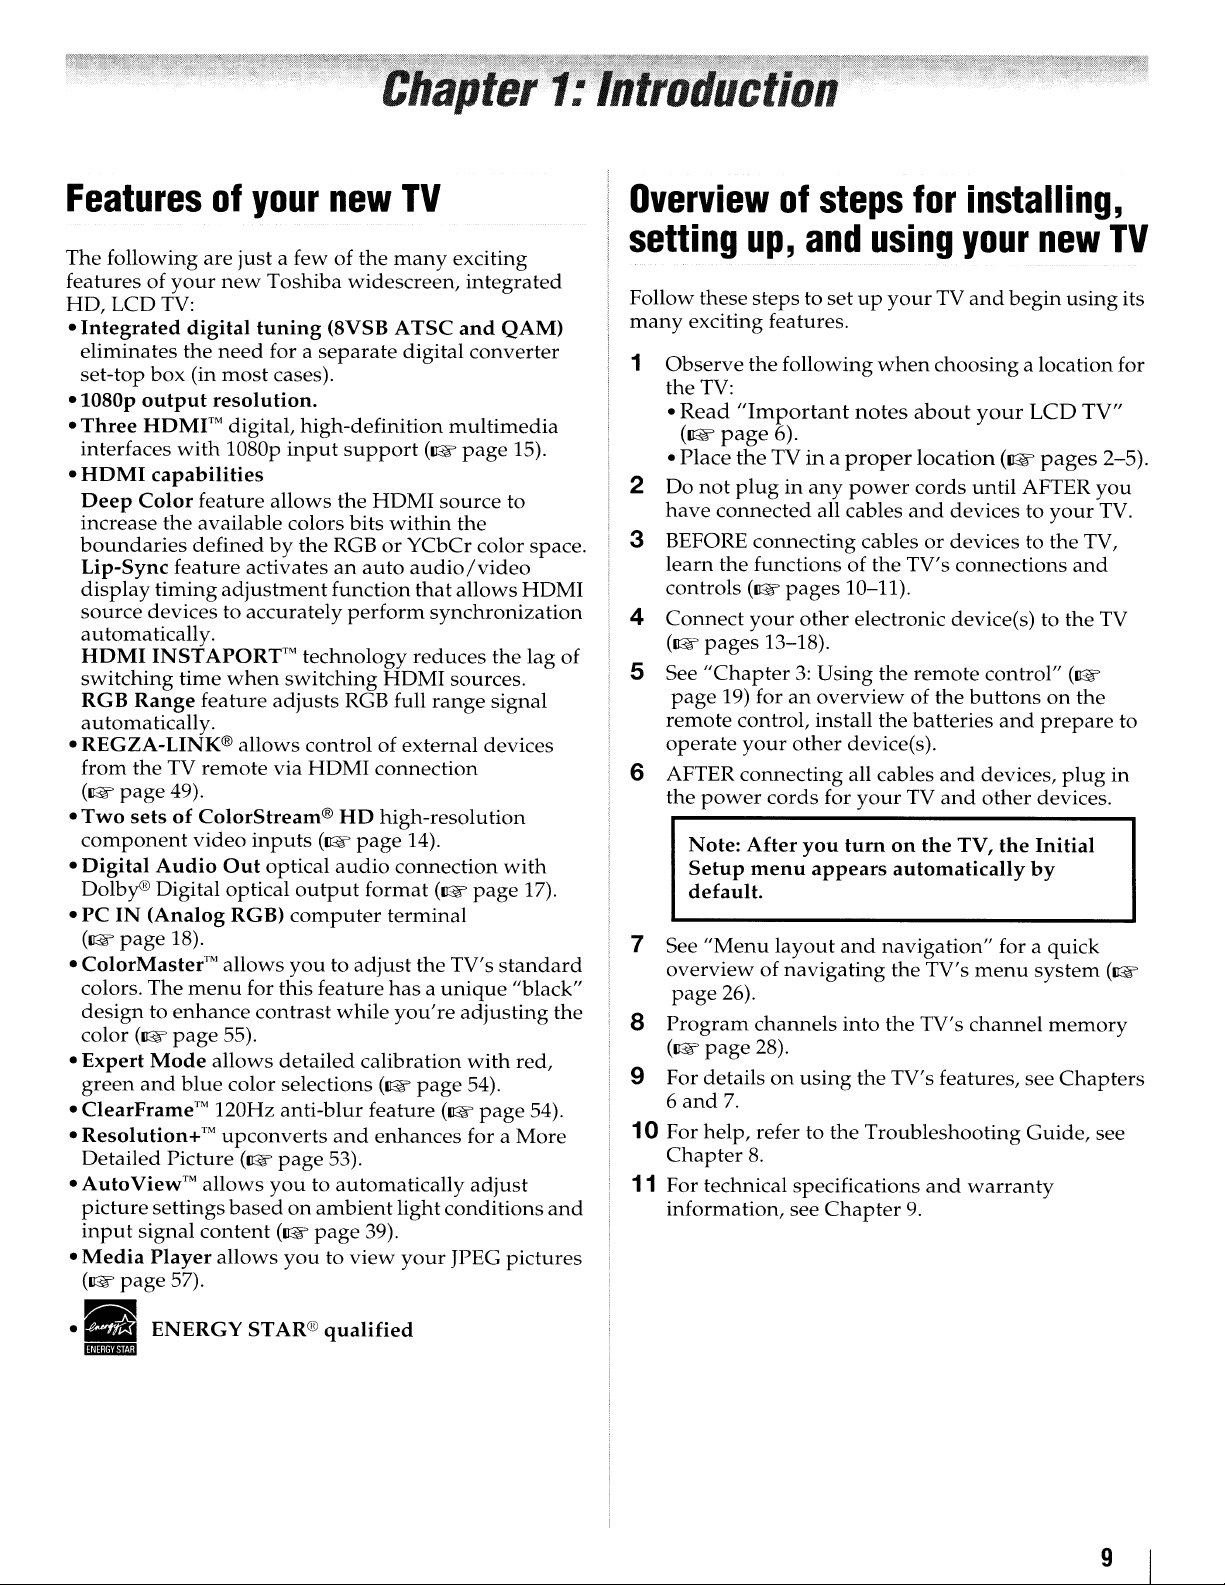
Featuresofyour
new
TV
Overviewofsteps
for
installing,
The
following
featuresofyour
HD,
LCD
Integrated
•
eliminates
set-top
·1080p
•
Three
interfaces
•
HDMI
Deep
Color
increase
boundaries
Lip-Sync
display
source
automatically.
HDMI
switching
RGB
Range
automatically.
• REGZA-LINK®
from
theTVremote
(I&'
page
•
Two
setsofColorStream®
component
•
Digital
Dolby® Digital
•
PCIN(Analog
(I&'
page
• ColorMaster'M
colors.
designtoenhance
color (I&'
•
Expert
green
and
• ClearFrame™
• Resolution+™
Detailed
• AutoView™
picture
input
signal
•
Media
(I&'
page
are
TV:
digital
the
box
(in
output
HDMI'"
with
capabilities
feature
the
available
definedbythe
feature
timing
devicestoaccurately
INSTAPORrMtechnology
time
feature
49).
video
Audio
18).
The
menu
page
Mode
blue
Picture
allows
settings
content
Player
57).
just
a fewofthe
new
Toshiba
tuning
need
most
resolution.
digital,
1080p
activatesanauto
adjustment
when
allows
inputs
Out
optical
optical
RGB)
allows
for
contrast
55).
allows
color selections
120Hz
upconverts
(I&'
basedonambient
allows
(8VSB A
for a
separate
cases).
high-definition
input
allows
adjusts
via
youtoautomatically
the
colors
RGBorYCbCr
function
switching
controlofexternal
HDMI
HD
(I&'
audio
output
computer
youtoadjust
this
feature
while
detailed
anti-blur
and
page
53).
(I&'
page
youtoview
many
widescreen,
TSC
digital
support
bits
perform
RGB full
page
calibration
(I&'
HDMI
within
audio/video
that
synchronization
reduces
HDMI
connection
high-resolution
14).
connection
format
terminal
the
hasaunique
you're
(~
page
feature
enhances
light
39).
your
exciting
integrated
and
QAM)
converter
multimedia
page
source
range
(I&'
(I&'
conditions
to
the
color
allows
the
sources.
signal
devices
with
page
TV's
standard
adjusting
with
54).
page
for a
adjust
JPEG
pictures
15).
space.
HDMI
lag
of
17).
"black"
the
red,
54).
More
and
setting
Follow
many
1
Observe
the
Read
•
(~page
Place
•
2
Do
have
3 BEFORE
learn
controls
4
Connect
(I&'
, 5 See
page
remote
operate
6 AFTER
the
7 See
overviewofnavigating
page
8
Program
(I&'
9
For
6
and
10
For
Chapter
11
For
information,
up,
and
these
stepstosetupyourTVand
exciting features.
the
following
TV:
"Important
6).
the
TVina
not
pluginany
connected
connecting
the
functionsofthe TV's
(I&'
pages
your
other
pages
"Chapter3:Using
power
Note:
Setup
default.
"Menu
detailsonusing
help,
technical specifications
13-18).
19) foranoverviewofthe
control,
your
other
connecting
cords
After
you
menu
layout
26).
channels
page
28).
7.
refer to
8.
see
using
when
notes
proper
power
all cables
cablesordevicestothe
10-11).
electronic device(s) to
the
install
appears
the
device(s).
all cables
for
your
tum
and
navigation"
into
the
the
Troubleshooting
Chapter
your
begin
choosingalocation
about
location
cords
and
remote
batteries
TV
on
automatically
the TV's
the
TV's features, see
9.
your
(~pages
until
devicestoyour
connections
control"
buttonsonthe
and
and
devices,
and
other
the
TV,
the
for a
menu
TV's
channel
and
warranty
AFTER
Guide,
new
using
LCD
and
the
(I&'
prepare
plug
devices.
Initial
by
quick
system
memory
Chapters
TV
its
for
TV"
2-5).
you
TV.
TV,
TV
to
in
(I&'
see
••
IJlIlllilID
ENERGYSTAR®
qualified
9
Page 10
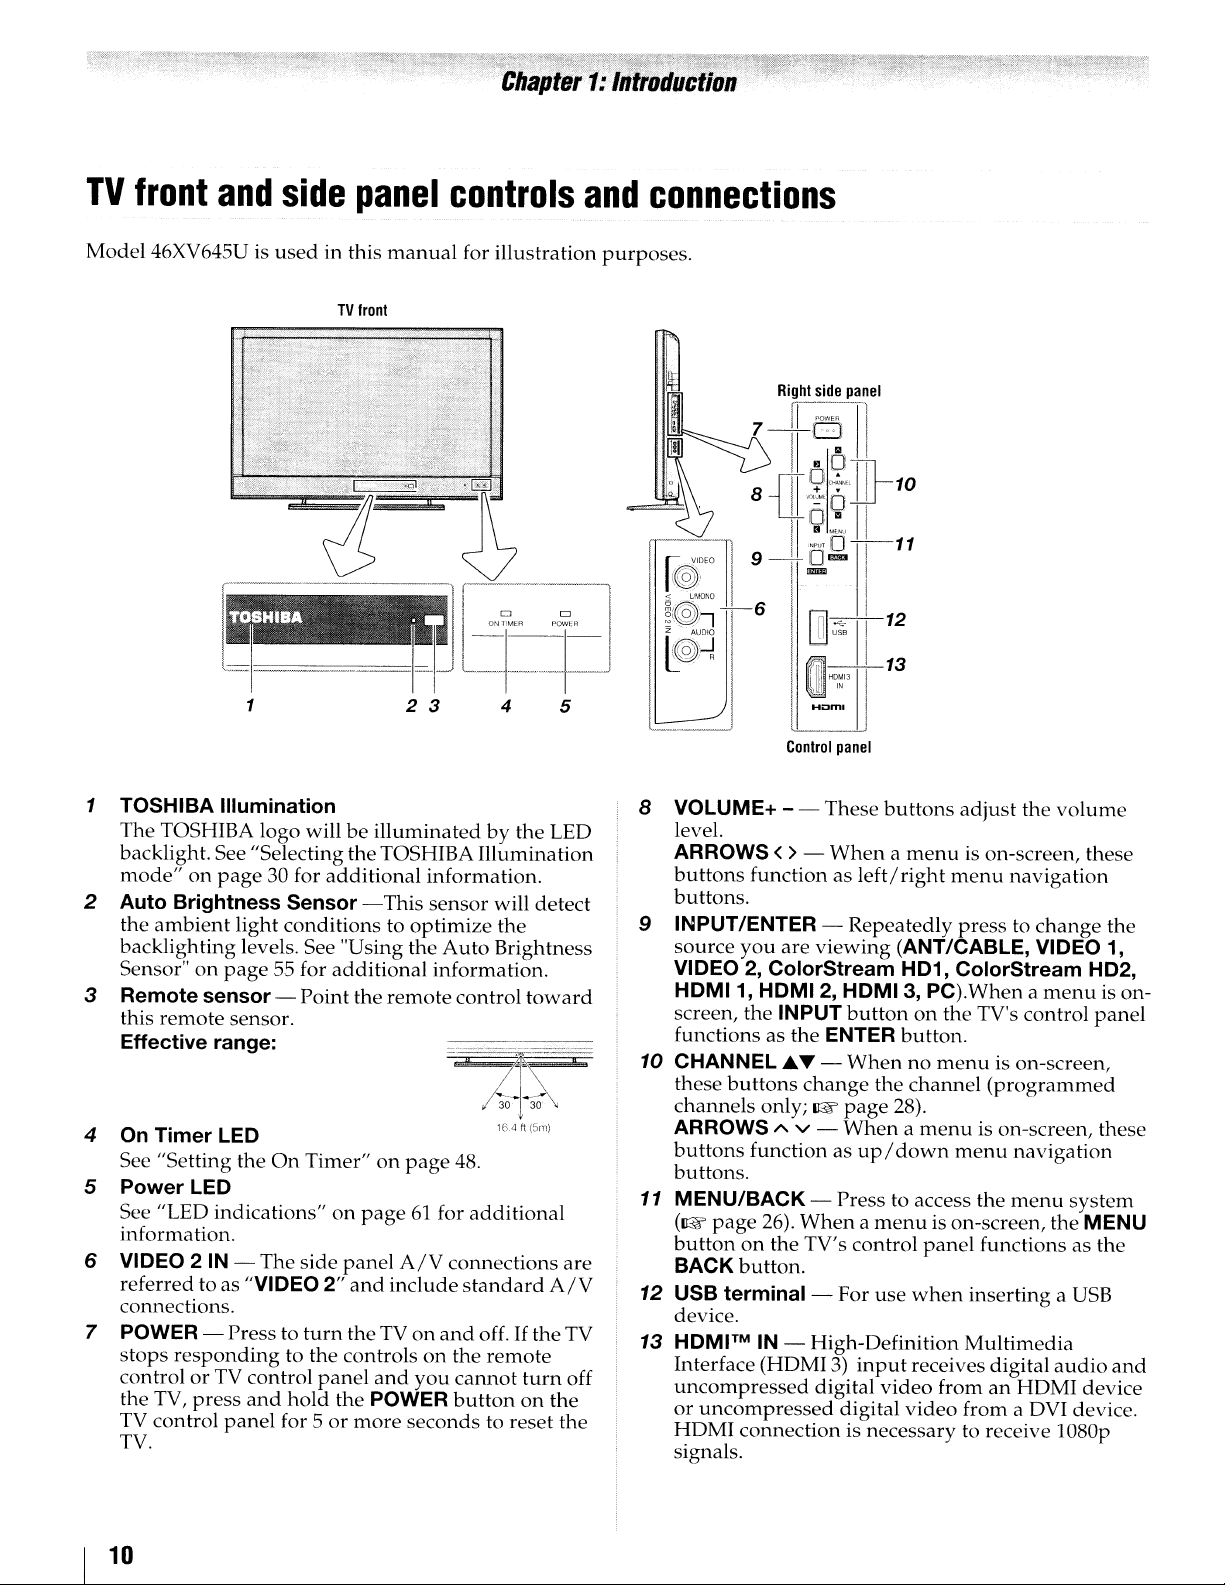
TV
front
and
side
panel
controls
and
connections
Model
46XV645U is
---
used
in this
TV
Iront
.- '. iI
..
~
~q---p
1 2 3 4 5
1 TOSHIBA
The
backlight. See "Selecting the TOSHIBA
mode"onpage
2
Auto
the
ambient
backlighting
Sensor"
Remote
3
this
Effective
4
On
Timer
See "Setting the
Power
5
See "LED indications"onpage61for
information.
VIDEO 2IN-
6
referred to as "VIDEO2"and
connections.
7
POWER - Press to
stops
controlorTV control
the TV,
TV
control
TV.
Illumination
TOSHIBA logo willbeilluminatedbythe LED
30 for
additional
Brightness
on
page
sensor-Point
remote
range:
LED
LED
responding
press
Sensor
light
conditionstooptimize
levels. See "Using the
55 for
sensor.
On
The
to the controlsonthe
and
hold
panel
for 5ormore
-This
additional
the
Timer"onpage
side
panel
turn
the TVonand
panel
and
the POWER
manual
information.
sensor
Auto
information.
remote
A/V
include
you
seconds
for illustration
1i
CJ
II~n~~i
Illumination
will
the
Brightness
control
--......,..------
"M~
16.4 "
48.
additional
cormections
standard
off.IftheTV
remote
cannot
buttononthe
to reset the
CJ
detect
toward
v
15m)
A/V
turn
~
are
off
purposes.
'I
,
111
N
<l..
t
~IOEO
1f8':\
~
10· I I
$
I
""0"0
~@:I-I61nl~11'
~II
l
__
dJ
8 VOLUME+ - - These
level.
ARROWS
buttons
buttons.
INPUT/ENTER -
9
source
VIDEO 2,
HDMI1,
screen, the INPUT
functions as the ENTER
10
CHANNEL..&.T -
these
channels
ARROWS A V -
buttons
buttons.
11 MENU/BACK - Press to access the
(1&
page
buttononthe TV's control
BACK
12
USB
device.
HDMITMIN- High-Definition
13
Interface (HDMI 3)
uncompressed
or
uncompressed
HDMI
signals.
Ri~ht
side.1.~nel
i POWER
'I
11
7-11~
'19,"~",]}-1
8 I
"'.~.·"O
{[
o ai'
D
'
I
9-Dma
I IllIIIiI I
I
l
~",
~'O-I-11
II
q;'li
...
Control
<>-
Whenamenu
function as
you
are
viewing
ColorStream
HDMI 2, HDMI3,PC).Whenamenu
buttons
button.
terminal
connection is necessary to receive lO80p
change
only;1&page
function as
26).
Whenamenu
- For use
digital
10
'
I
12
13
.)
panel
buttons
left/right
Repeatedly
(ANT/CABLE, VIDEO 1,
HD1,
buttononthe
button.
Whennomenu
the
28).
Whenamenu
up/down
input
video
digital
video
adjust
menu
presstochange
ColorStream
channel
menu
is on-screen, the MENU
panel
when
receives digital
fromanHDMI
the
volume
is on-screen, these
navigation
TV's control
is on-screen,
(programmed
is on-screen, these
navigation
menu
system
functions as
insertingaUSB
Multimedia
audio
from a DVI device.
the
HD2,
is on-
panel
the
and
device
10
Page 11
TV
back
panel
connections
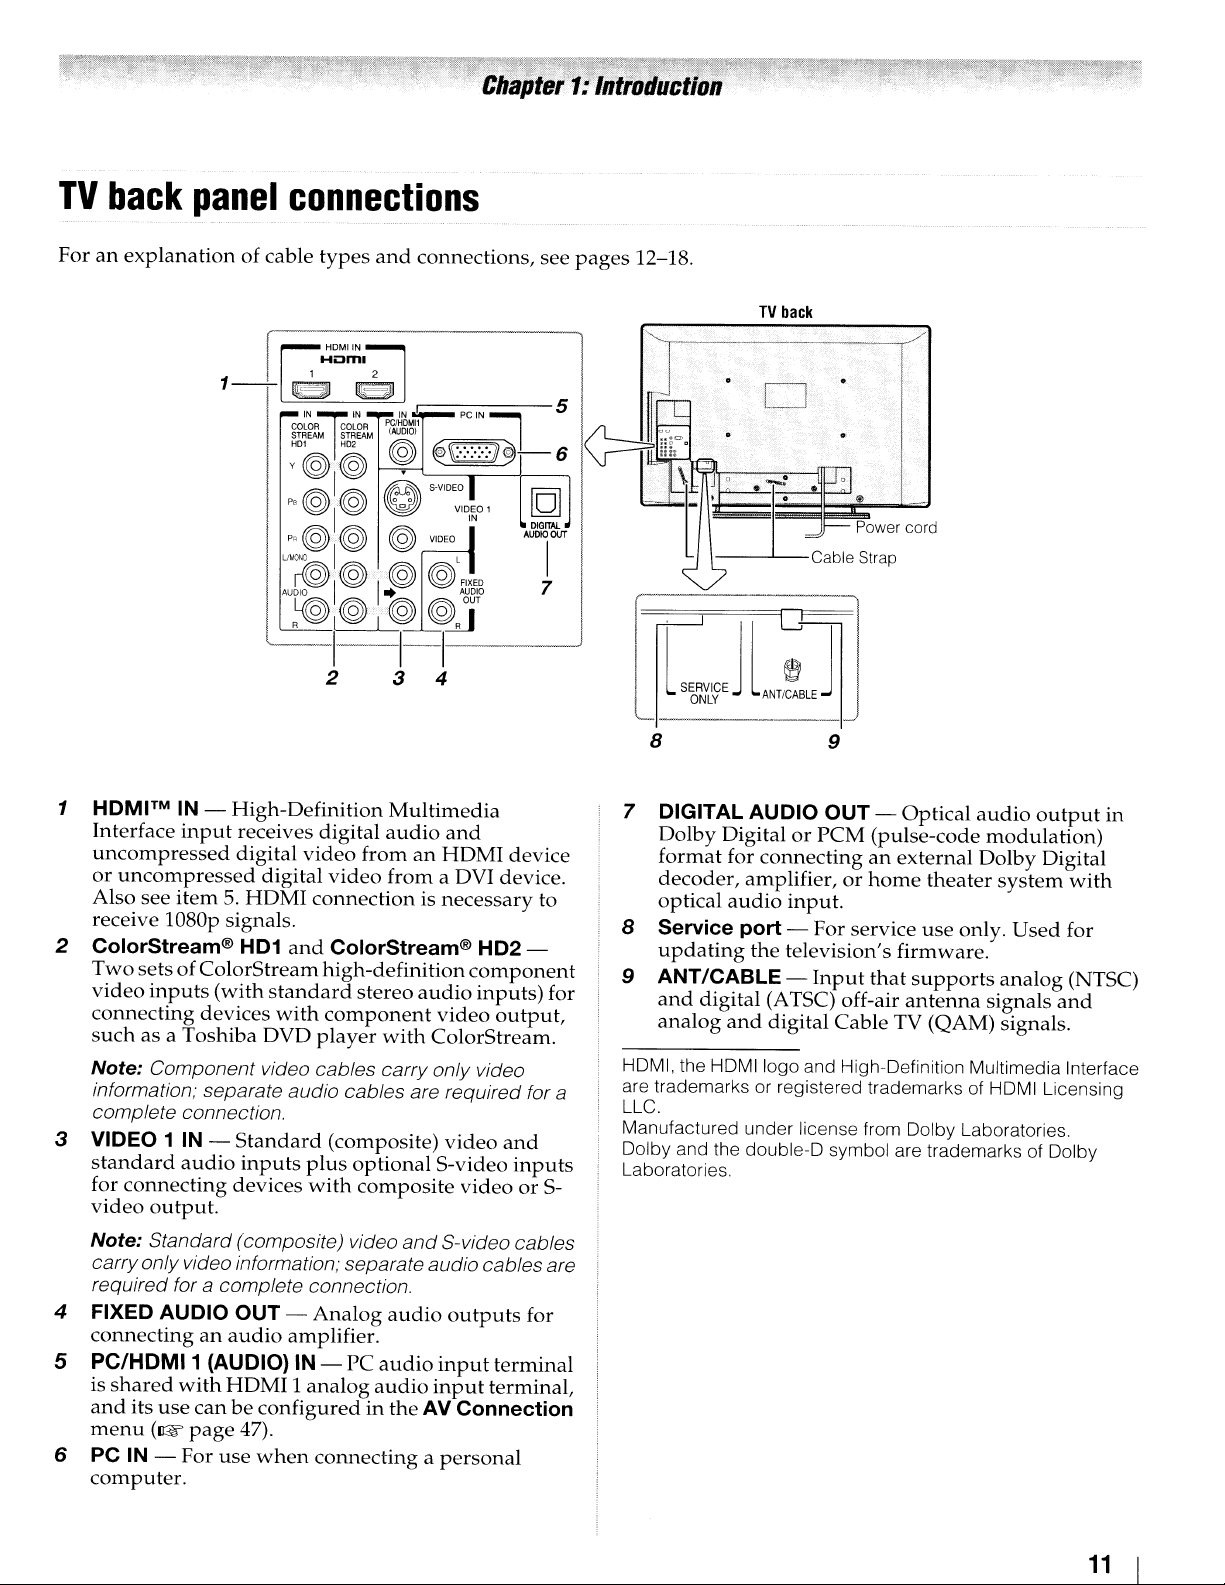
Foranexplanation
1
HDMITM
Interface
uncompressed
or
uncompressed
see
Also
receive
2
ColorStream® HD1
Two
video
connecting
suchasa
Note: Component video cables carry only video
information; separate
complete connection.
3 VIDEO 1 IN -
standard
for
video
Note: Standard (composite) video
carryonlyvideo information; separate
required for
item5.HDMI
l080p
setsofColorStream
inputs
connecting
output.
4 FIXED AUDIO
connectinganaudio
5
PC/HDMI1
is
shared
and
its
use
menu
6 PC IN -
computer.
(I@f
of cable
IN -
High-Definition
input
receives
digital
signals.
(with
devices
Toshiba
Standard
audio
inputs
devices
types
digital
video
fromanHDMI
digital
DVD
video
connectionisnecessary
and
ColorStream®
high-definition
standard
with
audio
stereo
component
player
cables are required for a
(composite)
plus
optional
with
composite
a complete connection.
OUT
-
Analog
amplifier.
(AUDIO) IN -
with
HDMI1analog
canbeconfiguredinthe
page
47).
For
use
when
PC
connectingapersonal
and
connections,
Multimedia
audio
from
audio
with
ColorStream.
and
audio
audio
audio
audio
AV Connection
see
and
device
a DVI device.
to
HD2-
component
inputs)
video
output,
video
and
S-video
S-video cables
outputs
input
input
inputs
videoorS-
cables are
for
terminal
terminal,
for
pages
12-18.
TV
back
o
8 9
7 DIGITAL AUDIO
Dolby
format
decoder,
optical
8 Service port -
updating
DigitalorPCM
for
connectinganexternal
amplifier,orhome
audio
the
9 ANT/CABLE -
and
digital
analog
HDMI, the
are trademarks or registered trademarks of HDMI Licensing
LLC.
Manufactured under license from Dolby Laboratories.
Dolby and the double-D symbol are trademarks of Dolby
Laboratories.
and
HDMIIogo
OUT
-
Optical
(pulse-code
input.
For
service
television's
Input
(ATSC) off-air
digital
Cable
and High-Definition Multimedia Interface
firmware.
that
supports
antenna
TV (QAM) signals.
theater
use
only.
audio
modulation)
Dolby
system
analog
signals
output
Digital
Used
in
with
for
(NTSC)
and
11
Page 12
Overviewofcable
types
HOMr
M
cable
(with
HOM
I
Logo
"HOml")
Cables
audio/video
sureofconnector
the
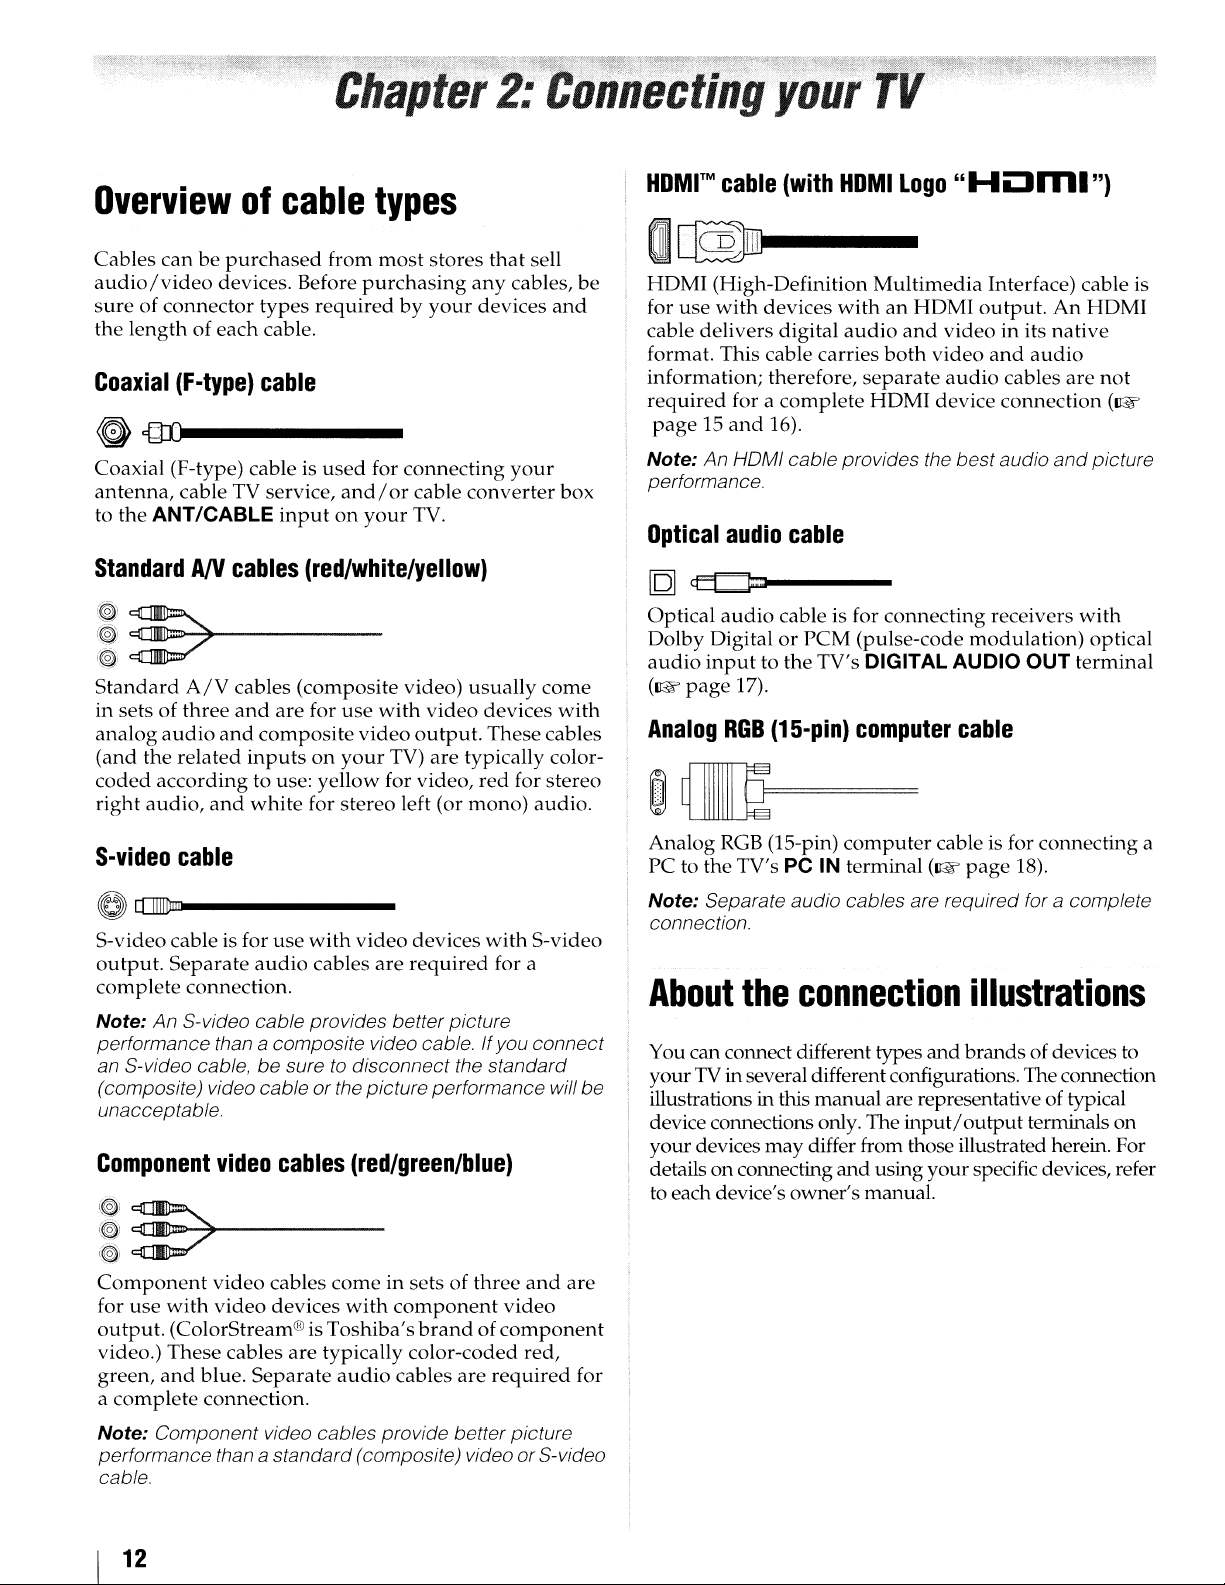
Coaxial
canbepurchased
devices. Before
lengthofeach
(F-type)
from
types
requiredbyyour
cable.
cable
most
stores
purchasing
G{U)------
Coaxial (F-type) cable is
antenna,
to the
cable TV service,
ANT/CABLE
StandardANcables
!~.~."'.)~
~
(~!
Standard
in
setsofthree
analog
(and
coded
right
-~..-------
A/V
cables (composite video)
and
audio
and
composite
the
related
according
audio,
inputsonyour
to use:
and
white
used
for
connecting
and/orcable
inputonyour
TV.
(red/white/yellow)
are
for
use
with
video
video
output.
TV)
yellow
for stereo left (or
for video,
are
that
sell
any
cables,
devices
your
converter
usually
devices
These cables
typically color-
red
for
mono)
be
and
box
come
with
stereo
audio.
I~
HDMI
for
cable
format. This cable carries
information;
required
page15and
Note: An HOMI cable provides the bestaudio
performance.
Optical
[Q]
Optical
! Dolby Digital
audio
(~page
Analog
(High-Definition
use
with
devices
delivers
for a
digital
therefore,
complete
16).
audio
~----
audio
cable is for
or
inputtothe
17).
RGB
(15-pin)
Multimedia
withanHDMI
audio
and
both
separate
HOM
output.
videoinits
video
audio
I device
cable
connecting
PCM
(pulse-code
TV's DIGITAL AUDIO OUT
computer
modulation)
cable
~~==
Interface) cable is
An
HDMI
native
and
audio
cables
are
not
connection
receivers
and
with
terminal
(~
picture
optical
S-video
cable
O[[][@m------
S-videocable is for use
output.
complete
Note: An S-video cable provides better picture
performance than a composite video cable. Ifyou connect
an S-video cable, be sure
(composite) video cable or the picture performance will
unacceptable.
Component
~
(~
Component
for
output.
video.)
green,
a
Separate
connection.
video
~~..-------
:;;;7
video
use
with
video
(ColorStream®is
These
and
complete
cables
blue.
connection.
with
audio
cables
cables
cables
devices
are
Separate
video
devices
are
required
to
disconnect the standard
with
(red/green/blue)
come
in sets of
with
component
Toshiba's
typically
audio
color-coded
cables
three
brandofcomponent
are
required
for a
video
S-video
and
are
red,
be
for
Analog
PCtothe
Note: Separate audio cables are required for a complete
connection.
About
You can connect different types
yourTVin several differentconfigurations. Theconnection
illustrations in this
device connections only. The
your
details on connecting
to each device's owner's manual.
RGB
(1S-pin)
TV's PC IN terminal (~
the
devices
may
computer
connection
manual
differ from those illustrated herein. For
and
cable is for connecting a
page
18).
illustrations
and
brands
are representative of typical
input/
output
using
your
ofdevices to
terminals on
specific devices, refer
Note: Component video cables provide better picture
performance than a standard (composite) video orS-video
cable.
12
Page 13
.
rJnnectmg
yo
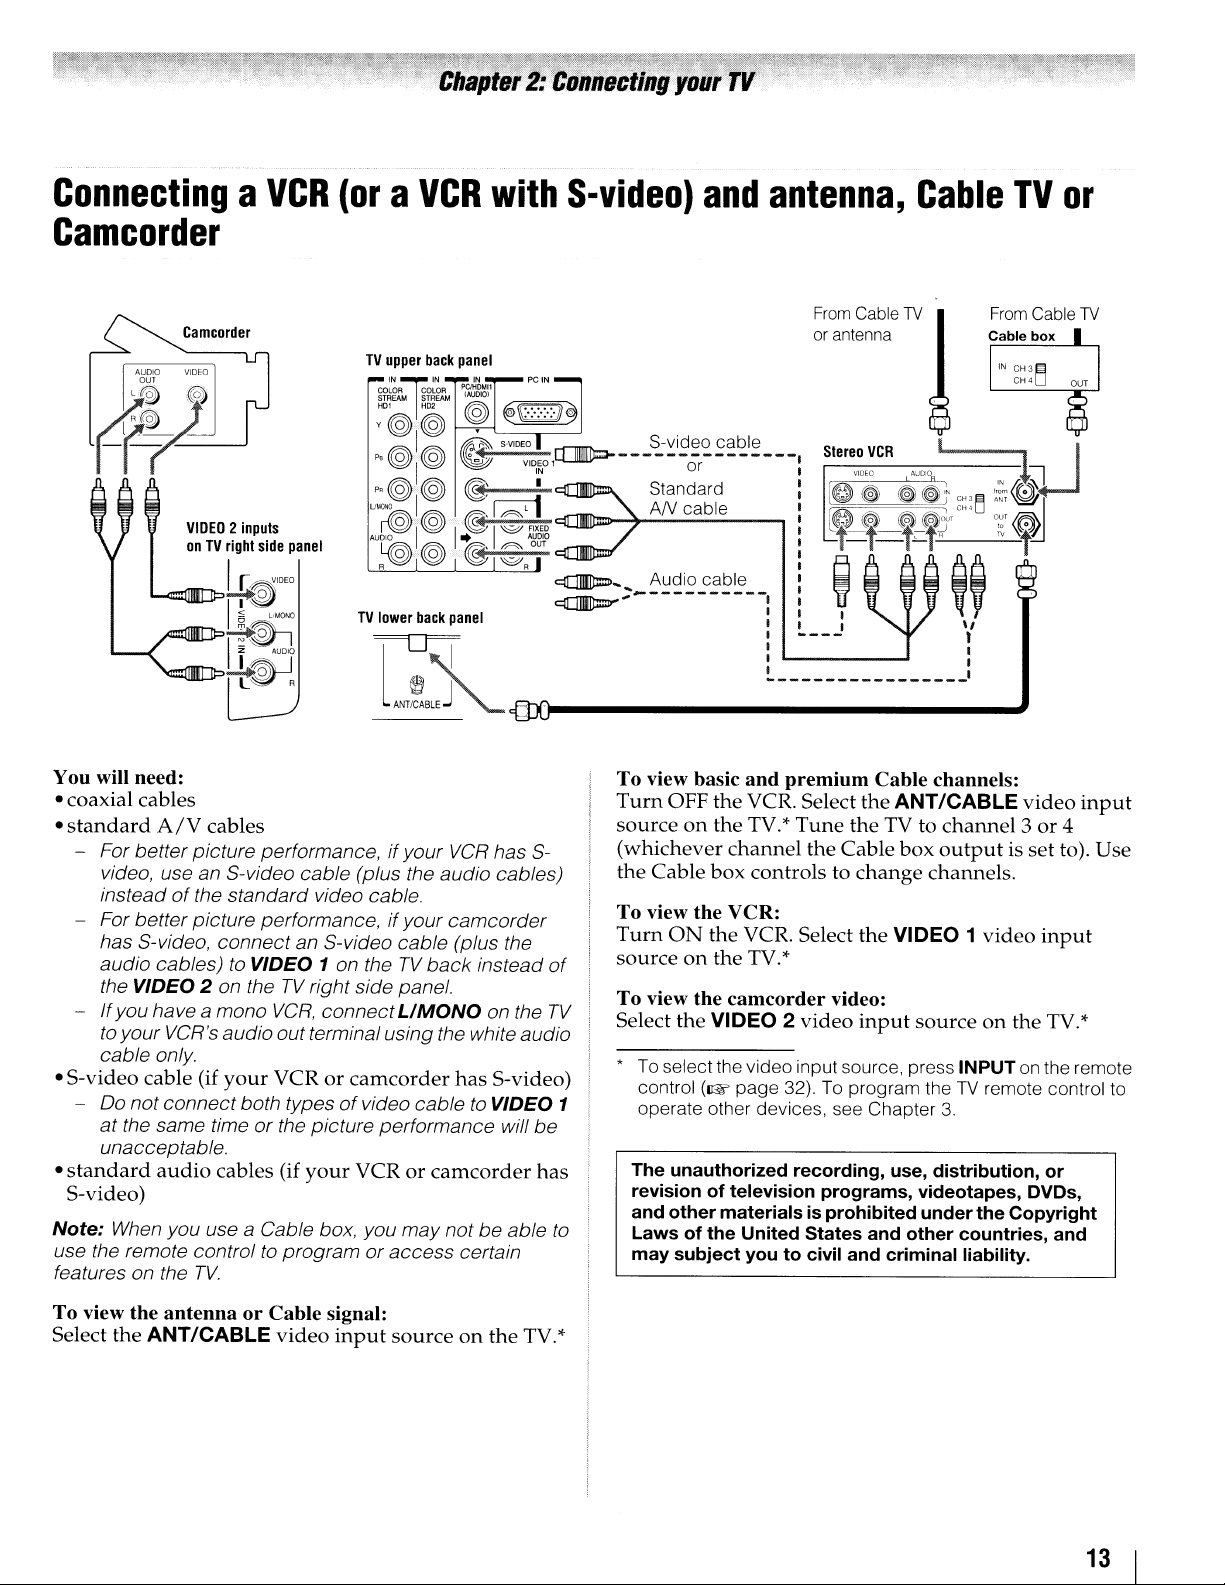
ConnectingaVCR
(oraVCR
Camcorder
CamcDrder
AUDIO
VIDEO
001
~~
VIDEO2inputs
DnTVright
--J-JI"""7~
/"-~
"-'TII"r-T!--.~~uDT
You will need:
coaxial
•
•
standard
- For better picture performance,ifyour
- For better picture performance,
-
•
S-video
-
•
standard
S-video)
Note:
use the remote control to program
features on the
cables
A/V
video, use an S-video
instead
has S-video,
audio cables)
the VIDEO 2 on theTVright side panel.
If
to your VCR's audio out terminal using the white audio
cable
00
at
unacceptable.
When you use a Cable box, you
of
the standard video cable.
you have a mono
only.
cable
not
connect
the same timeorthe picture performance will
audio
TV.
side
panel
I
r~'DEO
TV
lower
back
.......
~~
panel
°1
L~R
cables
cable
connect
to
(if
your
cables
an S-video
VIDEO 1 on theTVback
VCR,
connect
VCRorcamcorder
both typesofvideo cable to VIDEO 1
(if
your
Am!sA
VCR
(plus the audio cables)
if
your
camcorder
cable
(plus the
UMaNa
has
VCRorcamcorder
may
notbeable to
or
access
with
has
instead
on the
S-video)
certain
S-video)
ml
S-
of
TV
be
has
and
To view basic
Turn
OFF
sourceonthe
(whichever
the
Cable
To view
Turn
sourceonthe
To view
Select
•Toselectthe video input source, press INPUTonthe remote
The
revisionoftelevision
and
Lawsofthe
may
the
ON
the
the
control
operate other devices, see Chapter
(1&
unauthorized
other
subject
antenna,
From
or
antenna
and
premium
the
VCR. Select
TV.*
Tune
the
channel
box
VCR:
the
VCR. Select
camcorder
VIDEO 2
page 32). To program theTVremote control to
materialsisprohibited
United
youtocivil
the
Cable
controlstochange
TV.*
video:
video
recording,
programs,
States
and
Cable
Cable
TV
Cable channels:
the
ANT/CABLE
TV to
channel3or
box
outputisset
channels.
the
VIDEO 1
input
sourceonthe
3.
use,
distribution,
videotapes,
under
and
other
countries,
criminal
TV
From
.",
video
the
Copyright
liability.
Cable
video
input
TV.*
or
DVDs,
and
or
TV
4
to).
input
Use
To view
Select
the
antennaorCable
the
ANT/CABLE
video
signal:
input
sourceonthe
TV.*
13
Page 14
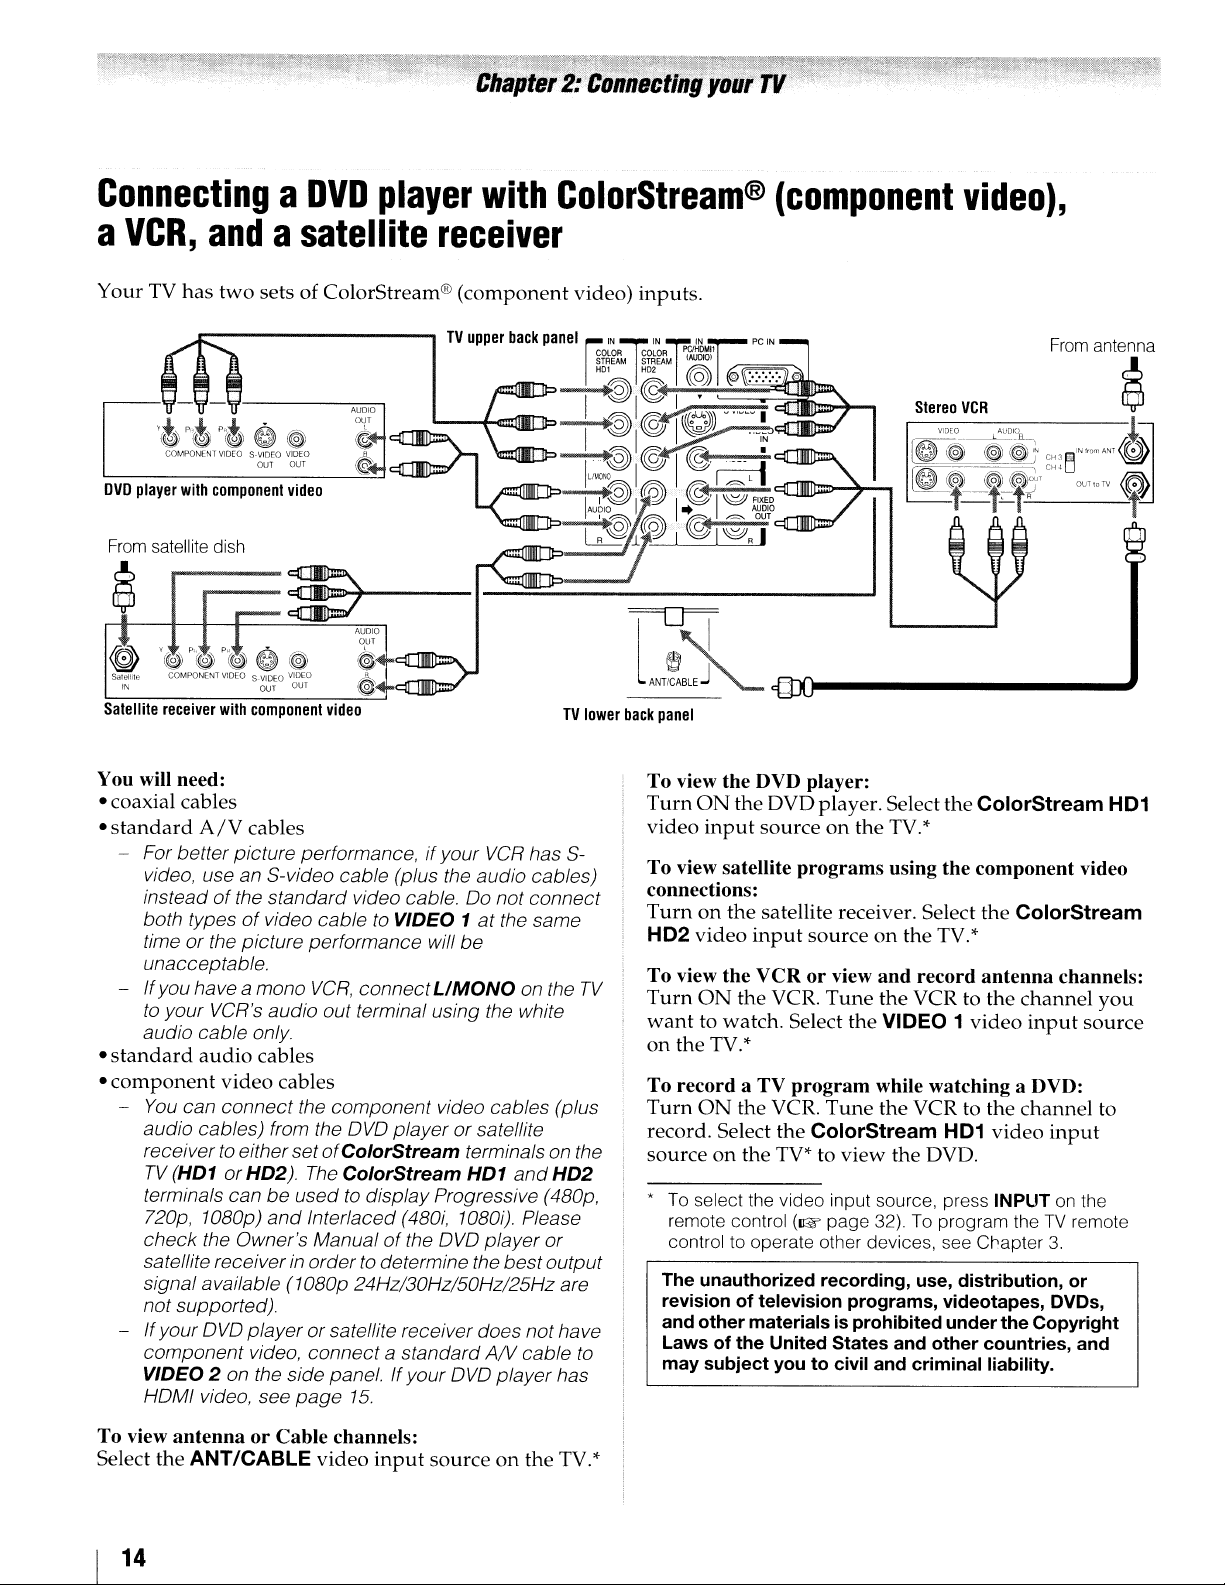
ConnectingaDVD
a
VCR,
andasatellite
player
receiver
with
ColorStream®
(component
video),
Your TV
l.---
DVD
From
Satellite
has
two
sets of ColorStream®
A~~:O
'~P'tJp'tJ
COMPONENT VIDEO S-VIDEO
player
with
satellite dish
receiver
component
r---
with
0
~
VIDEO
OU_T
_oUT_---..::;:~~oiI
video
~HC::[]1IIJP=!lI..
A
:>*"".UOIO--
OUT
~
,
~
, _.........
component
video
(component
TV
upper
"--+<::::nll[]::>-L~I~~~
.......
....IJIIJ>MM"
-~--=;==U===;=-l
-......,.,."'--.
""-J
You will need:
• coaxial cables
•
standard
- For better picture performance, ifyour
- Ifyouhave
•
standard
•
component
-
-
A/V
cables
video, use an S-video cable (plus the audio cables)
instead
both types
time or the picture performance will
unacceptable.
to
audio cable
You
audio cables) from the
receiver
TV
terminals canbeusedtodisplay Progressive (480p,
720p, 1080p)
check
satellite receiver
signal available (1080p 24Hz/30Hz/50Hz/25Hz are
not supported).
If
component video, connect
VIDEO 2 on the side panel. Ifyour
HoMI
of
the standard video cable.00not connect
of
video cabletoVIDEO 1atthe same
be
a mono
your VCR's audio out terminal using the white
audio
video
can connect the component video cables (plus
to
eitherset
(HD1orHD2)
the Owner's Manualofthe
your
OVO
playeror satellite receiver does not have
VCR,
connect
only
UMONO
cables
cables
OVO
player orsatellite
of
Co/orStream
The
ColorStream
and
Interlaced (480i, 1080i). Please
in
ordertodetermine the bestoutput
terminals on the I
HD1
OVO
a standard
OVO
video, see
page
15.
video)
back
panel
JCllIILJl=>----:~
~~;O'
inputs.
~
IN]IN
m~ ~~
@I
I
@I@
rFr"o"~1
:n
IN
~
=~'
~
c
v
"'V"V
I~
~'c~.i1
PC IN
:.:.:.:.:.
I ....,...,....-."
• --,,,,'''-
i=~I,~"",,~'~~-'"
~I
I @
l'~
'I@,1
~
;;;"
FIXED
AUDIO
",
c:[]lJffi:::iI'
AUDIO
~1nI!M>-.
I
~:f!J"
•
I @ I
-1-----'
A
~
VCR
has 5-
on the
and
player or
AN
cable
player has
TV
HD2
lower
TV
to
ANTfCABLEJ
back
panel
To view the DVD player:
Turn
ON
video
input
To view satellite
connections:
Turnonthe
HD2
video
To view the VCR
Turn
ON
want
to watch. Select the VIDEO 1
on
the
TV.*
To record a TV
Turn
ON
record. Select
sourceonthe
*
To
select the video input source, press INPUTonthe
remote control
control to operate other devices, see Cr.apter
The
unauthorized
revisionoftelevision
and
other
Lawsofthe
may
subject
cro-------------..1
the DVD player. Select
sourceonthe
programs
satellite receiver. Select
input
sourceonthe
or
view
the
VCR.
Tune
program
the
VCR.
Tune
the
ColorStream
TV*toview
(1& page 32).
recording,
programs,
materialsisprohibited
United
States
youtocivil and
L.----J
the
ColorStream
TV.*
using the component video
the
ColorStream
TV.*
and
the
record
VCR to
antenna
the
video
channels:
channel
input
source
while watching a DVD:
the
VCR to
the
To
use,
and
criminal
DVD.
the
channel
HD1
video
input
program theTVremote
3.
distribution,
videotapes, DVDs,
under
the
other
countries,
liability.
or
Copyright
and
HD1
you
to
To view
Select
14
antennaorCable channels:
the
ANT/CABLE
video
input
sourceonthe
TV.*
Page 15
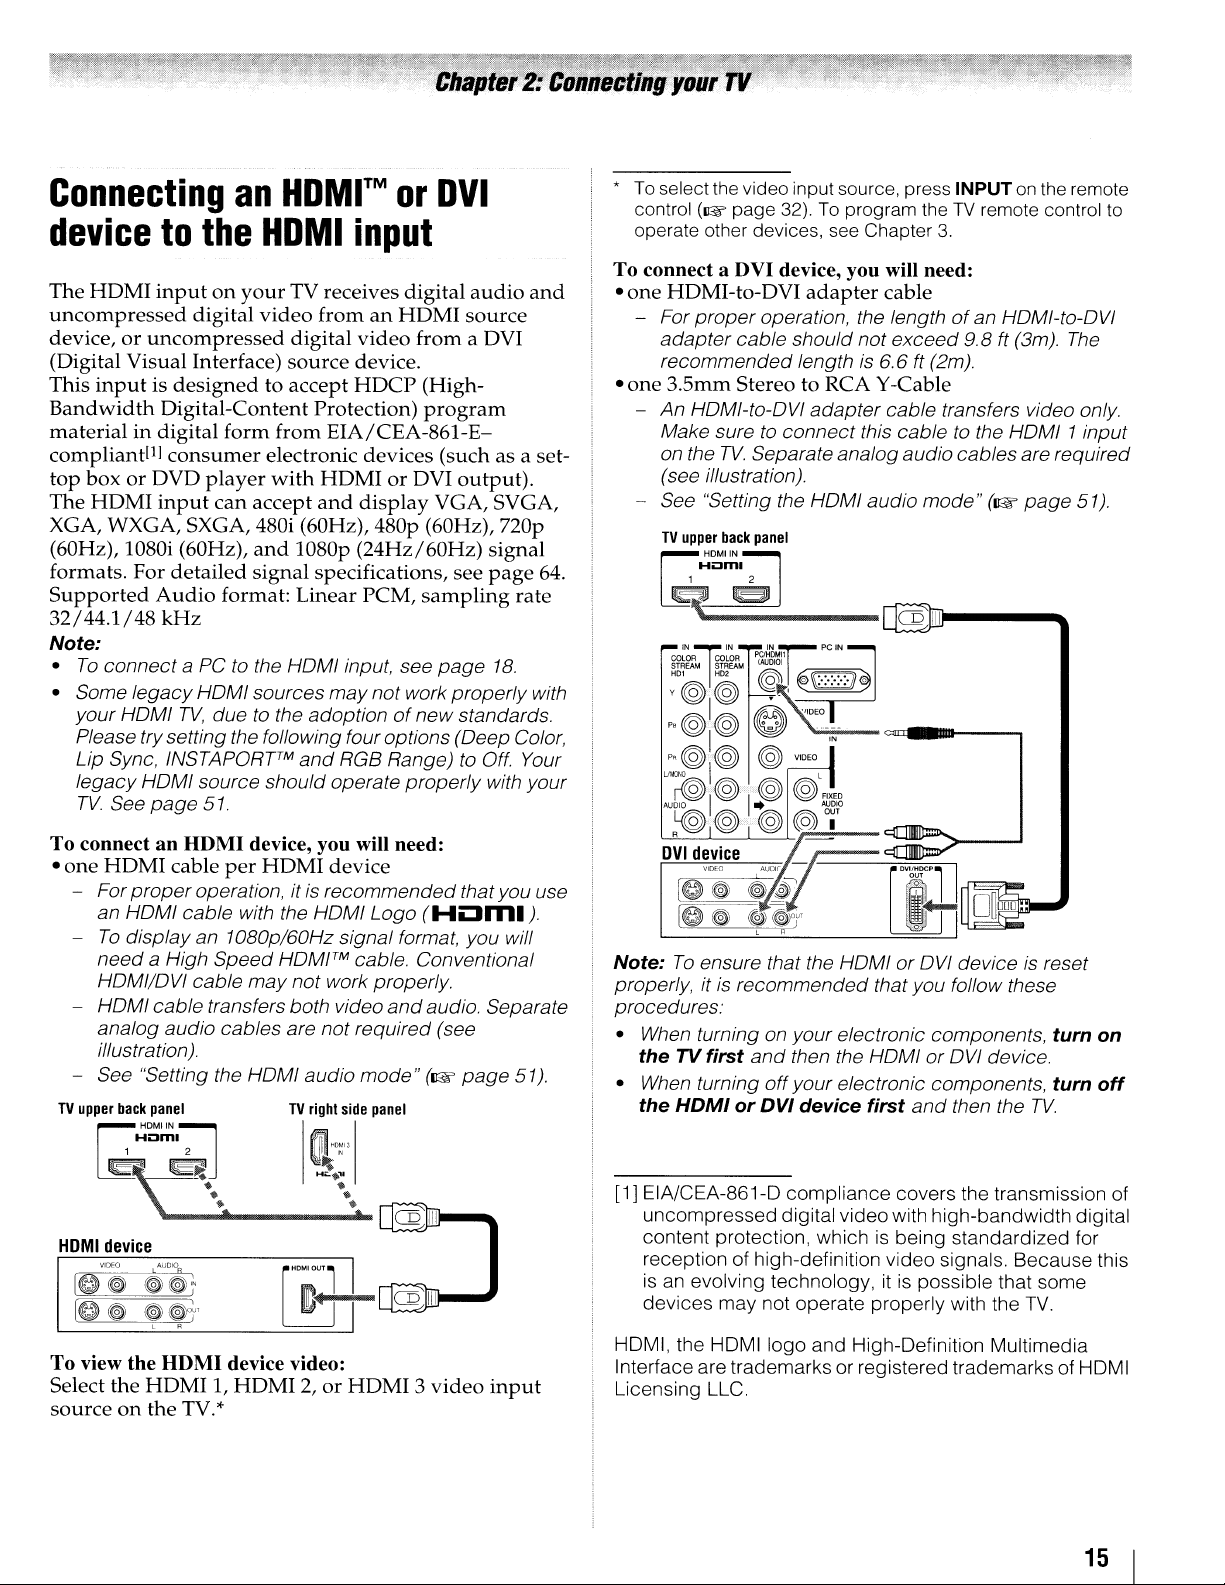
Connecting
device
The
HDMI
uncompressed
device,oruncompressed
(Digital Visual Interface)
This
inputisdesignedtoaccept
Bandwidth
materialindigital
compliant!l]
top
boxorDVD
The
HDMI
to
inputonyour
Digital-Content
consumer
input
an
the
digital
form
player
can
HDMI™orDVI
HDMI
TV receives
video
digital
source
from
electronic
with
accept
input
digital
fromanHDMI
video
from
device.
HDCP
Protection)
EIA/CEA-861-E-
devices
HDMIorDVI
and
display
audio
source
a DVI
(Highprogram
(such as a set-
output).
VGA, SVGA,
XGA, WXGA, SXGA, 480i (60Hz), 480p (60Hz),
(60Hz), 1080i (60Hz),
formats. For
Supported
32/44.1/48
Note:
•
To
connect a PC to the
• Some legacy
your
Please trysetting the following four options (Deep Color,
Lip Sync, INSTAPORFM
legacy
TV.
See
HoMI
HoMI
page
detailed
Audio
kHz
TV,
and
1080p
(24Hz/60Hz)
signal
format:
HoMI
sources
due to the adoptionofnew
source should operate properly with your
51.
specifications, see
Linear
HoMI
and
PCM,
sampling
input, see
may
not
work properly with
RGB Range) to Off. Your
signal
page
page
18.
standards.
nop
rate
and
64.
*
To
select
the
video input source, press INPUTonthe remote
control
operate other devices, see Chapter
To
•
one
- For
•
one
- An HoMI-to-oVI
- See "Setting the
(~
page
32).Toprogram theTVremote control
connect a DVI device, you will need:
HDMI-to-DVI
proper
adapter
recommended length is 6.6ft(2m).
3.5mm
Make sure to connect this cabletothe
on the
(see illustration).
TV
~~
~~
cable should not exceed 9.8 ft (3m).
Stereo to RCA Y-Cable
TV.
upper
back
DMIIN
Homl
1 2
adapter
operation, the lengthofan HoMI-to-oVI
adapter
Separate analogaudio cables are required
HoMI
panel
cable
cable transfers video only.
audio
to
3.
The
HoMI
mode"
as'IITIII~---""
(~page
1 input
51).
To
connectanHDMI
•
one
HDMI
- For
an
To
need
HoMI/oVI
HoMI
analog audio cables are not required (see
illustration).
See "Setting the
TV
upper
cable
proper
HoMI
cable with the
display an 1080p/60Hz signal format, you will
a High
cable transfers both video
back
panel
HDMIIN;]
Hom
I
device, you will need:
per
HDMI
operation, itisrecommended thatyou use
Speed
cable
may
HoMI
device
HoMI
HoMITM
not work properly.
TV
cable. Conventional
audio
mode"
right
side
~
~\
HOMI
device
[e~
[e~
To
view the
Select
sourceonthe
,c~,;,
~~+
, R
HDMI
the
HDMI1,HDMI2,or
device video:
TV.*
HDMI3video
Logo
(HOm.).
and
audio. Separate
(~
panel
as
III
page
input
51).
Note:Toensure that the
properly, itisrecommended that you follow these
procedures:
• When turning on your electronic components, turn on
theTVfirst
•
When
the
HDMIorDVI
[1] EIA/CEA-861-D compliance covers the transmission of
uncompressed digital video with high-bandwidth digital
content protection, which
reception of high-definition video signals. Because this
is
an evolving technology,itis
devices may not operate properly with the
HDMI, the
Interface are trademarks or registered trademarks of HDMI
Licensing LLC.
and
turning
HDMIIogo
off
HoMIoroVI
then the
your electronic components, turn
device
HoMIoroVI
first
is
being standardized for
and High-Definition Multimedia
deviceisreset
device.
and
then the
possible that some
TV.
TV.
off
15
Page 16
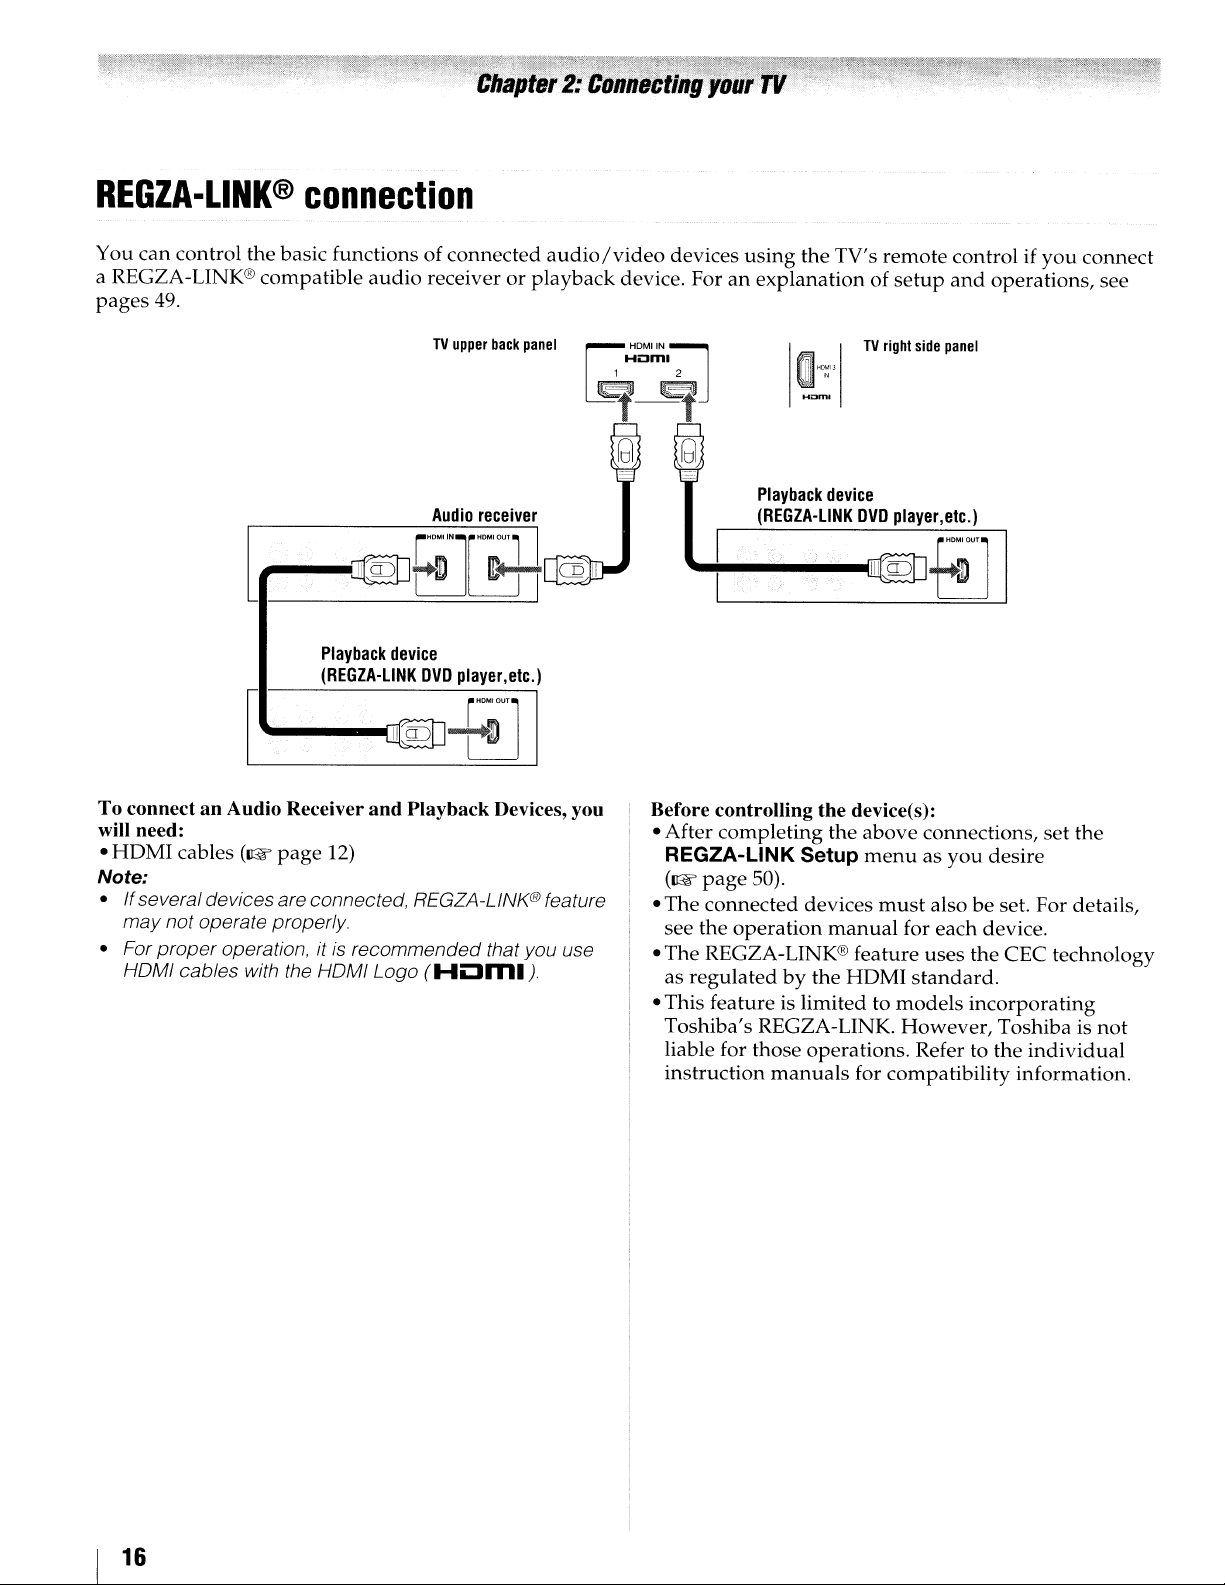
REGZA·LINK®
You
can
control
a REGZA-LINK®
pages
49.
connection
the
basic
functionsofconnected
compatible
audio
receiverorplayback
TV
upper
back
panel
audio/video
device. Foranexplanationofsetup
HDMIIN~
Hi:Jml
1 2
~
~~
g g
devices
using
the
TV's
remote
TV
right
controlifyou
and
side
panel
operations,
connect
see
Audio
receiver
Playback
(REGZA-L1NK
To connectanAudio Receiver
will need:
HOMI
•
Note:
• Ifseveral devices are connected, REGZA-LlNK@ feature
• For
cables (1&
may not operate properly.
proper
HOMI cables with the HOMI Logo
page
12)
operation, itisrecommended that you use
device
DVD
player,etc.)
and
Playback Devices, you
(HOm.).
Playback
(REGZA-L1NK
~~---~III
Before controlling the device(s):
•
After
completing
REGZA-L1NK
(1&
page
50).
The
connected
•
see
the
operation
The
REGZA-LINK®
•
as
regulatedbythe
• This
featureislimitedtomodels
Toshiba's
liable for
instruction
REGZA-LINK.
those
device
the
Setup
devices
manual
operations.
manuals
DVD
player,etc.)
QJ
8"']
above
feature
HOMI
for
connections,
menuasyou
must
for
uses
standard.
However,
Refer to
compatibility
I
desire
alsobeset.
each
device.
the
CEC
incorporating
Toshibaisnot
the
For
individual
information.
set
the
details,
technology
16
Page 17
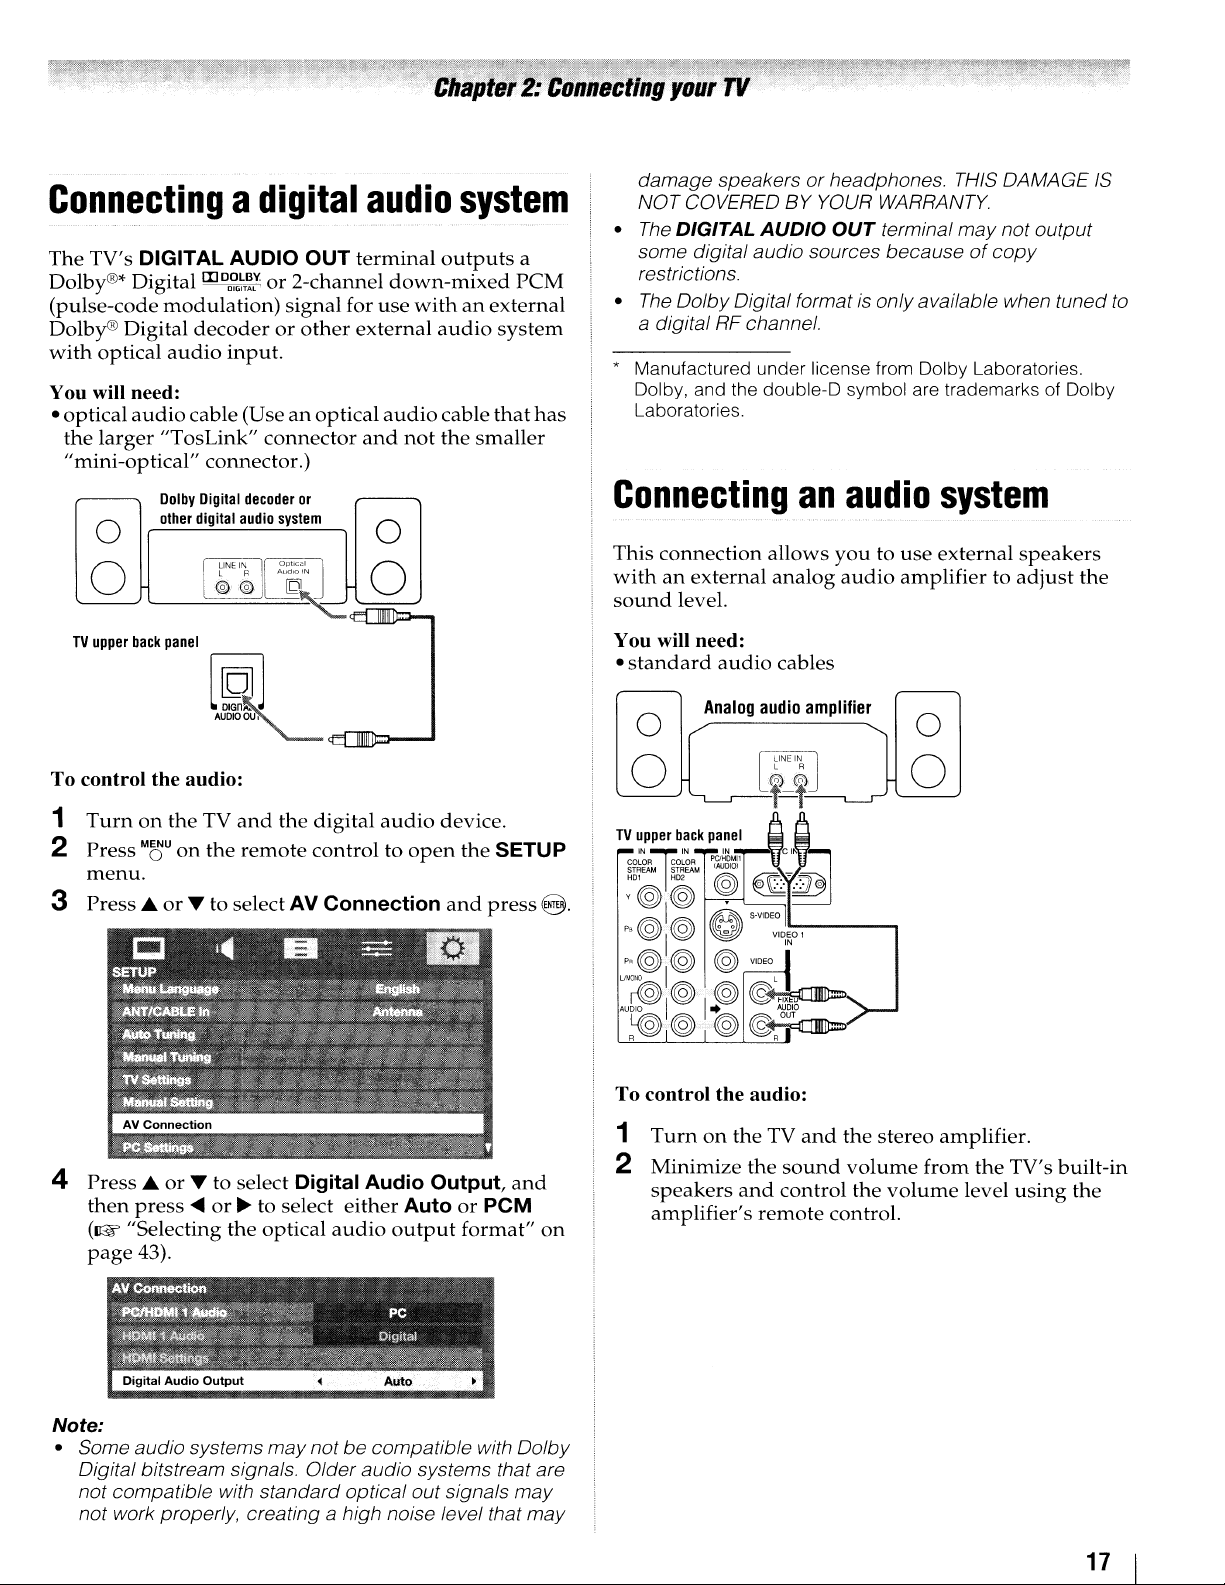
Connectingadigital
The
TV's
DIGITAL
Dolby®*
(pulse-code
Dolby®
with
You will need:
•
optical
the
"mini-optical"
DigitallIlDo~~T~.v.
Digital
optical
audio
larger
"TosLink"
Dolby
other
0
0
TV
upper
back
modulation)
audio
panel
AUDIO
decoderorother
input.
cable (Useanoptical
connector.)
Digital
decoder
digital
audio
L R
[r~[j~
@@
~
OUT
or
2-channel
signal
connector
system
AudiO
for
or
IN
[Ql~-=
•<Fl
<F"[]DD:
audio
terminal
down-mixed
use
withanexternal
external
audio
and
not
0
0
111111
n::::-.
system
outputs
audio
cable
the
a
PCM
system
that
smaller
has
damage speakersorheadphones. THIS DAMAGE
NOT COVERED BY YOUR WARRANTY.
•
The
DIGITAL
some digital audio sources because
restrictions.
•
The
Dolby
AUDIO
Digital formatisonlyavailable when tunedto
OUT
terminal
may
of
not output
copy
a digital RF channel.
* Manufactured under license from Dolby Laboratories.
Dolby, and the double-D symbol are trademarks of Dolby
Laboratories.
Connecting
This
connection
withanexternal
sound
You will need:
•
level.
standard
audio
Analog
o
allows
analog
cables
audio
an
youtouse
amplifier
audio
audio
amplifiertoadjust
o
system
external
speakers
IS
the
To
control
1
Turnonthe
2
Press
menu.
3
Press
4
Press
then
(Il:§ "Selecting
page
the
audio:
TV
and
the
digital
MOU
on
the
remote
....
or
T to select AV
....
orTto
press~or~to select
43).
select
the
controltoopen
Digital
optical
audio
Connection
Audio
either
AutoorPCM
audio
output
device.
the
and
press@.
Output,
format"
SETUP
and
on
o
To
control
1
TurnontheTVand
2
Minimize
speakers
amplifier's
the
and
audio:
the
sound
control
remote
the
stereo
volume
the
control.
o
from
volume
amplifier.
the
TV's
level
using
built-in
the
Note:
• Some audio systems
Digital bitstream signals. Older audio systems that are
not compatible with standard optical out signals
not work properly, creating a high noise level that
may
notbecompatible with
Dolby
may
may
17
Page 18
Connectingapersonal
computer
(PC)
With
either
thePCINorHOMI
watch
sound
To connect a PC to the PCINterminal on the TV:
When
use
audio
your
computer's
from
the
TV's
speakers.
connectingaPC
an
analog
cable.
TV
upper
~~~
~O@I(@
P'@I@
P"@@
UllCfi'
Au~l@
~@@@OUT
R R
Computer
RGB (IS-pin)
back
panel
IN]
IN IN
gx-~
I t
to$?)
~~1
~~€::lC~'8B~o
eJ
@
to thePCIN
VIOI~O'
VIDEO
@~J£
displayontheTVand
PC
IN
7l
computer
.~
_t------,
output
connection,
terminalontheTV,
PC
audio
cable
cable
you
andaPC
can
hear
the
• Signal
To connect aPCto the HDMI terminal on the TV:
When
useanadapter
If
HOM!
(ar:w
names
Pin
No.
1 R 6
2 G
3 B 8
4
5
*NC=Not
connectingaPC
connecting
cable.
page
TV
upper
for
mini
Signal
name
NC*
NC 10
connected
cable
a PC
withanHOM!
Separate
12).
back
panel
r~~~,
l§r
~i~iWk~M
~0(@1(@
P'@I@
I
~
~~)l
~
~~
0
p,@@ @
Vlt.)t,(l I L
AU~I@
~@
R R
I$?)
@@OUT
O-sub
Pin
No.
7
9
to the
and
analog
Signal'
name
Ground
Ground
Ground
NC
Ground
HOMI
analog
cables
IS-pin
connector
Pin
No.
11
12
13
14 V-sync
15 NC
terminalonthe
audio
terminal,
are
cables.
use
not
I
PCIN
€C-:-:-Jl~
...
o
__
+__
=-_-.
Vloiol
V'OEO
@:;:o\g
PC
audio
cable
Signal
name
NC
NC
H-sync
necessary
TV,
an
Conversion adapter
(if necessary)
.To
useaPc,
PC
before
can
accept
and
SXGA signal formats. For
specifications, see
display
• To
feature
page
47).
Note:
•
The
PC audio input terminals on the
the
HoMI
• Some
• An
adapterisnot
compatible mini o-sub15-pin terminal.
• Depending on the
the PC on which you are playing the oVo-Video, some
scenes may
pause during multi-angle scenes.
set
the
monitor
connecting
and
the
optimum
(ar:w
"Using
1analog audio input terminals.
PC models cannot
be
it to
display
page
thePCsettings
needed
oVo's
skipped
output
the
TV.
VGA, SVGA, XGA, WXGA,
detailed
63.
picture,
be
connectedtothis
for computers with a
title
and
oryou
resolutiononthe
ThePCIN
signal
use
thePCsettings
feature"
TV
the specifications
may
notbeable
on
are shared with
terminal
TV.
Computer
PC
audio
output
The
HOM!
XGA, WXGA, SXGA, 480i (60Hz), 480p (60Hz),
(60Hz), 1080i (60Hz),
formats. For
Note:
•
The
• If receiving
1080p signal program, Native mode scales the video
display the entire picture within the bordersofthe
screen (i.e no overscanning).
of
to
input
can
accept
and
detailed
edgesofthe images
signal specifications,
a 480i (HOM/), 480p(HOM/), 720p, 1080i, or
and
display
l080p
(24Hz/60Hz)
maybehidden.
VGA, SVGA,
nop
signal
see
page
64.
to
18
Page 19
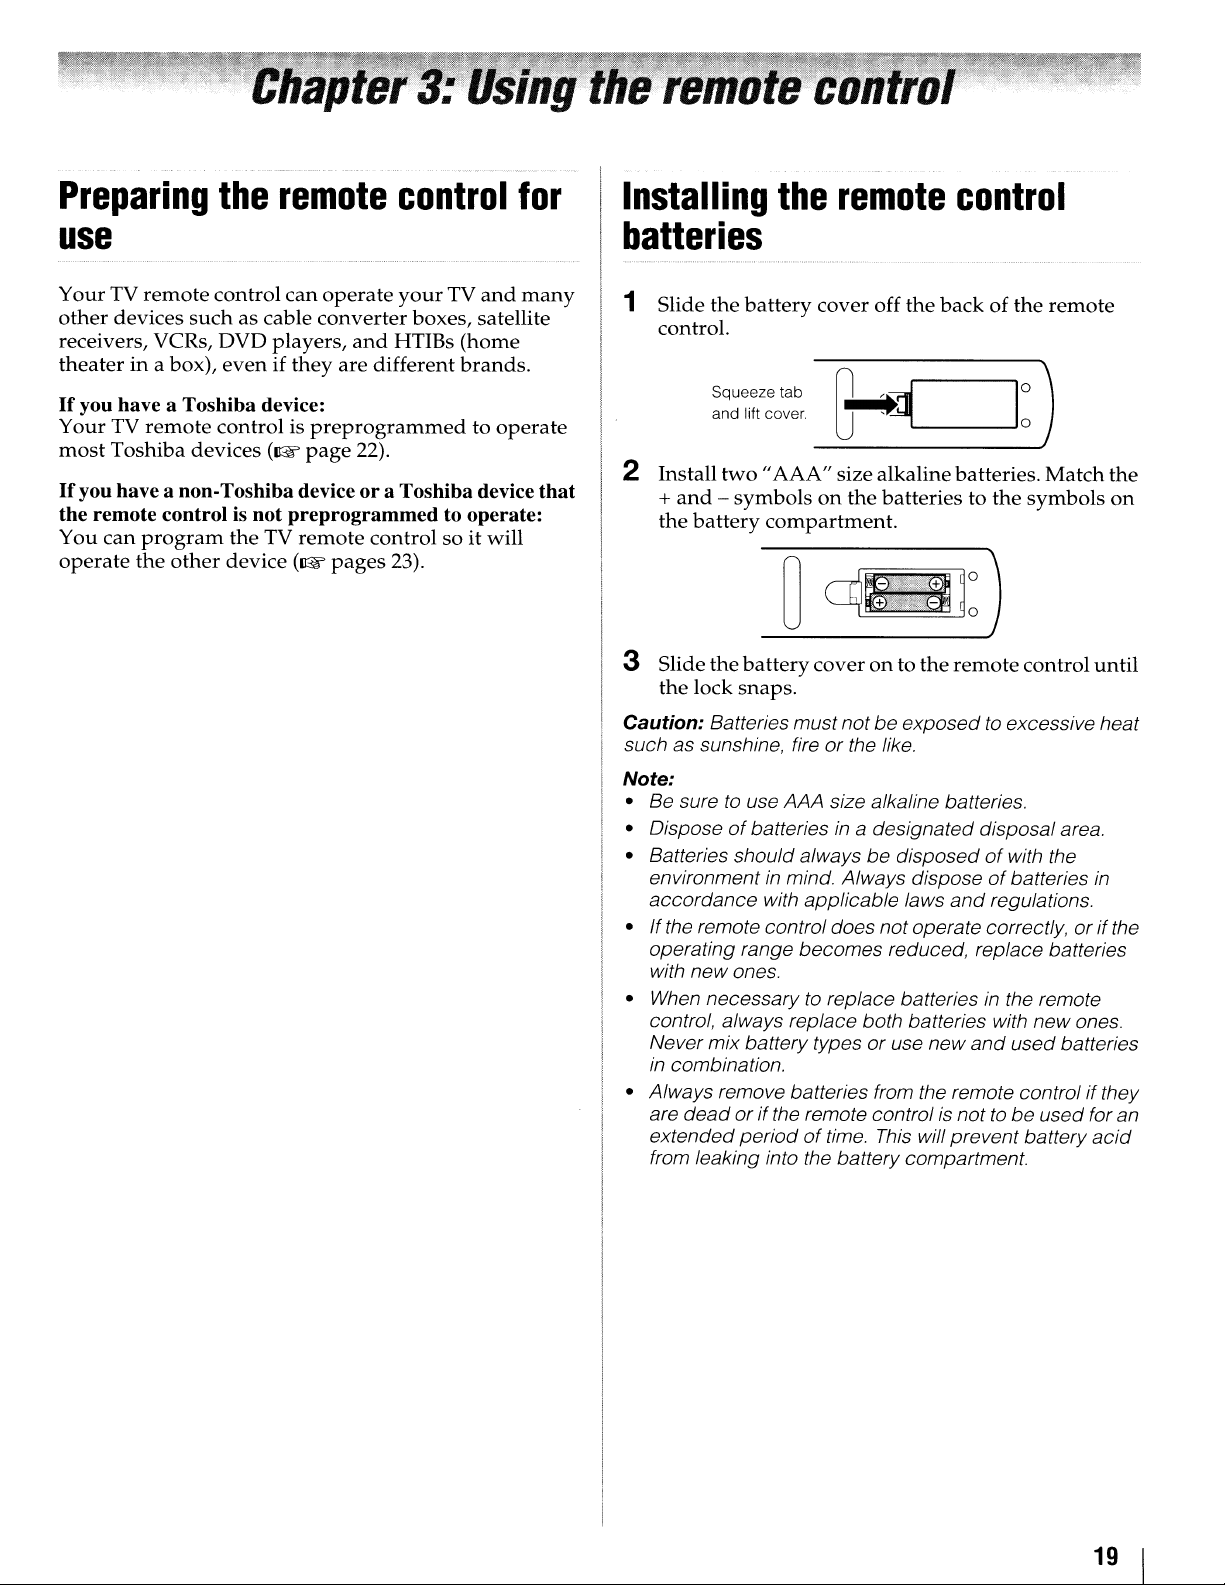
Preparing
the
remote
control
for
Installing
the
remote
control
use
YourTVremote
other
devices
receivers, VCRs,
theaterina box),
If
you have a
YourTVremote
most
Toshiba
If
you have a non-Toshiba deviceora
the
remote
You
can
program
operate
the
control
suchascable
DVD
evenifthey
Toshiba
devices
controlisnot
other
device:
controlispre
the
TV
device
can
operate
converter
players,
(~
page
preprogrammedtooperate:
remote
(~pages
your
TV
and
many
boxes, satellite
and
HTIBs
are
different
programmedtooperate
22).
Toshiba
controlsoit
23).
(home
brands.
device
will
that
batteries
1 Slide
2 Install
3 Slide
Caution:
such as sunshine, fireorthe like.
Note:
• Be suretouse AAA size alkaline batteries.
• Disposeofbatteries in a designated disposal area.
• Batteries should alwaysbedisposedofwith the
environmentinmind. Always disposeofbatteries
accordance
•Ifthe remote control does not operate correctly,orifthe
operating range becomes reduced, replace batteries
•
control, always replace both batteries with
Never mix battery typesoruse new
in
• Always remove batteries from the remote control if they
are
extended
the
battery
control.
Squeeze tab
and lift cover.
two
+
and-symbolsonthe
the
battery
the
battery
the
lock
snaps.
Batteries mustnotbeexposedto excessive heat
with new ones.
When
necessary to replace batteriesinthe remote
combination.
deadorif
periodoftime.
from leaking into the battery compartment.
cover
off
the
backofthe
"AAA"
compartment.
with applicable laws
the remote control is not tobeused for an
size
alkalinebatteries.
batteriestothe
C====-...JO
coveronto
This
o
the
remote
and
regulations.
and
will prevent battery
remote
Match
symbols
control
new
used batteries
the
on
until
in
ones.
acid
19
Page 20
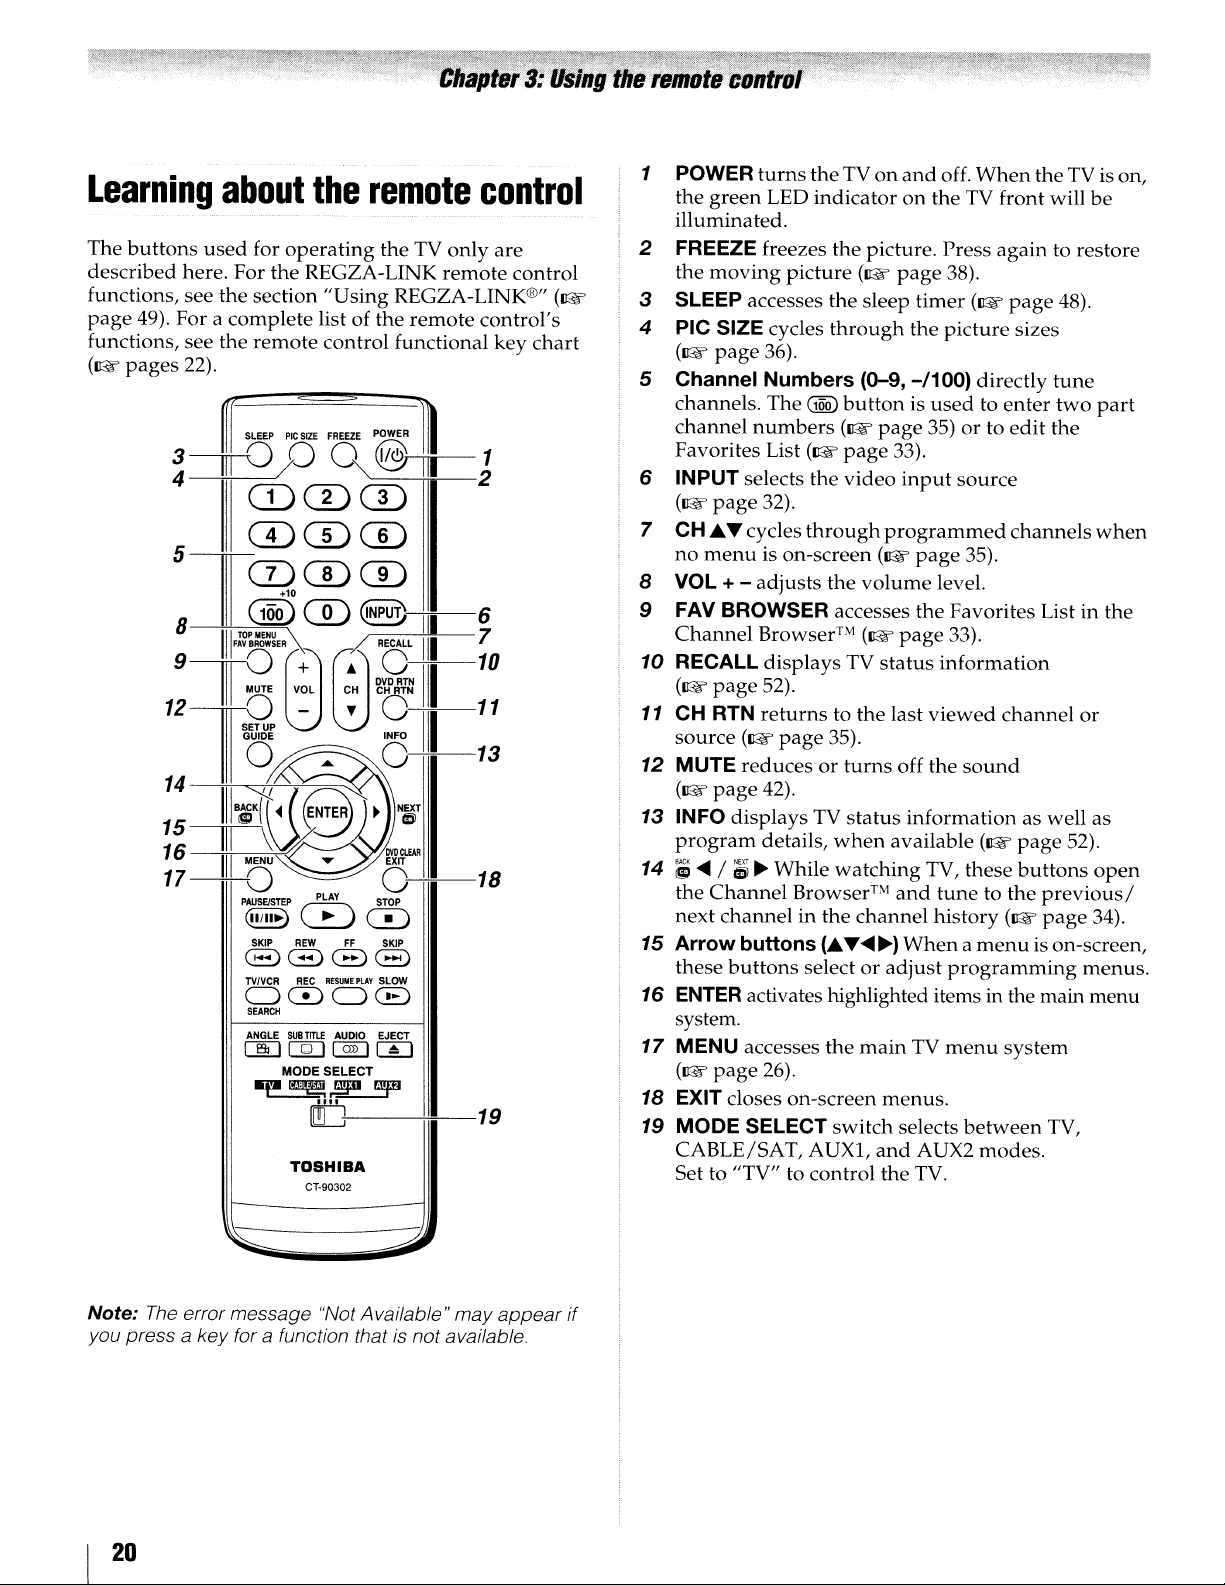
Learning
The
buttons
described
functions, see the section
page
49). For a
functions, see
(~
pages
about
used
here. For
complete
the
22).
Z r
for
operating
the
remote
SLEEP
PIC
~?
CDQ)(D
CD CD
5TCDCDG)
8
III
®CD~-;I~-6
TOP
MENU
\ 7
FA'
BROWSER
III
9~
12~
III
;;
lII~lf'{8'Z'"lf
16
------unVA
III
17--0
ffi
-
(~
MENU
PAUSE/STEP
(1I111~)
SKIP
REW
8GG8
TYNCR
REC
OeDOCE)
SEARCH
ANGLE
SUB
IE
[Q]
MODE SELECT
~~
TOSHIBA
the
remote
the TV
REGZA-LINK
"Using
list of the
control functional
SIZE
FREEIE
0
REGZA-LINK®" (~
remote
POWER
@ri-iIIi8-.-J
CD
RECALL
III
·
g:N~
111-::
Sill
A
PLAY
~
TITLE
[!fj:----+iii--19
CT-90302
O:~-13
DVDCl£AR
EXIT
O~-18
STOP
0
FF
SKIP
RESUM'
PLAY
SLOW
AUDIO
EJECT
C2TI
I~I
control
only
are
remote
control's
key
control
chart
1 POWER
the
illuminated.
2 FREEZE freezes
the
3 SLEEP accesses
4 PIC SIZE cycles
(~page
5 Channel Numbers (0-9,
channels. The
channel
Favorites List
6 INPUT selects the
(~page
7 CH.6....cycles
no
8 VOL + 9 FAV BROWSER accesses
Channel
10 RECALL
(~page
11
CH RTN
source
12 MUTE
(~page
13 INFO
program
14 ;~/
the
next
15 Arrow buttons
these
16
ENTER
system.
17
MENU accesses
(~page
18 EXIT closes on-screen
19 MODE SELECT
CABLE/SAT,
Set to "TV" to
turns
theTVon
green
LED
indicatoronthe TV front will
the
picture. Press
moving
menu
Channel
channelinthe
picture
36).
numbers
32).
is on-screen
adjusts
Browser™
displays
52).
returns
(~page
reducesorturns
42).
displaysTVstatus
details,
til
~
While
Browser™
buttons
activates highlighted items in the main
26).
(~
the
sleep
through
GQQ)
buttonisusedtoenter
(~
page
(~
page
33).
video
through
(.6.
selectoradjust
AUXl,
control
(~page
the
volume
(~page
TV
status
to the
35).
when
watching
channel
...
~~)
the
main
menus.
switch
and
the TV.
programmed
last
available
and
off.
When
again
page
38).
timer
(~
the
picture
-/100)
input
the
off the
information
and
Whenamenu
TV
selects
directly
35)orto
source
35).
level.
Favorites List in the
33).
information
viewed
TV, these
tunetothe
history
AUX2
channel
sound
(~page
(~
programming
menu
system
between
modes.
theTVis on,
to restore
page
48).
sizes
tune
two
edit
the
channels
or
as well
52).
buttons
previous/
page
is on-screen,
TV,
be
part
when
as
open
34).
menus.
menu
Note:
The
error message "Not Available" may appear if
you press a key for a function thatisnot available.
20
Page 21
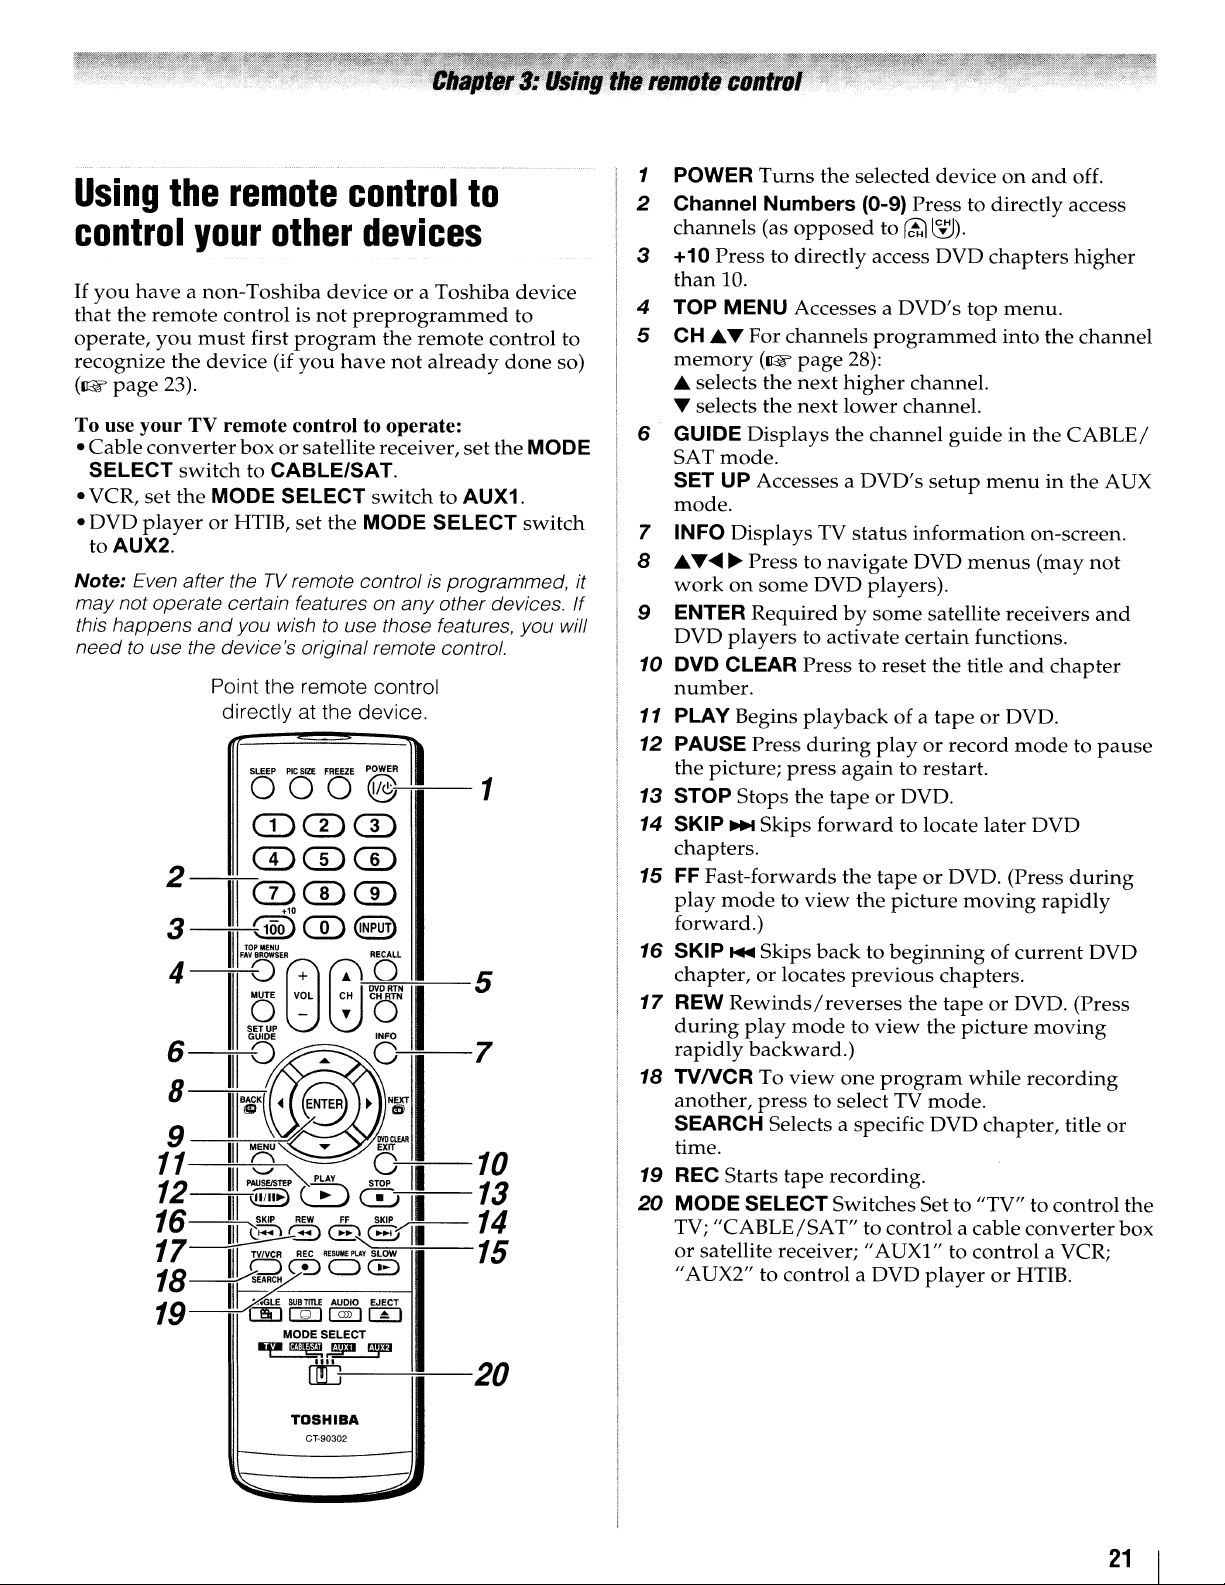
Using
control
If
you
that
operate,
recognize
(1&
To use your TV remote control to operate:
•
Cable
SELECT
• VCR,
•
DVD
to AUX2.
Note:
may
this happens
need
the
remote
your
haveanon-Toshiba
the
remote
you
must
the
device
page
23).
converter
switch
set
the
MODE
playerorHTIB,
Even after theTVremote control is programmed, it
not operate certain features on
and
to use the device's original remote control.
Point the remote control
other
controlisnot
first
(if
boxorsatellitereceiver,
to
CABLE/SAT.
SELECT
you wish to use those features, you will
directly at the device.
SLEEP
PIC
control
devices
deviceora
preprogrammed
program
you
have
set
the
MODE
StZE
FREEZE
POWER
the
remote
not
switch
any
Toshiba
already
to AUX1.
SELECT
other devices.
OOO@~-1
Q)(DG)
CD
CD CD
2--m--
3
4
-------T,.;..-FAVO~8
CD CD
111
(122:5
CD
III
TOP~NU
8:--";'9~::-+;-1-5
CD
~t§)
08l:fo
6
8
1~
12
16
17~g
18
19
115
II~'~'P'
III
~
III
PA~STE:C
---1
mII
(i3
1
SKIP
III
TVNeR
~
DCDGCE)
...
II~LE
-
1E1E@]1~1
~~
PLAY)
REW
REC
o/
SUBTITLE
MODE SELECT
d!D
~
O~I-7
.:
0
STOP
~
FF
~8f11
RESUME
PlAY
AUDIO EJECT
II
0
II
SKIP
~--
SLOW
I
to
set
10
13
14
15
20
device
to
control
done
the
MODE
switch
to
so)
1 POWER
2 Channel
channels
3 +10
than
TOP
4
5 CH ...... For
memory
... selects
... selects
GUIDE
6
SAT
SET
mode.
7 INFO
8
...........
If
workonsome
ENTER
9
DVD
10
DVD
number.
11 PLAY Begins
12
PAUSE Press
the
13
STOP
14
SKIP
chapters.
15
FF
play
forward.)
16
SKIP
chapter,orlocates
17
REW
during
rapidly
18
TVNCRToview
another,
SEARCH Selects a specific
time.
19
REC
20
MODE
TV;
or
"AUX2" to control a DVD
Turns
Press
10.
MENU
(1&
Displays
mode.
UP
Accesses a
DisplaysTVstatus
~
Presstonavigate
Requiredbysome
players
CLEAR
picture;
Stops
~
Skips
Fast-forwards
modetoview
...
Skips
Rewinds/reverses
play
backward.)
press
Starts
SELECTSwitches Set to "TV" to control
"CABLE/SAT"tocontrol
satellite receiver; "AUX1" to
the
selected
Numbers
(as
opposed
to directly access DVD
Accesses a
channels
page
the
next
the
next
press
the
modetoview
tape
(0-9)
programmed
28):
higher
lower
the
channel
DVD's
DVD players).
to activate
Press
to reset
playbackofa
during
again
tapeorDVD.
forward
the
the
backtobeginningofcurrent
previous
one
to select TV
recording.
deviceonand
Press
to
rct1
~).
DVD's
channel.
channel.
guideinthe
setup
information
DVD
satellite receivers
certain
the
tapeorDVD.
playorrecord
to restart.
to locate
tapeorDVD. (Press
picture
chapters.
the
tapeorDVD. (Press
the
program
mode.
DVD
playerorHTIB.
to directly access
chapters
top
menu.
into
menuinthe
menus
functions.
title
and
later
moving
picture
while
chapter,
a cable
control
off.
higher
the
channel
CABLE/
AUX
on-screen.
(may
not
and
chapter
modetopause
DVD
during
rapidly
DVD
moving
recording
title
or
the
converter
a VCR;
box
~
TOSHIBA
CT-90302
.--::;;;;;l
21
Page 22
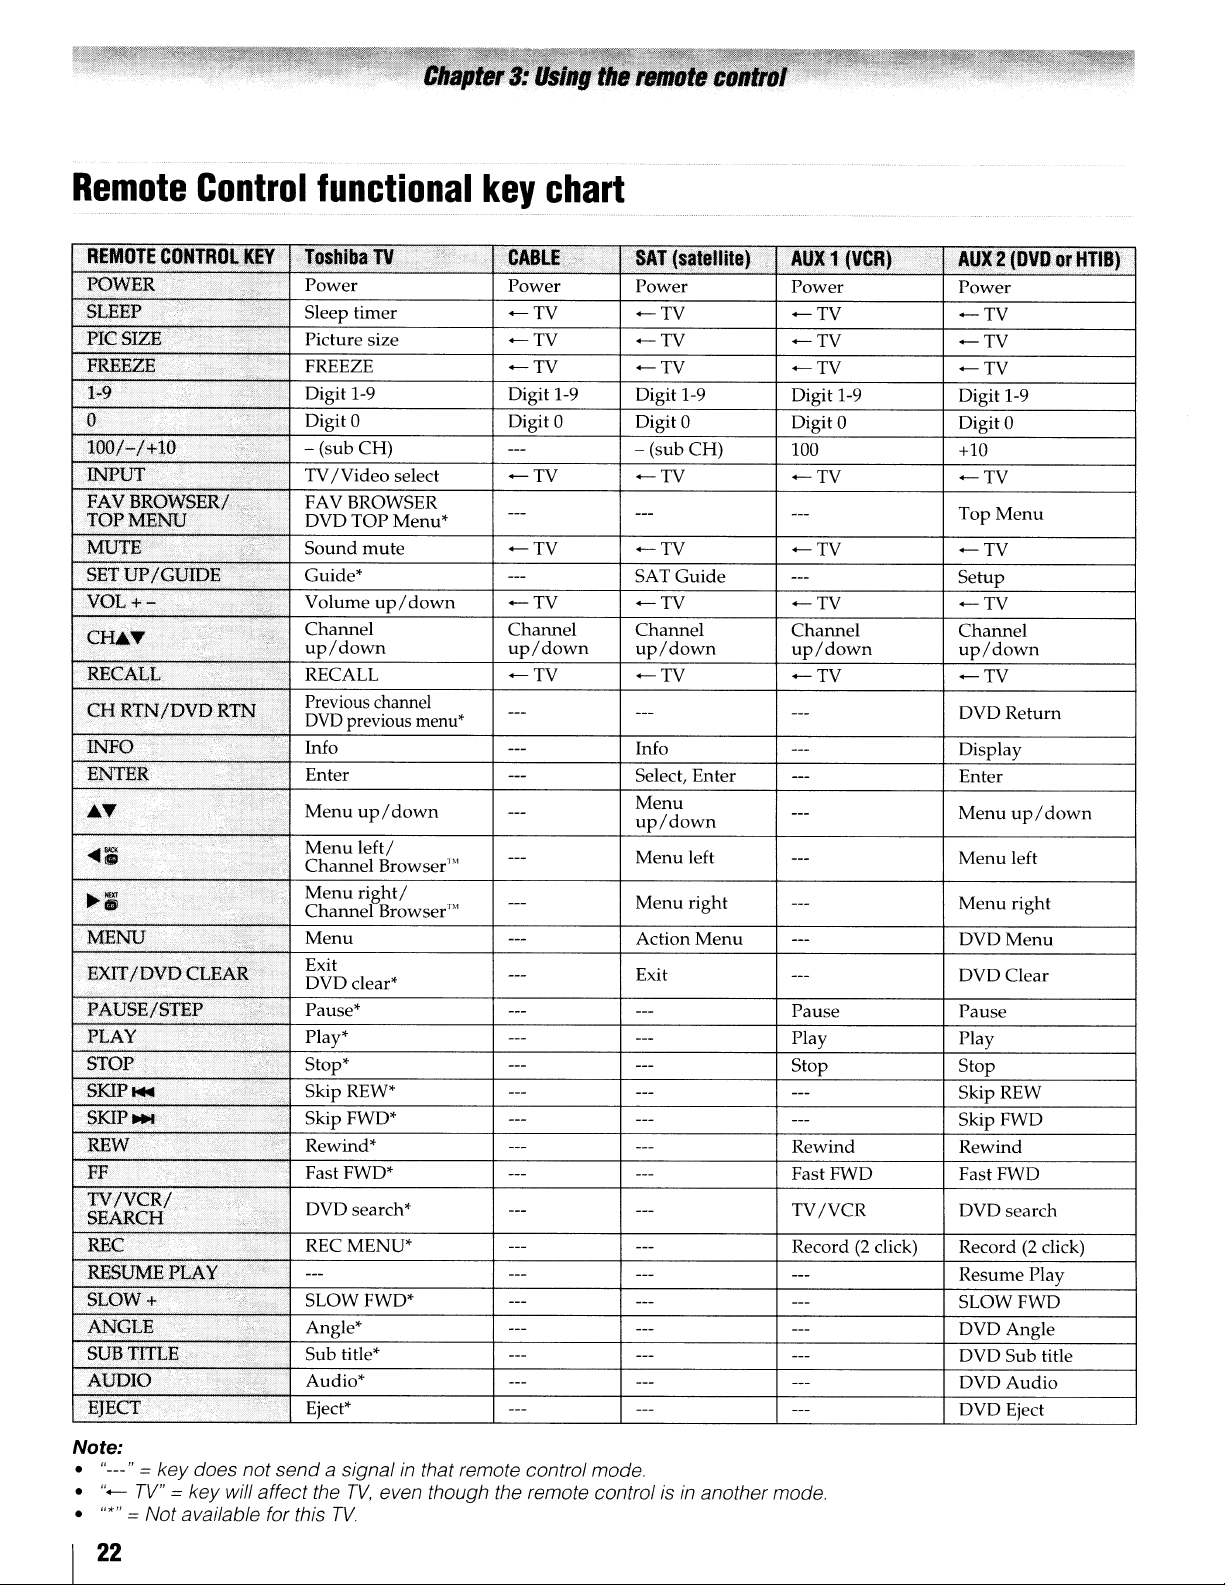
Remote
Control
functional
REMOTECOHTRQlklY
Power Power
Sleep timer Picture size -
~;'9>;
'0'
.
.
lQO
1:-/;l::~O
J1;-JfUT
FAVBROWSER FAV BROWSER
:rdp)yfENU'
MlJ'IE'
SETUP
.VOL+
'FF
;,TV
.
-:
CH
RrNIDVD'RTN
,
!NF0
,<'"
,~AU/
uv
PLAy·..,·
STOP.··
/VCR/
SEARCH'
REC "
AUDIO
'.';
.
..;;'>1:
.<~
:
Digit 1-9 Digit 1-9
, ; ; • Digit 0 Digit 0
-'-7T,-_--:("'-su--:""b-C=H-=)--------ir---"'-----t--=-:--::c::-----t--=------+----"'--------1
TV
/Video
DVD TOP Menu*
....
;'
ICtJIOIF~,r..
' ;
'",'
'..
Sound
, Guide*
,~,~.~
Volumeup/
Previous channel
f,"
DVD
..;";'
Info
previous
Menu
,
,<'
>.."
;.
Menu
Channel Browser'"
i"
Menu
Channel Browser'"
Menu
• •
"AI"·
Exit
DVD
Pause*
Play*
:
;,
"<,
Stop*
Skip
REW*
Skip FWD*
Rewind* Rewind
Fast FWD*
>,>:"
';'i.,
DVD search*
,
.....
,
RECMENU* Record(2click) Record(2click)
SLOW FWD*
Angle*
Sub title*
:'y/'
Audio*
Eject*
mute
up/down
left/
right/
c1ear*
select
down
menu*
key
TV
TV
-TV
chart
.•...
~.-_._-._
...
_
...
_
..
-
....
7.
SAT
(s~Jltllitet,,'.
Power
-TV -TV
-TV
-TV
Digit 1-9
AU~1(VCR)
Power Power
-TV
-TV
Digit 1-9 Digit 1-9
Digit 0 Digit 0
-TV
-TV
-TV
- (sub CH)
-TV
-TV
SAT
Guide
-TV
100 +10
-TV
-TV
-TV
Channel Channel Channel
up/down
-TV
up/down
-TV
up/down
-TV
Info
Select, Enter
Menu
up/down
Menu
left
Menu
right
Menu
Action
Exit
Pause
Play
Stop
Fast FWD Fast FWD
TV/VCR
;.
""
,"lJ~cZ(DV.D
-TV
-TV
-TV
Digit 0
-TV
Top
Menu
-TV
Setup
-TV
Channel
up/down
-TV
DVDReturn
Display
Enter
Menu
up/down
Menu
left
Menu
right
DVDMenu
DVD Clear
Pause
Play
Stop
Skip
REW
Skip FWD
Rewind
DVDsearch
Resume Play
SLOW FWD
DVDAngle
DVD Sub title
DVDAudio
DVD Eject
or
HTIB).
Note:
•
"---"
= key does not send a signal
•
"-
TV"
= key will affect the
•
"*"
= Not available for this
22
in
that remote control mode.
TV,
even though the remote controlisin
TV
another mode.
Page 23
Programming
to
control
Your Toshiba TV
operate
remote
Toshiba
operate), follow
the
most
control to
device
remote
Toshiba devices. To
thatitis
control to
your
remote
operate
the
steps
operate
the
remote
other
control is
a non-Toshiba device (or a
not
preprogrammed
below. For detailsonusing
devices
preprogrammed
program
the
device, see
control
your
to
page
TV
2l.
to
• Some newer
These
your
VCR
to the codes for your
otherposition ("VCR 1" or "VCR2")
remote control.
VCRs
respondtoeitheroftwo codes.
VCRs
have a switch labeled "VCR1NCR2." If
has this kindofswitch
VCR
brand, set the switchtothe
and
does not respond
and
reprogram the
1 In the
2 Set
3 While
4 To test
5
6 For
remote
find the
is listed,
that
works.
the
MODE
you
are
-
CABLE/SAT
satellite receiver), AUX1 (for a VCRorTV
combo),orAUX2 (for a DVD
theaterina box]).
holding
Number
device.
the
remote
•
If
thecorrect
off.
If
the device
•
using
•
If
the
device
will
needtouse
the device.
Remembertoset
to
"TV"
future
used:
control code table
code
for
your
try
each
one
SELECT
programming
(for a cable
down
buttonstoenter
code,
turnonthe
controlatit,
another
control
reference,
code
does
code.
does
the
the
the
and
was
not
not
MODE
TV.
(~
device.Ifmore
separately
switchtothe
the
remote
RE8LL,
the 3-digit
press
entered,
respond,
respondtoanother
remote
write
until
converter
playerorHTIB
press
device,
po~r.
the device will
repeat
control
SELECT
down
page
24-25),
than
one
code
you
find
one
type
ofdevice
controltooperate
box
or
/VCR
[home
the
Channel
code
for
your
point
the
See
notes
below.
turn
steps
1-4
code,
you
that
came
with
the
switch
code(s)
back
you
to
Note:
•Inaddition to
on theTVremote control operate your device.Ifsome
keys are not operational, repeat the device code setup
using another
device).
keysdonot operate your device, use the device's
original remote control.
• Every time you change the batteries, you will
reprogram the remote control.
POWER,
code
If,
after trying all listed codes, the necessary
confirm that all necessary keys
(if other codes are listed for your
need
to
23
Page 24
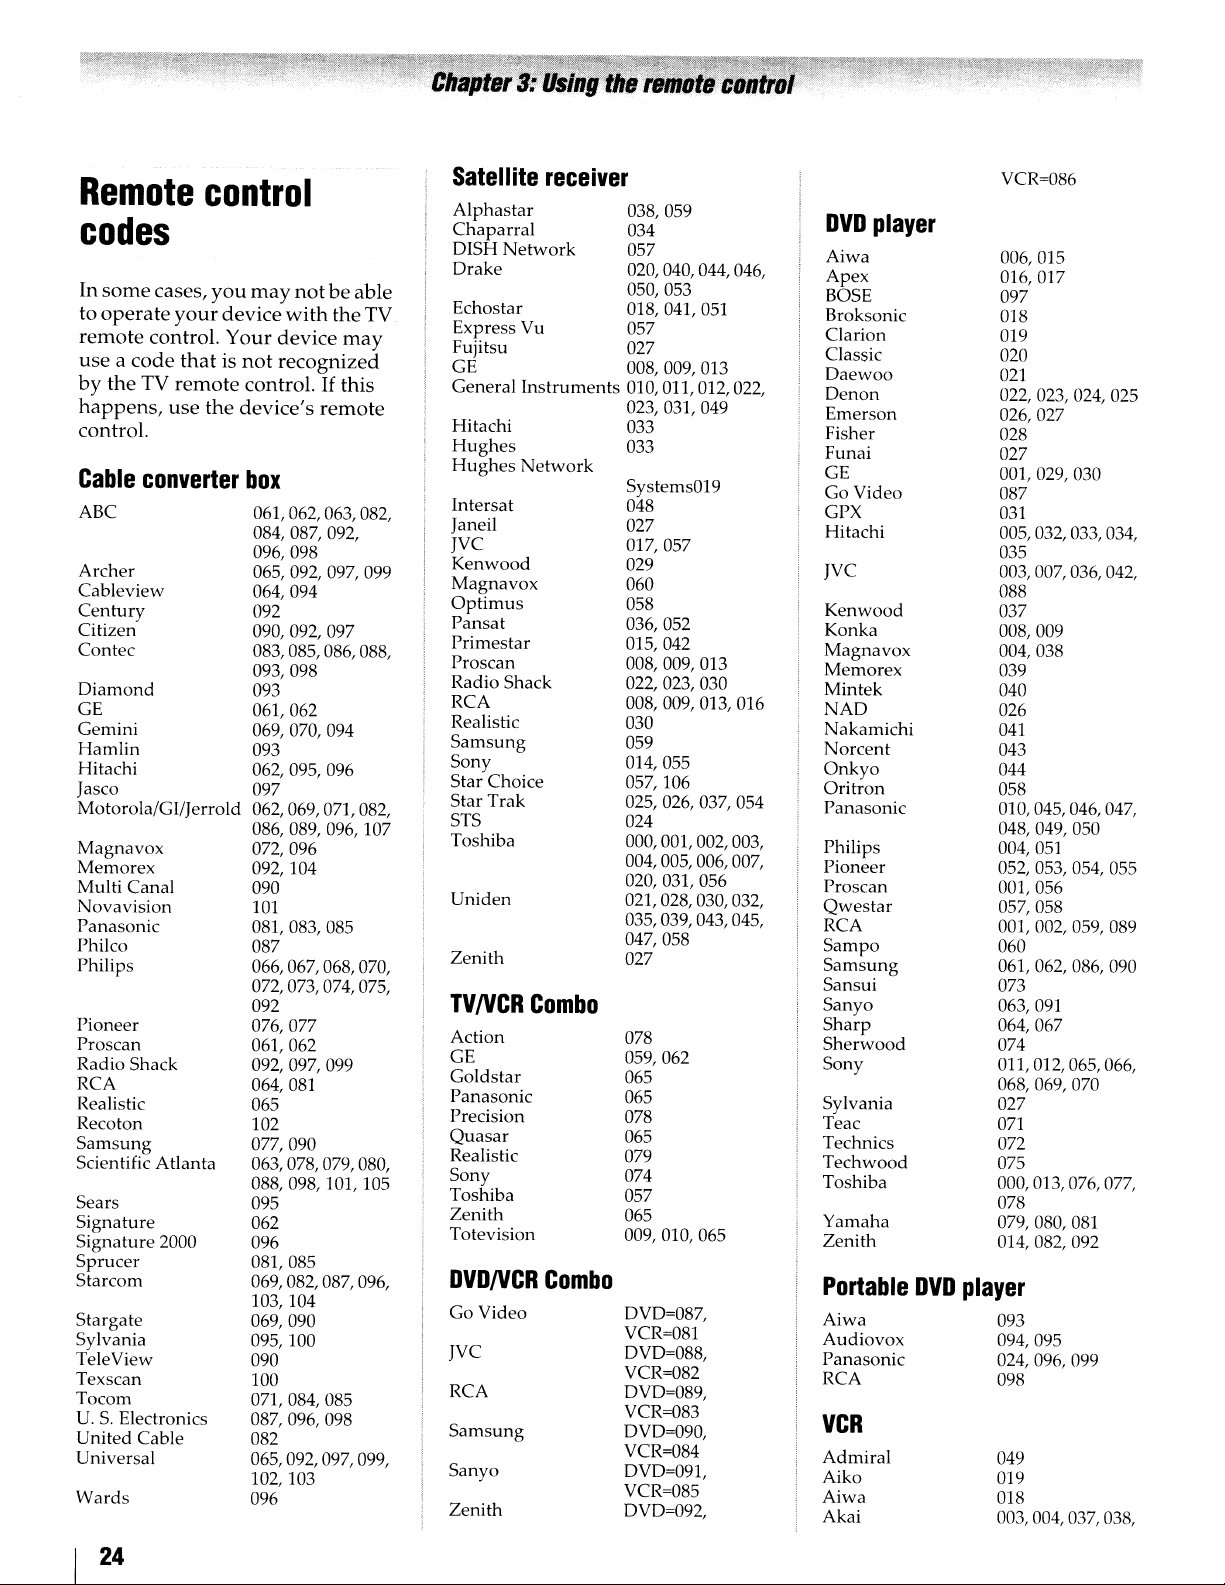
Remote
control
codes
In
some
cases,
you
may
to
operate
remote
useacode
by
the
happens,
control.
Cable
ABC
Archer
Cableview
Century
Citizen
Contec
Diamond
GE
Gemini
Hamlin
Hitachi
Jasco 097
Motorola/GI/Jerrold
Magnavox
Memorex
Multi
Novavision
Panasonic
Philco
Philips
Pioneer
Proscan
Radio
RCA
Realistic
Recoton
Samsung
Scientific
Sears
Signature
Signature
Sprucer
Starcom
Stargate
Sylvania
TeleView
Texscan
Tocom
U.S.Electronics
United
Universal
Wards
your
control.
thatisnot
TV
remote
use
converter
Canal
Shack
Atlanta
2000
Cable
device
Your
control.Ifthis
the
device's
box
061,062,063,082,
084,087,092,
096,098
065, 092, 097, 099
064, 094
092
090,092,097
083, 085, 086, 088,
093,098
093
061,062
069,070,094
093
062,095,096
062,069,071,082,
086, 089, 096, 107
072,096
092, 104
090
101
081,083,085
087
066,067,068,070,
072,073,074,075,
092
076,077
061,062
092, 097, 099
064,081
065
102
077,090
063,078,079,080,
088, 098, 101, 105
095
062
096
081,085
069,082,087,096,
103,104
069, 090
095, 100
090
100
071,084,085
087,096,098
082
065, 092, 097, 099,
102,103
096
notbeable
with
the
device
recognized
may
remote
TV
Satellite
Alphastar
Chaparral
DISH
Drake
Echostar
Express
Fujitsu
GE
General
Hitachi
Hughes
Hughes
Intersat
Janeil 027
JYC
Kenwood
Magnavox
Optimus
Pansat
Primestar
Pros
Radio
RCA
Realistic
Sam
Sony
Star
Star
STS
Toshiba
Uniden
Zenith
Network
Yu
Instruments
Network
can
Shack
sung
Choice
Trak
receiver
038,059
034
057
020, 040, 044, 046,
050, 053
018, 041, 051
057
027
008, 009, 013
010, OIl, 012, 022,
023,031,049
033
033
Systems019
048
017,057
029
060
058
036, 052
015, 042
008,009,013
022,023,030
008,009,013,016
030
059
014,055
057, 106
025,026,037,054
024
000,001,002,003,
004, 005, 006, 007,
020,031,056
021,028,030,032,
035,039,043,045,
047,058
027
TVNCRCombo
Action
GE
GoIdstar
Panasonic
Precision
Quasar
Realistic
Sony
Toshiba
Zenith
Totevision
DVDNCR
Go
Video
JYC
RCA
Samsung
Sanyo
Zenith
Combo
078
059, 062
065
065
078
065
079
074
057
065
009,010,065
DYD=087,
YCR=081
DYD=088,
YCR=082
DVD=089,
VCR=083
DYD=090,
VCR=084
DVD=091,
YCR=085
DVD=092,
DVD
player
Aiwa
Apex
BOSE
Broksonic
Clarion
Classic
Daewoo
Denon
Emerson
Fisher
Funai
GE
Go
Video
GPX
Hitachi
JYC
Kenwood
Konka
Magnavox
Memorex
Mintek
NAD
Nakamichi
Norcent
Onkyo
Oritron
Panasonic
Philips
Pioneer
Proscan
Qwestar
RCA
Sampo
Samsung
Sansui
Sanyo
Sharp
Sherwood
Sony
Sylvania
Teac
Technics
Techwood
Toshiba
Yamaha
Zenith
Portable
Aiwa
Audiovox
Panasonic
RCA
VCR
Admiral
Aiko
Aiwa
Akai
DVD
YCR=086
006,015
016,017
097
018
019
020
021
022,023,024,025
026,027
028
027
001,029,030
087
031
005,032,033,034,
035
003,007,036,042,
088
037
008, 009
004,038
039
040
026
041
043
044
058
010,045,046,047,
048, 049, 050
004,051
052,053,054,055
001,056
057,058
001,002,059,089
060
061,062,086,090
073
063,
091
064,067
074
011,012,065,066,
068,069,070
027
071
072
075
000,013,076, 077,
078
079,080,081
014,082,092
player
093
094,095
024,096,099
098
049
019
018
003, 004, 037, 038,
24
Page 25

Audiovox
Bell
&
Howell
Broksonic
Calix 010
Carver
CCE
Citizen
Colortyme
Craig
Curtis
Mathes
Daewoo
Daytron
Denon
Dimensia
Electrohome
Emerson
Fisher
Fuji
Funai
Garrard
GE
Go
Video
Goldstar
Gradiente
Harman
Hitachi
Kardon
JBL
Penney
JC
Jensen
JVC 005,006,007,014,
Kenwood
Kodak
LG
Lloyds
Logik
LXI
Magnasonic
Magnavox
Marantz
Memorex
MGA
MGN
039,058,069
010
007,068
008,017
026
019
009,010,011,012,
013,014,015,019,
057,073
005
009,010,016,061,
065,079
001,005,009,012,
014,040,048,053,
056,057
011,013,015,017,
018,019,057,078
078
063
001,048
010,020,065
003,008,010,011,
017,018,020,028,
039, 054, 057, 062,
065,068,072
007,016,021,022,
023,057,064,068,
070, 071, 079
004,041
018,073
018
001,002,009,040,
042,048,056
056, 059, 061,
005,010,014,054,
056,065,067
018, 065 083
005
024, 025, 035, 037,
042,063,070,080
076 056,060,065,075,
005,006,007,008,
009,010,023,024,
025,026,035,056,
061,063,065
024,025,037,050
037,043,055,062,
063,068,082
005,006,007,012,
014,037,043,050,
053, 068,
010
010 022,023,024,025,
053,073, 079
061
010
061,065,078
026,027,034,044,
057,061,072
005,006,007,012,
014,026,053,067
007,009,010,016,
018,034,049,063,
065,066,068,075,
079
020,028,039
056
081
071
Minolta
Mitsubishi
Montgomery
Motorola
MTC
Multitech
NEC
Nikko
Noblex
Optimus
Optonica
Orion
Panasonic
Pentax
Pentex
Philco
Philips
Pioneer
Portland
Proscan
Proton
Quasar
Radio
Shack
Radio
Shack/Realistic007, 009, 010, 016,
Radix
RCA
Realistic
Ricoh
Runco
Samsung
Sansui
Sanyo
Scott
Sears
Sharp
Shintom
Signature
Signature
Singer
Sony
STS
Sylvania
Ward
Research
2000
024,025,035,063
020,024,025,028,
039,043,065
049
049
009,046,061
009,012,018
005,006,007,012,
014,037,043,053,
054,067,070
010
009
010,049,065
031
054,057,062,065,
068,072
036,045,046,057,
061,072,079
012,024,025,035,
042,053,063
014
026, 027, 063
026,031,044,057
006,024,043,055
012, 013, 015
001, 002, 048
061
045
010,031,065
018,020,021,022,
031,049
010
001,002,003,009,
024,025,029,035,
040,042,045,048,
055,056,063,071,
007,009,010,
016,018,020,021,
022,031,049,051,
079
047
034
009,
073,084
006,037,043,061
007,009,016,054,
064,068,071,075,
079,085
008, OIl, 017, 028,
030, 057, 065, 072
007,010,016,021,
035,053,057,063,
064,065,068,071,
075,079
013,020,031, 049,
051,060,066
004,025,032,061
049
075
047,061
004,032,033,041,
052,058,070,074,
076,077,080
035
018,026,027,028,
OIl,
OIl,
038, 056,
Symphonic
Tandy
Tashiko
Tatung
Teac
Technics
Teknika
Toshiba
Totevision
Unitec
Unitech
Vector
Video
Wards
White
XR-1000
Yamaha
Zenith
Research
Concepts
Westinghouse
HTIB
Lasonic
Panasonic
Venturer
044,072
018,050,051,053,
073,079
007
010
037
018,029,037
036
010,018,065
000, OIl, 021, 023,
024,028,030,039,
057,074,078,079,
100,101
009,010,065
073
009
005,006, OIl, 012,
053
005,006,
039,053
009,010,
018,020,024,025,
031,035,049,051,
056,057,060,065,
066,079
073
018
005,006,007,014,
037,053
004,032,034,041,
047,069,086
083
084
085
OIl,
OIl,
012,
016,
25
Page 26

Main
To
on
open
the
menu
the
remote
Icon;
PICTURE
SOUND
14'
APPLICATIONS
PREFERENCES
---.....
......---
_.i
layout
main
menus
controlorTV
Itlm
Picture Mode
Reset
Backlight
Contrast
Brightness
Color
Tint
Sharpness
Advanced Picture Settings
Control Visualization 40
TheaterLock 40
MTS
Bass
Treble
Balance
Advanced Sound Settings
StableSound
Dynamic Range Control
Media Player 57
Channel Browser
Favorites Browser 33
REGZA-LINK Player Control
On
Sleep Timer
REGZA-LINK Setup 49
Photo Viewer Setup
Channel Browser Setup
CC
Selectors
PIN Setting
Parental Control
Auto Aspect
4:3
Blue Screen
Transparency
TOSHIBA Illumination
(illustrated
Timer
and
Digital Audio
Stretch
control
and
below),
panel.
Locks
press
M~U
~age
39
39
39
39
39
39
39
39
53
42
42
42
42
56
43
43
33
49
48
48
58
33
40
43
44
38
38
30
30
30
.
Item
SETUP
(}
Menu
ANT/CABLE In
Auto Tuning
Manual
TV
Manual Setting
AV Connection
PC Settings 47
Picture Position
Quick Setup
Power-On Mode
Location
System Information
Reset
Navigating
You
can
use
the
buttonsonthe
control
screen
•
•
• To
•
• All
• To c
paneltoaccess
menu
Press
M~U
Press
....
to
select
below.
use
the
TV
control
Press
....
menus
selection
I
oseamenu
system
to
open
or~on
the
or~to
the
top
menu,
items,
paneltomoveupand
adjust
close
within60seconds.
.
Language
Tuning
Settings
TV
the
press'"
automaticallyifyoudonot
. I
Instanty,press
and
.
the
main
remote
menu
navigate
menus.
controlorTV
its
respective
or'"onthe
settings.
system
remote
controlorTV
your
items
remote
down
MENU EXIT
0
or
TV's
control
through
O.
on-
will
control
make
Page
27
28
28
28
29
29
43
38
27
30
30
31
31
panel
appear
or
them.
a
26
Page 27
Initial
When
window
1
In
your
2
Press.
desired
3 Next, the Location
For normal home use,
press@.
4 Next, ANT/CABLE
Press'"
Antenna) for
5
If
setup
channels, select
preferentially
number
select Standard. Press @ to
Tuning.
6 Press @ to select Start Scan
Auto
You
do
not
Setup
TV. .
Setup
you
first
turnonor
will
appear.
the
Menu Language field,
preferred
or
time
or.
you
select Antenna,
window
directly, select Auto. For
Tuning.
can
stop
finish
window
language.
T to select Time Zone
zone
to select the
the
will
Digital. To
over
the
Initial
the
entire Initial
will
appear
reset
the
with'"
ANT/CABLE
setting
press'"
In
setup
the
appear.
analog
Setup
every
or.
window
or.
window
input
Channel Tuning
To
tune
when
with
Setup
TV, the Initial
press'"or• to select
and
set
your
and
press
@.
will
appear.
to select
source
inputonthe
tune
digital
entering
continuetoAuto
and
continue
E~!r
process,
time
Home
will
appear.
(Cable
only
digital
channels
channel
normal
Howeverifyou
you
tuning,
with
the
turnonthe
Setup
and
or
TV.
Mode
the
Initial
Quick
You
from
menu.
1 Press
2 Press ...
3 A
press'"or• to select Yes
4
Selecting
You
Fran<;ais
menus
1
2
Setup
can
conveniently
the
Quick
Mf!)U
to
or
confirmation
Other
procedures
(~
left-hand
can
choosefrom
and
Espanol) for
and
messages.
From
the
Language.
Press'"
language.
or.
Setup
open
T to select Quick Setup
message
column).
the
SETUP
to select
from
change
item
located
the SETUP
are
the
menu
. _ - -
three
different
the
menu,
highlight
your
the
SETUP
various
will
and
same
on-screen
preferred
basic TV settings
under
menu.
and
appearonthe
press
as Initial Setup
language
-.-
languages
Menu
the
SETUP
press
@.
display
menu
menu
@.
screen,
(English,
of
27
Page 28

Configuring
source
1
From
2 Press
Cable) for the ANT/CABLE
press
for
the SETUP
~or~
Ecr
the
the
menu,
to select the
antenna
ANT
ICABLE
highlight
input
inputonthe
input
terminal
ANT/CABLE
source (Antenna
TV
and
In.
or
1
Configure
already
2
From
3 A screen will
programs
4 Press e to
The TV will automatically cycle through all the channels,
and store all active channels in the channel memory.
When Auto Tuning is finished, press
programmed channels.
the ANT/CABLE
doneso(1rW
the SETUP
appear
and
settings willbedeleted.
start
input,ifyou
left-hand column).
menu,
Auto
highlight Auto Tuning.
warning
Tuning.
that
previous
rt.:l
or~to view the
have
not
Programming
TV's
When
control panel,
you
Follow the
TV's channel
Auto
YourTVcan automatically detect all active channels
your
channels are
manually
channel memory.
Note:
•
• Ifthe ANT/CABLE input
• Ifthe ANT/CABLE inputisconfigured for Antenna, the
•
• Programming channels when the ANT/CABLE input
channel
you
press
yourTVwill
programmed
steps
memory.
Tuning
area
and
store
programmed
addorerase
You
mustconfigure the ANT/CABLEinputsource before
programming channels.
automatic channel programming process erases
channels that were previouslyprogrammedinto the
memory
automatic channel programming process
found channels
channels (and does NOT erase channels that were
previously programmed into the
remove an Antenna source channel from the memory,
you must set
To
tune theTVto
channel memory, you must use the Channel Number
buttons on the remote control.
configured for Cable will take substantially longer than
when the antenna input
is
normal; however, once channel programming
finished, you should not havetorepeat the
programming process again unless your Cable
service lineup changes significantly
it
channels
memory
rt.:l
or~on
into the TV's channel
below to
them
to
the
to
Skip
a channel not programmed
the
remote
stop
onlyonthe channels
program
in its memory. After the
automatically,
individual
is
configured for Cable, the
existing setofprogrammed
is
configured forAntenna.
channels
channels in the
TV's
memory)
into
the
controlorTV
memory.
into
you
can
adds
newly
To
in
the
TV
the
TV's
This
is
is
in
Manual
After automatically
channel
the
physical
1
From
and
2 Use the
control to
digit
If
channels
of
the screen. Analog channels willbenotedbyan
"A
TV"
symbol.
Tuning
memory,
the
press
number)
are
symbol
you
channelisknown.
SETUP
e.
channel
enter
and
found,
and
programming
can
manually
menu,
number
the
channel
press
they
willbelistedatthe
digital channelsbya "DTV"
channels
enter
highlight
buttonsonthe
Manual Tuning
number
(up
e.
channels if
into
the
remote
to three-
bottom
28
Page 29

Setting
To
prevent
channel
1
2
positions
From
the
press@.
Press~or
@.
The
channel
certain
listofchannels
channels
canbeskipped.
SETUP
... to select Channel Options
menu,
skip
from
highlight
will
appear.
being
viewed,
TV Settings
and
press
and
Setting
If
you
skipped
pressing~.
To turn on the skip:
1
Tunetothe
2
From
and
3 Press
video
setavideo
over
when
video
the
SETUP
press@.The
~
or'"
to select
input
input
selecting
input
menu,
setting
skip
sourcetobe
the
inputbyrepeatedly
sourcetobe
highlight
window
~
(skip on)
skipped,itwill
skipped.
Manual Setting
will
appear.
and
press
be
E't!r
3
Press~or'"
skipped
To
remove
Note:
Skipped
however, they can stillbeaccessed
on the remote control.
to select a
and
press
the
tick,
channels cannot be selected with
@.
A tick will
press
channel
@ again.
positiontobe
appearinthe
using the
number
(£)
or
keys
box.
l:£l;
To turn
1 Select
2
3
Labeling
You
1
2
3
off
the skip:
the
video
number
From
and
Press~or'"
.-
can
Tunetothe
From
and
Press~to
select a label,
characters
entryorby
the
press@.
label
the
SETUP
press
input
SETUP
The
to select
video
video
input
input
@.
The
move
from
and
and
press
thatissettoskipbydirect
using~or
menu,
setting
.......
input
_.-
sources.
you
want
menu,
setting
the
press~
@.
...
and
highlight
window
(skip off)
sources
to label.
highlight
window
skip
selectioninorder
or
... to
putinthe
then
Manual Setting
will
and
Manual Setting
will
press
appear.
press
appear.
desired
@.
Et!r
to
4
Repeat
5 To
Note: Available characters are 0-9, A-Z,
steps1through
save
your
settings,
3 for
press
other
@.
inputs.
(,),"
+,
-,
and
I
29
Page 30

Setting
The Time
correct time zone for
allow the
time zone information for
1
From
press
2 Press
the
time
Zone
setup
will allow
your
TV
status
the SETUP
information to
menu,
8.
..
or
T to select Local Time Setting
8·
3 Highlight Time Zone
desired time zone.
4
If
you
want
to activate the
highlight
5 Press
Selecting
You
can
normal
1
From
2 Press
Daylight Saving Time.
....
or~to select On
the
location
select
HomeorStore for theTVlocation. For
home
use, select Home.
the SETUP
....
or~to select Home
menu,
zone
you
to specify the
region. This feature will
show
the correct
your
viewing area.
highlight TV Settings
and
and
press
....
or~to set
daylight
and
highlight Location.
and
press
press
saving time,
E~r
E~r
and
press
your
Selecting
You
can
select either Power-SavingorFast mode.
• Power-Saving
standby
longer for the
• Fast
mode. As a result, theTVwill
1
2 Press
modetobelow
mode
From
the SETUP
Mode.
....
then
press
Select Power-Saving for optimal energy efficiency.
Using
With
the Blue Screen feature, the screen will
and
the
sound
external
1 From the PREFERENCES
2 Press
input
Screen.
....
the
Power-On
mode
TVtoturn
increases
or~to select either Power-Saving or Fast,
E~r
Blue
willbemutedonanalog channels
modes
or~to select On,
keeps
power
1W. As a result, it takes a bit
on.
power
menu,
consumptioninstandby
turnonmore
highlight Power-On
Screen
whennosignal is received.
menu,
and
Mode
consumption
highlight Blue
press
E't!r
quickly.
turn
blue
and
in
Selecting
Illumination
You can set the illumination
located
1
2 Press
on
From
the PREFERENCES
TOSHIBA Illumination.
....
the
TOSHIBA
mode
the front
or~to select either On or Off,
paneltoOnorOff.
mode
oftheTOSHIBAlogo
menu,
highlight
then
press
E~!r
Setting
You can set the
system.
the
screen
transparency
1 From the PREFERENCES
Transparency.
2 Press
press
....
or~to select Low, Middle, High
E~r
transparency
of the on-screen
menu,
highlight
display
or
Off,
and
I
30
Page 31

Viewing
1
From
the
SETUP
Information.
2
Press@todisplay
the
system
.....................................•.•........•._.....................
menu,
the
highlight
system
status
System
information.
..
. .
Reset
You
default
1
From
press@.
2
Enter
3 Press
turn
To cancel the reset:
Press~or~to select No
Factory
can
reset all settings
values.
the SETUP
your
PIN
~or~
off automatically.
to select Yes
menu,
code
Defaults
and
channels
highlight
(if
PIN
code
and
press
and
press
@.
to their factory
Reset TV
has
been
@.
The
and
set).
TV will
31
Page 32

Selecting
to
view
To select the video
1 Press
2
~
on
And
then
either:
a)
Press
0-8;
b)
Repeatedly
control andthen press
or
c) Repeatedly press
or TV control panel to change the input.
Inputs
(!)
O~(d~o1
.
'@Vlded2
'E)
.0 Cj:l!or'Stream'H02
.
08(>MI:~
0HDMli'.
the
video
input
the
remote
or
press'"
ANT/CABLE
Col()rStrearn
j;iNWli!3..'.•';
input
source to view:
controlorTV control panel.
source
or T on the remote
@ to change the input;
~
on the remote control
'.'
" •
....
H01'
.
...
'.
To select a REGZA-LINK® device:
1 Press
2 Press
3
input
that
for
If
there
input,
~
or
'Y to
~
to
display
input
are
multiple
use~or
highlightanappropriate
the list of REGZA-LINK® devices
REGZA-LINK® devicesonthe
'Y to
highlightaparticular
4 Press8 to select the device
and
change
HOMI
device.
input
Note:
•
You
can label the video input sources
specific devices you have connected
(UE
"Labeling video input sources" on
• Sources can also
skip"onpage
• Inputs that are set
skipped
pressing~,
• Ifone ormore REGZA-LlNK@ devices are
an HOMI input, the REGZA-LlNK@ icon will appear.
this case, the label
input selector.
over only when selecting inputsbyrepeatedly
be
skipped
29).
to
skip willbegrayed
(UE
page
(UE
29) will not
accordingtothe
to
the
page
"Setting video input
out
connected
appearinthe
TV
29).
and
will
be
to
In
I
32
Page 33

Tuning
Tuning
Channel
The
Channel
interface
allows
•
Navigate
•
Keep
Browser,"
•
Keepahistoryofthe
viewed.
•
Quickly
inputs
(illustratedonthe
•
Surf
as
you
Select
Channel
•
Quickly
•
Quickly
REGZA-LINK
Favorites
The
Favorites
favorite
Channel
To add a favorite channeVinput:
1
Tunetothe
2
Press
seconds.
channels
channels
Browser™
Browser"t
for all
you
a listofyour
from
via
highlight
mode
channels/inputs
Browser™.
your
to:
the
contentsofallofyour
below).
surf
and
the
Channel
Browse
(to
surf
Browser™
change
select
REGZA-LINK®
List.
Browser
Browser
channelorinput.
and
hold
using
providesaneasy
channels
favorite
tune
next
mode
theminthe
over
before
inputs
FAV
BR~SER
channels
last32channelsorinputs
your
recently
Browser™
page).
(to
immediately
channelsinthe
you
from
allows
list
on
the
navigation
and
inputs.
Channel
select
the
Inputs
devices
youtoquickly
thatisintegrated
the
remote
This
inputs.
(see
"Favorites
viewed
History
tune
Browser™)
onetotune).
List.
from
control
feature
channels
List
channels
or
the
setupa
into
the
for 3
To set up the Channel
1
From
Channel Browser Setup
2
PressTor"
press
Mode.
3
PressTor..to
press
On or Off.
Note: History List will
powered
4
Press
then
5
PressTor..to
....
/
or~to
6
Press
press
7
PressTor..to
then
Note: REGZA-LiNK List will
out
and
switched to Off. (1&
8
To
returntofactory
press
To open the Channel
•
Press;
•
Press;
the
tuned32channelsinthe
in
the
ANT
Inputs
LINK
list,orthe
Favorites
the
PREFERENCES
to
....
or~
to
select
....
or~to
off.
Tor..to
press
....
or~to
highlight
select
Tor..to
....
or~to
press
....
or~to
set
to
Off
8.
or
;~on
or
;~to
/CABLE
list,
the
REGZA-LINK®
favorite
list.
Browser"':
menu,
and
highlight
highlight
select
highlight
OnorOff.
highlight
select
highlight
when Enable
Browser
the
surf
channel
Navigation,
either
Select
History List,
the
setting
be
cleared every time theTVis
ANT
select
OnorOff.
Inputs List,
Favorites List,
OnorOff.
REGZA-L1NK List,
select
OnorOff.
be
page
50)
defaults,
T
":
remote
backwardorforward
History
list,
channels/inputs
highlight
press
8.
and
Mode
you
ICABLE
automatically
REGZA-LINK
highlight
control.
the
devicesinthe
or Browse
and
prefer:
List,
and
Reset
list,
the
inputsinthe
in
then
then
either
and
then
press
and
then
and
grayed
is
and
through
channels
REGZAthe
Note: Additions are
Favorites list on the left sideofthe Channel Browser'M.
To delete a favorite channeVinput:
1
Press
FAVBROSER
2
Highlight
;
....
ods)~.
3
Press
and
input
willberemoved
addedtothe beginningofthe
to
open
the
Favorites
the
channelorinputtodeletebypressing
hold
GQQ)
for 3
seconds.
from
the
browser
The
channell
Favorites
list.
list.
33
Page 34
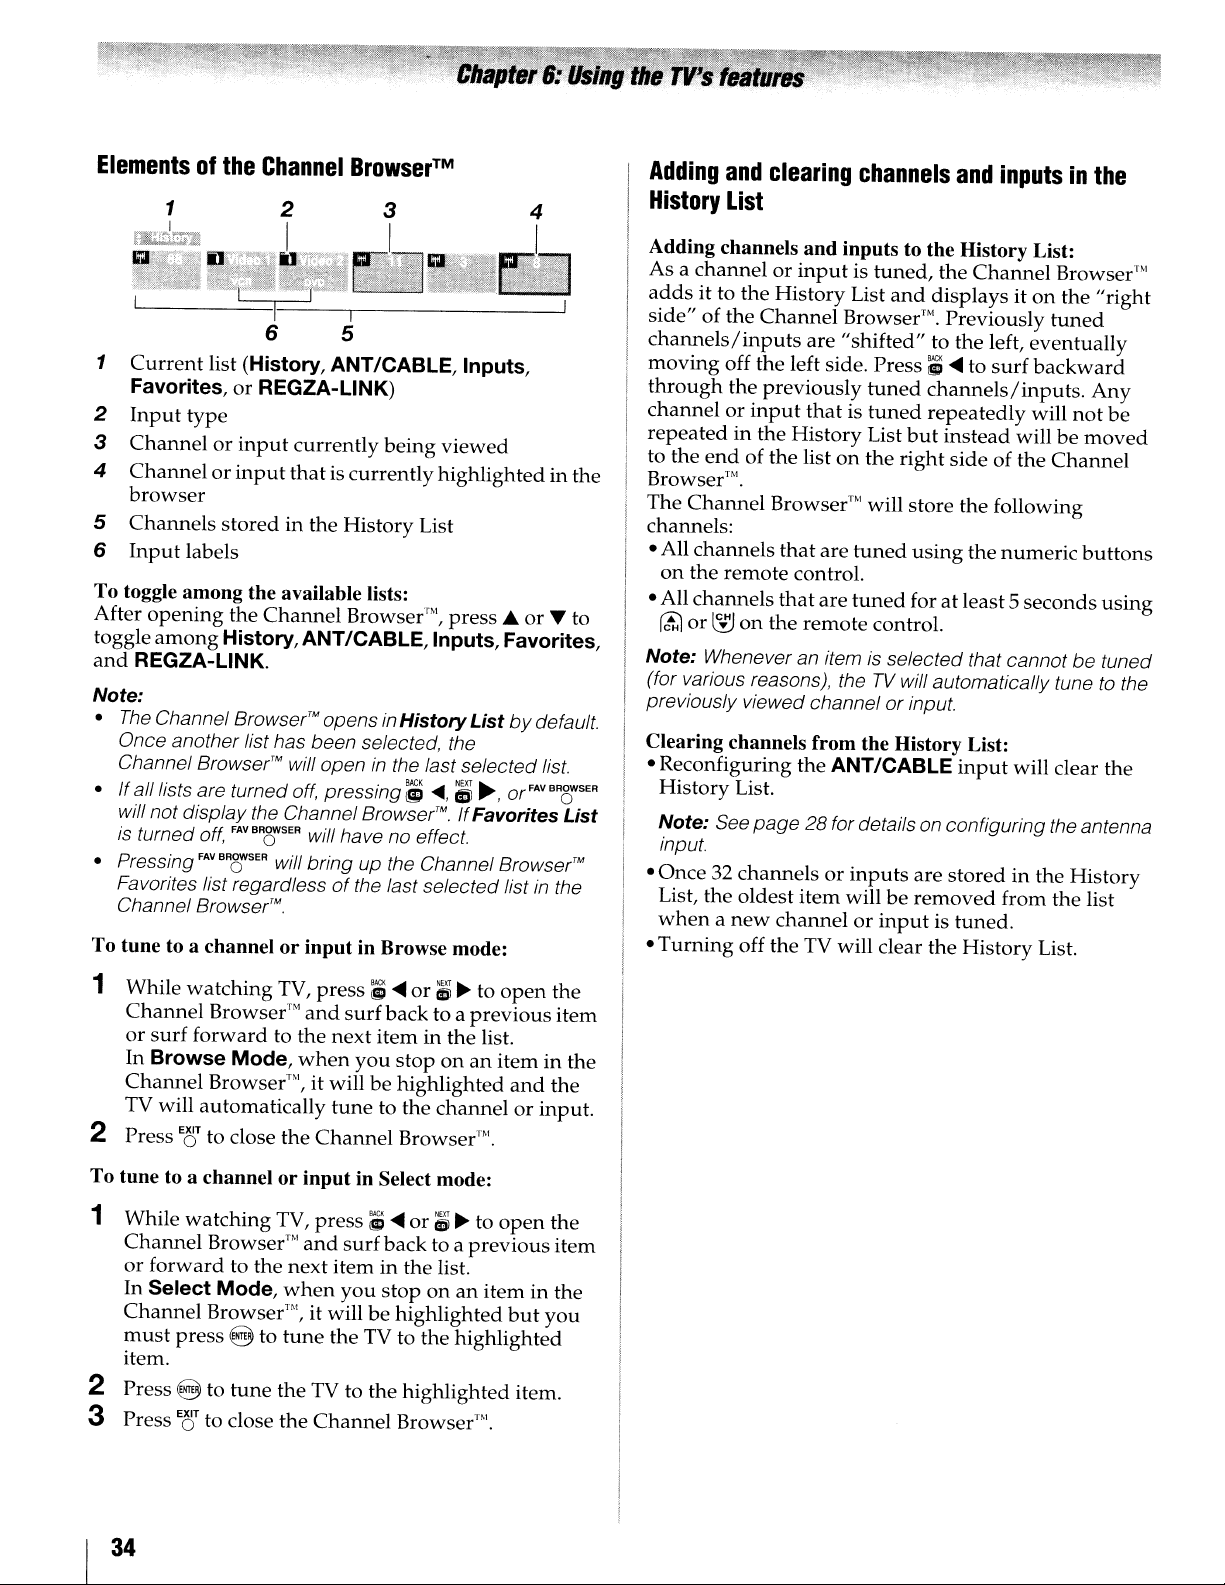
Elementsofthe
1
I
EmllOJ.k'
Channel
Browser™
I
6 5
1
Current
Favorites,orREGZA-L1NK)
2
Input
3
Channelorinput
4
Channelorinput
list (History, ANT/CABLE,
type
currently
being
thatiscurrently
Inputs,
viewed
highlighted
browser
5
6
Channels
Input
storedinthe
labels
History
List
To toggle among the available lists:
After
opening
toggle
and
Note:
among
REGZA-L1NK.
•
The
Channel
Once another list has been selected, the
Channel
• If all lists are turned
will not display the Channel
is
turned off,
• Pressing
Favorites list regardlessofthe last selected listinthe
Channel
To tune to a channelorinput
the
Channel
History,ANT/CABLE,Inputs,Favorites,
Browser™
Browser™
FAV
BROWSER will have no effect.
FAVBRC)'SER will bring up the Channel
Browser™
Browser"',
opensinHistory
will openinthe last selected list.
off,
pressing;;
Browser™IfFavorites
press
....
Listbydefault.
<II1II,
(;~,
Browser™
orFAVBRoWSER
in Browse mode:
or
in the
T to
List
Adding
History
Adding channels
Asachannelorinputistuned,
adds
side"
channels/inputs
moving
through
channelorinput
repeatedinthe
to the
and
clearing
List
it to the
of the
endofthe
History
Channel
off the left side.
the
previously
History
channels
and
inputs to the History List:
List
and
and
the
Channel
displaysiton
Browser"'. Previously
are
"shifted"
tuned
thatistuned
List
listonthe
to the left,
Press:;
....tosurf
channelslinputs.
repeatedly
but
instead
right
sideofthe
inputsinthe
willbemoved
Browser"'.
The
Channel
Browser'" will store the following
channels:
channels
• All
on
the
• All
channels
rt::l
or
l:rJ
Note:
Whenever an itemisselected that cannotbetuned
(for various reasons), the
previously viewed channel or input.
remote
on
the
that
control.
that
remote
are
are
tuned
using
the
numeric
tuned
foratleast5
control.
TV
will automatically tunetothe
Clearing channels from the History List:
the
• Reconfiguring
History
Note:
input.
•
Once32channelsorinputs
List, the
List.
See
page28for details on configuring the antenna
oldest
whenanew
•
Turning
off the TV will clear the
ANT/CABLE
item
willberemoved
channelorinputistuned.
are
input
stored
History
will clear the
in the
from
Browser'"
the
"right
tuned
eventually
backward
Any
will
not
Channel
buttons
seconds
History
the
list
List.
be
using
1 While
watching
Channel
or
surf
Browse
In
Channel
Browser'"
forward
Mode,
Browser"], it willbehighlighted
TV will automatically
2 Press
E8
to close the
To tune to a channel
1 While
Channel
or
In
Channel
must
watching
Browser"]
forward
Select
to the
Mode,
Browser"', it willbehighlighted
press
@ to
item.
2 Press @ to
3
PressE8to close
tune
34
TV,
press:;
and
surf
to the
next
when
you
tune
Channel
or
input
in Select mode:
TV,
press:;
and
surf
next
iteminthe list.
when
you
tune
the TVtothe
the TV to the
the
Channel
....
or;;~to
back
to a
iteminthe
stoponan
to the
channelorinput.
Browser"].
....
or;;~to
back
to a
stoponan
highlighted
highlighted
Browser"].
open
previous
list.
iteminthe
and
open
previous
iteminthe
but
item.
the
item
the
the
item
you
Page 35

Setting
This
feature
handled
in
Antenna
Note:Touse this feature, the
toAntenna
The
channel
Mode
Standard
Auto
(default)
Digital
To
set the
1
From
press@.
2
Press
3
Press
press
Note:
Channel Browser ANT/CABLE List will
automatically when
History List will
saved.
the
allows
for
analog
mode.
(I&'
tuning
..
Channel
the
or
or~to select
Channel
youtochoose
and
digital
page
28).
mode
Description
Both analog
tuned
normally
Digital channels will have priority
when
manually entering a channel
number
9)onthe remote control, analog
channels can stili be
available
Only digital channels can be
SETUP
... to
using the Channel
Tuning
menu,
highlight
Tuning
how
channels
ANT/CABLEInmustbeset
has
three
. .
and
digital channels can
tuned
Mode:
highlight
Channel
your
desired
Ecr
The
Channel Options windowaswell as the
you
be
change
cleared,
the mode. Also, the
but
the Favorites List will
tuning
when
options.
Number
by
TV
Settings
Tuning
mode
be
updated
Mode
will
the
(0-
(£) /
l:!'J
tuned
Mode.
and
be
TV is
be
if
and
then
be
Tuningtoa
specific
channel
(programmedorunprogrammed)
Tuning
Press
For
Tuning
Enter
control,
sub-channel
channel
Switching
using
The
between
channel
1 Select
2 Select a
3
Switching
analog channels:
the
Channel
example,toselect
digital channels:
the
major
followedbythe
125-1,
Channel
Channel
two
number
the
second
buttons
Press
CH~TN
channel
TV
will
switch
channels
Note:Ifyou
TV
will returntothe last-viewed input.
Number
channel
Channel
number.
pressI,2, 5,-,I,
For
between
Return
Return
channels
first
(and
on
will
that
feature
each
channel
channel
the
dash
the
display.
back
were
press
without
time.
remote
tuned.
CHc5TN
between
(0-9)
125,
Number
dash
(GQQ)
example,toselect
two
allows
you
using
(GQQ)
control.
Each
time
and
forth
from a non-antenna input, the
two
on
the
(0-9)
then
press
button
@.
remote
1,2,5,
on
the
and
digital
control.
then
remote
then
channels
youtoswitch
enteringanactual
want
to view.
the
Channel
buttonifneeded).
The
you
between
previous
press
the
Number
CH~TN,
last
channels
@.
the
the
two
Tuningtothe
next
channel
To
tunetothe
Press
r£)
Note:
This feature will
channels into the TV's channel
next
or~on
programmed
the
remote
not
work unless
programmed
channel:
controlorTV
memory
you
(I&'
control
program
page
panel.
28).
using
The
channeltothe
channel
CH~TN.
1
2
3
TheTVwill
only.
again,
button
back
tuned.This
SurfLock™
SurfLock™
quickly
To
memorizeachanneltothe
Tune
the
into
the
CH~TN
Press
and
message
channel
You
can
when
you
be
tuned.
Once
you
the
CH
will
functionasChannel
and
forth
feature
feature
CH~TN
button,soyou
from
any
TV to
the
button.
hold
CH~TN
"Memorized"
has
been
programmedtothe
then
change
press
CHc')TN,
returntothe
press
CH8N
RTN
memory
between
also
temporarily
other
channelbypressing
channel
for
the
works
you
about2seconds
appears
channels
the
memorized
memorized
and
then
willbecleared
Return,byswitching
last
two
for
"memorizes"
can
returntothat
CHc'rN
button:
wanttoprogram
until
on-screen.
C~TN
button.
repeatedly,
channel
channel
change
channels
external
one
channels
and
that
inputs.
one
the
The
and
will
time
the
are
35
Page 36

Selecting
You
can
view
picture
TheaterWide2,TheaterWide3,Normal
Dot.
Note:
The
vary depending on the format
currentlywatching Select the picture size that displays the
current program the way that looks best to you.
You
inputonyour
To select the picture size using the remote control:
1
2 While
sizes-Native,
The
formatofthe image (in anyofthe picture sizes) will
can
save
Press
P,cc3IZE
oneofthe
size:
•
Repeatedly
• Press
Picture
• Press
is open.
the
picture
many
program
4:3, Full,
"picture size" illustrations are examples only.
of
separate
TV.
on
the
Picture
following to select
the
corresponding
Size
Itt..
or~and8while
the
remote
press
screen is
picture
Size
screenisopen,
P,cc3IZE.
open.
size
formatsina
TheaterWide
and
the signal you are
size
preferences
control.
the
desired
Number
the
button
Picture
variety
1,
Dot
for
you
can
picture
while
Size
of
each
screen
by
do
the
Note:
Someofthe picture sizes may not be available
depending on the receiving signal format.
Using these functionstochange the picture size (i.e.,
changing the height! width ratio) for any purpose other
than your private viewing may be prohibited underthe
Copyright Laws
countries, and may subject you
liability.
Note:
If
you select oneofthe TheaterWide® picture sizes.
the top
subtitles or captions) may be hidden.
edges. eitheradjustthe
program
and
in
of
the United States and other
to
civil and criminal
bottom edgesofthe picture (including
To
view the hidden
4:3
or
Full
picture size.
Picture
Position
ortry viewing the
36
Page 37

·
Pictur.e
SIze
Native
(for480i
programs)
r:nyq~1
tlnij
•
•
•
Note:
• This
• Depending on the input signals, the
4:3
(HOMI),
If
receivingal080i,
480p
(HOMI)
the
videotodisplay
bordersofthe
Thisisespecially
suchasDVHS
Noneofthe
modeissupported
720p, 480i,
and
ANT/CABLE (digital) inputs (1080i, 1080p,
720p).
picture
480p
(HOMI),
°°°1
000
l080p,
signal
program,
the
screen
useful
moviesorPC
pictureishidden.
and
480p), ColorStream (1080i
maybehidden,
720p,
1080i,
nap, 480i
Native
entire
picture
(i.e.nooverscanning).
for
external
graphics.
only for HDMI (1080i, 1080p,
displayed
in black, or noisy.
and
1080p
(HOMI),
mode
scales
within
HO
borderofthe
the
sources
and
720p),
signal
or
and
TheaterWide
(for
4:3
format
1
programs)
1000Hoooi
000
The
centerofthe
proportion,
wider
to fill
TheaterWide
(for
letter
loooHO
000
The
top
and
TheaterWide
(for
letter
but
the
2
box
programs)
bottom
3
box
programs
000
picture
the
left
screen.
000
edgesofthe
and
°
with
remains
right
°1
subtitles)
closetoits
edges
are
picture
maybehidden*.
stretched
original
10°°1¢10
000 000
10
°
000
Some
barsatthe
Full
(for
°1¢10
program
top
16:9
[480i,
!OOOHO
000
If
receivingasqueezed
stretched
stretched
(for
10°°HO°°1
000
The
1080i,
edges
widertofill
taller.
1080p,
surrounding
000
formats
and
bottom.
480p]
000
and
000
°
°1
°
will
source
°
4:3
the
720P
the
°1
display
programs
01
format
widthofthe
program
program,
picture
with
only)
sources)
maybehidden.
sidebars
screen
the
picture
but
and/
not
or
The
top
and
bottom
Normal
(for
VGA,
SVGA,
10°°1¢10
000 000
"Normal"
formats
and
DotbyDot
(for
VGA,
is
"DotbyDot"
Dependingonthe
displayed
bottom.
* To view the hidden areas (such as subtitles or captions), see
"Scrolling the Picture"
is a
will
display
bottom.
SVGA,
with
(Example: VGA
edges
XGA,
WXGA,
°
°1
non-stretched
with
XGA,
WXGA,
is a
non-scaling
input
signal
sidebars
and/orbarsatthe
input
(~ page 38).
are
hidden*.
and
SXGA
display.
sidebars
and
display.
format,
source)
sources
Some
and/orbarsatthe
SXGA
sources
the
only)
input
only)
picture
top
signal
top
is
and
37
I
Page 38

Scrolling
If
the
edgesofthe
position
Note:
size
image.
You
is
settoTheaterWide
the
picture
can adjustthe picture position when the picture
1 From the SETUP
2 Press
3
Note:
Using
..or... to select
Press'"
The
or~to
adjustment
This
featureisnot available on digital channels,
the
Auto
feature
picture
are
2 or
menu,
Vertical
make
the
range
is from-5to +10.
Aspect
cut
off,
you
TheaterWide
highlight
Position.
appropriate
can
adjust
3,
Picture
adjustments.
Ratio
the
Position.
Using
When
4:3
changes
1
2
Note:
grayed
4:3
From
Stretch.
Press'"
When
out,
Using
1
When
picture
2 To
return
the
4:3
Stretch
Stretch is activated, the size
programs
the PREFERENCES
or~to select On,
Auto
the
viewing
a still picture.
to the
into full screen picture.
menu,
and
Aspectisset
FREEZE
the
TV,
moving
to
feature
press
picture,
then
Off, this feature will
FR8zE to
switching
highlight
press
make
press
FR8zE again.
system
4:3
EaT.
be
the
When
will
the following
the
auto
aspect ratio feature is set to
automatically
• A 480i, 480p, 720p, 1080i digital signal from the
CABLE
• A 480i signal from the Video 1
• A 480i signal
input
• A 480i, 480p, 720p, 1080i, 1080p,orVGA
75Hz) signal from the HOMI
Note:
PC
1
2
input
The
auto
input.
From
the PREFERENCES
Aspect.
Press'"
or~to select On,
select
the
input
sources is received:
from
the
ColorStream
aspect
ratio featureisnotapplicabletothe
picture
or
1/2/3
menu,
and
size
Video
then
On,
when
2
input
H01orH02
(60/72/
input
highlight
press
Ef!:r
the TV
one
ANTI
Auto
of
Note:IftheTVis
minutes, the FREEZE
released
Using the FREEZE function for any purpose other than
your private viewing may be prohibited under the
Copyright Laws
countries, and may subject you to civil and criminal
liability.
and
leftinFREEZE mode for more than
mode
will automatically
theTVwill returntomoving picture,
of
the United States and other
be
15
I 38
Page 39
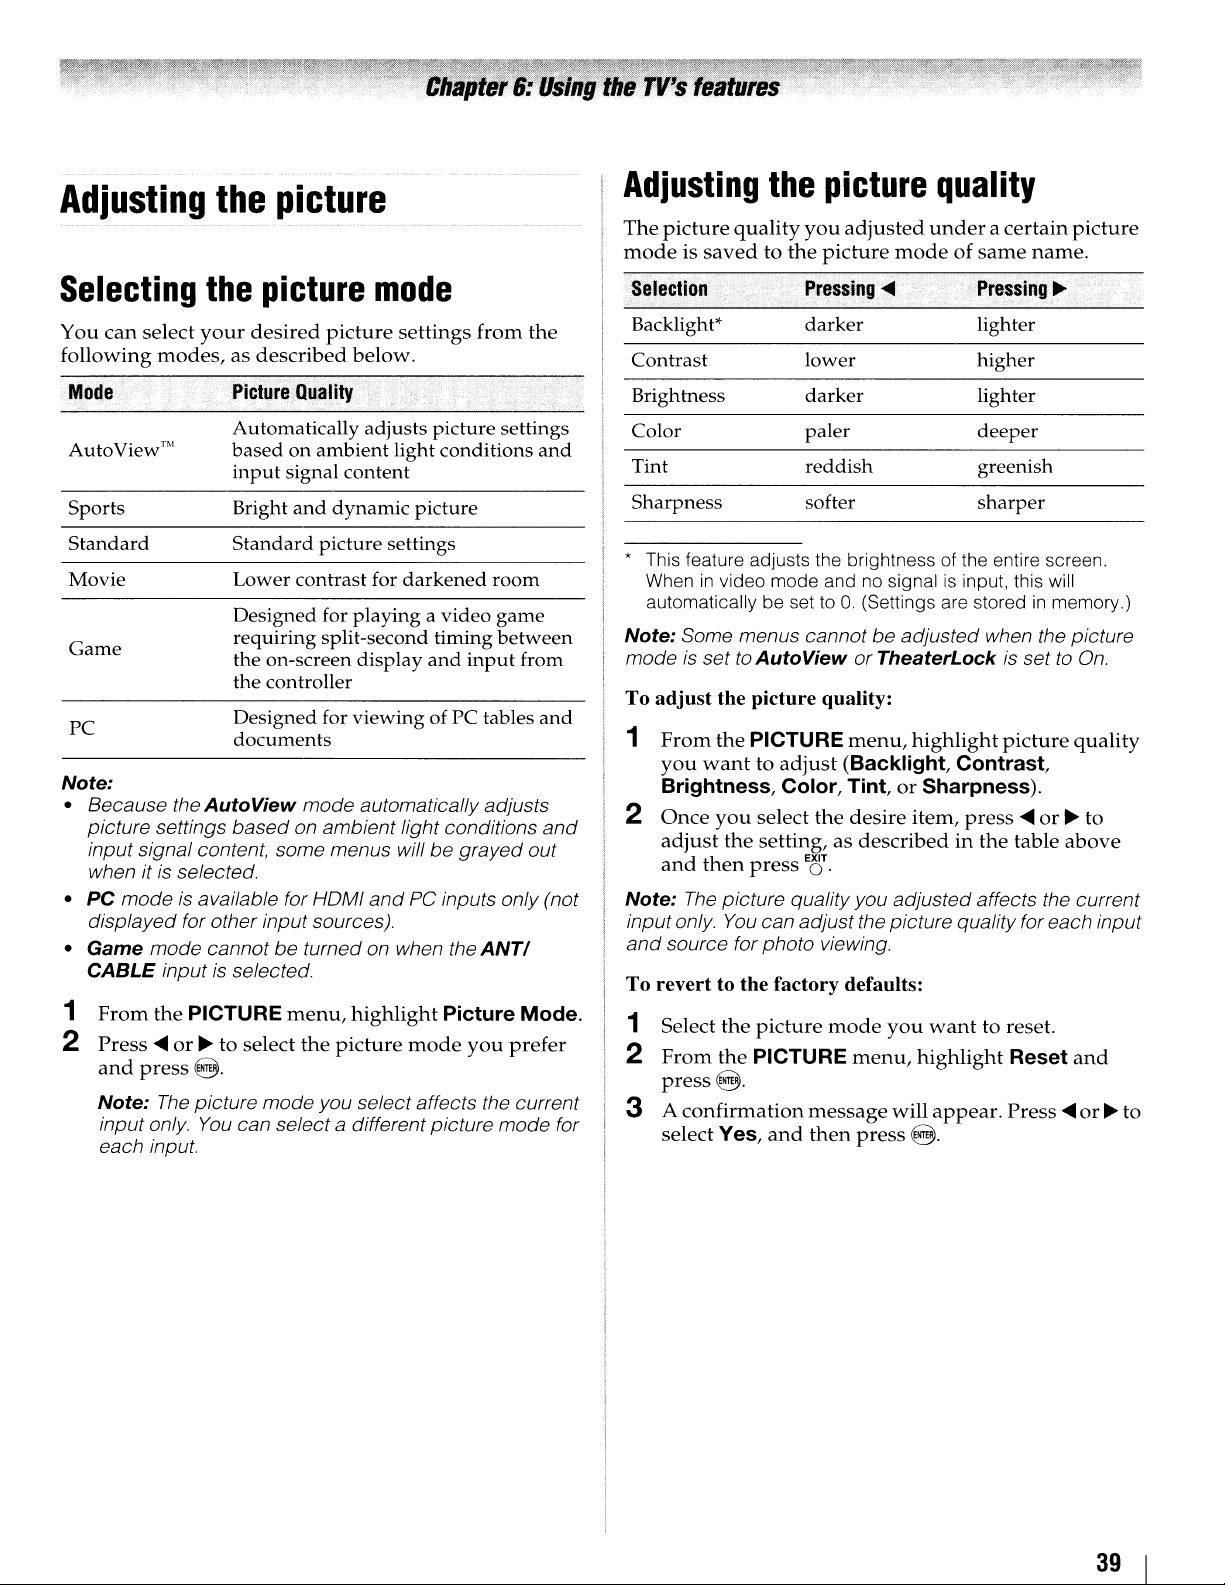
Adjusting
the
picture
Adjusting
The
picture
modeissavedtothe
the
quality
picture
you
adjusted
picture
quality
underacertain
modeofsame
picture
name.
Selecting
You
can
select
following
Mode
AutoView'"
Sports
Standard
Movie
Game
PC
Note:
• Because the
picture settings
input signal content, some menus willbegrayed
when it is selected.
• PC modeisavailable for HOMI
displayed for other input sources).
• Game mode cannot
CABLE input is selected.
1
From
2
Press
and
press@.
Note:
input only.
each input.
the
picture
your
desired
modes,asdescribed
Picture
Automatically adjusts picture settings
based
input
Bright
Standard
Lower contrast for
Designed for playing a video game
requiring split-second timing
the on-screen display
the controller
Designed for viewing of PC tables
documents
AutoView
based
the
PICTURE
....
or~to
The
picture mode you select affects the current
You
Quality
on
signal content
and
mode automatically adjusts
on ambient light conditions
be
turned on when the
menu,
select
the
can selecta different picture
mode
picture
ambient light conditions
dynamic picture
picture settings
picture
settings
below.
darkened
and
and
PC inputs only (not
highlight
Picture
mode
from
room
input
ANTI
you
the
and
between
from
and
and
out
Mode.
prefer
mode
for
Seleetion
Backlight*
Contrast lower higher
Brightness
Color paler
Tint
Sharpness
* This feature adjusts the brightness of the entire screen.
When
in
video mode and no signalisinput, this will
automatically be set to 0 (Settings are stored
Note: Some menus cannot
modeisset to AutoView or TheaterLockissettoOn.
To adjust the picture quality:
1
From
the
you
wanttoadjust
Brightness, Color, Tint, or Sharpness).
2
Once
you
adjust
and
Note:
inputonly.
and
To revert to the factory defaults:
1 Select
2
From
press@.
3 A
select
the
then
The
picture quality you adjusted affects the current
You
source for photo viewing.
the
the
confirmation
Yes,
Pressing
darker
darker
reddish
softer
PICTURE
select
the
setting,asdescribedinthe
press
E~r
can adjustthe picture quality for each input
picture
PICTURE
message
and
then
....
be
adjusted when the picture
menu,
(Backlight, Contrast,
desire
mode
menu,
press
highlight
item,
you
highlight
will
@.
Pressing~
lighter
lighter
deeper
greenish
sharper
press
want
to reset.
appear.
picture
in
....
or~to
table
Reset
Press
memory.)
quality
above
and
....
or~to
39
Page 40

Using
The
the
These
the TheaterLock
1
2 Press
Viewing
the
TheaterLock feature allows
PICTURE
items
From
the PICTURE
....
TheaterLock™
menu
that
willbegrayed
settingissetto"On".
or~to
select On,
the
Control
affect the
out
menu,
feature
you
picture
and
unavailable
highlight
and
then
to "lock"
press
items
display.
TheaterLock.
@.
Visualization
when
in
Using
Analog
The
Captions-An
•
narration,
videos
"CC"inprogram
•
Text-An
to the
(when
the
CC
closed
caption
and
that
are
on-screen
current
providedbyindividual
closed
caption
Mode
mode
has
two
on-screen
sound
closed
guides).
program,
display
effectsofTV
captioned
displayofinformation
suchasweatherorstock
mode
options:
of the dialogue,
programs
(usually
stations).
marked
not
and
related
data
window
This feature
illustrating
1
From
Visualization
will
displaysahistogram
the
the PICTURE
appear.
and
brightnessofthe TV.
menu,
and
press@.The
highlight
control
Control
histogram
curve
window
turn
To
1
2 Press T
3 Press T
To view captions
From
the
•Toview
•Toview
on the closed caption mode:
From
the
SETUP
press@.
or
• to select
and
press@.
or
• to select
or~to select On.
the
Closed
Analog
Press
Note:
captioned, no captions will display on-screen.
Press
CC Mode.
captions:
....
or~to
Ifthe program or video you selectedisnot closed
text:
....
or~to
menu,
or
text:
Captions
highlight
highlight
highlight
Closed
Closed
Settings
CC1, CC2, CC3,orCC4.
T1, T2, T3,orT4.
TV
Captions
Captions
menu,
Settings
Settings
and
press
highlight
and
....
2 Press
If
no
automatically.
I 40
CHaTN
key is
to close the
pressed
window
within10minutes,
andgobacktomenu.
it closes
Note:
If
textisnot availableinyour area, a black
rectangle may appearon screen. Ifthis happens, set the
Closed Captions setting
Note:
A closed caption signal may not display
following situations:
•
When
a videotape has been
•
When
the signal receptionisweak
•
When
the signal receptionisnon-standard
to
Off.
dubbed
in
the
Page 41

Digital
You
can
characteristicsbychanging
opacity,
Note:
• This feature
•
You
same
Mo~~
Caption Size
Caption
Type
Caption
Edge
Caption Text
Color
CC
customize
text size,
cannot
color
....
,
Text
Text
Settings
the
closed
type,
edge,
is available for digital channels only.
set
the Caption Text
,Description'':,
,~
~
.-:.,_.
-,
Auto, Small, Standard, Large
Auto, Default, Mono w. Serif, Prop. w.
Serif, Mono w /
Casual, Cursive, Small Capitals
Auto, None, Raised, Depressed,
Uniform, Left Drop Shadow, Right
Drop
shadow
Auto, Black, White, Red, Green, Blue,
Yellow, Magenta, Cyan
caption
the
background
and
;.:
,"'.....
display
color.
and
Background
0 Serif, Prop. w/ 0 Serif,
color,
as the
CC
Selector
You
can
use
the
CC
and Digital Audio Selectors to
temporarily
(set
in
However,
the
closed
backtothe
You
can
caption
not
available,
services.Ifthe
best
service willbeused
To select closed captions:
1
From
Digital Audio Selectors
2
Press
press
EXIT
o·
override
Analog
once
caption
current
also
services
the
.A.or... to
....
or~to select
the
CC
Mode) for a
you
changetoanother
setting
Analog
use
the
CC
(if available).
the
CC
Selector
selected
PREFERENCES
highlight
default
will
Selector
serviceisnot
instead.
the
analog
particular
automatically
CC
Mode
to
When
presentsadefault
menu,
and
press
Closed Caption,
desired
caption
channel.
analog
setting.
select
digi
such
services
available,
highlight
@.
service,
mode
channel,
change
tal
closed
list
the
CC
and
then
press
are
of
next
and
then
TextForeground
Opacity
Background
Color
Text
Background
Opacity
Caption
Edge Color
To customize the closed captions:
1
Text
From
the
press@.
2 Press.A.
and
press@.
3
Then
highlight
4 Press.A.
to
for
or'"tohighlight
change,
that
characteristic
Auto, Transparent, Translucent,
Flashing, Solid
Auto, Black, White, Red, Green, Blue,
Yellow, Magenta, Cyan
Auto, Transparent, Translucent,
Flashing, Solid
Auto, Black, White, Red, Green, Blue,
Yellow, Magenta, Cyan
SETUP
or
... to select Closed Captions Settings
and
menu,
Digital
then
CC
press
(see
highlight
the
....
table
TV Settings
Settings
characteristic
or~to
and
select
above).
press
you
the
and
@.
want
format
41
Page 42

Adjusting
Muting
MUTE
P
ress 0
MUTE)orturn
press
order:
If
the closed
"MUTE"
automatically
Captioned.Tomute
activating
volume
page
modes.
Note:
is
active, the mute will automatically be cancelledtoallow
for
Using
You
switch
those
temporarily
language
broadcasts"onright
To use the digital audio selector:
1
2
3
on
MOE,
the
C1/2
mode,
toO.See
40) for
Ifyou modify items
proper
the
can
use
between
channels
option
From
the
Digital
Press
Press
EXIT
o·
the
audio
the
sound
h .
t e
remote
off (MUTE) the
mute
Mute-Mute-Volume-~
caption
the
activatediftheTVprogramisClosed
the
closed
"Using
more
adjustment.
digital
the
Digital
audio
that
overrides
under
PREFERENCES
Audio
or..to select
or~to select
control
mode
modeisset
closed
the
audio
caption
the
informationonclosed
in
Audio
tracksona
have
the
MTS
hand
Selectors
to partIally
sound.
will
changeinthe
to Off
caption
closed
the
audio
multiple
audio
column).
Digital
the
feature
without
feature,
SOUND
use~to
caption
selector
settingtoconveniently
digital
audio
track
chosenbythe
(~"Selecting
menu,
and
desired
highlight
press
Audio.
service,
Each
when
automatically
caption
menu while mute
channel
tracks). This
8.
reduce
time
following
you
is
set
mode"
stereo/SAP
CC
then
(1/2
you
select
the
(~
(for
and
press
Selecting
The
multi-channelTVsound
to
output
transmitasecond
second
(when
When
word
RE~LL
analog
To listen a stereo sound:
1
language,
providedbyindividual
the
"STEREO"or"SAP"
is
pressed.
signalsonthe
From
2 Press
Note:
•
You
can typically leave theTVin
it will automatically output the type
broadcast (stereo ormonaural)
• Ifthe stereo sound
noise.
To listen a second audio
available):
Select
SAP
Note:
• A Second Audio Program (SAP) can be heard only on
TV
those
might broadcast another language as
program.
program on the screen but hear the other language
instead
•Ifyou have SAP on
notbroadcastinga second audio program, the station's
normal audio will be output. However, occasionally
there
is
the
MTS
Adjusting
You
can
adjust
treble,
and
stereo/SAP
high-fidelity
audio
music,orother
TV receives a
The
MTS
ANT/CABLE
the
SOUND
....
or~to select
is
in
step
2.
stations that offer
stereo
program
stereoorSAP
featureisonly
menu,
Stereo
noisy, select
programonan
broadcasts
(MTS) feature
sound.
appears
highlight
it.
MTS also
(SAP)
containing
audio
information
stations).
broadcast,
on-screen
available for
input.
MTS.
and
press
Stereo
For example, a station
mode because
of
sound being
Mono
to
analog station
allows
can
the
when
Et!r
reduce the
you
a second audio
If
you have SAP
of
the program's normal audio.
no soundatallinSAP mode. Ifthis happens, set
feature
to
Stereo
the
the
audio
balance.
on,
you will see the current
and
the station you are watching
mode.
audio
quality
qualitybyadjusting
the
bass,
a
(if
is
I 42
1
From
wanttoadjust
2
Press
then
•
....
the balance in the left channel (depending on the
item selected).
~
•
the balance
item selected).
the
SOUND
....
or~to
press
Et!JT.
makes the bass or treble weaker or increases
makes the bass or treble stronger or increases
menu,
(Bass, Treble,orBalance).
adjust
in
the right channel(depending on the
highlight
the
level of
the
desire
item
item,
you
and
Page 43

Using
The
level to
signal
sudden
TV
1
2
the
StableSound®
prevent
source
program
From
Press
changes
increaseinvolume
switchestoa commercial).
the
SOUND
....
or~to select On,
Selecting
format
You
can
use
this
output
decoderorother
AUDIO
1
2
3 Press..&.
4
format
OUT
Tune
to a
From
the
and
press
or
Press
....
or~to select Auto
Auto:
the
broadcast.
audio
digital
PCM:
this
this
output
terminalonthe
digital
SETUP
8.
StableSound®
feature
extreme
the
featuretoselect
when
digital
... to select Digital Audio Output.
mode
audio
mode
socket.
limits
changesinvolume
(for
example,toprevent
that
menu,
highlight
then
optical
you
connectaDolby
audio
systemtothe
TV.
sourceonthe
menu,
outputs
output
outputs
highlight
or
Dolby
socket
PCM
feature
the
highest
often
happens
StableSound.
press
E8
audio
the
optical
ANT/CABLE
AV Connection
PCM
,
then
DigitalorPCM
providing
formattothe
volume
when
T
•
output
audio
Digital
DIGITAL
press
it is
the
the
when
input.
being
digital
E8
to
Setting
A
PIN
a
Registeringanew
1
From
Setting
2 Press
Reenter
Changingordeleting
1
From
Setting
2
Press
code.
Change
•
Highlight
•
T
•
Delete
Highlight
If
Control and Locks
If
you
the
codeisnecessary
the
and
number
the
the
and
number
PIN
you
delete
cannot
PIN
PREFERENCES
press
8.
buttons to enter a four-digit number.
PIN
codetoconfirm
PREFERENCES
press
buttonstoenter
PIN
Change PIN
Delete PIN
the
PIN
remember
code
for
8.
are
some
PIN
A
new
A
new
and
and
code,
menu,
your
menu,
press
the
reset.
menus.
code
highlight
screen
it.
highlight
screen
your
press
8.
settings
your
will
display.
PIN
will
display.
four-digit
8.
of
PIN
PIN
code
PIN
PIN
Parental
code
Using
Range
This
dynamic
to
switch
dynamic
1
2
Note:
•
This
• This feature will also function
when the optical audio output format
the
Dolby®
Control
dynamic
From
Control.
Press
feature is only available on Digital Channels.
range
control
rangetobe
from
digitaltoanalog
range.
the
SOUND
....
or~to select On,
Digital
feature
feature
further
menu,
compressed,
highlight
then
Dynamic
causes
broadcastsatthe
press
to
the Digital
the
allowing
Dynamic Range
T
E8
•
Audio
is
set to PCM.
ATSC
same
Output
you
While
RE~LL
be
the
four
cleared
PIN
times
and
code
within
you
entering
five seconds.
can
enteranew
screen is
PIN
displayed,
The
PIN
code.
code
press
will
43
Page 44
Blocking
TV
programs
and
movies
by
Downloadinganadditional
rating
rating
SomeTVprograms
classify
dialogue,
detects
to
the
tablesonthe
Note:
this
To block
1
2
3
4
S
6
(V-Chip)
and
movies
the
contentofthe
language).
the
signals
ratings
Rating blocking is a functionofthe V-Chip feature
TV,
From
Parental
Enter
PressAor
Press
Press.
@.
The
PressA,.,
levelofblocking
rating
rating, a
bottomofthe
you
next
which supports the
and
unblock TV
the
PREFERENCES
Control
your
....
or~to select On.
to
Edit
Rating
that
definition
The
V-Chip
and
blocks
select. (For
page.)
programs
and
four-digit
• to
highlight
....
or~and
willbeblocked. As
screen.
PIN
highlight
Edit
Limits
you
prefer. A
for
include
program
rating
U.S.
Locks
screen
then
the
(violence, sex,
feature
the
programs
descriptions,
V-Chip system only.
and
menu,
and
code.
Enable
Rating
rating
Rating
Limits
appears.
press@
box
you
appearsatthe
highlight
press
signals
in this TV
according
movies:
@.
Blocking.
and
to select
with
an
highlight
that
see
press
"x"
a
the
the
is a
system
and
In
the future,anadditional
available for
Note:
digital signal before an additional rating system can be
in
downloaded.
To download the additional
(if
available):
1
From
Parental
2
Enter
and
3
PressAor
4
Press
S
Press.
@.
The
6
Highlight
Ratings
Note:
7
PressA.....~and
of
that
for
movies
The
currently tuned station mustbereceiving a
the
your
Locks
....
or~to select On.
Edit
•
The
Alt
additional rating system
• Itmay take several minutes for theTVto
the additional rating system.
The
•
Ratings
the additional rating system availableatthe time
download.
blocking
willbeblocked.
blocking
useinselectively blocking
PREFERENCES
Control
four-digit
windowisdisplayed.
• to
to
highlight
Rating
Alt
screen will
RS
information displayedinthe
you
and
highlight
Edit
Limits
RS
and
appear.
button will only be availableifan
screen will
then
prefer. A
TV
programs
rating
system
rating
system
menu,
Locks
PIN
press
depend
and
code. Parental
Enable Rating
Rating
screen
press
appears.
@.
The
is currently available.
on the configuration
@ to select
box
with
may
programs.
highlight
press
Limits
Edit
Alternate
an
"x" is a
become
@.
Control
Blocking.
and
press
Alternate
download
the
level
rating
of
of
44
Note:
•
The
additional rating system can only be downloaded
You
one time.
to
the rating system should such updates become
available.
•
The
additional rating system is not designed,
transmitted, or controlled
the availabilityofan additional rating system
determined or controlled
rating
of
determined, transmitted, or controlled
Toshiba.
•
The
additional rating system is an evolving technology;
therefore, availability. content,
will not be abletodownload anyupdates
by
theTVor Toshiba, nor is
by
Toshiba. Similarly, the
programsinan additional rating system is not
and
format may vary.
by
theTVor
Page 45

Independent
Ratings,
TV-MA
TV-14
TV-PG
TV-G
TV-Y7,
TV-Y7FV more intense or more combative than other
TV-Y
rating
system
.
Description
Mature Audience Only (This program is
specifically designed to be viewed by adults
and therefore may be unsuitable for children
under 17.)
L)
Crude or indecent language S) Explicit
sexual activity V) Graphic violence
Parents Strongly Cautioned (This program
contains some material that many parents
would find unsuitable for children under
years
D) Intensely suggestive dialogue
coarse language S) Intense sexual situations
Intense violence
Parental Guidance Suggested (This program
contains material parents may find unsuitable
for younger children.)
D) Some suggestive dialogue
coarse language S) Some sexual situations
V)
Moderate violence
General Audience (Most parents would find
this program suitable for all ages.)
Directed to Older Children (This program
designed for children age 7 and above. Note:
Programs
programs in this category are designated TVY7FV.)
All Children (This program is designed to be
appropriate for all children.)
for
broadcasters
and
Content
of
age.)
in
which fantasy violence may be
themes.
L)
L)
Infrequent
j
Strong,
14
,;
,
Unlocking
If
you
trytotune
rating
mode
You
unlocked
V)
is
limits
andawarning
can
either
program
programs
the TV to a
you
set, the TV will
message
unlock
the
to watch.
program
will
tha t exceeds the
enter
program
appear
on-screen.
programortunetoan
lock
Independent
a~"ings
X
NC-17
R
PG-13
PG
G General Audience (Appropriate for all ages)
Note:
•Ifyou
programs
however,
information will not
•
To
display the ratingofthe
press
word "NONE" appears in the RECALL screen (as
shown
no rating will
rating
system
D~s~rIPtionand
X-rated (For adults only)
Not intended for anyone17and under
Restricted (Under17requires accompanying
parent or adult)
Parents Strongly Cautioned (Some material may
be inappropriate for children under
Parental Guidance Suggested (Some material
may not be suitable for children)
place
an
'X"
rated
"None"or"Not
programs
RE8LL
on the remote control.Ifitis rated "None,
below
right). Ifrating informationisnotprovided,
appearinthe RECALL screen.
for
movies
~QDtenttheme!i
in
the
box
next to "None
Rated"
thatdonotprovide
be
blocked.
program
.,.
,
willbeblocked;
any
you are watching,
13)
rating
Rated
,.
",
"the
45
Page 46

Locking
With
the
The
locked
the
PIN.
1
From
press@.
2 Press ...
@.
3
Press~and
lock
4
PIN
channel.
Note:Ifthe PIN
message will appear.
channels
Lock feature,
channels
the
SETUP
or
The
listofchannels
column.
code
entry
S A tick will
remove
To
you
can
lock specific
can
onlybeaccessedbyentering
menu,
... to select Channel
then'"or... to select a
willberequiredtoset
code
appearinthe box.
the
tick,
highlightTVSettings
will
appear.
has
not
been set yet, a warning
press@again.
Options
channelinthe
locked
channels.
and
and
press
Using
You
playingavideo
GameTimer
and
device.
1
2
3
To
Select
To deactivate
activated it:
Set
Note:
• A
•
activated),
Using
the
GameTimer®
can
use
the
GameTimer® to
game
(30-120
expires,
locks
out
the
From
the
PREFERENCES
Parental
Enter
Press'"or... to select GameTimer,
...
or~to select
cancel the GameTimer®:
Offinstep
the
message
1minute remain on the GameTimer.
If
theTVloses
GameTimer, when
Input
Lock
Control
your
the
Input
LocktoOff
will
Lock
mode
and
(Il?
left-hand column)
the
theTVenters
input
source
and
Locks
four-digit
3 above.
Input
appear
power
you will have to deactivate the Input
panel
PIN
30,60,90,or120
Lock once the GameTimer® has
(1tW
when10minutes, 3 minutes,
with time remaining on the
power
is restored theTVwill enter
(as if the GameTimer
lock
feature
setatime
minutes).
Input
for
the
menu,
and
code.
left-hand
feature
limit
When
Lock
video
game
highlight
press
@.
and
then
minutes.
column).
had
for
the
mode
press
and
been
Using
You can
inputs
ColorStream
and
input
1
2
3
4
Mode
Video
Video+ channels 3 and
Off Unlocks all video inputs
the
input
use
the
Input
(Video1,Video 2,
HD2,
channels3and4.You will
sourcesorchannels
From
the
PREFERENCES
Parental
Enter
Press
Press'"
Control
your
four-digit
...
or'"
to select
or~to select Video, Video+orOff.
Description
Locks Video
H02,
HOMI1,HOMI2,HOMI3,and
Locks Video
H02,
HOMI1,HDMI2,HOMI3,PC,
• Select Video+ if you play video tapes via
ANT/CABLE input.
lock
Lock
ColorStream
HDMI1,
until
and
Locks
PIN
Input
1, Video
1,
Video2,ColorStream
4.
feature
HDMI2,
code.
feature
to lock
notbeabletoview
you
unlock
menu,
and
Lock.
2,
ColorStream
and
the
HD1,
HDMI3,
the
highlight
press
@.
channels 3
video
and
inputs.
HOI/
Pc.
HOI
and
and
PC)
the
/
an
You
can
lock
the
control
from
being
changed
example).
on
theTVcontrol
1
2
3
To
unlock the control panel:
Select
4.
When
From
the
Parental
Enter
your
Press
...or... to select Panel
or~to select On.
When
appear
are
pressed.Ifthe
switch
will
standbybyusing
Offinstep
Panel
panel
PREFERENCES
Control
four-digit
Panel
when
Lockisset
the
off
3 above.
paneltoprevent
accidentally
Lock
is On,
will
operate
menu,
and
Locks
PIN
code.
Lock,
to On, a
buttonsonthe TV
POWER
and
the
can
buttonispressed
onlybebrought
remote
(by
children,
noneofthe
except
highlight
and
press
and
reminder
control
control.
your
settings
for
controls
POWER.
@.
then
will
out
press
panel
the
of
...
TV
I 46
Page 47

Using
You
WhenaPCisconnectedtothe
can
the
If
the
Horizontal Position
pictureisaffectedbyinterference,
Phase
1 Select
2
the
can
viewanimage
use
thePCSettings
image.
edgesofthe
and
PC
sourcetoview"onpage
From
the
press@.
PC
settings
fromaPConthe
featuretomake
picture
and
Vertical Position.
Sampling Clock.
input
mode
(I@'
SETUP
menu,
TV'sPCIN
are
cut
"Selecting
32).
highlight
feature
TV screen.
terminal,
adjustments
off,
readjust
readjust
the
PC Settings
the
If
the
the
Clock
video
you
to
input
and
Setting
This
function
when
connecting
analog
1
From
and
2
Press
3
Press~or~to
Note: Setting PC/HOMI 1
Audio
the
allows
RGB cable.
the
SETUP
press@.
...or....
(~
page
using
to select
PC
Audio
youtooutput
thePCIN
menu,
PC/HDMI1
select PC.
51) to Digital mode.
sound
terminal
highlight
to
PC will force HOMI 1
from
your
PC
and
an
AV Connection
Audio.
Note: Ifa PC is not
signal, this feature will
3
Press
...or....tohighlight
adjust.
4
Press~or~to
Note:
The
screenisdisrupted
adjusting the
malfunction.
Mode
Horizontal
Position
Vertical
Position
Clock Phase
Sampling
Clock
connectedorthereisno PC input
be
grayed
the
makeanappropriate
PC
settings. Thisisnot a sign
Description
Moves the picture
The adjustment range is within ±10
from center.*
Moves the picture
adjustment
The
from center.*
Helps to reduce noise
picture.
The adjustment range is within
from center.
Helps to reduce noise
periodic vertical stripes on the screen.
The adjustment range is within
center.
out.
item
you
want
to
adjustments.
momentarily when
of
left/right.
up
/ down.
range is within ±10
and
sharpen the
±32
and
minimize
±5
from
* The default settings and
depending
on the input signal format.
lor
adjustment range vary
47
Page 48
Setting
You
can
set
to a
preset
channelorinputata
the
On
Timer
theontimertoautomatically
preset
turnonthe
time.
TV
Setting
You
can
set
the
lengthoftime
the
Sleep
sleep
(maximum
Timer
timertoturn
of 12
hours
off
theTVafteraset
and50minutes).
To activate the
1
From
Timer
2
Press.
press
Note:Ifthe EnableOnTimerissettoOff, othermenus
under On Timer cannotbechanged.
To set theOnTimer:
1
From
Timer
2
Press.
change,
adjustment.
Item:
Input
Channel
Volume
On
Timer:
the
APPLICATIONS
and
press
@.
or
... to select Enable On Timer,
....
or~to select On.
the
APPLICATIONS
and
press
@.
or
... to
highlight
and
then
press
:.
pe$criptio~
To selectvideo input source (ANT/CABLE,
1,
Video
ColorStream
HOMI3,or PC).
To
To set the volume when the
Video2,ColorStream
select the channel
menu,
menu,
the
item
....
or~to
H02,
HOMI1,HOMI
when
highlight
highlight
you
want
make
your
HOI,
theTVturns on.
TV
turns on.
On
and
On
to
desired
2,
then
To set the sleep
Press
until
the
increaseordecrease
to a
To set the sleep
1
2
Note:
maybecleared
To display the remaining sleep time:
Press
To cancel the sleep timer:
Repeatedly
P
s'8
theTVturns
timeinla-minute
maximum
From
Timer
Press
or
press
increments
Whenapower
S~EP.
timer
using the remote control:
on
the
remote
of 12
timer
the
APPLICATIONS
and
press
the
number
....
or~to increaseordecreaseinla-minute
(maximumof12
press
controltoset
off.
Repeatedly
increments,orpress.
the
timeinla-minute
hours
and50minutes.
using the on-screen menus:
menu,
8.
buttonstoenter
hours
failure occurs, the sleep timer setting
S~EP
until
it is
set
the
lengthoftime
press
scr
to increase
increments,
highlight
the
lengthoftime
and50minutes).
to a
minutes.
or'"
to
Sleep
To
Time until
Power
Note:
• While the
• Ifyou do not operate the
To cancel theOnTimer:
1
2
3
On
turned on (1&
onbythe On Timer feature, theTVwill automatically turn
itselfoff.
From
the
Timer
Press.
Press
....
set the time when theTVturns on from
now with
(maximum of
On
Timer
APPLICATIONS
and
press
or
... to select Enable On Timer.
or~to select Off.
....
is
"LEO
indications" on
@.
or~or the
12
set
to
TV
for 1hourafteritispowered
number
hours and 50 minutes).
On,
the On Timer LEO
page
menu,
highlight
buttons
61).
is
On
48
Page 49

Using
This
control
from
When
Setup
functions
REGZA·LINK®
player,
REGZA·LINK®
feature
theTVremote
uses
CEC
Toshiba
Enable REGZA-L1NK
menuisset
REGZA-LINK®
via
to
On,
willbeenabled.
playback
etc.)
control
..................................................................
technology
HDMI
in
the
following
connection
the
and
allows
compatible
REGZA-L1NK
REGZA-LINK®
device
you
to
devices
(~page
(DVD
16).
REGZA-LINK® Player Control menu functions:
1
From
the
APPLICATIONS
REGZA-L1NK Player Control
2
Press~orTto
and
press@.
Power
Root
Menu
Contents
Menu
Turns the select deviceonand
Access the top
Accesses the contents list
@.
Control
select
At
this time, the REGZA-L1NK Player
menu
menu,
and
the
item
you
menu
of the select device.
will disappear.
highlight
press
@.
wanttocontrol
off.
when
you
press
With
your
TV's
remote
LINK
Player
connected
watching.
Available remote control key functions:
Before
MODE
STOP
(j)
PAUSE/STEP
~
SKIP
~
SKIP
~
FF
(ffi
REW
~
CHRTN
o
EXIT
o
Control
REGZA-LINK®
using
the
following
SELECT
switchonthe
Begins playback.
Stops playback.
Pauses the picture
mode.
Skips forward.
Skips backward.
Fast-forwards.
Rewinds / reverses.
Navigates contents
Enters contents menu, etc.
Returns to the previous menu.
Closes the menu.
control,orusing
menu,
you
can
playback
key
functions,
remote
during
menu,
the
REGZA-
control
device
playorrecord
etc.
the
you
first
set
controltoTV.
are
the
Setup
Menu
Top
Menu
Menu
Note:
• These functions
•
The
REGZA-LINK Player Control item willbegrayed
in
the following conditions:
- A non-HOMI input is currently selected.
-
The
-
The
playbackorrecording device.
REGZA·LINK®
If
a REGZA-LINK®
capability
input,
thatisconnectedtothe
on
32).
you
the
Access the setup
Accesses the
playback.
Accesses the
playback.
depend
Enable REGZA-LiNK item
connected REGZA-LlNK® deviceisnot a
input
device
(e.g.
Amplifier)isconnectedtothe
can
select
another
remote
controlortheTVcontrol
menu
top
menu
menu
of a DVD
on the devices connected.
source
with
HDMI
REGZA-LINK®
master
HDMI
of a DVD player.
of a DVD
is
set to Off.
during
during
selection
switching
HDMI
device
device
panel
using
(~
out
~
page
Note: These functions
depend
on the devices connected.
49
Page 50
Amplifier
VOLUME
controls
With
your
TV's
remote
the
sound
MODE
~
•
•
MOE
Note:
•
To
- Set
LINK
- Confirm that a
as
source.
•
You
connectedtothe
(not HOMI connection).
audio input mode on the amplifier.
• These functions
Other
When
REGZA-L1NK
functions
volumeofyour
SELECT
~
adjust
turns
use this function:
Speaker
Setup
OVO
can also use this function when the amplifier
switchonthe
the
off
the
PreferencetoAmplifierinthe REGZA-
menu
connected
player, etc)isselected for the Amplifier input
REGZA·LINK®
the
Enable REGZA-L1NK
Setup
willbeenabled.
volume
sound.
TV's
depend
menu
control,
amplifier.
level.
DIGITAL
In
on the device connected.
and
REGZA-LlNK® device (such
this case, select a digital
MUTE
you
remote
AUDIO
can
adjustormute
First,
set
controltoTV
OUT
the
.
is
terminal
functions
and
each
iteminthe
are
set
to On,
the
following
To
set the REGZA-L1NK® Setup:
1
From
the
PREFERENCES
REGZA-L1NK
2
Press
3
Press
Note:Ifyou set
items under REGZA-LiNK Setup will
4
Press
item
or
• TV
•
Auto
•
Amplifier
•
Speaker
or
or~to select On.
...
or
you
desired
Auto
Standby:
REGZA·LlNK®
This
feature
formats
connected
Note:
connected.
and
to a REGZA-LINK® PC.
This
feature depends on the typeofequipment
Setup
T to
highlight
Enable
T to
highlight
wanttouse,
mode.
Power
Preference: TV
On:
On/Off
Control:
PC
automatically
picture
preferences
and
REGZA-LiNKtoOff, the other
and
On/Off
On/Off
Link
sets
menu,
press
Enable REGZA-L1NK.
the
press
Speakers/
highlight
8.
be
REGZA-L1NK
.....
or~to
Amplifier
suitable
when
widescreen
the
grayed
setup
select On
TV is
out.
Item
TV
Auto
Power
Note:
source, oradjust the sound volume, the sound will
output from the amplifier's speakers evenifTV
has been selected.
the sound from the
On
Auto Standby message to
Amplifier
Control
Speaker
Preference
When
Description
If
a REGZA-LINK® device is
the
TV
turnsonautomatically.
If
theTVis turned off, theTVwill
turn
off all of the REGZA-
LINK®
If
adjust the
sound
From this item, you can set
output
the amplifier. When this item is set to
Amplifier, the remote control can be used
to adjust or
This item
REGZA-LINK® compatible
receiverisconnected
speakers
you turn on the amplifier, change its input
devices connected to the
Amplifier Controlisset to
sound
using the remote control.
preference to theTVspeakers or
will be grayed
Turn
theTVoff
TV
speakers.
volume or
mute
the volume of the audio.
and
automatically.
and
turned
TV.
On,
turn
your
out
unless a
audio
set to
TV
Speakers
on againtooutput
on,
send
you can
off the
audio
be
a
50
Page 51
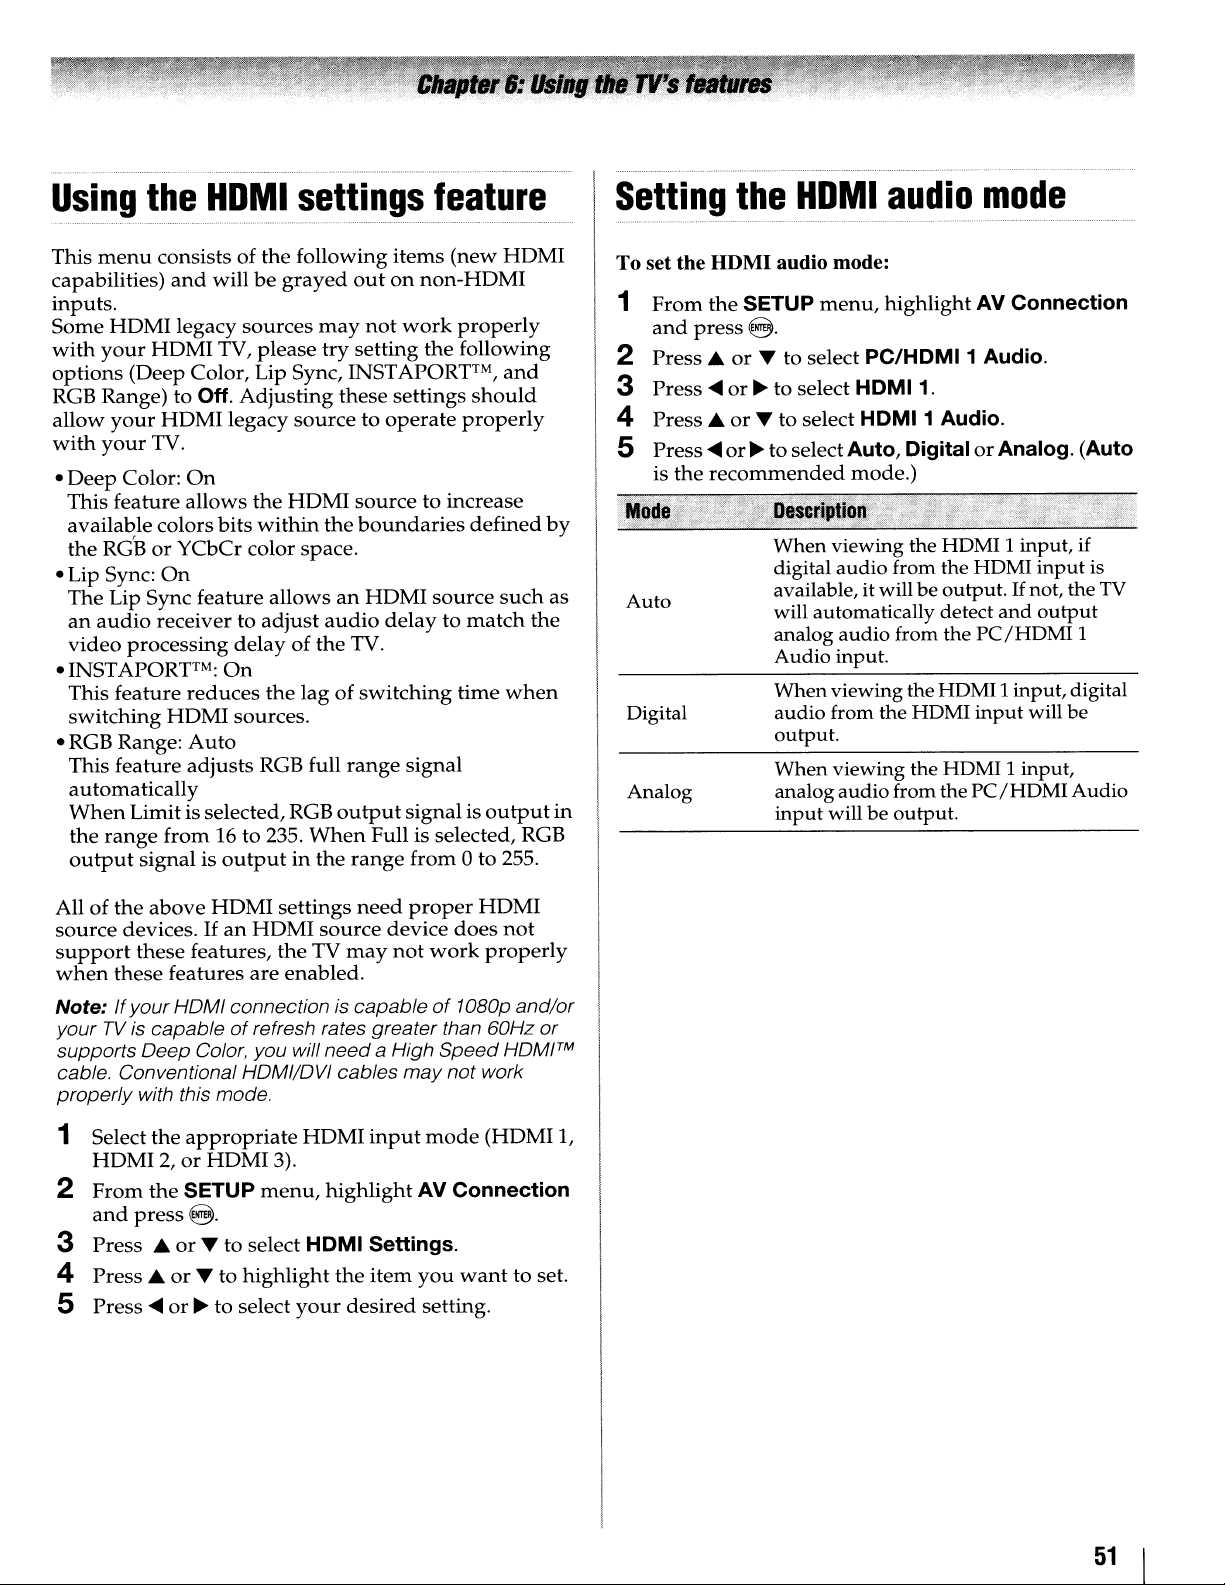
Using
This
capabilities)
inputs.
Some
with
options
RGB Range) to Off.
allow
with
•
Deep
This
availa~le
the
• Lip Sync:
The
an
video
• INSTAPORFM:
This
switching
• RGB Range:
This
automatically
When
the
output
the
HDMI
menu
consistsofthe
and
willbegrayed
HDMI
your
your
your
feature
RGBorYCbCr color space.
Lip Sync
audio
feature
feature
range
legacy
HDMI
(Deep Color, Lip Sync, INST
TV.
Color:
colors bits
receivertoadjust
processing
Limitis selected, RGB
signalisoutputinthe
HDMI
On
allows
On
feature
reduces
HDMI
Auto
adjusts
from
TV,
legacy
delayofthe
On
sources.
16 to 235.
settings
following
sources
please
Adjusting
the
within
RGB full
may
try
these
sourcetooperate
HDMI
the
allowsanHDMI
audio
TV.
the
lagofswitching
range
output
When
range
feature
items
(new
HDMI
outonnon-HDMI
not
work
properly
setting
sourcetoincrease
boundaries
the
following
APORFM,
settings
source
delaytomatch
signal
signalisoutput
Full is selected, RGB
from
and
should
properly
defined
such
time
when
0 to 255.
the
by
as
in
Setting
To set the
1
From
and
2
Press.
3
Press~or~to select HOMI
4
Press.
5
Press~or~to select
is
the
Auto
Digital
Analog
the
HDMI
the
press@.
recommended
audio mode:
SETUP
or
T to select
or
T to select
When viewing the HDMI 1 input, if
digital audio from the HDMI
available, it will be output.
will automatically detect and
analog audio from the
Audio input.
Whenviewing the HDMI 1input, digital
audio from the HDMI
output.
When viewing the HDMI 1 input,
analogaudiofrom the
input
HDMI
menu,
audio
highlight
PC/HOMI1Audio.
1.
HOMI1
Auto,
mode.)
will be output.
Audio.
OigitalorAnalog.
mode
AV
Connection
input
If
not, the
output
PC/HDMI
input
will be
PC/HDMI
.......................................
(Auto
is
TV
1
Audio
of
the
All
source
support
when
Note:
your
supports
cable. Conventional HOMI/OVI
properly
1 Select
2
3
4
5 Press
above
devices.Ifan
these
these
If
your
TViscapableofrefresh rates greater than 60Hz
Deep
with this mode.
the
HDMI2,or
From
the
and
press@.
Press.
Press.
~or~
HDMI
features,
features
HoMI
connection is
Color, you will
appropriate
HDMI
SETUP
or
T to select
or
T to
highlight
to select
settings
HDMI
theTVmay
are
enabled.
HDMI
3).
menu,
HOMI
your
need
proper
source
need
highlight
device
not
capableof1OBOp
a High
cables
the
input
Settings.
item
desired
may
AV
you
setting.
HDMI
does
work
properly
Speed
not
work
mode
(HDMI
Connection
wanttoset.
not
and/or
or
HOMITM
1,
51
Page 52

Displaying
To display TV status information using RECALL:
Press
RE~LL
on
The
following
Current
•
•
If
(for cable
Channel
•
•
Input
• Digital
right
• Stereo,
mode,
Video
•
•
Aspect
• V-Chip
•
GameTimer
input
ANT/CABLEisthe
TV)
number
label (if set)
signal
cornerofbox; for ATSC
MonoorSAP
Dolby
resolution
ratio of
rating
TV
status
the
remote
information
(ANT/CABLE, Video 1, etc.)
or
strength
DigitalorPCM)
incoming
status
(if set)
0)
Ste,..
current
"ANT"
(if
in
ANT/CABLE
audio
480i
control.
will
(for
indicator
video
@)
information
display
input,
over-the-air
mode)
(bar
signal
only)
status
(when
signal
(if applicable):
either
"CABLE"
broadcasts).
graphinlower
HDMI
(4:3or16:9)
II!!
input
Understanding
the
auto
power
off
feature
The TV will
approximately15minutes
channelora
day.
This
Note:
an extended periodoftime, you should unplug the power
cord.
Understanding
memory
If
the
the
Last
the
TV
automatically
station
feature
Ifitis
possible that you willbeaway from theTVfor
that
functions
turn
itself off after
if it is
completes
in
ANT/CABLE
the
last
tuned
its
to a
broadcast
mode
feature
poweriscut
Mode
when
off
while
Memory
the
powerisresupplied.
you
feature
are
viewing
automatically
vacant
for
mode
the
turns
the
only.
TV,
on
To close the
Press
To display TV status information using INFO:
(only available for
Press
The
following
off air
• Title
•
Duration
•
Detailed
To
display
control again.
entire
Note:
or bottomofthe screenbypressing ... or~while the
RECALL or INFO displayison-screen. (The last position
will be storedtomemory.)
RECALL
RE~LL
again.
I~O
on
the
additional
digital
banner.
The
channels
description
Next
Pressing
locationofthe banner can be movedtothe top
screen:
ANT/CABLE
remote
information,
control.
information
(if applicable):
I~O
a
press
third
input)
I~O
time
will
on
will
display
the
remove
for
remote
the
52
Page 53

Using
settings
Note:
notbeavailable for adjustment when the Picture
set
to
Using
The
levels for
sharp
To
set Resolution+™:
1
From
2
Press
((3.
3
Press
4
....
Note:
•Ifthe Picture
is from
•
If
will
• This feature
content.
• Noise
device
enhancer
the
advanced
picture
features
Someofthe
Auto
View.
the
Resolution+™feature
your
picture.
the
Picture
....
Press
or~to select
-2
the Picture
be
grayed
may
connectedtotheTV(e.g. a device with
Advanced
Picture Settings features will
Resolution+™feature
allows
desired
PICTURE
Settings
or"
or~to
or..to
Modeisset
to +2.
Modeisset
out.
may
appear
function).
picture
and
to
highlight
select On.
highlight
either
not
work
on the image
settings
menu,
highlight
press
((3.
Resolution+,
the
Level,
1,2,3,4,
to
AutoView,
to
GameorPC, this feature
properly
youtoadjust
andtoget
Advanced
and
and
or5and
the level range
depending
depending
Mode
then
press
on the
on the
specific
the
a
press
press
((3.
Using
Dynamic
that
then
is
1
2
3
Note:
range is from -5
Using
The
of
blackinthe
To
1
2
3
Using
This
the
Dynamic
Contrast
affect
the
automatically
From
the
Picture
Press
Press
The
or~to
adjustment
If
the Picture
the
static
gamma
adjust
the static
From
the
Picture
Press
Press
The adjustment rangeiswithin ±15 from center.
•
If
detailofblack
•
If
detailofblack
or~to
the
settingismovedinthe
the
settingismovedinthe
the
feature
detects
appearanceofyour
adjust
PICTURE
Settings
or"
and
to select
adjust
rangeisfrom0to
Modeisset to
to
+5.
Static
feature
picture.
gamma
PICTURE
Settings
or"
and
to
select
adjust
colors
colors willbeincreased.
Film
helpstoeliminate
Contrast
changesinthe
the
video.
menu,
highlight
press
((3.
Dynamic
the
level,
AutoView,
contrast
Contrast.
and
then
10.
picture
Advanced
Gamma
allows
menu,
youtoadjust
settings:
highlight
press
((3.
Static
the
willbedecreased.
Gamma.
level
minus
plus
and
Advanced
press
direction,
direction,
Stabilization
the
video
shaking.
settings
the level
quality
press
the
((3.
and
((3.
levels
the
the
Using
The
black
the
1
2
3
the
DynaLightTMfeature
coloringofdark
levelofdarkness.
From
the
PICTURE
Picture
Press
Press
Settings
or"
or~to select On
DynaLighfMfeature
areasinthe
and
to
select
automatically
menu,
highlight
press
((3.
DynaLight.
or
Off
strengthens
video
and
according
Advanced
press
the
to
E~:r
1
From
the
PICTURE
Picture
2
Press
3
Press
press
Note:
•Ifthe Picture Modeisset
Off
If
the Picture
•
Smooth,
Settings
or"
to select
or~to select
E~:r
automatically.
Mode
StandardorOff.
and
is set to
menu,
highlight
press
((3.
Film
Stabilization.
Smooth,
to
StandardorOff
Game, this feature
Auto
View,
Advanced
is
select
Auto,
set
53
and
to
Page 54

Using
the
Expert
Mode
Using
the
MPEG
NR
feature
This feature
Green,
more accurate
1
From
Picture Settings
2 Press ...
press
3
Press'"
4 Press
S Press
~
to
Note:
•Ifthe Picture Modeisset
be
grayed
•
When
modes
•Itis
time.
Using
The ClearFrame 120Hzanti-blur technology doubles
the frame rate from
per
second, virtually eliminating
adding
1
From
Picture Settings
2 Press ... or
3 Press
Note:
be
grayed
individually
and
Blue
components
adjustment
the PICTURE
or~to select the Expert Mode,
enables/disables
of the picture to allow for
of each color.
menu,
and
highlight Advanced
press
8.
the Red,
and
then
8.
or~to select either Red, Green
~or~
~
adjust
the Expert Mode menuisexited, the
of
not possibletoturn off all three colors at the same
the
flickerorreducing
the PICTURE
~or~
If
the Picture Modeisset
to select On.
to select Color or Tint,
then
press
Ecr
to
AutoView, this feature will
out.
Red, Green
and
Blue are no longer valid.
ClearFrame™
60
frames
and
~
to select ClearFrame.
to select On,
out.
per
image
menu,
press
then
and
feature
second to 120 frames
motion
brightness.
highlight Advanced
8.
press
to
Game, this feature will
then
blur
E(!{
or
Blue.
press~or
On/Off
without
TheMPEG noise
visible interference
1
From
the PICTURE
Picture Setings
2 Press ...
@.
3 Press ...
4 Press
Note: If the Picture Mode
be
grayed
Using
DNR
of a
1
~or~
High
and
the
enables
weak
signal to
From
the
Picture Settings
2 Press ...
@.
3 Press ...
4 Press
Note:
• Ifthe Picture Modeisset
grayed
•
The
best
lostifthe settingistoo high)
~or~
Off
and
differences may not alwaysbenoticeable (for the
result use lower settings as picture quality can
reduction
causedbyMPEG compression.
and
or~to select Noise Reduction
or~to
out.
or~to select Noise Reduction
or~to select DNR.
press
out.
highlight
to select either Off, Low, Middle,
press
8.
DNR
you
PICTURE
feature
to "soften" the screen
reduce
and
to select Low, Middle, High, Auto
8.
feature allows
menu,
menu,
highlight Advanced
press
8.
the
MPEG
is
set to Game, this feature will
the noise effect.
highlight
press
8.
to
Game, this feature will be
youtoreduce
and
NR.
representation
Advanced
and
press
or
press
or
be
54
Page 55
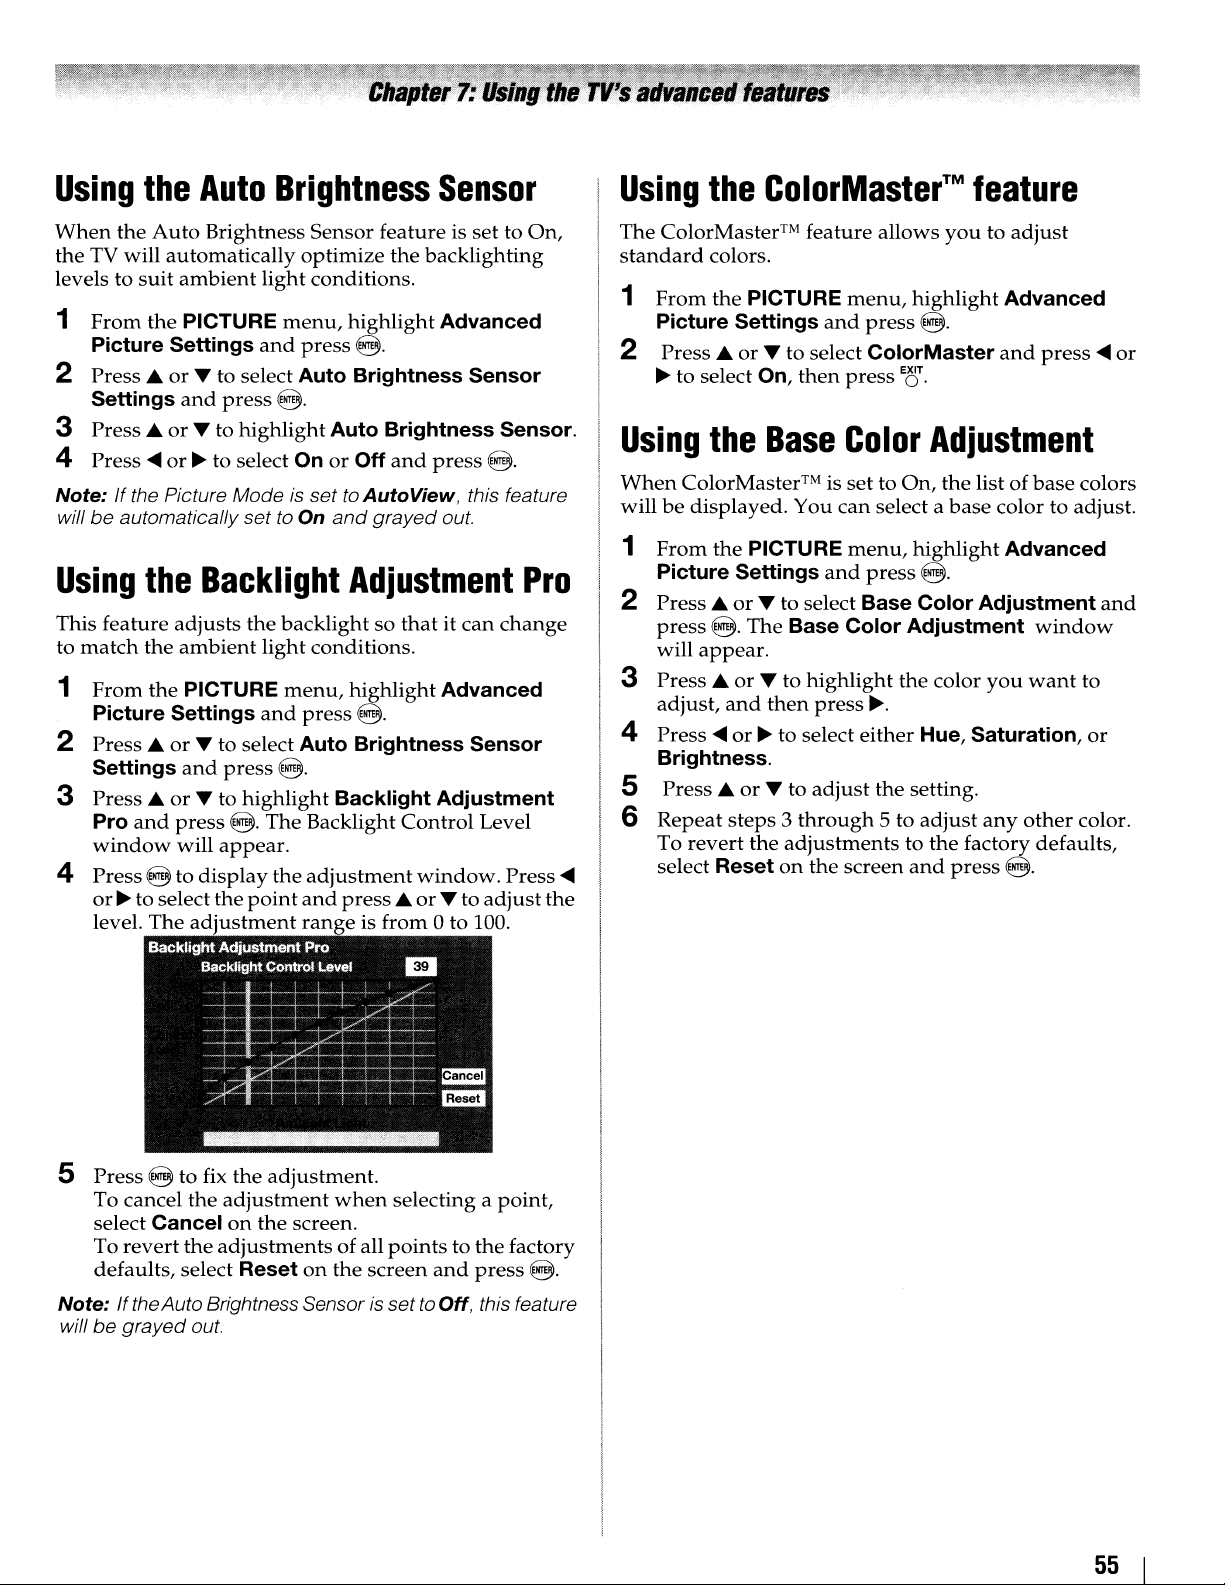
Using
the
Auto
Brightness
Sensor
Using
the
ColorMaster™
feature
When
the
levels to
1
2 Press ...
3
4
Note:
Using
This feature
to
1
2
3
4
the
Auto
Brightness
TV
will
automatically
suit
ambient
From
the PICTURE
Picture Settings
or
T to select Auto Brightness Sensor
Settings
Press
Press
If
willbeautomatically set to On
match
From
Picture Settings
Press'"
Settings
Press'"
Pro
window
Press
or~to select the
level.
and
press
orTto
or~to select On or Off
the Picture Modeisset to AutoView, this feature
the
adjusts
the
the
or
or
and
press
will
@ to
The
highlight
Backlight
ambient
PICTURE
T to select Auto Brightness Sensor
and
press
T to
@.
appear.
display
adjustment
optimize
light
menu,
and
press
@.
the
backlightsothatitcan
light conditions.
menu,
and
@.
highlight
The
the
point
and
rangeisfrom
Sensor
conditions.
feature is set to
the
backlighting
highlight
@.
Auto Brightness Sensor.
and
grayed
and
Advanced
press
@.
out.
Adjustment
change
highlight
press
@.
Backlight Adjustment
Backlight
adjustment
press'"
Advanced
Control
window.
or
T to
ato 100.
Level
adjust
On,
Pro
Press
the
The ColorMaster™ feature
standard
1
colors.
From
the
Picture Settings
2 Press ...
~
to select On,
Using
When
will
1
2 Press ...
3 Press ...
4 Press
5
6
....
the
ColorMaster™ is
be
displayed.
From
the
Picture Settings
or
press
@.
will
appear.
or
adjust,
Brightness.
Press
Repeat
To
select
and
....
or~to select
...
steps3through
revert
Reset
allows
PICTURE
or
T to select ColorMaster
Base
PICTURE
T to select Base Color Adjustment
The
T to
then
or
T to
the
adjustmentstothe
on
menu,
and
press
then
press
Color
settoOn,
You
can
select a
menu,
and
press
Base Color Adjustment
highlight
press
~.
either
adjust
the screen
the setting.
5 to
youtoadjust
highlight
@.
E~3r
Advanced
and
Adjustment
the
listofbase
base
color to adjust.
highlight
@.
the color
Hue, Saturation,
adjust
and
Advanced
window
you
want
any
other
factory defaults,
press
@.
press
....
or
colors
and
to
or
color.
5
Press@to
To cancel the
select Cancelonthe
revert
To
defaults, select
Note:
IftheAuto
willbegrayed
the
out.
fix
the
adjustment.
adjustment
adjustmentsofall
Reset
Brightness Sensorisset
when
screen.
on
the
pointstothe
screen
selecting a
and
to Off, this feature
point,
press
factory
@.
55
Page 56

Selecting
To
adjust
1
From
Picture
2 Press ...
the
color
the color temperature:
the
PICTURE
Settings
or
T toselect
and
menu,
press
Color
8·
3 Press
4 Press
range
Note:
adjustment range
To
adjust
1
From
Picture
2
Press'"orT toselect
@.
3 Press ...
adjust,
and
4 To
select
Note:
Color
or
T to
highlight
or~to
is 0
If the Picture ModeissettoAutoView,
RGB Offset
the PICTURE
Settings
or
and
press
revert
Reset
IfPicture ModeissettoAutoView,
Temperature
adjust
(warm)
is-5to
T to
highlight
then
@ to
returntothe
the
adjustments
on
the screen
the level.
to 10 (cool),
+5
and
RGB Gain:
menu,
and
press
Color
press
....
setting willbeavailable.
temperature
h!ghlight
~.
Temperature
Color
then
highlight
8.
Temperature
the
menu
or~to
previous
to the factory defaults,
and
Advanced
and
Temperature.
The
adjustment
press
E8.
the
Advanced
and
you
want
adjust
press
the
menu.
8.
setting
only the
press
press
to
Using
settings
Using
Stereo Extension, Voice
Bass Boost
experience
sources. Your TV's
wider.
1
2
3 Press
Mode'
Stereo
Extension
Voice To turn the vocal emphasis effect On or
Enhancement
Dynamic Bass To select the desired bass expansion
Boost level (Off, Low, or
the
advanced
features
the
surround
help
to create a thrilling
with
deep,
Put
the TV in STEREO
SAP
broadcasts"onpage
From
the
SOUND
Sound
adjust,
Settings
Tor
... to
and
then
Descriptjon
~.
To turn the surround sound effectOnor
Off.
Note:
Stereo Extension effect will not work.
Off.
sound
sound
Enhancement,
rich
bass
from stereo
audio
will
sound
mode
42).
menu,
and
highlight
press
c
highlight
press
8.
the
feature
....
or~to
..
..•.
If the broadcastismonaural, the
feature
and
Dynamic
surround
sound
fuller, richer,
(~"Selecting
Advanced
you
adjust
..
High).
the item.
,
sound
stereo/
want
and
to
I
56
Page 57

Using
TheTVallows
device.
Note:
• Do not insert/remove the USB device whileinuse.
•
MSU
Media
Device
USB
Supported
You must obtain any required permission from copyright
ownerstodownloadoruse copyrighted content. Toshiba
cannot and does not grant such permission.
the
is notavailable during playback.
device:
USB Mass Storage Class devices (MSC)
Note:
• Connectivity is not guaranteed for all devices.
• Connect the USB device
• Do not use
FA
Tl2,FATl6
Media
you
to enjoy
Player
a USB hub.
file
system
Player
photos
Specifications
and FAT32
storedona USB
to
theTVdirectly.
Basic
To set the Auto
1
2 Press
3
Note:
Player manually.
Auto
1
2 A
3 Press
Manual
1
2
3 Press
operation
From
the APPLICATIONS
Player
Press'"
Insert
side
press@.
thumbnail
Insert
sideofthe
From
Player
thumbnail
and
....
or
or~to select On.
Ifthe Auto Startisset
start:
USB device
of the TV.
prompt
....
or
Start:
USB device
the
and
....
or
start:
press
@.
T to
highlight
to
Off, you can start the Media
into
the
will
appear.
T to select Photo
will
appear.
TV.
APPLICATIONS
press
T to select Photo
will
appear.
Press'"
into
the USB terminalonthe
@.
menu,
Auto
USB
menu,
highlight
Start.
terminalonthe
or~to selectYes
and
press
highlight
and
press@.The
@.
Media
right
and
The
right
Media
To close the Media Player:
Press
E~:r
or
video
The TV will
input.
return
to the last-viewed
channel
57
Page 58

Viewing
To view in Single View mode:
1
When
Media
a file
2 Press@ to
the
Press
3
Press~to
previous
Note: Ifthe previous or next file
skipped
To view in Slideshow mode:
1 To
the
To
2
Press~to
previous
Note:
be
3 To close the
JPEG
the
thumbnail
Player
or
folder.
begin
selected folder.
CHSN
to
view
file.
automatically.
switch
Single
return
skipped
to the
View
to $ingle View
view
file.
If
the previous ornextfileisnotcompatible, it will
files
appears
(nE
page
viewing
return
automatically.
Media
to the
the
next
Slideshow
mode.
the
next
Player,
57),
after
starting
press
....
~
T • to select
theselected fileorto
upper
file,
mode,
file,
layer.
press
....toview
is
notcompatible. it will
mode,
press
press@during
press@
press
....toview
E8.
again.
the
open
the
the
be
To set the Slideshow mode settings:
1
From
the PREFERENCES
Viewer
2
Press.
3
Press
Interval Time
Repeat
To rotate the image:
During
press.
T to
rotate
To return to the thumbnail:
Press CHOTN
mode.
To display file status information:
1 Press
displayedonthe
•
•
• Date
• File size
• Slideshow icon
• Repeat
•
2 Press
off screen.
Setup
or
....
or~to
viewing
to
rotate
the
during
RE3LL.
Content
contents
Photo
title
and
play
Operation
RE3LL
and
press
T to
highlight
adjust
To set a time interval to view photos at
your preferred intervals (3sec, 5sec,
lOsee, 15sec, 30sec, 60sec, or 90sec).
To display photos in the same directory
repeatedly.
the
imageinthe
the
image90degrees
image90degrees
Single
The
following
bottomofthe
number
storedinthe
time
againtomake
/Total
taken
(if applicable)
icon (if applicable)
guide
menu,
@.
Interval
the
setting
On/Off
View
modeorSlideshow
information
number
same
the
highlight
Time
and
Single View
clockwise,
counterclockwise.
screen.
(only for the
directory)
information
Photo
or Repeat.
press
@.
mode,
will
be
disappear
press
Note:
The
file status information will disappear after about
6 seconds.
Compatibility
Data
compatibility: JPEG Exif
File format: DCF
Maximum
(Total
Maximum
Total
numberoffiles: Less
I
58
files:
viewable
number
photo
ver
2.2
ver
1.1
resolution: 16384 x 16384 pixels
of pixels: 10,000,000)
size: 9
MB
than
2000
per
folder
Page 59
General
Before
chapter
solutions
Black
TV
Other
TV
Picture
calling
box
•
stops
•IftheTVstops
problems
•Ifyour
will
•
•
troubleshooting
a service technician,
for a
possible
you
can
on-screen
The
closed
modes
(11,
to
Off
(~
respondingtocontrols
controlorTV
TV,
press
panel
for5or
TV's
Troubleshooting
has
not
procedure
not
turn
Make
sure
POWER
@.
The
remote
batteriesortry
problems
causeofthe
try.
caption
T2,
T3,orT4).
page
40).
respondingtothe
control
and
hold
more
problemisnot
worked,
use
(~page
on
the
power
control
the
featureissettooneofthe
panel
the
POWER
secondstoreset
sectionorthe
the
31).
cordisplugged
batteries
control
please
check
problem
Set
the
closed
caption
controlsonthe
and
you
cannot
buttonontheTVcontrol
the
addressedinthis
recommended
Reset
Factory
maybedead.
panel
Defaults
in,
buttons.
and
TV.
and
Replace
General picture problems
•
Check
the
•
Press@on
valid
video
connectedtoa
display
device
•
Antenna
outdoor
•
The
station
channel.
•
Adjust
•Ifyou
•
are
controlisset
Do
not
video
cabletothe
page
13).
antenna/cable
the
input
particular
when
you
connection
reception
antenna
may
have
the
picture
usingaVCR,
correctly
connect
bothastandard
source(~page
connections(~Chapter
remote
(if
controlortheTVand
inputonthe
select
that
particular
details,
maybepoor.
qualities(~page
VIDEO
see
applicable).
broadcast
make
sure~Ron
(~
page
1
inputatthe
Chapter
Useahighly
difficulties.
23).
video
32).Ifno
TV,nopicture
input
2.
39).
the
cable
same
Video Input Selection problems
•Ifthe
Input
Selection
press@onthe
press
@ a
second
video
input
source
window.
window
remote
time,
and
does
controlortheTVcontrol
which
display
the
not
appear
will
changetothe
Input
Selection
Cannot view external signalsorchannel 3or4
• If
you
cannot
view
connected
ColorStream
to
signals
VIDEO1,VIDEO
H02,
HOMI1,
from
external
2,
ColorStream
HOMI2,HOMI3,PC
devices
this
some
Text
feature
remote
turn
off
solution
then
press
select
device
source.
directional
Try
another
remote
andanS-
time
when
panel,
H01,
or
the
the
2).
is
will
For
(~
you
next
from
Poor
channels3or4,make
Off
(~
colororno
•
The
station
channel.
•
Adjust
the
page
Tint
46).
color
may
have
and/or
sure
the
broadcast
Color(~page
difficulties.
Input
39).
Lockisset
Try
another
to
Poor compositeorS-video picture
•IftheTVis
DVD
usingaColorStreamorHOMI
•Ifyou
the
standard
both
Picture
Sound
a
Remote
and
•Aswith
instances,
broadcasts,
the
phenomenon
including,
the
TV,
and
usedbybroadcastersintheir
wanttotry
which
phenomenon:
-IftheTVis
programmable
to
-Ifyou
channels,
or
problems
•
Check
•
The
channel.
•
The
•Ifyou
Stereo
•Ifyou
known
SAP
•Ifyou
you
the
mode
•Ifyou
HOMI
properly
control
•
Make
mode(~page
•
Remove
and
•
The
batteries(~page
connectedtoan
player,
video
game
connectanS-video
(composite)
typesofvideo
soundare
all
products
when
viewing
video
games,
sound
and
picture
canbecausedbyvarious
without
video
video
processingordifferent
may
help
synchronize
notice
satellite
the
antenna/cable
station
sound
hearnosound,
mode
are
not
SAP
mode
hear
are
watching
SAP
mode
(~
connectaPC
terminal,
set(~page
limitation,
processinginan
oneormoreofthe
helptoreduce
connectedtoanANreceiver
audio
this
please
providertoinform
may
have
maybemuted.
(~page
receivingasecond
source,
(~page
audio
that
(suchasmusicora
maybeon.
page
42).
make
problems
sure
the
remote
23).
all
obstructions
the
TV.
remote
control
externalANdevice
system,
cableatthe
set-top
video
connection
cable,besuretodisconnect
video
cable.Donot
same
time.
outofsync
that
containadigital
certain
content
DVDs),
are
slightly
delay
the
phenomenon
contact
connections(~Chapter
broadcast
try
setting
42).
make
42).
seems
using
either
sure
47).
controlissettothe
between
batteries
19).
you
outofsync.
video
processing
attached
compression
programming.
following
the
effectofthis
feature,
soundtothe
onlyoncertain
your
local
themofthis
difficulties.
Press
VOLUME.
the
audio
sure
the
MTS
"incorrect"
Set
the
MTS
thePCIN
that
thePCAudio
the
maybedead.
may
gaming
use
broadcast,
MTS
foreign
featuretoStereo
remote
(e.g.
box,
etc.)
try
instead.
connect
display,inrare
(e.g.
television
notice
that
This
factors
within
system,
rates
You
may
suggestions,
that
has
this
feature
picture.
feature
program
featureisset
for
terminaloran
correct
TV
cable,
issue.
Try
another
to
from
the
program
language),
setting
device
control
Replace
2).
a
a
to
is
the
(continued)
59
Page 60
•
•IftheTVstill
Channel
•
•
•
•Ifyou
YourTVremote
on
your
your
other
yourTVremote
featureonanother
came
with
Factory
tuning
Make
sure
mode
(Il@f'
The
channel
memorybythe
the
channel
The
channel
Unblock
are
antenna
unabletotune
the
channel
channel
tune
digital
procedure
to
controls"
control
external
Defaults
device.
devicetodetermine
control
the
device.
does
problems
the
remote
page
23).
may
Auto
memory
maybeblockedbythe
the
channel
unabletotune
configuration
digital
list
and
memory
channels,
(Il@f'
page
and
may
not
Refertothe
does
device,
not
procedure
have
(Il@f'
"Other
use
actasexpected,
(Il@f'
controlissettothe
been
erased
Tuning
feature.
(Il@f'
page
(Il@f'
page
digital
(Il@f'
page
channels,
reprogram
page
28).Ifyou
use
the
31).
Also
problems"
operate
its
not
the
28).
46).
channels,
clear
channels
Reset
see
certain
owner's
available
operateaspecific
remote
use
page
31).
correct
from
the
Add
the
lock
feature.
28).Ifyou
all
channels
into
are
Factory
''TV
stops
(Il@f'
page
features
manual
features.
control
the
Reset
device
channel
channel
check
the
are
still
from
the
still
unable
Defaults
responding
59).
that
for
HOM
I
problems
If
For HOMI cables
•
Make
sure
(HOm.)
For Deep
•
You
properly.
with
Color
should
this
Normal
option
the
HOMI
cables
are
used
needtouse
HOMIcableorOVI
(Il@f'
page
(Il@f'
High
15).
with
page
Speed
the
12).
HOMI
HOMI
cable
Logo
cabletowork
may
not
work
For Legacy HOMI source
•
Someoflegacy
with
latest
to
Media
to
adoption.
Color,
51).
with
Player
•
Make
•Ifyou
through
device.
Lip
Your
thisTVproducts.
problems
sure
connectaUSB
HOMI
sources
HOMITVproducts.
Please
trytoset
Sync,
RGB
Range,
legacy
HOMI
source
that
USB
devices
hub,
are
device
theTVdoes
may
not
duetonew
Off
the
HOMIsettings
INSTAPORpM)
should
operate
connected
with
separate
not
recognize
correctly.
work
standard
cable
properly
(Deep
(Il@f'
page
properly
or
the
USB
Closed
Rating
No
caption
•Ifthe
captioned,nocaptions
•Iftextisnot
If
page
• A
following
dubbed;b)when
when
blocking
•Ifyou
screenisdisplayed,
seconds.
cleared
•
The
system
REGZA-L1NK
•
The
REGZA-L1NK
•
Make
(HOm.)
•
When
correctly
turn
and
•Ifseveral
may
•
Read
connected
problems
programorvideo
available,ablack
this
happens,
40).
closed-caption
the
turn
situations:a)whenavideotape
signal
(V-Chip)
forget
your
The
PIN
(Il@f'
page
V-Chip
featureisavailable
only
(Il@f'
you
will
off
the
signal
may
the
signal
receptionisnonstandard
problems
PIN
code:
press~four
code
you
43).
page
44).
operation
REGZA-L1NK
sure
the
connected
after
off
yourTVand
turnonagain.
devices
not
operate
the
instruction
featureisavailable
compatible
the
HOMI
cables
are
used.
REGZA-L1NK
you
have
changed
unplug
are
connected,
properly.
manual
REGZA-L1NK
selectedisnot
display.
rectangle
closed
not
receptionisweak;orc)
While
previously
for
devices.
with
the
furnished
device.
may
caption
display
correctlyinthe
has
(Il@f'
the
PIN
code
times
within
stored
the
U.S.
for
Toshiba
the
HOMILogo
device
does
settingsofthe
power
cord,
REGZA-L1NK
with
closed-
appear.
feature
been
page
entering
5
will
V-Chip
not
device,
then
feature
the
(Il@f'
40).
be
work
plug
I
60
Page 61
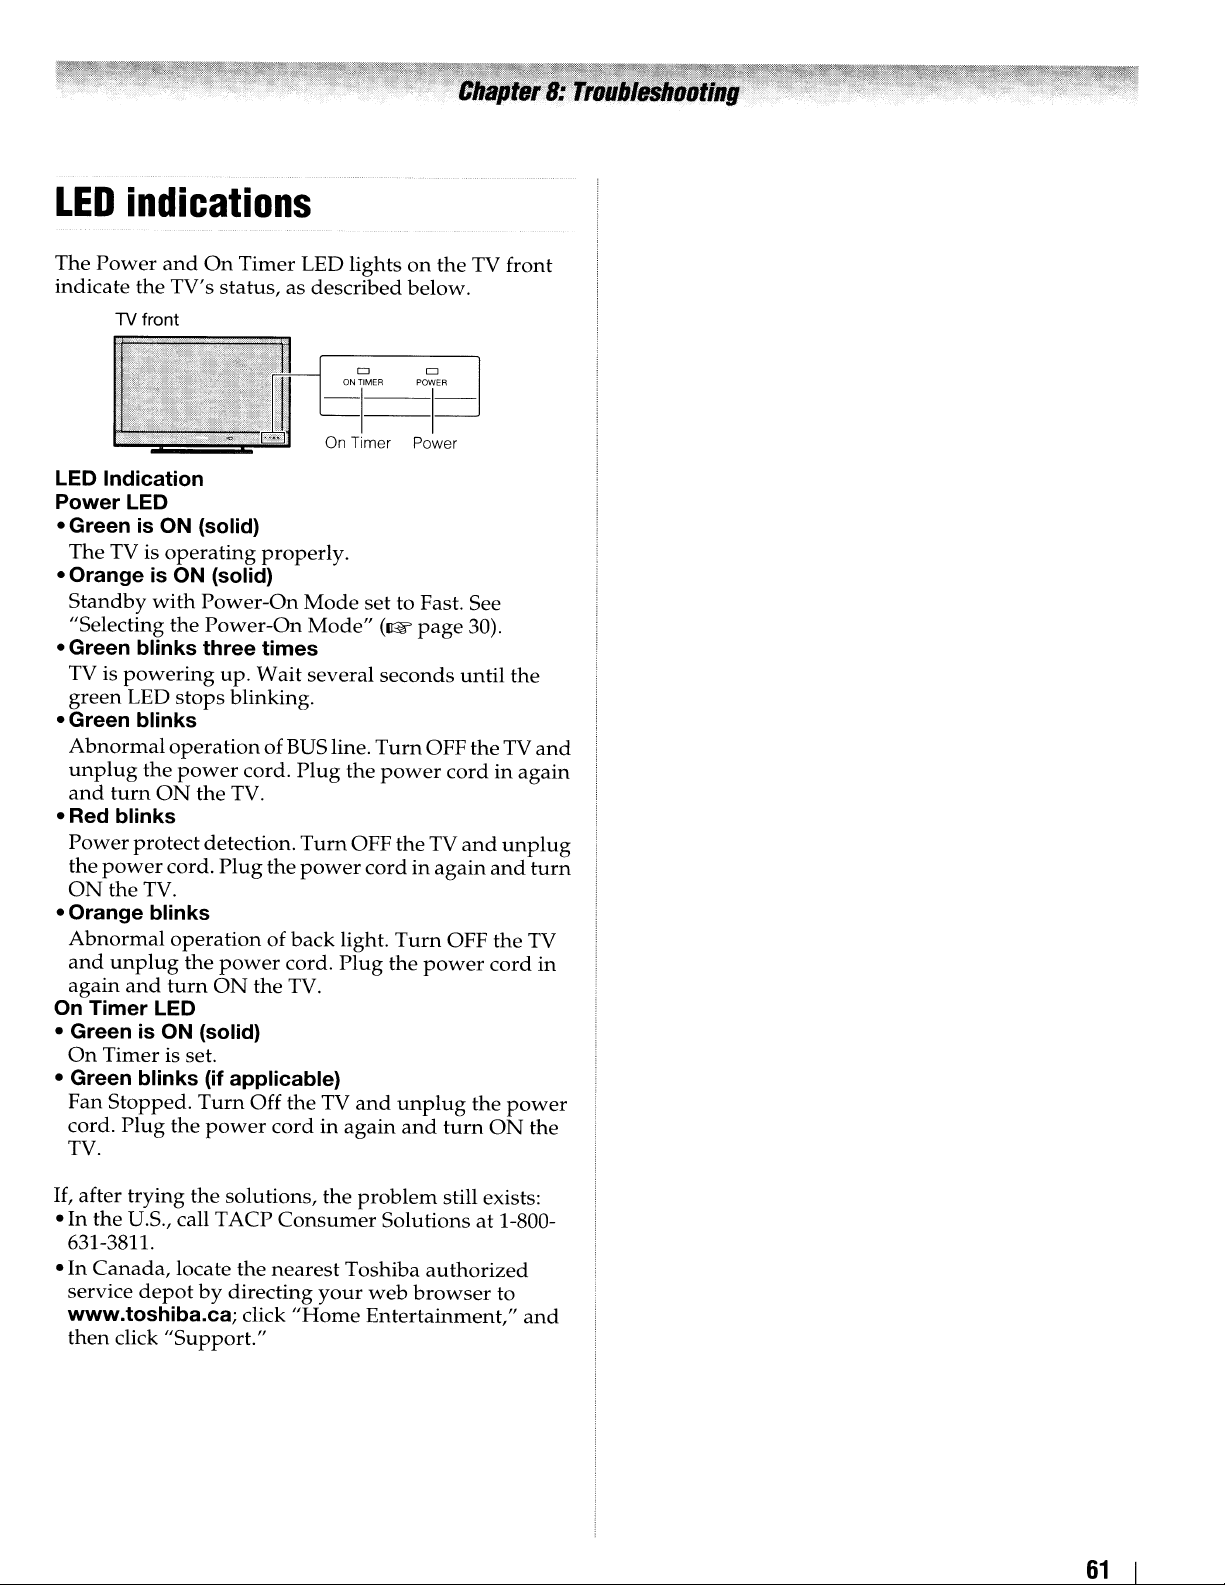
LED
The
indicate the TV's
indications
Power
and
1V front
On
Timer
status,asdescribed
LED lightsonthe
-1'_MEA
TV front
below.
CJ CJ
lEA
On Timer
LED Indication
Power LED
• Green
The
• Orange is ON (solid)
Standby
"Selecting
• Green blinks three times
TV is
green
• Green blinks
Abnormal
unplug
and
·Red
Power
the
ON
• Orange blinks
Abnormal
and
again
On Timer LED
• Green is ON (solid)
On
• Green blinks (if applicable)
Fan
cord.
TV.
is
ON (solid)
TV is
with
powering
LED
the
tum
ON
blinks
protect
power
the
TV.
unplug
and
Timer
Stopped.
Plug
operating
Power-On
the
stops
operationofBUS line.
power
the
cord.
operationofback
the
turn
is set.
Turn
the
properly.
Power-On
up.
Wait
blinking.
cord.
TV.
detection.
Plug
the
power
ON
the
Off the TV
power
cordinagain
Mode
Mode"
several
Plug
Turn
power
cord.
TV.
Power
set
to Fast. See
(1&
page
seconds
Turn
the
power
OFF
theTVand
cordinagain
light.
Turn
Plug
the
and
unplug
and
30).
until
the
OFF theTV
cordinagain
unplug
and
OFF
the
power
turn
the
cord
power
ON
and
turn
TV
in
the
If,
after
trying
•
In
the
U.s., call TACP
631-3811.
Canada,
• In
service
www.toshiba.ca; click
then
click
the
solutions,
locate
the
depotbydirecting
"Support."
the
Consumer
nearest
your
"Home
problem
Solutionsat1-800-
Toshiba
web
Entertainment,"
still exists:
authorized
browser
to
and
61
Page 62
Specifications
Note:
- This
-
- This
Television
Channel
Power
Power
Audio
Speaker
Video/Audio
model
below.
Designs
without
model
and/or
future.
complies
and
specifications
notice.
may
notbecompatible
specifications
with
the
are
that
maybeaddedinthe
System
NTSC
ATSC
Digital
standard
standard
Cable
(8VSB)
(64
QAM,
unencrypted)
256
QAM;
Coverage
VHF: 2
UHF: 14
Cable
through
through
TV:
Mid
Super
Hyper
Ultra
Source:
13
69
band
(A-8
through
bandGthrough
band
(AA
through
band
(65
through
120 V AC, 60 Hz
Consumption
40XV645U: 1.9
46XV645U:2.3
52XV645U:2.9 A(rms)
Power:
A(rms)
0.2 Winstandby
A(rms)
0.3 Winstandby
0.3 Winstandby
10 W +
(maximum
(maximum
(maximum
10
mode
mode
mode
W
Type
Main:
Two
1-3/8
x6-3/8
inches
Terminals
S-VIDEO
Y:
C:
VIDEO/AUDIO
VIDEO: I V(p-p), 75 ohm, negative sync.
AUDIO:150 mV(rms) (30% modulation
ColorStream®
VIDEO:Y:1V(p-p), 75 ohm
AUDiO: 150 mV(rms), 22 k ohm or greater
INPUT:
I V(p-p), 75 ohm, negative sync.
0.286 V(p-p) (burst signal), 75 ohm
INPUT:
equivalent, 22 k ohm or greater)
(component
PR:
0.7 V(p-p),75ohm
PB:
0.7 V(p-p), 75 ohm
Suggested formats: 1080p, I080i,
480i
video)
specifications
subjecttochange
with
in-the-clear,
A-1, A
W)
ZZ, AAA,
94,100 through
current)
current)
current)
(35 x 160
HD
listed
features
through
BBB)
mm)
INPUT:
nop,
I)
135)
480p,
HDMrMINPUT:
HDMI compliant
HDCP compliant
Audio Lip Sync supported
Deep Color supported (10 bit 4:4:4,
Suggested formats: See table on the next page.
HDMI Audio:2-channel Linear-PCM; 32/44.1/
48 kHz sampling frequency; 16/20/
24 bits per sample
FIXED
AUDIO
OUTPUT:
150 mv (rms) (30% modulation equivalent, 2.2 k
ohm or less)
DIGITAL
AUDIO
OUTPUT:
Optical type
PC
INPUT:
IS-Pin D-sub Analog RGB
Dimensions
40XV645U:
46XV645U:
52XV645U:
Mass
(weight)
40XV645U: 41.91bs (19.0 kg)
46XV645U: 52.91bs (24.0 kg)
52XV645U: 70.6 Ibs (32.5 kg)
Operating
Temperature:
Humidity:
Supplied
-
Remote
batteries
-Owner's
-Securement
Use
other
and
-Cleaning
panel)
(include
Width:
Height:
Depth:
Width:
Height:
Depth:
Width:
Height:33inches
Depth:
foot
38-3/8
26-1/8
10-3/8
43-5/8
29-1/8
11-3/4
49-1/4
13-7/8
conditions
32°F - 95°F
20 - 80% (no
moisture
Accessories
control
manual
this clip to
immovable
instructionsonpage
with
Clip
attach
cloth (to
two
(this
book)
the
structure.
clean
stand)
inches
inches
inches
inches
inches
inches
inches
inches
(O°C
size"
TV to a
5.
the
cabinet
(976
(663
(263
(1,108
(740
(299
(1,252
(839
mm)
(352
- 35°C)
condensation)
AAA"
wall
See
item23on
and
mm)
mm)
mm)
mm)
mm)
mm)
alkaline
stud,
12
bit 4:4:4)
mm)
mm)
pillar,
page
control
or
3
62
Page 63
Acceptable
signal
formats
for
PC
IN
and
HDMI
terminals
PCINsignal
Note:
•
The
PC IN on thisTVonly
Since some PCs input signals which are different from the resolution
following phenomenon
this case, set the monitor output format on
•
The
signals whose vertical frequency are 56Hz, 70Hz, 72Hz,or75Hz are convertedto60Hz signal.
• When you
•
The
VGA
SVGA
XGA
WXGA
SXGA
connect
PC IN on thisTVdoes not
formats
a PC to this
640 x 480
800 x 600
1024 x 768
1280 x 768
1360 x 768
1280 x 1024
accepts
may
the signal formats which are compliant with VESA-OMT as showninthe table below.
occur: incorrect display, false format detection, picture position failure, blur,orjudder.
your
PC to conform to
TV,
it is recommended to set the refresh rateofyour PCto60Hz.
accept
59.940Hz 31.469kHz 25.175MHz •
72.809Hz 37.861kHz 31.500MHz •
75.000Hz 37.500kHz 31.500MHz •
56.250Hz 35.156kHz 36.000MHz •
60.317Hz 37.879kHz 40.000MHz •
72.188Hz 48.077kHz 50.000MHz •
75.000Hz 46.875kHz 49.500MHz •
60.004Hz 48.363kHz 65.000MHz •
70.069Hz 56.476kHz 75.000MHz •
75.029Hz 60.023kHz 78.750MHz •
59.995Hz 47.396kHz 68.250MHz •
59.870Hz 47.776kHz 79.500MHz •
74.893Hz 60.289kHz 102.250MHz •
60.015Hz 47.712kHz 85.500MHz •
60.020Hz 63.981kHz 108.000MHz •
75.025Hz 79.976kHz 135.000MHz •
the Sync on Green, Composit Sync
and
frequency
any
signalsinthe table below.
and
describedinthe table below, the
Interlace signals.
In
63
I
Page 64
HDMI
Note:
•
•
•
signal
The
HOMI inputs on thisTVonly
VESA
as the table below. Since some PCs
and
frequency describedinthe table below, the following phenomenon may occur: incorrect display, false format
detection, picture position failure, blur, orjudder.
devicetoconformtoany
The
signals whose vertical frequency are 24Hz, 56Hz, 70Hz, 72Hz, or 75Hz are convertedto60Hz signal.
When
you connect a PC to this
formats
signalsinthe table below.
accept
TV,itis
VGA,
recommendedtoset the refresh rateofyour PCto60Hz.
and
SVGA,
HOMI or
XGA,
WXGA,
OVI
devices input signals which are different from the resolution
In
this case, set the monitor output format on your
and
SXGA signal formats which are compliant with
PC,
HOMIorOVI
Format
VGA
SVGA
XGA
WXGA
SXGA
480i
480p
nop
1080i 1920 x 1080i
1080p
640 x 480
800 x 600
1024 x 768
1280 x 768
1360 x 768
1280 x 1024
no x 480i
no x 480p
1280 x
nop
1920 x 1080p
59.940Hz
n.809Hz
75.000Hz
56.250Hz
60.317Hz
n.188Hz
75.000Hz
60.004Hz
70.069Hz
75.029Hz
59.995Hz
59.870Hz
74.893Hz
60.015Hz
60.020Hz
75.000Hz
59.940/60Hz
59.940/60Hz
59.940/60Hz
59.940/60Hz
23.976/24Hz
59.940/60Hz
31.469kHz
37.861kHz
37.500kHz
35.156kHz
37.879kHz
48.077kHz
46.875kHz
48.363kHz
56.476kHz
60.023kHz
47.396kHz
47.776kHz
60.289kHz
47.712kHz
63.981kHz
79.976kHz
15.734/15.750kHz
31.469/31.500kHz
44.955/45.000kHz
33.716/33.750kHz
26.973/27.000kHz
67.433/67.500kHz
r'
PixeICIj)ckFrequ~ncy;
25.175MHz •
31.500MHz •
31.500MHz •
36.000MHz •
40.000MHz •
50.000MHz •
49.500MHz •
65.000MHz •
75.000MHz •
78.750MHz •
68.250MHz •
79.500MHz •
102.250MHz •
85.500MHz •
108.000MHz •
135.000MHz •
27.000/27.027MHz
27.000/27.027MHz
74.176/74.250MHz
74.176/74.250MHz
74.176/74.250MHz
148.352/148.500MHz
,.
·VESA'
Standard:
I 64
Page 65

Limited
for
LCD
Toshiba America Consumer
the
following limited warrantiestooriginal consumersinthe
United
States
THESE
CONSUMER
THIS
LCD
CONSUMER
PURCHASERORTRANSFEREE.
LCD
TELEVISIONS
ANYWHERE
WITHOUT
COVEREDBYTHESE
LCD
TELEVISIONS
THE
U.S.A.,
AND
MEXICO,
COVEREDBYTHESE
Limited
ACP
warrants
T
defects
year
after
PERIOD,
REPLACEADEFECTIVE
REFURBISHED
PARTSORLABOR.
Service
warranty serviceisrequired. Dependingonthe
required,
the
LCD
Station
Rental Units
The
warranty
dateofthe
shipmenttothe
Limited Warranty
ACP
warrants
T
commercial purposesasfollows:
against defects
ninety
(90)
DURING
REPAIRORREPLACEADEFECTIVE
REFURBISHED
Owner's Manual and Product Registration Card
Read
this
LCD
Television.
Complete
register
www.tacp.toshiba.com/serviceassoonaspossible.By
registering
you
new
United
Televisions
LIMITED
One
in
TACP
Station
the
Television
for
THIS
your
products specifically designedtomeet
WARRANTIES
PURCHASERORANY
TELEVISIONASA
PURCHASER
PURCHASEDINTHE
OUTSIDEOFTHE
LIMITATION,
PURCHASED
INCLUDING,
AND
(1)
Year Warranty on Parts and Labor
this
LCD
materialsorworkmanship
the
dateoforiginal
WILL,ATTACP'S
PART
personnel
service
willbetakentoa
repair
and
for
LCD
first
rentalorthirty
rental
for
LCD
in
materialsorworkmanship
days
after
PERIOD,
PART
owner's
and
your
mail
LCD
LCD
manual
the
Television
States
26"
and
Products,
EXTENDTOTHE
GIFT
ANDTONO
U.S.A.,
CANADA
WARRANTIES.
WITHOUT
USEDINTHE
WARRANTIES.
Television
retail
PART
WITHANEW
WITHOUT
During
this period,
will
cometoyour
will
eitherbeperformedinyour
returnedtoyour
Television
firm,
Commercial Units
Televisions
the
TACP
WITHOUT
enclosed product registration card
Television
rental
(30)
whichever
that
dateoforiginal
WILL,ATTACP'S
thoroughly before operating
online
you
Warranty
Larger
L.L.C.
PERSON
FROM
AND
ANYWHERE
U.S.A.,
OPTION,
CHARGETOYOU
days
all
CHARGETOYOU
THE
OTHER
U.S.A.
INCLUDING,
MEXICO,
LIMITATION,
ARE
and
its
parts against
for
a periodofone
purchase.
TACP
TACP
Authorized
homeatno
units
after
comes
are
sold
parts
are
retail
PART
at
will
enable T
("TACP")
RECEIVING
DURING
REPAIR
OR
Authorized
home
beginsonthe
the
first.
and
warranted
for
WITHANEW
makes
ORIGINAL
ORIGINAL
AND
USED
ARE
NOT
OUTSIDE
CANADA
NOT
THIS
OR
FOR
when
typeofrepair
home
Service
costtoyou.
date
of
used
a period
purchase.
OPTION,
ACPtobring
your
needs
(1)
for
this
OF
of
OR
or
and
helpusto
notificationisrequired under
Safety
registration
rights.
Your Responsibility
THE
ABOVE
FOLLOWING
(1)
You
proofofpurchase.
(2)
All
performedbyan
(3)
The
Televisionispurchased
U.S.A.orPuerto
(4)
Labor service charges
adjustmentofcustomer controls,
of
Reception
systems,
distribution,
computer
connected signal source device
(5)
Warranties
workmanshipaslimited
LCD
by
caused
lightningorfluctuationsinelectric
installation, improper maintenance,
instructions furnishedbyT
through simultaneous
connected equipment;orto
modifiedorhad
defaced,
How to Obtain Warranty Service
If,
after
and
reviewing
that
serviceisneeded:
(1)Tofind
TACP's
or
1-800-631-3811
(2)
You
of
ALL
WARRANTIES
THE
or
MERCHANTABILITY
PURPOSE,
OF
THE
THE
LAWOFANY
contact
Act.
Failuretocomplete
card
WARRANTIES
CONDITIONS:
must
retain
warranty servicingofthis
warranties
antenna
youorto
following
contact
purchasetotheTACP
Foradditional information, visitTACP's website:
U.S.A.,
EXCEPTIONOFANY
systems
problems causedbyinadequate
misaligned satellite
leve11EEE-1394
extend
Televisionorparts
by
fires,
or
the
the
nearest
websiteatwww.tacp.toshiba.com/service
TACP's
must
present
INCLUDING
ARE
LIMITED
STATEOFTHE
youinthe
does
your
original
Authorized T
from
TACP
Rico.
are
VCRs,
DVD
onlytodefectsinmaterials
damagetothe
misuse,
the
serial
rendered illegible.
allofthe
section entitled "Troubleshooting,"
EXPRESSLY
WARRANTIES
operating instructionsinthis
TACP
Consumer
.
your
www.tacp.toshiba.com
IMPLIED
THE
AND
unlikely
the
U.S.
and
not
diminish
ARE
SUBJECTTOTHE
billofsaleorprovide
LCD
ACP
are
and
operatedinthe
for
set
installation,
not
coveredbythis
dishes,
players/recorders, personal
devices,
above,
that
have
LCD
accident, ActsofGod
ACP;
useofthis
units
number
Authorized
Solution
original billofsaleorother
Authorized
BYTHE
IMPLIED
FITNESS
LIMITEDTOTHE
SET
WARRANTIES
U.S.A.ASHEREBY
eventasafety
Consumer
return
Television
Service
effective
and
are
anddonot
been
Televisionorparts
power),
useormalfunction
LCD
that
removed,
LAWOFANY
FORAPARTICULAR
FORTH
the
your
onlyifthis
setup,
installationorrepair
cable television
and
any
your
responsibility.
extendtoany
lostordiscarded
improper
or
useinviolation
Television
have
Service
Center
Service
WARRANTIES
ABOVE.
IMPLIEDBYTHE
Product
product
warranty
other
must
be
Station.
LCD
Continental
warranty.
antenna
other
or
(such
and
been
altered,
manual
you
Station,
toll
free
proof
Station.
STATE
OF
DURATION
WITH
LIMITED,
as
of
find
visit
at
OF
65
Page 66

THE
FOREGOING
OF
All
OTHER
AGREEMENTS,
WITH
RESPECTTOTHE
ANY
PARTS.INNO
CONSEQUENTIALORINCIDENTAL
(INCLUDING,
BUSINESS
ERASUREOFRECORDED
OR
INABILITYTOUSE
No
person,
authorizedtochange, modify,orextend
warrantiesinany
an
action
mustbecommencedtoenforce
T
ACP
arising under
of
the
United
ninety
(90)
days
discovered,
implied warranties arising under
U.S.A.
THIS
WARRANTY
AND
YOU
MAY
VARY
FROM
STATESOFTHE
THE
DURATIONOFAN
ACTION
LIMITATIONOFINCIDENTALORCONSEQUENTIAL
DAMAGES.
NOT
MAYBEBROUGHT,ORTHE
APPLYTOYOU
Limited
for
Toshiba
ToshibaofCanada Limited ("TCl")
limited warranties
LIMITED
CONSUMER
THIS
"TElEVISION(S)"or"Television(s)")ASA
ORIGINAL
PURCHASERORTRANSFEREE.
TELEVISIONS
ANYWHERE
LIMITATION,
COVEREDBYTHESE
TELEVISIONS
CANADA,
STATES
COVEREDBYTHESE
Limited
Subjecttothe
for
WARRANTIES
TOSHIBA
INCLUDING,
AND
One
any
commercialorbusiness purposesasset
WARRANTYISEXCLUSIVE
WARRANTIES,
AND
SIMILAR
EVENT
BUT
NOT
LIMITED
INTERRUPTION,ORMODIFICATION
THIS
agent,
distributor, dealer,orcompany
manner
the
warrantyorunder
Statesorany
from
the
the
defect.
ALSO
STATETOSTATEINTHE
THEREFORE,
This
GIVES
HAVE
U.S.A.DONOT
IMPLIED
UNDER
Canadian
Brand
PURCHASERORANY
BRAND
CONSUMER
PURCHASEDINCANADA,
OUTSIDEOFCANADA
THE
PURCHASED
MEXICO,
(1)
Year
more
Flat
to
original consumersinCanada.
EXTENDTOTHE
FLAT
UNITED
WARRANTIES.
WITHOUT
AND
WARRANTIES.
WarrantyonParts
limited warrantyifthe
GUARANTEES,
OBLIGATIONSOFTACP
REPAIRORREPLACEMENT
SHAll
DATA
whatsoever.
state
date
YOU
THE
TACPBELIABLE
DAMAGES
TO,
lOST
PROFITS,
CAUSEDBYUSE,
LCD
TELEVISION).
the
termsofthese
The
time
any
any
thereofishereby limited
you
discover,orshould
limitation does
the
SPECIFIC
OTHER
AllOW
WARRANTY,
ABOVE
SUCH
not
lawofany
lEGAL
RIGHTS
CIRCUMSTANCES.
WHICH
U.S.A.
LIMITATIONS
EXCLUSION
PROVISIONS
statuteorlaw
Warranty
Panel
PANEL
PURCHASER
STATES
ANYWHERE
USEDINCANADA,
Televisions
makes
AND
LIMITATION,
the
ORIGINAL
PERSON
TELEVISION
GIFT
ANDTONO
AND
INCLUDING,
MEXICO,
OUTSIDE
and
Televisionisused
RECEIVING
ANDINLIEU
OR
is
within
obligation
apply
stateofthe
RIGHTS
SOME
WHEN
following
FROM
USED
WITHOUT
THE
ARE
Labour
out
OF
FOR
MISUSE
which
have
to
MAY
ON
AN
OR
MAY
THESE
(the
THE
OTHER
ARE
NOT
OF
UNITED
NOT
below,
TCl
warrants
defectsinmaterialsorworkmanship
Television
original
AT
TCl'S
PART
WITHANEWORREFURBISHED
CHARGETOYOU
(a)
FOR
DELIVER
TELEVISION AUTHORIZED
("ASP").
TRANSPORTATION
FOR
of
to
(b)
FOR
period,
warranty service
repair required, the service will either
your homeorthe
repair and returned
HOME
KilOMETERS
100 KilOMETERS
THE
PAY
CHARGES
THE
Limited
TCl
warrants Televisions
business purposesasfollows:
material
Television
of
original
AT
TCl'S
PART
WITHANEWORREFURBISHED
CHARGETOYOU,
(c)
FOR
DELIVER
MUST
INSURANCE
FROM
(d)
FOR
period,
warranty service
repair required, the service will either be performed
on-site
repair and returned at no cost
SERVICE
OFANASP.IFYOU
KilOMETERS
ENTIRE
FOR
CHARGES
THE
the
Television
failing
for
a periodofone
retail
purchase.
OPTION,
TELEVISIONS32INCHES
THE
TELEVISIONS
ASP
SERVICE
ENTIRE
FOR
ASP.
Warranty
defectsinmaterialsorworkmanship
failing
retail
OPTION,
TELEVISIONS32INCHESORlESS:
PAY
THE
TELEVISIONS
ASP
or
All
ASP.
REPAIRORREPLACEADEFECTIVE
FOR
THE
ENTIRE
YOU
MUST
TELEVISION
personnel will cometoyour home when
OFANASP.IFYOU
TELEVISIONTOAN
All
TRANSPORTATION
FOR
for
for
aperiodofninety
purchase.
REPAIRORREPLACE
THE
ENTIRE
FOR
CHARGES
ASP.
personnel will come on-site when
the
Television will be takentoan
ONLY APPLIES WITHIN 100 KilOMETERS
OFANASP,
TELEVISIONTOAN
TRANSPORTATION
FOR
and
its
parts against
that
resultinthe
(1)
year
after
DURING
PARTSORlABOUR.
AND
OVER32INCHES:
is
required. Dependingonthe type of
Television will be takentoan
to
ONLY APPLIES WITHIN 100
OFANASP,
THE
Commercial
that
All
TRANSPORTATION
OVER32INCHES:
is
required. Dependingonthe type of
THE
THIS
PERIOD,
PART
OR
LESS:
TELEVISIONTOA
SERVICE
PAY
FOR
All
INSURANCE CHARGES
TO
AND
your home atnocosttoyou.
TELEVISION
FROM
ARE
YOU
ASP.
AND
TO
PROVIDER
be
MUST
Units
are
used
for
any
all
parts
are
warranted against
(90)
days
DURING
TELEVISIONTOAN
ARE
TELEVISIONTOAND
FOR
NOT
THIS
PERIOD,
THE
PART
THE
TELEVISIONTOAND
to
you.
WITHIN 100
YOU
MUST
ASP.
YOU
AND
INSURANCE
material
the
date
TCl
Will,
WITHOUT
YOU
MUST
TCl
THE
ASP.
During this
performed
ASP
NOT WITHIN
DELIVER
YOU
MUST
INSURANCE
AND
FROM
commercial
that
resultinthe
after
the
TCl
DEFECTIVE
WITHOUT
YOU
MUST
ASP.
YOU
AND
During this
ASP
ON-SITE
DELIVER
MUST
FROM
of
in
for
IN-
or
date
Will,
for
THE
PAY
I 66
Page 67

Rental
The
first
rental
Your
THE
FOllOWING
(1)
(2)
(3)
(4)
(5)
Units
warranty
rentalorthirty
firm,
for
Television
(30)
whichever
days
comes
Responsibility
ABOVE
You
purchase.
All
performedbyan
The
Televisionis(i)
TClorfrom
resellers
labour charges
customer controls,
systems
problems causedbyinadequate
your
Warranties
workmanshipaslimited
a.
b.
c.
d.
e.
f.
g.
h.
i.
WARRANTIES
CONDITIONS:
must
provide
warranty
warranties
("ADR's")
are
responsibility.
Service,
accident,
neglect, accident,
improper installation, improper operation, improper
cleaning, improper
tear,
screen
prolonged displayofstatic
or
aging,
omission
theft,
actsofGod,
surgesorpower
faults,orrepairs,
persons
the
Television;
Replacementofmissing,
provisionofretrofits,orpreventive
Repairofdamage
affect
the
tear,
scratches
ServiceonToshiba-branded accessory
accessory
warranty);
Serviceonthird
necessarybyuseofincompatible third party products;
Service
this
Television
Modificationstothe
by
TCl,
installationofnon-Toshiba
Television;
Serviceofa
logo,
rating
or
removed;
On-site
your
servicingofthis
ASP.
from
TCl
purchasedasnew
TCl's
authorized
and
for
set
and
not
coveredbythese
extend
repairsorreplacement
other
made
and
service
onlytomaterial
misuse,
any
outside
Television
abuse,
damage,
burnorimage
other
the
alteration,
shortages,
modificationsorreplacements
than
thatiscosmetic
and
items
maybecoveredbytheir
party
necessarybythe
and
service
Televisiononwhich
labelorserial
and
rental
units
begins
from
the
dateofshipmenttothe
first.
ARE
SUBJECTTOTHE
billofsaleorother
Television
are
effective
distributors,
(ii)
located/operatedinCanada.
installation,
installationorrepairofantenna
antenna
above,
maintenance,
external
controlofTCl, including
those
functionality,
dents;
connected equipment;
Television
made
repairofthe
anddonot
moisture,
24/7
retention
images
causeorevent,
power
lightning,
authorizedbyTCltoservice
discardedorlost
productsorservice
not
necessarybythe
modificationstothe
number
with
the
proof
of
must
be
onlyifthe
and
unopened
dealers
setup,
adjustment
warranties.
defectsinmaterials
made
liquids,
applications,
normal
and/or phosphor
failures,
maintenance;
onlyordoes
suchaswear
simultaneous
approvedinwriting
the
have
Television;
Reception
systems
extend
necessary
dust,
wear
caused
act
other
electrical
parts,
items
own
made
TOSHIBA
been
by
power
(such
use
defaced
and
date
from
or
are
to:
dirt,
and
or
fire,
by
not
and
use
label
by
the
of
or
j.
Damagetothe
the
of
Disclaimer
TO
EXPRESS
REPRESENTATIONS
THE
REPRESENTATIONSOFMERCHANTABILITY
FORAPARTICULAR
AND
OR
IMPLIED
REPRESENTATIONS
CONDITIONS
of
or
or
LIMITEDINDURATIONTOTHE
WRITTEN
PRECLUDEDBYLAW,
WRITTEN
DISCLAIMS
REPRESENTATION
WHETHER
AFFILIATES,
ORAllYORIN
ANY
ADVERTISEMENT,
YOU
INSTRUCTIONSINTHE
OR
MAY
DAMAGE.
SERVICE
RESULTOFANY
USAGE
APPLY
TELEVISIONISOPENED,
PERSONS
SERVICEORREPAIR
IF
THE
ABOVE,
REPAIRORREPLACEMENTOFTHE
NO
AFFILIATES.
LIABLETOYOUORANY
DAMAGES.
EXPENSES.
MONEY,
KIND
INDIRECT
PERSON,
INCONVENIENCEOROTHER
EXEMPLARYORCONSEQUENTIAL
FOR
TORT
UNDER
WHETHER
specifications,
and/or
storage.
and
THE
EXTENT
AND
IMPLIED
EXCLUDED.IFTHE
OTHERWISE,
BROCHURE,
MUST
MANUALS.IFYOU
NOT
EVENT
WHATSOEVER
BREACHOFWARRANTY,
(INCLUDING
WARRANTIES,
WARRANTIES,
AND
LIMITED
WARRANTY
ANY
MADEBYTCl,
ADRs
READ
FUNCTION
THIS
THATISREQUIRED,INPARTORIN
INSTRUCTIONS.
AND
SHAllBEVOID
OTHER
TELEVISION
YOUR
WILL
ADRsORASPs
MONEY,
THIS
REIMBURSEMENT,
DAMAGES,
lOST
ANY
OTHER
ARISING
Television
User
causedbyfailuretofollow
manualsorguidesasto
LimitationofRemedy
NOT
PRECLUDEDBYLAW,
IMPLIED
OTHER
WRITING
WARRANTY
FAilURETOFOllOW
SOLE
TCL,
PROFITS,
WARRANTIES,
FOR
THIS
TELEVISION,
CONDITIONS
PURPOSE,
APPLICABLE
PRECLUDES
CONDITIONS
THEN
REPRESENTATIONS
WARRANTY.TOTHE
STATUTORYOROTHERWISE,
SUPERCEDES
NOT
STATEDINTHIS
AND
ASPs
PRESS
POINTOFSALE
AND
FOllOW
APPLICABLE
FAilTODO
PROPERLY
THAN
THE
FAilSTOWORKASWARRANTED
AND
TOSHIBA
REIMBURSEMENT,
LIMITATION
INCLUDING
DAMAGETOPROPERTY
NEGLIGENCE),
lAWORFORMORACTION,
OUTOFTHE
ARE
THE
SUCH
TERMOFTHIS
WARRANTY,
TOSHIBA
AND
(INCLUDING
RELEASE,
Will
THIS
WARRANTY
AND
SERVICED,ORREPAIRED
THOSE
TELEVISION.
EXCLUSIVE
CORPORATION
(THE
THIRD
APPLIESTODAMAGES,
COSTSOREXPENSESOFANY
lOST
SAVINGS,
SPECIAL,
BREACHOFCONTRACT,
CONDITIONS
AND
HEREBY
LAW,
EXCLUSIONOFANY
AND
IMPLIED
ARE
EXTENT
AND
CONDITION
WARRANTY,
CORPORATION,
WHETHER
ANY
ANNOUNCEMENT,
DISPLAY,
ALL
SET-UP
USER
SO,
THIS
AND
YOU
NOT
COVER
THE
UNENFORCEABLE
AUTHORIZEDBYTCl
REMEDY
DEFECTIVE
"RELATED
PARTY
FOR
COSTS
ANY
DIRECT
INCIDENTAL,
DAMAGES,
UNDERASTATUTE
USEOFOR
usage
All
OTHER
AND
INCLUDING
AND
FITNESS
DISCLAIMED
STATUTORY
WARRANTIES,
OTHERWISE
EXPRESS
NOT
THIS
SPECIFICAllY
OR
THEIR
MADE
STATEMENT
ETC.).
AND
USAGE
GUIDES
TELEVISION
MAY
WHOLE,ASA
SET-UP
DOES
PARTIES")
ANY
AND/
SUFFER
ANY
AND
NOT
IFTHE
BY
SHAll
PART
THEIR
OR
OR
OR
WHETHER
OR
INABILITY
.
TO
BE
.ltL
BE
OR
TO
IN
67
I
Page 68

USE
THE
TELEVISION,
PARTIES
SUCH
PARTY.
No
authorizedtochange,
warrantiesinany
Arbitration
To
controversyordisagreement
breachofcontract,
and/or fraudulent misrepresentation),
under
Related
warranty;
representations,
advertising,
promotional
relationships
claims,
collectively
and
of
to
participateinany
the
applicable
agreetoopt
proceedings. Arbitrationofany
the
TCl.
conductedbyone
relatingtoarbitration generallyinforceinthe
which
extent
disagreementofany
with
HAS
BEEN
DAMAGESOROF
person,
the
resolvedbyfinal
the
waive
Related
forum
agent,
and
extent
not
any
other
Parties
disputes controversies
courts).Tothe
Failing
you
not
any
arising
(ii)
the
announcement,
material
that
referredtoas
any
right
Parties
andtothe
outofany
andinthe
such
resideatthe
precludedbylaw,noclaim,
Disputebyyou,
EVENIFANYOFTHE
ADVISEDOFTHE
ANY
CLAIMBYANY
distributor,
modifyorextend
manner
Dispute
precludedbylaw,
tort
laworformofaction)
Television;
statements,
relatingtothe
result
and
extent
that
you
representativeorclass
relatingtoany
extent
mannerasagreedtobetween
agreement,
arbitrator
other
dealerorcompany
whatsoever.
Resolution
(whether
(including negligence
out
of,orotherwise
(iii)
any
brochures,
pointofsale
from
this
and
the
"Dispute"),
binding arbitration
not
precludedbylaw,
may
havetocommence
not
precludedbylaw,
such
representativeorclass
Dispute
the
pursuanttothe
time
that
person
without
POSSIBILITY
the
any
claim,
for
underastatute
against
oralorwritten
Television;
warranty,
disagreements
Dispute.Ifand
willbeconducted
arbitration
the
Dispute
dispute, controversy
maybejoinedorcombined
the
prior
breachofwarranty,
press
display,
shallbereferred
proceeding against
written
TCl
Critical
The
"critical applications." "Critical applications"
support
implanted
nuclear facilities
Television
or
IF
CRITICAL
ITS
RESPONSIBILITY
RIGHTTOREFUSETOSERVICE
A
AND
DAMAGES
SERVICEORREFUSALTOSERVICE
Applications
Television
catastrophic property
THE
CUSTOMER
AFFILIATES,
CRITICAL
ASPs
you
have
systems,
medical
failure
APPLICATION,
medical
devices,
or
systemsorany
could
ADRsORASPs-ASSUME
FOR
APPLICATION.
HEREBY
AND
CONSEQUENCES
USES
DISCLAIM
purchasedisnot
applications, connections
commercial
leadtoinjurytopersonsorlossoflife
damage.
THE
TELEVISIONINANY
THE
CUSTOMER-AND
SUCH
USE.
ANY
TCl,
ITS
ANY
designed
transportation,
other
applications
TCl
RESERVES
TELEVISION
AFFILIATES,
AND
ARISING
SUCH
RELATED
OF
OTHER
is
termsofthese
dispute,
and
negligent
or
anyofthe
relating
(the
All
to:
releases,
or
(iv)
the
foregoing
are
(to
the
exclusion
you
or
where
you
you
will
be
laws
and
jurisdiction
arises.Tothe
consent
for
means
SOLE
TELEVISION
life
to
NOT
AND
THE
USED
ADRs
LIABILITY,
OUTOFTHE
(i)
this
to
agree
further
and
rules
in
of
any
where
TCl,
FUll
in
or
IN
AND
FURTHER
CONSEQUENCES
RESULT
CRITICAL
General
If
andtothe
should
unenforceable
and
provisionsofthis
enforceable.Ifandtothe
limited
foundtobe
(the
tobeseveredorexcluded
provision
respectofthe
To
governed
Ontario.
the
Televisionorin
the
other
generallybefoundtobe
deemed
warrantyasit
"Excluded
the
extent
If
thereisany
one
hand,
contextofthe
hand,
prevail.
HowtoObtain
If,
after
following
and
checking
serviceisneeded:
(1)Tofind
www.toshiba.ca.orcall
(2)
Present
ASP.
For
additional
www.toshiba.ca
A copy
obtainedbycontacting
(800)631-3811.
of
providing
A copyofthe
obtainedbycontacting
(800)631-3811.
of
providing
Portionsofthis
FreeType
DISCLAIM
AND
FROM
THE
USEOFTHE
APPLICATIONS.
Provisions
extent
that
any
provision
nottoform
warranty
relatestoanyofthe
invalidorunenforceableinrespectofthat
Party"),
shall
remain
otherorremaining
permittedbylaw,
and
construedinaccordance
inconsistency
and
any
the
provisionsofthis
the
the
nearest
your
information,
of
the
GPl
the
lGPl
the
Project
the
valid,
any
statementinthe
other
promotionorsale
Warranty
allofthe
"Troubleshooting"
ASP,
billofsaleorother
source
There
willbeachargetocover
source
source
There
willbeachargetocover
source
software
(www.freetype.org).
ANY
AND
All
LIABILITY,
DAMAGES
provisionofthis
shallbesevered
partofthe
shallbeand
extent
Excluded
from
enforceable
between
document
Services
operating instructionsinthis
visit
codeinthis
Toshiba
code.
Toshiba
code.
are
THAT
MAY
TELEVISIONINANY
unenforceable,
from
warranty.
remain
that
any
provisionofthis
Related
Party
the
provision,
and
Related
this
limited
visit
TCl's
toll
TCl's
Consumer
codeinthis
Consumer
copyright ©
Parties.
limited
free
warranty
with
this
limited
packagingofthe
enclosed
of,
the
Television,onthe
warranty
section,
web
1-800-268-3404
proofofpurchasetothe
website
product
product
<2007>
All
rights
ARISE
limited
the
the
The
valid
shallbedeemed
and
applicable
the
warranty,
with,orused
you
site
at
may
Solutions
Solutions
OR
warranty
warranty
remaining
and
Parties
party
the
shall
laws
of
shall
manual
find
that
at
be
at
the
costs
may
be
at
the
costs
The
reserved.
is
in
be
on
in
I
68
Page 69

Index
A
Antenna input configuration 28
Audio quality adjustments 42
Audio system connection 17
Auto Aspect 38
Auto Brightness Sensor 55
Auto power off 52
Auto Tuning 28
AutoView™
39
B
Backlight 39
Backlight Adjustment Pro 55
Base Color Adjustment.. 55
Blue Screen 30
C
CH.,..
CH
Channel
Channel lock 46
Channel Number buttons 35
Channel Tuning Mode 35
ClearFrame™
Closed captions
ColorTemperature 56
ColorMaster™ 55
ColorStream® 14
Component video 14
buttons 35
RTN
button 35
Browser™
33
54
40
D
Deep Color
Digital Audio Out.. 17
Digital audio selector 42
Digital CC Settings
DNR 54
Dolby® Digital 43
Dynamic Range Control 43
DVD
player connection 14
DVI
connection 15
DynaLightT
Dynamic Bass Boost 56
Dynamic Contrast.. 53
M
51
41
53
E
Expert Mode 54
F
Film Stabilization 53
FREEZE 38
G
GameTimer® 46
H
HDMI audio mode
HDMI settings
Deep
Color
Lip
Sync
INSTAPORpM
RGB
HDMITM
Range
connection 15
I
INFO button 52
INPUT button 32
Input Lock 46
Input label 29
INSTAPORpM
Integrated digital tuning 9
51
51
51
51
51
51
51
..
JPEG 58
L
Language selection 27
Last
mode
memory feature
LED indications
Location 30
Lip Sync
M
Manual Tuning 28
Media Player 57
MODE SELECT 20, 21, 23
MPEG
MTS 42
MUTE 42
NR
o
On Timer 48
Optical audio output format.. 43
p
Panel Lock 46
PC Audio 47
PC connection 18
PC settings 47
Picture mode 39
Picture quality 39
Picture scroll 38
Picture size selection 36
code
PIN
POWER button 20,21
Power-On
R
RECALL button 52
REGZA-L1NK® connection 16
REGZA-L1NK® feature 49
Mode
52
61
51
54
43
30
Remote control
Battery installation
Device code table
Functional
Programming
Reset Factory Defaults
Resolution+™ 53
RGB Range
key
chart
24,
19
25
22
23
31
51
S
SAP sound 42
Satellite receiver connection 14
Sleep Timer 48
StableSound® 43
Static Gamma 53
Stereo Extension 56
Stereo sound .42
SurfLock
Surround 56
System status
TM
35
31
T
TheaterLock™ feature 40
TheaterWide® picture size 36
Time Zone 30
TOSHIBA Illumination 30
Transparency 30
TV
status information 52
V
V-Chip blocking .44
VCR connection 13
Voice Enhancement.. 56
69
Page 70

TOSHIBA
Corporate Headquarters: 82 TOTOWA ROAD,
NATIONAL SERVICE DIVISION: 1420-B TOSHIBA DRIVE, LEBANON,
AMERICA
CONSUMER
WAYNE,
NJ 07470, U.S.A.
TN
37087,
PRODUCTS.
U.SA
L.L.C.
TOSHIBA
HEAD OFFICE:
SERVICE CENTERS
TORONTO:
MANUFACTURED
TOSHIBA
AutoView, Channel Browser, ClearFrame, ColorMaster, DynaLight, SurfLock, and TheaterLock are trademarks of Toshiba
America Consumer Products, L.L.C.
ColorStream, GameTimer, StableSound, and TheaterWide are registered trademarks of Toshiba America Consumer
Products, L.L.C
REGZA and REGZA-L1NK are registered trademarks of Toshiba Corporation
Resolution+ is a trademark of Toshiba Corporation.
PRINTEDINMEXICO
(09-04)
191
191
McNABB
OF
McNABB
BY
CANADA
STREET,
STREET,
MARKHAM, ONTARIO L3R 8H2, CANADA -
ELECTROMEX,
LTD.
MARKHAM, ONTARIO,
S.A.
L3R
8H2, CANADA - TEL (905) 470-5400
TEL
(905) 470- 5400
DE
C.V.
TOSHIBA
Page 71
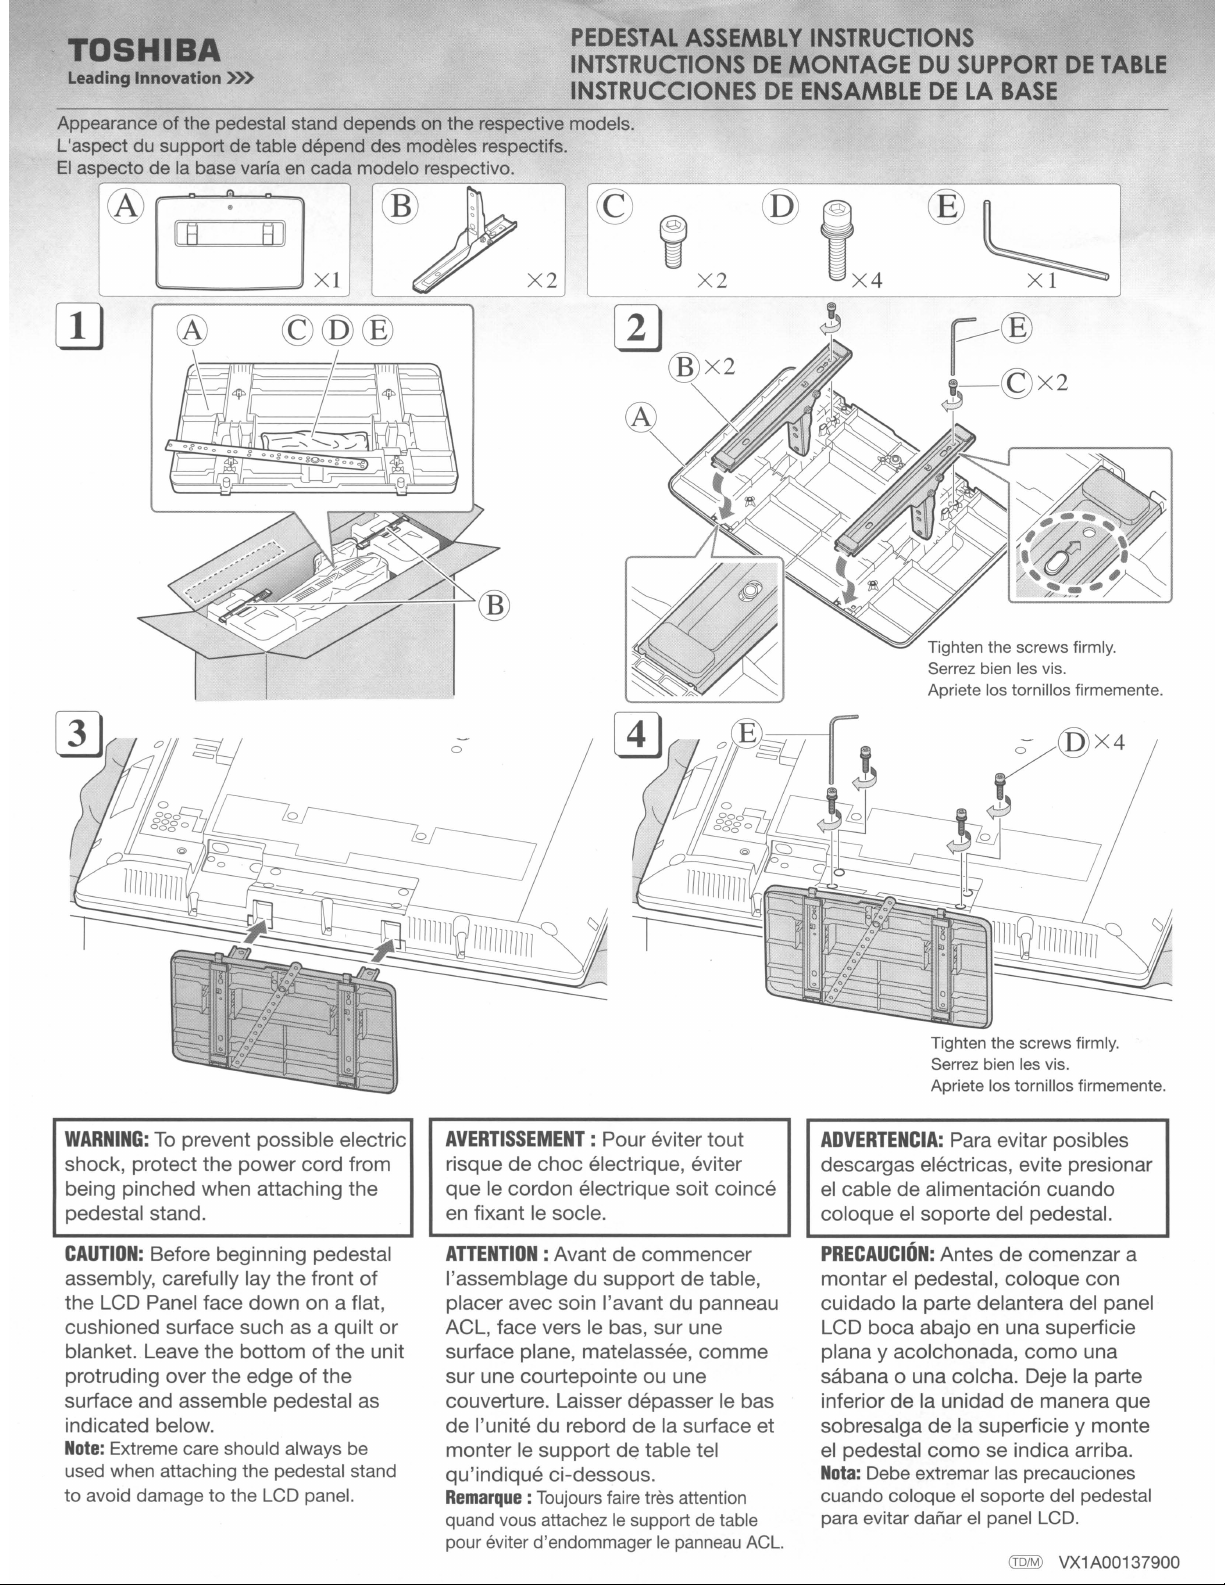
-
TOSHIBA
Leading Innovation »>
Appearanceofthe pedestal stand depends on the respective models.
de
L'aspect du support
EI
aspectodela base variaencada modelo respectivo.
table depend des modeles respectifs.
PEDESTAL
INTSTRUCTIONSDEMONTAGE
INSTRUCCIONESDEENSAMBLEDELA
ASSEMBLY
INSTRUCTIONS
DU
SUPPORTDETABLE
BASE
WARNING:
To
prevent possible electric
shock, protect the power cord from
being pinched when attaching the
pedestal stand.
AVERTISSEMENT
: Pour eviter tout
risque de choc electrique, eviter
que
Ie
cordon electrique soit coince
en
fixantIesoc
Ie.
Tighten the screws firmly.
Serrez bien les vis.
Apriete los tornillos firmemente.
Tighten the screws firmly.
Serrez bien les vis.
Apriete los tornillos firmemente.
ADVERTENCIA:
Para evitar posibles
descargas electricas, evite presionar
el
cable de alimentaci6n cuando
coloque
el
soporte del pedestal.
CAUTION:
assembly, carefully lay the front
Before beginning pedestal
of
the LCD Panel face down on a flat,
cushioned surface such as a quilt or
blanket. Leave the bottom
protruding over the edge
of
of
the unit
the
surface and assemble pedestal as
indicated below.
Note:
Extreme care should always be
used when attaching the pedestal stand
to
to avoid damage
the LCD panel.
ATTENTION:
Avantdecommencer
I'assemblage du support de table,
placer avec soin I'avant du panneau
ACL, face vers
Ie
bas, sur une
surface plane, matelassee, comme
sur une courtepointe ou une
couverture. Laisser depasser
de I'unite du rebord
monter
Ie
supportdetable tel
de
Ie
bas
la surface et
qu'indique ci-dessous.
Remarque
quand vous attachez
pour eviter d'endommager
:Toujours faire tres attention
Ie
support de table
Ie
panneau
ACL.
PRECAUCUlN:
montar
Antes de comenzar a
el
pedestal, coloque con
cuidado la parte delantera del panel
LCD boca abajo en una superficie
plana y acolchonada,
sabana
0 una colcha. Deje la parte
inferior de la unidad
sobresalga
el
pedestal
Nota:
Debe extremar las precauciones
cuando coloque
para evitar danar
de
la superficie y monte
como
el
como
una
de
manera que
se indica arriba.
soporte del pedestal
el
panel LCD.
CfQZM)
VX1
A00137900
Page 72
HDTV
Quick
Set-Up
Guide
(For
US
customers)
Congratulations
Getting HDTVisas
There are 3 basic
Over-The-
Additional
www.antennaweb.org
Once
If
HDTV
Antenna Reference Information
you have a High-Definition Signal you
you
are connecting directly fromanantennaorbasic
!
I Antenna Input
To
connect
antennaorbasic cable.
Connect
to
the
backofthe
directly
the
antenna
TV.
from
cable directly
inputonthe
on
the
purchaseofyour
easyas1,2or3.
waystoreceiveanHDTV
Air
(Antenna) 2 CABLE
Connect
antenna
to
(Reception
andisbasedonproximity
local signal)
an
the
antenna
a high quality
(not
supplied) directly
cannotbeguaranteed
If
y.u
2
HDMIT1'Iisthe
HDTV.
This
carries
digital audio.
outside
inputonthe
canbeobtained
are using an HD Cable
HDMr
is
a digital
both
TV.
to
best
connection
digital video and
Signal
from
to
HDMr
connection
new Toshiba High-Definition Television.
on your new High-Definition
Cable
subscribetoHigh-Definition
Digital Cable from
provider. (Additional monthly
subscription
or
Digital Cable
Programming makes!
Digital Satelliteisnot
needtoconnectitto
cable.
BoxorHD Satellite
DVI
connection.
TV using an
converter.
carries
digital video only.
analog audio
audio
to
BoxorHD
that
for
3
YourHDCable
DVI
a
jackonthe
DVI
DVI
a
separate
and
white
TV
Customers
HDTV.The picture qualityissuperiortostandard analog cable.
cost
will
need
your
local
may apply)
to
a High-Definition
Box.
there
are
3 standard connections
HDMr
Satellite Receiver may have
This willbeconnectedtothe
HDMIT1'I
cable
andanHDMIT1'I
Therefore,
connection
connections)
this will
as well. (use
You
Input
HDMIT1'I
to
require
the
red
must
get
HD Signal
to
get
an HD Picture!
3 SATELLITE
appropriate
may apply)
not
HDTV!
Customers
See
on
your
Satellite
High-Definition satellite receiver
and
(Additional monthly subscription
cost
butitis
TV.
that
can be usedtoreceiveanHD signal.
4 Component Video Input
ColorStream®HDComponent
receive HDTV.
ifnoHDMIT1'IorDVI
Use
There
are
3 jacks
color-coded
the
backoftheTVandHDCable BoxorHD
Receiver.
connection
This
connection.
(use
will
requireaseparate
the
red
may also be
Jackisavailable.
with Red-Green-Blue
and
white
audio
will
need
dish
hardware.
the difference
used
Satellite
analog audio
connections)
a
HD
to
on
INPUT
TV
Cable
HOm.
OUTPUT
box/Satellite
box
INPUT
TV
Hom.
OUTPUT
Cable
box / Satellite box
DVI
B5Ei5:55!:-m
R AUDIO L
~
Hom.
INPUT
TV
AUDIO
OUTPUT
Cable
box/Satellite
AUDIO
R L Y
~
•
Now
that
you
haveHDProgramming
Note:
Standard
analogTVchannels
If
you
are
experiencing
All cables and Adapters are sold separately.
For additional Toshiba Product Information visit www.tacp.com. Please remember to complete your product registration. Failure to register your product does not disminish your warranty rights.
and
are connectedtoanHDInput, TunetoanHDChannel (Remember
andHDchannels,
problems
evenonthe
same
network,
please call Toshiba
broadcastondifferent
channels.
Customer
not
Example:
Service
all
channels are
ABC
analog
currently
maybeon
at
1-800-631-381 I
broadcastinHD)
channel4,while
Sit back, relax and enjoy
ABC-HD
maybeon
channel
PaPR
104.
box
the
superior
INPUT
TV
AUDIO
R L Y
PaPR
~
qualityofHigh-Definition.
TOSHIBA
Leading
Innovation
VX1A00134900
»>
Page 73

If
you
are
experiencingatechnical
problemorhave
questions
regarding
operation,
authorized
service
centers,
warranty
or
parts,
Many
please
questions
website:
Si
vous
centres
Vous
la
trouverez
section
contact
eprouvez
de
service
egalement
Soutienala
our
Customer
regarding
des
parts,
difficultes
service,
techniques
autorises,lagarantie
des
reponsesade
clientele
de
Service
notre
Department
1-(800) 631-3811 (For
1-(800) 268-3404 (For Canadian Customers)
and
warranties
www.tacp.com (For
www.toshiba.ca (For Canadian Customers)
ousivous
ou
les
pieces,
1-(800) 631-3811 (Etats-Unis seulement)
1-(800) 268-3404 (Canada seulement)
nombreuses
site
Web:
at:
can
THANK
avez
des
veuillez
questions
US
be
answered
US
I
YOU
questions
appeler
Customers)
Customers)
www.tacp.com (Etats-Unis seulement)
www.toshiba.ca (Canada seulement)
by
visiting
the
Customer
concernantIefonctionnement
notre
sur
departement
les
pieces,Ieservice
du
Support
service a
et
les
garanties
Sectionofour
du
produit,
la
clientele
en
les
au:
visitant
MERCI
**PLEASE SEE OPPOSITE SIDE OF THIS PAPER FOR QUICK SETUP DIRECTIONS** .;>
VX1A00134900
Page 74
When
cleaning
your
cabinet,
please
first
remove
then
cloth
of
gently
or
adirty
scratch
any
dirt
wipe
other
cleaning
the
surface
or
dust
with
the
soft cloth.
cloth
of
the
from
the
enclosed
Harsh
or
stiff
cabinet.
surface
cleaning
rubbing
cloth
will
and
or
use
Quand
plait,
vous
au
debut,
poussieres
puis
a
coup
rigide
(VC/M)VX1
doucement
cet
effet
de
chiffon
rayera
A00080800
nettoyez
enlevez
qui
pourrait
nettoyez
ou
un
autre
ou
la
surface
votre
toutes
etre
avec
chiffon lisse.
I'usage
du
cabinet,
saletes
sur
d'un
la
Ie
chiffon
chiffon
cabinet.
s'iI
vous
ou
surface
prevu
Un
rude
sale
et
ou
Page 75

IMPORTANTI
TOSHIBA
Image is Everything™
Copyright
© 2004
PRODUCT
REGISTRATION
CARD
Complete and return this Product Registration Card within 10 days to receive
valuable Toshiba information. Failure to complete and return this card does not
diminish your warranty rights.
See details inside
If
you
have
comments
Toshiba America Consumer Products, L.L.C.»
All
Rights Reserved Please seal with tape. Do not staple.
or
suggestions
about
...
our
product,
82
Totowa Road
please
»Wayne,
write
NJ 07470
to:
Page 76

Please send products and other correspondence to:
Toshiba
82 Totowa Road
Wayne, NJ 07470
America
Consumer
Products, L.L.C.
Toshiba America Consumer Products, L.L.C.
First Class
Postage
Required
Post Office will
not deliver without
proper postage.
P.O.
Box 3980
Peoria, IL 61612-3980
Page 77

Congratulations for choosing Toshiba, a leader in developing tomorrow's technology today, Toshiba is committed to producing high-quality, reliable and innovative products.Touphold
our commitment to excellence, we need to understand our customers' needs.
Please complete the following Product Registration Card. The information we are asking from you below will help us bring you new products specifically designed
needs. By registering your product you will automatically be enrolled in our Consumer Information Program, which provides you with the following benefits:
1. PRODUCT
2. CONFIRMATION
theft, your registration will serve as your proof of purchase for insurance purposes.
3.
WARRANTY SERVICE: Filling out this card will help us contact you in case there is a problem with this product.
1. D
SAFETY
IMPORTANT: Please
Mr.
D Mrs. D Ms. D Miss Email address I I
NOTIFICATION: Registering our product will allow us to contact you in the unlikely event a product safety notification is required.
OF
OWNERSHIP: We will keep the model number, serial number, and other information on this card in our files for uptoten years. In the event of fire, flood or
register
your
product
within10daysbymailorregister
online@www.tacp.toshiba.comlregister
to
meet your
Date of
Purchase
Area Code Area Code Month Day Year
IMPORTANT! To
3. Model Number
5.
Price paid (excluding tax) $
Have you purchased a service contractorextended warranty for this product?
6.
1.
2. No, but contract was offered by my retail dealer
3.
a.
1.
2.
b.
1
r----..-'-'-..---·--
\
I
I
'"
ensure
your
enrollmentinToshiba's
U-Lll-lJ
§
Yes,
from my retail dealer
No, contract was not offered
If you answered ''yes'' to6,how long does your service contract or exlended warranty last?
D 1 Year 3. D 3 Years
D 2 Years 4. D More than 3 Years
Would you like to obtain more information from Toshiba on exlended warranties:
DYes
With#1being
1.
Where do
---
newspaper
tech magazines TV - projection TV
news broadcasts TV - tabletop
the
you
get new product information?
2. D No
-
'----~~-~---~-,,-~_
most
important,
Consumer
prioritize
Information
.00
the
following:
Program,
..
_~._--'.-'
write
4. Serial Number
the
complete
Check all
5.
Which of the following products do you own?
Product
model
numberofthe
7. Where was this product purchased?
01.
~
Received as a Gift
02.
Department Store
03. Discount Store
04.
TV/Appliance Store
05. Specialty/Electronics Store
06. WarehouselMembership Club
--'-,-
..
that
----~-
apply
--
......
-.-
UJUJUJ
product
you
purchasedinthe
07.
08.
09.
10.
11.
~
....-....--......
Manufacturer
Catalog Showroom
Rental Dealer
Mail Order
Premium Offer
Other
----.
! on-line TV Combination
i product literature TV - flat panel/plasma
! retail salesperson
! other Home Theater
DVD
player
in
a Box
i TiVo®
I
2.
What resources do you use to make your purchase decision? Home Networking Server
I,
I,
___
! other Receiver
','
3.
What do you look for when purchasing CE products: Other
!
,
___
'I'
'-
__
___
___
1
---
I
!
Why did you choose this product?
!
4.
___
___
___
I
___
I
___
___
___
I
---
1
friends/family Computer
on-line research Audio Player
retail salesperson Digital Camera
product reviews Digital Camcorder
Speakers - stand alone
style, cosmetics
picture quality
brand
quality
price
technology
reliability
brand image
quality
price
purchased other Toshiba products
technology
reliability
recommended by a friend/family
product reviews
,_-
......-
._,
__• •__,__- • _
_ , ,
6.
May we contact you?
DYes
Thanks for taking the time to fill out this
questionnaire. Your answers will
market research studies and reports.
D Please check here
you would prefer not to participate
D No Email: _
if,
for some reason,
._~
be
used for
in
the opportunity.
(YC/M)
space
below.
IoId here
~
VX1A00125200
__J
I
I
I
i
i
1
~
,
I
j
I
 Loading...