


3N70401A/COVER 7/4/03, 5:14 PM1
MODEL 15V31B
SETTING UP
This equipment has been designed and manufactured to meet international safety standards but, like any electrical
equipment, care must be taken if you are to obtain the best results and safety is to be assured. So, please read the
They are of a general nature, intended to help you with all your electronic
consumer products and some points may not apply to the goods you have just purchased.
DON'T throw your old batteries into a fire, dispose of
them in a designated disposal area.
ABOVE ALL – NEVER let anyone, especially
TO FULLY DISCONNECT THE TV, SWITCH OFF
THE MAINS SOCKET AND REMOVE THE POWER
PLUG.
children, push anything into holes, slots or any
other openings in the case – this could result in a
NEVER guess or take chances with electrical
equipment of any kind – it is better to be safe
than sorry.
Air Circulation… Do not…
Heat Damage…
Mains Supply…
Do…
SETTING UP
Air Circulation… Do not…
Heat Damage…
Mains Supply…
Do…
SETTING UP
Air Circulation… Do not…
Heat Damage…
Mains Supply…
Do…
For your safety
SETTING UP
points below for your own safety.
DON'T remove any fixed cover as this may expose
dangerous voltages.
DON'T obstruct the ventilation openings of the
equipment with items such as newspapers,
tablecloths, curtains, etc. Overheating will cause
damage and shorten the life of the equipment.
DON'T allow electrical equipment to be exposed to
dripping or splashing or objects filled with liquids,
such as vases, to be placed on the equipment.
DON’T place hot objects or naked flame sources,
such as lighted candles or nightlights on, or close to
equipment. High temperatures can melt plastic and
lead to fires.
DON'T use makeshift stands and NEVER fix legs with
wood screws. To ensure complete safety, always fit the
manufacturer’s approved stand or legs with the fixings
provided according to the instructions.
DON'T listen to headphones at high volume, as such
use can permanently damage your hearing.
DON'T leave equipment switched on when it is
unattended, unless it is specifically stated that it is
designed for unattended operation or has a standby
mode. Switch off using the switch on the equipment
and make sure your family know how to do this.
Special arrangements may need to be made for
infirm or handicapped people.
DON'T
continue to operate the equipment if you are
in any doubt about it working normally, or it is
damaged in any way – switch off, withdraw the mains
plug and consult your dealer.
fatal electric shock.
Leave at least 10cm clearance around the television to
allow adequate ventilation. This will prevent the TV
from overheating and consequential possible damage
to the TV. Dusty places should also be avoided.
Damage may occur if you leave the TV in direct sunlight
or near a heater. Avoid places subject to extremely high
temperatures or humidity, or locations where the
temperature is likely to fall below 5°C (41 °F).
The mains supply required for this equipment is
230-240V
AC 50Hz. Never connect to a DC supply
or any other power source. DO ensure that the TV is
not standing on the mains lead.
In the UK, the fuse
fitted in
this plug is 5A, and is approved by ASTA
or BSI to BS1362. It should only be replaced by a
correctly rated and
approved type and the fuse cover
must be
refitted. IF IN DOUBT PLEASE CONSULT
A COMPETENT ELECTRICIAN.
DO read the operating instructions before you attempt
to use the equipment.
DO ensure that all electrical connections (including the
mains plug, extension leads and inter-connections
between pieces of equipment) are properly made and
in accordance with the manufacturers’ instructions.
Switch off and withdraw the mains plug before making
or changing connections.
DO consult your dealer if you are ever in doubt about
the installation, operation or safety of your equipment.
DO be careful with glass panels or doors on
equipment.
Air Circulation… Do not…
Heat Damage…
Mains Supply…
Do…
3N70401A/COVER 7/4/03, 5:14 PM2

Features
• Your television has an Automatic Tuning System which makes tuning in your television easy. This
Automatic Tuning System scans the entire reception range in your area and automatically stores all
available channels of suitable signal strength. This will allow you to obtain the best possible sound and
picture. Your television store BBC1 in channel position 1 and BBC 2 in channel position 2 etc. Channel
6 is reserved for the channel from satellite system, cable or digital terrestrial STB. Your television also
has a scart connecter allowing improved reception from a VCR, Satellite system, a DVD player, cable
or digital terrestrial STB connections.
• The programmable on and off timer can be set to switch your television automatically. If the channel
being viewed stops broadcasting, your television will switch to standby after 15 minutes.
• The remote control allows you to operate the various functions of your television (when switched on)
from the comfort of your favourite viewing position.
• The on screen display allows precise remote control adjustment of brightness, contrast, colour and
sharpness. When you select a channel or make other changes, your television will show an indicator
on the screen for a few seconds.
• Your TV can be connected to a video cassette recorder for enhanced picture and sound quality using
a SCART lead.
• Your TV allows you to access Teletext, the magazine services operated by television companies. A
variety of information is available including News, Weather, Financial and Travel information. In
addition to Teletext your television incorporates Fastext.
remote control you may move around Teletext services with greater ease and speed.
Using the four coloured Fastext buttons on the
Contents
Television and remote control ...........................................................................................2
How to insert batteries in the remote control.....................................................................3
Connecting an aerial or a VCR .........................................................................................4
Connecting a VCR/Satellite/Cable/Digibox using a SCART lead......................................5
How to tune in television stations......................................................................................6
Channel Mapping ..............................................................................................................8
Manual Tuning ................................................................................................................10
Operating your television ................................................................................................12
Adjusting the picture........................................................................................................14
On screen information.....................................................................................................15
Setting the Panel Lock protection ...................................................................................16
EXT COLOUR Adjusting .................................................................................................17
Timer functions................................................................................................................18
Language selection .........................................................................................................19
Teletext feature ...............................................................................................................20
Before requesting service please check the following points..........................................24
Specifications .................................................................................................... back cover
3N70401A/P01-07 7/4/03, 5:14 PM1
1
1
Television and remote control
The majority of buttons listed in this section have the same function as the corresponding buttons on the remote control.
Front view of your TV
VIDEO2 AUDIO
Back view of your TV
Main power
switch ON/OFF
Remote
control sensor
Power indicator
On Timer indicator
Volume UP/DOWN buttons
Remote Control
Earphone socket
Video (EXT2)/Audio sockets
Channel UP/DOWN buttons
Aerial socket
SCART (EXT1) socket
Call/Text Index
Text/Mix/TV
Standby
~
Previous
Input Select
Selectable Picture
Mute
Exit
CH Down
Mains lead
Page
15, 22
20~22
6, 12, 19
12
15
13
7~10, 14~19
14
13
6~9, 11, 14~20
7~12, 14, 16~19, 21CH Up
7~12, 14, 16~19, 21
2
3N70401A/P01-07 7/4/03, 5:14 PM2
Volume Down
Sub Page
Reveal
Hold
10~11, 13~14
8, 10, 11, 13~14Volume Up
6~11, 14, 16~19
20, 21Four Coloured Fastext keys
22
23F/T/B
18ON/OFF Timer Set
23
22
22, 23Time/Text Cancel
How to insert batteries in the remote control
Push and lift the battery cover on the back of the remote control. Use two UM4 / AAA / IEC R03 1.5V batteries
for the remote control. Insert the batteries according to the polarity illustration inside the battery compartment.
Make sure + matches + and – matches –.
NOTES:
The batteries may last approximately
one year depending on how much
the remote control is used. For best
performance it is recommended that
batteries are replaced on a yearly
basis, or when remote control
operation becomes erratic.
Do not mix old and new batteries or
different types.
Dispose of them in a designated
disposal area.
Weak batteries can leak and
severely damage your remote
control. Always remove batteries
immediately they become weak, or
if your television is not to be used
for a long time.
5 metres
Remote control operation may
become erratic if direct sunlight,
fluorescent lamp, standard
household lamp (incandescent) or
any other strong light source shines
on the remote sensor on your TV.
Make sure there are no obstacles
between your TV and the remote
control.
Do not operate your TV from a
distance greater than 5 metres.
Do not operate your TV away from
the normal viewing angle; over 30
either side of the remote sensor on
your TV.
o
3N70401A/P01-07 7/4/03, 5:14 PM3
3
Connecting an aerial or a VCR
Your television can be tuned to receive up to 100 television broadcast stations (1-100). Before you can tune in these
stations your television must be connected to an aerial.
improve the TV's reception.
Using an external aerial instead of the loop aerial may
(supplied)
Aerial
Loop aerial
(not supplied)
Back view of your TV
If you wish to record and playback through a VCR please follow the guidance given on this and the opposite page.
Back view of your TV
(not supplied)
Aerial
Aerial connector lead
Back view of a VCR
IN
OUT
(not supplied)
(not supplied)
NOTES:
• All connections must be made with both your TV and VCR unplugged from the mains supply.
• The type of aerial required depends on the position of your home, it's distance from the transmitter and local
interference. If you do not have an aerial and you are uncertain of what to buy, you should seek the advice of a
local aerial contractor.
4
3N70401A/P01-07 7/7/03, 10:02 AM4
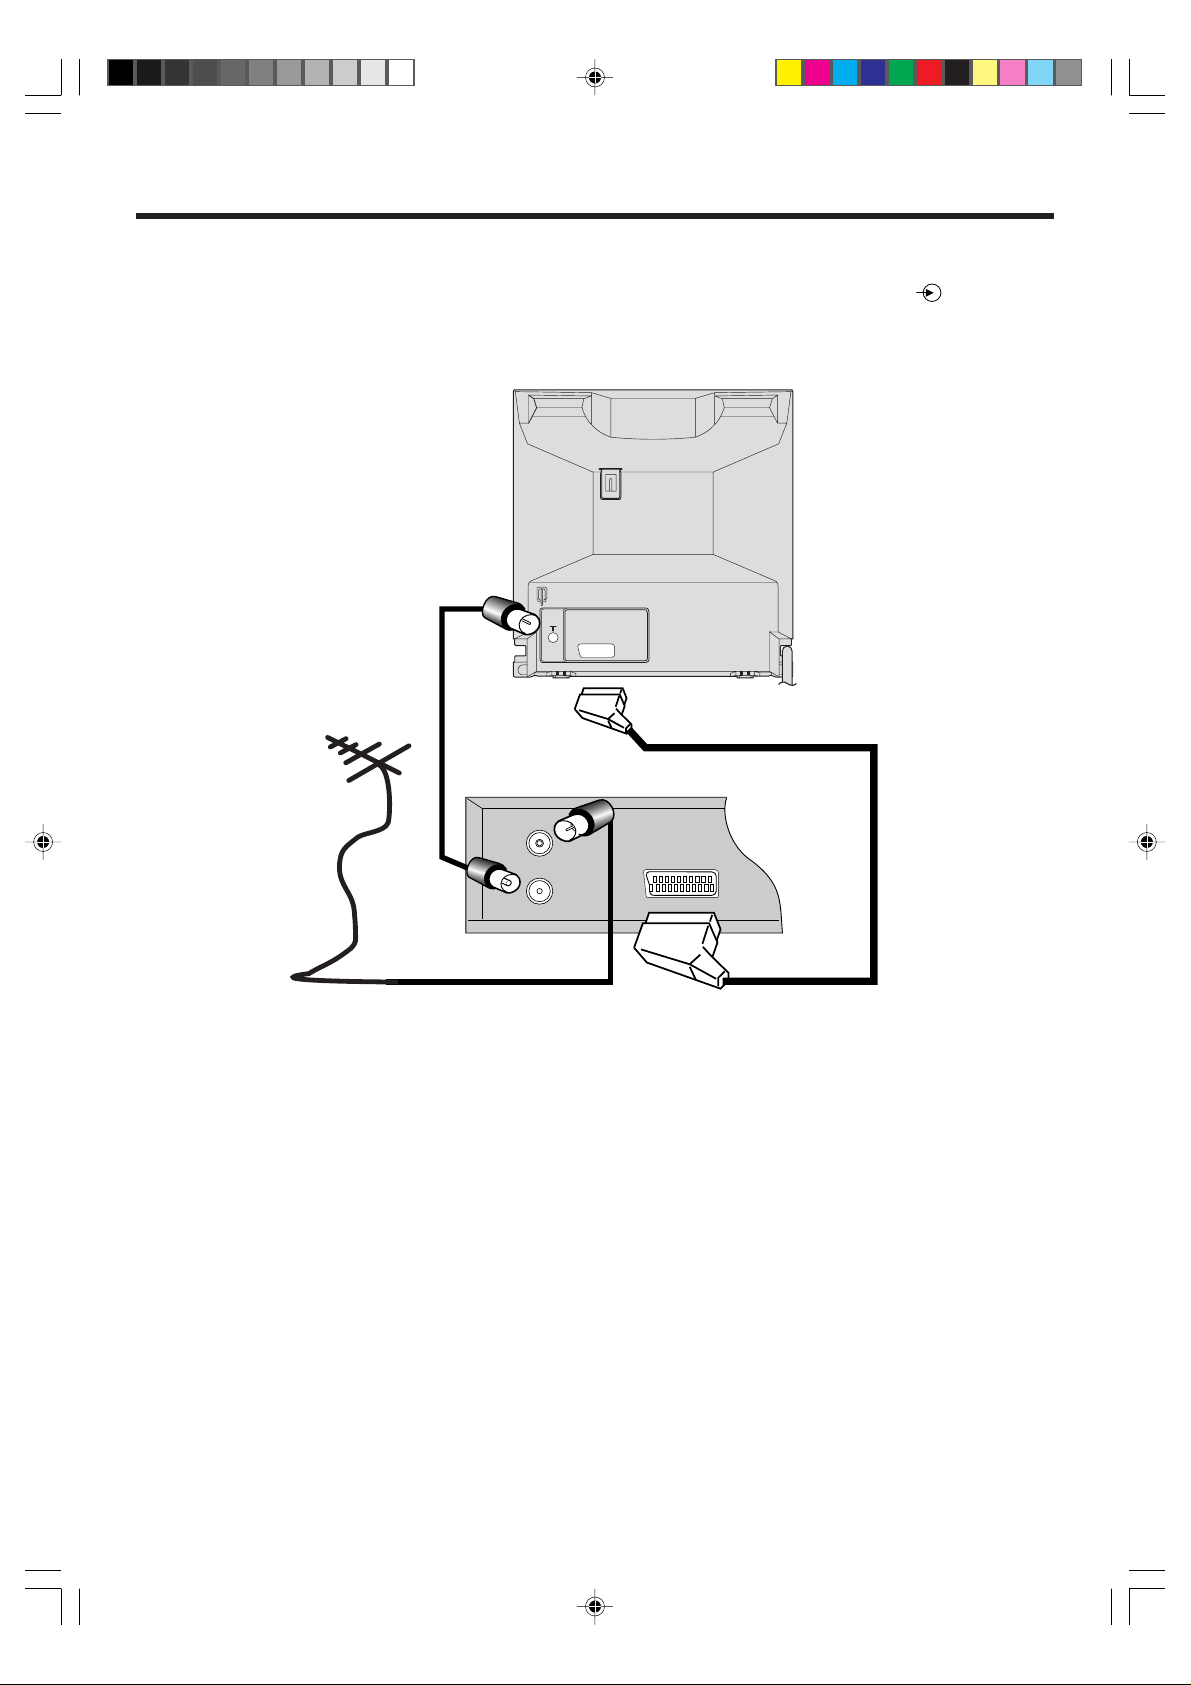
Connecting a VCR/Satellite/Cable/Digibox
using a SCART lead
By using a SCART lead you can improve the quality of playback. Remember you must still have the "normal"
aerial connector connected as shown on the opposite page. If you are using a SCART lead you should not have
to tune your TV to your VCR; instead select the appropriate EXT input by repeatedly pressing the (INPUT
SELECT) button on the remote control until you see the signal from the VCR.
Back view of your TV
Aerial connector
(not supplied)
Aerial
NOTES:
• All connections must be made with both your TV and VCR unplugged from the mains supply.
• The type of aerial required depends on the position of your home, it's distance from the transmitter and local
interference. If you do not have an aerial and you are uncertain of what to buy, you should seek the advice of a
local aerial contractor.
lead
(not supplied)
To EXT1
Back view of a VCR/Satellite/Cable/Digibox
IN
OUT
To Aerial
OUT of VCR
SCART lead
To Aerial IN of VCR
(not supplied)
(not supplied)
3N70401A/P01-07 7/7/03, 10:02 AM5
5
How to tune in television stations
Your television has an Automatic Tuning
System which makes tuning in your
television easy. This Automatic Tuning
System scans the entire reception range
in your area and automatically stores all
available channels of suitable signal
strength in the correct order e.g. BBC1
will tune into channel 1, BBC2 will tune
into channel 2, etc.
Before you can view a television station it must be stored in your
television memory, this section will show you how to achieve this. You
cannot tune TV channels if the aerial is not connected to the aerial
socket of your television.
Make sure that your TV is properly installed.
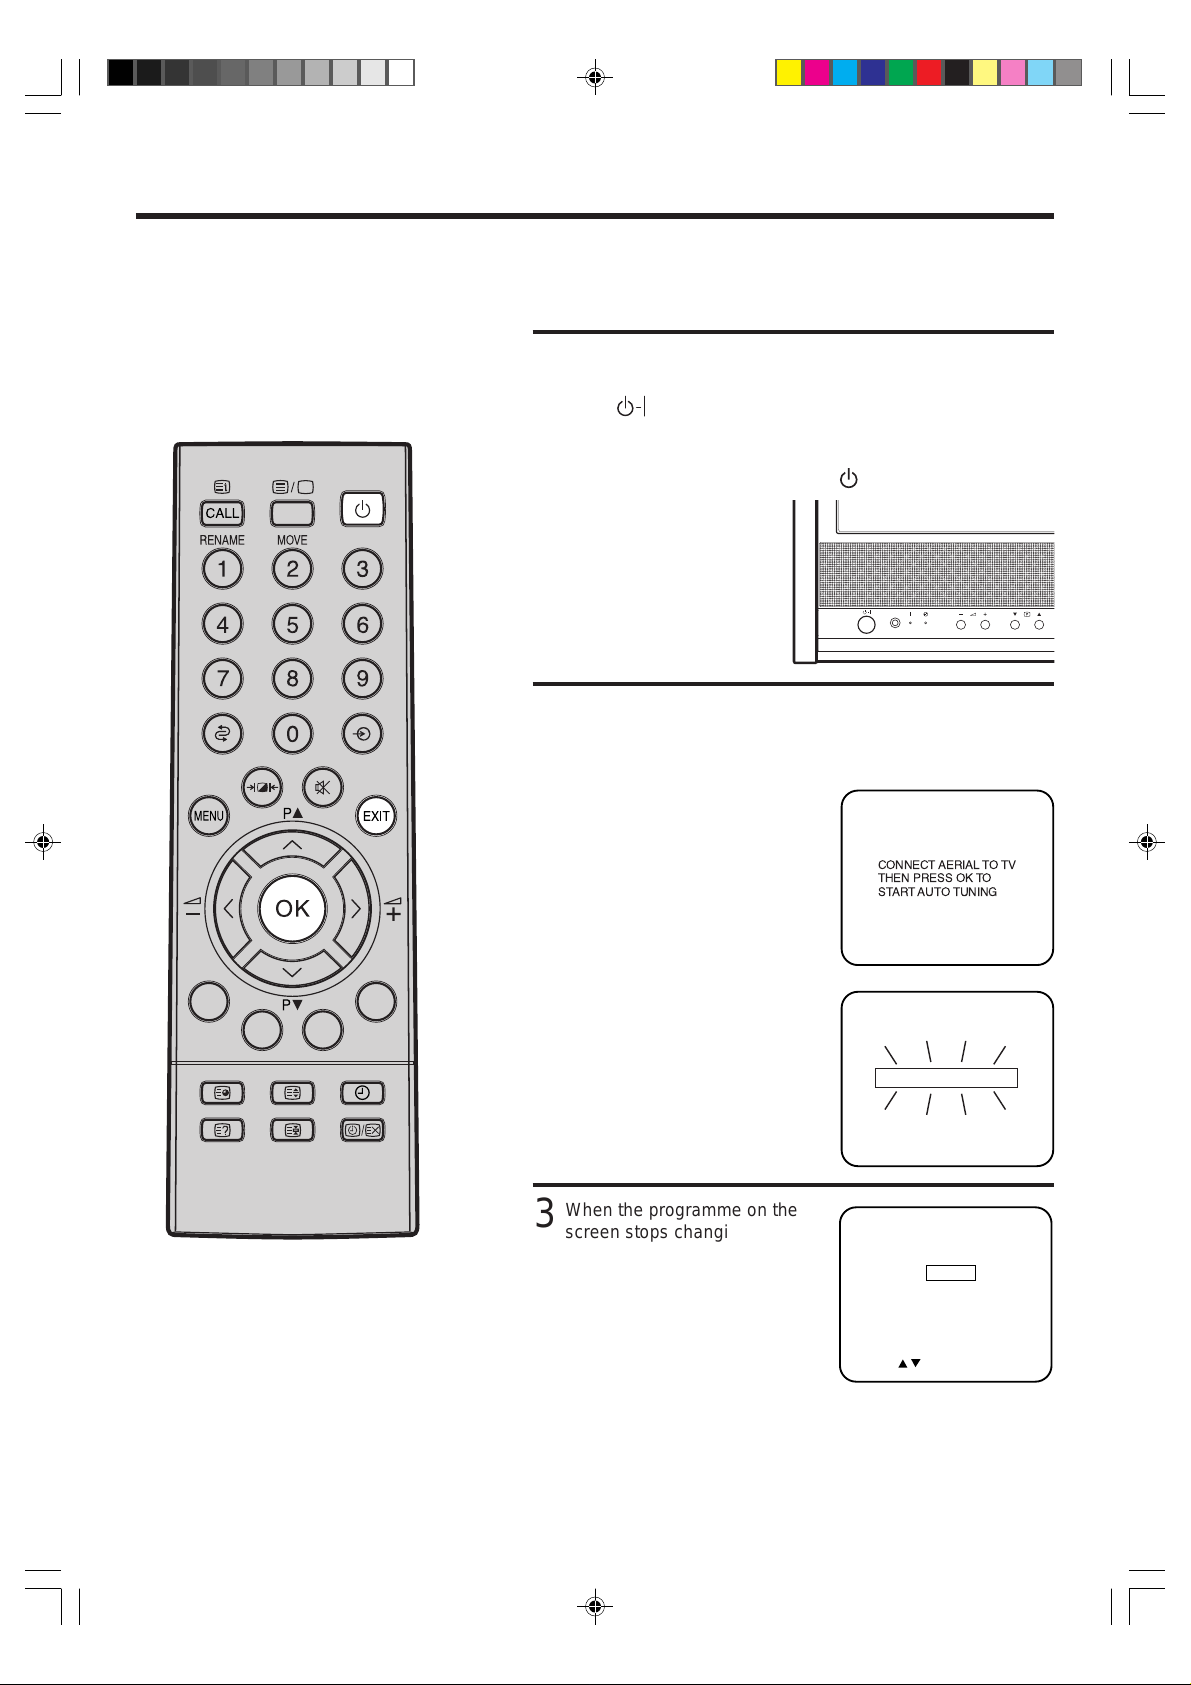
1
Press (main power) switch on the front panel, the red
standby indicator will light.
Switch on your television by pressing
(standby) on the remote
control.
If you have a VCR connected make sure that it is switched
2
on and it's test pattern is switched on or a video is playing . . .
you will be unable to see anything at the moment!
NOTES:
• ONLY WHEN YOU TURN ON THIS SET
FOR THE FIRST TIME, THE AUTOMATIC
TUNING PROCESS WILL START
AUTOMATICALLY.
• Please refer to your Satellite instruction
book to see how to select Sky One.
6
If you have a Satellite system
connected make sure that it is
switched on and you have
selected Sky One. . . you will
CONNECTAERIAL TO TV
THEN PRESS OKTO
START AUTO TUNING
be unable to see anything at
the moment!
Press OK on your remote
control!
Your TV will now automatically
tune in all available channels.
When the programme on the
3
screen stops changing and the
sound comes on, the tuning
process is complete.
AUTOMATIC TUNING
CHANNEL MAPPING
1 BBC1
2 BBC2
3 ITV
4 CH4
5 CH5
6SAT1
7
8
9
10
Press EXIT to clear the
CHANNEL MAPPING menu
PRESS : / / RENAME / MOVE/MENU/EXIT
display.
Your TV is now tuned in and ready to watch...
If you wish to change the order that the stations are
stored in, refer to the Channel Mapping section in this
book.
11
12
13
14
15
3N70401A/P01-07 7/4/03, 5:15 PM6
How to tune in television stations
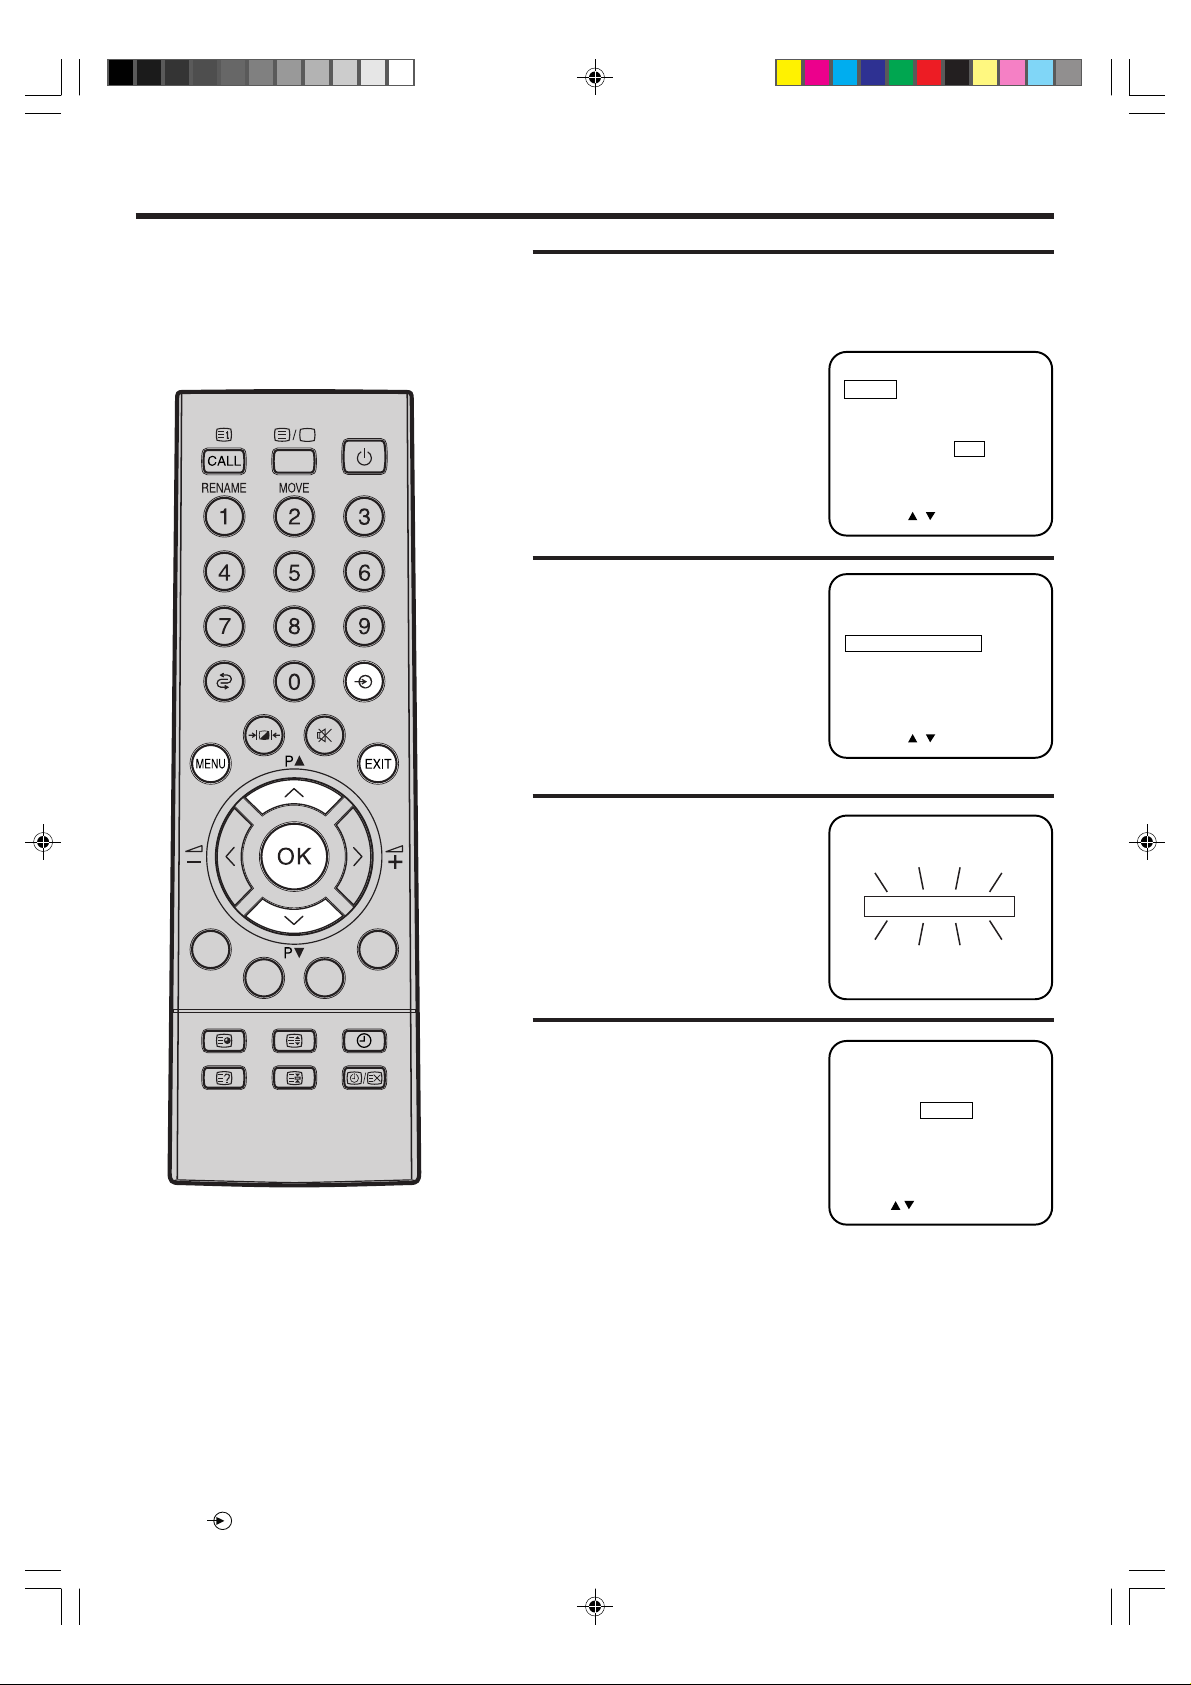
Press MENU on your remote control. The on screen display
1
will appear.
Press P ▲ or P ▼ on your remote control to select SETUP
menu.
ON/OFF TIMER
• When you plug the AC mains
lead in for the first time, the
Language menu will appear
instead of the main control
menu. Select the language
required.
SETUP
PICTURE
EXT COLOUR AUTO
LANGUAGE
PANEL LOCK ON OFF
PRESS :
/
/ OK / MENU / EXIT
NOTE:
Your TV stations, Video (if connected) and
Satellite (if connected) should be tuned in
the following order:
BBC 1 channel 1
BBC2 channel 2
ITV channel 3
CHANNEL 4 channel 4
CHANNEL 5 channel 5 (if receivable)
SATELLITE channel 6
VCR channel 7
Your VCR will be stored in a channel
position if connected with an aerial lead to
the TV. If it is connected by just a SCART
lead your VCR can be viewed by
pressing
.
Press OK to confirm.
2
The SETUP on screen display
will appear.
Press P ▲ or P ▼ to select
SETUP
MANUAL TUNING
AUTOMATIC TUNING
CHANNEL MAPPING
AUTOMATIC TUNING.
PRESS :
/
/ OK / MENU / EXIT
Press OK to confirm. This will
3
start the automatic tuning
process.
• This process will take a few
minutes to complete ... please
AUTOMATIC TUNING
be patient.
When the programme on the
4
screen stops changing and the
sound comes on, the tuning
process is complete.
Press EXIT to clear the
CHANNEL MAPPING menu
display.
CHANNEL MAPPING
1 BBC1
2 BBC2
3 ITV
4 CH4
5 CH5
PRESS : / / RENAME / MOVE/MENU/EXIT
6SAT1
7
8
9
10
Your TV is now tuned in and ready to watch ... If any
stations have been missed refer to the Manual Tuning
section in this book.
11
12
13
14
15
7
3N70401A/P01-07 7/4/03, 5:15 PM7

Channel Mapping
Broadcast names can be changed or added by
using the Channel Mapping menu below.
TO CHANGE A BROADCAST NAME
Press MENU on your remote
1
control. The on screen display
will appear.
Then press P▲ or P▼ to select
SETUP menu. Press OK to
confirm.
Press P▲ or P▼ to select
2
CHANNEL MAPPING menu.
Press OK to confirm.
Press P▲ or P▼ to select the
3
TV section to be named.
Press the number “1” to
rename a broadcast. The
CHANGE BROADCAST
NAME menu will appear.
ON/OFF TIMER
SETUP
PICTURE
EXT COLOUR AUTO
LANGUAGE
PANEL LOCK ON OFF
PRESS :
/
/ OK / MENU / EXIT
SETUP
MANUAL TUNING
AUTOMATIC TUNING
CHANNEL MAPPING
PRESS :
/
/ OK / MENU / EXIT
CHANNEL MAPPING
1 BBC1
2 BBC2
3 ITV
4 CH4
5 CH5
6 SAT1
7
8
9
10
11
12
13
14
15
PRESS : / / RENAME / MOVE/MENU/EXIT
Press P▲ or P▼ to name the
4
desired letter, then press
to store.
Repeat these steps for the
next character, then press OK.
The display changes as
follows:
A B
…
Z 0
CHANGE BROADCAST NAME
+
1 BBC1
2 BBC2
3 ITV
4 CH4
5 CH5
PRESS : / /
…
+–
(Space)
Repeat the step 3 and 4 for other TV stations.
Press EXIT to remove the menu from the screen.
9
6 SAT1
7 A
8
9
10
+ / -
/OK/MENU/EXIT
11
12
13
14
15
.
/
8
3N70401A/P08-15 7/4/03, 5:15 PM8

In some cases, your channels will not tune in
the correct order. In this case you may wish to
move the position of one of the stations.
TO MOVE THE TV STATION TO ANOTHER CHANNEL
POSITION
Example: Move the TV station from position 8 to position 9.
Press MENU on your remote
1
control. The on screen display
will appear.
Then press P▲ or P▼ to select
SETUP menu. Press OK to
ON/OFF TIMER
SETUP
PICTURE
EXT COLOUR AUTO
LANGUAGE
PANEL LOCK ON OFF
confirm.
PRESS :
/
/ OK / MENU / EXIT
Press P▲ or P▼ to select
2
CHANNEL MAPPING menu.
Press OK to confirm.
Press P▲ or P▼ to select the
3
TV station to be moved.
SETUP
MANUAL TUNING
AUTOMATIC TUNING
CHANNEL MAPPING
PRESS :
/
/ OK / MENU / EXIT
CHANNEL MAPPING
1 BBC1
2 BBC2
3 ITV
4 CH4
5 CH5
6 SAT1
7
8
9
10
11
12
13
14
15
Press the number “2” to
4
move a broadcast.
The MOVE CHANNEL menu
will appear.
Press P▲ or P▼ to select the
5
position number to which the
selected TV station is to be
moved.
Then press OK to store.
Repeat the step 3 to 5 for
other TV stations.
Press EXIT to remove the
menu from the screen.
PRESS : / / RENAME / MOVE/MENU/EXIT
MOVE CHANNEL
1 BBC1
2 BBC2
3 ITV
4 CH4
5 CH5
PRESS : / / OK/MENU/EXIT
MOVE CHANNEL
1 BBC1
2 BBC2
3 ITV
4 CH4
5 CH5
PRESS : / / OK/MENU/EXIT
6 SAT1
7
8
9
10
6 SAT1
7
8
9
10
8
11
12
13
14
15
8
11
12
13
14
15
9
3N70401A/P08-15 7/4/03, 5:15 PM9

Manual Tuning
In certain areas of the countries which have
poor reception the Automatic Tuning System
may not tune your television to the strongest
broadcast signal. If you are not satisfied with
the automatic tuning you may manually tune
your television to obtain the best possible
picture and sound.
Select your TV channel to
1
select your required channel
number for tuning by pressing
P▲ or P▼.
Press MENU on your remote
control.
Press P▲ or P▼ to select
2
SETUP menu. Press OK to
confirm.
Press P▲ or P▼ to select
3
MANUAL TUNING.
Press OK to confirm.
ON/OFF TIMER
SETUP
PICTURE
EXT COLOUR AUTO
LANGUAGE
PANEL LOCK ON OFF
PRESS :
/
/ OK / MENU / EXIT
SETUP
MANUAL TUNING
AUTOMATIC TUNING
CHANNEL MAPPING
CH 2
Press + to search up the
4
waveband or
down the waveband.
Each time a station is found
the search will stop.
• If you need to make the
picture clearer, press P▲ or
P▼ for Fine Tuning.
• Press
searching until the station
you want is found.
– to search
+ or – to continue
PRESS :
PRESS : +/
/
/ OK / MENU / EXIT
-
/ OK / MENU/EXIT
CH 2
10
3N70401A/P08-15 7/4/03, 5:15 PM10

Manual Tuning
Press OK to store the station you selected.
5
Press P▲ or P▼ to select
your required channel position
number (1~100).
Press OK to store the channel
number.
• Use the channel guide on
page 7 for guidance.
Repeat stages 4 - 5 for
6
tuning other channels.
Press EXIT to remove the
tuning menu from the screen.
TO SKIP A CHANNEL:
If at a later date you wish to skip an unwanted channel when
using P▲ or P▼, select the channel and press
the remote control at stage 5.
PRESS :
+/-/ / /
OK / MENU/EXIT
CH 2
or on
• The channel number will
flash when skip is selected
for that channel.
To cancel the skip function,
select the channel and press
or at stage 5. The
channel number will cease to
flash.
PRESS :
+/-/ / /
CH 2
OK / MENU/EXIT
3N70401A/P08-15 7/7/03, 10:04 AM11
11

Operating your television
The next two pages detail how to use your TV's
basic features; standby, changing channel, and
adjusting the volume.
1
Press (main power) switch on the front panel, the red
indicator will light.
Switch on your television by pressing
remote control.
(standby) on the
To set your TV into standby mode, press
2
the remote control.
The (standby) button on the remote control doesn't
switch the set off completely it only switches it to standby
mode. To turn your television off completely, switch off
(main power) on the front panel and unplug the television at
the wall socket.
Press the numbered buttons to select channels.
3
When selecting channels, press two numbered buttons. For
example, for channel 3 press 3, for channel 25 press 2 then 5.
Press P▲ or P▼ to select channels in sequence; e.g. 1, 2, 3,
4 etc.
• When a channel is selected the channel number is displayed
in the top right corner of the screen.
Use the
switch the TV on from standby mode.
(standby) button on the remote control to
(standby) on
12
3N70401A/P08-15 7/4/03, 5:15 PM12
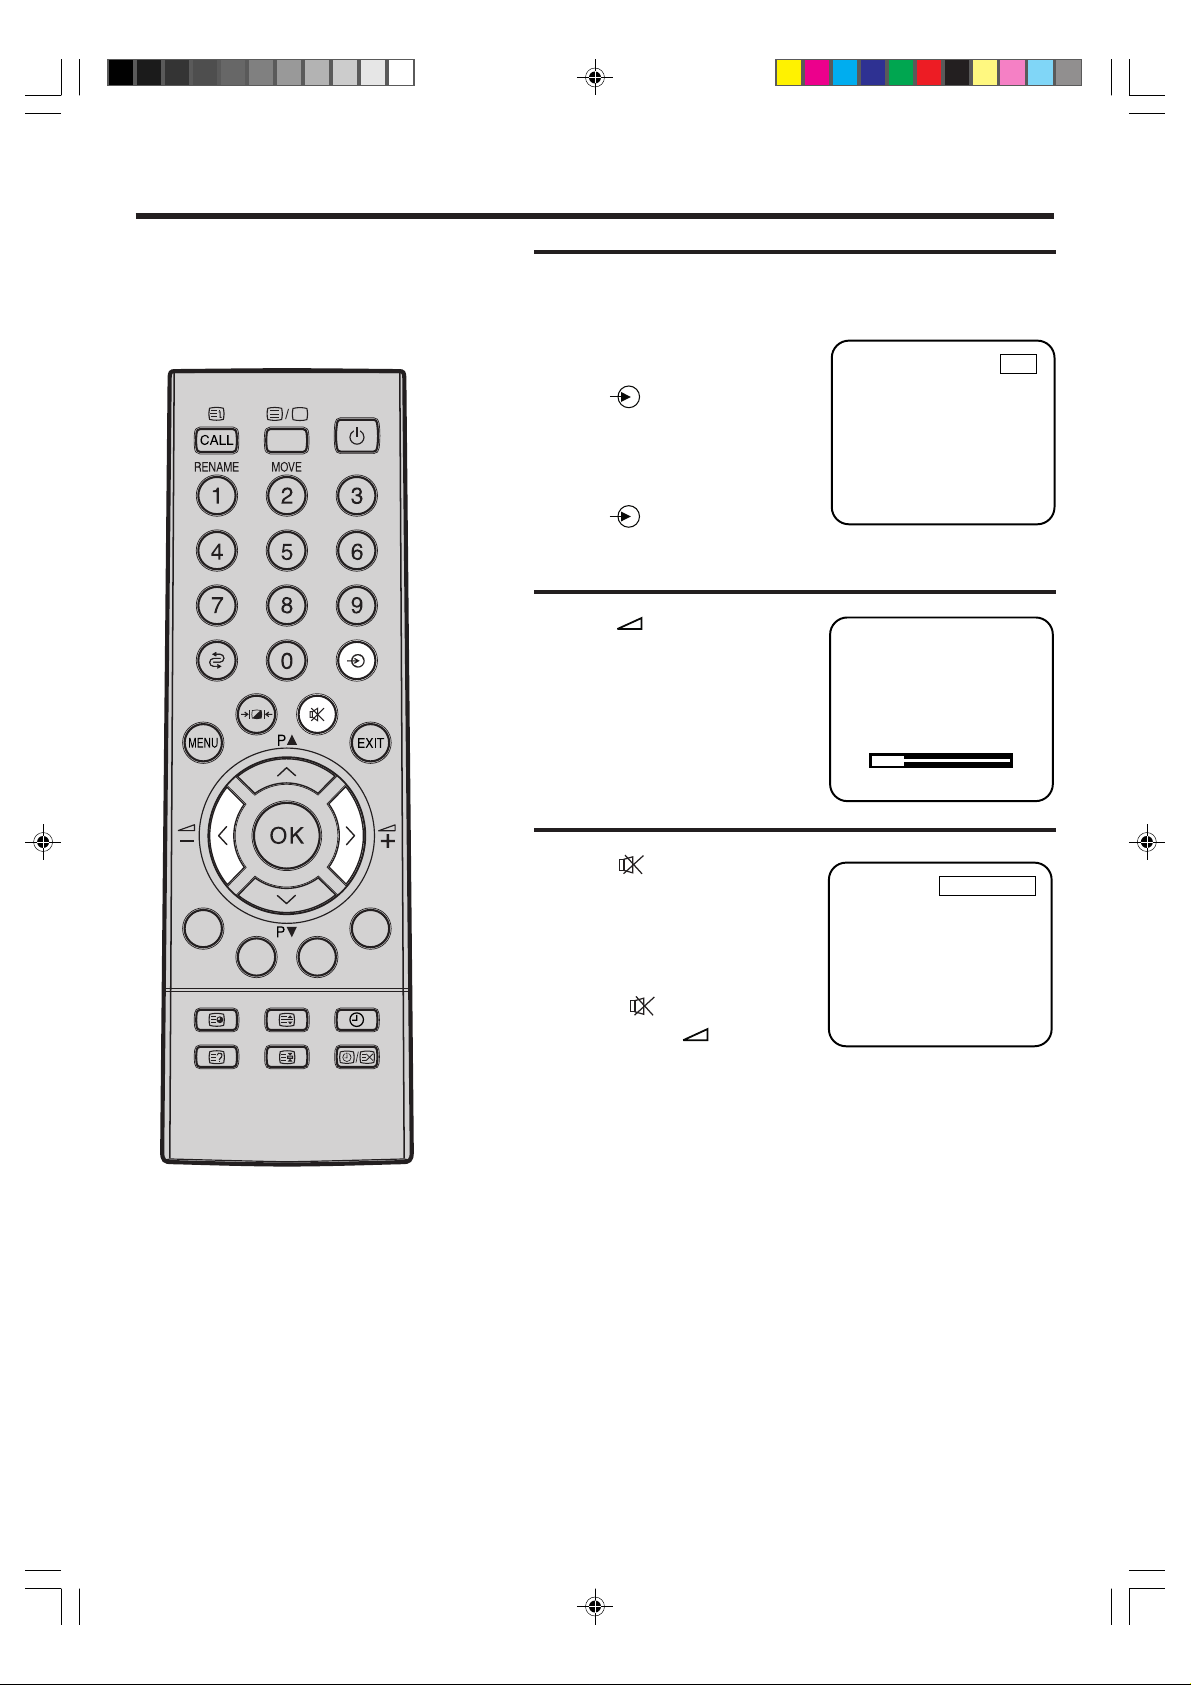
Operating your television
If you have a VCR, Satellite Receiver, DVD player or Games
1
Console you may connect them to your TV with a SCART lead.
To view equipment connected
to your TV with a SCART lead
press
until EXT1 or EXT2 appears
on your screen.
To view TV channels again
press
until a numbered TV channel
appears.
Press +/– to adjust the
2
sound level.
Press (Mute) to switch off
3
the sound.
• When the sound is switched
off SOUND MUTE will appear
on screen.
(INPUT SELECT)
(INPUT SELECT)
EXT1
VOLUME 10
SOUND MUTE
Press
time or press
the sound back on.
(Mute) a second
+/– to switch
13
3N70401A/P08-15 7/4/03, 5:15 PM13

Adjusting the picture
The picture settings have been adjusted by the
factory under optimum signal reception
conditions, however conditions may not be the
same in your area. After turning on your
television, allow it to warm up for a few
minutes before making any adjustments.
If the picture is not to your liking, make the following adjustments
using the remote control.
Press MENU on your remote
1
control. The on screen
display will appear.
Press P▲ or P▼ to select
2
PICTURE menu.
Press OK to select adjustment
screens.
Press P▲ to view BRIGHTNESS, CONTRAST, COLOUR or
3
ON/OFF TIMER
SETUP
PICTURE
EXT COLOUR AUTO
LANGUAGE
PANEL LOCK ON OFF
PRESS :
/
/ OK / MENU / EXIT
ON/OFF TIMER
SETUP
PICTURE
EXT COLOUR AUTO
LANGUAGE
PANEL LOCK ON OFF
PRESS :
/
/ OK / MENU / EXIT
SHARPNESS on screen displays. (Tint menu will be
displayed when an NTSC signal is input on SCART.)
NOTE :
Should you wish to reset picture controls to
factory settings (MODE-1/MODE-2/MODE-3),
press
to select your preferable picture
contrast.
Press +/– to adjust the
levels.
• Pictures appear sharpest in
the daytime by increasing
the contrast. In the evening
BRIGHTNESS 32
(when surroundings are
darker) the sharpest picture
PRESS :
+/–/ / / MENU/EXIT
can be obtained by reducing
the contrast.
Press EXIT to remove the
4
picture menu from the screen.
• If you do not make an
adjustment within 1 minute
the menu will disappear.
ON
PICTURE ADJUSTMENT :
Your preferable picture contrast can be selected by pressing
(Selectable Picture) button repeatedly.
PICTURE
MODE-M
(User’s Settings)
PICTURE
MODE-1
PICTURE
MODE-2
PICTURE
MODE-3
14
3N70401A/P08-15 7/4/03, 5:15 PM14

The screen call function lets you see at a
glance which channel is currently selected.
On screen information
Press CALL on the remote control; the TV screen will
1
display the current channel.
Press CALL a second time to disappear the channel.
2
• The channel number using the call display will not disappear
unless you press CALL again.
CH 2
Previous programme function:
button allows you to go back to the previous channel
selected by just pressing this button. Press this button again to
return to the channel you were watching.
Channel number
3N70401A/P08-15 7/4/03, 5:15 PM15
15

Setting the Panel Lock protection
If you set the Panel Lock to ON in the menu,
nobody will be able to operate the Volume and
Channel changes on the front button of your
TV. (The word “PANEL LOCK” will flash on
the screen when pressing P▲/P▼ or
+ / –
button.)
Press MENU on your remote
1
control. The on screen display
will appear.
Press P▲ or P▼ to select
2
PANEL LOCK ON/OFF menu.
Press OK to select ON or
3
OFF.
ON/OFF TIMER
SETUP
PICTURE
EXT COLOUR AUTO
LANGUAGE
PANEL LOCK ON OFF
PRESS :
/
/ OK / MENU / EXIT
ON/OFF TIMER
SETUP
PICTURE
EXT COLOUR AUTO
LANGUAGE
PANEL LOCK ON OFF
PRESS :
/
/ OK / MENU / EXIT
ON/OFF TIMER
SETUP
PICTURE
EXT COLOUR AUTO
LANGUAGE
PANEL LOCK ON OFF
PRESS :
Press EXIT to remove the menu from the screen.
4
/
/ OK / MENU / EXIT
16
3N70401A/P16-19 7/4/03, 5:15 PM16

When connecting external equipment to the
TV, the picture may become black and white.
This can be corrected by selecting Extension
Colour as follows.
EXT COLOUR Adjusting
Press MENU on your remote
1
control. The on screen display
will appear.
Press P▲ or P▼ to select the
EXT COLOUR menu.
Press OK to select one of the colour options, AUTO/PAL/
2
NTSC 4.43/NTSC 3.58.
• Usually select the AUTO option.
Press
3
EXIT to remove the menu from the screen.
ON/OFF TIMER
SETUP
PICTURE
EXT COLOUR AUTO
LANGUAGE
PANEL LOCK ON OFF
PRESS :
/
/ OK / MENU / EXIT
3N70401A/P16-19 7/4/03, 5:15 PM17
17

Timer functions
The on timer feature allows you to automatically
turn on your TV after a preset amount of time
(up to 12 hours and 59 minutes) at the
selected channel.
The off timer also allows you to turn off your TV
after a preset amount of time. You can set the
off timer in conjunction with the on timer.
Press MENU on your remote
1
control. The on screen
display will appear.
Press P▲ or P▼ to select
ON/OFF TIMER menu.
ON/OFF TIMER
SETUP
PICTURE
EXT COLOUR AUTO
LANGUAGE
PANEL LOCK ON OFF
Press OK.
Press P▲ or P▼ to select ON
2
TIMER menu.
Press OK.
Press P▲ to enter the hours
3
and minutes at which you
want your TV to
automatically switch on.
• For rapid time change in ten
minute intervals, press and
hold the P▲ button.
Press OK.
Press P▲ or P▼ to select the
4
channel you wish to display
when you TV switches on.
Press OK and press EXIT.
The yellow ON TIMER indicator
will light.
PRESS :
/
ON/OFF TIMER
ON TIMER
00:00 CH1
OFF TIMER
00:00
PRESS :
/
ON/OFF TIMER
ON TIMER
10:30 CH1
OFF TIMER
00:00
PRESS :
/
ON/OFF TIMER
ON TIMER
10:30 CH3
OFF TIMER
00:00
PRESS :
/
/ OK / MENU / EXIT
/ OK / MENU / EXIT
/ OK / MENU / EXIT
/ OK / MENU / EXIT
NOTE:
ON/OFF TIMER menu (step 2) can be also
accessed by pressing the
button while
watching the TV.
18
3N70401A/P16-19 7/4/03, 5:15 PM18
If you wish to set the OFF TIMER, press P▲ or P▼ to
select OFF TIMER at step 2.
Put your TV into standby mode by pressing
(standby)
button on the remote control. DO NOT turn off the TV using
the (main power) switch on the front panel.

This feature allows you to select the language
you wish your TV on screen display to appear
in.
Language selection
Make sure that your TV is properly installed.
1
Switch on your TV using the (main power) switch on
the front panel, then press
control.
Press MENU. The main control menu will appear on your TV
2
screen.
Press P▲ or P▼ to select LANGUAGE menu.
Press OK to select LANGUAGE screen.
• Only when you plug the AC
mains lead for the first time,
the main control menu will
be skipped and move to the
language screen. This is not
a fault, please select desired
language at first.
Press P▲ or P▼ to select
3
desired language.
Press OK to store your setting.
(standby) on the remote
ON/OFF TIMER
SETUP
PICTURE
EXT COLOUR AUTO
LANGUAGE
PANEL LOCK ON OFF
PRESS :
/
/ OK / MENU / EXIT
LANGUAGE
ENGLISH
Press EXIT to clear the screen.
PRESS :
/
/ OK / MENU / EXIT
3N70401A/P16-19 7/4/03, 5:15 PM19
19

Teletext feature
Teletext is the name given to the magazine services operated by
television companies.
A variety of information is available including News, Weather, Financial
and Travel information. Teletext is normally transmitted whenever a
station is on air. In addition to Teletext your television also incorporates
Fastext. Using the four coloured Fastext keys you may move around
Teletext services with greater ease and speed.
To view Teletext press
1
(text/mix/tv).
P100 TELETEXT 100 JAN 1 12:00:00
1st press .....Text only.
2nd press ....Text and TV
picture.
3rd press ....TV picture only.
TV GUIDE
An index page will be displayed. The top and bottom lines of
2
the page may look like this example:
TEXT
TEXT
TEXT
TEXT
P100 TELETEXT 100 JAN 1 12:00:00
Selected page
number
Teletext service name
Press the red
key to access
information
Displayed page number
(scrolls when searching)
Press the green
key to access
information
Press the yellow
Date
key to access
information
Time
Press the blue
key to access
information
WEATHERSPORT NEWS
20
3N70401A/P20-Last 7/4/03, 5:15 PM20
TV GUIDE
WEATHERSPORT NEWS
Teletext also has SUBTITLES available for many programmes.
Consult your TV guide for more details.

Teletext feature
In order to use Teletext the control codes must be transmitted by the
broadcasting authorities - its operation is, therefore dependent on
these codes being transmitted.
To view Teletext press
1
(text/mix/tv).
P100 TELETEXT 100 JAN 1 12:00:00
1st press .....Text only.
2nd press ....Text and TV
picture.
3rd press ....TV picture only.
To return to normal TV press
(text/mix/tv).
All Teletext pages are three digit numbers e.g. to select page
2
100, press 1, then 0, then 0.
If you accidentally press a wrong button, complete the
sequence with any three numbers, then re-enter the correct
number.
Press P▲ (Page) or P▼
(Page) to advance pages
sequentially up or down.
• Using the four coloured
Fastext keys you may move
around Teletext services
with greater ease and speed.
To switch from one Teletext
3
service to another press
(text/mix/tv) until the
TV picture is displayed.
TV GUIDE
TEXT
TEXT
TEXT
TEXT
P100 TELETEXT
TEXT
WEATHERSPORT NEWS
3N70401A/P20-Last 7/4/03, 5:15 PM21
Select another TV channel.
Press
revert to Teletext.
(text/mix/tv) to
ON
21

T eletext feature
Some Teletext pages contain too much information to be displayed on
a single page, when this occurs sub-pages are transmitted. Sub-pages
are identified by an additional numbering sequence, e.g. 1/3, where the
first number indicates the sub-page number and the second indicates
the number of available sub-pages.
Press (Hold) to freeze a page.
1
• The hold symbol will appear in the top left corner of the screen.
Press
time to release page.
• Pages and sub-pages are
transmitted in sequence with
an adequate pause for reading
each page. You may freeze a
page which is of particular
interest and hold it on screen.
Information cannot be
updated when page/sub-page
is held using hold.
• Also, you will miss any sub-pages which are broadcast while
using the
Press (sub page) to view a sub-page. 4 dashes will
2
appear;
removed by pressing (
Select the desired sub-page number, e.g. sub page number
2 press 0 0 0 2 by pressing the direct channel entry buttons.
(Hold) a second
TELETEXT 100 JAN 1 12:00:00
TEXT
TEXT
TEXT
TEXT
TV GUIDE
(Hold) function is being used.
if you do not enter any numbers they may only be
sub page
).
WEATHERSPORT NEWS
• Whilst using subpages it is
essential
numbers.
The current sub page will
stay on the screen until your
chosen one has been
broadcast. Your sub page will
stay on the screen and, as
information is received from
the transmitter, the screen
will be updated, e.g. a page
of share prices.
Press CALL (Index) to return to the INDEX page.
When viewing in normal TV
3
mode, press
Text Cancel)
current time (via teletext).
• The current teletext region
and service will also be
displayed.
to enter four
(Time/
to display the
- - - - TELETEXT 100 JAN 1 12:00:00
TEXT
TEXT
TEXT
TEXT
12:00:00
ON
22
3N70401A/P20-Last 7/4/03, 5:15 PM22

Teletext feature
In order to use Teletext the control codes must be transmitted by
the broadcasting authorities - it's operation is, therefore
dependent on these codes being transmitted.
Press (F/T/B) to increase
1
the size of the characters on
screen.
1st press .... View the top of
the page.
2nd press .... View the bottom
of the page.
3rd press
Press (Time/Text Cancel) then enter your page
2
number.
This function enables the TV
picture to be viewed whilst a
selected page is being
located. Once found the page
number will be displayed in the
top left of the TV picture.
.... Return to full
view of full page
(text normal size).
P100 TELETEXT 100 JAN 1 12:00:00
TEXT
TEXT
TEXT
101
ON
Press (text/mix/tv) to
view the selected page.
Press (Reveal) to display hidden text.
3
Some pages contain hidden text, e.g. a quiz page with
concealed
answers.
3N70401A/P20-Last 7/4/03, 5:15 PM23
23

Before requesting service please check the
following points
Symptom
No standby light.
No picture, no sound.
Is your TV plugged in?
Is the main power switch on the front
of your TV off?
Has the fuse in the mains plug
blown?
Is your TV plugged in?
Is the aerial connection cable broken
or damaged?
Possibly station trouble.
SolutionCause
Plug your TV into mains socket (AC
outlet).
Press
Replace fuse in mains plug.
Plug your TV into mains socket (AC
outlet).
Check all aerial connections for broken
or damaged wires. If necessary
replace with new cables.
Try other stations to see if they are
stronger or move the aerial away from
possible source of interference. If you
live in a known poor reception area try
using an aerial booster to improve the
quality of broadcast signal.
(main power) switch.
Unable to select channel
numbers 8 through to 100.
Is the main power switch on the front
of your TV off?
Have you pressed the
button or have you set the volume at
minimum?
During automatic tuning your
television didn’t find enough channels
to place in these numbered
positions?
(Mute)
Press
Press the (Mute) button again or
increase the volume using the
control.
If a television station has been missed
try repeating the automatic tuning
operation as described on page 7.
(main power) switch.
24
3N70401A/P20-Last 7/7/03, 10:05 AM24

Symptom
SolutionCause
Poor or no colour.
No teletext or strange
character letters on screen.
Remote control does not
work or operates erratically .
Unable to playback video
tapes.
Aerial or connection cable may not be
connected or cable is damaged or
broken?
Colour control is not adjusted?
Aerial connection is poor or
possibly station trouble?
Good performance of text depends on
a good strong broadcast signal.
Weak or exhausted batteries.
Batteries placed in the wrong way
round?
During automatic tuning you didn’t
have your VCR switched on, therefore
your television was unable to find the
VCR channel?
Check all aerial connections for broken
or damaged wires. If necessary replace
with new leads.
Adjust colour.
Check all aerial connections for broken
wires or try another channel.
This may require the use of a roof or
loft aerial.
Replace batteries.
Place the batteries correctly.
Before starting the automatic tuning
operation, make sure you have your
VCR switched on displaying it’s test
signal.
3N70401A/P20-Last 7/7/03, 10:05 AM25
25

Specifications
Television
Picture tube 15" (35.7 cm visible screen) measured diagonally
90 degrees deflection
Colour system PAL
Front Video Input RCA
Front Audio Input RCA
Other Terminal Earphone
External antenna 75 Ohm DIN type
SCART socket 21 PIN
Speaker 1.5"x2.7" Permanent magnet dynamic speaker
Normal Impedance 8 ohms
Sound output 5.0 W
General
Mains supply AC 230-240 V 50 Hz
Power consumption 46 W (3 W in standby)
Operating temperature 5˚C ~ 40˚C
Dimensions 366(W) x 396.7(D) x 373(H)
Weight 11.0 kg (without accessories)
Accessories Remote control
Remote control batteries (2 x UM-4 / AAA / IEC R03 1.5 V)
Loop aerial
Weight and Dimensions are approximate. Because we continually strive to improve our products we may change
specifications and designs without prior notice.
EXCLUSION CLAUSE
T oshiba shall under no circumstances be liable for loss and/or damage to the product caused by:
i) fire;
ii) earthquake;
iii) accidental damage;
iv) intentional misuse of the product;
v) use of the product in improper conditions;
vi) loss and/or damage caused to the product whilst in the possession of a third party;
vii) any damage or loss caused as a result of the owner’s failure and/or neglect to follow the instructions set
out in the owner’s manual;
viii) any loss or damage caused directly as a result of misuse or malfunction of the product when used
simultaneously with associated equipment;
Furthermore, under no circumstances shall Toshiba be liable for any consequential loss and/or damage
including but not limited to the following, loss of profit, interruption of business, the loss of recorded data
whether caused during normal operation or misuse of the product.
WARNING! NEVER LEAVE A
CARE and disposal
STATIONARY IMAGE ON THE SCREEN
If stationary images generated by TELETEXT,
CHANNEL IDENTIFICATION LOGOS, COMPUTER
DISPLAYS,VIDEO GAMES,ON SCREEN MENUS,
etc.are left on the TV screen for any length of time, they
could become permanently ingrained.
If you use your television to display completely still
images, or moving pictures which have a permanent still
image superimposed e.g. broadcast network logos, it is
always advisable to reduce BOTH the brightness and
contrast settings.
Cleaning the screen and cabinet...
Turn off the power, clean the screen and cabinet with a
soft, dry cloth. We recommend that you do not use any
proprietary polishes or solvents on the screen or
cabinet as this may cause damage.
Disposal...
When the set reaches the end of its useful life please
dispose of it in accordance with Local Government
Regulations or at a recycling centre.
’03.09
3N70401A/P20-Last 7/4/03, 5:15 PM26
X

QUICK SET-UP GUIDE
1. CONNECTIONS
MODEL - 15V31B
(not supplied)
Aerial
Aerial socket
2. INST ALLING BATTERIES
1.
Open the cover and remove.
Loop aerial
2.
Insert two batteries as shown below.
(supplied)
Use two “UM-4/AAA/IEC R03 1.5V” size batteries.
ONLY WHEN YOU TURN ON THIS SET FOR THE FIRST TIME, THE AUTOMATIC TUNING PROCESS WILL
START AUTOMATICALLY.
1. Press (main power) switch on the front panel, then press (standby) on the remote control.
2. Press OK on your remote control.
Your TV will now automatically tune in all available channels. (See page 6 of Owner’s Manual.)
3N70401A/QS 7/7/03, 10:26 AM1

3. AUTO TUNING
Press MENU on your remote control.
1.
The on screen display will appear.
Press P ▲ or P ▼ on your
remote control to select
SETUP menu.
Press OK to confirm. This will start the automatic
3.
tuning process.
ON/OFF TIMER
SETUP
PICTURE
EXT COLOUR AUTO
LANGUAGE
PANEL LOCK ON OFF
PRESS :
• This process will take a
few minutes to complete
. . . please be patient.
AUTOMATIC TUNING
4. MANUAL TUNING
Select your TV channel to select your required
1.
channel number for tuning by pressing P▲ or P▼.
Press MENU on your
remote control.
/
/ OK / MENU / EXIT
CH 2
Press OK to confirm.
2.
The SETUP on screen display will appear.
SETUP
Press P ▲ or P ▼ to select
AUTOMATIC TUNING.
When the programme on the screen stops
4.
MANUAL TUNING
AUTOMATIC TUNING
CHANNEL MAPPING
PRESS :
changing and the sound comes on, the tuning
process is complete.
Press EXIT to clear the
CHANNEL MAPPING
menu display.
Press P▲ or P▼ to select SETUP menu. Press
2.
OK to confirm.
CHANNEL MAPPING
1 BBC1
2 BBC2
3 ITV
4 CH4
5 CH5
PRESS : / / RENAME / MOVE/MENU/EXIT
ON/OFF TIMER
SETUP
PICTURE
EXT COLOUR AUTO
LANGUAGE
PANEL LOCK ON OFF
/
6 SAT1
7
8
9
10
/ OK / MENU / EXIT
11
12
13
14
15
Press P▲ or P▼ to select MANUAL TUNING.
3.
Press OK to confirm.
SETUP
MANUAL TUNING
AUTOMATIC TUNING
CHANNEL MAPPING
PRESS :
/
Press OK to store the station you selected.
5.
Press P▲ or P▼ to select
your required channel
number (1~100).
Press OK to store the channel
number.
PRESS :
+/-/ / /
/ OK / MENU / EXIT
CH 2
OK / MENU/EXIT
PRESS :
/
/ OK / MENU / EXIT
4.
Press
+ to search up the waveband or –
to search down the waveband.
Each time a station is found the search will stop.
• If you need to make the
picture clearer, press P▲
or P▼ for Fine Tuning.
• Press + or – to continue
searching until the station
you want is found.
Repeat stages 4 - 5 for tuning other channels.
6.
PRESS : +/
-
/ OK / MENU/EXIT
Press EXIT to remove the tuning menu from the
screen.
CH 2
J3N70407A X
3N70401A/QS 7/4/03, 5:16 PM2
 Loading...