

Page 1

30E2825A_En_COVER 1/15/07, 8:26 PM1
Model 32W300P
LCD Colour Television
Operating Instructions
Page 2

Features
• LCD MONITOR
Resolution: 1366 x 768 pixels
• On-Screen Language Display in 6 languages (English, Spanish, German, French,
Italian or Russian)
• NICAM/German A2 STEREO Reception
• Auto tuning system
• 99 Channel memory
• Videotext – Fastext/TOPtext
• Remote control
• Sleep timer
• 2 Scart sockets
• COMPONENT input
• Headphone Jack (for mini plug)
• PC Connection (VGA) (see P.26)
• 2 HDMI-connections
• 16 : 9 format
• Surround sound feature
•
CE Symbol Guaranteeing Compliance to Currently Effective European Standards
Headphone Warning
Loud music can damage your hearing irreversibly, therefore do not set the volume to a high level when
listening through headphones, particularly for extended listening periods.
Battery notice
Look after our environment - contact your local authorities for advice on how to safely dispose of
exhausted batteries.
Waste Disposal Tip
This symbol means that your electrical and electronic equipment should be disposed at the end
of its life separately from your household waste. There are separate collection systems for
recycling in the EU. For more information, please contact the local authority or your retailer
where you purchased the product.
2
30E2825A_En_P02-09 1/15/07, 8:26 PM2
Page 3

Contents
Features ................................................................... 2
Contents ................................................................... 3
Safety Precautions ................................................... 4
Installation and important information ...................... 5
Location of controls .................................................. 6
Remote Control ........................................................ 7
Antenna connection ................................................. 9
Quick guide for MENU operation ........................... 10
Selecting the video input source ............................ 10
On-screen Language Selection.............................. 11
Teletext Language Selection.................................. 11
Automatic station presetting with the built-in Tuner 12
Changing the order of stored channels .................. 13
Manual TV station presetting ................................. 14
Connection to Satellite Receiver ............................ 15
Basic Operation...................................................... 16
Stereo reception with the built-in tuner................... 17
Bass, Treble and Balance ...................................... 19
Using the surround sound feature .......................... 20
Turning off the built-in speakers ............................. 20
Brightness, Contrast, Colour and Sharpness ......... 21
DNR ....................................................................... 21
Back light................................................................ 22
Selecting the colour temperature ........................... 23
Blue back ............................................................... 23
Picture format ......................................................... 24
Scrolling the picture in CINEMA mode ................... 25
Auto 4:3 Default ..................................................... 25
PC connection ........................................................ 26
Connecting an HDMI or a DVI device to the
HDMI input ............................................................. 28
Teletext .................................................................. 29
Conceal stored channels........................................ 31
Connection to other equipment .............................. 32
AV colour adjustment ............................................. 35
Power return feature .............................................. 35
Troubleshooting table................................Back cover
Specifications ........................................... Back cover
* The “HD ready” Logo is a trademark of EICTA.
30E2825A_En_P02-09 1/15/07, 8:26 PM3
3
Page 4

Safety Precautions
This equipment has been designed and manufactured to meet international safety standards but, like any
electrical equipment, care must be taken to obtain the best results and for safety to be assured. Please
read the points below for your own safety. They are of a general nature, intended to help with all electronic
consumer products and some points may not apply to the goods you have just purchased.
Air Circulation
Leave at least 10cm clearance around the
television to allow adequate ventilation. This will
prevent overheating and possible damage to the
television. Dusty places should also be avoided.
Heat Damage
Damage may occur if the television is left in direct
sunlight or near a heater. Avoid places subject to
extremely high temperatures or humidity. Place in a
location where the temperature remains between
5°C (41°F) min. and 40°C (104°F) max.
Mains Supply
The mains supply required for this equipment is
220-240v AC 50/60Hz. Never connect to a DC
supply or any other power source. DO ensure that
the television is not standing on the mains lead.
DO NOT cut off the mains plug from this
equipment, this incorporates a special Radio
Interference Filter, the removal of which will impair
its performance. In the UK, the fuse fitted in this
plug is approved by ASTA or BSI to
should only be replaced by a correctly rated and
approved type and the fuse cover must be refitted.
IF IN DOUBT PLEASE CONSULT A COMPETENT
ELECTRICIAN.
BS1362
. It
DO
DO
read the operating instructions before you
attempt to use the equipment.
DO
ensure that all electrical connections
(including the mains plug, extension leads and
inter-connections between pieces of equipment)
are properly made and in accordance with the
manufacturers’ instructions. Switch off and
withdraw the mains plug before making or
changing connections.
DO
consult your dealer if you are ever in doubt
about the installation, operation or safety of your
equipment.
DO
be careful with glass panels or doors on
equipment.
DO NOT REMOVE ANY FIXED COVERS AS
THIS WILL EXPOSE DANGEROUS AND
'LIVE' PARTS.
THE MAINS PLUG IS USED AS A
DISCONNECTING DEVICE AND THEREFORE
SHOULD BE READILY OPERABLE.
Do not
DO NOT
equipment with items such as newspapers,
tablecloths, curtains, etc. Overheating will cause
damage and shorten the life of the equipment.
DO NOT
to dripping or splashing or objects filled with
liquids, such as vases, to be placed on the
equipment.
DO NOT
such as lighted candles or nightlights on, or close
to equipment. High temperatures can melt plastic
and lead to fires.
DO NOT
with wood screws. To ensure complete safety,
always fit the manufacturers’ approved stand,
bracket or legs with the fixings provided according
to the instructions.
DO NOT
such use can permanently damage your hearing.
DO NOT
unattended, unless it is specifically stated that it is
designed for unattended operation or has a
standby mode. Switch off by withdrawing the plug,
make sure your family know how to do this. Special
arrangements may need to be made for people
with disabilities.
DO NOT
are in any doubt about it working normally, or it is
damaged in any way – switch off, withdraw the
mains plug and consult your dealer.
ABOVE ALL – NEVER let anyone, especially
children, push or hit the screen, push anything
into holes, slots or any other openings in the
case.
NEVER guess or take chances with electrical
equipment of any kind – it is better to be safe
than sorry.
obstruct the ventilation openings of the
allow electrical equipment to be exposed
place hot objects or naked flame sources,
use makeshift stands and NEVER fix legs
listen to headphones at high volume, as
leave equipment switched on when it is
continue to operate the equipment if you
4
30E2825A_En_P02-09 1/15/07, 8:26 PM4
Page 5
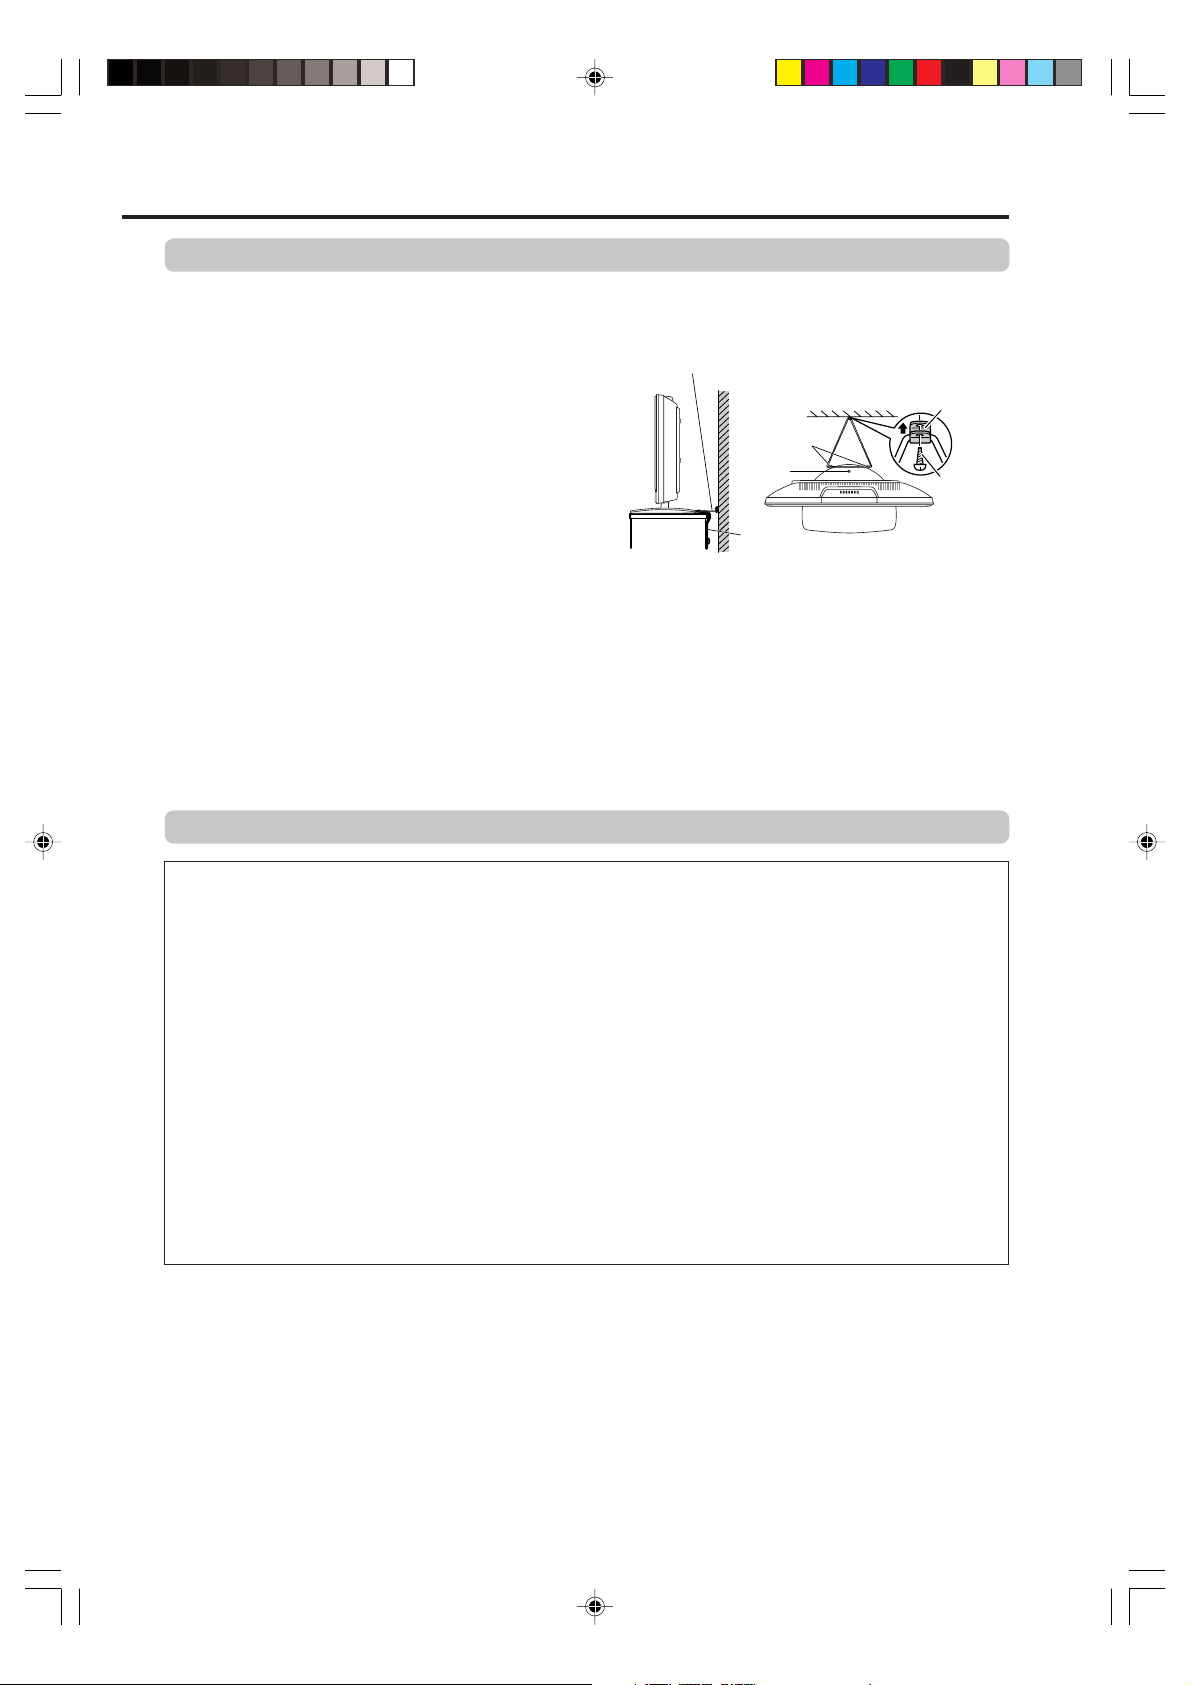
Installation and important information
Where to install
Locate the television away from direct sunlight and
strong lights, soft, indirect lighting is recommended
for comfortable viewing. Use curtains or blinds to
prevent direct sunlight falling on the screen.
Place on a sturdy platform, the mounting surface
should be flat and steady. It should then be
secured to the wall with a sturdy tie using the clip
on the back of the stand, or secured to the platform
using the fixing strap located underneath the table
top stand, this will prevent it from falling over.
The LCD display panels are manufactured using an
extremely high level of precision technology,
however sometimes some parts of the screen may
be missing picture elements or have luminous
spots. This is not a sign of a malfunction.
Make sure the television is located in a position where it cannot be pushed or hit by objects, as pressure will
break or damage the screen, and that small items cannot be inserted into slots or openings in the case.
Sturdy tie (as short as possible)
Hooks
Screw
hole
Band
Side View
Top View
Clip
Screw
Please take note
EXCLUSION CLAUSE
Toshiba shall under no circumstances be liable for loss and/or damage to the product caused by:
i) fire;
ii) earthquake;
iii) accidental damage;
iv) intentional misuse of the product;
v) use of the product in improper conditions;
vi) loss and/or damage caused to the product whilst in the possession of a third party;
vii) any damage or loss caused as a result of the owner’s failure and/or neglect to follow the
instructions set out in the owner’s manual;
viii) any loss or damage caused directly as a result of misuse or malfunction of the product when used
simultaneously with associated equipment;
Furthermore, under no circumstances shall Toshiba be liable for any consequential loss and/or
damage including but not limited to the following, loss of profit, interruption of business, the loss of
recorded data whether caused during normal operation or misuse of the product.
If stationary images generated by text services, channel identification logos, computer displays, video
games, on screen menus, etc. are left on the television screen for any length of time they could become
conspicuous, it is always advisable to reduce both the brightness and contrast settings.
30E2825A_En_P02-09 1/15/07, 8:26 PM5
5
Page 6
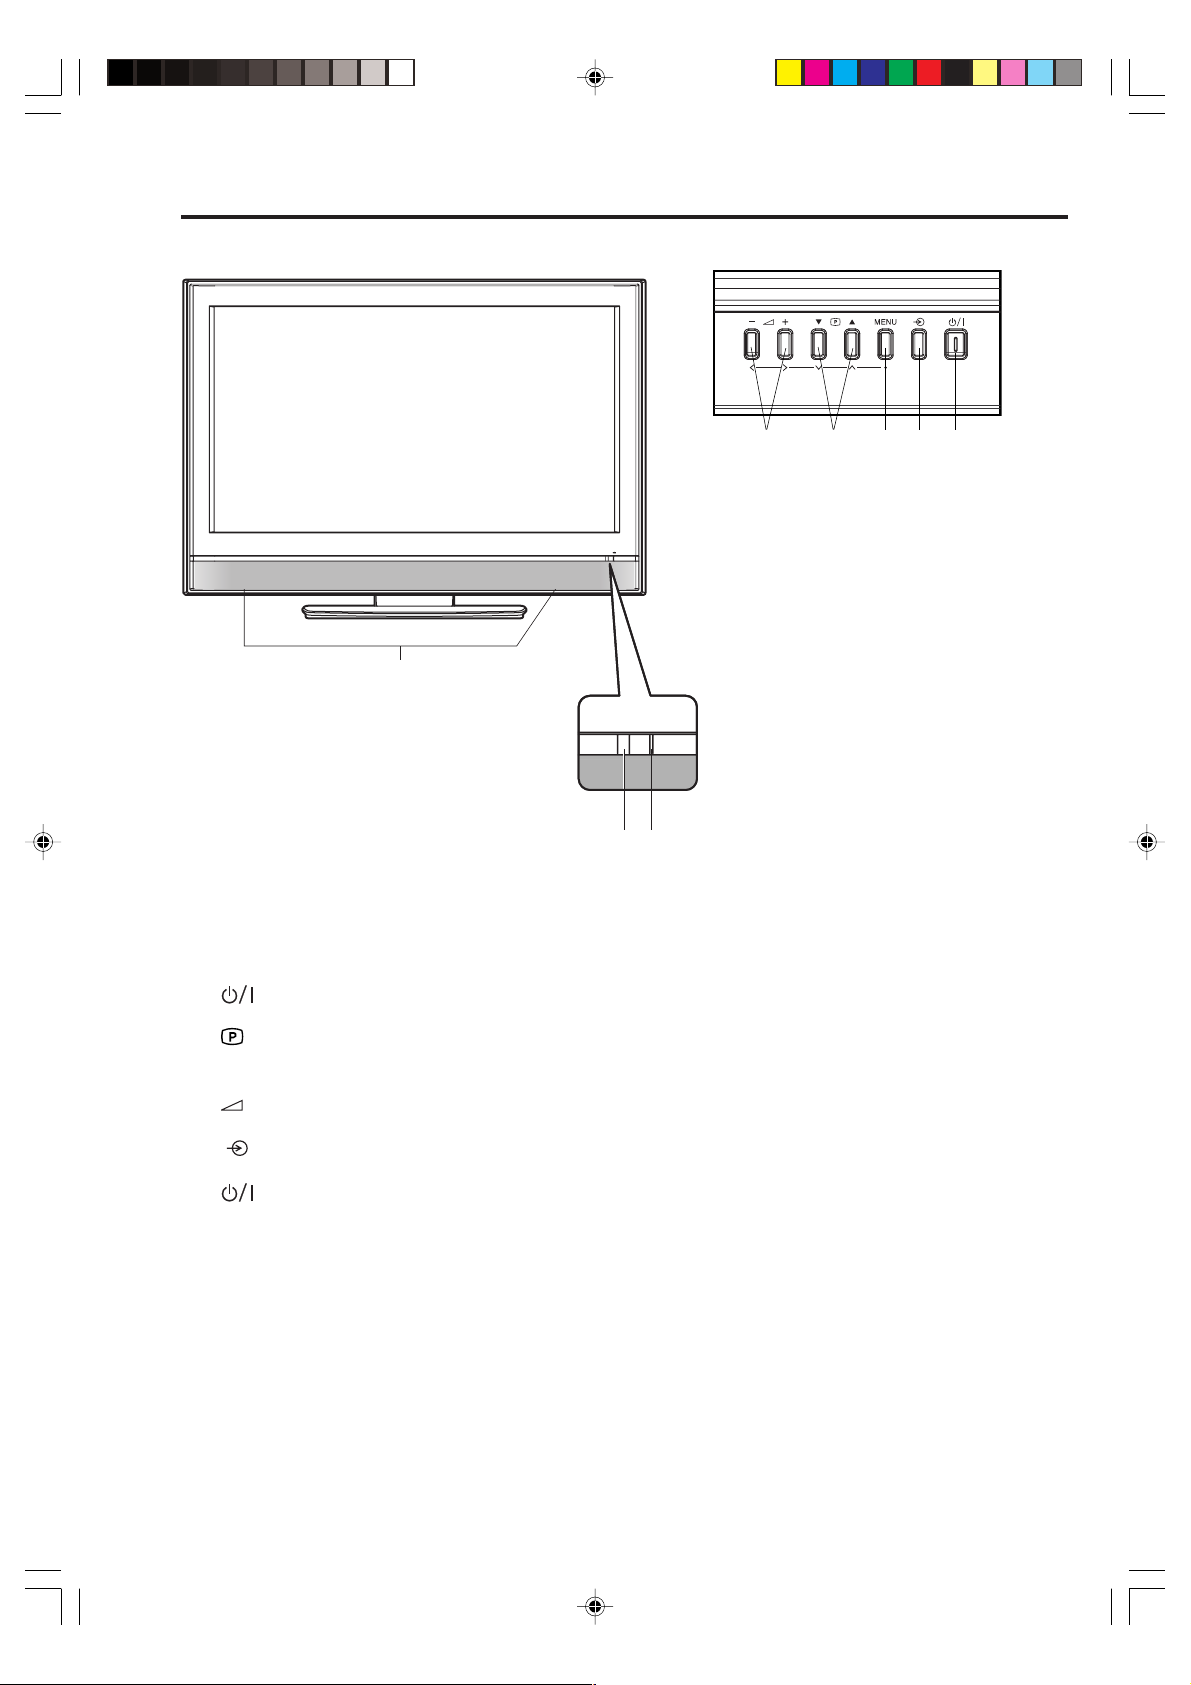
Location of controls
Front Side
Top
54678
1
Front Side
3
2
Description of Indicators and Controls
1. Loudspeakers
2. (On/Standby) indicator: It lights up in red at standby, and in green at power on.
3. Remote sensor
(Channel) ▲/▼ buttons: Press ▲ to change to a higher numbered channel set into memory.
4.
Press ▼ to change to a lower numbered channel set into memory. In Menu: Setting. In Standby:
Turning on the unit.
(Volume) +/– buttons : To set the volume. In Menu: Setting.
5.
6. MENU button: To display the menu screen.
(Input) button: Select input mode for TV/AV/COMPONENT/HDMI/PC. In Menu : Using as
7.
ENTER button.
8. (On/Standby) button: To turn the unit on or off. Power is still used unless the AC power cord is
disconnected from the supply.
6
30E2825A_En_P02-09 1/17/07, 4:02 PM6
Page 7
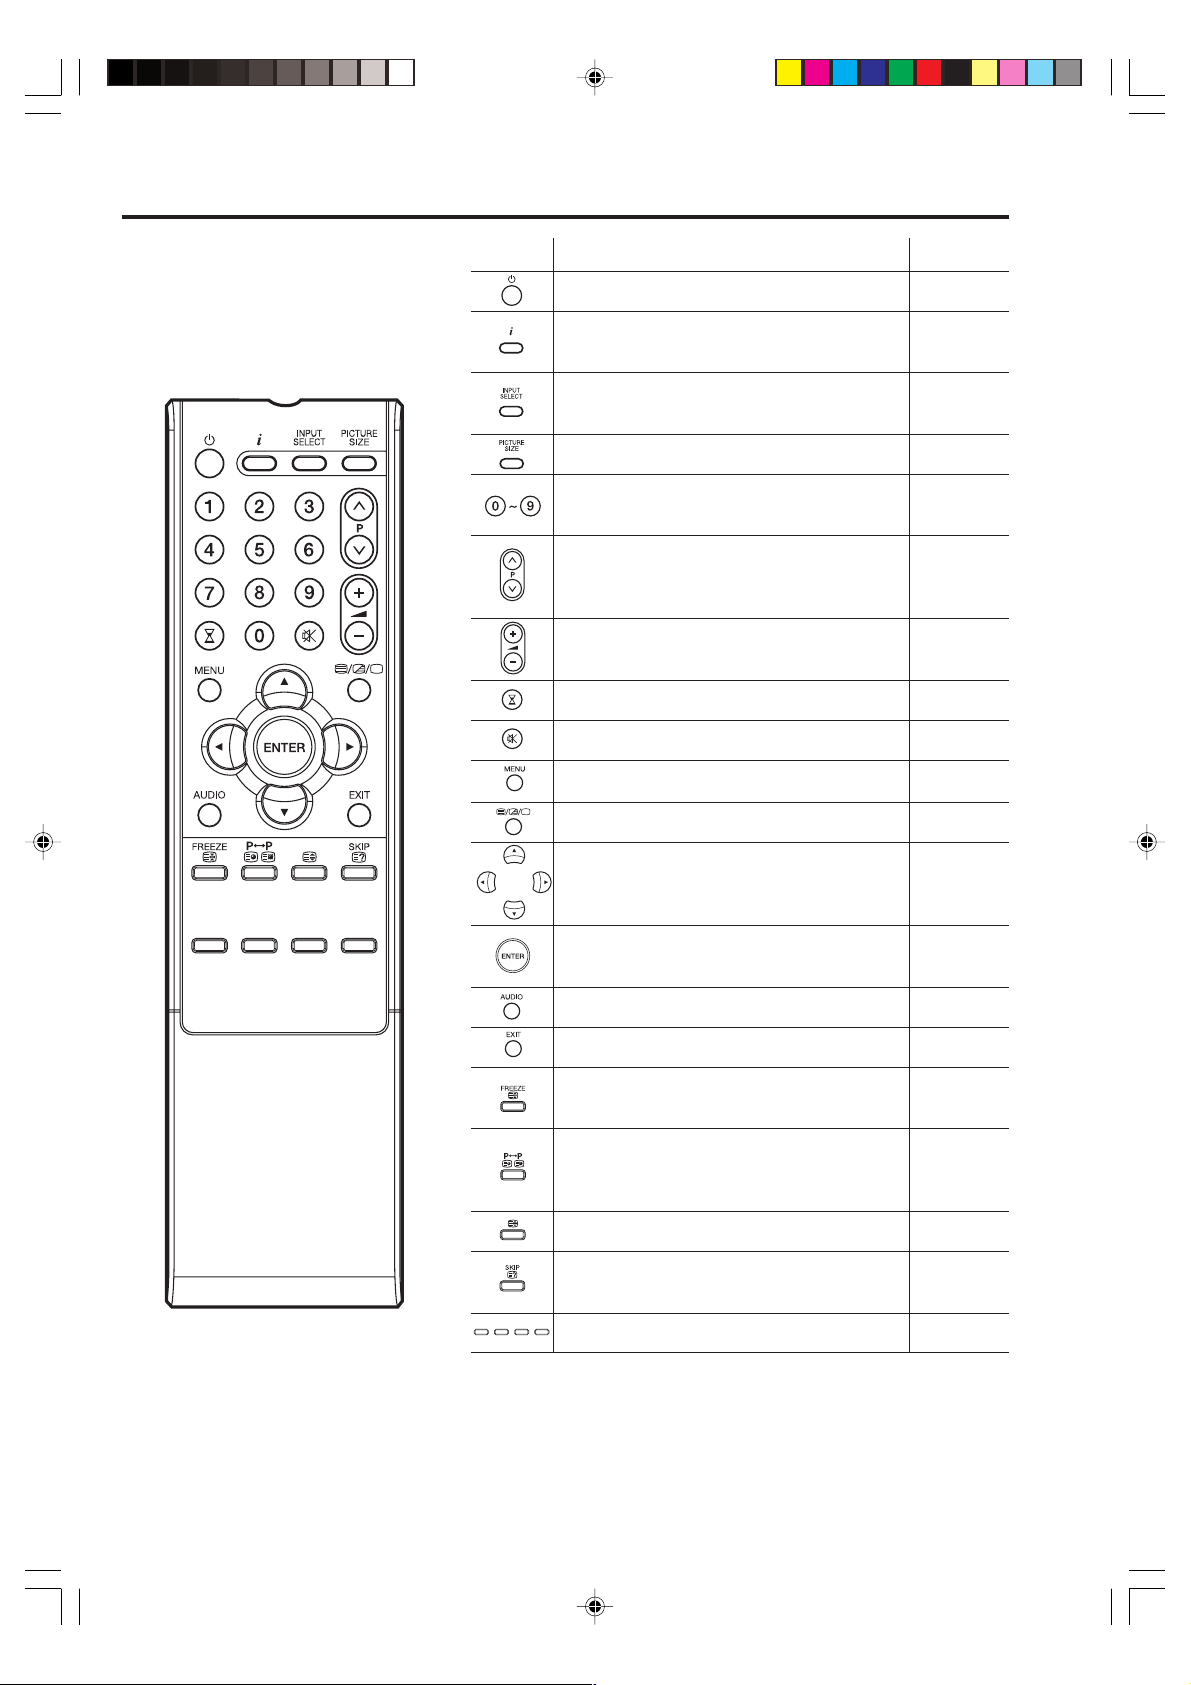
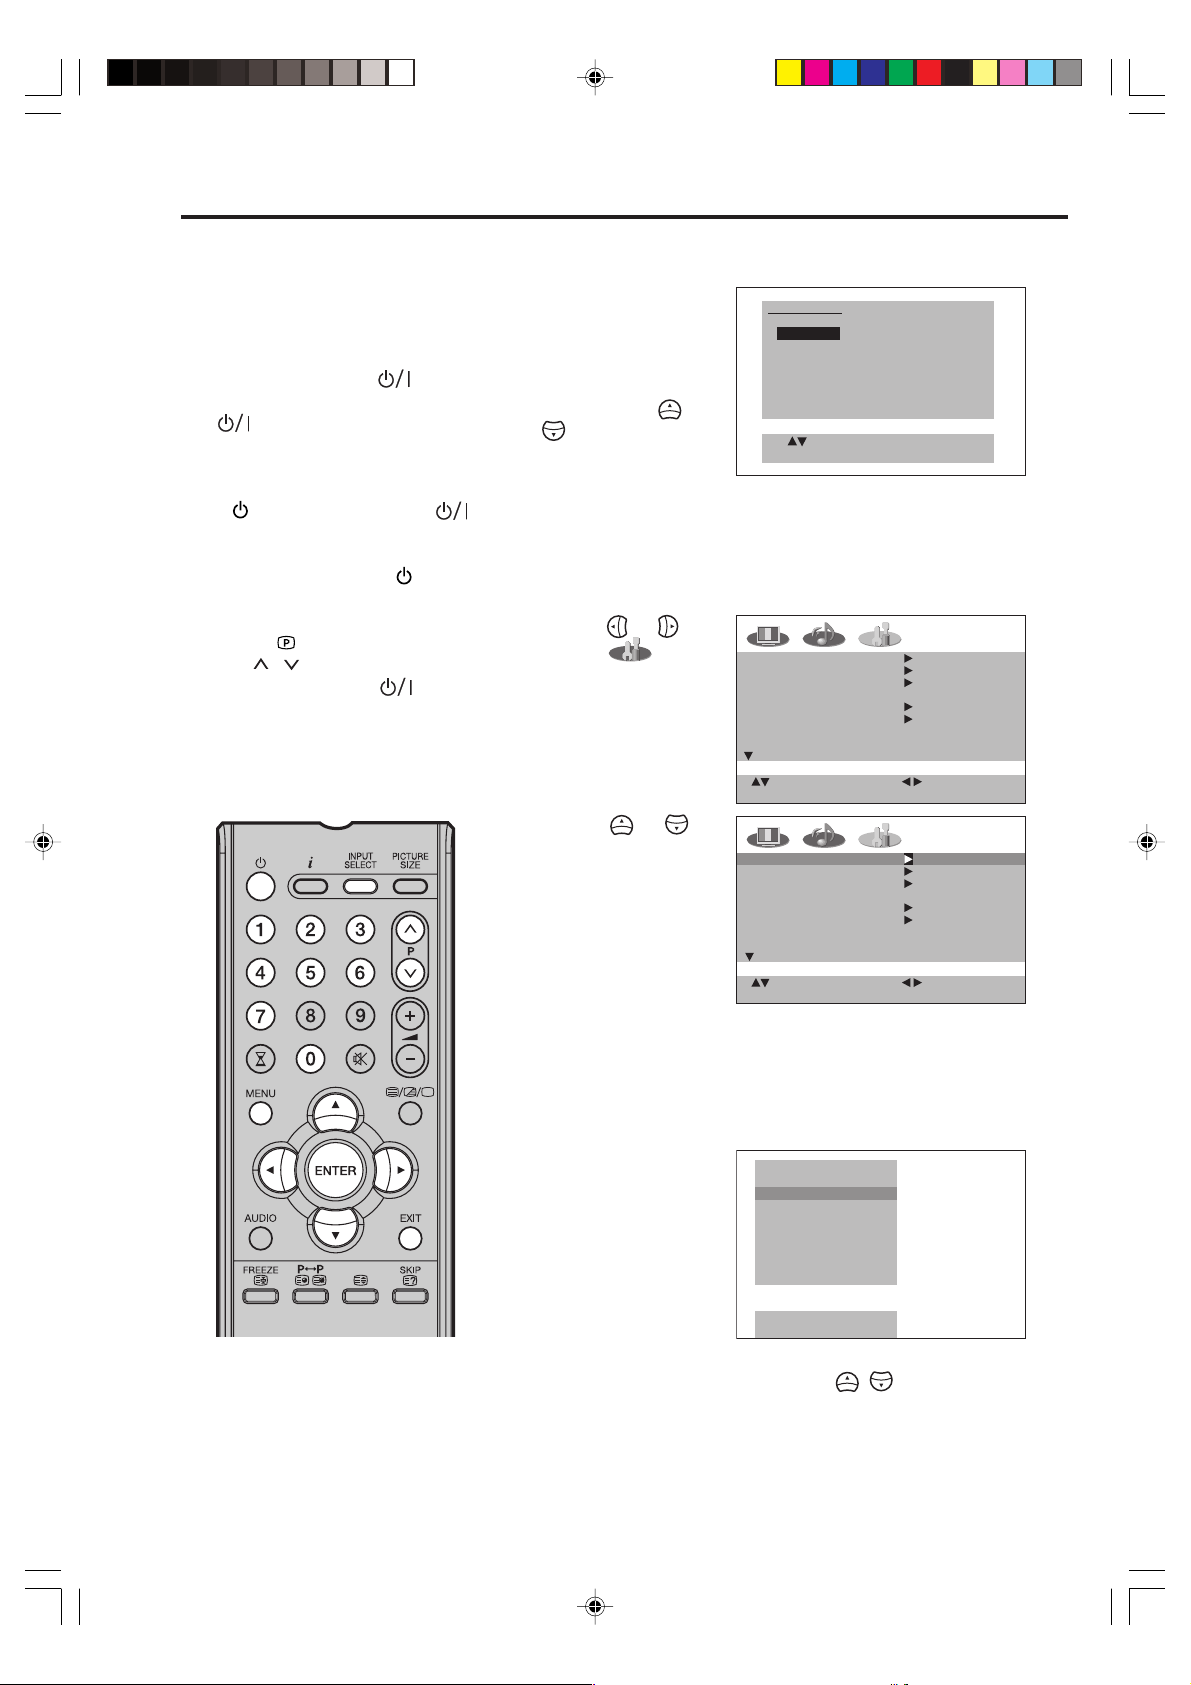
Remote Control
Function Page
Enter standby mode or turn on the power 10
Display program position number 16
Teletext time display
Select an input source 10, 26, 28,
32~34
Select picture format 24
Select channel 12, 16, 31
Select Teletext page 29, 30
Change the TV channel or Teletext page 16, 29, 31
up or down
In Standby: Turn on the power 10
Volume 16
Sleep Timer 16
Turn the sound on/off 16
Activate the Menu
Teletext ON / Mix / OFF 29
Cursor buttons
Memorize
Teletext page 100 30
Select between the available broadcast audio 18
Exit the menu screen
Still picture 16
Hold the text page 30
Switches between the present channel and
the last selected channel 16
Sub Page selection 30
Teletext enlargement 30
Program position-skipping 31
Reveal quiz page answers 30
Fastext/TOPtext buttons 29
30E2825A_En_P02-09 1/15/07, 8:26 PM7
7
Page 8
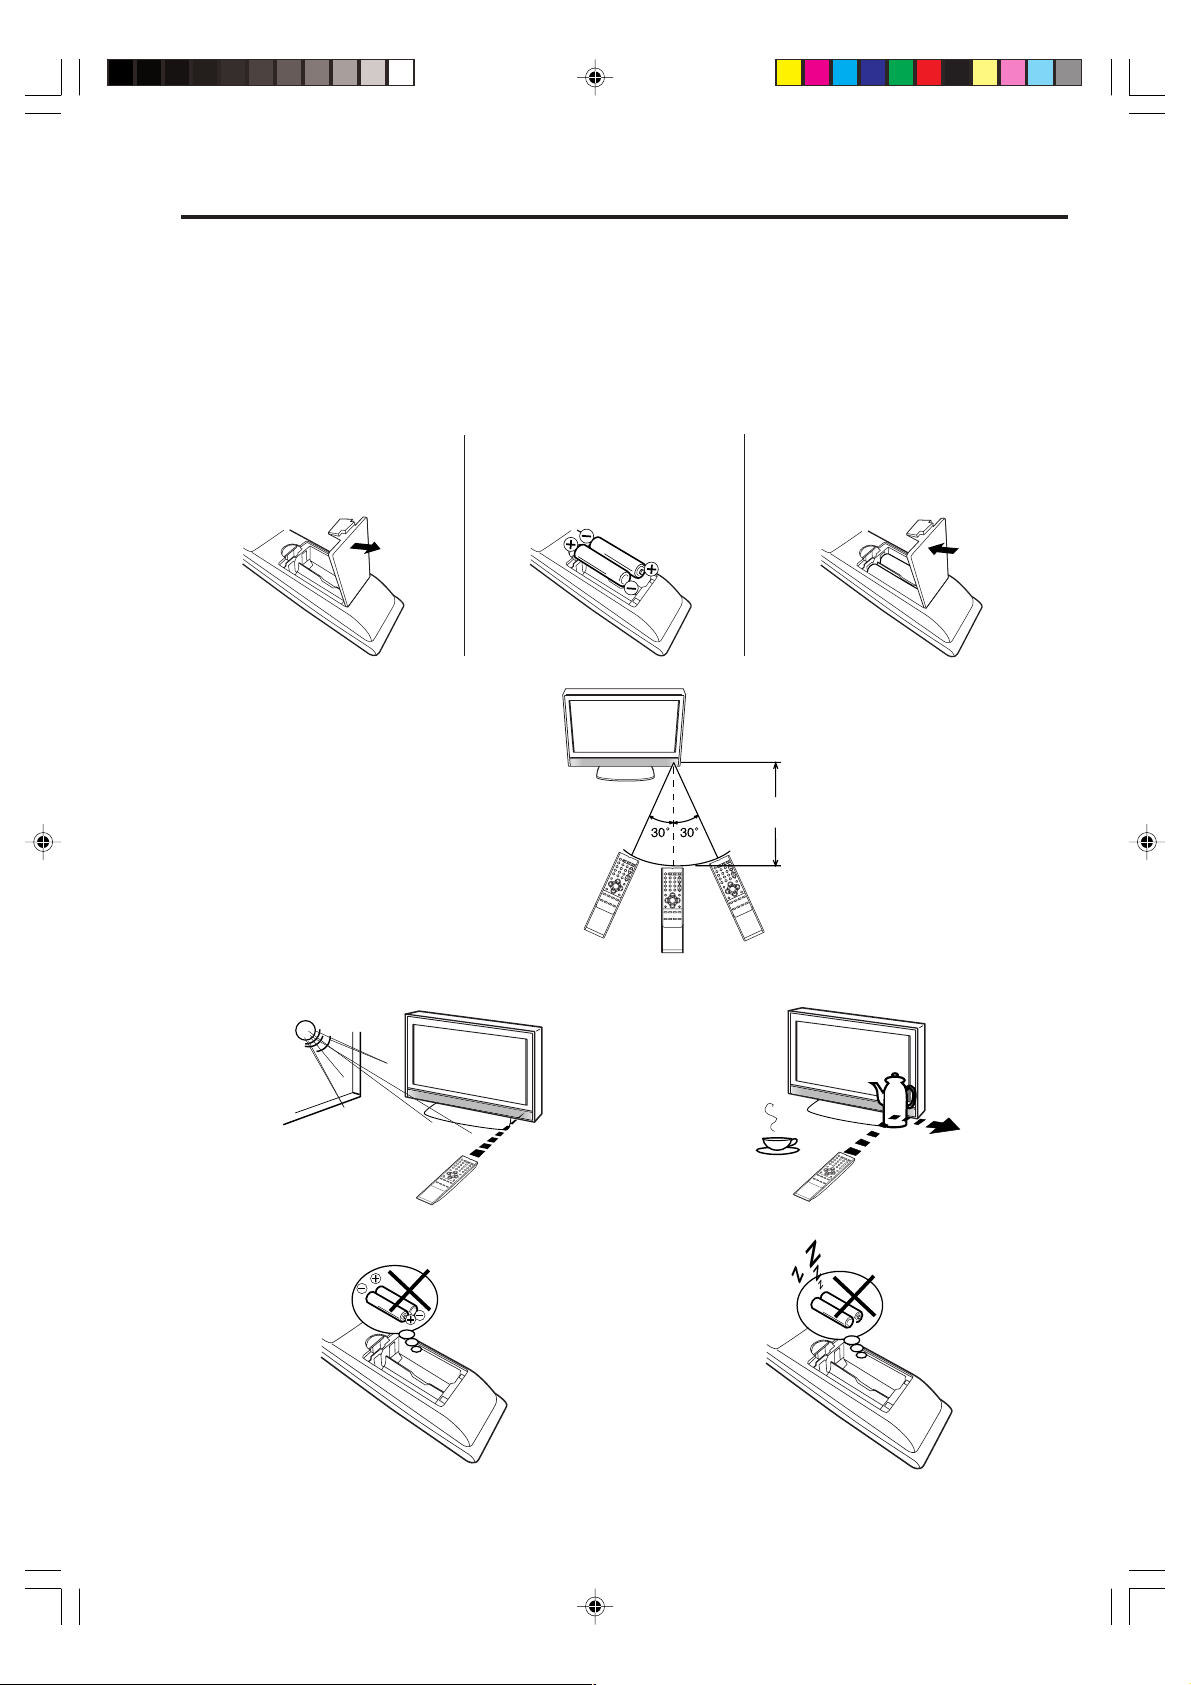
Remote Control
Install the batteries
Use batteries type UM3 (AA-Size).
Do not use old or weak batteries. The remote control may not work properly with a weak voltage from such
batteries. Replace exhausted batteries with new ones. Never try to recharge normal batteries - this could
cause an explosion.
Note:
Exhausted batteries can leak corrosive electrolyte, which may cause damage to the remote control therefore remove exhausted batteries immediately.
Open the battery
1
compartment.
Install the batteries as
2
shown below, ensuring the
correct polarity.
Distance of Remote Control Operation
Point the remote control
directly at the remote sensor.
The remote control handset will not work properly in the following cases:
! !
Maximum distance approx. 5m
Close the battery
3
compartment.
Remote sensor
Transmitter window
If bright sunlight directly beams onto the unit front. If an obstacle is placed between the unit and the
If the batteries have not been installed according to
their polarities.
8
30E2825A_En_P02-09 1/15/07, 8:26 PM8
handset.
If the batteries are weak.
Z
Z
Z
Z
Z
Z
Page 9
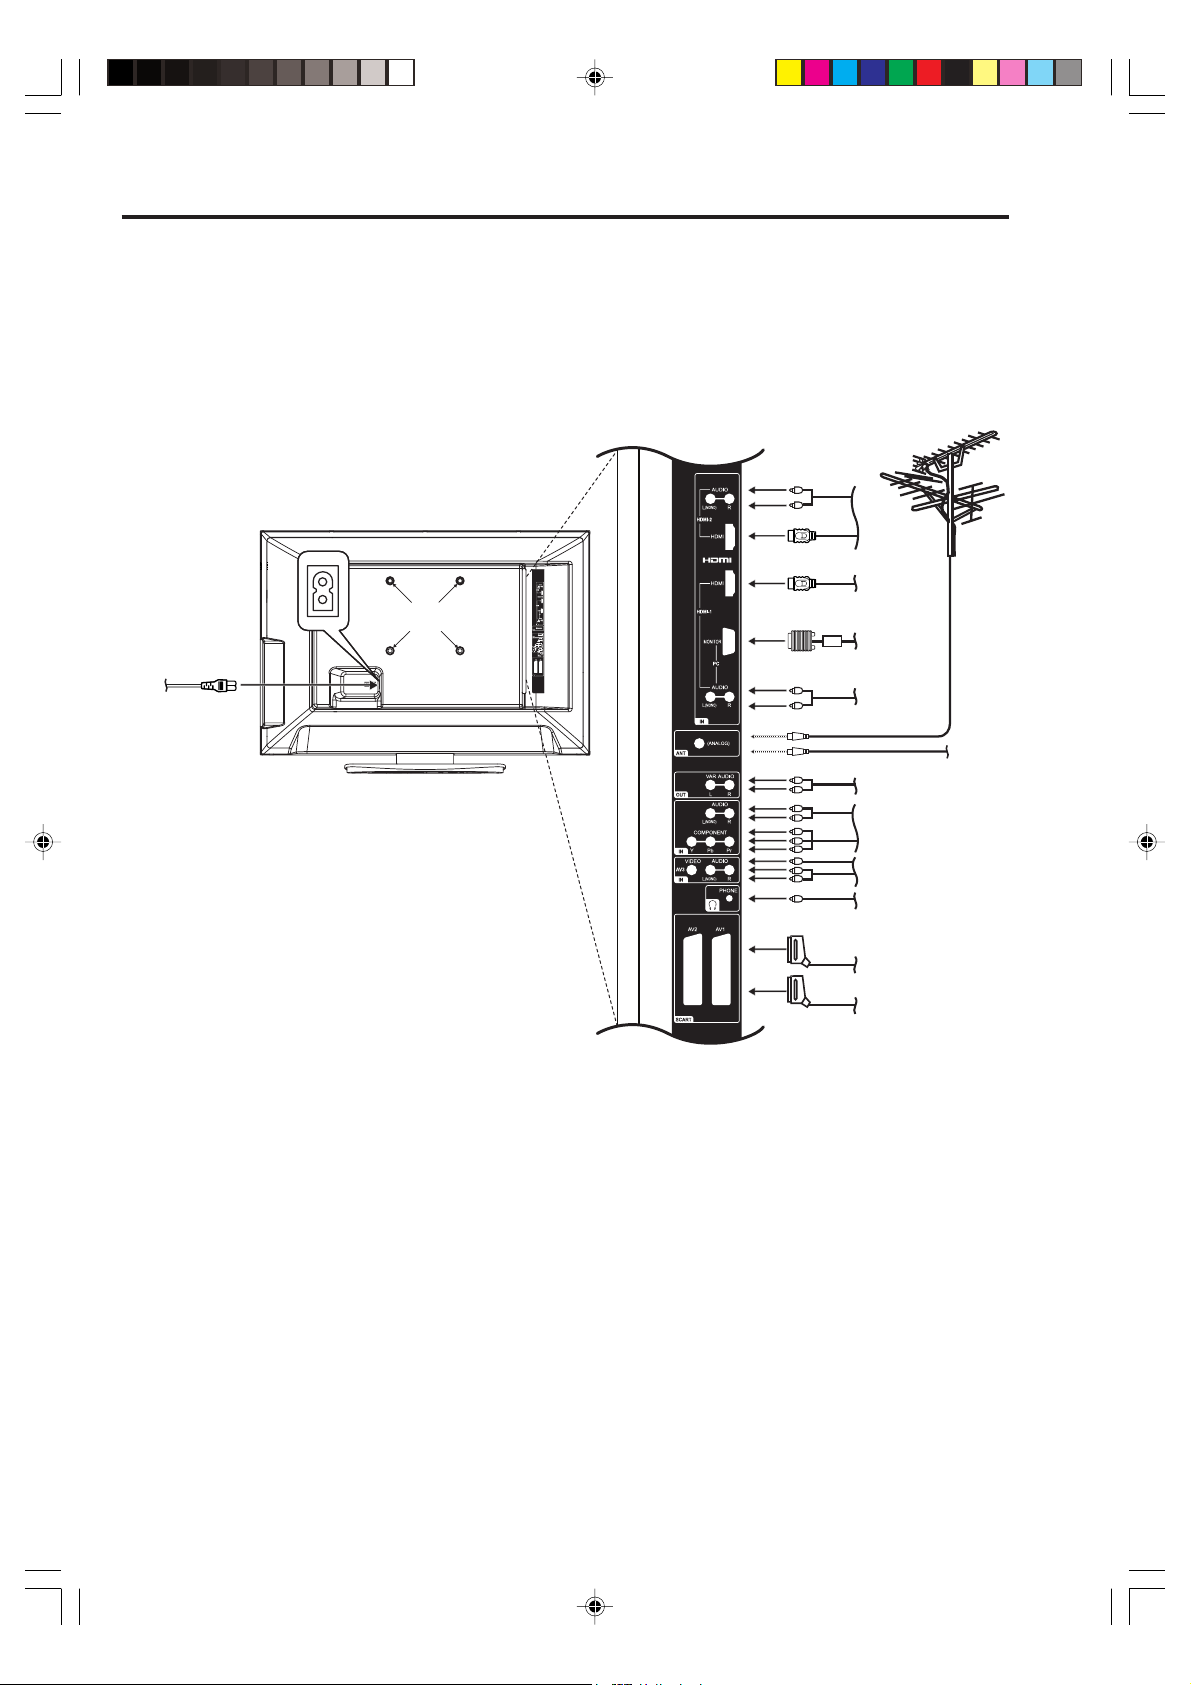
Antenna connection
Note: Before you connect other appliances:
•To avoid potentially damaging your set, make sure all items are switched off and disconnected from the
mains power when you make the connections.
• Arrange the desired connection.
• When you have finished making the connections, reconnect the mains power to the unit and switch it
back on.
Connect your antenna as shown below (A). Connections to other equipment is explained further on
P.32-34. If you have problems with reception, consult a specialist of antenna.
Back Side
(C)
(L)
(D)
(K)
AC INPUT
(E)
(A)
(B)
(F)
(G)
(H)
(I)
(J)
(A) Outdoor antenna: If the outdoor antenna already exists, you can also connect to it for analog TV-
program.
(B) CATV connection: The built-in Hyperband CATV tuner can receive analogue cable television pro-
grams (this is only applicable in some countries).
(C) HDMI input (HDMI-1/HDMI-2): See P.28.
(D) PC Monitor input (PC): See P.26.
(E) HDMI-1 AUDIO/PC AUDIO (LR) IN jacks: See P.26, 28.
(F) Variable Audio output: To connect to an audio amplifier and external speakers - the audio output
level is varied using the TV’s remote control. You can also disable the TV’s built-in speakers if desired
(see P.20).
(G) COMPONENT input: See P.33.
(H) AV3 input: Input for analogue A/V-Signal (Composite). See P.33.
(I) PHONE jack: Plug headphones with a mini plug (3.5 mm) into this jack.
(J) Scart sockets (AV1/AV2): For the connection of scart cables. See P.32.
(K) Power supply: Connect the supplied power cable to an AC 220-240V/50Hz mains power supply only
- do not attempt to connect it to any other type of supply. Never try to repair a damaged AC power
cord with isolation-tape - this should be repaired by a specialist or replaced. Do not let your pet loose
near the cable. Animals biting into the cable could receive a fatal electric shock, and could cause a
hazard to others.
(L) Bracket holes: Fix a wall mounting bracket (not supplied) here.
30E2825A_En_P02-09 07.1.16, 8:23 PM9
9
Page 10
Quick guide for MENU operation/Selecting the video input source
Make sure the antenna connection
and power supply are connected as
per the description on previous
page.
Preparation:
Tu rn on the unit with the
(On/
Standby) button on the top of the unit.
The
(On/Standby) indicator will
light up in green.
To change the unit to standby mode,
press
on the remote control.
(On/Standby) indicator will change
from green to red. To turn on the unit
from standby mode, press
on the
remote control again.
In standby mode, you can also turn the
unit on with
unit or P
To turn off the unit press
(Channel) ▲/▼ on the
/ on the remote control.
(On/
Standby) button on the unit - to
completely switch it off, disconnect the
mains power supply.
Quick guide for MENU operation
Notes:
• When you turn on the
unit for the first time,
the Language selection
screen will appear.
Select your desired
language with
or
. Press MENU to
exit the language
selection screen.
• Press 1. CH1 will appear.
Call MENU and for example: Select AUTO TUNING.
Press MENU.
1
Press
2
select
Press or to
3
or to
.
select AUTO
TUNING.
... on the following
pages the MENU
can be called in the
same way as here.
LANGUAGE
ENGLISH
ESPAÑOL
DEUTSCH
FRANÇ AIS
ITALIANO
кмллдав
: SELECT
AUTO TUNING
MANUAL TUNING
CH ALLOCATION
TELETEXT LANGUAGE WEST
LANGUAGE
VERTICAL POSITION
AUTO 4:3 DEFAULT FULL
: SELECT : ADJUST
: ENDEXIT
AUTO TUNING
MANUAL TUNING
CH ALLOCATION
TELETEXT LANGUAGE WEST
LANGUAGE
VERTICAL POSITION
AUTO 4:3 DEFAULT FULL
: SELECT : ADJUST
: ENDEXIT
: ENDEXIT: SETENTER
: ENDMENU
: RETURNMENU
Note:
If no buttons are pressed for more than
approx. 60 seconds, the MENU
disappears automatically.
10
30E2825A_En_P10-17 1/15/07, 8:26 PM10
Press EXIT to return to the normal screen.
4
Selecting the video input source
Press INPUT SELECT to
view a signal from
another device
connected to your TV,
such as a VCR or DVD
player. You can select
each input source
depending on which
input jacks you used to
connect your devices.
To select the video input source, press
corresponding number button. Then press ENTER within 6
seconds.
SOURCE SELECTION
0.TV
1.AV1
2.AV2
3.AV3
4.COMPONENT
5.HDMI1
6.HDMI2
7.PC
[0-7] : SELECT
: SETENTER
/ or the
Page 11
On-screen Language Selection/Teletext Language Selection
On-screen Language Selection
Select LANGUAGE (unless you have already selected
1
when the set was first switched on).
Then press
AUTO TUNING
MANUAL TUNING
CH ALLOCATION
TELETEXT LANGUAGE WEST
LANGUAGE
VERTICAL POSITION
AUTO 4:3 DEFAULT FULL
to display LANGUAGE menu.
: SELECT : ADJUST
: ENDEXIT
Press
2
Press EXIT to return to the normal screen.
3
or to select the desired language.
LANGUAGE
ENGLISH
ESPAÑOL
DEUTSCH
FRANÇ AIS
ITALIANO
кмллдав
: SELECT
: RETURNMENU
: RETURNMENU: SETENTER
Teletext Language Selection
Select TELETEXT LANGUAGE.
1
Then press
to your country (WEST is for Western Europe, EAST is for
Eastern Europe).
or to select WEST or EAST according
30E2825A_En_P10-17 1/15/07, 8:26 PM11
AUTO TUNING
MANUAL TUNING
CH ALLOCATION
TELETEXT LANGUAGE WEST/EAST
LANGUAGE
VERTICAL POSITION
AUTO 4:3 DEFAULT FULL
: SELECT : ADJUST
: ENDEXIT
Press EXIT to return to the normal screen.
2
: RETURNMENU
11
Page 12

Automatic station presetting with the built-in Tuner
The Automatic station presetting feature is for the set’s built-in analogue tuner only. If you have a
device such as a digital decoder (eg. Satellite or Digital Terrestrial) connected (see P.15), you would
need to tune it in separately according to its own instructions.
Preparation:
Make sure your antenna is connected to the antenna input (see
P.9).
Press 1 to switch to CH1 to begin with.
Select AUTO TUNING.
1
AUTO TUNING
MANUAL TUNING
CH ALLOCATION
TELETEXT LANGUAGE WEST
LANGUAGE
VERTICAL POSITION
AUTO 4:3 DEFAULT FULL
Press then press
2
: SELECT : ADJUST
: ENDEXIT
or to select the correct TV
: RETURNMENU
broadcast colour system.
Then press .
3
: SELECT : ADJUST
: ENDEXIT
: RETURNMENU
The automatic tuning will search for available broadcasts
and should store the channels in the correct order. During
the search the sound is muted. When all programs have
been stored, the AUTO TUNING menu will appear
automatically.
PAL CH 1
12
30E2825A_En_P10-17 1/15/07, 8:26 PM12
Page 13

Changing the order of stored channels
The Automatic station presetting
stores the stations in a specific
order. However, this order can be
changed if you wish.
Select CH ALLOCATION.
1
Then press
.
AUTO TUNING
MANUAL TUNING
CH ALLOCATION
TELETEXT LANGUAGE WEST
LANGUAGE
VERTICAL POSITION
AUTO 4:3 DEFAULT FULL
2
Press
: SELECT : ADJUST
: ENDEXIT
or until the position number that you want
: RETURNMENU
to move is selected (e.g. CH 40), then press ENTER.
CH 40
CH ALLOCATION CH 0 1
: SELECT
3
Press
ENTER
or until the channel position that you want to
: RETURNMENU: SET
move the program to is selected (e.g. CH 5), then press
ENTER.
CH 40
CH ALLOCATION CH 05
: SELECT
ENTER
: RETURNMENU: SET
Note:
When changing the order of the
channels, it is best to start with Ch1.
30E2825A_En_P10-17 1/15/07, 8:26 PM13
The original program 40 is now stored in memory position 5.
4
To arrange the other channels, repeat this procedure or...
CH 05
CH ALLOCATION CH 40
: SELECT
ENTER
Press EXIT to return to the normal screen.
5
: RETURNMENU: SET
13
Page 14

Manual TV station presetting
Usually the Automatic station presetting stores all available stations in that particular area.
However, if the reception is poor, some broadcasts may not be stored. If you do want to store
them, you can use the manual tuning procedure described below
Example: Preset the ZDF on program position 2.
Select MANUAL TUNING. Then press .
1
AUTO TUNING
MANUAL TUNING
CH ALLOCATION
TELETEXT LANGUAGE WEST
LANGUAGE
VERTICAL POSITION
AUTO 4:3 DEFAULT FULL
Notes:
• The auto search stops at the best
reception for each channel
automatically, so manual fine tuning
is not normally necessary. However
if you wish to, you can manually fine
tune the station - in step 3 when the
auto search has stopped at the
station, press
or until the
desired fine tuning is achieved.
Then press ENTER.
• The search moves up to the next
station position automatically. If you
want to you can also stop the search
manually - press
or at the
desired position and the search will
stop. If necessary you can operate
the fine tuning as described above.
2
Press
: SELECT : ADJUST
: ENDEXIT
or to select PAL or SECAM-L.
: RETURNMENU
Then press ENTER.
PAL CH 1
: ADJUST
ENTER
Press . The auto search starts forward. It will stop at
3
each station with good reception. Press
: RETURNMENU: SET
again until you
receive the ZDF. Then press ENTER.
PAL CH 1
: F.TUNING
ENTER
The channel position number will be highlighted. Press
4
MENU: SET
: SEARCH
: RETURN
or repeatedly until the number next to CH change to 2.
Then press ENTER.
The ZDF was now stored in the channel position CH 2.
PAL CH 2
: SELECT
ENTER
: SET
Repeat the steps 2 and 4 to preset other TV stations.
5
Press EXIT to return to the normal screen.
6
: RETURNMENU
14
30E2825A_En_P10-17 1/15/07, 8:26 PM14
Page 15

Connection to Satellite Receiver
Connect with Satellite receiver as shown below.
Select the TV-Program at the satellite receiver. To do this, use the remote control of the satellite
receiver. You can not store the same station once again additionally in LCD-Monitor which already
stored in satellite receiver.
Back Side
Satellite
Receiver
TV
To AV1
AC INPUT
Scart-cable (not supplied)
30E2825A_En_P10-17 1/15/07, 8:26 PM15
15
Page 16

Basic Operation
Channel selection
With the numbered buttons.
Example:
• No. 2: Press 0 and within 2 seconds, press 2.
The station stored on CH 2 will appear.
•No. 29: Press 2 and within 2 seconds, press 9.
The station stored on CH 29 will appear.
QuickView
channel.
Volume adjusting
Press
indicator disappears after 4 seconds.
MUTE
Press
approx. 4 seconds.
The muting can be released by pressing
Information display
Press
number and wide screen
type will appear. (The
display will disappear after
4 seconds.)
During display above,
press
displays the clock and
program information if this is currently available.
Press P or to change up or down a channel.
This takes approx. 2 seconds. If the auto search
only stored 5 stations, only these 5 will appear.
Skipped channels will not appear (see P.31).
button allows you to go back to the last selected
+ or – to adjust the volume. The volume level
. The sound will be cut off. MUTE will appear for
again or + or –.
once. Channel
again. The screen
Note:
If the built-in tuner does not receive
anything (e.g. if no antenna is
connected) during TV-operation, then
the TV-unit will change to standby after
approx. 15 minutes.
16
30E2825A_En_P10-17 1/15/07, 8:26 PM16
SLEEP TIMER
To set the sleep timer press
. SLEEP and the minutes
SLEEP
until shut-off will appear.
Each time you press
the
SLEEP time shown will
change. When the
displayed time runs out, the
unit will switch to standby.
The display will disappear after approx. 4 seconds
To cancel the sleep timer:
Press
repeatedly until “0” appears.
Still picture
Press FREEZE to make a still picture. To cancel the still
picture, press FREEZE again.
Notes:
• When this function is not available, “NOT AVAILABLE” will
appear.
• The still image automatically goes out after 30 minutes.
120
Page 17

Stereo reception with the built-in tuner
The built-in Tuner can detect and
receive NICAM stereo broadcasts
automatically.
NICAM stereo sound reception:
Select NICAM.
1
Press
or to select AUTO or OFF.
Select OFF if you do not want to receive NICAM sound.
NICAM AUTO/OFF
BASS 25
TREBLE 25
BALANCE 0
SURROUND OFF
SPEAKERS ON
HDMI1 HDMI
HDMI2 HDMI
RESET
: SELECT : ADJUST
: ENDEXIT
Press EXIT to return to the normal screen.
2
: RETURNMENU
The following types of broadcast are possible with
NICAM transmissions
“NICAM ST” illuminates
for approx. 4 seconds
when a NICAM
STEREO broadcast
signal is received.
Note:
In case of bad reception, the stereo
sound also can be disturbed.
“NICAM M1” illuminates
for approx. 4 seconds
when a NICAM MONO
A broadcast signal is
received.
“NICAM M1/M2”
illuminates for approx. 4
NICAM M1 / M2
seconds when a
NICAM MONO A and
MONO B broadcast
signal is received.
This will be displayed
for approx. 4 seconds if
a NICAM signal is
received when the
“NICAM OFF” option is
selected.
Stereo reception in Germany
“STEREO” illuminates
for approx. 4 seconds
when a STEREO
broadcast signal is
received.
STEREO
30E2825A_En_P10-17 1/15/07, 8:26 PM17
17
Page 18

Stereo reception with the built-in tuner
When 2-channel sound reception is
available, you can select your
preferred audio with the AUDIO
button.
Each time you press AUDIO, the sound channel will switch to
the alternative channel available.
NICAM 2-channel sound reception (not available in
Germany)
2-channel sound reception in Germany
18
30E2825A_En_P18-24 1/15/07, 8:26 PM18
Page 19

Bass, Treble and Balance
Select BASS. Then press or to adjust the bass.
1
NICAM AUTO
BASS 25
TREBLE 25
BALANCE 0
SURROUND OFF
SPEAKERS ON
HDMI1 HDMI
HDMI2 HDMI
RESET
: SELECT : ADJUST
: ENDEXIT
: RETURNMENU
If you wish to set the treble or balance, press
to select TREBLE or BALANCE. You can then
adjust these in the same way.
Press EXIT to return to the normal screen.
2
or
Notes:
•To reset BASS, TREBLE and
BALANCE to the factory preset
values, select RESET in step 1 then
press
or .
• If you do not press any button within
1 minute, the menu will disappear
automatically.
30E2825A_En_P18-24 1/15/07, 8:26 PM19
19
Page 20

Using the surround sound feature/
Turning off the built-in speakers
Using the surround sound feature
The SURROUND feature processes the audio signal to expand
the listening field wider and deeper to create a ‘pseudo
surround-sound’ from the TV’s speakers. The feature works
with stereo signals from aeTV broadcast or AV input.
Select SURROUND.
1
Then press or to select ON or OFF.
NICAM AUTO
BASS 25
TREBLE 25
BALANCE 0
SURROUND ON/OFF
SPEAKERS ON
HDMI1 HDMI
HDMI2 HDMI
RESET
Press EXIT to return to the normal screen.
2
: SELECT : ADJUST
: ENDEXIT
: RETURNMENU
Notes:
• Make sure the volume control of
your audio amplifier is set to a
moderate listening level.
• The PHONE jack and other output
sockets do not output the
SURROUND audio - this can only be
heard through the TV’s own
speakers.
Turning off the built-in speakers
Use this feature to turn the TV speakers off when you connect
an audio system (see P.33).
When SPEAKERS is set to OFF, the output volume from the
Var iable Audio output jacks can be adjusted by the volume
buttons of this unit. If it is set to ON, the output volume from the
Var iable Audio output jacks is fixed.
Select SPEAKERS.
1
Then press
Press EXIT to return to the normal screen.
2
or to select OFF.
NICAM AUTO
BASS 25
TREBLE 25
BALANCE 0
SURROUND OFF
SPEAKERS ON/OFF
HDMI1 HDMI
HDMI2 HDMI
RESET
: SELECT : ADJUST
: ENDEXIT
: RETURNMENU
20
30E2825A_En_P18-24 16/1/07, 12:11 PM20
Page 21

Brightness, Contrast, Colour and Sharpness/DNR
Brightness, Contrast, Colour and Sharpness
Select BRIGHTNESS. Then press or to adjust the
1
brightness.
BRIGHTNESS 25
CONTRAST 25
COLOUR 25
TINT 0
SHARPNESS 25
DNR OFF
: SELECT : ADJUST
: ENDEXIT
: RETURNMENU
If you wish to set the contrast, colour, tint, or
sharpness, press
or to select CONTRAST,
COLOUR, TINT, or SHARPNESS. These can all be
adjusted in the same way.
The “TINT” option can be selected if an NTSC 3.58MHz or
NTSC 4.43MHz signal is input through one of the AV
sockets, and NTSC or AUTO has been selected for the AV
COLOUR option (see P.35).
Press EXIT to return to the normal screen.
2
DNR
DNR (Digital Noise Reduction) can reduce the roughness of
the picture.
Select DNR. Then press or to select ON or OFF.
1
BRIGHTNESS 25
CONTRAST 25
COLOUR 25
TINT 0
SHARPNESS 25
DNR ON/OFF
Notes:
•To reset BRIGHTNESS,
CONTRAST, COLOUR, TINT and
SHARPNESS to the factory preset
values, select RESET in step 1 then
press
or .
• In HDMI or COMPONENT mode, the
“DNR” option cannot be selected.
30E2825A_En_P18-24 1/15/07, 8:26 PM21
: SELECT : ADJUST
: ENDEXIT
Press EXIT to return to the normal screen.
2
: RETURNMENU
21
Page 22

Back light
You can use the Back light feature
to adjust the screen brightness for
improved picture clarity.
Select BACKLIGHT. Then press or to adjust the
1
level you require.
A V2 INPUT AV
A V2 OUTPUT TV
AV COLOUR AUTO
BACKLIGHT 16
: SELECT : ADJUST
: ENDEXIT
Press EXIT to return to the normal screen.
2
: RETURNMENU
22
30E2825A_En_P18-24 1/15/07, 8:26 PM22
Page 23

Selecting the colour temperature/Blue back
Selecting the colour temperature
Change the picture quality by selecting from three preset
colour temperatures - cool, medium and warm - as described in
the following table;
Select COLOUR TEMPERATURE.
1
COLOUR
TEMPERATURE MEDIUM
BLUE BACK ON
RESET
COOL/MEDIUM/WARM
: SELECT : ADJUST
: ENDEXIT
Press or to select the desired setting.
2
Mode Picture Quality
COOL Bluish
MEDIUM Neutral
WARM Reddish
Press EXIT to return to the normal screen.
3
: RETURNMENU
Blue back
You can set the TV to automatically change to a blue screen
and mute the sound if the signal is weak or absent.
Select BLUE BACK.
1
Then press
COLOUR
TEMPERATURE MEDIUM
BLUE BACK ON/OFF
RESET
or to select ON or OFF.
30E2825A_En_P18-24 1/15/07, 8:27 PM23
: SELECT : ADJUST
: ENDEXIT
Press EXIT to return to the normal screen.
2
: RETURNMENU
23
Page 24

Picture format
The broadcaster may transmit a Wide Screen Signalling (WSS) signal which can determine the correct
picture width and set it automatically when the AUTO setting is used. If you want to change this setting,
you can select from the formats listed below.
Manual format setting
AUTO
Press PICTURE SIZE repeatedly until
AUTO appears. See above Note.
Pressing PICTURE SIZE repeatedly scrolls through the
following options.
4:3
This mode shows a 4:3 picture in its original size and shape
with vertical bands on the left and right side.
FULL SCREEN
Stretches the left and right hand sides of a 4:3 picture
horizontally to fill the screen, while leaving the centre of the
picture unstretched.
Notes:
• In PC mode, the PICTURE SIZE
feature is available only for 16:9 or
4:3 format. (In “WXGA INPUT” and
“WVGA INPUT” mode, the PICTURE
SIZE feature is not available.)
• In HDMI or COMPONENT mode of
scanning rate: 720p and 1080i, the
PICTURE SIZE feature is available
only for AUTO and CINEMA format.
Note:
In this mode the picture is geometrically distorted on the left
and the right sides of the screen.
16:9
This mode is used with 16:9 signals from a Digital decoder,
DVD player or other external source. This uniformly stretches a
4:3 image horizontally to fill the screen (For example, a 16:9
image is often stored “anamorphically” on a DVD, where the
16:9 image is stored as a horizontally compressed 4:3 image this mode restores the image to its correct 16:9 proportions).
CINEMA:
This mode is used to zoom-in on (expand) 4:3 ‘letterbox’ format
pictures (with black bars at the top and bottom) so that they fill
more of the screen.
Note:
In the CINEMA mode, part of the picture may be slightly cut off
due to the expansion. However, it is possible to scroll the
picture up or down to view the top or bottom part of the picture
(see P.25).
14:9
This enlarges a 4:3 picture to the 14:9 format.
(FULL SCREEN)
(16:9)
(CINEMA)
24
30E2825A_En_P18-24 1/15/07, 8:27 PM24
(14:9)
Page 25

Scrolling the picture in CINEMA mode/Auto 4:3 Default
Scrolling the picture in CINEMA mode
When the CINEMA mode is selected, you can adjust the
vertical picture position.
Note:
You cannot move the picture vertically in any of the other
picture modes.
Select
1
VERTICAL
POSITION.
Then press
AUTO TUNING
MANUAL TUNING
CH ALLOCATION
.
TELETEXT LANGUAGE WEST
LANGUAGE
VERTICAL POSITION
AUTO 4:3 DEFAULT FULL
Press or
2
: SELECT : ADJUST
: ENDEXIT
: RETURNMENU
to adjust the
vertical position of
the picture.
•To raise the
SCROLL ADJUSTMENT +10
picture, press
.
: ADJUST
: SETENTER
•To lower the
picture, press
.
SCROLL ADJUSTMENT –10
: ADJUST
: SETENTER
Note: You can adjust the vertical position upwards by up
to +20 and downwards by up to -10.
Press EXIT to return to the normal screen.
3
Notes:
•AUTO 4:3 DEFAULT is available only
for AUTO picture size setting.
• In COMPONENT mode, AUTO 4:3
DEFAULT is available only for
576i mode.
30E2825A_En_P25-31 1/15/07, 8:27 PM25
480i/
Auto 4:3 Default
This option selects the default way that a 4:3 signal is shown either as normal “4:3” or expanded in the “Full screen” mode,
according to your preferences.
Select AUTO 4:3
1
DEFAULT.
Then press
or to select
4:3 or FULL.
Press EXIT to return to the normal screen.
2
AUTO TUNING
MANUAL TUNING
CH ALLOCATION
TELETEXT LANGUAGE WEST
LANGUAGE
VERTICAL POSITION
AUTO 4:3 DEFAULT 4:3/FULL
: SELECT : ADJUST
: ENDEXIT
: RETURNMENU
25
Page 26

PC connection
As PCs are sometimes supplied with a ‘conventional’ CRT monitor, you may need to adjust the display
settings of your PC’s graphics card, otherwise the pictures may not appear correctly. Switch on your PC
(still with your original monitor) - select ‘1360 x 768’ for the screen resolution, and select 60 Hz for the onscreen refresh rate. Switch off your PC, then connect it to your LCD TV while both items are still switched
off.
Use a PC-VGA cable (not supplied) to connect the LCDMonitor to your PC. Make the connections carefully so as not to
break or bend the contacts inside the plug.
TV
(Left side view)
PC
VGA Cable
(not supplied)
Audio cable
(not supplied)
?
Note:
See next page for the PC Monitor
Menu.
The PC Monitor Menu settings are not
effective for normal TV mode or
external input modes.
Select PC input
Switch on the LCD-TV.
Select the PC input mode (see P.10).
Note:
If there is no video signal from the computer when the unit is in
PC mode, “NO SIGNAL” will appear on the TV screen.
Monitor Display modes
MODE Resolution Refresh rate
VGA 640x480 60Hz
VGA 720x400 70Hz
WVGA 848x480 60Hz
SVGA 800x600 60Hz
XGA 1024x768 60Hz
WXGA 1280x720/768 60Hz
WXGA 1360x768 60Hz
(according to Graphic card)
26
30E2825A_En_P25-31 1/15/07, 8:27 PM26
Page 27

PC connection
Example: Adjust the contrast.
During PC mode press MENU once. The Menu will appear
1
on the screen.
BRIGHTNESS 25
CONTRAST 25
HOR POSITION 25
VER POSITION 25
PHASE 25
CLOCK 0
Press or to select CONTRAST. Then press
2
to adjust CONTRAST.
BRIGHTNESS 25
CONTRAST 25
HOR POSITION 25
VER POSITION 25
PHASE 25
CLOCK 0
Press EXIT to return to the normal screen.
3
Description about the each setting option:
PICTURE Menu
BRIGHTNESS and CONTRAST: You can adjust
these according to to your personal preferences.
HOR POSITION and VER POSITION: to adjust
the horizontal and vertical placing of the image.
PHASE and CLOCK: eliminates the horizontal
(PHASE) and vertical (CLOCK) interfering lines.
RED/GREEN/BLUE: influences the colour
balance.
WXGA INPUT: When you input an WXGA signal,
set this option to “ON”.
WVGA INPUT: When you input an WVGA signal,
set this option to “ON”.
RESET: Press
or to reset BRIGHTNESS,
CONTRAST, RED, GREEN and BLUE to the
factory preset values.
AUDIO Menu
BASS/TREBLE/BALANCE: Tone setting menu.
SURROUND: Press
sound feature ON or OFF (see P. 20).
SPEAKERS: Press
ON or OFF (see P. 20).
RESET: Press
and BALANCE to the factory preset values.
: SELECT : ADJUST
: ENDEXIT
: SELECT : ADJUST
: ENDEXIT
: ENDMENU
: RETURNMENU
or to select surround
or to select SPEAKERS
or to reset BASS, TREBLE
or
30E2825A_En_P25-31 1/15/07, 8:27 PM27
27
Page 28

Connecting an HDMI or a DVI device to the HDMI input
The HDMI input receives digital audio and uncompressed video from a HDMI equipped device or
uncompressed digital video from a DVI equipped device.
When you connect to a DVI device with a HDMI-to-DVI adapter cable, it only transfers the video signal, so
it is necessary to use separate analogue leads (RCA/Phono type) to transfer the audio signals.
Select the HDMI1 or HDMI2 input mode (see P.10).
Notes:
• As well as HDMI2, you can also use
HDMI-1 IN to connect to DVI
equipped device - in this case, you
must connect the audio cables to
the HDMI-1 AUDIO/PC AUDIO (LR)
IN jacks.
• This set is classed as “HD-Ready”.
This means that it is capable of
displaying HD (High Definition)
signals when connected to a
suitable HD source, such as an HD
receiver or DVD player that has HD
capability, via HDMI, DVI, or
Component Video connections.
• Some devices may not operate
properly with the TV.
TV
DVI device
(Left side view)
RCA/Phono audio cable
(not supplied)
HDMI - to - DVI adapter cable
(HDMI type A connector)
(not supplied)
HDMI cable (type A connector)
(not supplied)
To HDMI output
HDMI device
Selecting the HDMI audio input source
You must choose the appropriate HDMI audio input setting for
each connection, depending on whether the source is
equipped with a DVI or HDMI socket.
Select HDMI1 or HDMI2.
1
Press
Press EXIT to return to the normal screen.
2
or to select HDMI or DVI.
NICAM AUTO
BASS 25
TREBLE 25
BALANCE 0
SURROUND OFF
SPEAKERS ON
HDMI1 HDMI/DVI
HDMI2 HDMI
RESET
: SELECT : ADJUST
: ENDEXIT
: RETURNMENU
To DVI
output
or
HDMI, the HDMI logo and HighDefinition Multimedia Interface are
trademarks or registered trademarks of
HDMI Licensing LLC.
28
30E2825A_En_P25-31 1/15/07, 8:27 PM28
Page 29

Teletext
Teletext is sent page by page. This unit is able to automatically store up to 812 pages, but they can only be
accessed once they have been stored. This can take a few moments.
Fastext/TOPtext
The Fastext/TOPtext is teletext with a special directory.
On the lower part of the screen there are four different coloured
fields (red, green, yellow and blue). These fields lead directly to
the pages shown within. The coloured buttons on the remote
control correspond to the coloured fields. Press the appropriate
coloured button in order to activate the desired colour field.
Switch on / off Teletext
Teletext is not transmitted by all channels.
Select a channel that shows teletext.
Press
shown without any text information, it may mean that the
channel you have selected does not support teletext.)
Press
simultaneously.
Press
Press
last page which was stored is now shown.
Note:
You cannot select any other channels as long as teletext is
switched on. Switch teletext off when you want to switch over
to another channel.
Select Page
Press P
the requested page number by using the 10 Number Buttons.
And if you mistype something, just enter the complete 3-digit
wrong page number then enter the desired number again. Or
... press one of the coloured teletext buttons so that a page
from Fastext/TOPtext is shown.
. You will now see a teletext page. (If “100” is
again. Teletext and TV picture are shown
again in order to switch off teletext.
again in order to switch on teletext again. The
or until the page you desire appears. Or ... enter
30E2825A_En_P25-31 1/15/07, 8:27 PM29
29
Page 30

Teletext
Hold Pages
Some pages are divided up into subpages by the channel.
Subpages are automatically shown in turn, as they are transmitted. In order to hold the page, press
to display the next subpage.
Directly Select Subpages
You can directly select the subpages if required.
Example:
Page 667 from ARD (German teletext) comprises of 2
subpages. In the right upper corner you will, for example, see
1/2. That means that page one of 2 subpages is being shown
at the moment.
. Press again in order
667 667 ARD-Text 21.07.03 15:01:38
Press
shown. Enter 0 0 0 2. It can take a minute before subpage
0002 appears.
Press
You can only select other teletext pages when the subpage
feature is switched off.
Enlargement
In order to enlarge the display, press
Either the upper or lower half of the screen is enlarged.
Each time you press
upper or lower half of the screen or the full picture.
Answering Quiz Questions
Some pages contain quiz questions with concealed answers.
Press
in order to select subpage 2. 4 dashes (----) are
again in order to switch off the subpage feature.
.
you switch between the display of the
in order to show the answers.
1/2
30
30E2825A_En_P25-31 1/15/07, 8:27 PM30
Page 100
Press ENTER in order to show page 100.
Page 31

Conceal stored channels
The channels stored in the memory can be selected using P
or .If you want to skip certain channels from the sequence,
you can conceal them. These channels are not deleted - they
can be accessed at any time with the numbered buttons.
Select the channel to be concealed (i.e. CH29).
1
Press SKIP.
The programme number flashes.
+0 '
Select the next channel to be concealed.
2
Press SKIP.
The programme number flashes.
You can conceal as many channels as you like.
Example:
5 channels are automatically stored via the automatic
channel storage feature. When you keep pressing P
(the channels will appear in the following order: 1, 2, 3, 4,
5, 1, 2, 3, 4, 5, 1, ... etc. If you conceal programme
positions 3 and 5, the sequence is now 1, 2, 4, 1, 2, 4, 1, ...
etc.)
Restoring a Concealed Channel
You can restore a channel that has been concealed using the
following process: Type in the number of the channel that you
wish to restore using the numbered buttons - the number will
flash on the screen. Then press the SKIP button - the channel
number will stop flashing, which indicates that it is now
restored.
30E2825A_En_P25-31 1/15/07, 8:27 PM31
31
Page 32

Connection to other equipment
1. Connecting other units to your TV
Satellite antenna
Satellite
receiver
VCR
DEC
Decoder
TV
(All illustrated SCART cables and antenna cables are not supplied)
Antenna
Video recorder
TV (Left side view)
TO ANT
TO AV2
TO AV1
DVD player
DVD player:
For to ensure optimum picture quality, select RGB for the DVD player’s output signal (see Owner’s manual
of the DVD player). Always connect the DVD player to the AV1 SCART, as this socket is compatible with
RGB signals.Select the AV1 input mode to view (see P.10).
Note:
S-Video signals can be played back through the AV2 SCART socket. If the source product has an
S-Video socket instead of a SCART output, you can use an S-Video-to-SCART-Adaptor (not supplied).
2. Connecting two video recorders (e.g. to duplicate a video tape)
Video recorder 1 to AV1
TV (Left side view)
Playback
Video recorder 2 to AV2
Recording
(All illustrated SCART cables are not supplied)
32
Select the “MONITOR” option in the
SETUP menu (see P.34 No.6 (2)).
Select the AV1 input mode (see P.10).
You can see the playback picture from
video recorder 1.
This signal is output via AV2 and can be
recorded by video recorder 2.
With this arrangement, Video recorder 2
will record exactly what is shown on the
screen.
30E2825A_En_P32-BACK 16/1/07, 3:34 PM32
Page 33

Connection to other equipment
3. Connecting an audio system
This connection allows you to hear the TV sound through external speakers connected to an audio
amplifier.
To control the audio through the amplifier turn on the TV and the amplifier set the volume of both to a
moderate level, and turn off the TV’s built-in speakers (see “Turning off the built-in speakers” on P.20).
Use a set of RCA/Phono cables to connect the TV to a suitable input on your hi-fi system as shown
below.
Note:
If the volume of either the TV or the amplifier is set to 0 (or OFF), you will not hear any sound.
Note: The Bass/Treble/Balance
adjustments (see P.19) only function with
the sound from the TV speakers - it does
not affect the audio output sockets.
TV (Left side view)
To VAR
(variable)
AUDIO
OUT
(Audio cable, not supplied)
Stereo amplifier
Audio input
4. Connecting a Video camera or Games
console
Connect the Video camera (or Games
console, etc.) to the TV with an appropriate
AV cable (RCA/Phono) as shown. Select
the AV3 input mode to view (see P.10).
Note:
TV (Left side view)
Video camera
(example)
AV output
(AV cable, not supplied)
To AV3 IN
When you input the PAL-M signal to AV3
input, select AV COLOUR setting to AUTO,
otherwise the monochrome images will be
displayed.
5. Connecting to a DVD player or other AV device with Component Video outputs
If your DVD player (or other device) has Component Video output jacks, use a suitable set of leads (RCA/
Phono) to connect these to the Component Video inputs on this TV as shown - it can greatly enhance the
picture quality and performance. Please remember that you will also need to connect separate leads
(RCA/Phono) for the audio signals. Select the COMPONENT input mode (see P.10).
TV (Left side view)
Audio cord (not supplied)
Video cord (not supplied)
To COMPONENT IN
Component output
Note:
YPbPr
Audio output
DVD player
The Component Video input of this unit are for use with equipment which outputs interlaced signals (PAL:
576i/1080i or NTSC: 480i/1080i) and progressive signals (PAL: 576p/720p or NTSC: 480p/720p).
30E2825A_En_P32-BACK 1/15/07, 8:27 PM33
33
Page 34

Connection to other equipment
6. Setting of Scart socket AV2
In , select AV2 INPUT or AV2 OUTPUT.
1
Selecting the “AV2 INPUT” type - this ensures that the
2
TV processes the input signal correctly.
Press
AV: Composite signal (e.g. from a video recorder).
S-VIDEO: S-Video signal (e.g. from DVD player with
or to select AV or S-VIDEO.
S-Video output).
A V2 INPUT AV/S-VIDEO
A V2 OUTPUT TV
AV COLOUR AUTO
BACKLIGHT 16
Selecting the “AV2 OUTPUT” option - this determines
whether the AV2 outputs the signal from the internal
tuner or whatever input is shown on the screen.
Press
or to select TV or MONITOR.
TV: Outputs the last channel position selected.
MONITOR: The picture displayed on TV-screen.
Note:
The TV-output over AV-2 causes MONO-sound, if you use
HDMI-input.
Press EXIT to return to the normal screen.
3
: SELECT : ADJUST
: ENDEXIT
A V2 INPUT AV
A V2 OUTPUT TV/MONITOR
AV COLOUR AUTO
BACKLIGHT 16
: SELECT : ADJUST
: ENDEXIT
: RETURNMENU
: RETURNMENU
34
30E2825A_En_P32-BACK 1/15/07, 8:27 PM34
Page 35

AV colour adjustment/Power return feature
AV colour adjustment
The AV Colour setting only applies when viewing devices connected to the AV inputs.
In menu, select AV COLOUR.
1
Press
2
If AUTO option does not work, press or to select
3
desired colour (e.g. NTSC 3.58).
Press EXIT to return to the normal screen.
4
Note:
PAL is the colour system used in Germany. NTSC 3.58 is used
in the USA, PAL 60 used in Germany handled video recorders,
which play NTSC video tape recording.
DVD players that play NTSC DVDs (ie.multi-region/region
code-free), can produce different signals according to each
particular model - the following signals may be output from the
player: PAL, SECAM, NTSC 3.58, NTSC4.43 and PAL60. If
possible select RGB on the DVD player as the output signal
instead of any of these types, and connect the DVD player to
TV with a SCART cable.
or to select AUTO.
A V2 INPUT AV
A V2 OUTPUT TV
AV COLOUR AUTO
AUTO / PAL / SECAM / NTSC4.43
NTSC3.58 / PAL60
BACKLIGHT 16
: SELECT : ADJUST
: ENDEXIT
: RETURNMENU
30E2825A_En_P32-BACK 1/15/07, 8:27 PM35
Power return feature
If the power is cut off while you are viewing the TV and the
power is resupplied, the Power return feature will turn the TV
on automatically.
If the power is going to be off for a long time or you are going to
be away from the TV for a long time, unplug the power cord to
prevent the TV from turning on in your absence.
35
Page 36

Troubleshooting table/Specifications
Troubleshooting table
Please check the following list before requesting service.
Symptom
No picture, no sound
No reception Have you tuned in the TV stations?
The TV switches off with
missing antenna input signal
In menu, the TUNING
option cannot be selected.
Wrong Colours
Switch on the set.
Check that the mains power outlet is properly connected.
Select appropriate input mode.
Press 1 on the remote control.
Connect the antenna.
Make sure the set is ON and not in Standby mode
This is normal.
15 minutes after the antenna signal has disappeared,
the set will change to standby mode.
The unit is set to AV mode. Press 1 on the remote
control.
Colour and Brightness errors can occur when the
viewing angle / ambient air temperature (see technical
specifications) are exceeded.
Possible solution
Specifications
System PAL B/G, D/K, I/I, SECAM L
Frequency Range PAL: 2-12, X, Y, Z, S1-S41, 21-69
SECAM: FB-FC, F1-F6, B-Q, F21-F69
Power Supply AC 220-240V, 50Hz
Power Consumption: Operation: approx. 170W
Stand by: approx. 1W
LCD 31.5” TYPE (80.04 cm visible)
TFT low-glass Active Matrix Colour LCD, 1366 x 768 Pixel
Video input PAL, SECAM, NTSC 3.58/4.43
HDMI input HDMI compliant (type A connector), HDCP compliant
Suggested scan rates: PAL: 576i/576p/720p/1080i
NTSC: 480i/480p/720p/1080i
HDMI Audio: 2-channel PCM, 32/44.1/48 kHz sampling frequency
16/20/24 bits per sample
Output Power 10W (MAX) x 2
Surrounding temperature Operation: 5°C ~ 40°C
Storage: –20°C ~ 60°C
Operating Humidity Less than 80%RH
Dimensions
Weight (w/o Accessories) approx. 19 kg
Accessories 2 batteries (AA/R6/UM-3)
82.2(W) x 60.4(H) x 33.3(D) cm
Remote control unit
AC cord
Page
9
10, 26, 32~34
9
9
16
12
Weight and dimensions are approximate. Because we continually strive to improve our products we may
change specifications and designs without prior notice.
J30E2825A SH 07/03
N
36
30E2825A_En_P32-BACK 07.1.19, 1:41 PM36
 Loading...