

Page 1

User’s Manual
30DVD/35DVD
Choose freedom.
Page 2

Copyright
Notice
© 2000 by Toshiba Corporation. All rights reserved. Under the copyright
laws, this manual cannot be reproduced in any form without the prior
written permission of Toshiba. No patent liability is assumed, with respect
to the use of the information contained herein.
Toshiba Satellite 30DVD/35DVD Portable Personal Computer
User’s Manual
First edition September 2000
The information contained in this manual, including but not limited to any
product specifications, is subject to change without notice.
TOSHIBA CORPORATION (TOSHIBA) PROVIDES NO WARRANTY
WITH REGARD TO THIS MANUAL OR ANY OTHER INFORMATION
CONTAINED HEREIN, AND HEREBY EXPRESSLY DISCLAIMS ANY
IMPLIED WARRANTIES OF MERCHANTABILITY OR FITNESS FOR
ANY PARTICULAR PURPOSE WITH REGARD TO ANY OF THE
FOREGOING. TOSHIBA ASSUMES NO LIABILITY FOR ANY
DAMAGES INCURRED DIRECTLY OR INDIRECTLY FROM ANY
TECHNICAL OR TYPOGRAPHICAL ERRORS OR OMISSIONS
CONTAINED HEREIN, OR FOR DISCREPANCIES BETWEEN THE
PRODUCT AND THE MANUAL. IN NO EVENT SHALL TOSHIBA BE
LIABLE FOR ANY INCIDENTAL, CONSEQUENTIAL SPECIAL, OR
EXEMPLARY DAMAGES, WHETHER BASED ON TORT, CONTRACT
OR OTHERWISE, ARISING OUT OF OR IN CONNECTION WITH THIS
MANUAL OR ANY OTHER INFORMATION CONTAINED HEREIN OR
THE USE THEREOF.
Trademarks
Intel is a registered trademark and Celeron is a trademark of Intel Corporation.
Microsoft, MS-DOS, Windows, Windows NT, NetMeeting, and Outlook are
registered trademarks of Microsoft Corporation.
Photo CD is a trademark of Eastman Kodak.
PS/2 is a trademark of International Business Machines Corporation.
SoundBlaster is a registered trademark of Creative Technology, Ltd.
All other brand and product names are trademarks or registered
trademarks of their respective companies.
EU Declaration of Conformity
This product carries the CE-Mark in accordance with the related European
ii User's Manual
Directives. CE Marking is the responsibility of Toshiba Europe GmbH,
Hammfelddamm 8, 41460 Neuss, Germany.
Page 3

General Precautions
Toshiba computers are designed to optimise safety, minimise strain and
withstand the rigors of portability. However, certain precautions should be
observed to further reduce the risk of personal injury or damage to the
computer. Be certain to read the general precautions below and to note the
cautions included in the text of the manual.
Stress injury
Carefully read the Safety Instruction Manual. It contains information on
prevention of stress injuries to your hands and wrists than can be caused
by extensive keyboard use. The User's Guide also includes information on
workspace design; posture and lighting that can help reduce physical
stress.
Heat Warning
The base of the PC can become very warm; while the temperature will not
be too hot to touch, prolonged physical contact may result in a temporary
heat imprint on the skin. It is recommended that prolonged physical
contact be avoided.
Also, if the computer has been used for a long time, avoid direct contact
with the metal plate supporting the I/O ports. It can become hot.
Mobile phones
Use of mobile phones can interfere with the PC sound system. The PC
operation is not impaired but it is recommended that a distance of 30cm be
maintained between the PC & the mobile phone.
Pressure or impact damage
Do not apply heavy pressure to the computer or subject it to strong impact
excessive pressure or impact can cause damage to computer component
or otherwise cause malfunctions.
PC card overheating
Some PC cards can become hot with prolonged use. If two cards are
installed, both can become hot even if only one is used extensively.
Overheating of a PC card can result in errors or instability in the PC card
operation. Also, be careful when you remove a PC card that has been
used for a long time.
User's Manual iii
Page 4

Working environment
This product was designed to fulfil the EMC (electromagnetic compatibility)
requirement to be observed for so-called "Residential, commercial and
light industry environments".
Toshiba do not approve the use of this product in working environments
other than the above mentioned "Residential, commercial and light
industry environments".
For example, the following environments are not approved:
Industrial Environments (environments with a mains voltage >230V~)
Medical Environments
Automotive Environments
Aircraft Environments
If this product is supplied with a network port, please refer to the
paragraph “Network connection”.
Any consequences resulting from the use of this product in working
environments that are not approved are not the responsibility of Toshiba
Europe GmbH.
The consequences of the use of this product in non-approved working
environments may be:
Interference with other devices or machines in the near
surrounding area
Malfunction of, or data loss from, this product caused by disturbances
generated by other devices or machines in the near surrounding area
Therefore Toshiba strongly recommend that the electromagnetic
compatibility of this product should be suitably tested in all non-approved
working environments before use. In the case of automobiles or aircraft,
the manufacturer or airline respectively should be asked for permission
before use of this product.
Furthermore, for general safety reasons, the use of this product in
environments with explosive atmospheres is not permitted.
Network connection (class A warning)
If this product has networking capabilities and will be connected to a
network, Class A radiation limits will be observed (in accordance with
technical conventions). This means that if the product will be used in a
domestic environment, other devices in the near surrounding may suffer
interference. Consequently, please do not use this product in such
environments (for example a living room), otherwise you could be held
responsible for any ensuing interference.
iv User's Manual
Page 5

CE compliance
This product and the original options are designed to observe the related
EMC (Electromagnetic compatibility) and safety standards. However,
Toshiba should not guarantee that this product still observes these EMC
standards if options or cables not produced by Toshiba are connected or
implemented In this case the persons who have connected/ implemented
those options / cables have to assure that the system (PC plus options /
cables) still fulfils the required standards. To avoid in general EMC
problems following advice should be observed:
Only CE marked options should be connected / implemented
Only best shielded cables should be connected
Conformity Statement
The equipment has been approved to [Commission Decision "CTR21 "] for
pan-European single terminal connection to the Public Switched
Telephone Network (PSTN).
However, due to differences between the individual PSTNs provided in
different countries the approval does not, in itself, give an unconditional
assurance of successful operation on every PSTN network termination
point.
In the event of problems, you should contact your equipment supplier in
the first Instance.
Network Compatibility Statement
This product is designed to work with, and is compatible with the following
networks. It has been tested and found to conform with the additional
requirements contained in EG 201 121.
Germany - ATAAB AN005, AN006, AN007, AN009, AN010,
and DE03, 04, 05, 08, 09, 12, 14, 17
Greece - ATAAB AN005, AN006 and GR01, 02, 03, 04
Portugal - ATAAB AN001, 005, 006, 007, 011 and
P03, 04, 08, 10
Spain - ATAAB AN005, 007, 012, and ES01
Switzerland - ATAAB AN002
All other countries - ATAAB AN003, 004
Specific switch settings or software setup are required for each network,
please refer to the relevant sections of the user guide for more details.
The hookflash (timed break register recall) function is subject to separate
national type approval. It has not been tested for conformity to national
type regulations, and no guarantee of successful operation of that specific
function on specific national networks can be given.
User's Manual v
Page 6

Table of Contents
Introduction ................................................................................... x
This guide ................................................................................................. x
Safety icons ............................................................................................. xi
Everyday handling ................................................................................. xii
The computer ......................................................................................xii
Floppy disk .........................................................................................xiii
CD-ROM/DVD-ROM........................................................................... xiv
Power Cord.........................................................................................xiv
Keyboard ............................................................................................xiv
LCD .....................................................................................................xv
Modem.................................................................................................xv
Carrying your computer with you .........................................................xv
Consumption parts .............................................................................xvi
About disposal ....................................................................................xvi
Other documentation............................................................................ xvi
Service options...................................................................................... xvi
Chapter 1: Before you turn on the computer .......................... 1-1
Description of the parts........................................................................1-1
The computer ........................................................................................1-1
Ports for connection of peripheral devices.........................................1-3
Status indicator lights......................................................................... 1-5
Accessories ....................................................................................... 1-6
Preparing the computer........................................................................ 1-7
Using the computer comfortably ........................................................ 1-7
Setup environment ............................................................................ 1-7
Operation environment ...................................................................... 1-7
Working posture.................................................................................1-8
Connecting to a power source ........................................................... 1-9
Treatment methods.......................................................................... 1-10
Opening the display............................................................................ 1-11
Power indicators .............................................................................. 1-12
Charging the battery ........................................................................... 1-13
Operating on battery power ............................................................. 1-13
Battery indicators.............................................................................1-14
vi User's Manual
Page 7

Using the touch pad and the left/right button...................................1-15
Basic functions.................................................................................1-15
Keyboard..............................................................................................1-17
Adjusting the volume ..........................................................................1-23
Control with Volume Control Slider...................................................1-23
Chapter 2: From turning on to switching off the computer .. 2-1
Turning on the computer ......................................................................2-1
When a password is set.....................................................................2-2
Easy Buttons..........................................................................................2-3
Function .............................................................................................2-3
Software specification ........................................................................2-3
Chapter 3: Travelling with the computer................................. 3-1
Operating on battery power..................................................................3-1
Checking the battery charge ..............................................................3-1
Checking through the battery status lamp..........................................3-1
Checking through the icon .................................................................3-2
Battery’s operating time .....................................................................3-2
When the battery power is low ...........................................................3-3
Built in battery .......................................................................................3-4
Changing the battery pack....................................................................3-5
Removing/ Installing...........................................................................3-5
Saving battery power ............................................................................3-6
Chapter 4: Hardware.................................................................. 4-1
Installing peripherals ............................................................................4-1
Connecting a cable to the computer ..................................................4-2
Exchange selectable devices ...............................................................4-2
Save your data and close all applications ..........................................4-3
Floppy disk drive...................................................................................4-4
Installing the floppy disk drive ............................................................4-4
Formatting a floppy disk.....................................................................4-4
How to format a disk ..........................................................................4-4
DVD-ROM drive......................................................................................4-5
Which CDs/DVDs you can use ..........................................................4-5
Inserting and removing a CD/DVD.....................................................4-6
Inserting a CD/DVD ...........................................................................4-6
Removing a CD/DVD .........................................................................4-8
PC cards...............................................................................................4-10
Installation........................................................................................ 4-11
Removal...........................................................................................4-13
Connecting to the telephone line.......................................................4-14
Installation........................................................................................4-14
User's Manual vii
Page 8

Connecting to a LAN........................................................................... 4-15
The proper cable .............................................................................4-15
Connecting the LAN cable ............................................................... 4-16
USB devices.........................................................................................4-17
Installation .......................................................................................4-17
Removal ..........................................................................................4-17
i.LINK (IEEE 1394) devices ................................................................. 4-18
Installing/removing the cable ........................................................... 4-18
Connecting to LAN via i.LINK .......................................................... 4-19
Printer..............................................................................................4-20
Printer setup .................................................................................... 4-20
Other devices.......................................................................................4-21
PS/2 devices.................................................................................... 4-21
Microphone......................................................................................4-22
Headphones .................................................................................... 4-23
External Monitor ..............................................................................4-24
Chapter 5: Convenient Functions ............................................ 5-1
Using the Easy Buttons........................................................................5-1
Chapter 6: BIOS Setup .............................................................. 6-1
About BIOS Setup ................................................................................. 6-1
How to start the BIOS Setup.............................................................. 6-1
How to run the BIOS Setup ...............................................................6-2
Contents of the BIOS Setup ..............................................................6-4
Main Menu Details.................................................................................6-5
System Devices Menu Details..............................................................6-7
Security Menu Details.........................................................................6-10
Power Menu Details ............................................................................6-12
Others Menu Details............................................................................ 6-13
Boot Menu Details...............................................................................6-14
Exit Menu Details ................................................................................6-15
Chapter 7: Restoring the preinstalled software...................... 7-1
Restoring the complete system .........................................................7-1
Restoring Toshiba utilities and drivers ...............................................7-1
Chapter 8: Troubleshooting...................................................... 8-1
When problems occur........................................................................... 8-1
Before reading the Q&A collection..................................................... 8-1
Turning the computer on or off….......................................................8-1
A program is running automatically.................................................... 8-2
The power goes off............................................................................8-3
The computer cannot be turned off.................................................... 8-3
The computer turned itself on ............................................................ 8-3
viii User's Manual
Page 9

Display and screen................................................................................8-4
Nothing appears on the screen ..........................................................8-4
The automatic display stop function does not work............................8-5
Taskbar and windows display.............................................................8-5
I can't find the file ..................................................................................8-6
I don't know to which location I saved my file.....................................8-6
Applications...........................................................................................8-6
I can't use the application...................................................................8-6
Printing...................................................................................................8-7
I can't print out ...................................................................................8-7
Keyboard, Mouse, Touch pad ...............................................................8-8
I can't enter the characters I would like to enter.................................8-8
I can't use the mouse.........................................................................8-9
Problems with peripheral devices......................................................8-10
Floppy disk/Floppy disk drive ...........................................................8-10
CD.................................................................................................... 8-11
PC Cards .........................................................................................8-12
The LAN function doesn't work ........................................................8-13
USB devices ....................................................................................8-13
Infrared communication....................................................................8-14
Internet/Mail .....................................................................................8-15
Audio ....................................................................................................8-21
No sound from the speakers ............................................................8-21
There are strange sounds ................................................................8-22
Strange behaviour ...............................................................................8-23
There is an interference with the TV and radio ................................8-23
The Hibernation mode doesn't work.................................................8-23
The computer acts strangely............................................................8-24
Other unusual conditions .................................................................8-25
I receive unclear messages .............................................................8-25
In case of irregularities or damage...................................................8-27
Appendix A: Hot Keys ...............................................................A-1
Appendix B: Features and Specifications...............................B-1
Appendix C: Power Cable Connectors....................................C-1
Appendix D: Video Modes.........................................................D-1
Appendix E: International Warranty......................................... E-1
Appendix F: If your computer is stolen................................... F-1
Index............................................................................................ F-3
User's Manual ix
Page 10

Introduction
Welcome to the world of portable computing. With your new Toshiba
Satellite
Satellite 30DVD and 35DVD computers provide fast and easy Internet
access. Microsoft® Windows® Millennium Edition is already installed on the
Satellite 35DVD model, while the Satellite 30DVD comes with Windows
2000. Both offer exciting new features and easy Internet access.
This guide
This guide introduces the computer’s features. You can:
Read the entire guide from beginning to end.
Skim through and stop when a topic interests you.
Use the table of contents and the index to find specific information.
If you are new to computers, or have not used a notebook computer
before, read through the first couple of chapters to familiarise you with the
parts of the computer and how to turn it on. After that, seek out whatever
interests you most.
®
computer, your work can accompany you wherever you go.
x User's Manual
Page 11
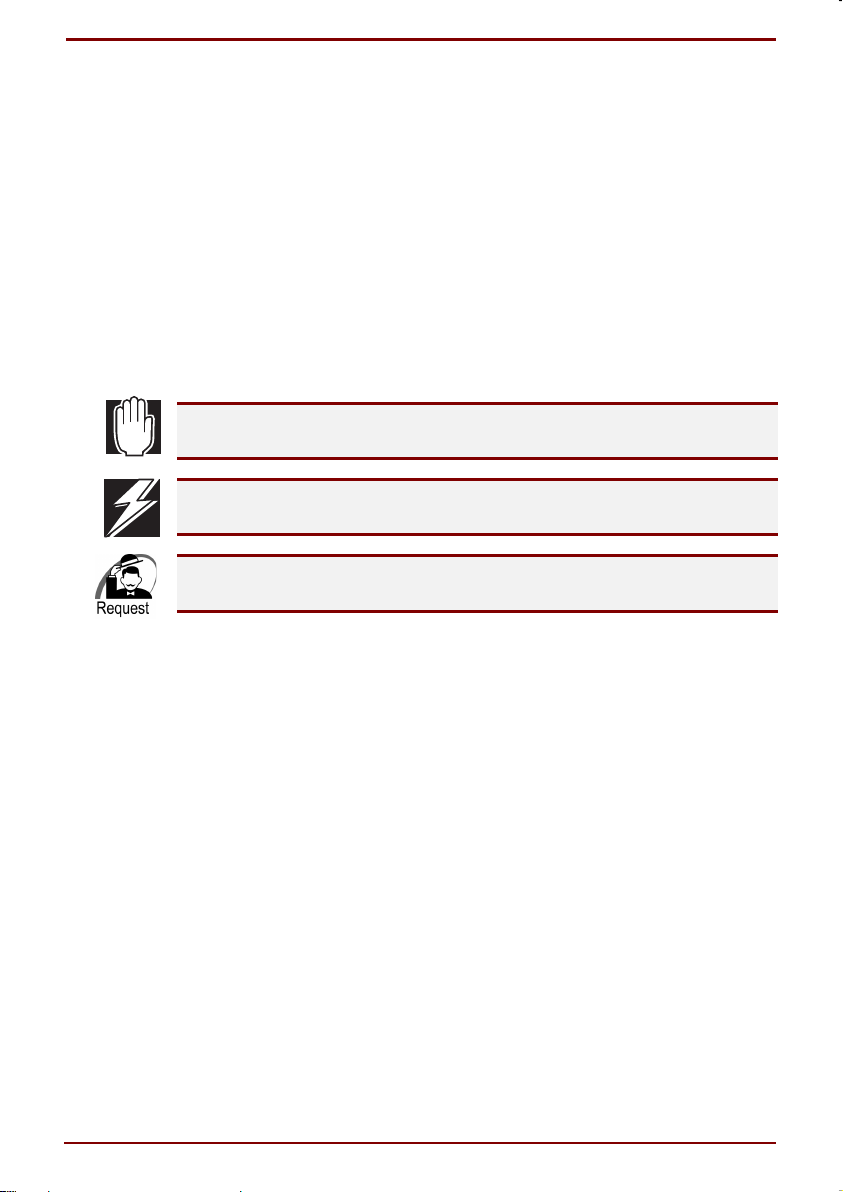
Safety icons
This manual contains safety instructions that must be observed in order to
avoid potential hazards that could result in personal injury, damage to your
equipment, or loss of data. The safety cautions have been classified
according to the seriousness of the risk and the following icons highlight
these instructions as follows:
DANGER: This icon indicates the existence of a hazard that could result in
death or serious bodily injury the safety instruction is not observed.
WARNING: This icon indicates the existence of a hazard that could result
in bodily injury if the safety instruction is not observed.
CAUTION: This icon indicates the existence of a hazard that could result in
damage to equipment or property if the safety instruction is not observed.
NOTE: This icon indicates information that relates to the safe operation of
the equipment or related items.
REQUEST: Contains information in order to prevent a loss or damage of
data or a drop in efficiency.
User's Manual xi
Page 12

Everyday handling
For the everyday handling of your computer, please follow the instructions
below.
The computer
DANGER: Before carrying out any repair, remove the computer and its
peripherals from the power source and disconnect the power cable from
the AC power source. Repair work on the computer without disconnecting
it from the power source first could result in an electric shock.
Be careful not to subject the computer to heavy shock or external
pressure.
There are precision parts used in this product, those parts could be
damaged when subjected to heavy shock or external pressure.
Do not bring the computer in direct contact with water or any kind of
detergent, as this could damage the product.
Please do not use benzine, thinner or similar volatile solvents, chemical
cleaning cloths and the like. This could damage the computer.
If the computer gets dirty, please wipe it with a soft dry cloth.
In case it is soiled heavily, please wipe it with a wet cloth that has been
wrought thoroughly. Please do not use chemicals like benzine or
thinner.
Please close the display carefully.
The operating conditions are as following:
Temperature: 5 ~ 35°C, Humidity: 20 ~ 80%
Please do not use or store in the following environments:
In places where it is exposed to direct sunlight
In places that are exceptionally hot or cold
In places where sudden temperature changes might occur (to prevent
condensation)
In places with strong magnetic fields (near speakers, etc.)
In places with a lot of dust
In places where strong vibrations occur
In places that are filled with chemicals
In places where it could come in contact with chemicals
The computer's base and the AC adaptor become hot during operation.
This heat is only generated by the computer's normal operating
process and is not an indication of damage.
xii User's Manual
Page 13

Floppy disk
Floppy disks are subject to aging and wear. If they are damaged, please
exchange them.
Please follow the instructions below when handling floppy disks.
Please create copies regularly so you are prepared in case data saved
to a floppy disk gets damaged or erased. Please note that Toshiba
cannot be held responsible for any damage to data contents saved
onto a floppy disk.
Please do not open the shutter part and do not touch the magnetic
surface therein.
If the magnetic surface (on the disk surface) is damaged or dirty,
please do not use the disk.
Please do not bring the disks near objects that emit strong magnetism,
like speakers.
Please do not expose to direct sunlight and don not keep it near
objects that radiate strong heat.
Please do not put heavy objects like books or notebooks on top of it.
Operation and storage temperature are as shown below:
Environment Operation Storage
Temperature 5 ~ 35°C
41 ~ 95° F
Please adhere the label onto the appropriate place. If you change
labels, please do not stick them one on top of the other.
Please do not keep it in places with a lot of dust or places that are filled
with tobacco smoke.
For storage, please keep in a plastic case.
Please do not keep the floppy disk near food, tobacco or eraser chips.
4 ~ 53°C
-4 ~ 149° F
User's Manual xiii
Page 14

CD-ROM/DVD-ROM
Please note that no warranty can be provided for the damage of contents
of the CD-ROM/DVD-ROM, regardless of the reasons. To increase the life
of these products and protect your data, please follow the instruction below
when you operate them.
Please do not break or bend the CD-ROM/DVD-ROM and do not
damage its surface. You may then be unable to read information stored
on the disk.
Please do not keep the CD-ROM/DVD-ROM in places where they are
exposed to direct sunlight or extreme temperatures. Please do not put
any heavy objects on top of the CD-ROM/DVD-ROM.
Please store them in their case and keep them clean.
Please hold the CD-ROM/DVD-ROM at their outer rim or at the
opening in the middle. If there are fingerprints on the surface, the data
cannot be read properly.
Please do not write anything on the surface of the
CD-ROM/DVD-ROM.
In case the CD-ROM/DVD-ROM got dirty or is covered with dust,
please wipe it with a clean dry cloth.
Please do not just wipe across the disk, but wipe in a straight motion
from the middle towards the rim of the disk. In case a dry cloth does
not work, please clean with a damp cloth using water or a neutral
detergent.
Please do not use chemicals like benzine or thinner.
Power Cord
When the plug of the power cord is connected to the AC outlet for a long
period of time, dust can collect on the plug. Please wipe this dust off
regularly.
Keyboard
Please clean with a soft dry cloth. In case it is soiled heavily, please wipe it
with a wet cloth that has been wrought thoroughly, using water or a neutral
detergent. If dirt collects in the gaps between the keys, use a vacuum
cleaner or something similar to suck it out.
xiv User's Manual
Page 15

LCD
Liquid crystal display
There is a deflection film on the surface of the screen. This film can
easily be damaged, so please do not touch it excessively.
If the surface is dirty, please wipe it with a soft clean cloth. Please do
not use water, neutral detergents, volatile solvents, and chemical
cleaning cloths and the like.
Do not handle or operate with excessive force.
The liquid crystal display elements are injected in designated
distribution between the glass panels. Therefore, when pressure is
applied, the order of distribution may be disturbed, and in certain cases
the original order could not be restored.
About the sideline FL tube
The light emission of sideline FL tube (cold negative pole tube) which is
installed in the display decreases little by little the longer you use the
computer, the display becomes darker. If the display gets hard to read,
please contact your dealer.
Modem
The built in modem conforms to the ITU-T V.90 and K56flex standards. If
your provider's equipment does not correspond to V.90 or K56flex
standards, the highest possible download speed will be 33.6Kbps
Carrying your computer with you
To prevent malfunction and damage to your equipment, please follow the
instructions below when you take your computer with you.
Make sure you turn off the computer.
Please do not move the computer if the hard disk drive light is on after
you switched the computer off.
Please do not subject the equipment to sudden temperature changes
(i.e. moving it from a cold room to a hot room). If a sudden temperature
change cannot be prevented, please wait a while before you turn it on.
Please remove attached devices and cables. If there is a floppy disk or
CD/DVD inserted in your system, please take them out.
Please do not drop the computer and do not subject it to strong
shocks. Do not leave it inside a vehicle that is subjected to direct
sunlight. This could cause damage to the equipment.
Please close the display whenever you move the computer.
User's Manual xv
Page 16

Consumption parts
The following parts are subject to consumption.
Battery pack (Rechargeable Lithium-Ion battery) The charging function
decreases with prolonged use. Please exchange it for a separately bought
battery pack, if the re-charging function decreases.
About disposal
Please follow the regulations and rules of your local government when
disposing of the computer.
Other documentation
Your computer comes with the following documentation:
This user's guide, which contains technical information about how the
computer works.
The QuickStart poster shows how to connect the computer’s
components and get started quickly.
The Safety Instruction manual provides important safeguards that must
observed in order to avoid potential hazards that could result in
personal injuries or could damage your computer.
The Microsoft Windows documentation which explains the features of
your Microsoft Windows operating system.
Service options
Toshiba offers a full line of service options built around its warranty
programs. See the warranty and service material included with your
computer for registration information.
If you have a problem or need to contact Toshiba, see Appendix E.
xvi User's Manual
Page 17
Chapter 1
Before you turn on the computer
In this section the necessary preparations before switching on the
computer are explained.
Description of the parts
Here you find a simple explanation of the names and functions of the different
parts. A more detailed description is given in the respective sections.
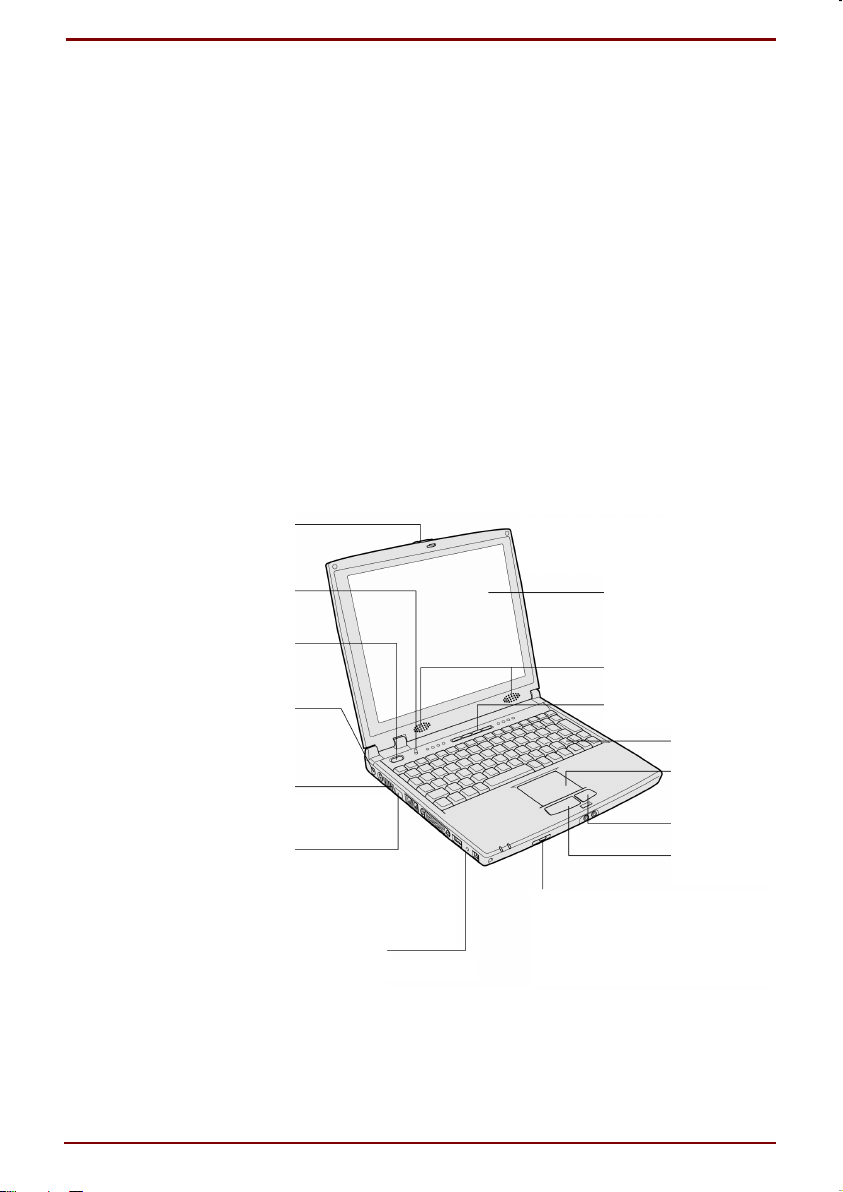
The computer
1
2
3
4
5
6
15
7
1 Display Latch
2 Lid switch
3 Power switch
User's Manual Before you turn on the computer 1-1
8
9
10
11
12
13
14
Page 18
4 DC IN socket
5 Fan – Through this opening the heat from inside the computer
can escape.
6 Infrared port – When you use the infrared port, you can
communicate with other devices that also possess an IrDA type
compatible infrared port. The devices involved in an infrared
transmission should use the same communication application.
7 Emergency power off switch – Turns the power off forcefully.
Press with a ballpoint pen or similar object with a small tip.
8 Liquid crystal display – The display device.
9 Speaker
10 One-Touch operation button
11 Keyboard
12 Touch pad
13 Right button
14 Left button
15 Volume control bar – To control the volume of headphones or
speakers. Slide to the right side to increase the volume, and to
the left side to decrease it.
Under normal circumstances, you should turn off the computer via the
shutdown function of the operating system. Use of the power switch or the
shutdown button could result in data loss.
Use the shutdown button only if the computer fails to shut down by other
means.
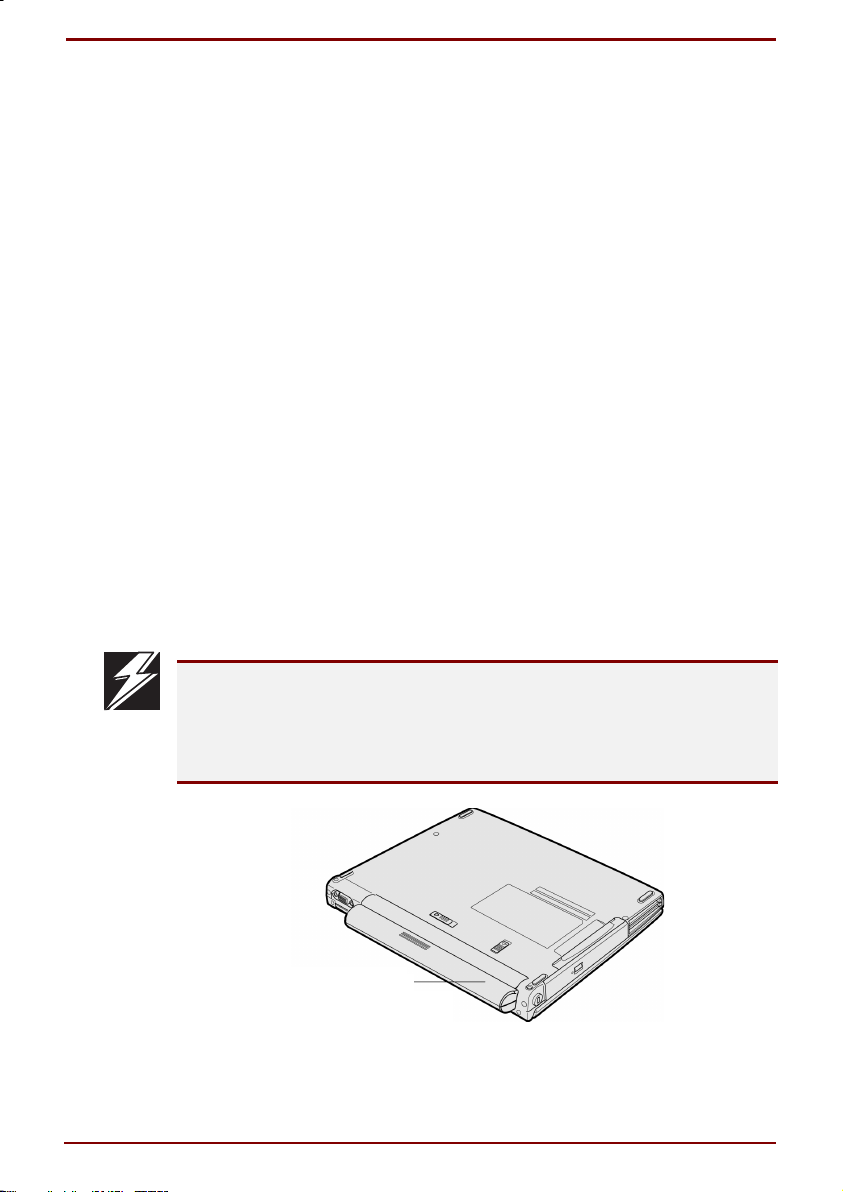
Battery Pack
Battery pack If the battery is charged, you can operate on
battery power
1-2 Before you turn on the computer User's Manual
Page 19
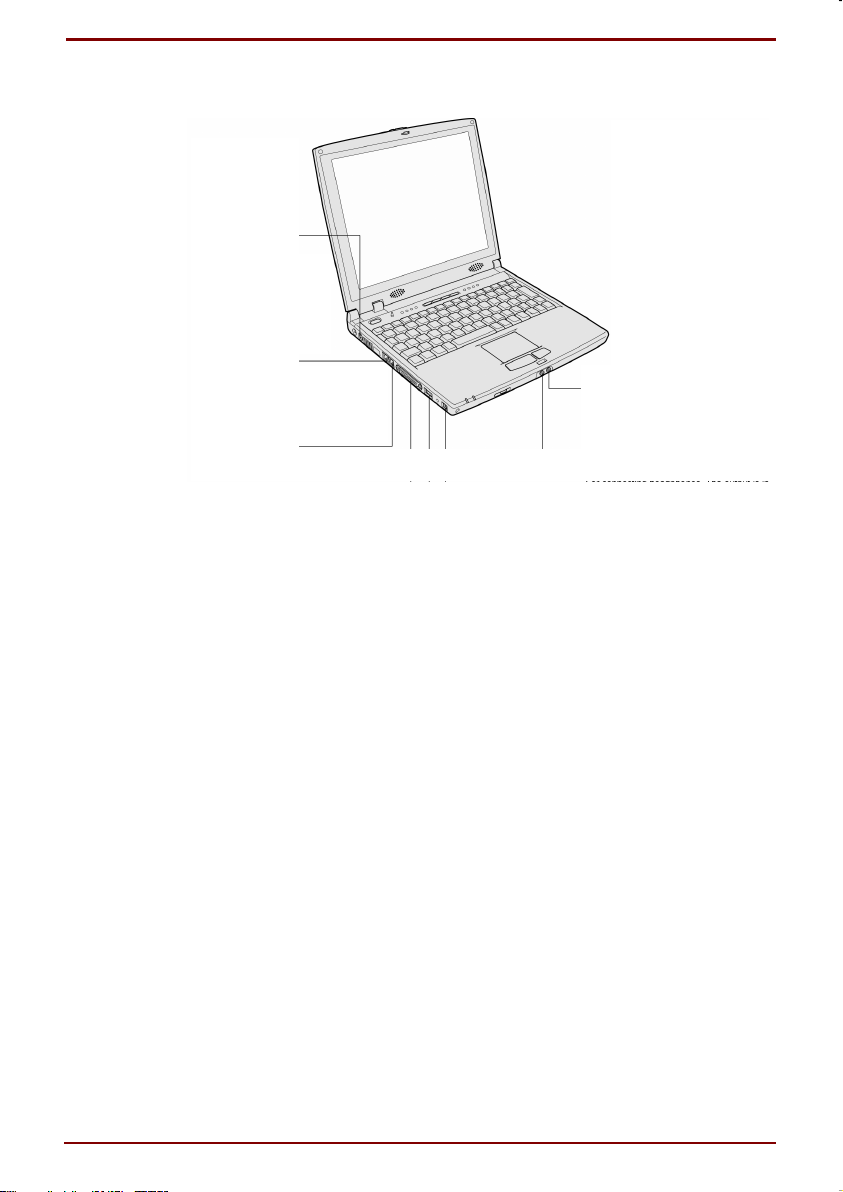
Ports for connection of peripheral devices
1
2
8
3
4 5 6 7
1 PS/2 port – For connecting a PS/2 compatible keyboard or
mouse. Be sure to turn the computer off before connecting the
device.
2 Modular jack – For connecting to the telephone line through a
modular cable, to use the modem.
3 LAN connector – For connecting to a network cable.
4 PRT/FDD port – For connecting to a printer or floppy disk
devices.
5 USB port – For connecting USB (Universal Serial Bus) standard
devices.
6 i.LINK connector – For connecting i.LINK (IEEE1394) standard
devices.
7 Headphone-out jack – For connecting headphones. The output
is in stereo. Please use a 3.5 mm stereo mini jack headphone.
8 Microphone-in jack – For connecting a microphone. Please
use a 3.5 mm mono aural mini jack microphone.
User's Manual Before you turn on the computer 1-3
Page 20

1
2
4
3
1 PC Card Slot 1 (top) and 2 (bottom) – Allows you to connect
PC Card Standard TYPE I/II cards. You can also connect other
CardBus compatible cards.
2 RGB port – For connecting a CRT monitor.
3 Security lock slot – Can be connected to a chain etc. to
prevent theft.
4 SelectBay – At the time of purchase, a CD-ROM drive is
located in the SelectBay, but you can also use it for the floppy
diskette drive that comes with this product. Whenever you do
not use this bay, please install the weight saver.
1-4 Before you turn on the computer User's Manual
Page 21
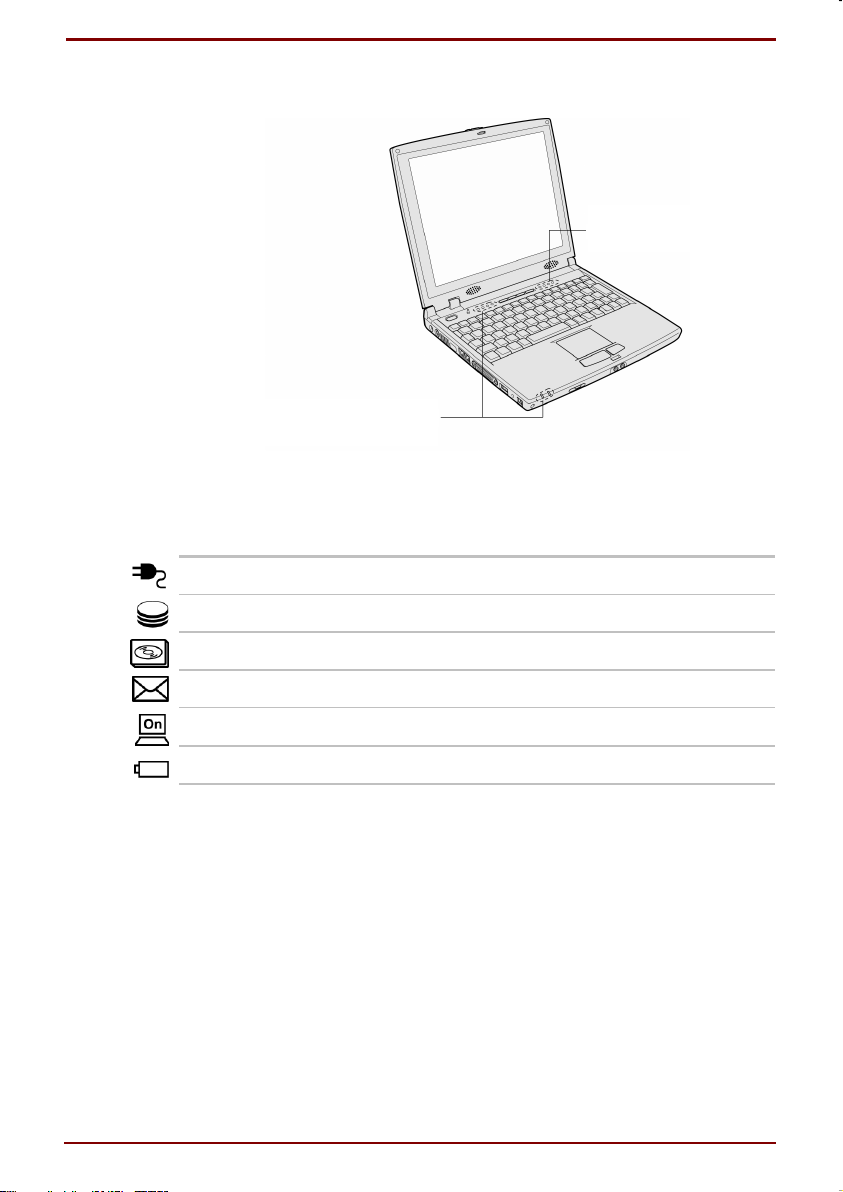
Status indicator lights
Status indicator lights
The meaning of each light is described below:
Status indicators
AC Power light Glows when the power cord is connected
Hard disk drive light Indicates that the hard disk drive is in use
SelectBay light Indicates that the SelectBay is in use
Keyboard indicator
lights
"Mail arrived" light Glows to confirm new mail
On/ off light Shows the power status
Battery status light Indicates the battery status
User's Manual Before you turn on the computer 1-5
Page 22
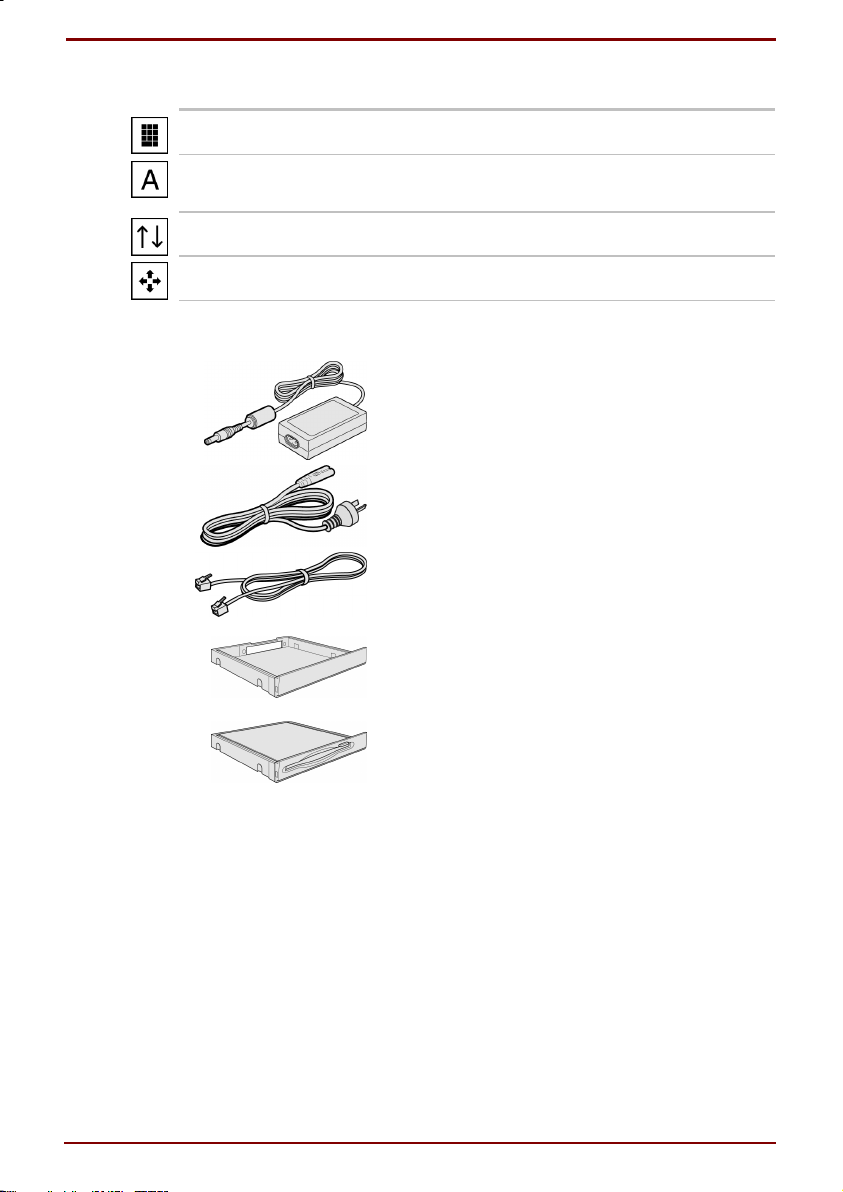
Keyboard indicators
Numeric mode light Character keys are in Numeric input mode
Caps Lock light Character keys are in Capital (uppercase) letter
input mode
Scroll mode light Arrow keys are in Scroll mode
Cursor Character keys are in Cursor input mode
Accessories
AC adaptor
This supplies the computer with power, it is
plugged into the computers power jack.
Power cord
This is the cable for connecting the AC adaptor to
a power source.
Modem cable
This cable connects the internal modem to the
telephone line.
Weight saver
When you do not use any selectable devices,
please install this into the SelectBay.
Floppy disk drive
It can either be installed into the SelectBay, or
connected to the computer with an attached
cable.
1-6 Before you turn on the computer User's Manual
Page 23
Preparing the computer
While using your computer, you are able to work more comfortably by
adjusting the lighting, the height of your desk and chair, the angle of the
screen etc. The creation of the right work environment decreases physical
fatigue and also helps a little to prolong the life of the computer.
In this section you can find information on how to protect your health and
safety and create an environment where you can use your computer
comfortably.
Using the computer comfortably
Please follow the instructions above when you setup or use your computer.
Setup environment
Please, do not keep it in places where water or other liquids can be spilled
on it and do not expose it to direct sunlight.
Do not place it on unsteady or sloping surfaces, or other unsafe places.
The computer could fall and become damaged.
Please do not place it near devices like speakers that generate a strong
magnetic field. This could result in a loss of data.
Use in an environment with temperatures of 5 ∼ 35°C and humidity
of 20 ∼ 80%.
Do not use in an environment where it is subject to sudden changes in
temperature or humidity.
Do not place it near a heater or other devices that radiate heat.
Do not place it near corrosive chemicals.
Operation environment
Place the computer on a flat surface with the right height and distance.
To avoid eye fatigue, the display should be lower than eye level.
Sit straight in front of the computer, choose an appropriate place to
operate the computer and peripheral devices.
The display angle is easy to adjust, so make sure there is a certain amount
of space behind the computer.
Please adjust the display angle in order to achieve a bright and broad view.
Because of the heat radiation from the computer, please make sure that
there is a sufficient amount of space around it.
User's Manual Before you turn on the computer 1-7
Page 24
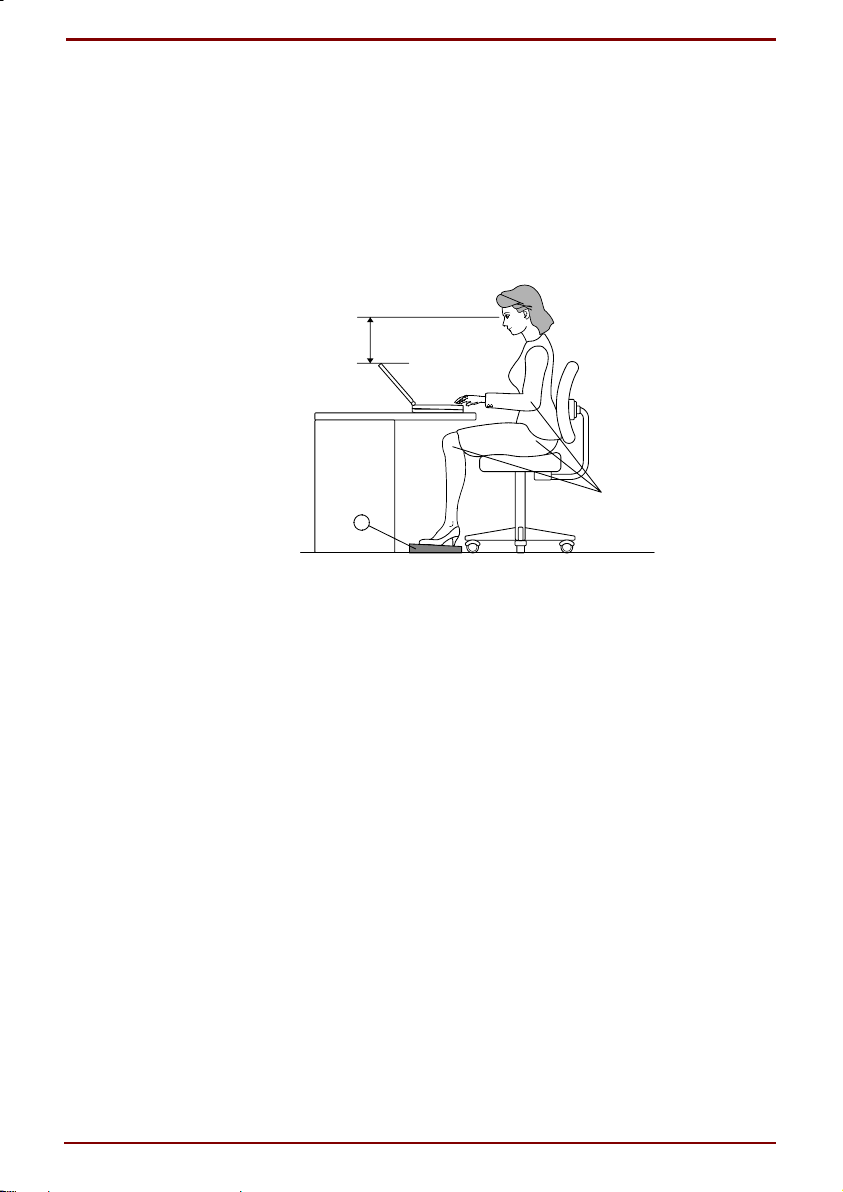
Working posture
Please adjust the height of your chair so that the keyboard is slightly below
elbow level.
Sit in a position where your knees are slightly higher than your hips.
Adjust the back of your chair so that you do not bend your back muscles.
Sit facing the monitor, ensuring that your knees and elbows form
approximately 90-degree angles. Please, do not bend forward or backward
while working.
90°
1
Lighting
Position in a way so that sunlight or other light does not reflect in the
screen.
Use tinted window glass, blinds or screens to dim the light.
Do not place your computer in a position where bright light or sunlight can
shine directly in your eyes.
If possible, use soft, indirect lighting when you use the computer.
To illuminate documents and the desk, use a desk lamp. This lamp should
be placed so that the light is not reflected in the screen and does not shine
directly in your eyes.
1-8 Before you turn on the computer User's Manual
Page 25
Work habits
Sit in a relaxed position.
Please put your chair and computer in an appropriate position to avoid
pain in shoulders and neck.
Alter your position from time to time
Stand up and stretch from time to time.
Move and stretch your wrists and your neck several times a day.
Do not look at the screen for a prolonged period of time. Every 15 minutes
focus your eyes on a distant object for about 30 seconds.
Take frequent breaks, even short breaks are effective. Take a
2 ∼ 3 minutes break every 30 minutes.
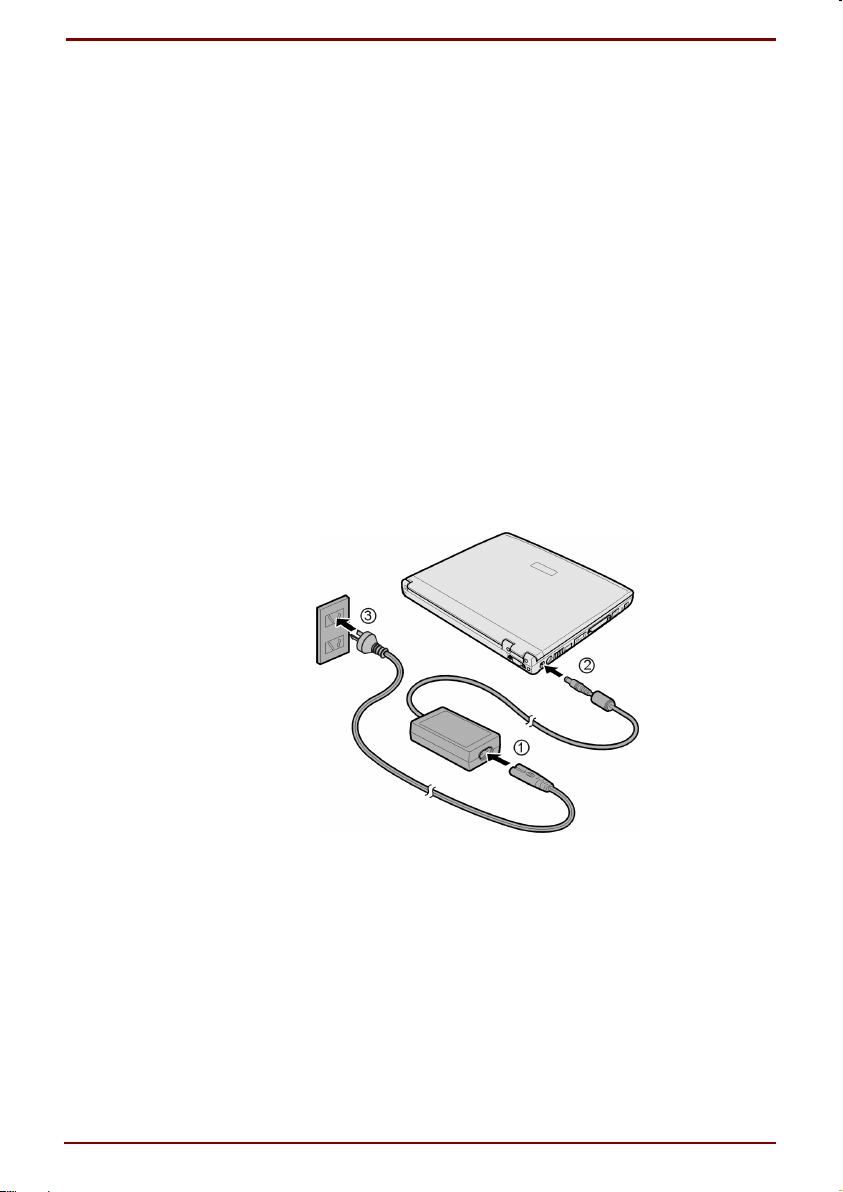
Connecting to a power source
How to connect
Please make sure that the battery pack is installed when you supply the
computer with power. Please follow the steps ➀Æ➁Æ➂ below to connect
the AC adaptor and power cable. To disconnect, follow the steps in reverse
order, ➂Æ➁Æ➀.
User's Manual Before you turn on the computer 1-9
Page 26
Treatment methods
Please follow the instructions below when handling the power cord or the
AC adaptor.
Never connect the plug of the power cord with an outlet other than a 230V
wall socket. This could result in smoke or fire.
Do not use if the power cable or power plug are damaged, broken, or
altered.
This could result in an electric shock, fire or scalding. Please, only use the
AC adaptor that is supplied with this computer.
The use of an AC adaptor other than the one that comes with your
computer could result in smoke or fire.
Please do not bend, stretch or twist unreasonably and do not put heavy
objects on top of it. This could result in a short circuit, or fire or electric
shock due to the snapping of a wire.
When you disconnect the power cord from the outlet, make sure you hold
the plug part while pulling. The power cord can be damaged if it is pulled
which could lead to fire and electric shock. Please do not touch the power
cord with wet hands. This could result in an electric shock.
Please disconnect the power cord from the electric outlet when the AC
adaptor is not connected to the computer.
The AC adaptor and the battery become warm when the AC adaptor is
connected, this is normal.
1-10 Before you turn on the computer User's Manual
Page 27
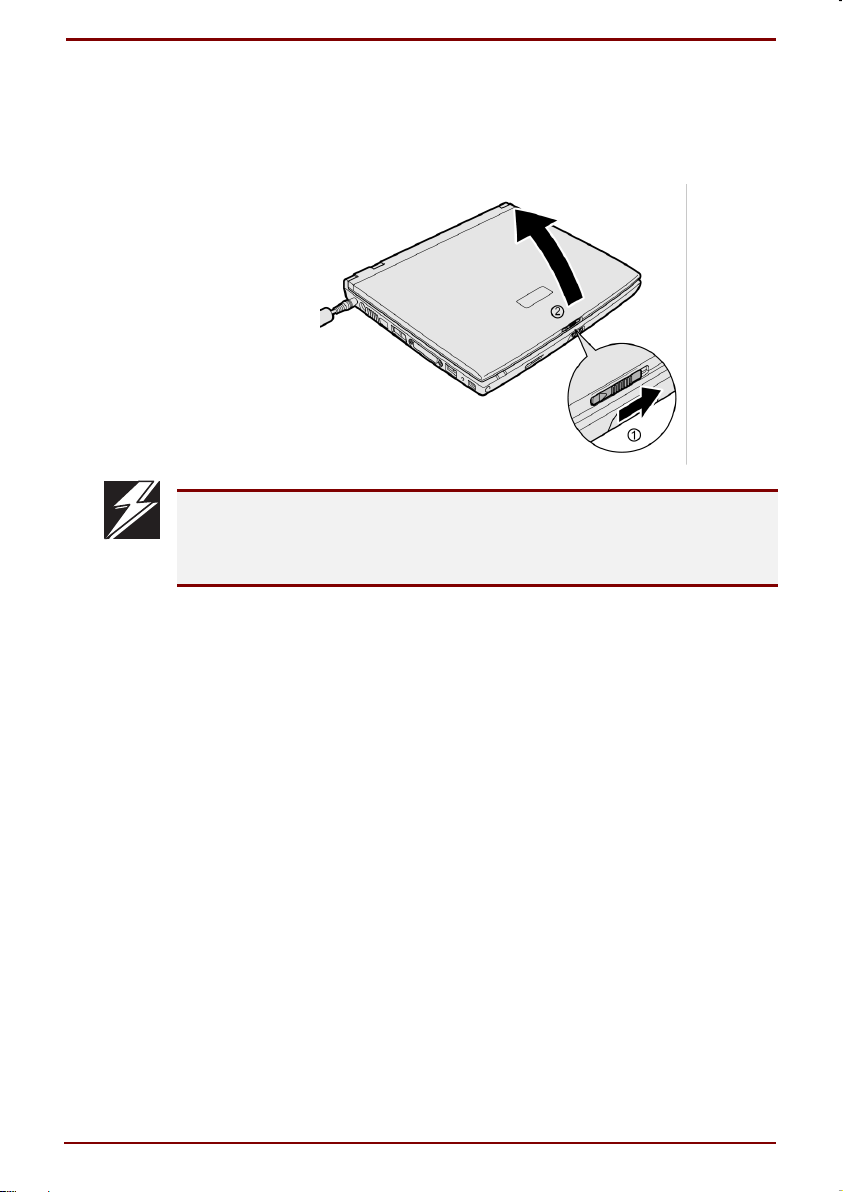
Opening the display
Open the display by sliding the display latch to the right and lift the display
carefully.
Please close the display carefully. Closing it to forcefully could damage
the hard disk drive, the display, etc. If the magnetic part of the hard disk is
damaged, the equipment can no longer be used. Damage to this magnetic
part cannot be repaired.
User's Manual Before you turn on the computer 1-11
Page 28
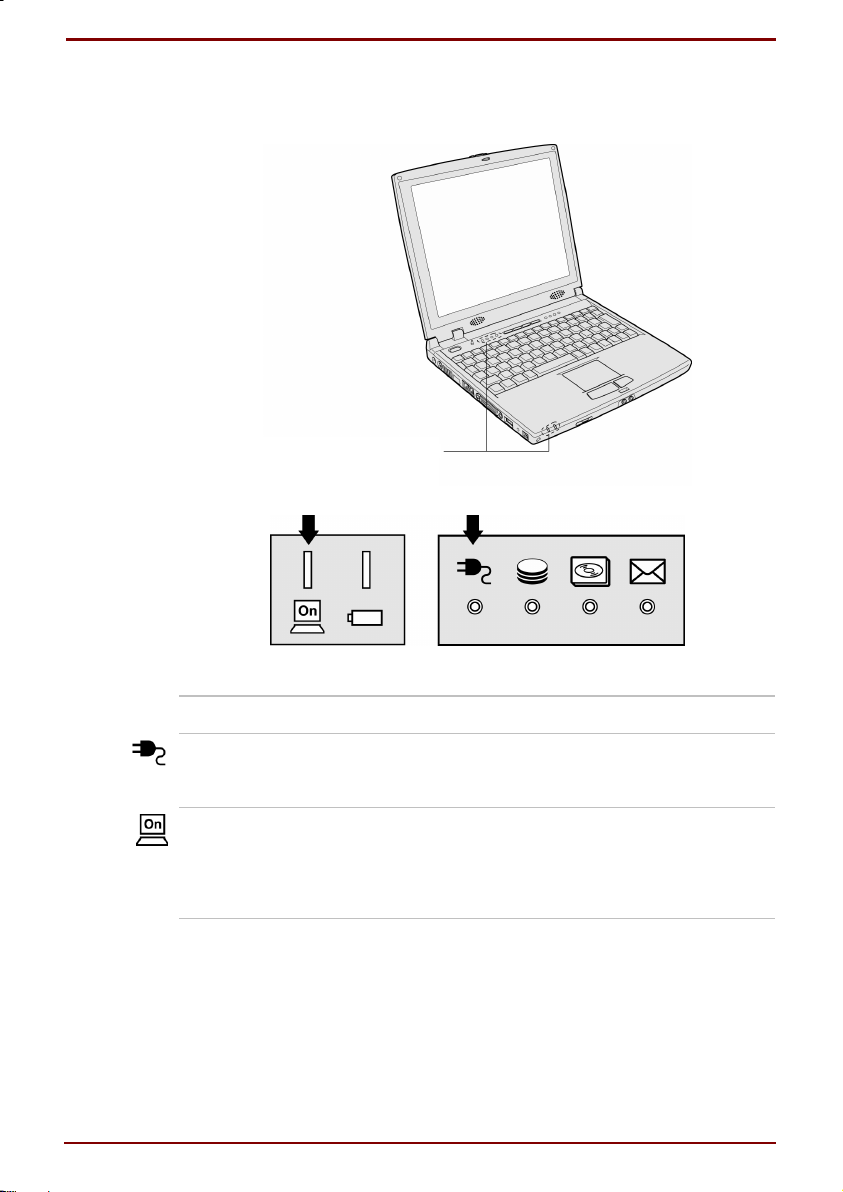
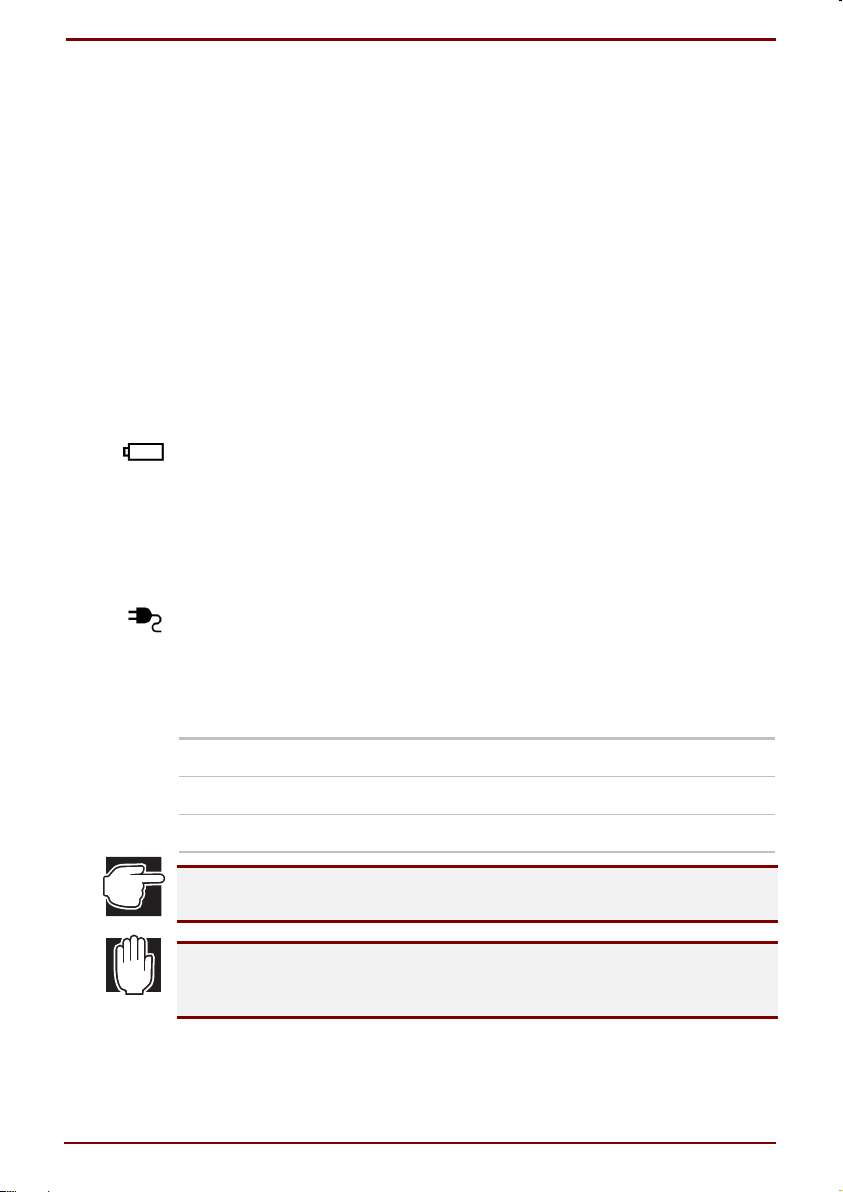
Power indicators
The following lights display information about the power source.
Status indicator lights
The meaning of each light is described below:
State System status
AC Power light Glows AC adaptor is connected
Off AC adaptor is not connected
On/ off light Glows Power is on
Blinks Standby mode
Off Power is off
1-12 Before you turn on the computer User's Manual
Page 29
Charging the battery
Operating on battery power
There is a battery pack installed in the computer. After charging the
battery, the computer can be operated on battery power (without having
the AC adaptor connected).
For operating on battery power, connect the AC adaptor and charge the
battery completely (fully charged). Or install an already completely charged
battery pack.
You can also operate on battery power when the battery is not completely
(fully charged), however your operating time will be shorter.
Methods of charging the battery and the time it takes until the battery is
fully charged are explained below.
Charging methods
1. Connect the AC adaptor to the computer and plug the power cord into
an outlet.
The charging process starts when the battery status light is blinking.
When the AC adaptor is connected to the computer the battery will be
charged until it is full, no matter if the power is on or off.
2. Supply power until the battery status light stops blinking
The battery status light is blinking while the battery is charged.
3. If the AC power light goes off, power is no longer supplied. Please
check the connection of the AC adaptor and the power cord.
Charging time
The standard charging time is shown in the following table.
Status
Power ON About 3.5 hours
Power OFF About 2.5 hours
If the ambient temperature is low and peripheral devices are installed, the
User's Manual Before you turn on the computer 1-13
charging process could take longer than indicated above.
If you notice a strange smell, abnormal heat radiation, a change in colour
or shape, or any other abnormalities during the use, charging or storage of
the battery, immediately remove it from the computer.
Page 30
Please charge the battery at the appropriate ambient temperature
(5° ∼ 35° C). If you do not charge it at the right ambient temperature, a
leakage could occur, heat can develop and it may affect the functionality
and life of the battery adversely.
Please protect the battery pack from water and seawater and do not let it
get wet. This could lead to heat generation and rust.
If you notice rust, a strange smell, abnormal heat radiation, or any other
abnormalities when you use a battery pack for the first time after you
purchased it, please stop using it.
Please ask the dealer were you purchased it or Toshiba for an inspection.
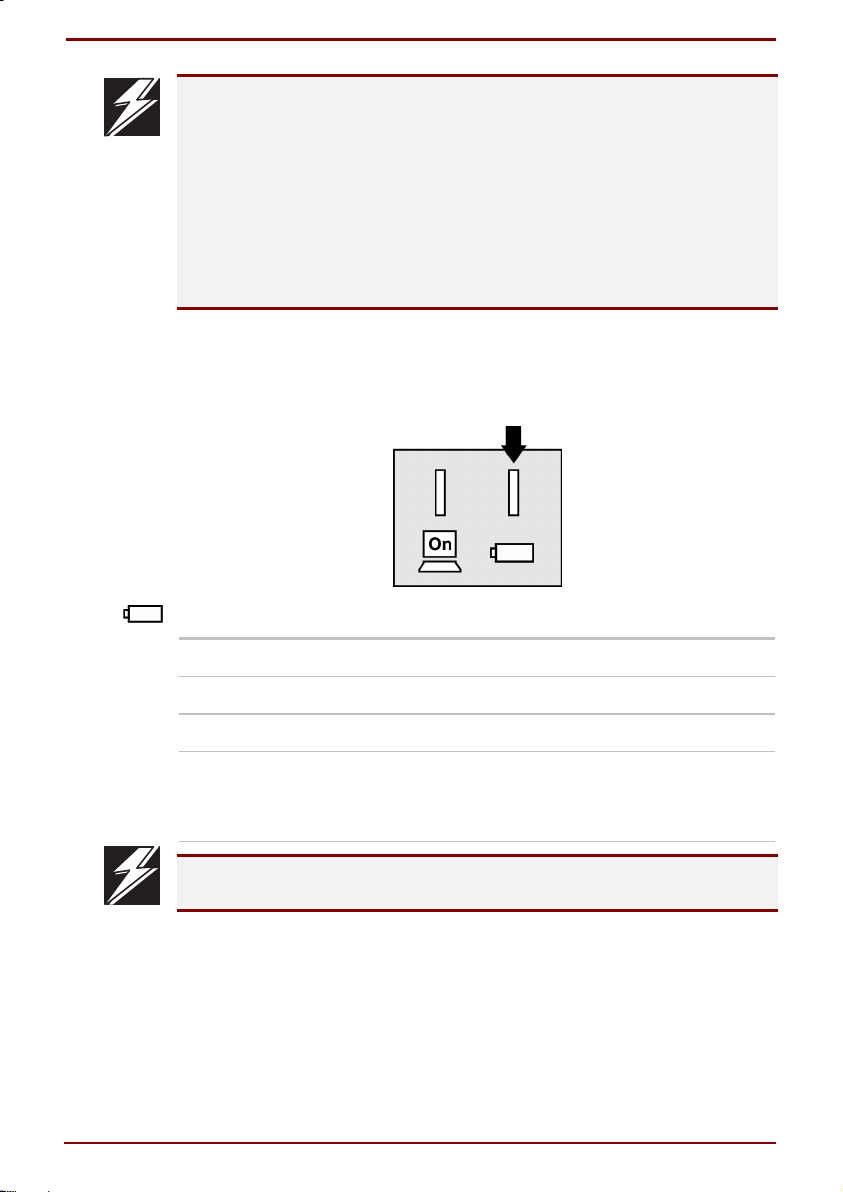
Battery indicators
The arrow in the picture below indicates the icon that shows the battery
status.
The meaning of the battery status light is described below:
Green Charging process completed
Blinks green Currently charging
Orange Needs to be charged
OFF • Battery is not installed
• AC Adaptor is not connected
• Battery does not function normally
If the battery status light starts blinking, (orange) please connect the
1-14 Before you turn on the computer User's Manual
AC adaptor immediately to supply power.
Page 31

Using the touch pad and the left/right button
In the Windows screen the following symbol ( Û ) is called "mouse pointer"
(i.e. cursor). Using the touch pad and the left/ right button you can operate
the mouse pointer. The touch pad and the left/ right button have the same
functions like a mouse and its buttons.
1
2
3
1 Touch Pad – You can move the mouse pointer easily around
the screen by moving your fingers across the touch pad
2 Left button – Functions like the left button of a mouse
3 Right button – Functions like the right button of a mouse
Basic functions
Place your finger on the touch pad and move it upwards, downwards, to
the right or to the left. The mouse pointer on the screen will follow the
movements of your fingers.
Please do not press down on the touch pad too hard and do not use sharp
User's Manual Before you turn on the computer 1-15
objects like ballpoint pens, etc. This may damage the touch pad.
Click Bring the mouse pointer into the right position by
using the touch pad, click once on the left or right
button. Tapping lightly on the touch pad once
produces the same function.
Page 32

Double click Bring the mouse pointer into the right position by
using the touch pad, click twice quickly on the left
button.
Tapping lightly on the touch pad twice produces
the same function.
Drag and Drop Press and hold the left or right button and move
the mouse pointer with the touch pad (drag). After
dragging, release the button at the position you
aimed for (drop).
Tapping lightly on the touch pad twice can
produce the same action, keeping the finger on
the touch pad after the second tap, releasing it
the desired position.
Scroll Moving up and down, right and left, inside a
document is called scrolling. By scrolling you can
see parts of the document that are hidden due to
limitations of the screen size. Scroll vertically by
moving your finger up and down in the right edge
of the touch pad, scroll horizontally by moving
your finger right and left on the bottom edge of
the touch pad.
At the time of purchase you can perform the basic functions with your
touch pad. After the Windows setup, please install the touch pad utility to
enable more functions.
1-16 Before you turn on the computer User's Manual
Page 33

Keyboard
In this section the basic function and name of the keys are described,
however there are differences in the usage of the keyboard depending on
the software you are using.
Character keys
The keys that are used to input letters or symbols are called character
keys.
There are 2 ∼ 6 types of letters or symbols imprinted on those keys. Which
of the imprinted characters is entered depends on the combination with the
control keys you are using.
The key shown below is used as an example to explain the character input
methods.
Character or symbol
you wish to enter
Character or symbol in
the top left corner
Character or symbol in
the left middle
User's Manual Before you turn on the computer 1-17
Input method Content
Press the key while
holding the Shift key
down
Just press the key For entering numbers or
For entering symbols or
alphabetical upper case
(capital) letters (in this
case “&”).
See “Description and
function of the main
keys, in this part”.
alphabetical smaller
case characters (in this
case “7”)
Page 34

Character or symbol in
the bottom left corner
In cursor key input
mode, press the key or
press the key while
holding
pressed down
Cursor key function
(in this case key)
See: Cursor key input
mode
B Numeric/ Cursor key
Input Mode, in this part.
Character or symbol in
the bottom right corner
In numeric input mode,
press the key or press
the key while holding
down the key
For entering numerals or
symbols (in this
case “7”)
See: Numeric Input
Mode “
B Numeric/ Cursor key
Input Mode,” in this part.
Description and function of the main keys
Key Action
(Escape) Is used to cancel an operation.
(Shift) Allows changing between uppercase and
lowercase alphabetical letters and entering
symbols etc.
(Alt),
(Control)
áááá (Windows) Pressing the Windows key opens the Windows
(Space) This key is used to input a space character.
(Application)
Used in combination with other keys, allows you
to perform special operations.
Start menu. In combination with other keys it can
be used as a shortcut.
Pressing this button produces the same action
like pressing the right mouse button or the right
button on the computer.
(Fn) Used in combination with other keys, allows you
to perform special operations.
(Insert) In letter input mode this key is used to change
between insert/ overwrite.
(Delete) This key is used to delete characters, etc.
1-18 Before you turn on the computer User's Manual
Page 35

BackSpace This key is used to delete characters, etc.
ÅÅÅÅ ÆÆÆÆ ÇÇÇÇ ÈÈÈÈ (Arrows) These keys are used to move the cursor, etc.
Enter This key is used to execute operations, etc.
F1 ∼∼∼∼ F12
(Function keys)
These keys are used to carry out special
tasks, etc.
Special function keys using the Fn key
Key Action
Fn + F1
(Instant security
function)
Fn + ÇÇÇÇ
(Display brightness
adjustment)
Fn + ÈÈÈÈ
(Display brightness
adjustment)
Fn + F4
(Alarm volume
adjustment)
Fn + F5
(Changes display
mode)
Turns off the screen, the computer can not longer
operated from the keyboard or touch pad.
To undo, please follow these steps.
When a password is set: Enter the password and
press the Enter key
When no password is set: Press the Enter key
Decreases the display brightness.
Increases the display brightness.
Changes the alarm volume.
OffÆLowÆMediumÆHigh
Changes the display mode.
By pressing Fn + F5 you can change from the
current display mode to the next one on the list.
InternalÆBothÆExternal
Internal: LCD Display
Both: LCD Display and external monitor
External: External monitor
Fn + Key
where character is
inscribed in the
Enables the keys where cursors are inscribed
with grey symbols on the bottom left corner of the
keys.
bottom left corner of
the key
User's Manual Before you turn on the computer 1-19
Page 36

Fn + F10
(Cursor input mode)
To turn the cursor input mode off, once again
press Fn + F10.
Fn + Shift + Key
where character is
inscribed in the
bottom right corner
of the key
Fn + F11
(Numeric input
mode)
Fn + F12
(Scroll mode)
When using an external keyboard, the functions of the Fn key can be
performed by the Ctrl + Alt key on the left-hand side.
Shortcuts using the
You can use the following shortcuts by combining the á key with other
keys.
Key Action
áááá + R Displays the "Run" dialog box
áááá + M Minimise all
Enables the keys where grey numerals or other
characters are inscribed in the bottom right
corner of the keys.
To turn the numeric input mode off, once again
press Fn + F11.
In some applications you can use the Ç È Å Æ
keys to scroll inside a document.
To turn the scroll mode off, once again press
Fn + F12.
áááá
key
Shift + áááá + M Undoes minimise all
áááá + F1 Starts the Windows Help
áááá + E Starts the Windows Explorer
áááá + F Searches for files or folders
Ctrl + áááá + F Searches for other computers
áááá + Tab Changes to the next Taskbar button
áááá + Break Displays the "System properties" dialog box
1-20 Before you turn on the computer User's Manual
Page 37

Special function keys
Combining several keys in the following way can enable some special
functions.
Special function Key Description
Restarts the system Ctrl + Alt + Del The Close Program box is
displayed. When you press
again, the computer will restart.
Copies the screen Fn + Ins Copies everything that is
currently displayed on the
screen into the Clipboard.
Alt + Fn + Del Copies the active screen you
are currently running into the
Clipboard.
Please use the Alt + Fn + Del combination only if the system is not
responding any more, because it could lead to a data loss.
Numeric/ Cursor key input mode
The keys shown inside the dotted line below can be used as numeric or
cursor keys. However you cannot use both modes at the same time.
In the numeric input mode, you can enter the numbers or symbols, which
are inscribed in the bottom right corner of the keys.
In the cursor input mode, you can use the functions, which are inscribed in
the bottom left corner of the keys.
User's Manual Before you turn on the computer 1-21
Page 38

Assignment of numeric keys and cursor keys
Key Numeric key
function
77Home
88ÇÇÇÇ
99PgUp
0* *
U4 ÅÅÅÅ
I5No
O6 ÆÆÆÆ
P- -
J1End
K2 ÈÈÈÈ
L3PgDn
M0 Ins
>. Del
?/ /
Cursor key
function
Fixed Numeric/Cursor input mode
In this mode the keys shown inside the dotted line above are normally
used in the numeric/ cursor input mode.
Using the cursor input function
When Fn + F10 is pressed, the indicator of the cursor key input mode is
glowing, press any key
Using the numeric input function
When Fn + F11 is pressed, the indicator of the numeric key input mode is
glowing, press any key
1-22 Before you turn on the computer User's Manual
Page 39

Using the Numeric/ Cursor input mode only once
Here you are not working in the fixed Numeric/ Cursor input mode,
because you only use the numeric/ cursor keys once.
Using the cursor input function
While holding the key pressed down, press any key
Using the numeric input function
While holding the keys pressed down, press any key
Adjusting the volume
Your computer comes with voice/sound applications pre-installed.
Your computer’s sound system conforms to Microsoft Windows Sound
System and Sound Blaster Pro.
Control with Volume Control Slider
The sound volume can be controlled by the Volume Control Slider on the
front of your computer. To increase volume, slide it to the right, to
decrease, to the left.
User's Manual Before you turn on the computer 1-23
Page 40

Chapter 2
From turning on to switching off the
computer
In this chapter, you will find a description of the things that happen when
the computer starts up and how to switch it off.
Turning on the computer
When the computer remains turned on for a long time the computer will
radiate heat. Please do not let it come into direct contact with your bare
skin after a long running time. This could result in a minor burning.
1. Make sure the floppy disk drive is empty
2. When peripheral devices are installed, switch them on
3. Press the On/Off (Power) switch. When the power lamp goes on after
you released the power switch, the computer is switched on.
Power Switch
User's Manual From turning on to switching off the computer 2-1
Page 41

When you turn on your computer for the first time, the "Windows Setup"
screen is displayed. To setup Windows, please follow the instructions on
the screen.
If the computer is in Standby or Hibernation mode, it returns to the state it
was in before the power was switched off.
By pressing the Power switch you can return from the Standby/
Hibernation mode into the normal operation mode.
In Standby mode the data remains in the system memory, in Hibernation
mode the data is saved onto the hard disk.
The LAN settings went into effect when you purchased the computer, this
slows the start process down. To speed up the start process, disable the
LAN settings after the Windows setup. Please follow the steps below:
• Click on Start - Settings - Control Panel
• Double click on the System icon. The System Properties window is
displayed.
• In the Device Manager tab, click on the + left of Network Adaptor.
• Choose "Accton EN2242 Series Mini PCI Fast Ethernet Adaptor", click
on the Properties button.
• In the Device usage section of the General tab, check the "Disable for
this hardware profile" checkbox and click on the OK button.
• In the System Properties window, click on the OK button.
When a password is set
If a password is set, the following message is displayed when the
computer starts.
Enter Password [ ]
Type in the password you have set and press the Enter key.
When you have failed to enter the correct password three consecutive
2-2 From turning on to switching off the computer User's Manual
times, you cannot retry anymore. In this case, turn off the computer and
restart it.
Page 42

Easy Buttons
Function
Internet function Mode
Internet Browser button:
Press this button to launch the system’s default Internet Browser
application, such as Microsoft
E-mail button:
Press this button to launch Microsoft® Outlook Express.
It will also turn off E-mail LED, if there were new E-mails detected which
made the E-mail LED light.
Two User defined buttons:
Press these buttons to launch user defined applications.
See the following section for a detailed description about how to configure
these 2 user defined buttons.
Software specification
Configuration Menu
®
Internet Explorer or Netscape.
An Easy Button activator icon appears in the Windows Taskbar.
Right-click the activator icon to popup a menu with which you can select
the following items;
User's Manual From turning on to switching off the computer 2-3
Page 43

Exit
Select this menu item to close all four Easy Button applications and their
functions.
Find the Easy Button icon from the Start Menu and select it to launch this
program again. When you restart Windows, the Easy Button program will
always run automatically.
Configuration
Select this menu item will invoke a Configure Buttons dialog box.
OnScreen Display
This menu item contains 4 sub items for you to configure the properties of
the OSD.
Disable: Disables the OSD function.
Colour: Selects the colour of the OSD text.
Font: Selects Font and Style of the OSD text.
Settings: Invokes an OSD Configuration dialog box for you to configure
the OSD size, display timeout, and its transparency.
Size: Selects the OSD size from the Size list box.
Timeout: Sets the interval time of showing OSD.
Transparent: Enables or disables the transparency of OSD.
If the transparency is disabled, you can select background Colour.
2-4 From turning on to switching off the computer User's Manual
Page 44

Configure Buttons dialog box
From this dialog box, you can configure all 4 Easy buttons.
The dialog box contains the following items to configure the buttons to your
specific needs.
Button list box: Selects the button you want to configure.
Default button: Restores the default function of the selected button.
Caption text box: Changes the text message on the OSD and Hint label.
Predefined Function: Those functions on the list have been predefined and
supported by the program.
The predefined functions are;
Mute: To make the sound mute on or off.
Close Application: To close the currently active application.
Task Switch: To switch the current task (application window) to next task.
User's Manual From turning on to switching off the computer 2-5
Page 45

Application Launch: To link an executable application file or select
predefined application from the list. If you select the Application Launch
option, the displayed window has two more items described as below.
Browse: To open a dialog box to find the path of that file. Or, you can drag
the icon of that file from the Windows Explorer and drop it into the
Application Launch File Name text box.
Application Launch File Name: You can directly input the specific
application file name with its path or parameter (if necessary).
Email Detector Application
This application will monitor your POP3 E-mail server, to see if you have
any new incoming mail on the server.You can set an interval value to
connect to the server periodically. If you have new incoming mail, it will
inform you in the following ways:
1. POP up a message box, 2. play a sound, or 3. turn on a dedicate LED.
An E-mail Detector activator icon appears in the Windows Taskbar.
Right-click the activator icon to popup a menu with which you can select
the following items;
Detect Now: To check immediately if there is any new mail on the server.
Configuration: To configure your E-mail box information, and other
properties for E-mail detection. See the detailed description as below.
Exit: To close the E-Mail Detector application.
2-6 From turning on to switching off the computer User's Manual
Page 46

E-Mail Detector Configuration dialog box
Before you start to use this E-Mail Detector application, you have to
configure your E-mail box information in the E-Mail Detector Configuration
dialog box.
Search Info: To ask program to grab the default information of your E-mail
box information, which includes POP3 sever address, User name, and
Port Number, but not includes Password.
POP3 Server: Server address.
User Name: Mail box user name.
Port: Click the Advance button to edit the Mail box’s Port Number.
Password: Mail box Password.
Detect email at beginning: Always detects email when the system starts.
Enable Auto-Detect: If enabled, the program will periodically detect the
mail server for new mail automatically.
At interval of ? Minutes - Set the intervals of time for periodically
detecting for new mail.
By showing an E-Mail message: When activated, a receiving mail
message is shown.
By playing sound: When activated, a selected audio file is played.
User's Manual From turning on to switching off the computer 2-7
Page 47

How the E-mail Detector Works?
After you complete the configuration of E-mail Detector, you can select
Detect Now from the menu to check if the configuration works well.
The procedure of mail detection of the program is described below;
Step 1. The program will first check if the line is connected.
Otherwise, it will invoke Dial-Up to connect to the server.
Step 2. When the connection succeeds, it then checks the validation of
User Name and password.
Step 3. If Step1 and Step 2 are both valid, the program starts retrieving the
E-mail information, and reporting it by showing a message box, playing
sound, or turning on the E-mail LED.
After that, the program will disconnect the line if the line was disconnected
before detection. Or it keeps the connection if it was already connected
before detection.
2-8 From turning on to switching off the computer User's Manual
Page 48

Chapter 3
Travelling with the computer
This chapter covers precautions and computing tips that you should follow
when using your Satellite computer. It also provides important information
about the basic features of your system.
Operating on battery power
You can operate the computer on battery power (without having the
AC adaptor connected), if you charge the battery first or if you install a
battery pack that is already charged.
Please use only Toshiba batteries (Toshiba high-capacity battery pack).
The battery is not charged at the time of purchase. The battery will also
discharge if you do not use it for a long time.
When you use the computer for the first time, or you did not use it for a
long time, please charge the battery before you use it.
Checking the battery charge
If you fail to confirm the battery charge when you are operating on battery
power, you could suddenly face a condition where the low charge of the
battery forces you to interrupt your work halfway and you have to hurry to
connect a power cable. You can confirm your battery power in the following
ways.
Checking through the battery status lamp
When the AC adaptor is connected to the computer, the battery status
lamp blinks green, indicating that the battery is charging. When the green
lamp glows steadily, it is fully charged.
User's Manual Travelling with the computer 3-1
Page 49

Checking through the icon
You can check the level of your battery power by bringing the cursor on top
of the Power Meter icon (
When the AC adaptor is connected
When operating on battery power
If you double click, the screen of the "Power Meter" will be displayed.
or ) of the taskbar.
How to make the Power Meter icon ( or ) appear.
In case the Power Meter icon is not displayed, please follow the steps
below to make it appear.
1. Click on [Start], [Settings] and [Control Panel]
2. Double click on [Power Management]
If the icon does not appear, please click on "Display all control panel
options" on the left side of the screen.
3. Check [Display icon normally in the taskbar] in the [Details] tab
4. Click on the [OK] button
Battery’s operating time
The running time of a battery can be slightly different depending on the
charging and the circumstances under which you are using it.
Please always thoroughly check the remaining battery power when you
3-2 Travelling with the computer User's Manual
are operating on battery power.
If the battery (battery pack, clock battery) is used up, the Standby mode
and Hibernation mode will not work any longer and the contents of the
memory will be lost when the power goes off. Also time and date will no
longer be displayed correctly. In this case you have to connect the
AC adaptor and charge the battery completely.
The operation time of the battery varies depending on the environment in
which the computer is used. Using a completely charged battery
The standard operation time is about 3.0 hours.
Page 50

Operation time of the battery when the computer is not
in use
The battery pack will slowly discharge even when the computer is not in
use.
This maintenance time depends on the environment in which the computer
is stored, and therefore the values below serve as a guideline.
The battery was fully charged when the power was turned off
Computer mode Operation time
Standby About 36 hours
Power is off, or
Hibernation mode
When the battery power is low
The following warning signals are displayed, when the battery power gets
low while the computer is in use.
The battery status lamp blinks (indicating that the battery power is
getting low)
An alarm (a beep) is audible
In these cases connect an AC adaptor immediately and supply the
computer with power.
A battery that has not been used for a long time discharges naturally and
you might not know it because there is neither the battery status lamp nor
the alarm to warn you. Please charge a battery that you have not used in a
long time before you start using it again.
About 57 weeks
User's Manual Travelling with the computer 3-3
Page 51

Built in battery
Beside the removable battery pack, there is also a built in battery (clock
battery). The clock battery provides power for the internal clock, and
maintains the settings in the BIOS setup. The charging time for the clock
battery is shown in the table below, however to be able to use it you do not
have to wait until it is fully charged. Moreover there is no way to know the
power level of this battery.
Status Clock battery
Power On About 24 hours
Power Off About 24 hours
The clock battery is charged when the AC adaptor is connected to the
computer, or when the battery pack is installed.
During usual use you do not need to worry about that too much. However
if the clock battery reaches a very low condition, the clock will stop or will
be delayed. Furthermore, the BIOS setup will return to the default settings.
If the battery is discharged, a warning message will prompt you to set the
time again when you wake the computer up from the Hibernation mode.
Please always shut down Windows and turn off the power before you
remove the battery pack. Removing the battery while the system is in
Standby or Hibernation mode will result in a data loss.
3-4 Travelling with the computer User's Manual
Page 52

Changing the battery pack
Please use only the battery pack that is intended for use in this computer.
When the battery life has expired, please only replace it with the
recommended type. If you use a different type, the difference in voltage
and polarity of the terminals may lead to smoke and fire. When disposing
of the battery pack, please follow the regulations and rules of your local
government.
Removing/ Installing
1. Save your data and close all applications.
2. Click on Start and Shut down Windows.
3. Select Shut down and click on the OK button. Turn off the power after
Windows has shut down.
4. Disconnect the AC adaptor and the various cables of the peripherals
from the computer.
5. Close the display and turn the computer upside down.
6. While sliding the battery latch, pull the battery pack out and remove it
from the computer.
Battery pack
If you store the battery pack, wrap a good amount of isolation tape over
User's Manual Travelling with the computer 3-5
the poles to prevent short circuits. If you just store it like it is this could
cause an explosion or fire.
Please do not touch the poles of the battery, this could lead to damage.
Battery latch
Page 53

7. Insert the replacement battery pack carefully. Please be sure to hear a
clicking sound.
Please make sure that the battery pack is installed securely. If not installed
properly, it can fall out when you move the computer and unexpected
injuries could be the result.
Saving battery power
There are several methods to help prolonging the battery operation time.
Charge the battery completely (full charge)
Recharge the battery after you have used it
Use the Standby or Hibernation mode, turn off the power whenever
possible
The Standby or Hibernation mode allows you to return to the state the
system was in before, when you turn on the power again.
Close the display when you are not using the computer
Setup power saving options
3-6 Travelling with the computer User's Manual
Page 54

Chapter 4
Hardware
In this chapter you can find information about the hardware and peripheral
devices that you can connect to your computer.
Please pay attention to the safety instructions and handle the devices
properly.
Installing peripherals
For information on installing and using each peripheral device, please
consult their respective manuals.
The installing/ removing process is different with each peripheral. Please
perform this procedure only after you read all the paragraphs.
When you install peripherals that can not be attached while the computer
is running, please be sure to turn the power off and disconnect the plug of
the power cable, before you carry out the installation.
To prevent condensation, please do not subject the equipment to sudden
temperature changes, even inside the range of acceptable operation
temperatures. Be especially careful in winter.
Please carry out the procedure in an environment where the temperature
is moderate and where little dust is present, and where it is not subjected
to direct sunlight.
Please do not carry out the procedure in places where static electricity can
occur easily.
Please use a screwdriver that is suitable for the size and shape of the
screws.
If you make any changes to the computer itself, the guarantee becomes
invalid and you are not eligible for other support services anymore
User's Manual Hardware 4-1
Page 55

Connecting a cable to the computer
Please pay attention to the following points, when you make a connection.
If you connect a cable to the computer's port, make sure to attach the
connector the right way up and in the proper direction
If there are fixing screws on the cable's connector, tighten the screw after
the cable has been connected to the computer's port, to prevent it from
getting loose.
Please pay attention to the shape of the connector and attach it properly
when you connect it. If you handle the connector with too much force, pins
could be broken or bent.
When using peripheral devices, there are more procedures necessary
beside the ones mentioned here. These procedures vary according to the
system you are using. For more information please refer to the manuals
that come with each peripheral device.
Exchange selectable devices
The following devices can be installed into the SelectBay.
DVD-ROM drive
Floppy disk drive
Please install the weight-saver into the SelectBay whenever you are not
using it.
For safety reasons please make sure you always have either one of the
selectable modules or the weight-saver installed in the SelectBay.
Please do not swap selectable bay modules under the following
circumstances. Doing so could damage the computer or the selectable
devices and could also result in a data loss.
• When the computer is turned on
• When the system is in Standby mode
• When the system is in Hibernation mode
4-2 Hardware User's Manual
Page 56

Save your data and close all applications
1. Click on Start and Shut down Windows.
2. Select Shut down and click on the OK button.
3. Turn off the power after Windows has shut down.
4. Disconnect the AC adaptor and the various cables of the peripherals
from the computer
5. Close the display and turn the computer upside down
Please be careful not to subject the computer to a shock when you turn it
upside down.
6. Release the SelectBay latch, pull the SelectBay out. The device stands
slightly out from the SelectBay.
7. Take the device out by firmly pulling it. Please pull the device out
horizontally.
User's Manual Hardware 4-3
Page 57

8. Release the SelectBay latch, turn the device that you want to install
upside down, and firmly push it in.
9. Please make sure that the SelectBay latch is securely locked.
Floppy disk drive
Installing the floppy disk drive
The floppy disk drive that comes with your computer can be installed into
the SelectBay.
For information regarding the installation into the SelectBay, please refer to
the "Exchange selectable devices" section in this chapter.
Formatting a floppy disk
To be able to use a newly purchased floppy disk, it is necessary to carry
out a procedure called "formatting" to make it suitable for your system.
In the formatting process basic information like track numbers, head
numbers, etc., are written onto the floppy disk to make it ready for use.
New floppy disks are either formatted for different systems, or not
formatted at all. If you buy new floppy disks, please make sure whether
they are "Formatted for Windows" or not. Please always format disks that
are not preformatted. You can also use disks that are formatted for other
systems in Windows, as long as you format them for Windows.
Formatting a disk erases all information on that disk. So please be careful
when you format a disk that has been used already.
How to format a disk
Below is a simple explanation about the formatting process in Windows.
For more detailed information, please have a look at the Windows Help.
4-4 Hardware User's Manual
Page 58

DVD-ROM drive
The SelectBay of your computer is designed to usually hold the DVD-ROM
drive. However you can replace it with the floppy disk drive.
Which CDs/DVDs you can use
The following CDs/DVDs can be read in the DVD-ROM drive.
1. Music CDs
You can use 8cm and 12cm music CDs.
2. Photo CDs
3. CD-ROM
You can use the CD-ROMs with the ISO 9660 format these conform to
the system you are using.
4. CD Extra
5. CD-RW (read only)
6. CD-R (read only)
7. DVD-ROM
8. DVD-Video
This computer is designed for the usage of round disks.
The usage of disks that have different (i.e. not round) shapes will damage
the equipment.
Depending on the characteristics of the media and the write-in time, there
are cases where CDs/DVDs cannot be read.
User's Manual Hardware 4-5
Page 59

Inserting and removing a CD/DVD
Please do not touch the insert inside the disk tray. This can damage the
DVD-ROM drive.
The glowing of the SelectBay light indicates that the DVD-ROM drive is in
use. Under this circumstances, please do not press the eject button. This
could ruin the CD/DVD and damage the DVD-ROM drive.
When you move the computer, please make sure that there is no CD/DVD
inside the DVD-ROM drive. If there is a CD/DVD inside, please remove it.
You can insert/ remove CDs/DVDs only when the computer is turned on.
In the following conditions, the DVD-ROM tray will not slide out, even
when you push the eject button, or it will at least not slide out immediately.
Directly after the computer was turned on
Directly after resetting
Directly after the disk tray was closed
In these cases, please wait a while before you press the eject button.
Inserting a CD/DVD
To insert a CD/DVD into the DVD-ROM drive, please follow the steps below.
1. Turn on the computer
If the computer is turned off, the DVD-ROM tray will not slide out, even
when you push the eject button.
2. Press the eject button. Please release the eject button after you have
pressed it. The disk tray will slightly slide out (it takes some seconds).
Eject button
4-6 Hardware User's Manual
Page 60

3. Pull the disk tray out completely.
4. Put the CD/DVD with the label facing up into the tray bringing its hole
over the centre spindle and press it down. Make sure the CD/DVD is
inserted properly, there should be a "click" when you press it down.
Please do not touch the lens or its surroundings inside the disk tray. This
can damage the DVD-ROM drive.
Do not apply too much pressure, when you insert the CD/DVD into the disk
tray.
The CD/DVD will get damaged if you do not insert it properly into the disk
drive.
User's Manual Hardware 4-7
Page 61

5. Push the disk tray in until it clicks into place.
Removing a CD/DVD
Please do not remove a CD/DVD while the SelectBay light ( ) is on.
This could result in a damage of the CD/DVD data and the DVD-ROM
drive.
Please remove the CD/DVD from the DVD-ROM drive, when you move the
computer.
1. Turn on the computer
2. Press the eject button
The disk tray will slightly slide out.
3. Pull the disk tray out
Pull the tray that holds the CD/DVD out completely.
4. Hold the CD/DVD on both edges and remove it by lifting it up
Press slightly on the centre spindle while you are taking out the
CD/DVD. This will make the removing easy.
4-8 Hardware User's Manual
Page 62

5. Push the disk tray in until it clicks into place.
If the computer is turned off, the DVD-ROM tray will not slide out, even
when you push the eject button. If you cannot turn the power on because
of a malfunction, etc., you can open the drive manually through the
emergency eject hole. Use a narrow object (for example a straightened
paperclip) to press the emergency eject hole. The disk tray will open.
Please do not use the emergency eject hole when the power is on.
This could damage the DVD-ROM drive and the data of the rotating
CD/DVD.
User's Manual Hardware 4-9
Page 63

PC cards
Your computer allows you to install PC Cards (optional).
If you are using a PC Card that does not support hot swapping, please
make sure you turn off the computer before installing/ removing the card.
There are some PC Cards on the market that generate a lot of heat. If you
use these cards for a long period of time, their performance might become
unstable as a result of that heat. Also if you use them together with other
cards, those cards' performance might become unstable as well, because
of the heat.
Hot-swapping. This means that you can install/ remove PC Cards while the
computer is turned on. But there are also PC Cards that will not support
this function.
The type of PC Cards you can use depends on the slot you are using.
Slot you use Type you can use
1 (Top) Type II
0 (Bottom) Type II/ III
Below are examples of PC Cards.
Modem Card
SCSI Adaptor
Flash Memory
LAN Card
Card Bus compatible cards
If you are using a Type III PC Card in slot 0, you cannot install a PC Card
into slot 1.
Please refer to the documentation, which comes with your PC Card.
4-10 Hardware User's Manual
Page 64

Installation
1. Connect the cable to the PC Card
Please carry out this procedure for cards like LAN Cards, etc. that
require a cable.
Please pay attention to the shape of the connector and attach it properly
when you connect it. If you handle the connector with too much force, pins
could be broken or bent.
2. Press the eject button
The eject button will pop out.
User's Manual Hardware 4-11
Page 65

3. Press the eject button again.
Please press until you hear a "click". The dummy card will slightly
come out.
4. Take the dummy card out.
Please keep the dummy card for further use.
5. Insert the PC Card the right way up and in the proper direction.
To connect the card properly, please push it in carefully, and do not use
excessive force.
Please check the card's setting after you connected it.
For information about the connection of the card and the operation
environment, please refer to the documentation, which comes with your
PC Card.
4-12 Hardware User's Manual
Page 66

Removal
Be sure to stop using the PC Card. If you remove a PC Card that is in use
at that moment, it can have a fatal effect on the system.
Please remove the PC Card only after you made sure it is not used by an
application or the system.
1. Press the eject button of the card you want to remove.
The eject button will pop out.
2. Press the eject button of the card you want to remove once more.
Please press until you hear a "click". The card will slightly come out.
3. Grip the card tightly and pull it out.
PC Cards that were used for a long period of time radiate heat. Please
wait a while until the card gets cooler before you remove it. Or use gloves,
etc., to remove it.
User's Manual Hardware 4-13
Page 67

4. Insert the dummy card.
Connecting to the telephone line
When you use the built in modem, connect the modem cable to a 2-line
telephone circuit.
Installation
1. Connect one plug of the modem cable to the computer's modem jack.
Please connect the modem cable only to the modem jack. It could cause
damage if you connect it to the wrong connector.
4-14 Hardware User's Manual
Page 68

2. Connect the other plug of the modem cable to the telephone jack
If you are using an ISDN line, please connect to the terminal adaptor
(TA) you are using or to the dial-up analogue router.
Please use the modem with a normal telephone line (analogue line). You
cannot connect it to a digital line (ISDN, etc.). Connecting it to a digital
public phone or a digital switching device (PBX) could also lead to
damage. Never connect it to telephone circuits used for home telephones
or business phones.
Please insert the plug of the modem cable into the modem jack until it
clicks into place.
If you use one of the diverting adaptors available on the market and
connect other devices parallel, it could have a negative effect on the
modem's data transmission and on the performance of other devices.
When using circuit switchers, please use the double-switching models
(which are constructed in a way that the unused equipment is completely
cut off from the circuit).
When the modem cable is connected to the modem jack of the computer,
please avoid from either pulling the modem cable or moving the computer.
Such handling may damage the modem jack.
Removal
Unplug the modem plug that is connecting the computer to the telephone
jack.
Connecting to a LAN
There is a LAN interface built into this computer that is conform to Fast
Ethernet (100BASE-TX) and Ethernet (10BASE-T). When you connect the
LAN cable to the LAN connector on the computer, it will automatically
detect if it is Fast Ethernet or Ethernet. Below you find instructions about
the LAN cable connection and the usage of the LAN interface.
The proper cable
If you use the LAN interface with the 100BASE-TX standard (100Mbps), it
is necessary to use the Category 5 (CAT 5) cable and connector. You
cannot use the Category 3 cable.
If you the 10BASE-T standard (10Mbps, you can use either the Category 3
or the Category 5 cable.
You can also use the i.Link (IEEE 1394) cable to make the LAN connection
via i.Link.
User's Manual Hardware 4-15
Page 69

Connecting the LAN cable
Please hold on to the jack when you insert or disconnect the LAN cable.
Also, when you disconnect the LAN cable, press the little latch on the jack
down while you pull the cable out.
1. Turn off all peripheral devices that are connected to your computer.
2. Connect the jack of the LAN cable to the LAN connector on the left
side of the computer
3. Connect the jack on the other side of the LAN cable to the connector
on the network device of the connection terminal.
About the terminal points of network devices and the setup of a
network, please refer to the 'Windows Help'. If you are using it at the
company or at school, please ask the network administrator for
assistance.
4-16 Hardware User's Manual
Page 70

USB devices
This product has an USB port that allows you to install devices, which
comply with the USB standard.
Installation
1. Insert the plug of the USB cable into the USB port on the computer.
2. Connect the plug on the other end of the USB cable with the USB
device.
On some devices step 2 is not necessary.
For using USB conform peripheral devices the system (OS) and the
peripheral device driver also have to follow that standard.
Regarding USB peripheral devices released in the future, we cannot
confirm their performance and therefore we cannot guarantee that all
those peripheral devices will work properly with this equipment.
Removal
Unplug the USB cable that connects the computer to the USB device
For detailed information on USB devices, please refer to the manual that
came with your USB device.
User's Manual Hardware 4-17
Page 71

i.LINK (IEEE 1394) devices
This product has an i.Link connector that allows you to install devices,
which comply with the i.Link (IEEE 1394) standard.
Installing/removing the cable
Installing
1. Insert the plug of the cable into the i.Link connector on the computer.
2. Connect the plug on the other end of the cable with the i.LINK device.
Please pay attention to the shape of the connector and attach it properly
when you connect it. If you handle the connector with too much force, pins
could be broken or bent.
For using i.LINK conform peripheral devices the system (OS) and the
peripheral device driver also has to follow that standard.
We do not carry out performance checks for all i.LINK conform peripheral
devices. Therefore we cannot guarantee that all i.LINK conform peripheral
devices will work properly with this equipment.
Please use a cable that complies with the standards (S100, S200, S400
conform). For detailed information, please contact the cable manufacturer.
Do not use a cable that is longer than 2m.
Depending on the peripheral device you install, there are cases where you
cannot setup the standby mode or hibernation mode.
When you connect an i.LINK device and use it through an application,
please do not install/ remove i.LINK devices and do not disconnect the
power cable or the AC adaptor, and do not operate the computer in a
power saving mode where the power is turned off automatically. At this
case we cannot guarantee for the data contents.
Please have the AC adaptor connected when you capture or return
pictures from a digital video camera. In case the system hangs up,
optimise the disk and close all other applications.
Optimising the disk: [Click Start], [Program], [Accessories], [System Tools],
[Defragmenter]
4-18 Hardware User's Manual
Page 72

Removal
1. Click the Remove Hardware icon in the taskbar.
2. Select the i.LINK device you want to remove.
3. After the message "You can safely remove it" was displayed, click on
the OK button.
4. Disconnect the cable that attaches the computer to the i.LINK device.
For disconnecting a digital video camera, steps 1 ∼ 3 are not necessary.
For more information on i.LINK devices, please consult the manual that
came with your i.LINK device.
Connecting to LAN via i.LINK
If you connect several computers that have an i.LINK connector with an
i.LINK (IEEE 1394) cable, you can communicate as LAN.
Installation
1. Insert the jack of the cable into the i.LINK connector on the computer
2. Connect the plug on the other end of the cable with the i.LINK
connector of the device
Even in a computer equipped with an i.LINK connector, depending on the
model there are cases where you cannot make a connection.
User's Manual Hardware 4-19
Page 73

Printer
A printer with parallel interface is connected to the parallel port. A USB
conform printer can also be connected to the USB port. For details on the
connection and setup of a printer, please refer to your printer's manual.
Installation
For the connection to the parallel port, please follow the steps below.
Switch off the computer as well as the printer to perform the connection.
1. Insert the plug of the printer cable into the parallel port on the
computer.
2. Connect the plug on the other side of the cable with the printer
Turn on the printer first and then turn on the computer.
Printer setup
Installing the driver
To use the printer, you have to install the driver. Please install the driver
according to your printer's manual.
Setting up the printer port mode
You have to setup a printer port mode that is suitable for your printer.
1. Start the BIOS Setup.
For starting the BIOS Setup, please refer to "How to start the BIOS
Setup"
2. In the System Devices menu, under Parallel port, select Enabled or
Auto.
4-20 Hardware User's Manual
Page 74

3. If you selected Enabled select the suitable settings for your printer in
Mode.
ECP Sets the ECP conformity. In most printers ECP
is set.
Bi-directional
(default)
EPP Sets the EPP conformity.
Normal Mode Sets the exclusively used output.
Removal
Unplug the printer cable that connects the printer to the computer. Please
turn off the power if your printer requires it.
Other devices
PS/2 devices
You can use these devices when you connect them to the computer's PS/2
port.
Here are some PS/2 compatible devices:
Mouse
Keyboard
Numeric key pad
Track ball
Please make sure the power is turned off before you connect a PS/2
device. Connecting it with the power on could cause damage.
Sets up two-way communication. Is set for some
printers and also if parallel interface devices other
than printers are used.
User's Manual Hardware 4-21
Page 75

Installation
Insert the plug of the cable into the PS/2 port. Please insert the plug well
into the port until it fits securely, the arrow mark has to be on the top of the
plug. If you handle the connector with too much force, pins could be
broken or bent.
Microphone
The microphone is connected to the Microphone-in jack. Please use a
microphone with a 3.5mm mono-aural minijack type plug.
Connection
Insert the microphone plug into the Microphone-in jack. For disconnection,
simply unplug the Microphone from the microphone-in jack.
4-22 Hardware User's Manual
Page 76

Headphones
The headphones are connected to the Headphones-out jack. Please use
headphones with a 3.5mm stereo minijack type plug. The volume of the
headphones can either be controlled with the Volume control bar or
through the Windows Volume control.
Please take care not to turn on the volume too high when you are using
headphones. It can negatively affect your hearing abilities if you listen to
loud sounds that irritate your ears over a long period of time.
Connection
Insert the headphone plug into the Headphones-out jack. For disconnection,
simply unplug the Headphones from the Headphones-out jack.
Please, do not use headphones under the following circumstances, as
noises could occur.
While you turn the computer on/ off.
While you attach/ remove the headphones.
User's Manual Hardware 4-23
Page 77

External Monitor
An external monitor can be connected to the video port.
For information on how to handle the external monitor, please consult the
manual of your monitor.
Installation
Please install the external monitor when both the monitor and the
computer are turned off.
1. Insert the plug of the monitor’s video cable into the video port. Please
pay attention to the shape of the connector and attach it properly when
you connect it. If you handle the connector with too much force, pins
could be broken or bent.
2. Insert the plug on the other side of the cable into the port of the
external monitor.
Removal
1. Turn off the external monitor and the computer.
2. Disconnect the cable from the video port.
4-24 Hardware User's Manual
Page 78

Changing the display mode
If you have an external monitor connected, you can choose between the
following display modes:
external monitor only.
Both, external monitor and the built in LCD display at the same time.
Built in LCD display only.
Please do not change the display mode in the following conditions.
Otherwise a data loss could occur.
While data is read or written. This will cause an error. Please wait, until the
data exchange is completed.
During transmission. This will cause an error. Please wait, until the
transmission is completed.
Sometimes when you are using an external monitor, the position and
width, etc., of the displayed image will not be correct. In that case, please
set the display position and width of the external monitor.
User's Manual Hardware 4-25
Page 79

Chapter 5
Convenient Functions
Here you find information about software and functions that make your
computer even more convenient to use.
The screen images are examples only.
Using the Easy Buttons
This computer features Easy Buttons that allow you to start applications by
simply pressing them once.
User 2
button
button
You can open applications or files by simply pushing a button and you can
carry out specific operations (closing, sound mute, etc.) as well.
The default settings are shown in the table below.
User 1 Button/
User 2 Button
Mail Button Link to Outlook Express
Internet Button Link to Internet Explorer
Not set yet.
When you press these buttons for the first time,
the registration screen will appear.
Internet
button
Mail buttonUser 1
Usage
Press each button. If the computer is turned OFF, keep the button pressed
down for 2 seconds, the computer will turn ON when you release the
button.
When you press the User1/ User2 buttons for the first time, the registration
screen will appear.
User's Manual Convenient Functions 5-1
Page 80

Chapter 6
BIOS Setup
In this section you will find information about the usage and function of the
BIOS Setup program. You can adjust the computer's system setup,
register/ cancel a password, etc. by using the BIOS Setup program.
About BIOS Setup
The BIOS Setup is a program that allows you to set up a password and the
usage of peripheral devices, hard disk, and others.
The information set in the BIOS Setup is stored by a built in battery so it is
not lost when the power is turned off. You only have to run the BIOS Setup
once. But in case the built in battery discharges completely, the BIOS
Setup will return to its default values. Therefore it is advisable to take
notes of the settings you made in case they should be lost.
How to start the BIOS Setup
Press the F2 key directly after you turn on the power (during the start up).
During the start up process, the TOSHIBA screen below appears. Press
the F2 key while this screen is displayed.
A few seconds after you turned on the power, you can press the F2 key. If
you do not press the F2 key at that point, the system will start as usual. If
you were unable to enter the BIOS Setup, please shut down the system
normally and repeat as described above.
TOSHIBA
Press <F2> to enter SETUP, Press <C> to boot from CD-ROM
User's Manual BIOS Setup 6-1
Page 81

How to run the BIOS Setup
The BIOS Setup screen
1 2
3
4
1 Menu Bar – The menu that is currently open appears in blue.
Use the ÅÆ
ÅÆ keys to move to other menus.
ÅÆÅÆ
2 You can change the items that appear in brackets [ ]. However
the items which appear in blue cannot be changed.
3 The selected item appears in white letters.
4 An explanation regarding the selected item is displayed.
Keys you can use
In the BIOS Setup you have to use the keyboard keys to move between
menus and items or entering information, because the touch pad or mouse
will not work in here.
The main keys you are working with in the BIOS Setup are described
below.
F1, Alt + H key
Displays the [General Help] where you find information about the
BIOS Setup and how to use it.
Use the PgUp, PgDn keys to move up and down inside the screen and
to places that are not shown. To close the General Help, press the
F1 key again, or press Alt + H.
Ç key
Moves to the next upper item.
È key
Moves to the next lower item.
Å key
Moves to the menu before.
6-2 BIOS Setup User's Manual
Page 82

Æ key
Moves to the next menu.
PgUp key, Home key
Moves to the first item of the menu.
PgDn key, End key
Moves to the last item of the menu.
F5 key
Moves to the next item before and returns to the previous selected
item.
F6 key, Space key
Moves to the next item ahead and proceeds to the next selected item.
Enter key
Displays a list of submenus or settings and changes settings.
F9 key
Returns all the BIOS Setup values to their default settings (cancels the
password).
When you press F9, the message "Load default configuration now?"
will appear. Select "Yes" if you want to return to the preset values,
select "No" if you do not want to load the default values and wish to
continue the setup.
F10 key
Saves the current setup, ends the BIOS Setup and reboots the system.
When you press F10, the message "Save configuration changes and
exit now" will appear. Select "Yes" if you want to save the changes and
exit, select "No" if you do not want to save the changes and wish to
continue the setup.
Esc, Alt + X key
Displays the [Exit] menu. In a submenu, leaves the submenu to return
to the previous menu and displays the previous screen.
User's Manual BIOS Setup 6-3
Page 83

Contents of the BIOS Setup
The Bios Setup consists of the following 7 menus.
Main menu
For setting or displaying time and date and during start up, the HDD,
FDD, memory size etc.
System Devices menu
For setting up the I/O port and upgrade functions.
Security menu
For setting a password to prevent unauthorised access to the
computer.
Power menu
For setting the battery usage methods during battery operation.
Others menu
For setting the battery alarm and system beep.
Boot menu
For setting how the system starts when the power is turned on.
Exit menu
To leave the BIOS Setup
The contents of the BIOS Setup can vary somewhat depending on its
release date.
6-4 BIOS Setup User's Manual
Page 84

Main Menu Details
When the BIOS Setup starts, the Main menu is displayed first.
In the Main menu you can set the time and date and get information on
devices like the floppy disk drive or the hard disk.
System Time
Sets the system time (24h mode). Use the Enter or Tab key to move
between the [Hours: Minutes: Seconds] items.
System Date
Sets the system date (western calendar). Use the Enter or Tab key to
move between the [Month/Day/Year] items.
Floppy Drive
Displays information about the floppy disk drive type (display only). Usually
shows a standard [1.44MB, 3½"] type floppy disk drive.
Hard Disk
Shows the IDE interface device (display only).
User's Manual BIOS Setup 6-5
Page 85

Quiet Boot
Here you can set whether or not a test should be carried out during the
start up process. If you skip the system test, the start up process will be
shorter.
Enabled System test is carried out
Disabled System test is not carried out
Power on display
To select the display device (Not valid in Windows Me.).
Auto Selected In case an external monitor is connected, it will
be used as the display device, if not then only the
computers internal display is used.
Simultaneous Both the external monitor as well as the
computers LCD display are used.
LCD Display Stretch
To select the form of the LCD display output. (Not valid in Windows Me.)
Enabled Centred display
Disabled Full screen display
System Memory
Shows the system's memory capacity (display only).
Extended Memory
Shows the size of extended memory (display only).
BIOS Ver.
Shows the current version of BIOS.
6-6 BIOS Setup User's Manual
Page 86

System Devices Menu Details
The System Devices Menu contains settings of the computer's hardware
devices.
If unsuitable settings are carried out, Windows might not work properly
anymore. If you want to load the original values again, press F9 to return
to the default settings.
Pointing device
To adjust the settings of the touch pad and the external PS/2 mouse.
Auto-Selected Selects whether the touch pad or the PS/2 mouse
is enabled. If a PS/2 mouse is connected, only
the PS/2 mouse is activated, the touch pad will
not work. If no PS/2 mouse is connected, then
the touch pad will be enabled.
Simultaneous Both the touch pad and the PS/e mouse can be
used at the same time.
Ext. Keyboard “Fn”
The Ctrl + Alt key combination produces the same action as pressing the
Fn key.
Enabled Activated
Disabled Not activated
User's Manual BIOS Setup 6-7
Page 87

IDE Controller
For setting the IDE devices.
Both Standard IDE controller and additional IDE
controller are used at the same time
Primary Only the standard IDE controller is used
Disabled Not activated
FDD Controller
For setting the floppy disk driver.
Disabled Not activated
Enabled Activated
Infrared Port
For setting the Infrared Port.
Disabled Not activated
Enabled Activated
Auto Detects automatically
Mode
This is displayed when the [Infrared Port] is either set to [Enabled] or
[Auto].
SIR/ FIR/ ASK-IR
Base I/O address
This is displayed when the [Infrared Port] is set to [Enabled]. Here the
Base I/O address is set.
Please do not assign it to the same address like the [Base I/O address] of
the [Parallel Port].
3F8 IRQ4/ 2F8 IRQ3/ 3E8 IRQ4/ 2E8 IRQ3
DMA channel
This is displayed when the [Infrared Port] is set to [Enabled] and [FIR] is
selected in [Mode].
Please do not select the same channel as the [DMA channel] for the
[Parallel Port].
DMA 0/ DMA 1/ DMA 3
6-8 BIOS Setup User's Manual
Page 88

Parallel port
For setting the PRT port.
Disabled Not activated
Enabled Activated
Auto Detects automatically
Mode
This is displayed when the Parallel port is set to Enabled.
Bi-directional For using peripheral devices that support the two
way mode.
EPP For using EPP compliant peripheral devices
Normal Mode For using peripheral devices that are used in the
preferred output mode.
Base I/O address
This is displayed when the Parallel Port is set to Enabled.
Please do not assign it to the same address like the [Base I/O address] of
the Infrared Port.
378 / 278 / 3BC
Interrupt
This is displayed when the Parallel Port is set to Enabled.
IRQ 5 / IRQ 7
DMA channel
This is displayed when the Parallel Port is set to Enabled and ECP is
selected in Mode.
Please do not select the same channel as the [DMA channel] for the
Infrared Port.
DMA 0/ DMA 1/ DMA 3
User's Manual BIOS Setup 6-9
Page 89

Security Menu Details
In the Security Menu you can set a password to prevent other people from
using the computer and changing its settings.
If you do not enter the correct password after the computer is turned on,
you cannot use the computer.
The password is not displayed so you cannot confirm it that way.
If you forget the password, please ask Toshiba for a password
cancellation. The cancellation of the password at Toshiba has to be
paid for.
User Password
Indicates whether or not a user password is set.
Clear User password is not set
Set User password is set
Set User Password
The user password can contain up to 8 alphanumeric characters
(half width).
Please do not use symbols or any national specific characters. If you make
a mistake while entering the password, delete the incorrect character using
the BackSpace key.
6-10 BIOS Setup User's Manual
Page 90

Setting the password
1. In Set User Password, move the cursor to Enter and press the
Enter key. The Set User Password screen will appear.
2. In Enter New Password, type in the password and press the Enter
key.
3. In Confirm New Password, enter the same password again and
press the Enter key
The Setup Notice screen appears.
4. Press the Enter key
When the password is setup, the User Password will now
indicate Set.
Changing the password
1. In Set User Password, move the cursor to Enter and press the
Enter key.
The Set User Password screen will appear.
2. In Enter Current Password, type in the valid password and press
the Enter key.
3. In Enter New Password, type in a new password and press the
Enter key
4. In Confirm New Password, enter the same password again and
press the Enter key
The [Setup Notice] screen appears.
5. Press the Enter key
The password has been changed.
Cancelling the password
1. In Set User Password, move the cursor to Enter and press the
Enter key.
The Set User Password screen will appear.
2. In Enter Current Password, type in the valid password and press
the Enter key.
3. Press the Enter key twice.
Do not type the password in Enter New Password or Confirm New
Password.
The Setup Notice screen appears.
4. Press the Enter key
The password has been cancelled, the User Password will now
indicate Clear.
User's Manual BIOS Setup 6-11
Page 91

Password On Boot
If a user password is set, you can set an additional password here that has
to be entered before the system starts up.
If you do not select [Enabled] although a password is set, the system will
not prompt you to enter a password before booting up.
Disabled Not set
Enabled Set
Power Menu Details
Here the battery usage methods during battery operation are set.
Long Life Mode (Battery)
Sets the battery usage modes.
Disabled Using the battery with system's operation speed
as a priority.
Enabled Extends the battery's operating time, but
decreases the system's operation speed.
6-12 BIOS Setup User's Manual
Page 92

Others Menu Details
The alarm during the computer operation is set here.
Low Battery Alarm
Sets an alarm for the case when the battery charge reaches a low level.
Disabled Not set
Enabled Set
Panel Close Alarm
Sets an alarm when the display panel is closed.
Disabled Not set
Enabled Set
System Beep
Sets a beep tone when the computer starts up.
Disabled Not set
Enabled Set
User's Manual BIOS Setup 6-13
Page 93

Boot Menu Details
Sets the parameters for the computer startup.
Removable Devices, Hard Drives and CD-ROM/DVD-ROM
Drives
Here you can select the boot order for the devices during the startup
process.
Select the device and change its order by using the F5 and F6 key.
Pressing F5 moves the selected device (reversed order) one place down.
Pressing F6 moves the selected device (reversed order) one place up.
Removable Devices Floppy disk drive/ Super disk drive
Hard Drive Hard disk device
CD-ROM/DVD Drive CD-ROM/DVD drive
If you boot from a floppy disk, you first have to format it for use as
6-14 BIOS Setup User's Manual
starting disk.
If you boot from a CD-ROM drive, you need a CD capable to start
(bootable CD).
Page 94

Exit Menu Details
Here you can end the BIOS Setup.
You can also load the default settings, or return to the settings as they
were before the current changes.
If you press Exit Saving Changes or F10 in the Exit menu, but the BIOS
Setup settings are not yet written onto the CMOS-RAM the contents of the
BIOS Setup will not be updated.
Exit Saving Changes
Saves the changed settings (written onto the CMOS-RAM) and exits the
BIOS Setup.
Exit Discarding changes
Exits the BIOS Setup without saving the changed settings (returns to the
last settings that were saved).
Load Setup Defaults
Resets the Settings in the BIOS Setup to their default values without
ending the BIOS Setup.
Discard Changes
Returns to the settings as they were before the changes (the last settings
that were saved) without ending the BIOS.
Save Changes
Saves the changed settings (written onto the CMOS-RAM) without ending
the BIOS.
User's Manual BIOS Setup 6-15
Page 95

Chapter 7
Restoring the preinstalled software
If preinstalled files are damaged, use the Product Recovery CD-ROM or
the Toshiba Tools & Utilities CD-ROM to restore them.
Restoring the complete system
To restore the operating system and all preinstalled software, follow the
steps below.
When you reinstall the Windows operating system, the hard disk will be
reformatted and all data will be lost. Make sure you have a backup copy of
your data, before you perform a complete system recovery.
1. Load the Product Recovery CD-ROM in the drive and turn off the
computer’s power.
2. Hold down the C key and turn on the power. When the Toshiba logo
appears, release the C key.
3. Follow the on-screen instructions.
4. After recovery is complete, remove the Product Recovery CD.
5. Press Ctrl + Alt + Del to restart the system. Refer to your Microsoft
user’s manual for Windows’ setup instructions.
Restoring Toshiba utilities and drivers
If Windows is working properly, individual drivers or applications can be
separately restored. Use the Tools & Utilities CD-ROM according to
instructions in the booklet contained in the CD box to reinstall Toshiba
utilities and drivers.
User's Manual Restoring the preinstalled software 7-1
Page 96

Chapter 8
Troubleshooting
In this chapter you will find information on how to cope with problems. If
things don't go very smoothly during operation, please read this section.
When problems occur
Here we would like to introduce you to some remedies in case things do
not run very well when you use the computer or if you have the feeling that
something is "strange".
Before reading the Q&A collection
At this point you find an explanation for opening the Control Panel, which
is often used to confirm settings.
Opening the Control Panel from the Start menu
1. Click on the Start button
2. Move the mouse pointer to Settings.
3. Click on Control Panel.
The Control Panel opens.
If the icon does not appear, please click on "Display all control panel
options" on the left side of the screen.
Opening the Control Panel from the My Computer icon
1. Double click the My Computer icon on the desktop
2. Double click on the Control Panel icon.
The Control Panel opens.
If the icon does not appear, please click on "Display all control panel
options" on the left side of the screen.
Turning the computer on or off…
The computer does not turn on/ the system does not
start…
The computer doesn't turn on
The Power Switch was not pressed long enough. Please keep the Power
Switch pressed down for a little while.
User's Manual Troubleshooting 8-1
Page 97

The power goes on briefly and immediately switches off
again (The battery light is blinking)
The battery is low.
Please follow the instructions below.
Connect the computer's AC adaptor. You cannot use AC adaptors from
other devices.
Install a fully charged battery pack
The contact to the power source is bad
Please follow the instructions below.
Make sure the AC adaptor is connected properly
Make sure the battery pack is installed properly
The emergency stop function is activated. If the temperature inside the
computer rises above a certain level, an emergency stop function stops
the system automatically. The operation environment ranges from
5 ∼ 35°C. If you can't turn on the computer, please contact your dealer or
Toshiba for help.
I turned the power on, but the system doesn't start
A floppy disk is inserted that doesn't contain the files necessary to start the
computer. Remove the floppy disk and then restart the system.
The Scan Disk starts automatically when Windows starts
Last time the computer was turned off without following the Windows Shut
Down procedure. If the hard disk is ok, Windows will start after the Scan
Disk is finished. If Windows doesn't start normally, please follow the
onscreen instructions.
A program is running automatically
A program is running at the same time when Windows
starts
It is registered in the Start up. If is registered in the Start up, the program
will run at the same time Windows starts.
Please follow the steps below.
1. Click Start, Settings, Taskbar and Start menu
2. In the Details tab, click on the Cancel button.
The Cancel shortcuts or folders screen appears.
3. Double click on Start up.
An icon appears below Start up.
4. Click on the icon of the program you wish to cancel and click the
Cancel button
5. In the Taskbar and Start menu screen, click on the Close button
8-2 Troubleshooting User's Manual
Page 98

The power goes off
The computer turns off while I use it
The emergency stop function is activated. If the temperature inside the
computer rises above a certain level, an emergency stop function stops
the system automatically. The operation environment ranges from
5 ∼ 35°C. If you can't turn on the computer, please contact your dealer or
Toshiba for help.
There was an alarm sound and the battery light was
blinking
The battery is low
Please follow the steps below:
Connect the computer's AC adaptor. You cannot use AC adaptors from
other devices.
Install a fully charged battery pack
The computer cannot be turned off
The power doesn't go off even when I press the Power
Switch
Please follow the steps below.
Keep the Power Switch pressed for 5 seconds
Press the Emergency power-off switch
First remove the AC adaptor then the battery pack, an then install them
again in reversed order (battery pack Æ AC adaptor)
The computer turned itself on
The computers turned itself on automatically
In Windows or a utility the computer was set to start automatically. The
Task Scheduler in Windows is set.
Please click Start, Programs, Accessories, System Tools, Scheduled
Tasks and cancel the program that was set.
User's Manual Troubleshooting 8-3
Page 99

Display and screen
Nothing appears on the screen
Nothing appears on the screen (The Power (On/Off) light is
off or it is blinking)
The computer is turned off or in Standby mode. Please press the Power
Switch.
Nothing appears on the screen (The Power (On/Off) light is
glowing)
Please follow the steps below:
Press Shift or Ctrl.
Move the mouse or use the touch pad
If you have a CRT monitor connected, it can take up to 10 seconds before
the output is displayed, this is not a defect.
The instant security function (automatic display stop) is carried out.
Please follow the steps below:
If no password is set.
Press Enter or F1.
If a password is set.
Type in the password and press Enter.
In case you have forgotten the password, please seek assistance from
Toshiba, after confirming the model you are using.
The display device is not set up properly. Please change the display.
The colours don't look good
You only set a small number of colours. Please follow the steps below:
1. Open the Control Panel and double click on Display
2. In the Settings tab, change the Colours to High Colour or True Colour
3. Click on the OK button
Depending on the resolution, sometimes you cannot set to "High Colour"
or "True Colour".
8-4 Troubleshooting User's Manual
Page 100

I can't change the screen area or colour
The display settings are not correct. Please follow the steps below:
1. Open the Control Panel and double click on Display
2. In the Display Manager tab, check if the settings in the Display
Adaptor are correct
3. Click on the OK button
The automatic display stop function does not work
Although the automatic display stop function was set, it
does not go off automatically
An MS-DOS prompt is activated. Please follow the steps below:
Minimise the MS-DOS prompt
Taskbar and windows display
The Start button/ Taskbar is not displayed
The height of the Taskbar is set too low. Please follow the steps below:
1. Move the mouse pointer to the bottom of the screen
2. When the mouse pointer becomes a two-headed arrow (↕↕↕↕) drag it up
and down with the mouse
3. Release the mouse button at the desired location
The Auto hide feature of the taskbar is enabled. Please change the
settings so that the taskbar is always displayed, follow the steps below.
1. Click Start, Settings, Taskbar and Start menu
2. In the General tab, uncheck Auto hide and click on the OK button
The window I was using has disappeared
It is hidden under another window.
It is displayed in the taskbar, click on the button that has the same name
as the window you used before.
In case it is hidden under another window, it is displayed orderly on the
taskbar.
User's Manual Troubleshooting 8-5
 Loading...