

Page 1

ENER Y STAR
PAR TNER
Safeguards
Important
Welcome to
Toshiba
Connecting
your TV
Remote Control
Using the
Setting up
your TV
Using the TV’s
Features
30HFX84
3R40321A/E COVER 9/7/04, 15:071
Appendix
Page 2
Important
Safeguards
Dear Customer,
Thank you for purchasing this Toshiba TV. This manual will
help you use the many exciting features of your new TV.
Before operating the TV, please read this manual
completely, and keep it nearby for future reference.
Child Safety
It Makes A Difference
Safety Precautions
WARNING
TO REDUCE THE RISK OF FIRE OR ELECTRIC SHOCK,
DO NOT EXPOSE THIS APPLIANCE TO RAIN OR
MOISTURE.
WARNING: TO REDUCE THE RISK OF ELECTRIC
SHOCK, DO NOT REMOVE COVER (OR BACK).
NO␣ USER-SERVICEABLE PARTS INSIDE. REFER
SERVICING TO QUALIFIED SERVICE PERSONNEL.
The lightning symbol in the triangle tells you that the
voltage inside this product may be strong enough to
cause an electric shock. DO NOT TRY TO SERVICE
THIS PRODUCT YOURSELF.
The exclamation mark in the triangle tells you that
important operating and maintenance instructions
follow this symbol.
CAUTION
TO PREVENT ELECTRIC SHOCK DO NOT USE THIS
POLARIZED PLUG WITH AN EXTENSION CORD,
RECEPTACLE OR OTHER OUTLET UNLESS THE
BLADES CAN BE FULLY INSERTED TO PREVENT
BLADE EXPOSURE.
Where Your TV Stands
Congratulations on your purchase! As␣ you enjoy
your new TV, keep these␣ safety tips in mind:
The Issue
¾ If you are like most consumers, you have a TV in your home.
Many homes, in fact, have more than one TV.
¾ The home theater entertainment experience is a growing
trend, and larger TVs are popular purchases; however, they
are not always supported on the proper TV stands.
¾ Sometimes TVs are improperly secured or inappropriately
situated on dressers, bookcases, shelves, desks, audio
speakers, chests, or carts. As a result, TVs may fall over,
causing unnecessary injury.
Toshiba Cares!
¾ The consumer electronics industry
is␣ committed to making home
entertainment enjoyable and safe.
¾ The Consumer Electronics
Association formed the Home
Entertainment Support Safety
Committee, comprised of TV and
consumer electronics furniture
manufacturers, to advocate
children’s safety and educate
consumers and their families about
television safety.
NOTE TO CATV INSTALLERS
This is a reminder to call the CATV system installer’s
attention to␣ Article 820-40 of the NEC, which provides
guidelines for proper grounding and, in particular, specifies
that the cable ground shall be connected to the grounding
system of the building, as close to the point of cable entry
as practical. For additional antenna grounding information,
see items␣ 25 and␣ 26 on page␣ 4.
NOTICE OF POSSIBLE ADVERSE EFFECTS
ON TV PICTURE TUBE
If a fixed (non-moving) pattern remains on the TV
screen␣ for long periods of time, the image can become
permanently engrained in the picture tube. This type of
damage is NOT COVERED BY YOUR WARRANTY.
See item 33 on page 4.
ENERGY STAR® qualified TV. Products that earn
the ENERGY STAR prevent green house gas
emissions by meeting strict energy efficiency
guidelines set by the U.S. Environmental
Protection Agency and the U.S. Department of
ENER Y STAR
Energy. ENERGY STAR and the ENERGY STAR
mark are registered U.S. marks.
2
Tune Into Safety
¾ One size does NOT fit all! Use appropriate
furniture large enough to support the weight of your
TV (and other electronic components).
¾ Use appropriate angle braces, straps, and anchors to secure
your furniture to the wall (but never screw anything directly
into the TV).
¾ Carefully read and understand the other enclosed
instructions␣ for proper use of this product.
¾ Do not allow children to climb on or play with furniture
and␣ TVs.
¾ Avoid placing any item on top of your TV (such as a VCR,
remote control, or toy) that a curious child may reach for.
¾ Remember that children can become excited while watching
a␣ program and can potentially push or pull a TV over.
¾ Share our safety message about this hidden hazard of
home with your family and friends. Thank you!
2500 Wilson Blvd.
Arlington, VA 22201 U.S.A.
Tel. 703-907-7600␣ ␣ Fax 703-907-7690
www.CE.org
CEA is the Sponsor, Producer and
0303
2
Manager of the International CES
the
®
3R40321A/E P02-06 9/7/04, 15:072
Page 3
Safeguards
QUALIFIED
SERVICE
TECHNICIAN
Safeguards
Important
Important
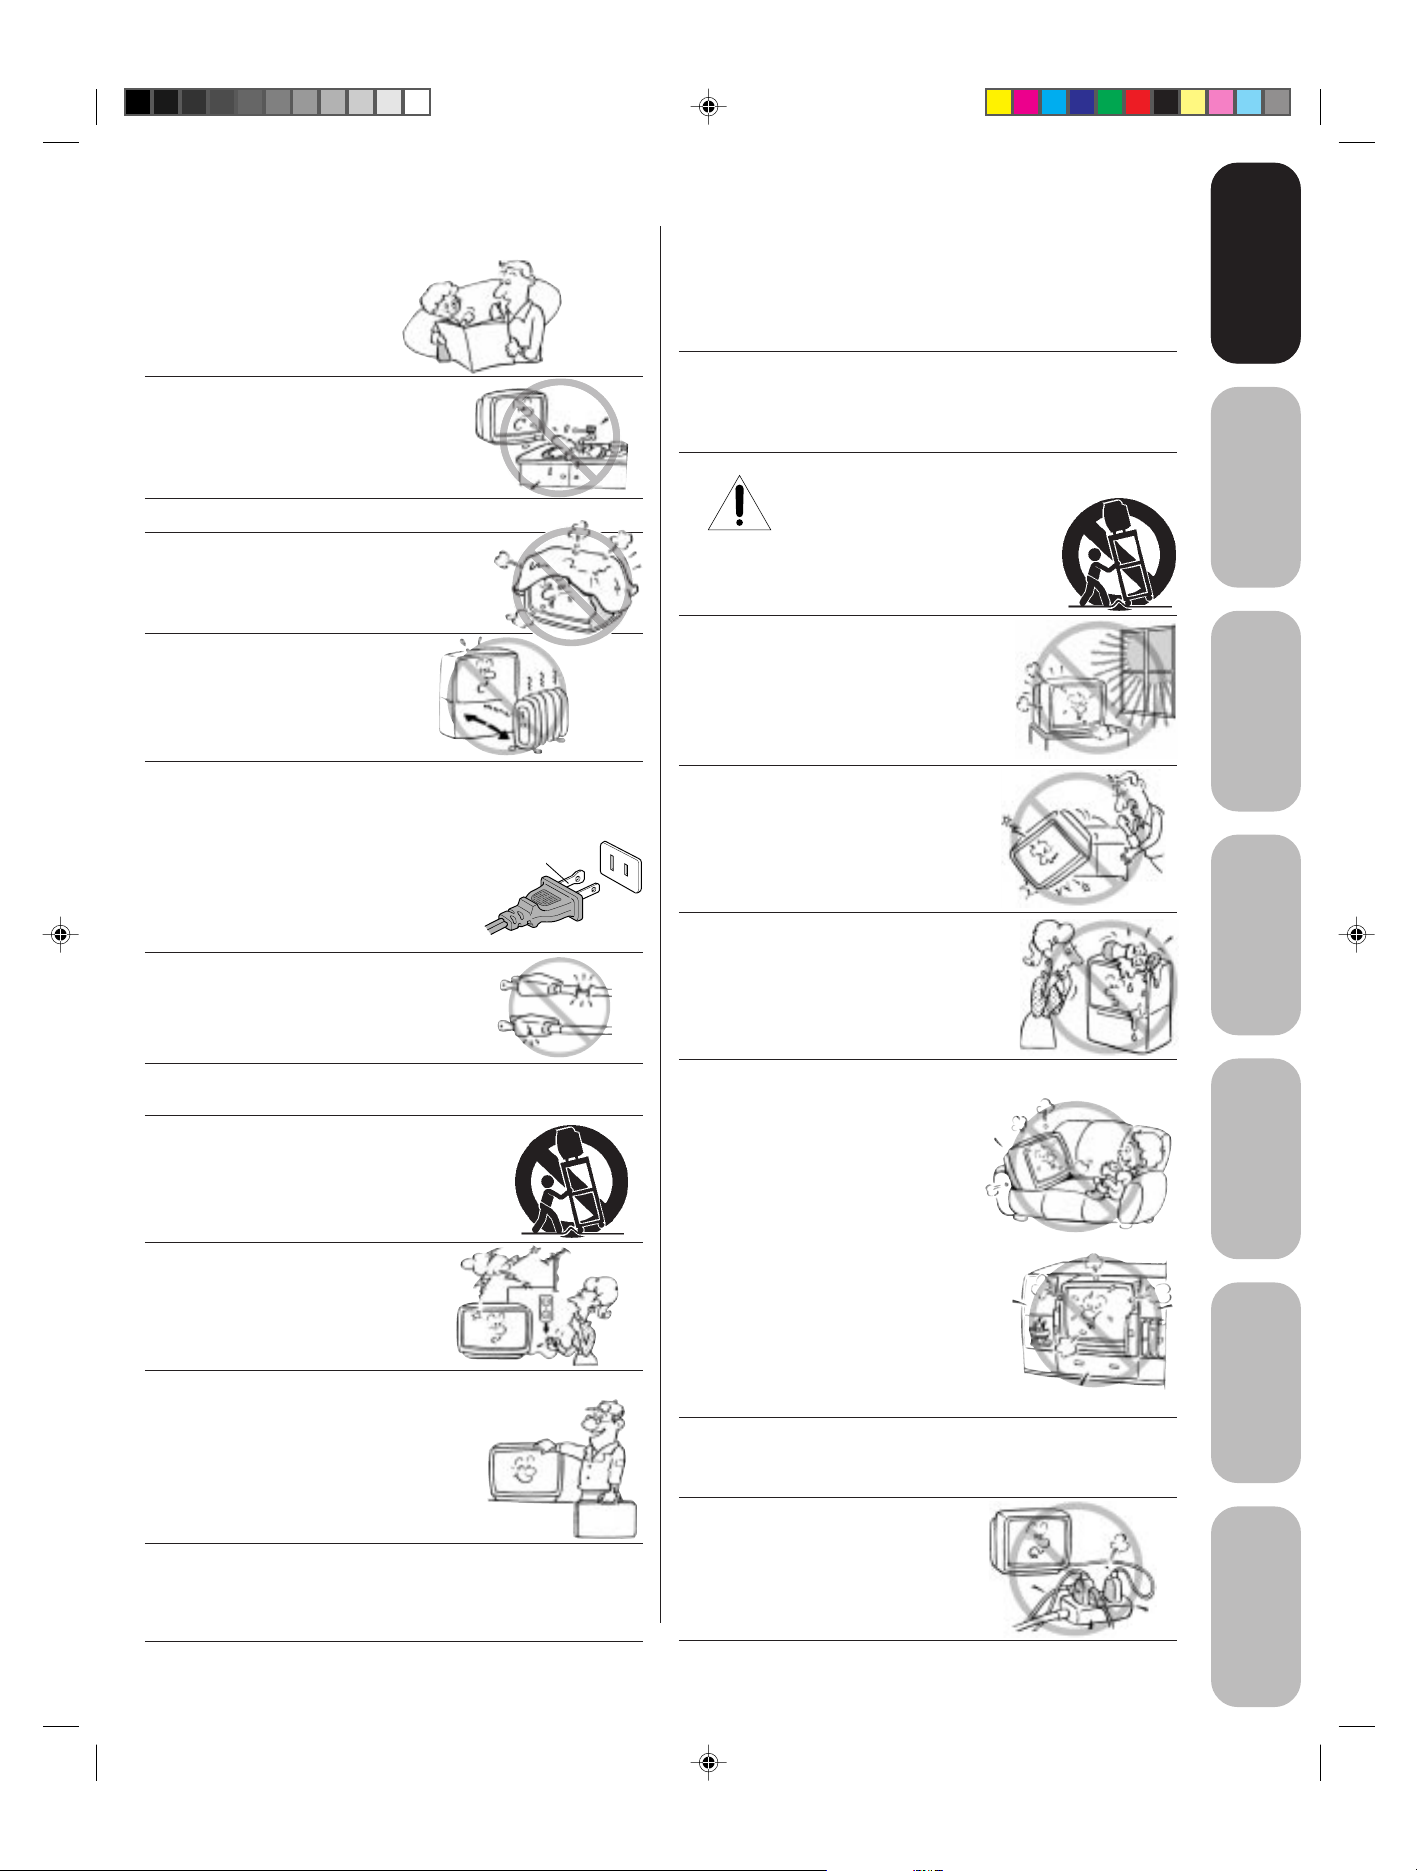
Important Safety Instructions
1) Read these instructions.
2) Keep these instructions.
3) Heed all warnings.
4) Follow all instructions.
5) Do not use this apparatus near
water.
6) Clean only with a dry cloth.
7) Do not block any ventilation
openings. Install in accordance with
the manufacturer’s instructions.
8) Do not install near any heat
sources such as radiators,
heat registers, stoves, or other
apparatus (including amplifiers)
that produce heat.
9) Do not defeat the safety purpose of the polarized or
grounding type plug. A␣ polarized plug has two blades
with␣ one wider than the other. A␣ grounding type plug has
two blades and a third grounding
prong. The wide blade or the third
prong are provided for your safety.
If the provided plug does not fit into
your outlet, consult an electrician
for replacement of the obsolete outlet.
Wide plug
Installation, Care, and Service
Installation
Follow these recommendations and precautions and heed all
warnings when installing your TV:
16) Never modify this equipment. Changes or modifications
may void: a) the warranty, and b) the user’s authority to
operate this equipment under the rules of the Federal
Communications Commission.
17) DANGER: RISK OF SERIOUS PERSONAL
INJURY, DEATH, OR EQUIPMENT
DAMAGE! Never place the TV on
an unstable cart, stand, or␣ table. The TV
may fall, causing serious personal injury,
death, or serious damage to the TV.
18) Never place or store the TV in direct
sunlight; hot, humid areas; areas
subject to excessive dust or vibration;
or locations with temperatures at or␣
below 41°F (5°C).
19) Always place the TV on the floor
or a sturdy, level, stable surface that
can support the weight of the unit.
Welcome to
Toshiba
Connecting
your TV
Remote Control
Using the
10) Protect the power cord from being
walked on or pinched, particularly at
plugs, convenience receptacles, and
the point where it exits the apparatus.
11) Only use attachments/accessories specified by the
manufacturer.
12) Use only with the cart, stand, tripod,
bracket, or table specified by the
manufacturer, or sold with the
apparatus. When a cart is used, use
caution when moving the cart/apparatus
combination to avoid injury from tip-over.
13) Unplug this apparatus during
lightning storms or when
unused for long periods
of␣ time.
14) Refer all servicing to qualified service personnel.
Servicing is required when the apparatus has been
damaged in any way, such as power␣ supply
cord or plug is damaged, liquid has
been spilled or objects have fallen into
the apparatus, the apparatus has been
exposed to rain or␣ moisture, does not
operate normally, or has been dropped.
15) CAUTION: To reduce the risk of electric shock, do not
use␣ the polarized plug with an extension cord, receptacle,
or other outlet unless the blades can be inserted
completely to prevent blade exposure.
20) Never place items such as vases,
aquariums, or candles on top of the TV.
21) Never block or cover the slots or
openings in the TV cabinet back,
bottom, and sides. Never place
the TV:
• on a bed, sofa, rug, or similar
surface;
• too close to drapes, curtains,
or walls; or
• in a confined space such as a
bookcase, built-in cabinet, or any
other place with poor ventilation.
The slots and openings are provided
to protect the TV from overheating
and to help maintain reliable
operation of the TV.
22) Never allow anything to rest on or roll over the power
cord, and never place the TV where the power cord is
subject to wear or abuse.
23) Never overload wall outlets and
extension cords.
0303
3
3
Setting up
your TV
Using the TV’s
Features
Appendix
3R40321A/E P02-06 9/7/04, 15:073
Page 4
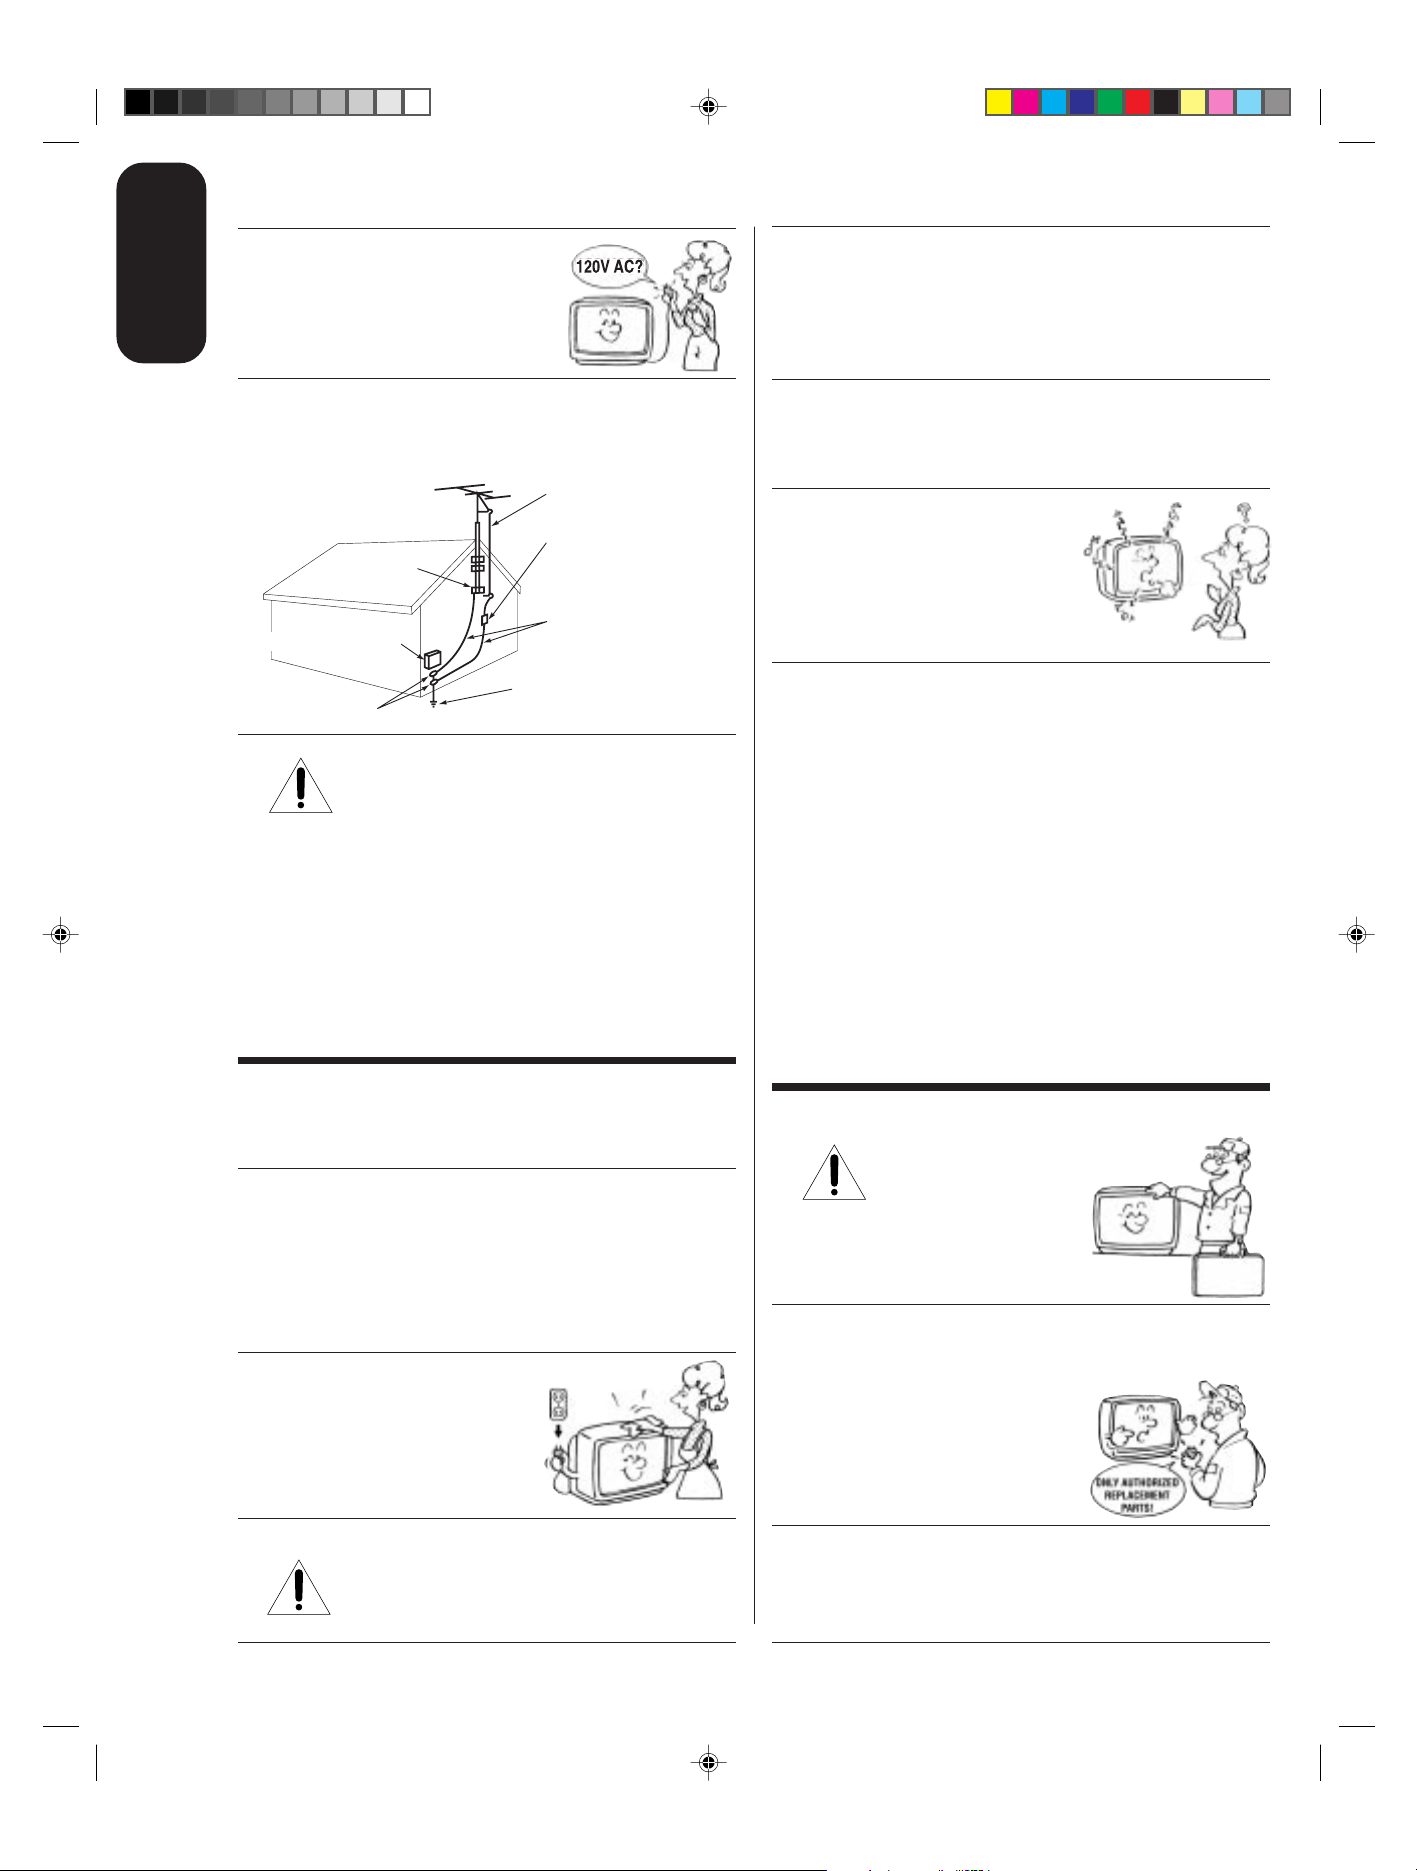
Ground clamp
Antenna discharge unit
(NEC Section 810-20)
Grounding conductors
(NEC Section 810-21)
Power service grounding
electrode system (NEC Art 250 Part H)
Ground clamps
Antenna lead-in wire
Electric service equipment
QUALIFIED
SERVICE
TECHNICIAN
Important
Safeguards
24) Always operate this equipment from
a 120 V AC, 60 Hz power source only.
30) [This item applies to projection TVs only.] If the air
temperature rises suddenly (for example, when the TV is
first delivered), condensation may form on the lenses. This
can make the picture appear distorted or the color appear
faded. If this happens, turn off the TV for 6 to 7 hours to
allow the condensation to evaporate.
25) Always make sure the antenna system is␣ properly
grounded to␣ provide adequate protection against voltage
surges and built-up static charges (see␣ Section 810 of␣ the
National Electric Code).
26) DANGER: RISK OF SERIOUS PERSONAL
INJURY OR DEATH!
•␣ Use␣ extreme care to make sure you are␣ never in
a position where your␣ body (or any item you are in contact
with, such as a ladder or screwdriver) can accidentally
touch overhead power lines. Never locate the antenna
near overhead power lines or other electrical circuits.
• Never attempt to install any of the following during
lightning activity:
a)␣ an antenna system; or b)␣ cables, wires, or any home
theater component connected to an antenna or phone
system.
31) For added protection of your TV from lightning and power
surges, always unplug the power cord and disconnect the
antenna from the TV if you leave the TV unattended or
unused for long periods of time.
32) During normal use, the TV may make
occasional snapping or popping
sounds. This is normal, especially
when the unit is being turned on or
off. If␣ these sounds become frequent
or continuous, unplug the power cord
and contact a Toshiba Authorized Service Center.
33) Possible Adverse Effects on TV Picture Tube: If a fixed
(non-moving) pattern remains on the TV screen for long
periods of time, the image can become permanently
engrained in the picture tube and cause subtle but
permanent ghost images. This type of damage is NOT
COVERED BY YOUR WARRANTY. Never leave your TV
on for long periods of time while it is␣ displaying the
following formats or images:
• Fixed Images, such as PIP/POP windows, stock tickers,
video game patterns, TV station logos, and websites.
• Special Formats that do not use the entire screen. For
example, viewing letterbox style (16:9) media on a
normal (4:3) display (gray bars at top and bottom of
screen); or viewing normal style (4:3) media on a
widescreen (16:9) display (gray bars on left and right
sides of screen).
3R40321A/E P02-06 9/7/04, 15:074
Care
For better performance and safer operation of your TOSHIBA
TV, follow these recommendations and precautions:
27) Always sit approximately 10–25 feet away from the TV and
as directly in front of it as possible. The picture can appear
dull if you sit too far to the left or right of the TV, or if
sunlight or room lights reflect on the screen. Turn the TV
off to check for reflections on the screen, and then remove
the␣ source of reflections while viewing the TV.
28) Always unplug the TV before
cleaning. Never use liquid or
aerosol cleaners.
29) WARNING: RISK OF ELECTRIC SHOCK!
Never spill liquids or push objects of any kind
into the TV cabinet slots.
Service
34) WARNING: RISK OF ELECTRIC
SHOCK! Never attempt to service the
TV yourself. Opening and
removing the covers may expose
you to dangerous voltage or other
hazards. Refer all servicing to a
Toshiba Authorized Service Center.
35) If you have the TV serviced:
• Ask the service technician to use only replacement parts
specified by␣ the manufacturer.
• Upon completion of service, ask
the service technician to perform
routine safety checks to determine
that the TV is in safe operating
condition.
36) When the TV reaches the end of its useful life, ask a
qualified service technician to properly dispose of the TV.
Improper disposal may result in␣ a␣ picture tube implosion
and possible personal injury.
0303
4
4
Page 5

Important Safety Information ........................................................................................................................2-4
Welcome to Toshiba .........................................................................................................................................6
Exploring your new TV................................................................................................................................................... 6
Selecting a location for the TV ....................................................................................................................................... 6
Connecting your TV .......................................................................................................................................... 7
Connecting a VCR ......................................................................................................................................................... 7
Connecting a cable converter box ................................................................................................................................. 8
Connecting a DVD player/satellite receiver and a VCR................................................................................................. 9
Connecting a DVD player with ColorStream
Connecting a DTV receiver / set-top box with ColorStream
Connecting two VCRs.................................................................................................................................................. 12
Connecting a camcorder.............................................................................................................................................. 13
Connecting an HDMI™ or a DVI device to the HDMI input ......................................................................................... 14
Connecting an audio system........................................................................................................................................ 15
®
(component video) and a VCR............................................................. 10
®
(component video) and a VCR ......................................11
Using the remote control................................................................................................................................ 16
Preparing the remote control for use ........................................................................................................................... 16
Installing the remote control batteries .......................................................................................................................... 16
Remote control functional key chart............................................................................................................................. 17
Programming the remote control for use with your audio/video devces ...................................................................... 19
Device code setup .............................................................................................................................................. 19
Searching and sampling the code of a device (8500) ......................................................................................... 19
Using the volume lock feature (8000) ................................................................................................................. 20
Operational feature reset (8900) ......................................................................................................................... 20
Device code table ............................................................................................................................................... 21
Learning about the remote control ............................................................................................................................... 23
Setting up your TV .......................................................................................................................................... 24
Starting setup............................................................................................................................................................... 24
Changing the on-screen display language................................................................................................................... 24
Image tilt correction...................................................................................................................................................... 25
Adding channels to the TV’s memory .......................................................................................................................... 25
Using the TV’s Features ................................................................................................................................. 26
Adjusting the channel settings ..................................................................................................................................... 26
Using the locks menu................................................................................................................................................... 27
Selecting a password .......................................................................................................................................... 27
Using the V-Chip (parental control) feature......................................................................................................... 28
Locking channels ................................................................................................................................................ 29
Locking the video inputs ..................................................................................................................................... 30
Setting the GameTimer
Using the front panel lock feature ....................................................................................................................... 31
Labeling channels ........................................................................................................................................................ 31
Selecting the video input source .................................................................................................................................. 32
Labeling the video input sources ................................................................................................................................. 32
Setting the clock........................................................................................................................................................... 33
Setting the ON timer .................................................................................................................................................... 33
Viewing the wide-screen picture formats (480i and 480p signals only) ....................................................................... 34
Scrolling the TheaterWide
Selecting the cinema mode.......................................................................................................................................... 37
Using the ASPECT feature .......................................................................................................................................... 37
Selecting the display format (for 480p signals only) .................................................................................................... 37
Adjusting the picture .................................................................................................................................................... 38
Selecting the picture mode ................................................................................................................................. 38
Adjusting the picture quality ................................................................................................................................ 38
Selecting the color temperature .......................................................................................................................... 39
Selecting the Scan Velocity Modulation (SVM)................................................................................................... 39
Resetting your picture adjustments..................................................................................................................... 39
Setting the sleep timer ................................................................................................................................................. 40
Using the closed caption feature.................................................................................................................................. 40
Adjusting the sound ..................................................................................................................................................... 41
Muting the sound ................................................................................................................................................ 41
Selecting stereo/SAP broadcasts........................................................................................................................ 41
Adjusting the sound quality ................................................................................................................................. 41
Resetting your audio adjustments....................................................................................................................... 42
Using the StableSound
Using the Dolby Virtual sorround feature ............................................................................................................ 42
Using the WOW™ surround sound feature ........................................................................................................ 43
Turning off the built-in speakers.......................................................................................................................... 43
Selecting the HDMI1 (or HDMI2) audio input source .......................................................................................... 44
Displaying on-screen information................................................................................................................................. 44
Auto power off.............................................................................................................................................................. 44
Understanding the Power Return feature .................................................................................................................... 44
TM
.................................................................................................................................... 30
®
picture (TheaterWide 2 and 3 only).................................................................................. 36
®
feature.......................................................................................................................... 42
Appendix..........................................................................................................................................................45
Troubleshooting ........................................................................................................................................................... 45
Specifications............................................................................................................................................................... 46
Limited Warranty.......................................................................................................................................................... 47
5
Safeguards
Important
Welcome to
Toshiba
Connecting
your TV
Remote Control
Using the
Setting up
your TV
Using the TV’s
Features
Appendix
3R40321A/E P02-06 9/7/04, 15:075
Page 6
Welcome to T oshiba
Congratulations! You have purchased one of the finest color TVs on the
market. The goal of this manual is to guide you through setting up and
operating your Toshiba TV as quickly as possible.
You may need to purchase other audio or video cables to connect your
equipment. See “Connecting your TV” on page 7 for more information.
Please read all the safety and operating instructions carefully before
you begin.
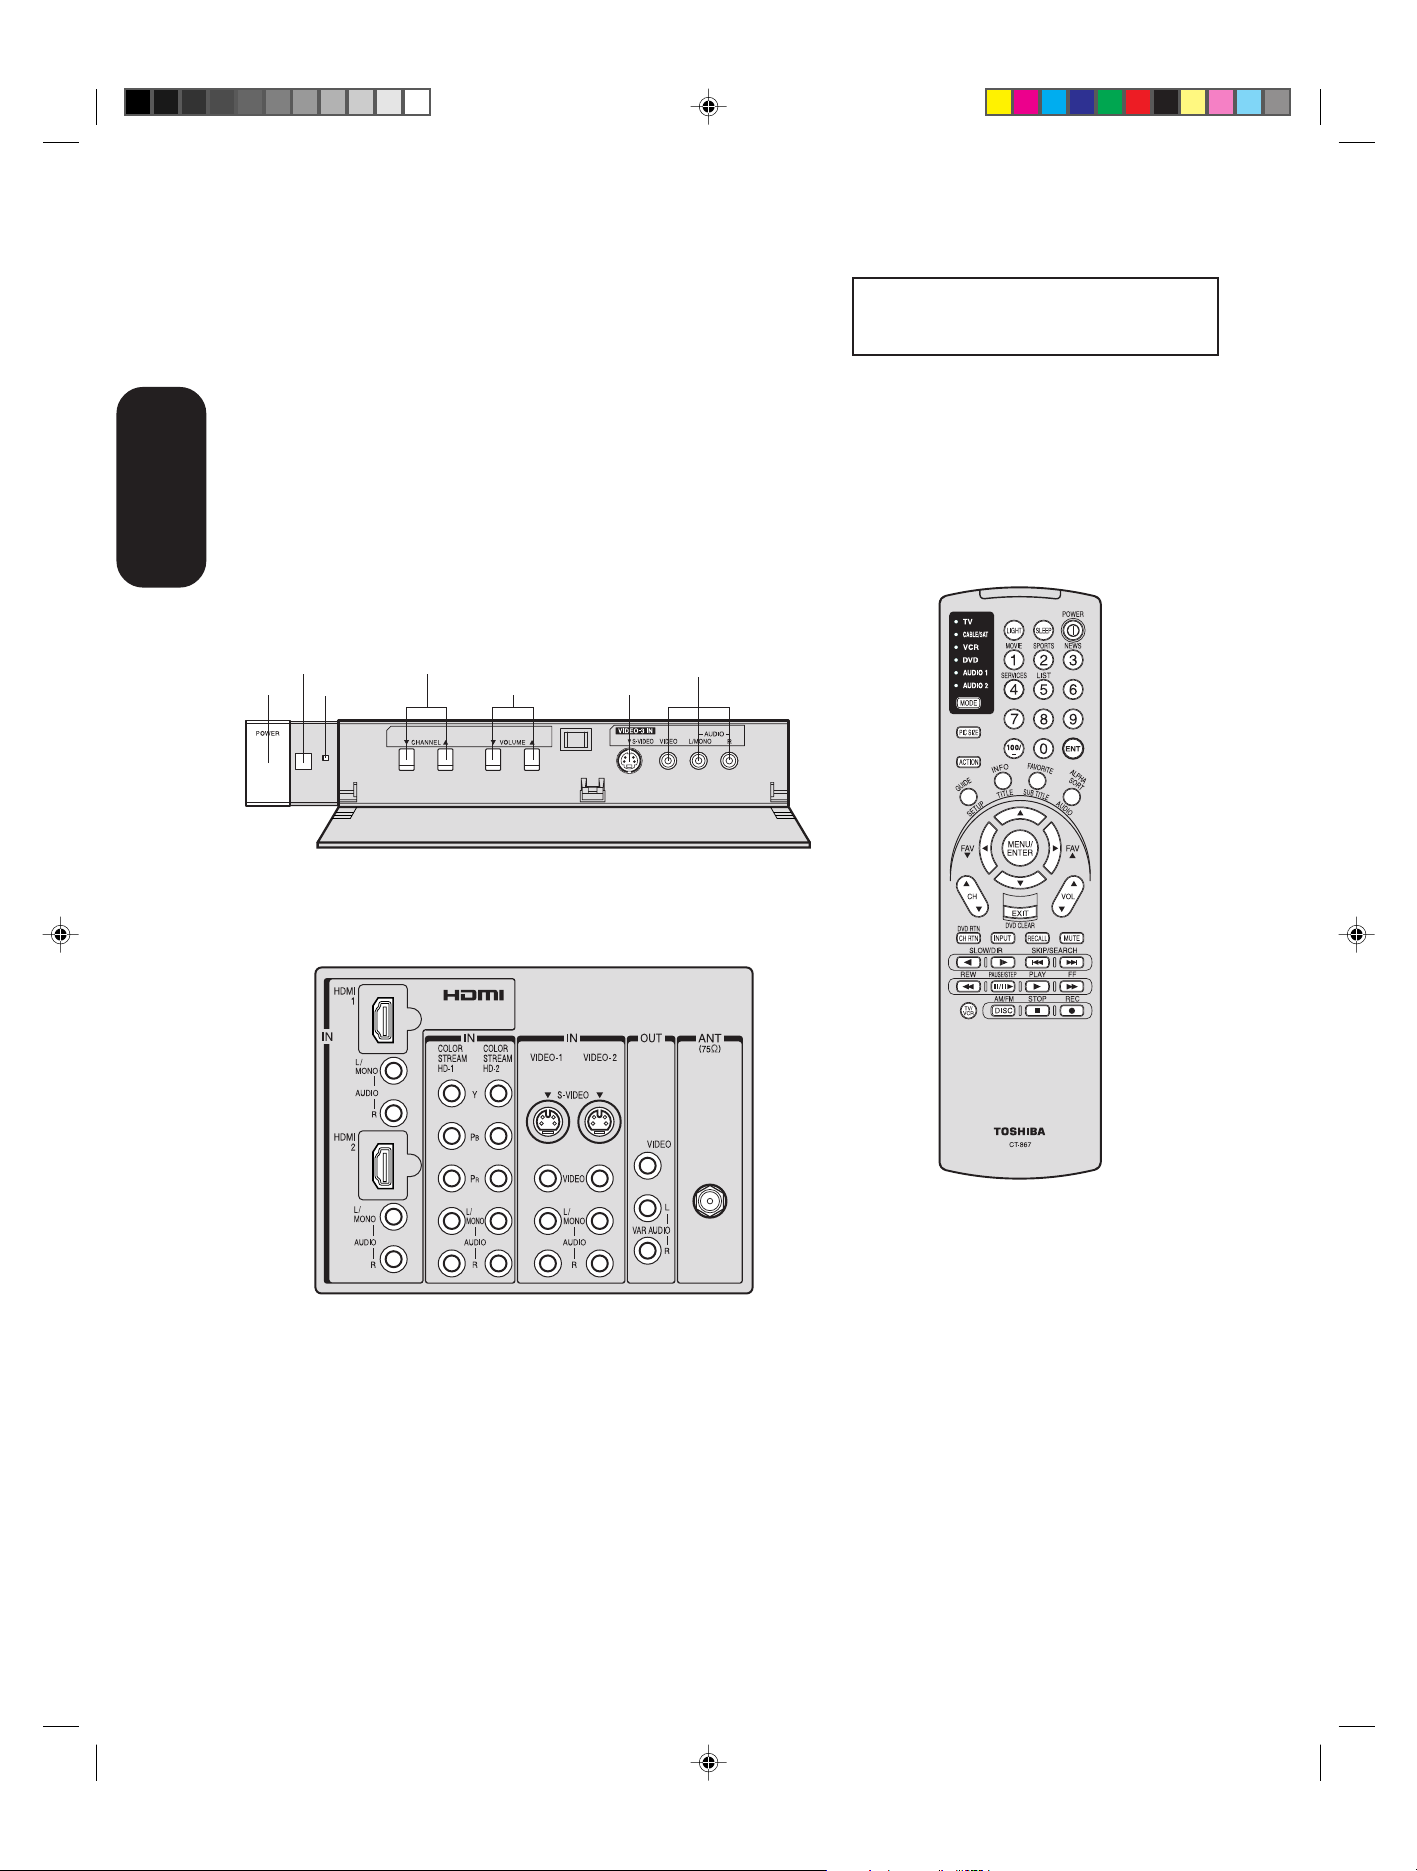
Exploring your new TV
You can operate your TV by using the buttons on the front panel or the
Toshiba
Welcome to
remote control. The front and back panels provide all the inputs you will
need to connect other equipment to your TV.
TV front panel
Remote sensor
POWER
Power indicator
Channel
Volume
The STAR TING SETUP feature appears
the first time you turn on the TV. See page
24 for details.
Audio(L/R)/Video In
S-video In
TV back panel
Selecting a location for the TV
• Place the TV on the floor or on a sturdy platform in a location where
light does not directly hit the screen.
• Place the TV far enough from the walls to allow proper ventilation.
Inadequate ventilation may cause overheating, which may damage
the TV.
3R40321A/E P02-06 9/7/04, 15:076
6
Page 7
Connecting your TV
If you haven’t connected electronic equipment before, or you have
been frustrated in the past, you may wish to read this section. (Cables
are not supplied.)
• A coaxial cable is the standard cable that comes in from your
antenna or cable converter box. Coaxial cables use “F” connectors.
• Standard A/V (audio/video) cables are usually color coded
according to use: yellow for video and red and white for audio. The
red audio cable is for the stereo right channel, and the white audio
cable is for the stereo left (or mono) channel. If you look at the rear
panel of the TV, you will see that the terminals are color coded in
the same manner as the cables.
• S-video cables provide better picture performance than standard
video cables. S-video cables can only be used with S-video
compatible components.
• Component video cables provide better picture performance than
S-video cables. Component video cables can only be used with
component video compatible components.
• HDMI (High Definition Multimedia Interface) cable is for use with
video equipment that has HDMI output (see page 14).
S-Video
ANTENNA
Coaxial Cable
Cable
Note:
To prevent equipment damage, do not plug in
any power cords until you have finished
connecting all equipment.
Safeguards
Important
Welcome to
T oshiba
Connecting
Connecting
your TV
your TV
AUDIO
Cables
VIDEO
Cable
Component video
Cables
HDMI
Cable
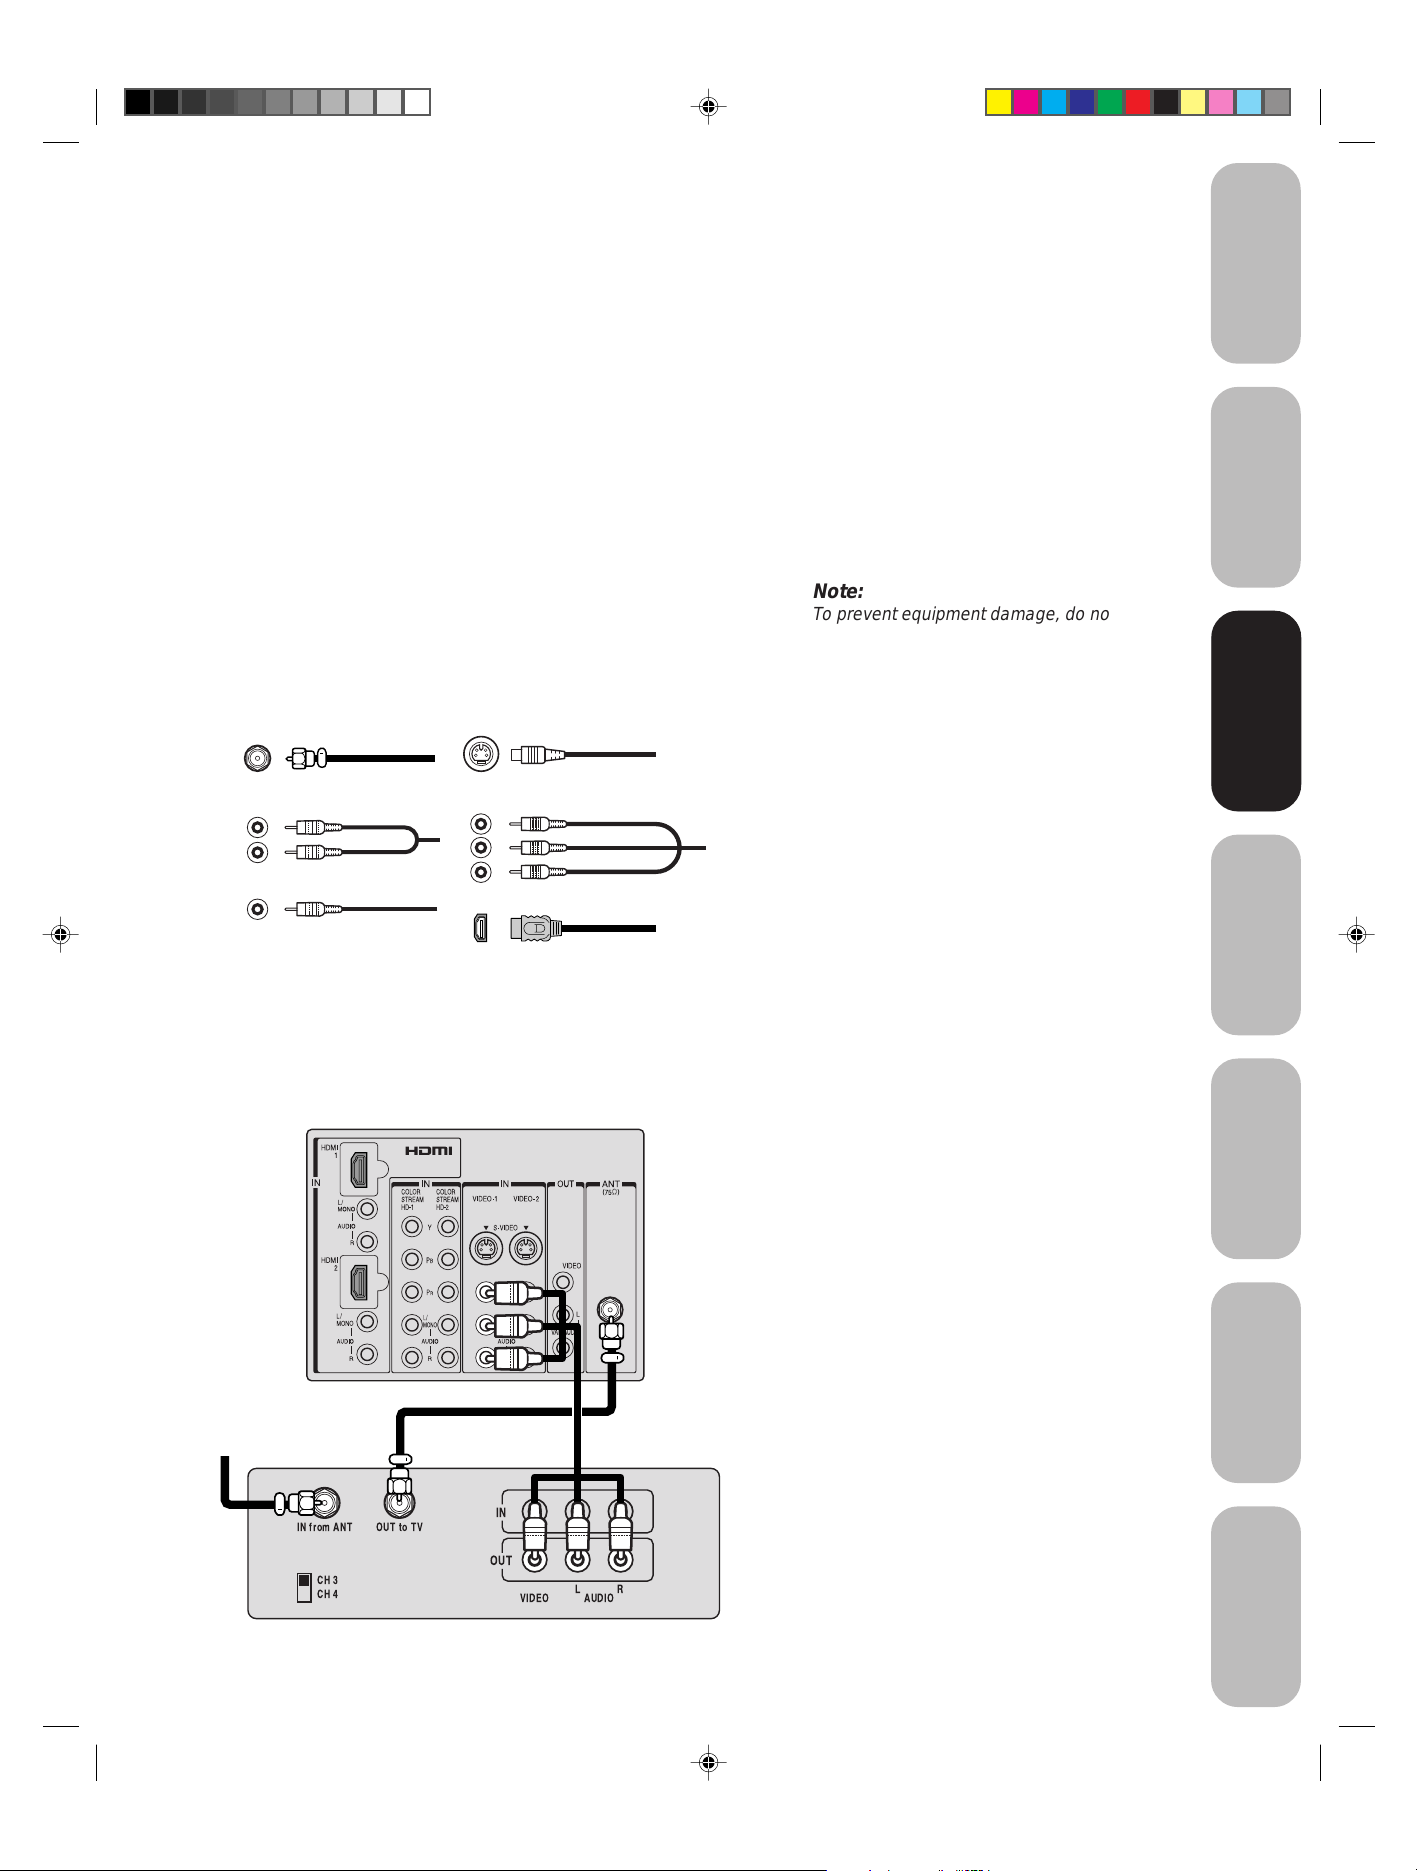
Connecting a VCR
This connection allows you to watch local channels and video programs,
play or record on the VCR while watching TV, and record from one
channel while watching another channel.
TV
Cable Lead-in
from cable box
or antenna
Stereo VCR
You will need:
• two coaxial cables
• one set of standard A/V cables
Note:
If using a mono VCR, connect L/Mono to
VCR Audio OUT using only one audio cable.
For better picture quality , if your VCR has Svideo, you can use an S-video cable instead
of the standard video cable. Do not connect a
standard video cable and an S-video cable to
VIDEO-1 (or VIDEO-2) simultaneously.
Remote Control
Using the
Setting up
your TV
Using the TV’s
Features
IN from ANT
CH 3
CH 4
3R40321A/E P07-15 9/7/04, 15:077
OUT to TV
IN
OUT
VIDEO
LR
AUDIO
Appendix
7
Page 8
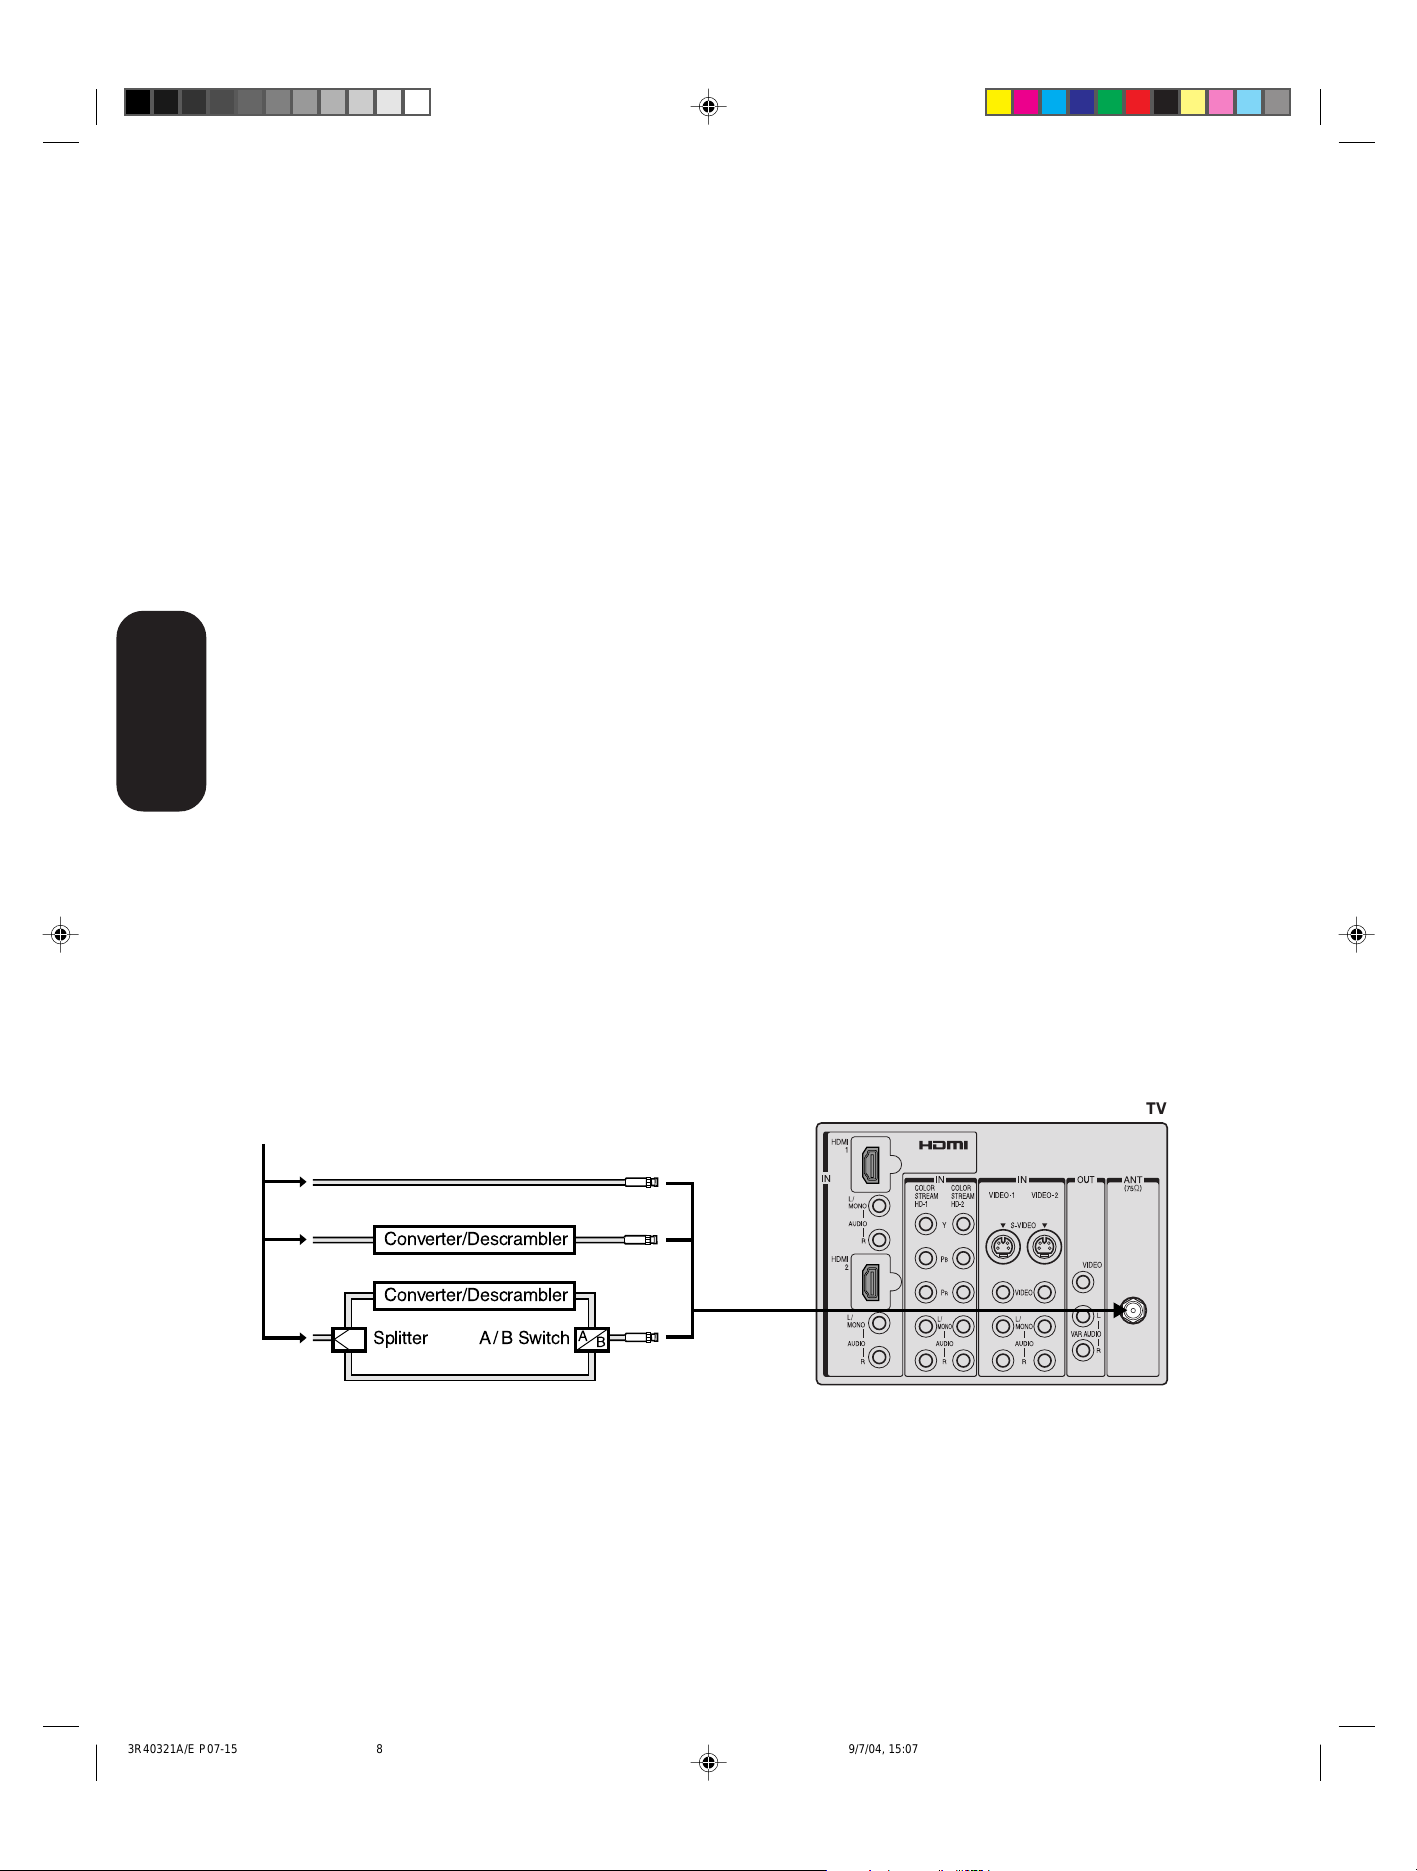
Connecting a cable converter box
This television has an extended tuning range and can tune most cable
channels without using a cable company supplied converter box. Some
cable companies offer "premium pay channels" in which the signal is
scrambled. Descrambling these signals for normal viewing requires the
use of a descrambler device, which is generally provided by the cable
company.
For Subscribers to Basic Cable TV Service
For basic cable service not requiring a Converter/Descrambler box,
connect the incoming 75 ohm Coaxial Cable directly to the Antenna
Jack on the back of the television.
For Subscribers to Scrambled Cable TV Service
If you subscribe to a cable service that requires the use of a Converter/
Descrambler box, connect the incoming cable to the Converter/
Descrambler box and connect the output of the box to the Antenna
Jack on the back of the television. Follow the connections shown
below. Set the television to the output of the Converter/Descrambler
box (usually channel 3 or 4) and use the Converter/Descrambler box to
select channels.
your TV
Connecting
For Subscribers to Unscrambled Basic Cable with
Scrambled Premium Channels
If you subscribe to a cable service in which basic cable channels are
unscrambled and premium channels require the use of a Converter/
Descrambler box, you may wish to use a two-set signal splitter (sometimes called a "two-set coupler") and an A/B Switch box from the cable
installer or an electronics supply store. Follow the connections shown
below. With the switch in the "B" position, you can directly tune any
nonscrambled channels on your TV. With the switch in the "A" position,
tune your TV to the output of the Converter/Descrambler box (usually
channel 3 or 4) and use the box to tune scrambled channels.
Note:
When you use a converter box with your TV,
there may be features that you cannot
program using the remote control, such as
labeling channels, blocking channels, and
programming your favorite channels.
From Cable
Converter/Descrambler
Converter/Descrambler
A/ B SwitchSplitter
TV
A
B
8
3R40321A/E P07-15 9/7/04, 15:078
Page 9
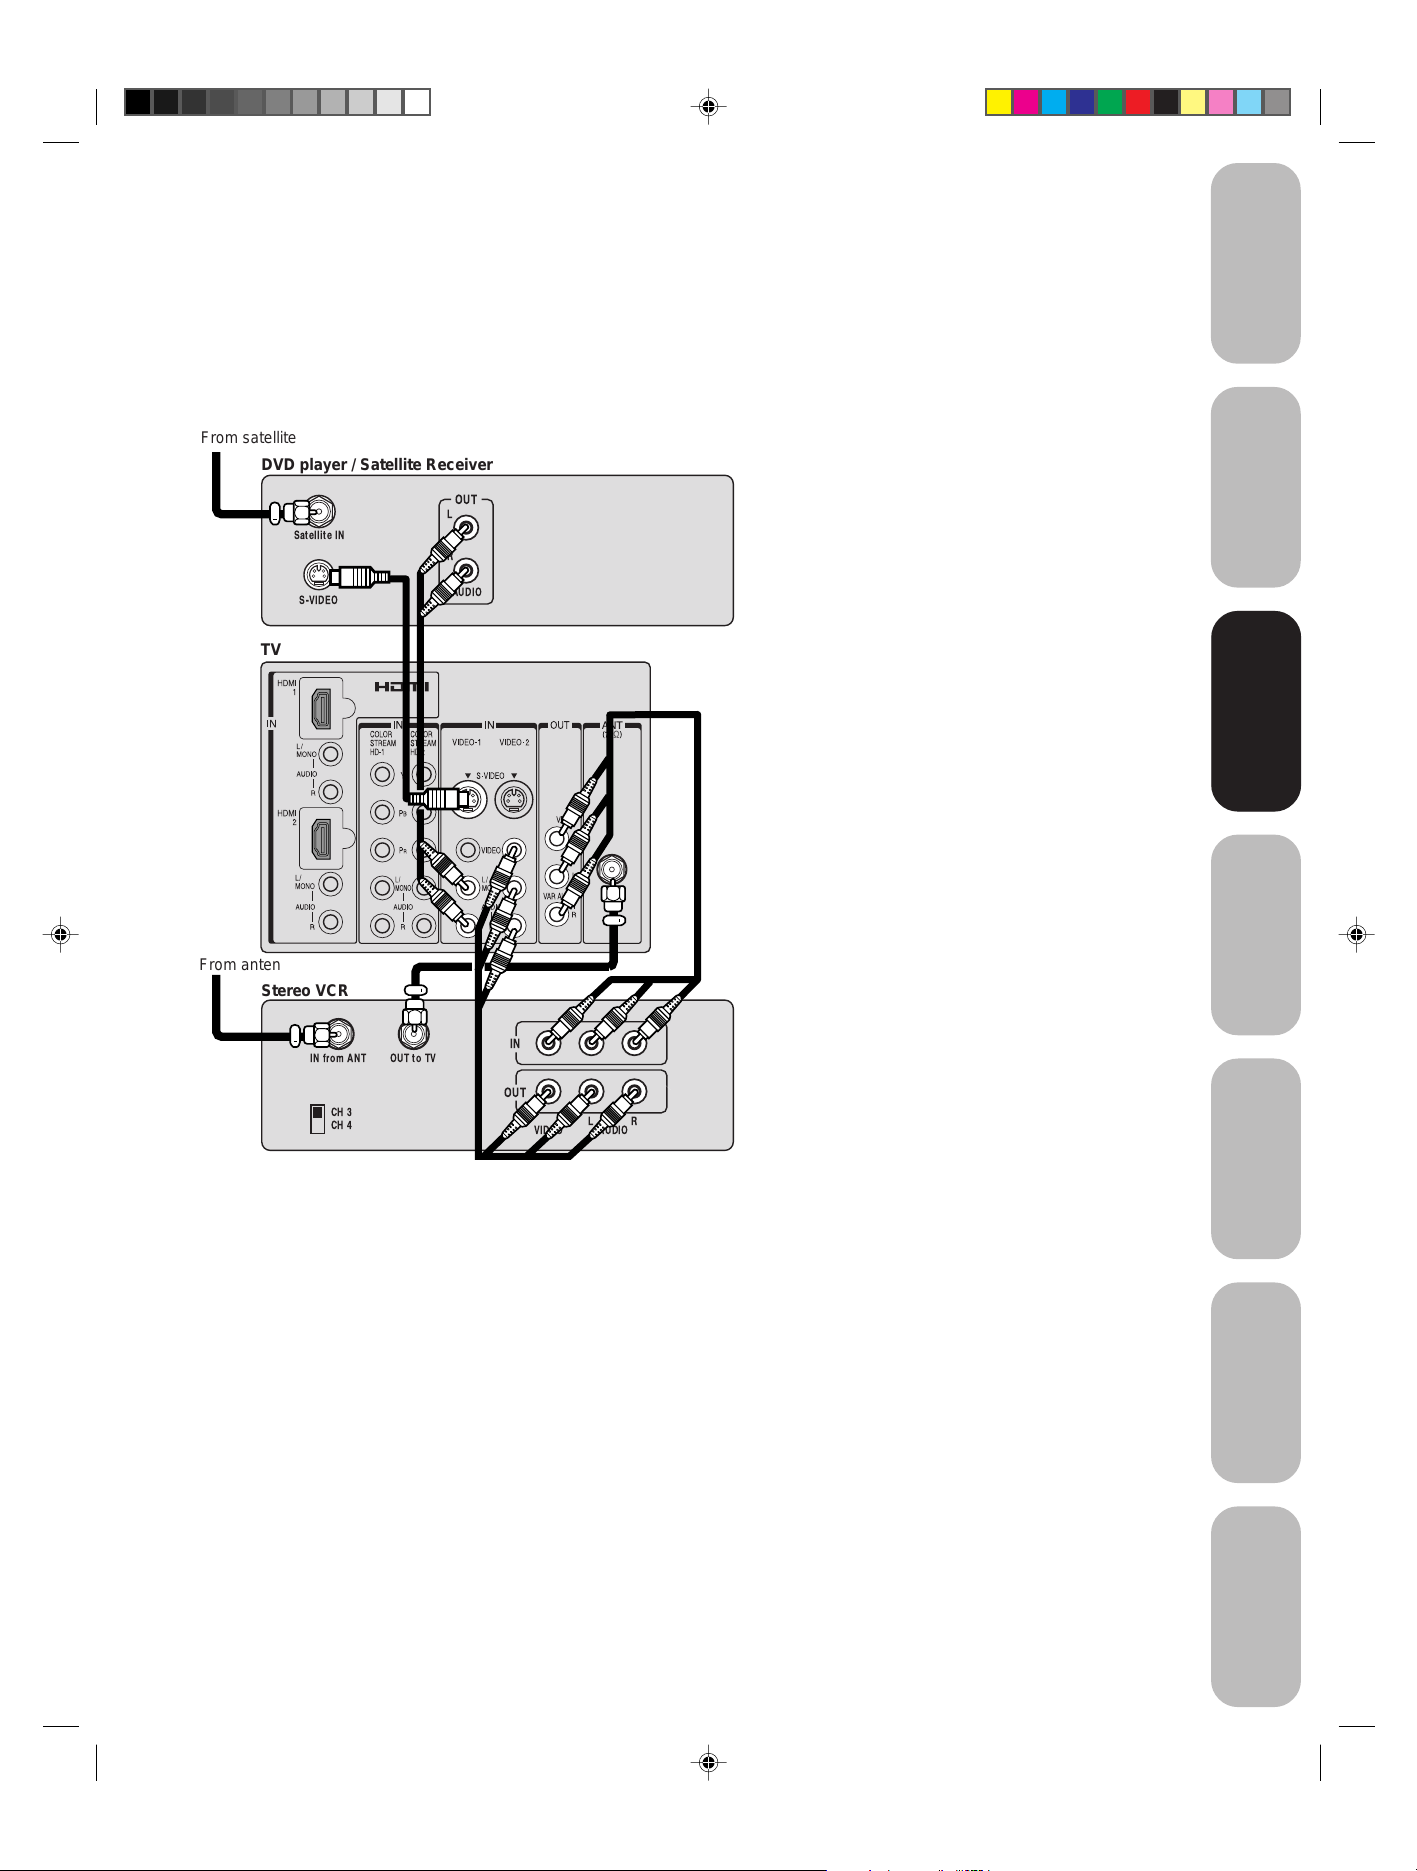
Connecting a DVD player/satellite receiver
and a VCR
This connection allows you to watch DVD/satellite, VCR, or TV
programs. Y ou can record from the satellite receiver and TV , as well as
record one TV channel while watching another channel.
You will need:
• three coaxial cables
• two sets of standard A/V cables
• one S-video cable
• one pair of standard audio cables
Safeguards
Important
From satellite
DVD player / Satellite Receiver
TV
From antenna
Stereo VCR
Satellite IN
S-VIDEO
OUT
L
R
AUDIO
Note:
You can use a standard video cable instead of
the S-video cable, but the picture quality will
decrease. If you use an S-video cable
between the TV and DVD player/satellite
receiver, make the audio connections but
remove the standard video cable. Do not
connect both an S-video and a standard
video cable to VIDEO1 (or VIDEO2) at the
same time or the picture performance will be
unacceptable.
Welcome to
T oshiba
Connecting
Connecting
your TV
your TV
Remote Control
Using the
IN from ANT
CH 3
CH 4
OUT to TV
IN
OUT
VIDEO AUDIO
LR
Setting up
your TV
Using the TV’s
Features
Appendix
3R40321A/E P07-15 9/7/04, 15:079
9
Page 10
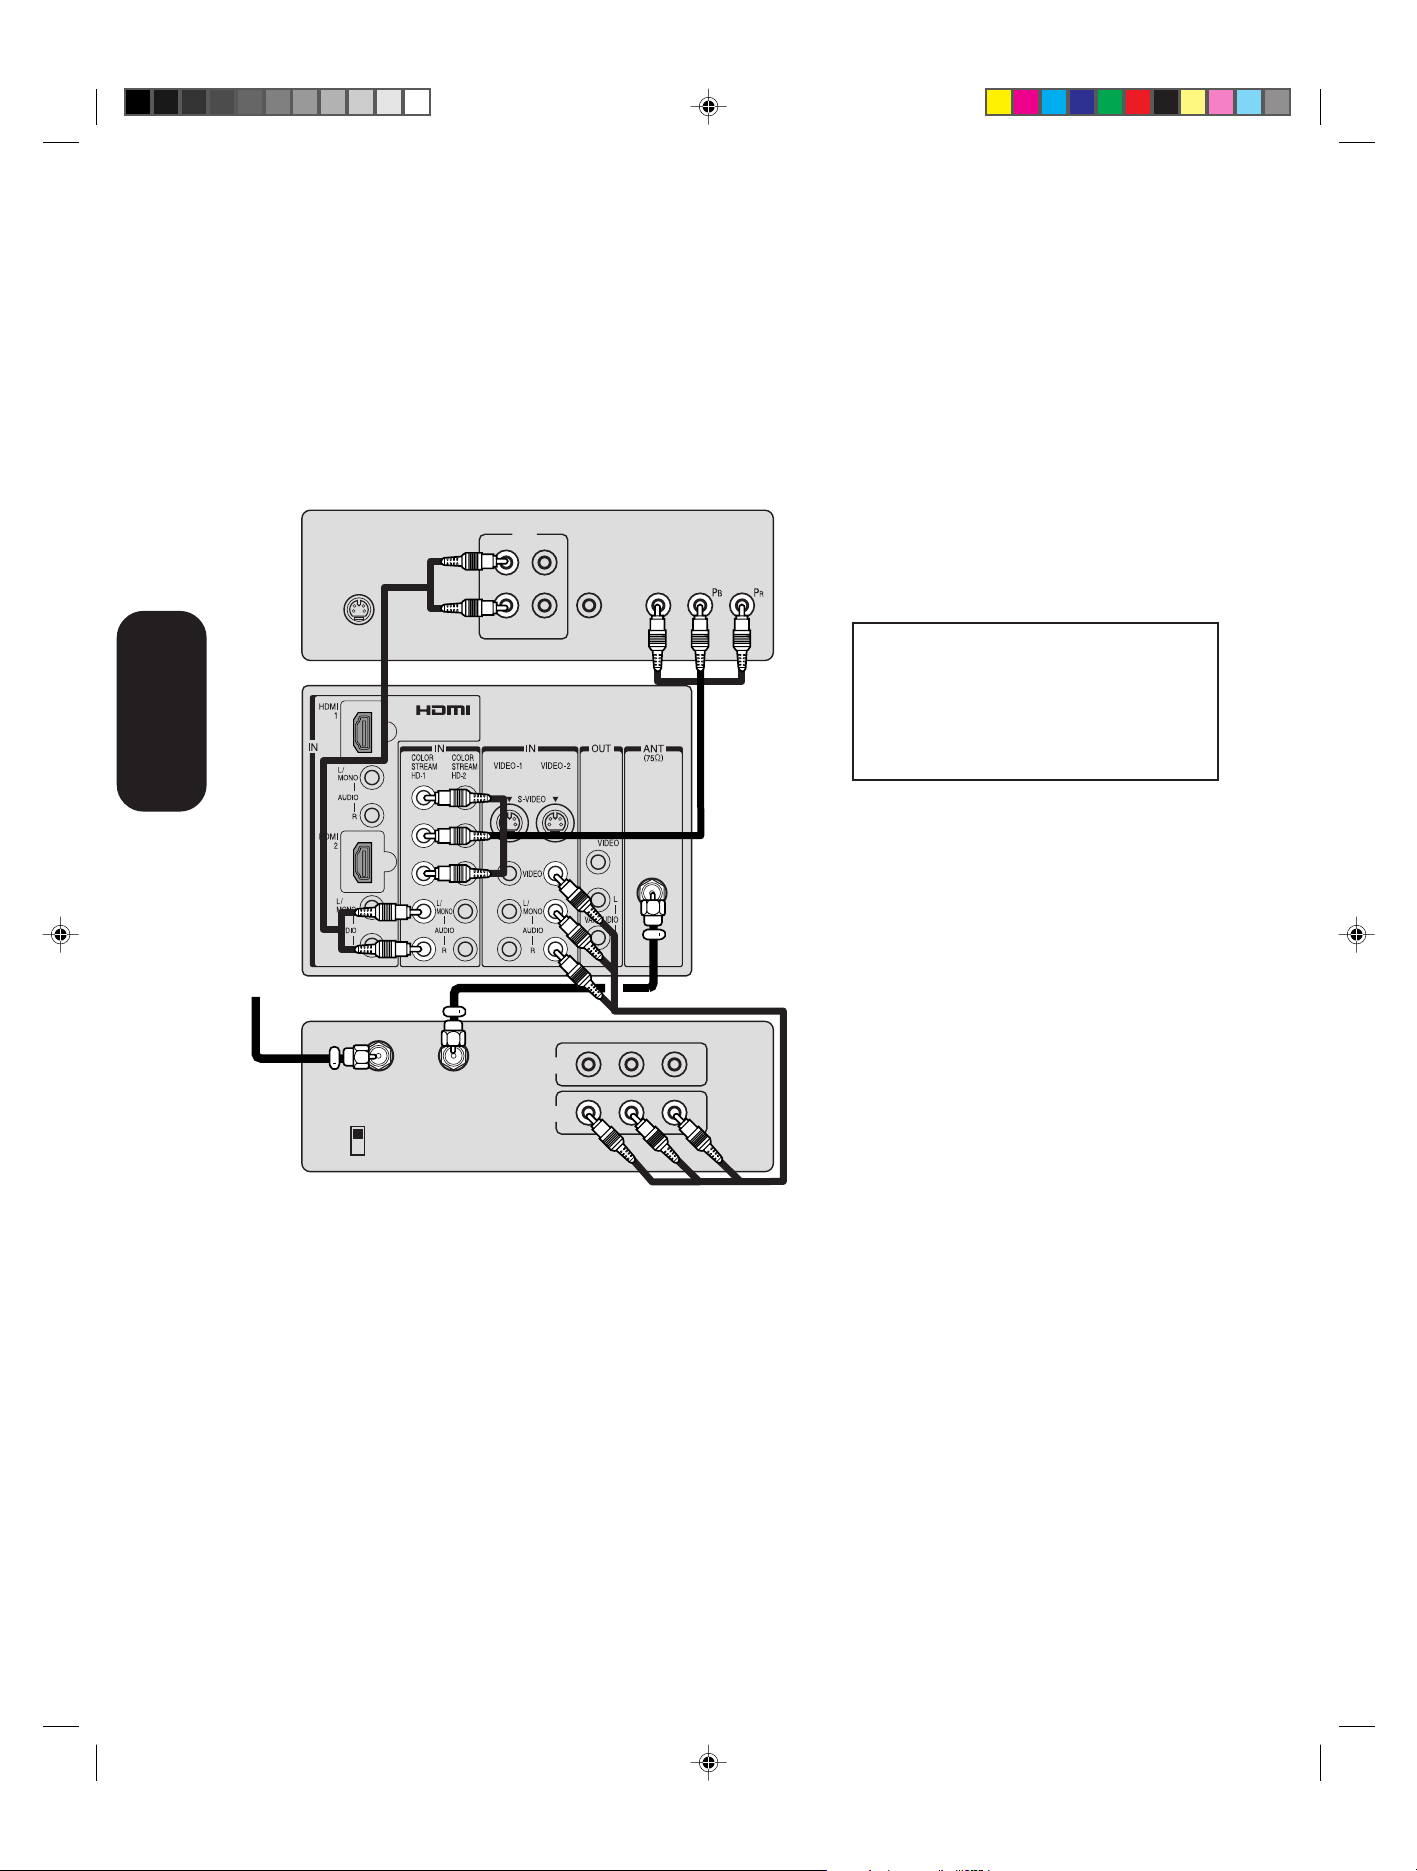
Connecting a DVD player with ColorStream
(component video) and a VCR
This connection allows you to watch DVD, VCR, or TV programs and
record TV programs. You can record from one source while watching a
program from another source. Your TV is capable of using ColorStream
(component video). Connecting your TV to a component video compatible DVD player, such as a Toshiba DVD player with ColorStream®, can
greatly enhance picture quality and performance.
your TV
Connecting
DVD player with ColorStream
L
R
S-VIDEO
TV
®
OUT
AUDIO
VIDEO
OUT
COLORSTREAM
Y
TM
®
You will need:
• two coaxial cables
• one set of standard A/V cables
• one set of component video cables
• one pair of standard audio cables
Note:
You can connect the component video cables
to either set of ColorStream jacks on the TV
(HD-1 or HD-2).
The ColorStream HD-1 and HD-2 jacks can
be used with Progressive (480p, 720p) and
Interlaced (480i, 1080i) scan systems. A
1080i signal will provide the best picture
performance.
The unauthorized recording, use, distribution or revision of television programs,
videotapes, DVDs, and other materials is
prohibited under the Copyright Laws of the
United States and other countries, and may
subject you to civil and criminal liability.
From antenna
Stereo VCR
IN from ANT
CH 3
CH 4
OUT to TV
IN
OUT
VIDEO
LR
AUDIO
3R40321A/E P07-15 7/9/04, 16:4810
10
Page 11
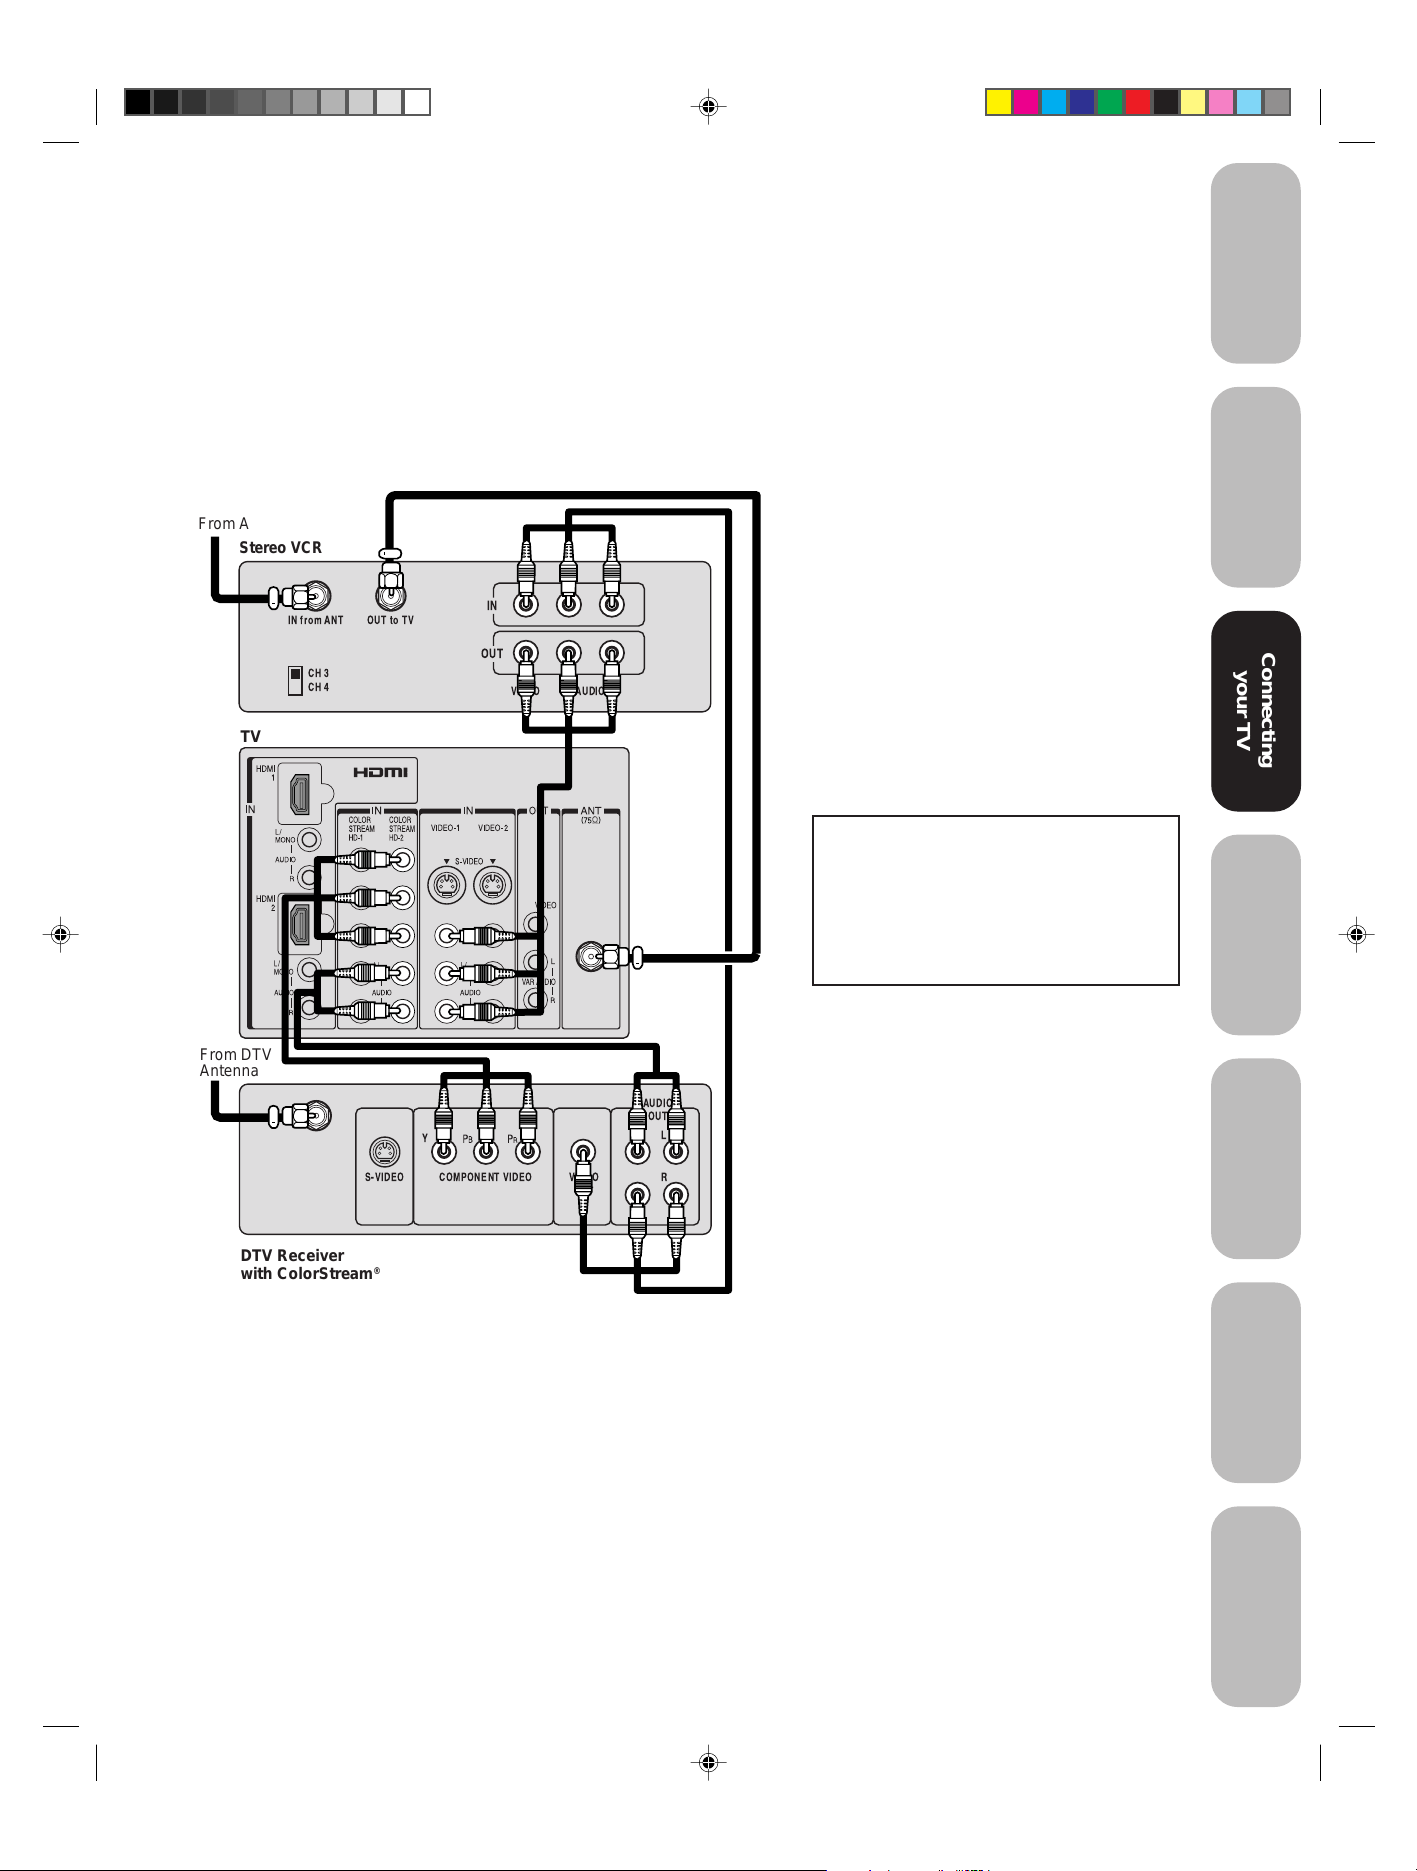
Connecting a DTV receiver / set-top box with
®
ColorStream
(component video) and a VCR
Safeguards
Important
This connection allows you to watch DTV (digital TV), VCR, and TV
programs, and record DTV and TV programs.
®
Your TV has ColorStream
(component video) inputs. Connecting your
TV to a DTV receiver with component video can greatly enhance
picture quality and realism.
From Antenna
Stereo VCR
IN
OUT
VIDEO
LR
AUDIO
TV
IN from ANT
CH 3
CH 4
OUT to TV
You will need:
• three coaxial cables
• two sets of standard A/V cables
• one pair of audio cables
• one set of component video cables
Note:
You can connect the component video cables
to either set of ColorStream jacks on the TV
(HD-1 or HD-2).
The ColorStream HD-1 and HD-2 jacks can
be used with Progressive (480p, 720p) and
Interlaced (480i, 1080i) scan systems. A
1080i signal will provide the best picture
performance.
If your DTV receiver does not have component video, use the S-video and standard
audio connections instead. Do not connect
both an S-video and a standard video cable
to VIDEO1 (or VIDEO2) at the same time or
the picture performance will be unacceptable.
The unauthorized recording, use,
distribution, or revision of television
programs, videotapes, DVDs, and other
materials is prohibited under the
Copyright Laws of the United States and
other countries, and may subject you to
civil and criminal liability.
Welcome to
T oshiba
Connecting
Connecting
your TV
your TV
Remote Control
Using the
From DTV
Antenna
DTV Receiver
with ColorStream
Y
S-VIDEO VIDEO
®
COMPONENT VIDEO
OUT
AUDIO
OUT
L
R
Setting up
your TV
Using the TV’s
Features
Appendix
3R40321A/E P07-15 9/7/04, 15:0711
11
Page 12
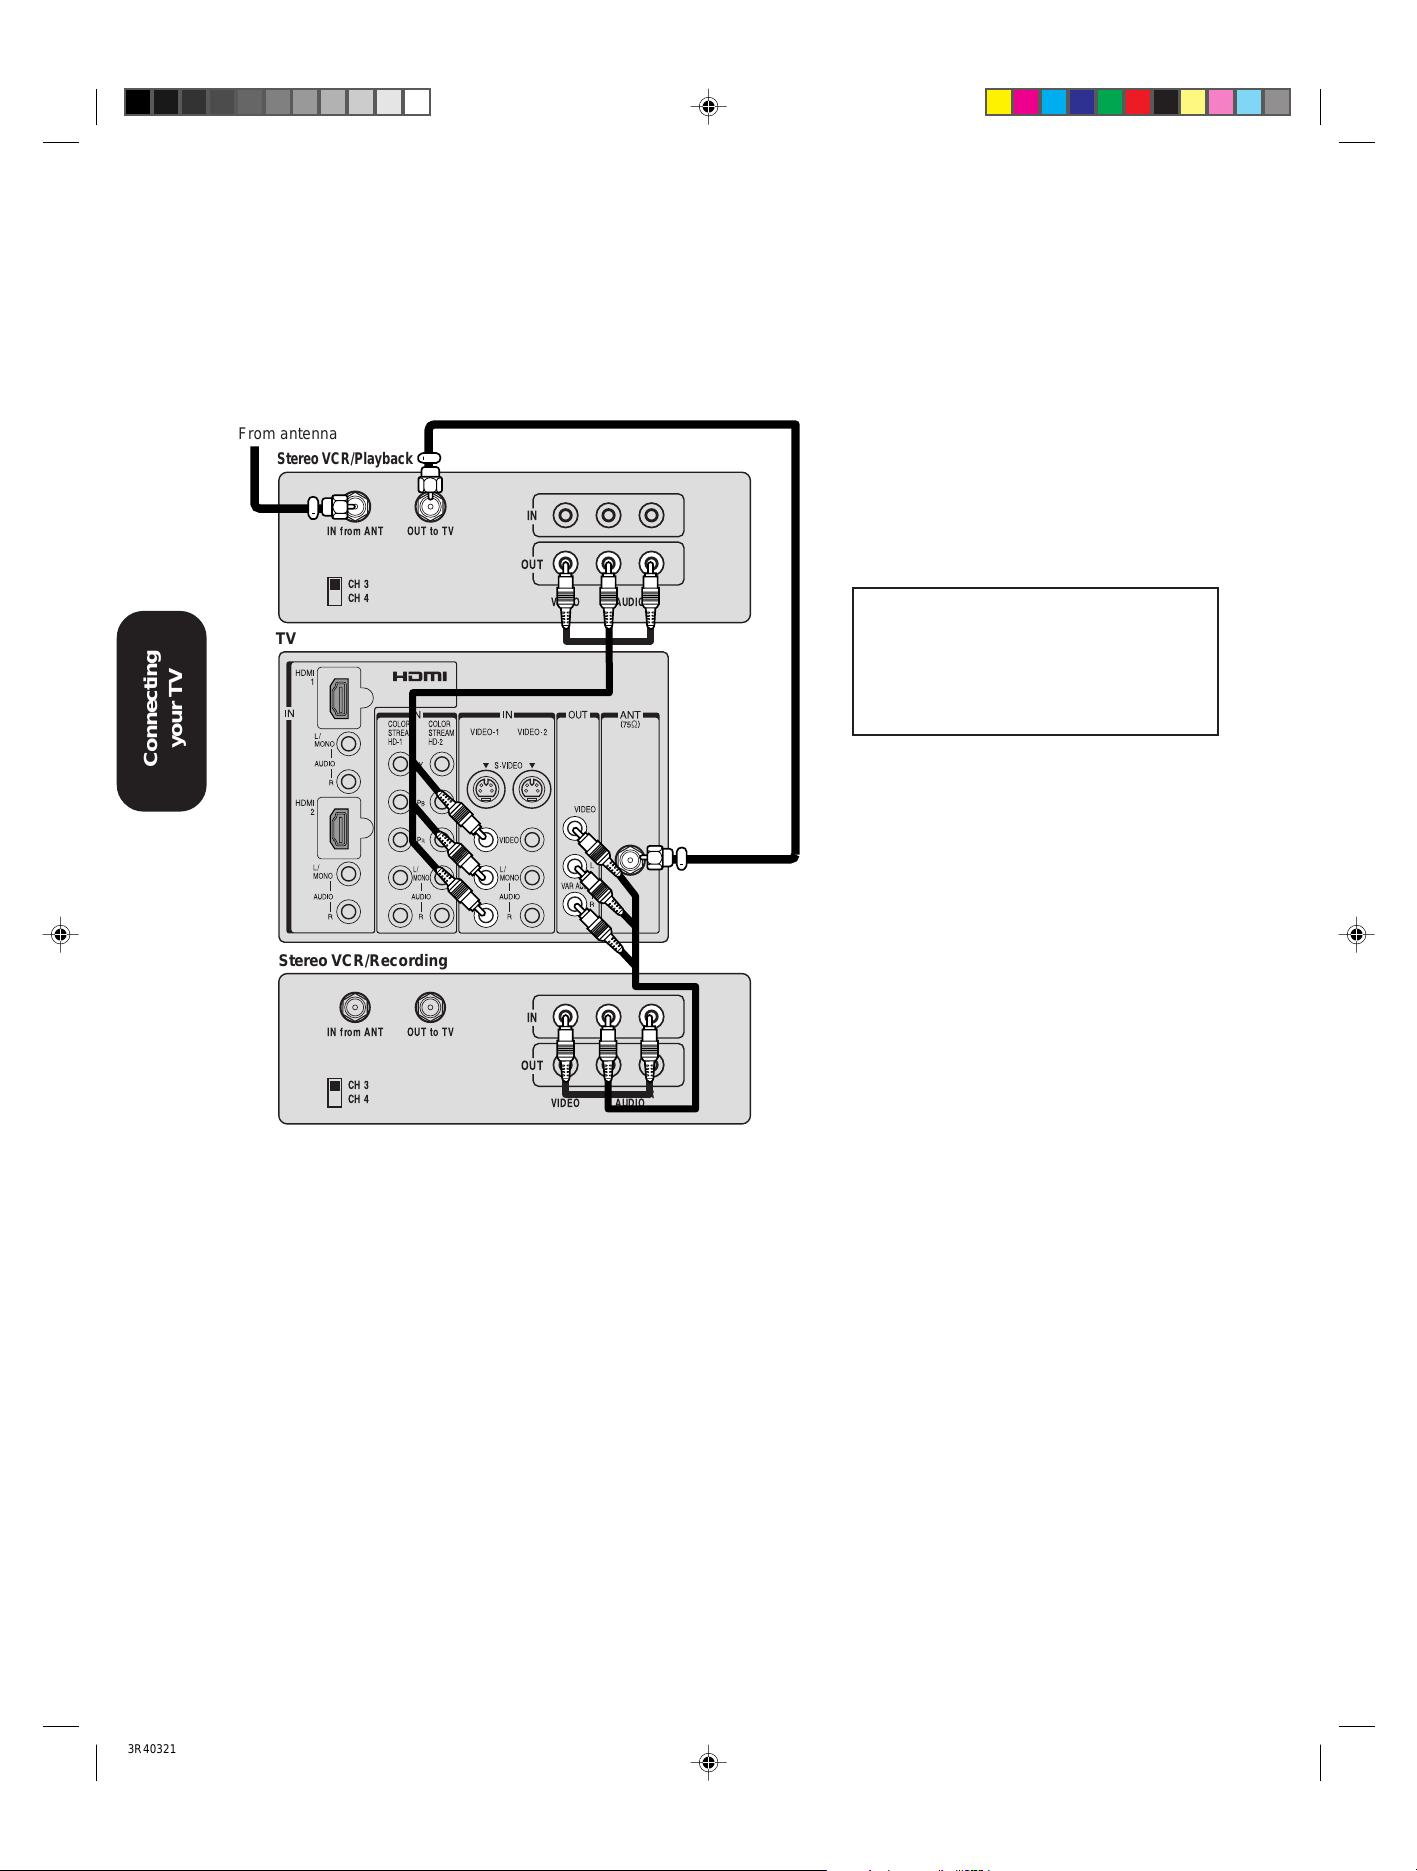
Connecting two VCRs
This connection allows you to record (dub/edit) from one VCR to
another VCR.
You will also be able to record from one TV channel while watching
another channel.
From antenna
your TV
Connecting
Stereo VCR/Playback
IN from ANT
CH 3
CH 4
OUT to TV
TV
IN
OUT
VIDEO
LR
AUDIO
You will need:
• two coaxial cables
• two sets of standard A/V cables
Note:
Do not connect the same VCR to the output
and input jacks on the TV at the same time.
For better picture quality , if your VCR has Svideo, you can use an S-video cable instead
of the standard video cable. Do not connect a
standard video cable and an S-video cable to
VIDEO-1 (or VIDEO-2) simultaneously.
The unauthorized recording, use, distribution or revision of television programs,
videotapes, DVDs, and other materials is
prohibited under the Copyright Laws of the
United States and other countries, and may
subject you to civil and criminal liability.
Stereo VCR/Recording
IN from ANT
CH 3
CH 4
OUT to TV
IN
OUT
VIDEO
LR
AUDIO
3R40321A/E P07-15 9/7/04, 15:0712
12
Page 13
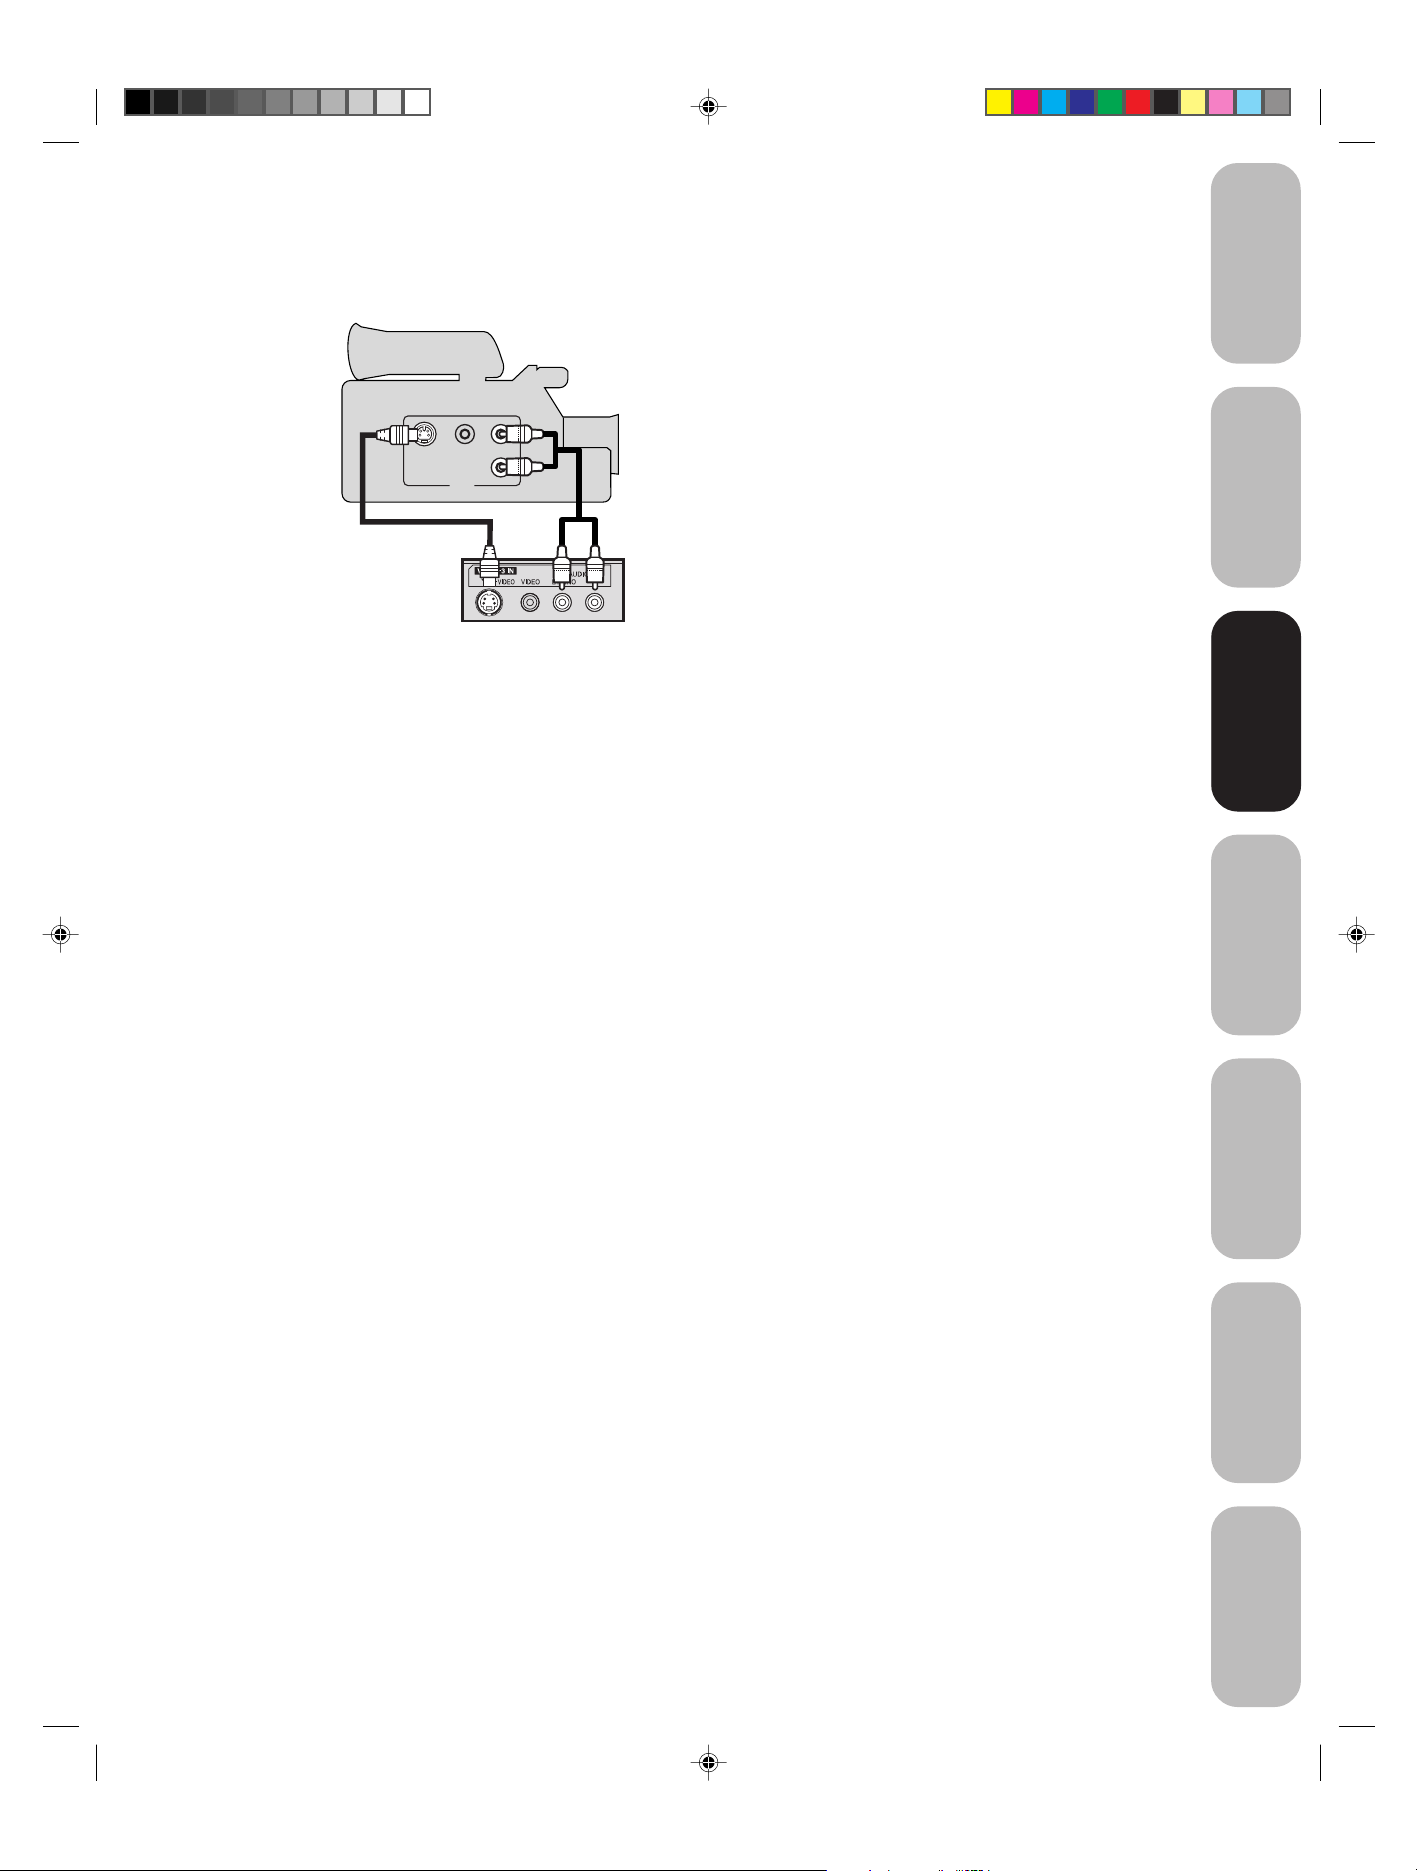
Connecting a camcorder
This connection allows you to watch videos recorded on a camcorder.
S-VHS Camcorder
AUDIO
VIDEO
S-VIDEO
Front Panel of TV
L
R
OUT
R
You will need:
• one S-video cable
• one pair of standard audio cables
Note:
For better picture quality, if your camcorder
has S-video, you can use an S-video cable
(plus the standard audio cables) instead of a
standard video cable.
Do not connect both a standard video cable
and an S-video cable at the same time, or the
picture performance will be unacceptable.
Safeguards
Important
Welcome to
T oshiba
Connecting
Connecting
your TV
your TV
Remote Control
Using the
Setting up
your TV
Using the TV’s
Features
3R40321A/E P07-15 9/7/04, 15:0713
Appendix
13
Page 14
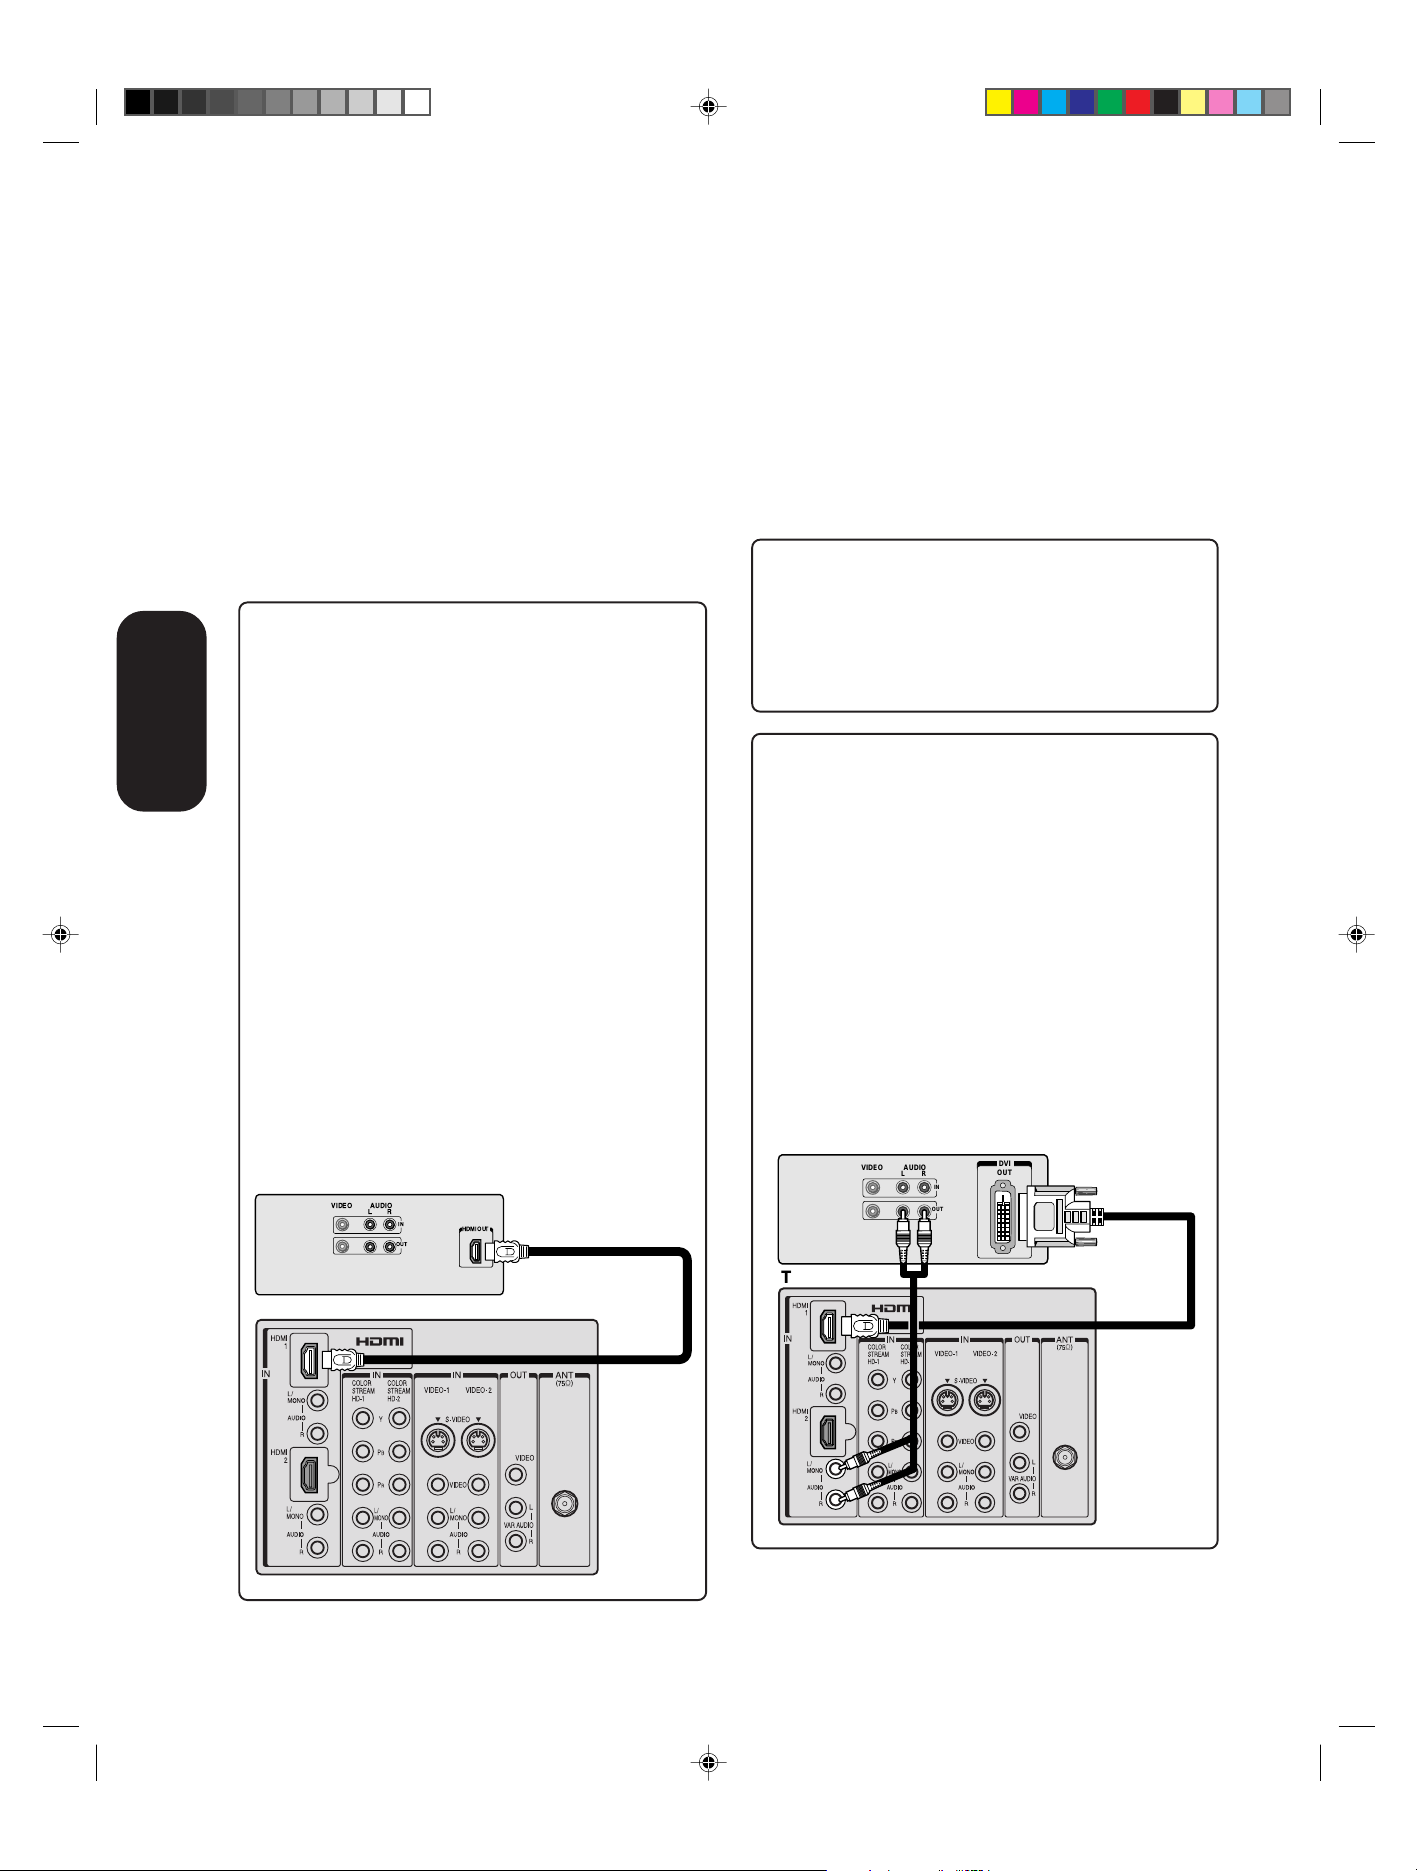
Connecting an HDMI™ or a DVI device to the HDMI input
The HDMI
uncompressed digital video from an HDMI device or
uncompressed digital video from a DVI
This input is designed to accept HDCP
in digital form from EIA/CEA-861/861B– compliant
consumer electronic devices (such as a set-top box or
DVD player with HDMI or DVI output).
The HDMI input is designed for best performance with
1080i high-definition video signals, but will also accept and
display 480i, 480p, and 720p signals.
[1]
input on your TV receives digital audio and
[2]
device.
[3]
program material
[1]
HDMI = High-Definition Multimedia Interface.
[2]
DVI = Digital Video Interface.
[3]
HDCP = High-bandwidth Digital Content Protection.
[4]
EIA/CEA-861/861B compliance covers the
[4]
transmission of uncompressed digital video with highbandwidth digital content protection, which is being
standardized for reception of high-definition video
signals.
Because this is an evolving technology, it is possible
that some devices may not operate properly with the
TV.
Note: This TV is not intended for connection to and
should not be used with a personal computer.
To connect an HDMI device, you will need:
• one HDMI cable (type A connector)
your TV
Connecting
Note: you can connect the HDMI cable to either HDMI
jacks on the TV (HDMI1 or HDMI2).
You must set the HDMI audio input setting to HDMI
in the AUDIO menu (see page 44).
Some CDVs (Video CDs) may not output digital audio
signals. In that case, you may hear sound by connecting
analog audio cables. If you do use analog audio cables for
this reason, you will need to set the HDMI audio input
setting to “DVI” to hear the analog audio (see page 44).
Note: If you connect an HDMI device and analog audio
cables (as described in the previous paragraph), and
then you play media with digital audio output, to hear
digital audio you must set the HDMI audio input setting
to “HDMI” (page 44).
HDMI device
For proper operation, it is recommended that you use
a short HDMI cable. You should not encounter
difficulty if you use an HDMI cable that is shorter than
16.4ft (5m).
HDMI cable transfers both video and audio. Separate
analog audio cables are not required (see illustration
below).
VIDEO AUDIO
LR
IN
OUT
HDMI OUT
To ensure that the HDMI or DVI device is reset
properly, it is recommended that you follow these
procedures:
• When turning on your electronic components, turn
on the TV first, and then the HDMI or DVI device.
• When turning off your electronic components, turn
off the HDMI or DVI device first,and then the TV.
To connect a DVI device, you will need:
• one HDMI–to–DVI adapter cable
(HDMI type A connector)
For proper operation, the length of an HDMI-to-DVI
adapter cable should not exceed 9.8 ft (3m). The
recommended length is 6.6 ft (2m).
• one pair of standard analog audio cables
An HDMI-to-DVI adapter cable transfers only video.
Separate analog audio cables are required (see
illustration below).
Note: you can connect the HDMI-to-DVI adapter cable
and analog audio cables to either HDMI jacks on the TV
(HDMI1 or HDMI2).
You must set the HDMI audio input setting to DVI in
the AUDIO menu (see page 44).
DVI device
VIDEO AUDIO
LR
IN
OUT
DVI
OUT
TV
HDMI, the HDMI logo, and High-Definition Multimedia
Interface are trademarks or registered trademarks of HDMI
Licensing, LLC.
3R40321A/E P07-15 9/7/04, 15:0714
TV
14
Page 15
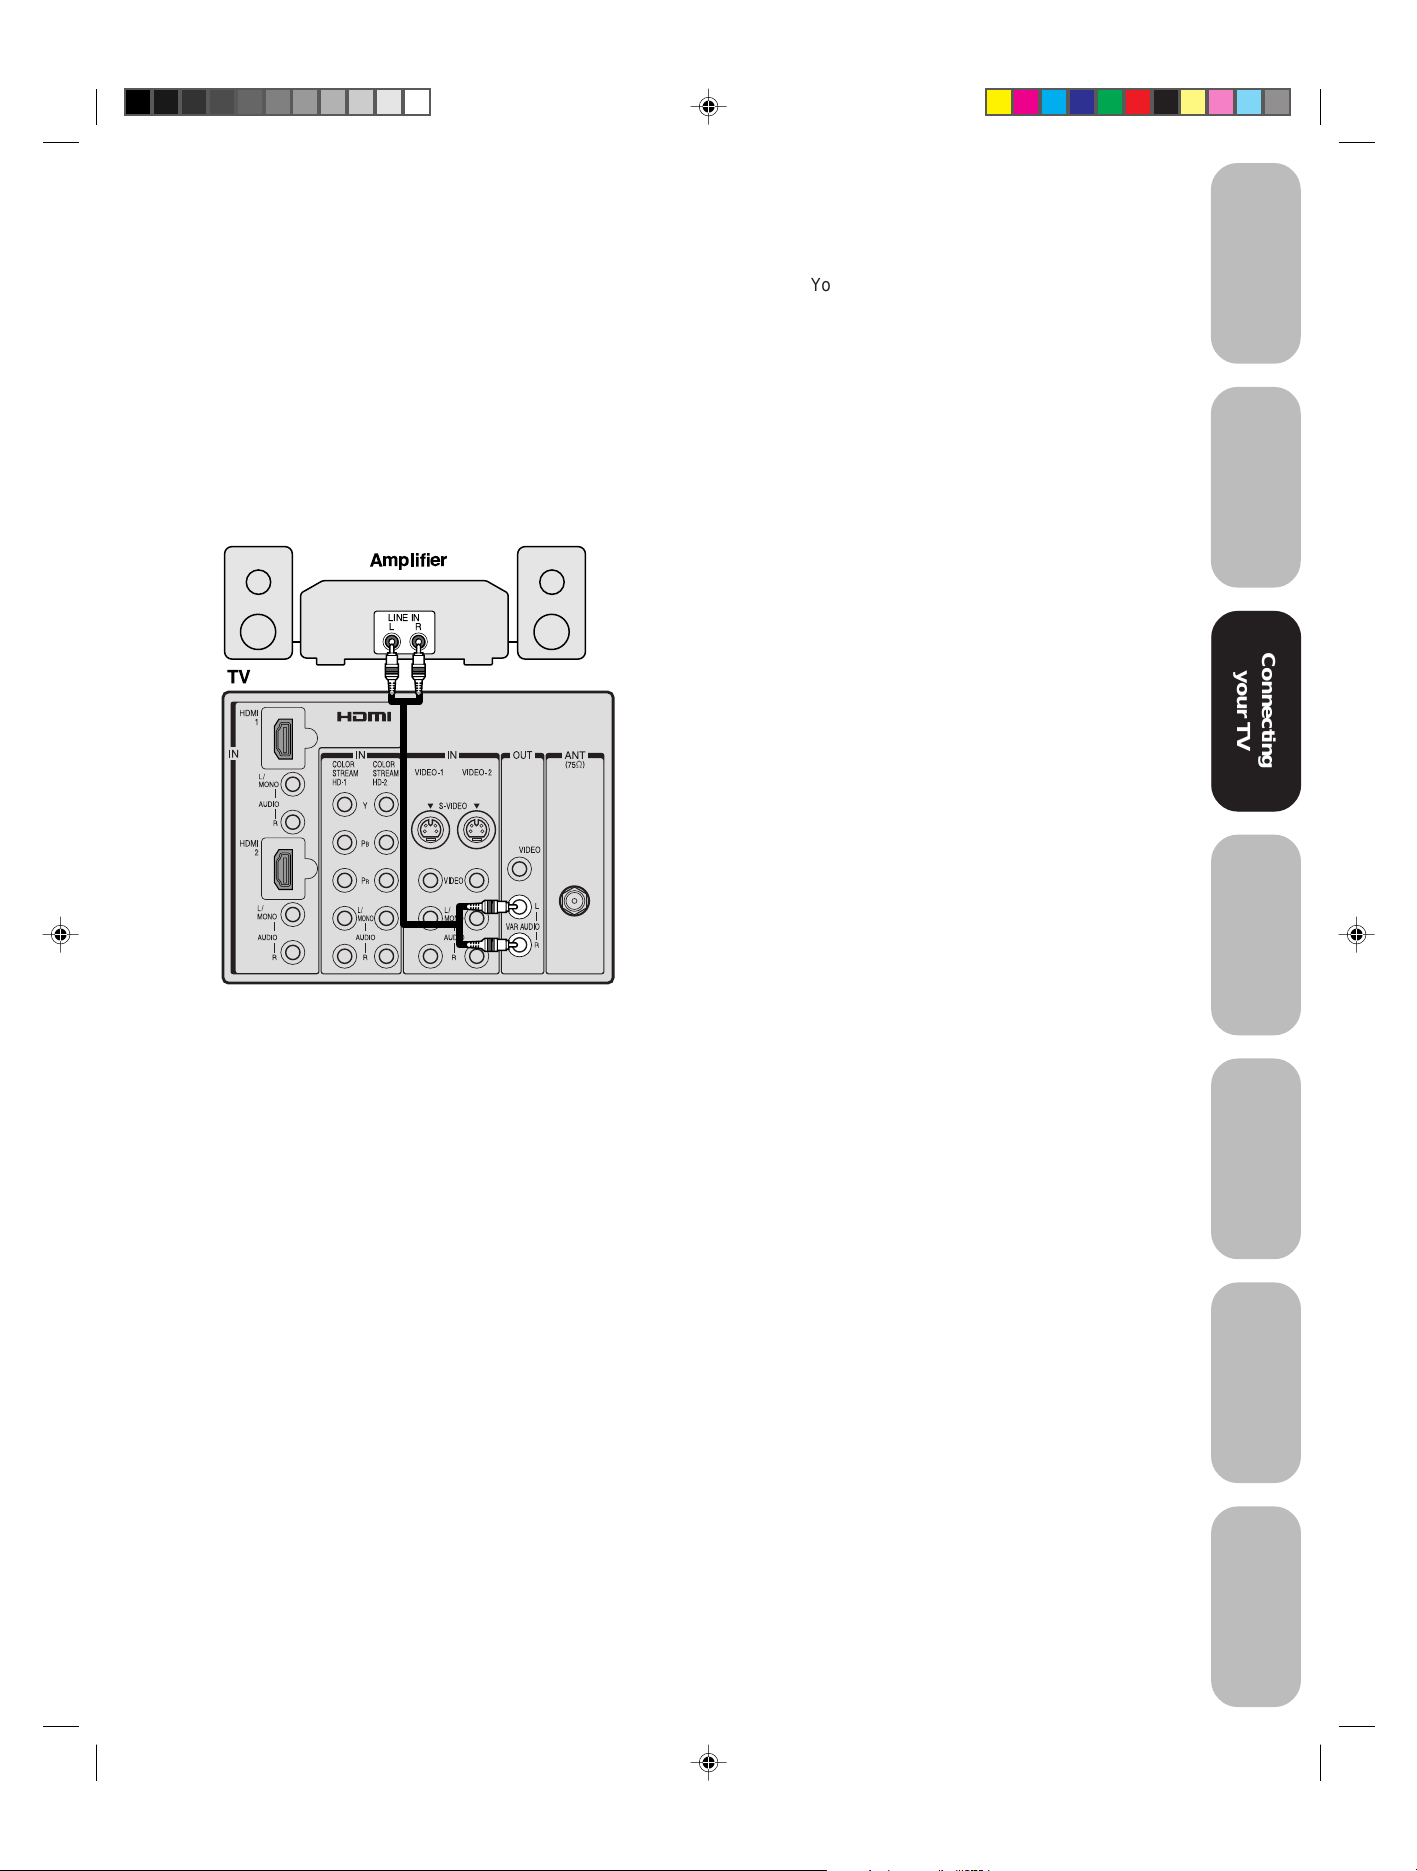
Connecting an audio system
This connection allows you to use an audio amplifier and external
speakers, and adjust the audio level using the TV’s remote control.
To control the audio, turn on the TV and the stereo amplifier, and turn
off the TV's built-in speakers (see “Turning off the built-in speakers” on
page 43).
Note:
To hear sound when using an external audio amplifier, the volume of
both the TV and the amplifier must be set above 0 (zero).
For example, if the volume of the TV is set to 0, you will not be able to
hear any sound, even the volume of the amplifier is at its highest level.
Amplifier
LINE IN
LR
TV
Y ou will need:
• one pair of standard audio cables
Safeguards
Important
Welcome to
T oshiba
Connecting
Connecting
your TV
your TV
Remote Control
Using the
Setting up
your TV
Using the TV’s
Features
3R40321A/E P07-15 9/7/04, 15:0715
Appendix
15
Page 16

Using the
Remote Control
3R40321A/E P16-23 9/7/04, 15:0716
16
Page 17

Remote control functional key chart
Safeguards
Important
Key Label
LIGHT Lights the remote key, and toggles between enabled and disabled Illumination mode.
SLEEP
POWER Power Power Power Power Power Power Power Power
1/MOVIE Digit 1 Digit 1 Digit 1 Digit 1 Digit 1 AV input 1 Digit 1 Digit 1
2/SPORTS Digit 2 Digit 2 Digit 2 Digit 2 Digit 2 AV input 2 Digit 2 Digit 2
3/NEWS Digit 3 Digit 3 Digit 3 Digit 3 Digit 3 AV input 3 Digit 3 Digit 3
4/SERVICES Digit 4 Digit 4 Digit 4 Digit 4 Digit 4 AV input 4 Digit 4 Digit 4
5/LIST Digit 5 Digit 5 Digit 5 Digit 5 Digit 5 CD Digit 5 Digit 5
6 Digit 6 Digit 6 Digit 6 Digit 6 Digit 6 Tuner Digit 6 Digit 6
MODE Remote control device mode selection
PIC SIZE Selects the TV TV TV TV TV TV TV
7 Digit 7 Digit 7 Digit 7 Digit 7 Digit 7 Phono Digit 7 Digit 7
8 Digit 8 Digit 8 Digit 8 Digit 8 Digit 8 Cassette Digit 8 Digit 8
9 Digit 9 Digit 9 Digit 9 Digit 9 Digit 9 Aux Digit 9 Digit 9
ACTION --- --100/– 100 --- 100 100 100 100 100 100
0 Digit 0 Digit 0 Digit 0 Digit 0 Digit 0 Digit 0 Digit 0 Digit 0
ENT
GUIDE/SETUP
INFO/TITLE --- --- INFO --- TITLE= --- --- ---
FAVORITE/
SUBTITLE
ALPHASORT/ --- --- Alphasort --- Audio --- --- --AUDIO
MENU
ENTER
Enter
CD
BA/(FAVCD)
VOLCD Volume Volume Volume Volume Volume Volume Volume -- up/down* up/down* up/down* up/down* up/down* up/down* up/down*
EXIT/ Exit Exit Exit Exit DVD clear Exit/ Exit/ Exit/
DVD CLEAR Clear Clear Clear
CHCD Channel Channel Channel Channel --- Channel --- -- up/down up/down up/down up/down up/down
INPUT TV/Video TV TV VCR input TV Input TV TV
MUTE
RECALL On-screen --- On-screen On-screen On-screen --- --- ---
display display display display
CH RTN/ Previous Previous Previous Previous DVD --- --- ---
DVD RTN channel channel channel channel return
SLOW/ A --- --- --- Forward Forward --- --- ---
DIR B --- --- --- --- Reverse --- --- --SKIP/ A --- --- --- --- Forward --- Forward Forward
SEARCH B --- --- --- --- Reverse --- Reverse Reverse
REW VCR VCR VCR Rewind Rewind Rewind Rewind Rewind
PAUSE/STEP VCR VCR VCR Pause Pause Pause Pause Pause
PLAY VCR VCR VCR Play Play Play Play Play
FF VCR VCR VCR F.Forward F.Forward F.Forward F.Forward F.Forward
Toshiba TV Cable Satellite VCR DVD/LD Receiver CD/MD Cassette
(TV) (CBL/SAT) (CBL/SAT) (AUDIO) (AUDIO) (VCR)
Sleep timer
image shape.
--- CH Enter CH Enter CH Enter --- --- --- ---
--- --- Guide --- DVD setup --- --- ---
Favorite CH
Menu open/
Menu select
Menu select/
FAV CD
select
Sound mute* Sound mute* Sound mute* Sound mute* Sound mute* Sound mu
--- --- --- --- --- --- ---
Action, Menu
---
--- Select --- Enter --- --- ---
---
---
Favorite CH
Menu select
Menu select
--- Menu --- --- ---
Top menu
--- Subtitle --- --- ---
---
---
Menu select
Menu select
--- --- ---
--- --- ---
te*
Sound mute*
---
Welcome to
Toshiba
Connecting
your TV
Remote Control
Remote Control
Using the
Using the
Setting up
your TV
Using the TV’s
Features
Appendix
3R40321A/E P16-23 9/7/04, 15:0717
17
Page 18

ey Label
K
TV/VCR VCR --- TV/SAT TV/VCR --- --- --- Reverse
AM/FM --- --- --- --- Disc shift AM/FM Disc shift Deck side
DISC A/B switch
STOP VCR VCR VCR Stop Stop Stop Stop Stop
REC** VCR VCR VCR Record --- Record Record Record
Notes:
• “---” will send nothing.
• “ TV” will jump to TV.
• “ VCR” will jump to last active VCR or DVD. Active VCR/DVD is defined as the mode that remains for a
minimum of 5 seconds, or if a key is pressed in that mode.
The VOLUME and MUTE will jump to “TV” by default. When the volume is unlocked, all the devices will have
*
their own volume. The AUDIO1/2 (Receiver, CD) modes will have their own volume even if Volume Lock is on
TV, CABLE/SAT, VCR, or DVD. See “Using the volume lock feature” on page 20.
Press the REC button twice within 5 seconds to record each audio/video source.
**
Toshiba TV
(TV) (CBL/SAT) (CBL/SAT) (AUDIO) (AUDIO) (VCR)
Cable Satellite VCR DVD/LD Receiver CD/MD Cassette
Using the
Remote Control
3R40321A/E P16-23 9/7/04, 15:0718
18
Page 19

Programming the remote control for use with
your audio/video devices
Safeguards
Important
Device code setup
1. Refer to the Device code table on pages 21–22 to find
the code for your device.
If more than one number is listed, try each one separately
until you find one that works.
2. Press MODE until the Mode indicator for the device
(CABLE/SAT, VCR, DVD, AUDIO1, AUDIO2) lights up.
3. While holding down the RECALL button, press the
Channel Number buttons to enter the four-digit code of
your blank of device.
If a valid code is entered, the mode indicator will blink
twice.
If an invalid code is entered, the mode indicator will blink
one long blink.
4. Point the remote control at the device and press POWER
to test the code.
If the device turns on, you have entered the correct code.
If the device does not respond to the remote control, you
may have entered the wrong code. Repeat steps 3 and 4
using another code.
5. Press MODE to select the TV mode to control the TV.
Searching and sampling the code of a device (8500)
If you do not know the device code for a particular target unit, you can
cycle the remote control through the available codes for that device
mode and sample the functions to find the code that properly operates
the target device. The keys available to be sampled, provided they are
applicable to that mode, are 0, 1, 2, 3, POWER, VOL C, CH C, PLAY
and STOP. Invalid keys will be ignored while in program mode.
To cycle through each available device code and sample its functions:
1. Press MODE to select the mode you want to set up.
2. While holding down the RECALL button, press 8 –5 –0 –0.The
remote control will enter program mode.
3. Point the remote control at the target device and press POWER
(or other function buttons that are available to be sampled).
4. If the device responds to the remote control:
Press RECALL to store the device code.
The mode indicator will blink twice and the remote control will exit
the program mode.
If the device does not respond to the remote control:
Press C, and then press POWER.
Repeat this step until the device responds to the remote control,
and then press RECALL.
Note: When a search cycle is completed, the mode indicator will blink
three times. The remote control will begin to cycle through the
available codes again. If no key is pressed within 10 seconds while
programming, the remote control will exit the program mode and
return to the previous code.
Notes:
• Every time you replace the batteries, you
must reprogram the remote control.
• Some newer VCRs are capable of working
on either of two remote codes.These VCRs
have a switch labeled “VCR1/VCR2.”
If your VCR has this kind of switch and
does not respond to any of the codes for
your VCR brand, set the switch to the other
position (VCR1 or VCR2) and reprogram
the remote control.
POWER
Numbers
MODE
C
RECALL
Welcome to
Toshiba
Connecting
your TV
Remote Control
Remote Control
Using the
Using the
Setting up
your TV
Using the TV’s
Features
3R40321A/E P16-23 9/7/04, 15:0719
Appendix
19
Page 20

Using the
Remote Control
3R40321A/E P16-23 9/7/04, 15:0720
20
Page 21

Safeguards
Important
VCR setup codes
Brand Code
ADMIRAL 0135
AIWA 0127, 0132, 0181
AKAI 0129, 0114, 0115,
0116
AUDIO DYNAMIC 0139, 0111
BELL&HOWELL 0105, 0113
BROKSONIC 0120, 0126, 0180
CANON 0123, 0125
CCE 0143
CITIZEN 0106
CRAIG 0105, 0129, 0106
CURTIS MATHES 0145, 0124, 0127
DAEWOO 0143, 0101, 0124,
0175
DBX 0139, 0110, 0111
DIMENSIA 0145
EMERSON 0143, 0126, 0119,
0103, 0125, 0142,
0120, 0118
FISHER 0105, 0108, 0109,
0107, 0113, 0165
FUNAI 0127, 0126, 0120,
0134
GE 0133, 0145, 0124
GO VIDEO 0137, 0151, 0163,
0149, 0150, 0182
GOLDSTAR 0106
GRADIENTE 0170, 0171, 0168,
0134, 0156
HITACHI 0123, 0145, 0100,
0127, 0168
INSTANT REPLAY 0124, 0123
JENSEN 0139
JVC 0139, 0110, 0111,
0134, 0157, 0158,
0184, 0185
KENWOOD 0139, 0110, 0106,
0111
LG 0159
LXI 0127, 0106, 0100,
0107, 0108, 0105,
0109
MAGNAVOX 0131, 0123, 0124,
0173
MARANTZ 0139, 0110, 0111
MARTA 0106
MEMOREX 0124, 0109
MGA 0138, 0140, 0147,
0148, 0141, 0142
MINOLTA 0100, 0145
MITSUBISHI 0138, 0140, 0147,
0148, 0141, 0142,
0161, 0164
MULTITECH 0147, 0127, 0104
NEC 0139, 0110, 0111,
0134
OLYMPIC 0124, 0123
OPTIMUS 0128, 0121, 0135,
0106
ORION 0126, 0120, 0132
PANASONIC 0123, 0124, 0121,
0122
PENNEY 0124, 0100, 0145,
0105, 0139, 0110,
0111
PENTAX 0100, 0111, 0145
PHILCO 0131, 0124, 0127,
PHILIPS 0131, 0123, 0124,
PIONEER 0123
PROSCAN 0145, 0100, 0123,
QUASAR 0121, 0122, 0123,
RADIO SHACK 0133, 0124, 0105,
RCA 0133, 0145, 0100,
REALISTIC 0124, 0105, 0136,
SAMSUNG 0137, 0102, 0104,
SAMTRON 0163
SANSUI 0139, 0126, 0120,
SANYO 0105, 0109, 0113
SCOTT 0101, 0102, 0104,
SEARS 0105, 0106, 0107,
SHARP 0135, 0136, 0167,
SHINTOM 0117
SIGNATURE 2000 0127, 0135
SINGER 0117
SONY 0128, 0129, 0130,
SV2000 0127
SYLVANIA 0131, 0123, 0124,
SYMPHONIC 0127, 0168, 0177
TASHIRO 0106
TATUNG 0139, 0110, 0111
TEAC 0139, 0110, 0127,
TECHNICS 0121, 0122, 0123,
TEKNICA 0124, 0127, 0112
THOMSON 0179, 0183
TOSHIBA 0101, 0146, 0166,
VECTOR RESEARCH
WARDS 0135, 0136, 0109,
YAMAHA 0105, 0139, 0110,
ZENITH 0144, 0106, 0169,
0123, 0126, 0120,
0143
0173
0124, 0131, 0146,
0101, 0102, 0133,
0174
0124
0136, 0109, 0140,
0127
0123, 0124, 0131,
0146, 0101, 0102,
0170, 0172, 0174,
0176, 0183
0109, 0140, 0127
0133
0152
0109, 0138, 0140,
0147, 0148, 0126,
0120
0108, 0100
0162
0153, 0154, 0155
0127, 0178
0111
0124
0160
0111
0144, 0106
0111
0180
Cable box setup codes
Brand Code
ABC 1124
ARCHER 1132, 1125
CABLEVIEW 1105, 1132
CITIZEN 1122, 1105
CURTIS 1112, 1113
DIAMOND 1124, 1132, 1125
EAGLE 1129
EASTERN 1134
GCBRAND 1132, 1105
GEMINI 1122, 1143
G.I./JERROLD 1119, 1124, 1125,
1126, 1127, 1120,
1121, 1122, 1111,
1123, 1152
HAMLIN 1140, 1141, 1142,
1145, 1118, 1112
HITACHI 1103, 1124
MACOM 1103, 1104, 1105,
1108
MAGNAVOX 1133
MEMOREX 1130
MOVIETIME 1132, 1105
OAK 1139, 1137, 1102
PANASONIC 1109, 1110, 1114,
1151, 1153
PHILIPS 1128, 1129, 1130,
1106, 1107, 1150,
1131
PIONEER 1101, 1116
PULSAR 1105, 1132
PUSER 1132
RCA 1115
REALISTIC 1132
REGAL 1112, 1118, 1140,
1141, 1142, 1145,
1149
REGENCY 1134
REMBRANT 1137, 1132, 1105,
1138
SAMSUNG 1105
S.A. 1111, 1112, 1113
SLMARK 1105, 1101
SPRUCER 1105, 1110
STARGATE 1132, 1105
TELECAPTION 1148
TELEVIEW 1101, 1105
TEXSCAN 1144
TOCOM 1135, 1136, 1147
TOSHIBA 1104, 1146
UNIKA 1132, 1125
UNIVERSAL 1122, 1132
VIDEOWAY 1106
VIEWSTAR 1129, 1130
ZENITH 1117, 1100
ZENITH/DRAKE
SATELLITE 1100
Welcome to
Toshiba
Connecting
your TV
Remote Control
Remote Control
Using the
Using the
Setting up
your TV
Using the TV’s
Features
Appendix
3R40321A/E P16-23 9/7/04, 15:0721
21
Page 22

CD Player setup codes
Brand Code
ADMIRAL 6126
AIWA 6133, 6135
CARVER 6129
DENON 6142, 6151
EMERSON 6139
FISHER 6105, 6106
GARRARD 6117
HARMAN KARDON
HITACHI 6107
JENSEN 6134
JVC 6140, 6141, 6145,
KENWOOD 6100, 6101, 6111,
LXI 6136
MAGNAVOX 6129, 6132
MARANTZ 6129
MCINTOSH 6121
NAKAMICHI 6110
ONKYO 6114, 6115
OPTIMUS 6108, 6118, 6120,
PANASONIC 6124, 6125, 6127,
PHILIPS 6129, 6130, 6149
PIONEER 6108
Remote Control
Using the
QUASAR 6125, 6127, 6124
RCA 6147, 6137, 6138,
SANSUI 6110, 6146, 6113
SANYO 6105
SCOTT 6110, 6146
SHARP 6142, 6143
SHERWOOD 6120
SONY 6128
SOUNDE-SIGH 6144
TEAC 6112, 6116, 6118
TECHNICS 6127, 6124, 6125
VICTOR 6140, 6141, 6145
YAMAHA 6102, 6103, 6104
Receiver setup codes
Brand Code
ADMIRAL 4120
AIWA 4125, 4126, 4146
DENON 4134, 4135, 4136,
FISHER 4104
GARRARD 4113
HARMAN KARDON
JENSEN 4129
JVC 4132, 4133, 4140,
KENWOOD 4100, 4108, 4141,
MAGNAVOX 4127, 4128
MARANTZ 4124
MCINTOSH 4116
MITSUBISHI 4148
NAKAMICHI 4106, 4117
ONKYO 4109, 4114
OPTIMUS 4103, 4127, 4131,
PANASONIC 4119, 4118, 4121
PHILIPS 4123
PIONEER 4105, 4107, 4150
6120, 6121, 6123,
6119
6148, 6151
6145
6122
6150
6131, 6152
4143
4115, 4123, 4145
4144
4142, 4147
4130
QUASAR 4119, 4118, 4121
RCA 4103, 4105, 4127,
4131, 4130, 4149
SANSUI 4103, 4111, 4139
SHARP 4134, 4137
SONY 4122
SOUNDE-SIGH 4138
TEAC 4112, 4113, 4111,
4110
TECHNICS 4121, 4118, 4119
VICTOR 4132, 4133
YAMAHA 4101, 4102
Cassette Player setup codes
Brand Code
AIWA 7123, 7124, 7125
DENON 7131
FISHER 7103
JENSEN 7114
JVC 7129, 7130, 7132,
7133
KENWOOD 7100, 7107
MARANTZ 7102
NAKAMICHI 7105
ONKYO 7108, 7109, 7113
PANASONIC 7116, 7118
PHILIPS 7122, 7121
PIONEER 7104, 7106
RCA 7126, 7127, 7128,
7134, 7135
SANSUI 7105, 7110, 7112
SHARP 7131
SONY 7119, 7120
TEAC 7110, 7111, 7115
TECHNICS 7116, 7118, 7117
YAMAHA 7101, 7102
Laser Disc setup codes
Brand Code
DENON 5114
HITACHI 5100
KENWOOD 5102, 5103
MAGNAVOX 5101
MARANTZ 5114
MITSUBISHI 5114, 5118, 5119
NEC 5114
PANASONIC 5104, 5105, 5106,
5115
PHILIPS 5111
PIONEER 5114
PROSCAN 5114
QUASAR 5104, 5105, 5106,
5115
RCA 5114
SAMSUNG 5112
SANYO 5114, 5117
SHARP 5113, 5116
SONY 5107, 5108, 5109,
5110
TEAC 5114
TOSHIBA 5114
YAMAHA 5101
DVD setup codes
Brand Code
AIWA 3123
APEX 3120
DENON 3100, 3117
FERGUSON 3101
HITACHI 3111
JVC 3109
KENWOOD 3115, 3129
KONKA 3119
MITSUBISHI 3105
NORDMENDE 3101
ONKYO 3121
ORITRON 3124
PANASONIC 3100
PHILIPS 3103, 3116
PIONEER 3102
RAITE 3113
RCA 3101, 3106
SABA 3101
SAMPO 3114
SAMSUNG 3110
SHARP 3108
SILVANIA 3132, 3118
SMC 3125
SONY 3104, 3126, 3127,
3128
TECHNICS 3100
THOMSON 3101
TOSHIBA 3103
WAVE 3122
YAMAHA 3100, 3130
ZENITH 3107, 3112
VIALTA 3131
FUNAI 3132, 3118
Satellite Receiver setup codes
Brand Code
DISH NETWORK
(Echostar) 2105, 2115, 2116,
2117
ECHOSTAR 2105
EXPRESS VU 2105, 2115
G.E. 2106
G.I. (GENERAL
INSTRUMENT) 2108
GRADIENTE 2114
HITACHI 2103, 2111, 2112
HNS (Hughes) 2103
MAGNAVOX 2101, 2102
PANASONIC 2104
PHILIPS 2101, 2102, 2118
PRIMESTAR 2108
PROSCAN 2106, 2109, 2110,
2113
RCA 2106, 2109, 2110,
2113
SONY 2107
STAR CHOICE 2103, 2108
TOSHIBA 2100, 2103, 2119,
2120, 2121
UNIDEN 2101, 2102
3R40321A/E P16-23 9/7/04, 15:0722
22
Page 23

Safeguards
Important
Welcome to
Toshiba
Connecting
your TV
Remote Control
Remote Control
Using the
Using the
Setting up
your TV
Using the TV’s
Features
3R40321A/E P16-23 9/7/04, 15:0723
Appendix
23
Page 24

Setting up your TV
Starting setup
The STARTING SETUP feature appears the first time you turn on the
TV, and helps you select the menu language, specify the TV/CABLE
setting, and program channels automatically .
IMPORTANT: Make sure that the antenna or cable TV system
connection is made!
1. Press POWER. The starting setup
function begins and the Language
setup menu appears on the screen.
Press ▲ or ▼ to select your desired
language, then press ENTER.
2. Press ▲ or ▼ to select “TV” or
“CABLE”, then press ENTER.
3. Press ▲ or ▼ to select “START”, then press ENTER. If you select
“CANCEL” and press ENTER, the STARTING SETUP stops and
changes to the TV screen.
4. Now the “AUTO SETUP” starts. After the starting setup is completed, the TV channel appears on the screen.
• If you press the EXIT button in the process of “AUTO SETUP”
the STARTING SETUP stops and changes to the TV screen.
After you have installed the batteries and programmed the remote
control, you need to set some preferences on the TV using the menu
system. You can access the menu system with the buttons on the
remote control.
• When you make a menu selection, your changes occur immediately. You do not have to press MENU or EXIT to see your
changes.
• After one minute, the menu screen will automatically close if you do
not make a selection. Your changes will still be saved.
• When you are finished programming the menus, press EXIT.
LANGUAGE / LANGUE / IDIOMA
ENGLISH
FRANÇAIS
ESPAÑOL
:SELECT SET :ENTER
POWER
Menu/Enter
Exit
Changing the on-screen display language
You can choose from three different languages (English, French and
Spanish) for the on-screen displays. Adjustment menus and messages
will appear in the language of your choice.
To select a language:
your TV
Setting up
1. Press MENU, then press
SETUP
LANGUAGE
CLOCK SET
TV / CABLE
CH PROGRAM
ADD / ERASE
:SELECT :ADJUST
ENGLISH
12:00AM
CABLE
ADD
or until the SETUP menu appears.
2. Press ▲ or ▼ to highlight LANGUAGE.
ENGLISH
12:00AM
CABLE
ADD
:SELECT :ADJUST
3. Press or to highlight your desired language.
3R40321A/E P24-26 9/7/04, 15:0724
24
Page 25

Image tilt correction
When you install or change the direction of the TV, the picture may
become tilted (caused by the Earth’s magnetism). If this happens, use
the image tilt correction feature to obtain the best possible picture.
To adjust the image tilt:
1. Press MENU, then press or
until the SETUP menu appears.
2. Press ▲ or ▼ to highlight IMAGE
TILT.
3. Press
or to adjust the picture
tilt (from –10 to +10).
SETUP
CLOSED CAPTION
PICTURE SIZE
PICTURE SCROLL
CINEMA MODE
ASPECT
IMAGE TILT
:SELECT :ADJUST
OFF
VIDEO
OFF
0
Adding channels to the TV’s memory
When you press CH ▲ or ▼, your TV will stop only on the channels
you have stored in the TV's channel memory . Follow the steps below to
program channels into the channel memory.
Programming channels automatically
Your TV can automatically detect all active channels and store them in
its memory. After the TV has stored the channels in its memory automatically, you can add or erase channels manually.
To add channels automatically:
1. Press MENU, then press
2. Press ▲ or ▼ until the TV/CABLE
selection is highlighted.
3. Press or to highlight either
TV or CABLE, depending on
which you use.
If you use an antenna, choose TV.
If you use cable, choose CABLE.
4. Press ▼ until the CH PROGRAM selection is highlighted.
5.
Press or to start channel programming. The TV will automatically
cycle through all the TV or Cable channels (depending on which you
selected), and store all active channels in the channel memory.
While the TV is cycling through the channels, the message
“PROGRAMMING NOW-PLEASE WAIT” appears.
6. When channel programming is complete, the message “COMPLETED”
appears.
7. Press CH ▲ or ▼ to view the programmed channels.
or to display the SETUP menu.
SETUP
LANGUAGE
CLOCK SET
TV / CABLE
CH PROGRAM
ADD / ERASE
:SELECT :ADJUST
ENGLISH
12:00AM
TV / CABLE
ADD
Menu
Channel ▲▼
Safeguards
Important
Welcome to
T oshiba
Connecting
your TV
Remote Control
Using the
Setting up
Setting up
your TV
your TV
Adding and erasing channels manually
After you have programmed the channels automatically, you can add or
erase specific channels manually.
T o add or erase channels manually:
1. Select the channel you want to add or erase. If adding channels, you
must select the channel to add using
the Channel Number buttons.
2. Press MENU, then press
display the SETUP menu.
3. Press ▲ or ▼ to highlight ADD/
ERASE.
4. Press
ERASE, whichever function you want to perform.
5. Repeat steps 1-4 for other channels you want to add or erase.
3R40321A/E P24-26 9/7/04, 15:0725
or to select ADD or
or to
SETUP
LANGUAGE
CLOCK SET
TV / CABLE
CH PROGRAM
ADD / ERASE
:SELECT :ADJUST
ENGLISH
11:02PM
CABLE
ADD / ERASE
25
Using the TV’s
Features
Appendix
Page 26

Changing channels
To change to the next programmed channel:
Press Channel ▼ or ▲ on the TV or CH ▲ or ▼ on the remote
control.
T o change to a specific channel (programmed or unprogrammed):
Press the Channel Number buttons (0-9 and 100) on the remote
control.
For example, to select channel 125, press 100, 2, 5.
Using the TV’s features
Adjusting the channel settings
Channel
Numbers
Switching between two channels
You can switch between two channels without entering an actual
channel number each time.
To switch between two channels:
Each time you press CH RTN, the TV will switch back and forth
between the two channels.
Programming your favorite channels
You can preset up to 12 of your favorite channels using the Favorite
Channel Programming feature. Because this feature scans through
only your favorite channels, it allows you to skip other channels you
do not normally watch.
You can still use Channel ▲ / ▼ to scan through all the channels you
programmed in the TV’s memory.
To program your favorite channels:
your TV
Setting up
1. Select the first channel you want to view.
2. Select a second channel using the Channel Number buttons (0-9,
100).
3. Press CH RTN. The previous channel will be displayed.
1. Select a channel you want to program.
2. Press MENU, then press
or to display the OPTION menu.
3. Press ▲ or ▼ to highlight FAVORITE CH.
OPTION
ON TIMER
FAVORITE CH
CH LABEL
VIDEO LABEL
:SELECT :ADJUST
OFF
Channel ▲▼
CH RTN
Channel
Numbers
Menu/
Enter
FAV
Channel
Exit
4. Press or to display the FAVORITE CH menu. SET/CLEAR will
be highlighted.
FAVORITE CH :CH 002
SET / CLEAR
SETUP CH 0000
TV CABLE 0000
:ADJUST SET :ENTER
5. Press or to highlight SET and press ENTER.
6. Press EXIT to return to normal viewing.
7. Repeat steps 1-6 for up to 11 other channels.
To select your favorite channels:
Press the FAV ▲ ▼ buttons on the remote control to select your
favorite channels.
The FAV ▲ ▼ buttons will not work until you have programmed
your favorite channels.
3R40321A/E P24-26 9/7/04, 15:0826
0000
END:EXIT
26
Page 27

To clear your favorite channels:
1. Select a channel you want to clear.
2. Press MENU, then press or to display the OPTION menu.
3. Press ▲ or ▼ to highlight FAVORITE CH.
4. Press or to display the FAVORITE CH menu. SET/CLEAR will
be highlighted.
5. Press
or to highlight CLEAR.
FAVORITE CH :CH 002
SET / CLEAR
SETUP CH 002 0 0 0
TV CABLE 0 0 0 0
:ADJUST CLEAR:ENTER
0 0 0 0
END:EXIT
Menu/
Enter
Safeguards
Important
Welcome to
T oshiba
6. Press ENTER until “0” replaces the channel number you want to
erase.
7. Press EXIT to return to normal viewing.
8. Repeat steps 1-6 for the other channels.
Using the LOCKS menu
The V-Chip feature is available only for the U.S. V -Chip system. The
Canadian V-Chip system is not supported.
You can prevent others from viewing certain programs or channels by
blocking them using the V-Chip feature.
Selecting a password
Before you can block programs and channels, you must select a
password. The password you select prevents others from changing the
rating limits you set.
To select your password and access the LOCKS menu:
1. Press MENU, then press or to highlight the LOCKS menu.
2. Press ▲ or ▼ to display the password entering mode.
LOCKS
NEW PASSWORD
SELECT:[0-9] SET:ENTER
----
END:EXIT
Exit
Note:
The password you programmed is also used in
the LOCKS menu; see pages 29-31.
Channel
Numbers
Menu/
Enter
Connecting
your TV
Remote Control
Using the
Setting up
your TV
3. Use the Channel Number buttons (0-9) to enter your password.
If you are accessing the LOCKS menu for the first time, select a
four-digit number to be your password. Press ENTER.
LOCKS
NEW PASSWORD
SELECT:[0-9] SET:ENTER
END:EXIT
4. Enter the password again to confirm it, and then press ENTER.
The LOCKS menu appears.
LOCKS
CONFIRM PASSWORD
SELECT:[0-9] SET:ENTER
3R40321A/E P27-33 9/7/04, 15:0827
END:EXIT
27
Using the TV’s
Using the TV’s
Features
Features
Appendix
Page 28

Features
Using the TV’s
5. You may now set up the LOCKS menu. See “Using the V-Chip
(parental control) feature” (below), “Locking channels” (page 29),
TM
“Locking video input” (page 30), “Setting the GameTimer
” (see
page 30) or “Using the front panel lock feature” (page 31).
To change your password:
1. Press MENU, then press
or to display the LOCKS menu.
2. Press ▲ or ▼ to display the password entering mode.
3. Use the Channel Number buttons (0-9) to enter your password.
Press ENTER. The LOCKS menu appears.
4. Press ▲ or ▼ to highlight NEW PASSWORD and press
or to
display the NEW PASSWORD menu.
5. Use the Channel Number buttons (0-9) to enter a new code. Press
ENTER.
6. Enter the password again to confirm it, and then press ENTER.
7. Press EXIT to return to normal viewing.
Using the V-Chip (parental control) feature
The Motion Picture Association of America (MPAA) uses a rating
system to qualify motion picture content. Television broadcasters
employ a rating system to qualify the content of television programs, as
well. The TV and MOVIE ratings work with the V-Chip feature and
allow you to block programs according to the rating limits you set.
T o use the V-Chip to block programs by rating:
1. Press MENU, then press
display the LOCKS menu.
2. Press ▲ or ▼ to display the
password entering mode.
3. Use the Channel Number buttons
(0-9) to enter your password.
Press ENTER. The LOCKS menu
appears.
4. Press ▲ or ▼ to highlight V -CHIP.
• Press
or to highlight ON to
enable V-Chip program blocking
by rating.
• Press
or to highlight OFF to
disable V-Chip program blocking by
rating.
5. Press ▲ or ▼ to highlight TV RA TING. Then, press
display the desired rating.
OFF : TV RATING is not set
TV-Y : All children
TV-Y7 : 7 years old and above
TV-G : General audience
TV-PG : Parental guidance
TV-14 : 14 years old and above
TV-MA : 17 years old and above
• When you select TV-Y7, TV-PG, TV-14 or TV-MA, press RECALL to
explain the rating. Press
Press
or to select the setting “ON” or “OFF”.
6. Press ▲ or ▼ to highlight MOVIE
RATING. Then, press
display the desired rating.
OFF : MOVIE RATING is not set
G:All ages
PG : Parental guidance
PG-13 : Parental guidance
less than 13 years old
R:Under 17 years old
Parental guidance suggested
NC17 : 17 years old and above
X:Adult only
or to
LOCKS
V-CHIP SET
V-CHIP
TV RATING
MOVIE RATING
:SELECT :ADJUST
LOCKS
V-CHIP SET
V-CHIP
TV RATING
MOVIE RATING
:SELECT :ADJUST
ON / OFF
OFF
OFF
ON
OFF
OFF /TV-Y/TV-Y7/TV-G
TV-PG / TV-14 / TV-MA
OFF
or to
▲ or ▼ to select the desired rating you want.
or to
LOCKS
V-CHIP SET
V-CHIP
TV RATING
MOVIE RATING
OFF / G / PG-13/R/NC17 / X
:SELECT :ADJUST
ON
TV-PG
OFF
28
Channel
Numbers
Menu/
Enter
Exit
Recall
Note:
If you forget your password, press RECALL
four times within five seconds from the
password entering mode. This allows you to
reset your password.
3R40321A/E P27-33 9/7/04, 15:0828
Page 29

7. When you are done selecting the ratings, press EXIT to return to
normal viewing.
When you try to view a program with a ratings block, a message will
appear listing the program’s ratings. The program can still be viewed if
you press MUTE and then enter your password to temporarily bypass
the block.
Locking channels
With the CH LOCK feature, you can lock specific channels. You will not
be able to tune locked channels unless you clear the setting. You can
choose to lock up to nine TV channels and nine cable channels.
To lock channels:
1. Use the Channel Number buttons (0-9 and 100) to display the
television channel you wish to lock.
2. Press MENU, then press or to display the LOCKS menu.
3. Press ▲ or ▼ to display the password entering mode.
4. Use the Channel Number buttons (0-9) to enter your password,
then press ENTER. The LOCKS
menu appears.
5. Press ▲ or ▼ to highlight CH
LOCK and press
or to display
the CH LOCK menu.
6. Press or to select the following:
• SET– to set the channel as one
to be locked. Then press ENTER.
• CLEAR– to clear all channels from
the list of locked channels. Then
press ENTER.
7. Repeat steps 1 through 6 to lock
other channels. When you are
finished locking channels, press EXIT to return to normal viewing.
If you try to tune a locked channel, the TV will not display it, but will
display the nearest unlocked channel.
LOCKS
LOCK
CH LOCK
VIDEO LOCK
GAME TIMER
FRONT PANEL LOCK
NEW PASSWORD
:SELECT :ADJUST
CH LOCK :CH 002
SET / CLEAR
SET UP CH 0 0 0
TV CABLE 0 0 0
:ADJUST SET :ENTER
OFF
OFF
OFF
0 0 0
END:EXIT
Channel
Numbers
Menu/
Enter
Exit
Note:
After programming CH LOCK, change
channels before turning off the television.
Safeguards
Important
Welcome to
T oshiba
Connecting
your TV
Remote Control
Using the
T o unlock channels:
1. Press MENU, then press
or to display the LOCKS menu.
2. Press ▲ or ▼ to display the password entering mode.
3. Use the Channel Number buttons (0-9) to enter your password,
then press ENTER. The LOCKS menu appears.
4. Press ▲ or ▼ to highlight CH LOCK and press
or to display
the CH LOCK menu.
5. Press or to highlight CLEAR and clear all channels from the
list of locked channels. Press ENTER.
6. Press EXIT to return to normal viewing.
Setting up
your TV
Using the TV’s
Using the TV’s
Features
Features
Appendix
3R40321A/E P27-33 9/7/04, 15:0829
29
Page 30

Locking the video inputs
With the VIDEO LOCK feature, you can lock out the input sources
(VIDEO1, VIDEO2, VIDEO3, COLORSTREAM HD1, COLORSTREAM
HD2, HDMI1, HDMI2) and channels 3 and 4.
You will not be able to select the input sources with the INPUT button
or Channel buttons unless you clear the setting.
To set up the video lock:
1. Press MENU, then press
2. Press ▲ or ▼ to display the password entering mode.
3. Use the Channel Number buttons (0-9) to enter your password,
then press ENTER. The LOCKS menu appears.
4. Press ▲ or ▼ to highlight VIDEO LOCK.
5. Press
or to select:
• OFF: Unlocks all video input sources.
•
VIDEO: Locks VIDEO1, VIDEO2,
VIDEO3 and COLORSTREAM
HD1, COLORSTREAM HD2,
HDMI1, HDMI2
.
• VIDEO +: Locks VIDEO1,
VIDEO2, VIDEO3,
COLORSTREAM HD1,
COLORSTREAM HD2, HDMI1,
HDMI2, channel 3 and channel 4. This option should be used if
you use the antenna terminal to play a video tape.
7. Press EXIT to return to normal viewing.
T o unlock video input:
1. Press MENU, then press
2. Press ▲ or ▼ to display the password entering mode.
3. Use the Channel Number buttons (0-9) to enter your password,
then press ENTER. The LOCKS menu appears.
4. Press ▲ or ▼ to highlight VIDEO LOCK and press or to
highlight OFF.
5. Press EXIT to return to normal viewing.
or to display the LOCKS menu.
LOCKS
LOCK
CH LOCK
VIDEO LOCK
GAME TIMER
FRONT PANEL LOCK
NEW PASSWORD
:SELECT :ADJUST
OFF
OFF / VIDEO / VIDEO+
OFF
OFF
or to display the LOCKS menu.
Channel
Numbers
Menu/
Enter
Exit
Input
Note:
After programming VIDEO LOCK, change
channels or activate the INPUT key before
turning off the television.
Features
Using the TV’s
Setting the GameTimer
With the
VIDEO LOCK feature (VIDEO setting)
GameTimerTM feature, you can automatically activate the
TM
to set a time limit for playing a
video game (30, 60, 90 or 120 minutes).
To set up the GameTimer:
1. Press MENU, then press
or to display the LOCKS menu.
2. Press ▲ or ▼ to display the password entering mode.
3. Use the Channel Number buttons (0-9) to enter your password,
then press ENTER. The LOCKS menu appears.
4. Press ▲ or ▼ to highlight GAME TIMER.
5. Press
or to select a time limit (30 minutes, 60 minutes, 90
minutes, 120 minutes or OFF).
6. Press EXIT to return to normal viewing. After the GameTimer is
programmed, the display will
appear briefly every ten minutes to
remind you that the GameTimer
operating.
When the programmed time is
reached, the TV will change
is
LOCKS
LOCK
CH LOCK
VIDEO LOCK
GAME TIMER
FRONT PANEL LOCK
NEW PASSWORD
:SELECT :ADJUST
OFF
OFF
OFF /30/60/90/120
OFF
channels automatically and enter
VIDEO LOCK mode.
Note:
To deactivate the GameTimer, set the VIDEO
LOCK to OFF (see “Locking the video inputs”
above).
3R40321A/E P27-33 9/7/04, 15:0830
30
Page 31

Safeguards
Important
Using the front panel lock feature
You can lock the front panel buttons to prevent your settings from
being changed accidentally (by children, for example). When the front
panel lock is in ON, all control buttons on the TV front panel (except
POWER) do not operate.
T o lock the front panel:
1. Press MENU, then press
2. Press ▲ or ▼ to display the password entering mode.
3. Use the Channel Number buttons (0-9) to enter your password,
then press ENTER. The LOCKS
menu appears.
4. Press
or to highlight FRONT
PANEL LOCK and press ▲ or ▼ to
highlight ON.
If a button on the front panel is
pressed, the message“NOT
AVAILABLE” appears.
To unlock the front panel:
Press and hold the VOL ▼ button on the TV front panel for about 10
seconds until the message "FRONT PANEL LOCK:OFF" appears
on-screen.
You also can unlock the front panel using the menus:
1. Press MENU, and then press
2. Press ▲ or ▼ to display the password entering mode.
3. Use the Channel Number buttons (0-9) to enter your password,
then press ENTER. The LOCKS menu appears.
4. Press ▲ or ▼ to highlight FRONT PANEL LOCK, and then press
or to highlight OFF.
or to display the LOCKS menu.
LOCKS
LOCK
CH LOCK
VIDEO LOCK
GAME TIMER
FRONT PANEL LOCK
NEW PASSWORD
:SELECT :ADJUST
OFF
OFF
ON / OFF
or to display the LOCKS menu.
TV front panel
Buttons to be locked
TV front panel
VOL
Channel
Numbers
Menu/
Enter
Welcome to
T oshiba
Connecting
your TV
Remote Control
Using the
Labeling channels
Channel labels appear over the channel number display each time you
turn on the TV, select a channel, or press the Recall button. You can
choose any four characters to identify a channel.
T o create channel labels:
1. Select a channel you want to label.
2. Press MENU, then press
until the OPTION menu appears.
3. Press ▲ or ▼
to highlight CH
LABEL.
4. Press
to display the CH LABEL
menu. SET/CLEAR will be highlighted.
5. Press
or to highlight SET.
6. Press ▲ or ▼ to highlight LABEL.
7. Press or to enter a character in
the first space. Press the button
repeatedly until the character you
want appears on the screen. Press
ENTER.
8. Repeat step 7 to enter the rest of
the characters.
If you would like a blank space in
the label name, you must choose
an empty space from the list of
characters; otherwise, a dash will
appear in that space.
9. Repeat steps 1-8 for other channels. You can assign a label to
each channel.
10. Press EXIT to return to normal viewing.
or
OPTION
ON TIMER
FAVORITE CH
CH LABEL
VIDEO LABEL
:SELECT :ADJUST
CH LABEL :CH 025
SET / CLEAR
LABEL
:ADJUST SET :ENTER
CH LABEL :CH 025
SET / CLEAR
LABEL
:ADJUST SET :ENTER
OFF
— — — —
END:EXIT
— — — —
END:EXIT
Exit
Note:
The character will change as below.
—
SPACE
To erase channel labels:
1. Select a channel with a label.
2. Press MENU, then press
OPTION menu appears.
3. Press ▲ or ▼ to highlight CH LABEL.
4. Press
or to display the CH LABEL
menu. SET/CLEAR will be highlighted.
5. Press or to highlight CLEAR.
6. Press ENTER.
7. Repeat steps 1-6 to erase other channel
labels.
+
or until the
—
Setting up
your TV
Using the TV’s
Using the TV’s
Features
Features
Appendix
3R40321A/E P27-33 9/7/04, 15:0831
31
Page 32

Selecting the video input source
Press INPUT to view a signal from another device connected to your
TV, such as a VCR or DVD player. You can select ANT, VIDEO 1,
VIDEO 2, VIDEO 3, ColorStream HD1, ColorStream HD2, HDMI1, or
HDMI2 depending on which input jacks you used to connect your
devices (see “Connecting your TV” on page 7).
SOURCE SELECTION
0. ANT
1. VIDEO1
2. VIDEO2
3. VIDEO3
4. ColorStream HD1
5. ColorStream HD2
6. HDMI1
7. HDMI2
SELECT: [0-7]
Pressing INPUT on the remote
control displays the current signal
source (press INPUT again or 07 to change)
Labeling the video input sources
The video label feature allows you to label each input source for your
TV from the following preset list of labels:
– : Uses the default label name
VCR : Video cassette recorder
DVD : DVD video
DTV : Digital TV set-top box
SAT : Satellite box
CBL : Cable box
To label the video input sources:
1. Press MENU, and then press
to display the OPTION menu.
2. Press ▲ or ▼ to highlight VIDEO
LABEL.
3. Press
to display the VIDEO
LABEL menu.
4. Press ▲ or ▼ to highlight the video
source you want to label.
5. Press or to select the desired
label for that input source.
6. Press EXIT to return to normal
viewing.
or
OPTION
ON TIMER
FAVORITE CH
CH LABEL
VIDEO LABEL
:SELECT :ADJUST
OPTION
1.VIDEO1
2.VIDEO2
3.VIDEO3
4.ColorStream HD1
4.ColorStream HD2
6.HDMI1
7.HDMI2
:SELECT :ADJUST
OFF / OFF / SET
-
/ VCR / DVD / DTV
-
-
-
-
-
-
SAT / CBL
Note:
When ColorStream HD 1, HD 2, HDMI1
HDMI2 is selected, the video OUT jack does
not output a signal. To receive a video OUT
signal, you must use a standard video or Svideo connection instead.
Please note the following regarding
the HDMI source selection:
This TV is not intended for connection
to and should not be used with a PC
(personal computer). See “Connecting
an HDMI or a DVI device to the HDMI
input” on page 14 for details.
, or
Menu
Exit
Input
Features
Using the TV’s
3R40321A/E P27-33 9/7/04, 15:0832
32
Page 33

Setting the clock
You must set the clock before you can program the ON timer.
T o set the clock: (Example: 8:30 AM)
1. Press MENU, then press or to
display the SETUP menu.
2. Press ▲ or ▼ to highlight CLOCK
SET.
3. Press
or to highlight the hour
position.
4. Press ▲ or ▼ to set the hour, then
press
to highlight the minute
position.
5. Press ▲ or ▼ to set the minutes,
then press EXIT to return to normal
viewing.
SETUP
LANGUAGE
CLOCK SET
TV / CABLE
CH PROGRAM
ADD / ERASE
:SELECT :ADJUST
SETUP
LANGUAGE
CLOCK SET
TV / CABLE
CH PROGRAM
ADD / ERASE
:SELECT :ADJUST
ENGLISH
12:00AM
CABLE
ADD
ENGLISH
8:30AM
CABLE
ADD
Menu
Exit
Safeguards
Important
Welcome to
T oshiba
Setting the ON timer
This feature allows you to program the TV to turn on automatically at a
set time. If you program the ON TIMER to “DAILY,” the TV will turn on
every day at the same time to the same channel until you clear the ON
TIMER.
T o set the on timer: (Example: Turning on the TV to channel 012 at
6:30 AM, DAILY)
1. Set the clock, if you have not already done so (see above).
2. Press MENU, and then press
3. Press ▲ or ▼ to highlight ON TIMER.
4. Press or to highlight SET, then press ENTER. The ON TIMER
menu appears.
5. Press ▲ or ▼ to set the desired hour,
then press
.
6. Set the desired minutes and channel,
as in step 5.
or to display the OPTION menu.
ON TIMER
ON TIMER
6 :00AM
:SELECT :ADJUST
ON TIMER
ON TIMER
6:30AM
:SELECT :ADJUST
CH003
CLEAR
END:EXIT
CH003
CLEAR
END:EXIT
Note:
If the power source for the TV is interrupted
(for example, the power cord is unplugged or
a power failure occurs), you will need to reset
the clock.
Note:
After a power failure or disconnection of the
power, the timer settings will be lost.
Connecting
your TV
Remote Control
Using the
Setting up
your TV
7. Press
to select ONCE or DAILY.
8. Press EXIT to return to normal
viewing.
To cancel the on timer:
Select CLEAR in step 6 above.
Press EXIT to return to normal viewing.
3R40321A/E P27-33 9/7/04, 15:0833
ON TIMER
ON TIMER
6:30AM
:ADJUST :ADJUST
ONCE DAILY CLEAR
CH012
END:EXIT
33
Using the TV’s
Using the TV’s
Features
Features
Appendix
Page 34

Viewing the wide-screen picture formats
SETUP
CLOSED CAPTION
PICTURE SIZE
PICTURE SCROLL
CINEMA MODE
ASPECT
IMAGE TILT
:SELECT :ADJUST
OFF
VIDEO
OFF
0
(480i and 480p signals only)
You can view 480i and 480p format programs in a variety of
picture sizes—Natural, TheaterWide 1, TheaterWide 2, TheaterWide 3,
and Full.
The way the image displays in any of the picture sizes will vary
depending on the format of the program you are viewing. Select the
picture size that displays the current program the way that looks best
to you.
Selecting the picture size
1. Press PIC SIZE on the remote control.
2. Press the corresponding number button (0-4) to select the desired
picture size, as described below and on the next page.
PICTURE SIZE
0: NATURAL
1: THEATER WIDE1
2: THEATER WIDE2
3: THEATER WIDE3
4: FULL
SELECT: [0¥4]
Natural picture size
• The image is displayed close to its originally formatted proportion.
Some program formats will display with side bars and/or bars at the
top and bottom.
Natural picture size example: The way the image displays will vary
depending on the format of the program you are currently watching.
Channel
Numbers
Pic Size
Note:
You also can change the picture size by
selecting PICTURE SIZE in the SETUP
menu.
Features
Using the TV’s
Conventional (4:3) picture
on a conventional TV
screen
Conventional (4:3) picture in
Natural size on your wide-screen
TV
TheaterWide 1 picture size (for 4:3 format programs)
• The picture is non-uniformly
enlarged—the center of the
picture remains close to its
original proportion, but the left
and right edges are stretched
wider to fill the screen.
• The top and bottom edges of the
picture may be hidden; however,
this mode cannot be scrolled.
TheaterWide 1 picture size
example
34
Notes:
• The PICTURE SIZE feature is not available
for some program formats (such as 1080i
or 720p). Such formats will display in
Natural picture size.
• If you select TheaterWide 2 or 3, the top
and bottom edges of the picture may be
hidden. T o see the hidden edges, either
scroll the picture (see page 36) or try
viewing the program in Full picture size.
NOTICE OF POSSIBLE ADVERSE
EFFECTS ON TV PICTURE TUBE
Avoid displaying stationary images on your
TV screen for extended periods of time.
Fixed (non-moving) images (such as still
PIP/POP windows of black/gray bars in
wide-screen picture or PIP/POP formats)
can become permanently engrained in the
picture tube. This type of damage is NOT
COVERED BY YOUR WARRANTY
because it is the result of misuse. See item
33 on page 4.
• Using these functions to change the picture
size (i.e., changing the height/ width ratio)
for any purpose other than your private
viewing may be prohibited under the
Copyright Laws of the United States and
other countries, and may subject you to civil
and criminal liability.
3R40321A/E P34-40 9/7/04, 15:0834
Page 35

TheaterWide 2 picture size (for letter box programs)
• The entire picture is uniformly
enlarged—it is stretched the same
amount both wider and taller
(retains its original proportion).
• The top and bottom edges of the
picture may be hidden. To view the
hidden areas, see “Scrolling the
TheaterWide picture” on page 36.
A B C D E F G - - - - - - - - - - - - - - - -
TheaterWide 2 picture size
example
TheaterWide 3 picture size (for letter box programs
with subtitles)
• The picture is non-uniformly
enlarged—it is stretched wider to fill
the width of the screen, but only
slightly stretched taller.
• The top and bottom edges of the
picture may be hidden. To view the
hidden areas (such as subtitles or
captions), see “Scrolling the
TheaterWide picture” on page 36.
A B C D E F G - - - - - - - - - - - - - - - -
A B C D E F G - - - - - - - - - - - - - - - - - - - - - - - - - -
TheaterWide 3 picture size
example
Note:
Using these functions to change the picture
size (i.e., changing the height/ width ratio)
for any purpose other than your private
viewing may be prohibited under the
Copyright Laws of the United States and
other countries, and may subject you to
civil and criminal liability.
Safeguards
Important
Welcome to
T oshiba
Connecting
your TV
Remote Control
Using the
Full picture size (for 16:9 source programs)
• The picture is non-uniformly
enlarged—if receiving a 4:3 format
program, it is stretched wider to
fill the width of the screen, but
not stretched taller.
• None of the picture is hidden.
Full picture size example
NOTICE OF POSSIBLE ADVERSE
EFFECTS ON TV PICTURE TUBE
Avoid displaying stationary images on your
TV screen for extended periods of time.
Fixed (non-moving) images (such as still
PIP/POP windows of black/gray bars in
wide-screen picture or PIP/POP formats)
can become permanently engrained in the
picture tube. This type of damage is NOT
COVERED BY YOUR WARRANTY
because it is the result of misuse. See item
33 on page 4.
Setting up
your TV
Using the TV’s
Using the TV’s
Features
Features
3R40321A/E P34-40 9/7/04, 15:0835
Appendix
35
Page 36

Scrolling the TheaterWide® picture
(TheaterWide 2 and 3 only)
1. Press PIC SIZE to select the TheaterWide 2 or 3 mode.
2. Press MENU, and then press
3. Press ▲ or ▼ to highlight PICTURE SCROLL.
or until the SETUP menu appears.
SETUP
: TO ADJUST
OFF
VIDEO
OFF
0
CLOSED CAPTION
PICTURE SIZE
PICTURE SCROLL
CINEMA MODE
ASPECT
IMAGE TILT
:SELECT :ADJUST
4. Press
SCROLL ADJUSTMENT 0
or to display the Scroll Adjustment mode.
5. Press ▲ or ▼ to adjust the vertical position of the picture.
• Normal (center) position
SCROLL ADJUSTMENT 0
: TO ADJUST
• To raise the picture, press ▲.
Pic Size
Menu
Note:
You can scroll the picture in TheaterWide 2
and TheaterWide 3 only. The scroll amounts
are as follows:
• 480i/480p signal source:
Wide 1 : Not adjustable
Wide 2 : -10 to +20
Wide 3 : -10 to +20
Features
Using the TV’s
SCROLL ADJUSTMENT +20
: TO ADJUST
• To lower the picture, press ▼.
SCROLL ADJUSTMENT Ð10
: TO ADJUST
3R40321A/E P34-40 9/7/04, 15:0836
36
Page 37

Selecting the cinema mode
When you view a DVD movie (3:2 pulldown processed) from a DVD
player connected to the ColorStream (component video) inputs on the
TV, smoother and more natural motion can be obtained by setting the
CINEMA MODE to FILM.
To set the CINEMA MODE to FILM:
or to
or
SETUP
CLOSED CAPTION
PICTURE SIZE
PICTURE SCROLL
CINEMA MODE
ASPECT
IMAGE TILT
:SELECT :ADJUST
OFF
FILM / VIDEO
OFF
0
1. Press MENU, and then press
until the SETUP menu appears.
2. Press ▲ or ▼ to highlight CINEMA
MODE, and then press
select FILM.
T o set the CINEMA MODE to VIDEO (off):
Press or to select VIDEO in step 2 above.
Menu
Safeguards
Important
Welcome to
T oshiba
Using the ASPECT feature
When the ASPECT feature is set to ON and the TV receives a
480i signal, the picture size is automatically selected (as described in
the following table).
Automatic aspect size
Aspect ratio of signal source
4:3 Normal
16:9 Full
4:3 Letter box
Not defined
If the signal does not include aspect information, the picture size you
selected on pages 34 and 35 is displayed.
To turn on the ASPECT feature:
1. Press MENU, and then press
or until the SETUP menu appears.
2. Press ▲ or ▼ to highlight ASPECT, and then press
ON.
SETUP
CLOSED CAPTION
PICTURE SIZE
PICTURE SCROLL
CINEMA MODE
ASPECT
IMAGE TILT
:SELECT :ADJUST
OFF
VIDEO
ON / OFF
0
(automatically selected
when ASPECT is ON)
Natural
Full
TheaterWide 2
User-set mode
or to select
Connecting
your TV
Remote Control
Using the
Setting up
your TV
Selecting the display format (for 480p signals
only)
This feature converts a 480p input signal to 540p or 1080i.
T o select the display format:
1. Press MENU, and then press
appears.
2. Press ▲ or ▼ to highlight DISPLAY FORMAT.
3. Press
3R40321A/E P34-40 9/7/04, 15:0837
or to select 540p or 1080i.
PICTURE
COLOR
TEMPERATURE
DISPLAY FORMAT
SVM
RESET
:SELECT :ADJUST
COOL
540p / 1080i
HIGH
or until the PICTURE menu
37
Notes:
• The DISPLAY FORMAT feature is available
only for 480p input. 1080i is always output
when a signal other than 480p is input.
• If you notice flickering in a 480p image, try
setting the DISPLA Y FORMAT to 540p.
Using the TV’s
Using the TV’s
Features
Features
Appendix
Page 38

Adjusting the picture
Selecting the picture mode
You can select four picture modes—Sports, Standard, Movie, and
Memory—as described in the following table:
Mode Picture Quality
SPORTS Bright and dynamic picture (factory-set)
STANDARD Standard picture quality (factory-set)
MOVIE Movie-like picture setting (factory-set)
MEMORY Your personal preferences (set by you; see
“Adjusting the picture quality”)
Menu
To select the picture mode:
1. Press MENU, then press
or to display the PICTURE menu.
2. Press ▲ or ▼ to highlight MODE.
PICTURE
MODE
SPORTS / STANDARD / MOVIE/MEMORY
BRIGHTNESS
CONTRAST
COLOR
TINT
SHARPNESS
:SELECT :ADJUST
SPORTS
25
50
25
0
25
3. Press or to highlight the mode you prefer.
4. Press EXIT to return to normal viewing.
Adjusting the picture quality
You can adjust the picture quality to your personal preferences,
including the brightness, contrast, color, tint, and sharpness. The
qualities you choose will be stored automatically in your TV’s memory
so you can recall them at any time.
To adjust the picture quality:
1. Press MENU, then press
2. Press ▲ or ▼ until the item you want to adjust is highlighted.
PICTURE
MODE
BRIGHTNESS
CONTRAST
COLOR
TINT
SHARPNESS
:SELECT :ADJUST
SPORTS
25
50
25
0
25
or to display the PICTURE menu.
Exit
Menu
Exit
3. Press or to adjust the level.
Selection Pressing
BRIGHTNESS darker lighter
CONTRAST lower higher
COLOR paler deeper
TINT reddish greenish
Features
Using the TV’s
3R40321A/E P34-40 9/7/04, 15:0838
SHARPNESS softer sharper
4. Press EXIT to return to normal viewing.
38
Page 39

Selecting the color temperature
Change the picture quality by selecting from three preset color temperatures—cool, medium, and warm—as described in the following
table:
Mode Picture Quality
COOL Blueish
MEDIUM Neutral
WARM Reddish
To select the color temperature:
1. Press MENU, then press
2. Press ▲ or ▼ to highlight COLOR TEMPERATURE.
or to display the PICTURE menu.
Menu
Safeguards
Important
Welcome to
T oshiba
PICTURE
COLOR
TEMPERATURE
DISPLAY FORMAT
SVM
RESET
:SELECT :ADJUST
3. Press
or to highlight the mode you prefer.
COOL
COOL / MEDIUM / WARM
1080i
HIGH
4. Press EXIT to return to normal viewing.
Selecting the Scan V elocity Modulation (SVM)
The SVM feature enhances picture contrast and sharpness. This
feature has three modes: HIGH, LOW, and OFF.
To select the SVM feature:
1. Press MENU, then press
2. Press ▲ or ▼ to highlight SVM.
PICTURE
COLOR
TEMPERATURE
DISPLAY FORMAT
SVM
RESET
:SELECT :ADJUST
COOL
1080i
HIGH
HIGH / LOW / OFF
3. Press or to select the mode you prefer.
To turn off the SVM:
Select OFF in step 3.
or to display the PICTURE menu.
Exit
Note:
SVM is not required when viewing some
high-quality video material. If you are
watching high-quality video material, you may
want to set SVM to OFF.
Menu
Connecting
your TV
Remote Control
Using the
Setting up
your TV
Resetting your picture adjustments
The RESET function returns your picture quality adjustments to the
following factory settings:
Mode............................sports Tint.......................... center (0)
Brightness............ center (25) Sharpness............. center (25)
Contrast .................. max (50) Color temperature............ cool
Color .................... center (25) SVM................................. high
T o reset your picture adjustments:
1. Press MENU, then press
2. Press ▲ or ▼ to highlight RESET, and then press
PICTURE
COLOR
TEMPERATURE
DISPLAY FORMAT
SVM
RESET
:SELECT :ADJUST
3R40321A/E P34-40 9/7/04, 15:0839
COOL
1080i
HIGH
or to display the PICTURE menu.
.
39
Menu
Using the TV’s
Using the TV’s
Features
Features
Appendix
Page 40

Setting the sleep timer
You can set the TV so it turns off automatically.
To set the sleep timer:
Repeatedly press SLEEP on the remote control to set the length of
time until the TV turns off. The clock will increase 10 minutes for each
press of the SLEEP button (0h00mm, 0h10mm, ...1h50mm, 2h00mm).
After the sleep timer is programmed, the display will appear briefly
every ten minutes to remind you that the sleep timer is operating.
To confirm the sleep timer setting:
Press SLEEP one time. The remaining time will be momentarily
displayed.
To cancel the sleep timer:
Repeatedly press SLEEP until the display turns to 0h00m.
Using the closed caption feature
The Closed Caption feature has two options:
• Captions—An on-screen display of the dialogue, narration, and
sound effects of programs and videos that are closed-captioned
(usually identified in your local TV listing as “CC”).
• Text—An on-screen display of information not related to the
program, such as weather or stock data (if available in your viewing
area).
To view captions or text:
1. Tune the TV to the desired program.
2. Press MENU, and then press
3. Press ▲ or ▼ to highlight CLOSED CAPTION.
SETUP
CLOSED CAPTION
PICTURE SIZE
PICTURE SCROLL
CINEMA MODE
ASPECT
IMAGE TILT
:SELECT :ADJUST
4. Press
or to select the desired Closed Caption mode, as
OFF
C1/C2/T1/T2/OFF
VIDEO
OFF
0
follows:
• To view captions, select C1 or C2 (C1 displays translation of the
primary language in your area). Note: If the program or video
you selected is not closed-captioned, no captions will display
on-screen.
• To view text, select T1 or T2. Note: If text is not available in your
viewing area, a black rectangle may appear on-screen. If this
happens, set the Closed Caption feature to OFF.
• To turn the Closed Caption feature off, highlight OFF in the
Closed Caption menu.
or to display the SETUP menu.
Sleep
Menu
Note:
A closed caption signal may not be decoded
in the following situations:
• when a video tape has been dubbed
• when the signal reception is weak
• when the signal reception is non-standard
Features
Using the TV’s
3R40321A/E P34-40 9/7/04, 15:0840
40
Page 41

Adjusting the sound
Muting the sound
Press MUTE to temporarily turn off the sound. While the sound is off,
the screen will display the word MUTE in the lower right-hand corner.
To restore the sound, press MUTE again.
Selecting stereo/SAP broadcasts
The multi-channel TV sound (MTS) feature provides high-fidelity stereo
sound. MTS also can transmit a second audio program (SAP)
containing a second language or other audio information.
Note: The MTS feature is not available in VIDEO mode.
When the TV receives a stereo or SAP broadcast, the word “STEREO”
or “SAP” displays on-screen every time you turn the TV on, change the
channel, or press RECALL.
To listen to stereo sound:
1. Press MENU, then press or to display AUDIO menu.
2. Press ▲ or ▼ to highlight MTS.
3. Press or to highlight STR (stereo).
Notes:
• In general, you can leave your TV in stereo mode because the
TV automatically outputs the type of sound being broadcast
(stereo or mono).
If the stereo sound is noisy, select MONO to reduce the noise.
•
AUDIO
MTS
BASS
TREBLE
BALANCE
STABLE SOUND
SPEAKERS
:SELECT :ADJUST
4. Press EXIT to return to normal viewing.
To listen to a second audio program (SAP):
1. Press MENU, then press or to display AUDIO menu.
2. Press ▲ or ▼ to highlight MTS.
3. Press or to highlight SAP. The TV speakers will output the
second audio program instead of normal audio.
4. Press EXIT to return to normal viewing.
STR / SAP / MONO
25
25
0
ON
ON
Menu
Exit
Mute
Recall
Note:
A second audio program (SAP) can be heard
only on those TV stations that offer it.
For example, a station might broadcast music
as a second audio program. If you have SAP
on, you will see the current program on the
screen but hear music instead of the
program’s normal audio.
However, if you have SAP on, and the station
you are watching is not currently
broadcasting a second audio program, the
station’s normal audio will be output;
however, occasionally there is no sound at all
in SAP mode. If this happens, set the MTS
feature to STEREO mode.
Safeguards
Important
Welcome to
T oshiba
Connecting
your TV
Remote Control
Using the
Setting up
your TV
Adjusting the sound quality
You can change the sound quality of your TV by adjusting the bass,
treble, and balance.
To adjust the sound quality:
1. Press MENU, then press
2. Press ▲ or ▼ to highlight the item you want to adjust.
AUDIO
MTS
BASS
TREBLE
BALANCE
STABLE SOUND
SPEAKERS
:SELECT :ADJUST
3. Press or to adjust the level.
makes the sound quality weaker or decreases the balance in
•
the right channel, depending on the item selected.
• makes the sound quality stronger or decreases the balance in
the left channel, depending on the item selected.
3R40321A/E P41-Back 9/7/04, 15:0841
STEREO
ON
ON
Using the TV’s
Using the TV’s
or until the AUDIO menu appears.
25
25
0
Features
Features
Appendix
41
Page 42

Resetting your audio adjustments
The RESET function returns the audio adjustments to the following
factory settings:
Bass ..................center (25)
Treble ............... center (25)
Balance ............ center (0)
T o reset your audio adjustments:
1. Press MENU, then press
2. Press ▲ or ▼ to highlight RESET, and then press
AUDIO
Dolby Virtual
WOW SRS 3D
FOCUS
TruBass
HDMI1
HDMI2
RESET
:SELECT :ADJUST
OFF
OFF
OFF
OFF
HDMI
HDMI
or to display the AUDIO menu.
.
Using the StableSound® feature
The StableSound feature limits the highest volume level to prevent
extreme changes in volume when the signal source is changed.
To turn on the StableSound® feature:
1. Press MENU, then press
2. Press ▲ or ▼ to highlight STABLE SOUND.
3. Press or to highlight ON.
or to display the AUDIO menu.
Menu
Features
Using the TV’s
AUDIO
MTS
BASS
TREBLE
BALANCE
STABLE SOUND
SPEAKERS
:SELECT :ADJUST
To turn off the StableSound
STEREO
25
25
0
ON / OFF
ON
®
feature:
Highlight OFF in step 3 above.
Using the Dolby Virtual surround feature
The Dolby Virtual surround feature allows you to listen to your TV in
just like a surround sound mode.
To turn on the Dolby Virtual surround feature:
1. Press MENU, then press
2. Press ▲ or ▼ to highlight Doldy Virtual.
3. Press or to highlight ON.
AUDIO
Dolby Virtual
WOW SRS 3D
FOCUS
TruBass
HDMI1
HDMI2
RESET
:SELECT :ADJUST
ON/OFF
OFF
OFF
OFF
HDMI
HDMI
To turn off the Dolby Virtual surround feature:
Highlight OFF in step 3 above.
or to display the AUDIO menu.
Manufactured under license from Dolby
laboratories. “Dolby” and the double-D
symbol are trademarks of Dolby Laboratories.
Note:
Dolby Virtual surround feature is not available
when WOW SRS 3D feature is set to ON.
3R40321A/E P41-Back 9/7/04, 15:0942
42
Page 43

Safeguards
Important
Using the WOW™ surround sound feature
WOW is a special combination of SRS Labs audio technologies that
creates a thrilling surround sound experience with deep, rich bass
from stereo sound sources. Your TV’s audio will sound fuller, richer,
and wider. WOW consists of three features; SRS 3D, FOCUS, and
TruBass.
To adjust the WOW feature:
1. Select STEREO mode (see “selecting stereo/SAP broadcasts” on
page 41).
2. Press MENU, and then press
3. Press
or to highlight the desired WOW feature you want to
adjust.
• SRS 3D — To turn on or off the surround sound effect.
• FOCUS — To turn on or off the vocal emphasis effect.
• TruBass — To select your desired bass expansion level
(HIGH, LOW or OFF).
AUDIO
Dolby Virtual
WOW SRS 3D
FOCUS
TruBass
HDMI1
HDMI2
RESET
:SELECT :ADJUST
4. Press
or to adjust the item.
OFF
ON / OFF
OFF
OFF
HDMI
HDMI
or to display the AUDIO menu.
Notes:
• If the broadcast is monaural, the SRS 3D
effect will not work.
• WOW SRS 3D feature is not available
when Dolby Virtual surround feature is set
to ON.
SRS WOW, SRS and symbol are
trademarks of SRS Labs, Inc.
SRS WOW technology is incorporated under
license from SRS Labs, Inc.
Menu
Welcome to
T oshiba
Connecting
your TV
Turning off the built-in speakers
Use this feature to turn the TV speakers off when you connect an
audio system (see “Connecting an audio system” on page 15).
To turn off the built-in speakers:
1. Press MENU, then press or to display the AUDIO menu.
2. Press ▲ or ▼ to highlight SPEAKERS, and then press
select OFF.
AUDIO
MTS
BASS
TREBLE
BALANCE
STABLE SOUND
SPEAKERS
:SELECT :ADJUST
STEREO
25
25
0
ON
ON / OFF
To turn on the built-in speakers:
Select ON in step 2 above.
or to
Note:
Make sure the volume control of your audio
amplifier is set to a moderate listening level.
Remote Control
Using the
Setting up
your TV
Using the TV’s
Using the TV’s
Features
Features
3R40321A/E P41-Back 9/7/04, 15:0943
Appendix
43
Page 44

Selecting the HDMI1 (or HDMI2) audio input source
See page 14 for details on connecting an HDMI or a DVI device to the TV’s
HDMI input.
If you connect a DVI device, to hear audio you must also connect analog
audio cables to the HDMI audio IN jacks. Set the HDMI audio input setting
to “DVI” with this connection.
If you connect an HDMI device and play media with digital audio output, to
hear digital audio set the HDMI audio input setting to “HDMI” with this
connection.
If you connect an HDMI device but play media with analog audio output
(for example, certain CDVs do not output digital audio), to hear audio you
must also connect analog audio cables to the HDMI audio IN jacks. Set the
HDMI audio input setting to “DVI” with this connection.
To select the HDMI1 (or HDMI2) audio input source:
1. Press MENU, and then press
2. Press
3. Press
or to highlight HDMI1 (or HDMI2).
or to select HDMI or DVI.
AUDIO
Dolby Virtual
WOW SRS 3D
FOCUS
TruBass
HDMI1
HDMI2
RESET
:SELECT :ADJUST
OFF
OFF
OFF
OFF
HDMI / DVI
HDMI
or to display the AUDIO menu.
Menu
Features
Using the TV’s
Displaying on-screen information
Press RECALL to display the following on-screen information:
• Clock
• Channel number or VIDEO mode selected
• Channel label (if preset)
• Stereo or SAP (second audio program) audio status
• Content rating
• On timer, Sleep time (if preset)
• Picture size
Recall
STEREO
SAP
TV-PG L V
ON TIMER 12:00AM
SLEEP TIMER 2h00m
FULL ABCD
CLOCK 12:00AM TV
ANT
007
Auto power off
The TV will automatically turn off after approximately 15 minutes if it is tuned to a vacant channel or a station that completes
broadcast for the day and stops broadcasting on that channel. This feature does not work in VIDEO mode.
its
Understanding the Power Return feature
If the power is cut off while you are viewing the TV and the power is resupplied, the Power Return feature will turn the TV
on automatically .
If the power is going to be off for a long time or you are going to be away from home for a long time, unplug the power cord
from the wall outlet to prevent the TV from turning on in your absence.
3R40321A/E P41-Back 9/7/04, 15:0944
44
Page 45

Appendix
T roubleshooting
Before calling a service technician, please check the following table for a possible cause of the problem and some solutions.
Problem Solution
TV will not turn on • Make sure the power cord is plugged in, then press POWER.
• The remote control batteries may be dead. Replace the batteries.
No picture, no sound • Check the antenna/cable connections.
No sound, picture OK • The sound may be muted. Press VOLUME.
• The station may have broadcast difficulties. Try another
• The MTS feature may be in SAP mode. Select STR or MONO in the
MTS menu.
Poor sound, picture OK • The station may have broadcast difficulties. Try another channel.
• The MTS feature may be in SAP mode. Select STR or MONO in the
MTS menu.
Poor picture, sound OK • Check the antenna connections.
• The station may have broadcast difficulties. Try another channel.
• Adjust the PICTURE menu.
Poor reception of broadcast channels • The station may have broadcast difficulties. Try another channel.
• Check the antenna connections.
• If you are using a video input, make sure the TV/VCR button is set
correctly.
Cannot receive above channel 13 • Make sure TV/CABLE is set to CABLE mode.
Unable to select a certain channel • The channel may be blocked by the V-Chip feature or CH LOCK
feature, or erased with the add/erase feature.
Cannot access signal input sources (Video1, • Check the VIDEO LOCK feature.
Video2, Video3 and ColorStream HD1, ColorStream HD2, HDMI1 and HDMI2) and/or
Channels 3 and 4
Multiple images • The station may have broadcast difficulties. Try another channel.
• Use a highly directional outdoor antenna.
Poor color or no color • The station may have broadcast difficulties. Try another channel.
• Adjust the TINT and/or COLOR in the PICTURE menu.
• If you change the direction of the TV while it is turned on, the picture
could suffer from color shading. If so, turn off the TV and allow it to cool
for several hours before turning it on again.
Black box on screen • Select OFF in the Closed Caption menu to turn off the Closed Caption
Text mode.
No stereo or SAP sound from a • Make sure the MTS feature is set properly (AUDIO menu).
known MTS broadcast
The V-Chip password does not work • Change or reset your password (page 28).
(U.S. V-Chip system only)
The remote control does not operate • Make sure the TV • CBL/SAT • VCR • DVD • AUDIO1 • AUDIO2 mode
is set properly.
• Remove all obstructions between the remote control and the TV.
• The remote control batteries may be dead. Replace the batteries.
The front panel buttons do not operate • Check the FRONT PANEL LOCK feature.
channel.
Safeguards
Important
Welcome to
T oshiba
Connecting
your TV
Remote Control
Using the
Setting up
your TV
Using the TV’s
Features
3R40321A/E P41-Back 9/7/04, 15:0945
45
Appendix
Appendix
Page 46

Specifications
Note: This model complies with the specifications listed below. Designs and specifications are subject to change without
notice. This model may not be compatible with features and/or specifications that may be added in the future.
Picture Tube Type 30 (760 mm diagonal)
Television system NTSC standard
Channel coverage VHF: 2 – 13
UHF: 14 – 69
Cable TV: 4A, A-5 – A-1, A-I,
J – W, W+1 – W+84
Power source 120V AC, 60 Hz
Power consumption 198 W
Audio power 10 W + 10 W
Speaker type 1-13/16 x 3-7/8 inches (46 x 99 mm) x 2 pcs.
Video/Audio terminals S-VIDEO INPUT
Y-INPUT: 1V (p-p), 75 ohm, negative sync.
C-INPUT: 0.286V (p-p) (burst signal), 75 ohm
VIDEO/AUDIO INPUT
VIDEO: 1V (p-p), 75 ohm, negative sync.
AUDIO: 150 mV (rms) (30% modulation equivalent, 47k ohm)
®
ColorStream
Y: 1V (p-p), 75 ohm
PR: 0.7V (p-p), 75 ohm
PB: 0.7V (p-p), 75 ohm
VIDEO/AUDIO OUTPUT
VIDEO: 1V (p-p), 75 ohm, negative sync.
AUDIO: 150 mV (rms) (30% modulation equivalent, 47k ohm)
HDMI INPUT: HDMI compliant (type A connector)
HDCP compliant
E-EDID* compliant
Suggested scan rates: 1080i, 480p, 480i, 720p
HDMI Audio: 2-channel PCM
Dimensions Width: 31-5/16 inches (796 mm)
Height:21-5/8 inches (549.2 mm)
Depth: 22-3/16 inches (563 mm)
Weight 88.2 Ibs. (54 kg)
Supplied accessories Remote control with two size “AA” batteries
(component video) INPUT
32/44.1/48 kHz sampling frequency
16/20/24 bits per sample
* E-EDID = Enhanced-Extended Display Identification
Appendix
3R40321A/E P41-Back 9/7/04, 15:0946
46
Page 47

Limited United States Warranty
for 27'' FST PURE® and All Larger TVs and All HD-Ready and HD Integrated TVs
Toshiba America Consumer Products, L.L.C. (“TACP”) makes the
following limited warranties to original consumers in the United
States. THESE LIMITED WARRANTI ES EXTEND TO THE
ORIGINAL CONSUMER PURCHASER OR ANY PERSON
RECEIVING THIS TELEVISION AS A GIFT FROM THE ORIGINAL
CONSUMER PURCHASER AND TO NO OTHER PU RCHASER
OR TRANSFEREE.
PRODUCTS PURCHAS ED IN THE U.S.A. AND USED I N
CANADA AR E NOT COVERED BY THESE WARRANTIES.
PRODUCTS PURCHAS ED IN CANADA AND USED I N THE
U.S.A. ARE NOT COVERED BY THESE WARRANTIES.
Limited One (1) Year Warranty on Parts and Labor*
TACP warrants this television and its parts against defects in
materials or workmanship for a period of one (1) year after the date
of original retail purchase. DURING TH IS PERIOD, TACP WILL, AT
TACP’S OPTION, REPAIR OR REPLACE A DEFECTIVE PART WITH
A NEW OR REFURBISHED PART WITHOUT CHARGE TO YOU
FOR PARTS OR LABOR. TACP Authorized Service Station
personnel will come to your home when warranty service is
required. Depending on the type of repair required, either the
service will be performed in your home or the set will be taken to
the TACP Authorized Service Station for repair and returned to your
home at no cost to you.
Limited Two (2) Year Warranty on Picture Tube*
TACP warrants the picture tube in this television against defects in
materials or workmanship for a period of two (2) years after the date
of original retail purchase. DURING TH IS PERIOD, TACP WILL, AT
TACP’S OPTION, REPAIR OR REPLACE A DEFECTIVE PICTURE
TUBE WITH A NEW OR REFURBISHED PICTURE TUBE
WITHOUT CHARGE TO YOU. LABOR CHARGES FOR PICTURE
TUBE REPLACEMENT ARE NOT COVERE D UNDER THIS
WARRANTY AFTER ONE (1) YEAR FROM THE DATE OF THE
ORIGINAL RETAIL PURCHASE. TACP Authorized Service Station
personnel will come to your home when warranty service is
required. Depending on the type of repair required, either the
service will be performed in your home or the set will be taken to
the TACP Authorized Service Station for repair and returned to your
home at no cost to you.
Rental Units
The warranty for rental units begins with the date of first rental or
thirty (30) days from the date of shipment to the rental firm,
whichever comes first.
*Limited Warranty for Commercial Units
TACP warrants televisions sold and used for commercial purposes
as follows: all parts are warranted against defects in materials or
workmanship for a period of ninety (90) days after the date of
original purchase. DURING THIS PERIOD, TACP WILL, AT TACP’S
OPTION, R EPAIR OR REPLACE A DEFECTIVE PART WITH A
NEW OR REFURBISHED PART WITHOUT CHARGE TO YOU.
Owner’s Manual and Product Registration
Read this owner’s manual thoroughly before operating this
television.
Complete and mail the enclosed product registration card or register
your product online at www.tacp.toshiba.com/service as soon
as possible. By registering your product you will enable TACP to
provide you with better customer service and improved product
support. Failure to register your product does not diminish your
warranty rights.
47
Your Responsibility
THE ABOVE WARRANTIES ARE SUBJECT TO THE FOLLOWING
CONDITIONS:
(1) You must provide your bill of sale or other proof of purchase.
(2) All warranty servicing of this television must be performed by an
Authorized TACP Service Station.
(3) These warranties from TACP are effective only if the television is
purchased and operated in the U.S.A. or Puerto Rico.
(4) Labor charges for installation, setup, adjustment of customer
controls, and installation or repair of antenna systems are not
covered by these warranties. Reception problems caused by
inadequate antenna systems are your responsibility.
(5) Warranties extend only to defects in materials or workmanship
as limited above, and do not extend to any television or parts
that have been lost or discarded by you or to damage to the
television or parts caused by fires, misuse, accident, Acts of
God (such as lightning or fluctuations in electric power),
improper installation, improper maintenance, or use in violation
of instructions furnished by TACP; use or malfunction through
simultaneous use of this product and connected equipment; or
to units that have been modified or had the serial number
removed, altered, defaced, or rendered illegible.
How to Obtain Warranty Services
If, after following all of the operating instructions in this manual and
checking the “Troubleshooting” section, you find that service is
needed:
(1) To find the nearest TACP Authorized Service Station, visit
TACP’s web site at www.tacp.toshiba.com/service or call
toll free 1-800-631-3811.
(2) Present your bill of sale or other proof of purchase to the
Authorized Service Station.
For additional information, visit TACP’s web site:
ALL WARRANTIES IMPLIED BY THE LAW OF ANY STATE OF
THE U.S.A., INCLUDING THE IMPLIED WARRANTIES OF
MERCHANTABILITY AND FITNESS FOR A PARTICULAR
PURPOSE, ARE EXPRESSLY LIMITE D TO THE DURATION OF
THE LIMITED WARRANTI ES SET FORTH ABOVE. WITH THE
EXCEPTION OF ANY WARRANTIES I MPLIED BY THE LAW OF
ANY STATE OF THE U.S.A. AS HEREBY LIMITED, THE
FOREGOING WARRANTY IS EXCLUSIVE AND IN LIEU OF ALL
OTHER WARRANTIES, GUARANTEE S, AGR EEMENTS, AND
SIMILAR OBLIGATIONS OF TACP WITH RESPECT TO THE
REPAIR OR REPLACEMENT OF ANY PARTS. IN NO EVENT
SHALL TACP BE LIABLE FOR CONSEQUENTIAL OR
INCIDENTAL DAMAGES (INCLUDING, BUT NOT LIM ITED TO,
LOST PROFITS, BUSINESS INTERRUPTION, OR MODIFICATION
OR ERASU RE OF RECORDED DATA CAUSED BY USE, MISUSE,
OR INABILITY TO USE TH IS PRODUCT).
No person, agent, distributor, dealer, or company is authorized to
change, modify, or extend the terms of these warranties in any
manner whatsoever. The time within which action must be
commenced to enforce any obligation of TACP arising under this
warranty or under any law of the United States or of any state
thereof is hereby limited to 90 days from the date you discover, or
should have discovered, the defect. This limitation does not apply to
implied warranties arising under the law of any state of the U.S.A.
THIS WARRANTY GIVES YOU SPECIFIC LEGAL RIGHTS, AND
YOU MAY ALSO HAVE OTHER RIGHTS, WHICH MAY VARY
FROM STATE TO STATE IN THE U.S.A. SOME STATES OF TH E
U.S.A. DO NOT ALLOW LIM ITATIONS ON THE DURATION OF
AN IMPLIED WARRANTY, LIMITATIONS ON THE TIME WITH IN
WHICH AN ACTION MAY BE BROUGHT, OR THE EXCLUSION
OR LIM ITATION OF INCIDENTAL OR CON SEQUENTIAL
DAMAGE S; THEREFORE, THE ABOVE LIMITATIONS OR
EXCLUSIONS MAY NOT APPLY TO YOU UN DER SUCH
CIRCUMSTANCES.
FST PUR E® is a registered trademark of Toshiba America Consumer Products, L.L.C.
061404
www.tacp.toshiba.com
.
Safeguards
Important
Welcome to
T oshiba
Connecting
your TV
Remote Control
Using the
Setting up
your TV
Using the TV’s
Features
Appendix
Appendix
3R40321A/E P41-Back 9/7/04, 15:0947
Page 48

Toshiba of Canada Limited (“TCL”) makes the following limited
warranties to original consumers in Canada. THESE LI MITED
WARRANTIES EXTEND TO THE ORIGINAL CONSU MER
PURCHASER OR ANY PERSON R ECEIVING THIS TELEVISION
AS A GIFT FROM THE ORIGINAL CONSUM ER PURCHASER
AND TO NO OTHER PURCHASER OR TRANSFE REE.
PRODUCTS PURCHASED IN THE U.S.A. AND USED I N
CANADA ARE NOT COVERED BY THESE WARRANTIES.
PRODUCTS PURCHASED IN CANADA AND USED IN THE
U.S.A. ARE NOT COVERED BY THESE WARRANTIES.
Limited One (1) Year Warranty on Parts and Labor*
TCL warrants this television and its parts against defects in materials
or workmanship for a period of one (1) year after the date of original
retail purchase. DURING THIS PERIOD, TCL WILL, AT TCL’S
OPTION, REPAIR OR REPLACE A DEFECTIVE PART WITH A
NEW OR REFURBISHED PART WITHOUT CHARGE TO YOU
FOR␣ PARTS OR LABOR. YOU M UST DELIVE R TH E ENTIR E
TELEVISION TO AN AUTHORIZED TCL SERVICE DEPOT. YOU
MUST PAY FOR ALL TRANSPORTATION AND INSURANCE
CHARGES FOR THE TELEVISION TO AND FROM THE SERVICE
DEPOT.
Limited Two (2) Year Warranty on Picture Tube*
TCL warrants the picture tube in this television against defects in
materials or workmanship for a period of two (2) years after the date
of original retail purchase. DURING TH IS PERIOD, TCL WILL, AT
TCL’S OPTION, REPAIR OR REPLACE A DEFECTIVE PICTURE
TUBE WITH A NEW OR REFURBISHED PICTURE TUBE
WITHOUT CHARGE TO YOU. LABOR CHARGES FOR PICTURE
TUBE REPLACEMENT ARE NOT COVERED UN DER THIS
WARRANTY AFTER ONE (1) YEAR FROM THE DATE OF THE
ORIGINAL RETAIL PURCHASE. YOU MUST DELIVER THE
ENTIRE TELEVIS ION TO AN AUTHORIZED TCL SERVICE
DEPOT. YOU MUST PAY FOR ALL TRANSPORTATION AND
INSURANCE CHARGES FOR THE TELEVISION TO AND FROM
THE SERVICE DEPOT.
Rental Units
The warranty for rental units begins with the date of first rental or
thirty (30) days from the date of shipment to the rental firm,
whichever comes first.
*Limited Warranty for Commercial Units
TCL warrants televisions sold and used for commercial purposes as
follows: all parts are warranted against defects in materials or
workmanship for a period of ninety (90) days after the date of
original purchase. DURING THIS PERIOD, TCL WILL, AT␣ TCL’S
OPTION, REPAIR OR REPLACE A DEFECTIVE PART WITH A
NEW OR REFURBISHED PART WITHOUT CHARGE TO YOU.
YOU MUST DELIVER THE ENTIRE TELEVISION TO AN
AUTHORIZED TCL SERVICE DEPOT. YOU MUST PAY FOR ALL
TRANSPORTATION AND INSURANCE CHARGES FOR TH E
TELEVISION TO AND FROM THE SERVICE DEPOT.
Owner’s Manual and Product Registration
Read this owner’s manual thoroughly before operating this
television.
Register your product online at www.toshiba.ca as soon as
possible. By registering your product you will enable TCL to provide
you with better customer service and improved product support.
Failure to register your product does not diminish your warranty
rights.
Appendix
Limited Canada Warranty
for 25” to 31” Television Models
Your Responsibility
THE ABOVE WARRANTIES ARE SUBJECT TO THE FOLLOWING
CONDITIONS:
(1) You must provide your bill of sale or other proof of purchase.
(2) All warranty servicing of this television must be performed by an
Authorized TCL Service Depot.
(3) These warranties from TCL are effective only if the television is
purchased in Canada from an authorized TCL dealer and
operated in Canada.
(4) Labor charges for installation, setup, adjustment of customer
controls, and installation or repair of antenna systems are not
covered by these warranties. Reception problems caused by
inadequate antenna systems are your responsibility.
(5) Warranties extend only to defects in materials or workmanship
as limited above, and do not extend to any television or parts
that have been lost or discarded by you or to damage to the
television or parts caused by fires, misuse, accident, Acts of
God (such as lightning or fluctuations in electric power),
improper installation, improper maintenance, or use in violation
of instructions furnished by TCL; use or malfunction through
simultaneous use of this product and connected equipment; or
to units that have been modified or had the serial number
removed, altered, defaced, or rendered illegible.
How to Obtain Warranty Services
If, after following all of the operating instructions in this manual and
checking the “Troubleshooting” section, you find that service is
needed:
(1) To find the nearest TCL Authorized Service Depot, visit TCL’s
web site at www.toshiba.ca.
(2) Present your bill of sale or other proof of purchase to the
Authorized Service Depot.
For additional information, visit TCL’s web site:
www.toshiba.ca
ALL WARRANTIES IMPLIED BY THE LAW OF ANY PROVINCE
OF CANADA, INCLUDING THE IMPLIED WARRANTIES OF
MERCHANTABILITY AND FITNESS FOR A PARTICULAR
PURPOSE, ARE EXPRESSLY LIMITED TO THE DURATION OF
THE LIMITED WARRANTIES SET FORTH ABOVE. WITH THE
EXCEPTION OF ANY WARRANTI ES IMPLIED BY THE LAW OF
ANY PROVINCE OF CANADA AS HEREBY LIMITED, THE
FOREGOING WARRANTY IS EXCLUSIVE AN D IN LI EU OF ALL
OTHER WARRANTIES, GUARANTEES, AGREEMENTS, AND
SIM ILAR OBLIGATIONS OF TCL WITH R ESPECT TO THE REPAIR
OR REPLACEMENT OF ANY PARTS. IN NO EVENT SHALL TCL
BE LIABLE FOR CONSEQUENTIAL OR I NCIDENTAL DAMAGES
(INCLUDING, BUT NOT LIMITED TO, LOST PROFITS, BUSINESS
INTERRU PTION, OR MODI FICATION OR ERASURE OF
RECORDED DATA CAUSED BY USE, MISUSE, OR INABILITY TO
USE TH IS PRODUCT).
No person, agent, distributor, dealer, or company is authorized to
change, modify, or extend the terms of these warranties in any
manner whatsoever. The time within which action must be
commenced to enforce any obligation of TCL arising under this
warranty or under any law of Canada or of any province thereof is
hereby limited to 90 days from the date you discover, or should have
discovered, the defect. This limitation does not apply to implied
warranties arising under the law of any province of Canada.
THIS WARRANTY GIVES YOU SPECIFIC LEGAL RIGHTS, AND
YOU MAY ALSO HAVE OTHER RIGHTS, WHICH MAY VARY
FROM PROVINCE TO PROVINCE IN CANADA. SOME
PROVINCES OF CANADA DO NOT ALLOW LIMITATIONS ON
THE DURATION OF AN IMPLIED WARRANTY, LIMITATIONS ON
THE TIME WITHIN WHICH AN ACTION MAY BE BROUGHT, OR
THE EXCLUSION OR LIMITATION OF INCIDENTAL OR
CONSEQUENTIAL DAMAGES; THEREFORE, THE ABOVE
LIMITATIONS OR EXCLUSIONS MAY NOT APPLY TO YOU
UNDER SUCH CIRCUMSTANCES.
061504
48
3R40321A/E P41-Back 9/7/04, 15:0948
Page 49

Memo
.................................................................................................................................................................................................
.................................................................................................................................................................................................
.................................................................................................................................................................................................
.................................................................................................................................................................................................
.................................................................................................................................................................................................
.................................................................................................................................................................................................
.................................................................................................................................................................................................
.................................................................................................................................................................................................
.................................................................................................................................................................................................
.................................................................................................................................................................................................
.................................................................................................................................................................................................
.................................................................................................................................................................................................
.................................................................................................................................................................................................
.................................................................................................................................................................................................
.................................................................................................................................................................................................
.................................................................................................................................................................................................
.................................................................................................................................................................................................
.................................................................................................................................................................................................
.................................................................................................................................................................................................
.................................................................................................................................................................................................
.................................................................................................................................................................................................
.................................................................................................................................................................................................
.................................................................................................................................................................................................
.................................................................................................................................................................................................
.................................................................................................................................................................................................
.................................................................................................................................................................................................
.................................................................................................................................................................................................
.................................................................................................................................................................................................
.................................................................................................................................................................................................
.................................................................................................................................................................................................
.................................................................................................................................................................................................
.................................................................................................................................................................................................
.................................................................................................................................................................................................
.................................................................................................................................................................................................
.................................................................................................................................................................................................
.................................................................................................................................................................................................
.................................................................................................................................................................................................
.................................................................................................................................................................................................
.................................................................................................................................................................................................
.................................................................................................................................................................................................
.................................................................................................................................................................................................
.................................................................................................................................................................................................
.................................................................................................................................................................................................
.................................................................................................................................................................................................
.................................................................................................................................................................................................
.................................................................................................................................................................................................
.................................................................................................................................................................................................
.................................................................................................................................................................................................
.................................................................................................................................................................................................
.................................................................................................................................................................................................
.................................................................................................................................................................................................
.................................................................................................................................................................................................
.................................................................................................................................................................................................
.................................................................................................................................................................................................
.................................................................................................................................................................................................
.................................................................................................................................................................................................
.................................................................................................................................................................................................
3R40321A/E P41-Back 9/7/04, 15:0949
Page 50

National Service Division
TEL.: (905) 470-5400
Service Centers:
TORONTO: 191 McNABB STREET,
MARKHAM, ONTARIO, L3R 8H2, CANADA
TEL.: (905) 470-5400
MONTREAL: 18050 TRANS CANADA, KIRKLAND,
QUEBEC, H9J-4A1, CANADA
TEL.: (514) 390-7766
VANCOUVER: 22171 FRASERWOOD WAY,
ColorStream®, FST Pure®, TheaterWide® and StableSound® are
registered trademarks of Toshiba America Consumer Products, L.L.C.
GameTimer is a trademark of Toshiba America Consumer Products, L.L.C.
RICHMOND, B.C., V62 1J5, CANADA
TEL.: (604) 303-2500
3R40321A/E P41-Back 9/7/04, 15:0950
Printed in Thailand
 Loading...