

Page 1

MULTIFUNCTIONAL DIGITAL SYSTEMS
Troubleshooting Guide
Page 2

©2009, 2010 TOSHIBA TEC CORPORATION All rights reserved
Under the copyright laws, this manual cannot be reproduced in any form without prior written permission of TTEC. No patent liability
is assumed, however, with respect to the use of the information contained herein.
Page 3
Preface
Thank you for purchasing TOSHIBA Multifunctional Digital Systems. This manual describes how to troubleshoot the
problems that could occur while you are using the equipment. Keep this manual within easy reach, and use it to configure
an environment that makes the best use of the e-STUDIO’s functions.
This equipment provides the scanning function as an option. However, this optional scanning function is already installed in some
models.
How to read this manual
Symbols in this manual
In this manual, some important items are described with the symbols shown below. Be sure to read these items before
using this equipment.
Indicates a potentially hazardous situation which, if not avoided, could result in death, serious
injury, or serious damage, or fire in the equipment or surrounding objects.
Indicates a potentially hazardous situation which, if not avoided, may result in minor or moderate
injury, partial damage to the equipment or surrounding objects, or loss of data.
Indicates information to which you should pay attention when operating the equipment.
Other than the above, this manual also describes information that may be useful for the operation of this equipment with
the following signage:
Describes handy information that is useful to know when operating the equipment.
Pages describing items related to what you are currently doing. See these pages as required.
Screens
y Screens on this manual may differ from the actual ones depending on how the equipment is used, such as the status
of the installed options.
y The illustration screens used in this manual are for paper in the A/B format. If you use paper in the LT format, the
display or the order of buttons in the illustrations may differ from that of your equipment.
Trademarks
y The official name of Windows 2000 is Microsoft Windows 2000 Operating System.
y The official name of Windows XP is Microsoft Windows XP Operating System.
y The official name of Windows Vista is Microsoft Windows Vista Operating System.
y The official name of Windows 7 is Microsoft Windows 7 Operating System.
y The official name of Windows Server 2003 is Microsoft Windows Server 2003 Operating System.
y The official name of Windows Server 2008 is Microsoft Windows Server 2008 Operating System.
y Microsoft, Windows, Windows NT, and the brand names and product names of other Microsoft products are
trademarks of Microsoft Corporation in the US and other countries.
y Apple, AppleTalk, Macintosh, Mac, Mac OS, Safari and TrueType are trademarks of Apple Inc. in the US and other
countries.
y Adobe, Adobe Acrobat, Adobe Reader, Adobe Acrobat Reader, and PostScript are trademarks of Adobe Systems
Incorporated.
y Mozilla, Firefox and the Firefox logo are trademarks or registered trademarks of Mozilla Foundation in the U.S. and
other countries.
y IBM, AT and AIX are trademarks of International Business Machines Corporation.
y NOVELL, NetWare, and NDS are trademarks of Novell, Inc.
y TopAccess is a trademark of Toshiba Tec Corporation.
y Other company names and product names in this manual are the trademarks of their respective companies.
Preface 1
Page 4

Page 5

CONTENTS
Preface....................................................................................................................................... 1
Chapter 1 TROUBLESHOOTING FOR THE HARDWARE
Messages Displayed on the Touch Panel .............................................................................. 8
Clearing a Paper Jam ............................................................................................................. 11
Locating a paper jam ........................................................................................................... 11
Clearing a paper jam ........................................................................................................... 12
Paper jam in the Reversing Automatic Document Feeder (optional) (Lower) ..................... 13
Paper jam in the Reversing Automatic Document Feeder (optional) (Upper) ..................... 14
Paper jam in the drawer feeding portion.............................................................................. 16
Paper jam in the Large Capacity Feeder (optional)............................................................. 16
Paper jam in the Paper Feed Pedestal (optional)................................................................ 17
Paper jam in the bypass tray ............................................................................................... 17
Paper jam in the automatic duplexing unit........................................................................... 18
Paper jam on the paper transport path................................................................................ 19
Paper jam in the fuser unit................................................................................................... 20
Paper jam in the Job Separator and the Offset Tray (both optional) ................................... 22
Paper jam in the Bridge Kit (optional).................................................................................. 23
Paper jam in the Finisher MJ-1101 and the Hole Punch Unit MJ-6101 (both optional)....... 23
Paper jam in the Saddle Stitch Finisher MJ-1024 and the Hole Punch Unit MJ-6004 (both
optional) .............................................................................................................................. 28
Paper jam in the saddle stitch unit of the Saddle Stitch Finisher MJ-1024 (optional).......... 30
Paper jam in the Saddle Stitch Finisher MJ-1025 (optional) ............................................... 32
Paper jam in the Hole Punch Unit of the Saddle Stitch Finisher MJ-1025 (optional) .......... 33
Paper jam in the stapler unit of the Saddle Stitch Finisher MJ-1025 (optional)................... 34
Paper jam in the saddle stitch unit of the Saddle Stitch Finisher MJ-1025 (optional).......... 35
Paper jam in the Hanging Finisher MJ-1031 (optional) ...................................................... 37
Clearing paper jams caused by a wrong paper size setting ................................................ 38
Clearing a Staple Jam ............................................................................................................ 43
Staple jam in a finisher ........................................................................................................43
Staple jam in the saddle stitch unit ...................................................................................... 50
Replacing a Toner Cartridge ................................................................................................. 53
Replacing a “Near Empty” toner cartridge ........................................................................... 57
Refilling With Staples............................................................................................................. 59
Refilling finisher staples....................................................................................................... 59
Refilling saddle stitch unit staples........................................................................................ 66
Cleaning the Charger ............................................................................................................. 69
Cleaning the Hole Punch Dust Bin ....................................................................................... 70
Hole Punch Unit MJ-6101 / MJ-6004................................................................................... 70
Hole Punch Unit MJ-6005.................................................................................................... 70
Removal and Installation of the Exit Support Tray ............................................................. 72
Chapter 2 TROUBLESHOOTING FOR COPYING
Copying Problems.................................................................................................................. 74
Chapter 3 TROUBLESHOOTING FOR PRINTING
Print Job Problems................................................................................................................. 78
Clearing print job errors .......................................................................................................78
CONTENTS 3
Page 6

Cannot remember the document password for a Private Print job...................................... 79
Printer Driver Problems .........................................................................................................80
Cannot print (port setting problems) .................................................................................... 80
Cannot print (SNMP Community Name problems).............................................................. 80
Command line options not processed ................................................................................. 80
Retrieval of printer configuration failed................................................................................ 81
Cannot print a job as expected using PS3 printer driver ..................................................... 81
Cannot change settings on the [Fonts] tab and the [Configuration] tab .............................. 81
Network Connection Problems ............................................................................................. 82
Cannot print with the equipment (network connection problems)........................................ 82
Cannot print with SMB print................................................................................................. 82
Cannot print properly with AppleTalk print........................................................................... 82
Client Problems ..................................................................................................................... 83
Checking the client status.................................................................................................... 83
Hardware Problems................................................................................................................ 84
Startup page not printed ...................................................................................................... 84
Print jobs not output ............................................................................................................ 84
Chapter 4 TROUBLESHOOTING FOR SCANNING
Scanning Problems ................................................................................................................ 86
Cannot E-mail my scans...................................................................................................... 86
Cannot find the data saved in the shared folder.................................................................. 86
Chapter 5 TROUBLESHOOTING FOR e-Filing
e-Filing Web Utility Problems ................................................................................................ 88
e-Filing Web Utility terminates the session.......................................................................... 88
Numerous sub windows repeatedly appear ........................................................................ 88
Displaying the items in the Contents Frame takes a long time............................................ 88
Error messages ................................................................................................................... 89
Chapter 6 TROUBLESHOOTING FOR NETWORK CONNECTIONS
Locating the Equipment in the Network............................................................................... 92
Cannot locate the equipment in the network ....................................................................... 92
Cannot locate the equipment with Local Discovery............................................................. 93
Equipment does not respond to ping command .................................................................. 94
LDAP Search and Authentication Problems........................................................................ 95
Network shutdown occurs or touch panel disabled after LDAP search ............................... 95
LDAP authentication takes a long time................................................................................ 95
4 CONTENTS
Printing Problems (Network Related) ................................................................................... 96
SMB print and Point&Print in a Windows operating system environment ........................... 96
Raw TCP or LPR print in a Windows operating system environment ................................. 96
IPP print in a Windows operating system environment ....................................................... 97
Novell print in a NetWare environment................................................................................ 97
Macintosh environment ....................................................................................................... 98
UNIX/Linux environment...................................................................................................... 98
Network Fax (N/W-Fax) Driver Problems.............................................................................. 99
N/W-Fax Driver Installation Error Messages ....................................................................... 99
N/W-Fax Driver General Errors ......................................................................................... 100
Page 7

Chapter 7 CHECKING THE EQUIPMENT STATUS WITH TopAccess
Hardware Status Icons on TopAccess [Device] Tab......................................................... 104
Error Messages .................................................................................................................... 106
Error Codes........................................................................................................................... 110
Error codes on print jobs ................................................................................................... 110
Error codes on transmission and reception ....................................................................... 112
Error codes on scan jobs................................................................................................... 115
Chapter 8 WHEN SOMETHING IS WRONG WITH THE EQUIPMENT
When You Think Something Is Wrong With the Equipment............................................. 120
General operations ............................................................................................................ 120
Originals and paper ........................................................................................................... 121
Regular Maintenance ........................................................................................................... 122
INDEX ................................................................................................................................................................... 123
CONTENTS 5
Page 8

6 CONTENTS
Page 9

1.
TROUBLESHOOTING FOR THE HARDWARE
This chapter describes how to troubleshoot problems with paper, toner and other finishing processes.
This chapter also describes how to supply the paper, toner and staples.
Messages Displayed on the Touch Panel .............................................................................. 8
Clearing a Paper Jam............................................................................................................. 11
Locating a paper jam............................................................................................................................................11
Clearing a paper jam ............................................................................................................................................12
Paper jam in the Reversing Automatic Document Feeder (optional) (Lower) ......................................................13
Paper jam in the Reversing Automatic Document Feeder (optional) (Upper) ......................................................14
Paper jam in the drawer feeding portion ..............................................................................................................16
Paper jam in the Large Capacity Feeder (optional) ..............................................................................................16
Paper jam in the Paper Feed Pedestal (optional).................................................................................................17
Paper jam in the bypass tray................................................................................................................................17
Paper jam in the automatic duplexing unit ...........................................................................................................18
Paper jam on the paper transport path.................................................................................................................19
Paper jam in the fuser unit ...................................................................................................................................20
Paper jam in the Job Separator and the Offset Tray (both optional) ....................................................................22
Paper jam in the Bridge Kit (optional)...................................................................................................................23
Paper jam in the Finisher MJ-1101 and the Hole Punch Unit MJ-6101 (both optional)........................................23
Paper jam in the Saddle Stitch Finisher MJ-1024 and the Hole Punch Unit MJ-6004 (both optional) .................28
Paper jam in the saddle stitch unit of the Saddle Stitch Finisher MJ-1024 (optional)...........................................30
Paper jam in the Saddle Stitch Finisher MJ-1025 (optional) ................................................................................32
Paper jam in the Hole Punch Unit of the Saddle Stitch Finisher MJ-1025 (optional) ...........................................33
Paper jam in the stapler unit of the Saddle Stitch Finisher MJ-1025 (optional)....................................................34
Paper jam in the saddle stitch unit of the Saddle Stitch Finisher MJ-1025 (optional)...........................................35
Paper jam in the Hanging Finisher MJ-1031 (optional) ........................................................................................37
Clearing paper jams caused by a wrong paper size setting.................................................................................38
Clearing a Staple Jam............................................................................................................43
Staple jam in a finisher .........................................................................................................................................43
Staple jam in the saddle stitch unit .......................................................................................................................50
Replacing a Toner Cartridge ................................................................................................. 53
Replacing a “Near Empty” toner cartridge ............................................................................................................57
Refilling With Staples............................................................................................................. 59
Refilling finisher staples........................................................................................................................................59
Refilling saddle stitch unit staples.........................................................................................................................66
Cleaning the Charger.............................................................................................................69
Cleaning the Hole Punch Dust Bin ....................................................................................... 70
Hole Punch Unit MJ-6101 / MJ-6004 ...................................................................................................................70
Hole Punch Unit MJ-6005 ....................................................................................................................................70
Removal and Installation of the Exit Support Tray ............................................................. 72
Page 10
1 TROUBLESHOOTING FOR THE HARDWARE
Messages Displayed on the Touch Panel
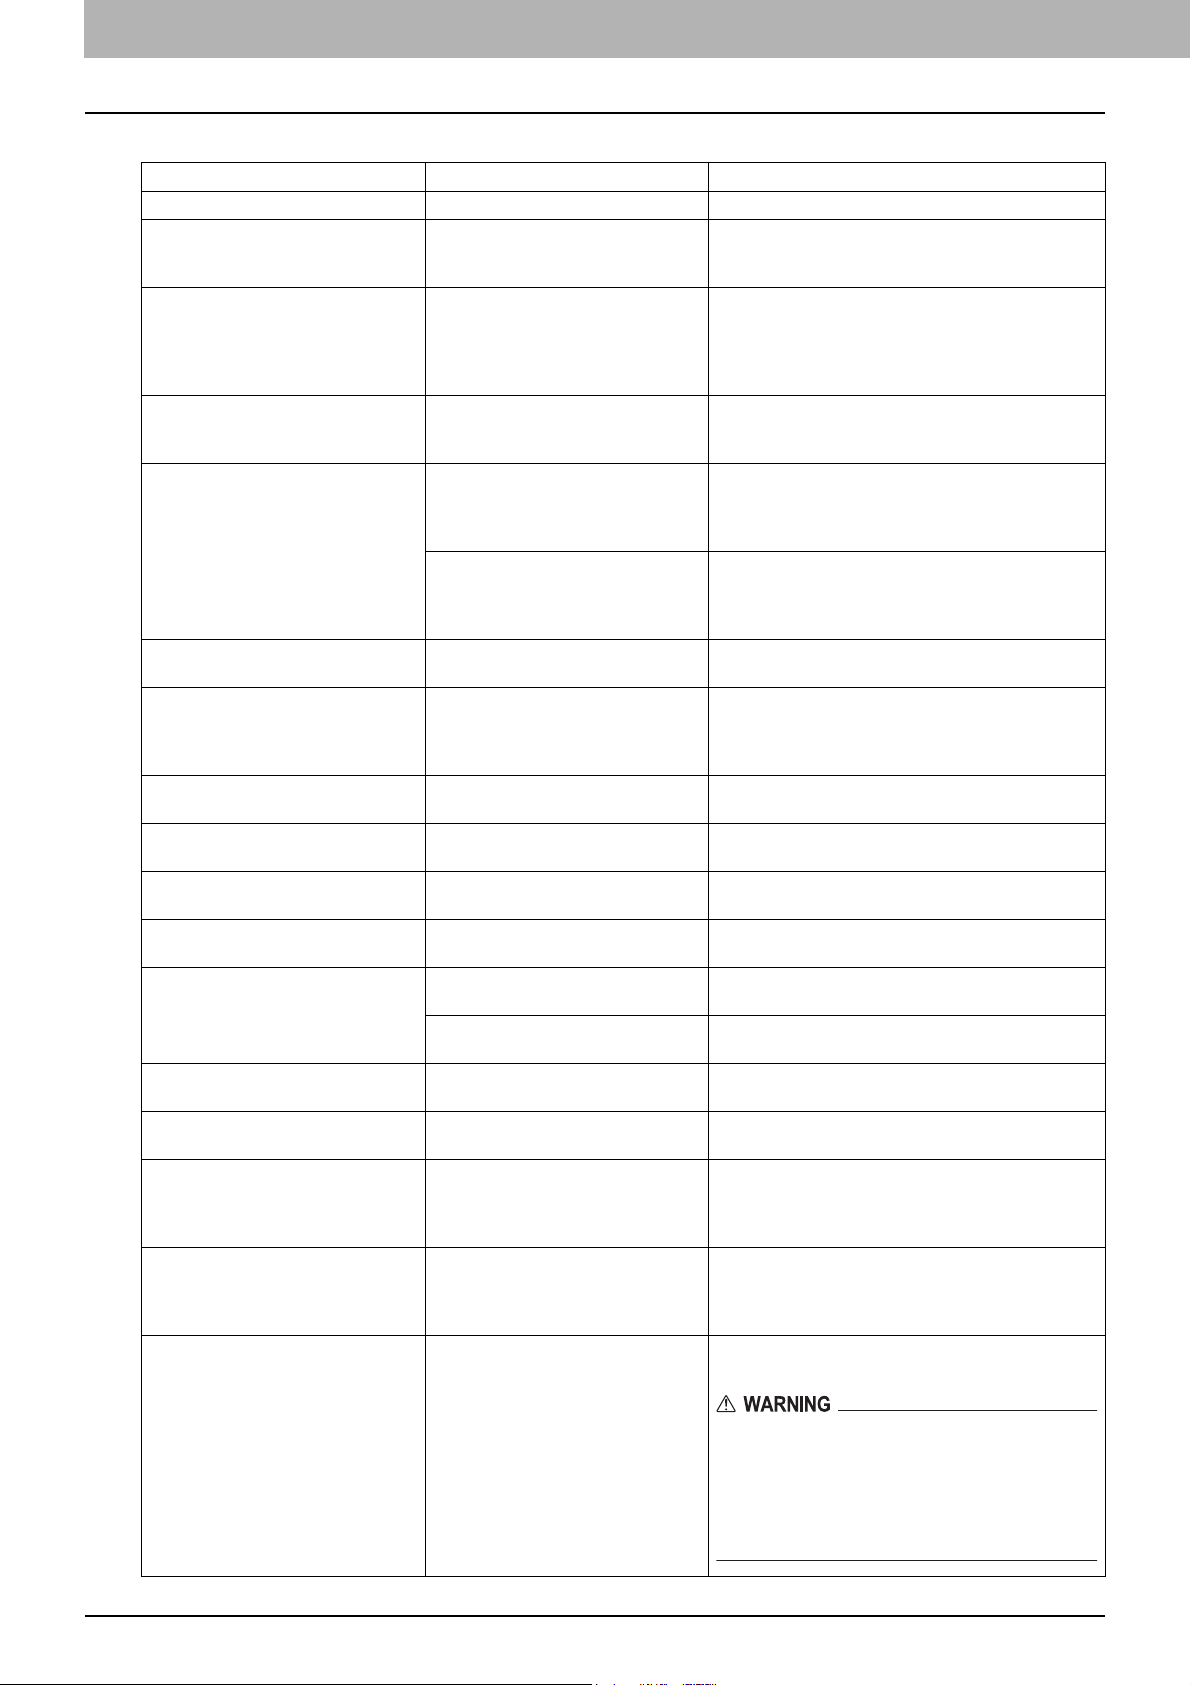
When a message appears on the touch panel, see the table below to solve the problem.
Message Problem Description Corrective Action
Close *** cover. The cover indicated by *** is open. Check the cover on the touch panel and close it.
Misfeed in *** Paper jam has occurred inside the
Check paper size setting on control
panel for drawer N
Wait (Performing Self-check) The equipment is undergoing
Check the original and set it again The original is jammed inside of the
Change direction of original The orientation of the original placed
Change from this mode
Count over, cannot store anymore
READY (CHECK SADDLE STITCH
STAPLER)
READY (CHECK SADDLE STITCH
STAPLER)
READY (CHECK STAPLER) Staple jam has occurred in the stapler
READY (CHECK STAPLER) No staples are left in the stapler of the
READY (TONER NOT
RECOGNIZED)
READY (HOLE PUNCH DUST BIN IS
FULL)
READY (INNER TRAY FULL) The exit tray of the equipment is full of
Cannot copy
Check DEPARTMENT COUNTER
Add paper No paper is left in a drawer or on the
Call for service The equipment requires adjusting by
equipment.
Paper jam has occurred because of
the mismatch between the paper size
placed in drawer N and the size
registered for the drawer N in the
equipment.
maintenance to keep its imaging
quality.
Reversing Automatic Document
Feeder (optional).
The direction or the size of the
original placed on the Reversing
Automatic Document Feeder is
incorrect.
on the original glass is incorrect.
The number of originals to be
scanned has exceeded the limit
specified with the department or user
code during scanning.
Staple jam has occurred in the stapler
of the saddle stitch unit.
No staples are left in the stapler of the
saddle stitch unit.
of the finisher.
finisher.
The toner cartridge is not installed. Or
it is not installed correctly.
A toner cartridge not recommended
by TOSHIBA is being used.
Hole punch dust bin is full of paper
punchings.
paper.
The number of originals to be
scanned has exceeded the limit
specified with the department code
during scanning.
bypass tray.
a service technician.
Remove the jammed paper following the guidance
displayed on the touch panel.
P.11 “Clearing a Paper Jam”
Just removing the jammed paper does not prevent
another paper jam. Be sure to correctly register the
paper size in the equipment.
P.38 “Clearing paper jams caused by a wrong
paper size setting”
Wait until the adjustment is completed and the
message disappears.
Remove the jammed original following the guidance
on the touch panel.
P.13 “Paper jam in the Reversing Automatic
Document Feeder (optional) (Lower)”
Check the direction and the size of the original and
then replace it on the Reversing Automatic Document
Feeder. Then reattempt the operation.
Change the orientation of the original by 90 degrees
and place it on the original glass.
Ask your administrator for details of setting the limit for
the number of copies.
Remove the jammed staples.
P.50 “Staple jam in the saddle stitch unit”
Refill the staples.
P.66 “Refilling saddle stitch unit staples”
Remove the jammed staples.
P.43 “Clearing a Staple Jam”
Refill the staples.
P.59 “Refilling With Staples”
Install the toner cartridge correctly.
P.53 “Replacing a Toner Cartridge”
Use a TOSHIBA-recommended toner cartridge.
P.53 “Replacing a Toner Cartridge”
Remove the paper punchings.
P.70 “Cleaning the Hole Punch Dust Bin”
Remove the paper from the exit tray of the equipment.
Ask your administrator for details of setting the limit for
the number of copies.
Set paper in the drawer or on the bypass tray. The
touch panel indicates which drawer (or the bypass
tray) has no paper.
To set paper, refer to the Copying Guide.
Contact your service representative with the error
code displayed on the right side of the touch panel.
8 Messages Displayed on the Touch Panel
Never attempt to repair, disassemble or modify
the equipment by yourself.
You could cause a fire or get an electric shock.
Always contact your service representative for
maintenance or repair of the internal parts of the
equipment.
Page 11
1 TROUBLESHOOTING FOR THE HARDWARE
Message Problem Description Corrective Action
Examine stapler in the Saddle Stitch
unit
Check staple cartridge in the Saddle
Stitch unit
Check staple cartridge No staples are left in the stapler of the
Examine Stapler Staple jam has occurred in the stapler
Saving energy Press START button The equipment has entered into the
CHANGE DRAWER TO CORRECT
PAPER SIZE
Time for periodic maintenance The equipment requires inspection
POWER FAILURE A job was interrupted by a power
ERASING DATA The Data Overwrite Enabler is
Check paper size setting on control
panel for Bypass
Set the paper on the bypass tray
again.
Check the direction or size of the
paper on the bypass tray and press
START
Reboot the machine An error has occurred in the
TONER NOT RECOGNIZED The toner cartridge is not installed. Or
Toner near Empty Toner is running out. Prepare a new toner cartridge.
Staple jam has occurred in the stapler
of the saddle stitch unit.
No staples are left in the stapler of the
saddle stitch unit.
finisher.
of the finisher.
energy saving mode since it has not
been used for a certain time.
No paper suitable for the original is
set.
The size of the original is not detected
correctly because the original is sent
from the Reversing Automatic
Document Feeder (optional) at a
skew.
and maintenance by a service
technician.
failure or some other reason.
clearing the data.
Paper jam has occurred because of a
mismatch between the paper size
placed in the bypass tray and the size
registered for the bypass tray in the
equipment.
The paper placed on the bypass tray
jammed.
The direction or the size of the paper
placed on the bypass tray is incorrect.
equipment and it stopped normal
operation.
it is not installed correctly.
A toner cartridge not recommended
by TOSHIBA is being used.
Remove the jammed staples.
P.50 “Staple jam in the saddle stitch unit”
Refill the staples.
P.59 “Refilling With Staples”
Refill the staples.
P.59 “Refilling With Staples”
Remove the jammed staples.
P.43 “Clearing a Staple Jam”
Press any of the [START], [COPY], [e-FILING],
[SCAN], [PRINT], [FAX] and [ENERGY SAVER]
buttons to clear the energy saving mode.
Place the suitable size paper for the original in the
drawer.
Replace the original while aligning the side guides of
the Reversing Automatic Document Feeder to its
width so that it will be placed straight.
Contact your service representative for maintenance.
The print or fax job may be incomplete. Press [JOB
STATUS] to check whether any jobs are unfinished.
To clear the messages, press the [FUNCTION
CLEAR] button twice.
This message is displayed if the Data Overwrite
Enabler (optional) is installed. You can operate the
equipment while the message is displayed.
Register the paper size correctly. Just releasing the
paper jam does not prevent another paper jam.
P.38 “Clearing paper jams caused by a wrong
paper size setting”
Remove the jammed paper and set the paper again.
Check the direction and the size of the paper and then
replace it on the bypass tray.
Rebooting the equipment may correct the error. To
reboot the equipment, turn the main power switch off
and then on.
Install the toner cartridge correctly.
P.53 “Replacing a Toner Cartridge”
Use a TOSHIBA-recommended toner cartridge.
P.53 “Replacing a Toner Cartridge”
(About another 1000 copies, set at the time of
shipment, can be made after this message appears.)
y Replace a toner cartridge after the message
“Install new toner cartridge” is displayed.
y If you replace a toner cartridge with a new one
while some toner is still left, make sure you
follow the procedure P.57 “Replacing a
“Near Empty” toner cartridge”.
Install new toner cartridge No toner is left. Replace the toner cartridge.
P.53 “Replacing a Toner Cartridge”
Please Empty Hole Punch Waste The Hole Punch Unit dust bin is full. Remove the paper punchings.
P.70 “Cleaning the Hole Punch Dust Bin”
Not enough Work Space to store
originals
Will you print out stored originals?
Internal memory available ran out
while scanning.
To print out the data for the originals stored (scanned)
until the message appeared, press [YES] on the touch
panel. To delete the stored data, press [NO].
Messages Displayed on the Touch Panel 9
Page 12

1 TROUBLESHOOTING FOR THE HARDWARE
Message Problem Description Corrective Action
The number of originals exceeds the
limits.
The scanned data are deleted.
The number of originals exceeds the
limits.
Will you copy stored originals?
The number of originals to be
scanned has exceeded the limit of
1000 sheets during scanning. (The
magazine sort or page number
function is used.)
The number of originals to be
scanned has exceeded the limit of
1000 sheets during scanning.
Reduce the number of originals to be scanned, and
try again.
To print out the data for the originals stored (scanned)
until the message appeared, press [YES] on the touch
panel. To delete the stored data, press [NO].
Error Codes
The error codes indicating the status of the equipment may appear on the touch panel. You can find the listings of these
error codes in Chapter 7.
P.110 “Error Codes”
10 Messages Displayed on the Touch Panel
Page 13
1 TROUBLESHOOTING FOR THE HARDWARE
Clearing a Paper Jam
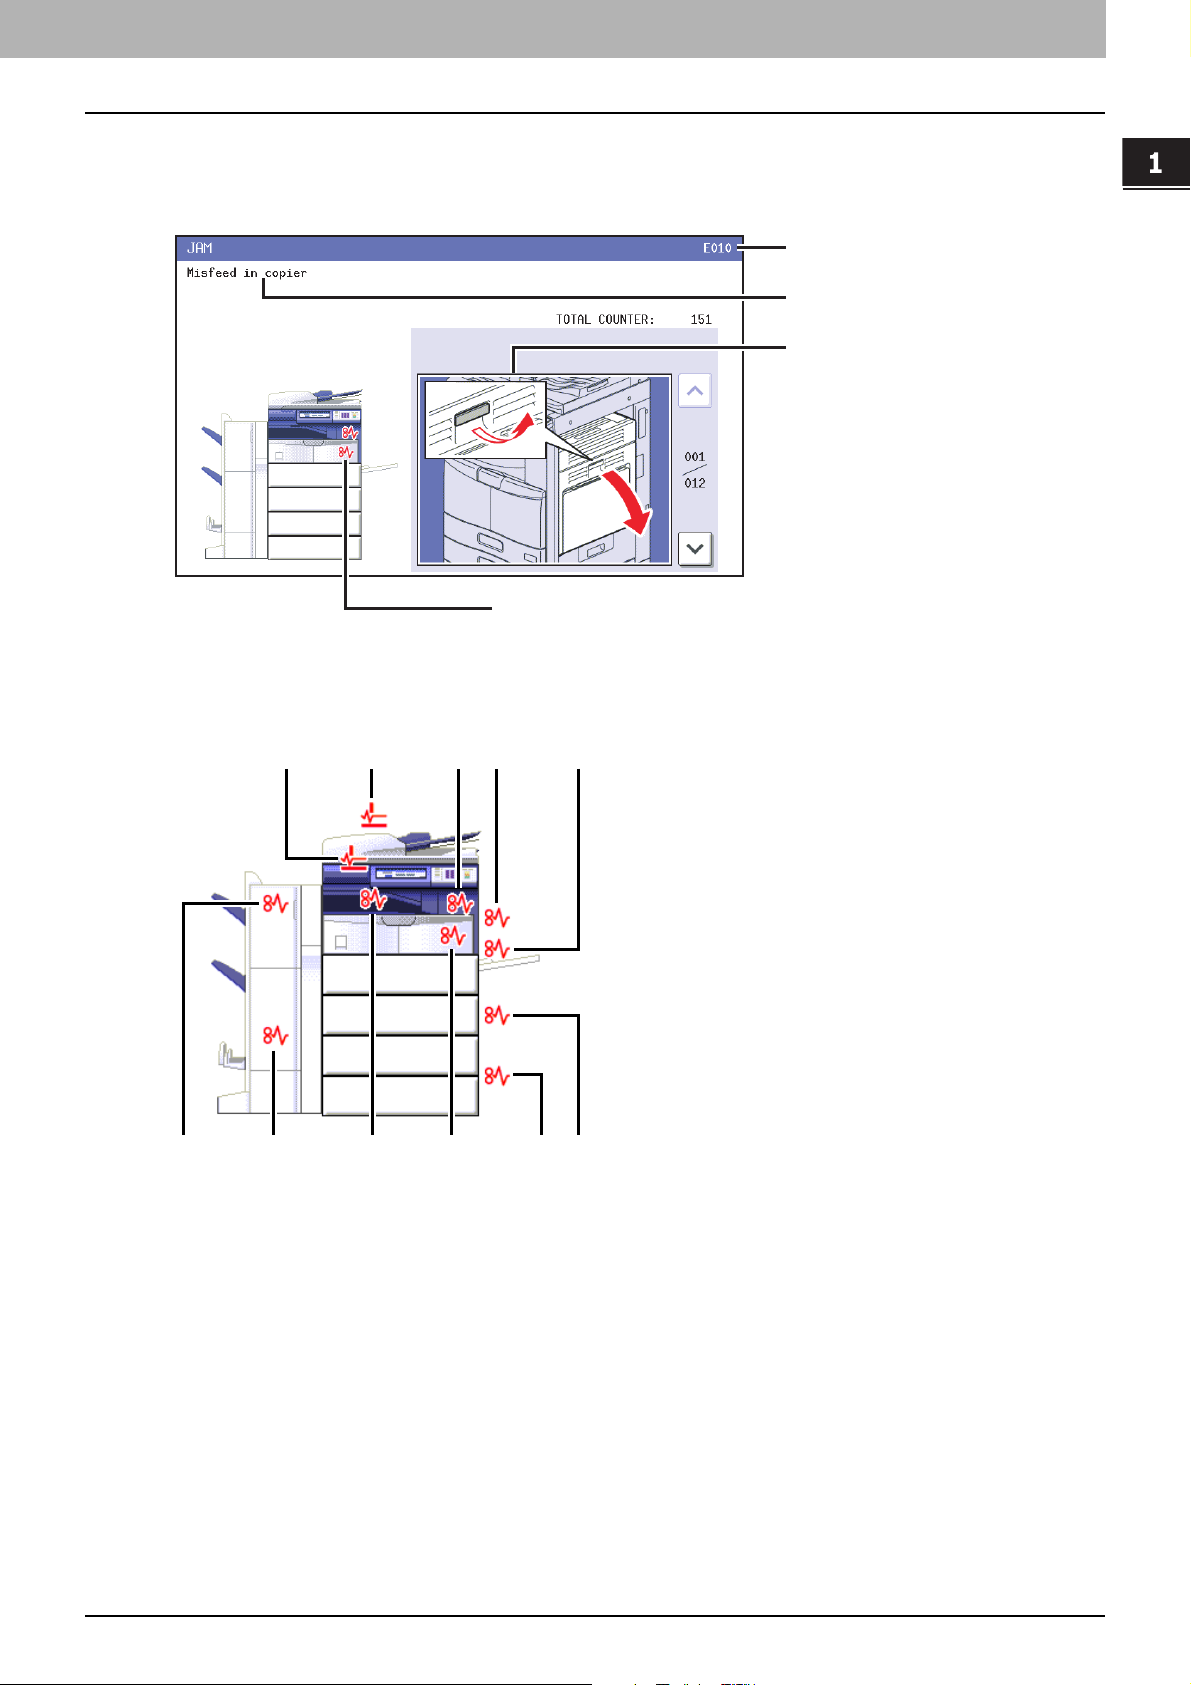
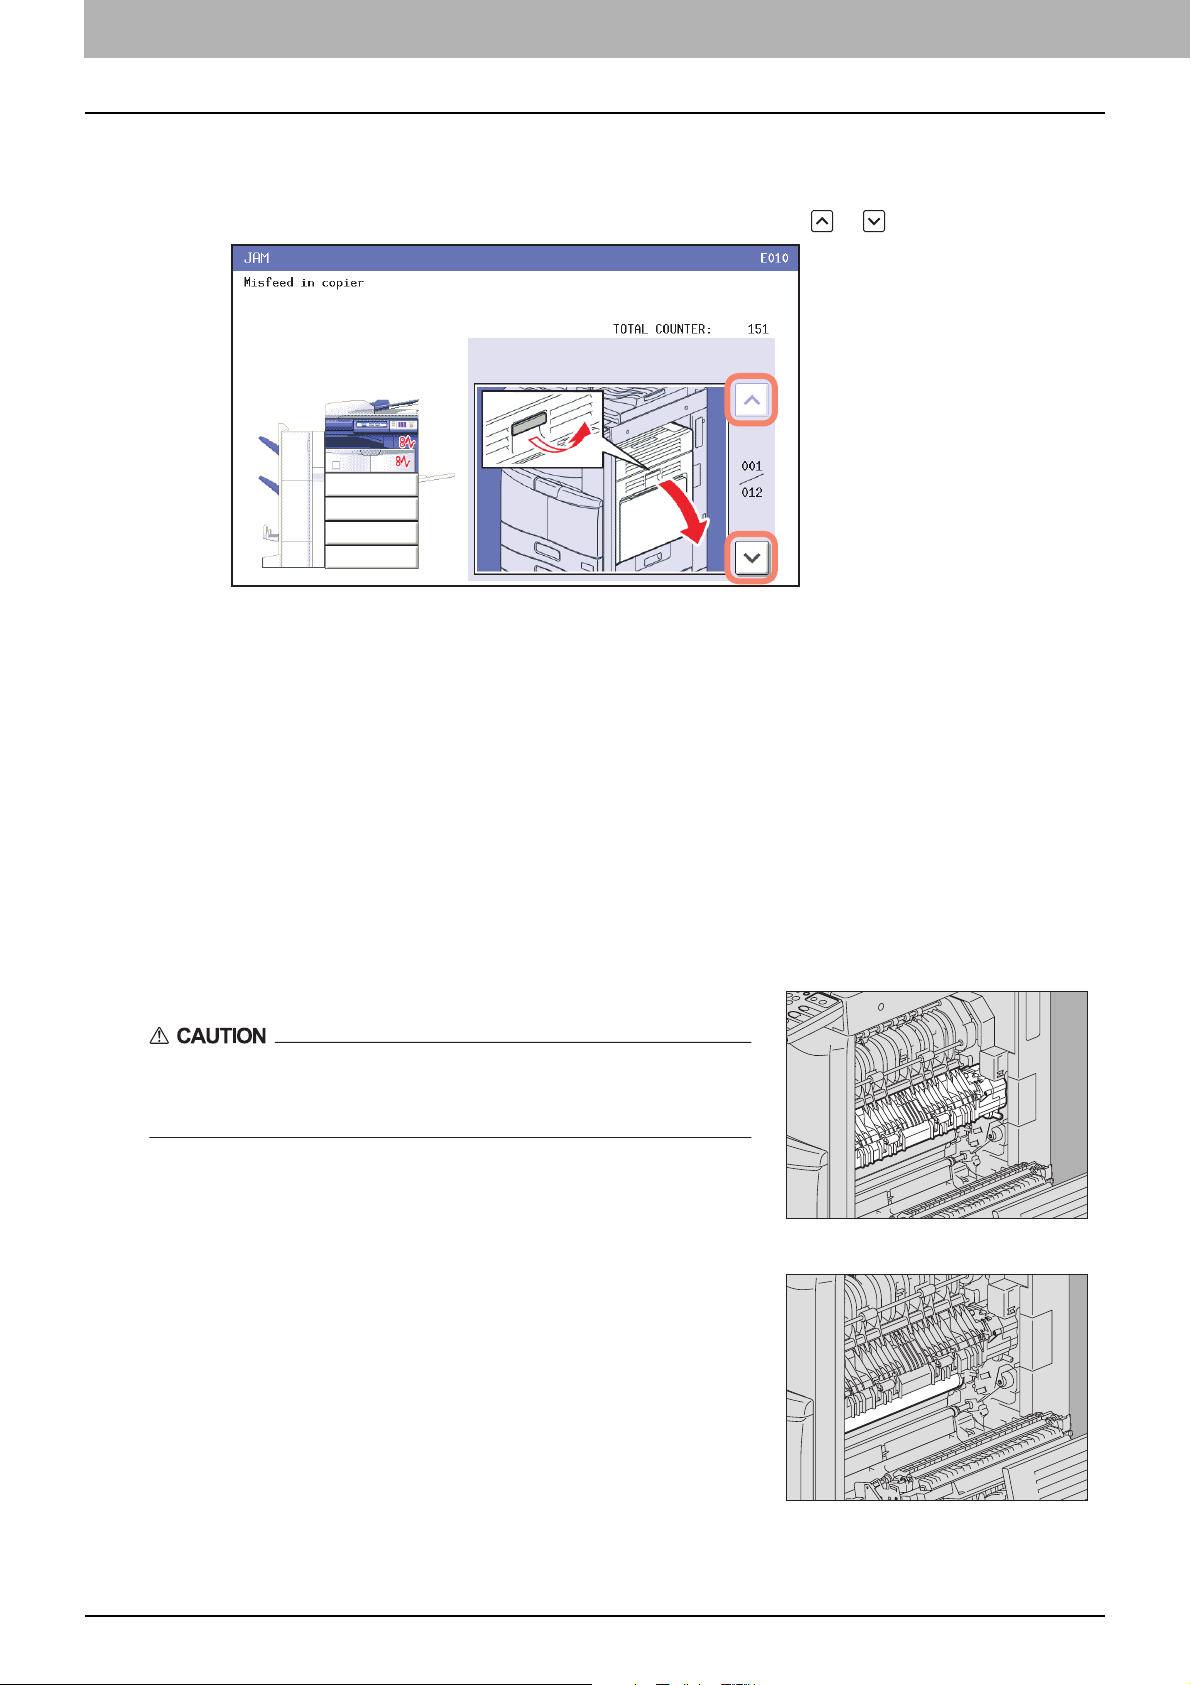
Locating a paper jam
The equipment stops copying when the original or copy paper is jammed. Paper jams are notified on the touch panel as
follows:
Error code
Error message
Guidance for
clearing paper jams
Paper jam symbols
The paper jam symbol helps you locate the paper jam.
1
1011
2 3 4 5
89 67
1. Reversing Automatic Document Feeder (optional) (lower) ( P.1 3 )
2. Reversing Automatic Document Feeder (optional) (upper) ( P.14)
3. Fuser unit ( P.20)
4. Automatic duplexing unit ( P.18)
5. Bypass tray ( P. 1 7 )
6. Drawer feeding portion ( P. 1 6 )
7. Large Capacity Feeder ( P.16) or Paper Feed Pedestal (both optional) ( P. 1 7 )
8. Paper transport path ( P.1 9 )
9. Job Separator, Offset Tray or Bridge Kit (all optional) ( P.22, P.23)
10. Saddle stitch unit (optional) ( P.30, P.35)
11. Finisher and Hole Punch Unit (both optional) ( P. 2 3 , P. 2 8 , P. 3 2 , P. 3 3 , P. 3 4 , P. 3 7 )
The picture of the hardware device shown on the touch panel differs depending on the finisher options installed.
Clearing a Paper Jam 11
Page 14
1 TROUBLESHOOTING FOR THE HARDWARE
Clearing a paper jam
Clear the paper jam
1
Clear the paper jam following the guidance shown on the touch panel. Press or to scroll the pages.
After clearing the jam, close all the opened covers.
2
The equipment starts the warm-up. Follow the guidance on the touch panel.
Tips on removing the jammed paper
Note the following points in removing the jammed paper.
Remove the jammed paper carefully so as not to tear it.
To avoid tearing the jammed paper, remove the paper slowly with both hands. Using force may tear the paper, making it
more difficult to remove. See also that no pieces of torn paper are left inside the equipment.
When the paper jam sign remains after removing the jammed paper;
Depending on the timing of the occurrence, no jammed paper may be found where the paper jam sign indicates. If the
sign does not disappear after you have removed the jammed paper, follow the steps as instructed on the touch panel.
Do not touch the fuser unit or the metal portion around it.
Do not touch the fuser unit or the metal portion around it when you remove
the paper jammed in the right side of the equipment. This could burn you or
the shock could cause you to get your hand injured in the machine.
Do not touch the photoconductive drum.
When you remove the paper jammed in the right side of the equipment, be
sure not to touch the photoconductive drum. This could stain copy images.
12 Clearing a Paper Jam
Page 15
1 TROUBLESHOOTING FOR THE HARDWARE
1.TROUBLESHOOTING FOR THE HARDWARE
If paper jams occur frequently
The following are the common causes of paper jams. If the problem persists, check for the following situations.
y An unsuitable original is placed on the Reversing Automatic Document Feeder.
y Unavailable paper with the equipment is used.
y Paper sizes are not consistent between the size in a drawer or the bypass tray and the size registered in the
equipment.
y All the jammed paper has not been removed.
y There is too much of a gap between the paper and the side or end guide in the drawer.
y The amount of paper placed in a drawer exceeds the limit indicated on the side guide of the drawer.
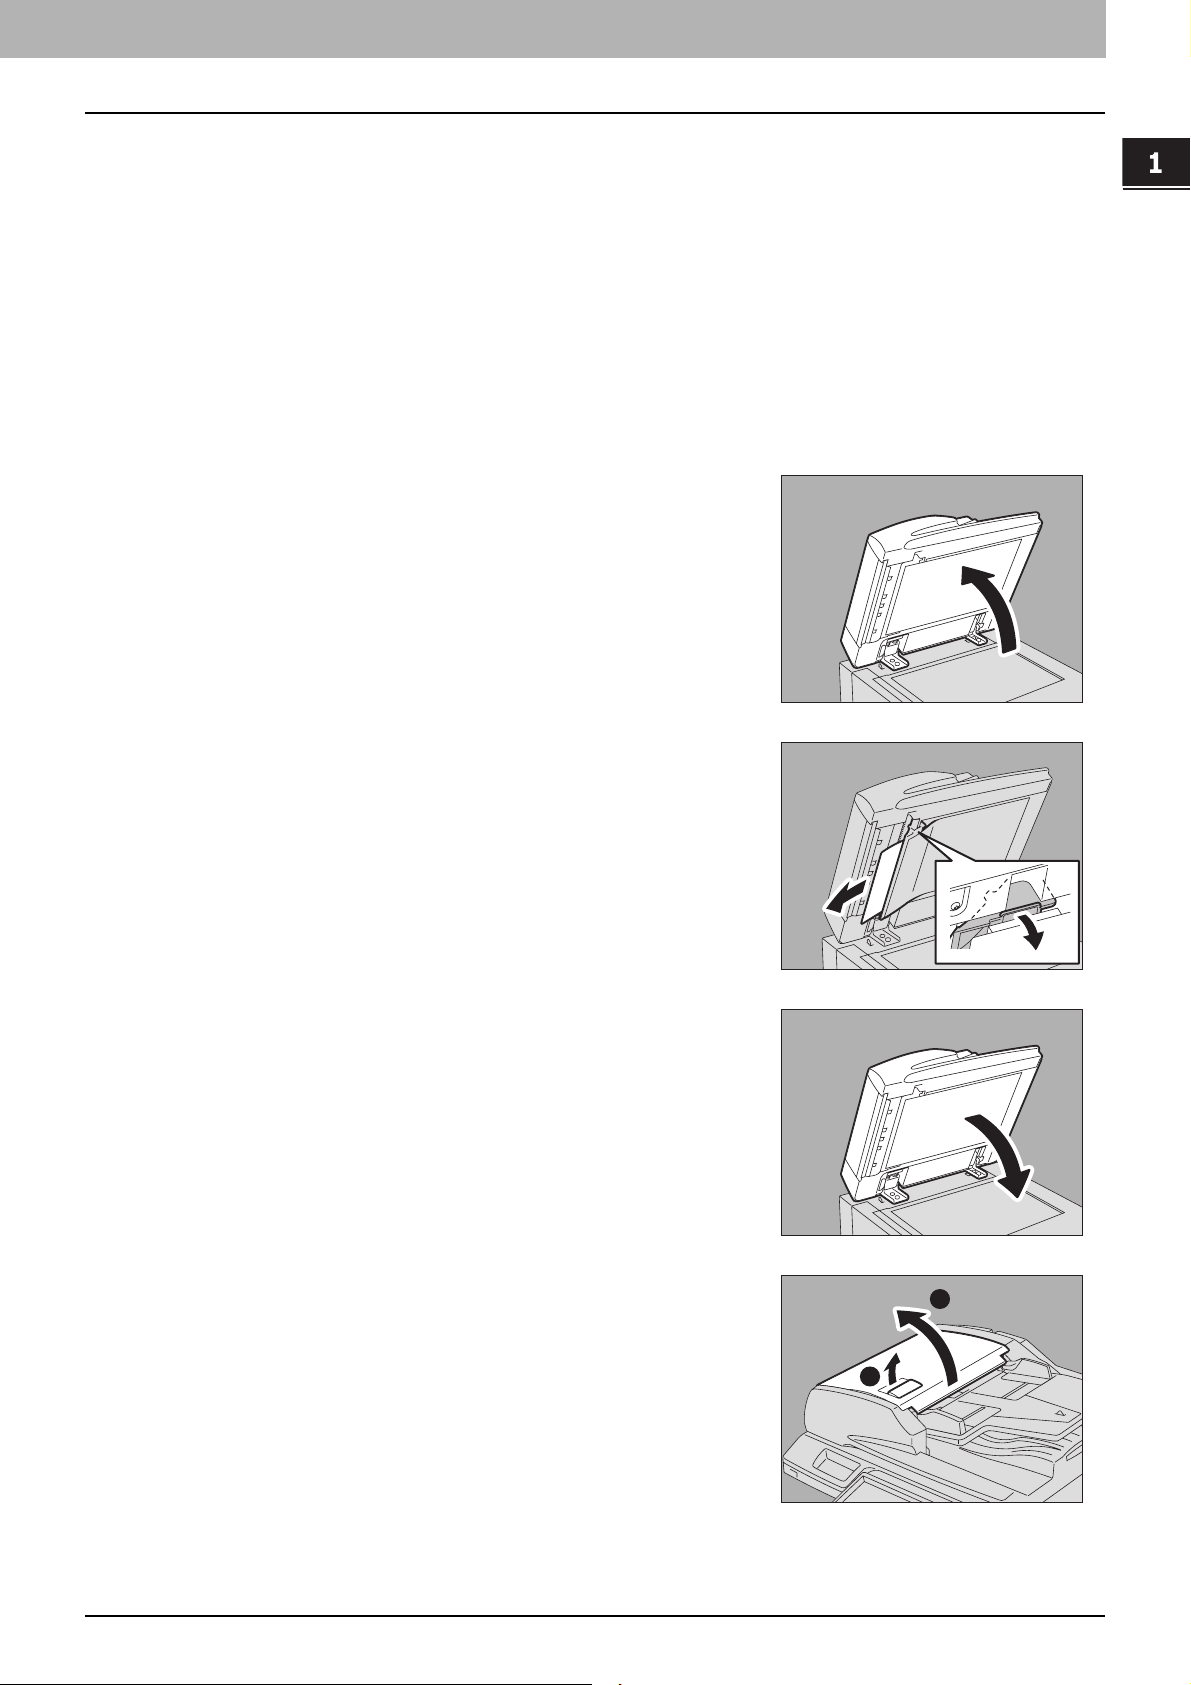
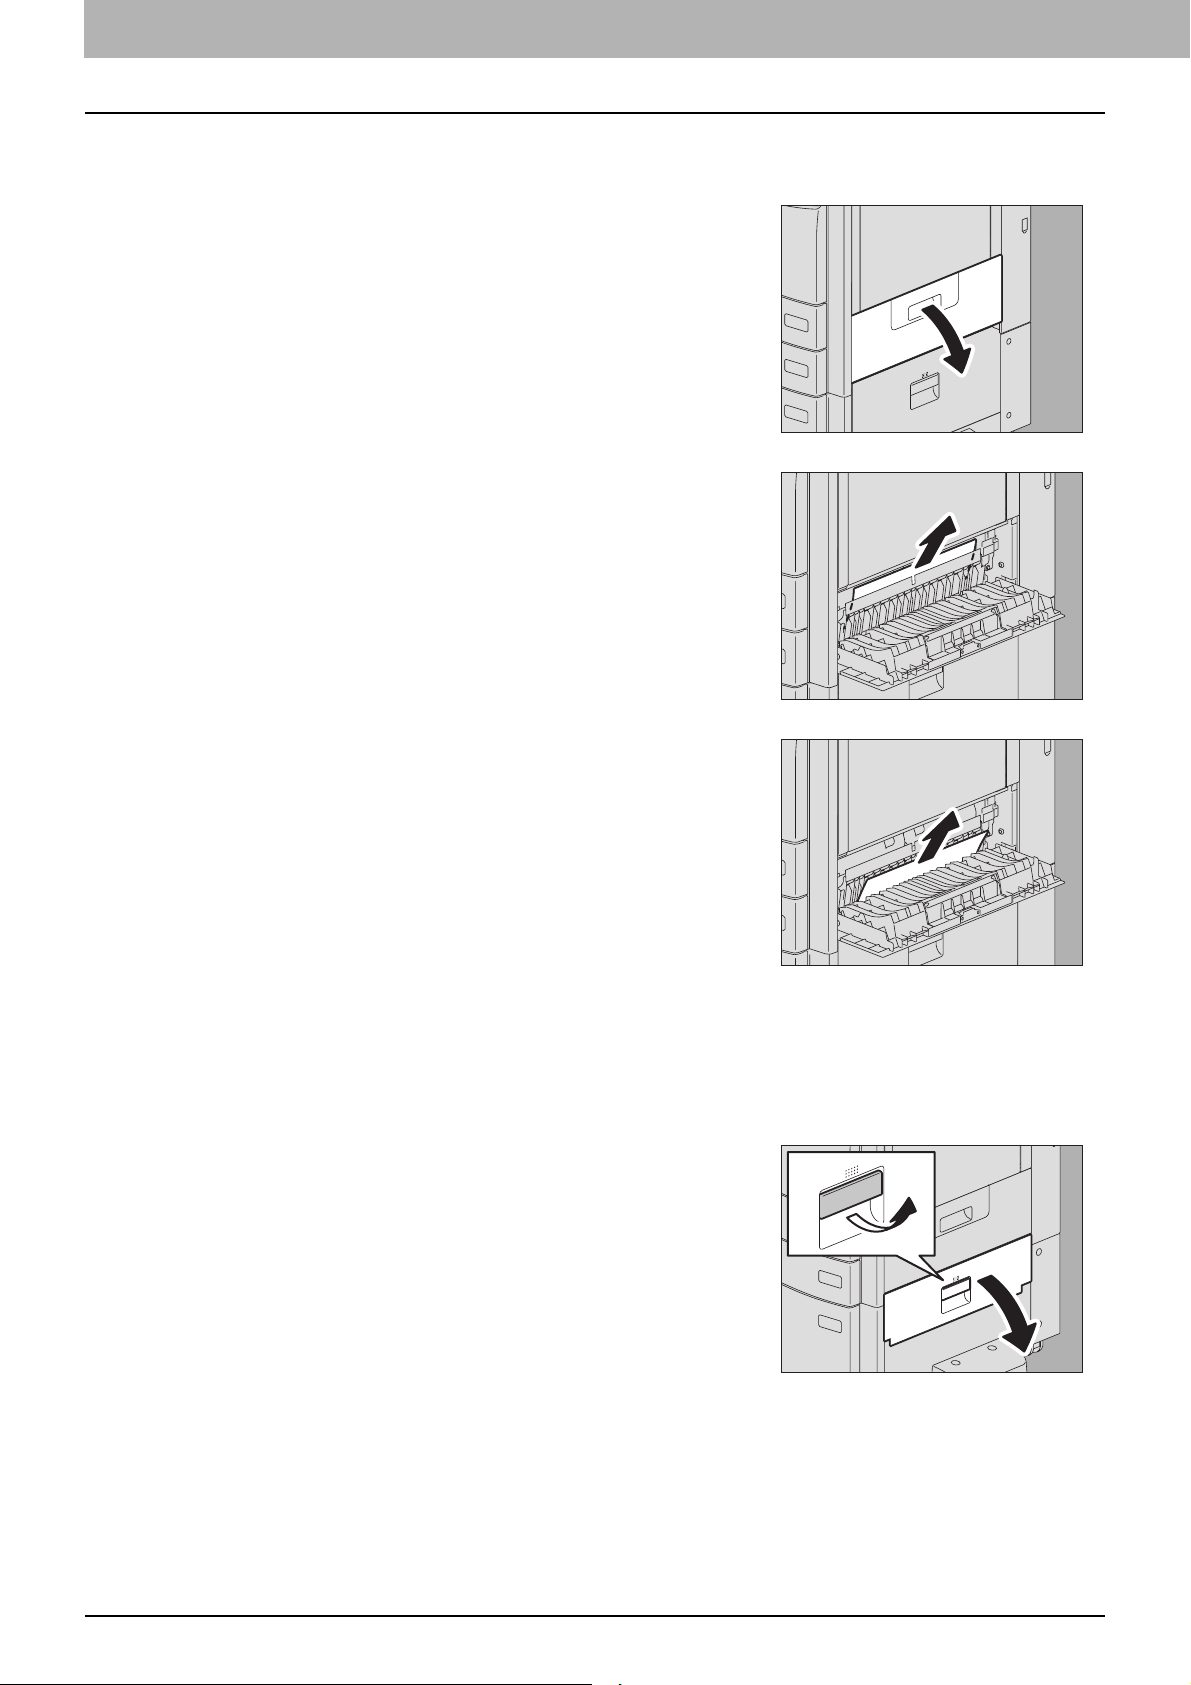
Paper jam in the Reversing Automatic Document Feeder (optional) (Lower)
Open the Reversing Automatic Document Feeder.
1
Open the reverse cover, and remove the original.
2
Close the Reversing Automatic Document Feeder.
3
Raise the lever, and open the upper cover.
4
2
1
Clearing a Paper Jam 13
Page 16
1 TROUBLESHOOTING FOR THE HARDWARE
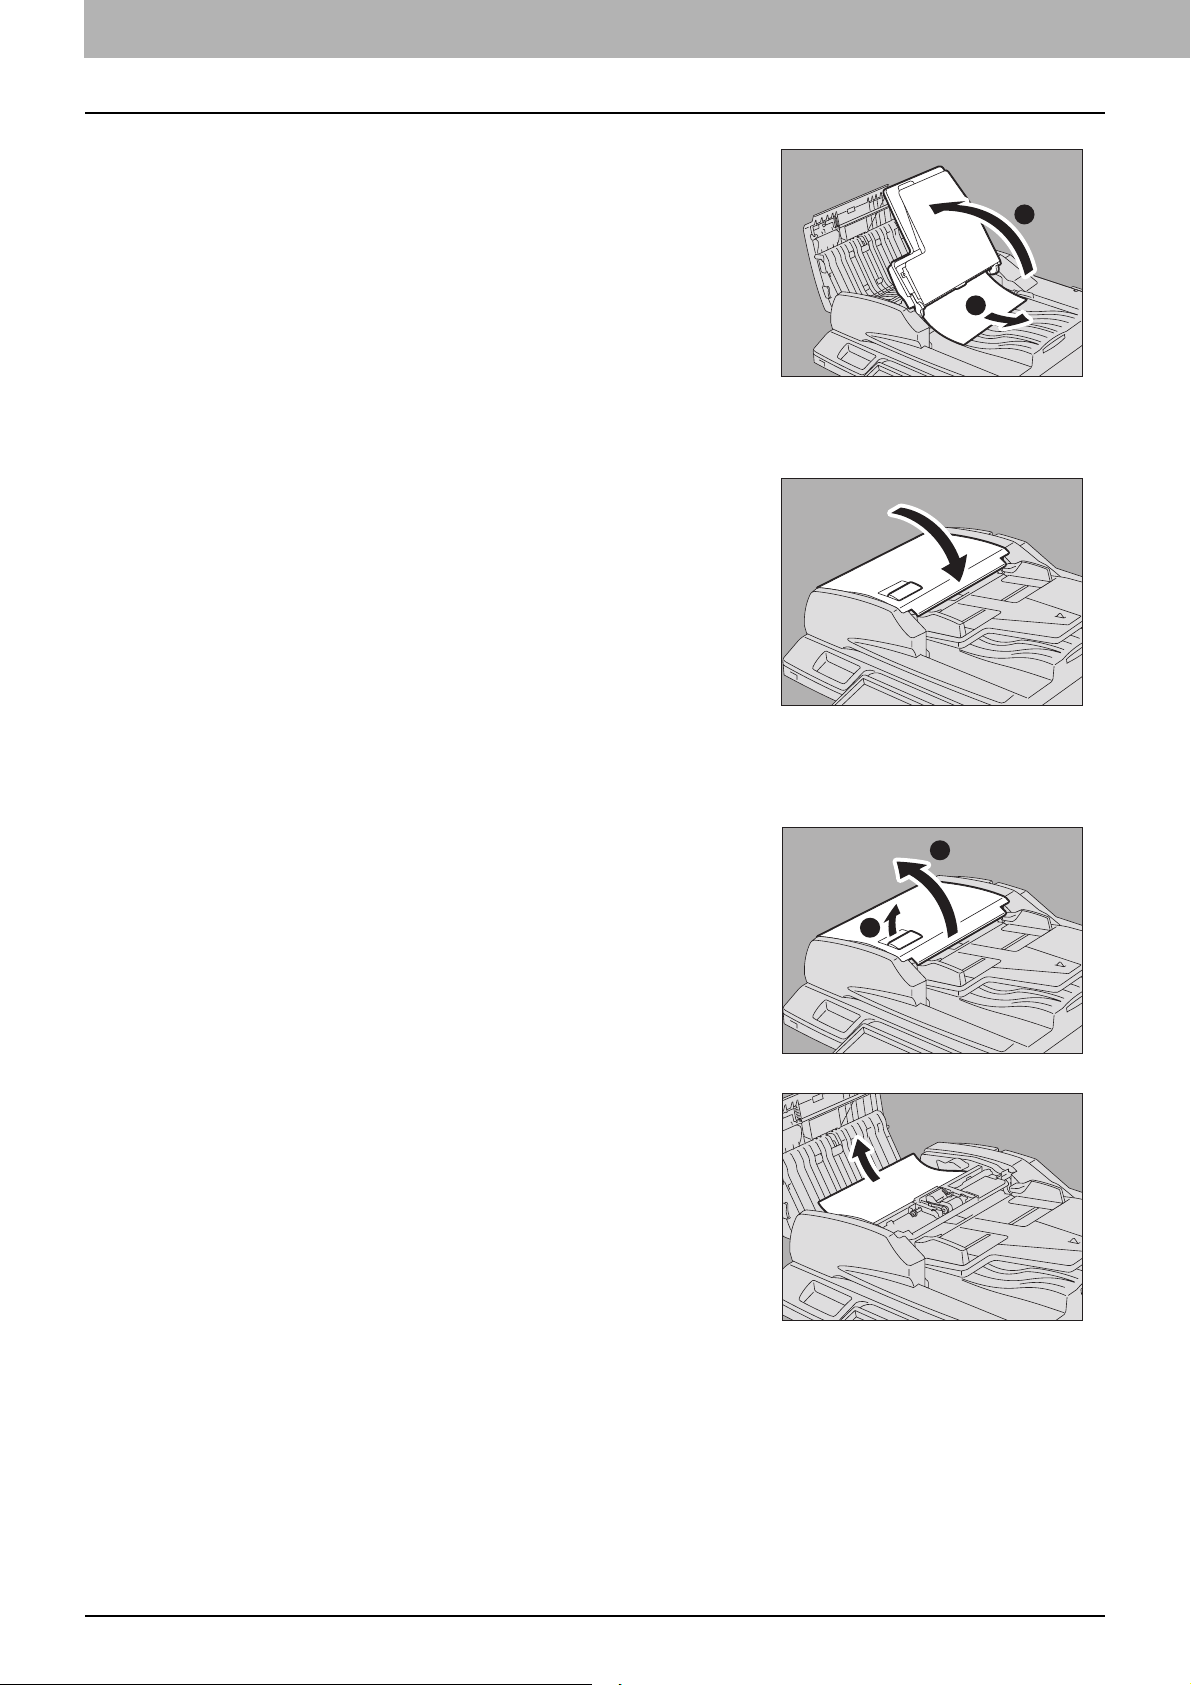
Raise the original feeder tray, and remove the original
5
under the tray.
Lower the original feeder tray.
6
Close the upper cover.
7
1
2
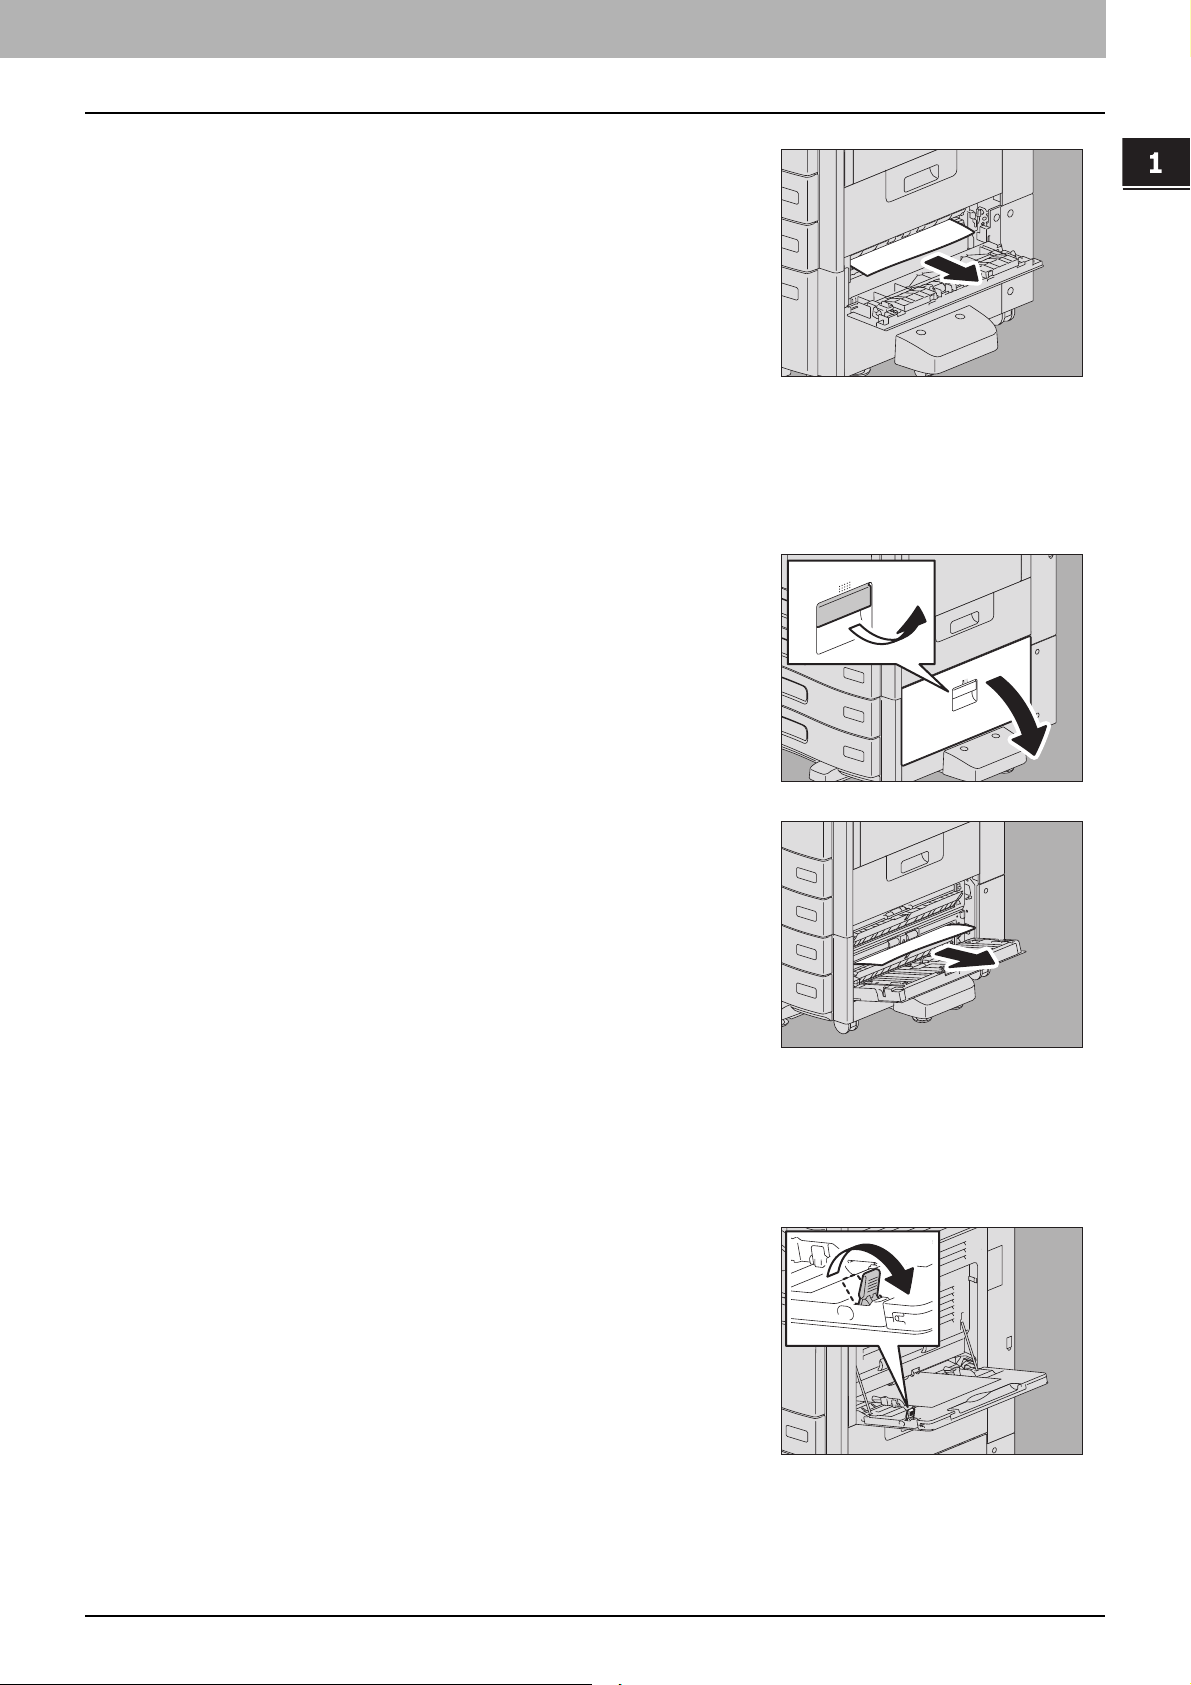
Paper jam in the Reversing Automatic Document Feeder (optional) (Upper)
Raise the lever and open the upper cover.
1
Remove the original.
2
1
2
14 Clearing a Paper Jam
Page 17
1.TROUBLESHOOTING FOR THE HARDWARE
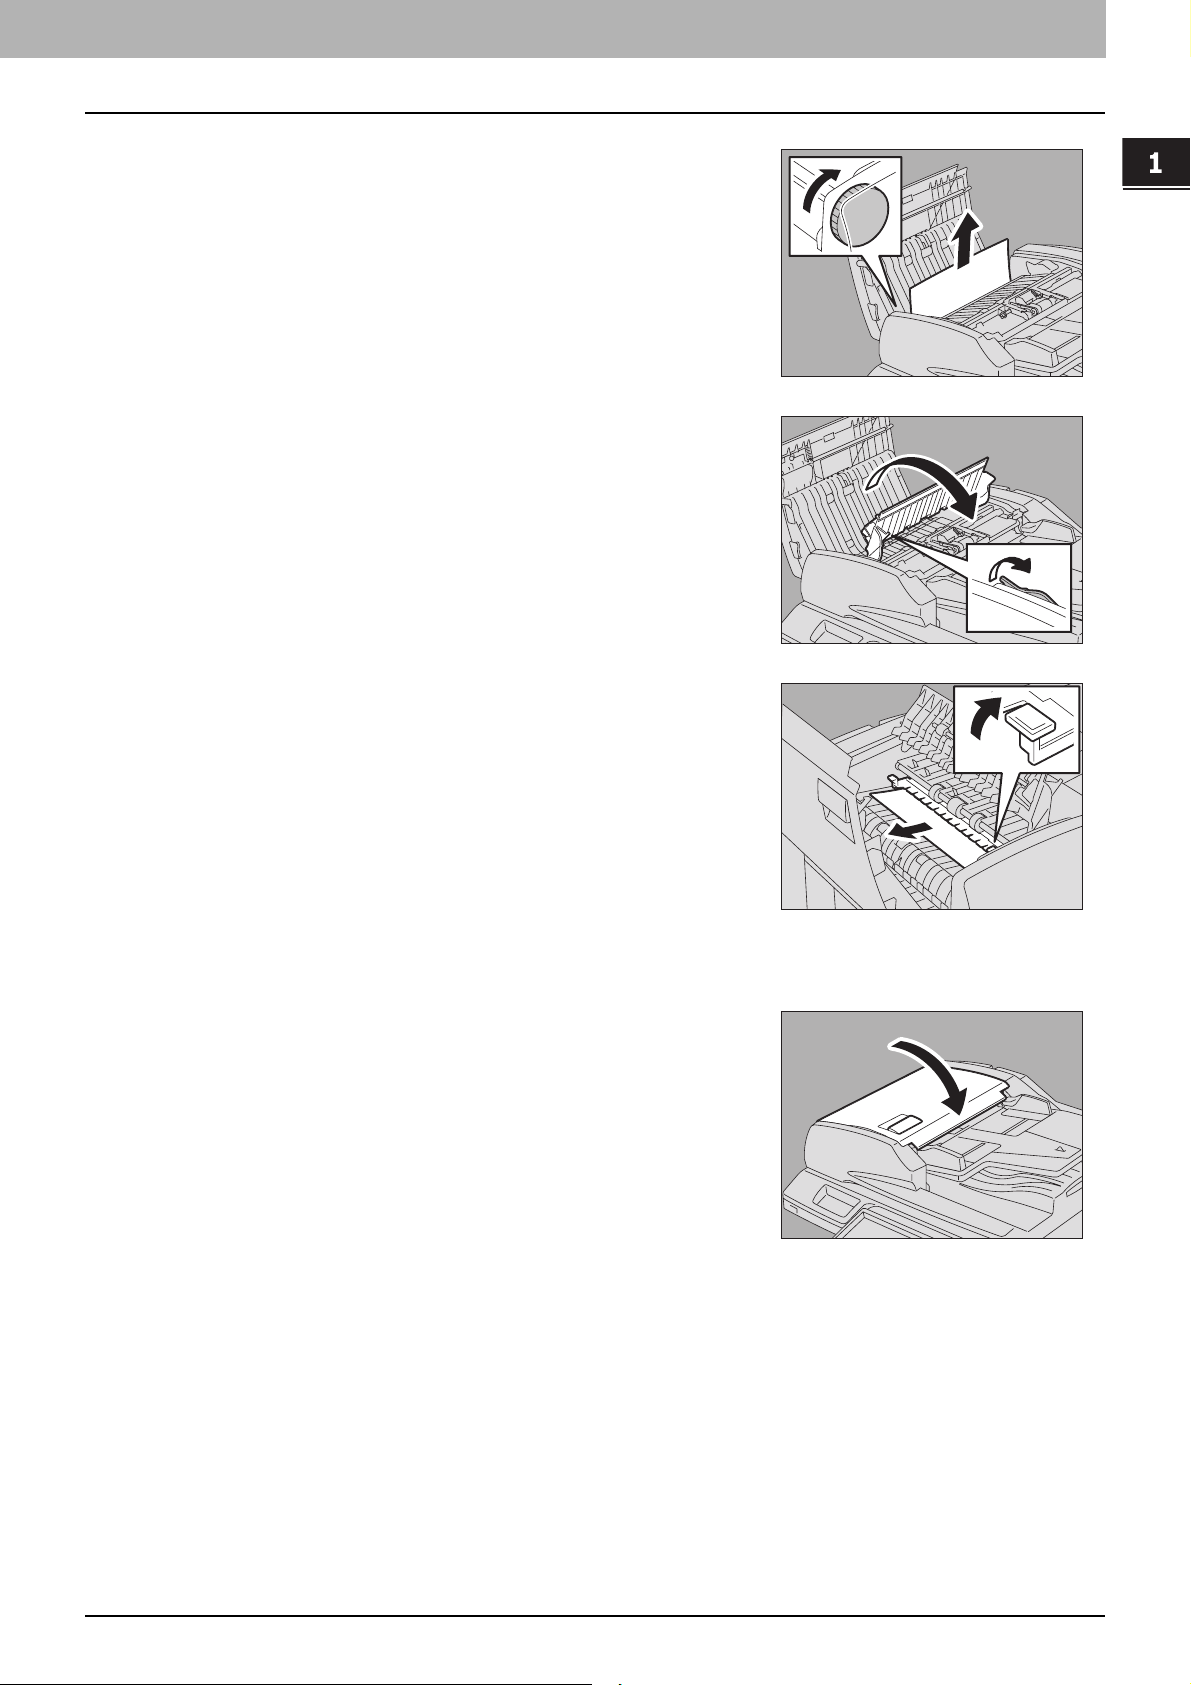
Turn the dial to remove the original.
3
Open the transport guide.
4
1 TROUBLESHOOTING FOR THE HARDWARE
Raise the guide plate under the transport guide, and
5
remove the original under the guide plate.
Close the transport guide.
6
Close the upper cover.
7
Clearing a Paper Jam 15
Page 18
1 TROUBLESHOOTING FOR THE HARDWARE
Paper jam in the drawer feeding portion
Open the cover of the drawer feeding portion.
1
Remove the jammed paper.
2
If the paper is jammed on the cover side, remove it as shown in the
figure on the right.
Close the cover of the drawer feeding portion.
3
Paper jam in the Large Capacity Feeder (optional)
Open the Large Capacity paper feed cover.
1
16 Clearing a Paper Jam
Page 19
1.TROUBLESHOOTING FOR THE HARDWARE
Remove the jammed paper.
2
Close the paper feed cover.
3
Paper jam in the Paper Feed Pedestal (optional)
Open the paper feeder cover of the Paper Feed
1
Pedestal.
1 TROUBLESHOOTING FOR THE HARDWARE
Remove the jammed paper.
2
Close the paper feeder cover.
3
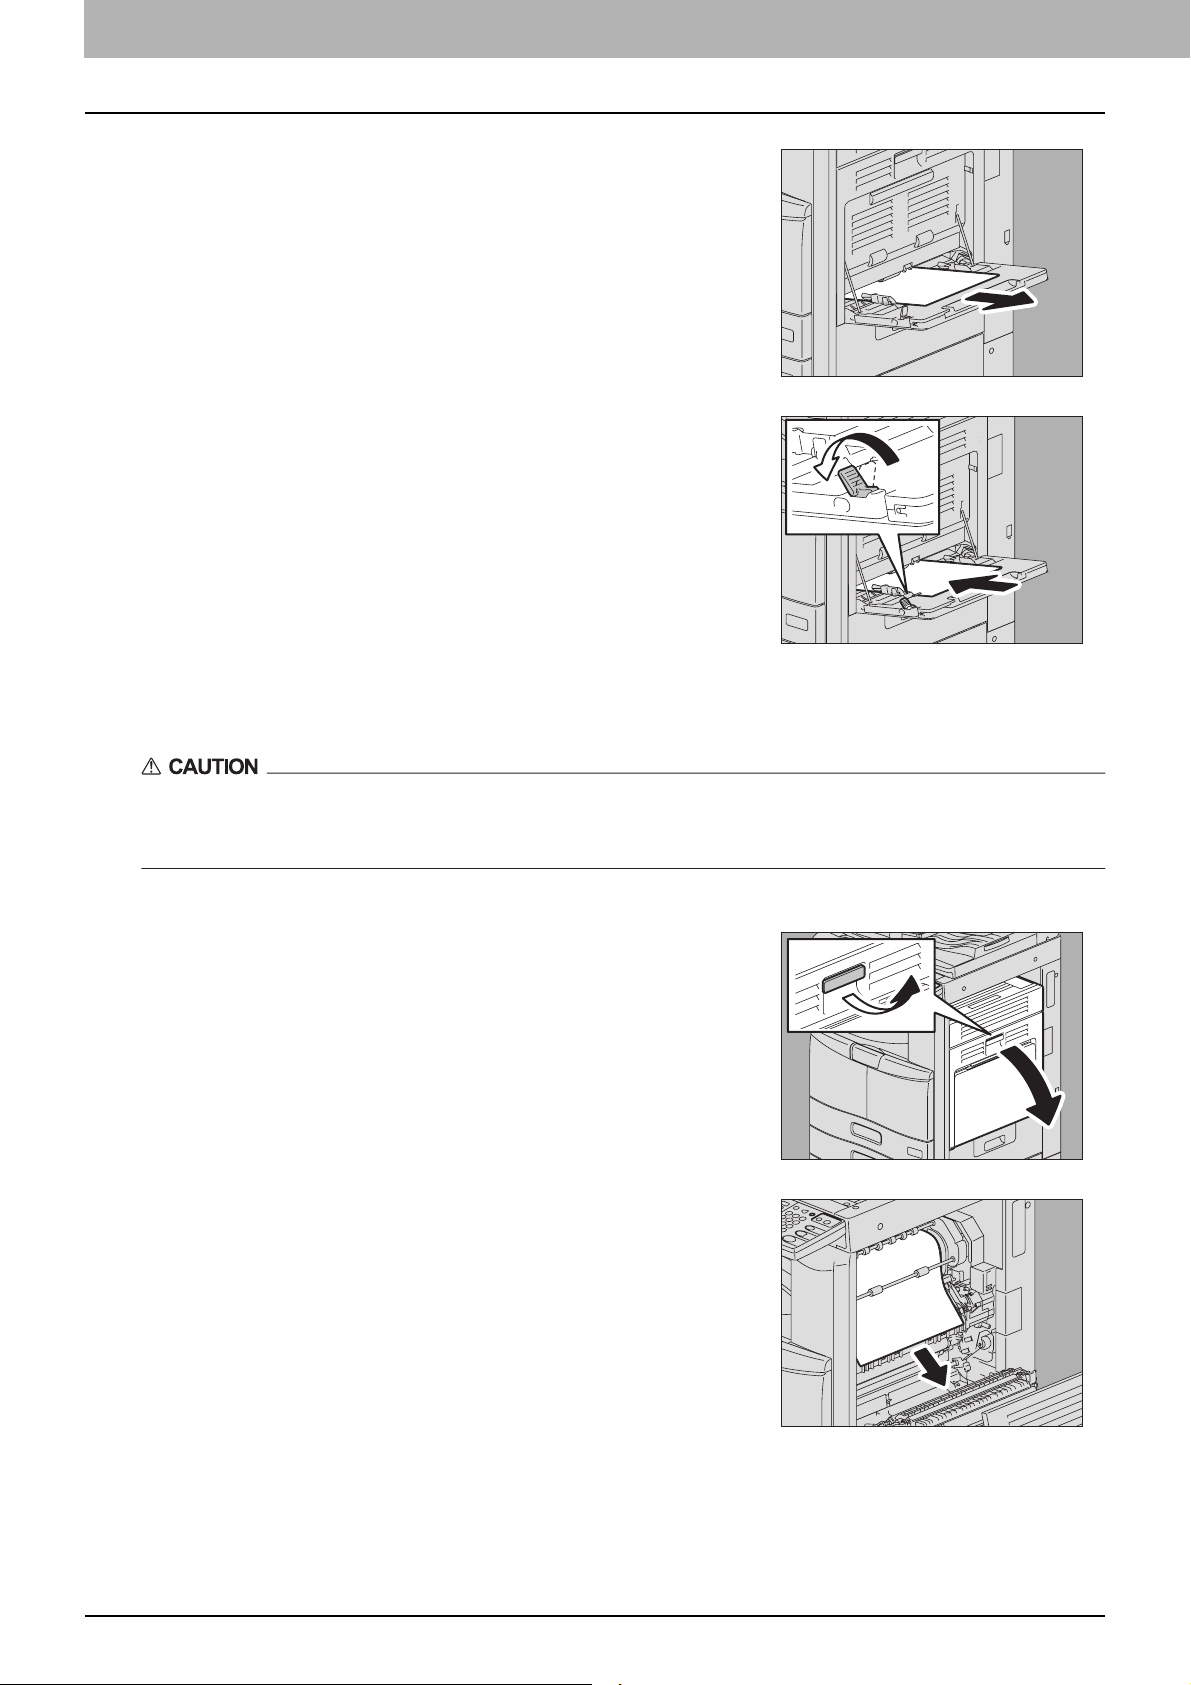
Paper jam in the bypass tray
Move the paper holding lever toward the outside.
1
The paper can now be released.
Clearing a Paper Jam 17
Page 20
1 TROUBLESHOOTING FOR THE HARDWARE
Pull out the jammed paper in the bypass tray.
2
Place paper on the bypass tray and then move the
3
paper holding lever toward the equipment.
Paper jam in the automatic duplexing unit
Be careful not to let your fingers be caught between the equipment and the duplexing unit or automatic duplexing
unit.
This could injure you.
Open the automatic duplexing unit.
1
Remove paper jammed on the paper transport path
2
above the fuser unit. (Only for e-STUDIO355/455)
18 Clearing a Paper Jam
Page 21
1 TROUBLESHOOTING FOR THE HARDWARE
1.TROUBLESHOOTING FOR THE HARDWARE
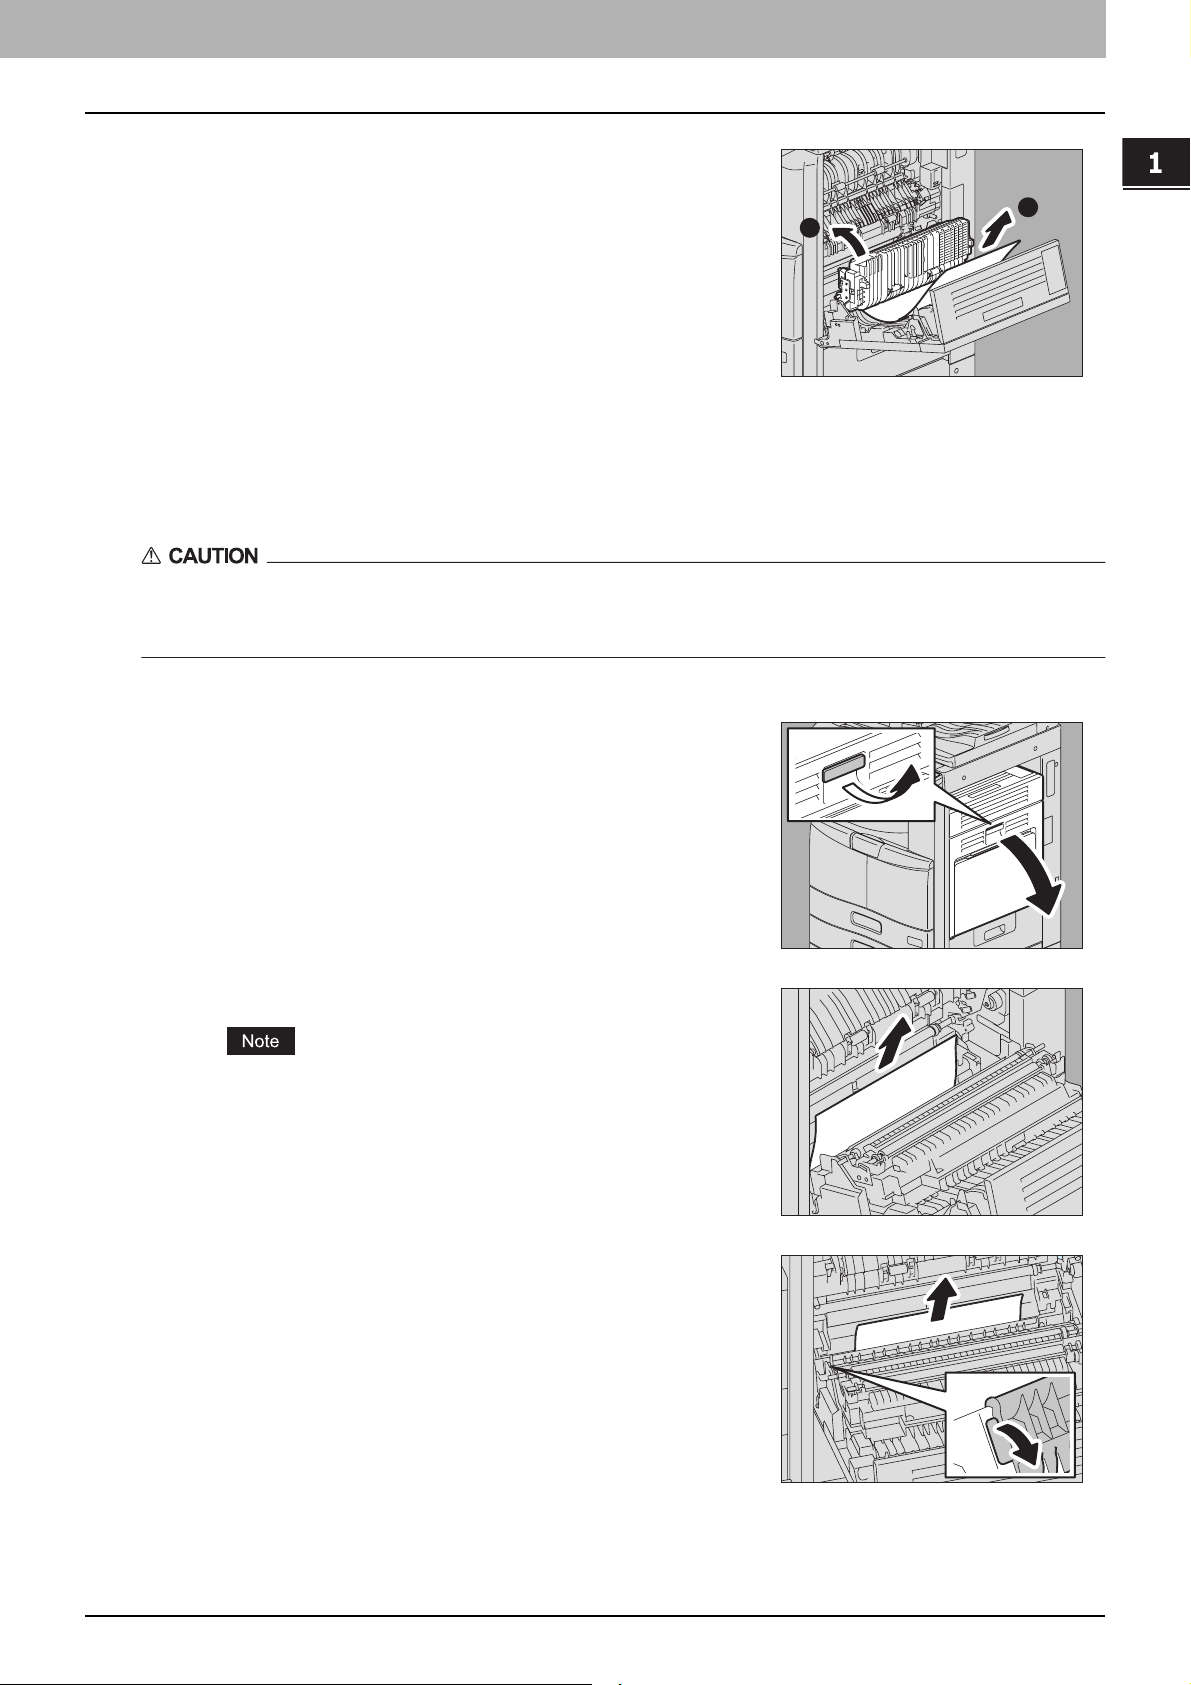
Remove the jammed paper while lifting up the transfer
3
unit.
1
Lower the transfer unit carefully and then close the automatic duplexing unit.
4
Paper jam on the paper transport path
Be careful not to let your fingers be caught between the equipment and the duplexing unit or automatic duplexing
unit.
This could injure you.
2
Open the automatic duplexing unit.
1
Remove the jammed paper.
2
Be sure not to touch the photoconductive drum when releasing the
jammed paper.
Open the transport guide of the paper feeding area
3
and check if any paper is jammed under this guide.
Clear the paper if there is any.
Close the automatic duplexing unit.
4
Clearing a Paper Jam 19
Page 22
1 TROUBLESHOOTING FOR THE HARDWARE
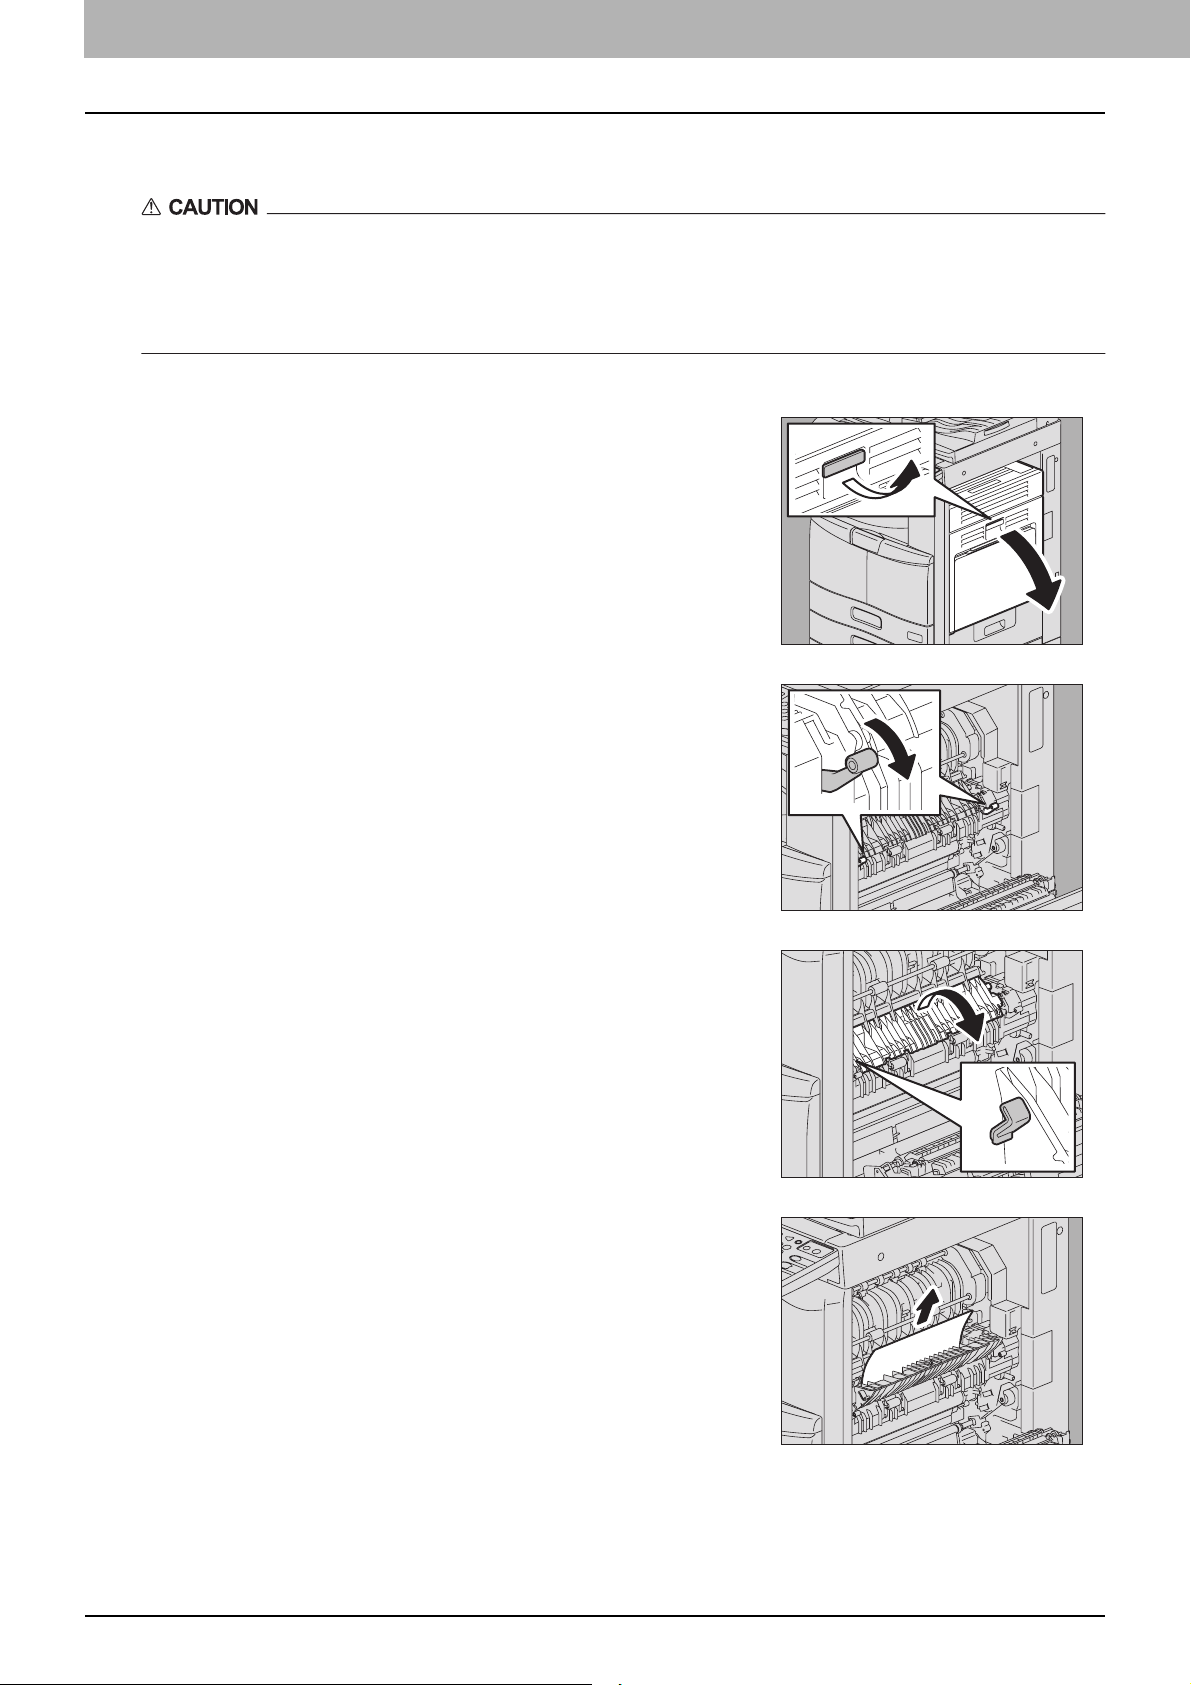
Paper jam in the fuser unit
y Be careful not to let your fingers be caught between the equipment and the duplexing unit or automatic
duplexing unit.
This could injure you.
y Do not touch the fuser unit or the metal portion around it.
Since they are very hot, you could be burned or the shock could cause you to get your hand injured in the machine.
Open the automatic duplexing unit.
1
Press down the two fuser pressure release levers
2
(green) until they come to a stop.
Open the transport guide holding the green knob.
3
Release the jammed paper. Pull the jammed paper up
4
or down as shown in the illustrations depending on
the position of the paper.
Pulling it up
20 Clearing a Paper Jam
Page 23
1.TROUBLESHOOTING FOR THE HARDWARE
Pulling it down
Remove paper that sticks out from the exit tray side.
5
1 TROUBLESHOOTING FOR THE HARDWARE
When a finisher (optional) is installed, open the
6
Bridge Kit (optional) cover.
Remove the jammed paper.
7
When a finisher is installed, close the Bridge Kit
8
cover.
Clearing a Paper Jam 21
Page 24
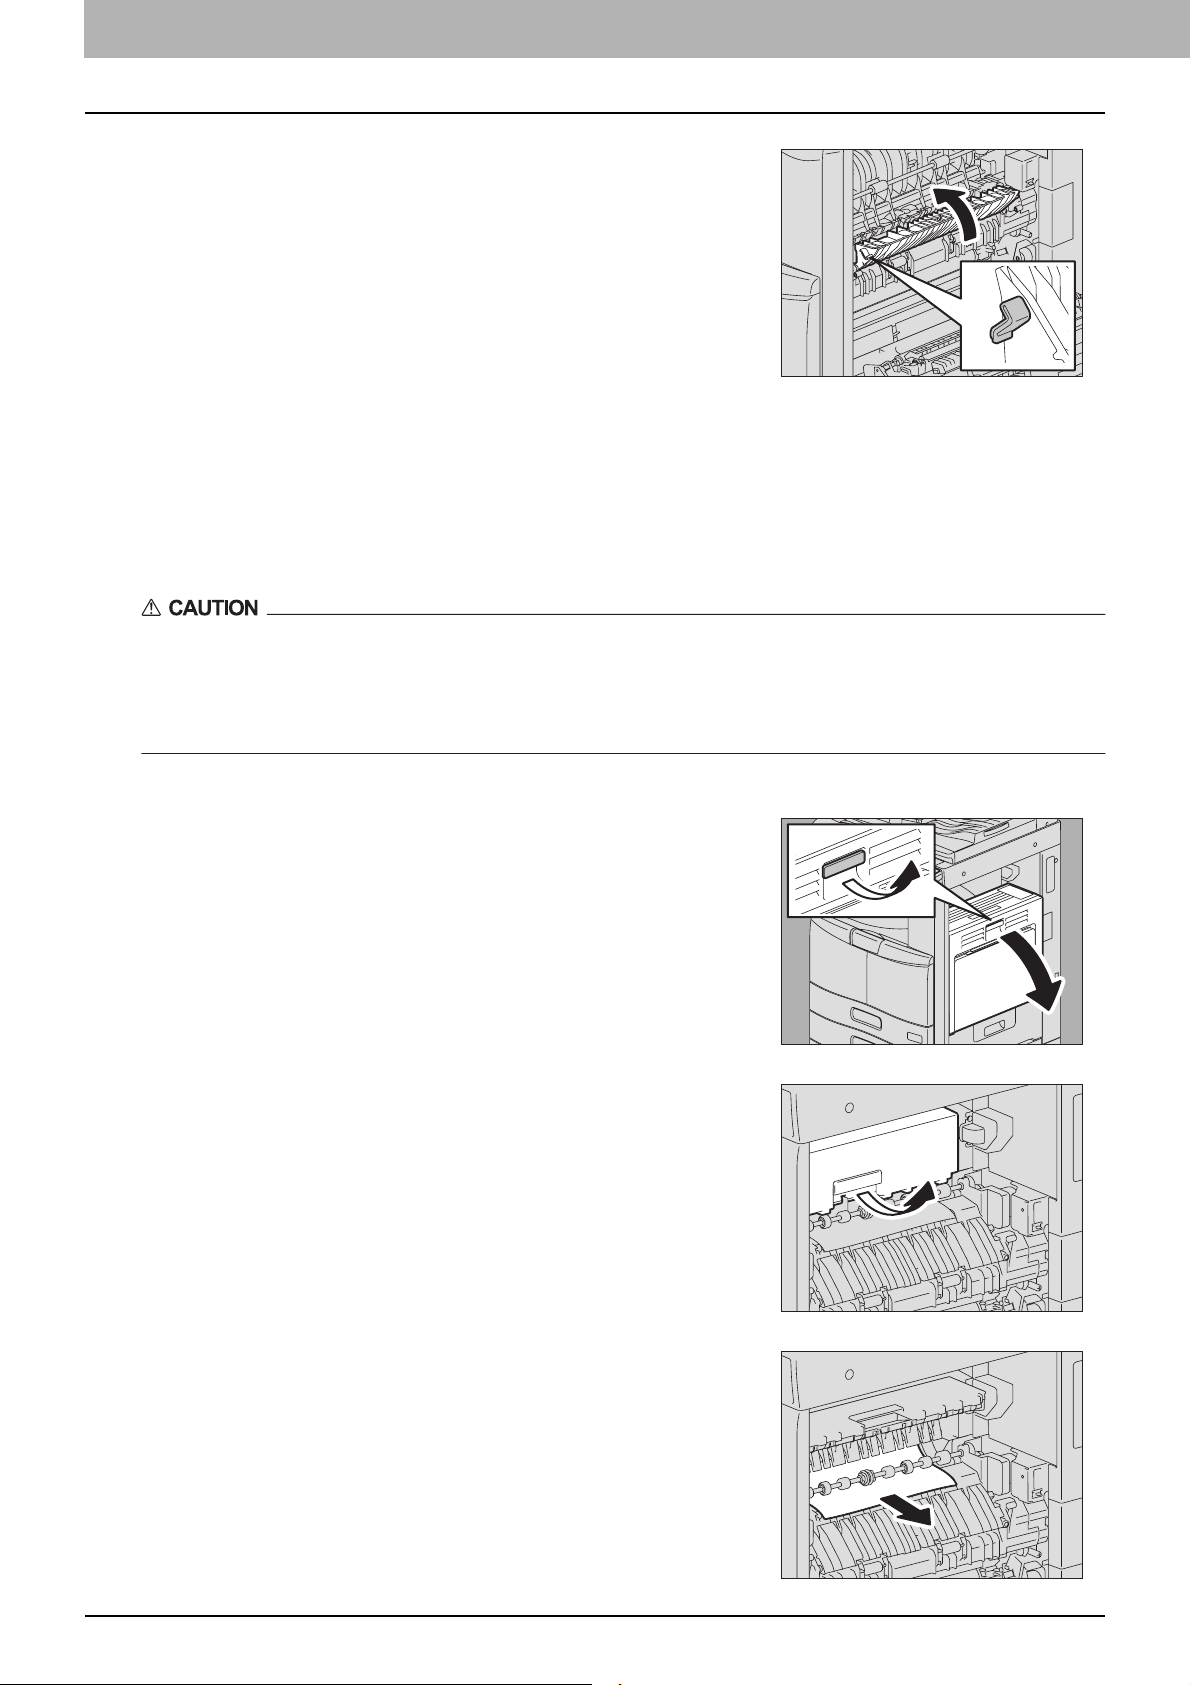
1 TROUBLESHOOTING FOR THE HARDWARE
Close the transport guide holding the green knob.
9
Close the automatic duplexing unit.
10
Paper jam in the Job Separator and the Offset Tray (both optional)
The procedure below is only for e-STUDIO205L/255/305 with the Job Separator or the Offset Tray installed and not valid
for e-STUDIO355/455 with the Job Separator installed.
y Be careful not to let your fingers be caught between the equipment and the duplexing unit or automatic
duplexing unit.
This could injure you.
y Do not touch the fuser unit or the metal portion around it.
Since they are very hot, you could be burned or the shock could cause you to get your hand injured in the machine.
Open the automatic duplexing unit.
1
Open the Job Separator cover or the Offset Tray
2
cover.
Remove paper jammed inside of the Job Separator or
3
the Offset Tray.
22 Clearing a Paper Jam
Page 25
1.TROUBLESHOOTING FOR THE HARDWARE
Close the Job Separator cover or the Offset Tray cover.
4
Close the automatic duplexing unit.
5
Paper jam in the Bridge Kit (optional)
Open the cover holding the handle of the Bridge Kit.
1
1 TROUBLESHOOTING FOR THE HARDWARE
Remove the paper inside the Bridge Kit.
2
If the jammed paper cannot be removed because the right side is
caught by the fuser unit, follow the steps on P.20 “Paper jam in
the fuser unit”.
Close the Bridge Kit cover.
3
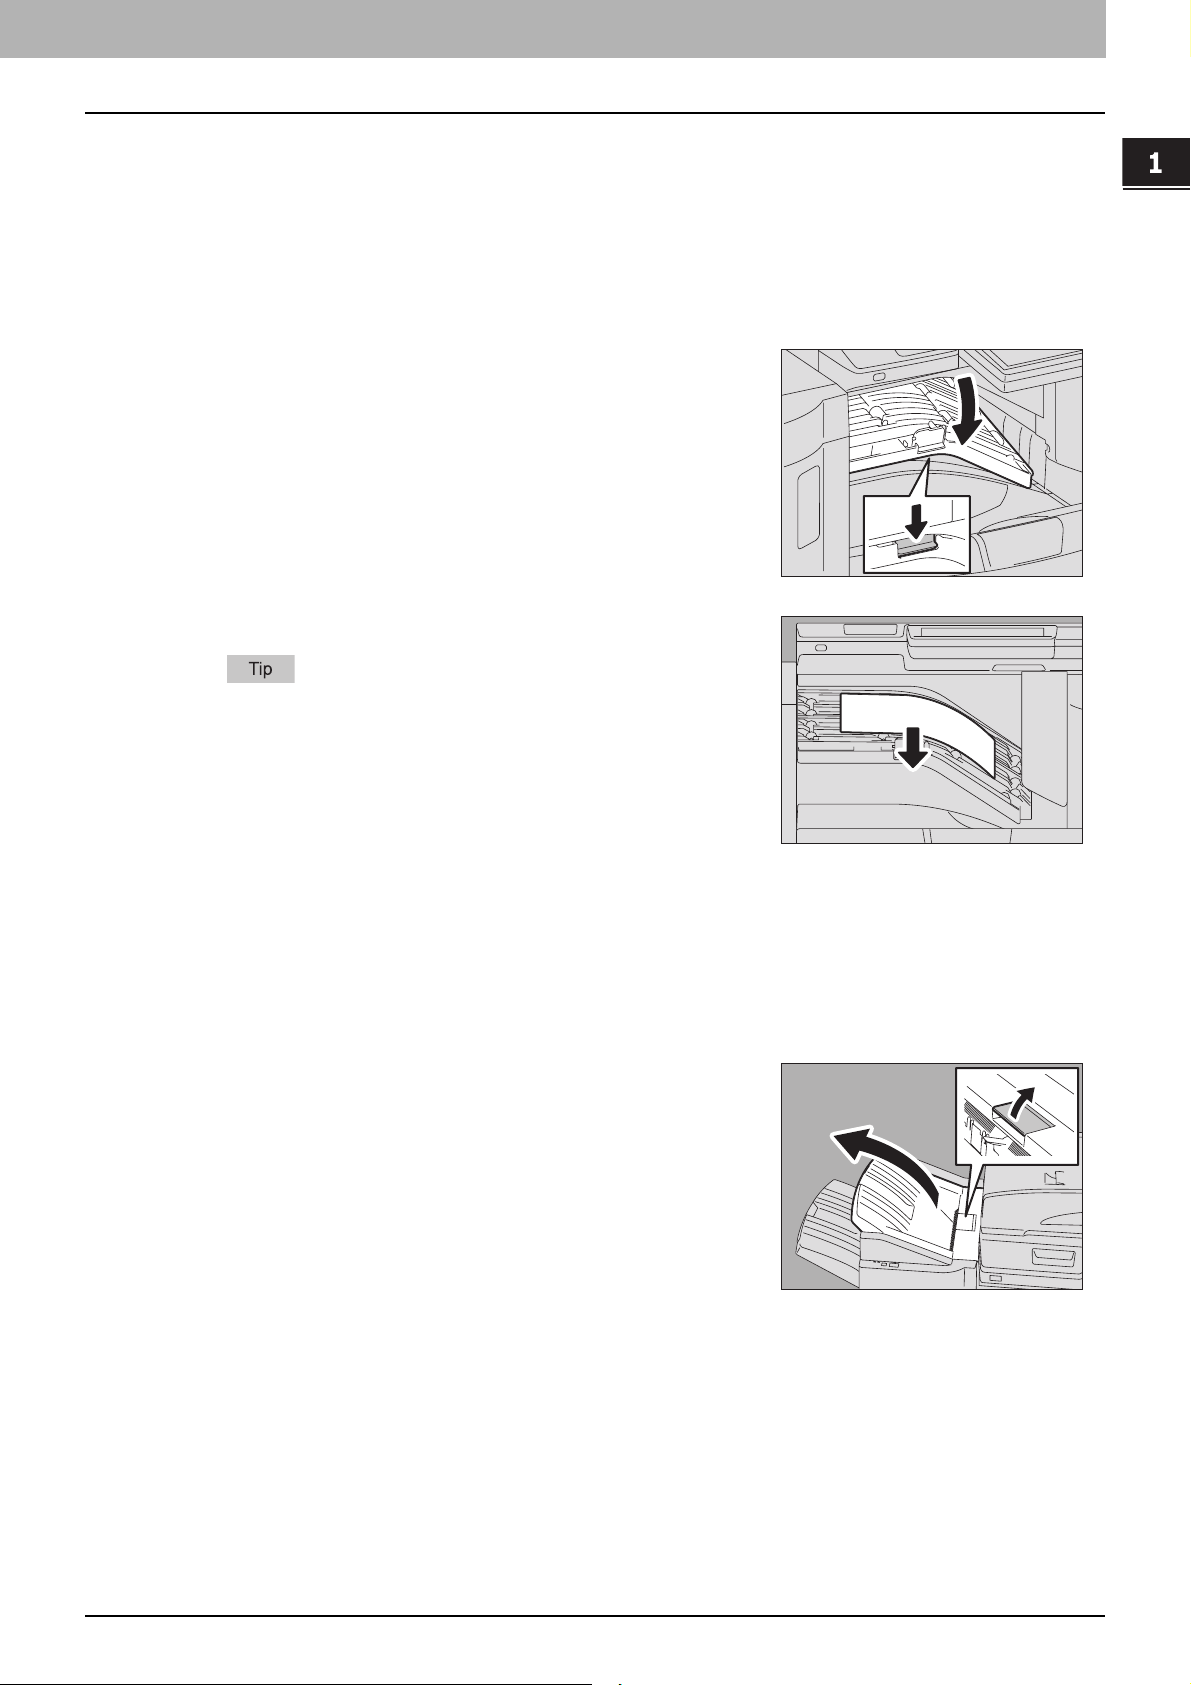
Paper jam in the Finisher MJ-1101 and the Hole Punch Unit MJ-6101 (both optional)
Paper Jam in the upper receiving tray
Raise the lever and open the upper receiving tray.
1
Clearing a Paper Jam 23
Page 26
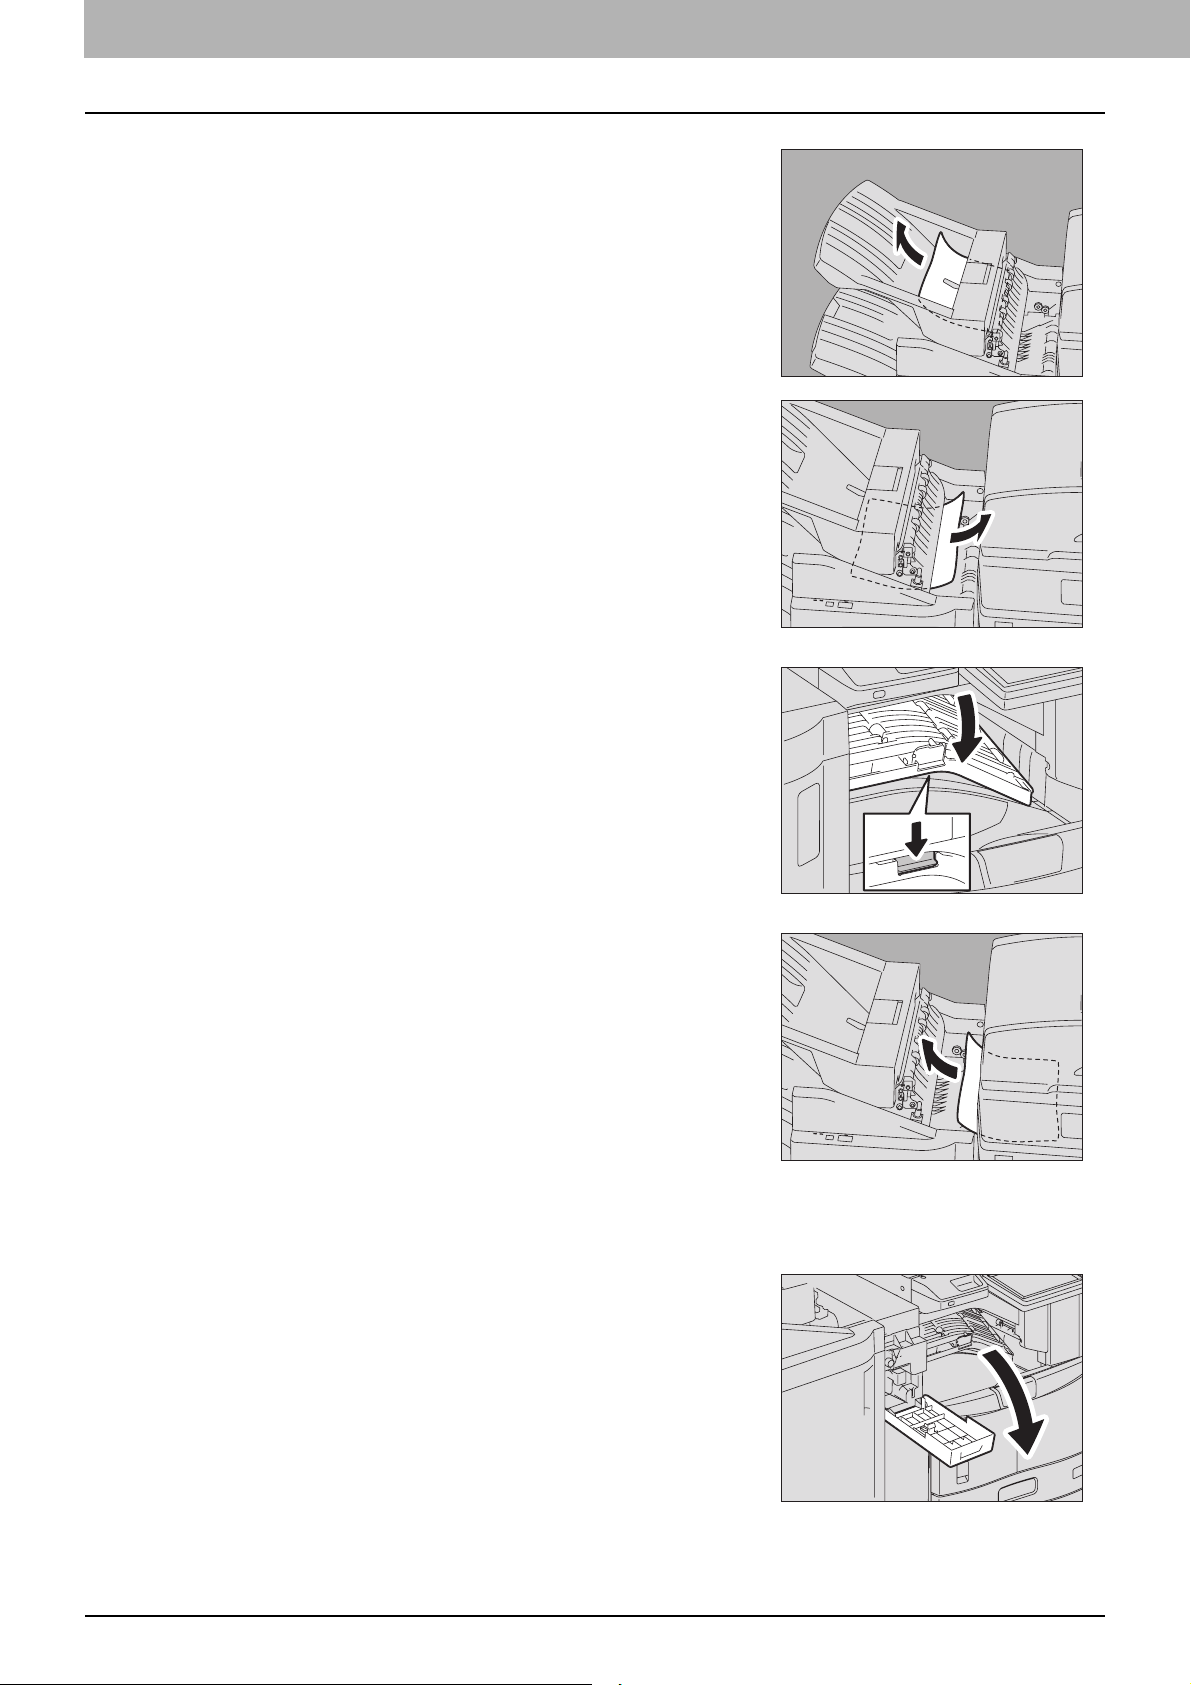
1 TROUBLESHOOTING FOR THE HARDWARE
Remove the jammed paper.
2
Open the Bridge Kit cover.
3
When the Hole Punch Unit MJ-6101 is installed, proceed to step 5.
Remove the jammed paper.
4
Proceed to step 8.
When the Hole Punch Unit MJ-6101 is installed
Open the Hole Punch Unit cover.
5
24 Clearing a Paper Jam
Page 27
1.TROUBLESHOOTING FOR THE HARDWARE
Remove the jammed paper by turning the knob.
6
Close the Hole Punch Unit cover.
7
1 TROUBLESHOOTING FOR THE HARDWARE
Close the Bridge Kit cover.
8
Close the upper receiving tray of the finisher.
9
Place your hands on the near and far side of the lever and push to
close the tray until it clicks.
Be careful not to let your fingers be caught between the
finisher body and the upper tray of the finisher.
This could injure you.
The upper receiving tray can also be closed by pressing the right
side of the lever.
Jam in the lower receiving tray.
Holding the lever, open the upper receiving tray of the
1
finisher.
Clearing a Paper Jam 25
Page 28
1 TROUBLESHOOTING FOR THE HARDWARE
Remove the jammed paper.
2
Lower the shutter of the paper exit portion to open it.
3
Remove the jammed paper.
4
Open the Bridge Kit cover.
5
When the Hole Punch Unit MJ-6101 is installed, proceed to step 7.
Remove the jammed paper.
6
Proceed to step 10.
26 Clearing a Paper Jam
Page 29
1.TROUBLESHOOTING FOR THE HARDWARE
When the Hole Punch Unit MJ-6101 is installed
Open the Hole Punch Unit cover.
7
Remove the jammed paper by turning the knob.
8
1 TROUBLESHOOTING FOR THE HARDWARE
Close the Hole Punch Unit cover.
9
Close the Bridge Kit cover.
10
Close the upper receiving tray of the finisher.
11
Place your hands on the near and far side of the lever and push to
close the tray until it clicks.
Be careful not to let your fingers be caught between the
finisher body and the upper tray of the finisher.
This could injure you.
The upper receiving tray of the finisher can also be closed by
pressing the right side of the lever.
Clearing a Paper Jam 27
Page 30

1 TROUBLESHOOTING FOR THE HARDWARE
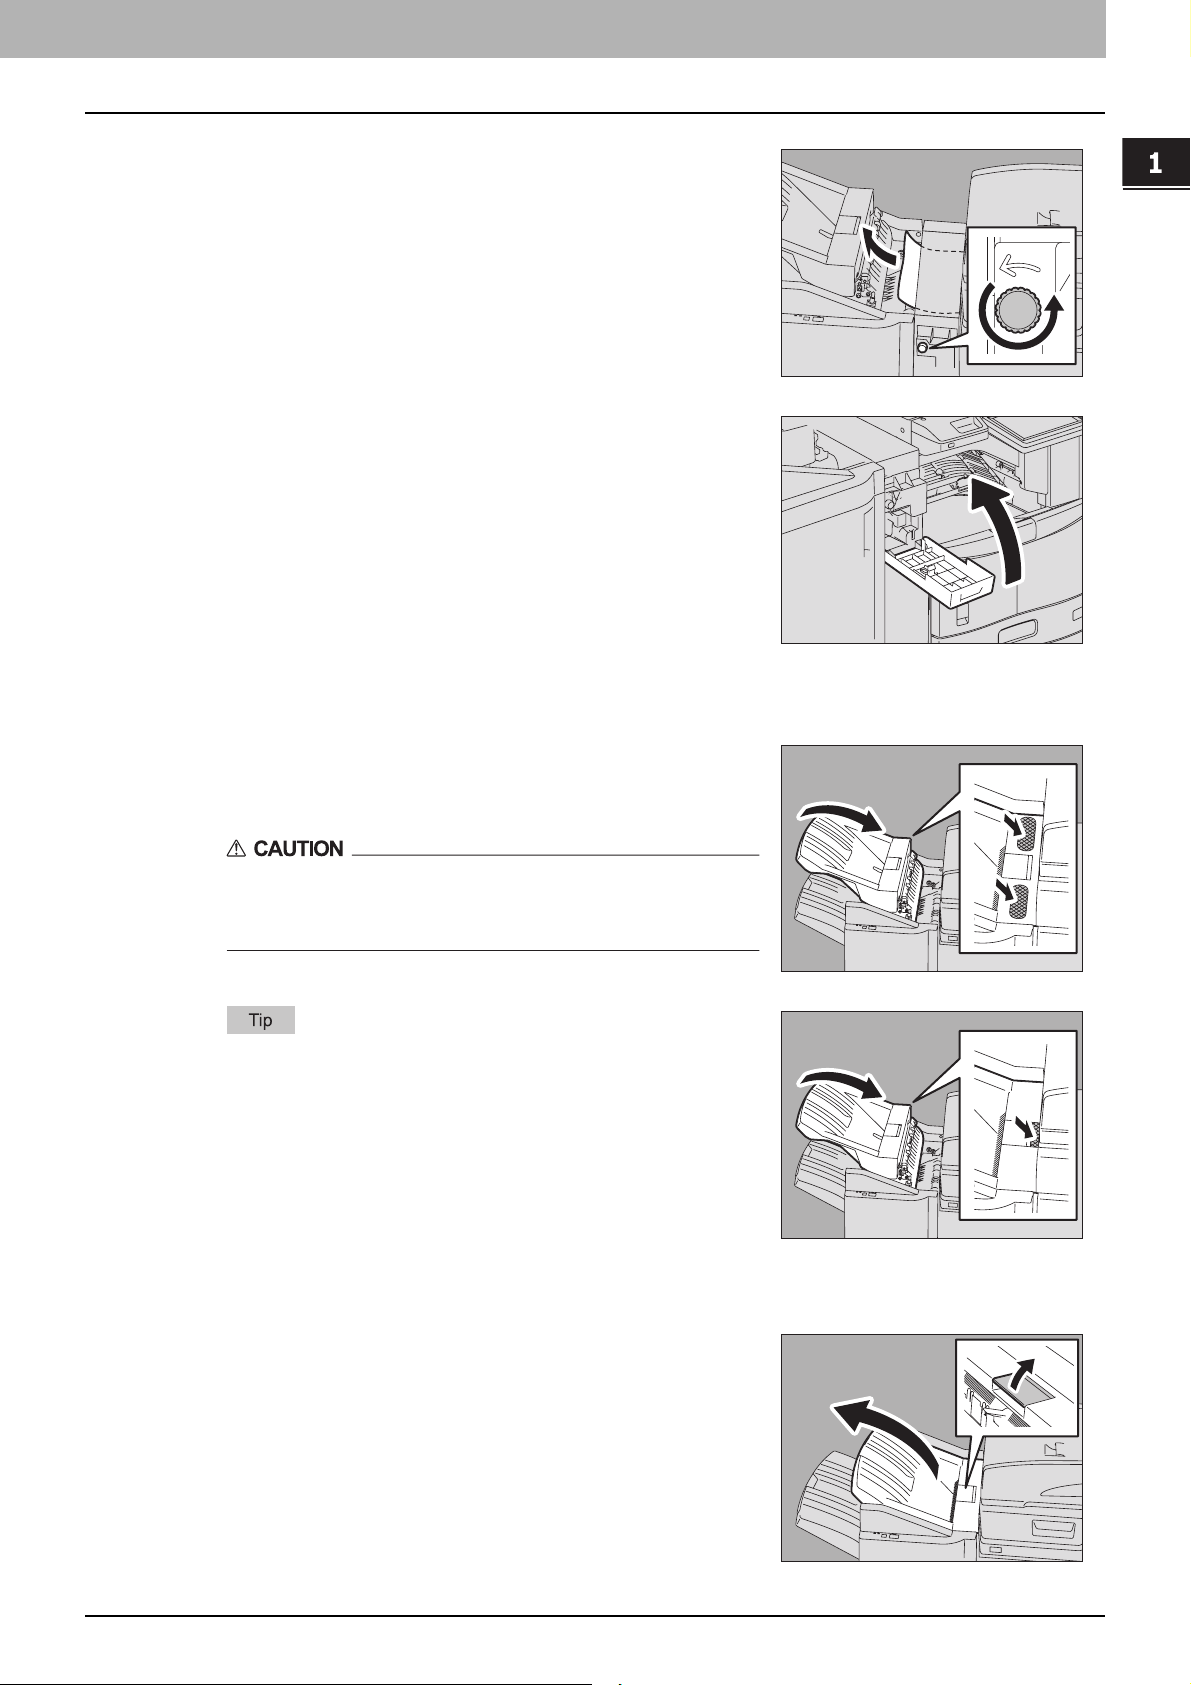
Paper jam in the Saddle Stitch Finisher MJ-1024 and the Hole Punch Unit MJ-6004 (both optional)
Hold up the guide of the paper exit portion and
1
remove the jammed paper.
When the Hole Punch Unit MJ-6004 is installed, proceed to step 2. If
not, go to step 6.
When the Hole Punch Unit MJ-6004 is installed
Open the Hole Punch Unit cover.
2
2
1
Turn the green knob to locate within the area
3
indicated on the label.
With the knob set in this position, the punches are up so that paper can
be released.
Lift up the Hole Punch Unit and remove the jammed
4
paper.
1
2
28 Clearing a Paper Jam
Page 31

1.TROUBLESHOOTING FOR THE HARDWARE
Return the Hole Punch Unit to its original position, and close the front cover.
5
Raise the lever, and open the upper cover of the
6
finisher until it is locked.
Remove the jammed paper.
7
1 TROUBLESHOOTING FOR THE HARDWARE
2
1
Close the upper cover of the finisher.
8
Clearing a Paper Jam 29
Page 32

1 TROUBLESHOOTING FOR THE HARDWARE
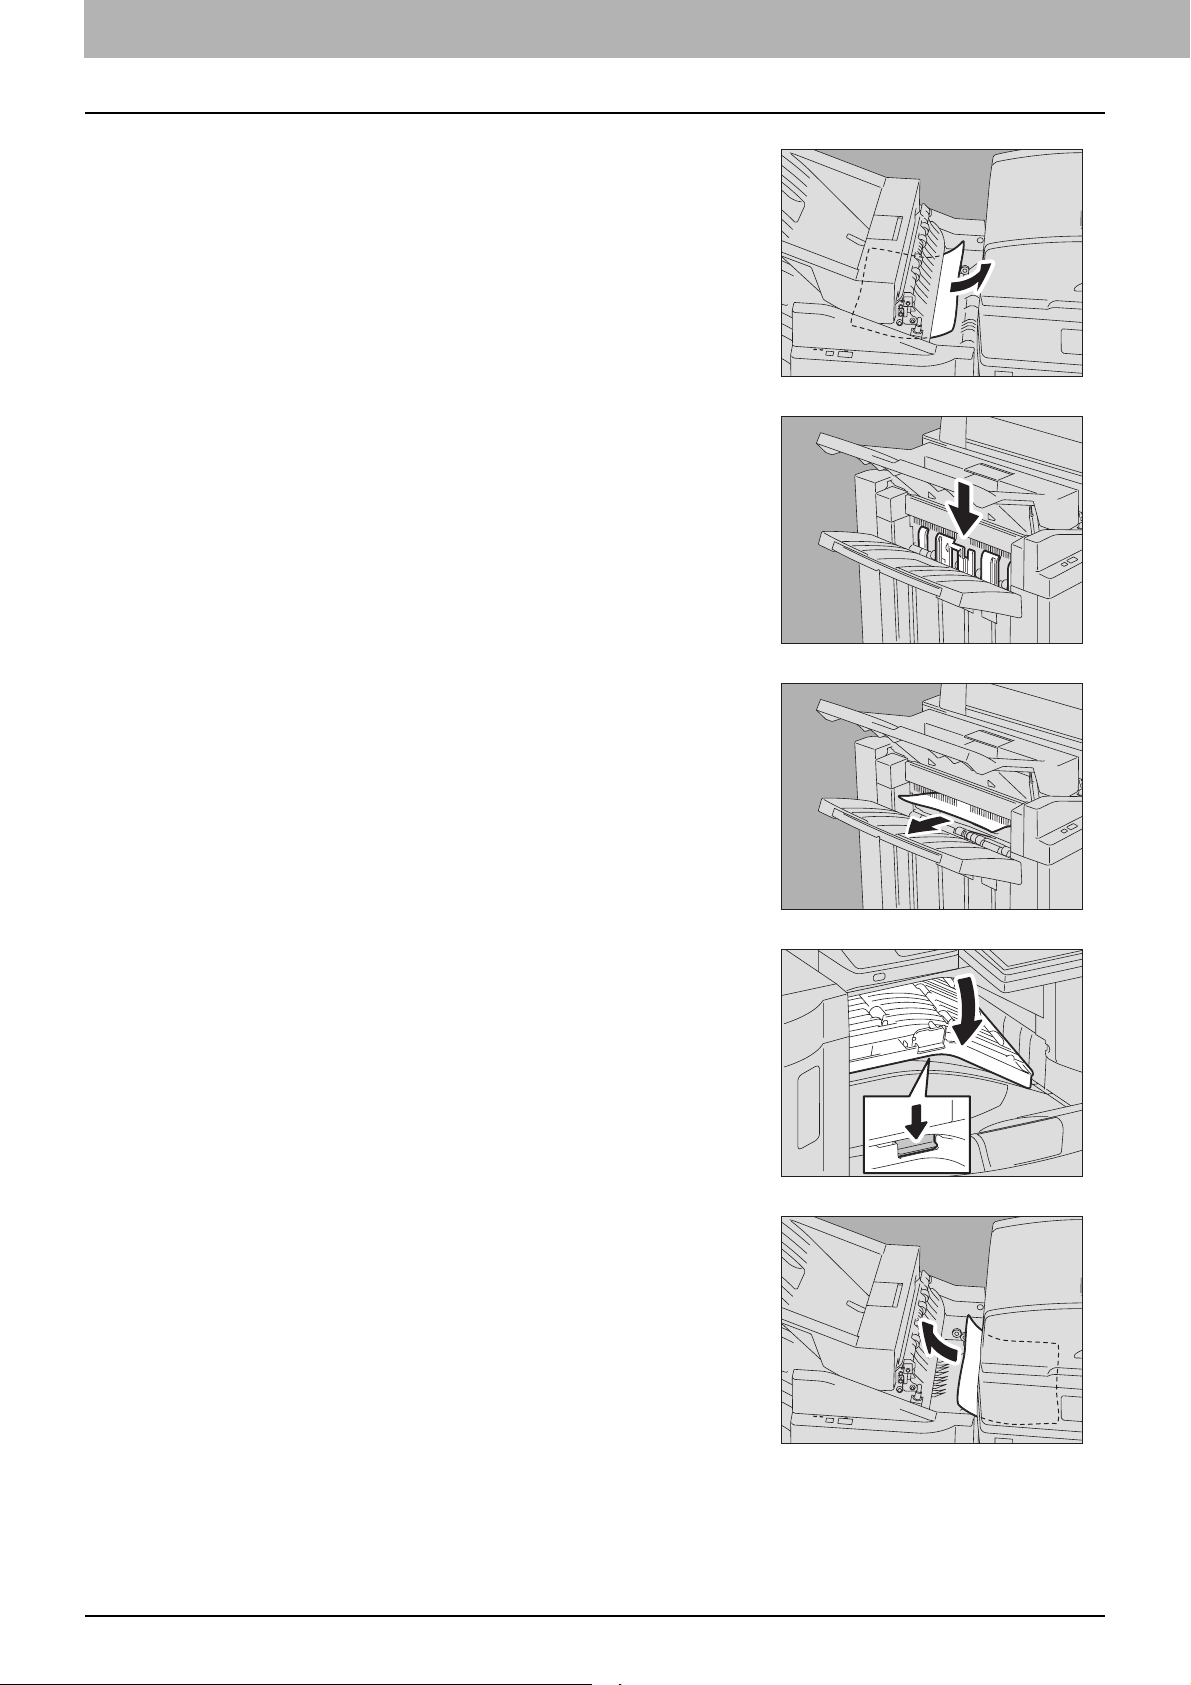
Paper jam in the saddle stitch unit of the Saddle Stitch Finisher MJ-1024
(optional)
Open the front cover of the finisher.
1
Slide the green handle toward the right, and remove
2
the jammed paper.
2
Move the green handle to the right-hand side.
3
Remove the jammed paper and return the lever to its
4
original position.
1
Turn the right knob counterclockwise.
5
30 Clearing a Paper Jam
Page 33

1.TROUBLESHOOTING FOR THE HARDWARE
Turn the left knob clockwise while pressing it.
6
Remove the jammed paper from the exit portion of the
7
saddle stitch unit.
1 TROUBLESHOOTING FOR THE HARDWARE
Lift the lever up and open the paper exit cover of the
8
saddle stitch unit.
Remove the jammed paper.
9
Close the paper exit cover of the saddle stitch unit and the front cover of the finisher.
10
Clearing a Paper Jam 31
Page 34

1 TROUBLESHOOTING FOR THE HARDWARE
Paper jam in the Saddle Stitch Finisher MJ-1025 (optional)
Remove the jammed paper from the paper exit
1
portion.
Open the upper cover of the finisher.
2
Remove the paper jammed inside of the finisher.
3
Close the upper cover of the finisher.
4
32 Clearing a Paper Jam
Page 35

1 TROUBLESHOOTING FOR THE HARDWARE
1.TROUBLESHOOTING FOR THE HARDWARE
Paper jam in the Hole Punch Unit of the Saddle Stitch Finisher MJ-1025 (optional)
Be careful not to let your fingers be caught between the equipment and the finisher (optional).
This could injure you.
Separate the finisher from the equipment.
1
Press the lever to unlock the finisher and slowly separate it from the
equipment, placing both of your hands on the front and back of the
finisher.
Turn the green knob until the triangle mark ( ) falls
2
within the diagonal-line area on the right side of the
knob.
With the knob set in this position, the punches are up so that paper can
be released.
Remove the jammed paper.
3
Connect the finisher to the equipment.
4
Move the finisher slowly toward the equipment, placing both of your
hands on the front and the back of the finisher.
Clearing a Paper Jam 33
Page 36

1 TROUBLESHOOTING FOR THE HARDWARE
Paper jam in the stapler unit of the Saddle Stitch Finisher MJ-1025 (optional)
Open the front cover of the finisher.
1
Turn the green knob at the center clockwise until the
2
inside of the window above the knob turns blue. Then
remove the jammed paper.
When you turn the green knob until the inside of the window above the
knob turns blue, the stapler is raised so that the paper can be released.
Close the front cover of the finisher.
3
34 Clearing a Paper Jam
Page 37

1 TROUBLESHOOTING FOR THE HARDWARE
1.TROUBLESHOOTING FOR THE HARDWARE
Paper jam in the saddle stitch unit of the Saddle Stitch Finisher MJ-1025
(optional)
Be careful not to let your fingers be caught between the equipment and the finisher (optional).
This could injure you.
Separate the finisher from the equipment.
1
Press the lever to unlock the finisher and slowly separate it from the
equipment, placing both of your hands on the front and back of the
finisher.
Open the jam access cover.
2
Remove the jammed paper.
3
Open the front cover of the finisher.
4
Clearing a Paper Jam 35
Page 38

1 TROUBLESHOOTING FOR THE HARDWARE
Turn the green knob on the lower right side clockwise
5
and then remove the paper jammed at the exit section
of the saddle stitch unit.
Close the jam access cover and the front cover of the finisher.
6
Connect the finisher to the equipment.
7
Move the finisher slowly toward the equipment, placing both of your
hands on the front and the back of the finisher.
36 Clearing a Paper Jam
Page 39

1 TROUBLESHOOTING FOR THE HARDWARE
1.TROUBLESHOOTING FOR THE HARDWARE
Paper jam in the Hanging Finisher MJ-1031 (optional)
Be careful not to let your fingers be caught between the equipment and the finisher (optional).
This could injure you.
Separate the finisher from the equipment.
1
Press the lever to unlock the finisher and slowly separate it from the
equipment, placing both of your hands on the front and back of the
finisher.
Open the Bridge Kit cover.
2
Remove the jammed paper from the equipment side.
3
Close the Bridge Kit cover.
4
Remove the jammed paper from the paper exit
5
portion.
Clearing a Paper Jam 37
Page 40

1 TROUBLESHOOTING FOR THE HARDWARE
Connect the finisher to the equipment.
6
Move the finisher slowly toward the equipment, placing both of your
hands on the front and the back of the finisher.
Clearing paper jams caused by a wrong paper size setting
Paper jams occur when there is a mismatch between the size of the paper in a drawer or the bypass tray and the size
registered for the corresponding drawer or the bypass tray in the equipment. The message “Check paper size setting on
control panel for drawer N” or “Check paper size setting on control panel for Bypass” appears on the touch panel.
In this case, just clearing the jammed paper does not prevent another paper jam. Be sure to follow the procedure below.
During the operation, the guidance for clearing the paper jam on the touch panel is not displayed. Take notes of the
following before operation: where the paper jam occurred and for which drawer the paper size setting is incorrectly
registered.
Troubleshooting differs depending on how the paper jam has occurred:
P.38 “Jam when making copies or prints (using a drawer)”
P.40 “Jam when making copies or prints (using the bypass tray)”
P.41 “Jam when printing from the FAX”
Jam when making copies or prints (using a drawer)
Press the [POWER] button on the control panel until a
1
sound is heard.
“Shutdown in progress” appears on the menu. After a while, the power
of the equipment is turned OFF.
38 Clearing a Paper Jam
Page 41

1.TROUBLESHOOTING FOR THE HARDWARE
Remove the jammed paper.
2
Press the [POWER] button on the control panel.
3
The equipment starts warming-up.
Press the [USER FUNCTIONS] button on the control
4
panel.
1 TROUBLESHOOTING FOR THE HARDWARE
Press the [USER] tab to enter the [USER] menu and press [DRAWER].
5
Press the drawer button indicated in the message.
6
Clearing a Paper Jam 39
Page 42

1 TROUBLESHOOTING FOR THE HARDWARE
Press the paper size button for the paper that is set in the drawer.
7
Press the [USER FUNCTIONS] button to return to the basic menu and try copying or
8
printing again.
Jam when making copies or prints (using the bypass tray)
Press the [POWER] button on the control panel until a
1
sound is heard.
“Shutdown in progress” appears on the menu. After a while, the power
of the equipment is turned OFF.
Remove the jammed paper.
2
Press the [POWER] button on the control panel.
3
The equipment starts warming-up.
Place the paper on the bypass tray and set the paper size.
4
Try copying or printing again.
5
40 Clearing a Paper Jam
Page 43

1.TROUBLESHOOTING FOR THE HARDWARE
Jam when printing from the FAX
Turn off the main power switch.
1
Shutting down via the control panel is not possible in this case.
Remove the jammed paper.
2
Pull out the drawer indicated in the message and
3
remove all the paper from the drawer.
1 TROUBLESHOOTING FOR THE HARDWARE
Close the drawer and turn on the main power switch.
4
The equipment starts warming-up.
Check the paper size registered to the drawer indicated in the message by means of the
5
drawer button on the touch panel.
Clearing a Paper Jam 41
Page 44

1 TROUBLESHOOTING FOR THE HARDWARE
Place the paper in the drawer indicated in the message. Be sure to place the same-
6
sized paper as the size you checked in step 5.
Printing resumes.
If you change the paper size again after printing has been completed, make sure that the size of the paper placed
in the drawer is the same as the size registered for the corresponding drawer in the equipment.
42 Clearing a Paper Jam
Page 45

1 TROUBLESHOOTING FOR THE HARDWARE
Clearing a Staple Jam
When a staple jam has occurred in the stapler of the finisher or saddle stitch unit, clear the jam following the procedure
below.
P.43 “Staple jam in a finisher”
P.50 “Staple jam in the saddle stitch unit”
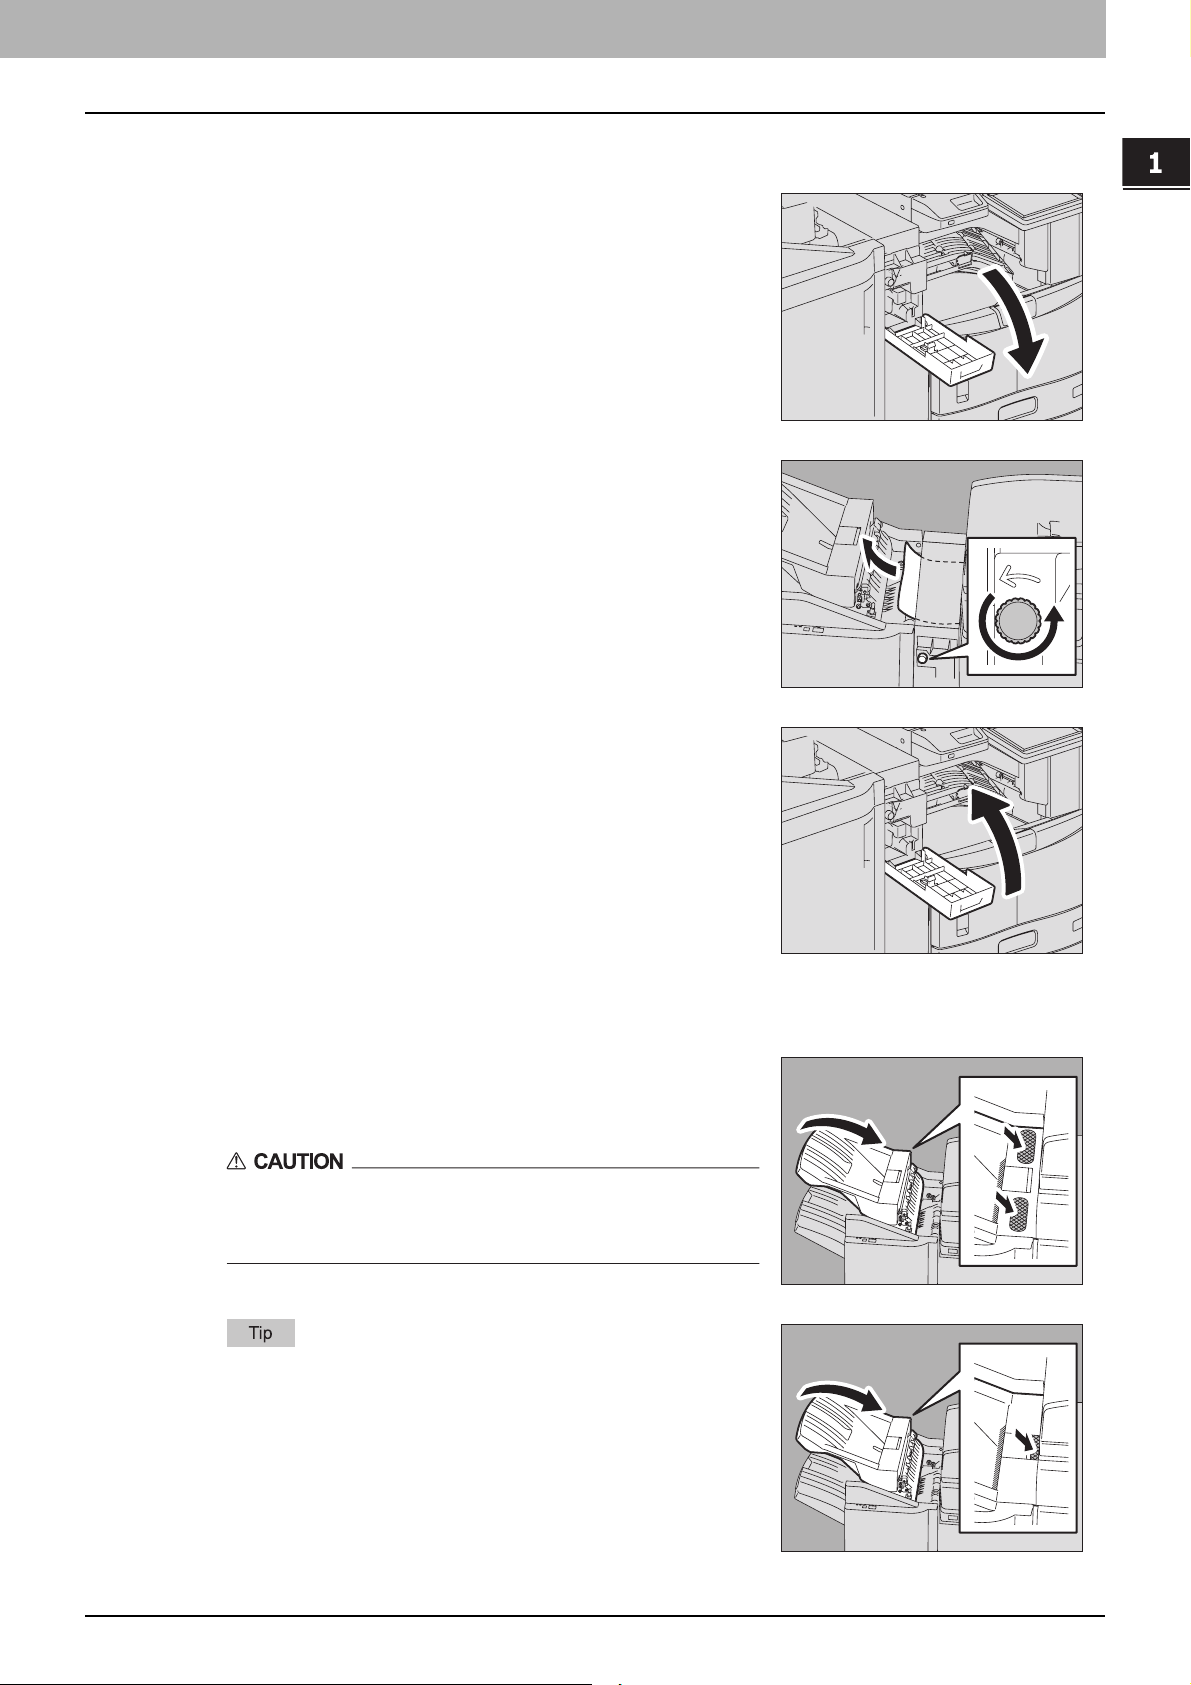
Staple jam in a finisher
Finisher MJ-1101
Open the front cover of the finisher.
1
Remove the staple cartridge.
2
Lower the guide while holding the knob.
3
A: Stapling area
Do not touch the stapling area.
The actual needle point could cause you personal injury.
Remove the jammed staples.
4
A
Clearing a Staple Jam 43
Page 46

1 TROUBLESHOOTING FOR THE HARDWARE
Holding the knob, raise the guide, and return it to its
5
original position.
Fit the staple cartridge into the stapler.
6
When fitting the staple cartridge, hold the green-labeled portion of the
bracket securely so that the bracket will not move.
Insert the cartridge until it is caught by the latch and fixed with a click.
Close the front cover of the finisher.
7
Saddle Stitch Finisher MJ-1024
Open the front cover of the finisher.
1
Remove the staple cartridge.
2
44 Clearing a Staple Jam
Page 47

1.TROUBLESHOOTING FOR THE HARDWARE
Lower the guide while holding the knob.
3
A: Stapling area
Do not touch the stapling area.
The actual needle point could cause you personal injury.
Remove the jammed staples.
4
1 TROUBLESHOOTING FOR THE HARDWARE
A
Holding the knob, raise the guide, and return it to its
5
original position.
Fit the staple cartridge on the stapler.
6
Insert the cartridge until it is caught by the latch and fixed with a click.
Close the front cover of the finisher.
7
Clearing a Staple Jam 45
Page 48

1 TROUBLESHOOTING FOR THE HARDWARE
Saddle Stitch Finisher MJ-1025
Open the front cover of the finisher.
1
Pull out the stapler unit holding the green handle.
2
Turn the top green knob clockwise until the triangle
3
mark and the rectangular mark are aligned as shown
in the figure on the right, so that the stapler is pulled
out toward you.
Take out the staple cartridge holding its green portion
4
on both sides.
Raise the guide while holding the knob.
5
46 Clearing a Staple Jam
Page 49

1.TROUBLESHOOTING FOR THE HARDWARE
Remove the jammed staples.
6
Holding the knob, lower the guide, and return it to its
7
original position.
1 TROUBLESHOOTING FOR THE HARDWARE
Fit the staple cartridge on the stapler.
8
Insert the cartridge until it is fixed with a click.
Return the stapler unit to the finisher.
9
Close the front cover of the finisher.
10
Clearing a Staple Jam 47
Page 50

1 TROUBLESHOOTING FOR THE HARDWARE
Hanging Finisher MJ-1031
Be careful not to let your fingers be caught between the equipment and the finisher (optional).
This could injure you.
Separate the finisher from the equipment.
1
Press the lever to unlock the finisher and slowly separate it from the
equipment, placing both of your hands on the front and back of the
finisher.
Open the staple cartridge unit cover.
2
Remove the staple cartridge.
3
Lower the guide while holding the knob.
4
A: Stapling area
A
Do not touch the stapling area.
The actual needle point could cause you personal injury.
48 Clearing a Staple Jam
Page 51

1.TROUBLESHOOTING FOR THE HARDWARE
Remove the jammed staples.
5
Holding the knob, raise the guide, and return it to its
6
original position.
1 TROUBLESHOOTING FOR THE HARDWARE
Fit the staple cartridge on the stapler.
7
Insert the cartridge until it is caught by the latch and fixed with a click.
Close the staple cartridge unit cover.
8
Connect the finisher to the equipment.
9
Slowly move the finisher toward the equipment by placing both of
your hands on the front and the back of the finisher.
Clearing a Staple Jam 49
Page 52

1 TROUBLESHOOTING FOR THE HARDWARE
Staple jam in the saddle stitch unit
When staples are jammed in the saddle stitch unit of the Saddle Stitch Finisher MJ-1024, follow the procedure below to
clear the jam.
Open the front cover of the finisher.
1
Slowly pull out the saddle stitch unit.
2
Pull the stapler handle on the saddle stitch unit
3
toward you to unlock it. Then turn the stapler
clockwise by 60 degrees.
The stapler is locked and cannot be turned further when it lies almost
horizontally.
Remove the staple cartridge.
4
While pushing the lever (1 in the figure) downward,
5
pull up the shutter with the knob (2).
2
1
50 Clearing a Staple Jam
1
2
Page 53

1.TROUBLESHOOTING FOR THE HARDWARE
Remove the jammed staples.
6
A: Stapling area
Do not touch the stapling area
The actual needle point could cause you personal injury.
Push the knob (2) to return it to its original position.
7
Make sure that the lever (1) is latched on the shutter.
1 TROUBLESHOOTING FOR THE HARDWARE
A
12
Fit the staple cartridges.
8
Push down each cartridge until it is fixed with a click.
Unlock the stapler by pulling its handle toward you.
9
Then return the stapler to its original position.
Carefully insert the saddle stitch unit into the finisher.
10
2
1
Make sure of the following two requirements before test stapling:
11
y The finisher is securely attached to the equipment.
y A3, B4, A4-R, LD, or LT-R paper is set in the drawer.
Clearing a Staple Jam 51
Page 54

1 TROUBLESHOOTING FOR THE HARDWARE
Close the front cover of the finisher.
12
Test stapling starts automatically.
Test stapling is necessary to prevent void stapling. Note that the test stapling starts automatically when the two
requirements in step 11 are met with the front cover of the finisher closed. If the test stapling does not start,
make sure to check the two requirements again. Then open and again close the front cover of the finisher.
52 Clearing a Staple Jam
Page 55

1 TROUBLESHOOTING FOR THE HARDWARE
Replacing a Toner Cartridge
When the toner cartridge runs out, the message “Install New toner cartridge” appears. Replace the toner cartridge
following the procedure below when you see this message.
To assure optimal printing performance, we recommend that you use only genuine TOSHIBA toner cartridges.
Replacing a Toner Cartridge 53
Page 56

1 TROUBLESHOOTING FOR THE HARDWARE
Recommended toner cartridges
To assure optimal printing performance, we recommend that you use only genuine TOSHIBA toner cartridges.
If you use a TOSHIBA-recommended toner cartridge, you can utilize the following three functions of this equipment:
Cartridge detecting function: This function checks if the toner cartridge is correctly installed and notifies you if it is
not.
Toner remaining check function: This function notifies you when there is little toner remaining in the cartridge, as
well as notifying your authorized service representative automatically by remote service.
Image quality optimization function: This function controls image quality according to the characteristics of the toner
to be used and enables you to print images of an optimal quality.
If you are using a toner cartridge other than the one we recommend, the equipment may not be able to detect whether
it is installed or not. Therefore, even if the toner cartridge is correctly installed, the error message “TONER NOT
RECOGNIZED” appears on the touch panel and printing may not be performed. You may also not be able to utilize the
image quality optimization function, the toner remaining check function, and the remote service function which notifies
your service representative automatically.
If you are using a toner cartridge other than the one we recommend and find the cartridge detection function
inconvenient, please contact your service representative. The cartridge detecting function set by default can be
canceled. Remember once this function has been canceled, you will not be able to utilize the three functions
mentioned above even if you change the cartridge to the one we recommend.
Never attempt to incinerate toner cartridges.
Dispose of used toner cartridges in accordance with local regulations.
Some toner remains in the toner cartridge while the message “Toner near Empty” is displayed. Although you can
replace the toner cartridge with a new one, make sure you follow the procedure P.57 “Replacing a “Near Empty”
toner cartridge”.
Open the front cover.
1
Hold down the green lever.
2
The toner cartridge is slightly pushed out.
54 Replacing a Toner Cartridge
Page 57

1.TROUBLESHOOTING FOR THE HARDWARE
Pull out the toner cartridge.
3
Never attempt to incinerate toner cartridges.
Dispose of used toner cartridges in accordance with local
regulations.
Shake the new toner cartridge strongly with the label
4
surface down to loosen the toner inside.
1 TROUBLESHOOTING FOR THE HARDWARE
10
Remove the protective sheet from the end of the
5
cartridge.
Pull out the seal in the direction of the arrow.
6
Insert the toner cartridge along the rail.
7
Insert the toner cartridge until it clicks.
Replacing a Toner Cartridge 55
Page 58

1 TROUBLESHOOTING FOR THE HARDWARE
Clean the charger.
8
Hold the cleaning knob of the charger and pull it out toward you
carefully until it comes to a stop. Then reinsert it in its original position
carefully. Repeat this procedure two or three times.
Check if the cleaning knob is fully inserted after cleaning.
Close the front cover.
9
56 Replacing a Toner Cartridge
Page 59

1 TROUBLESHOOTING FOR THE HARDWARE
1.TROUBLESHOOTING FOR THE HARDWARE
Replacing a “Near Empty” toner cartridge
The message “Toner near Empty” appears on the touch panel when there is not much toner left in a toner cartridge.
Some toner remains in the toner cartridge while the message “Toner near Empty” is displayed. You can replace the toner
cartridge with a new one, but if you do so, make sure that you follow the procedure below. This procedure is needed to
reset the toner counter to display the next “Toner near Empty” message at the proper time.
Press [JOB STATUS].
1
Press the [TONER] tab.
2
Replacing a Toner Cartridge 57
Page 60

1 TROUBLESHOOTING FOR THE HARDWARE
Press [REPLACE TONER CARTRIDGE].
3
To replace a toner cartridge, press [YES]. To cancel, press [NO].
4
Replace the toner cartridge.
5
See P.53 “Replacing a Toner Cartridge” for the correct procedure.
Press [FINISH].
6
Press the [USER FUNCTIONS] or [COPY] button on the control panel.
7
The menu returns to the BASIC menu.
58 Replacing a Toner Cartridge
Page 61

1 TROUBLESHOOTING FOR THE HARDWARE
Refilling With Staples
Refill with staples according to the following procedures when the staples in the stapler of the finisher and saddle stitch
unit run out.
P.59 “Refilling finisher staples”
P.66 “Refilling saddle stitch unit staples”
Refilling finisher staples
Finisher MJ-1101
Open the front cover of the finisher.
1
Remove the staple cartridge.
2
Take the empty staple case out of the staple cartridge.
3
Pull up the empty staple case while pushing both sides as shown in the
figure.
Fit a new staple case on the staple cartridge.
4
Push the staple case hook into the staple cartridge socket until you
hear a click.
Refilling With Staples 59
Page 62

1 TROUBLESHOOTING FOR THE HARDWARE
Fit the staple cartridge into the stapler.
5
When fitting the staple cartridge, hold the green-labeled portion of the
bracket securely so that the bracket will not move.
Insert the cartridge until it is caught by the latch and fixed with a click.
Close the front cover of the finisher.
6
If the message “Check staple cartridge” remains, repeat the procedure above from steps 1 to 6.
Saddle Stitch Finisher MJ-1024
Open the front cover of the finisher.
1
Remove the staple cartridge.
2
Press the buttons on both sides of the cartridge.
3
The transparent cover of the cartridge is lifted.
60 Refilling With Staples
Page 63

1.TROUBLESHOOTING FOR THE HARDWARE
After the transparent cover is lifted, take out the
4
empty staple case.
Fit the new staple case into the staple cartridge.
5
Push the staple case into the cartridge until it clicks.
In this step, do not remove the seal bundling the staples.
1 TROUBLESHOOTING FOR THE HARDWARE
1
2
Push the transparent cover down to its original
6
position, and pull out the seal bundling the staples.
Fit the staple cartridge into the stapler.
7
Insert the staple cartridge until it is caught by the latch and fixed with a
click.
Close the front cover of the finisher.
8
1
2
If the message “Check staple cartridge” remains, repeat the procedure above from steps 1 to 8.
Refilling With Staples 61
Page 64

1 TROUBLESHOOTING FOR THE HARDWARE
Saddle Stitch Finisher MJ-1025
Open the front cover of the finisher.
1
Pull out the stapler unit holding the green handle.
2
Turn the top green knob clockwise until the triangle
3
mark and the square mark are aligned as shown in the
figure on the right, so that the stapler is pulled out
toward you.
Take out the staple cartridge holding its green portion
4
on both sides.
Press the buttons on both sides of the cartridge.
5
The transparent cover of the cartridge is lifted.
62 Refilling With Staples
Page 65

1.TROUBLESHOOTING FOR THE HARDWARE
After the transparent cover is lifted, remove the empty
6
staple case.
Fit the new staple case into the staple cartridge.
7
Push the staple case into the cartridge until it clicks.
In this step, do not remove the seal bundling the staples.
1 TROUBLESHOOTING FOR THE HARDWARE
1
2
Push the transparent cover down to its original
8
position, and pull out the seal bundling the staples.
Fit the staple cartridge on the stapler.
9
Insert the cartridge until it is fixed with a click.
Return the stapler unit to the finisher.
10
1
2
Refilling With Staples 63
Page 66

1 TROUBLESHOOTING FOR THE HARDWARE
Close the front cover of the finisher.
11
If the message “Check staple cartridge” remains, repeat the procedure above from steps 1 to 11.
Hanging Finisher MJ-1031
Be careful not to let your fingers be caught between the equipment and the finisher (optional).
This could injure you.
Separate the finisher from the equipment.
1
Press the lever to unlock the finisher and slowly separate it from the
equipment, placing your hands on the front and rear of the finisher.
Open the staple cartridge unit cover.
2
Remove the staple cartridge.
3
64 Refilling With Staples
Page 67

1.TROUBLESHOOTING FOR THE HARDWARE
Press the buttons on both sides of the cartridge.
4
The transparent cover of the cartridge is lifted.
After the transparent cover is lifted, remove the empty
5
staple case.
1 TROUBLESHOOTING FOR THE HARDWARE
1
Fit the new staple case into the staple cartridge.
6
Push the staple case into the cartridge until it clicks.
In this step, do not remove the seal bundling the staples.
Push the transparent cover down to its original
7
position, and pull out the seal bundling the staples
2
1
2
Fit the staple cartridge into the stapler.
8
Insert the staple cartridge until it is caught by the latch of the staple
cartridge and is fixed with a click.
Refilling With Staples 65
Page 68

1 TROUBLESHOOTING FOR THE HARDWARE
Close the staple cartridge unit cover.
9
Connect the finisher to the equipment.
10
Move the finisher slowly toward the equipment, placing both of your
hands on the front and the back of the finisher.
If the message “Check staple cartridge” remains, repeat the procedure above from steps 1 to 10.
Refilling saddle stitch unit staples
When the staples of the stapler in the Saddle Stitch Finisher MJ-1024 have run out, refill staples following the procedure
below.
Open the front cover of the finisher.
1
Slowly pull out the saddle stitch unit.
2
66 Refilling With Staples
Page 69

1.TROUBLESHOOTING FOR THE HARDWARE
Unlock the stapler of the saddle stitch unit by pulling
3
its handle toward you. Keep pulling the handle, and
turn the stapler clockwise by about 60 degrees.
The stapler is locked and cannot be turned any further when it lies
almost horizontally.
Remove the empty staple cartridges.
4
Replace both cartridges at a time.
1 TROUBLESHOOTING FOR THE HARDWARE
2
1
Fit the new cartridges.
5
Insert each cartridge until it is caught by the latch and is fixed with a
click.
Unlock the stapler of the saddle stitch unit by pulling
6
its handle toward you, and lower the stapler to its
original position.
Slowly insert the saddle stitch unit into the finisher.
7
2
1
Refilling With Staples 67
Page 70

1 TROUBLESHOOTING FOR THE HARDWARE
Make sure that the following two requirements are met before test stapling:
8
y The finisher is securely attached on the equipment.
y A3, B4, A4-R, LD, or LT-R paper is loaded in the drawer
When the message “Check staple cartridge in the Saddle Stitch unit” is displayed, this step is unnecessary.
Proceed to step 9.
Close the front cover of the finisher.
9
When the message “READY (CHECK STAPLER)” is displayed, test stapling starts automatically.
Test stapling is necessary to prevent void stapling. Note that the test stapling starts automatically when the two
requirements in step 8 are met with the front cover of the finisher closed. If the test stapling does not start, make
sure to check the two requirements again. Then open and again close the front cover of the finisher.
68 Refilling With Staples
Page 71

1 TROUBLESHOOTING FOR THE HARDWARE
Cleaning the Charger
If the inside of the charger is dirty, staining may appear on the copied image. Clean the charger following the procedure
below.
Open the front cover.
1
Clean the charger.
2
Hold the cleaning knob of the charger and pull it out toward you
carefully until it comes to a stop. Then reinsert it in its original position
carefully. Repeat this procedure two or three times.
Check if the cleaning knob is fully inserted after cleaning.
Close the front cover.
3
Cleaning the Charger 69
Page 72

1 TROUBLESHOOTING FOR THE HARDWARE
Cleaning the Hole Punch Dust Bin
When the hole punch dust bin becomes full, dispose of the paper punchings following the procedure below.
Hole Punch Unit MJ-6101 / MJ-6004
Open the Hole Punch Unit cover.
1
Pull out the hole punch dust bin.
2
Dispose of the paper punchings.
3
Push back in the hole punch dust bin.
4
Close the Hole Punch Unit cover.
5
Hole Punch Unit MJ-6005
Separate the finisher from the equipment.
1
Press the lever to unlock the finisher and slowly separate it from the
equipment, placing both of your hands on the front and back of the
finisher.
Pull the hole punch dust box out of the Hole Punch
2
Unit.
70 Cleaning the Hole Punch Dust Bin
Page 73

1.TROUBLESHOOTING FOR THE HARDWARE
Dispose of the paper punchings.
3
Push back in the hole punch dust bin.
4
Connect the finisher to the equipment.
5
Move the finisher slowly toward the equipment, placing both of your
hands on the front and the back of the finisher.
1 TROUBLESHOOTING FOR THE HARDWARE
Cleaning the Hole Punch Dust Bin 71
Page 74

1 TROUBLESHOOTING FOR THE HARDWARE
Removal and Installation of the Exit Support Tray
If a large number of sheets is printed at a time, some printed sheets may be pushed out of the exit tray. Remove the exit
support tray on the exit tray of the equipment when printing more than 300 sheets.
If the exit support tray is removed, the alignment of a large number of printed sheets can be improved and about 500
sheets of Toshiba recommended plain paper can be loaded on the exit tray.
y To maintain the alignment of the printed sheets, use the exit support tray unless a large number of sheets is
printed.
y When an optional finisher or Job Separator is installed in the equipment, do not remove the exit support tray.
(e-STUDIO205L/255/305, in which the Offset Tray or Job Separator is installed, has no exit support tray.)
Removing the exit support tray
Place your fingers in the 2 grooves on the exit
1
support tray and lift it up by pressing the latches
inward.
Installing the exit support tray
Hold the exit support tray so that the letter “F” on its
1
back points towards you.
Install the exit support tray.
2
Align the grooves on the exit tray with the protrusions on the back of
the exit support tray and push it until it clicks in order to fix it.
72 Removal and Installation of the Exit Support Tray
Page 75

2.TROUBLESHOOTING FOR COPYING
This chapter describes how to troubleshoot the problems on copying and copy output.
Copying Problems.................................................................................................................. 74
Page 76

2 TROUBLESHOOTING FOR COPYING
Copying Problems
See the table below when you have a problem in operating copy function or have an unexpected copy output.
Problem Description Cause Corrective Action
Functions cannot be set. Another function that is unavailable
for the combination has already been
set.
Copying stops while scanning the
originals. (The message “The
number of originals exceeds the
limits Will you print out stored
originals?” appears.)
Copying stops while scanning the
originals. (The message “Not
enough Work Space to store
originals Will you print out stored
originals?” appears.)
Copied image is too light. No toner is left. The message “Install new toner cartridge” appears when
Copied image is too dark. Copy density is set too dark. Lighten the density manually or try the automatic density
Copied image has stains. The Original Cover (optional) or the
Copy image is skewed. The original is sent from the
Copied image is partially missing. The size or orientation of the copy
Copied image is blurred. There is a gap between the original
The number of scanned pages has
reached the maximum.
No available internal memory
remains.
Copy density is set too light. Darken the density manually or try the automatic density
Reversing Automatic Document
Feeder (optional) is not fully lowered.
The original glass, platen sheet,
scanning area and guide are stained.
The copy density is set too dark. Lighten the density manually or try the automatic density
A transparent original such as a
transparency or tracing paper is being
used.
Reversing Automatic Document
Feeder (optional) at a skew.
paper and that of the original are not
consistent. The reduction ratio is not
properly set.
The binding margin is too wide. Set the binding margin width to fully cover the original.
The original is larger than the
printable area.
glass and the original.
Some functions cannot be combined.
For details, refer to Chapter 8 of the Copying Guide.
To copy the scanned images, press [YES]. To cancel,
press [NO].
To copy the scanned images, press [YES]. To cancel,
press [NO].
no toner is left. Replace the toner cartridge.
P.53 “Replacing a Toner Cartridge”
mode.
mode.
Lower them fully to block the outside light.
Clean them.
P.122 “Regular Maintenance”
mode.
To copy a transparent original clearly, put a sheet of blank,
white paper behind the original. Make sure that the paper
is large enough to cover the original.
Replace the original while aligning the side guides of the
Reversing Automatic Document Feeder to its width so that
it will be placed straight.
Fit the copy paper size to the original or set the reduction
ratio for the copy paper.
For details, refer to Chapter 4 of the Copying Guide.
The outside part of the printable area cannot be copied.
Lower the Original Cover (optional) or the Reversing
Automatic Document Feeder (optional) fully so that the
original fully contacts the platen glass.
74 Copying Problems
The copy paper is damp. Replace it with dry copy paper.
Page 77

2.TROUBLESHOOTING FOR COPYING
Problem Description Cause Corrective Action
Copied image has unevenness in
the horizontal direction.
2 TROUBLESHOOTING FOR COPYING
The charger is stained. Clean the charger.
P.69 “Cleaning the Charger”
Copied image has black streaks
in the horizontal direction.
The scanning area or guides are
stained.
The charger is stained. Clean the charger.
Clean them.
P.122 “Regular Maintenance”
P.69 “Cleaning the Charger”
Copying Problems 75
Page 78

Page 79

3.TROUBLESHOOTING FOR PRINTING
This chapter describes how to troubleshoot the problems on printing.
Print Job Problems ................................................................................................................ 78
Clearing print job errors........................................................................................................................................78
Cannot remember the document password for a Private Print job.......................................................................79
Printer Driver Problems.........................................................................................................80
Cannot print (port setting problems).....................................................................................................................80
Cannot print (SNMP Community Name problems)...............................................................................................80
Command line options not processed ..................................................................................................................80
Retrieval of printer configuration failed .................................................................................................................81
Cannot print a job as expected using PS3 printer driver ......................................................................................81
Cannot change settings on the [Fonts] tab and the [Configuration] tab ...............................................................81
Network Connection Problems............................................................................................. 82
Cannot print with the equipment (network connection problems).........................................................................82
Cannot print with SMB print..................................................................................................................................82
Cannot print properly with AppleTalk print............................................................................................................82
Client Problems......................................................................................................................83
Checking the client status.....................................................................................................................................83
Hardware Problems................................................................................................................ 84
Startup page not printed .......................................................................................................................................84
Print jobs not output .............................................................................................................................................84
Page 80

3 TROUBLESHOOTING FOR PRINTING
Print Job Problems
This section describes how to clear the print jobs errors.
Clearing print job errors
Problem Description
A print job error occurs and [JOB STATUS] blinks when the paper specified by the computer is not set in the drawers of the
equipment.
Corrective Action
Clear the error following the procedure below.
To print by placing paper on the bypass tray
Press the [JOB STATUS] which is blinking.
1
Place paper of the size specified with the computer on the bypass tray, and press the
2
[START] button.
Printing is performed. Press [JOB STATUS] when printing has been completed.
Printing by selecting a paper size already placed in another drawer
You can perform printing with the paper already placed in the drawers. Some part of the image may not be printed,
however, if the paper size in the drawer is smaller than the one you have specified.
Press the drawer button you intend to use on the touch panel and press the [START] button.
78 Print Job Problems
Page 81

3 TROUBLESHOOTING FOR PRINTING
3.TROUBLESHOOTING FOR PRINTING
Cannot remember the document password for a Private Print job
Problem Description
I cannot remember the document password for my Private Print job.
Corrective Action
The document password for a Private Print job is never shown, once the job has been sent to the equipment.
To print the failed Private Print job, submit the document again as a new Private Print job.
The failed Private Print job remains unprinted in the job queue. To delete it, either way below is required. Contact the
administrator of the equipment.
y Enter the administrator’s password in the Private Print job list on the touch panel and delete the job.
For details, refer to the Printing Guide.
y Log on TopAccess with the administrator’s password and delete the job in the Print Job list.
For details, refer to the TopAccess Guide.
Print Job Problems 79
Page 82

3 TROUBLESHOOTING FOR PRINTING
Printer Driver Problems
This section describes the troubleshooting for the printer drivers.
For the error messages that appear during the installation of the printer drivers, refer to the Software Installation
Guide.
Cannot print (port setting problems)
Problem Description
I cannot perform printing with the equipment.
Corrective Action
If the printer driver on the client computer points to a wrong network port, jobs neither appear in the current jobs queue nor
are printed. Fix the problem following the procedure below:
1. Open the Printers folder from the Control Panel.
2. Right-click the printer driver icon.
3. Select Properties from the shortcut menu.
4. Select the [Ports] tab.
5. Make sure that the path to the printer and the device name are correct.
\\<device name>\print
<device name> is the same as the device name set from the touch panel. “print” may be “pcl6” or “ps3” depending on
the printer driver you use.
6. Click the [General] Tab and click [Print Test Page] to confirm that the settings are correct.
Cannot print (SNMP Community Name problems)
Problem Description
I cannot perform printing with the equipment.
Corrective Action
Check if the SNMP community names are the same in the following 3 settings.
y Equipment
y TCP/IP port of the [Ports] tab in the printer driver
y [SNMP Settings] dialog box of the [Configuration] tab in the printer driver
Command line options not processed
Problem Description
All the print options are sent to the equipment at the beginning of the print job. If the print file already contains print
commands, they overwrite the command line options you set. For example, if the print file specifies Letter paper, and you
specify A4 paper with the lp command, the document is printed on Letter size paper.
Corrective Action
Change the properties of the document you intend to print to create another print file. Submit the print job using the lp
command without setting additional parameters.
80 Printer Driver Problems
Page 83

3 TROUBLESHOOTING FOR PRINTING
3.TROUBLESHOOTING FOR PRINTING
Retrieval of printer configuration failed
Problem Description
When accessing the printer properties, the message “Retrieval of printer configuration failed” is displayed.
Corrective Action
The printer driver cannot communicate with the equipment. Try the steps in the checklist below.
No Check... Yes No Corrective Action
1 Is the equipment turned on? Next Step
2 Can you connect the computer to the equipment
via TopAccess?
3 Does the same message appear again when you
access the property of the printer driver?
Ø
Next Step
Ø
Ö End
Turn on the equipment.
Ö
Restart the equipment.
Ö
Check the printer driver port assignment and
make sure that it is correct.
Cannot print a job as expected using PS3 printer driver
Problem Description
When printing with the PS3 printer driver from the application that creates the PostScript code for printing such as Adobe
Acrobat, the following print options may not work correctly:
y Manual Scale
y Print Paper Size
y Paper Type
y Use Front Cover
y Use Back Cover
y Insert Pages
y Interleave Pages
y Booklet
y Multiple Pages per Sheet
y All options from the [Effect] tab
y All options from the [Image Quality] tab
Corrective Action
Disable [Use PostScript Passthrough] in the [PostScript Settings] dialog box and print the document.
Cannot change settings on the [Fonts] tab and the [Configuration] tab
Problem Description
The [Fonts] tab and [Configuration] tab are grayed out and their settings cannot be changed.
Corrective Action
Users who do not have the privilege to change the printer driver setting cannot change the options in the [Fonts] tab and
[Configuration] tab. Please log on with the Administrator or a Power User.
Printer Driver Problems 81
Page 84

3 TROUBLESHOOTING FOR PRINTING
Network Connection Problems
This section describes the troubleshooting for printing in the network connection environment.
See also the checklists by types of printing and operating systems on P.96 “Printing Problems (Network Related)”
Cannot print with the equipment (network connection problems)
Problem Description
I cannot perform printing with the equipment.
Corrective Action
See the checklist below to determine if the cause of the problem is related to a network.
If it is, see P.96 “Printing Problems (Network Related)”. In that section, several OS- and printing method-based check
lists are provided to help you find an appropriate action to take.
No. Check... Yes No Corrective Action
1 Have you set the protocol settings so they are
compatible with your network and client protocol
settings?
2 Have you set up the appropriate type(s) of print
services that should be supported?
3 If you are using Novell print services, did you set
up the Novell side of network printing, such as
creating print servers and attaching the print
queue?
4 If you set up Novell print services, can you see the
print job using PCONSOLE or NWAdmin?
5 Have you checked the gateway and subnet
settings to make sure that the equipment is part of
the same network gateway as the client from
which you are trying to print?
6 Are other services and communications
performed over the network behaving in the
normal and expected manner?
Next Step
Ø
Next Step
Ø
Next Step
Ø
Next Step
Ø
Next Step
Ø
End Ö
Set up the proper protocol.
Ö
Check the settings required for your printing
Ö
environment.
Set up the NetWare server.
Refer to the Software Installation Guide.
Ö
Refer to your Novell PCONSOLE or NWAdmin
Ö
user documentation for help with using these
utilities.
Set up the TCP/IP correctly.
Ö
Refer to your network documentation or use a
network diagnostic utility to identify the network
problem.
Cannot print with SMB print
Problem Description
When trying to print a document using an SMB connection, the job cannot be printed and such messages continuously
appear as “No more connections can be made to this remote computer” or “Your file could not be printed due to an error”.
Corrective Action
SMB print is supposed to be utilized in a small network. If you can use Windows 2000, Windows XP, Windows Vista,
Windows 7, Windows Server 2003, or Windows Server 2008 as a print server, printing via the Windows Print Server is
recommended.
If you cannot use the Windows Print Server in your network, use LPR print instead.
Cannot print properly with AppleTalk print
Problem Description
y Text will be printed as stripe lines when printing an email message.
y Some text is not printed in a document.
y When printing from a web browser, the web page is not printed in spite of the print job being sent to the equipment.
Corrective Action
If the errors above occur with AppleTalk print, use LPR print instead.
82 Network Connection Problems
Page 85

3 TROUBLESHOOTING FOR PRINTING
Client Problems
This section describes how to identify and correct the problems caused by the clients* connected to the equipment.
* One of the common examples of clients is a computer that sends a print job to the equipment and make it perform printing.
Checking the client status
Problem Description
The printing problems are caused by the printer driver settings, network settings, errors in the network connections, and
so forth. First, contact the administrator of the equipment to see if there is one of these kinds of problem, or see the
following sections:
P.80 “Printer Driver Problems”
P.82 “Network Connection Problems”
P.96 “Printing Problems (Network Related)”
Another possible cause is one related to a client. If the print jobs sent from a specific client within a network fails, the
problem may be caused by the client.
The checklist below will help you identify the source of the error and direct you to the information resolving the problem. If
the problem persists after you have followed all of the steps, contact your service representative.
No. Check... Yes No Corrective Action
1 Does the equipment work properly? Are copy jobs
output properly?
2 See the Device page of TopAccess. Are the
options specified for the job supported by the
hardware configuration?
3 Can you print the jobs from other clients?
4 Have you ever printed successfully from this
client?
5 Did you set up the printer driver other than by an
SMB connection?
6 (For Macintosh only)
Can you see the equipment you created in the
Selector?
7 At this point, the problem is most likely to be related to a client-side error. Refer to the Printing Guide to fix the problem.
Next Step
Ø
Next Step
Ø
Next Step
Ø
Next Step
Ø
Next Step
Ø
Next Step
Ø
Check the device status displayed in the Device
Ö
page of TopAccess.
If not, delete the job, install the required
Ö
components, and try again. Contact your service
representative for further information.
See the following section to fix the problem.
Ö
P.82 “Cannot print with the equipment
(network connection problems)”
See the following section to fix the problem.
Ö
P.80 “Cannot print (port setting problems)”
See the following section to fix the problem.
Ö
P.82 “Cannot print with SMB print”
Refer to the Software Installation Guide.
Ö
Client Problems 83
Page 86

3 TROUBLESHOOTING FOR PRINTING
Hardware Problems
This section describes troubles caused by the hardware device (the equipment).
If an icon or a message indicating an error is not displayed, or the problems on printer drivers or the network connection
cannot be specified, a hardware problem is a possible cause of the trouble.
The following are common factors involved in the hardware problems:
y System board, cables, and connectors
y The equipment, and its (optional) components such as the duplexing unit or the Finisher
y System software or firmware of the equipment
Startup page not printed
Problem Description
If the startup page is not printed when you turn on the equipment, even though the Print Startup Page is enabled, there
may be a hardware error. Contact your service representative.
Corrective Action
1. Make sure that Print Startup Page is enabled.
2. Turn on the equipment. (If it is already on, restart it.)
3. Check if the startup page is output.
When the Print Startup Page is enabled, normally the Startup Page is automatically printed. If not, the problem is possibly
caused by the hardware. Contact your service representative.
Print jobs not output
Problem Description
All the clients within a network fail to make the equipment output the print jobs.
Corrective Action
There remains a possibility that an improper settings of the software such as printer drivers caused the problem, however,
a hardware error is possible, if none of the clients can print the jobs. Try the steps on the checklist below. If the problem
persists after you have followed all of the steps, contact your service representative.
No Check... Yes No Corrective Action
1 Is printing prohibited from all connected client
computers?
2 Can you see the job from TopAccess or another
print monitoring utility, such as PCONSOLE or
Print Manager?
3 Can you identify the problem with the error
message or the error code and resolve it? End Ö
Next Step
Ø
Next Step
Ø
Also refer to the Printing Guide for more information on resolving output errors caused by software settings.
See the following section to fix the problem:
Ö
P.82 “Network Connection Problems”
See the following section to fix the problem:
Ö
P.92 “Locating the Equipment in the Network”
See the following sections to fix the problem:
P.106 “Error Messages”
P.110 “Error Codes”
84 Hardware Problems
Page 87

4.TROUBLESHOOTING FOR SCANNING
This chapter describes how to troubleshoot the problems of scanning.
Scanning Problems................................................................................................................ 86
Cannot E-mail my scans ......................................................................................................................................86
Cannot find the data saved in the shared folder...................................................................................................86
Page 88

4 TROUBLESHOOTING FOR SCANNING
Scanning Problems
This section describes troubleshooting for using scan data.
Cannot E-mail my scans
Problem Description
I have scanned a document and sent the copy as an e-mail attachment, but the e-mail does not reach the specified e-mail
address.
Corrective Action
Check the following points:
y The correct e-mail addresses are specified.
y The equipment is correctly configured for and connected to the network.
y For the SMTP Client settings, the SMTP server address is correctly set.
y For the SMTP Client settings, the Port Number is correctly set.
y For the SMTP Client settings, the settings for SSL and/or authentication are correctly set.
y The data size of the attached file is smaller than/equal to the maximum data size receivable on the recipient’s side.
For details on the network settings, refer to the TopAccess Guide.
For details on e-mailing the scanned image, refer to the Scanning Guide.
Cannot find the data saved in the shared folder
Problem Description
I have scanned a document and saved the copy in shared folder of the equipment, but cannot locate the saved file.
Corrective Action
y For Windows OS, search the network for the equipment using the search function of Explorer. The data are stored in
the equipment’s shared folder named “FILE_SHARE.”
y For Macintosh, make sure that the OS version is Mac OS X 10.3.x or later; a client computer running Mac OS X 10.2.x
or earlier cannot access the shared folder on the equipment. If your computer is running Mac OS X 10.3.x or later,
search the network for the equipment on Finder and access the folder named “FILE_SHARE.”
y If you cannot find the equipment on the network, make sure that the SMB Server Protocol setting is enabled on
TopAccess.
For details on the network settings, refer to the TopAccess Guide.
For details on storing the scanned image, refer to the Scanning Guide.
86 Scanning Problems
Page 89

5.TROUBLESHOOTING FOR e-Filing
This chapter describes how to troubleshoot the problems on e-Filing.
e-Filing Web Utility Problems................................................................................................88
e-Filing Web Utility terminates the session...........................................................................................................88
Numerous sub windows repeatedly appear .........................................................................................................88
Displaying the items in the Contents Frame takes a long time.............................................................................88
Error messages ....................................................................................................................................................89
Page 90

5 TROUBLESHOOTING FOR e-Filing
e-Filing Web Utility Problems
This section describes troubleshooting for the web browser-based e-Filing web utility. You will also find the error messages
and the corrective actions for each message.
e-Filing Web Utility terminates the session
Problem Description
The message “This operation will end your e-Filing session.” appears and e-Filing Web Utility returns to its top page.
Corrective Action 1
Clicking [Return], [Refresh], and [home] button or [login] link leads to this message and e-Filing Web Utility returns to its
top page. In this case, try to do the operation you intend to do again.
Corrective Action 2
Closing the window by clicking the [x] button of the browser leads to the message “This operation will end your e-Filing
session.” and the e-Filing session ends. Finish your current operation before you close the window.
Corrective Action 3
Operating the main window while the sub window is displayed leads to the message “This operation will end your e-Filing
session.” and the processing displayed on the sub window ends. Do not operate the main window until the processing on
the sub window has been completed.
Numerous sub windows repeatedly appear
Problem Description
Numerous sub windows repeatedly appear and e-Filing becomes uncontrollable.
Corrective Action
Close all the windows and exit from the web browser. Then restart the browser and clear the cookie files from “Internet
Option” (for Internet Explorer).
Displaying the items in the Contents Frame takes a long time
Problem Description
Displaying the items in the Contents Frame takes a long time.
Corrective Action
Displaying more than 100 items in the Contents Frame may take a long time. A smaller number of items shortens the time
for displaying.
88 e-Filing Web Utility Problems
Page 91

5.TROUBLESHOOTING FOR e-Filing
Error messages
See the table below to troubleshoot the problem if a message appears.
Message Corrective Action
Internal error occurred. Please restart e-Filing. Turn OFF and then ON the power of the equipment and then try
Your e-Filing Session has Timed Out. Please Restart. Exit from e-Filing and change the session timer setting to be
The items have been modified. The items are currently being modified by another user. Try again
Cannot start e-Filing Session. The Disk is Full. Erase the unnecessary data from the Control Panel. For
Cannot create a Box. The Disk is full. Erase unnecessary data using the administrative function or
Cannot create a Folder. The Disk is full. Erase unnecessary data using the administrative function or
Cannot edit the Document. The Disk is full. Erase unnecessary data using the administrative function or
Cannot insert Page. The Disk is full. Erase unnecessary data using the administrative function or
Cannot archive Documents. The Disk is full. Erase unnecessary data using the administrative function or
Cannot upload archived file. The Disk is full. Erase unnecessary data using the administrative function or
Cut failed. Disk is full. Erase unnecessary data using the administrative function or
Copy failed. Disk is full. Erase unnecessary data using the administrative function or
Paste failed. Disk is full. Erase unnecessary data using the administrative function or
Save failed. Disk is full. Erase unnecessary data using the administrative function or
Cannot create a Folder. Maximum number of folders has been
reached.
Cannot create a document. Maximum number of documents has
been reached.
Cannot insert Page. Maximum number of pages has been
reached.
Paste failed. Maximum number of page range is reached. Delete unnecessary pages and paste pages in the document. A
Cut failed. The items have been deleted or modified. Refresh the page and make sure that the item was deleted or is
Copy failed. The items have been deleted or modified. Refresh the page and make sure that the item was deleted or is
Paste failed. The items have been deleted or modified. Refresh the page and make sure that the item was deleted or is
Delete failed. The items have been deleted or modified. Refresh the page and make sure that the item was deleted or is
Please enter valid password. Enter the correct password.
A folder with the name you specified already exists. Please try
again.
Another user has been archiving or uploading. Please try again
later.
The Maximum Possible Archive Size exceed. Archiving is not
Possible.
The Box cannot be erased. A document contained in Box is being
used.
5 TROUBLESHOOTING FOR e-Filing
again. If the error message is still displayed, contact your system
administrator or contact your dealer for support.
longer on the Setup page of the TopAccess Administrator mode.
Then restart it.
after the other user has finished modifying the items.
instructions on how to delete data from the Control Panel, refer to
the e-Filing Guide.
deleting the data in boxes for making hard disk space.
deleting the data in boxes for making hard disk space.
deleting the data in boxes for making hard disk space.
deleting the data in boxes for making hard disk space.
deleting the data in boxes for making hard disk space.
deleting the data in boxes for making hard disk space.
deleting the data in boxes for making hard disk space.
deleting the data in boxes for making hard disk space.
deleting the data in boxes for making hard disk space.
deleting the data in boxes for making hard disk space.
Delete unnecessary folders and create a new folder. You can
create up to 100 folders in each box.
Delete unnecessary documents and create a new document. You
can create up to 400 documents in each box and folder.
Delete unnecessary pages and insert a new page. A document
can contain up to 200 pages.
document can contain up to 200 pages.
currently being modified.
currently being modified.
currently being modified.
currently being modified.
Use a name that does not exist in the box.
The document is being archived or uploaded by another user. Try
again after the other user has finished archiving or uploading.
An archive file larger than 2 GB cannot be created. Make sure
that the archive file will be less than 2 GB by archiving smaller
groups of files instead of a large one.
A document contained in the box is being used by another user.
Try again after the other user has finished using the document.
e-Filing Web Utility Problems 89
Page 92

5 TROUBLESHOOTING FOR e-Filing
Message Corrective Action
The document is being used. Please try again later. The selected document is being used by another user. Try again
File format doesn’t correspond. Please contact Administrator. Contact your administrator to convert the archive file and try
e-Filing is not ready. Please try again later. e-Filing has not yet been activated. Try again later.
after the other user has finished using the document.
again.
90 e-Filing Web Utility Problems
Page 93

6.TROUBLESHOOTING FOR NETWORK
CONNECTIONS
This chapter describes how to troubleshoot the problems on network connections.
Locating the Equipment in the Network...............................................................................92
Cannot locate the equipment in the network ........................................................................................................92
Cannot locate the equipment with Local Discovery..............................................................................................93
Equipment does not respond to ping command ...................................................................................................94
LDAP Search and Authentication Problems........................................................................95
Network shutdown occurs or touch panel disabled after LDAP search ................................................................95
LDAP authentication takes a long time.................................................................................................................95
Printing Problems (Network Related)................................................................................... 96
SMB print and Point&Print in a Windows operating system environment ............................................................96
Raw TCP or LPR print in a Windows operating system environment ..................................................................96
IPP print in a Windows operating system environment ........................................................................................97
Novell print in a NetWare environment.................................................................................................................97
Macintosh environment ........................................................................................................................................98
UNIX/Linux environment ......................................................................................................................................98
Network Fax (N/W-Fax) Driver Problems ............................................................................. 99
N/W-Fax Driver Installation Error Messages ........................................................................................................99
N/W-Fax Driver General Errors ..........................................................................................................................100
Page 94

6 TROUBLESHOOTING FOR NETWORK CONNECTIONS
Locating the Equipment in the Network
Cannot locate the equipment in the network
Problem Description
I cannot locate the equipment in the network.
Corrective Action
Improper settings may cause the problems in locating the equipment in the network. Try the checklist below to detect the
cause of the problem. If the problem remains unsolved, contact your service representative.
No. Check... Yes No Corrective Action
1 Is the startup page printed out? If not, wait until
the communication comes online. Examine the
protocol settings listed on the startup page. Are
they correct?
2 Print out a configuration page. Make sure that
there are not any discrepancies or inconsistencies
between the current network settings and your
network environment. Change the network
settings, if necessary. Use the Find Computer
utility from your Windows computer to locate the
equipment by its device name. Can you find the
equipment?
3 Can you locate other computers connected to the
same network?
4 Check the link LED activity on the hub and/or NIC
of the equipment and the client machine. Do the
hardware components appear to be functioning
properly?
5 Make sure that the device name for the
equipment is unique and verify that the WINS
and/or DNS server database are not causing
potential naming conflicts with the network
settings on the equipment. If necessary, change
the network settings on the equipment. After the
communication comes back online, can you see
the equipment in the network?
6 If the network environment is using complex
subnet or supernet structures, is the IP address
used by the equipment within the network
structures range of valid addresses?
Next Step
Ø
Next Step
Ø
Next Step
Ø
Next Step
Ø
Next Step
Ø
End Ö
Set up the proper protocols.
Ö
Set up the proper protocol if required.
Once you have located the equipment, configure
the port that it is mapped correctly to the device.
Ö
Check the network settings on the client computer
Ö
to make sure that they are compatible with the
network settings on the equipment.
Contact your service representative.
Ö
Set up the NetBIOS name of the device correctly.
Ö
Contact your local network support specialist for
further assistance.
92 Locating the Equipment in the Network
Page 95

6 TROUBLESHOOTING FOR NETWORK CONNECTIONS
6.TROUBLESHOOTING FOR NETWORK CONNECTIONS
Cannot locate the equipment with Local Discovery
Problem Description
Local Discovery cannot detect the equipment.
Corrective Action
The equipment is normally located automatically by SNMP. When the TWAIN driver, File Downloader, Address Book
Viewer, Backup/Restore Utility, or Remote Scan driver cannot automatically discover the equipment over the network, the
most likely cause is limitations of the protocols supported by the computer. In some cases, you need to add or update
network components; however, first see the checklist below to fix the problem.
No. Check... Yes No Corrective Action
1 Check the SNMP version.
Is the SNMP setting configured for SNMP V3?
2 Is SNMP enabled on the equipment?
Is “public” specified for the Read Community?
3 Confirm that the protocol suite installed on the
client computer has been updated with the latest
software for the given operating system. If your
network only supports the IPX/SPX protocol,
make sure that the most current version of Novell
Client software is installed.
4 Print an NIC Configuration page from the
equipment. Does the equipment support the same
protocol as the network?
5 Change the protocol settings from TopAccess, if
necessary, and reboot the equipment for the
changes to take effect. Repeat step 2. Was the
device discovered?
6 Check the NIC Configuration page. Are the IP
address and subnet mask settings correct?
7 Check the router to make sure that it is not
filtering out the equipment packets. Is the router
processing equipment packets correctly?
8 Can another computer within the same network
segment discover the equipment?
9 Check the NIC Configuration page. Is the Unit
Serial Number part of the device name?
10 Check link activities on the port being used by the
equipment and the integrity of the network cable,
hub, or switch that connects the equipment to the
network. Replace any network components that
you can tell or suspect are faulty.
Ö
Next Step
Ø
Next Step
Ø
Next Step
Ø
End
Next Step
Ø
Next Step
Ø
Next Step
Ø
Next Step
Ø
End Ö
Next Step
Next Step
Check whether the SNMP V3 is available on your
Ø
environment.
Enable the SNMP (MIB) and confirm the Read
Ö
Community setting.
See the vendor’s Web site for information about
product updates and technical supports.
Ö
Configure the proper protocol.
Ö
Ø
Setup the TCP/IP settings correctly.
Ö
Adjust the router settings.
Ö
See the following section to fix the problem:
Ö
P.92 “Locating the Equipment in the Network”
Contact your service representative.
Ö
Locating the Equipment in the Network 93
Page 96

6 TROUBLESHOOTING FOR NETWORK CONNECTIONS
Equipment does not respond to ping command
Problem Description
The equipment does not respond to a ping command.
Corrective Action
Check the network settings following the checklist below.
No. Check... Yes No Corrective Action
1 Confirm that the TCP/IP protocol suite is installed
on the client computer.
2 Look at the NIC configuration page and confirm
that the TCP/IP settings are correct. Is the IP
address entered and valid? Are the Gateway and
Subnet settings correct?
3 Reboot the equipment. Check the NIC
Configuration page that is printed out. Are the
TCP/IP settings correct?
4 Try to ping the equipment again. Did the
equipment respond to the ping?
5 Can you ping the equipment from any other
computer within the same network? If not, the
equipment might have an IP address that is out of
range or invalid.
6 Can you ping to another computer within the
same network?
7 If you have customized the device name, you can
check if the NIC is functional by restoring the
default settings. When the equipment
automatically reboots and an NIC Configuration
page is printed, does the device name include the
NIC’s unit serial number?
8 Check link activities on the port being used by the
equipment and also the integrity of the network
cable, hub, or switch that is connecting the
equipment to the network. Replace any network
components that you suspect are faulty. Can you
ping the equipment now?
Next Step
Ø
Next Step
Ø
Next Step
Ø
End
Next Step
Ø
Next Step
Ø
Next Step
Ø
End Ö
Ö
Ö
Ö
Next Step
Ø
Ö
Ö
Ö
Refer to the networking section of your operating
system documentation.
Enter the correct TCP/IP settings.
The settings are not binding, contact your service
representative.
Contact your local network specialist for a valid IP
address for the equipment.
Check the computer’s protocol settings to make
sure the gateway and subnet settings are correct.
The NIC is faulty or improperly installed. Contact
your service representative.
Contact your service representative.
94 Locating the Equipment in the Network
Page 97

6 TROUBLESHOOTING FOR NETWORK CONNECTIONS
LDAP Search and Authentication Problems
Network shutdown occurs or touch panel disabled after LDAP search
Problem Description
After performing the LDAP search, the network shutdown occurs or the touch panel is disabled.
Corrective Action
Try the checklist below. If the problem remains unsolved, contact your service representative.
No. Check... Yes No Corrective Action
1 Is the LDAP server correctly running? Next Step
2 Is the LDAP server setting correctly set?
LDAP authentication takes a long time
Problem Description
It takes a long time to perform LDAP authentication on the touch panel.
Ø
End Ö
Confirm that the LDAP server is correctly running.
Ö
Enter the correct LDAP setting. Re-enter the
correct password carefully because it is displayed
by asterisks.
Corrective Action
Try the checklist below. If the problem remains unsolved, contact your service representative.
No Check... Yes No Corrective Action
1 Is the LDAP server correctly running? Next Step
Ø
2 Is the LDAP server setting correctly set?
End Ö
Check the LDAP server is correctly running.
Ö
Enter the correct LDAP setting. Especially reenter the correct password carefully because it
displays with asterisks.
LDAP Search and Authentication Problems 95
Page 98

6 TROUBLESHOOTING FOR NETWORK CONNECTIONS
Printing Problems (Network Related)
Among the several ways to use the equipment in the network, the simplest one is to set the equipment in the TCP/IP
environment using a DHCP server to assign IP addresses dynamically to devices. Using the default settings also assures
an easier network implementation, although you may be required to customize the settings to accommodate them in your
particular environment.
Some common network configurations are shown below, along with the steps required to configure the equipment. If you
perform all the steps in the applicable checklist and still cannot print satisfactorily with the equipment, contact your service
representative.
y You can change the network protocol settings with the touch panel of the equipment or with TopAccess (the
Administration page).
y For the error messages that appear during the installation of the printer drivers, refer to the Software Installation
Guide.
SMB print and Point&Print in a Windows operating system environment
No Check... Yes No Corrective Action
1 Are the IP address properties correctly set? Next Step
2 Is the Microsoft computer name (device name)
unique?
3 Is the workgroup name valid and correctly
entered?
4 Is the WINS server address correctly set?
5 If the client computers are located in different
segments, is the WINS service correctly
provided?
6 Can you see the equipment in Windows Network
Neighborhood?
7 Were the proper printer drivers installed?
8 Is the driver’s port name valid?
9 Can you print with the equipment?
Ø
Next Step
Ø
Next Step
Ø
Next Step
Ø
Next Step
Ø
Next Step
Ø
Next Step
Ø
Next Step
Ø
End Ö
Set up the IP address correctly.
Ö
Set up the device name correctly.
Ö
Set up the workgroup correctly.
Ö
Set up the WINS server address correctly, or
Ö
enter “0.0.0.0” for the WINS server address to
disable the WINS service.
Set up the WINS server and enable it on the
Ö
equipment to allow users access from a different
segments.
See the following section to fix the problem:
Ö
P.92 “Cannot locate the equipment in the
network”
Refer to the Software Installation Guide to
Ö
install the proper printer drivers.
Refer to the Software Installation Guide to
Ö
configure the proper port.
See the following section to fix the problem:
P.82 “Cannot print with the equipment
(network connection problems)”
Raw TCP or LPR print in a Windows operating system environment
No Check... Yes No Corrective Action
1 Are the IP Address properties correctly set? Next Step
2 Is Raw TCP print correctly set? Next Step
3 Is LPR/LPD print correctly set? Next Step
4 Were the proper printer drivers installed?
5 Is the Raw TCP or LPR port configured with the
correct IP address?
6 Can you print with the equipment?
96 Printing Problems (Network Related)
Ø
Ø
Ø
Next Step
Ø
Next Step
Ø
End Ö
Set up the IP address correctly.
Ö
Set up the Raw TCP print service correctly.
Ö
Set up the LPD print service correctly.
Ö
Refer to the Software Installation Guide to
Ö
install the proper printer drivers.
Refer to the Software Installation Guide to
Ö
configure the proper port.
See the following section to fix the problem:
P.82 “Cannot print with the equipment
(network connection problems)”
Page 99

6 TROUBLESHOOTING FOR NETWORK CONNECTIONS
6.TROUBLESHOOTING FOR NETWORK CONNECTIONS
IPP print in a Windows operating system environment
No. Check... Yes No Corrective Action
1 Are the IP address properties correctly set? Next Step
2 Is the HTTP server on the equipment enabled?
3 Is the IPP print correctly set? Next Step
4 Were the proper printer drivers installed?
5 Is the IPP port configured with the correct URL?
6 Can you print with the equipment?
Ø
Next Step
Ø
Ø
Next Step
Ø
Next Step
Ø
End Ö
Set up the IP address correctly.
Ö
Enable the HTTP server in the HTTP Network
Ö
Service.
Set up the IPP print service correctly.
Ö
Refer to the Software Installation Guide to
Ö
install the proper printer drivers.
Refer to the Software Installation Guide to
Ö
configure the proper port.
See the following section to fix the problem:
P.82 “Cannot print with the equipment
(network connection problems)”
Novell print in a NetWare environment
No. Check... Yes No Corrective Action
1 Are the IPX/SPX protocols enabled? Is the correct
frame type selected?
2 If applicable, did you successfully set up queue-
based print?
3 Did you configure the equipment for a NetWare
connection?
4 Did you configure the equipment for Novell print
service?
5 Were the proper printer drivers installed?
6 Is the IPP port configured with the correct URL?
7 Can you see the equipment in Windows Network
Neighborhood?
8 Can you print with the equipment?
Next Step
Next Step
Next Step
Next Step
Next Step
Next Step
Next Step
Ø
Ø
Ø
Ø
Ø
Ø
Ø
End Ö
Set up the IPX/SPX correctly.
Ö
Set up the NetWare server properly.
Ö
Set up the NetWare network settings correctly.
Ö
Set up the Novell print service correctly.
Ö
Refer to the Software Installation Guide to
Ö
install the proper printer drivers.
Refer to the Software Installation Guide to
Ö
configure the proper port.
Check that the SMB protocol is enabled in the
Ö
client computers.
See the following section to fix the problem.
P.82 “Cannot print with the equipment
(network connection problems)”
Printing Problems (Network Related) 97
Page 100

6 TROUBLESHOOTING FOR NETWORK CONNECTIONS
Macintosh environment
No. Check... Yes No Corrective Action
1 Is AppleTalk enabled on the equipment? Next Step
2 Are the IP address properties correctly set? Next Step
3 Is the equipment available in the Chooser when
you click the LaserWriter 8 printer icon?
4 Can you access any other network device from
the Macintosh computer?
5 Can another Macintosh computer on the network
print to the equipment? If so, compare the settings
to determine which need to be changed to support
print from this machine.
UNIX/Linux environment
Ø
Ø
Next Step
Ø
Next Step
Ø
End Ö
Enable AppleTalk.
Ö
Set up the IP address correctly.
Ö
Make sure that the AppleTalk zone is supported
Ö
by the Macintosh client.
Refer to your Macintosh networking
Ö
documentation or contact Macintosh technical
support.
Refer to your Macintosh networking
documentation or contact Macintosh technical
support.
No. Check... Yes No Corrective Action
1 Are the IP address properties correctly set? Next Step
2 Is the LPR/LPD print correctly set? Next Step
3 Did you successfully install the UNIX/Linux filters?
4 Did you successfully create and set up a print
queue?
5 Can you print to the equipment using LPD as the
root?
6 Can you ping the equipment from your computer?
7 Is the LP Daemon functioning? Next Step
8 Can you print with the equipment? End Ö Contact your service representative.
Ø
Ø
Next Step
Ø
Next Step
Ø
Next Step
Ø
Next Step
Ø
Ø
Set up the IP address correctly.
Ö
Set up the LPD print service correctly.
Ö
Refer to the Software Installation Guide to
Ö
install UNIX/Linux filters.
Refer to the Software Installation Guide to
Ö
configure the print queue.
Set up UNIX/Linux access for the equipment to
enable other users to print from the Bourne shell.
Ö
Refer to your UNIX/Linux documentation for more
information.
Try a remote ping from another server. If you can
reach the equipment from that server, check for
Ö
conflicts between the equipment and your current
network segment.
Reload Daemon or restart the system.
Ö
98 Printing Problems (Network Related)
 Loading...