

Torrid Marine IX Series Owner's Manual
TORRID MARINE
YACHT QUALITY
Since 1979
www.torridmarine.com |8895 Three Tree Lane NE, Suite 8, Bainbridge Island, WA 98110 | 800-722-5123
Rev 319 ..
Marine Water Heaters
Owner’s Manual
TORRID MARINE
YACHT QUALITY
Since 1979
www.torridmarine.com |8895 Three Tree Lane NE, Suite 8, Bainbridge Island, WA 98110 | 800-722-5123
Rev 319 ..
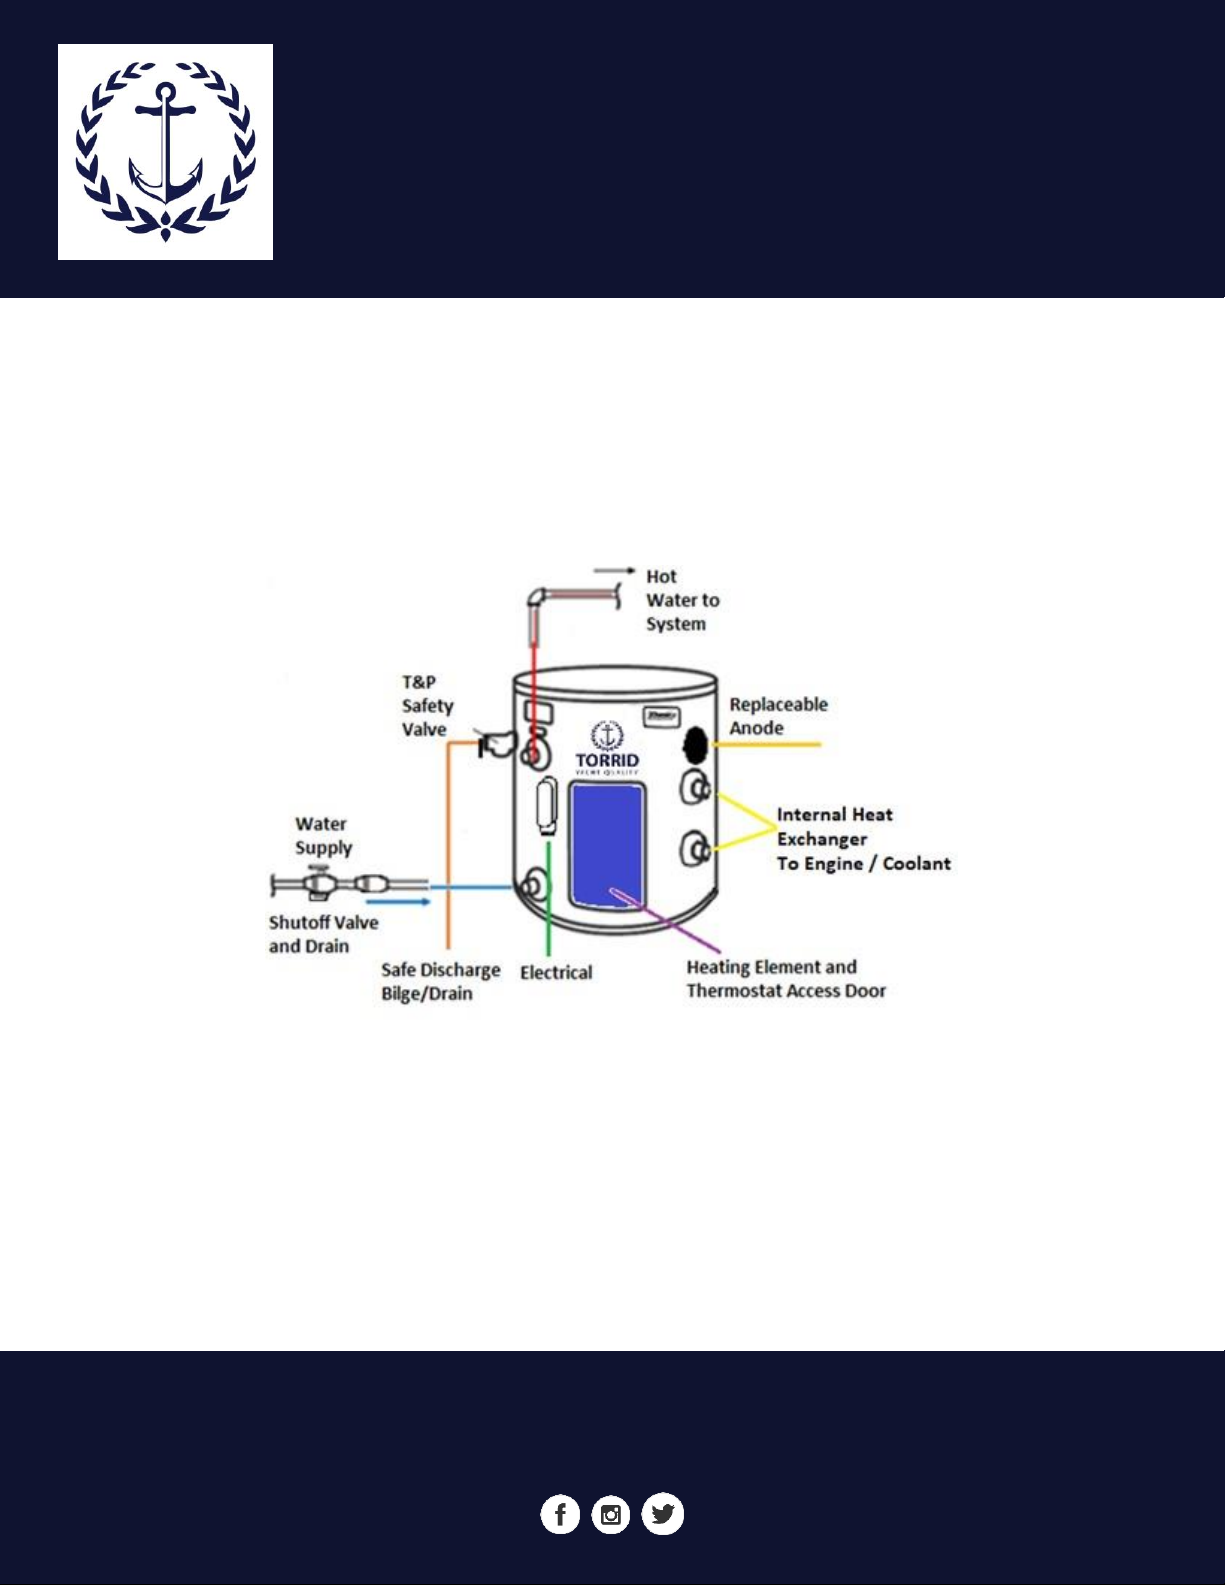
Plumbing Configuration
Thank you for purchasing a new Torrid Marine Water Heater. This manual is meant to be read in its entirety
to properly install and maintain your new Torrid Marine Water Heater and to help insure its long lasting, safe
and reliable use. While Torrid Marine is always happy to offer advice, we highly recommend you choose a
professional marine technician to install your new Torrid Marine Water Heater.
*Important: Do not plug, cap or in any way restrict the T&P (Temperature and Pressure) relief valve.
Plumb the T&P with an open, unobstructed drain line only. Water expands in the tank as it heats. If it does
not have a place to expand, the pressure may rise, causing the T&P valve to momentarily open and
discharge a small amount of water. This is not uncommon. We recommend installing the water heater in
a manner that allows water to expand into a dedicated expansion tank and potential T&P discharge to be
monitored. The installer is responsible to provide and properly fit all connections, including wiring, hoses,
pipes, elbows, and diversion or shut-off valves. Installation of expansion tank and maintenance shut-off,
isolation, drain or bypass valves (not provided) may be overlooked but is highly recommended.
*Warning: To reduce the risk of electrical shock, disconnect from power supply before servicing the device.

TORRID MARINE
YACHT QUALITY
Since 1979
www.torridmarine.com |8895 Three Tree Lane NE, Suite 8, Bainbridge Island, WA 98110 | 800-722-5123
Rev 319 ..
Installation Instructions
IMPORTANT: Torrid Marine recommends installation to be performed by experienced and qualified personnel only.
Warranty does not cover any damage caused during installation. When using electrical appliances, safety precautions to
reduce the risk of fire, electric shock, or injury to persons should be followed. To reduce the risk of electrical shock,
disconnect from power supply before servicing the Water Heater. This Water Heater must be grounded to a properly
grounded circuit. Use Water Heater only for intended use.
Read all instructions thoroughly before installing and operating
1. Secure the heater base in desired location, above or away from bilge water or water spray. This is an electrical
appliance and must be kept dry. Additional strapping and brackets may be required. Make sure to position it so
that the thermostat and element access door, all fittings and anode cap are accessible for routine maintenance.
2. Turn off incoming power at the circuit breaker. Check for live wire hazard before working with any wiring.
3. The fresh water inlet and outlet are ¾” NPT. These too should be plumbed by an experienced professional.
4. Make sure all fresh water system and coolant connections are properly made and fill the hot water heater. Open
a connected hot water faucet to allow air within the tank to escape and allow water to fill and run clear.
5. Furnish a dedicated and appropriately sized protected circuit breaker and wire gauge for water heater power
demand (i.e., 15 amp for standard 1500-watt, 120-volt elements). Note: Circuit protection should be provided
according to the requirements for a particular installation. For technical support, please contact Torrid Marine.
6. Properly connect power to the Water Heater at the gray conduit box on the face of the Water Heater with an
appropriately sized 3-wire connection, making certain that the green ground wire is connected to an active
ground wire on the incoming power connection line.
7. A drain line should be fitted to the temperature and pressure relief valve and should extend below the base of
the water heater, to bilge, or elsewhere. Relief valve will operate at 210° Fahrenheit and/or pressure of 100 PSI.
8. Energize the water heater at the breaker panel. Test and monitor for proper hot water production.
• IMPORTANT SAFETY NOTES: The thermostat is equipped with a high limit temperature electrical cutoff. This energy
cutoff will operate if the water temperature exceeds 200° Fahrenheit. To reset the high limit via the thermostat red
reset button, please refer to the maintenance section.
• If element fails to heat, disable power at the breaker and investigate the cause.
• All connections are ¾” NPT threaded. Drain water from the water heater if freezing of stored water is possible.
Freezing can rupture water lines and /or water heater’s internal tank.
• Do not rotate pre-installed outlet fitting. This fitting is positioned so that the attached air-vent tubing end is at the
top of the water storage tank; this helps eliminate trapped air. The black line on the outlet pipe nipple indicates the
air vent position. This mark should be on top of this fitting pointed upward.
• Use care when check valves are installed before the Water Heater’s inlet. The water will expand as it heats and
must have a place to expand. Improperly placed check valves can cause the pressure relief valve to open.
 Loading...