

Page 1
BASCULAS TORREY
WLS SERIES
USERS MANUAL
Page 2

CONTENTS
1.- Introduction - - - - - - - - - - - - - - - - - - - - - - - - - - - - - - - - - - - - - - - - - - - - - - - 1
2.- Technical Specifications - - - - - - - - - - - - - - - - - - - - - - - - - - - - - - - - - - - - - - - 2
3.- Unpacking and Scale parts - - - - - - - - - - - - - - - - - - - - - - - - - - - - - - - - - - - - - 2
4.- Screens - - - - - - - - - - - - - - - - - - - - - - - - - - - - - - - - - - - - - - - - - - - - - - - - - - - - 3-4
4.1.- Operator Screen - - - - - - - - - - - - - - - - - - - - - - - - - - - - - - - - - - - - - - - - - 3
4.2.- Client Screen - - - - - - - - - - - - - - - - - - - - - - - - - - - - - - - - - - - - - - - - - - - - 4
5.- Indicators - - - - - - - - - - - - - - - - - - - - - - - - - - - - - - - - - - - - - - - - - - - - - - - - - - - 5
6.- Touchpad - - - - - - - - - - - - - - - - - - - - - - - - - - - - - - - - - - - - - - - - - - - - - - - - - - 5-7
7.- MENU Key - - - - - - - - - - - - - - - - - - - - - - - - - - - - - - - - - - - - - - - - - - - - - - - - - - 8
7.1.- Shutdown - - - - - - - - - - - - - - - - - - - - - - - - - - - - - - - - - - - - - - - - - - - - - - - 8
7.2.- Hibernate - - - - - - - - - - - - - - - - - - - - - - - - - - - - - - - - - - - - - - - - - - - - - - - 8
7.3.- Configuration - - - - - - - - - - - - - - - - - - - - - - - - - - - - - - - - - - - - - - - - - - - - 8
7.4.- Cancel- - - - - - - - - - - - - - - - - - - - - - - - - - - - - - - - - - - - - - - - - - - - - - - - - - 8
8.- Sales modes- - - - - - - - - - - - - - - - - - - - - - - - - - - - - - - - - - - - - - - - - - - - - - - - - - 8-9
8.1.- Pre-pack mode (label) - - - - - - - - - - - - - - - - - - - - - - - - - - - - - - - - - - - - - - - 8
8.2.- Point of sale mode (ticket) - - - - - - - - - - - - - - - - - - - - - - - - - - - - - - - - - - - - 9
9.- Product type -- - - - - - - - - - - - - - - - - - - - - - - - - - - - - - - - - - - - - - - - - - - - - - - - 10
9.1.- Weighable products - - - - - - - - - - - - - - - - - - - - - - - - - - - - - - - - - - - - - - - - 10
9.2.- Non-weighable products - - - - - - - - - - - - - - - - - - - -- - - - - - - - - - - - - - - - - - - 10
9.3.- Miscellaneous- - - - - - - - - - - - - - - -- - - - - - - - - - - - - - - - - - - - - - - - - - - - - 10
10.- Scale operation- - - - - - - - - - - - - - - - - - - - - - - - - - - - - - - - - - - - - - - - - - - - - - 10-20
10.1.- Zero settings- - - - - - - - - - - - -- - - - - - - - - - - - - - - - - - - - - - - - - - - - - - - - 10
10.2.- TARE function - -- - - - - - - - - - - - - - - - - - - - - - - - - - - - - - - - - - - - - - - - - 10
10.3.- Agent selection- - - - - - - - - - - - - - - - - - - - - - - - - - - - - - - - - - - - - - - - - - - 11
10.4.- PLU search- - - - - - - - - - - - - - - - - - - - - - - - - - - - - - - - - - - - - - - - - - - - - - 12
10.5.- Product sale- - - - - - - - - - - - - - - - - - - - - - - - - - - - - - - - - - - - - - - - - - - - - 14
10.6.- Unitary price modification- - - - - - - - - - - - - - - - - - - - - - - - - - - - - - - - - - - 15
11.- Point of sale exclusive operations (ticket) - -- - - - - - - - - - - - - - - - - - - - - - - - - 20-25
11.1.- Removing products - - - - - -- - - - - - - - - - - - - - - - - - - - - - - - - - - - - - - - - - 20
11.2.- Change delivery - - - - - -- - - - - - - - - - - - - - - - - - - - - - - - - - - - - - - - - - - - - 21
11.3.- Discounts applications - - - - - - - - - - - - - -- - - - - - - - - - - - - - - - - - - - - - - - 23
11.4.- Devolutions - - - - - - - - - - - -- - - - - - - - - - - - - - - - - - - - - - - - - - - - - - - - - - 24
12.- Configuration (Programming mode) - - - - - - - - - - - - - - - - - - - - - - - - - - - - - 26-49
12.1.- Products - - - - - - - - - - - - - - - - - - - - - - -- - - - - - - - - - - - - - - - - - - - - - - - - 26
12.2.- Offers - - - - - - - - - - - - - - - - - - - - - - - - - - - - - - - - - - - - - - - - - - - - - - - - - 31
12.3.- Agents- - - - - - - - - - - - - - -- - - - - - - - - - - - - - - - - - - - - - - - - - - - - - - - - - 31
12.4.- Reports - - - - - -- - - - - - - - - - - - - - - - - - - - - - - - - - - - - - - - - - - - - - - - - - - 32
12.5.- Printer - - - - - - - - - - - - - - - - - - - - - - - - - - - - - - - - - - - - - - - - - - - - - - - - - 34
12.6.- Screensaver - - - - - - - - - - - - - - - - - - - - - - - - - - - - - - - - - - - - - - - - - - - - - - 41
12.7.- Date and time - - - - - - - - - - - - - - - - - - - - - - - - - - -- - - - - - - - - - - - - - - - - - 44
12.8.- USB - - - - - - - - - - - - - - - - - - - - - - - - - - - - - - - -- - - - - - - - - - - - - - - - - - - - 45
12.9.- PC Software - - - - - - - - - - - - - - - - - - - - - - - - - - - - - - - - - - - - - - - - - - - - - 46
12.10.- Connectivity - - - - - - - - - - - - - - - - - - - - - - - - - - - - - - - - - - - - - - - - - - - - 47
12.11.- Settings - - - - - - - - - - - - - - - - - - - - - - - - - - - - - - - - - - - - - - - - - - - - - - - - 48
Page 3
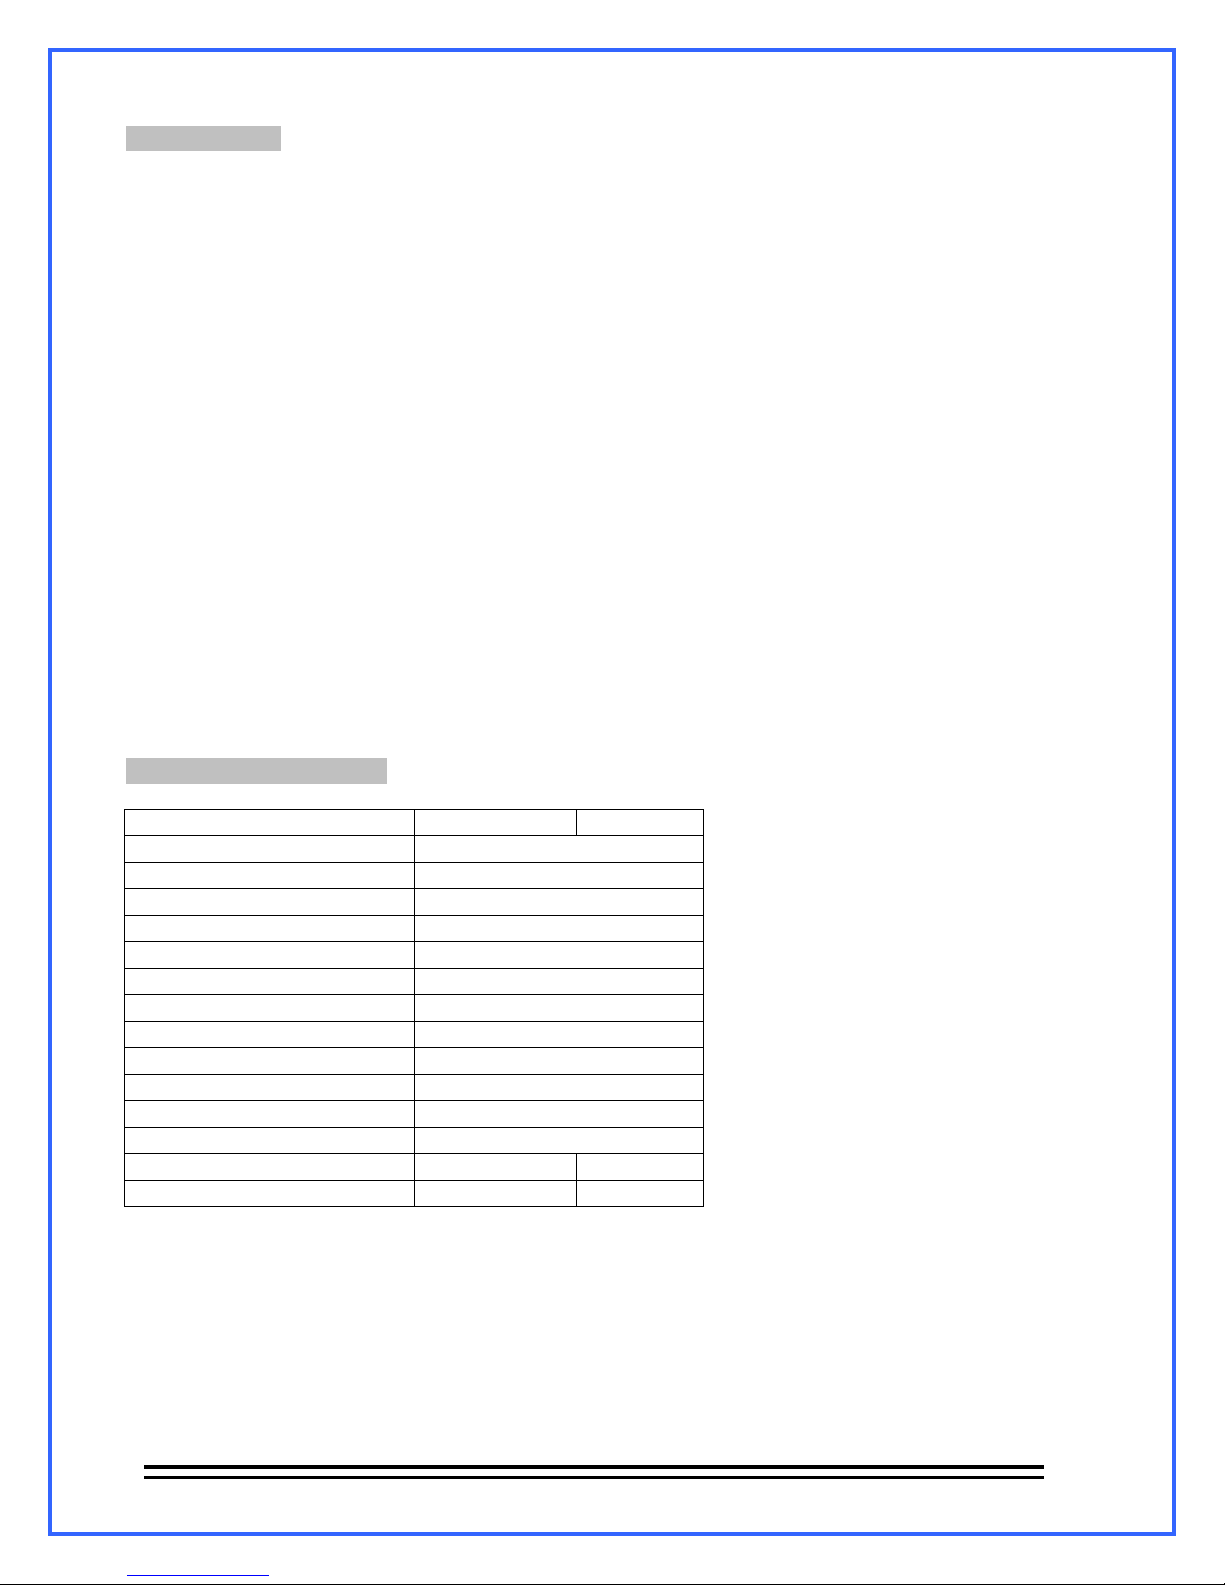
1.- Introduction.
The new WLS labeling scale offers a weighting and selling products method very versatile and accurate,
you can monitor the sales, devolutions and the agents performance behavior, also count with a remote
administration system and the capacity to connect several scales between them.
Characteristics:
• Stainless steel cabinet and plate
• Aluminum base
• Thermal printer
• Touch screen keyboard technology
• Bubble level and adjustable leveling foots
• Permanent illumination on both screens
• Weight, Unitary price and Total price screens
• Pre-pack and Point-of-sale modes
• Weight or Unit prices
• Publicity messages
• Capacity to administrate several agents
• Sales reports, devolutions and agents performance
• Due balance function
• Ethernet and Wi-Fi connections
• Administration PC software
• Capacity to storage up to 10,000 PLUs
2.- Technical Specifications.
Model WLS20 WLS40
Capacity 40 lb
Minimum Division 0.01 lb
Programmable memories 10,000 PLUs
Interface Touch Screen
Rough use cable Included
Power Supply 110/220 VCA 60Hz
Maximum Tare 9,99 lb
Plate dimensions 38cm (L) x 30cm (A)
Maximum unitary price $ 999,99
Maximum total price $ 9999,99
Operation temperature -10 a 40ºC (14 a 104 ºF)
Storage temperature -20 a 50ºC (-4 a 122 ºF)
Weight 18 kg 24 kg
Gross weight 21 kg 26 kg
- 1 -
Page 4
n
r
r
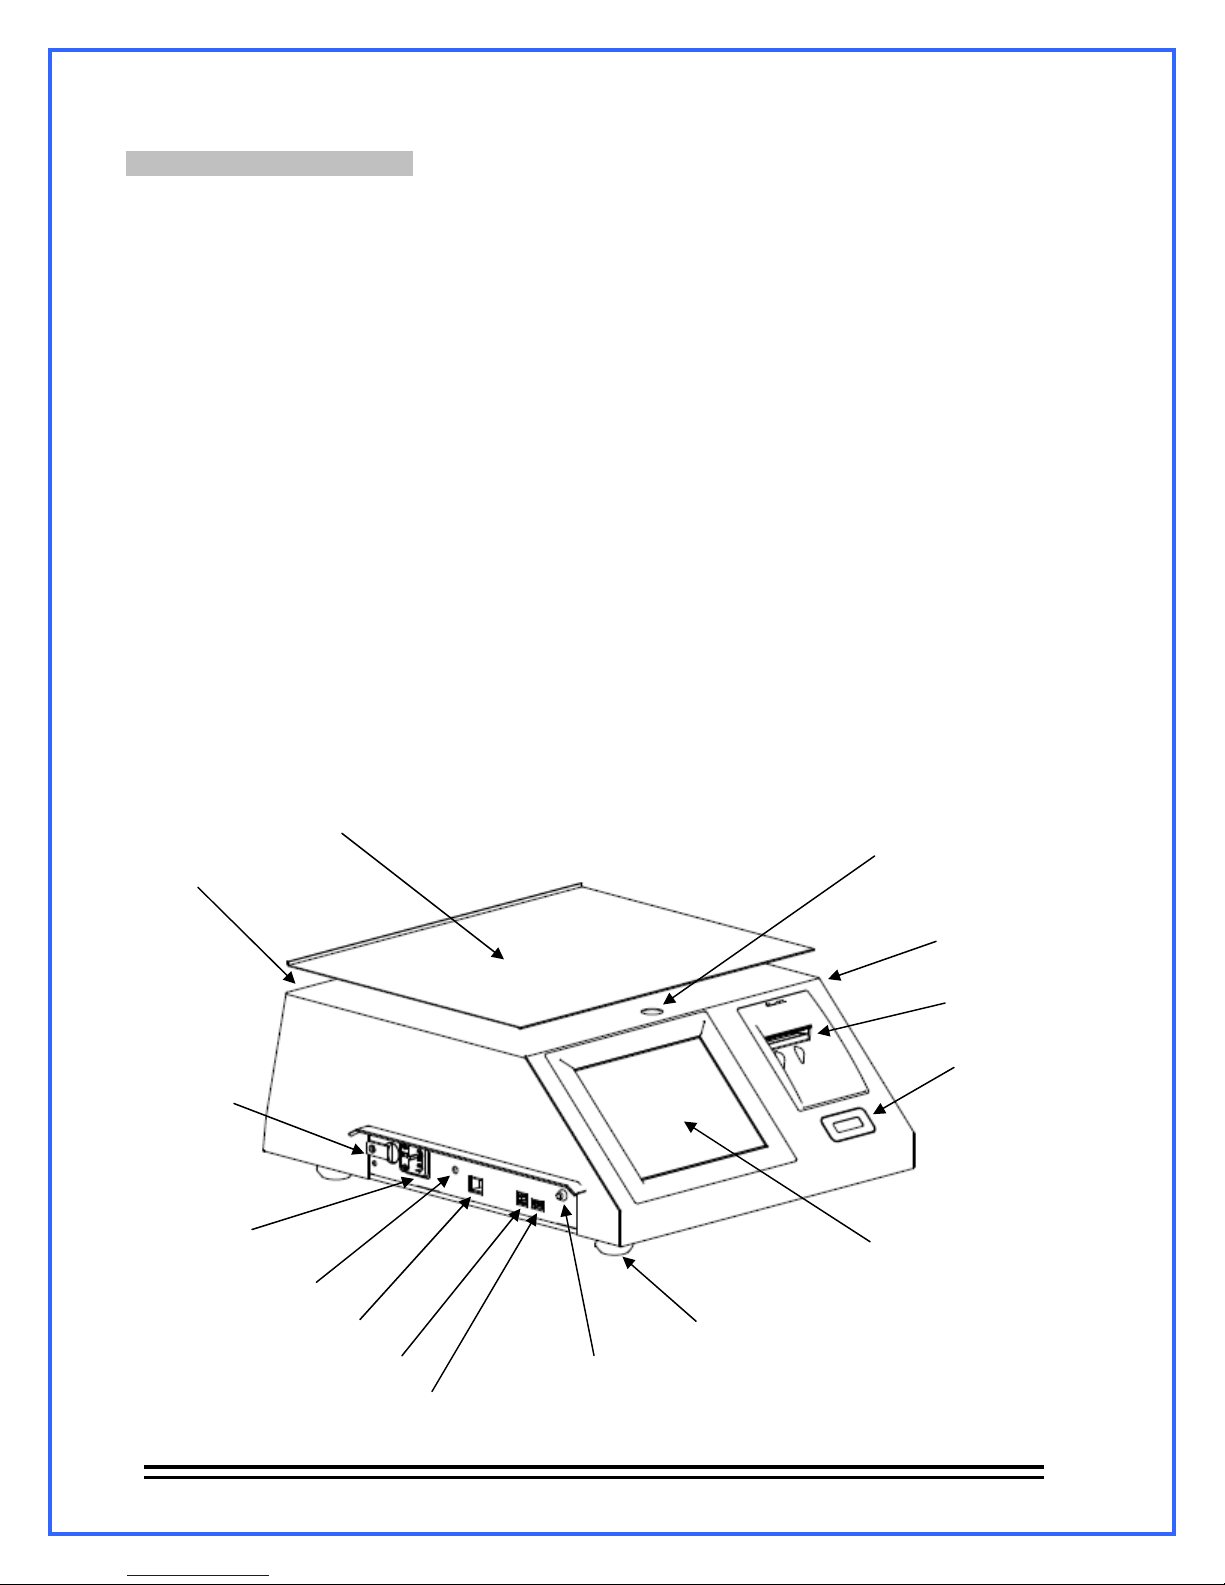
3.- Unpacking and Scale parts.
Inside the WLS scale package you will find the next items:
• 1 WLS20 or WLS40 scale.
• 1 Power cable.
• 1 Ticket roll
Before installing and operating your scale read the following recommendations:
• Avoid installing the scale on unstable places.
• Only place the scale on rigid surfaces.
• Avoid powering the scale in non-regulated electric sockets.
• Avoid placing fans or heaters facing the scale.
• Avoid operating the touch screen with sharp objects as knives, knifes, pencils, pens, etc.
• Use a slightly wet to clean the Scale.
• Do not hit the scale plate with the object you are about to weight, this can damage the
weighing sensor.
• Avoid opening the scale by your own; this will void the warranty of the scale.
Scale parts:
Client screen
Calibration
seal
Power supply
entrance
Antenna entrance
Ethernet port
B type USB port
A type USB port
Plate
Bubble level
Sidedoo
Printe
Touch screen
Adjustable leveling foots
On/Off button
Print butto
- 2 -
Page 5
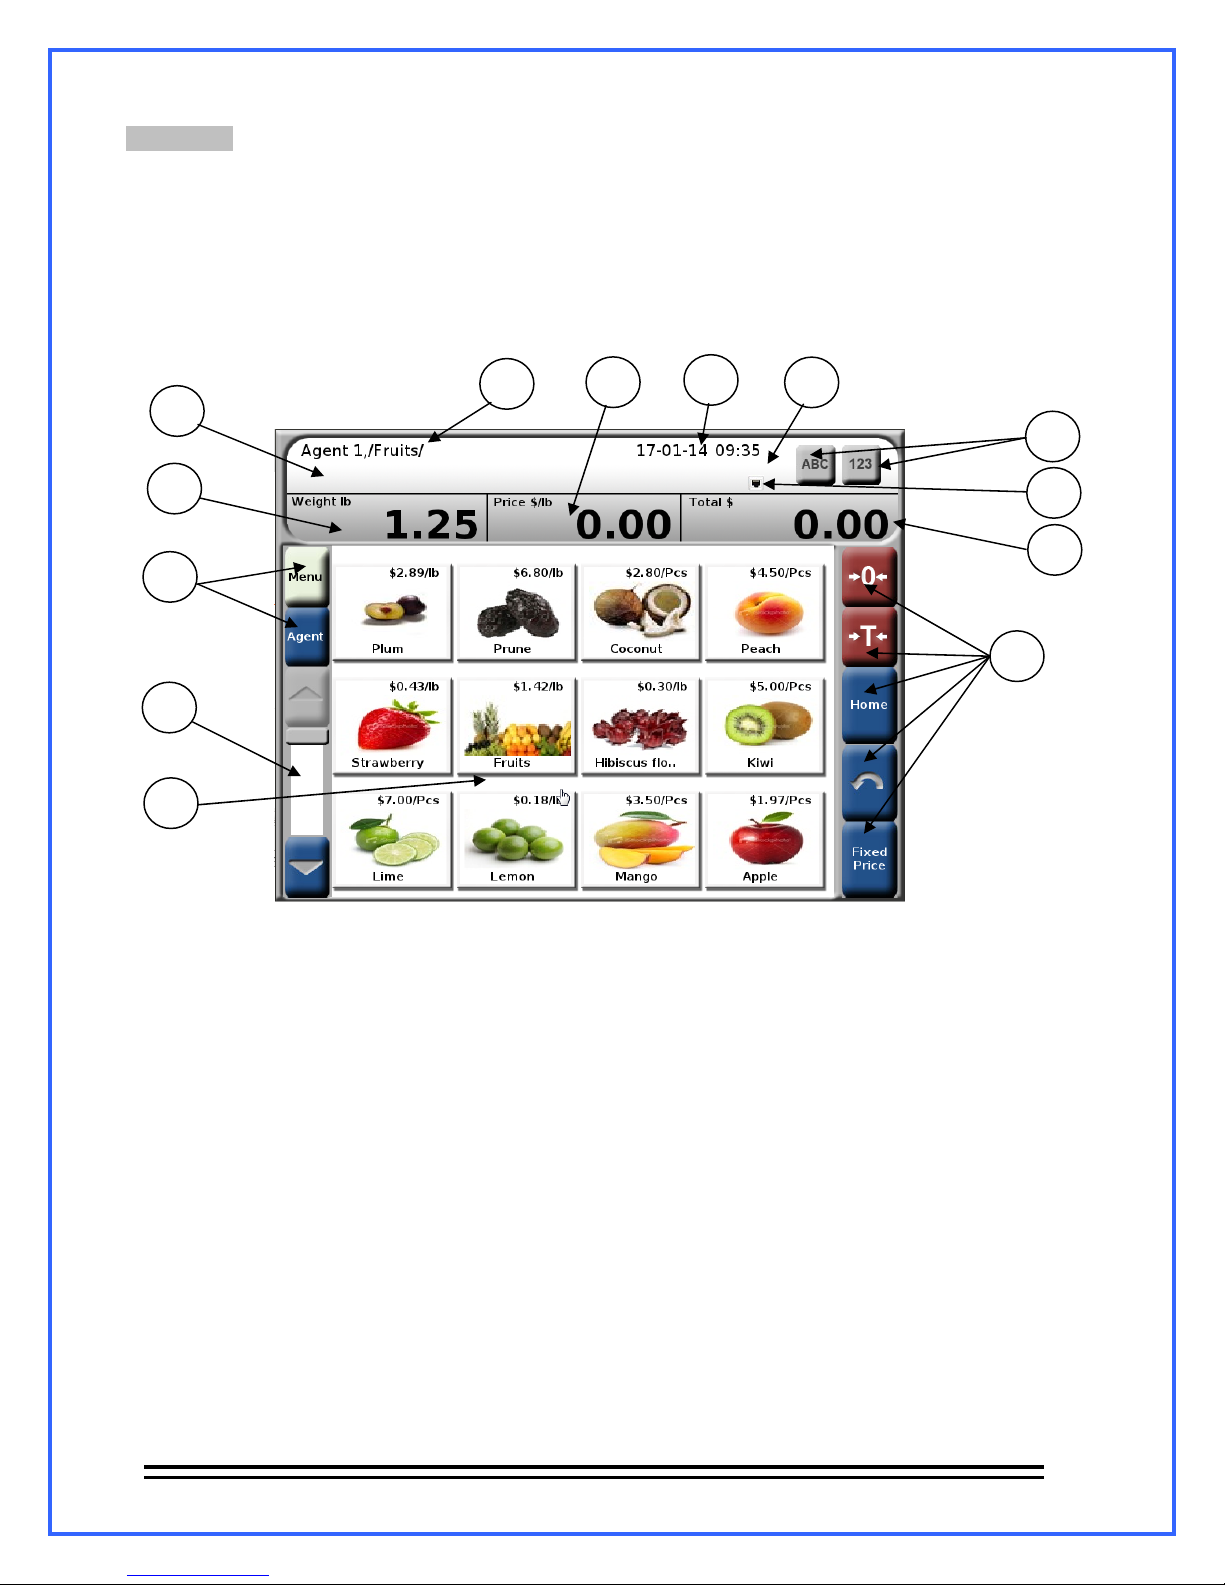
4.- Screens.
The WLS scale feature two screens, the operator screen (touch screen) and the client screen.
4.1.- Operator screen.
This screen is the interface between the operator and the scale because its here where the information,
about the actual operations, is shown and it’s where the touch screen and advertising are, or advices
through screensavers. These are the elements of the screen:
8
9
2
7
10
6
1
6
6
4
5
1.- Weight/Quantity screen.- Shows the amount of product that is being sold (kg or pcs).
2.- Unitary price screen.- Shows the unitary price of the selected product..
3.- Total price screen.- Shows the total price to pay by the client.
4.- Scrollbar.- Allows navigating between folders area and products.
5.- Folders area and products.- This area it’s intended to show the shortcuts to folders and products in
the scale database.
6.- Keyboard.- see section “6.- Touchpad”.
7.- Date and time indicator.- Shows the date and time of the scale.
8.- PLU name.- This area shows the selected product name.
9.- Agent/directory field.- this field shows the name of the active agent and the folder that is currently
in.
10.- Items indicator- Indicates the quantity of accumulated items in the current sell (point of sale only).
11.- Active connection icon.- Shows the type of the active connection (Ethernet or Wireless).
11
3
- 3 -
Page 6
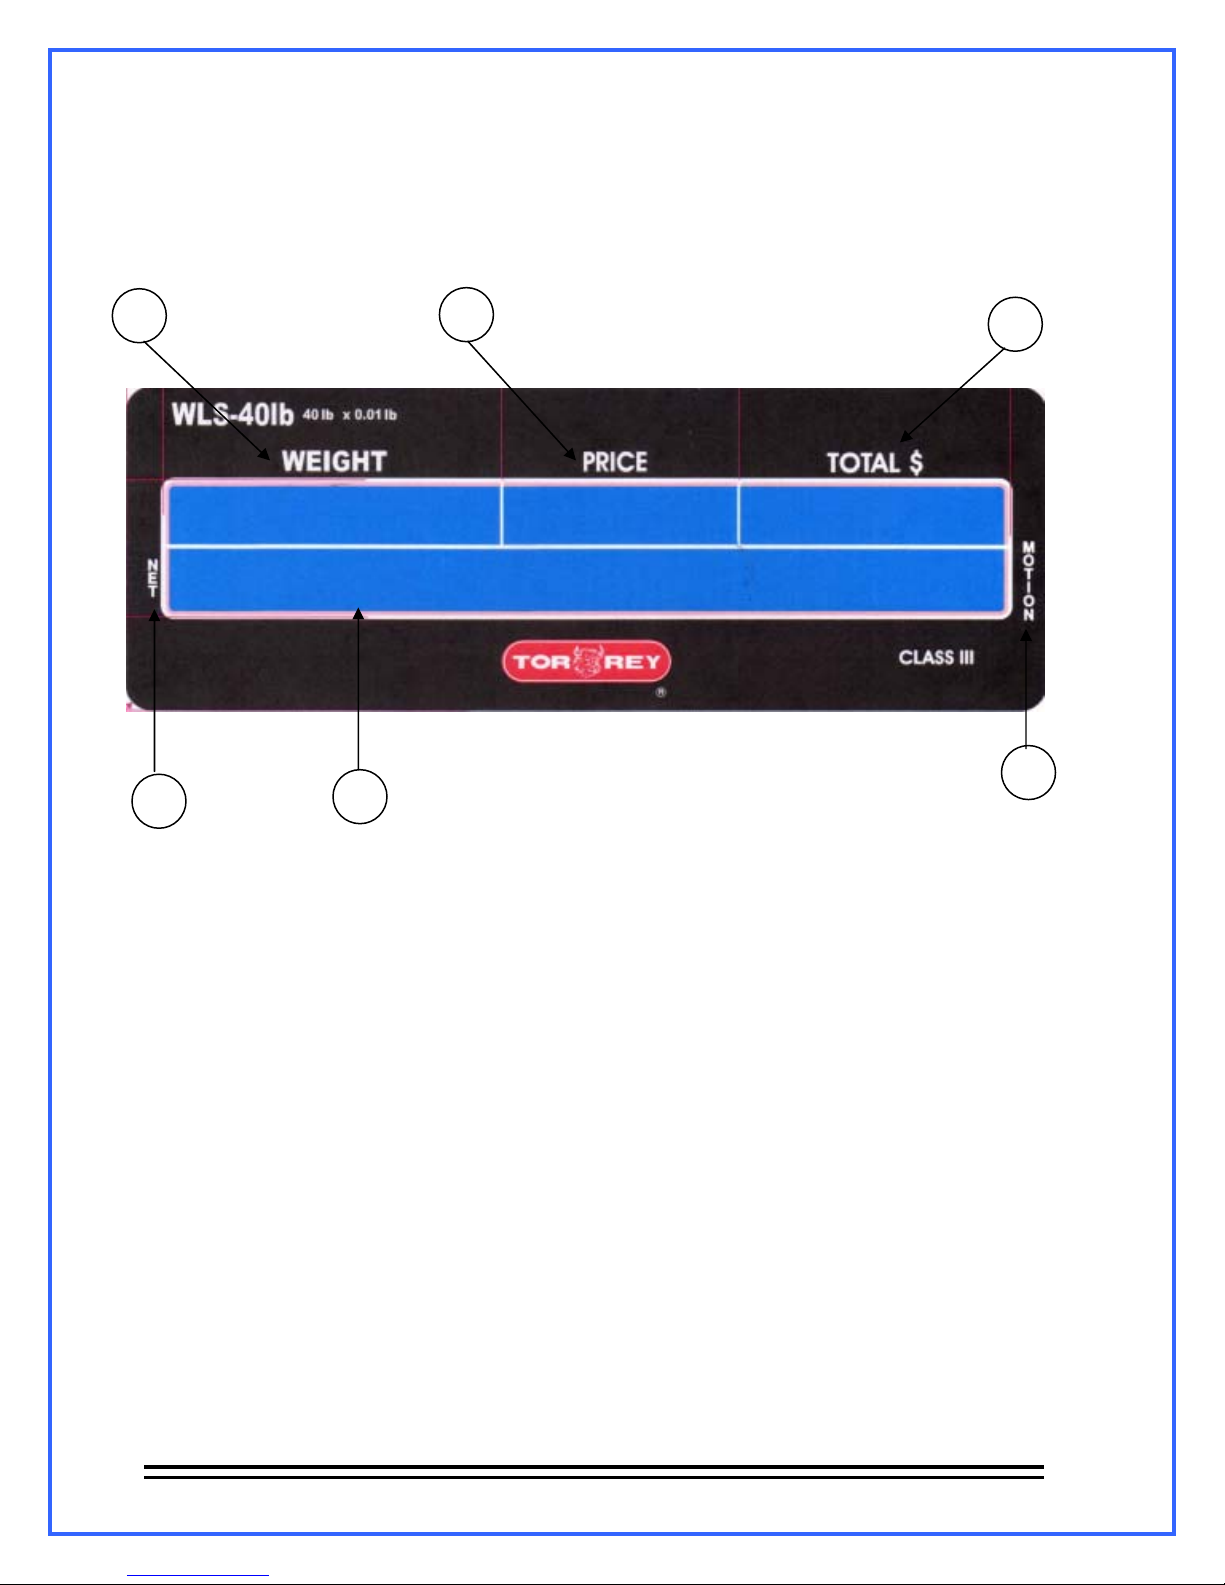
4.2.- Client screen.
This screen shows the information of interest and the product quantity (kg or pcs) for the clients, the
unitary price of the product, the total a pay and the name of the product, also shows the movement
conditions and tare mode through indicators and deploys customizable advertising messages when the
screensaver appears. These are the elements of the screen:
1 2
6
1.- Weight/Quantity screen: In this screen is shown the amount of product (kg o pcs) that is being sold.
2.- Unitary price screen.- muestra el precio unitario del producto seleccionado.
3.- Total price screen.- Shows the total price to pay by the client.
4.- Motion indicator.- see section “5.- Indicators”.
5.- Product/Advertising screen.- This screen shows the name of the selected product and, when the
screensaver activates, advertising.
6.- NET indicator.- see section “5.- Indicators”.
5
3
4
- 4 -
Page 7
5.- Indicators.
Next is shown a list of the indicators of the scale and also their meanings and the conditions under which
they activate:
Indicator Description Activation conditions
Zero Zero load indicator
NET Net weight indicator When the TARE function is activated
Motion Unstable load indicator
Amount of products in the
Items: x
currently transaction
indicator
Fixed Fixed price indicator When the FIXED PRICE button has been pressed.
Offer Offer applied indicator When the selected product has an offer applied.
Auto Impression
Automatic impression
indicator
When the scale does not have any load on the plate or when
TARE function is activated and no weight has been added.
When the load lecture has not been stabilized or the load is
receiving disturbances.
While on Point of sale mode the “x” indicates the number of
items that have the actual sale.
When the automatic impression function is activated.
The operator screen shows every indicator previously seen, while the client screen only shows the NET
weight and Motion indicators.
6.- Touchpad.
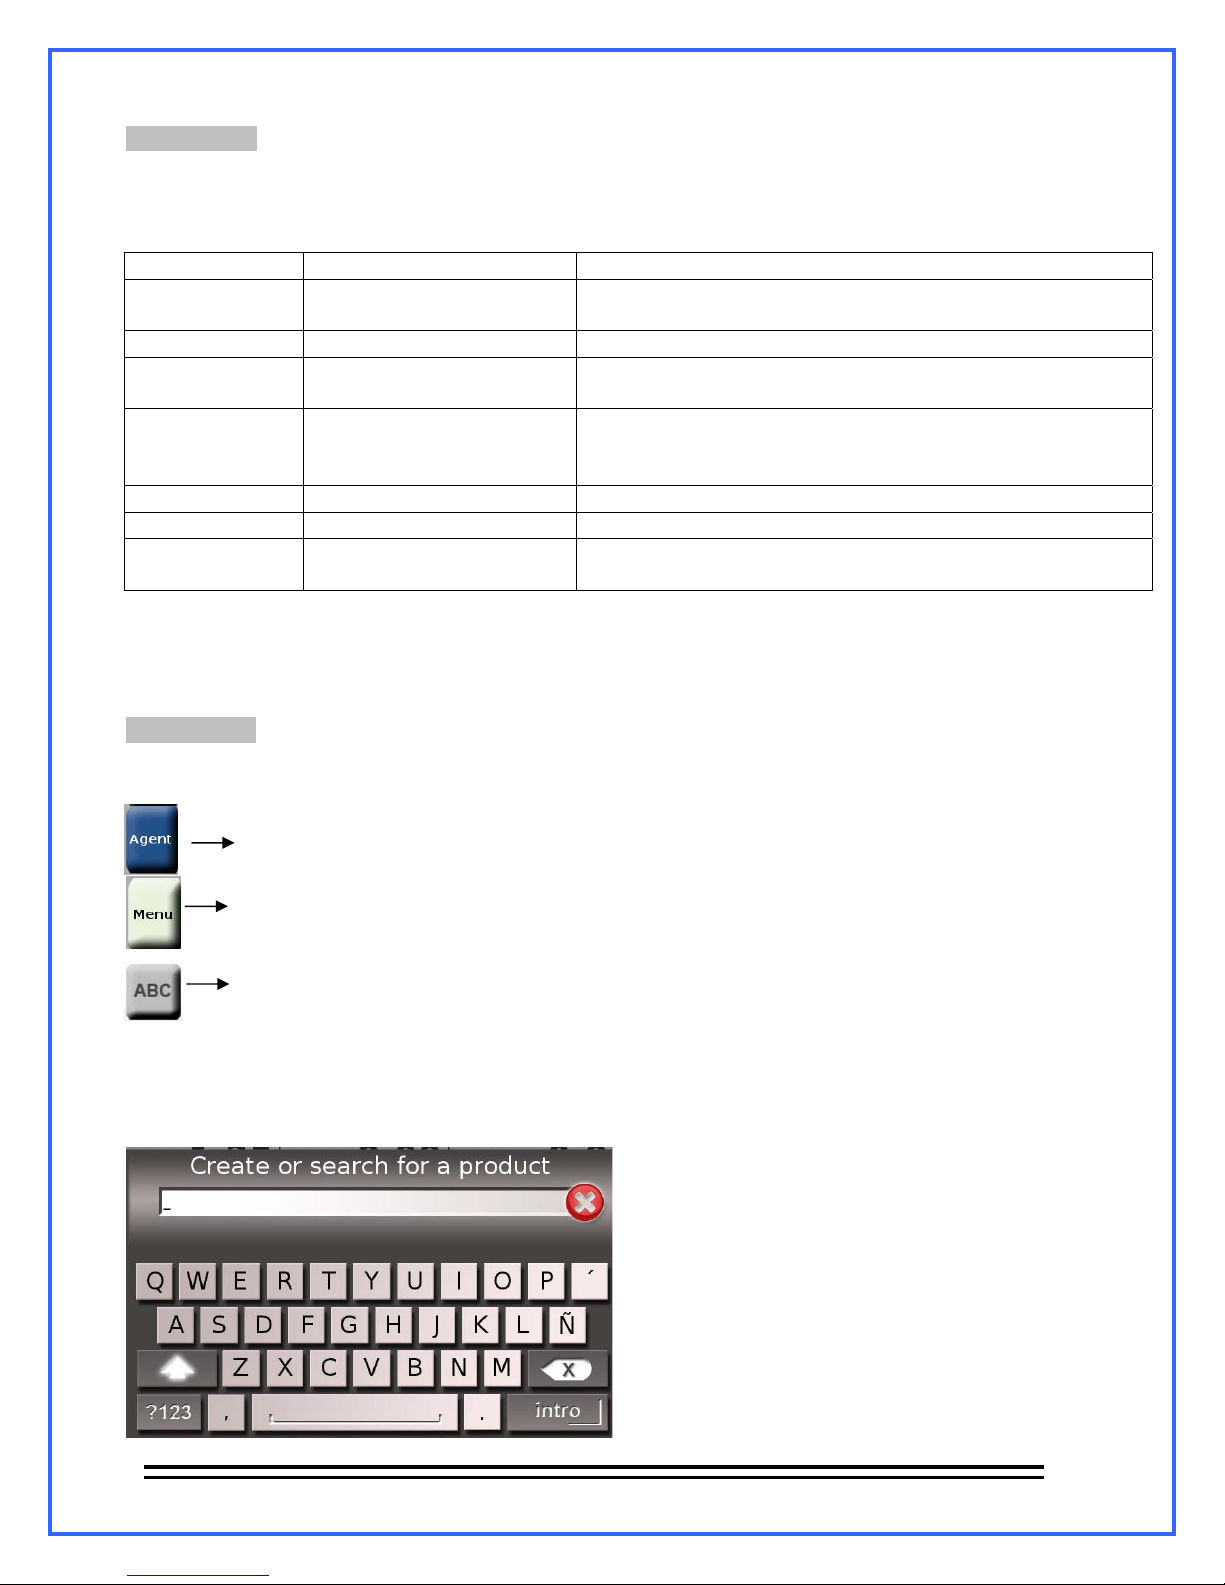
In this section the scale keys and their functions are shown
Opens the list of the agents (previously saved in the database) and allows selecting any of
them to register their transactions.
Opens the options menu of the scale, for more information see section
“7.- MENU key”.
Opens the alphanumerical keyboard from where you can create or search products.
Alphanumerical Keyboard:
- 5 -
Page 8
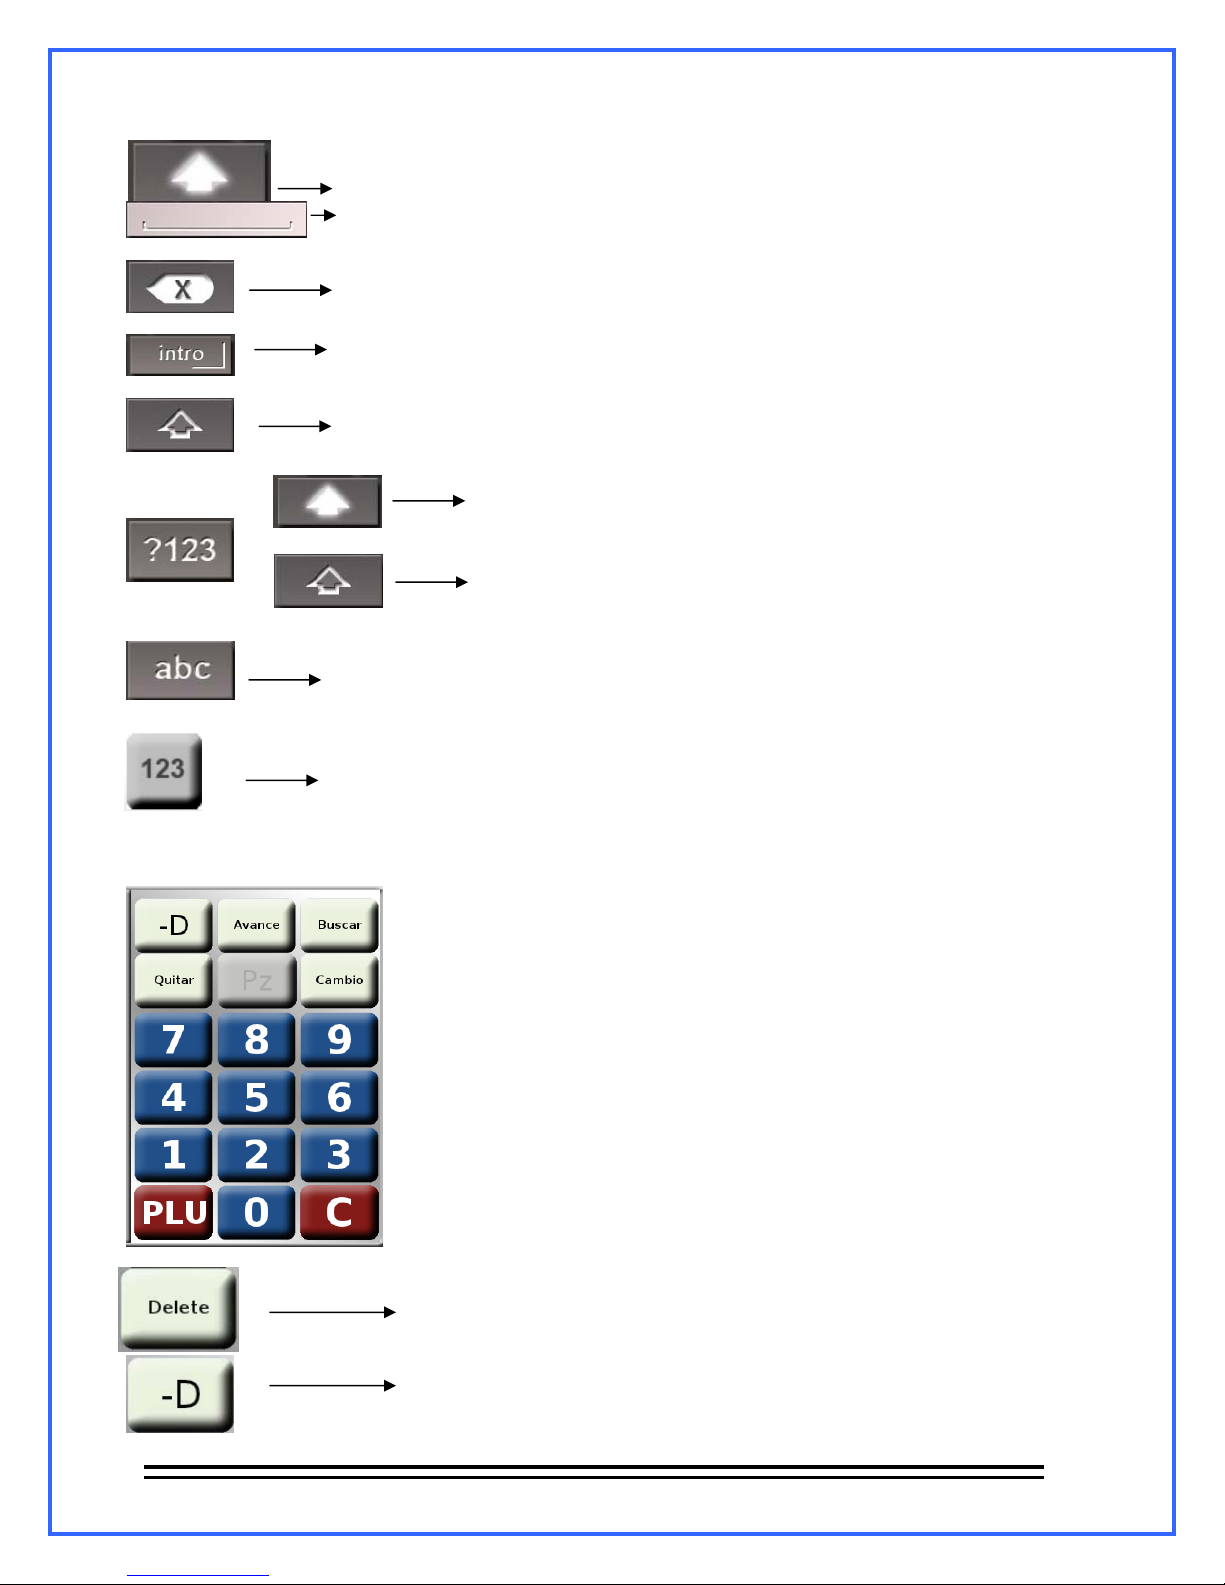
Change to capital letters.
Spacebar.
Deletes text inputs.
Enter the text input.
Change to lowercase letters..
Change to numerical mode + Signs pack #1
+
Change to numerical mode + Signs pack #2
Change to alphabetical mode
Opens numerical keyboard
Numerical keyboard:
Remove products from the current sale(For more information see section
11.1 – Removing products).
Allows entering discounts (for more information see section
11.3 – Discount application).
- 6 -
Page 9
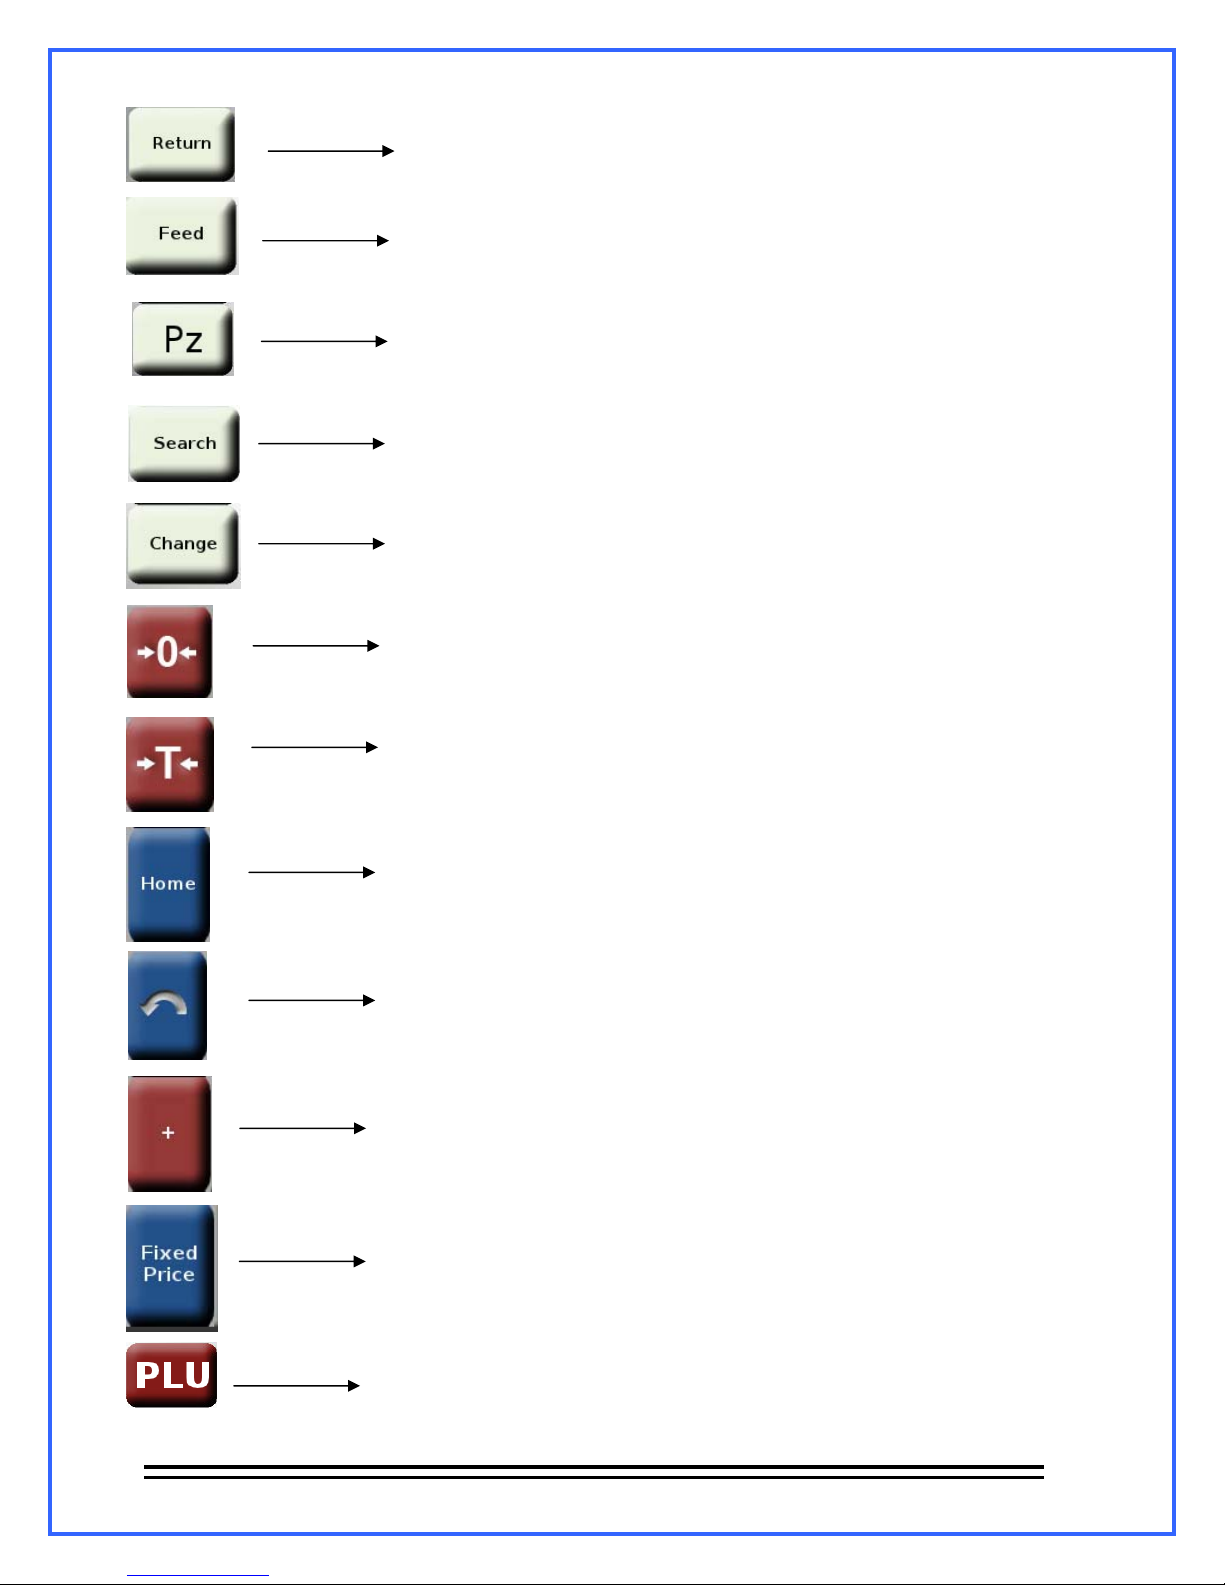
Allows doing devolutions (Not illustrated, for more
Information see section 11.4.- Devolutions).
Activates the advance of the paper or label..
Activates the miscellaneous, Non-weighable products (for more
Information see section 10.5.- Product sales).
Activates PLUs search (for more information see section
10.4.- PLU search).
Activates “change” function (for more information see
section 11.2 – Change delivery).
Allows taking a new zero reference load.
Activates TARE function (for more information see section
10.2 – Tare function).
Loads the home screen of the scale
Returns to the previous navigation level, it deactivates when the
minimum navigation level is reached (Home screen)
Starts a new sale or adds another product to the current sale (Point of
sale mode only, for more information see section 10.5.- Product
sale).
Activates Fixed price function (Pre-pack mode only, for more information
s see section 10.5.- Product sale).
Take the entered numerical value such as a PLU number, searches in
the database and, if found, it shows it on the screen. In case it didn’t
found it, the scale will only make a beep sound and will not show
anything
- 7 -
Page 10

Deletes the introduced numerical value.
- 8 -
Page 11
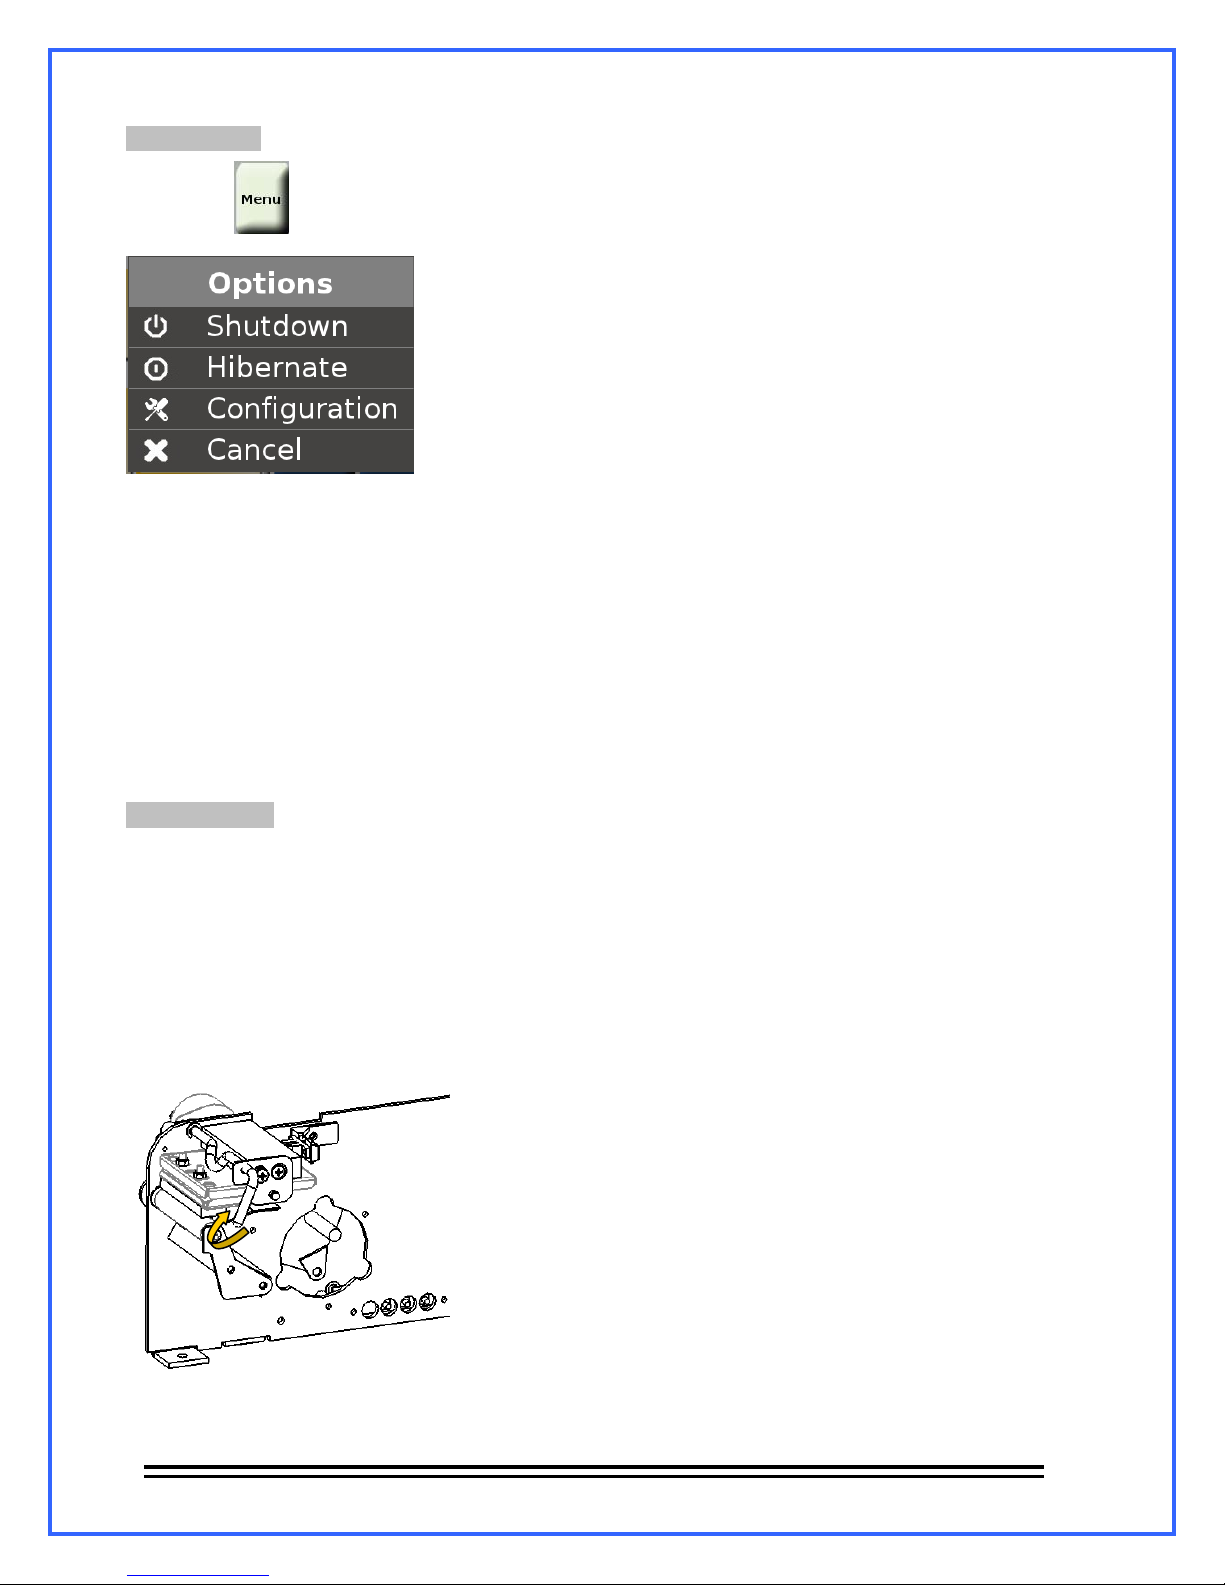
7.-MENU key.
Pressing the key, the scale will deploy the next options menu:
Shutdown: Turn off the scale. Also by pressing the on/off button for 30 seconds you can turn off the
scale.
Hibernate: Puts the scale into sleep mode, the screens and the light from the on/off button will turn off,
however, the scale processor will continue working. If it needs to be used again, just press the on/off
button and the scale will continue its normal operation.
Configuration: This option allows entering to the Programming mode (for more information see section
11. - Configuration (Programming mode)).
Cancel.- Returns from the menu and goes back to the active screen.
8.- Sales modes.
The WLS labeling scale features two sales modes: Pre-pack mode and Point of sale mode.
8.1.- Pre-pack mode (Label).
This mode is useful when you wish to pre-pack containers or trays with certain quantity of a determined
product. To access to this sale mode you must configure the plastic cartridge according to the next steps:
1.-
Open the side door of the scale and pull up the crank of the printer header:
The scale will show the next message “The printer header is open”, push the ok button.
- 9 -
Page 12
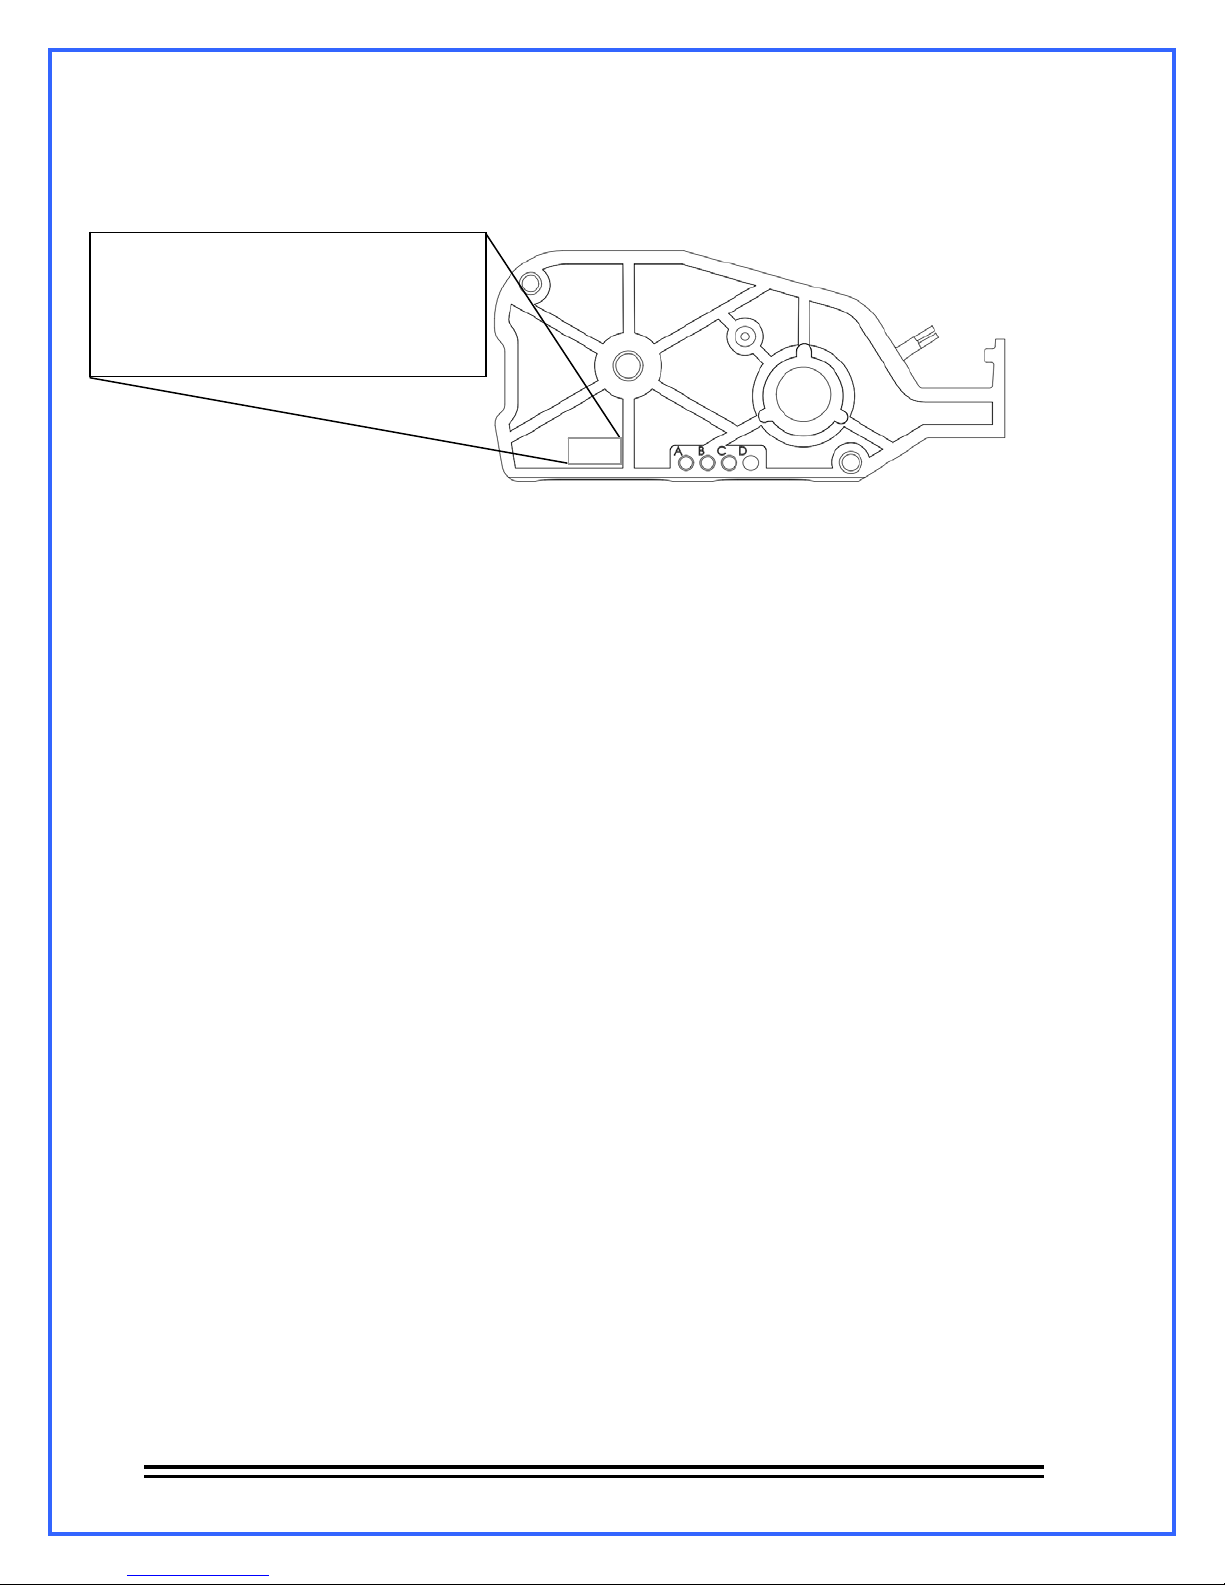
2.- Turn the handle named “LABELS” to unscrew the cartridge, remove it and look for the label
FORMAT:
FORMAT
A PAPER
B CONTINUOUS LABELS
C LABEL WITHOUT SEPARATOR
D LABEL WITH SEPARATOR
3.-
Remove the rubber cap from the current position and move it to the “D” position, put the
thermal labels roll in the plastic cartridge ( follow the instructions located on the top part of the
cartridge), insert it and screw it to the side of the scale. For last, push down the crank of the
printer header.
.
4.-
The scale will show the message “A cartridge with labels was detected. Do you want to
change the scale to PRE-PACK mode?”, push the OK button. The scale will make a quick
reboot and the label roll will advance, from that moment the scale will be configured as Prepack mode and will be ready to use.
8.1.- Point of sale mode (ticket).
This sale mode is used when it’s required to sell more than 1 product in only one transaction.
While in Point of sale mode, discount can be applied to the total price, calculate the change,
make devolutions of products or delete a product from the sale in course. To configure the scale
into Point of sale mode follow the next steps:
1.-
Steps 1 and 2 are the same as Pre-pack mode
}
2.-
3.-
Remove the rubber cap from the actual position and move it to ”A” position, put the paper
roll into the plastic cartridge (follow the instructions located on the top part of the cartridge),
insert it and screw it to the side of the scale. For last, push down the crank of the printer header.
The scale will show the message “A cartridge with continuous paper was detected. Do you
4.-
want to change the scale to POINT OF SALE mode?”, push the OK button. The scale will make
a quick reboot and the label roll will advance, from that moment the scale will be configured as
Point of sale mode and will be ready to use.
- 10 -
Page 13
9.- Product type.
The WLS scale can manage 3 kinds of products: Weighable, Non-weighable and miscellaneous:
9.1.- Weighable products.
These are the products that their unitary price its in function of 1kg of their weight, for example:
Beans, flour, sugar, meat cuts, etc.
9.2.- Non-weighable products.
These are the products that their unitary price its in function of 1 piece of product, for example:
pineapple, watermelon, melon, corn, etc.
9.3.- Miscellaneous.
These products are not in the database of the scale but they can be manually added for their
selling. Also this kind of products can be divided into miscellaneous weighable products and
miscellaneous Non-weighable products.
10.- Scale operation.
10.1.- Zero adjustment.
To take a new reference as it was zero, make sure that the scale does not have any load on the
plate and press the button. .
10.2.- TARE function.
The TARE function is used when you need to weight products inside a container without
counting the weight from it. For using this function, put the container on the empty plate and
press the button
The weight indicator will return to zero and the Zero and Net indicators will be turned on, from
that moment you can put the product inside the container. If the container is retired from the
plate the scale will show the weight of the container but with a negative sign.
.
To deactivate the TARE function, remove the container from the plate and press the
button again, the weight indication will return to zero, the Zero indicator will be turne d on and
the Net indicator will be turned off.
.
- 11 -
Page 14
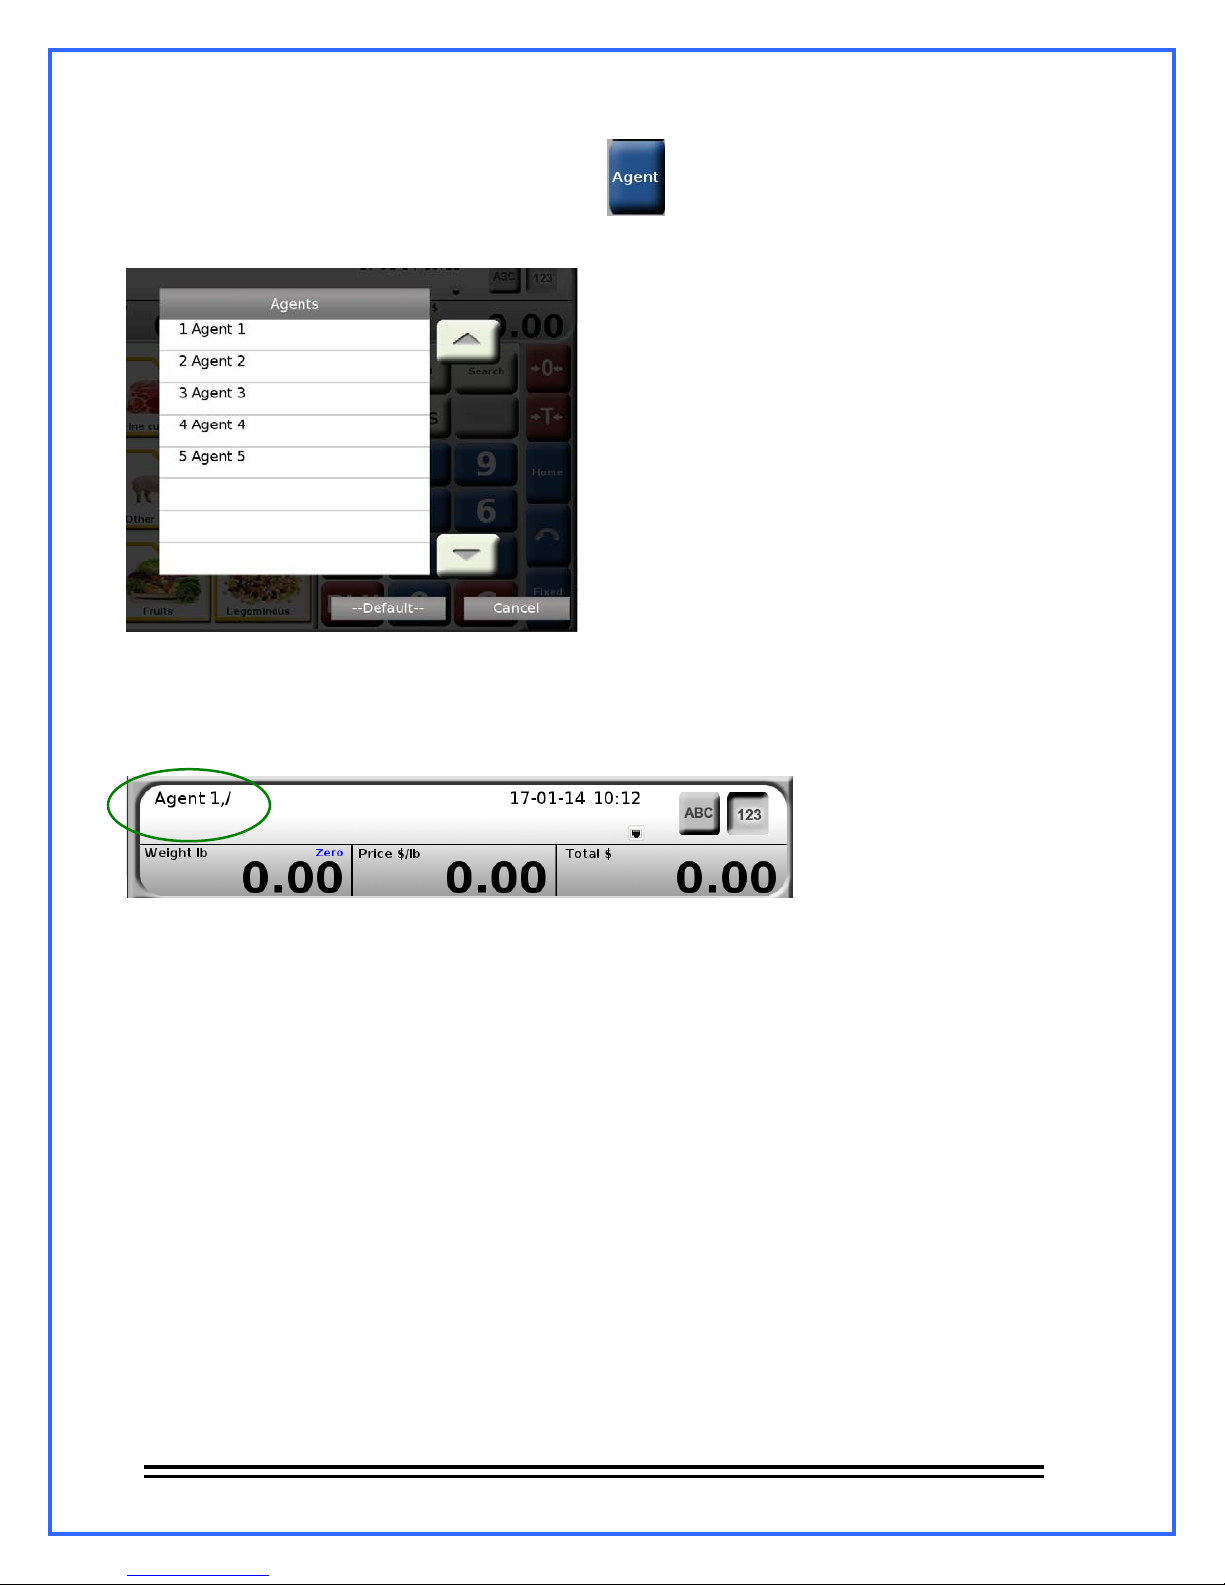
10.3.- Agent selection.
To select an agent signed up in the scale press the button, it will deploy a menu that
shows the names of the agents:
Use the Arrows to navigate and push the agent that you want to select, by doing this, the scale
will return to the home screen and will show, on the Agent/Directory field, the name of the
selected agent.
- 12 -
Page 15
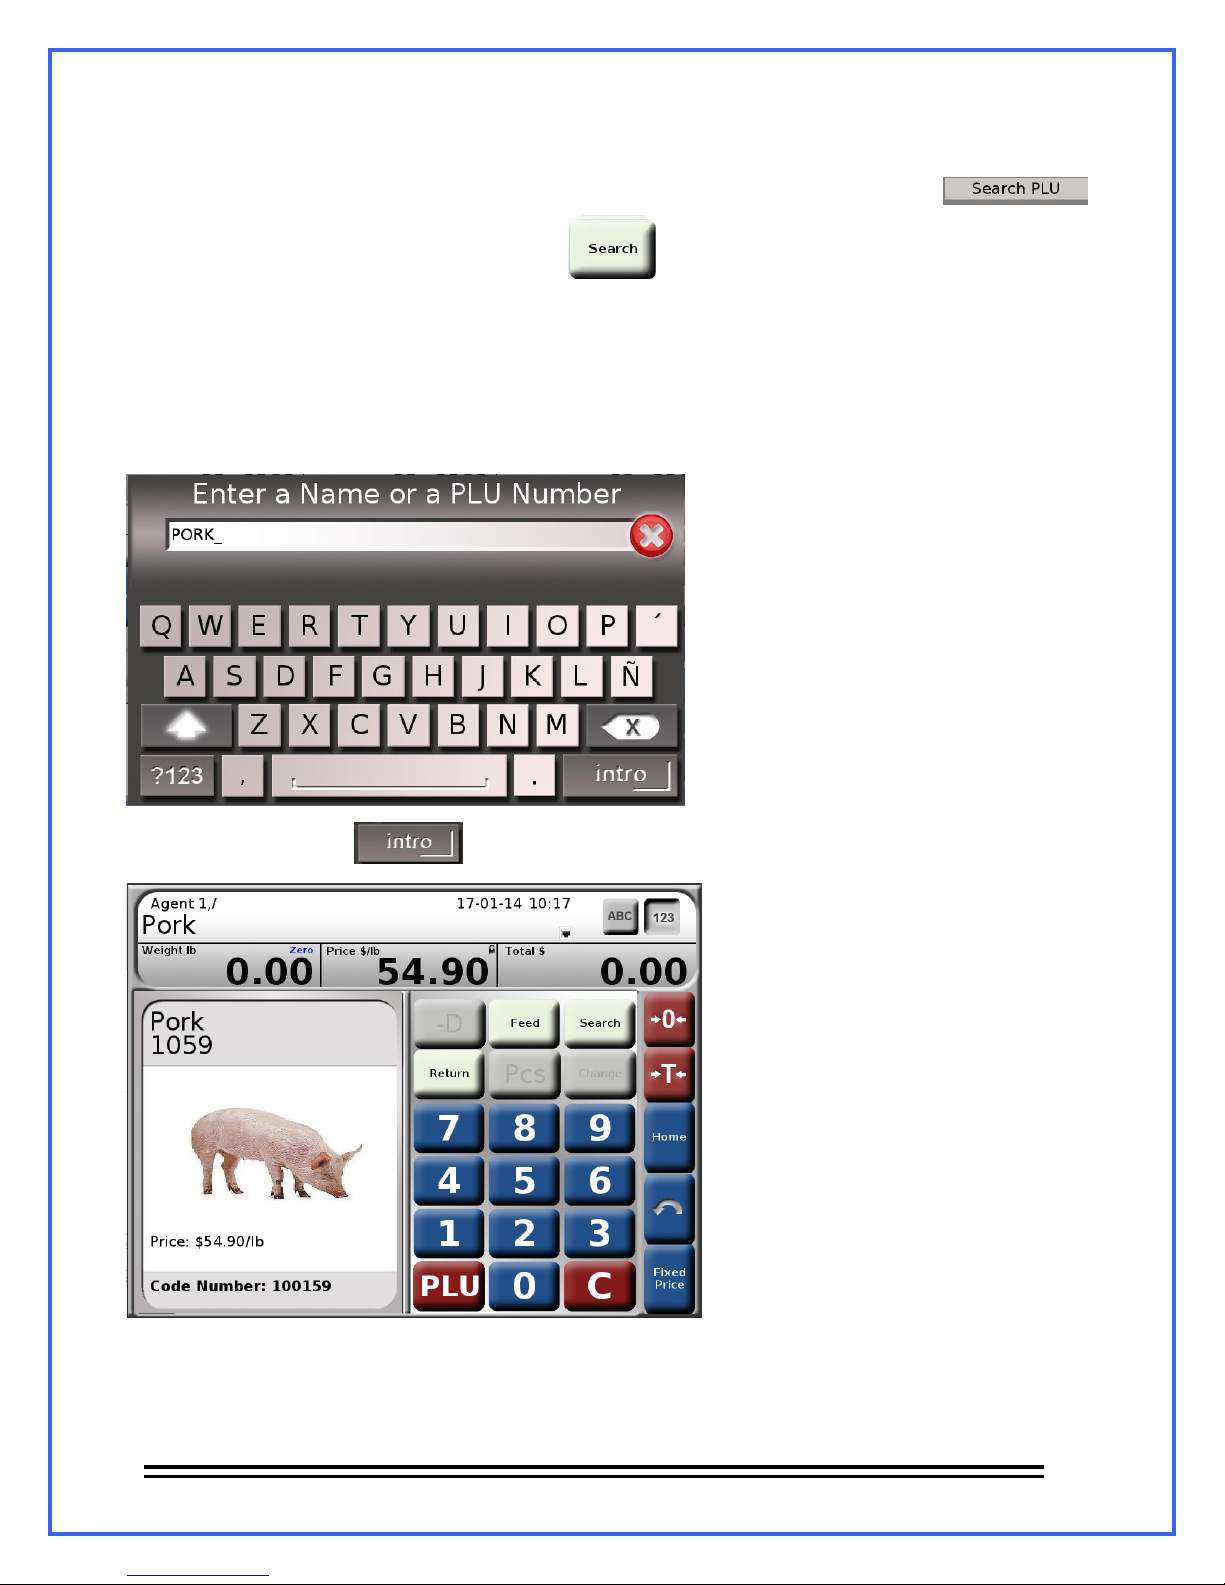
10.4.- PLU search.
The PLU search can be done from the alphanumerical keyboard, pressing the button:
Or from the numerical keyboard, by pressing
By pressing any of the previous buttons, will show the Search PLU window in which we
introduce the number of the PLU or the PLU name.
Search PLU by name.
In the next example we search the PLU “PORK”
By pressing the button the scale deploys the PLU directly.
The previous search happens because it already exist a PLU called “Pork” in the scale database.
On the other hand, if we don’t remember the name of the PLU, we can search it with their initial
letters:
- 13 -
Page 16
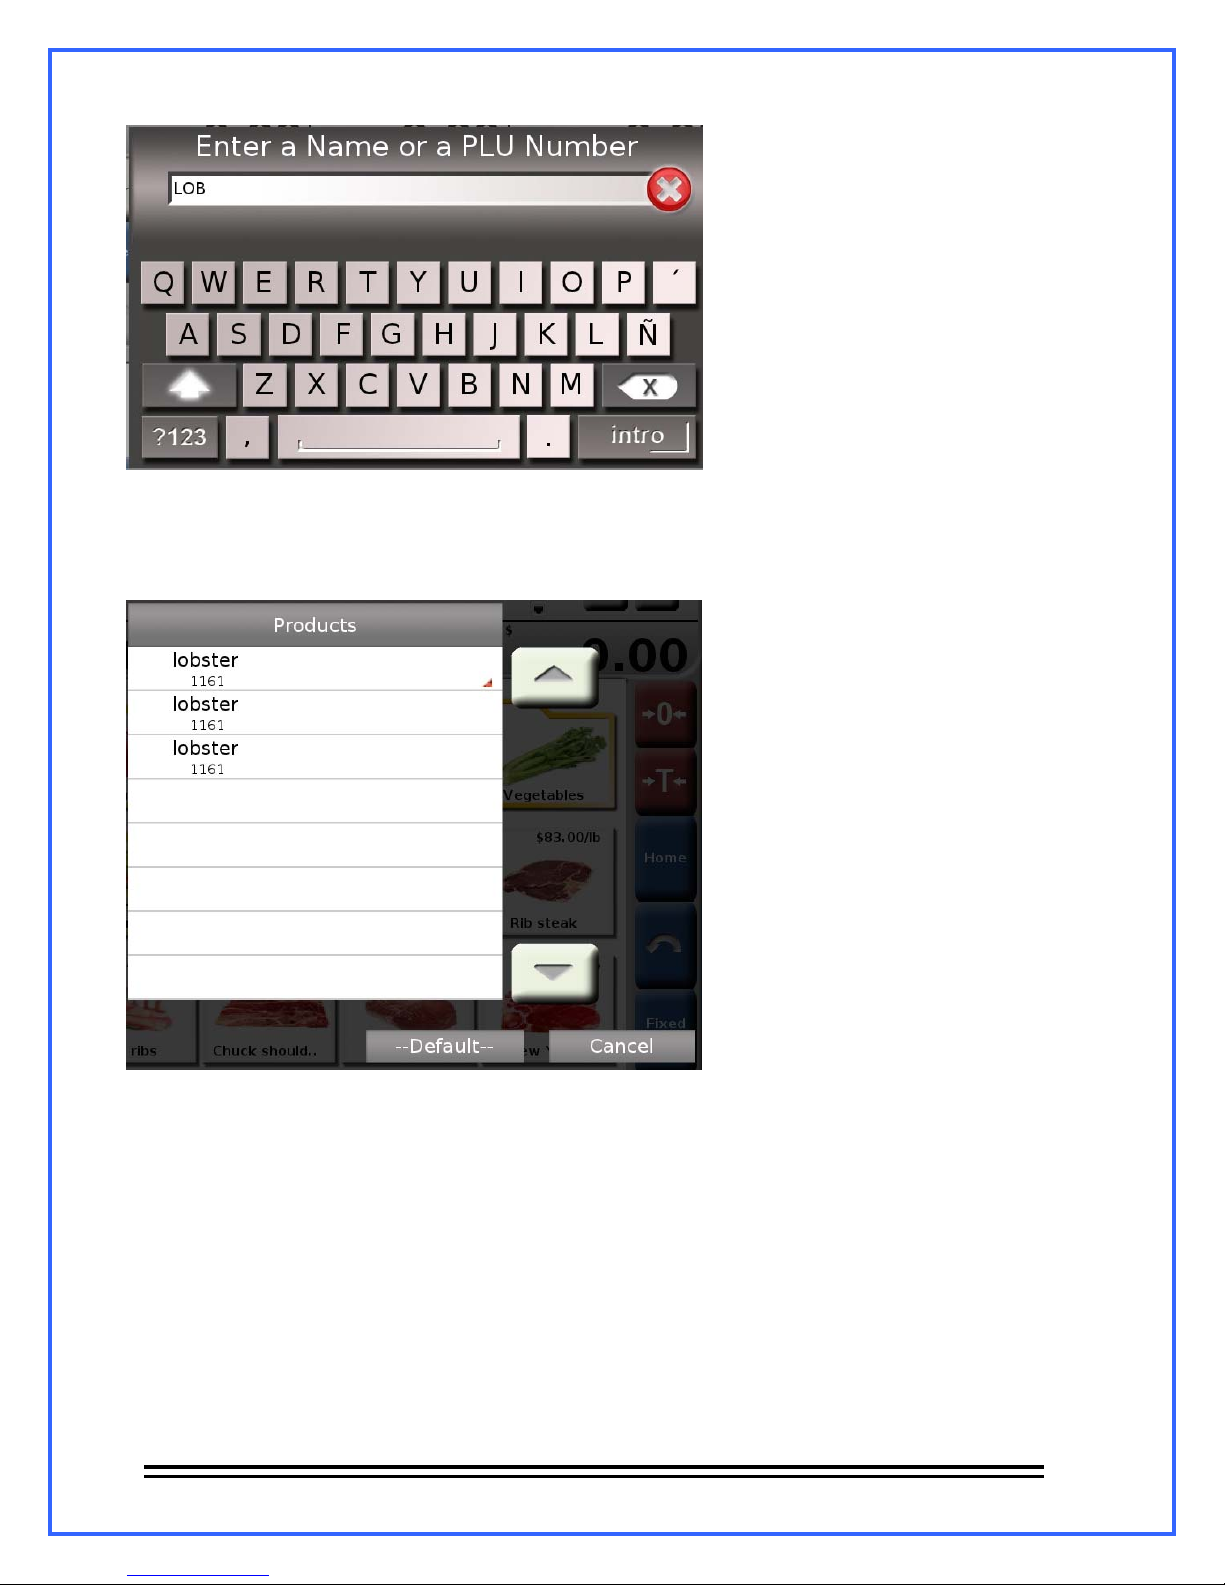
In this example we search a PLU that begins with the letters “LOB”.
The scale will show us the results of the search in a new window:
To select and deploy the selected PLU just press it.
Search PLU by number.
The search using the PLUs number can be done by the exact or approximate number. In the next
example we search for, with the exact number, the PLU 1010:
- 14 -
Page 17
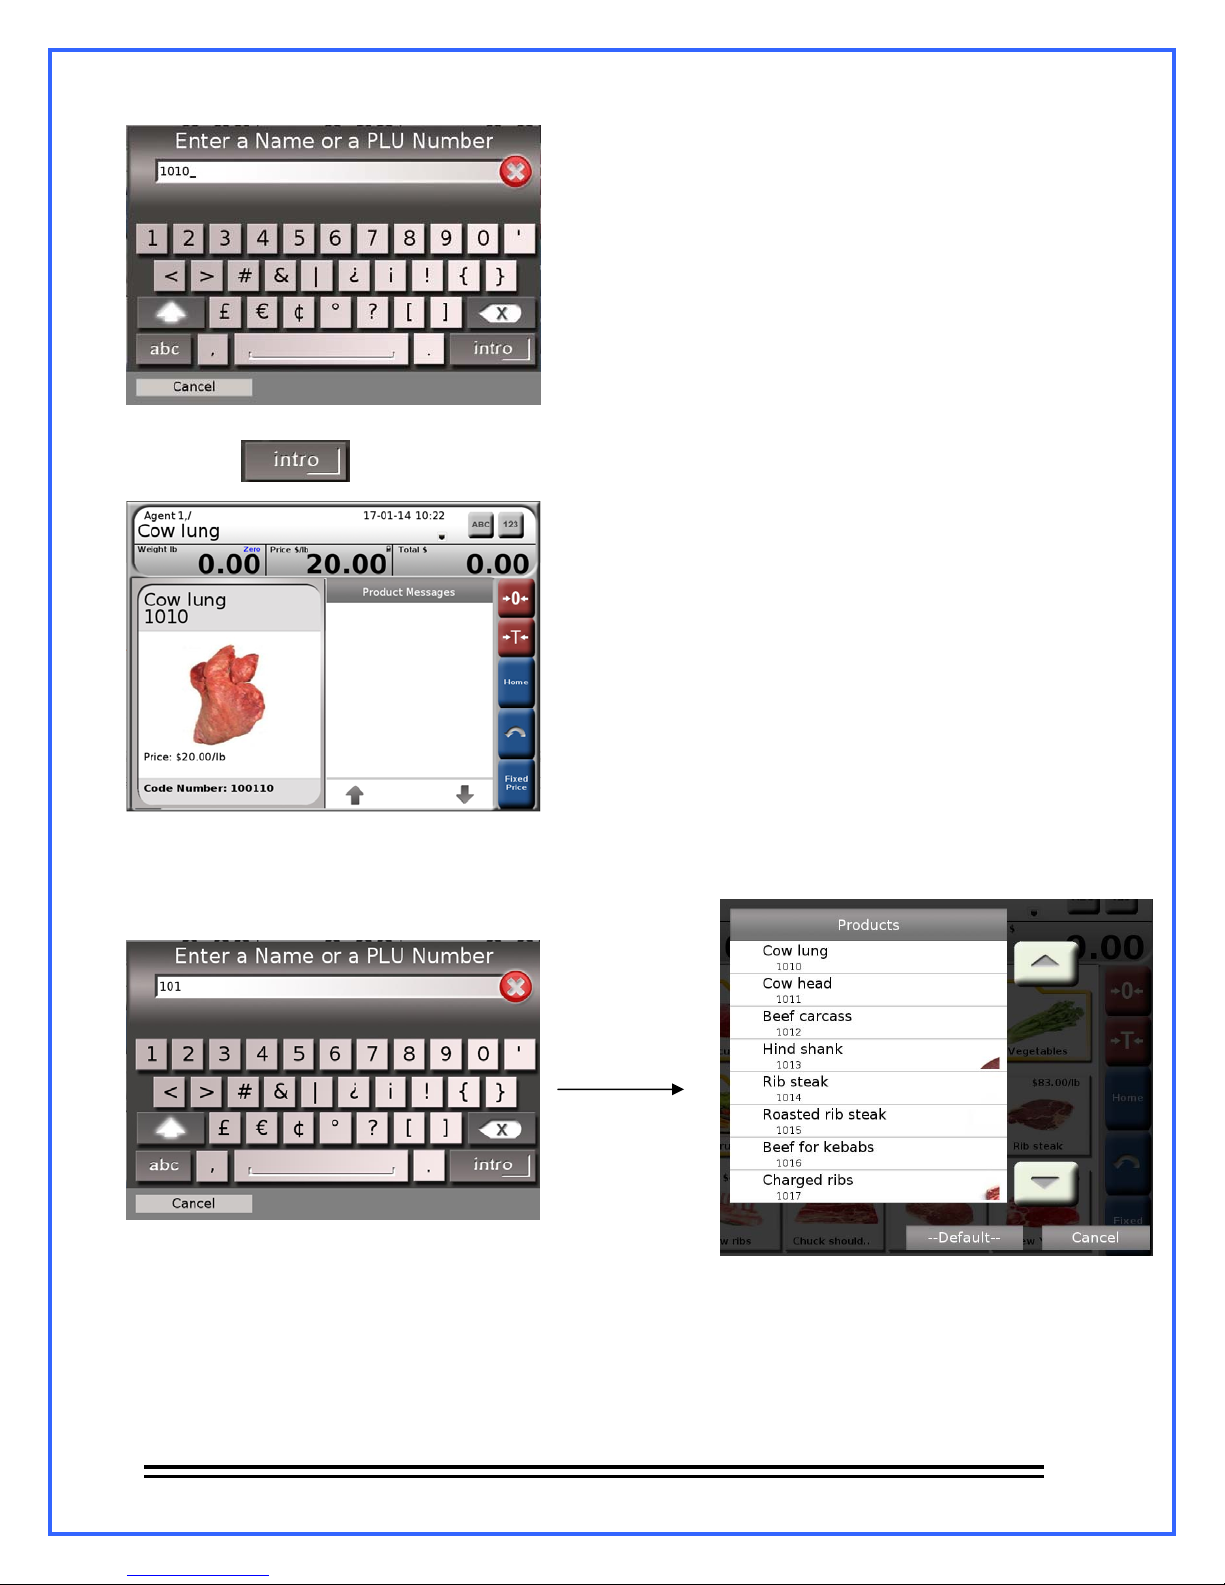
By pressing , the scale deploys the PLU associated with the entered number
Also the search can be done using an approximate of the PLUs number, in the following
example the PLUs are searched with the starting number “101”.
Navigate between the results using the arrows, once founded the desired PLU push the icon to
deploy it.
For both search modes, if the search doesn’t give any result the following message will appear
“No results were found”.
- 15 -
Page 18
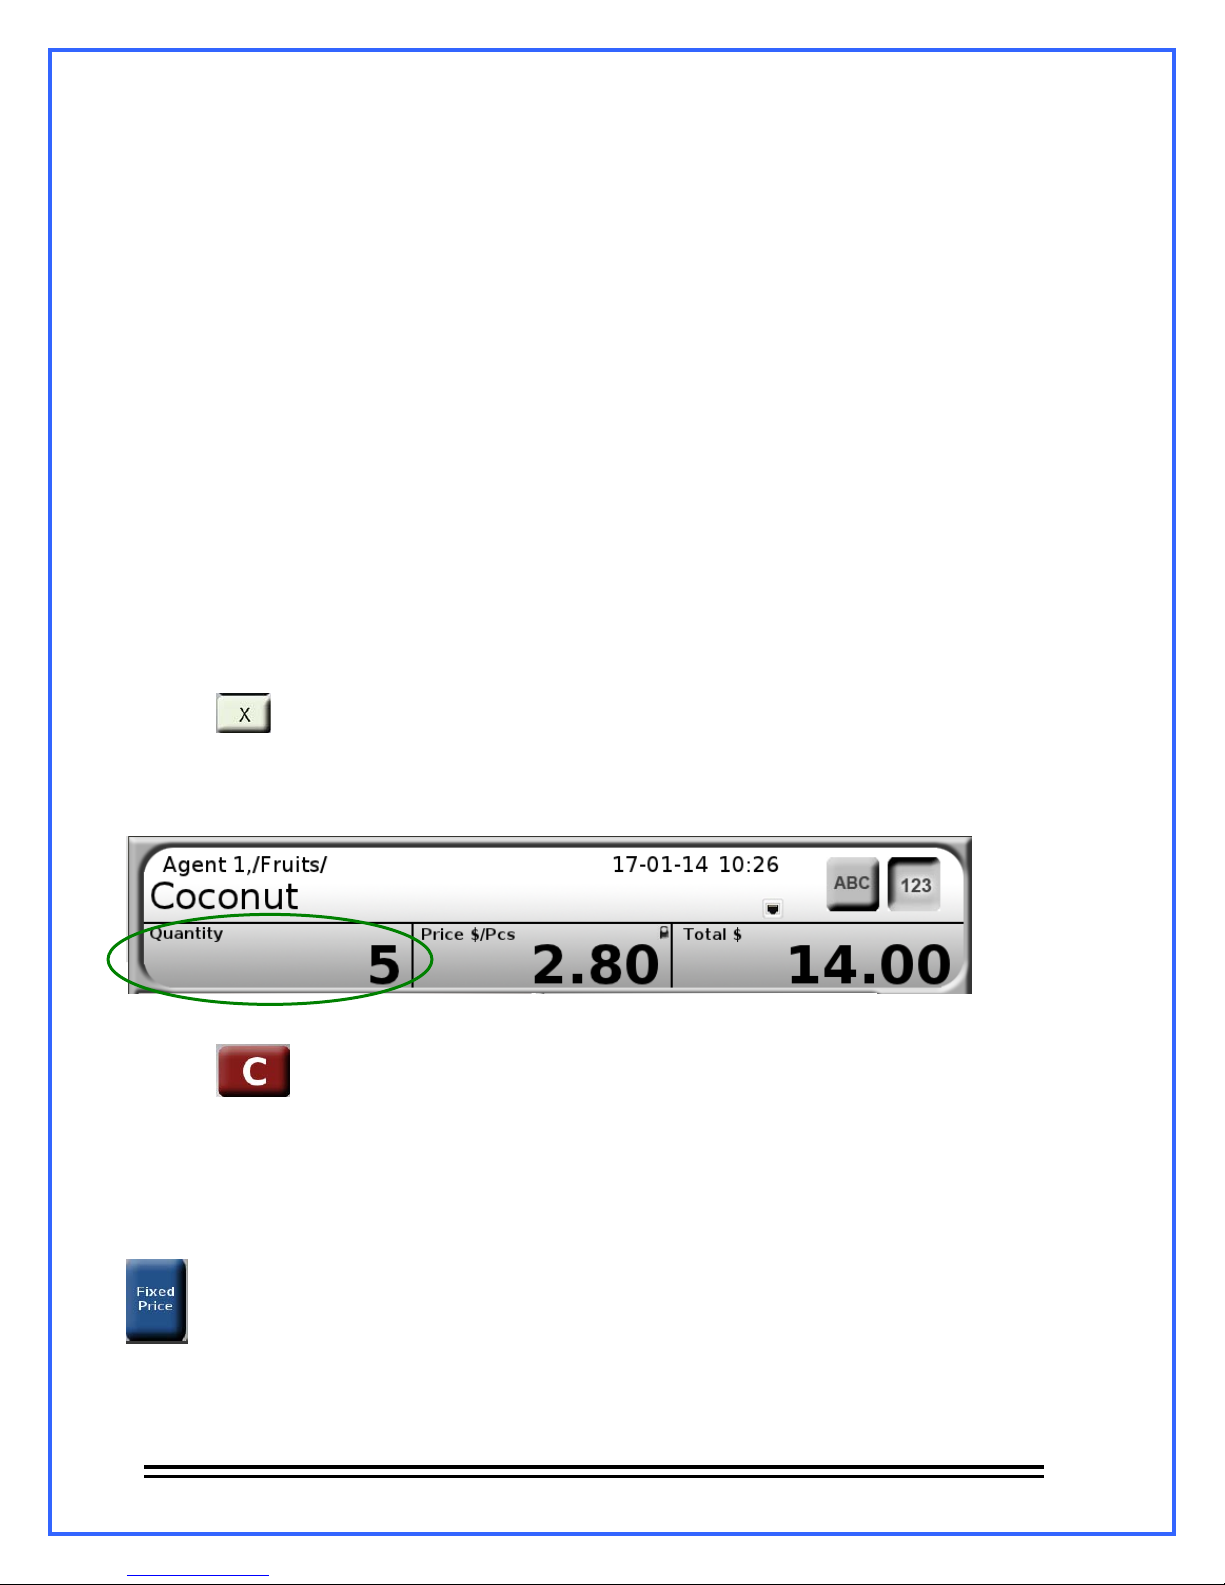
10.5.- Product Sales.
10.5.1.- Pre-pack mode – Weighable products sale.
For selling a weighable product we must follow the next steps:
1.- Select the PLU.
2.- Put the product on the scale.
3.- Wait until the weight stabilizes, once stabilized, the scale will print the label automatically.
To avoid the scale print labels automatically it should disable this function, to do this see section
12.11.- Settings
10.5.2.- Pre-pack mode – Non-weighable product sale.
In the Non-weighable product sale it shouldn’t be any load on the scale, if so the scale will show
the message “Remove the load to see the product”
For selling Non-weighable products follow the next instructions
1.- Select the PLU.
2.- Press on the numerical keyboard.
3.- The quantity screen will start flashing:
:
4.- Press to put the quantity in 0.
5.- Enter the quantity of pieces that are going to be sold and press the PRINT button.
For both cases, once printed the label, the current view of the screen will return to where the
product was selected. If desired to avoid the previous step, to work with only one product
without selecting it multiple times, select the product and press fixed price.
This button will keep fixed the product and the unitary price allowing printing only labels of the
selected item.
- 16 -
Page 19
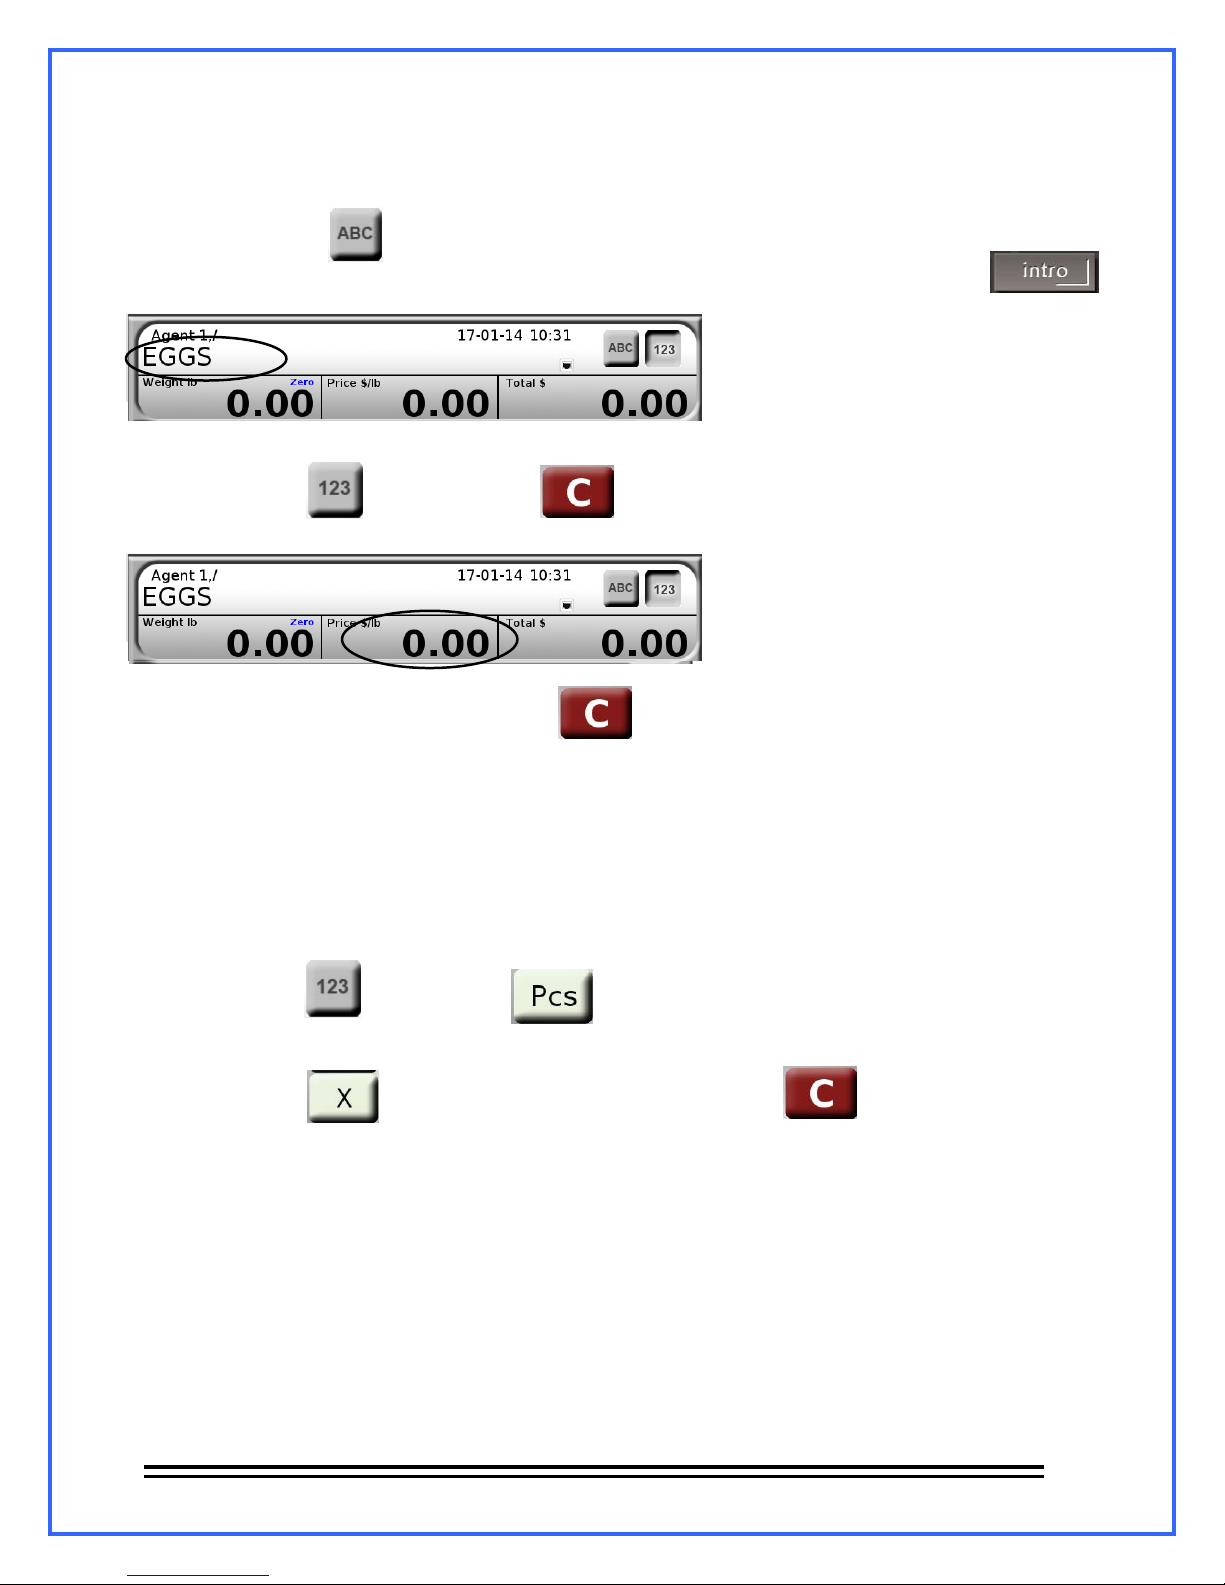
10.5.3.- Pre-pack mode – Weighable miscellaneous products sale,
For the selling of weighable miscellaneous products you must follow the next steps:
1.- Press the button
2.- Type the name of the product with the alphanumerical keyboard and press the button
. The typed name will appear on the PLU name area.
In this example the product “EGGS” will be sold.
3.- Press the button and then the button ,
the price digits will start flashing, type the
unitary price of the product.
If it needs to correct the entered price, press and enter the correct price.
4.- Place the weight on the plate.
5.- Press the PRINT button.
10.5.4.- Pre-pack mode – Non-weighable miscellaneous products sale.
Step 1 and 2 are the same as weighable miscellaneous product sale. Make sure there is no weight on the scale
1.-
plate
}
2.-
3.- Press the button and then press
4.-
The unitary price digits will start flashing, type the price by piece of product.
5.- Press the button , the quantity digits will start flashing. Press to put back to zero
the quantity of pieces, once that is done, type the quantity of pieces for selling and press the PRINT
button.
- 17 -
Page 20
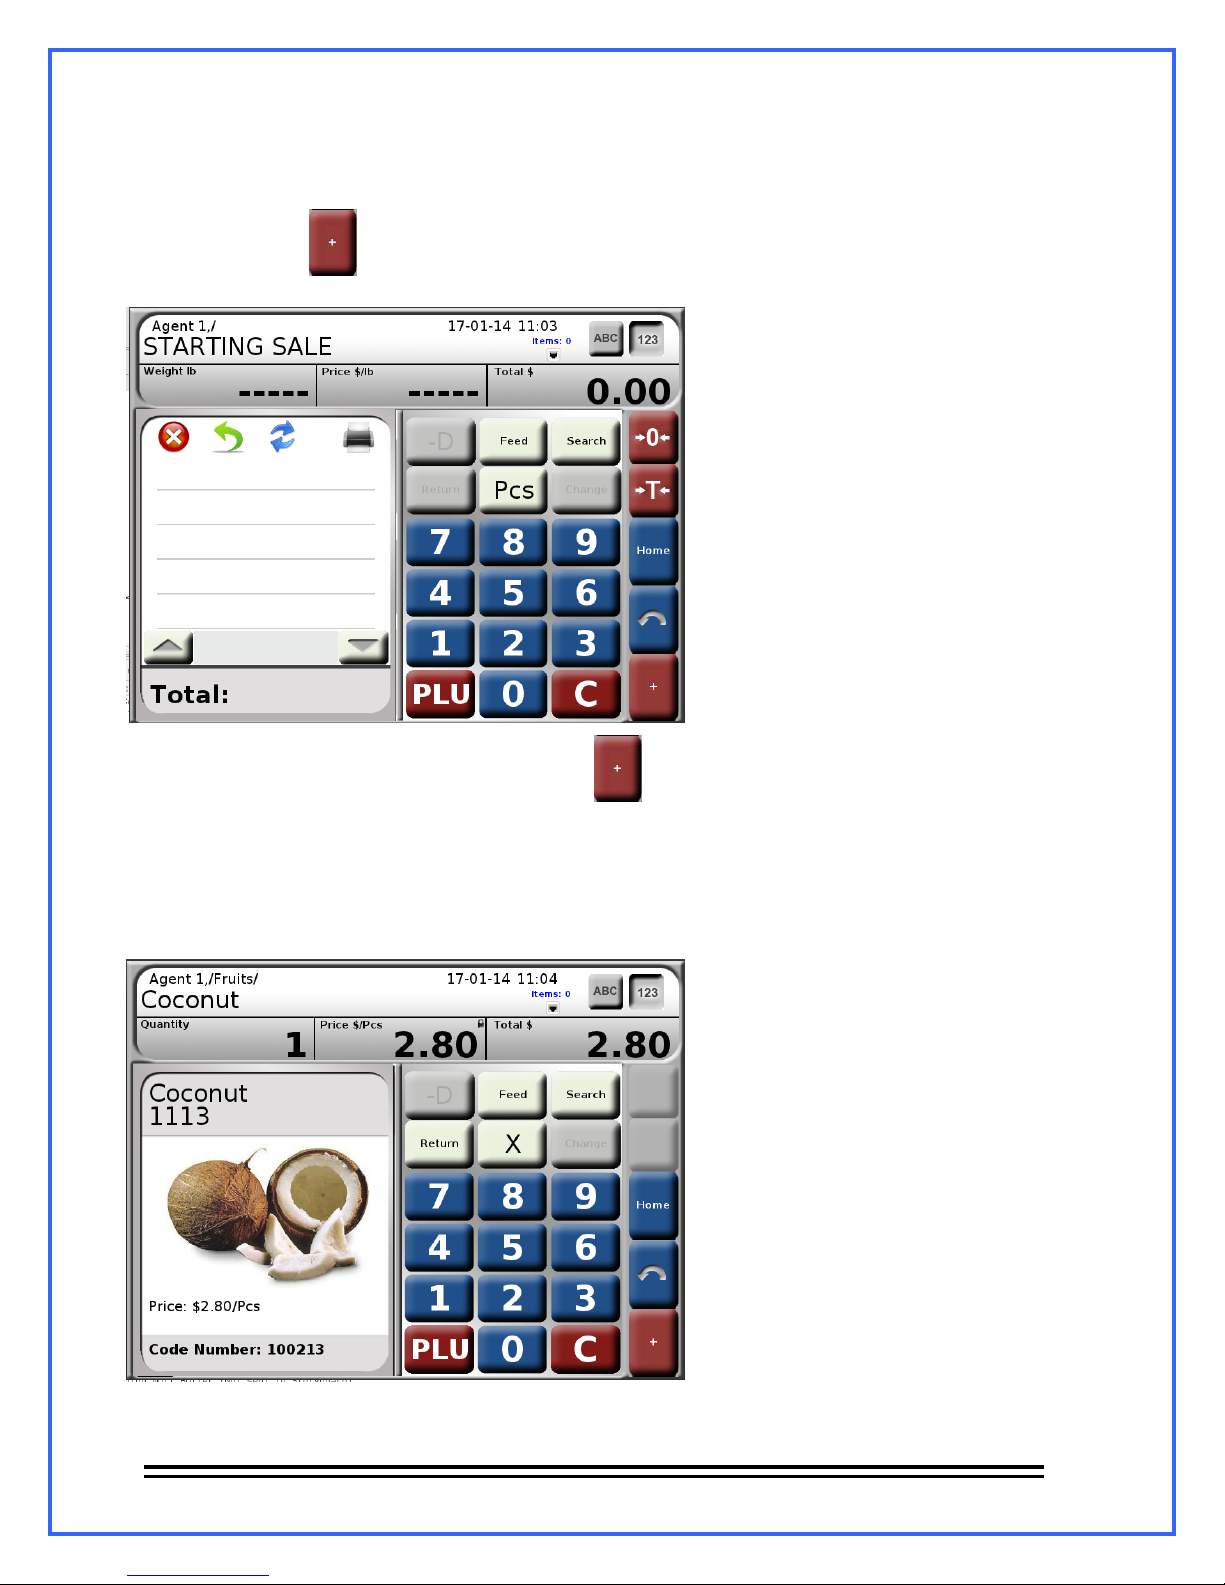
10.5.5.- Point of Sale mode – Weighable and Non-weighable product sale.
For starting a sale on Point of sale follow the next steps:
1.- Press the button .
2.-
For adding products to the current sale press , the actual view will change for the home
The screen will show a Sale window named “STARTING SALE”:
screen of the scale.
Search and select the product that you wish to add to the sale. In the next example we add 2
3.-
pieces of the PLU “coconut”
- 18 -
Page 21
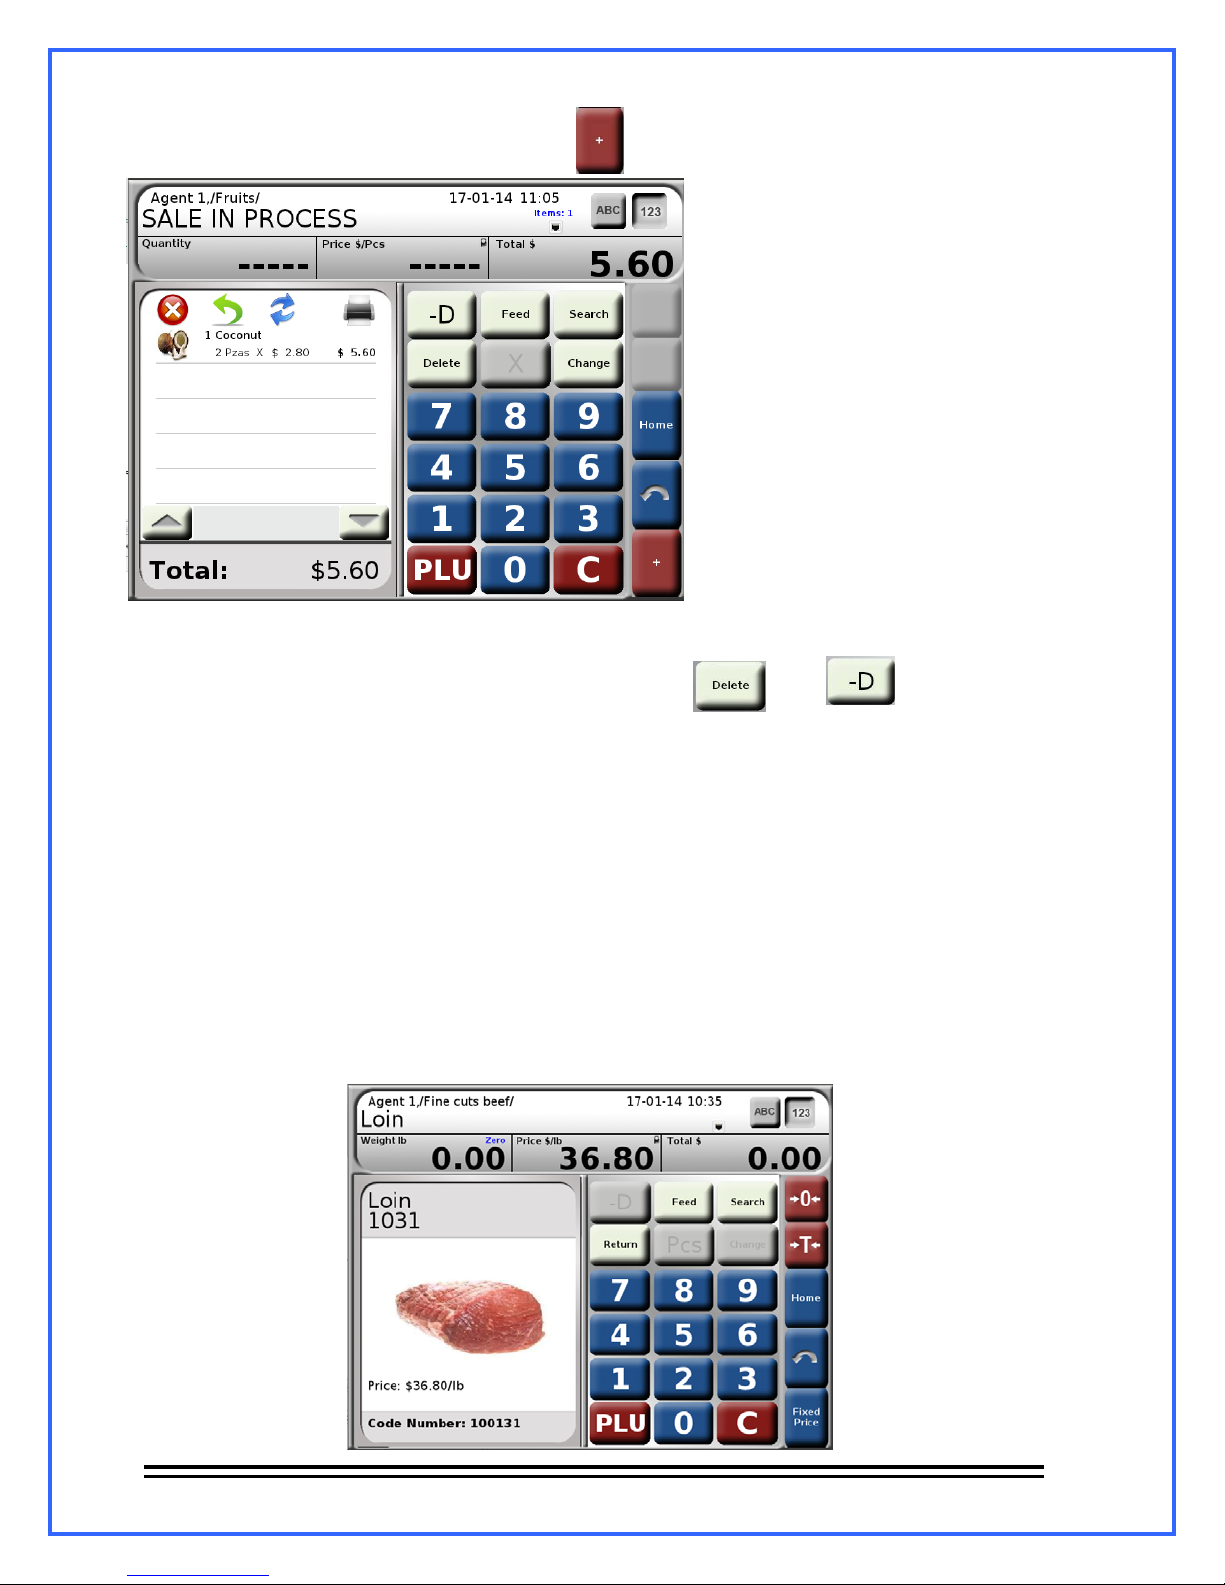
4.- To add a product to the current sale, press
The sale screen will change its title to “sale in progress”, it will actualize the list of products and
the total due, the items indicator: it increases by 1 and the and buttons will
be activated.
Continue assign products to the sale following the same procedure, when finished , press the
5.-
PRINT button.
To the current sale you can add any product either weighable or not weighable and
Note:
miscellaneous.
10.6.- Unitary price modification.
The unitary price modification works for both Pre-pack and Point of sale. To perform this
operation, follow the next steps:
Select the product which you want to change the unitary price. In the next example we will
1.-
change the unitary price of the product “Loin”
- 19 -
Page 22
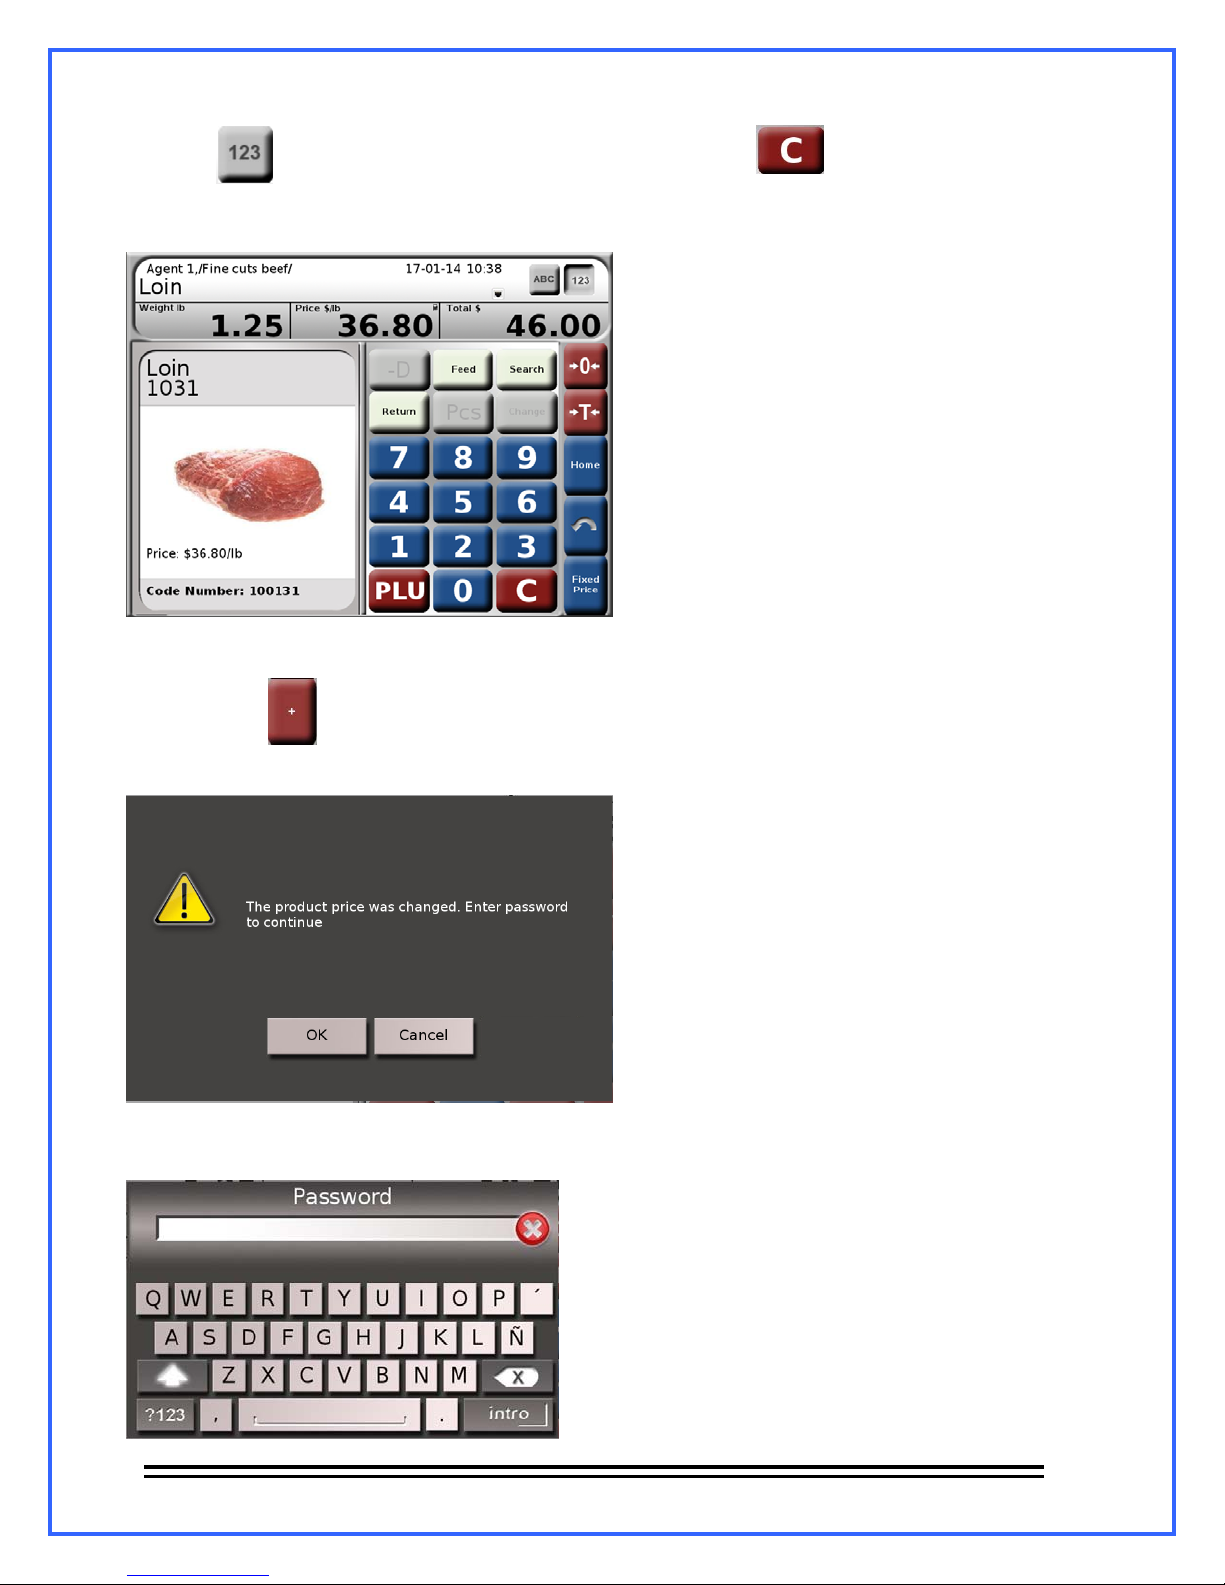
2.- Press to deploy the numerical keyboard and then press
3.- The unitary price of the product will become 0.00 and will start flashing, enter the new unitary price.
In this example the price was changed from 36.80 to 50.00
4.- By pressing (In point of sale mode) or the PRINT button (In pre-pack mode) the scale will
deploy a message, where it asks for the Admin. password to continue with the operation. Press Ok to
proceed.
It will show up a new window in which you must introduce the Administrator password.
5.-
- 20 -
Page 23
6.- Done that, if the scale is in Point of sale mode, will add the product with the changed price in the
current sale or, if the scale is in Pre-pack mode, will print the label with the modified price.
Note: the changes in the unitary price will only be valid for the current transaction, to definitely change
the unitary price see section 12.1.- Products.
11.- Point of sale exclusive operations (ticket)
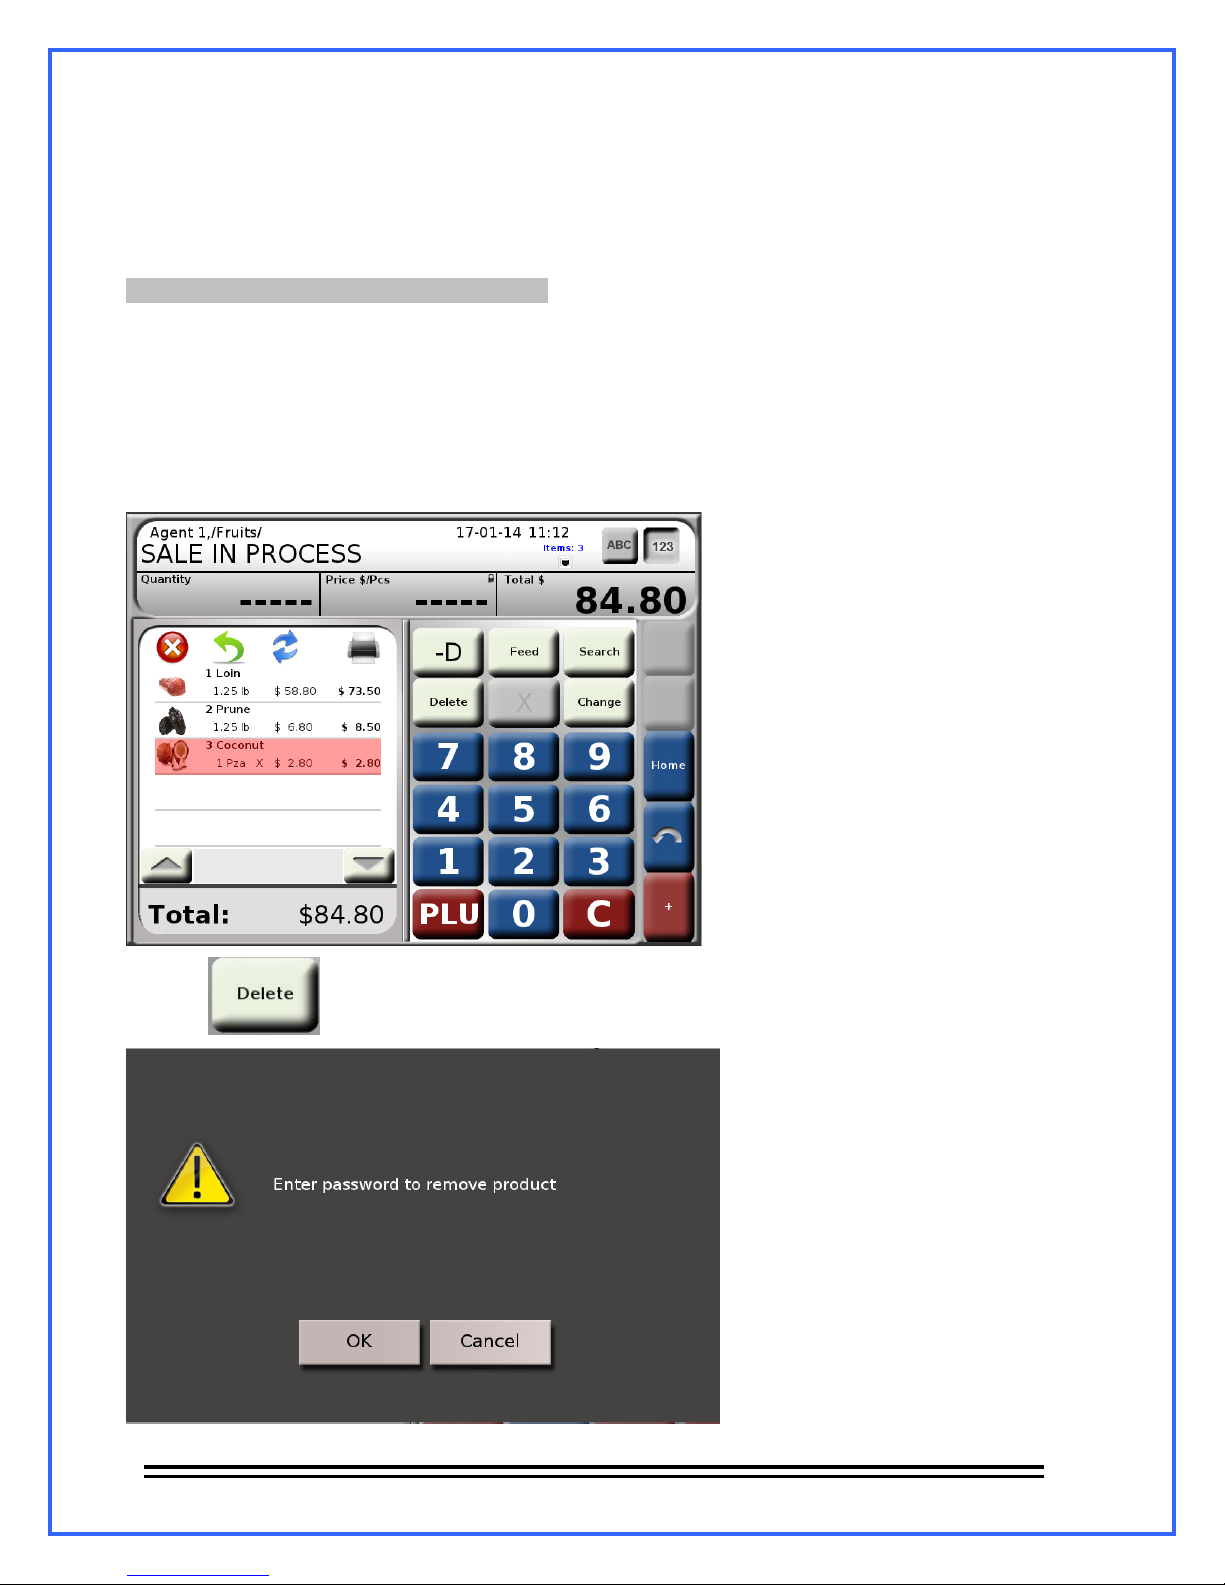
11.1.- Removing Products.
This operation allows removing products from the current sale. For doing this follow the next
steps:
Open the current sale and select the product that is going to be removed:
1.-
2.- Press , this message will appear “Enter password to remove product”:
Press the OK button. The window for introducing the Admin password will deploy. .
- 21 -
Page 24
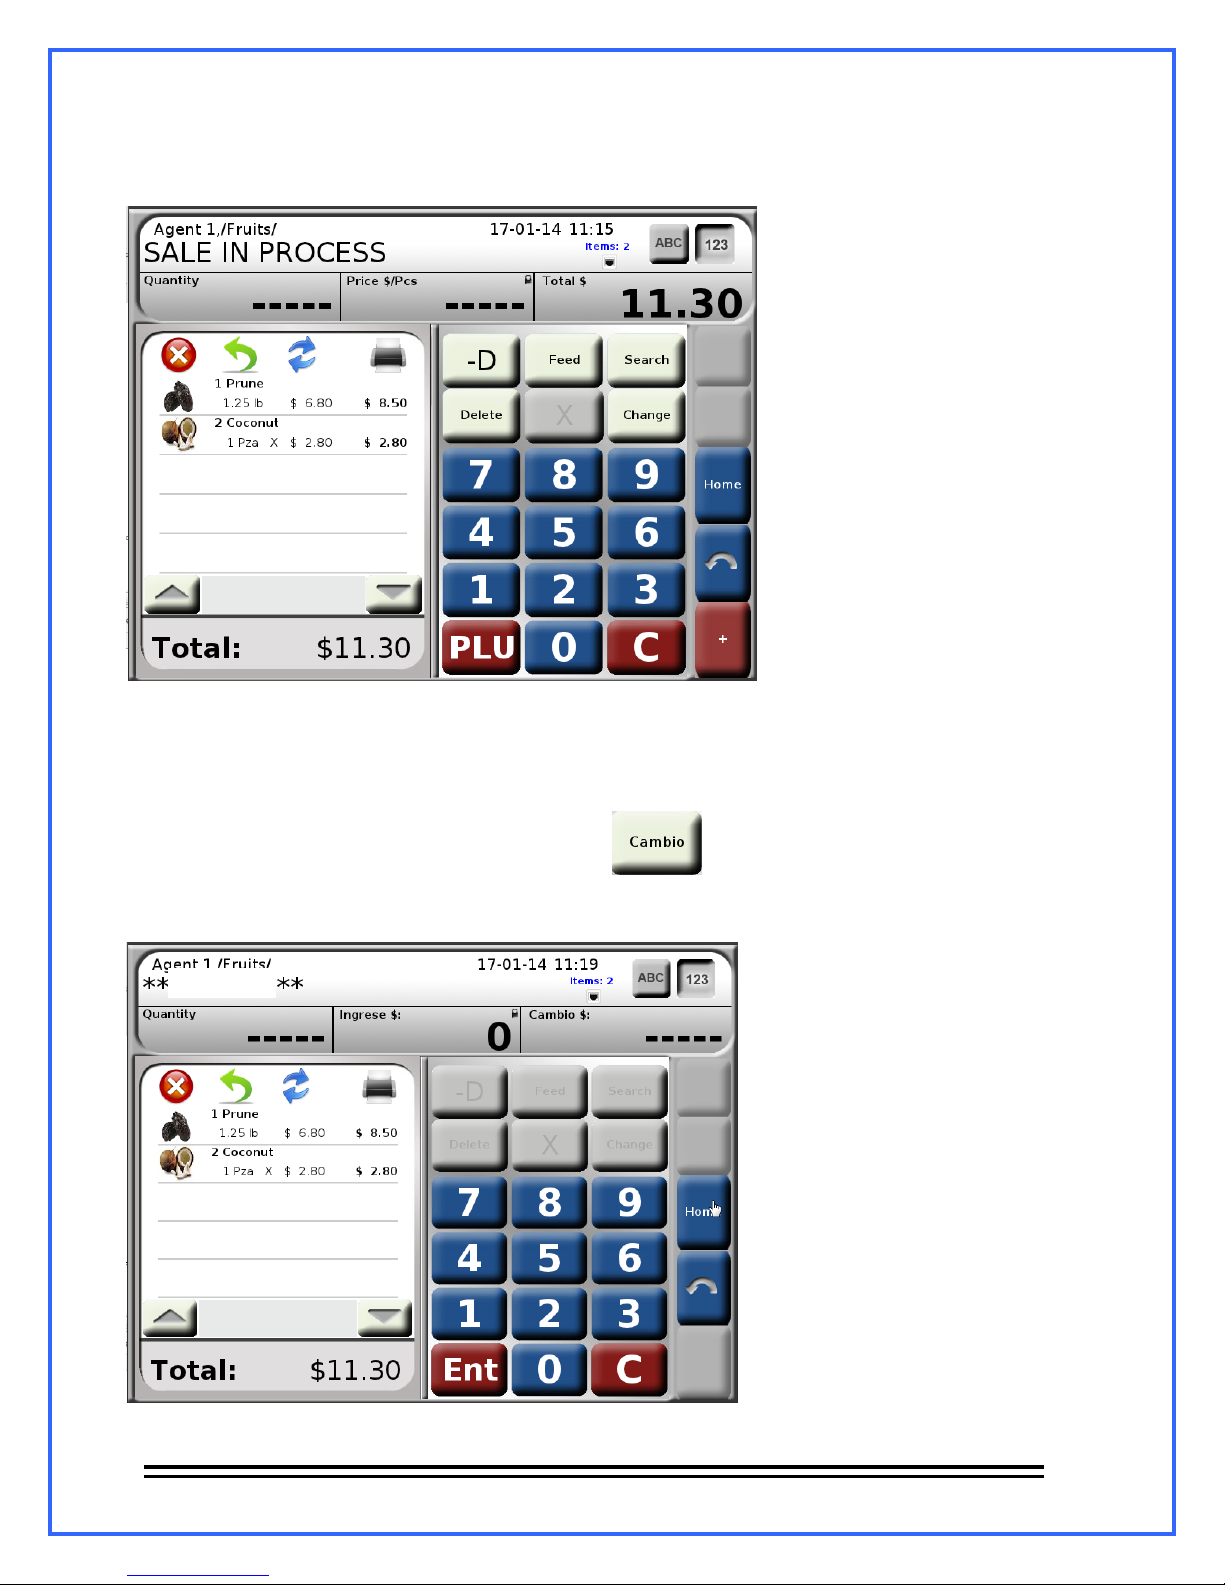
3.- Enter the administrator password, once done that, the selected product will be removed from
the current sale:
11.2.- Change delivery.
This function allows calculating the change that has to be returned to the client. Follow the next
step to perform this operation:
While in SALE IN PROCESS window, press .
1.-
The window title will change to **CHANGE** and the “Enter $” field will be flashing:
2.-
CHANGE
- 22 -
Page 25
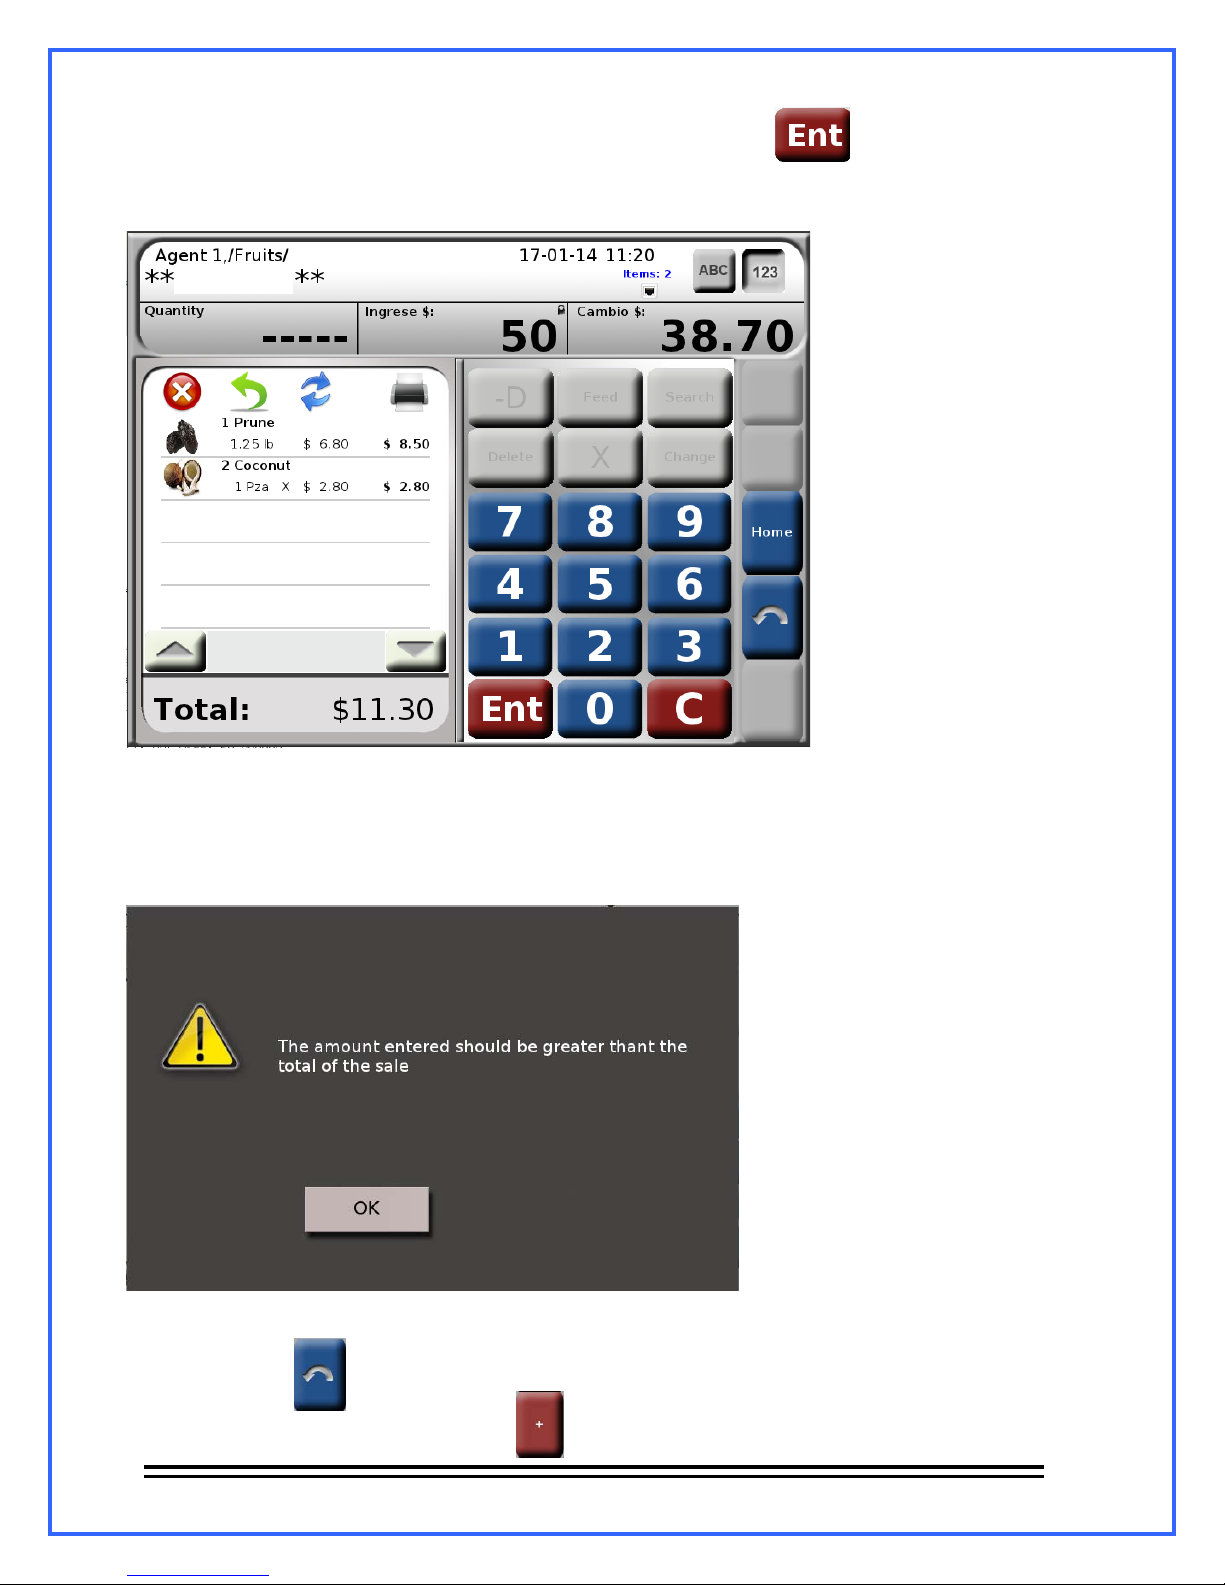
3.- Enter the amount of money that the client is giving and press
The scale will calculate the change and will displays it in the “Change $” field.
4.-
CHANGE
For this example we have a total due of $82.00 and we receive $100.00
In case that the amount is less that the Total, this message will show “the amount entered
shouldn’t be greater than the total of the sale”.
Press the OK button
.
5.- To return press . The scale will go back to the home screen,
to return to the current sale,
Remove any load on the scale and press
- 23 -
Page 26
11.3.- Discount Applications.
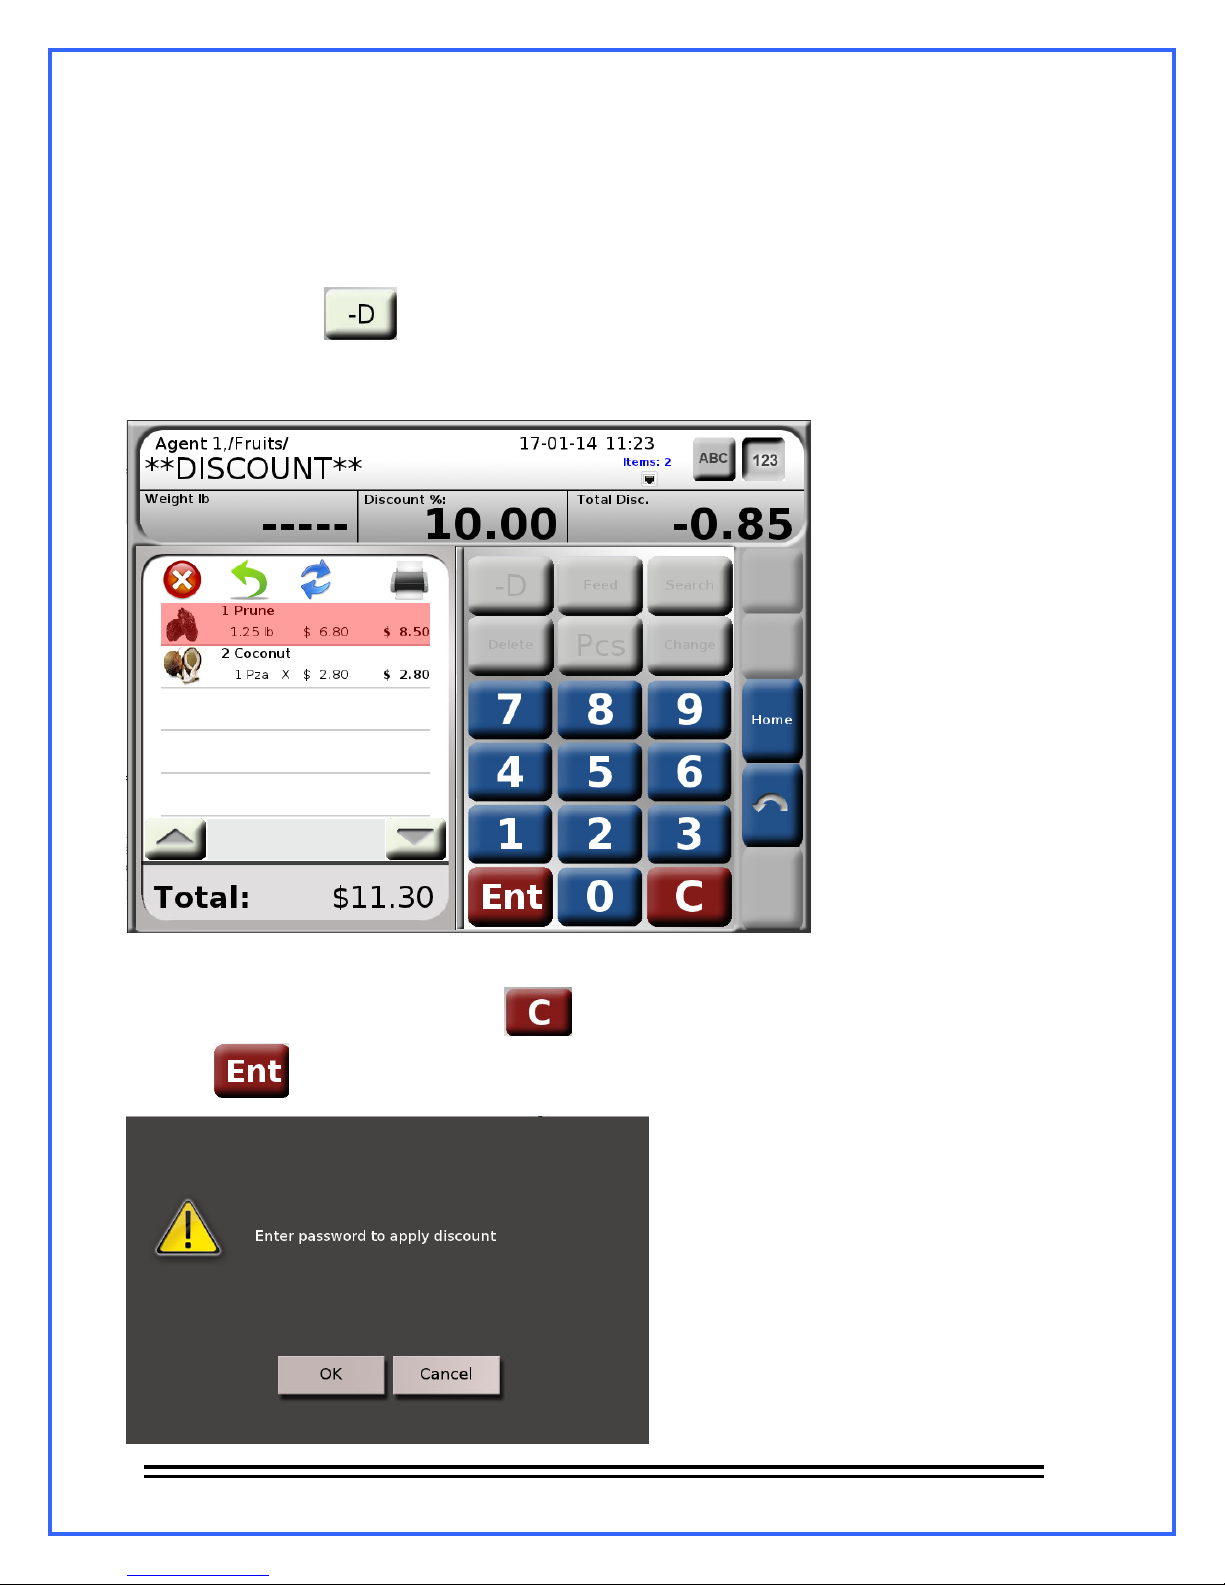
This function allows applying discounts over the total price of a determined product, to do this
you must follow these next steps:
1. In the “SALE IN PROCESS” window, select the product to which you want to apply the
discount and press
The sale screen will change to **DISCOUNT**, type the discount percentage wanted for the
2.-
.
selected product:
The Total Disc. $ field shows the amount that is going to be reduced from the total price of the
product. If a correction is needed press
.
Press , by doing this the message “Enter password to apply discount” will appear.
3.-
- 24 -
Page 27
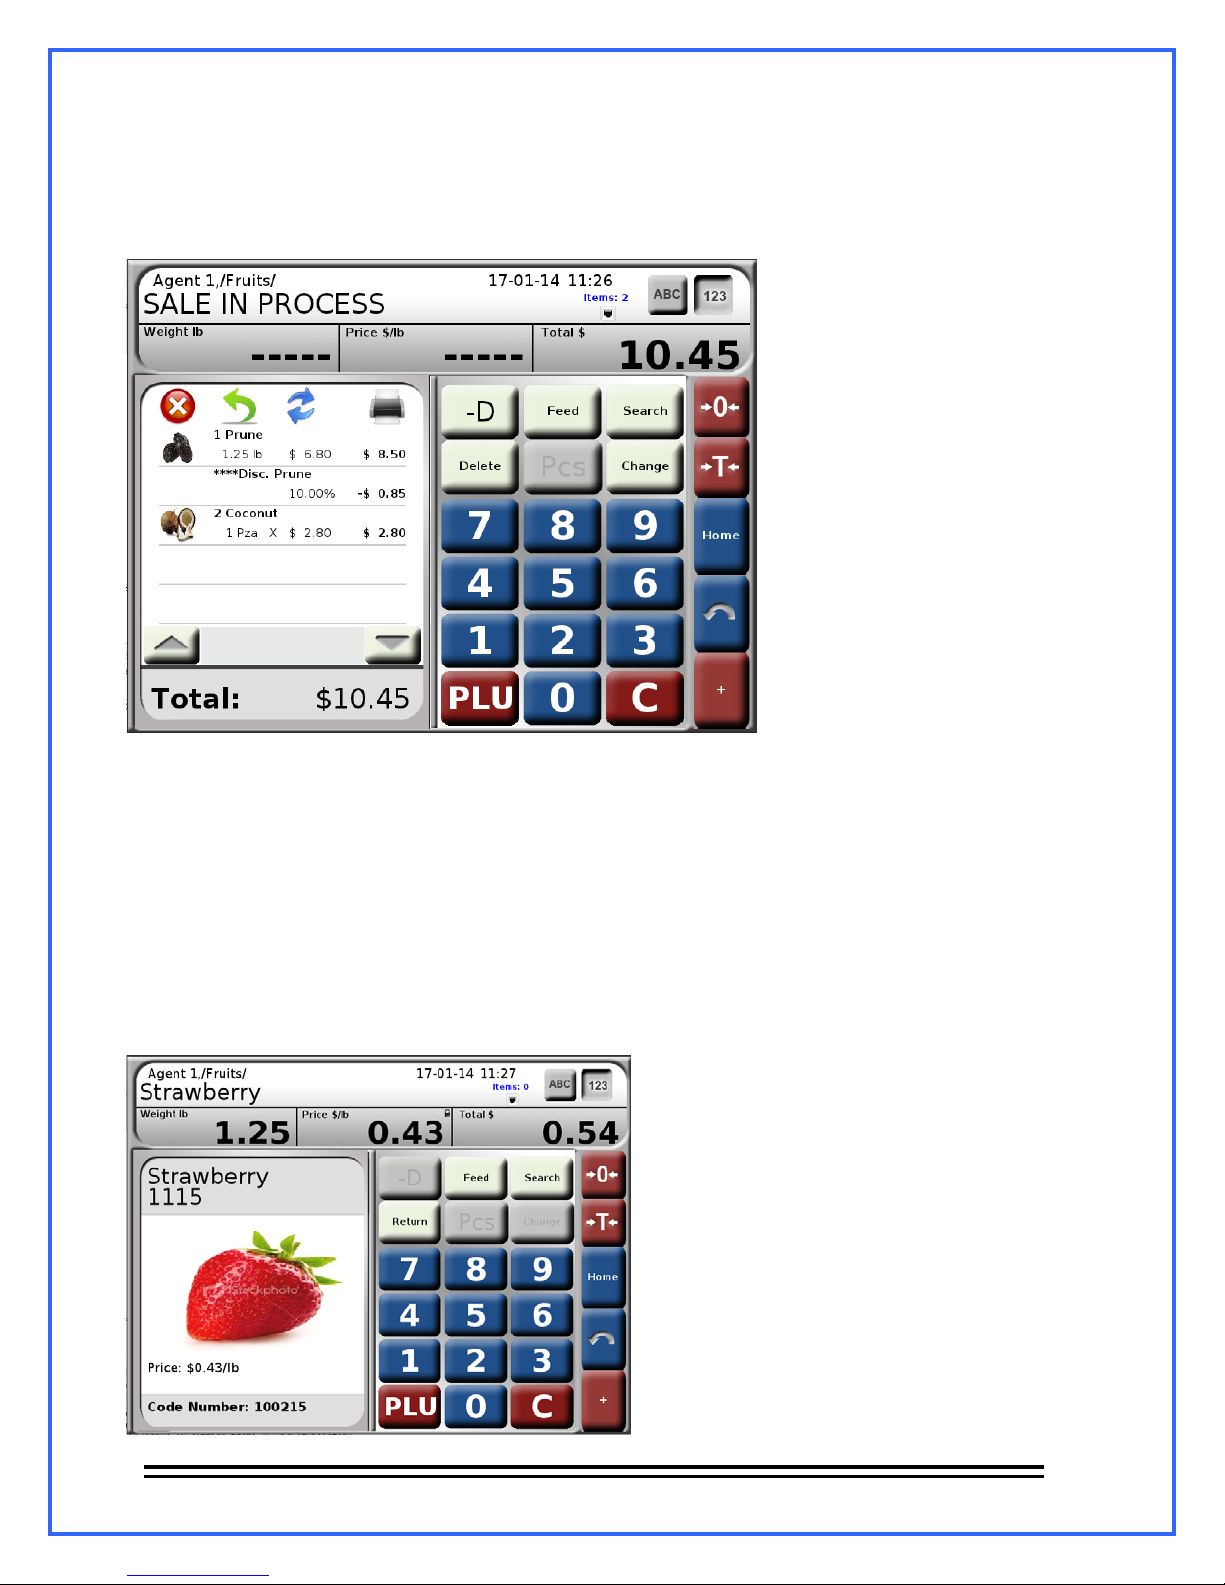
Press OK. The window to enter the Admin password will deploy.
Enter the Admin. Password, by doing this the “SALE IN PROCESS” will show with the
4.-
applied discount:
For applying discounts to more products follow the same procedure.
11.4.- Devolutions.
This operation allows to register products devolutions, shouldn’t be confused with the Remove
product operation because the first one is for returning items that already been sold while the
other is to remove them from the current sale.
To make devolution follow the next steps:
1.- Select the product you want to return and deploy the numerical keyboard
- 25 -
Page 28
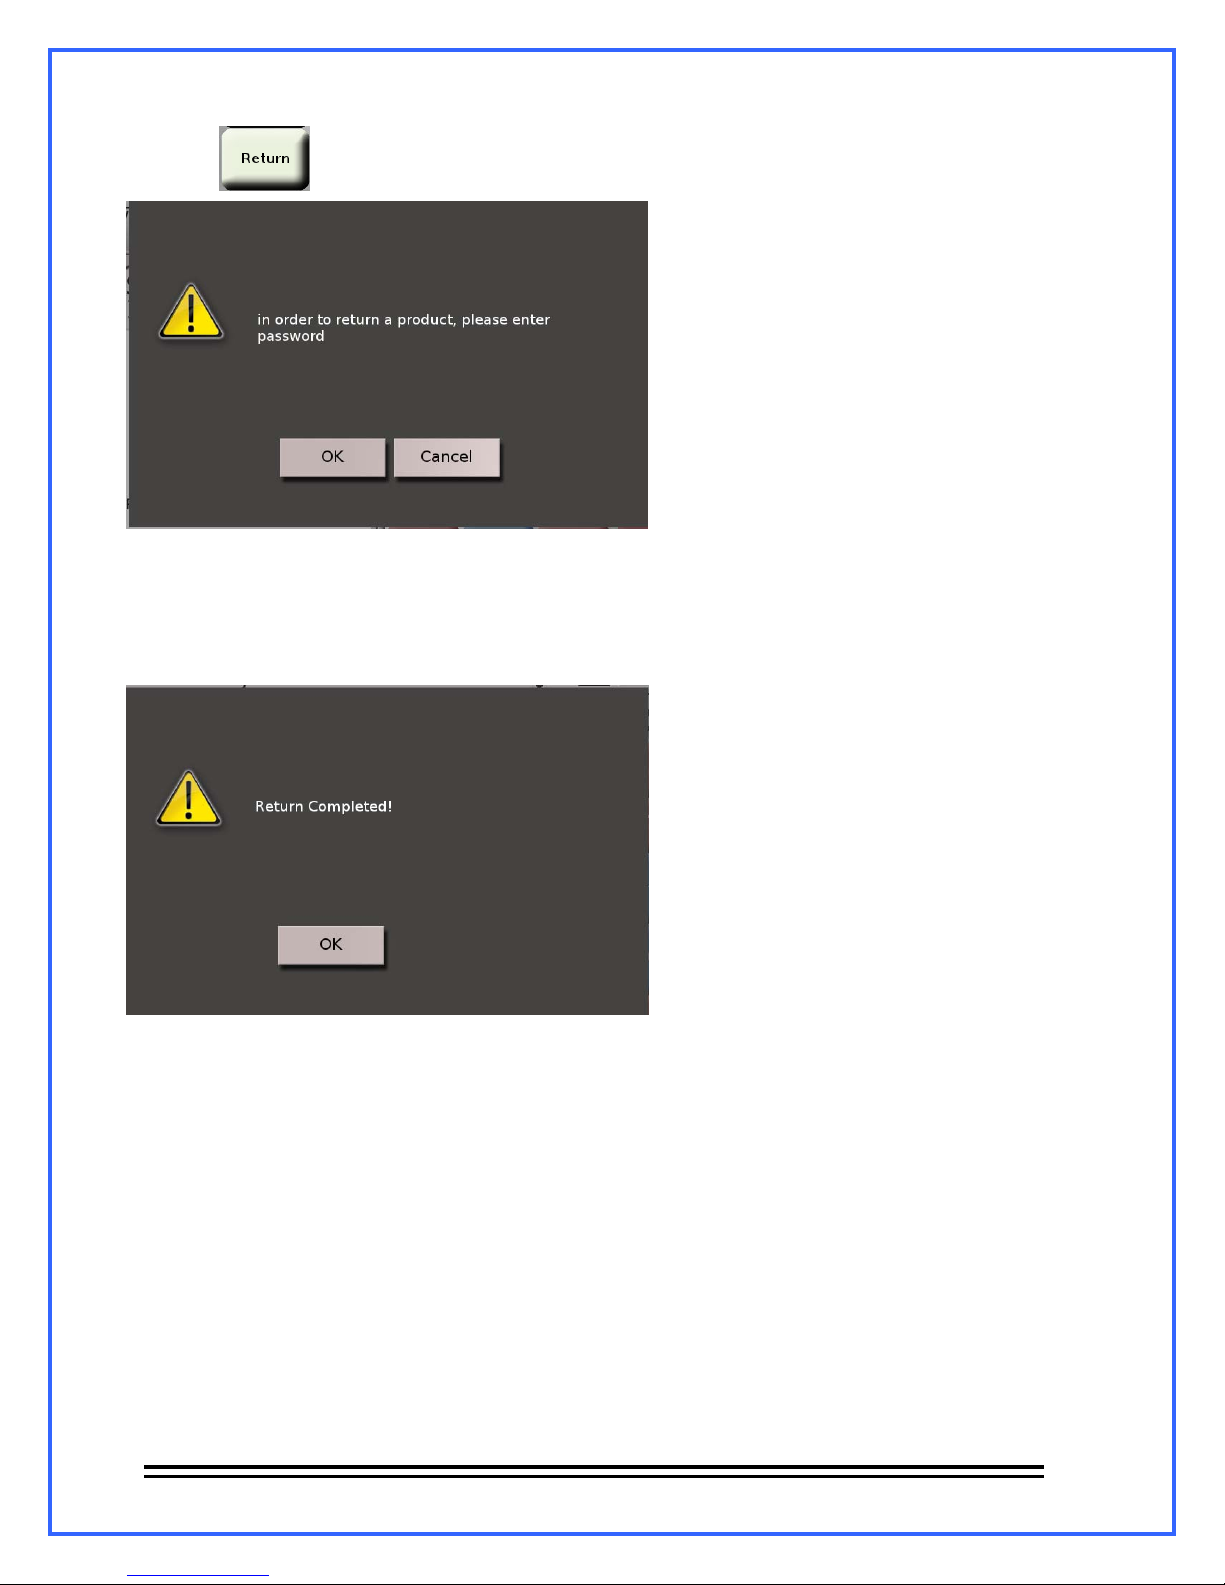
2.- Press , the next message will show:
Press OK.
Once the Admin password is entered this message will deploy:
3.-
The window to enter the Admin password will deploy.
Press Ok.
The devolution will be registered in the devolutions reports (Registered as negative
sales)
- 26 -
Page 29
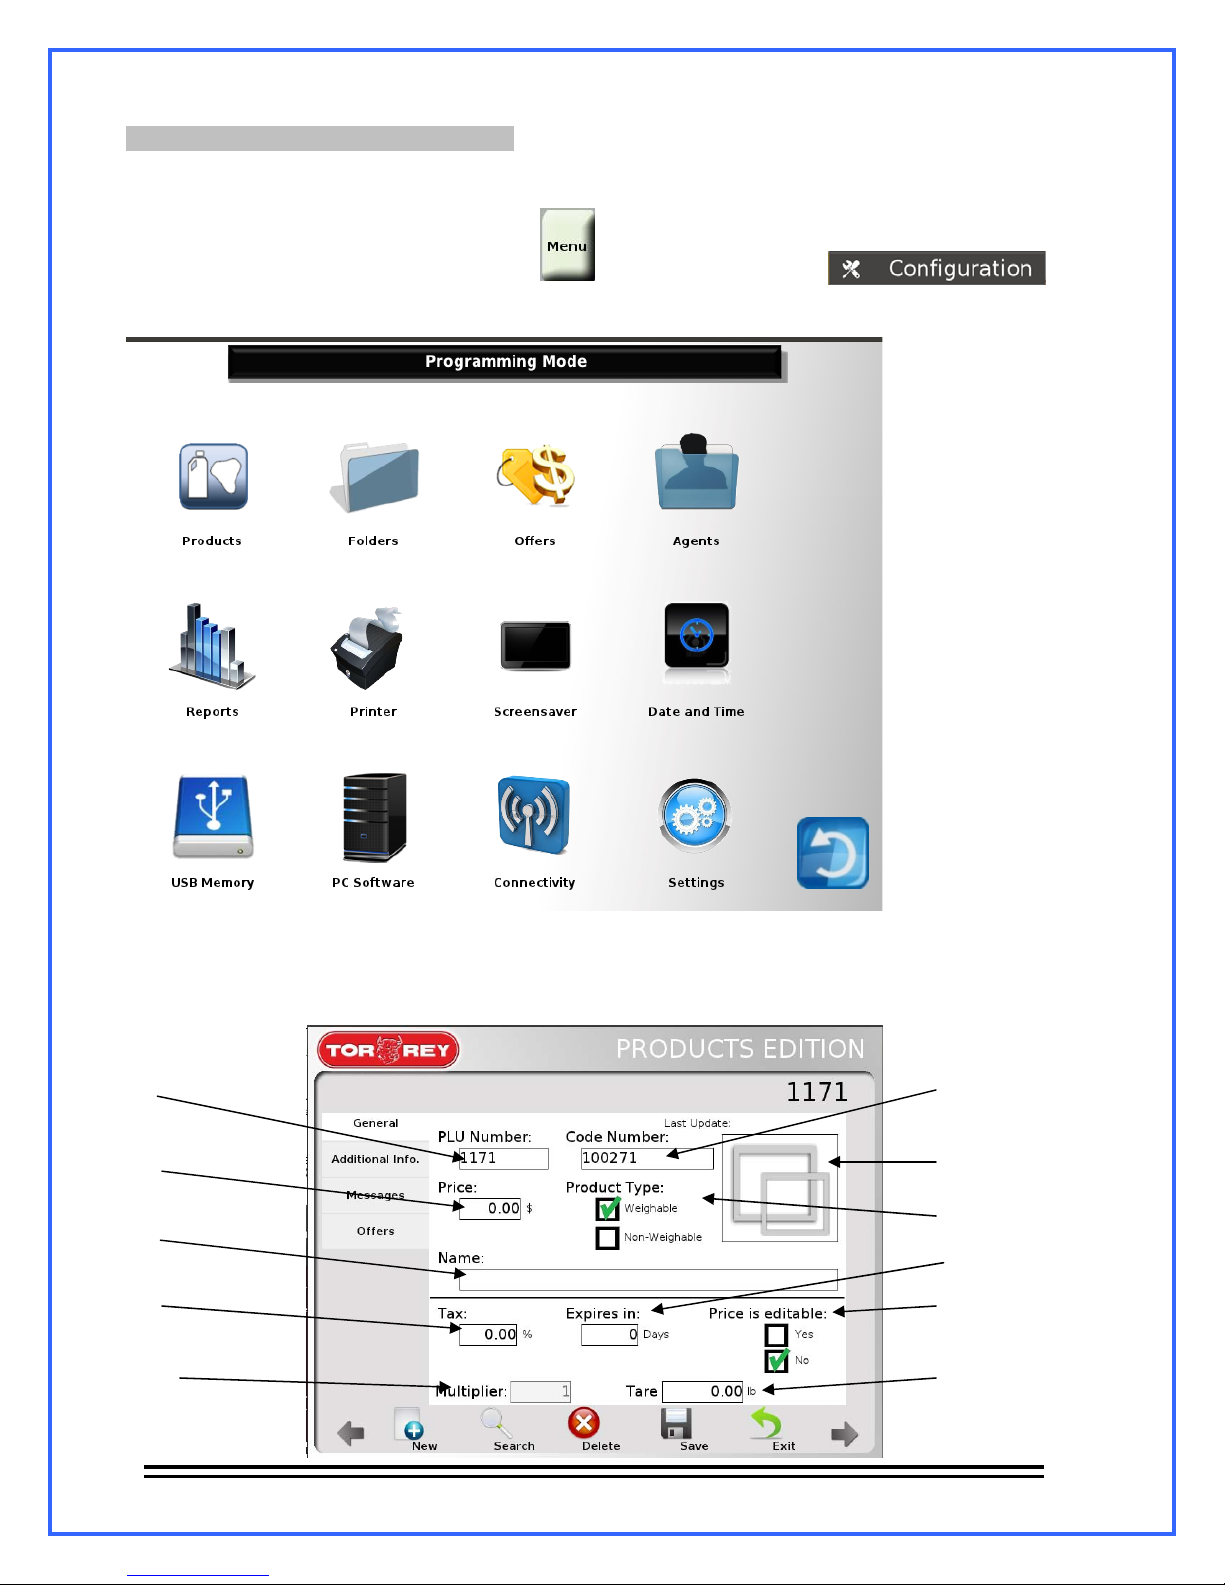
12.- Configuration (Programming mode).
In this option you will have access to the configuration and administration of the scale. To enter
this mode, follow the next steps:
In the main screen of the scale, press and select the option
1.-
The scale will deploy the configuration menu:
12.1.- Products.
This option gives access to the configuration of the products also create new products, this is the
interface:
1
4
5
8
11
2
3
6
7
9
10
- 27 -
Page 30
Elementos de la pestaña General:
1.-
PLU number: This number identifies the PLU. This value can be changed only if the new
value is not equal to a number already in existence.
2.-
Code: Represents the PLU inside the database. This value can be changed only if the new
value is not equal to a number already in existence.
3.- Image slot:
4.- Price: Shows and allows changing the unitary price of the selected PLU..
5.- Name: Show and allows changing the name of the selected PLU.
6.- Product type: Show and allows changing the PLUs type.
7.- Expiration: Allows entering expiration dates.
8.- Tax: Allows tax with a levy percentage to the selected product.
9.- Editable price: Allows activate or deactivate the modification of the price while in sale
Shows the actual PLU image and allows changing for a new image.
operation, If activated, when a price is modified will ask for the Admin.
password to accept the change, otherwise the change will be done without
any restriction.
10.- Tare: Allows the entry of a pre-programmed tare. The maxim tare that can be introduced is
9.995 kg for WLS20 model and 9.99 kg for WLS40.
11.- Multiplier: Only applies for non-weighable products. Enter the multiple in which the
products will be sold (by 1, by 2, etc.).
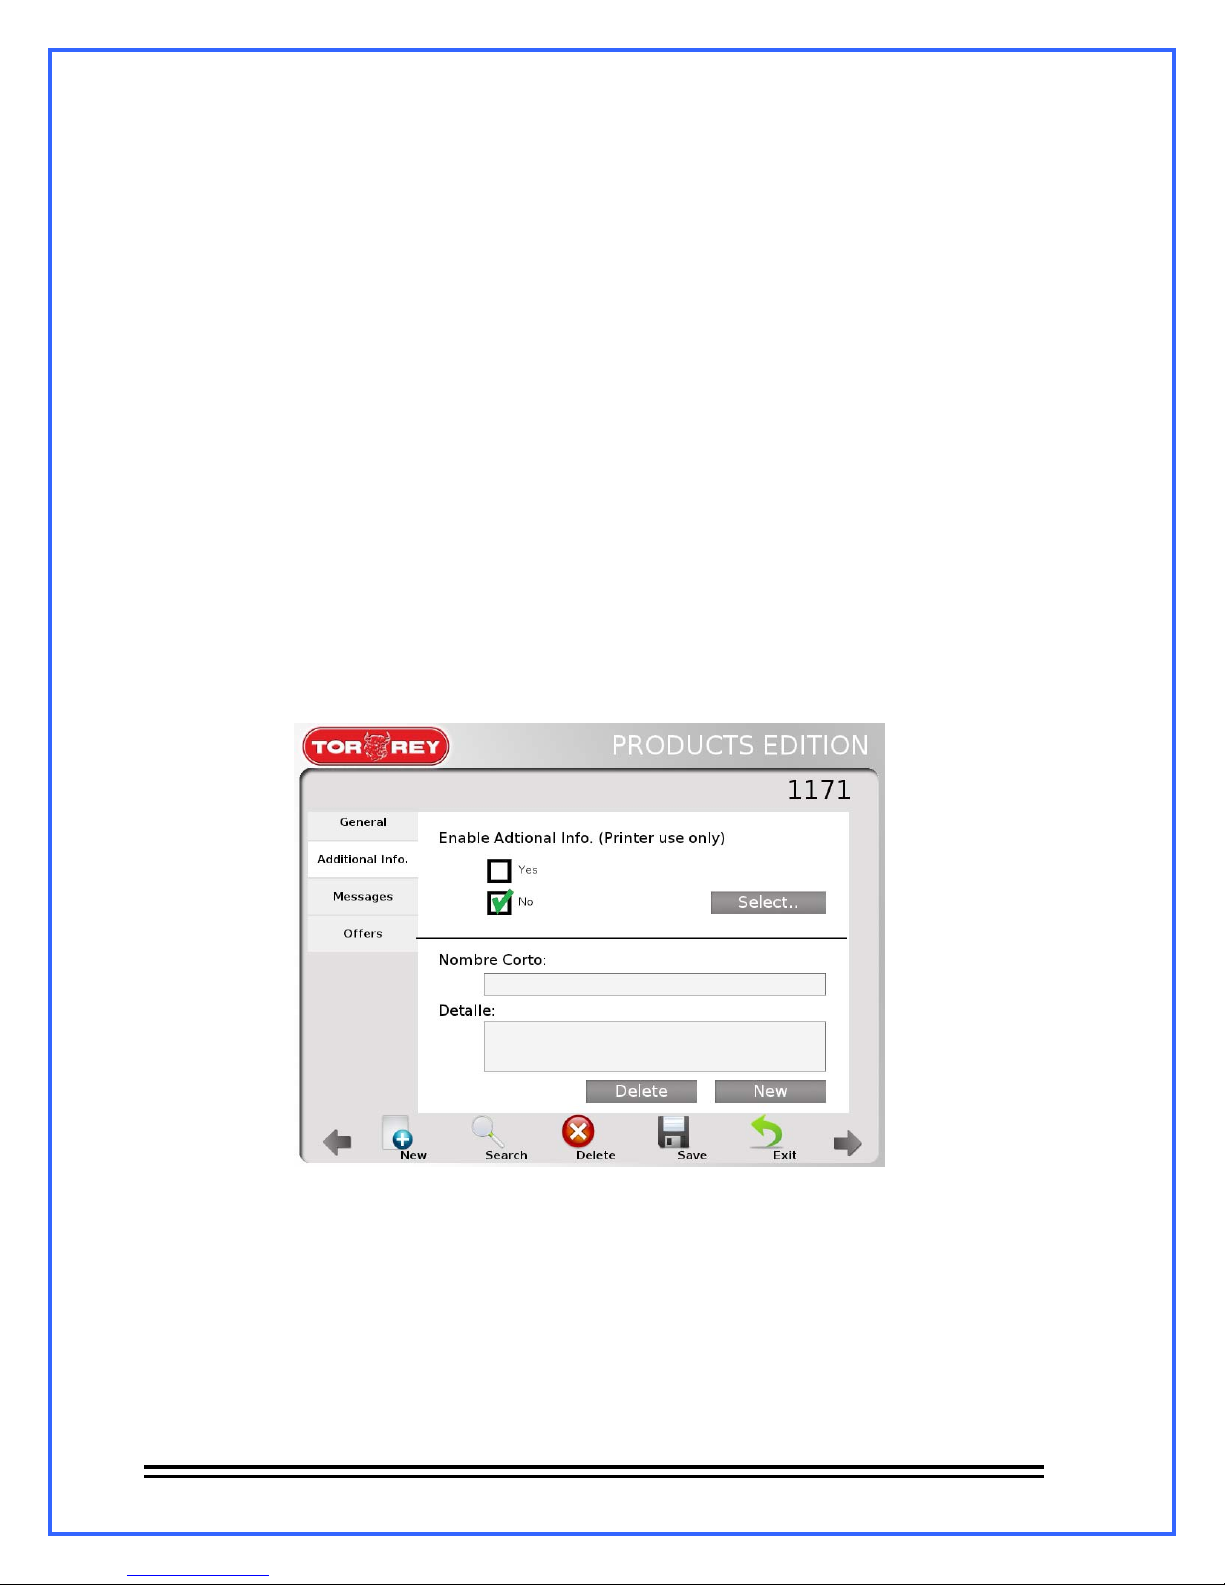
Additional info. tab:
Allows aggregating additional info to a selected product. To activate select a PLU and mark the
“Yes” box, after doing this a new window will show up (See next page):
NOTE: This option is only available in Pre-pack mode.
- 28 -
Page 31
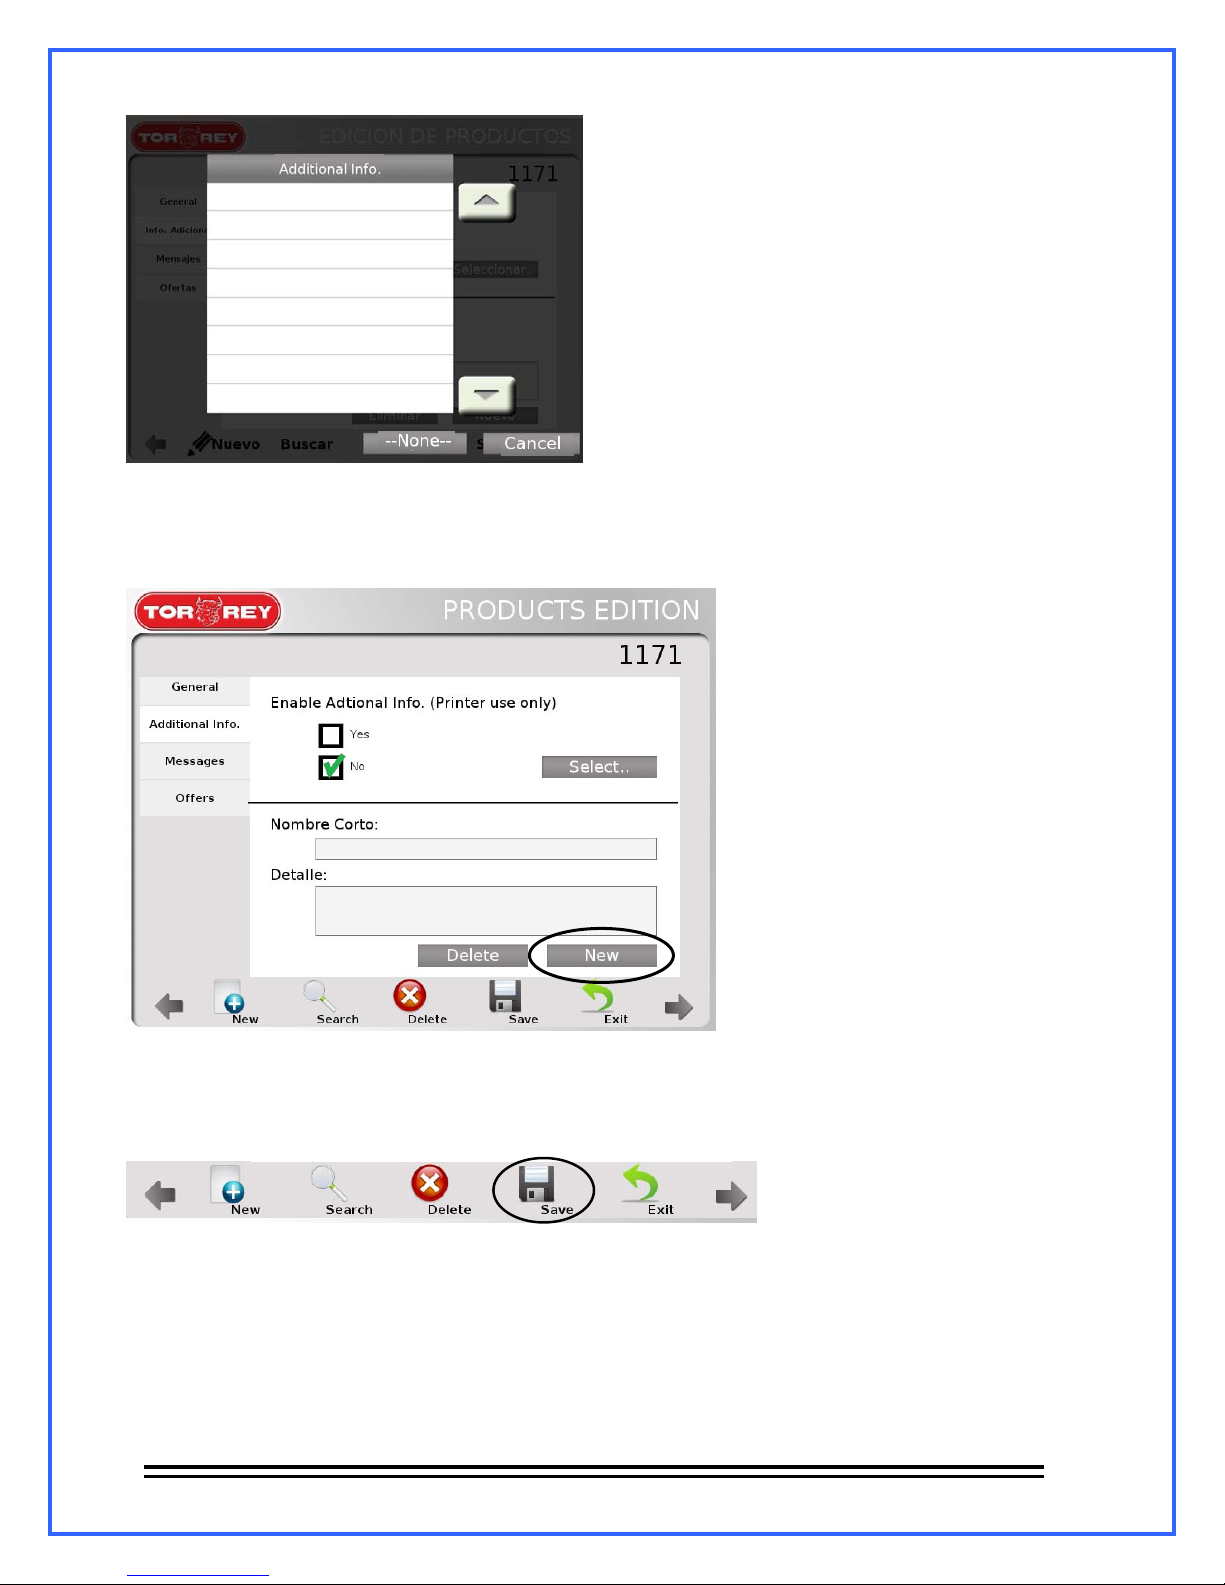
In this screen you will choose the additional info. to apply to the product. As you can see there
is no additional info. To add, so you will need to create it, to do this press the Cancel key and
return to the Additional info. window. Once there press New
Type the short name of the message. For example, enter this as short name: EXP QUALITY.
Press on Detail field and type “Exportation Quality”. For saving this information press the Save
key.
It will display a message that says “The PLU (Active PLU) was saved successfully”, pres OK.
Return to the Additional info. screen, select any PLU and activate the additional info. For
example we will apply the Additional Information to the “Coconut” PLU.
- 29 -
Page 32
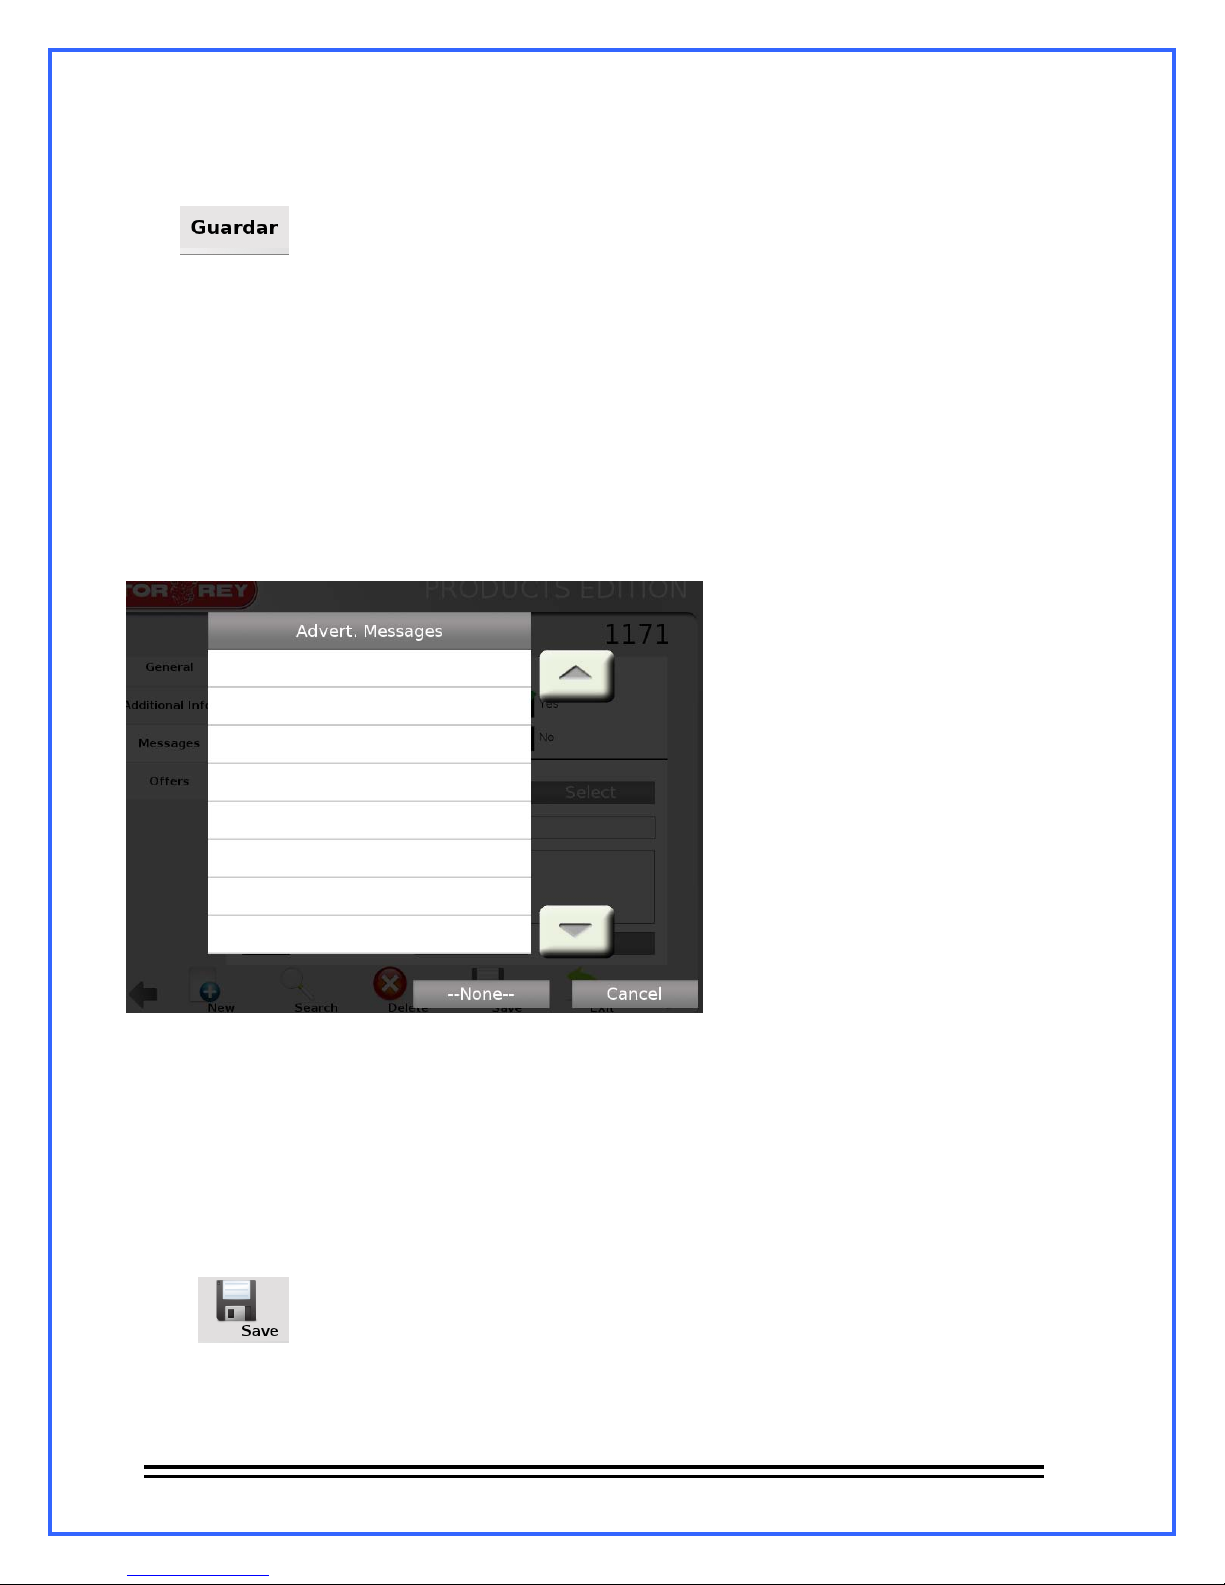
- Select the “Coconut” PLU and activate the “Yes” box in the Additional Info tab. In the
deployed menu select the information that you just created.
Press .
It will show the message “The PLU 1113 “Coconut” was saved successfully”
The additional info that you just added to the PLU “Coconut” can only be seen on the product
printed label.
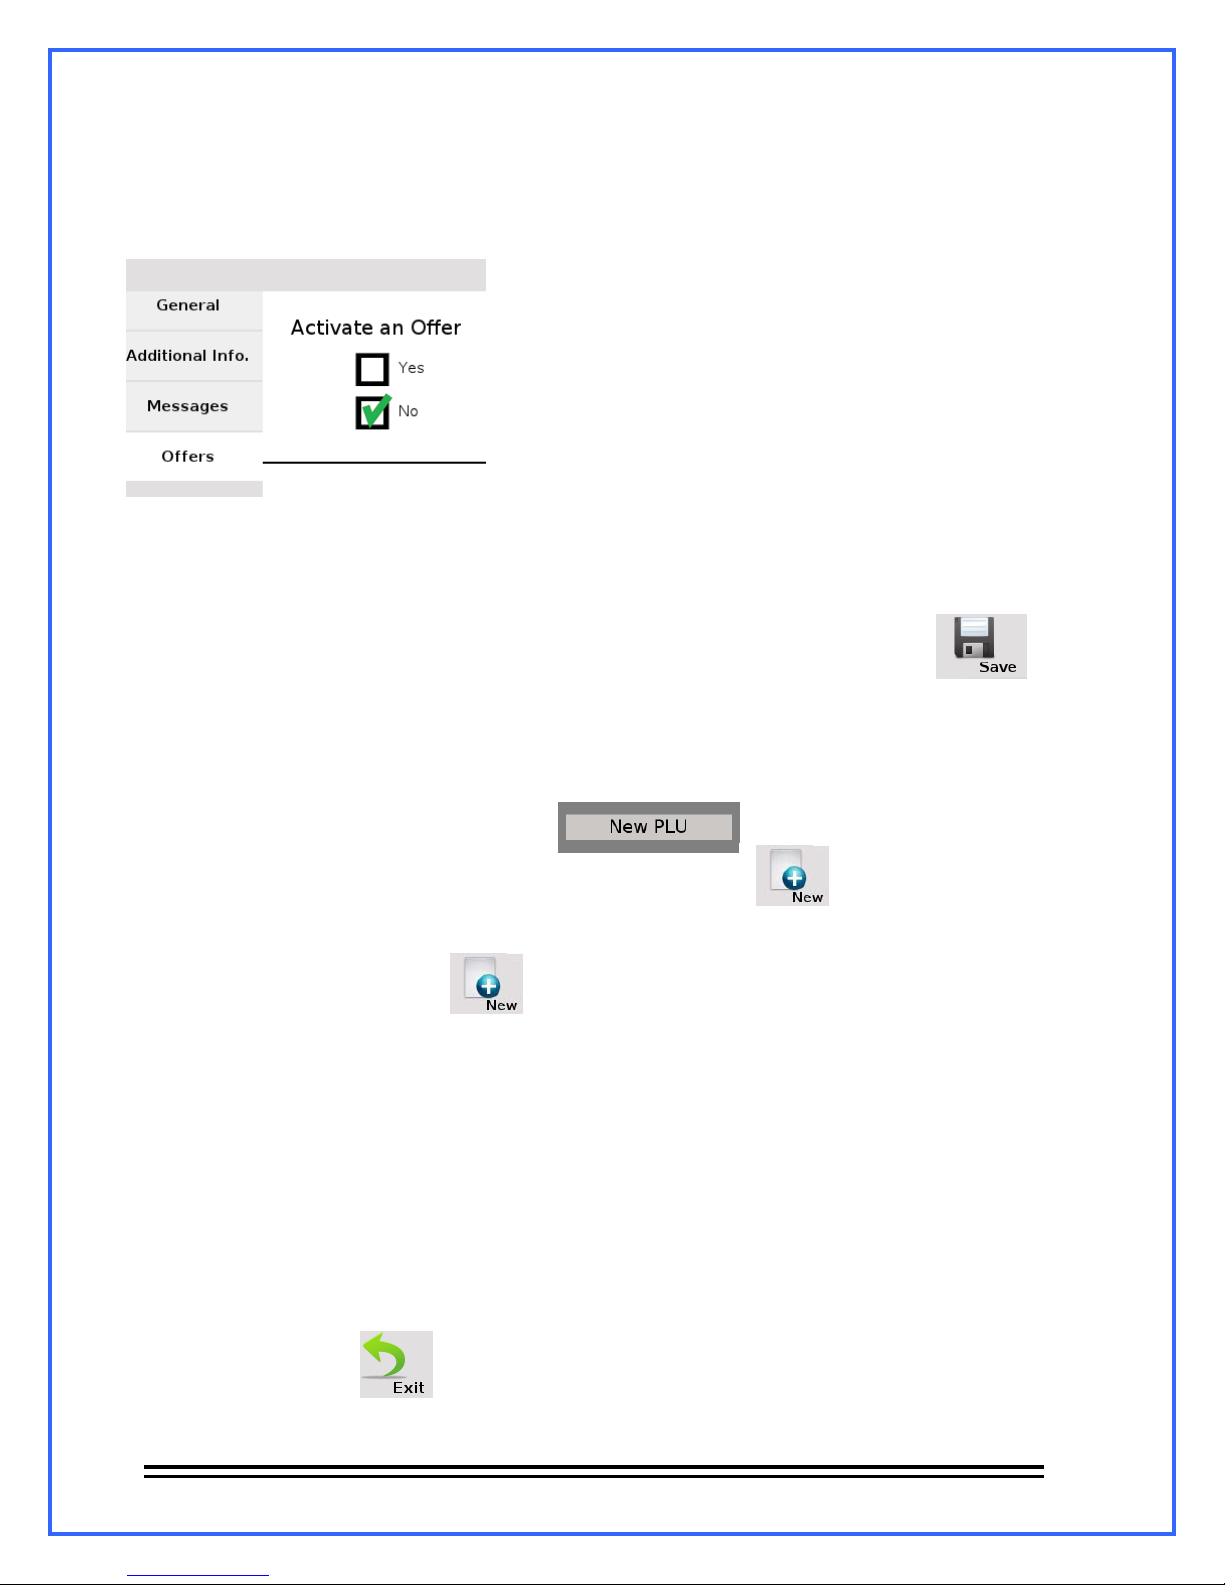
The tab “Messages” allows the message activation for messages directed to the operator of the
scale as can be offer reminders, promotions, interest facts about the product, etc. To activate
them is necessary to select the product in which will be added, open its Messages tab and
activate the “Yes” tab in “Enable messages for the product”.
The message selection window will deploy, in which can be selected the message you want to
add to the product.
As you can see currently there is no advertisement message, therefore be necessary to create
them. To get familiarized to the message creation, perform the next example:
Press the Cancel key to return to the message tab, once there search for “1049” PLU and press
New (In the Messages tab)
Enter the next short name: Turkey Ham.
Press the “Detail” field and type this: “Turkey Ham Offer”.
Press .
The message “The PLU 1049 “Sirloin” was saved successfully”. Press OK
Exit from the configuration mode and search for the “1049” PLU, note that , in the Product
Messages field, is shown the message you just added to this product.
- 30 -
Page 33
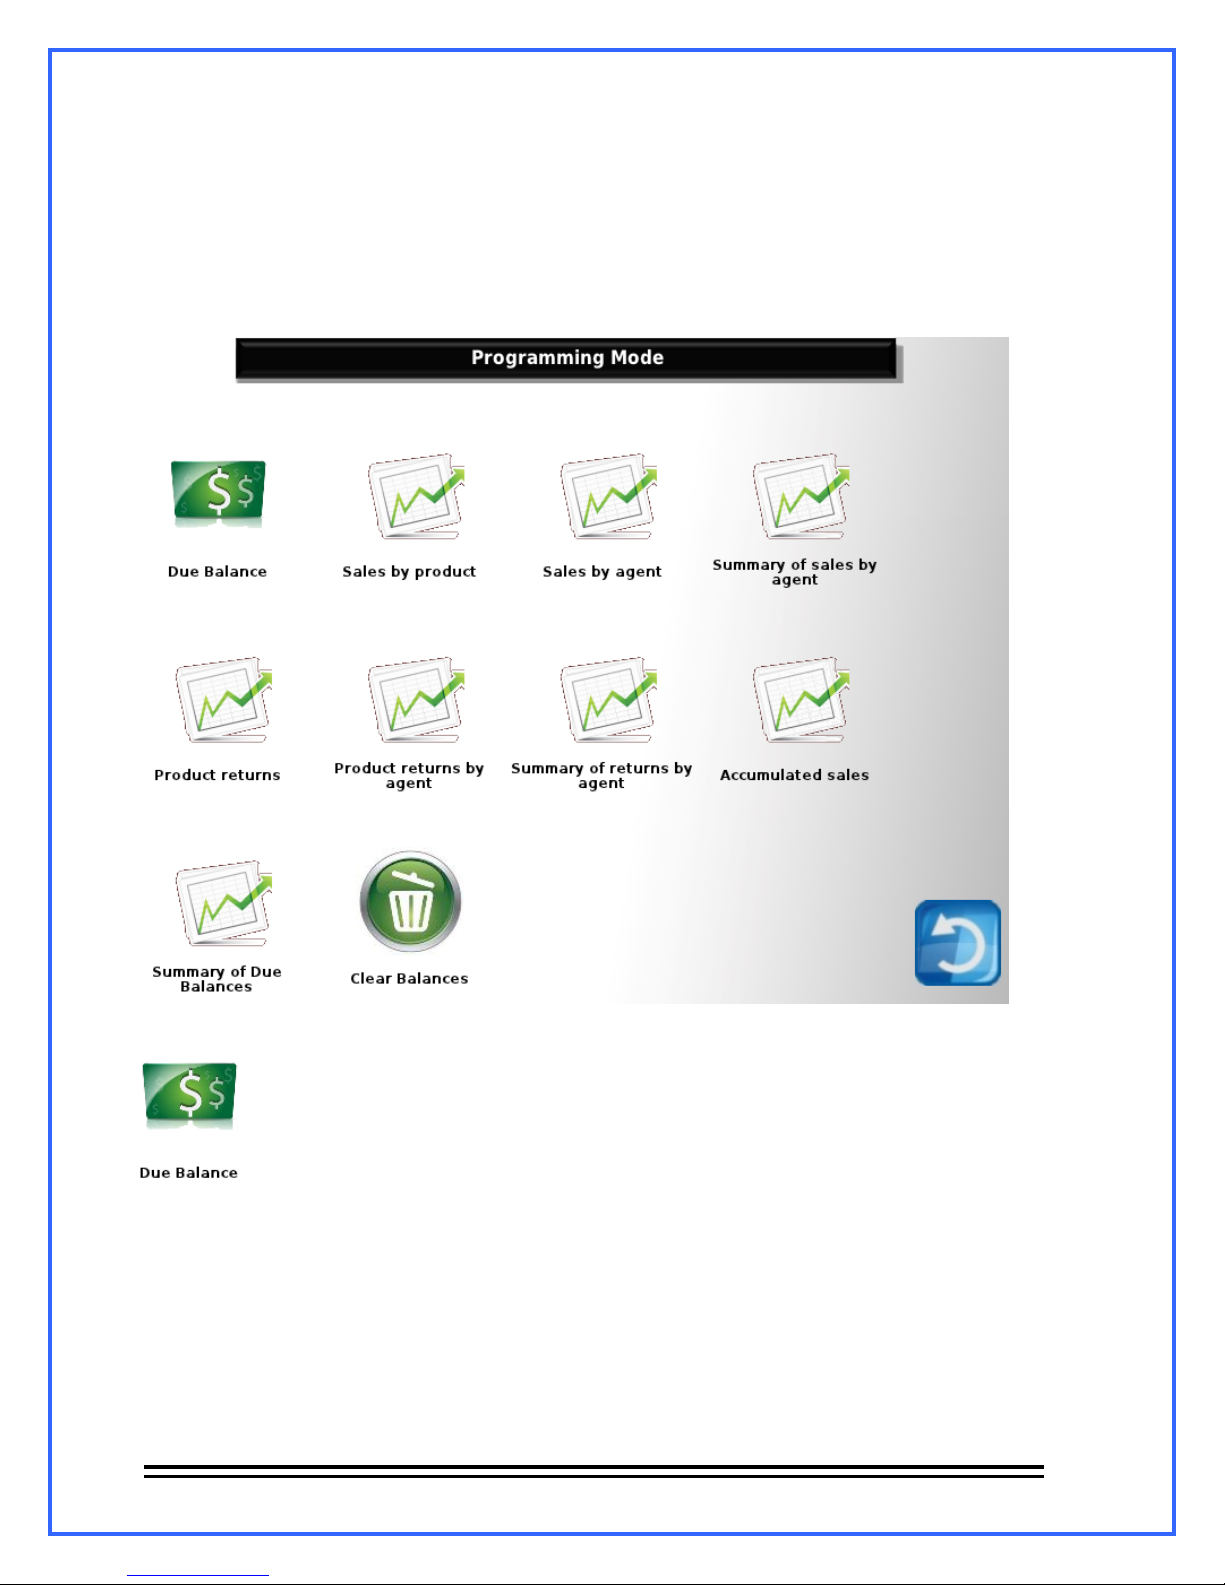
The Offer tab allows the offers application on products. To apply an offer this is what you need
to do:
- In “Activate an Offer” check the “Yes” box and the next window will deploy:
In this window the offers, saved in the system, are listed, as it can be seen, there is no offers
saved so it will be necessary to create them. To create one or more offers see section 12.2.-
Offers
For applying an offer just select it from the list and save the PLU changes pressing
.
PLU creation.
It can be accessed to the PLU creation window in two different ways:
1.- From the alphanumerical keyboard, pressing and typing the Admin. password.
2.- From the Products (Programming mode) menu, Pressing
For the better understanding of the product creation an exercise is proposed: the creation of a
product named “Guava”
1.- From the Products menu, Press
2.- In the General tab, The PLU number and Code fields doesn’t modify.
3.- Press Price field: Enter the next unitary price: $19.00
4.- In products type check Non-Weighable.
5.- Press Name field: and type: Guava.
6.- Put 16% of Tax.
7.- In the Expires in field: type 0.
8.- In Multiplier: type 1.
9.- In Price is editable: Check the “Yes” box.
10.- Press the Image slot and choose “Fruits.jpg”. Press OK.
11.- For last, press Save.
The message “The PLU (Actual PLU) “Guava” was saved successfully”. Press OK.
To end this process press
Note: if you want to add additional info, messages or Offers, follow the procedures previously seen
- 31 -
Page 34

12.2.- Offers.
This interface is used to create or edit offers. To create an offer, follow the next steps:
1.- Enter to the Offers option from the Programming mode menu:
2.- The offers window will deploy.
3.- To create a new offer press the button New.
4.- The OFFER EDITION window will appear.
Press the Name field and type the name that you
will give to the offer; enter the starting and ending dates of the offer and for last type the
discount percentage. To exemplify this, the next information is given:
- Name: Fruit week
- Starts at: October 7, 2013
- Ends at: October 11, 2013
- Discount percentage: 10%
5.-
When you finish press OK. The message “The offer ´FRUIT WEEK´ was saved
successfully” will deploy.
To edit an existing offer, select it and press Edit, change the desired values and press OK , the
message “The offer ´(selected offer)´ was updated successfully” will appear.
To delete an offer, select it and press Delete, a window will deploy saying if you want to delete
the offer, press OK. The deleted offer will be erased from the list.
12.3.- Agents.
This interface allows signing up new vendors, editing their names or deleting them. This is the
agents interface:
To sign up a new agent just press New, type the name and press INTRO, a Unique code
window will appear (every agent have a different unique code). The scale will deploy the
following message: “the agent was created successfully”.
To edit an agent, select it from the list and press Edit, type the new name and press INTRO, the
message “The agent was edited successfully”, press OK.
- 32 -
Page 35
For deleting an agent, select it from the list and press Delete, the message “Do you want to
remove the agent (Agent selected)?”, press OK, the agent will be erased from the agents list.
12.4. Reports.
This interface gives access to the sales reports and devolutions also to the “due balance”
function. The Reports interface is the following:
Due Balance: This function works for restart the records of the sales indicators. This function
storages 2 sales periods: The previous (Goes from the last Due balance to the actual Due
balance) and the Actual (Is the one in course). To perform a due balance, press the
correspondent icon and press OK in the deployed window (Do you want to execute a Due
Balance?)
For all reports, in case there is more than 1 Due Balance (sales period), the window “Select due
balance” will appear with the options: Previous and current, in this window, select the period of
sales you need the report of.
- 33 -
Page 36
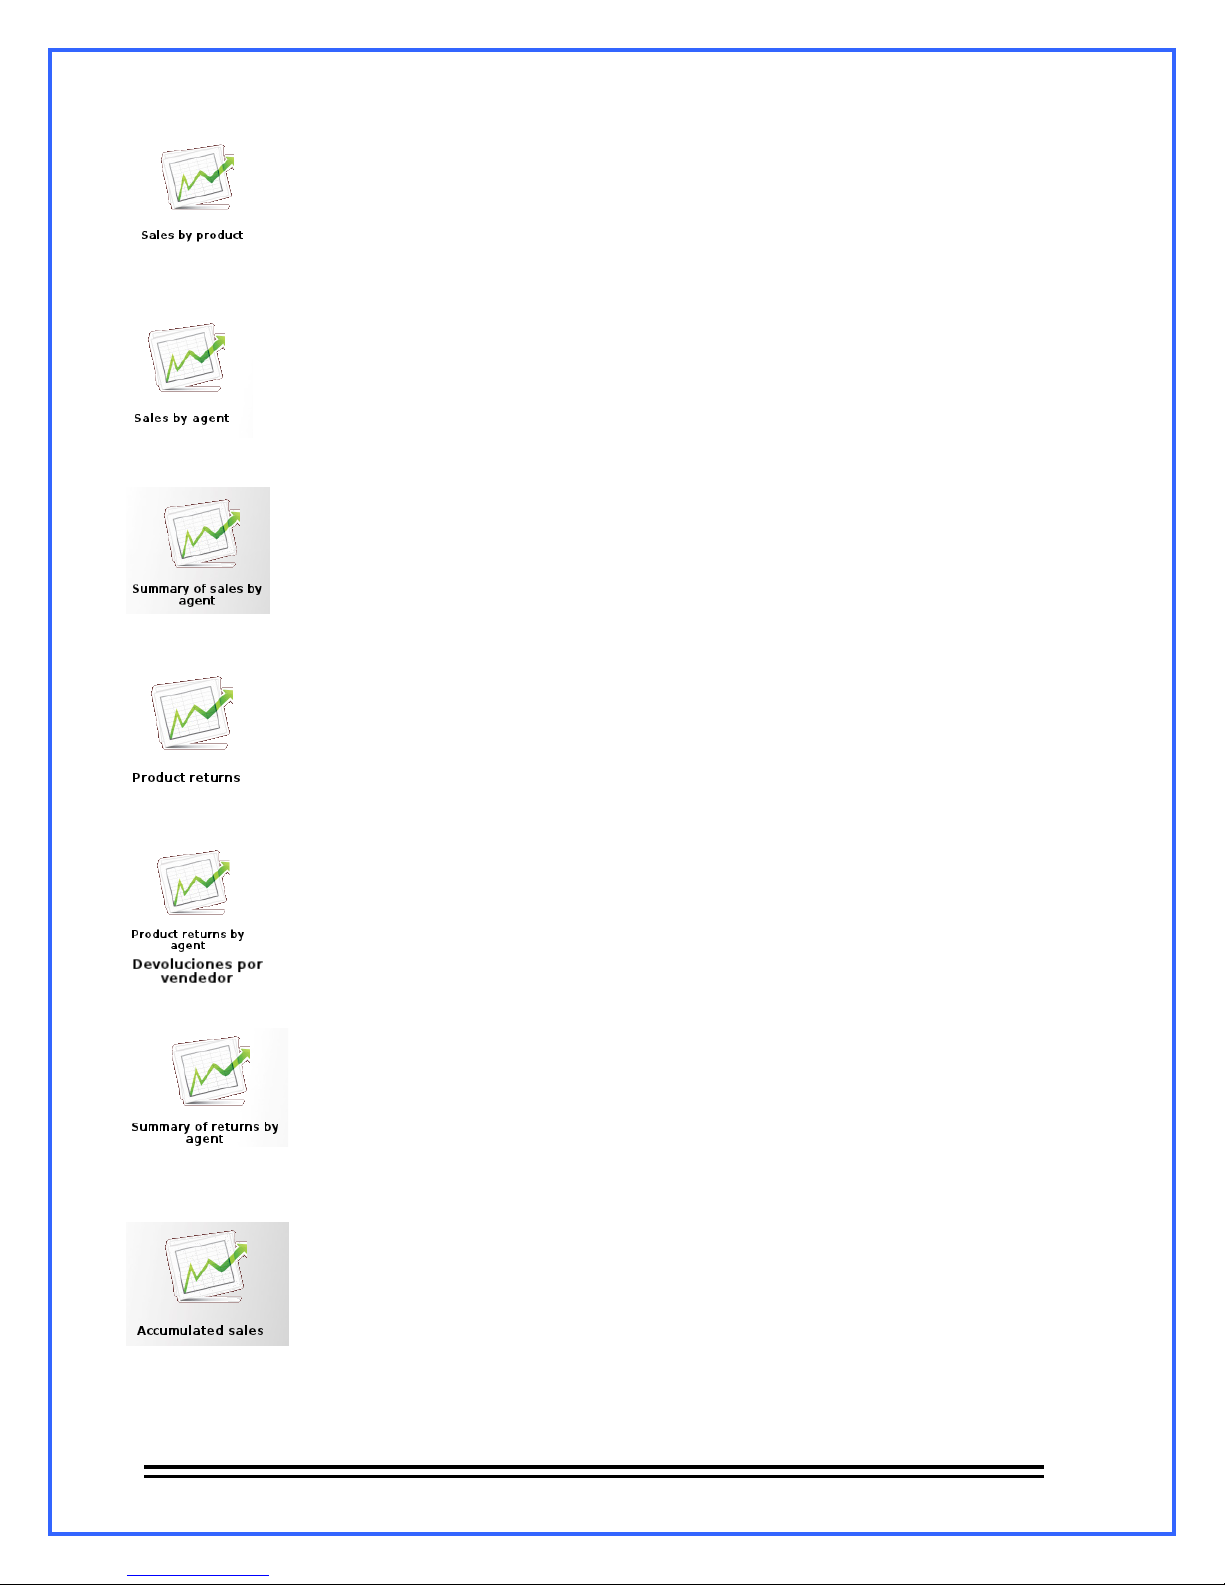
Sales by product: Make a list of registered sales by product.
Sales by agent: Make a list of registered sales by agent.
Summary of sales by agent: Summarizes the sales made by each one of the agents.
Product returns: Summarizes the registered product returns.
Product returns by agent: Summarizes the registered product returns by agent..
Summary of product returns by agent: presents a summary of the registered product returns made by
agents.
Accumulated Sales: Presents the total due made in each due balance and the accumulated of both.
- 34 -
Page 37
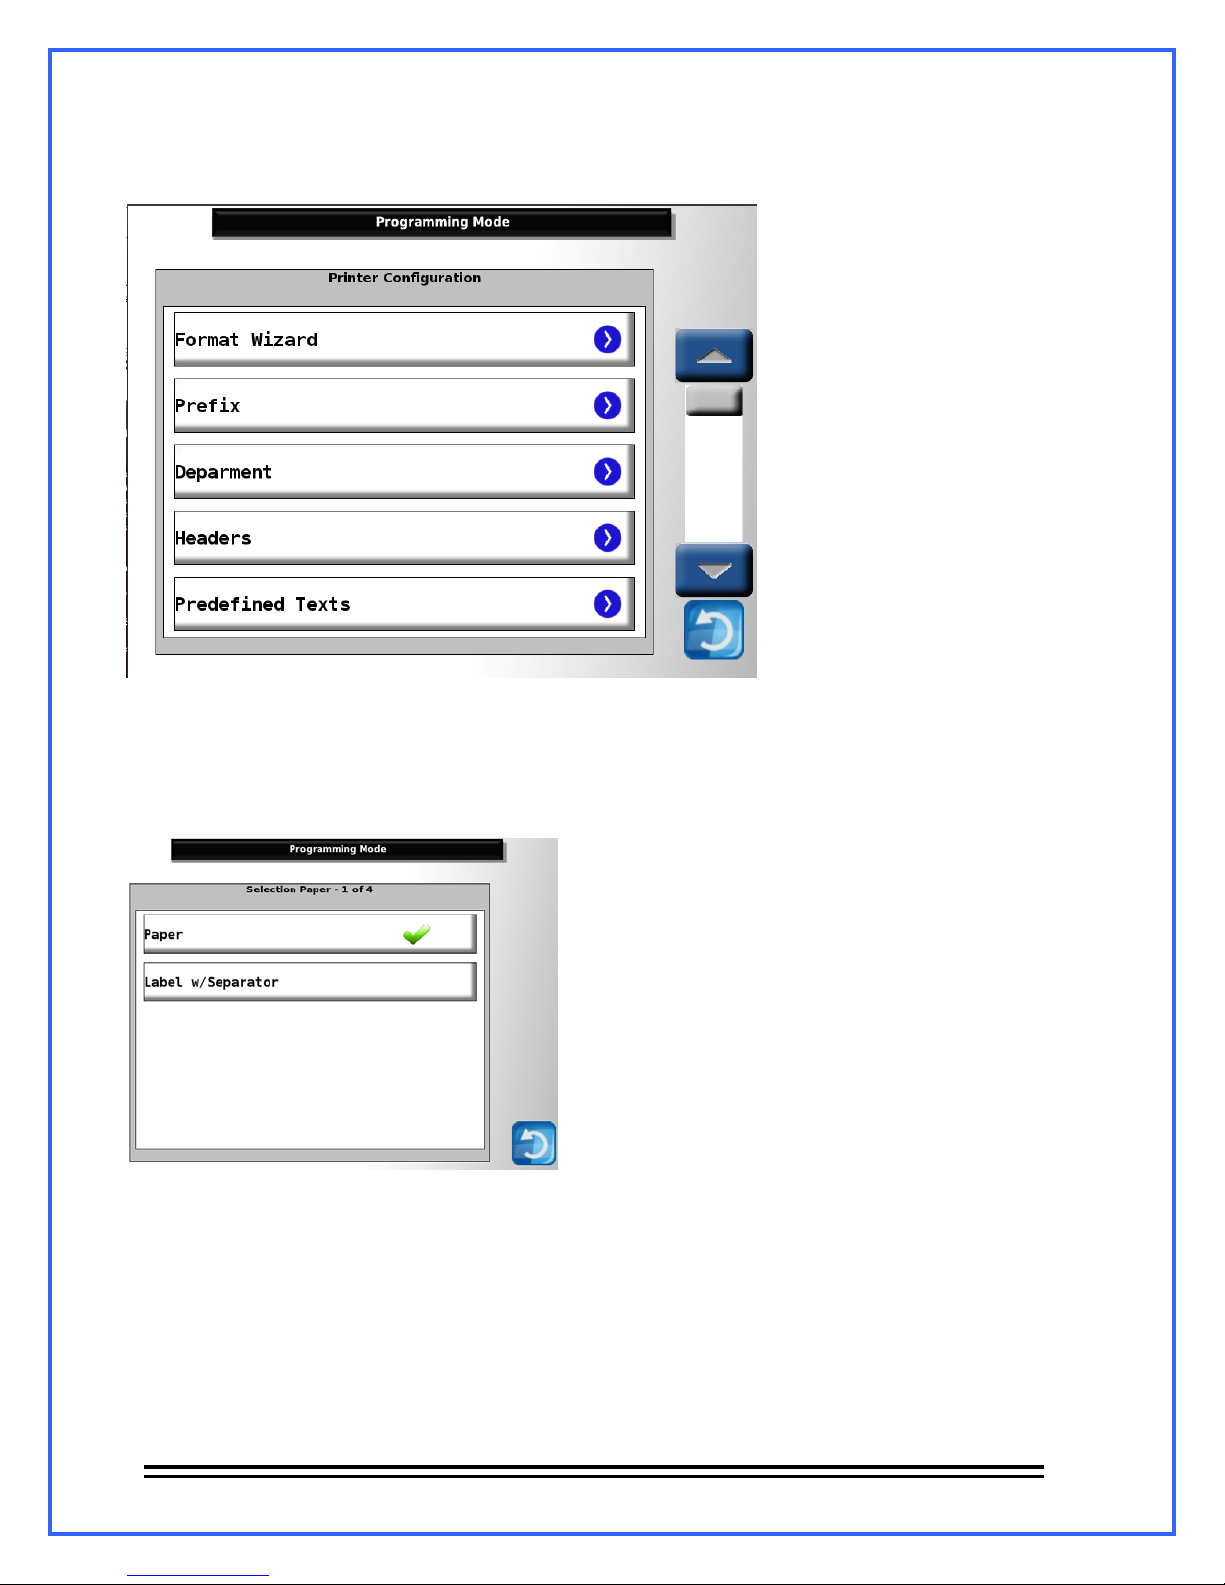
12.5.- Printer.
This section shows the printer configuration options. This is the main interface:
12.5.1.- Format wizard: This assistant configures, in 4 steps, the format that will have the
continuous paper (ticket) and/or the label. The next page shows the steps to modify the format.
12.5.1.1.-
Select the Format Wizard, once doing that the next window will appear:
In this window, select the format which is going to be modified or configured, for this example
we will choose Paper.
.
- 35 -
Page 38
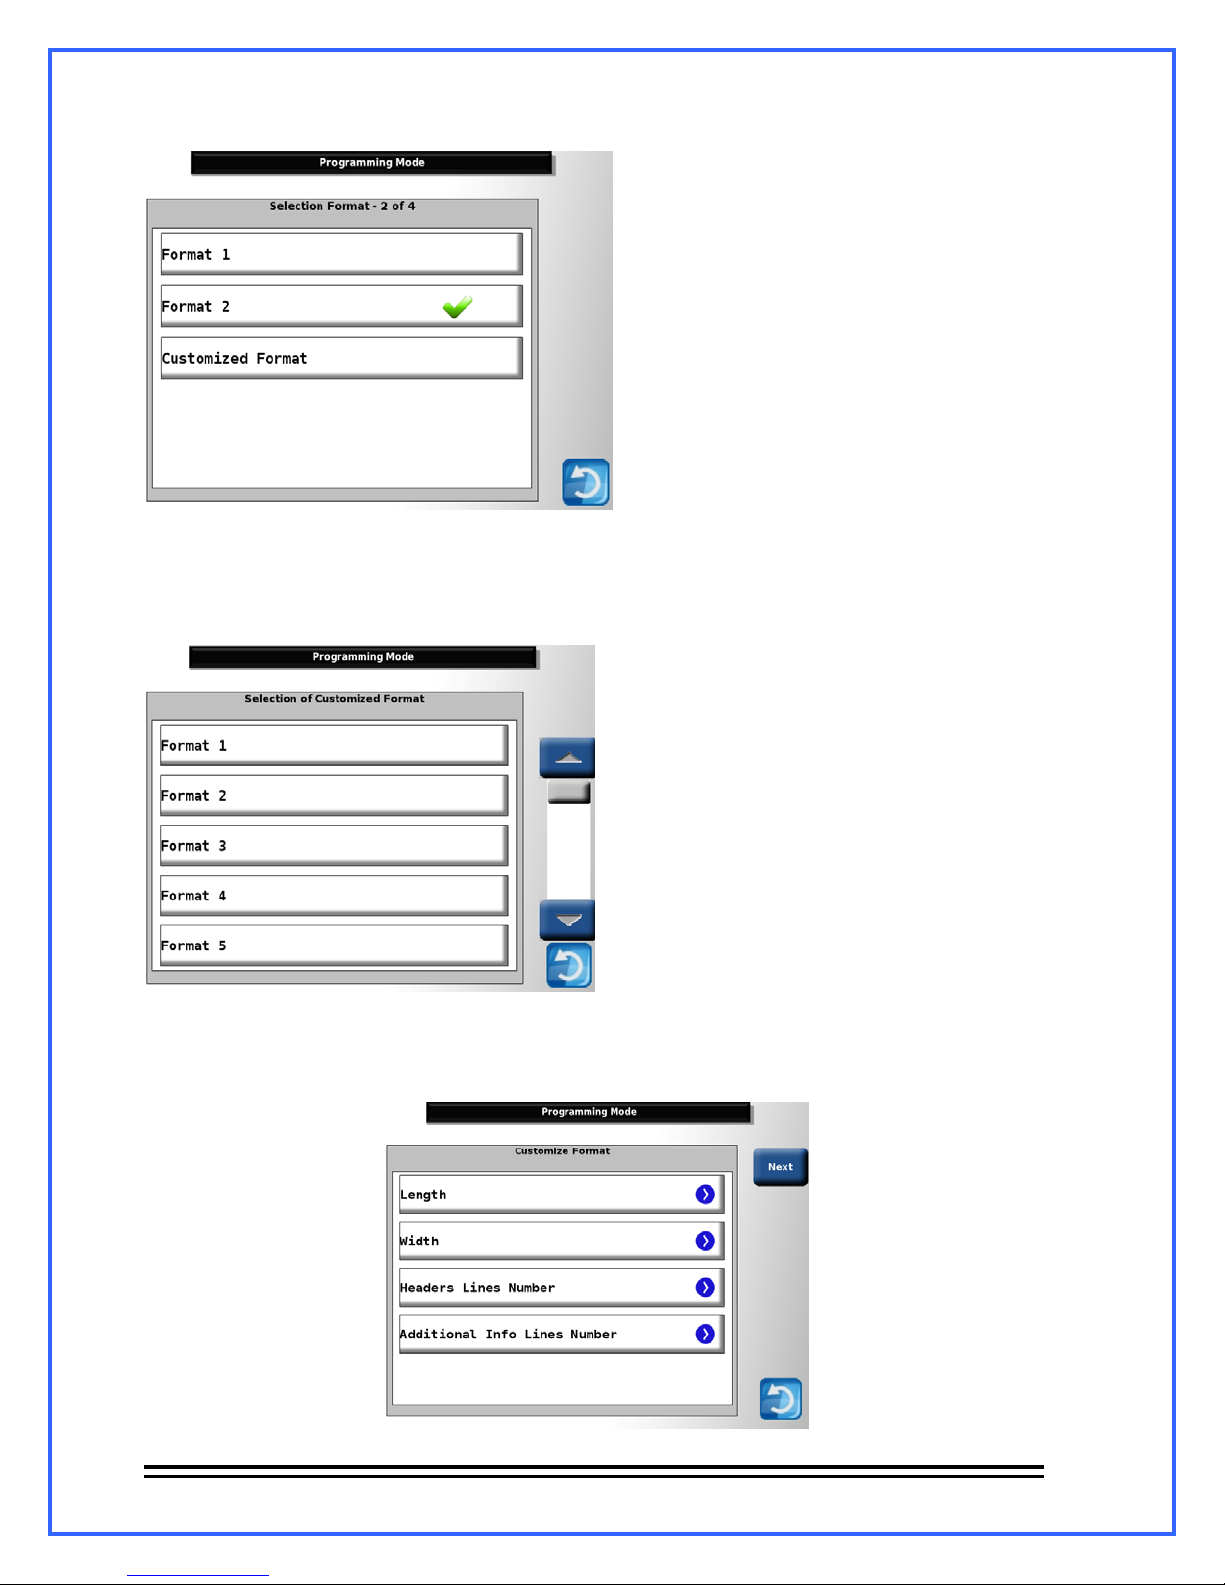
12.5.1.2.- The next screen will show::
In this window gives you the option to choose between 2 predefined formats or one customized
format. In order to explain in detail the formats, we will choose Customized Format. The next
window will appear:
Note: If you choose one of the predefined formats skip to the step 12.5.1.3. This window
contains a list of 10 formats that can be customized, for our example we chose Format 1.
The next window will appear:
- 36 -
Page 39
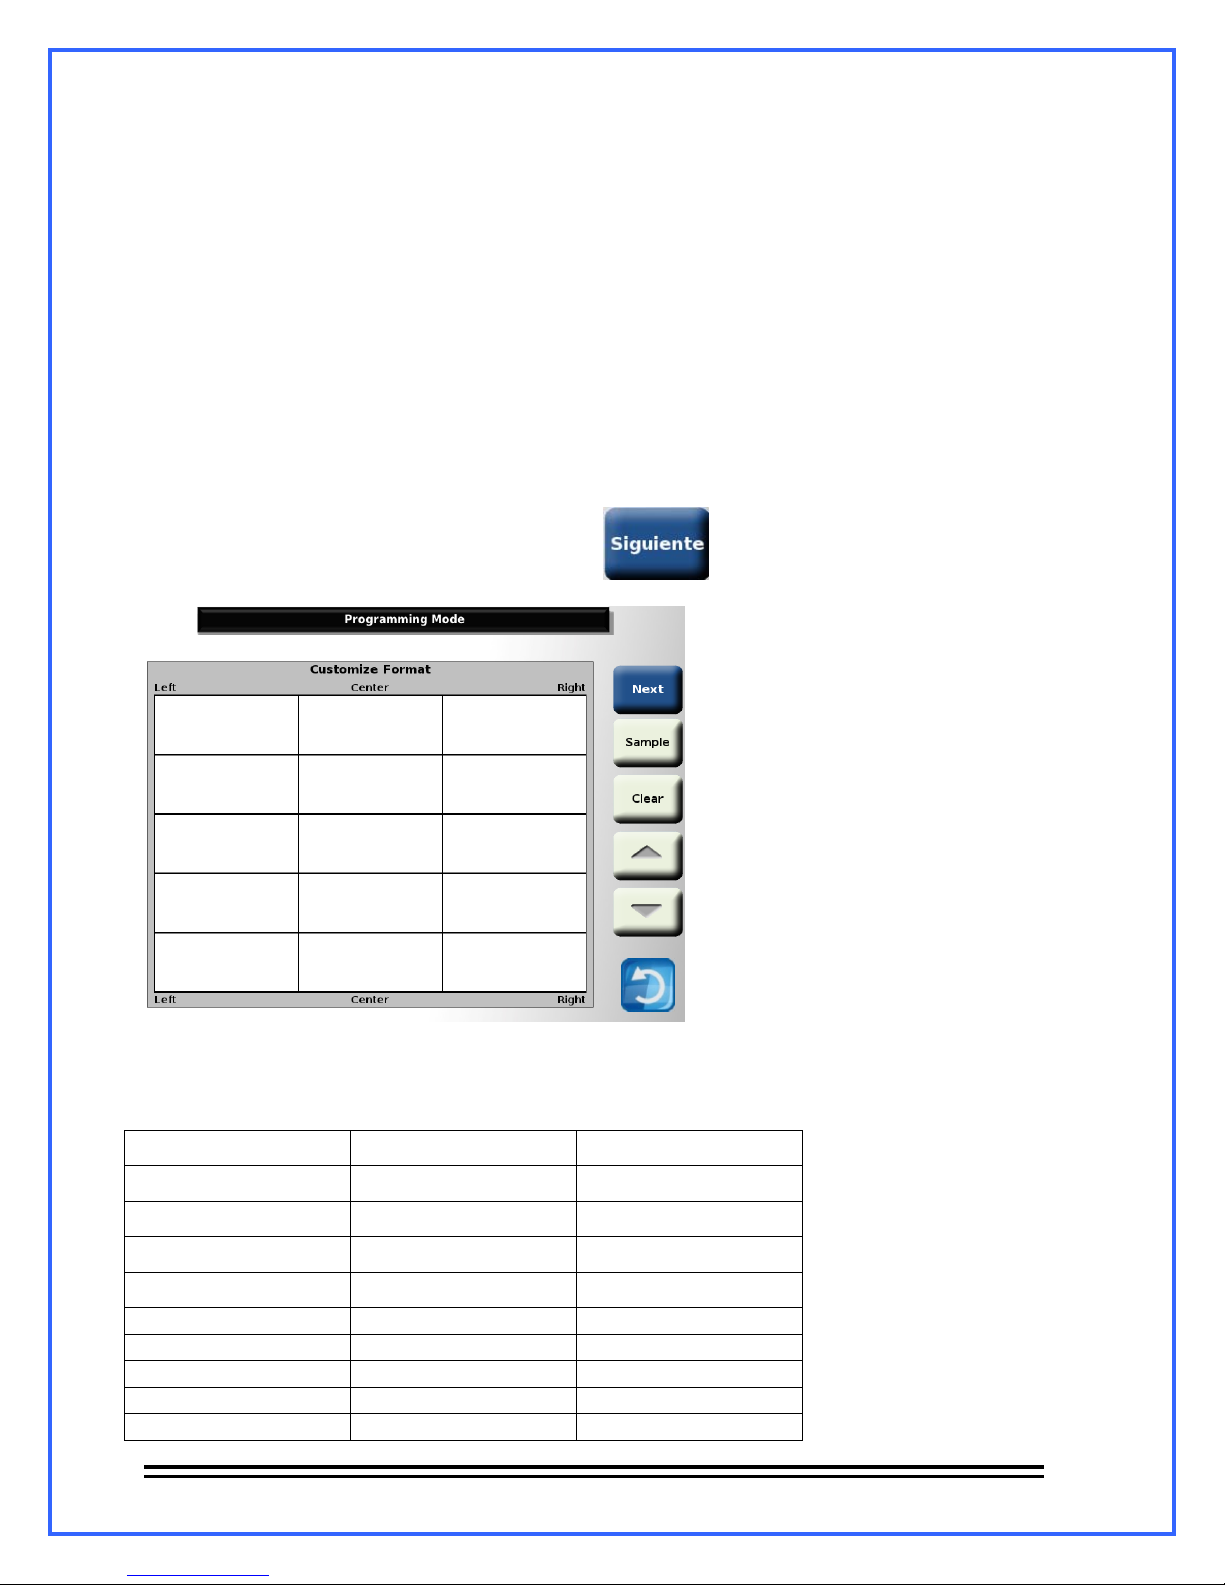
Length: Allows defining, in millimeters, the length of the label. For example the length of the
labels that comes with the scale; 40.
Width:
Allows defining, in millimeters, the width of the label. For example the width of the
labels that comes with the scale; 54.
Separation: Allows defining, in millimeters, the separation between one label and another.
For
example, the separation between the labels that come with the scale; 3.
Headers lines number:
Allows to define the quantity of header that the label will show, for the
example we will use 2.
Additional info. lines number: Allows defining the quantity of additional information lines that
the label will show. For this example we will use 2
Once we are done with the configuration, we press
This window will deploy:
The grid represents the distribution that the label will have. Pressing any of the cells will deploy
a list that contains all the information that can be chosen to appear in the selected position
reflected on the label. For this example the next distribution was used:
Headers
PLU name
Date text
Date Time
Weight text Price text Total text
Weight Price Total
- 37 -
Page 40
Barcode
Additional message
To continue press . This window will appear:
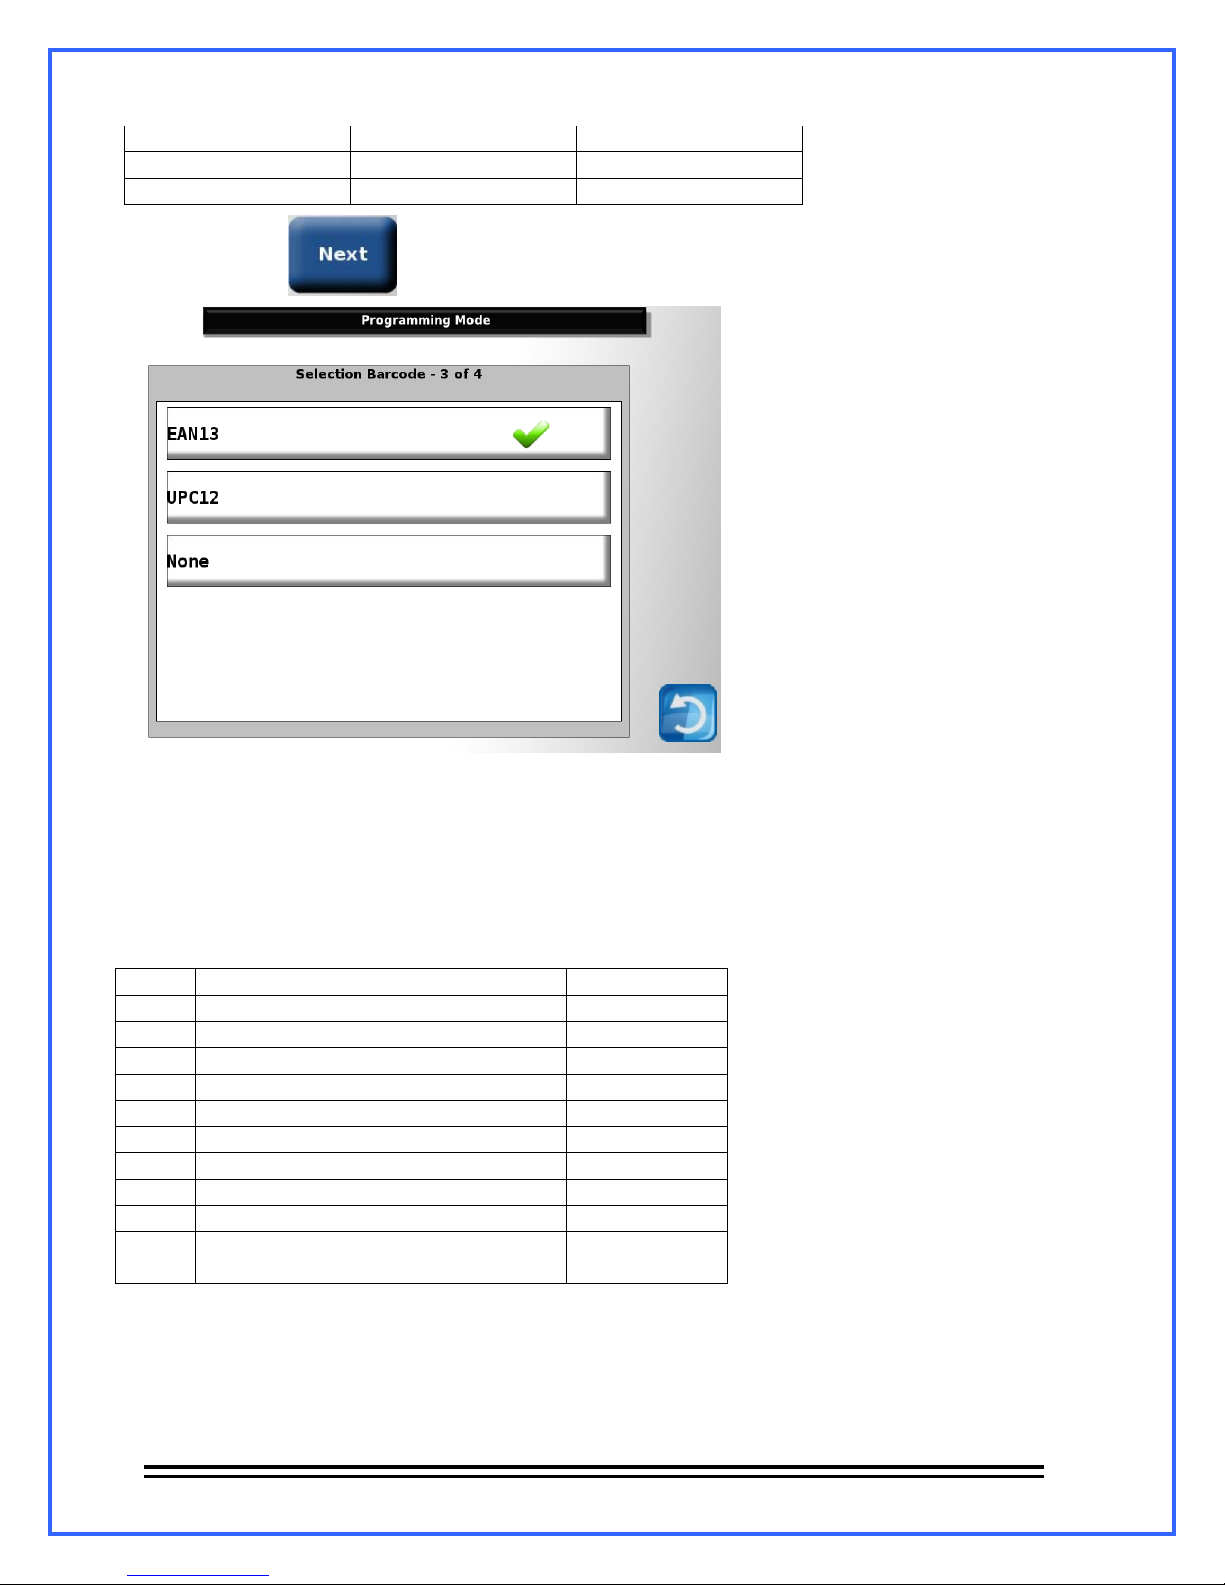
In this window the barcode, that is going to be on the label, is chosen.
12.5.1.3.-
Choose the Barcode that is going to be printed on the label. For this example we chose
EAN13.
12.5.1.4.-
In the following window, the barcode format will be chosen. The barcode is made
according to the chosen format:
Letter Meaning Recommended
A AGENT 2
F CONSECUTIVE 6
C PRODUCT CODE 6
W PRODUCTS WEIGHT 5
T TOTAL 6
D DEPARTAMENT 2
N PRODUCT NUMBER 2
P PREFIX 2
X NON READED DIGIT -
CHECKER (NON EDITABLE –
V
AUTOMATIC)
- Code-Weight format:
EAN13: P C C C C C C W W W W W V
UPC12: X C C C C C C W W W W W V
-
- 38 -
Page 41
- Code-Total format:
EAN13: P C C C C C C T T T T T V
UPC12: X C C C C C C T T T T T V
To customize the format of the barcode, press Customized and introduce, according to the
chosen barcode in the previous step, the letter sequence (data) that will contain the barcode. For
our example, as we chose EAN13 in the previous step, we must enter a 12 letter sequence,
which will be: PDCCCCCCTTTT.
The EAN13 format only allows 12 characters, while the UPC12 only 10 characters
Note:
By entering this sequence, the main interface of the printer configuration will be loaded.
12.5.2.- Prefix: Allows visualizing and modifying the Prefix that is printed at the beginning of de
barcodes. For our example, we use the number 3.
12.5.3.- Department:
Allows visualizing and modifying the number of the Department assigned
to the scale. For our example we use the number 2.
12.5.4.- Headers:
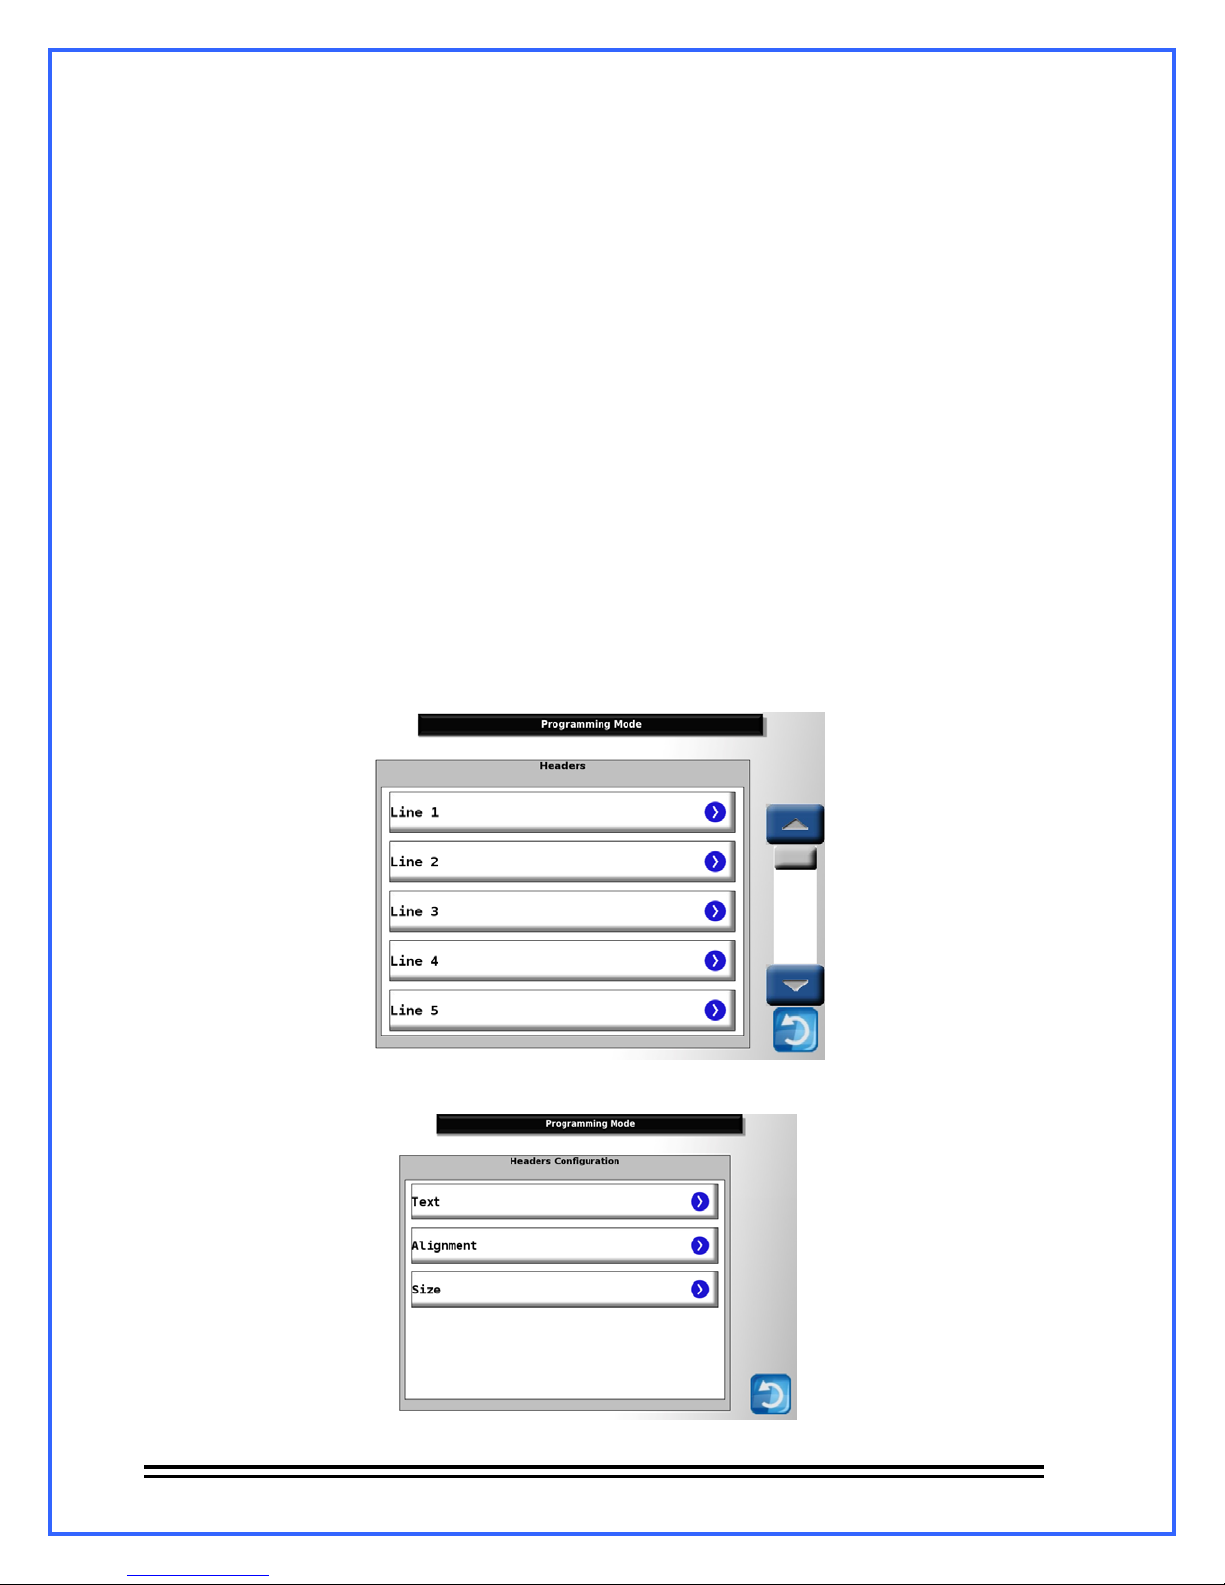
Allows visualizing and modifying the headers. By selecting this option the
next window will deploy.
In this window you can edit the headers. By selecting any of them, the header configuration
window, will deploy:
- 39 -
Page 42
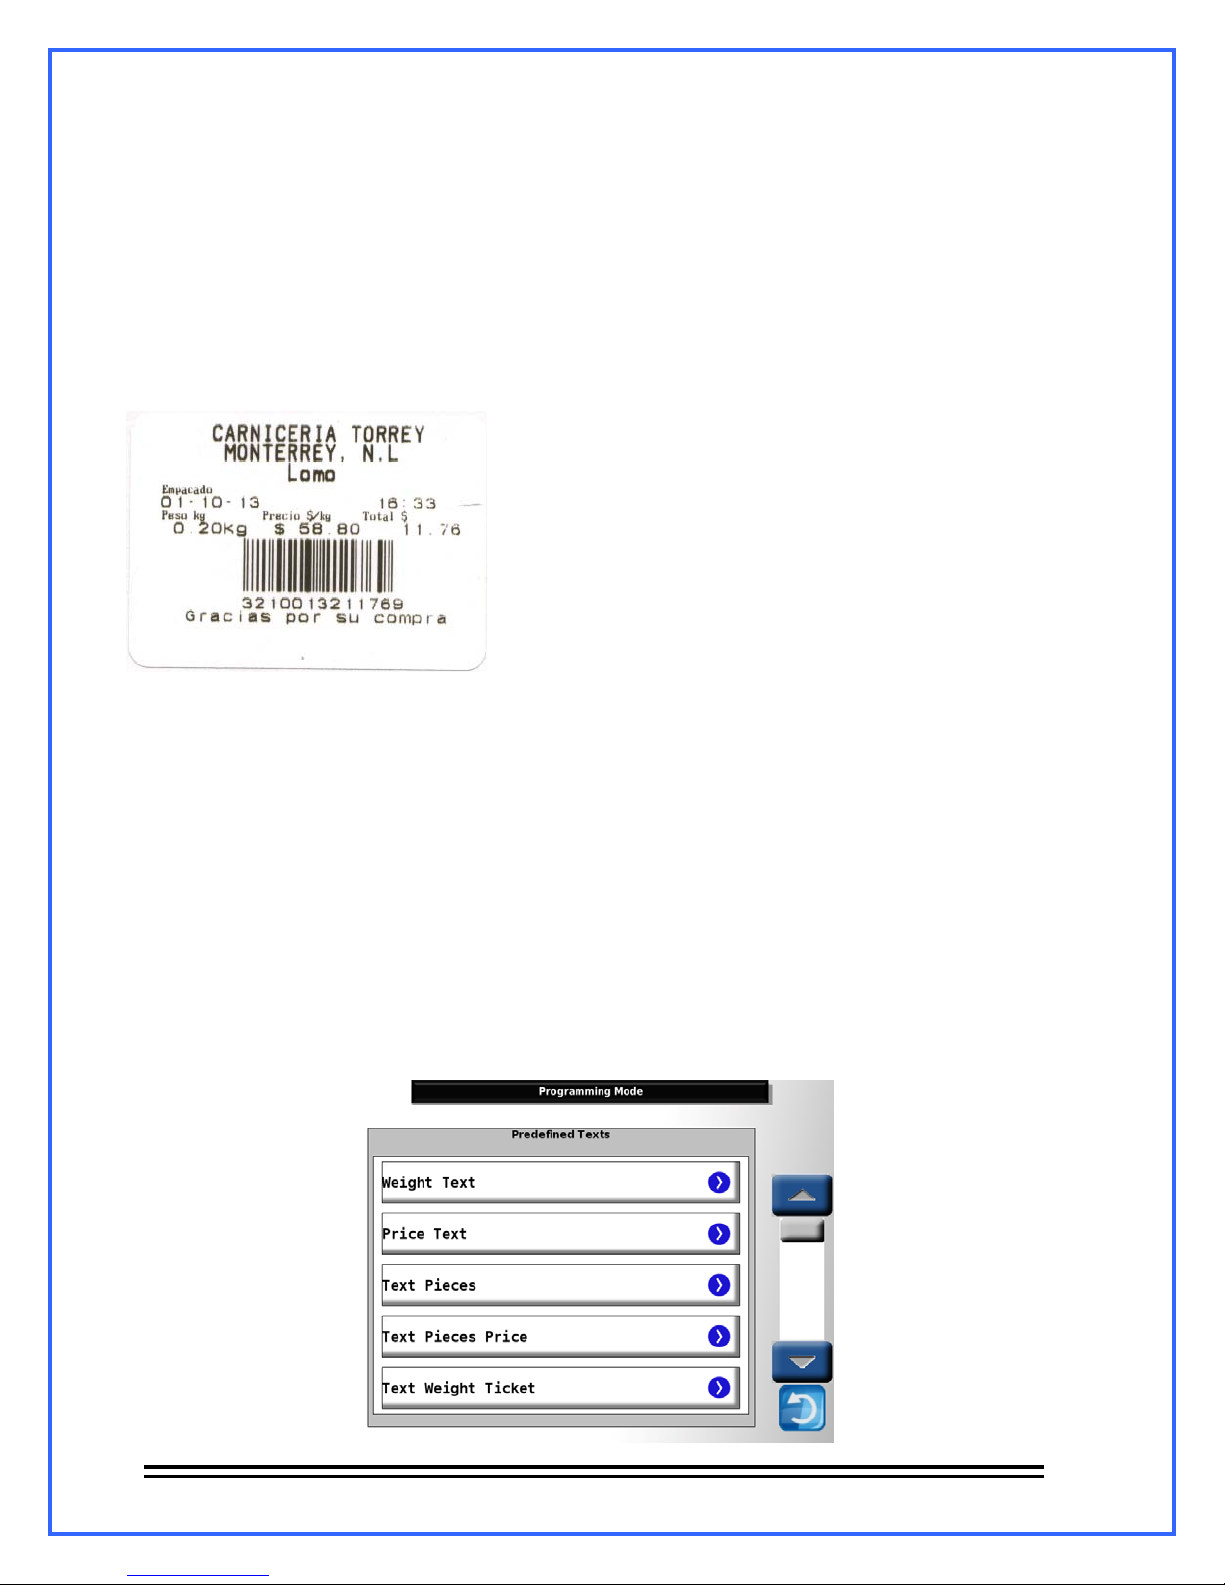
Text: Allows modifying the text in the selected header. For our example we selected line 1 and
typed: “CARNICERIA TORREY”.
Alignment: Allows modifying the position that the selected header will be printed. For our
example, we chose Center.
Size: Allows selecting the font size of the text. For our example we chose: Font 3 – 16x24
To continue with the example, we modified the Line 2 to make the text be “MONTERREY,
N.L”, also the position was changed to Center and the font size to Font 3-16x24
The following is the finished label, with the custom format, that we made for our example:
12.5.5.- Predefined texts:
Allows the modification of the texts that are printed on the Thermal
labels and continuous paper (ticket). This is its interface:
- 40 -
Page 43

12.5.5.1.- Weight text: Is the text that is printed above the weight indicator. By default is set as
“Weight kg”.
12.5.5.2.- Price text: Is the text that is printed above the price indicator. By default is set as
“Price $/kg”.
12.5.5.3.- Text pieces: Is the text that is printed above the quantity indicator. By default is set as
“Quantity”.
12.5.5.4.- text pieces price: Is the text that is printed above the pieces price indicator. By
default is set as “Price $/Pcs”.
12.5.5.5.- Text weight ticket: Is the text that is printed above the weight/quantity when a tickt is
printed (Point of sale). By default is set as “Net weight/Qty”.
12.5.5.6.- Text price ticket: Is the text that is printed above the unitary price column when a
ticket is printed. By default is set as “$/kg $/pcs”.
12.5.5.7.- Total text: Is the text that is printed above the Total. By default is set as “Total $”.
12.5.5.8.- Tail text: Is the text that is printed above the weight ticket text when in Point of sale
mode. By default is set in blank
12.5.5.9.- Date text: Is the text that is printed above the date. By default is set as “Packed”.
12.5.5.10.- Caducity text: Is the text that is printed above the expiration date. By default is set
as “expiration date”.
12.5.5.11.- Agent text: Is the text that is printed above the Agents name. By default its set as
“Agent”.
12.5.5.12.- Additional message text: Is the text that is printed underneath the barcode. By
default its set as “Thanks for your purchase”.
12.5.5.13.- Return text: Non-used option.
12.5.5.14.- Discount text: Is the text that is printed to the left of the applied discount. By default
its set as “Discount $”.
12.5.5.15.- Cash text: Is the text that is printed to the left of the received cash. By default its set
as “Cash $”.
12.5.5.16.- Change text: Is the text that is printed to the left of the change. By default its set as
“Change $”.
12.5.5.17.- Tare text: Non-used option
12.5.6.- Contrast: Allows changing the contrast levels for the continuous paper (ticket) and the
thermal label
12.5.7.- Barcode: Allows changing the Barcode format .
12.6.- Screensaver.
This option gives access to the advertisement messages configuration for the client screen and
the screensaver images for the operator screen. This is its interface (see next page):
- 41 -
Page 44
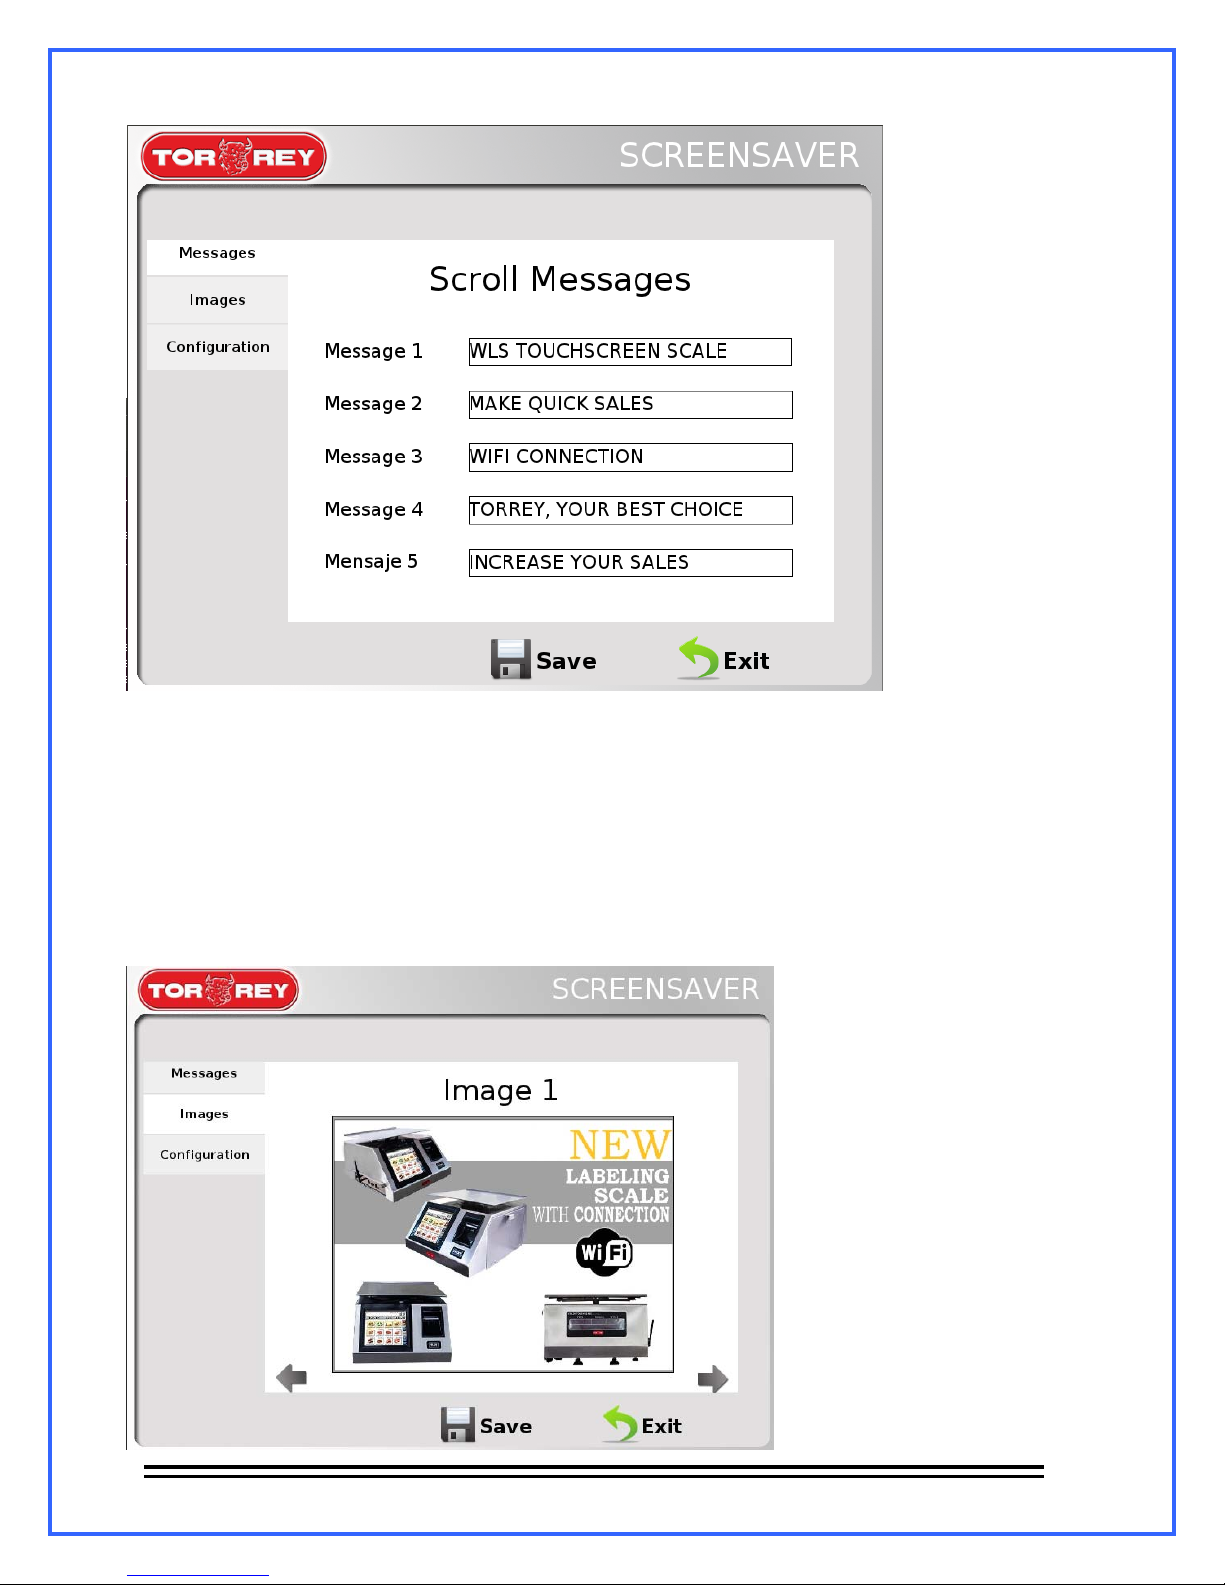
The first tab: Messages, advertisement messages that are going to be shown on the client screen
are listed in here, to modify them just select the desired message and add the new text. While is
active the screensaver, the publicity messages will be displayed consecutively.
In the second tab: Images, the screensaver images are shown, to navigate between them use the
navigation arrows.
- 42 -
Page 45
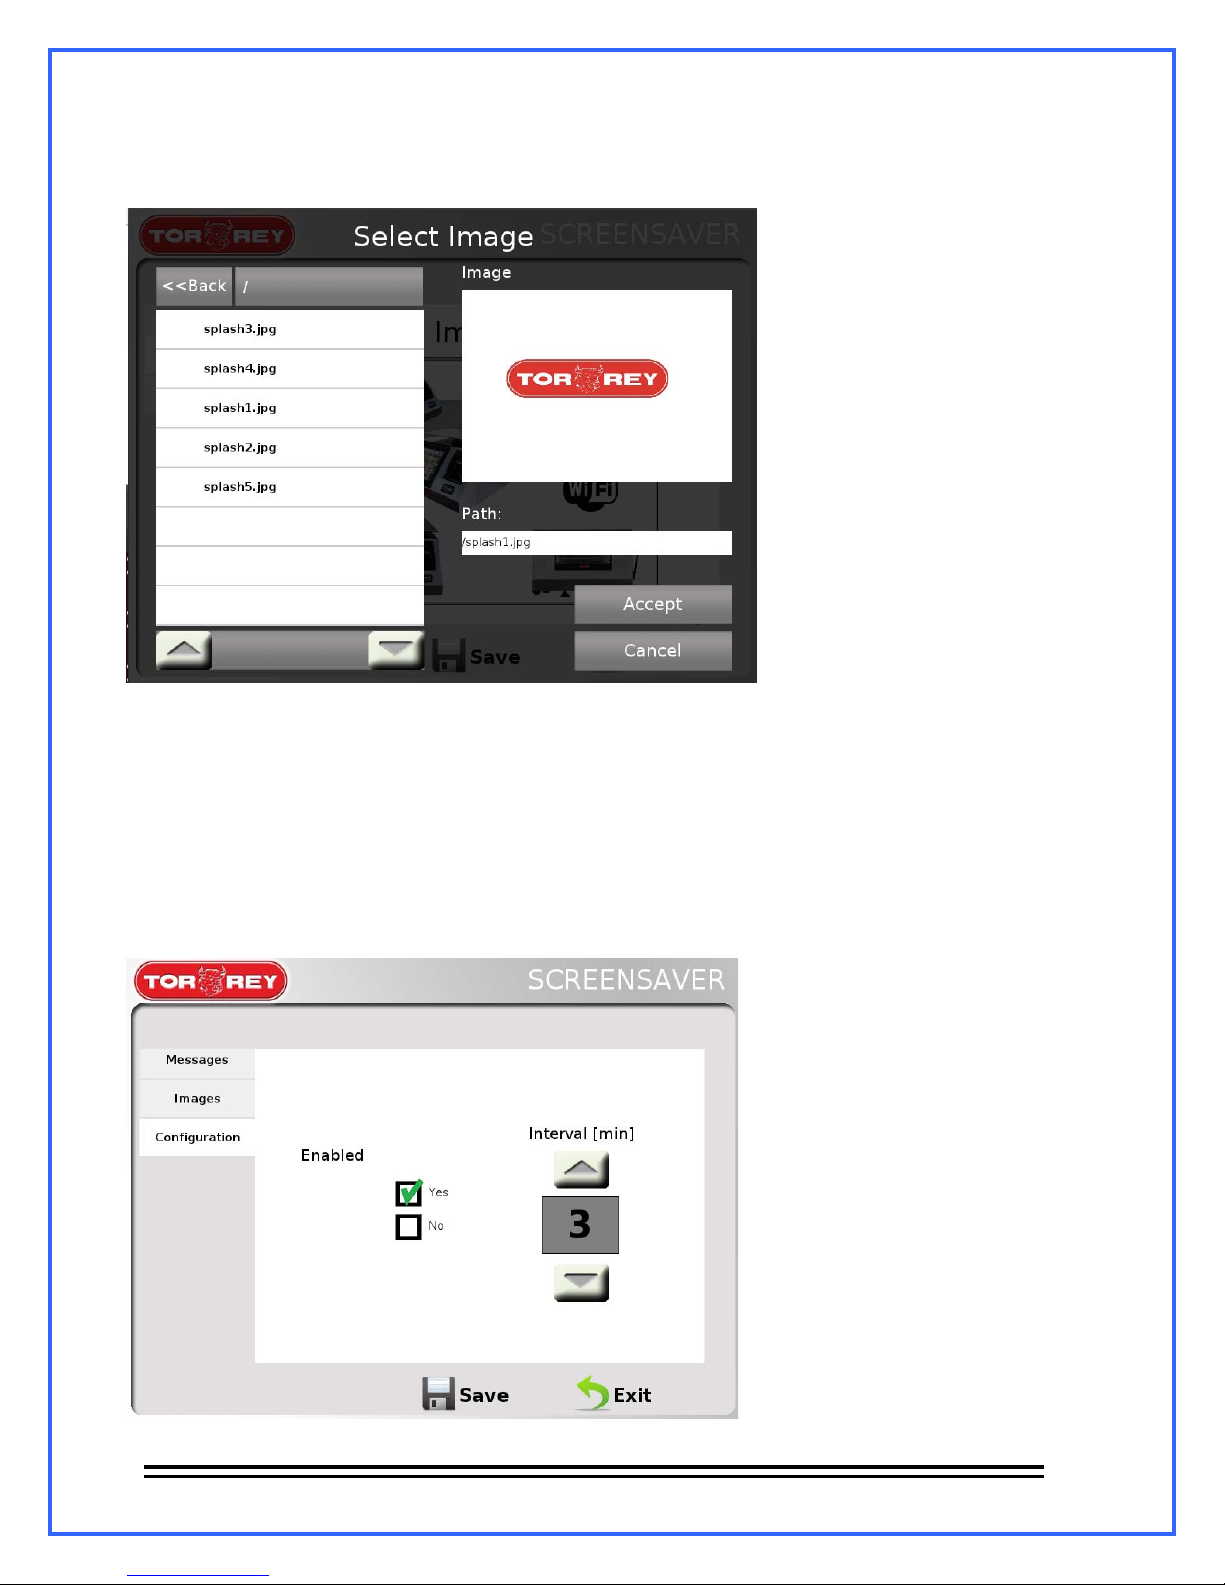
If you want to change a determined image press the image slot, it will deploy a window where
you can select a new image.
Select the desired image and press OK
The third tab: Configuration, give access to the activation and deactivation of the screensaver
and the enabling time as well.
To activate/deactivate the screensaver check the “Enable” boxes for whatever you need. To set
the time of enabling for the screensaver, increase or decrease with the navigation arrows in the
“Time” function.
- 43 -
Page 46
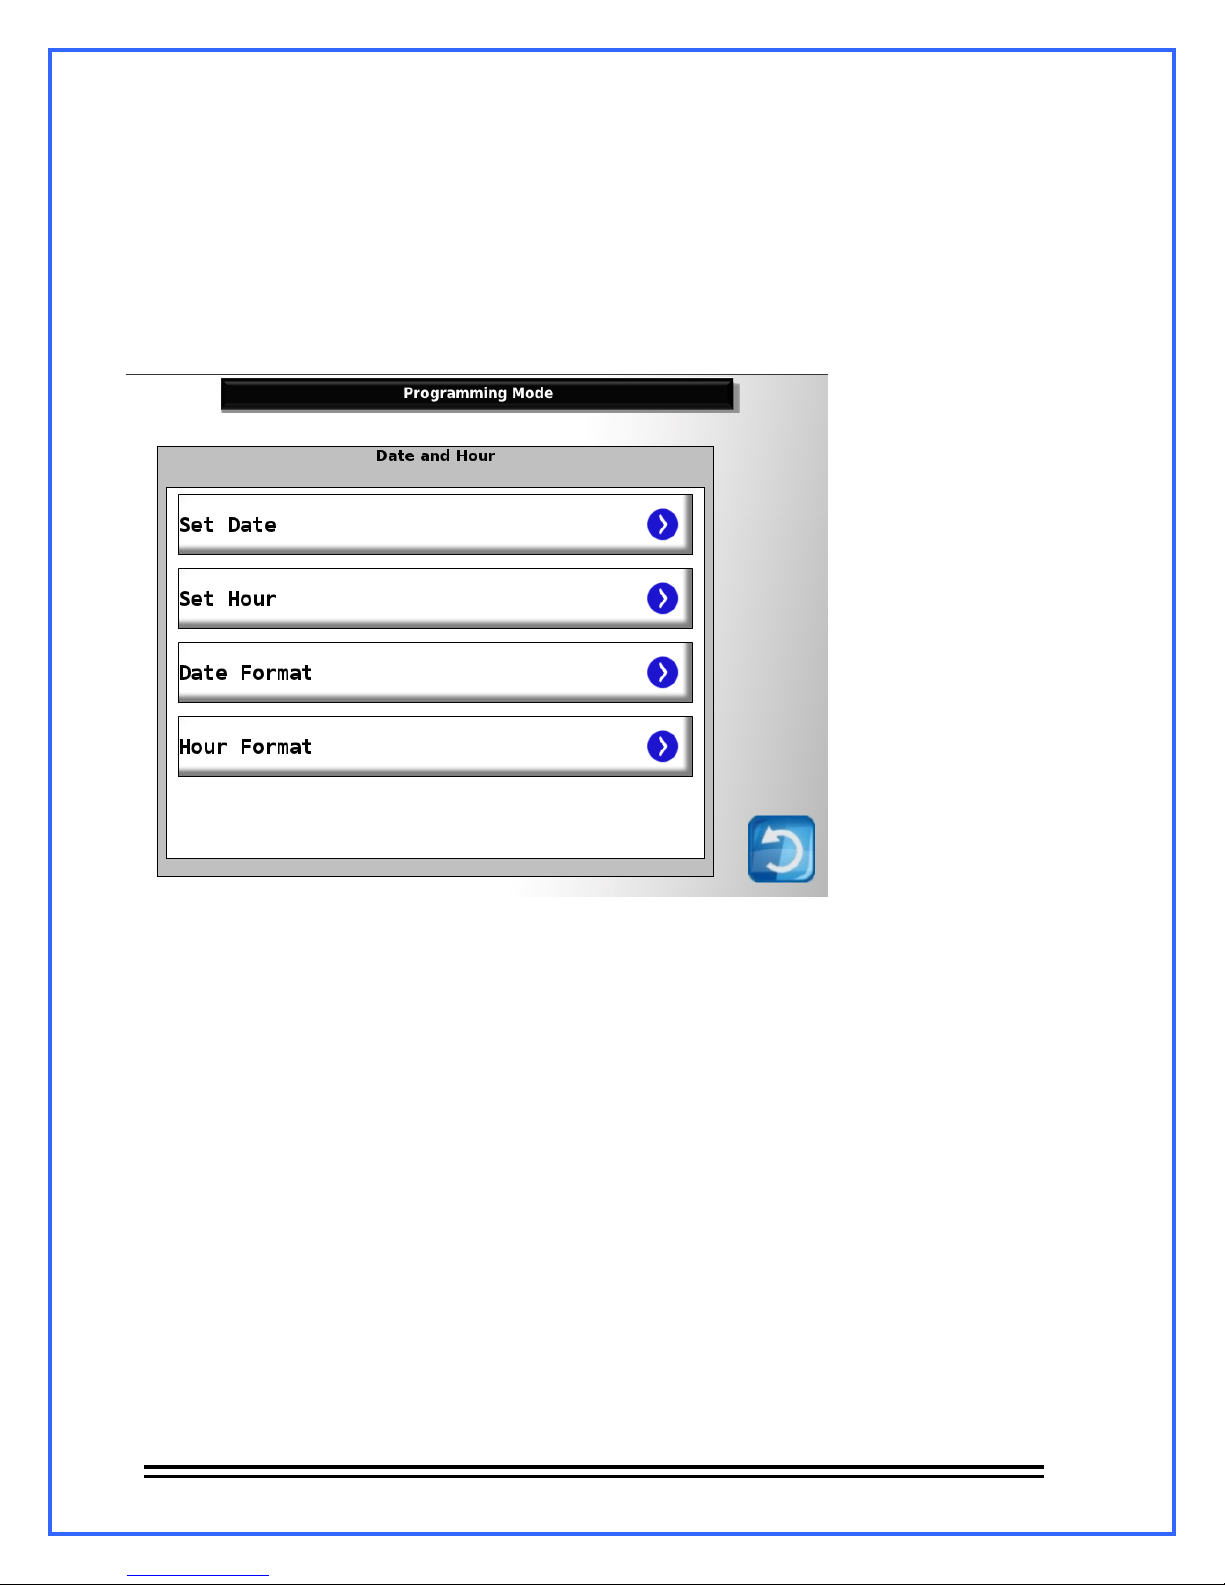
To save the changes press Save, it will show the message “the screensaver information was
saved successfully”, press OK and then Exit.
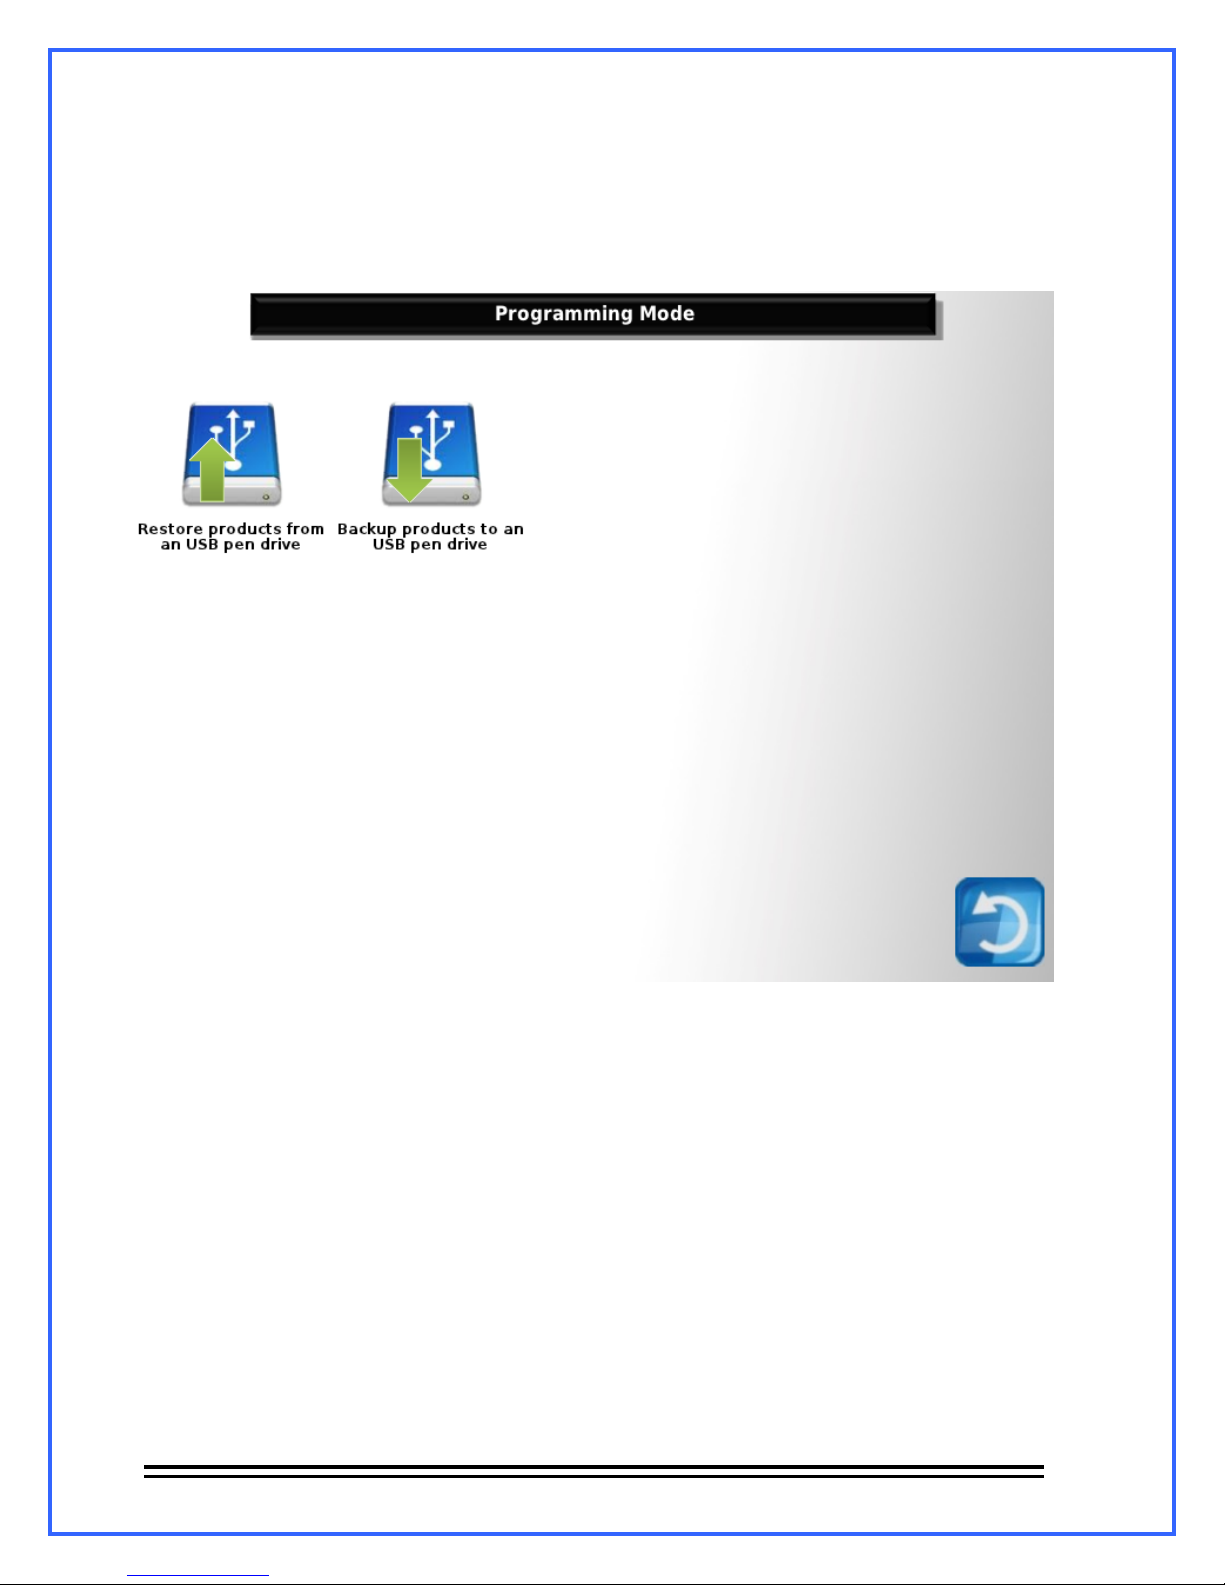
12.7.- Date and Time.
This option gives access to the Date and Time adjustment and configuration settings. This is the
interface:
12.7.1.- Date adjustment: Allows adjusting the actual date of the scale by pressing the arrows
of each field to increase or decrease the showed number. When finished, press OK.
12.7.2.- Time adjustment: Allows adjusting the actual time of the scale by pressing the arrows
of each field to increase or decrease the showed number. When finished, press OK.
12.7.3.- Date format: Allows selecting the date format, the available options are: DD/MM/YY
and MM/DD/YY.
12.7.4.- Time format: Allows selecting the time format, the available options are: 12 hours and
24 hours.
- 44 -
Page 47
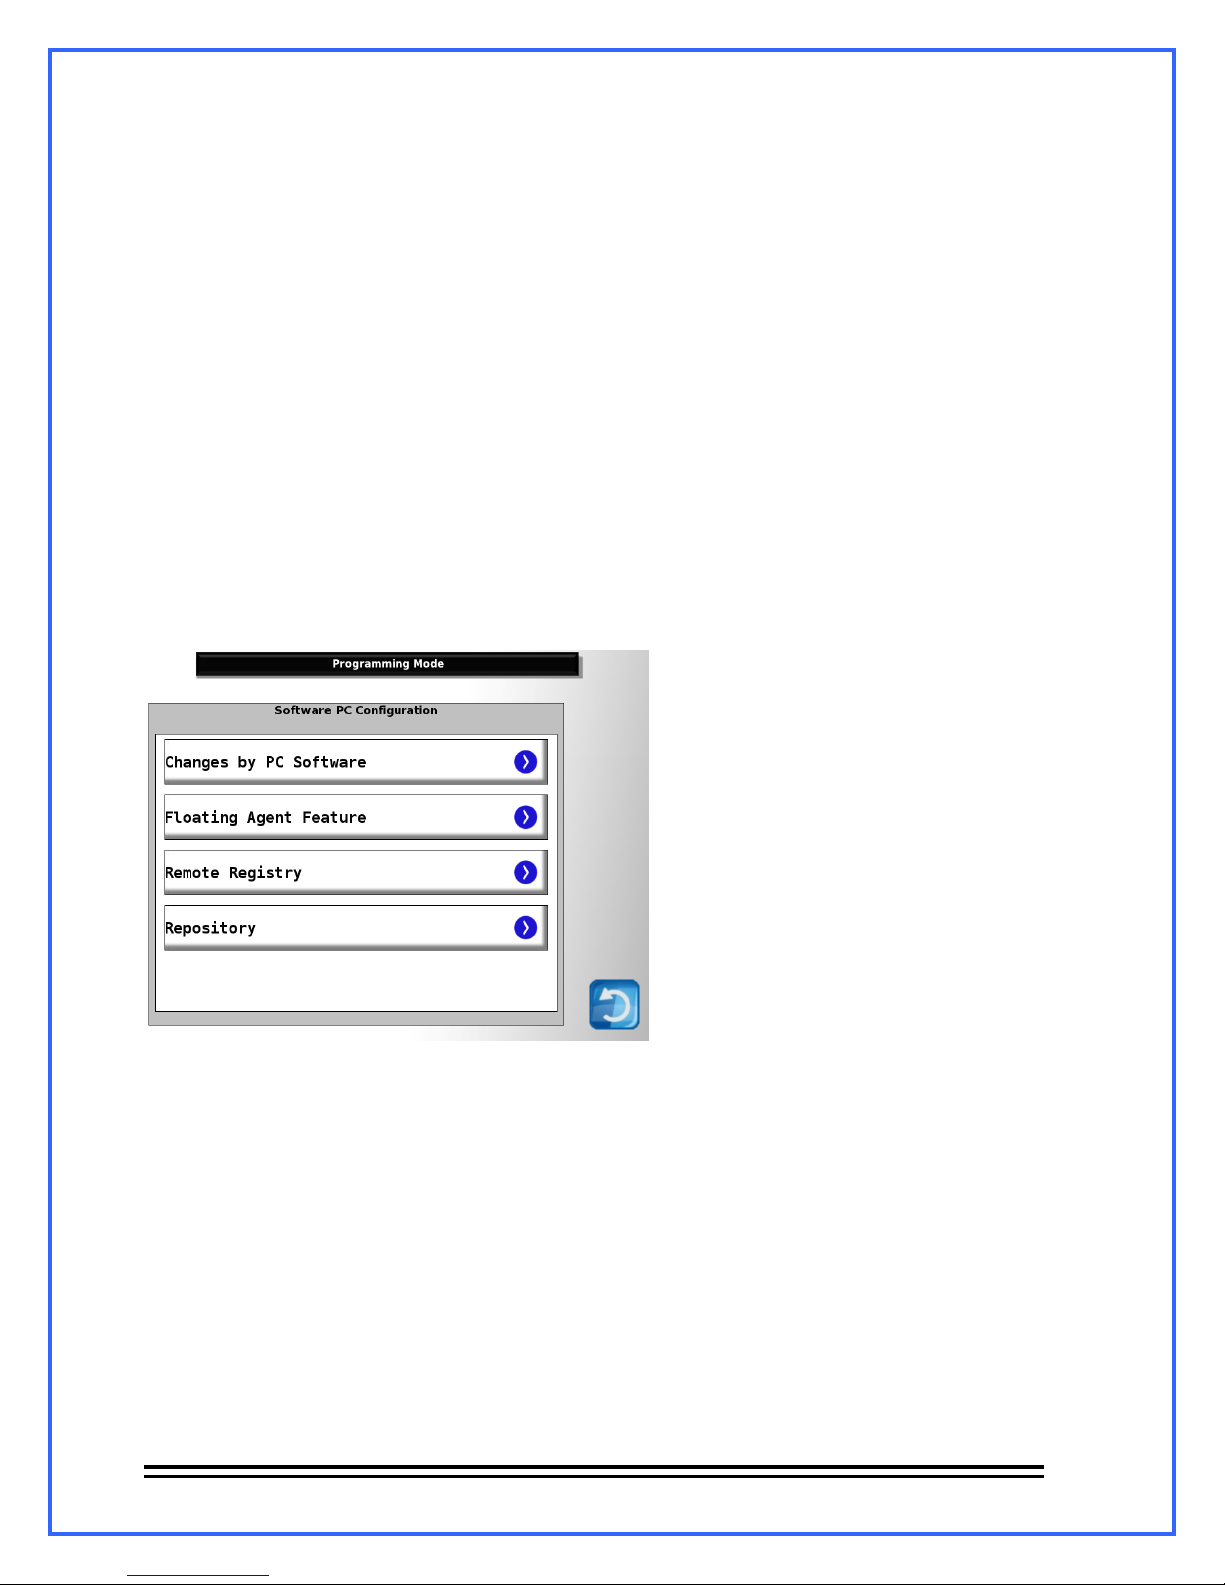
12.8.- USB.
This option gives access to the operations Product restoration and Product recovery from the
USB memory. This is the interface:
12.8.1.- Backup product to a USB: Allows making a general backup of the data and
configurations of the scale, but not from the sales data. To perform a backup connect a USB and
press the corresponding button for this operation, the backup window will deploy.
Select the directory to where the data is going to storage and press OK.
The name of the file has the next structure: WLS_YYMMDD_hhmmss.wls
YY = year hh = hours
MM = month mm = minutes
DD = day ss = seconds
- 45 -
Page 48
Note: to observe the directory where the file will be saved observe the text at the right side of
the button <<Back, just show the actual position in the root directory of the USB.
When the backup operation ends, the message” Backup completed! You can remove the USB”,
remove the USB and press OK.
12.8.2.- Restore products from a USB: This operation allows restoring the scale configuration
using a backup file (.wls). To perform this operation insert the USB that has the desired backup
file and press the corresponding button for this operation, the restore window will deploy.
Open the folder where the backup file is, select it and press OK.
When the process ends the message” Restoration completed! Remove the USB”, remove the
USB and press OK.
12.9.- PC Software.
This option gives access to the PC-scale communication configuration. This is its interface:
12.9.1.- Server PC IP address: Allows the modification of the IP address of the server where
the software is installed.
12.9.2.- Changes through software PC: All to enable or disabling the changes made in the
scale using Software PC.
12.9.3.- Floating vendor feature: Allows enabling or disabling the floating agent feature,
which let an agent changing between scales without losing the current transactions in course,
just enabling his/her user in another scale. With this function the agent can start a sale in one
scale and finish it in another. For using this function the 2 scales must be connected in the same
network.
- 46 -
Page 49
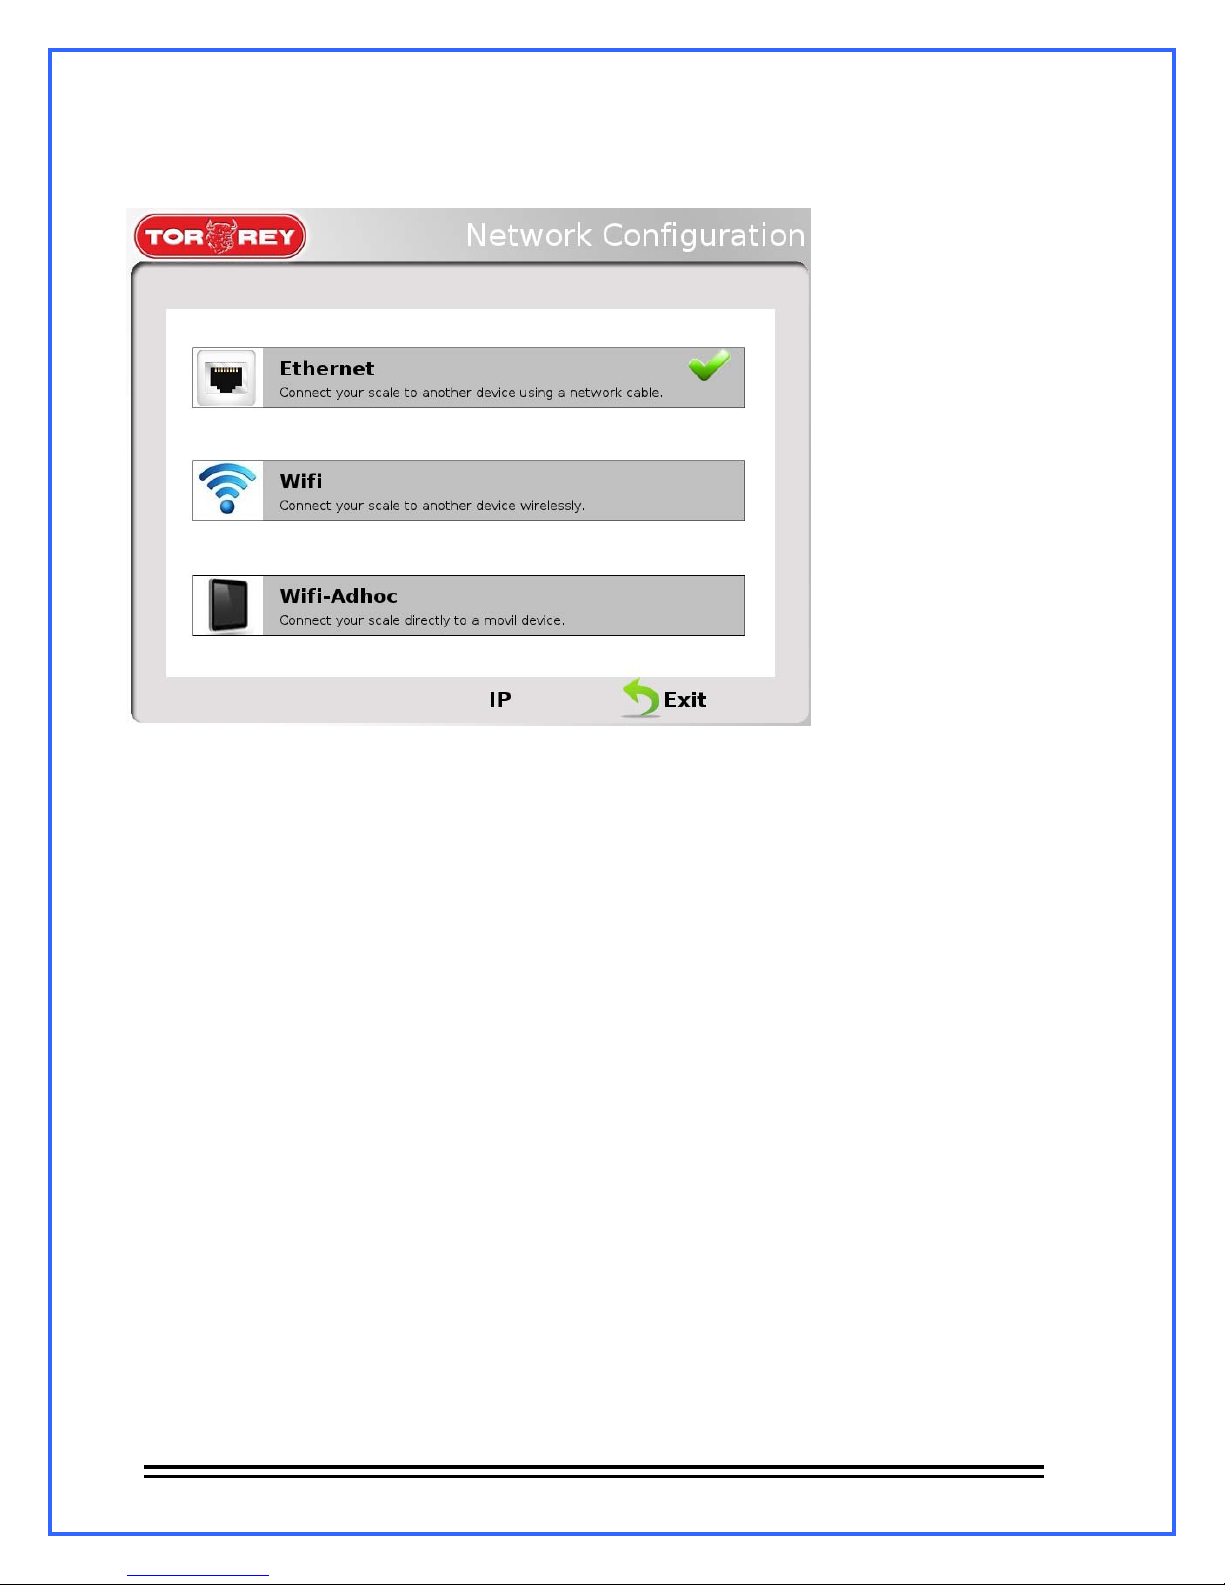
12.10.- Connectivity.
This option allows configuring the scale connections. This is its interface:
12.10.1.- Ethernet.
Select this connection if you are going to connect the scale to the network thru Ethernet cable.
To configure this connection follow the next procedure:
1.- Check the “Enable Ethernet”, this will establish the Ethernet connection as active.
2.- Select the IP type that is going to be assigned to the scale:
- Dynamic IP address: Select this when the IP is given automatically from the modem.
- Static IP address: Select this when the parameters are entered manually.
12.10.2.- Wifi.
Select this connection if you are going to connect the scale thru wireless connection. To make
the configuration of the wireless connection, follow the next procedure:
1.- Check the “Enable Wifi” box, the scale will begin searching for available wireless
connections and will show them on the screen.
2.- Select the desired network and enter the password if needed.
Types of security supported: Open/WEP/WAP-PSK/WAP2-PSK.
Types of scripts supported: WEP64/WEP128/TKIP/AES
- 47 -
Page 50
12.10.3.- Wifi Ad-Hoc.
Select this connection if the scale needs to be managed from remote devices. To make the
configuration for this connection follow the next procedure:
1.- Check the “Ad-Hoc Wifi”, the scale will start creating the Ad-hoc wifi network, where the
devices will connect.
2.- When the network is already created the next information will appear:
SSID Æ Shows and allow the edition of the network name.
Security Æ Allows to protect the network with a password (Only supports WAP-PSK
security), If the network doesn’t need to be secured, choose the option “Open”.
Password Æ Shows the password of the network.
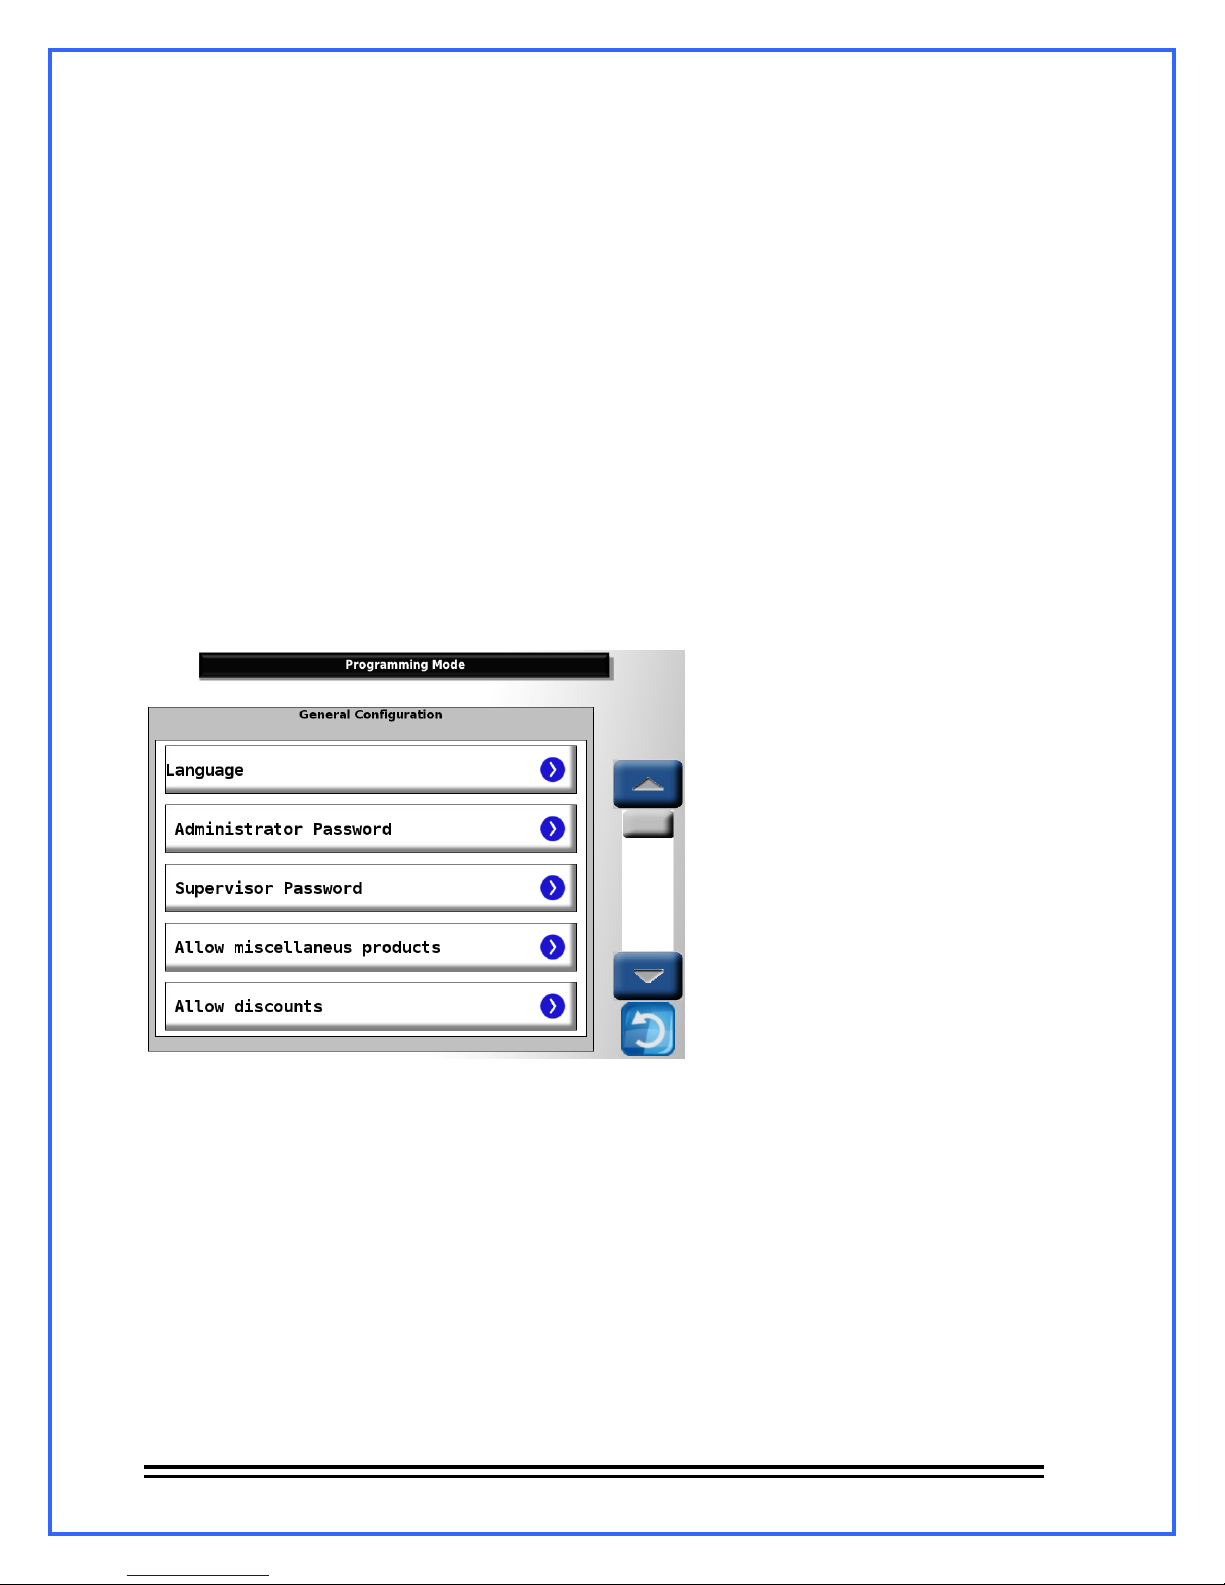
12.11.- Settings.
This option allows to access to the General Configuration of the scale. This is its interface:
12.11.1.- Administrator Password: Allows changing the administrator password. To change
the password, the scale will ask for the current admin password, entre the password and the
change can be done.
12.11.2.- Supervisor password: Allows changing the supervisor password. To change the
password, the scale will ask for the admin password, entre the password and the change can be
done.
12.11.3.- Allow miscellaneous products: Enables and disables the miscellaneous products
sale..
12.11.4.- Allow discounts: Allow establishing, when applying a discount, if the scale will ask
or not for the administrator password.
12.11.5.- Allow returns: Allow establishing, when entering a return, if the scale will ask or not
for the administrator password.
12.11.6.- Allow Re-impression: Allow establishing, when re-printing a label, if the scale will
ask or not for the administrator password.
- 48 -
Page 51

12.11.7.- Allow Automatic printing: Allow enabling or disabling the Auto-impression (Pre-
pack mode only) which automatically print the label when a product is selected, the weight is
loaded and the weight indicator is stabilized.
12.11.8.- Price block by password: Allow enabling or disabling the price block by password
when changing a products price.
- 49 -
 Loading...