

Page 1

1
XP-300 Series Sprinklers
Installation & Service Instructions
Introduction
____________________________________________________________
The XP-300 Series Sprinkler is a multiple-stream gear-driven sprinkler ideal for residential and commercial applications.
Sprinkler arc is determined by an Arc Disc™ located under the nozzle. Eleven arc discs are available to cover virtually
any watering requirement. Three nozzle sizes are available to provide from 1.43–10.81 GPM flow and produce watering
radii from 36'–43'. A fourth nozzle which provides 1.01–5.28 GPM flow and produces watering radii from 28'–31' is available only as a service replacement part.
To assure maximum performance from your XP-300 Shrub, Lawn or Hi-Pop sprinklers, please read the instructions completely prior to installation or servicing procedures.
Specifications
___________________________________________________________
Nozzle Performance Data
__________________________________________________
* ▲▲ Precipitation rates are for triangular spacing, shown in inches per hour, calculated at 50% of diameter.
■■ Precipitation rates are for square spacing, shown in inches per hour, calculated at 50% of diameter.
All performance specifications are based on the stated working pressure available at the base of the sprinkler head.
* * 05 Nozzle is available only as a service replacement part.
Nozzle Performance
❚ Radius: 28'–43'
❚ Flow rate: 1.01–10.80 GPM
❚ Trajectory: 28°
❚ Maximum height of spray:
❚
#05 Nozzle: 9' 3" @ 50 PSI
❚
#07 Nozzle: 9' 1" @ 50 PSI
❚
#09 Nozzle: 9' 1" @ 50 PSI
❚
#10 Nozzle: 9' 6" @ 50 PSI
Shrub
❚ Recommended operating
pressure: 35–60 PSI
❚ Maximum operating
pressure: 75 PSI
❚
1
⁄2" & 3⁄4" NPT female
thread inlet
❚ Dimensions:
❚
Body diameter: 13⁄4"
❚
Height: 61⁄2"
Hi-Pop
❚ Recommended operating
pressure: 35–60 PSI
❚ Maximum operating
pressure: 75 PSI
❚ Pop-up: 12
3
⁄4"
❚ Pop-up to nozzle: 12
1
⁄2"
❚
3
⁄4" NPT female thread
bottom and side inlet
❚ Side inlet – 7" from top of
sprinkler to center of side
inlet
❚ Dimensions:
❚
Body diameter: 23⁄8"
❚
Cap diameter: 3"
❚
Height: 161⁄2"
Lawn Pop-Up
❚ Recommended operating
pressure: 35–60 PSI
❚ Maximum operating
pressure: 75 PSI
❚ Pop-up: 3
3
⁄4"
❚ Pop-up to nozzle: 3
1
⁄2"
❚
3
⁄4" NPT female thread
inlet
❚ Dimensions:
❚
Body diameter: 23⁄8"
❚
Cap diameter: 3"
❚
Height: 61⁄8"
360° 270° 250° 225° 210° 195° 180° 165° 140° 115° 90°
Prec. Rates*
Nozzle PSI Rad. ▲▲ ■■ Gallons Per Minute
35 28' .57 .50 4.04 3.03 2.81 2.53 2.36 2.19 2.02 1.85 1.57 1.29 1.01
40 29' .56 .48 4.23 3.24 3.00 2.70 2.52 2.34 2.16 1.98 1.68 1.38 1.08
05
50 30' .60 .52 4.83 3.62 3.35 3.02 2.82 2.62 2.42 2.21 1.88 1.54 1.21
60 31' .61 .53 5.29 3.97 3.67 3.31 3.09 2.87 2.65 2.42 2.06 1.69 1.32
35 36' .49 .42 5.70 4.28 3.93 3.60 3.31 3.08 2.85 2.62 2.22 1.82 1.43
40 38' .47 .41 6.14 4.61 4.24 3.87 3.56 3.32 3.07 2.82 2.39 1.96 1.54
07
50 40' .48 .41 6.85 5.14 4.73 4.32 3.97 3.70 3.43 3.15 2.67 2.19 1.71
60 41' .49 .43 7.47 5.60 5.15 4.71 4.33 4.03 3.74 3.44 2.91 2.39 1.87
35 38' .53 .46 6.94 5.21 4.79 4.37 4.03 3.75 3.47 3.19 2.71 2.22 1.74
40 39' .54 .47 7.43 5.57 5.13 4.68 4.31 4.01 3.72 3.42 2.90 2.38 1.86
09
50 41' .55 .48 8.38 6.29 5.78 5.28 4.86 4.53 4.19 3.85 3.27 2.68 2.10
60 43' .56 .48 9.26 6.95 6.39 5.83 5.37 5.00 4.63 4.26 3.61 2.96 2.32
35 37' .65 .56 7.95 5.96 5.49 5.01 4.61 4.29 3.98 3.66 3.10 2.54 1.99
40 39' .63 .54 8.58 6.44 5.92 5.41 4.98 4.63 4.29 3.95 3.35 2.75 2.15
10
50 41' .65 .56 9.76 7.32 6.73 6.15 5.66 5.27 4.88 4.49 3.81 3.12 2.44
60 42' .68 .59 10.81 8.11 7.46 6.81 6.27 5.84 5.41 4.97 4.22 3.50 2.70
* *
Page 2
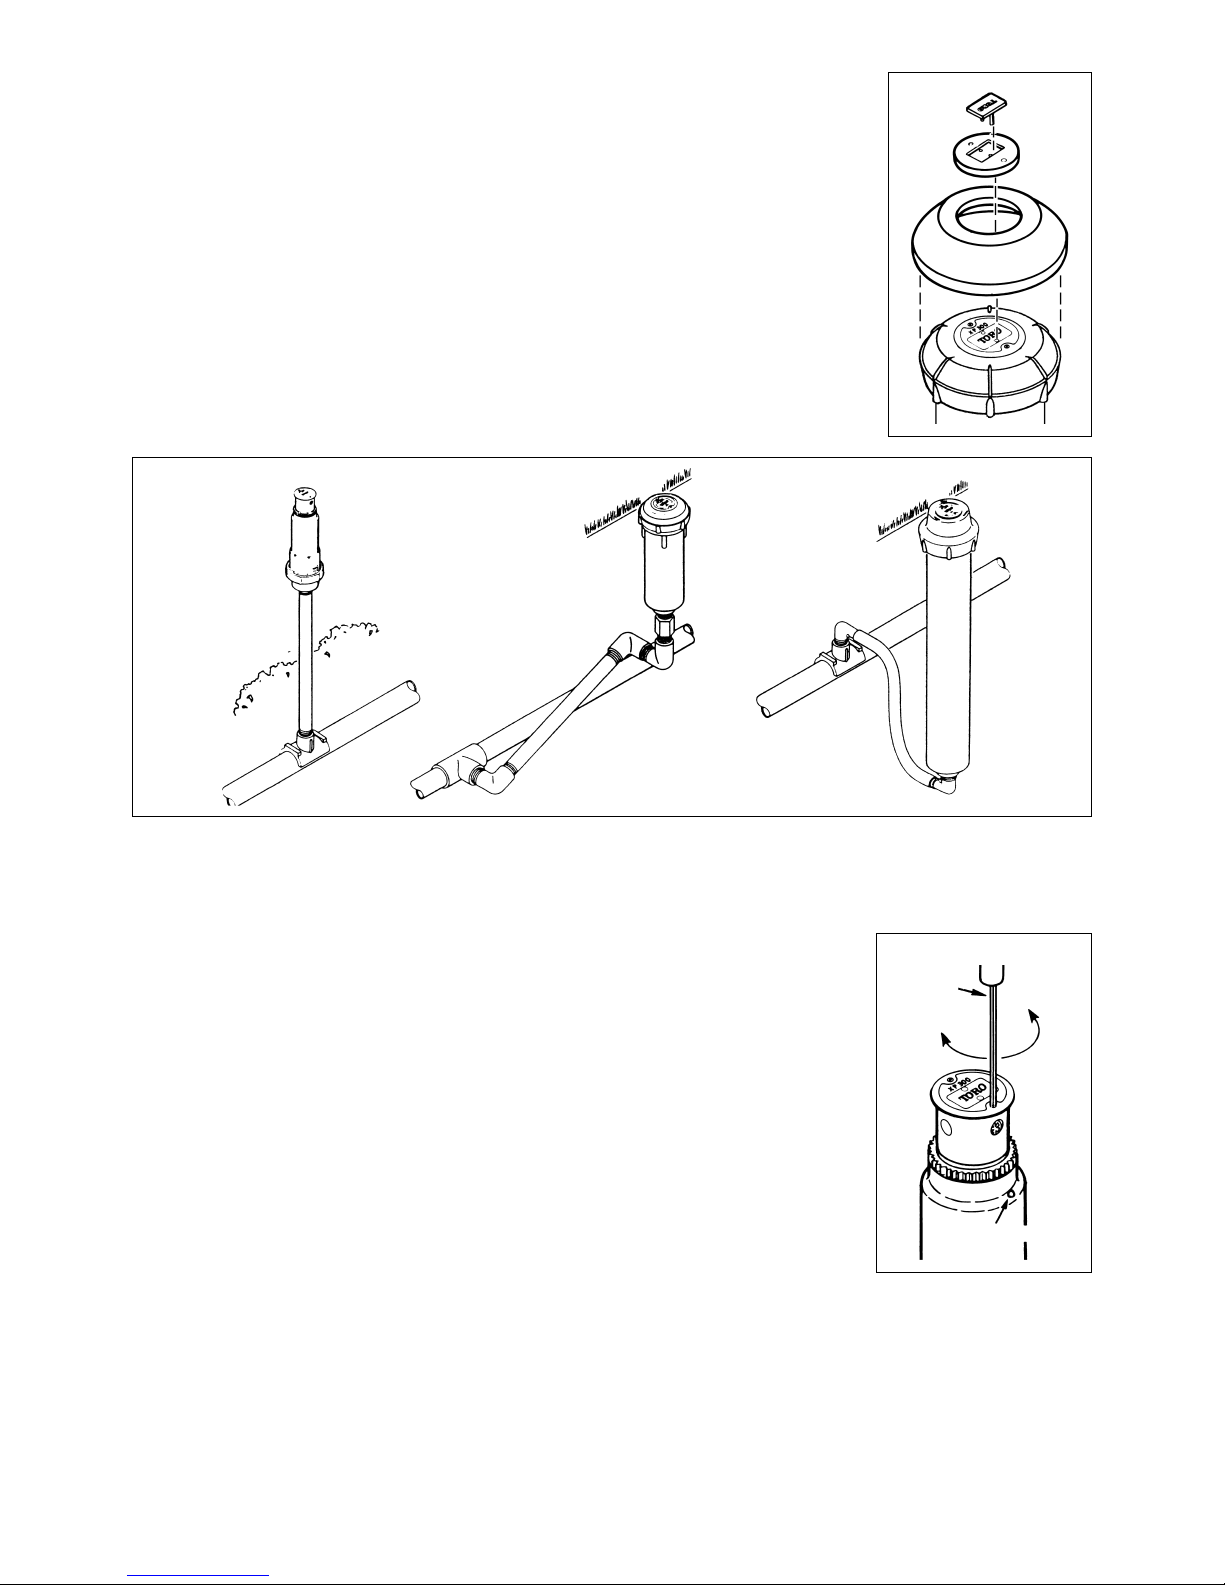
Rubber Cover Kit – Lawn Pop-Up
Attach rubber cover (optional) to sprinkler cap, using Loctite Super Bonder®(or equivalent)
adhesive as follows:
1. Assure bonding surfaces are dry and free of dirt, grease, and foreign substances.
2. Spread thin film of adhesive on underside of rubber cap cover and rubber nozzle cover.
3. Assemble immediately. Press retainer plug pins into two (2) holes in nozzle. See
Figure 1.
4. Apply firm pressure until set (approximately 15 seconds).
Installation Procedure
NOTE: Toro Funny Pipe®is recommended for ease of installation and accurate sprinkler
positioning when installing the XP-300 Lawn and Hi-Pop sprinklers. Unlike a rigid connection, the flexible Funny Pipe link helps protect the PVC piping and fittings from breakage due to downward or lateral sprinkler movement. XP-300 Lawn and Hi-Pop sprinklers
should be installed with top of cap level with finish grade (soil).
CAUTION
Use only Teflon Tape™ to make threaded connections between polyethylene riser or barbed ell and
sprinkler body. Deterioration of sprinkler body may occur if other sealing compounds are used.
Shrub Sprinkler Installation
1. Flush all lines thoroughly prior to installing sprinkler on riser.
2. Grasp base of sprinkler by cap (not body) and screw securely onto teflon taped riser.
Do not over-torque, handtight is sufficient.
3. To align part-circle sprinkler to coverage area, locate raised alignment dot on sprinkler
shoulder (see
Figure 3). Align dot with center of coverage area. If dot cannot be positioned correctly when sprinkler is tight, unscrew nozzle assembly and reposition Arc Disc
to coverage area. (See
Figure 6.)
4. Turn on water to system and refine part circle spray pattern.
5. Adjust spray radius if required (see
Figure 3).
Lawn and Hi-Pop Sprinkler Installation
1. Flush all lines thoroughly prior to installing sprinkler.
2. Grasp sprinkler by body (not cap) and screw securely onto teflon taped riser or barbed ell. Do not over-torque,
handtight is sufficient.
3. To align part-circle sprinkler coverage area, locate raised dot on body and align with center of coverage area. If dot
cannot be positioned correctly when sprinkler is tight, unscrew nozzle assembly and reposition Arc Disc to coverage
area (see
Figure 9). NOTE: Lawn Pop-Up has only one riser tab.
4. Backfill soil around sprinkler avoiding soil contact with nozzle assembly.
5. Turn on water to system and refine part circle spray pattern.
6. Adjust spray radius if required (see
Figure 3).
2
Figure 1
Figure 3
Figure 2
SHRUB
SPRINKLER
AND
RISER
SWING JOINT
BARBED FITTINGS
WITH TORO
FUNNY PIPE
DECREASE
INCREASE
ALIGNMENT
DOT
1/16" HEX
DRIVER
Page 3

Shrub Sprinkler Disassembly
1. Unscrew nozzle, lift out Arc Disc and Arc Disc seal.
2. Unscrew cap assembly from body and remove washer seal.
3. Remove basket screen from body and flush thoroughly to remove dirt and debris.
4. Remove variable stator from body. Clean ports if clogged.
5. Remove drive assembly from body by pressing gently on outer edge of drive assembly with flat blade screwdriver.
(See
Figure 4.)
CAUTION
Do not apply pressure directly on center shaft of drive assembly. Push on outer edge of drive assembly
housing. Excessive force applied directly to shaft may cause permanent damage to drive assembly and
loss of sprinkler performance.
Shrub Sprinkler Resassembly
1. Invert shrub body, install drive assembly (threaded end first), variable stator and basket screen.
2. Place washer seal into cap and screw cap onto shrub body.
NOTE: Inspect Arc Disc seal for damage and replace if necessary.
3. Holding shrub body in upright position, install Arc Disc seal, tapered side up. (See Figure 5.)
4. Install Arc Disc, aligning center of part circle spray pattern with designated body tab. (See
Figure 6.)
5. Screw nozzle assembly into drive assembly. (Do not overtighten.)
Lawn and Hi-Pop Sprinkler Disassembly
1. Using 1⁄16" hex driver, loosen set screw on Locking Cap (Hi-Pop only).
2. Unscrew cap from body and remove cap, nozzle assembly and riser from body.
3. Remove basket screen from bottom of riser. Flush thoroughly to eliminate dirt and debris.
4. Push riser assembly through cap and grasp riser between cap and nozzle assembly firmly.
5. Unscrew and remove nozzle assembly.
6. Lift out Arc Disc and Arc Disc seal.
7. Slowly release riser assembly and remove cap, riser seal and return spring from riser.
8. Invert riser and pry-out variable stator assembly from Lawn Pop-up by inserting a knife edge between lip of stator and
riser. Inspect stator and clean ports if clogged.
9. Remove drive assembly from riser by pressing gently on outer edge of drive assembly with flat blade screwdriver. (See
Figure 7.) On Hi-Pop models, variable stator assembly will be pressed out with drive assembly.
3
Figure 4
Figure 5 Figure 6
SHRUB
BODY
DRIVE ASSEMBLY
FLAT BLADE
SCREWDRIVER
DO NOT
PRESS HERE
ARC DISK
SEAL
ARC DISK
TAPERED
AREA
SHRUB
BODY
CENTER OF
SPRAY
PATTERN
USE THIS TAB
FOR SPRAY
ALIGNMENT
RAISED
ALIGNMENT
DOT
ARC DISC
SEAL
BODY
TAB
TOP VIEW
Page 4

CAUTION
Do not apply pressure directly on center shaft of drive assembly. Push on outer edge of drive assembly housing. Excessive force applied directly to shaft may cause permanent damage to drive assembly and loss of sprinkler performance.
Lawn and Hi-Pop Sprinkler Reassembly
1. Invert riser, install drive assembly (threaded end first) and variable stator assembly.
NOTE: To aid installation of variable stator assembly in Hi-Pop models, mark a piece of 3⁄4" PVC pipe to 103⁄4" from one end.
Place stator assembly over end of pipe and insert into riser until stop is felt or 103⁄4"mark is even with riser bottom.
2. Place return spring, riser seal and cap on riser, compressing spring with cap.
NOTE: Inspect Arc Disc seal for damage and replace if necessary.
3. Grasp riser firmly between cap and riser top and install Arc Disc seal, tapered side up (See Figure 8.)
4. Install Arc Disc, aligning center of part circle spray pattern with designated riser tab. (See
Figure 9.)
NOTE: Lawn Pop-up has only one riser tab for alignment of Arc Disc.
5. Screw nozzle assembly into drive assembly (do not overtighten) and slowly release cap.
6. Insert basket screen into riser bottom (Hi-pop). Press screen (Lawn Pop-up) onto riser bottom, aligning keys of screen
with keyways of riser bottom.
7. Insert riser into body (see
NOTE below).
NOTE: To properly align part-circle models, insert riser assembly into body aligning marked riser keyway with marked
body key. These marks are located on bottom of riser (under screen on Lawn Pop-up) and raised dot on body exterior.
8. Screw cap onto body.
9. Tighten locking cap set screw (Hi-Pop only).
4
Figure 7
Figure 8 Figure 9
RISER
(Lawn Pop-Up shown)
DRIVE ASSEMBLY
FLAT BLADE
SCREWDRIVER
DO NOT PRESS
HERE
ARC DISK
SEAL
ARC DISK
TAPERED
AREA
RISER
RISER
CENTER OF
SPRAY
PATTERN
USE THIS RISER
TAB FOR SPRAY
ALIGNMENT
RISER TAB
ARC DISC
SEAL
TOP VIEW
Page 5

5
XP-300 Shrub
Item Part No. Nomenclature Qty Per
No. Assy.
1 35-5460 Nozzle Assy., 5.0 GPM 1
1 XP300-02* Nozzle Assy., 7.0 GPM 1
1 XP300-03* Nozzle Assy., 9.0 GPM 1
1 XP300-04* Nozzle Assy., 10.0 GPM 1
2 360-0223 Screw, Set, Half Dog Point 2
3 XP304-00* Disc, Arc, 90° 1
3 XP305-00* Disc, Arc, 115° 1
3 XP306-00* Disc, Arc, 140° 1
3 XP307-00* Disc, Arc, 165° 1
3 XP308-00* Disc, Arc, 180° 1
3 XP309-00* Disc, Arc, 195° 1
3 XP310-00* Disc, Arc, 210° 1
3 XP311-00* Disc, Arc, 225° 1
3 XP312-00* Disc, Arc, 250° 1
3 XP313-00* Disc, Arc, 270° 1
3 XP314-00* Disc, Arc, 360° 1
4 35-2137 Seal 1
5 35-2187 Body, Spray, Shrub 1
6 35-8580 Drive Assy. 1
7 35-2859 Stator Assy. 1
8 9-5212 Screen, Basket 1
9 9-5211 Seal 1
10 89-6094 Threaded Insert, 3/4" – 1/2" 1
11 89-8305 Base, Shrub 1
Service Parts & Assemblies
9-5209 Base, Shrub (Pre-10/97)
9-5698 Insert, 1/2"
9-5699 Insert, 3/4"
* Order through Finished Goods
Distribution System – Minneapolis
XP-300 Lawn
Item Part No. Nomenclature Qty Per
No. Assy.
1 ---------- Plug, Retainer 0
2 ---------- Cover, Rubber 0
3 35-5460 Nozzle Assy., 5.0 GPM 1
3 XP300-02* Nozzle Assy., 7.0 GPM 1
3 XP300-03* Nozzle Assy., 9.0 GPM 1
3 XP300-04* Nozzle Assy., 10.0 GPM 1
4 360-0223 Screw, Set, Half Dog Point 2
5 XP304-00* Disc, Arc, 90° 1
5 XP305-00* Disc, Arc, 115° 1
5 XP306-00* Disc, Arc, 140° 1
5 XP307-00* Disc, Arc, 165° 1
5 XP308-00* Disc, Arc, 180° 1
5 XP309-00* Disc, Arc, 195° 1
5 XP310-00* Disc, Arc, 210° 1
5 XP311-00* Disc, Arc, 225° 1
5 XP312-00* Disc, Arc, 250° 1
5 XP313-00* Disc, Arc, 270° 1
5 XP314-00* Disc, Arc, 360° 1
6 35-2137 Seal 1
7 9-4394 Cap 1
8 9-4449 Seal, Riser 1
9 9-2137 Spring, Return 1
10 35-2138 Riser 1
11 35-8580 Drive Assy. 1
12 35-2858 Stator Assy. 1
13 35-2136 Screen, Basket 1
14 9-1661 Body 1
Service Kits
600-01 Kit, Rubber Cover
(Includes Items 1 and 2)
* Order through Finished Goods
Distribution System – Minneapolis
1
2
3
4
5
6
7
8
9
12
10
11
14
13
Page 6

XP-300 High-Pop
Item No. Part No. Nomenclature Quantity
Per Assy.
1 XP312-02* Nozzle Assy., with sleeve, 7.0 (Includes Items 2 and 3) 1
1 XP312-03* Nozzle Assy., with sleeve, 9.0 (Includes Items 2 and 3) 1
1 XP312-04* Nozzle Assy., with sleeve, 10.0 (Includes Items 2 and 3) 1
2 360-0223 Screw, Set, Half Dog Point 2
3 35-2249 Sleeve, Nozzle 1
4 XP304-00* Disc, Arc, 90° 1
4 XP304-00* Disc, Arc, 90° 1
4 XP305-00* Disc, Arc, 115° 1
4 XP306-00* Disc, Arc, 140° 1
4 XP307-00* Disc, Arc, 165° 1
4 XP308-00* Disc, Arc, 180° 1
4 XP309-00* Disc, Arc, 195° 1
4 XP310-00* Disc, Arc, 210° 1
4 XP311-00* Disc, Arc, 225° 1
4 XP312-00* Disc, Arc, 250° 1
4 XP313-00* Disc, Arc, 270° 1
4 XP314-00* Disc, Arc, 360° 1
5 35-2137 Seal 1
6 35-4515 Cap, Locking (Includes Item 7) 1
7 360-0223 Screw, Set, Half Dog Point 1
8 35-3630 Seal, Riser 1
9 35-7579 Spring, Return 1
10 35-2247 Riser 1
11 35-8580 Drive Assy. 1
12 35-3822 Stator Assy. 1
13 9-4571 Screen, Basket 1
14 89-1960 Body 1
15 363-3187 Plug, 3/4 NPT Male 1
* Order through Finished Goods Distribution System – Minneapolis
© 2001 The Toro Company, Irrigation Division Form Number 363-0092 Rev. D
 Loading...