

Page 1
76cmTurfMaster™Walk-BehindLawnMower
G023543
1
ModelNo.22205TE—SerialNo.400000000andUp
Introduction
Thisrotary-blade,walk-behindlawnmowerisintended
tobeusedbyresidentialhomeownersorprofessional,
hiredoperators.Itisdesignedprimarilyforcuttinggrass
onwell-maintainedlawnsonresidentialorcommercial
properties.Itisnotdesignedforcuttingbrushorfor
agriculturaluses.
Readthisinformationcarefullytolearnhowtooperateand
maintainyourmachineproperlyandtoavoidinjuryand
equipmentdamage.Y ouareresponsibleforoperatingthe
machineproperlyandsafely.
YoumaycontactTorodirectlyatwww .Toro.comforproduct
andaccessoryinformation,helpndingadealer,ortoregister
yourproduct.
Wheneveryouneedservice,genuineT oroparts,oradditional
information,contactanAuthorizedServiceDealerorToro
CustomerServiceandhavethemodelandserialnumbersof
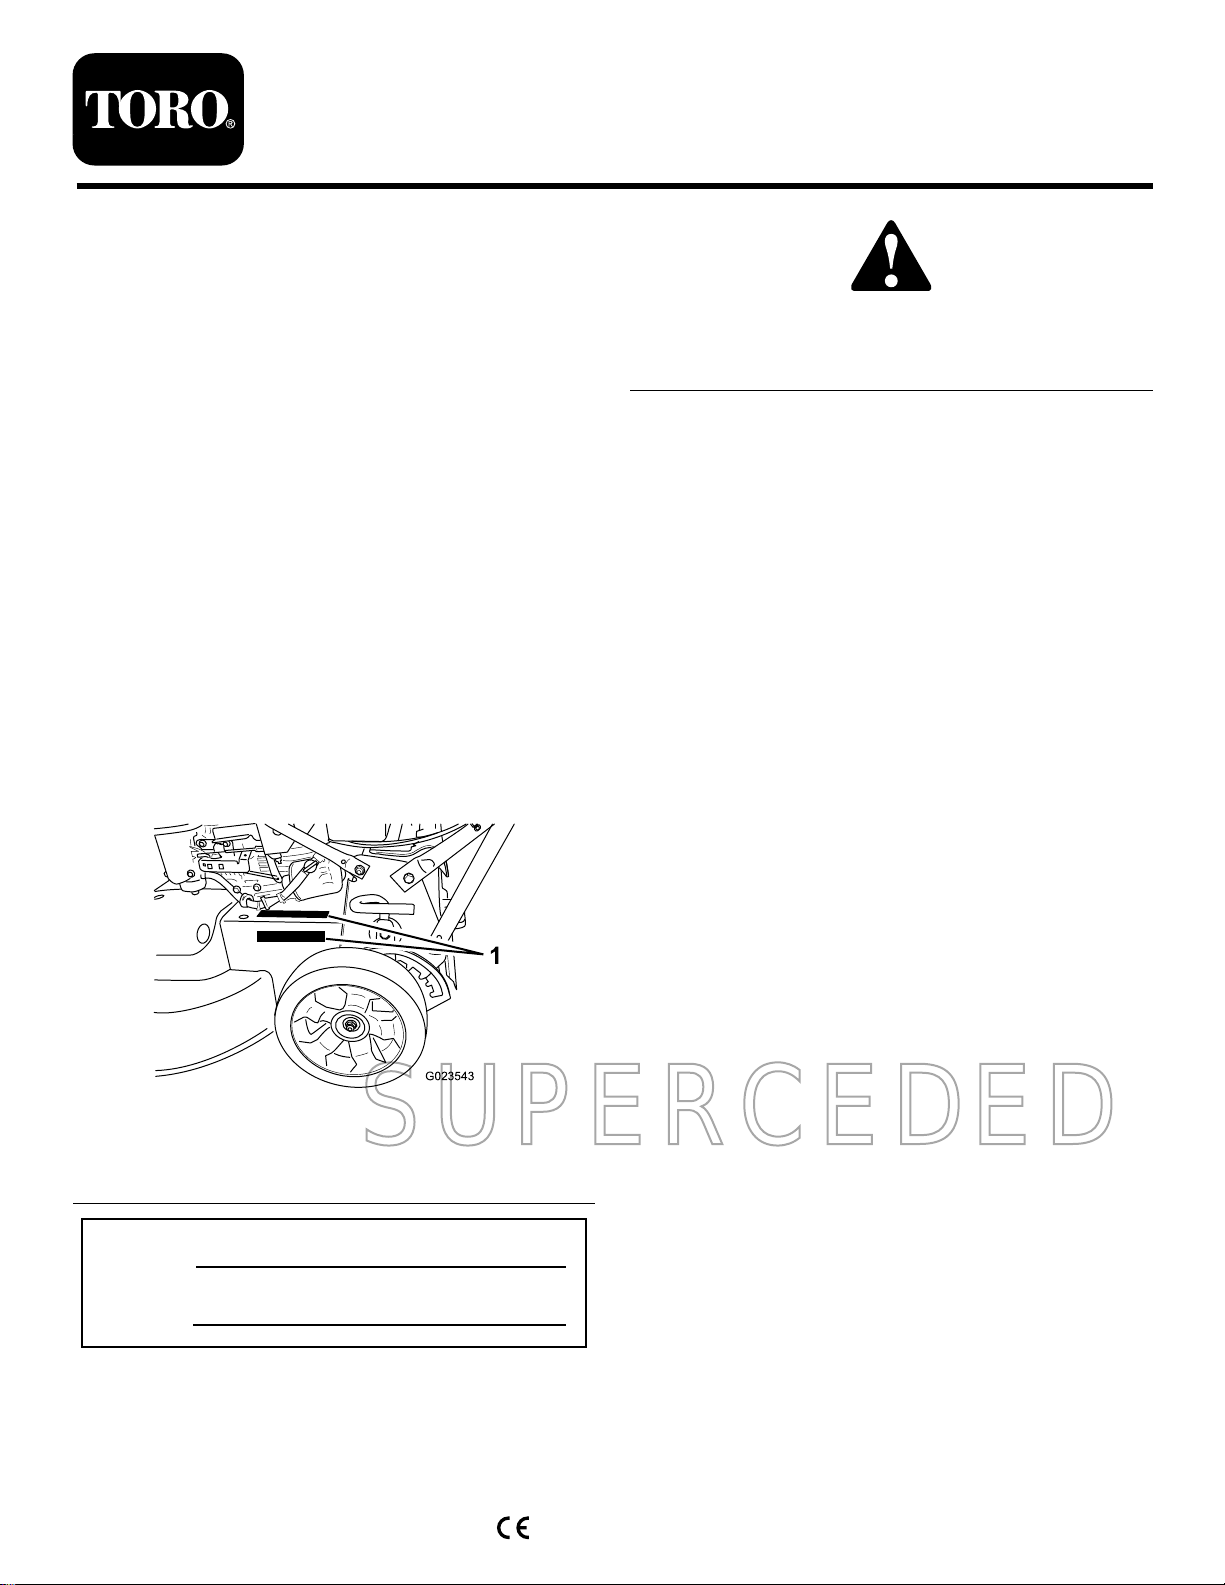
yourmachineready.Figure1identiesthelocationofthe
modelandserialnumbersontheproduct.Writethenumbers
inthespaceprovided.
FormNo.3409-542RevB
Operator'sManual
g000502
Figure2
1.Safety-alertsymbol
Thismanualuses2wordstohighlightinformation.
Importantcallsattentiontospecialmechanicalinformation
andNoteemphasizesgeneralinformationworthyofspecial
attention.
ThisproductcomplieswithallrelevantEuropeandirectives.
Fordetails,pleaseseetheseparateproductspecic
DeclarationofConformity(DOC)sheet.
NetTorque:Thegrossornettorqueofthisenginewas
laboratoryratedbytheenginemanufacturerinaccordance
withtheSocietyofAutomotiveEngineers(SAE)J1940.
Asconguredtomeetsafety,emission,andoperating
requirements,theactualenginetorqueonthisclassofmower
willbesignicantlylower.Gotowww.Toro.comtoview
specicationsonyourmowermodel.
Figure1
1.Themodelandserialnumberplateisineitherofthese2
locations.
ModelNo.
SerialNo.
Thismanualidentiespotentialhazardsandhassafety
messagesidentiedbythesafety-alertsymbol(Figure2),
whichsignalsahazardthatmaycauseseriousinjuryordeath
ifyoudonotfollowtherecommendedprecautions.
SUPERCEDED
Contents
Introduction..................................................................1
Safety...........................................................................2
GeneralSafety.........................................................2
SafetyandInstructionalDecals.................................2
Setup............................................................................5
1InstallingtheHandle.............................................5
2AdjustingtheHandleHeight..................................5
g023543
3FillingtheEnginewithOil......................................6
4AssemblingtheGrassBag......................................6
ProductOverview..........................................................8
Controls................................................................8
Specications.........................................................8
Operation.....................................................................9
BeforeOperation.......................................................9
BeforeOperationSafety...........................................9
FillingtheFuelTank................................................9
CheckingtheEngine-OilLevel.................................10
AdjustingtheCuttingHeight....................................10
CheckingtheBlade-StopSystemOperation................11
DuringOperation.....................................................11
DuringOperatingSafety..........................................11
StartingtheEngine.................................................12
ShuttingofftheEngine...........................................12
©2017—TheToro®Company
8111LyndaleAvenueSouth
Bloomington,MN55420
Registeratwww.Toro.com.
OriginalInstructions(EN)
PrintedintheUSA
AllRightsReserved
*3409-542*B
Page 2

OperatingtheSelf-PropelDriveandEngagingthe
CuttingBlades....................................................12
EngagingandDisengagingtheParking
Brake................................................................13
RecyclingtheClippings...........................................13
BaggingtheClippings.............................................14
Side-DischargingtheClippings.................................14
OperatingTips......................................................15
AfterOperation........................................................15
AfterOperatingSafety............................................15
CleaningundertheMachine.....................................15
CleaningtheWheels...............................................16
Maintenance.................................................................17
RecommendedMaintenanceSchedule(s)......................17
MaintenanceSafety.................................................17
ServicingtheAirFilter............................................17
ChangingtheEngineOil.........................................18
ChangingtheOilFilter............................................19
ServicingtheSparkPlug..........................................20
CheckingtheConditionoftheBelts..........................20
EmptyingtheFuelTankandCleaningthe
Filter.................................................................20
ChangingtheFuelFilter..........................................20
ServicingtheBlade-DriveSystem.............................21
ServicingtheCuttingBlades.....................................22
ChangingtheBlade-DriveBelt.................................24
ChangingtheBlade-Brake-Clutch(BBC)
Belt...................................................................25
AdjustingtheBlade-BrakeCable...............................25
ChangingtheTransmissionBelt...............................26
AdjustingtheTransmission......................................27
AdjustingtheSelf-PropelCable................................27
Storage........................................................................28
GeneralInformation...............................................28
PreparingtheFuelSystem.......................................28
PreparingtheEngine..............................................28
RemovingtheMachinefromStorage.........................28
Troubleshooting...........................................................29
Safety
ThismachinehasbeendesignedinaccordancewithENISO
5395:2013.
GeneralSafety
Thisproductiscapableofamputatinghandsandfeetand
ofthrowingobjects.Alwaysfollowallsafetyinstructionsto
avoidseriouspersonalinjury.
Usingthisproductforpurposesotherthanitsintendeduse
couldprovedangeroustoyouandbystanders.
•ReadandunderstandthecontentsofthisOperator’sManual
beforestartingtheengine.
•Donotputyourhandsorfeetnearmovingcomponents
ofthemachine.
•Donotoperatethemachinewithoutallguardsandother
safetyprotectivedevicesinplaceandworkingonthe
machine.
•Keepclearofanydischargeopening.Keepbystandersa
safedistanceawayfromthemachine.
•Keepchildrenoutoftheoperatingarea.Neverallow
childrentooperatethemachine.
•Stopthemachineandshutofftheenginebeforeservicing,
fueling,oruncloggingthemachine.
Improperlyusingormaintainingthismachinecanresult
ininjury.Toreducethepotentialforinjury,complywith
thesesafetyinstructionsandalwayspayattentiontothe
safety-alertsymbol,whichmeansCaution,Warning,or
Danger—personalsafetyinstruction.Failuretocomplywith
theseinstructionsmayresultinpersonalinjuryordeath.
Youcanndadditionalitemsofsafetyinformationintheir
respectivesectionsthroughoutthismanual.
SafetyandInstructionalDecals
Safetydecalsandinstructionsareeasilyvisibletotheoperatorandarelocatednearanyareaofpotential
danger.Replaceanydecalthatisdamagedormissing.
SUPERCEDED
Manufacturer'sMark
1.Indicatesthebladeisidentiedasapartfromtheoriginal
machinemanufacturer.
decaloemmarkt
1.Warning—donotoperatethemowerwiththedeectorup
orremoved;keepthedeectorinplace.
2.Cutting/dismembermenthazardofhandorfoot,mower
blade—stayawayfrommovingparts.
2
93-7009
decal93-7009
Page 3
112-8760
1.Thrownobjecthazard—keepbystandersasafedistance
awayfromthemachine.
2.Cutting/dismembermentofhandorfoot—stayawayfrom
movingparts.
decal112-8760
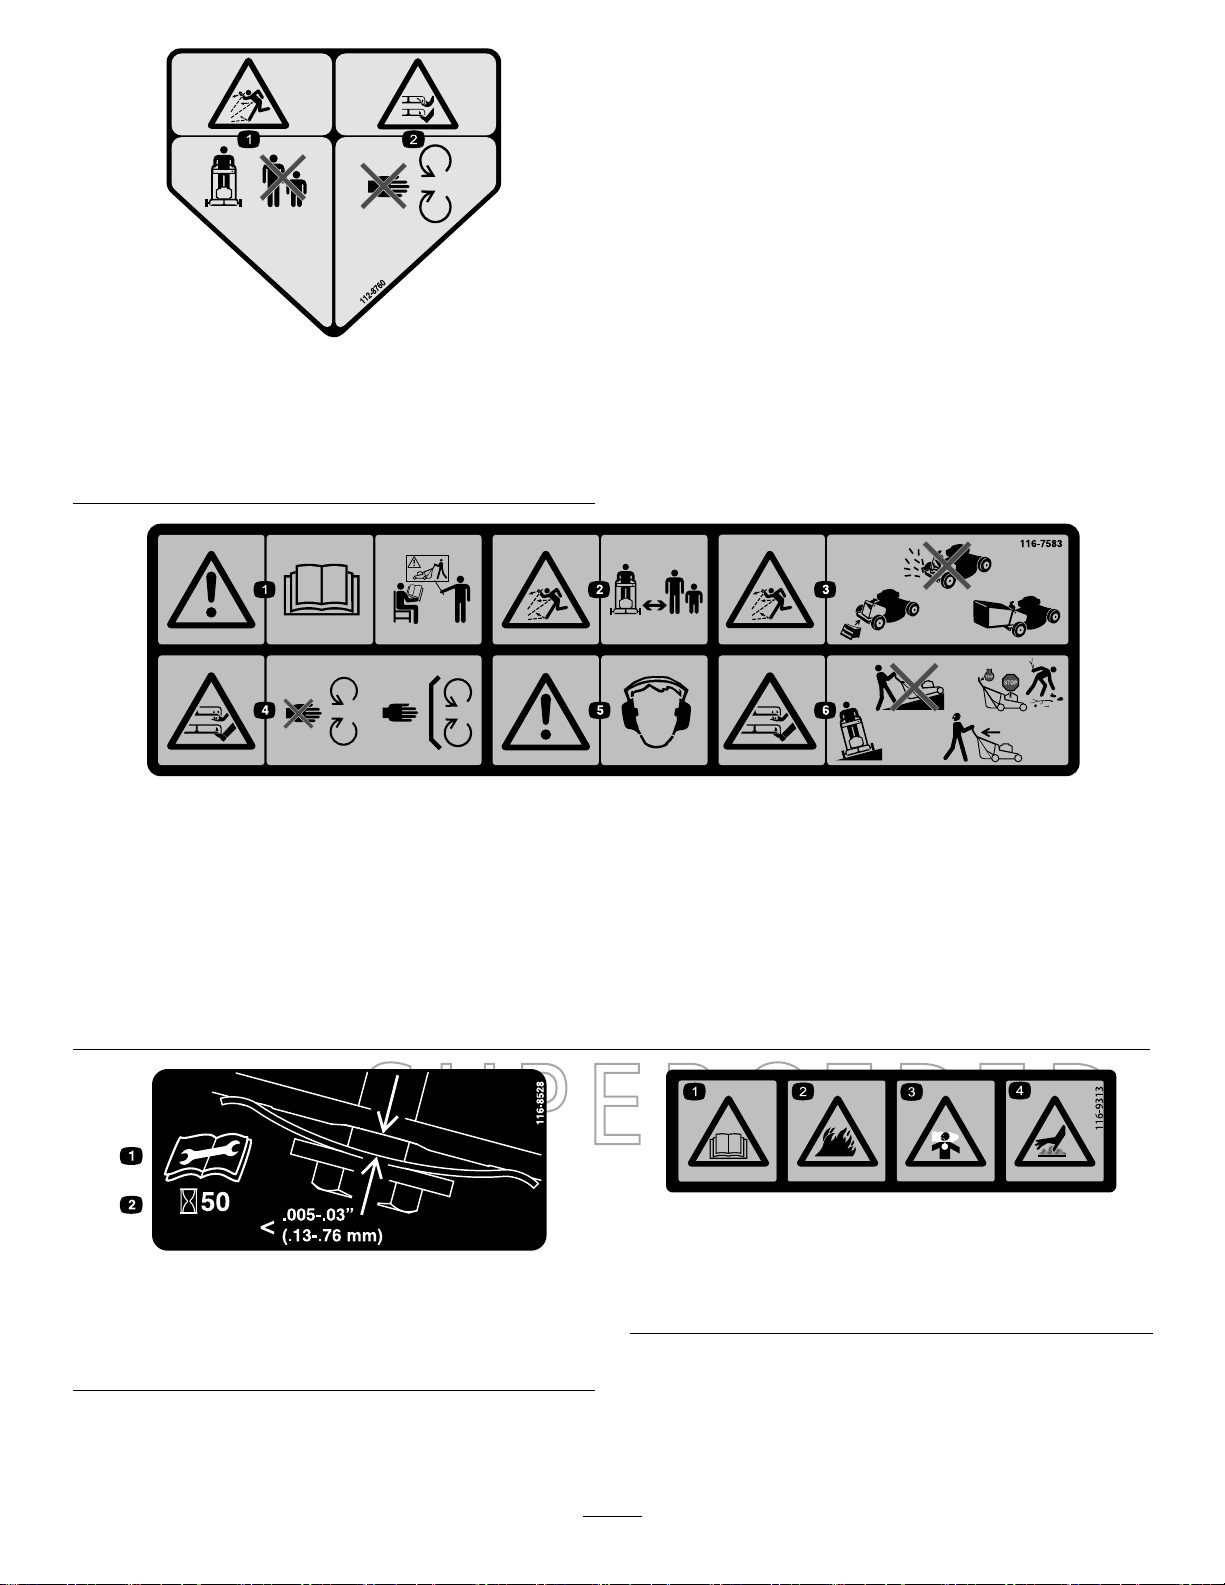
decal116-7583
116-7583
1.Warning–ReadtheOperator’sManual.Donotoperatethis
machineunlessyouaretrained.
2.Thrownobjecthazard—keepbystandersasafedistance
awayfromthemachine.
3.Thrownobjecthazard—Donotoperatethemowerwithoutthe
reardischargeplugorbaginplace.
SUPERCEDED
decal116-8528
116-8528
1.ReadtheOperator’s
Manualbeforeperforming
anymaintenance.
2.Checkbelttensionevery
50hours.
4.Cutting/dismembermenthazardofhandorfoot,mower
blade—stayawayfrommovingparts;keepallguardsinplace.
5.Warning—wearhearingprotection.
6.Cutting/dismembermenthazardofhandorfoot,mower
blade—Donotoperateupanddownslopes;operateside
tosideonslopes;shutofftheenginebeforeleavingthe
operatingposition—pickupobjectsthatcouldbethrownby
theblades;andlookbehindyouwhenbackingup.
116-9313
1.ReadtheOperator's
Manual.
2.Firehazard
3.Toxicgasinhalation
hazard
4.Hotsurface;burnhazard
decal116-9313
3
Page 4

120-9570
1.Warning—stayawayfrommovingparts,keepallguards
andshieldsinplace.
121-1449
1.Warning—donotparkonslopesunlessthewheelsare
chockedorblocked.
decal120-9570
decal121-1449
decal130-9656
130-9656
1.Choke3.Slow
2.Fast4.Engine—stop
decal127-6864
127-6864
1.Height-of-cut—front
SUPERCEDED
decal127-6865
127-6865
1.Height-of-cut—back
4
Page 5

Setup
G028426
1
2
G028427
2
1
3
Important:Removeanddiscardtheprotectiveplastic
sheetthatcoverstheengineandanyotherplasticor
wrappingonthemachine.
1
InstallingtheHandle
NoPartsRequired
Procedure
WARNING
Foldingorunfoldingthehandleimproperlycan
damagethecables,causinganunsafeoperating
condition.
•Donotdamagethecableswhenfoldingor
unfoldingthehandle.
•Ifacableisdamaged,contactanAuthorized
ServiceDealer.
1.Removethe2boltsfromthemachineframeinthe
locationshowninFigure3.
Figure4
1.Installacabletiehere.
2.Nutonhandlesupport
bracket(2)
5.Installacabletietosecurethecablestothelower
handleinthelocationshowninFigure4andtrimoff
theexcessmaterialfromthetie.
3.Bolt(4)
2
AdjustingtheHandleHeight
NoPartsRequired
Procedure
1.Standintheoperatingpositiontodeterminethemost
comfortablehandleheight.
g028427
1.Bolt(2)
2.Rotatethehandlerearwardtotheoperatingposition.
3.Securethehandletothemachinewiththeboltsthat
youremovedinstep1.
4.Tightenthefastenersthatsupportthehandleonboth
sidesofthemachineasshowninFigure4.
Figure3
SUPERCEDED
2.Nutonhandlesupport
bracket(2)
2.Removethehandleboltandinsertitin1ofthe3holes
locatedatthebottomofthehandlebracket(Figure5).
g028426
5
Page 6

G021 150
1
2
3
Figure5
1.Lowesthandleheight
setting
2.Middlehandleheight
setting
3.Tightenthehandleboltuntilitissnug.
4.Repeatthestepsabovefortheothersideofthe
machine.
3.Highesthandleheight
setting
g021150
1.Full3.Low
2.High
3.Carefullypourabout3/4oftheenginecapacityofoil
intotheoil-lltube.
4.Waitabout3minutesfortheoiltosettleintheengine.
5.Wipethedipstickcleanwithacleancloth.
6.Insertthedipstickintotheoil-lltube,thenremove
thedipstick.
7.Readtheoillevelonthedipstick(Figure6).
Figure6
g194742
3
FillingtheEnginewithOil
NoPartsRequired
Procedure
Important:Yourmachinedoesnotcomewithoilin
theengine.Beforestartingtheengine,lltheengine
withoil.
Engineoilcapacity:Withoillter:0.85L(29oz);
withoutoillter:0.65L(22oz)
Oilviscosity:SAE30orSAE10W-30detergentoil
APIserviceclassication:SJorhigher
1.Movethemachinetoalevelsurface.
2.Removethedipstickbyrotatingthecap
counterclockwiseandpullingitout(Figure6).
SUPERCEDED
•IftheoillevelisbelowtheAddmarkonthe
dipstick,carefullypourasmallamountofoilinto
theoil-lltube,wait3minutes,andrepeatsteps3
through6untiltheoillevelisattheFullmarkon
thedipstick.
•IftheoillevelisabovetheFullmarkonthe
dipstick,draintheexcessoiluntiltheoillevelisat
theFullmarkonthedipstick;refertoChanging
theEngineOil(page18).
Important:Iftheoillevelintheengineistoo
lowortoohighandyouruntheengine,youmay
damagetheengine.
8.Installthedipstickintotheoil-lltubesecurely.
Important:Changetheengineoilaftertherst5
operatinghours;changeityearlythereafter.Referto
ChangingtheEngineOil(page18).
6
Page 7
4
g027717
1
2
3
g027718
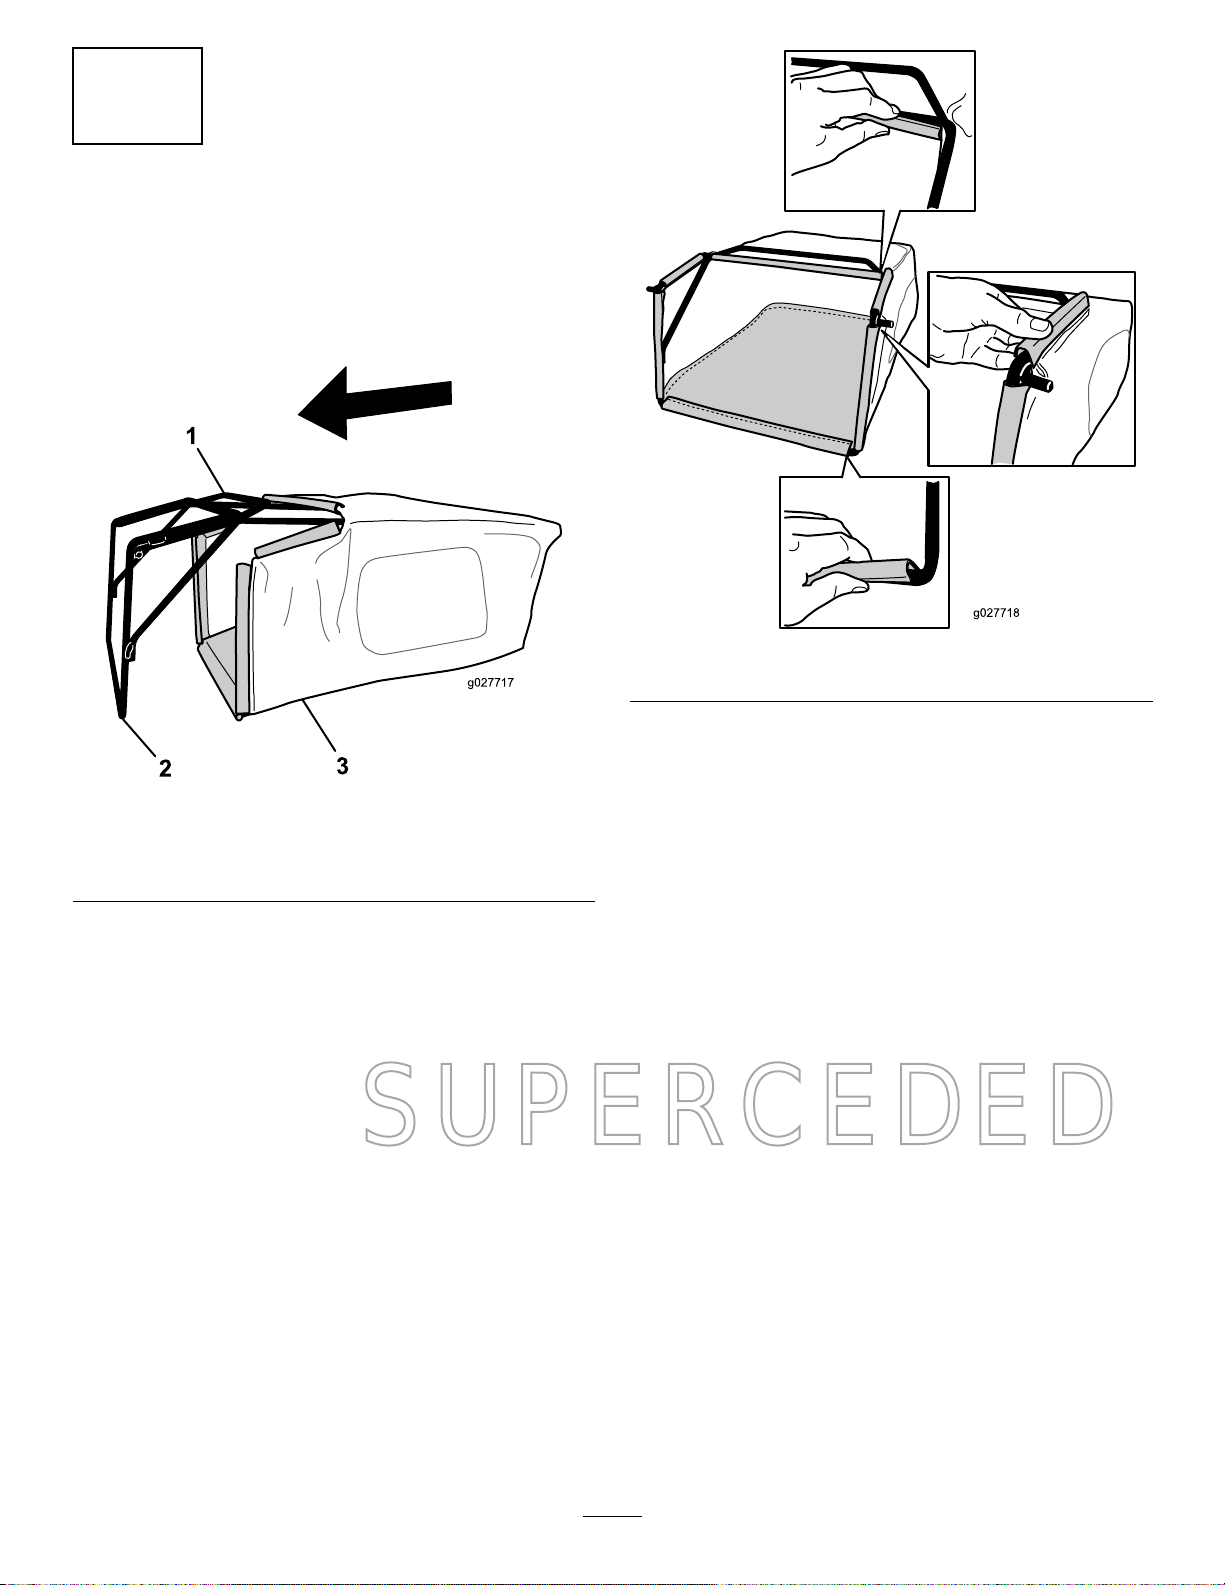
AssemblingtheGrassBag
NoPartsRequired
Procedure
1.SlipthegrassbagovertheframeasshowninFigure7.
g027718
Figure8
Figure7
1.Handle
2.Frame
Note:Donotslipthebagoverthehandle(Figure7).
2.Hookthebottomchannelofthebagontothebottom
oftheframe(Figure8).
3.Grassbag
SUPERCEDED
3.Hookthetopandsidechannelsofthebagontothetop
andsidesoftheframe,respectively(Figure8).
g027717
7
Page 8

ProductOverview
1
2
3
4
5
6
7
8
9
10
11
12
13
14
15
g028352
16
g019644
1
2
3
4
g019652
1 2
3
4
1
2
G019669
g028352
Figure9
Controls
Figure11
Throttle(throttlelevernotshownforthesakeofclarity)
1.Choke3.Slow
2.Fast
4.Stop
g019652
1.Sparkplug(underbrush
guard)
2.Airlter11.Grassbag
3.Oilll/dipstick
4.Throttlelever
5.Fuel-tankcap
6.Reardoor15.Beltcover
7.Brakelever16.Frontcutting-heightlever
8.Stop
9.Handle
10.Controlbar
12.Rearcutting-heightlever
13.Fuel-shutoffvalve
14.Oillter
17.Belt-cover-accesspanel
SUPERCEDED
Figure10
1.Grassbag3.Side-dischargechute
2.Rear-dischargeplug
4.Side-dischargedoor
g019669
Figure12
1.Handle
Controlbar
2.Controlbar
Specications
g019644
ModelWeightLengthWidthHeight
22205TE72kg
(159lb)
175cm
(69
inches)
81cm
(32
inches)
97cm
(38-1/2
inches)
8
Page 9

Operation
g019643
1
BeforeOperation
BeforeOperationSafety
GeneralSafety
•Becomefamiliarwiththesafeoperationoftheequipment,
operatorcontrols,andsafetysigns.
•Checkthatallguardsandsafetydevices,suchasdoors
and/orgrasscatchers,areinplaceandworkingproperly.
•Alwaysinspectthemachinetoensurethattheblades,
bladebolts,andcuttingassemblyarenotwornor
damaged.
•Inspecttheareawhereyouwillusethemachineand
removeallobjectsthatthemachinecouldthrow.
•Adjustingthecuttingheightmaybringyouintocontact
withthemovingblade,causingseriousinjury.
–Shutofftheengineandwaitforallmovingpartsto
stop.
–Donotputyourngersunderthehousingwhen
adjustingthecuttingheight.
FillingtheFuelTank
•Forbestresults,useonlyclean,fresh,unleadedgasoline
withanoctaneratingof87orhigher((R+M)/2rating
method).
•ETHANOL:Gasolinewithupto10%ethanol(gasohol)
or15%MTBE(methyltertiarybutylether)byvolume
isacceptable.EthanolandMTBEarenotthesame.
Gasolinewith15%ethanol(E15)byvolumeisnot
approvedforuse.Neverusegasolinethatcontainsmore
than10%ethanolbyvolume,suchasE15(contains15%
ethanol),E20(contains20%ethanol),orE85(contains
upto85%ethanol).Usingunapprovedgasolinemay
causeperformanceproblemsand/orenginedamage.
Usingunapprovedgasolinewillnotbecoveredunderthe
productwarranty.
•Donotusegasolinecontainingmethanol.
•Donotstorefueleitherinthefueltankorinfuel
containersoverthewinterunlessfuelstabilizerhasbeen
addedtothefuel.
•Donotaddoiltogasoline.
Important:Toreducestartingproblems,addfuel
stabilizertothefuelallseason,mixingitwithgasoline
lessthan30daysold.
FuelSafety
DANGER
Fuelisextremelyammableandhighlyexplosive.
Areorexplosionfromfuelcanburnyouand
othersandcandamageproperty.
•Topreventastaticchargefromignitingthefuel,
placethecontainerand/ormachinedirectlyon
thegroundbeforelling,notinavehicleoron
anobject.
•Fillthefueltankoutdoors,inanopenarea,when
theengineiscold.Wipeupanyfuelthatspills.
•Donothandlefuelwhensmokingoraroundan
openameorsparks.
•Storefuelinanapprovedcontainerandkeepit
outofthereachofchildren.
SUPERCEDED
WARNING
Fuelisharmfulorfatalifswallowed.Long-term
exposuretovaporscancauseseriousinjuryand
illness.
•Avoidprolongedbreathingofvapors.
•Keepyourhandsandfaceawayfromthenozzle
andthefuel-tankopening.
•Keepfuelawayfromyoureyesandskin.
Refertoyourenginemanualforadditionalinformation.
g019643
Figure13
1.Fuel-tankcap
9
Page 10
CheckingtheEngine-OilLevel
1
2
4
6
7
8
3
5
G01991 1
g019653
1
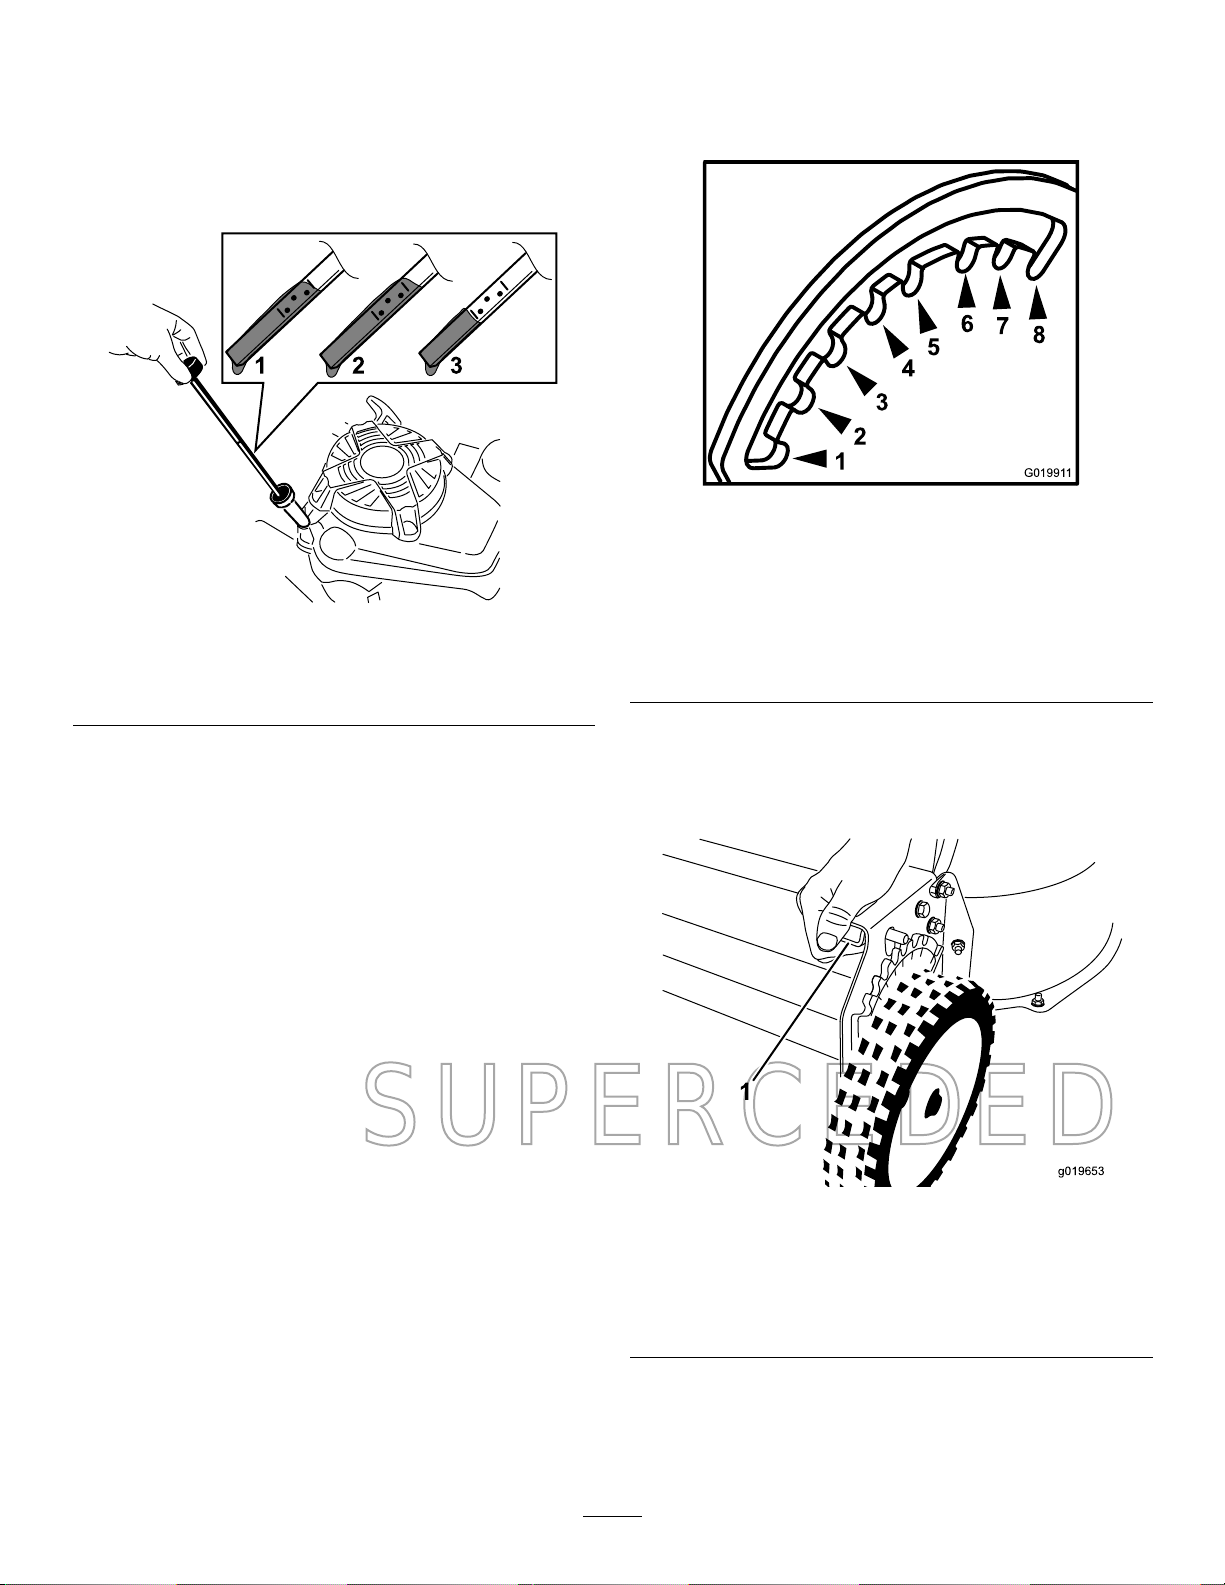
AdjustingtheCuttingHeight
ServiceInterval:Beforeeachuseordaily
1.Movethemachinetoalevelsurface.
2.Removethedipstickbyrotatingthecap
counterclockwiseandpullingitout(Figure14).
Figure14
1.Full3.Low
2.High
Thecuttingheightsrangefrom38mm(1-1/2inches)to127
mm(5inches)in13mm(1/2inch)increments.
g019911
Figure15
Viewfromfront,leftsideofthemachine
1.38mm(1-1/2inches)5.89mm(3-1/2inches)
g194742
2.51mm(2inches)6.102mm(4inches)
3.64mm(2-1/2inches)7.114mm(4-1/2inches)
4.76mm(3inches)8.127mm(5inches)
3.Wipethedipstickcleanwithacleancloth.
4.Insertthedipstickintotheoil-lltube,thenremove
thedipstick.
5.Readtheoillevelonthedipstick(Figure14).
•IftheoilisbelowtheAddmarkonthedipstick,
carefullypourasmallamountofoilintotheoil-ll
tube,wait3minutes,andthenrepeatsteps3
through5untiltheoillevelisattheFullmarkon
thedipstick.
•IftheoilisabovetheFullmarkonthedipstick,
draintheexcessoiluntiltheoillevelisattheFull
markonthedipstick.Todraintheexcessoil,refer
toChangingtheEngineOil(page18).
Important:Iftheoillevelinthecrankcaseistoo
lowortoohighandyouruntheengine,youmay
damagetheengine.
6.Installthedipstickintotheoil-lltubesecurely.
SUPERCEDED
Thecuttingheightiscontrolledwithafrontleverandarear
lever,bothontheleftsideofthemachine(Figure16and
Figure17).Toraiseorlowerthemachine,engagethelever,
raiseorlowerthemachine,andthendisengagethelever.
g019653
Figure16
Frontcutting-heightlever
1.Squeezethelevertodisengageit.
10
Page 11

g019645
Figure17
Rearcutting-heightlever
NotUsingtheGrassBag
1.Movethemachineontoapavedsurfaceinanon-windy
area.
2.Setall4wheelstothe89mm(3-1/2inch)cutting
heightsetting.
3.Takeahalfsheetofnewspaperandcrumpleitintoa
ballsmallenoughtogounderthemachine(about75
mmor3inchesindiameter).
4.Placethenewspaperballabout13cm(5inches)in
frontofthemachine.
5.Starttheengine.
6.Engagetheblades.
7.Releasethecontrolbarandbegincountingout3
seconds.
8.Onthecountof3,pushthemachinequicklyforward
overthenewspaper.
g019645
9.Shutofftheengineandwaitforallmovingpartsto
stop.
10.Gotothefrontofthemachineandcheckthe
newspaperball.
Note:Ifthenewspaperballdidnotgounderthe
machine,repeatsteps4through10.
CheckingtheBlade-Stop SystemOperation
Beforeeachuse,checkthatthebladesstopwithin3seconds
ofreleasingthecontrolbar.
UsingtheGrassBag
ServiceInterval:Beforeeachuseordaily—Checkthe
blade-stopsystemoperation.Theblades
shouldstopwithin3secondsofreleasing
thecontrolbar;iftheydonot,contactan
AuthorizedServiceDealer.
Youcanusethegrassbagtochecktheblade-stopsystem.
1.Removetherear-dischargeplug.
2.Installtheemptygrassbagonthemachine.
3.Starttheengine.
4.Engagetheblades.
Note:Thebagshouldbegintoinate,indicatingthat
thebladesarerotating.
5.Whilewatchingthebag,releasethecontrolbar.
Note:Ifthebagdoesnotdeatewithin3secondsof
releasingthecontrolbar,theblade-stopsystemmaybe
deterioratingand,ifignored,couldresultinanunsafe
operatingcondition.Havethemachineinspectedand
servicedbyanAuthorizedServiceDealer.
6.Shutofftheengineandwaitforallmovingpartsto
stop.
SUPERCEDED
Important:Ifthenewspaperisunravelledor
shredded,thebladesdidnotstopproperly,which
couldresultinanunsafeoperatingcondition.
ContactanAuthorizedServiceDealer.
DuringOperation
DuringOperatingSafety
GeneralSafety
•Wearappropriateclothing,includingeyeprotection;
slip-resistant,substantialfootwear;andhearing
protection.Tiebacklonghair,securelooseclothing,and
donotwearjewelry.
•Donotoperatethemachinewhileill,tired,orunderthe
inuenceofalcoholordrugs.
•Thebladeissharp;contactingthebladecanresultin
seriouspersonalinjury.Shutofftheengineandwaitfor
allmovingpartstostopbeforeleavingtheoperating
position.
•Whenyoureleasetheblade-controlbar,theengineshould
shutoffandthebladeshouldstopwithin3seconds.If
not,stopusingyourmachineimmediatelyandcontactan
AuthorizedServiceDealer.
•Operatethemachineonlyingoodvisibilityand
appropriateweatherconditions.Donotoperatethe
machinewhenthereistheriskoflightning.
•Wetgrassorleavescancauseseriousinjuryifyouslipand
contacttheblade.Avoidmowinginwetconditions.
11
Page 12

•Useextremecarewhenapproachingblindcorners,
g019650
1
g019651
1
G019671
1
shrubs,trees,orotherobjectsthatmayblockyourview.
3.MovethethrottlecontroltotheCHOKEposition
(Figure11).
•Watchforholes,ruts,bumps,rocks,orotherhidden
objects.Uneventerraincouldcauseaslip-and-fall
accident.
•Stopthemachineandinspectthebladesafterstrikingan
objectorifthereisanabnormalvibrationinthemachine.
Makeallnecessaryrepairsbeforeresumingoperation.
•Beforeleavingtheoperatingposition,shutofftheengine,
andwaitforallmovingpartstostop.
•Iftheenginehasbeenrunningthemuferwillbehotand
canseverelyburnyou.Keepawayfromthehotmufer.
•Checkthegrasscatchercomponentsandthedischarge
guardfrequentlyandreplacethemwiththemanufacturer’s
recommendedpartswhennecessary.
•UseaccessoriesandattachmentsapprovedbytheThe
Toro®Companyonly .
SlopeSafety
•Mowacrossthefaceofslopes;neverupanddown.Use
extremecautionwhenchangingdirectiononslopes.
•Donotmowonexcessivelysteepslopes.Poorfooting
couldcauseaslip-and-fallaccident.
4.Pullthestarterhandlelightlyuntilyoufeelresistance,
thenpullitsharply.
5.MovethethrottlecontrollevertotheFASTposition
whentheenginestarts(Figure11).
Note:Iftheenginefailstostartafter3pulls,repeat
steps3through5.
ShuttingofftheEngine
1.MovethethrottlecontroltotheOFFpositionandwait
forallmovingpartstostop.
2.Closethefuel-shutoffvalveanddisconnectthewire
fromthesparkplugifyoudonotusethemachineor
leaveitunattended.
OperatingtheSelf-Propel DriveandEngagingthe CuttingBlades
•Tooperatetheself-propeldrivewithoutengagingthe
blades,raisethecontrolbartothehandle(Figure19).
•Mowwithcautionneardrop-offs,ditches,or
embankments.
StartingtheEngine
1.Connectthewiretothesparkplug(Figure9).
2.Openthefuel-shutoffvalve(Figure18).
Note:Whenthefuel-shutoffvalveisopen,theleveris
parallelwiththefuelline.
SUPERCEDED
g019671
Figure19
1.Raisethecontrolbartothehandle.
•Tooperatetheself-propeldriveandengagetheblades,
slidethecontrolbarallthewaytotherightandraiseit
tothehandle(Figure20).
1.Fuel-shutoffvalve
g019651
Figure18
12
Page 13

G019672
2
1
Figure20
g028360
1
2
3
g028359
1
2
3
G019812
DisengagingtheParkingBrake
Disengagetheparkingbrakebypushingthebrakeleverdown
tothehandle(Figure22).
g019672
1.Slidethecontrolbartothe
right.
2.Raisethecontrolbarto
thehandle.
•Todisengagetheself-propeldriveandtheblades,release
thecontrolbar.
Note:Youcanvarythegroundspeedbyincreasingor
decreasingthedistancebetweenthecontrolbarandthe
handle.Lowerthecontrolbartoreducethespeedwhenyou
makeaturnorifthemachineismovingtoofast.Ifyoulower
thecontrolbartoofar,themachinestopsself-propelling.
Squeezethecontrolbarclosertothehandletoincreasethe
groundspeed.Whenyouholdthecontrolbartightagainst
thehandle,themachineself-propelsatthemaximumground
speed.
EngagingandDisengagingthe ParkingBrake
EngagingtheParkingBrake
Engagetheparkingbrakebypullingthebrakeleverupfrom
thehandle(Figure21).
Figure22
Parkingbrakedisengaged
1.Brakelever
2.Stop
Note:Whentheparkingbrakeisdisengagedandthecontrol
barisuptooperatetheself-propeldrive,thestoponthe
controlbarpreventsyoufromengagingtheparkingbrake.
3.Controlbar
RecyclingtheClippings
Thismachinecomesfromthefactoryreadytorecyclegrass
andleafclippingsbackintothelawn.Topreparethemachine
torecycle:
•Iftheside-dischargechuteisonthemachine,removeit
andinstalltheside-dischargedeector;refertoRemoving
theSide-DischargeChute(page15).
•Ifthegrassbagisonthemachine,removeit;referto
RemovingtheGrassBag(page14).
g028359
SUPERCEDED
Figure21
Parkingbrakeengaged
1.Brakelever
2.Stop
Note:Whentheparkingbrakeisengaged,thestoponthe
controlbarpreventsyoufromraisingthecontrolbarto
operatetheself-propeldrive.
3.Controlbar
•Iftherear-dischargeplugisnotinstalled,gripitby
thehandle,raisethereardoor,andinsertitintothe
rear-dischargechuteuntilthelatchlocksintoplace;refer
toFigure23.
g028360
g019812
Figure23
1.Rear-dischargeplug2.Reardoor
13
Page 14

BaggingtheClippings
1
G019798
2
G019649
1
2
3
g019647
1
Usethegrassbagwhenyouwanttocollectgrassandleaf
clippingsfromthelawn.
Iftheside-dischargechuteisonthemachine,removeitand
installtheside-dischargedoorbeforebaggingtheclippings;
refertoRemovingtheSide-DischargeChute(page15).
InstallingtheGrassBag
1.Raiseandholdupthereardoor(Figure24).
InstallingtheSide-DischargeChute
Important:Ensurethattherear-dischargeplugisin
placebeforeyourecycletheclippings.
1.Shutofftheengineandwaitforallmovingpartsto
stop.
2.Removethegrassbagifitisinstalledonthemachine;
refertoRemovingtheGrassBag(page14).
3.Inserttherear-dischargeplug;refertoBaggingthe
Clippings(page14).
4.Removetheside-dischargedoorbypullinguponthe
springthatholdsthedoorinplaceandremovingthe
door(Figure25).
Figure24
1.Bagrod2.Reardoor
2.Removetherear-dischargeplugbypullingdownonthe
latchwithyourthumbandpullingtheplugoutfrom
themachine(Figure23).
3.Installthebagrodintothenotchesatthebaseofthe
handle,androckthebagbackandforthtoensurethat
therodisseatedatthebottomofbothnotches;refer
toFigure24.
4.Lowerthereardooruntilitrestsonthegrassbag.
SUPERCEDED
RemovingtheGrassBag
Toremovethebag,reversethestepsinInstallingtheGrass
Bag(page14).
Side-Dischargingthe Clippings
Usethesidedischargeforcuttingverytallgrass.
g019798
g019649
Figure25
1.Topofside-dischargedoor3.Side-dischargedoor
2.Spring
5.Installtheside-dischargechute(Figure26)bypulling
uponthespring,placingthechuteovertheopening,
andloweringthespringoverthetapsonthetopof
thedischargechute.
g019647
Figure26
1.Side-dischargechute
14
Page 15

RemovingtheSide-DischargeChute
Toremovetheside-dischargechute,reversethestepsin
InstallingtheSide-DischargeChute(page14).
OperatingTips
GeneralTips
•Reviewthesafetyinstructionsandreadthismanual
carefullybeforeoperatingthemachine.
•Cleartheareaofsticks,stones,wire,branches,andother
debristhatthebladescouldhitandthrow .
•Keepeveryone,especiallychildrenandpets,awayfrom
theareaofoperation.
•Avoidstrikingtrees,walls,curbs,orothersolidobjects.
Neverdeliberatelymowoveranyobject.
•Ifthemachinestrikesanobjectorstartstovibrate,
immediatelyshutofftheengine,disconnectthewirefrom
thesparkplug,andexaminethemachinefordamage.
•Maintainsharpbladesthroughoutthecuttingseason.
Periodicallyledownnicksontheblades.
•ReplacethebladeswhennecessarywithoriginalToro
replacementblades.
•Mowonlydrygrassorleaves.Wetgrassandleavestend
toclumpontheyardandcancausethemachinetoplug
ortheenginetostall.
•Cleantheundersideofthemachinedeckaftereach
mowing.RefertoCleaningundertheMachine(page15).
•Keeptheengineingoodrunningcondition.
•Settheenginespeedtothefastestpositionforthebest
cuttingresults.
•Cleantheairlterfrequently.Mulchingstirsupmore
clippingsanddustwhichclogstheairlterandreduces
engineperformance.
CuttingGrass
•Grassgrowsatdifferentratesatdifferenttimesofthe
year.Inthesummerheat,itisbesttocutgrassatthe51
mm(2inch),64mm(2-1/2inch),or83mm(3inch)
cutting-heightsettings.Cutonlyaboutathirdofthegrass
bladeatatime.Donotcutbelowthe51mm(2inch)
settingunlessthegrassissparseoritislatefallwhen
grassgrowthbeginstoslowdown.
•Whencuttinggrassover15cm(6inches)tall,rstmow
atthehighestcuttingheightsettingandwalkslower;then
mowagainatalowersettingforthebestlawnappearance.
Ifthegrassistoolongandtheleavesclumpontopofthe
lawn,themachinemayplugandcausetheenginetostall.
•Alternatethemowingdirection.Thishelpsdispersethe
clippingsoverthelawnforevenfertilization.
Ifthenishedlawnappearanceisunsatisfactory,try1or
moreofthefollowing:
SUPERCEDED
•Sharpentheblades.
•Walkataslowerpacewhilemowing.
•Raisethecuttingheightonyourmachine.
•Cutthegrassmorefrequently.
•Overlapcuttingswathsinsteadofcuttingafullswath
witheachpass.
CuttingLeaves
•Aftercuttingthelawn,ensurethathalfofthelawnshows
throughthecutleafcover.Youmayneedtomakemore
thanasinglepassovertheleaves.
•Forlightleafcoverage,setallthewheelsatthesame
cuttingheightsetting.
•Slowdownyourmowingspeedifthemachinedoesnot
cuttheleavesnelyenough.
AfterOperation
AfterOperatingSafety
GeneralSafety
•Cleangrassanddebrisfromthemachinetohelpprevent
res.Cleanupoilorfuelspills.
•Allowtheenginetocoolbeforestoringthemachinein
anyenclosure.
•Neverstorethemachineorfuelcontainerwherethereis
anopename,spark,orpilotlight,suchasonawater
heateroronotherappliances.
HaulingSafety
•Usecarewhenloadingorunloadingthemachine.
•Securethemachinefromrolling.
CleaningundertheMachine
Foroptimalcuttingperformance,keeptheundersideofthe
machinehousingclean.Youmayeitherwashorscrapethe
clippingsawayfromunderthemachinehousing.
WashingundertheMachine
ServiceInterval:Beforeeachuseordaily—Cleanunderthe
machinehousing.
1.Positionthemachineonaatconcreteorasphalt
surfacenearagardenhose.
2.Starttheengine.
3.Holdtherunninggardenhoseathandlelevelanddirect
thewatertoowonthegroundjustinfrontofthe
rightrearwheel(Figure27).
15
Page 16

Figure27
1.Rightrearwheel
Note:Thebladeswilldrawinwaterandwashout
clippings.Letthewaterrununtilyounolongersee
clippingsbeingwashedoutfromunderthemachine.
4.Shutofftheengineandwaitforallmovingpartsto
stop.
5.Turnoffthewater.
6.Startthemachineandletitrunforafewminutestodry
outthemoistureonthemachineanditscomponents.
g002275
g196471
Figure28
1.Gears
ScrapingundertheMachine
Ifwashingdoesnotremovealldebrisfromunderthe
machine,scrapeitclean.
1.Disconnectthewirefromthesparkplug.
2.Drainthefuelfromthefueltank;refertoEmptying
theFuelTankandCleaningtheFilter(page20).
3.Tipthemachineontoitsside,withtheairlterupin
theair,untiltheupperhandlerestsontheground.
4.Removethedirtandgrassclippingswithahardwood
scraper;avoidburrsandsharpedges.
5.Turnthemachineupright.
6.Fillthefueltank.
7.Connectthewiretothesparkplug.
CleaningtheWheels
ServiceInterval:Every40hours
1.Removetherearwheelsandcleananydebrisfromthe
wheel-geararea.
SUPERCEDED
2.Aftercleaning,applyasmallamountofanti-seizeto
thegears.
Note:Ifyouareoperatingthemachineinextreme
conditions,cleaningthewheelsmorefrequentlythan
recommendedwillresultinincreasedgearlife.
Note:Topreventdamagetothebearingseals,donotusea
highpressurewatersprayeronthebearings.
16
Page 17

Maintenance
RecommendedMaintenanceSchedule(s)
MaintenanceService
Interval
Aftertherst5hours
Beforeeachuseordaily
Every25hours
Every40hours
Every50hours
Every100hours
MaintenanceProcedure
•Changetheengineoilwithouttheoillter.
•Servicetheblade-drivesystem.
•Checktheengine-oillevel.
•Checktheblade-stopsystemoperation.Thebladesshouldstopwithin3secondsof
releasingthecontrolbar;iftheydonot,contactanAuthorizedServiceDealer.
•Cleanunderthemachinehousing.
•Inspecttheairlter.
•Checkthecuttingbladesandservicethem,ifnecessary.
•Inspecttheblades.
•Cleanthefoampre-cleaner(morefrequentlyindustyconditions).
•Cleanthewheelsandgears.
•Changetheengineoil(moreoftenindustyconditions).
•Checktheconditionofthebelts.
•Checkthefuelhoseandreplaceitifnecessary .
•Removedebrisfromunderthebeltcover.
•Servicetheblade-drivesystem.
•Changetheoillter.
•Checkthesparkplug.
•Cleanthefueltanklter.
•Changethefuellter.
Every250hours
Every300hours
Yearlyorbeforestorage
Note:Determinetheleftandrightsidesofthemachinefromthenormaloperatingposition.
Important:Refertoyourenginemanualforadditionalmaintenanceprocedures.
MaintenanceSafety
•Disconnectthespark-plugwirefromthesparkplug
beforeperforminganymaintenanceprocedure.
•Wearglovesandeyeprotectionwhenservicingthe
machine.
•Thebladeissharp;contactingthebladecanresultin
seriouspersonalinjury.Weargloveswhenservicingthe
blade.
•Changetheblade-brake-clutchbelt.
•Changethetransmissionbelt.
•Replacethepaperairlter(morefrequentlyindustyconditions).
•Emptythefueltankbeforerepairsasdirectororbeforestorage.
ServicingtheAirFilter
ServiceInterval:Beforeeachuseordaily
Every25hours—Cleanthefoampre-cleaner(more
SUPERCEDED
frequentlyindustyconditions).
Every300hours—Replacethepaperairlter(more
frequentlyindustyconditions).
Important:Donotoperatetheenginewithouttheair
lterassembly;extremeenginedamagewilloccur.
•Nevertamperwithsafetydevices.Checktheirproper
operationregularly.
1.Shutofftheengineandwaitforallmovingpartsto
stop.
•Tippingthemachinemaycausethefueltoleak.Fuelis
ammableandexplosive,andcancausepersonalinjury.
Runtheenginedrytoremovethefuelwithahandpump;
neversiphonthefuel.
2.Disconnectthewirefromthesparkplug.
3.Removethecoverandcleanitthoroughly(Figure29).
17
Page 18

ChangingtheEngineOil
ServiceInterval:Aftertherst5hours—Changetheengine
oilwithouttheoillter.
Every50hours—Changetheengineoil(moreoften
industyconditions).
Note:Runtheengineafewminutesbeforechangingthe
oiltowarmit.Warmoilowsbetterandcarriesmore
contaminants.
Engineoilcapacity:Withoillter:0.85L(29oz);without
oillter:0.65L(22oz)
Oilviscosity:SAE30orSAE10W-30detergentoil
APIserviceclassication:SJorhigher
Figure29
1.Cover3.Air-lterbase
2.Foampre-lterandpaper
lter
4.Removethefoampre-lterfromthepaperlter(Figure
29),andreplacethepaperlterifitisexcessivelydirty.
Important:Donottrytocleanapaperlter.
5.Washthefoampre-cleanerwithamilddetergentand
water,thenblotitdry.
Note:Donotaddoiltothefoampre-cleaner.
6.Installthefoampre-cleanerontothepaperlter.
7.Installtheair-lterassembly.
8.Installthecover.
g006591
1.Movethemachinetoalevelsurface.
2.RefertoMaintenance(page17).
3.Removethedipstickbyrotatingthecap
counterclockwiseandpullingitout(Figure30).
g194742
Figure30
1.Full3.Low
2.High
4.Tipthemachineontoitsside(sothattheairlterisup)
SUPERCEDED
18
todraintheusedoilfromtheoil-lltube(Figure31).
Page 19

G019648
g019648
g019650
1
Figure31
5.Afterdrainingtheusedoil,returnthemachinetothe
operatingposition.
6.Carefullypourabout3/4oftheenginecapacityofoil
intotheoil-lltube.
7.Waitabout3minutesfortheoiltosettleintheengine.
6.Removetheoillter(Figure32).
Note:Makesurethattheoil-ltergasketcomesoff
withthelter.
g019650
Figure32
1.Oillter
8.Wipethedipstickcleanwithacleancloth.
9.Insertthedipstickintotheoil-lltube,thenremove
thedipstick.
10.Readtheoillevelonthedipstick(Figure30).
•IftheoillevelisbelowtheAddmarkonthe
dipstick,carefullypourasmallamountofoilinto
theoil-lltube,wait3minutes,andrepeatsteps
8through10untiltheoillevelisattheFullmark
onthedipstick.
•IftheoillevelisabovetheFullmarkonthe
dipstick,draintheexcessoiluntiltheoillevelisat
theFullmarkonthedipstick.
Important:Iftheoillevelintheengineistoo
lowortoohighandyouruntheengine,youmay
damagetheengine.
11.Installthedipsticksecurely.
12.Recycletheusedoilproperly.
SUPERCEDED
ChangingtheOilFilter
ServiceInterval:Every100hours
1.Runtheenginetowarmtheoil.
2.Shutofftheengineandwaitforallmovingpartsto
stop.
3.Disconnectthewirefromthesparkplug.
4.Draintheengineoil;refertoChangingtheEngineOil
(page18).
5.Placearagundertheoilltertocatchanyoilthatmay
leakoutasyouremovethelter.
7.Useyourngertocoatthegasketonthenewlter
withoil(Figure33).
g002805
Figure33
1.Gasket
8.Installthenewlteruntilthegasketcontactsthelter
base,thenhandtightenthelteranadditional2/3turn.
9.FillthecrankcasetotheFulllineonthedipstickwith
freshoil;refertoChangingtheEngineOil(page18).
10.Connectthewiretothesparkplug.
11.Runtheengineforabout3minutes.
12.Shutofftheengine,waitforallmovingpartstostop,
andcheckforoilleakagearoundthelter.
13.Addoiltocompensatefortheoilintheoillter;refer
toChangingtheEngineOil(page18)
14.Recycletheusedoillteraccordingtolocalcodes.
19
Page 20

ServicingtheSparkPlug
g019650
1
g019924
1
2
EmptyingtheFuelTankand
ServiceInterval:Every100hours
UseanNGKBPR5ESsparkplugorequivalent.
1.Shutofftheengineandwaitforallmovingpartsto
stop.
2.Disconnectthewirefromthesparkplug.
3.Cleanaroundthesparkplug.
4.Removethesparkplugfromthecylinderhead.
Important:Replaceacracked,fouled,ordirty
sparkplug.Donotcleantheelectrodesbecause
gritenteringthecylindercandamagetheengine.
5.Setthegapontheplugto0.76mm(0.030inch);refer
toFigure34.
Figure34
CleaningtheFilter
ServiceInterval:Every50hours—Checkthefuelhoseand
replaceitifnecessary.
Every100hours—Cleanthefueltanklter.
Yearlyorbeforestorage—Emptythefueltankbefore
repairsasdirectororbeforestorage.
Note:Thefueltanklter(screen)elementislocatedinside
thefueltankattheoutlet.Thislterisapartofthefueltank
andcannotberemoved.
1.Shutofftheengineandwaitforittocooldown.
Important:Drainfuelfromacoldengineonly.
2.Disconnectthewirefromthesparkplug.
3.Closethefuel-shutoffvalve.
4.Disconnectthefuellinebylooseningthetubeclampat
thecarburetor.
5.Openthefuel-shutoffvalveanddrainthefuel
completelyfromthetankandfuellineintoanapproved
fuelcontainer.
6.Removethefueltankfromthemachine.
7.Pourasmallamountoffuelinthefueltank,move
thefuelaroundinthetank,andpouritoutintoan
g000533
approvedfuelcontainer.
8.Installthefueltankandthefuelline.
1.Center-electrodeinsulator3.Airgap(nottoscale)
2.Sideelectrode
6.Installthesparkplugandthegasketseal.
7.Torquetheplugto23N∙m(17ft-lb).
8.Connectthewiretothesparkplug.
CheckingtheConditionofthe Belts
ServiceInterval:Every50hours
1.Shutofftheengineandwaitforallmovingpartsto
stop.
2.Removethebeltcover(Figure9)byremovingthe4
boltsthatholdittothemachinehousing.
3.Checkthebeltsforanycracks,frayededges,burn
marks,oranyotherdamage.
4.Replacealldamagedbelts.
5.Ifyoureplacetheblade-drivebelt,youmustadjustit.
RefertoServicingtheBlade-DriveSystem(page21).
6.Installthebeltcoverwiththe4boltsthatyouremoved
instep2.
SUPERCEDED
ChangingtheFuelFilter
ServiceInterval:Every100hours
1.Shutofftheengineandwaitforallmovingpartsto
stop.
2.Disconnectthewirefromthesparkplug.
3.Closethefuel-shutoffvalve(Figure35).
g019924
Figure35
1.Fuellter2.Fuel-shutoffvalve
20
Page 21

4.Removethefuellter(Figure35)fromthefuellineby
g019641
1
2
3
4
5
6
7
8
looseningthetubeclampssurroundingthefuellter.
5.Installanewfuellterinthefuellineusingthetube
clampsthatyouremovedinstep4.
ServicingtheBlade-Drive System
ServiceInterval:Aftertherst5hours
Every50hours—Removedebrisfromunderthebelt
cover.
Every50hours—Servicetheblade-drivesystem.
1.Loosenthe2screwsonthebelt-cover-accesspaneland
removethepanel(Figure36).
Figure37
1.ReadtheOperator’s
Manualbeforeperforming
anymaintenance.
Note:Ifthereisavisiblegapbetweenthegaugeand
thespring,tightentheadjustingboltandthenutuntil
thefeelergaugebarelyslidesfreelyinandoutofthe
gap(Figure36).
Important:Donotovertightentheadjustingbolt.
Thiscoulddamagetheblade-drivebelt.
4.Installthebelt-cover-accesspanel.
2.Checkbelttensionevery
50hours.
decal116-8528
Figure36
1.Belt-tensionspring5.Blade-drivebelt
2.Adjustingbolt6.Wall
3.Gap
4.Adjustingnut8.Belt-cover-accesspanel
2.Brushorblowoutdebrisfromtheinsideofthebelt
coverandaroundalltheparts.
3.Holdafeelergaugesetbetween0.005and0.03inches
(0.13and0.76mm)againstthewallandslideitdown
behindthebelttensionspring;refertoFigure37.
7.Beltcover
SUPERCEDED
g019641
21
Page 22

ServicingtheCuttingBlades
g017223
ServiceInterval:Beforeeachuseordaily
Important:
blades pr oper l y .
areuncomfortableperformingthisprocedure,contact
anAuthorizedServiceDealer.
Examinethebladesforsharpnessandanywearordamage
wheneveryourunoutoffuel;refertoInspectingthe
Blades(page22).Ifthebladeedgeisdullornicked,haveit
sharpenedorreplaceit.Ifthebladesareworn,bent,damaged
orcracked,replacethemimmediatelywithagenuineToro
replacementblades.
Y ou will need a torque wr ench to install the
Ifyoudonothaveatorquewrenchor
DANGER
Awornordamagedbladecanbreak,andapieceof
thebladecouldbethrowntowardyouorbystanders,
resultinginseriouspersonalinjuryordeath.
•Inspectthebladesperiodicallyforwearor
damage.
•Replacewornordamagedblades.
Note:Maintainsharpbladesthroughoutthecuttingseason,
becausesharpbladescutcleanlywithouttearingorshredding
thegrassblades.Tearingandshreddingturnsgrassbrownat
theedges,whichslowsgrowthandincreasesthechanceof
disease.
g017223
Figure38
1.Curvedarea3.Wear/slotforming
2.Cuttingedge4.Crack
2.Inspectthebladesthemselves,especiallythecurved
area(Figure38).Ifyounoticeanydamage,wear,or
aslotforminginthisarea,immediatelyreplacethem
withnewblades.
DANGER
Ifyouallowabladetowear,aslotwillform
betweenthesailandatpartoftheblade.
Eventuallyapieceoftheblademaybreak
offandbethrownfromunderthehousing,
possiblyresultinginseriousinjurytoyouor
bystanders.
•Inspectthebladesperiodicallyforwearor
damage.
•Nevertrytostraightenabladethatisbent
orweldabrokenorcrackedblade.
PreparingtoServicetheCuttingBlades
Tipthemachineontoitsside,withtheairlterupintheair,
untiltheupperhandlerestsontheground.
WARNING
Thebladesaresharp;contactingabladecould
resultinseriouspersonalinjury.
•Disconnectthewirefromthesparkplug.
•Weargloveswhenservicingtheblades.
SUPERCEDED
InspectingtheBlades
ServiceInterval:Beforeeachuseordaily
1.Inspectthecuttingedges(Figure38).Iftheedgesare
notsharporhavenicks,removethebladesandhave
themsharpenedorreplacethem.
•Checkforbentblades;refertoChecking
forBentBlades(page22).
CheckingforBentBlades
1.Rotatethebladesuntiltheyarepositionedasshown
inFigure39.
22
Page 23

B
B
2
1
3
g016532
Figure39
G016530
1
2
3
4
g016527
g016532
Figure40
1.Frontofcuttingdeck3.Measureformthecutting
2.MeasureatlocationsA
andB
2.Measurefromalevelsurfacetothecuttingedges
atlocationsAandB,(Figure39),andrecordboth
dimensions.
3.Rotatethebladessothattheiroppositeendsareat
locationsAandB.
4.Repeatthemeasurementsinstep2andrecordthem.
Note:IfthedifferencebetweenthedimensionsAand
Bobtainedinsteps2and4exceeds1/8inch,replace
theblades;refertoRemovingtheBlades(page23).
edgetoasmooth,level
surface
WARNING
Abladethatisbentordamagedcouldbreak
apartandcouldseriouslyinjureorkillyouor
bystanders.
•Alwaysreplaceabentordamagedblade
withanewblade.
•Neverleorcreatesharpnotchesinthe
edgesorsurfacesofablade.
RemovingtheBlades
Replacethebladeswhentheystrikeasolidobject,areoutof
balance,bent,orworn.UseonlygenuineTororeplacement
blades.
1.Useablockofwoodtoholdeachbladesteadyandturn
thebladeboltcounterclockwiseasshowninFigure40.
SUPERCEDED
2.RemoveeachbladeasshowninFigure41.
g016530
Figure41
1.Spindle(2)3.Blade(2)
2.Bladedriver(2)4.Bladebolt(2)
3.Inspectthepinsonthebladedriversforwearand
damage.
InstallingtheBlades
WARNING
Incorrectlyinstallingthebladescoulddamagethe
machineorcauseaninjurytotheoperatororto
bystanders.
Installthebladesaccordingtotheinstructions.
1.Installtherstbladesothatitishorizontal,alongwith
allmountinghardwareasshowninFigure41.
Note:Tightentheboltwithyourngers.
23
Page 24

Important:Positionthecurvedendsoftheblades
g016537
1
G016536
G019899
1
2
topointtowardthemachinehousing.Besureto
nesttheraisedareasoneachbladedriverwiththe
recessesintheheadofitscorrespondingspindle,
andthepinsontheothersideofeachbladedriver
withtheholesinitscorrespondingblade.
2.Steadyeachbladewithaboardandturnthebladebolt
clockwisewithatorquewrenchasshowninFigure42;
torqueeachbladeboltto82N∙m(60ft-lb).
4.Tightenthesecondblade;refertostep2.
5.Rotatethebladesbyhandafull360°turntoensure
thattheydonottouch.
Note:Ifthebladestoucheachother,theyarenot
mountedcorrectly.Repeatsteps1through3untilthe
bladesnolongertoucheachother.
ChangingtheBlade-DriveBelt
Changetheblade-drivebeltasneeded.
1.Shutofftheengineandwaitforallmovingpartsto
stop.
2.Disconnectthewirefromthesparkplug.
3.Removethebeltcover(Figure9)byremovingthe4
boltsthatholdittothemachinehousing.
Note:Savetheboltsforinstallingthebeltcoverto
themachinehousing.
4.Removeanydebrisfromunderthebeltcover.
5.RemovetheBBCbeltguardandthemounting
hardware.
Figure42
Important:Abolttorquedto82N∙m(60ft-lb)is
verytight.Putyourweightbehindthewrenchand
tightentheboltsecurely.Thisboltisverydifcult
toovertighten.
3.Rotatetheinstalledblade1/4turnuntilitisvertical,
andinstalltheotherbladeinthesamemannerasthe
rst(refertostep1).
Note:Thebladesshouldbeperpendicular,forming
aninverted“T”asshowninFigure43.
SUPERCEDED
Note:SavetheBBCbeltguardandhardwarefor
installationlater.
g016537
g019899
Figure44
1.BBCbelt2.BBCbeltguard
6.RemovetheBBCbeltfromthefront,leftpulley.
7.Loosentheadjustingbolt(Figure36).
8.Removethexedidlerpulleyandthehardware(Figure
45).
Figure43
1.Blade(2)
g016536
Note:Savetheidlerpulleyandhardwarefor
installationlater.
24
Page 25

G019922
Figure45
G019899
1
2
TheBBCidlerpulleyisremovedforclarity
1.Holeinthehousing3.Fixed-idlerpulley
2.Rightsprockethole
9.Removetheblade-drivebelt.
10.Aligntheholesintherightandleftsprocketswiththe
holesinthehousingasshowninFigure45.
4.Leftsprockethole
2.Disconnectthewirefromthesparkplug.
3.Removethe4boltsthatholdthebeltcovertothe
machinehousing.
Note:Savetheboltsforinstallingthebeltcoverto
themachinehousing.
4.Removethebeltcover.
5.Removeanydebrisfromunderthebeltcover.
6.Removethetransmissionbelt;refertoChangingthe
TransmissionBelt(page26).
7.RemovetheBBCbeltguard(Figure46).
Note:Savethemountinghardwareforinstallingthe
BBCbeltguardlater.
g019922
Note:Holdthesprocketsinplacewitharodora
screwdriver.
11.Whenyouhavelockedthesprocketsinplace,install
theblade-drivebeltandthexedidlerpulley.
Note:Ensurethattheteethareengagedinthe
sprockets.
12.Tightenthebelttensiontotherecommendedsettings;
refertoServicingtheBlade-DriveSystem(page21).
13.Removetherodorscrewdriverfromthesprockets.
14.Ensurethatthebladesunderthehousingareproperly
aligned;refertoServicingtheCuttingBlades(page22).
15.InstalltheBBCbeltandtheBBCbeltguardand
hardware.
16.Installthebeltcoverusingthe4boltsthatyouremoved
instep3.
17.Connectthewiretothesparkplug.
18.Checktheoperationofthecontrolbarandthe
blade-brakeclutch.
SUPERCEDED
Changingthe Blade-Brake-Clutch(BBC) Belt
ServiceInterval:Every250hours
1.Shutofftheengineandwaitforallmovingpartsto
stop.
g019899
Figure46
1.BBCbelt2.BBCbeltguard
8.RemovetheBBCbeltfromthebrake-drumpulleyand
thenremovethebeltfromthemachine.
Note:Holdoneofthebladesusingagloveorarag
andturnthebladespindletohelpremovetheBBCbelt.
9.ToinstallanewBBCbelt,reversethestepsabove.
10.AdjusttheBBCcable;refertoAdjustingthe
Blade-BrakeCable(page25).
AdjustingtheBlade-Brake Cable
Adjusttheblade-brakecablewheneveryouinstallanewcable
orreplacetheBBCbelt.
1.Shutofftheengineandwaitforallmovingpartsto
stop.
2.Disconnectthewirefromthesparkplug.
3.Removethebeltcover(Figure9)byremovingthe4
boltsthatholdittothemachinehousing.
25
Page 26

Note:Savetheboltsforinstallingthebeltcoverto
1
2
G019923
themachinehousing.
4.Removeanydebrisfromunderthebeltcover.
5.Loosenthecable-clampscrew(Figure47).
Figure47
g195615
Figure49
1.Markthecablehere
g019923
Figure48
2.Blade-brakecable
SUPERCEDED
1.Cable-clampscrew
6.Pullthecablejackettoremoveslack(Figure48).
Note:Donotputtensiononthespring.
1.Cableclamp2.Spring
7.Markthebrakecable(Figure49),thenadjustthejacket
untilthereisapproximately3mm(1/8inch)ofslack
(Figure50).
g195616
Figure50
1.Slack—3mm(1/8inch)
8.Torquethecable-clampscrewto11to14N∙m(99to
121in-lb)tolocktheadjustmentinplace.
9.Installthebeltcoverwiththe4boltsthatyouremoved
instep3.
10.Connectthewiretothesparkplug.
11.Checktheoperationoftheblade-brakeclutch.
ChangingtheTransmission
g195540
Belt
ServiceInterval:Every250hours
1.Shutofftheengineandwaitforallmovingpartsto
stop.
2.Disconnectthewirefromthesparkplug.
3.Removethe4boltsthatholdthebeltcovertothe
machinehousing.
Note:Savetheboltsforinstallingthebeltcoverto
26
themachinehousing.
4.Removethebeltcover.
5.Removeanydebrisfromunderthebeltcover.
Page 27

6.Loosenthebracketandrotatethebracketforward
G019876
1
(Figure51).
Note:Thebracketpreventsthetransmissionfrom
tippingtothepointwherethetransmissionbeltcomes
off.
1.Stopthemachineandwaitforallmovingpartstostop.
2.Loosenthecable-supportnut(Figure52).
g019876
Figure52
1.Cable-supportnut
Figure51
1.Transmissiontension
spring
2.Bracket5.Transmissionbelt
3.Transmission
7.Removethetransmissiontensionspring.
8.Removethetransmissionbeltfromthetransmission
pulley.
9.Removethetransmissionbelt.
10.Toinstallanewtransmissionbelt,reversethesteps
above.
4.BBCbelt
AdjustingtheTransmission
Ifthemachinestartstolosetraction,checkandadjustthe
transmission.
1.Shutofftheengineandwaitforallmovingpartsto
stop.
2.Disconnectthewirefromthesparkplug.
g196531
3.Slidethecable-supportnuttowardthemachineto
increasetheself-propelaction;slidethecable-support
nutawayfromthemachinetodecreasetheself-propel
action.
4.Tightenthecable-supportnut.
5.Checktheoperationforthedesireddrivecontrol,and
repeatthestepsabove,ifnecessary.
Note:Ifthemachinecreepsforwardwithoutthe
controlbarengagedorifthewheelsspinwhenyou
lifttherearwheelsofftheground,thecableistoo
tight;loosenthecable-supportnut,pullthecablejacket
upward(awayfromthemachine)slightly ,andtighten
thecable-supportnut.
Note:Youmayalsoadjustthemaximumground
speed(whenthecontrolbarisfullyengaged)asdesired.
3.Loosentheboltandnutholdingthebracketintoplace.
4.Adjustthebracketsothatitisincontactwiththe
transmission.
Note:Thebracketpreventsthetransmissionfrom
tippingtothepointwherethetransmissionbeltcomes
off.
5.Tightentheboltandnuttosecurethebracketinto
place.
SUPERCEDED
AdjustingtheSelf-Propel Cable
Ifthemachinedoesnotself-propelortendstocreepforward
whenyoureleasethecontrolbar,adjustthedrivecable.
27
Page 28

Storage
GeneralInformation
Storethemachineinacool,clean,dryplace.Coverthe
machinetokeepitcleanandprotected.
1.Performtherecommendedannualmaintenance
procedures;refertoMaintenance(page17).
2.Cleanunderthemachine;refertoCleaningunderthe
Machine(page15).
3.Removechaff,dirt,andgrimefromtheexternalparts
oftheengine,theshrouding,andthetopofthe
machine.
4.Checktheconditionoftheblades;refertoInspecting
theBlades(page22).
5.Servicetheairlter;refertoServicingtheAirFilter
(page17).
6.Tightenallnuts,bolts,andscrews.
7.Touchupallrustedorchippedpaintsurfaceswith
paintavailablefromanAuthorizedServiceDealer.
2.Removethesparkplug.
3.Usinganoilcan,addabout30ml(1oz),ofmotoroil
totheenginethroughthespark-plughole.
4.Slowlypullthestarterropeseveraltimestodistribute
oilthroughoutthecylinder.
5.Installthesparkplugbutdonotconnectthewireto
thesparkplug.Securethewiresothatitdoesnotcome
intocontactwiththesparkplug.
RemovingtheMachinefrom Storage
1.Checkandtightenallfasteners.
2.Removethesparkplugandspintheenginerapidly
usingthestartertoblowexcessoilfromthecylinder.
3.Inspectthesparkplugandreplaceitifitisdirty,worn,
orcracked;refertotheengineowner’smanual.
4.Installthesparkplugandtightenittotherecommended
torqueof20N∙m(180in-lb).
5.Performanyneededmaintenanceprocedures;referto
Maintenance(page17).
PreparingtheFuelSystem
WARNING
Fuelcanvaporizeifyoustoreitoverlongperiods
oftimeandexplodeifitcomesintocontactwith
anopename.
•Donotstorefueloverlongperiodsoftime.
•Donotstorethemachinewithfuelinthefuel
tankorthecarburetorinanenclosurewithan
opename.(Forexample,afurnaceorawater
heaterpilotlight.)
•Allowtheenginetocoolbeforestoringitinany
enclosure.
Onthelastrefuelingoftheyear,addfuelstabilizertothefuel
asdirectedbytheenginemanufacturer.Emptythefueltank
whenmowingthelasttimebeforestoringthemachine.
1.Runthemachineuntiltheengineshutsofffrom
runningoutoffuel.
2.Starttheengineagain.
SUPERCEDED
6.Checktheengine-oillevel;refertoCheckingthe
Engine-OilLevel(page10).
7.Fillthefueltankwithfreshfuel;refertoFillingthe
FuelTank(page9).
8.Connectthewiretothesparkplug.
3.Allowtheenginetorununtilitshutsoff.Whenyou
cannolongerstarttheengine,itissufcientlydry.
PreparingtheEngine
1.Whiletheengineisstillwarm,changetheengineoil
andtheoillter;refertoChangingtheEngineOil
(page18)andChangingtheOilFilter(page19).
28
Page 29

Troubleshooting
Problem
Theenginedoesnotstart.
Theenginestartshardorlosespower.
PossibleCauseCorrectiveAction
1.Thefueltankisemptyorthefuel
systemcontainsstalefuel.
2.Thefuelshutoffvalveisclosed.2.Openthefuelshutoffvalve.
3.Thethrottleleverisnotinthecorrect
position.
4.Thereisdirt,water,orstalefuelinthe
fuelsystem.
5.Thewireisnotconnectedtothespark
plug.
6.Thesparkplugispitted,fouled,orthe
gapisincorrect.
7.Thereisdirtinthefuellter.7.Replacethefuellterandcleanthe
1.Theairlterelementisdirtyandis
restrictingtheairow.
2.Theengineoillevelislowortheoilis
dirty.
3.Thefueltankventhoseisplugged.3.Cleanorreplacethefueltankvent
4.Thereisdirtinthefuellter.4.Replacethefuellterandcleanthe
5.Thereisdirt,water,orstalefuelinthe
fuelsystem.
6.Theundersideofthemachinecontains
clippingsanddebris.
7.Thesparkplugispitted,fouled,orthe
gapisincorrect.
1.Drainand/orllthefueltankwith
freshgasoline.Iftheproblempersists,
contactanAuthorizedServiceDealer .
3.MovethethrottlelevertotheChoke
position.
4.ContactanAuthorizedServiceDealer.
5.Connectthewiretothesparkplug.
6.Checkthesparkplugandadjustthe
gapifnecessary .Replacethespark
plugifitispitted,fouled,orcracked.
in-tanklterscreen.
1.Cleantheairlterpre-cleanerand/or
replacethepaperlter.
2.Checktheengineoil.Changetheoilif
itisdirtyoraddoilifitislow.
hose.
in-tanklterscreen.
5.ContactanAuthorizedServiceDealer.
6.Cleanunderthemachine.
7.Checkthesparkplugandadjustthe
gapifnecessary .Replacethespark
plugifitispitted,fouled,orcracked.
Theenginerunsrough.
Themachineorenginevibrates
excessively.
1.Thewireisnotsecurelyconnectedto
thesparkplug.
2.Thesparkplugispitted,fouled,orthe
gapisincorrect.
3.ThethrottleleverisnotintheFast
position.
4.Theairlterelementisdirtyandis
restrictingtheairow.
5.Thereisdirtinthefuellter.5.Replacethefuellterandcleanthe
SUPERCEDED
1.Abladeisbentorisoutofbalance.1.Balancetheblade(s).Ifabladeis
2.Ablade-mountingboltisloose.2.Tightentheblade-mountingbolts.
3.Theundersideofthemachinehousing
containsclippingsanddebris.
4.Theenginemountingboltsareloose.4.Tightentheenginemountingbolts.
5.Theenginepulley ,idlerpulley ,orblade
pulleyareloose.
6.Theenginepulleyisdamaged.
7.Thebladespindleisbent.
8.Thebeltisdamaged.8.Replacethebelt.
1.Connectthewiresecurelytothespark
plug.
2.Checkthesparkplugandadjustthe
gapifnecessary .Replacethespark
plugifitispitted,fouled,orcracked.
3.MovethethrottlelevertotheFast
position.
4.Cleantheairlterpre-cleanerand/or
replacethepaperlter.
in-tanklterscreen.
bent,replaceit.
3.Cleantheundersideofthemachine
housing.
5.Tightentheloosepulley .
6.ContactanAuthorizedServiceDealer.
7.ContactanAuthorizedServiceDealer.
29
Page 30

Problem
PossibleCauseCorrectiveAction
Thereisanunevencuttingpattern.
Thedischargechutegetspluggedup.
Themachinedoesnotself-propel.
Thebladesdonotrotateortheyslip.
1.All4wheelsarenotatthesameheight.1.Placeall4wheelsatthesameheight.
2.Thebladesaredull.
3.Youaremowinginthesamepattern
repeatedly.
4.Theundersideofthemachinecontains
clippingsanddebris.
5.Thebladespindleisbent.
1.ThethrottleleverisnotintheFast
position.
2.Thecuttingheightistoolow.
3.Youaremowingtoofast.3.Slowdown.
4.Thegrassiswet.
5.Theundersideofthemachinecontains
clippingsanddebris.
1.Theself-propeldrivecableisoutof
adjustmentorisdamaged.
2.Thereisdebrisinthebeltarea.
3.Thebeltisdamaged.3.Replacethebelt.
1.TheBBCbeltorthetimingbeltisworn,
loose,orbroken.
2.TheBBCbeltisoffthepulley .2.Checkthebeltfordamageandcontact
3.TheBBCcableisworn,loose,or
broken.
2.Sharpenandbalancetheblades.
3.Changethemowingpattern.
4.Cleanunderthemachine.
5.ContactanAuthorizedServiceDealer.
1.MovethethrottlelevertotheFast
position.
2.Raisethecuttingheight;ifnecessary,
mowasecondtimeatalowercutting
height.
4.Allowthegrasstodrybeforemowing.
5.Cleanunderthemachine.
1.Adjusttheself-propeldrivecable;
replacethecableifnecessary.
2.Cleanthedebrisfromthebeltarea.
1.AdjusttheBBCcable;adjustthetiming
belttension;replacethemifnecessary .
anAuthorizedServiceDealerif
necessary.
3.AdjusttheBBCcable;replaceitif
necessary.
Thebladescontacteachother.
1.Thebladesareinstalledoraligned
incorrectly.
2.Thebladeadaptersareworn,loosen,
orbroken.
3.Thetimingbeltorworn,loose,or
broken.
4.Thetimingsprocketsoridlerpulleyis
worn,loose,orbroken.
1.Installthebladesproperly.
2.Replacethebladeadapters.
3.ContactanAuthorizedServiceDealer.
4.ContactanAuthorizedServiceDealer.
SUPERCEDED
30
Page 31

EuropeanPrivacyNotice
TheInformationT oroCollects
ToroWarrantyCompany(T oro)respectsyourprivacy.Inordertoprocessyourwarrantyclaimandcontactyouintheeventofaproductrecall,weaskyou
tosharecertainpersonalinformationwithus,eitherdirectlyorthroughyourlocalT orocompanyordealer .
TheT orowarrantysystemishostedonserverslocatedwithintheUnitedStateswhereprivacylawmaynotprovidethesameprotectionasapplies
inyourcountry.
BYSHARINGYOURPERSONALINFORMATIONWITHUS,YOUARECONSENTINGTOTHEPROCESSINGOFYOURPERSONALINFORMA TION
ASDESCRIBEDINTHISPRIV ACYNOTICE.
TheWayT oroUsesInformation
Toromayuseyourpersonalinformationtoprocesswarrantyclaims,tocontactyouintheeventofaproductrecallandforanyotherpurposewhichwetell
youabout.T oromayshareyourinformationwithT oro'safliates,dealersorotherbusinesspartnersinconnectionwithanyoftheseactivities.Wewillnot
sellyourpersonalinformationtoanyothercompany .Wereservetherighttodisclosepersonalinformationinordertocomplywithapplicablelawsand
withrequestsbytheappropriateauthorities,tooperateoursystemsproperlyorforourownprotectionorthatofotherusers.
RetentionofyourPersonalInformation
Wewillkeepyourpersonalinformationaslongasweneeditforthepurposesforwhichitwasoriginallycollectedorforotherlegitimatepurposes
(suchasregulatorycompliance),orasrequiredbyapplicablelaw.
Toro'sCommitmenttoSecurityofYourPersonalInformation
Wetakereasonableprecautionsinordertoprotectthesecurityofyourpersonalinformation.Wealsotakestepstomaintaintheaccuracyandcurrent
statusofpersonalinformation.
AccessandCorrectionofyourPersonalInformation
Ifyouwouldliketorevieworcorrectyourpersonalinformation,pleasecontactusbyemailatlegal@toro.com.
AustralianConsumerLaw
AustraliancustomerswillnddetailsrelatingtotheAustralianConsumerLaweitherinsidetheboxoratyourlocalT oroDealer.
SUPERCEDED
374-0282RevC
Page 32

TheToroWarranty
Landscape
Contractor
Equipment(LCE)
ConditionsandProductsCovered
TheT oroCompanyanditsafliate,T oroWarrantyCompany ,pursuanttoan
agreementbetweenthem,jointlypromisetorepairtheT oroProductslisted
belowifdefectiveinmaterialsorworkmanship.
Thefollowingtimeperiodsapplyfromtheoriginaldateofpurchase:
ProductsWarrantyPeriod
WalkBehindMowers
53cm&76cmMowers–
Residentialuse
53cm&76cmMowers–
Commercialuse
•Engine2years
Mid-SizeWalk-BehindMowers
•Engine2years
GrandStand
•Engine3years
ZMaster
•Engine3years
ZMaster
•Engine2years
ZMaster
•Engine3years
TitanHDMowerandEngine4yearsor500hours
AllMowers
•Battery2years
•Attachments2years
1
Residentialusemeansuseoftheproductonthesamelotasyourhome.Useatmorethanone
locationisconsideredcommercialuseandthecommercialwarrantywouldapply .
2
SomeenginesusedonT oroLCEProductsarewarrantedbytheenginemanufacturer .
3
Whicheveroccursrst.
Thiswarrantyincludesthecostofpartsandlabor ,butyoumustpay
transportationcosts.
®
®
®
®
6000SeriesMowers
7000SeriesMowers
8000SeriesMowers
1
Mowers
2years
1year
2
2years
2
5yearsor1,200hours
5yearsor1,200hours
2
5yearsor1,200hours
2
2years
2
3
3
3
3
ItemsandConditionsNotCovered
Thereisnootherexpresswarrantyexceptforspecialemissionsystem
coverageandenginewarrantycoverageonsomeproducts.Thisexpress
warrantydoesnotcoverthefollowing:
•Costofregularmaintenanceserviceorparts,suchaslters,fuel,
lubricants,oilchanges,sparkplugs,airlters,bladesharpening
orwornblades,cable/linkageadjustments,orbrakeandclutch
adjustments
•Componentsfailingduetonormalwear
•Anyproductorpartwhichhasbeenalteredormisusedorneglected
orrequiresreplacementorrepairduetoaccidentsorlackofproper
maintenance
•Pickupanddeliverycharges
•RepairsorattemptedrepairsbyanyoneotherthananAuthorizedT oro
ServiceDealer
•Repairsnecessaryduetofailuretofollowrecommendedfuel
procedure(consulttheOperator'sManualformoredetails)
–Removingcontaminantsfromthefuelsystemisnotcovered
–Useofoldfuel(morethanonemonthold)orfuelwhichcontains
morethan10%ethanolormorethat15%MTBE
–Failuretodrainthefuelsystempriortoanyperiodofnon-use
overonemonth
GeneralConditions
Thepurchaseriscoveredbythenationallawsofeachcountry .Therights
towhichthepurchaserisentitledwiththesupportoftheselawsarenot
restrictedbythiswarranty.
InstructionsforObtainingWarrantyService
IfyouthinkthatyourT oroProductcontainsadefectinmaterialsor
workmanship,followthisprocedure:
1.Contactyoursellertoarrangeserviceoftheproduct.Ifforanyreason
itisimpossibleforyoutocontactyourseller ,youmaycontactanyT oro
AuthorizedDistributortoarrangeservice.Visithttp://www.toro.com/to
locateaT orodistributorinyourarea.
2.Bringtheproductandyourproofofpurchase(salesreceipt)tothe
ServiceDealer.
3.IfforanyreasonyouaredissatisedwiththeServiceDealer’s
analysisorwiththeassistanceprovided,contactusat:
ToroWarrantyCompany
811 1LyndaleAvenueSouth
Bloomington,MN55420-1196
001-952-948-4707
SUPERCEDED
OwnerResponsibilities
YoumustmaintainyourT oroProductbyfollowingthemaintenance
proceduresdescribedintheOperator'sManual.Suchroutinemaintenance,
whetherperformedbyadealerorbyyou,isatyourexpense.
374-0272RevF
 Loading...