

Page 1
FormNo.3381-349RevA
30inTurfMasterWalk-BehindLawnMower
ModelNo.22200—SerialNo.314000001andUp
Operator'sManual
Introduction
Thisrotary-blade,walk-behindlawnmowerisintended
tobeusedbyresidentialhomeownersorprofessional,
hiredoperators.Itisdesignedprimarilyforcuttinggrass
onwell-maintainedlawnsonresidentialorcommercial
properties.Itisnotdesignedforcuttingbrushorfor
agriculturaluses.
Readthisinformationcarefullytolearnhowtooperateand
maintainyourproductproperlyandtoavoidinjuryand
productdamage.Youareresponsibleforoperatingthe
productproperlyandsafely.
YoumaycontactTorodirectlyatwww .T oro.comforproduct
andaccessoryinformation,helpndingadealer,ortoregister
yourproduct.
Wheneveryouneedservice,genuineToroparts,oradditional
information,contactanAuthorizedServiceDealerorToro
CustomerServiceandhavethemodelandserialnumbersof
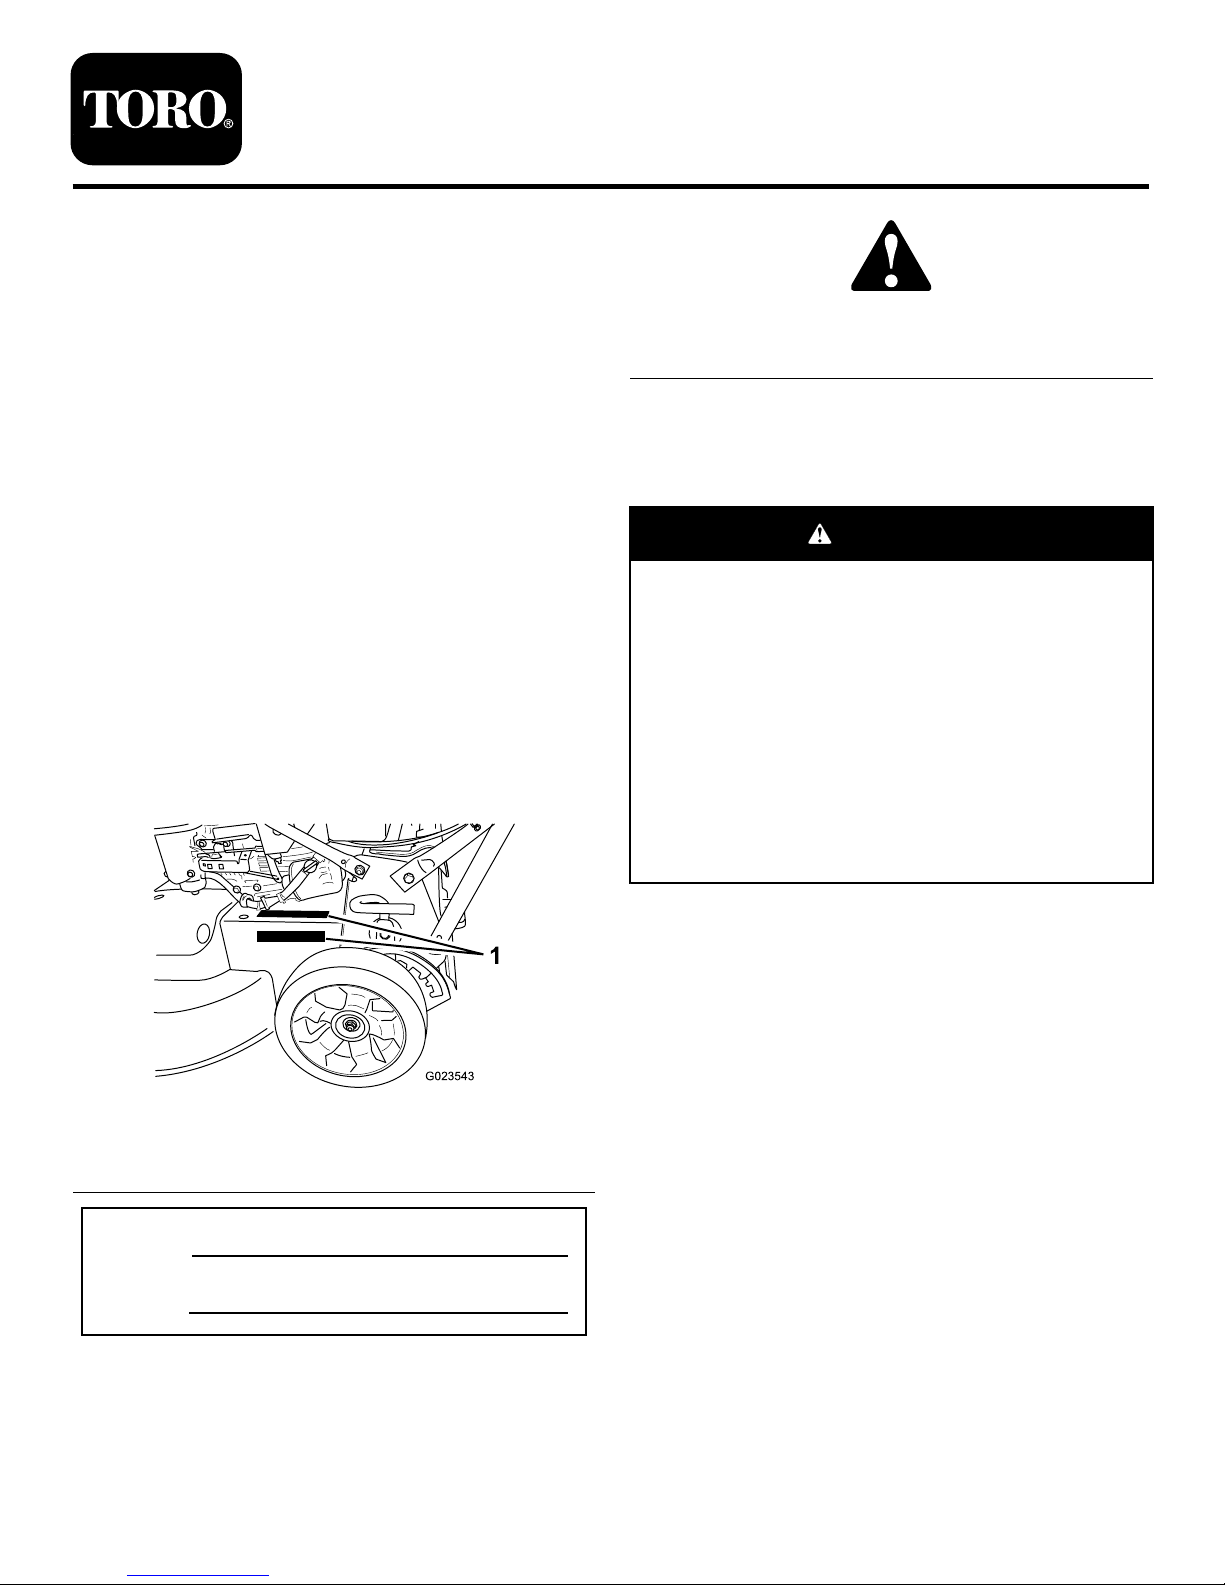
yourproductready.Figure1identiesthelocationofthe
modelandserialnumbersontheproduct.Writethenumbers
inthespaceprovided.
G023543
1
Figure1
1.Themodelandserialnumberplateisinoneofthese2
locations.
ModelNo.
SerialNo.
Thismanualidentiespotentialhazardsandhassafety
messagesidentiedbythesafetyalertsymbol(Figure2),
whichsignalsahazardthatmaycauseseriousinjuryordeath
ifyoudonotfollowtherecommendedprecautions.
Figure2
1.Safetyalertsymbol
Thismanualuses2wordstohighlightinformation.
Importantcallsattentiontospecialmechanicalinformation
andNoteemphasizesgeneralinformationworthyofspecial
attention.
WARNING
CALIFORNIA
Proposition65Warning
Thisproductcontainsachemicalorchemicals
knowntotheStateofCaliforniatocausecancer,
birthdefects,orreproductiveharm.
Theengineexhaustfromthisproduct
containschemicalsknowntotheStateof
Californiatocausecancer,birthdefects,
orotherreproductiveharm.
Important:Thisengineisnotequippedwithaspark
arrestermufer.ItisaviolationofCaliforniaPublic
ResourceCodeSection4442touseoroperatetheengine
onanyforest-covered,brush-covered,orgrass-covered
land.Otherstatesorfederalareasmayhavesimilarlaws.
ThissparkignitionsystemcomplieswithCanadianICES-002.
TheenclosedEngineOwner’sManualissuppliedfor
informationregardingtheUSEnvironmentalProtection
Agency(EPA)andtheCaliforniaEmissionControl
Regulationofemissionsystems,maintenance,and
warranty.Replacementsmaybeorderedthroughthe
enginemanufacturer.
NetTorque:Thegrossornettorqueofthisenginewas
laboratoryratedbytheenginemanufacturerinaccordance
withtheSocietyofAutomotiveEngineers(SAE)J1940.
Asconguredtomeetsafety,emission,andoperating
requirements,theactualenginetorqueonthisclassofmower
willbesignicantlylower.Gotowww.Toro.comtoview
specicationsonyourmowermodel.
©2013—TheT oro®Company
8111LyndaleAvenueSouth
Bloomington,MN55420
Registeratwww.Toro.com.
OriginalInstructions(EN)
PrintedintheUSA
AllRightsReserved
*3381-349*A
Page 2

Contents
Introduction..................................................................1
GeneralLawnMowerSafety.....................................2
SafetyandInstructionalDecals.................................4
Setup............................................................................6
1InstallingtheHandle.............................................6
2AdjustingtheHandleHeight..................................6
3FillingtheCrankcasewithOil.................................7
ProductOverview..........................................................8
Controls................................................................8
Operation.....................................................................9
CheckingtheEngineOilLevel..................................9
FillingtheFuelTankwithGasoline............................9
AdjustingtheCuttingHeight....................................10
StartingtheEngine.................................................11
StoppingtheEngine...............................................11
OperatingtheSelf-propelDriveandEngagingthe
CuttingBlades....................................................11
CheckingtheBlade-stopSystemOperation................12
RecyclingtheClippings...........................................12
BaggingtheClippings.............................................13
Side-dischargingtheClippings..................................14
OperatingTips......................................................15
Maintenance.................................................................16
RecommendedMaintenanceSchedule(s)......................16
ServicingtheAirFilter............................................16
ChangingtheEngineOil.........................................17
ChangingtheOilFilter............................................18
ServicingtheSparkPlug..........................................18
CheckingtheConditionoftheBelts..........................18
EmptyingtheFuelTankandCleaningthe
Filter.................................................................19
ChangingtheFuelFilter..........................................19
ServicingtheBlade-driveSystem..............................19
ServicingtheCuttingBlades.....................................20
ChangingtheBlade-Brake-Clutch(BBC)
Belt...................................................................22
AdjustingtheSelf-propelCable................................23
AdjustingtheBlade-brakeCable...............................23
ChangingtheBlade-driveBelt..................................24
CleaningundertheMachineHousing........................24
Storage........................................................................25
GeneralInformation...............................................25
PreparingtheFuelSystem.......................................25
PreparingtheEngine..............................................25
RemovingtheMachinefromStorage.........................26
Troubleshooting...........................................................27
Safety
ThislawnmowermeetsorexceedstheCPSCblade
safetyrequirementsforwalk-behindrotarylawnmowers
andtheB71.4specicationsoftheAmericanNational
StandardsInstituteineffectatthetimeofproduction.
Improperlyusingormaintainingthislawnmowercan
resultininjury.Toreducethepotentialforinjury,
complywiththesesafetyinstructions.
Torodesignedandtestedthislawnmowerforreasonably
safeservice;however,failuretocomplywiththefollowing
instructionsmayresultinpersonalinjury.
WARNING
Engineexhaustcontainscarbonmonoxide,an
odorless,deadlypoisonthatcankillyou.
Donotruntheengineindoorsorinanenclosed
area.
Toensuremaximumsafety,bestperformance,and
togainknowledgeoftheproduct,itisessentialthat
youandanyotheroperatorofthemachinereadand
understandthecontentsofthismanualbeforethe
engineiseverstarted.Payparticularattentiontothe
safetyalertsymbol(Figure2)whichmeansCaution,
Warning,orDanger—“personalsafetyinstruction.”
Readandunderstandtheinstructionbecauseithasto
dowithsafety.Failuretocomplywiththeinstruction
mayresultinpersonalinjury.
GeneralLawnMowerSafety
Thislawnmoweriscapableofamputatinghandsandfeetand
ofthrowingobjects.Failuretoobservethefollowingsafety
instructionscouldresultinseriousinjuryordeath.
Thefollowinginstructionshavebeenadaptedfromthe
ANSI/OPEIstandardB71.4-2012.
Training
•ReadtheOperator’sManualandothertrainingmaterial.
•Iftheoperator(s)ormechanic(s)cannotreadEnglishitis
theowner’ sresponsibilitytoexplainthismaterialtothem.
•Becomefamiliarwiththesafeoperationoftheequipment,
operatorcontrols,andsafetysigns.
•Alloperatorsandmechanicsshouldbetrained.The
ownerisresponsiblefortrainingtheusers.
•Neverletchildrenoruntrainedpeopleoperateorservice
theequipment.Localregulationsmayrestricttheageof
theoperator.
•Theownerand/orusercanpreventandisresponsible
foraccidentsorinjuriesoccurringtothemselves,other
people,orproperty.
Preparation
•Evaluatetheterraintodeterminewhataccessoriesand
attachmentsareneededtoproperlyandsafelyperform
thejob.
•Onlyuseaccessoriesandattachmentsapprovedbythe
manufacturer.
2
Page 3

•Wearappropriateclothing,includingsafetyglassesand
hearingprotection.Longhair,looseclothing,orjewelry
maygettangledinmovingparts.
•Inspecttheareawheretheequipmentistobeusedand
removeallobjectssuchasrocks,toys,andwirewhichcan
bethrownbythemachine.
•Checkthatoperator’spresencecontrols,safetyswitches
andshieldsareattachedandfunctioningproperly .Donot
operatethemunlesstheyarefunctioningproperly.
Operation
•Neverrunanengineinanenclosedarea.
•Onlyoperateingoodlight,keepingawayfromholesand
hiddenhazards.
•Onlystartenginefromtheoperator’sposition.
•Besureofyourfootingwhileusingpedestrian-controlled
equipment,especiallywhenbackingup.
•Walk,don’trun.
•Neveroperateonwetgrass.Reducedfootingcouldcause
slipping.
•Slowdownanduseextracareonhillsides.Besureto
travelintherecommendeddirectiononhillsides.
•Usecautionwhileoperatingneardrop-offs.
•Slowdownandusecautionwhenmakingturnsandwhen
changingdirectionsonslopes.
•Neverraisethedeckwiththebladesrunning.
•Neveroperatewiththedischargedeectorraised,
removedoraltered,unlessusingagrasscatcher.
•Donotchangetheenginegovernorsettingoroverspeed
theengine.
•Stoponlevelgroundandshutoffenginebeforeleaving
theoperator’spositionforanyreasonincludingemptying
thecatchersoruncloggingthechute.
•Stopequipmentandinspectbladesafterstrikingobjects
orifanabnormalvibrationoccurs.Makenecessary
repairsbeforeresumingoperation.
•Keephandsandfeetawayfromthecuttingunits.
•Lookbehindanddownbeforebackinguptobesureof
aclearpath.
•Beawareofthemowerdischargedirectionanddonot
pointitatanyone.
•Donotoperatethemowerwhileundertheinuenceof
alcoholordrugs.
•Usecarewhenloadingorunloadingthemachineintoa
trailerortruck.
•Usecarewhenapproachingblindcorners,shrubs,trees,
orotherobjectsthatmayobscurevision.
SafeHandlingofFuels
•Toavoidpersonalinjuryorpropertydamage,use
extremecareinhandlinggasoline.Gasolineisextremely
ammableandthevaporsareexplosive.
•Extinguishallcigarettes,cigars,pipes,andothersources
ofignition.
•Useonlyanapprovedfuelcontainer.
•Neverremovefuelcaporaddfuelwiththeengine
running.
•Allowenginetocoolbeforerefueling.
•Neverrefuelthemachineindoors.
•Neverstorethemachineorfuelcontainerwherethereis
anopename,spark,orpilotlightsuchasonawater
heateroronotherappliances.
•Neverllcontainersinsideavehicleoronatruckor
trailerbedwithaplasticliner.Alwaysplacecontainerson
thegroundawayfromyourvehiclebeforelling.
•Removeequipmentfromthetruckortrailerandrefuelit
ontheground.Ifthisisnotpossible,thenrefuelsuch
equipmentwithaportablecontainer,ratherthanfroma
fueldispensernozzle.
•Keepthenozzleincontactwiththerimofthefueltank
orcontaineropeningatalltimesuntilfuelingiscomplete.
•Donotuseanozzlelockopendevice.
•Iffuelisspilledonclothing,changeclothingimmediately.
•Neveroverllfueltank.Replacefuelcapandtighten
securely.
Hauling
•Usecarewhenloadingorunloadingthemachineintoa
trailerortruck.
•Tiethemachinedownsecurelyusingstraps,chains,cable,
orropes.Bothfrontandrearstrapsshouldbedirected
downandoutwardfromthemachine.
MaintenanceandStorage
•Waitforallmovementtostopbeforeadjusting,cleaning
orrepairing.
•Cleangrassanddebrisfromcuttingunit,mufer,and
enginetohelppreventres.
•Cleanupoilorfuelspills.
•Letenginecoolbeforestoringanddonotstorenear
ame.
•Donotstorefuelnearamesordrainindoors.
•Neverallowuntrainedpersonneltoservicemachine.
•Usecarewhencheckingtheblades.
•Wrapthebladesorweargloves,andusecautionwhen
servicing.
•Onlyreplaceblades.Neverstraightenorweldthem.
•Keephandsandfeetawayfrommovingparts.
•Ifpossible,donotmakeadjustmentswiththeengine
running.
3
Page 4
•Keepallpartsingoodworkingconditionandallhardware
tightened.
•Replaceallwornordamageddecals.
SafetyandInstructionalDecals
Safetydecalsandinstructionsareeasilyvisibletotheoperatorandarelocatednearanyareaofpotentialdanger.Replace
anydecalthatisdamagedorlost.
Manufacturer'sMark
1.Indicatesthatthebladeisidentiedasapartfromthe
originalmachinemanufacturer .
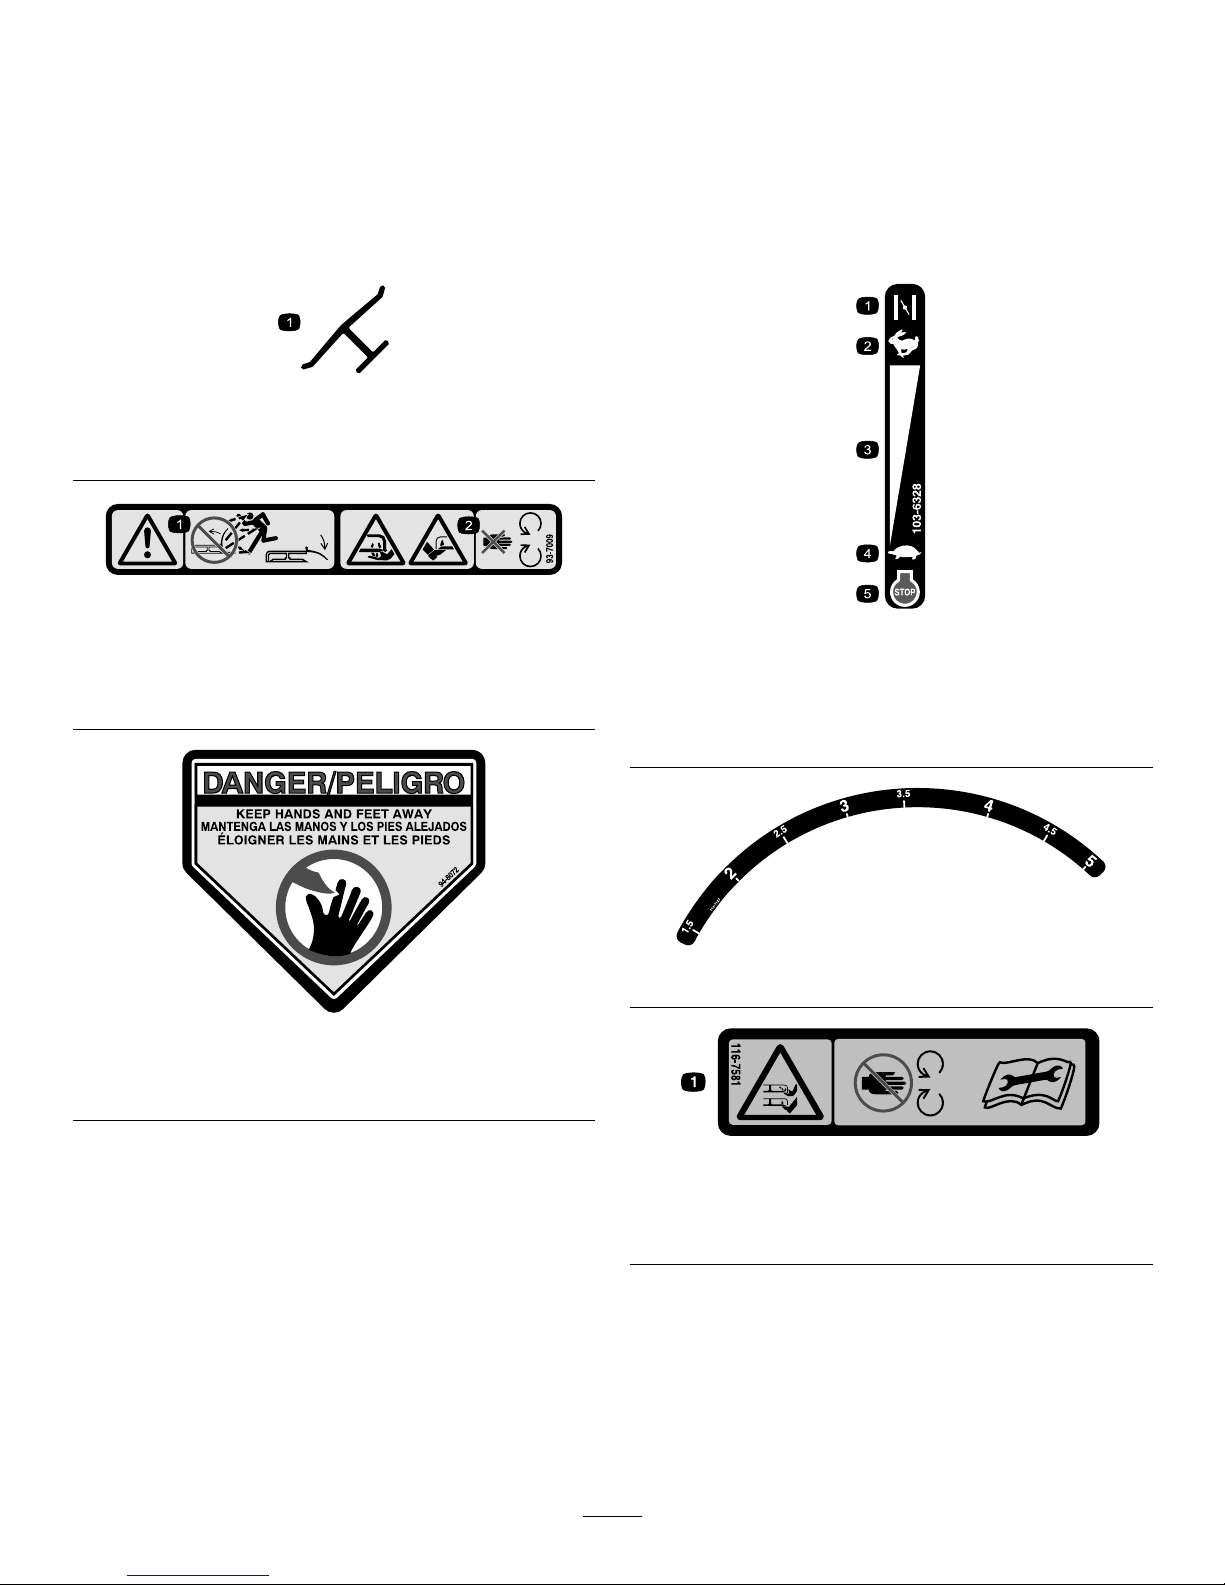
93-7009
1.Warning—don'toperatethemowerwiththedeectorupor
removed;keepthedeectorinplace.
2.Cutting/dismembermenthazardofhandorfoot,mower
blade—stayawayfrommovingparts.
94-8072
1.Warning—cutting/dismembermenthazardofhandorfoot,
cuttingmechanism.
103-6328
1.Choke4.Slow
2.Fast5.Engine—stop
3.Continuousvariable
setting
116-7127
116-7581
1.Cutting/dismembermenthazardofhandorfoot,mower
blade-stayawayfrommovingparts.ReadtheOperator’s
Manualbeforeadjustingservicing,orcleaning.
4
Page 5
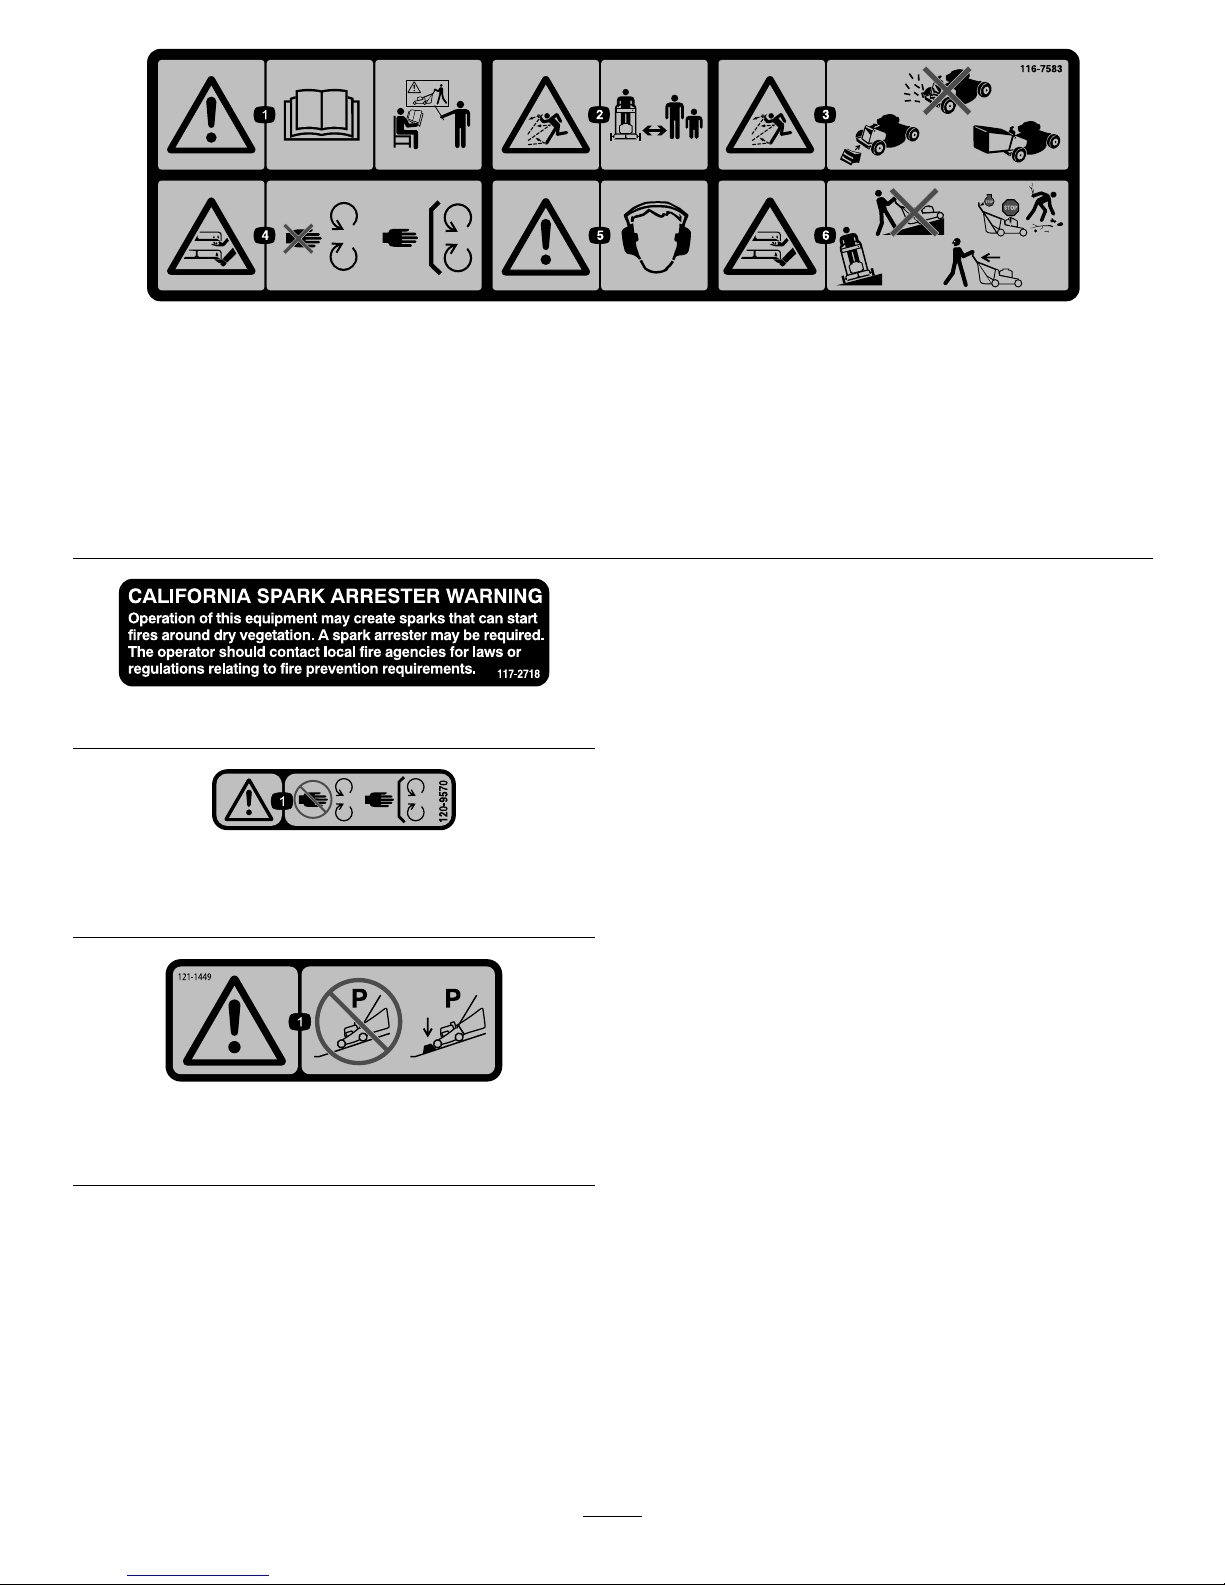
116-7583
1.Warning–ReadtheOperator’sManual.Donotoperatethis
machineunlessyouaretrained.
4.Cutting/dismembermenthazardofhandorfoot,mower
blade—stayawayfrommovingparts;keepallguardsinplace.
2.Thrownobjecthazard—keepbystandersasafedistancefrom
themachine.
5.Warning—wearhearingprotection.
3.Thrownobjecthazard—Donotoperatethemowerwithoutthe
reardischargeplugorbaginplace.
6.Cutting/dismembermenthazardofhandorfoot,mower
blade—Donotoperateupanddownslopes;operatesideto
sideonslopes;stoptheenginebeforeleavingtheoperating
position—pickupobjectsthatcouldbethrownbytheblades;
andlookbehindyouwhenbackingup.
117–2718
120-9570
1.Warning—stayawayfrommovingparts;keepallguards
andshieldsinplace.
121-1449
1.Warning—donotparkonslopesunlesswheelsarechocked
orblocked.
5
Page 6
Setup
1
InstallingtheHandle
NoPartsRequired
Procedure
WARNING
Foldingorunfoldingthehandleimproperlycan
damagethecables,causinganunsafeoperating
condition.
•Donotdamagethecableswhenfoldingor
unfoldingthehandle.
•Ifacableisdamaged,contactanAuthorized
ServiceDealer.
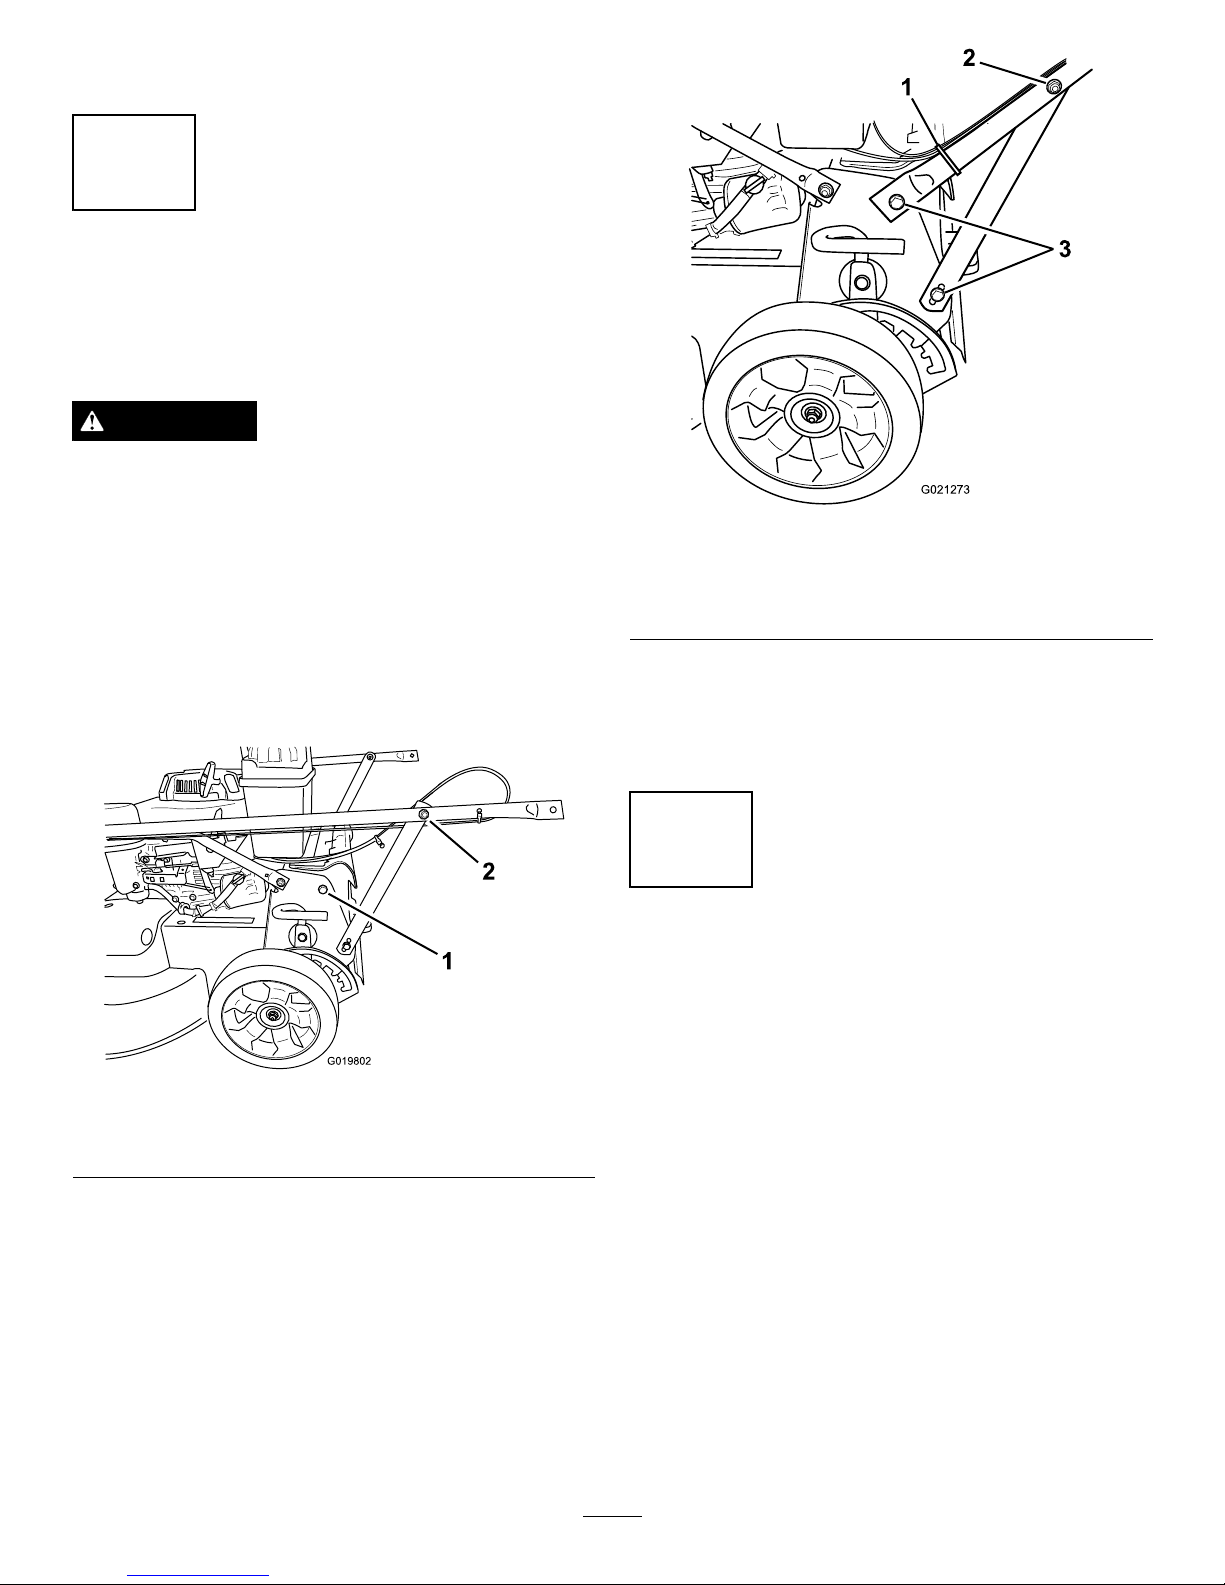
1.Removethe2boltsfromthemachineframeinthe
locationshowninFigure3.
G019802
1
2
Figure3
1.Bolt(2)
2.Nutonhandlesupport
bracket(2)
2.Rotatethehandlerearwardtotheoperatingposition.
3.Securethehandletothemachinewiththeboltsthat
youremovedinstep
1
4.Tightenthefastenersthatsupportthehandleonboth
sidesofthemachineasshowninFigure4.
G021273
2
1
3
Figure4
1.Cabletie3.Bolt(4)
2.Nutonhandlesupport
bracket(2)
5.Useacabletietosecurethecablestothelowerhandle
inthelocationshowninFigure4.
6.Securethecabletieonthehandleandtrimoffthe
excessmaterialfromthetie.
2
AdjustingtheHandleHeight
NoPartsRequired
Procedure
1.Standintheoperatingpositiontodeterminethemost
comfortablehandleheight.
2.Removethehandleboltandinsertitin1ofthe3holes
locatedatthebottomofthehandlebracket(Figure5).
6
Page 7
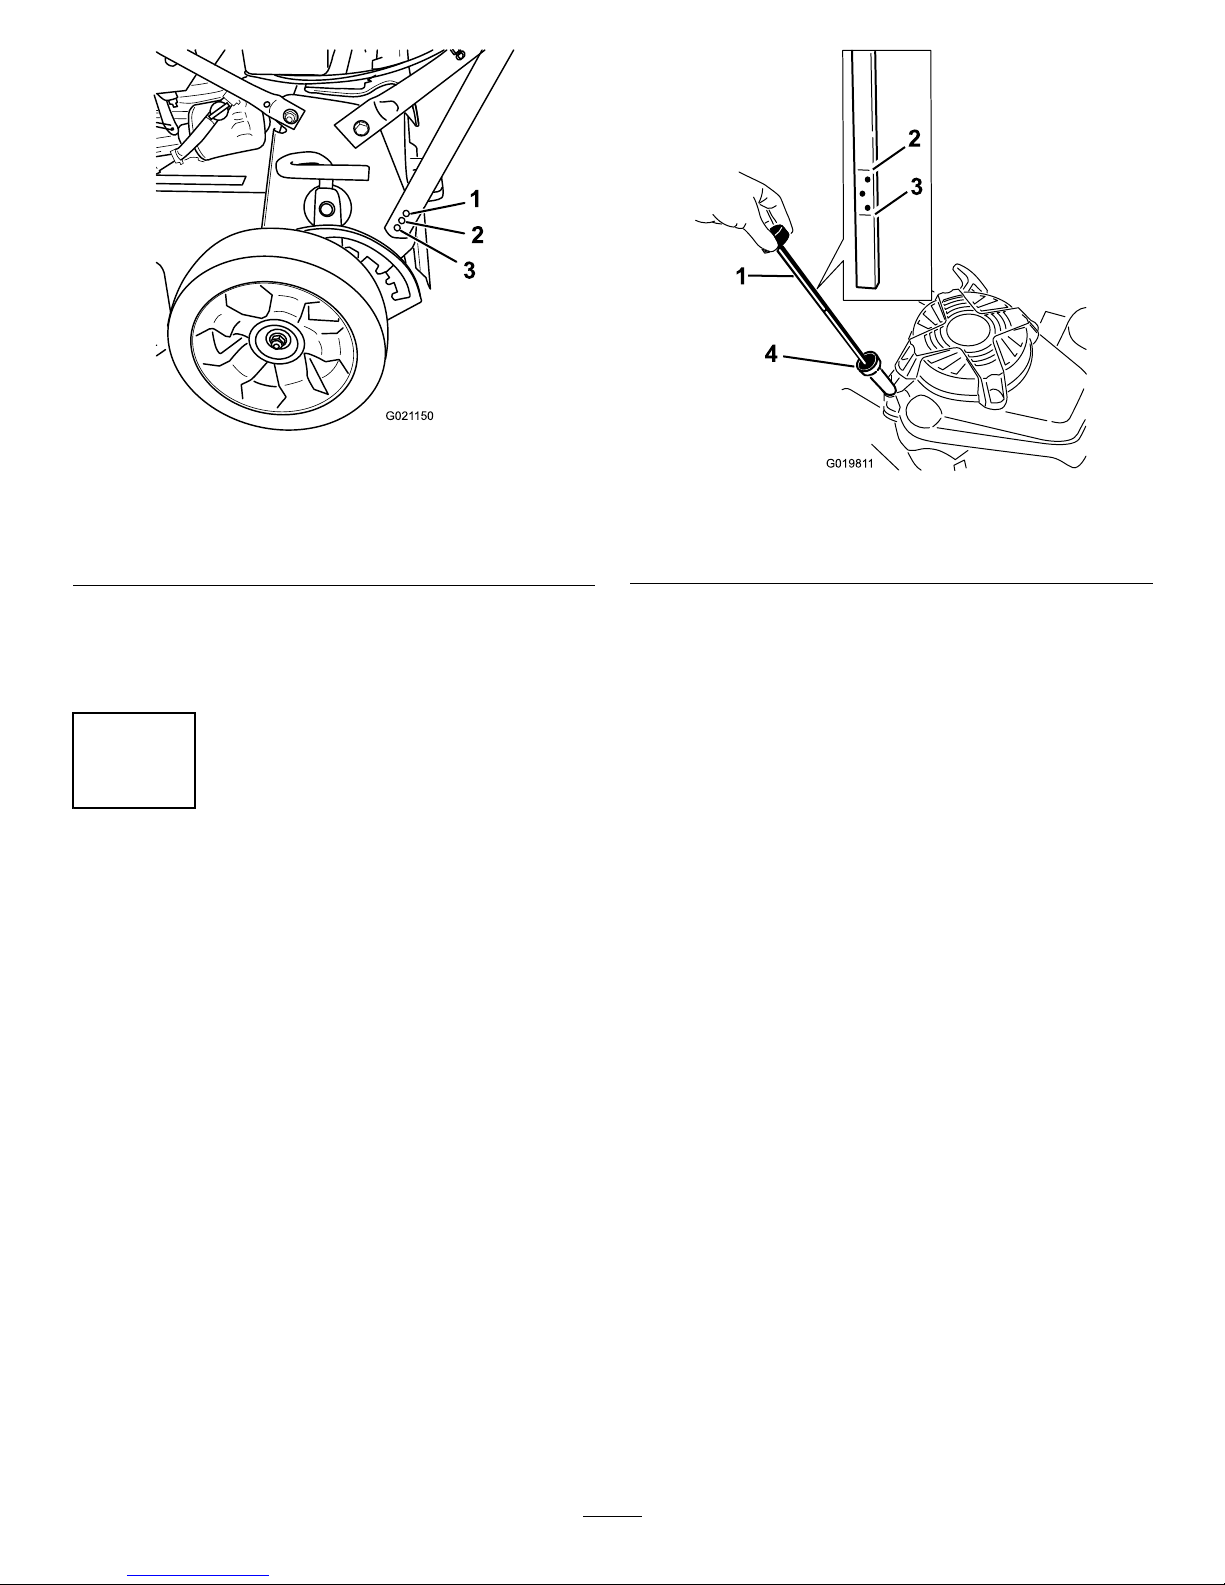
G021 150
1
2
3
Figure5
1.Lowesthandleheight
setting
3.Highesthandleheight
setting
2.Middlehandleheight
setting
3.Tightenthehandleboltuntilitissnug.
4.Repeatthestepsabovefortheothersideofthe
machine.
3
FillingtheCrankcasewithOil
NoPartsRequired
Procedure
Important:Thismachinedoesnotcomewithoilinthe
engine.Beforestartingtheengine,lltheenginewith
oil.
1.Movethemachinetoalevelsurface.
2.Removethedipstickbyrotatingthecap
counterclockwiseandpullingitout.
3.Ifthecrankcaseisempty,addabout3/4ofthe
crankcasecapacityofoilintotheoil-lltube(Figure6).
Note:Max.ll:29oz.(0.85l)withoillter;22oz.
(0.65l)withoutoillter;type:SAE30orSAE10W30
weightdetergentoilwithanAPIserviceclassication
ofSF,SG,SH,SJ,SL,orhigher.
G01981 1
4
Figure6
1.Dipstick3.Addmark
2.Fullmark
4.Oil-lltube
4.Wipethedipstickcleanwithacleancloth.
5.Insertthedipstickintothellerneck,thenremoveit.
Note:Toensureanaccurateoillevelreading,install
thedipstickfully.
6.Readtheoillevelonthedipstick(Figure6).
•IftheoillevelisbelowtheAddmark,addasmall
amountofoilslowlytotheoil-lltube,thenrepeat
steps4through6untiltheoillevelisattheFull
markonthedipstick.
•IftheoillevelabovetheFullmark,drainthe
excessoiluntiltheoillevelisattheFullmarkon
thedipstick;refertoChangingtheEngineOil
(page17).
Important:Iftheoillevelinthecrankcaseis
toolowortoohighandyouruntheengine,
youmaydamagetheengine.
7.Insertthedipstickintothellerneckandrotatethecap
clockwiseuntilitistight.
7
Page 8
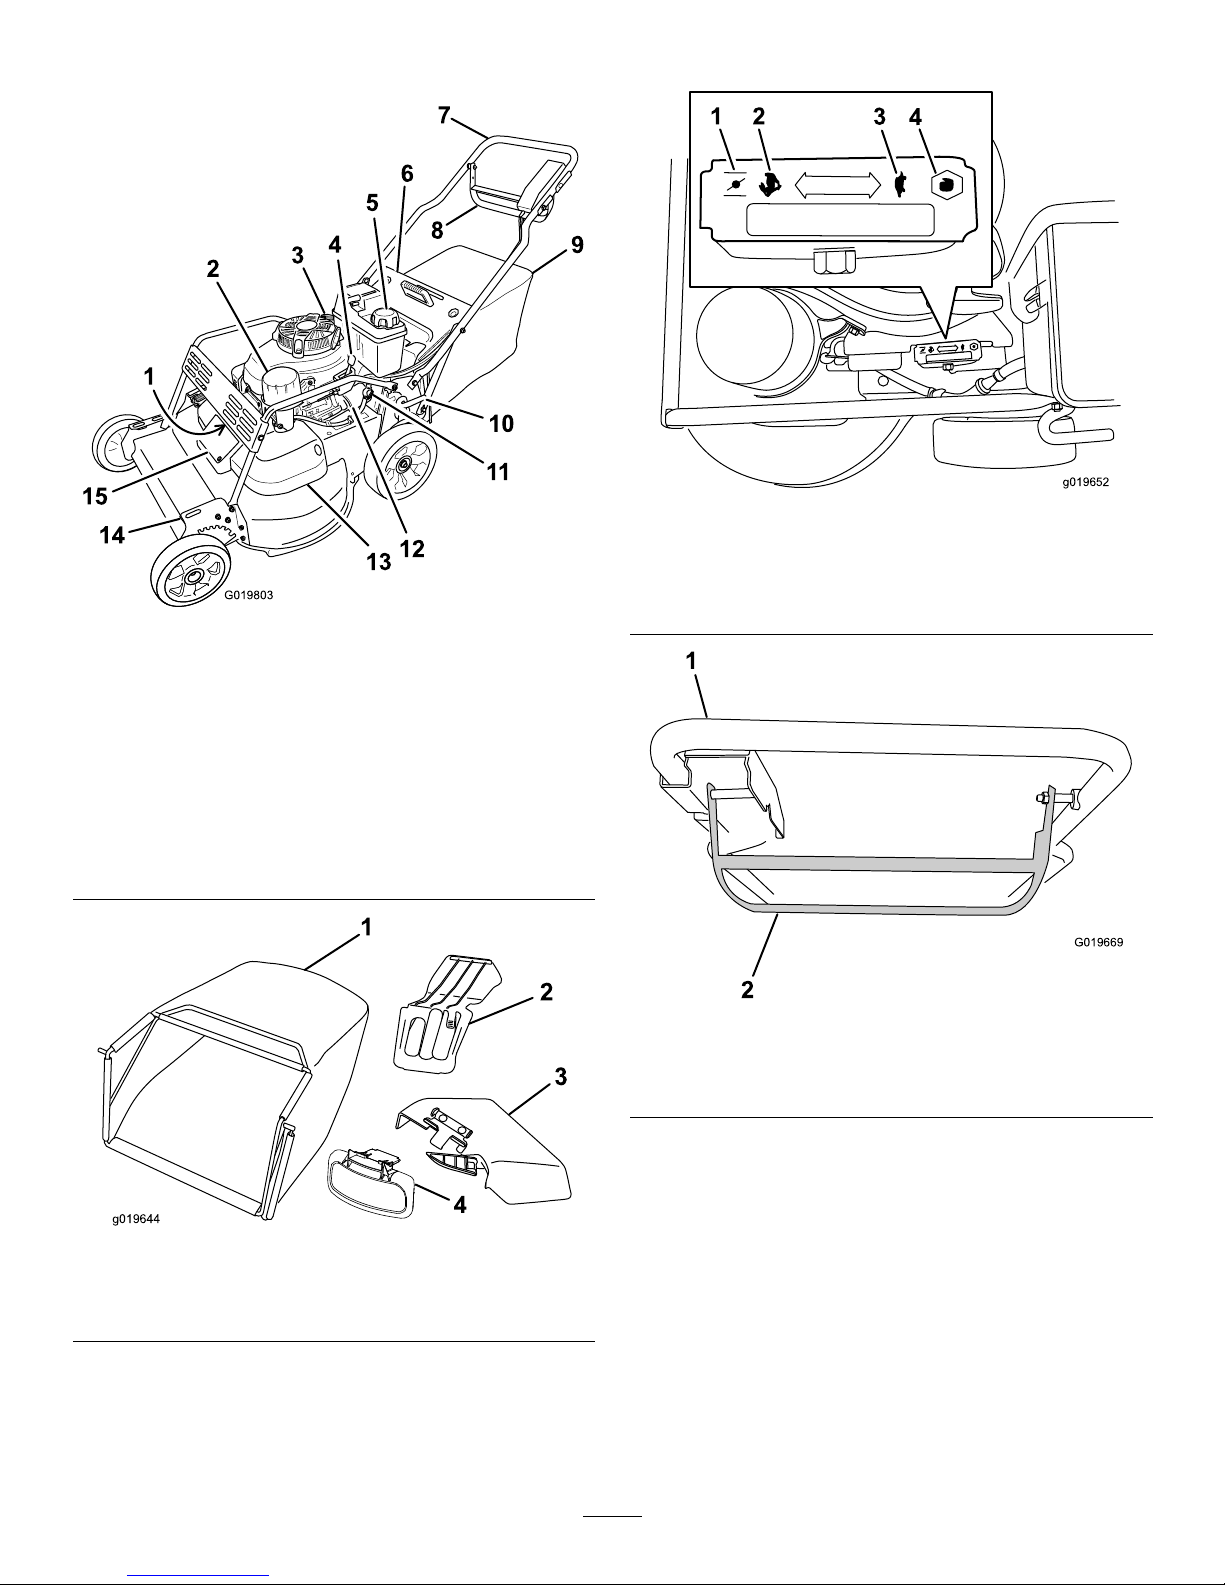
ProductOverview
1
2
3
4
5
6
7
8
9
10
11
12
13
14
G019803
Figure7
1.Sparkplug(underbrush
guard)
9.Grassbag
2.Airlter
10.Rearcutting-heightlever
3.Oilll/dipstick11.Fuelshut-offvalve
4.Throttlelever
12.Oillter
5.Fuel-tankcap13.Beltcover
6.Reardeector
14.Frontcutting-heightlever
7.Handle15.Belt-cover-accesspanel
8.Controlbar
g019644
1
2
3
4
Figure8
1.Grassbag3.Side-dischargechute
2.Rear-dischargeplug
4.Side-dischargedeector
Controls
g019652
1 2
3
4
Figure9
Throttle(Throttlelevernotshownforthesakeofclarity)
1.Choke3.Slow
2.Fast
4.Stop
1
2
G019669
Figure10
Controlbar
1.Handle
2.Controlbar
8
Page 9
Operation
Note:Determinetheleftandrightsidesofthemachine
fromthenormaloperatingposition.
Eachtimebeforeyoumow,ensurethattheself-propeldrive
andthecontrolbaroperateproperly.Whenyoureleasethe
controlbar,thebladesandtheself-propeldriveshouldstop.
Iftheydonot,contactanAuthorizedServiceDealer.
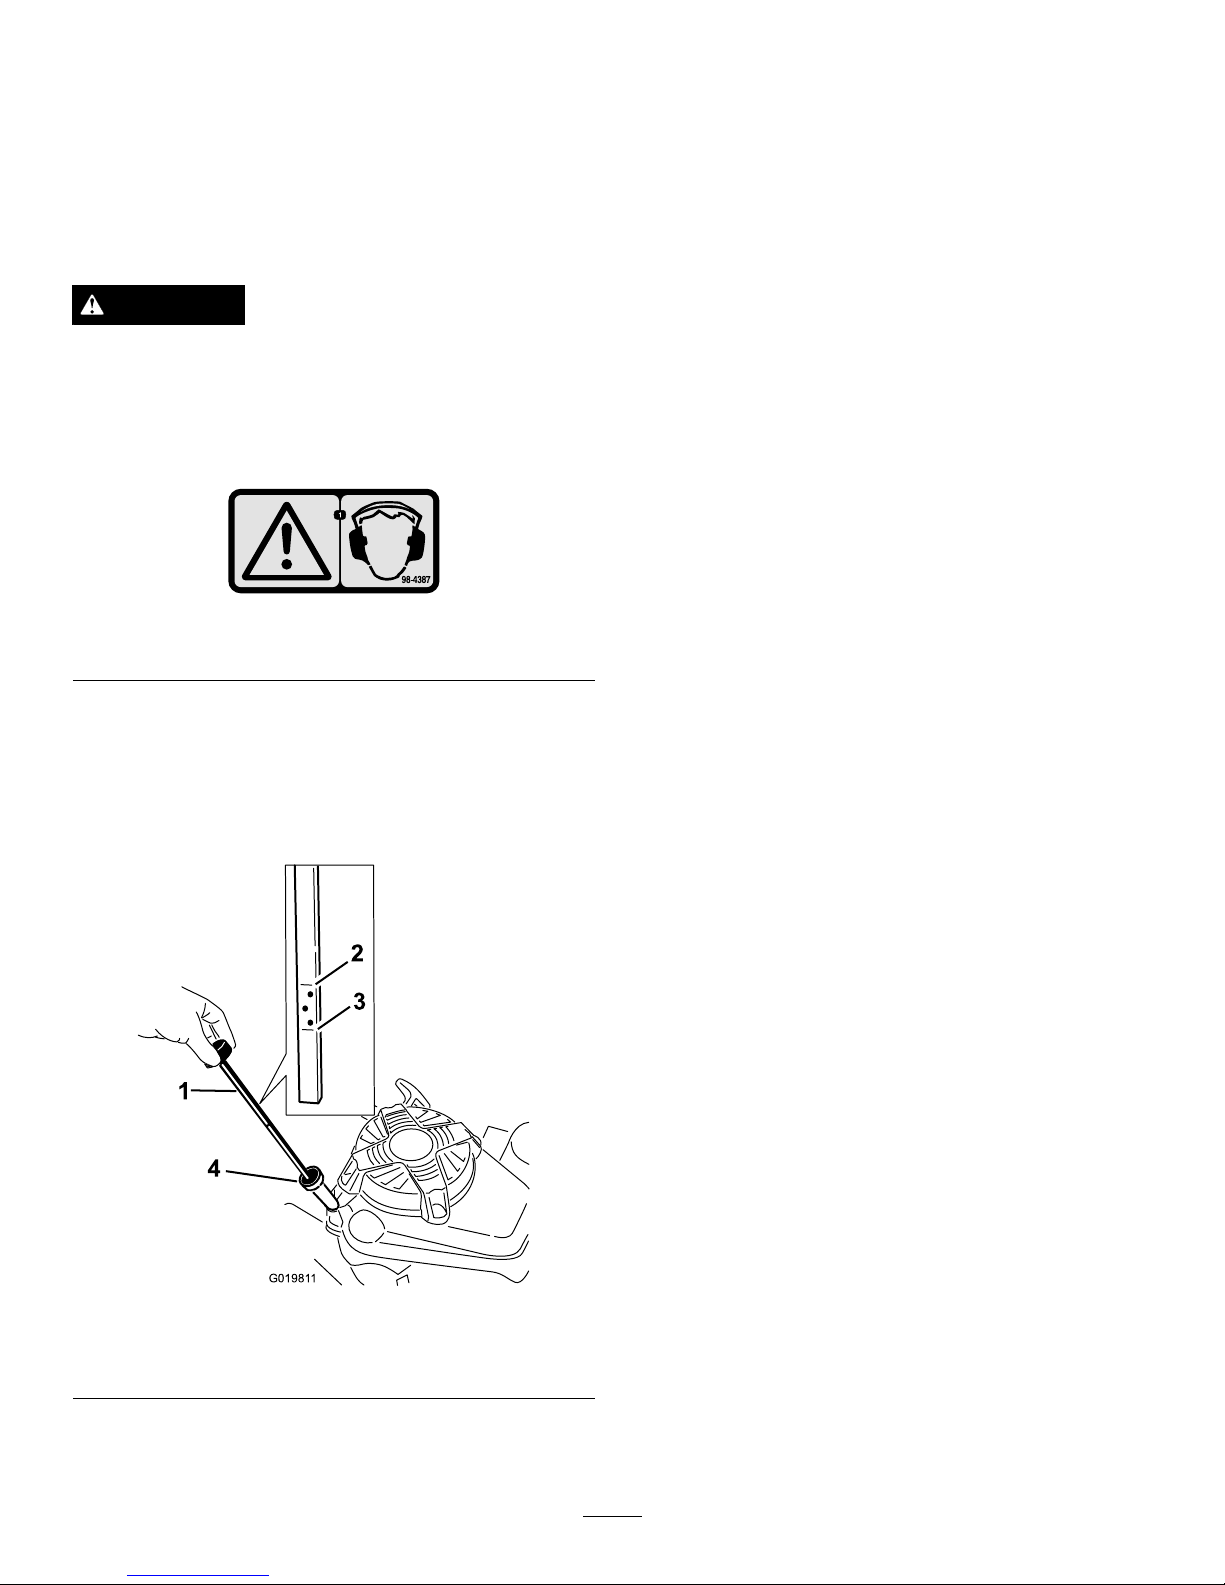
CAUTION
Thismachineproducessoundlevelsinexcessof
85dBAattheoperator’searandcancausehearing
lossthroughextendedperiodsofexposure.
Wearhearingprotectionwhenoperatingthis
machine.
Figure11
1.Warning—wearhearingprotection.
CheckingtheEngineOilLevel
ServiceInterval:Beforeeachuseordaily
Beforeeachuse,ensurethattheoillevelisbetweentheAdd
andFullmarksonthedipstick(
Figure12).
G01981 1
4
Figure12
1.Dipstick3.Addmark
2.Fullmark
4.Oil-lltube
1.Movethemachinetoalevelsurface.
2.Cleanaroundthedipstick(Figure12).
3.Removethedipstickbyrotatingthecap
counterclockwiseandpullingitout.
4.Wipethedipstickcleanwithacleancloth.
5.Insertthedipstickintothellerneck,thenremoveit.
Note:Toensureanaccurateoillevelreading,install
thedipstickfully.
6.Readtheoillevelonthedipstick(Figure12).
•IftheoillevelisbelowtheAddmark,addasmall
amountofoilslowlytotheoil-lltube,thenrepeat
steps
4through6untiltheoillevelisattheFull
markonthedipstick.
•IftheoillevelabovetheFullmark,drainthe
excessoiluntiltheoillevelisattheFullmarkon
thedipstick;referto
ChangingtheEngineOil
(page17).
Important:Iftheoillevelinthecrankcaseis
toolowortoohighandyouruntheengine,
youmaydamagetheengine.
7.Insertthedipstickintothellerneckandrotatethecap
clockwiseuntilitistight.
FillingtheFuelTankwith
Gasoline
RecommendedFuel:
•Forbestresults,useonlyclean,fresh(lessthan30days
old),unleadedgasolinewithanoctaneratingof87or
higher((R+M)/2ratingmethod).
•Ethanol:Gasolinewithupto10%ethanol(gasohol)
or15%MTBE(methyltertiarybutylether)byvolume
isacceptable.EthanolandMTBEarenotthesame.
Gasolinewith15%ethanol(E15)byvolumeisnot
approvedforuse.Neverusegasolinethatcontains
morethan10%ethanolbyvolume,suchasE15
(contains15%ethanol),E20(contains20%ethanol),or
E85(containsupto85%ethanol).Usingunapproved
gasolinemaycauseperformanceproblemsand/orengine
damagewhichmaynotbecoveredunderwarranty.
•Donotusegasolinecontainingmethanol.
•Donotstorefueleitherinthefueltankorfuelcontainers
overthewinterunlessafuelstabilizerisused.
•Donotaddoiltogasoline.
Important:Toreducestartingproblems,addfuel
stabilizertothefuelallseason,mixingitwithgasoline
lessthan30daysold;runthemachinedrybeforestoring
itformorethan30days.
Donotusefueladditivesotherthanafuel
stabilizer/conditioner.Donotusefuelstabilizers
withanalcoholbasesuchasethanol,methanol,or
isopropanol.
9
Page 10
DANGER
Gasolineisextremelyammableandexplosive.A
reorexplosionfromgasolinecanburnyouand
others.
•Topreventastaticchargefromignitingthe
gasoline,placethecontainerand/ormachine
directlyonthegroundbeforelling,notina
vehicleoronanobject.
•Fillthetankoutdoorswhentheengineiscold.
•Wipeupspills.
•Donothandlegasolinewhensmokingoraround
anopenameorsparks.
•Storegasolineinanapprovedfuelcontainer,out
ofthereachofchildren.
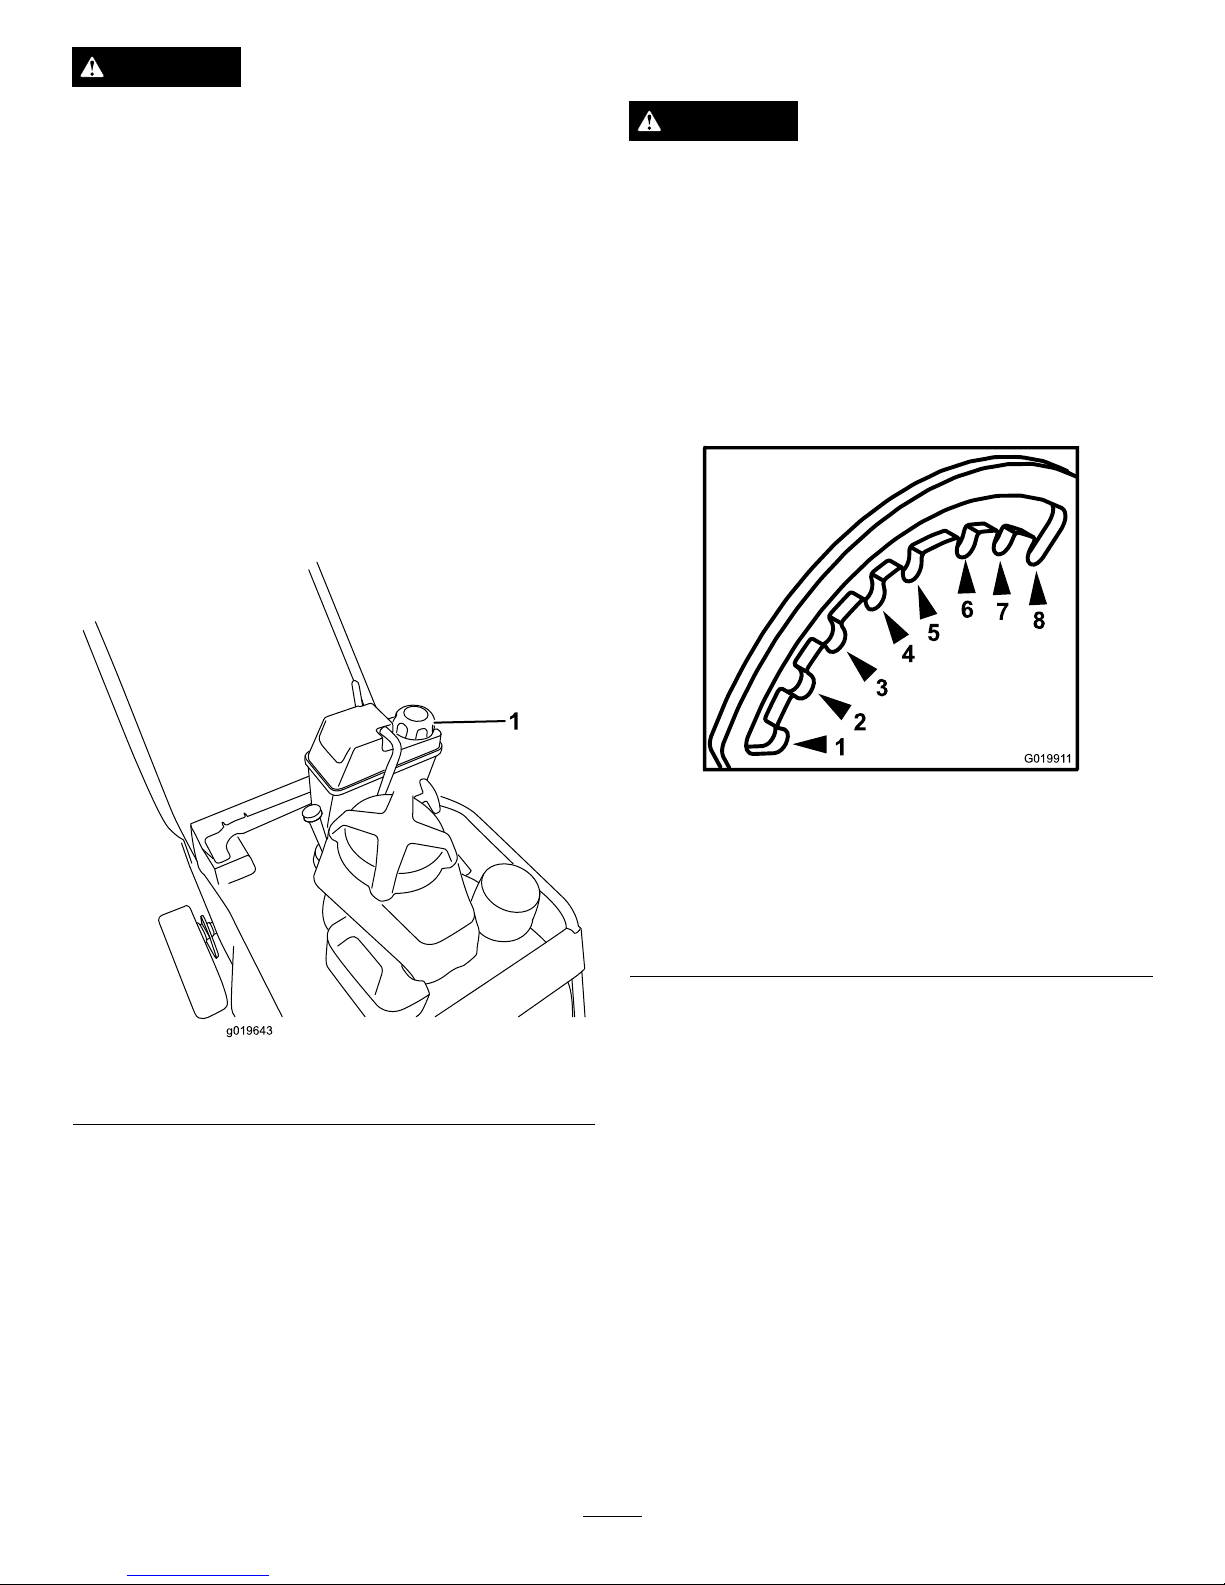
1.Cleanaroundthefuel-tankcap(Figure13).
g019643
1
Figure13
1.Fuel-tankcap
2.Removethecapfromthetank.
3.Fillthefueltankwithunleadedgasolinetowithin1/4
to1/2inch(6to13mm)fromthetopofthetank.Do
notllintothellerneck.
Important:Donotllthetankmorethan1/4
inch(6mm)fromthetopofthetankbecausethe
gasolinemusthaveroomtoexpand.
4.Installthefueltankcapandwipeupanyspilled
gasoline.
AdjustingtheCuttingHeight
DANGER
Adjustingthecuttingheightleverscouldbringyour
handsintocontactwithamovingbladeandresult
inseriousinjury.
•Stoptheengineandwaitforallmovementto
stopbeforeadjustingthecuttingheight.
•Donotputyourngersunderthehousingwhen
adjustingthecuttingheight.
Thecuttingheightsrangefrom1-1/2inches(38mm)to5
inches(127mm)in1/2-inch(13mm)increments.
1
2
4
6
7
8
3
5
G01991 1
Figure14
Viewfromfrontleft-handsideofthemachine
1.1-1/2in(38mm)5.3-1/2in(89mm)
2.2in(51mm)6.4in(102mm)
3.2-1/2in(64mm)7.4-1/2in(114mm)
4.3inch(76mm)8.5in(127mm)
Thecuttingheightiscontrolledwithafrontleverandarear
lever,bothontheleftsideofthemachine(Figure15and
Figure16).Toraiseorlowerthemachine,engagethelever,
raiseorlowerthemachine,andthendisengagethelever.
10
Page 11

g019653
1
Figure15
Frontcuttingheightlever
1.Squeezethelevertodisengageit.
g019645
Figure16
Rearcuttingheightlever
StartingtheEngine
1.Connectthewiretothesparkplug(Figure7).
2.Openthefuelshut-offvalve(Figure17).
Note:Whenthefuelshut-offvalveisopen,thelever
isparallelwiththefuelline.
g019650
1
g019651
1
Figure17
1.Fuelshut-offvalve
3.MovethethrottlecontroltotheChokeposition
(Figure9).
4.Pullthestarterhandlelightlyuntilyoufeelresistance,
thenpullitsharply.
5.MovethethrottlecontrollevertotheFastposition
whentheenginestarts(Figure8).
Note:Iftheenginefailstostartafter3pulls,repeat
steps3through5.
StoppingtheEngine
1.MovethethrottlecontroltotheOffpositionandwait
forallmovingpartstostop.
2.Closethefuelshut-offvalveanddisconnectthewire
fromthesparkplugifyoudonotusethemachineor
leaveitunattended.
OperatingtheSelf-propel
DriveandEngagingthe
CuttingBlades
•Tooperatetheself-propeldrivewithoutengagingthe
blades,raisethecontrolbartothehandle(Figure18).
11
Page 12

G019671
1
Figure18
1.Raisethecontrolbartothehandle.
•Tooperatetheself-propeldriveandengagetheblades,
slidethecontrolbarallthewaytotherightandraiseit
tothehandle(
Figure18).
G019672
2
1
Figure19
1.Slidethecontrolbartothe
right.
2.Raisethecontrolbarto
thehandle.
•Todisengagetheself-propeldriveandtheblades,release
thecontrolbar.
Note:Youcanvarythegroundspeedbyincreasingor
decreasingthedistancebetweenthecontrolbarandthe
handle.Lowerthecontrolbartoreducethespeedwhenyou
makeaturnorifthemachineismovingtoofast.Ifyoulower
thecontrolbartoofar,themachinestopsself-propelling.
Squeezethecontrolbarclosertothehandletoincreasethe
groundspeed.Whenyouholdthecontrolbartightagainst
thehandle,themachineself-propelsatthemaximumground
speed.
CheckingtheBlade-stop
SystemOperation
Beforeeachuse,checkthatthebladesstopwithin3seconds
ofreleasingthecontrolbar.
UsingtheGrassBag
ServiceInterval:Beforeeachuseordaily—Checkthe
blade-stopsystemoperation.Theblades
shouldstopwithin3secondsofreleasing
thecontrolbar;iftheydonot,contactan
AuthorizedServiceDealer.
Youcanusethegrassbagtochecktheblade-stopsystem.
1.Removetherear-dischargeplug.
2.Installtheemptygrassbagonthemachine.
3.Starttheengine.
4.Engagetheblades.
Note:Thebagshouldbegintoinate,indicatingthat
thebladesarerotating.
5.Whilewatchingthebag,releasethecontrolbar.
Note:Ifthebagdoesnotdeatewithin3secondsof
releasingthecontrolbar,theblade-stopsystemmaybe
deterioratingand,ifignored,couldresultinanunsafe
operatingcondition.Havethemachineinspectedand
servicedbyanAuthorizedServiceDealer.
6.Stoptheengineandwaitforallmovingpartstostop.
NotUsingtheGrassBag
1.Movethemachineontoapavedsurfaceinanon-windy
area.
2.Setall4wheelstothe3-1/2inch(89mm)cutting
heightsetting.
3.Takeahalfsheetofnewspaperandcrumpleitintoa
ballsmallenoughtogounderthemachine(about3
inchesor75mmindiameter).
4.Placethenewspaperballabout5inches(13cm)in
frontofthemachine.
5.Starttheengine.
6.Engagetheblades.
7.Releasethecontrolbarandbegincountingout3
seconds.
8.Onthecountof3,pushthemachinequicklyforward
overthenewspaper.
9.Stoptheengineandwaitforallmovingpartstostop.
10.Gotothefrontofthemachineandcheckthe
newspaperball.
Note:Ifthenewspaperballdidnotgounderthe
machine,repeatsteps
4through10.
Important:Ifthenewspaperisunravelledor
shredded,thebladesdidnotstopproperly,which
couldresultinanunsafeoperatingcondition.
ContactanAuthorizedServiceDealer.
RecyclingtheClippings
Thismachinecomesfromthefactoryreadytorecyclegrass
andleafclippingsbackintothelawn.T opreparethemachine
torecycle:
12
Page 13

•Iftheside-dischargechuteisonthemachine,removeit
andinstalltheside-dischargedeector;refertoRemoving
theSide-dischargeChute(page14).
•Ifthegrassbagisonthemachine,removeit;referto
RemovingtheGrassBag(page14).
•Iftherear-dischargeplugisnotinstalled,gripitbythe
handle,raisethereardeector,andinsertitintothe
rear-dischargechuteuntilthelatchlocksintoplace;refer
toFigure20.
G019812
Figure20
1.Rear-dischargeplug
2.Reardeector
WARNING
Ensurethattherear-dischargeplugisinplace
beforeyourecycletheclippings.Neverengagethe
bladeswithouteithertherear-dischargeplugorthe
grassbaginstalled.
BaggingtheClippings
Usethegrassbagwhenyouwanttocollectgrassandleaf
clippingsfromthelawn.
WARNING
Aworngrassbagcouldallowsmallstonesandother
similardebristobethrowntowardtheoperatoror
bystandersandresultinseriouspersonalinjuryor
death.
Checkthegrassbagfrequently.Ifitisdamaged,
installanewTororeplacementbag.
Iftheside-dischargechuteisonthemachine,removeit
andinstalltheside-dischargedeectorbeforebaggingthe
clippings;refertoRemovingtheSide-dischargeChute(page
14).
WARNING
Thebladesaresharp;contactingthebladescan
resultinseriouspersonalinjury.
Stoptheengineandwaitforallmovingpartstostop
beforeleavingtheoperatingposition.
InstallingtheGrassBag
1.Raiseandholdupthereardeector(Figure21).
1
G019798
2
Figure21
1.Bagrod
2.Reardeector
2.Removetherear-dischargeplugbypullingdownonthe
latchwithyourthumbandpullingtheplugoutfrom
themachine(
Figure20).
3.Installthebagrodintothenotchesatthebaseofthe
handle,androckthebagbackandforthtoensurethat
13
Page 14

therodisseatedatthebottomofbothnotches;refer
toFigure21.
4.Lowerthereardeectoruntilitrestsonthegrassbag.
MowingwiththeGrassBag
WARNING
Aworngrassbagcouldallowsmallstonesand
othersimilardebristobethrownintheoperator’sor
bystander’sdirectionandresultinseriouspersonal
injuryordeathtotheoperatororbystanders.
Checkthegrassbagfrequently.Ifitisdamaged,
installanewTororeplacementbag.
RemovingtheGrassBag
Toremovethebag,reversethestepsinInstallingtheGrass
Bagabove.
DANGER
Themachinecanthrowgrassclippingsand
otherobjectsthroughanopendischargetunnel.
Objectsthrownwithenoughforcecouldcause
seriouspersonalinjuryordeathtotheoperatoror
bystander.
Neveropenthedooronthedischargetunnelwhen
theengineisrunning.
Side-dischargingtheClippings
Usethesidedischargeforcuttingverytallgrass.
WARNING
Thebladesaresharp;contactingthebladescan
resultinseriouspersonalinjury.
Stoptheengineandwaitforallmovingpartstostop
beforeleavingtheoperatingposition.
DANGER
Anuncovereddischargeopeningwillallowobjects
tobethrowninthedirectionoftheoperatoror
bystanders.Also,contactwiththebladescould
occur.Thrownobjectsorbladecontactcancause
seriousinjuryordeath.
Neveroperatethemachinewithoutthe
side-dischargedeectororside-dischargechutein
placeandworkingproperly.
InstallingtheSide-dischargeChute
Important:Ensurethattherear-dischargeplugisin
placebeforeyourecycletheclippings.
1.Stoptheengineandwaitforallmovingpartstostop.
2.Removethegrassbagifitisinstalledonthemachine;
referto
RemovingtheGrassBag(page14).
3.Inserttherear-dischargeplug;refertoRecyclingthe
Clippings(page12).
4.Removetheside-dischargedeectorbypullingup
onthespringthatholdsthedeectorinplaceand
removingthedeector(Figure22).
G019649
1
2
3
Figure22
1.Topoftheside-discharge
deector
3.Side-dischargedeector
2.Spring
5.Installtheside-dischargechute(Figure23)bypulling
uponthespring,placingthechuteovertheopening,
andloweringthespringoverthetabsontopofthe
dischargechute.
g019647
1
Figure23
1.Side-dischargechute
RemovingtheSide-dischargeChute
Toremovetheside-dischargechute,reversethestepsin
InstallingtheSide-dischargeChute.
14
Page 15

OperatingTips
GeneralTips
•Reviewthesafetyinstructionsandreadthismanual
carefullybeforeoperatingthemachine.
•Cleartheareaofsticks,stones,wire,branches,andother
debristhatthebladescouldhitandthrow .
•Keepeveryone,especiallychildrenandpets,awayfrom
theareaofoperation.
•Avoidstrikingtrees,walls,curbs,orothersolidobjects.
Neverdeliberatelymowoveranyobject.
•Ifthemachinestrikesanobjectorstartstovibrate,
immediatelystoptheengine,disconnectthewirefrom
thesparkplug,andexaminethemachinefordamage.
•Maintainsharpbladesthroughoutthecuttingseason.
Periodicallyledownnicksontheblades.
•ReplacethebladeswhennecessarywithoriginalToro
replacementblades.
•Mowonlydrygrassorleaves.Wetgrassandleavestend
toclumpontheyardandcancausethemachinetoplug
ortheenginetostall.
WARNING
Wetgrassorleavescancauseseriousinjuryif
youslipandcontacttheblades.
Mowonlyindryconditions.
•Cleantheundersideofthemachinedeckaftereach
mowing.RefertoCleaningundertheMachineHousing
(page24).
•Keeptheengineingoodrunningcondition.
•Settheenginespeedtothefastestpositionforthebest
cuttingresults.
WARNING
Operatingamachinewithitsenginerunning
ataspeedgreaterthanthefactorysettingcan
causethemachinetothrowapartofabladeor
engineintotheoperator’sorbystander’sarea
andresultinseriouspersonalinjuryordeath.
–Donotchangetheenginespeedsetting.
–Ifyoususpecttheenginespeedisfaster
thannormal,contactanAuthorizedService
Dealer.
•Cleantheairlterfrequently.Mulchingstirsupmore
clippingsanddustwhichclogstheairlterandreduces
engineperformance.
CuttingGrass
•Grassgrowsatdifferentratesatdifferenttimesofthe
year.Inthesummerheat,itisbesttocutgrassatthe
2-inch(51mm),2-1/2-inch(64mm),or3-inch(83mm)
cuttingheightsettings.Cutonlyaboutathirdofthegrass
bladeatatime.Donotcutbelowthe2-inch(51mm)
settingunlessthegrassissparseoritislatefallwhen
grassgrowthbeginstoslowdown.
•Whencuttinggrassover6inches(15cm)tall,rstmow
atthehighestcuttingheightsettingandwalkslower;then
mowagainatalowersettingforthebestlawnappearance.
Ifthegrassistoolongandtheleavesclumpontopofthe
lawn,themachinemayplugandcausetheenginetostall.
•Alternatethemowingdirection.Thishelpsdispersethe
clippingsoverthelawnforevenfertilization.
Ifthenishedlawnappearanceisunsatisfactory,tryoneor
moreofthefollowing:
•Sharpentheblades.
•Walkataslowerpacewhilemowing.
•Raisethecuttingheightonyourmachine.
•Cutthegrassmorefrequently.
•Overlapcuttingswathsinsteadofcuttingafullswath
witheachpass.
•Setthecuttingheightonthefrontwheelsanotchlower
thantherearwheels.Forexample,setthefrontwheels
at2inches(51mm)andtherearwheelsat2-1/2inches
(64mm).
CuttingLeaves
•Aftercuttingthelawn,ensurethathalfofthelawnshows
throughthecutleafcover.Y oumayneedtomakemore
thanonepassovertheleaves.
•Forlightleafcoverage,setallthewheelsatthesame
cuttingheightsetting.
•Iftherearemorethan5inches(12.7cm)ofleavesonthe
lawn,setthefrontcuttingheight1or2notcheshigher
thantherearcuttingheight.Thismakesiteasiertofeed
theleavesunderthemachinedeck.
•Slowdownyourmowingspeedifthemachinedoesnot
cuttheleavesnelyenough.
15
Page 16

Maintenance
RecommendedMaintenanceSchedule(s)
MaintenanceService
Interval
MaintenanceProcedure
Aftertherst5hours
•Changetheengineoilwithouttheoillter.
•Servicetheblade-drivesystem.
Beforeeachuseordaily
•Checktheengineoillevel.
•Checktheblade-stopsystemoperation.Thebladesshouldstopwithin3secondsof
releasingthecontrolbar;iftheydonot,contactanAuthorizedServiceDealer.
•Inspecttheairlter.
•Checkthecuttingbladesandservicethem,ifnecessary.
•Inspecttheblades.
•Cleanunderthemachinehousing.
Every25hours
•Cleanthefoampre-cleaner(morefrequentlyindustyconditions).
Every50hours
•Changetheengineoil(moreoftenindustyconditions).
•Checktheconditionofthebelts.
•Checkthefuelhoseandreplaceitifnecessary.
•Removedebrisfromunderthebeltcover.
•Servicetheblade-drivesystem.
Every100hours
•Changetheoillter.
•Checkthesparkplug.
•Cleanthefueltanklter.
•Changethefuellter.
Every250hours
•Changetheblade-brake-clutchbelt.
Every300hours
•Replacethepaperairlter(morefrequentlyindustyconditions).
Yearlyorbeforestorage
•Emptythefueltankbeforerepairsasdirectororbeforestorage.
Important:RefertoyourEngineOperator’sManualforadditionalmaintenanceprocedures.
CAUTION
Ifyouleavethewireonthesparkplug,someonecouldaccidentlystarttheengineandseriouslyinjure
youorotherbystanders.
Disconnectthewirefromthesparkplugbeforeyoudoanymaintenance.Setthewireasidesothatitdoes
notaccidentlycontactthesparkplug.
ServicingtheAirFilter
ServiceInterval:Beforeeachuseordaily
Every25hours—Cleanthefoampre-cleaner(more
frequentlyindustyconditions).
Every300hours—Replacethepaperairlter(more
frequentlyindustyconditions).
Important:Donotoperatetheenginewithouttheair
lterassembly;extremeenginedamagewilloccur.
1.Stoptheengineandwaitforallmovingpartstostop.
2.Disconnectthewirefromthesparkplug.
3.Removethecoverandcleanitthoroughly(
Figure24).
16
Page 17

Figure24
1.Cover3.Air-lterbase
2.Foampre-lterandpaper
lter
4.Removethefoampre-lterandpaperlter(Figure24).
5.Removethefoampre-lterfromthepaperlter(Figure
24),andreplacethepaperlterifitisexcessivelydirty.
Important:Donottrytocleanapaperlter.
6.Washthefoampre-cleanerwithamilddetergentand
water,thenblotitdry.
Note:Donotaddoiltothefoampre-cleaner.
7.Installthefoampre-cleanerontothepaperlter.
8.Installtheair-lterassembly.
9.Installthecover.
ChangingtheEngineOil
ServiceInterval:Aftertherst5hours—Changetheengine
oilwithouttheoillter.
Every50hours—Changetheengineoil(moreoften
industyconditions).
1.Runtheenginetowarmtheengineoil.
Note:Warmoilowsbetterandcarriesmore
contaminants.
WARNING
Oilmaybehotafterenginehasbeenrun,and
contactwithhotoilcancauseseverepersonal
injury.
Avoidcontactingthehotengineoilwhenyou
drainit.
2.Stoptheengineandwaitforallmovingpartstostop.
3.Disconnectthewirefromthesparkplug.
4.Placeasuitabledrainpanundertherightsideofthe
machine.
5.Removethedipstickbyrotatingthecap
counterclockwiseandpullingitout.
6.Tipthemachine,withtheairlterup,todraintheoil
intothedrainpan(
Figure24).
G019648
Figure25
Note:Youcanalsoremovetheoilfromthecrankcase
usinganoilextractor.
7.Returnthemachinetotheoperatingposition.
8.Insertthedipstickintothellerneckandrotatethecap
clockwiseuntilitistight.
9.Recycletheusedoilaccordingtolocalcodes.
10.FillthecrankcasetotheFulllineonthedipstickwith
freshoil.Referto
3FillingtheCrankcasewithOil
(page7).
11.Wipeupanyspilledoil.
17
Page 18

ChangingtheOilFilter
ServiceInterval:Every100hours
1.Runtheenginetowarmtheoil.
WARNING
Oilmaybehotaftertheenginehasbeenrun,
andcontactwithhotoilcancausesevere
personalinjury.
Avoidcontactingthehotengineoilwhenyou
drainit.
2.Stoptheengineandwaitforallmovingpartstostop.
3.Disconnectthewirefromthesparkplug.
4.Draintheengineoil;referto
ChangingtheEngineOil
(page17).
5.Placearagundertheoilltertocatchanyoilthatmay
leakoutasyouremovethelter.
6.Removetheoillter(
Figure26).
g019650
1
Figure26
1.Oillter
7.Useyourngertocoatthegasketonthenewlter
withoil(Figure27).
Figure27
1.Gasket
8.Installthenewlteruntilthegasketcontactsthelter
base,thenhandtightenthelteranadditional2/3turn.
9.FillthecrankcasetotheFulllineonthedipstickwith
freshoil;referto3FillingtheCrankcasewithOil(page
7).
10.Connectthewiretothesparkplug.
11.Runtheengineforabout3minutes.
12.Stoptheengine,waitforallmovingpartstostop,and
checkforoilleakagearoundthelter.
13.Addoiltocompensatefortheoilintheoillter;refer
to
CheckingtheEngineOilLevel(page9)
14.Recycletheusedoillteraccordingtolocalcodes.
ServicingtheSparkPlug
ServiceInterval:Every100hours
UseanNGKBPR5ESsparkplugorequivalent.
1.Stoptheengineandwaitforallmovingpartstostop.
2.Disconnectthewirefromthesparkplug.
3.Cleanaroundthesparkplug.
4.Removethesparkplugfromthecylinderhead.
Important:Replaceacracked,fouled,ordirty
sparkplug.Donotcleantheelectrodesbecause
gritenteringthecylindercandamagetheengine.
5.Setthegapontheplugto0.030in.(0.76mm);refer
toFigure28.
Figure28
1.Center-electrodeinsulator3.Airgap(nottoscale)
2.Sideelectrode
6.Installthesparkplugandthegasketseal.
7.Torquetheplugto17ft-lb(23N-m).
8.Connectthewiretothesparkplug.
CheckingtheConditionofthe
Belts
ServiceInterval:Every50hours
1.Stoptheengineandwaitforallmovingpartstostop.
18
Page 19

2.Removethebeltcover(Figure7)byremovingthe4
boltsthatholdittothemachinehousing.
3.Checkthebeltsforanycracks,frayededges,burn
marks,oranyotherdamage.
4.Replacealldamagedbelts.
5.Ifyoureplacetheblade-drivebelt,youmustadjustit.
Referto
ServicingtheBlade-driveSystem(page19).
6.Installthebeltcoverwiththe4boltsthatyouremoved
instep2.
EmptyingtheFuelTankand
CleaningtheFilter
ServiceInterval:Every50hours—Checkthefuelhoseand
replaceitifnecessary.
Every100hours—Cleanthefueltanklter.
Yearlyorbeforestorage—Emptythefueltankbefore
repairsasdirectororbeforestorage.
Note:Thefueltanklter(screen)elementislocatedinside
thefueltankattheoutlet.Thislterisapartofthefueltank
andcannotberemoved.
1.Stoptheengineandwaitforittocooldown.
Important:Draingasolinefromacoldengine
only.
2.Disconnectthewirefromthesparkplug.
3.Closethefuelshut-offvalve.
4.Disconnectthefuellinebylooseningthetubeclampat
thecarburetor.
5.Openthefuelshut-offvalveanddrainthegasoline
completelyfromthetankandfuellineintoanapproved
fuelcontainer.
6.Removethefueltankfromthemachine.
7.Pourasmallamountoffuelinthefueltank,move
thefuelaroundinthetank,andpouritoutintoan
approvedfuelcontainer.
8.Installthefueltankandthefuelline.
ChangingtheFuelFilter
ServiceInterval:Every100hours
1.Stoptheengineandwaitforallmovingpartstostop.
2.Disconnectthewirefromthesparkplug.
3.Closethefuelshut-offvalve(Figure29).
g019650
1
g019924
1
2
Figure29
1.Fuellter2.Fuelshut-offvalve
4.Removethefuellter(Figure29)fromthefuellineby
looseningthetubeclampssurroundingthefuellter.
5.Installanewfuellterinthefuellineusingthetube
clampsthatyouremovedinstep4.
ServicingtheBlade-drive
System
ServiceInterval:Aftertherst5hours
Every50hours—Removedebrisfromunderthebelt
cover.
Every50hours—Servicetheblade-drivesystem.
1.Loosenthe2screwsonthebelt-cover-accesspaneland
removethepanel(
Figure30).
g019641
1
2
3
4
5
6
7
8
Figure30
1.Belt-tensionspring5.Blade-drivebelt
2.Adjustingbolt6.Wall
3.Gap
7.Beltcover
4.Adjustingnut8.Belt-cover-accesspanel
19
Page 20

2.Brushorblowoutdebrisfromtheinsideofthebelt
coverandaroundalltheparts.
3.Holdafeelergaugesetbetween0.005and0.03inches
(0.13and0.76mm)againstthewallandslideitdown
behindthebelttensionspring;refertoFigure31.
Figure31
Note:Ifthereisavisiblegapbetweenthegaugeand
thespring,tightentheadjustingboltandthenutuntil
thefeelergaugebarelyslidesfreelyinandoutofthe
gap(Figure30).
Important:Donotovertightentheadjustingbolt.
Thiscoulddamagetheblade-drivebelt.
4.Installthebelt-cover-accesspanel.
ServicingtheCuttingBlades
ServiceInterval:Beforeeachuseordaily
Important:
Y ou will need a torque wr ench to install the
blades pr oper l y .
Ifyoudonothaveatorquewrenchor
areuncomfortableperformingthisprocedure,contact
anAuthorizedServiceDealer.
Examinethebladesforsharpnessandanywearordamage
wheneveryourunoutofgasoline;refertoInspectingthe
Blades(page20)
.Ifthebladeedgeisdullornicked,haveit
sharpenedorreplaceit.Ifthebladesareworn,bent,damaged
orcracked,replacethemimmediatelywithagenuineToro
replacementblades.
DANGER
Awornordamagedbladecanbreak,andapiece
ofthebladecouldbethrowntowardtheoperator
orabystander,resultinginseriouspersonalinjury
ordeath.
•Inspectthebladesperiodicallyforwearor
damage.
•Replacewornordamagedblades.
Note:Maintainsharpbladesthroughoutthecuttingseason,
becausesharpbladescutcleanlywithouttearingorshredding
thegrassblades.Tearingandshreddingturnsgrassbrownat
theedges,whichslowsgrowthandincreasesthechanceof
disease.
PreparingtoServicetheCuttingBlades
Tipthemachineontoitsside,withtheairlterupintheair,
untiltheupperhandlerestsontheground.
WARNING
Thebladesaresharp;contactingabladecould
resultinseriouspersonalinjury.
•Disconnectthewirefromthesparkplug .
•Weargloveswhenservicingtheblades.
InspectingtheBlades
ServiceInterval:Beforeeachuseordaily
1.Inspectthecuttingedges(
Figure32).Iftheedgesare
notsharporhavenicks,removethebladesandhave
themsharpenedorreplacethem.
g017223
Figure32
1.Curvedarea3.Wear/slotforming
2.Cuttingedge4.Crack
2.Inspectthebladesthemselves,especiallythecurved
area(Figure42).Ifyounoticeanydamage,wear,or
aslotforminginthisarea(Figure32),immediately
replacethemwithnewblades.
DANGER
Ifyouallowabladetowear,aslotwillform
betweenthesailandatpartoftheblade.
Eventuallyapieceoftheblademaybreak
offandbethrownfromunderthehousing,
possiblyresultinginseriousinjurytoyouor
bystanders.
•Inspectthebladesperiodicallyforwearor
damage.
•Nevertrytostraightenabladethatisbent
orweldabrokenorcrackedblade.
•Checkforbentblades;referto
Checking
forBentBlades(page20).
CheckingforBentBlades
1.Rotatethebladesuntiltheyarepositionedasshown
inFigure33.
20
Page 21

B
B
2
1
3
g016532
Figure33
1.Frontofcuttingdeck3.Measureformthecutting
edgetoasmooth,level
suface
2.MeasureatlocationsA
andB
2.Measurefromalevelsurfacetothecuttingedges
atlocationsAandB,(Figure33),andrecordboth
dimensions.
3.Rotatethebladessothattheiroppositeendsareat
locationsAandB.
4.Repeatthemeasurementsinstep2andrecordthem.
Note:IfthedifferencebetweenthedimensionsAand
Bobtainedinsteps2and4exceeds1/8inch,replace
theblades;refertoRemovingtheBlades(page21)and
InstallingtheBlades(page21).
WARNING
Abladethatisbentordamagedcouldbreak
apartandcouldseriouslyinjureorkillyouor
bystanders.
•Alwaysreplaceabentordamagedblade
withanewblade.
•Neverleorcreatesharpnotchesinthe
edgesorsurfacesofablade.
RemovingtheBlades
Replacethebladeswhentheystrikeasolidobject,areoutof
balance,bent,orworn.UseonlygenuineT ororeplacement
blades.
1.Useablockofwoodtoholdeachbladesteadyandturn
thebladeboltcounterclockwiseasshownin
Figure34.
Figure34
2.RemoveeachbladeasshowninFigure35.
G016530
1
2
3
4
Figure35
1.Spindle(2)3.Blade(2)
2.Bladedriver(2)4.Bladebolt(2)
3.Inspectthepinsonthebladedriversforwearand
damage.
InstallingtheBlades
1.Installtherstbladesothatitishorizontal,alongwith
allmountinghardwareasshowninFigure35.
Note:Tightentheboltwithyourngers.
Important:Positionthecurvedendsoftheblades
topointtowardthemachinehousing.Besureto
nesttheraisedareasoneachbladedriverwiththe
recessesintheheadofitscorrespondingspindle,
andthepinsontheothersideofeachbladedriver
withtheholesinitscorrespondingblade.
21
Page 22

2.Steadyeachbladewithaboardandturnthebladebolt
clockwisewithatorquewrenchasshowninFigure36;
torqueeachbladeboltto60ft-lb(82N-m).
g016537
Figure36
Important:Abolttorquedto60ft-lb(82N-m)is
verytight.Putyourweightbehindthewrenchand
tightentheboltsecurely.Thisboltisverydifcult
toovertighten.
3.Rotatetheinstalledblade1/4turnuntilitisvertical,
andinstalltheotherbladeinthesamemannerasthe
rst(refertostep1).
Note:Thebladesshouldbeperpendicular,forming
aninverted“T”asshowninFigure37.
1
G016536
Figure37
1.Blade(2)
4.Tightenthesecondblade;refertostep2.
5.Rotatethebladesbyhandafull360°turntoensure
thattheydonottouch.
Note:Ifthebladestoucheachother,theyarenot
mountedcorrectly.Repeatsteps1through3untilthe
bladesnolongertoucheachother.
WARNING
Incorrectlyinstallingthebladescoulddamage
themachineorcauseaninjurytotheoperator
ortobystanders.
Changingthe
Blade-Brake-Clutch(BBC)
Belt
ServiceInterval:Every250hours
1.Stoptheengineandwaitforallmovingpartstostop.
2.Disconnectthewirefromthesparkplug.
3.Removethe4boltsthatholdthebeltcovertothe
machinehousing.
Note:Savetheboltsforinstallingthebeltcoverto
themachinehousing.
4.Removethebeltcover.
5.Removeanydebrisfromunderthebeltcover.
6.RemovetheBBCbeltguard(Figure38).
Note:Savethemountinghardwareforinstallingthe
BBCbeltguardlater.
G019899
1
2
Figure38
1.BBCbelt2.BBCbeltguard
7.RemovetheBBCbeltfromthebrake-drumpulley.
8.Movethetabforward(Figure39).
Note:Thetabpreventsthetransmissionfromtipping
tothepointwherethetransmissionbeltcomesoff.
22
Page 23

G019898
1
2
3
4
5
Figure39
1.Transmissiontension
spring
4.Transmissionbelt
2.Transmission5.Tab
3.BBCbelt
9.Removethetransmissiontensionspring.
10.Removethetransmissionbeltfromthetransmission
pulley.
11.RemovetheBBCbelt.
Note:Holdoneofthebladesusingagloveorarag
andturnthebladespindletohelpremovetheBBCbelt.
12.ToinstallanewBBCbelt,reversethestepsabove.
13.AdjusttheBBCcable;refertoAdjustingtheBBCcable
in
AdjustingtheBlade-brakeCable(page23).
AdjustingtheSelf-propel
Cable
Ifthemachinedoesnotself-propelortendstocreepforward
whenyoureleasethecontrolbar,adjustthedrivecable.
1.Stopandwaitforallmovingpartstostop.
2.Loosenthecable-supportnut(Figure40).
G019876
1
Figure40
1.Cable-supportnut
3.Slidethecable-supportnuttowardthemachineto
increasetheself-propelaction;slidethecable-support
nutawayfromthemachinetodecreasetheself-propel
action.
4.Tightenthecable-supportnut.
5.Checktheoperationforthedesireddrivecontrol,and
repeatthestepsabove,ifnecessary.
Note:Ifthemachinecreepsforwardwithoutthe
controlbarengagedorifthewheelsspinwhenyou
lifttherearwheelsofftheground,thecableistoo
tight;loosenthecable-supportnut,pullthecablejacket
upward(awayfromthemachine)slightly,andtighten
thecable-supportnut.
Note:Youmayalsoadjustthemaximumground
speed(whenthecontrolbarisfullyengaged)asdesired.
AdjustingtheBlade-brake
Cable
Adjusttheblade-brakecablewheneveryouinstallanewcable
orreplacetheBBCbelt.
1.Stoptheengineandwaitforallmovingpartstostop.
2.Disconnectthewirefromthesparkplug.
3.Removethebeltcover(Figure7)byremovingthe4
boltsthatholdittothemachinehousing.
Note:Savetheboltsforinstallingthebeltcoverto
themachinehousing.
4.Removeanydebrisfromunderthebeltcover.
5.Loosenthecable-clampscrew(Figure41).
1
2
G019923
Figure41
1.Cable-clampscrew
2.Blade-brakecable
6.Pullthecablejacketuntilthereisapproximately1/8
inch(3mm)ofslack.
Note:Donotputtensiononthespring.
23
Page 24

7.Tightenthecable-clampscrewtolocktheadjustment
inplace.
8.Installthebeltcoverwiththe4boltsthatyouremoved
instep3.
9.Connectthewiretothesparkplug.
10.Checktheoperationoftheblade-brakeclutch;referto
CheckingtheBlade-stopSystemOperation(page12).
ChangingtheBlade-driveBelt
Changetheblade-drivebeltasneeded.
1.Stoptheengineandwaitforallmovingpartstostop.
2.Disconnectthewirefromthesparkplug.
3.Removethebeltcover(Figure7)byremovingthe4
boltsthatholdittothemachinehousing.
Note:Savetheboltsforinstallingthebeltcoverto
themachinehousing.
4.Removeanydebrisfromunderthebeltcover.
5.RemovetheBBCbeltguardandthemounting
hardware.
Note:SavetheBBCbeltguardandhardwarefor
installationlater.
G019899
1
2
Figure42
1.BBCbelt2.BBCbeltguard
6.RemovetheBBCbeltfromthefrontleft-handpulley.
7.Loosentheadjustingbolt(Figure30).
8.Removethexedidlerpulleyandthehardware(Figure
43).
Note:Savetheidlerpulleyandhardwarefor
installationlater.
G019922
Figure43
TheBBCidlerpulleyisremovedforclarity
1.Holeinthehousing3.Fixed-idlerpulley
2.Right-handsprockethole
4.Left-handsprockethole
9.Removetheblade-drivebelt.
10.Aligntheholesintheright-handandleft-hand
sprocketswiththeholesinthehousingasshownin
Figure43.
Note:Holdthesprocketsinplacewitharodora
screwdriver.
11.Whenyouhavelockedthesprocketsinplace,install
theblade-drivebeltandthexedidlerpulley.
Note:Ensurethattheteethareengagedinthe
sprockets.
12.Tightenthebelttensiontotherecommendedsettings;
refertoServicingtheBlade-driveSystem(page19).
13.Removetherodorscrewdriverfromthesprockets.
14.Ensurethatthebladesunderthehousingareproperly
aligned;referto
ServicingtheCuttingBlades(page20).
15.InstalltheBBCbeltandtheBBCbeltguardand
hardware.
16.Installthebeltcoverusingthe4boltsthatyouremoved
instep3.
17.Connectthewiretothesparkplug.
18.Checktheoperationofthecontrolbarandthe
blade-brakeclutch.
CleaningundertheMachine
Housing
Foroptimalcuttingperformance,keeptheundersideofthe
machinehousingclean.Youmayeitherwashorscapethe
clippingsawayfromunderthemachinehousing.
24
Page 25

WashingundertheMachineHousing
ServiceInterval:Beforeeachuseordaily—Cleanunderthe
machinehousing.
1.Positionthemachineonaatconcreteorasphalt
surfacenearagardenhose.
2.Starttheengine.
3.Holdtherunninggardenhoseathandlelevelanddirect
thewatertoowonthegroundjustinfrontofthe
rightreartire(
Figure44).
Figure44
1.Rightrearwheel
Note:Thebladeswilldrawinwaterandwashout
clippings.Letthewaterrununtilyounolongersee
clippingsbeingwashedoutfromunderthehousing.
4.Stoptheengineandwaitforallmovingpartstostop.
5.Turnoffthewater.
6.Startthemachineandletitrunforafewminutestodry
outthemoistureonthemachineanditscomponents.
ScrapingundertheMachineHousing
Ifwashingdoesnotremovealldebrisfromunderthe
machine,scrapeitclean.
1.Disconnectthewirefromthesparkplug.
2.Drainthefuelfromthefueltank;referto
Emptying
theFuelTankandCleaningtheFilter(page19).
WARNING
Tippingthemachinemaycausethefuelto
leakfromthecarburetororthefueltank.
Gasolineisextremelyammable,highly
explosive,and,undercertainconditions,can
causepersonalinjuryorpropertydamage.
Avoidfuelspillsbyrunningtheenginedryor
byremovingthegasolinewithahandpump;
neversiphon.
3.Tipthemachineontoitsside,withtheairlterupin
theair,untiltheupperhandlerestsontheground.
4.Removethedirtandgrassclippingswithahardwood
scraper;avoidburrsandsharpedges.
5.Turnthemachineupright.
6.Fillthefueltank.
7.Connectthewiretothesparkplug.
Storage
Storethemachineinacool,clean,dryplace.Coverthe
machinetokeepitcleanandprotected.
GeneralInformation
Storethemachineinacool,clean,dryplace.Coverthe
machinetokeepitcleanandprotected.
1.Performtherecommendedannualmaintenance
procedures;refertoMaintenance(page16).
2.Cleanunderthemachinehousing;refertoCleaning
undertheMachineHousing(page24).
3.Removechaff,dirt,andgrimefromtheexternalparts
oftheengine,theshrouding,andthetopofthe
machine.
4.Checktheconditionoftheblades;referto
Inspecting
theBlades(page20).
5.Servicetheairlter;refertoServicingtheAirFilter
(page16).
6.Tightenallnuts,bolts,andscrews.
7.Touchupallrustedorchippedpaintsurfaceswith
paintavailablefromanAuthorizedServiceDealer.
PreparingtheFuelSystem
WARNING
Gasolinecanvaporizeifyoustoreitoverlong
periodsoftimeandexplodeifitcomesintocontact
withanopename.
•Donotstoregasolineoverlongperiodsoftime.
•Donotstorethemachinewithgasolineinthe
fueltankorthecarburetorinanenclosurewith
anopename.(Forexample,afurnaceora
waterheaterpilotlight.)
•Allowtheenginetocoolbeforestoringitinany
enclosure.
Onthelastrefuelingoftheyear,addfuelstabilizertothefuel
asdirectedbytheenginemanufacturer.Emptythefueltank
whenmowingthelasttimebeforestoringthemachine.
1.Runthemachineuntiltheenginestopsfromrunning
outoffuel.
2.Starttheengineagain.
3.Allowtheenginetorununtilitstops.Whenyoucan
nolongerstarttheengine,itissufcientlydry.
PreparingtheEngine
1.Whiletheengineisstillwarm,changetheengineoil
andtheoillter;refertoChangingtheEngineOil
(page17)andChangingtheOilFilter(page18).
25
Page 26

2.Removethesparkplug.
3.Usinganoilcan,addabout1oz.(30ml),ofmotoroil
totheenginethroughthespark-plughole.
4.Slowlypullthestarterropeseveraltimestodistribute
oilthroughoutthecylinder.
5.Installthesparkplugbutdonotconnectthewireto
thesparkplug.Securethewiresothatitdoesnotcome
intocontactwiththesparkplug.
RemovingtheMachinefrom
Storage
1.Checkandtightenallfasteners.
2.Removethesparkplugandspintheenginerapidly
usingthestartertoblowexcessoilfromthecylinder.
3.Inspectthesparkplugandreplaceitifitisdirty,worn,
orcracked;refertotheEngineOperator’sManual.
4.Installthesparkplugandtightenittotherecommended
torqueof180in-lb(20N-m).
5.Performanyneededmaintenanceprocedures;referto
Maintenance(page16).
6.Checktheengineoillevel;referto
CheckingtheEngine
OilLevel(page9).
7.Fillthefueltankwithfreshgasoline;referto(page).
8.Connectthewiretothesparkplug.
26
Page 27

Troubleshooting
Problem
PossibleCauseCorrectiveAction
1.Thefueltankisemptyorthefuel
systemcontainsstalefuel.
1.Drainand/orllthefueltankwith
freshgasoline.Iftheproblempersists,
contactanAuthorizedServiceDealer.
2.Thefuelshut-offvalveisclosed.2.Openthefuelshut-offvalve.
3.Thethrottleleverisnotinthecorrect
position.
3.MovethethrottlelevertotheChoke
position.
4.Thereisdirt,water,orstalefuelinthe
fuelsystem.
4.ContactanAuthorizedServiceDealer.
5.Thewireisnotconnectedtothespark
plug.
5.Connectthewiretothesparkplug.
6.Thesparkplugispitted,fouled,orthe
gapisincorrect.
6.Checkthesparkplugandadjustthe
gapifnecessary .Replacethespark
plugifitispitted,fouled,orcracked.
Theenginedoesnotstart.
7.Thereisdirtinthefuellter.7.Replacethefuellterandcleanthe
in-tanklterscreen.
1.Theairlterelementisdirtyandis
restrictingtheairow.
1.Cleantheairlterpre-cleanerand/or
replacethepaperlter.
2.Theengineoillevelislowortheoilis
dirty.
2.Checktheengineoil.Changetheoilif
itisdirtyoraddoilifitislow .
3.Thefueltankventhoseisplugged.3.Cleanorreplacethefueltankvent
hose.
4.Thereisdirtinthefuellter.4.Replacethefuellterandcleanthe
in-tanklterscreen.
5.Thereisdirt,water,orstalefuelinthe
fuelsystem.
5.ContactanAuthorizedServiceDealer.
6.Theundersideofthemachinehousing
containsclippingsanddebris.
6.Cleantheundersideofthemachine
housing.
Theenginestartshardorlosespower.
7.Thesparkplugispitted,fouled,orthe
gapisincorrect.
7.Checkthesparkplugandadjustthe
gapifnecessary .Replacethespark
plugifitispitted,fouled,orcracked.
1.Thewireisnotsecurelyconnectedto
thesparkplug.
1.Connectthewiresecurelytothespark
plug.
2.Thesparkplugispitted,fouled,orthe
gapisincorrect.
2.Checkthesparkplugandadjustthe
gapifnecessary .Replacethespark
plugifitispitted,fouled,orcracked.
3.ThethrottleleverisnotintheFast
position.
3.MovethethrottlelevertotheFast
position.
4.Theairlterelementisdirtyandis
restrictingtheairow.
4.Cleantheairlterpre-cleanerand/or
replacethepaperlter.
Theenginerunsrough.
5.Thereisdirtinthefuellter.5.Replacethefuellterandcleanthe
in-tanklterscreen.
1.Abladeisbentorisoutofbalance.1.Balancetheblade(s).Ifabladeisbent,
replaceit.
2.Ablade-mountingboltisloose.2.Tightentheblade-mountingbolts.
3.Theundersideofthemachinehousing
containsclippingsanddebris.
3.Cleantheundersideofthemachine
housing.
4.Theenginemountingboltsareloose.4.Tightentheenginemountingbolts.
5.Theenginepulley,idlerpulley ,orblade
pulleyareloose.
5.Tightentheloosepulley.
6.Theenginepulleyisdamaged.
6.ContactanAuthorizedServiceDealer.
7.Thebladespindleisbent.
7.ContactanAuthorizedServiceDealer.
Themachineorenginevibrates
excessively.
8.Thebeltisdamaged.8.Replacethebelt.
27
Page 28

Problem
PossibleCauseCorrectiveAction
1.All4wheelsarenotatthesameheight.1.Placeall4wheelsatthesameheight.
2.Thebladesaredull.
2.Sharpenandbalancetheblades.
3.Youaremowinginthesamepattern
repeatedly.
3.Changethemowingpattern.
4.Theundersideofthemachinehousing
containsclippingsanddebris.
4.Cleantheundersideofthemachine
housing.
Thereisanunevencuttingpattern.
5.Thebladespindleisbent.
5.ContactanAuthorizedServiceDealer.
1.ThethrottleleverisnotintheFast
position.
1.MovethethrottlelevertotheFast
position.
2.Thecuttingheightistoolow.
2.Raisethecuttingheight;ifnecessary ,
mowasecondtimeatalowercutting
height.
3.Youaremowingtoofast.3.Slowdown.
4.Thegrassiswet.
4.Allowthegrasstodrybeforemowing.
Thedischargechutegetspluggedup.
5.Theundersideofthemachinehousing
containsclippingsanddebris.
5.Cleantheundersideofthemachine
housing.
1.Theself-propeldrivecableisoutof
adjustmentorisdamaged.
1.Adjusttheself-propeldrivecable;
replacethecableifnecessary.
2.Thereisdebrisinthebeltarea.
2.Cleanthedebrisfromthebeltarea.
Themachinedoesnotself-propel.
3.Thebeltisdamaged.3.Replacethebelt.
1.TheBBCbeltorthetimingbeltisworn,
loose,orbroken.
1.AdjusttheBBCcable;adjustthetiming
belttension;replacethemifnecessary.
2.TheBBCbeltisoffthepulley.2.Checkthebeltfordamage,andreplace
itifnecessary .
Thebladesdonotrotateortheyslip.
3.TheBBCcableisworn,loose,or
broken.
3.AdjusttheBBCcable;replaceitif
necessary.
1.Thebladesareinstalledoraligned
incorrectly.
1.Installthebladesproperly.
2.Thebladeadaptersareworn,loosen,
orbroken.
2.Replacethebladeadapters.
3.Thetimingbeltorworn,loose,or
broken.
3.Re-timethebladesandadjustthe
timingbelttension,replaceitif
necessary.
Thebladescontacteachother .
4.Thetimingsprocketsoridlerpulleyis
worn,loose,orbroken.
4.Replacethesprocketsortheidler
pulleyifnecessary .
28
Page 29

Notes:
29
Page 30

Notes:
30
Page 31

Notes:
31
Page 32

TheToroTotalCoverageWarranty
Landscape
ALimitedWarranty(seewarrantyperiodsbelow)Contractor
Equipment(LCE)
ConditionsandProductsCovered
TheToroCompanyanditsafliate,ToroWarrantyCompany,pursuanttoan
agreementbetweenthem,jointlypromisetotheoriginalpurchasertorepairtheT oro
Productslistedbelowifdefectiveinmaterialsorworkmanship.
Thefollowingtimeperiodsapplyfromthedateofpurchasebytheoriginalowner:
ProductsWarrantyPeriod
21in.Mowers2yearsResidentialUse
1
1yearCommercialUse
•Engines
4
Honda–2years
Kawasaki–3years
30in.Mowers2yearsResidentialUse
1
1yearCommercialUse
•Engines
4
Kawasaki–3years
Mid-SizeWalk-BehindMowers
2years
•Engines
4
Kawasaki–3years
GrandStand
®
Mowers
5yearsor1,200hours
2
•Engines
4
3years
•Frame
Lifetime(originalowneronly)
3
ZMaster
®
2000SeriesMowers
4yearsor500hours
2
•Engines
4
3years
•Frame
Lifetime(originalowneronly)
3
ZMaster
®
3000SeriesMowers
5yearsor1,200hours
2
•Engines
4
3years
•Frame
Lifetime(originalowneronly)
3
ZMaster
®
5000SeriesMowers
5yearsor1,200hours
2
•Engines
4
KohlerCommand–2years
KohlerEFI–3years
•Frame
Lifetime(originalowneronly)
3
ZMaster
®
6000SeriesMowers
5yearsor1,200hours
2
•Engines
4
Kawasaki–3years
•Frame
Lifetime(originalowneronly)
3
ZMaster
®
7000SeriesMowers
5yearsor1,200hours
2
•Engines
4
2years
•Frame
Lifetime(originalowneronly)
3
AllMowers
•Battery90daysPartsandLabor
1yearPartsonly
•BeltsandT ires90days
•Attachments1year
1
Residentialusemeansuseoftheproductonthesamelotasyourhome.Useatmorethanone
locationisconsideredcommercialuseandthecommercialwarrantywouldapply.
2
Whicheveroccursrst.
3
LifetimeFrameW arranty-Ifthemainframe,consistingofthepartsweldedtogethertoformthe
tractorstructurethatothercomponentssuchastheenginearesecuredto,cracksorbreaksin
normaluse,itwillberepairedorreplaced,atT oro'soption,underwarrantyatnocostforparts
andlabor.Framefailureduetomisuseorabuseandfailureorrepairrequiredduetorustor
corrosionarenotcovered.
4
SomeenginesusedonToroProductsarewarrantedbytheenginemanufacturer.
InstructionsforObtainingWarrantyService
IfyouthinkthatyourT oroProductcontainsadefectinmaterialsorworkmanship,
followthisprocedure:
1.ContactanyAuthorizedT oroServiceDealertoarrangeserviceattheir
dealership.T olocateadealerconvenienttoyou,refertotheY ellowPagesof
yourtelephonedirectory(lookunder“LawnMowers”)oraccessourwebsite
atwww.T oro.com.Youmayalsocallthenumberslistedinitem#3tousethe
24-hourToroDealerlocatorsystem.
2.Bringtheproductandyourproofofpurchase(salesreceipt)totheService
Dealer.Thedealerwilldiagnosetheproblemanddetermineifitiscovered
underwarranty.
3.IfforanyreasonyouaredissatisedwiththeServiceDealer’sanalysisorwith
theassistanceprovided,contactusat:
RLCCustomerCareDepartment
ToroWarrantyCompany
811 1LyndaleAvenueSouth
Bloomington,MN55420-1 196
888-865-5676(U.S.Customers)
888-865-5691(Canadacustomers)
OwnerResponsibilities
YoumustmaintainyourToroProductbyfollowingthemaintenanceprocedures
describedintheOperator'sManual.Suchroutinemaintenance,whetherperformed
byadealerorbyyou,isatyourexpense.
ItemsandConditionsNotCovered
Thereisnootherexpresswarrantyexceptforspecialemissionsystemcoverage
andenginewarrantycoverageonsomeproducts.Thisexpresswarrantydoesnot
coverthefollowing:
•Costofregularmaintenanceserviceorparts,suchaslters,fuel,lubricants,oil
changes,sparkplugs,airltersbladesharpeningorwornblades,cable/linkage
adjustments,orbrakeandclutchadjustments
•Componentsfailingduetonormalwear
•Anyproductorpartwhichhasbeenalteredormisusedorneglectedand
requiresreplacementorrepairduetoaccidentsorlackofpropermaintenance
•Pickupanddeliverycharges
•RepairsorattemptedrepairsbyanyoneotherthananAuthorizedToroService
Dealer
•Repairsnecessaryduetofailuretofollowrecommendedfuelprocedure
(consultOperator'sManualformoredetails)
–Removingcontaminantsfromthefuelsystemisnotcovered
–Useofoldfuel(morethanonemonthold)orfuelwhichcontainsmore
than10%ethanolormorethat15%MTBE
–Failuretodrainthefuelsystempriortoanyperiodofnon-useoverone
month
GeneralConditions
AllrepairscoveredbythesewarrantiesmustbeperformedbyanAuthorizedToro
ServiceDealerusingToroapprovedreplacementparts.
NeitherTheToroCompanynorToroWarrantyCompanyisliableforindirect,
incidentalorconsequentialdamagesinconnectionwiththeuseoftheToro
Productscoveredbythiswarranty,includinganycostorexpenseofproviding
substituteequipmentorserviceduringreasonableperiodsofmalfunctionor
non-usependingcompletionofrepairsunderthiswarranty .
Allimpliedwarrantiesofmerchantability(thattheproductistforordinary
use)andtnessforuse(thattheproductistforaparticularpurpose)are
limitedtothedurationoftheexpresswarranty.
Somestatesdonotallowexclusionsofincidentalorconsequentialdamages,
orlimitationsonhowlonganimpliedwarrantylasts,sotheaboveexclusions
andlimitationsmaynotapplytoyou.
Thiswarrantygivesyouspeciclegalrights,andyoumayalsohaveotherrights
whichvaryfromstatetostate.
CountriesOtherthantheUnitedStatesorCanada
CustomerswhohavepurchasedT oroproductsoutsidetheUnitedStatesorCanadashouldcontacttheirT oroDistributor(Dealer)toobtainguaranteepoliciesforyourcountry,
province,orstate.IfforanyreasonyouaredissatisedwithyourDistributor'sserviceorhavedifcultyobtainingguaranteeinformation,contacttheT oroimporter.Ifallother
remediesfail,youmaycontactusatT oroWarrantyCompany.
AustralianConsumerLaw:AustraliancustomerswillnddetailsrelatingtotheAustralianConsumerLaweitherinsidetheboxoratyourlocalT oroDealer.
374-0252RevF
 Loading...