

Page 1
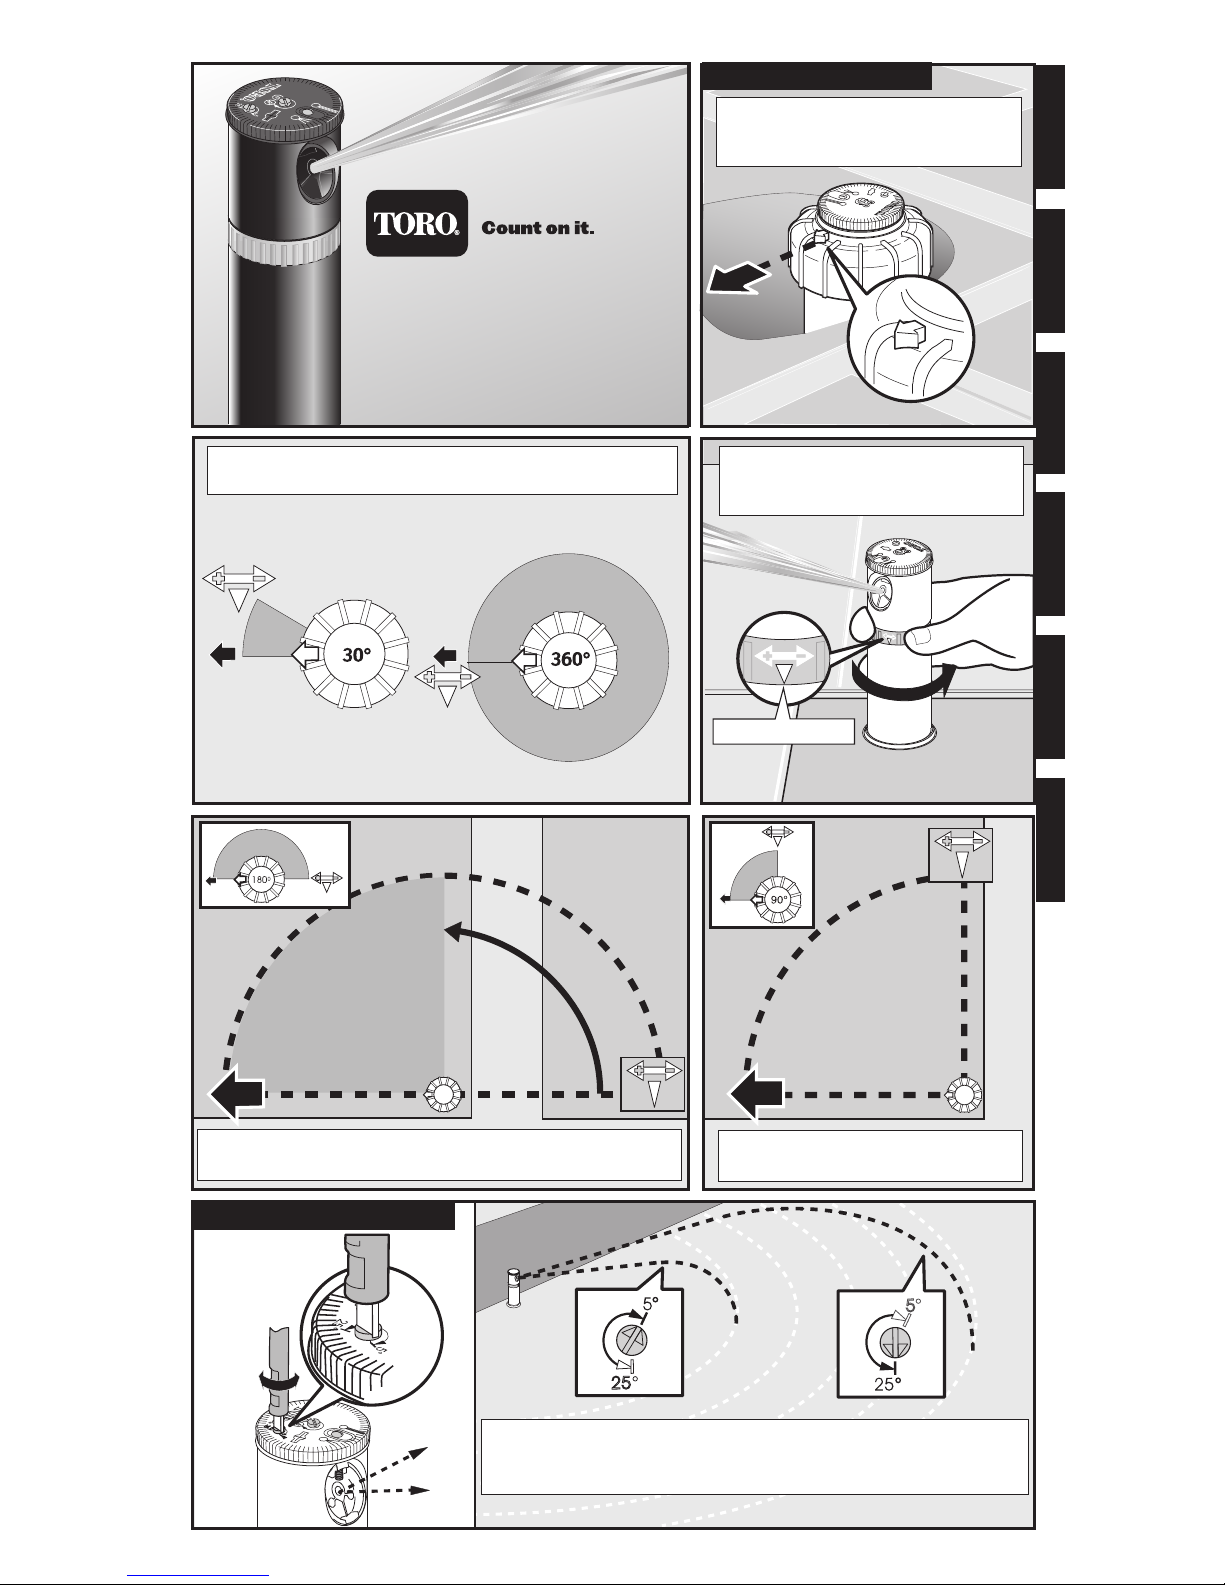
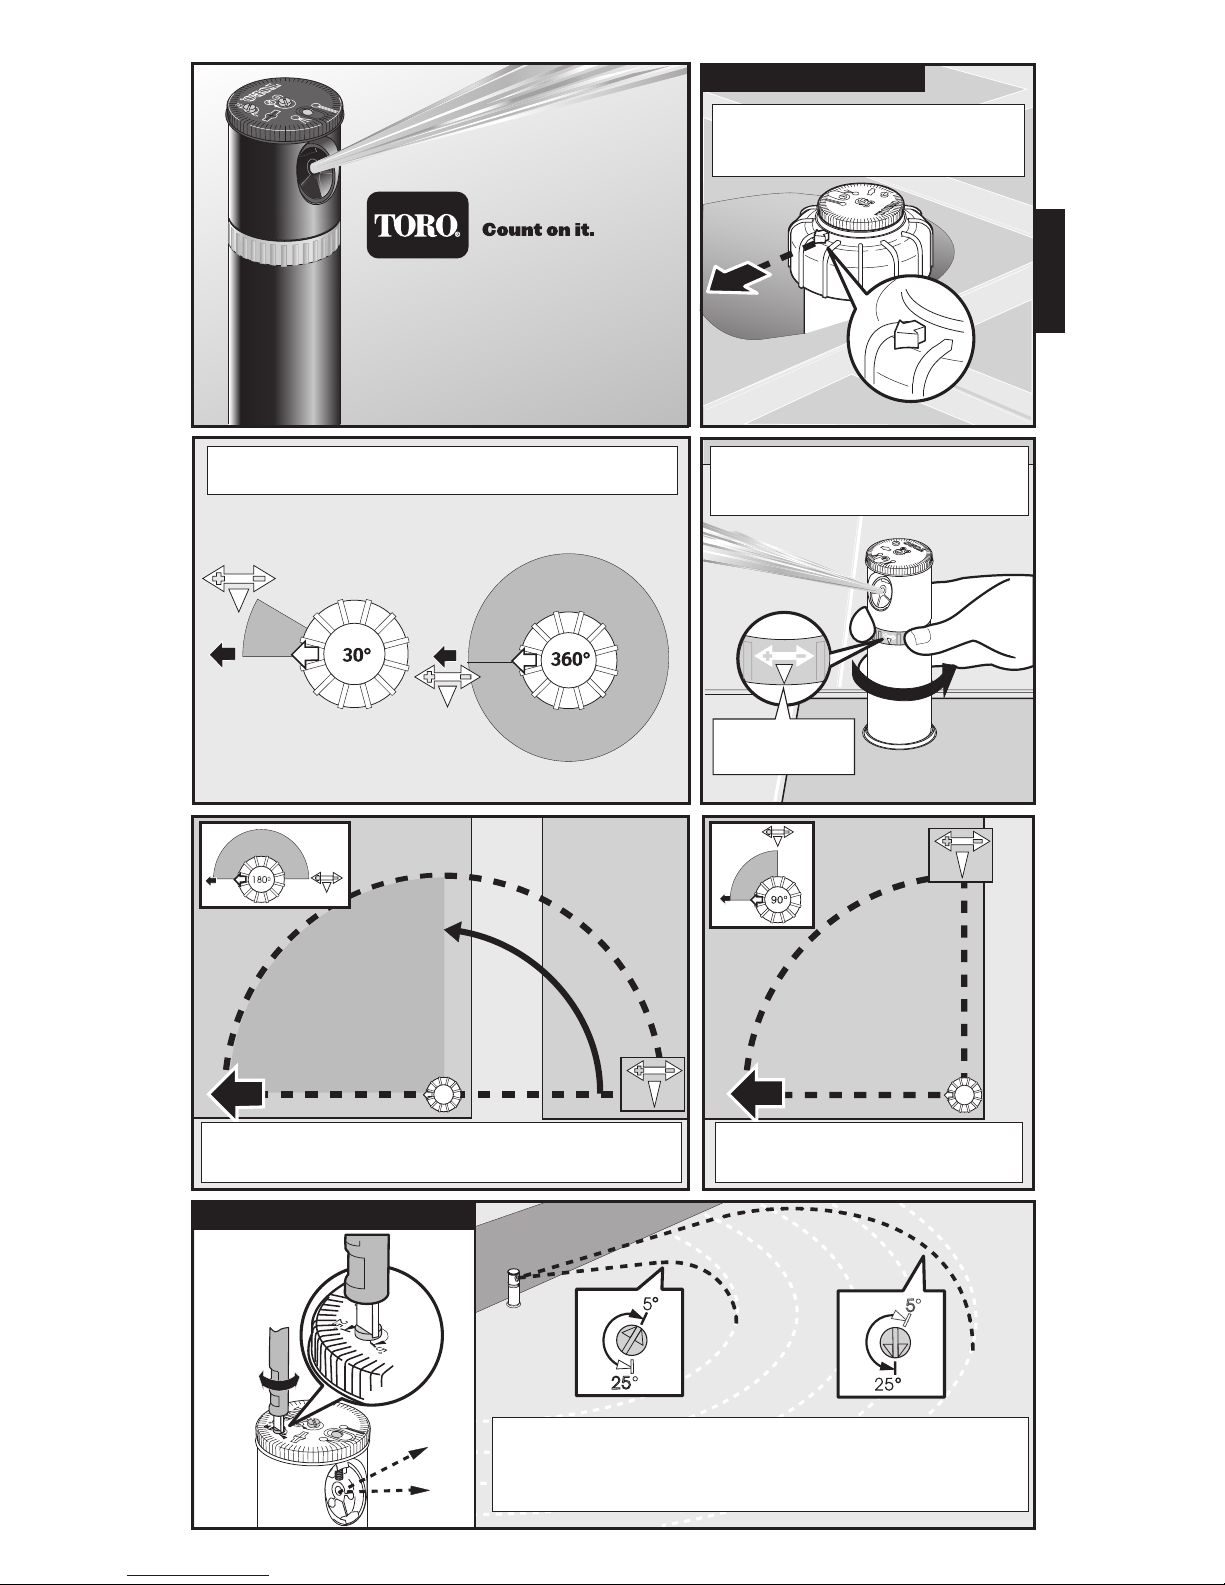
TR50XT
SERIES ROTOR
Align the cap arrow with the left side
of the watering area. This is the nonadjustable side of the watering arc.
Turn the arc adjustment ring to align
the white arrow to the right side of
the watering arc.
The nozzle trajectory angle can be adjusted between 5° and 25°.
Turn the adjustment screw right to decrease the angle and shorten
spray radius, or left to increase the angle and lengthen spray radius.
The watering area can be adjusted between 30° and 360°.
When set to 360°, the nozzle does not reverse direction.
Instruction Guide
Watering Arc Adjustment
Nozzle Trajectory Adjustment
The watering area is between the cap arrow and the right stop
arrow on the arc adjustment ring. This example is set to 180°.
Align the right stop arrow to the right
side of the watering arc.
Right Stop Arrow
Español
English
Français Deutsch Italiano
português
Page 2
© 2003 The Toro Company, Irrigation Division • An ISO 9000-certified Company • www.toro.com Form Number 373-0291 Rev. A
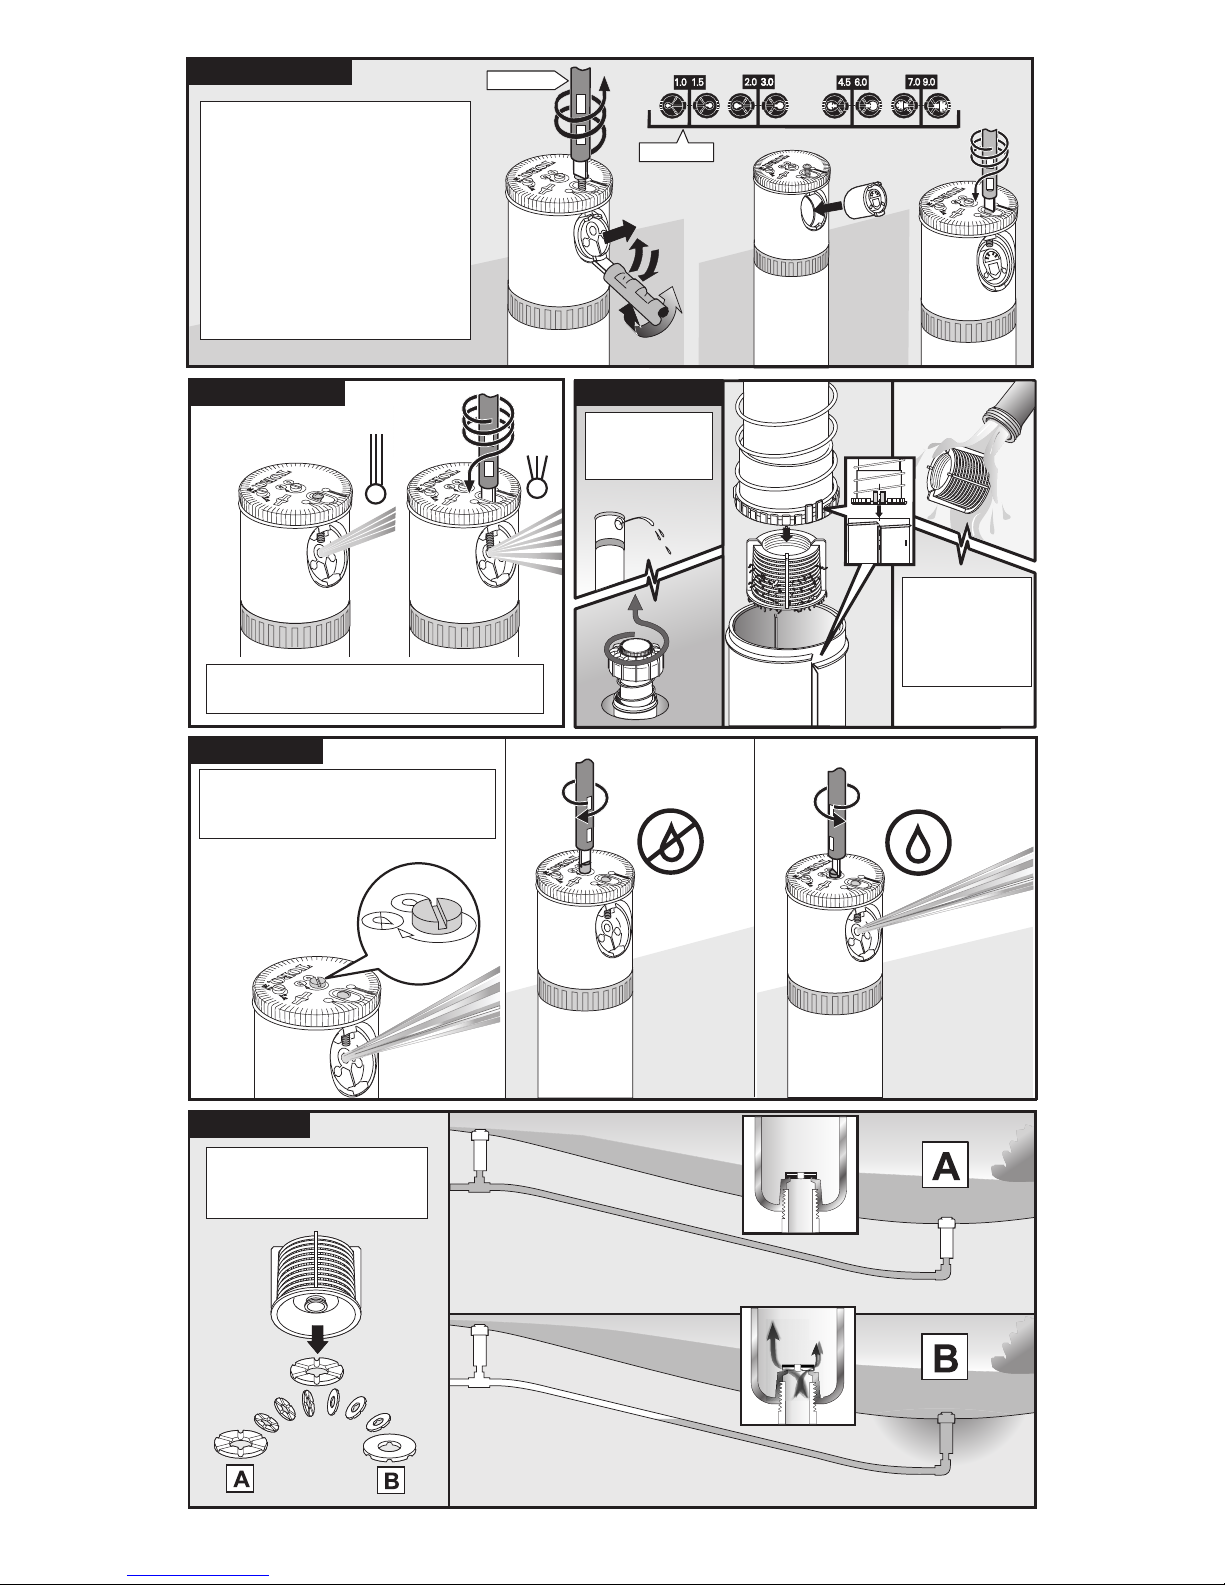
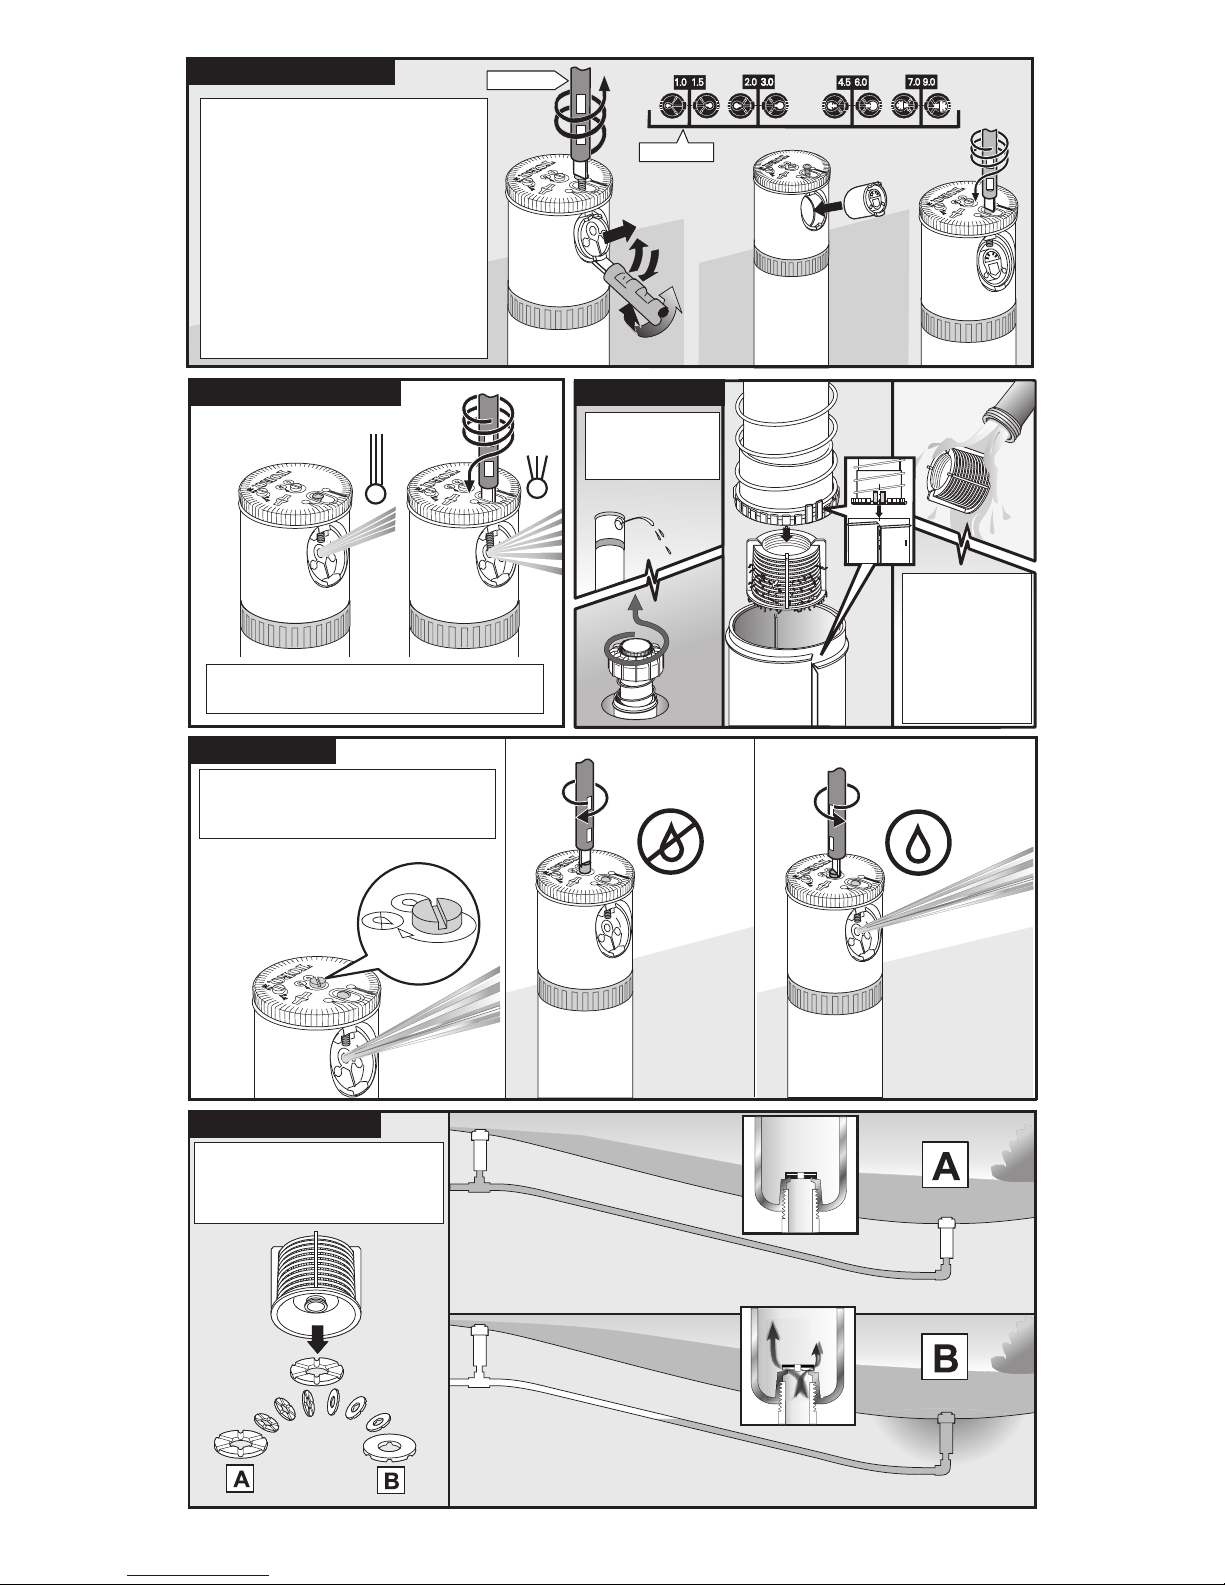
The TR50XT sprinkler comes with
eight additional nozzle sizes from
1 to 9 GPM (4.5 to 41 LPM). To
change the nozzle, use the blade
end of the sprinkler tool or a
screwdriver to turn the nozzle
screw out until it clears the nozzle.
Pry the nozzle out at the bottom
and install the new nozzle. Return
the nozzle screw to its previous
position.
Turn the nozzle screw in to diffuse and
shorten the spray radius.
Turn the center screw right to shut
off flow. Turn the screw left to open
flow.
To eliminate check valve
function, install the check
valve disk in position B.
Remove and
flush screen
as needed.
Changing Nozzle
Adjusting Spray
Cleaning Screen
Check Valve
Flow Shut Off
To maintain left
stop, align riser
with body as
shown when
reassembling.
102-1303
102-1877
Page 3
Alinee la flecha del tapón con el lado
izquierdo del área de riego. Ése es el
lado no ajustable del arco de riego.
Gire el anillo de ajuste del arco para
alinear la flecha de detención a la derecha
con el lado derecho del arco de riego.
Se puede ajustar el ángulo de la trayectoria de la boquilla entre
5° y 25°. Para reducir el ángulo y el radio de aspersión, gire el
tornillo de ajuste a la derecha. Para incrementarlos, gire el tornillo
a la izquierda.
Se puede ajustar el área de riego entre 30° y 360°.
Si se ajusta a 360°, la boquilla no cambia de sentido.
Ajuste del arco de riego
Ajuste de la trayectoria de la boquilla
El área de riego se extiende desde la flecha del tapón a la
flecha de detención a la derecha del anillo de ajuste del arco.
El ejemplo muestra un ajuste a 180°.
Alinee la flecha de detención a la
derecha con el lado derecho del arco
de riego.
Flecha de
detención a
la derecha
TR50XT
ROTOR DE LA SERIE
Manual de instrucciones
Español
Page 4
© 2003 The Toro Company, Irrigation Division • Una compañía certificada por la ISO 9000 • www.toro.com N.º de formulario 373-0291 Rev. A
El aspersor TR50XT incorpora ocho
tamaños de boquillas diferentes de
1 a 9 GPM (de 4.5 a 41 l/min). Para
cambiar la boquilla, introduzca el
extremo plano de la herramienta
para aspersores o un destornillador
en el tapón para girar el tornillo de la
boquilla hasta que la boquilla quede
liberada. Tire de la boquilla por la
parte inferior e instale una nueva.
Vuelva a colocar el tornillo de la
boquilla en la posición anterior.
Para aumentar y reducir el radio de
aspersión, gire el tornillo de la boquilla.
Para cerrar el flujo, gire el tornillo
central a la derecha. Para abrirlo,
gire el tornillo a la izquierda.
Para eliminar la función de la
válvula de retención, coloque
el disco de la válvula de
retención en la posición B.
Retire y aclare
el filtro según
sea necesario.
Cambio de la boquilla
Ajuste de la aspersión
Limpieza del filtro
Válvula de retención
Cierre del flujo
Para conservar
la detención
izquierda,
cuando vuelva
a montar el
aspersor, alinee
el elevador con
la carcasa.
102-1303
102-1877
Page 5

TR50XT
GAMME D’ARROSEURS ROTATIFS
Faire correspondre la flèche du
capuchon avec le bord gauche de la
zone. Il s’agit du côté non réglable
de l’arc d’arrosage.
Tourner la bague de réglage de l’arc
pour faire correspondre la flèche de
butée droite au bord droit de l’arc
d’arrosage.
L’angle de la trajectoire de la buse peut se régler entre 5 et 25°.
Tourner la vis de réglage vers la droite pour réduire l’angle et
raccourcir le rayon d’arrosage ou vers la gauche pour augmenter
l’angle et allonger le rayon d’arrosage.
L’angle de la zone d’arrosage peut se régler entre 30 et
360°. Quand il est réglé sur 360°, la buse ne fait pas de
va-et-vient.
mode d’emploi
Réglage de l’arc d’arrosage
Réglage de la trajectoire de la buse
La zone d’arrosage est délimitée par la flèche du capuchon
et la flèche de butée droite située sur la bague de réglage de
l’arc. Dans cet exemple, elle est réglée sur 180°.
Faire correspondre la flèche de
butée droite au bord droit de l’arc
d’arrosage.
Flèche de butée
droite
Français
Page 6

© 2003 The Toro Company, Irrigation Division • Société homologuée ISO 9000 • www.toro.com Document n° 373-0291 rév. A
L’arroseur TR50XT est fourni
avec huit autres buses de
différents débits (de 4,5 à 41 l/mn).
Pour changer la buse, insérer la
lame de l’outil fourni avec l’arroseur
ou d’un tournevis à travers le
capuchon et desserrer la vis de la
buse jusqu’à ce qu’elle se dégage
de celle-ci. Extraire la buse et
installer la nouvelle. Reposer la
vis de la buse.
Serrer la vis de la buse pour diffuser le
jet et réduire son rayon.
Tourner la vis centrale vers la droite
pour couper le débit ou vers la
gauche pour l’ouvrir.
Pour empêcher le fonctionnement du clapet d’arrêt,
installer le disque du clapet
en position B.
Au besoin,
enlever et
rincer le filtre.
Changement de la buse
Réglage du jet
Nettoyage du filtre
Clapet d’arrêt
Fermeture du débit
Pour conserver
le réglage de la
butée gauche,
remonter en
alignant la tuyère
et le corps de
la manière
indiquée.
102-1303
102-1877
Page 7

Den Pfeil auf der Kappe mit der linken
Seite der Beregnungsfläche ausrichten.
Das ist die nicht verstellbare Seite des
Beregnungsbogens.
Den Bogeneinstellring so verdrehen,
dass der rechte Stopp-Pfeil mit der
rechten Seite des Beregnungsbogens
ausgerichtet ist.
Der Düsenstrahlwinkel kann zwischen 5° und 25° eingestellt werden.
Die Einstellschraube nach rechts drehen, um den Winkel zu verringern
und damit den Regnerradius zu verkleinern, bzw. nach links drehen, um
den Winkel zu vergrößern und damit den Regnerradius zu vergrößern.
Die Beregnungsfläche kann zwischen 30° und 360°
eingestellt werden. Bei der Einstellung auf 360° kehrt die
Düse die Drehrichtung nicht um.
Einstellung des Beregnungsbogens
Einstellung des Düsenstrahlwinkels
Die Beregnungsfläche liegt zwischen dem Pfeil auf der Kappe
und dem rechten Stopp-Pfeil auf dem Bogeneinstellring. In
diesem Beispiel ist sie auf 180° eingestellt.
Den rechten Stopp-Pfeil mit der
rechten Seite des Beregnungsbogens
ausrichten.
Rechter Stopp-Pfeil
TR50XT
ROTOR DER SERIE
Anleitung
Deutsch
Page 8

© 2003 The Toro Company, Irrigation Division • Ein nach ISO 9000 zertifiziertes Unternehmen • www.toro.com Formular-Nr. 373-0291 Rev. A
Der Regner TR50XT wird mit acht
zusätzlichen Düsengrößen zwischen
4,5 und 41 L/min (1 bis 9 GPM)
geliefert. Zum Düsenwechsel die
Düsenschraube mit der Klinge des
Regnerwerkzeugs oder mit einem
Schraubendreher soweit herausdrehen, dass sie nicht mehr an der
Düse anliegt. Die Düse von unten
herausdrücken und die neue Düse
einbauen. Die Düsenschraube
wieder in die vorherige Stellung
bringen.
Die Düsenschraube hineindrehen,
um den Strahl zu zerstäuben und den
Regnerradius zu verkürzen.
Die mittlere Schraube nach rechts
drehen, um den Durchfluss zu
sperren. Die Schraube nach links
drehen, um den Durchfluss zu öffnen.
Um die Funktion des Rückschlagventils zu deaktivieren,
die Rückschlagventilscheibe
in Stellung B einbauen.
Entfernen
und Sieb
nach Bedarf
spülen.
Düsenwechsel
Einstellen des Strahls
Reinigungssieb
Rückschlagventil
Durchfluss gesperrt
Um den linken
Stopp beizubehalten, den
Düsenkopf beim
Zusammenbau
wie dargestellt mit
dem Gehäuse
ausrichten.
102-1303
102-1877
Page 9

TR50XT
SERIE ROTORE
Allineare la freccia del cappuccio con
il lato sinistro dell'area di irrigazione:
questo rappresenta il lato non
regolabile dell'arco di irrigazione.
Girare l'anello di regolazione dell'arco
per allineare la freccia bianca con il
lato destro dell'arco di irrigazione.
L'angolo della traiettoria dell'ugello può essere regolato fra 5° e 25°.
Girare la vite di regolazione verso destra per diminuire l'angolo e
accorciare il raggio dello spruzzo, oppure girarla verso sinistra per
aumentare l'angolo e allungare il raggio.
L'area di irrigazione può essere regolata fra 30° e 360°.
Quando impostato su 360°, l'ugello non inverte la direzione.
Guida operativa
Regolazione dell'arco di irrigazione
Regolazione della traiettoria dell'ugello
L'area di irrigazione si trova fra la freccia del cappuccio e la
freccia di arrestro destra sull'anello di regolazione dell'arco.
Questo esempio è impostato a 180°.
Allineare la freccia di arresto destra
con il lato destro dell'arco di
irrigazione.
Freccia di arresto
destra
Italiano
Page 10

© 2003 The Toro Company, Irrigation Division • Una società certificata ISO 9000 • www.toro.com Modulo numero 373-0291 Rev. A
L'irrigatore TR50XT è dotato di
altre otto misure di ugello da 1 a 9
galloni al minuto (4,5 - 41 l/min).
Per sostituire l'ugello, inserire
l'estremità affilata dell'utensile
per irrigatori, oppure un cacciavite,
per svitare la vite dell'ugello fino a
quando non si libera. Estrarre dal
di sotto l'ugello e installarne uno
nuovo. Rimettere la vite dell'ugello
nella sua posizione originale.
Avvitare la vite dell'ugello per allargare e
accorciare il raggio dello spruzzo.
Girare verso destra la vite centrale in
modo da interrompere il flusso;
girandola verso sinistra si apre il flusso.
Per eliminare la funzione della
valvola di ritegno, installare il
disco della valvola di ritegno in
posizione B.
Togliere e lavare
lo schermo
secondo
necessità.
Sostituzione dell'ugello
Regolazione dello spruzzo
Pulizia dello
schermo
Valvola di ritegno
Interruzione del flusso
Per mantenere
l'arresto di sinistra,
allineare il
montante con
il corpo durante
l'assemblaggio,
come mostrato
nell'illustrazione.
102-1303
102-1877
Page 11

Alinhe a seta da tampa com o limite
lateral esquerdo da área de irrigação.
Este é o limite fixo do arco de irrigação.
Gire o anel de ajuste do arco para
alinhar a seta de parada direita com
o limite direito do arco de irrigação.
O ângulo da trajetória do bico pode ser ajustado entre 5 e 25°.
Gire o parafuso de ajuste para a direita quando quiser diminuir o
ângulo e reduzir o raio de borrifo, ou para a esquerda quando
quiser aumentar o ângulo e alongar o raio de borrifo.
A área de irrigação pode ser ajustada entre 30 e 360°.
Quando o ajuste for feito para uma área de 360°,
o bico não reverte a direção.
Ajuste do Arco de Irrigação
Ajuste da Trajetória do Bico
A área de irrigação encontra-se entre a seta da tampa e a
seta de parada direita no anel de ajuste de arco.
Este exemplo faz o ajuste para 180°.
Alinhe a seta de parada direita
com o limite direito do arco de
irrigação.
Seta de Parada
Direita
TR50XT
ROTOR DA SÉRIE
Manual de Instruções
português
Page 12

© 2003 The Toro Company, Irrigation Division • Uma empresa certificada pelo ISO 9000 • www.toro.com Número de formulário 373-0291 Rev. A
Oito tamanhos diferentes de bico,
de 1 a 9 GPM (de 4,5 a 41 LPM)
acompanham o irrigador automático
TR50XT. Para substituir o bico,
insira a extremidade da lâmina da
ferramenta do irrigador automático
ou uma chave de fenda para girar o
parafuso do bico até retirá-lo. Solte
o bico de sua base e instale o novo
bico. Recoloque o parafuso do bico
em sua posição anterior.
Gire o parafuso do bico para dentro a fim de
abrir (espalhar) e encurtar o raio do borrifo.
Gire o parafuso central para a
direita a fim de interromper o fluxo.
Gire-o para a esquerda para abri-lo.
Para eliminar a função da
válvula de verificação, instale o
disco da válvula de verificação
na posição B.
Remova e lave
a tela sempre
que necessário.
Substituição do Bico
Ajuste do Borrifo
Limpeza da Tela
Válvula de Verificação
Interrupção de Fluxo
Para conservar a
parada esquerda,
alinhe o tubo
ascendente com o
corpo, conforme
demonstrado,
quando realizar a
montagem.
102-1303
102-1877
 Loading...