How it Works
Log In / Sign Up
Buy Points
How it Works
FAQ
Contact Us
Questions and Suggestions
Users
Toro
Loading...
T
TimeCutter Z5000
3
TimeCutter Z5020
TimeCutter Z5020 74372
TimeCutter Z5030
2
TimeCutter Z5035
TimeCutter Z5040
TimeCutter Z5060
2
TimeCutter Z530
TimeCutter ZS 3200
timecutter zs 3200s
3
timecutter zs 4200
2
timecutter zs 4200s
3
timecutter zs 4200T
2
timecutter zs 5000
5
TimeCutter ZS 5000TF
TimeCutter ZX440
TimeCutter ZX525
Timemaster 20199
Timemaster 20200
2
TimeMaster 20975
TimeMaster 20977
2
TIS-240
TITAN 74861
TITAN 74862
TITAN 74863
TITAN 74891
TITAN 74892
TITAN 74893
TITAN HD 1500
TITAN HD 1500 Series
TITAN HD 2000 Series
TITAN HD 2500 Series
TITAN HD Series
titan mx
2
TITAN MX4800
2
TITAN MX5400
3
TITAN MX6000
3
TITAN series
Titan Z4800
3
Titan Z4800 74812
2
titan Z5200
3
Titan Z5200 74814
2
titan zx
2
titan zx 4800
4
TITAN ZX4820
TITAN ZX 5400
3
TITAN ZX5420
TITAN ZX6000
TM5490
TM7490
TMC-212
2
TMC-212 Series
TMC-424
3
TMC-424E
2
TMC-424E Series
3
TMC-424 Series
TMR-1
2
Tondeuse Super Recycler
topdresser 2300
Total Control Series
3
TouchNet 89-9150
TPV Series
TR100D8714
2
TR16504236
TR16504236E
TR16504244
TR16504244E
TR16504A36
TR16504A36E
TR16504A44
TR16504A44E
TR16504C36
TR16504C36E
TR16504C44
TR16504C44E
TR16504M36
TR16504M36E
TR16504M44
TR16504M44E
TR16504R36
TR16504R36E
TR16504R44
TR16504R44E
TR16504S36
TR16504S36E
TR16504S44
TR16504S44E
TR16504T36
TR16504T36E
TR16504T44
TR16504T44E
TR16506236
TR16506236E
TR16506244
TR16506244E
TR16506A36
TR16506A36E
TR16506A44
TR16506A44E
TR-34D
Loading...
Loading...
Nothing found
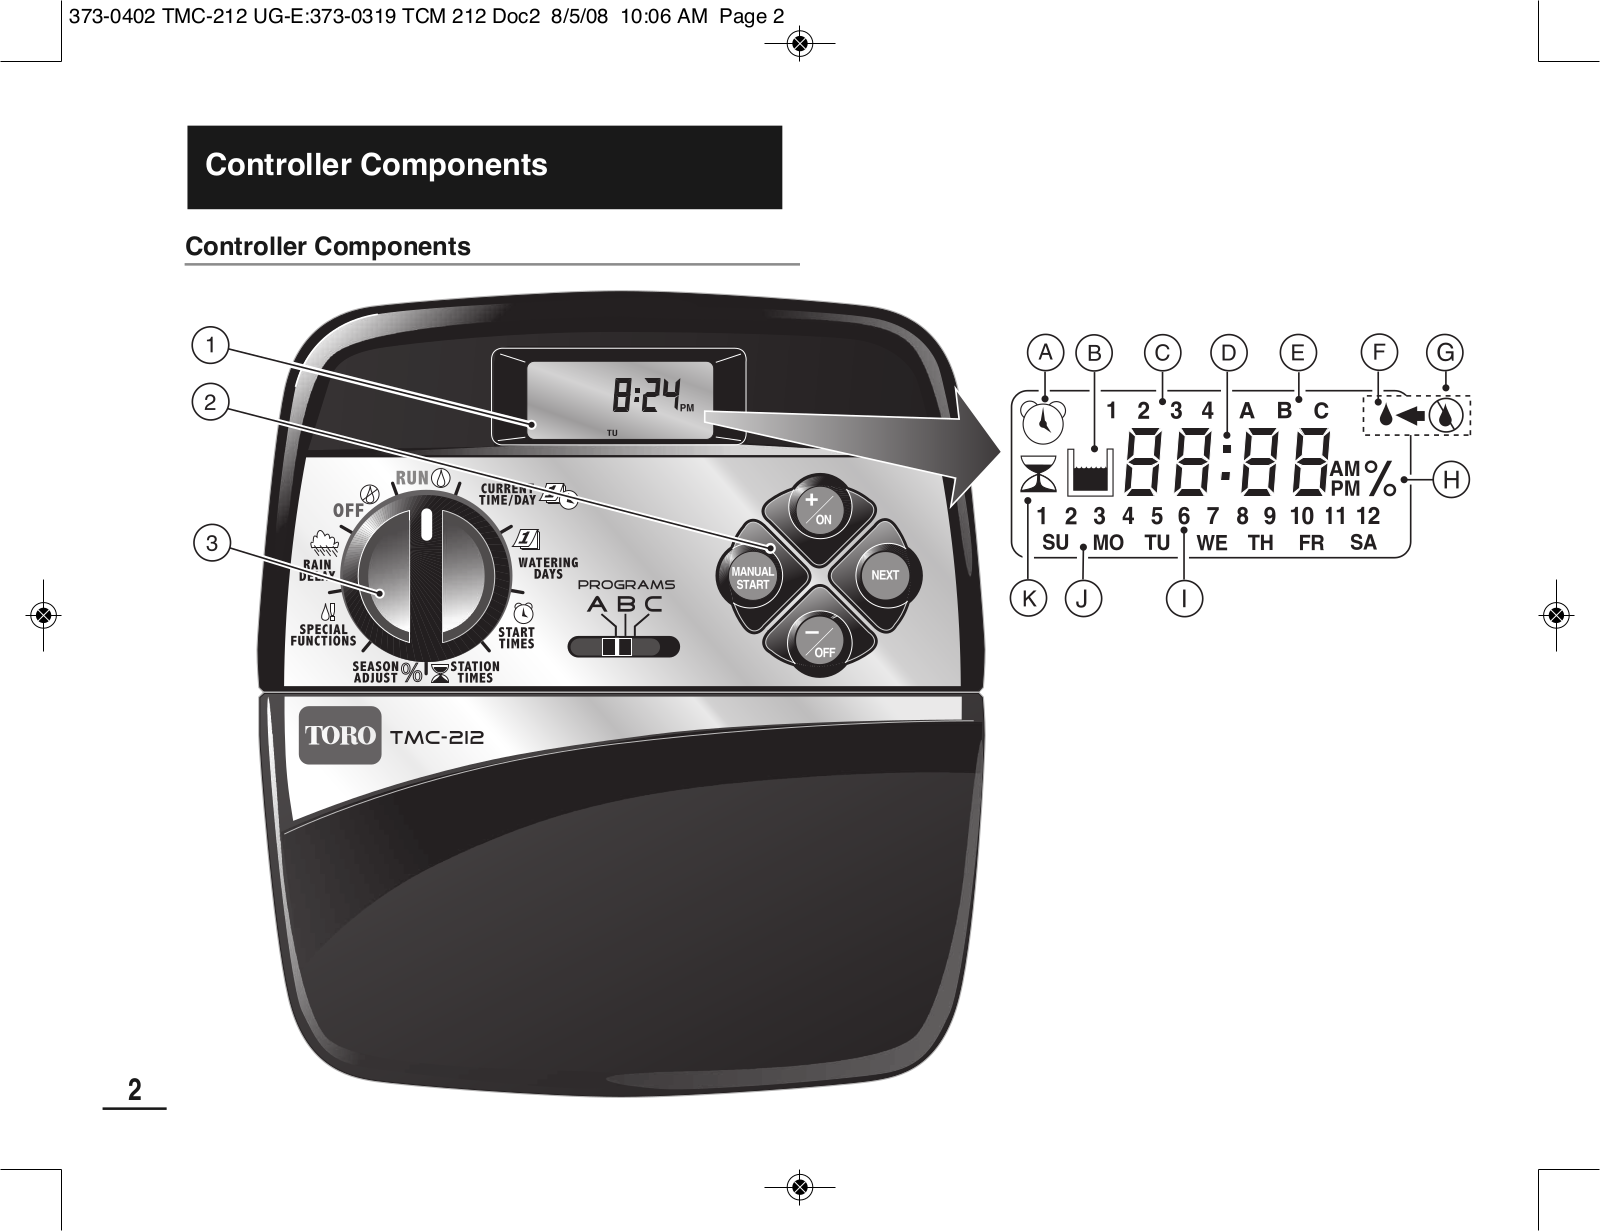
TMC-212
User Manual
44 pgs
4.93 Mb
2
User Manual
1 pgs
13.69 Kb
0
Table of contents
Loading...
Toro TMC-212 User Manual
...
Toro User Manual
Download
Specifications and Main Features
Frequently Asked Questions
User Manual
Download
Loading...
+
hidden pages
Unhide
You need points to download manuals.
1 point = 1 manual.
You can buy points or you can get point for every manual you upload.
Buy points
Upload your manuals
 Loading...