

Page 1
FormNo.3381-266RevA
1
G017280
TimeMaster76cmLawnMower
ModelNo.20975—SerialNo.314000001andUp
ModelNo.20977—SerialNo.314000001andUp
Operator'sManual
Introduction
Thisrotary-blade,walk-behindlawnmowerisintended
tobeusedbyresidentialhomeowners.Itisdesigned
primarilyforcuttinggrassonwell-maintainedlawns
onresidentialproperties.Itisnotdesignedforcutting
brushorforagriculturaluses.
Readthisinformationcarefullytolearnhowtooperateand
maintainyourmachineproperlyandtoavoidinjuryand
equipmentdamage.Y ouareresponsibleforoperatingthe
machineproperlyandsafely.
YoumaycontactTorodirectlyatwww .Toro.comforproduct
andaccessoryinformation,helpndingadealer,ortoregister
yourproduct.
Wheneveryouneedservice,genuineToroparts,oradditional
information,contactanAuthorizedServiceDealerorToro
CustomerServiceandhavethemodelandserialnumbersof
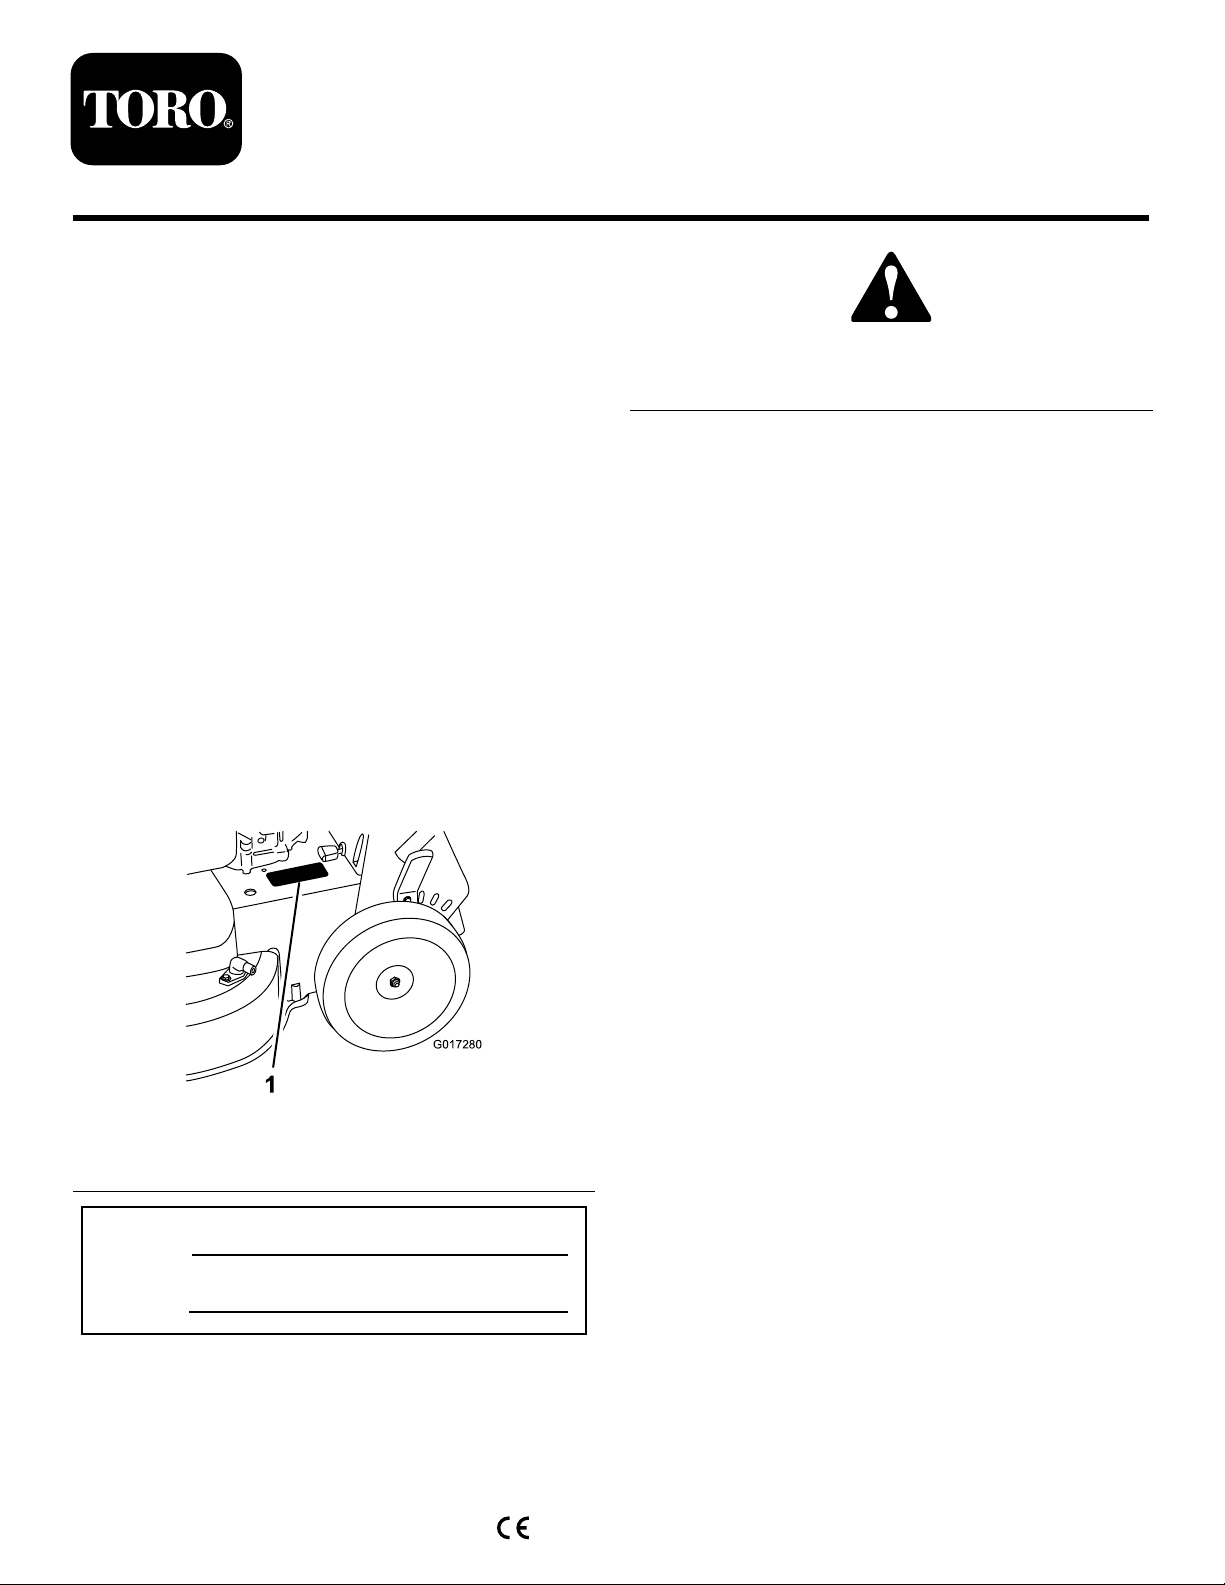
yourmachineready.Figure1identiesthelocationofthe
modelandserialnumbersontheproduct.Writethenumbers
inthespaceprovided.
Figure2
1.Safetyalertsymbol
Thismanualuses2wordstohighlightinformation.
Importantcallsattentiontospecialmechanicalinformation
andNoteemphasizesgeneralinformationworthyofspecial
attention.
ThisproductcomplieswithallrelevantEuropeandirectives.
Fordetails,seetheseparateproduct-specicDeclarationof
Conformity(DOC)sheet.
Formodelswithstatedenginehorsepower,thegross
horsepoweroftheenginewaslaboratoryratedbytheengine
manufacturerinaccordancewithSAEJ1940.Ascongured
tomeetsafety,emission,andoperatingrequirements,the
actualenginehorsepoweronthisclassoflawnmowerwill
besignicantlylower.
Donottamperwiththeenginecontrolsoralterthegovernor
speed;doingsomaycreateanunsafeconditionresultingin
personalinjury.
Figure1
1.Modelandserialnumberplate
ModelNo.
SerialNo.
Thismanualidentiespotentialhazardsandhassafety
messagesidentiedbythesafetyalertsymbol(Figure2),
whichsignalsahazardthatmaycauseseriousinjuryordeath
ifyoudonotfollowtherecommendedprecautions.
©2013—TheToro®Company
8111LyndaleAvenueSouth
Bloomington,MN55420
Registeratwww.T oro.com.
Contents
Introduction..................................................................1
GeneralLawnMowerSafety.....................................2
SoundPressure......................................................3
SoundPower..........................................................3
Hand/ArmVibration..............................................3
SafetyandInstructionalDecals.................................4
Setup............................................................................5
1AssemblingtheHandle..........................................5
2InstallingtheBlade-controlBar...............................5
3FillingtheEnginewithOil......................................6
4ChargingtheBattery..............................................6
ProductOverview..........................................................7
Specications.........................................................8
Operation.....................................................................8
FillingtheFuelTank................................................8
CheckingtheEngineOilLevel..................................9
AdjustingtheCuttingHeight....................................9
AdjustingtheHandleHeight....................................10
StartingtheEngine.................................................10
UsingtheSelf-propelDrive......................................11
StoppingtheEngine...............................................11
OriginalInstructions(EN)
PrintedintheUSA
AllRightsReserved
*3381-266*A
Page 2

EngagingtheBlade.................................................12
DisengagingtheBlade.............................................12
CheckingtheBlade-stopSystemOperation................12
RecyclingtheClippings...........................................13
BaggingtheClippings.............................................13
Side-dischargingtheClippings..................................14
OperatingTips......................................................15
Maintenance.................................................................16
RecommendedMaintenanceSchedule(s)......................16
PreparingforMaintenance.......................................16
ServicingtheAirFilter............................................17
ChangingtheEngineOil.........................................17
ChargingtheBattery...............................................18
ReplacingtheFuse..................................................19
ReplacingtheBattery..............................................19
AdjustingtheSelf-propelDriveCable........................20
ServicingtheBlade-driveSystem..............................20
ServicingtheCuttingBlades.....................................21
WashingUnderneaththeMachine.............................23
Storage........................................................................24
GeneralInformation...............................................24
PreparingtheFuelSystem.......................................24
PreparingtheEngine..............................................25
RemovingtheMachinefromStorage.........................25
•Neverallowchildrenorpeopleunfamiliarwiththese
instructionstousethemower.Localregulationscan
restricttheageoftheoperator.
•Keepinmindthattheoperatororuserisresponsiblefor
accidentsorhazardsoccurringtootherpeopleortheir
property.
•Understandexplanationsforallpictogramsusedonthe
mowerorintheinstructions.
Gasoline
WARNING!Gasolineishighlyammable.Takethe
followingprecautions.
•Storefuelincontainersspecicallydesignedforthis
purpose.
•Refueloutdoorsonlyanddonotsmokewhilerefueling.
•Addfuelbeforestartingtheengine.Neverremovethe
capofthefueltankoraddgasolinewhiletheengineis
runningorwhentheengineishot.
•Ifgasolineisspilled,donotattempttostarttheengine
butmovethemowerawayfromtheareaofspillageand
avoidcreatinganysourceofignitionuntilgasolinevapors
havedissipated.
•Replaceallfueltankandcontainercapssecurely.
Safety
Improperlyusingormaintainingthismowercanresult
ininjury.T oreducethepotentialforinjury,complywith
thesesafetyinstructions.
Torodesignedandtestedthismachineforreasonablysafe
service;however,failuretocomplywiththefollowing
instructionsmayresultinpersonalinjury.
Toensuremaximumsafety,bestperformance,and
togainknowledgeoftheproduct,itisessentialthat
youandanyotheroperatorofthemowerreadand
understandthecontentsofthismanualbeforethe
engineiseverstarted.Payparticularattentiontothe
safetyalertsymbol(
Warning,orDanger—“personalsafetyinstruction.”
Readandunderstandtheinstructionbecauseithasto
dowithsafety.Failuretocomplywiththeinstruction
mayresultinpersonalinjury.
GeneralLawnMowerSafety
ThefollowinginstructionshavebeenadaptedfromEN836.
Thiscuttingmachineiscapableofamputatinghandsandfeet
andofthrowingobjects.Failuretoobservethefollowing
safetyinstructionscouldresultinseriousinjuryordeath.
Training
•Readtheinstructionscarefully .Befamiliarwiththe
controlsandtheproperuseoftheequipment.
Figure2),whichmeansCaution,
Preparation
•Whilemowing,alwayswearsubstantialfootwearandlong
trousers.Donotoperatetheequipmentwhenbarefoot
orwearingopensandals.
•Thoroughlyinspecttheareawheretheequipmentisto
beusedandremoveallstones,sticks,wires,bones,and
otherforeignobjects.
•Beforeusing,alwaysvisuallyinspecttoseethatguards,
andsafetydevices,suchasdeectorsand/orgrass
catchers,areinplaceandworkingcorrectly.
•Beforeusing,alwaysvisuallyinspecttoseethatthe
blades,bladebolts,andcutterassemblyarenotwornor
damaged.Replacewornordamagedbladesandboltsin
setstopreservebalance.
Starting
•Donottiltthemowerwhenstartingtheengineunlessthe
mowerhastobetiltedforstarting.Inthiscase,donot
tiltitmorethanabsolutelynecessary,andliftonlythepart
whichisawayfromtheoperator.
•Starttheenginecarefullyaccordingtoinstructionsand
withfeetwellawayfromtheblade(s)andnotinfrontof
thedischargechute.
Operation
•Nevermowwhilepeople,especiallychildren,orpetsare
nearby.
•Mowonlyindaylightoringoodarticiallight.
•Stayalertforholesintheterrainandotherhiddenhazards.
2
Page 3

•Donotputhandsorfeetnearorunderrotatingparts.
Keepclearofthedischargeopeningatalltimes.
•Neverpickuporcarryalawnmowerwhiletheengineis
running.
•Neverstoretheequipmentwithgasolineinthetankand
insideabuildingwherefumescanreachanopename
orspark.
•Allowtheenginetocoolbeforestoringinanyenclosure.
•Useextremecautionwhenreversingorpullinga
pedestrian-controlledlawnmowertowardsyou.
•Walk,neverrun.
•Slopes:
–Donotmowexcessivelysteepslopes.
–Exerciseextremecautionwhenonslopes.
–Mowacrossthefaceofslopes,neverupanddown,
andexerciseextremecautionwhenchangingdirection
onslopes.
–Alwaysbesureofyourfootingonslopes.
•Reducespeedonslopesandinsharpturnstoprevent
overturningorlossofcontrol.
•Stopthebladeifthelawnmowerhastobetiltedfor
transportationwhencrossingsurfacesotherthangrass
andwhentransportingthelawnmowertoandfromthe
areatobemowed.
•Donotoperatetheengineinaconnedspacewhere
dangerouscarbonmonoxidefumescancollect.
•Stoptheengine
•Toreducetherehazard,keeptheengine,silencer,
batterycompartmentandgasolinestorageareafreeof
grass,leaves,orexcessivegrease.
•Checkgrasscatchercomponentsandthedischargeguard
frequently,andreplacewithmanufacturer'srecommended
parts,whennecessary.
•Replacewornordamagedpartsforsafety.
•Replacefaultysilencers.
•Ifthefueltankhastobedrained,dothisoutdoors.
•Donotchangetheenginegovernorsettingsoroverspeed
theengine.Operatinganengineatexcessivespeedcan
increasethehazardofpersonalinjury.
•Becarefulduringadjustmentofthelawnmowerto
prevententrapmentofthengersbetweenmovingblades
andxedpartsofthelawnmower.
•Toensurethebestperformanceandsafety,
purchaseonlygenuineT ororeplacementpartsand
accessories.Donotuse
theymaycauseasafetyhazard.
will t
partsandaccessories;
–wheneveryouleavethelawnmower.
–beforerefueling.
–beforeremovingthegrasscatcher.
–beforemakingheightadjustmentunlessadjustment
canbemadefromtheoperator'sposition.
•Stoptheengineanddisconnectthespark-plugwire
–beforeclearingblockagesoruncloggingchute.
–beforechecking,cleaningorworkingonthelawn
mower.
–afterstrikingaforeignobject,inspectthelawnmower
fordamageandmakerepairsbeforestartingand
operatingthelawnmower.
–iflawnmowerstartstovibrateabnormally(check
immediately).
•Lightningcancausesevereinjuryordeath.Ifyousee
lightningorhearthunderinthearea,donotoperatethe
machine;seekshelter.
•Watchoutfortrafcwhencrossingornearroadways.
MaintenanceandStorage
SoundPressure
Thisunithasasoundpressurelevelattheoperator’searof89
dBA,whichincludesanUncertaintyValue(K)of1dBA.
Thesoundpressurelevelwasdeterminedaccordingtothe
proceduresoutlinedinEN836.
SoundPower
Thisunithasaguaranteedsoundpowerlevelof100dBA,
whichincludesanUncertaintyValue(K)of1dBA.
Thesoundpowerlevelwasdeterminedaccordingtothe
proceduresoutlinedinISO11094.
Hand/ArmVibration
Measuredvibrationlevelforrighthand=7.5m/s
Measuredvibrationlevelforlefthand=5.5m/s
UncertaintyValue(K)=3.0m/s2
Measuredvaluesweredeterminedaccordingtotheprocedures
outlinedinEN836.
•Keepallnuts,bolts,andscrewstighttobesurethatthe
equipmentisinsafeworkingcondition.
•Donotusepressure-cleaningequipmentonmachine.
3
Page 4
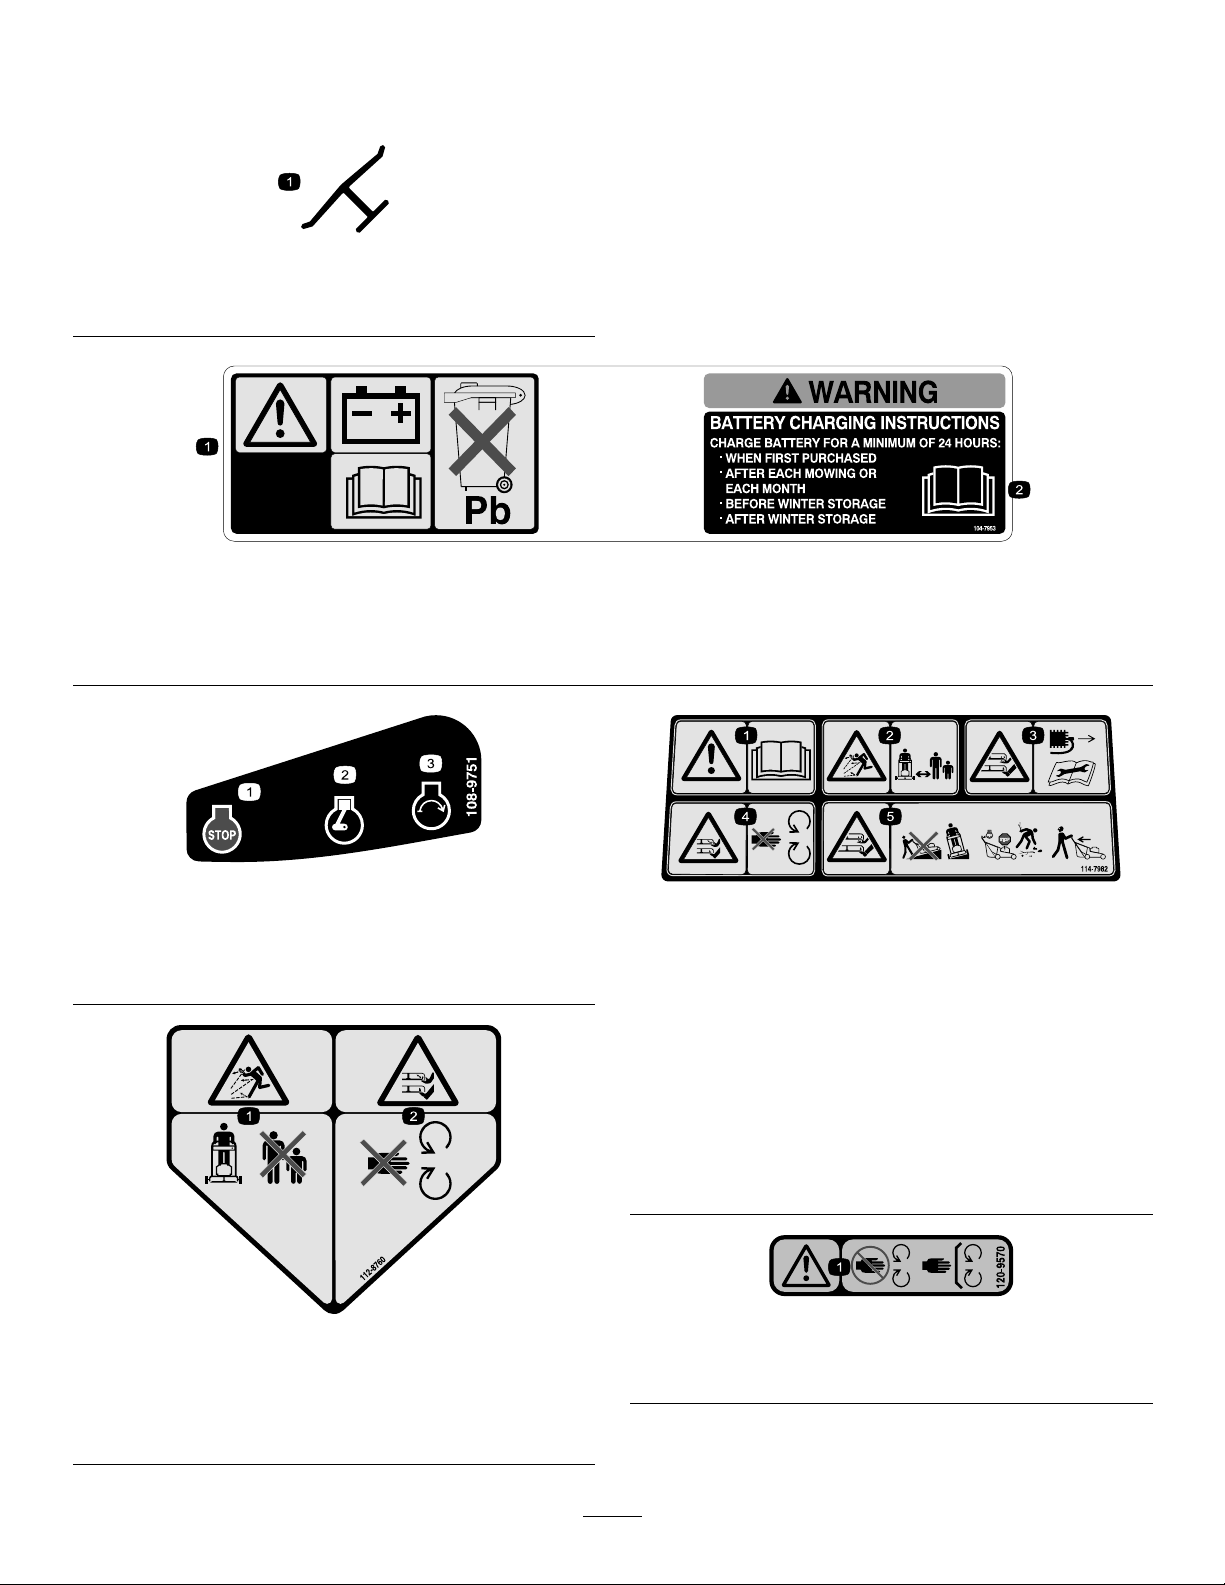
SafetyandInstructionalDecals
Important:Safetyandinstructiondecalsarelocatednearareasofpotentialdanger.Replacedamageddecals.
Manufacturer'sMark
1.Indicatesthebladeisidentiedasapartfromtheoriginal
machinemanufacturer.
104-7953
Electric-startmodelonly
1.Warning—readtheOperator'sManualforinformationonchargingthebattery;containslead;donotdiscard.
2.ReadtheOperator'sManual.
108-9751
Electric-startmodelonly
1.Engine—stop3.Engine—start
2.Engine—run
112-8760
1.Thrownobjecthazard—keepbystandersasafedistance
fromthemachine.
2.Cutting/dismembermentofhandorfoot—stayawayfrom
movingparts.
114-7982
1.Warning—readtheOperator'sManual.
2.Thrownobjecthazard—keepbystandersasafedistance
fromthemachine.
3.Cutting/dismembermenthazardofhandorfoot,mower
blade—disconnectthespark-plugwireandreadthe
instructionsbeforeservicingorperformingmaintenance.
4.Cutting/dismembermenthazardofhandorfoot,mower
blade—stayawayfrommovingparts.
5.Cutting/dismembermenthazardofhandorfoot,mower
blade—donotoperateupanddownslopes;operatesideto
sideonslopes;stoptheenginebeforeleavingtheoperating
position;andlookbehindyouwhenbackingup.
120-9570
1.Warning—stayawayfrommovingparts,keepallguards
andshieldsinplace.
4
Page 5

Setup
1
G016547
2
1
G016551
Important:Removeanddiscardtheprotectiveplastic
sheetthatcoverstheengine.
1
AssemblingtheHandle
NoPartsRequired
Procedure
WARNING
Assemblingandunfoldingthehandleimproperly
candamagethecables,causinganunsafeoperating
condition.
•Donotdamagethecableswhenunfoldingthe
handle.
•Ifacableisdamaged,contactanAuthorized
ServiceDealer.
1.Rotatetheupperhandlesothatitneststogetherwith
thelowerhandle(Figure3),andtightenbothknobson
thehandletolocktheupperhandleinplace(Figure4).
Figure4
1.Handle-locklever
2.Releasethehandle-locklever(Figure4).
3.Pullthehandlerearwardandlockitintoposition
(Figure4).
2
InstallingtheBlade-control Bar
NoPartsRequired
Procedure
Installtheblade-controlbarintotheupperhandle(Figure5).
Figure3
1.Upperhandle
2.Knob(2)
5
Page 6

G017217
Figure5
G017514
3
FillingtheEnginewithOil
Partsneededforthisprocedure:
0.59lEngineoil
Figure6
3.Wipeoffthedipstickendwithacleancloth.
4.Insertthedipstickintotheoil-lltube,andscrewit
inuntilitstops.
5.Removethedipstickandreadtheoillevelonthe
dipstick;refertoFigure7.
Figure7
Procedure
Important:Thismachine
engine.Beforestartingtheengine,lltheenginewith
oil.
1.Movethemachinetoalevelsurface.
2.Removethedipstick(Figure6)andpourabout3/4of
thecrankcasecapacityofoilintotheoil-lltube.
Note:Max.ll:0.59l(20oz.),type:SAE30detergent
oilwithanAPIserviceclassicationofSF,SG,SH,
SJ,SL,orhigher.
does not
comewithoilinthe
1.Theoillevelistoolow;
addoiltothecrankcase.
2.Theoillevelistoohigh;
removeoilfromthe
crankcase.
3.Theoilleveliscorrect.
•Iftheoillevelistoolow,addasmallamountofoil
slowlytotheoil-lltube,andthenrepeatsteps
3through5untiltheoilleveliscorrectasshown
inFigure7.
•Iftheoillevelistoohigh,draintheexcessoiluntil
youobtainthecorrectoillevelonthedipstick.To
draintheexcessoil,refertoChangingtheEngine
Oil(page17).
Important:Iftheoillevelinthecrankcaseis
toolowortoohighandyouruntheengine,
youmaydamagetheengine.
6.Installthedipsticksecurelybyhand.
6
Page 7
4
2
14
1
13
3
4
5
6
7
8
9
10
11
12
g016439
15
16
2
1
3
4
g017218
ChargingtheBattery
NoPartsRequired
Procedure
Electric-startmodelonly
RefertoChargingtheBattery(page18).
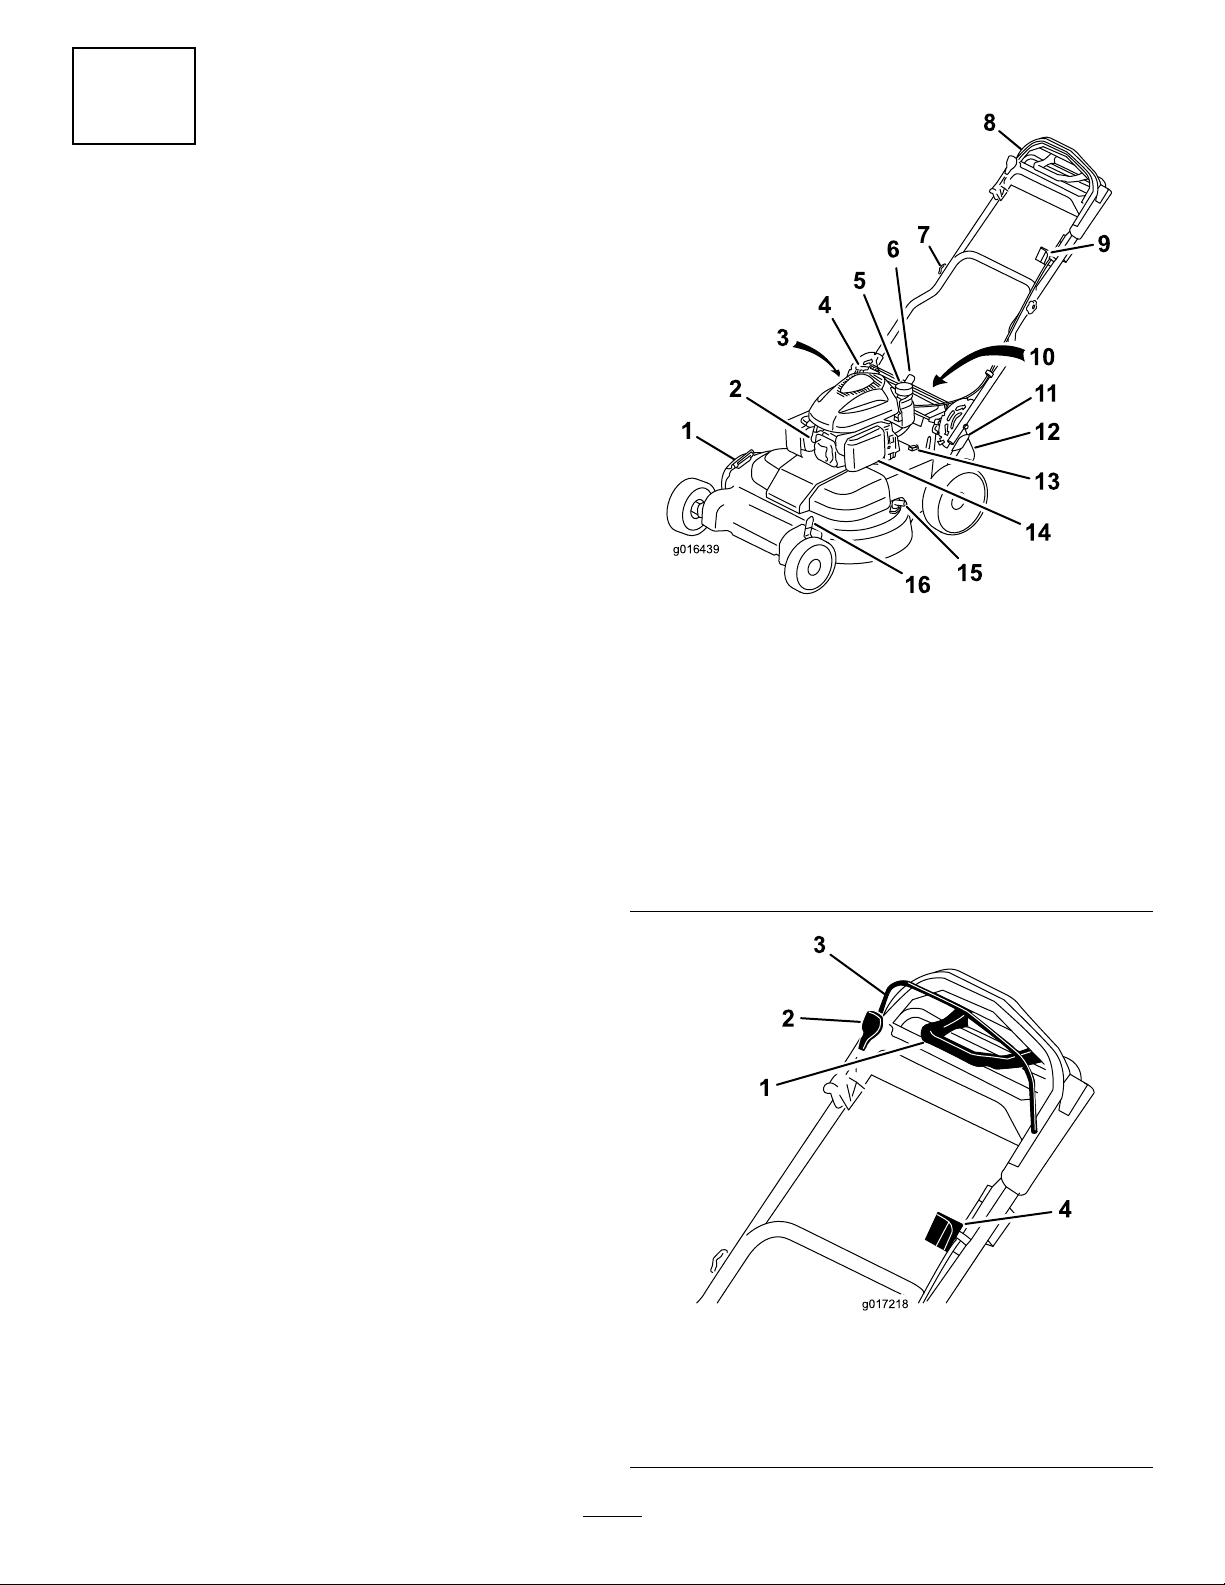
ProductOverview
Figure8
1.Side-dischargedeector
2.Sparkplug10.Battery(notshown;
3.Dipstick/oil-lltube(not
shown)
4.Recoil-starthandle
5.Fuel-tankcap13.Fuse
6.Handle-locklever
7.Handleknob(2)
8.Upperhandle16.Frontcutting-heightlever
9.Ignitionswitch
electric-startmodelonly)
11.Rearcutting-heightlever
12.Rear-dischargedeector
14.Airlter
15.Washoutport
Figure9
Upperhandle
1.Traction-assisthandle3.Blade-controlbar
2.Blade-controlbarlock4.Ignitionswitch
7
Page 8
g017219
1
2
34
Figure10
1.Grassbag3.Side-dischargechute
2.Rear-dischargeplug
(installed)
4.Batterycharger
(electric-startmodelonly)
Operation
FillingtheFuelTank
RecommendedFuel:
•Forbestresults,useonlyclean,fresh(lessthan30days
old),unleadedgasolinewithanoctaneratingof87or
higher((R+M)/2ratingmethod).
•Ethanol:Gasolinewithupto10%ethanol(gasohol)
or15%MTBE(methyltertiarybutylether)byvolume
isacceptable.EthanolandMTBEarenotthesame.
Gasolinewith15%ethanol(E15)byvolumeisnot
approvedforuse.Neverusegasolinethatcontains
morethan10%ethanolbyvolume,suchasE15
(contains15%ethanol),E20(contains20%ethanol),or
E85(containsupto85%ethanol).Usingunapproved
gasolinemaycauseperformanceproblemsand/orengine
damagewhichmaynotbecoveredunderwarranty.
•Donotusegasolinecontainingmethanol.
•Donotstorefueleitherinthefueltankorfuelcontainers
overthewinterunlessafuelstabilizerisused.
Specications
ModelWeightLengthWidthHeight
2097562kg
(137lb)
2097765kg
(143lb)
163cm
(64in)
163cm
(64in)
•Donotaddoiltogasoline.
Important:Toreducestartingproblems,addfuel
81cm
(32in)
81cm
(32in)
112cm
(44in)
112cm
(44in)
stabilizertothefuelallseason,mixingitwithgasoline
lessthan30daysold;runthemachinedrybeforestoring
itformorethan30days.
Donotusefueladditivesotherthanafuel
stabilizer/conditioner.Donotusefuelstabilizers
withanalcoholbasesuchasethanol,methanol,or
isopropanol.
DANGER
Gasolineisextremelyammableandexplosive.A
reorexplosionfromgasolinecanburnyouand
others.
•Topreventastaticchargefromignitingthe
gasoline,placethecontainerand/ormachine
directlyonthegroundbeforelling,notina
vehicleoronanobject.
•Fillthetankoutdoorswhentheengineiscold.
Wipeupspills.
•Donothandlegasolinewhensmokingoraround
anopenameorsparks.
•Storegasolineinanapprovedfuelcontainer,out
ofthereachofchildren.
1.Cleanaroundthefuel-tankcap,andremovethecap
fromthetank(Figure11).
8
Page 9
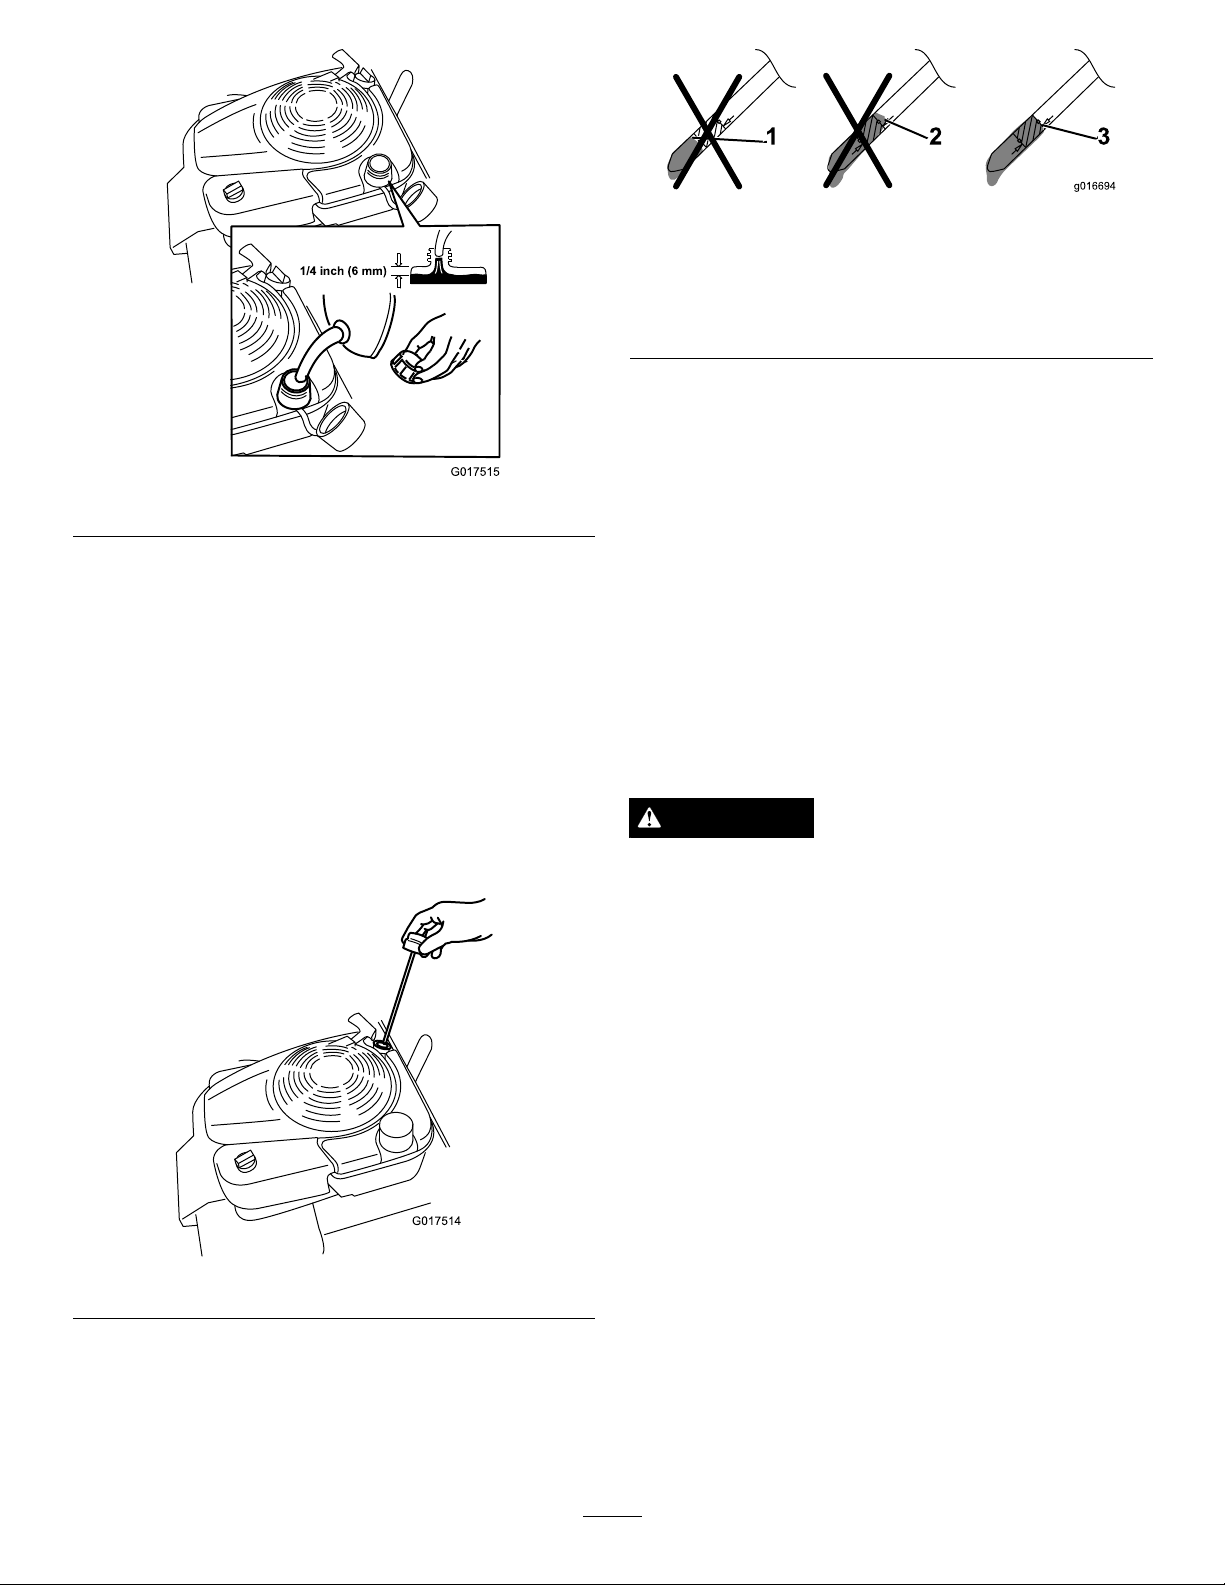
1/4 inch (6 mm)
G017515
G017514
Figure13
Figure11
2.Fillthefueltank,leavingatleast6mm(1/4inch)from
thebottomoftheneckemptytoallowthegasoline
roomtoexpand.
3.Installthefueltankcapandtightenitsecurelybyhand.
CheckingtheEngineOilLevel
ServiceInterval:Beforeeachuseordaily
Max.ll:0.59l(20oz.),type:SAE30detergentoilwithan
APIserviceclassicationofSF,SG,SH,SJ,SL,orhigher.
1.Movethemachinetoalevelsurface.
2.Removethedipstick(Figure12).
1.Theoillevelistoolow;
addoiltothecrankcase.
2.Theoillevelistoohigh;
removeoilfromthe
crankcase.
3.Theoilleveliscorrect.
•Iftheoillevelistoolow,addasmallamountofoil
slowlytotheoil-lltube,andthenrepeatsteps
3through5untiltheoilleveliscorrectasshown
inFigure7.
•Iftheoillevelistoohigh,draintheexcessoiluntil
youobtainthecorrectoillevelonthedipstick;to
draintheexcessoil,refertoChangingtheEngine
Oil(page17)
.
Important:Iftheoillevelinthecrankcaseis
toolowortoohighandyouruntheengine,
youmaydamagetheengine.
6.Installthedipsticksecurelybyhand.
AdjustingtheCuttingHeight
WARNING
Adjustingthecuttingheightmaybringyouinto
contactwiththemovingblades,causingserious
injury.
Figure12
3.Wipeoffthedipstickendwithacleancloth.
4.Insertthedipstickintotheoil-lltubeandscrewitin
untilitstops.
5.Removethedipstickandreadtheoillevel;referto
Figure13.
•Stoptheengineandwaitforallmovingparts
tostop.
•Donotputyourngersunderthehousingwhen
adjustingthecuttingheight.
Adjustthecuttingheightasdesired;refertoFigure14and
Figure15.
Note:Toraisethemachine,movethefrontandrearcutting
heightleversforward;tolowerthemachine,movethecutting
heightleversrearward.Setthefrontandrearwheelstothe
sameheightunlessspecialcircumstancesrequireotherwise;
referto
OperatingTips(page15).
9
Page 10

1
2
3
4
5
6
7
G017634
Figure14
1
2
3
4
5
6
7
G017635
2
G016488
3
1
Frontcutting-heightlever
1.A=10.8cm(4-1/4inches)5.E=5.7cm(2-1/4inches)
2.B=9.5cm(3-3/4inches)6.F=4.4cm(1-3/4inches)
3.C=8.3cm(3-1/4inches)7.G=3.2cm(1-1/4inch)
4.D=7.0cm(2-3/4inches)
AdjustingtheHandleHeight
Youcanraiseorlowerthehandletoapositionmore
comfortableforyou.
1.Pullthehandle-lockleverrearwardtodisengagethe
handle-lockpins(Figure16).
Figure16
1.Handle-locklever3.Notches
2.Handle-lockpin(2)
2.Rotatethehandleandalignthedesirednotchinthe
handlebrackettothehandle-lockpins;refertoFigure
16.
1.A=10.8cm(4-1/4inches)5.E=5.7cm(2-1/4inches)
2.B=9.5cm(3-3/4inches)6.F=4.4cm(1-3/4inches)
3.C=8.3cm(3-1/4inches)7.G=3.2cm(1-1/4inch)
4.D=7.0cm(2-3/4inches)
Figure15
Rearcutting-heightlever
3.Releasethehandle-locklevertosecurethehandlein
place.
StartingtheEngine
StandardModel
Pulltherecoilhandleslowlyuntilyoufeelresistance,thenpull
itsharply.Allowtheropetoreturntotheengineslowly.
Note:Ifthemachinedoesnotstartafterseveralattempts,
contactanAuthorizedServiceDealer.
Electric-startModel
Youcanstarttheengineonanelectric-startmodelbyusing
eithertheignitionkeyortherecoil-starthandle.
•IgnitionKey:TurnandholdtheignitionkeytotheStart
position(Figure17);whentheenginestarts,releasethe
key.
Important:Donotattempttostarttheenginewith
theblade-controlbarengaged;otherwise,youmay
blowthefuse.
Note:DonotholdtheignitionkeyintheStartposition
forlongerthan5secondstopreventburningoutthe
startermotor.
10
Page 11

G017516
Figure17
G017595
G017636
G017517
StoppingtheEngine
StandardModel
Pressthetoggleswitch(Figure19)totheStoppositionand
holdituntiltheenginestops.
•Recoil-startHandle:
1.TurntheignitionkeytotheRunposition(Figure
17).
2.Pulltherecoilhandleslowlytotherearuntilyou
feelresistance,thenpullsharply .Allowtheropeto
returntotheengineslowly.
UsingtheSelf-propelDrive
Tooperatetheself-propeldrive,simplywalkwithyourhands
grippingtheupperhandleandyourelbowsatyoursides,and
themachinewillautomaticallykeeppacewithyou(
Note:Youcanself-propelthemachinewiththeblades
engagedordisengaged.
Figure18).
Figure19
Electric-startModel
1.TurnthekeytotheOffposition(Figure20).
Figure20
Figure18
Note:Usethetraction-assisthandleinsituationswhenyou
needmorecontrolthanyouhavewiththeself-propeldrive
alone.
2.Whentheenginestops,removetheignitionkeyand
takeitwithyouwhenyouleavethemachine.
11
Page 12

EngagingtheBlade
g016484
1
2
g016485
G017596
CheckingtheBlade-stop
Whenyoustartyourengine,thebladesdonotturn.You
mustengagethebladestomow.
1.Pulltheblade-control-barlockbacktotheblade-control
bar(Figure21).
Figure21
1.Blade-controlbarlock2.Blade-controlbar
2.Slowlypulltheblade-controlbarbacktothehandle
(Figure21).
3.Holdtheblade-controlbaragainstthehandle(
22).
SystemOperation
Beforeeachuse,checkthatthebladesstopwithin3seconds
ofreleasingtheblade-controlbar.
UsingtheGrassBag
ServiceInterval:Beforeeachuseordaily
Youcanusethegrassbagtochecktheblade-stopsystem.
1.Removetherear-dischargeplug.
2.Installtheemptygrassbagonthemachine.
3.Starttheengine.
4.Engagetheblades.
Note:Thebagshouldbegintoinate,indicatingthat
thebladesarerotating.
5.Whilewatchingthebag,releasetheblade-controlbar.
Note:Ifthebagdoesnotdeatewithin3secondsof
releasingtheblade-controlbar,theblade-stopsystem
maybedeterioratingand,ifignored,couldresultin
Figure
anunsafeoperatingcondition.Havethemachine
inspectedandservicedbyanAuthorizedService
Dealer.
6.Stoptheengineandwaitforallmovingpartstostop.
NotUsingtheGrassBag
1.Movethemachineontoapavedsurfaceinanon-windy
area.
2.Setall4wheelstothe89mm(3-1/2inch)cutting
Figure22
DisengagingtheBlade
Releasetheblade-controlbar(Figure23).
Figure23
Important:Whenyoureleasetheblade-controlbar,
thebladesshouldstopwithin3seconds.Iftheydonot
stopproperly,stopusingyourmachineimmediatelyand
contactanAuthorizedServiceDealer.
heightsetting.
3.Takeahalfsheetofnewspaperandcrumpleitintoa
ballsmallenoughtogounderthemachine(about75
mmor3inchesindiameter).
4.Placethenewspaperballabout13cm(5inches)in
frontofthemachine.
5.Starttheengine.
6.Engagetheblades.
7.Releasetheblade-controlbarandbegincountingout3
seconds.
8.Onthecountof3,pushthemachinequicklyforward
overthenewspaper.
9.Stoptheengineandwaitforallmovingpartstostop.
10.Gotothefrontofthemachineandcheckthe
newspaperball.
Note:Ifthenewspaperballdidnotgounderthe
machine,repeatsteps4through10.
11.Ifthenewspaperisunravelledorshredded,theblades
didnotstopproperly ,whichcouldresultinanunsafe
operatingcondition.ContactanAuthorizedService
Dealer.
12
Page 13

RecyclingtheClippings
1
2
G016490
3
1
2
G017408
3
BaggingtheClippings
Thismachinecomesfromthefactoryreadytorecyclegrass
andleafclippingsbackintothelawn.Topreparethemachine
torecycle:
•Iftheside-dischargechuteisonthemower,removeit
andlowertheside-dischargedeector;referto
theSide-dischargeChute(page14).
Removing
•Ifthegrassbagisonthemachine,removeit;referto
RemovingtheGrassBag(page14).
•Iftherear-dischargeplugisnotinstalled,gripitbythe
handle,raisethereardeector,andinsertitintothe
rear-dischargechuteuntilthelatchlocksintoplace;refer
toFigure24.
Usethegrassbagwhenyouwanttocollectgrassandleaf
clippingsfromthelawn.
WARNING
Aworngrassbagcouldallowsmallstonesandother
similardebristobethrowntowardtheoperatoror
bystandersandresultinseriouspersonalinjuryor
death.
Checkthegrassbagfrequently.Ifitisdamaged,
installanewTororeplacementbag.
Iftheside-dischargechuteisonthemower,removeitbefore
baggingtheclippings;refertoRemovingtheSide-discharge
Chute(page14).
WARNING
Thebladesaresharp;contactingthebladescan
resultinseriouspersonalinjury.
Stoptheengineandwaitforallmovingpartstostop
beforeleavingtheoperatingposition.
Figure24
1.Reardeector
2.Inserttherear-discharge
plug
3.Therear-dischargeplug
installed
WARNING
Ensurethattherear-dischargeplugisinplace
beforeyourecycletheclippings.Neverengagethe
bladeswithouteithertherear-dischargeplugorthe
grassbaginstalled.
InstallingtheGrassBag
1.Raiseandholdupthereardeector(Figure25).
Figure25
1.Reardeector
2.Rear-dischargeplug
2.Removetherear-dischargeplugbypullingdownonthe
latchwithyourthumbandpullingtheplugoutfrom
themachine(Figure25).
3.Latch
3.Installthebagrodintothenotchesatthebaseofthe
handleandrockthebagbackandforthtoensurethat
therodisseatedatthebottomofbothnotches;refer
to
Figure26.
13
Page 14

G016513
1
2
Figure26
G017521
1
2
G017522
1.Bagrod
4.Lowerthereardeectoruntilitrestsonthegrassbag.
2.Notch(2)
RemovingtheGrassBag
Toremovethebag,reversethestepsinInstallingtheGrass
Bagabove.
Side-dischargingtheClippings
Usethesidedischargeforcuttingverytallgrass.
Ifthebagisonthemachine,removeitandinsertthe
rear-dischargeplug;referto
beforeside-dischargingtheclippings.
14)
Important:Ensurethattherear-dischargeplugisin
placebeforeyourecycletheclippings(
WARNING
Thebladeissharp;contactingthebladecanresult
inseriouspersonalinjury.
RemovingtheGrassBag(page
Figure24).
Figure27
1.Side-dischargedeector2.Side-dischargechute
2.Installtheside-dischargechuteasshowninFigure27
andFigure28,andclosethedeectorontothechute.
Figure28
Stoptheengineandwaitforallmovingpartstostop
beforeleavingtheoperatingposition.
InstallingtheSide-dischargeChute
Withthechuteinyourrighthand:
1.Liftopentheside-dischargedeector(Figure27).
RemovingtheSide-dischargeChute
Toremovetheside-dischargechute,reversethestepsin
InstallingtheSide-dischargeChuteabove.
14
Page 15

OperatingTips
GeneralMowingTips
•Cleartheareaofloosesticks,branches,stones,wire,
twine,andotherdebristhatthebladescouldhit.
•Avoidstrikingsolidobjectswiththeblades.Never
deliberatelymowoveranyobject.
•Ifthemachinestrikesanobjectorstartstovibrate,
immediatelystoptheengine,disconnectthewirefrom
thesparkplug,andexaminethemachinefordamage.
•Forbestperformance,installnewTororeplacement
bladesforyourmodelbeforethecuttingseasonbegins.
•ReplacethebladeswhennecessarywithTororeplacement
blades.
CuttingGrass
•Cutonlyaboutathirdofthegrassbladeatatime.Do
notcutbelowthe51mm(2inch)settingunlessthegrass
issparseoritislatefallwhengrassgrowthbeginsto
slowdown.
•Whencuttinggrassover15cm(6inches)tall,mowatthe
highestcuttingheightsettingandwalkslower;thenmow
againatalowersettingforthebestlawnappearance.If
thegrassistoolong,themachinemayplugandcause
theenginetostall.
•Alternatethemowingdirection.Thishelpsdispersethe
clippingsoverthelawnforevenfertilization.
•Ifthenishedlawnappearanceisunsatisfactory,tryone
ormoreofthefollowing:
–Replacethebladesorhavethemsharpened.
–Walkataslowerpacewhilemowing.
–Raisethecuttingheightonyourmachine.
–Overlapcuttingswathsinsteadofcuttingafullswath
witheachpass.
–Setthecuttingheightonthefrontwheelsanotch
lowerthantherearwheels.
–Cutthegrassmorefrequently.
•Cutonlydrygrassorleaves.Wetgrassandleavestend
toclumpontheyardandcancausethemachinetoplug
ortheenginetostall.
•Iftherearemorethan13cm(5inches)ofleavesonthe
lawn,setthefrontcuttingheight1or2notcheshigher
thantherearcuttingheight.
•Slowdownyourmowingspeedifthemowerdoesnot
cuttheleavesnelyenough.
WARNING
Mowingwetgrassorleavescanleadtoserious
injuryifyouslipandcontacttheblade.Mow
onlyindryconditions.
CuttingLeaves
•Aftercuttingaleaf-coveredlawn,ensurethatatleasthalf
ofthelawnshowsthroughthecutleaves.Youmayneed
tomowtheleavesagain.
15
Page 16

Maintenance
G017520
1
Note:Determinetheleftandrightsidesofthemachinefromthenormaloperatingposition.
RecommendedMaintenanceSchedule(s)
MaintenanceService
Interval
Aftertherst5hours
Beforeeachuseordaily
Every25hours
Every50hours
Beforestorage
Yearly
Important:Refertothe
MaintenanceProcedure
•Changetheengineoil.
•Checktheengineoillevel.
•Checktheblade-stopsystemoperation.
•Checktheaircleanerandcleanorreplaceit,ifnecessary.
•Checkthecuttingblades.
•Washunderneaththemachine.
•Chargethebattery(electric-startmodelonly).
•Changetheengineoil.
•Servicetheblade-drivesystem.
•Chargethebattery(electric-startmodelonly).
•Emptythefueltankbeforerepairsasdirectedandbeforeannualstorage.
•Servicetheairlter;replaceitmorefrequentlyindustyoperatingconditions.
•Changetheengineoil.
•Replacethebladesorhavethemsharpened(morefrequentlyifthebladeedges
dullquickly).
•Checkthesparkplug(useaChampionRC12YC,NGKBKR5SE-11,orequivalent);
refertotheEngineOperator’sManual.
•RefertoyourEngineOperator’sManualforadditionalmaintenanceprocedures.
Engine Operator’ s Man ual
foradditionalmaintenanceprocedures.
PreparingforMaintenance
1.Stoptheengineandwaitforallmovingpartstostop.
2.Disconnectthespark-plugwirefromthesparkplug
(
Figure29).
Figure29
1.Spark-plugwire
Important:Beforetippingthemowertochange
theoilorreplacetheblades,allowthefueltankto
rundrythroughnormalusage.Ifyoumusttipthe
mowerpriortorunningoutoffuel,useahandfuel
pumptoremovethefuel.Alwaystipthemower
ontoitssidesothattheairlterisupintheair.
WARNING
Tippingthemachinemaycausethefuelto
leak.Gasolineisammable,explosive,and
cancausepersonalinjury.
16
Page 17

ServicingtheAirFilter
G017216
2
1
3
4
G017281
ChangingtheEngineOil
ServiceInterval:Y early
Beforeeachuseordaily
1.Loosenthefastenerandremovetheairltercover
Figure30).
(
Figure30
1.Cover
2.Fastener4.Base
3.Filter
ServiceInterval:Aftertherst5hours
Every50hours
Yearly
Max.ll:0.59l(20oz.),type:SAE30detergentoilwithan
APIserviceclassicationofSF,SG,SH,SJ,SL,orhigher.
1.Ensurethatthefueltankcontainslittleornofuelso
thatfueldoesnotleakoutwhenyoutipthemower
ontoitsside.
2.Runtheengineafewminutesbeforechangingtheoil
towarmit.
Note:Warmoilowsbetterandcarriesmore
contaminants.
3.Disconnectthewirefromthesparkplug.Referto
PreparingforMaintenance(page16).
4.Tipthemowerontoitsside,withthedipstickdown,
untiltheupperhandlerestsontheground.
5.Setanoil-drainpanunderthedipstick.
6.Removethedipstickanddraintheusedoilintoan
oil-drainpan(Figure31).
2.Removeandinspectthelter.
•Ifthelterisdamagedoriswetwithoilorfuel,
replaceit.
•Ifthelterisdirty,tapitonahardsurfaceseveral
timesorblowthedebrisoutwardfromtheinterior
ofthelterusingcompressedairatlessthan207
kPa(30psi).
Note:Donotbrushorblowdirtfromtheoutside
ofthelter;eitherforcesdirtintothebers.
3.Cleantheairlterbodyandcoverusingadamprag.
Keepdirtawayfromtheairopening .
4.Installthelterontothebase.
5.Installthecoverandscrewthefastenerdownsecurely .
7.Afterdrainingtheusedoil,returnthemowertothe
operatingposition.
8.Removethedipstick(
thecrankcasecapacityofoilintotheoil-lltube.
Note:Max.ll:0.59l(20oz.),type:SAE30detergent
oilwithanAPIserviceclassicationofSF,SG,SH,
SJ,SL,orhigher.
Figure31
Figure32)andpourabout3/4of
17
Page 18

G017514
ChargingtheBattery
G017518
ServiceInterval:Every25hours
Beforestorage
Electric-startmodelonly
WARNING
Batteryposts,terminals,andrelatedaccessories
containleadandleadcompounds,chemicals
knowntotheStateofCaliforniatocausecancer
andreproductiveharm.
batter y .
W ash hands after handling
Figure32
9.Wipeoffthedipstickendwithacleancloth.
10.Insertthedipstickintotheoil-lltube,andscrewit
inuntilitstops.
11.Removethedipstickandreadtheoillevelonthe
dipstick;refertoFigure33.
Figure33
1.Theoillevelistoolow;
addoiltothecrankcase.
2.Theoillevelistoohigh;
removeoilfromthe
crankcase.
3.Theoilleveliscorrect.
•Iftheoillevelistoolow,addasmallamountofoil
slowlytotheoil-lltube,andthenrepeatsteps9
through11untiltheoilleveliscorrectasshownin
Figure33.
•Iftheoillevelistoohigh,draintheexcessoiluntil
youobtainthecorrectoillevelonthedipstick.To
draintheexcessoil,refertoChangingtheEngine
Oil(page17).
Important:Iftheoillevelinthecrankcaseis
toolowortoohighandyouruntheengine,
youmaydamagetheengine.
12.Installthedipsticksecurelybyhand.
13.Recycletheusedoil.
Chargethebatteryfor24hoursinitially,thenmonthly(every
25starts)orasneeded.Alwaysusethechargerinasheltered
area,andchargethebatteryatroomtemperature(about22°
C,or70°F)wheneverpossible.
Note:Themachineisequippedwithanalternatorcharging
system.
1.Connectthechargertothewireharness,whichis
locatedbelowtheignitionkey(Figure34).
Figure34
2.Plugthechargerintoawalloutlet.
Note:Yourbatterychargermayhavea2-colorLEDdisplay
thatindicatesthefollowingstatesofcharging:
•Aredlightindicatesthatthechargerischargingthe
battery.
•Agreenlightindicatesthatthechargerisfullychargedor
isdisconnectedfromthebattery.
•Aashinglightthatalternatesbetweenredandgreen
indicatesthatthebatteryisnearlyfullycharged.Thisstate
lastsonlyafewminutesuntilthebatteryisfullycharged.
Note:Whenthebatterynolongerholdsacharge,recyclethe
lead-acidbatteryaccordingtolocalcodes.
18
Page 19

ReplacingtheFuse
1
g016487
G017523
1
Electric-startmodelonly
Ifthebatterydoesnotchargeortheenginedoesnotturn
withtheelectricstarter,thefusemaybeblown;replaceitwith
a40-ampplug-intypefuse.
Important:Youcannotstartthemachinewiththe
electricstarterorchargethebatteryunlessaworking
fuseisinstalled.
1.Openthesealedfuseholderandreplacethefuse
(Figure35).
Figure35
Figure36
1.Rear-deectorandhandle-lockleverassembly
8.Removethecoverfromthebattery.
9.Disconnecttheleadsfromthebattery.
10.Removeandbatteryandrecycleit.
Note:Recyclethebatteryaccordingtoyourstateand
localregulations.
1.Fuseholder
2.Closethecovertothefuseholder,andensurethatit
issealedtightly.
ReplacingtheBattery
Electric-startmodelonly
RemovingtheOldBattery
1.ContactanAuthorizedPartsDealertoobtaina
replacementbattery.
2.Removethebeltcover;refertostep1ofServicingthe
Blade-driveSystem(page20).
3.Removetherear-dischargeplug.
4.Movethehandletotheverticalposition.
5.Removethe4smallboltsthatholdtherear-deector
andhandle-lockleverassemblyinplace.
6.Foldthehandleallthewayforward.
7.Removetherear-deectorandhandle-locklever
assembly(
Figure36).
InstallingtheNewBattery
1.Cleanthebattery-holdingareaonthemowerhousing.
2.Setthenewbatteryinplaceonthemowerhousing.
3.Connecttheleadstothenewbattery.
Note:Ensurethatyouconnecttheblack(negative)
wiretothenegative(-)terminalandthered(positive)
wiretothepositive(+)terminal.
4.Installthecoverontothebattery.
Note:Ensurethatthecovertsproperlyoverthe
wiringharness.
5.Installtherear-deectorandhandle-lockleverassembly
ontothemachine.
6.Raisethehandletotheverticalposition.
7.Securetheshroudwiththe4smallboltsthatyou
removedinstep
8.Installtherear-dischargeplug.
9.Returnthehandletotheoperatingposition.
5ofRemovingtheOldBattery.
19
Page 20

AdjustingtheSelf-propelDrive
g019641
1
2
3
4
5
6
7
8
ServicingtheBlade-drive
Cable
Wheneveryouinstallanewself-propelcable,orif
theself-propeldriveisoutofadjustment,adjustthe
self-propel-drivecable.
1.Loosenthecablesupportnut(Figure37).
Figure37
2.Pulldownthecablejacket(towardthemower)until
thereisnoslackinthecable(Figure38).
System
ServiceInterval:Every50hours
1.Loosenthe2screwsonthebelt-coverpaneland
removethepanel(Figure39).
Figure39
1.Belt-tensionspring5.Blade-drivebelt
2.Adjustingbolt6.Wall
3.Gap
4.Adjustingnut8.Belt-coverpanel
7.Beltcover
Figure38
3.Tightenthenutonthecablesupport.
2.Brushorblowoutdebrisfromtheinsideoftheshield
andaroundalltheparts.
3.Holda0.255mm(0.010inch)feelergauge,apieceof
paper,oranotecardagainstthewallandslideitdown
behindthebelttensionspring(Figure39).
Note:Ifthereisavisiblegapbetweenthegaugeand
thespring,tightentheadjustingboltandthenutuntil
thepaperbarelyslidesfreelyinandoutofthegap
(Figure39).
Important:Donotovertightentheadjustingbolt.
Thiscoulddamagetheblade-drivebelt.
4.Installthebelt-coverpanel.
20
Page 21

ServicingtheCuttingBlades
g017223
ServiceInterval:Y early
Important:
blades pr oper l y
areuncomfortableperformingthisprocedure,contact
anAuthorizedServiceDealer.
Examinethebladesforsharpnessandanywearordamage
wheneveryourunoutofgasoline;refertoInspectingthe
Blades(page21).Ifthebladeedgeisdullornicked,haveit
sharpenedorreplaceit.Ifthebladeisworn,bent,damaged
orcracked,replaceitimmediatelywithagenuineToro
replacementblade.
DANGER
Awornordamagedbladecanbreak,andapiece
ofthebladecouldbethrowntowardtheoperator
orabystander,resultinginseriouspersonalinjury
ordeath.
•Inspectthebladesperiodicallyforwearor
damage.
•Replaceawornordamagedblade.
Note:Maintainsharpbladesthroughoutthecuttingseason,
becausesharpbladescutcleanlywithouttearingorshredding
thegrassblades.Tearingandshreddingturnsgrassbrownat
theedges,whichslowsgrowthandincreasesthechanceof
disease.
Y ou will need a torque wr ench to install the
.Ifyoudonothaveatorquewrenchor
2.Inspectthebladesthemselves,especiallythecurved
area(Figure41).Ifyounoticeanydamage,wear,or
aslotforminginthisarea(Figure41),immediately
replaceitwithanewblade.
Figure41
1.Cuttingedge3.Wear/slotforming
2.Curvedarea4.Crack
DANGER
Ifyouallowabladetowear,aslotwillform
betweenthesailandatpartoftheblade.
Eventuallyapieceoftheblademaybreak
offandbethrownfromunderthehousing,
possiblyresultinginseriousinjurytoyouor
bystanders.
•Inspectthebladeperiodicallyforwearor
damage.
•Nevertrytostraightenabladethatisbent
orweldabrokenorcrackedblade.
PreparingtoServicetheCuttingBlades
1.Lockthehandleintheverticalposition(Figure40);
refertoAdjustingtheHandleHeight(page10).
Figure40
1.Handlelockedintheverticalposition
2.Tipthemachineontoitsside,withtheairlterupin
theair,untiltheupperhandlerestsontheground.
WARNING
Thebladesaresharp;contactingabladecould
resultinseriouspersonalinjury.
•Disconnectthewirefromthesparkplug .
•Weargloveswhenservicingtheblade.
InspectingtheBlades
ServiceInterval:Beforeeachuseordaily
•Replaceawornordamagedblade.
3.Checkforbentblades;refertoCheckingforBent
Blades(page21).
CheckingforBentBlades
1.Rotatethebladesuntiltheyarepositionedasshown
inFigure42.
1.Inspectthecuttingedges(
notsharporhavenicks,removethebladesandhave
themsharpenedorreplacethem.
Figure41).Iftheedgesare
21
Page 22

B
B
2
1
3
g016532
Figure42
G016530
1
2
3
4
Figure43
1.Frontofcuttingdeck3.Measurefromthecutting
edgetoasmooth,level
surface
2.MeasureatlocationsA
andB
2.Measurefromalevelsurfacetothecuttingedges
atlocationsAandB,(Figure42),andrecordboth
dimensions.
3.Rotatethebladessothattheiroppositeendsareat
locationsAandB.
4.Repeatthemeasurementsinstep2andrecordthem.
Note:Ifthedifferencebetweenthedimensions
AandBobtainedinsteps2and4exceeds3mm
(1/8inch),thebladeisbentandmustbereplaced;
refertoRemovingtheBlades(page22)andInstalling
theBlades(page22).
WARNING
Abladethatisbentordamagedcouldbreak
apartandcouldseriouslyinjureorkillyouor
bystanders.
•Alwaysreplaceabentordamagedblade
withanewblade.
2.RemoveeachbladeasshowninFigure44.
Figure44
1.Spindle(2)3.Blade(2)
2.Bladedriver(2)4.Bladebolt(2)
3.Inspectthepinsonthebladedriversforwearand
damage.
•Neverleorcreatesharpnotchesinthe
edgesorsurfacesofablade.
RemovingtheBlades
Replacethebladeswhenthemachinehitsasolidobjector
whenabladeisoutofbalanceorbent.Useonlygenuine
Tororeplacementblades.
1.Useablockofwoodtoholdeachbladesteadyandturn
thebladeboltcounterclockwiseasshowninFigure43.
InstallingtheBlades
1.Installtherstbladesothatitishorizontal,alongwith
allmountinghardwareasshownin
Note:Tightentheboltwithyourngers.
Important:Positionthecurvedendsoftheblades
topointtowardthemachinehousing.
Besuretonesttheraisedareasoneachbladedriver
withtherecessesintheheadofitscorresponding
spindle,andthepinsontheothersideofeach
bladedriverwiththeholesinitscorresponding
blade.
22
Figure44.
Page 23

2.Steadyeachbladewithaboardandturnthebladebolt
g016537
1
G016536
clockwisewithatorquewrenchasshowninFigure45;
torquethebladeboltto82N-m(60ft-lb).
Important:Abolttorquedto82N-m(60ft-lb)is
verytight.Putyourweightbehindthewrenchand
tightentheboltsecurely.Thisboltisverydifcult
toovertighten.
WARNING
Incorrectlyinstallingthebladescoulddamage
themachineorcauseaninjurytotheoperator
ortobystanders.
WashingUnderneaththe Machine
ServiceInterval:Beforeeachuseordaily—Washunderneath
themachine.
1.Movethemachinetoalevelsurface.
2.Stoptheengineandwaitforallmovingpartstostop
beforeleavingtheoperatingposition.
3.Lowerthemachinetothelowestheight-of-cut.
4.Attachahosetothewashouttting,andturnthewater
onhigh(
Note:Spreadpetroleumjellyonthewashouttting
O-ringtomakethecouplingslideoneasierandprotect
theO-ring.
Figure47).
Figure45
3.Rotatetheinstalledblade1/4turnuntilitisvertical,
andinstalltheotherbladeinthesamemannerasthe
rst(refertostep1).
Note:Thebladesshouldbeperpendicular,forming
aninverted“T”asshownin
Figure46.
Figure47
1.Washouttting3.O-ring
2.Hose
4.Coupling
5.Starttheengine,engagetheblade-controllever,andlet
themachinerunfor1to3minutes.
Figure46
6.Disengagetheblade-controllever,stoptheengine,and
waitforallmovingpartstostop.
1.Blade(2)
7.Shutoffthewaterandremovethecouplingfromthe
washouttting.
4.Tightenthesecondblade;refertostep2.
thattheydonottouch.
Note:Ifthebladestoucheachother,theyarenot
5.Rotatethebladesbyhandafull360°turntoensure
mountedcorrectly.Repeatsteps
1through3untilthe
Note:Ifthemachineisnotcleanafterasingle
washing,soakitandletitstandfor30minutes.Then
repeattheprocess.
8.Runthemachineagainandengagethebladesfor1to3
minutestoremovetheexcesswater.
bladesnolongertoucheachother.
23
Page 24

WARNING
Abrokenormissingwashoutttingcould
exposeyouandotherstothrownobjectsor
bladecontact.Contactwithabladeorthrown
debriscancauseinjuryordeath.
•Replaceabrokenormissingwashout
ttingimmediately,beforeusingthe
machineagain.
•Neverputyourhandsorfeetunderthe
machineorthroughopeningsinthe
mower.
Storage
Storethemachineinacool,clean,dryplace.
GeneralInformation
1.Performtherecommendedannualmaintenance
procedures;refertoMaintenance(page16).
2.Cleanunderthemachine;refertoWashingUnderneath
theMachine(page23).
3.Removechaff,dirt,andgrimefromtheexternalparts
oftheengine,theshrouding,andthetopofthe
machine.
4.Checktheconditionoftheblades;referto
theBlades(page21).
5.Servicetheairlter;refertoServicingtheAirFilter
(page17).
6.Tightenallnuts,bolts,andscrews.
7.Touchupallrustedorchippedpaintsurfaceswith
paintavailablefromanAuthorizedServiceDealer.
8.Chargethebatteryfor24hours,thenunplugthe
batterychargerandstorethemachineinanunheated
area.Ifyoumuststorethemachineinaheatedarea,
youmustchargethebatteryevery90days(electric-start
modelonly).
9.Foldthehandleforstorage;referto
HandleHeight(page10).
Adjustingthe
PreparingtheFuelSystem
WARNING
Gasolinecanvaporizeifyoustoreitoverlong
periodsoftimeandexplodeifitcomesintocontact
withanopename.
Inspecting
•Donotstoregasolineoverlongperiodsoftime.
•Donotstorethemachinewithgasolineinthe
fueltankorthecarburetorinanenclosurewith
anopename.(Forexample,afurnaceora
waterheaterpilotlight.)
•Allowtheenginetocoolbeforestoringitinany
enclosure.
Onthelastrefuelingoftheyear,addfuelstabilizertothefuel
asdirectedbytheenginemanufacturer.Emptythefueltank
whenmowingthelasttimebeforestoringthemachine.
1.Runthemachineuntiltheenginestopsfromrunning
outoffuel.
2.Starttheengineagain.
3.Allowtheenginetorununtilitstops.Whenyoucan
nolongerstarttheengine,itissufcientlydry.
24
Page 25

PreparingtheEngine
1.Whiletheengineisstillwarm,changetheengineoil;
refertoChangingtheEngineOil(page17).
2.Removethesparkplug.
3.Usinganoilcan,addabout30ml(1oz.),ofmotoroil
totheenginethroughthespark-plughole.
4.Slowlypullthestarterropeseveraltimestodistribute
oilthroughoutthecylinder.
5.Installthesparkplugbutdonotconnectthewireto
thesparkplug.Securethewiresothatitdoesnotcome
intocontactwiththesparkplug.
RemovingtheMachinefrom Storage
1.Unfoldthehandle;refertoAdjustingtheHandle
Height(page10).
2.Checkandtightenallfasteners.
3.Removethesparkplugandspintheenginerapidly
usingthestartertoblowexcessoilfromthecylinder.
4.Inspectthesparkplugandreplaceitifitisdirty,worn,
orcracked;refertotheEngineOperator’sManual.
5.Installthesparkplugandtightenittotherecommended
torqueof20N-m(180in-lb).
6.Performanyneededmaintenanceprocedures;referto
Maintenance(page16).
7.Checktheengineoillevel;refertoCheckingtheEngine
OilLevel(page9).
8.Fillthefuelinthefueltankwithfreshgasoline;referto
FillingtheFuelTank(page8).
9.Chargethebattery(electric-startmodelonly);referto
ChargingtheBattery(page18).
10.Connectthewiretothesparkplug.
25
Page 26

Notes:
26
Page 27

InternationalDistributorList
Distributor:
AgrolancKft
BalamaPrimaEngineeringEquip.HongKong85221552163
B-RayCorporation
CascoSalesCompany
CeresS.A.CostaRica
CSSCTurfEquipment(pvt)Ltd.SriLanka
CyrilJohnston&Co.
CyrilJohnston&Co.RepublicofIreland
EquiverMexico525553995444ParklandProductsLtd.NewZealand6433493760
FemcoS.A.Guatemala
ForGarderOU
G.Y .K.CompanyLtd.
GeomechanikiofAthensGreece
GolfinternationalTurizm
GuandongGoldenStarChina
HakoGroundandGardenSweden
HakoGroundandGarden
HayterLimited(U.K.)
HydroturfInt.CoDubai
HydroturfEgyptLLC
IrrimacPortugal351212388260T oroEuropeNVBelgium3214562960
IrrigationProductsInt'lPvtLtd.India00914424494387ValtechMorocco212537663636
JeanHeybroekb.v .Netherlands3130639461 1VictusEmakPoland48618238369
Country:
Hungary3627539640
Korea82325512076
PuertoRico7877888383
NorthernIreland442890813121
Estonia3723846060
Japan81726325861
Turkey902163365993Riversa
Norway4722907760
UnitedKingdom441279723444
UnitedArabEmirates97143479479T-MarktLogisticsLtd.Hungary3626525500
Egypt2025194308ToroAustraliaAustralia61395807355
PhoneNumber:Distributor:
5062391138
94112746100
442890813121
5024423277
30109350054
862087651338
4635100000
MaquiverS.A.Colombia
MaruyamaMfg.Co.Inc.
Mountelda.s.CzechRepublic
Mountelda.s.Slovakia
MunditolS.A.
NormaGarden
OslingerTurfEquipmentSA
OyHakoGroundandGardenAb
Perfetto
PratoverdeSRL.
Prochaska&Cie
RTCohen2004Ltd.
LelyTurfcare
SolvertS.A.S.
SpyprosStavrinidesLimitedCyprus
SurgeSystemsIndiaLimited
Country:
Japan81332522285
Argentina541148219999
Russia74954116120
Ecuador59342396970
Finland35898700733
Poland48618208416
Italy390499128128
Austria4312785100
Israel97298617979
Spain
Denmark4566109200
France33130817700
India911292299901
PhoneNumber:
5712364079
420255704220
420255704220
34952837500
35722434131
EuropeanPrivacyNotice
TheInformationT oroCollects
ToroWarrantyCompany(T oro)respectsyourprivacy.Inordertoprocessyourwarrantyclaimandcontactyouintheeventofaproductrecall,weaskyou
tosharecertainpersonalinformationwithus,eitherdirectlyorthroughyourlocalT orocompanyordealer.
TheTorowarrantysystemishostedonserverslocatedwithintheUnitedStateswhereprivacylawmaynotprovidethesameprotectionasapplies
inyourcountry.
BYSHARINGYOURPERSONALINFORMA TIONWITHUS,YOUARECONSENTINGTOTHEPROCESSINGOFYOURPERSONALINFORMA TION
ASDESCRIBEDINTHISPRIV ACYNOTICE.
TheW ayToroUsesInformation
Toromayuseyourpersonalinformationtoprocesswarrantyclaims,tocontactyouintheeventofaproductrecallandforanyotherpurposewhichwetell
youabout.T oromayshareyourinformationwithToro'safliates,dealersorotherbusinesspartnersinconnectionwithanyoftheseactivities.Wewillnot
sellyourpersonalinformationtoanyothercompany .Wereservetherighttodisclosepersonalinformationinordertocomplywithapplicablelawsand
withrequestsbytheappropriateauthorities,tooperateoursystemsproperlyorforourownprotectionorthatofotherusers.
RetentionofyourPersonalInformation
Wewillkeepyourpersonalinformationaslongasweneeditforthepurposesforwhichitwasoriginallycollectedorforotherlegitimatepurposes
(suchasregulatorycompliance),orasrequiredbyapplicablelaw.
Toro'sCommitmenttoSecurityofY ourPersonalInformation
Wetakereasonableprecautionsinordertoprotectthesecurityofyourpersonalinformation.Wealsotakestepstomaintaintheaccuracyandcurrent
statusofpersonalinformation.
AccessandCorrectionofyourPersonalInformation
Ifyouwouldliketorevieworcorrectyourpersonalinformation,pleasecontactusbyemailatlegal@toro.com.
AustralianConsumerLaw
AustraliancustomerswillnddetailsrelatingtotheAustralianConsumerLaweitherinsidetheboxoratyourlocalT oroDealer.
374-0269RevH
Page 28

TheToroWarranty
TheToroGTSStartingGuarantee
ResidentialProducts
and
ConditionsandProductsCovered
TheT oroCompanyanditsafliate,T oroWarrantyCompany ,pursuant
toanagreementbetweenthem,jointlypromisetorepairfortheoriginal
purchaser
workmanshiporiftheT oroGTS(GuaranteedtoStart)enginewillnotstart
ontherstorsecondpull,providedtheroutinemaintenancerequiredin
theOperator'sManualhavebeenperformed.
Thefollowingtimeperiodsapplyfromthedateofpurchase:
ProductsWarrantyPeriod
WalkPowerMowers
•CastDeck
•Engine
•Battery2years
•SteelDeck
•Engine
TimeMasterMowers3yearsResidentialUse
•Engine
•Battery2years
ElectricHandHeldProducts2yearsResidentialUse
Snowthrowers
•SingleStage
•Engine
•TwoStage
•Chute,chutedeectorand
impellerhousingcover
ElectricSnowthrowers
AllRide-OnUnitsBelow
•Engine
•Battery2yearsResidentialUse
•Attachments2yearsResidentialUse
DHLawn&GardenTractors
XLSLawn&GardenTractors
TimeCutter
TITANMowers3yearsor240hours
•Frame
1
OriginalPurchasermeansthepersonwhooriginallypurchasedtheT oroProduct.
2
Residentialusemeansuseoftheproductonthesamelotasyourhome.Useatmorethanone
locationisconsideredcommercialuseandthecommercialusewarrantywouldapply.
3
TheToroGTSStartingGuaranteedoesnotapplywhentheproductisusedcommercially.
4
SomeenginesusedonToroProductsarewarrantedbytheenginemanufacturer.
5
Whicheveroccursrst.
6
LifetimeFrameWarranty-Ifthemainframe,consistingofthepartsweldedtogethertoformthe
tractorstructurethatothercomponentssuchastheenginearesecuredto,cracksorbreaksin
normaluse,itwillberepairedorreplaced,atT oro'soption,underwarrantyatnocostforparts
andlabor .Framefailureduetomisuseorabuseandfailureorrepairrequiredduetorustor
corrosionarenotcovered.
Warrantymaybedeniedifthehourmeterisdisconnected,altered,or
showssignsofbeingtamperedwith.
1
theT oroProductlistedbelowifdefectiveinmaterialsor
5yearsResidentialUse
90DaysCommercialUse
5yearsGTSGuarantee,
ResidentialUse
3
2yearsResidentialUse
30DaysCommercialUse
2yearsGTSGuarantee,
ResidentialUse
3
90DaysCommercialUse
3yearsGTSGuarantee,
ResidentialUse
3
NoWarrantyforCommercialUse
2yearsResidentialUse
45DaysCommercialUse
2yearsGTSGuarantee,
ResidentialUse
3
3yearsResidentialUse
45DaysCommercialUse
Lifetime(originalowneronly)
2yearsResidentialUse
NoWarrantyforCommercialUse
Seeenginemanufacturer'swarranty
2yearsResidentialUse
30DaysCommercialUse
3yearsResidentialUse
30DaysCommercialUse
3yearsResidentialUse
30DaysCommercialUse
5
Lifetime(originalowneronly)
2
2
2
2
2
2
2
2
2
2
2
2
OwnerResponsibilities
YoumustmaintainyourT oroProductbyfollowingthemaintenance
proceduresdescribedintheOperator'sManual.Suchroutine
maintenance,whetherperformedbyadealerorbyyou,isatyourexpense.
InstructionsforObtainingWarrantyService
IfyouthinkthatyourT oroProductcontainsadefectinmaterialsor
workmanship,followthisprocedure:
1.Contactyoursellertoarrangeserviceoftheproduct.Ifforany
reasonitisimpossibleforyoutocontactyourseller ,youmaycontact
anyT oroAuthorizedDistributortoarrangeservice.Seeattached
DistributorList.
2.Bringtheproductandyourproofofpurchase(salesreceipt)to
theservicingoutlet.Ifforanyreasonyouaredissatisedwiththe
servicingoutlet’sanalysisorwiththeassistanceprovided,contact
usat:
ToroCustomerCareDepartment,RLCDivision
ToroWarrantyCompany
811 1LyndaleAvenueSouth
Bloomington,MN55420-1196
001–952–948–4707
ItemsandConditionsNotCovered
Thereisnootherexpresswarrantyexceptforspecialemissionsystem
coverageandenginewarrantycoverageonsomeproducts.Thisexpress
warrantydoesnotcoverthefollowing:
•Costofregularmaintenanceserviceorparts,suchaslters,fuel,
lubricants,oilchanges,sparkplugs,airltersbladesharpening
orwornblades,cable/linkageadjustments,orbrakeandclutch
adjustments
•Componentsfailingduetonormalwear
5
•Anyproductorpartwhichhasbeenalteredormisusedorneglected
andrequiresreplacementorrepairduetoaccidentsorlackofproper
maintenance
•Pickupanddeliverycharges
•RepairsorattemptedrepairsbyanyoneotherthananAuthorized
4
ToroServiceDealer
•Repairsnecessaryduetofailuretofollowrecommendedfuel
procedure(consultOperator'sManualformoredetails)
–Removingcontaminantsfromthefuelsystemisnotcovered
–Useofoldfuel(morethanonemonthold)orfuelwhichcontains
morethan10%ethanolormorethat15%MTBE
–Failuretodrainthefuelsystempriortoanyperiodofnon-use
overonemonth
•Repairsoradjustmentstocorrectstartingdifcultiesduetothe
following:
–Failuretofollowpropermaintenanceproceduresor
6
recommendedfuelprocedure
–Rotarymowerbladestrikinganobject
•Specialoperationalconditionswherestartingmayrequiremorethan
twopulls:
–Firsttimestartsafterextendedperiodofnon-useoverthree
monthsorseasonalstorage
–Cooltemperaturestartssuchasthosefoundinearlyspringand
lateautumn
–Improperstartingprocedures-ifyouarehavingdifcultystarting
yourunit,pleasechecktheOperator'sManualtoensurethat
youareusingthecorrectstartingprocedures.Thiscansavean
unnecessaryvisittoanAuthorizedT oroServiceDealer .
GeneralConditions
Thepurchaseriscoveredbythenationallawsofeachcountry .Therights
towhichthepurchaserisentitledwiththesupportoftheselawsarenot
restrictedbythiswarranty.
374-0268RevF
 Loading...