

Page 1

FormNo.3416-485RevB
myTurfProAssetManagementSystem
YoumaycontactT orodirectlyatwww.Toro.comforproductsafetyandoperationtrainingmaterials,accessory
information,helpndingadealer,ortoregisteryourproduct.
Introduction
AccessmyTurfathttp://myturf.toro.com.
myTurfisanassetmanagementsystemdesigned
toincreasetheefciencyofyourteambyutilizing
automatedprocesses,whichremovemanualtasks
fromyourday-to-daywork.
myTurfallowsyoutoeasilyperformthefollowing
tasks:
•OrderpartsonlineanytimefromyourToro
Distributor
•Trackallassets
SoftwareGuide
•AccessthelatestOperator’sManualforeachToro
machineinyoureet
•AccessthelatestServiceBulletinsandproduct
trainingforeachT oromachine
•Createandmanageworkorders
•Viewcostreports
Contents
Introduction...............................................................1
Operation..................................................................2
GettingStarted...................................................2
NavigatingmyTurf............................................33
CreatinganAddressforOrdering
Parts.............................................................56
EditinganAddressforOrderingParts...............60
OrderingPartsforRepair..................................64
ReceivingPartsintoInventory..........................71
AssigningaWirelessHourMeter......................73
AddingaBaseStation/Repeater.......................77
AddingaWirelessHourMeter..........................79
ManagingAttachments.....................................80
ManagingthePreventiveMaintenance
Schedule.......................................................83
ManagingWorkOrders.....................................89
ManagingtheMaintenanceScheduleforan
Asset.............................................................99
RetiringorScrappinganAsset........................105
TrackingFuelUsageandCost.........................110
GeneratingReports.........................................112
©2018—TheT oro®Company
8111L yndaleAvenueSouth
Bloomington,MN55420
Registeratwww.Toro.com.
OriginalInstructions(EN)
PrintedintheUSA
AllRightsReserved
*3416-485*B
Page 2

Operation
GettingStarted
EnrollinginmyTurf
BeforeyoucanutilizemyTurf,youmustcompletetheToromyT urfCustomerEnrollment.
FilloutthefollowingToromyT urfCustomerEnrollmentformbeforeusingmyTurf.
2
Page 3
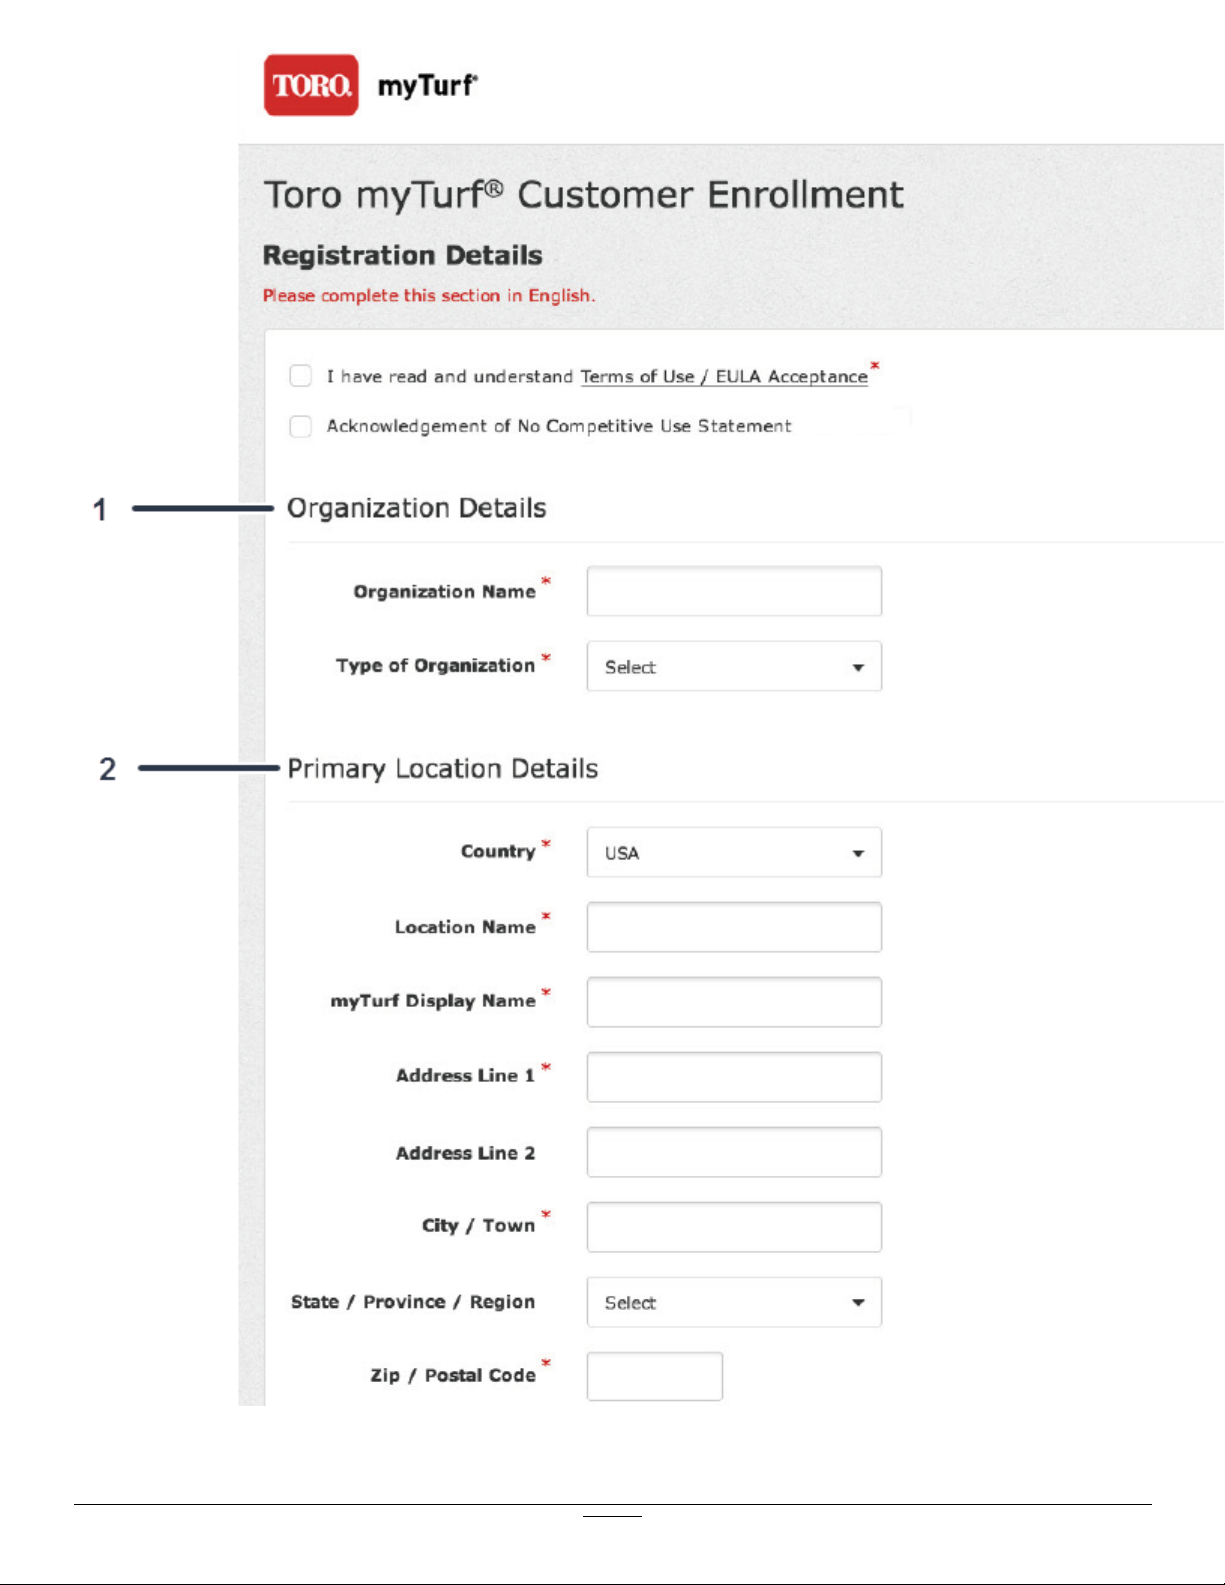
Figure1
1.Fillouttheorganizationdetails.2.Fillouttheprimarylocationdetails.
3
g245192
Page 4
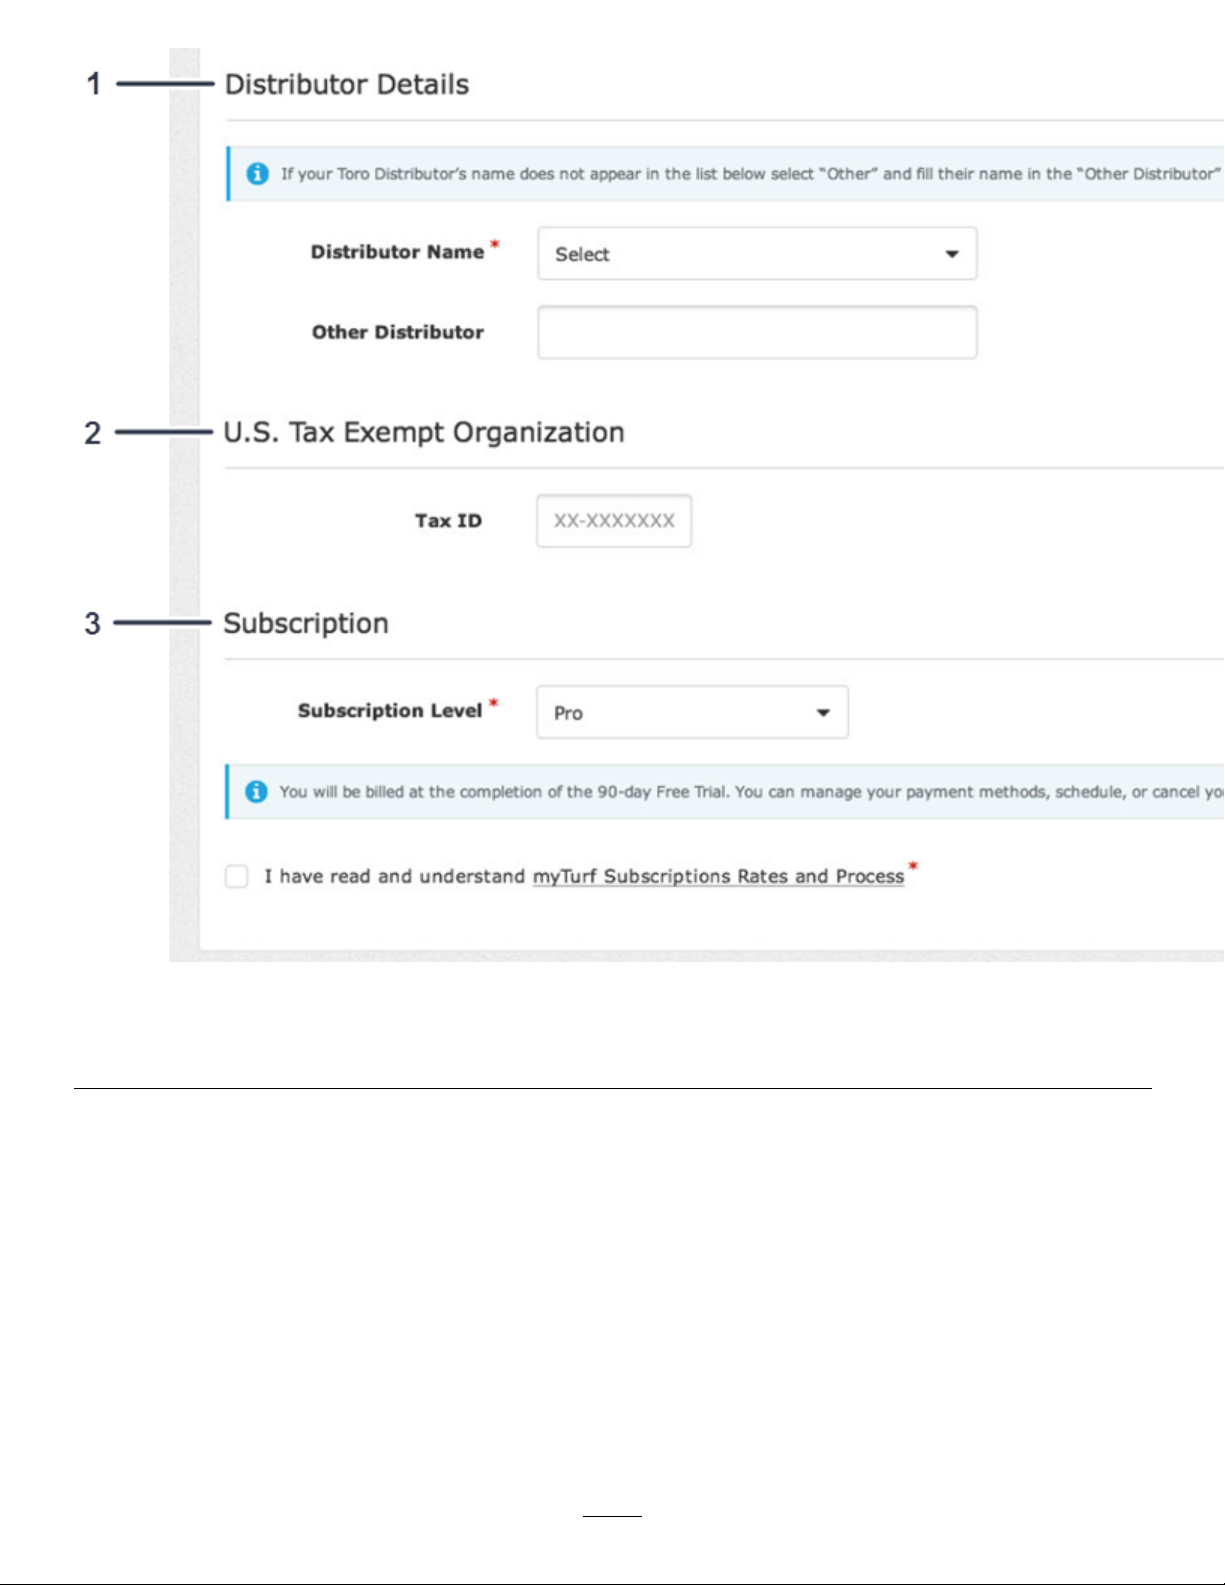
Figure2
1.Filloutthedistributordetails.3.Filloutthesubscriptiondetails.
2.FillouttheUnitedStatesTaxExemptionOrganizationdetails.
4
g245239
Page 5
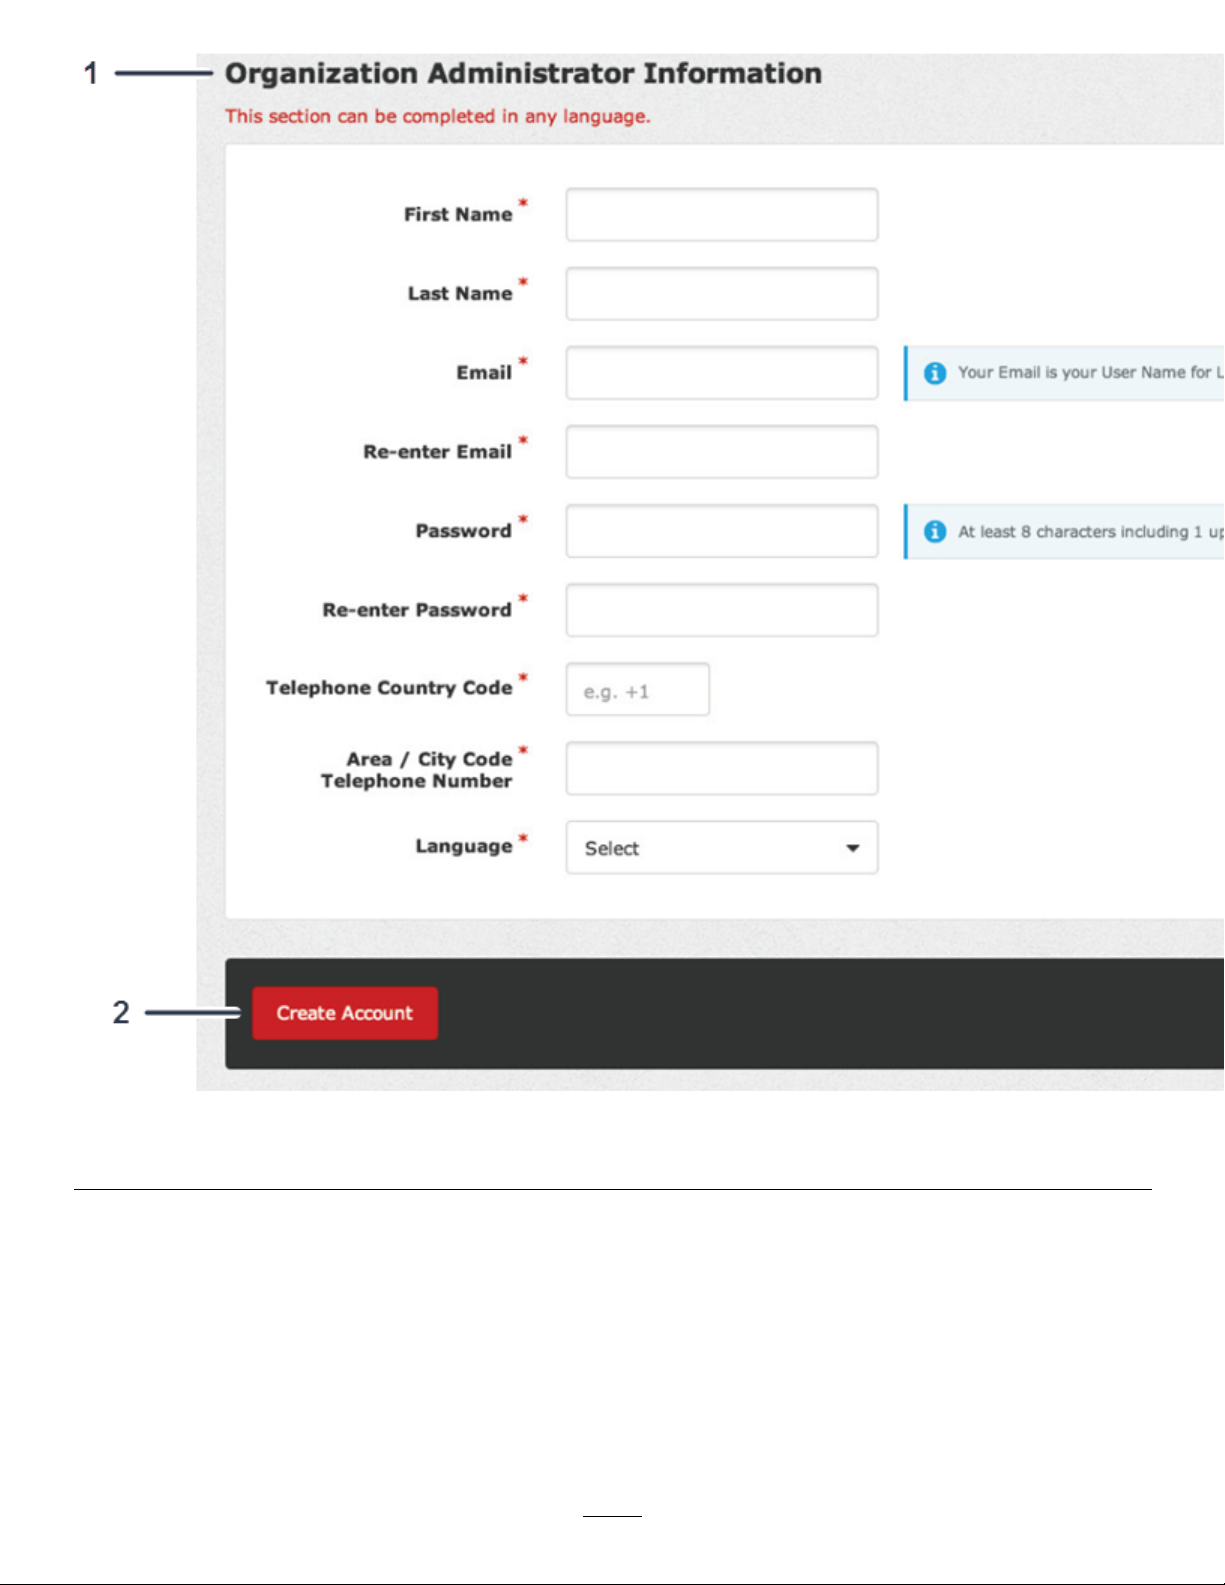
Figure3
1.Fillouttheorganizationadministratorinformation.2.Clicktocreateyouraccount.
AdministeringLocations
1.FromtheDashboard,clickAdmin,locatedintheupper,rightcornerofthescreen(Figure4).
5
g245240
Page 6

Figure4
1.ClickAdmin.
2.ClicktheLocationRecordicontoadministeraspeciclocation(Figure5).
g245241
6
Page 7

Figure5
1.Clickthelocationrecordicon.
FromtheLocationRecordscreen(Figure6),youcanviewandupdatethefollowinginformation:
•Locationdetailsandcontactinformation(Figure6)
7
g245242
Page 8
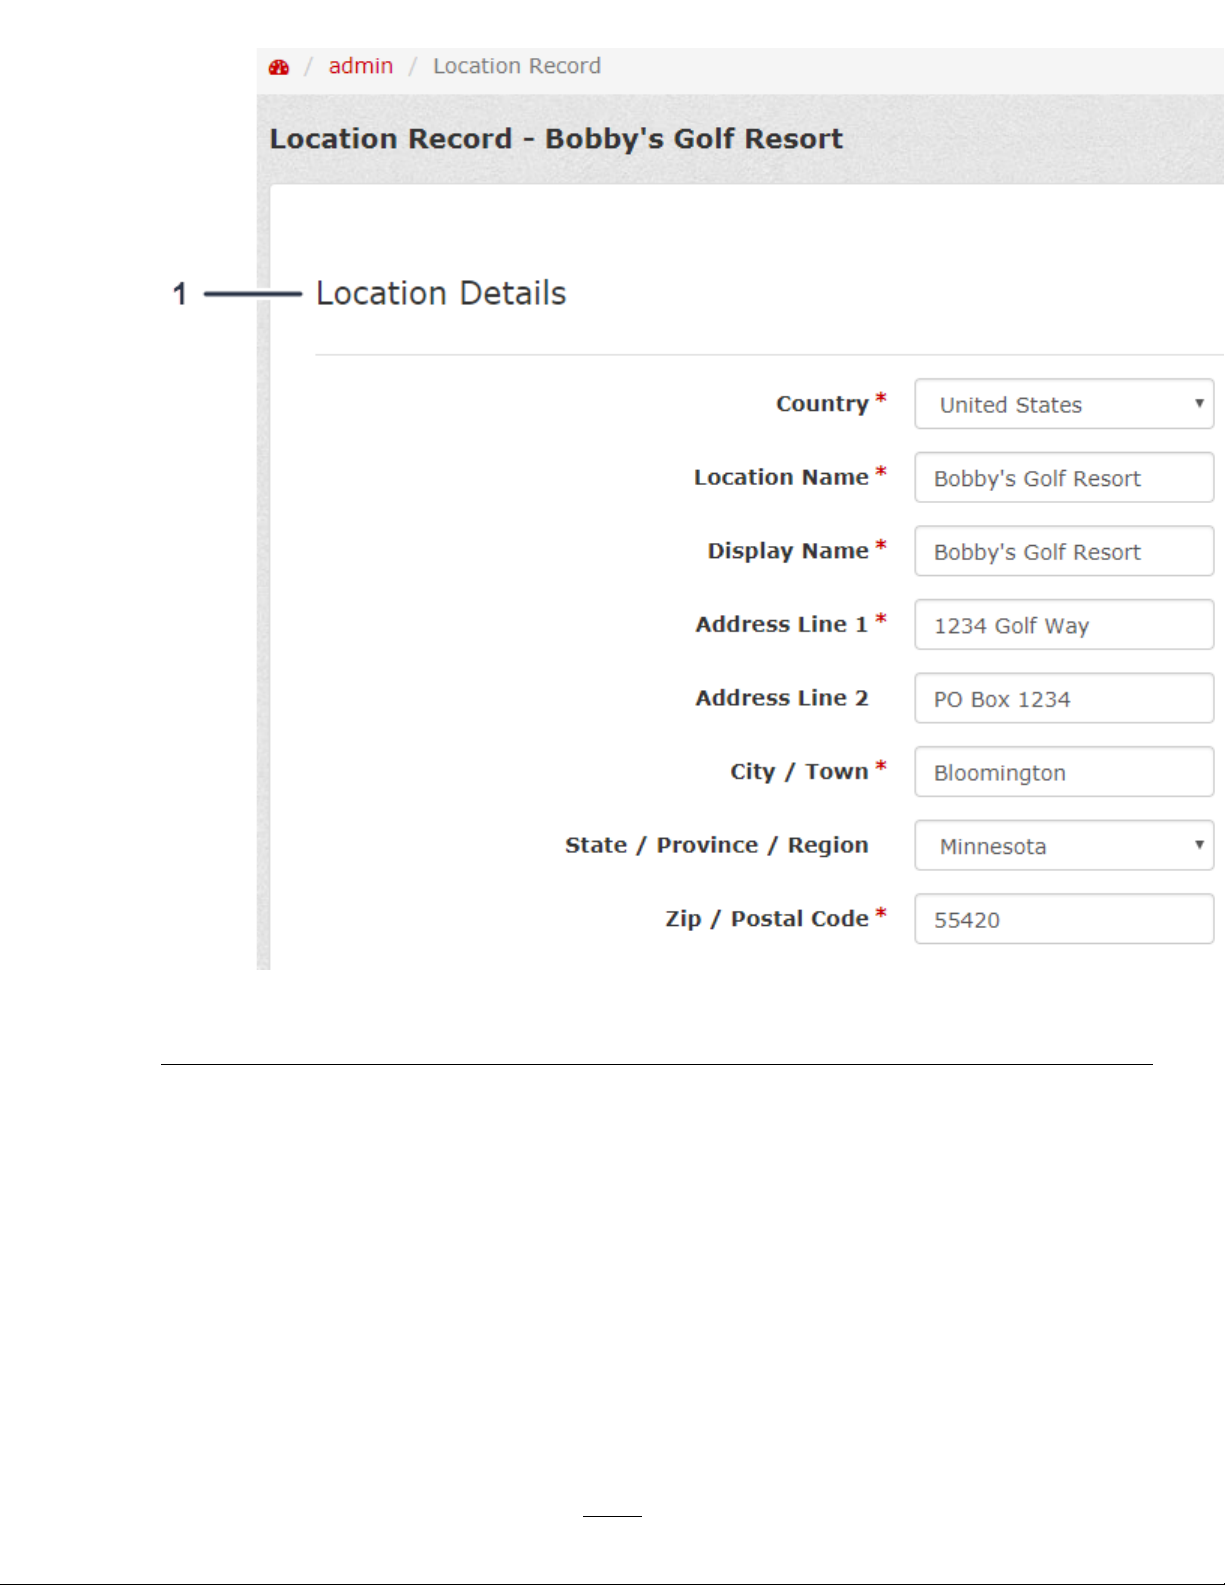
1.Enterthelocationdetails.
•Subscriptionandpaymentdetails(Figure7)
Note:IfyouareaUnitedStatestaxexemptorganization,enterthosedetails(Figure7).
g245245
Figure6
8
Page 9
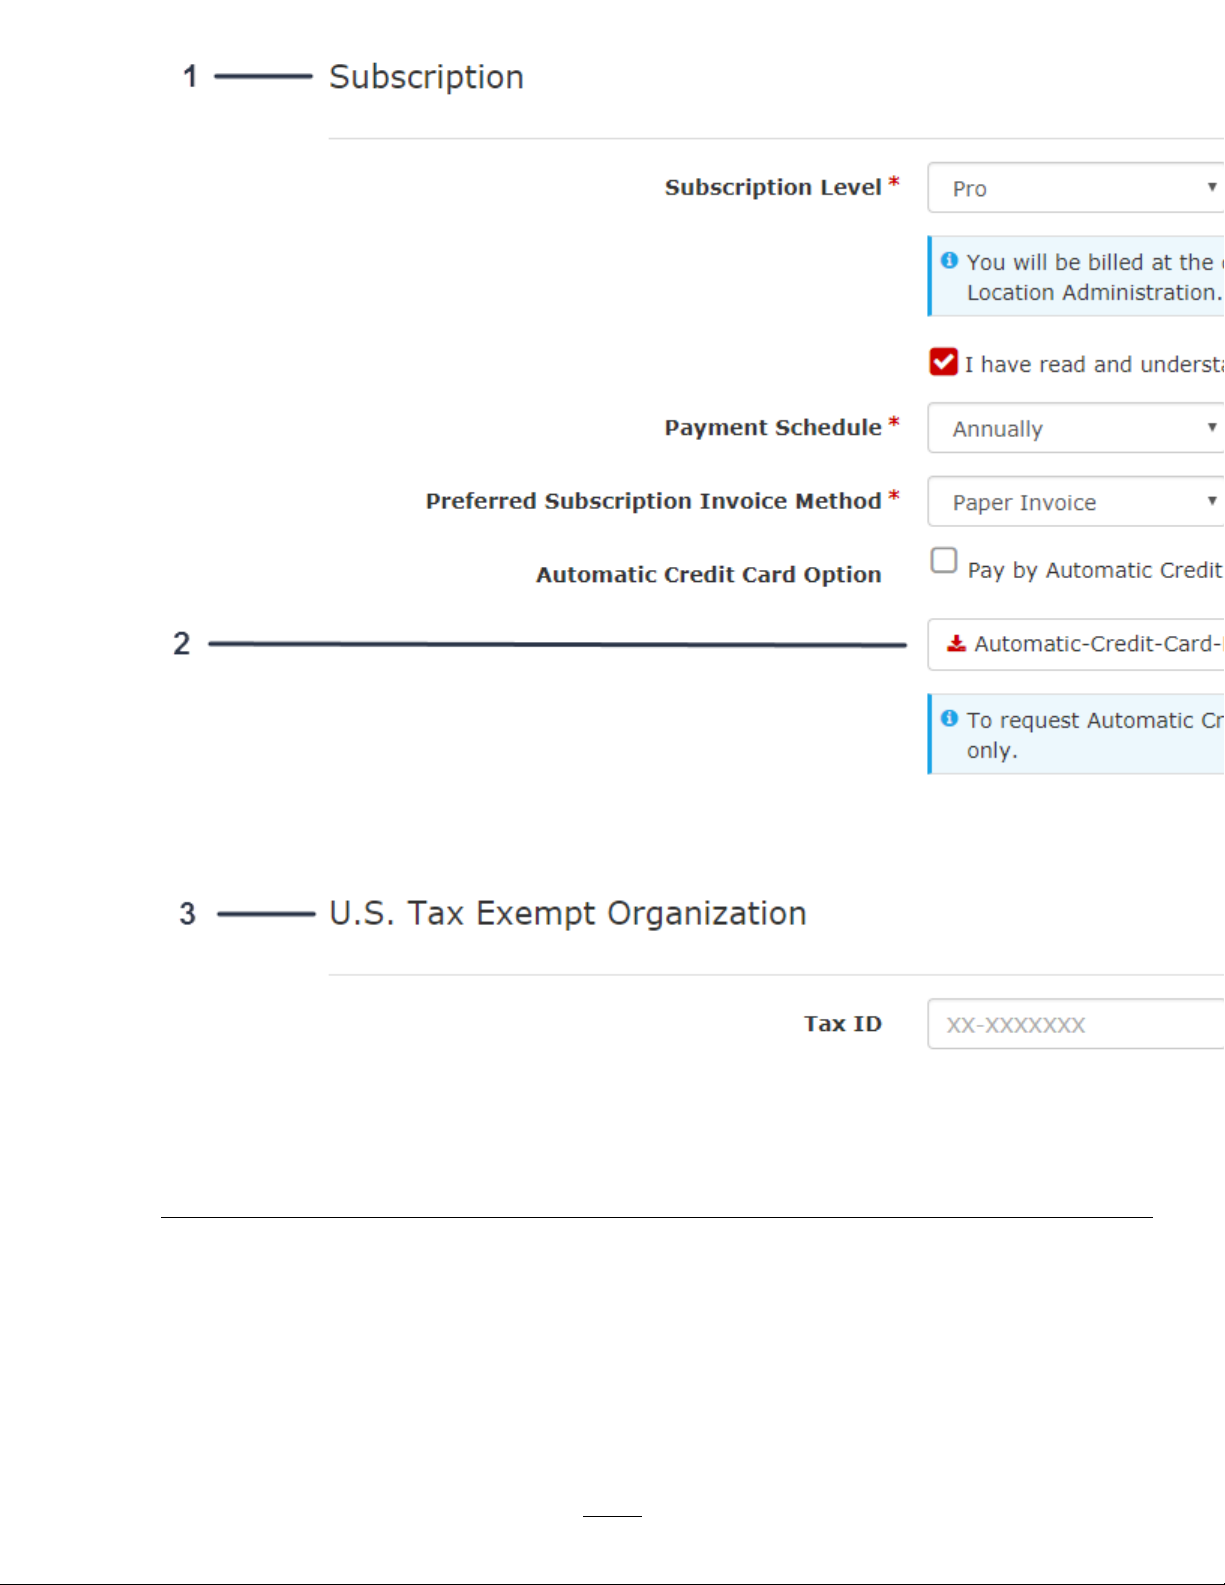
Figure7
g245246
1.Enterthesubscriptiondetails.
2.Ifyouchooseautomaticpayment,clickheretollouttheform.
3.IfyouareaUnitedStatestaxexemptorganization,enter
thosedetails.
•Subscriptioninvoicecontactinformationandsubscriptioninvoiceaddress(Figure8)
9
Page 10
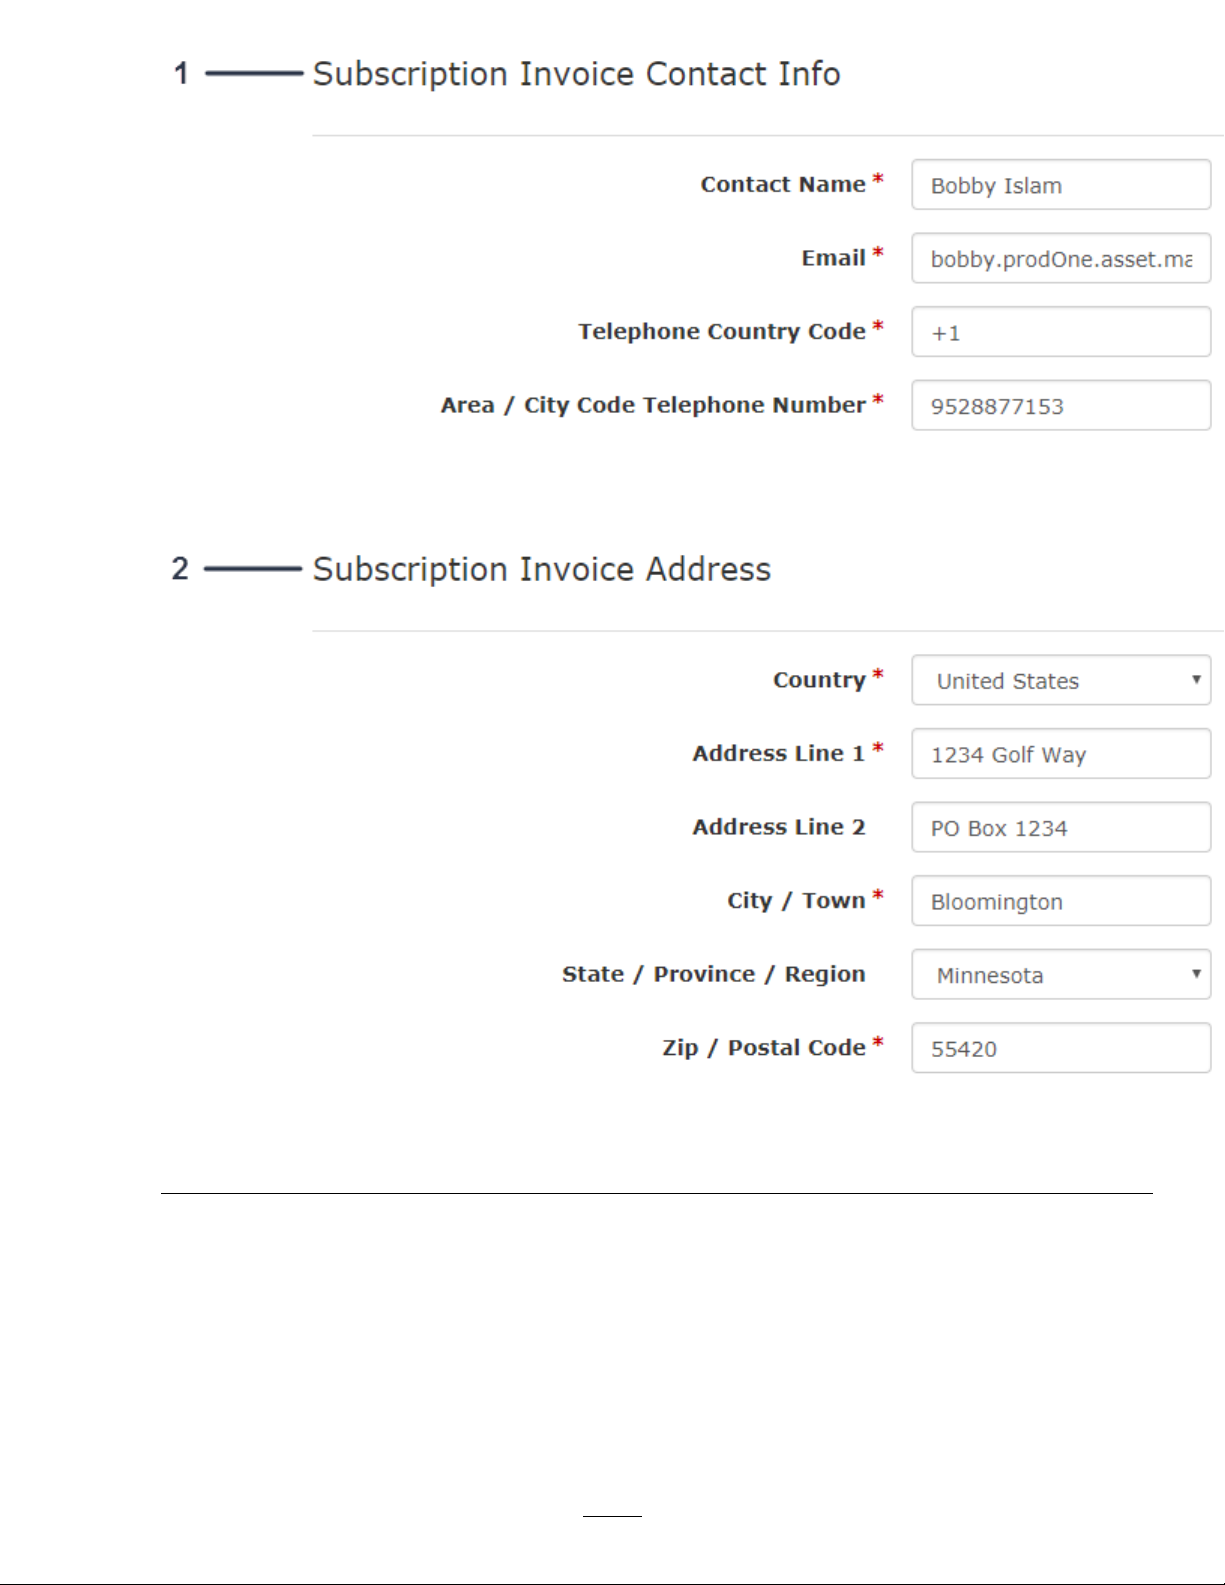
Figure8
g245268
1.Enterthesubscriptioninvoicecontactinformation.
2.Enterthesubscriptioninvoiceaddress.
•Laborwageandfuel(maintenancelaborwagerates);refertoFigure9
•Foroperators,averagewagerate(Figure9)
10
Page 11
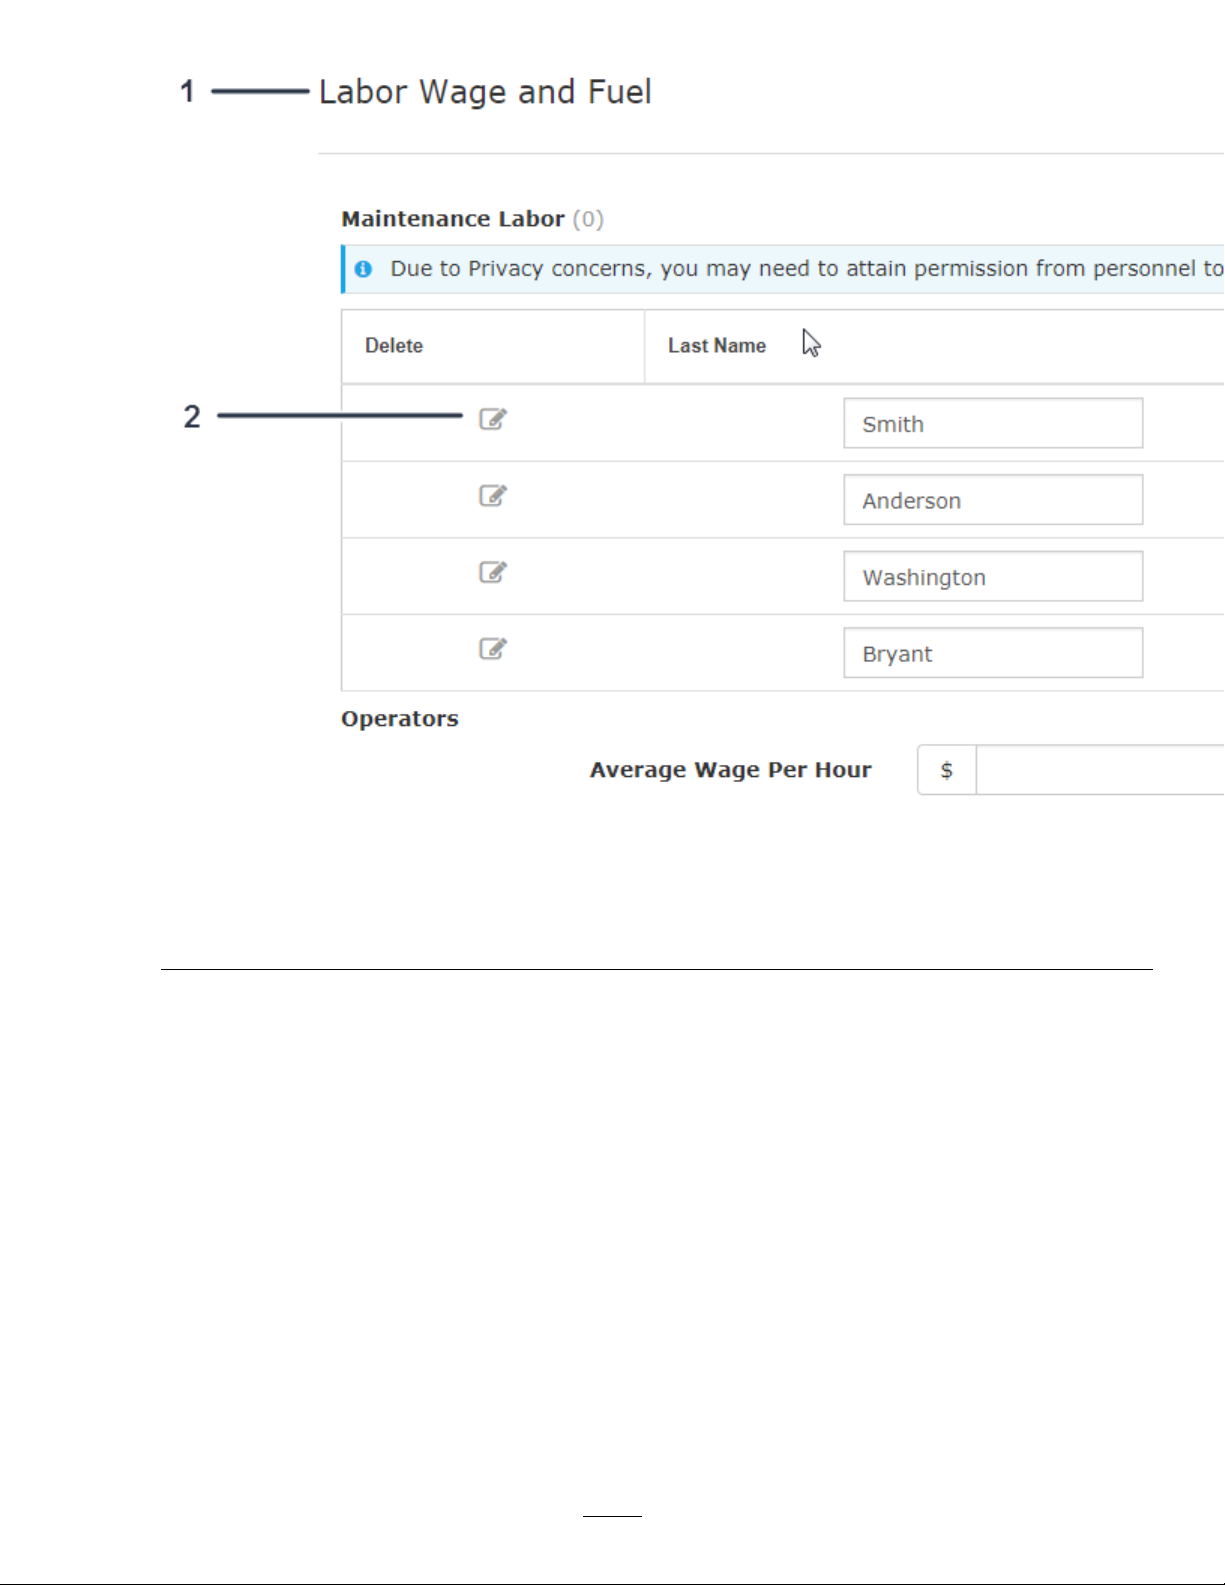
Figure9
1.Enterthelaborwageandfuelinformation.4.Enterthewageforeachmaintenanceemployeehere.
2.Clicktheicontoeditpersonneldetails.5.Clicktoaddnewlabor.
3.Enterthewageforoperatorshere.
•Fuelcost(Figure10)
g245269
11
Page 12
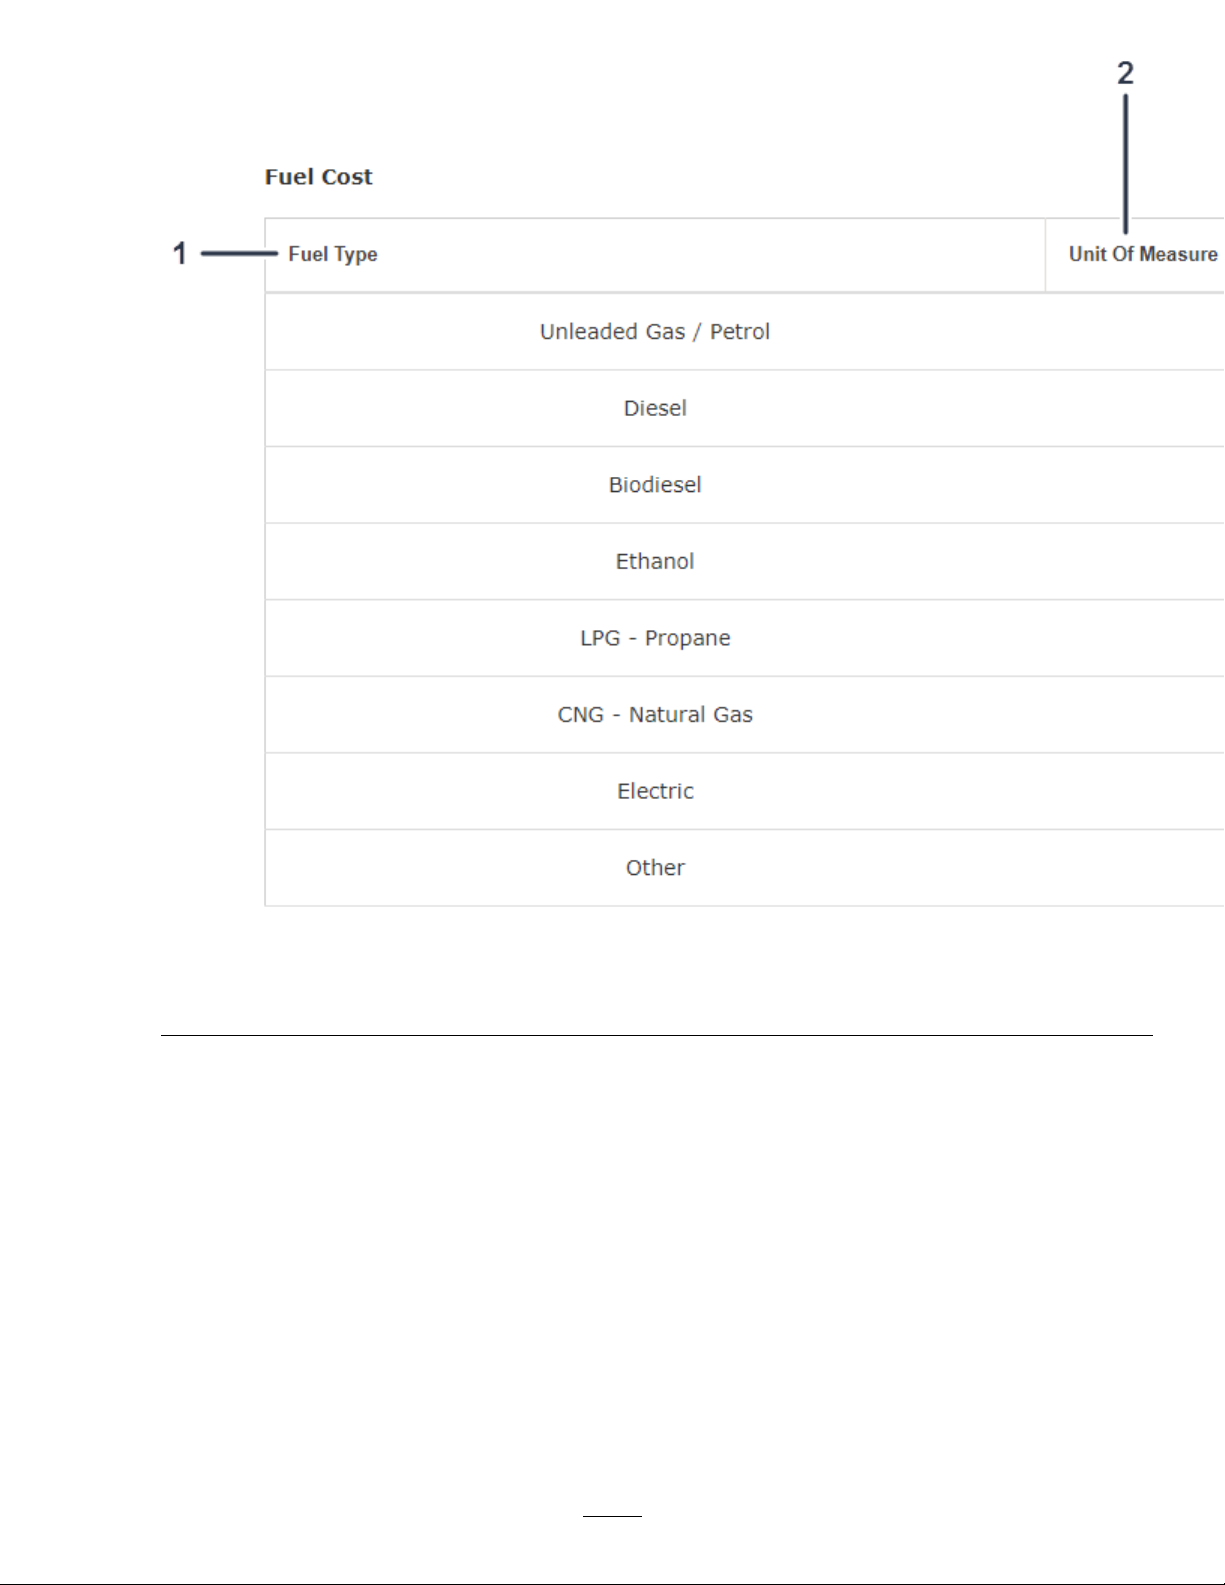
Figure10
g245310
1.Fueltype
2.Unitofmeasure4.Enterthefuelcosthere.
3.Fuelcostperunitofmeasure
•Localesettings(Figure1 1)
12
Page 13
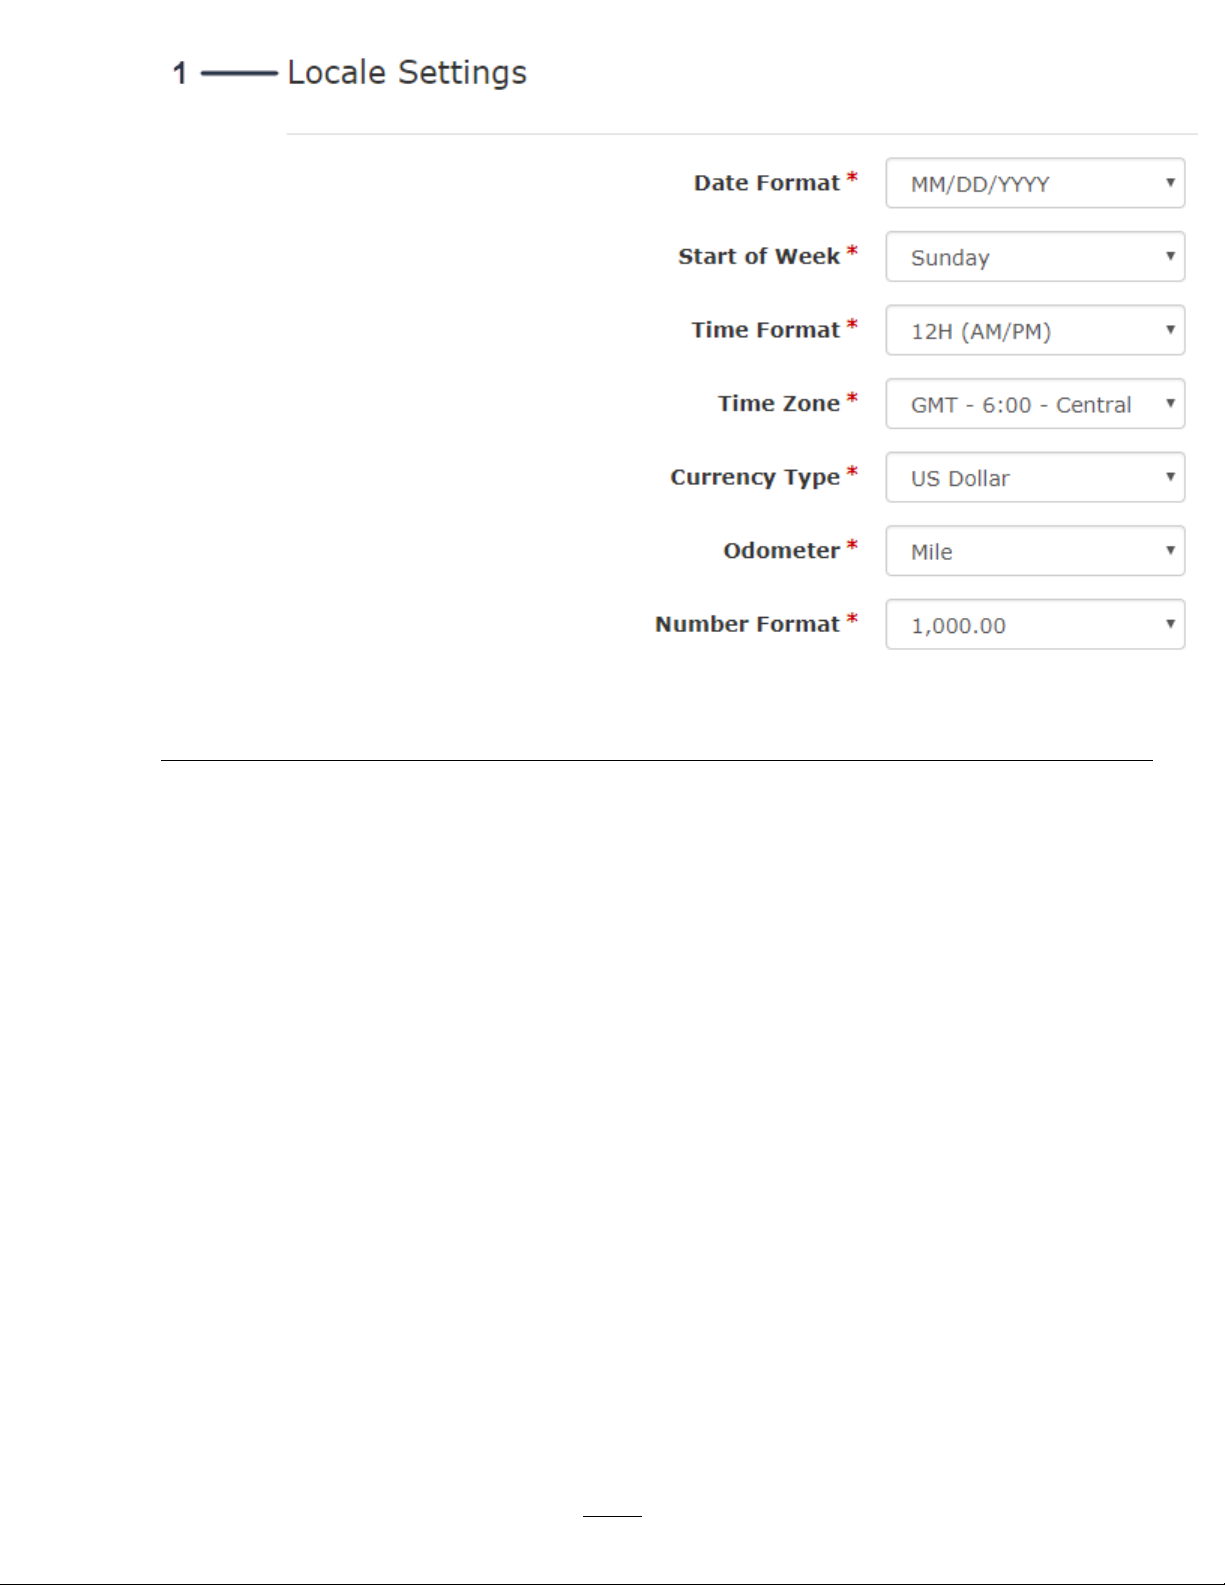
Figure11
1.Enterthelocalesettings.
CreatingaNewUser
ThisfeatureallowsyoutomanagetheusersinyourmyTurf.
1.FromtheLocationRecordscreen,clickUsers(Figure12).
g245311
13
Page 14

1.Clickusers.
2.ClickCreateNewUser(Figure13).
g245322
Figure12
14
Page 15
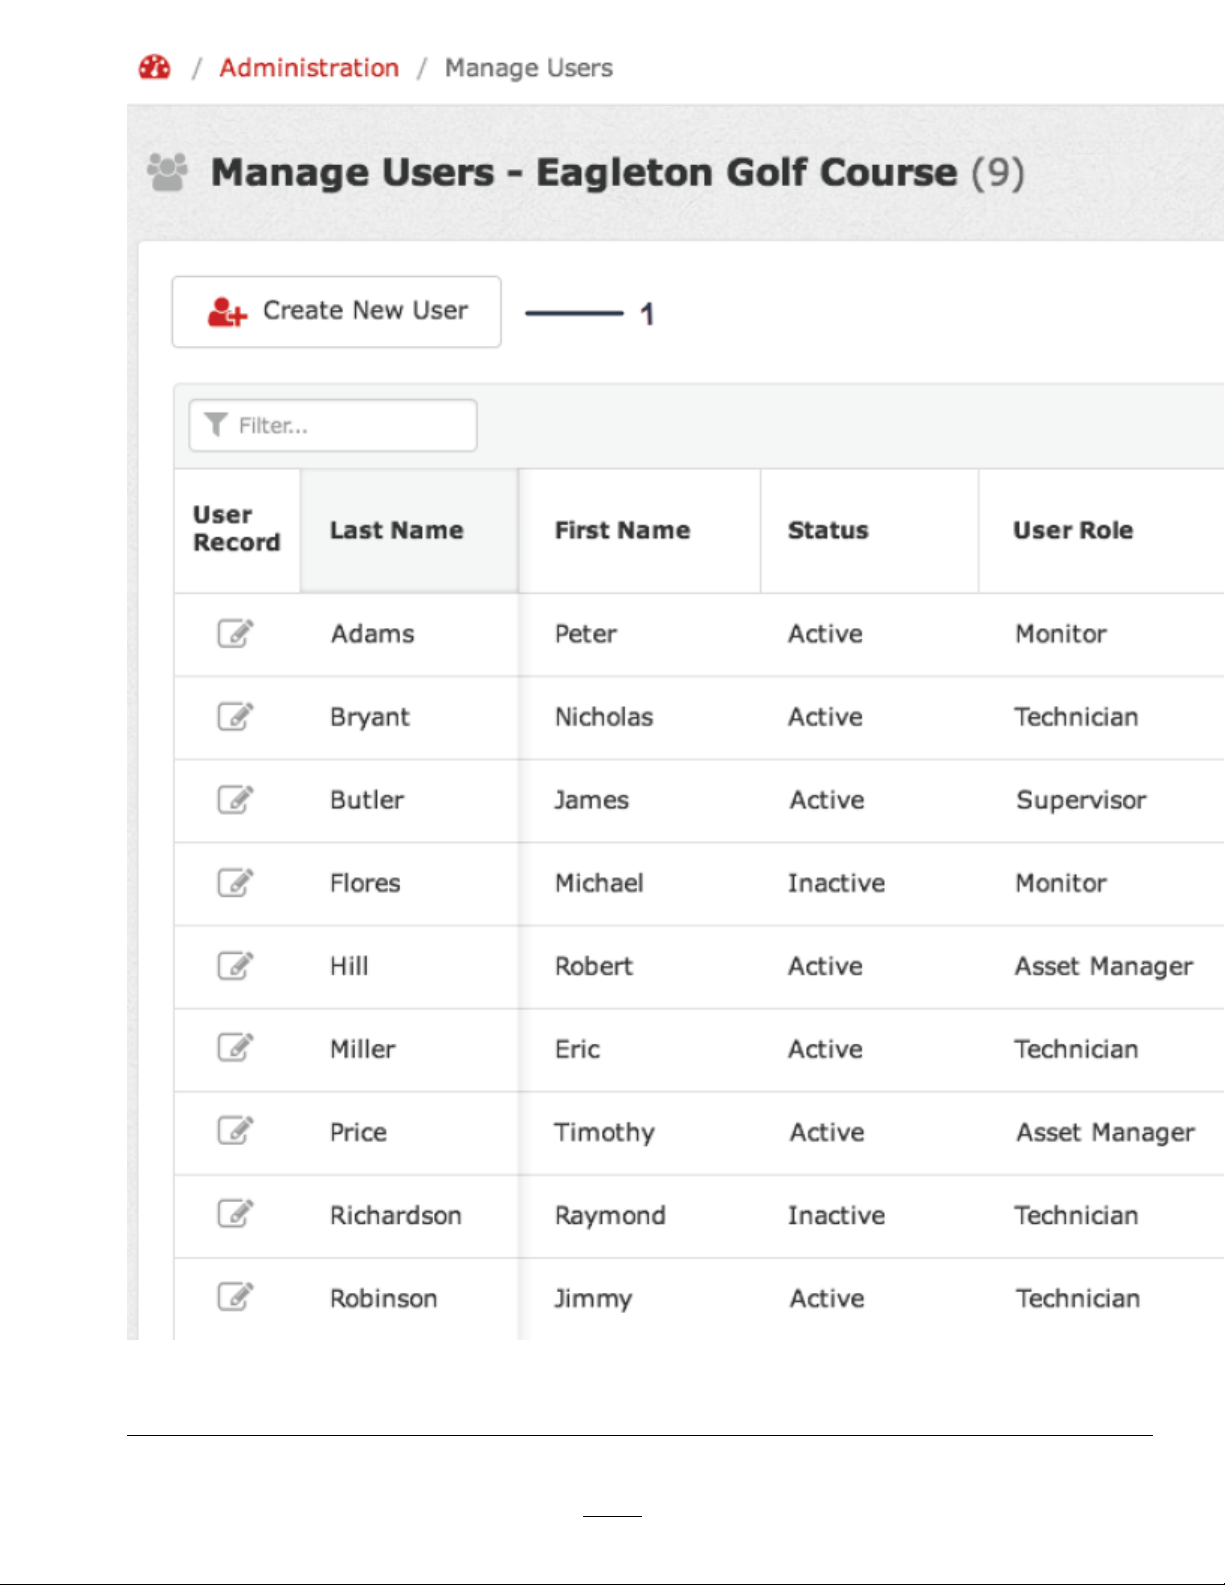
1.Clickcreatenewuser.
g245323
Figure13
15
Page 16

3.FillouttheCreateNewUserform(Figure14).
Note:Thepasswordthatyouenterisatemporarypassword.Theuserwillcreatetheirnewpassword.
Figure14
1.Filloutthecreatenewuserinformation.
4.AssigntheUserRoleandAdministrationRoleforthenewuser(Figure15).
5.Ifyouhavemultiplelocation,assignthelocationsthatthenewusercanworkinandview(Figure15).
6.AssigntheUserStatustoActive(Figure15).
16
g245324
Page 17
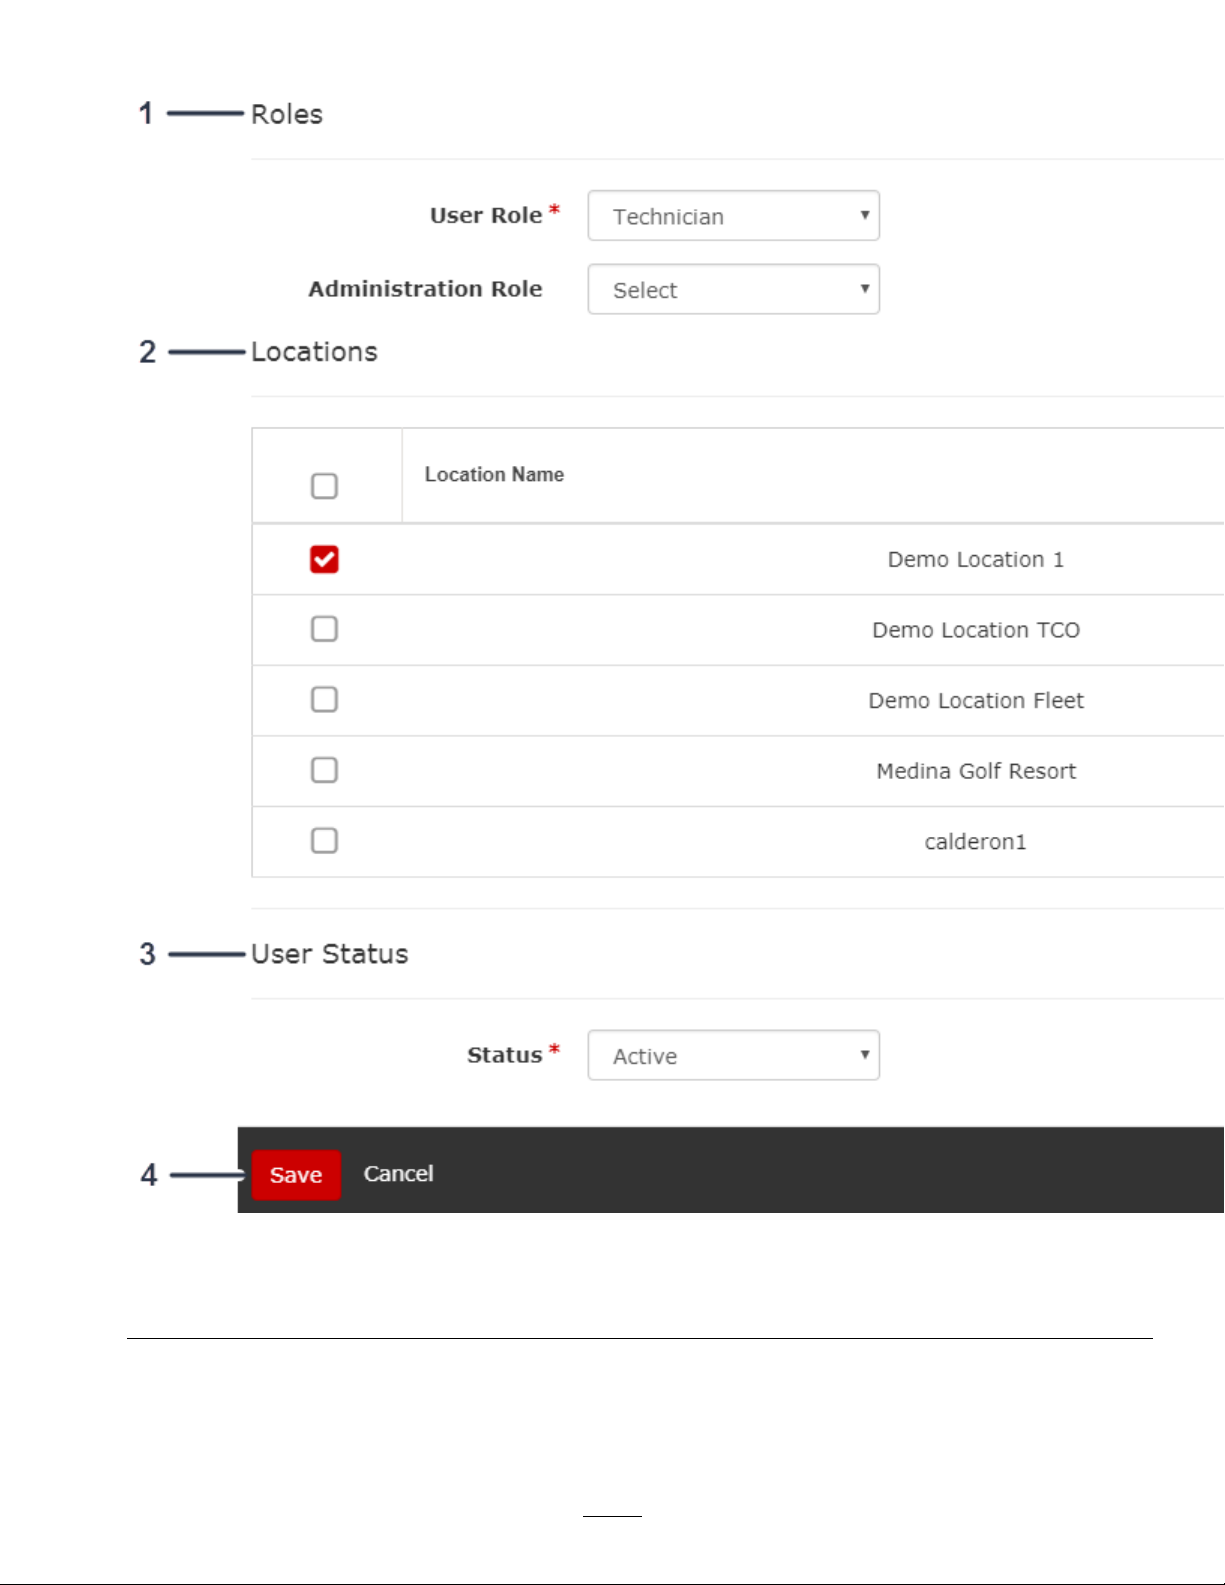
7.ClickSavetoaddthenewuser(Figure15).
Figure15
1.Assigntherolesoftheuser.3.Selecttheuser’sstatus.
2.Assignthelocationinwhichyouwanttheusertoapply.
4.Clicksavetocreatetheuser.
ManagingAssetGroups
Managingassetgroupsallowsyoutolabelandsetupforgroupsforyourassets.
17
g245325
Page 18
SettingupPartsOrdering
Thisfeatureallowsyoutosetupwhoyourorderyourpartsfrom(e.g.,distributor),aswellasyourshipping
soldtoandbilltoinformation.
DeletingaLocation
AdministratorFunctionOnly
IfyouwanttoremovealocationfromyourmyTurf,clickDeleteLocation.
CreatingAssetGroups
1.FromtheDashboard,clickAdmin(Figure16).
1.ClickAdmin.
2.ClicktheEditLocationIcon(Figure17).
g245241
Figure16
18
Page 19
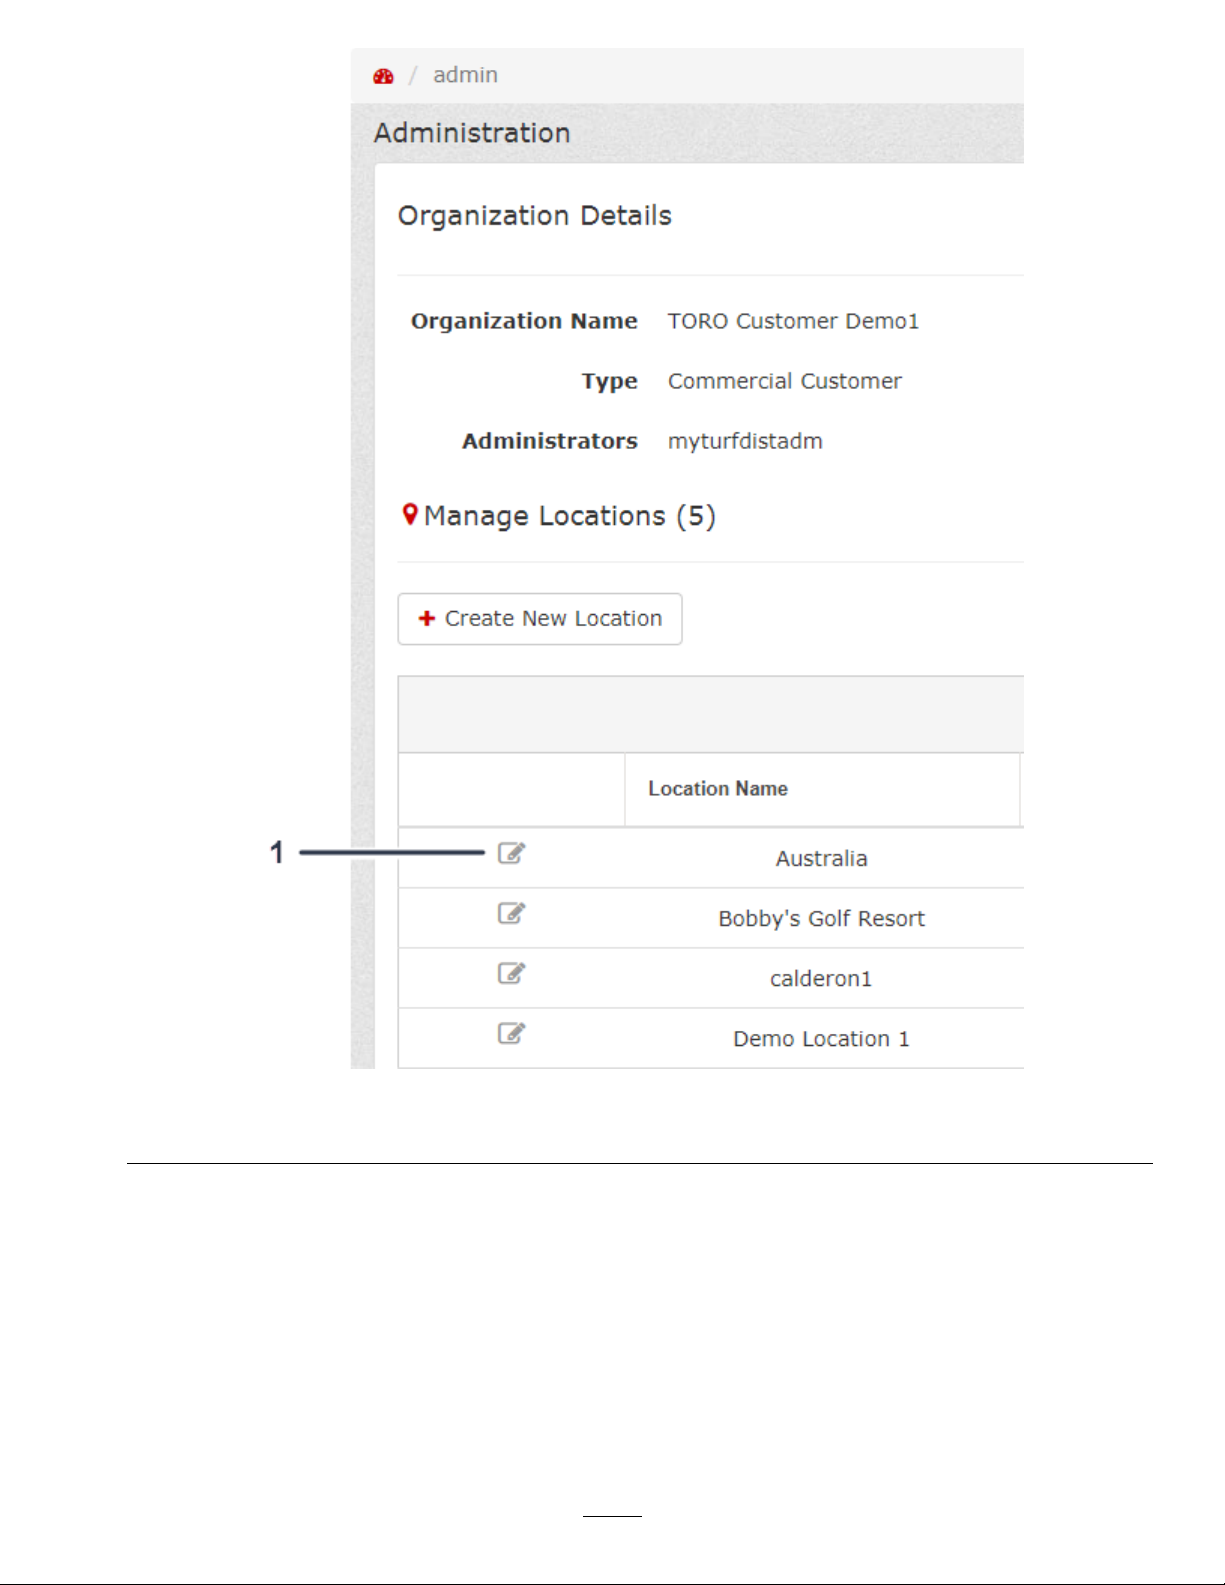
Figure17
1.Clicktoeditthelocation.
3.FromtheLocationRecord,clickAssetGroups(Figure18).
19
g246195
Page 20
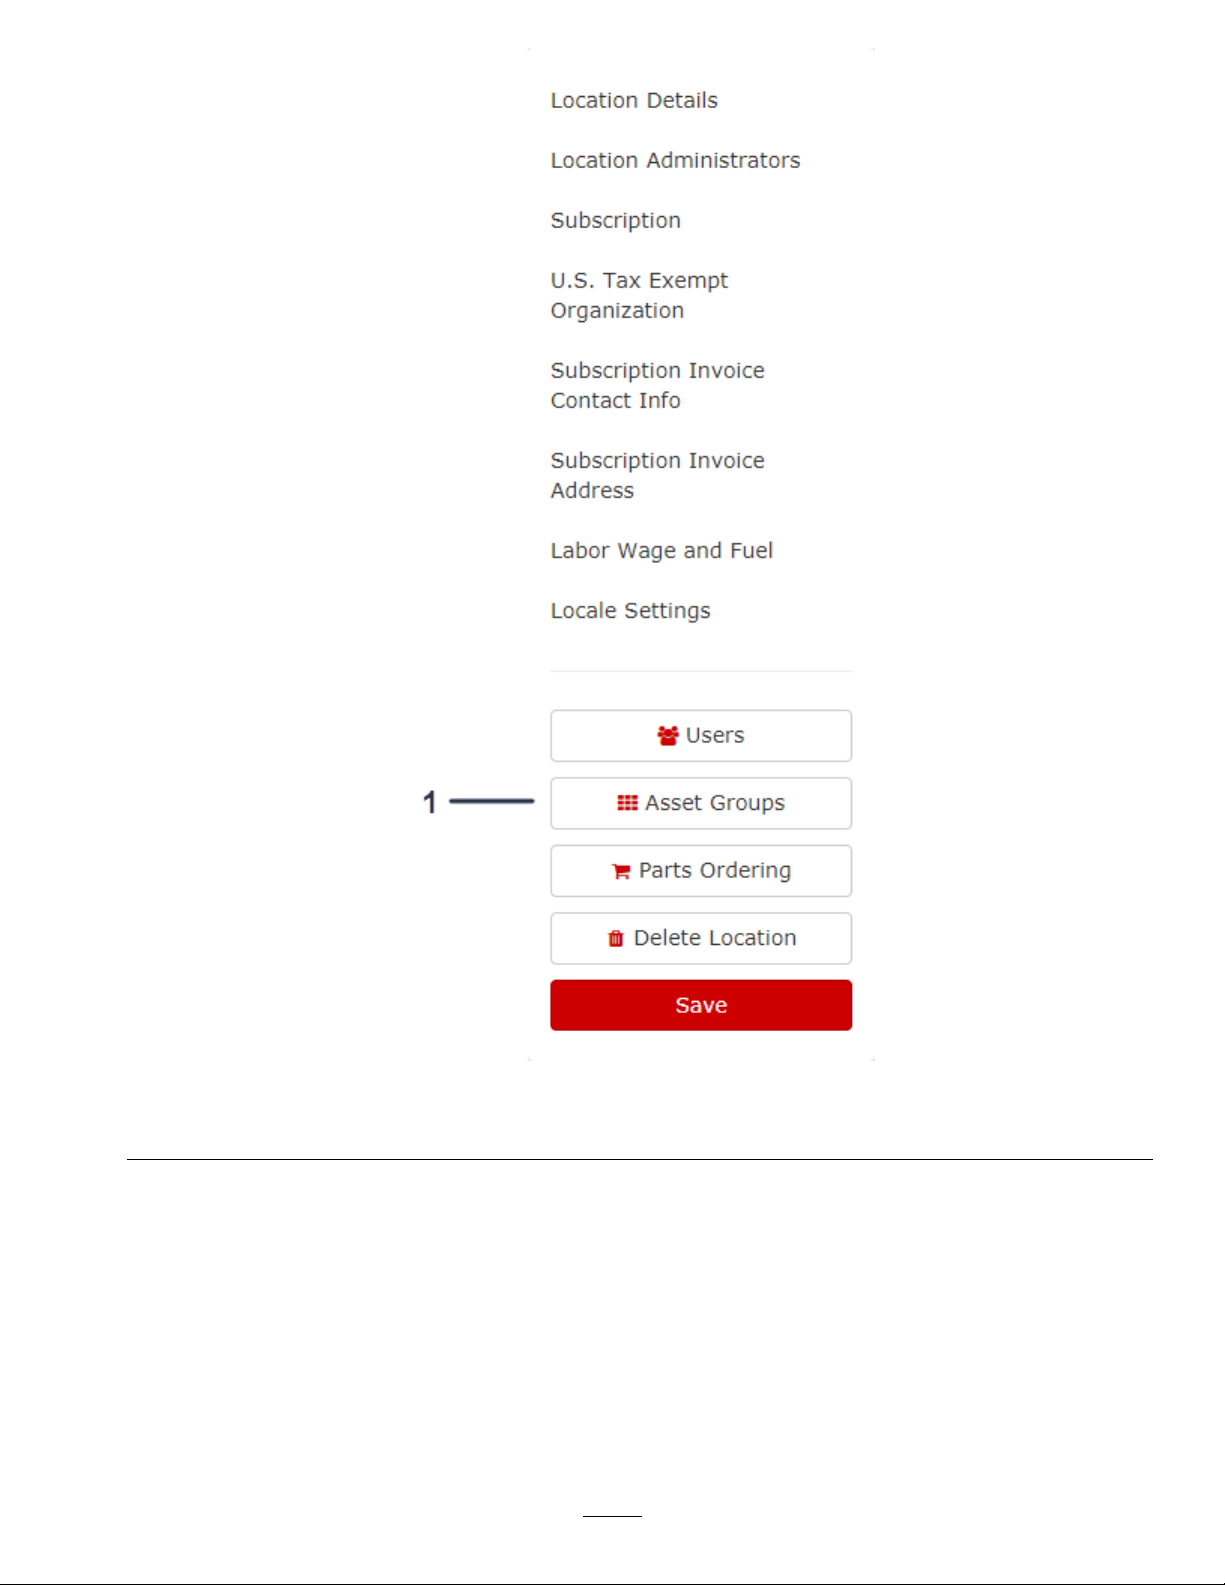
Figure18
1.ClickAssetGroups.
4.FromManageAssetGroups,clickCreateNewGroup(Figure19).
20
g246206
Page 21

Figure19
1.ManageAssetGroups2.ClickCreateNewGroup.
5.SelecttheAssetTypeandentertheGroupNamethatyouwantassignedtothenewgroup(Figure20).
6.ClickCreatetocreatethenewassetgroup(Figure20).
g246207
21
Page 22
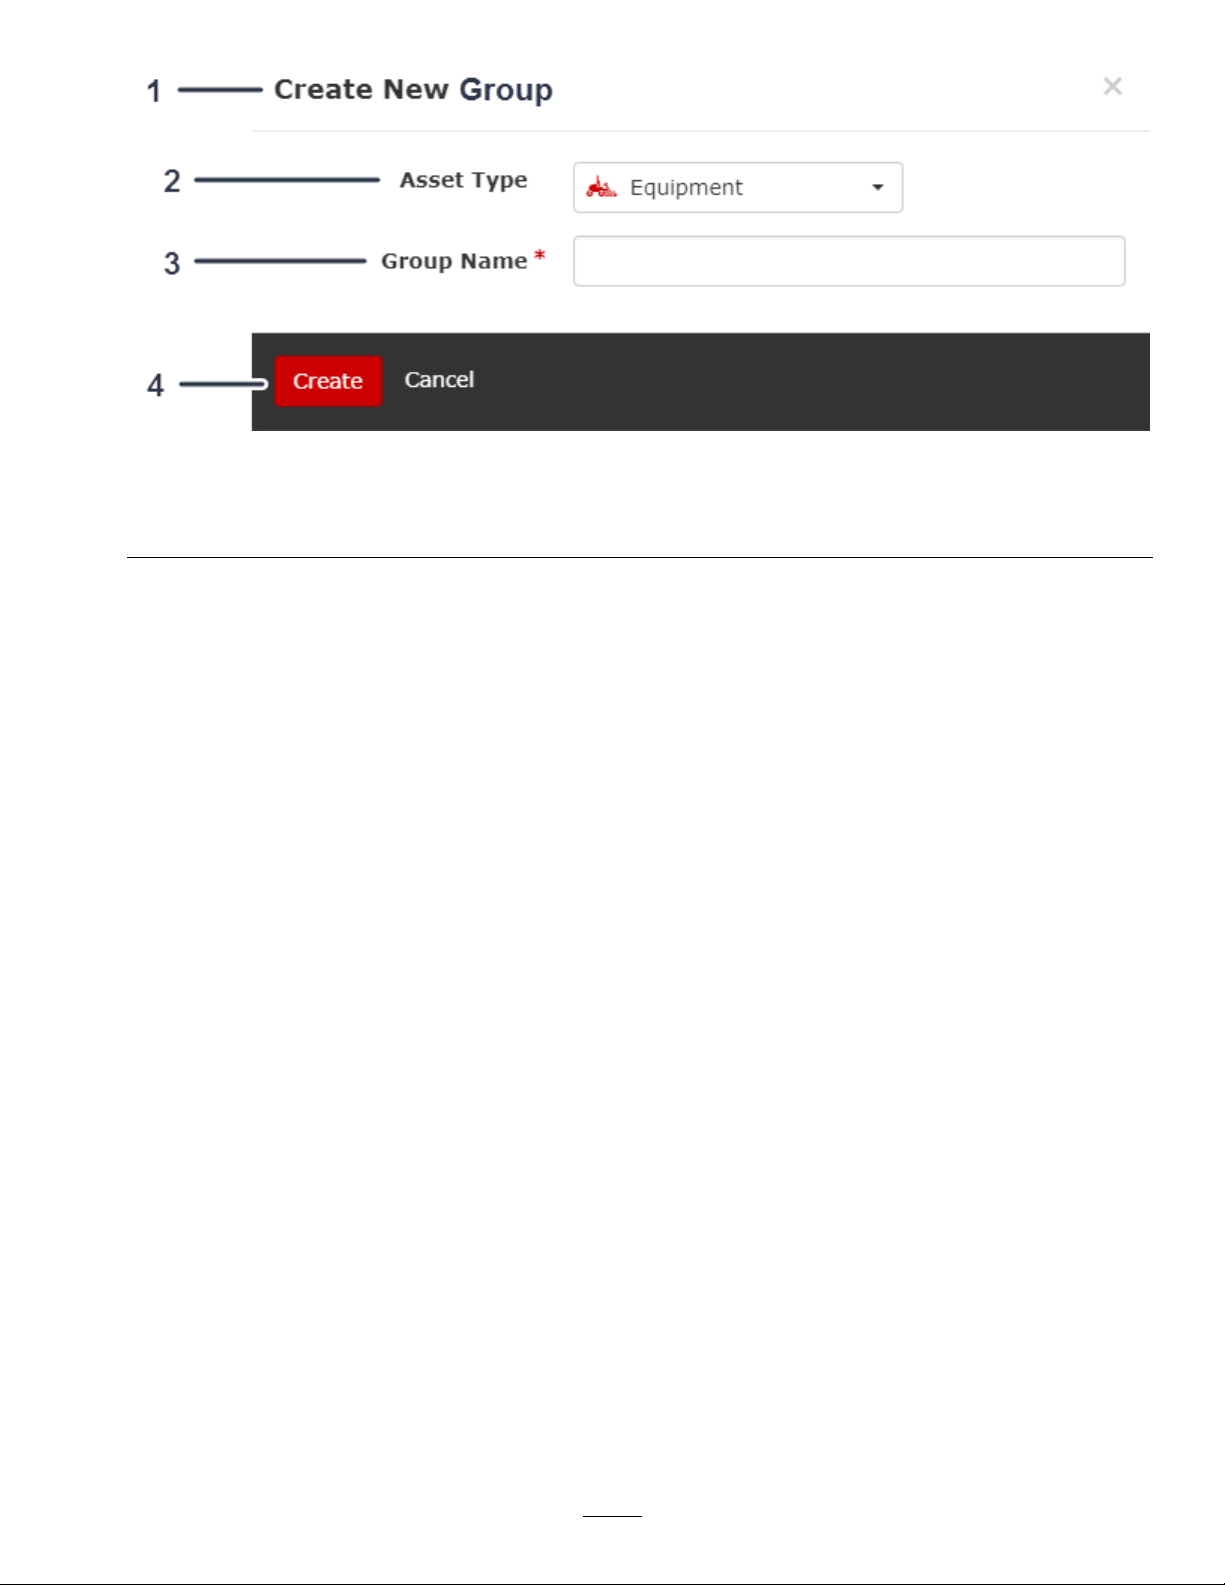
Figure20
g246209
1.CreateNewGroup
2.Selecttheassettype.4.Clickcreatetoaddthenewassetgroup.
3.Enterthenewgroupname.
AddingAssetsandAttachments
AddingaSingleAsset
1.FromtheAssetList,clicktheAdd/UpdateAssetsdrop-down(Figure21).
2.ClickAddSingleAssetfromthedrop-down(Figure21).
22
Page 23

Figure21
1.ClicktheAdd/UpdateAssetsdrop-down.2.ClickAddSingleAsset.
3.FillouttheCreateNewAssetform(Figure22,Figure23,andFigure24).
g246211
23
Page 24
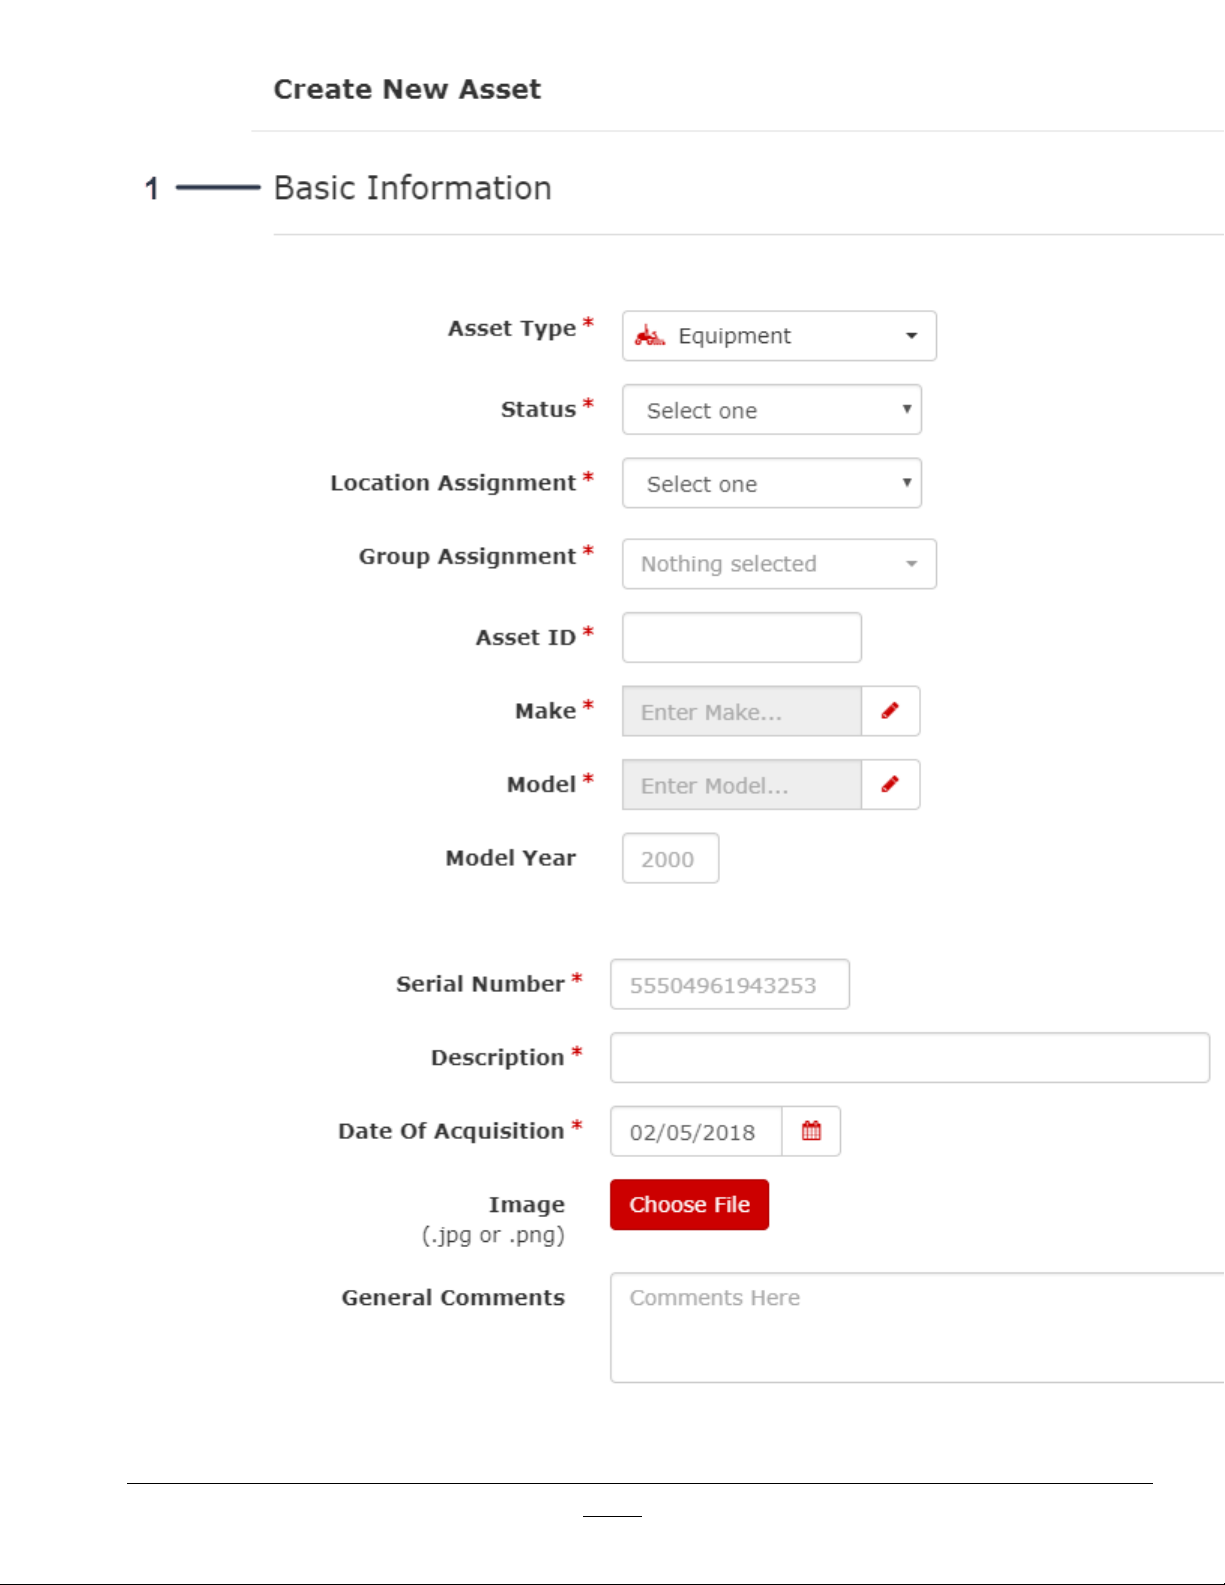
1.Filloutthebasicinformationfortheasset.
g246213
Figure22
24
Page 25
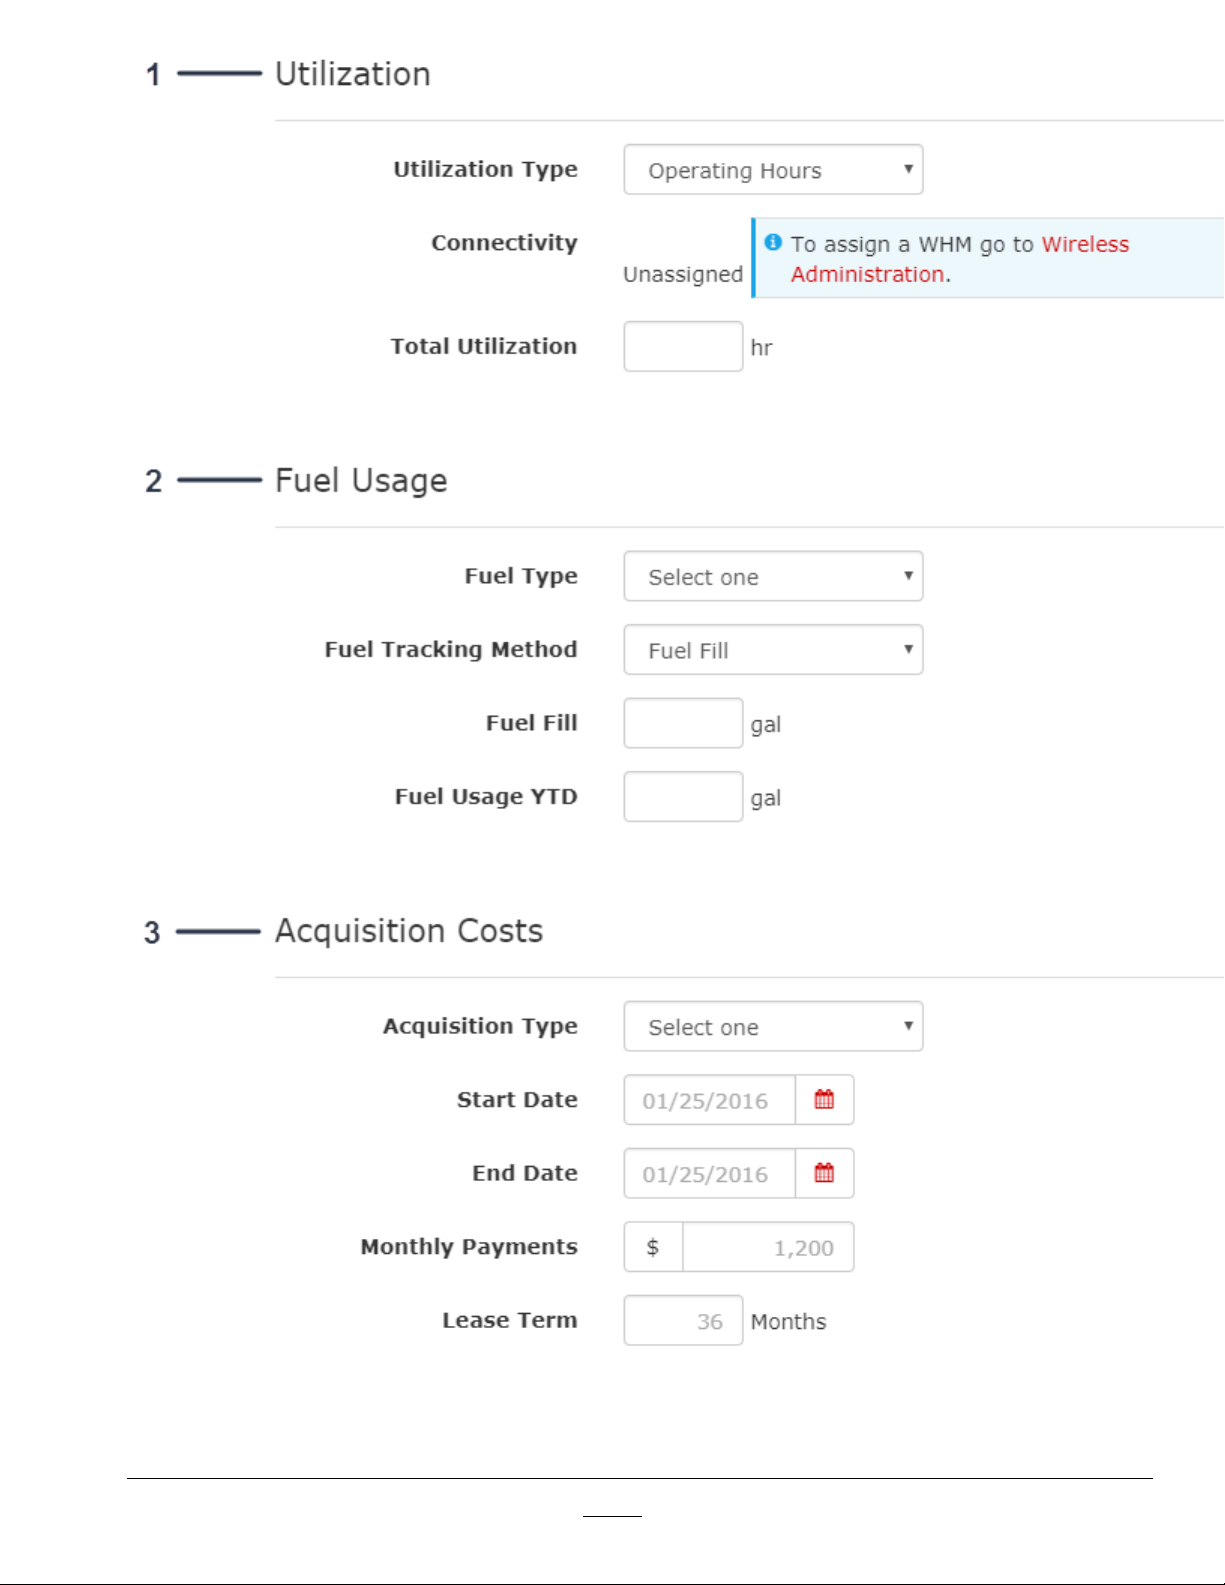
Figure23
1.Fillouttheutilizationinformationfortheasset.3.Fillouttheacquisitioncostsinformationfortheasset.
2.Filloutthefuelusageinformationfortheasset.
25
g246217
Page 26
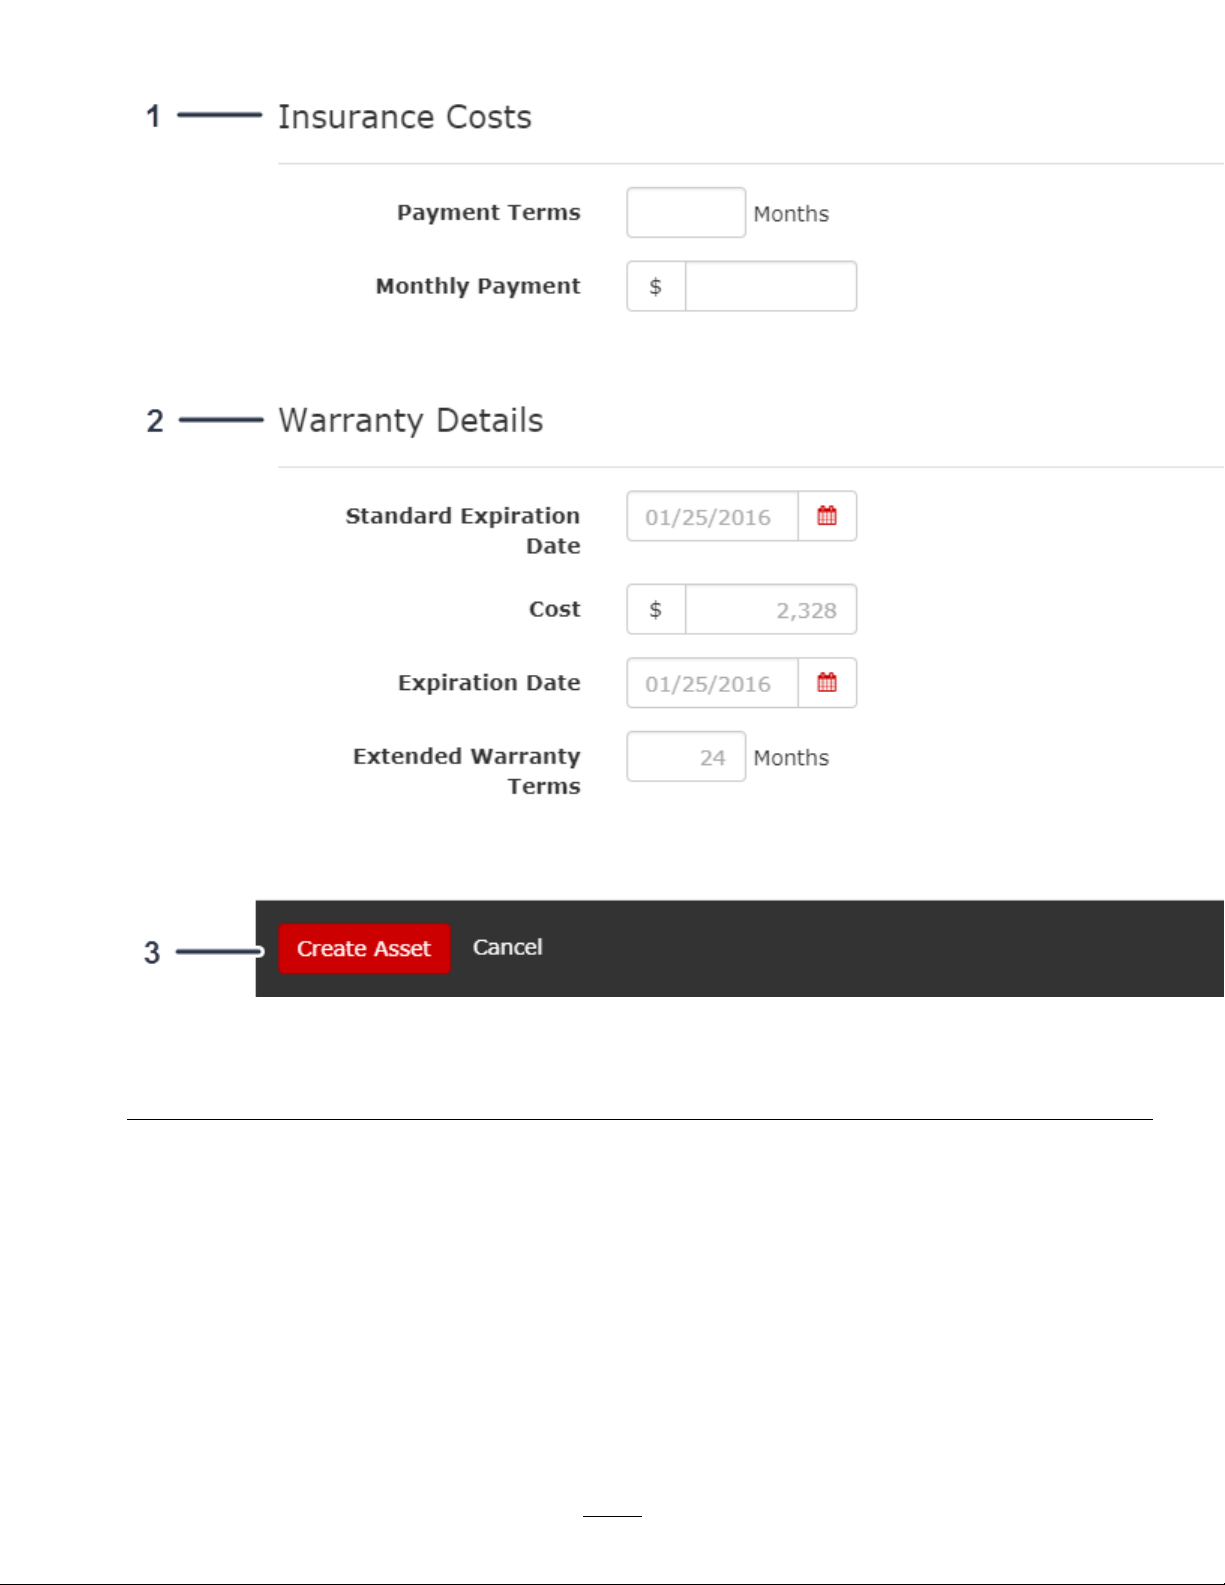
4.Whenyounishllingouttheform,clickCreateAsset(Figure24).
Figure24
1.Fillouttheinsurancecostsinformationfortheasset.3.Clicktocreatetheasset.
2.Filloutthewarrantydetailsfortheasset.
AddingMultipleAssets
1.FromtheAssetList,clicktheAdd/UpdateAssetsdrop-down(Figure25).
2.ClickBulkUploadfromthedrop-down(Figure25).
26
g246218
Page 27
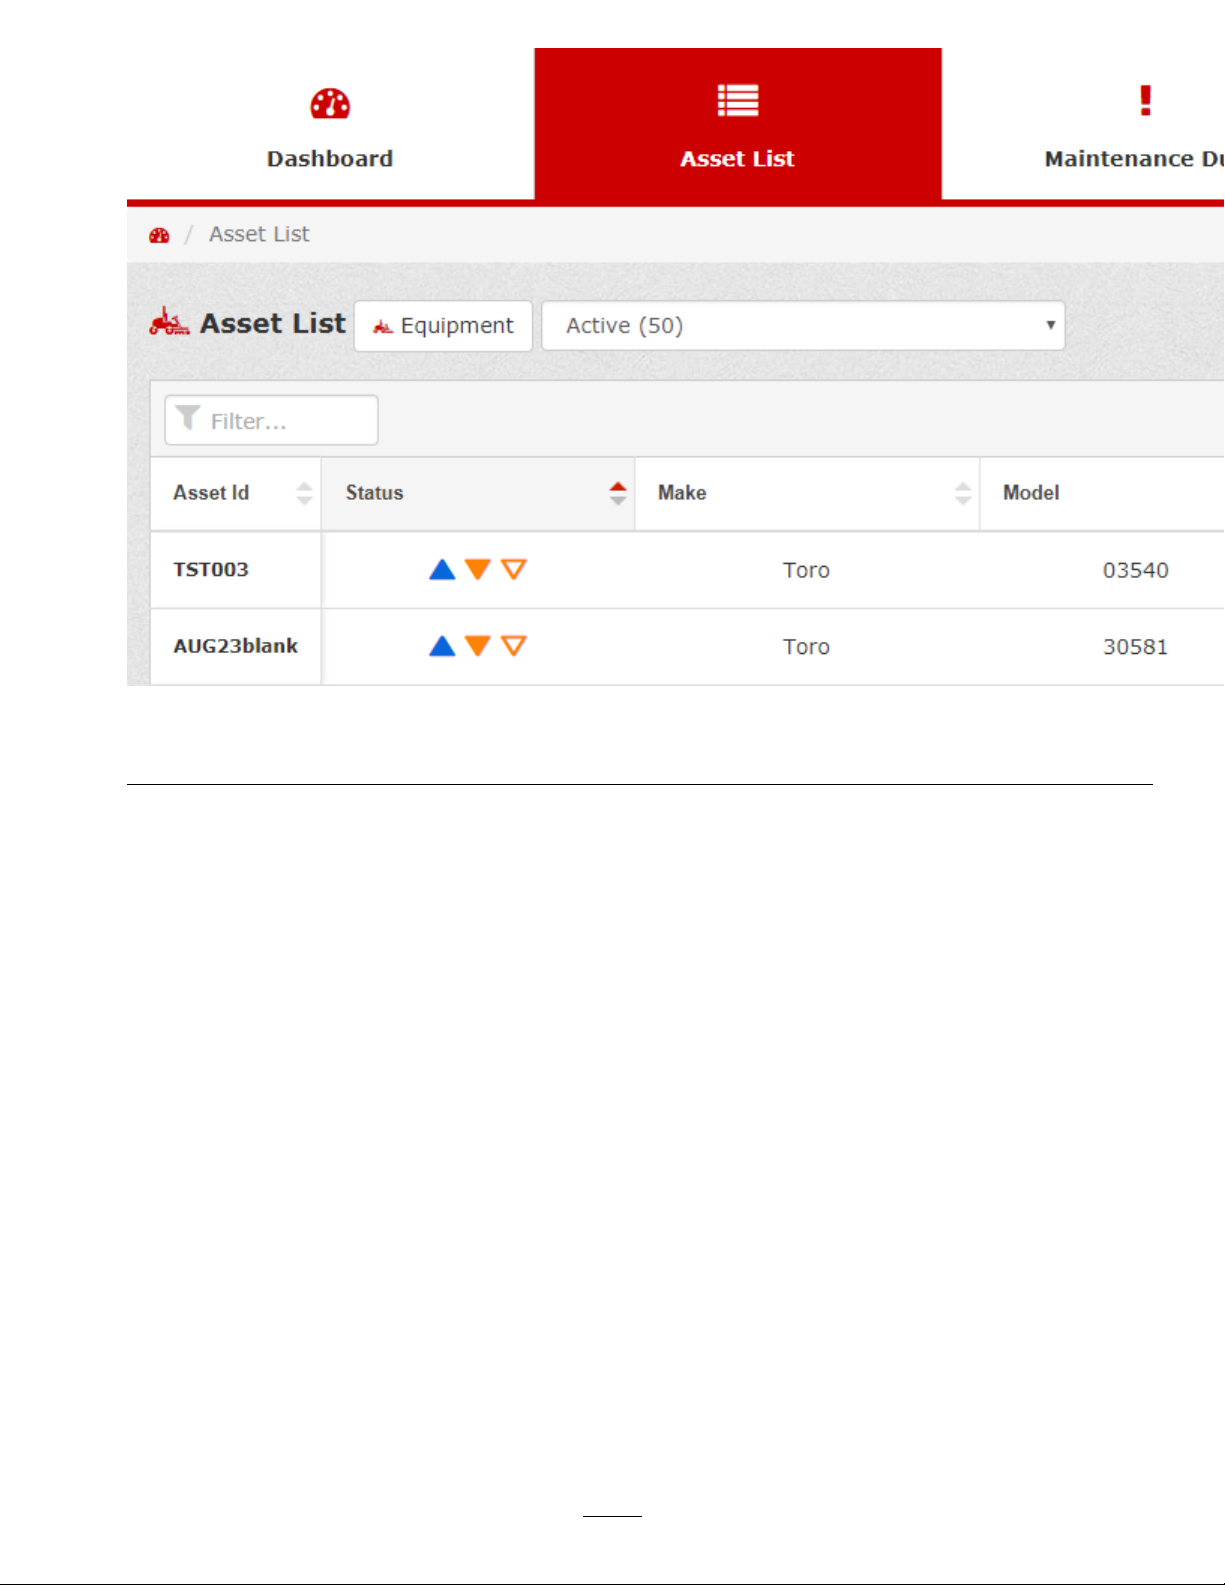
Figure25
1.ClicktheAdd/UpdateAssetsdrop-down.2.ClickBulkUpload.
3.ClickChooseFileandselecttheletouploadmultipleassetsordownloadastartertemplatetoupload
bulkassets(Figure26).
Note:Youcanalsovieworeditpendingassetuploads.
g246229
27
Page 28
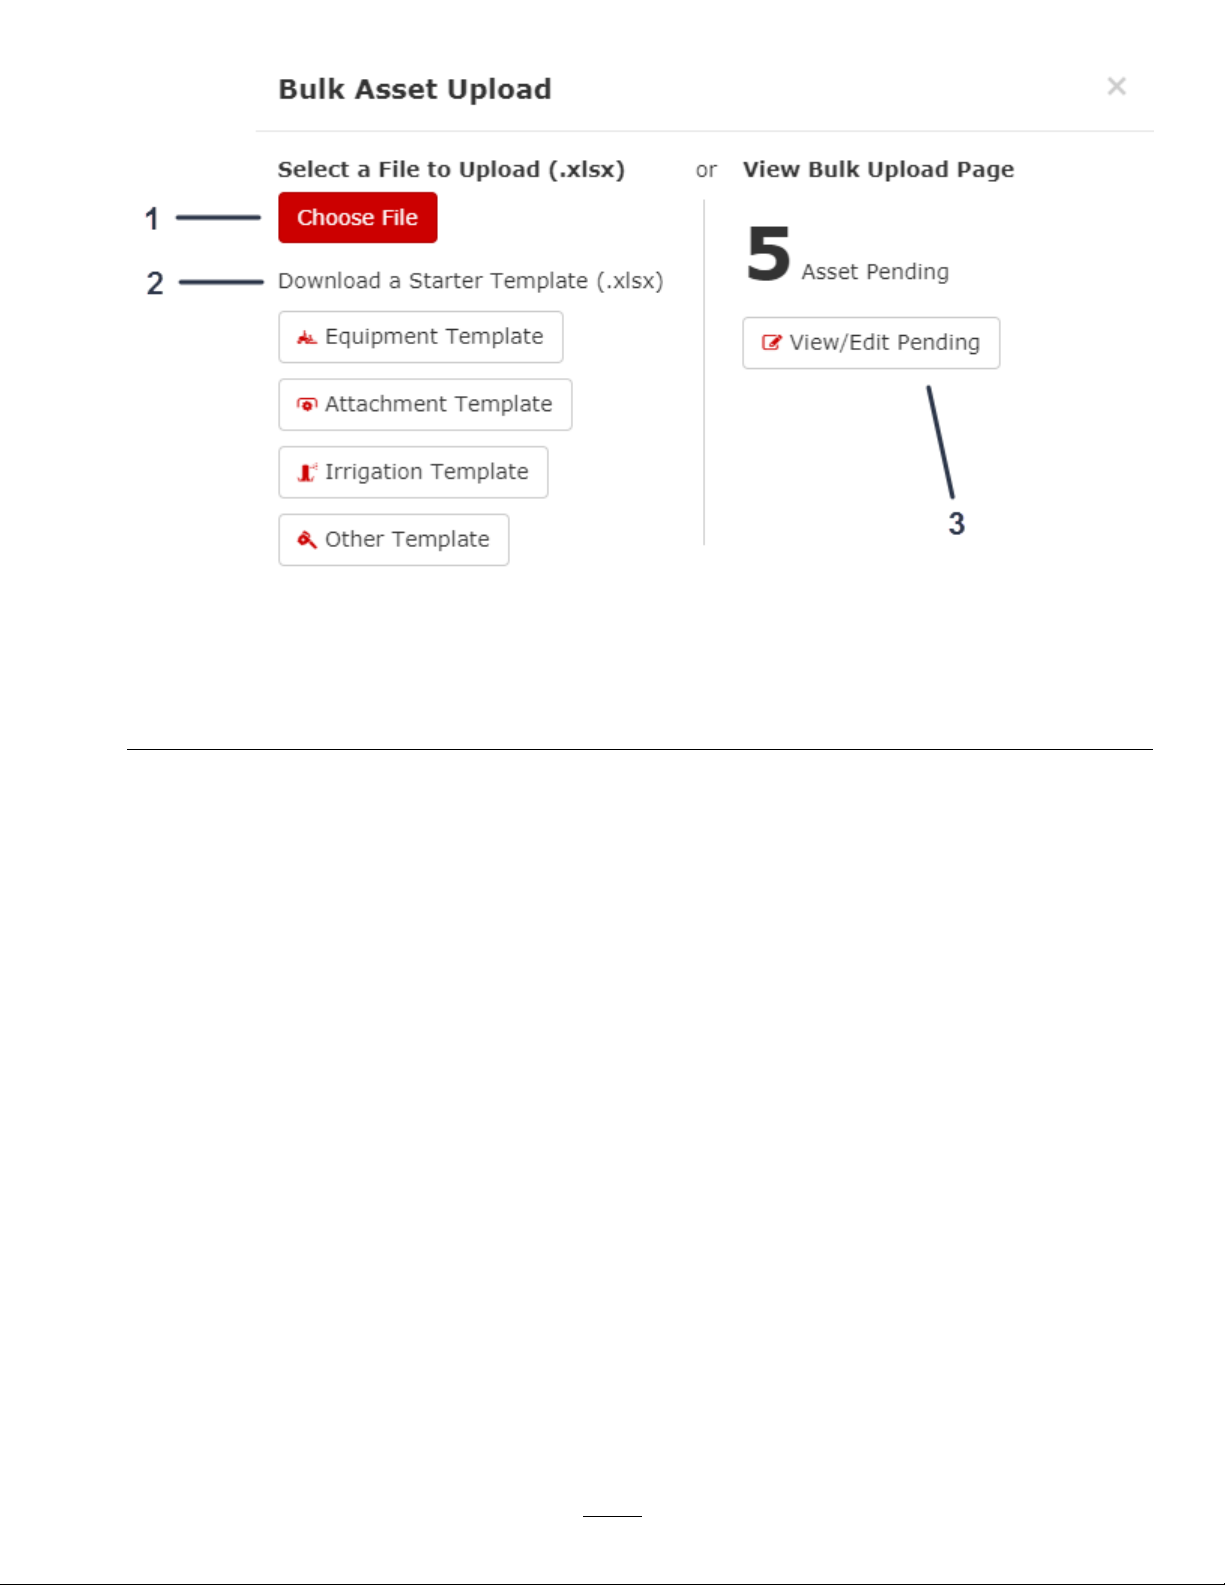
Figure26
1.ClickChooseFiletouploadtheassets.3.Clicktoieworeditpendingassetuploads.
2.Clickoneofthesubsequenttemplatestodownloadastarter
templatetouploadbulkassets.
AddinganAttachment
1.FromtheAssetList,selectanasset,andclickAssetOverview(Figure27).
g246230
28
Page 29
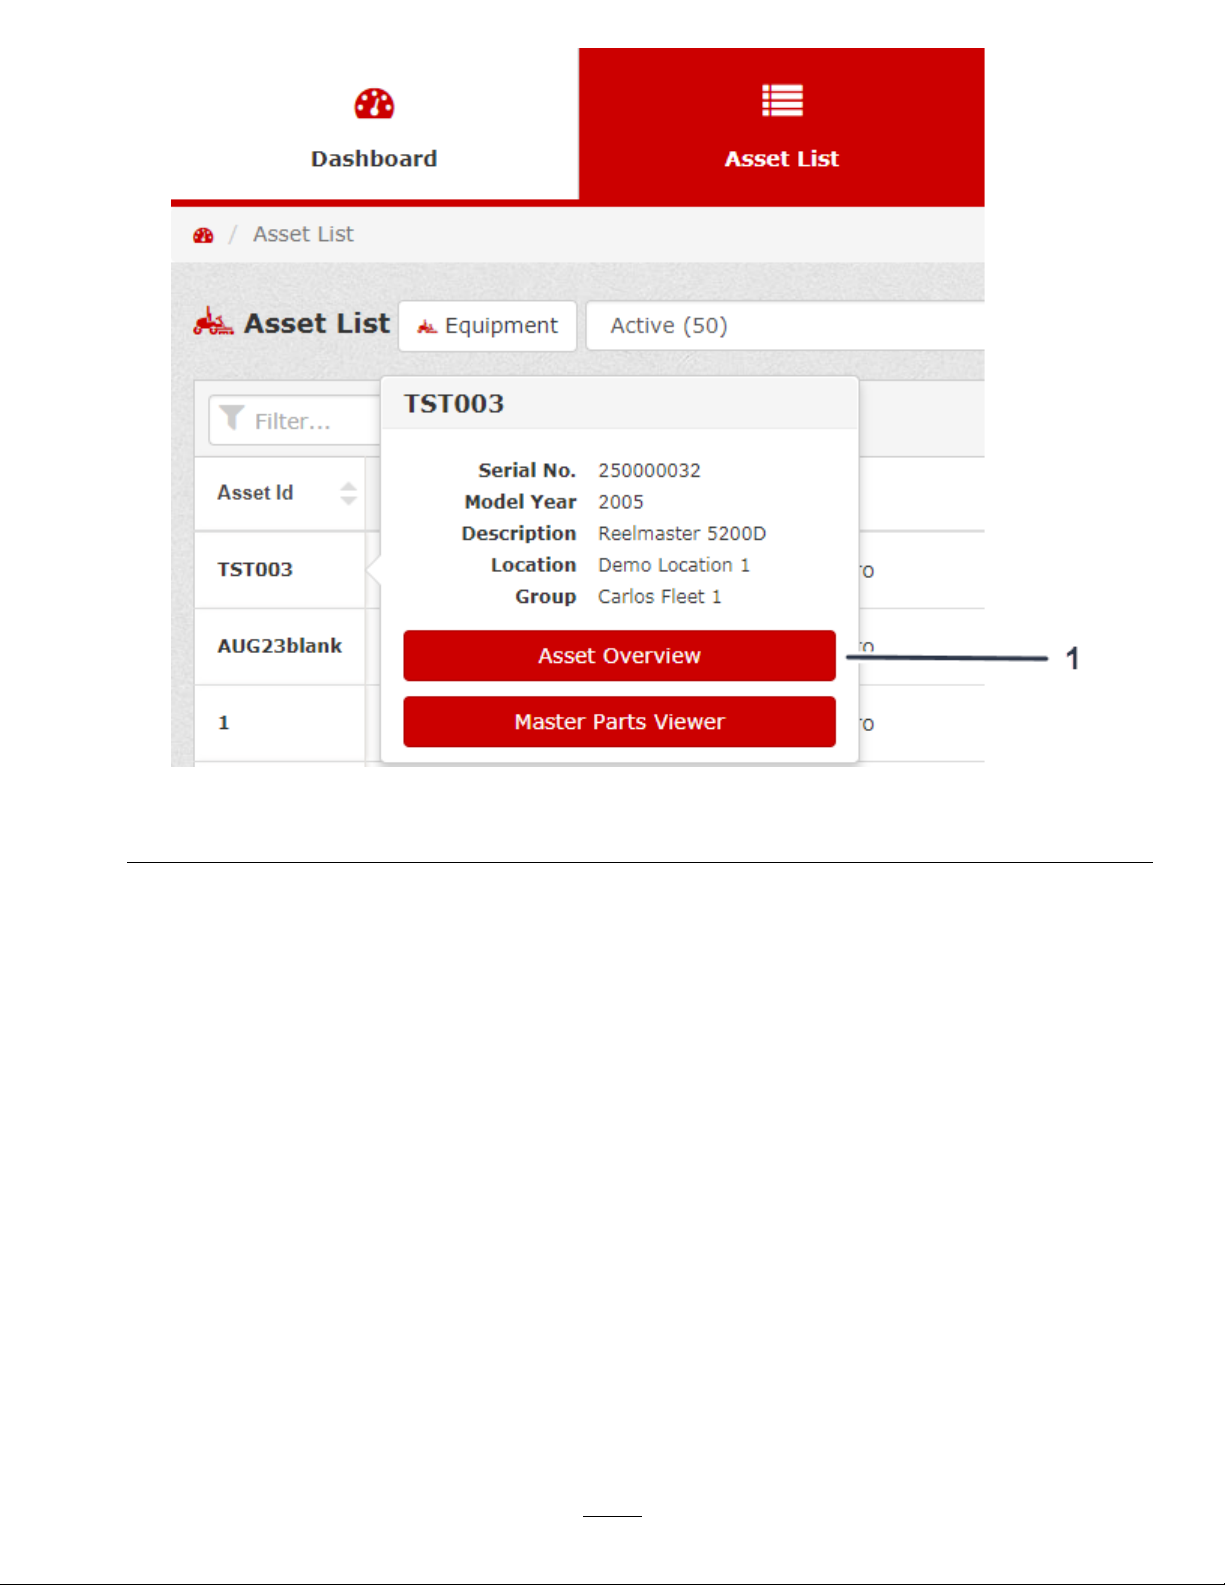
Figure27
1.Clicktoviewtheassetoverview.
2.FromtheAssetOverview,clickCreateNewAttachments(Figure28).
g246282
29
Page 30
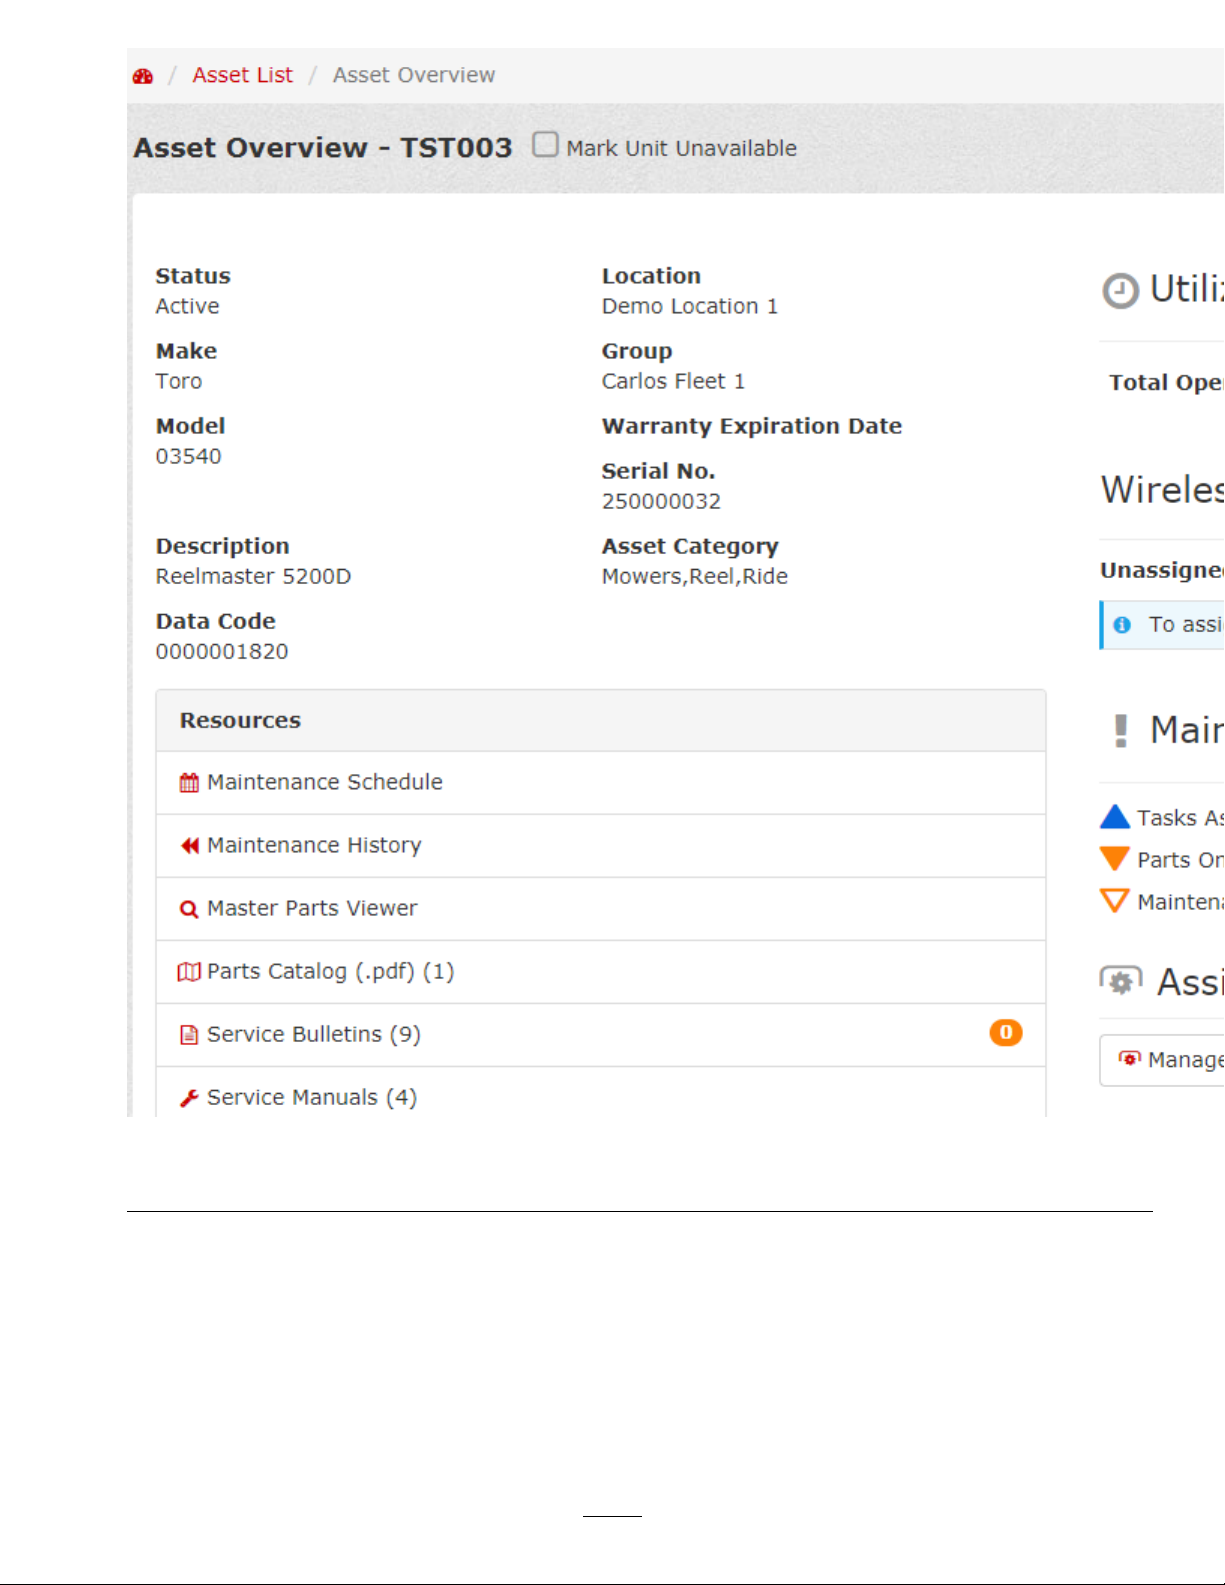
Figure28
1.Clicktocreateanewattachment.
3.FillouttheCreateNewAttachmentform(Figure29,Figure30,andFigure31).
4.Whenyounishllingouttheform,clickCreateAttachment(Figure31).
30
g246296
Page 31

1.Filloutthebasicinformationfortheattachment.
g246319
Figure29
31
Page 32

Figure30
1.Fillouttheutilizationdetailsfortheattachment.2.Fillouttheacquisitioncostdetailsfortheattachment.
32
g246320
Page 33

Figure31
1.Filloutthewarrantydetailsfortheattachment.2.Clicktocreatethenewattachment.
NavigatingmyTurf
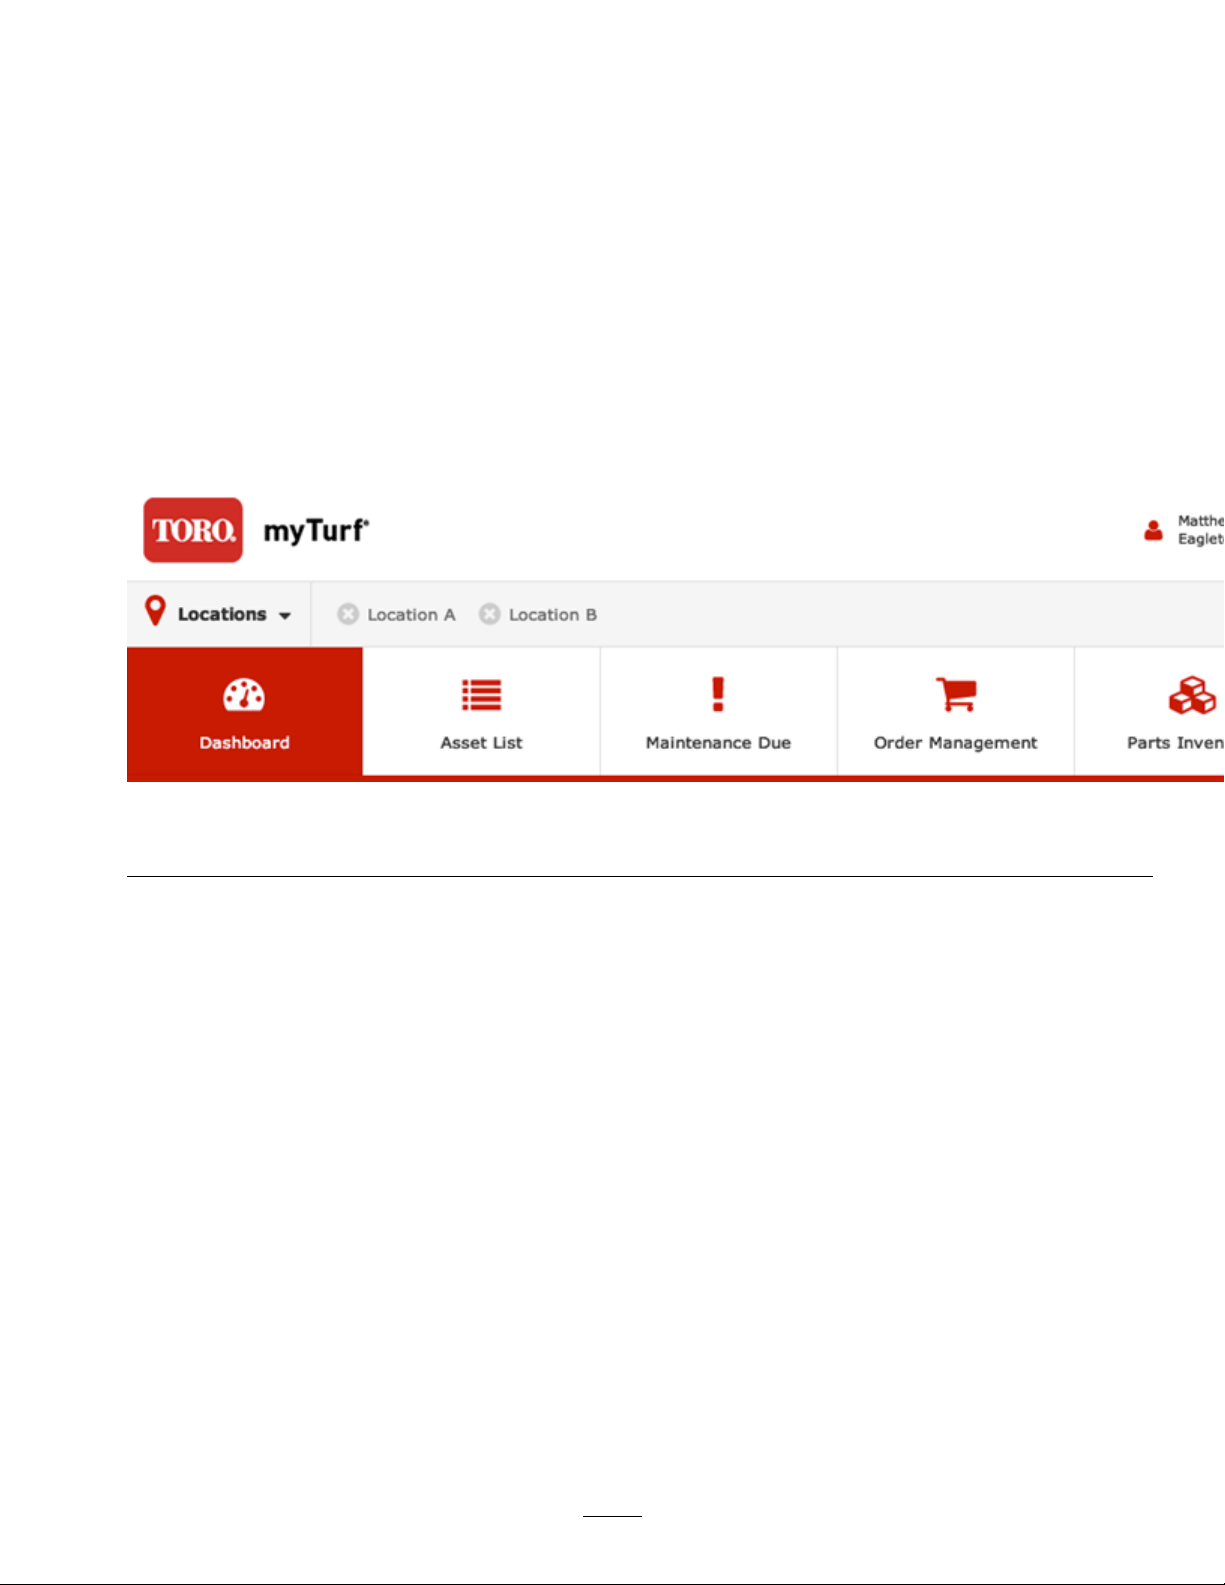
Dashboard
WhenyourstentermyTurf,thedashboardappears.Thedashboardisthesummaryofyouroverallsystem.
Fromthedashboard,youcanaccessfollowingtabs:
•AssetList(page39)
•MaintenanceDue(page44)
•OrderManagement(page47)
•PartsInventory(page49)
•Reports(page52)
•Wireless(page53)
myTurfStatus
Asshownintheexamplescreen(Figure32),thedashboardprovidesthestatusofyoureetwhenyourst
entermyTurf.
g246321
ThemyTurfstatustellsyouthefollowingat-a-glanceinformation:
•Machinesinyoureetareunderrepairormaintenance
•Maintenanceisdueandpartsareneededformachinesinyoureet
•Maintenanceisdueandyouhavethepartsonhandformachinesinyoureet
•Partswithsafetystockalert
33
Page 34

•Openworkorders
•Servicebulletinalerts
•Anyerroroccurringwithawirelessdevice
Figure32
SelectingLocations
FromtheDashboard,youcanselectthelocation(s)thatyouwanttoview.
Afteryouselectthedesiredlocation(s),clickApplytosetthelocation(s)asshowninFigure33.
34
g246400
Page 35

Figure33
1.Selectedlocation(s)2.Clicktoapplythedesiredlocation(s).
FilteringAssetsbyGroup
1.FromtheDashboard,clickEquipment(Figure34).
g246401
35
Page 36

Figure34
1.ClickEquipment.
2.FromtheDashboard,clicktheFilterAssetsbyGroupdrop-downtolteryourassetssothatyou
canviewthosegroupsonly(Figure35).
Youcanselectthegroupsofequipment,attachments,irrigation,orotherassetsthatyouwouldliketo
view,regardlessoflocation.Afterselectingthedesiredgroups,youcanviewtheassetsinyourAsset
List(Figure35).
g246433
36
Page 37

Figure35
1.Filterassetsbygroupdrop-down4.Irrigationgroupselection
2.Attachmentgroupselection
5.Othergroupselection
3.Equipmentgroupselection
3.Selecttheparticularlocation(s)thatyouwanttolter(Figure36).
g246435
37
Page 38

Figure36
g246436
1.Filterassetsbygroupdrop-down
3.Selecttheparticularlocations.
2.Location
4.ClickApplytoltertheassetsbytheselectedlocations(Figure37).
38
Page 39

Figure37
1.Clicktoapplythelter.
AssetList
FromtheDashboard,clicktheAssetListtab.
Theassetlistprovidesthesummaryofyourassets(Figure38).
g246437
39
Page 40

Figure38
g246534
1.AssetID4.Assetmodelnumber7.Wirelesshourmeter
connection
2.Assetstatus5.T otaloperatinghours
3.Assetmake
6.Odometer
8.NewServiceBulletin
40
9.Assetattachments
indicator
10.Fueltype
11.Clickthearrowtoviewthe
fuelusage(year-to-date)
andthefuelll
Page 41

WhenviewingyourAssetList,youcandisplayaselectnumberofassetsatatimebyselectinganumber,or
youcanclickAlltodisplayallyourassetsatonce(Figure39).
Figure39
1.Clicktodisplayaselectnumberofassetsatatime.2.Clicktoviewallassets.
AssetID/AssetOverview
FromtheAssetList,youcanselectaparticularAssetIDtoviewdetailspertainingtothatasset.
Toviewanasset,selectthatparticularAssetIDtoviewtheAssetOverview(Figure40).
Youcandownloadtheassetoverviewasadocument(Figure40).
YoucanchangedetailsabouttheassetbyclickingAssetRecord(Figure40).
Note:AfteralteringtheAssetRecord,clickSave.
TheAssetOverview,allowsyoutoviewthefollowinginformationforanasset:
•Assetdetails:
–Status
–Make
–Modelnumber
–Serialnumber
–Description(example:Groundsmaster4500-D,WorkmanHDX-D,Reelmaster5010-H,etc.)
–Location
–Group
–Warrantyexpirationdate(ifapplicable)
–Extendedprotectionexpirationdate(ifapplicable)
•Utilizationandfueldetails:
–Totaloperatinghours
–Fueltype
–Fuelusage(year-to-date)
g250654
41
Page 42

–Fuelll
•Wirelesshourmeterconnection(ifapplicable)
•Maintenancestatus
•Assignedattachments
–Manageattachments
–Createanewattachment
•Notes
•Resources
–Maintenanceschedule
–Maintenancehistory
–Masterpartsviewer
–PartsCatalog
–ServiceBulletins
–ServiceManuals
–Operator’sManuals
–Myuploads
–Trainingvideos
–Producttraining
42
Page 43

Figure40
43
g247608
Page 44

Status
Thestatusofanassetinyoureetisdesignatedasfollows:
SymbolStatus
MaintenanceDue
TheMaintenanceDuetaballowsyoutoviewthefollowinginformation:
Assetisingood,operatingcondition
Workordercreated/tasksassigned
Maintenancedue,partsonhand
Maintenancedue,partsneeded
Maintenancecomingdue
Assetunderrepairormaintenance
•AssetID—allowsyoutoselectaparticularassettoviewallthemaintenancetasksforthatasset(Figure41
andFigure42).
•Status—refertotheStatus(page44)tableforthecurrentstatusofanasset.
•Task—statesthetaskthatyouneedtocomplete(Figure41).
•TaskT ype—thetypeoftaskiscategorizedasgeneral,preventive,orrepair(Figure41).
•PartsNeeded—clickthenumberbelowthecolumntoviewthepartsnecessaryforthemaintenancetask
(Figure41).
•WorkOrder—clicktheworkordernumbertoviewtheworkorderdetailsandtoseewhoisassigned
totheworkorder(Figure41).
•Attachments—clickthenumberbelowthecolumntoviewtheassociateattachmentstotheasset.Ifthereis
atooliconnexttothenumberofattachments,attachmentsalsoneedservice(Figure41).
44
Page 45

Figure41
g247729
45
Page 46

Figure42
g247760
46
Page 47

OrderManagement
TheOrderManagementtaballowsyoutoviewthefollowinginformationforcurrentorpastorders:
•CartID—clicktheCartIDtoviewalltheparticularinformationthatcart(Figure43).
•Name—tellsyoutowhomthecartbelongs(Figure43)
•Location—statesthelocationofthecart(Figure43)
•CartStatus—tellsyouwhetheracartisstillbeingcompiled,ifacartisreadytoorder,orifthecartis
awaitingapprovalfromthesupervisor(Figure43)
•ReorderCart—clickthereordercarticontoorderthesamepartsagain(Figure43).
•Parts—statesthetotalnumberofpartsintheorder(Figure43)
•TotalCost—statesthetotalcostofthepartsintheorder(Figure43)
•CreatedBy—stateswhocreatedtheorder(Figure43)
•DateModied—statesthedatethattheorderwaslastmodied(Figure43)
Ifyouwanttodeleteacart,selectthecart,andclickDeleteSelected(Figure43).
47
Page 48

Figure43
1.Iconindicatingthatacartisawaitingsupervisorapproval3.Iconindicatingthatacartisstillbeingcompiled
2.Iconindicatingthatacartisreadytoorder
4.Clickthereordercarticon.
48
g248456
Page 49

PartsInventory
ThePartsInventorytaballowsyoutoviewthefollowinginformationforthepartsinyourinventory:
•PartNumber—statesthepartnumberthatyouwanttoorder(Figure44)
Clickthe“i”iconnexttoapartnumberforadditionalinformation.Thepartyouhaveinyourinventorymay
havebeensuperseded,cross-referenced,discontinued,etc.(Figure44).
•Status—tellsyouwhetherornotyouhavetherequiredpartsinyourinventory ,ifyouneedtoorderparts,or
ifthepartshavebeenorderedbutareinprocess(Figure44)
•Make—liststhemanufacturerofthepart(Figure44)
•Description—providesadescriptionofthepart(Figure44)
•CostPerUnitofMeasure—stateshowmucheachpartcosts(Figure44)
•QuantityinStock—stateshowmanyofthatparticularpartthatyouhaveinyourinventory(Figure44)
•UnitofMeasure—provideshowthepartismeasured(i.e.,each,oz,mg,gram,etc.);refertoFigure44
•Subtotal—statesthesubtotalcostoftheparts(Figure44)
•BinNumber—enterthebinnumberwhereyouwantthepartlocated(Figure45).
•Location—statesthelocationinwhichthepartsexist(Figure45)
•NeededforOpenWorkOrders—tellsyouthequantityofthepartsyouneedtofulllthecurrentopen
workorders(Figure45)
•Available—statesthetotalquantityofthepartcurrentlyavailable(Figure45)
•NeededforMaintenanceDue—tellsyouthequantityofthepartsyouneedtofulllforthemachinesdue
formaintenance(Figure45)
•OnOrder—statesthequantityofthepartsyoucurrentlyhaveonorder,butareinyourinventoryyet
(Figure45)
•LastUsedDate—statesthedatethatthepartswerelastusedformaintenance(Figure45)
•ShowRelatedAssets—clicktheicontoviewrelatedassets(Figure45).
49
Page 50

Figure44
g248466
1.Clickthe“i”iconnexttoapartnumberforadditional
information.
2.Iconindicatingthatyoupartshavebeenorderedbutarein
process
3.Iconindicatingthatyouneedtoordertheparts
50
Page 51

Figure45
Selectthepartsthatyouwanttoorder,andclickOrderSelectedtoordertheselectedparts(Figure46).
Ifyouwanttodeleteparts,selecttheparts,andclickDeleteSelected(Figure46).
51
g248467
Page 52

Figure46
1.Clicktoordertheselectedparts.2.Clicktodeletetheselectedparts.
Reports
TheReportstab(Figure47)allowsyoutogeneratethefollowingtypesofreports:
•AssetUtilization
•LocationMaintenanceCost
•MaintenanceDueandPartsNeeded
•PartOrdersPlaced
–Option1—bycarts
–Option2—bypartnumbers
•TotalCostofOwnership
g248468
52
Page 53

g250257
Figure47
Togenerateareport,refertoGeneratingReports(page112).
Wireless
TheWirelesstaballowsyoutoviewthefollowinginformationforbasestations/repeaters:
•BaseStation/RepeaterID—statestheidenticationnumberofthebasestation/repeater(Figure48)
•Status—tellsyouifthebasestation/repeaterisnotconnectedorisoutofrange(Figure48)
•Location—statesthelocationinwhichthebasestation/repeaterexists(Figure48)
•LastUpdateReceived—stateswhenthebasestation/repeatermostrecentlyreceivedanupdate(Figure48)
53
Page 54

Figure48
g248491
1.Clicktoaddabasestationorrepeater.
2.Indicatesthatarmwareupdateisneeded.
3.Indicatesthatabasestationorrepeaterisnotcommunicating.
TheWirelesstabalsoallowsyoutoviewthefollowinginformationforassignedorunassignedwirelesshour
meters:
•WirelessHourMeterID—statestheidenticationnumberofthewirelesshourmeter(Figure49)
•ActiveorInactive—stateswhetherthewirelesshourmeterisactiveorinactive(Figure49)
•Status—tellsyouifthebasestation/repeaterisnotconnectedorisoutofrange(Figure49)
54
Page 55

•AssetType—tellsyouwhichtypeofassetthewirelesshourmeterispairedwith(Figure49)
•Group—statesthegroupinwhichthebasestation/repeaterexists(Figure49)
•AssetID—statetheassetIDassociatedwiththewirelesshourmeter(Figure49)
•MeterReading—providesthecurrentwirelesshourmeterreading(Figure49)
•LastUpdateReceived—stateswhenthewirelesshourmetermostrecentlysentanupdate(Figure49)
Figure49
1.Clicktoaddawirelesshourmeter.
2.Indicatesthatarmwareupdateisneeded.
3.Indicatesthatthewirelesshourmeterisnotcommunicating.
Toaddabasestation/repeater,clickAddBaseStation/RepeaterID(Figure48);refertoAddingaBase
Station/Repeater(page77).
Toaddawirelesshourmeter,clickAddWirelessHourMeter(Figure49);refertoAddingaWirelessHour
Meter(page79).
55
g248492
Page 56

CreatinganAddressforOrderingParts
1.FromtheDashboard,clickAdmin,locatedintheupper,rightcornerofthescreen(Figure50).
Figure50
1.ClickAdmin.
g245241
2.ClicktheEditLocationIcon(Figure51).
56
Page 57

Figure51
1.Clicktoeditthelocation.
3.FromtheLocationRecord,clickPartsOrdering(Figure52).
57
g246195
Page 58

Figure52
1.ClickPartsOrdering.
4.FromtheManagePartsOrderingscreen,clickCreateNewAddress(Figure53).
58
g248504
Page 59

1.Clicktocreateanewaddressforordering.
g248505
Figure53
59
Page 60

5.FillouttheCreateNewAddressform,andclickCreatetocompletetheprocess(Figure54).
Figure54
1.Selecttheboxesthatapplytotheaddress.3.Clicktosavetheaddress.
2.Checktheboxtorequestaddressverication.
EditinganAddressforOrderingParts
1.FromtheDashboard,clickAdmin,locatedintheupper,rightcornerofthescreen(Figure50).
60
g248507
Page 61

2.ClicktheEditLocationIcon(Figure51).
3.FromtheLocationRecord,clickPartsOrdering(Figure52).
4.FromtheManagePartsOrderingscreen,clicktheEditAddressicon(Figure55).
61
Page 62

1.Clicktheicontoedittheaddress.
g248508
Figure55
62
Page 63

5.FillouttheEditAddressform,andclickSaveafteryoumakethechanges(Figure56).
Note:Y oucandeletetheaddressbyclickingthetrashcanicon(Figure56).
Figure56
1.Selecttheboxesthatapplytotheaddress.3.Clicktosavetheaddresschanges.
2.Checktheboxtorequestaddressverication.4.Clicktodeletetheaddress.
63
g248519
Page 64

OrderingPartsforRepair
1.ClicktheAssetListtab.
2.ClickthedesiredAssetID(Figure57).
3.ClickMasterPartsViewer(Figure57).
Note:Y oucanalsoaccesstheMasterPartsViewerfromtheAssetOverview.
Figure57
1.ClicktheAssetID.2.ClicktoviewtheMasterPartsViewer.
4.Findtheappropriateassemblydrawingthatincludesthepart(s)youneed(Figure58).
64
g248520
Page 65

Figure58
5.Afteryoundthepartsyouneed,selectthemontheleftsideoftheassemblydrawingandclickAddto
Cart(Figure59).
65
g248551
Page 66

66
Page 67

6.Afteryoureceivethemessageindicatingthatyousuccessfullyaddedtheparts,clickyourShopping
Cart(Figure60).
Figure60
1.Clickyourshoppingcart.
7.ReviewthepartsandthequantitiesofthepartsinyourShoppingCart,andensurethattheyarecorrect
(Figure61).
Ifyouwanttodeleteanypartsfromyourcart,selectthemontheleftside,andclickDeleteSelected.
8.ClickPrepareOrderandlloutthenecessaryinformation(Figure61).
67
g248596
Page 68

68
Figure61
1.Clicktodeletetheentirecart.4.Clicktosavechangesmadetothecart.
g248597
Page 69

9.Afterreviewingthepaymentandshippinginformation,clickReviewandPlaceOrder(Figure62).
69
Page 70

Figure62
1.Afterverifyingthepaymentandshippinginformation,clickReviewandPlaceOrder.
70
g248599
Page 71

10.Ensurethatallthedetailsarecorrect,theneitherclickPlaceOrderorselectMarkforApproval(for
supervisorapproval)andclickPlaceOrder.
ReceivingPartsintoInventory
1.ClicktheOrderManagementtab(Figure63).
2.SelectPurchasedorderstoviewtheordersthatwereplaced,butyouhavenotreceived,andorders
thatyoureceived(Figure63).
3.Afterreceivingyourparts,clicktheReceivePartsicontoviewthepartsfromthatorder(Figure63).
71
Page 72

Figure63
72
g248686
1.Selectpurchasedorders.
4.Iconindicatingthattheorderisplaced,butnotreceivedinto
Page 73

4.Selectthepartsyoureceived,then,ifnecessary,adjustthePartGrouptheybelongto,thecost,and/or
thequantityofeachpartreceived(Figure64).
Note:Youcanalsoadjusttheshippingandtaxcostsbeforeaddingthepartstoyourinventory.
Figure64
1.Selectthepartsyoureceived.
2.Addthepartstoyourinventory.
5.ClickAddtoInventorytoaddtheselectedpartstoyourinventory(Figure64).
Note:Ifthiswasdoneproperly,youshouldreceiveamessageindicatingthatyousuccessfullyreceived
thepartsintoyourinventory.
AssigningaWirelessHourMeter
1.ClicktheWirelesstab(Figure65).
2.UnderWirelessHourMeters,selectUnassignedfromthedrop-down(Figure65).
3.ClickthedesiredWirelessHourMeterID(Figure65).
g248687
73
Page 74

Figure65
1.SelectUnassignedfromthedrop-down.2.SelectthewirelesshourmeterID.
74
g248703
Page 75

4.FromtheWirelessHourMeterRecord,selecttheLocation,AssetType,Group,andAssetIDthat
youwouldliketoassignthewirelesshourmeterwith(Figure66).
5.EntertheMeterReadingshownonyourwirelesshourmeter(Figure66).
75
Page 76

1.Enterthemeterreadingshownonyourwirelesshourmeter.
g248704
Figure66
76
Page 77

6.EnterthedesiredMaximumDurationBetweenUpdates(Figure67).
7.ClickAssign/UpdateWirelessHourMeter(Figure67).
Note:Priortoassigningorupdatingthewirelesshourmeter,parkthemachinewithinrangeofthe
wirelesshourmeter,andensurethatitisintheONposition.
8.ClickSendTestSignaltotesttheconnection(Figure67).
9.Aftersuccessfulconnection,clickSaveontherightsideofthescreen(Figure67).
Figure67
1.Setthemaximumdurationbetweenupdates.3.Clicktotestthesignalofthewirelesshourmeter.
2.Clicktoassignorupdatethewirelesshourmeter.
4.Clicktosavethewirelesshourmeter.
AddingaBaseStation/Repeater
1.ClicktheWirelesstab.
2.ClickAddBaseStation/Repeater(Figure68).
77
g248707
Page 78

Figure68
3.SelecttheT ype,enterthebasestationorrepeaterID,andassigntheLocationforbasestationor
repeater(Figure69).
4.ClickCreate(Figure69).
78
g249050
Page 79

Figure69
1.Selectwhetheritisabasestationorrepeater.3.Selectthelocationforthewirelesshourmeter.
2.EntertheID.
4.Clicktocreatethenewbasestationorrepeater.
AddingaWirelessHourMeter
1.ClicktheWirelesstab.
2.ClickAddWirelessHourMeter(Figure68).
3.EntertheWirelessHourMeterIDandassigntheLocationforthewirelesshourmeter(Figure70).
4.ClickCreate(Figure70).
g249049
79
Page 80

Figure70
g249051
1.EntertheID.
2.Selectthelocationforthewirelesshourmeter.
3.Clicktocreatethenewwirelesshourmeter.
ManagingAttachments
1.ClicktheAssetListtab.
2.ClickthedesiredAssetIDandclickAssetOverview(Figure71).
80
Page 81

1.Clicktoviewtheassetoverview.
3.ClickManageAttachments(Figure72).
g246282
Figure71
81
Page 82

Figure72
1.ClickManageAttachments.
4.Selecttheattachmentsthatyouwanttoassigntotheasset(Figure73).
5.ClickSavetoassigntheattachments(Figure73).
82
g249409
Page 83

Figure73
1.Selecttheattachmentsyouwanttoassign.2.ClickSavetoassigntheattachments.
ManagingthePreventiveMaintenanceSchedule
WhenyouloadanassetintomyTurf,thePreventiveMaintenanceScheduleforthatassetautomatically
populates.
83
g249460
Page 84

AccessingtheMaintenanceSchedule
YoucanaccesstheMaintenanceScheduleinthefollowing2ways:
•FromtheAssetOverviewofanasset,clickMaintenanceSchedule(Figure74).
Figure74
1.ClicktoaccesstheMaintenanceSchedule.
•FromtheAssetList,clickontheStatusfortheasset,andclickMaintenanceSchedule(Figure75).
84
g249520
Page 85

Figure75
1.Clickonthestatusfortheasset.2.ClicktoaccesstheMaintenanceSchedule.
DownloadingaMaintenanceSchedule
ClicktheDownload(.xlsx)buttontodownloadyourPreventiveMaintenanceSchedule.
AddingaMaintenanceTask
IftherearemaintenancetasksnotlistedinthePreventiveMaintenanceSchedule,youcanmanuallyaddthem.
Whenaddingamaintenancetask,youcanchooseoneofthefollowingtasktypes:
•ScheduledMaintenance
•AsNeededInspection
•DailyChecks
•Break-InMaintenance
85
g249521
Page 86

CopyingaMaintenanceTask
YoucancopyamaintenancetasktoyourassetfromanotherassetinyoureetbyclickingCopySchedule
fromthePreventiveMaintenanceSchedulescreen(Figure76).
ResettingthePreventiveMaintenanceSchedule
YoucanresetthePreventiveMaintenanceScheduletotheT orodefaultschedulebyclickingResettoDefault
fromthePreventiveMaintenanceSchedulescreen(Figure76).
EditingaMaintenanceTask
1.FromthePreventiveMaintenanceSchedulescreen,clicktheTaskRecordicon(Figure76).
86
Page 87

Figure76
1.ClicktheT askRecordicon.
2.FromtheT askRecordscreen,youcanturntheTasktotheONorOFFposition,edittheT askType,Sub
Type,Description,PartsNeededforthetask(youcanaddordeletepartshere),IntervalType,Interval,
whenthetaskisNextDue,andyoucanattachaleforthetask(Figure77).
3.Afteryoueditthetask,clickSave(Figure77).
87
g249599
Page 88

88
Page 89

ManagingWorkOrders
AddingMaintenanceLabor
1.FromtheDashboard,clickAdmin,locatedintheupper,rightcornerofthescreen(Figure78).
Figure78
g245241
1.ClickAdmin.
2.ClicktheEditLocationIcon(Figure79).
89
Page 90

Figure79
1.Clicktoeditthelocation.
3.FromtheLocationRecord,clickAddNewLabor(Figure80).
4.Entertheindividual’snameandtheirwageperhour(Figure80).
90
g246195
Page 91

Figure80
1.Clicktoaddnewlabor.
5.ClickSaveontherightsideofthescreen.
CreatingaWorkOrder
1.ClicktheMaintenanceDuetab(Figure81).
2.SelecttheTaskinthelistthatyouneedtocreateaworkorderfor,andclickCreateWorkOrder(Figure
81).
g249602
91
Page 92

Figure81
1.Selectthetask.2.Clicktocreatethenewworkorder.
92
g249607
Page 93

3.CompletetheCreateNewWorkOrderformbyselectingtheindividualthatyouwanttoassignthework
ordertoandclickSavetoWorkOrder(Figure82).
Figure82
1.Clicktosavetheworkorder.2.Selecttheindividualtoassignthemtotheworkorder .
CompletingaWorkOrder
CompletingaWorkOrderbyWorkOrderList
1.Aftercreatingtheworkorder,selectWorkOrderList(Figure83).
2.Clickaworkordernumber(Figure83).
93
g249608
Page 94

Figure83
1.SelectWorkOrderList.2.Clicktheworkordernumber.
3.Checkthetaskscompletedintheworkorder,enterthetimetheindividualspentonthetask,enterany
associatedmiscellaneouscosts,andrecordanyequipmentdowntimethatoccurredduringthetask
(Figure84).
4.ClickComplete/Incomplete(Figure84).
g250274
94
Page 95

95
g250275
Page 96

5.EntertheupdatedUtilizationandclickComplete/Incomplete(Figure85).
Figure85
g250276
1.Updatetheutilization.
2.Clicktocompletetheworkorder.
CompletingaWorkOrderbyTaskList
1.Aftercreatingtheworkorder,clicktheWorkOrdernumberontherightsideofthescreen(Figure86).
96
Page 97

Figure86
1.Clicktheworkordernumber.
2.Checkthetaskscompletedintheworkorder,enterthetimetheindividualspentonthetask,enterany
associatedmiscellaneouscosts,andrecordanyequipmentdowntimethatoccurredduringthetask
(Figure87).
3.ClickComplete/Incompletetocompletetheworkorder(Figure87).
Note:Youwillreceiveamessageindicatingthatyouupdatedtheworkorderandwhenyoureturntothe
screen,thecompletedtaskswillhavegreencheckmarksnexttothem.
g249634
97
Page 98

98
Page 99

4.EntertheupdatedUtilizationandclickComplete/Incomplete(Figure88).
Figure88
g250276
1.Updatetheutilization.
2.Clicktocompletetheworkorder.
ClosingaWorkOrder
Aftercompletingtheworkorder,clickCloseWorkOrder(Figure87).
ManagingtheMaintenanceScheduleforanAsset
AccessingtheMaintenanceSchedule
1.FromtheAssetList,clicktheAssetIDoftheassetyouwanttomanage,andclickAssetOverview
(Figure89).
99
Page 100

Figure89
1.Clicktoviewtheassetoverview.
2.FromtheAssetOverview,clickMaintenanceSchedule(Figure90).
g246282
100
 Loading...