

Page 1

1
TBC
TM
HH Programmer
User’s Guide
English Español Français
Page 2

2
Table of Contents
Introduction - - - - - - - - - - - - - - - - - - - - - - - - - - - - - - 3
Icons Overview
- - - - - - - - - - - - - - - - - - - - - - - - - - - - 3
Buttons Overview
- - - - - - - - - - - - - - - - - - - - - - - - - - 4
Battery and Comm Cable Installation
- - - - - - - - - - - - - - 4
Communication Procedure
- - - - - - - - - - - - - - - - - - - - 4
Hand-Held Programmer Setup
- - - - - - - - - - - - - - - - - - 5
Time and Date Setup
- - - - - - - - - - - - - - - - - - - - - - - - 6
Controller Setup
- - - - - - - - - - - - - - - - - - - - - - - - - - - 7
Receive/Confirm Module Number
- - - - - - - - - - - - - - - - 8
Weekly Calendar Schedule Setup
- - - - - - - - - - - - - - - - 9
Odd/Even Schedule Setup (Toro Mode Only)
- - - - - - - - 10
Interval Schedule Setup (Toro Mode Only)
- - - - - - - - - - 11
Program Start Time Setup
- - - - - - - - - - - - - - - - - - - - 12
Station Run Time Setup
- - - - - - - - - - - - - - - - - - - - - 12
Season Adjust Setup
- - - - - - - - - - - - - - - - - - - - - - - 13
Manual Station Start
- - - - - - - - - - - - - - - - - - - - - - - - 14
Manual Cycle Program Start
- - - - - - - - - - - - - - - - - - 15
System ON/OFF
- - - - - - - - - - - - - - - - - - - - - - - - - - 15
Advance Setup
- - - - - - - - - - - - - - - - - - - - - - - - - - - 16
Troubleshooting Guide
- - - - - - - - - - - - - - - - - - - - - - 18
Warranty Information
- - - - - - - - - - - - - - - - - - - - - - - 19
FCC
Compliance - - - - - - - - - - - - - - - - - - - - Back
Cover
Specifications - - - - - - - - - - - - - - - - - - - - - - Back Cover
Technical
Support Information - - - - - - - - - - - Back
Cover
TBC™ is a trademark of The Toro Company.
Page 3
1 2 3 4 5 6
7 8 9 10 11 12 13 14 15
3
Introduction
Thank you for purchasing the most versatile hand-held programmer
in the market to date. The Toro Battery Controller Hand-Held
Programmer (TBC
TM
HH) can program Toro’s Battery-operated
Waterproof controller (TBC
TM
WP) utilizing infrared technology or with
the optional radio communication capability. In addition, the TBC
TM
HH
Programmer is fully compatible and a perfect upgrade to other battery
operated controllers in the market.
Aside from the easy to read, back-lit LCD display, TBC
TM
HH offers
additional functions when used in Toro mode. With Toro mode, you’ll
have more programming flexibility by having the ability to use odd,
even and interval scheduling, season adjustment, etc. These features
are not offered for use with non-Toro controllers.
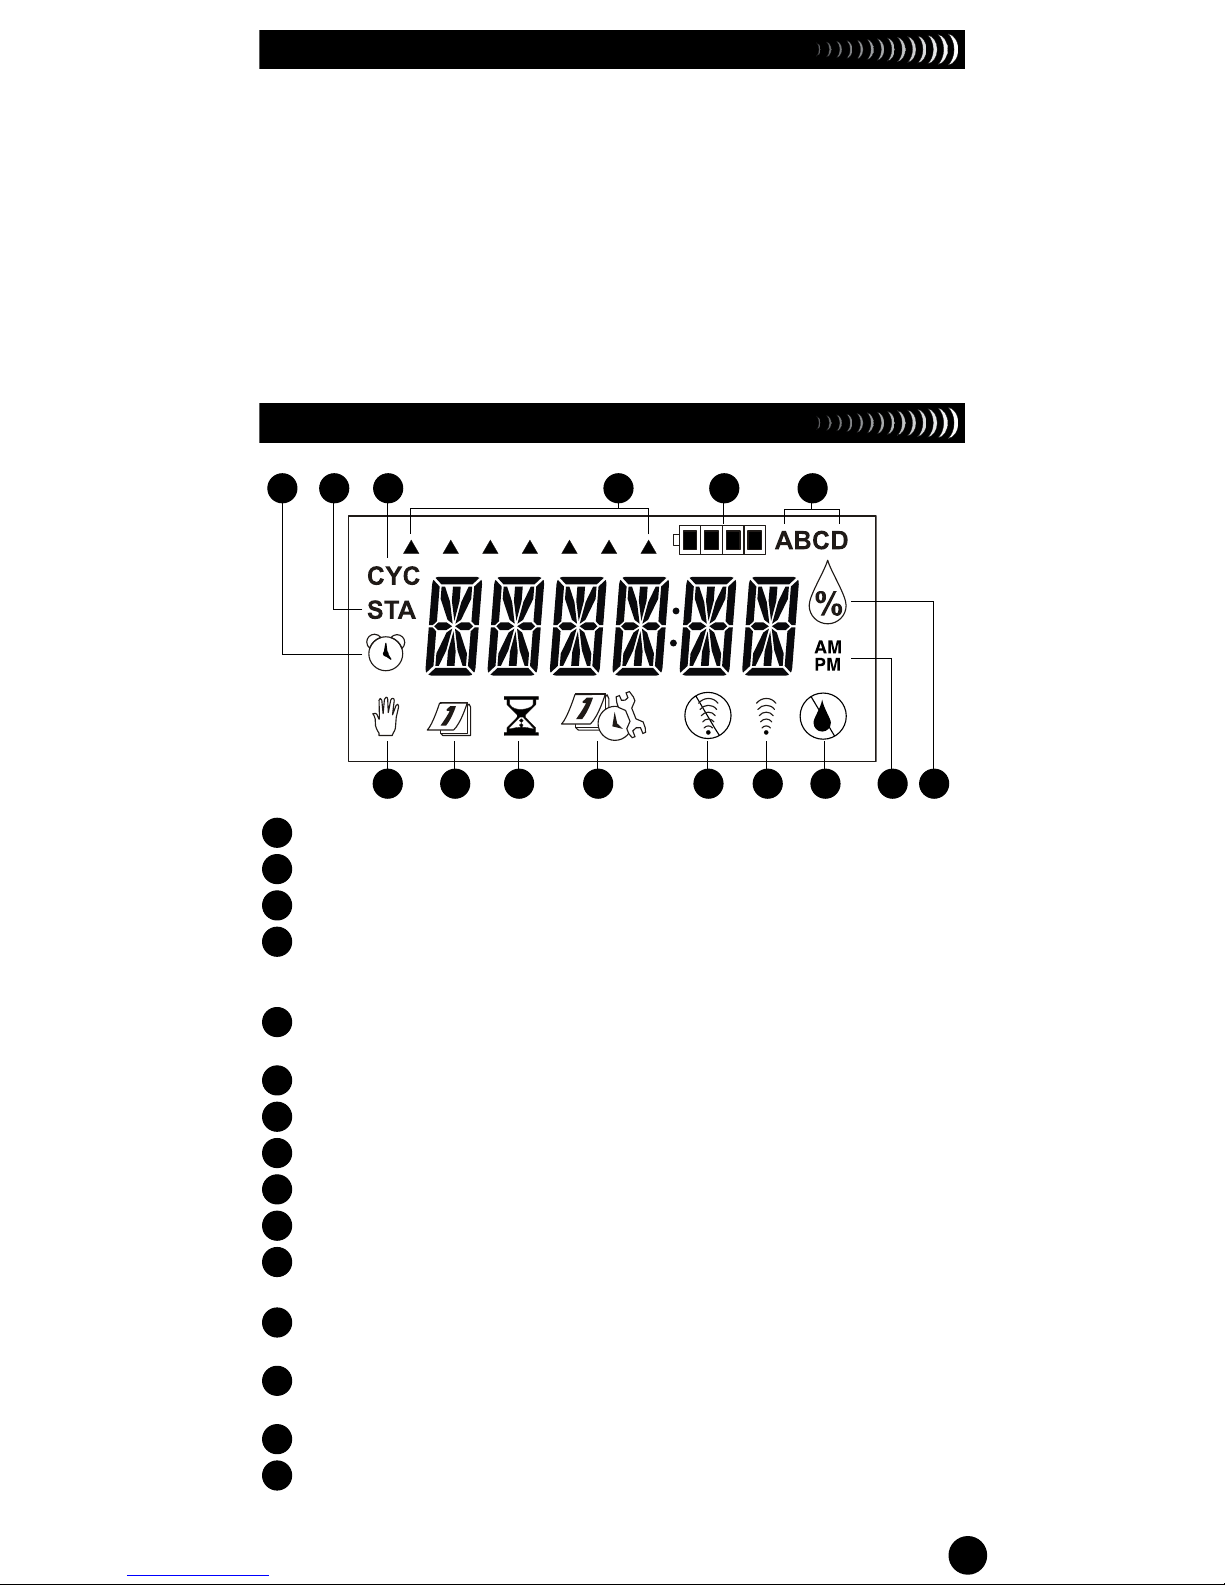
Icons Overview
1
- Start Time icon.
2
- Station icon.
3
- Program Cycle icon. It is present when activating a program manually.
4
- Day of the Week indicators. Each arrow indicator designates an active
watering day. Watering will not activate on an Excluded day (no arrow
indicator).
5
- Battery Level indicator. Monitors the battery voltage level. Replace the
battery when low.
6
- Program indicator. It will indicate the program being modified (A, B, C or D).
7
- Manual icon. When present, it indicates manual operation.
8
- Calendar icon. It is present when modifying schedule setup.
9
- Run Time icon. It is present when modifying station run time.
10
- Advanced Setup icon. Station Delay, Load and Save programs, etc.
11
- No Communication icon. It is present when the hand-held is not able to
establish communication with the
TBC
TM
WP controller.
12
- Communication icon. It is present when the hand-held is actively
communicating.
13
- No Watering icon. It is present to identify the current day is a non-watering
day in the schedule.
14
- AM/PM indicators. Only present when the clock is set in 12-Hour mode.
15
- Season Adjust icon. It is present when modifying the season adjust
percentage.
Page 4

4
Buttons Overview
– Transmit button
– Receive button
ON
– ON/+ (Increase) button
OFF
– OFF/– (Decrease) button
A
B
C
D
– Program Select button
DIAL
– Electronic Dial button
NEXT
– NEXT button
Battery and Comm Cable Installation
The TBC
TM
HH Programmer is
powered by a 9 VDC battery.
Follow the steps to install the
battery.
Step 1 - Remove the
programmer’s back
cover by loosening the
three retaining screws.
See
Figure 2 insert.
Step 2 - Install the battery onto
the socket as shown on
Figure 2.
Step 3 - To install/remove the
communication cable,
remove or plug the
communication cable into
the RJ45 socket indicated
on
Figure 2. Once
installed/removed, verify
that the rubber cover seal
is properly seated.
Step 3 - Reinstall the programmer’s back cover.
Communication Procedure
The TBC
TM
HH Programmer is designed to communicate with the
TBC
TM
WP and other battery operated controllers using an IR cable
that plugs into the controller’s communication receptacle. See
Figure 3.
The
TBC
TM
HH can also be purchased with an optional radio
transmitter for wireless operation. See
Figure 4.
To load programs from the
TBC
TM
HH to a controller, simply press
the button. The two devices will initiate a verification procedure
that will match their Programmer I.D. and Controller Number
(verification process is not required for wired I.R. communication).
Figure 1
Figure 2
Page 5

5
Hand Held Programmer Setup (Radio Users Only)
Since a single TBC
TM
HH may be used to connect with multiple
controllers, the
TBC
TM
system is designed to have a unique
HHP Number (Programmer I.D.) (1–99) and a separate unique
Controller Number (1–99). Each of the 1–99 Programmer I.D. can
be assigned a Controller Number 1–99. This enables the
TBC
TM
HH to communicate with up to 9,800 individual controllers.
The unique
Programmer I.D. and Controller Number must be
set in each controller within two minutes upon initial power-up.
Mismatched Programmer I.D. and Controller Number during
hand-held to controller communication will return an ERROR
message. Follow the procedure to set the Programmer I.D.
NOTE
Programmer I.D. and Controller Number
synchronization is only required for wireless radio communication.
Step 1 - The TBC
TM
HH I.D. is set during initial power up and the
value can be changed from the hand-held’s Advance
Setup function. When installing the battery for the first
time, the following screen will immediately display.
If the battery is already installed and you want to modify
the Programmer I.D., press the
DIAL
button until ADVSET
is displayed. Press the
NEXT
button until above screen is
displayed.
Step 2 - Press
ON
or
OFF
button to select the appropriate
Programmer I.D. you would like to assign the hand-held.
Step 3 - Press the
DIAL
button to accept the change.
NOTE
Proceed to Controller Setup (pg. 7) to
establish the controller’s Programmer I.D. and Controller
Number.
HHP - Hand-Held Programmer
Programmer I.D. Indicator
Figure 3 Figure 4
Optional Wireless
Radio Communication
Infrared (IR)
Communication
Page 6
6
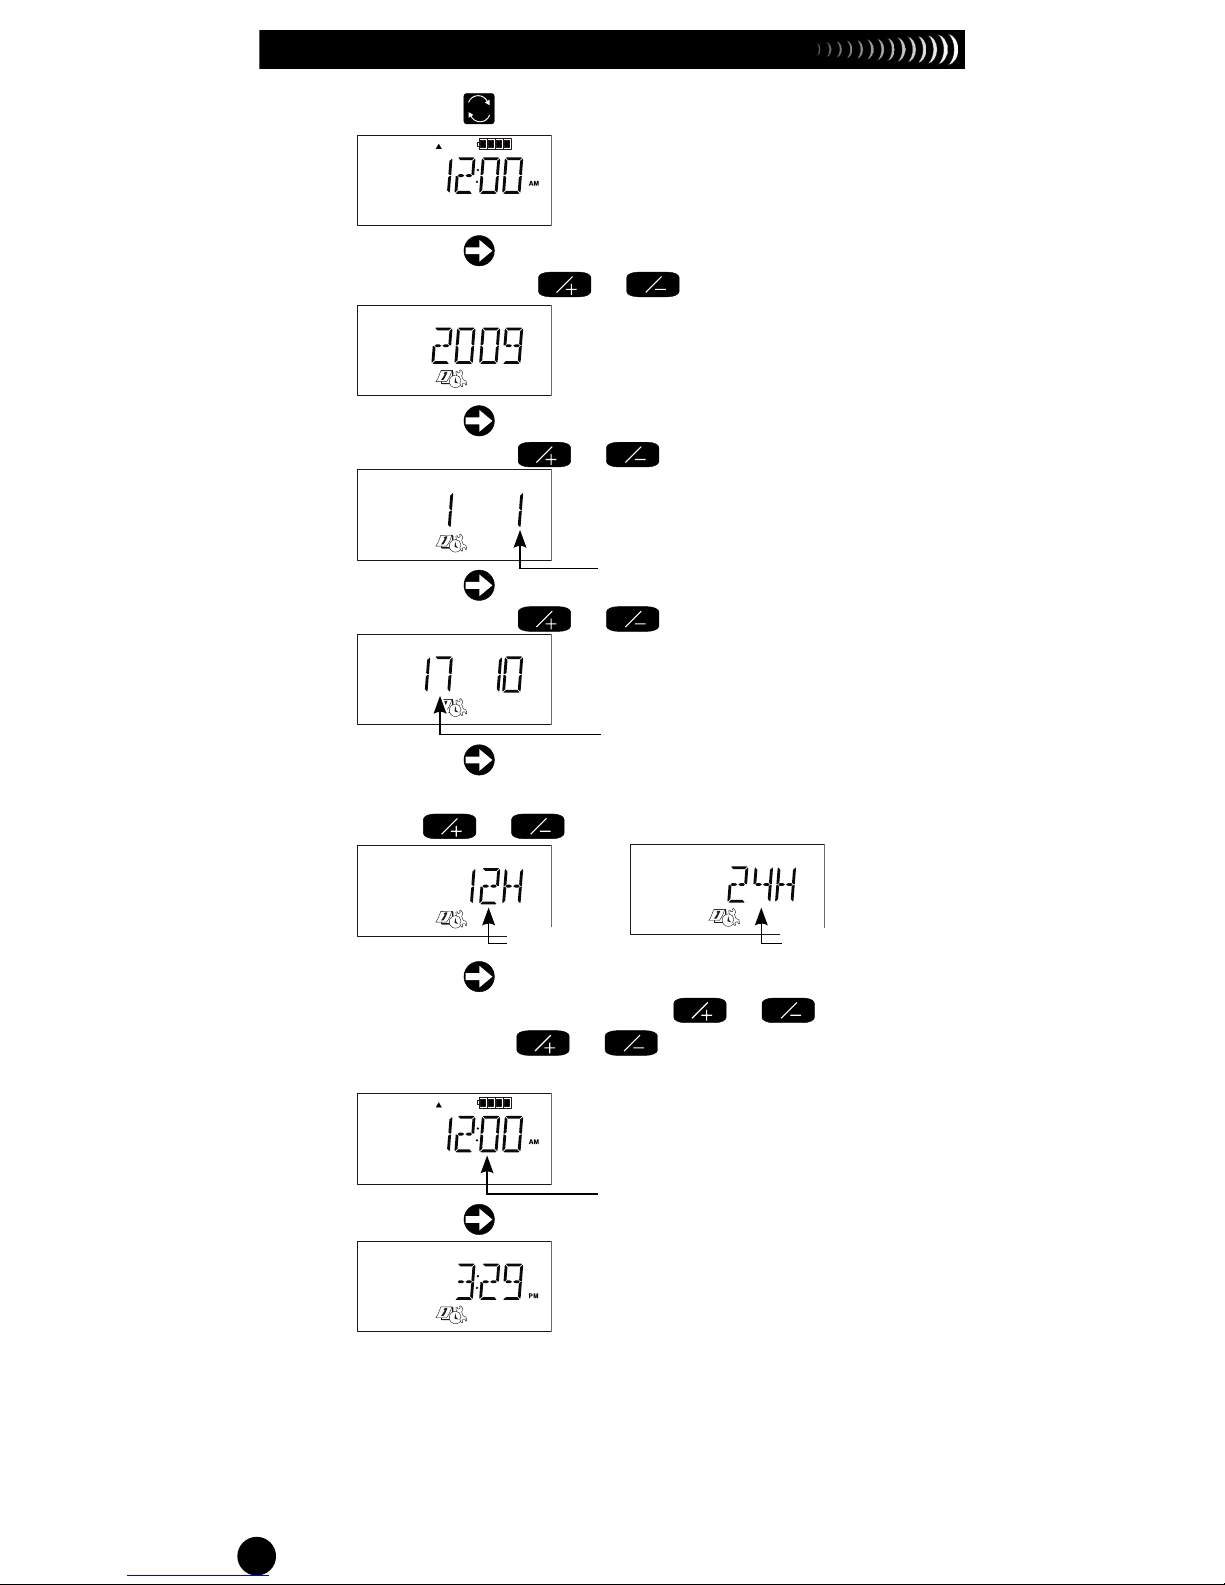
Time and Date Setup
Step 1 - Press the
DIAL
button until the current time is displayed.
Step 2 - Press the
NEXT
button. The current year should be
displayed. Press
ON
or
OFF
button to edit.
Step 3 - Press the
NEXT
button. The current month should be
blinking. Press
ON
or
OFF
button to edit.
Step 4 - Press the
NEXT
button. The current calendar day should be
blinking. Press
ON
or
OFF
button to edit.
Step 5 - Press the
NEXT
button. The time format should be
displayed, 12H for U.S. and 24H for International format.
Press
ON
or
OFF
button to edit.
Step 6 - Press the
NEXT
button. The current time should be
displayed and blinking. Press
ON
or
OFF
button to
edit. Press the
ON
or
OFF
button continuously for
faster scrolling.
Step 7 - Press the
NEXT
button to finalize Time and Date setup.
Month (Blinking)
Day (Blinking)
U.S. Format International Format
Blinking
Page 7

7
Controller Setup
The TBC
TM
system allows you to assign each TBC
TM
WP a unique
Controller Number. Once assigned a number, the TBC
TM
WP will
only respond and accept programs from a hand-held with that
Controller Number. When uploading and downloading programs
from the TBC
TM
HH using wireless radio communication, make sure
that the TBC
TM
HH is set to the correct Controller Number. Wireless
radio communication is only possible when both devices have
identical numbers. Follow the Steps to set the Controller Number
and assign the controller type, whether it is a Toro brand or not.
Step 1 - Press the
DIAL
button until TORO Y is displayed. The
display will prompt you to select the controller type.
Assign Y (Yes) for Toro TBC
TM
WP controller or N (No) for
non-Toro controllers.
Step 2 - Press the
DIAL
button to set the Controller Number.
Step 3 - Press
ON
or
OFF
button to select the appropriate
Controller Number you would like to assign to the
controller.
NOTE
(Pertains to radio communication ONLY)
Once the controller is assigned with a Controller
Number, it will not accept any wireless radio program
uploads/downloads from the hand-held unless it has
the same Controller Number. Make sure the hand-held
is set to the correct Controller Number before wirelessly
downloading any program to the controller.
To assign a different Controller Number to the controller,
you must reset it by disconnecting the batteries and
waiting two minutes to discharge the memory capacitor.
Step 4 - Attach the batteries to the TBC
TM
WP controller (You can
only reprogram the controller’s Programmer I.D. during
the initial power-up). Once the batteries are installed, you
only have two minutes to process Step 5.
Page 8

8
Step 5 - Send the identification numbers to the controller. Please
allow more than two minutes prior to reinstalling the
batteries for Step 4.
NOTE
Identification numbers can only be sent to
the controller from the screen shown in
Step 2..
Indicates the controller has accepted the identification
numbers.
Indicates that there is another controller within range
with the same identification numbers. Select a different
controller number and repeat
Steps 2–5.
NOTE
Identification numbers are retained in the
controller until reprogrammed.
Receive/Confirm Module Number
NOTE
This is an advanced feature of the TBC
TM
WP controller
and it does not apply to other non-Toro controllers.
Wireless radio communication requires for both the Programmer
I.D. and Controller Number to match. It is possible to retrieve the
Controller Number from the
TBC
TM
WP unit if it is unknown or lost.
However, it is not possible to retrieve the Programmer I.D. from
the TBC
TM
WP.
NOTE
This process is only valid for wireless radio
communication. Programmer I.D. and Controller Number
matching is not required for wired IR communication.
Step 1 - Press the
DIAL
button until CTRL01 is displayed.
Step 2 - Press the button to receive the Controller Number
from the TBC
TM
WP.
Step 3 - After OK is displayed, press the
DIAL
button and the
Controller Number will be displayed.
NOTE
If more than one radio equipped TBC
TM
WP is within
radio reception, you will receive the value of the unit with the
stronger signal or the TBC
TM
HH will display an error message.
If error message is displayed, refer to Troubleshooting Guide
section on page 18.
Page 9

9
Weekly Calendar Schedule Setup
Selecting the weekly calendar scheduling allows you to water on a
7-day week schedule. You can also exclude any days of the week
starting from Sunday until Saturday.
Step 1 - Press the
DIAL
button until CAL is displayed. If ODD,
EVEN, or IN01:01 is on display, press the
NEXT
button
until
CAL is displayed.
Step 2 - Press
A
B
C
D
button to select the program.
Step 3 - Press the
ON
to activate or
OFF
to exclude the
blinking days of the week. Repeat until all of the days of
the week are set.
Active Day Indicator
Program Indicator
SuMoTuWeThFrSa
Active Watering Day
(With arrow indicator)
Excluded (Non-watering) Day
(Without arrow indicator)
Page 10

10
Odd / Even Schedule Setup (Toro Mode Only)
Selecting the Odd or Even schedule allows you to water on the
Odd or Even numbered days in the calendar month. In addition,
you can also select any days of the week to exclude in the
watering schedule.
If you select Even and exclude Wednesdays and Saturdays, the
TBC
TM
WP controller will only water on even numbered days in the
calendar. It will not water on Odd days as well as Wednesdays
and Saturdays, even if they fall on even numbered days.
Step 1 - Press the
DIAL
button until CAL, ODD, EVEN, or IN01:01
is displayed.
Step 2 - Press
A
B
C
D
button to select the program.
Step 3 - Press the
NEXT
button until your preference ODD or EVN
(Even) is displayed.
Step 4 - (Optional) Press the
ON
to activate or
OFF
to exclude
the blinking days of the week. Repeat until all of the days
of the week are set.
SuMoTuWeThFrSa
Excluded (Non-watering) Day
(Without arrow indicator)
Active Watering Day
(With arrow indicator)
Page 11

11
Interval Schedule Setup (Toro Mode Only)
Interval scheduling allows you to select a specific interval watering
to activate your program. Select an interval from 1 (everyday) to
31 (every 31 days). In addition, you can select any weekdays to
exclude.
If you select an interval of 5 and exclude Friday, the controller will
water every fifth day and will not activate if the fifth day falls on a
Friday.
Step 1 - Press the
DIAL
button until CAL, ODD, EVEN, or IN01:01
is displayed.
Step 2 - Press
A
B
C
D
button to select the program.
Step 3 - Press the
NEXT
button until your preference IN01:01
(Interval) is displayed.
Step 5 - Press the
NEXT
button to set the interval length in days.
Select an interval from 1–31 days. For example,
Selecting 1 will activate the programs every day and
selecting 4 will activate the programs every 4th day.
Step 6 - Press the
NEXT
button to set the location of the current day
within the interval. For example, the interval is every 4th
day and you want tomorrow to be the active day, set the
current day to 3.
Step 4 - Press the
ON
to activate or
OFF
to exclude the
blinking days of the week. Repeat until all of the days of
the week are set.
Interval Designator
Current Day Indicator. The example
displays the current day (day-3) of a
4-day watering cycle.
SuMoTuWeThFrSa
Excluded (Non-watering) Day
Active Watering Day
Page 12

12
Program Start Time Setup
Each of the TBC
TM
WP’s program (A, B, C and D) can have up to
10 start times. Non-Toro controllers will have programs A, B and
C and can have up to 8 available start times. Select a start time
that is best suited to the type of plant and landscape you are
irrigating.
NOTE
When two stations are set to activate at the same
start time, the
TBC
TM
WP controller will activate the 1st priority
station, recharge for up to 1-minute and activate the second
station. The
TBC
TM
WP controller will use the program letter, then
station number to prioritize the station order.
Step 1 - Press the
DIAL
button until the icon is displayed.
Step 2 - Press
A
B
C
D
button to select the program.
Step 3 - Press the
ON
or
OFF
button to adjust the start time.
Press the button continuously to scroll faster.
Step 4 - Press the
NEXT
button to set to the next Start Time.
Repeat
Steps 3 and 4 to adjust additional start times.
NOTE
The TBC
TM
WP controller will organize the start
time automatically in chronological order from 12:00am
(00.00) to 11:59pm (23:59).
Station Run Time Setup
Station run times can be set from OFF to 11:59 (11 hours and 59
minutes).
Step 1 - Press the
DIAL
button until the icon is displayed.
Step 2 - Press
A
B
C
D
button to select the program.
Run Time Icon
Start Time Number
Program Designator
Start Time Icon
Start Time Number
Program Designator
Start Time
Page 13

13
Step 3 - Press the
ON
or
OFF
button to adjust the station’s
run time (Hours:Minutes). Hold the button to scroll
faster. Run time is increased or decreased in 1-minute
increments.
NOTE
Deactivate a station by selecting OFF run
time. When the run time of the same station in
TBC
TM
WP
overlaps to the next start time, the next schedule will be
stacked. For non-Toro controllers, the second start of
the same station will be ignored.
Step 4 - Press the
NEXT
button to advance to the next station.
Repeat
Step 3 for the remaining stations and programs
as necessary.
Season Adjust Setup (Toro Mode Only)
The TBC
TM
system season adjust feature allows you to adjust
each month’s irrigation without modifying the program. With
monthly adjust, you can fully customize your watering schedule to
conserve water by decreasing your irrigation duration during the
wet or cold seasons or increase your irrigation during the dry or
hot seasons.
Step 1 - Press the
DIAL
button until the icon is displayed.
Step 2 - Press
A
B
C
D
button to select the program.
Step 3 - Press the
ON
or
OFF
button to adjust the percentage
adjustment for the selected month. Hold the button to
scroll faster. The season adjustment can be adjusted up
to 300% or down to 00% (Program would be off) in 10%
increments.
NOTE
Season adjust default is set at 100%
(program run times are not adjusted).
Step 4 - Press the
NEXT
button to advance to the next month.
Example: Select 1 for January, 2 for February, etc.
Repeat
Step 3 for each month as necessary.
Month Designator
Season Adjust Icon
Program Designator
Percentage Adjustment
Page 14

14
Manual Station Start
The TBC
TM
HH manual station start feature allows you to activate a
station on demand.
Toro Mode
Step 1 - Press the
DIAL
button until the STA and icon is
displayed.
Step 2 - Press the
ON
or
OFF
to select the station number to
activate.
Step 3 - Press the
NEXT
button to advance to the Run Time field.
Step 4 - Press the
ON
or
OFF
to select the run time duration.
Step 5 - Press the button to activate.
NOTE
The run time can not be increased or
decreased during manual watering. Multiple stations can
be manually activated by repeating Steps 1 through 5.
Non-Toro Mode
Step 1 - Press the
DIAL
button until the STA and icon is
displayed.
Step 2 - Press the
NEXT
button to select the station number.
Step 3 - Press the
ON
button to activate or the
OFF
button to
shut off.
NOTE
TBC
TM
HH will use the programmed station
run time. To modify the run time, see
Station Run Time
Setup on page 12. Multiple stations can be manually
activated by repeating Steps 1 through 3.
Manual Watering Icon
Station Number
Manual Watering Icon
Station Number
Page 15

15
Manual Cycle Program Start
The TBC
TM
HH manual station start feature allows you to activate a
program on demand.
Toro Mode
Step 1 - Press the
DIAL
button until the CYC and icon is
displayed.
Step 2 - Press
A
B
C
D
button to select the program.
Step 3 - Press the
ON
button to activate the program. Press the
OFF
button to deactivate.
Step 4 - Press the button to activate.
Non-Toro Mode
Step 1 - Press the
DIAL
button until the CYC and icon is
displayed.
Step 2 - Press
A
B
C
D
button to select the program.
Step 3 - Press the
ON
button to activate the program. Press the
OFF
button to deactivate.
System ON / OFF
The TBC
TM
WP controller can be turned OFF/ON without modifying
the programs. Follow the steps to turn the controller OFF or ON.
This function is especially useful during extended irrigation system
shut off (i.e. wet weather conditions, site construction, etc).
Step 1 - Plug the TBC
TM
HH communication cable onto the
controller (IR communication only).
Step 2 - Press the
DIAL
button until the ON, OFF or DLY icon is
displayed.
Step 3 - Press the button to select ON to activate the
system, OFF to turn off the system or DLY to specify the
length of days you want to suspend controller activity.
NOTE
While the TBC
TM
WP controller is in OFF or
DLY mode, all scheduled program and manual activities
will be suspended.
Delay Duration (Days)
(Toro Mode only)
Manual Watering Icon
Program Cycle Icon
Program Designator
Manual Watering Icon
Program Cycle Icon
Program Designator
Page 16

16
Advanced Setup
The advanced setup allows you to save programs, load
programs, specify a delay duration between station activations,
set whether the module is sensor equipped, activation of the
radio (if equipped) and modify the Programmer I.D. (HHP#). For
the Programmer I.D. function, refer to
Hand-Held Programmer
Setup on page 6.
Access the advanced setup function by pressing the
DIAL
button
until the ADVSET is displayed.
Save an Irrigation Program
Press the
NEXT
button to advance to SAVE--. This function allows
you to save the program parameters currently loaded on the
TBC
TM
HH for easy programming of multiple controllers. Press the
ON
or
OFF
button to assign a program number. Assigning an
existing program number will overwrite the program previously
saved. Press the
NEXT
button to save. Display will prompt OK to
confirm. You can save a total of 99 programs.
Load an Irrigation Program
Press the
NEXT
button to advance to LOAD--. This function
allows you to recall programs you previously saved for easy
programming of multiple controllers. Press the
ON
or
OFF
button to select the program number you would like to recall.
Press the
NEXT
button to load. Display will prompt OK to confirm.
Station Delay
(Toro Mode only) Press the
NEXT
button to advance to DLY :00
(Station Delay). Select a station delay time in minutes that will
serve as pause between station activations. Press
A
B
C
D
to select
the program. Press the
ON
or
OFF
button to adjust the station
delay from 00 (no pause) to 30 minutes. Repeat for the remaining
programs. Select the program number you would like to recall.
Press the
NEXT
button to load. Display will prompt OK to confirm.
Page 17

17
Activate Sensor
(Toro Mode only) Press the
NEXT
button to advance to
SEN N.
This function allows you to configure the TBC
TM
WP controller to
scan the sensor terminals for a signal. Press
A
B
C
D
button to select
the program. Press the
ON
or
OFF
button to select
Y or N.
Press the
NEXT
button to accept.
Radio Shutoff Feature
(Toro Mode only) Press the
NEXT
button to advance to the
and icons. The TBC
TM
WP polls its Radio sensor in anticipation
of TBC
TM
HH communication. To conserve energy, the TBCTM HH
can set a time when radio communication is not expected to save
battery power. Use this function to set that time. Press the
ON
or
OFF
button to set the non-communication start time. Press
the
NEXT
button to accept.
(Toro Mode only) Press the
NEXT
button to advance to the and
icons. Use this function to set the time when the TBC
TM
WP
should start scanning for Hand-Held communications. Press the
ON
or
OFF
button to set the activate-communication start time.
Press the
NEXT
button to accept.
From the above display examples, the TBC
TM
WP will be set
to stop radio communication starting at 8 pm (20:00) and will
resume communication starting at 6 am (06:00).
NOTE
IR communication is always active.
Page 18

18
Troubleshooting Guide
Problem: Communication “ERROR” whe using IR.
Possible Cause: Programming a non-Toro controller, while in Toro mode.
Solution: Change the
Toro N setting to Toro Y in the TBCTMHH and
retry communication.
Possible Cause: Low Battery Power in Either TBC
TM
HH or TBCTMWP.
Solution: Look at Battery Indicator and replace if showing low.
Possible Cause: Improper Battery Connection.
Solution: Verify that the batteries are connected properly.
Possible Cause: There is debris on either IR connector.
Solution: Clean debris from both the TBC
TM
WP and TBCTMHH IR
interfaces.
Possible Cause: TBC
TM
WP may be responding.
Solution: Reset the TBC
TM
WP by removing the batteries from the
controller, ground the lead terminals fo the controller for 1
minute. Reinstall batteries.
Possible Cause: The IR cable has been damaged and has a short.
Solution: Obtain a new IR cable from your dealer and replace the
damaged cable.
Problem: Communication “ERROR” when using the radio.
Possible Cause: The TBC
TM
HH Programmer I.D. and Controller Number codes
do not match.
Solution: Reset the Controller by removing the batteries. See
Hand-
Held Programmer Setup on page 5 and Controller Setup
on page 7.
Possible Cause: You may be too far away from the TBC
TM
WP.
Solution: Move Closer to the TBC
TM
WP and send transmission again,
or use the IR cable to communicate.
Possible Cause: There may be too much radio interference from other devices.
Solution: Move Closer to the TBC
TM
WP and send transmission again,
or use the IR cable to communicate.
Possible Cause: Toro TBC
TM
HH is not compatible with the system.
Solution: Consult your Toro dealer for a list of compatible controllers.
Problem: Not able to find program features.
Possible Cause: You may be in the
TORO N mode.
Solution: Change setting to
TORO Y and send transmission. This will
set the controller to the Toro feature set.
Possible Cause: You are trying to program a non-Toro controller unit.
Solution: To use the advanced Toro Features, you must use a Toro
TBCTMWP controller.
Possible Cause: You may not have the correct controller type set in the
controller.
Solution: You need to select
Toro N for non-Toro controllers, and Toro
Y for TBCTMWP and transmit to the controller.
Problem: Valves don’t turn on immediately.
Possible Cause: The Controller may be in a “low charge” mode where it can
take up to 1 minute to send the charge to the solenoid.
Solution: This is normal operation when the batteries are low. To
improve the response time, replace with fresh batteries.
Possible Cause: You have scheduled two programs to start at the same time.
Solution: The TBC
TM
WP will only fire one station at a time, the second
station will be delayed, but will fire within 1 minute of the first.
Page 19

19
Problem: TBC-HH does not respond.
Possible Cause: Unit is in Sleep Mode.
Solution: Push the
DIAL
button to activate the TBCTMHH from sleep
mode.
Problem: “CLOCK” received after upload with controller.
Possible Cause: The controller time varies from the hand-held time by more
than 10 minutes.
Solution: Program the correct time in TBC
TM
HH (page 6) and transmit
program to the controller.
Problem: “1SHORT” received after communication with
controller.
Possible Cause: The flashing number is the station number of the
shorted station.
Solution: Verify connections to the solenoid, replace solenoid if
necessary.
Warranty Information
Limited Three-Year Warranty
The Toro Company and its afliate, Toro Warranty Company, pursuant to
an agreement between them, jointly warrants, to the owner, against defects
in material and workmanship for a period of three years from the date of
purchase.
Neither The Toro Company nor Toro Warranty Company is liable for failure of
products not manufactured by them even though such products may be sold
or used in conjunction with Toro products.
During such warranty period, we will repair or replace, at our option, any part
found to be defective.
Return the defective part to the place of purchase.
Our liability is limited solely to the replacement or repair of defective parts.
There are no other express warranties.
This warranty does not apply where equipment is used, or installation is
performed, in any manner contrary to Toro’s specications and instructions, nor
where equipment is altered or modied.
Neither The Toro Company nor Toro Warranty Company is liable for indirect,
incidental or consequential damages in connection with the use of equipment,
including but not limited to: vegetation loss, the cost of substitute equipment or
services required during periods of malfunction or resulting non-use, property
damage or personal injury resulting from installer’s negligence.
Some states do not allow the exclusion or limitation of incidental or
consequential damages, so the above limitation or exclusion may not apply to
you.
All implied warranties, including those of merchantability and tness for use,
are limited to the duration of this express warranty.
Some states do not allow limitations of how long an implied warranty lasts, so
the above limitation may not apply to you.This warranty gives you specic legal
rights and you may have other rights which vary from state to state.
Page 20

20
FCC Compliance
(Applies to TBCTM Hand-Held Programmer With Radio Models Only) This
equipment generates and uses radio frequency energy and if not installed
and used properly, that is, in strict accordance with the manufacturer’s
instructions, may cause interference to radio and television reception. It
has been type tested and found to comply with the limits for a FCC Class
B computing device in accordance with the specications in Subpart
J of Part 15 of FCC Rules, which are designed to provide reasonable
protection against such interference in a residential installation. However,
there is no guarantee that interference will not occur in a particular
installation. If this equipment does cause interference to radio or television
reception, which can be determined by turning the equipment off and on,
the user is encouraged to try to correct the interference by one or more of
the following measures:
• Reorient the receiving antenna.
• Relocate the irrigation controller with respect to the receiver.
• Move the irrigation controller away from the receiver.
• Plug the irrigation controller into a different outlet so that the irrigation
controller and receiver are on different branch circuits.
If necessary, the user should consult the dealer or an experienced radio/
television technician for additional suggestions. The user may nd the
following booklet prepared by the Federal Communications Commission
helpful: “How to Identify and Resolve Radio/TV Interference Problems.”
This booklet is available from the U.S. Government Printing Ofce,
Washington, DC 20402. Stock No. 004-000-00345-4.
Specifications
Mechanical Specifications
TBCTMWP Dimensions: 3.85" x 3.35" x 5.20" (98 x 85 x 132 mm) (W x H x D)
TBCTMWP Weight: 1.65 lbs (0.75 kg)
TBCTMHH Dimensions: 3.00" x 2.00" x 6.25" (76 x 51 x 159 mm) (W x H x D)
TBCTMHH Weight: 0.50 lbs (0.23 kg)
Electrical Specifications
TBCTMWP Input Power: 9 VDC (up to two 9V alkaline batteries; not supplied)
TBCTMWP Station Output Power: Operates one 9 VDC latching solenoid
per station
TBCTMHH Input Power: 9 VDC alkaline battery (not supplied)
Operating Temperature: 14°F to 120°F (-10°C to 50°C)
Storage Temperature (excluding battery): -22°F to 149°F (-30°C to 65°C)
Maximum distance between TBC
TM
WP and a DC latching solenoid using
AWG #18 size wire: 200' (61m)
Technical Support Information
• U.S./Canada:
Phone: 1-877-345-TORO (8676) (7:30 am–4 pm, M–F, PT)
E-mail: irrigation.support@toro.com
• Europe:
Contact your local Toro distributor
E-mail: intlirrigation.support@toro.com
• Australia:
Phone: 1300-130-898
E-mail: intlirrigation.support@toro.com
© 2009 The Toro Company, Irrigation Div. • www.toro.com • P/N 373-0497 Rev. B
 Loading...