

Toro Recycler 20373 Operator's Manual
22inRecycler
ModelNo.20373—SerialNo.400000000andUp
®
Introduction
Thisrotary-blade,walk-behindlawnmowerisintendedto
beusedbyresidentialhomeowners.Itisdesignedprimarily
forcuttinggrassonwell-maintainedlawnsonresidential
properties.Itisnotdesignedforcuttingbrushorfor
agriculturaluses.
Readthisinformationcarefullytolearnhowtooperateand
maintainyourproductproperlyandtoavoidinjuryand
productdamage.Youareresponsibleforoperatingthe
productproperlyandsafely.
YoumaycontactTorodirectlyatwww .Toro.comforproduct
andaccessoryinformation,helpndingadealer,ortoregister
yourproduct.
Wheneveryouneedservice,genuineToroparts,oradditional
information,contactanAuthorizedServiceDealerorToro
CustomerServiceandhavethemodelandserialnumbersof
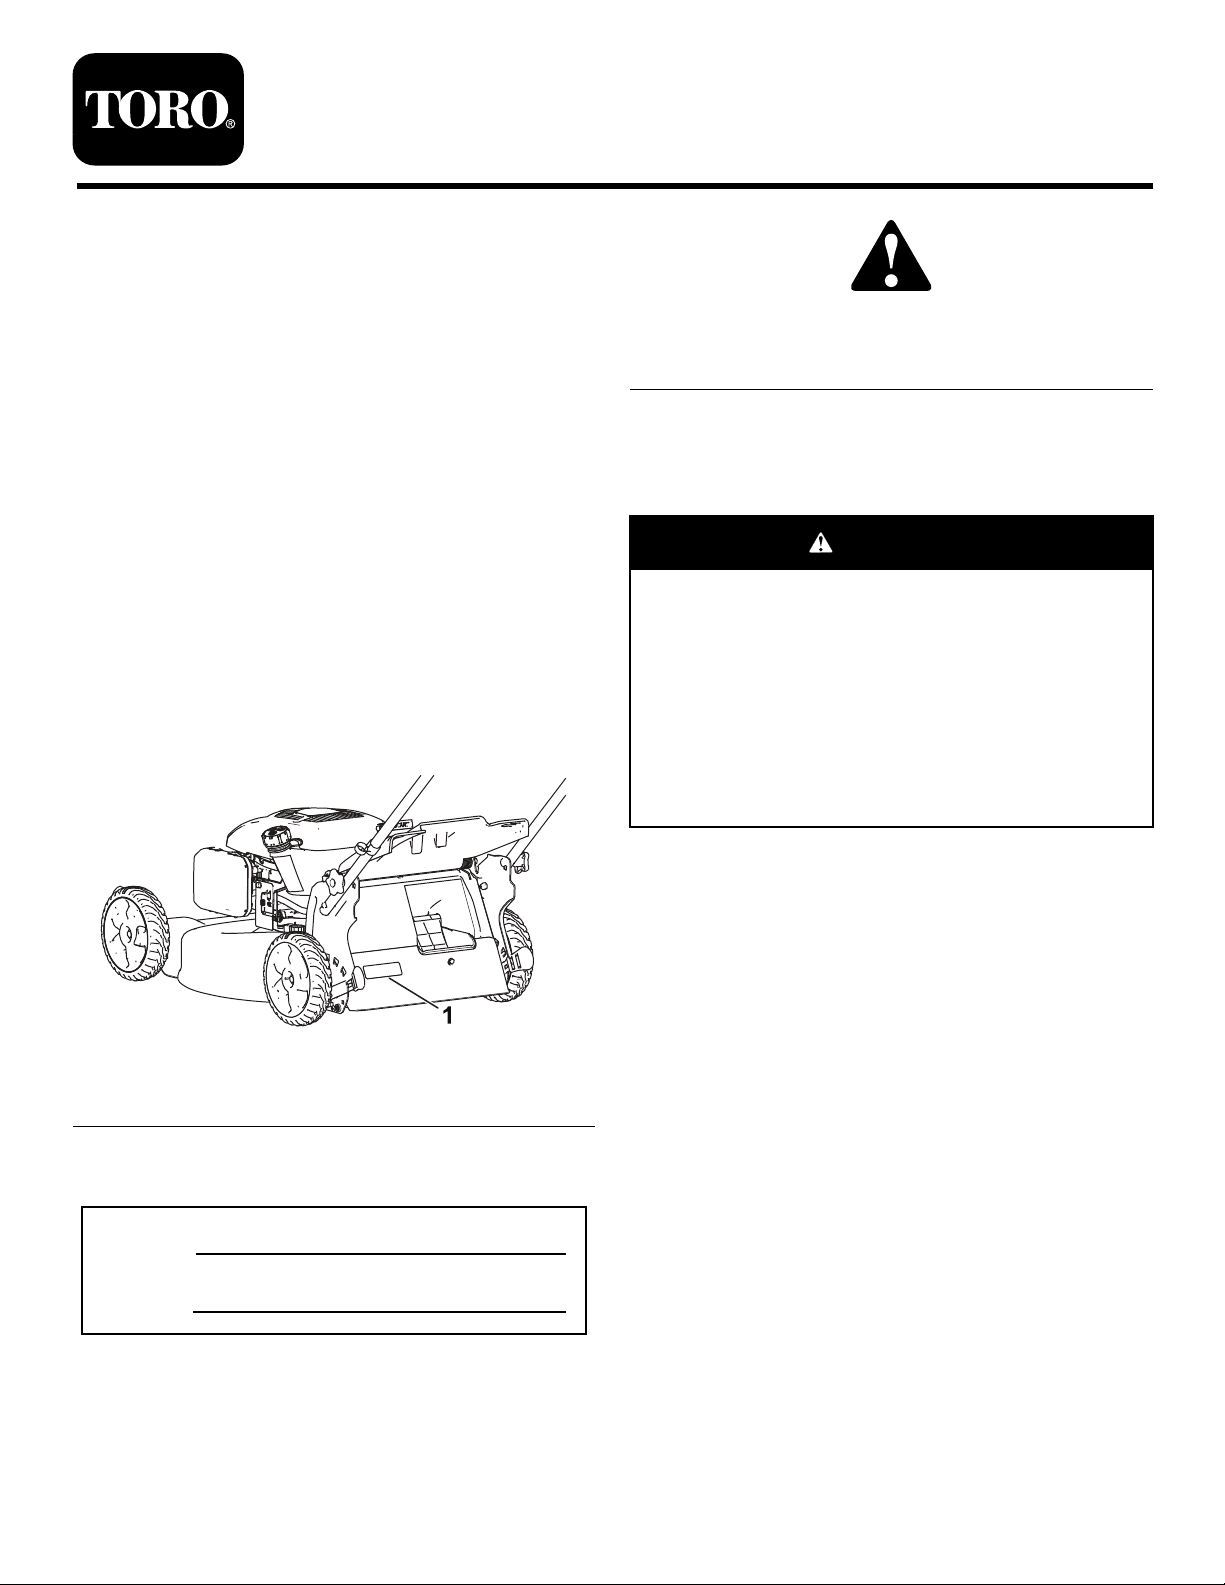
yourproductready.Figure1identiesthelocationofthe
modelandserialnumbersontheproduct.
FormNo.3408-966RevA
LawnMower
Operator'sManual
g000502
Figure2
1.Safety-alertsymbol
Thismanualuses2wordstohighlightinformation.
Importantcallsattentiontospecialmechanicalinformation
andNoteemphasizesgeneralinformationworthyofspecial
attention.
WARNING
CALIFORNIA
Proposition65Warning
Thisproductcontainsachemicalorchemicals
knowntotheStateofCaliforniatocausecancer,
birthdefects,orreproductiveharm.
Theengineexhaustfromthisproduct
containschemicalsknowntotheStateof
Californiatocausecancer,birthdefects,
orotherreproductiveharm.
Figure1
1.Modelandserialnumberplate
Writetheproductmodelandserialnumbersinthespace
below:
ModelNo.
SerialNo.
Thismanualidentiespotentialhazardsandhassafety
messagesidentiedbythesafety-alertsymbol(Figure2),
whichsignalsahazardthatmaycauseseriousinjuryordeath
ifyoudonotfollowtherecommendedprecautions.
ItisaviolationofCaliforniaPublicResourceCode
Section4442or4443touseoroperatetheengineonany
forest-covered,brush-covered,orgrass-coveredlandunless
theengineisequippedwithasparkarrester,asdenedin
Section4442,maintainedineffectiveworkingorderorthe
engineisconstructed,equipped,andmaintainedforthe
preventionofre.
g195421
ThissparkignitionsystemcomplieswithCanadianICES-002.
NetTorque:Thegrossornettorqueofthisenginewas
laboratoryratedbytheenginemanufacturerinaccordance
withtheSocietyofAutomotiveEngineers(SAE)J1940.
Asconguredtomeetsafety,emission,andoperating
requirements,theactualenginetorqueonthisclassofmower
willbesignicantlylower.Gotowww.Toro.comtoview
specicationsonyourmowermodel.
Important:Ifyouareusingthismachineabove1500m
(5,000ft)foracontinuousperiod,ensurethattheHigh
AltitudeKithasbeeninstalledsothattheenginemeets
CARB/EPAemissionregulations.TheHighAltitude
Kitincreasesengineperformancewhilepreventing
spark-plugfouling,hardstarting,andincreased
emissions.Onceyouhaveinstalledthekit,attach
thehigh-altitudelabelnexttotheserialdecalonthe
machine.ContactanyAuthorizedT oroServiceDealer
©2016—TheToro®Company
8111LyndaleAvenueSouth
Bloomington,MN55420
Registeratwww.T oro.com.
OriginalInstructions(EN)
PrintedintheUSA
AllRightsReserved
*3408-966*A

toobtaintheproperHighAltitudeKitandhigh-altitude
labelforyourmachine.Tolocateadealerconvenientto
you,accessourwebsiteatwww .Toro.comorcontactour
ToroCustomerCareDepartmentatthenumber(s)listed
inyourEmissionControlWarrantyStatement.
Removethekitfromtheengineandrestoretheengine
toitsoriginalfactorycongurationwhenrunningthe
engineunder1500m(5,000ft).Donotoperateanengine
thathasbeenconvertedforhigh-altitudeuseatlower
altitudes;otherwise,youcouldoverheatanddamage
theengine.
Ifyouareunsurewhetherornotyourmachinehasbeen
convertedforhigh-altitudeuse,lookforthefollowing
label(Figure3).
Figure3
AfterOperation........................................................15
AfterOperatingSafety............................................15
CleaningundertheMachine.....................................15
FoldingtheHandle.................................................16
Maintenance.................................................................16
RecommendedMaintenanceSchedule(s)......................17
MaintenanceSafety.................................................17
PreparingforMaintenance.......................................17
ServicingtheAirFilter............................................18
ChangingtheEngineOil.........................................18
ReplacingtheBlade................................................19
CleaningtheBlade-Brake-ClutchShield.....................19
AdjustingtheSelf-PropelDrive................................20
Storage........................................................................20
PreparingtheMachineforStorage............................20
RemovingtheMachinefromStorage.........................20
Safety
ThismachinehasbeendesignedinaccordancewithANSI
decal127-9363
B71.1-2012.
Contents
Introduction..................................................................1
Safety...........................................................................2
GeneralSafety.........................................................2
SafetyandInstructionalDecals.................................3
Setup............................................................................5
1AssemblingandUnfoldingtheHandle.....................5
2FillingtheEnginewithOil......................................5
3AssemblingtheGrassBag......................................7
ProductOverview..........................................................8
Operation.....................................................................8
BeforeOperation.......................................................8
BeforeOperationSafety...........................................8
FillingtheFuelTank................................................9
CheckingtheEngine-OilLevel..................................9
AdjustingtheHandleHeight....................................10
AdjustingtheCuttingHeight....................................10
DuringOperation.....................................................11
DuringOperatingSafety..........................................11
StartingtheEngine.................................................11
UsingtheSelf-PropelDrive.....................................11
ShuttingOfftheEngine..........................................12
EngagingtheBlade.................................................12
DisengagingtheBlade.............................................12
CheckingtheBlade-Brake-ClutchOperation..............12
RecyclingtheClippings...........................................13
BaggingtheClippings.............................................13
OperatingtheBag-on-DemandLever.......................13
Side-DischargingtheClippings.................................14
OperatingTips......................................................15
GeneralSafety
Thisproductiscapableofamputatinghandsandfeetand
ofthrowingobjects.Alwaysfollowallsafetyinstructionsto
avoidseriouspersonalinjury.
Usingthisproductforpurposesotherthanitsintendeduse
couldprovedangeroustoyouandbystanders.
•ReadandunderstandthecontentsofthisOperator’ sManual
beforestartingtheengine.
•Donotputyourhandsorfeetnearmovingcomponents
ofthemachine.
•Donotoperatethemachinewithoutallguardsandother
safetyprotectivedevicesinplaceandworkingonthe
machine.
•Keepclearofanydischargeopening.Keepbystandersa
safedistanceawayfromthemachine.
•Keepchildrenoutoftheoperatingarea.Neverallow
childrentooperatethemachine.
•Stopthemachineandshutofftheenginebeforeservicing,
fueling,oruncloggingthemachine.
Improperlyusingormaintainingthismachinecanresult
ininjury.Toreducethepotentialforinjury,complywith
thesesafetyinstructionsandalwayspayattentiontothe
safety-alertsymbol,whichmeansCaution,Warning,or
Danger—personalsafetyinstruction.Failuretocomplywith
theseinstructionsmayresultinpersonalinjuryordeath.
Youcanndadditionalitemsofsafetyinformationintheir
respectivesectionsthroughoutthismanual.
2

SafetyandInstructionalDecals
Safetydecalsandinstructionsareeasilyvisibletotheoperatorandarelocatednearanyareaofpotential
danger.Replaceanydecalthatisdamagedormissing.
Manufacturer'sMark
1.Indicatesthebladeisidentiedasapartfromtheoriginal
machinemanufacturer.
decaloemmarkt
94-8072
112-8867
1.Lock2.Unlock
117–2718
decal94-8072
decal125-5026
125-5026
1.Recyclingon2.Baggingon
decal112-8867
decal117-2718
decal125-5092
125–5092
1.Steponthedecktostarttheengine.
3
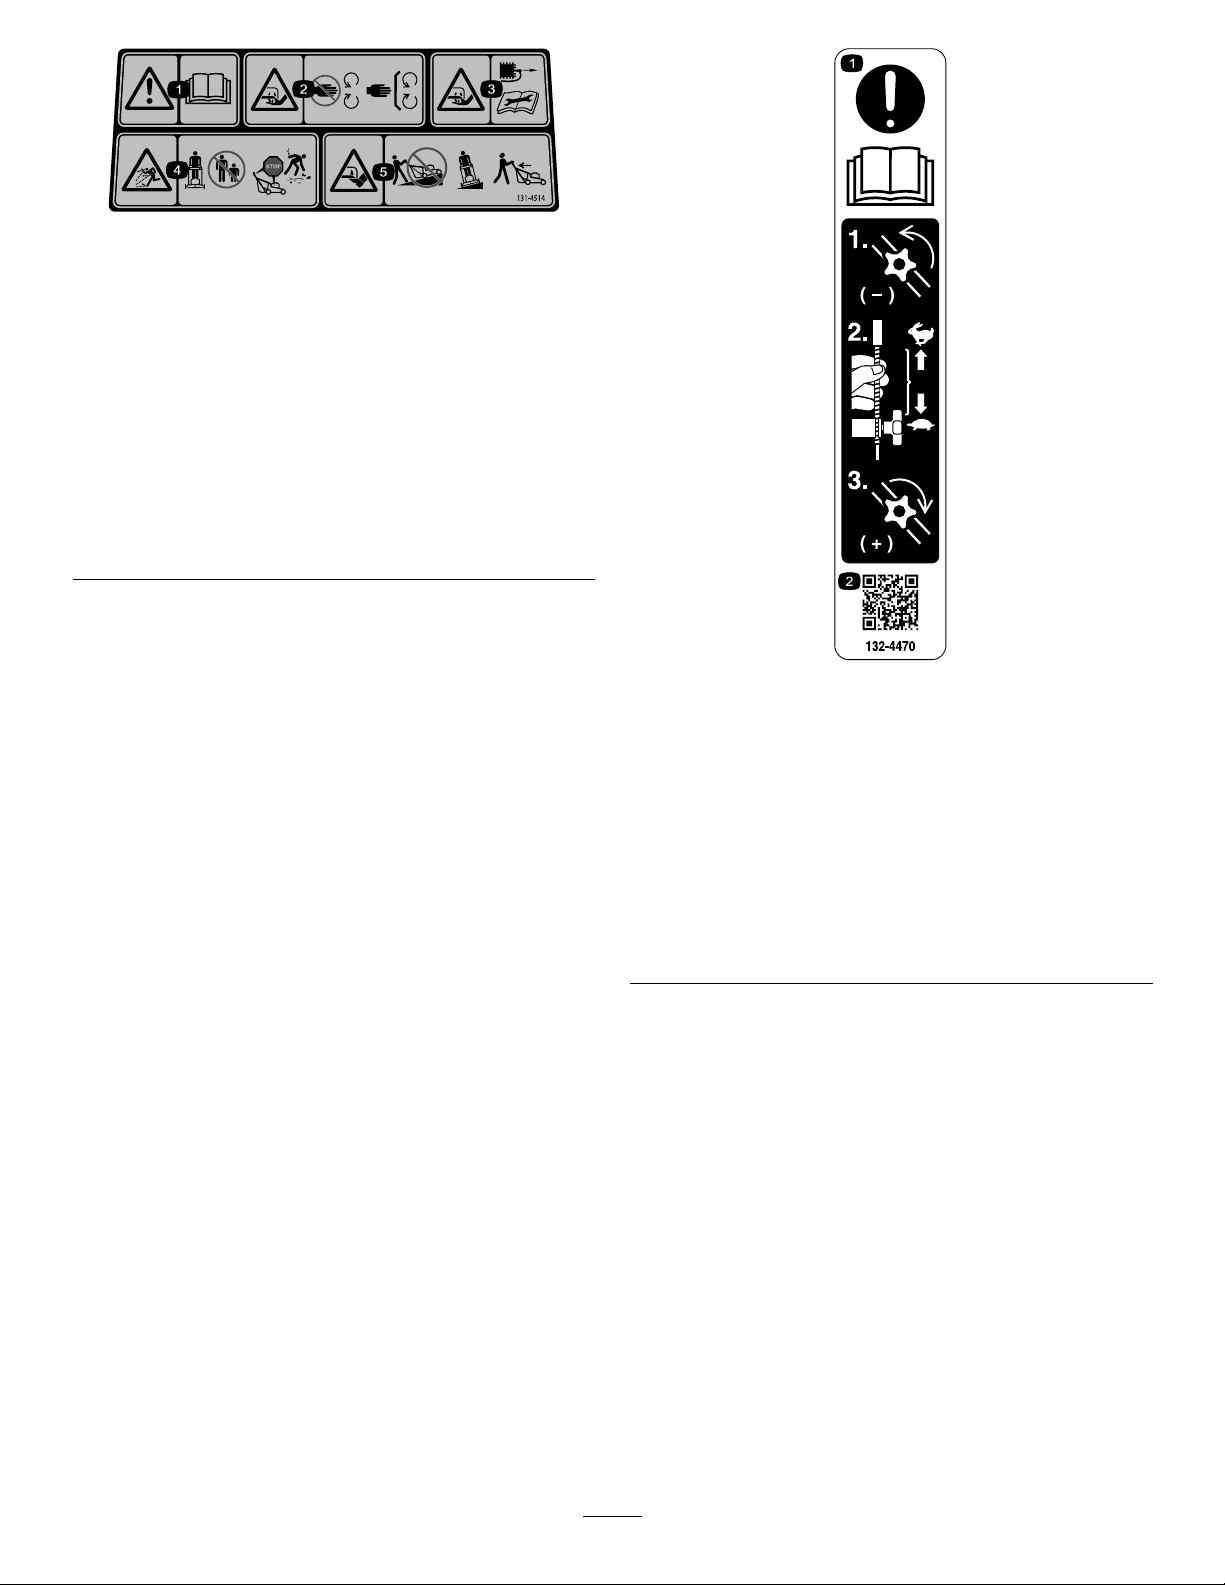
131-4514
1.Warning—readtheOperator'sManual.
2.Cutting/dismembermenthazardofhandorfoot,mower
blade—stayawayfrommovingparts;keepallguardsand
shieldsinplace.
3.Cutting/dismembermenthazardofhandorfoot,mower
blade—disconnectthespark-plugwireandreadthe
instructionsbeforeservicingorperformingmaintenance.
4.Thrownobjecthazard—keepbystandersasafedistance
awayfromthemachine;shutofftheenginebeforeleaving
theoperatingposition;pickupanydebrisbeforemowing.
5.Cutting/dismembermenthazardofhandorfoot,mower
blade—donotoperateupanddownslopes;operatesideto
sideonslopes;lookbehindyouwhenbackingup.
decal131-4514b
decal132-4470
132-4470
TractionAdjustment
1.Attention;readthe
Operator'sManual—1)
Loosentheknobbyturning
itcounterclockwise;2)Pull
thecable(s)awayfrom
theenginetodecrease
thetraction,orpushthe
cable(s)towardtheengine
toincreasethetraction;
3)Tightentheknobby
turningitclockwise.
2.ScantheQRcodefor
moreinformationon
tractionadjustment.
4
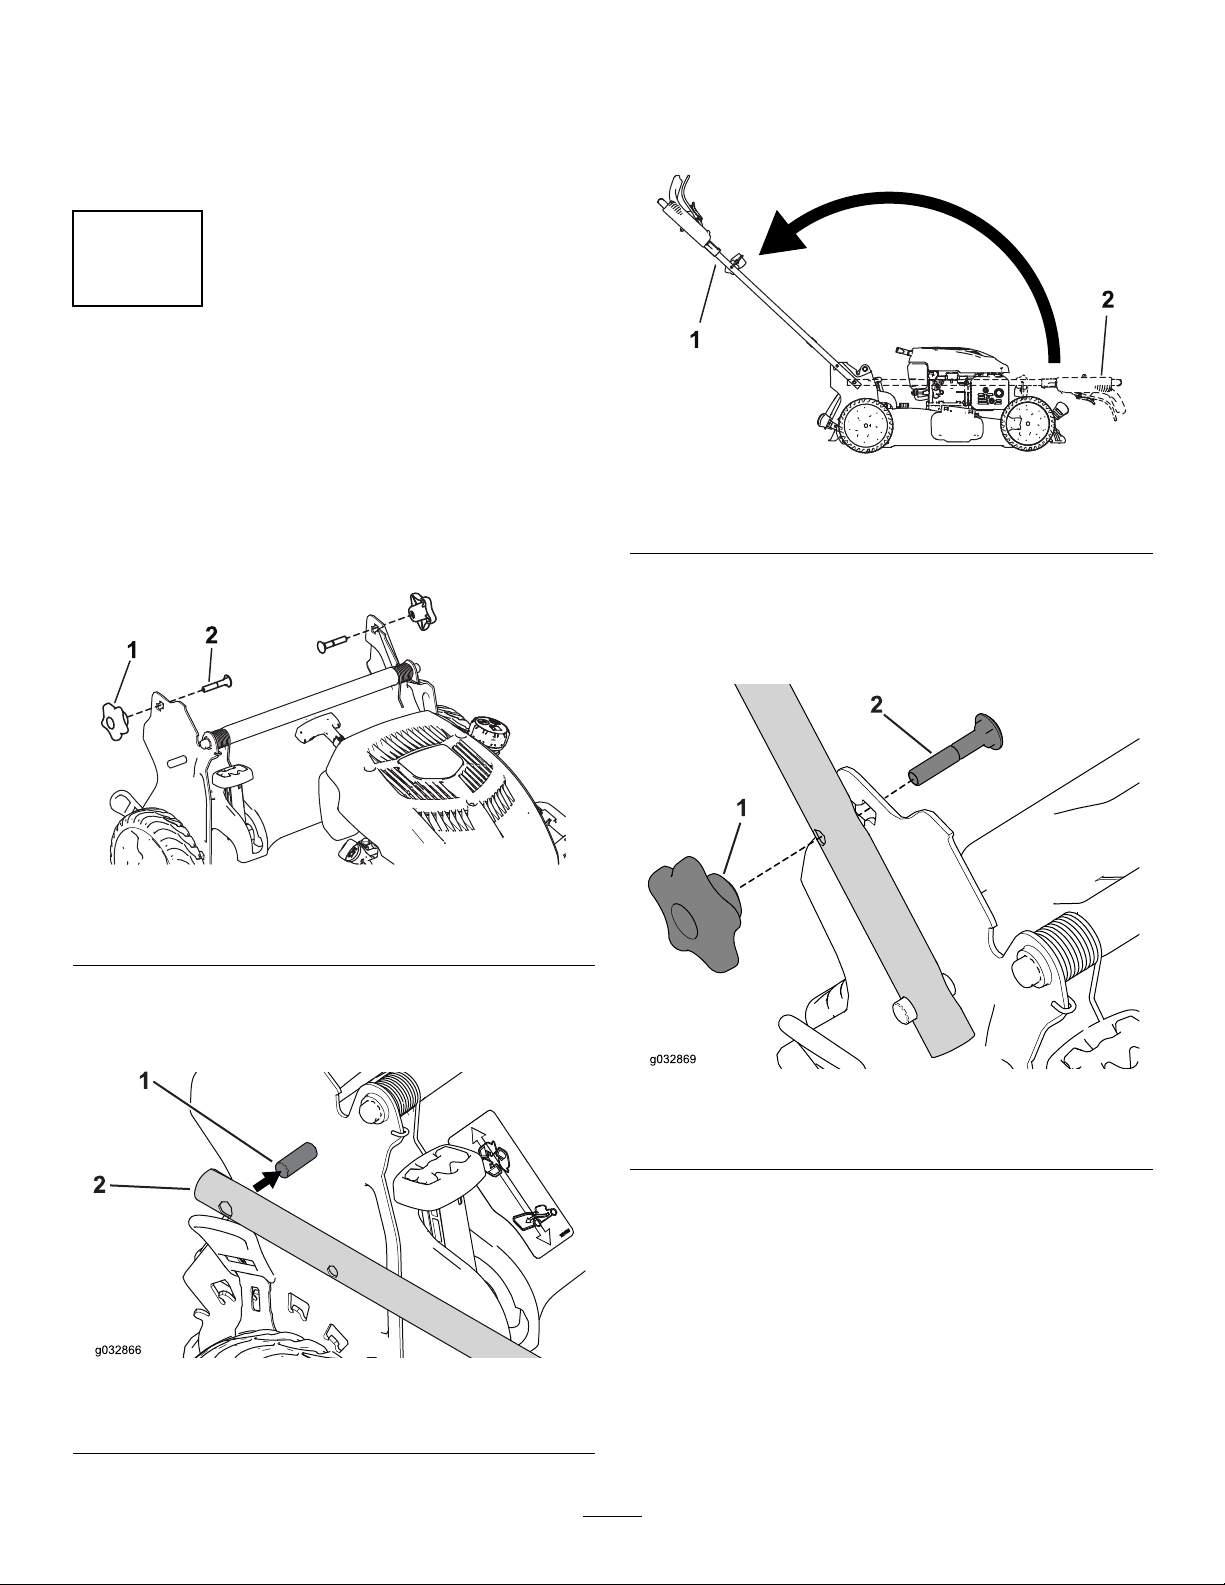
Setup
Note:Thepinsdonotshowthroughtheholesinthe
handleendswhenthehandleisinthefoldedposition.
Important:Removeanddiscardtheprotectiveplastic
sheetthatcoverstheengineandanyotherplasticor
wrappingonthemachine.
1
AssemblingandUnfoldingthe Handle
NoPartsRequired
Procedure
1.Removeandsavethe2handleknobsand2carriage
boltsfromthehandlebrackets(Figure4).
3.Unfoldthehandletotheoperatingpositionbyrotating
itrearward(Figure6).
Figure6
1.Operatingposition
4.Insertthecarriagebolt(withtheboltheadtoward
theinside)throughtheupperorlowersquareholein
handlebracketandtheupperholeinthehandleend
(Figure7).
2.Foldedposition
g195431
Figure4
1.Handleknob(2)2.Carriagebolt(2)
2.Installthehandleendsontothemowerhousingsothat
thepinattachedtoeachhandlebracketisinthelower
holeofitsrelatedhandleend(Figure5).
Figure5
1.Pin2.Handleend
g195430
g032869
Figure7
1.Handleknob
5.Looselyinstallthehandleknobsontothecarriagebolts.
6.Refertosteps3through5ofAdjustingtheHandle
Height(page10).
g032866
2.Carriagebolt
5

wait3minutes,andrepeatsteps5through7until
theoillevelonthedipstickisatthecorrectlevel.
2
FillingtheEnginewithOil
NoPartsRequired
Procedure
Important:Yourmachinedoesnotcomewithoilin
theengine,butitdoescomewithabottleofoil.Before
startingtheengine,lltheenginewithoil.
Engineoilcapacity:0.53L(18oz)
Oilviscosity:SAE30orSAE10W-30detergentoil
APIserviceclassication:SJorhigher
Note:Whenthecrankcaseisempty,pourabout3/4of
thecrankcasecapacityofoilinthecrankcase,thendothe
following:
1.Movethemachinetoalevelsurface.
2.Removethedipstickbyrotatingthecap
counterclockwiseandpullingitout(Figure8).
•Iftheoillevelonthedipstickistoohigh,drain
theexcessoiluntiltheoillevelonthedipstickis
atthecorrectlevel;refertoChangingtheEngine
Oil(page18).
Important:Iftheoillevelinthecrankcaseistoo
lowortoohighandyouruntheengine,youmay
damagetheengine.
8.Installthedipstickintotheoil-lltubesecurely.
Figure8
1.Full3.Low
2.High
3.Carefullypourabout3/4oftheenginecapacityofoil
intotheoil-lltube.
4.Waitabout3minutesfortheoiltosettleintheengine.
5.Wipethedipstickcleanwithacleancloth.
6.Insertthedipstickintotheoil-lltube,butdonot
screwitin,thenremovethedipstick.
7.Readtheoillevelonthedipstick(Figure9).
•Iftheoillevelonthedipstickistoolow ,carefully
pourasmallamountofoilintotheoil-lltube,
g186624
6
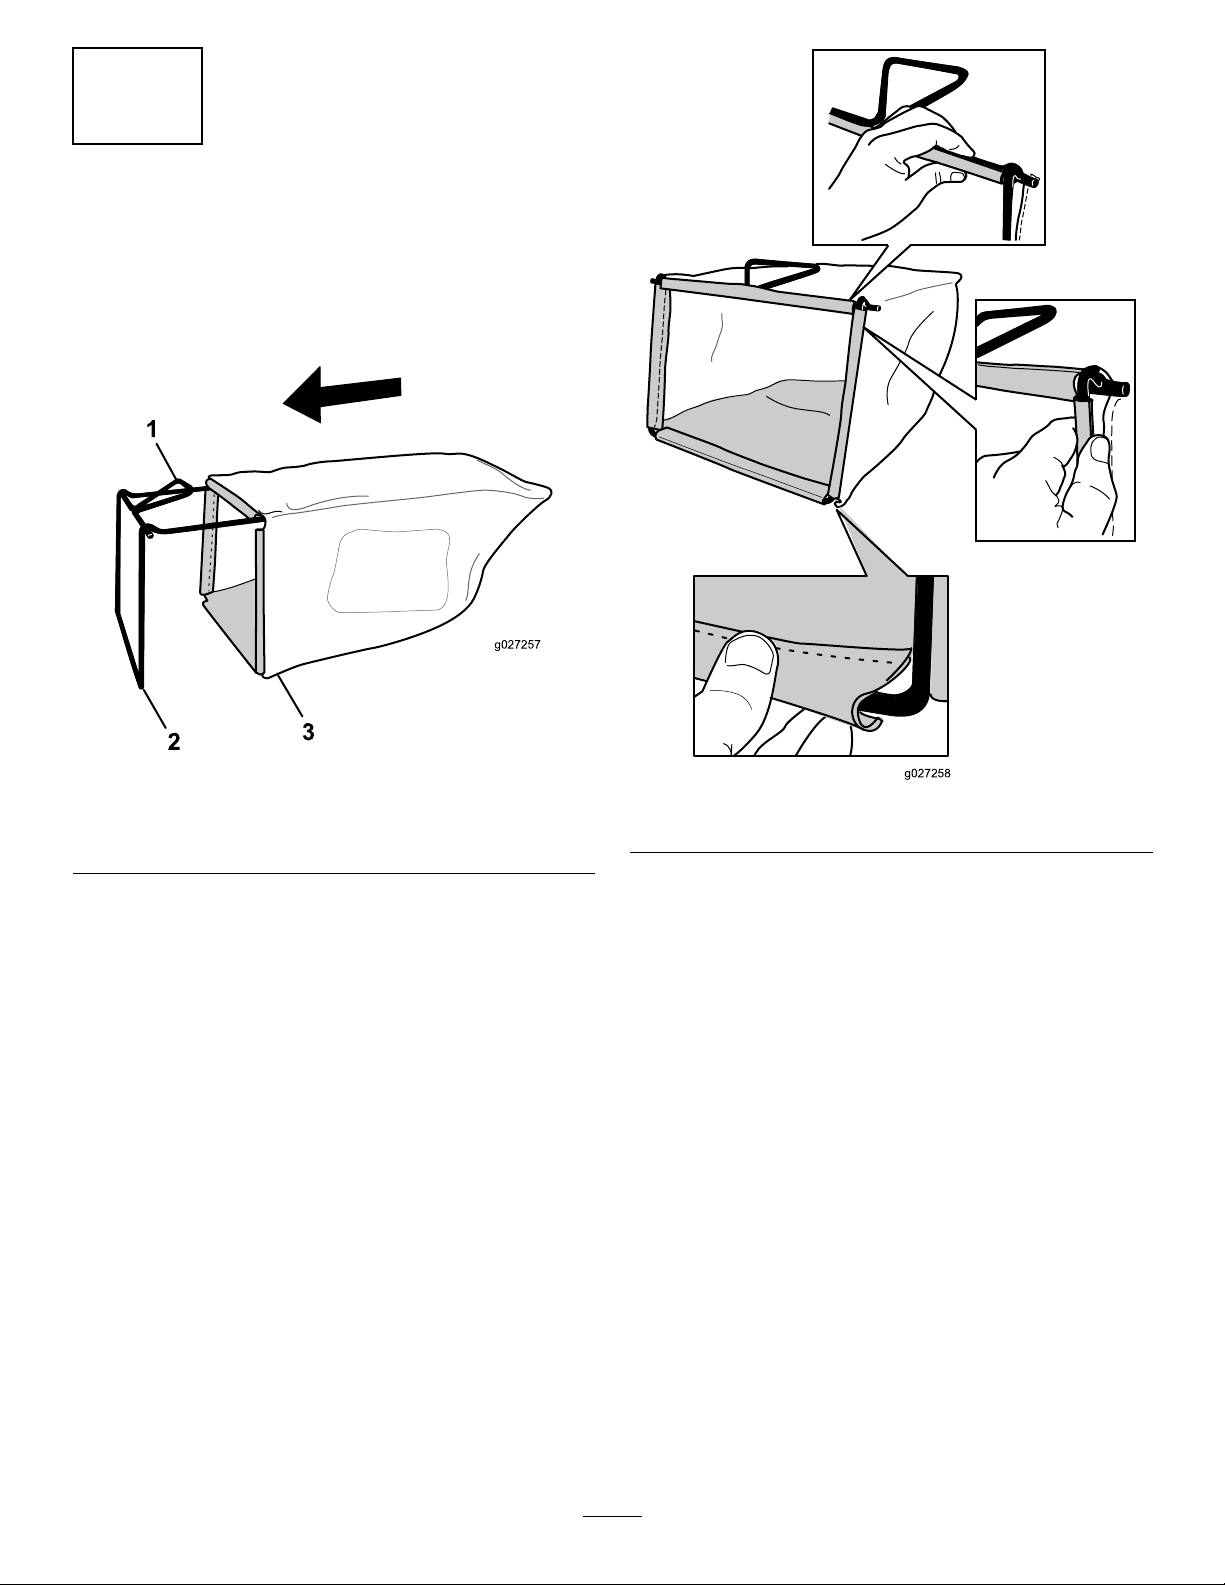
3
g027257
1
2
3
g027258
AssemblingtheGrassBag
NoPartsRequired
Procedure
1.SlipthegrassbagovertheframeasshowninFigure9.
Figure9
1.Handle
2.Frame
Note:Donotslipthebagoverthehandle(Figure9).
2.Hookthebottomchannelofthebagontothebottom
oftheframe(Figure10).
3.Grassbag
g027257
g027258
Figure10
3.Hookthetopandsidechannelsofthebagontothetop
andsidesoftheframe,respectively(Figure10).
7
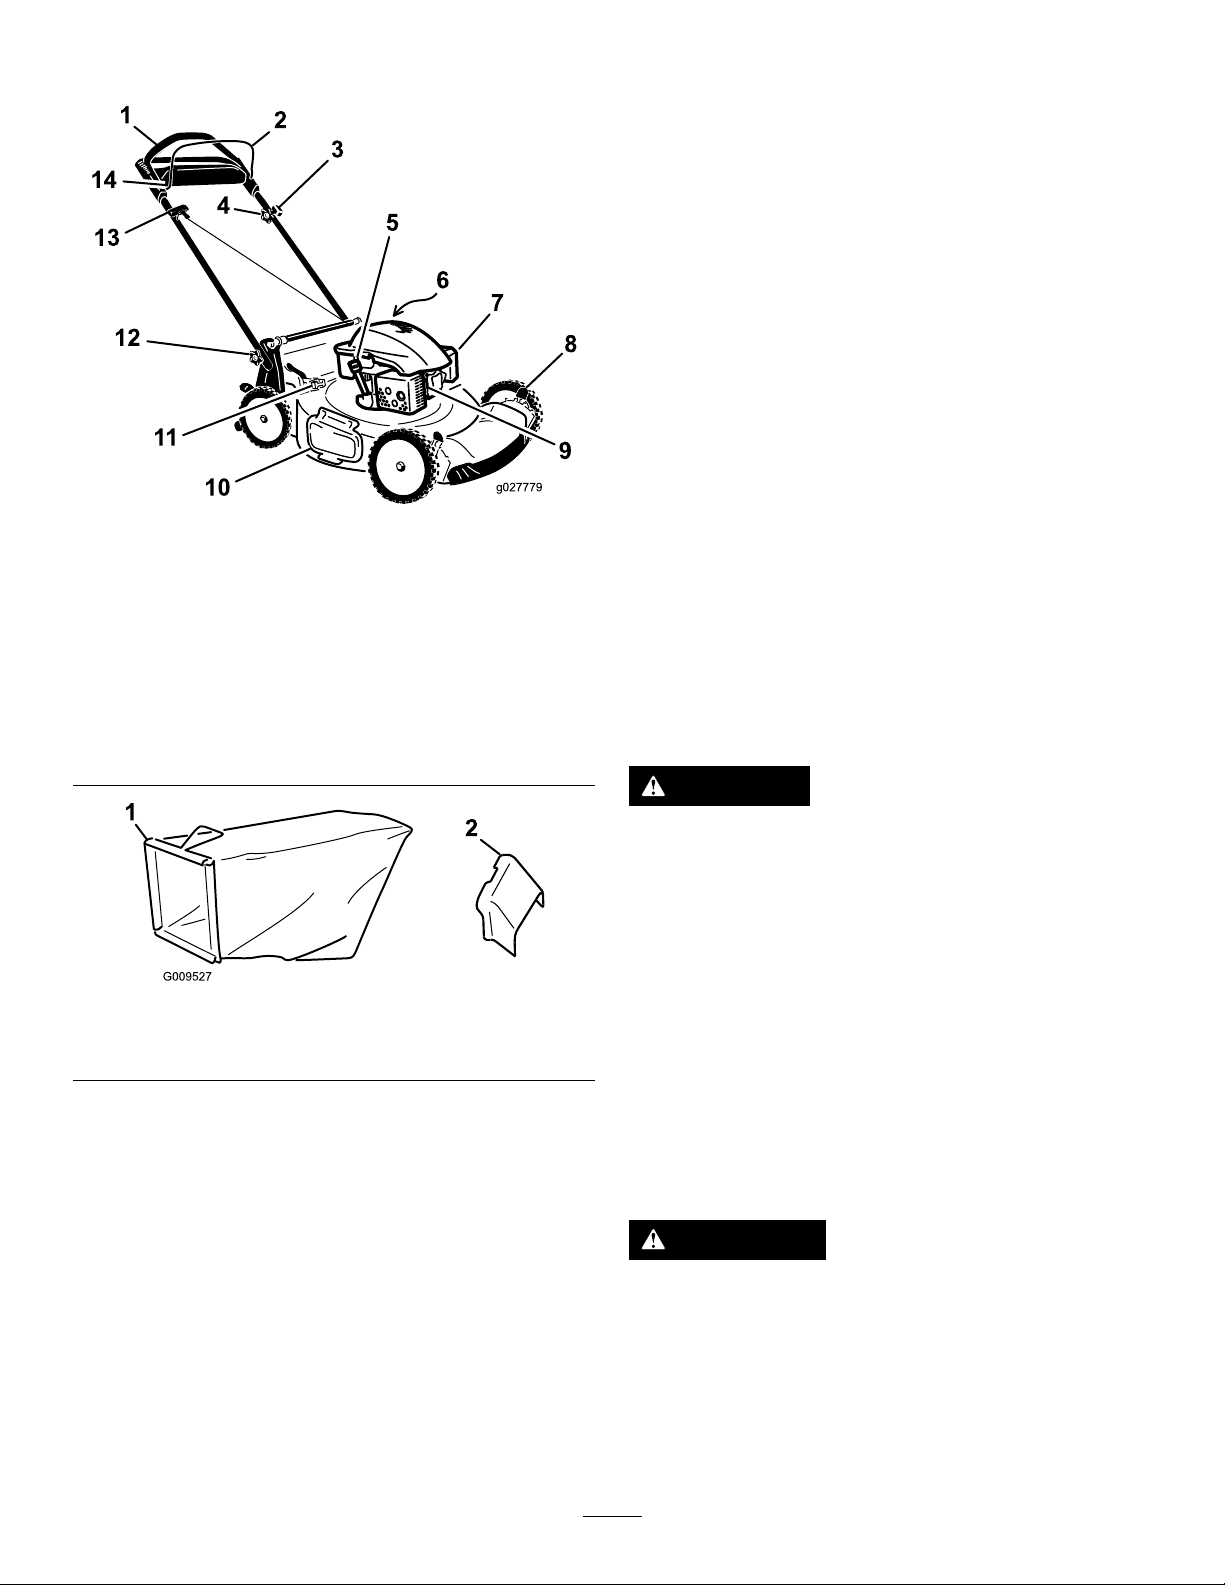
ProductOverview
14
g027779
Figure11
1.Handle
2.Blade-controlbar
3.Ignitionswitch
4.Adjustmentknobforthe
self-propeldrive
5.Oilll/dipstick12.Handleknob(2)
6.Fuel-tankcap(notshown)
7.Airlter14.Control-barlock
8.Cutting-heightlever(4)
9.Sparkplug
10.Side-dischargedoor
11.Bag-on-demandlever
13.Recoil-starthandle
Operation
BeforeOperation
BeforeOperationSafety
GeneralSafety
•Becomefamiliarwiththesafeoperationoftheequipment,
operatorcontrols,andsafetysigns.
•Checkthatallguardsandsafetydevices,suchasdoors
and/orgrasscatchers,areinplaceandworkingproperly.
•Alwaysinspectthemachinetoensurethattheblades,
bladebolts,andcuttingassemblyarenotwornor
damaged.
•Inspecttheareawhereyouwillusethemachineand
g027779
removeallobjectsthatthemachinecouldthrow .
•Adjustingthecuttingheightmaybringyouintocontact
withthemovingblade,causingseriousinjury.
–Shutofftheengineandwaitforallmovingpartsto
stop.
–Donotputyourngersunderthehousingwhen
adjustingthecuttingheight.
FuelSafety
Figure12
1.Grassbag2.Side-dischargechute
DANGER
Fuelisextremelyammableandhighlyexplosive.
Areorexplosionfromfuelcanburnyouand
othersandcandamageproperty.
•Topreventastaticchargefromignitingthefuel,
placethecontainerand/ormachinedirectlyon
thegroundbeforelling,notinavehicleoron
g009527
anobject.
•Fillthefueltankoutdoors,inanopenarea,when
theengineiscold.Wipeupanyfuelthatspills.
•Donothandlefuelwhensmokingoraroundan
openameorsparks.
•Storefuelinanapprovedcontainerandkeepit
outofthereachofchildren.
WARNING
Fuelisharmfulorfatalifswallowed.Long-term
exposuretovaporscancauseseriousinjuryand
illness.
•Avoidprolongedbreathingofvapors.
•Keepyourhandsandfaceawayfromthenozzle
andthefuel-tankopening.
•Keepfuelawayfromyoureyesandskin.
8
 Loading...