

Page 1
22in Recycler ®Lawn Mower
Model No. 20073--Serial No. 270000001 and Up
Model No. 20073A--Serial No. 270000001 and Up
Model No. 20074_Serial No. 270000001 and Up
Model No. 20074A_Serial No. 270000001 and Up
Introduction
Form No. 3357-441 Rev A
Operator's Manual
Read this information carefully to learn how to operate and
m_nt_n your product properly and to avoid injury and
product damage. You are responsible %r operating the
product properly and safely.
You may contact Toro directly at www.Toro.com for
product and accessory information, help finding a dealer,
or to register your product.
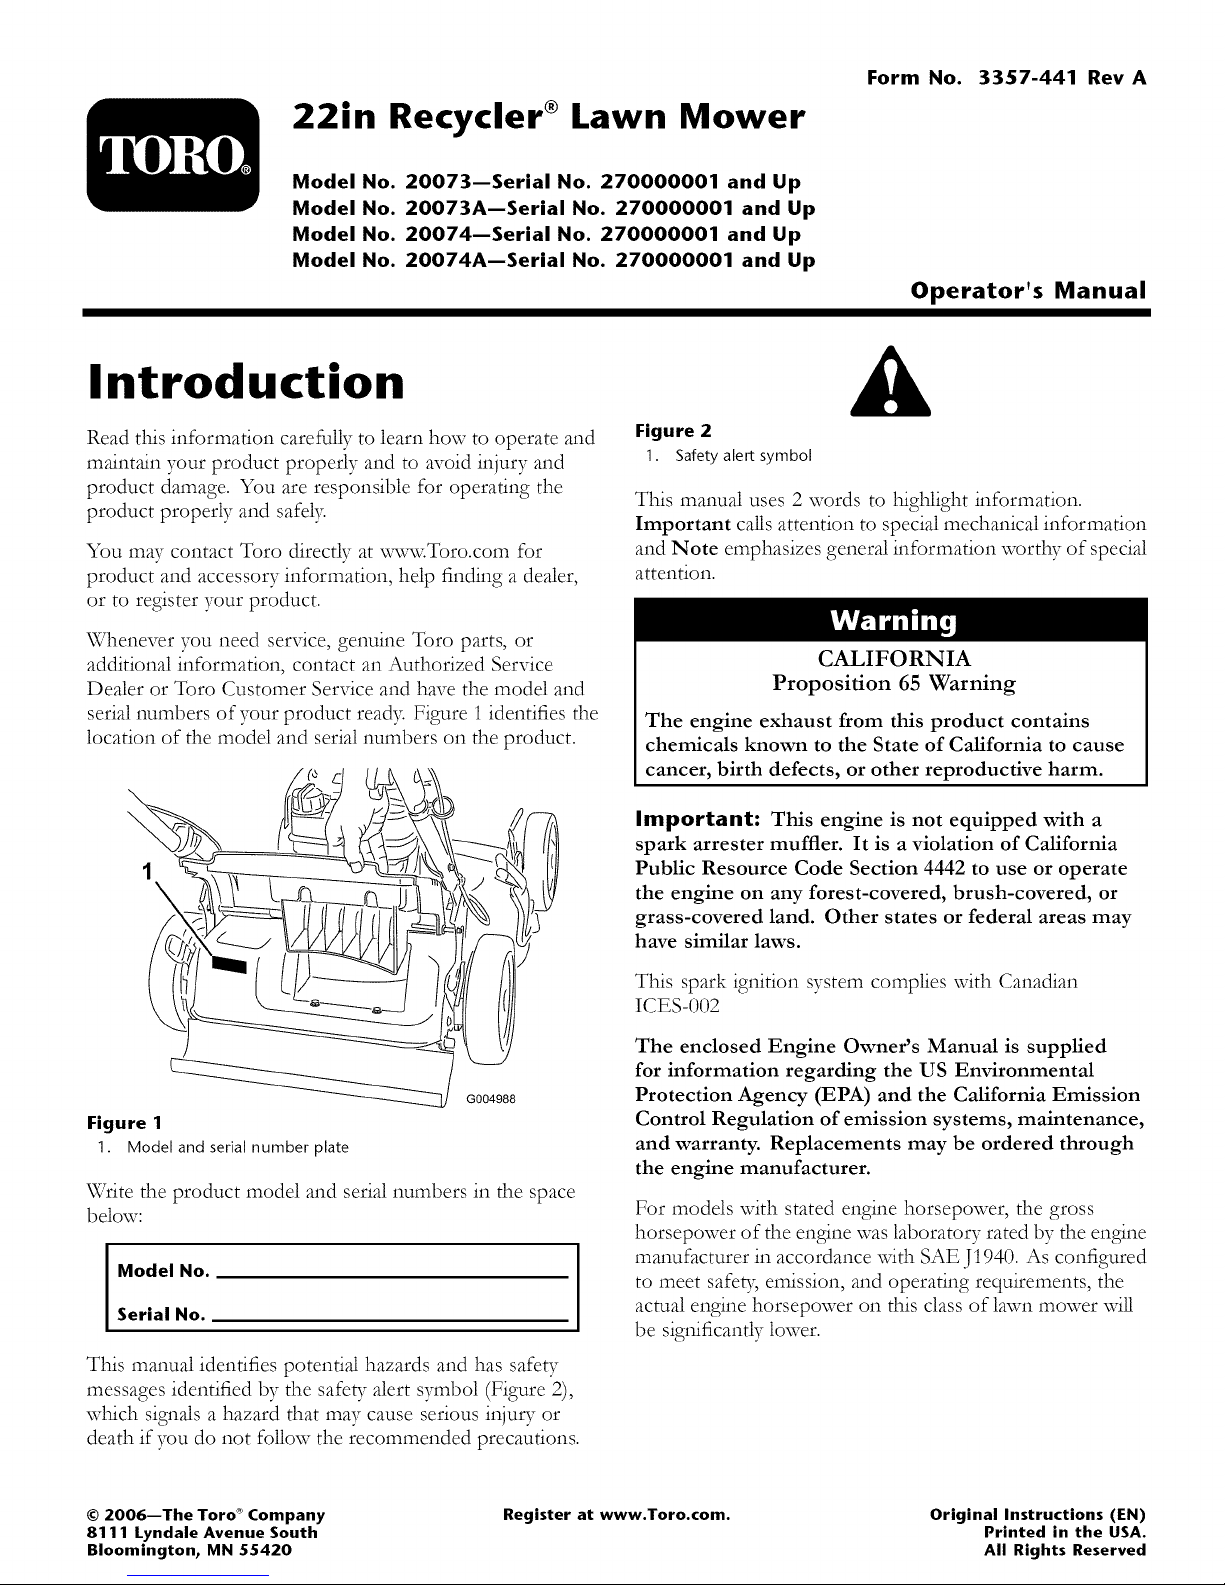
Whenever you need service, genuine Toro parts, or
additional information, contact an Authorized Service
Dealer or Toro Customer Service and have the model and
serial numbers of your product read> Figure 1 identifies the
location of the model and serial numbers on the product.
\
1
Figure 2
1. Safetyalert symbol
This manual uses 2 words to highlight information.
Important calls attention to special mechanical information
and Note emphasizes general information worthy of special
attention.
CALIFORNIA
Proposition 65 Warning
The engine exhaust from this product contains
chemicals known to the State of California to cause
cancer, birth defects, or other reproductive harm.
Important: This engine is not equipped with a
spark attester muffler. It is a violation of California
Public Resource Code Section 4442 to use or operate
the engine on any forest-covered, brush-covered, or
grass-covered land. Other states or federal areas may
have similar laws.
This spark ignition system complies with Canadian
ICES-002
Figure 1
1. Model and serial number plate
\Vrite the product model and serial numbers in the space
below:
Model No.
Serial No.
This manual identifies potential hazards and has safety
messages identified by the safety alert symbol (Fgure 2),
which signals a hazard that may cause serious injury or
death if you do not follow the recommended precautions.
© 2006--The Toro _ Company
8111 Lyndale Avenue South
Bloomington, MN 55420
The enclosed Engine Owner's Manual is supplied
for information regarding the US Environmental
G004988
Register at www.Toro.com. Original Instructions (EN)
Protection Agency (EPA) and the California Emission
Control Regulation of emission systems, maintenance,
and warranty. Replacements may be ordered through
the engine manufacturer.
For models with stated engine horsepower, the gross
horsepower of the engine was laboratory rated by the engine
manufacturer in accordance with SAE J1940. As configured
to meet safeb, emission, and operating requirements, the
actual engine horsepower on this class of lawn mower will
be sgnificantly lower.
Printed in the USA.
All Rights Reserved
Page 2
Safety
This lawn mower meets or exceeds the CPSC blade safety
requirements for walk-behind rotary lawn mowers and the
B71.t specifications of the American National Standards
Institute in effect at the time of production.
Read and understand the contents of this manual
before you start the engine.
The safety alert symbol (Figure 2) is used to alert you to
potential personal injury hazards. Obey all safety messages
that follow this symbol to avoid possible injury or death.
Improperly using or maintaining this mower could result in
injury or death. To reduce this potential, comply with the
following safety instructions.
The following instructions have been adapted from the
ANSI/OPEI standard B71.t-2003.
This cutting machine can amputate hands and feet and
throw objects. Failure to observe the following safety
instructions could result in serious injury or death.
General Operation
• Read, understand, and follow all instructions on the
machine and in the manual(s) before starting.
• Do not put hands or feet near or under the machine.
Keep clear of the discharge opening at all times.
• Only allow responsible adults, who are familiar with the
instructions, to operate this machine.
• Clear the area of objects such as rocks, wire, toys, etc.,
which could be thrown by the blade. Stay behind the
handle when the engine is runnin&
• Be sure the area is clear of bystanders before operatin&
Stop machine if awone enters the area.
• Do not operate machine barefooted or while wearing
sandals. Always wear substantial footwear.
• Do not pull machine backward unless absolutely
necessar> Always look down and behind before and
while moving backward.
• Never direct discharged material toward awone. Avoid
discharging material against a wall or obstruction.
Material may ricochet back toward the operator. Stop
the blade when crossing gravel surfaces.
• Do not operate machine without the entire grass
catcher, discharge guard, rear guard, or other safety
protective devices in place and worMng.
• Never leave a running machine unattended.
• Stop the engine and wait until the blade comes to a
complete stop before cleaning the machine, removing
grass catcher, or unclogging the discharge guard.
• Operate machine only in daylght or good artificial light.
• Do not operate machine while under the influence of
alcohol or drugs.
• Never operate mower in wet grass. Always be sure of
your footing; walk; never run.
• Disengage the drive system, if so equipped, before
starting the engine.
• If the machine should start to vibrate abnormally,
stop the engine and check for the cause immediatel>
Vibration is generally a warning of troul)le.
• Always wear eye protection when operating machine.
• See manufacturer's instructions for proper operation
and installation of accessories. Only use accessories
approved by the manufacturer.
Slope Operation
Slopes are a major factor related to slip and fall accidents,
which can result in severe injur> Operation on all slopes
require extra caution. If you feel uneasy on a slope, do
not mow it.
• Mow across the face of slopes; never up and down.
Exercise extreme caution when changing direction on
slopes.
• Watch for holes, ruts, bumps, rocks, or other l'ridden
objects. Uneven terrain could cause a slip and fall
accident. Tall grass can hide obstacles.
• Do not mow on wet grass or excessively steep slopes.
Poor footing could cause a slip and fall accident.
• Do not mow near drop-offs, ditches, or embankments.
You could lose your footing or balance.
Children
Tragic accidents can occur if the operator is not alert to
the presence of children. Children are often attracted to
the machine and the mowing activity. Never assume that
children will remain where you last saw them.
• Keep children out of the mowing area and under the
watchful care of a responsible adult other than the
operator.
Be alert and turn mower off if a child enters the area.
Never allow children to operate the machine.
Use extra care when approaching blind corners, shrubs,
trees, or other objects that may block your view of a
child.
Service
Safe Handling of Gasoline
To avoid personal injury or property damage, use
extreme care in handling gasoline. Gasoline is
extremely flammable and the vapors are explosive.
Page 3
• Extinguish all cigarettes, cigars, pipes, and other sources
of ignition.
Mower blades are sharp. Wrap the blade or wear gloves,
and use extra caution when servicing them.
• Use only an approved gasoline container.
• Never remove gas cap or add fuel with the engine
running. Allow engine to cool be_re refueling.
Never refuel the machine indoors.
Never store the machine or fuel cont_ner where there
is an open i_ame, spark, or pilot light such as on a water
heater or on other appliances.
Never fill containers inside a vehicle or on a truck or
trailer bed with a plastic liner. Always place containers
on the ground away from your vehicle before filling.
Remove gas-powered equipment from the truck or
trailer and refuel it on the ground. If this is not possible,
then refuel such equipment with a portable container,
rather than from a gasoline dispenser nozzle.
Keep the nozzle in contact with the rim of the fuel
tank or container opening at all times until fueling is
complete. Do not use a nozzle lock-open device.
If fuel is spilled on clothing, change clothing
immediatel3=
Never overfill fuel tank. Replace gas cap and tighten
securel3:
Do not change the engine governor setting or overspeed
the engine.
Maintain or replace safety and instruction labels, as
necessary.
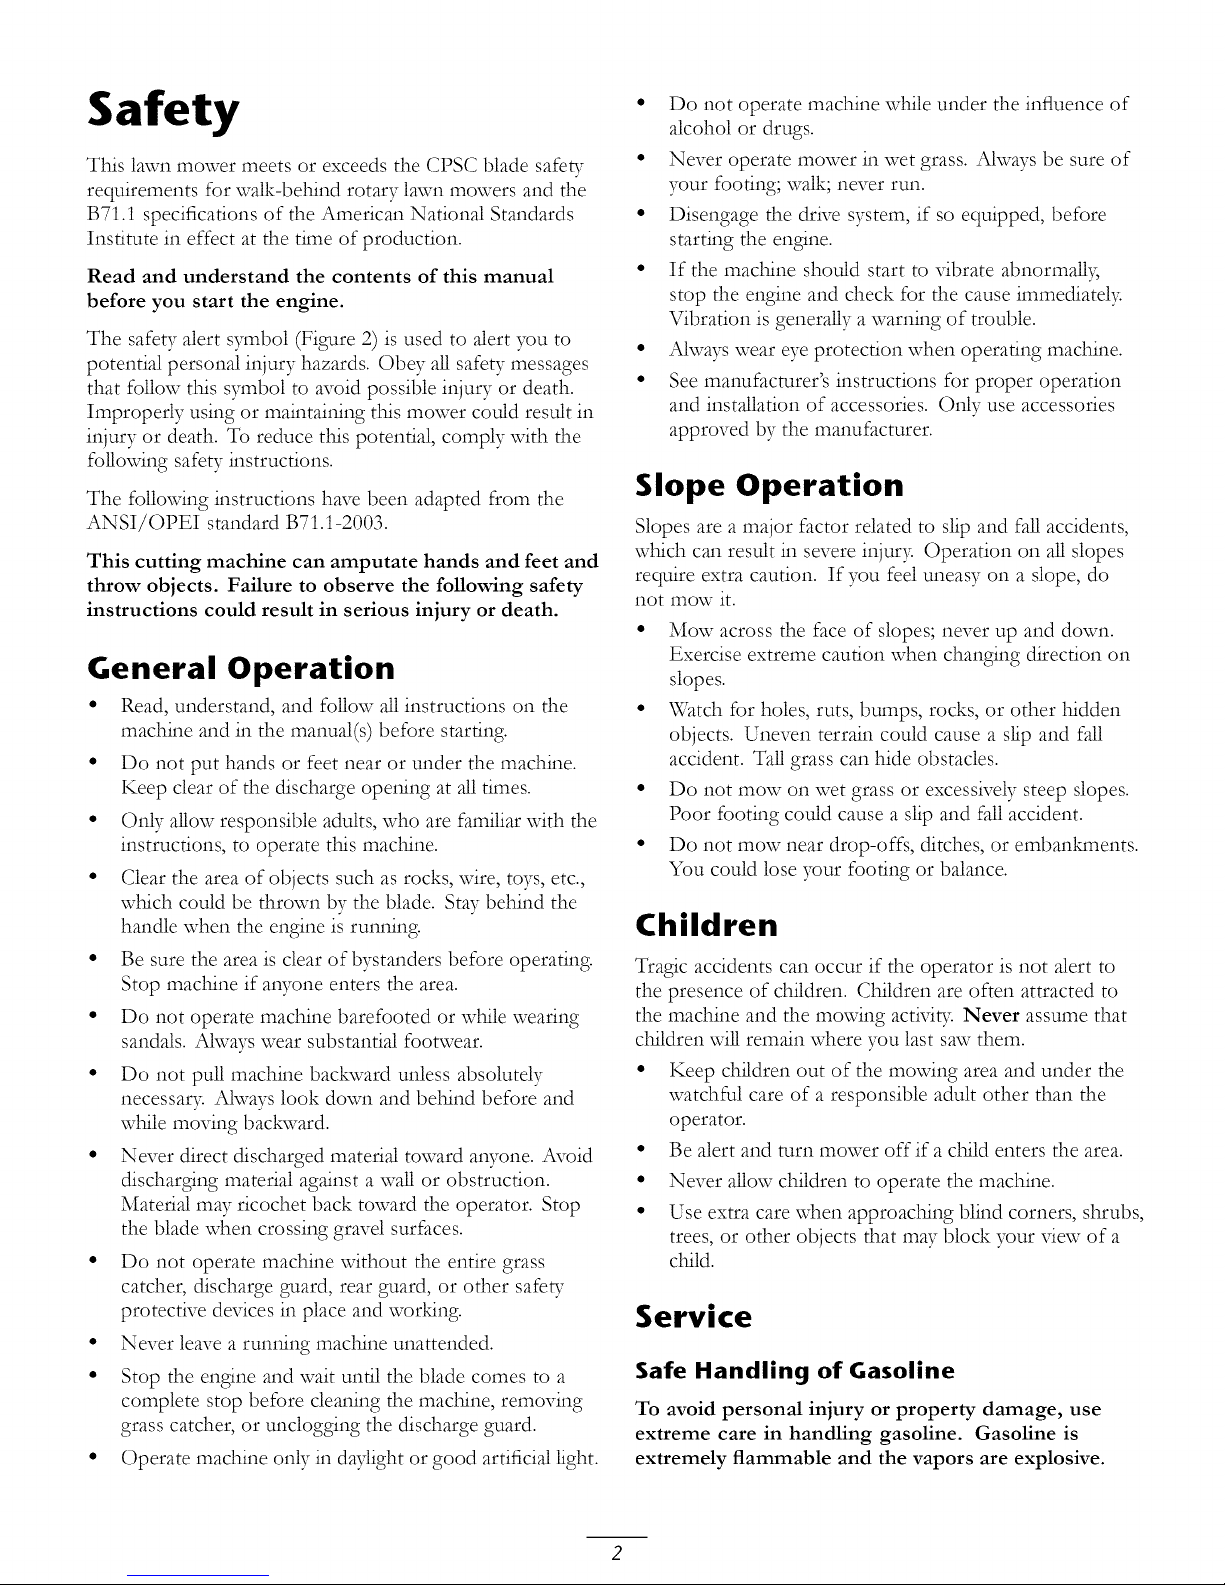
Safety and Instructional Decals
Important: Safety and instruction decals are located
near areas of potential danger. Replace damaged
decals.
Manufacturer's Mark
1. Indicates the blade is identified as a part from the original machine
manufacturer.
Exhaust contains carbon monoxide, an odorless,
deadly poison that can kill you.
Do not run the engine indoors or in an enclosed area.
General Service
Never operate machine in a closed area.
Keep all nuts and bolts tight to be sure the equipment is
in safe working condition.
Never tamper with safety devices. Check their proper
operation regularl3:
Keep machine free of grass, leaves, or other debris
build-up. Clean up oil or fuel spillage and remove
aW fuel-soaked debris. Allow machine to cool before
storing.
If you strike a foreign object, stop and inspect the
machine. Repair, if necessar 5 before starting.
Never make aW adjustments or repairs with the engine
runnin& Disconnect the spark plug wire and ground
against engine to prevent unintended starting.
Check grass catcher components and the discharge
guard frequently and replace with manufacturer's
recommended parts, when necessar7
94-8072
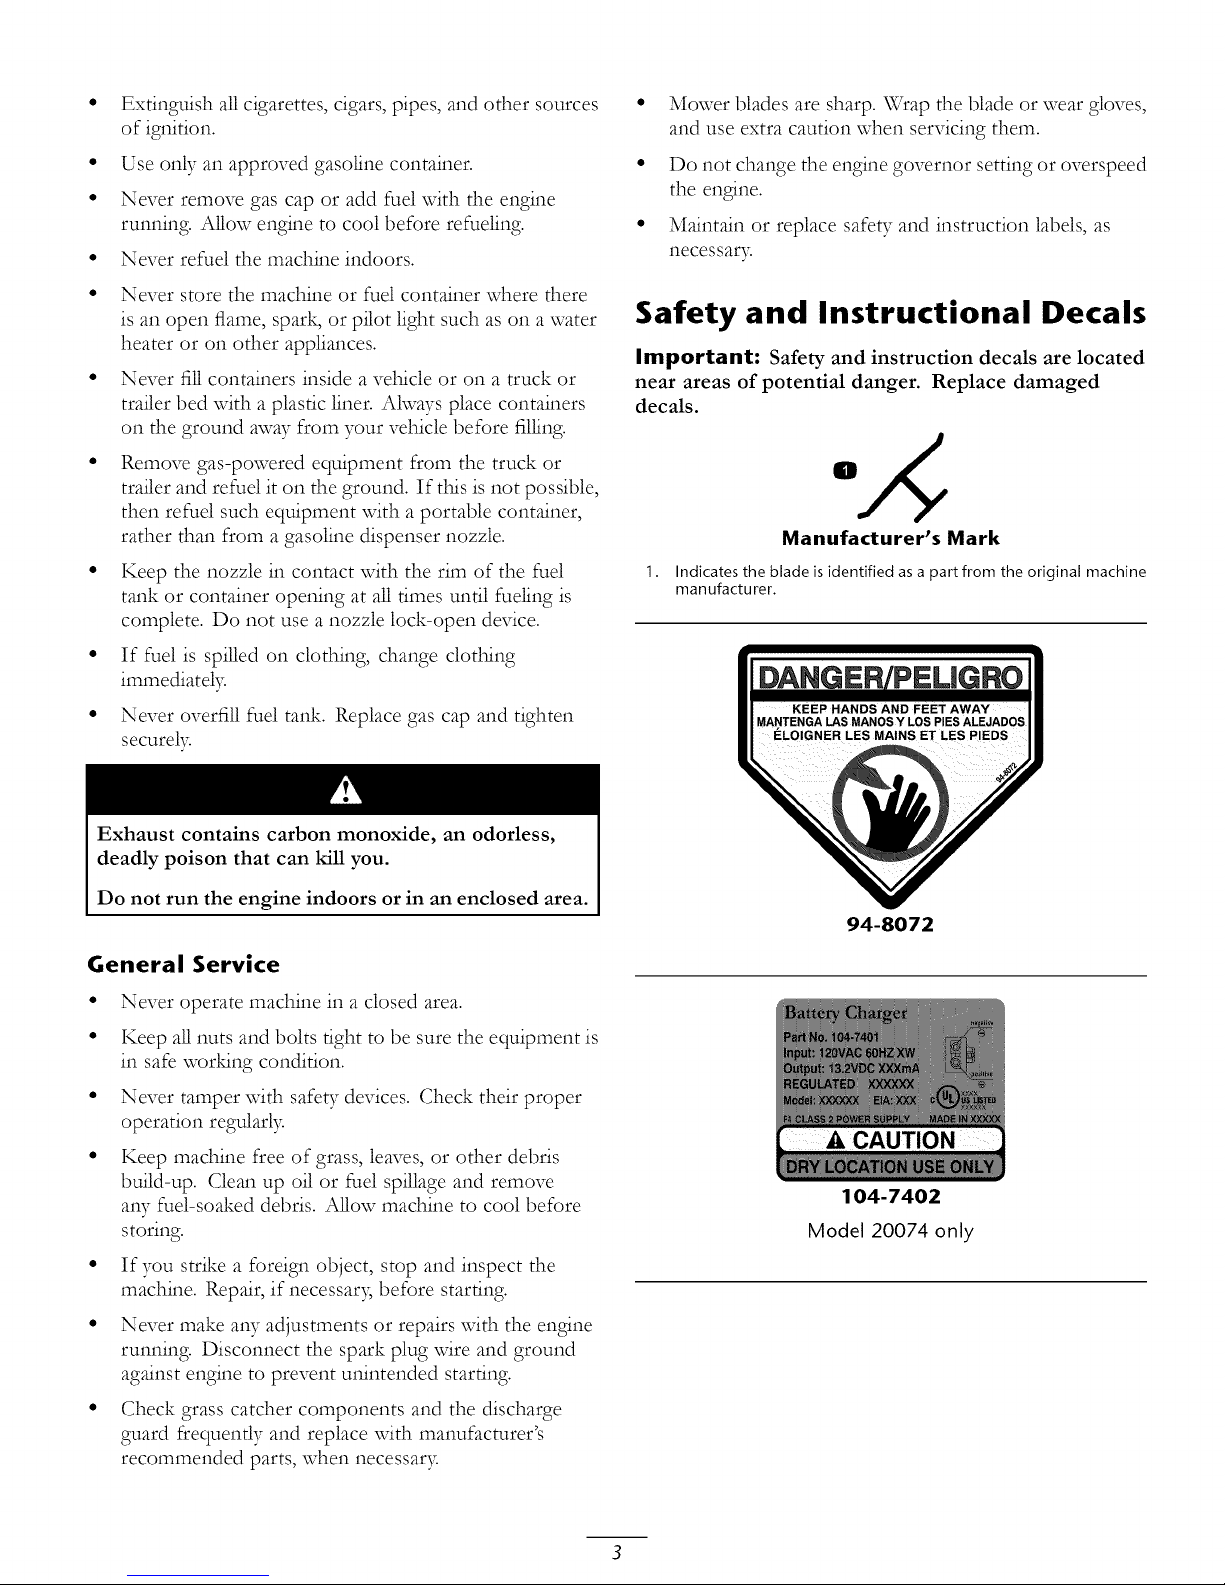
104-7402
Model 20074 only
Page 4
A, CUIDADO:
A A'I-I'ENTION:
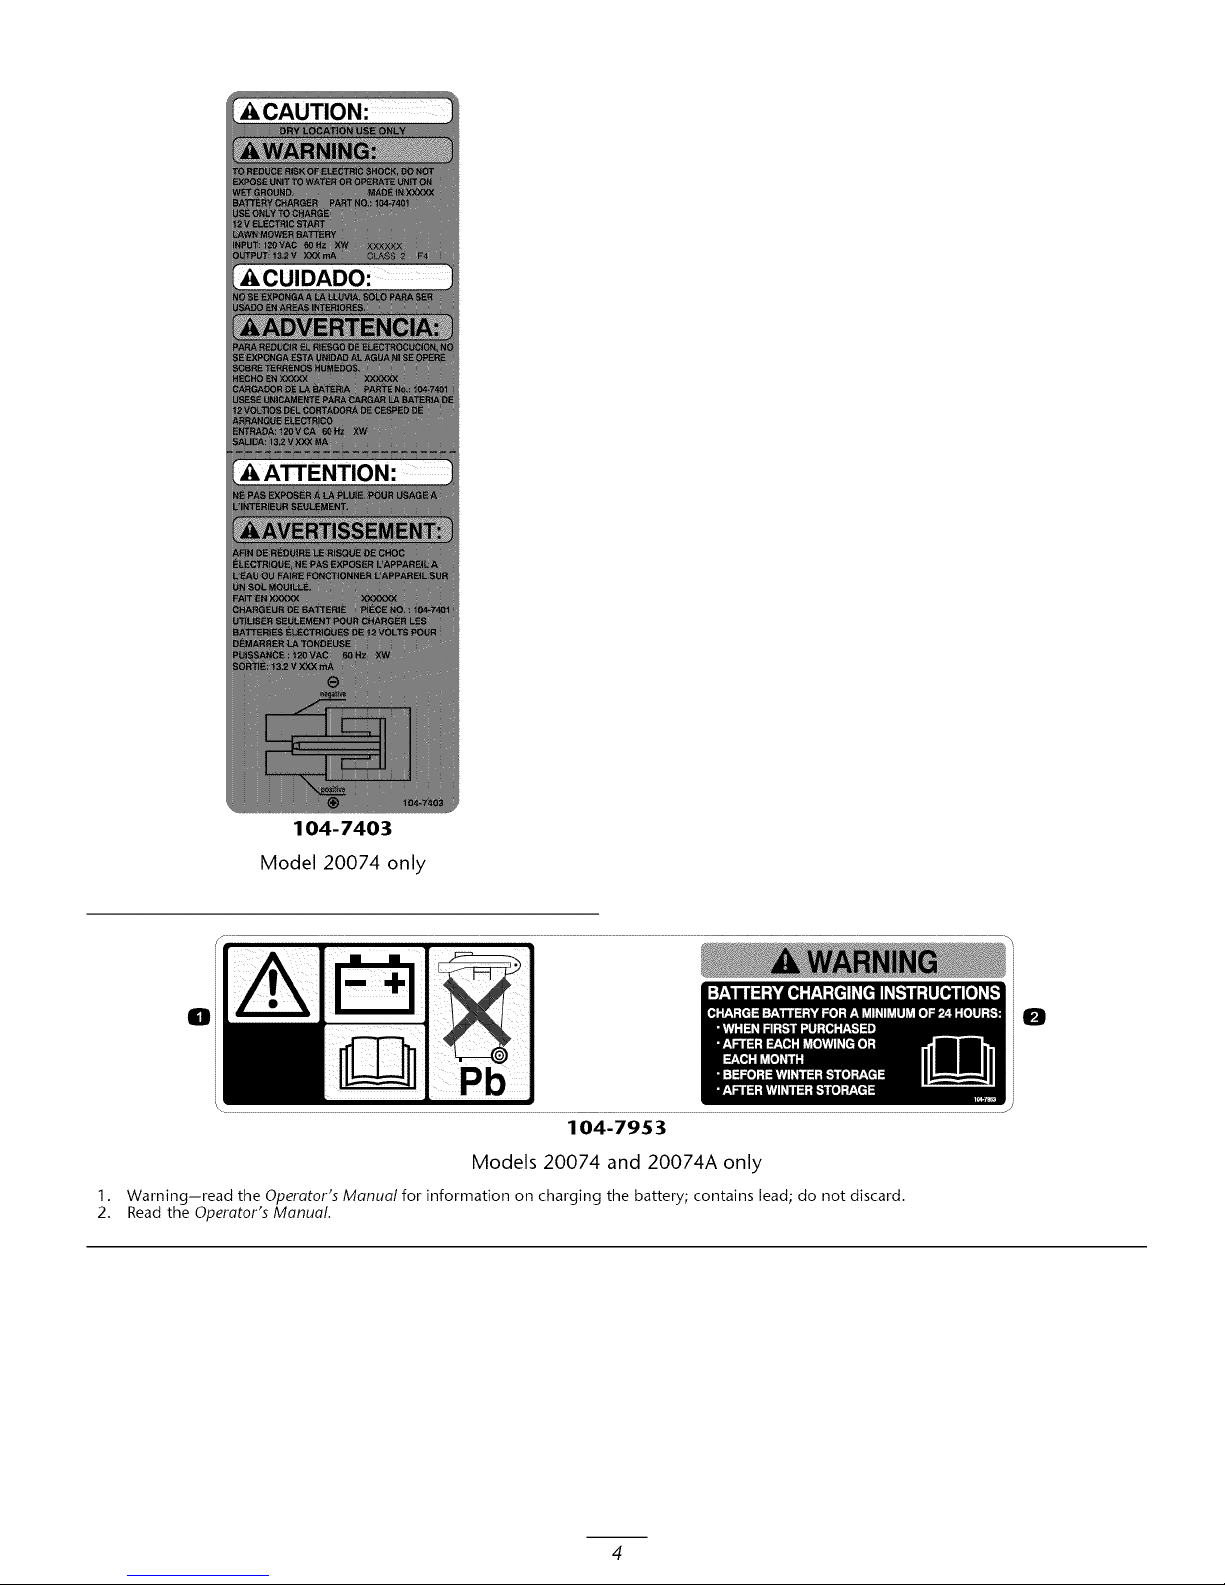
104-7403
Model 20074 only
O O
104-7953
Models 20074 and 20074A only
1.
Warning--read the Operator's Manual for information on charging the battery; contains lead; do not discard.
2.
Read the Operator's Manual.
Page 5
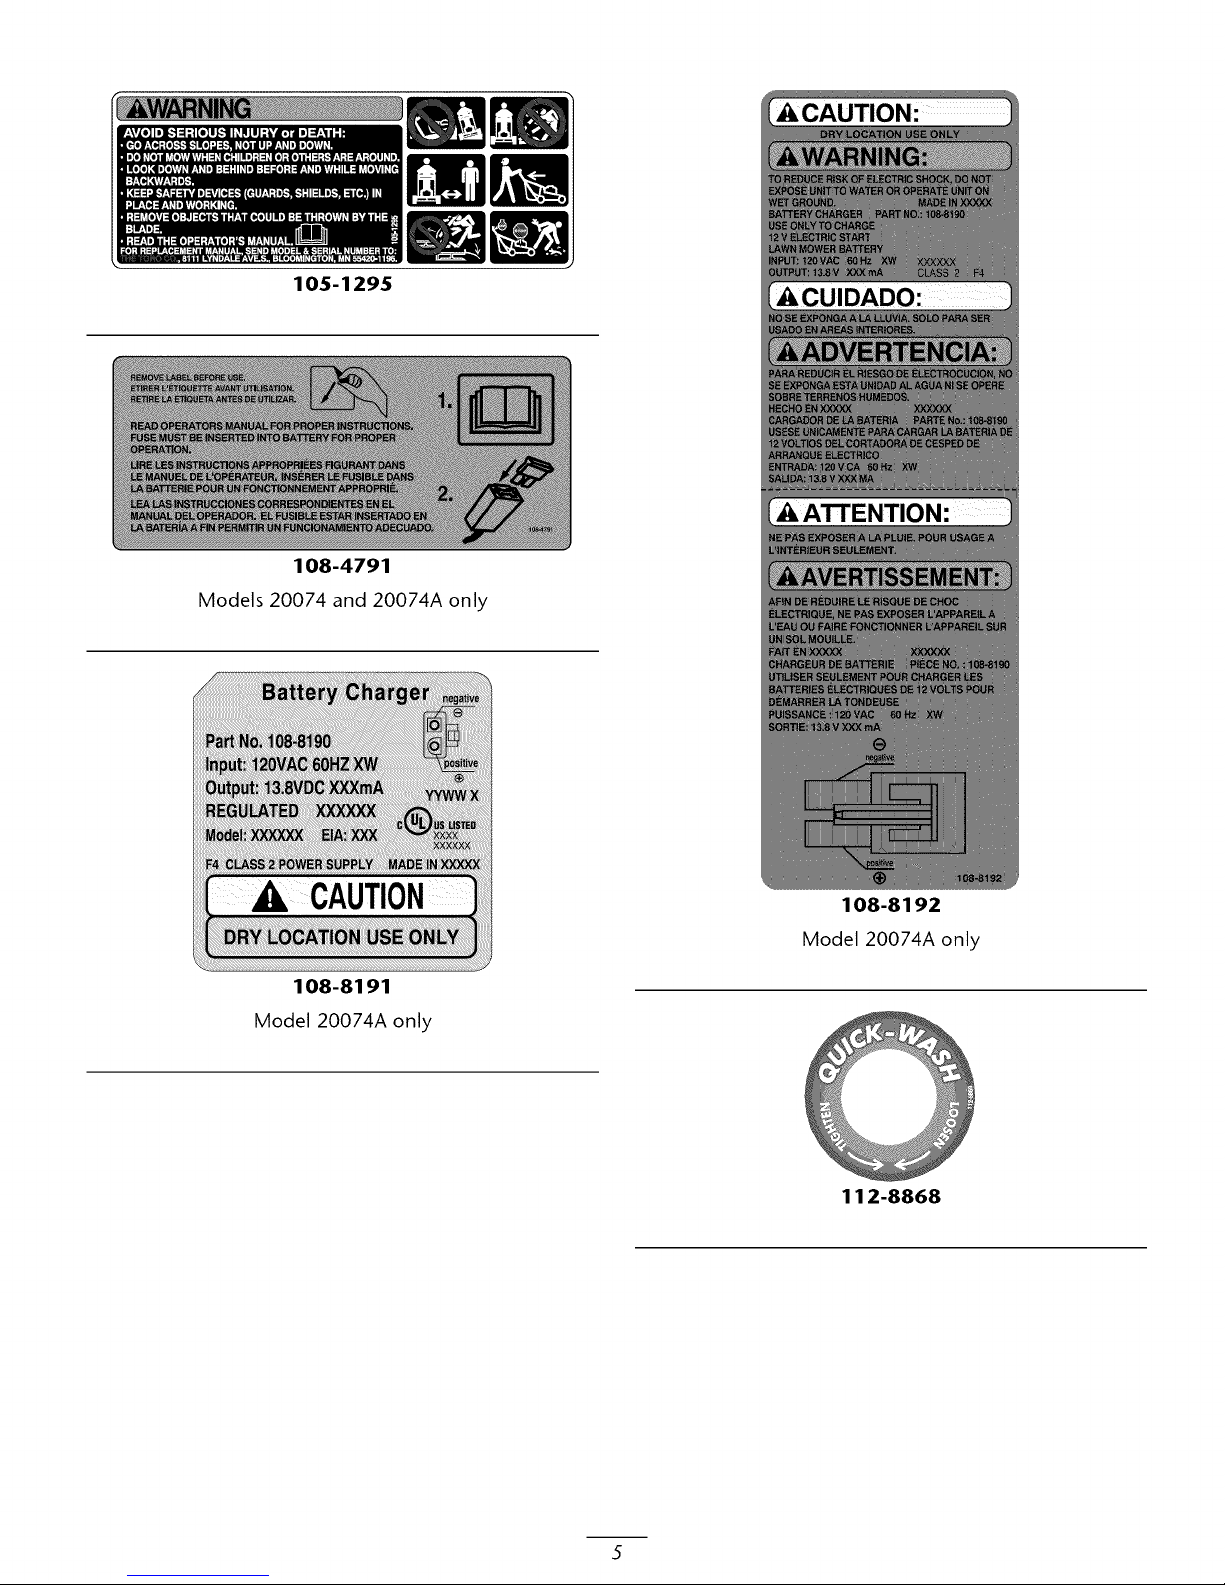
105-1295
108-4791
Models 20074 and 20074A only
108-8191
Model 20074A only
108-8192
Model 20074A only
112-8868
Page 6
Setup
Important: Remove and discard the protective
plastic sheet that covers the engine.
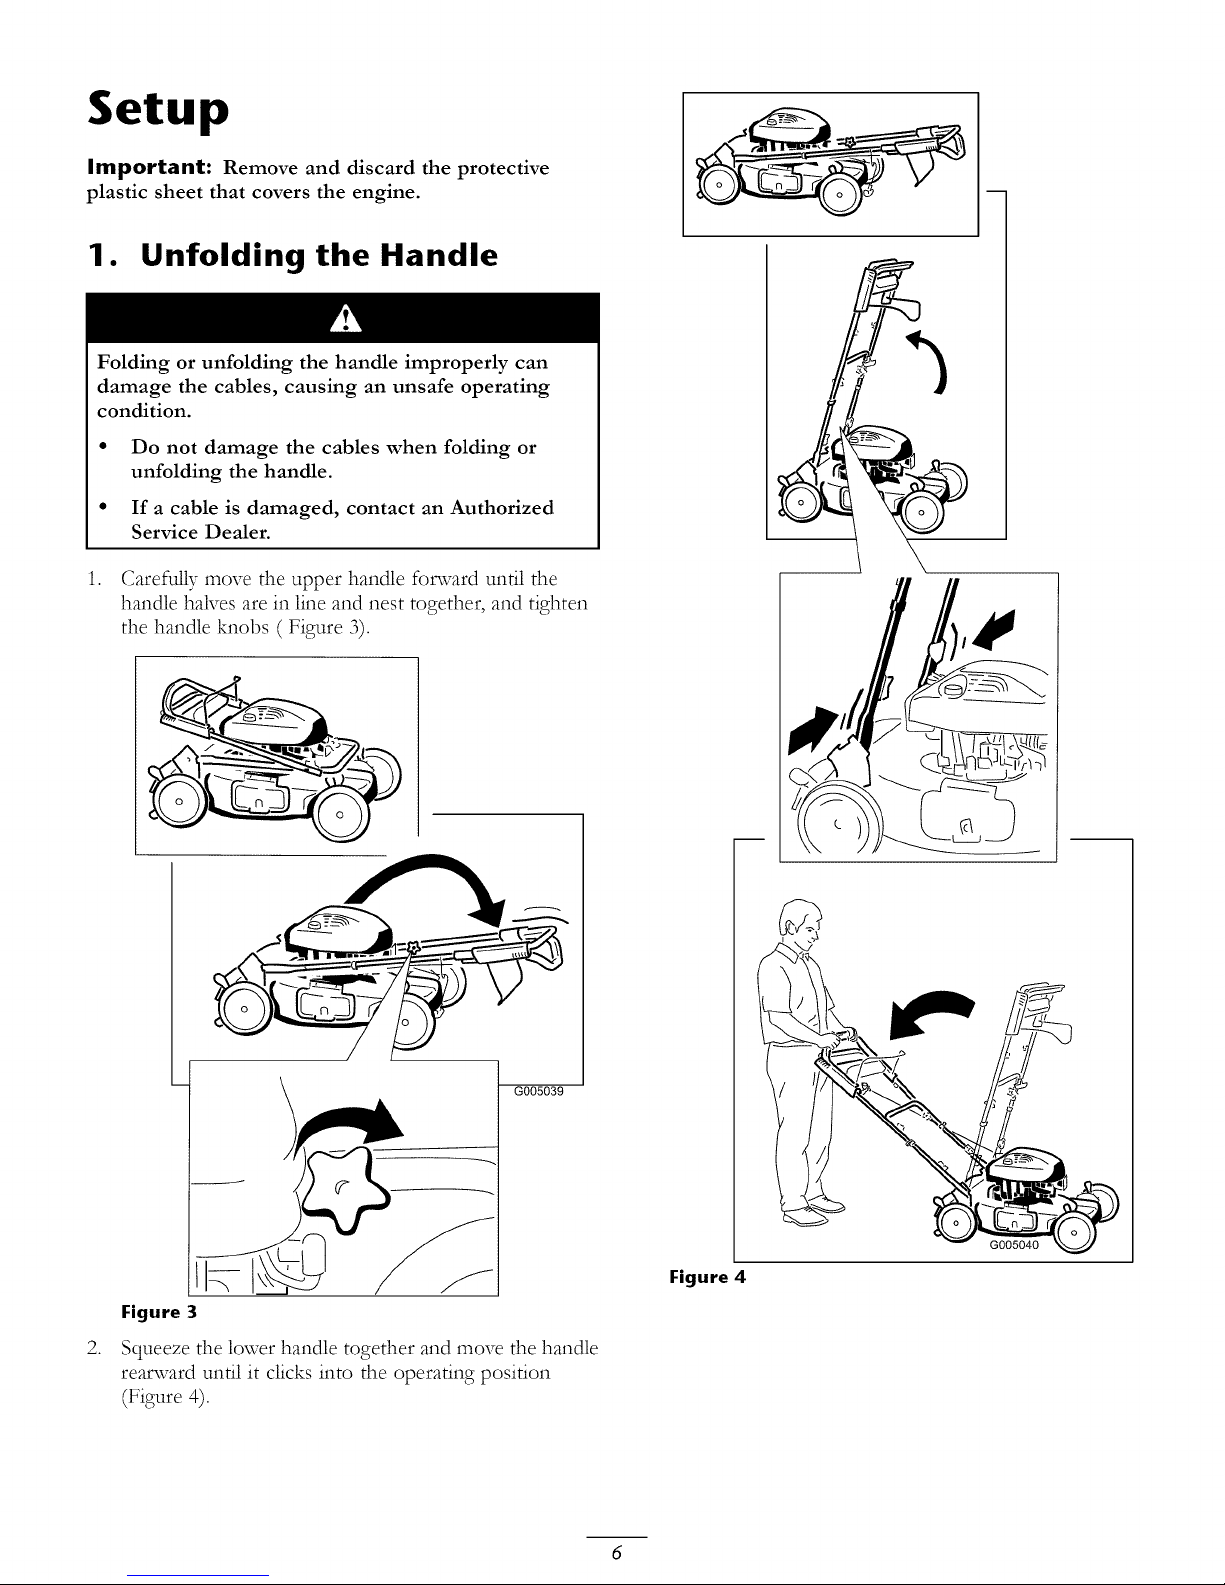
1. Unfolding the Handle
Folding or unfolding the handle improperly can
damage the cables, causing an unsafe operating
condition.
Do not damage the cables when folding or
unfolding the handle.
If a cable is damaged, contact an Authorized
Service Dealer.
1. Carefully move the upper handle forward until the
handle halves are in line and nest together, and tighten
the handle knobs ( Figure 3).
A
/
\
Figure 3
.
Squeeze the lower handle together and move the handle
rearward until it clicks into the operating position
(Figure 4).
G005039
G005040
Figure 4
Page 7

2. Filling the Engine with Oil
Your mower does not come with oil in the engine, but it
does come with a bottle of oil.
1. Remove the dipstick (Figure 5).
G004992
Figure 5
.
Slowly pour oil into the oil fill tube until the oil level
reaches the Full line on the dipstick (Figure 5). Do not
overfill. (Max. fill: 20 oz., type: SAE 30\V detergent
oil with an API service classification of SF, SG, SH, SJ,
SL, or higher.)
3. Install the dipstick securel3:
G005041
Figure 6
.
Insert the fuse into the fuse holder (Figure 7).
G002878
Figure 7
Note: Your mower comes with a fuse in the owner's
packet and another fuse in the battery box.
.
Install the battery cover.
Important: Change the engine oil after the first 2
operating hours; change it yearly thereafter. Refer
to Changing the Engine OiL
3. Installing the Fuse
Models 20074 and 20074A only
Your mower comes with a 40-amp fuse that protects the
electric starter.
Important: You cannot start the mower with the
electric starter or charge the battery unless you install
the fuse.
1. Unclip both ends of the battery cover and remove it
(Figure 6).
4. Charging the Battery
Models 20074 and 20074A only
Refer to Charging the Batter?: in the Maintenance section.
Page 8

Product Overview
Operation
2
\
12
Figure 8
1. Cutting height lever
2. Oil fill/Dipstick
3. Recoil start handle
4. Blade control bar
5. Self-propel drive bar
6. Ignition key (models 20074
and 20074A only)
4
3
G005042
7. Fuel tank cap
8. Battery (not shown; models
20074 and 20074A only)
9. Air filter
10. Washout port
11. Primer
12. Spark plug
10
11
5
Filling the Fuel Tank
Gasoline is extremely flammable and explosive. A
fire or explosion from gasoline can burn you and
others.
To prevent a static charge from igniting the
8
gasoline, place the container and/or mower
directly on the ground before filling, not in a
vehicle or on an object.
Fill the tank outdoors when the engine is cold.
Wipe up spills.
Do not handle gasoline when smoking or around
an open flame or sparks.
Store gasoline in an approved fuel container, out
of the reach of children.
Fill the fuel tank with fresh unleaded regular gasoline from
a major name-brand service station (Figure 10).
Note: Never use methanol, gasoline contailaing methanol,
or gasohol contailaing more than 10% ethanol because the
fuel system could be damaged. Do not mix oil with gasoline.
Important: To reduce starting problems, add fuel
stabilizer to the fuel all season, mixing it with gasoline
less than 30 days old.
2
v
Figure 9
1. Grassbag
2. Side discharge chute
3. Battery charger (models
20074 and 20074A only)
4
Figure 10
G004995
Page 9

Checking the Engine Oil Level
1. Remove the dipstick, wipe it clean, and fully install the
dipstick (Figure 1i).
G004992
Figure 11
.
Remove the dipstick and check the oil level (Figure 11).
If the oil level is below the Add mark on the dipstick,
slowly pour oil into the oil fill tube to rinse the oil level
to the Full mark on the dipstick. Do not overfill. (Max.
fill: 20 oz., _'pe: SAE 30W detergent oil with an API
service classification of SF, SG, SH, SJ, SL, or higher.)
3. Install the dipstick securel?:
Page 10

Adjusting the Cutting Height
Adjusting the cutting height may bring you into contact with the moving blade, causing serious injury.
• Stop the engine and wait for all moving parts to stop.
• Do not put your fingers under the housing when adjusting the cutting height.
If the engine has been running, the muffler will be hot and can severely burn you. Keep away from the hot
muffler.
Adjust the cutting height as desired. Set the Dont wheels to the same height as the rear wheels (Figure 12).
in. (108mm)
3-1/2 in. (899rnm)
3-1/8 in. (79mm)
I 3-7/8 in. (98mm)
2-3/4 in. (70mm)
in. (60mm)
2 in. (51mm)
in. (41mm)
(32mm)
Figure 1 2
4-1/4 in. (108mm)
3-7/8 in. (98mm)
3-1/2 in. (89mm)
3-1/8 in. (79mm)
2-3/4 in. (70mm)
2-3/8 in. (60mm)
2 in. (51mm)
1-5/8 in. (41mm)
1-1/4 in. (32mm)
7O
Page 11

Starting the Engine
1. Firmly push in the primer 3 times with your thumb,
holding the primer in %r a second before releasing it
each time (Figure 13).
.
Turn the ignition key (Figure 15) (models 20074 and
20074A only) or pull the recoil start handle (Figure 16).
Note: When you pull the recoil start handle, keep }Tour
fingers away from the cable on the handle.
G005045
Figure 15
G004997
Figure 1 3
Note: If the air temperature is below 55°F (13°C),
firmly push the primer in 5 times.
.
Hold the blade control bar against the handle (Figure
14).
G005048
Figure 16
.
If the mower does not start in 1 or 2 pulls (or within
5 seconds using the electric starter), press the primer
button 1 or 2 times and try starting it again.
Note: If the mower still does not start, contact an
Authorized Service Dealer.
Figure 14
1. Bladecontrol bar
11
Page 12

Using the Self-propel Drive
Bagging the Clippings
To operate the self-propel drive, simply walk with your
hands on the upper handle and your elbows at your sides,
and the mower will automatically keep pace with you
{Figure 17).
/
G005046
Figure 1 7
Stopping the Engine
To stop the engine, release the blade control bar.
Note: Remove the ignition key when you leave the mower
{models 20074 and 20074A only).
Important: When you release the blade control
bar, both the engine and blade should stop within 3
seconds. If they do not stop properly, stop using your
mower immediately and contact an Authorized Service
Dealer.
Use the grass bag when you want to collect grass and leaf
clippings from the lawn.
A worn grass bag could allow small stones and
other similar debris to be thrown in the operator's or
bystander's direction and result in serious personal
injury or death to the operator or bystanders.
Check the grass bag frequently. If it is damaged,
install a new Toro replacement bag.
If the side discharge chute is on the mower, remove it and
lock the side discharge door (refer to Removing the Side
Discharge Chute) before bagging the clippings.
The blade is sharp; contacting the blade can result
in serious personal injury.
Stop the engine and wait for all moving parts to stop
before leaving the operating position.
Installing the Grass Bag
1. Raise and hold up the rear door {Figure 18).
Recycling the Clippings
Your mower comes from the factory ready to recycle the
grass and leaf clippings back into the lawn.
If the grass bag is on the mower, remove it {refer to
Removing the Grass Bag) before recycling the clippings. If
the side discharge chute is on the mower, remove it and
lock the side discharge door {refer to Removing the Side
Discharge Chute) before recycling the clippings.
Figure 18
.
Install the grass bag {Figure 19).
J G004999
12
Page 13

Side-discharging the Clippings
Use the side discharge for cutting very tall grass.
If the bag is on the mower, remove it before side-discharging
the clippings.
The blade is sharp; contacting the blade can result
in serious personal injury.
Stop the engine and wait for all moving parts to stop
before leaving the operating position.
Installing the Side Discharge Chute
.
Unlock the side discharge door (Figure 20).
Figure 19
.
Lower the rear door.
Removing the Grass Bag
G005002
G005004
Figure 20
2.
Install the side discharge chute (Figure 21).
<
To remove the bag, reverse the steps above.
13
Page 14

G005004
Figure 22
Operating Tips
General Mowing Tips
• Clear the area of sticks, stones, wire, branches, and
other debris that the blade could hit.
Avoid striking solid objects with the blade. Never
deliberately mow over any object.
If the mower strikes an object or starts to vibrate,
immediately stop the engine, disconnect the wire from
the spark plug, and examine the mower for damage.
For best performance, install a new blade before the
cutting season begins.
Replace the blade when necessary with a Toro
replacement blade.
Cutting Grass
Cut only about a third of the grass blade at a time. Do
not cut below the 2-inch (51 ram) setting unless the
grass is sparse or it is late fall when grass growth begins
to slow down. Refer to Adjusting the Cutting Height.
Figure 21
Removing the Side Discharge Chute
To remove the side discharge chute, reverse the steps above.
Important: Lock the side discharge door after you
close it (Figure 22).
G005003
When cutting grass over 6 inches (l 5 cm) tall, mow
at the highest cutting height setting and walk slower;
then mow again at a lower setting for the best lawn
appearance. If the grass is too long, the mower may
plug and cause the engine to stall.
• Mow only dr): grass or leaves. \E.et brass and leaves tend
to clump on the yard and ca:: cause the mower to plug
or the engine to stall.
T: Cr
Wet grass or leaves can cause serious injury if
you slip and contact the blade. Mow only in dry
conditions.
Be aware of a potential fire hazard in very dr):
conditions, follow all local fire warnings, and keep the
mower free of dry grass and leaf debris.
14
Page 15

Alternate the mowing direction. This helps disperse the
clippings over the lawn %r even fertilization.
If the finished lawn appearance is unsatisfactor 5 try one
or more of the following:
- Replace the blade or have it sharpened.
- Walk at a slower pace while mowin&
- Raise the cutting height on your mower.
- Cut the grass more frequentl>
- Overlap cutting swaths instead of cutting a full
swath with each pass.
- Set the cutting height on the front wheels one
notch lower than the rear wheels. For example, set
Cutting Leaves
• After cutting the lawn, ensure that half of the lawn
• If there are more than 5 inches (13 cm) of leaves on the
• Slow down your mowing speed if the mower does not
the front wheels at 2 inches (51 ram) and the rear
wheels at 2-3/8 inches (60 ram).
shows through the cut leaf cover. You may need to
make more than one pass over the leaves.
lawn, set the front cutting height one or two notches
higher than the rear cutting height.
cut the leaves finely enough.
Maintenance
Note: Determine the left and right sides of the machine from the normal operating position.
Recommended Maintenance Schedule(s)
Maintenance Service
Interval
After the first 2 operating • Change the engine oil.
Before each use or daily bar.
Important: Refer to your Engine Operator's Manual for additional maintenance procedures.
hours
Every 25 hours • Charge the battery for 24 hours (models 20074 and 20074A only).
Before storage • Empty the fuel tank before repairs as directed and before annual storage.
Yearly
Maintenance Procedure
• Check the engine oil level.
• Ensure that the engine stops within 3 seconds after releasing the blade control
• Clean grass clippings and dirt from under the mower.
• Replace the air filter (more frequently in dusty operating conditions).
• Change the engine oil.
• Lubricate the wheel gears.
• Replace the blade or have it sharpened (more frequently if the edge dulls quickly).
• Refer to your Engine Operator's Manual for any additional yearly maintenance
procedures.
15
Page 16

Preparing for Maintenance J
1. Stop the engine and wait for all moving parts to stop.
2. Disconnect the spark plug wire from the spark plug
and hook it onto the retaining post (Figure 23) before
performing any maintenance procedure.
Figure 24
1. Air filter cover
.
Replace the air filter.
4.
Install the cover.
G005005
Figure 23
1. Spark plug retaining post
.
After performing the maintenance procedure(s),
connect the spark plug wire to the spark plug.
Important: Before tipping the mower to change
the oil or replace the blade, aUow the fuel tank to
run dry through normal usage. If you must tip the
mower prior to running out of fuel, use a hand fuel
pump to remove the fuel. Always tip the mower
onto its side, with the air filter up.
Changing the Engine Oil
Change the engine oil after the first 2 operating hours;
change it yearly thereafter.
Run the engine a few minutes before changing the oil
to warm it. Warm oil flows better and carries more
contaminants.
1. Refer to Preparing for Maintenance.
2. Remove the dipstick (Figure 25).
G005006
2. Air filter
Tipping the mower may cause the fuel to leak.
Gasoline is flammable, explosive and can cause
personal injury.
Run the engine dry or remove the gasoline with a
hand pump; never siphon.
Replacing the Air Filter
Replace the air filter yearly; replace it more frequently in
dus V operating conditions.
1. Refer to Preparing for Maintenance.
2. Rotate the ,airfilter cover to remove it (Figure 24).
16
\
G004992
Figure 25
.
Tip the mower onto its side with the ,airfilter up to drain
the used oil out through the oil fill tube (Figure 26).
Page 17

G005001
Figure 26
.
Slowly pour oil into the oil fill tube until the oil level
reaches the Full line on the dipstick (Figure 27). Do not
overfill. (Max. fill: 20 oz., type: SAE 30\V detergent
oil with an API service classification of SF, SG, SH, SJ,
SL, or hgher.)
Charging the Battery
Models 20074 and 20074A only
CALIFORNIA
Proposition 65 Warning
Battery posts, terminals, and related accessories
contain lead and lead compounds, chemicals known
to the State of California to cause cancer and
reproductive harm. Wash hands after handling.
Charge the battery for 24 hours iMtiall}, then monthly
(every 25 starts) or as needed. Always use the charger in a
sheltered area and charge the battery at room temperature
(70 ° or 22 ° C) whenever possible.
1. Connect the charger to the mower wire harness located
below the ignition key (Figure 28).
G002889
Figure 28
.
Plug the charger into a wall outlet.
_G005007
Figure 27
.
Install the dipstick securely.
6.
Dispose of the used oil properly at a local recycling
center.
Note: When the battery no longer holds a charge,
recycle or dispose of the lead-acid battery according to
local codes.
Replacing the Fuse
Models 20074 and 20074A only
/
If the battery does not charge or the engine does not run
with the electric starter, the fuse may be blown. Replace it
with a 40-amp plug-in b_pe fuse. Refer to Installing the Fuse.
17
Page 18

Lubricating the Wheel Gears
1. Remove the wheel bolts on the rear wheels and remove
the rear wheels.
2. Apply a lubricating oil to the inner and outer sides of
the gear as shown in Figure 29.
G005008
Figure 29
.
Install the rear wheels.
G005009
Figure 30
.
Remove the blade, s_qng all mounting hardware (Figure
30).
.
Install the new blade and all mounting hardware (Figure
31).
Replacing the Blade
Important: You will need a torque wrench to instaU
the blade properly. If you do not have a torque wrench
or are uncomfortable performing this procedure,
contact an Authorized Service Dealer.
Examine the blade whenever you run out of gasoline. If the
blade is damaged or cracked, replace it immediately. If the
blade edge is dull or nicked, have it sharpened or replace it.
The blade is sharp; contacting the blade can result
in serious personal injury.
Wear gloves when servicing the blade.
1. Refer to Preparing for Maintenance.
2. Tip the mower onto its side with the air filter up.
3. Use a block of wood to hold the blade steady (Figure
30).
G005010
Figure 31
Important: Position the curved ends of the blade
to point toward the mower housing.
.
Use a torque wrench to tighten the blade bolt to
60 ft-lb (82 N-m).
Important: A bolt torqued to 60 ft-lb (82 N-m)
is very tight. While holding the blade with a block
of wood, put your weight behind the ratchet or
wrench and tighten the bolt securely. This bolt is
very difficult to overtighten.
18
Page 19

Adjusting the Self-propel Drive
Cable
Whenever you install a new self-propel cable or if the
self-propel drive is out of adjustment, adjust the self-propel
drive cable.
1. Loosen the cable support nut (Figure 32).
Figure 32
.
Pull down the cable jacket (toward the mower) until
there is no slack in the cable (Figure 33).
Cleaning the Mower
The mower may dislodge material from under the
mower housing.
• Wear eye protection.
• Stay in the operating position (behind the
handle) when the engine is running.
• Do not allow bystanders in the area.
For best results, clean the mower soon after you have
completed mowing.
1. Lower the mower to its lowest cutting height settin&
Refer to Adjusting the Cutting Height.
2. Move the mower onto a flat paved surface.
3. Attach a garden hose that is connected to a water supply
to the washout port on the mower housing (Figure 34).
/
Figure 33
.
Tighten the nut on the cable support.
\
Figure 34
.
Turn the water on.
5.
Start the engine and run it until there are no more
clippings that come out from under the mower housin&
.
Stop the engine.
7.
Shut off the water and disconnect the garden hose from
the mower.
.
Start the engine and run it for a few minutes to dry the
housing to prevent it from rustin&
/G005012
19
Page 20

Storage
Store the mower in a cool, clean, dry place.
Preparing the Mower for
Storage
Folding the Handle
Folding or unfolding the handle improperly can
damage the cables, causing an unsafe operating
condition.
Do not damage the cables when folding or
unfolding the handle.
Gasoline vapors can explode.
Do not store gasoline more than 30 days.
• Do not store the mower in an enclosure near an
open flame.
• Allow the engine to cool before storing it.
.
On the last refueling of the )Tear, add fuel stabilizer to
the fuel as directed by the engine manufacturer.
.
Dispose of any unused fuel properly. Recycle it
according to local codes, or use it in )Tour automobile.
Note: Old fuel in the fuel tank is the leading cause of
hard starting. Do not store fuel without stabilizer more
than 30 days, and do not store stabilized fuel more than
90 days.
.
Run the mower until the engine stops from running
out of fuel.
.
Prime the engine and start it again.
5.
Allow the engine to run until it stops. When you can no
longer start the engine, it is sufficiently dr?:
.
Disconnect the wire from the spark plug and connect
the wire onto the retaining post.
.
Remove the spark plug, add 1 oz. (30 ml) of oil through
the spark plug hole, and pull the starter rope slowly
several times to distribute oil throughout the cylinder to
prevent cylinder corrosion during the off-season.
8. Loosely instaU the spark plug.
9. Tighten all nuts, bolts, and screws.
10. Charge the battery for 24 hours, then unplug the battery
charger an store the mower in an unheated area. If you
must store the mower in a heated area, you must charge
the battery every 90 days (models 20074 and 20074A
only).
If a cable is damaged, contact an Authorized
Service Dealer.
.
Remove the ignition key (models 20074 and 20074A
only).
.
Loosen the handle knobs until you can move the upper
handle fred):
3. Fold the upper handle %rward as shown in Figure 35.
Important: Route the cables to the outside of the
handle knobs as you fold the upper handle.
G005047
Figure 35
.
To unfold the handle, reverse the steps above.
Removing the Mower from
Storage
1. Remove the spark plug and spin the engine rapidly using
the starter to blow the excess oil from the cylinder.
2. InstaU the spark plug and tighten it with a torque
wrench to 15 ft-lb (20 N-m).
3. Charge the battery for 24 hours (models 20074 and
20074A only).
4. Connect the wire to the spark plug.
20
Page 21

22in Recycler!m
Walk Power Mowers
The Toro Total Coverage Guarantee
A Two -Year Full Warranty (Limited for Commercial Use)
and
The Toro Starting Guarantee oil GTS-2 (Guaranteed to Start) Engines
A Two -Year Full Warranty (Not applicable for Commercial Use)
The Toro Company and its affiliate, Toro Warrant?: Company, pursuant to an agreement between them, jointly promise to repair any Toro Product, when used for residential purposes*, if defective in
materials or workmanship or if it stops functioning due to the failure of a component. The IBllowing time periods apply from the date of original pnrchase:
• All Products and attachments • 2 year full warranty
• Batteries • 1 year fullwarranty
Toro Products used for commercial, institutional, or rental use are warranted against defects in materials or workmanship l_r the following time periods from the original date of purchase:
All Products and attachments 45 day limited warranty
This warranty covers the cost of parts and labor, but you mnst pay transportation costs. This warranty applies to all Toro Recycler walk power mowers and their attachments.
The Toro Company and its affiliate, Toro Warranty Company, pursuant to an agreement between them, jointly guarantee that yonr Toro GTS-2 Engine, when used l_r residential purposes*, will start
on the first or second pull for two years from the date of original pnrchase, ifyou provide the routine maintenance it requires, or we will fix it free of charge.
This warranty covers the cost of parts and labor, but you mnst pay transportation costs. This warranty applies to all Toro Recycler walk power mowers.
The Toro Starting Guarantee does not apply when the prodnct is used commercially. Use at more than one location is considered commercial use.
Conditions and Products Covered under The Toro Total Coverage Guarantee
Products Warrant,/Period
Limited Warrant" for Commercial Use
Products Warranty Period
Conditions and Products Covered Under the Toro Starting Guarantee
The followin_ applies to both the Toro Total Coverage Guarantee & the Toro Startin_ Guarantee:
Items and Conditions Not Covered
There is no other express warranty except l_r special emission system coverage on some products. This express warranty does not cover the l_llowing:
• Cost of regular maintenance service or parts, such as filters, filel, lubricants, oil changes, air filter, blade sharpening/worn blade on mowers, cable/linkage ac!iustments, or brake and clutch
ac!iustments
• Any product or part which has been altered or misused and requires replacement or repair dne to accidents or lack of proper maintenance
• Repairs necessal T due to improper battery care, electrical supply irregularities, failnre to use fresh fuel (less than one month old), or failure to properly prepare the unit prior to any period of
non-use over one month
• Pickup and delivery charges
• Operational misuse, neglect, or accidents
• Repairs or attempted repairs by anyone other than an Authorized Toro Service Dealer
• Repairs or ac!iustments to correct starting difficulties dne to the following:
• Special operational conditions where starting may require more than two pulls:
If vou are having difficulty starting yonr unit, please check the @erector _ 3Jam/al to ensnre that you are using the correct starting procednres. This can save an unnecessary visit to a Service Dealer.
You mnst maintain yonr Toro Prodnct by l_llowing the maintenance procednres described in the Operator_ 3iamtal. Snch rontine maintenance, whether perl_nned by a dealer or by yon, is at yonr
expense.
If you think that your Toro Prodnct contains a defect in materials or workmanship, or if a normal, able-bodied adnlt can no longer start your prodnct's engine in one or two pulls, follow this procedure:
1. Contact an?: Authorized Toro Service Dealer to arrange service at their dealership. To locate a dealer convenient to you, refer to the }'ellou P, ges of your telephone directory (look under "Lawn
Mowers") or access our website at www.Toro.com. U.S. Customers may also call the number listed in item #3 to use our 24-hour Toro dealer locator system.
2. Bring the prodnct and your proof of pnrchase (sales receipt) to the Service Dealer. The dealer will diagnose the problem and determine if it is to be covered under warranty.
3. If lbr an?: reason you are dissatisfied with the Service Dealer's analysis or with the assistance provided, contact us at: Customer (?are Department -( onsumer, Toro Warrant?: Company, 8111
Lyndale Avemle South, Bloomington, MN 55420-1196; or call us toll free at 1-866-214-9807 (U.S. customers) or 1-866-214-9808 (Canada customers).
All repairs covered by these warranties must be perNnned by an Authorized Toro Service Dealer using Toro approved replacement parts
Neither The Toro Company nor Toro Warranty Company is liable for indirect, incidental, or consequential damages in connection with the use of the Toro Products covered by these
warranties, including any cost or expense of providing substitute equipment or service during reasonable periods of malfunction or non-use pending completion of repairs under these
warranties.
Some states do not allow exclusions of incidental or consequential damages, so the above exclusions and limitations may not apply to you. This warranty gives you specific legal rights, and you
may also have other rights which vary from state to state.
(ustomers who have purchased Toro prodncts exported from the United States or (anada should contact their Toro Distributor (Dealer) to obtain gnarantee policies for your cmmtry, province, or state. If
l)r any reason you are dissatisfied with yonr Distributor's service or have difficuhy obtaining guarantee information, contact the Toro importer. If all other remedies fail, you may contact us at Toro
Warranty Company.
Failure to follow proper maintenance procednres
Rotal T mower blade striking an otziect
Contaminants in the filel system
hnproper fuel (consult yonr Operator's 3iamtal if in doubt)
Failure to drain the filel system prior to any period of non-use over one month
First time starts after extended period of non-use over one month or seasonal storage
Cool temperatnre starts such as those l_und in early spring and late autumn (applies to rotary mowers only)
hnproper starting procedures
Owner Responsibilities
Instructions for Obtaining Warranty Service
General Conditions
Countries Other than the United States or Canada
*Residential pm_)osesmeansu_eof the product on the same lot as ymlihome Use at morethan one location is considered conmlmcial use. and the conmlmcia111sewarran*ywould apply
374-0052 Rev B
 Loading...