

Page 1
Form No. 3354-815 Rev B
Groundsmaster® 7200 and
7210 Mower
Model No. 30360 —Serial No. 270000001 and Up
Model No. 30360TE —Serial No. 270000001 and Up
Model No. 30361 —Serial No. 270000001 and Up
Model No. 30362 —Serial No. 270000001 and Up
Model No. 30363 —Serial No. 270000001 and Up
Model No. 30363TC —Serial No. 270000001 and Up
Model No. 30363TE —Serial No. 270000001 and Up
Model No. 30364 —Serial No. 270000001 and Up
Model No. 30364TC —Serial No. 270000001 and Up
Model No. 30365 —Serial No. 270000001 and Up
Register your product at www.Toro.com Original Instructions (EN)
Page 2
Warning
CALIFORNIA
Pr oposition 65 W ar ning
Diesel engine exhaust and some of its
constituents ar e kno wn to the State of
Calif or nia to cause cancer , bir th defects, and
other r epr oducti v e har m.
Because in some areas there are local, state , or
federal regulations requiring that a spark ar rester
be used on the engine of this mac hine , a spark
ar rester is a v ailable as an option. If y ou require a
spark ar restor , contact y our A uthorized Ser vice
Dealer .
Gen uine T oro spark ar resters are appro v ed b y the
USD A F orestr y Ser vice .
Important: It is a violation of Calif or nia
Public R esource Code Section 4442 to use
or operate the engine on an y f or est-co v er ed,
br ush-co v er ed, or g rass-co v er ed land without
a spar k ar r ester muf fler maintained in w or king
order , or the engine constricted, equipped, and
maintained f or the pr ev ention of fir e. Other
states or federal ar eas may ha v e similar la ws.
Introduction
R ead this infor mation carefully to lear n ho w to
operate and maintain y our product properly and
to a v oid injur y and product damag e . Y ou are
responsible for operating the product properly
and safely .
Y ou ma y contact T oro directly at www .T oro .com
for product and accessor y infor mation, help
finding a dealer , or to register y our product.
W henev er y ou need ser vice , g en uine T oro par ts ,
or additional infor mation, contact an A uthorized
Ser vice Dealer or T oro Customer Ser vice and ha v e
the model and serial n umbers of y our product
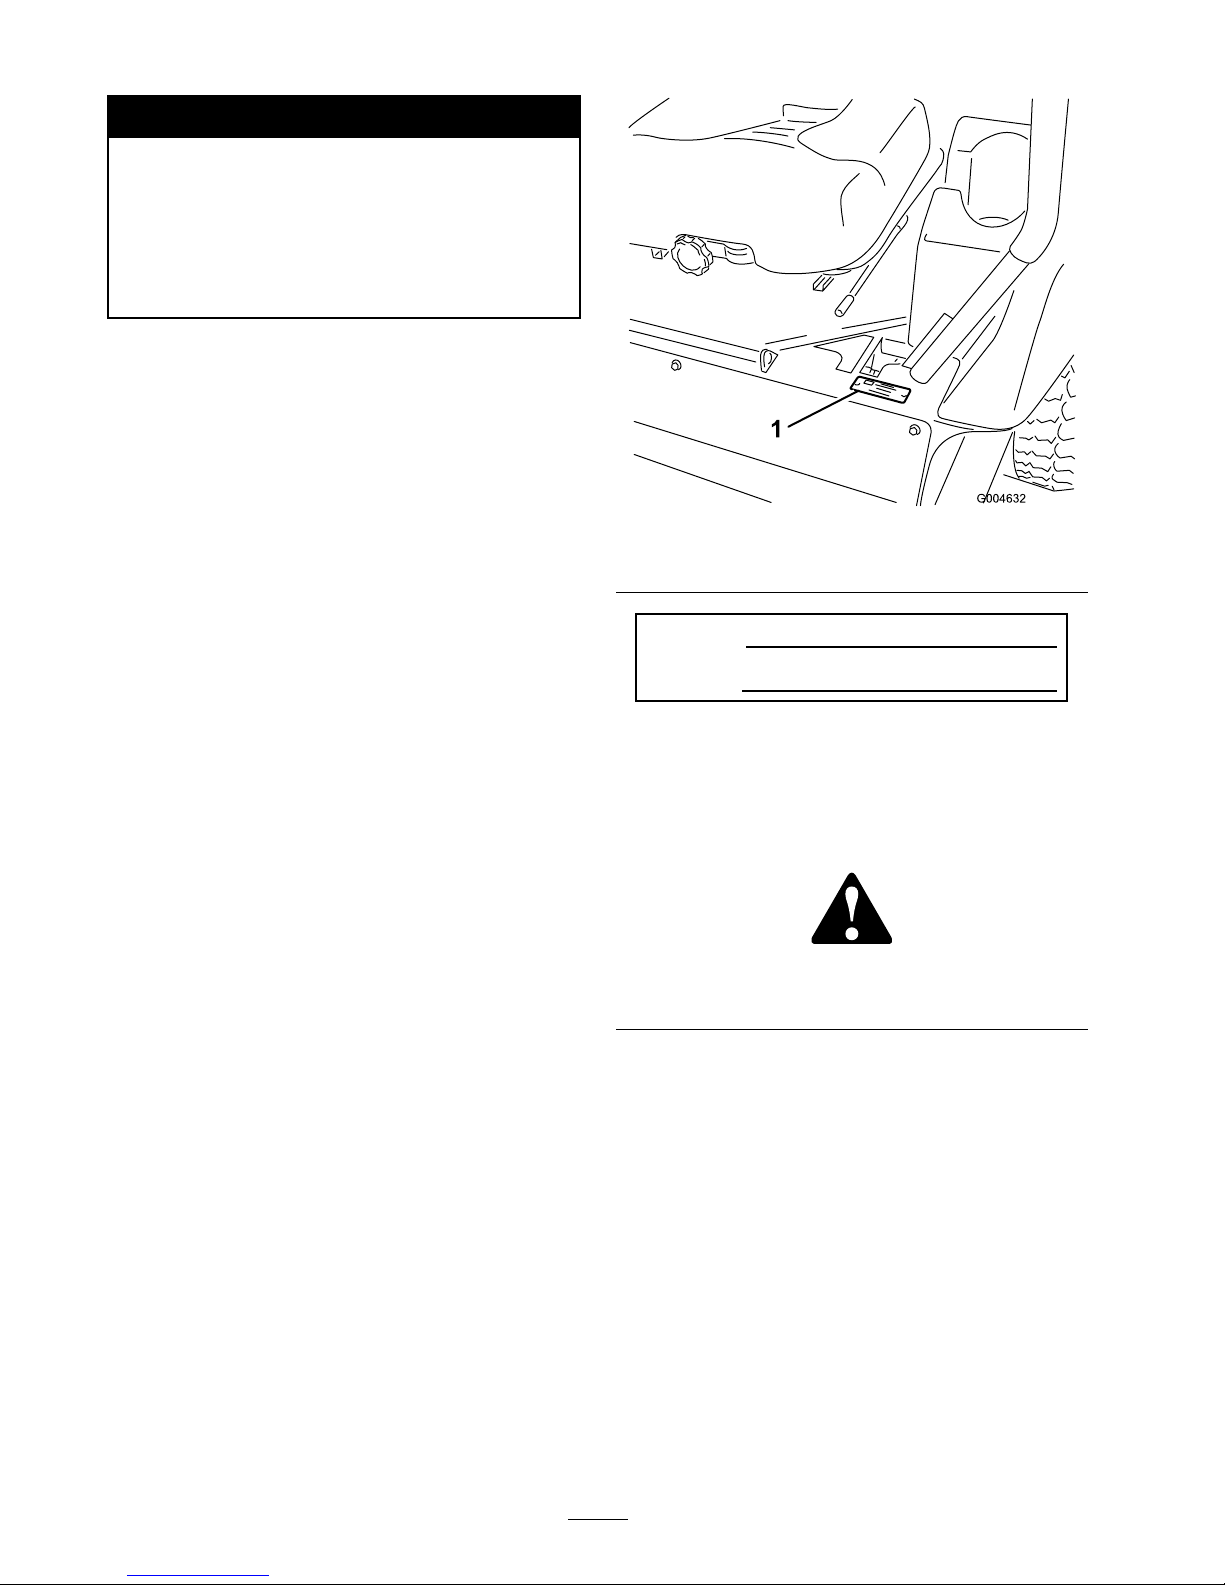
ready . Figure 1 identifies the location of the model
and serial n umbers on the product. W rite the
n umbers in the space pro vided.
Figure 1
1. Model and serial number location
Model No.
Serial No.
T his man ual identifies potential hazards and has
safety messag es identified b y the safety aler t
symbol ( Figure 2 ), whic h signals a hazard that ma y
cause serious injur y or death if y ou do not follo w
the recommended precautions .
Figure 2
1. Safety alert symbol
T his man ual also uses 2 w ords to highlight
infor mation. Impor tant calls attention to special
mec hanical infor mation and Note emphasizes
g eneral infor mation w or th y of special attention.
© 2006—The Toro® Company
8111 Lyndale Avenue South
Bloomington, MN 55420
2
Contact us at www.Toro.com.
Printed in the USA.
All Rights Reserved
Page 3

Contents
Introduction . . . . . . . . . . . . . . . . . . . . . . . . . . . . . . . . . . . . . . . . . . . . . . . . . . . . . . . 2
Safety . . . . . . . . . . . . . . . . . . . . . . . . . . . . . . . . . . . . . . . . . . . . . . . . . . . . . . . . . . . . . . . . . . 5
Safe Operating Practices . . . . . . . . . . . . . . . . . . . . . . 5
T oro Riding Mo w er Safety . . . . . . . . . . . . . . . . . . . 6
Sound Pressure Lev el . . . . . . . . . . . . . . . . . . . . . . . . . . . 8
Sound P o w er Lev el . . . . . . . . . . . . . . . . . . . . . . . . . . . . . . 8
Vibration Lev el . . . . . . . . . . . . . . . . . . . . . . . . . . . . . . . . . . . . 8
Slope Char t . . . . . . . . . . . . . . . . . . . . . . . . . . . . . . . . . . . . . . . . . 9
Safety and Instr uctional
Decals . . . . . . . . . . . . . . . . . . . . . . . . . . . . . . 10
Setup . . . . . . . . . . . . . . . . . . . . . . . . . . . . . . . . . . . . . . . . . . . . . . . . . . . . . . . . . . . . . . . . 16
1 Installing the Left R ear Tire
(Model 30360TC and
30363TC Only) . . . . . . . . . . . . . . . . . . 16
2 Acti v ating and Charging the
Batter y (Model 30360TC
and 30363TC Only) . . . . . . . . . . . 16
3 Adjusting the R OPS . . . . . . . . . . . . . . . . . . . . . . . . 18
4 Chec king the Tire Pressure . . . . . . . . . . . . . . 19
5 Installing W eights
(Groundsmaster 7210
Models in Europe
Only) . . . . . . . . . . . . . . . . . . . . . . . . . . . . . . . . . 20
6 Chec king Fluid Lev els . . . . . . . . . . . . . . . . . . . . . 21
7 R eading the Man uals and Viewing
the D VD . . . . . . . . . . . . . . . . . . . . . . . . . . . 21
Product Ov er view . . . . . . . . . . . . . . . . . . . . . . . . . . . . . . . . . . . . . . . . . . . . . 22
Controls . . . . . . . . . . . . . . . . . . . . . . . . . . . . . . . . . . . . . . . . . . . 22
Specifications . . . . . . . . . . . . . . . . . . . . . . . . . . . . . . . . . . . 24
Operation . . . . . . . . . . . . . . . . . . . . . . . . . . . . . . . . . . . . . . . . . . . . . . . . . . . . . . . . . . 25
Adding Fuel . . . . . . . . . . . . . . . . . . . . . . . . . . . . . . . . . . . . . . 25
Chec king the Engine Oil Lev el . . . . . . . . . . . 26
Chec king the Cooling System . . . . . . . . . . . . . 26
Chec king the Hy draulic
System . . . . . . . . . . . . . . . . . . . . . . . . . . . . . . . 26
Using the R ollo v er Protection
System (R OPS) . . . . . . . . . . . . . . . . . . 27
T hink Safety First . . . . . . . . . . . . . . . . . . . . . . . . . . . . . . 28
Operating the P arking Brak e . . . . . . . . . . . . . . 28
Star ting and Stopping the
Engine . . . . . . . . . . . . . . . . . . . . . . . . . . . . . . 29
Dri ving the Mac hine . . . . . . . . . . . . . . . . . . . . . . . . . . 30
Stopping the Mac hine . . . . . . . . . . . . . . . . . . . . . . . . 31
Operating the Mo w er . . . . . . . . . . . . . . . . . . . . . . . . . 31
T he Safety Interloc k System . . . . . . . . . . . . . . . 35
P ositioning the Seat . . . . . . . . . . . . . . . . . . . . . . . . . . . 36
Unlatc hing the Seat . . . . . . . . . . . . . . . . . . . . . . . . . . . . 37
Pushing the Mac hine b y Hand . . . . . . . . . . . . 37
Loading Mac hines . . . . . . . . . . . . . . . . . . . . . . . . . . . . . 38
T ranspor ting Mac hines . . . . . . . . . . . . . . . . . . . . . . 39
Operating Tips . . . . . . . . . . . . . . . . . . . . . . . . . . . . . . . . . . 39
Maintenance . . . . . . . . . . . . . . . . . . . . . . . . . . . . . . . . . . . . . . . . . . . . . . . . . . . . . . 41
R ecommended Maintenance
Sc hedule(s) . . . . . . . . . . . . . . . . . . . . . . . . . . . . . . . 41
Daily Maintenance Chec klist . . . . . . . . . . . . . . 42
Lubrication . . . . . . . . . . . . . . . . . . . . . . . . . . . . . . . . . . . . . . . . . . . . . . . . 43
Greasing the Bearings and
Bushings . . . . . . . . . . . . . . . . . . . . . . . . . . . 43
Ser vicing the Mo w er Dec k Gear
Bo x Lubricant . . . . . . . . . . . . . . . . . . . 45
Engine Maintenance . . . . . . . . . . . . . . . . . . . . . . . . . . . . . . . . . . 46
Air Cleaner Maintenance . . . . . . . . . . . . . . . . . . . 46
Ser vicing the Engine Oil . . . . . . . . . . . . . . . . . . . . 47
Fuel System Maintenance . . . . . . . . . . . . . . . . . . . . . . . . . . 49
Ser vicing the W ater Se parator . . . . . . . . . . . . 49
Cleaning the Fuel T ank . . . . . . . . . . . . . . . . . . . . . . 49
R e placing the Fuel Pre-Filter . . . . . . . . . . . . . . 49
Fuel Lines and Connections . . . . . . . . . . . . . . . 50
Bleeding the Fuel System . . . . . . . . . . . . . . . . . . . 50
Bleeding Air F rom the
Injectors . . . . . . . . . . . . . . . . . . . . . . . . . . . . 51
Electrical System Maintenance . . . . . . . . . . . . . . . . . . . 51
Ser vicing the Batter y . . . . . . . . . . . . . . . . . . . . . . . . . . 51
Storing the Batter y . . . . . . . . . . . . . . . . . . . . . . . . . . . . . 52
Chec king the Fuses . . . . . . . . . . . . . . . . . . . . . . . . . . . . 52
Dri v e System Maintenance . . . . . . . . . . . . . . . . . . . . . . . . . 52
Chec king the Tire Pressure . . . . . . . . . . . . . . . . . 52
R e placing the Castor W heels and
Bearings . . . . . . . . . . . . . . . . . . . . . . . . . . . . 53
Cooling System Maintenance . . . . . . . . . . . . . . . . . . . . . 53
Chec king the Cooling System . . . . . . . . . . . . 54
Cleaning the Radiator . . . . . . . . . . . . . . . . . . . . . . . . 54
Brak e Maintenance . . . . . . . . . . . . . . . . . . . . . . . . . . . . . . . . . . . . 55
Adjusting the P arking Brak e
Interloc k Switc h . . . . . . . . . . . . . . . . 55
Belt Maintenance . . . . . . . . . . . . . . . . . . . . . . . . . . . . . . . . . . . . . . . 55
Chec king the Alter nator Belt . . . . . . . . . . . . . 55
R e placing the Blade Dri v e
Belts . . . . . . . . . . . . . . . . . . . . . . . . . . . . . . . . . . 56
Controls System Maintenance . . . . . . . . . . . . . . . . . . . . 56
Adjusting the Control Lev er
Neutral Interloc k
Switc h . . . . . . . . . . . . . . . . . . . . . . . . . . . . . . . 56
Adjusting the Control Lev er
Neutral R etur n . . . . . . . . . . . . . . . . . . 57
Adjusting the T raction Dri v e for
Neutral . . . . . . . . . . . . . . . . . . . . . . . . . . . . . . 58
Adjusting the Maxim um Ground
Speed . . . . . . . . . . . . . . . . . . . . . . . . . . . . . . . . 59
Adjusting the T rac king . . . . . . . . . . . . . . . . . . . . . . . 60
3
Page 4

Hy draulic System Maintenance . . . . . . . . . . . . . . . . . . 61
Chec king the Hy draulic
System . . . . . . . . . . . . . . . . . . . . . . . . . . . . . . . 61
Changing the Hy draulic Oil And
Filter . . . . . . . . . . . . . . . . . . . . . . . . . . . . . . . . . 62
Mo w er Dec k Maintenance . . . . . . . . . . . . . . . . . . . . . . . . . 62
Ser vicing the Cutting Blades . . . . . . . . . . . . . . . 63
Cor recting Mo w er Dec k
Mismatc h . . . . . . . . . . . . . . . . . . . . . . . . . . 66
Adjusting the Mo w er Dec k
Pitc h . . . . . . . . . . . . . . . . . . . . . . . . . . . . . . . . . . 66
R e placing the Grass Deflector . . . . . . . . . . . . 67
Cleaning . . . . . . . . . . . . . . . . . . . . . . . . . . . . . . . . . . . . . . . . . . . . . . . . . . . . 67
Cleaning Under the Mo w er . . . . . . . . . . . . . . . . 67
W aste Disposal . . . . . . . . . . . . . . . . . . . . . . . . . . . . . . . . . . 68
Storag e . . . . . . . . . . . . . . . . . . . . . . . . . . . . . . . . . . . . . . . . . . . . . . . . . . . . . . . . . . . . . . 69
Mac hine . . . . . . . . . . . . . . . . . . . . . . . . . . . . . . . . . . . . . . . . . . . . 69
Engine . . . . . . . . . . . . . . . . . . . . . . . . . . . . . . . . . . . . . . . . . . . . . . 69
Sc hematics . . . . . . . . . . . . . . . . . . . . . . . . . . . . . . . . . . . . . . . . . . . . . . . . . . . . . . . . 70
4
Page 5

Safety
Mac hines with model n umbers 30360TC ,
30360TE, 30361, 30362, 30363TC , 30363TE,
30364, or 30365 meet or ex ceed CEN standard
EN 836:1997 and ANSI B71.4-2004 specifications
in effect at the time of production. Mac hines with
model n umbers 30360 or 30363 meet or ex ceed
ANSI B71.4-2004 specifications in effect at the
time of production.
Improper use or maintenance b y the operator
or o wner can result in injur y . T o reduce the
potential for injur y , comply with these safety
instr uctions and alw a ys pa y attention to the safety
aler t symbol, whic h means Caution, W ar ning , or
Danger —personal safety instr uction. F ailure to
comply with the instr uction ma y result in personal
injur y or death.
Safe Operating Practices
T he follo wing instr uctions are from the CEN
standard EN 836:1997 and ANSI B71.4-2004.
T his product is capable of amputating hands and
feet and thro wing objects . Alw a ys follo w all safety
instr uctions to a v oid serious injur y or death.
Training
• R ead the Operator’ s Manual and other training
material carefully . Be familiar with the
controls , safety signs , and the proper use of the
equipment.
• Nev er allo w c hildren or people unfamiliar with
these instr uctions to use the la wn mo w er .
Local regulations can restrict the ag e of the
operator .
• Nev er mo w while people , especially c hildren,
or pets are nearb y .
• K ee p in mind that the operator or user is
responsible for accidents or hazards occur ring
to other people or their proper ty .
• Do not car r y passeng ers .
• All dri v ers should seek and obtain professional
and practical instr uction. Suc h instr uction
should emphasize:
– the need for care and concentration when
w orking with ride-on mac hines;
– control of a ride-on mac hine sliding on a
slope will not be reg ained b y the application
of the control lev ers . T he main reasons for
loss of control are:
◊ insufficient wheel g rip , especially on
w et g rass;
◊ being dri v en too fast;
◊ inadequate braking;
◊ the type of mac hine is unsuitable for its
task;
◊ lac k of a w areness of the effect of
g round conditions , especially slopes;
◊ incor rect load distribution.
Preparation
• W hile mo wing, alw a ys w ear substantial
footw ear and long trousers . Do not operate
the equipment when barefoot or w earing open
sandals .
• T horoughly inspect the area where the
equipment is to be used and remo v e all objects
whic h ma y be thro wn b y the mac hine .
• W ar ning —fuel is highly flammable .
– Store fuel in containers specifically designed
for this pur pose .
– R efuel outdoors only and do not smok e
while refueling .
– Add fuel before star ting the engine . Nev er
remo v e the cap of the fuel tank or add fuel
while the engine is r unning or when the
engine is hot.
– If fuel is spilled, do not attempt to star t the
engine but mo v e the mac hine a w a y from
the area of spillag e and a v oid creating any
source of ignition until fuel v apors ha v e
dissipated.
– R e place all fuel tank and container caps
securely .
• R e place faulty silencers/m ufflers .
• Before using, alw a ys visually inspect to see that
the blades , blade bolts and cutter assembly
are not w or n or damag ed. R e place w or n or
damag ed blades and bolts in sets to preser v e
balance .
• On m ulti-bladed mac hines , tak e care as rotating
one blade can cause other blades to rotate .
5
Page 6

Operation
• Be aler t, slo w do wn and use caution when
making tur ns . Look behind and to the side
before c hanging directions .
• Do not operate the engine in a confined space
where dang erous carbon mono xide fumes can
collect.
• Mo w only in da ylight or in g ood ar tificial light.
• Before attempting to star t the engine ,
diseng ag e all blade attac hment clutc hes and
shift into neutral.
• R emember there is no suc h thing as a safe
slope . T ra v el on g rass slopes requires par ticular
care . T o guard ag ainst o v er tur ning:
– do not stop or star t suddenly when on a
slope;
– use slo w speeds on slopes and during tight
tur ns;
– sta y aler t for humps and hollo ws and other
hidden hazards;
• W atc h out for traffic when crossing or near
roadw a ys .
• Stop the blades from rotating before crossing
surfaces other than g rass .
• W hen using any attac hments , nev er direct
disc harg e of material to w ard b ystanders
nor allo w any one near the mac hine while in
operation.
• Nev er operate the mac hine with damag ed
guards , shields , or without safety protecti v e
devices in place .
• Do not c hang e the engine g o v er nor settings or
o v erspeed the engine . Operating the engine
at ex cessi v e speed ma y increase the hazard of
personal injur y .
• Before lea ving the operator’ s position:
– diseng ag e the po w er tak e-off and lo w er the
attac hments;
– c hang e into neutral and set the parking
brak e;
– stop the engine and remo v e the k ey .
• Diseng ag e dri v e to attac hments , stop the
engine , and remo v e the ignition k ey:
– before clearing bloc kag es or unclog ging
c hute;
– before c hec king, cleaning or w orking on
the la wn mo w er;
– after striking a foreign object. Inspect
the la wn mo w er for damag e and mak e
re pairs before restar ting and operating the
equipment;
– if the mac hine star ts to vibrate abnor mally
(c hec k immediately).
• Diseng ag e dri v e to attac hments when
transpor ting or not in use .
• Stop the engine and diseng ag e dri v e to
attac hment before refuelling .
Maintenance and Storage
• K ee p all n uts , bolts and screws tight to be sure
the equipment is in safe w orking condition.
• Nev er store the equipment with fuel in the
tank inside a building where fumes ma y reac h
an open flame or spark.
• Allo w the engine to cool before storing in any
enclosure .
• T o reduce the fire hazard, k ee p the engine ,
silencer/m uffler , batter y compar tment and fuel
storag e area free of g rass , lea v es , or ex cessi v e
g rease .
• R e place w or n or damag ed par ts for safety .
• If the fuel tank has to be drained, do this
outdoors .
• On m ulti-bladed mo w ers , tak e care as man ually
rotating one blade can cause other blades to
rotate .
• W hen mac hine is to be park ed, stored or left
unattended, lo w er the mo w er dec k.
Toro Riding Mower Safety
T he follo wing list contains safety infor mation
specific to T oro products or other safety
infor mation that y ou m ust kno w that is not
included in the CEN standard.
• Engine exhaust contains carbon mono xide ,
whic h is an odorless , deadly poison that can
kill y ou. Do not r un engine indoors or in an
enclosed area.
• K ee p hands , feet, hair and loose clothing a w a y
from attac hment disc harg e area, underside of
mo w er and any mo ving par ts while engine is
r unning .
• Do not touc h equipment or attac hment par ts
whic h ma y be hot from operation. Allo w to
6
Page 7

cool before attempting to maintain, adjust, or
ser vice .
• Batter y acid is poisonous and can cause bur ns .
A v oid contact with skin, eyes and clothing .
Protect y our face , eyes , and clothing when
w orking with a batter y .
• T his mac hine is not designed or equipped for
on-road use and is a “slo w-mo ving v ehicle . ”
If y ou m ust cross or tra v el on a public road,
y ou should be a w are of and comply with
local regulations , suc h as required lights , slo w
mo ving v ehicle signs , and reflectors .
• Batter y g ases can explode . K ee p cig arettes ,
sparks and flames a w a y from batter y .
• Use only g en uine T oro re placement par ts to
ensure that original standards are maintained.
• Use only T oro appro v ed attac hments .
W ar ranty ma y be v oided if used with
unappro v ed attac hments .
Slope Operation
• Do not mo w near drop-offs , ditc hes , stee p
banks or w ater . W heels dropping o v er edg es
can cause rollo v ers , whic h ma y result in serious
injur y , death, or dro wning .
• Do not mo w slopes when g rass is w et. Slipper y
conditions reduce traction and could cause
sliding and loss of control.
• Do not mak e sudden tur ns or rapid speed
c hang es .
• Use a w alk behind mo w er and/or a hand
trimmer near drop-offs , ditc hes , stee p banks
or w ater .
• R educe speed and use extreme caution on
slopes .
• R emo v e or mark obstacles suc h as roc ks , tree
limbs , etc . from the mo wing area. T all g rass
can hide obstacles .
• W atc h for ditc hes , holes , roc ks , dips , and rises
that c hang e the operating angle , as rough
ter rain could o v er tur n the mac hine .
• A v oid sudden star ts when mo wing uphill
because the mo w er ma y tip bac kw ards .
• Be a w are that loss of traction ma y occur g oing
do wnhill. W eight transfer to the front wheels
ma y cause dri v e wheels to slip and cause loss
of braking and steering .
• Alw a ys a v oid sudden star ting or stopping on
a slope . If tires lose traction, diseng ag e the
blades and proceed slo wly off the slope .
• F ollo w the man ufacturer’ s recommendations
for wheel w eights or counterw eights to
impro v e stability .
• Use extreme care with attac hments . T hese can
c hang e the stability of the mac hine and cause
loss of control.
Using the Rollover Protection System
(ROPS)
• K ee p the roll bar in the raised and loc k ed
position and use the seat belt when operating
the mac hine .
• Be cer tain that the seat belt can be released
quic kly in the ev ent of an emerg ency .
• Be a w are there is no rollo v er protection when
the roll bar is do wn.
• Chec k the area to be mo w ed and nev er fold
the R OPS in areas where there are slopes , drop
offs or w ater .
• Lo w er the rollbar only when absolutely
necessar y . Do not w ear the seat belt with
the r oll bar f olded do wn.
• Chec k carefully for o v erhead clearances (i.e .
branc hes , doorw a ys , electrical wires) before
dri ving under any objects and do not contact
them.
7
Page 8

Sound Pressure Level
Note: T he data contained in this section only
per tains to units mark ed with the CE log o ( ).
T his unit has an equi v alent contin uous A-w eighted
sound pressure lev el at the operator ear of 90 dB A,
based on measurements of identical mac hines per
EN 11201.
Sound Power Level
Note: T he data contained in this section only
per tains to units mark ed with the CE log o ( ).
T his unit has a guaranteed sound po w er lev el of
105 dB A, based on measurements of identical
mac hines per EN 11094.
Vibration Level
Hand-Arm
T his unit does not ex ceed a hand/ar m vibration
lev el of 2.5 m/s
2
, based on measurements of
identical mac hines per EN 1033.
Whole Body
T his unit does not ex ceed a whole body vibration
lev el of 0.5 m/s
2
, based on measurements of
identical mac hines per EN 1032.
8
Page 9

Slope Chart
9
Page 10
Safety and Instructional
Decals
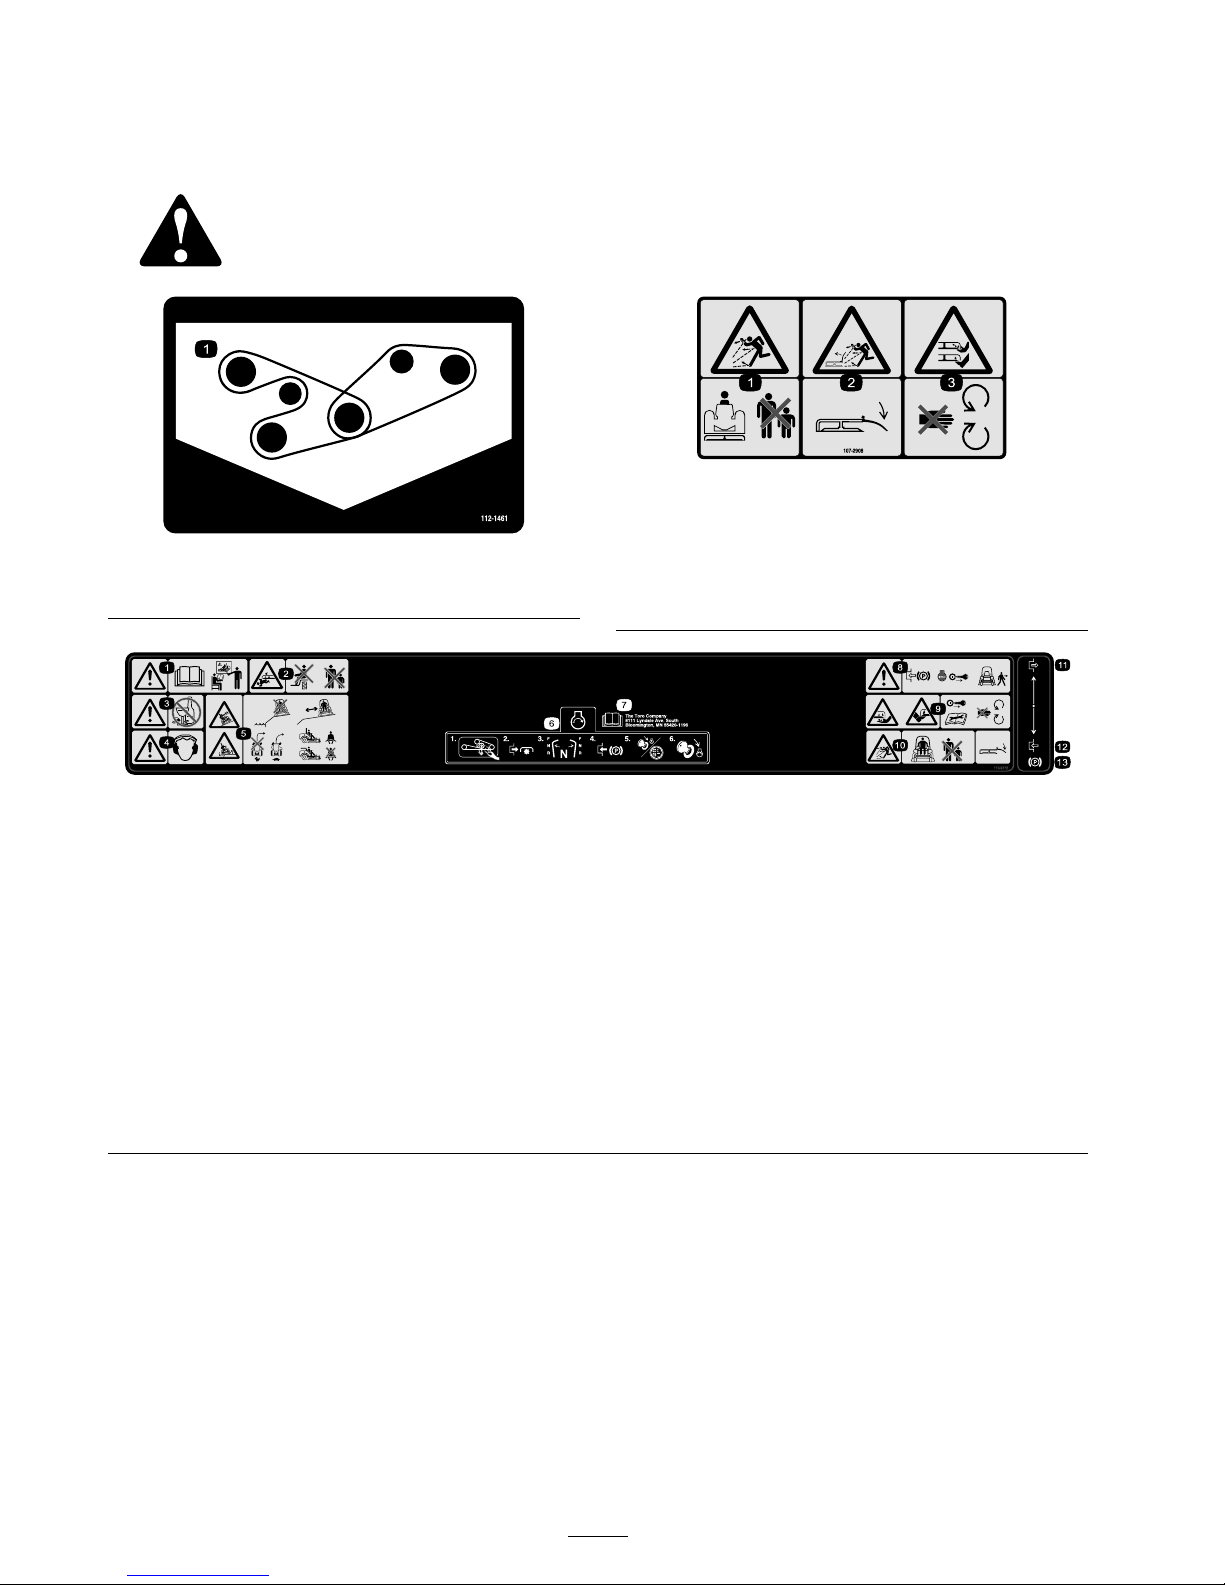
Safety decals and instr uctions are easily visible to the operator and are located near any
area of potential dang er . R e place any decal that is damag ed or lost.
112-1461
1. Belt routing
107-2908
1. Thrown object hazard—keep bystanders a safe distance from
the machine.
2. Thrown object hazard—do not operate the mower with the
deector up or removed, keep the deector in place.
3. Cutting/dismemberment hazard of hand or foot, mower
blade—stay away from moving parts.
110-9772
1. Warning—read the Operator’s Manual and receive training.
8. Warning—engage the parking brake, stop the engine and
remove the ignition key before leaving the machine.
2. Crushing/dismemberment hazard of bystanders—do not carry
passengers, keep bystanders a safe distance from the machine.
9. Cutting hazard of hand or foot—remove the ignition key
and read the instructions before servicing or performing
maintenance, keep away from moving parts.
3. Warning—do not use drugs or alcohol. 10. Thrown object hazard—keep bystanders a safe distance from
the machine; keep all deectors and shields in place.
4. Warning—wear hearing protection.
11. Disengage
5. Tipping, drop off hazard—do not operate near water drop-offs,
stay a safe distance from drop-offs, slow machine before
turning, do not turn at high speeds, wear a seat belt when a
ROPS is in place, do not wear a seat belt when ROPS is lowered.
12. Engage
6. To start the engine: clear any debris from mower belt,
disengage the PTO, move the motion control levers to the
neutral position, engage the parking brake, turn the ignition
to Run and wait for the glow plug light to turn off, turn the
ignition key to Start.
13. Parking brake
7. Read the Operator’s Manual.
10
Page 11
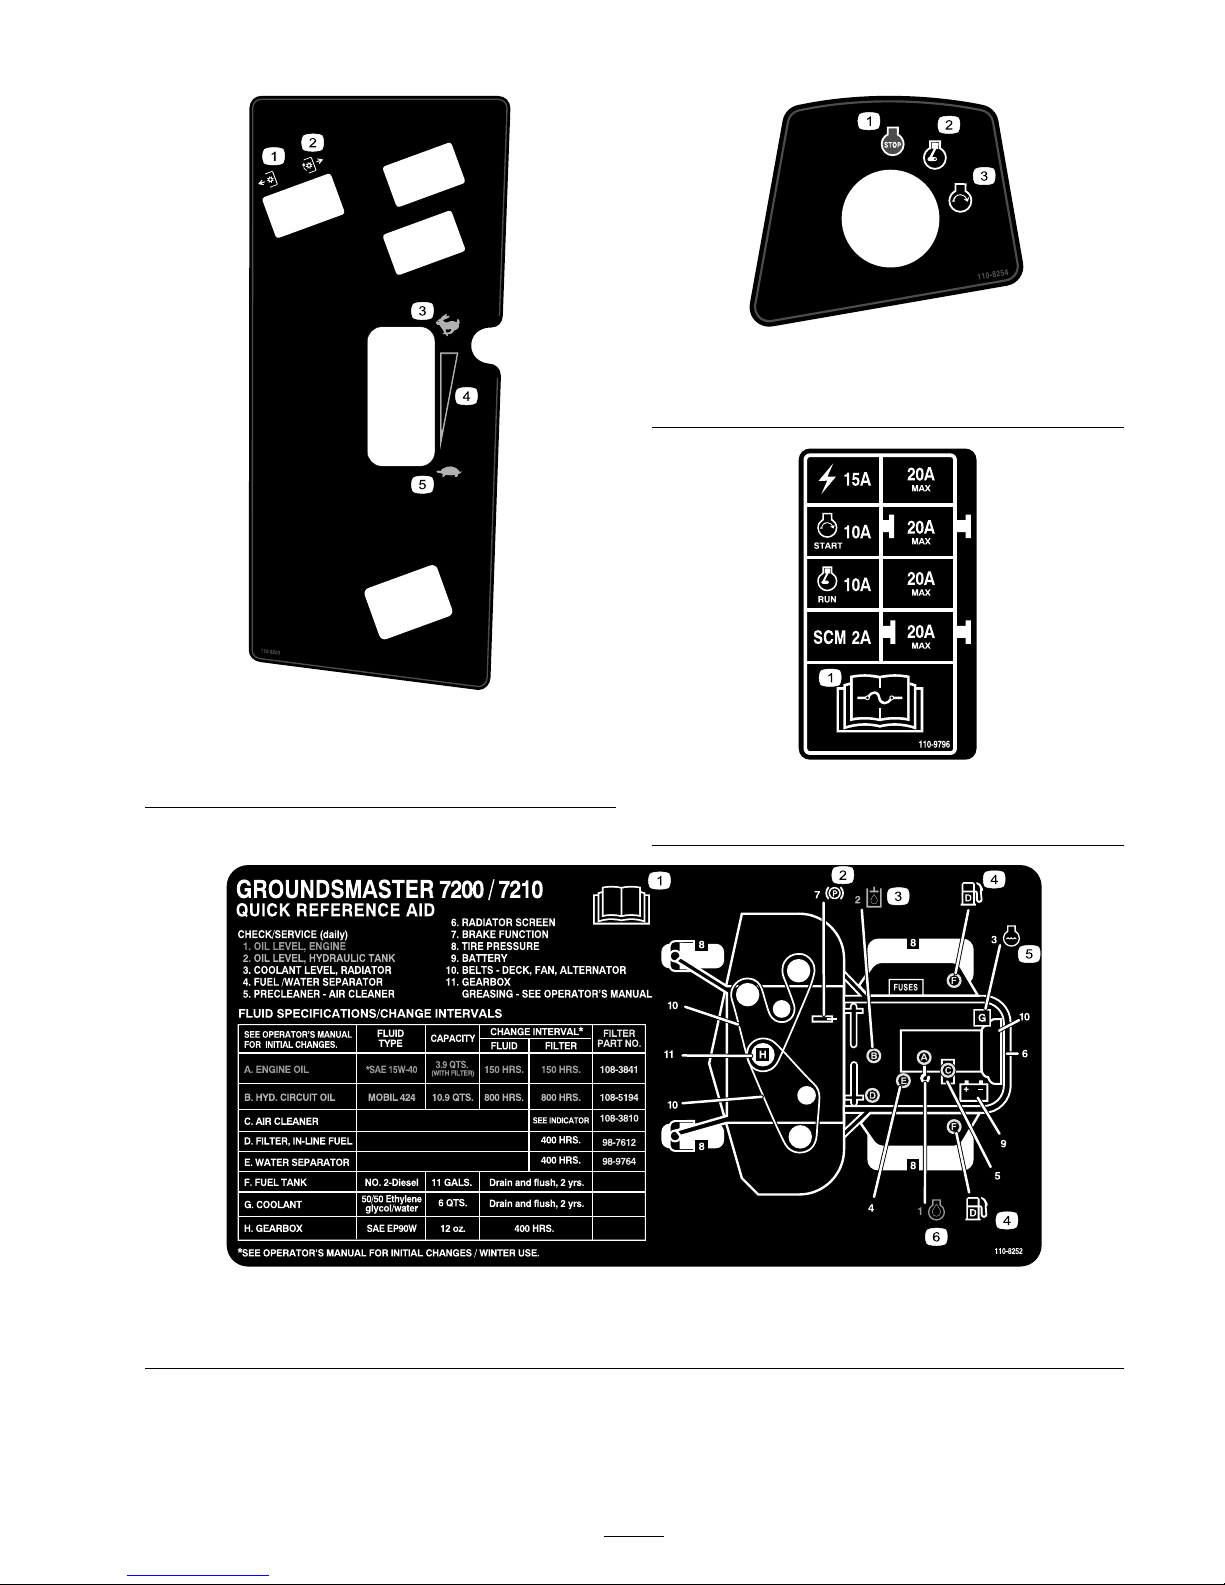
110-8253
1. PTO–Off 4. Continuous variable setting
2. PTO—On
5. Slow
3. Fast
110-8254
1. Engine–Stop 3. Engine—Start
2. Engine—Run
110-9796
1. Read the Operator’s Manual for information on fuses.
110-8252
1. Read the Operator’s Manual.
3. Hydraulic oil 5. Engine coolant
2. Parking brake 4. Fuel 6. Engine oil
11
Page 12
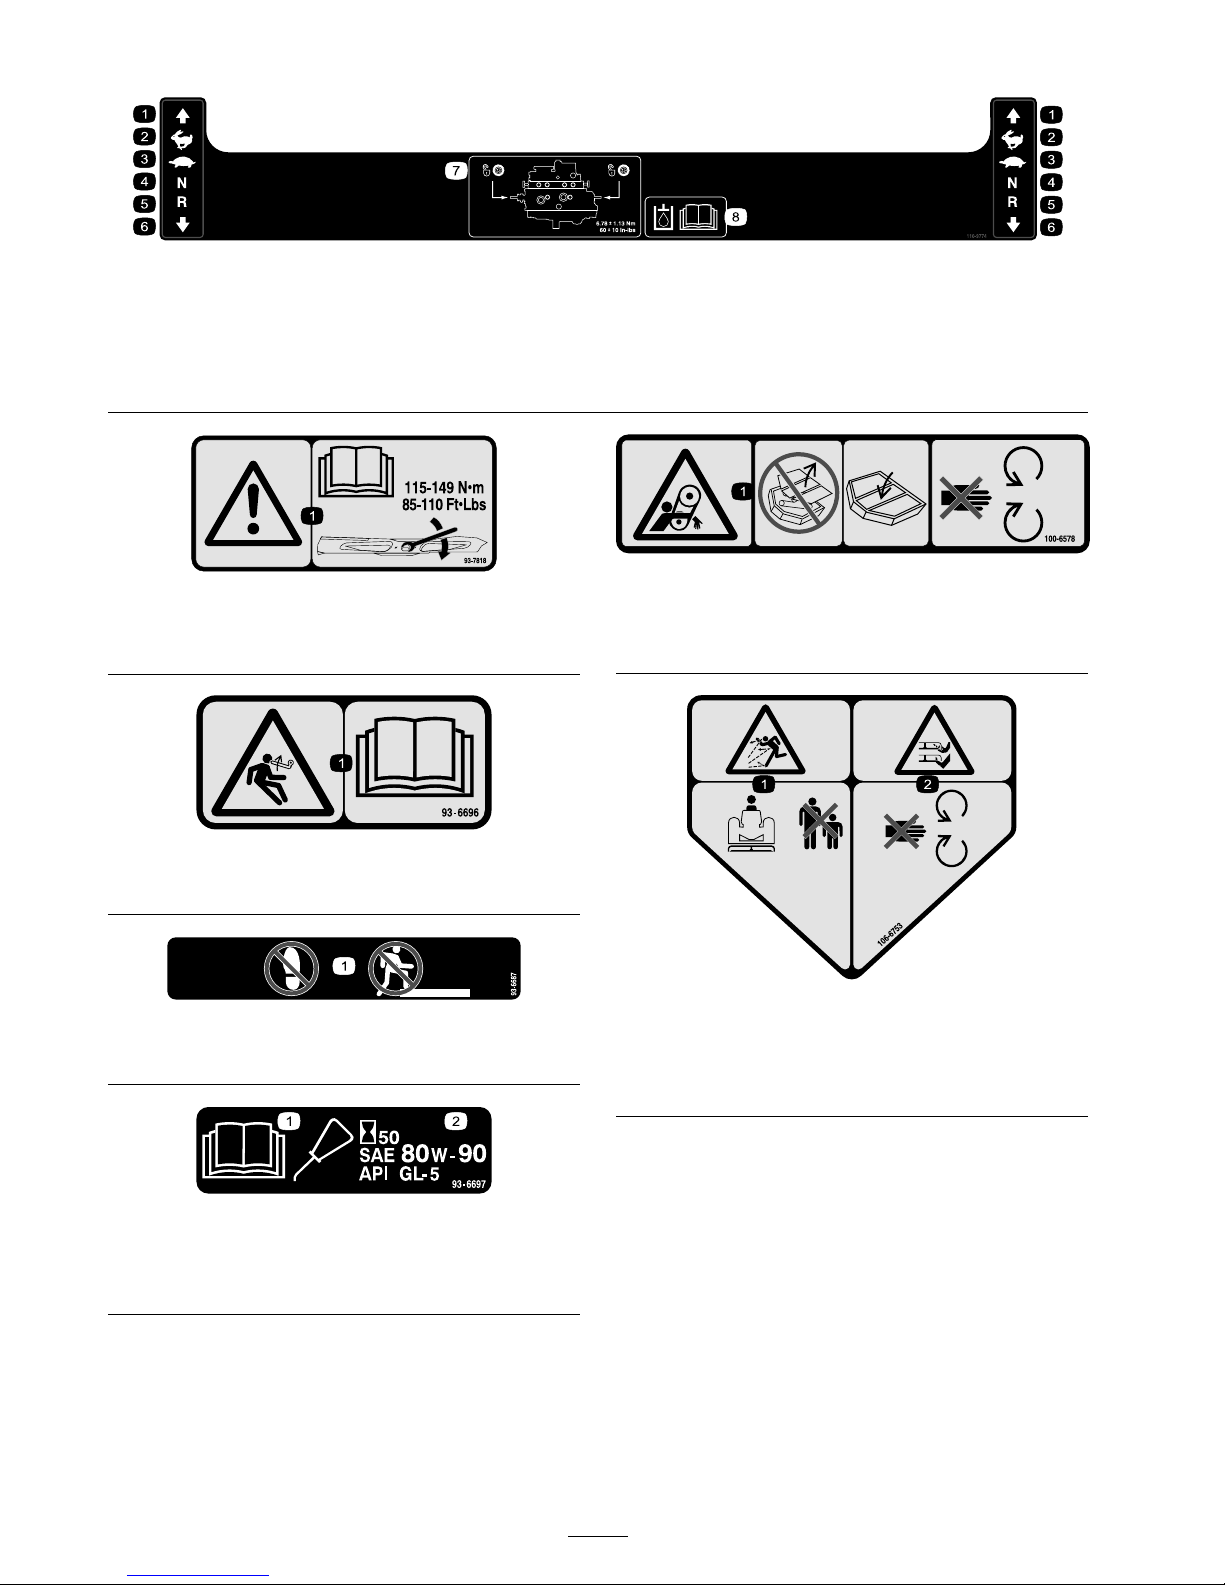
110-9774
1. Forward 3. Slow
5. Reverse
7. Tow valve location; torque
the tow valves to 6.78 ± 1.13
N ⋅ m (60 ± 10 in-lbs).
2. Fast
4. Neutral 6. Backward
8. Read the Operator’s Manual
for more information on the
hydraulic oil.
93-7818
1. Warning—read the Operator’s Manual for instructions on
torquing the blade bolt/nut to 115-149 N•m (85-110 ft-lb).
93-6696
1. Stored energy hazard—read the Operator’s Manual .
93-6687
1. Do not step here.
93-6697
1. Read the Operator’s
Manual .
2. Check the oil every 50
hours. Add SAE 80w-90
(API GL-5) oil if needed.
100-6578
1. Entanglement hazard, belt—do not operate the machine
with the shields or guards removed; always keep the shields
and guards in place; stay away from moving parts.
106-6753
1. Thrown object hazard—keep bystanders a safe distance from
the machine.
2. Cutting/dismemberment hazard of hand or foot, mower
blade—stay away from moving parts.
12
Page 13
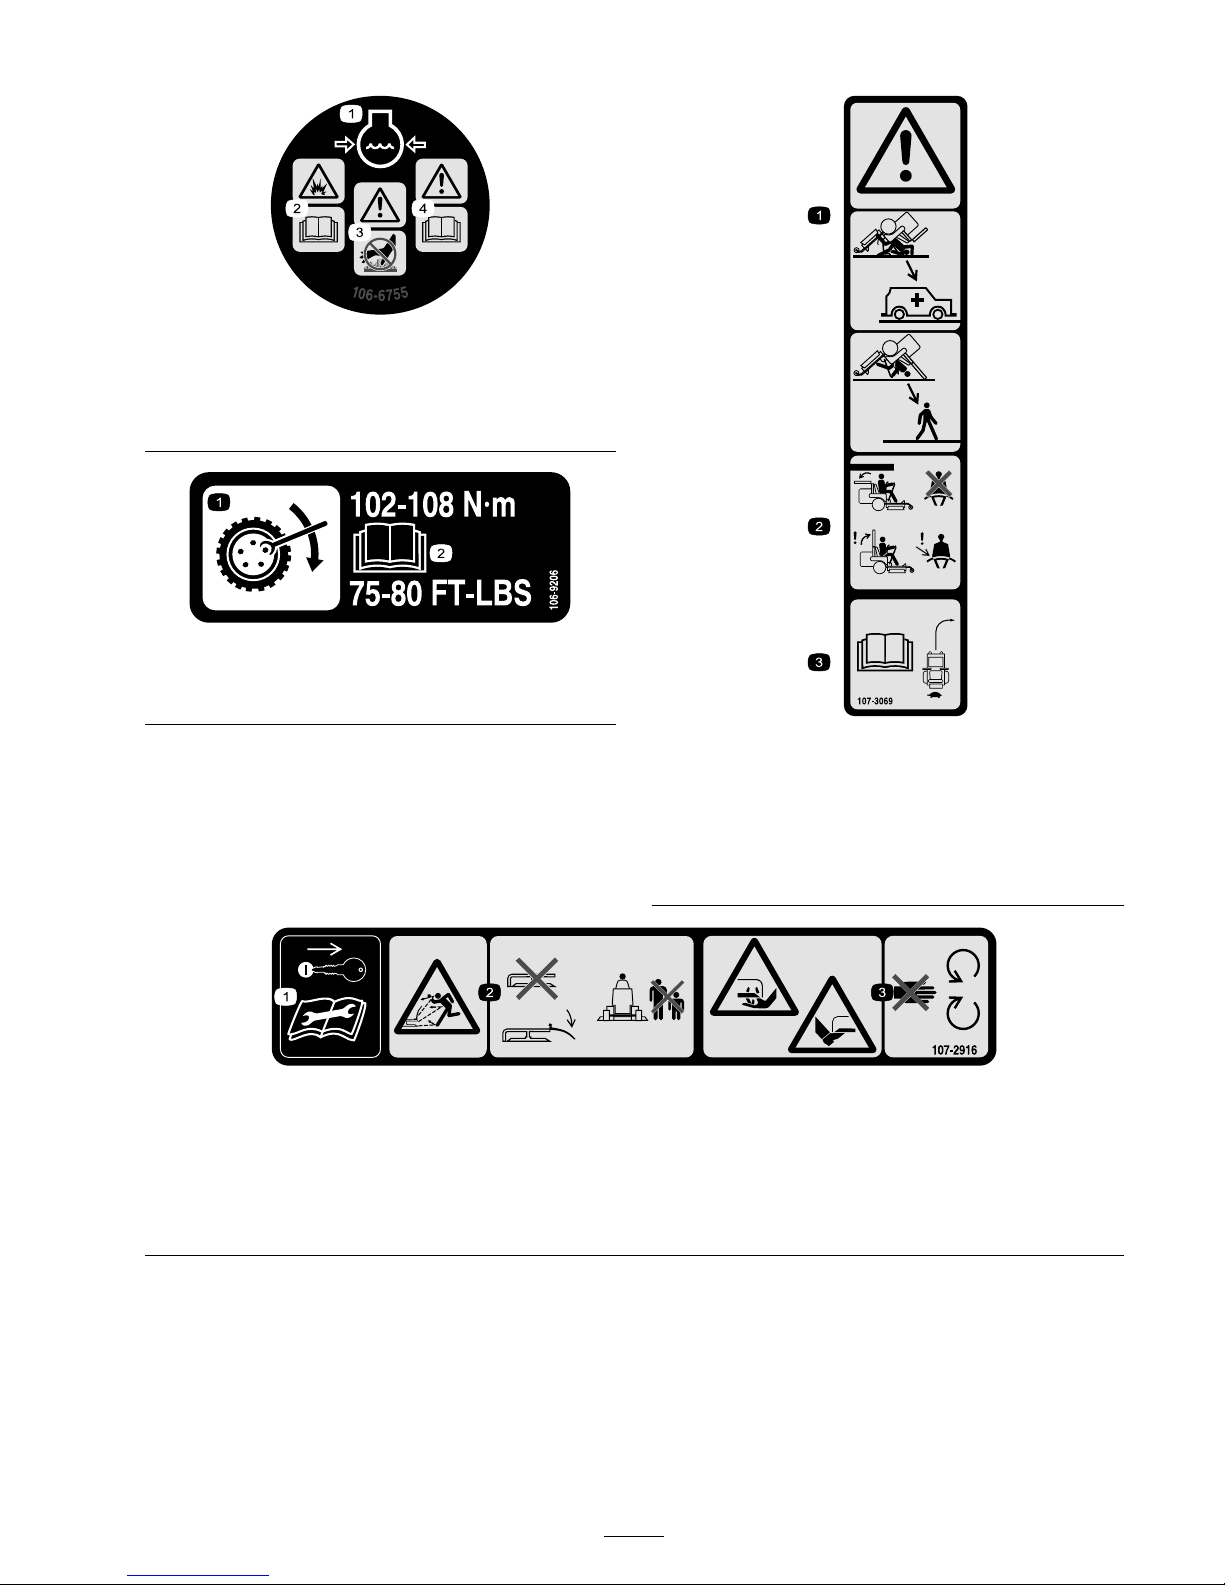
106-6755
1. Engine coolant under
pressure.
3. Warning—do not touch the
hot surface.
2. Explosion hazard—read the
Operator’s Manual.
4. Warning—read the
Operator’s Manual.
106-9206
1. Wheel torque specications
2. Read the Operator’s Manual .
107-3069
1. Warning—there is no rollover protection when the roll bar is
down.
2. To avoid injury or death from a rollover accident, keep the
roll bar in the raised and locked position and wear the seat
belt. Lower the roll bar only when absolutely necessary; do
not wear the seat belt when the roll bar is down.
3. Read the Operator’s Manual ; drive slowly and carefully.
107-2916
Side Discharge Models Only
1. Remove the ignition key and read the
Operator’s Manual before servicing or
performing maintenance.
2. Thrown object hazard—do not operate
the mower with the deector up or
removed, keep the deector in place;
keep bystanders a safe distance from
the machine.
3. Cutting/dismemberment hazard of
hand or foot, mower blade—stay away
from moving parts.
13
Page 14
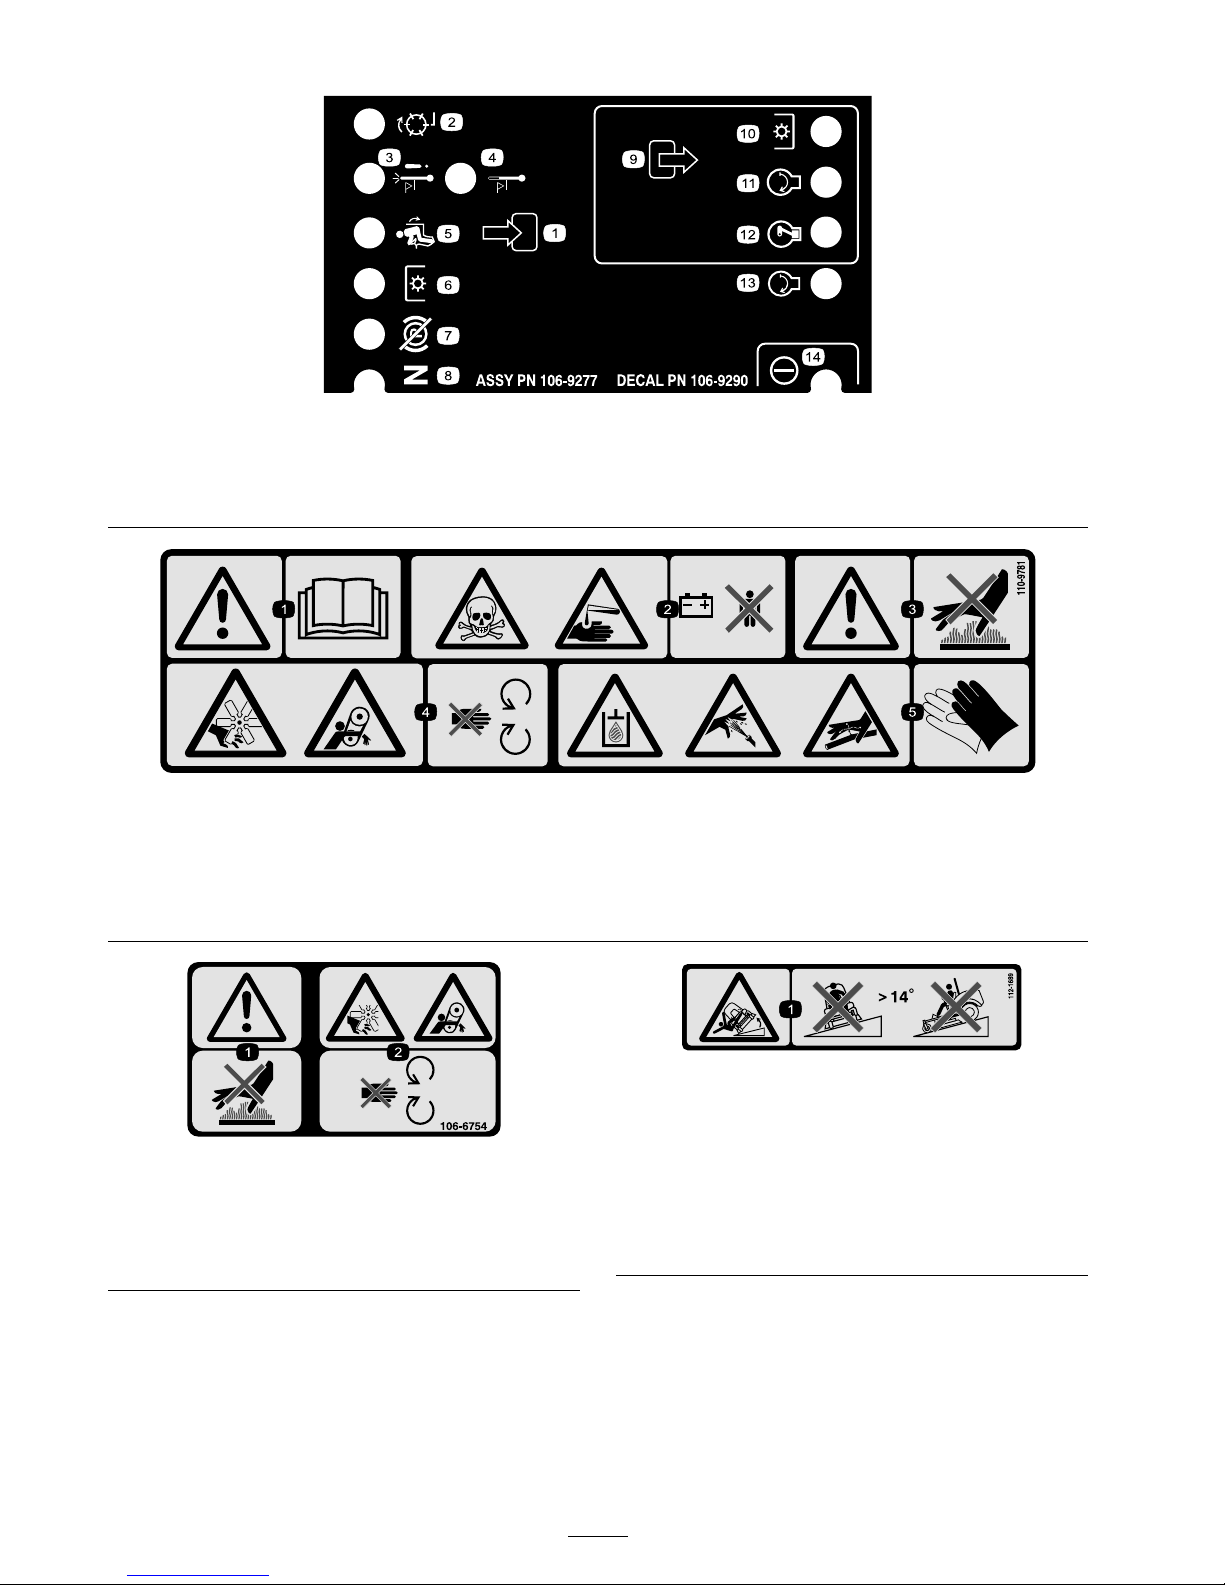
106-9290
1. Inputs 5. In seat
9. Outputs 13. Start
2. (not active on this machine) 6. Power Take-off (PTO) 10. Power Take-off (PTO)
14. Power
3. High temperature shutdown 7. Parking brake Off
11. Start
4. High temperature warning 8. Neutral
12. Energize to Run (ETR)
110-9781
1. Warning—read the Operator’s Manual.
2. Poison and caustic liquid/chemical burn hazard—keep children a safe distance from the battery.
3. Warning—do not touch the hot surface.
4. Cutting/dismemberment hazard, fan and entanglement hazard, belt—stay away from moving parts.
5. Hydraulic oil in system under pressure, escaping hydraulic oil penetrating skin hazard, broken hydraulic lines hazard—wear
protective hand protection when handling hydraulic system components.
106-6754
CE Marked Models Only (With the CE Kit Installed)
1. Warning—do not touch the hot surface.
2. Cutting/dismemberment hazard, fan and entanglement
hazard, belt—stay away from moving parts.
112-1689
CE Marked Models Only (With the CE Kit Installed)
* T h i s s a f e t y d e c a l i n c l u d e s a s l o p e w a r n i n g r e q u i r e d o n t h e m a c h i n e f o r
c o m p l i a n c e t o t h e E u r o p e a n L a w n M o w e r S a f e t y S t a n d a r d E N 8 3 6 : 1 9 9 7 .
T h e c o n s e r v a t i v e m a x i m u m s l o p e a n g l e s i n d i c a t e d f o r o p e r a t i o n o f t h i s
m a c h i n e a r e p r e s c r i b e d b y a n d r e q u i r e d b y t h i s s t a n d a r d .
1. Tipping hazard—do not operate on slopes greater than 14
degrees.
14
Page 15
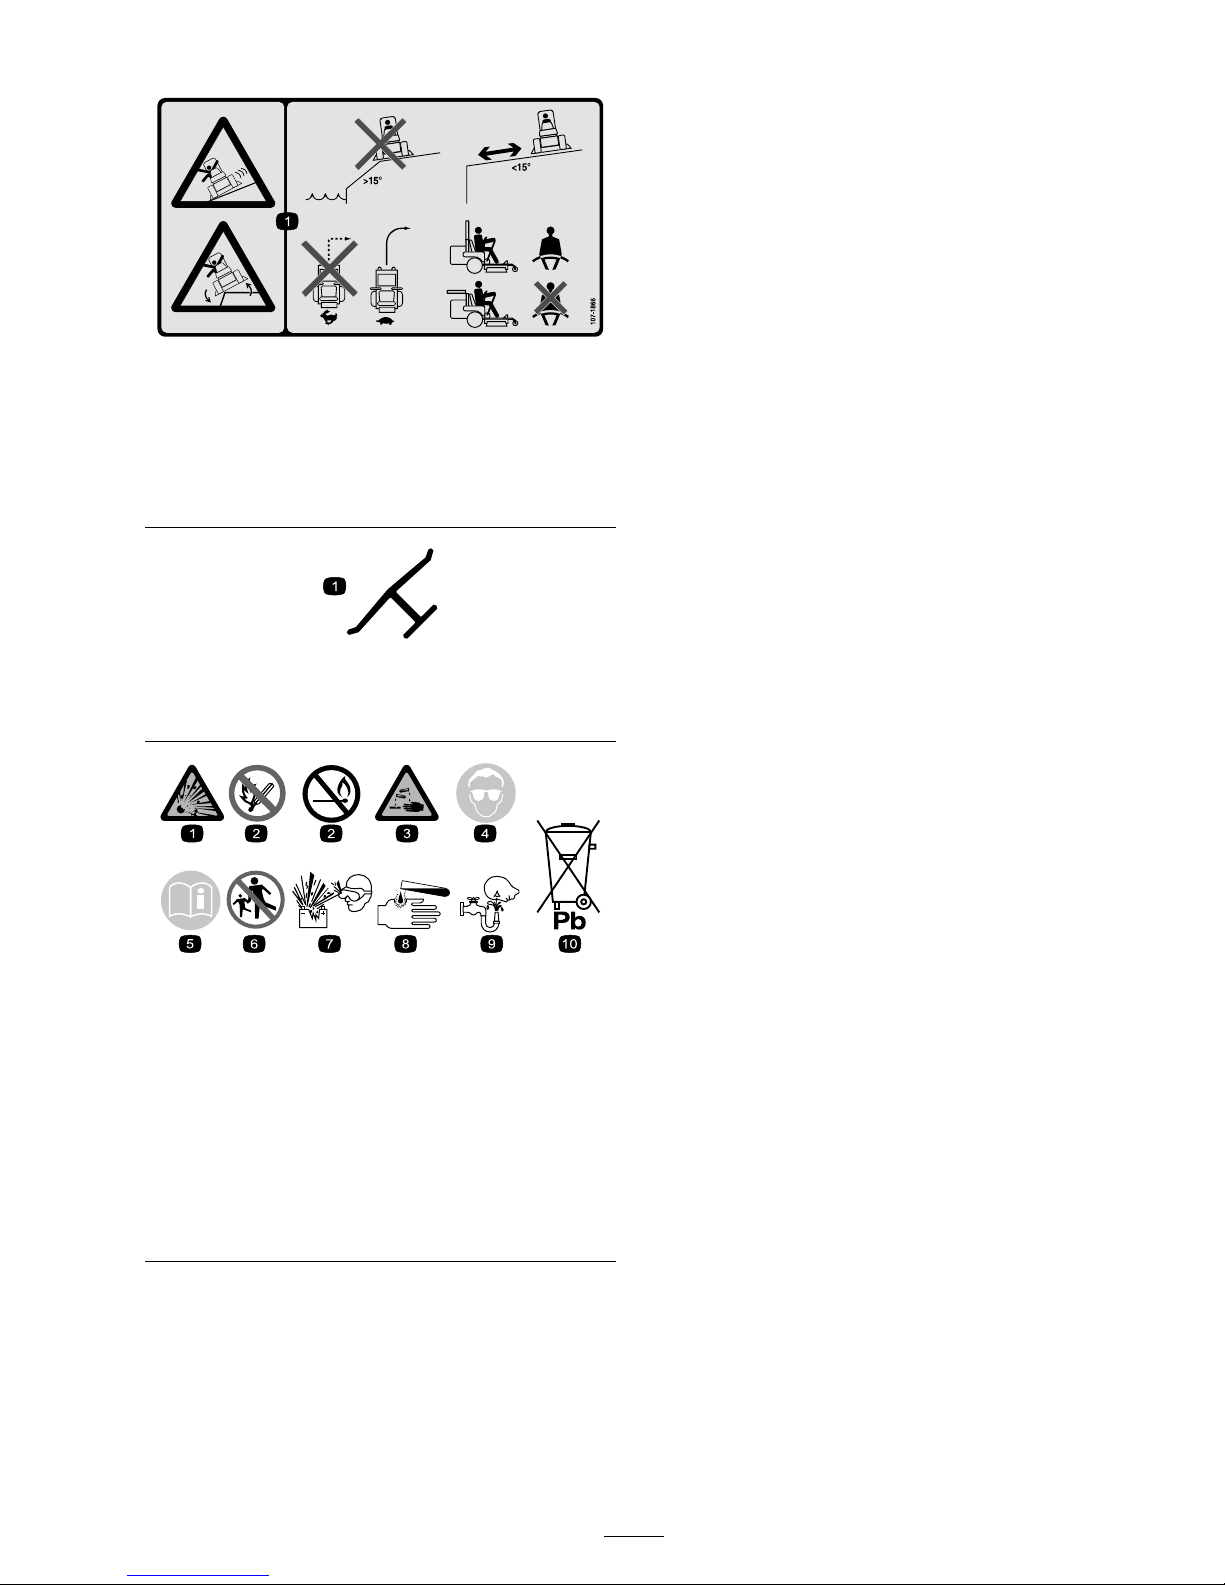
107-1866
1. Sliding and loss of control hazard and tipping hazard,
drop-offs—do not operate the machine near drop-offs,
slopes greater than 15 degrees, or water; keep a safe
distance from drop-offs; do not turn sharply while traveling
fast, instead, slow down and turn gradually; if the roll bar is
raised, wear the seat belt; if the roll bar is lowered, do not
wear the seat belt.
Manufacturer’s Mark
1. Indicates the blade is identied as a part from the original
machine manufacturer.
Battery Symbols
Some or all of these symbols are on your battery
1. Explosion hazard 6. Keep bystanders a safe
distance from the battery.
2. No re, open ame, or
smoking.
7. Wear eye protection;
explosive gases can cause
blindness and other injuries
3. Caustic liquid/chemical
burn hazard
8. Battery acid can cause
blindness or severe burns.
4. Wear eye protection
9. Flush eyes immediately
with water and get medical
help fast.
5. Read the Operator’s
Manual.
10. Contains lead; do not
discard.
15
Page 16

Setup
Loose Parts
Use the chart below to verify that all parts have been shipped.
Step
Description
Qty.
Use
Tire
1
1
Lug nut 5
Install the left rear tire (model
30360TC and 30363TC only).
2
No parts required
–
Activate and charge the battery
(model 30360TC and 30363TC
only).
3
No parts required
–
Adjust the ROPS.
4
No parts required
–
Check the tire pressure.
5
No parts required
–
Install weights.
6
No parts required
–
Check the hydraulic uid, engine
oil, and coolant levels.
Operator’s Manual
1
Engine Operator’s Manual
1
Parts Catalog
1
Operator Training DVD
1
Pre-delivery Inspection Sheet
1
Engine warranty
1
CE certicate
1
7
Certicate of Quality
1
Read the manuals and watch the
DVD before operating the machine.
Use the remaining parts for the
installation of attachments.
Step
1
Installing the Left Rear
Tire (Model 30360TC and
30363TC Only)
Parts needed for this step:
1
Tire
5 Lug nut
Procedure
1. Suppor t the left rear of the mac hine with jac k
stands .
2. R emo v e the lug n uts from the tire mounting
studs .
3. Pull the crate and brac k et off of the wheel hub .
4. Install the rear tire onto the hub and secure it
using the lug n uts remo v ed previously .
5. T or que the lug n uts to 75 to 80 ft-lb (102 to
108 N ⋅ m).
16
Page 17
Step
2
Activating and Charging
the Battery (Model 30360TC
and 30363TC Only)
No Parts Required
Procedure
Use only electrolyte (1.265 Specific Gra vity) to fill
batter y initially .
1. R emo v e the batter y from the mac hine .
Important: Do not add electr ol yte while
the batter y is in the machine. Y ou could
spill it, causing cor r osion.
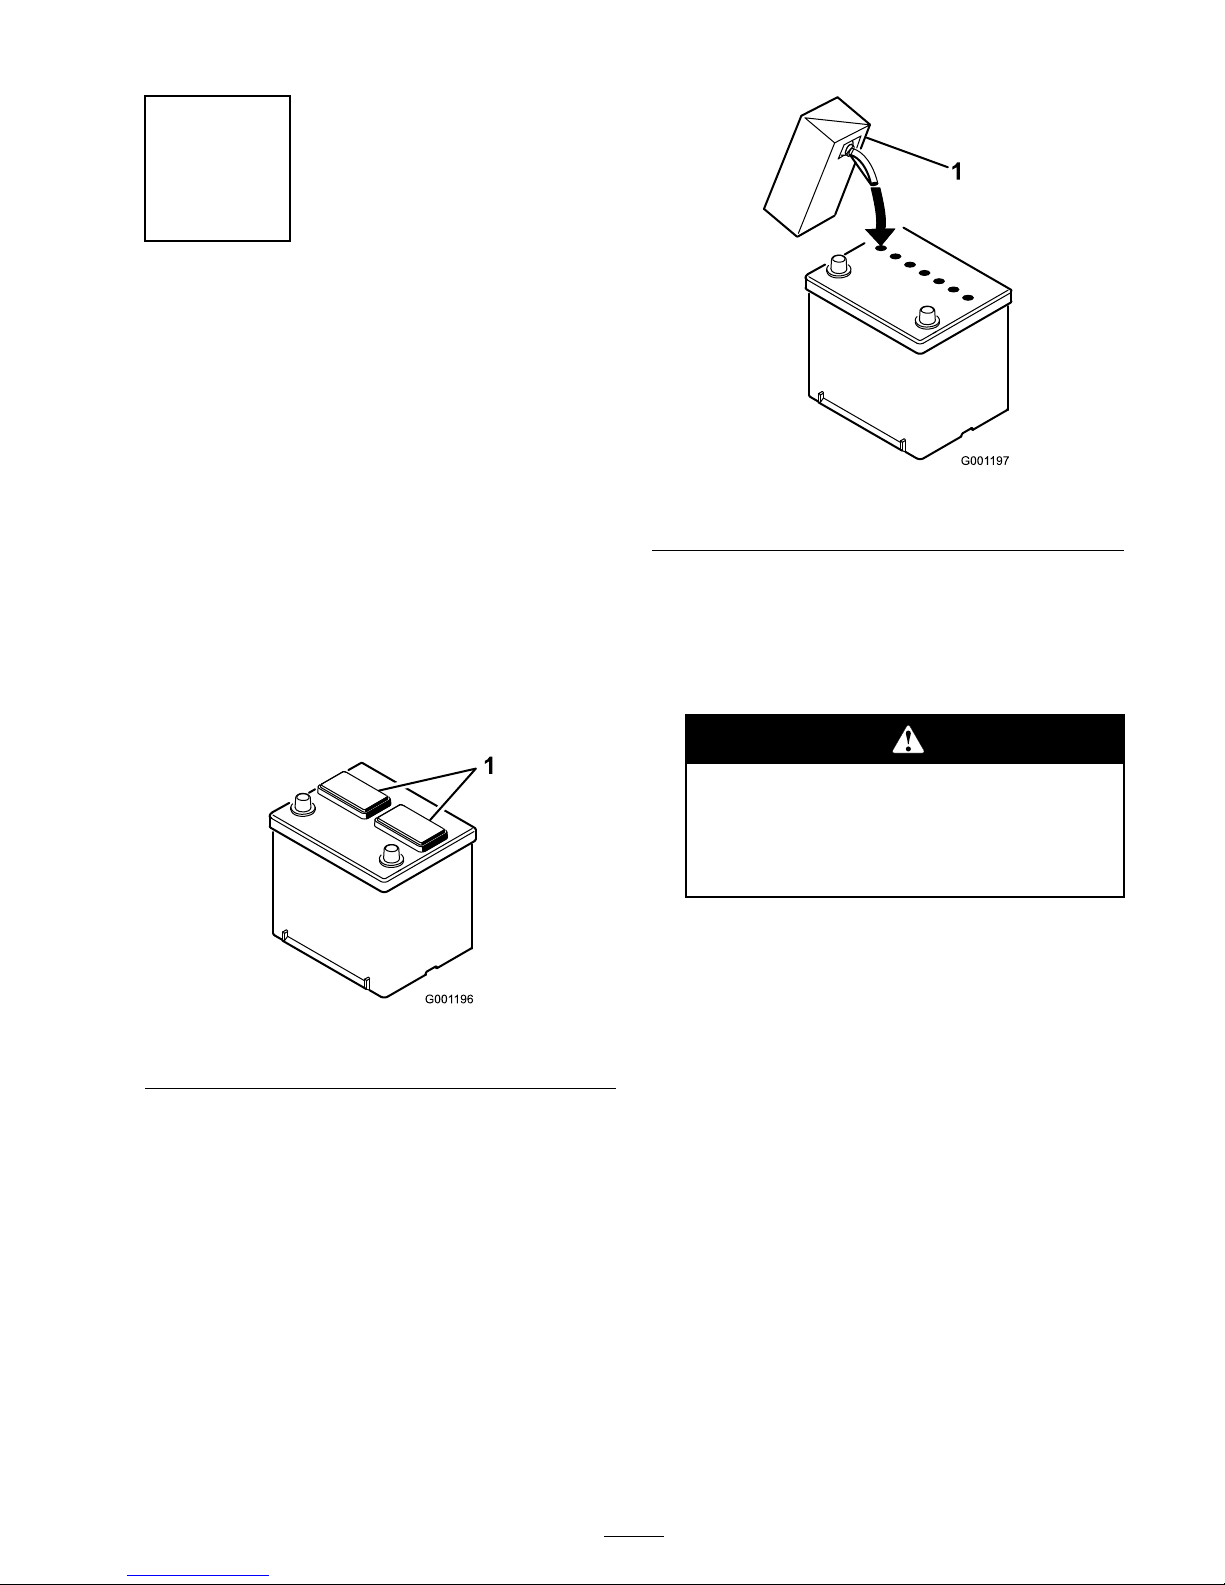
2. Clean the top of the batter y and remo v e the
v ent caps ( Figure 3 ).
Figure 3
1. Vent caps
3. Carefully fill eac h cell with electrolyte until the
plates are co v ered with about 1/4 inc h (6 mm)
of fluid ( Figure 4 ).
Figure 4
1. Electrolyte
4. Allo w appro ximately 20 to 30 min utes for the
electrolyte to soak into the plates . R efill as
necessar y to bring the electrolyte to within
about 1/4 inc h (6 mm) of the bottom of the
fill w ell ( Figure 4 ).
Charging the batter y pr oduces gasses
that can explode.
Nev er smok e near the batter y and k eep
spar ks and flames a w ay fr om batter y .
5. Connect a 3 to 4 amp batter y c harg er to the
batter y posts . Charg e the batter y at a rate of
3 to 4 amps until the specific g ra vity is 1.250
or higher and the temperature is at least 60°F .
(16°C) with all cells g asing freely .
6. W hen the batter y is c harg ed, disconnect the
c harg er from the electrical outlet and batter y
posts .
Note: After the batter y has been acti v ated,
add only distilled w ater to re place nor mal loss ,
although maintenance-free batteries should
not require w ater under nor mal operating
conditions .
17
Page 18
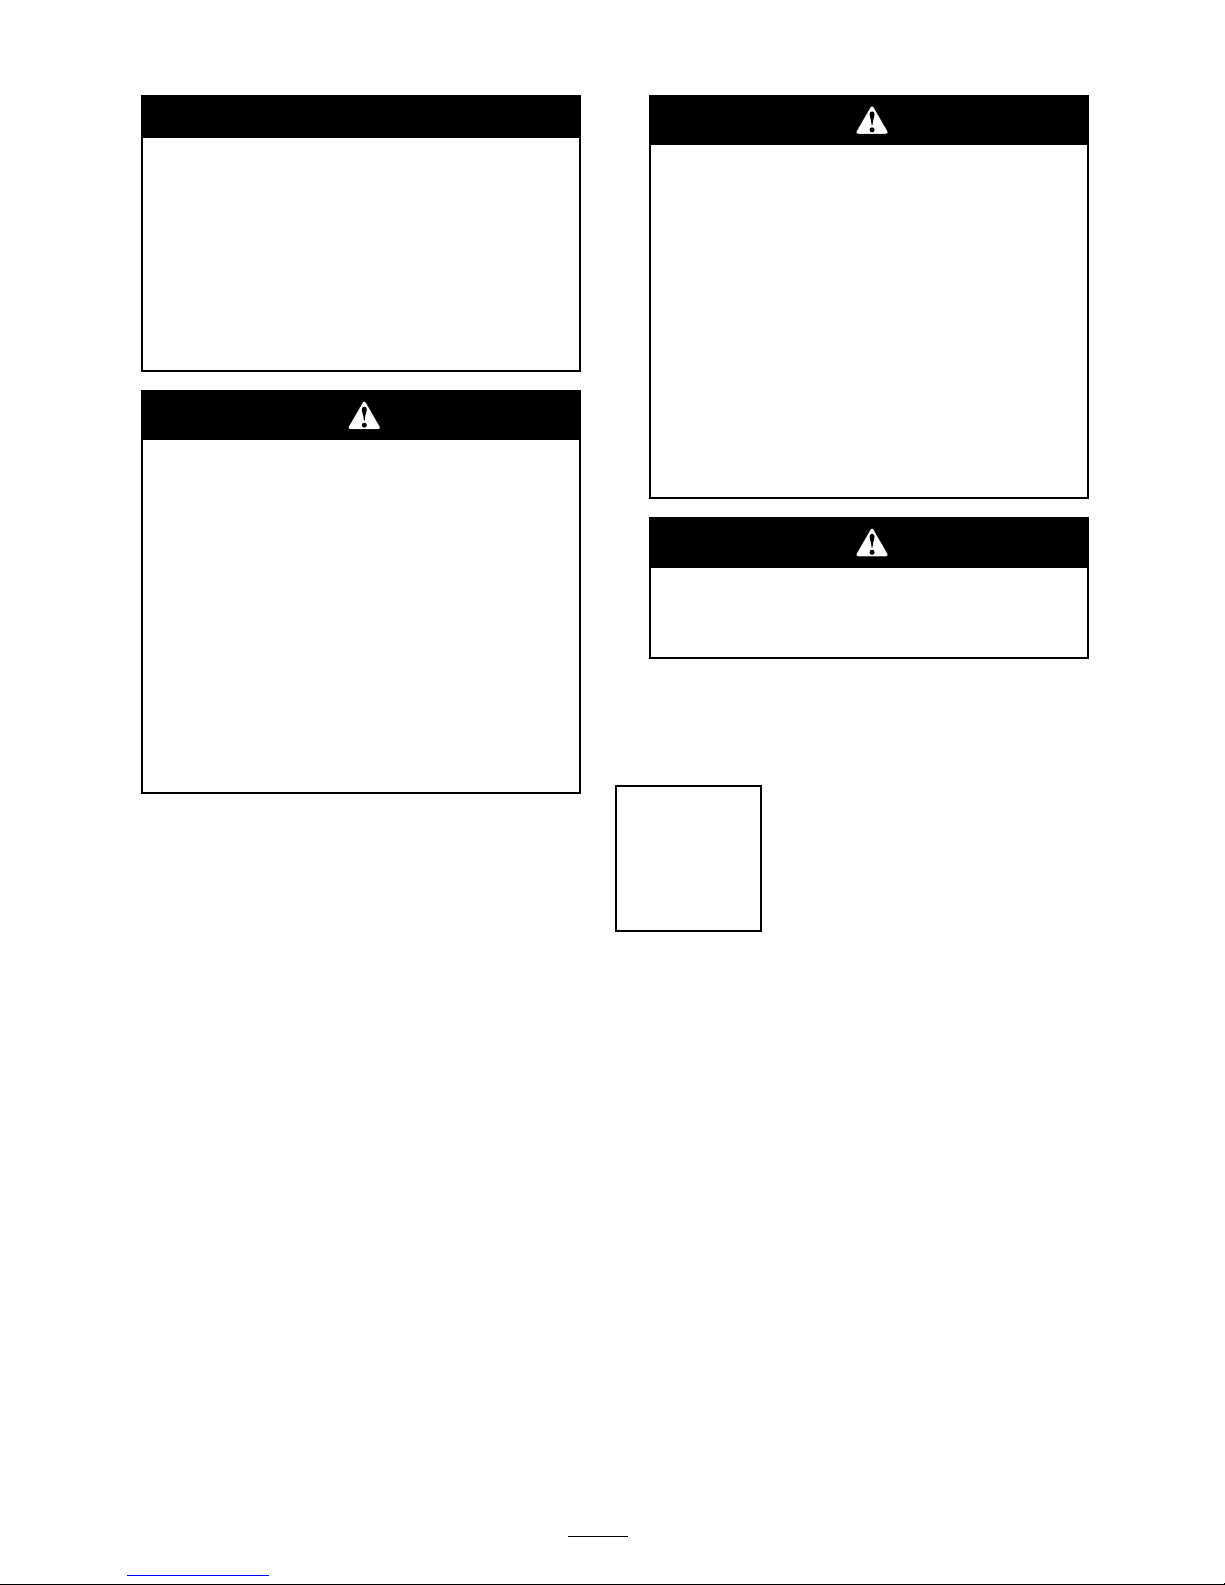
Warning
CALIFORNIA
Pr oposition 65 W ar ning
Batter y posts, ter minals, and r elated
accessories contain lead and lead
compounds, chemicals kno wn to the
State of Calif or nia to cause cancer and
r epr oducti v e har m. W ash hands after
handling .
Batter y ter minals or metal tools could
shor t a gainst metal tractor components
causing spar ks. Spar ks can cause the
batter y gasses to explode, r esulting in
per sonal injur y .
• W hen r emo ving or installing the
batter y , do not allo w the batter y
ter minals to touch an y metal par ts of
the tractor .
• Do not allo w metal tools to shor t
betw een the batter y ter minals and
metal par ts of the tractor .
7. Install the batter y into the mac hine and secure
it.
Important: T he batter y must not be a ble
to mo v e or wig g le when pushed.
8. First, install the positi v e cable (red) to the
positi v e (+) ter minal and then the neg ati v e
cable (blac k) to the neg ati v e (-) ter minal of
the batter y . Slide the r ubber boot o v er the
positi v e ter minal to prev ent a possible shor t
from occur ring .
Incor r ect batter y ca ble r outing could
dama ge the machine and ca bles causing
spar ks. Spar ks can cause the batter y
gasses to explode, r esulting in per sonal
injur y .
• Al w ays disconnect the negati v e
(black) batter y ca ble bef or e
disconnecting the positi v e (r ed)
ca ble.
• Al w ays connect the positi v e (r ed)
batter y ca ble bef or e connecting the
negati v e (black) ca ble.
Connecting ca bles to the wr ong post
could dama ge the electrical system and
r esult in per sonal injur y .
Note: Ensure that the batter y cables are
routed a w a y from any shar p edg es or mo ving
par ts .
Step
3
Adjusting the ROPS
No Parts Required
Procedure
1. R emo v e the hair pin cotter pins and remo v e the
tw o pins from the roll bar ( Figure 5 ).
18
Page 19
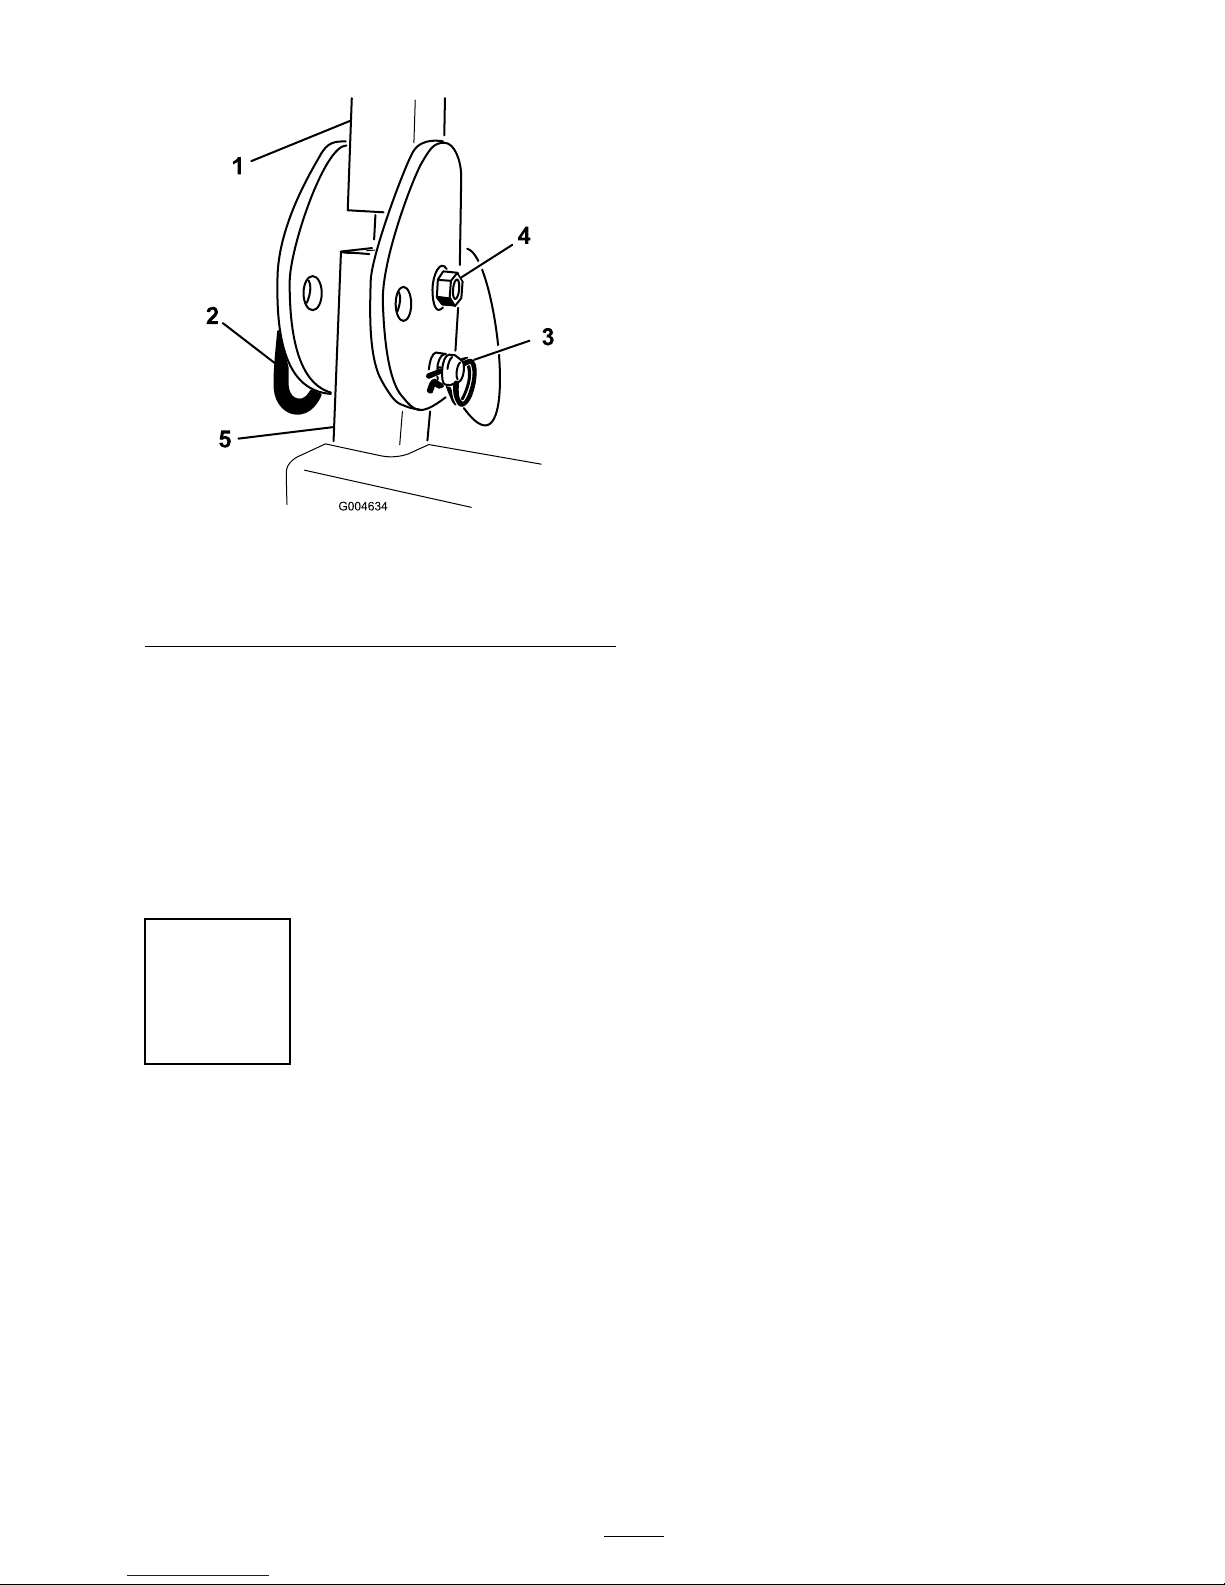
Figure 5
Right Side Shown
1. Roll bar
3. Hairpin cotter pin
2. Pin
2. Raise the roll bar to the upright position and
install the tw o pins and secure them with the
hair pin cotter pins ( Figure 5 ).
Note: If y ou m ust lo w er the roll bar , push
the bar forw ard to reliev e pressure on the
pins , remo v e the pins , lo w er the bar slo wly ,
and secure it with the pins so that it does not
damag e the hood.
Step
4
Checking the Tire Pressure
No Parts Required
Procedure
T he tires are o v er inflated for shipping . T herefore ,
release some of the air to reduce the pressure . T he
cor rect air pressure is 15 psi (103 kP a) in the rear
tires and 25 psi (172 kP a) in the caster wheels .
19
Page 20

Step
5
Installing Weights (Groundsmaster 7210 Models in Europe
Only)
No Parts Required
Procedure
T he Groundsmaster 7210 mac hine does not need added w eight to meet CE standards so long as there are
no attac hments added to it. Ho w ev er , y ou ma y need to purc hase and install additional w eight de pending
on mo w er dec k size/type and the attac hments y ou install on the mac hine . T he follo wing table lists the
v arious attac hment configurations and the additional front w eight needed for eac h model:
Note: T he Groundsmaster 7200 mac hine does not need w eight in any configuration to meet the CE
standards .
Attachment
Conguration
Weight Required with
a 62 inch (157.5 cm)
Guardian Mower
Weight Required with
a 72 inch (183 cm)
Guardian Mower
Weight Required with
a 72 inch (183 cm)
Side-discharge Mower
Groundsmaster 7210
Traction Unit with no
Added Attachments
22 lb (10 kg) 0 lb (0 kg) 0 lb (0 kg)
Groundsmaster 7210
Traction Unit and Hard
Canopy
75 lb (34 kg) 21 lb (9.5 kg) 33 lb (15 kg)
Groundsmaster 7210
Traction Unit, Hard Canopy,
and Road Light Kit
71 lb (32.2 kg) 63 lb (28.5 kg) 22 lb (10 kg)
Groundsmaster 7210
Traction Unit, Hard Canopy,
Road Light Kit, and Jack
Stand
40 lb (18 kg) 37 lb (17 kg) 22 lb (10 kg)
Groundsmaster 7210
Traction Unit, Hard Canopy,
and Jack Stand
31 lb (14 kg) 22 lb (10 kg) 22 lb (10 kg)
Groundsmaster 7210
Traction Unit, Road Light
Kit, and Jack Stand
0 lb (0 kg) 0 lb (0 kg) 0 lb (0 kg)
Groundsmaster 7210
Traction Unit and Road
Light Kit
25 lb (11.3 kg) 0 lb (0 kg) 0 lb (0 kg)
Groundsmaster 7210
Traction Unit and Jack Stand
0 lb (0 kg) 0 lb (0 kg) 0 lb (0 kg)
Contact y our A uthorized T oro Distributor to obtain the appropriate kits and w eights for y our mac hine .
20
Page 21

Step
6
Checking Fluid Levels
No Parts Required
Procedure
1. Chec k the h y draulic fluid lev el before star ting
the engine , refer to Chec king the Hy draulic
Fluid Lev el in Hy draulic System Maintenance ,
pag e 61 .
2. Chec k the engine oil lev el before and after
star ting the engine , refer to Chec king the
Engine Oil Lev el in Engine Maintenance ,
pag e 46 .
3. Chec k the cooling system before star ting the
engine; refer to Chec king the Cooling System
in Cooling System Maintenance , pag e 53
Step
7
Reading the Manuals and
Viewing the DVD
Parts needed for this step:
1
Operator’s Manual
1
Engine Operator’s Manual
1
Parts Catalog
1
Operator Training DVD
1
Pre-delivery Inspection Sheet
1
Engine warranty
1
CE certicate
1
Certicate of Quality
Procedure
1. R ead the man uals .
2. View the Operator T raining D VD .
21
Page 22
Product Overview
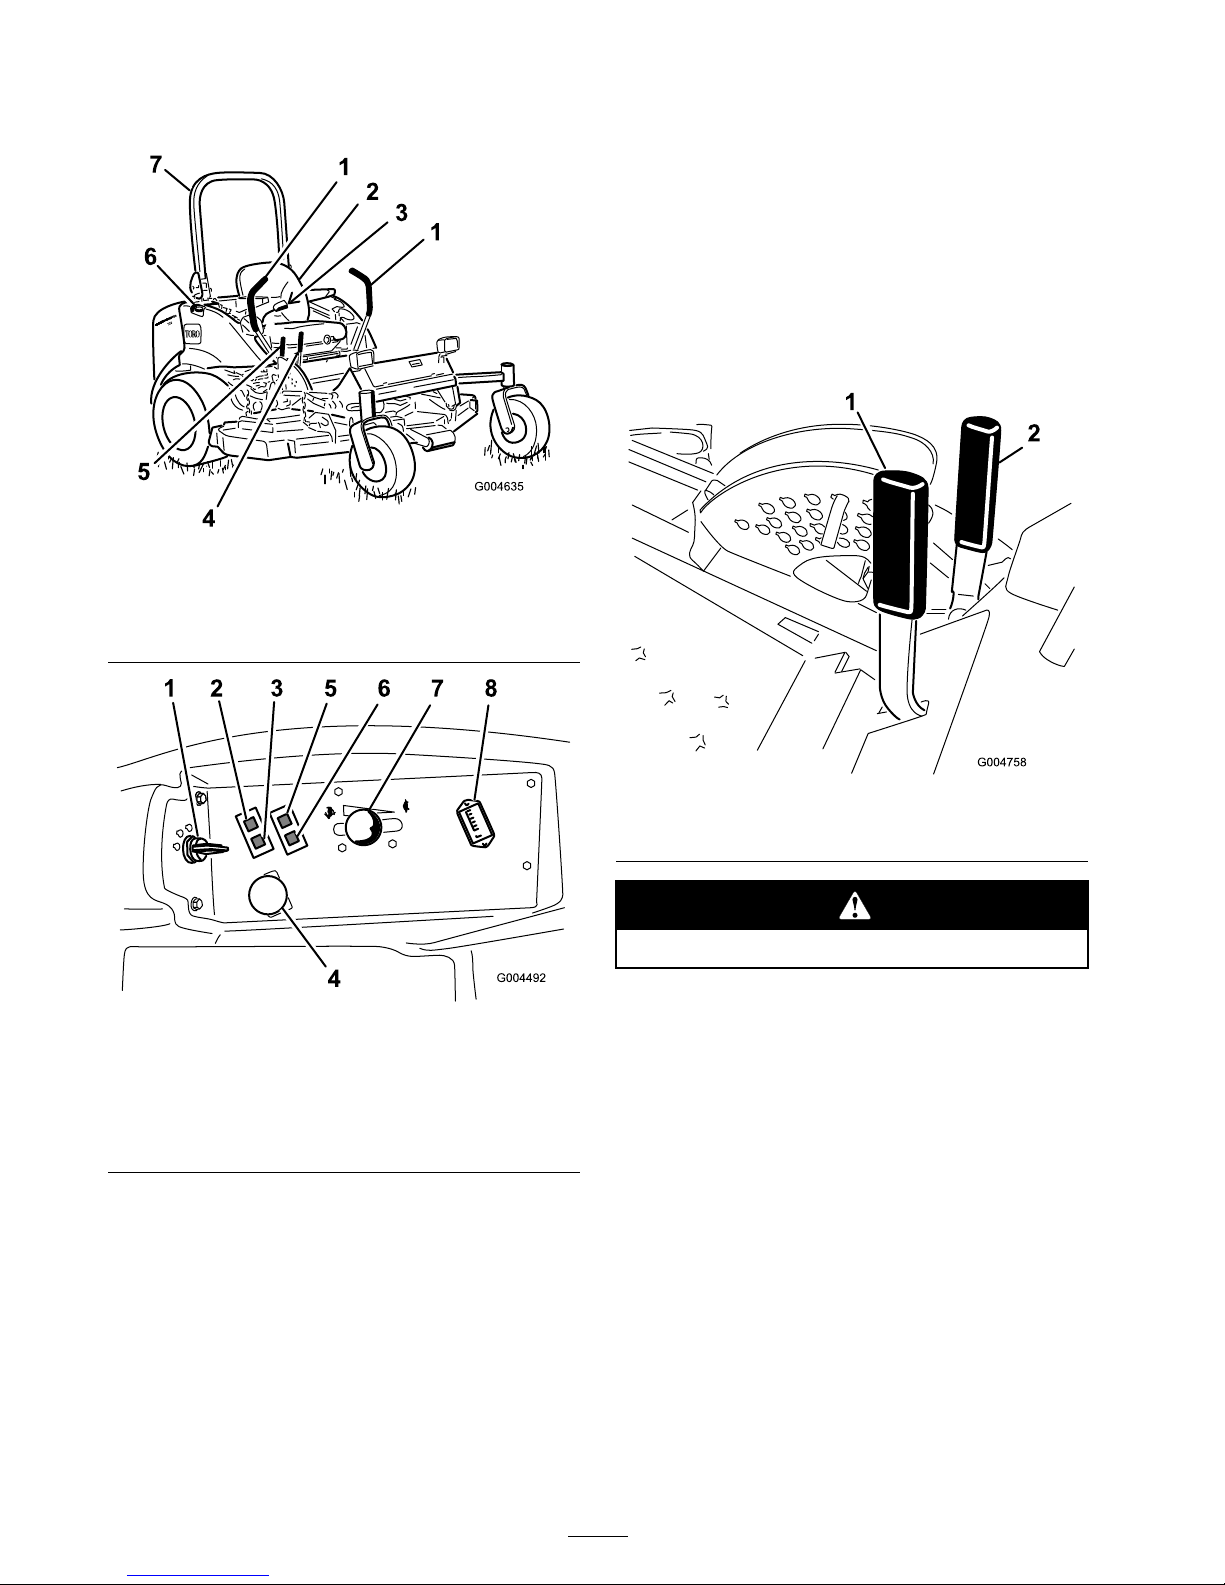
Figure 6
1. Motion control lever 5. Mower deck lift lever
2. Seat
6. Fuel cap (both sides)
3. Seat belt 7. Roll bar
4. Parking brake lever
Figure 7
1. Ignition switch 5. Oil pressure warning light
2. Engine coolant
temperature warning
light
6. Charge indicator light
3. Glow plug light 7. Throttle lever
4. Power take off (PTO) Switch
8. Hour meter
Controls
Become familiar with all the controls before y ou
star t the engine and operate the mac hine ( Figure 6
and Figure 7 ).
Motion Control Levers
T he motion control lev ers control the forw ard
and rearw ard motions as w ell as the tur ning of the
mac hine . R efer to Dri ving F orw ard or Bac kw ard
in Operation , pag e 25 .
Parking Brake Lever
W henev er the engine is shut off , eng ag e the
parking brak e to prev ent accidental mo v ement of
the mac hine . T o eng ag e the parking brak e , pull the
parking brak e lev er rearw ard and up ( Figure 8 ). T o
release the parking brak e , push the parking brak e
lev er forw ard and do wn.
Figure 8
1. Parking brake lever 2. Mower deck lift lever
Do not par k the traction unit on a slope.
Deck Lift Lever
T he dec k lift lev er acti v ates the h y draulic circuit
that raises and lo w ers the mo w er dec k. Pull bac k
on the lev er to raise the mo w er dec k and push
forw ard on it to lo w er it.
Important: Do not contin ue to hold the
lev er back or f orw ard after the mo w er deck
has been full y raised or lo w er ed. Doing so will
dama ge the h y draulic system.
Ignition Switch
T he ignition switc h has three positions: Off ,
On/Preheat, and Star t.
22
Page 23
Throttle Lever
T he throttle lev er controls the speed of the engine .
Mo ving the throttle lev er forw ard to w ard the F ast
position increases the engine speed. Mo ving it
rearw ard to w ard the Slo w position decreases the
engine speed. T he throttle controls the speed of
the blades and, in conjunction with motion control
lev ers , controls g round speed of the mac hine .
Alw a ys r un the mac hine with the throttle in the
F ast position when cutting g rass .
Power Take Off (PTO) Switch
T he po w er tak e off (PTO) switc h star ts and stops
the mo w er blades .
Hour Meter
T he hour meter records the n umber of hours the
engine has operated. It operates when the k ey
switc h is in the R un position. Use these times for
sc heduling regular maintenance .
Glow Plug Light (Orange Light)
T he glo w plug indicator light tur ns on when the
ignition switc h is tur ned to the On position. It
remains lit for 6 seconds . W hen the light tur ns off ,
the engine is ready to be star ted.
Engine Coolant Temperature Warning
Light
T his light glo ws and the cutting blades stop if the
engine coolant temperature is high. If the mac hine
is not stopped and the coolant temperature rises
another 20° F , the engine will stop .
Important: If the mo w er deck shuts do wn
and the temperatur e w ar ning light is on, push
PT O knob do wn, dri v e to a safe flat ar ea,
mo v e the thr ottle lev er to the Slo w position,
mo v e the motion contr ol lev er s into the neutral
lock ed position, and enga ge the par king
brak e. Allo w the engine to idle f or sev eral
min utes while it cools to a safe lev el. Stop
the engine and check the cooling system;
r efer to Checking the Cooling System in
Cooling System Maintenance , pa ge 53 .
Charge Indicator
Illuminates when the system c harging circuit
malfunctions .
Oil Pressure Warning Light
T he oil pressure w ar ning light glo ws when the oil
pressure in engine drops belo w a safe lev el. If
lo w oil pressure ev er occurs , stop the engine and
deter mine the cause . R e pair the damag e before
star ting the engine ag ain.
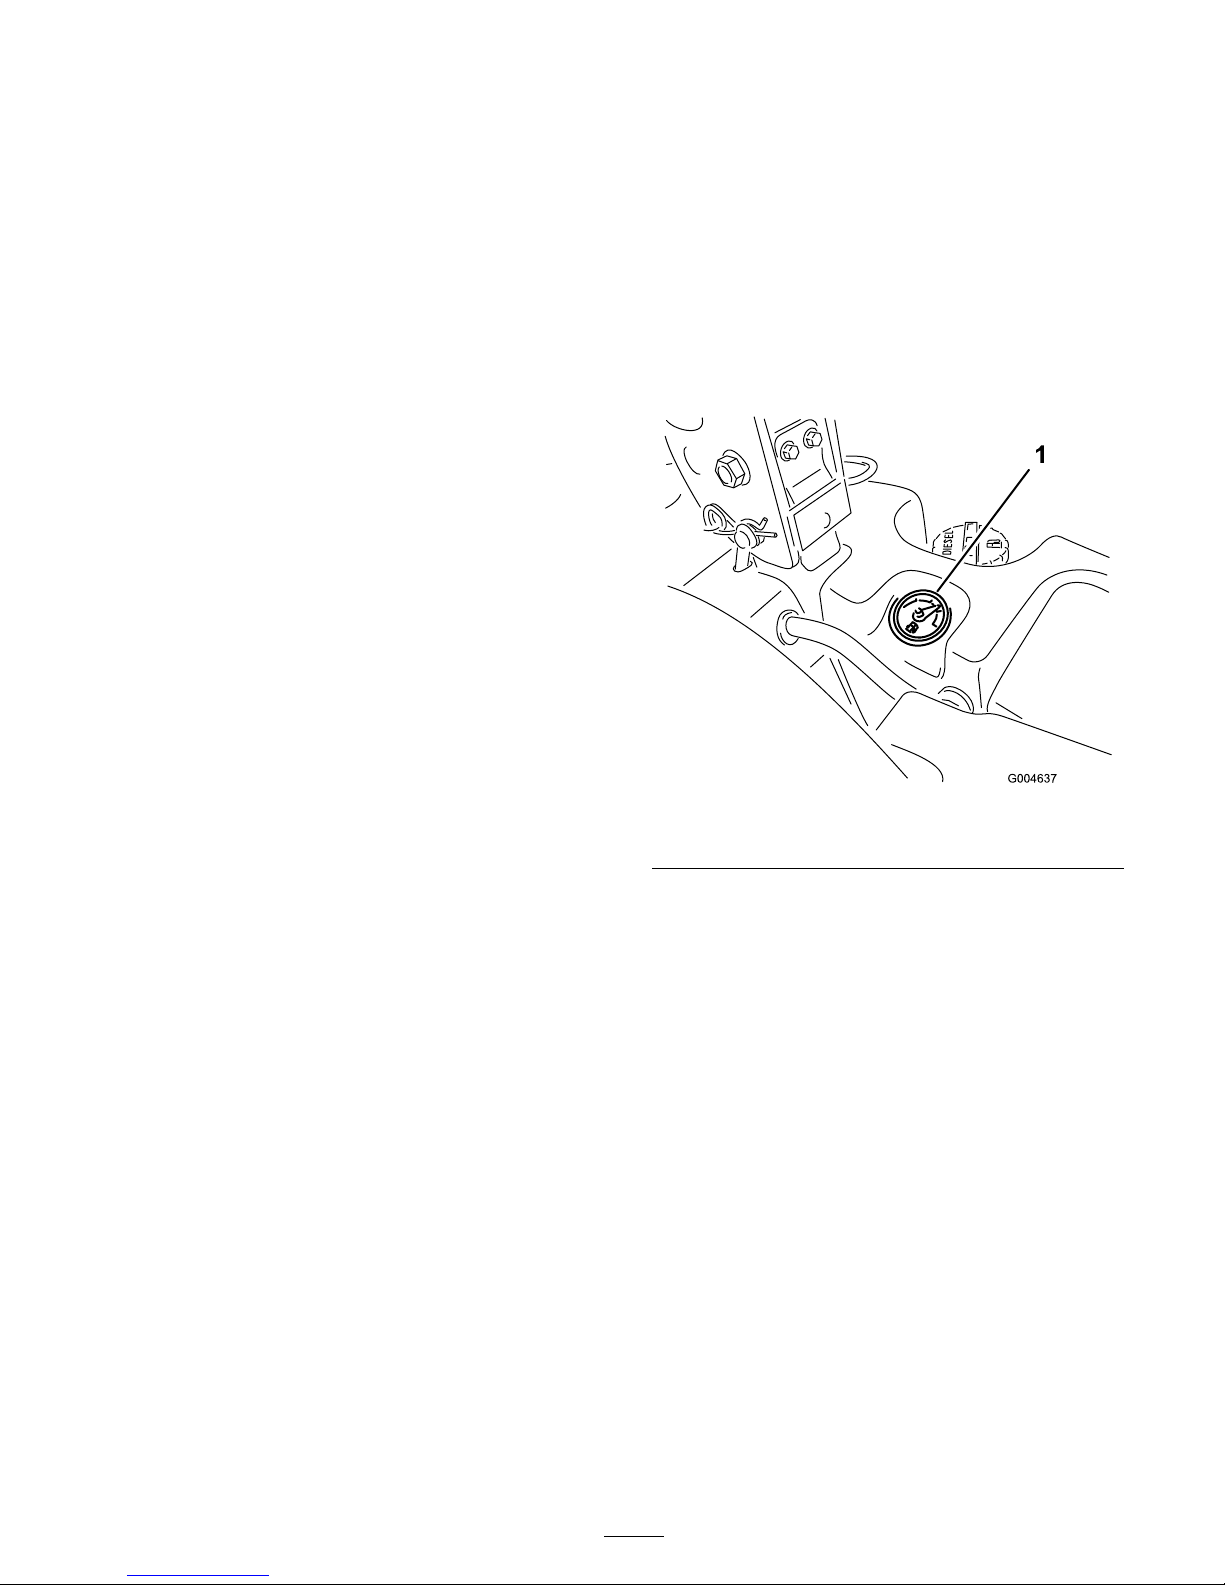
Fuel Gauge
T he fuel g aug e ( Figure 9 ) indicates the quantity of
fuel remaining in the fuel tanks .
Figure 9
1. Fuel gauge
23
Page 24

Specications
Note: Specifications and design are subject to
c hang e without notice .
Length
97 inches (246.4 cm)
Width (Rear Wheels) 57 inches (144.8 cm)
Height (Roll Bar Up) 72 inches (182.9 cm)
Height (Roll Bar Down) 48 inches (121.9 cm)
Weight, Model 30360,
30360TE, 30360TC,
30363, 30363TE, and
30363TC
2220 lb (1007 kg)
Weight, Model 30361 and
30364
2196 lb (996 kg)
Weight, Model 30362 and
30365
2142 lb (971.4 kg
Attachments/Accessories
A selection of T oro appro v ed attac hments and
accessories are a v ailable for use with the mac hine
to enhance and expand its capabilities . Contact
y our A uthorized Ser vice Dealer or Distributor or
g o to www .T oro .com for a list of all appro v ed
attac hments and accessories .
24
Page 25

Operation
Note: Deter mine the left and right sides of the
mac hine from the nor mal operating position.
T his machine pr oduces sound lev els in
ex cess of 85 dB A at the operator s ear and
can cause hearing loss thr ough extended
periods of exposur e.
W ear hearing pr otection when operating
this machine.
Adding Fuel
T he engine r uns on clean, fresh diesel fuel with
a minim um octane rating of 40. Purc hase fuel
in quantities that can be used within 30 da ys to
ensure fuel freshness .
Combined tank capacity: 11.5 US g allons
(43.5 l)
Use summer g rade diesel fuel (No . 2-D) at
temperatures abo v e 20° F (-7° C) and winter g rade
diesel fuel (No . 1-D or No . 1-D/2-D blend) belo w
20° F (-7° C). Use of winter g rade diesel fuel at
lo w er temperatures pro vides lo w er flash point
and pour point c haracteristics , therefore easing
star tability and lessening c hances of c hemical
se paration of the fuel due to lo w er temperatures
(w ax appearance , whic h ma y plug filters).
Use of summer g rade diesel fuel abo v e 20° F (-7°
C) will contribute to w ard long er life of the pump
components .
Important: Do not use k er osene or gasoline
instead of diesel fuel. F ailur e to obser v e this
caution will dama ge the engine.
Fuel is har mful or f atal if s w allo w ed.
Long-ter m exposur e to v apor s can cause
serious injur y and illness.
• A v oid pr olonged br eathing of v apor s.
• K eep f ace a w ay fr om nozzle and gas tank
or conditioner opening .
• K eep fuel a w ay fr om ey es and skin.
In cer tain conditions, fuel is extr emel y
flamma ble and highl y explosi v e. A fir e or
explosion fr om fuel can bur n y ou and other s
and can dama ge pr oper ty .
• Fill the fuel tank outdoor s, in an open
ar ea, when the engine is cold. W ipe up
an y fuel that spills.
• Nev er fill the fuel tank inside an enclosed
trailer .
• Nev er smok e when handling fuel, and
stay a w ay fr om an open flame or wher e
fuel fumes may be ignited by a spar k.
• Stor e fuel in an appr o v ed container and
k eep it out of the r each of childr en.
Nev er buy mor e than a 30-day suppl y of
fuel.
• Do not operate without entir e exhaust
system in place and in pr oper w or king
condition.
25
Page 26
In cer tain conditions during fueling , static
electricity can be r eleased causing a spar k
which can ignite the fuel v apor s. A fir e or
explosion fr om fuel can bur n y ou and other s
and can dama ge pr oper ty .
• Al w ays place fuel container s on the
g r ound a w ay fr om y our v ehicle bef or e
filling .
• Do not fill fuel container s inside a v ehicle
or on a tr uck or trailer bed because
interior car pets or plastic tr uck bed liner s
may insulate the container and slo w the
loss of an y static charge.
• W hen practical, r emo v e equipment
fr om the tr uck or trailer and r efuel the
equipment with its wheels on the g r ound.
• If this is not possible, then r efuel such
equipment on a tr uck or trailer fr om a
por ta ble container , rather than fr om a
fuel dispenser nozzle.
• If a fuel dispenser nozzle must be used,
k eep the nozzle in contact with the rim
of the fuel tank or container opening at
all times until fueling is complete.
Filling the Fuel Tank
1. P ark the mac hine on a lev el surface .
Important: T he fuel tanks ar e
connected, but the fuel does not transfer
quickl y fr om one tank to the other . It is
impor tant when filling that y ou par k on a
lev el surf ace. If y ou par k on a hill, y ou may
inadv er tentl y o v erfill the tanks.
2. Shut the engine off and set the parking brak e .
3. Clean around eac h fuel tank cap and remo v e
the cap .
Important: Do not open the fuel tanks
when par k ed on a hill. T he fuel could spill
out.
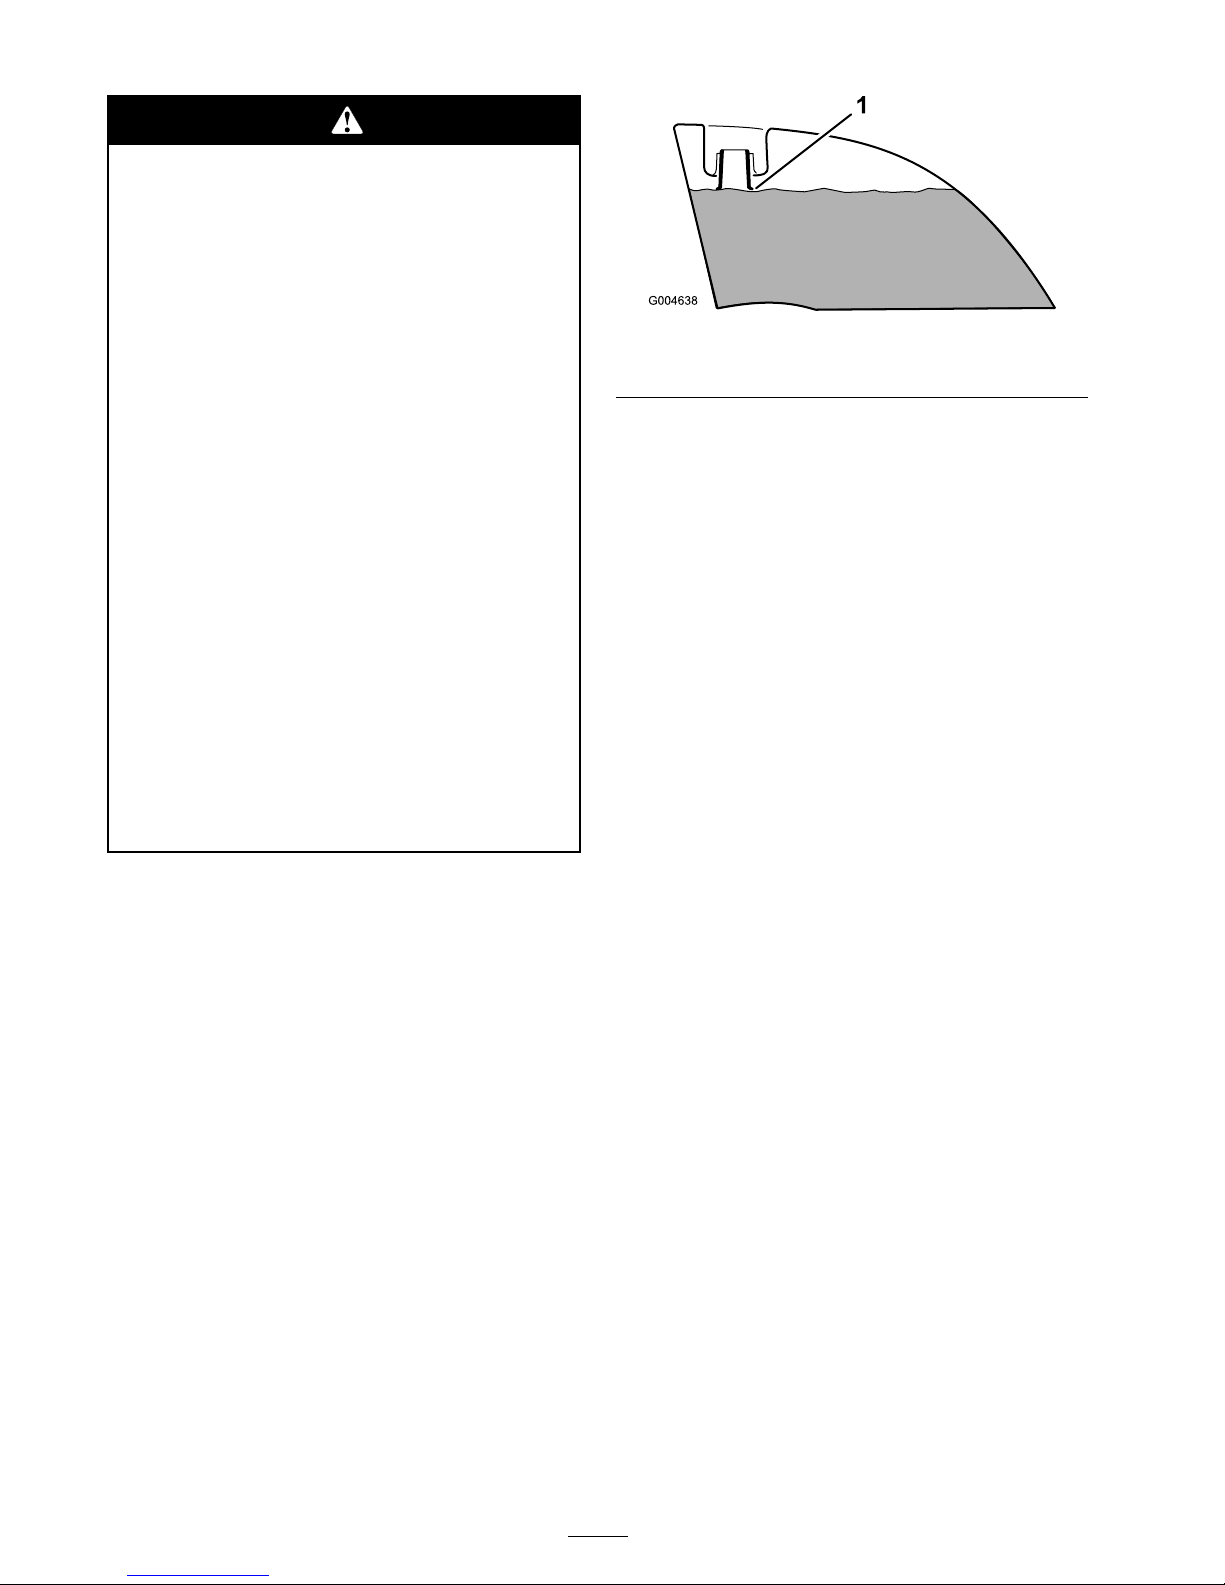
4. Add fuel to both fuel tanks , until the lev el
is ev en with the bottom of the filler nec k
( Figure 10 ). Do not o v er fill the fuel tanks.
Figure 10
1. Bottom of the ller neck
5. Install the fuel tank caps securely . Wipe up any
fuel that ma y ha v e spilled.
Note: If possible , fill the fuel tanks after eac h
use . T his will minimize possible buildup of
condensation inside the fuel tank.
Checking the Engine Oil
Level
Before y ou star t the engine and use the mac hine ,
c hec k the oil lev el in the engine crankcase; refer
to Chec king Oil Lev el in Engine Maintenance ,
pag e 46
Checking the Cooling System
Before y ou star t the engine and use the mac hine ,
c hec k the cooling system; refer to Chec king the
Cooling System in Cooling System Maintenance ,
pag e 53
Checking the Hydraulic
System
Before y ou star t the engine and use the
mac hine , c hec k the h y draulic system; refer
to Chec king the Hy draulic System in
Hy draulic System Maintenance , pag e 61
26
Page 27
Using the Rollover
Protection System (ROPS)
T o a v oid injur y or death fr om r ollo v er : k eep
the r oll bar in the raised lock ed position and
use the seat belt.
Ensur e that the r ear par t of the seat is
secur ed with the seat latch.
T her e is no r ollo v er pr otection when the r oll
bar is in the do wn position.
• Lo w er the r oll bar onl y when a bsolutel y
necessar y .
• Do not w ear the seat belt when the r oll
bar is in the do wn position.
• Dri v e slo wl y and car efull y .
• R aise the r oll bar as soon as clearance
per mits.
• Check car efull y f or o v erhead clearances
(i.e. branches, doorw ays, electrical wir es)
bef or e dri ving under an y objects and do
not contact them.
Important: Lo w er the r oll bar onl y when
a bsolutel y necessar y .
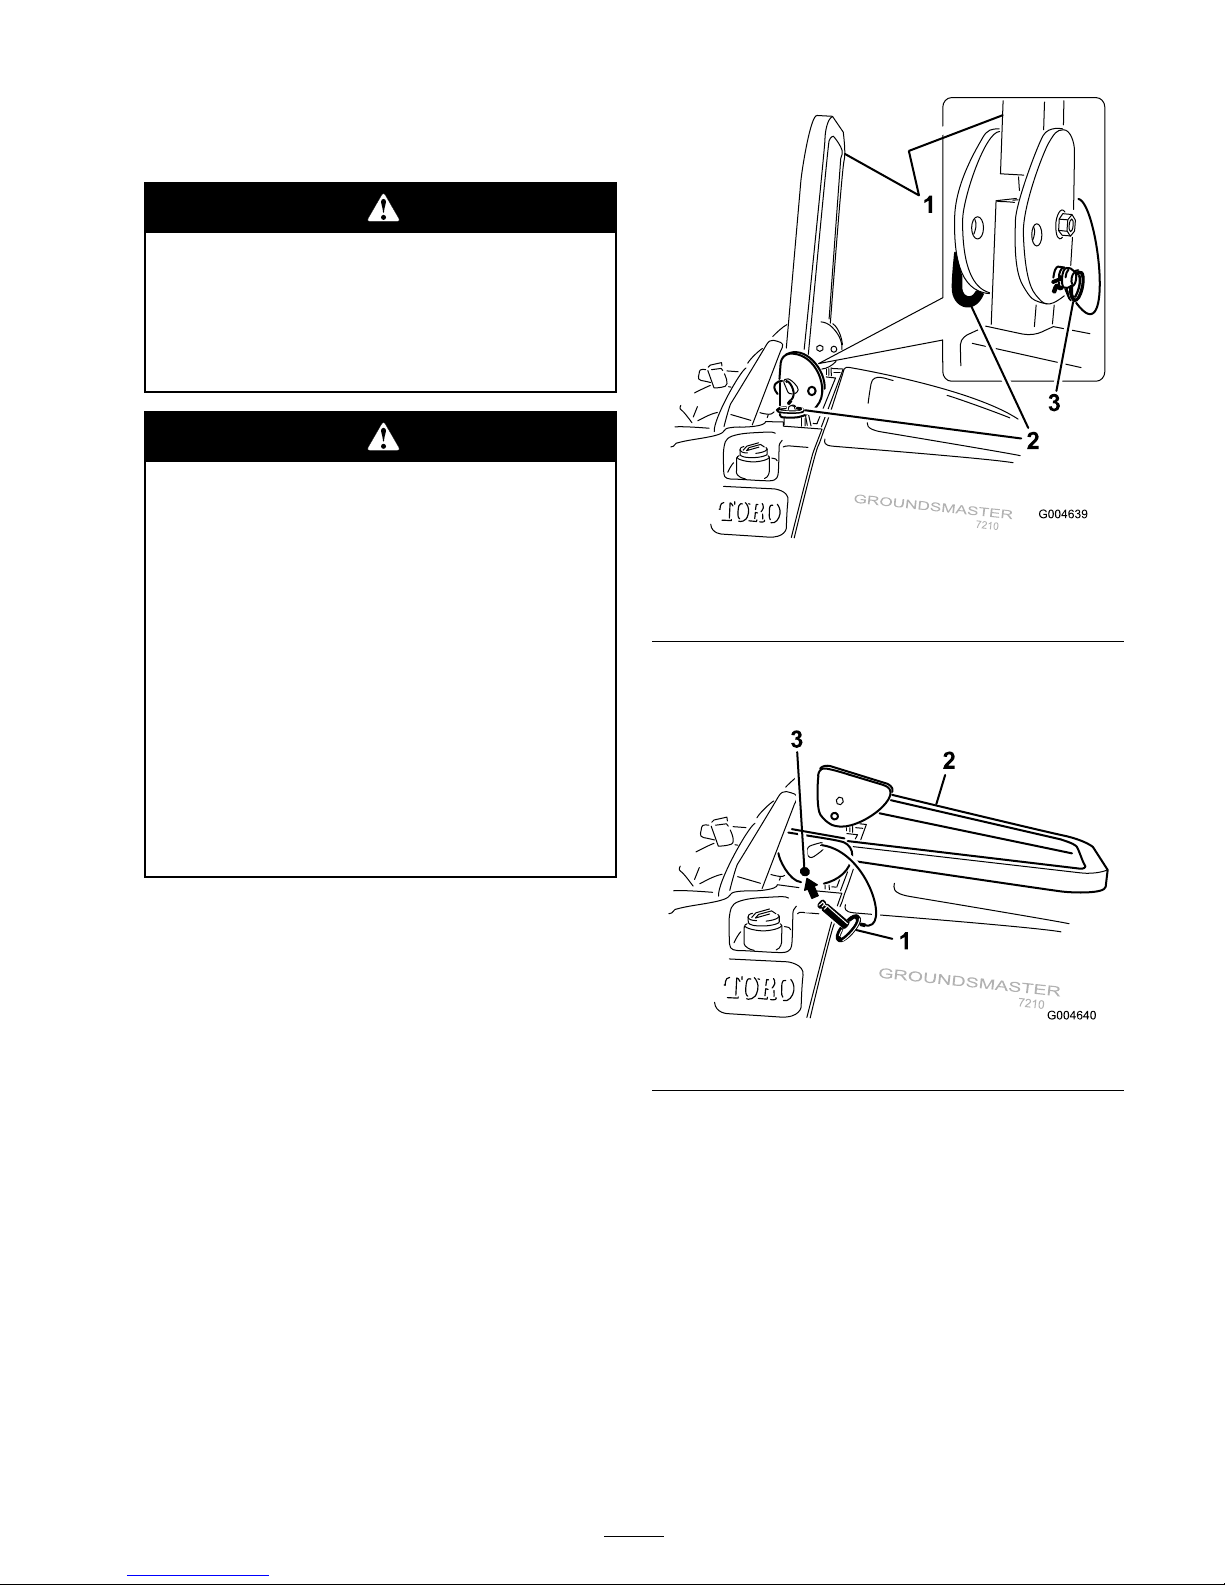
1. T o lo w er the roll bar , remo v e the hair pin
cotters , push the roll bar forw ard ag ainst the
springs , and remo v e the tw o pins ( Figure 11 ).
Figure 11
1. Roll bar
3. Pin
2. Raised position
4. Hairpin cotter
2. Lo w er the roll bar to the do wn position
( Figure 12 ).
Figure 12
3. Install the tw o pins and secure them with the
hair pin cotter pins ( Figure 11 ).
Important: Ensur e that the r ear par t of
the seat is secur ed with the seat latch.
4. T o raise the roll bar , remo v e the hair pin cotter
pins and remo v e the tw o pins ( Figure 11 ).
5. Raise the roll bar to the upright position and
install the tw o pins and secure them with the
hair pin cotter pins ( Figure 11 ).
27
Page 28

Important: Al w ays use the seat belt when
the r oll bar is in the raised and lock ed position.
Do not use the seat belt when the r oll bar is in
the lo w er ed position.
Think Safety First
Please read all safety instr uctions and symbols
in the safety section. Kno wing this infor mation
could help y ou or b ystanders a v oid injur y .
Operating on w et g rass or steep slopes can
cause sliding and loss of contr ol.
W heels dr opping o v er edges can cause
r ollo v er s, which may r esult in serious injur y ,
death or dr o wning .
T her e is no r ollo v er pr otection when the r oll
bar is do wn.
Al w ays k eep the r oll bar in the raised and
lock ed position and use the seat belt.
R ead and f ollo w the r ollo v er pr otection
instr uctions and w ar nings.
T o a v oid loss of contr ol and possibility of
r ollo v er :
• Do not operate near dr op-of fs or near
w ater .
• R educe speed and use extr eme caution
on slopes.
• A v oid sudden tur ns or rapid speed
changes.
Figure 13
1. Safe Zone
3. Water
2. Use walk behind mower
and/or hand trimmer near
drop-offs and water.
T his machine pr oduces sound lev els in
ex cess of 85 dB A at the operator s ear and
can cause hearing loss thr ough extended
periods of exposur e.
W ear hearing pr otection when operating
this machine.
T he use of protecti v e equipment for eyes , ears ,
feet and head is recommended.
Operating the Parking
Brake
Alw a ys set the parking brak e when y ou stop the
mac hine or lea v e it unattended.
Setting the Parking Brake
1. Mo v e the motion control lev ers ( Figure 18 ) out
to the neutral loc k ed position.
2. Pull up and bac k on the parking brak e lev er to
set the parking brak e ( Figure 14 ). T he parking
brak e lev er should sta y fir mly in the eng ag ed
position.
28
Page 29
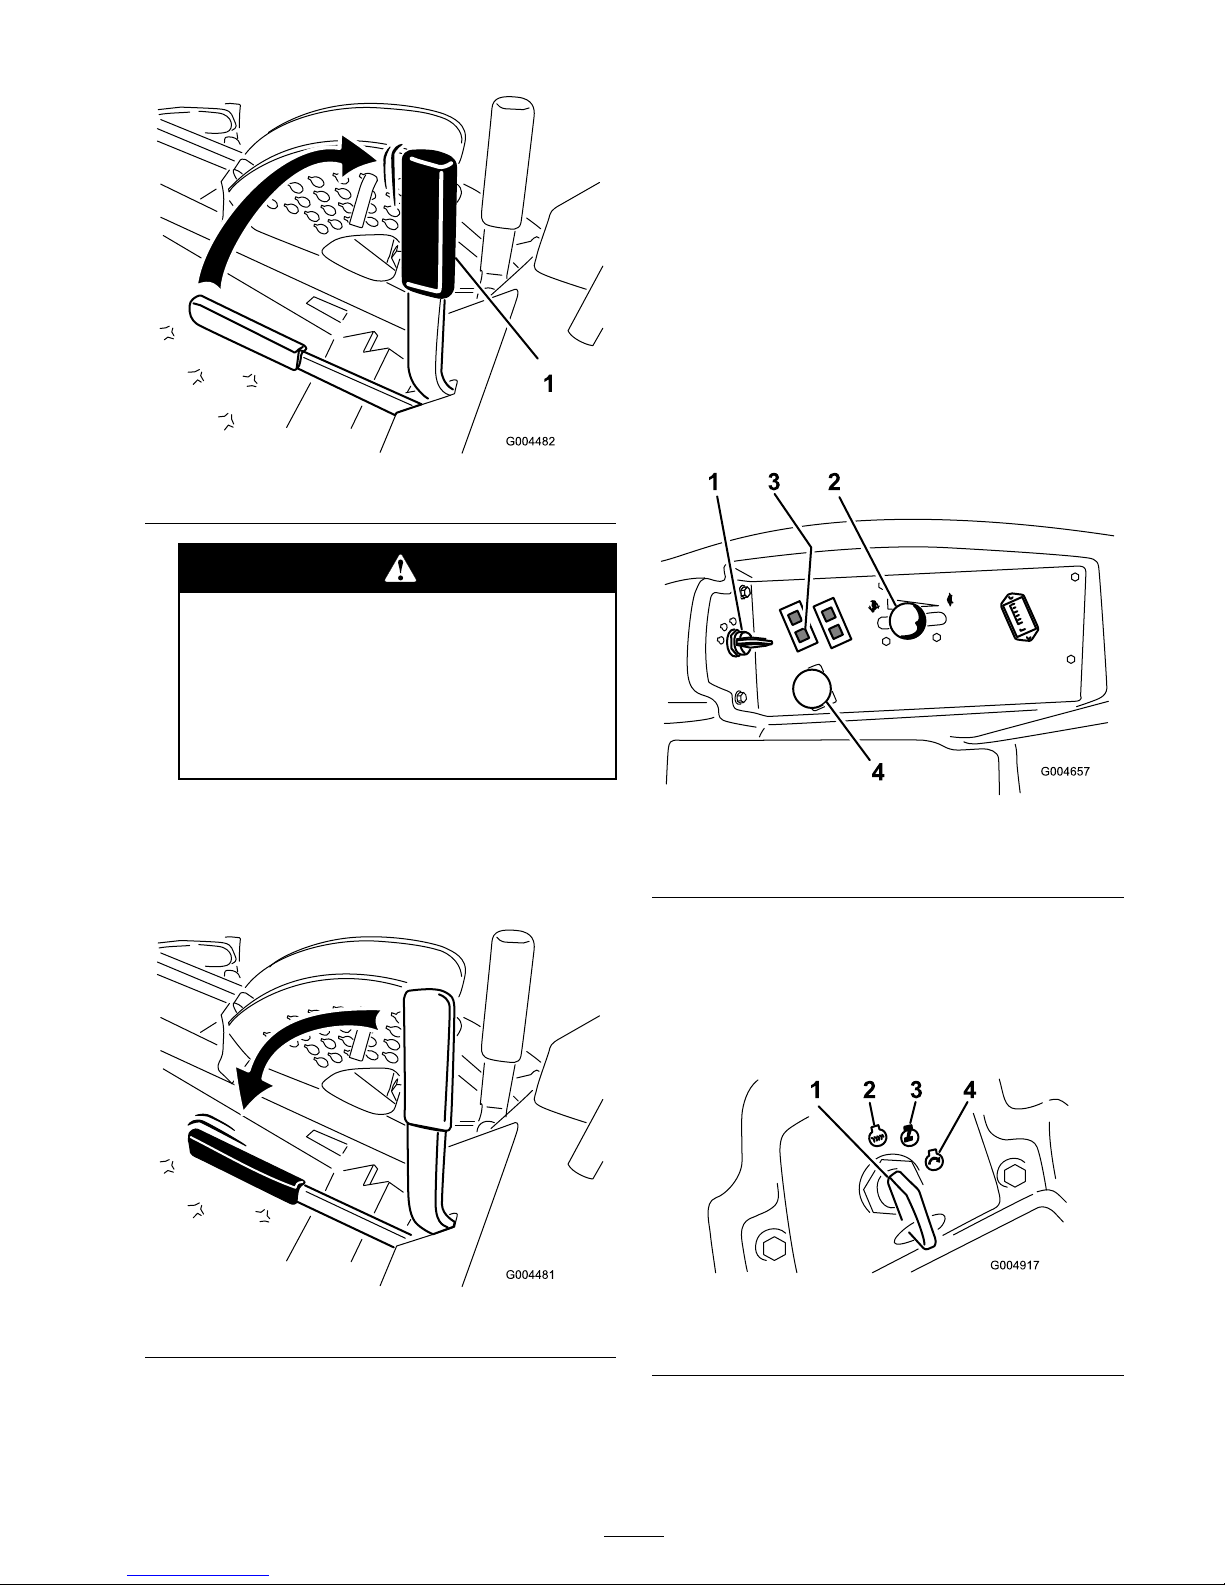
Figure 14
T he par king brak e may not hold the
machine par k ed on a slope and could
cause per sonal injur y or pr oper ty
dama ge.
Do not par k on slopes unless the wheels
ar e chock ed or block ed
Releasing the Parking Brake
Push forw ard and do wn on the parking brak e lev er
to release the parking brak e ( Figure 14 ).
Figure 15
Starting and Stopping the
Engine
Starting the Engine
1. Raise the roll bar up and loc k it into place , sit
on the seat, and fasten the seat belt.
2. Ensure that the motion controls are in the
neutral loc k ed position.
3. Set the parking brak e; refer to Setting the
P arking Brak e .
4. Mo v e the PTO (po w er tak e off) switc h to the
off position ( Figure 16 ).
Figure 16
1. Ignition switch 3. Glow plug light
2. Throttle control
4. Power take off switch (PTO)
5. Mo v e the throttle lev er midw a y betw een the
F ast and Slo w positions ( Figure 16 ).
6. T ur n the ignition k ey cloc kwise to the R un
position ( Figure 17 ).
T he glo w plug light will tur n on for 6 seconds .
Figure 17
1. Ignition switch 3. Run/glow pug
2. Off
4. Start
7. After the glo w plug indicator light g oes out,
tur n the k ey to the Star t position. W hen the
engines star ts release the k ey .
29
Page 30

Important: Use star ting cy cles of no
mor e than 15 seconds per min ute to a v oid
o v erheating the star ter motor .
Note: Additional star ting cycles ma y be
required when star ting the engine for the first
time after the fuel system has been completely
drained.
8. Lea v e the throttle midw a y betw een the Slo w
and F ast positions until the engine and
h y draulic system w ar m up .
Important: W hen engine is star ted f or
the fir st time, or after an engine oil change,
or an o v erhaul of the engine, transmission,
or wheel motor , operate the machine with
the thr ottle lev er in the Slo w position in
both the f orw ard and r ev er se dir ections
f or one to tw o min utes. Also operate the
lift lev er and PT O lev er to ensur e pr oper
operation of all par ts. T hen shut the engine
of f and check fluid lev els, check f or oil
leaks, loose par ts, and an y other noticea ble
malfunctions.
Shut the engine of f and w ait f or all
mo ving par ts to stop bef or e checking
f or oil leaks, loose par ts, or other
malfunctions.
Stopping the Engine
1. Diseng ag e the PTO , mo v e the motion control
lev ers to the neutral loc k ed position, set the
parking brak e , and mo v e the throttle lev er to
the Slo w position.
2. Let the engine idle for 60 seconds .
3. T ur n the ignition k ey to the Off position
( Figure 17 ). W ait for all mo ving par ts to stop
before lea ving the operating position.
4. R emo v e the k ey before transpor ting or storing
mac hine .
Important: Mak e sur e to r emo v e the k ey
as the fuel pump or accessories may r un
and cause the batter y to lose charge.
Childr en or bystander s may be injur ed
if they mo v e or attempt to operate the
tractor while it is unattended.
Al w ays r emo v e the ignition k ey and
set the par king brak e when lea ving the
machine unattended, ev en if just f or a
few min utes.
Driving the Machine
T he throttle control regulates the engine speed as
measured in r pm (rev olutions per min ute). Place
the throttle control in the F ast position for best
perfor mance . Alw a ys operate in the F ast throttle
position when mo wing .
T he machine can tur n v er y rapidl y . Y ou may
lose contr ol of it and cause per sonal injur y
or dama ge to machine.
• Use caution when making tur ns.
• Slo w the machine do wn bef or e making
shar p tur ns.
1. R elease the parking brak e; refer to R eleasing
the P arking Brak e in Operation , pag e 25 .
Note: T he engine will kill if the traction
control lev ers are mo v ed with the parking
brak e eng ag ed.
2. Mo v e the lev ers to the center , un-loc k ed
position.
3. Dri v e the mac hine as follo ws:
• T o g o straight forw ard, slo wly push the
motion control lev ers forw ard ( Figure 18 ).
• T o g o Straight bac kw ard, slo wly pull the
motion control lev ers rearw ard ( Figure 18 ).
• T o tur n, slo w the mac hine b y pulling bac k
on both lev ers and then push forw ard on
the lev er on the opposite side from whic h
y ou w ant to tur n ( Figure 18 ).
• T o stop , pull the motion control lev ers to
the neutral position.
Note: T he far ther y ou mo v e the traction
control lev ers in either direction, the faster the
mac hine will mo v e in that direction.
30
Page 31
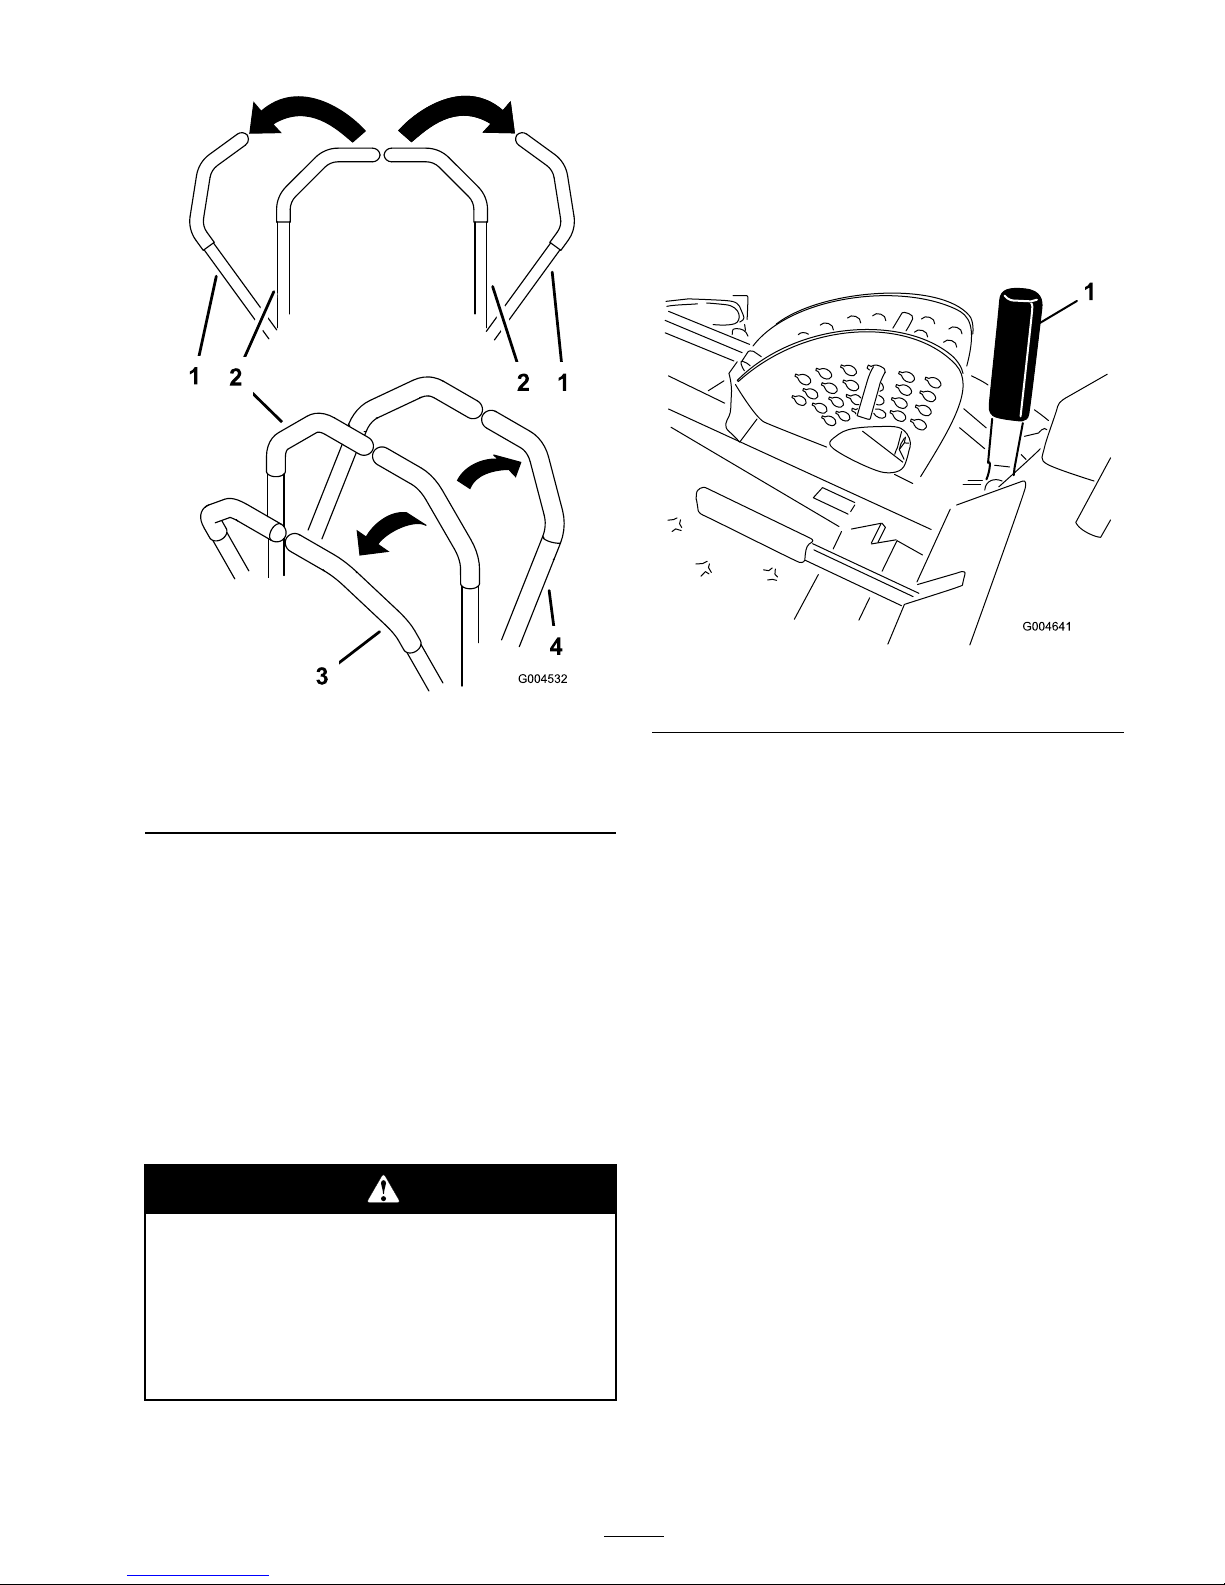
Figure 18
1. Motion control
lever-neutral locked
position
3. Forward
2. Center un-lock position 4. Backward
Stopping the Machine
T o stop the mac hine , mo v e the traction control
lev ers to neutral and to the loc k ed position,
diseng ag e the po w er tak e off (PTO), mo v e the
throttle to the Slo w position, and stop the engine .
Set the parking brak e when y ou lea v e the mac hine;
refer to Setting the P arking Brak e in Operation ,
pag e 25 . R emember to remo v e the k ey from the
ignition switc h.
Childr en or bystander s may be injur ed if
they attempt to mo v e or operate the tractor
while it is unattended.
Al w ays r emo v e the ignition k ey and set the
par king brak e when lea ving the machine
unattended, ev en if just f or a few min utes.
Operating the Mower
Raising and Lowering the Mower
T he dec k lift lev er raises and lo w ers the mo w er
dec k ( Figure 19 ). T he engine m ust be r unning for
y ou to use this lev er .
Figure 19
1. Deck lift lever
• T o lo w er the mo w er dec k, push the lev er
forw ard.
• T o raise the mo v er dec k, pull the lev er
rearw ard.
Important: Do not contin ue to hold the
lev er back or f orw ard after the mo w er has full y
raised or lo w er ed. Doing so will dama ge the
h y draulic system.
Note: T o loc k the mo w er dec k in a raised
position, raise the dec k past the 6 inc h (15 cm)
position, remo v e the height of cut stop pin (refer
to Adjusting the Height-of-Cut), and place the
pin in the 6 inc h (15 cm) height-of-cut position
( Figure 21 ).
Engaging the Power Take Off (PTO)
T he po w er tak e off (PTO) switc h star ts and stops
the mo w er blades and some po w ered attac hments .
1. If the engine is cold, allo w the engine to w ar m
up 5 to 10 min utes before eng aging the PTO .
2. W hile seated in the seat, release the pressure
on the traction control lev ers and place them
in neutral.
3. Pull up on the PTO switc h to eng ag e it
( Figure 20 ).
31
Page 32
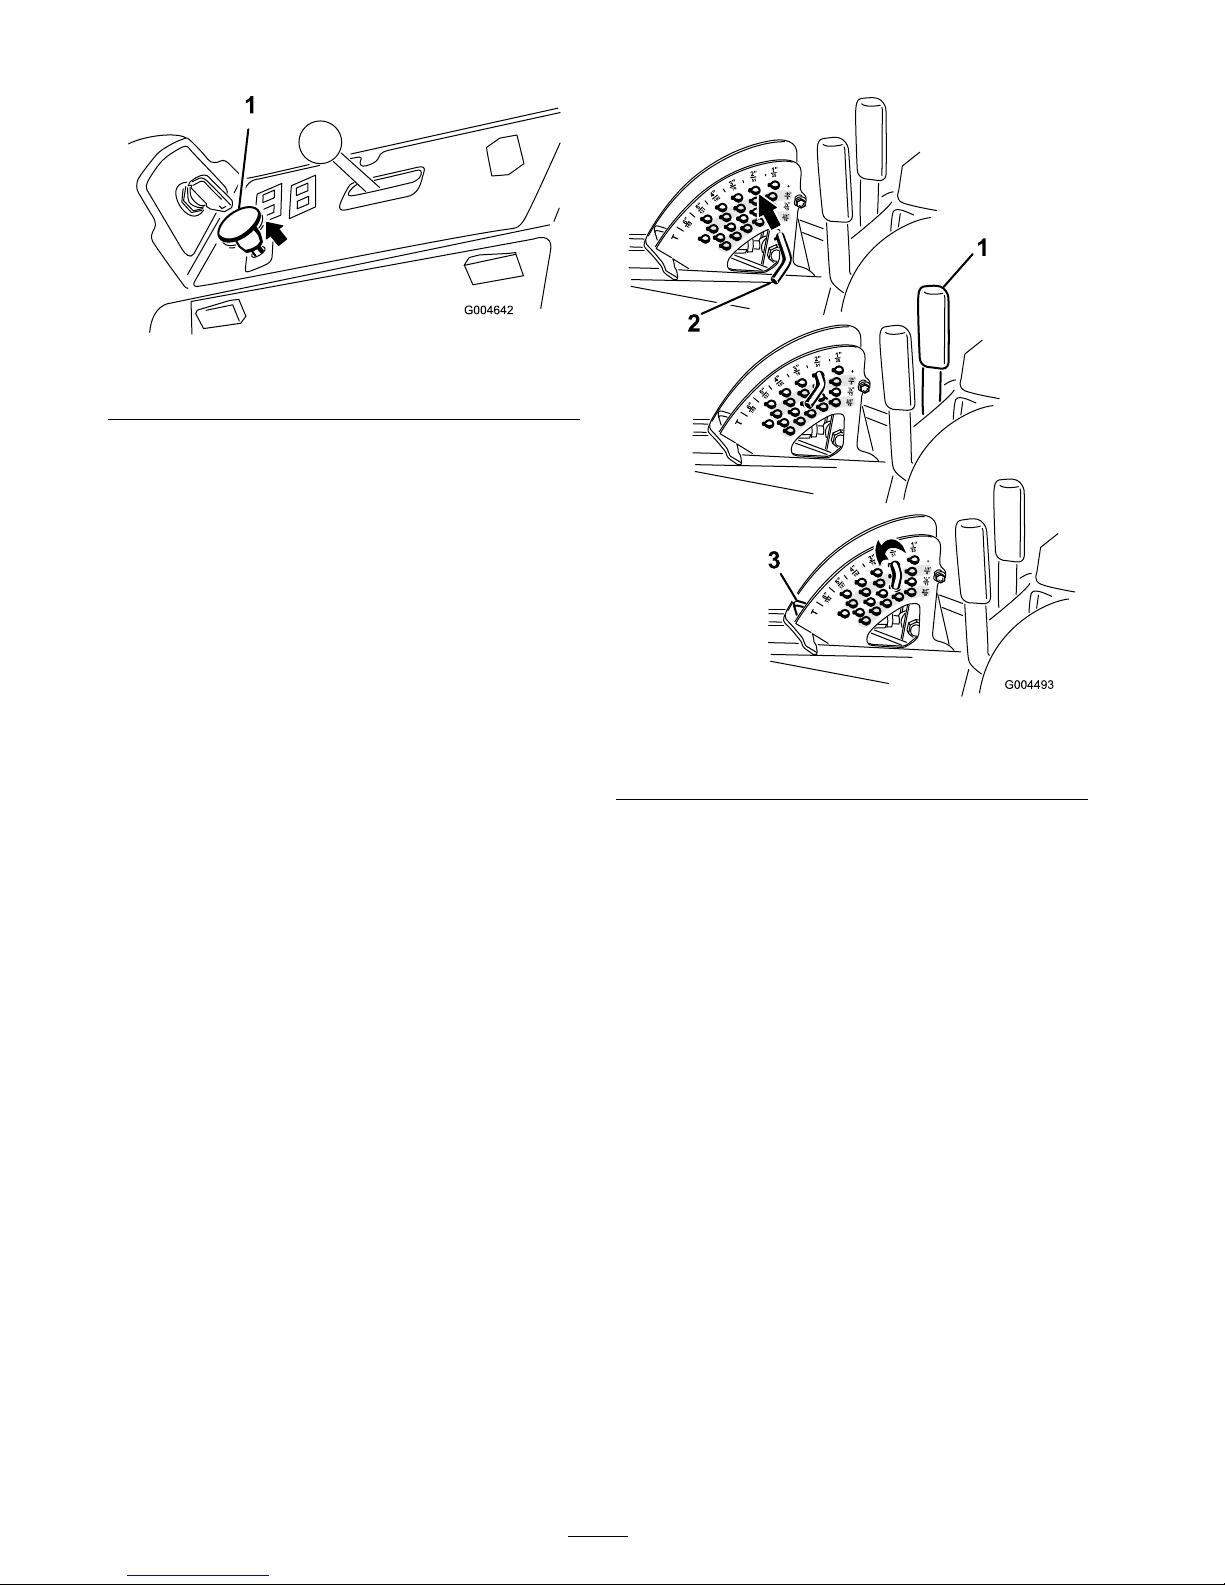
Figure 20
1. PTO switch
Disengaging the PTO
T o diseng ag e , push the PTO switc h to the off
position.
Adjusting the Height-of-Cut
T he height-of-cut is adjusted from 1 to 6 inc hes
(2.5 to 15.8 cm) in 1/4 inc h (6 mm) increments b y
relocating the stop pin into different hole locations .
1. With the engine r unning, pull bac k on the dec k
lift lev er until the mo w er dec k is fully raised and
r elease the lev er immediatel y ( Figure 21 ).
2. T o adjust, rotate the stop pin until the roll pin
in it lines up with the slots in the holes in the
height-of-cut brac k et and remo v e it ( Figure 21 ).
3. Select a hole in the height-of-cut brac k et
cor responding to the height-of-cut desired,
inser t the pin, and rotate it do wn to loc k it in
place ( Figure 21 ).
Note: T here are four ro ws of hole positions
( Figure 21 ). T he top ro w gi v es y ou the height
of cut listed abo v e the pin. T he second ro w
do wn gi v es y ou the height listed plus 1/4
inc h (6 mm). T he third ro w do wn gi v es y ou
the height listed plus 1/2 inc h (12 mm). T he
bottom ro w gi v es y ou the height listed plus
3/4 inc h (18 mm). F or the 6 inc h (15.8 cm)
position there is only one hole , located in the
second ro w . T his does not add 1/4 inc h (6
mm) to the 6 inc h (15.8 cm) position.
Figure 21
1. Deck lift lever 3. Height of cut stop
2. Stop pin
4. Adjust the anti-scalp rollers and skids as
required.
Adjusting the Skids
Mount the skids in the lo w er position when
operating in height of cuts higher than 2-1/2
inc hes (64 mm) and in the higher position when
operating in height of cuts lo w er than 2-1/2 inc hes
(64 mm).
Note: On Guardian
®
mo w ers , when the skids
become w or n, y ou can switc h the skid to the
opposite sides of the mo w er , flipping them o v er .
T his will allo w y ou to use the skids long er before
re placing them.
1. Diseng ag e the PTO , mo v e the motion control
lev ers to the neutral loc k ed position, and set
the parking brak e .
2. Mo v e the throttle lev er to the Slo w position,
stop the engine , remo v e the k ey , and w ait for
all mo ving par ts to stop before lea ving the
operating position.
32
Page 33
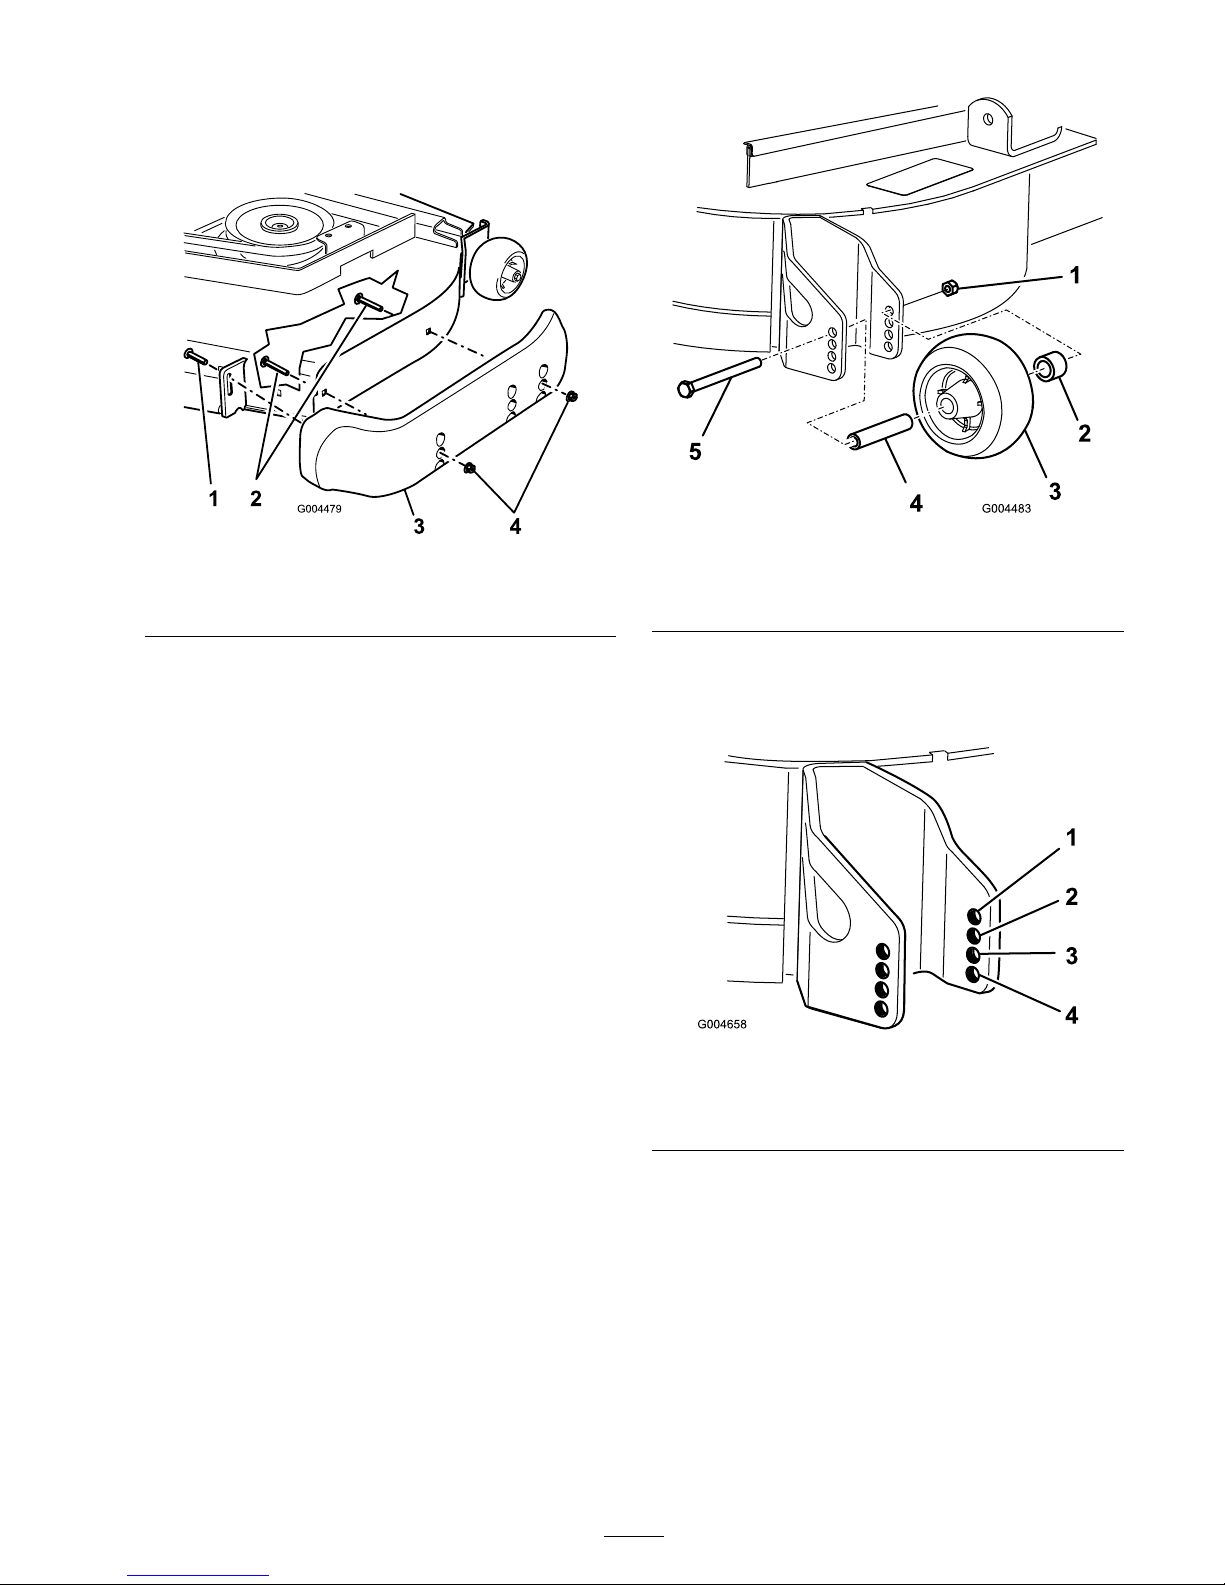
3. Loosen the screw at the front of eac h skid
(2 skids on Guardian dec ks and 1 skid on
side-disc harg e dec ks).
Figure 22
1. Screw
3. Skid
2. Flange-head bolt
4. Nut
4. R emo v e the flang e-head bolts and n uts from
eac h skid.
5. Mo v e eac h skid to the desired position and
secure them with the flang e-head bolts and
n uts .
Note: Only use the top or center sets of holes
to adjust the skids . T he bottom holes are used
when switc hing sides on a Guardian mo w er
dec k, at whic h time they become the top holes
on the other side of the mo w er .
6. T or que the screw at the front of eac h skid to
80 to 100 in-lb (9 to 11 N ⋅ m).
Adjusting the Rear Anti-Scalp Rollers
W henev er y ou c hang e the height-of-cut, adjust the
height of the rear anti-scalp rollers .
1. Diseng ag e the PTO , mo v e the motion control
lev ers to the neutral loc k ed position, and set
the parking brak e .
2. Mo v e the throttle lev er to the Slo w position,
stop the engine , remo v e the k ey , and w ait for
all mo ving par ts to stop before lea ving the
operating position.
3. After adjusting the height-of-cut, adjust the
rollers b y remo ving the flang e n ut, bushing,
spacer , and bolt ( Figure 23 ).
Figure 23
1. Flange nut
4. Spacer
2. Bushing 5. Bolt
3. Anti-scalp roller
4. Select a hole so the anti-scalp roller is
positioned to the nearest cor responding
height-of-cut desired ( Figure 24 ).
Figure 24
1. 1-1/2 inches (38 mm) 3. 2-1/2 inches (63 mm)
2. 2 inches (51 mm) 4. 3 inches (76 mm) and
higher
5. Install the flang e n ut bushing, spacer , and bolt.
T or que to 40-45 ft-lb (54-61 N ⋅ m) ( Figure 23 ).
Adjusting the Rollers
Mount the rollers in the lo w er position when
operating in height of cuts higher than 2-1/2
inc hes (64 mm) and in the higher position when
operating in height of cuts lo w er than 2-1/2 inc hes
(64 mm).
33
Page 34
1. Diseng ag e the PTO , mo v e the motion control
lev ers to the neutral loc k ed position and set
the parking brak e .
2. Mo v e the throttle lev er to the Slo w position,
stop the engine , remo v e the k ey , and w ait for
all mo ving par ts to stop before lea ving the
operating position.
3. Raise the front of the mac hine and suppor t it
on jac k stands .
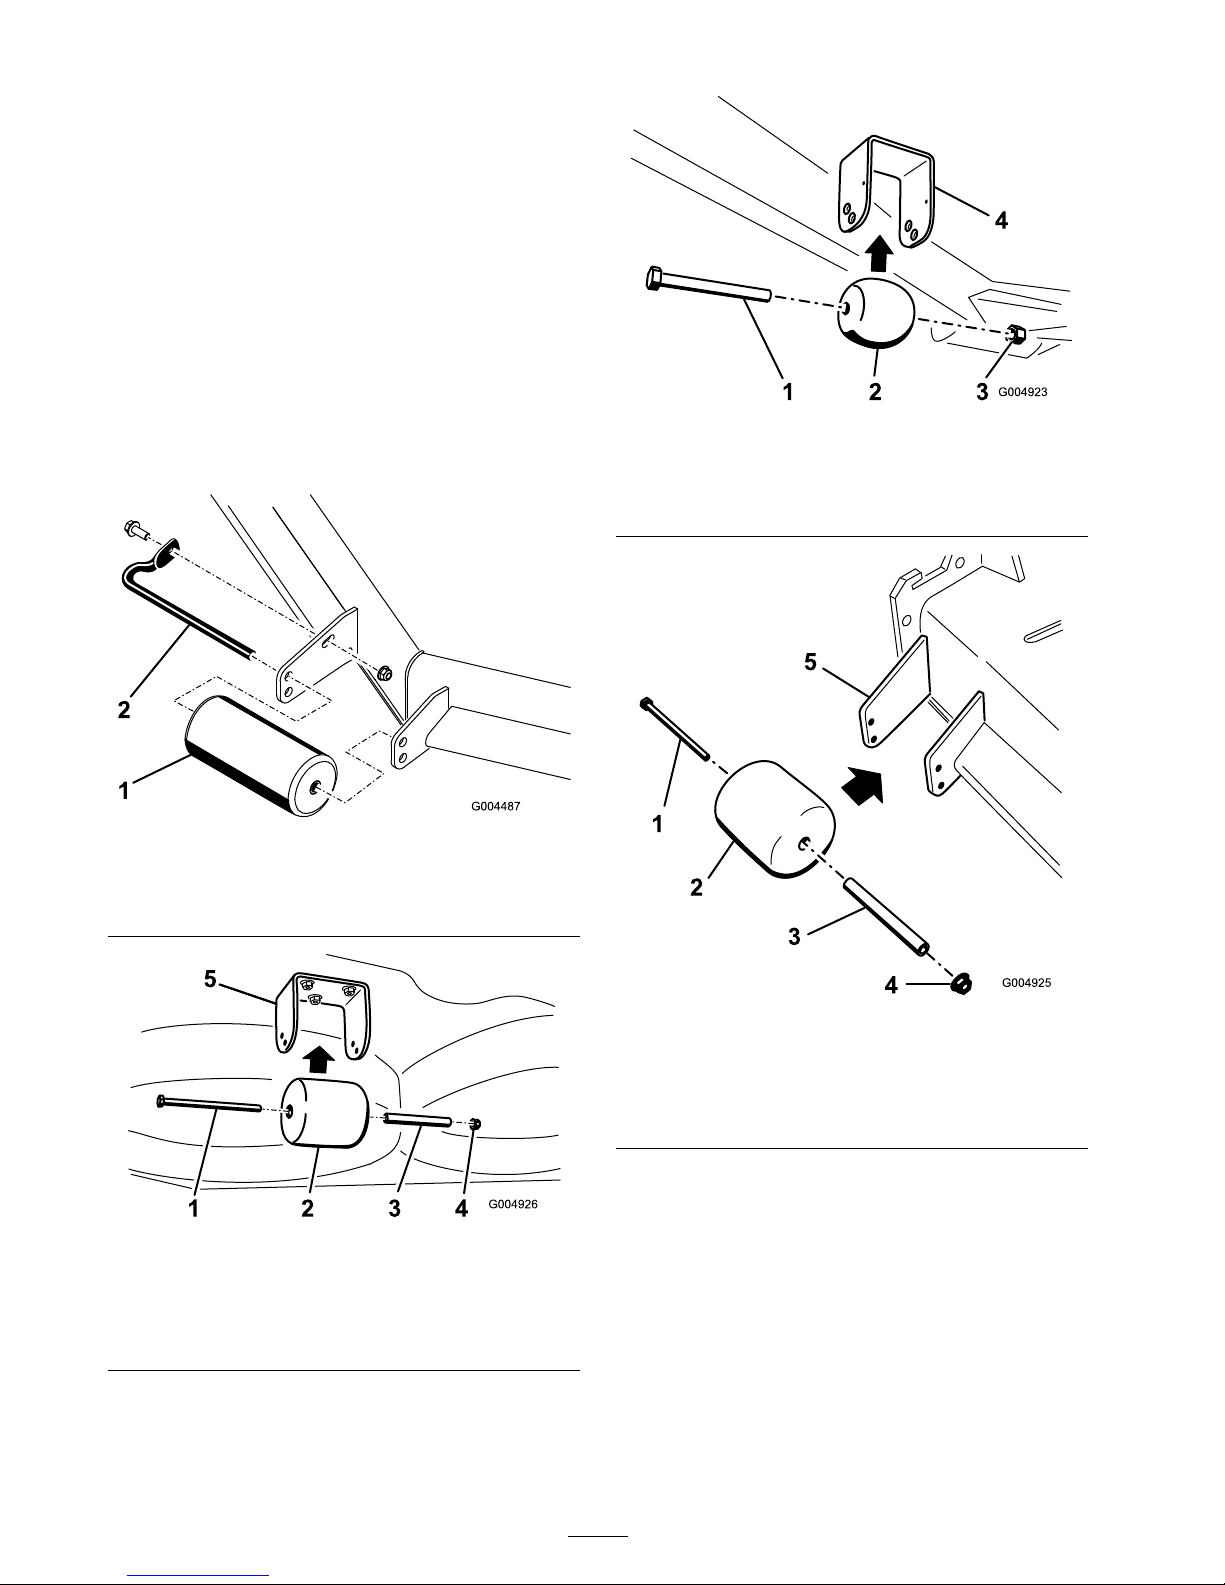
4. R emo v e the fasteners securing eac h roller on
y our mo w er dec k and mo v e the rollers up or
do wn as desired; refer to Figure 25 through
Figure 29 as applicable for y our mo w er .
Figure 25
All Mower Decks
1. Front roller 2. Roller shaft
Figure 26
Guardian Mower Decks Only
1. Bolt
4. Nut
2. Rear under-deck roller 5. Bracket
3. Spacer
Figure 27
Guardian Mower Decks Only
1. Bolt
3. Nut
2. Front under-deck roller 4. Bracket
Figure 28
Side-discharge Mower Decks Only
1. Bolt
4. Nut
2. Chute-side roller 5. Bracket
3. Spacer
34
Page 35
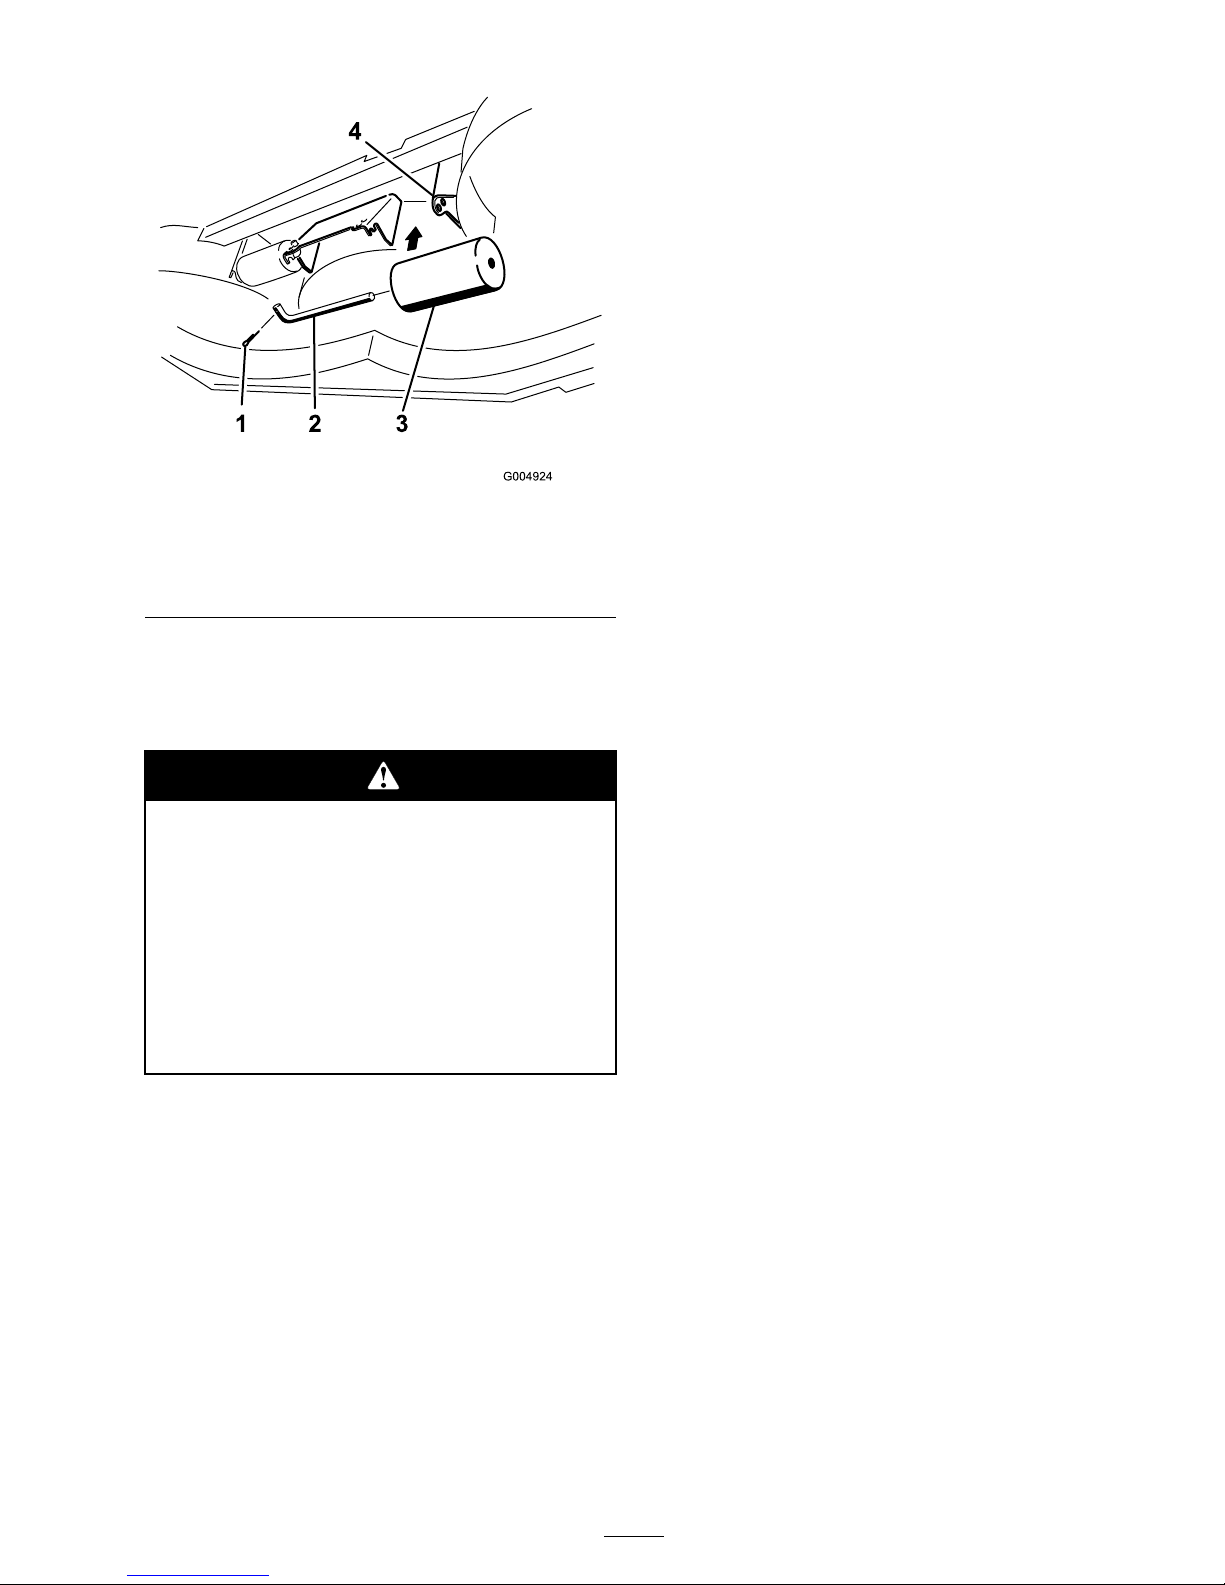
Figure 29
Side-discharge Mower Decks Only
1. Bolt
3. Under-deck roller (2)
2. Roller shaft 4. Bracket
5. Install the fasteners as illustrated.
The Safety Interlock System
If the safety inter lock s witches ar e
disconnected or dama ged the machine
could operate unexpectedl y causing
per sonal injur y .
• Do not tamper with the inter lock
s witches.
• Check the operation of the inter lock
s witches dail y and r eplace an y dama ged
s witches bef or e operating the machine.
Understanding the Safety Interlock
System
T he safety interloc k system is designed to prev ent
the engine from star ting unless:
• Y ou are sitting on the seat or the parking brak e
is eng ag ed.
• T he po w er tak e off (PTO) is diseng ag ed.
• T he motion control lev ers are in the neutral
loc k ed position
• T he engine temperature is belo w the maxim um
operating temperature .
T he safety interloc k system also is designed to stop
the engine when the traction controls are mo v ed
from the neutral loc k ed position with the parking
brak e eng ag ed. If y ou rise from the seat when the
PTO is eng ag ed there is a 1 second dela y and then
the engine stops .
Testing the Safety Interlock System
T est the safety interloc k system before y ou use
the mac hine eac h time . If the safety system
does not operate as described belo w , ha v e an
A uthorized Ser vice Dealer re pair the safety system
immediately .
1. Sitting on the seat, eng ag e the parking brak e
and mo v e the PTO to on. T r y star ting the
engine; the engine should not crank.
2. Sitting on the seat, eng ag e the parking brak e
and mo v e the PTO to off . Mo v e either motion
control lev er (out of neutral loc k ed position).
T r y star ting the engine; the engine should not
crank. R e peat for other control lev er .
3. Sitting on the seat, eng ag e the parking brak e ,
mo v e the PTO switc h to off and mo v e the
motion control lev ers to the neutral loc k ed
position. No w star t the engine . W hile the
engine is r unning, release the parking brak e ,
eng ag e the PTO and rise slightly from the seat;
the engine should stop within 2 seconds .
4. Without an operator on the seat, eng ag e the
parking brak e , mo v e the PTO switc h to off and
mo v e the motion control lev ers to the neutral
loc k ed position. No w star t the engine . W hile
the engine is r unning, center either motion
control; the engine should stop within 2
seconds . R e peat for the other motion control.
5. Without an operator on the seat, diseng ag e
the parking brak e , mo v e the PTO switc h to
off , and mo v e the motion control lev ers to
the neutral loc k ed position. T r y star ting the
engine; the engine should not crank.
Using the SCM to Diagnose System
Problems
T he mac hine is equipped with a standard control
module (SCM) monitoring system that trac ks the
function of v arious k ey systems . T he SCM is
located under the right control panel. Access it
through the side panel co v er ( Figure 30 ). T o open
35
Page 36
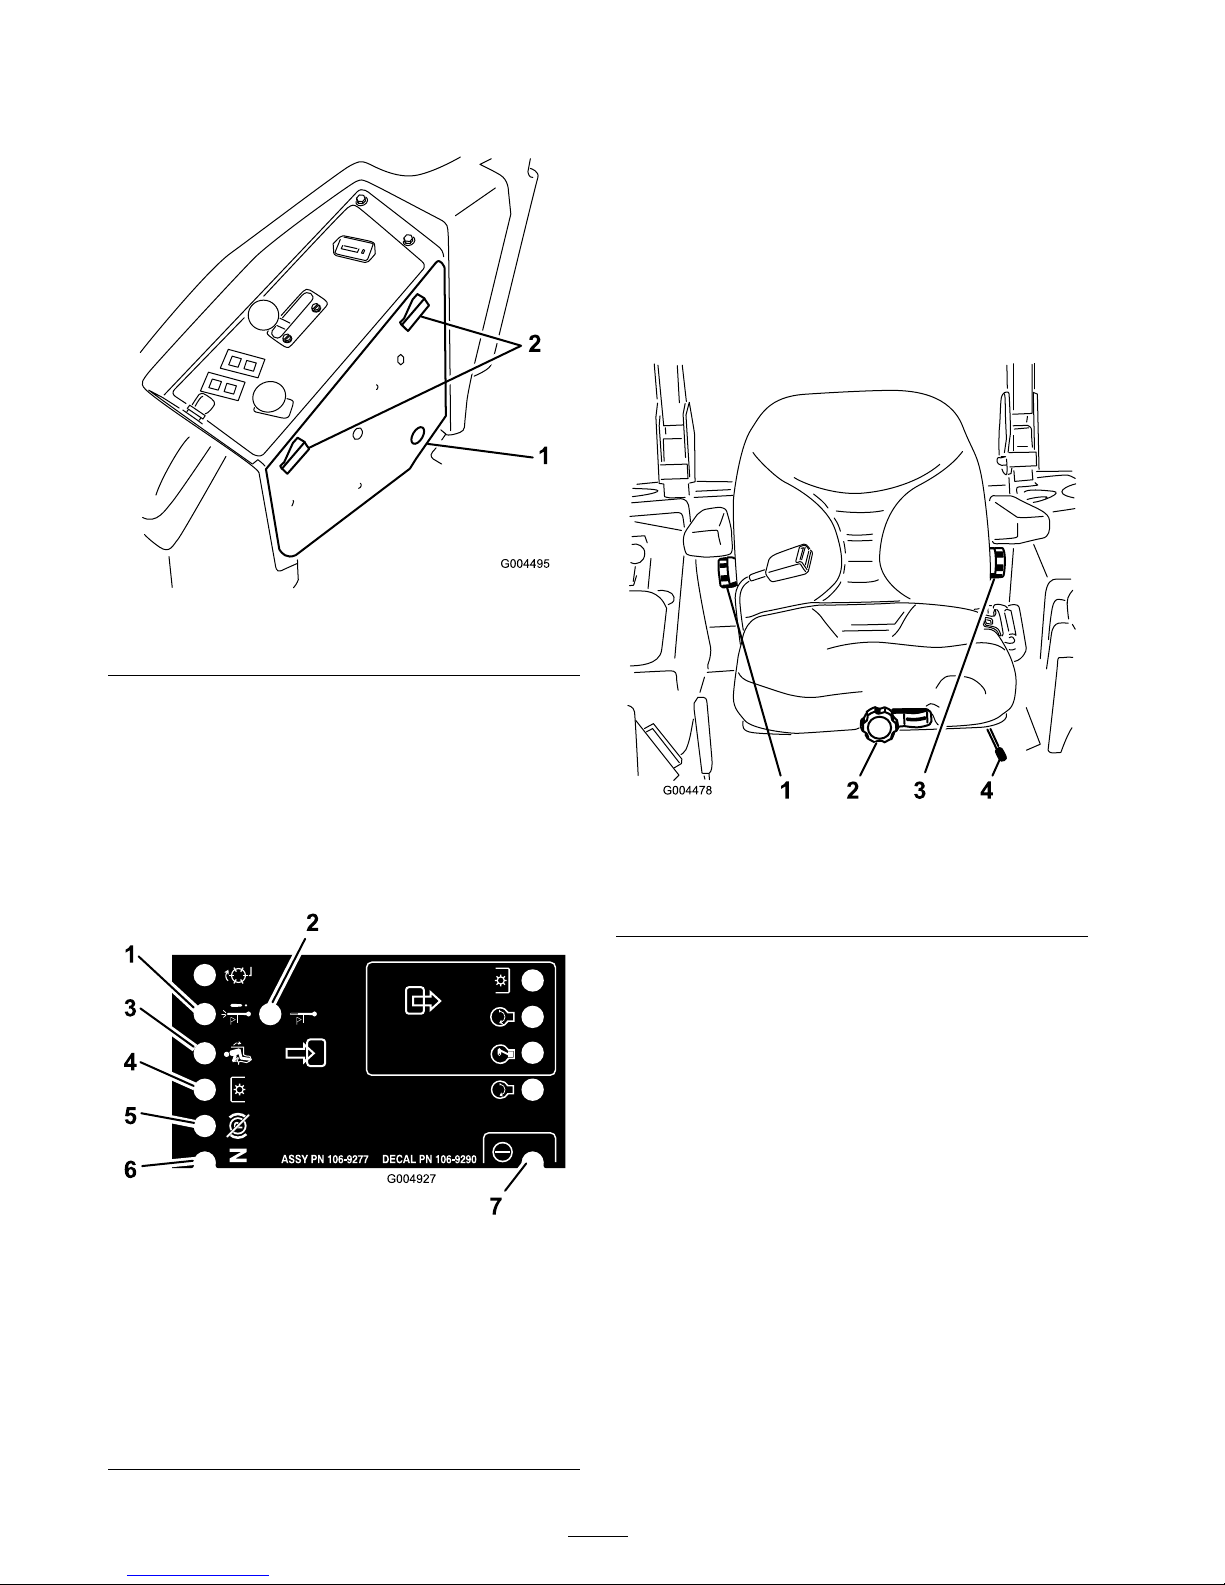
the side panel co v er , release the 2 latc hes and pull
out on it.
Figure 30
1. Side panel cover 2. Latches
On the face of the SCM are 11 LEDs that
illuminate to indicate v arious system conditions .
Sev en of these lights can be used b y the operator
for system diagnosis . R efer to Figure 31 for a
description of what eac h light means . F or details
on using the rest of the SCM functions , refer to the
Ser vice Manual , a v ailable through y our A uthorized
T oro Distributor .
Figure 31
1. High temperature shutdown—the engine temperature has
exceeded safe levels and the engine has been shut down.
Check the cooling system.
2. High temperature warning—the engine temperature is
approaching unsafe levels and the mower deck has been
shut down. Check the cooling system.
3. Operator is in the seat
4. The PTO is On
5. The parking brake is not engaged
6. Controls are in Neutral
7. The SCM is receiving power and is operational
Positioning the Seat
Changing the Seat Position
T he seat can mo v e forw ard and bac kw ard.
P osition the seat where y ou ha v e the best control
of the mac hine and are most comfor table .
1. T o adjust, mo v e the lev er sidew a ys to unloc k
the seat ( Figure 32 ).
Figure 32
1. Back rest knob 3. Lumbar support
adjustment knob
2. Seat suspension knob 4. Seat position adjustment
lever
2. Slide the seat to the desired position and
release lev er to loc k in position.
3. V erify that the seat has loc k ed into place b y
attempting to mo v e it bac k and for th.
Changing the Seat Suspension
T he seat can be adjusted to pro vide a smooth and
comfor table ride . P osition the seat where y ou are
most comfor table .
Without sitting on the seat, tur n the knob in
front either direction to pro vide the best comfor t
( Figure 32 ).
36
Page 37
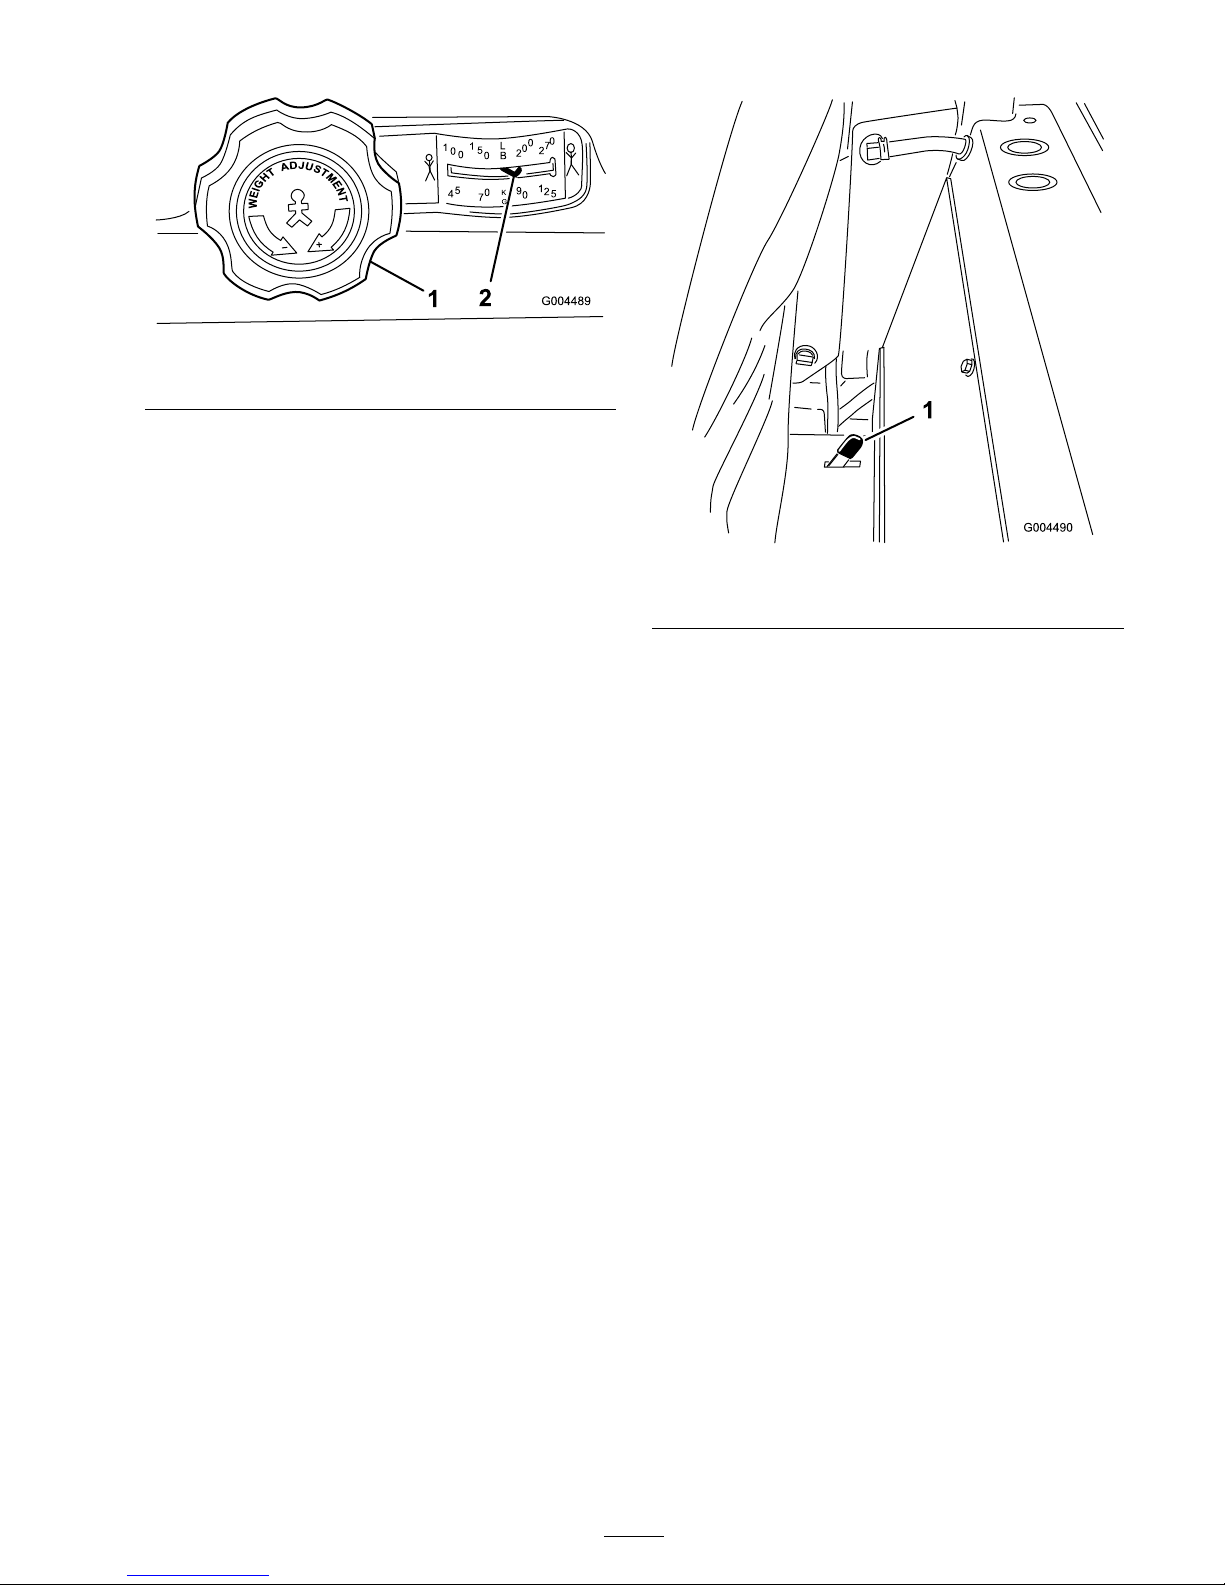
Figure 33
1. Seat suspension knob 2. Operator weight setting
Changing the Back Position
T he bac k of the seat can be adjusted to pro vide
a comfor table ride . P osition the bac k of the seat
where it is most comfor table .
T o adjust it, tur n the knob , under the right-side
ar m rest, in either direction to pro vide the best
comfor t ( Figure 32 ).
Changing the Lumbar Support
T he bac k of the seat can be adjusted to pro vide a
customized lumbar suppor t for y our lo w er bac k.
T o adjust it, tur n the knob , under the left-side
ar m rest, in either direction to pro vide the best
comfor t ( Figure 32 ).
Unlatching the Seat
T o access the h y draulic and other systems under
the seat, y ou need to unlatc h the seat and swing
it forw ard.
1. Use the seat position adjustment lev er to slide
the seat all the w a y forw ard.
2. Push one of the seat latc hes , located behind
and to the sides of the seat, rearw ard to unlatc h
the seat and pull forw ard on the top of the seat
( Figure 34 ).
Figure 34
1. Seat latch
Pushing the Machine by
Hand
If the mac hine breaks , r uns out of fuel, etc . y ou
ma y need to push it. T o do so , y ou first need to
open the h y draulic b y-pass v alv es .
Important: Al w ays push the machine
by hand. Nev er to w the machine because
h y draulic dama ge may occur .
Pushing the Machine
1. Diseng ag e the po w er tak e off (PTO) and tur n
the ignition k ey to off . Mo v e the lev ers to the
neutral loc k ed position and apply the parking
brak e . R emo v e the k ey .
2. Lift the seat.
3. R otate eac h b y-pass v alv e countercloc kwise
1 tur n ( Figure 35 ).
T his allo ws h y draulic fluid to b y-pass the pump
enabling the wheels to tur n .
Important: Do not r otate the by-pass
v alv es mor e than 1 tur n. T his pr ev ents
v alv es fr om coming out of the body and
causing fluid to r un out.
37
Page 38
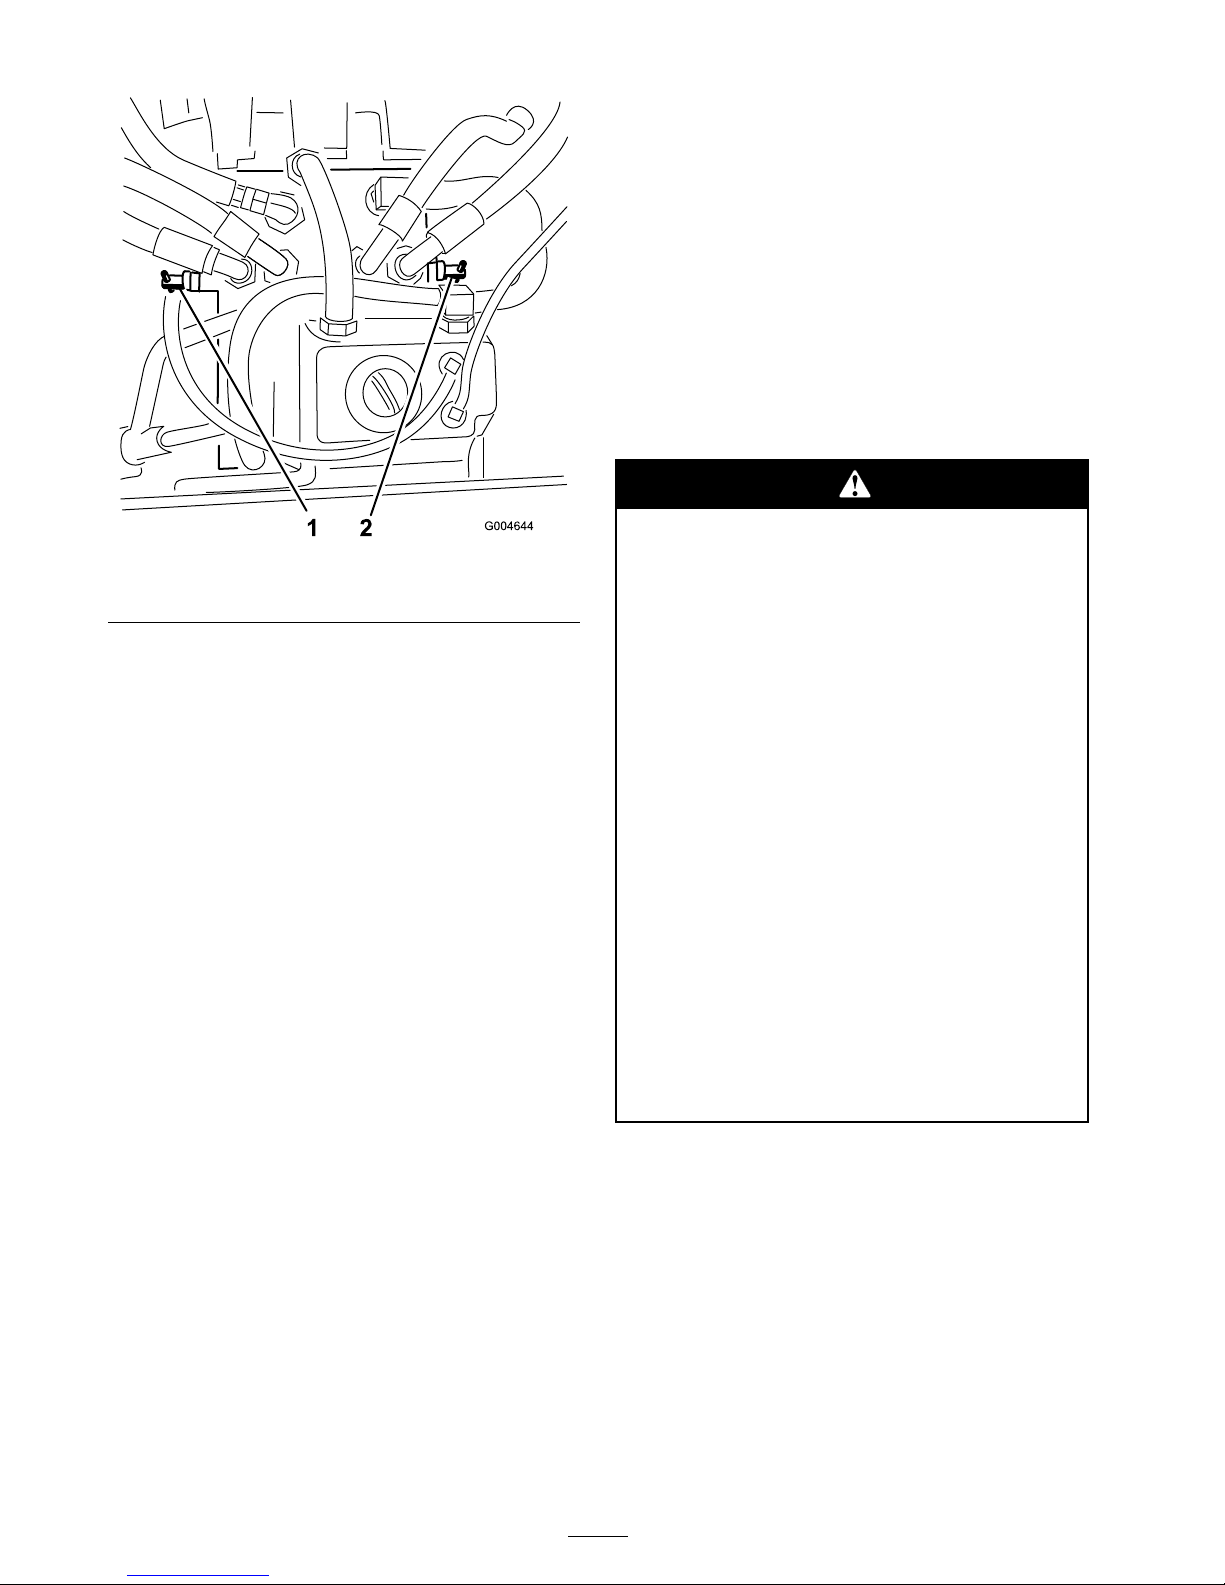
Figure 35
1. Right by-pass valve 2. Left by-pass valve
4. Diseng ag e the parking brak e before pushing .
Changing to Machine Operation
R otate eac h b y-pass v alv e cloc kwise 1 tur n and
hand tighten them (tor que of appro ximately 71
in-lb (8 N ⋅ m)) ( Figure 35 ).
Note: Do not o v er tighten the b y-pass v alv es .
T he mac hine will not dri v e unless b y-pass v alv es
are tur ned in.
Loading Machines
Use extreme caution when loading units on trailers
or tr uc ks . One full width ramp that is wide enough
to extend bey ond the rear tires is recommended
instead of indi vidual ramps for eac h side of the
unit ( Figure 36 ). T he lo w er rear section of the
tractor frame extends bac k betw een the rear
wheels and ser v es as a stop for tipping bac kw ard.
Ha ving a full width ramp pro vides a surface for the
frame members to contact if the unit star ts to tip
bac kw ard. If it is not possible to use one full width
ramp , use enough indi vidual ramps to sim ulate a
full width contin uous ramp .
T he ramp should be long enough so that the
angles do not ex ceed 15 deg rees ( Figure 36 ). A
stee per angle ma y cause mo w er components to g et
caught as the unit mo v es from ramp to trailer or
tr uc k. Stee per angles ma y also cause the unit to tip
bac kw ard. If loading on or near a slope , position
the trailer or tr uc k so it is on the do wn side of the
slope and the ramp extends up the slope . T his
will minimize the ramp angle . T he trailer or tr uc k
should be as lev el as possible .
Important: Do not attempt to tur n the unit
while on the ramp; y ou may lose contr ol and
dri v e of f the side.
A v oid sudden acceleration when dri ving up a ramp
and sudden deceleration when bac king do wn a
ramp . Both maneuv ers can cause the unit to tip
bac kw ard.
Loading a unit onto a trailer or tr uck
incr eases the possibility of backw ard
tip-o v er and could cause serious injur y or
death.
• Use extr eme caution when operating a
unit on a ramp .
• Use onl y a sing le, full width ramp; Do
not use indi vidual ramps f or each side of
the unit.
• If indi vidual ramps must be used, use
enough ramps to cr eate an unbr ok en
ramp surf ace wider than the unit.
• Do not ex ceed a 15 deg r ee ang le betw een
ramp and g r ound or betw een ramp and
trailer or tr uck.
• A v oid sudden acceleration while dri ving
unit up a ramp to a v oid tipping backw ard.
• A v oid sudden deceleration while backing
unit do wn a ramp to a v oid tipping
backw ard.
38
Page 39
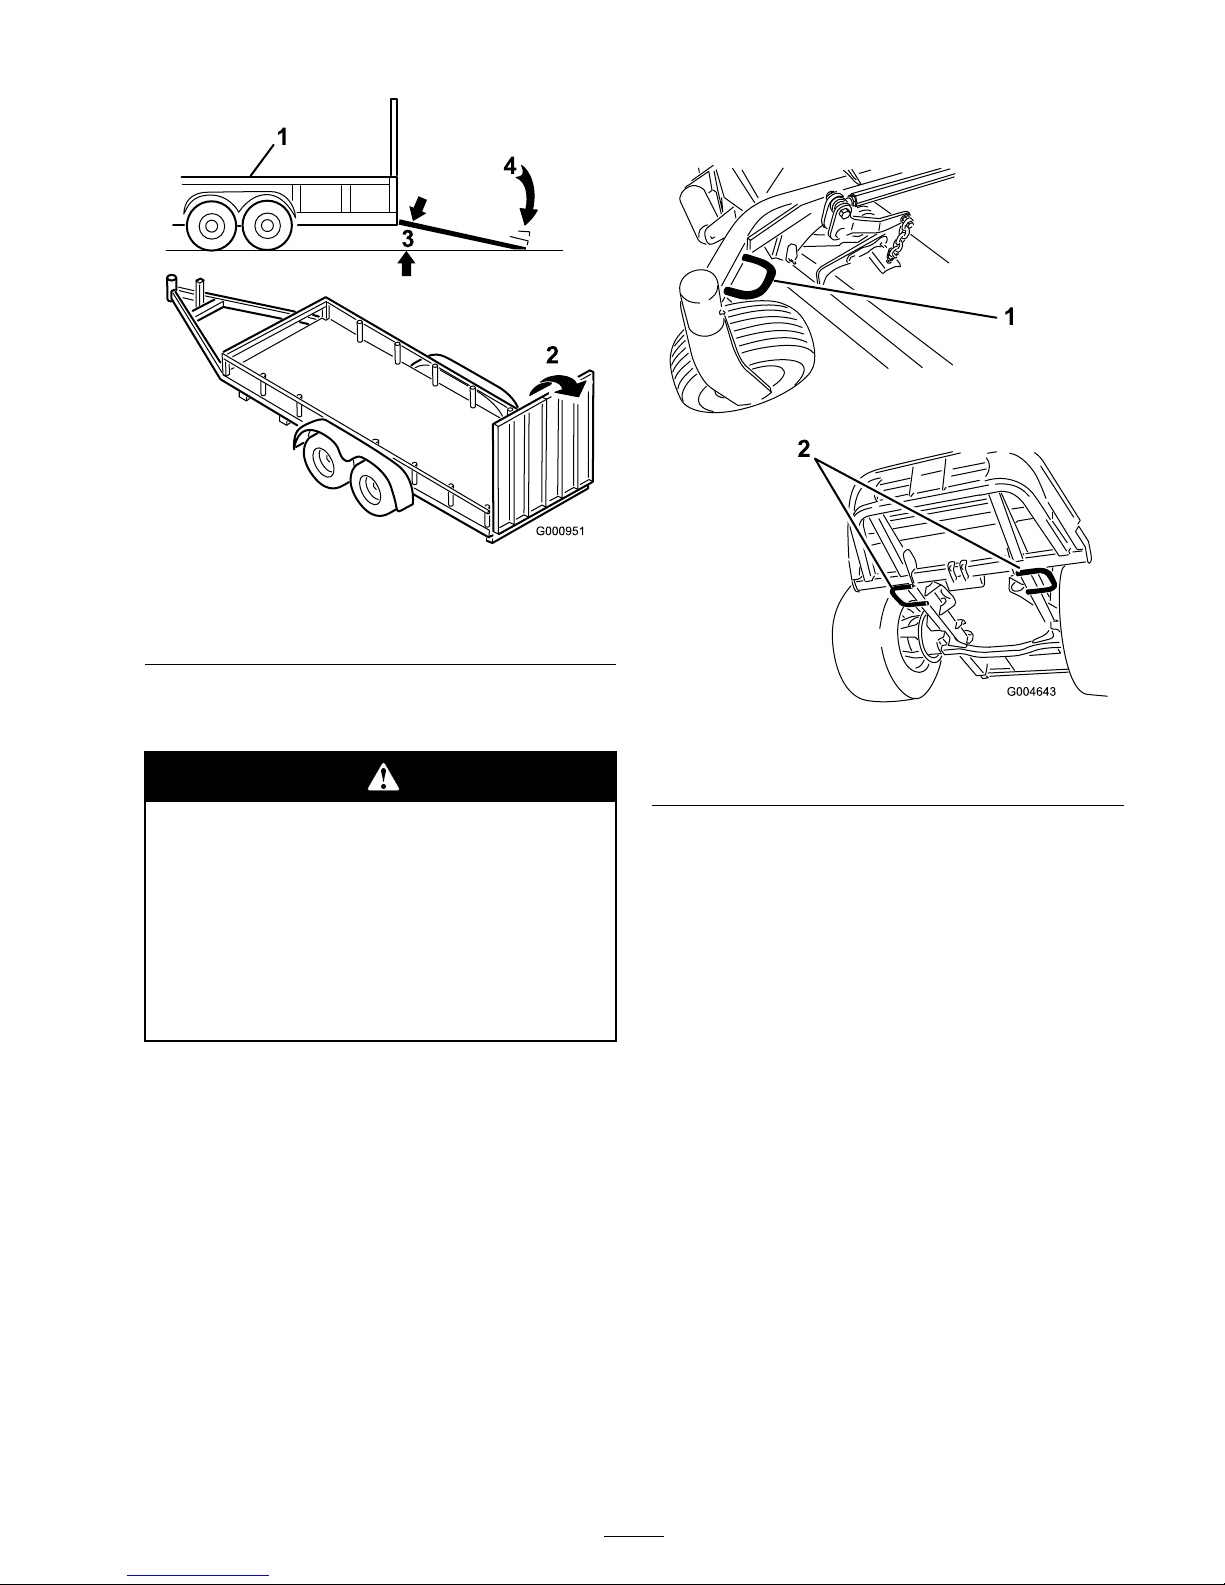
Figure 36
1. Trailer 3. Not greater than
15 degrees
2. Full width ramp 4. Full width ramp—side view
Transporting Machines
Dri ving on the str eet or r oad w ay without
tur n signals, lights, r eflecti v e mar kings, or a
slo w mo ving v ehicle emblem is danger ous
and can lead to accidents causing per sonal
injur y .
Do not dri v e machine on a public str eet
or r oad w ay without signs, lights, and/or
mar kings r equir ed by local r egulations.
Use a hea vy-duty trailer or tr uc k to transpor t the
mac hine . Ensure that the trailer or tr uc k has all
necessar y lighting and marking as required b y la w .
Please carefully read all the safety instr uctions .
Kno wing this infor mation could help y ou or
b ystanders a v oid injur y .
T o transpor t the mac hine:
• Ensure that y our v ehicle , hitc h, safety c hains ,
and trailer are adequate for the load y ou are
pulling and that they meet all local traffic
regulations for y our area.
• Loc k the brak e and bloc k the wheels .
• Securely fasten the mac hine to the trailer or
tr uc k with straps , c hains , cable , or ropes as
required b y local traffic regulations in y our area
( Figure 37 ).
Figure 37
1. Front tie-down (left side
shown)
2. Rear tie-downs
Operating Tips
Fast Throttle Setting/Ground Speed
T o maintain enough po w er for the mac hine and
dec k while mo wing, operate the engine at the fast
throttle position and adjust y our g round speed
for conditions . A g ood r ule to follo w is: decrease
g round speed as the load on the cutting blades
increases; and increase g round speed as load on
the blades decreases .
Mowing Direction
Alter nate mo wing direction to a v oid making r uts
in the turf o v er time . T his also helps disperse
clippings whic h enhances decomposition and
fer tilization.
Cutting Speed
T o impro v e cut quality , use a slo w er g round speed
in cer tain conditions .
39
Page 40

Avoid Cutting Too Low
If the cutting width of the mo w er is wider than the
mo w er y ou previously used, raise the cutting height
to ensure that unev en turf is not cut too shor t.
Long Grass
If the g rass is ev er allo w ed to g ro w slightly long er
than nor mal, or if it contains a high deg ree of
moisture , raise the cutting height higher than usual
and cut the g rass at this setting . T hen cut the g rass
ag ain using the lo w er , nor mal setting .
Keep the Underside of the Mower
Clean
Clean clippings and dir t from the underside of the
mo w er after eac h use . If g rass and dir t build up
inside the mo w er , cutting quality will ev entually
become unsatisfactor y .
Blade Maintenance
Maintain a shar p blade throughout the cutting
season because a shar p blade cuts cleanly without
tearing or shredding the g rass blades . T earing
and shredding tur ns g rass bro wn at the edg es ,
whic h slo ws g ro wth and increases the c hance of
disease . Chec k the blades daily for shar pness , and
for any w ear or damag e . Shar pen the blades as
necessar y . If a blade is damag ed or w or n, re place
it immediately with a g en uine T oro re placement
blade . R efer to Ser vicing the Cutting Blades in
Mo w er Dec k Maintenance , pag e 62 for more
infor mation or identifying blade problems and
shar pening the blades .
40
Page 41

Maintenance
Note: Deter mine the left and right sides of the mac hine from the nor mal operating position.
Recommended Maintenance Schedule(s)
Maintenance Service
Interval
Maintenance Procedure
After the rst 10
operating hours
• Check the alternator belt tension.
• Torque the frame mounting bolts.
• Torque wheel lug nuts.
After the rst 50
operating hours
• Change the mower deck gear box lubricant
• Change the engine oil and lter.
After the rst 200
operating hours
• Change the hydraulic oil and lter.
Before each use or daily
• Test the safety system.
• Check the engine oil level.
• Check the engine coolant level.
• Clean the radiator with compressed air (do not use water)
• Check the hydraulic uid level.
• Check the mower blades.
• Clean the mower deck.
Every 50 hours
• Grease the bearing and bushing grease ttings.
• Check battery cable connections.
• Check the tire pressure.
• Check the condition of the blade drive belts on the mower deck.
Every 150 hours
• Check the lubricant in the mower deck gear box.
• Change the engine oil and lter.
Every 200 hours
• Inspect cooling system hoses and seals. Replace them if cracked or torn.
• Check the alternator belt tension.
• Torque wheel lug nuts.
Every 400 hours
• Change the mower deck gear box lubricant
• Service the air cleaner.
• Replace the fuel lter canister.
• Replace the fuel pre-lter.
• Check the fuel lines and connections.
Every 800 hours
• Change the hydraulic oil and lter.
• Inspect engine valve clearance. Refer to your Engine Operator’s Manual.
Every 1,500 hours
• Replace moving hoses
Every 2 years
• Drain and clean the fuel tank.
• Flush and replace cooling system uid.
• Replace safety switches.
Important: R efer to y our Engine Operator’ s Man ual f or additional maintenance pr ocedur es.
A detailed Ser vice Man ual is also a v aila ble f or purchase fr om y our Authoriz ed T or o Distributor .
41
Page 42
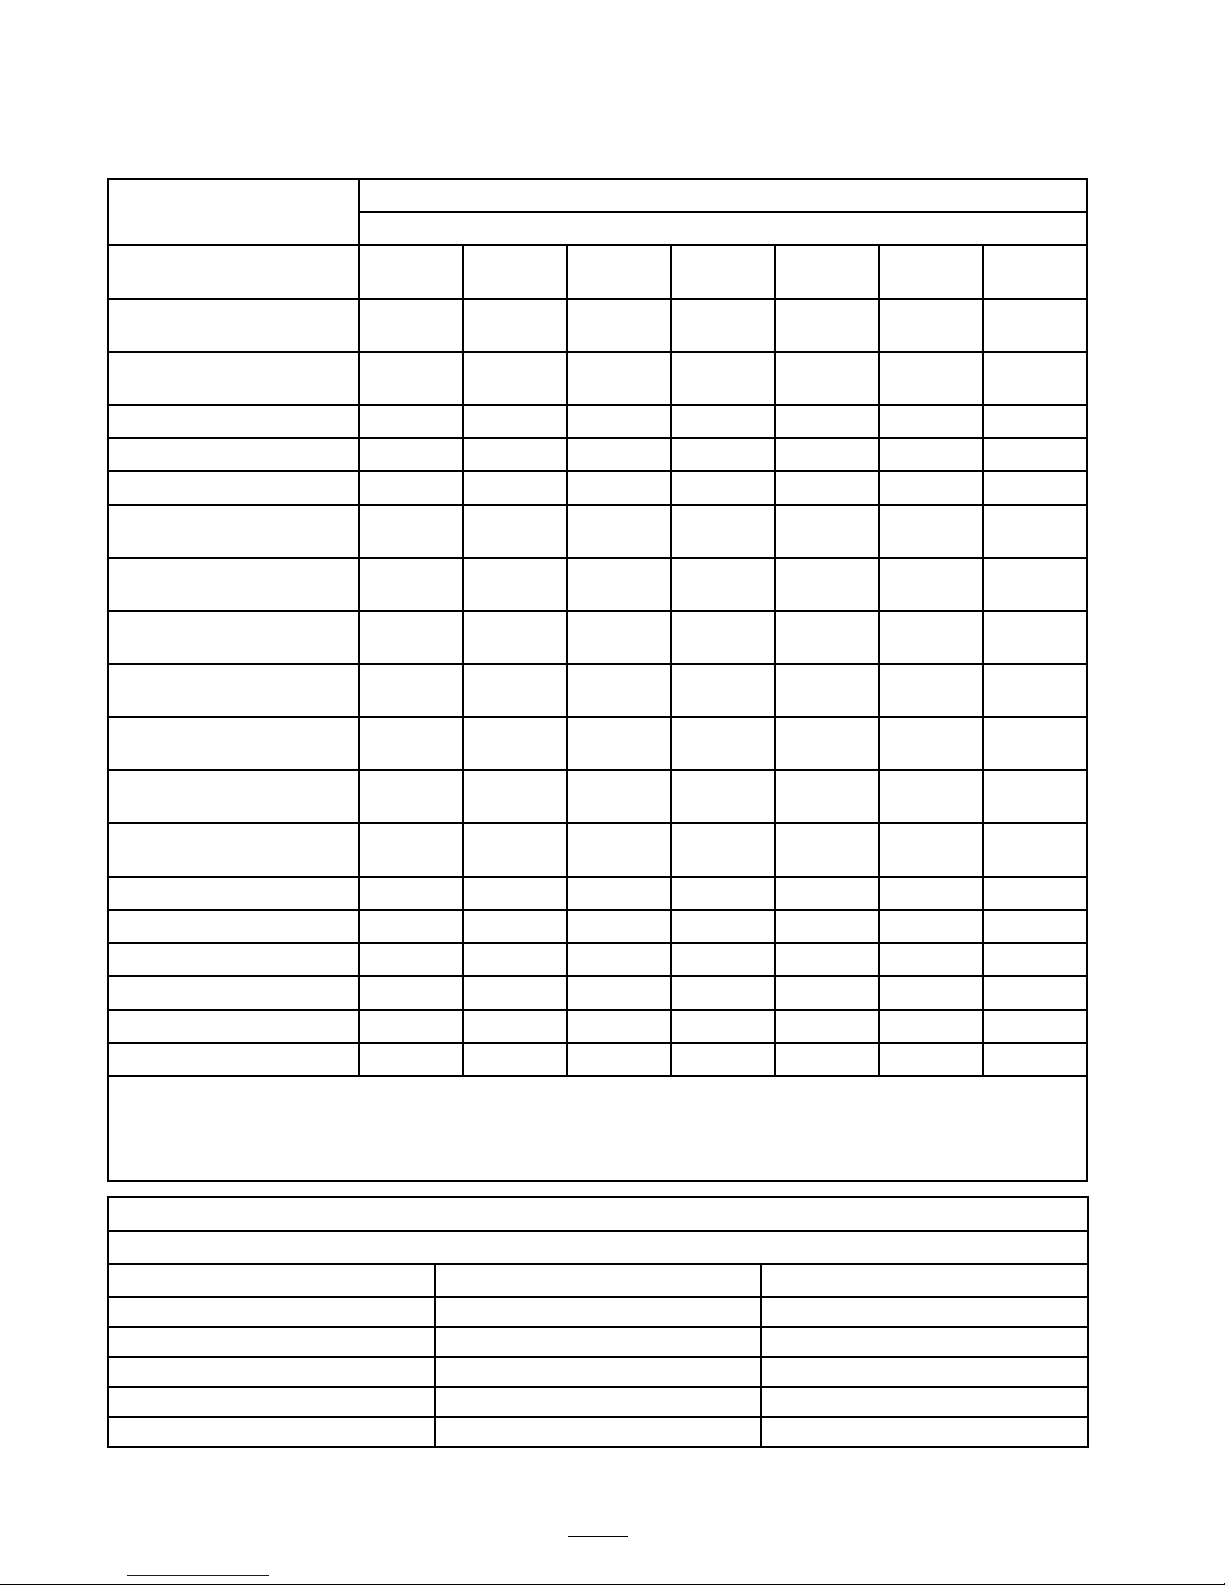
Daily Maintenance Checklist
Duplicate this page for routine use.
For the week of:
Maintenance Check Item
Mon. Tues.
Wed. Thurs.
Fri.
Sat. Sun.
Check Safety Interlock
Operation
Check Grass Deector in
Down Position (if applicable)
Check Parking Brake
Operation
Check Fuel Level
Check Hydraulic Oil Level
Check Engine Oil Level
Check Cooling System Fluid
Level
Check Drain Water/Fuel
Separator
Check Air Filter Restriction
Indicator
3
Check Radiator & Screen for
Debris
Check Unusual Engine
Noises
1
Check Unusual Operating
Noises
Check Hydraulic Hoses for
Damage
Check Fluid Leaks
Check Tire Pressure
Check Instrument Operation
Check Condition of Blades
Lubricate All Grease Fittings
2
Touch-up Damaged Paint
1. Check glow plug and injector nozzles, if hard starting, excess smoke or rough running is noted.
2. Immediately after every washing, regardless of the interval listed.
3. If indicator shows red
Notation for Areas of Concern
Inspection performed by:
Item Date
Information
42
Page 43
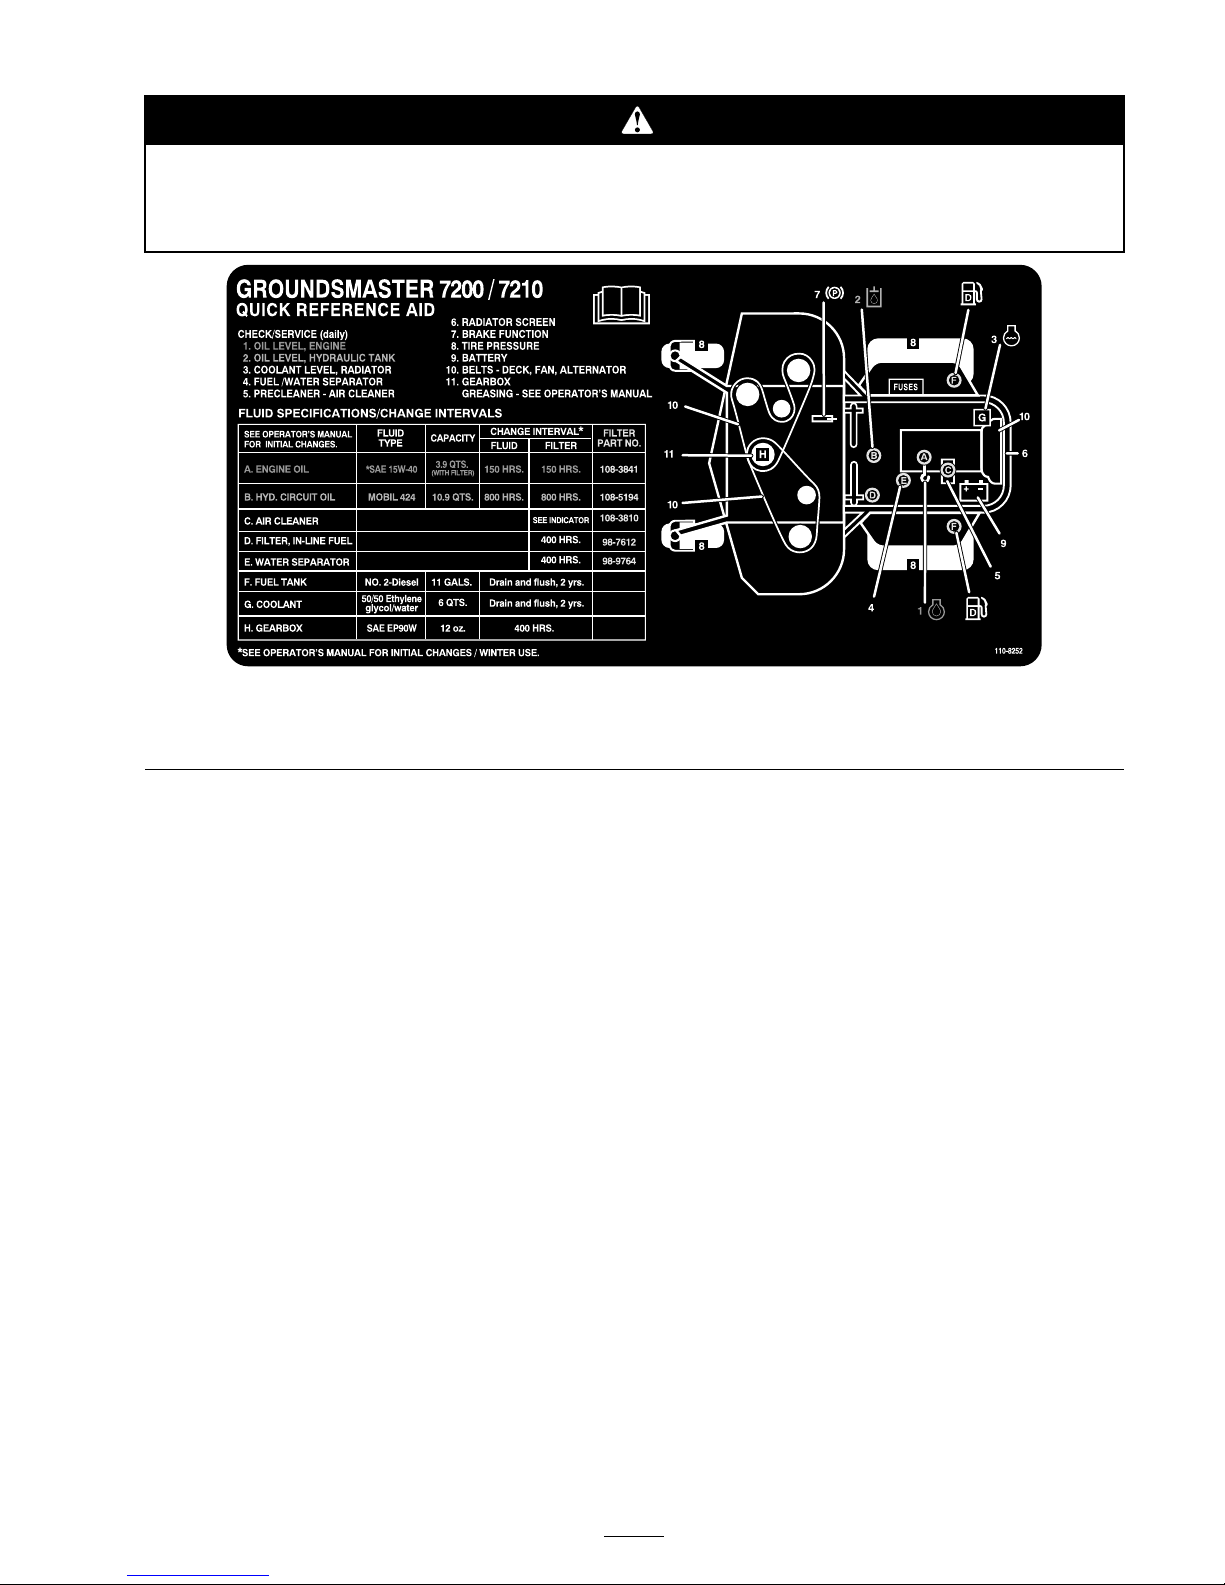
If y ou lea v e the k ey in the ignition s witch, someone could accidentl y star t the engine and
seriousl y injur e y ou or other bystander s.
R emo v e the k ey fr om the ignition bef or e y ou do an y maintenance.
Figure 38
Service Interval Chart
Lubrication
Greasing the Bearings and
Bushings
T he mac hine has g rease fittings that m ust be
lubricated regularly with No . 2 General Pur pose
Lithium Base Grease . If the mac hine is operated
under nor mal conditions , lubricate all bearings
and bushings after ev er y 50 hours of operation.
Bearings and bushings m ust be lubricated daily
when operating conditions are extremely dusty and
dir ty . Dusty and dir ty operating conditions could
cause dir t to g et into the bearings and bushings ,
resulting in accelerated w ear . Lubricate the g rease
fittings immediately after ev er y w ashing, reg ardless
of inter v al specified.
1. Wipe the g rease fittings clean so foreign matter
cannot be forced into the bearing or bushing .
2. Pump g rease into the fittings .
3. Wipe off ex cess g rease .
Figure 39 and Figure 40 illustrate the locations of
the g rease fittings .
Important: T he fittings on the axles of the
caster wheels ar e not illustrated. Ensur e that
y ou g r ease these fittings as w ell.
43
Page 44
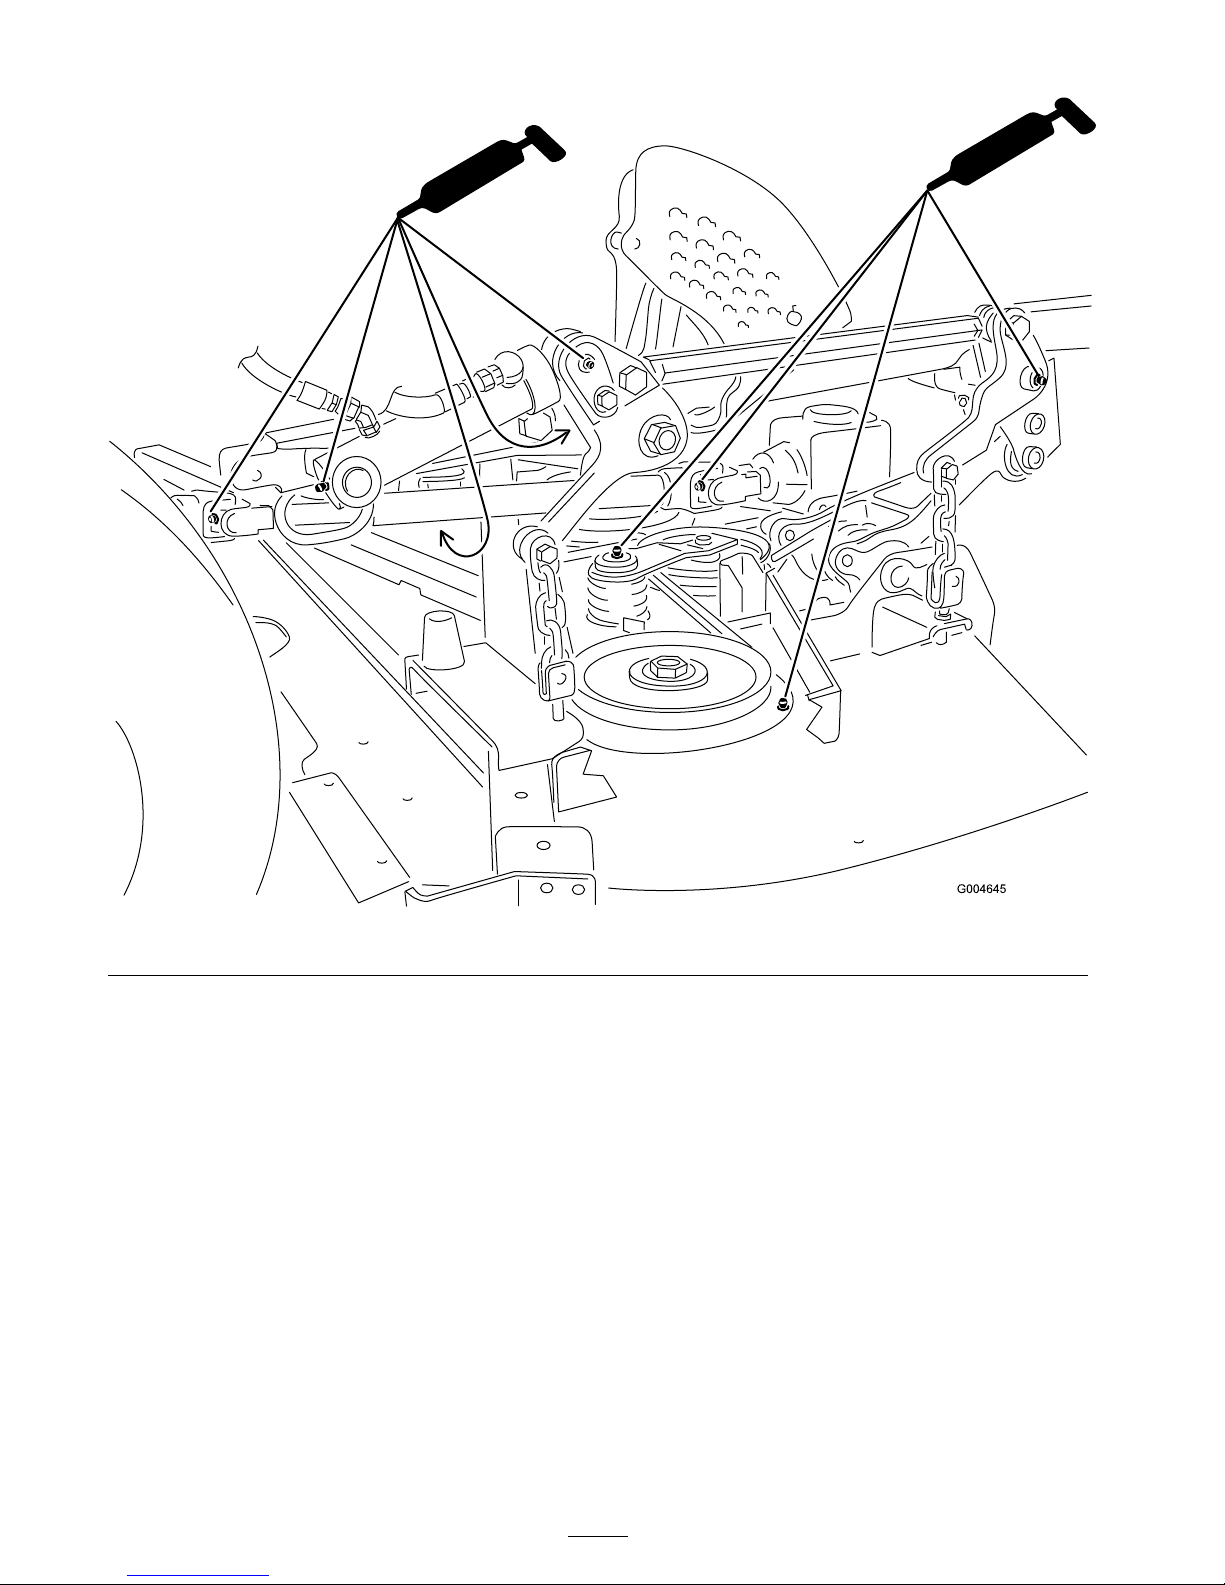
Figure 39
44
Page 45
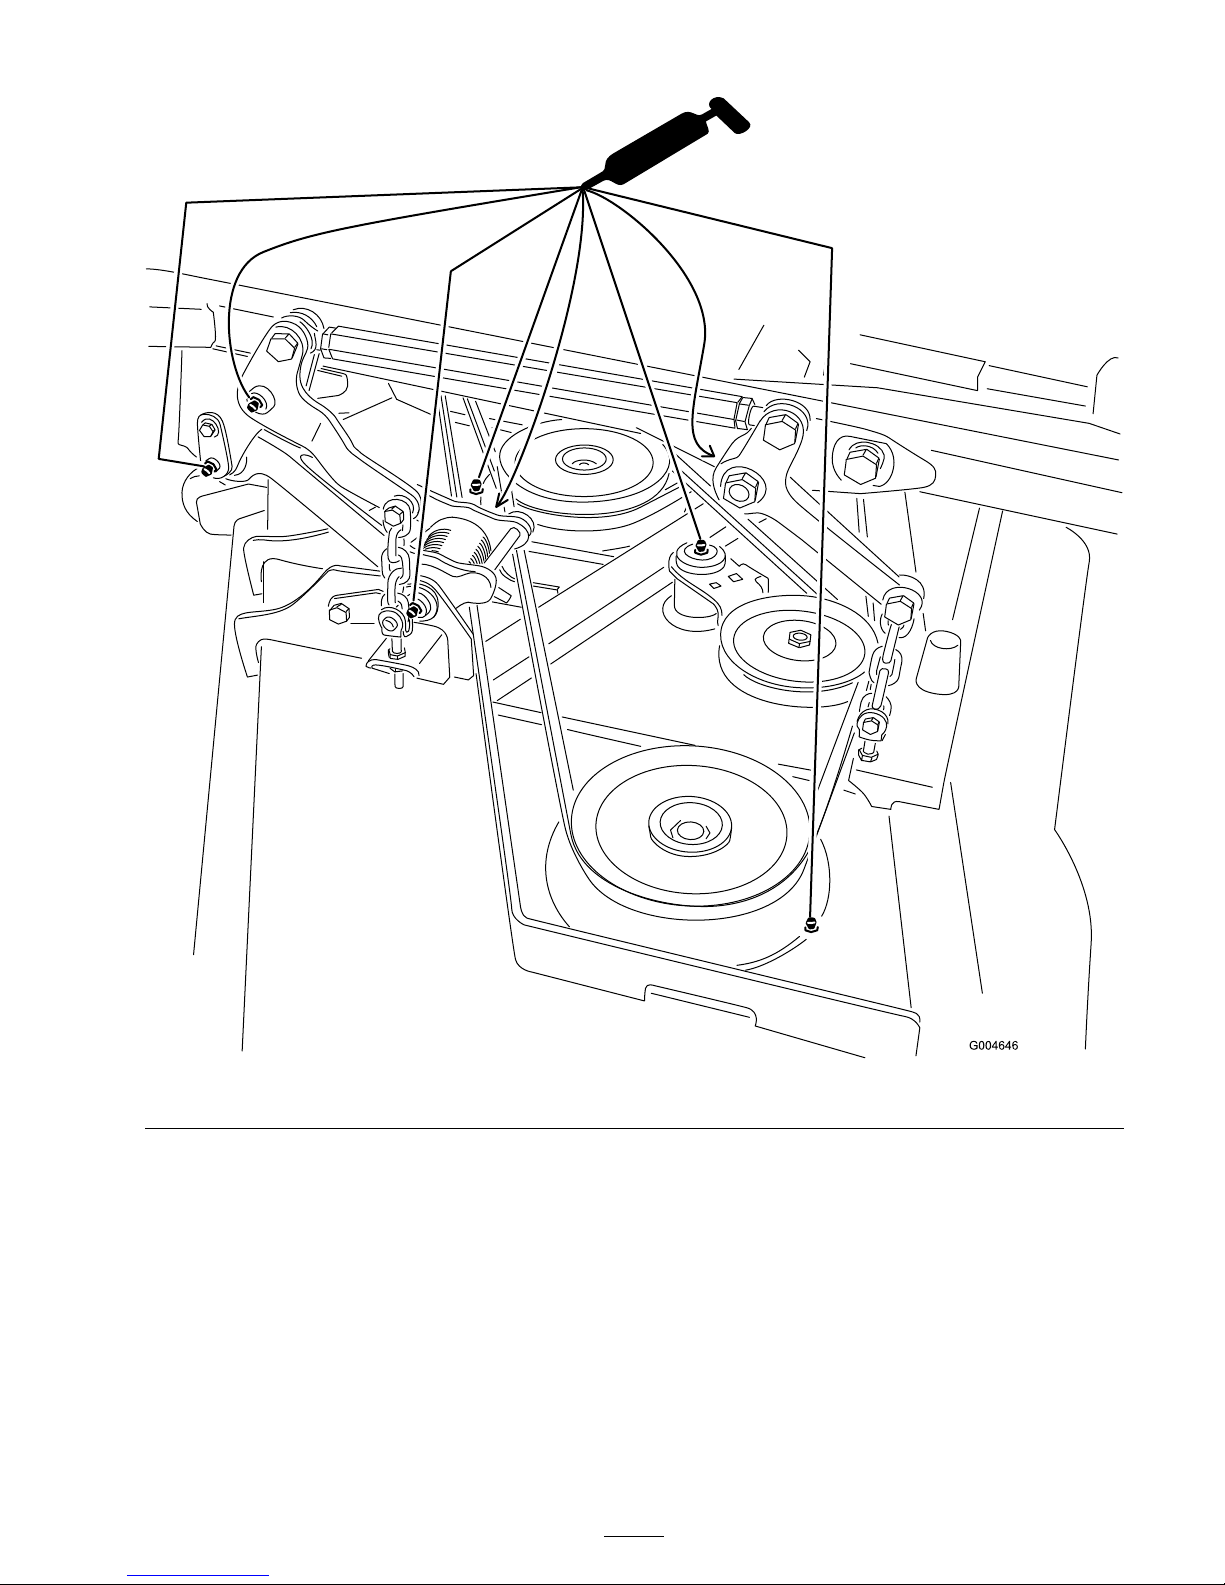
Figure 40
Note: Bearing life can be neg ati v ely affected
b y improper w ash do wn procedures . Do not
w ash do wn the unit when it is still hot and a v oid
directing high-pressure or high v olume spra y at
the bearings or seals .
Servicing the Mower Deck
Gear Box Lubricant
T he g ear bo x is designed to operate with SAE
80-90 g ear lube . Although the g ear bo x is shipped
with lubricant from the factor y , c hec k the lev el
before operating the cutting unit for the first time
and ev er y 150 operating hours thereafter . Chang e
the lubricant in the g ear bo x ev er y 400 operating
hours .
Checking the Mower Deck Gear Box
Lubricant
1. P osition the mac hine and cutting unit on a
lev el surface .
2. Lo w er the mo w er dec k to the 1 inc h (2.5 cm)
height-of-cut.
45
Page 46
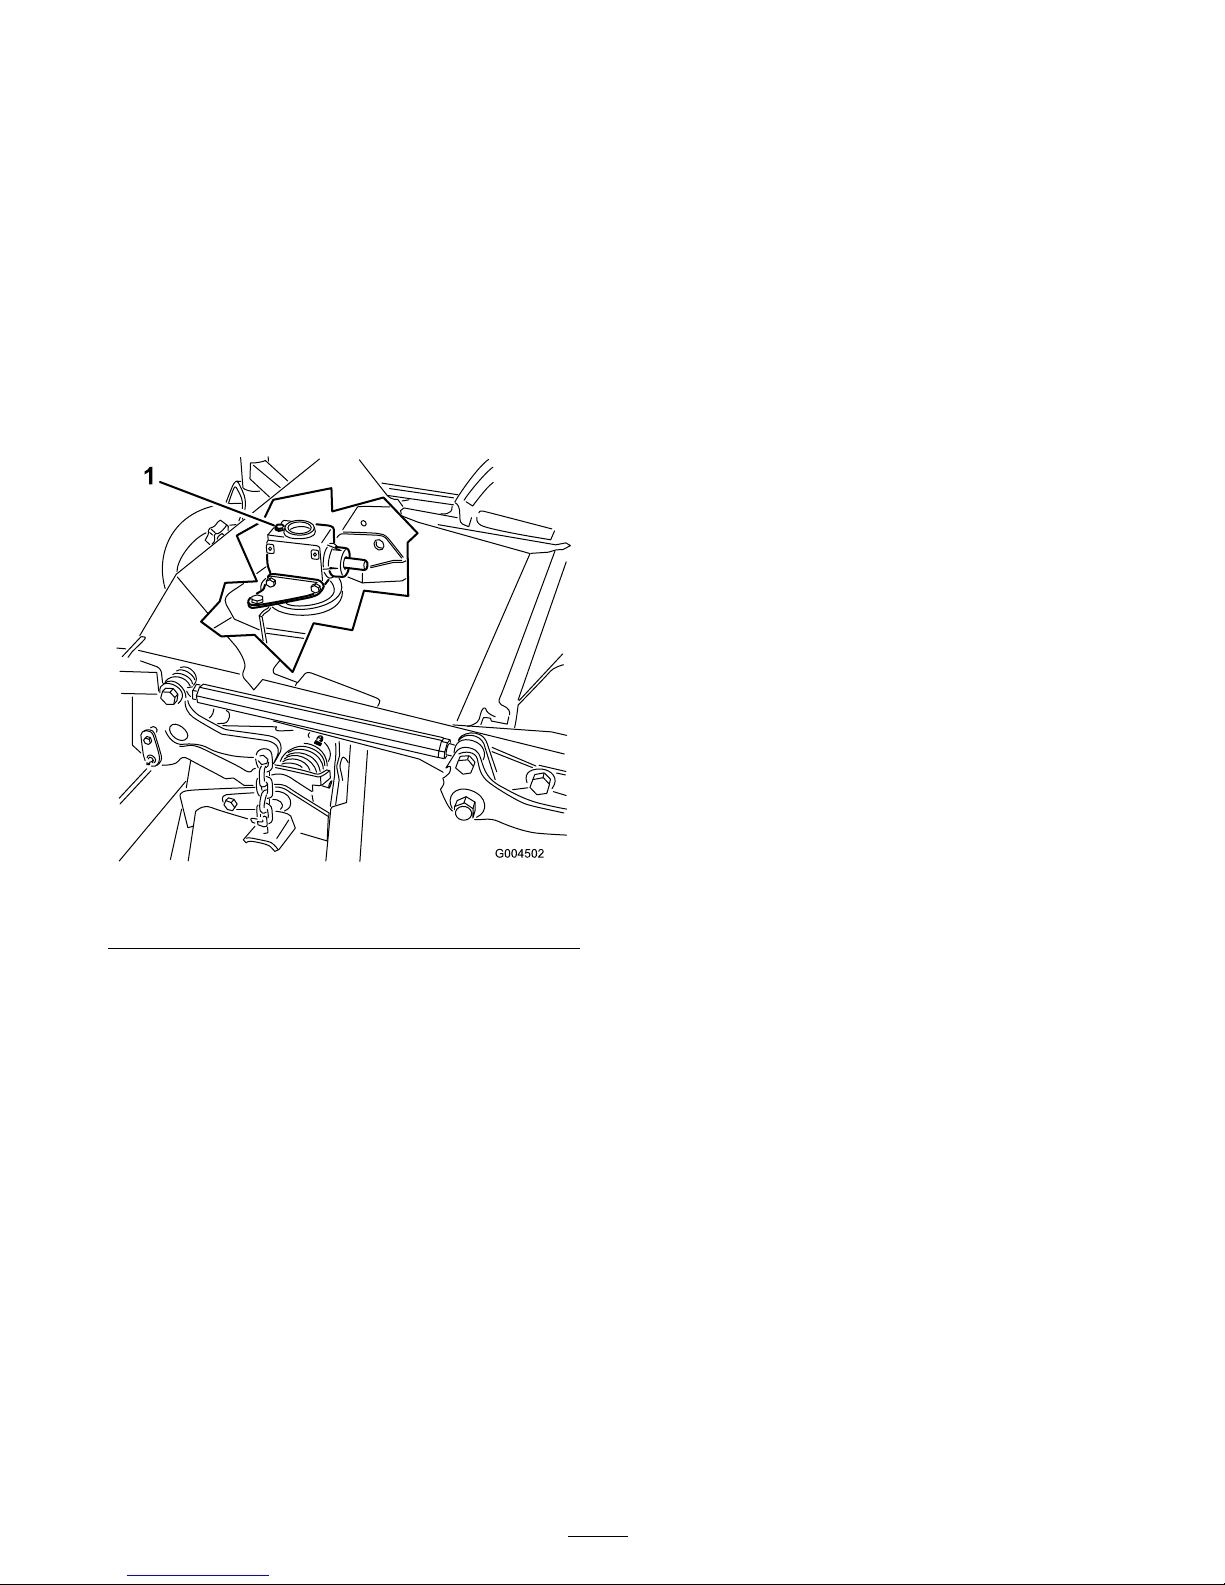
3. Diseng ag e the PTO , mo v e the motion control
lev ers to the neutral loc k ed position and set
the parking brak e .
4. Mo v e the throttle lev er to the Slo w position,
stop the engine , remo v e the k ey , and w ait for
all mo ving par ts to stop before lea ving the
operating position.
5. Lift the footrest, exposing the top of the
mo w er dec k.
6. R emo v e the dipstic k/fill plug from the top of
the g ear bo x ( Figure 41 ) and mak e sure that the
lubricant is betw een the marks on the dipstic k.
Figure 41
1. Fill plug and dipstick
7. If the lubricant lev el is lo w , add enough
lubricant until the lev el is betw een the marks
on the dipstic k.
Note: Do not o v er fill or the g earbo x ma y
be damag ed.
Changing the Mower Deck Gear Box
Lubricant
1. P osition the mac hine and cutting unit on a
lev el surface .
2. Lo w er the mo w er dec k to the 1 inc h (2.5 cm)
height-of-cut.
3. Diseng ag e the PTO , mo v e the motion control
lev ers to the neutral loc k ed position and set
the parking brak e .
4. Mo v e the throttle lev er to the Slo w position,
stop the engine , remo v e the k ey , and w ait for
all mo ving par ts to stop before lea ving the
operating position.
5. Lift the footrest, exposing the top of the
mo w er dec k.
6. R emo v e the dipstic k/fill plug from the top of
the g ear bo x ( Figure 41 ).
7. Place a funnel and drain pan under the drain
plug located under the front of the g ear bo x
and remo v e the plug, draining the lubricant
into the pan.
8. R e place the drain plug .
9. Add enough lubricant, appro ximately 12 oz
(283 ml), until the lev el is betw een the marks
on the dipstic k.
Note: Do not o v er fill or the g earbo x ma y
be damag ed.
Engine Maintenance
Air Cleaner Maintenance
• Chec k the air cleaner body for damag e whic h
could possibly cause an air leak. R e place a
damag ed air cleaner body . Chec k the whole
clean air intak e system for leaks , damag e , or
loose hose clamps .
• Ser vice the air cleaner filter when the air
cleaner indicator ( Figure 42 ) sho ws red or
ev er y 400 hours (more frequently in extremely
dusty or dir ty conditions). Do not o v er ser vice
the air filter .
46
Page 47
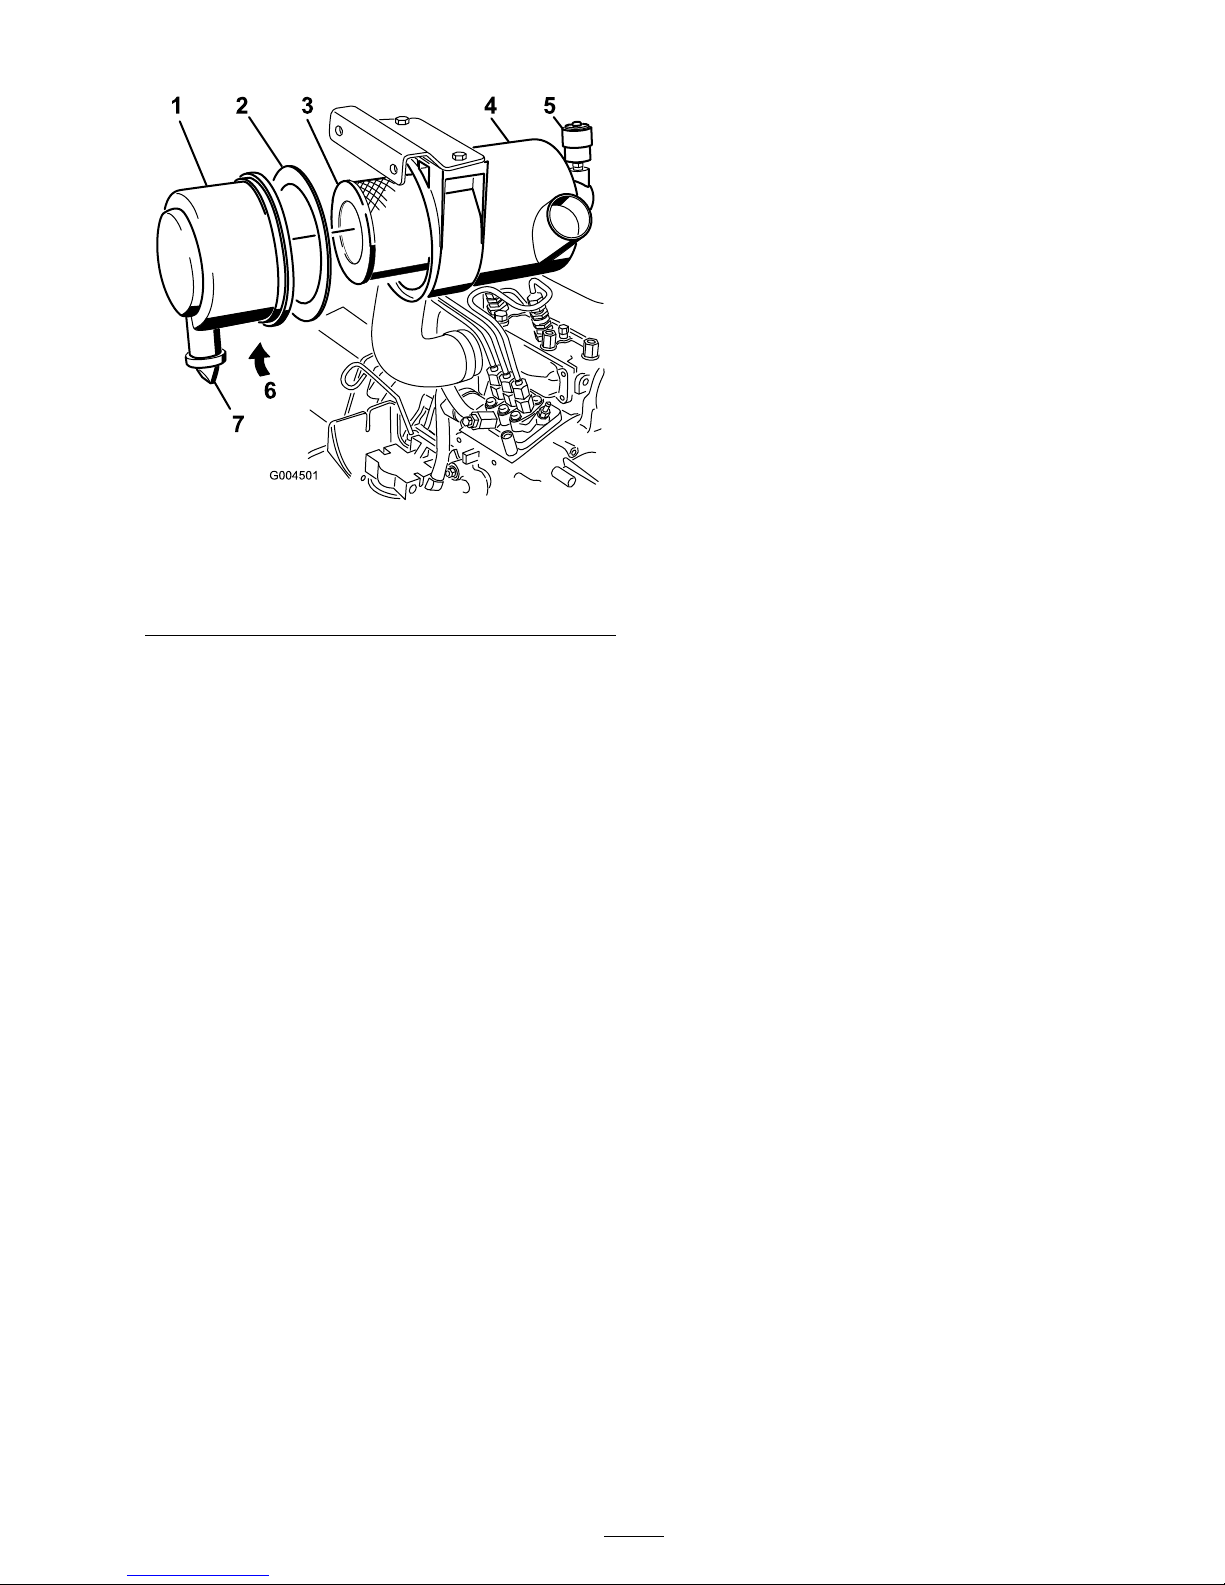
Figure 42
1. Air cleaner cover 5. Air cleaner indicator
2. Gasket 6. Air cleaner latch
3. Filter 7. Rubber outlet valve
4. Air cleaner body
• Be sure the co v er is seated cor rectly and seals
with the air cleaner body .
Servicing the Air Cleaner
1. Pull the latc h outw ard and rotate the air cleaner
co v er counter -cloc kwise ( Figure 42 ).
2. R emo v e the co v er from the air cleaner body
( Figure 42 ).
3. Before remo ving the filter , use lo w pressure
air (40 psi, clean and dr y) to help remo v e
larg e accum ulations of debris pac k ed betw een
outside of primar y filter and the canister .
T his cleaning process prev ents debris from
mig rating into the intak e when the primar y
filter is remo v ed.
Important: A v oid using high pr essur e
air which could f orce dir t thr ough the filter
into the intak e tract.
4. R emo v e and re place the primar y filter
( Figure 42 ).
Important: Do not clean the used
element to a v oid dama ge to the filter
media.
5. Inspect the new filter for shipping damag e ,
c hec king the sealing end of the filter and the
body .
Important: Do not use a dama ged
element.
6. Ensure that the foam g ask et is in place in
the co v er and that it is not tor n or damag ed
( Figure 42 ). If it is damag ed, re place it.
7. Inser t the new filter b y applying pressure to
the outer rim of the element to seat it in the
canister .
Important: Do not appl y pr essur e to the
flexible center of the filter .
8. Clean the dir t ejection por t located in the
remo v able co v er , as follo ws:
A. R emo v e the r ubber outlet v alv e from the
co v er ( Figure 42 ).
B . Clean the ca vity .
C . R e place the outlet v alv e .
9. Install the co v er orienting the r ubber outlet
v alv e in a do wnw ard position—betw een
appro ximately 5:00 to 7:00 when view ed from
the end.
10. R eset the indicator ( Figure 42 ) if sho wing red.
Servicing the Engine Oil
Checking the Engine Oil Level
T he engine is shipped with oil in the crankcase;
ho w ev er , the oil lev el m ust be c hec k ed before and
after the engine is first star ted. Chec k oil lev el
before eac h da y’ s operation or eac h time mac hine
is used.
T he crankcase capacity is appro ximately 4 qt.
(3.8 l) with the filter . Use high-quality engine oil
that meets the follo wing specifications:
• API Classification Lev el R equired: CH-4, CI-4
or higher .
• Prefer red oil: SAE 15W -40 (abo v e 0°F (-17°C)
• Alter nate oil: SAE 10W -30 or 5W -30 (all
temperatures)
Note: T oro Premium Engine oil is a v ailable
from y our distributor in either 15W -40 or 10W -30
viscosity . See the par ts catalog for par t n umbers .
1. P ark the mac hine on a lev el surface , lo w er the
mo w er dec k, mo v e the throttle lev er to the
Slo w position, stop the engine , and remo v e the
k ey from the ignition switc h. Open the hood.
2. R emo v e the dipstic k ( Figure 43 ), wipe it clean,
and install the dipstic k. R emo v e the dipstic k
and c hec k the oil lev el.
47
Page 48
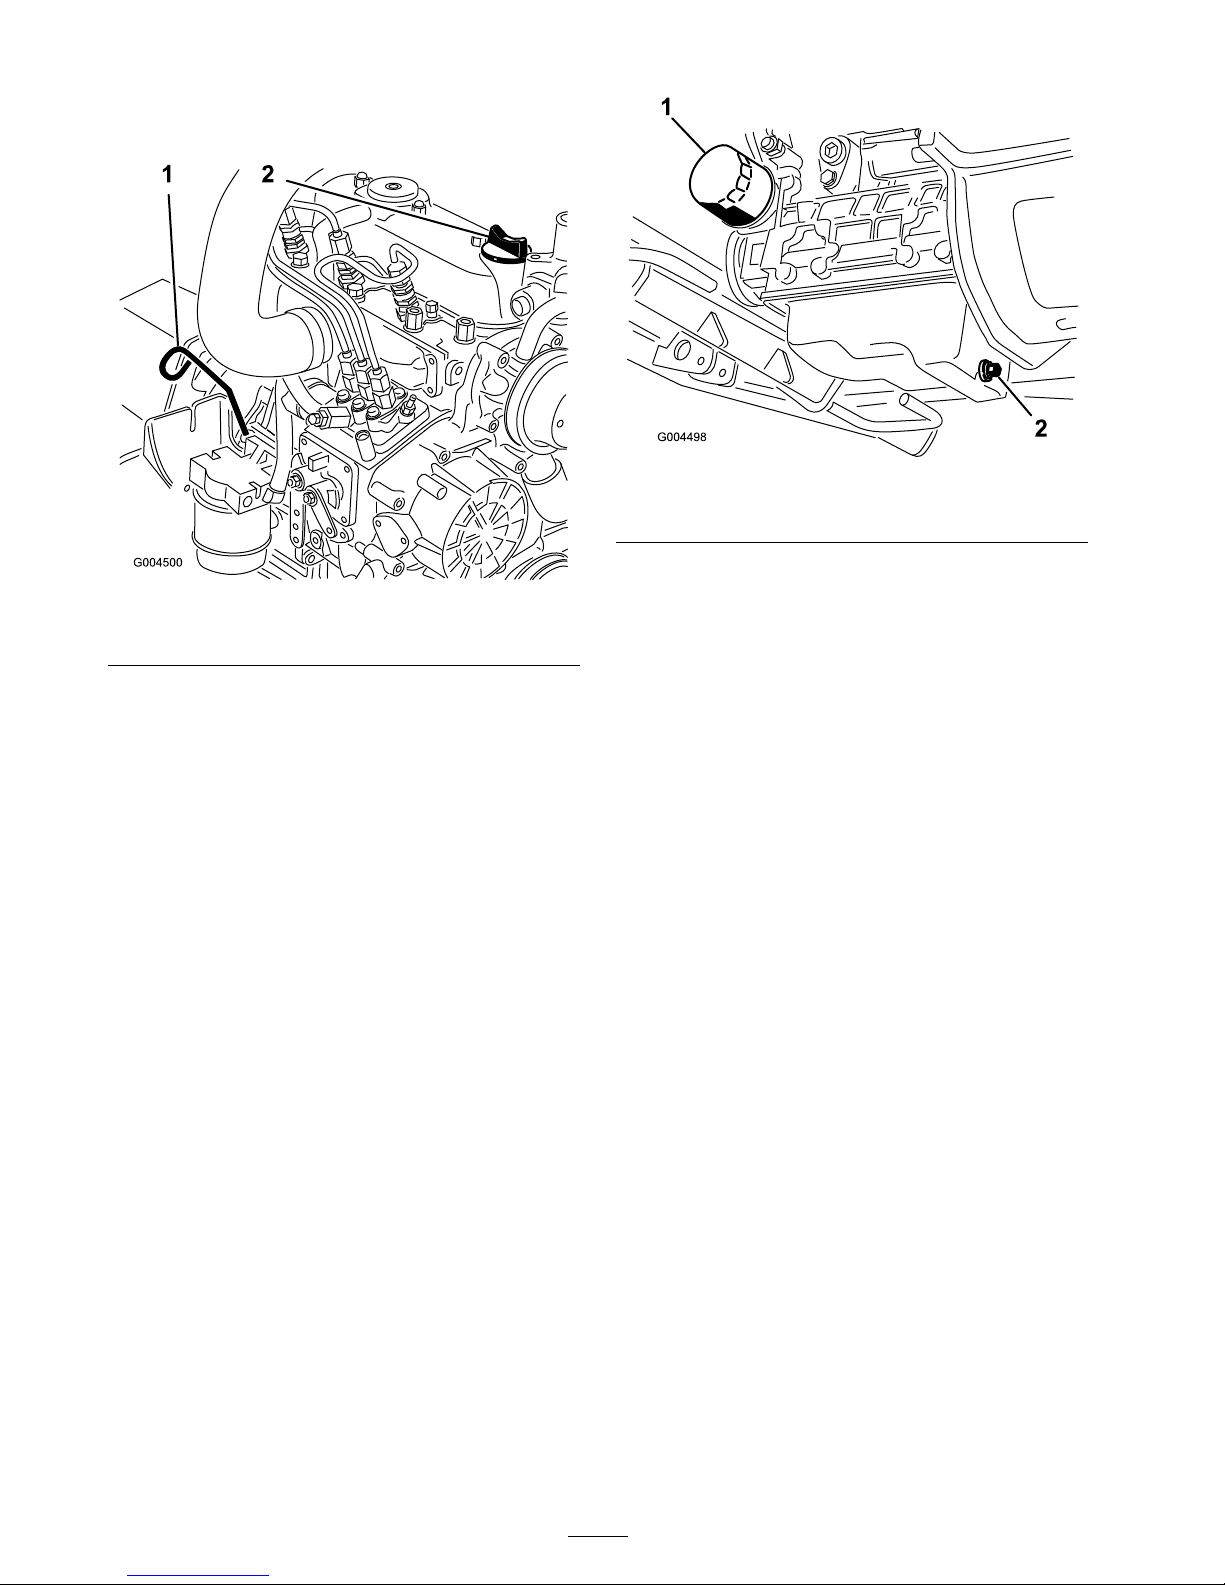
T he oil lev el should be up to the Full mark on
the dipstic k.
Figure 43
1. Dipstick 2. Oil ll
3. If the oil lev el is belo w the Full mark, remo v e
the fill cap ( Figure 43 ) and add oil until the
lev el reac hes the Full mark on the dipstic k.
Important: Do not o v erfill.
Note: Use a clean funnel to prev ent spills .
4. Install the oil fill cap and close the hood.
Changing the Engine Oil And Filter
Chang e the oil and filter initially after first 50
hours of operation and then ev er y 150 hours of
operation thereafter . If possible , r un the engine
just before c hanging the oil because w ar m oil flo ws
better and car ries more contaminants than cold oil.
1. P osition the mac hine on a lev el surface .
2. Open the hood.
3. Set a drain pan under the oil pan and in line
with the drain plug ( Figure 44 ).
Figure 44
1. Oil lter 2. Drain plug
4. Clean the area around the drain plug .
5. R emo v e the drain plug and allo w the oil to
flo w into drain pan.
6. R emo v e and re place the oil filter ( Figure 44 ).
7. After the oil is drained, install the drain plug
and wipe up any oil that is spilled.
8. Fill the crankcase with oil; refer to Chec king
the Engine Oil Lev el.
48
Page 49
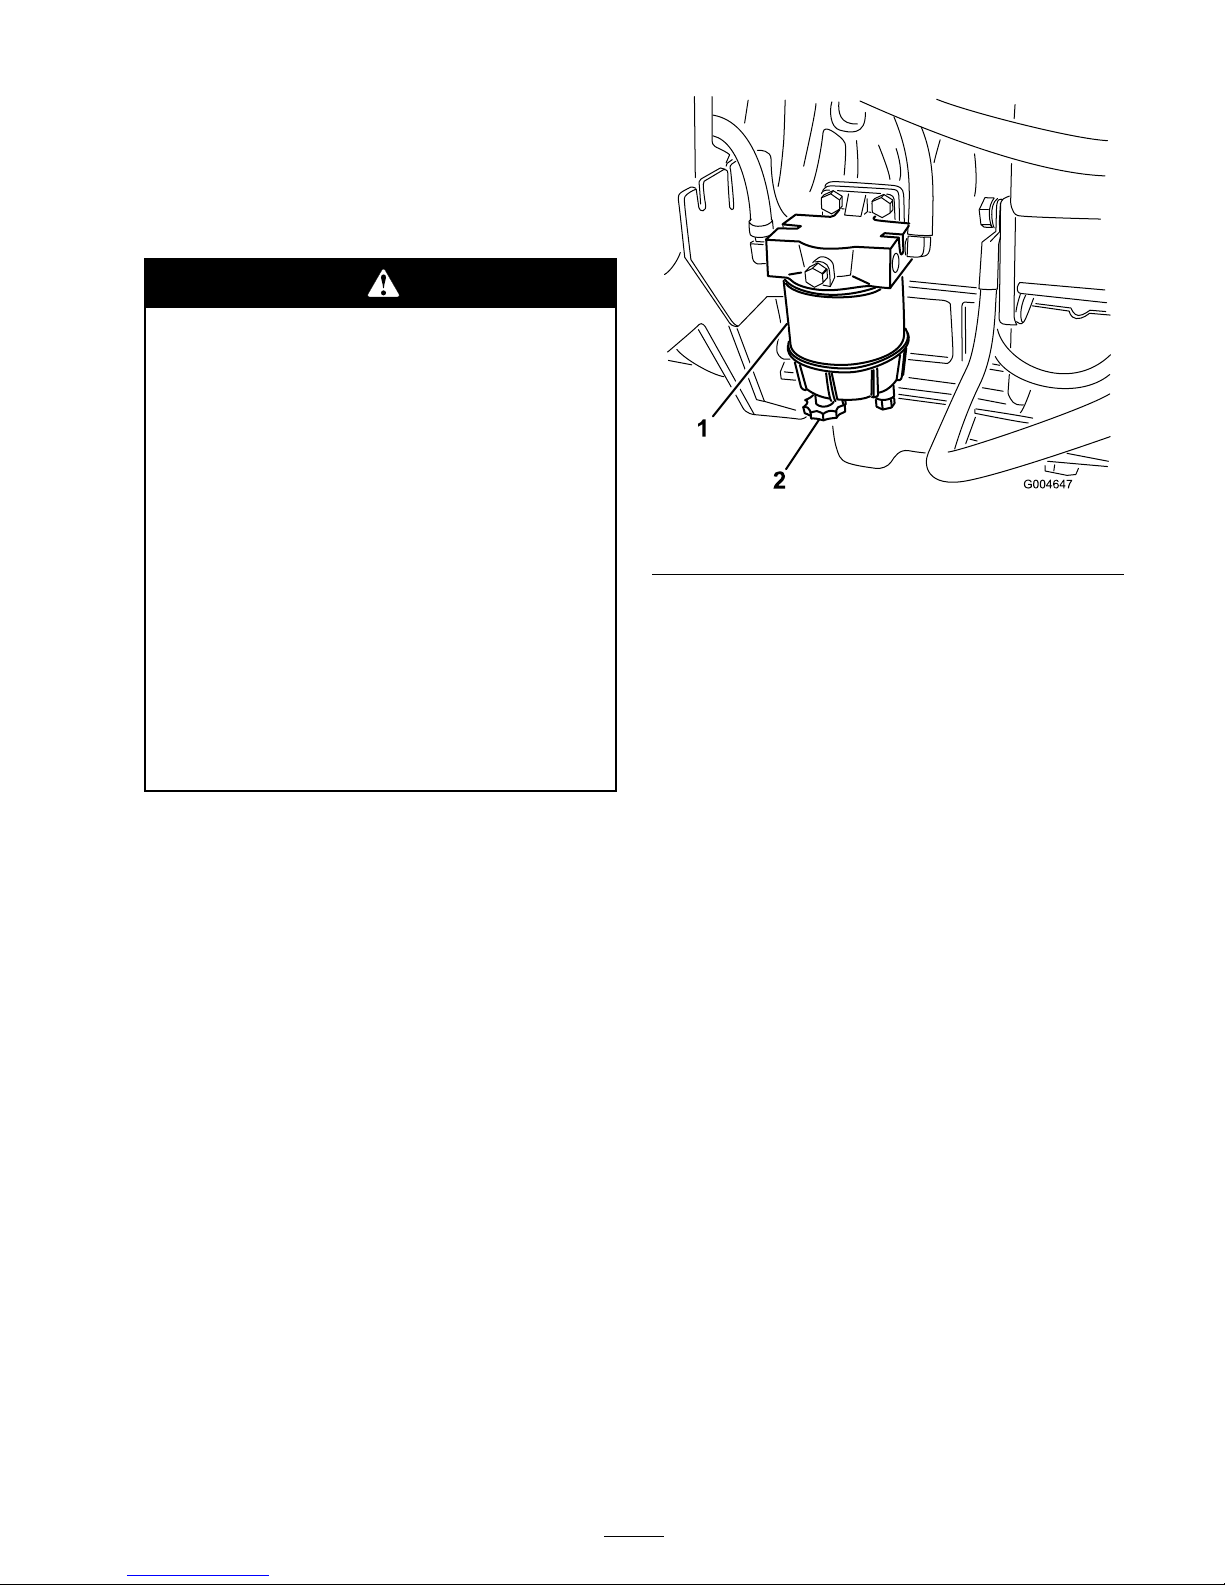
Fuel System
Maintenance
Note: R efer to Adding Fuel for proper fuel
recommendations .
Under cer tain conditions, diesel fuel and fuel
v apor s ar e highl y flamma ble and explosi v e.
A fir e or explosion fr om fuel can bur n y ou
and other s and can cause pr oper ty dama ge.
• Use a funnel and fill the fuel tank
outdoor s, in an open ar ea, when the
engine is of f and is cold. W ipe up an y
fuel that spills.
• Do not fill the fuel tank completel y full.
Add fuel to the fuel tank until the lev el is
to the bottom of the filler neck.
• Nev er smok e when handling fuel, and
stay a w ay fr om an open flame or wher e
fuel fumes may be ignited by a spar k.
• Stor e fuel in a clean, safety-appr o v ed
container and k eep the cap in place.
Servicing the Water
Separator
Drain w ater or other contaminants from w ater
se parator ( Figure 45 ) daily . R e place filter canister
after ev er y 400 hours of operation.
1. Place a clean container under the fuel filter .
2. Loosen the drain plug on the bottom of the
filter canister .
Figure 45
1. Water separator
2. Drain plug
3. Clean the area where the filter canister mounts .
4. R emo v e the filter canister and clean the
mounting surface .
5. Lubricate the g ask et on the filter canister with
clean oil.
6. Install the filter canister b y hand until the
g ask et contacts mounting surface , then rotate
it an additional 1/2 tur n.
7. Tighten the drain plug on the bottom of the
filter canister .
Cleaning the Fuel Tank
Drain and clean fuel tank ev er y 2 years . Also , drain
and clean the tank if the fuel system becomes
contaminated or if the mac hine is to be stored for
an extended period. Use clean diesel fuel to flush
out the tank.
Replacing the Fuel Pre-Filter
R e place the fuel pre-filter ( Figure 46 ), located
betw een the fuel tank and fuel pump after ev er y
400 operating hours or yearly , whic hev er occurs
first.
1. Clamp both fuel lines that connect to the
pre-filter so fuel cannot drain when the lines
are remo v ed ( Figure 46 ).
49
Page 50
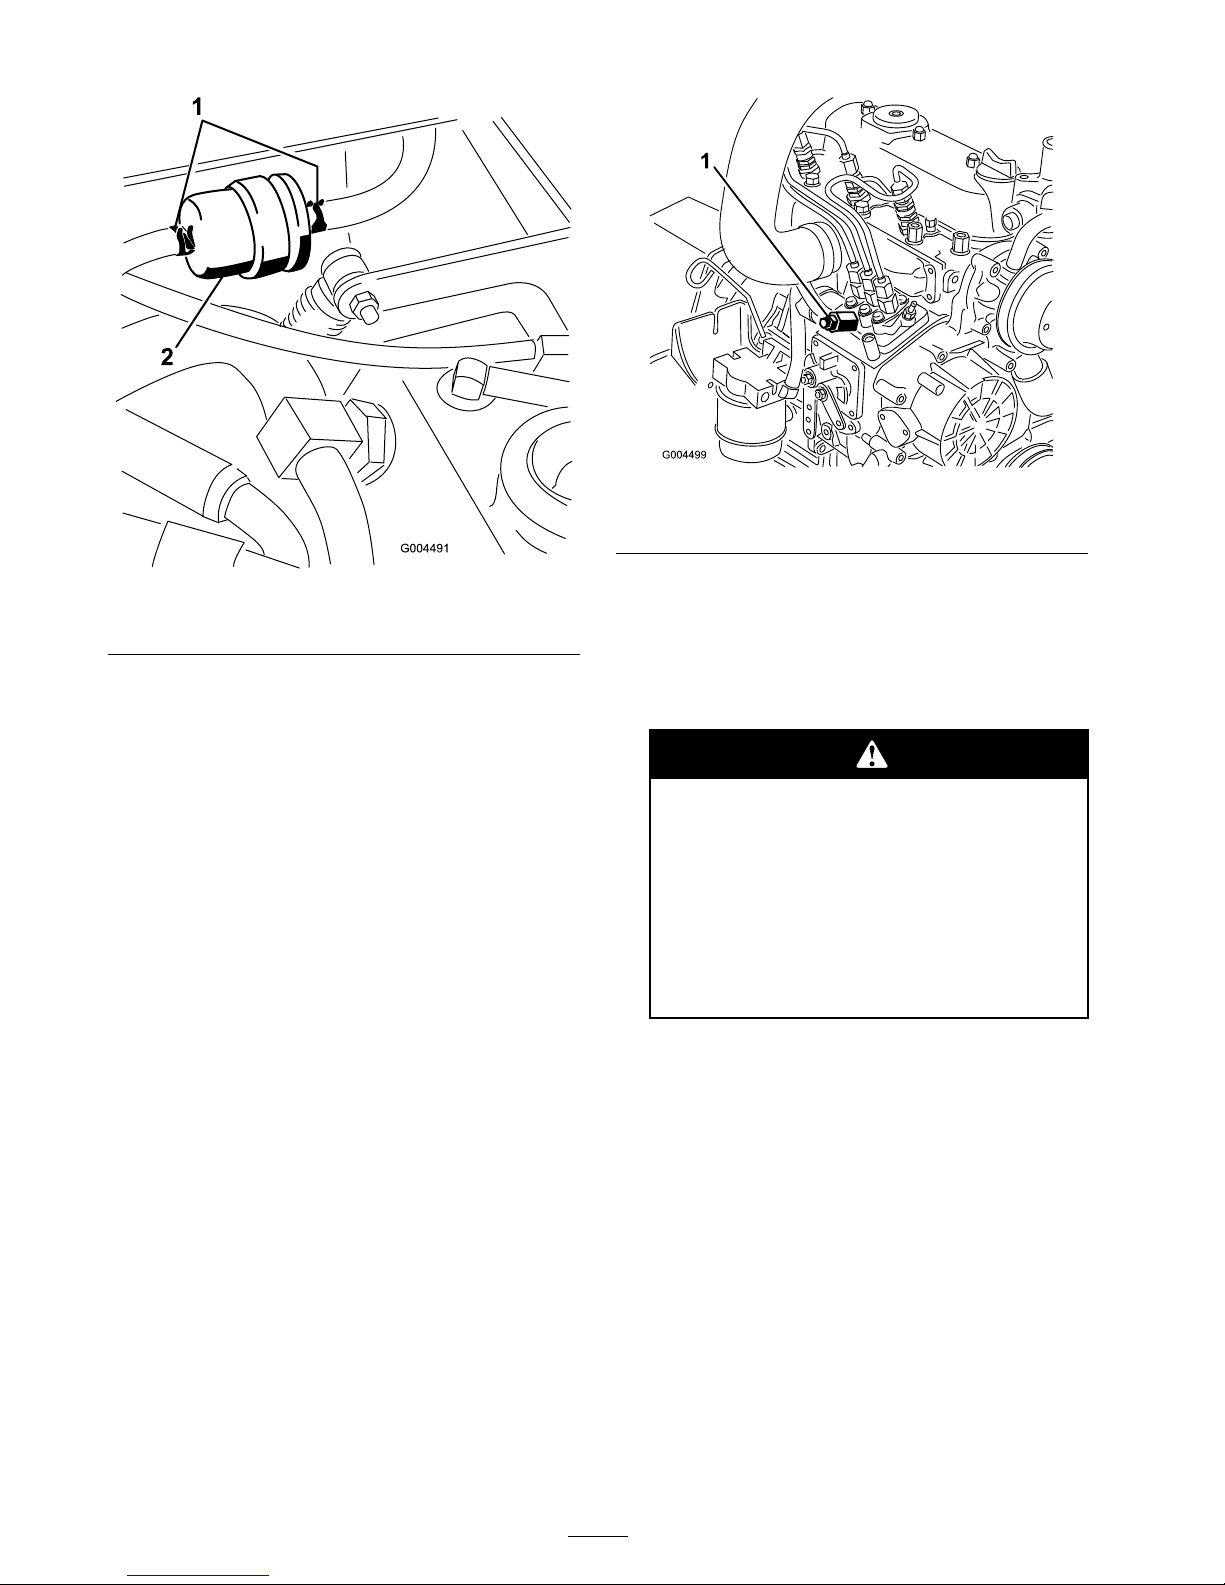
Figure 46
1. Hose clamps 2. Fuel pre lter
2. Loosen the hose clamps at both ends of the
filter and pull the fuel lines off of the filter .
3. Slide the hose clamps onto ends of the fuel
lines .
4. Push fuel lines onto the pre-filter and secure
them with hose clamps .
Important: Ensur e that the ar r o w on the
side of the filter points to w ard the injection
pump .
Fuel Lines and Connections
Chec k the fuel lines and connections ev er y 400
hours or yearly , whic hev er comes first. Inspect
them for deterioration, damag e , c haffing, or loose
connections .
Bleeding the Fuel System
1. P ark the mac hine on a lev el surface . Ensure
that the fuel tank is at least half full.
2. Unlatc h and raise the hood.
3. Place a rag under the air bleed screw on the
fuel injection pump and open it ( Figure 47 ).
Figure 47
1. Fuel injection pump bleed screw
4. T ur n the k ey in the ignition switc h to the On
position.
T he electric fuel pump will begin operation,
thereb y forcing air out around the air bleed
screw .
T he engine may star t during this
pr ocedur e. Mo ving f ans and belts in a
r unning engine can sev er el y injur e y ou
or bystander s.
K eep hands, finger s, loose
clothing/jew elr y , and hair a w ay
fr om the engine f an and belt during this
pr ocedur e.
5. Lea v e the k ey in the On position until a solid
stream of fuel flo ws out around the screw .
6. Tighten the screw and tur n k ey to the Off
position.
Note: Nor mally , the engine should star t
after abo v e bleeding procedures are follo w ed.
Ho w ev er , if engine does not star t, air ma y be
trapped betw een injection pump and injectors;
refer to Bleeding Air F rom the Injectors .
50
Page 51
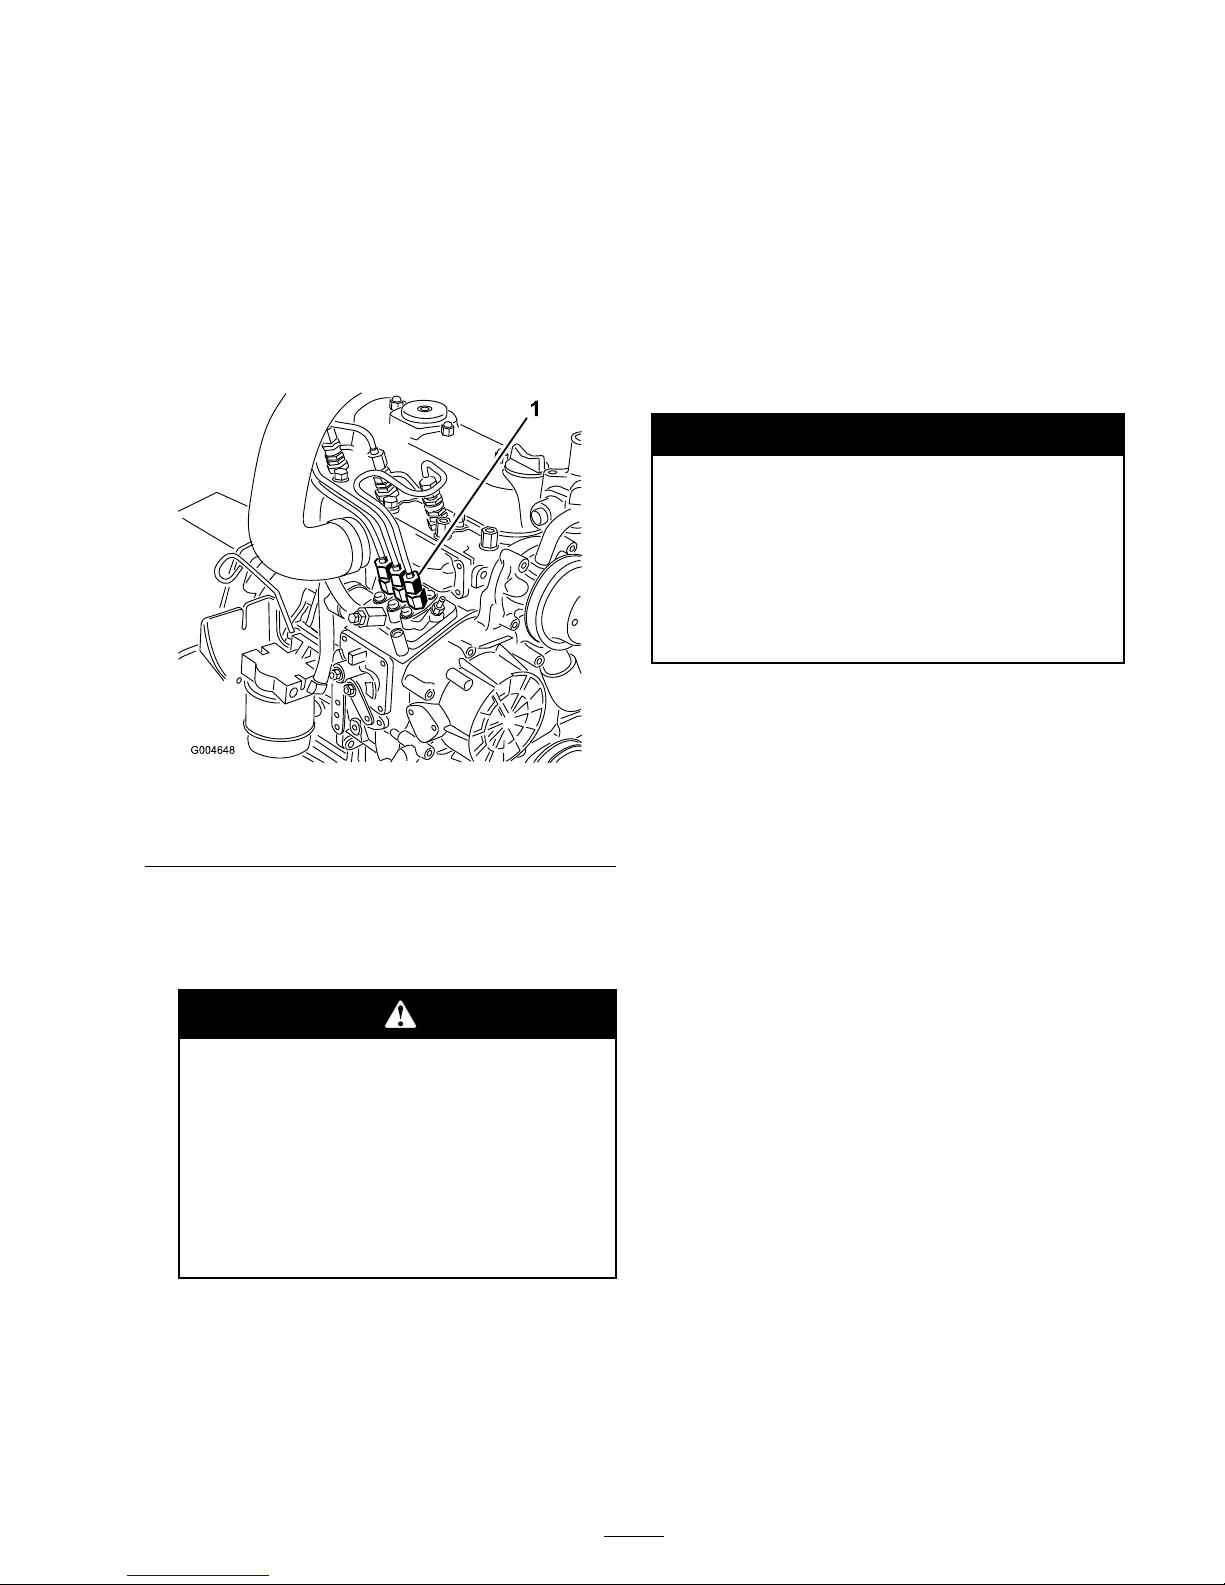
Bleeding Air From the
Injectors
Note: T his procedure should be used only if the
fuel system has been purg ed of air through nor mal
priming procedures and engine will not star t; refer
to Bleeding the Fuel System.
1. Place a rag under the pipe connection coming
from the injection pump to the No . 1 injector
nozzle as illustrated in Figure 48 .
Figure 48
1. Pipe connection from the injection pump to the No. 1
injector nozzle
2. Mo v e the throttle to the F ast position.
3. T ur n the ignition k ey the Star t position and
w atc h the fuel flo w around the connector .
T he engine may star t during this
pr ocedur e. Mo ving f ans and belts in a
r unning engine can sev er el y injur e y ou
or bystander s.
K eep hands, finger s, loose
clothing/jew elr y , and hair a w ay
fr om the engine f an and belt during this
pr ocedur e.
4. Tighten the pipe connector securely when it
attains a solid flo w .
5. T ur n the k ey to the Off position.
6. R e peat this procedure for the remaining
nozzles .
Electrical System
Maintenance
Important: W henev er w or king with
the electrical system, al w ays disconnect
the batter y ca bles, negati v e (-) ca ble fir st,
to pr ev ent possible wiring dama ge fr om
shor t-outs.
Servicing the Battery
Warning
CALIFORNIA
Pr oposition 65 W ar ning
Batter y posts, ter minals, and r elated
accessories contain lead and lead
compounds, chemicals kno wn to the State of
Calif or nia to cause cancer and r epr oducti v e
har m. W ash hands after handling .
K ee p the top of the batter y clean. If y ou store
the mac hine in a location where temperatures are
extremely high, the batter y will r un do wn more
rapidly than if the mac hine is stored in a location
where temperatures are cool.
K ee p the top of the batter y clean b y w ashing it
periodically with a br ush dipped in ammonia or
bicarbonate of soda solution. Flush the top surface
with w ater after cleaning it. Do not remo v e the fill
caps while cleaning the batter y .
T he batter y cables m ust be tight on the ter minals
to pro vide g ood electrical contact.
If cor rosion occurs at the ter minals , disconnect
the cables , neg ati v e (-) cable first, and scrape
the clamps and ter minals se parately . R econnect
the cables , positi v e (+) cable first, and coat the
ter minals with petroleum jelly .
51
Page 52
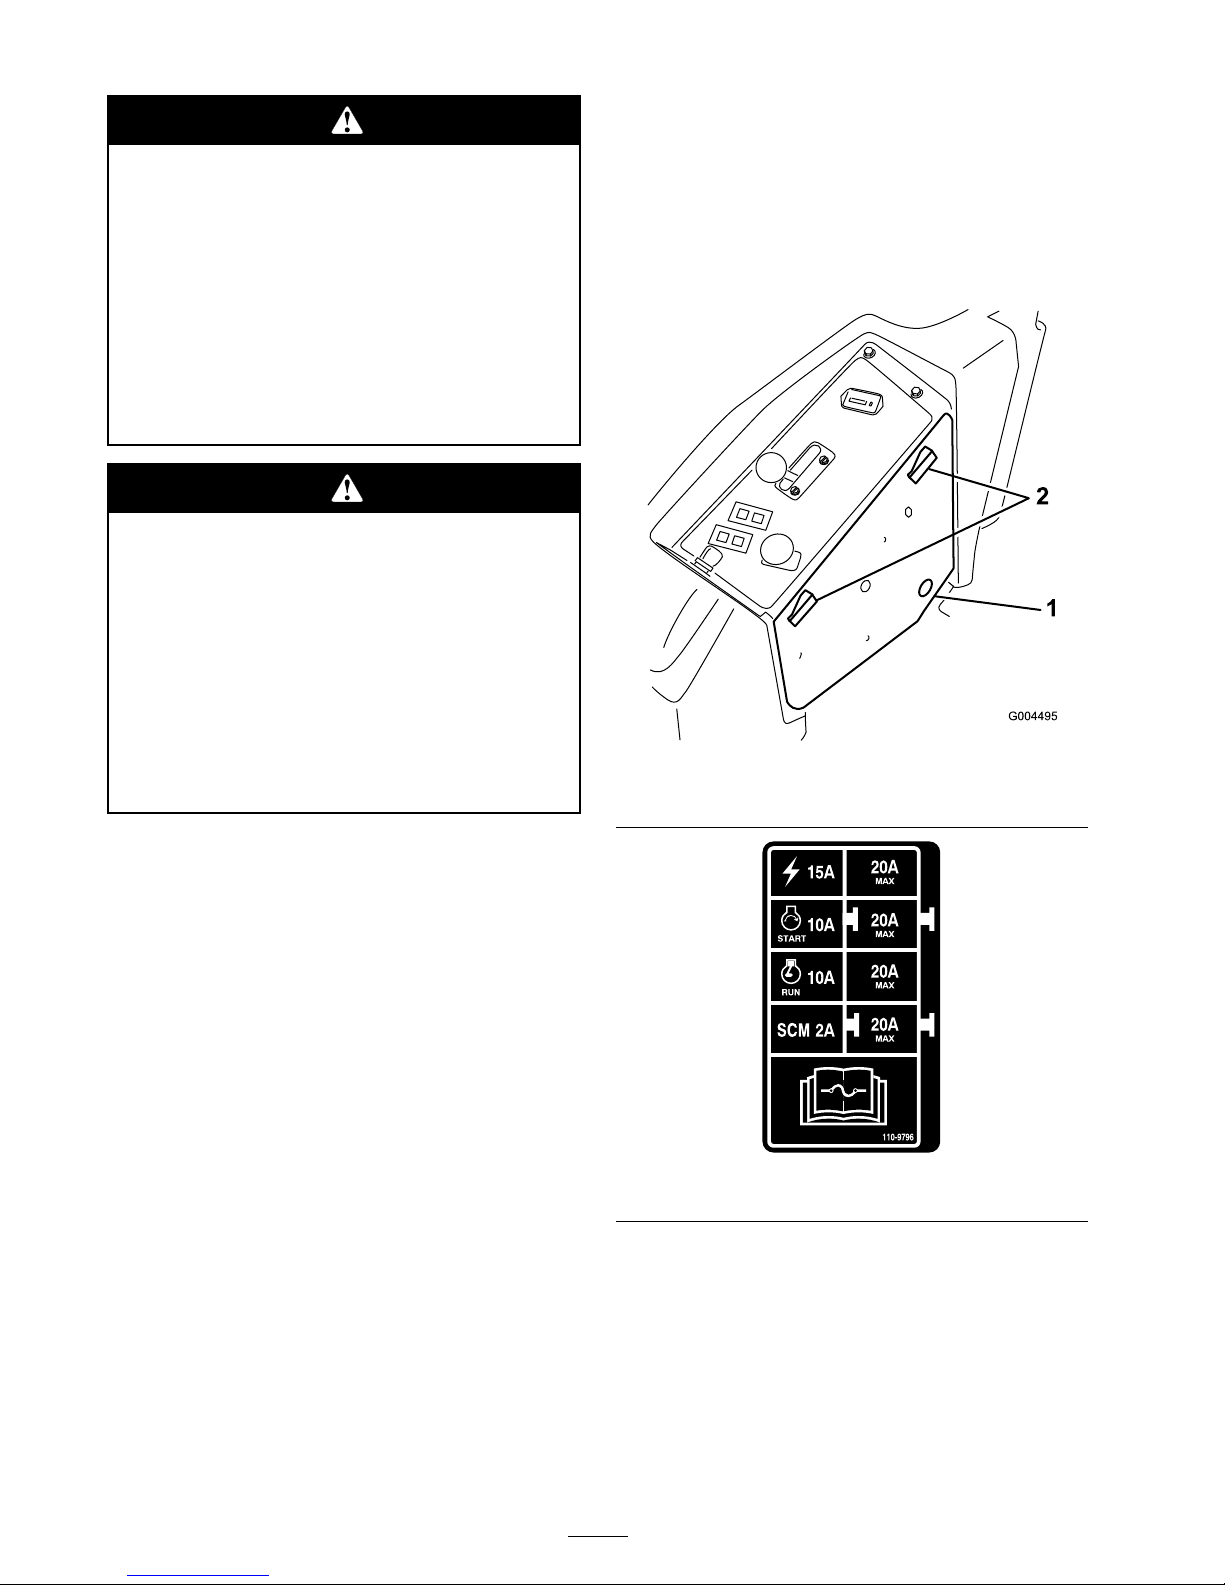
Batter y ter minals or metal tools could shor t
a gainst metal machine components causing
spar ks. Spar ks can cause the batter y gasses
to explode, r esulting in per sonal injur y .
• W hen r emo ving or installing the batter y ,
do not allo w the batter y ter minals to
touch an y metal par ts of the machine.
• Do not allo w metal tools to shor t betw een
the batter y ter minals and metal par ts of
the machine.
Incor r ect batter y ca ble r outing could
dama ge the machine and ca bles causing
spar ks. Spar ks can cause the batter y gasses
to explode, r esulting in per sonal injur y .
• Al w ays disconnect the negati v e (black)
batter y ca ble bef or e disconnecting the
positi v e (r ed) ca ble.
• Al w ays connect the positi v e (r ed) batter y
ca ble bef or e connecting the negati v e
(black) ca ble.
Storing the Battery
If the mac hine will be stored more than 30 da ys ,
remo v e the batter y and c harg e it fully . Either
store it on a shelf or on the mac hine . Lea v e the
cables disconnected if it is stored on the mac hine .
Store the batter y in a cool atmosphere to a v oid
quic k deterioration of the c harg e in the batter y .
T o prev ent the batter y from freezing, mak e sure
it is fully c harg ed. T he specific g ra vity of a fully
c harg ed batter y is 1.265-1.299.
Checking the Fuses
T he fuses are located under the control panel.
Access them through the side panel co v er
( Figure 49 ). T o open the side panel co v er , release
the 2 latc hes and pull out on it.
If the mac hine stops or has other electrical system
issues , c hec k the fuses . Grasp eac h fuse in tur n
and remo v e them one at a time , c hec king to see
if any are blo wn. If y ou need to re place a fuse ,
alw a ys use the same type and ampera ge rated
fuse as the one y ou are re placing, otherwise y ou
could dama ge the electrical system (refer to the
decal next to the fuses ( Figure 50 ) for a diag ram
of eac h fuse and its amperag e).
Note: If a fuse blo ws frequently , y ou probably
ha v e a shor t in the electrical system and should
ha v e it ser viced b y a qualified ser vice tec hnician.
Figure 49
1. Side panel cover 2. Latches
Figure 50
Drive System
Maintenance
Checking the Tire Pressure
Chec k the pressure after ev er y 50 operating hours
or monthly , whic hev er occurs first ( Figure 51 ).
52
Page 53
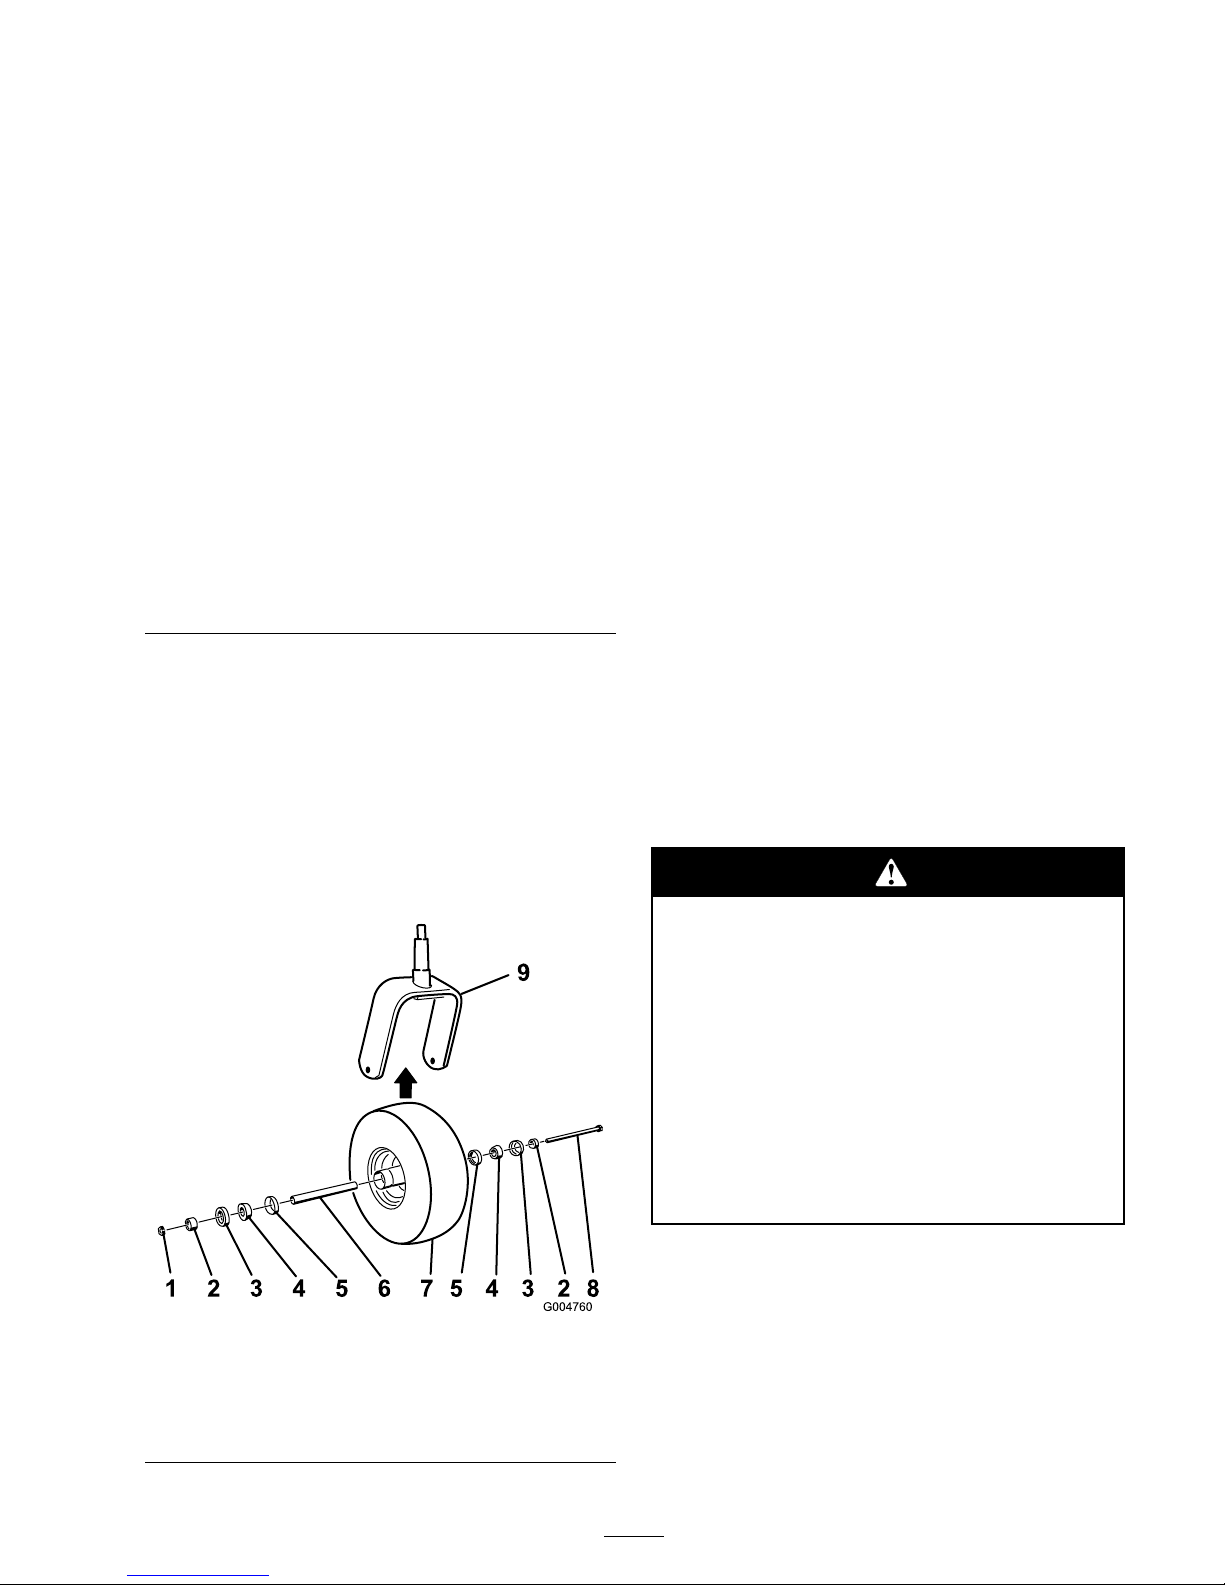
Maintain the air pressure in the front and rear
tires . T he cor rect air pressure is 15 psi (103 kP a)
in the rear tires and 25 psi (172 kP a) in the caster
wheels . Unev en tire pressure can cause unev en
cut. Chec k the tires when they are cold to g et the
most accurate pressure reading .
Figure 51
Replacing the Castor Wheels
and Bearings
1. Obtain a new caster wheel assembly , cone
bearings , and bearing seals for y our A uthorized
T oro Distributor .
2. R emo v e the loc kn ut from the bolt holding the
castor wheel assembly betw een the castor fork
( Figure 52 ).
Figure 52
1. Nut
6. Spacer
2. Bearing spacer
7. Caster wheel
3. Outer bearing seal 8. Axle bolt
4. Cone bearing 9. Caster fork
5. Inner bearing seal
3. Grasp the castor wheel and slide the bolt out
of the fork or pi v ot ar m.
4. Discard the old caster wheel and bearings .
5. Assemble the castor wheel b y pushing the cone
bearings and seals , pac k ed with g rease , into the
wheel hub , positioned as sho wn in Figure 52 .
6. Slide the spacer into the wheel hub through
the bearings , capti v ating the spacer inside the
wheel hub with 2 bearing spacers .
Important: Ensur e that the seal lips ar e
not f olded in.
7. Install the castor wheel assembly betw een the
castor fork and secure it in place with the bolt
and loc kn ut.
8. Tighten the n ut until the wheel no long er spins
freely , then bac k it off just until the wheel spins
freely .
9. Attac h a g rease gun to the g rease fitting on
the caster wheel and fill it with No . 2 General
Pur pose Lithium Base Grease .
Cooling System
Maintenance
Discharge of hot pr essuriz ed coolant or
touching hot radiator and sur r ounding par ts
can cause sev er e bur ns.
• Do not r emo v e the radiator cap when
the engine is hot. Al w ays allo w the
engine to cool at least 15 min utes or
until the radiator cap is cool enough to
touch without bur ning y our hand bef or e
r emo ving the radiator cap .
• Do not touch radiator and sur r ounding
par ts that ar e hot.
53
Page 54
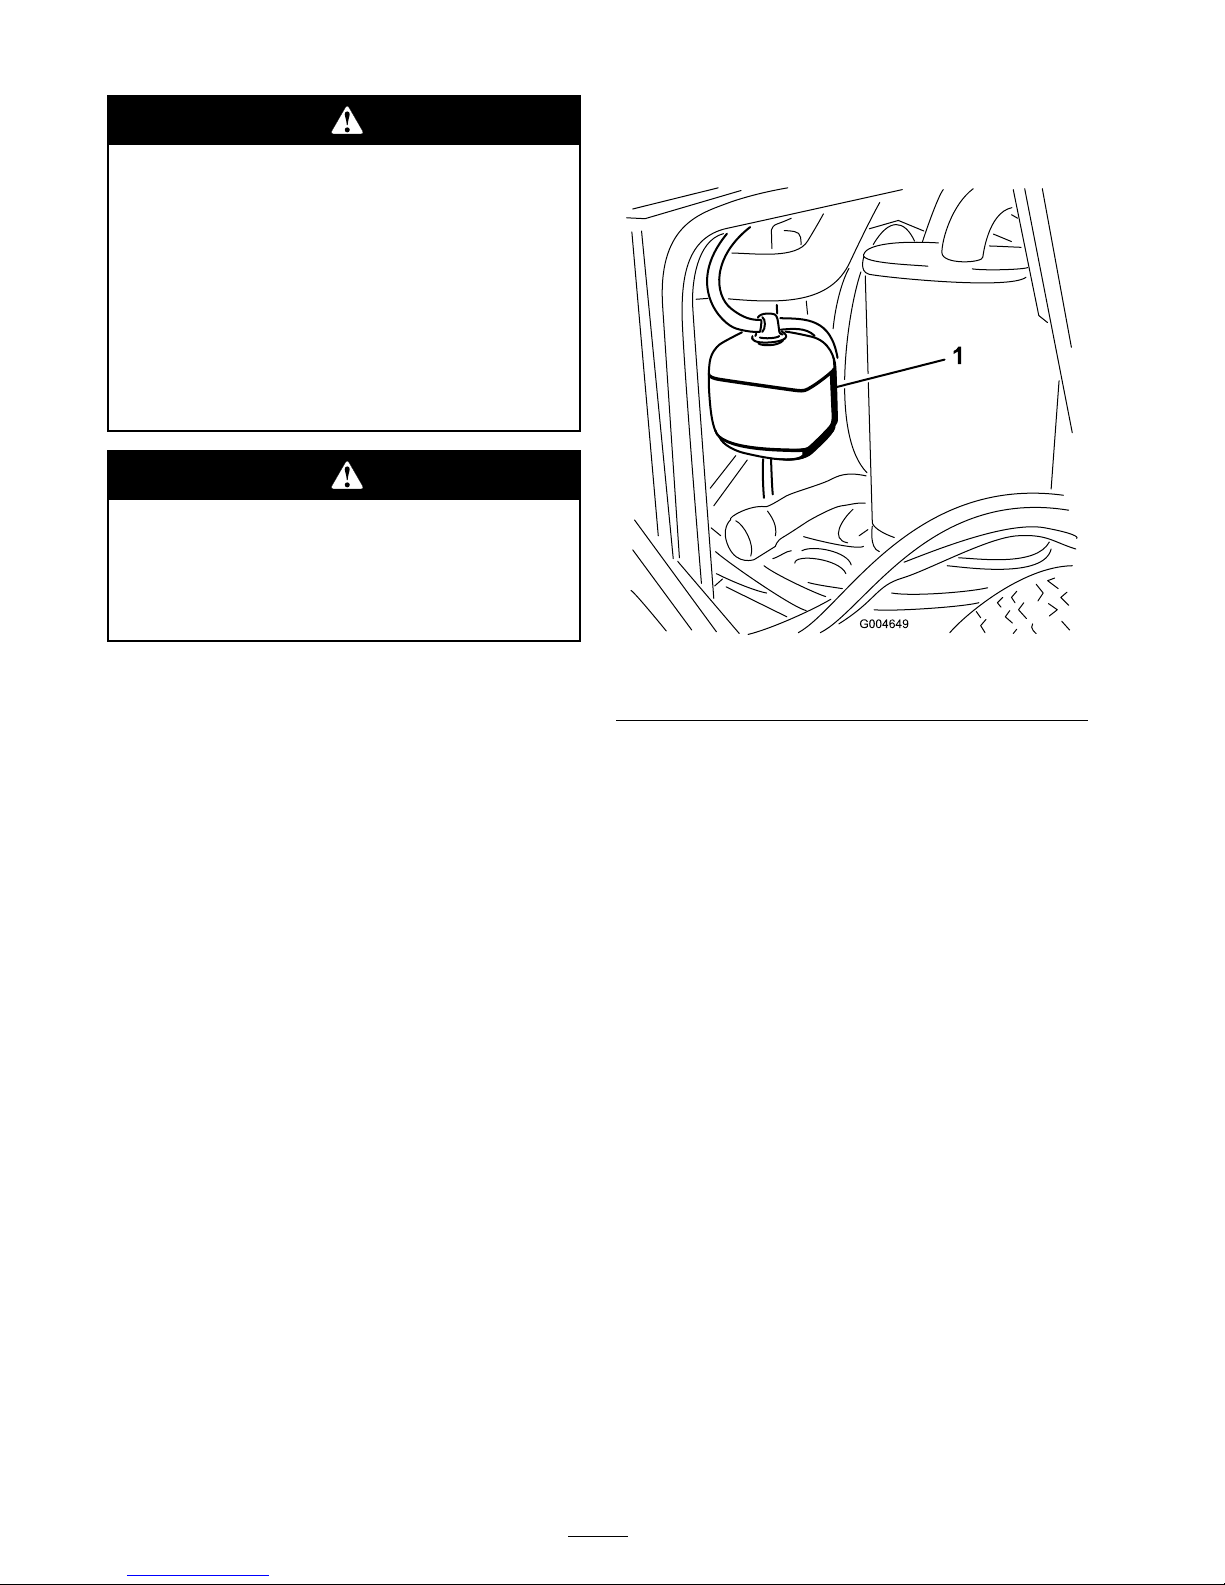
T he r otating f an and dri v e belt can cause
per sonal injur y .
• Do not operate the machine without the
co v er s in place.
• K eep finger s, hands and clothing clear of
r otating f an and dri v e belt.
• Shut of f the engine and r emo v e
the ignition k ey bef or e perf or ming
maintenance.
Sw allo wing engine coolant can cause
poisoning .
• Do not s w allo w engine coolant.
• K eep out of r each fr om childr en and pets.
Checking the Cooling System
T he cooling system is filled with a 50/50 solution
of w ater and per manent eth ylene glycol anti freeze .
Chec k the lev el of the coolant in the expansion
tank at the beginning of eac h da y before star ting
the engine . T he capacity of the cooling system is 6
quar ts (7.5 l).
1. Chec k the lev el of the coolant in the expansion
tank ( Figure 53 ). T he coolant lev el should be
betw een the marks on the side of the tank.
Figure 53
1. Expansion tank
2. If coolant lev el is lo w , remo v e the expansion
tank cap and re plenish the system. Do not
o v erfill .
3. Install the expansion tank cap .
Cleaning the Radiator
T o prev ent the engine from o v erheating, the
radiator m ust be k e pt clean. Nor mally , c hec k the
radiator daily and, if necessar y , clean any debris off
these par ts . Ho w ev er , it will be necessar y to c hec k
and clean the radiator frequently in extremely
dusty and dir ty conditions .
Note: If the mo w er dec k or engine shuts off
due to o v erheating, first c hec k the radiator for
ex cessi v e buildup of debris .
Clean the radiator as follo ws:
1. Open the hood.
2. W orking from the fan side of the radiator ,
blo w out debris with lo w pressure (50 psi)
compressed air (do not use w ater) . R e peat
the ste p from the front of the radiator and
ag ain from the fan side .
54
Page 55
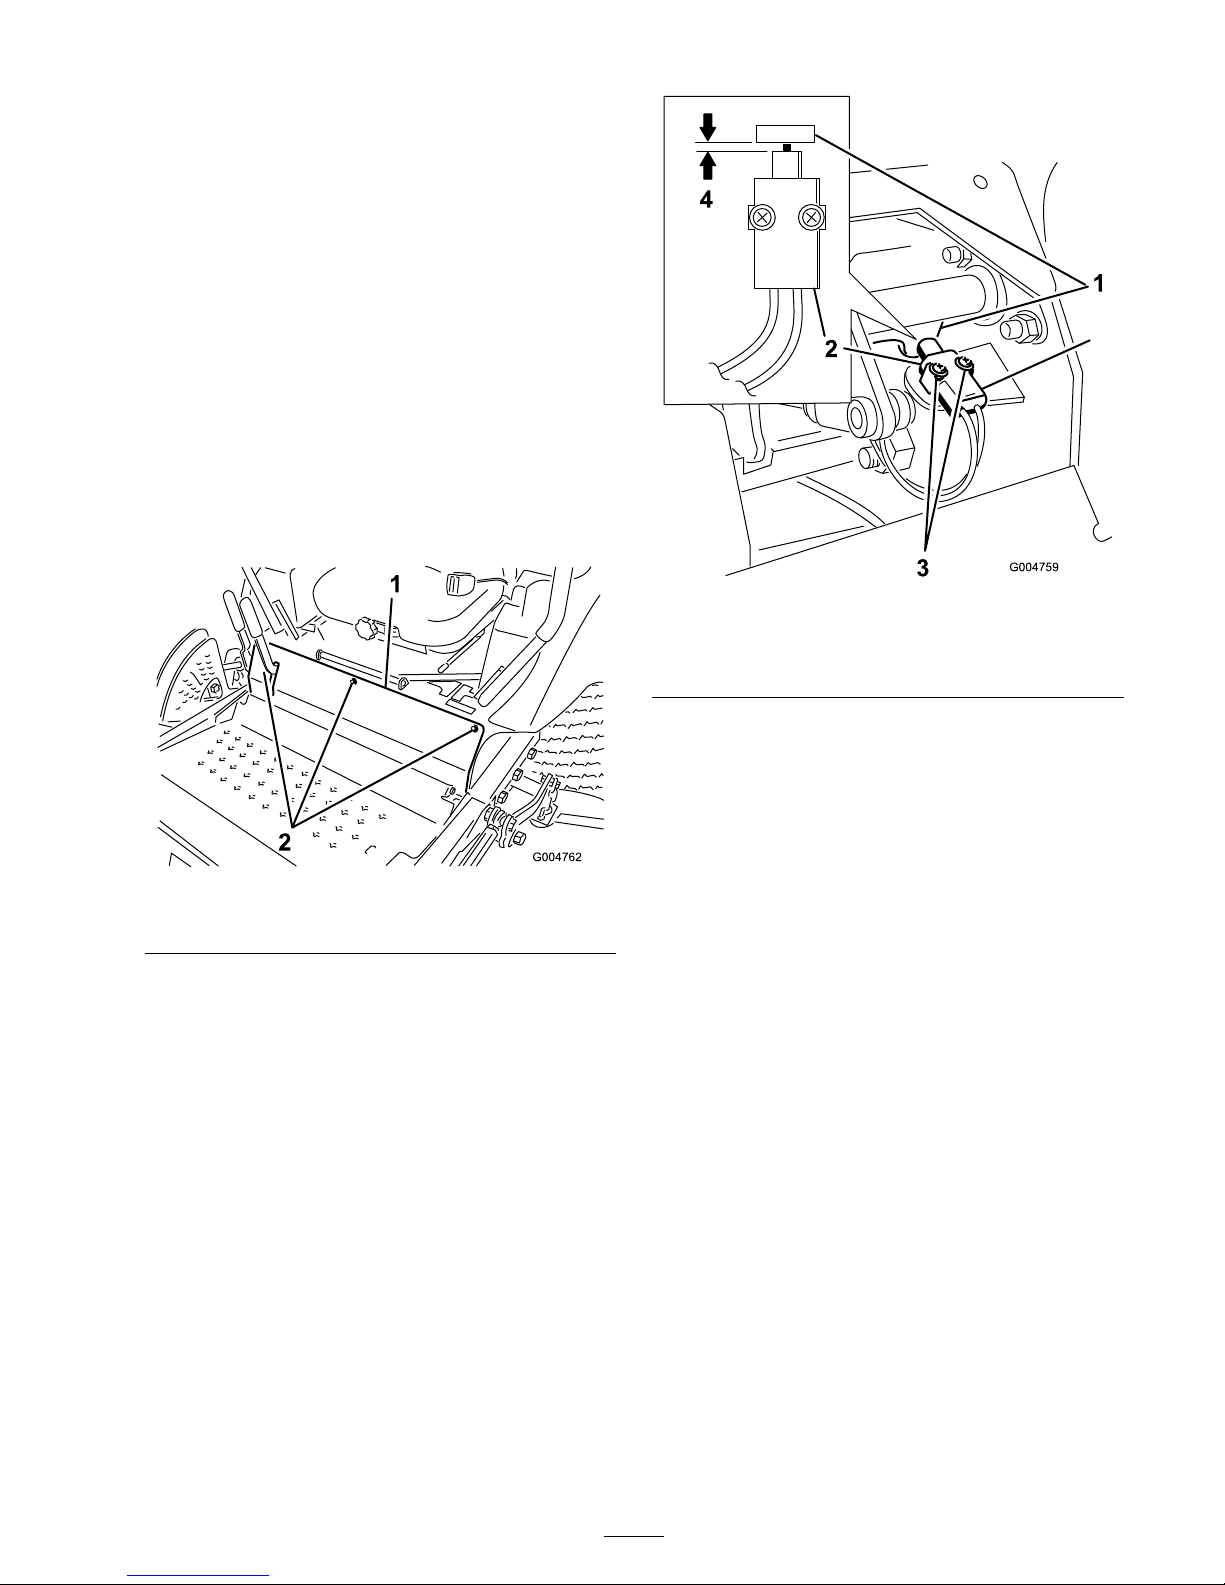
3. After the radiator is thoroughly cleaned, clean
out debris that ma y ha v e collected in the
c hannel at the radiator base .
4. Close the hood.
Brake Maintenance
Adjusting the Parking Brake
Interlock Switch
1. Stop the mac hine , mo v e the control lev ers
fully into the neutral-loc k ed position, set the
parking brak e , and remo v e the ignition k ey .
2. R emo v e the bolts securing the front panel and
remo v e the panel ( Figure 54 ).
Figure 54
1. Front panel bolts
3. Loosen the 2 screws securing the interloc k
switc h.
Figure 55
1. Tab on the brake shaft
3. Screws
2. Parking brake interlock
switch
4. 0.015 to 0.045 inch (0.4 to
1 mm)
4. Mo v e the switc h to w ard the tab on the brak e
shaft until the distance betw een the tab and
switc h body is 0.015 to 0.045 inc h (0.4 to
1 mm) ( Figure 55 ).
5. Secure the switc h.
6. T est the adjustment as follo ws:
A. Ensure that the parking brak e is eng ag ed
and y ou are not sitting on the seat, then
star t the engine .
B . Mo v e the control lev ers out of the neutral
loc k ed position.
T he engine should stop . If not, rec hec k the
adjustment y ou made to the switc h.
7. Install the front panel.
Belt Maintenance
Checking the Alternator
Belt
Chec k tension of alter nator belt ( Figure 56 ) after
ev er y 200 operating hours .
1. Apply 10 lb of force to the alter nator belt,
midw a y betw een the pulleys .
2. If the deflection is not 3/8 in. (10 mm), loosen
the alter nator mounting bolts .
55
Page 56
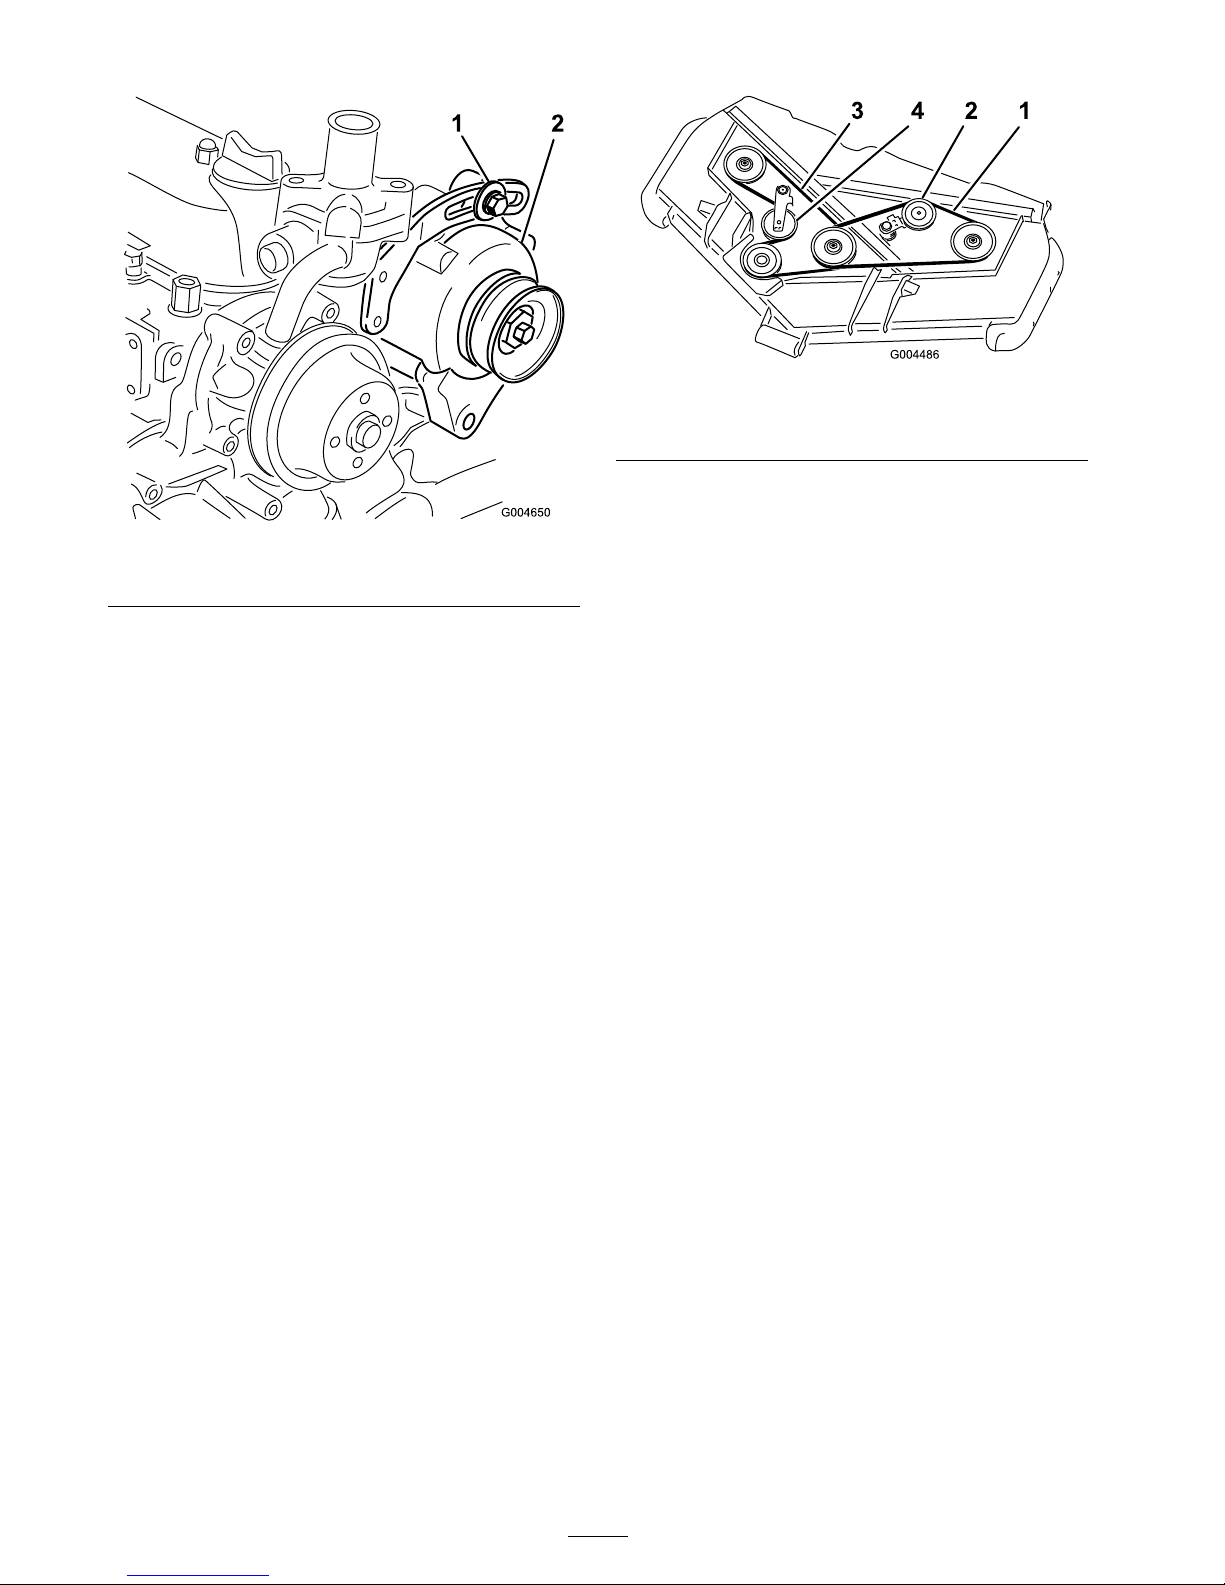
Figure 56
1. Mounting bolt 2. Alternator
3. Increase or decrease the alter nator belt tension
and tighten the bolts .
4. Chec k the deflection of the belt ag ain to ensure
that the tension is cor rect.
Replacing the Blade Drive
Belts
T he blade dri v e belts , tensioned b y the spring
loaded idler pulleys , are v er y durable . Ho w ev er ,
after many hours of use , the belts will sho w signs
of w ear . Signs of a w or n belt are: squealing when
belt is rotating, blades slipping when cutting g rass ,
fra yed edg es , bur n marks and crac ks . R e place the
belts if any of these conditions are evident.
1. Lo w er the cutting unit to the 1 inc h height of
cut setting, mo v e the throttle lev er to the Slo w
position, stop the engine , set the parking brak e ,
and remo v e the ignition k ey .
2. R emo v e the belt co v ers from the top of the
cutting unit and set the co v ers aside .
3. Using a break er bar or similar tool, mo v e the
idler pulley for the top belt ( Figure 57 ) a w a y
from the top dri v e belt to release the belt
tension and allo w the belt to be slipped off the
pulleys .
Figure 57
1. Top belt 3. Bottom belt
2. Top idler pulley 4. Bottom idler pulley
4. Using a break er bar or similar tool, mo v e the
idler pulley for the bottom belt ( Figure 57 )
a w a y from the bottom dri v e belt to release the
belt tension and allo w the belt to be slipped
off the pulleys .
5. R oute a new belt around the g earbo x pulley ,
bottom spindle pulleys , and idler pulley
assembly as sho wn in Figure 57 .
6. R oute a new belt around the top spindle
pulleys and idler pulley assembly as sho wn in
Figure 57 .
7. Install the belt co v ers .
Controls System
Maintenance
Adjusting the Control Lever
Neutral Interlock Switch
1. Stop the mac hine , mo v e the control lev ers
fully into the neutral-loc k ed position, set the
parking brak e , and remo v e the ignition k ey .
2. R emo v e the bolts securing the front panel and
remo v e the panel ( Figure 58 ).
56
Page 57
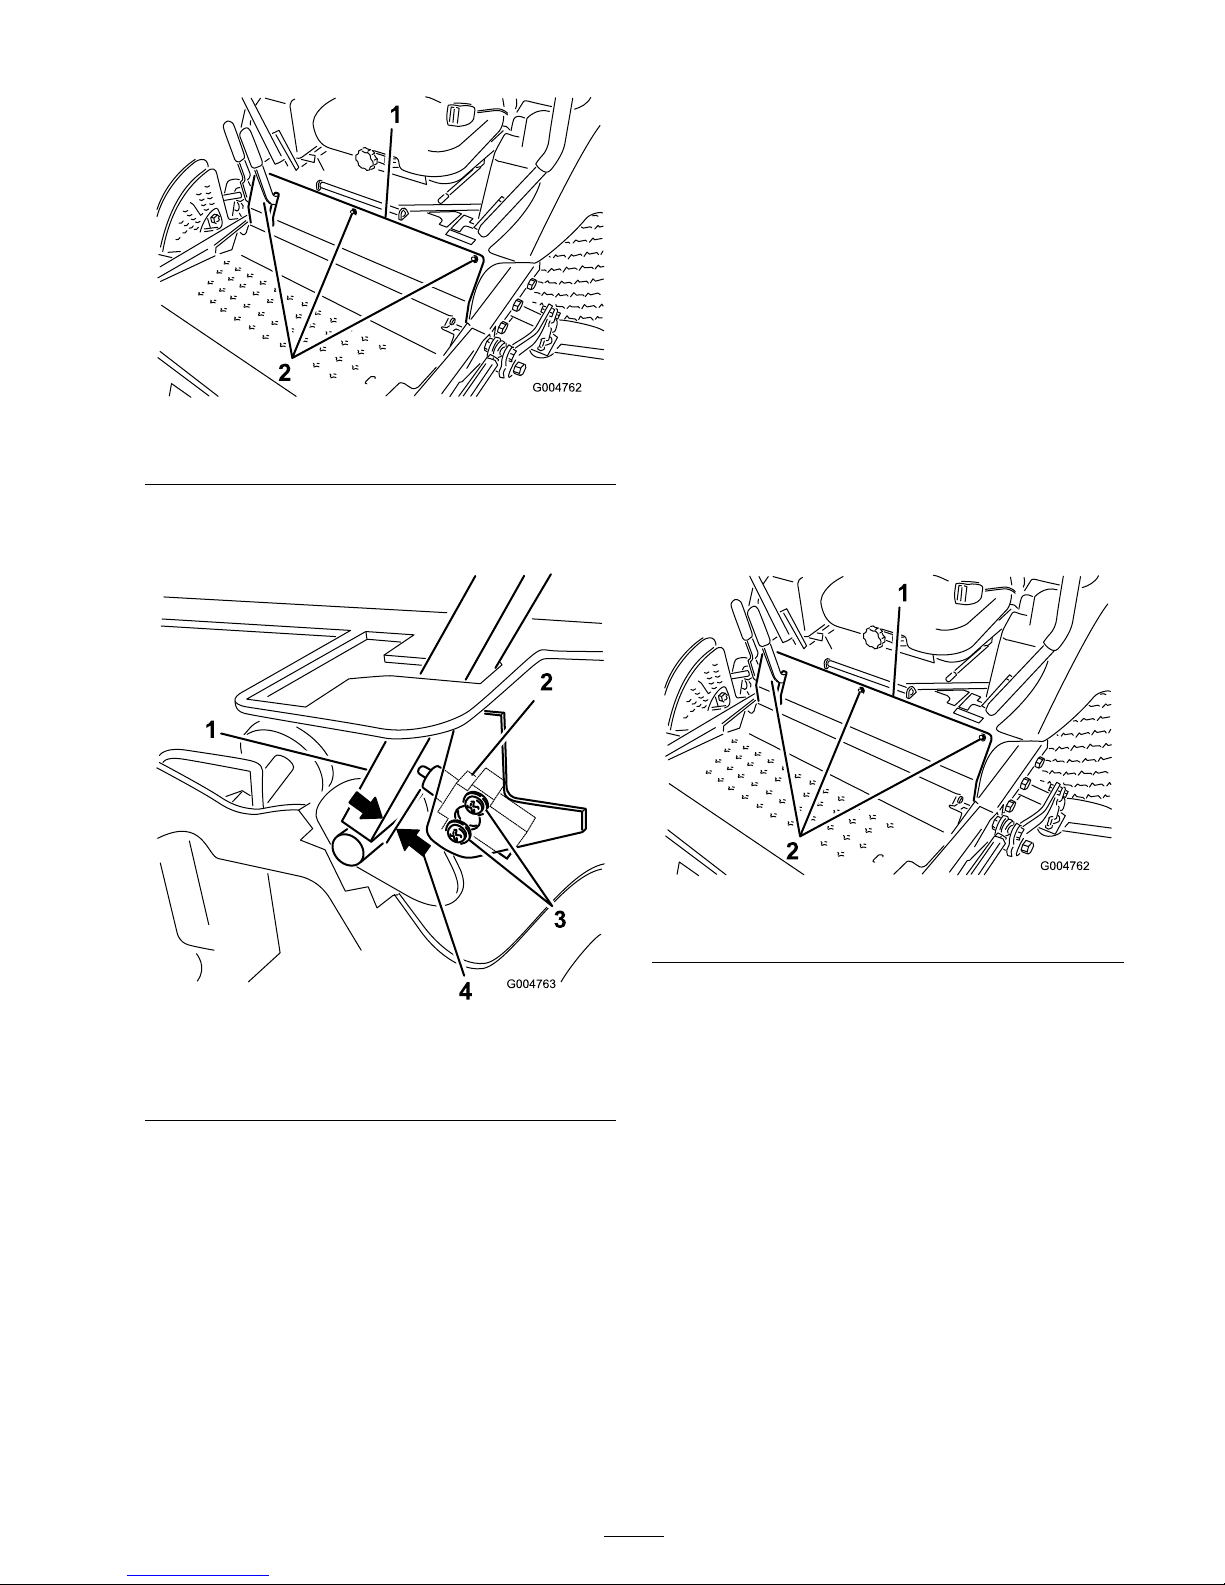
Figure 58
1. Front panel bolts
3. Loosen the 2 screws securing the interloc k
switc h ( Figure 59 ).
Figure 59
1. Control lever
3. Screws
2. Neutral interlock switch
4. 0.015 to 0.045 inch (0.4 to
1 mm)
4. Holding the control lev er ag ainst the frame ,
mo v e the switc h to w ard the lev er until the
distance betw een lev er and switc h body is
0.015 to 0.045 inc h (0.4 to 1 mm) ( Figure 59 ).
5. Secure the switc h.
6. R e peat ste ps 3 to 5 for the other lev er .
7. Install the front panel.
Adjusting the Control Lever
Neutral Return
If the motion control lev ers do not align with the
neutral slots when released from the rev erse dri v e
position, adjustment is required. Adjust eac h lev er ,
spring, and rod se parately .
1. Diseng ag e the PTO , mo v e the motion control
lev ers to the neutral loc k ed position and set
the parking brak e .
2. Mo v e the throttle lev er to the Slo w position,
stop the engine , remo v e the k ey , and w ait for
all mo ving par ts to stop before lea ving the
operating position.
3. R emo v e the bolts securing the front panel and
remo v e the panel ( Figure 60 ).
Figure 60
1. Front panel bolts
4. Mo v e one of the lev ers to the neutral position
but not lock ed ( Figure 62 ).
5. Pull the lev er bac k until the clevis pin (on an
ar m abo v e the pi v ot shaft) contacts the end
of the slot (just beginning to put pressure on
the spring) ( Figure 61 ).
57
Page 58
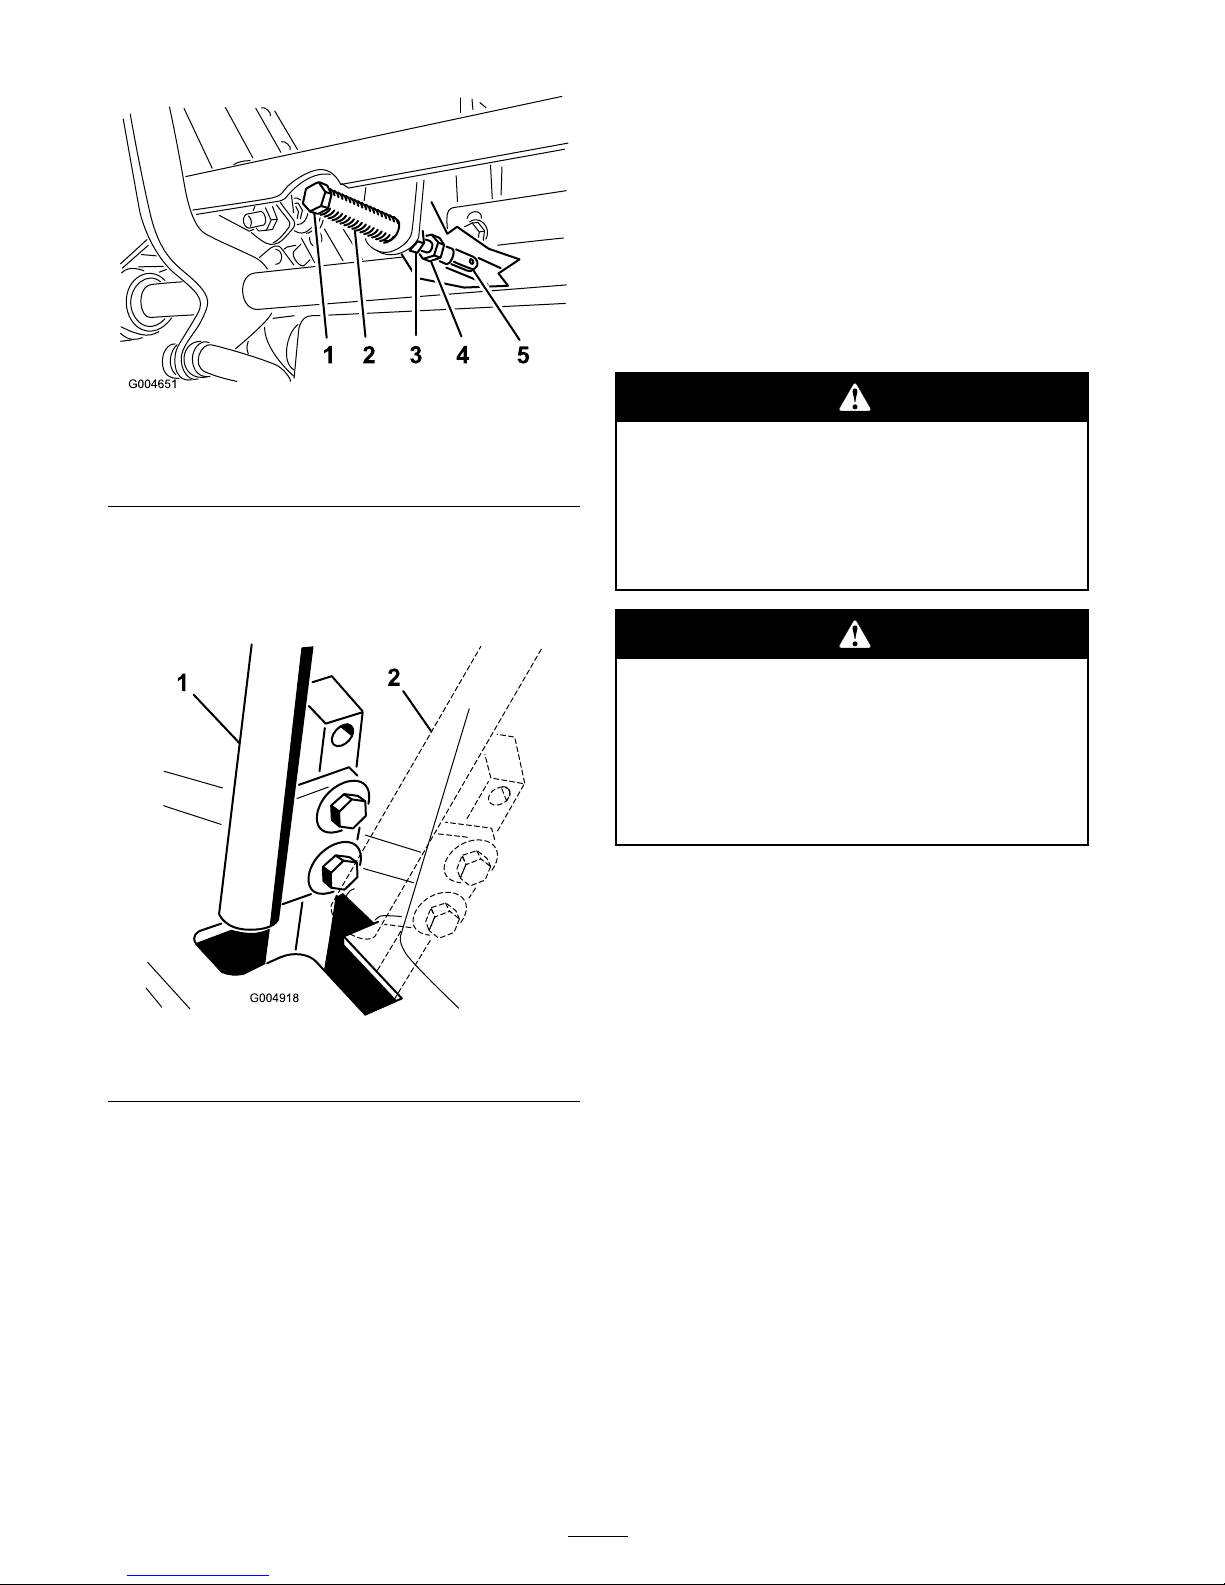
Figure 61
1. Clevis pin 4. Adjustment bolt
2. Slot 5. Yoke
3. Jam nuts
6. Chec k where the control lev er is relati v e to
notc h in console ( Figure 62 ). It should be
centered allo wing lev er to pi v ot outw ard to the
neutral loc k position.
Figure 62
1. Neutral position 2. Neutral locked position
7. If adjustment is needed, loosen the n ut and
jam n ut ag ainst the y ok e ( Figure 61 ).
8. Applying slight rearw ard pressure on the
motion control lev er , tur n the head of the
adjustment bolt in the appropriate direction
until the control lev er is centered in the neutral
loc k position ( Figure 61 ).
Note: K ee ping rearw ard pressure on the
lev er will k ee p the pin at the end of the slot and
allo w the adjustment bolt to mo v e the lev er to
the appropriate position.
9. Tighten the n ut and jam n ut ( Figure 61 ).
10. R e peat ste ps 4 through 9 for the other control
lev er .
11. Install the front panel.
Adjusting the Traction Drive
for Neutral
T his adjustment m ust be made with dri v e wheels
tur ning .
Mechanical or h y draulic jacks may f ail to
suppor t machine and cause a serious injur y .
• Use jack stands when suppor ting
machine.
• Do not use h y draulic jacks.
T he engine must be r unning to perf or m this
adjustment. Contact with mo ving par ts or
hot surf aces may cause per sonal injur y .
K eep hands, feet, f ace, clothing , and other
body par ts a w ay fr om r otating par ts, muf fler ,
and other hot surf aces.
1. Raise the frame onto stable jac k stands so that
the dri v e wheels can rotate freely .
2. Slide seat forw ard, unlatc h it, and swing it up
and forw ard.
3. Disconnect the electrical connector from the
seat safety switc h. T emporarily install a jumper
wire across ter minals in the wiring har ness
connector .
4. Star t the engine , ensure that the throttle lev er is
midw a y betw een the F ast and Slo w positions ,
and release the parking brak e
Note: T he motion control lev ers m ust be in
the neutral loc k ed position while making any
adjustments .
5. Adjust the pump rod length on one side b y
rotating the hex shaft, in the appropriate
direction, until the cor responding wheel is still
or slightly cree ping in rev erse ( Figure 63 ).
58
Page 59
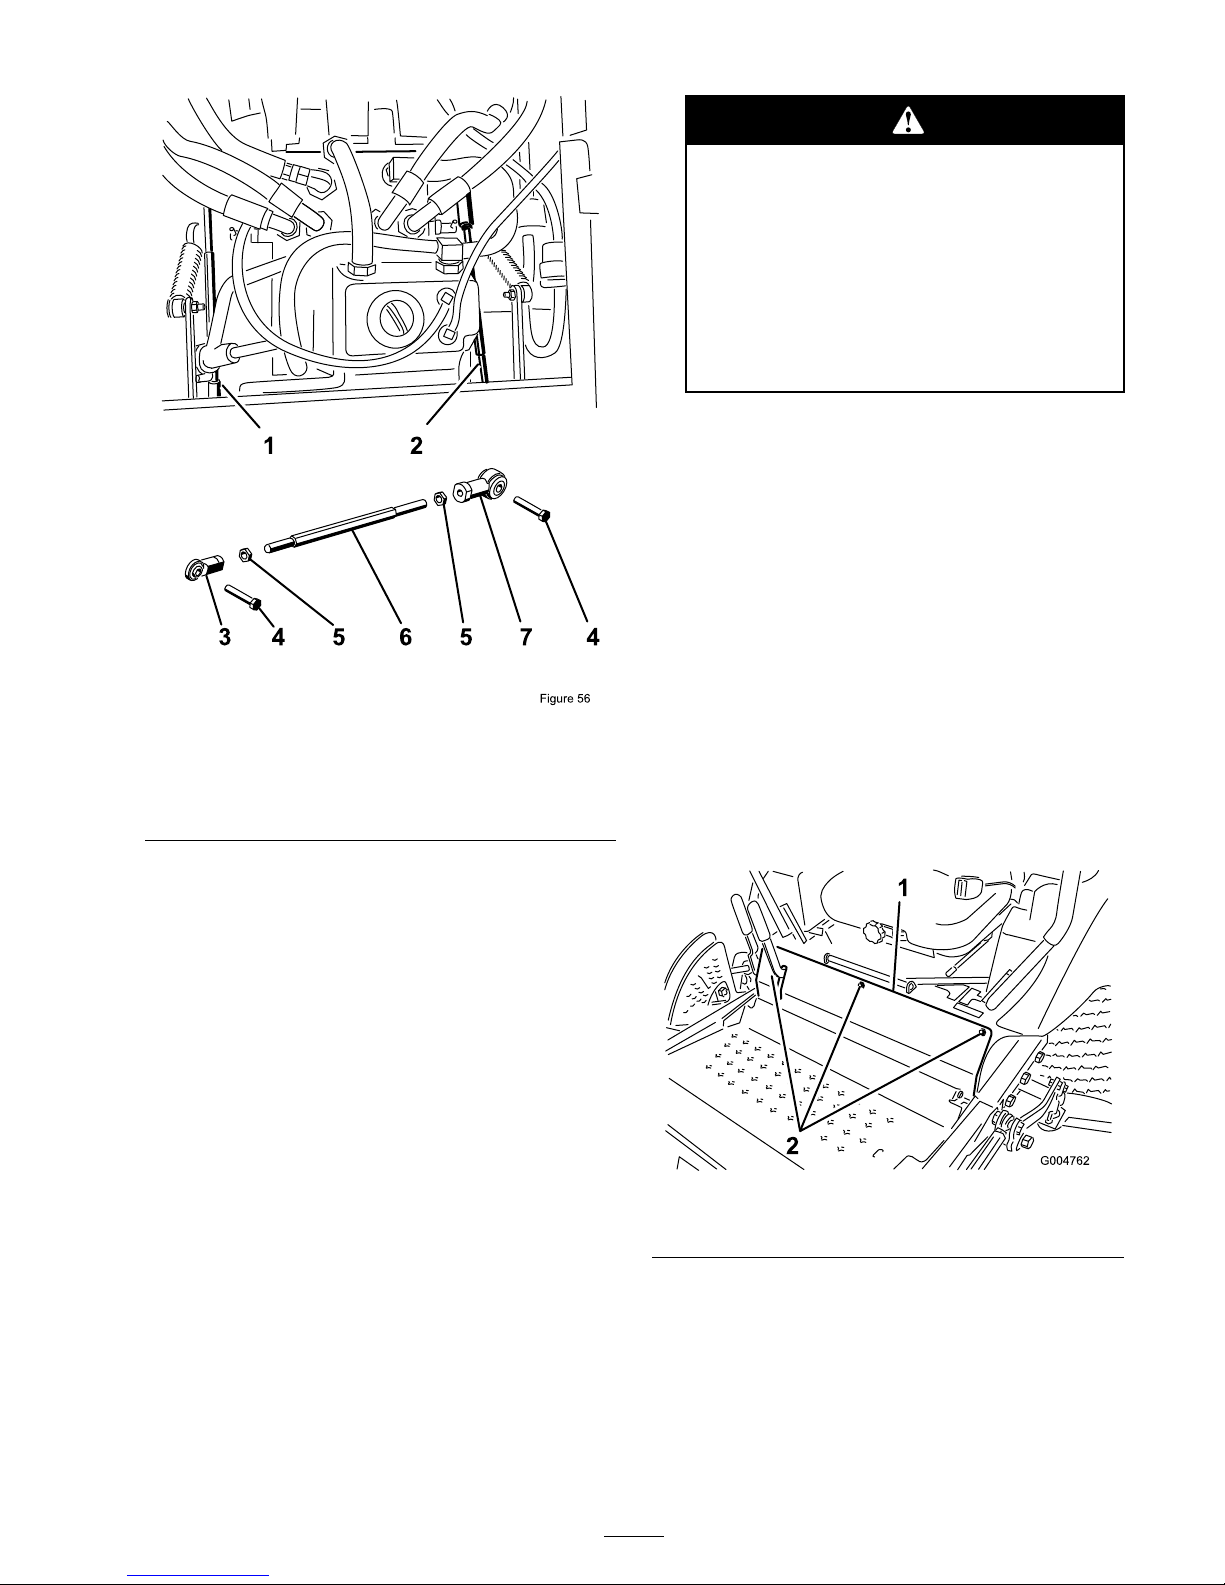
Figure 63
1. Right pump rod
5. Jam Nut
2. Left pump rod 6. Hex shaft
3. Ball joint 7. Ball joint
4. Bolt
6. Mo v e the motion control lev er forw ard and
rev erse , then bac k to neutral. T he wheel m ust
stop tur ning or slightly cree p in rev erse .
7. Mo v e the throttle lev er to the F ast position.
Mak e sure wheel remains stopped or slightly
cree ps in rev erse , adjust if necessar y .
8. R e peat ste ps 5 through 7 for the other side .
9. Tighten the jam n uts at the ball joints
( Figure 61 ).
10. Mo v e the throttle lev er to the Slo w position
and stop the engine .
11. R emo v e the jumper wire from the wire har ness
connector and plug the connector into the seat
switc h.
Electrical system will not perf or m pr oper
safety shut of f with jumper wir e installed.
• R emo v e jumper wir e fr om wir e
har ness connector and plug
connector into seat s witch when
adjustment is completed.
• Nev er operate this unit with jumper
installed and seat s witch bypassed.
12. Lo w er the seat into position.
13. R emo v e the jac k stands .
Adjusting the Maximum
Ground Speed
1. Diseng ag e the PTO , mo v e the motion control
lev ers to the neutral loc k ed position and set
the parking brak e .
2. Mo v e the throttle lev er to the Slo w position,
stop the engine , remo v e the k ey , and w ait for
all mo ving par ts to stop before lea ving the
operating position.
3. R emo v e the bolts securing the front panel and
remo v e the panel ( Figure 64 ).
Figure 64
1. Front panel bolts
4. Loosen the jam n ut on the stop bolt for one of
the control lev ers ( Figure 65 ).
59
Page 60
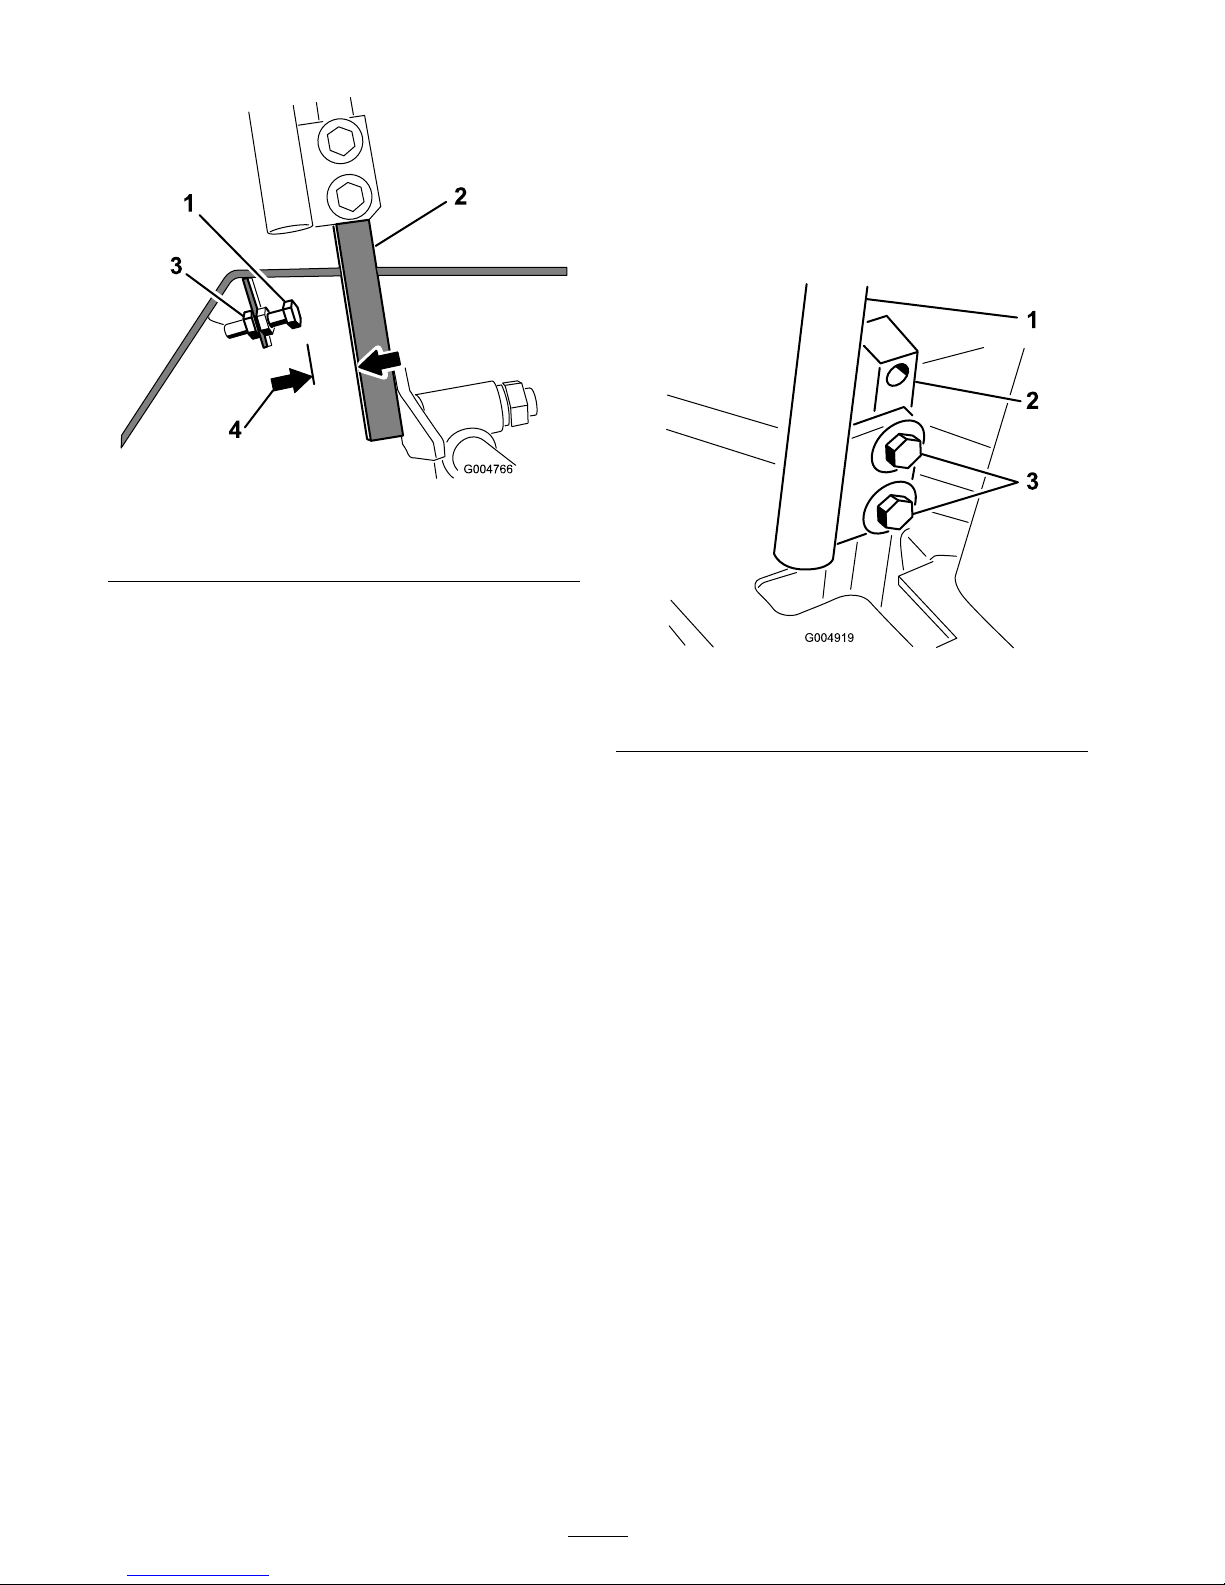
Figure 65
1. Stop bolt
3. Jam nut
2. Control lever
4. 0.060 inch (1.5 mm)
5. T hread the stop bolt all the w a y in (a w a y from
the control lev er).
6. Push the control lev er all the w a y forw ard until
it stops and hold it there .
7. T hread the stop bolt out (to w ards the control
lev er) until there is a g ap of 0.060 inc h (1.5
mm) betw een the head of the stop bolt and
the control lev er .
8. Tighten the jam n ut to secure the stop bolt in
place .
9. R e peat ste ps 4 through 8 for the other control
lev er .
10. Install the front panel.
Note: If y ou wish to reduce the maxim um
mac hine speed, set the speed for both control
lev ers as directed abo v e , then bac k eac h stop bolt
out an equal amount to w ard the control lev er until
y ou reac h the maxim um speed y ou desire (y ou will
lik ely ha v e to test y our adjustment sev eral times).
Ensure that the mac hine dri v es straight and does
not tur n when both control lev ers are pushed all
the w a y forw ard. If the mac hine tur ns , y ou do
not ha v e the stop bolts ev enly set and will need
to adjust them fur ther .
Adjusting the Tracking
1. Diseng ag e the PTO , mo v e the motion control
lev ers to the neutral loc k ed position and set
the parking brak e .
2. Mo v e the throttle lev er to the Slo w position,
stop the engine , remo v e the k ey , and w ait for
all mo ving par ts to stop before lea ving the
operating position.
3. Loosen the bolts securing the control lev ers
( Figure 66 )
Figure 66
1. Control lever 3. Bolts
2. Control lever post
4. Ha v e someone push the control lev er posts
(not the control lev ers) all the w a y forw ard into
the maxim um speed position and hold them
there .
5. Adjust the control lev ers so that they line up
( Figure 67 ) and tighten the bolts , securing the
lev ers to the posts .
60
Page 61
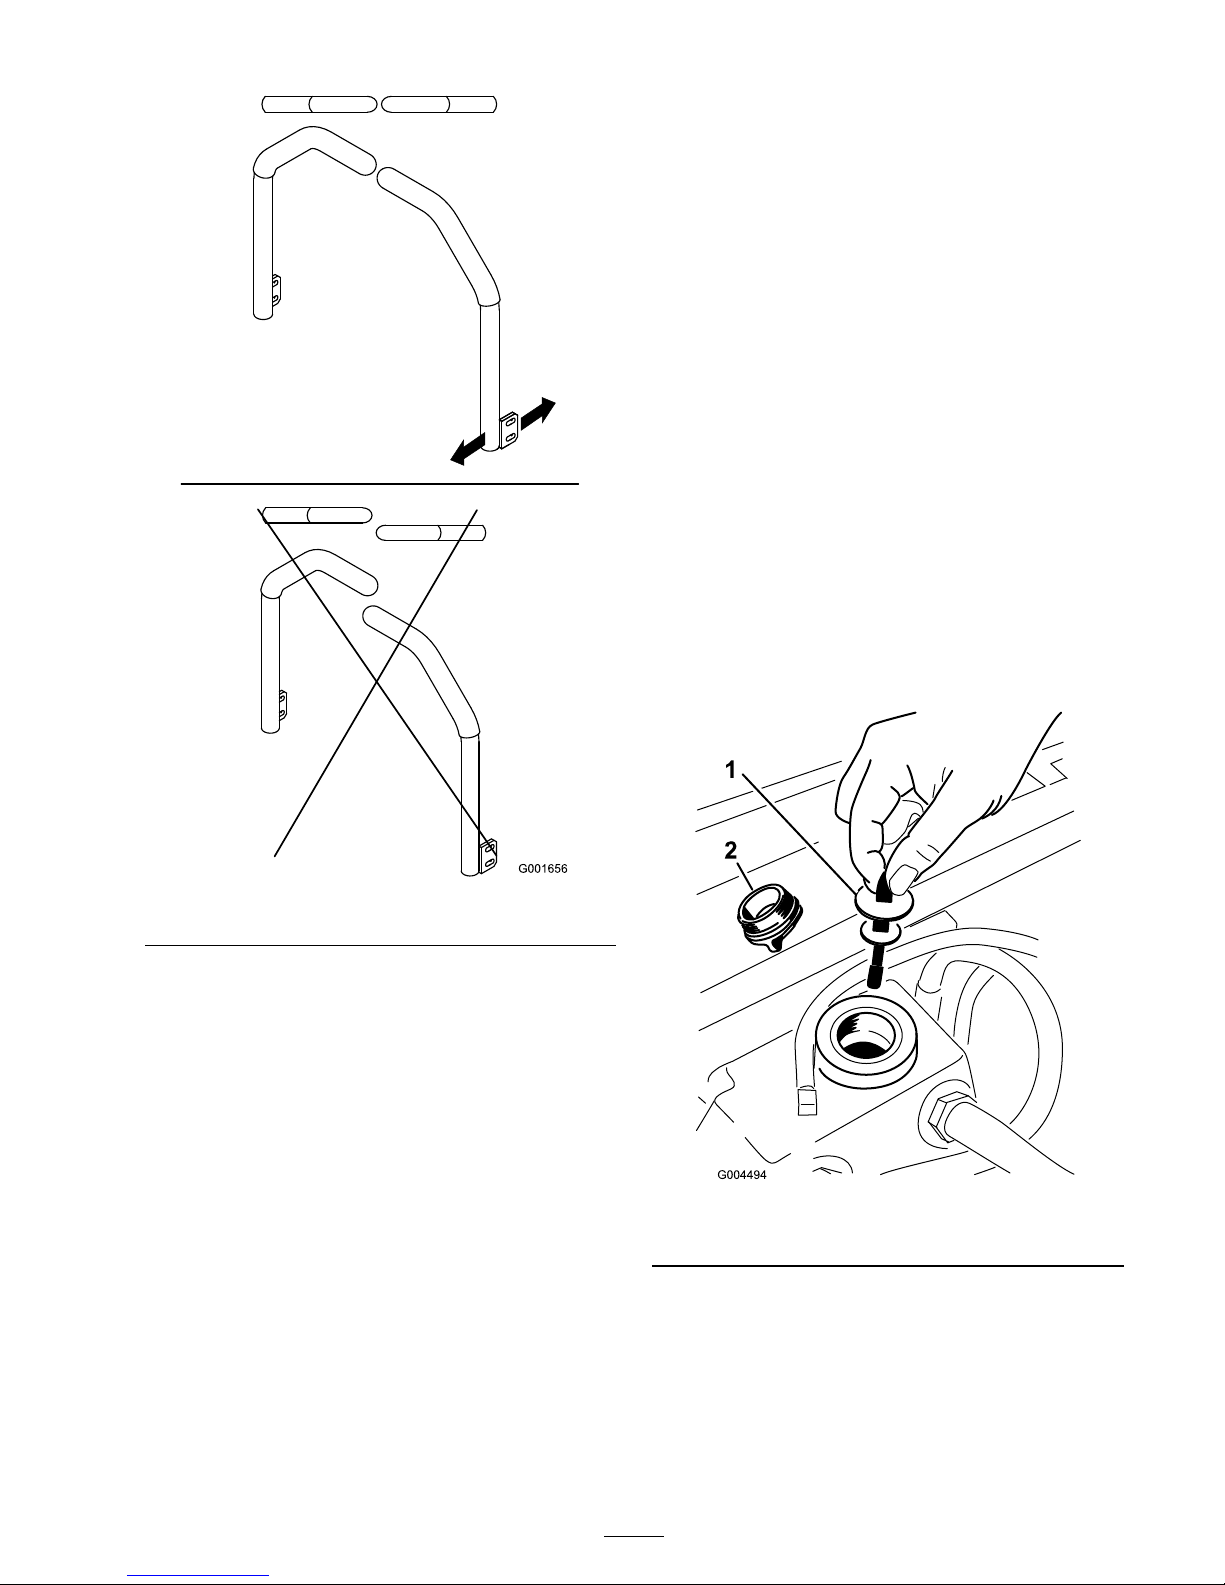
Figure 67
Hydraulic System
Maintenance
T he reser v oir is filled at the factor y with
appro ximately 5 quar ts (4.7 l) of high quality
tractor transmission/h y draulic fluid. T he
recommended re placement fluid is as follo ws:
Toro Premium Transmission/Hydraulic
Tractor Fluid (Available in 5 gallon pails or 55
gallon drums. See parts catalog or Toro distributor
for part numbers.)
Alter nate fluids: If the T oro fluid is not a v ailable ,
Mobil® 424 h y draulic fluid ma y be used.
Note: T oro will not assume responsibility for
damag e caused b y improper substitutions .
Note: Many h y draulic fluids are almost colorless ,
making it difficult to spot leaks . A red dye additi v e
for the h y draulic system oil is a v ailable in 2/3 oz.
(20 ml) bottles . One bottle is sufficient for 4-6
g al (15-22 1) of h y draulic oil. Order par t n umber
44-2500 from y our authorized T oro distributor .
Checking the Hydraulic
System
Chec k the lev el of the h y draulic fluid before the
engine is first star ted and daily thereafter .
1. P osition the mac hine on a lev el surface . Place
the controls in the neutral loc k ed position and
star t the engine . R un engine at lo w est possible
RPM to purg e the system of air . Do not
enga ge the PT O . Raise the dec k to extend lift
cylinders , stop the engine , and remo v e the k ey .
2. Raise the seat to access the h y draulic fluid tank.
3. R emo v e the h y draulic fill cap ( Figure 68 ) from
filler nec k.
Figure 68
1. Dipstick 2. Fill cap
4. R emo v e the dipstic k and wipe it with a clean
rag ( Figure 68 ).
5. Place the dipstic k into the filler nec k; then
remo v e it and c hec k lev el of fluid ( Figure 68 ).
If lev el is not within notc hed area of the
dipstic k, add enough high quality h y draulic
61
Page 62
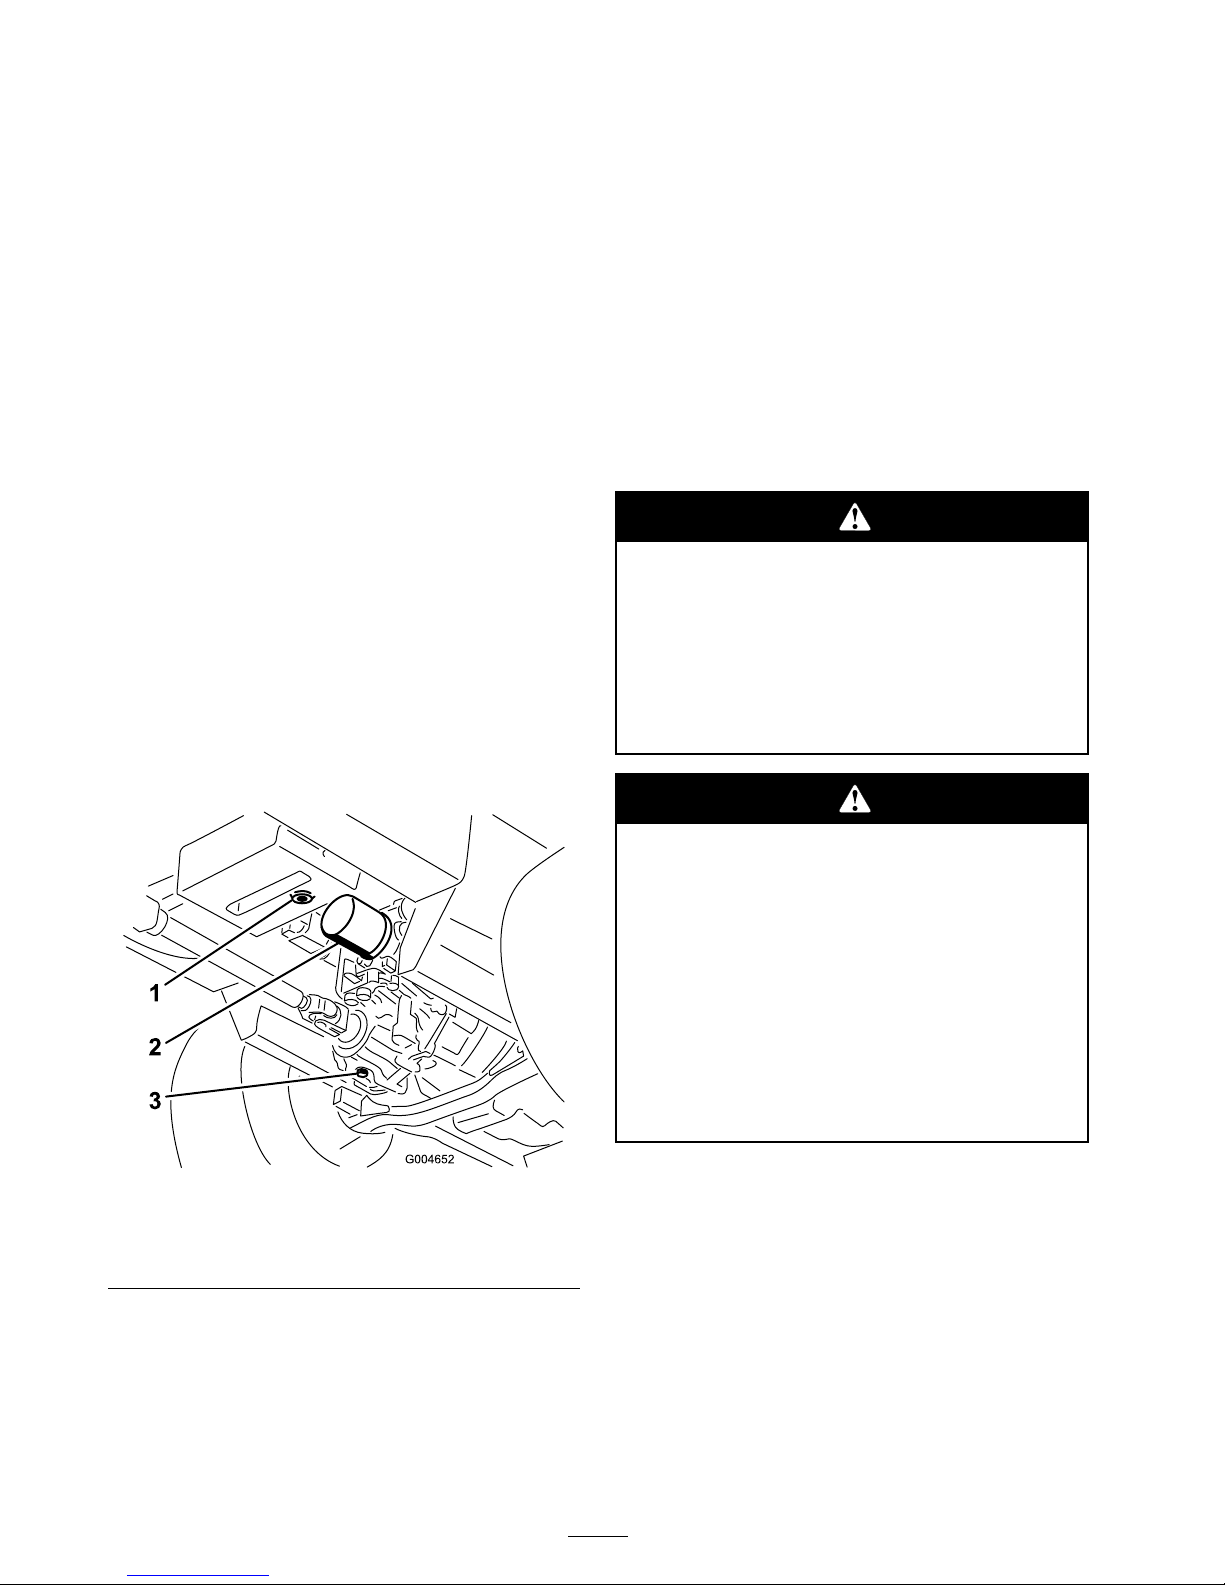
fluid to raise lev el to within the notc hed area.
Do not o v erfill .
6. R e place the dipstic k and thread the fill cap
fing er -tight onto filler nec k.
7. Chec k all hoses and fittings for leaks .
Changing the Hydraulic Oil
And Filter
Initially , re place the h y draulic oil filter after the
first 200 hours of operation.
R e place the filter and oil after ev er y 800 hours of
operation.
1. Diseng ag e the PTO , mo v e the motion control
lev ers to the neutral loc k ed position and set
the parking brak e .
2. Mo v e the throttle lev er to the Slo w position,
stop the engine , remo v e the k ey , and w ait for
all mo ving par ts to stop before lea ving the
operating position.
3. Place a larg e pan under the h y draulic reser v oir
and transmission case and remo v e the plugs ,
draining all of the h y draulic fluid ( Figure 69 ).
Figure 69
1. Hydraulic reservoir drain
plug
3. Transmission case drain
plug
2. Filter
4. Clean the area around the h y draulic oil filter
and remo v e it ( Figure 69 ).
5. Immediately install a new h y draulic oil filter .
6. Install the h y draulic reser v oir and transmission
case drain plugs .
7. Fill the reser v oir to the proper lev el
(appro ximately 6 quar ts); refer to Chec king the
Hy draulic Fluid.
8. Star t the engine and c hec k for oil leaks . Allo w
the engine to r un for about fiv e min utes , then
shut it off .
9. After tw o min utes , c hec k the lev el of the
h y draulic fluid; refer to Chec king the Hy draulic
Fluid.
Mower Deck
Maintenance
If y ou raise the machine using onl y a jack to
suppor t it while y ou w or k under the mo w er
deck, the jack could tip , causing the mo w er
deck to f all, cr ushing y ou or bystander s.
Al w ays secur e the machine with at least 2
jack stands when y ou ha v e the mo w er deck
raised.
On the top of the mo w er deck ar e tw o links
that connect them to the frame. Connected
to these links ar e tor sion spring that ar e
under tension ( Figur e 70 ). If y ou disconnect
the link the stor ed energ y in the tor sion
spring will be r eleased and could cause the
links to mo v e, dama ging y our hands or
finger s.
Be car eful when r emo ving the mo w er deck
fr om the frame and secur e the links bef or e
disconnecting them fr om the frame.
62
Page 63
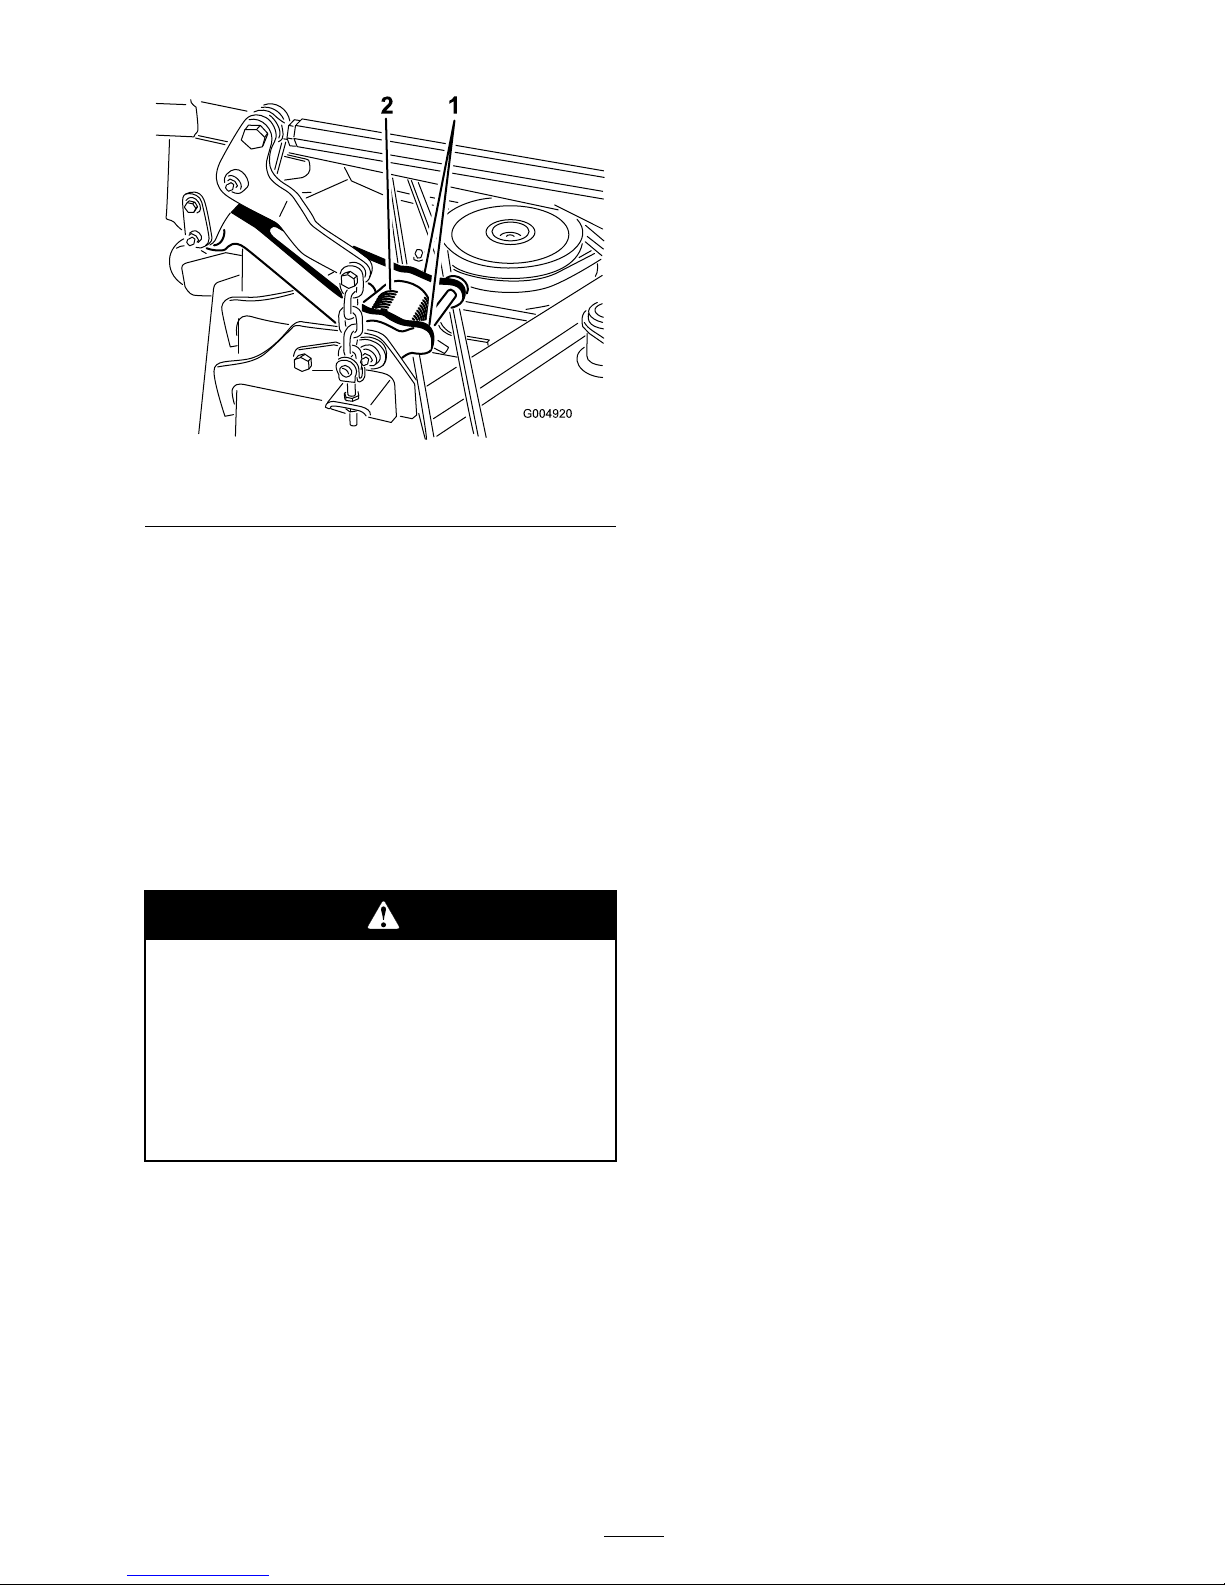
Figure 70
1. Link
2. Torsion spring
Servicing the Cutting Blades
Maintain shar p blades throughout the cutting
season because shar p blades cut cleanly without
tearing or shredding the g rass blades . T earing and
shredding tur ns g rass bro wn at the edg es , whic h
slo ws g ro wth and increases the c hance of disease .
Chec k the blades daily for shar pness , and for
any w ear or damag e . Shar pen the blades as
necessar y . If a blade is damag ed or w or n, re place
it immediately with a g en uine T oro re placement
blade .
A w or n or dama ged blade can br eak, and a
piece of the blade could be thr o wn into the
operator’ s or bystander’ s ar ea, r esulting in
serious per sonal injur y or death.
• Inspect the blade periodicall y f or w ear
or dama ge.
• R eplace a w or n or dama ged blade.
Inspect and c hec k the blades ev er y 8 hours .
Before Inspecting or Servicing the
Blades
1. Diseng ag e the PTO , mo v e the motion control
lev ers to the neutral loc k ed position and set
the parking brak e .
2. Mo v e the throttle lev er to the Slo w position,
stop the engine , remo v e the k ey , and w ait for
all mo ving par ts to stop before lea ving the
operating position.
Inspecting the Blades
1. Inspect the cutting edg es ( Figure 71 ). If the
edg es are not shar p or ha v e nic ks , remo v e and
shar pen the blades . R efer to Shar pening the
Blades .
2. Inspect the blades , especially the cur v ed area
( Figure 71 ). If y ou notice any damag e , w ear ,
or a slot for ming in this area ( Figure 71 ),
immediately install a new blade .
63
Page 64
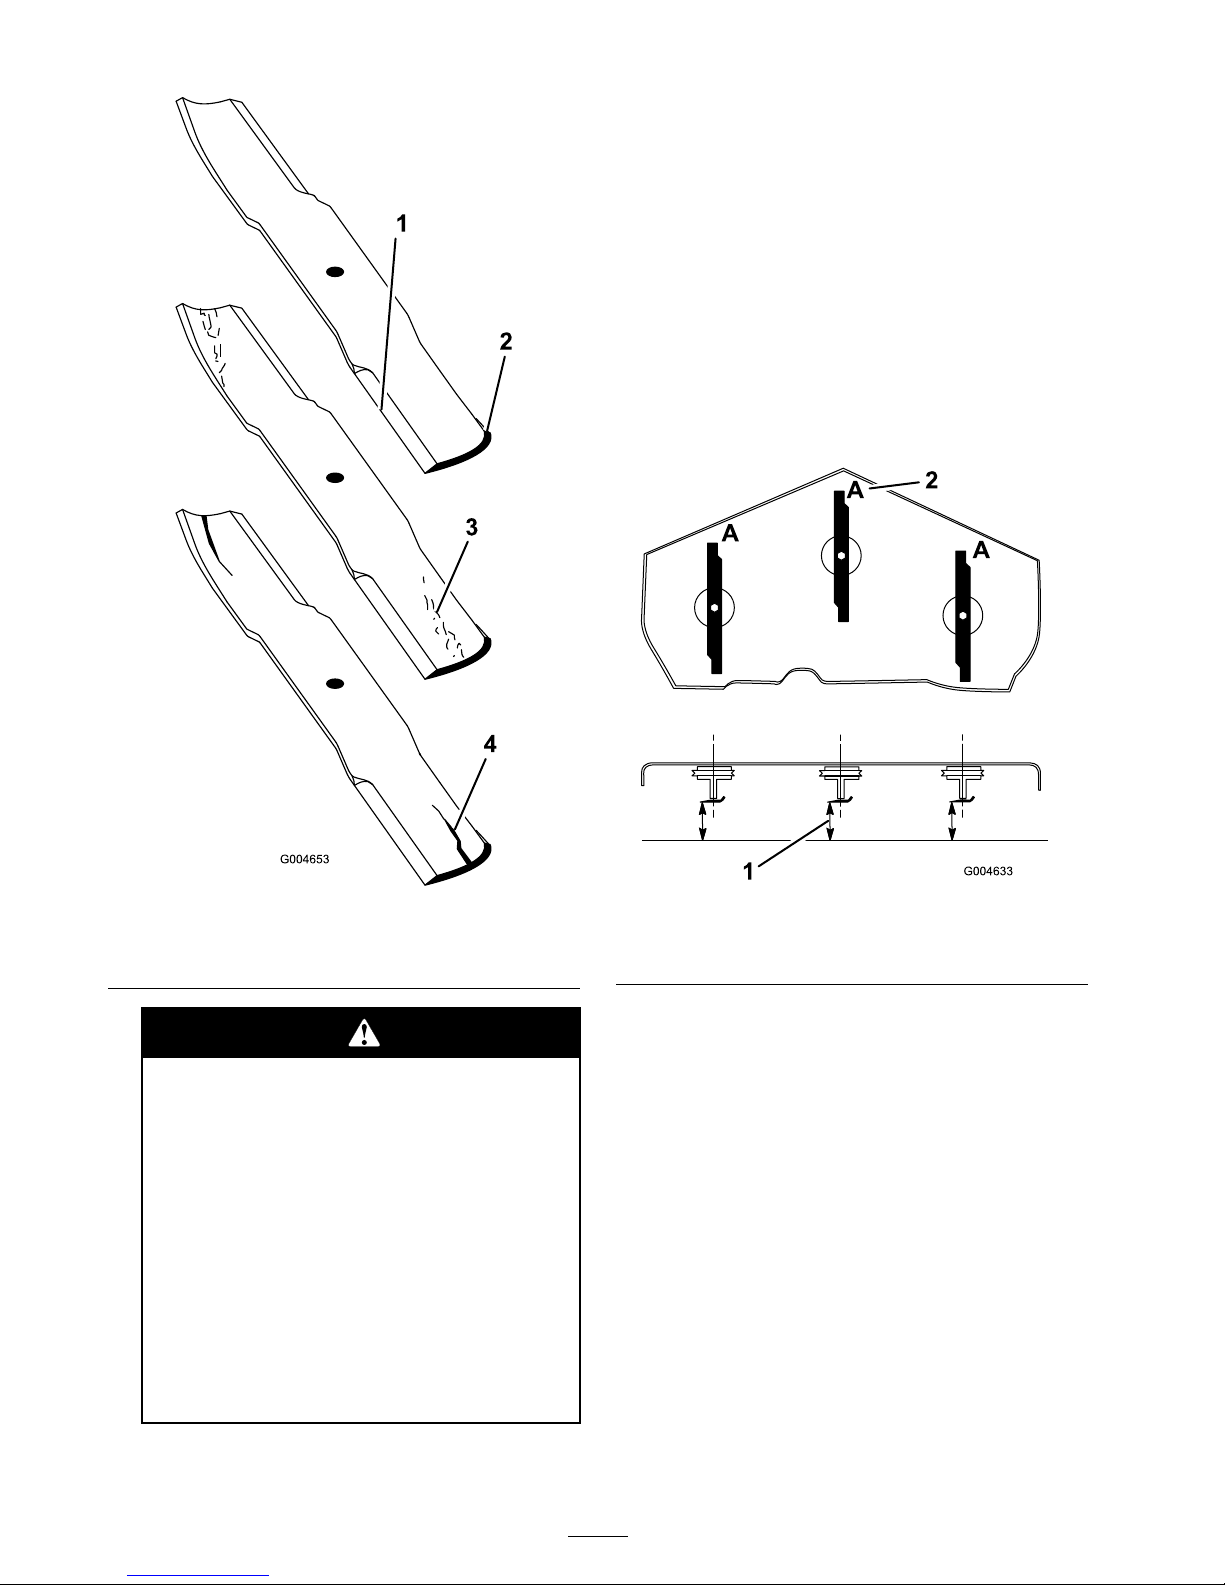
Figure 71
1. Cutting Edge 3. Wear/slot Forming
2. Curved Area 4. Crack
If y ou allo w the blade to w ear , a slot will
f or m betw een the sail and flat par t of the
blade. Ev entuall y a piece of the blade
may br eak of f and be thr o wn fr om under
the housing , possibl y r esulting in serious
injur y to y ou or bystander s.
• Inspect the blade periodicall y f or
w ear or dama ge.
• Nev er tr y to straighten a blade that
is bent or w eld a br ok en or crack ed
blade.
• R eplace a w or n or dama ged blade.
Checking for Bent Blades
1. Diseng ag e the PTO , mo v e the motion control
lev ers to the neutral loc k ed position and set
the parking brak e .
2. Mo v e the throttle lev er to the Slo w position,
stop the engine , remo v e the k ey , and w ait for
all mo ving par ts to stop before lea ving the
operating position.
3. R otate the blades until the ends face forw ard
and bac kw ard ( Figure 72 ). Measure from a
lev el surface to the cutting edg e , position A , of
the blades ( Figure 72 ). Note this dimension.
Figure 72
1. Measure here from blade
to hard surface
2. Position A
4. R otate the opposite ends of the blades forw ard.
5. Measure from a lev el surface to the cutting
edg e of the blades at the same position as
in ste p 3 abo v e . T he difference betw een the
dimensions obtained in ste ps 3 and 4 m ust not
ex ceed 1/8 inc h (3 mm). If this dimension
ex ceeds 1/8 inc h (3 mm), the blade is bent
and m ust be re placed; refer to R emo ving the
Blades and Installing the Blades .
64
Page 65

A blade that is bent or dama ged could
br eak apar t and could seriousl y injur e or
kill y ou or bystander s.
• Al w ays r eplace bent or dama ged
blade with a new blade.
• Nev er file or cr eate shar p notches in
the edges or surf aces of blade.
Removing the Blades
Blades m ust be re placed if a solid object is hit,
if the blade is out of balance or is bent. T o
ensure optim um perfor mance and contin ued
safety confor mance of the mac hine , use g en uine
T oro re placement blades . R e placement blades
made b y other man ufacturers ma y result in
non-confor mance with safety standards .
Contact with a shar p blade can cause serious
injur y .
W ear g lo v es or wrap shar p edges of the
blade with a ra g .
1. Hold the blade end using a rag or
thic kly-padded glo v e .
2. R emo v e the blade bolt, anti-scalp plate , and
blade from the spindle shaft ( Figure 75 ).
Sharpening the Blades
W hen shar pening blade, pieces of blade
could be thr o wn and cause serious injur y .
W ear pr oper ey e pr otection when shar pening
blades.
1. Shar pen the cutting edg e at both ends of
the blade ( Figure 73 ). Maintain the original
angle . T he blade retains its balance if the same
amount of material is remo v ed from both
cutting edg es .
Figure 73
1. Sharpen at original angle
2. Chec k the balance of the blade b y putting it on
a blade balancer ( Figure 74 ). If the blade sta ys
in a horizontal position, the blade is balanced
and can be used. If the blade is not balanced,
file some metal off the end of the sail area only
( Figure 75 ). R e peat this procedure until the
blade is balanced.
Figure 74
1. Blade 2. Balancer
Installing the Blades
1. Install the blade onto the spindle shaft
( Figure 75 ).
Important: T he cur v ed par t of the blade
must be pointing up w ard to w ard the inside
of the mo w er to ensur e pr oper cutting .
2. Install the anti-scalp plate and blade bolt
( Figure 75 ).
65
Page 66
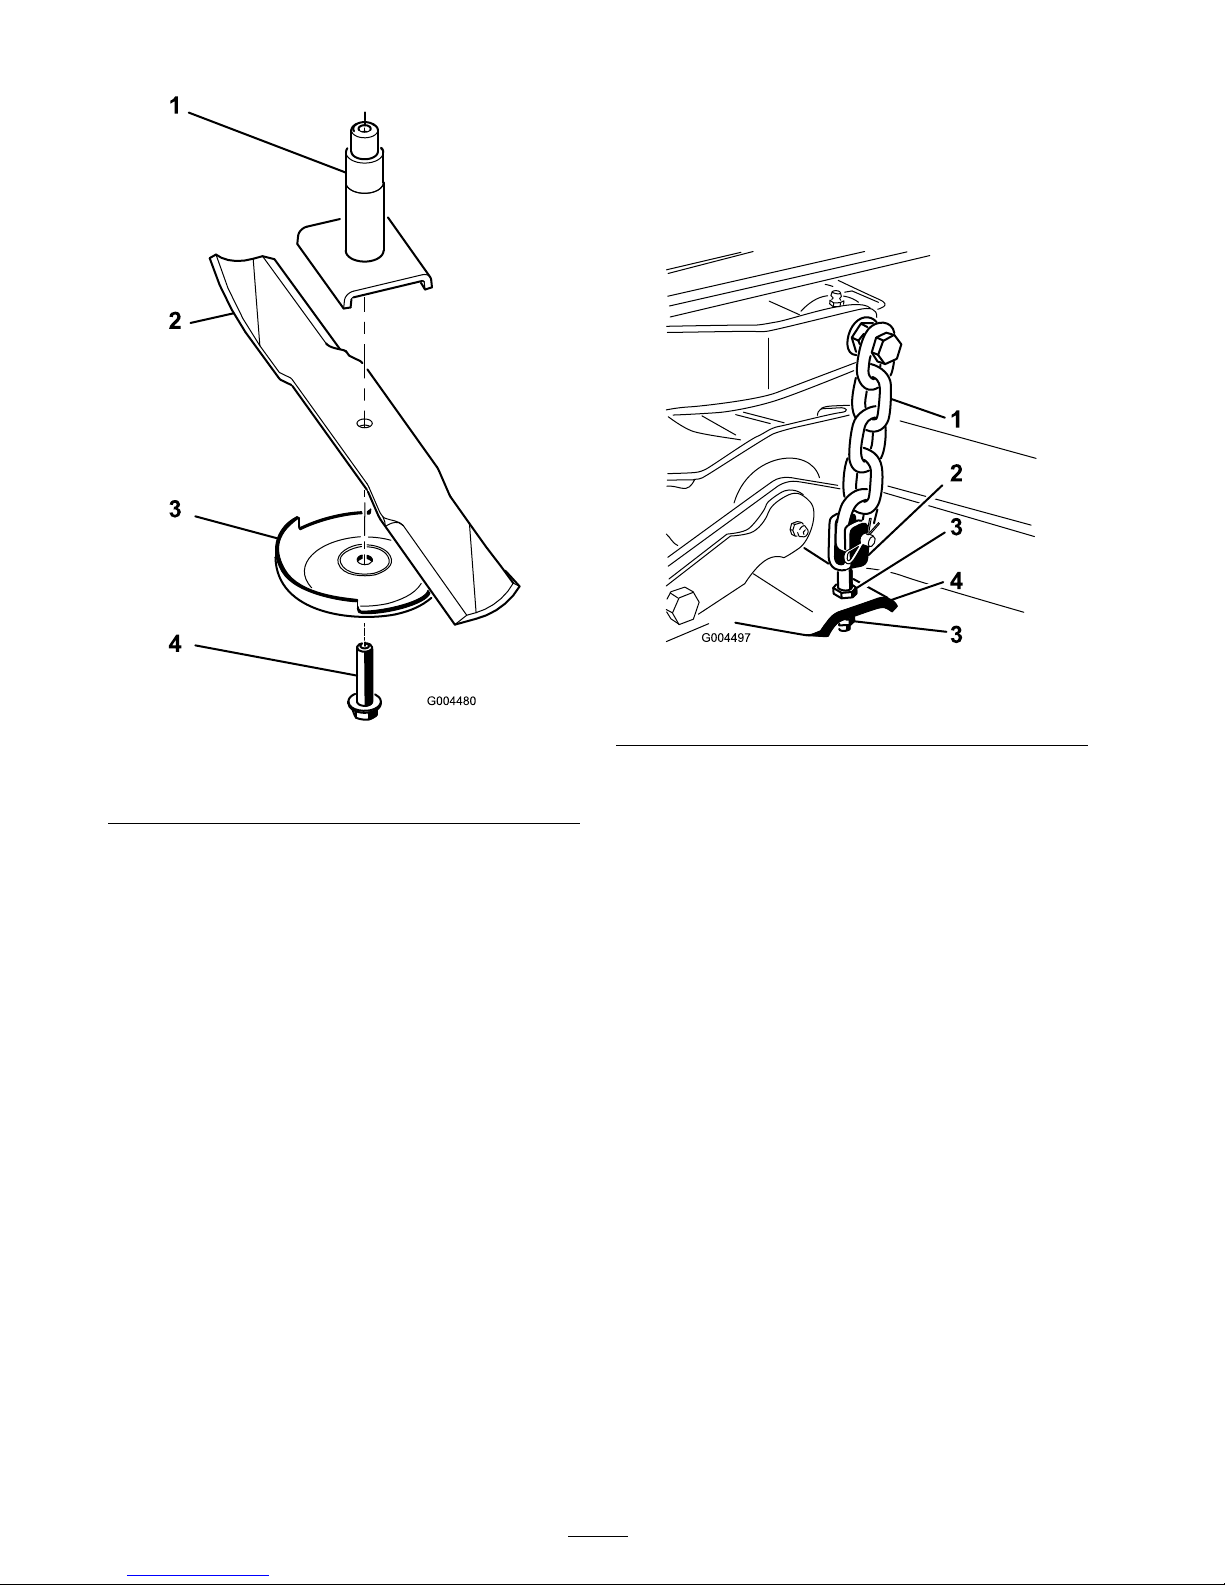
Figure 75
1. Spindle 3. Anti-scalp plate
2. Sail Area of Blade 4. Blade Bolt
3. T or que the blade bolt to 85-110 ft-lb
(115-150 N ⋅ m).
Correcting Mower Deck
Mismatch
If the cut is unev en across the mo w er sw ath,
cor rect it as follo ws:
1. P osition the mac hine on a lev el surface on the
shop floor .
2. Set the cutting unit to the desired height of cut,
mo v e the throttle lev er to the Slo w position,
stop the engine , set the parking brak e , and
remo v e the ignition k ey .
3. Chec k and adjust front and rear tractor tire
pressure; refer to Chec king Tire Pressure in
Dri v e System Maintenance , pag e 52 .
4. Chec k for bent blades .
5. R emo v e the co v ers from the top of the cutting
units .
6. R otate the blade on eac h spindle until the ends
face forw ard and bac kw ard.
7. Measure from the floor to the front tip of the
cutting edg e .
8. Adjust the jam n uts securing the dec k
y ok es/c hains to the mo w er dec k until the
mo w er dec k is lev el.
Figure 76
1. Chain
3. Jam nut
2. Yoke 4. Mower deck
Adjusting the Mower Deck
Pitch
Cutting unit pitc h is the difference in height-of-cut
from the front of the blade plane to the bac k of
the blade plane . T oro recommends a blade pitc h
of appro ximately 5/16 inc h (8 mm). T hat is the
bac k of the blade plane is 5/16 inc h (8 mm) higher
than the front.
1. P osition the mac hine on a lev el surface on the
shop floor .
2. Set the cutting unit to the desired height-of-cut,
mo v e the throttle lev er to the Slo w position,
stop the engine , set the parking brak e , and
remo v e the ignition k ey .
3. R otate the center blade so that it points straight
forw ard.
4. Using a shor t r uler , measure from the floor to
the front tip of the blade .
5. R otate the same blade tip to the rear and
measure from the floor to the tip of the blade
at the rear of the dec k.
66
Page 67
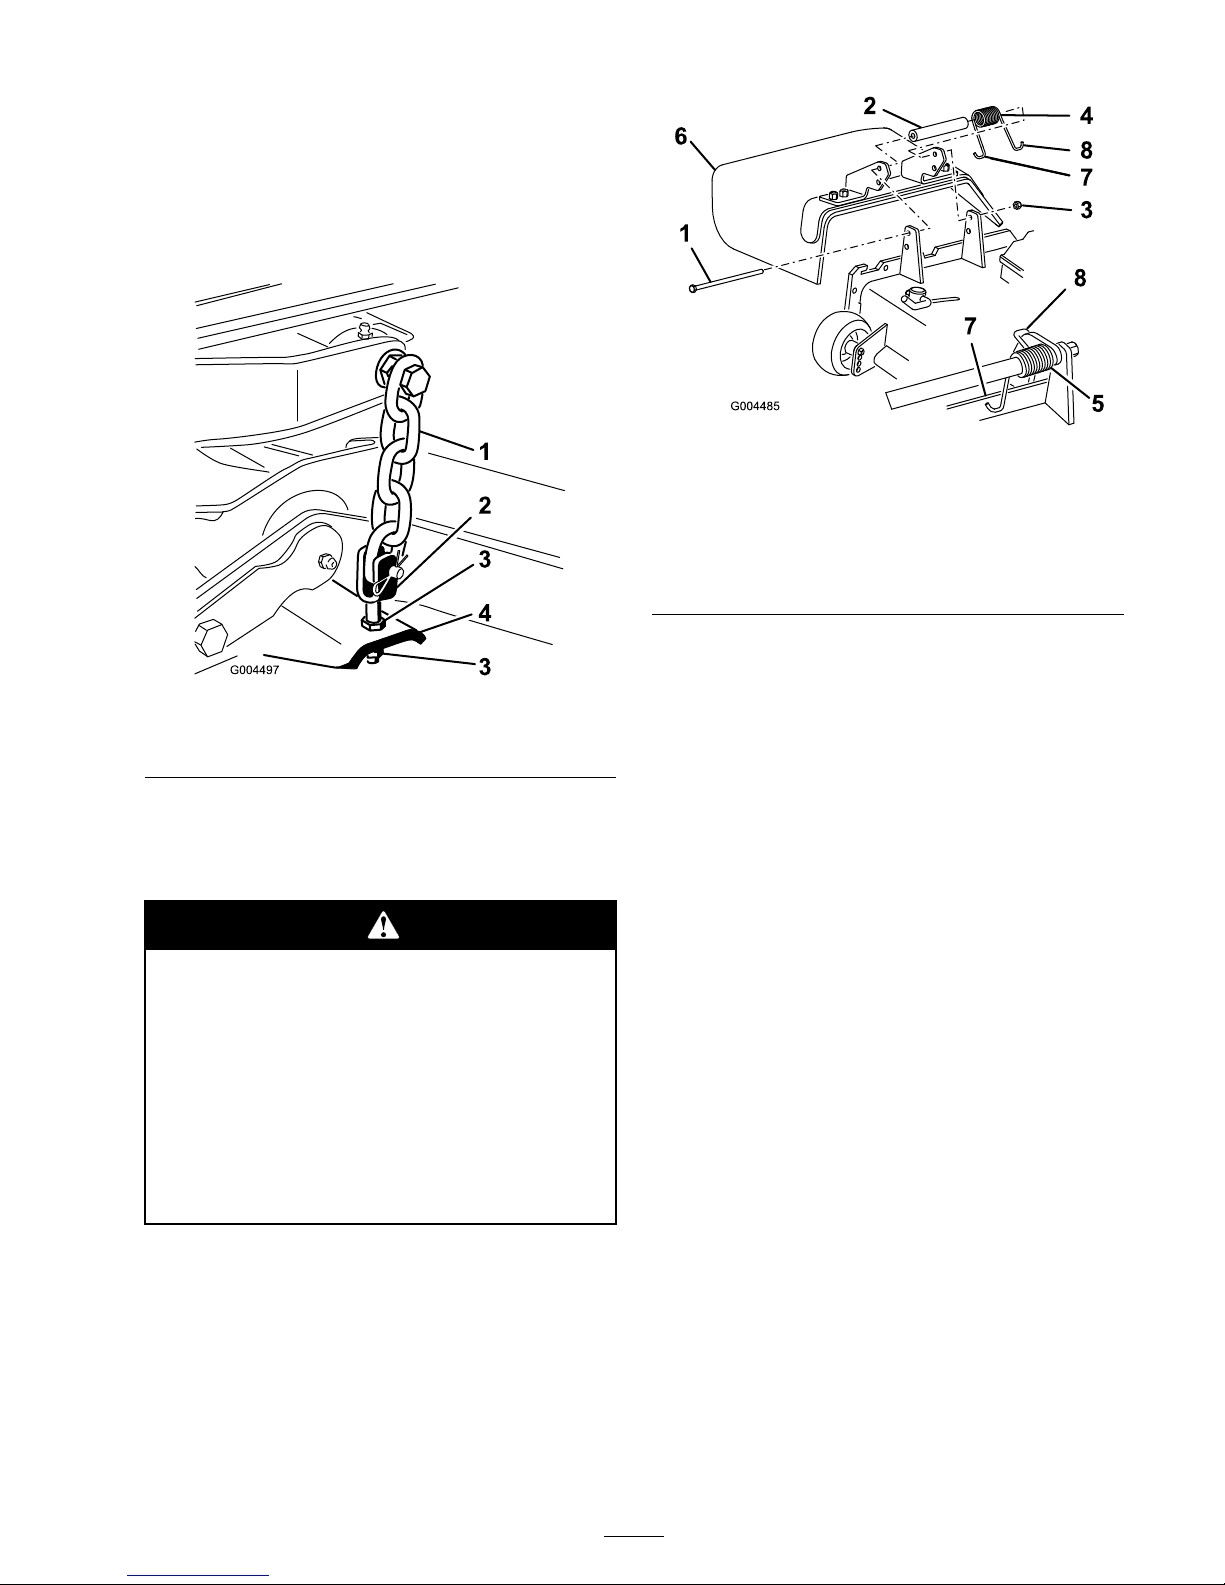
6. Subtract the front dimension from the rear
dimension to calculate the blade pitc h.
7. Adjust the jam n uts securing the rear dec k
y ok es/c hains to raise the rear of the dec k so
that the blade pitc h is set to 5/16 inc h (8 mm)
( Figure 77 ).
Figure 77
1. Chain
3. Jam nut
2. Yoke 4. Mower deck
Replacing the Grass
Deector
An unco v er ed discharge opening could
allo w the la wn mo w er to thr o w objects in
the operator’ s or bystander’ s dir ection and
r esult in serious injur y . Also, contact with
the blade could occur .
• Nev er operate the la wn mo w er without a
mulch kit or g rass deflector installed.
• Mak e sur e the g rass deflector is in the
do wn position.
1. Lo w er the cutting unit to the shop floor , mo v e
the throttle lev er to the Slo w position, stop the
engine , set the parking brak e , and remo v e the
ignition k ey .
2. R emo v e the loc kn ut, bolt, spring and spacer
holding the deflector to the pi v ot brac k ets
( Figure 78 ). R emo v e damag ed or w or n g rass
deflector .
Figure 78
1. Bolt 5. Spring installed
2. Spacer
6. Grass Deector
3. Locknut 7. Left hand hook end of
spring, place behind deck
edge before installing bolt
4. Spring
8. Right hand hook end of
spring
3. Place the spacer and spring betw een
the re placement g rass deflector brac k ets
( Figure 78 ). Place the left hand J hook end of
the spring behind the dec k edg e .
Note: Mak e sure the left hand J hook end
of the spring is installed behind the dec k edg e
before installing the bolt as sho wn in Figure 78 .
4. Install the bolt and n ut. Place the right hand
J hook end of the spring around the g rass
deflector ( Figure 78 ).
Important: T he g rass deflector must be
a ble to lo w er do wn into position. Lift the
deflector up to test that it lo w er s into the
full do wn position.
Cleaning
Cleaning Under the Mower
R emo v e the g rass buildup under the mo w er daily .
1. Diseng ag e the PTO , mo v e the motion control
lev ers to the neutral loc k ed position and set
the parking brak e .
2. Mo v e the throttle lev er to the Slo w position,
stop the engine , remo v e the k ey , and w ait for
all mo ving par ts to stop before lea ving the
operating position.
67
Page 68

3. Raise the mo w er to the transpor t position.
4. Raise the front of the mac hine b y using jac k
stands .
5. T horoughly clean the underside of the mo w er
with w ater .
Waste Disposal
Engine oil, batteries , h y draulic oil, and engine
coolant are pollutants to the en vironment.
Dispose of these according to y our state and local
regulations .
68
Page 69
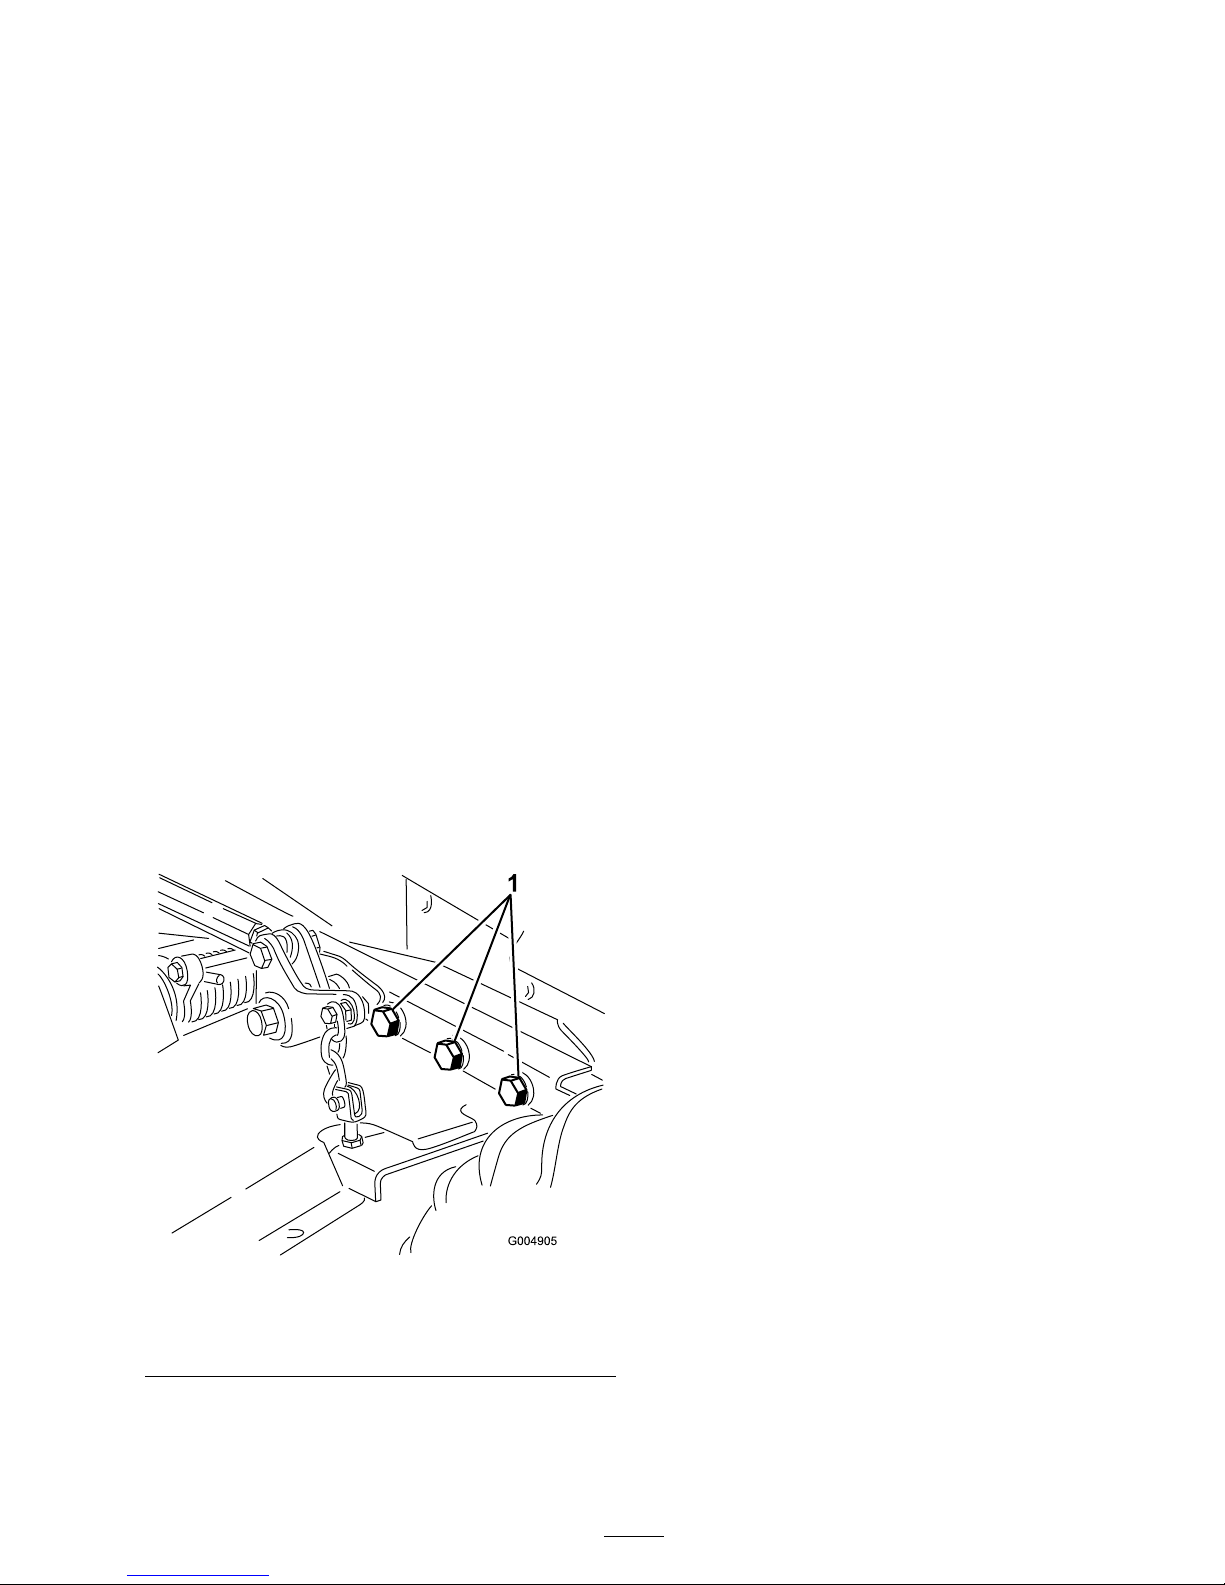
Storage
Machine
1. T horoughly clean the mac hine , dec k and the
engine , pa ying special attention to these areas:
• Radiator and radiator screen
• Under neath the dec k
• Under the dec k belt co v ers
• Counterbalance springs
• PTO shaft assembly
• All g rease fittings and pi v ot points
• R emo v e the control panel and clean out
inside of the control bo x
• Beneath the seat plate and top of the
transmission
2. Chec k and adjust front and rear tractor tire
pressure; refer to Chec king Tire Pressure in
Dri v e System Maintenance , pag e 52 .
3. R emo v e , shar pen, and balance the mo w er
blades . Install the blades and tor que the blade
fasteners to 85-110 ft-lb (115-149 N ⋅ m).
4. Chec k all fasteners for looseness and tighten
them as necessar y . Especially tor que the 6 bolts
securing the mo w er dec k frame to the traction
unit ( Figure 79 ) to 265 ft-lb (359 N ⋅ m).
Figure 79
Right side not shown.
1. Bolts
5. Grease or oil all g rease fittings , pi v ot points ,
and transmission b y-pass v alv e pins . Wipe off
any ex cess lubricant.
6. Lightly sand and use touc h up paint on painted
areas that are scratc hed, c hipped or r usted.
R e pair any dents in the metal body .
7. Ser vice the batter y and cables as follo ws:
A. R emo v e the batter y ter minals from the
batter y posts .
B . Clean the batter y , ter minals , and posts with
a wire br ush and baking soda solution.
C . Coat the cable ter minals and batter y posts
with Grafo 112X skin-o v er g rease (T oro
P ar t No . 505-47) or petroleum jelly to
prev ent cor rosion.
D . Slo wly rec harg e the batter y for 24 hours
ev er y 60 da ys to prev ent lead sulfation of
the batter y .
Engine
1. Drain the engine oil from the oil pan and
re place the drain plug .
2. R emo v e and discard the oil filter . Install a new
filter .
3. R efill the engine with 4 quar ts (3.8 l) of
recommended motor oil. R efer to Changing
the Engine Oil in Operation , pag e 25 .
4. Star t the engine and r un it at idle speed for
tw o min utes .
5. Drain the fuel from the fuel tank, fuel lines ,
pump , filter , and se parator . Flush the fuel tank
with clean diesel fuel and connect all fuel lines .
6. T horoughly clean and ser vice the air cleaner
assembly .
7. Seal the air cleaner inlet and the exhaust outlet
with w eather proof masking tape .
8. Chec k the oil filler cap and fuel tank cap to
ensure they are securely in place .
69
Page 70
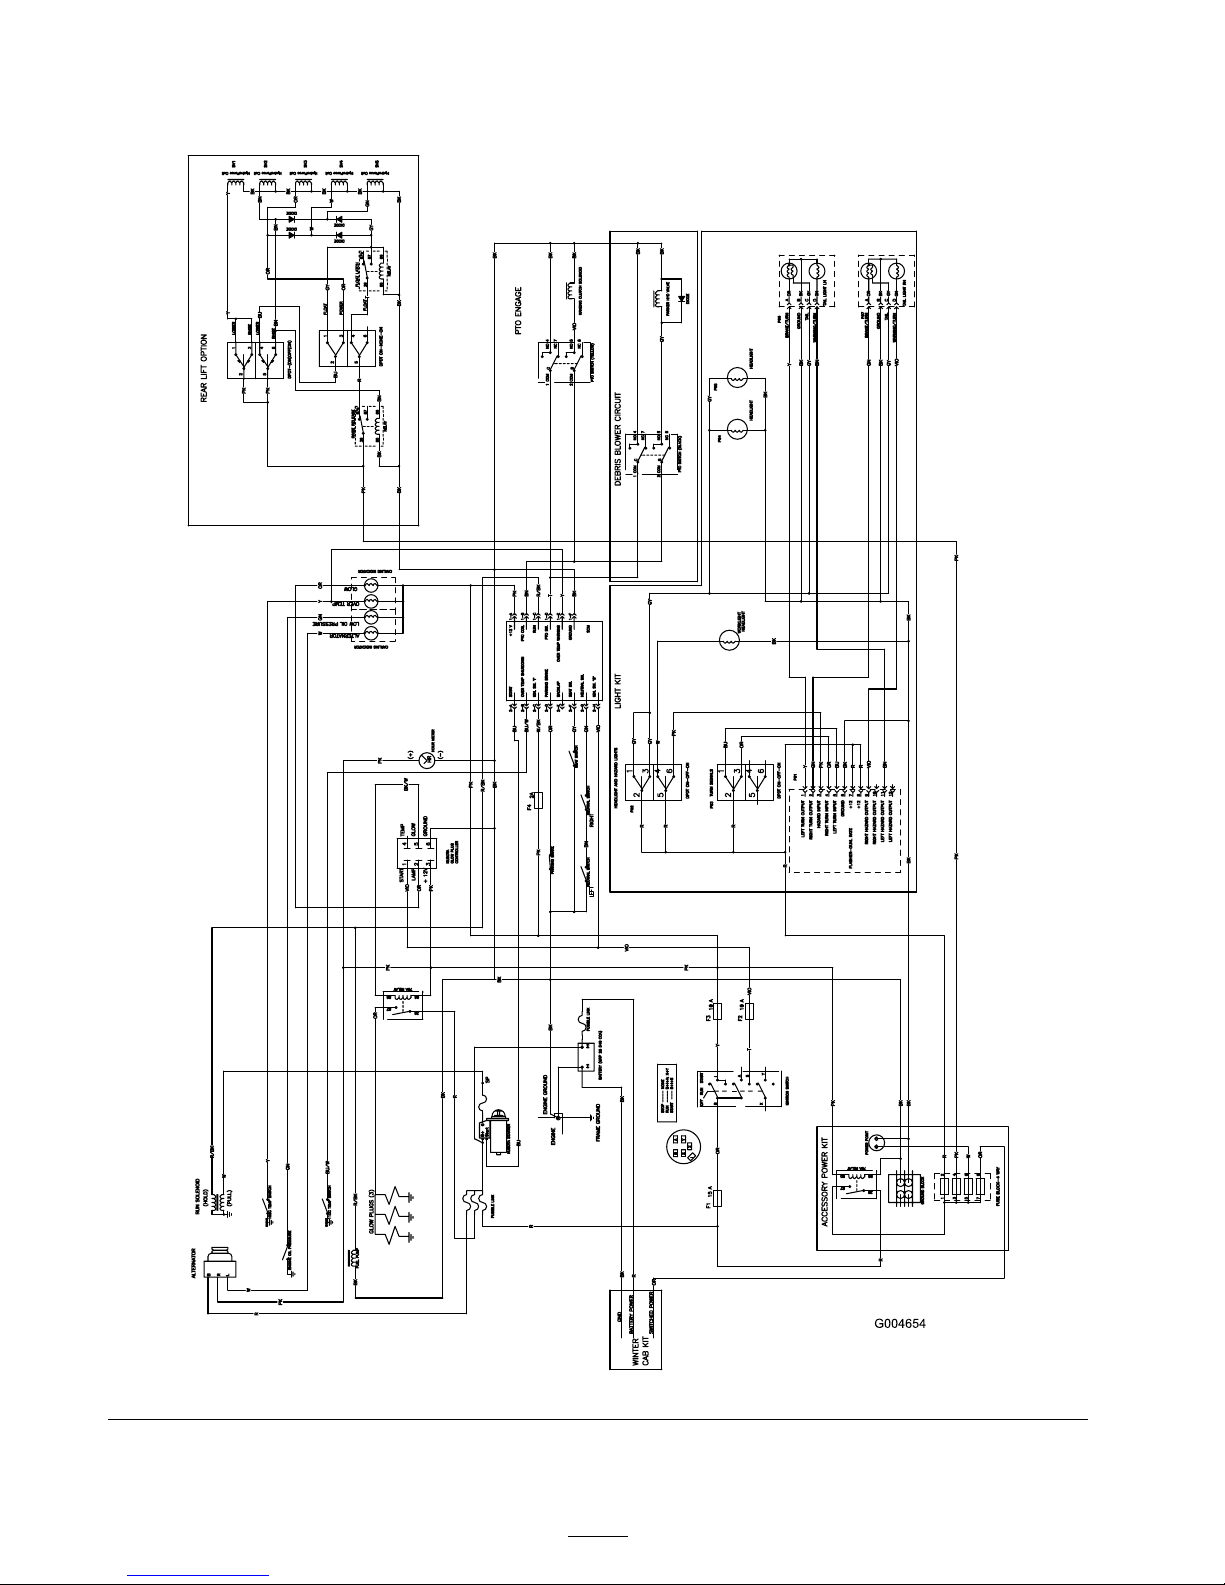
Schematics
Electrical Schematic (Rev. A)
70
Page 71
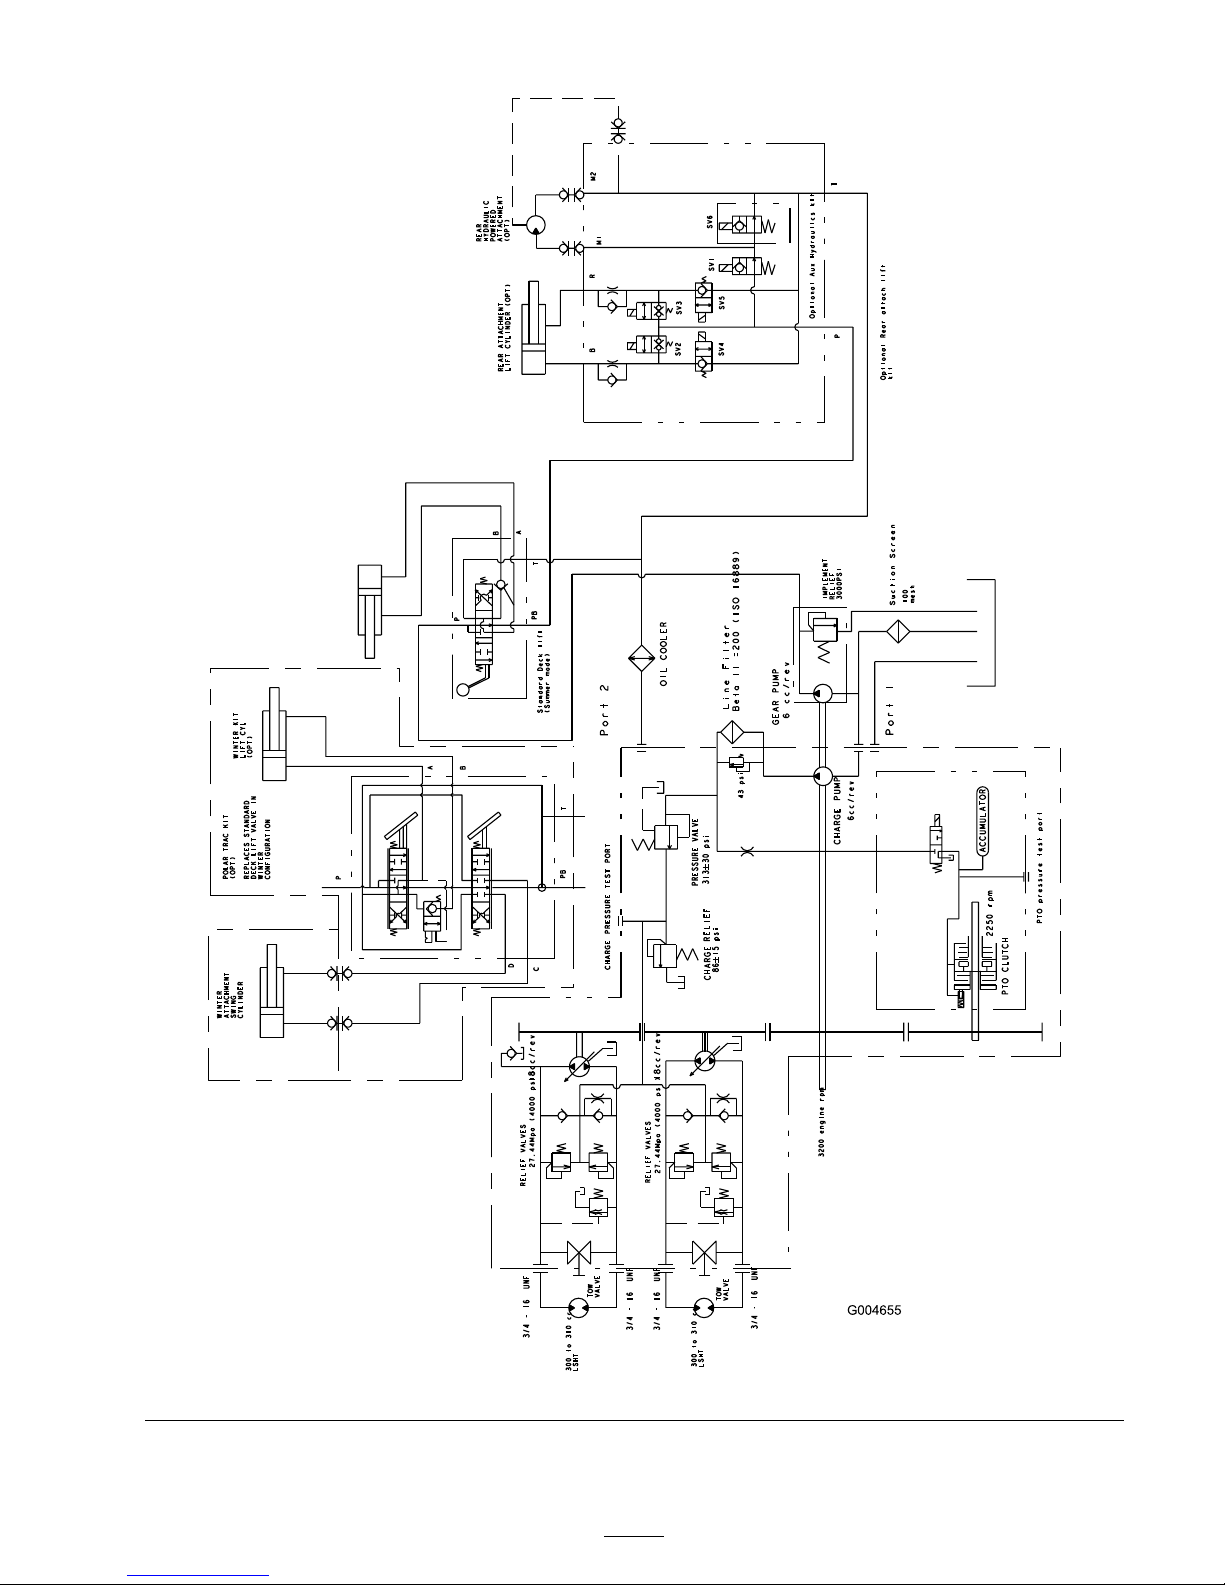
Hydraulic Schematic (Rev. A)
71
Page 72

The Toro General Commercial Products Warranty
A Two-Year Limited Warranty
Conditions and Products Covered
The Toro® Company and its afliate, Toro Warranty Company,
pursuant to an agreement between them, jointly warrant your
Toro Commercial Product (“Product") to be free from defects
in materials or workmanship for two years or 1500 operational
hours*, whichever occurs rst. Where a warrantable condition
exists, we will repair the Product at no cost to you including
diagnosis, labor, parts, and transportation. This warranty
begins on the date the Product is delivered to the original retail
purchaser.
P r o d u c t e q u i p p e d w i t h h o u r m e t e r
Instructions for Obtaining Warranty Service
You are responsible for notifying the Commercial Products
Distributor or Authorized Commercial Products Dealer from
whom you purchased the Product as soon as you believe a
warrantable condition exists.
If you need help locating a Commercial Products Distributor
or Authorized Dealer, or if you have questions regarding your
warranty rights or responsibilities, you may contact us at:
Toro Commercial Products Service Department
Toro Warranty Company
8111 Lyndale Avenue South
Bloomington, MN 55420-1196
952-888-8801 or 800-982-2740
E-mail: [email protected]
Owner Responsibilities
As the Product owner, you are responsible for required
maintenance and adjustments stated in your operator’s manual.
Failure to perform required maintenance and adjustments can be
grounds for disallowing a warranty claim.
Items and Conditions Not Covered
Not all product failures or malfunctions that occur during the
warranty period are defects in materials or workmanship. This
express warranty does not cover the following:
• Product failures which result from the use of non-Toro
replacement parts, or from installation and use of add-on,
modied, or unapproved accessories
• Product failures which result from failure to perform required
maintenance and/or adjustments
• Product failures which result from operating the Product in
an abusive, negligent or reckless manner
• Parts subject to consumption through use unless found to be
defective. Examples of parts which are consumed, or used
up, during normal Product operation include, but are not
limited to, blades, reels, bedknives, tines, spark plugs, castor
wheels, tires, lters, belts, and certain sprayer components
such as diaphragms, nozzles, and check valves, etc.
• Failures caused by outside inuence. Items considered to be
outside inuence include, but are not limited to, weather,
storage practices, contamination, use of unapproved
coolants, lubricants, additives, or chemicals, etc.
• Normal “wear and tear" items. Normal “wear and tear"
includes, but is not limited to, damage to seats due to wear
or abrasion, worn painted surfaces, scratched decals or
windows, etc.
Parts
Parts scheduled for replacement as required maintenance are
warranted for the period of time up to the scheduled replacement
time for that part.
Parts replaced under this warranty become the property of
Toro. Toro will make the nal decision whether to repair any
existing part or assembly or replace it. Toro may use factory
remanufactured parts rather than new parts for some warranty
repairs.
General Conditions
Repair by an Authorized Toro Distributor or Dealer is your sole
remedy under this warranty.
Neither The Toro® Company nor Toro Warranty Company
is liable for indirect, incidental or consequential
damages in connection with the use of the Toro
Products covered by this warranty, including any cost or
expense of providing substitute equipment or service
during reasonable periods of malfunction or non-use
pending completion of repairs under this warranty.
Except for the Emissions warranty referenced below,
if applicable, there is no other express warranty. All
implied warranties of merchantability and tness for
use are limited to the duration of this express warranty.
Some states do not allow exclusions of incidental or consequential
damages, or limitations on how long an implied warranty lasts,
so the above exclusions and limitations may not apply to you.
This warranty gives you specic legal rights, and you may also
have other rights which vary from state to state.
Note regarding engine warranty: The Emissions Control System
on your Product may be covered by a separate warranty meeting
requirements established by the U.S. Environmental Protection
Agency (EPA) and/or the California Air Resources Board (CARB).
The hour limitations set forth above do not apply to the Emissions
Control System Warranty. Refer to the Engine Emission Control
Warranty Statement printed in your operator’s manual or
contained in the engine manufacturer’s documentation for
details.
Countries Other than the United States or Canada
Customers who have purchased Toro products exported from the United States or Canada should contact their Toro Distributor
(Dealer) to obtain guarantee policies for your country, province, or state. If for any reason you are dissatised with your Distributor’s
service or have difculty obtaining guarantee information, contact the Toro importer. If all other remedies fail, you may contact us
at Toro Warranty Company.
374-0031 Rev C
 Loading...