

Page 1

FormNo.3358-477Rev D
CCR
ModelNo.38576—SerialNo.280000001andUp
ModelNo.38577—SerialNo.280000001andUp
®
6053QuickClear™Snowthrower
Operator'sManual
Introduction
Readthisinformationcarefullytolearnhowtooperate
andmaintainyourproductproperlyandtoavoidinjury
andproductdamage.Youareresponsibleforoperating
theproductproperlyandsafely.
YoumaycontactTorodirectlyatwww.Toro.comfor
productandaccessoryinformation,helpndinga
dealer,ortoregisteryourproduct.
Wheneveryouneedservice,genuineToroparts,or
additionalinformation,contactanAuthorizedService
DealerorToroCustomerServiceandhavethemodel
andserialnumbersofyourproductready.Figure1
identiesthelocationofthemodelandserialnumbers
ontheproduct.Writethenumbersinthespace
provided.
Figure2
1.Safetyalertsymbol
Thismanualuses2wordstohighlightinformation.
Importantcallsattentiontospecialmechanical
informationandNoteemphasizesgeneralinformation
worthyofspecialattention.
Safety
ThissnowthrowermeetsorexceedstheISO
standard8437ineffectatthetimeofproduction.
Readandunderstandthecontentsofthismanual
beforetheengineiseverstarted.
Thisisthesafetyalertsymbol.Itisusedtoalert
youtopotentialpersonalinjuryhazards.Obeyall
safetymessagesthatfollowthissymboltoavoid
possibleinjuryordeath.
Improperlyusingormaintainingthissnowthrower
couldresultininjuryordeath.Toreducethis
potential,complywiththefollowingsafety
instructions.
Figure1
1.Modelandserialnumberlocation
ModelNo.
SerialNo.
Thismanualidentiespotentialhazardsandhas
safetymessagesidentiedbythesafetyalertsymbol
(Figure2),whichsignalsahazardthatmaycauseserious
injuryordeathifyoudonotfollowtherecommended
precautions.
©2008—TheToro®Company
8111LyndaleAvenueSouth
Bloomington,MN55420
Registeratwww.Toro.com.
Training
•Read,understand,andfollowallinstructionsonthe
machineandinthemanual(s)beforeoperatingthis
unit.Bethoroughlyfamiliarwiththecontrolsand
theproperuseoftheequipment.Knowhowtostop
theunitanddisengagethecontrolsquickly .
•Neverallowchildrentooperatetheequipment.
Neverallowadultstooperatetheequipmentwithout
properinstruction.
•Keeptheareaofoperationclearofallpersons,
particularlysmallchildren.
•Exercisecautiontoavoidslippingorfalling.
OriginalInstructions(EN)
PrintedintheUSA
AllRightsReserved
Page 2

Preparation
Operation
•Thoroughlyinspecttheareawheretheequipmentis
tobeusedandremovealldoormats,sleds,boards,
wires,andotherforeignobjects.
•Donotoperatetheequipmentwithoutwearing
adequatewintergarments.Avoidloosetting
clothingthatcangetcaughtinmovingparts.Wear
footwearthatwillimprovefootingonslippery
surfaces.
•Handlefuelwithcare;itishighlyammable.
–Useanapprovedfuelcontainer.
–Neveraddfueltoarunningengineorhotengine.
–Fillfueltankoutdoorswithextremecare.Never
llfueltankindoors.
–Neverllcontainersinsideavehicleorona
truckortrailerbedwithaplasticliner.Always
placecontainersontheground,awayfromyour
vehicle,beforelling.
–Whenpractical,removegas-poweredequipment
fromthetruckortrailerandrefuelitonthe
ground.Ifthisisnotpossible,thenrefuelsuch
equipmentonatrailerwithaportablecontainer,
ratherthanfromagasolinedispensernozzle.
–Keepthenozzleincontactwiththerimof
thefueltankorcontaineropeningatalltimes,
untilrefuelingiscomplete.Donotuseanozzle
lock-opendevice.
–Replacegasolinecapsecurelyandwipeupspilled
fuel.
–Iffuelisspilledonclothing,changeclothing
immediately.
–Donotsmokewhilehandlinggasoline.
•Useextensioncordsandreceptaclesasspeciedby
themanufacturerforallunitswithelectricstarting
motors.
•Donotattempttoclearsnowfromagravelor
crushedrocksurface.Thisproductisintendedfor
useonlyonpavedsurfaces.
•Neverattempttomakeanyadjustmentswhile
theengineisrunning(exceptwhenspecically
recommendedbymanufacturer).
•Donotputhandsorfeetnearorunderrotatingparts.
Keepclearofthedischargeopeningatalltimes.
•Exerciseextremecautionwhenoperatingonor
crossinggraveldrives,walks,orroads.Stayalertfor
hiddenhazardsortrafc.
•Afterstrikingaforeignobject,stoptheengine,
removetheignitionkey,thoroughlyinspectthe
snowthrowerforanydamage,andrepairthedamage
beforerestartingandoperatingthesnowthrower.
•Iftheunitshouldstarttovibrateabnormally,stop
theengineandcheckimmediatelyforthecause.
Vibrationisgenerallyawarningoftrouble.
•Stoptheenginewheneveryouleavetheoperating
position,beforeuncloggingtherotorbladehousing
ordischargechute,andwhenmakinganyrepairs,
adjustmentsorinspections.
•Whencleaning,repairing,orinspectingthe
snowthrower,stoptheengineandmakecertainthat
therotorbladesandallmovingpartshavestopped.
•Donotruntheengineindoors,exceptwhenstarting
theengineandfortransportingthesnowthrower
inoroutofthebuilding.Opentheoutsidedoors;
exhaustfumesaredangerous.
•Exerciseextremecautionwhenoperatingonslopes.
•Neveroperatethesnowthrowerwithoutproper
guardsandothersafetyprotectivedevicesinplace
andworking.
•Neverdirectthedischargetowardpeopleorareas
wherepropertydamagecanoccur.Keepchildren
andothersaway.
•Donotoverloadthemachinecapacitybyattempting
toclearsnowattoofastarate.
•Lookbehindandusecarewhenbackingupwiththe
snowthrower.
•Disengagepowertotherotorbladeswhen
snowthroweristransportedornotinuse.
•Neveroperatethesnowthrowerwithoutgood
visibilityorlight.Alwaysbesureofyourfooting,and
keeparmholdonthehandles.Walk;neverrun.
•Nevertouchahotengineormufer.
•Alwayswearsafetyglassesoreyeshieldsduring
operationorwhileperforminganadjustmentor
repairtoprotecteyesfromforeignobjectsthatmay
bethrownfromthemachine.
•Letengineandmachineadjusttooutdoor
temperaturesbeforestartingtoclearsnow.
ClearingaCloggedDischarge
Chute
Handcontactwiththerotatingrotorbladesinsidethe
dischargechuteisthemostcommoncauseofinjury
2
Page 3

associatedwithsnowthrowers.Neveruseyourhandto
cleanoutthedischargechute.
Toclearthechute:
•Shuttheengineoff!
•Wait10secondstobesuretherotorbladeshave
stoppedrotating.
•Alwaysuseaclean-outtool,notyourhands.
•Donottouchtheenginewhileitisrunningorsoon
afterithasstoppedbecausetheenginemaybehot
enoughtocauseaburn.
•Performonlythosemaintenanceinstructions
describedinthismanual.Beforeperformingany
maintenance,service,oradjustment,stoptheengine
andremovethekey.Ifmajorrepairsareeverneeded,
contactanAuthorizedServiceDealer.
•Donotchangethegovernorsettingsontheengine.
MaintenanceandStorage
•Checkallfastenersatfrequentintervalsforproper
tightnesstobesuretheequipmentisinsafeworking
condition.
•Neverstorethemachinewithfuelinthefueltank
insideabuildingwhereignitionsourcesarepresent,
suchashotwaterheaters,spaceheaters,orclothes
dryers.Allowtheenginetocoolbeforestoringin
anyenclosure.
•AlwaysrefertotheOperator’sManualforimportant
detailsifthesnowthroweristobestoredforan
extendedperiod.
•Maintainorreplacesafetyandinstructionlabels,as
necessary.
•Runthemachineafewminutesafterthrowingsnow
topreventfreeze-upoftherotorblades.
ToroSnowthrowerSafety
Thefollowinglistcontainssafetyinformationspecic
toToroproductsorothersafetyinformationthatyou
mustknow.
•Rotatingrotorbladescaninjurengersor
hands.Staybehindthehandlesandawayfromthe
dischargeopeningwhileoperatingthesnowthrower.
Keepyourface,hands,feet,andanyotherpart
ofyourbodyorclothingawayfrommovingor
rotatingparts.
•Whenstoringthesnowthrowerformorethan30
days,drainthefuelfromthefueltanktoprevent
apotentialhazard.Storefuelinanapprovedfuel
container.Removethekeyfromtheignitionswitch
beforestoringthesnowthrower.
•PurchaseonlygenuineTororeplacementpartsand
accessories.
SoundPressure
Thisunithasamaximumsoundpressurelevelatthe
operator’searof94dBA,basedonmeasurementsof
identicalmachinesperEN11201.
SoundPower
Thisunithasaguaranteedsoundpowerlevelof105
dBA,basedonmeasurementsofidenticalmachinesper
EN3744.
Vibration
Thisunitdoesnotexceedahand/armvibrationlevelof
12.7m/s
perEN1033.
2
,basedonmeasurementsofidenticalmachines
•Beforeadjusting,cleaning,repairing,andinspecting
thesnowthrower,andbeforeuncloggingthe
dischargechute,stoptheengine,removethekey ,
andwaitforallmovingpartstostop.
•Beforeleavingtheoperatingposition,stopthe
engine,removethekey,andwaitforallmovingparts
tostop.
•Ifashield,safetydevice,ordecalisdamaged,
illegible,orlost,repairorreplaceitbeforebeginning
operation.Also,tightenanyloosefasteners.
•Donotusethesnowthroweronaroof.
3
Page 4
SafetyandInstructionalDecals
Important:Safetyandinstructiondecalsarelocatednearareasofpotentialdanger.Replacedamaged
decals.
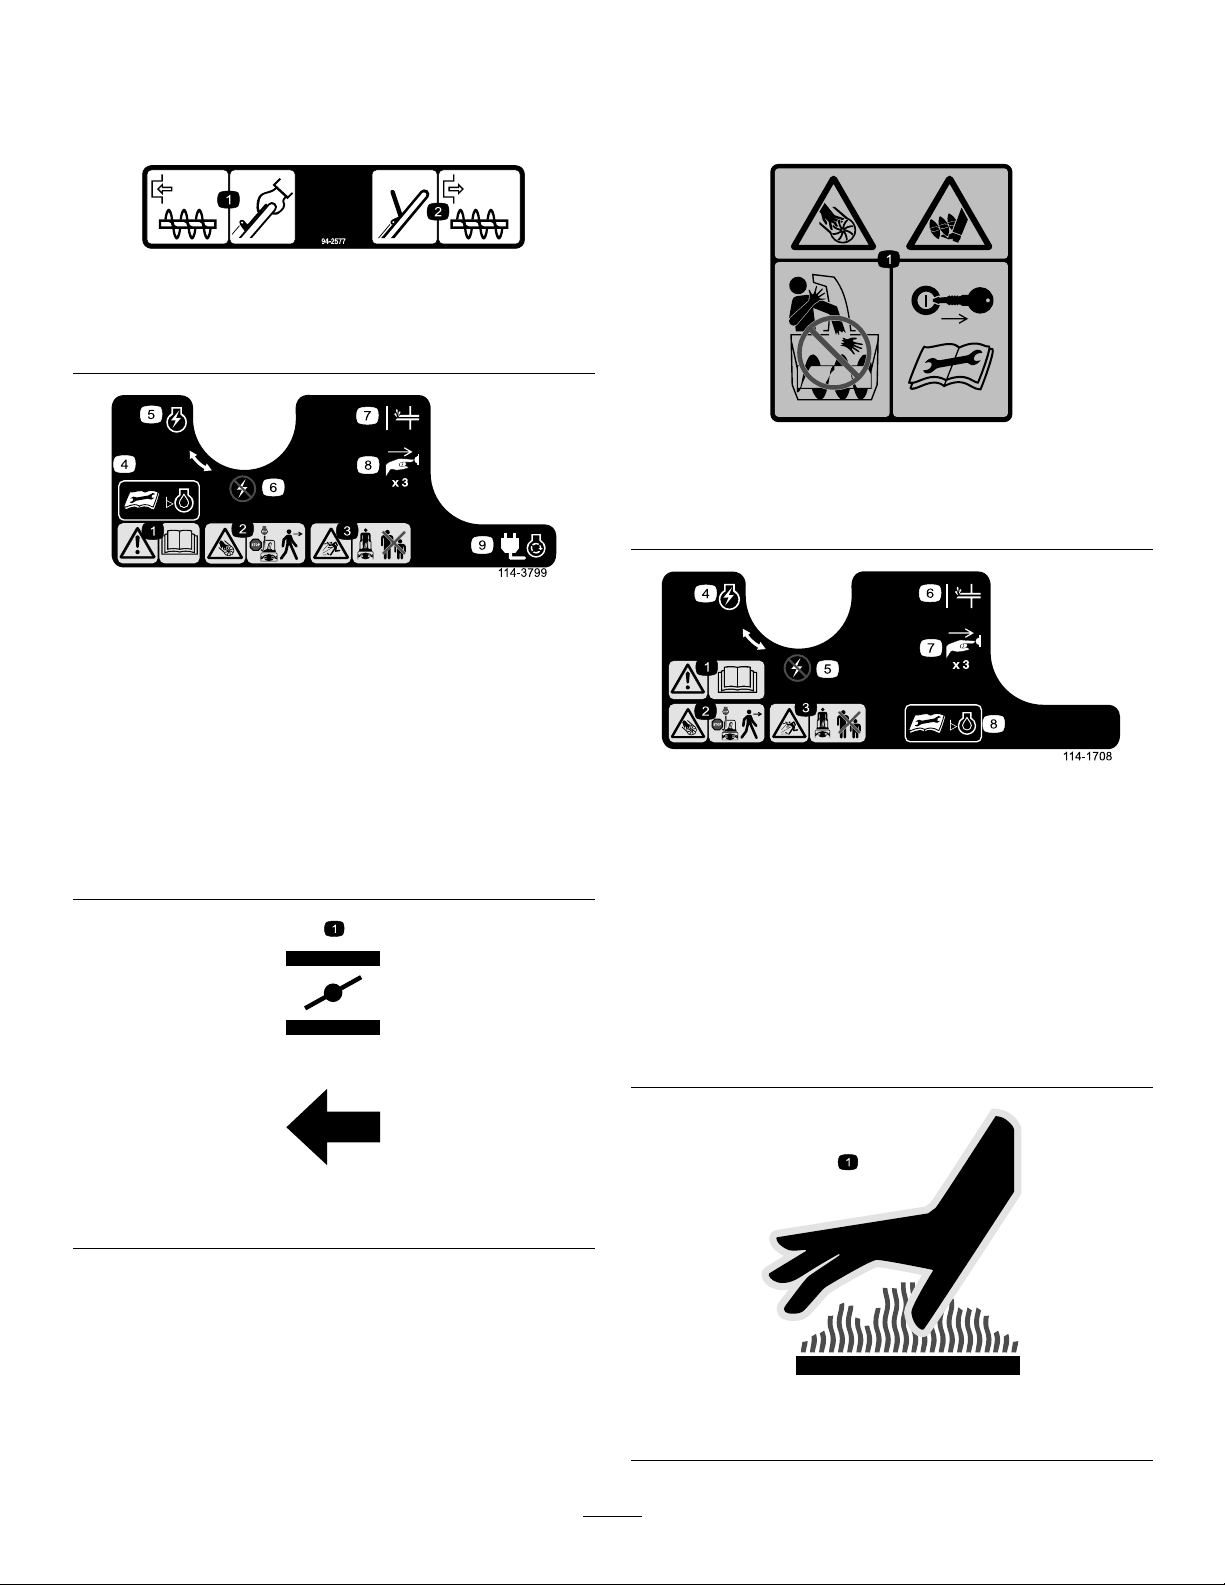
94-2577
1.Toengagetherotorblades,holdthecontrolbaragainst
thehandle.
2.Todisengagetherotorblades,releasethecontrolbar.
114-1711
1.Cutting/dismembermenthazard,rotorblades—donotplace
yourhandinthechute;removetheignitionkeyandreadthe
instructionsbeforeservicingorperformingmaintenance.
108-4930(Model38577only)
1.Warning—readtheOperator’sManual.
2.Cutting/dismembermenthazard,rotorblades—stopthe
enginebeforeleavingthemachine.
3.Thrownobjecthazard—keepbystandersasafedistance
fromthemachine.
4.ReadtheOperator’sManualbeforecheckingengineoil
level.
5.EngineswitchOn
6.EngineswitchOff
7.Primer
8.Pushtheprimerthreetimestoprimetheengine.
9.Plugthemachineintopowertheelectricstarter.
1.Warning—readthe
Operator’sManual.
2.Cutting/dismemberment
hazard,rotorblades—stop
theenginebeforeleaving
themachine.
3.Thrownobject
hazard—keepbystanders
asafedistancefromthe
machine.
4.EngineswitchOn8.ReadtheOperator’s
114-3753(Model38576only)
5.EngineswitchOff
6.Primer
7.Pushtheprimerthree
timestoprimetheengine.
Manualbeforechecking
engineoillevel.
110-9363
1.Choke
114-3794
1.Hotsurface(onexhaustbafe)
4
Page 5

Setup
LooseParts
Usethechartbelowtoverifythatallpartshavebeenshipped.
ProcedureDescription
1.
2.
Nopartsrequired
Screws
Chuteassembly
1.UnfoldingtheHandle
Procedure
1.Loosenthehandleknobs,pulloutthe“U”-shaped
handlelocksuntilyoucanmovethehandlefreely ,
androtatethehandletotheoperatingposition
(Figure3).
Qty.
–
3
1
Unfoldthehandle.
Installthedischargechute.
Figure4
Use
Important:Ensurethatyoudonotpinchor
kinkthecontrolcableortheQuickShoot™
cables(Figure5).
Figure3
1.“U”-shapedhandlelock(2)
2.Handleknobs
2.Inserttheendofthe“U”-shapedhandlelockinto
theopenholeinthehandleandtightenthehandle
knobsuntiltheyaresnug(Figure4).
Figure5
1.Controlcable2.QuickShoot™cables
5
Page 6

2.InstallingtheDischarge
Chute
3
Screws
1
Chuteassembly
Procedure
Installthedischargechuteasshown(Figure6).
Figure6
1.Dischargechute
2.Screw(3)
1.Movethesnowthrowertoalevelsurface.
2.Cleanaroundtheoilllcap(Figure7).
Figure7
1.Oilllcap
3.Unscrewtheoilllcapandremoveit.
4.Withthesnowthrowerintheoperatingposition,
carefullypouroilintothecrankcaseuntilthepoint
ofoverow.
5.Screwtheoilllcapintotheoilllholeandtighten
itsecurely.
4.AdjustingtheControlCable
Note:Foreasierinstallation,useasmallratchetwrench
totightenthescrews.
Important:Donotovertightenthescrews;
otherwiseyoumaydamagethedischargechuteand
preventitfromturningfreely.
3.FillingtheEnginewithOil
Procedure
Yoursnowthrowerdoesnotcomewithoilintheengine,
butitdoescomewithabottleofoil.
Important:Beforestartingtheengine,llthe
enginewithoil.
Note:Thebottleofoilmaycontainmorethanis
required.Donotoverlltheengine.
Maxll:21oz.(0.62l),type:automotivedetergentoil
withanAPIserviceclassicationofSJ,SL,orhigher.
•Fortemperaturesabove32°F(0°C),useSAE30.
•Fortemperaturesbetween0°Fand32°F(–18°Cand
0°C),useSAE5W30orSAE10.
Procedure
RefertoAdjustingtheControlCableinMaintenance.
•Fortemperaturesbelow0°F(–18°C),useSAE
0W30.
6
Page 7

ProductOverview
Figure8
1.Chutedeectortrigger
2.Dischargechute9.Ignitionkey
3.Fueltankcap
4.Controlbar11.Oildrainplug
5.QuickShoot™control12.Oilllcap
6.Recoilstarthandle
7.Primer
8.Electric-startbutton
10.Chokelever
13.Chutedeector
(model38577only)
FillingtheFuelTank
Fillthefueltankwithfreshunleadedgasoline(Figure9).
Figure9
1.1/4inch(6mm)
Important:DonotuseE85orE20fuel.Alternative
fuelswithhighalcoholcontentcancausehard
starting,poorengineperformance,andmaycause
internalenginedamage.
Operation
Note:Determinetheleftandrightsidesofthemachine
fromthenormaloperatingposition.
Gasolineisextremelyammableandexplosive.
Areorexplosionfromgasolinecanburnyou
andothers.
•Topreventastaticchargefromigniting
thegasoline,placethecontainerand/or
snowthroweronthegroundbeforelling,
notinavehicleoronanobject.
•Fillthetankoutdoorswhentheengineis
cold.Wipeupspills.
•Donothandlegasolinewhensmokingor
aroundanopenameorsparks.
•Storegasolineinanapprovedfuelcontainer,
outofthereachofchildren.
CheckingtheEngineOilLevel
ServiceInterval:Beforeeachuseordaily—Check
theengineoillevelandaddoilif
necessary.
1.Movethesnowthrowertoalevelsurface.
2.Cleanaroundtheoilllcap(Figure10).
Figure10
1.Oilllcap
3.Unscrewtheoilllcapandremoveit.
4.Iftheoillevelislow,keepthesnowthrowerinthe
operatingpositionandcarefullypouroilintothe
crankcaseuntilthepointofoverow .(Max.ll:21
7
Page 8

oz.(0.62l),type:SAE30detergentoilwithanAPI
serviceclassicationofSJ,SL,orhigher.)
5.Screwtheoilllcapintotheoilllholeandtighten
itsecurely.
StartingtheEngine
1.TurntheignitionkeyclockwisetotheOnposition
(Figure11).
Figure11
2.Pulloutthechokelever(Figure12).
Figure13
Note:Removeyourglovewhenyoupushinthe
primersothataircannotescapefromtheprimer
hole.
Important:Donotusetheprimerorthechoke
iftheenginehasbeenrunningandishot.
Excessiveprimingmayoodtheengineand
preventitfromstarting.
4.Connectanextensioncordtoapowersourceand
thesnowthrower,andpushtheelectric-startbutton
(model38577only)(Figure14),orpulltherecoil
starthandle(Figure15).
Figure12
1.Chokelever
3.Firmlypushintheprimer3timeswithyourthumb,
holdingtheprimerinaforasecondbeforereleasing
iteachtime(Figure13).
Figure14
8
Page 9

Figure15
Figure16
1.Controlbar
Important:Runtheelectricstarternomore
than10timesatintervalsof5secondson,then
5secondsoff.Runningtheelectricstarter
extensivelycanoverheatanddamageit.Ifthe
enginedoesnotstartafterthisseriesofattempts,
waitatleast40minutestoallowthestarterto
coolbeforeattemptingtostartitagain.Ifthe
enginedoesnotstartafterthesecondseriesof
attempts,takethesnowthrowertoanAuthorized
ServiceDealerforservice(model38577only).
5.Whiletheengineisrunning,pushinthechokelever
slowly.
6.Unplugtheextensioncordfromthepowersource
andthesnowthrower(model38577only).
Ifyouleavethesnowthrowerpluggedintoa
poweroutlet,someonecaninadvertentlystart
thesnowthrowerandinjurepeopleordamage
property(model38577only).
DisengagingtheRotorBlades
Todisengagetherotorblades,releasethecontrolbar
(Figure17).
Figure17
StoppingtheEngine
Unplugthepowercordwheneveryouarenot
startingthesnowthrower.
EngagingtheRotorBlades
Toengagetherotorblades,holdthecontrolbaragainst
thehandle(Figure16).
Tostoptheengine,turntheignitionkey
counterclockwisetotheOffposition(Figure18).
Figure18
9
Page 10

AdjustingtheDischargeChute
PreventingFreeze-upafter
andChuteDeector
Toadjustthedischargechute,pressthetriggerofthe
QuickShoot™controlontherighthandsideofthe
handleandmoveitupordownalongthehandle.Moving
thecontroldownthehandlerotatesthedischargechute
totheleft;movingthecontrolupthehandlerotatesthe
dischargechutetotheright(Figure19).
Use
•Lettheenginerunforafewminutestoprevent
movingpartsfromfreezing.Stoptheengine,wait
forallmovingpartstostop,andremoveiceand
snowfromthesnowthrower.
•Cleanoffanysnowandicefromthebaseofthe
chute.
•Rotatethedischargechuteleftandrighttofreeit
fromanyicebuildup.
•WiththeignitionkeyintheOffposition,pullthe
recoilstarterhandleseveraltimesorpushtheelectric
startbuttononce(model38577only)topreventthe
recoilandelectricstartersfromfreezingup.
•Insnowyandcoldconditions,somecontrolsand
movingpartsmayfreeze.Donotuseexcessiveforce
whentryingtooperatefrozencontrols.Ifyouhave
difcultyoperatinganycontrolorpart,startthe
engineandletitrunforafewminutes.
OperatingTips
Figure19
Toraiseorlowertheangleofthechutedeector,press
thetriggeronthechutedeectorandmovethechute
deectorupordown(Figure20).
Figure20
1.Chutedeectortrigger2.Chutedeector
Therotorbladescanthrowstones,toys,and
otherforeignobjectsandcauseseriouspersonal
injurytotheoperatorortobystanders.
•Keeptheareatobeclearedfreeofallobjects
thattherotorbladescouldpickupand
throw.
•Keepallchildrenandpetsawayfromthe
areaofoperation.
•Removethesnowassoonaspossibleafteritfalls.
•Ifthesnowthrowerdoesnotpropelitselfforward
onslipperysurfacesorinheavysnow,pushforward
onthehandle,butallowthesnowthrowertowork
atitsownpace.
•Overlapeachswathtoensurecompletesnow
removal.
•Dischargethesnowdownwindwheneverpossible.
10
Page 11

Maintenance
Note:Determinetheleftandrightsidesofthemachinefromthenormaloperatingposition.
RecommendedMaintenanceSchedule(s)
MaintenanceService
Interval
Afterthersthour
Aftertherst2hours
Beforeeachuseordaily
Yearly
Yearlyorbeforestorage
MaintenanceProcedure
•Checkthecontrolcableandadjustitifnecessary .
•Checkforloosefastenersandtightenthemifnecessary.
•Changetheengineoil.
•Checktheengineoillevelandaddoilifnecessary .
•Checkthecontrolcableandadjustitifnecessary .
•InspecttherotorbladesandhaveanAuthorizedServiceDealerreplacetherotor
bladesandscraperifnecessary.
•Changetheengineoil.
•Servicethesparkplugandreplaceitifnecessary .
•Checkforloosefastenersandtightenthemifnecessary.
•HaveanAuthorizedServiceDealerinspectthedrivebeltandreplaceitifnecessary .
•Preparethesnowthrowerforstorage.
AdjustingtheControlCable
CheckingtheControlCable
ServiceInterval:Afterthersthour—Check
thecontrolcableandadjustitif
necessary.
Note:Ensurethata1/16-inchto1/8-inch(2mmto3
mm)gapexistsbetweenthecontrolbarandthehandle
(Figure21).
Important:Thecontrolcablemustcontainsome
slackwhenyoudisengagethecontrolbarforthe
rotorbladestostopproperly.
Yearly—Checkthecontrolcableand
adjustitifnecessary.
Movethecontrolbarbacktowardthehandletoremove
theslackinthecontrolcable(Figure21).
Figure21
1.Controlbar2.1/16-inchto1/8-inch(2
mmto3mm)gap
AdjustingtheControlCable
1.Slideupthespringcoverandunhookthespring
fromtheadjusterlink(Figure22).
Figure22
1.Adjusterlink
2.Z-tting
3.Springcover
4.Unhookthespringhere.
11
Page 12

Note:Youcanpulluptheadjusterlinkandcableto
makeunhookingthespringeasier.
2.MovetheZ-ttingtoahigherorlowerholeonthe
adjusterlinkasneededtoobtainthe1/16-inchto
1/8-inch(2mmto3mm)gapbetweenthecontrol
barandthehandle(Figure21).
Note:MovingtheZ-ttinghigherdecreasesthe
gapbetweenthecontrolbarandthehandle;moving
itlowerincreasesthegap.
3.Hookthespringtotheadjusterlinkandslidethe
springcoverovertheadjusterlink.
4.Checktheadjustment;refertoCheckingtheControl
Cable.
Note:Afterextendeduse,thedrivebeltmaywear
andloseitsproperbelttension.Ifthedrivebelt
slips(continuouslysqueals)underaheavyload,
disconnectthespringfromtheadjustorlinkand
movetheupperendofthespringtotheholethat
isfurtherfromthepivotpointinthecontrolbar
(Figure23).Thenconnectthespringtotheadjustor
linkandadjustthecontrolcable.
InspectingtheRotorBlades
ServiceInterval:Yearly—Inspecttherotorbladesand
haveanAuthorizedServiceDealer
replacetherotorbladesandscraperif
necessary.
Beforeeachsession,inspecttherotorbladesforwear.
Whenarotorbladeedgehasworndowntothewear
indicatorhole,haveanAuthorizedServiceDealer
replacetherotorbladesandthescraper(Figure24).
Figure24
1.Wearindicatorhole
Figure23
1.Removetheupperendof
springfromthishole
2.Inserttheupperendof
springintothishole
3.Pivotpoint
4.Upperendofspring
Note:Thebeltmayslip(squeal)inwetconditions;
todryoutthedrivesystem,starttherotorandrun
itwithoutaloadfor30seconds.
ChangingtheEngineOil
ServiceInterval:Aftertherst2hours
Yearly
Runtheengineafewminutesbeforechangingtheoil
towarmit.Warmoilowsbetterandcarriesmore
contaminants.
1.Stoptheengineandwaitforallmovingpartstostop.
2.Movethesnowthrowertoalevelsurface.
3.Placeanoildrainpanundertheoildrainplug,
removetheoildrainplug,andtipthesnowthrower
backwardanddraintheusedoilintheoildrainpan
Figure25).
Figure25
4.Afterdrainingtheusedoil,returnthesnowthrower
totheoperatingposition.
5.Installtheoildrainplugandtightenitsecurely.
12
Page 13

6.Cleanaroundtheoilllcap(Figure26).
ServicingtheSparkPlug
ServiceInterval:Yearly—Servicethesparkplugand
replaceitifnecessary.
UseaChampionRN4Csparkplugorequivalent.
1.Stoptheengineandwaitforallmovingpartstostop.
2.Waituntiltheenginehasfullycooled.
Figure26
1.Oilllcap
7.Unscrewtheoilllcapandremoveit(Figure26).
8.Withthesnowthrowerintheoperatingposition,
carefullypouroilintotheoilllholetothepoint
ofoverow(Figure27).
Maxll:21oz.(0.62l),type:automotivedetergent
oilwithanAPIserviceclassicationofSJ,SL,or
higher.
•Fortemperaturesabove32°F(0°C),useSAE30.
•Fortemperaturesbetween0°Fand32°F(–18°C
and0°C),useSAE5W30orSAE10.
•Fortemperaturesbelow0°F(–18°C),useSAE
0W30.
Aftertheenginehasbeenrunning,themufer
andotherenginecomponentswillbeveryhot
andwillseverelyburnyouifyoutouchthem.
Thisprocedurerequiresyoutoremovethe
exhaustbafefromoverthemuferandto
placeyourhandclosetothemuferandengine.
Allowtheenginetofullycoolbeforestarting
thisprocedure.
3.Removeandsavethefastenersthatsecurethe
shroudasshown(Figure28).
Figure27
9.Screwtheoilllcapintotheoilllhole,andtighten
itsecurely.
10.Wipeupanyspilledoil.
11.Disposeoftheusedoilproperlyatalocalrecycling
center.
Figure28
1.Removethese4fasteners
4.Liftupontheleftrearcorneroftheshroudand
pulltheexhaustbafedownandoutoftheengine
compartment(Figure29).
13
Page 14

8.Setthegapontheplugto0.030inch(0.76mm)
(Figure31).
Figure31
1.Centerelectrodeinsulator3.Airgap(nottoscale)
2.Sideelectrode
9.Installthesparkplugandtightentheplugsecurely.
10.Connectthewiretothesparkplug.
11.Tipthesnowthrowerforwardontoitsfronttomake
installingtheexhaustbafeeasier(Figure32).
Figure29
1.Exhaustbafe
5.Disconnectthewirefromthesparkplug(Figure30).
Figure30
1.Spark-plugwire
6.Cleanaroundthesparkplug.
Figure32
12.Fromtherearleftposition,inserttheexhaustbafe
upintotheshroud.
Note:Ensurethattheupperlipoftheexhaust
bafetsintothetabsontheinsideoftheshroud
(Figure33).
7.Removethesparkplugfromthecylinderhead.
Important:Replaceacracked,fouled,or
dirtysparkplug.Donotcleantheelectrodes
becausegritenteringthecylindercandamage
theengine.
14
Page 15

Figure33
1.Tabs
13.Installthe2screwsintotheexhaustbafe.
14.Returnthesnowthrowertotheoperatingposition.
15.Tuckthelowerlipoftheguardbehindthebeltcover
(Figure34).
Figure34
16.Securetheexhaustbafeusingthesmallsidescrew
thatyoupreviouslyremoved(Figure35).
Figure35
1.Smallsidescrewhere
ReplacingtheDriveBelt
Ifdrivebeltbecomesworn,oil-soaked,excessively
cracked,frayed,orotherwisedamaged,replacethebelt.
1.Removethedrivebeltcoverbyremovingthe3bolts
asshowninFigureFigure36.
15
Page 16

7.Installthecurvedwasherandtherotorpulleybolt
andtightenthemsecurely(Figure36).
Note:Theconcavesideofthecurvedwashergoes
againsttheoutsideofthepulley.
8.Installthebrakespringontotheidlerarm(Figure37).
9.Installthedrivebeltcoverwiththeboltsyou
removedinstep1.
Note:Ensurethatthedrivebeltisproperlyadjusted
andoperating;refertoCheckingtheControlCable
andAdjustingtheControlCable.
AdjustingtheQuickShoot™
Figure36
1.Drivebeltcover6.Drivebelt
2.Bolt(3)7.Rotorshaft
3.Rotorpulleybolt
4.Curvedwasher
5.Rotorpulley10.Enginepulley
8.Brakespring(unhookfrom
idlerarmhere)
9.Idlerpulley
2.Unhookthebrakespringfromtheidlerarmto
releasethebelttension(Figure36).
3.Removethescrewandcurvedwasherthatholdsthe
rotorpulley(Figure36).
4.Removetherotorpulleyandthedrivebelt
(Figure36).
5.Installthenewdrivebelt,routingitasshownin
(Figure37).
Control
Ifthereismorethan1/2inch(13mm)ofslackinthe
QuickShootcable(Figure38)orthedischargechute
doesnotrotateleftandrightinequalangles,adjustthe
QuickShootcontrolcables.
Figure38
1.1/2inch(13mm)maximumslack
1.LoosenthetwoQuickShootcontrolcableclamps
(Figure39).
Figure37
1.Brakespring(installon
idlerarmhere)
2.Idlerpulley4.Rotorpulley
3.Enginepulley
Note:Routethenewdrivebeltrstaroundthe
enginepulley,thentheidlerpulley,andnallyaround
thelooserotorpulleypositionedjustabovetherotor
shaft(Figure36).
6.Installtherotorpulleyontotherotorshaft
(Figure36).
Figure39
1.Cableclamps
16
Page 17

2.PositiontheQuickShootcontrolbetweenthetwo
arrowslocatedontherighthandsideoftheupper
handle(Figure40).
Figure40
1.Arrows
3.Rotatethedischargechutesothatitfacesstraight
aheadandthearrowonthebackofthedischarge
chutealignswiththearrowontheshroud(Figure41).
Figure42
1.Lowercablecasing
5.Pulltheuppercablecasingforwarduntilyouremove
theslackinthecable,andtightenthescrewonthe
uppercableclampsecurely(Figure43).
Figure41
4.Holdthedischargechuteinthestraight-ahead
position,pullthelowercablecasingdownwarduntil
youremovetheslackinthecable,andtightenthe
screwonthelowercableclampsecurely(Figure42).
Figure43
1.Uppercablecasing
Note:Donotover-tensionthecables.Ifthecables
areover-tensioned,theQuickShootwillbehardto
operate.
17
Page 18

Storage
14.Tightenanyloosefasteners.Repairorreplaceany
damagedparts.
StoringtheSnowthrower
•Gasolinefumesarehighlyammable,
explosive,anddangerousifinhaled.Ifyou
storetheproductinanareawithanopen
ame,thegasolinefumesmayigniteand
causeanexplosion.
•Donotstorethesnowthrowerinahouse
(livingarea),basement,oranyotherarea
whereignitionsourcesmaybepresent,
suchashotwaterandspaceheaters,clothes
dryers,furnaces,andotherlikeappliances.
1.Onthelastrefuelingoftheyear,addfuelstabilizer
tofreshfuelasdirectedbytheenginemanufacturer.
2.Runtheenginefor10minutestodistributethe
conditionedfuelthroughthefuelsystem.
3.Stoptheengine,allowittocool,andsiphonthefuel
tankorruntheengineuntilitstops.
15.Coverthesnowthrowerandstoreitinaclean,dry
placeoutofthereachofchildren.Allowtheengine
tocoolbeforestoringitinanyenclosure.
4.Starttheengineandrunituntilitstops.
5.Chokeorprimetheengine,startitathirdtime,and
runtheengineuntilitwillnotstart.
6.Disposeofunusedfuelproperly.Recycleitaccording
tolocalcodes,oruseitinyourautomobile.
Note:Donotstorestabilizedgasolineformore
than90days.
7.Whiletheengineisstillwarm,changetheengineoil.
RefertoChangingtheEngineOil.
8.Removethesparkplug.
9.Squirt2teaspoonsofoilintothesparkplughole.
10.Installthesparkplugbyhandandthentightenit
securely.Ifyoudonothaveatorquewrench,tighten
theplugrmly.
11.WiththeignitionkeyintheOffposition,pullthe
recoilstarterslowlytodistributetheoilontheinside
ofthecylinder.
12.Cleanthesnowthrower.
13.Touchupchippedsurfaceswithpaintavailable
fromanAuthorizedServiceDealer.Sandaffected
areasbeforepainting,andusearustpreventativeto
preventthemetalpartsfromrusting.
18
Page 19

International Distributor List
Distributor: Country: Phone Number:
Atlantis Su ve Sulama Sisstemleri Lt Turkey 90 216 344 86 74
Balama Prima Engineering Equip Hong Kong 852 2155 2163
B-Ray Corporation Korea 82 32 551 2076
Casco Sales Company Puerto Rico 787 788 8383
Ceres S.A Costa Rica 506 239 1138
CSSC Turf Equipment (pvt) Ltd Sri Lanka 94 11 2746100
Cyril Johnston & Co Northern Ireland 44 2890 813 121
Equiver Mexico 52 55 539 95444
Femco S.A. Guatemala 502 442 3277
G.Y.K. Company ltd. Japan 81 726 325 861
Geomechaniki of Athens Greece 30 10 935 0054
Guandong Golden Star China 86 20 876 51338
Hako Gorund and Garden Sweden 46 35 10 0000
Hayter Limited (U.K.) United Kingdom 44 1279 723 444
Hydroturf Int. Co Dubai United Arab Emirates 97 14 347 9479
Hydroturf Egypt LLC Egypt 202 519 4308
Ibea S.p.A. Italy 39 0331 853611
Irriamc Portugal 351 21 238 8260
Jean Heybroek b.v. Netherlands 31 30 639 4611
Lely (U.K.) Limited United Kingdom 44 1480 226 800
Maquiver S.A. Colombia 57 1 236 4079
Maruyama Mfg. Co. Inc. Japan 81 3 3252 2285
Metra Kft Hungary 36 1 326 3880
Mountfield a.s. Czech Republic 420 255 704 220
Munditol S.A. Argentina 54 11 4 821 9999
Oslinger Turf Equipment SA Ecuador 593 4 239 6970
Oy Hako Ground and Garden Ab Finland 358 987 00733
Parkland Products Ltd New Zealand 64 3 34 93760
Prochaska & Cie Austria 43 1 278 5100
RT Cohen 2004 Ltd Israel 972 986 17979
Riversa Spain 34 9 52 83 7500
Roth Motorgerate GmBh & Co Germany 49 7144 2050
Sc Svend Carlsen A/S Denmark 45 66 109 200
Solvert S.A.S France 33 1 30 81 77 00
Spypros Stavrinides Limited Cyprus 357 22 4341 31
Surge Systems India Limited India 91 1 292299901
T-Markt Logistics Ltd Hungary 36 26 525 500
Toro Australia Australia 61 3 9580 7355
Toro Europe BVBA Belgium 32 14 562 960
374-0102 Rev B
Page 20

TheToroWarranty
ConditionsandProductsCovered
TheToro®Companyanditsafliate,ToroWarrantyCompany,pursuantto
anagreementbetweenthem,jointlypromisestotheoriginalpurchaser*to
repairanyToroProductusedfornormalresidentialpurposes*ifdefectivein
materialsorworkmanship.Thefollowingtimeperiodsapplyfromthedate
oforiginalpurchase:
Products
WalkPowerMowers
RearEngineRiders2-yearlimitedwarranty
Lawn&GardenTractors
ElectricHandHeldProducts
Snowthrowers
ConsumerZeroTurn
*“Originalpurchaser”meansusethepersonwhooriginallypurchasedToro
products.
*“Normalresidentialpurposes”meansuseoftheproductonthesamelotas
yourhome.Useatmorethanonelocationisconsideredcommercialuse,and
thecommercialusewarrantywouldapply.
WarrantyPeriod
2-yearlimitedwarranty
2-yearlimitedwarranty
2-yearlimitedwarranty
2-yearlimitedwarranty
2-yearlimitedwarranty
LimitedWarrantyforCommercialUse
ToroConsumerProductsandattachmentsusedforcommercial,institutional,
orrentalusearewarrantedagainstdefectsinmaterialsorworkmanshipforthe
followingtimeperiodsfromthedateoforiginalpurchase:
Products
WalkPowerMowers
RearEngineRiders90daywarranty
Lawn&GardenTractors
ElectricHandHeldProducts
Snowthrowers
ConsumerZeroTurn
WarrantyPeriod
90daywarranty
90daywarranty
90daywarranty
90daywarranty
45daywarranty
InstructionsforObtainingWarrantyService
IfyouthinkthatyourToroProductcontainsadefectinmaterialsor
workmanship,followthisprocedure:
1.Contactyoursellertoarrangeserviceoftheproduct.Ifforanyreason
itisimpossibleforyoutocontactyourseller,youmaycontactanyToro
AuthorizedDistributortoarrangeservice.
2.Bringtheproductandyourproofofpurchase(salesreceipt)toyourseller
ortheServiceDealer.
IfforanyreasonyouaredissatisedwiththeServiceDealer’sanalysisorwiththe
assistanceprovided,contacttheToroimporterorcontactusat:
CustomerCareDepartment,ConsumerDivision
ToroWarrantyCompany
8111LyndaleAvenueSouth
Bloomington,MN55420-1196
Manager:TechnicalProductSupport:001-952-887-8248
SeeattachedDistributorList
OwnerResponsibilities
YoumustmaintainyourToroProductbyfollowingthemaintenanceprocedures
describedintheoperator’smanual.Suchroutinemaintenance,whether
performedbyadealerorbyyou,isatyourexpense.
ItemsandConditionsNotCovered
Thisexpresswarrantydoesnotcover:
•Costofregularmaintenanceserviceorparts,suchaslters,fuel,lubricants,
tune-upparts,bladesharpening,brakeandclutchadjustments.
•Anyproductorpartwhichhasbeenalteredormisusedorrequired
replacementorrepairduetonormalwear,accidents,orlackofproper
maintenance.
•Repairsnecessaryduetoimproperfuel,contaminantsinthefuelsystem,or
failuretoproperlypreparethefuelsystempriortoanyperiodofnon-use
overthreemonths.
•Engineandtransmission.Thesearecoveredbytheappropriate
manufacturer’sguaranteeswithseparatetermsandconditions.
AllrepairscoveredbythiswarrantymustbeperformedbyanAuthorizedToro
ServiceDealerusingToroapprovedreplacementparts.
GeneralConditions
Thepurchaseriscoveredbythenationallawsofeachcountry.Therightsto
whichthepurchaserisentitledwiththesupportoftheselawsarenotrestricted
bythiswarranty.
374-0101RevA
 Loading...