

Page 1
CCR™6053RQuickClearSnowthrower
ModelNo.38567—SerialNo.311000001andUp
ModelNo.38569—SerialNo.311000001andUp
FormNo.3365-599RevC
Operator'sManual
Introduction
Thismachineisintendedtobeusedbyresidential
homeownersorprofessional,hiredoperators.It
isdesignedprimarilyforremovingsnowfrom
pavedsurfaces,suchasdrivewaysandsidewalks,
andothersurfacesfortrafconresidentialor
commercialproperties.Itisnotdesignedfor
removingmaterialsotherthansnow,norisit
designedforclearingoffgravelsurfaces.
Readthisinformationcarefullytolearnhowtooperate
andmaintainyourmachineproperlyandtoavoidinjury
andmachinedamage.Youareresponsibleforoperating
themachineproperlyandsafely.
YoumaycontactTorodirectlyatwww .Toro.comfor
machineandaccessoryinformation,helpndinga
dealer,ortoregisteryourmachine.
Wheneveryouneedservice,genuineToroparts,
oradditionalinformation,contactanAuthorized
ServiceDealerorToroCustomerServiceandhave
themodelandserialnumbersofyourmachineready.
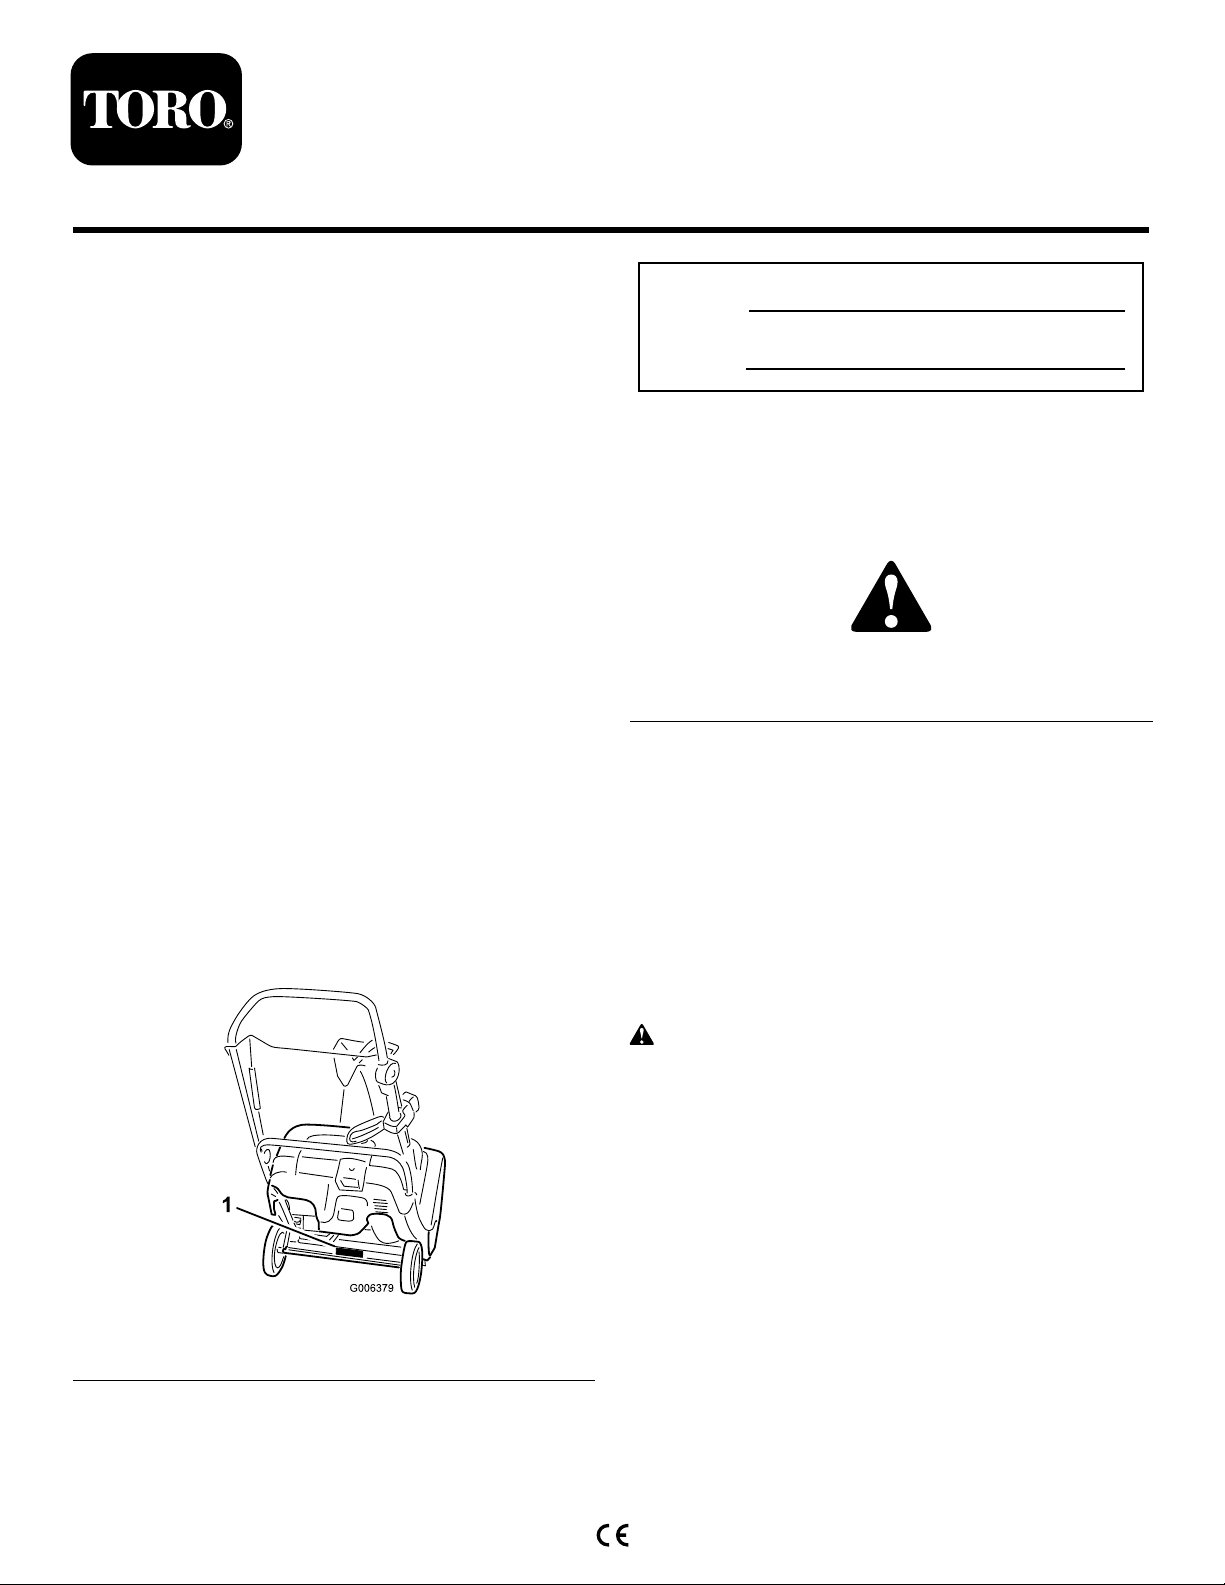
Figure1identiesthelocationofthemodelandserial
numbersonthemachine.Writethenumbersinthe
spaceprovided.
ModelNo.
SerialNo.
Thismanualidentiespotentialhazardsandhassafety
messagesidentiedbythesafetyalertsymbol(Figure2),
whichsignalsahazardthatmaycauseseriousinjury
ordeathifyoudonotfollowtherecommended
precautions.
Figure2
1.Safetyalertsymbol
Thismanualuses2wordstohighlightinformation.
Importantcallsattentiontospecialmechanical
informationandNoteemphasizesgeneralinformation
worthyofspecialattention.
Safety
Readandunderstandthecontentsofthismanual
beforeyoustarttheengine.
1.Modelandserialnumberlocation
©2010—TheT oro®Company
8111LyndaleAvenueSouth
Bloomington,MN55420
Figure1
Registeratwww.Toro.com.
Thisisthesafetyalertsymbol.Itisusedtoalert
youtopotentialpersonalinjuryhazards.Obeyall
safetymessagesthatfollowthissymboltoavoid
possibleinjuryordeath.
Improperlyusingormaintainingthismachine
couldresultininjuryordeath.T oreducethis
potential,complywiththefollowingsafety
instructions.
Training
•Read,understand,andfollowallinstructionsonthe
machineandinthemanual(s)beforeoperatingthis
machine.Bethoroughlyfamiliarwiththecontrols
andtheproperuseofthemachine.Knowhowto
stopthemachineanddisengagethecontrolsquickly.
OriginalInstructions(EN)
PrintedintheUSA
AllRightsReserved
Page 2

•Neverallowchildrentooperatethemachine.Never
allowadultstooperatethemachinewithoutproper
instruction.
•Keeptheareaofoperationclearofallpersons,
particularlysmallchildren.
•Exercisecautiontoavoidslippingorfalling.
•Alwayswearsafetyglassesoreyeshieldsduring
operationorwhileperforminganadjustmentor
repairtoprotecteyesfromforeignobjectsthatmay
bethrownfromthemachine.
•Lettheengineandmachineadjusttooutdoor
temperaturesbeforestartingtoclearthesnow.
Preparation
•Thoroughlyinspecttheareawherethemachineis
tobeusedandremovealldoormats,sleds,boards,
wires,andotherforeignobjects.
•Donotoperatethemachinewithoutwearing
adequatewintergarments.Avoidloosetting
clothingthatcangetcaughtinmovingparts.Wear
footwearthatwillimprovefootingonslippery
surfaces.
•Handlefuelwithcare;itishighlyammable.
–Useanapprovedfuelcontainer.
–Neveraddfueltoarunningengineorhotengine.
–Fillfueltankoutdoorswithextremecare.Never
llthefueltankindoors.
–Neverllcontainersinsideavehicleorona
truckortrailerbedwithaplasticliner.Always
placecontainersontheground,awayfromyour
vehicle,beforelling.
–Whenpractical,removegas-poweredmachinery
fromthetruckortrailerandrefuelitonthe
ground.Ifthisisnotpossible,thenrefuelsuch
machineryonatrailerwithaportablecontainer,
ratherthanfromagasolinedispensernozzle.
–Keepthenozzleincontactwiththerimofthe
fueltankorcontaineropeningatalltimes,until
refuelingiscomplete.Donotuseanozzle
lock-opendevice.
–Replacegasolinecapsecurelyandwipeupspilled
fuel.
–Iffuelisspilledonclothing,changeclothing
immediately.
–Donotsmokewhilehandlinggasoline.
•Useextensioncordsandreceptaclesasspecied
bythemanufacturerforallmachineswithelectric
startingmotors.
•Donotattempttoclearsnowfromagravelor
crushedrocksurface.Thismachineisintendedfor
useonlyonpavedsurfaces.
•Neverattempttomakeanyadjustmentswhile
theengineisrunning(exceptwhenspecically
recommendedbymanufacturer).
Operation
•Donotputhandsorfeetnearorunderrotatingparts.
Keepclearofthedischargeopeningatalltimes.
•Exerciseextremecautionwhenoperatingonor
crossinggraveldrives,walks,orroads.Stayalertfor
hiddenhazardsortrafc.
•Afterstrikingaforeignobject,stoptheengine,
removetheignitionkey,thoroughlyinspectthe
machineforanydamage,andrepairthedamage
beforerestartingandoperatingthemachine.
•Ifthemachineshouldstarttovibrateabnormally,
stoptheengineandcheckimmediatelyforthecause.
Vibrationisgenerallyawarningoftrouble.
•Stoptheenginewheneveryouleavetheoperating
position,beforeuncloggingtherotorbladehousing
ordischargechute,andwhenmakinganyrepairs,
adjustmentsorinspections.
•Whencleaning,repairing,orinspectingthemachine,
stoptheengineandmakecertainthattherotor
bladesandallmovingpartshavestopped.
•Donotruntheengineindoors,exceptwhenstarting
theengineandfortransportingthemachineinor
outofthebuilding.Opentheoutsidedoors;exhaust
fumesaredangerous.
•Exerciseextremecautionwhenoperatingonslopes.
•Neveroperatethemachinewithoutproperguards
andothersafetyprotectivedevicesinplaceand
working.
•Neverdirectthedischargetowardpeopleorareas
wherepropertydamagecanoccur.Keepchildren
andothersaway.
•Donotoverloadthemachinecapacitybyattempting
toclearsnowattoofastarate.
•Lookbehindandusecarewhenbackingupwiththe
machine.
•Disengagepowertotherotorbladeswhenthe
machineisbeingtransportedornotinuse.
•Neveroperatethemachinewithoutgoodvisibility
orlight.Alwaysbesureofyourfooting,andkeepa
rmholdonthehandles.Walk;neverrun.
•Nevertouchahotengineormufer(
Figure3).
2
Page 3

Figure3
ClearingaCloggedDischarge
Chute
Handcontactwiththerotatingrotorbladesinsidethe
dischargechuteisthemostcommoncauseofinjury
associatedwithsnowthrowers.Neveruseyourhandto
cleanoutthedischargechute.
Toclearthechute:
•Shuttheengineoff!
Keepyourface,hands,feet,andanyotherpart
ofyourbodyorclothingawayfrommovingor
rotatingparts.
•Beforeadjusting,cleaning,repairing,andinspecting
themachine,andbeforeuncloggingthedischarge
chute,stoptheengine,removethekey,andwait
forallmovingpartstostop.
•Beforeleavingtheoperatingposition,stopthe
engine,removetheignitionkey,andwaitforall
movingpartstostop.
•Ifashield,safetydevice,ordecalisdamaged,
illegible,orlost,repairorreplaceitbeforebeginning
operation.Also,tightenanyloosefasteners.
•Donotsmokewhilehandlinggasoline.
•Donotusethemachineonaroof.
•Donottouchtheenginewhileitisrunningorsoon
afterithasstoppedbecausetheenginemaybehot
enoughtocauseaburn.
•Wait10secondstobesuretherotorbladeshave
stoppedrotating.
•Alwaysuseaclean-outtool,notyourhands.
MaintenanceandStorage
•Checkallfastenersatfrequentintervalsforproper
tightnesstobesurethemachineisinsafeworking
condition.
•Neverstorethemachinewithfuelinthefueltank
insideabuildingwhereignitionsourcesarepresent,
suchashotwaterheaters,spaceheaters,orclothes
dryers.Allowtheenginetocoolbeforestoringin
anyenclosure.
•AlwaysrefertotheOperator’sManualforimportant
detailsifthemachineistobestoredforanextended
periodoftime.
•Maintainorreplacesafetyandinstructionlabels,as
necessary.
•Runthemachineafewminutesafterthrowingsnow
topreventfreeze-upoftherotorblades.
•Performonlythosemaintenanceinstructions
describedinthismanual.Beforeperformingany
maintenance,service,oradjustment,stoptheengine
andremovethekey.Ifmajorrepairsareeverneeded,
contactanAuthorizedServiceDealer.
•Donotchangethegovernorsettingsontheengine.
•Whenstoringthemachineformorethan30days,
drainthefuelfromthefueltanktopreventa
potentialhazard.Storefuelinanapprovedfuel
container.Removethekeyfromtheignitionswitch
beforestoringthemachine.
•PurchaseonlygenuineTororeplacementpartsand
accessories.
SoundPressure
Thismachinehasasoundpressurelevelattheoperator’s
earof88dBA,whichincludesanUncertaintyValue(K)
of1dBA.Thesoundpressurelevelwasdetermined
accordingtotheproceduresoutlinedinENISO11201.
SoundPower
ToroSnowthrowerSafety
Thefollowinglistcontainssafetyinformationspecic
toToroproductsorothersafetyinformationthatyou
mustknow.
•Rotatingrotorbladescaninjurengersor
hands.Staybehindthehandlesandawayfrom
thedischargeopeningwhileoperatingthemachine.
Thismachinehasaguaranteedsoundpowerlevelof104
dBA,whichincludesanUncertaintyValue(K)of3.75
dBA.Thesoundpowerlevelwasdeterminedaccording
totheproceduresoutlinedinENISO3744.
3
Page 4
Hand-ArmVibration
Measuredvibrationlevelforthelefthand=8.4m/s
Measuredvibrationlevelfortherighthand=10.7m/s
UncertaintyValue(K)=4.3m/s
2
Themeasuredvaluesweredeterminedaccordingtothe
proceduresoutlinedinENISO20643.
2
2
SafetyandInstructionalDecals
Important:Safetyandinstructiondecalsarelocatednearareasofpotentialdanger.Replacedamaged
decals.
94-2577
1.Toengagetherotorblades,holdthecontrolbaragainst
thehandle.
2.Todisengagetherotorblades,releasethecontrolbar.
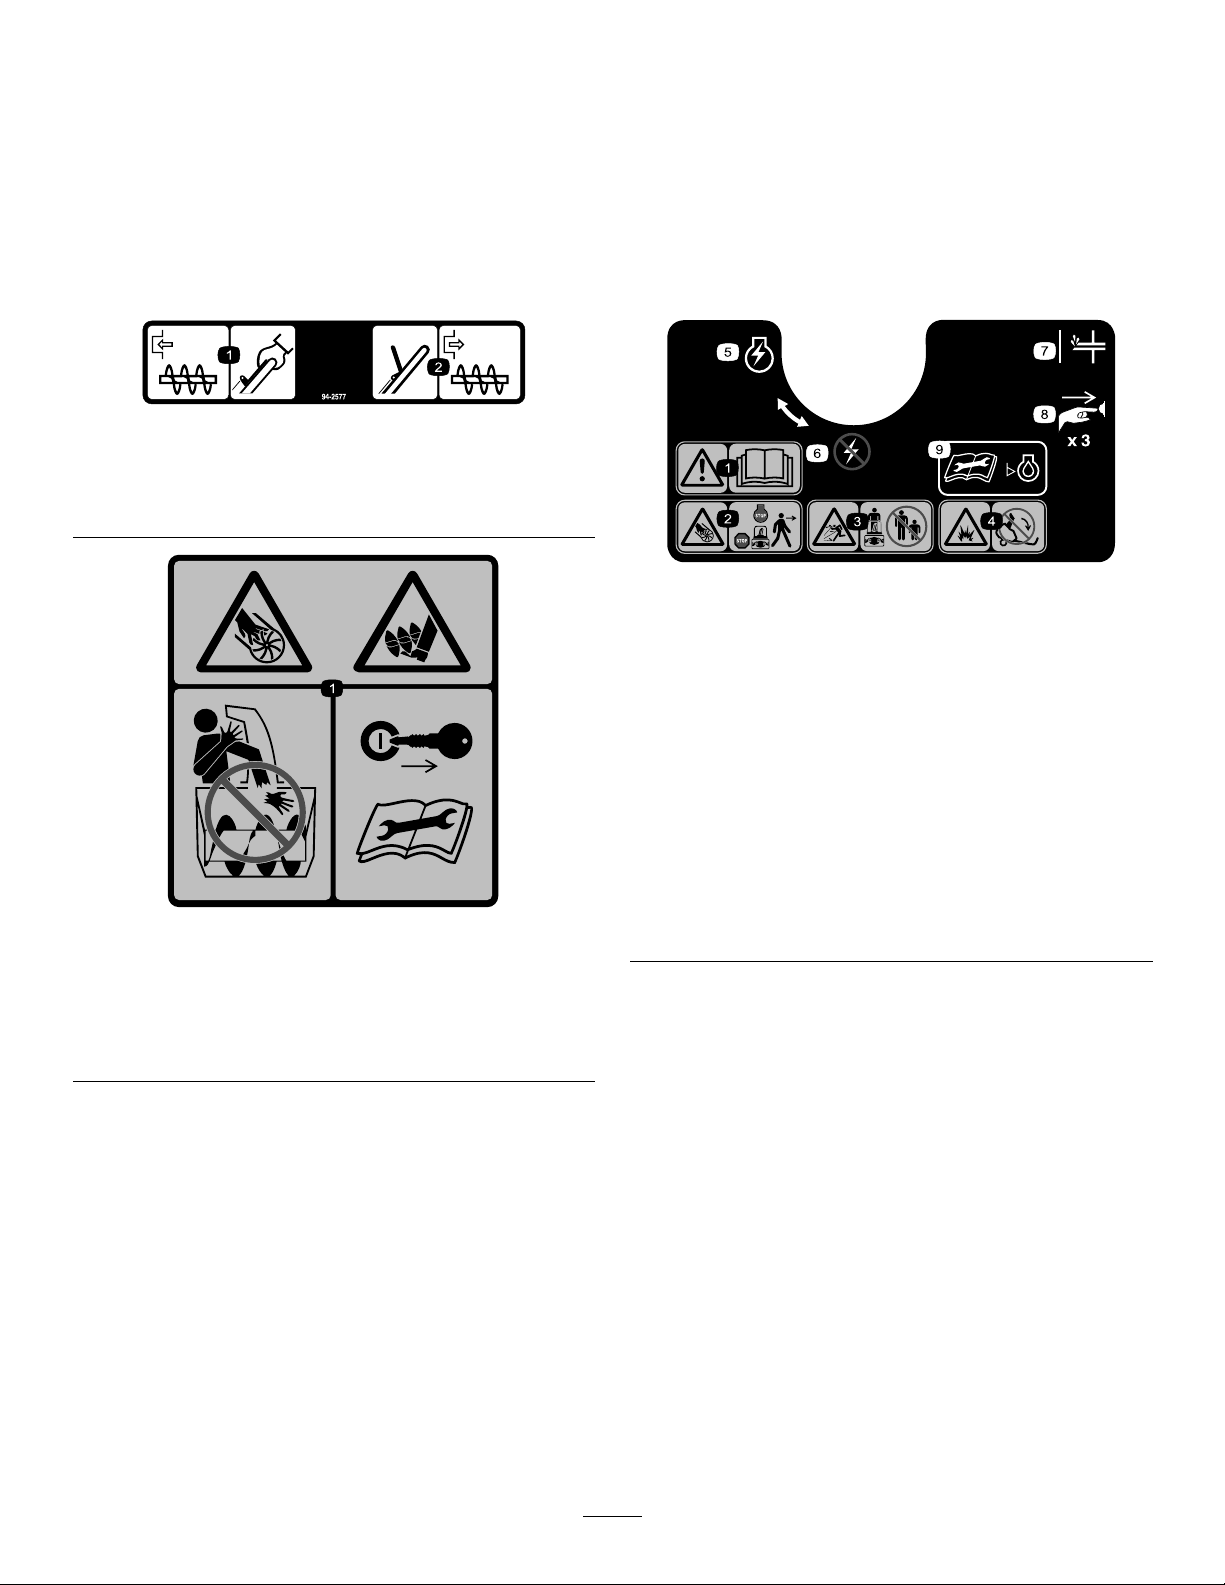
117-9102
Orderpartno.117-6036
115–5698
Orderpartno.117-9121
1.Cuttingdismembermenthazards,impellerandauger—do
notplaceyourhandinthechute;removetheignitionkey
andreadtheinstructionsbeforeservicingorperforming
maintenance.
1.Warning—readthe
Operator'sManual.
2.Cutting/dismemberment
hazard,impeller—stopthe
enginebeforeleavingthe
machine.
3.Thrownobject
hazard—keepbystanders
asafedistancefromthe
machine.
4.Fuelspillhazard—donot
tipmachinebackward.
5.EngineswitchOn
6.EngineswitchOff
7.Primer
8.Pushtheprimerthree
timestoprimetheengine.
9.ReadtheOperator's
Manualbeforechecking
engineoillevel.
4
Page 5
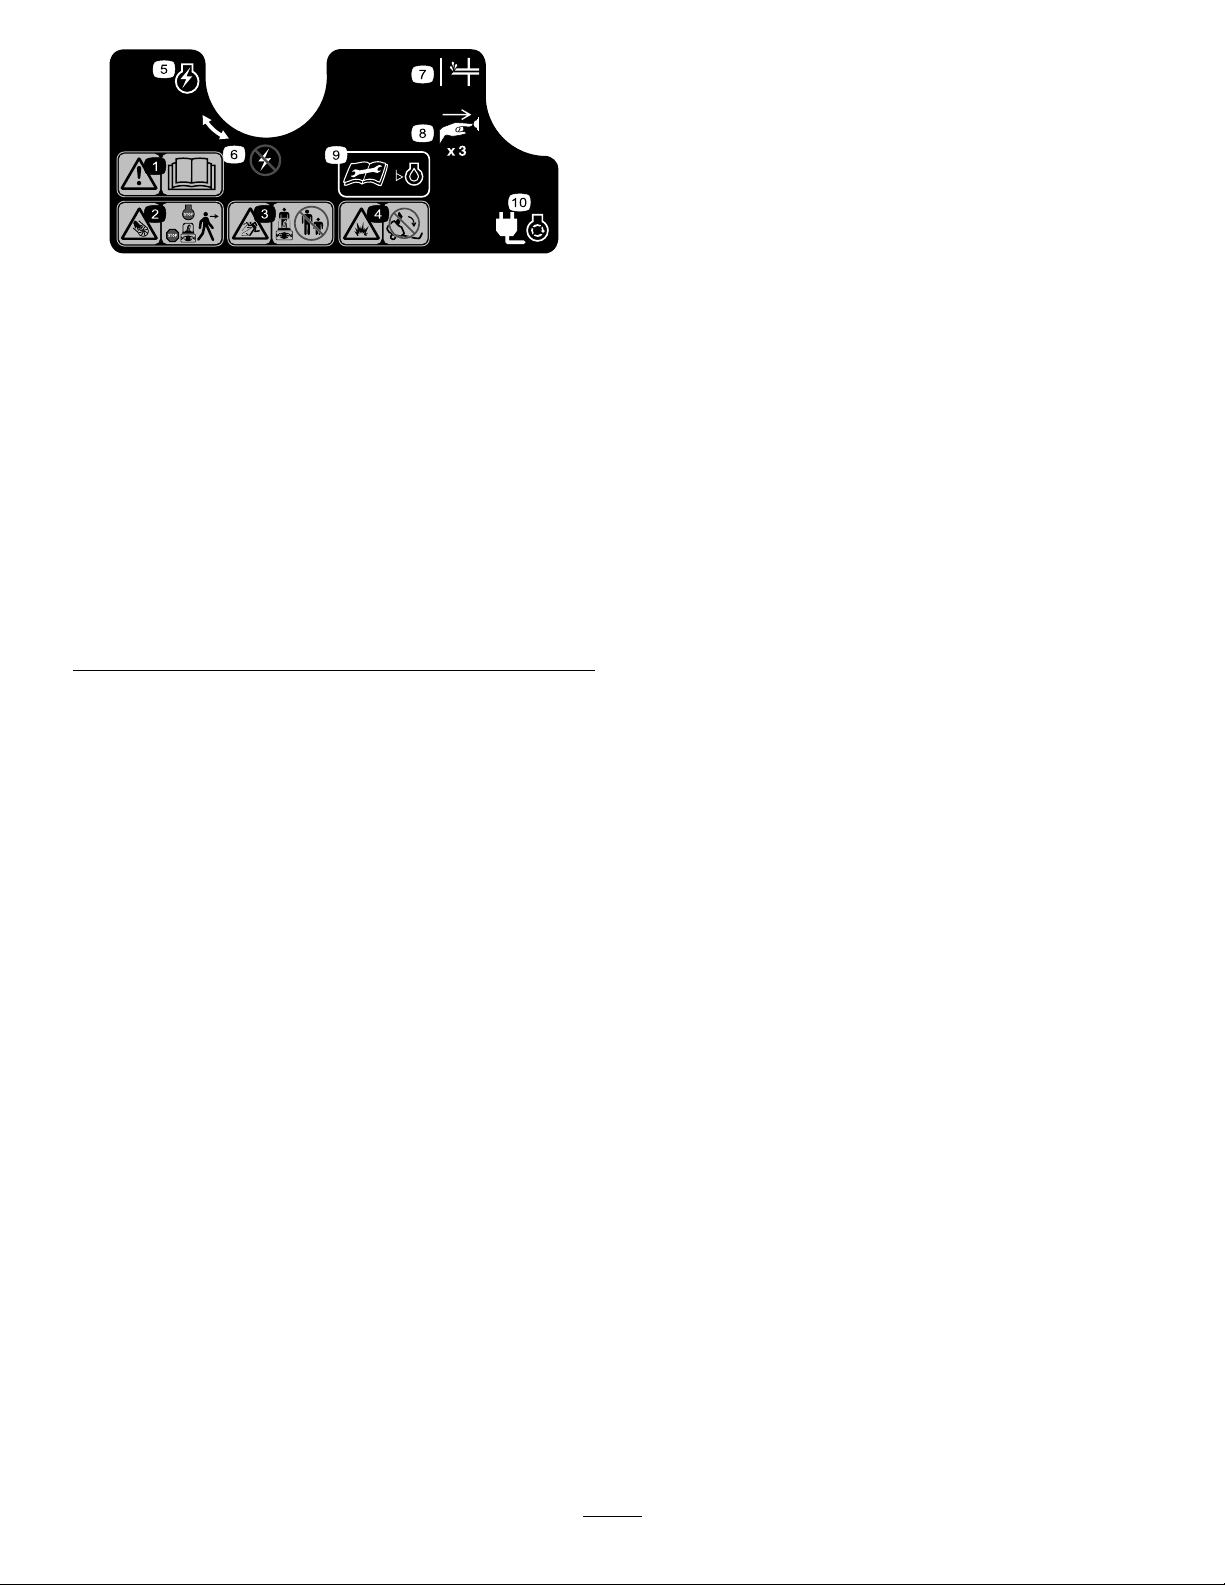
Orderpartno.117-6046
117-9103
1.Warning—readthe
Operator'sManual.
2.Cutting/dismemberment
hazard,impeller—stopthe
enginebeforeleavingthe
machine.
3.Thrownobject
hazard—keepbystanders
asafedistancefromthe
machine.
4.Fuelspillhazard—donot
tipmachinebackward.
5.EngineswitchOn
6.EngineswitchOff
7.Primer
8.Pushtheprimerthree
timestoprimetheengine.
9.ReadtheOperator's
Manualbeforechecking
engineoillevel.
10.Plugthemachineinto
powertheelectricstarter .
5
Page 6
Setup
LooseParts
Usethechartbelowtoverifythatallpartshavebeenshipped.
ProcedureDescription
1
2
Nopartsrequired
Screws
Chuteassembly
1
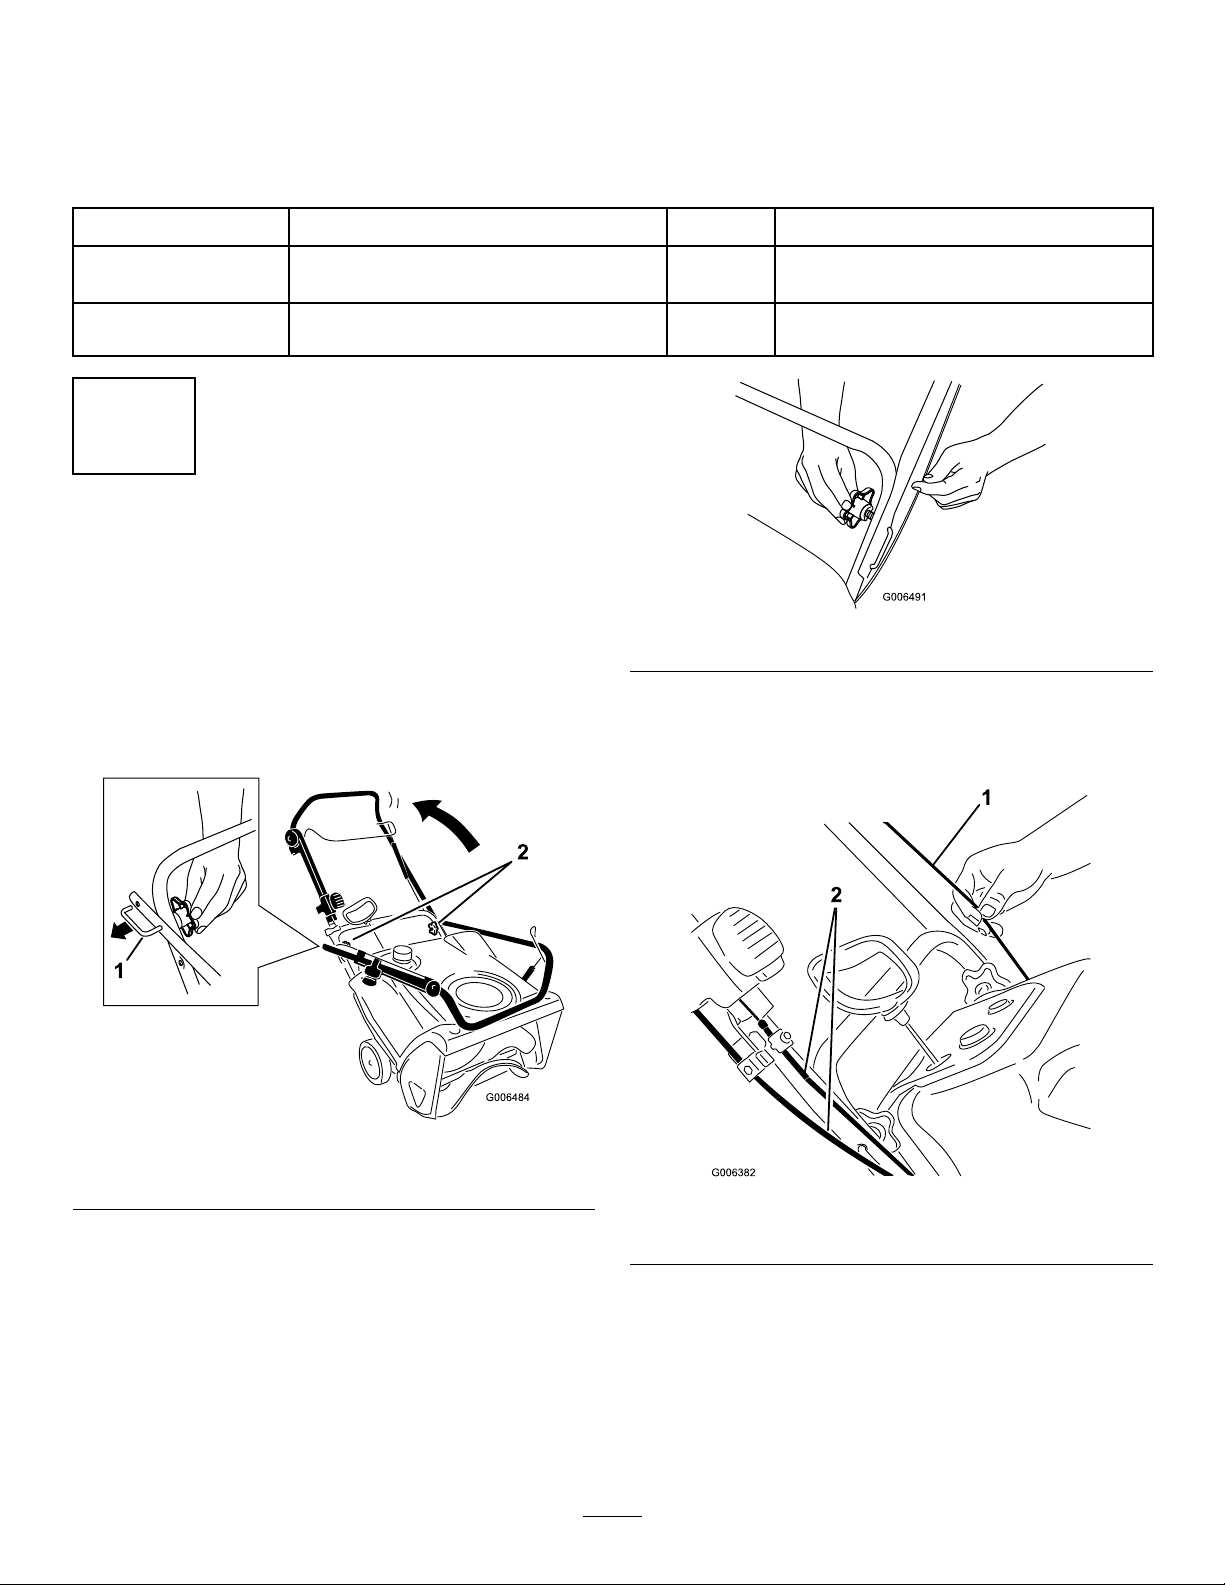
UnfoldingtheHandle
NoPartsRequired
Procedure
1.Loosenthehandleknobs,pulloutthe“U”-shaped
handlelocksuntilyoucanmovethehandlefreely,
androtatethehandletotheoperatingposition
Figure4).
(
Qty.
–
3
1
Important:Ensurethatyoudonotpinchor
kinkthecontrolcableortheQuickShoot™
cables(Figure6).
Unfoldthehandle.
Installthedischargechute.
Figure5
Use
Figure4
1.“U”-shapedhandlelock(2)
2.Inserttheendofthe“U”-shapedhandlelockinto
theopenholeinthehandleandtightenthehandle
knobsuntiltheyaresnug(Figure5).
2.Handleknobs
Figure6
1.Controlcable2.QuickShoot™cables
6
Page 7
Note:Thebottleofoilmaycontainmorethanis
required.Donotoverlltheengine.
2
InstallingtheDischargeChute
Partsneededforthisprocedure:
3
Screws
1
Chuteassembly
Procedure
Installthedischargechuteasshown(Figure7).
Figure7
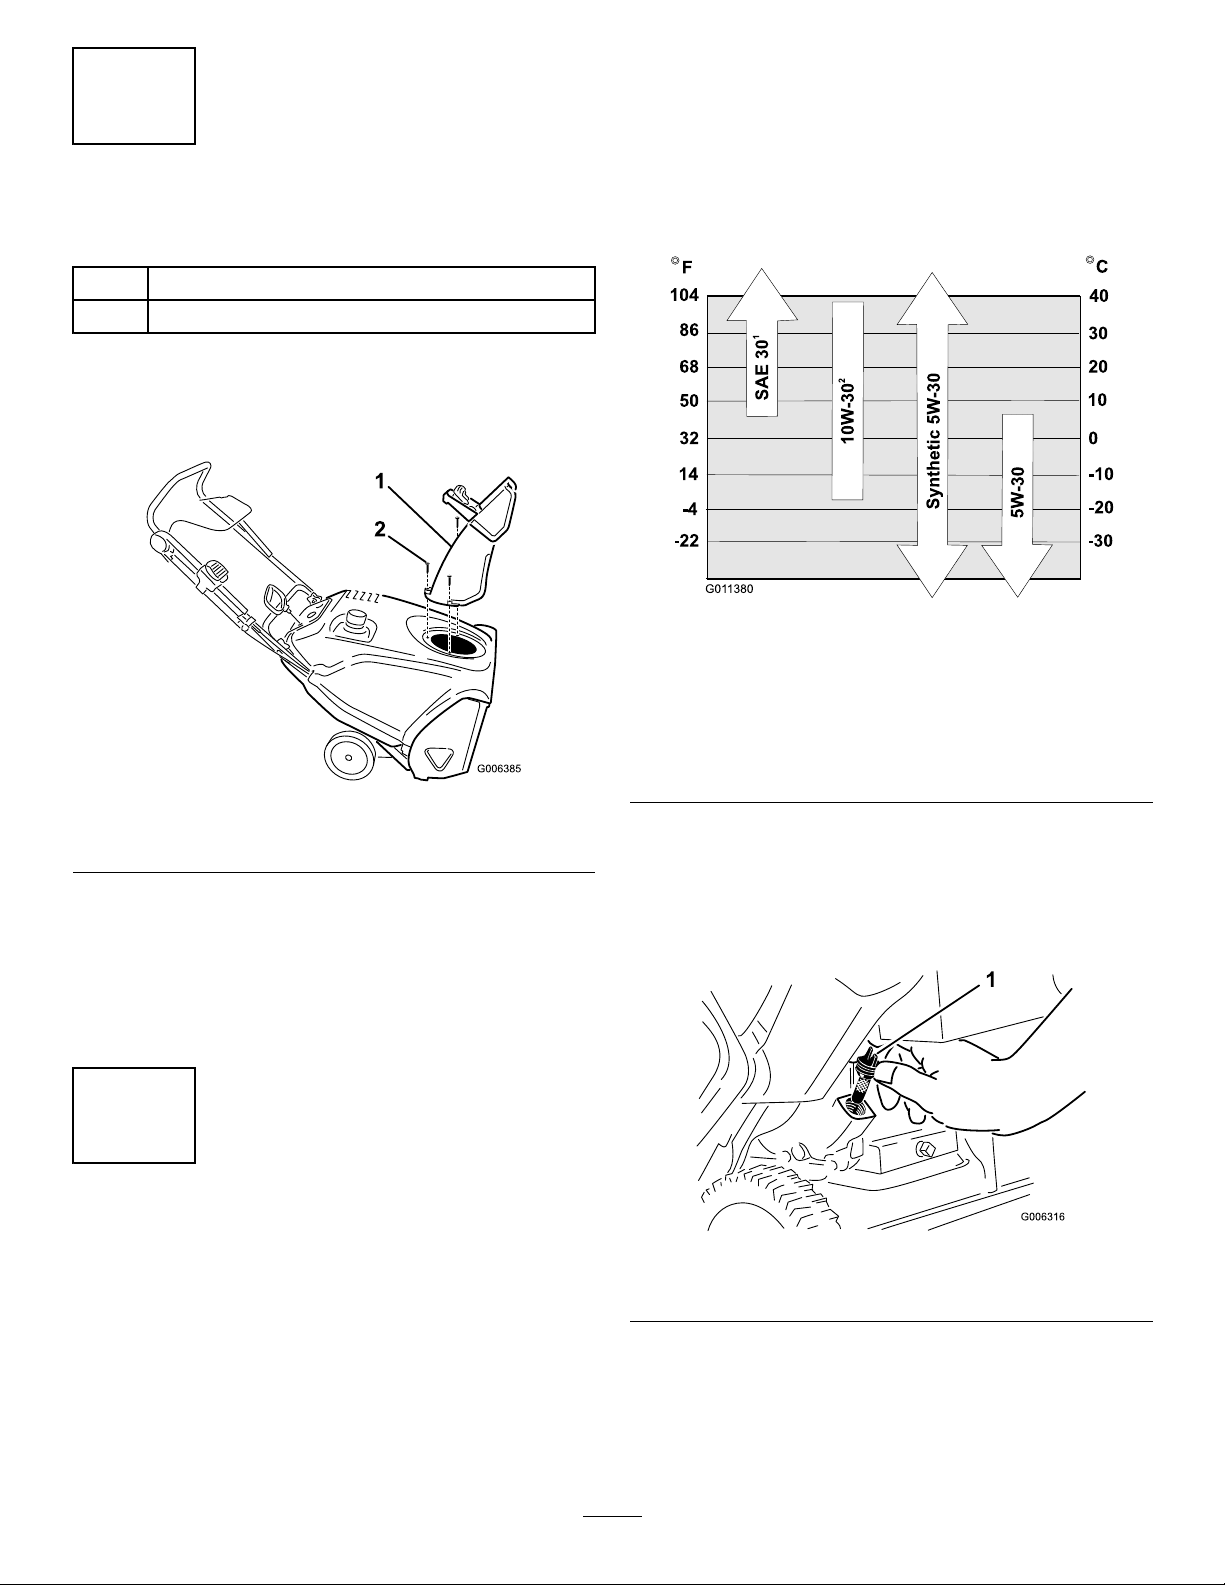
Maxll:20oz.(0.6l),type:automotivedetergentoil
withanAPIserviceclassicationofSJ,SL,orhigher.
Figure8belowtoselectthebestoilviscosityforthe
Use
outdoortemperaturerangeexpected:
Figure8
1.UsingSAE30atoutdoor
temperaturesbelow40°F
(4°C)willresultinhard
starting.
2.Using10W-30atoutdoor
temperaturesabove
80°F(27°C)mayresultin
increasedoilconsumption;
therefore,checktheoil
levelmorefrequentlyin
thesecircumstances.
1.Dischargechute
Note:Foreasierinstallation,useasmallratchetwrench
totightenthescrews.
Important:Donotovertightenthescrews;
otherwiseyoumaydamagethedischargechuteand
preventitfromturningfreely.
2.Screw(3)
3
FillingtheEnginewithOil
NoPartsRequired
Procedure
Yourmachinedoesnotcomewithoilintheengine,but
itdoescomewithabottleofoil.
Note:0W30syntheticoilisacceptableforuseincold
temperatures.
1.Movethemachinetoalevelsurface.
2.Cleanaroundtheoilllcap(
Figure9
1.Oilllcap
3.Unscrewtheoilllcapandremoveit.
Figure9).
Important:Beforestartingtheengine,llthe
enginewithoil.
7
Page 8
4.Withthemachineintheoperatingposition,carefully
pouroilintothecrankcase.Wait3minutes,thenadd
oiluntilthepointofoverow .
5.Screwtheoilllcapintotheoilllholeandtighten
itsecurely.
4
AdjustingtheControlCable
NoPartsRequired
Procedure
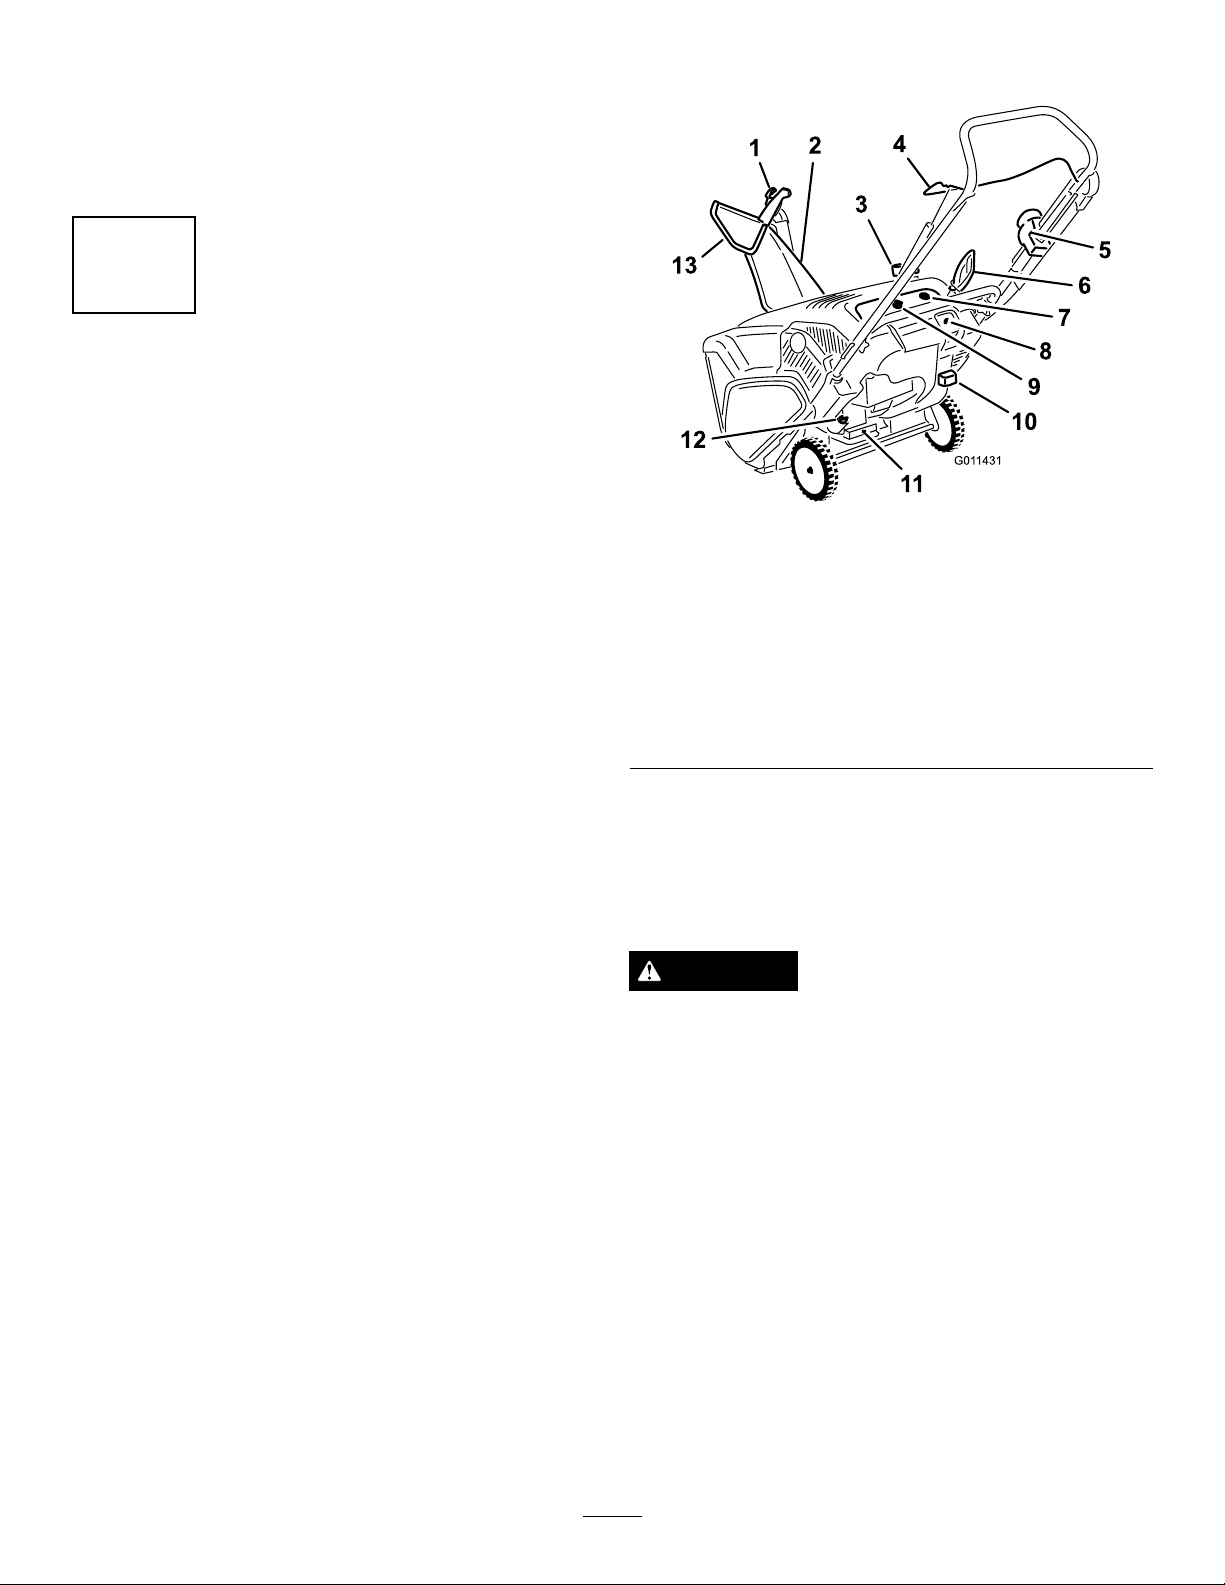
ProductOverview
RefertoAdjustingtheControlCableinMaintenance.
Figure10
1.Chutedeectortrigger
2.Dischargechute9.Ignitionkey
3.Fueltankcap
4.Controlbar11.Oildrainplug
5.QuickShoot™control12.Oilllcap
6.Recoilstarthandle
7.Primer
8.Electric-startbutton
(model38569only)
10.Chokelever
13.Chutedeector
Operation
Note:Determinetheleftandrightsidesofthemachine
fromthenormaloperatingposition.
DANGER
Gasolineisextremelyammableandexplosive.A
reorexplosionfromgasolinecanburnyouand
others.
•Topreventastaticchargefromignitingthe
gasoline,placethecontainerand/ormachine
onthegroundbeforelling,notinavehicleor
onanobject.
•Fillthetankoutdoorswhentheengineiscold.
Wipeupspills.
•Donothandlegasolinewhensmokingoraround
anopenameorsparks.
•Storegasolineinanapprovedfuelcontainer,out
ofthereachofchildren.
•Donottipthemachinebackwardwithfuelin
thefueltank;otherwise,fuelmayleakoutof
themachine.
8
Page 9

FillingtheFuelTank
Fillthefueltankwithfreshunleadedgasolinehavingan
octaneratingatornear87fromamajorname-brand
servicestation(Figure11).
Figure11
Figure12
1.Oilllcap
3.Unscrewtheoilllcapandremoveit.
4.Iftheoillevelislow,keepthemachineinthe
operatingpositionandcarefullypouroilintothe
crankcase.Wait3minutes,thenaddoiluntilthe
pointofoverow .(Max.ll:20oz.(0.6l),type:SAE
30detergentoilwithanAPIserviceclassication
ofSJ,SL,orhigher.)
1.1/4inch(6mm)
Important:Donotaddoiltothegasoline.
Important:DonotuseE85orE20fuel.Alternative
fuelswithhighalcoholcontentcancausehard
starting,poorengineperformance,andmaycause
internalenginedamage.
Note:Forbestresults,purchaseonlythequantityof
gasolinethatyouexpecttousein30days.Otherwise,
youmayaddfuelstabilizertonewlypurchasedgasoline
tokeepitfreshforupto6months.
CheckingtheEngineOilLevel
ServiceInterval:Beforeeachuseordaily—Check
theengineoillevelandaddoilif
necessary.
1.Movethemachinetoalevelsurface.
2.Cleanaroundtheoilllcap(
Figure12).
5.Screwtheoilllcapintotheoilllholeandhand
tightenitsecurely.
StartingtheEngine
1.TurntheignitionkeyclockwisetotheOnposition
(Figure13).
Figure13
2.Pulloutthechokelever(Figure14).
9
Page 10

Figure14
1.Chokelever
3.Firmlypushintheprimer3timeswithyourthumb,
holdingtheprimerinaforasecondbeforereleasing
iteachtime(Figure15andFigure16).
Note:Removeyourglovewhenyoupushinthe
primersothataircannotescapefromtheprimer
hole.
Important:Donotusetheprimerorthechoke
iftheenginehasbeenrunningandishot.
Excessiveprimingmayoodtheengineand
preventitfromstarting.
4.Connectanextensioncordtoapowersourceand
themachine,andpushtheelectric-startbutton
(model38569only)(
Figure17),orpulltherecoil
starthandle(Figure18).
Figure15
Figure17
Note:UseonlyaUL-listed,16-gaugeextension
cordrecommendedforoutdoorusethatisnot
longerthan50feet(15m).
WARNING
Theelectricalcordcanbecomedamaged,
causingashockorre.
Thoroughlyinspecttheelectricalcordbefore
pluggingitintoapowersource.Ifthe
cordisdamaged,donotuseittostartthe
machine.Replaceorrepairthedamagedcord
immediately.ContactanAuthorizedService
Dealerforassistance.
Figure16
1.Symbolsonthechokeleverindicatingtomovethechoke
levertothelefttoactivatethechoke.
10
Page 11

Figure18
Figure19
1.Controlbar
Important:Runtheelectricstarternomore
than10timesatintervalsof5secondson,then
5secondsoff.Runningtheelectricstarter
extensivelycanoverheatanddamageit.Ifthe
enginedoesnotstartafterthisseriesofattempts,
waitatleast40minutestoallowthestarterto
coolbeforeattemptingtostartitagain.Ifthe
enginedoesnotstartafterthesecondseriesof
attempts,takethemachinetoanAuthorized
ServiceDealerforservice(model38569only).
Note:Ifyoupulltherecoilhandleandfeelno
resistance,thestartermaybefrozen.Thawoutthe
starterbeforeattemptingtostartthemachine.
5.Whiletheengineisrunning,pushinthechokelever
slowly.
6.Unplugtheextensioncordfromthepowersource
andthemachine(model38569only).
CAUTION
Ifyouleavethemachinepluggedintoapower
source,someonecaninadvertentlystartthe
machineandinjurepeopleordamageproperty
(model38569only).
DisengagingtheRotorBlades
Todisengagetherotorblades,releasethecontrolbar
(Figure20).
Figure20
StoppingtheEngine
Tostoptheengine,turntheignitionkeycounterclockwise
totheOffposition(Figure21).
Unplugthepowercordwheneveryouarenot
startingthemachine.
EngagingtheRotorBlades
Toengagetherotorblades,holdthecontrolbaragainst
thehandle(Figure19).
Figure21
11
Page 12

AdjustingtheDischargeChute
ClearingaCloggedDischarge
andChuteDeector
Toadjustthedischargechute,pressthetriggerofthe
QuickShoot™controlontherighthandsideofthe
handleandmoveitupordownalongthehandle.Moving
thecontroldownthehandlerotatesthedischargechute
totheleft;movingthecontrolupthehandlerotatesthe
dischargechutetotheright(
Figure22).
Chute
Important:Handcontactwiththerotatingrotor
bladesinsidethedischargechuteisthemost
commoncauseofinjuryassociatedwithsnow
throwers.Neveruseyourhandtocleanoutthe
dischargechute.
Toclearthechute:
•Shuttheengineoff!
•Wait10secondstobesuretherotorbladeshave
stoppedrotating.
•Alwaysuseaclean-outtool,notyourhands
Figure24).
(
Figure22
Toraiseorlowertheangleofthechutedeector,press
thetriggeronthechutedeectorandmovethechute
deectorupordown(Figure23).
Figure23
1.Chutedeectortrigger2.Chutedeector
Figure24
PreventingFreeze-upafterUse
•Lettheenginerunforafewminutestoprevent
movingpartsfromfreezing.Stoptheengine,wait
forallmovingpartstostop,andremoveiceand
snowfromthemachine.
•Cleanoffanysnowandicefromthebaseofthe
chute.
•Rotatethedischargechuteleftandrighttofreeit
fromanyicebuildup.
•WiththeignitionkeyintheOffposition,pullthe
recoilstarterhandleseveraltimesorconnectthe
electricalcordtoapowersourceandthemachine
andpushtheelectricstartbuttononce(model38569
12
Page 13

only)topreventtherecoilstarterand/ortheelectric
starterfromfreezingup.
•Insnowyandcoldconditions,somecontrolsand
movingpartsmayfreeze.Donotuseexcessiveforce
whentryingtooperatefrozencontrols.Ifyouhave
difcultyoperatinganycontrolorpart,startthe
engineandletitrunforafewminutes.
OperatingTips
WARNING
Therotorbladescanthrowstones,toys,andother
foreignobjectsandcauseseriouspersonalinjuryto
theoperatorortobystanders.
•Keeptheareatobeclearedfreeofallobjects
thattherotorbladescouldpickupandthrow.
•Keepallchildrenandpetsawayfromthearea
ofoperation.
•Removethesnowassoonaspossibleafteritfalls.
•Ifthemachinedoesnotpropelitselfforwardon
slipperysurfacesorinheavysnow,pushforwardon
thehandle,butallowthemachinetoworkatitsown
pace.
•Overlapeachswathtoensurecompletesnow
removal.
•Dischargethesnowdownwindwheneverpossible.
Maintenance
Note:Determinetheleftandrightsidesofthemachinefromthenormaloperatingposition.
RecommendedMaintenanceSchedule(s)
MaintenanceService
Interval
Afterthersthour
Aftertherst2hours
Beforeeachuseordaily
Yearly
Yearlyorbeforestorage
MaintenanceProcedure
•Checkthecontrolcableandadjustitifnecessary.
•Checkforloosefastenersandtightenthemifnecessary.
•Changetheengineoil.
•Checktheengineoillevelandaddoilifnecessary.
•Checkthecontrolcableandadjustitifnecessary.
•InspecttherotorbladesandhaveanAuthorizedServiceDealerreplacetherotor
bladesandscraperifnecessary.
•Changetheengineoil.
•Servicethesparkplugandreplaceitifnecessary.
•Checkforloosefastenersandtightenthemifnecessary.
•HaveanAuthorizedServiceDealerinspectthedrivebeltandreplaceitifnecessary.
•Preparethemachineforstorage.
AdjustingtheControlCable
CheckingtheControlCable
ServiceInterval:Afterthersthour—Check
thecontrolcableandadjustitif
necessary.
Yearly—Checkthecontrolcableand
adjustitifnecessary.
Movethecontrolbarbacktowardthehandletoremove
theslackinthecontrolcable(Figure25).
13
Page 14

Figure25
1.Controlbar2.1/16-inchto1/8-inch(2
mmto3mm)gap
Note:Ensurethata1/16-inchto1/8-inch(2mmto3
mm)gapexistsbetweenthecontrolbarandthehandle
Figure25).
(
Important:Thecontrolcablemustcontainsome
slackwhenyoudisengagethecontrolbarforthe
rotorbladestostopproperly.
Note:MovingtheZ-ttinghigherdecreasesthe
gapbetweenthecontrolbarandthehandle;moving
itlowerincreasesthegap.
3.Hookthespringtotheadjusterlinkandslidethe
springcoverovertheadjusterlink.
4.Checktheadjustment;refertoCheckingtheControl
Cable.
Note:Afterextendeduse,thedrivebeltmaywear
andloseitsproperbelttension.Ifthedrivebelt
slips(continuouslysqueals)underaheavyload,
disconnectthespringfromtheadjustorlinkand
movetheupperendofthespringtotheholethat
isfurtherfromthepivotpointinthecontrolbar
Figure27).Thenconnectthespringtotheadjustor
(
linkandadjustthecontrolcable.
AdjustingtheControlCable
1.Slideupthespringcoverandunhookthespring
fromtheadjusterlink(Figure26).
Figure26
1.Adjusterlink
2.Z-tting
3.Springcover
4.Unhookthespringhere.
Figure27
1.Removetheupperendof
springfromthishole
2.Inserttheupperendof
springintothishole
3.Pivotpoint
4.Upperendofspring
Note:Thebeltmayslip(squeal)inwetconditions;
todryoutthedrivesystem,starttherotorandrun
itwithoutaloadfor30seconds.
Note:Youcanpulluptheadjusterlinkandcableto
makeunhookingthespringeasier.
2.MovetheZ-ttingtoahigherorlowerholeonthe
adjusterlinkasneededtoobtainthe1/16-inchto
1/8-inch(2mmto3mm)gapbetweenthecontrol
barandthehandle(Figure25).
14
Page 15

InspectingtheRotorBlades
ServiceInterval:Yearly—Inspecttherotorbladesand
haveanAuthorizedServiceDealer
replacetherotorbladesandscraperif
necessary.
Beforeeachsession,inspecttherotorbladesforwear.
Whenarotorbladeedgehasworndowntothewear
indicatorhole,haveanAuthorizedServiceDealer
replacetherotorbladesandthescraper(
Figure28).
4.Afterdrainingtheusedoil,returnthemachinetothe
operatingposition.
5.Installtheoildrainplugandtightenitsecurely.
6.Cleanaroundtheoilllcap(
Figure30
1.Oilllcap
Figure30).
7.Unscrewtheoilllcapandremoveit(Figure30).
Figure28
1.Thewearindicatorholeis
intact;youdonotneedto
replacetherotorblades.
2.Thewearindicatorholeis
exposed;replacetherotor
blades.
ChangingtheEngineOil
ServiceInterval:Aftertherst2hours
Yearly
Runtheengineafewminutesbeforechangingtheoil
towarmit.Warmoilowsbetterandcarriesmore
contaminants.
1.Siphonthefuelfromthefueltankintoanapproved
fuelcontainer,orruntheengineuntilitstops.
2.Movethemachinetoalevelsurface.
3.Placeanoildrainpanundertheoildrainplug,
removetheoildrainplug,andtipthemachine
backwardanddraintheusedoilintheoildrainpan
Figure29).
8.Withthemachineintheoperatingposition,carefully
pouroilintotheoilllhole.W aitthreeminutes,
thenaddoiltothepointofoverow(
Figure32).
Maxll:20oz.(0.6l),type:automotivedetergentoil
withanAPIserviceclassicationofSJ,SL,orhigher.
Figure31belowtoselectthebestoilviscosity
Use
fortheoutdoortemperaturerangeexpected:
Figure31
1.UsingSAE30atoutdoor
temperaturesbelow40°F
(4°C)willresultinhard
starting.
2.Using10W-30atoutdoor
temperaturesabove
80°F(27°C)mayresultin
increasedoilconsumption;
therefore,checktheoil
levelmorefrequentlyin
thesecircumstances.
Figure29
Note:0W30syntheticoilisacceptableforusein
coldtemperatures.
15
Page 16

Figure32
9.Screwtheoilllcapintotheoilllhole,andhand
tightenitsecurely.
10.Wipeupanyspilledoil.
11.Disposeoftheusedoilproperlyatalocalrecycling
center.
ServicingtheSparkPlug
ServiceInterval:Y early—Servicethesparkplugand
replaceitifnecessary.
UseaNGKBPR6ESorChampionRN9YCspark
plugorequivalent.
1.Stoptheengineandwaitforallmovingpartstostop.
2.Rotatethedischargechutesothatitfacesforward.
3.Removethedischargechute,thedischargechute
handle,andthechutesealbyremovingthe3large
screwsandonesmallscrew(Figure33).
Figure33
1.Fueltankcap
2.Largescrews(3)5.Chuteseal
3.Dischargechute
4.Smallscrew
4.Removethe4screwsthatsecuretheshroud
(Figure34).
Figure34
1.Screw(4)3.Sparkplug
2.Shroud4.Spark-plugwire
5.Removethefueltankcap.
6.Removetheshroud(
Figure34).
7.Installthefueltankcap.
8.Disconnectthewirefromthesparkplug.
16
Page 17

9.Cleanaroundthesparkplug.
16.Installthefueltankcap.
10.Removethesparkplugfromthecylinderhead.
Important:Replaceacracked,fouled,or
dirtysparkplug.Donotcleantheelectrodes
becausegritenteringthecylindercandamage
theengine.
11.Setthegapontheplugto0.030inch(0.76mm)
Figure35).
(
Figure35
1.Centerelectrodeinsulator3.Airgap(nottoscale)
2.Sideelectrode
17.Installthechuteseal,thedischargechute,andthe
dischargechutehandleontothemachineusingthe
hardwareyouremovedinstep
3.
Note:Thesmallscrewgoesthroughthesmallhole
inthechutesealatthefrontofthedischargechute
opening.
12.Installthesparkplugandtorqueitto20–22ft-lb
(27–30N-m).
13.Connectthewiretothesparkplug.
Note:Ensurethatthebreathertubeisroutedabove
thesparkplugwireasshownin
Figure36
1.Breathertube
Figure36.
2.Carburetordrainbolt
14.Removethefueltankcap.
15.Installtheshroudwiththescrewsyouremovedin
step4.
Note:Ensurethattheupperandlowershroudst
togetherinthesidegrooves.
17
Page 18

AdjustingtheQuickShoot™
Control
Ifthereismorethan1/2inch(13mm)ofslackinthe
QuickShootcable(
doesnotrotateleftandrightinequalangles,adjustthe
QuickShootcontrolcables.
1.1/2inch(13mm)maximumslack
1.LoosenthetwoQuickShootcontrolcableclamps
(Figure38).
Figure37)orthedischargechute
Figure37
Figure39
1.Arrows
3.Rotatethedischargechutesothatitfacesstraight
aheadandthearrowonthebackofthedischarge
chutealignswiththearrowontheshroud(
Figure40).
Figure38
1.Cableclamps
2.PositiontheQuickShootcontrolbetweenthetwo
arrowslocatedontherighthandsideoftheupper
handle(
Figure39).
Figure40
4.Holdthedischargechuteinthestraight-ahead
position,pullthelowercablecasingdownwarduntil
youremovetheslackinthecable,andtightenthe
screwonthelowercableclampsecurely(Figure41).
18
Page 19

Figure41
1.Lowercablecasing
5.Pulltheuppercablecasingforwarduntilyouremove
theslackinthecable,andtightenthescrewonthe
uppercableclampsecurely(Figure42).
Figure42
1.Uppercablecasing
Note:Donotover-tensionthecables.Ifthecables
areover-tensioned,theQuickShootwillbehardto
operate.
19
Page 20

Storage
areasbeforepainting,andusearustpreventativeto
preventthemetalpartsfromrusting.
StoringtheMachine
WARNING
•Gasolinefumesarehighlyammable,explosive,
anddangerousifinhaled.Ifyoustorethe
machineinanareawithanopename,the
gasolinefumesmayigniteandcausean
explosion.
•Donotstorethemachineinahouse(living
area),basement,oranyotherareawhereignition
sourcesmaybepresent,suchashotwaterand
spaceheaters,clothesdryers,furnaces,and
otherlikeappliances.
•Donottipthemachinebackwardwithfuelin
thefueltank;otherwise,fuelmayleakoutof
themachine.
1.Onthelastrefuelingoftheseason,addfuelstabilizer
tofreshfuelasdirectedbytheenginemanufacturer.
2.Runtheenginefor10minutestodistributethe
conditionedfuelthroughthefuelsystem.
15.Tightenanyloosefasteners.Repairorreplaceany
damagedparts.
16.Coverthemachineandstoreitinaclean,dryplace
outofthereachofchildren.Allowtheengineto
coolbeforestoringitinanyenclosure.
3.Stoptheengine,allowittocool,andsiphonthefuel
tankorruntheengineuntilitstops.
4.Starttheengineandrunituntilitstops.
5.Chokeorprimetheengine,startitathirdtime,and
runtheengineuntilitwillnotstart.
6.Drainthefuelinthecarburetorthroughthe
carburetordrainbolt(
gasolinecontainer.
7.Disposeofunusedfuelproperly.Recycleitaccording
tolocalcodes,oruseitinyourautomobile.
8.Whiletheengineisstillwarm,changetheengineoil.
RefertoChangingtheEngineOil.
9.Removethesparkplug.
10.Squirt2teaspoonsofoilintothesparkplughole.
11.Installthesparkplugbyhandandthentorqueitto
20–22ft-lb(27–30N-m).
12.WiththeignitionkeyintheOffposition,pullthe
recoilstarterslowlytodistributetheoilontheinside
ofthecylinder.
Figure36)intoanapproved
13.Cleanthemachine.
14.Touchupchippedsurfaceswithpaintavailable
fromanAuthorizedServiceDealer.Sandaffected
20
Page 21

Notes:
21
Page 22

FederalEmissionControlWarrantyStatement
ATwo-YearLimitedWarranty
YourWarrantyRightsandObligations
TheU.S.EnvironmentalProtectionAgency(EP A),TheT oroCompany ,and
itsafliate,T oroWarrantyCompany,arepleasedtoexplaintheemission
controlsystemwarrantyonyour2009andlaterutility/lawn/garden
equipmentengine.2009andlatermodelyearutility/lawn/garden
equipmentenginesmustbedesigned,builtandequipped,atthetime
ofsale,tomeettheU.S.EP Aregulationsforsmallnon-roadengines.
Theequipmentenginemustbefreefromdefectsinmaterialsand
workmanship,whichcauseittofailtoconformwithU.S.EP Astandards,
forthersttwoyearsofengineusefromthedateofsaletotheultimate
purchaser.TheToroCompanyanditsafliate,ToroWarrantyCompany,
warranttheemissioncontrolsystemonyourutility/lawn/gardenequipment
enginefortheperiodoftimelistedabove,providedtherehasbeenno
abuse,neglect,orimpropermaintenanceofyourutility/lawn/garden
equipmentengine.
Youremissioncontrolsystemmayincludepartssuchasthecarburetor
orfuelinjectionsystem,theignitionsystem,andcatalyticconverter.Also
includedmaybefuellines,fuellinefasteners,connectors,andother
emission-relatedassemblies.
Whereawarrantableconditionexists,TheToroCompanyanditsafliate,
ToroWarrantyCompany,promisetorepairyourengineatnocosttoyou,
includingdiagnosis,parts,andlabor.
Manufacturer’sWarrantyCoverage
TheT oroCompanyanditsafliate,ToroWarrantyCompany,pursuant
toanagreementbetweenthem,jointlywarrantthe2009andlater
utility/lawn/gardenequipmentenginesfortwoyearsfromthedateof
delivery.Ifanyemission-relatedpartonyourengineisdefectivein
materialsorworkmanship,wewillrepairorreplacethepart,freeofcharge.
OwnerResponsibilities
Astheengineowner ,youareresponsiblefortheperformanceofthe
requiredmaintenancelistedinyourOperator'sManual.Werecommend
thatyouretainallreceiptscoveringmaintenanceonyourequipment,but
wecannotdenywarrantysolelyforthelackofreceiptsorforyourfailureto
ensuretheperformanceofallscheduledmaintenance.
Anyreplacementpartorservicethatisequivalentinperformanceand
durabilitymaybeusedinnon-warrantymaintenanceorrepairs,andshall
notreduceourwarrantyobligation.
Astheengineowner,youshouldbeawarethatwemaydenyyouwarranty
coverageifyourengineoraparthasfailedduetoabuse,neglect,
impropermaintenance,orunapprovedmodicationsorparts.
YouareresponsibleforpresentingyourequipmentenginetoanAuthorized
ServiceDealerassoonasaproblemexists.Thewarrantyrepairsshould
becompletedinareasonableamountoftime,nottoexceedthirty(30)
days.
Ifyouhaveanyquestionsregardingyourwarrantyrightsand
responsibilities,contactusat:
CustomerCareDepartment,ConsumerDivision
ToroWarrantyCompany
811 1LyndaleAvenueSouth
Bloomington,MN55420-1196
Tollfreeat800–348–2424(U.S.customers)
Tollfreeat800–544–5364(Canadiancustomers)
WarrantedParts
Thewarrantyperiodbeginsonthedatetheengineorequipmentis
deliveredtoaretailpurchaser.TheToroCompanyanditsafliate,
ToroWarrantyCompany ,jointlywarranttotheinitialownerandeach
subsequentpurchaserthattheengineisfreefromdefectsinmaterialsand
workmanship,whichcausetheenginetofailtoconformwithapplicable
regulations,foraperiodoftwoyears.
Failurescausedbyabuse,neglect,orimpropermaintenancearenot
covered.Theuseofadd-onormodiedpartscanbegroundsfor
disallowingawarrantyclaim.Wearenotliabletocoverfailuresof
warrantedpartscausedbytheuseofadd-onormodiedparts.Weare
liablefordamagestootherenginecomponentscausedbythefailureof
awarrantedpartstillunderwarranty.Theownerisresponsibleforthe
performanceoftherequiredmaintenance,asdenedintheOperator's
Manual.
Anywarrantedpartwhichisnotscheduledforreplacementasrequired
maintenance,orwhichisscheduledonlyforregularinspectiontotheeffect
of“repairorreplaceasnecessary”shallbewarrantedforthewarranty
period.Anywarrantedpartwhichisscheduledforreplacementasrequired
maintenanceshallbewarrantedfortheperiodoftimeuptotherst
scheduledreplacementpointforthatpart.Coverageunderthiswarranty
extendsonlytothepartslistedbelow(theemissionssystemparts)tothe
extentthatthesepartswerepresentontheenginewhenpurchased.
•FuelMeteringSystem
—Coldstartenrichmentsystemincludingthechokemechanismor
primingsystem
—Fuelpump
—Carburetorandinternalparts
•AirInductionSystem
—Aircleaner
—Intakemanifold
—Controlledhotairintakesystem
•IgnitionSystem
—Sparkplug(s)
—Ignitioncoilsandelectronics
—Advance/retardmechanisms
•Mufer
•MiscellaneousItemsUsedintheAboveSystems
—Vacuum,temperature,andtime-sensitivevalvesandswitches
—Hoses,connectors,andassembliesofsame
InstructionsforObtainingWarrantyService
IfyouthinkthatyourT oroProductcontainsadefectinmaterialsor
workmanship,followthisprocedure:
1.ContactanyAuthorizedT oroServiceDealertoarrangeserviceat
theirdealership.T olocateadealerconvenienttoyou,refertothe
YellowPagesofyourtelephonedirectory(lookunder“LawnMowers”)
oraccessourwebsiteatwww.T oro.com.Y oumayalsocallthe
numberslistedabovetousethe24-hourToroDealerlocatorsystem.
2.Bringtheproductandyourproofofpurchase(salesreceipt)tothe
ServiceDealer.
Theownershallnotbechargedfordiagnosticlaborwhichleadstothe
determinationthatawarrantedpartisdefective,ifthediagnosticwork
isperformedatawarrantystation.
GeneralConditions
NeitherTheT oroCompanynorT oroWarrantyCompanyisliablefor
indirect,incidental,orconsequentialdamagesinconnectionwiththe
useoftheT oroProductscoveredbythesewarranties,includingany
costorexpenseofprovidingsubstituteequipmentorserviceduring
reasonableperiodsofmalfunctionornon-usependingcompletionof
repairsunderthesewarranties.
Allimpliedwarrantiesofmerchantability(thattheproductistforordinary
use)andtnessforuse(thattheproductistforaparticularpurpose)are
limitedtothedurationoftheexpresswarranty.
Somestatesdonotallowexclusionsofincidentalorconsequential
damages,sotheaboveexclusionsmaynotapplytoyou.
Thiswarrantygivesyouspeciclegalrights,andyoumayalsohaveother
rightswhichvaryfromstatetostate.
374-0267RevA
Page 23

InternationalDistributorList
Distributor:
AtlantisSuveSulamaSisstemleriLt
BalamaPrimaEngineeringEquip.HongKong85221552163
B-RayCorporation
CascoSalesCompany
CeresS.A.CostaRica
CSSCTurfEquipment(pvt)Ltd.SriLanka
CyrilJohnston&Co.
EquiverMexico525553995444
FemcoS.A.Guatemala
G.Y .K.CompanyLtd.
GeomechanikiofAthensGreece
GuandongGoldenStarChina
HakoGroundandGardenSweden
HakoGroundandGarden
HayterLimited(U.K.)
HydroturfInt.CoDubai
HydroturfEgyptLLC
IbeaS.P .A.
IrriamcPortugal351212388260
IrrigationProductsInt'lPvtLtd.India862283960789
JeanHeybroekb.v.Netherlands3130639461 1
Lely(U.K.)Limited
MaquiverS.A.Colombia
MaruyamaMfg.Co.Inc.
MetraKft
Mountelda.s.CzechRepublic
MunditolS.A.
OslingerTurfEquipmentSA
OyHakoGroundandGardenAb
ParklandProductsLtd.NewZealand6433493760
Prochaska&Cie
RTCohen2004Ltd.
Riversa
RothMotorgerateGmBh&Co.Germany
ScSvendCarlsenA/S
SolvertS.A.S.
SpyprosStavrinidesLimitedCyprus
SurgeSystemsIndiaLimited
T-MarktLogisticsLtd.Hungary3626525500
ToroAustraliaAustralia61395807355
ToroEuropeBVBABelgium3214562960
Country:
Turkey902163448674
Korea82325512076
PuertoRico7877888383
NorthernIreland442890813121
Japan81726325861
Norway4722907760
UnitedKingdom441279723444
UnitedArabEmirates97143479479
Egypt2025194308
Italy390331853611
UnitedKingdom441480226800
Japan81332522285
Hungary3613263880
Argentina541 148219999
Ecuador59342396970
Finland35898700733
Austria4312785100
Israel97298617979
Spain
Denmark4566109200
France33130817700
India911292299901
PhoneNumber:
5062391138
941 12746100
5024423277
30109350054
862087651338
4635100000
5712364079
420255704220
34952837500
4971442050
35722434131
374-0269RevA
Page 24

TheToroWarranty
ConditionsandProductsCovered
TheToro®Companyanditsafliate,T oroWarrantyCompany ,pursuantto
anagreementbetweenthem,jointlypromisetorepairtheToroProduct
listedbelowifusedforresidentialpurposes*ifdefectiveinmaterialsor
workmanship.
Thefollowingtimeperiodsapplyfromthedateofpurchase:
ProductsWarrantyPeriod
WalkPowerMowers2yearlimitedwarranty
RearEngineRiders2yearlimitedwarranty
Lawn&GardenTractors
ElectricHandHeldProducts2yearlimitedwarranty
Snowthrowers
ConsumerZeroTurn
*OriginalPurchasermeansthepersonwhooriginallypurchasedtheToro
Product
*Residentialpurposesmeansuseoftheproductonthesamelotasyour
home.Useatmorethanonelocation,orinstitutionalorrentaluse,is
consideredcommercialuse,andthecommercialusewarrantywouldapply.
2yearlimitedwarranty
2yearlimitedwarranty
2yearlimitedwarranty
LimitedWarrantyforCommercialUse
ToroConsumerProductsandattachmentsusedforcommercial,
institutional,orrentaluse,arewarrantedagainstdefectsinmaterials
orworkmanshipforthefollowingtimeperiodsfromthedateoforiginal
purchase:
ProductsWarrantyPeriod
WalkPowerMowers90daywarranty
RearEngineRiders90daywarranty
Lawn&GardenTractors
ElectricHandHeldProducts90daywarranty
Snowthrowers
ConsumerZeroTurn
90daywarranty
90daywarranty
45daywarranty
InstructionsforObtainingWarrantyService
IfyouthinkthatyourT oroProductcontainsadefectinmaterialsor
workmanship,followthisprocedure:
1.Contactyoursellertoarrangeserviceoftheproduct.Ifforanyreason
itisimpossibleforyoutocontactyourseller,youmaycontactany
ToroAuthorizedDistributortoarrangeservice.
2.Bringtheproductandyourproofofpurchase(salesreceipt)tothe
ServiceDealer.IfforanyreasonyouaredissatisedwiththeService
Dealer’sanalysisorwiththeassistanceprovided,contactusat:
CustomerCareDepartment,ConsumerDivision
TheT oroCompany
811 1LyndaleAvenueSouth
Bloomington,MN55420-1196
Manager:TechnicalProductSupport:001–952–887–8248
SeeattachedDistributorList
OwnerResponsibilities
YoumustmaintainyourToroProductbyfollowingthemaintenance
proceduresdescribedintheOperator'sManual.Suchroutine
maintenance,whetherperformedbyadealerorbyyou,isatyourexpense.
ItemsandConditionsNotCovered
Thisexpresswarrantydoesnotcoverthefollowing:
•Costofregularmaintenanceserviceorwearparts,suchasrotor
blades(paddles),scraperblades,belts,fuel,lubricants,oilchanges,
sparkplugs,cable/linkageorbrakeadjustments
•Anyproductorpartwhichhasbeenalteredormisusedandrequires
replacementorrepairduetoaccidentsorlackofpropermaintenance
•Repairsnecessaryduetofailuretousefreshfuel(lessthanone
monthold),orfailuretoproperlypreparetheunitpriortoanyperiod
ofnon-useoveronemonth
•Engineandtransmission.Thesearecoveredbytheappropriate
manufacturer’sguaranteeswithseparatetermsandconditions
Allrepairscoveredbythesewarrantiesmustbeperformedbyan
AuthorizedToroServiceDealerusingT oroapprovedreplacementparts.
GeneralConditions
Thepurchaseriscoveredbythenationallawsofeachcountry.Therights
towhichthepurchaserisentitledwiththesupportoftheselawsarenot
restrictedbythiswarranty .
374-0268RevA
 Loading...