

Page 1

FORM NO. 3319–285
WASHOUT PORT KIT
PART NO. 95–7067
Loose Parts
Note: Use the chart below to identify parts used for assembly.
DESCRIPTION QTY. USE
Fitting
O–ring
Bolt 1/4–20 x 7/8” (22 mm)
Washer 1/4” (19 mm)
Nut (thin) 1/4”
1
1
2
2
2
Install washout fitting
Locate Fitting On Mower
1. Shut off engine and and wait for all moving parts
to stop. Remove spark plug wire(s).
POTENTIAL HAZARD
• Corroded or cracked mowers may be
weakened or damaged by drilling to install
washout fitting.
INSTALLATION
INSTRUCTIONS
POTENTIAL HAZARD
• If you leave the wire on the spark plug,
someone could start the engine.
WHAT CAN HAPPEN
• Accidental starting of engine could
seriously injure you or other bystanders.
HOW TO AVOID THE HAZARD
• Pull wire off spark plug before you do any
maintenance. Also push wire aside so it
does not accidentally contact spark plug.
2. Clean underside and examine integrity of mower.
WHAT CAN HAPPEN
• A weakened mower can crack or break.
• Broken or missing pieces exposes you and
others to thrown objects or blade contact.
HOW TO AVOID THE HAZARD
• Only install fitting on sound mowers.
• Replace all broken or cracked mowers
immediately.
• Never put your hands or feet under the
mower or through openings in the mower.
3. Attach fitting to coupling on hose (Fig. 1).
1
Page 2
Installation
3
1. Hose
2. Coupling
2
Figure 1
1
3. Fitting
Walk-Behind Mowers
m–2911
4. Select a location with the hose fitting assembly
on left side of mower inside the preferred
location diagram (Fig. 2 or 3).
Note: Hose should not interfere with wheels,
handles or controls.
IMPORTANT: Location must be on a flat
surface and not obstructing any decals.
IMPORTANT: Look under mower, location
must be inside blade cutting circle away from
any mulching baffles and not interfere with
any other mower hardware.
Riding Mowers
21
m–2859
Figure 3
1. Left side of mower 2. –––– Preferred location
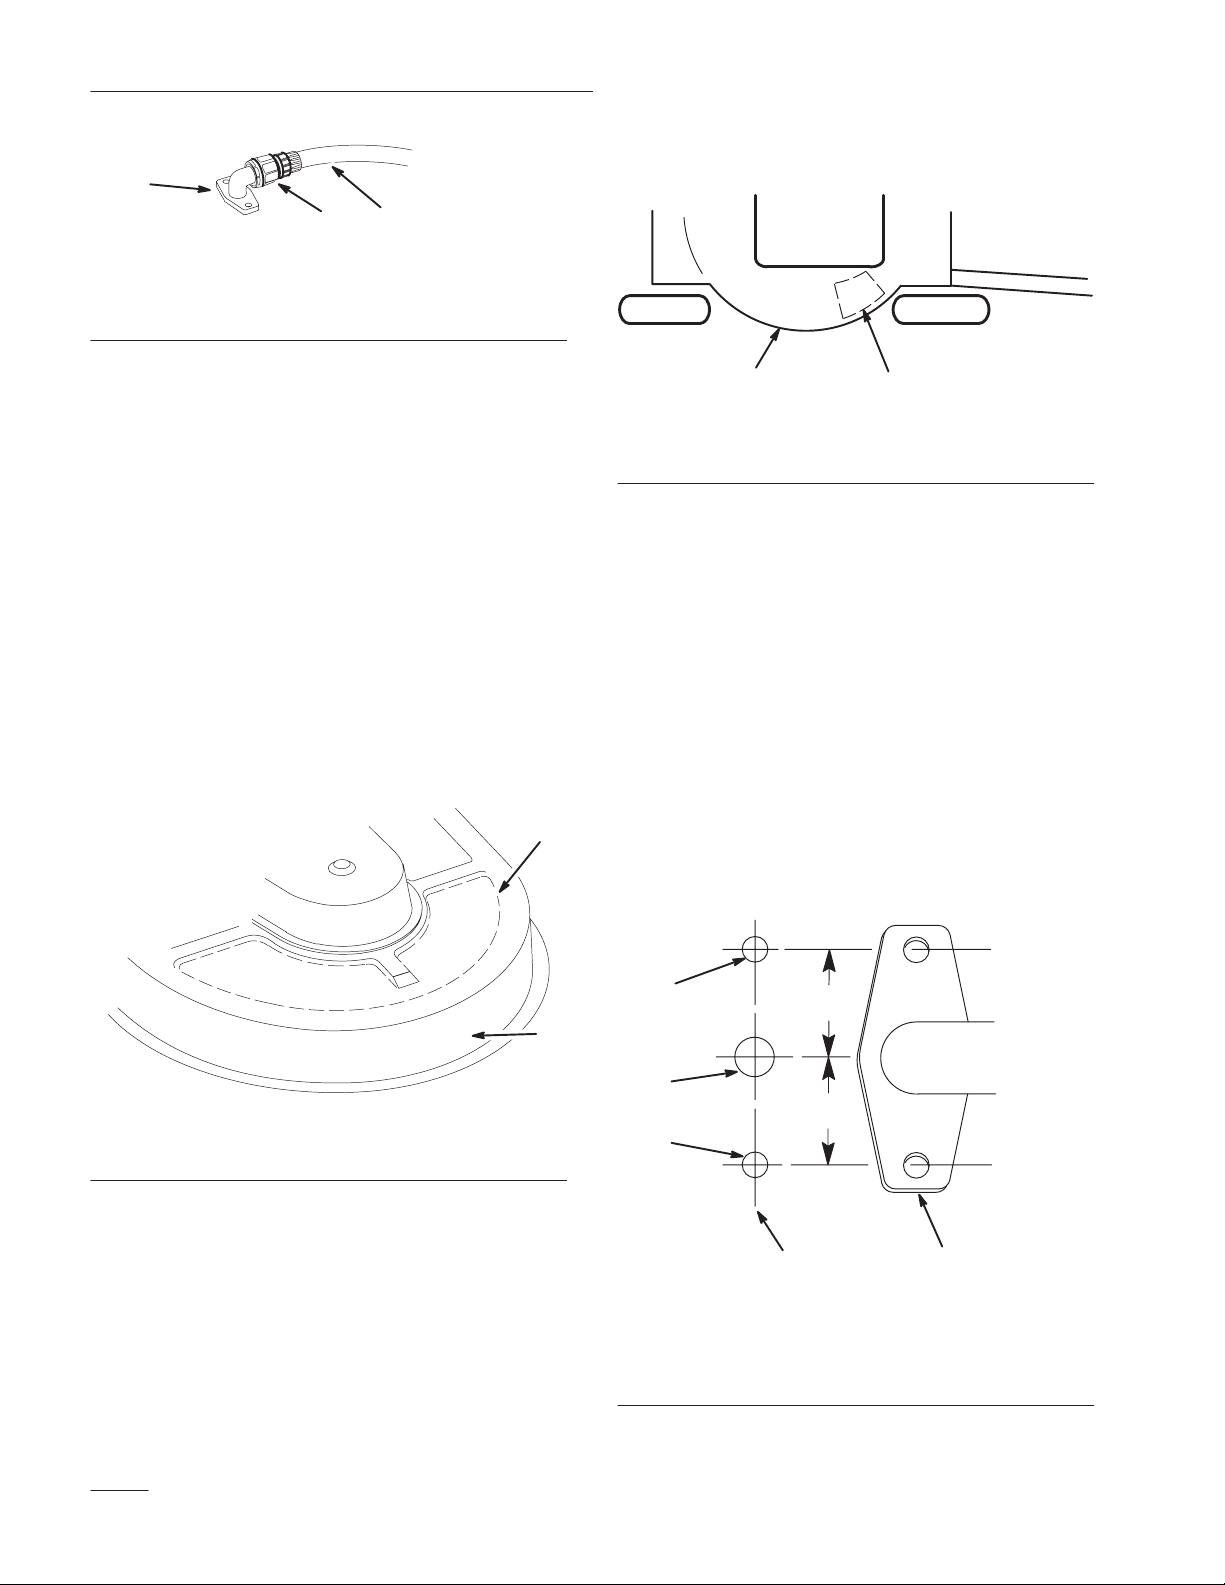
Mark and Drill Holes
5. Use fitting as a template and mark the location
of two mounting holes (Fig. 4).
6. Place a straight edge between mounting holes
and mark the center line (Fig. 4).
7. Measure half-way between mounting holes and
mark water hole location (Fig. 4).
2
8. Center punch and drill two (2) 9/32” (8 mm)
mounting holes and one (1) 3/8” (9.5 mm) water
hole (Fig. 4).
m–2855
Figure 2
1. Left side of mower 2. –––– Preferred location
2
2
1”
1
4
1”
2
m–2856
3
1
Figure 4
1. Fitting
2. Mounting holes 9/32”
(8 mm)
3. Center line
4. Water hole 3/8” (9.5 mm)
Page 3

Installation
Install Fitting
9. Place fitting on mower facing outward, and
secure with (2) 1/4–7/8” (22 mm) bolts, (2) 1/4”
(7 mm) washers and (2) 1/4” nuts (Fig. 5 or 6).
Riding Mowers
m–2857
Figure 5
1. Fitting
2. Bolts 1/4–7/8” (22 mm)
3. Washer 1/4” (7 mm)
4. Nut 1/4”
Washing Underside of Mower
After each use wash the underside of the mower to
prevent grass build-up for improved mulch action and
clipping dispersal.
1. Park the machine on a hard level surface,
disengage the power take off (PTO) and turn the
ignition key to “OFF” to stop the engine.
43
2. Attach hose coupling to the end of the mower
1
2
washout fitting, turn water on high (Fig. 7 or 8).
3. Lower the mower to the lowest height-of-cut.
4. Start the engine, refer to Operator’s Manual for
instructions. Engage blade or power take off
(PTO) and let mower run for one to three
minutes.
Note: The larger the mower the longer you
may need to wash.
5. Disengage the blade, power take off (PTO) and
turn the ignition key to “OFF” to stop the
engine. Wait for all moving parts to stop.
Walk-Behind Mowers
3
m–2860
1. Fitting
2. Bolts 1/4–7/8” (19 mm)
2
Figure 6
4
1
3. Washer 1/4” (7 mm)
4. Nut 1/4”
6. Turn the water off, remove hose coupling from
the washout fitting.
Note: If the mower is not clean after one
washing, soak and let stand for 30
minutes. Then repeat process again.
7. Run mower again for one to three minutes to
remove excess water.
3
Page 4

Installation
Riding Mowers
Figure 7
1. Washout fitting
2. Coupling
Walk-Behind Mowers
1
3. Hose
Maintenance
3
2
m–2755
3
2
Spread petroleum jelly on washout fitting o-ring to
make coupling slide on easier and protect o-ring.
POTENTIAL HAZARD
• A broken or missing washout fitting could
expose you and others to thrown objects or
blade contact.
WHAT CAN HAPPEN
• Contact with thrown debris or blade
contact will cause injury or death.
HOW TO AVOID THE HAZARD
• Replace broken or missing washout fitting
immediately, before using mower again.
• Plug any hole(s) in mower with bolts and
locknuts.
• Never put your hands or feet under the
mower or through openings in the mower.
1. Washout fitting
2. Coupling
1
m–2865
Figure 8
3. Hose
4
 Loading...