

Page 1

20VMaxLi-IonBatteryandBatteryCharger
ModelNo.88500—SerialNo.319000001andUp
ModelNo.88502—SerialNo.319000001andUp
FormNo.3424-963RevA
Operator'sManual
YoumaycontactT orodirectlyatwww.T oro.comfor
productandaccessoryinformation,helpndinga
dealer,thecompletewarrantydetails,ortoregister
yourproduct.
WARNING
CALIFORNIA
Proposition65Warning
Thepowercordonthisproductcontains
lead,achemicalknowntotheState
ofCaliforniatocausebirthdefects
orotherreproductiveharm.Wash
handsafterhandling.
Safety
Importantsafetyinstructions—Savethese
instructions.
DANGER
Toreducetheriskofreorelectricshock,
carefullyfollowtheseinstructions:
CAUTION
Thebatteryusedinthisdevicemaypresenta
riskofreorchemicalburnifmistreated.
Donotdisassemble,heatabove104degrees
F(40degreesC),orincinerate.Replace
batterywithTorogenuinebatteriesonly.Use
ofanotherbatterymaypresentariskofre
orexplosion.
CAUTION
Disposeofausedbatterypromptly .Keep
awayfromchildren.Donotdisassembleand
donotdisposeofinre.
CAUTION
Overheatingbatteriescancausereand
severeburns.
Donotopen,crush,heatabove104degrees
F(40degreesC),orincinerate.Followthe
manufacturer’sinstructions.
1.Besurevoltageselectorisincorrect
voltagepositionbeforepluggingin.
2.ForuseintheU.S.A.,thevoltageselector
switchmustbeplacedinthe120volt
position.Foruseincountriesotherthan
theU.S.A.,thevoltageselectormayneed
tobeplacedinotherthanthe120volt
position.Conrmthevoltageavailable
ateachcountrylocationbeforeusing
theproduct.
3.Forconnectiontoasupplynotinthe
U.S.A.,useanattachmentplugadapter
ofthepropercongurationforthepower
outlet,ifneeded.
©2018—TheToro®Company
8111LyndaleAvenueSouth
Bloomington,MN55420
Registeratwww.Toro.com.
Thispowerunitisintendedtobecorrectlyorientated
inaverticaloroormountedposition.
OriginalInstructions(EN)
PrintedinChina
AllRightsReserved
*3424-963*A
Page 2
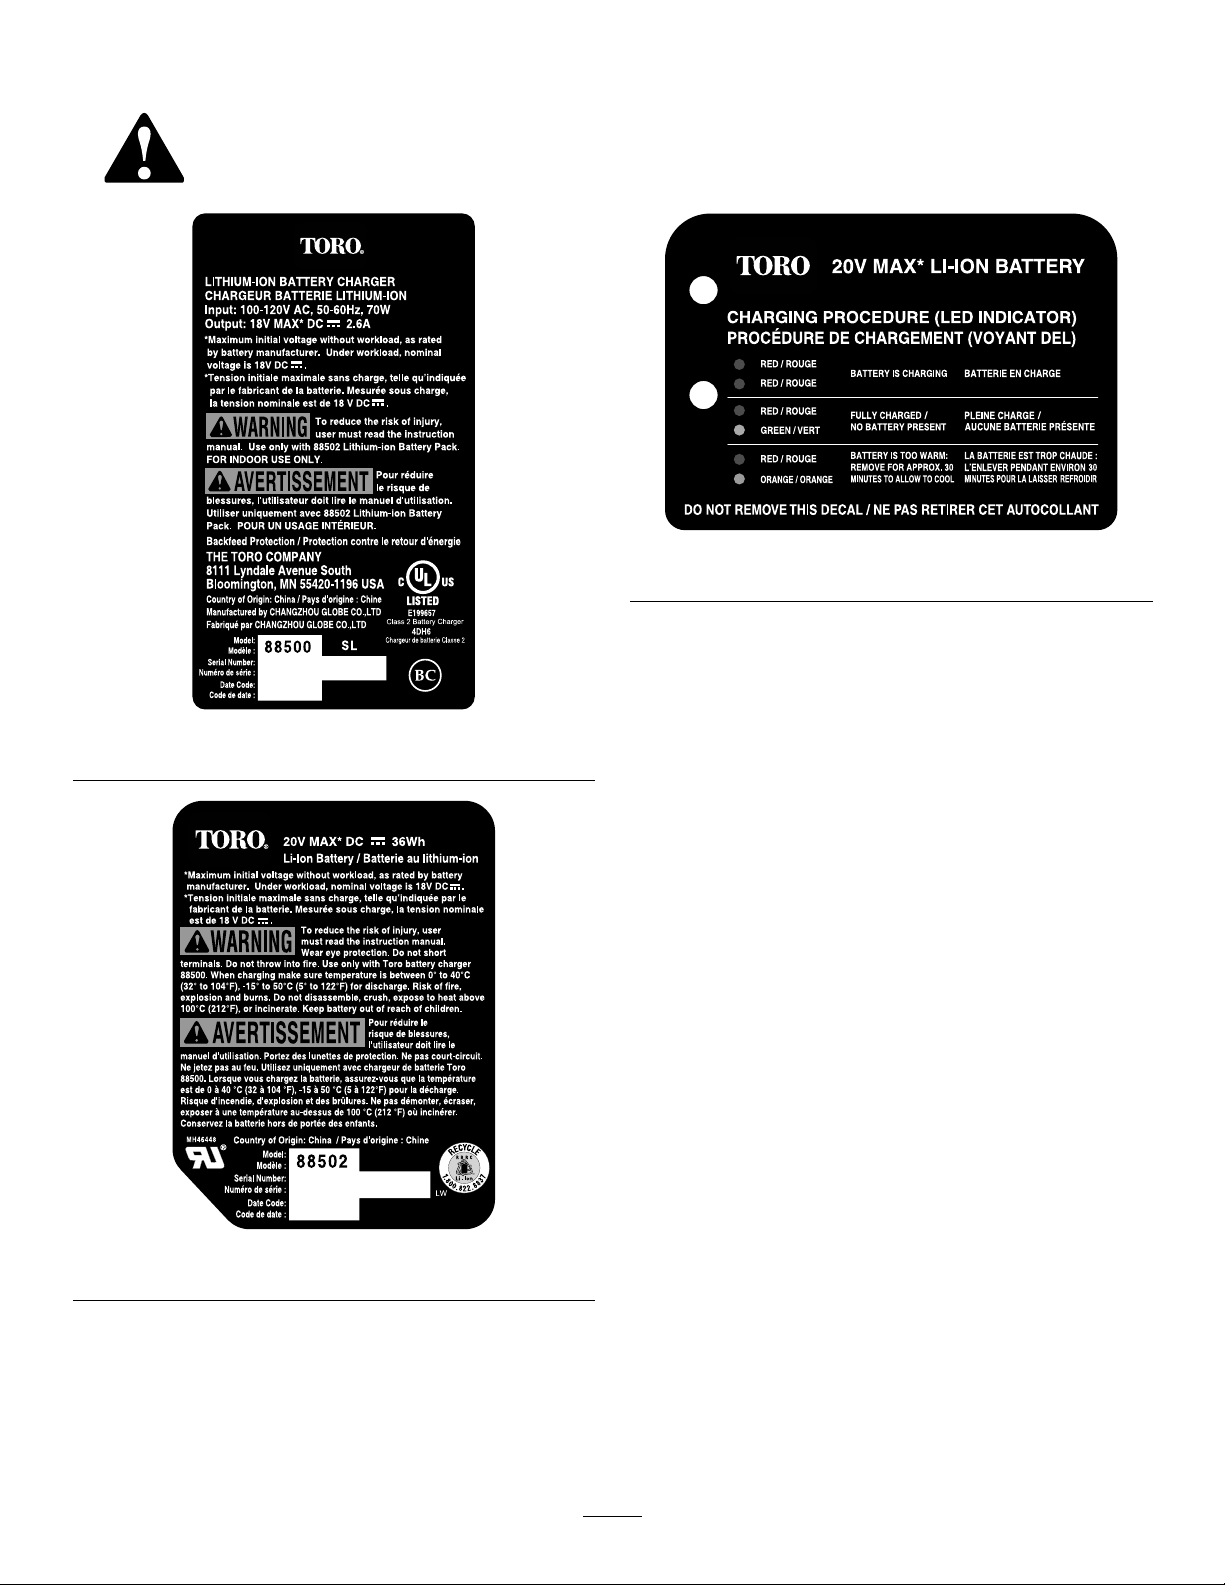
SafetyandInstructionalDecals
Safetydecalsandinstructionsareeasilyvisibletotheoperatorandarelocatednearanyarea
ofpotentialdanger.Replaceanydecalthatisdamagedormissing.
decal121-7691
121–7691
decal125-3279
125–3279
decal125-3295
125–3295
2
Page 3
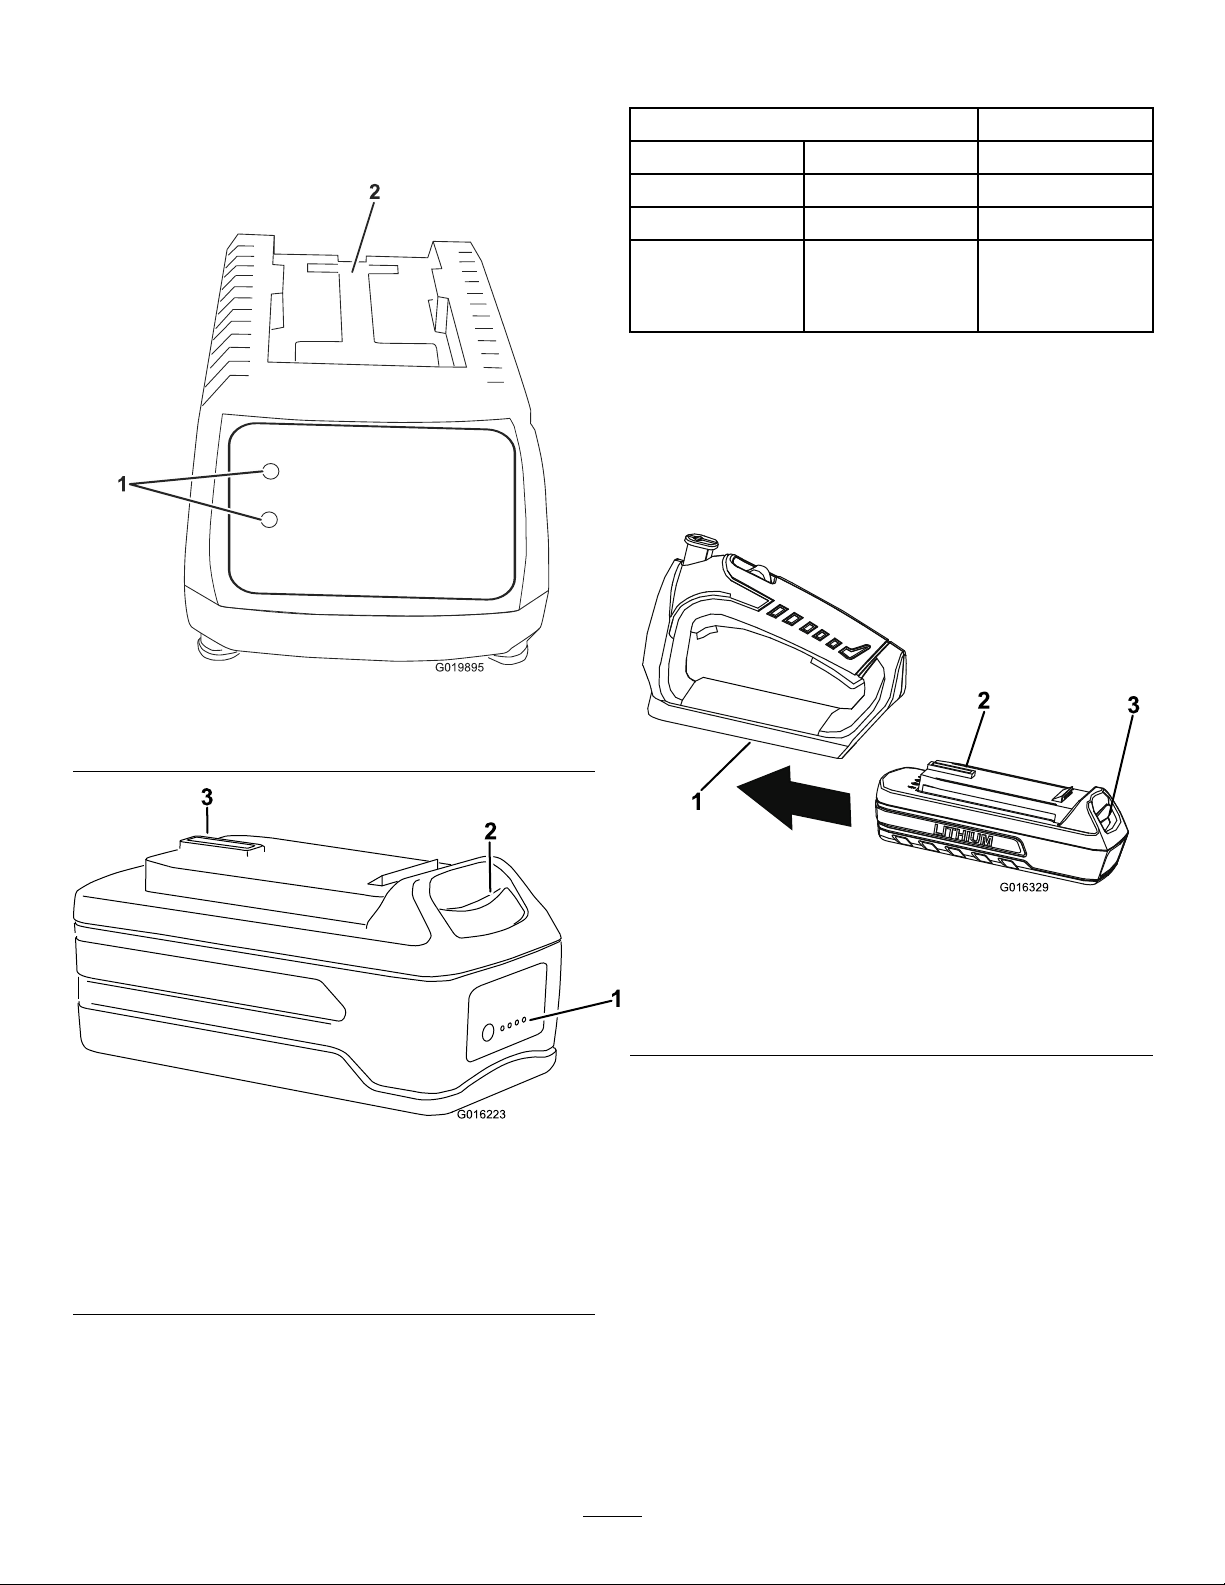
ChargingtheBatteryPack
1.Turnthebatteryupsidedownandlineupthe
batteryterminalwiththeslotinthecharger
(Figure1andFigure2).
4.RefertothetablebelowtointerprettheLED
indicatorsonthebatterycharger.
LEDCOLOR
TopBottomIndicates:
RedRedBatteryischarging
Red
Red
Green
Orange
Fullycharged
Batteryistoo
warm:Remove
forapproximately
30minutes
InsertingtheBatteryinto
theTrimmer
1.Alignthetongueofthebatterypackwiththe
cavityinthehandlehousing(Figure3).
Figure1
1.LEDindicators2.Insertbatteryhere
Figure2
1.LEDindicators(levelof
charge)
2.Releasebutton
3.Batteryterminal
2.Slidethebatteryintothechargeruntilitclicks
intoplace.
3.Toremovethebattery,pressdownonthe
releasebuttonandslidethebatterybackwards
outofthecharger.
g019895
g016329
Figure3
Hedgetrimmerhandleshown
1.Cavity
2.Tongue
3.Latch
2.Graspthetrimmerhandle.
3.Pushthebatterypackintothehandleuntilthe
latchlocksintoplace.
g016223
Important:Thebatterypackisnotfully
chargedwhenitispurchased.Beforeusing
thetrimmerforthersttime,placethe
batterypackinthechargerandchargeituntil
theLEDindicatorsturngreen.Makesureto
readallsafetyprecautions.Withregularuse,
itwillneedshorterchargingtime.Ifstoring
foraprolongedperiodoftime,removethe
battery.Whenreadytouseagain,chargethe
batterypackuntiltheLEDindicatorsturn
green.
3
Page 4

BatteryPackPreparation
ForRecycling
WARNING
Uponremoval,coverthebatterypack's
terminalswithheavy-dutyadhesivetape.Do
notattempttodestroyordisassemblethe
batterypackorremoveanyofitscomponents.
Lithium-ionbatteriesmustberecycledor
disposedofproperlyatthenearestbattery
recyclingfacility.
4
Page 5

Troubleshooting
Usingthebatterywhenitishotcanreducetheoperatingtime.Thebatterywillautomaticallystopworkingwhen
itisoverheatedtopreventdamagetoit.Removethebatteryfromthechargerandallowittocoolbefore
placingitbackintothetrimmer.
Usingthebatterywhenthereismoistureontheleadscancausethetrimmertomalfunction.Allowthebatteryto
dryorwipeitdrybeforeplacingitbackintothetrimmer.
5
Page 6

Notes:
Page 7

CaliforniaProposition65WarningInformation
Whatisthiswarning?
Youmayseeaproductforsalethathasawarninglabellikethefollowing:
WARNING:CancerandReproductiveHarm—www.p65Warnings.ca.gov.
WhatisProp65?
Prop65appliestoanycompanyoperatinginCalifornia,sellingproductsinCalifornia,ormanufacturingproductsthatmaybesoldinorbroughtinto
California.ItmandatesthattheGovernorofCaliforniamaintainandpublishalistofchemicalsknowntocausecancer ,birthdefects,and/orother
reproductiveharm.Thelist,whichisupdatedannually,includeshundredsofchemicalsfoundinmanyeverydayitems.ThepurposeofProp65isto
informthepublicaboutexposuretothesechemicals.
Prop65doesnotbanthesaleofproductscontainingthesechemicalsbutinsteadrequireswarningsonanyproduct,productpackaging,orliteraturewith
theproduct.Moreover ,aProp65warningdoesnotmeanthataproductisinviolationofanyproductsafetystandardsorrequirements.Infact,the
CaliforniagovernmenthasclariedthataProp65warning“isnotthesameasaregulatorydecisionthataproductis‘safe’or‘unsafe.’”Manyofthese
chemicalshavebeenusedineverydayproductsforyearswithoutdocumentedharm.Formoreinformation,gotohttps://oag.ca.gov/prop65/faqs-view-all
AProp65warningmeansthatacompanyhaseither(1)evaluatedtheexposureandhasconcludedthatitexceedsthe“nosignicantrisklevel”;or(2)
haschosentoprovideawarningbasedonitsunderstandingaboutthepresenceofalistedchemicalwithoutattemptingtoevaluatetheexposure.
Doesthislawapplyeverywhere?
Prop65warningsarerequiredunderCalifornialawonly .ThesewarningsareseenthroughoutCaliforniainawiderangeofsettings,includingbutnot
limitedtorestaurants,grocerystores,hotels,schools,andhospitals,andonawidevarietyofproducts.Additionally,someonlineandmailorder
retailersprovideProp65warningsontheirwebsitesorincatalogs.
.
HowdotheCaliforniawarningscomparetofederallimits?
Prop65standardsareoftenmorestringentthanfederalandinternationalstandards.TherearevarioussubstancesthatrequireaProp65warning
atlevelsthatarefarlowerthanfederalactionlimits.Forexample,theProp65standardforwarningsforleadis0.5μg/day ,whichiswellbelow
thefederalandinternationalstandards.
Whydon’tallsimilarproductscarrythewarning?
•ProductssoldinCaliforniarequireProp65labellingwhilesimilarproductssoldelsewheredonot.
•AcompanyinvolvedinaProp65lawsuitreachingasettlementmayberequiredtouseProp65warningsforitsproducts,butothercompanies
makingsimilarproductsmayhavenosuchrequirement.
•TheenforcementofProp65isinconsistent.
•CompaniesmayelectnottoprovidewarningsbecausetheyconcludethattheyarenotrequiredtodosounderProp65;alackofwarningsfora
productdoesnotmeanthattheproductisfreeoflistedchemicalsatsimilarlevels.
WhydoesToroincludethiswarning?
Torohaschosentoprovideconsumerswithasmuchinformationaspossiblesothattheycanmakeinformeddecisionsabouttheproductstheybuyand
use.Toroprovideswarningsincertaincasesbasedonitsknowledgeofthepresenceofoneormorelistedchemicalswithoutevaluatingthelevelof
exposure,asnotallthelistedchemicalsprovideexposurelimitrequirements.WhiletheexposurefromT oroproductsmaybenegligibleorwellwithinthe
“nosignicantrisk”range,outofanabundanceofcaution,TorohaselectedtoprovidetheProp65warnings.Moreover,ifT orodoesnotprovidethese
warnings,itcouldbesuedbytheStateofCaliforniaorbyprivatepartiesseekingtoenforceProp65andsubjecttosubstantialpenalties.
RevA
Page 8

 Loading...