

Page 1

97cmRecycler
XLSSeries™LawnTractor
ModelNo.79175
LooseParts
Usethechartbelowtoverifythatallpartshavebeenshipped.
FormNo.3370-763RevA
®
Kit
InstallationInstructions
ProcedureDescription
1
2
3
4
Rearbafe
Bolt(1/4x3/4inches)
Locknut(1/4inch)
Frontbafe
Bolt(3/8x7/8inches)
Locknut(3/8inch)
Carriagebolt(5/16x3/4inch)
Locknut(5/16inch)
Kickerplate4
Screw#8x5/8inches
Bolt(1/4x2-3/4inches)
Locknut(1/4inch)
Dischargecover1
Recycler®Mowerdecal
Qty.
1
2
2
1
2
2
1
1
8
2
2
1Installthedecal.
Use
Installthebafes.
Installthekickerplates.
Installthedischargecover.
©2011—TheT oro®Company
8111LyndaleAvenueSouth
Bloomington,MN55420
Registeratwww.Toro.com.
OriginalInstructions(EN)
PrintedintheUSA.
AllRightsReserved
Page 2
1
g017271
2
2
1
3
3
g017272
3
5
4
1
2
2
InstallingtheBafes
Partsneededforthisprocedure:
1
Rearbafe
2
Bolt(1/4x3/4inches)
2
Locknut(1/4inch)
1
Frontbafe
2
Bolt(3/8x7/8inches)
2
Locknut(3/8inch)
1
Carriagebolt(5/16x3/4inch)
1
Locknut(5/16inch)
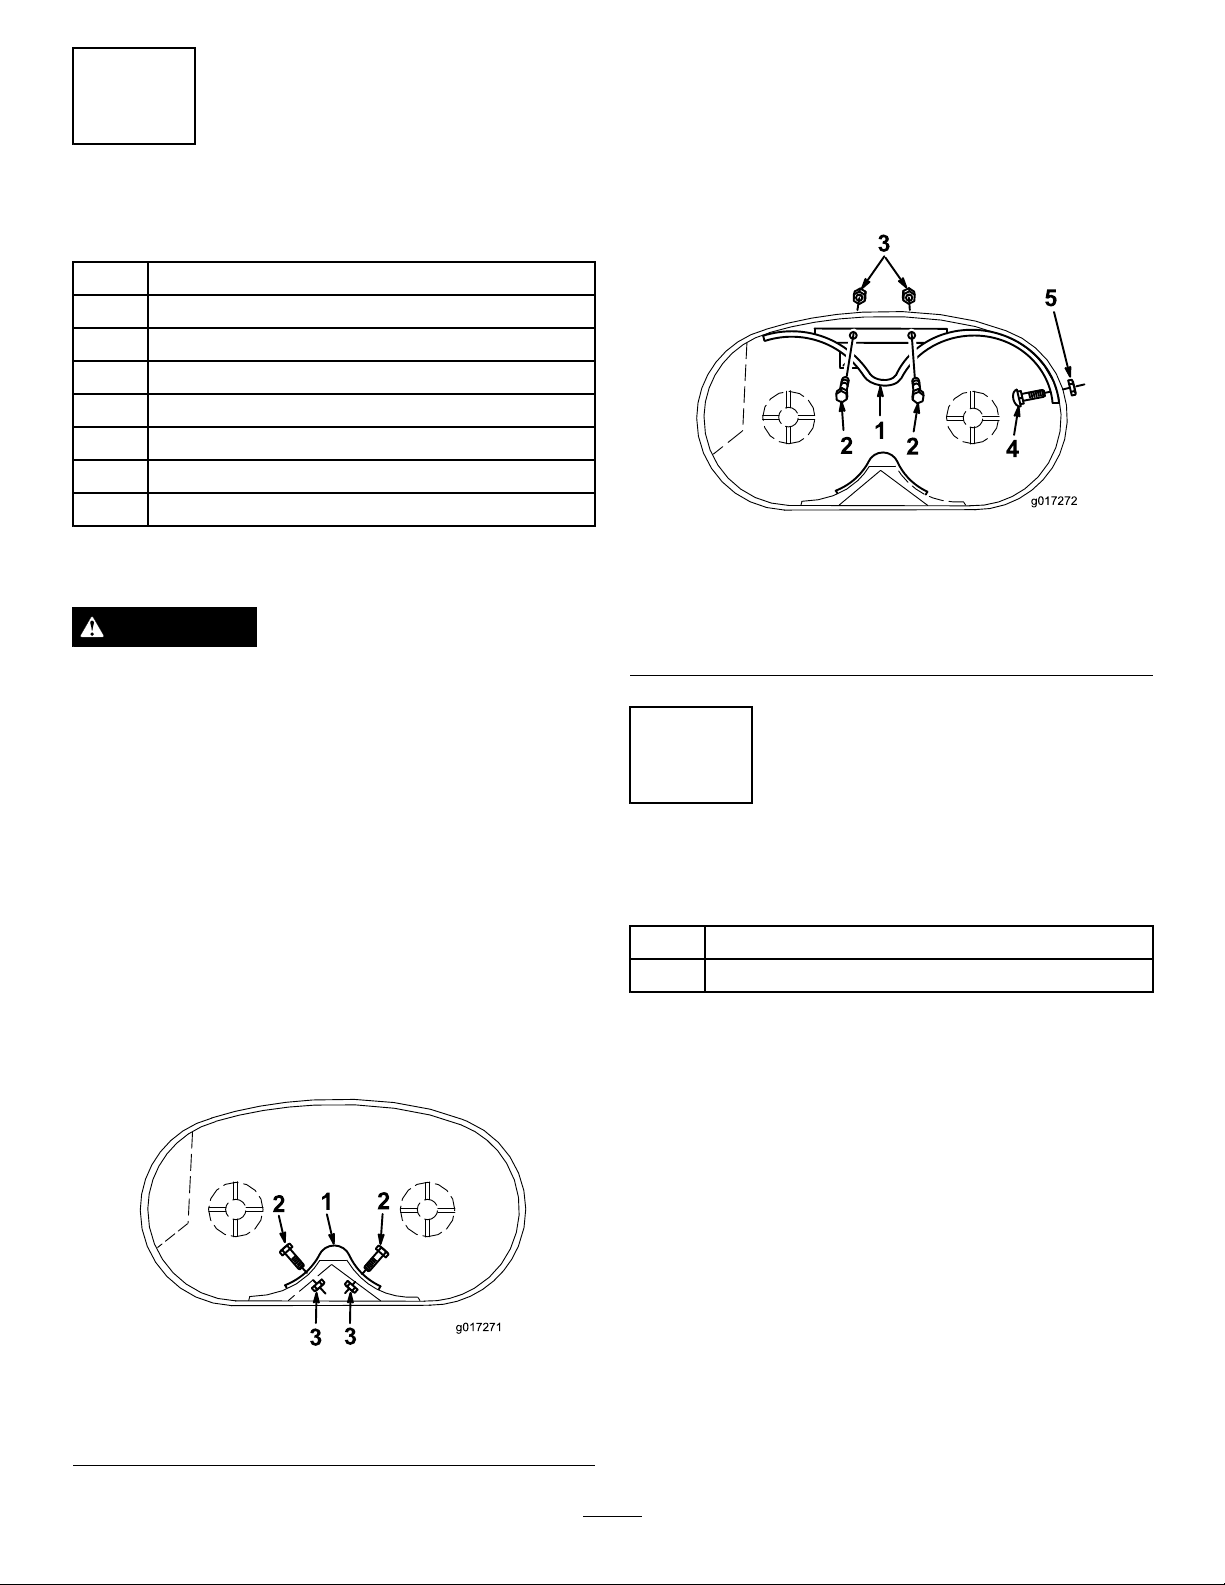
5.Positionthefrontbafeonthemowerdeckand
aligntheholes.Securethefrontbafeusing2bolts
(3/8x7/8inches)and2locknuts(3/8inch).
6.Securethesideoffrontbafewithacarriage
bolt(5/16x3/4inch)andalocknut(5/16inch)
Figure2).
(
Figure2
Procedure
WARNING
Thebladesaresharp;contactingabladecanresult
inseriouspersonalinjury.
Usecarewheninstallingthebafes.Placea
suitablecoveringoverthebladestopreventinjury.
Important:Thenutsmustbeinstalledonthe
outsideofthemowerdeck.
1.Stoptheengine,removetheignitionkeyandpull
thesparkplugwire.
2.Removethemowerfromthetractorasoutlinedin
thetractorOperator’sManual.
3.Turnthemowerupsidedown.
4.Centertherearbafeasshownin
therearbafetothemowerdeckwith2bolts(1/4x
3/4inches)and2locknuts(1/4inch).
Figure1.Install
1.Frontbafe4.Carriagebolt(5/16x3/4
2.Bolt(3/8x7/8inches)5.Locknut(5/16inch)
3.Locknut(3/8inch)
inch)
2
InstallingtheKickerPlates
Partsneededforthisprocedure:
4Kickerplate
8
Screw#8x5/8inches
Procedure
Installthe4kickerplateswiththeholestowardthetop
ofthemowerdeckusing8screws(#8x5/8inches)
(Figure3).Thescrewsareinstalledfromthetop
ofmowerdeck.Thelongslopeonkickersmustbe
positionedinaclockwisedirectionasviewedinFigure3.
Figure1
1.Rearbafe3.Locknuts(1/4inch)
2.Bolts(1/4x3/4inches)
2
Page 3

g017273
2
1
Figure3
1
6
5
3
5
6
4
2
g017275
1
2
g017274
1.Kickerplate
2.Screws(#8x5/8inches)
3
InstallingtheDischargeCover
Partsneededforthisprocedure:
2
Bolt(1/4x2-3/4inches)
2
Locknut(1/4inch)
1Dischargecover
Procedure
1.Liftthegrassdeectorandslidethetabsontop
ofthedischargecoverunderthegrassdeector
retainingrod.Rotatethedischargecoverdownover
theopening,andontothelowerlipofthemower
Figure4).
(
2.Securethedischargecovertothelowerlipofthe
mowerwith2bolts(1/4x2-3/4inches)and2nuts
(1/4inch)(
Figure4).
Figure4
1.Grassdeector
2.Tabsunderrod
3.Dischargecover
3.Toconvertbacktoasidedischargemower,remove
thedischargecoverandlowerthegrassdeector
overthedischargeopening.
4.InstallthemowerasoutlinedinthetractorOperator’ s
Manual.
4.Lowerlip
5.Bolt(1/4x2-3/4inches)
6.Nut(1/4inch)
4
InstallingtheDecal
Partsneededforthisprocedure:
1
Recycler®Mowerdecal
Procedure
InstalltheRecycler®Mowerdecalontheleftsideof
themower(Figure5).
Figure5
1.Decal
3
2.Leftsideofthemower
Page 4

Operation
anddensegrassyoumayhavetoraisetheheight-of-cut
settinganothernotchorconverttosidedischargeor
baggingoperations.
ConvertingtoSide-discharge
Operation
DANGER
Withoutthegrassdeector,dischargecover,or
completegrasscatcherassemblymountedin
place,youandothersareexposedtobladecontact
andthrowndebris.Contactwithrotatingmower
blade(s)andthrowndebriswillcauseinjuryor
death.
•Neverremovethegrassdeectorfromthe
mowerbecausethegrassdeectorroutes
materialdowntowardtheturf.Ifthe
grassdeectoriseverdamaged,replaceit
immediately.
•Neverputyourhandsorfeetunderthemower.
•Nevertrytoclearthedischargeareaormower
bladesunlessyoumovethepowertakeoff
(PTO)todisengageandturntheignitionkey
tooff.Alsoremovethekeyandpullthewire
offthesparkplug(s).
Note:Tousethemowerinsidedischargemode,
onlythedischargecovermustberemoved.Mounting
hardwaremustbeinstalledinopenholes.
1.Stoptheengineandremovetheignitionkey.
2.Removethe2boltsandnutsthatsecurethe
dischargecovertothemower.
3.Removethedischargecover.
4.Ifthemoweroriginallyhadacutoffbafe,install
itnow.
5.Lowerthegrassdeectoroverthedischarge
opening.
Important:Ensurethemowerhasahinged
grassdeectorthatdispersesclippingstothe
sideanddowntowardtheturf,whileinside
dischargemode.
MowinginExtremeConditions
Airisrequiredtocutandrecutgrassclippingsinthe
mowerhousing,sodonotsettheheight-of-cuttoolow
ortotallysurroundthehousingbyuncutgrass.Always
haveonesideofthemowerhousingfreefromuncut
grass,allowingairtobedrawnintohousing.When
makinganinitialcutthroughthecenteroftheuncut
area,operatethemachineataslowerspeedandbackup
ifthemowerstartstoclog.
MowingattheProperIntervals
Undernormalconditionsyou'llneedtomowevery
4-5days.However,grassgrowsatdifferentratesat
differenttimes.Thus,inordertomaintainthesame
height-of-cut,whichisagoodpractice,you'llneedto
cutmorefrequentlyinearlyspring;asthegrassgrowth
rateslowsinmidsummer,cutonlyevery8-10days.
Ifyouareunabletomowforanextendedperioddue
totheweatherconditionsorotherreasons,convertto
sidedischargeorbaggingoptionsormowrstwiththe
height-of-cutatahighlevel;thenmowagain2-3days
laterwithalowerheightsetting.
AlwaysMowwithSharpBlades
Asharpbladecutscleanlyandwithouttearingor
shreddingthegrassbladelikeadullblade.Tearingand
shreddingcausesthegrasstoturnbrownattheedges
whichimpairsgrowthandincreasessusceptibilityto
disease.
CleaningAfterOperating
Toensureoptimumperformance,cleantheunderside
ofthemowerhousing.Ifresidueisallowedtobuildup
inmowerhousing,cuttingperformancewilldecrease.
Tomulchgrassclippings,installthedischargecover
intotheopeninginthesideofthemower;referto
InstallingtheDischargeCover.
OperatingTips
SelectingtheProperHeight-of-Cut
SettingtoSuittheConditions
Removeapproximatelyoneinchornomorethat1/3
ofthegrassbladewhencutting.Inexceptionallylush
4
 Loading...